

Page 1

FREESTANDING QUAD DOOR
REFRIGERATOR FREEZER
CONTEMPORARY
RF70QZUVB1, RF70QNUVX1 & RF70QNUVB1 models
INSTALLATION GUIDE
NZ AU
Page 2

Page 3

CONTENTS
Safety and warnings 4
ActiveSmart™ Refrigerator 7
Unpacking and moving your appliance 8
Before installation 9
Supplied parts 10
Product dimensions 11
Cabinetry dimensions – Proud 13
Cabinetry dimensions – Flush 15
Electrical 17
Water connection 18
Flushing the water filter 20
Positioning your refrigerator 21
Complete installation 23
Final checklist 24
Registration
To register your product visit our website: fisherpaykel.com/register
3
Page 4
SAFETY AND WARNINGS
!
WARNING!
Electric Shock Hazard
Failure to follow this advise may result in
death, electric shock, fire or injury to persons.
• Read and follow the safety and warnings
outlined in this guide before operating
this appliance.
!
WARNING!
Risk of fire/flammable material
This refrigerator contains flammable refrigerant
isobutane (R600a).
READ AND SAVE THIS GUIDE
Use this appliance only for the intended purpose as described in the user guide.
When using this appliance always exercise basic safety precautions
including the following:
z
Keep ventilation openings, in the appliance enclosure or the built-in structure, clear
of obstruction.
z
Do not damage the refrigerant circuit.
z
In case of damage to the refrigerant circuit, ventilate the area by opening all windows.
Do not operate electrical equipment or any other equipment that may produce arcs,
sparks or flames in the area. Contact your Fisher&Paykel trained and supported
service technician immediately to arrange for the appliance to be repaired.
z
It is hazardous for anyone other than a Fisher&Paykel trained and supported service
technician to service thisappliance.
z
In Queensland the authorised service person must hold a gas work licence or
authorisation for hydrocarbon refrigerants to carry out service or repairs which involve
removal of covers.
z
Your refrigerator is designed to operate for many years without the need for service
checks. However, if your refrigerator is malfunctioning, have it attended to by your
Fisher&Paykel trained and supported service technician as soon as possible. All
electrical repairs must be carried out by an adequately trained service technician or
qualified electrician.
z
This refrigerating appliance is not intended to be used as a built-in appliance.
z
It is hazardous for anyone other than a Fisher&Paykel trained and supported service
technician to service thisappliance.
z
This refrigerating appliance performs optimally at ambient temperatures ranging
from 16°C to 38°C.
4
Page 5

SAFETY AND WARNINGS
Electrical
z
This appliance must be installed in accordance with the installation
instructions before use.
z
To allow disconnection of the appliance from the supply after installation, incorporate a
switch in the fixed wiring in accordance with the wiring rules.
z
Never unplug your refrigerator by pulling on the power cord. Always grip the plug
firmly and pull straight out from the outlet.
z
Do not plug in any other appliance at the same power point as your refrigerator or use
extension cords or double adapters.
z
Repair or replace immediately all electric service cords that have become frayed or
otherwise damaged. Do not use a cord that shows cracks or abrasion along its length or
at either the plug or appliance end.
z
If the power supply cord is damaged, it must only be replaced by your Fisher&Paykel
trained and supported service technician because special purpose tools are required.
z
When moving your appliance away from the wall, be careful not to roll over or damage
the power cord.
z
Do not use electrical appliances inside the food storage compartments of the appliance,
unless they are of the type recommended by the manufacturer.
z
When positioning the appliance, ensure the power cord is not trapped or damaged.
z
Do not locate multiple portable socket-outlets or portable power supplies at the rear
of the appliance.
5
Page 6

SAFETY AND WARNINGS
Water filter
z
To reduce the risk associated with choking:
z
DO NOT allow children under 3 years of age to have access to small parts during the
installation of the water filter.
z
The water connection to your Ice & water refrigerator must be installed by a qualified
plumber or Fisher&Paykel trained and supported service technician and comply with
all state and local laws.
z
Installation and use MUST comply with all state and local plumbing codes. Checkwith
your local public works department for plumbing codes. You must follow their
guidelines as you install the water filtration system.
z
To avoid serious illness or death, only connect your water filter to safe drinking water.
z
The water filter cartridge needs to be changed when the replacement indicator icon
illuminates. This will happen every 6 months.
z
If the water filtration system has been allowed to freeze, replace filter cartridge.
Failure to replace the disposable filter at recommended intervals may lead to reduced
filter performance and failure of the filter, causing property damage from water
leakage or flooding.
z
When installing the product use new tubing supplied with the refrigerator, DO NOT
reuse any existing water connections.
z
The water system is designed to operate between 138–827kPa (20–120psi). DO NOT
install if water pressure exceeds 827kPa (120psi).
z
To reduce the risk associated with property damage due to water leakage or flooding:
z
DO NOT install systems in areas where ambient temperatures may go above 38°C or
drop below 0.6°C.
z
DO NOT install on hot water supply lines. The water filter system is designed with a
maximum inlet temperature of 38°C.
z
DO NOT install where water hammer conditions may occur. If water hammer
conditions exist, you must install a water hammer arrester.
z
To avoid serious illness or death, only connect your water filter to safe drinking water.
6
Page 7
ACTIVESMART™ REFRIGERATOR
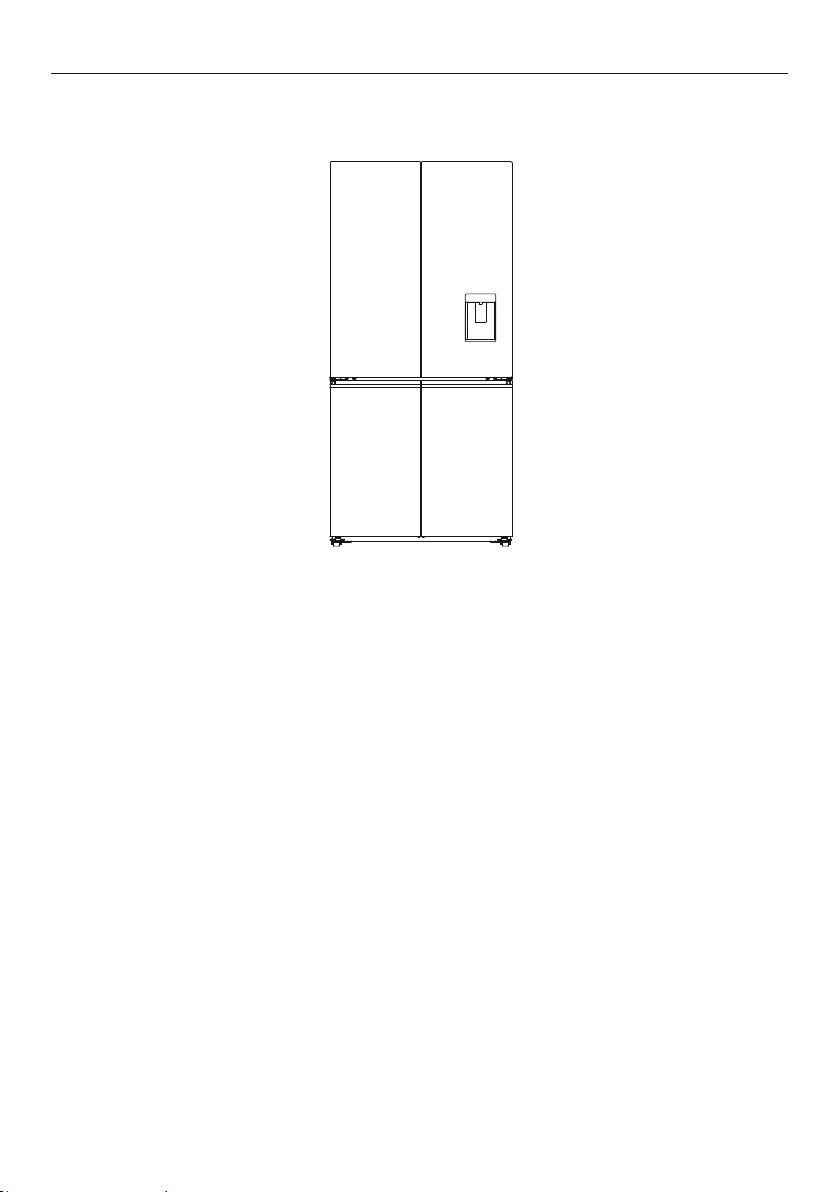
Quad Door Fridge Freezer, 905mm, 690L, Ice & Water
Contemporary
RF730QZUVB1, RF730QNUVX1 & RF730QNUVB1 models
7
Page 8
UNPACKING AND MOVING YOUR APPLIANCE
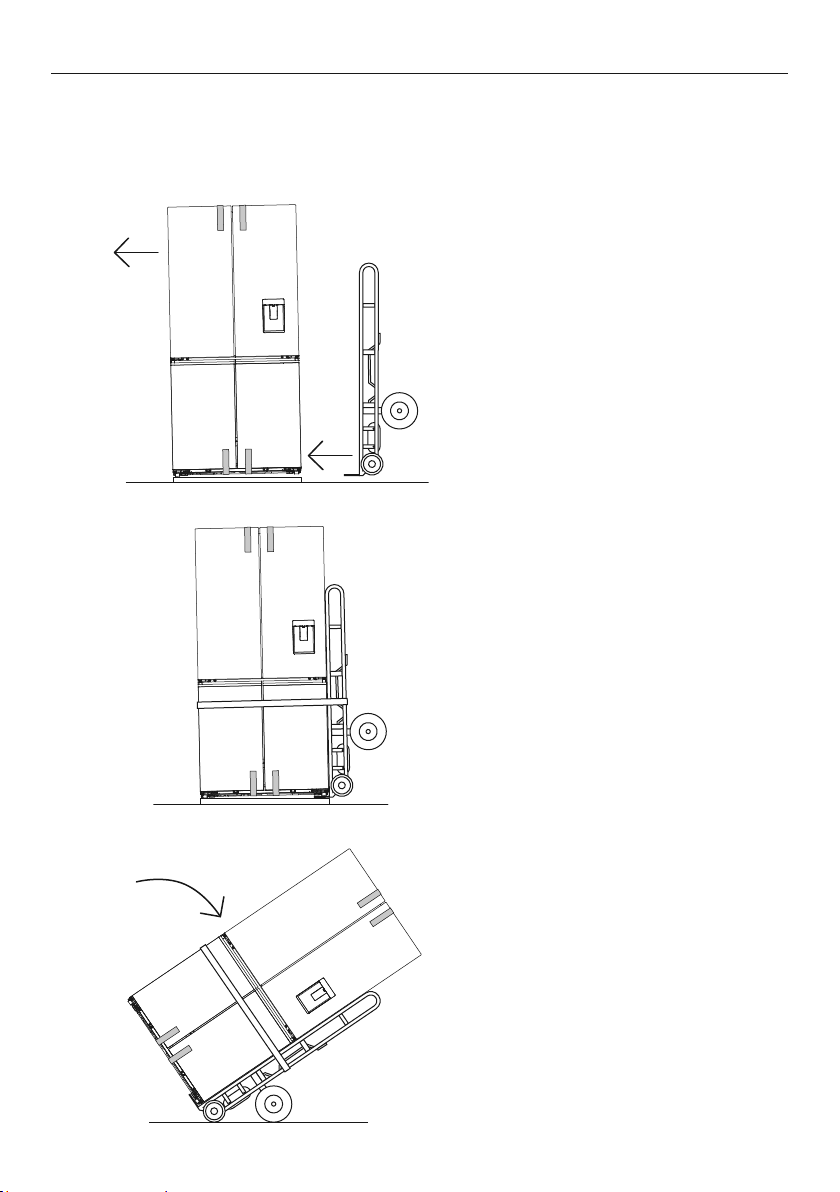
Check that your appliance is the correct model as per your order.
Follow the steps below to move your appliance to the install location. Be careful when
tilting the appliance forward/backward. Tape the door shut to prevent opening while
moving the appliance.
Tilt the appliance slightly forward
and Insert the hand truck between
1
the plastic base and appliance (at
the right hand side when viewed
from the front).
8
2
3
Restrain the appliance with a strap.
Tilt backward to load appliance
onto hand truck and push to
install location.
Page 9
BEFORE INSTALLATION
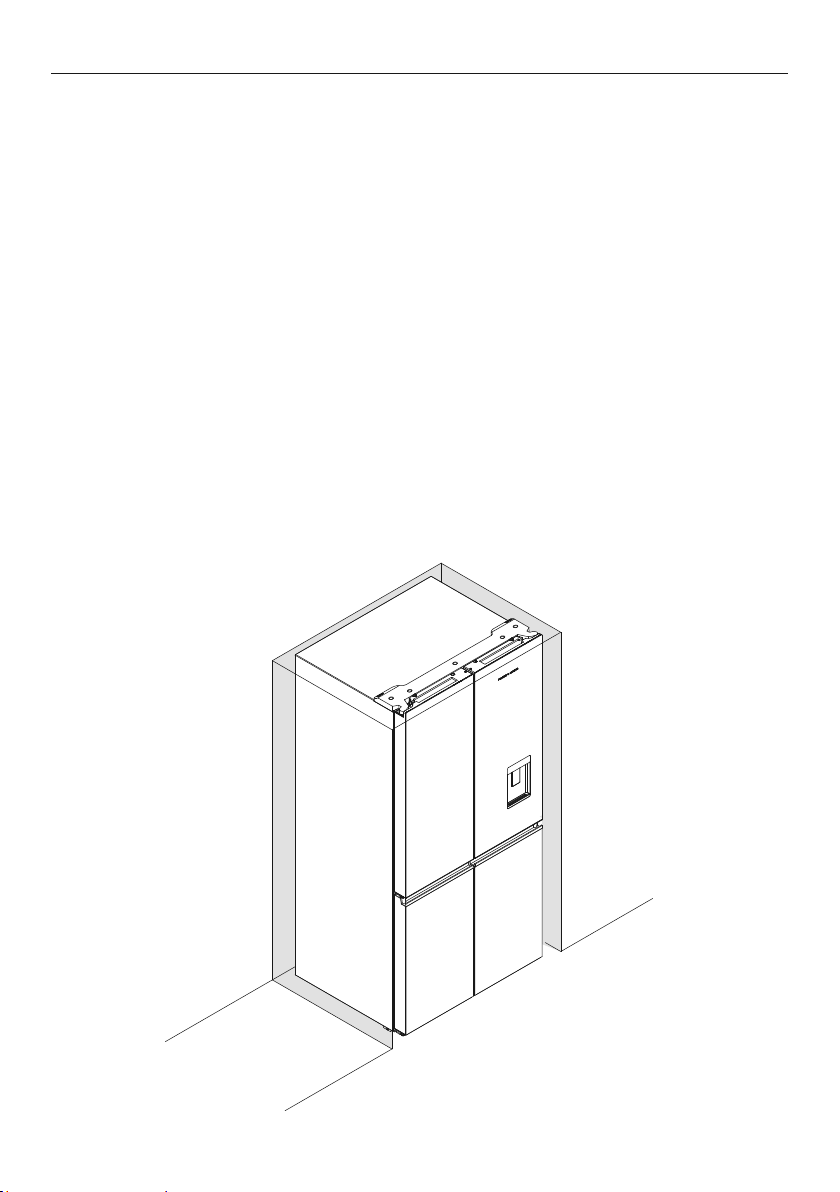
Please follow the installation steps below to ensure your appliance operates correctly.
Before installation
Power
z
Install your appliance where the plug is easily accessible.
z
Connect your refrigerator to a separate power point. Avoid sharing the power point with
other appliances. Do not use extension cords and double adaptors as the combined
weight of two power cords can pull the double adaptor from the power outlet.
z
For power requirements, refer to the information on the serial plate located at the front
bottom right-hand side of the refrigerator when the door is open.
z
Ensure your appliance is properly grounded (earthed).
z
Connect the appliance to the electrical supply (220V–240V 50Hz) with the
fitted plug and lead.
z
Connections to the mains supply should be in accordance with local regulations.
Ice & Water models
z
Your Ice & Water refrigerator must be installed by a qualified plumber or Fisher&Paykel
trained and supported service technician as incorrect plumbing can lead to water leaks.
z
Fisher&Paykel Appliances does not accept responsibility for damage (including water
damage) caused by faulty installation or plumbing.
9
Page 10
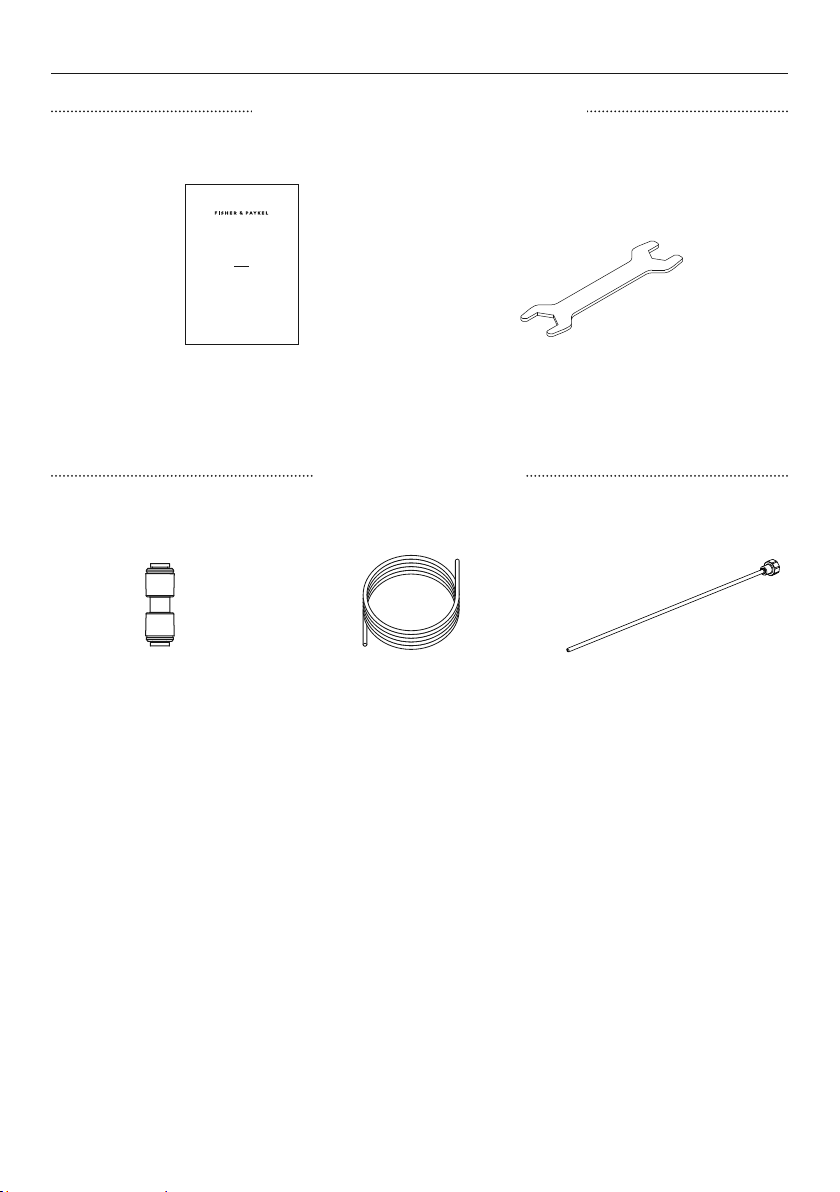
SUPPLIED PARTS
USER GUIDE
MISCELLANEOUS ITEMS PACK
FREESTANDING QUAD DOOR
REFRIGERATOR FREEZER
CONTEMPORARY
RF730QZUVB1, RF730QNUVX1 & RF730QNUVB1 models
USER/INSTALLATION GUIDE
NZ AU
User/Installation guide (1)
WATER FILTER KIT
Hose connector (2) Water hose 4m (1)
Spanner (1)
Tap adaptor brass 1/4 OD
1/2 BSP (1)
10
Page 11
C
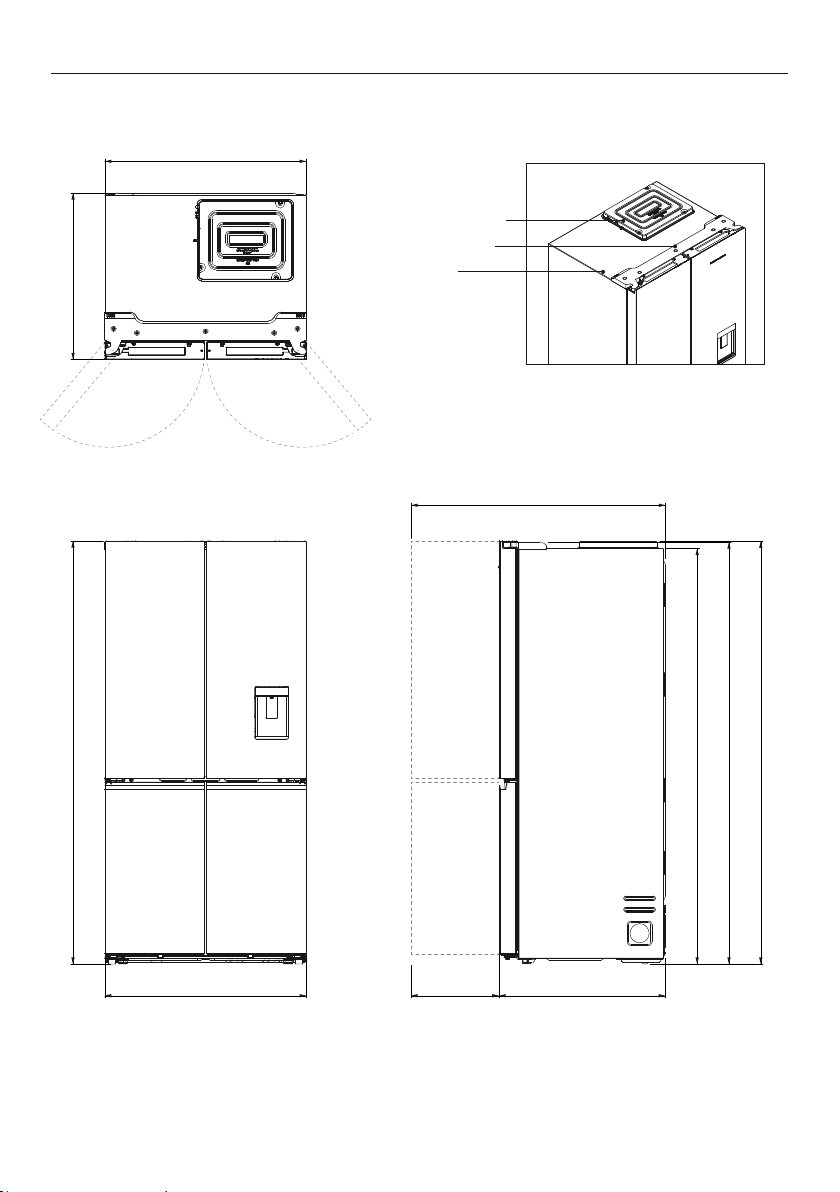
PRODUCT DIMENSIONS
b
Control cover
Hinge cover
Chassis
PLAN
D
b E C
FRONT
hF AG
PROFILE
11
Page 12
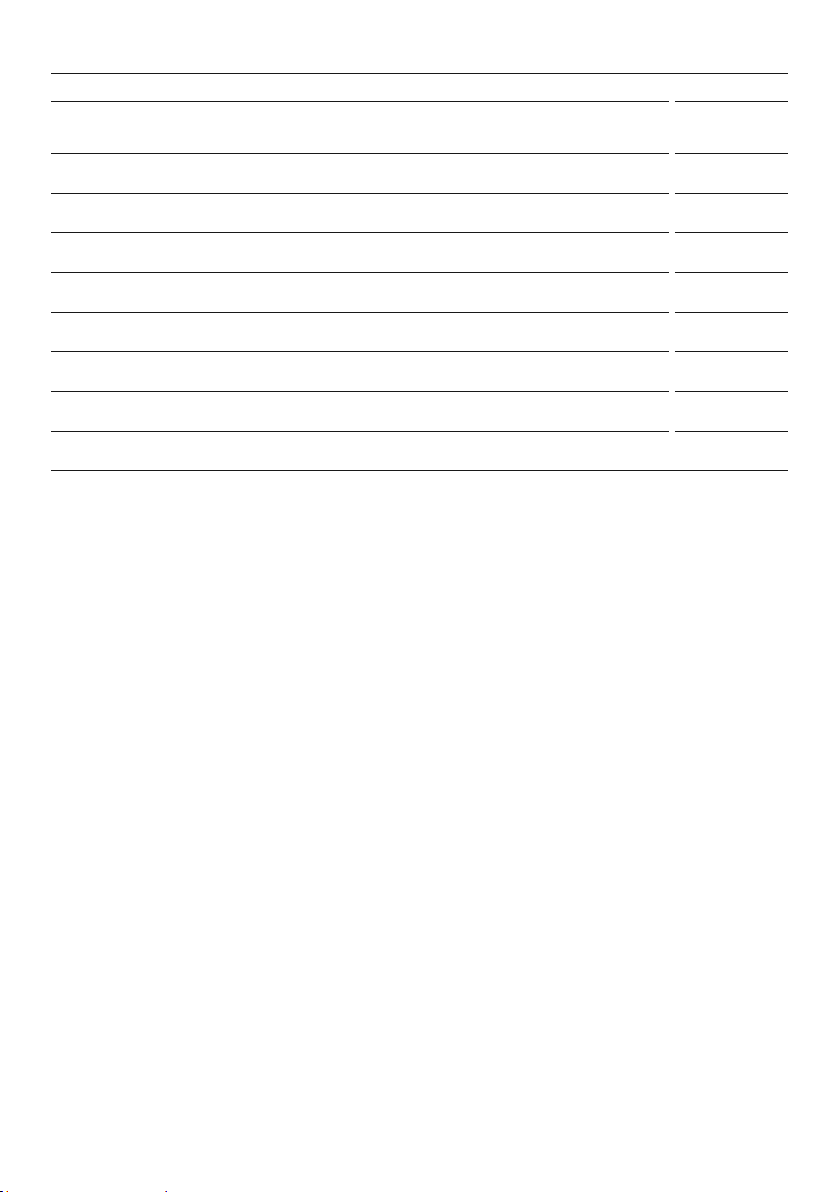
PRODUCT DIMENSIONS
PRODUCT DIMENSIONS
MM
A Overall height of product 1900
B Overall width of product 905
C Overall depth of product
(excludes handle) 748
D Depth with door open – from rear of fridge – 90° rotation 1142
E Depth with door open – from flush with door – 90° rotation 394
F Height to top of chassis 1867
G Height to top of hinge cover 1896
H Height to top of control cover 1899
Actual product dimensions may vary by ± 2 mm
12
Page 13
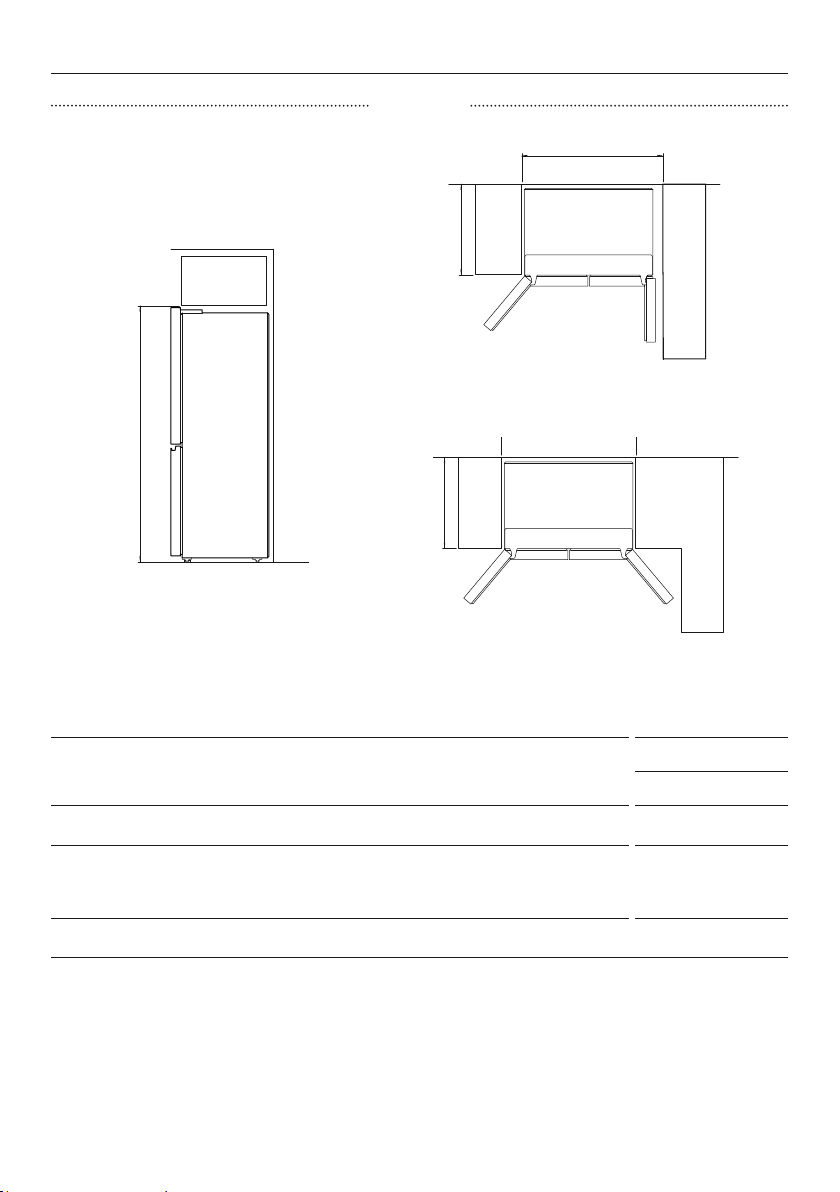
CABINETRY DIMENSIONS – PROUD
CUTOUT
B
a
C
CABINETRY DIMENSIONS (incl. minimum air clearances)
RF730Q
MM
A Inside height of cavity* 1920
B Inside width
z
90° rotation**
z
full rotation
985
945
C Overall depth 690
*Measurement includes a feet increase of 10mm.
**For full drawer/shelf access, the doors need to be open past 90°. To avoid damaging the
product ensure doors do not contact the adjacent cabinetry/wall.
13
Page 14
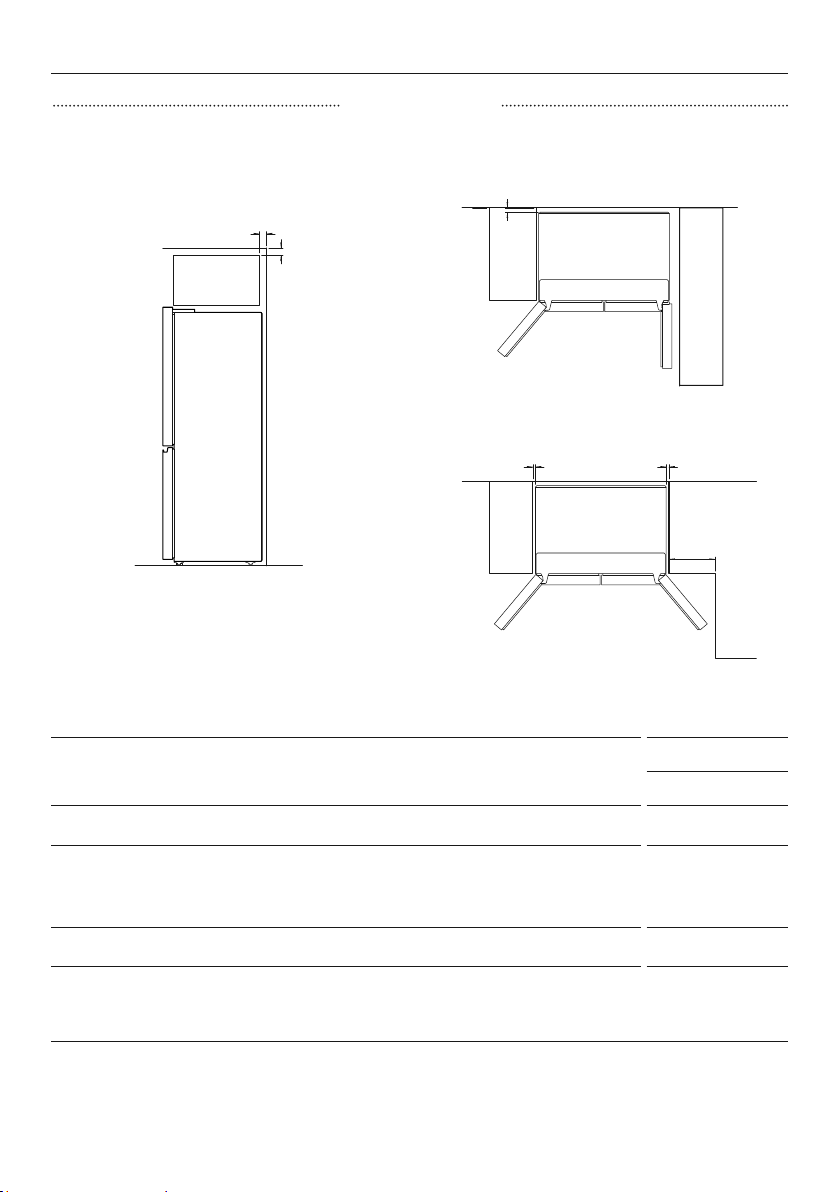
CABINETRY DIMENSIONS – PROUD
CLEARANCES
a
a
MINIMUM CLEARANCE DIMENSIONS
C
bb
D
RF730Q
MM
A Vent (above refrigerator cabinet or around top of cupboard) 50
B Side clearance
z
90° rotation*
z
full rotation
C Rear clearance 30
D Door clearance
z
90° rotation*
z
full rotation
*For full drawer/shelf access, the doors need to be open past 90°. To avoid damaging the
product ensure doors do not contact the adjacent cabinetry/wall.
14
60
20
N/A
350
Page 15
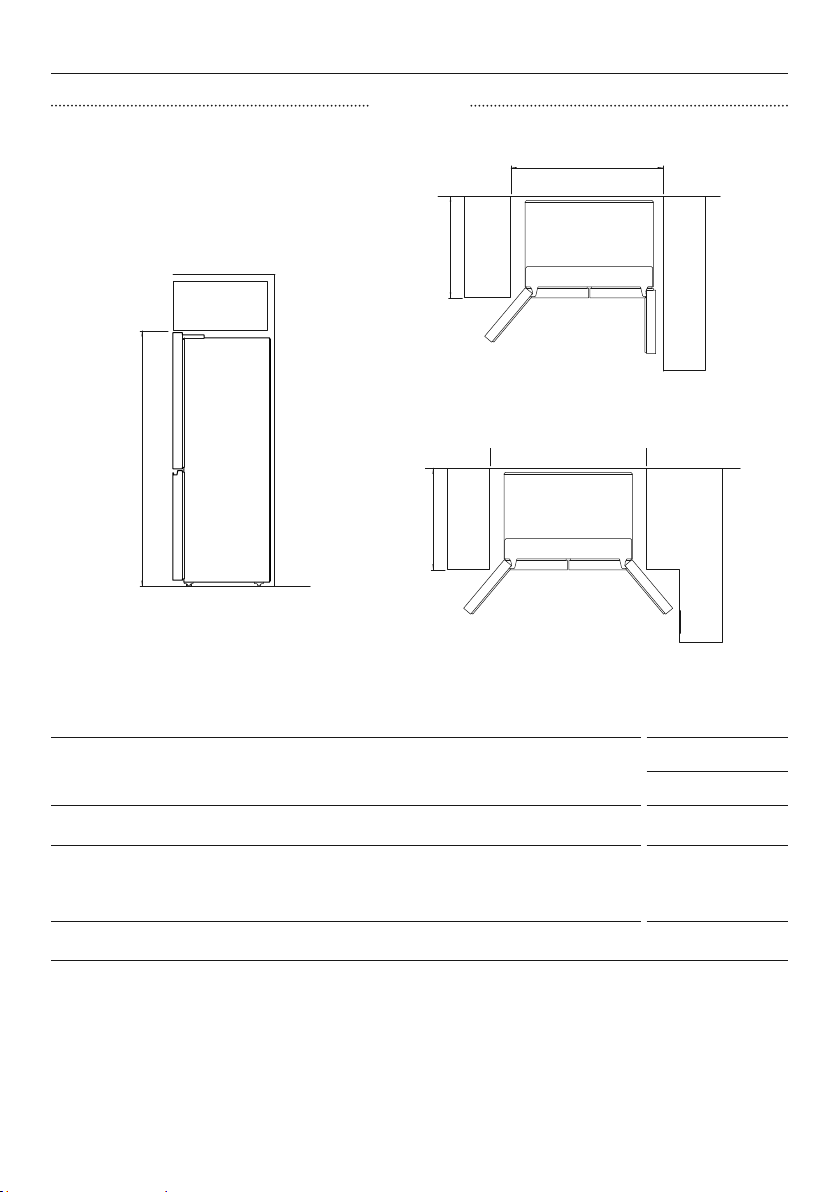
CABINETRY DIMENSIONS – FLUSH
CUTOUT
b
a
C
CABINETRY DIMENSIONS (incl. minimum air clearances)
RF730Q
MM
A Inside height of cavity* 1945
B Inside width
z
90° rotation**
z
full rotation
1075
1125
C Inside depth 778
*Measurement includes a feet increase of 10mm.
**For full drawer/shelf access, the doors need to be open past 90°. To avoid damaging the
product ensure doors do not contact the adjacent cabinetry/wall.
15
Page 16
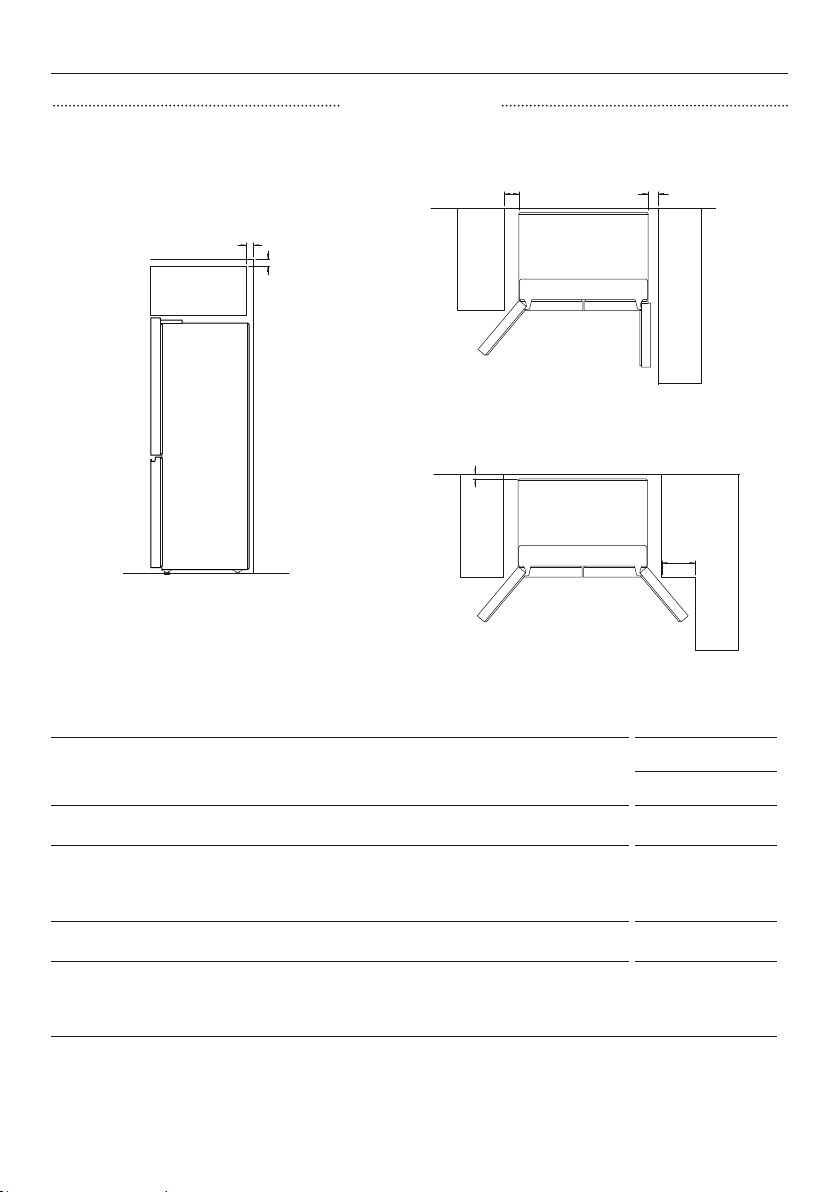
CABINETRY DIMENSIONS – FLUSH
CLEARANCES
a
a
c
bb
d
MINIMUM CLEARANCE DIMENSIONS
RF730Q
A Vent (above refrigerator cabinet or around top of cupboard) 50
B Side clearance
z
90° rotation*
z
full rotation
C Rear clearance 30
D Door clearance
z
90° rotation*
z
full rotation
*For full drawer/shelf access, the doors need to be open past 90°. To avoid damaging the
product ensure doors do not contact the adjacent cabinetry/wall.
16
MM
60
110
N/A
260
Page 17
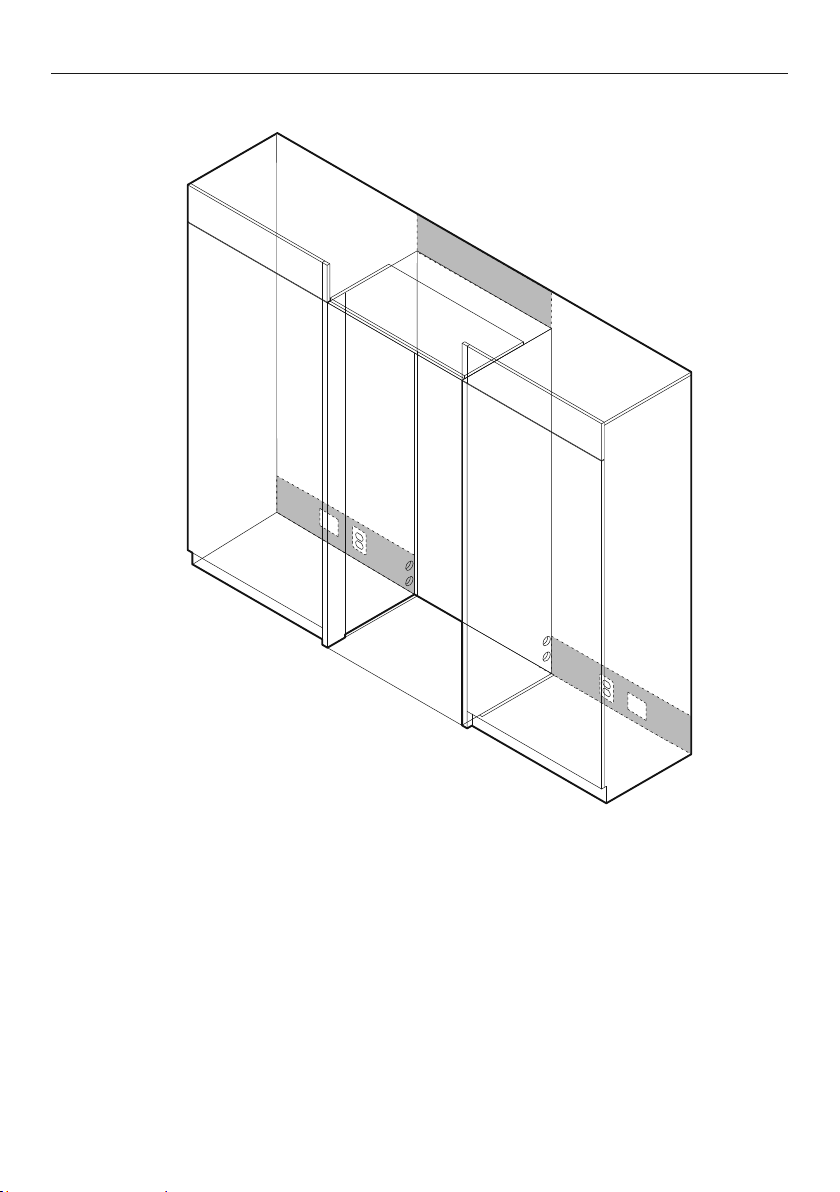
ELECTRICAL
Electrical connection should be located in an adjacent cabinet to either side of the
refrigerator or above the refrigerator cavity. We recommend the use of an isolating switch
that is easily accessible to the user after the refrigerator is installed.
17
Page 18
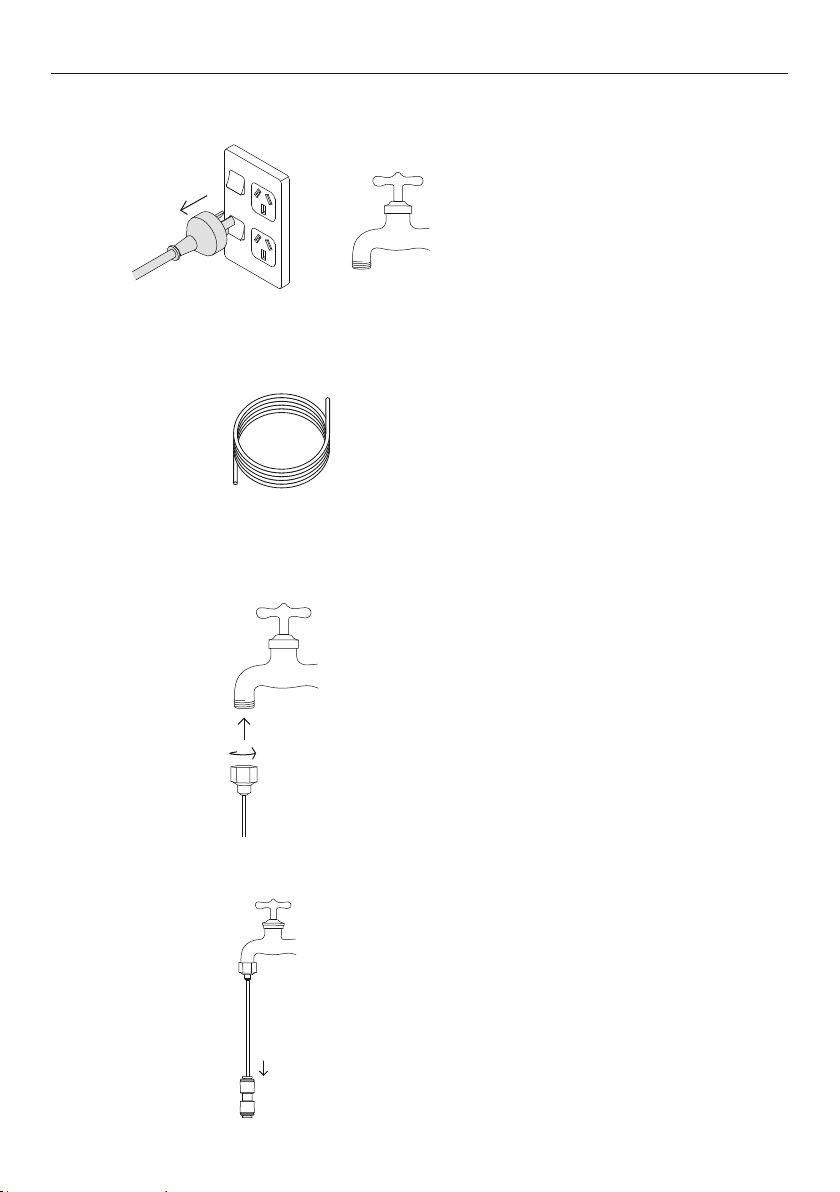
1
2
WATER CONNECTION
Ensure the refrigerator is not
plugged into a power supply. Locate
the isolation tap for cold water
connection (tee and tap fitting
not supplied).
Locate the water filter kit
to complete the water
connection installation.
18
3
4
Fasten the tap adaptor with short
tube to the isolation tap. Tighten
by hand and tighten one additional
turn with a spanner. Take care not
to overtighten.
Insert the end of tap adaptor short
tube into one end of the first hose
connector as far as possible.
Page 19
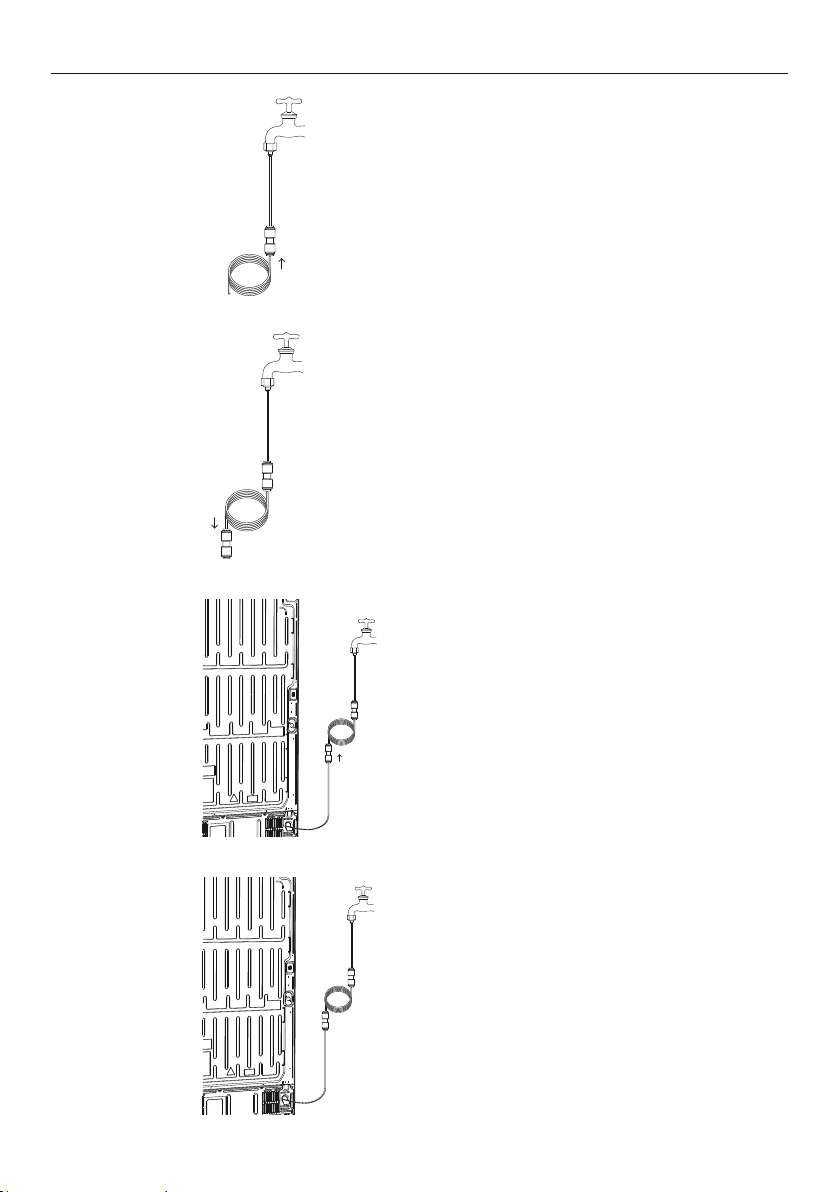
5
WATER CONNECTION
Insert one end of the water hose into
the other end of hose connector as
far as possible.
6
7
8
Insert the other end of the water hose
into one end of the second hose
connector as far as possible.
Connect the other end of the second
hose connector to the hose attached
to the back of the product.
Push the hose as far as possible into
the connector.
Check the connections, turn on the
water supply and check for leaks.
19
Page 20
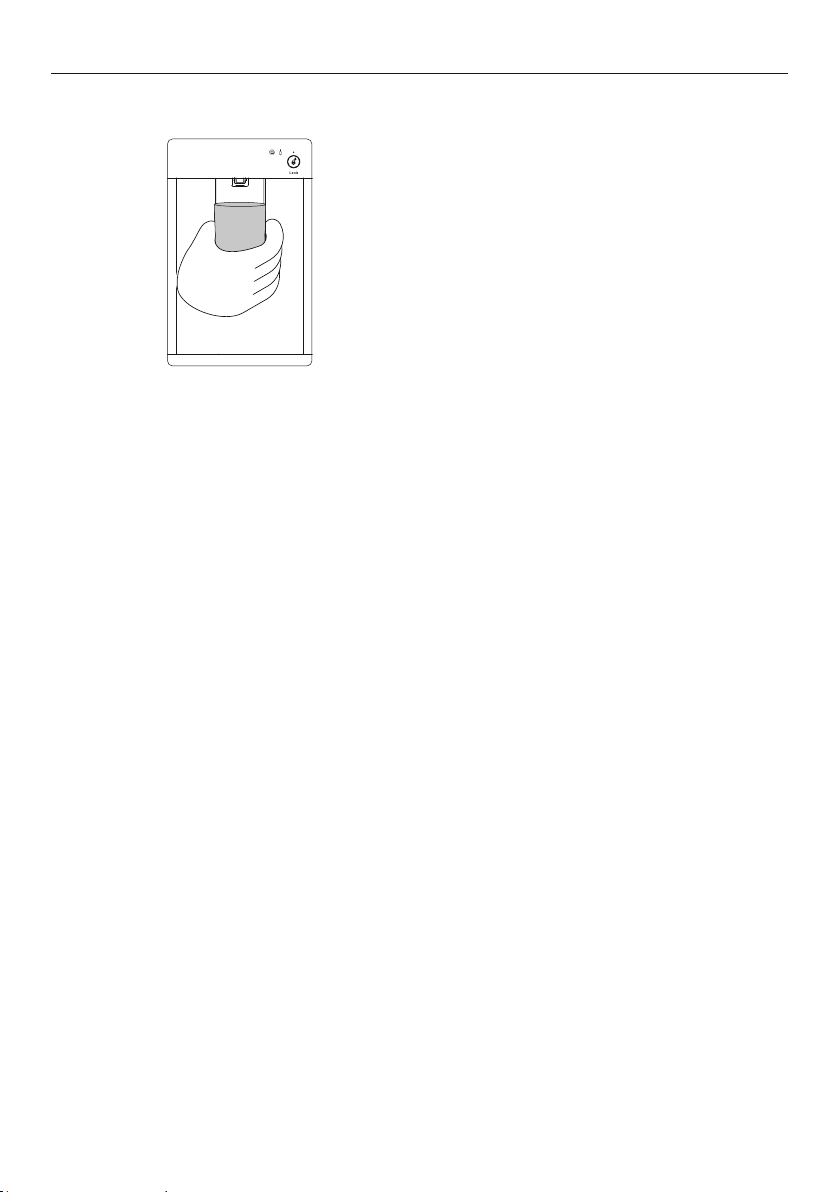
FLUSHING THE WATER FILTER
1 Press the water dispenser pad to dispense
4L of water. Wait for fourminutes before
dispensing again.
2 Dispense 4L of water and then wait for
another fourminutes. There may be
carbon residue dispensed together with
water. This is not harmful, and is normal
during the flushing process.
3 Dispense another 4L of water. This
prevents excessive dripping of water from
your dispenser.
There may be a few drips of water coming out of the dispenser for a few days after
installation. This is normal and occurs as the remaining trapped air is cleared from the system.
Ensure your refrigerator has cooled for at least 2hours beforeuse.
20
Page 21
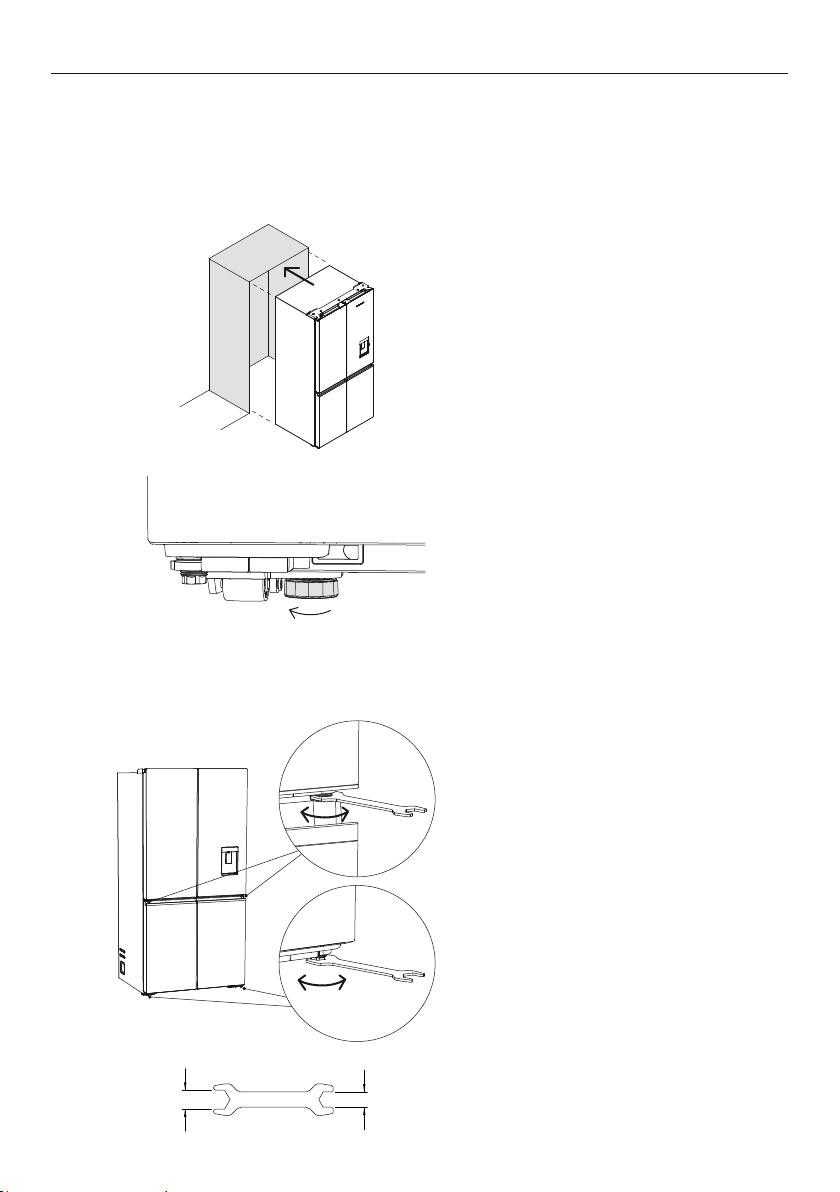
POSITIONING YOUR REFRIGERATOR
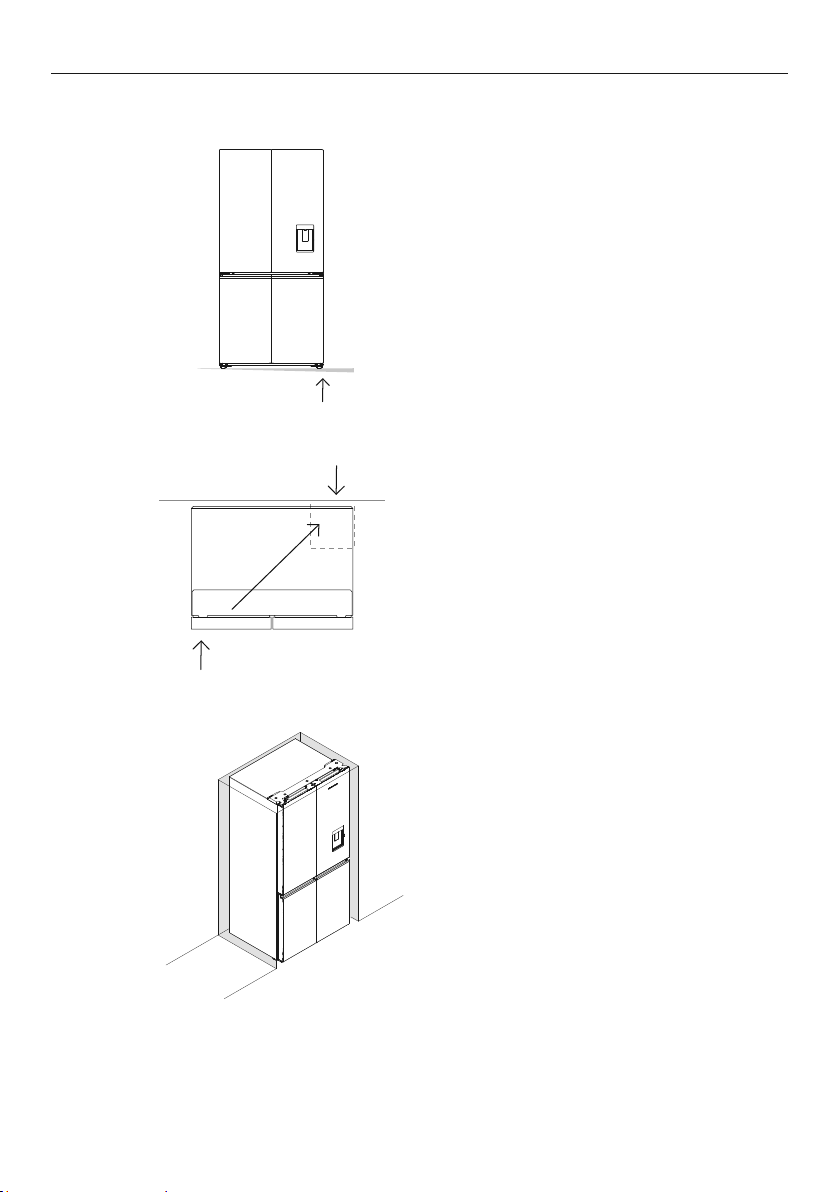
Your Fisher&Paykel ActiveSmart™ refrigerator is fitted with front and rear rollers to allow
you to easily move your refrigerator forward and backward. Avoid moving your refrigerator
sideways to prevent damaging the rollers or the floor coveringsurface.
Your refrigerator will arrive with the front feet wound up to assist with moving the product
into its final location.
Roll the refrigerator into its final
position ensuring there is the
1
2
correct air gap between the product
and surrounding cabinetry. See
minimum clearance in cabinetry
dimensions table.
Adjust the front feet down until the
refrigerator is leaning backward with
the front approximately 10mm higher
than the back. This will ensure a
good door closing action.
Levelling of refrigerator doors
3
17mm
Using the spanner provided, turn the
hinge anti-clockwise to lift the door or
clockwise to drop the door.
The larger end of the spanner is for
use on the bottom of the upper doors
(centre hinges).
After adjustment on bottom hinges,
ensure there is clearance between
lower doors and centre hinge and
doors swing freely.
14mm
21
Page 22
POSITIONING YOUR REFRIGERATOR
What to do if your product is unstable
1
2
Gently push the refrigerator back until
the rear rollers contact the floor.
Measure the gap under the front foot,
which has come off the floor.
Obtain some solid packing material
(hardwood, plastic,etc) which fits
firmly into the gap under the foot.
Wind both front feet up and roll the
product out ofposition.
Place the packing material in the
location diagonally opposite the front
roller that lifts off the floor.
Ensure the packing material stays in
place when the product is pushed
back into position.
22
3
Roll the refrigerator back into
position and adjust front feet. Check
alignment and door closing action are
satifactory. Make small adjustments to
the front feet where necessary.
Page 23

COMPLETE INSTALLATION
Before placing food in the fridge or freezer compartments
z
Remove all internal packaging. Ensure that all transit clips are removed from the
refrigerator. These are small rubber stoppers located at the back of the shelves.
z
Clean the inside of the appliance with a mix of warm water and a small amount of liquid
detergent. Use a soft cloth to remove dust collected during manufacture and transport.
z
Allow the refrigerator and freezer to run empty for 2–3 hours to allow each
compartment to cool to the appropriate temperature.
z
The appliance may have an odour on its initial operation, this will go when the
refrigerator and freezer have cooled sufficiently.
23
Page 24

FINAL CHECKLIST
TO BE COMPLETED BY THE INSTALLER
Ensure that:
Check all parts are installed.
Ensure the appliance is level.
Ensure all internal and external packaging is removed from the appliance before use.
Ensure the water filter is installed and has been flushed.
Complete and keep for safe reference:
Model
Serial No.
Purchase Date
Purchaser
Dealer Address
Installer’s Name
Installer’s Signature
Installation Company
Installation Date
24
Page 25

FISHERPAYKEL.COM
© Fisher & Paykel Appliances 2023. All rights reserved.
The models shown in this guide may not be available in all markets
The product specifications in this guide apply to the specific products and
models described at the date of issue. Under our policy of continuous product
improvement, these specifications may change at any time.
For current details about model and specification availability in your country,
please go to our website or contact your local Fisher&Paykel dealer.
and are subject to change at any time.
41084B 04.2
 Loading...