

Page 1
ACTIVESMART™
FREESTANDING REFRIGERATOR
CONTEMPORARY
QUAD DOOR REFRIGERATOR FREEZER ICE & WATER
RF500QNUB1, RF500QNUX1
QUAD DOOR REFRIGERATOR FREEZER NON-ICE & WATER
RF500QNB1, RF500QNX1
USER GUIDE
NZ AU
Page 2

Page 3

CONTENTS
Safety and warnings 4
Before you begin 9
Using the control panel 10
Storage features 11
Using your appliances 12
Temperature control 12
Door alarms 13
Alarm mute 13
Key mute 13
Key lock 13
Sabbath mode 14
Features 15
Water dispenser* 19
Dispenser lock 20
Shelves 22
Humidity Control Lid 22
Wi-Fi connection 23
Cleaning and care 24
Foodcare 30
Moving or storing your appliance 32
User warnings and sounds 33
Troubleshooting 34
Manufacturer’s warranty 38
European Directive 2012/19/EU on
Waste Electrical and Electronic Equipment (WEEE) 39
*Available in Ice & Water models only.
Registration
To register your product visit our website: fisherpaykel.com/register
3
Page 4
SAFETY AND WARNINGS
WARNING!
Electric Shock Hazard
Failure to do so can result in death, electric
shock, fire or injury to persons.
• Read and follow the safety and warnings
outlined in this user guide before operating
this appliance.
WARNING!
This appliance contains flammable
refrigerant isobutane (R600a).
4
Page 5

SAFETY AND WARNINGS
READ AND SAVE THIS GUIDE
WARNING!
Read entire manual. Failure to follow all guides and rules could cause personal injury or
property damage. When using this appliance, always exercise basic safety precautions
including thefollowing:
General Use
z
This refrigerating appliance is not intended to be used as a built-in appliance.
z
This product has been designed for use in a normal domestic (residential) environment.
z
Children aged 3 to 8 years may load and unload this appliance under supervision.
z
Children should be supervised to ensure that they do not play with the appliance.
z
Cleaning and user maintenance shall not be undertaken by children without supervision.
z
This appliance can be used by children aged from 8years and above and persons
withreduced physical, sensory or mental capabilities or lack of experience and
knowledge if they have been given supervision or instruction concerning use of
theappliance in a safe way and understand the hazards involved.
z
The manufacturer’s installation instructions for product and cabinetry ventilation
mustbe followed when installing the appliance.
z
To avoid hazard due to instability of the appliance, it must be fixed in accordance
withinstallation instructions.
z
Keep ventilation openings, in the appliance enclosure or the built-in structure,
clearofobstruction.
z
Do not use mechanical devices or other means to accelerate the defrosting process,
other than those recommended by the manufacturer.
z
Do not damage the refrigerant circuit.
z
In case of damage to the refrigerant circuit, ventilate the area by opening all windows.
z
Do not operate electrical equipment or any other equipment that may produce arcs,
sparks or flames in the area. Contact your Fisher & Paykel trained and supported
service technician immediately to arrange for the appliance to be repaired.
z
Connect to potable water supply only.
z
This refrigerating appliance is intended to be used at ambient temperatures ranging
from 16 °C to 43 °C. The product performance may be compromised when operating
outside of this temperature range.
z
It is hazardous for anyone other than a Fisher & Paykel trained and supported service
technician to service this appliance. In Queensland – the authorized Service Person
MUST hold a Gas Work Authorisation for hydrocarbon refrigerants, to carry out
Servicing or repairs which involve the removal of covers.
Electrical
z
This appliance must be installed in accordance with the installation instructions
before use.
z
To allow disconnection of the appliance from the supply after installation, incorporate a
switch in the fixed wiring in accordance with the wiring rules.
z
Never unplug your refrigerator by pulling on the power cord. Always grip the plug
firmly and pull straight out from the outlet.
z
Do not plug in any other appliance at the same power point as your refrigerator or use
extension cords or double adapters.
5
Page 6

SAFETY AND WARNINGS
z
Repair or replace immediately all electric service cords that have become frayed or
otherwise damaged. Do not use a cord that shows cracks or abrasion along its length or
at either the plug or appliance end.
z
If the power supply cord is damaged, it must only be replaced by your Fisher & Paykel
trained and supported service technician because special purpose tools are required.
z
When moving your appliance away from the wall, be careful not to roll over or damage
the power cord.
z
WARNING: Do not use electrical appliances inside the food storage compartments of
the appliance, unless they are of the type recommended by the manufacturer.
z
When positioning the appliance, ensure the power cord is not trapped or damaged.
z
Do not locate multiple portable socket-outlets or portable power supplies at the rear
of the appliance.
Food safety
z
Regularly clean accessible draining systems and surfaces that come in
contact with food.
z
Ensure any raw meat or fish is stored in sealed containers to prevent
cross-contamination.
z
Immediately clean any drips or spills on surfaces.
z
If the appliance will be left empty for long periods, switch off, defrost, clean, dry, and
leave the door open to prevent mould developing within the appliance.
z
Opening the door for long periods can cause a significant increase of the temperature
in the compartments of the appliance.
Storing food and drinks/wine
z
Do not store explosive substances such as aerosol cans with a flammable propellant
inthis appliance.
z
Never store volatile or flammable materials in your appliance as they may explode.
z
Never freeze liquids in glass containers. Liquid expands during freezing, which may
cause the container to explode.
z
Never freeze carbonated drinks. They may explode.
Servicing
z
Your refrigerator is designed to operate for many years without the need for service
checks. However, if your refrigerator is malfunctioning, have it attended to by your
Fisher & Paykel trained and supported service technician as soon as possible. All
electrical repairs must be carried out by an adequately trained service technician or
qualified electrician.
z
The LED light cannot be serviced by the user. Contact your Fisher & Paykel Dealer or
Fisher & Paykel trained and supported service technician.
z
If you suspect that the product is not getting cold — items such as ice cream are
melting— remove all perishable food and store in another appliance or cooler to prevent
spoilage. Immediately call for a service technician.
Cleaning
z
Use mild dish-washing liquid with warm water and a lint-free cloth to clean the product.
z
Avoid using anti-bacterial cleaning products on either the interior or exterior
of the cabinet as they may cause rusting of metal components and cracking of
plasticcomponents.
6
Page 7

SAFETY AND WARNINGS
Disposal
z
Extreme care must be taken when disposing of your old appliance to avoid hazards:
z
The flammable refrigerant gas must be safely removed by a qualified servicetechnician.
z
The thermal insulation foam in this appliance may contain flammable insulationblowing
gases, any exposed foam may be highly flammable andmustbe carefully treated
during disposal.
z
WARNING: Risk of child entrapment. Before you throw away your old refrigerator or
freezer, the doors and panels should be removed and the racks left in place so that
children may not easily climb inside.
z
Consult your local energy authority or local codes as to the best way to dispose
ofyour old appliance.
Water connection
z
The water connection to your Ice & water refrigerator must be installed by an
authorised plumber or Fisher & Paykel trained and supported service technician.
z
Installation and use MUST comply with all state and local plumbing codes. Check
with your local public works department for plumbing codes. You must follow their
guidelines as you install the water filtration system.
z
If the water tank has not been used for an extended period of time, or has developed
an unpleasant taste or odour, flush the water system. If the problem persists, replace
the water filter cartridge and refer to the flushing instructions detailed in section
‘Flushing through the water dispenser’.
z
To avoid serious illness or death, only connect your water filter to safe drinking water.
z
The water filter cartridge needs to be changed when the replacement indicator icon
illuminates. This will happen every six months.
z
If the water filtration system has been allowed to freeze, replace filter cartridge.
Failure to replace the disposable filter at recommended intervals may lead to reduced
filter performance and failure of the filter, causing property damage from water
leakage or flooding.
z
In cases of excessively reduced filter life — we recommend that you consult a local
plumber or your water supplier for advice on suitable filtration requirements for the
water supplied to your home.
z
Filter replacement is the consumer’s responsibility and will not be covered by the
warranty except in the case of faulty parts or materials within the filter cartridge.
z
If the product has not created ice for some time or ice has an unpleasant taste or odour
dispose of ice and refer to ‘Automatic ice’ for flushing instructions. If unpleasant taste
or odour persists, you may wish to fit a new filter cartridge.
z
Use new tubing supplied with the refrigerator. DO NOT reuse old tubing from old water
and ice connections.
z
Your water filtration system can withstand up to 827kPa of water pressure.
z
DO NOT install if water pressure exceeds 827kPa.
To reduce the risk associated with property damage due to water leakage or flooding:
z
DO NOT install systems in areas where ambient temperatures may go above 38°C or
drop below 0°C.
z
DO NOT install on hot water supply lines. The maximum operating water temperature of
this filter system is 38°C.
z
DO NOT install where water hammer conditions may occur. If water hammer conditions
exist, you must install a water hammer arrester.
7
Page 8

SAFETY AND WARNINGS
WARNING!
To reduce the risk associated with choking:
z
DO NOT allow children under 3 years of age to have access to small parts during the
installation of the water filter.
Ice making
z
Avoid contact with the moving parts of the ice maker ejector mechanism, and do
not place your fingers on the automatic ice- making mechanism while the appliance
is inoperation.
z
At first use or after water filter has been replaced, there may be discolouration in the
first bin of ice cubes. Discard the discoloured ice cubes. If discolouration continues in
successive bins, contact your Fisher & Paykel trained and supported service technician.
Power failure
z
In the event of a power interruption, the appliance will automatically save the current
temperature settings. When power is recovered, the appliance will revert to the current
temperature settings only.
z
Most power failures are corrected within a short period of time. 1 – 2 hours loss of
power will not affect the appliance’s temperatures.
z
To avoid sudden change of temperature while the power is off, you should avoid
opening the door. A refrigerator will keep food safe for up to 4 hours during a power
outage. Keep the door closed as much as possible. Discard refrigerated perishable food
such as meat, poultry, fish, eggs, and leftovers after 4 hours without power.
Light source information
z
This product contains light sources of energy efficiency class F. The light source used in
this appliance is not suitable for room illumination.
8
Page 9
BEFORE YOU BEGIN
z
Ensure the installer has completed the final checklist in the installation guide.
z
Read this guide, taking special note of the safety and warnings section.
z
Remove all packaging and dispose of it responsibly. Recycle items that you can.
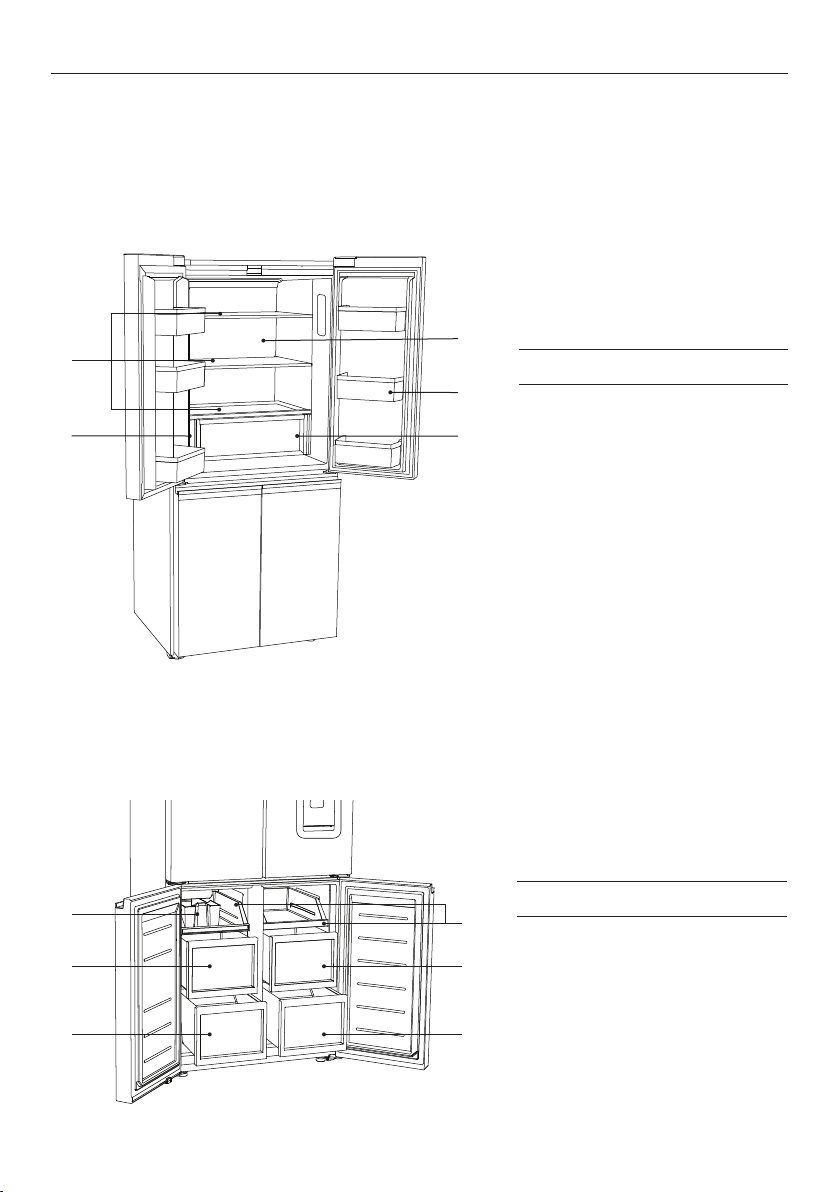
Refrigerator compartment
3
1
4
Refrigerator features
1 Shelving
2
Freezer compartment
1
3
4
2 Water filter*
5
3 Back light panel
4 Door shelves
5 Humidity control
compartment
Freezer features
2
1 Ice storage bin with scoop*
3
2 Trays
3 Mid bins
4
4 Bottom bins
*Ice & Water models only
9
Page 10
USING THE CONTROL PANEL
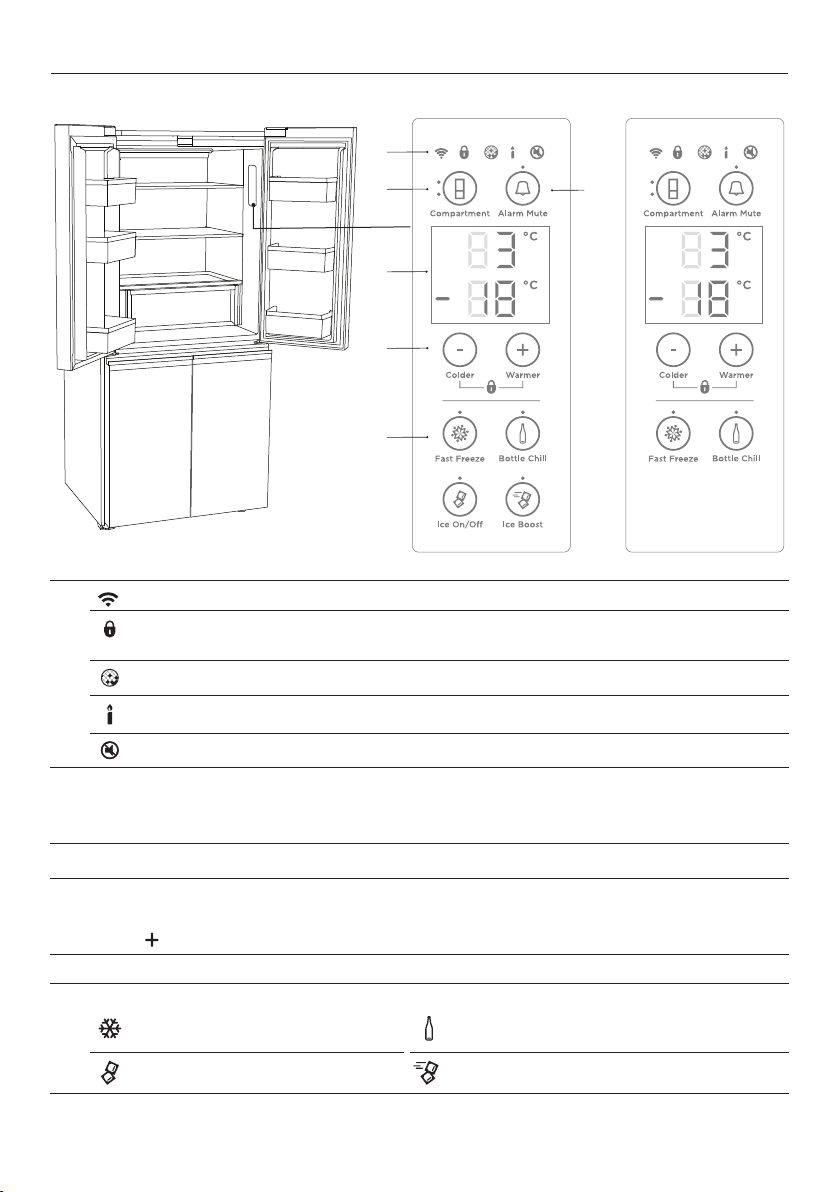
RF500QNUB1, RF500QNUX1 models RF500QNB1, RF500QNX1 models
1
2 3
4
5
6
1
Wi-Fi illuminates when functionality is activated.
Illuminates to indicate that the keys on the control panel are locked. When the
door is closed the display is automatically locked.
Illuminates when the water filter needs replacing.
IIluminates to indicate that Sabbath mode is activated.
Illuminates to indicate key press sounds are deactivated.
Allows you to select the compartment to adjust the temperature.
2
z
Upper light to indicate the refrigerator compartment is selected.
z
Lower light to indicate the freezer compartment is selected.
Alarm mute deactivates the door alarm for 20minutes.
3
Displays the set temperature of the compartments.
4
To change between Celsius and Fahrenheit on the display:
Press
Allows you to adjust the temperature of the selected compartment.
5
Allows you to select features:
6
10
for sixseconds.
FAST FREEZE
ICE ON/OFF ICE BOOST
BOTTLE CHILL
Page 11
STORAGE FEATURES
REFRIGERATOR
Humidity control compartment Lids create a humid microclimate by reducing dry air
going into the bins. The specially designed groves
retain condensation, keeping humidity high and
reduce dripping onto the produce below.
Cantilever glass shelving Heat-treated safety glass
Can be removed and positioned at heights to suit
your storage requirements.
Door shelves The door shelves are designed for general items
such as condiments and drinks or items you require
frequent access to.
Clear windows give ultimate visibility to what is being
stored in the door shelves.
FREEZER
Ice maker* Removable ice container.
Hygienic ice scoop.
Freezer bins Allow for easy storage of frozen food items.
* Ice & Water and Automatic Ice models only.
11
Page 12
USING YOUR APPLIANCES
Temperature control
When you turn your refrigerator on for the first time, the cooling system will automatically
cool all compartments to their set temperatures within 2-3 hours.
The internal control panel enables you to change and control the temperature of all
compartments accurately and independently. The internal control panel default setting is to
show the set temperature for the refrigerator compartment.
For common foodstuffs, the factory default setting provides the optimum setting
for foodcare.
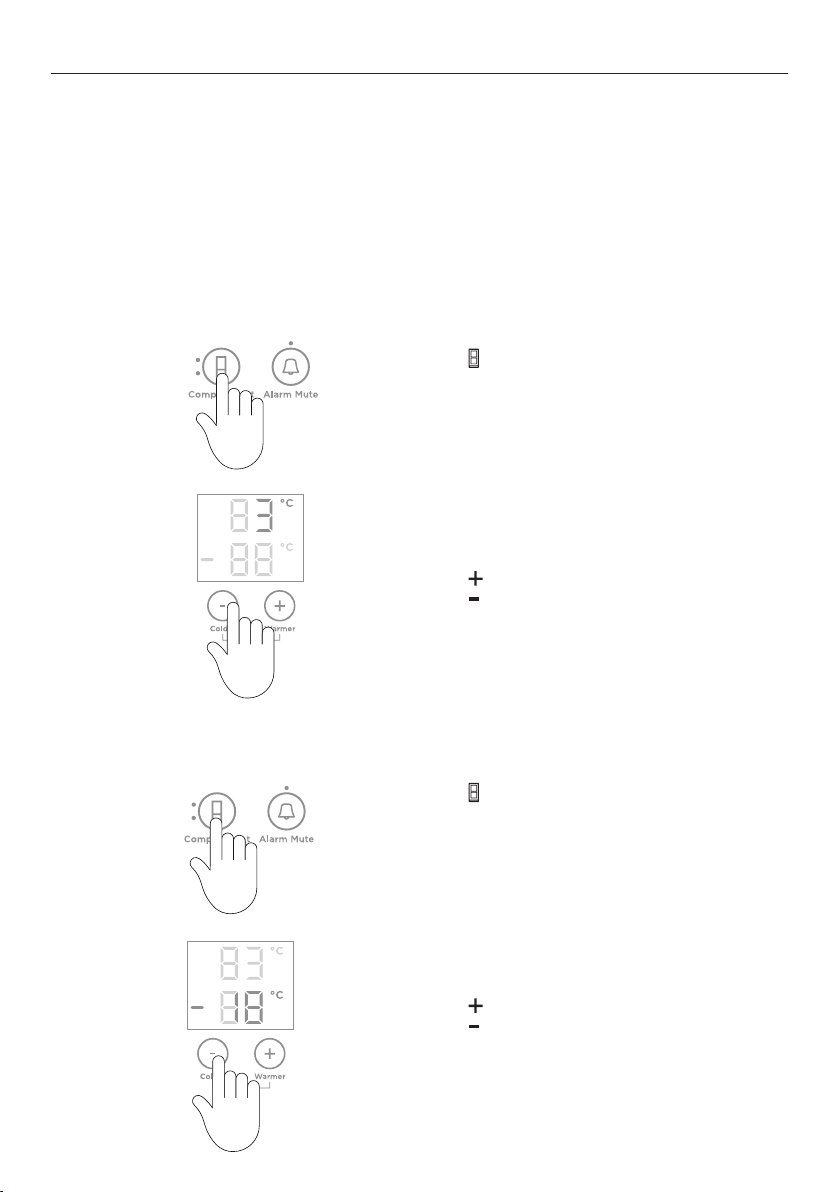
How to adjust the temperature — Refrigerator compartment
until the refrigerator compartment
1
Press
light is illuminated, indicated by the top light.
2
How to adjust the temperature — Freezer compartment
1
2
12
Press
Press to decrease the temperature.
Press twice to adjust the freezer
compartment temperature.
The freezer compartment light will illuminate.
Press
Press to decrease the temperature.
to increase the temperature,
to increase the temperature,
Page 13
86.116%150%>70%
USING YOUR APPLIANCE
Door alarms
If the refrigerator compartment door is left open, the alarm will beep after 90seconds, if
the freezer door is left open the alarm will beep after 60seconds. If either of the doors
remains open, subsequent beeps will sound every 30 seconds for fiveminutes.
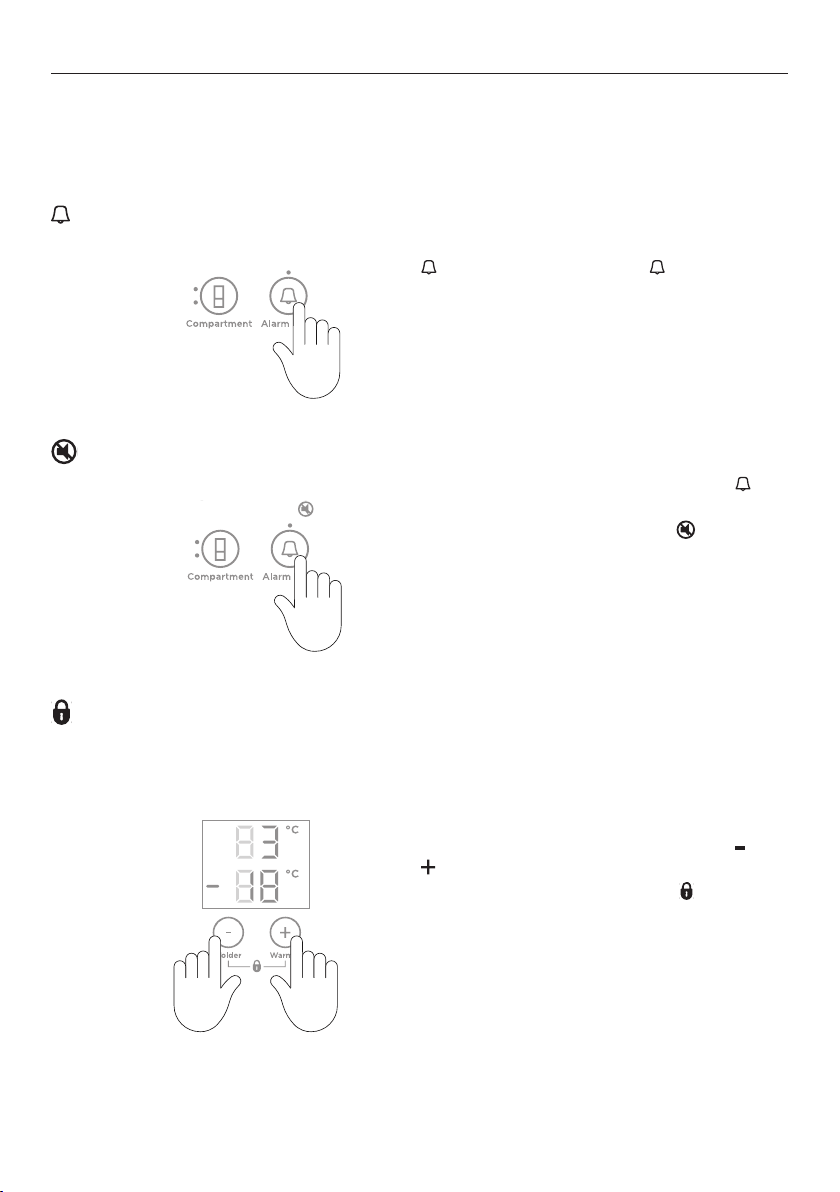
Alarm mute
To activate/deactivate ALARM MUTE, press
once. The light above the button
will illuminate to indicate the door alarm
is muted.
ALARM MUTE will automatically deactivate
after 20minutes or when the door is closed.
Key mute
To activate/deactivate KEY MUTE, press for
fourseconds.
Once
KEY MUTE is activated the icon on
the internal control panel illuminates, all key
sounds are silenced.
Door alarms and the
still operational.
BOTTLE CHILL alarm are
Key lock
KEY LOCK allows you to disable the buttons on the internal control panel. This is useful
when cleaning your refrigerator.
To activate/deactivate KEY LOCK, press and
together for fourseconds.
When
KEY LOCK is activated the icon on
the internal control panel will illuminate.
Pressing any of the buttons will sound several
beeps to tell you that they are disabled.
13
Page 14
USING YOUR APPLIANCE
Sabbath mode
In
SABBATH MODE, alarms, lights and displays are deactivated for 80 hours.
Once in Sabbath mode:
z
The interior light will not turn on when you open the refrigerator.
z
The door alarms will not operate.
z
The display will not illuminate, except the Sabbath mode icon.
z
The internal and external control panels will not operate.
z
Sabbath mode automatically deactivates after 80 hours.
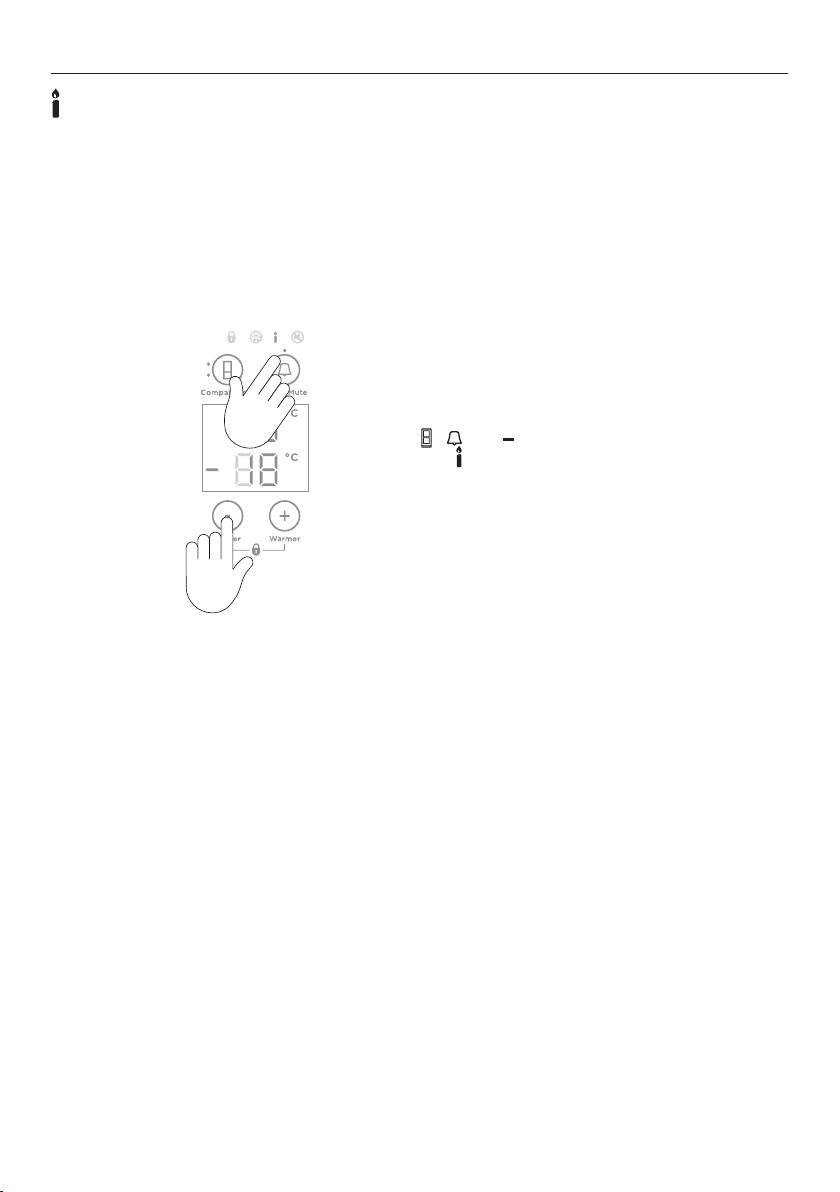
To activate/deactivate SABBATH MODE, press
, and together for fourseconds.
The icon on the internal control panel will
illuminate when SABBATH MODE is activated.
If you turn off your refrigerator while in
the refrigerator is switched on again.
14
SABBATH MODE it will resume automatically once
Page 15
USING YOUR APPLIANCE
Features
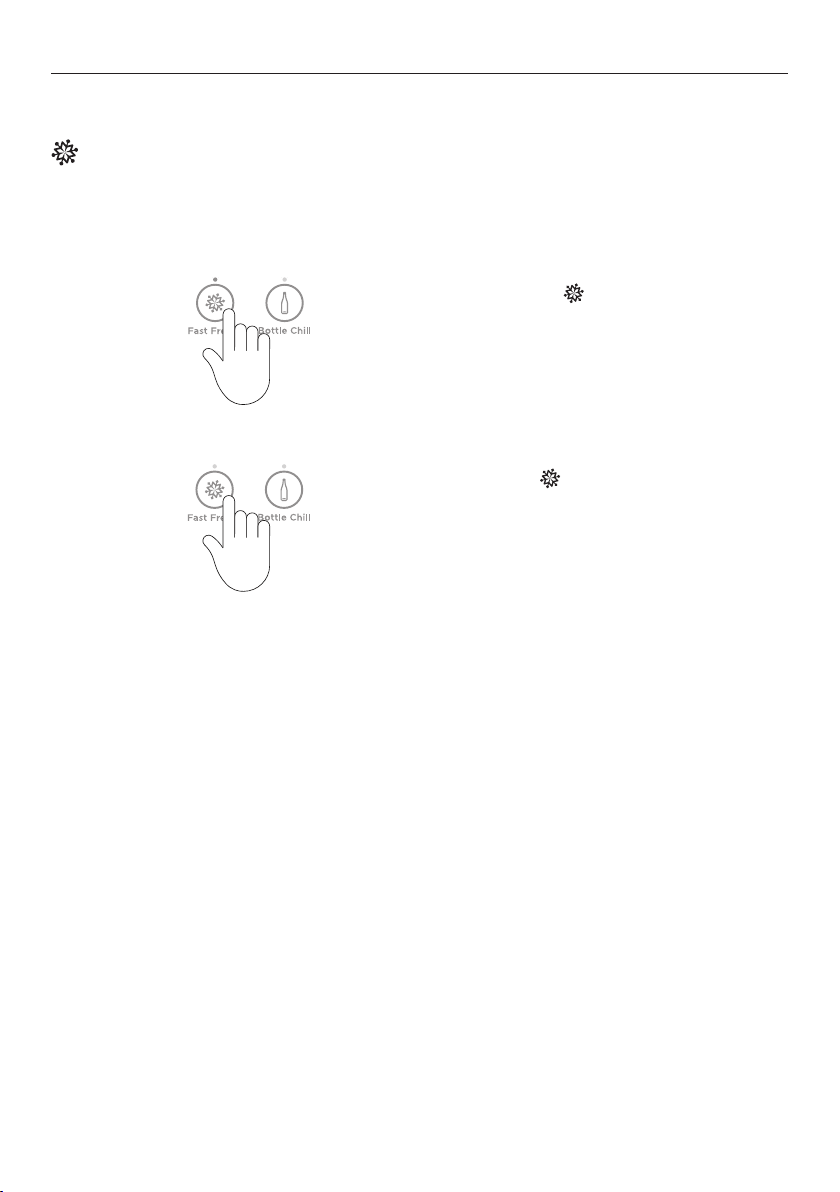
Fast Freeze
FAST FREEZE boosts freezing speed by dropping to its coldest temperature for 12 hours,
helping retain freshness, texture and taste during the freezing process.
1
2
For best results activate the function before it is required. Alternatively, activate it
whenplacing food into the freezer.
To activate, press on the internal display.
The FAST FREEZE light will illuminate.
To deactivate before the 12hours has
elapsed, press
When FAST FREEZE is deactivated the
light is off.
again.
15
Page 16
USING YOUR APPLIANCE
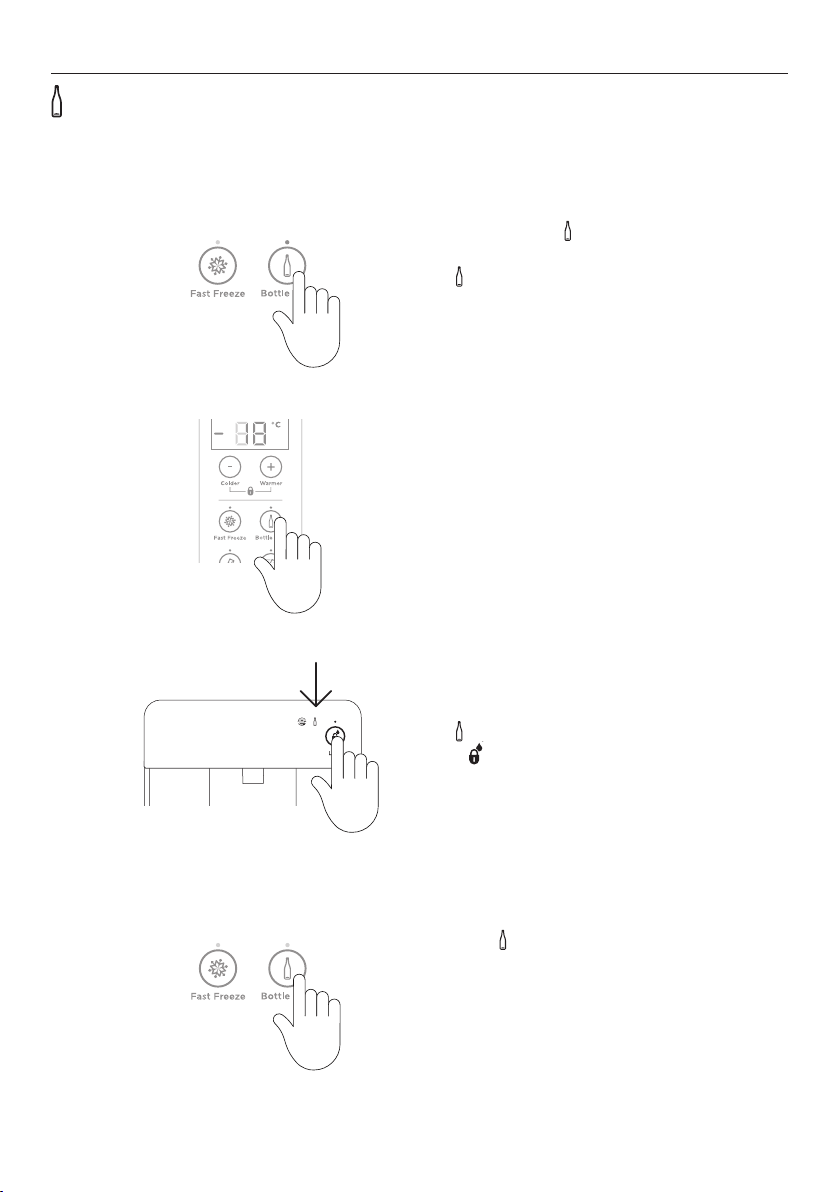
Bottle Chill
BOTTLE CHILL rapidly chills your beverages in the freezer for a set time of 15 minutes.
Depending on bottle size, you may need to return it to the freezer and reset.
To activate, press on the control panel.
1
2
The BOTTLE CHILL light will illuminate.
The
icon will illuminate on the external
display (Ice & Water models only).
An alarm will sound after 15minutes to
remind you to remove your beverage.
For non water-dispensing models
Open the refrigerator compartment door
and press anybutton on the control panel to
silence the alarm.
16
3
4
For water-dispensing models
The
icon will flash on the external display.
Press on the external display to silence
the alarm.
To deactivate BOTTLE CHILL before 15minutes,
press the button on the control panel.
When
BOTTLE CHILL is deactivated, the
light will not illuminate and the icon is not
visible on the external display (Ice & Water
model only).
Page 17
USING YOUR APPLIANCE
150%>70%
IceOn/Off
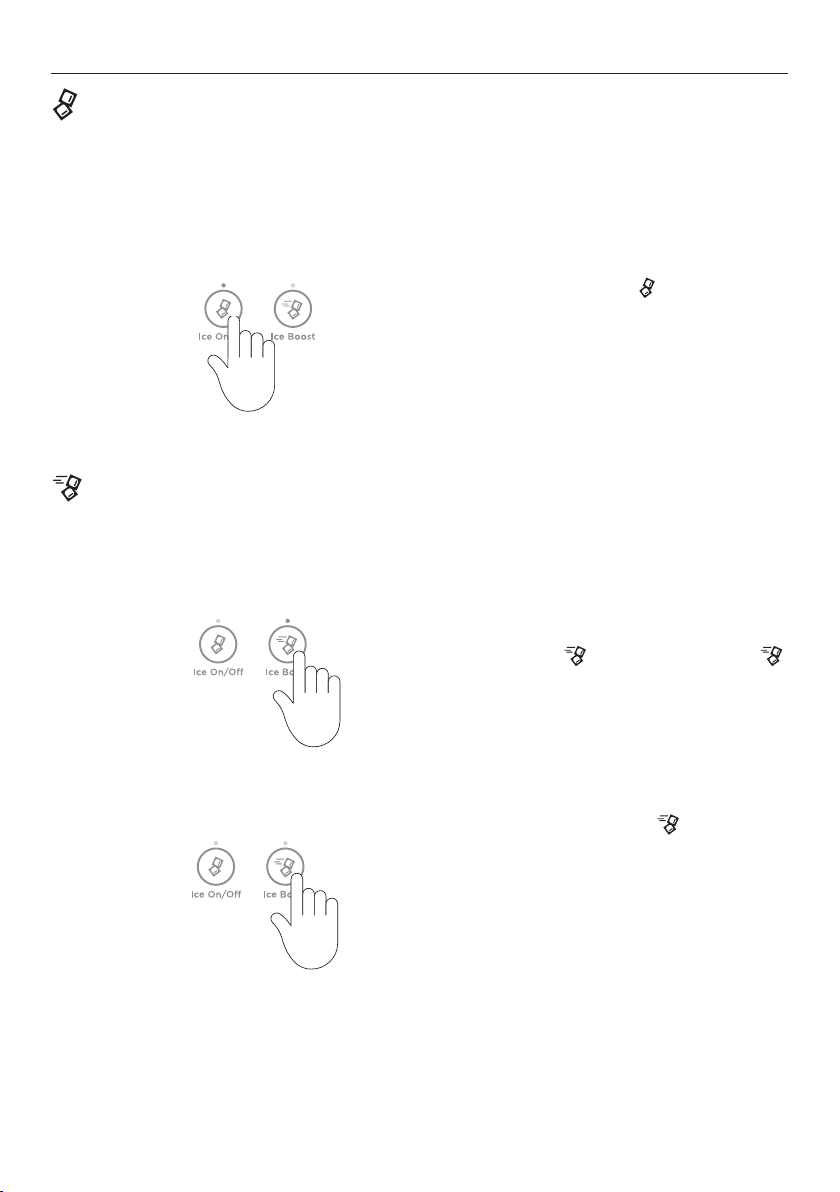
ICE ON/OFF activates automatic ice - this is only available in the freezer compartment.
Your ice maker is designed to automatically dispense ice into the ice storage bin below
until it detects the bin is full. The more ice you use, the more it makes. Before first use the
automatic ice systems needs to be flushed. Refer to ‘Flushing the water filter’ for details.
To activate/deactive, press
1
Ice Ice Boost
ICE BOOST increases ice production and will automatically deactivate after 24 hours.
1
2
When the ice maker is activated the light will
illuminate.
When you first turn your ice maker on, ICE
is off.
BOOST
To activate, press
button will illuminate.
ICE BOOST will pause once your ice bin is full.
To manually deactivate press
The light will not illuminate.
Activating
on ice making.
Deactivating ice making automatically
deactivates
ICE BOOST will automatically turn
ICE BOOST.
. The light above the
.
again.
17
Page 18

USING YOUR APPLIANCE
Information about your ice maker
Your automatic ice maker will produce approximately eight cubes of ice every 3 – 4hours,
depending on the freezer compartment temperature and the number of door openings.
The ice cube tray will fill with water. When cubes are frozen, they will be ejected from the
ice tray into the ice storage bin. Ice making will continue until the storage bin is full. Ice
making will resume once you start to use the stored ice.
Your Ice & Water product comes with a smaller ice bin inside the freezer tray. Attached to
the ice storage bin is the scoop for the ice. This scoop provides hygienic access to the ice.
For maximum ice storage, level the stored cubes with the ice scoop.
If ice is not used often, old cubes will become cloudy, taste stale, will shrink and may
stick together. Empty the ice storage bin periodically and wash in lukewarm water. Dry
thoroughly and place back into the correct position.
Turn your ice maker off if:
z
There is no water supply for several hours.
z
You are removing the ice storage bin for a period of time.
z
You are going on holiday/vacation.
18
Page 19
USING YOUR APPLIANCE
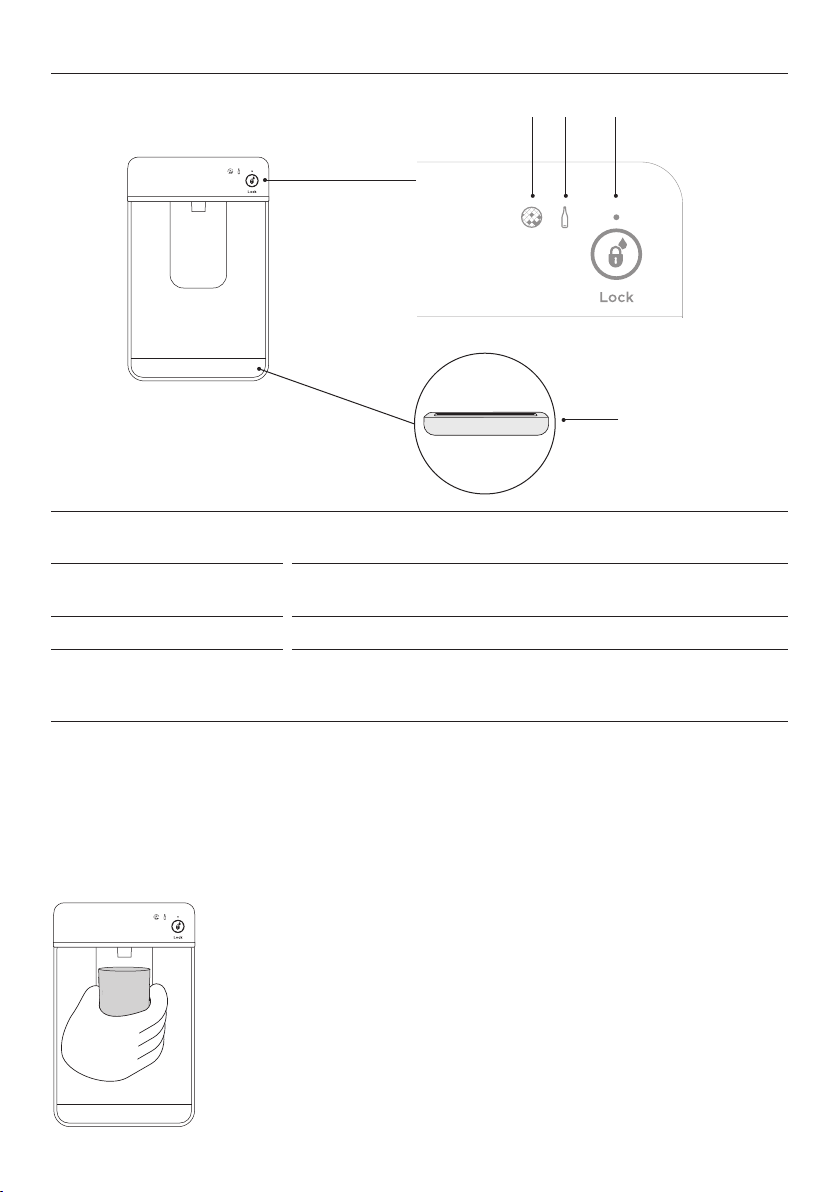
Water dispenser*
Dispenser lock button
1
and LED light
Bottle Chill indicator
2
Filter change indicator
3
Drip tray
4
3 2 1
4
Locks/unlocks the water dispenser. The LED above the lock
button will illuminate when dispenser is locked.
Icon will illuminate when
BOTTLE CHILL isactivated and
flashes when the beverage is ready.
Icon will illuminate when water filter requires changing.
The drip tray is designed to fit into the bottom of the water
dispenser panel to capture any odd drips of water that may
fall after dispensing.
Using your water dispenser
Ensure you have followed the steps outlined in your installation guide prior to your first use
of the water dispenser.
Dispensing
Your water dispenser is designed for one-handed operation.
To dispense water, gently press the dispensing pad with a glass
or container.
To stop the flow of water, simply pull your glass or container
away from the dispensing pad.
Pressing hard against the dispensing pad will not increase the
flow or dispense more water.
When dispensing for long durations, a time out period may
occur where an alarm will sound. Please wait 3 minutes before
dispensing again.
*Available in Ice & Water models only.
19
Page 20
USING YOUR APPLIANCE
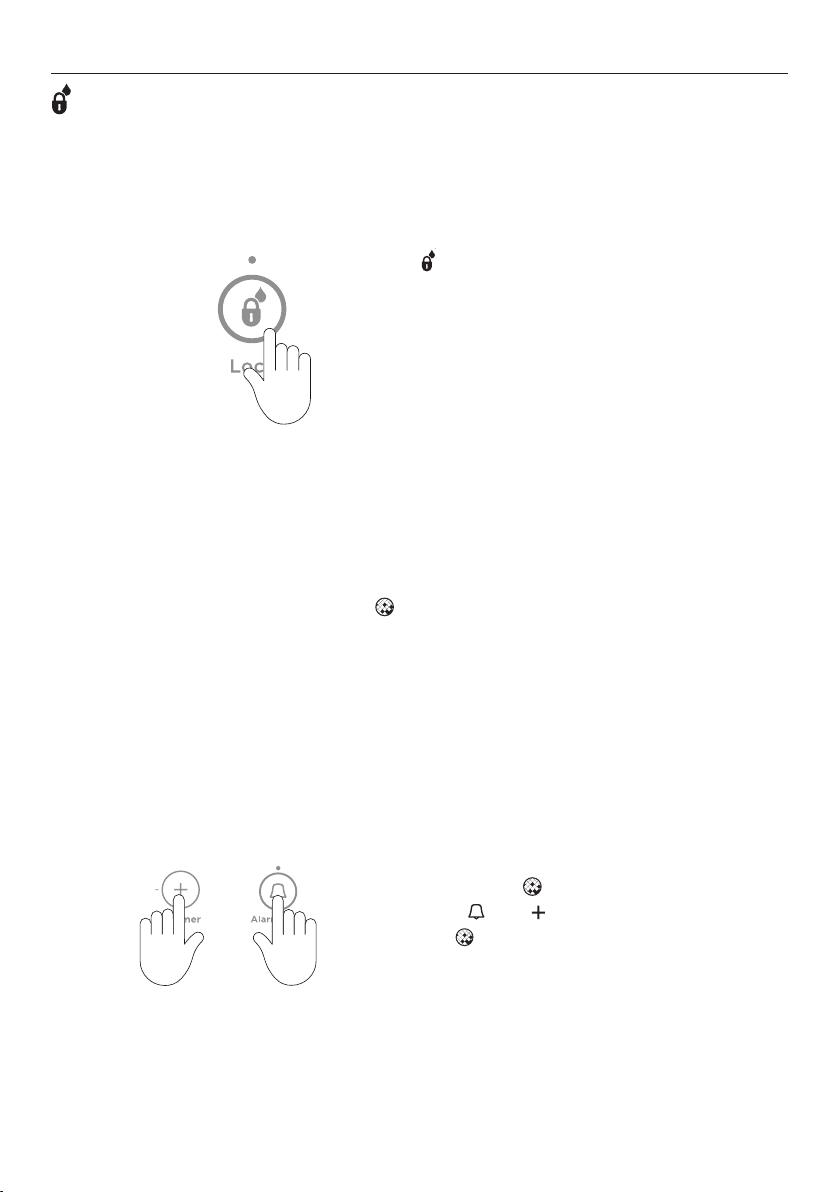
Dispenser lock
The
DISPENSER LOCK is located on the external display and can be activated to prevent
water from being dispensed. Thisisuseful when you are cleaning the external display or
when there are small children around.
To activate/deactivate DISPENSER LOCK, press
for fourseconds.
When activated the light above the button
1
Water filter
The water supplied to your refrigerator is filtered to remove impurities through a filter
located internally at the bottom left corner of the refrigerator. Replace your filter cartridge
every 6months.
z
There is a replacement indicator icon on the internal control panel and external
display which will appear when the filter needs replacing. The icon will flash, as a
reminder, when water isdispensed.
z
Replacement filter cartridges are available from your Fisher & Paykel dealer, online or
from a Fisher & Paykel service technician. The details of the replacement filter cartridge
are labelled on the cartridge.
will illuminate.
When the dispenser pad is pressed, several
beeps will sound to alert the user that water
cannot be dispensed.
Changing the water filter cartridge
Guidance of how to replace your water filter can be found at fisherpaykel.com/water-filter.
To reset the filter indicator:
Press
The
and together for 4seconds.
on the control panel will turn off
when reset.
20
Page 21
USING YOUR APPLIANCE
Flushing the water filter
Before you start using the Ice & Water function, complete the flushing steps to ensure
optimum performance of your water filter.
To flush through the water dispenser
Press the water dispenser pad to dispense 1L
of water.
Wait for 3 minutes before dispensing again.
Repeat this cycle 8 times. At least 8L of
water needs to be flushed through the
system. This prevents excessive dripping of
water from your dispenser.
NOTE: There may be carbon residue
dispensed together with water. This is not
harmful, and normal during flushing process.
To flush the automatic icemaker
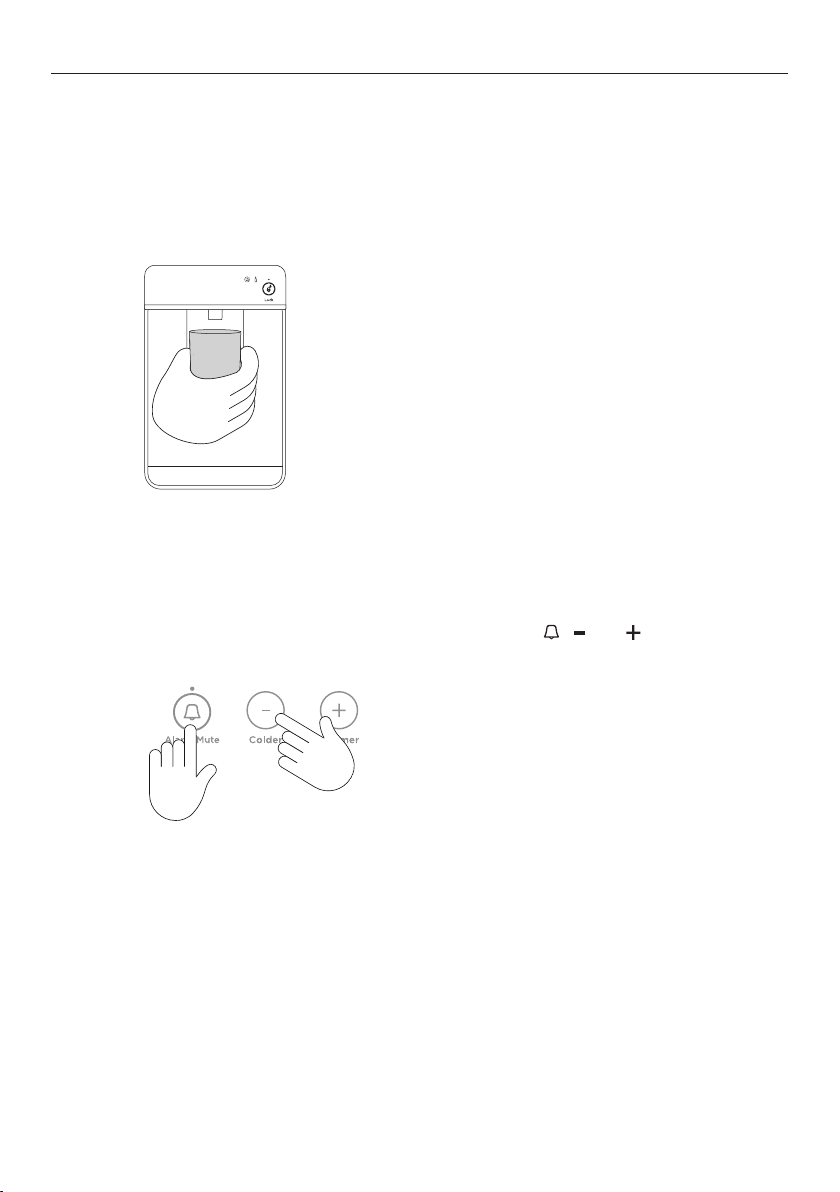
Press and hold , and together for
4seconds then close the door(s). The ice
tray will flip twice and empty the water
into the bin below. The ice tray will flip
1
only after the doors are closed.
Repeat the cycle to help remove any
dust in the ice tray collected during
manufacture and transport.
Empty the water in the bin and return the bin correctly. Ensure that the scoop is located in
front of the bin.
Once your ice maker is turned on, discard the first 3harvests of ice (8cubes per harvest).
This will flush away any impurities in the water line and ensure the best ice quality.
Carry out the above steps after a holiday/vacation or extended periods of not using ice.
21
Page 22
USING YOUR APPLIANCE
Shelves
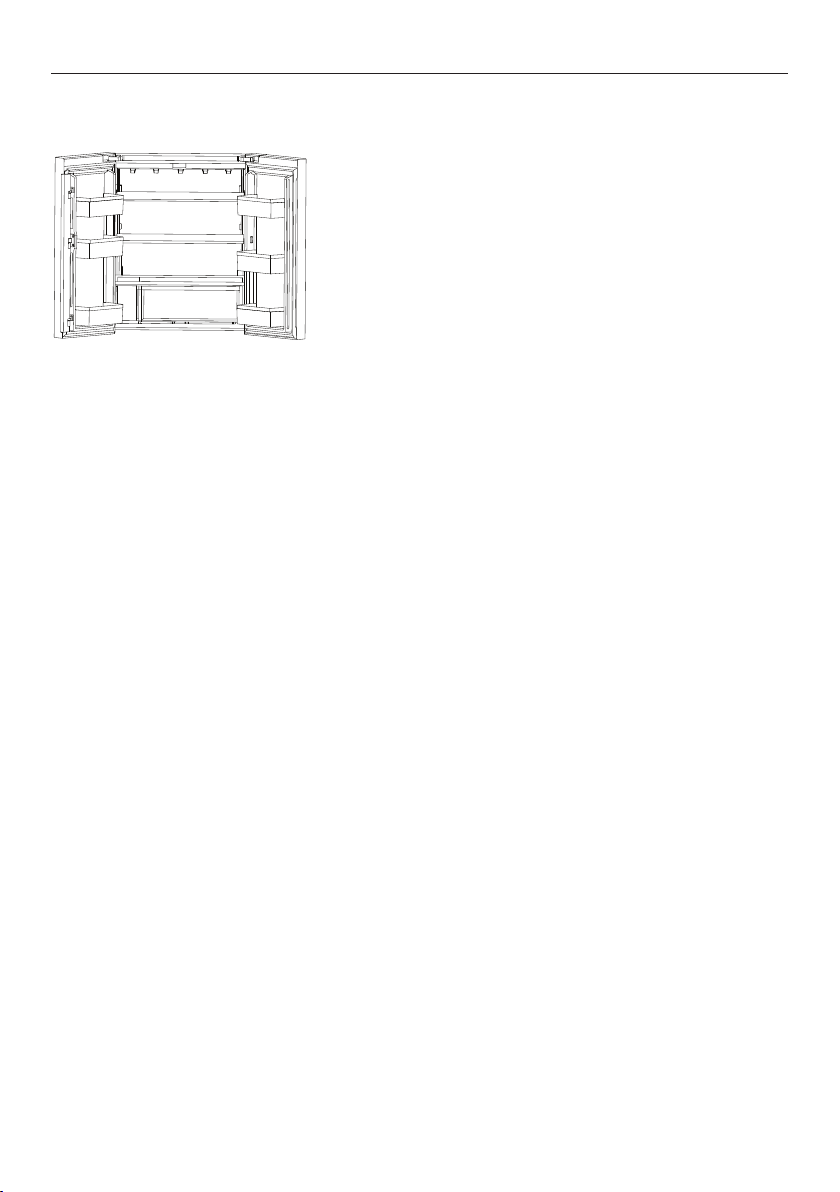
The two full-width cantilever glass shelves
are removable and can be repositioned in
your refrigerator. The fixed glass shelf can be
removed, but not repositioned.
Refer to ‘Cleaning and care’ for details on how
to remove glass shelves.
Humidity Control Lid
The Humidity Control Lid is fitted to the fruit and vegetable bin of your refrigerator and
provides a humid microclimate to extend the storage times of fruit and vegetables. This lid
has specially designed grooves that retain moisture to prevent condensation from dripping
onto the fruit and vegetables at times of high humidity.
22
Page 23

WI-FI CONNECTION
Your appliance may be connected to your home wireless network and operated remotely
using the app.
Getting started
z
Ensure your home Wi-Fi network is turned on.
z
You will be given step by step guidance on your mobile device.
z
It may take up to 10 minutes to connect your appliance.
On your mobile device:
1 Download the app from www.fisherpaykel.com/connect
2 Register and create an account.
3 Add your appliance and set up the Wi-Fi connection.
23
Page 24
CLEANING AND CARE
Exterior
Clean all surfaces with liquid dishwashing detergent dissolved in warm water andasoft
cloth. Rinse with clean water and dry with a clean, lint-free cloth.
Do not use any abrasive stainless steel cleaners, glass cleaners, solvents or scourer pads as
these will damage the door surface.
Door gasket
Clean the magnetic door gasket every three months with a toothbrush, and liquid detergent
dissolved in warm water.
Cabinet surround
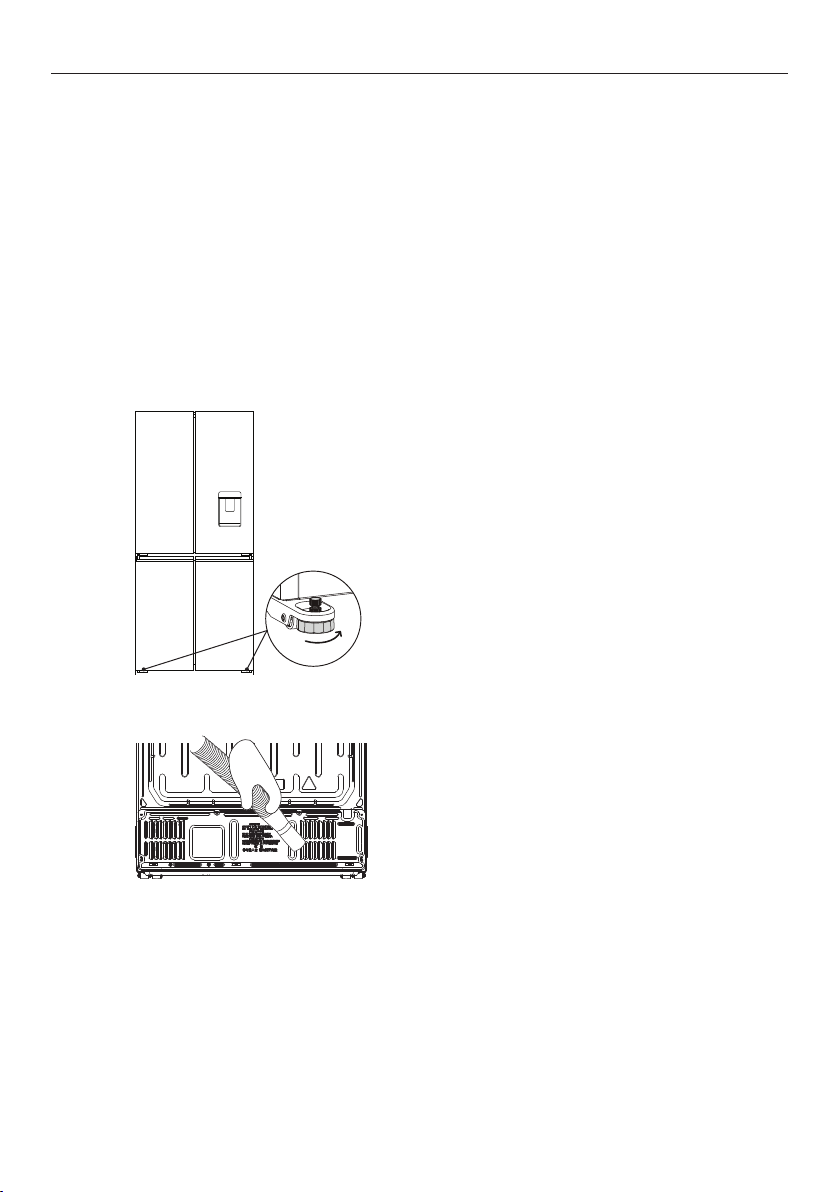
To maximise operating efficiency regularly vacuum the flooring around your refrigerator.
Cleaning behind your refrigerator is required once or twice a year.
Wind up the feet and carefully ease
1
the refrigerator out of its position.
Switch off andunplug.
24
2
Vacuum the flooring behind your
refrigerator and the rear compartment cover
(wherefitted) to remove dust.
Useadry lint-free cloth to clean the
refrigerator walls and surrounding cabinetry.
After cleaning, plug in and switch on.
Pushtherefrigerator into position and wind
feetdown.
Page 25
CLEANING AND CARE
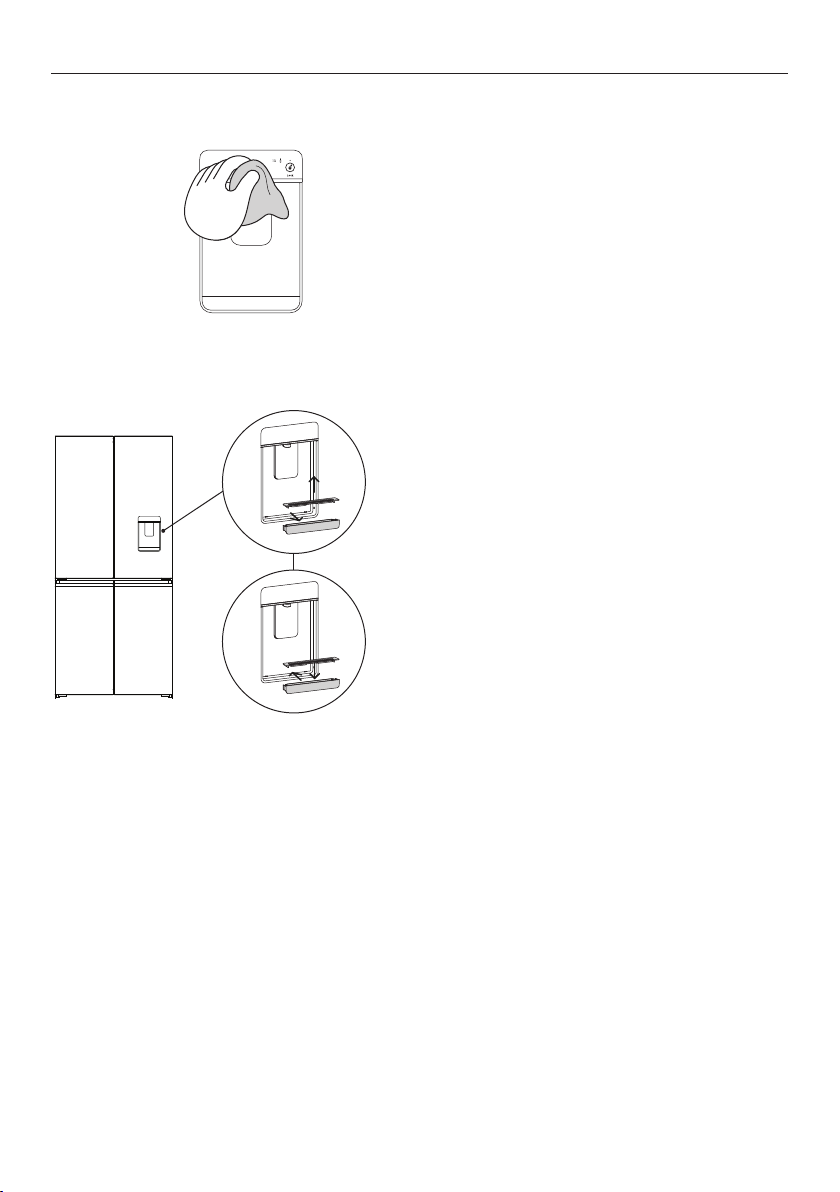
External display and water dispenser (Water-dispensing models only)
1
Drip tray (Water-dispensing models only)
Activate the
water from dispensing when cleaning, refer
‘Dipenser lock’ section for details.
Clean the pad and external display with a
damp, soft lint-free cloth.
Remove the drip tray from the
dispenser panel.
Pull the two halves of the tray apart.
Clean with liquid detergent dissolved in
1
water and a soft lint-free cloth.
Rinse with clean water and dry with a
clean, lint-free cloth.
Securely clip the two halves together.
Re-insert the drip tray back into the
2
dispenser panel, rounded sides first.
DISPENSER LOCK to prevent
Interior
Do not use harsh chemicals, abrasives, ammonia, chlorine, bleach, concentrated detergents,
solvents or abrasive scouring pads on any part of your appliance. Some of these chemicals
may damage your appliance.
Clean all surfaces with a mild liquid detergent dissolved in warm water and a soft cloth.
Rinse with clean water and dry with a clean, lint-free cloth.
25
Page 26
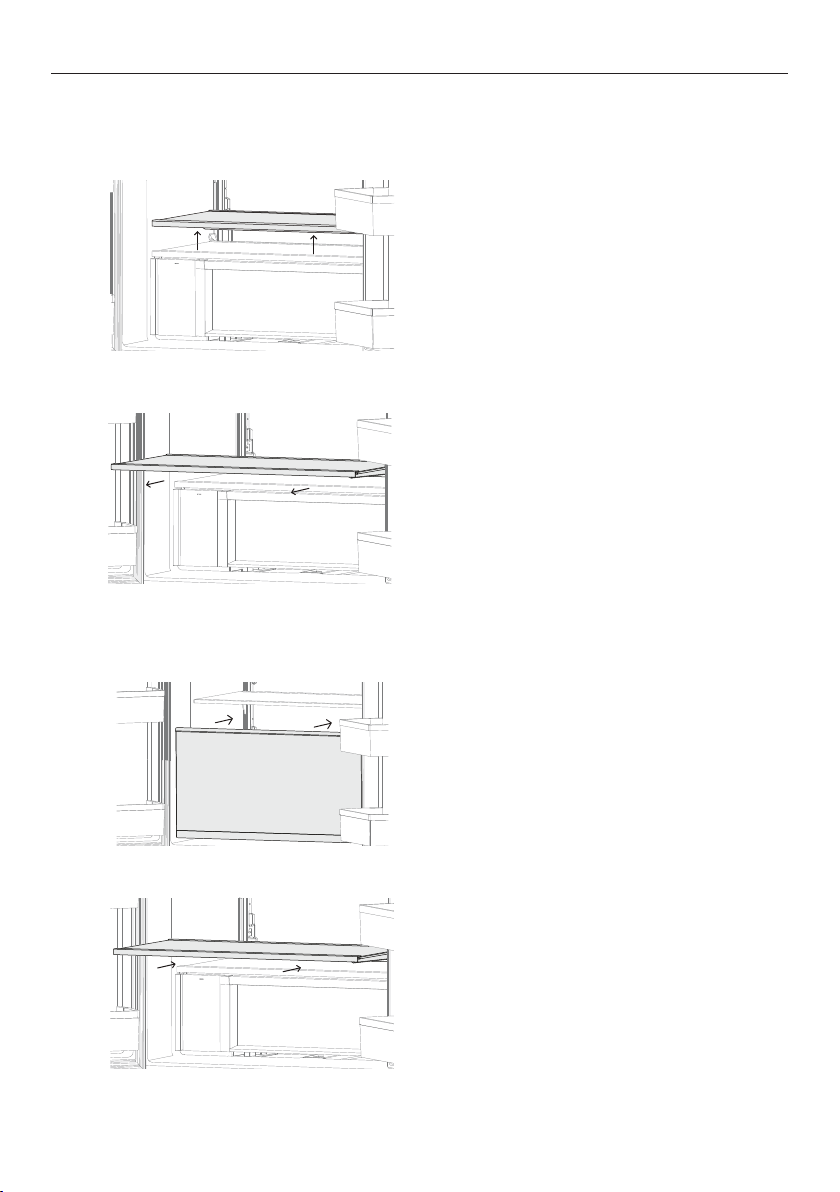
Glass shelf
To remove
1
2
CLEANING AND CARE
Lift the shelf up vertically. The Humidity
Control Lid is attached to the shelf and will
be removed together.
Slide the shelf towards you.
As you pull the shelf towards you, tilt the
front downwards and lower until it is vertical.
Remove the shelf from the compartment
To replace
1
2
26
Holding the shelf vertically, slide back into
the compartment.
Tilt the shelf back, guide the shelf onto
the shelf supports and slide into the
compartment.
Page 27
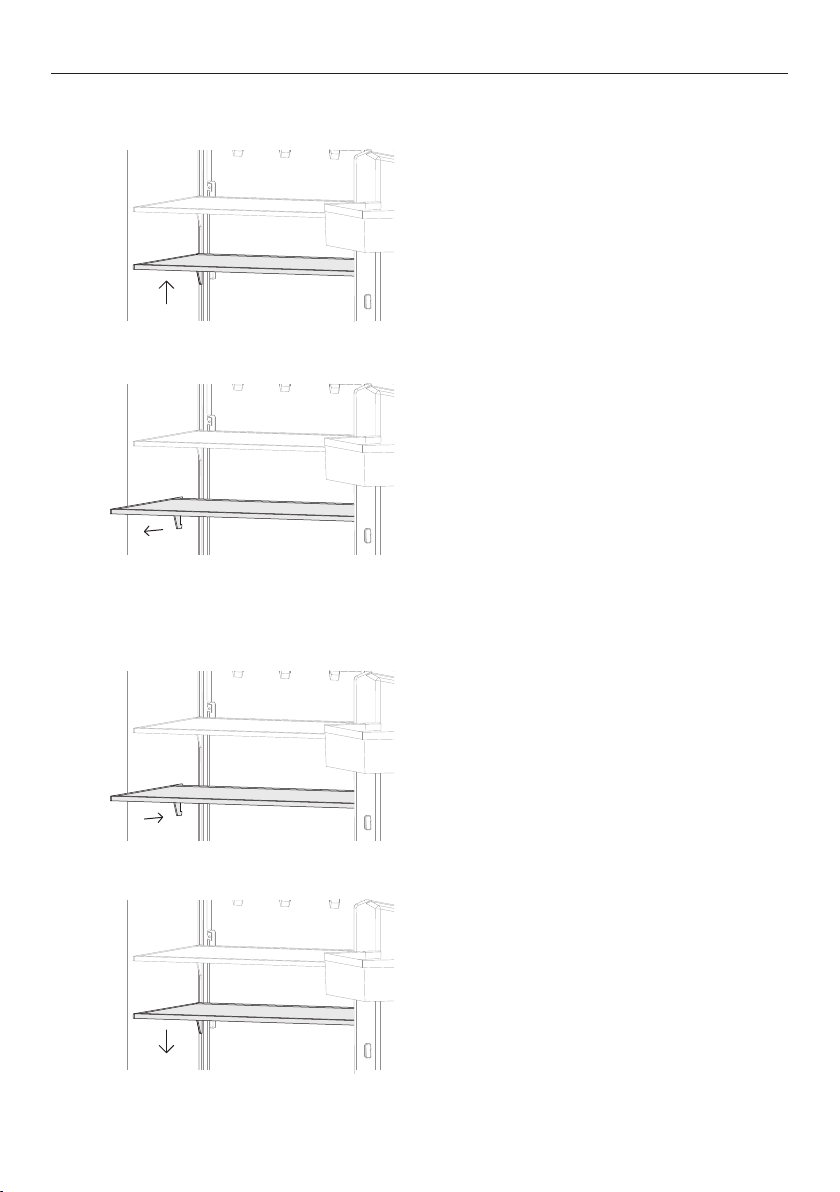
Cantilever glass shelves
To remove
1
CLEANING AND CARE
Holding the front and back edge of the
shelf firmly, push the shelf up vertically
to dislodge from backsupport lugs.
2
To replace
1
2
Slide the shelf towards you.
Slide shelf into the compartment.
Holding the front and back edge of the shelf
firmly, push the shelf down to secure to back
support lugs.
27
Page 28
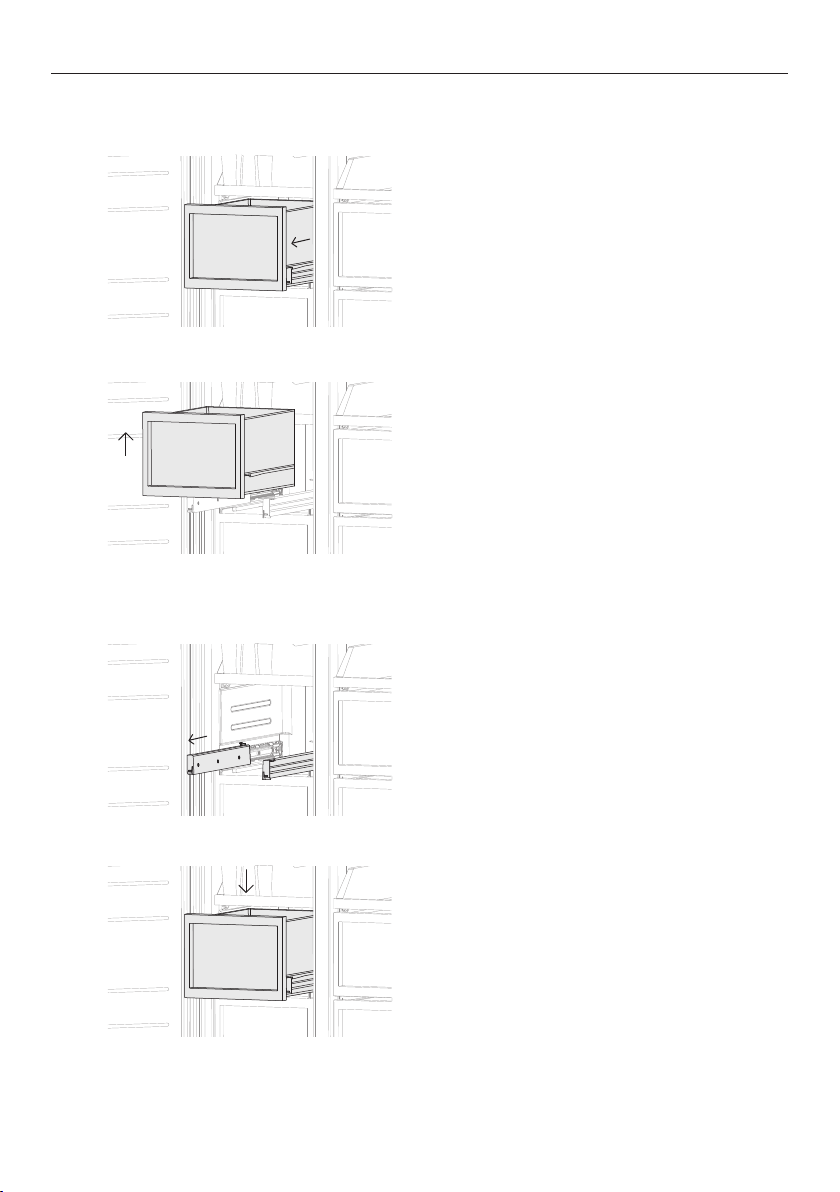
CLEANING AND CARE
Mid bins and humidity control compartment
To remove
1
2
How to replace
1
Remove food from the bin.
Pull the bin out to full extension.
Lift up the bin to dislodge.
Push the slides back into the compartment.
Extend the slide out from the refrigerator.
Place the bin on top of the runners.
28
2
Gently push the bin down on both sides
at the same time, until you feel it click
into place.
Page 29
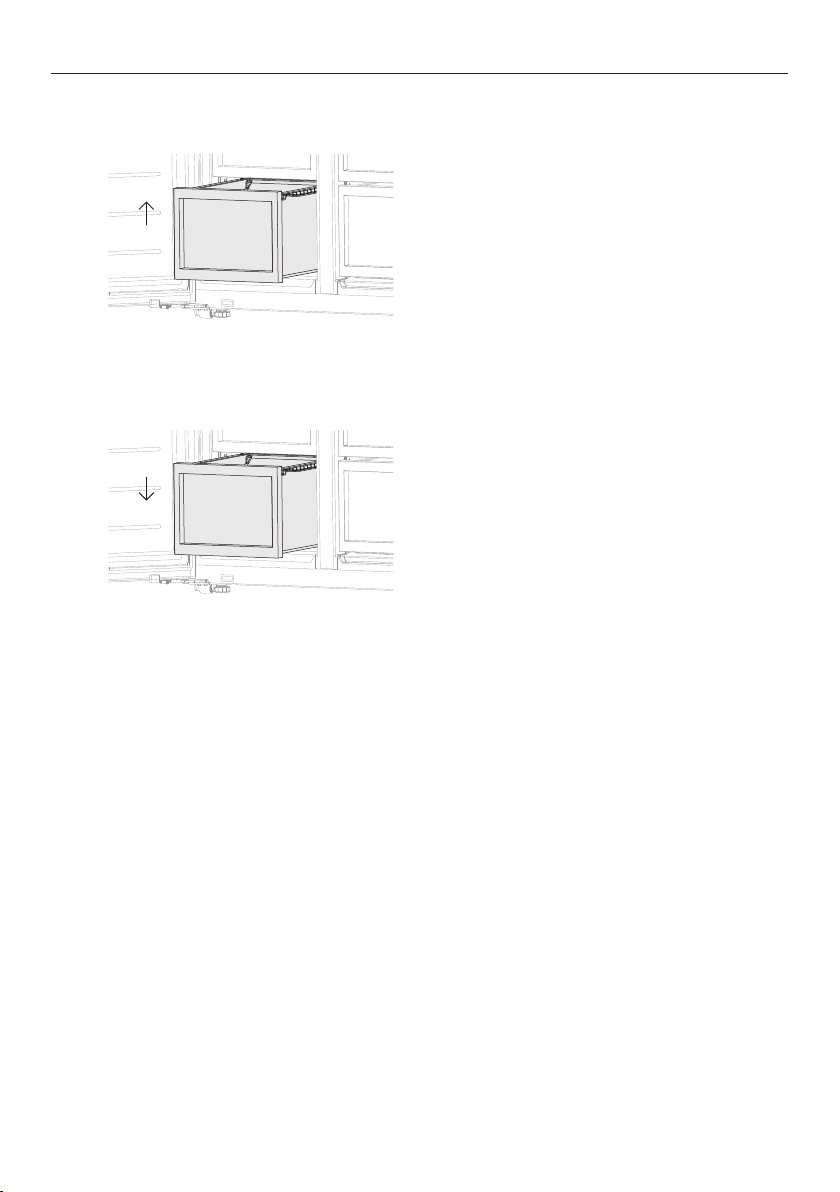
Bottom bins & trays
To remove
1
How to replace
CLEANING AND CARE
Remove food from the tray or bin.
Lift the tray/bin up at the front and pull out
over the ledge.
1
Ice storage bin
Clean your ice bin and discard any old ice in the bottom of the bin(s) regularly. Ensure that
the ice scoop is placed in the centre of the bin.
Line up the tray/bin in position and push the
bin back over the ledge.
29
Page 30

FOODCARE
For best food care
z
Store only high-quality, fresh food in your refrigerator.
z
Store perishable foods in the refrigerator immediately after purchase. Storingatroom
temperature increases the rate of deterioration and can allow harmfulmicrobialgrowth.
z
Foods such as meat, poultry and seafood should be well wrapped or sealed in
suitablepackaging to prevent dehydration, colour deterioration, loss of flavour, and
transfer ofodour.
z
We recommend storing these foods on the bottom shelf of your refrigerator to
prevent potential spills and cross-contamination with otherfoods.
z
Ensure hot foods and beverages are cooled sufficiently before placing them into
therefrigerator. Hot items may cause other foods to warm to unsafe temperatures. Hot
items mayalso cause sealed items to sweat/condensate — which is undesirable.
z
Beverages are best stored standing upright in the door shelves or on the bottle
racksprovided.
z
Ensure raw and cooked foods are stored separately to avoid cross-contamination.
z
Consume food items within the recommended storage times. Discard foods that
showsign of spoilage.
z
Keep door openings to a minimum to maintain optimum storage temperatures inside
your refrigerator.
z
We recommend using FAST FREEZE when you are adding food items toyour product,
such as after grocery shopping. This feature will ensure the food isfrozen within the
shortest period of time, locking in the freshness andextending the shelf life of your food.
z
For storage of general household foods in the most efficient manner, it is recommended
to use the product in the factory configuration supplied. Moving the shelves and bins will
have a minimal impact on efficiency.
z
Storing at temperatures other than settings recommended may impact the storage life.
Items stored in your refrigerator
z
Dairy items such as butter and cheeses should be stored in the door shelf tominimise
any transfer of odour or odour absorption from other foods.
z
Eggs should be stored in their carton to avoid absorption of strong odours through
theirporous shell structure.
30
Page 31

FOODCARE
Items stored in your freezer
z
We recommend cooling carbonated beverages only when the BOTTLE CHILL
function isactive.
z
Do not store carbonated drinks without this function in the freezer.
Failure toremove beverages could lead to freezing liquid and the likelihood
ofbottle/canexplosion.
z
Ensure air is removed from packaging to avoid large formation of ice crystals and
prevent freezer burn.
z
To maintain freshness and quality, we recommend defrosting foods in the refrigerator.
These foods should not be in contact with fresh foods. Ensure partially or fully defrosted
foods are never re-frozen – cook immediately.
z
Do not store foods to be frozen in contact with food for storage. If defrosting
frozen food in the refrigerator compartment ensure frozen items are not in contact
with fresh foods.
z
Defrosting food repeatedly is not recommended. Frozen foods that will be used regularly
should be stored in smaller quantities.
31
Page 32
MOVING OR STORING YOUR APPLIANCE
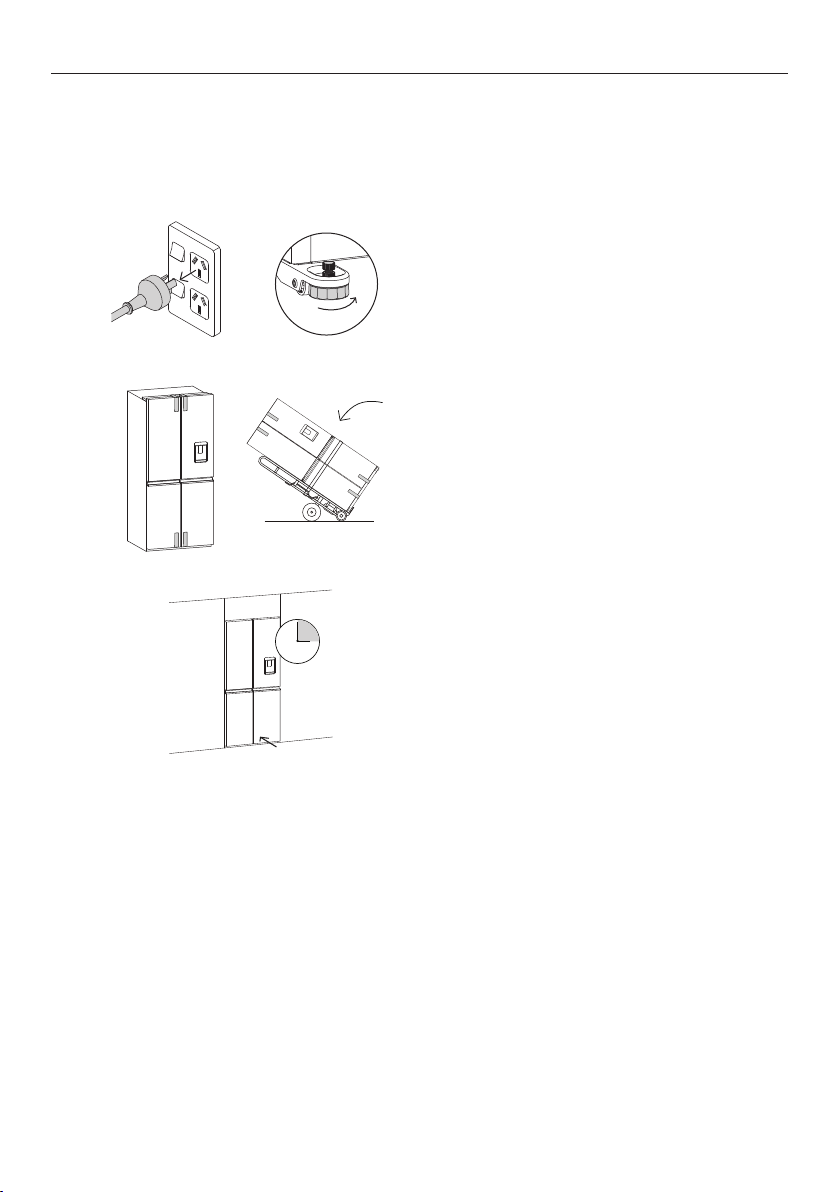
If your refrigerator is turned off for any reason, wait 10 minutes before turning it back on.
This will allow the refrigeration system pressures to equalise before restarting.
Moving your refrigerator
Turn off the refrigerator and unplug from the
1
2
power point. Remove all food.
Turn the adjustable feet to the right as far as
they will turn.
Ease the refrigerator out of its position.
Tuck the power cord away, tape the shelves
in place and tape the doors closed. If the
cabinet needs to be placed at an angle or laid
down, carefully lay it on its side (the left hand
side when viewed from the front).
Relocate and install. If the refrigerator has
3
Take care when moving this refrigerator, ensure all obstacles are removed to prevent any
physical impact that may cause damage.
Storing your Refrigerator
z
When storing your cleaned refrigerator, leave the doors open. This allows air to circulate
and prevents the build up of bacteria and moulds.
z
Before using again, clean well using a mixture of warm water and a small amount of
liquid dishwashing detergent. Rinse with clean water and dry with a soft lint-free cloth.
Holiday/Vacation time
Leave your refrigerator operating while you are on holiday/vacation.
32
been left on its side for any length of time,
leave it standing upright as long as you can
(a few hours) before turning on.
Page 33

USER WARNINGS AND SOUNDS
Faults
z
Count the number of beeps made when the refrigerator compartment door isopened.
z
Record the number and sequence of temperature lights displayed on the internal control
panel and contact a Fisher & Paykel trained and supported service technician in order to
repair the fault. You can do this by going online to fisherpaykel.com or by contacting our
Customer Care Centre.
z
To silence the fault alarm press any button on the internal control panel.
Normal refrigerator sounds
ActiveSmart™ refrigerators are designed to have excellent energy ratings and cooling
performance. As a result, you may hear sounds somewhat different to your old refrigerator.
Normal operational sounds include:
z
Fan air flow sound. ActiveSmart™ refrigerators have fans which change speed depending
on demand. During cooling periods, such as after frequent door openings, fans circulate
the cold air in the refrigerator and freezer compartments producing
some air flow sound. This is quite normal.
z
Cracking or popping sounds. This may occur when the automatic defrost function
is operating.
z
Running water sound. This is the liquid refrigerant in the system and can be heard
as a boiling or gurgling noise.
z
An audible hissing sound after closing the freezer door. This is due to the pressure
difference between the warm air that has entered the cabinet and suddenly cooled,
and the outside airpressure.
z
Humming sounds. This is the compressor running and is quite normal.
z
Gasket noises. Normally occur over time due to a build up of dirt and/or grime. See
‘Cleaning and care’ section.
z
Ice maker and water dispenser sounds:
z
Motor operation (low humming).
z
Running water as the ice maker and/or water tank fills.
z
Water valve opening and closing (hissing sound).
z
Loosened from the ice molding tray (cracking).
z
z
Ice dropping into bin (clunking).
Other sounds may be heard for the following reasons:
z
Cabinet not level
z
Floor uneven or weak
z
Bottles or jars rattling on shelves
33
Page 34
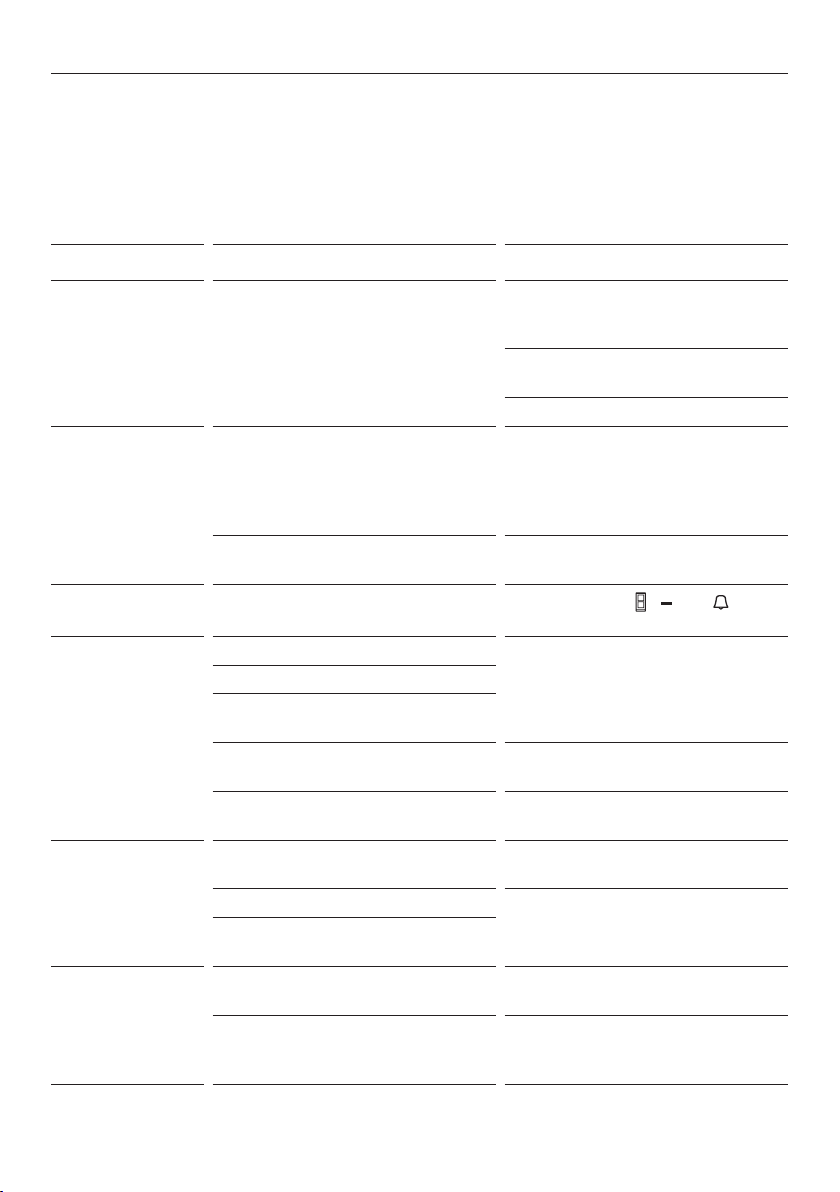
TROUBLESHOOTING
If there is a problem with your refrigerator, please check the following points before
contacting your local Fisher&Paykel trained and supported service technician or the
Customer Care Centre.
Product parts and accessories can be purchased through Fisher&Paykel Customer Care
Centre or online at fisherpaykel.com (this service is available to selected markets only).
All models
PROBLEM POSSIBLE CAUSES WHAT TO DO
Refrigerator does
not operate
Light
not working
Light and display
not working
Motor operates
for long periods
Storage
compartments
too warm
Food freezing in
the refrigerator
No electricity at power outlet. Check that the plug is
correctly connected and power
switched on.
Check another refrigerator at the
same outlet.
Check house fuse.
Light not functioning. The LED light cannot be
serviced by the user. Contact
your Fisher&Paykel Dealer or
Fisher&Paykel trained and
supported service technician.
Refrigerator not working. Check refrigerator is turned on
at wall.
Product in
Hot weather. Minimise door openings to allow
Frequent door openings.
Large amount of food
recentlyadded.
Temperature control set toolow. Refer to section
Doors not sealing properly. Check that cabinet is level and
Temperature setting not correct. Refer to section
Frequent door openings. Minimise door openings to allow
Large amount of food
recentlyadded.
Temperature setting not correct. Refer to section
Food placed directly in front of
air outlets.
SABBATH MODE.
Press and hold
together for four seconds.
temperature to stabilise.
‘Temperature control’.
gasket seals are clean.
‘Temperature control’.
temperature to stabilise.
‘Temperature control’.
Move chill sensitive foods
away from the centre back of
the shelves.
, and
34
Page 35
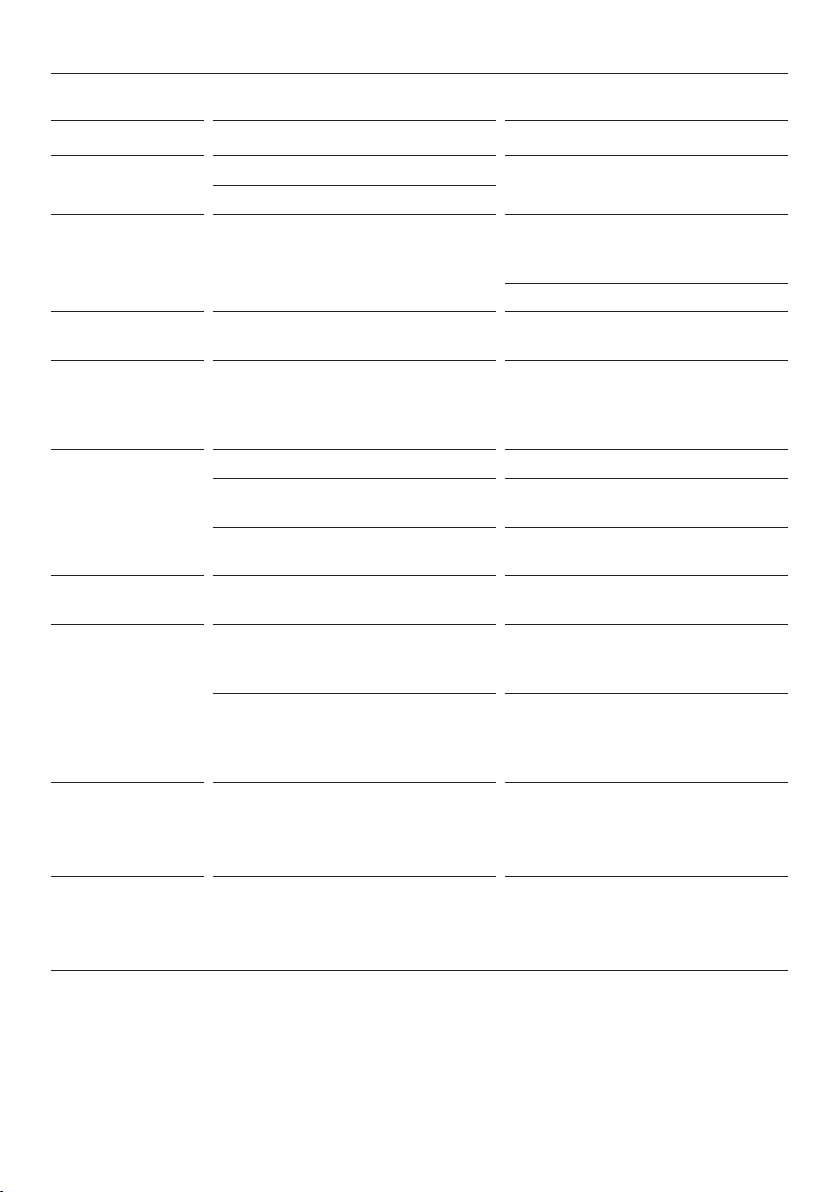
TROUBLESHOOTING
All models
PROBLEM POSSIBLE CAUSES WHAT TO DO
Unfamiliar noises Cabinet not stable or level. Refer to your Installation guide
or ‘User warnings and sounds’.
A small amount of condensation
is beneficial for fruit and
vegetable storage.
Wipe out water with a cloth.
Wipe dry.
and sealing tightly.
Wipe dry.
Refer to your installation guide.
packaging is trapped behind
the tray/bin.
bin, extend the runners fully by
using a firm pull — this will reset
the runner.
Refer to section
‘Cleaning and care’.
If problem persists please
contact Customer Care.
Deactivate BOTTLE CHILL,
FAST FREEZE
or ICE BOOST if
function is not desired.
Water in the
vegetable bin
Exterior of
cabinet is warm
Condensation
on outside of
refrigerator/
freezer
Condensation
inside
refrigerator
compartment
Door out of
alignment
Tray/bin does
not slide in and
out evenly
Refrigerator
operating
inefficiently
Cannot adjust
temperature
in freezer
compartment
Freezer is defrosting.
Condensation is formed by
the water produced by fruit
and vegetables.
This is normal.
Not unusual during periods of
high humidity.
Frequent or long door openings. Minimise door openings.
Door gasket leaking. Check that gasket is sitting flat
Not unusual during periods of
high humidity.
With time and usage, movement
may occur.
Packaging trapped. Check to ensure no food or
Runners not extending fully. Holding onto sides of tray/
Accumulation of dust
on or behind the rear
compartment cover.
BOTTLE CHILL, FAST FREEZE
Either
or ICE BOOST is activated.
35
Page 36
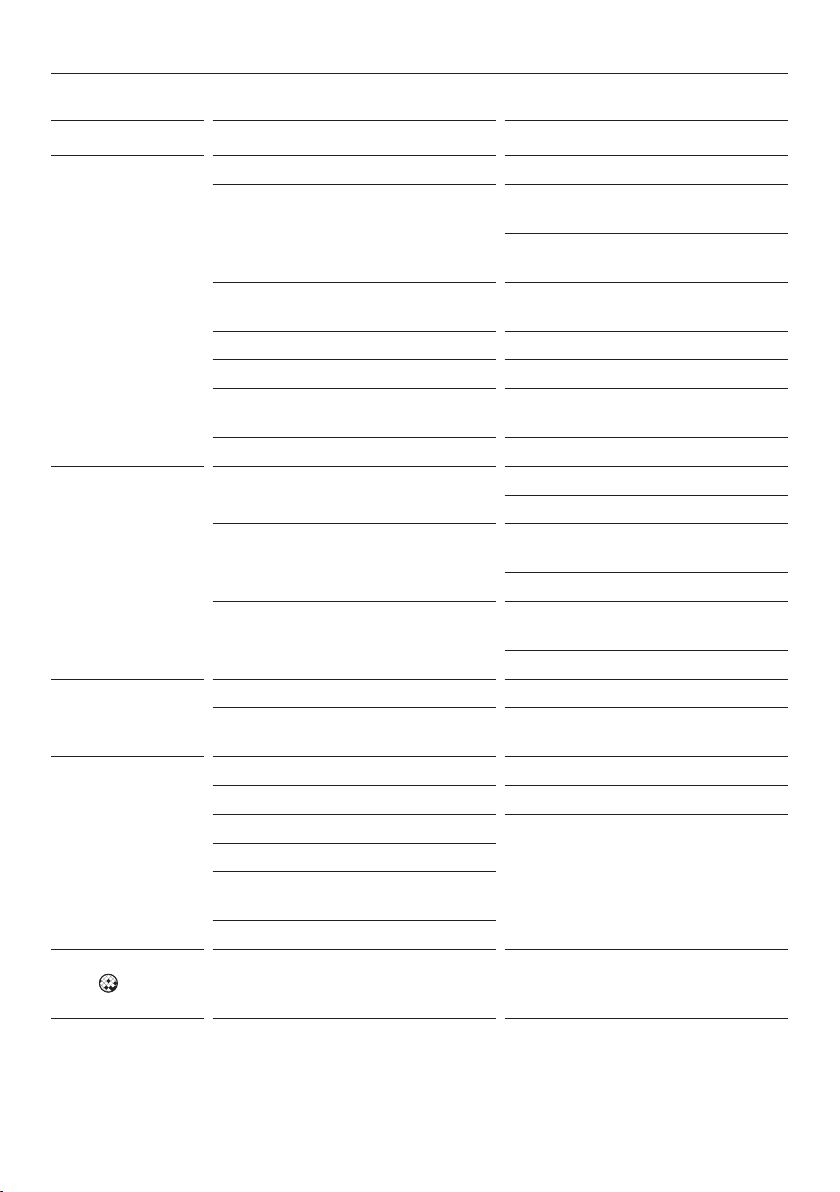
TROUBLESHOOTING
Ice & Water models only
PROBLEM POSSIBLE CAUSES WHAT TO DO
Automatic ice
maker does
notwork
Ice cubes have
odour/taste
Slow ice cube
freezing
Wet ice/
iceclumping
Filter warning
light
is flashing
Ice maker has not been turned on. Switch on ice maker.
Bin is in the wrong way or there
is no bin in place.
Water supply turned off or
not connected.
Freezer compartment not working. Contact Customer Care.
Water pressure too low. Check water pressure.
Water line kinked/squashed. Check water line for
Filter clogged. Water filter may need replacing.
Unsealed packages may be
transmitting odour/taste.
Interior of freezer needs cleaning. Ice storage bin needs to be
Poor taste from incoming water. Filter may need to be replaced
Door may have been left ajar. Close door.
Freezer compartment too warm. Turn temperature to a
Low water pressure. Check water pressure.
Filter blocked. Replace filter.
Long freezer door openings. Gently tap ice with scoop to
High ambient temperature.
Ice bin left out of freezer
compartment for a length of time.
Ice will stick together over time.
Filter needs replacing. Replace filter as soon as possible.
Place bin so scoop is in the front
of the ice bin.
Ice bin sits directly under ice
maker on top left side of freezer.
Connect water supply.
kinks/squashing.
Old cubes need to be discarded.
Ensure food packaging is sealed.
emptied and washed.
Clean refrigerator.
with new one.
Force 2 – 3 ice tray flips.
colder setting.
unstick or, if large clumps occur,
empty ice bin and make new ice.
36
Page 37
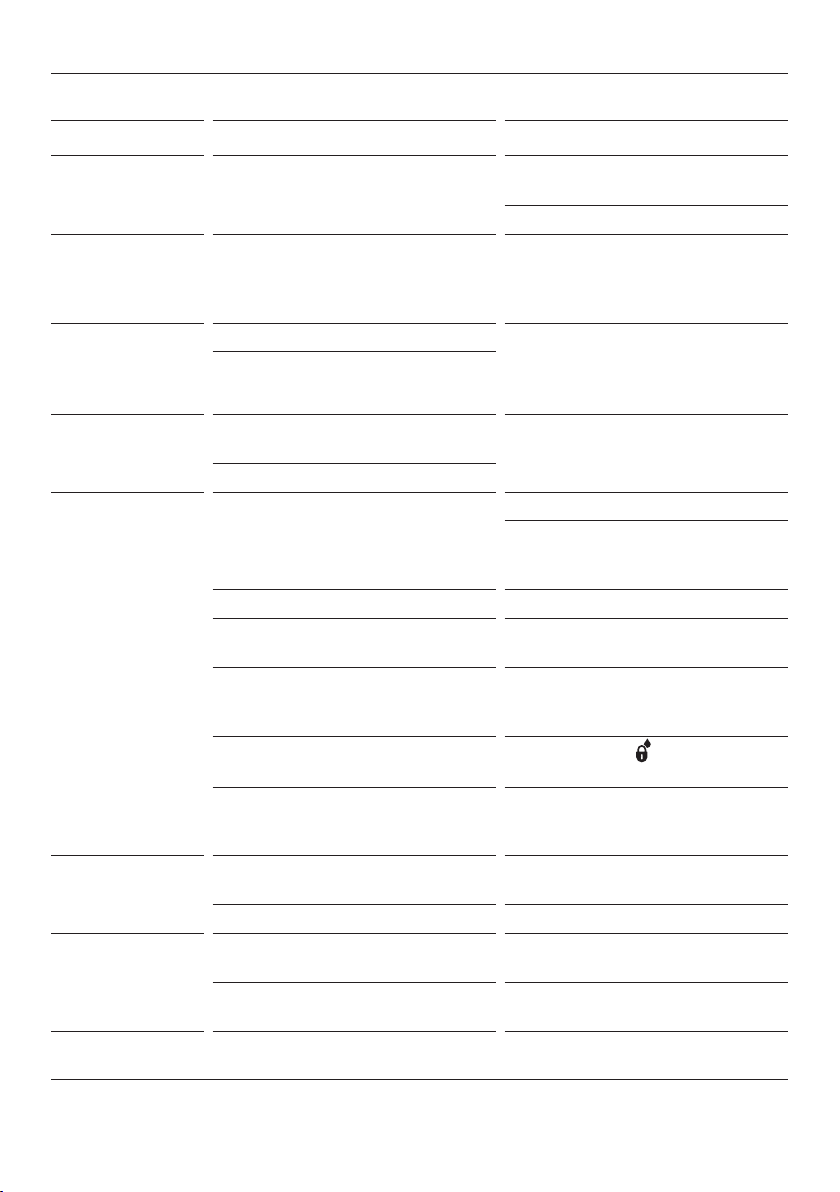
TROUBLESHOOTING
Ice & Water models only
PROBLEM POSSIBLE CAUSES WHAT TO DO
Ice build up
inside freezer
compartment
Ice maker
makes unfamiliar
sounds or
seems too loud
Ice boost
function not
increasing rate of
ice production
Water has poor
taste/odour
Water dispenser
does not work
Water in first
glass is warm
Drips overflow
drip-shelf
Water flow rate
has slowed down
Freezer door not closing tightly. Arrange items in freezer so door
can close tightly.
Check and clean door gasket seal.
Normal ice maker operation. Refer to section ‘User warnings
and sounds’.
Ambient temperature very warm. Minimise door openings.
Refrigerator is in high usage.
Refrigerator not used for an
extended period.
New filter installed.
Water supply turned off or
not connected.
Supply line may be blocked. Check supply for kinks or leaks.
On first installation there may be
air in water system.
Filter may be blocked and
need replacing.
DISPENSER LOCK activated.
Water frozen in tank. Increase temperature to a
Water dispenser not used for
extended period.
Tank capacity used recently. Allow water time to cool.
Air trapped in tank. Flush 8L water through dispenser,
New filter installed. Flush 8L water through dispenser,
Filter cartridge is restricted. Replace filter as soon as possible.
Dispense 8L of water so fresh
water supply is replenished.
Turn water on.
Press dispenser for fourminutes
to remove trapped air from water
line and to fill the water system.
To remove air, run 8L of water
through the dispenser.
Replace filter (see your ‘Service
& Warranty’ document provided
with your refrigerator).
Press and hold
fourseconds.
warmer setting in refrigerator
compartment andfreezer.
Discard first glass of
water dispensed.
stopping intermittently.
stopping intermittently.
for
37
Page 38

MANUFACTURER’S WARRANTY
For details of your Manufacturer’s Warranty and contacts for servicing, please refer to your
separate ‘Service & Warranty’ book provided with your refrigerator.
This product has been designed for use in a normal domestic (residential environment). This
product is not designed for any commercial use. Any commercial use by the customer will
affect this products Manufacturer’s Warranty.
For spare parts, please contact Fisher & Paykel Customer Care. Spare parts are available
for all Fisher & Paykel refrigerators for a minimum period of 10 years from the date
of manufacture.
Complete and keep for safe reference:
Model
Serial No.
Purchase Date
Purchaser
Dealer
Suburb
Tow n
Country
38
Page 39

EUROPEAN DIRECTIVE 2012/19/EU ON
WASTE ELECTRICAL AND ELECTRONIC EQUIPMENT (WEEE)
GB This appliance is marked according to the European directive 2012/19/EU on Waste
Electrical and Electronic Equipment (WEEE). By ensuring this product is disposed of
correctly, you will help prevent potential negative consequences for the environment and
human health, which could otherwise be caused by inappropriate handling of this product.
The symbol
indicates that this appliance cannot be treated as household waste. It shall be handed over
to the applicable collection point for the recycling of electrical and electronic equipment.
Disposal of the appliance shall be carried out in accordance with the local environment
regulations for waste disposal and ensure the refrigerant circuit is not damaged.
For more detailed information about treatment, recovery and recycling of this product,
please contact your local city office, your household waste disposal service or your
Fisher&Paykel retailer/dealer from whom you purchased this product.
marked on the serial plate, or on the documents accompanying the product,
39
Page 40

FISHERPAYKEL.COM
© Fisher & Paykel Appliances 2023. All rights reserved.
The models shown in this guide may not be available in all markets
The product specifications in this guide apply to the specific products and
models described at the date of issue. Under our policy of continuous product
improvement, these specifications may change at any time.
For current details about model and specification availability in your country,
please go to our website or contact your local Fisher&Paykel dealer.
and are subject to change at any time.
4111B 02.2
 Loading...