

Page 1

STEAM OVEN
OS60 models
USER GUIDE
NZ AU GB IE
Page 2

Page 3

CONTENTS
Safety and warnings 2
Introduction 9
First use 10
User preference settings 15
Starting your oven 18
Cooking mode tables 19
Traditional cooking 20
Steam cooking 21
Using oven lights 24
Automatic cooking 25
Using the meat probe (some models only) 27
Recipes 30
Care and cleaning 33
Replacing the oven lamp 34
Troubleshooting 35
Cooking charts 36
Warranty and service 37
IMPORTANT!
SAVE THESE INSTRUCTIONS
The models shown in this user guide may not be available in all markets and are subject
to change at any time. For current details about model and specification availability
in your country, please go to our website fisherpaykel.com or contact your local
Fisher & Paykel dealer.
1
Page 4
SAFETY AND WARNINGS
Operation
Your oven has been carefully designed to operate safely during normal cooking procedures.
Keep the following safety instructions in mind when you are using it:
WARNING!
ELECTRICAL SHOCK HAZARD
Before carrying out any work on the
electrical section of the appliance, it must
be disconnected from the mains electricity
supply.
Connection to a good ground wiring system
is absolutely essential and mandatory.
Alterations to the domestic wiring
system must only be made by a qualified
electrician.
Turn the oven off at the wall before
replacing the oven lamp.
Failure to follow this advice may result in
electrical shock or death.
WARNING!
FIRE HAZARD
Do not place aluminium foil, dishes, trays,
water or ice on the oven
floor during cooking, as doing so will
irreversibly damage the enamel; lining the
oven with aluminium foil may even cause
fire.
Do not use adapters, reducers, or branching
devices to connect this appliance to the
mains power supply.
Never use your appliance for warming or
heating the room. Persons could be burned
or injured or a fire could start.
Storage in or on appliance: flammable
materials should not be stored in an oven or
near its surface.
Failure to follow this advice may result in
overheating, burning, and injury.
2
Page 5
SAFETY AND WARNINGS
WARNING!
CUT HAZARD
Take care – some edges are sharp.
Failure to use caution could result in injury
or cuts.
WARNING!
HOT SURFACE HAZARD
Accessible parts may become hot when in
use.
To avoid burns and scalds, keep children
away.
Use oven mitts or other protection when
handling hot surfaces such
as oven shelves or dishes.
Use care when opening the oven door.
Let hot air or steam escape before removing
or replacing food.
Do not touch heating elements or interior
surfaces of the oven.
Heating elements may be hot even though
they are dark in colour. Interior surfaces of
an oven become hot enough to cause burns.
During and after use, do not touch, or let
clothing or other flammable materials
contact heating elements or interior
surfaces of the oven until they have had
sufficient time to cool.
Other surfaces of the appliance may
become hot enough to cause burns – among
these surfaces are the oven vent,
the surface near the oven vent, and the oven
door.
Failure to follow this advice could result in
burns and scalds.
3
Page 6

SAFETY AND WARNINGS
IMPORTANT SAFETY INSTRUCTIONS!
Save these instructions for the local inspectors use.
To avoid hazard, follow these instructions carefully
before installing or using this appliance.
●
Make this information available to the person
installing the appliance – doing so could reduce your
installation costs.
●
This oven is to be installed and connected to the
electricity supply only by an authorised person.
●
If the installation requires alterations to the domestic
electrical system, call a qualified electrician. The
electrician should also check that the socket cable
section is suitable for the electricity drawn by the
oven.
●
The oven must be earthed.
●
Installation must comply with your local building and
electricity regulations.
●
This appliance must be installed and connected to
the mains power supply only by a suitably qualified
person according to these installation instructions
and in compliance with any applicable local building
and electricity regulations.
Failure to install the appliance correctly could
invalidate any warranty or liability claims.
●
If the power supply cable is damaged, it must be
replaced by the manufacturer, its service agent or
similarly qualified person in order to avoid a hazard.
●
A circuit breaker is recommended.
●
Do not use adaptors, reducers or branching devices
to connect the oven to the mains electricity supply,
as they can cause overheating and burning.
●
Make sure the cavity is completely sealed with no
gaps. This is to ensure the oven cooling system
functions correctly.
4
Page 7

SAFETY AND WARNINGS
IMPORTANT SAFETY INSTRUCTIONS!
To reduce the risk of fire, electrical shock, injury to
persons or damage when using the oven, follow the
important safety instructions listed below:
●
Read all the instructions before using the oven. Use
the oven only for its intended purpose as described
in these instructions.
●
PROPER INSTALLATION: be sure your appliance
is properly installed and earthed by a qualified
technician.
●
ISOLATING SWITCH: make sure this oven is
connected to a circuit which incorporates
an isolating switch providing full disconnection from
the power supply.
●
Household appliances are not intended to be played
with by children.
●
Do not leave children alone. Children should not
be left alone or unattended in the area where the
appliance is in use. They should never be allowed to
sit or stand on any part of the appliance.
●
Children of less than 8 years old must be kept away
from the appliance unless continuously supervised.
This appliance can be used by children aged from 8
years and above, and persons with reduced physical,
sensory or mental capabilities or lack of experience
and knowledge, if they have been given supervision
or instruction concerning the use of the appliance
in a safe way and they understand the hazards
involved. Cleaning and user maintenance shall not be
done by children without supervision.
5
Page 8

SAFETY AND WARNINGS
IMPORTANT SAFETY INSTRUCTIONS!
●
Do not place heavy objects on the oven door.
●
Wear proper apparel. Do not wear loose fitting or
hanging garments when using the appliance. They
could ignite or melt if they touch an element or hot
surface and you could be burned.
●
In addition, avoid using acid or alkaline substances
(such as lemon, vinegar, salt, tomatoes, etc.).
Avoid using products containing chlorine, acids or
abrasives, especially for cleaning painted parts.
●
USER SERVICING: do not repair or replace any part
of the appliance unless specifically recommended in
the manual. All other servicing should be referred to
a qualified technician.
●
Do not use water on grease fires. Smother the
fire or flame or use a dry chemical or foam type
extinguisher.
●
Use only dry oven mitts or potholders. Moist or
damp potholders on hot surfaces could result in
burns from steam. Do not let potholders touch hot
areas or heating elements. Do not use a towel or a
bulky cloth for a potholder. It could catch fire.
●
Do not heat unopened food containers. They can
build up pressure that may cause the container to
burst and result in injury.
●
SAFE FOOD HANDLING: leave food in the oven for
as short a time as possible before and after cooking.
This is to avoid contamination by organisms which
may cause food poisoning. Take particular care
during warm weather.
●
Always keep oven vents unobstructed.
●
Do not operate your appliance by means of an
external timer or separate remote control system.
6
Page 9

SAFETY AND WARNINGS
IMPORTANT SAFETY INSTRUCTIONS!
●
CAUTION: Hot air can blow from the vent at the base
of the oven as part of the oven’s cooling system.
●
PLACEMENT OF OVEN SHELVES: always position
shelves in the desired location while the oven is
cool (before preheating). If a shelf must be removed
while the oven is hot, do not let the oven mitts or
potholder contact hot heating elements in the
oven or the base of the oven.
●
Do not clean the oven seal or use any oven-cleaning
products on it. It is essential for a good seal, which
ensures that the oven operates efficiently. Care
should be taken not to rub, damage or move it.
●
Do not use oven cleaners, harsh/abrasive cleaning
agents, waxes, or polishes.
No commercial oven cleaner, oven liner, or protective
coating of any kind should be used in or around any
part of the oven. Do not use harsh/abrasive cleaners,
scourers or sharp metal scrapers to clean the oven
door glass since they scratch the surface, which may
result in the glass shattering.
●
Clean only the parts listed in this manual.
●
Do not use a steam cleaner to clean any part of the
oven.
●
Do not store things children might want above the
oven. Children could be burned or injured while
climbing on the oven to retrieve items.
●
Do not install or operate the appliance if it is
damaged or not working properly.
If you receive a damaged product, contact your
dealer or installer immediately.
●
Use only bakeware approved for oven use. Follow
the bakeware manufacturer’s instructions.
7
Page 10

Page 11
INTRODUCTION
Congratulations on your new purchase. Your Fisher & Paykel oven has a number of
features to make cooking a great experience for you:
●
A wide choice of oven functions.
●
Intuitive controls and displays.
Before you start
●
Make sure the installer has completed the ‘Final checklist’ in the Installation instructions.
●
Read this guide, taking special note of the ‘Safety and warnings’ section.
●
Remove all internal and external packaging and dispose of it responsibly.
Recycle items that you can.
●
The oven should be thoroughly cleaned with soap and water and carefully rinsed.
●
It is important that you condition the oven before using it for cooking and baking.
Conditioning will burn off any manufacturing residue and ensure you get the best results
from the start. There will be a distinctive smell and a small amount of smoke during
conditioning. This is normal, but make sure the kitchen is well ventilated.
●
Heat the oven for 30 minutes at the maximum temperature.
Use the true convection function without accessories in the oven.
●
Before using the accessories for the first time, clean them carefully with hot water,
dishwashing liquid and a soft cloth.
1
2
3
4
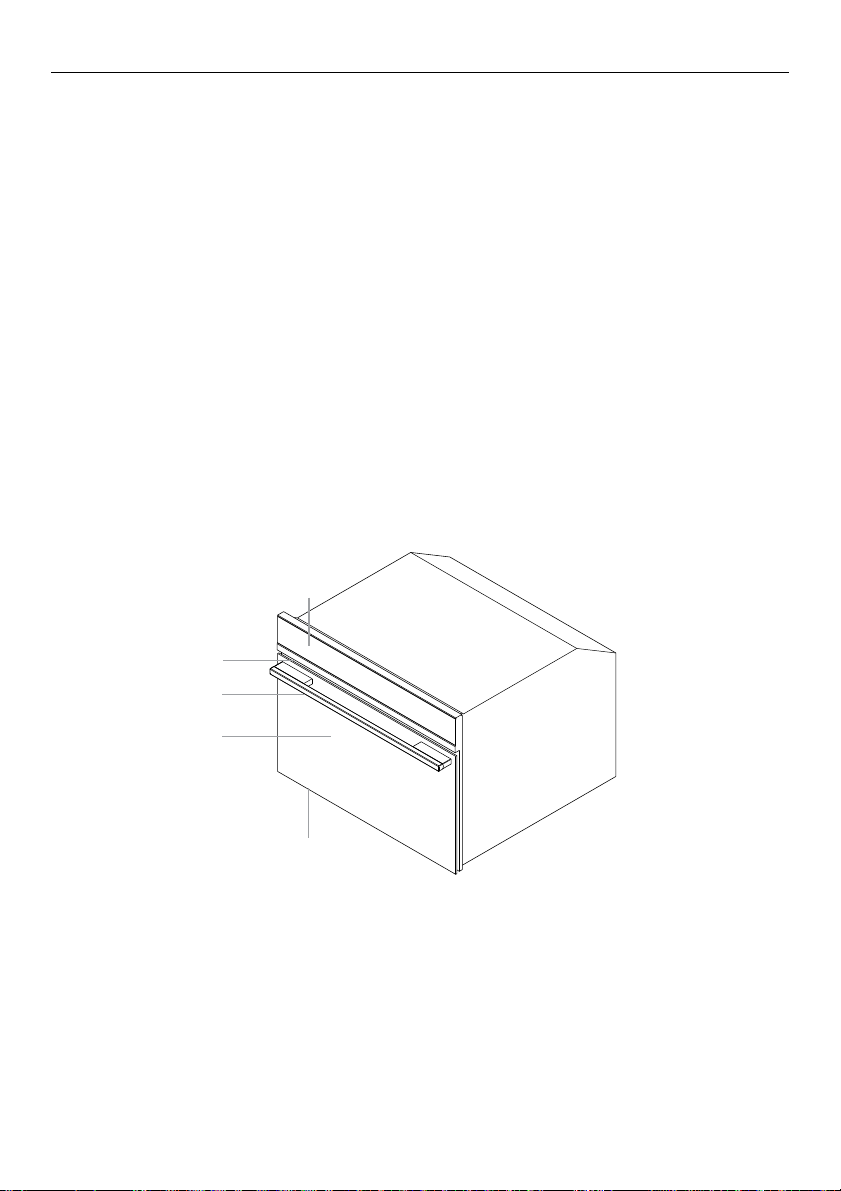
5
1 Control panel
2 Oven vent louvres
3 Oven door and handle
4 Oven light (not illustrated)
5 Oven seal (not illustrated)
9
Page 12
FIRST USE
Using the wire shelf
●
To remove the wire shelf, pull it towards
you until it stops and then lift, by pulling
upwards, until it comes completely out.
●
To insert the wire shelf, slide it in at an
angle of 45° until it locks and then lower
it horizontally and push it all the way in.
●
If the wire shelf has a low drip tray,
to remove it, lift it slightly and slide it
towards you.
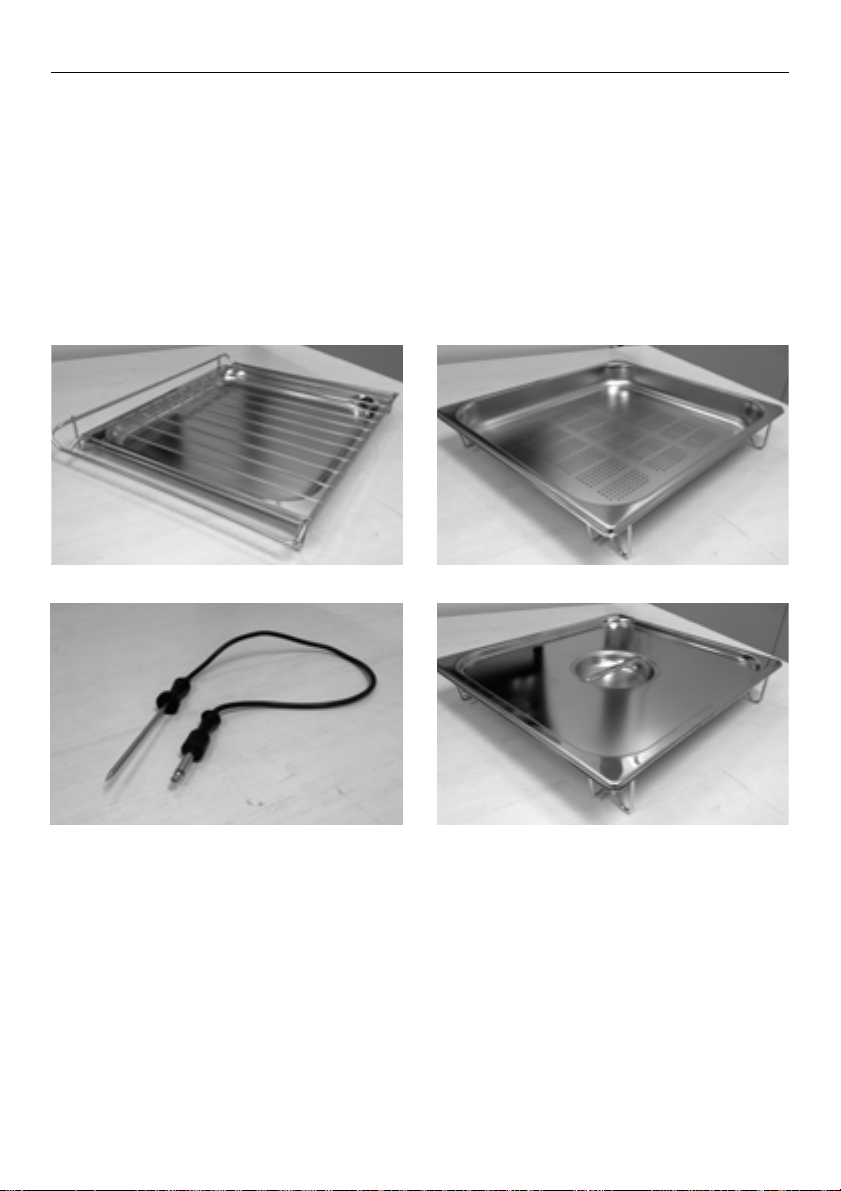
Wire shelf and baking pan
Using the perforated tray
This tray is used for steam cooking and
is positioned on the flat grill together
with its support. We recommend also
using it in combination with the drip tray
to catch everything the drips from the
food during cooking.
Perforated tray
Meat probe (some models only)
10
Perforated tray with lid
Page 13

FIRST USE
KeypadDisplay
FRIDAY 11/20/2015
PM
04:26
Keypad
To operate the keypad, press gently. The keypad will not work if more than one key
is pressed at the same time.
Movement arrows
Cancel and return to previous display page.
Keep pressed to return to Home screen.
Switches the oven on and off.
Confirms the settings and starts cooking operations.
When pressed during a cooking operation, the function
is placed in pause. Press again to restart.
To set the timer.
Enter the functions menu during cooking.
Switches the inner oven light on and off.
11
Page 14

FIRST USE
Error codes
Error codes appear when a fault has been detected. When the error appears, the
current function is blocked. If the type of error is related to a safety function, the oven
becomes unusable and you will need to contact Customer Care. If the error relates to
a minor fault, after being restarted the oven can be used for the functions that do not
involve the faulty part (eg a heating element).
Beeps
●
Confirms that the command has been received after a key has been pressed.
●
It also indicates that a time function has been completed (eg Timer or Automatic Cooking).
●
When using the recipe function a beep will indicate that the oven is waiting for
operation by the user (eg insert a dish).
●
Beeps will also signal that there is an oven fault.
Default temperature
The cooking modes automatically select a suitable temperature when the cooking
mode is selected, the temperature can be modified at any time.
F Failure number codes
Failure codes appear when the error code is recorded in the Error Log in the Setup
menu. This error can be communicated to the service technician so they can understand
the possible cause of the problem in advance.
12
Page 15

FIRST USE
Timer
IMPORTANT!
The timer on your oven does not turn the appliance on or off. If you want to turn
the oven off automatically, please refer to the automatic cooking section to use the
end-of-cooking or delayed cooking function.
NOTE: pressing the
button does not reset or stop the timer.
1 Press and set the desired time using the arrows and confirm by pressing .
To switch the selection between hours and minutes use the arrows .
2 The timer can be set from 1 minute to 12 hours and 59 minutes.
When set, the remaining time is always visible in the status bar until the time expires
or is reset.
3 To change or cancel the time set, you must reset the timer by pressing and holding
for a few seconds.
4 The timer format is usually HR:MIN, and switches to MIN:SEC during the last minute.
5 When the time expires, the display shows 00:00 and an alert will sound for one minute
or until is pressed.
Preheat
●
When preheating, the current temperature is displayed together with the
thermometer icon.
●
When the set temperature is reached, the control sounds an ‘end of preheat’ beep and
the current temperature value disappears from the display.
High altitude baking
When cooking at high altitude, recipes and cooking time will vary from the standard.
13
Page 16

FIRST USE
First use and user settings
When using your oven for the first time, you will be prompted to enter user settings for:
●
Time
●
Date
●
Language
●
Temperature and weight measurements
NOTE: at the first connection and subsequent re-connections to the power supply,
the door lock mechanism performs a calibration cycle in this phase, always keep
the door closed.
These settings can be modified at anytime by accessing the settings menu.
14
Page 17

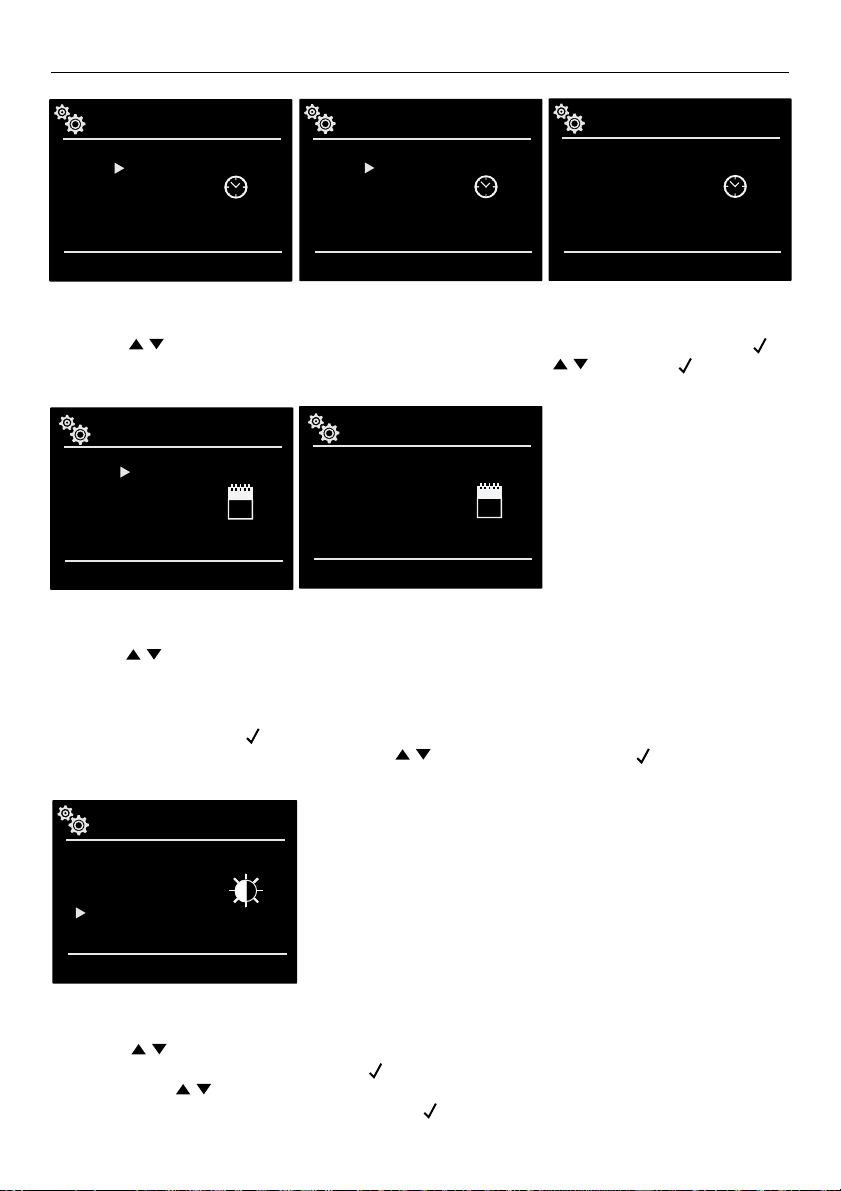
USER PREFERENCE SETTINGS
From the home screen press to select . Then press .
To access the settings menu, no active cooking or any set time functions
must be in progress.
SETUP
SETTING
\
Press to select the and
1
confirm by pressing .
SETUP
abc
yk
12
LANGUAGE
In the set-up menu press or
2
to select the setting you want
to change, then press .
°F
°C
lb
Kg
Language
Press to choose from available
language options, make your selection
by pressing .
Temperature and weight
Press and choose from
available temperature and weight
options, make your selection by
pressing .
15
Page 18
USER PREFERENCE SETTINGS
12h
AM
PM
04 : 26
24h
Time
Press to choose from the available time settings, make your selection by pressing .
Then, set the time by pressing the up and down scroll arrows and press to confirm.
D.M.Y.
Y.M.D.
M.D.Y.
12
Date
Press
●
Day.Month.Year
●
Year.Month.Date
●
Month.Date.Year
to choose from the available date options:
Confirm by pressing .
Subsequently set the date by pressing and confirm by pressing key.
PM
11/20/2015
12
ON STAND-BY
LOW
MID
HIGH
DARK
MID
HIGH
Brightness
1 Press
to choose a brightness setting when the oven is in operation.
Confirm your selection by pressing .
2 Then press arrows to choose a brightness setting when the oven is in stand-by
mode. Confirm your selection by pressing .
16
Page 19

USER PREFERENCE SETTINGS
LEVEL
LOW
MID
HIGH
Volume
Press to select the volume level and press to confirm your selection.
SETUP
SERVICE
SYSTEM
EVENT LOGS
MAIN VOLTAGE
DEMO
OM 15
System setup
The system menu allows you to access event logs – which displays errors and voltage
information. Select and confirm by pressing .
1 Press to select and confirm by pressing .
2 Press choose from the available options. Press to confirm your selection.
EVENT LOGS
01 12/11/2015 07:06 CODE: F10305
02 17/11/2015 13:17 CODE: F10305
Event log
The Event Log displays any recorded errors or faults. These codes can be communicated
to Customer Support in the event of an error or fault.
17
Page 20

STARTING YOUR OVEN
Switching the oven on and off
●
Press to switch the oven on and press again to switch it off. The oven returns to
standby mode.
●
After switching off the oven, the cooling fan may continue to operate until the oven has
cooled down.
Selecting the cooking mode
TRADITIONAL COOKING STEAM COOKING
TRUE CONVECTION
RING & GRILL
CONVECTION BROIL
BROIL
CLEANING
130
STEAM 100
STEAM 130
STEAM & RING
CLEAN STEAM OVEN
ECO BAKING
CLEAN STEAM CIRCUIT
Select and press . Select the appropriate cooking mode by pressing
1
and confirm by pressing .
2 If the proposed temperature is correct, press to start cooking, if is not pressed
within 10 seconds, the oven will begin cooking automatically on the settings that
are currently selected. The temperature can also be adjusted during cooking.
3 To cancel a cooking mode during cooking press and then press .
18
Page 21

COOKING MODE TABLES
COOKING MODE ICON
TRUE CONVECTION
RING & GRILL
CONVECTION BROIL
BROIL
ECO BAKING
STEAM 100
STEAM 130
130
TEMPERATURE
MIN. PRESET MAX.
50°C 165°C 230°C
50°C 210°C 230°C
50°C 165°C 230°C
50°C 230°C 230°C
50°C 165°C 230°C
40°C 100°C 100°C
70°C 130°C 130°C
STEAM & RING
CLEAN MODE ICON
CLEAN STEAM OVEN
CLEAN STEAM CIRCUIT
50°C 165°C 230°C
TEMPERATURE
MIN. PRESET MAX.
– 100°C –
–– –
19
Page 22

TRADITIONAL COOKING
Changing the cooking mode
1 Cooking can be paused by pressing .
Cooking can be restarted by pressing again.
2 To change the mode while cooking, press key and then .
Another cooking mode can then be selected from the available options
by pressing
Changing temperature
1 From the cooking mode screen, the temperature can be changed by pressing
and confirming your selection by pressing .
2 During cooking the temperature can be changed, by pressing .
Pre-heating
When the oven is preheating the actual temperature is displayed underneath the
cooking mode icon.
.
TRUE CONVECTION
++
325°F
1
1 Actual temperature
2 Set temperature
275°F
11:00 am
When the set temperature is reached, a beep will confirm that the oven is preheated.
The ‘actual temperature’ will disappear from the display.
NOTE: selecting a higher temperature does not shorten the preheat time.
The preheating function is recommended to achieve the best results when cooking
meat or baking cakes, biscuits, pastries and breads.
2
--
TRUE CONVECTION
325°F
11:06 am
++
--
20
Page 23

STEAM COOKING
Steam cooking has numerous benefits which include retaining the nutritional value
of food, along with retaining taste, structure, color and natural juices.
Useful tips
●
To ensure that you get the best results from using the steam function, start cooking
food from a cold oven. Avoid using the steam cooking function directly after using
the convection oven, as this will reduce the benefits of steam cooking.
●
We recommend using the perforated stainless steel tray together with the baking pan,
to get the best results when using the steam function. This allows food to be fully
cooked while collecting juice from the food in the tray.
NOTE: the steam functions will not start until the door is closed.
●
To start steam cooking select the required steam functions from the available options
by pressing . Confirm your selection by pressing .
●
The steam cooking function can be pused at any time by pressing .
When pressed again the function restarts.
When done cooking, the support of the perforated tray can be used as a support
to keep the hot tray off of the counter while you remove the food you just cooked.
21
Page 24

STEAM COOKING
130
Steam cooking
IMPORTANT
Before using any steam functions, the water container must be filled.
If while the oven is on, the message CHECK WATER CONTAINER appears on
the display, open the door and avoid hot steam that will be released, extract the
container and refill it. When the door is closed, the oven will go into PAUSE mode.
Press
Steam 100
This function allows you to cook on three different rack levels at the same time.
We recommend placing meat on the upper and middle racks and vegetables
on the middle and lower racks.
NOTE: use oven safe dishes and trays when using the steam functions.
Remove any lids and ensure food is positioned above the grill.
Steam 130
This mode allows you to modify the temperature while steam cooking.
This type of function is particularly suitable for heating pre-cooked food and for
preparing ready, semi-ready meals and frozen foods from 72°C to 130°C.
to continue cooking.
IMPORTANT!
Once the functions have been completed, a circuit discharge request will be sent
(see WATER DISCHARGE paragraph).
22
Page 25

STEAM COOKING
Steam and ring
●
After starting the oven, food is initially steamed. Depending on the size and
amount of food being cooked, the oven will automatically move into a convection
cooking phase.
●
This function is particularly suited to cooking large meat and seafood dishes as well
as baking bread and pastries. The recommended cooking temperature for baking bread
and pastries using this function is from 188°C to 210°C.
NOTE: if you’re using this function to cook consecutive meals, ensure that the oven
has cooled before starting to cook the following meal.
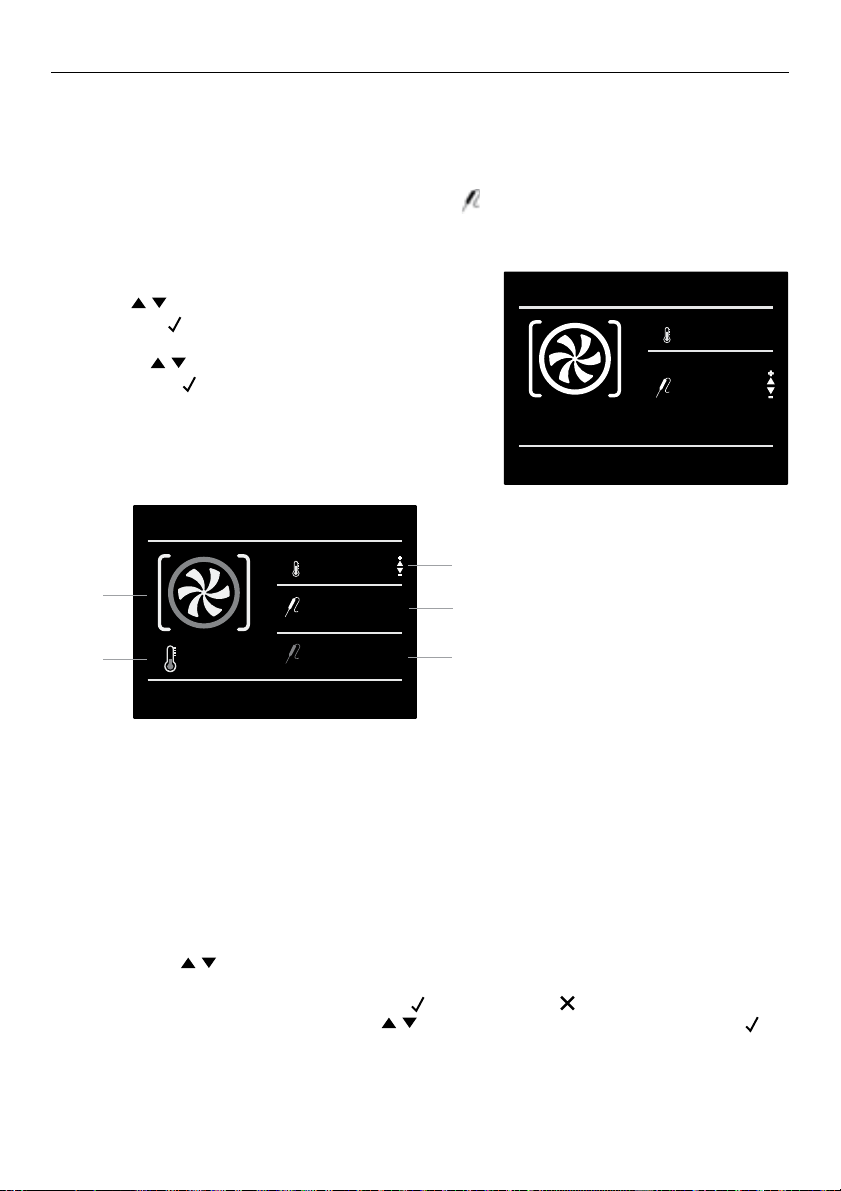
Steam assist function
●
This particular function can only be used with convection oven functions.
By adding steam to the oven cavity it will ensure that food remains tender
and does not dry out. This function is ideal for cooking roasts, seafood or
large meat dishes.
●
Once the oven has been turned on, the steam assist function will only become
available once the internal oven temperature has exceeded 100°C.
At this stage will appear on the display.
NOTE: this function is not enabled during steam cooking.
To inject steam inside the cavity, press then select using
and confirm your selection by pressing .
●
The steam assist function will continue
for five minutes, and will then return
to the previously set cooking function.
23
Page 26

USING OVEN LIGHTS
●
Press to turn lights on or off.
●
The oven lights will turn on automatically when the door is opened.
●
When a cooking mode has started, the oven lights will turn on automatically.
●
When a cooking mode is finished or cancelled the lights will turn off.
NOTE: when using oven mode the lights will automatically turn off after three minutes.
To turn the lights back on, press
or open the door.
24
Page 27
AUTOMATIC COOKING
To use automatic cooking modes ensure that the clock is displaying the correct time.
NOTE: the time functions cannot be used if the meat probe is on. The maximum
cooking time that can be set is 12 hours.
Automatic cooking
Use the ‘Cook time’ function to operate the oven for a set period of time.
The oven starts immediately and switches off automatically once the time has expired.
To set a timed mode
Select the cooking mode and temperature.
1
2 There are two ways to set the function:
●
Select to set the total cooking time and press .
●
Select to set the the time you would like cooking to end and press .
3 After selecting one of the two above options, set the time by pressing and
confirm pressing .
TRUE CONVECTION
a
275°F
11:00 am
325°F
END
11:50 am
TIME
00:50
++
--
b
c
d
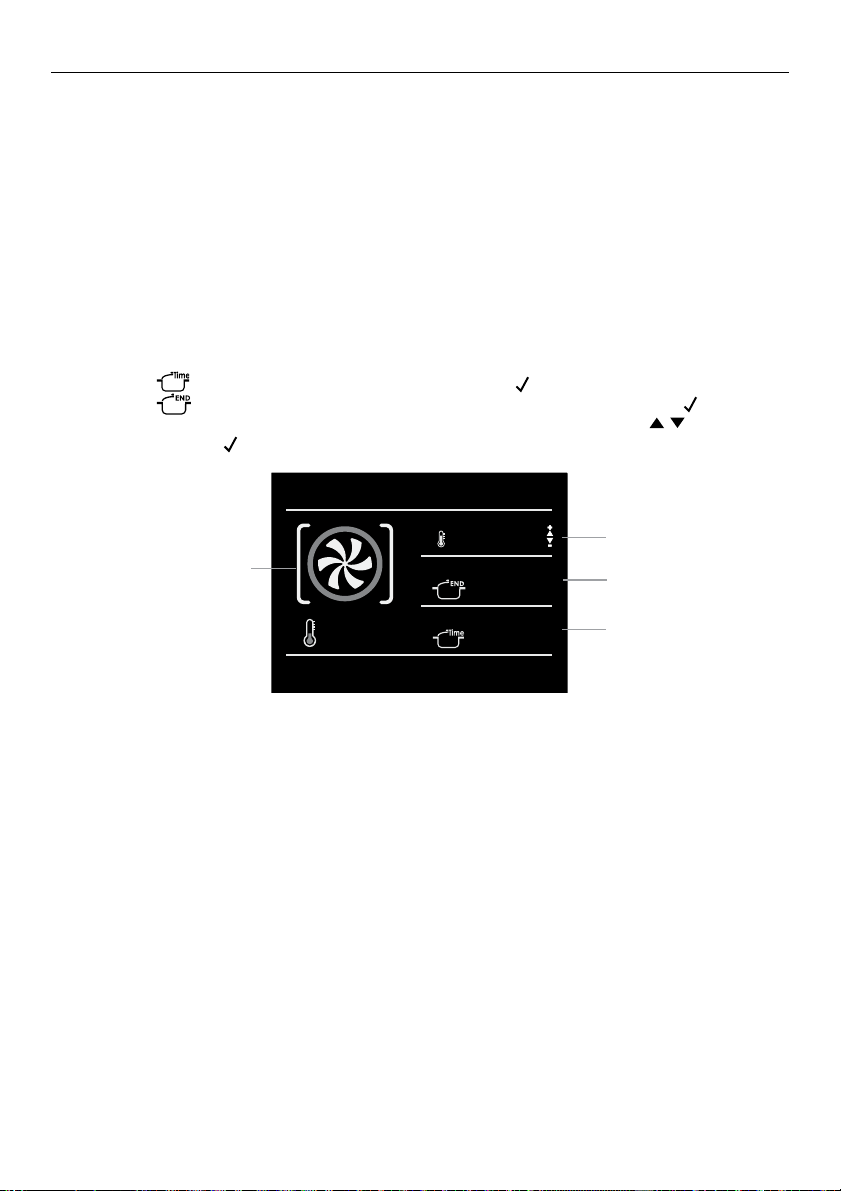
4 Cooking starts and the automatic cooking information is shown on the display:
a Cooking mode
b Temperature
c End of cooking time
d Total cooking time
5 A series of beeps will indicate when the end time has been reached and the oven
will automatically switch off.
25
Page 28

AUTOMATIC COOKING
To change the set cooking time when the oven is operating, press and enter a new
cooking time, then press .
Setting start and end times
Set the total cooking time as indicated in the ‘Automatic cooking’ section.
1
2 Select to set the end time and press .
3 Change the cooking end time by pressing and confirm your selection
by pressing .
TRUE CONVECTION
++
--
a
275°F
11:00 am
Start
325°F
END
12:30 pm
START
11:40
4 Based on the times provided for total cook time and end time, the oven will calculate
the correct start time. The oven will turn on and off automatically.
a Cooking mode
b Temperature
c Cooking end time
d Cooking start time
b
c
d
NOTE: the maximum cooking time that can be set is 12 hours.
5 A series of beeps will indicate when the end time has been reached and the oven
will automatically switch off.
To change the cooking time and end time during cooking, press or
and change the time by pressing .
Confirm your selection by pressing .
To cancel this function during cooking press and then press .
26
Page 29

USING THE MEAT PROBE (SOME MODELS ONLY)
Setting the temperature for meat probe
The meat probe is supplied with some models only. For other models it may
be purchased separately. For further information or to purchase a meat probe,
contact Customer Care, your authorised service centre or visit our website:
fisherpaykel.com.
Use your meat probe to accurately judge when meat is perfectly cooked.
The meat probe will gauge the core temperature of the meat and will stop
cooking when the selected temperature has been reached.
IMPORTANT
Only use the meat probe that has been supplied for this oven.
FOOD MINIMUM INTERNAL TEMPERATURE
MINCE
Hamburger 74°C
Beef, veal, lamb, pork 74°C
Chicken, turkey 74°C
BEEF, VEAL, LAMB
Roasts and steaks: Rare 51°C
Medium-rare 57°C
Medium 63°C
Well done 71°C
PORK
Chops, roasts, ribs: Medium 71°C
Well done 77°C
Fresh sausages 74°C
POULTRY
Whole chicken or chicken pieces 77°C
Duck 77°C
Turkey breast 77°C
27
Page 30

USING THE MEAT PROBE (SOME MODELS ONLY)
IMPORTANT!
●
To avoid burns, use a kitchen glove to fit and remove the meat probe
when the oven is hot.
●
Always remove the probe using the grip. Removing it by pulling the cable,
may cause damage.
●
Make sure food is completely defrosted before using the probe.
●
The meat probe is not enabled for all functions, for example the meat probe function
cannot be used when using the recipe function.
●
If the meat probe is fitted during a function it is not enabled for, a removal message
will appear on the display.
●
If the meat probe is accidentally removed during operation, a warning message
appears on the display.
●
The temperature of the probe can be set between 40°C and 100°C.
●
The oven stores the last temperature set by the user.
●
The probe socket is located in the
upper left corner of the oven cavity,
protected by a metal cover.
●
Prior to turning the oven on,
remove the cover and insert the
probe connection all the way in.
●
The probe should click into place.
NOTE: the probe will not work if it is
connected when the oven is already
turned on.
Keep the metal cover in a safe place
when using the meat probe, as this will
need to be re-inserted for use in other
cooking modes.
28
Page 31
USING THE MEAT PROBE (SOME MODELS ONLY)
Insert the tip of the probe into the center of the thickest part of the fully defrosted
meat. The thicker the meat, the longer it will take to cook, so it is important that
the probe is measuring the temperature of the meat at its thickest point.
Make sure the probe does not touch bone, fat or gristle, as these will heat up
more quickly than the lean meat.
The meat probe icon will appear on the display
When a cooking mode is selected with the probe inserted, a display page will appear
where you can select the settings for the meat probe.
1 Select the cooking mode and then
press to set the oven temperature
and press to confirm.
2 Set the required probe temperature by
pressing and confirm your selection
by pressing .
TRUE CONVECTION
++
--
a
325°F
145°F
.
325°F
145°F
11:00 am
c
d
++
--
b
275°F
11:00 am
70°F
e
3 Cooking will start and all probe cooking details appear on the screen.
a Cooking mode
b Actual temperature
c Set temperature
d Set probe temperature
e Current probe temperature
Once the set probe temperature is reached, the oven switches off and a tone indicates
that cooking is completed.
NOTE: after cooking has started, the oven temperature can be changed at any time
by pressing .
To change the probe temperature, press and then press .
Change the temperature by pressing and confirm your selection by pressing .
29
Page 32

RECIPES
The Recipe function on your oven enables you to cook without having to set the oven
manually every time. By selecting a recipe, the cooking mode, temperature and time are
automatically set according to the recipe selected from the menu.
RECIPE LIST TYPE OF FOOD FOOD CONDITION RECIPES LIST
PRESET or
PERSONAL
FRESH
BREAD PIZZA
FIRST
FROZEN
WHOLE
MEAT
IN PIECES
WHOLE
POULTRY
IN PIECES
WHOLE
FISH
IN PIECES
INFORMATION
DISPLAYED
TYPE OF
ACCESSORY
LEVEL
POSITION
FOOD
WEIGHT
COOKING
TIME
30
PREHEAT
-
VEGETABLES
-
-
PIES
-
REQUIRED
(YES/NO)
Page 33

Select a preset recipe
RECIPES
1 Press then press .
2 Press to choose from ‘PRESET’ or
‘PERSONAL’ and confirm your selection
by pressing
.
3 Choose the type of food to be cooked
by pressing and and confirm
your selection by pressing .
4 Press to choose from ‘FRESH’ or
‘FROZEN’ options or from ‘WHOLE’ or
ROASTED TURKEY
RECTANGULAR GRID
LEVEL
WEIGHT
COOKING TIME
PREHEAT
1
3800g
03:00
YES
‘IN PEICES’ confirm your selection by
pressing .
START
SAVE
5 Select a recipe by pressing
confirm your selection by pressing .
6 When the recipe is confirmed, the following
display page appears on the screen.
7 To start the cooking, confirm by pressing .
During a recipe, a number of tones will signify visual messages appearing on the display.
Follow these instructions to complete cooking the recipe.
8 A series of beeps along with a message on the display will indicate that the recipe
is completed and the oven will switch off.
Saving a personalised recipe
When a recipe has been selected, the ‘Time’
and ‘Weight’ can be changed and the recipe
can be saved among the ‘PERSONAL’ ones.
This will allow you to quickly access your
POULTRY
WEIGHT
favourite recipes.
1 When a recipe has been selected, press
and confirm your selection by pressing .
3800g
2 Change the weight by pressing and
confirm your selection by pressing
.
3 Change the cooking time by pressing
and confirm your selection by pressing .
POULTRY
COOKING TIME
03:00
31
Page 34

Select an already-set recipe
RECIPES
4 By selecting ‘SAVE’ and confirming this
selection by pressing , the recipe will now
be saved in the ‘PERSONAL’ list of recipes.
NOTE: if the time and weight is changed and
not saved immediately at the end of the recipe,
a message appears which asks whether you
want to save it.
To start the recipe press .
5
Removing a personalised recipe
To remove a recipe from the list of
personalised recipes:
1 Select the recipe you want to remove.
Then press the recipe.
2 A message ‘Do you want to remove the
recipe’ will appear on the display.
Select ‘Yes’ and press .
ROASTED TURKEY
RECTANGULAR GRID
LEVEL
WEIGHT
COOKING TIME
PREHEAT
START
1
2500g
02:00
YES
SAVE
POULTRY
DO YOU WANT REMOVE RECIPE
N0
YES
32
Page 35

CARE AND CLEANING
Oven clean
This function performs a cleaning cycle by injecting steam into the cavity for 15 minutes.
At the end of the cycle, any crusting that may have formed due to high-temperature
cooking inside the oven cavity, will be softened and become much easier to remove.
1 Press
2 To cancel this function press and then press .
. Press to select and confirm your selection by pressing .
IMPORTANT!
Once the functions have been completed, a circuit discharge request will be sent
(see WATER DISCHARGE paragraph).
Circuit clean
This function performs a cleaning cycle of the circuit, to keep it clean and operating
efficiently. Press
. Press to select and confirm your selection by pressing .
IMPORTANT!
Once the functions have been completed, a circuit discharge request will be sent
(see WATER DISCHARGE paragraph).
This oven does not require any descalers to keep the steam generation system
running efficiently.
Circuit discharge
At the end of any steam function, when the oven is turned off. The following message
will appear on the display: NEED TO DISCHARGE/OPEN THE DOOR.
Carefully open the door as hot steam will be released. A message will appear
on the display to remove the container and empty the water to the level indicated.
When the water has been emptied, re-insert the container and press
At the end of this function, the
message DISCHARGE ENDED
REMOVE AND EMPTY THE
TANK will appear on the display,
confirming that the discharge
was successful.
If you do not wish to immediately
repeat a new steam cooking
cycle, it is recommended to
empty the container refill it
with fresh water, reinsert the
container and close the door.
The oven is now ready for
a new cooking cycle.
.
33
Page 36

REPLACING THE OVEN LAMP
The oven lamp must have the following specifications.
●
Structure suitable for high temperatures up to 300°C.
●
Power supply: see the V/Hz value on the serial number plate.
●
Power 25W.
●
Type G9 connector.
IMPORTANT!
Ensure the appliance is off before replacing the
lamp to avoid the possibility of electric shock.
●
To protect the oven cavity, spread a tea towel
inside the oven.
●
Remove the screws holding the steel frame.
●
Remove the old lamp by sliding it out of its
socket and taking care not to break it.
●
Insert the new bulb taking care not to touch
it with your hands (we recommend using a
disposable latex glove when handling the bulb).
●
Replace the stainless steel frame taking care
not to pinch the silicone gasket seal.
●
Re-insert the screws that were previously removed.
●
Re-connect the oven to power.
34
Page 37

TROUBLESHOOTING
Cooking problems
If there is a problem, check the chart below to see if you can fix it.
If the problem cannot be fixed or persists, call your Authorised Repairer or
Customer Care.
Food browns unevenly - Oven is not preheated
- Aluminium foil on oven rack or oven bottom
- Baking pan is too large for recipe
- Baking pans are touching each other or
oven walls
Food too brown on bottom - Oven is not preheated
- Using glass, dull or darkened metal pans
- Incorrect rack position
- Baking pans are touching each other or
oven walls
Food is dry or has shrunk excessively - Oven temperature too low
- Oven not preheated
Food is baking or roasting too slowly
Pie crusts do not brown on bottom or
have soggy crust
Cakes pale, flat and may not be
cooked inside
Cakes high in middle with crack on top - Baking temperature is too high
Pie crust edges too brown - Oven temperature too high
- Oven door opened frequently during cooking
- Food is tightly sealed with aluminium foil
- Pan size too small
- Baking time is not long enough
- Using shiny steel pans
- Rack position is incorrect
- Oven temperature is too low
- Oven is temperature too low
- Baking time is not long enough
- The cake has been tested too soon
- The oven door has been opened too often
during baking
- Baking pan size may be too large
- Baking time is too long
- Baking pans are touching each other or
oven walls
- Rack position is incorrect
- Baking pan size may be too small
- Edges of crust is too thin
35
Page 38

COOKING CHARTS
OVEN PROBLEM PROBLEM SOLVING STEPS
Other F__ Error appears in the
display window
The oven display won’t turn on Turn off power at the main power supply,
The cooling fan continues to run
after the oven is turned off
Oven is not heating Check the circuit breaker or fuse box to your house.
Oven is not cooking evenly Refer to cooking charts for recommended
Oven light is not working properly Check that power is being supplied to the oven.
Clock and timer are not working
properly
Excessive moisture Using the convection mode will eliminate any
Turning off demo mode
Remove power and turn it back on again after
a few seconds. If condition persists, note the
code number (in the EVENT LOG list) and contact
Customer Support or your authorised repairer.
then turn the power back on.
If this does not resolve the issue, call
Customer Support or an authorised repairer.
The fan will turn off automatically when the
electronic components have cooled sufficiently.
Check that power is being supplied to the oven.
Make sure the oven temperature has been selected.
rack position.
Always reduce recipe temperature by 15°C
when baking with Convection Bake mode.
Refer to the clock section of this userguide.
Make sure there is proper electrical power to
the oven.
moisture in the oven.
To disable the function, press the arrows
to enter the DEMO display page and select off.
Confirm your selection by pressing .
36
Page 39

WARRANTY AND SERVICE
Before you call for service or assistance...
Check the things you can do yourself. Refer to the installation instructions and your
user guide and check that:
1 Your product is correctly installed.
2 You are familiar with its normal operation.
If after checking these points you still need assistance or parts, please refer to the
Service & Warranty book for warranty details and your nearest Authorised Service
Centre, Customer Care, or contact us through our website fisherpaykel.com.
Complete and keep for safe reference:
Model
Serial No.
Purchase Date
Purchaser
Dealer
Suburb
Town
Country
37
Page 40

FISHERPAYKEL.COM
© Fisher & Paykel Appliances 2018. All rights reserved.
The product specifications in this booklet apply to the specific products
and models described at the date of issue. Under our policy of continuous
product improvement, these specifications may change at any time. You
should therefore check with your Dealer to ensure this booklet correctly
describes the product currently available.
NZ AU GB IE
591542A 02.18
 Loading...