

Fisher & Paykel OB90S9LEX1 User Manual

USER GUIDE
NZ AU
BUILT-IN OVEN
OB90S9LEX1 model


1
CONTENTS
IMPORTANT!
SAVE THESE INSTRUCTIONS
The models shown in this user guide may not be available in all markets and are subject to
change at any time. For current details about model and specification availability in your
country, go to our website fisherpaykel.com or contact your local Fisher&Paykel dealer.
Safety and warnings 2
Introduction 6
Control panel 7
First use 8
Using your oven 9
Oven functions 10
Using the rotisserie 12
Using the timer 14
Automatic cooking 15
Cooking chart 17
User preference settings 18
Sabbath setting 20
Care and cleaning 22
Troubleshooting 29
Alert codes 31
Warranty and service 32
2
Your oven has been carefully designed to operate safely during normal cooking procedures.
Please keep the following safety instructions in mind when you are using it:
!
WARNING!
ELECTRIC SHOCK HAZARD
Turn the oven off at the wall before replacing the oven lamp.
Failure to follow this advice may result in electric shock or death.
!
WARNING!
FIRE HAZARD
Carefully follow the instructions for starting a Self Clean cycle.
Do not place combustible materials (eg wood, fabric, plastic) in the
oven during a Self Clean cycle.
Do not place aluminium foil, dishes, trays, water or ice on the oven
floor during cooking, this will irreversibly damage the enamel.
Lining the oven with aluminium foil may cause fire.
Never use your appliance for warming or heating the room.
Persons could be burned or injured or a fire could start.
Flammable materials should not be stored in an oven or near
its surface.
Failure to follow this advice may result in overheating, burning,
and injury.
!
WARNING!
HOT SURFACE HAZARD
To avoid burns and scalds, keep children away from this appliance.
Surfaces of the appliance may become hot enough to cause burns.
Examples include the oven vent, the surface near the oven vent, and
the oven door.
Do not touch heating elements or interior surfaces of the oven.
Heating elements may be hot even though they are dark in colour.
Use protection when handling hot surfaces such as oven shelves
or dishes.
Use care when opening the oven door. Let hot air or steam escape
before removing or replacing food.
During and after use, do not touch, or let clothing or other
flammable materials contact heating elements or interior surfaces of
the oven until they have had sufficient time to cool.
Failure to follow this advice could result in burns and scalds.
SAFETY AND WARNINGS

3
SAFETY AND WARNINGS
!
WARNING!
CUT HAZARD
Take care — some edges are sharp.
Failure to use caution could result in injury or cuts.
IMPORTANT SAFETY INSTRUCTIONS
Read this user guide carefully and keep for future reference.
WARNING!
Do not attempt to operate this oven with the door open. Keep the door closed to
prevent harmful exposure to microwave energy.
Do not place any object between the oven front face and the door, or allow food or
cleaner residue to accumulate on sealing surfaces.
Do not operate the oven if it is damaged. Ensure the oven door is closed properly
and there is no damage to the:
– Door (bent)
– Hinges and latches (broken or loosened)
– Door seals and sealing surfaces.
Ensure the oven is adjusted or repaired only by a Fisher & Paykel trained and
supported service technician.
if the door or door seals are damaged, do not operate the oven until it has been
repaired by a Fisher & Paykel trained and supported service technician.
Follow the basic precautions to reduce the risk of fire, electric shock, injury to persons
or exposure to excessive microwave oven energy when using your appliance.
Installation
This appliance is intended to be used for normal personal, family or household use.
This is a built-in oven intended to be installed in a cavity only.
Ensure that all the packing materials are removed from the inside of the door.
DO NOT use the oven outdoors.
Check the oven for any damage, such as misaligned or bent door, damaged door seals
and sealing surface, broken or loose door hinges and latches and dents inside the
cavity or on the door. If there is any damage, do not operate the oven and contact a
Fisher & Paykel trained and supported service technician.
This microwave oven must be placed on a flat, stable surface to hold its weight and
the heaviest food likely to be cooked in the oven.
Do not place the oven where heat, moisture or high humidity are generated or near
combustible materials.

4
SAFETY AND WARNINGS
Electrical
Never unplug your appliance by pulling on the power cord. Always grip the plug
firmly and pull straight out from the outlet.
Do not plug in any other appliance at the same power point as your appliance or
use extension cords or double adapters or ungrounded (two prong) adapters.
If the power supply cord is damaged, it must only be replaced by a
Fisher & Paykel trained and supported service technician.
All electrical repairs must be carried out by a Fisher & Paykel trained and
supported service technician or qualified electrician in order to avoid a hazard.
Ensure that the appliance is switched off before replacing the lamp to avoid the
possibility of electric shock.
It is hazardous for anyone other than a Fisher & Paykel trained and supported
service technician or qualified electrician to carry out any service or repair
operation that involves the removal of a cover which gives protection against
exposure to microwave energy.
Disposal/Recycling
The packaging materials for this appliance are recyclable.
Operation
Do not use the cavity for storage purposes. Do not leave paper products,
cooking utensils or food in the cavity when not in use.
Watch cooking time. Cook for the shortest amount of time indicated and add
more as needed.
Do not operate your appliance by means of an external timer or separate remote
control system.
Always position the shelves in the desired location while the oven is cool
(before preheating). If a shelf must be removed while the oven is hot, do not let
the oven mitts or potholder contact hot heating elements in the oven or the base
of the oven.
Food Safety
Use only utensils that are suitable for use in ovens.
Be fire wise. Switch off or unplug the appliance and keep the door closed if
smoke is observed in order to stop any flames.
Do not heat unopened food containers. They can build up pressure that may
cause the container to burst and result in injury.
Food severely overcooked can smoke or ignite.
Cover food items while cooking. Covers prevent spattering and help food items
to cook evenly.
Child Safety
Keep the appliance and its cord out of reach of children aged less than 8 years.
Ensure that children (aged 8 years and above) and persons with reduced
physical, sensory or mental capabilities or lack of experience and knowledge can
only use the appliance if they are supervised or have been given instruction on
how to use the appliance safely and understand the hazards involved.
Never allow children to play with the appliance.

5
IMPORTANT!
Ensure that your oven is regularly cleaned to avoid damage to its surface that can
result in hazards or potential injury.
Cleaning
Clean the oven regularly and remove any food deposits. Failure to maintain the oven
in a clean condition could lead to deterioration of the surface that could adversely
affect the life of the appliance and possibly result in a hazardous situation.
Do not clean the appliance with a steam cleaner.
Always unplug the appliance from the power supply before cleaning.
Clean the cavity of the oven after using with a slightly damp cloth.
Clean the accessories with soapy water.
The door frame, seal and neighbouring parts must be regularly cleaned with a
damp
cloth.
Do not use harsh abrasive cleaners or sharp metal scrapers to clean the oven door
glass, this may scratch the surface which may result in shattering of the glass.
SAFETY AND WARNINGS
6
1 Oven vent louvres
2 Control panel
3 Stainless steel strip
4 Side racks
5 Grill tray and rotisserie
6 Oven door and handle
7 Oven seal
2
4
3
5
6
7
1
Congratulations on your new purchase. Your oven has a number of features to make
cooking a great experience for you:
a choice of nine oven functions, including Rotisserie (optional and can be purchased
separately as a kit)
intuitive electronic controls and displays
illuminated halos around the dials for visual feedback
preference settings — see ‘User preference settings’ and ‘Sabbath setting’.
Before you start
Make sure the installer has completed the ‘Final checklist’ in the Installation instructions.
Read this guide, taking special note of the ‘Safety and warnings’ section.
Remove all the packaging and check that you have all the accessories listed below.
Make sure you follow the instructions under ‘Setting the clock and first use’ before
using your oven for cooking or baking.
Not illustrated:
Baking tray
Step-down oven shelf
Oven shelf
Grill rack
INTRODUCTION

7
-
+
CONTROL PANEL
Locking the control panel
You can lock the control panel to prevent unintended use (eg children playing with
theoven). Doing so will disable the dials and all the buttons.
To lock the control panel
1 Make sure the oven is not in use (the function dial is turned to Off) and neither
automatic cooking nor the timer is set (no indicator is lit in the display).
2 Press and hold the select
button until the lock indicator
comes on.
To unlock the control panel
Press and hold the cancel
button until the lock indicator
flashes and then goes out.
Cooking time indicator (see ‘Automatic cooking’)
Stop time indicator (see ‘Automatic cooking’)
Control lock indicator (see ‘Locking the control panel’).
Function indicators (see ‘Oven functions’)
Function dial (see ‘Using your oven’)
Function dial halo
Temperature dial halo
Temperature dial (see ‘Using your oven’)
Temperature indicator
Scroll Select Cancel
Timer indicator (see ‘Using the timer’)
8
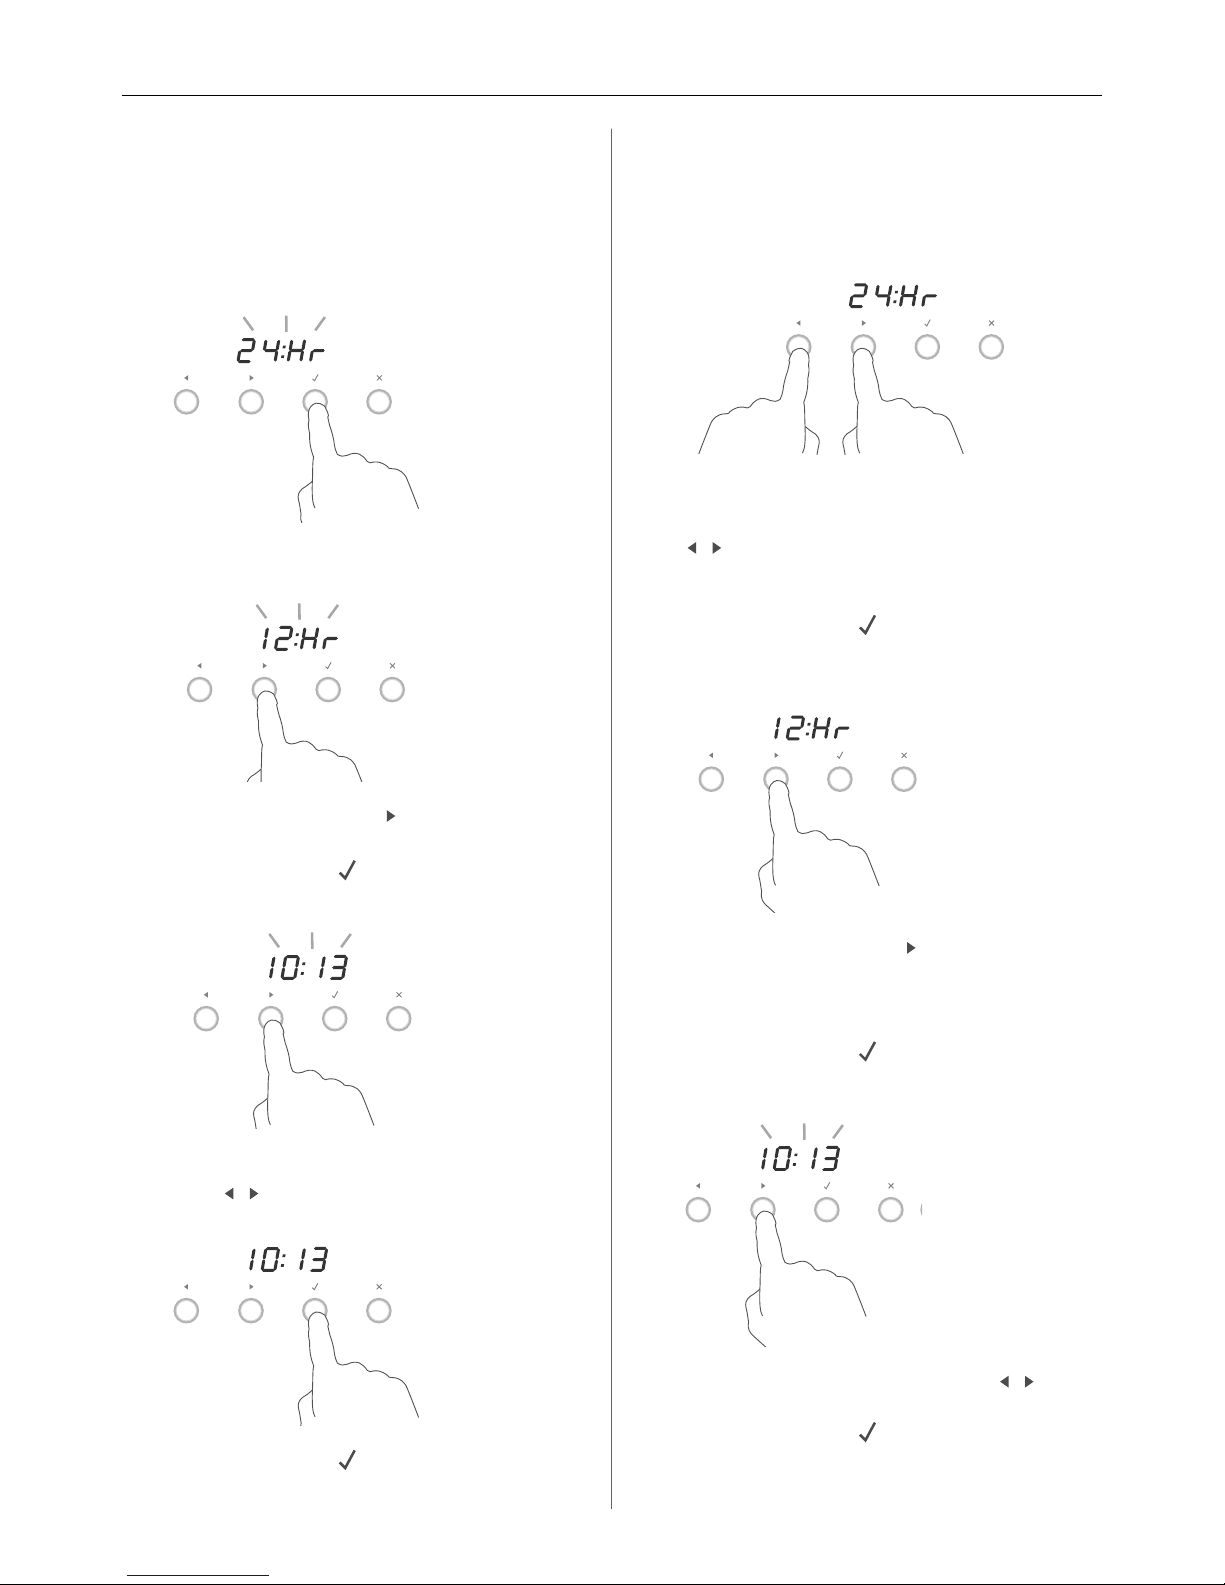
FIRST USE
Setting the clock
When your oven is first turned on, or
after a power cut, the display will flash.
You will need to set the clock in order
to use the oven.
1 The display will flash 24 Hr.
4 Press the left and right
scroll
buttons to set the time.
2 Press the right scroll
button to scroll
between 24 Hr and 12 Hr
3 Press the select
button to confirm.
5 Press the select
button to confirm.
The time set will now be steadily lit.
Changing the time
Set the clock within the user
preference menu.
5 Press the left and right scroll
buttons to set the time.
6 Press the select
button to confirm.
3 Press the right scroll
button to scroll
between 24 Hr, 12 Hr or OFF to
turn the display off (see ‘Setting User
preferences’ for more information).
4 Press the select
button to confirm.
1 To enter the user preference menu,
press and hold the left and right scroll
buttons together for 3 seconds.
The display will either flash 12 Hr
or 24 Hr
2 Press the select
button to confirm.
The display will flash.
9
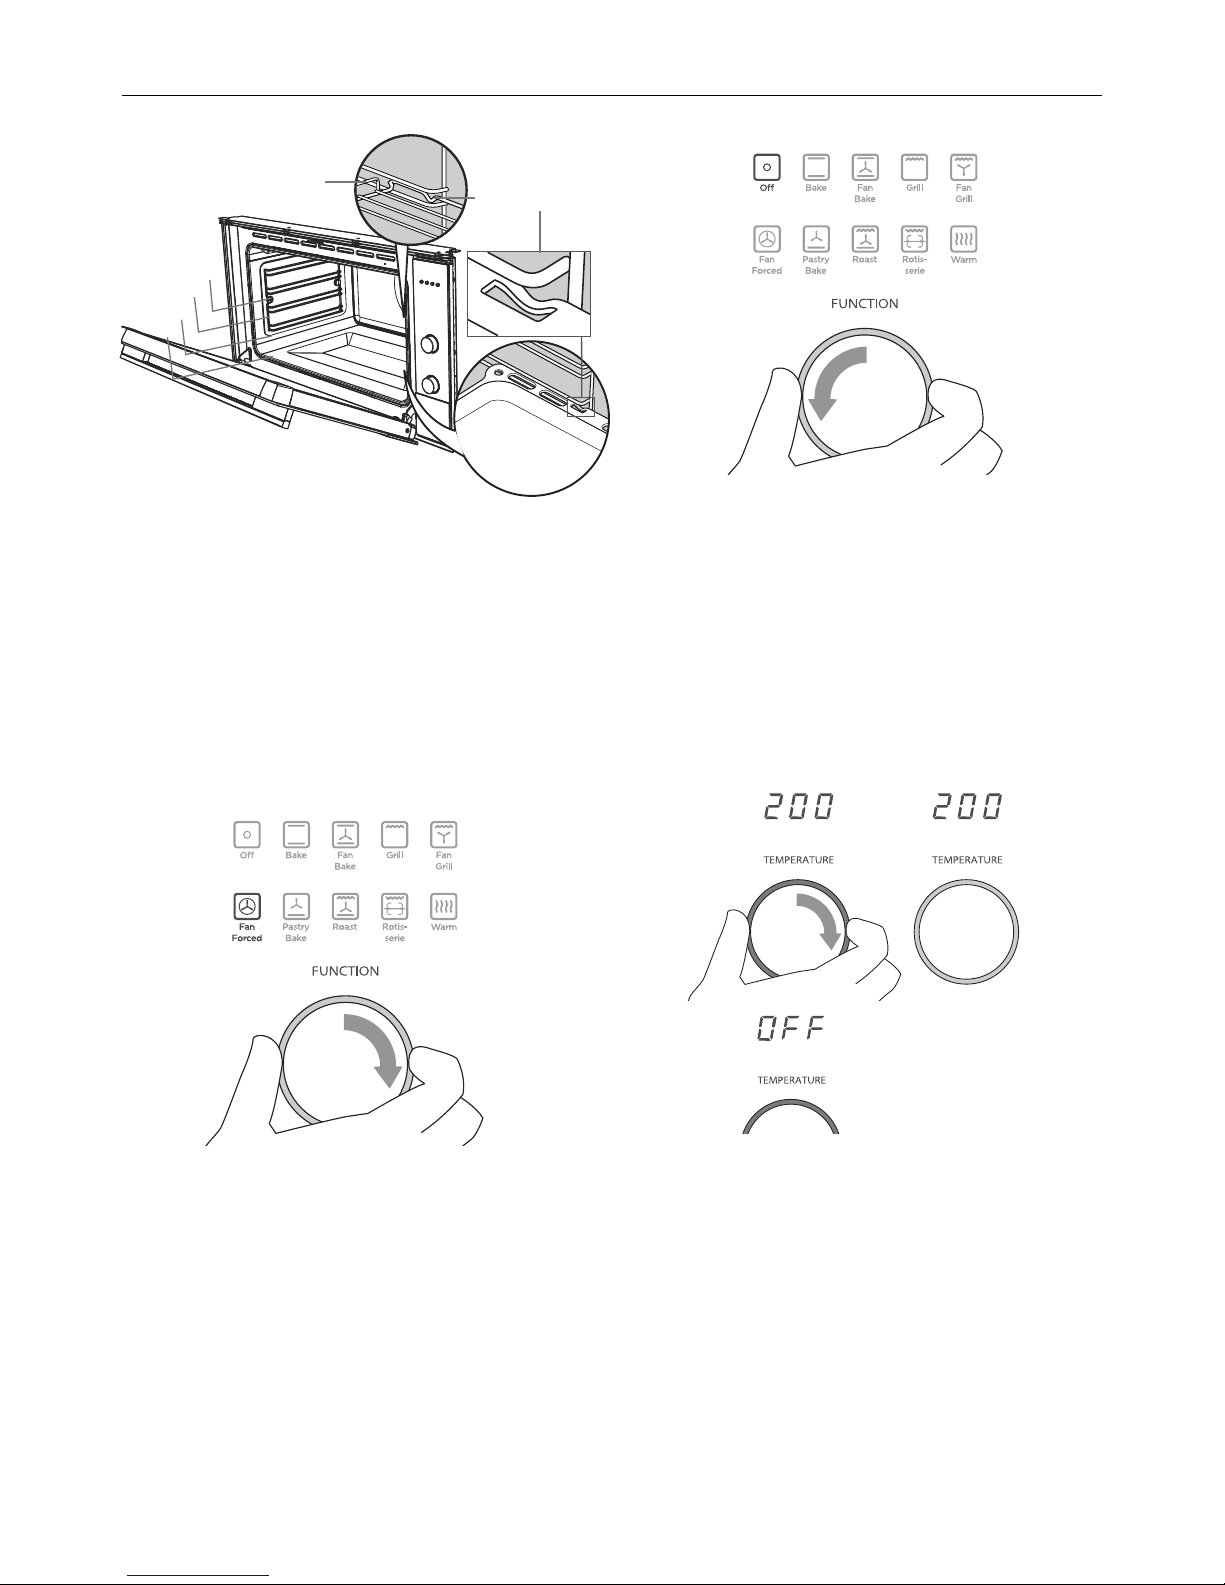
3 Set the temperature.
While the oven is heating up, the halo
will glow red and the temperature
indicator will alternately show the
actual and settemperatures.
When the oven has reached set
temperature, a long tone will sound
and the halo will turn white.
Note: Grill provides instant radiant heat,
so the halo will stay red and there will be
no tone.
-
+
2 Select a function.
The halo will glow white.
4 When you have finished
cooking, turn the function
dial to Off.
-
+
- - - - - -
1 Insert the shelves that you need.
Ensurethat,
they are between two wires of a
shelfposition
the stop notches point down
the guard rail is at the back.
Note: The grill tray should be positioned
between the two wires of a shelf
position and orientated as shown.
Shelf
positions
Guard rail
Stop notch
1
2
3
4
USING YOUR OVEN
 Loading...