

Fisher & Paykel OB76 Series User Manual

NZ AU
User guide
Aerotech oven
OB76models


1
Contents
Safety and warnings
2
Introduction
5
Using your oven - before you start
Setting the clock
6
Using the oven controls
7
Oven functions
8
Using your oven
Positioning the shelves
10
Choosing the right bakeware
11
Selecting function and temperature
12
Preheating your oven
12
Using the oven functions
13
Using the meat probe
16
Automatic cooking
18
Cooking guidelines
20
Care and cleaning
28
User preference settings
32
Troubleshooting
35
Warranty and service
37
Important!
SAVE THESE INSTRUCTIONS
The models shown in this user guide may not be available in all markets and are
subject to change at any time. For current details about model and specification
availability in your country, please visit our local website listed on the back cover
or contact your local Fisher & Paykel dealer.
2
Operation
Your oven has been carefully designed to operate safely during normal cooking procedures.
Please keep the following guidelines in mind when you are using your oven:
WARNING!
Hot Surface Hazard
Accessible parts may become hot when in use.
To avoid burns and scalds, keep children away.
Use oven mitts or other protection when handling hot surfaces such as oven
shelves or dishes.
Use care when opening the oven door.
Let hot air or steam escape before removing or replacing food.
Do not touch heating elements or interior surfaces of the oven. Heating
elements may be hot even though they are dark in colour. Interior surfaces
of an oven become hot enough to cause burns. During and after use, do not
touch, or let clothing or other flammable materials contact heating elements
or interior surfaces of the oven until they have had sufficient time to cool.
Other surfaces of the appliance may become hot enough to cause burns among these surfaces are the oven vent, the surface near the oven vent, and
the oven door and window, which could also become hot enough to cause
burns.
Failure to follow this advice could result in burns and scalds.
WARNING!
Electrical Shock Hazard
Turn the oven off at the wall before replacing fuses or the oven lamp.
Failure to do so may result in death or electrical shock.
Safety and warnings

3
Safety and warnings
Important safety instructions
To reduce the risk of fire, electrical shock, injury to persons, or damage when using the oven,
follow the important safety precautions listed below:
Read all the instructions before using the oven. Use the oven only for its intended purpose as
described in these instructions.
Proper installation: be sure your appliance is properly installed and earthed by a qualified
technician.
Isolating switch: make sure this oven is connected to a circuit which incorporates an isolating
switch providing full disconnection from the power supply.
Never use your appliance for warming or heating the room. Persons could be burned or injured or
a fire could start.
Household appliances are not intended to be played with by children.
Do not leave children alone. Children should not be left alone or unattended in the area where
the appliance is in use. They should never be allowed to sit or stand on any part of the appliance.
Children or persons with a disability which limits their ability to use the appliance, should have a
responsible person to instruct them in its use. The instructor should be satisfied that they can use
the appliance without danger to themselves or their surroundings.
Do not place heavy objects on the oven door.
Wear proper apparel. Do not wear loose fitting or hanging garments when using the appliance.
They could ignite or melt if they touch an element or hot surface and you could be burned.
User servicing: do not repair or replace any part of the appliance unless specifically
recommended in the manual. All other servicing should be referred to a qualified technician.
Storage in or on appliance: flammable materials should not be stored in an oven or near its
surface.
Do not use water on grease fires. Smother the fire or flame or use a dry chemical or foam type
extinguisher.
Use only dry oven mitts or potholders. Moist or damp potholders on hot surfaces could result in
burns from steam. Do not let potholders touch hot areas or heating elements. Do not use a towel
or a bulky cloth for a potholder. It could catch fire.
Do not heat unopened food containers. They can build up pressure that may cause the container
to burst and result in injury.
Safe food handling: leave food in the oven for as short a time as possible before and after
cooking. This is to avoid contamination by organisms which may cause food poisoning. Take
particular care during warm weather.
Always keep oven vents unobstructed.
Caution. Hot air can blow from the vent at the base of the oven as part of the oven’s cooling
system.
Do not place aluminium foil, dishes, trays, water or ice on the oven floor during cooking, as this
will irreversibly damage the enamel.

4
Safety and warnings
Placement of oven racks (shelves): always position racks (shelves) in the desired location while
the oven is cool (before preheating). If a rack (shelf) must be removed while the oven is hot, do
not let the oven mitts or potholder contact hot heating elements in the oven or the base of the
oven.
Do not clean the door seal or cavity seals (gaskets) or use any oven-cleaning products on them.
They are essential for a good seal, which ensures that the oven operates efficiently. Care should
be taken not to rub, damage or move them.
Do not use oven cleaners, harsh/abrasive cleaning agents, waxes, or polishes. No commercial
oven cleaner, oven liner, or protective coating of any kind should be used in or around any part of
the oven. Do not use harsh/abrasive cleaners, scourers or sharp metal scrapers to clean the oven
door glass since they scratch the surface, which may result in the glass shattering.
Clean only the parts listed in this manual.
Do not use a steam cleaner to clean any part of the oven.
Before starting a self-clean cycle, remove oven shelves/racks, side racks/shelf supports, griller pan
and all other cookware/utensils, and wipe up large food spills or grease deposits.
During a self-clean cycle, the oven reaches higher temperatures than it does for cooking. Under
such conditions, the surfaces may get hotter than usual and children should be kept away.
Do not store things children might want above the oven. Children could be burned or injured
while climbing on the oven to retrieve items.
Do not install or operate the appliance if it is damaged or not working properly. If you receive a
damaged product, contact your dealer or installer immediately.
Use only bakeware approved for oven use. Follow the bakeware manufacturer’s instructions.
5
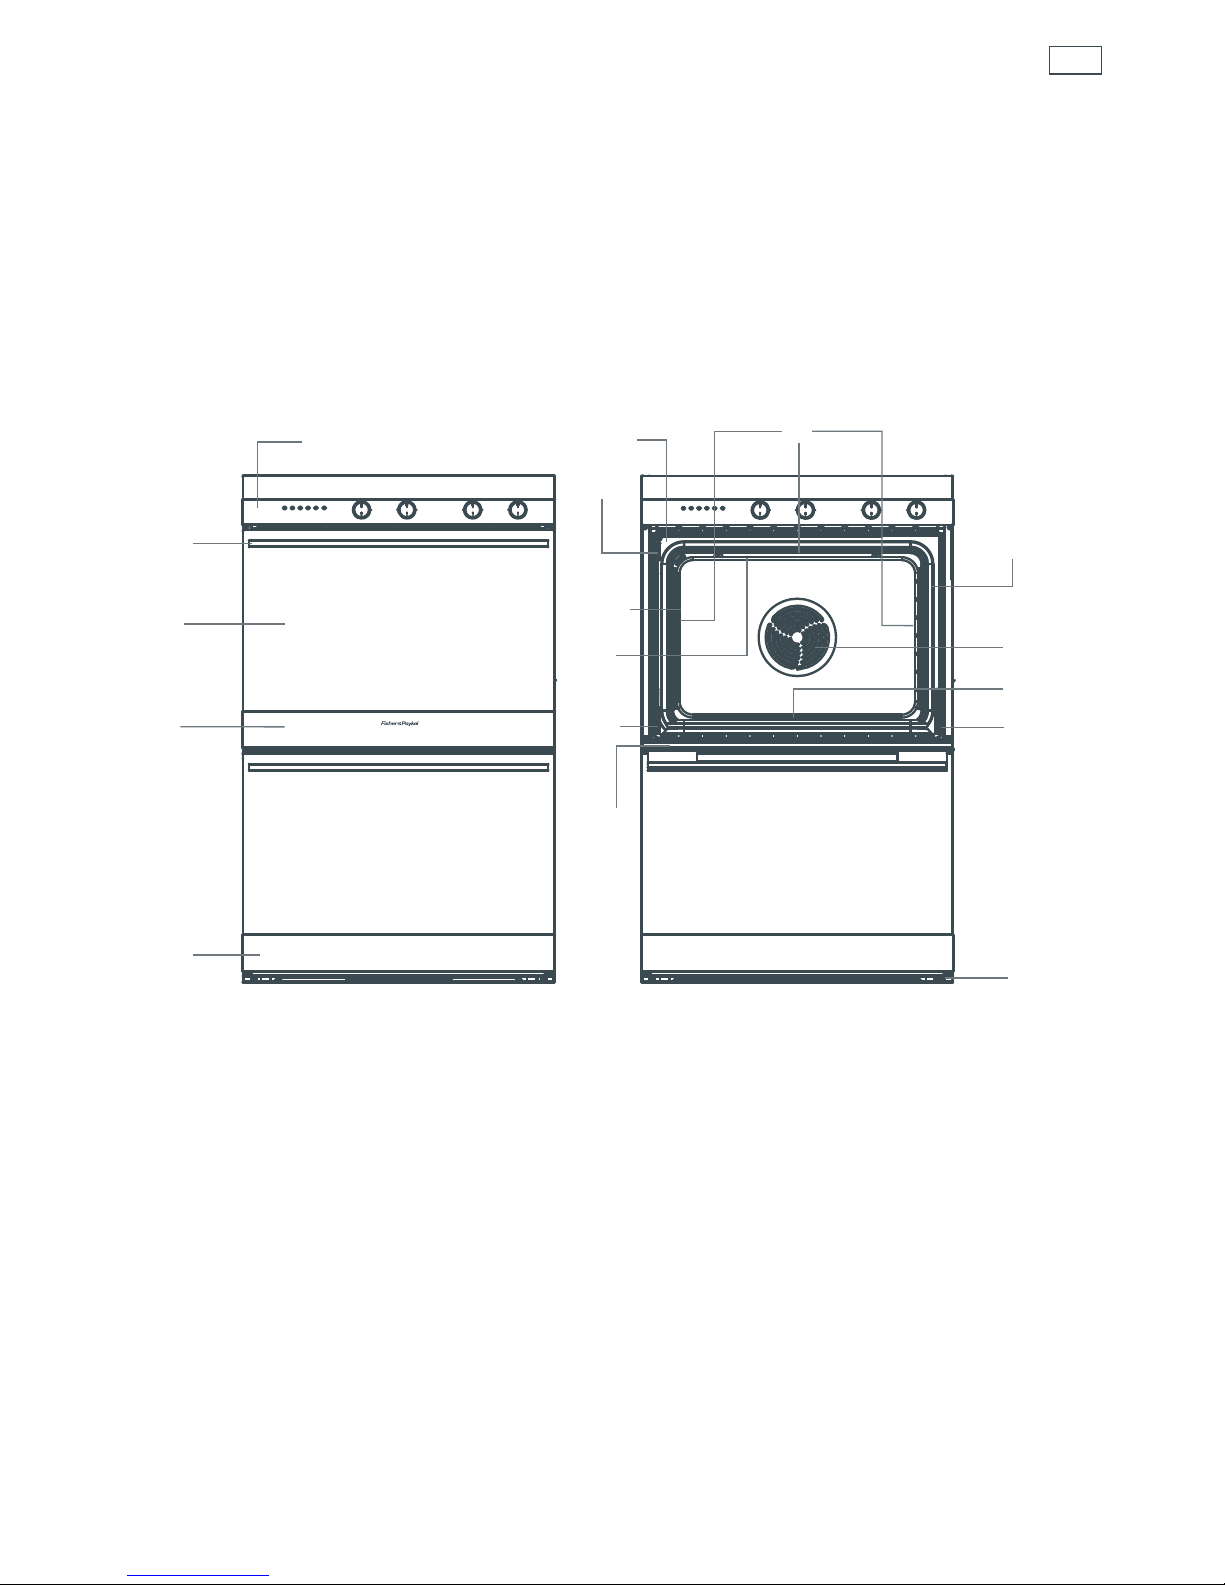
Introduction
1
Control panel
2
Door handle
3
Oven window
4
Upper oven
5
Lower oven (double models only)
6
Model & serial number
7
Self-clean latch
8
Door seal (gasket)
9
Cavity seal (gasket)
10
Top element
11
Oven lights
12
Meat probe socket
13
Convection fan & concealed element
14
Lower concealed element
15
Door hinge
16
Oven vent
1
2
3
4
5
6
7
9
8
11
13
12
15
15
14
10
About your new oven
Thank you for buying a Fisher & Paykel built-in multifunctional oven. Now that it is installed and
ready to use, you will want to know everything about it to make sure you get excellent results
right from the start. This guide introduces you to all its features, as well as giving you a set of
cooking guidelines. We recommend you read the entire guide before using your new oven, for
both safety and for cooking success.
16

6
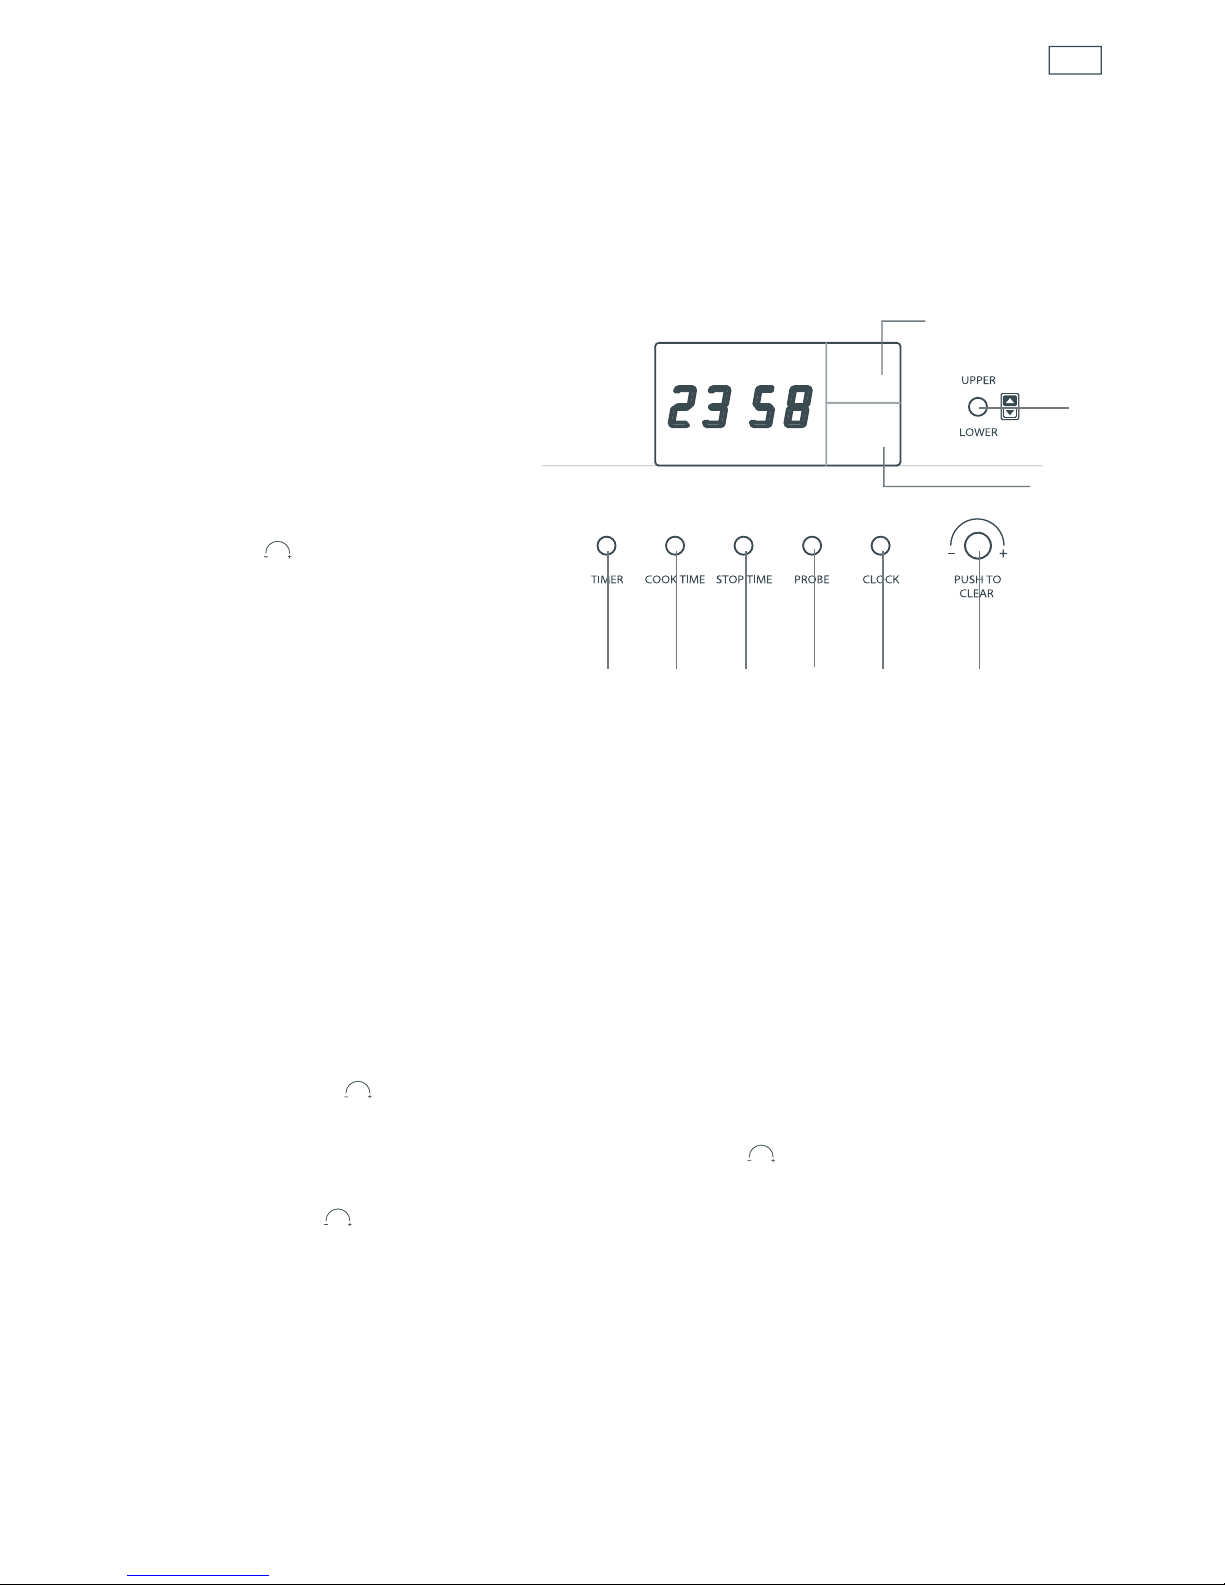
Setting the clock
When your oven is connected to a power supply for the first time, a tone will sound and the
clock display will light up. The clock display will show ‘12:00’ and the colon ( : ) will flash. Next,
set the clock.
Important!
You must set the clock before you can use the oven.
To set the clock
1
While the colon (:) is flashing, rotate the
PUSH TO
CLEAR
button until the correct time is showing.
2
Press the CLOCK button to set the time, or wait eight seconds and it will set automatically.
Refer to ‘User preference settings’ for instructions on how to change between 12-hour and 24-
hour display.
a
Clock display
b
CLOCK button
- allows you to set the clock
c
PUSH TO
CLEAR
- turn this button to set the clock, timer,
probe temperature, cook time, stop time
- press this button to clear the display
a
b
c
Using your oven - before you start
7
Using your oven - before you start
Using the oven controls
In double ovens, knobs on the left are for the upper oven and knobs on the right are for the
lower oven. Pushing the oven cavity selector button lets you toggle between the oven cavities,
for example if you are setting automatic programs.
a
TIMER button
b
COOK TIME button
c
STOP TIME button
d
PROBE button
e
CLOCK button
f
PUSH TO
CLEAR
button (rotate/press)
g
Upper oven cavity display
h
Lower oven cavity display
i
Oven cavity selector button - press this
button to toggle between upper and
lower cavity settings
g, h,
and
i
are on double models only
Timer
You can use the timer at any time, even when you are not using the oven.
To set the timer
1
Press the TIMER button. The TIMER symbol and the colon will flash in the clock display.
2
Rotate the
PUSH TO
CLEAR
button until you have the time you need. Press the TIMER button or wait
eight seconds for the setting to be adopted and the timer will begin to count down.
3
To cancel the timer, press the TIMER button then the
PUSH TO
CLEAR
button.
4
When the set time finishes, the TIMER symbol and 0:00 will flash and the oven will beep. Press the
TIMER or
PUSH TO
CLEAR
button to stop the beeping and clear the timer.
The timer does not turn the oven off.
g
h
f
i
d
ecba

8
Oven Functions
BAKING
TRUE AERO: fan plus fan element
A concealed heating element surrounding the fan in the rear of the oven heats air,
which is then blown into the cavity. The consistent temperature ensures baking is
well risen and evenly coloured. Cookies are crisp on the outside and chewy in the
middle, meat and poultry are deliciously browned and sizzling while remaining
juicy and tender. Casseroles are cooked to perfection and reheating is quick and
efficient. TRUE AERO is the function to choose for multi-shelf cooking and complete
oven meals.
AERO BAKE: fan plus upper and lower elements
The oven fan circulates hot air from the top outer and the lower concealed
elements and distributes it around the oven cavity. Food cooked using the AERO
BAKE function tends to brown more quickly than foods cooked on the traditional
BAKE function. Use AERO BAKE at a low temperature – 50°C– for drying fruit,
vegetables and herbs.
BAKE: upper and lower elements
Heat comes from the top outer and lower concealed elements. BAKE is the
traditional baking function, ideal for cakes. If baking on two shelves, arrange dishes
so no item is directly over another. BAKE is ideal for foods that require baking for a
long time or at low temperatures, like meringues and rich fruitcakes.
AERO PASTRY: fan plus lower element
The fan circulates heat from the lower concealed element throughout the oven.
Excellent for sweet and savoury pastry foods, for moist breads and brownies and
cookies that you want extra chewy.
PASTRY BAKE: lower element
Heat comes from the lower element only. This is a traditional baking function,
suitable for recipes that were developed in older ovens. For best results, bake on
only one shelf at a time. It is perfect for foods that require delicate baking and have
a pastry base, like custard tarts, pies, quiches and cheesecake or anything that does
not require direct heat and browning on the top.
ROASTING
ROAST
This is a two-step program. The oven does not require preheating. An initial 20minute searing stage crisps and browns the roast and caramelises the juices on the
outside of the meat , then the temperature drops to the level you have preset for
the remainder of the cooking period, producing a tender and juicy roast that is full
of flavour. This function is also great for cooking vegetables. Little browning takes
place after the initial searing.
Using your oven - before you start

9
GRILLING
GRILL: upper inner element
GRILL delivers intense heat from the inner region of the top element. Great when
you need to quickly grill one to two portions of your usual favourites, like crispy
chicken breasts or a steak.
MAXI GRILL: upper inner and outer elements
MAXI GRILL delivers intense heat from the entire top element. It is the most suitable
function for ‘finishing off’ many meals, for example browning the top of potato
gratin and frittata. Use MAXI GRILL to toast bread or to grill your favourite chicken,
fish and steak.
AERO GRILL: fan plus upper inner and outer elements
AERO GRILL produces food with a finish that is similar to a rotisserie. Meat, poultry
and vegetables cook beautifully; food is crisp and brown on the outside while
the inside remains moist and tender. Try using this function for whole chicken or
tenderloin of beef.
WARM
WARM is a constant low heat of 75°C. Use it to keep cooked food hot, or to
warm plates and serving dishes. To reheat food from cold, use TRUE AERO and
change to WARM only when the food is piping hot, as this function will not bring
cold food up to a temperature high enough to kill any harmful bacteria.
SELF CLEAN
This oven features a pyrolytic self-cleaning cycle that takes care of the mess and
grime that is traditionally associated with oven cleaning. During self-cleaning, the
oven reaches very high temperatures. This burns off and breaks down soil and
grease deposits. A smoke eliminator and active venting system eradicates odour.
For instructions on how to use SELF CLEAN, see the ‘Care and cleaning’ section.
Cooling fan
A cooling fan will come on automatically and blow air out below the oven door during the use
of most oven functions. It may continue to run after the oven is turned off to keep the door and
control panel cool.
Using your oven - before you start

10
Positioning the shelves
Placing the telescopic sliding shelves on the side racks provides eight cooking
positions to choose from. See the ‘Cooking guidelines’ for suggested shelf positions.
To position the shelves
Always position oven shelves BEFORE heating the oven.
To remove a sliding shelf, grip it by its two front corners (making sure you are gripping the
wire shelf and the sliding frame together), tilt upwards and pull it out of the oven.
To place a sliding shelf in the oven correctly, position it so that the front bar is toward you, as
shown.
Check that the sliding frame is not extended.
Check the guard rail (as shown) to make sure the shelf is the right way up.
Position the shelf so that it is level and the rear shelf tags on both sides of the sliding frame
rest on the side racks (as shown).
Then push the sliding shelf all the way to the back of the oven, until the front shelf tags drop
into place.
Note: generally, the shelf positions in the top of the oven are suitable for grilling. Those in the
middle or lower region of the oven are suitable for baking, roasting and casseroles.
For your safety, the wire shelves and telescopic sliding frames are built together as one unit
and are not separable. This means that when placed properly on the side racks, the slides will
prevent the wire shelves from tilting when pulled towards you.
To prevent the tags from lifting off the side racks, take care to slide the shelves forward
horizontally.
Using your oven
Side rack
Side rack
Mounting
slots
Retaining wire
Lock
stud
Wire shelf
Front bar
Sliding frame
(push fully into place)
Shelf tag
8
1
2
3
4
5
6
7
Guard rail
11
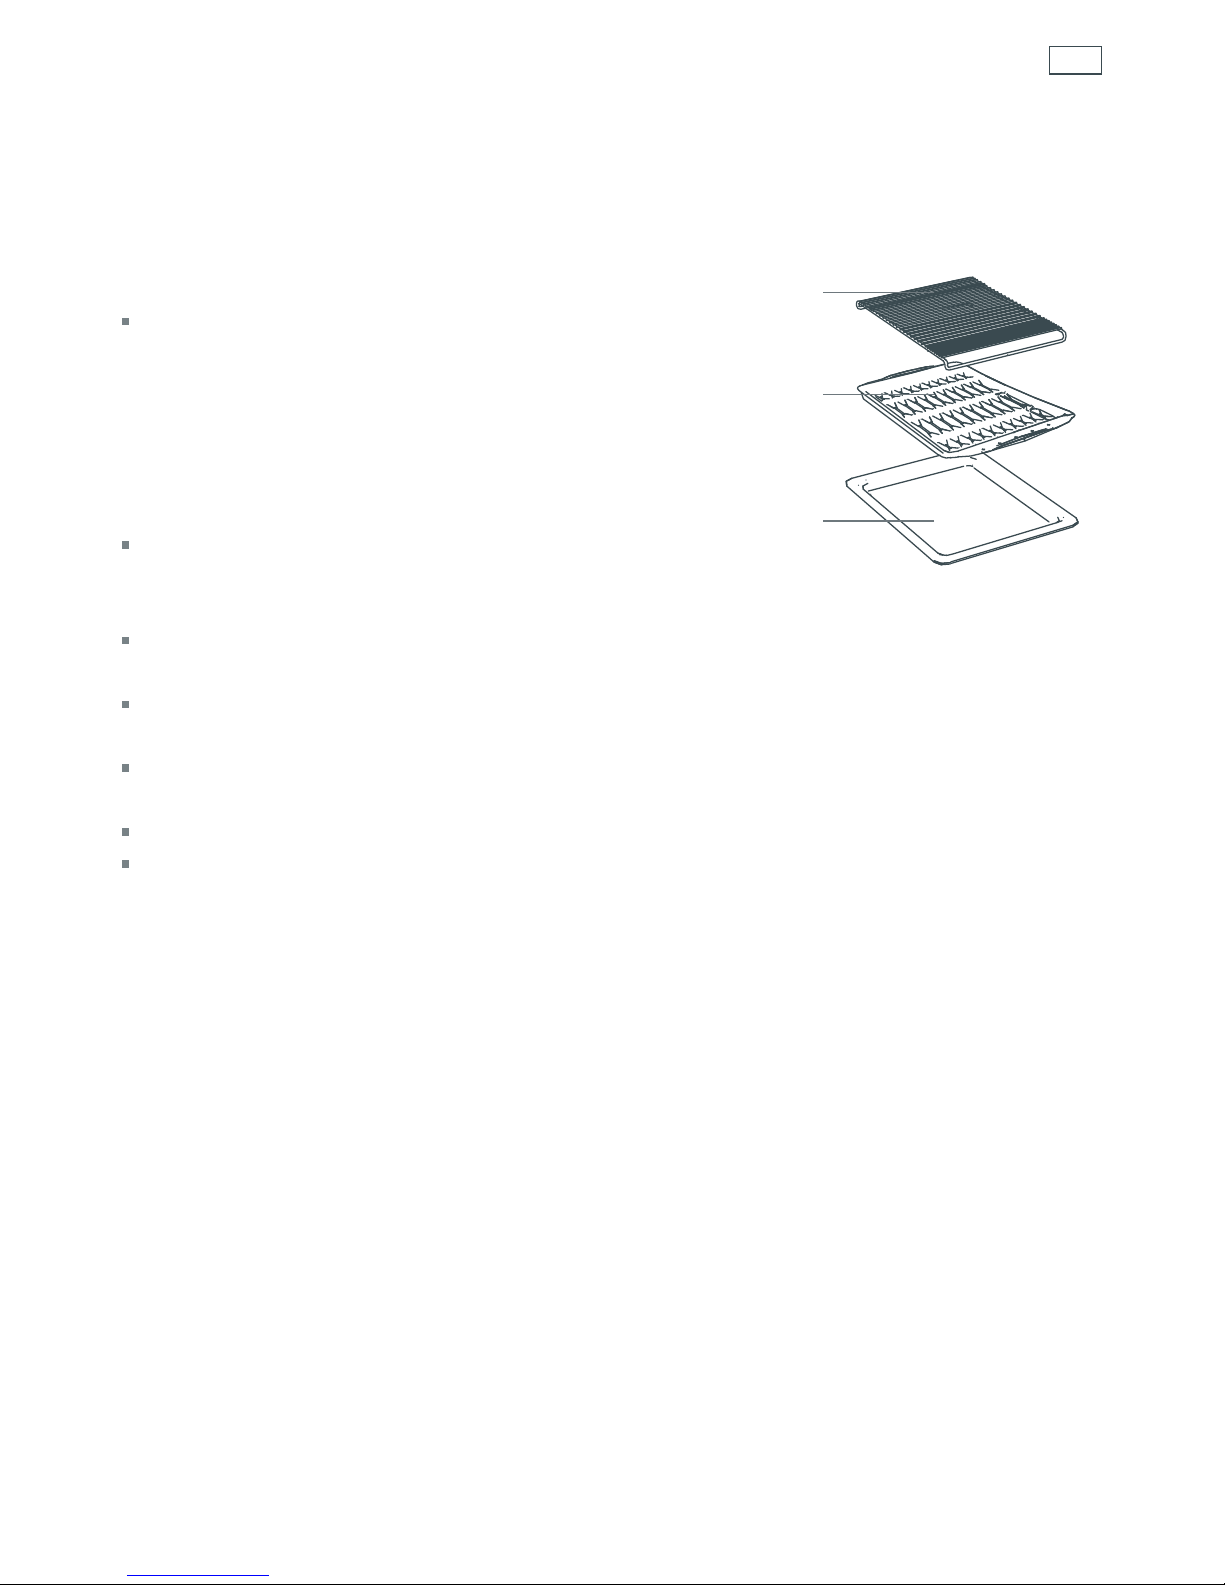
Using your oven
Choosing the right bakeware
The size, shape and material of the bakeware will affect the
baking time.
The three-piece grill/roast system provided with your
oven (consisting of the pan, grid and rack) has been
designed to reduce splatter and smoke, and is therefore
ideal for grilling and roasting. We suggest you place meat
on the grill/roast rack (on top of the pan and grid) to
allow hot air to circulate around it. This gives more even
browning and a result similar to a rotisserie.
On occasions, you may want to use only two pieces of the
system. For example, when roasting a large turkey, use
only the pan and grid for greater stability.
Metal bakeware results in the fastest baking time. Dark baking pans or those with a dull finish
absorb heat or brown food, especially on the base, faster than shiny pans.
A shiny finish may work best for some cakes and cookies, as it reflects some heat and gives a less
intensive baking surface.
If using dark baking pans, it may be necessary to reduce the oven temperature by 10°C. It may
also be necessary to extend the baking time by a couple of minutes.
Insulated cookie sheets or baking pans may increase the length of baking time.
Use glass or ceramic bakeware for foods that do not require a dark brown crust (eg soufflé or
lasagna).
Rack
Grid
Pan

12
Using your oven
Selecting function and temperature
To select a function, turn the function knob.
To select a temperature, turn the temperature knob
clockwise.
For double ovens, knobs on the left are for the upper
oven and knobs on the right are for the lower oven.
See the ‘Cooking guidelines’ section for suggested
functions and temperatures.
Preheating your oven
Preheat your oven when using the following functions for baking: TRUE AERO, AERO BAKE, BAKE,
AERO PASTRY and PASTRY BAKE. These functions are equipped with a fast preheat: the oven will
heat to 175°C in approximately 10 minutes and to 225°C in approximately 15 minutes.
When your oven is preheating, the selected temperature is displayed alternately with the actual
oven temperature. When the oven reaches the selected temperature, a beep will sound and the
illuminated ring around the temperature knob will change from red to white.
If you want to increase the oven temperature during cooking, follow these steps to reactivate the
fast preheat:
1
Turn the function and temperature knobs to OFF.
2
Wait for the display lights to go out.
3
Then select the new settings.
 Loading...