

Fisher & Paykel OB60SL User Manual
OB60SL ROTISSERIE KIT
This sheet is an accompaniment to your “Quick start guide” and “User guide” which is included with your oven.
See our website www.fisherpaykel.com for recipes that have been specially developed and tested for use in this oven.
Using the rotisserie kit
Important!
Do not use the meat probe when using the rotisserie kit (the cable could become entangled and damaged).
The rotisserie can be used with ANY function, but we recommend Fan Grill for best results.
1
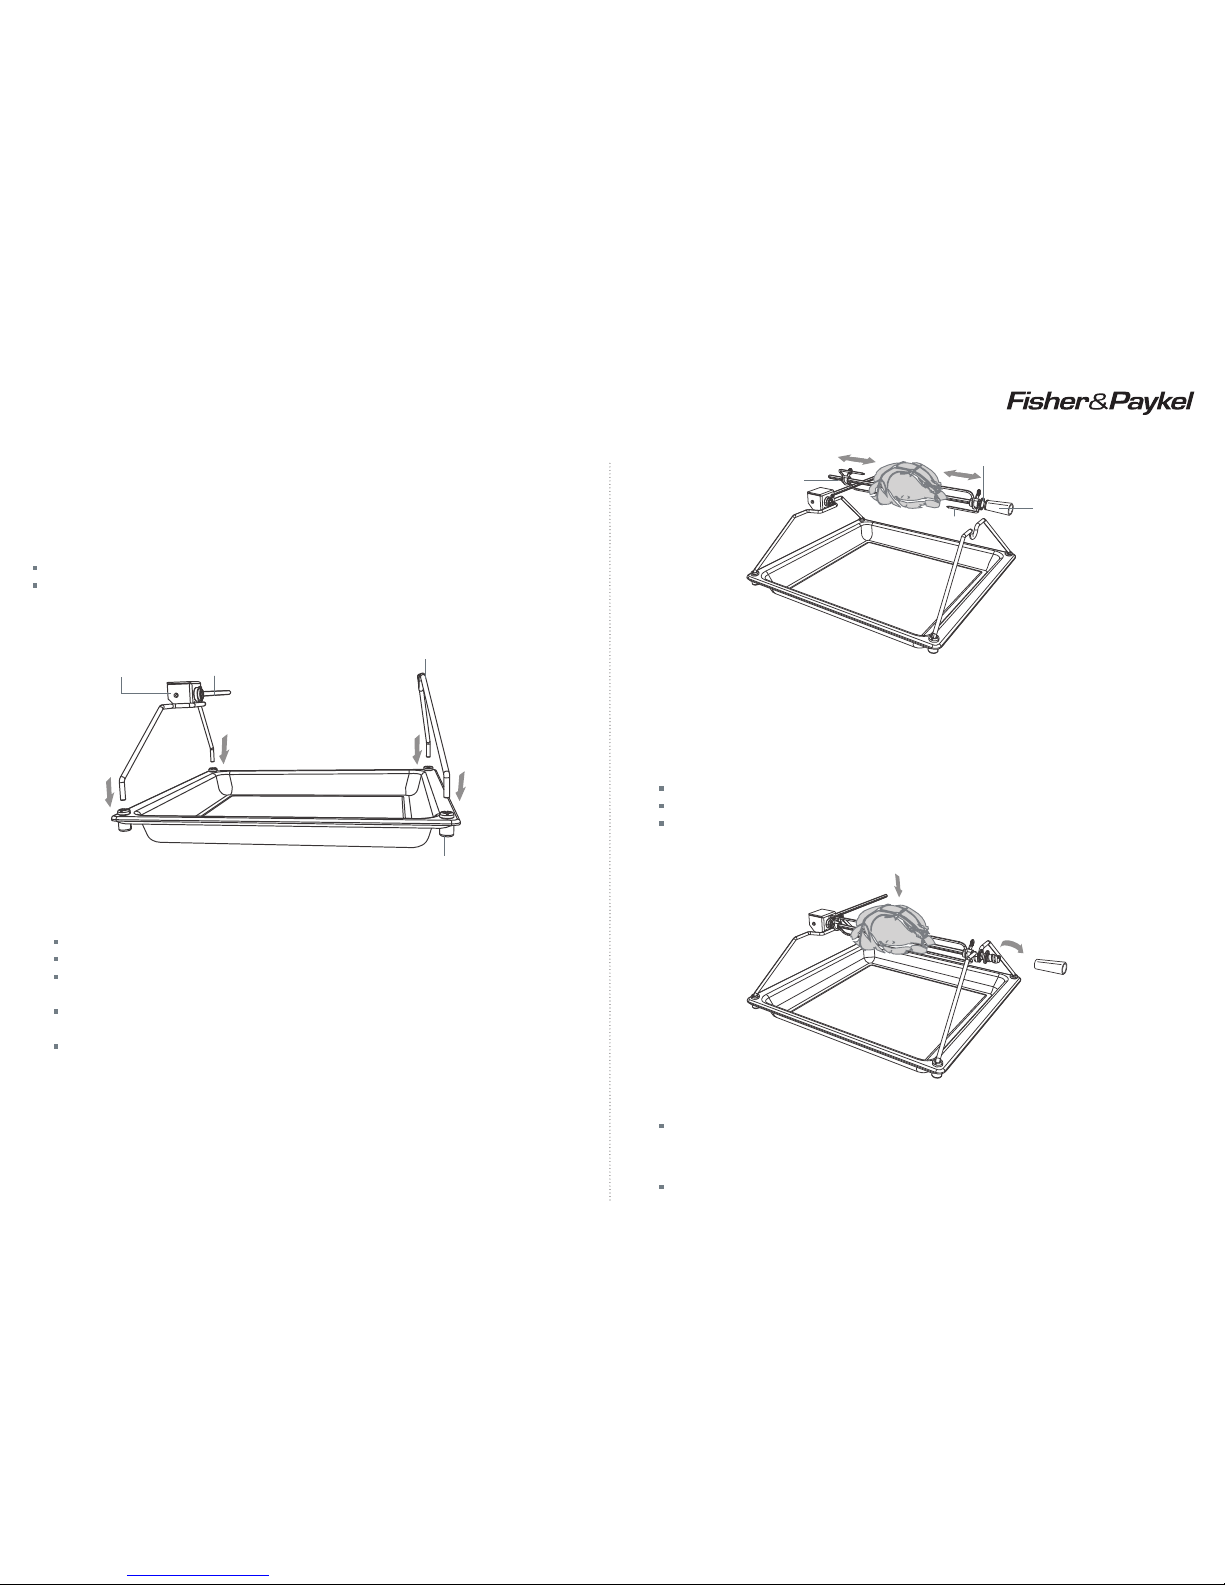
Prepare the rotisserie supports.
Place the grill tray on the benchtop.
Insert the supports into the lock studs.
Fit the support with the rotisserie shaft on the left hand side of the grill tray with the shaft
on the outside (as shown).
Fit the right support so the support angles inward toward the middle of
the grill tray.
Push the supports all the way down to lock them in firmly.
Lock stud
Shaft
Support
Spit
Housing
3
Position the skewer on the supports.
Place the skewer on the supports, ensuring the skewer slots into the spit housing, and
check that the meat does not touch the grill tray.
Important!
Twist the handle off. It must not be left in the oven.
2
Secure the meat.
Important!
Take care, the forks are sharp!
Slide one fork on to the skewer (prongs facing inward) and tighten the fastening screw to secure
in place. Carefully slide the meat onto the skewer until it rests firmly against the fork.
Fit the second fork, ensuring the meat is held firmly in place. Tighten the fastening screw to
secure.
When securing the meat, ensure that:
the skewer goes through the centre of the meat
the forks hold the meat firmly in place
there are no loose or projecting parts. Poultry should be trussed.
Note: the rotisserie can rotate up to 6 kg of meat.
Fork
Handle
Fastening
screw
Skewer

590610A 06.13
www.sherpaykel.com
6a
The Rotisserie grill tray needs to be placed on a telescopic sliding shelf set on position 1.
Refer to your “Quick start guide” for instructions on repositioning a telescopic sliding shelf if
necessary.
6b
Place the grill tray on the telescopic sliding shelf (shelf position 1).
6c
Slide the telescopic sliding shelf all the way to the back.
6d
The shaft should be lined up and inserted fully into the rotisserie drive hole on the back wall of
the oven. You may need to rotate the skewer slightly in order to engage the shaft.
6e
Close the oven door. The skewer will then start to rotate.
Check that the meat does not touch the grill tray or the grill element at the top of the oven.
Shaft
Rotisserie
Drive hole
Telescopic sliding
shelf set on shelf
position 1
4
Select a function. For best results we
recommend using Fan Grill.
5a
Press the right scroll
button until the
rotisserie indicator
comes on.
5b
Press the select
button to confirm.
The rotisserie icon will glow steadily.
NOITCNUF
NOITCNUF
7
Set the temperature.
We recommend around 190 °C.
ERUTAREPMET
NOITCNUF
Cancelling the rotisserie
You may turn off the rotisserie function without turning off the oven.
1
Press the right scroll
button and scroll through the indicators until the rotisserie indicator
comes on again.
2
Press and hold the cancel
button and the rotisserie indicator
will go out.
The skewer will stop rotating but the oven will remain on.
When you have finished using the rotisserie
1
Turn the oven off.
2
Using oven mitts, carefully slide the shelf out. This will disengage the shaft from the rotisserie
drive hole.
3
Place the grill tray on a heat-resistant surface.
4
Twist the handle onto the right hand end of the skewer.
5
Lift the skewer off the supports by the handle.
6
Loosen the fork screws and slide the meat off the skewer.
Tips for using the rotisserie
The rotisserie will stop rotating when the door is open.
For food safety reasons, we do not recommend using the rotisserie with stuffed meat.
If your meat is too big or heavy (over 6 kg) for the skewer, place it on top of the grill rack in the
grill tray, and use Roast . This function will give a result similar to a rotisserie.
Use a meat thermometer to ensure that meat is cooked through to a safe temperature.
See ‘Care and cleaning’ in the “User guide” for advice on cleaning the rotisserie parts.
 Loading...