

Fisher & Paykel OB60SC5LC User Manual

Built-in Oven
OB60SC5LC
models
NZ AU
USER GUIDE


1
CONTENTS
Safety and warnings 2
Introduction 12
The Control Panel 14
First Use 15
Using the Timer 16
Cooking guide 18
Oven functions 20
Cooking charts 22
Cooking with Auto-off 28
Care and cleaning 30
Trouble shooting 43
Warranty and service 44
IMPORTANT!
SAVE THESE INSTRUCTIONS
The models shown in this user guide may not be available in all markets and are subject
to change at any time. For current details about model and specification availability in
your country, please go to our website www.fisherpaykel.com or contact your local
Fisher & Paykel dealer.
2
Your oven has been carefully designed to operate safely during normal cooking
procedures. Please keep the following safety instructions in mind when you are using it:
SAFETY AND WARNINGS
WARNING!
Electrical Shock Hazard
Turn the oven off at the wall
before replacing the oven lamp.
Failure to follow this advice
may result in electrical shock or
death.
!

3
SAFETY AND WARNINGS
WARNING!
Fire Hazard
Do not place aluminium foil,
dishes, trays, water or ice on
the oven floor during cooking,
as doing so will irreversibly
damage the enamel; lining the
oven with aluminium foil may
even cause fire.
Never use your appliance for
warming or heating the room.
Persons could be burned or
injured or a fire could start.
Storage in or on appliance:
flammable materials should not
be stored in an oven or near its
surface.
Failure to follow this advice may
result in overheating, burning,
and injury.
!
4
SAFETY AND WARNINGS
WARNING!
Hot Surface Hazard
Accessible parts may become
hot when in use.
To avoid burns and scalds, keep
children away.
Use oven mitts or other
protection when handling hot
surfaces such as oven shelves or
dishes.
Use care when opening the oven
door.
Let hot air or steam escape
before removing or replacing
food.
Do not touch heating elements
or interior surfaces of the oven.
Heating elements may be hot
even though they are dark in
colour. Interior surfaces
of an oven become hot enough
to cause burns. During and after
use, do not touch, or let clothing
or other flammable materials
contact heating elements or
interior surfaces of the oven
until they have had sufficient
time to cool.
Other surfaces of the appliance
may become hot enough to
cause burns - among these
surfaces are the oven vent,
the surface near the oven vent,
and the oven door.
Failure to follow this advice
could result in burns and scalds.
!
5
SAFETY AND WARNINGS
WARNING!
Cut Hazard
Take care - some edges are
sharp.
Failure to use caution could
result in injury or cuts.
!

6
SAFETY AND WARNINGS
IMPORTANT SAFETY INSTRUCTIONS
To reduce the risk of fire, electrical
shock, injury to persons or damage
when using the oven, follow the
important safety instructions listed
below:
• Read all the instructions before using
the oven. Use the oven only for its
intended purpose as described in
these instructions.
• Proper installation: be sure your
appliance is properly installed and
earthed by a qualified technician.
• Isolating switch: make sure this
oven is connected to a circuit which
incorporates an isolating switch
providing full disconnection from the
power supply.
• Household appliances are not
intended to be played with by
children.

7
SAFETY AND WARNINGS
• Do not leave children alone.
Children should not be left alone or
unattended in the area where the
appliance is in use. They should never
be allowed to sit or stand on any part
of the appliance.
• Children of less than 8 years old must
be kept away from the appliance
unless continuously supervised. This
appliance can be used by children
aged from 8 years and above, and
persons with reduced physical,
sensory or mental capabilities or
lack of experience and knowledge,
if they have been given supervision
or instruction concerning the use of
the appliance in a safe way and they
understand the hazards involved.
Cleaning and user maintenance shall
not be done by children without
supervision.
• Do not place heavy objects on the
oven door.
• Wear proper apparel. Do not wear
loose fitting or hanging garments
when using the appliance. They
could ignite or melt if they touch an
element or hot surface and you could
be burned.

8
SAFETY AND WARNINGS
• User servicing: do not repair or
replace any part of the appliance
unless specifically recommended in
the manual. All other servicing should
be referred to a qualified technician.
• Do not use water on grease fires.
Smother the fire or flame or use a dry
chemical or foam type extinguisher.
• Use only dry oven mitts or potholders.
Moist or damp potholders on hot
surfaces could result in burns from
steam. Do not let potholders touch
hot areas or heating elements. Do
not use a towel or a bulky cloth for a
potholder. It could catch fire.
• Do not heat unopened food
containers. They can build up pressure
that may cause the container to burst
and result in injury.
• Safe food handling: leave food in the
oven for as short a time as possible
before and after cooking. This is to
avoid contamination by organisms
which may cause food poisoning. Take
particular care during warm weather.
• In the event of a power failure
always turn the oven function and
temperature dials to off (0).

9
SAFETY AND WARNINGS
• Always keep oven vents unobstructed.
• Do not operate your appliance
by means of an external timer or
separate remote-control system.
• Caution: Hot air can blow from the
vent at the top of the oven as part of
the oven’s cooling system.
• Placement of oven shelves: always
position shelves in the desired
location while the oven is cool
(before preheating). If a shelf must
be removed while the oven is hot, do
not let the oven mitts or potholder
contact hot heating elements in the
oven or the base of the oven.
• Do not clean the oven seal or use
any oven-cleaning products on it. It
is essential for a good seal, which
ensures that the oven operates
efficiently. Care should be taken not
to rub, damage or move it.

10
SAFETY AND WARNINGS
• Do not use oven cleaners, harsh/
abrasive cleaning agents, waxes, or
polishes. No commercial oven cleaner,
oven liner, or protective coating of
any kind should be used in or around
any part of the oven. Do not use
harsh/abrasive cleaners, scourers or
sharp metal scrapers to clean the
oven door glass since they scratch the
surface, which may result in the glass
shattering.
• Clean only the parts listed in this
manual.
• Do not use a steam cleaner to clean
any part of the oven.
• Do not store things children might
want above the oven. Children could
be burned or injured while climbing
on the oven to retrieve items.

11
SAFETY AND WARNINGS
• Do not install or operate the
appliance if it is damaged or not
working properly. If you receive
a damaged product, contact your
dealer or installer immediately.
• Use only bakeware approved for
oven use. Follow the bakeware
manufacturer’s instructions.
12
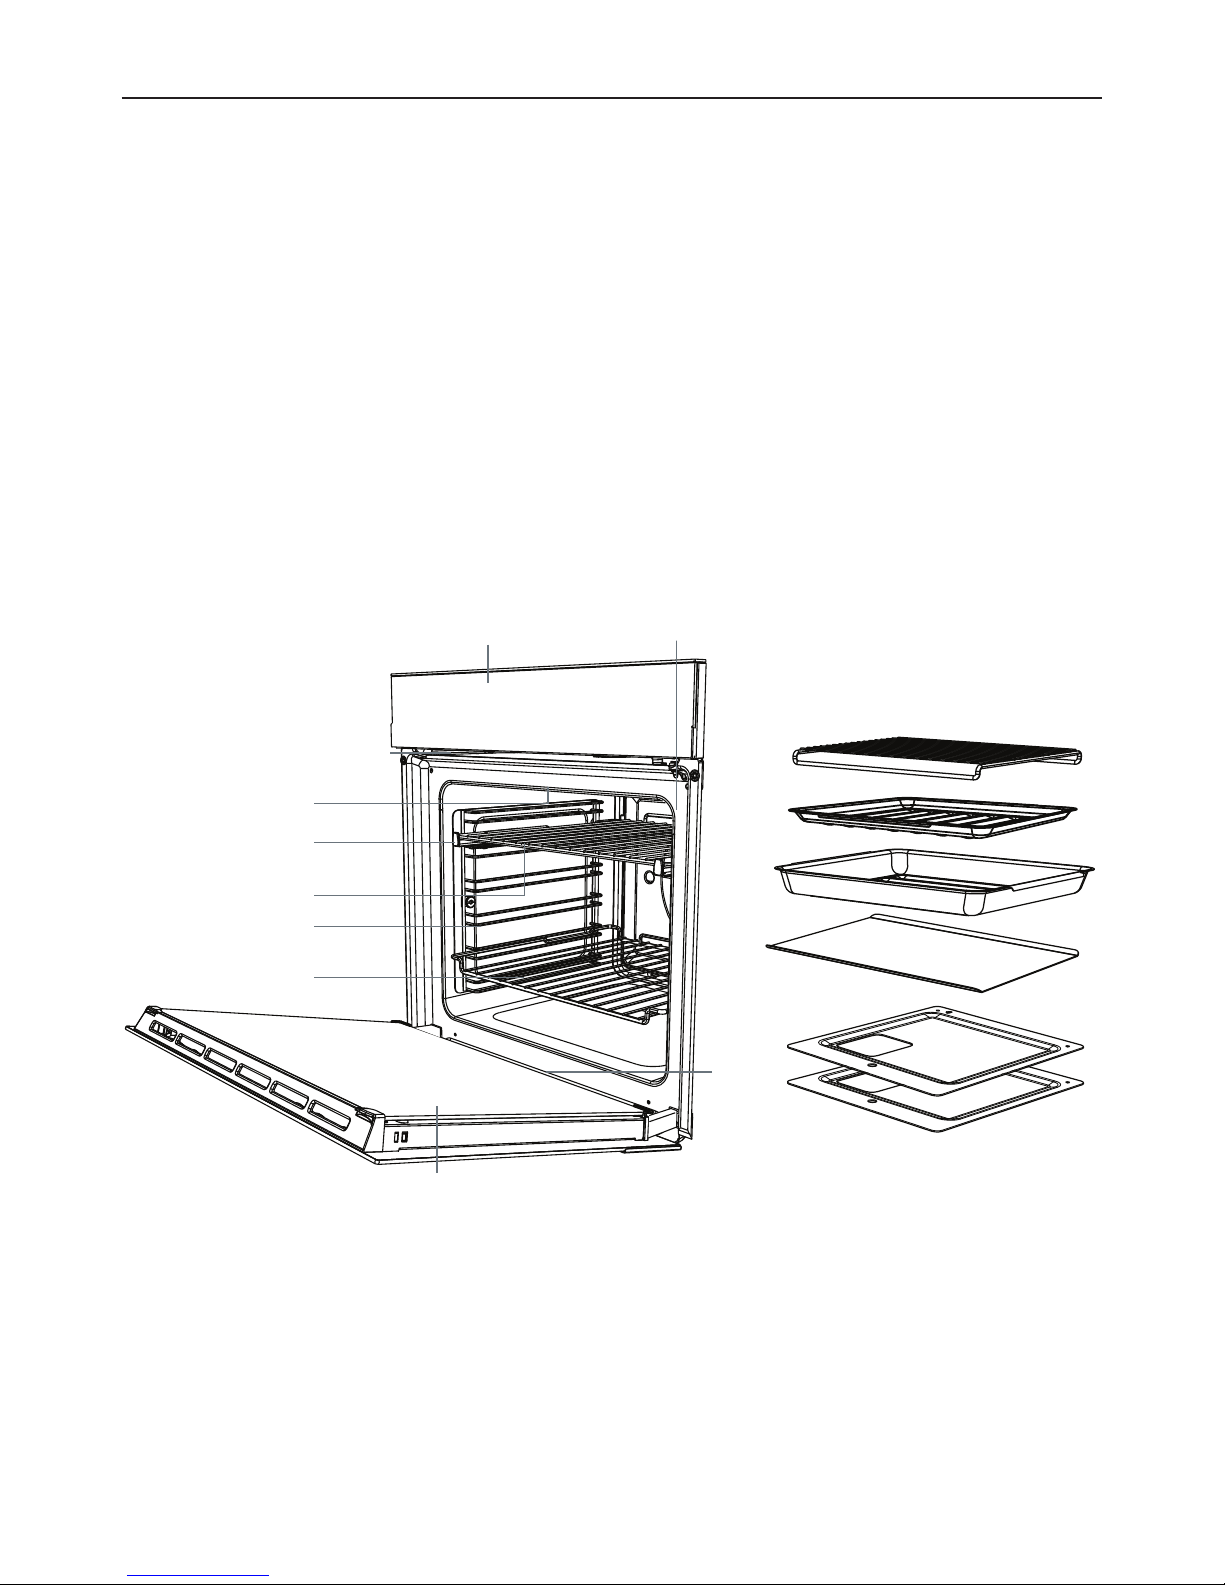
1 Control panel
2 Oven vent louvres
3 Oven light
4 Sliding shelf support
5 Wire shelf
6 Side rack
7 Step down oven wire
shelf
8 Oven door and handle
9 Oven seal
!0 Drip channel
Accessories:
!1 Grill rack
!2 Grid
!3 Roast Dish
!4 Flat baking tray
(purchased separately)
!5 Catalytic panels
(purchased separately)
!1
!3
!2
!4
!0
!5
2
4
3
5
6
7
8
1
9
INTRODUCTION
Congratulations on your new purchase. Your Fisher & Paykel oven has a number of
features to make cooking a great experience for you:
a wide choice of oven functions
intuitive controls and displays
Before you start
Make sure the installer has completed the ‘Final checklist’ in the Installation instructions.
Read this guide, taking special note of the ‘Safety and warnings’ section.
Remove all packaging and dispose of it responsibly. Recycle items that you can.
Fit the side racks and catalytic panels (see ‘Fitting the side racks and catalytic panels’).
We recommend you then condition the oven.
Note: Not all accessories are provided with all models. To purchase other accessories,
contact your nearest Fisher & Paykel Authorised Service Centre, Customer Care or visit
our local website listed on the back cover.
13
INTRODUCTION
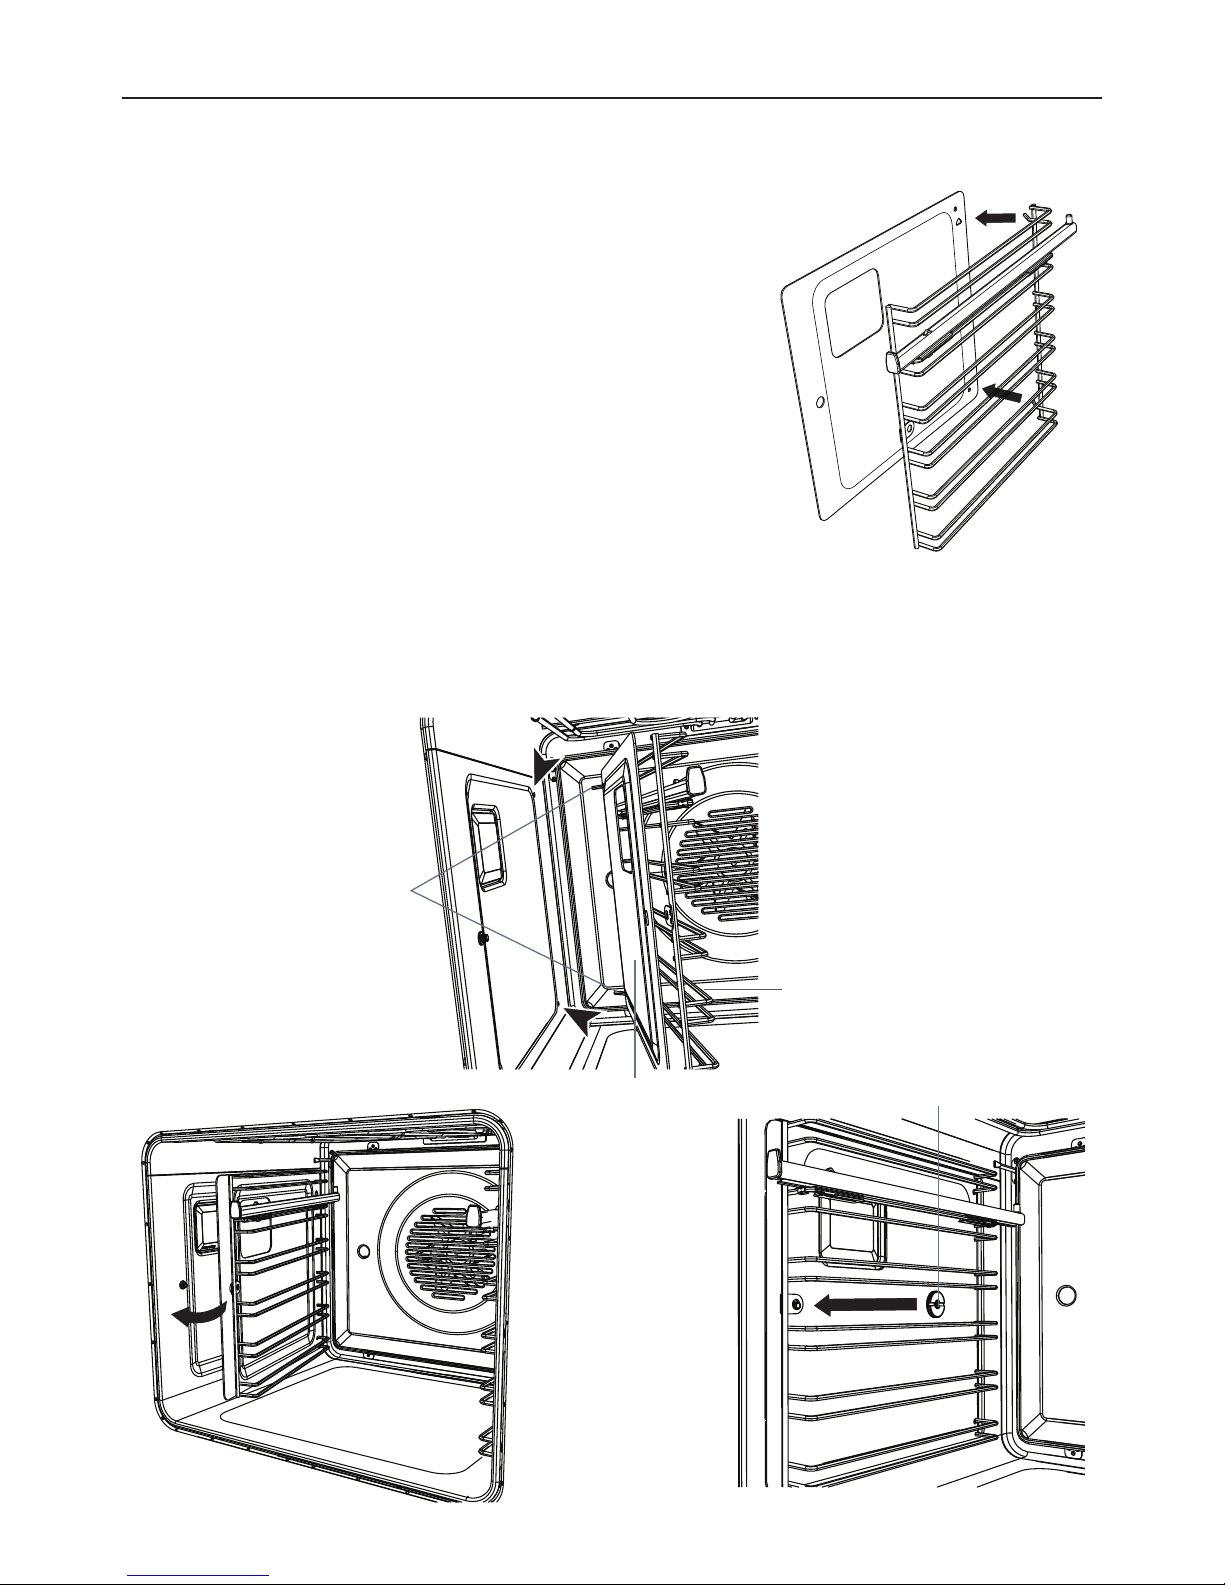
Fitting the side racks and catalytic panels (purchased separately)
You will find your side racks in the accessory box
supplied with your oven. Catalytic panels may be
purchased separately.
Fit the catalytic panel to the side rack
1 Ensure the panels are placed the correct way around:
in models with side lights: the cutout fits over the
light and the hole for the fixing screw goes to the
front of the oven.
in models with a ceiling light: the hole for the fixing
screw goes to the front of the oven.
(Note: panels should sit flush against the oven wall).
2 Fit the rear prongs of the side rack through the
holes in the catalytic panel.
Fit the side racks
1 Slide the rear prongs of the side rack into the holes at the rear of the oven
2 Fit the side rack front tab (and catalytic panel if fitted) over the fixing screw.
3 Replace the fixing nut. You may use a coin to tighten the nut.
Fixing nut
Side rack
Rear prongs
Catalytic panel
(if fitted)
 Loading...