

Page 1
HC230
SERIES
Operating Manual
Manuel de l’utilisation
Manual del Usiario
Page 2

SECTION
English
.................... A
Francais
................... B
Español
................... C
Page 3
TABLE OF CONTENTS
1. Symbol Definitions ................................................................................2
2. Warnings .......................................................................................2
3. Oxygen Use Warnings .............................................................................2
4. Intended Use.....................................................................................2
5. Description of the device ...........................................................................3
5.1 Important Parts of Your Device - Standard CPAP Range .................................................3
5.2 Important Parts of Your Device -Integrated CPAP Range ...............................................3
5.3 Accessories ..................................................................................3
6. Cleaning & Maintenance ...........................................................................4
7. Setup Instructions ................................................................................4
8. Controls and Display - Integrated CPAP Range ..........................................................5
8.1 Display Descriptions and Functions ................................................................5
8.2 Patient Menu Summary - Integrated CPAP Range......................................................6
8.3 Patient Menu - Additional Settings Summary- Integrated CPAP Range......................................6
9. Controls and Display - Standard CPAP Range............................................................7
9.1 Display Descriptions and Functions ................................................................7
9.2 Patient Menu Summary - Standard CPAP Range.......................................................8
9.3 Patient Menu - Additional Settings Summary- Standard CPAP Range.......................................8
10. Frequently Asked Questions ........................................................................9
11. Product Specifications .............................................................................9
12. Operating Conditions............................................................................10
13. Storage and Transport Conditions ..................................................................10
14. Troubleshooting ................................................................................10
15. Appendix ...................................................................................10
PLEASE READ ALL INSTRUCTIONS BEFORE INITIAL USE
Caution: USA Federal Law restricts this device for sale by or on the order of a physician.
A- 1
HC230 SERIES
HUMIDIFIED CPAP SYSTEMS
The HC230 series are a range of CPAP systems
designed for use in the home for the treatment
of OSA.
For further assistance, please contact your local
F&P office – see reverse for addresses. Please
keep this manual for future reference.
English
Page 4

2. WARNINGS
PLEASE NOTE:- This manual refers to the HC230 Series CPAP unit
as "the device".
1. The device should only be used with masks, connectors and
delivery tubes recommended by Fisher & Paykel
Healthcare, or by your physician or respiratory therapist.
2. Never operate the device if:
a) it has a damaged power cord or plug, b) the tube has
been damaged with holes, tears or kinks, c) it has been
dropped or damaged, d) it has been dropped into water,
e) it is not working properly, f) it is connected to a PC
during CPAP treatment.
Return the device to an authorised service center for
examination and repair.
3. Do not use the device when the room temperature exceeds
35°C (95°F) as this may lead to an elevated airflow
temperature which may give rise to an irritation of the airways.
4. Ensure an air filter is fitted when operating your unit.
5. Remove the humidification chamber before filling.
6. Do not fill the chamber with boiling water.
7. When handling the device with chamber and water avoid
tilting the machine to prevent any chance of water entering
the unit enclosure.
8. Place your device on a level surface lower than your head
height to prevent water entering the respiratory tubing
should the device be knocked over.
9. Do not store or use your device where it can fall or be
pulled into water. If water has entered the unit enclosure,
disconnect the power cord and discontinue use. Seek
advice from your homecare provider.
10. Never block the air openings of the device or place it on a
soft surface such as a bed or couch, where the filter area
may be blocked. Keep the air openings free of lint, hair or
the like.
11. Ensure that the unit is dry before plugging into the power
socket.
12. A mask should not be used unless the device is switched
on, and operating properly. The vent hole(s) associated with
the mask should never be blocked.
13. Due to the operating temperature of the heater plate,
avoid making contact to the exposed heater plate or
chamber base.
14. At low CPAP pressures, the flow through the mask may be
insufficient to clear all exhaled gas from the tubing, and
consequently some re-breathing may occur.
15. Adjusting the pressure control can result in ineffective
therapy. The pressure control must only be adjusted by a
healthcare professional.
16. Never drop or insert any object into any opening or tube.
17. Always switch off the device and unplug the power cord
from the power socket before cleaning.
18. Empty all the water from the chamber before transporting
your device.
19. Refer all maintenance to qualified service personnel except
as outlined in this manual.
* Only applicable to integrated CPAP devices
1. SYMBOL DEFINITIONS
3. OXYGEN USE WARNINGS
If supplemental oxygen is used with the device, the oxygen flow must be turned off when the device is not operating. This
ensures that oxygen will not flow through the tube and accumulate in the device enclosure.
•
The device should be located in a position where ventilation around the device is not restricted.
•
It is recommended that supplemental oxygen be administered at the mask.
•
Oxygen should not be used while smoking or in the presence of an open flame.
•
The use of oxygen in therapy requires that special care be taken to reduce the risk of fire. Any materials which will burn in air
and some that will not are easily ignited and burn rapidly in high concentrations of oxygen. Accordingly, for safety it is
necessary that all sources of ignition be kept away from the product and preferably out of the room in which it is being used.
•
A spontaneous and violent ignition may occur if oil, grease or greasy substances come in contact with oxygen under pressure.
These substances must be kept away from oxygen regulators, cylinder valves, tubing and connections, and all other oxygen
equipment.
•
At a fixed flow rate of supplemental oxygen flow, the inhaled oxygen concentration will vary, depending on the pressure
settings, patient breathing pattern, mask selection and leak rate.
4. INTENDED USE
The device is used to assist with patient breathing while sleeping, for the purpose of treating Obstructive Sleep Apnea (OSA).
This is done by the delivery of Continuous Positive Airway Pressure (CPAP) in order to prevent airway obstruction. The addition
of heated respiratory humidification to the device relieves the drying and irritating effects on the patient airways which usually
arises from use of a CPAP system. The CPAP device is for use on adult patients at home or in the sleep lab. Please refer to the
HC230-Series Product range listed in the Appendix section of this manual.
Type BF
Applied Part
ATTENTION
Consult
accompanying
documents
Alternating
Current
Drip Proof
93/42/EEC
Class IIb
Class ll
Double Insulated
A- 2
Standby or
On/Off
*
*
*
*
*
Page 5
5. DESCRIPTION OF THE DEVICE
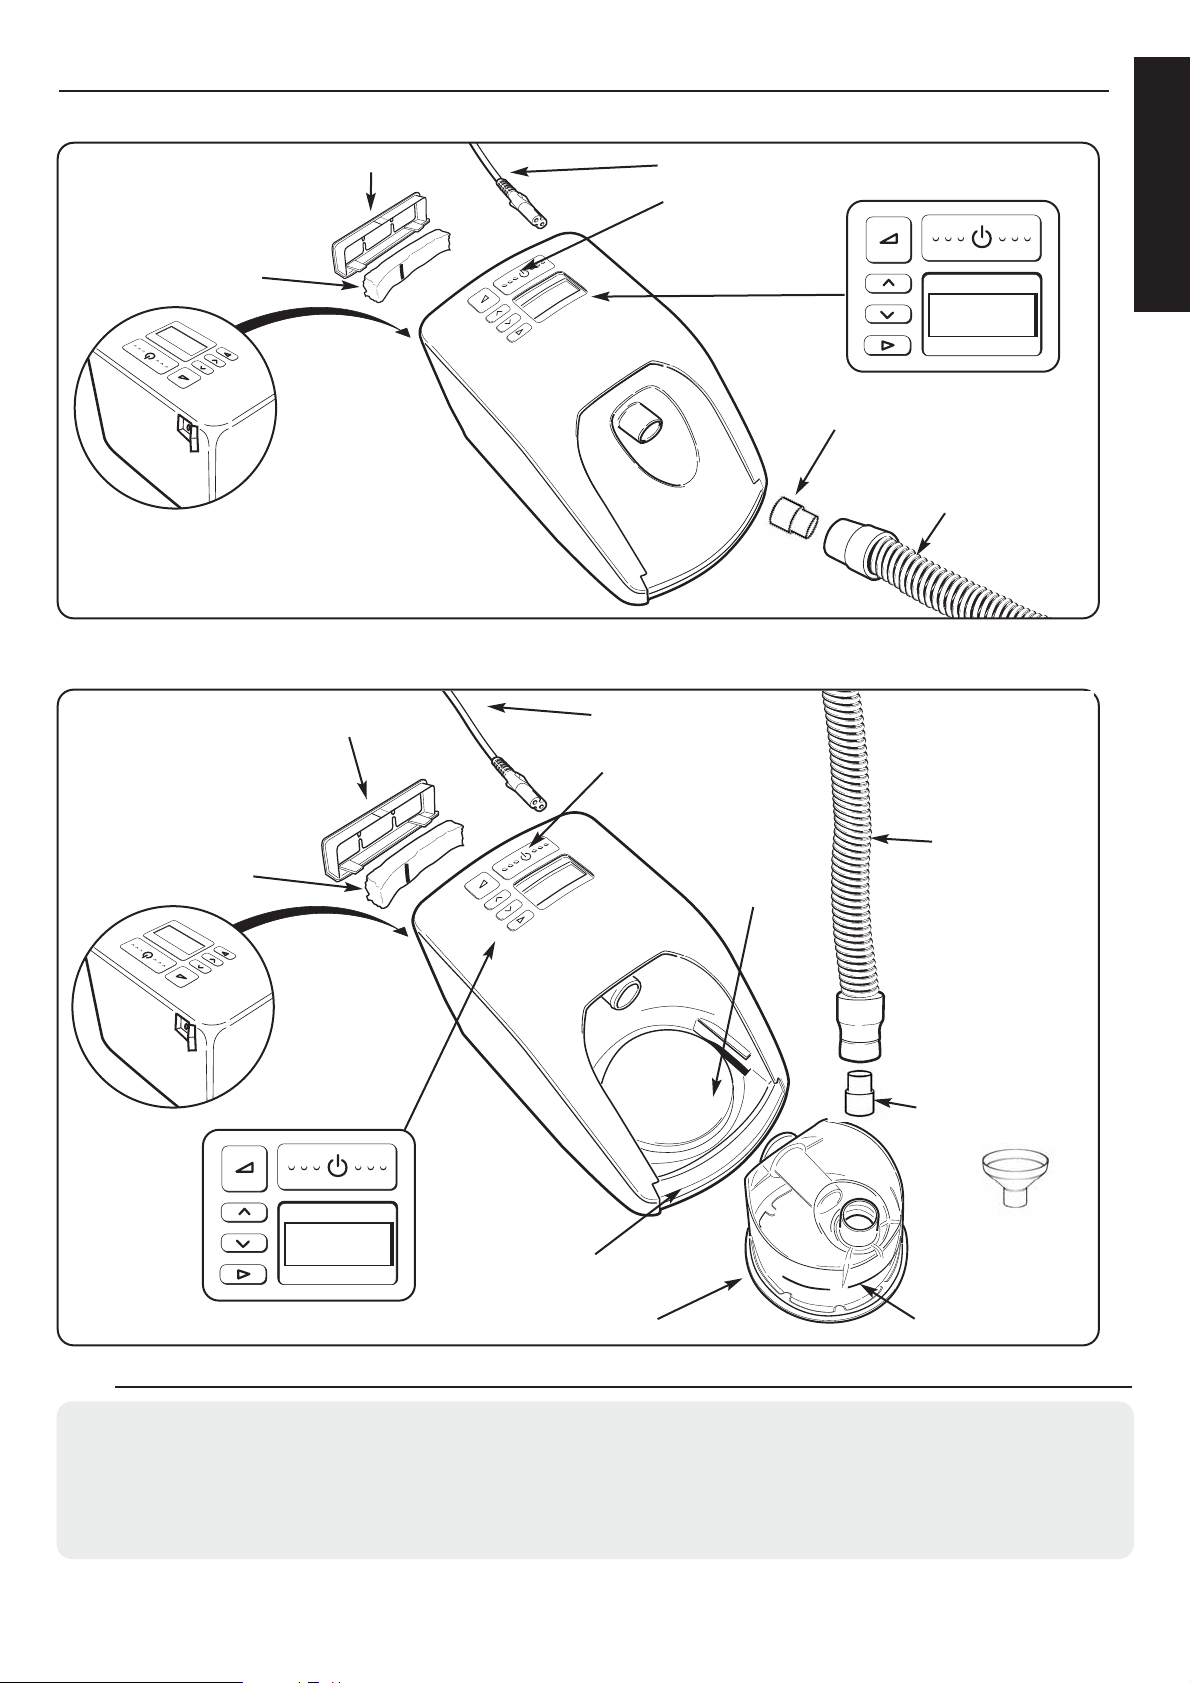
5.1 Important Parts of Your Device - Standard Range
5.2 Important Parts of Your Device - Integrated Range
A- 3
POWER CORD
900HC221 TUBE
900HC010 CONNECTOR
WATER CHAMBER
CHAMBER GUARD
HEATERPLATE
WATER LEVEL LINE
FILTER HOLDER
DISPLAY
AIR FILTER
ON/OFF BUTTON
5.3 Accessories
HC385S Standard Humidification Chamber
HC355* Extended Life Humidification Chamber
900HC010 Connector
900HC221 Tube
900HC240 Filter
900HC230 Compliance Maximizer Software
900HC232 Compliance Download Serial Cable
HC225 Remote Control (Laboratory)
900HC226 Lead Extension Kit for HC225
*Not available in all countries
POWER CORD
ON/OFF BUTTON
DISPLAY
FILTER HOLDER
AIR FILTER
900HC221 TUBE
900HC010 CONNECTOR
FUNNEL
SERIAL PORT
SERIAL PORT
DISPLAY
English
Page 6

A- 4
6. CLEANING & MAINTENANCE
1. Switch off the device and unplug from the power socket.
2. Wipe the exterior of the device with a clean, damp (not wet) cloth and mild dishwashing detergent.
Do not use harsh abrasives or solvents, as these may damage the device.
3. DAILY
Clean chamber and tube.
•
Remove the breathing tube from the chamber.
•
Rinse the tube with soapy water. Hang – up hose with hose ends pointing to floor to dry.
•
Remove the chamber by pushing down the finger guard and pulling out the chamber.
•
Pour out & discard the remaining water.
•
Clean the chamber with soapy water, rinse and dry.
4. WEEKLY
Thoroughly clean the chamber
•
Soak the inside of the chamber for 10 minutes in a solution of one part white vinegar
to two parts water.
5. Replace the air filter when it becomes significantly discoloured, at least once
every 3 months or after 1000 hours machine running time.
•
Remove the filter holder from the back of the device and take out the filter.
•
Replace the old filter with a new filter: Ensure the vertical black line is
facing towards the device.
7. SETUP INSTRUCTIONS
HOW TO SET UP YOUR SYSTEM
1. Remove your device from its packaging.
2. Place the device on a low shelf or on the floor beside your bed,
so that the device is positioned below head height.
3. Chamber Setup (only applicable to integrated CPAP devices)
a. Remove one water chamber from the packaging.
b. Remove the blue caps and discard them (Fig.1).
c. Fill the chamber up to the water filling line with distilled water
only (Fig.2).
Never fill the chamber while it is attached to the device.
When moving your device, ensure that the water chamber is
empty. Machine failure due to water damage is not covered by
warranty.
d.To attach the water chamber to the device, press down the
finger guard and slide the chamber on (Fig.3) (Fig. 4).
e.When the chamber is fitted correctly, the finger guard will
click into place.
4. One end of the tube has a white plastic connector.
Push this onto the outlet on top of the chamber (Fig.5) or CPAP outlet
(Fig.5a) .
5. Connect the other end of the tube to the mask.
6. Plug the device power cord into your household power socket and
into the rear of the device.
7. Switch on the device by pressing the on/off button (See Fig.6 ).
The current humidity setting is displayed.
8. For changing the setting refer to section 8 “Controls and Display”.
Your device is now ready for use.
Fig.1
Fig.2
Fig.3
Fig.4
Fig.5 Fig.5a
Fig.6
Page 7

A- 5
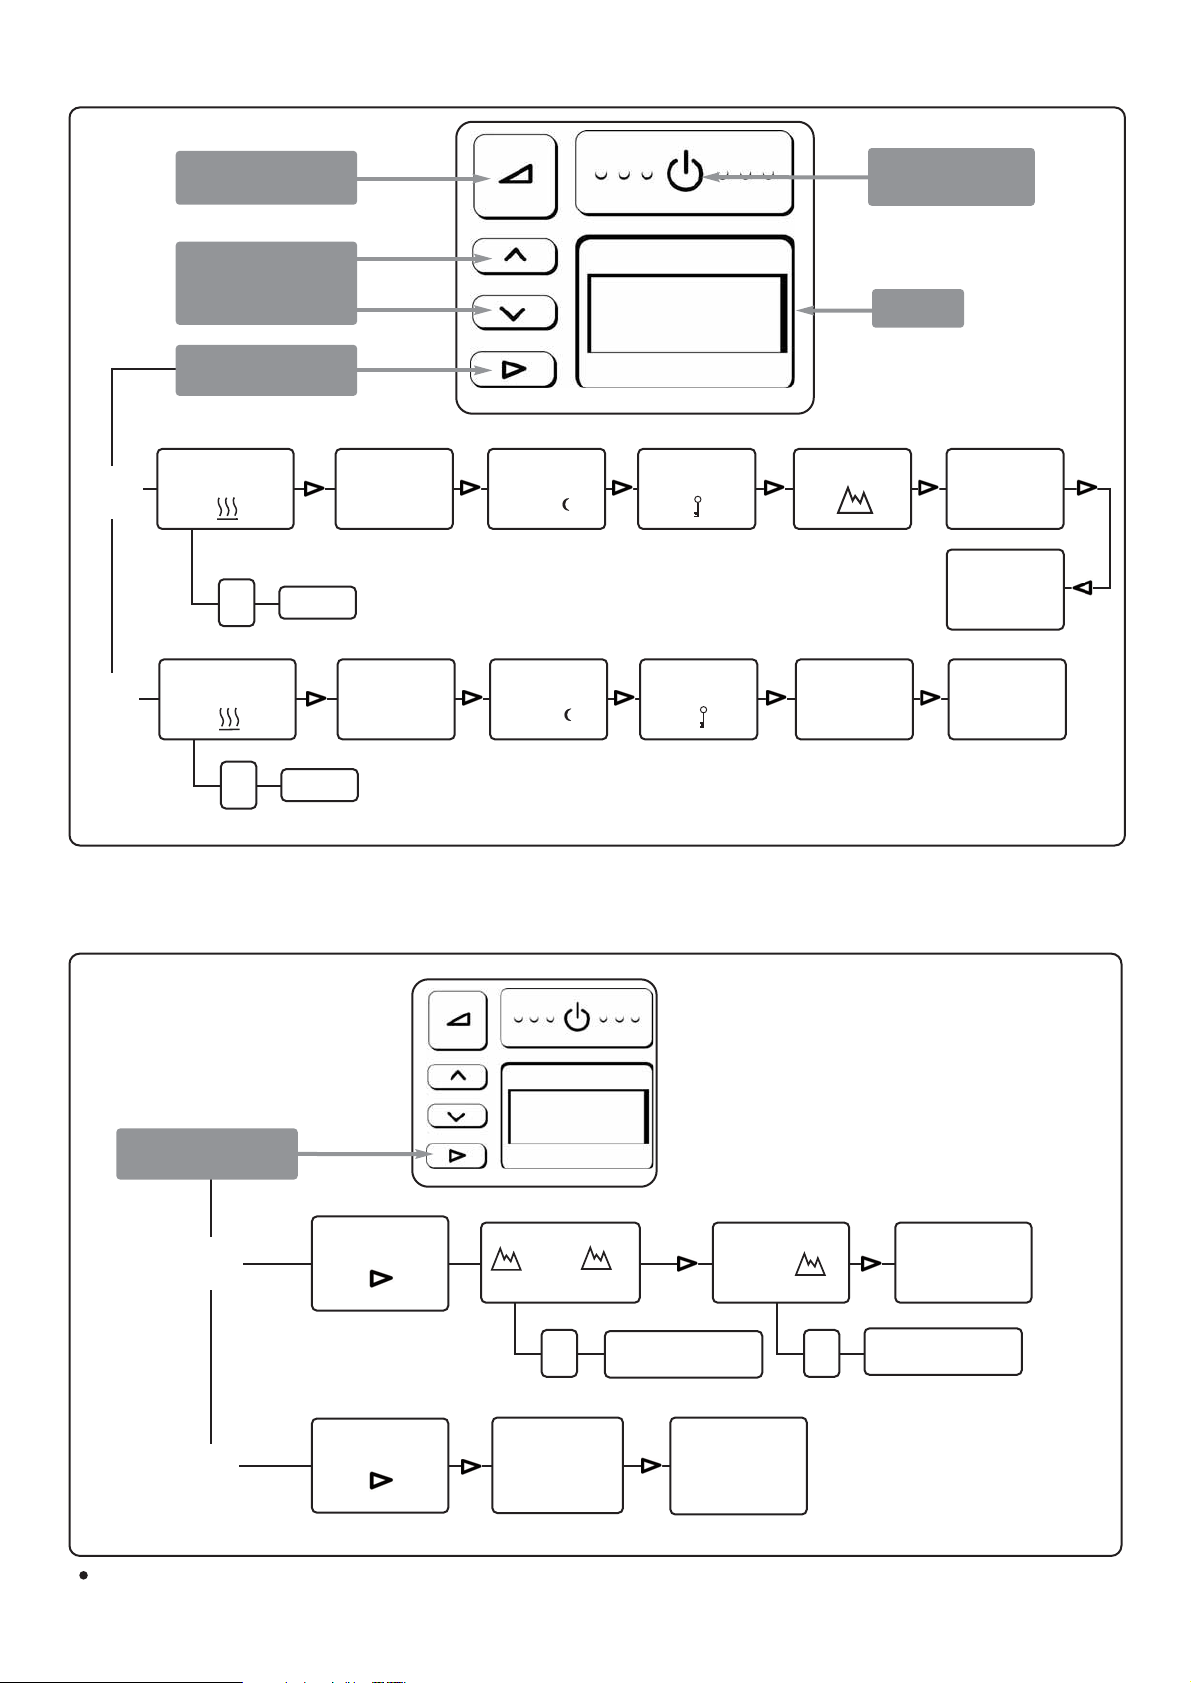
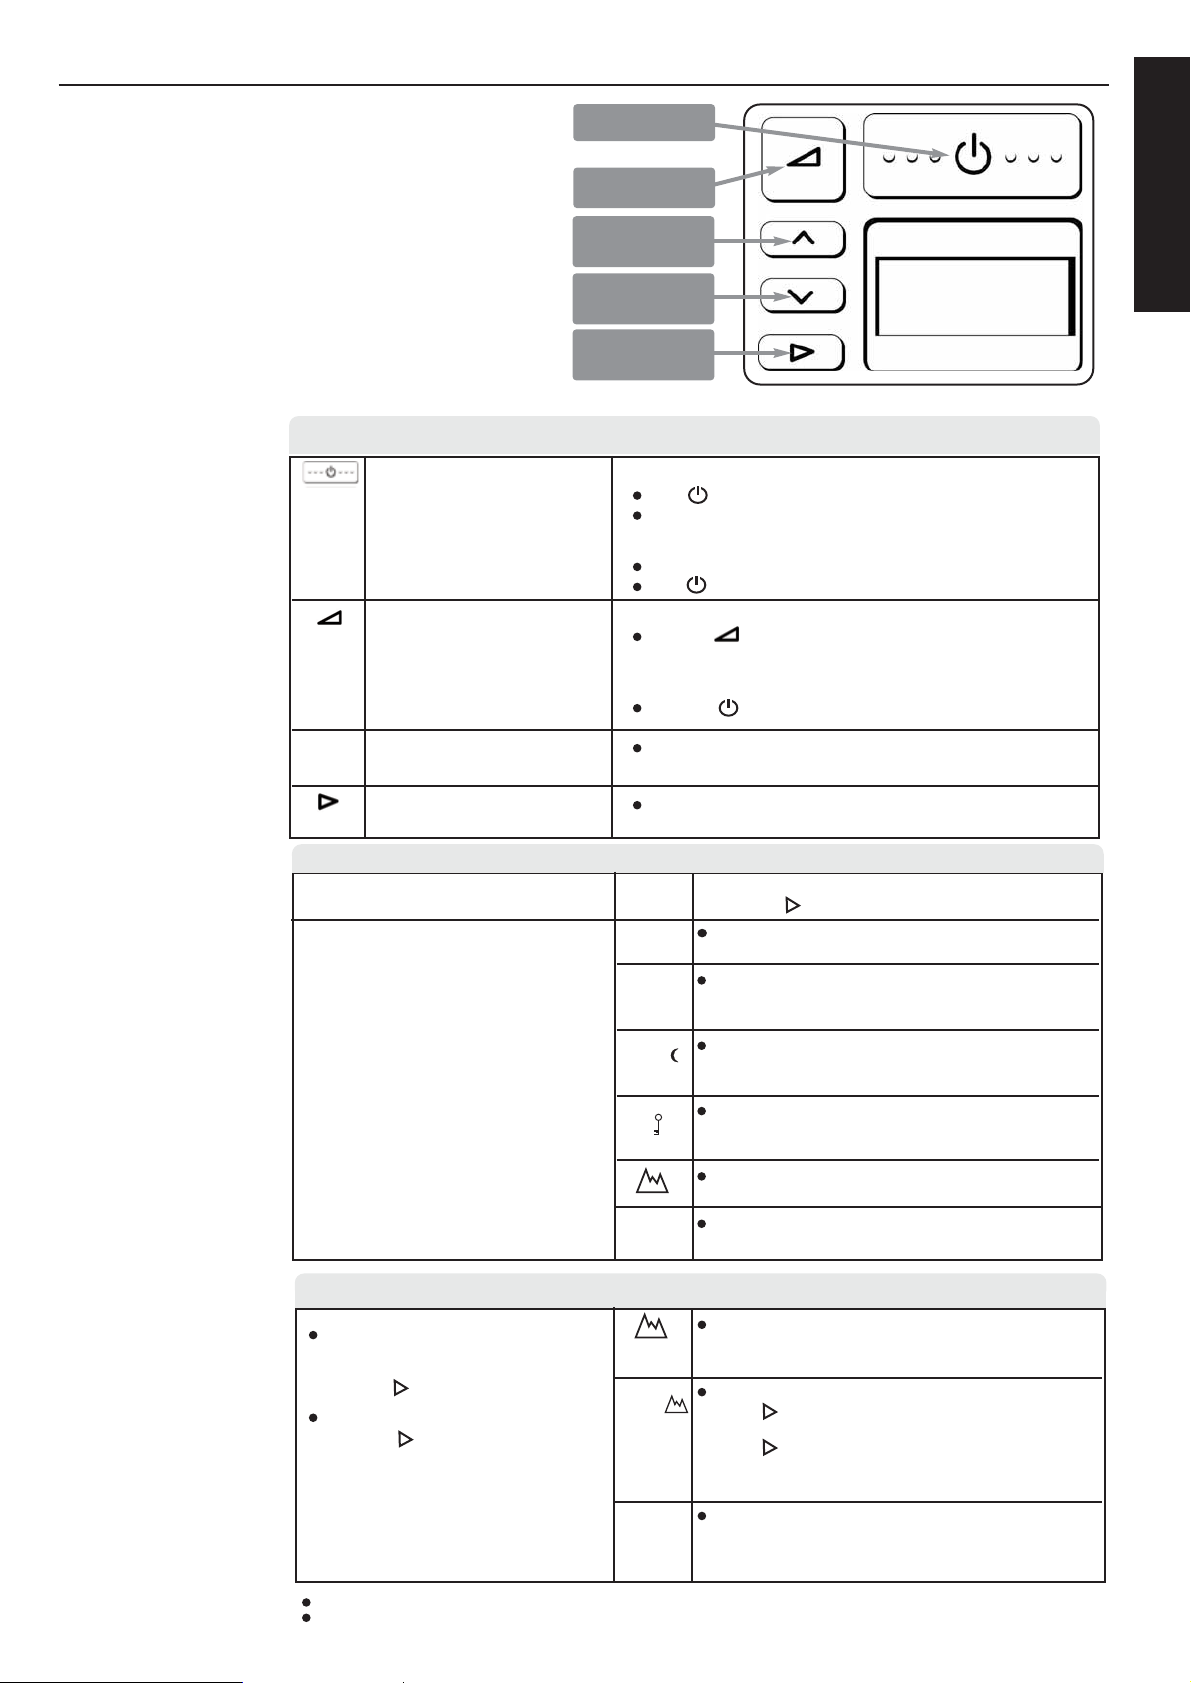
8. CONTROLS AND DISPLAY - INTEGRATED CPAP RANGE
Mode button
Step through the options
Down button
Decrease Setting
Up button
Increase Setting
Ramp button
On/Off button
KEY FUNCTION & DESCRIPTION OPERATION
ON/OFF
Switches the device ON & OFF
RAMP
Reduces pressure to a lower
level to help you fall asleep.
The pressure will gradually return
to full operating pressure
over 20 minutes
INCREASE/DECREASE
Adjusts settings up or down
MODE
To step through options
TO SWITCH “ON”
Press button briefly
The device will default to display the humidity setting.
TO SWITCH “OFF”
Remove your mask
Press button briefly
TO START THE RAMP
Press the button
NB: to reset ramp during a cycle the device must be switched off first
TO SWITCH “OFF”
Press the button
Press the and button to raise or lower settings
Press sequentially to step through and view options available
<
<
8.1 DISPLAY DESCRIPTION AND FUNCTIONS
<
<
PATIENT MENU DISPLAY OPERATION
For viewing of CPAP settings, humidity,
compliance data, altitude and pressure settings
TO VIEW ITEMS
Press the “ ” button to sequentially view:
Humidity Setting (default display)
For adjusting humidity levels to minimize upper airway side effects
from CPAP use. Press and buttons to raise or lower settings
Total run hours
Displays the total number of hours the device has been
switched on (includes hours without mask use)
Average compliance hours per night*
Displays average number of hours the device has been
used at night with the mask on
Checksum*
Displays information for medical practitioner or dealer use
to check compliance
Altitude setting
Displays altitude setting
Pressure setting
Displays pressure setting
cmH2O
hr
hr/
PATIENT MENU - ADDITIONAL SETTINGS DISPLAY OPERATION
To access additional settings:
From the Default setting “HUMIDITY”
Press the “ ” key for 3 seconds
To view subsequent items:
Press the “ ” key.
Altitude
Select “m” for metres of “ft” for feet using
the and keys
Altitude level
- Press to change altitude level
- Set the altitude level by pressing the and keys
- Press to exit menu
NOTE: Failure to select correct altitude setting (for any given location)
will have an adverse effect on delivered pressure.
Actual Pressure
Displays actual pressure
NOTE: Only available on devices with Automatic Altitude Adjustment/Leak
Compensation feature
3000
<
<
<
<
NOTE: Manual adjustment of altitude is not featured on units where there is the Automatic Altitude Adjustment/Leak Compensation feature
* Only available on devices with Compliance Monitoring.
cmH2O
<
<
English
Page 8
A- 6
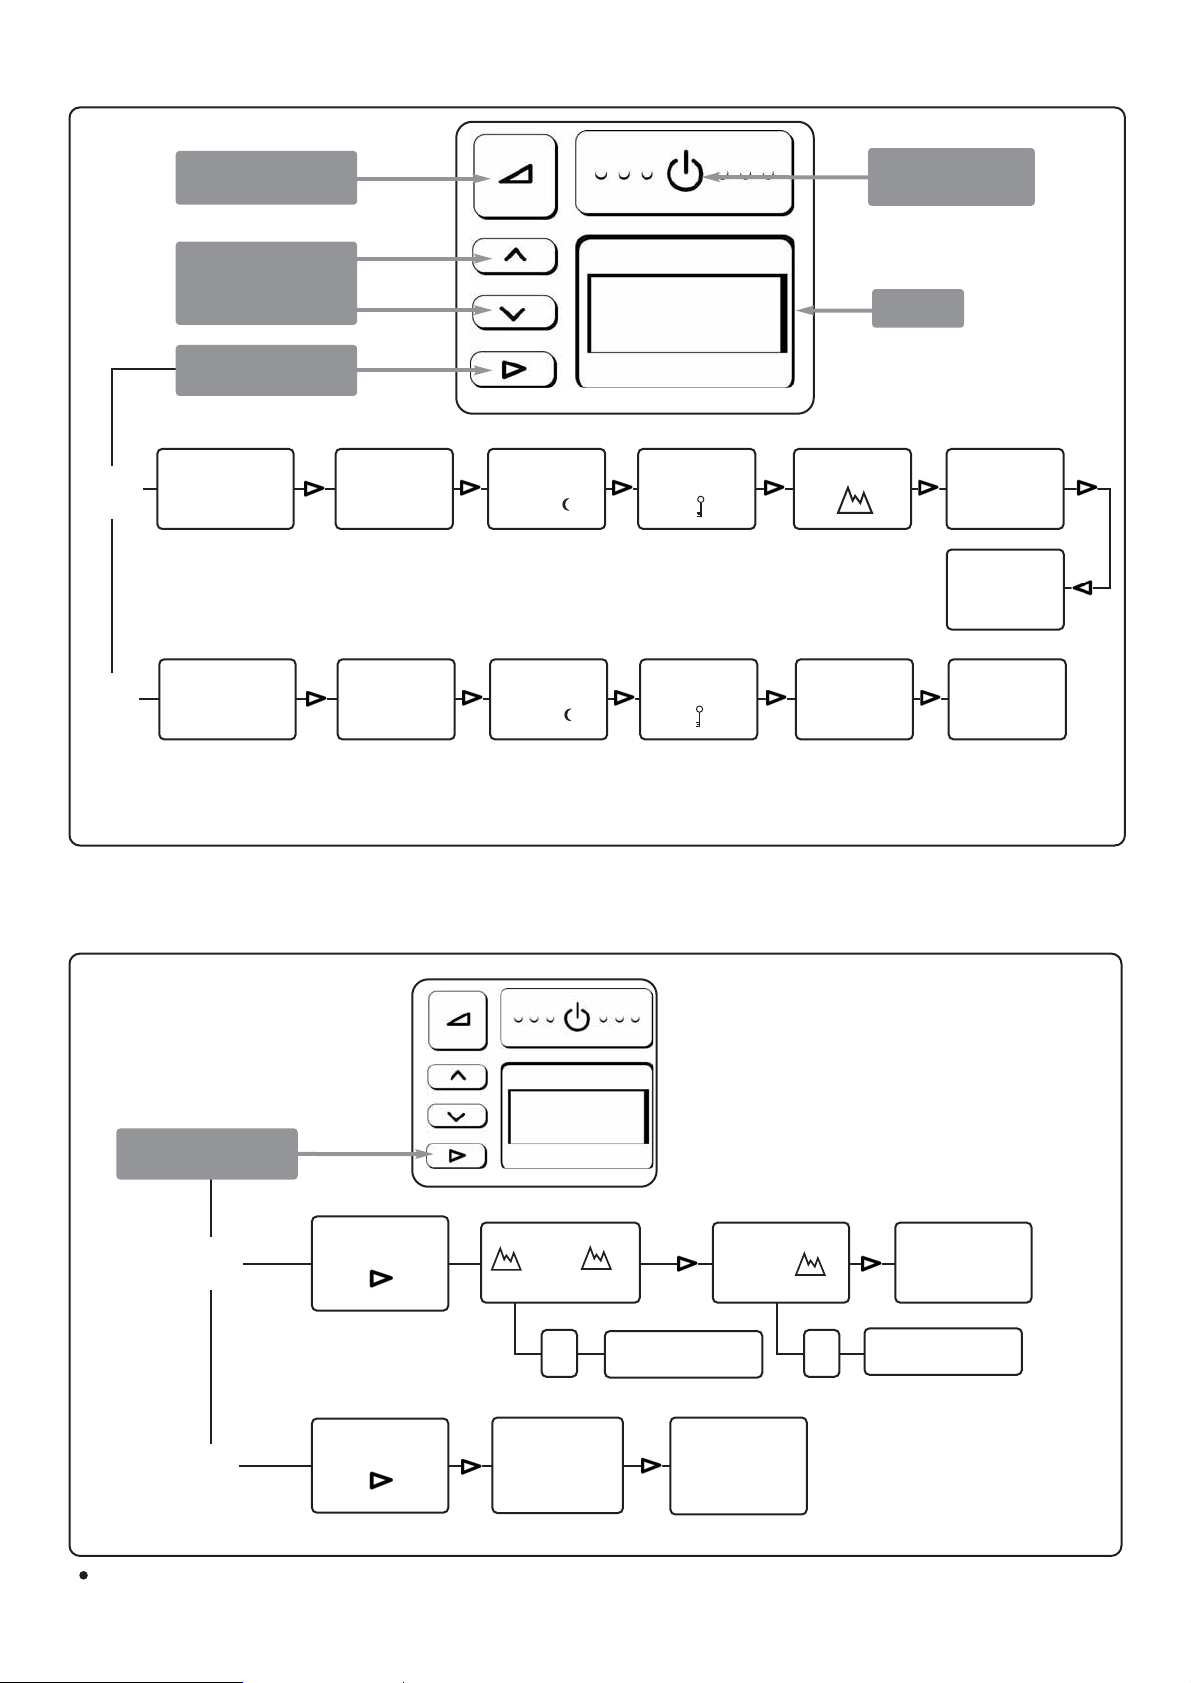
8.2 PATIENT MENU SUMMARY - INTEGRATED CPAP RANGE
Increase
Decrease
Press to activate
Ramp
Press once to switch
device on/off
Display
MODE
Humidity Setting
(default)
Pressure
Setting
Altitude Setting
cmH2O
0,1,2,3,4
+
-
0.5 INCREMENT
8.3 PATIENT MENU - ADDITIONAL SETTINGS SUMMARY - INTEGRATED CPAP RANGE
MODE
ADVANCED
PATIENT MENU
RETURN
TO DEFAULT
or
m
ft
Increase/Decrease
altitude Level
Hold for 3 seconds
<
<
or
<
<
or
<
<
or
Average Hours
per night
hr/
Check sumTotal Run Time
hr
Select Units
for Altitude
3000
RETURN
TO DEFAULT
Warning: Failure to select correct altitude setting (for any given location) will have an adverse effect on delivered pressure.
*
ADVANCED
PATIENT MENU
RETURN
TO DEFAULT
Hold for 3 seconds
*
Humidity Setting
(default)
Pressure
Setting
cmH2O
0,1,2,3,4
+
-
0.5 INCREMENT
<
<
or
Average Hours
per night
hr/
Check sumTotal Run Time
hr
RETURN
TO DEFAULT
**
MODELS
HC233
HC234
MODELS
HC237
HC238
MODELS
HC233
HC234
MODELS
HC237
HC238
ACTUAL
PRESSURE
cmH2O
* Only available on devices with Compliance Monitoring.
Page 9
A- 7
9. CONTROLS AND DISPLAY - STANDARD CPAP RANGE
Mode button
Step through the options
Down button
Decrease Setting
Up button
Increase Setting
Ramp button
On/Off button
KEY FUNCTION & DESCRIPTION OPERATION
ON/OFF
Switches the device ON & OFF
RAMP
Reduces pressure to a lower
level to help you fall asleep.
The pressure will gradually return
to full operating pressure
over 20 minutes
INCREASE/DECREASE
Adjusts settings up or down
MODE
To step through options
TO SWITCH “ON”
Press button briefly
The device will default to display the humidity setting.
TO SWITCH “OFF”
Remove your mask
Press button briefly
TO START THE RAMP
Press the button
NB: to reset ramp during a cycle the device must be switched off first
TO SWITCH “OFF”
Press the button
Press the and button to raise or lower settings
Press sequentially to step through and view options available
<
<
9.1 DISPLAY DESCRIPTION AND FUNCTIONS
<
<
PATIENT MENU DISPLAY OPERATION
For viewing of CPAP settings, humidity,
compliance data, altitude and pressure settings
TO VIEW ITEMS
Press the “ ” button to sequentially view:
Model Type (default display)
Displays model type as default setting
Total run hours
Displays the total number of hours the device has been
switched on (includes hours without mask use)
Average compliance hours per night*
Displays average number of hours the device has been
used at night with the mask on
Checksum*
Displays information for medical practitioner or dealer
use to check compliance
Altitude setting
Displays altitude setting
Pressure setting
Displays pressure setting
cmH2O
hr
hr/
PATIENT MENU - ADDITIONAL SETTINGS DISPLAY OPERATION
Altitude
Select “m” for metres of “ft” for feet using
the and keys
Altitude level
- Press to change altitude level
- Set the altitude level by pressing the and keys
- Press to exit menu
NOTE: Failure to select correct altitude setting (for any given location)
will have an adverse effect on delivered pressure.
Actual Pressure
Displays actual pressure
NOTE: Only available on devices with Automatic Altitude Adjustment/Leak
Compensation feature
3000
<
<
<
<
NOTE: Manual adjustment of altitude is not featured on units where there is the Automatic Altitude Adjustment/Leak Compensation feature
* Only available on devices with Compliance Monitoring.
cmH2O
23
x
English
To access additional settings:
From the Default setting
Press the “ ” key for 3 seconds
To view subsequent items:
Press the “ ” key.
Page 10
A- 8
9.2 PATIENT MENU SUMMARY - STANDARD CPAP RANGE
Increase
Decrease
Press to activate
Ramp
Press once to switch
device on/off
Display
MODE
Model
Type
(default)
Pressure
Setting
Altitude Setting
cmH2O
9.3 PATIENT MENU - ADDITIONAL SETTINGS SUMMARY - STANDARD CPAP RANGE
MODE
ADVANCED
PATIENT MENU
RETURN
TO DEFAULT
or
m
ft
Increase/Decrease
altitude Level
Hold for 3 seconds
<
<
or
<
<
or
Average Hours
per night
hr/
Check sumTotal Run Time
hr
Select Units
for Altitude
3000
RETURN
TO DEFAULT
Warning: Failure to select correct altitude setting (for any given location) will have an adverse effect on delivered pressure.
*
ADVANCED
PATIENT MENU
RETURN
TO DEFAULT
Hold for 3 seconds
*
Model
Type
(default)
Pressure
Setting
cmH2O
Average Hours
per night
hr/
Check sumTotal Run Time
hr
RETURN
TO DEFAULT
**
MODELS
HC231
HC232
MODELS
HC235
HC236
MODELS
HC231
HC232
MODELS
HC235
HC236
ACTUAL
PRESSURE
cmH2O
* Only available on devices with Compliance Monitoring.
Page 11

English
10. FREQUENTLY ASKED QUESTIONS
For integrated CPAP devices:
a. When I wake up in the morning, my nose and throat feel dry. What can I do?
Try increasing your humidity setting. If this does not help, please contact your clinician for advice.
b. How do I prevent condensation in the tubing?
The humidity setting enables adjustment of humidity, so that there should be fine misting in the six inches (183cm) of the
breathing tube closest to your face. If the humidity setting is too high for the conditions, condensation may occur in the
breathing tube.
Note: Using greater than 6' (183 cm) of tubing will increase condensation.
There are several ways of reducing condensation in the tube:
i Ensure the device is not positioned in a cool draft.
ii Decrease the humidity setting on your device slightly. Gradually decrease the setting until the condensation no
longer occurs.
iii Warm the air in the room.
c. Do I have to use distilled water with my device?
The use of distilled water will maximize the life of the water chamber. Water from the faucet will often contain minerals
which can damage the chamber, causing pitting in the base, even if the water is passed through a filter.
d. When do I replace my water chamber?
Replace the chamber if the plastic walls of the chamber become cracked or cloudy or the chamber base becomes pitted.
(Note: If the chamber leaks at all, it should be replaced immediately).
Can I use my device in other countries?
Yes. Simply use the appropriate electrical socket adaptor and the device will automatically adapt to any voltage supply.
Note: When moving your device, ensure that the water chamber is empty. Machine failure due to water damage is not covered by
warranty.
Can I use supplemental oxygen with my device?
Yes, oxygen can be administered at the mask. Turn the device on before turning on the oxygen. Ensure that the oxygen source is
turned off before turning off the device to avoid oxygen accumulating in the machine.
DIMENSIONS: 275mm x 170mm x 140mm
(10.8" x 6.7" x 5.5")
WEIGHT: 1.9kg (4.2lbs)
(3.0kg packaged in bag incl. accessories)
ELECTRICAL RATINGS
Supply Frequency: 50-60 Hz
Supply Voltage and Current: 100-115V~ (1.2A, 1.3A max),
220-240V~ (0.8A, 1.8A max)
Note: These values represent
average current
DC to AC Inverter requirements: 115V - 200W/300W surge
230V - 300W/500W surge
Heater Plate : 85W max
Heater Plate Temperature: 65°C (149°F) max
PERFORMANCE
Pressure Range 4 to 20 cmH
2
O
Altitude Range 0 to 3000m, or 0 to 9000 ft
STANDARDS COMPLIANCE
Designed to conform to the
requirements of: EN / IEC 60601-1
UL60601-1
CSA C22.2/No.601.1
AS3200.1.0
The device complies with the electromagnetic compatibility
requirements of IEC 60601-1-2. In certain circumstances, the
device may affect or be affected by nearby equipment due to
the effects of electromagnetic interference. If this should
happen, try moving your unit or the location of the device
causing interference, or alternatively consult your homecare
provider.
11. SPECIFICATIONS
A-9
Page 12

12. OPERATING CONDITIONS:
AMBIENT TEMPERATURE: 5 - 35°C
HUMIDITY: 10 - 95% RH
ALTITUDE: 0 - 3000m (9000ft)
Above 500m (1500 ft) the maximum operating pressure will be reduced.
13. STORAGE AND TRANSPORT CONDITIONS:
The device should be stored and transported in environmental conditions of: -10 to 60°C .
14. TROUBLESHOOTING:
If you feel that your device is not operating correctly, consult your homecare dealer.
Do not attempt to repair the device yourself.
Fisher & Paykel Healthcare have a policy of continued product improvement and
reserve the right to alter specifications without notice.
15. APPENDIX
The following table lists the main difference in features across the HC230 Product Range.
Note:
Some models may not be available for sale in certain countries
A- 10
Features
Product Code
Standard CPAP ✓✓ ✓✓
Fully Integrated CPAP
with Heated Humidification ✓✓ ✓✓
Patient Compliance Monitoring
(LCD & Full Download) ✓✓✓✓
Auto Altitude Adjustment ✓✓✓✓
Leak Compensation ✓✓✓✓
Ambient Tracking PLUS ✓✓ ✓✓
Proportional Ramp ✓✓✓✓✓✓✓✓
HC231 HC232 HC233 HC234 HC235 HC236 HC237 HC238
Page 13

B - 1
SÉRIE HC230
PPC AVEC SYSTÈME
D'HUMIDIFICATION INTÉGRÉ
Les systèmes de PPC de série HC230 ont été
conçus pour le traitement à domicile du SAS.
Pour une assistance complémentaire, veuillez
contacter votre Bureau local F&P – voir adresse
au verso. Conserver ce manuel pour futures
références.
Français
TABLE DES MATIÈRES
1. Définitions des symboles ...........................................................................2
2. Avertissement ....................................................................................2
3. Avertissement contre l’utilisation d’oxygène .............................................................2
4. Utilisation recommandée............................................................................2
5. Description de l’appareil ...........................................................................3
5.1 Eléments principaux de l'appareil - PPC standard ........................................................3
5.2 Eléments principaux de l'appareil- PPC avec humidificateur intégré........................................3
5.3 Accessoires ..................................................................................3
6. Nettoyage et Entretien .............................................................................4
7. Instructions d’installation ...........................................................................4
8. Réglages et Affichage - PPC avec humidificateur intégré ...................................................5
8.1 Affichage : Descriptions et Fonctions ...............................................................5
8.2 Résumé du menu patient - PPC avec humidificateur intégré .............................................6
8.3 Menu patient - Réglages complémentaires - PPC avec humidificateur intégré ................................6
9. Réglages et Affichage - PPC standard ..................................................................7
9.1 Affichage : Descriptions et Fonctions ...............................................................7
9.2 Résumé du menu patient - PPC standard ............................................................8
9.3 Menu patient - Réglages complémentaires - PPC standard ..............................................8
10. Questions fréquemment posées .....................................................................9
11. Caractéristiques techniques.........................................................................9
12. Conditions de fonctionnement .....................................................................10
13. Stockage et Transport ............................................................................10
14. Dépannage ....................................................................................10
15. Appendice ....................................................................................10
VEUILLEZ LIRE LES INSTRUCTIONS DANS LEUR TOTALITÉ AVANT D'UTILISER VOTRE APPAREIL POUR LA PREMIÈRE FOIS
Page 14

2. AVERTISSEMENT
A noter : Ce manuel ne concerne que les appareil de PPC de
série HC230
1. L’appareil ne peut être utilisé qu’avec des masques,
connecteurs et circuit recommandés par Fisher & Paykel
Healthcare, votre médecin ou thérapeute.
2. Ne jamais utiliser l’appareil si:
a) le cordon d'alimentation ou la prise électrique sont
endommagé, b) le circuit est endommagé ; trous,
déchirures, pliures, c) l’appareil est endommagé ou s’il est
tombé par terre, d) l’appareil est tombé dans l’eau, e)
l’appareil ne fonctionne pas correctement, f) l'appareil est
connecté à un ordinateur.
Retourner l’appareil à un centre de dépannage agrée pour
inspection et réparation.
3. Ne pas utiliser l’appareil lorsque la température extérieure
s’élève à plus de 35°C (95°F), cela pouvant accroître la
température du flux d’air, risquant d’entraîner une irritation
des voies respiratoires.
4. S'assurer que le filtre à air soit présent lors du
fonctionnement de l'appareil.
5. Retirer la chambre d’humification avant remplissage.
6. Ne pas remplir la chambre avec de l’eau bouillante
7. Ne pas secouer l'appareil lorsque la chambre
d'humidification est remplie d'eau pour éviter de noyer la
machine.
8. Placer votre appareil à une hauteur inférieure à celle de
votre tête pour éviter tout risque de pénétration d'eau dans
le circuit chauffant si l'appareil venait à se renverser..
9. Ne pas entreposer ou utiliser l'appareil dans un endroit où
il est susceptible de tomber par terre ou dans l’eau. Si de
l’eau s’est infiltrée dans l’appareil, déconnecter le
cordon d’alimentation et ne plus l’utiliser. Solliciter le
conseil de votre prestataire de service.
10. Ne jamais boucher les ouvertures d'air de l'appareil ou le
placer sur une surface tel qu'un lit ou un canapé, sur
lesquels le filtre risque de s'obstruer. S'assurer que les
ouvertures d'air ne comportent pas de matières telles que
peluches ou cheveux.
11. S'assurer que l'appareil soit sec avant de le rebrancher.
12. Ne pas utiliser de masque si l’appareil est éteint ou s’il ne
fonctionne pas correctement. Ne jamais boucher la fuite
expiratoire du masque.
13. En raison de la température de fonctionnement de la
plaque chauffante, éviter tous contacts avec la plaque
chauffante ou la base de la chambre d’humidification.
14. Si la pression de PPC est basse, le flux circulant à travers le
masque peut s'avérer insuffisant pour évacuer tous les gaz
exhalés du circuit chauffant, ce qui peut entraîner une
réinhalation de celui-ci.
15. Changer la pression peut rendre la thérapie inefficace. La
pression ne devrait être contrôlée que par un professionnel
du corps médical.
16. Ne jamais insérer ou faire tomber de corps étrangers dans
les ouvertures ou le tuyau.
17. Avant tout nettoyage, éteindre l’appareil et débrancher le
cordon d’alimentation de la prise murale.
18. Vider la totalité de l’eau avant transport.
19. Tout entretien autre que celui décrit dans ce manuel doit
être effectué par du personnel qualifié.
* Uniquement disponible avec les appareils de PPC avec
humidificateur intégré
1. DÉFINITION DES SYMBOLES
3. AVERTISSEMENT CONCERNANT L'UTILISATION DE L'OXYGÈNE
Si un enrichissement en oxygène est utilisée avec l'appareil, couper le débit d'oxygène lorsque l'appareil n'est pas en service pour
éviter toute accumulation à l'intérieur de l'appareil.
•
L'appareil doit être placé dans un endroit ventilé.
•
L'enrichissement en oxygène doit être administrée au niveau du masque.
•
Ne pas utiliser de l'oxygène en présence de flamme. Ne pas fumer en présence d'oxygène.
•
L'utilisation d'oxygène lors de la thérapie comporte des risques d'incendie et requiert par conséquent une attention
particulière. Tout matériau inflammable à l'air et certains matériaux non inflammables peuvent prendre feu facilement en
présence de hautes concentrations en oxygène. C'est pourquoi, pour des raisons de sécurité, il est recommandé de garder à
distance et de préférence hors de la pièce où l'appareil est utilisé toute source possible d'ignition.
•
Une inflammation spontanée et agressive peut se produire si de l’huile, de la graisse ou des substances graisseuses, entrent
en contact avec des régulateurs d’oxygène, soupapes, tubes et connecteurs, et tout autre équipement se rapportant à
l’oxygène.
•
Pour un débit d'oxygène fixé, la concentration d'oxygène inhalée varie en fonction des paramètres de pression, les
caractéristiques ventilatoires, le masque et le taux de fuite.
4. UTILISATION RECOMMANDÉE
L'appareil a pour objectif le traitement du syndrome des apnées du sommeil (SAS). La méthode consiste à délivrer une
Pression Positive Continue (PPC) afin de prévenir le collapsus des voies respiratoires supérieures. L'adjonction d'un
humidificateur respiratoire chauffant prévient les effets desséchants et irritants des voies respiratoires couramment observés
lors de l'utilisation d'appareils de PPC. L'appareil est conçu pour une utilisation aussi bien à domicile que professionnelle
dans un laboratoire du sommeil. Se référer à la liste des différents produits de la série HC230 dans la section Appendice de
ce manuel.
Type BF
Pièce utilisée
ATTENTION
Consulter les
documents joints
Courant
alternatif
Anti-écoulement
93/42/EEC
Classe IIb
Class ll
Double isolation
B - 2
Veille
On/Off
*
*
*
*
*
Page 15

5. DESCRIPTION DE L’APPAREIL
5.1 Eléments principaux de l'appareil - PPC standard
B - 3
5.3 Accessoires
HC385S Chambre d'humidification standard
HC355* Chambre d'humidification à durée de vie étendue
900HC010 Connecteur
900HC221 Circuit
900HC240 Filtre à poussières (x2)
900HC230 Logiciel d’observance Maximizer
900HC232 Câble de téléchargement
HC225 Télécommande
900HC226 Rallonge d’extension du HC225
*Non disponible dans certains pays
Français
5.2 Eléments principaux de l'appareil - PPC avec humidificateur intégré
SUPPORT DE FILTRE
AFFICHAGE
FILTRE A AIR
CORDON D’ALIMENTATION
INTERRUPTEUR
CIRCUIT 900HC221
CONNECTEUR 900HC010
PORT SÉRIE
CORDON D’ALIMENTATION
CIRCUIT 900HC221
CONNECTEUR 900HC010
CHAMBRE D’HUMIDIFCATION HC385
DISPOSITIF PROTECTEUR
DE LA CHAMBRE
PLAQUE CHAUFFANTE
NIVEAU D’EAU
INTERRUPTEUR
DISPLAY
SUPPORT DE FILTRE
FILTRE A AIR
ENTONNOIR
PORT SÉRIE
AFFICHAGE
Page 16

B - 4
6. NETTOYAGE & ENTRETIEN
1. Eteindre l’appareil et débrancher le cordon d’alimentation de la prise murale.
2. Essuyer l'extérieur du l'appareil à l'aide d'un chiffon propre humecté d'eau (non mouillé) et d'un détergent doux. Ne pas
utiliser de produits abrasifs ou de solvants risquant d'endommager l'appareil.
3. JOURNALIER
Nettoyer la chambre et le circuit.
•
Déconnecter le circuit respiratoire de la chambre d’humidification.
•
Rincer le circuit avec de l'eau savonneuse. Pendre le circuit à la verticale pour qu'il sèche.
•
Retirer la chambre en poussant la protection vers le bas et faire sortir la chambre.
•
Vider et jeter l'eau résiduelle.
•
Nettoyer la chambre à l’eau savonneuse, rincer et laisser sécher
4. HEBDOMADAIRE
Nettoyer la chambre
•
Nettoyer soigneusement la chambre en la faisant tremper 10 minutes dans une solution de
vinaigre blanc et d’eau ( 1 dose de vinaigre blanc pour 2 doses d’eau).
5. Replacer le filtre à air lorsqu’il se décolore de manière significative, au moins une fois
tous les 3 mois ou après 1000 heures de fonctionnement.
•
Retirer le support du filtre à l’arrière de l’appareil et retirer le filtre.
•
Remplacer l’ancien filtre par un filtre neuf. La ligne verticale noire doit faire face à l’appareil.
7. INSTRUCTIONS D’INSTALLATION
1. Retirer l’appareil de son emballage.
2. Placer l’appareil sur une étagère basse ou par terre à côté de votre lit.
Placer l’appareil à une hauteur inférieure à celle de votre tête.
3. Montage de la chambre d'humidification (uniquement pour les appareils
avec humidificateur intégré)
a. Retirer une chambre d'humidification de l’emballage.
b. Retirer et jeter les capuchons bleus (Fig.1).
c. Remplir la chambre d'humidification avec de l'eau jusqu'au trait
noir (Fig. 2).
Ne jamais remplir la chambre d'humidification lorsqu'elle est en place.
Lors du transport de l'appareil, toujours s'assurer que la chambre soit
vide.La garantie ne couvre pas les dommages occasionnés par l'eau.
d. Pour positionner la chambre d'humidification sur l'appareil, appuyer
sur la protection et y glisser la chambre. (Fig.3) (Fig. 4).
e. Lorsque la chambre est placée correctement, la protection
s’enclenche
4. Une des extrémité du circuit possède un connecteur en plastique blanc.
Positionner ce connecteur sur la sortie de la chambre d'humidification
situé sur le dessus de celle-ci (Fig. 5) ou Sortie de la PPC (Fig. 5a).
5. Connecter l’autre extrémité au masque.
6. Brancher le cordon d'alimentation à l'arrière de l'appareil et la prise
électrique.
7. Allumer l'appareil à l'aide de l'interrupteur se trouvant sur le dessus de
celui-ci. (Fig. 6)
8. Pour modifier les paramètres, consulter le chapitre “Contrôles et
Affichages “
Votre appareil est prêt à l'utilisation.
Fig.1
Fig.2
Fig.3
Fig.4
Fig.5 Fig.5a
Fig.6
Page 17

8. RÉGLAGES ET AFFICHAGE - PPC AVEC HUMIDIFICATEUR INTÉGRÉ
B- 5
Bouton mode
Naviguer entre les options
Bouton Bas
Diminue le réglage
Bouton Haut
Augmente le réglage
Bouton monté
en pression
progressive
Interrupteur
ON/OFF
Français
8.1 AFFICHAGE : DESCRIPTIONS ET FONCTIONS
BOUTON DESCRIPTION ET FONCTION FONCTIONNEMENT
MARCHE /ARRET
Mise en marche & arrêt
MODE PROGRESSIF
Réduction de pression pour
favoriser l’endormissement.
Augmentation progressive de la
pression à la valeur prescrite
après 20 minutes.
AUGMENTER / DIMINUER
Ajuste le réglage
MODE
Naviguer entre les options
METTRE EN MARCHE
Appuyer sur le bouton brièvement.
L’appareil affiche la valeur d’humidité par défaut .
ÉTEINDRE L'APPAREIL
Retirer le masque
Appuyer sur le bouton brièvement
MISE EN MARCHE DU MODE PROGRESSIF
Appuyer sur le bouton
A noter : pour réinitialiser le mode progressif lors d’un cycle, il est
nécessaire d’éteindre l’appareil préalablement.
ÉTEINDRE L'APPAREIL
Appuyer sur le bouton
Utiliser le bouton et pour augmenter ou réduire les réglages
Appuyer séquentiellement pour naviguer et voir les options disponibles
<
<
<
<
MENU PATIENT AFFICHAGE FONCTIONNEMENT
Visualisation des paramètres
PPC (humidité, observance,
données, altitude et pression)
VISUALISER LES VALEURS
Appuyer sur le bouton “ ” pour visualiser séquentiellement:
Paramètres d’humidité (paramètres par défaut)
Pour ajuster le niveau d’humidité afin de minimiser les effets secondaires
subies par les voies aériennes supérieures provoquées par l’utilisation de PPC.
Changer la température à l’aide des boutons et
Durée totale de fonctionnement
Affiche la durée totale de fonctionnement de l’appareil (comprenant la durée
d’utilisation sans le masque)
Durée d’observance moyenne par nuit *
Affiche la durée moyenne d’utilisation avec un masque
Chiffre clé *
Affiche des informations de contrôle d’observance destinées au praticien ou
prestataire
Ajuster l’altitude
Affiche l’altitude
Pression
Affiche la pression
cmH2O
hr
hr/
MENU PATIENT: Réglages supplémentaires AFFICHAGE FONCTIONNEMENT
Pour accéder aux réglages additionnels :
Depuis le réglages par défaut de
l'humidité
Appuyer sur “ ”pendant 3 secondes
Pour voir les sous-réglages consécutifs :
Appuyer sur “ ”
Unité d’altitude
Sélectionner "m" pour mètres ou "ft" pour pied a l’aide des boutons ou
Niveau d’altitude
- Appuyer pour changer l’altitude
- Régler l’altitude a l’aide des boutons ou
- Appuyer le bouton pour sortir du menu
REMARQUE : Un mauvais réglage de l'altitude (quelque soit le lieu) peut avoir un
effet délétère sur la valeur de pression délivrée.
Pression délivrée
Affichage de la pression délivrée
REMARQUE : Uniquement disponible sur les appareil possédant la compensation de
fuite et l'ajustement automatique de l'altitude.
3000
<
<
REMARQUE : L'ajustement manuel de l'altitude n'est pas disponible sur les appareils possédant la compensation de fuite et l'ajustement
automatique de l'altitude.
* Disponible uniquement sur les appareils avec relevé d’observance
<
<
<
<
cmH2O
Page 18

B - 6
8.2 RÉSUMÉ DU MENU PATIENT - PPC AVEC HUMIDIFICATEUR INTÉGRÉ
8.3 MENU PATIENT - RÉGLAGES COMPLÉMENTAIRES - PPC AVEC HUMIDIFICATEUR INTÉGRÉ
MODE
Augmenter / diminuer
Appuyer pour activer le
mode Progressif
Affichage
Appuyer une fois pour
allumer/arrêter l’appareil
Paramètres
d’humidité
Réglage par défaut
PressionAjuster
l’altitude
cmH2O
0,1,2,3,4
+
-
0.5 INCREMENT
<
<
ou
Durée
d’observance
moyenne par nuit*
hr/
Chiffre
clé*
Durée totale de
fonctionnement
hr
RÉGLAGE PAR
DÉFAUT
Paramètres
d’humidité
Réglage par défaut
RÉGLAGE PAR
DÉFAUT
Pression
cmH2O
0,1,2,3,4
+
-
0.5 INCREMENT
<
<
ou
Durée
d’observance
moyenne par nuit*
hr/
Chiffre
clé*
Durée totale de
fonctionnement
hr
MODE
Menu Patient Réglages
Supplémentaires
RÉGLAGE PAR
DÉFAUT
RÉGLAGE PAR
DÉFAUT
or
m
ft
Augmenter / diminuer
le niveau de l’altitude
Menu Patient Réglages
Supplémentaires
appuyer pendant 3 secondes
PRESSION
DÉLIVRÉE
<
<
ou
<
<
ou
Sélectionner l'unité
d'altitude
3000
ATTENTION : Effectuer un mauvais réglage de l’altitude (quelque soit le lieu) peut engendrer des effets délétères sur la pression délivrée
* Disponible uniquement sur les appareils avec relevé d’observance
cmH2O
Modèles
HC233
HC234
Modèles
HC237
HC238
Modèles
HC233
HC234
Modèles
HC237
HC238
appuyer pendant 3 secondes
Page 19

9. RÉGLAGES ET AFFICHAGE - PPC STANDARD
Bouton mode
Naviguer entre les options
Bouton Bas
Diminue le réglage
Bouton Haut
Augmente le réglage
Bouton monté
en pression
progressive
Interrupteur
ON/OFF
9.1 AFFICHAGE : DESCRIPTIONS ET FONCTIONS
BOUTON DESCRIPTION ET FONCTION FONCTIONNEMENT
MARCHE /ARRET
Mise en marche & arrêt
MODE PROGRESSIF
Réduction de pression pour
favoriser l’endormissement.
Augmentation progressive de la
pression à la valeur prescrite
après 20 minutes.
AUGMENTER / DIMINUER
Ajuste le réglage
MODE
Naviguer entre les options
METTRE EN MARCHE
Appuyer sur le bouton brièvement.
L’appareil affiche la valeur d’humidité par défaut .
ETEINDRE L’APPAREIL
Retirer le masque
Appuyer sur le bouton brièvement
METTRE EN MARCHE
Appuyer sur le bouton
A noter : pour réinitialiser le mode progressif lors d’un cycle, il est
nécessaire d’éteindre l’appareil préalablement.
ETEINDRE
Appuyer sur le bouton Marche/Arrêt.
Utiliser le bouton et pour augmenter ou réduire les réglages
Appuyer séquentiellement pour naviguer et voir les options disponibles
<
<
<
<
MENU PATIENT AFFICHAGE FONCTIONNEMENT
Visualisation des paramètres
PPC (humidité, observance,
données, altitude et pression)
VISUALISER LES VALEURS
Appuyer sur le bouton “ ” pour visualiser séquentiellement:
Type de modèle (Affichage par défaut)
Affichage du type de modèle comme réglage par défaut
Durée totale de fonctionnement
Affiche la durée totale de fonctionnement de l’appareil (comprenant la durée
d’utilisation sans le masque)
Durée d’observance moyenne par nuit *
Affiche la durée moyenne d’utilisation avec un masque
Chiffre clé *
Affiche des informations de contrôle d’observance destinées au praticien ou
prestataire
Ajuster l’altitude
Affiche l’altitude
Pression
Affiche la pression
cmH2O
hr
hr/
MENU PATIENT: Réglages supplémentaires AFFICHAGE FONCTIONNEMENT
Pour accéder aux réglages additionnels :
Depuis le réglages par défaut
Appuyer sur “ ”pendant 3 secondes
Pour voir les sous-réglages consécutifs :
Appuyer sur “ ”
Unité d’altitude
Sélectionner "m" pour mètres ou "ft" pour pied a l’aide des boutons ou
Niveau d’altitude
- Appuyer pour changer l’altitude
- Régler l’altitude a l’aide des boutons ou
- Appuyer le bouton pour sortir du menu
REMARQUE : Un mauvais réglage de l'altitude (quelque soit le lieu) peut avoir un
effet délétère sur la valeur de pression délivrée.
Pression délivrée
Affichage de la pression délivrée
REMARQUE : Uniquement disponible sur les appareil possédant la compensation de
fuite et l'ajustement automatique de l'altitude.
3000
<
<
<
<
23
x
B - 7
Français
REMARQUE : L'ajustement manuel de l'altitude n'est pas disponible sur les appareils possédant la compensation de fuite et l'ajustement
automatique de l'altitude.
* Disponible uniquement sur les appareils avec relevé d’observance
Page 20

9.2 RÉSUMÉ DU MENU PATIENT - PPC STANDARD
9.3 MENU PATIENT - RÉGLAGES COMPLÉMENTAIRES - PPC STANDARD
MODE
Augmenter / diminuer
Appuyer pour activer le
mode Progressif
Affichage
Appuyer une fois pour
allumer/arrêter l’appareil
Type
de modèle
(par défaut)
PressionAjuster
l’altitude
cmH2O
0,1,2,3,4
+
-
0.5 INCREMENT
<
<
ou
Durée
d’observance
moyenne par nuit
*
hr/
Chiffre
clé*
Durée totale de
fonctionnement
hr
RÉGLAGE PAR
DÉFAUT
Type
de modèle
(par défaut)
RÉGLAGE PAR
DÉFAUT
Pression
cmH2O
0,1,2,3,4
+
-
0.5 INCREMENT
<
<
ou
Durée
d’observance
moyenne par nuit
*
hr/
Chiffre
clé*
Durée totale de
fonctionnement
hr
MODE
Menu Patient Réglages
Supplémentaires
RÉGLAGE PAR
DÉFAUT
RÉGLAGE PAR
DÉFAUT
ou
m
ft
Augmenter / diminuer
le niveau de l’altitude
Menu Patient Réglages
Supplémentaires
appuyer pendant 3 secondes
PRESSION
DÉLIVRÉE
<
<
ou
<
<
ou
Selectionner
l’unité d’altitude
3000
ATTENTION : Effectuer un mauvais réglage de l’altitude (quelque soit le lieu) peut engendrer des effets délétères sur la pression délivrée
* Disponible uniquement sur les appareils avec relevé d’observance
cmH2O
Modèles
HC231
HC232
Modèles
HC235
HC236
Modèles
HC231
HC232
Modèles
HC235
HC236
B - 8
appuyer pendant 3 secondes
Page 21

10. QUESTIONS FRÉQUEMMENT POSÉES
Pour les appareils de PPC avec humidificateur intégré
a.
À mon réveil le matin, j'ai le nez et la gorge sèches. Que puis-je faire ?
Vous pouvez ajuster le réglage du contrôle de l'humidité. Si cela n'est pas suffisant, veuillez contacter votre médecin.
b. Comment puis-je empêcher la formation de condensation dans le circuit ?
Le contrôle de l'humidité permet l'ajustement de l'humidité jusqu'à l'apparition de buée (pas de condensation mobile) à
l'extrémité du circuit près du masque. Si l'humidité est réglée à une valeur trop élevée pour les conditions ambiantes, de
la condensation peut apparaître dans le circuit.
Remarque : L'utilisation d'un circuit de plus d'1m80 peut augmenter la formation de condensation
Il existe plusieurs moyens de réduire la condensation dans le circuit :
i. Veillez à ne pas placer l’appareil dans un courant d’air froid.
ii. Diminuer légèrement le réglage de température. Diminuer graduellement le réglage jusqu'à ce que la condensation
n’apparaisse plus.
iii. Chauffez l’air ambiant.
c. Dois je utiliser de l'eau distillée avec mon appareil ?
L’emploi d’eau distillée augmentera la durée de vie de la chambre d’humidification. L’eau du robinet, même filtrée, contient
des minéraux qui peuvent endommager la chambre d’humidification en la corrodant.
d. A quel moment dois-je remplacer la chambre d'humidification ?
Remplacer la chambre si les parties en plastique se décolorent ou présentent des fissures, ou si la base de la chambre est
abîmée. Remarque : si la chambre fuit, remplacez-la immédiatement.
Puis-je utiliser mon appareil dans d'autres pays ?
Oui. Utiliser simplement l'adaptateur électrique adéquat et l'appareil s'adaptera à n'importe quelle tension électrique.
Remarque : Lors du transport de l'appareil s'assurer que la chambre soit vide.
La garantie ne couvre pas les dommages
occasionnés par l'eau.
Puis-je utiliser un enrichissement en oxygène avec mon appareil ?
Oui, il est possible d'administrer de l'oxygène via le masque. Mettre l'appareil sous tension avant d'ouvrir l'oxygène. Vérifiez que
la source d'oxygène soit fermée avant de mettre l'appareil hors tension afin d'éviter l'accumulation d'oxygène dans l'appareil.
Français
B -9
11. CARACTÉRISTIQUES TECHNIQUES
DIMENSIONS : 275mm x 170mm x 140mm
POIDS: 1.9kg (3.0kg avec les accessoires
le tout emballé dans un sac)
SPÉCIFICATIONS ELECTRIQUES
Fréquence : 50-60 Hz
Tension et Courant: 100-115V (1.2A, max 1.3A),
220-240V (0.8A, max 1.8A)
Remarque : Ces valeurs
représentent un courant moyen
Inversion: 115V - 200W/300W surintensité
230V – 300W/500W surintensité
Plaque chauffante: Maximum 85W
Température de plaque chauffante Plaque chauffante opérée à une
température de 65°C max (149°F)
PERFORMANCE
Pression délivrée : 4 à 20 cmH2O
Altitude de fonctionnement 0 à 3000m, ou 0 à 9000 ft
STANDARDS DE CONFORMITÉ
Conception conforme aux
spécificités suivantes: EN / IEC 60601-1
UL60601-1
CSA C22.2/No.601.1
AS3200.1.0
L'appareil de PPC avec humidificateur intégré est
conforme aux exigences de compatibilité électromagnétiques IEC 60601-1-2.
Dans certains cas, l'appareil peut être affecté par
des interférences électromagnétiques
d'équipements électriques se trouvant à proximité.
Si cela se produit, déplacez l'appareil ou la cause
de l'interférence, ou bien consultez votre médecin
traitant.
Page 22

12. CONDITIONS DE FONCTIONNEMENT:
TEMPÉRATURE AMBIANTE : 5 à 35°C
HUMIDITÉ 10 à 95% RH
ALTITUDE: 0 à 3000m (9000pieds)
Au-dessus de 500m (1500 pieds) la pression maximale sera réduite.
13. CONDITIONS DE STOCKAGE ET DE TRANSPORT:
L’appareil doit être entreposé et transporté dans une température ambiante allant de -10 à 60° C.
14. DÉPANNAGE
Si votre appareil ne fonctionne pas correctement, consulter votre fournisseur. Ne pas tenter de réparer l’appareil soi-même.
Fisher & Paykel Healthcare améliore constamment ses produits et réserve le droit de modifier
certaines spécifications sans préavis
15. APPENDICE
Le tableau suivant liste les fonctionnalités disponibles majeures concernant les produits de série HC230.
Remarques :
Certains modèles ne sont pas disponibles dans tous les pays
B -10
Caractéristiques
MODÈLE
PPC Standard ✓✓ ✓✓
PPC Avec
Humidificateur Intégré ✓✓ ✓✓
Monitorage De La Compliance Du Patient
(Affichage LCD & Téléchargement) ✓✓✓✓
Ajustement Automatique de l'altitude ✓✓✓✓
Compensation Automatique des Fuites ✓✓✓✓
Ambient Tracking PLUS ✓✓ ✓✓
Mode Progressif ✓✓✓✓✓✓✓✓
HC231 HC232 HC233 HC234 HC235 HC236 HC237 HC238
Page 23

ÍNDICE DE MATERIAS
1. Definición de los símbolos ..........................................................................2
2. Advertencias .....................................................................................2
3. Advertencias sobre el uso de oxígeno .................................................................2
4. Uso para el que ha sido diseñado .....................................................................2
5. Descripción del aparato.............................................................................3
5.1 Partes importantes de su equipo - Rango CPAP estándar................................................3
5.2 Partes importantes de su equipo - Rango CPAP integrado ..............................................3
5.3 Accessorios ..................................................................................3
6. Limpieza y mantenimiento...........................................................................4
7. Instrucciones de Operación .........................................................................4
8. Controles y Pantallas - Rango CPAP Integrado ...........................................................5
8.1 Pantalla: Descripcion y función. Rango CPAP Integrado .................................................5
8.2 Resumén del Menú de Paciente - Rango CPAP Integrado ...............................................6
8.3 Menú del Paciente - Resumén de Los Ajustes Adicionales - Rango CPAP Integrado ...........................6
9. Controles y Pantallas - Rango CPAP Estándar ............................................................7
9.1 Pantalla: Descripciones y Funcion..................................................................7
9.2 Resumén del Menú del Paciente - Rango CPAP estándar................................................8
9.3 Menú del Paciente - Resumén de Ajustes Adicionales - Rango CPAP estándar................................8
10. Preguntas más frecuentes ..........................................................................9
11. Especificaciones del producto.......................................................................9
12. Condiciones de operación ........................................................................10
13. Condiciones de almacenamiento y transporte .........................................................10
14. Solución de problemas...........................................................................10
15. Apéndice ...................................................................................10
POR FAVOR LEA TODAS LAS INSTRUCCIONES ANTES DE USAR POR PRIMERA VEZ
Precaución: La ley federal de los Estados Unidos estipula que este aparato solamente puede ser vendido por un médico o por su orden.
C - 1
HC230 SERIE
SISTEMA CPAP HUMIDIFICADOR
Los HC230 son un tipo de sistemas CPAP diseñados para uso doméstico en el tratamiento
de OSA .
Para más ayuda, póngase en contacto con la oficina
F&P local – direcciones en el reverso.
Sírvase guardar este manual para futuras consultas.
Español
Page 24

2. ADVERTENCIAS
Obs: Este manual se refiere a la unidad CPAP de la Serie
HC230 como "el equipo"
l. Del equipo deberán ser utilizados únicamente con las mas-
carillas, conectores y tubos de suministro recomendados
por Fisher & Paykel Healthcare o por su médico o terapeuta
respiratorio.
2. Nunca haga functionar l’equipo si:
a) éste tiene el cable eléctrico o el enchufe dañado, b) el
tubo ha sido dañado presentando agujeros, razgaduras o
dobladuras, c) se ha caído al suelo o está dañado, d) este
se ha dejado caer en el agua, e) este no esta funcionado
correttamente, f) si está contectado a un PC durante el
tratamiento CPAP.
Envie l’equipo a un centro de servicio autorizado para que
sea revisado y reparado.
3. No utilice del equipo cuando la temperatura ambiente
sobrepase los 35°C (95°F) ya que podría generar un
aumento en la temperatura de flujo, lo que a su vez puede
causar irritación de las vías respiratorias.
4. Asegúrese de que el filtro de aire esté instalado cuando la
unidad esté funcionando.
5. Retire la cámara de humidificación antes de llenar.
6. No llene la cámara con agua hirviendo.
7. When handling the device with a chamber and water avoid
tilting the machine to prevent any chance of water entering
the unit enclosure.
8. Coloque del equipo a un nivel inferior a la altura de su
cabeza para evitar que entre agua en el tubo con hilo
calentado respiratorio en caso de que del equipo sea
golpeado y caiga.
9. No conserve o utilice del equipo en un lugar donde pueda
caerse o donde pueda ser tirado al agua. Si ha entrado
agua en el interior del aparato desconecte el cable
eléctrico e interrumpa su uso. Consulte con su proveedor
de asistencia domiciliaria.
10. No obstruya nunca las aberturas de ventilación del equipo
ni lo coloque sobre una superficie mullida, como la cama o
un sillón, donde el área del filtro pueda quedar bloqueada.
Mantenga las aberturas de ventilación libres de pelusa,
pelo y similares.
11. Asegúrese de que la unidad esté seca antes de enchufarla
en el tomacorriente.
12. No se deberá utilizar una mascarilla a menos que del
equipo esté encendido y funcionando correctamente. El
orificio u orificios de ventilación asociados con la mascarilla
no deberán obstruirse nunca.
13. Debido a la temperatura de operación de la placa del
calentador, evite contacto con la placa o la base de la cámara.
14. A bajas presiones de CPAP, puede que el flujo a través de
la mascarilla no sea suficiente para eliminar todos los gases
espirados en el tubo con hilo calentado y por consiguiente
puede haber cierto grado de reinhalación.
15. El ajustar el control de presión puede resultar en una
terapia ineficaz. El control de presión debe ser ajustado
únicamente por un profesional de la salud .
16. No deje caer nunca ni inserte ningún objeto en ninguna de
las aberturas ni tubos con hilo calentado.
17. Apague siempre del equipo y desconecte el cable eléctrico
del tomacorriente antes de limpiarlo.
18. Vacíe toda el agua de la cámara antes de transportar su del
equipo.
19. Remita todo el trabajo de mantenimiento al personal de
servicio cualificado excepto según se indique en este manual.
* Se aplica unicamente a los equipos CPAP integrados
1. DEFINICIÓN DE LOS SÍMBOLOS
3. ADVERTENCIAS SOBRE EL USO DE OXÍGENO
Si se utiliza oxígeno adicional con del equipo, el flujo de oxígeno debe ser desconectado cuando del equipo no esté operando.
Eso asegura que el oxígeno no pase por el tubo con hilo calentado, acumulándose en la cámara del equipo.
•
El equipo debe ser colocado en una posición en la cual no se restrinja la ventilación alrededor del equipo.
•
El oxígeno adicional deberá ser administrado en la máscara.
•
No utilice oxígeno cuando se esté fumando o cerca del fuego.
•
Cuando se está haciendo una terapia con oxígeno deben ser tomadas precauciones especiales para reducir el riesgo de
incendio. Especialmente con aquellos materiales que quemen con el aire y ciertos materiales que no se encienden fácilmente
y queman rápidamente en altas concentraciones de oxígeno. Por eso, como una cuestión de seguridad, es necesario que todas
las fuentes de ignición sean mantenidas lejos y preferiblemente fuera del lugar donde se está utilizando el oxígeno.
•
Una ignición espontánea y violenta puede ocurrir si aceite, grasas o substancias grasosas, entran en contacto con los
reguladores de oxígeno, válvulas del cilindro, tubos, conexiones y otros equipos que utilizan oxígeno.
•
Con un flujo fijo de oxígeno adicional, la concentración de oxígeno varia, dependiendo de la regulación de presión, del ritmo
de la respiración del paciente, de la máscara seleccionada y del nivel de fuga.
4. USO PARA EL QUE HA SIDO DISEÑADO
El equipo se utiliza para ayudar a respirar al paciente mientras duerme, para el tratamiento de la Apnea Obstructiva del Sueño
(AOS). Esto se consigue mediante el suministro de Presión Positiva y Continua a las Vías Respiratorias para evitar la obstrucción
de las vías respiratorias. El añadir humidificación respiratoria calentada al aparato alivia los efectos de sequedad e irritación de
las vías respiratorias del paciente que suelen derivarse del uso del sistema CPAP. El equipo es para ser utilizado por pacientes
adultos en su domicilio o en el laboratorio del sueño. Refira-se a la lista de Productos de la Série HC230, que se encuentra en
el Apéndice de este manual.
Tipo BF
Pieza aplicada
ATENCIÓN:
Consulte la
documentación
adjunta
Corriente
alterna
A prueba de
goteras
93/42/EEC
Clase IIb
Clase II
Doble aislación
C - 2
Standby o
Encendido/Apagado
*
*
*
*
*
Page 25

C- 3
5. DESCRIPCIÓN DEL EQUIPO
5.1 Partes importantes de su equipo - Rango CPAP estándar
5.3 Accesorios
HC385S Cámara de humidificación Estándar
HC355* Cámara de Humidificación Larga Vida
900HC010 Conector
900HC221 Tubo
900HC240 Filtro De Aire
900HC230 Software potenciador de cumplimiento
900HC232 Cable serial para descarga de cumplimiento
HC225 Control Remoto (Laboratorio)
900HC226 Kit de alargue para HC225
*No disponible en todos los países
Español
5.2 Partes importantes de su equipo - Rango CPAP integrado
PORTAFILTRO
PANTALLA
FILTRO DE AIRE
CABLE ELÉCTRICO
BOTÓN DE
ENCENDIDO/APAGADO
TUBO 900HC221
CONECTOR 900HC010
PUERTO SERIAL
CABLE ELÉCTRICO
TUBO 900HC221
CONECTOR 900HC010
CÁMARA DE AGUA
PROTECCIÓN DE LA CÁMARA
PLATO CALENTADOR
MARCA DEL NIVEL DE AGUA
BOTÓN DE
ENCENDIDO/APAGADO
DISPLAY
PORTAFILTRO
FILTRO DE AIRE
EMBUDO
PUERTO SERIAL
PANTALLA
Page 26

C - 4
6. LIMPIEZA Y MANTENIMIENTO
1. Apague del equipo y desconéctelo del tomacorriente.
2. Limpie el exterior del equipo con un trapo limpio y húmedo (no mojado) y con detergente suave para vajilla. No utilice
solventes ni abrasivos fuertes, ya que esto puede dañar al aparato del equipo.
3. DIARIAMENTE
Limpie el tubo y la cámara.
•
Retire el tubo de respiración de la cámara.
•
Enjuague el tubo en agua enjabonada. Cuelgue la manguera para secar de manera que sus extremos apunten hacia el suelo.
•
Retire la cámara presionando la protección con los dedos y sacando la cámara hacia arriba.
•
Vierta y deseche el agua restante.
•
Limpie la cámara con agua y jabón, enjuáguela y séquela.
4. SEMANALMENTE
Limpie a fondo la cámara de agua.
•
Deje remojar durante 10 minutos el interior de la cámara en una solución de 1 parte de vinagre blanco en dos partes
de agua.
5. Cambie el tubo de aire cuando haya perdido su color de forma considerable, al
menos una vez cada 3 meses o tras 1000 de horas de funcionamiento del aparato.
•
Retire el portafiltro de la parte trasera del aparato y saque el filtro.
•
Cambie el filtro usado por uno nuevo. Asegúrese de que la línea vertical negra quede
orientada hacia el aparato.
7. INSTRUCCIONES DE OPERACIÓN
1. Retire del equipo de su embalaje
2. Coloque del equipo sobre un estante bajo o en el suelo junto a la cama.
La unidad debe colocarse a un nivel inferior a la altura de su cabeza.
3. Operación de la Cámara (se aplica unicamente a los equipos CPAP integrados)
a. Retire una de las cámaras de agua del embalaje.
b. Retire los tapones azules y deséchelos (Fig. 1).
c. Llene la cámara hasta la marca de llenado con agua destilada
solamente (Fig. 2).
Nunca llene la cámara mientras ésta se encuentre acoplada al equipo.
Cuando mueva su el equipo, asegúrese de que la cámara
de agua se encuentre vacía. Las fallas de la máquina debidas a daños
provocados por agua no están cubiertas por la garantía.
d. Para fijar la cámara de agua al aparato serie HC230, presione la
protección con los dedos y deslice la cámara sobre del equipo (Fig.3 y Fig. 4).
e. Cuando la cámara esté correctamente colocada la protección para
los dedos volverá a su posición con un clic.
4. Un extremo del tubo contiene un conector plástico blanco. Colocar este
concetor en la salida que se encuentra en la parte superior de la cámara
(Fig. 5) o en la salida CPAP (Fig 5a)
5. Conecte el otro extremo del tubo a la máscara.
6. Conecte el cable del equipo en el enchufe de la pared y en la parte de
atrás del equipo.
7. Encienda del equipo pulsando y manteniendo presionado el botón de
encendido/apagado (Fig. 6). La pantalla indica la configuración de
humedad actual.
8. Para cambiar el ajuste consulte la sección 8 "Controles y Pantalla".
Del equipo se encuentra ahora listo para el uso.
Fig.1
Fig.2
Fig.3
Fig.4
Fig.5 Fig.5a
Fig.6
Page 27

8. CONTROLES Y PANTALLA - RANGO CPAP INTEGRADO
C - 5
Español
BOTON DESCRIPCIÓN Y FUNCIÓN OPERACIÓN
ENCENDIDO / APAGADO
Encendido y apagado del equipo
MODO PROGRESIVO
Reduce la presión a un nivel
inferior para ayudar el paciente a
dormir. La presión volverá
gradualmente a la presión de
operación total en 20 minutos
AUMENTAR / DISMINUIR
Para ajustar los niveles bajado o subido
MODO
Avance las opciones
PARA "ENCENDER"
Presionar el botón brevemente
El aparato presentará el ajuste de humedad estándar.
PARA "APAGAR"
Retire la máscara
Presione brevemente el botón
Poner en funcionamiento el modo progresivo
Presionar el botón
Nota.: para reajustar el modo progresivo durante el ciclo, es necesario
primero apagar el equipo.
Para " APAGAR "
Presione el botón
Utilizar el botón y para aumentar o bajar los ajustes.
Pulse en secuencia por avancar las opciones
<
<
8.1 PANTALLA: DESCRIPCIÓN Y FUNCIÓN
<
<
MENÚ PACIENTE PANTELLA OPERACIÓN
Para visualizar puntos, humedad,
cumplimiento, altitud y presion
PARA VISUALIZAR PUNTOS
Presionar la tecla para visualizar en secuencia:
Ajuste de la humedad (ajuste estándar)
Para cambiar los niveles de humedad para minimizar los efectos colaterales a
las vías respiratorias superiores debido al uso de CPAP
Modifique la temperatura suministrada utilizando las teclas y
Tiempo total de funcionamiento
Presenta el número total de horas que el equipo estuvo encendido (incluso el
número de horas en que la máscara no ha sido utilizada)
Promedio de horas de uso por noche*
Presenta el número promedio de horas en que el equipo ha sido utilizado con la
máscara
El total de control *
Presenta la información referente a la conformidad para uso médico o para el
distribuidor
Ajuste de altitud
Presenta el ajuste de altitud
Ajuste de la presión
Presenta el ajuste de presión
cmH2O
hr
hr/
MENÚ PACIENTE: Ajustes adicionales PANTELLA OPERACIÓN
Para acceder a ajustes adicionales:
Desde el ajuste padrón ”HUMEDAD”
Presione la tecla durante 3 segundos
Para visualizar los puntos que sigien:
Presione la tecla
Unidad de altitud
Seleccione "m" de metros o "p' de pies utilizando las teclas o
Ajuste de altitud
- Presione para modificar la altitud
- Ajustar el nivel de altitud presionando las teclas o
- Presione para salir del menú
PRECAUCIÓN: No eligir la altitud correcta (para una ubicación en particular)tendrá un efecto adverso en el suministro de presión.
Presión actual
Presenta el presión actual
PRECAUCIÓN: Unicamente disponible en equipos con Ajuste Automático de
Altitud/Característica de Compensación de Fuga
3000
<
<
<
<
<
<
Precaución: Las unidades que contienen el Ajuste manual de la altitud/Característica de Compensación de Fuga, no tienen la característica de ajuste manual de altitud
* Solo disponible en aquellos equipos que posean Monitoreamiento de conformidad
Botón de modo
Avance las opciones
Botón de bajada
Disminuir ajuste
Botón de subida
Aumentar ajuste
Botón de
rampa
Botón de
Encendido/Apagado
cmH2O
Page 28

C - 6
8.2 RESUMEN DEL MENÚ DE PACIENTE - RANGO CPAP INTEGRADO
Aumentar / disminuir
Presionar el botón para
activar rampa
Pulsar y mantener
presionado para
encender/apagar el
aparato
Pantalla
MODO
Ajuste de la humedad
(ajuste estándar)
Ajuste de la
presión
Ajuste de altitud
cmH2O
0,1,2,3,4
+
-
0.5 INCREMENT0
8.3 MENU DEL PACIENTE - RESUMEN DE LOS AJUSTES ADICIONALES - RANGO CPAP INTEGRADO
MODO
MENÚ PACIENTE:
AJUSTES ADICIONALES
AJUSTE
ESTÁNDAR
o
m
ft
Fije la altitud
Presione durante 3 segundos
MENÚ PACIENTE:
AJUSTES ADICIONALES
Presione durante 3 segundos
<
<
o
<
<
o
<
<
o
Promedio de
horas de uso por
noche*
hr/
El total de
control*
Tiempo total de
funcionamiento
hr
Selcionna unidades
de altitud
3000
Ajuste de la humedad
(ajuste estándar)
Ajuste de la
presión
0,1,2,3,4
+
-
0.5 INCREMENTO
<
<
o
Promedio de
horas de uso por
noche*
hr/
El total de
control*
Tiempo total de
funcionamiento
hr
AJUSTE
ESTÁNDAR
Precaución: No eligir la altitud correcta tendrá un efecto adverso en el suministro de presión
* Solo disponible en aquellos equipos que posean Monitoreamiento de conformidad
MODELOS
HC233
HC234
MODELOS
HC237
HC238
AJUSTE
ESTÁNDAR
cmH2O
PRESIÓN
ACTUAL
AJUSTE
ESTÁNDAR
cmH2O
MODELOS
HC233
HC234
MODELOS
HC237
HC238
Page 29

9. CONTROLES Y PANTALLA - RANGO CPAP ESTÁNDAR
C - 7
BOTON DESCRIPCIÓN Y FUNCIÓN OPERACIÓN
ENCENDIDO / APAGADO
Encendido y apagado del equipo
MODO PROGRESIVO
Reduce la presión a un nivel
inferior para ayudar el paciente a
dormir. La presión volverá
gradualmente a la presión de
operación total en 20 minutos
AUMENTAR / DISMINUIR
Para ajustar los niveles bajado o subido
MODO
Avance las opciones
PARA "ENCENDER"
Presionar el botón brevemente
El aparato presentará el ajuste de humedad estándar.
PARA "APAGAR"
Retire la máscara
Presione brevemente el botón
Poner en funcionamiento el modo progresivo
Presionar el botón
Nota.: para reajustar el modo progresivo durante el ciclo, es necesario
primero apagar el equipo.
Para " APAGAR "
Presione el botón
Utilizar el botón y para aumentar o bajar los ajustes.
Pulse en secuencia por avancar las opciones
<
<
9.1 PANTALLA: DESCRIPCIÓN Y FUNCIÓN
<
<
MENÚ PACIENTE PANTELLA OPERACIÓN
Para visualizar puntos, humedad,
cumplimiento, altitud y presion
PARA VISUALIZAR PUNTOS
Presionar la tecla para visualizar en secuencia:
Tipo de Modelo (Pantalla padron)
Presenta el Tipo de Modelo como ajuste padron
Tiempo total de funcionamiento
Presenta el número total de horas que el equipo estuvo encendido (incluso el
número de horas en que la máscara no ha sido utilizada)
Promedio de horas de uso por noche*
Presenta el número promedio de horas en que el equipo ha sido utilizado con la
máscara
El total de control *
Presenta la información referente a la conformidad para uso médico o para el
distribuidor
Ajuste de altitud
Presenta el ajuste de altitud
Ajuste de la presión
Presenta el ajuste de presión
cmH2O
hr
hr/
MENÚ PACIENTE: Ajustes adicionales PANTELLA OPERACIÓN
Para acceder a ajustes adicionales:
Desde el ajuste padrón
Presione la tecla durante 3 segundos
Para visualizar los puntos que sigien:
Presione la tecla
Unidad de altitud
Seleccione "m" de metros o "p' de pies utilizando las teclas o
Ajuste de altitud
- Presione para modificar la altitud
- Ajustar el nivel de altitud presionando las teclas o
- Presione para salir del menú
PRECAUCIÓN: No eligir la altitud correcta (para una ubicación en particular)tendrá un efecto adverso en el suministro de presión.
Presión actual
Presenta el presión actual
PRECAUCIÓN: Unicamente disponible en equipos con Ajuste Automático de
Altitud/Característica de Compensación de Fuga
3000
<
<
<
<
Precaución: Las unidades que contienen el Ajuste manual de la altitud/Característica de Compensación de Fuga, no tienen la característica de ajuste manual de altitud
* Solo disponible en aquellos equipos que posean Monitoreamiento de conformidad
Botón de modo
Avance las opciones
Botón de bajada
Disminuir ajuste
Botón de subida
Aumentar ajuste
Botón de
rampa
Botón de
Encendido/Apagado
cmH2O
23
x
Español
Page 30

C - 8
9.2 RESUMÉN DEL MENÚ DEL PACIENTE - RANGO CPAP ESTÁNDAR
Aumentar / disminuir
Presionar el botón para
activar rampa
Pulsar y mantener
presionado para
encender/apagar el
aparato
Pantalla
MODO
Tipo
de Modelo
(padron)
Ajuste de la
presión
Ajuste de altitud
cmH2O
0,1,2,3,4
+
-
0.5 INCREMENTO
9.3 MENÚ DEL PACIENTE: RESUMEN DE AJUSTES ADICIONALES - RANGO CPAP ESTÁNDAR
MODO
MENÚ PACIENTE:
AJUSTES ADICIONALES
AJUSTE
ESTÁNDAR
o
m
ft
Fije la altitud
Presione durante 3 segundos
MENÚ PACIENTE:
AJUSTES ADICIONALES
Presione durante 3 segundos
<
<
o
<
<
o
<
<
o
Promedio de
horas de uso por
noche*
hr/
El total de
control*
Tiempo total de
funcionamiento
hr
Selcionna unidades
de altitud
3000
Tipo
de Modelo
(padron)
Ajuste de la
presión
0,1,2,3,4
+
-
0.5 INCREMENTO
<
<
o
Promedio de
horas de uso por
noche*
hr/
El total de
control*
Tiempo total de
funcionamiento
hr
AJUSTE
ESTÁNDAR
Precaución: No eligir la altitud correcta tendrá un efecto adverso en el suministro de presión
* Solo disponible en aquellos equipos que posean Monitoreamiento de conformidad
MODELOS
HC231
HC232
MODELOS
HC235
HC236
AJUSTE
ESTÁNDAR
cmH2O
PRESIÓN
ACTUAL
AJUSTE
ESTÁNDAR
cmH2O
MODELOS
HC231
HC232
MODELOS
HC237
HC238
Page 31

DIMENSIONES: 273mm x 170mm x 140mm
PESO: 1,9kg (3,0kg empaquetados
en bolsa incluyendo accesorios)
ESPECIFICACIONES ELÉCTRICAS
Frecuencia de alimentación: 50-60 Hz
Voltaje y corriente de
alimentación: 100-115V (1,2A, máx. 1,3A),
220-240V (0,8A, máx. 1,8A)
Nota: Estos valores representan
la corriente promedio.
Invertidor: Sobrevoltaje 115V - 200W/300W,
sobrevoltaje 230V - 300W/500W
Placa del Calentador: Max 85W
Temperatura del plato calentador: 65°C (149°F) máx
RENDIMIENTO
Rango de presión 4 to 20 cmH
2
O
Rango de altitud 0 to 3000m, or 0 to 9000 ft
CUMPLIMIENTO DE NORMAS
Diseñado para cumplir con l
as exigencias de: EN / IEC 60601-1
UL60601-1
CSA C22.2/No.601.1
AS3200.1.0
El equipo cumple con los requisitos de compatibilidad
electromagnética de IEC 60601-1-2. En algunas circunstancias, el equipo podrá afectar o verse afectado por
equipo cercano debido a los efectos de interferencia
electromagnética. En caso de que esto ocurra, pruebe
mover su unidad o el dispositivo que está causando
interferencias, o bien consulte a su proveedor de asistencia domiciliaria.
10. PREGUNTAS MÁS FRECUENTES
Para equipos CPAP integrados:
a. ¿Cuando me despierto por la mañana siento la nariz y la garganta secas. ¿Qué puedo hacer?
Intente aumentar el ajuste en su control de humedad. Si esto no ayuda, tenga a bien consultar a su médico.
b. ¿Cómo se puede evitar la condensación en el tubo?
El control de humedad hace posible el ajuste del nivel de humedad de forma que debería haber una fina condensación
en los 15 cm del tubo más cercanos a su cara. Si el control de humedad estuviera demasiado alto para la condiciones
ambientales, es posible que se forme condensación en el tubo de respiración.
Nota: El uso de un tubo de más de 183 cm (6 pdas) largo incrementará la condensación.
Há várias maneiras de reduzir a condensação no tubo.
i. Asegúrese de que el dispositivo Serie HC230 no se encuentre en una posición en la que esté expuesto a una corriente fría.
ii. Disminuya levemente el control de temperatura en su equipo. Disminuya gradualmente el ajuste hasta que la
condensación desaparezca.
ii. Caliente el aire de la habitación.
c. ¿Es necesario usar agua destilada con el aparato?
El uso de agua destilada prolongará la vida útil de la cámara de agua . El agua del grifo a menudo contiene minerales
que pueden dañar la cámara picando la base, incluso cuando se filtre el agua.
d. ¿Cuándo se debe cambiar la cámara de agua?
Cambie la cámara si las paredes de plástico de la cámara se agrietaran u opacaran o si la base de la cámara se picara.
(Nota: Si se advirtiera la más mínima fuga, la cámara deberá cambiarse inmediatamente.
¿Se puede utilizar el equipo en otros países?
Sí. Simplemente utilice el adaptador de enchufe eléctrico apropiado y el aparato serie el equipo se adaptará automáticamente al
voltaje de cualquier suministro. Nota: Cuando mueva su equipo, asegúrese de que la cámara de agua se encuentre vacía. Las fallas de la máquina debidas a daños provocados por agua no están cubiertas por la garantía.
¿Se puede utilizar oxígeno complementario con el aparato el equipo?
Sí, se puede administrar oxígeno directamente a través de la mascarilla. Encienda el aparato el equipo antes de abrir el paso del
oxígeno. Asegúrese de que la fuente de oxígeno esté cerrada antes de apagar el aparato el equipo para evitar la acumulación de
oxígeno en la máquina.
10. ESPECIFICACIONES DEL PRODUCTO
Español
C - 9
Page 32

12. CONDICIONES DE OPERACIÓN
TEMPERATURA AMBIENTE: 5 a 35°C
HUMEDAD: 10 a 95% de RH
ALTITUD: 0 - 3000m (9000 pies).
A más de 500m (1500 pies) se reducirá el máximo de presión de funcionamiento.
13. CONDICIONES DE ALMACENAMIENTO Y TRANSPORTE
El aparato d’el equipo deberá almacenarse y transportarse en las siguientes condiciones ambientales: -10 a 60° C
14. SOLUCIÓN DE PROBLEMAS
Si tiene la impresión de que su el equipo no está funcionando como debiera, consulte a su distribuidor de productos para
el cuidado domiciliario. No intente reparar el equipo usted mismo.
Fisher & Paykel Healthcare tiene una política de mejoramiento constante de sus productos y se
reserva el derecho de alterar las especificaciones sin previo aviso
15. APENDICE
El cuadro a continuación indica las principales diferencias en características entre los productos de la série HC230.
Nota:
Es posible que algunos modelos no se encuentren disponibles a la venta en ciertos países
C - 10
Características
MODELO
CPAP Estándar ✓✓ ✓✓
CPAP Totalmente Integrado
Con Humidificación Calentada ✓✓ ✓✓
Monitoreo de Adhesión ✓✓✓✓
Ajuste Auto de la Altitud ✓✓✓✓
Compensación de Fuga ✓✓✓✓
Ambient Tracking PLUS ✓✓ ✓✓
Progresivo Proporcional ✓✓✓✓✓✓✓✓
HC231 HC232 HC233 HC234 HC235 HC236 HC237 HC238
Page 33

Fisher & Paykel Healthcare Offices:
INTERNATIONAL P O Box 14 348, Panmure, Auckland 1134, New Zealand Tel:+64 9 574 0100 Fax:+64 9 574 0158 Email: info@fphcare.com Web Site: www.fphcare.com
USA Tel: 1800 446 3908 or +1 949 470 3900 Fax:+1 949 470 3933 AUSTRALIA Tel:+61 3 9879 5022 Fax:+61 3 9879 5232 AUSTRIA Tel: 0800 29 31 23 Fax: 0800 29 31 22
BENELUX Tel:+31 78 644 0924 Fax:+31 78 644 0914 CHINA Tel:+86 20 8363 4286 Fax:+86 20 8363 3595 FRANCE Tel:+33 1 6446 5201 Fax:+33 1 6446 5221
GERMANY Tel:+49 7182 93777 0 Fax:+49 7182 93777 99 INDIA Tel:+91 80 51236041 Fax:+91-80-51236044 IRISH REPUBLIC Tel:1800 409 011 ITALY Tel:+39 06 7839 2939
Fax:+39 06 7814 7709 JAPAN Tel:+81 3 3661 7205 Fax:+81 3 3661 7206 SPAIN Tel:+34 902 013 346 Fax:+34 902 013 379 SWITZERLAND Tel: 0800 83 47 63 Fax: 0800 83 47 54
UK (EU Authorised Representative) Tel:+44 1628 626 136 Fax:+44 1628 626 146 Nthn Ireland Tel: 0800 132 189
185043325 REV D
 Loading...