

Page 1
Use Care
®
MODEL GWLO8
Page 2

Page 3

CONTENTS
1. Important Safety Instructions
• Safety Information 2
2. Operating Instructions
• Introducing Your Smart Drive® 5
• Using Your Smart Drive 6
3. Wash Cycles and Options
• The Wash Cycles 8
• Changing the Wash Options 9
• Advancing the Wash Cycle 10
• Water Levels 11
• Water Saver 12
• Delay Start 13
• Time Saver 13
• Soak 14
• Spin Hold 14
• Favorite Cycle 15
• Customizing the Wash Cycle 16
• Washing Woollens 17
4. Before You Wash
• Sorting 18
• Loading 19
• Washing Bulky Items 19
• Detergent 20
• Scrud 20
• Fabric Softener 21
• Bleach 21
• How to Remove Stains 22
• Diaper Sanitizers 22
5. Changing Pre-set Options
• Option Adjustment Mode 23
• Rinse Options 25
• Volume of Water Used in
Water Saver Option 25
• End of Cycle Beeps 26
• Out of Balance Recovery
Routine 26
• Auto Water Fill Level 27
6. Machine Information
• Care and Cleaning 28
• Products That Might
Damage Your Smart Drive 29
• Smart Drive Sounds and
Beeps 29
• Specifications 30
7. Problem Solving
• Saving Water 31
• Wash Problems 33
• Operating Problems 34
• If Your Smart Drive Beeps
for Help 35
8. Warranty
• Warranty 36
• Proof of Purchase 38
9. Service
• Fisher & Paykel
Authorized Service Agents 38
NOTE: Proof of purchase is required for any warranty claim. Refer to back cover.
Page 4
IMPORTANT SAFETY INSTRUCTIONS
READ ALL SAFETY INFORMATION BEFORE USING
Many washers are located near a gas dryer or a water heater in the home.
WARNING:
For your safety the information in this manual must be followed to minimize the risk of fire
or explosion or to prevent property damage, personal injury or loss of life.
Do not store or use gasoline or other flammable vapors and liquids in the vicinity of this
or any other appliance.
Installation and service must be performed by a qualified installer, service agency or the
gas supplier.
If you smell gas
1. Do not try to light any appliance.
2. Do not touch an electrical switch; do not use any phone in your building.
3. Clear the room, building or area of all occupants.
4. Immediately call your supplier from your neighbor’s phone.
Follow the gas suppliers instructions.
5. If you cannot reach your gas supplier, call the fire department.
WATER HEATER SAFETY:
Under certain conditions hydrogen gas may be produced in a water heater that has not
been used for two weeks or more.
HYDROGEN GAS CAN BE EXPLOSIVE UNDER THESE CIRCUMSTANCES.
If the hot water has not been used for two weeks or more, prevent the possibility of
damage or injury by turning on all hot water faucets and allowing them to run for several
minutes before using any electrical appliance which is connected to the hot water system.
This will allow any hydrogen gas to escape. Since the gas is flammable, do not smoke or
use an open flame or appliance during this process.
2
Page 5

IMPORTANT SAFETY INSTRUCTIONS
READ ALL SAFETY INFORMATION BEFORE USING
WARNING:
To reduce the risk of fire, electric shock, or injury to persons when
using your appliance, follow basic precautions, including the following:
Safety Precautions:
• Read all instructions before using the appliance.
• Use this appliance only for its intended purpose as described in this USE & CARE book.
• Do not use washer if inspection cover (on bottom right-hand front of washer) has been
removed or damaged.
• This washer must be properly installed and located in accordance with the
INSTALLATION INSTRUCTIONS before it is used. If you did not receive an
INSTALLATION INSTRUCTION sheet with your washer, you can obtain one by calling,
toll-free, 888 9FNP USA (888 936 7872).
• Properly ground to conform with all governing codes and ordinances.
Follow details in INSTALLATION INSTRUCTIONS.
• Do not install or store washer where it will be exposed to temperatures below freezing or
exposed to the weather.
• Connect to a properly rated, protected and sized power supply circuit to avoid
electrical overload.
• Connect to adequate plumbing and drain facilities as described in the INSTALLATION
INSTRUCTIONS.
• Turn off water faucets when the washer is not in use to relieve pressure on hoses and
valves and to minimize leakages if a hose or valve should break or rupture.
• Do not repair or replace any part of the appliance or attempt any servicing unless
specifically recommended in this USE & CARE book or in published user repair
instructions that you understand and have skills to carry out.
• When disconnecting the appliance pull by the plug rather than the cord or junction of
cord to avoid damage to the cord or junction of the cord plug.
• Make sure that the cord is located so that it will not be stepped on, tripped over or
otherwise subject to damage or stress.
• Keep all laundry aids (such as detergents, bleach, fabric softener, etc.) out of the reach
of children, preferably in a locked cabinet. Observe all warnings on container labels
to avoid personal injury.
3
Page 6

IMPORTANT SAFETY INSTRUCTIONS
• Do not tamper with the controls.
• Keep the area around/underneath your appliance free from the accumulation of combustible
materials, such as lint, paper, rags, chemicals, etc.
• Keep the floor around your appliance clean and dry to reduce the possibility of slipping.
• Never reach into the washer if the basket or agitator is moving.
Before loading, unloading or adding clothes, press START/PAUSE and wait until the
machine has completely stopped before opening the lid.
• Close supervision is necessary if this appliance is used by or near children. Do not
allow children to play inside, or with this appliance or any discarded appliance.
Dispose of discarded appliances and shipping/packing materials properly. Before
discarding a washer, or removing from service, remove the washer lid.
• Do not leave washer lid up during the cycle. This will stop the wash and spin action
and prevent completion of the cycle. To restart, close lid and press START/PAUSE.
• Do not wash or dry articles that have been cleaned in, washed in, soaked in, or spotted
with combustable or explosive substances (such as wax, oil, paint, gasoline, degreasers,
dry-cleaning solvents, kerosene, etc.) which may ignite or explode. Do not add these
substances to the wash water. Do not use these substances around your washer and/or
dryer during operation, as they give off vapors that could ignite or explode.
• The laundry process can reduce the flame retardancy of fabrics. To avoid such a
result, the garment manufacture’s care instruction should be followed very carefully.
• Do not mix chlorine bleach with ammonia or acid such as vinegar and/or rust remover.
Mixing can produce a toxic gas which may cause death.
• Never climb on or stand on the washer top or lid.
• Do not wash fibreglass articles in your washer. Skin irritation could result from the
remaining particles that may be picked up by clothing during subsequent washer use.
• To minimize the possibility of electric shock, unplug this appliance from the power
supply or disconnect the washer at the household distribution panel by removing the
fuse or switching off the circuit breaker before attempting any maintenance or
cleaning.
• NOTE: Pressing POWER button does NOT disconnect the appliance from the power
supply, even though the lights are out.
• Do not operate this appliance if it is damaged, malfunctioning, partially disassembled
or has missing or broken parts, including a damaged cord or plug.
• Do not operate this appliance if the lid has been incorrectly fitted.
• If you are using an extension cord or a portable electrical outlet device (eg mulitsocket outlet box), ensure that it is positioned so that it does not come into contact
with water or moisture.
SAVE THESE INSTRUCTIONS
4
Page 7

OPERATING INSTRUCTIONS
WARNING: To reduce the risk of fire, electric shock, or injury to persons, read the
IMPORTANT SAFETY INSTRUCTIONS before operating this appliance.
INTRODUCING YOUR SMART DRIVE
Your Smart Drive has a unique control and drive system developed by Fisher & Paykel for
use in washers. The Smart Drive system includes a sophisticated package of electronics in
the console of the washer which controls a variable speed motor coupled directly to the
agitator. This allows much greater versatility than conventional mechanical machines that
use clutches, brakes and gearboxes to control one or two speed motors. Using this system,
the wash cycle can be controlled in such a way that soil removal is maximized with
minimum wear and tear to clothes.
AGITATOR ACTIONS
Your Smart Drive has an almost infinite number of agitator actions, which will be
automatically customized for each individual load. This ensures a consistently high wash
performance.
HANDWASHING
The unique Delicate and Wool cycles allow you to wash articles that you would have
previously only washed by hand. The wool cycle is for machine washable woollens only.
WATER TEMPERATURE
Your Smart Drive has a range of five electronically controlled water temperatures. Electronic
control protects your clothes and ensures optimum wash performance by mixing the hot
and cold water prior to entering the wash basket.
WATER LEVELS
On Auto Water Level your Smart Drive will automatically select the optimum water level
for each wash load. Unlike conventional mechanical washers, your Smart Drive allows the
lowest water level to start at the base of the agitator. The combination of Auto Water Level
and the range of five water levels adds not only convenience but greater water savings with
smaller wash loads.
SPIN SPEEDS
The same electronic flexibility that provides a variety of agitator actions also provides a
range of spin speeds (300, 700 and 1000 rpm) to cater for all fabrics. The top spin speed of
1000 rpm will leave your clothes noticeably drier.
CONTROLS
The electronic controls are designed for maximum ease of use. Software prevents you from
programming your machine in a way that will damage your clothes. The Favorite cycle
allows you to select the cycle and wash options at the touch of a button.
In summary, your Smart Drive offers better wash performance over a greater range of fabric
types, water levels and clothes loads whilst increasing the machine’s ease of operation.
5
Page 8
USING YOUR SMART DRIVE
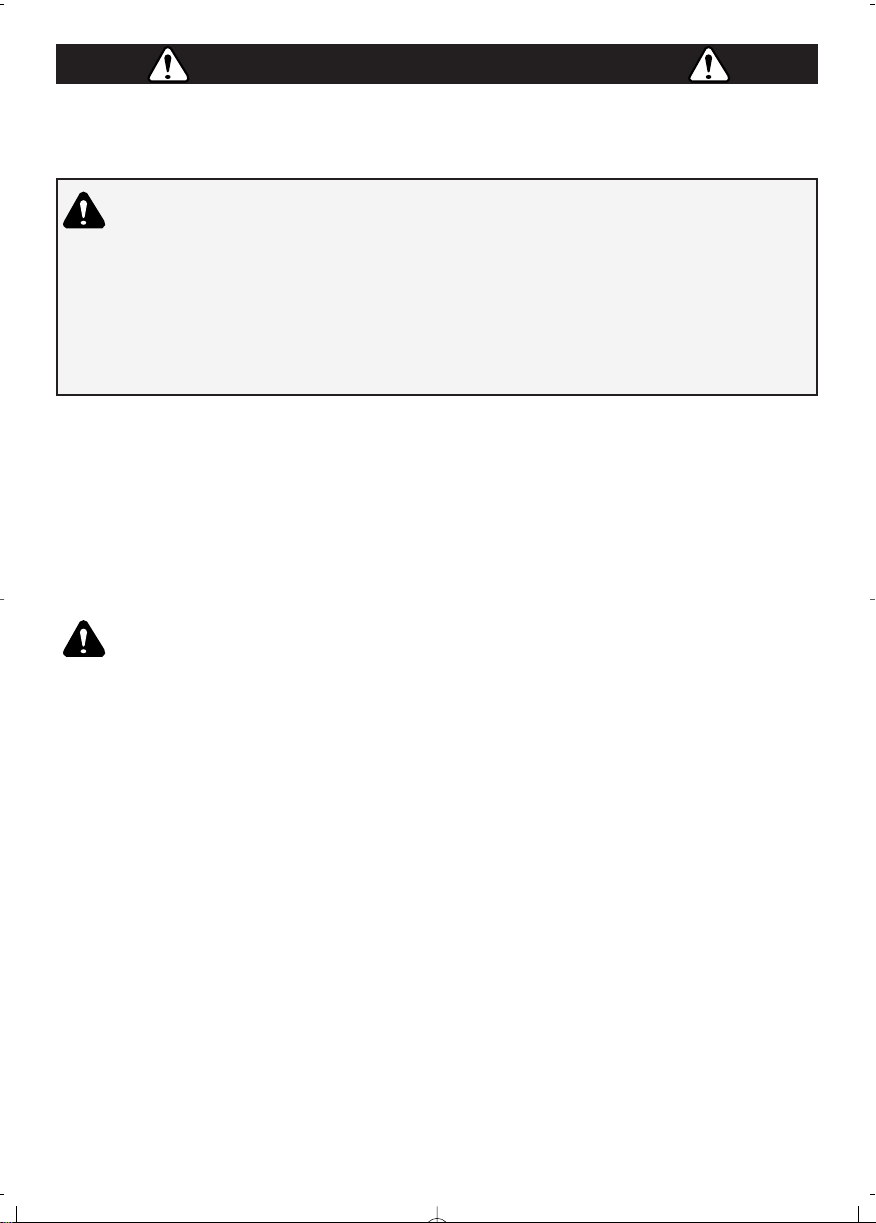
1. POWER AND WATER
Turn on the power and water supplies.
2. LOADING
Place the load evenly around the
agitator. (Refer to Sorting and
Loading pages 18-19.)
3. DETERGENT
• Use the mark on the agitator, nearest to the
top of the clothes, as a guide to the correct
amount of detergent to use.
• Remove the fabric softener dispenser. Pour
the detergent down the center of the
agitator stem.
• Replace the fabric softener dispenser as this
stops small articles falling down the center
of the agitator.
(Refer to Detergent page 20.)
4. BLEACH
• Remove the fabric softener dispenser.
• Pour diluted bleach down the center of the
agitator stem.
(Refer to Bleach page 21.)
6
Page 9
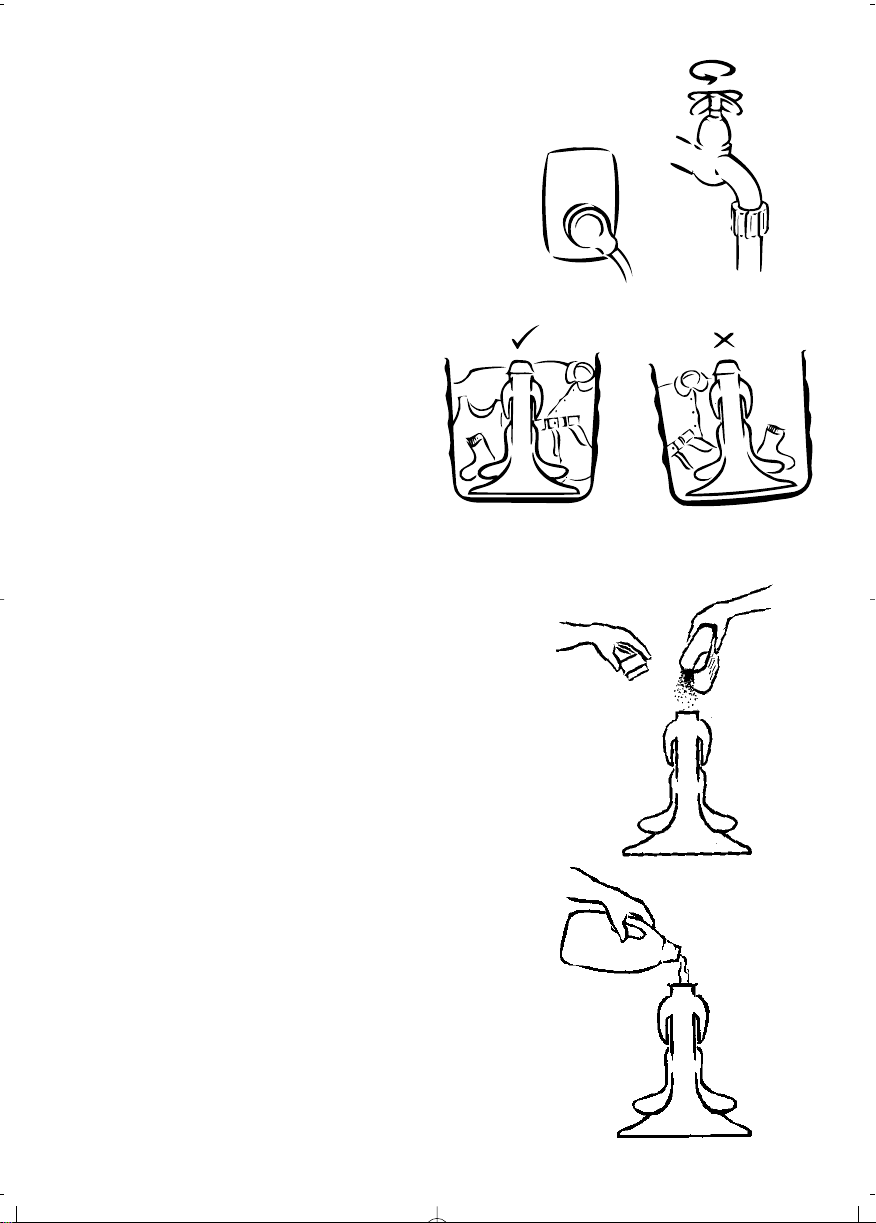
5. FABRIC SOFTENER
• If you wish to use fabric softener, place it in
the dispenser on the top of the agitator.
• If you want to use fabric softener you will
need to select the Softener Rinse Option.
(Refer to Fabric Softener page 21.)
6. WASH CYCLE
Close the lid and press your chosen wash cycle.
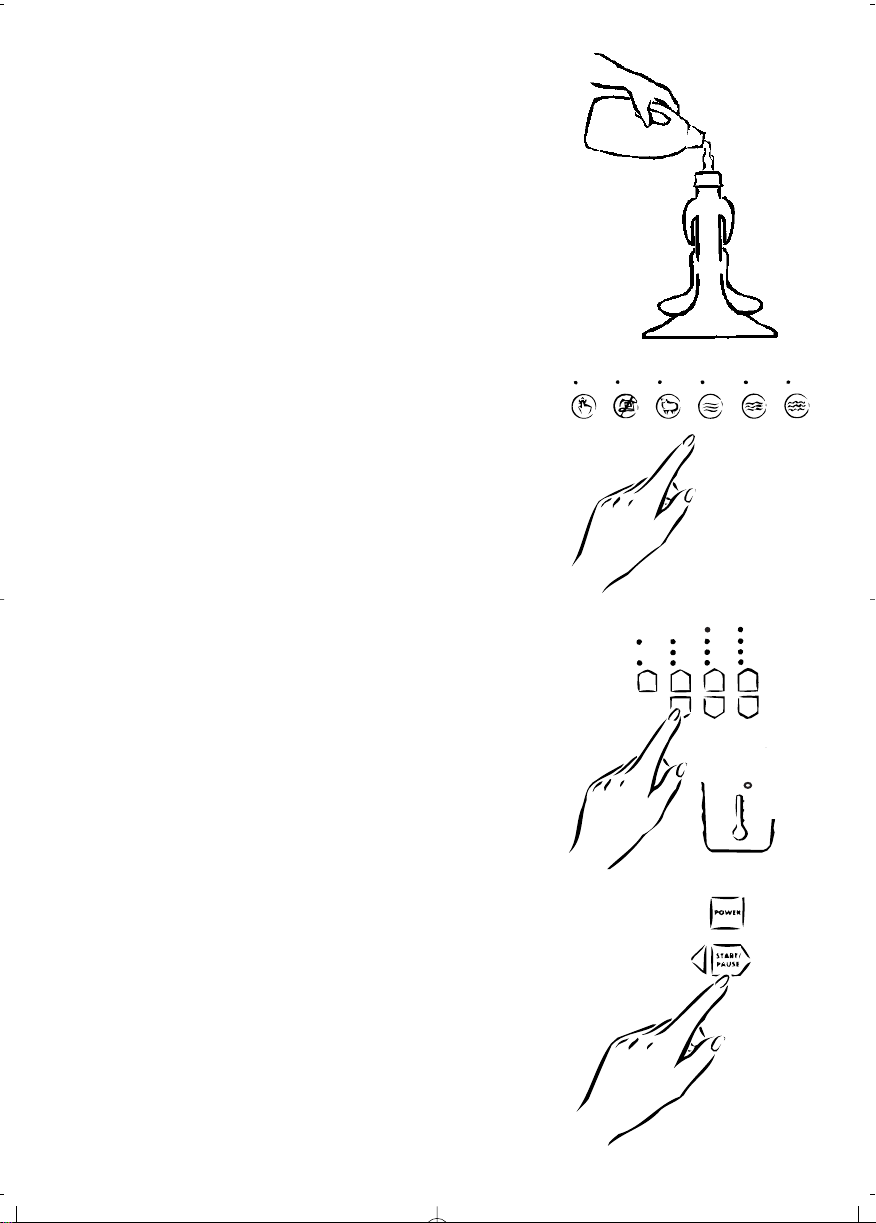
7. WASH OPTIONS
Select the wash temperature and other wash
options.
(Refer to pages 8-14)
8. START
Press START/PAUSE to start the machine.
F
7
Page 10
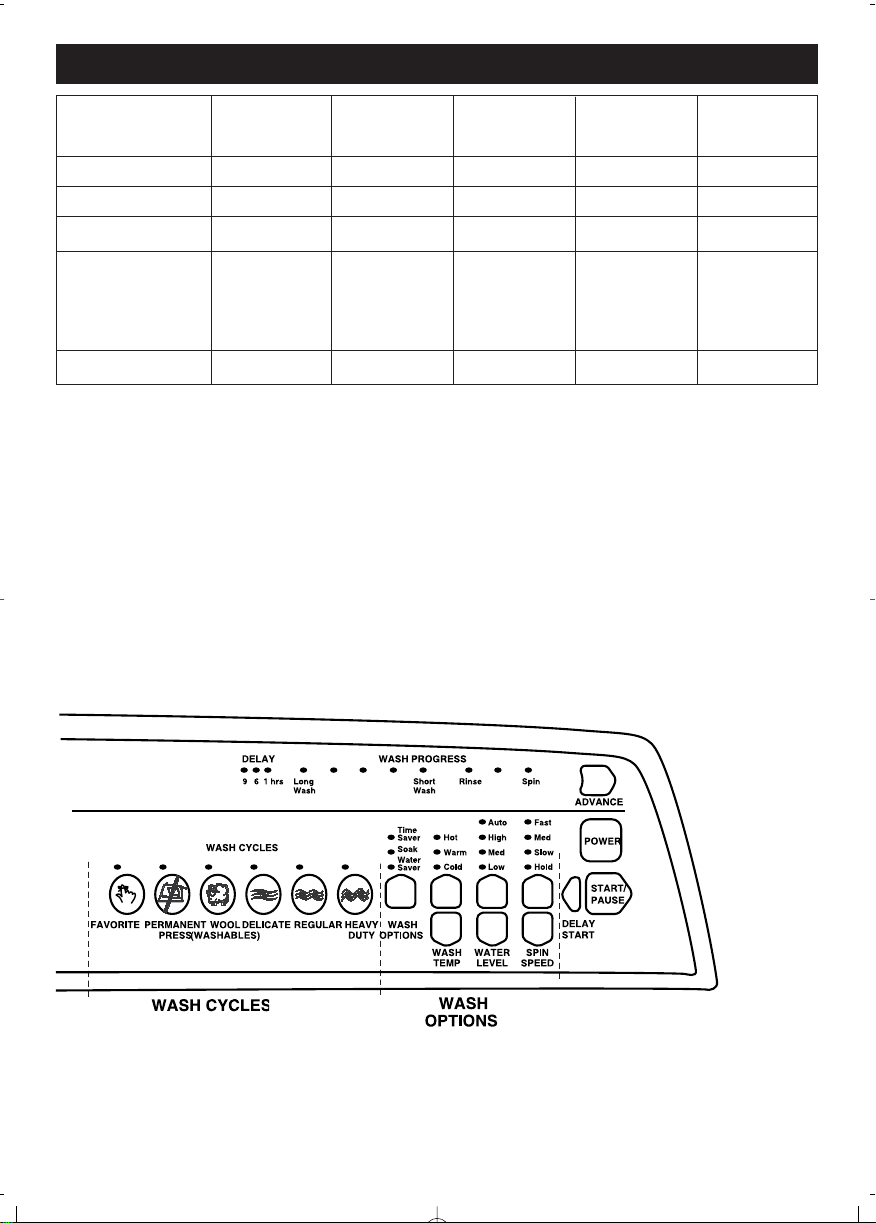
WASH CYCLES & OPTIONS
WASH CYCLES AND OPTIONS
Wash Time
Wash Action
Wash Temp
Rinse
Spin Speed
PERMANENT
PRESS
6
Regular
Warm/cold
Cold Double
Deep
Slow
WOOL DELICATE REGULAR HEAVY
8
Delicate
Warm/cold
spray +
w/cold deep
rinse
Medium
8
Delicate
Warm
Cold Double
Deep
Slow
12
Regular
Warm
Water Saver
Fast
Heavy Duty
Water Saver
DUTY
Warm
THE WASH CYCLES
FAVORITE Lets you design a wash cycle to suit your needs.
See Favorite Wash Cycle (see page 14).
PERMANENT PRESS For synthetics, blends and/or delicate fabrics with normal soil.
WOOL Specially designed for normally soiled knits.
DELICATE For lingerie and special-care fabrics with light soils.
REGULAR For medium to light soiled cottons, linens, work and play clothes.
HEAVY DUTY For heavily soiled and heavy duty fabrics.
15
Fast
8
Page 11
CHANGING THE WASH OPTIONS
When you press POWER to turn on your Smart
Drive, it will automatically select a:
• REGULAR wash cycle,
• WARM wash temperature,
• AUTO water level
• FAST spin speed.
Each of these wash options can be altered to suit
your wash needs. The following pages explain each
of the wash options and how to use them.
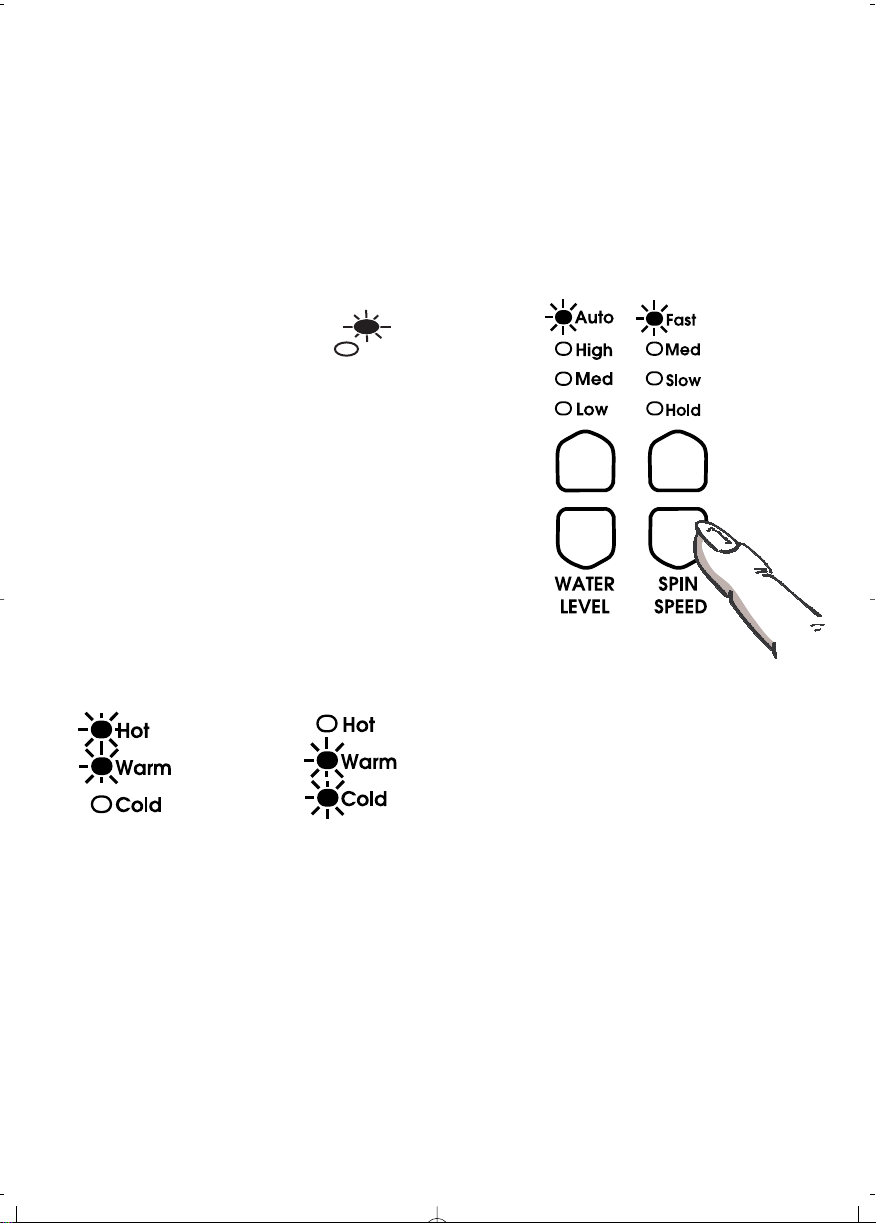
In the following diagrams when a is displayed
it indicates a light is on. When ( ) is displayed,
it indicates a light that is off.
TO ALTER THE WASH OPTIONS
1. Select wash cycle.
2. Use the up or down buttons to alter the
Wash Options.
3. Press START / PAUSE.
Two lights are sometimes used to show some wash
options.
For example, on WARM-HOT or WARM-COLD
water temperature the display will look like this.
( )
WARM - HOT WARM - COLD
Alter the Wash Options using
the Up or Down buttons
9
Page 12
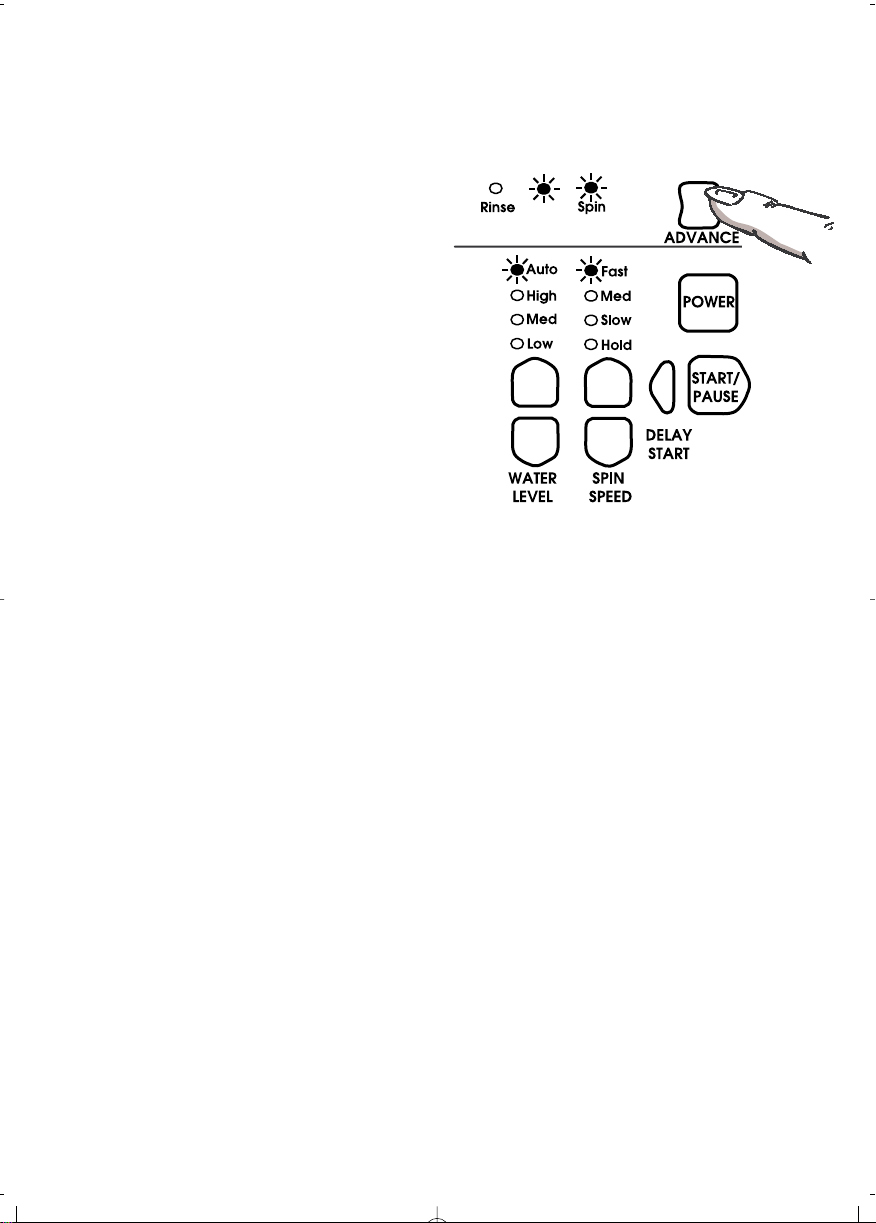
ADVANCING THE WASH CYCLE
The Wash Progress lights show all the tasks your
Smart Drive will do during the wash cycle. As each
task is completed a light goes out, so you can tell at a
glance how far the cycle has to go.
TO SHORTEN THE WASH TIME,
TO RINSE AND SPIN or TO SPIN DRY
1. Press ADVANCE until only the right
number of lights remain on.
2. Press START / PAUSE.
STOPPING THE MACHINE
If you wish to pause or stop your Smart Drive at any
stage, press START / PAUSE. Wait until the machine
has fully stopped before opening the lid.
To restart the machine close the lid and press
START/PAUSE.
CLOTHES CARE SAFEGUARDS
To avoid accidentally damaging your clothes, there
are a few options that your Smart Drive will not
accept. For example, you can not select a hot wash
on Delicate, Permanent Press or Wool cycles. Your
Smart Drive knows that these options could cause
fabric damage.
AUTOMATIC LINT DISPOSAL SYSTEM
Your Smart Drive has a self cleaning lint disposal
system. This means that it automatically separates the
lint from the wash water as it washes. The lint
becomes trapped between the basket and tub and is
flushed out at the end of the wash cycle.
10
Page 13

WATER LEVELS
AUTO WATER LEVEL
Your Smart Drive can automatically select the
appropriate water level for the load.
1. Place your clothes in the machine.
2. Select wash cycle (select AUTO if not automatically
selected).
3. Press START / PAUSE.
During fill the machine will pause occasionally
to sense the water level. The machine will check if
the water level is correct by using a series of two
different agitate strokes. A slow stroke to sense the
load and an agitate stroke to mix the load. (This
may take over a minute). If it detects that the water
level is not enough it will fill with more water and
re-check the level.
• When washing an unusual load eg large bulky
garments, pillows, we recommend you manually
select the water level.
• Manually select the water level if there is already
water in the machine.
Note: If you feel the machine does not fill to the
correct level, you can adjust the level the machine
selects. Refer to the Option Adjustment instructions
on pages 23 and 27.
MANUAL WATER LEVEL SELECTION
The agitator has five levels marked on its stem that can
be used to help you select the correct water level.
Select the correct water level by using the mark
nearest to the top of the clothes.
• The levels marked on the agitator do not
correspond exactly to the level of water. They
indicate the level of dry clothes suitable for the
water level.
• Your Smart Drive may occasionally add water
during agitation. This is to maintain the water
level due to the release of air trapped in the
garments.
High
Med/high
Medium
Med/low
Low
ACTUAL
LEVEL
OF WATER
11
Page 14

WATER SAVER
Use the WATER SAVER option when you want to
minimize the amount of water used during a Regular
or Heavy Duty wash cycle.
When you have selected Water Saver, your Smart
Drive will alter the rinse phase to a give a shower
rinse. A shower rinse alternately showers the clothes
with water and spins them to remove the sudsy water.
• The Water Saver option is not designed to be
used with fabric softener. The shower rinse does
not have a deep rinse so it cannot dispense fabric
softener correctly.
• There are some wash loads that may not suit
being washed using the Water Saver option. For
instance, loads that have a lot of sand or sawdust
etc in them, or garments where color runs.
• Smart Drive customizes the rinse water volume to
suit each load size.
TO USE WATER SAVER
1. Select REGULAR or HEAVY DUTY wash cycle
and your wash options.
2. Select WATER SAVER.
3. Press START / PAUSE.
If you wish to use Time Saver or Soak with Water
Saver push the WASH OPTIONS button until both
options have been selected.
Note: Water Saver is only available on the Regular
and Heavy Duty cycles. If you try to select Water
Saver on the Wool, Delicate or Permanent Press
cycle your Smart Drive will skip over the option.
12
Page 15

DELAY START
DELAY
9 6 1
Delay Start will delay the wash cycle for one, six or nine
hours.
TO USE DELAY START
1. Select wash cycle and wash options.
2. Press DELAY START.
A delayed start of 1 hour will appear first. Press
again for 6 hours, a third time for 9 hours and
again to return to normal.
Your Smart Drive is now programmed to begin the
wash after the delay period.
• Be careful if using Delay Start for non-colorfast
clothes as dyes may run if the clothes are damp.
Note: It is not possible to program a delayed start
into the Favorite cycle.
TIME SAVER
Time Saver allows you to shorten the wash cycle for
lightly soiled clothes. Selecting this option means that
the wash and spin times are reduced.
TO USE TIME SAVER
1. Select wash cycle and wash options.
2. Select TIME SAVER.
3. Press START / PAUSE.
Time Saver can be turned on or off at any time during
the cycle.
If you wish to use Water Saver with Time Saver push
the wash options button until both options have been
selected.
13
Page 16

SOAK
Use the Soak option to soak clothes at the end of the
wash phase or when you wish to reuse the wash
water.
When you select Soak your Smart Drive will soak for
a period of 2 hours before completing rinse and spin.
During soak your washer will agitate for a few
seconds every minute.
TO USE SOAK
1. Select wash cycle and wash options.
2. Select SOAK.
3. Press START / PAUSE.
If at any time during the soak you wish to continue
on with the rest of the cycle press ADVANCE and the
machine will start the rinsing phase of the cycle.
SPIN HOLD
Use the Spin Hold option to:
• Remove drip dry garments from a mixed load
before the wash goes into spin.
• Minimize the clothes creasing when they are left
to sit in the bottom of the basket at the end of the
cycle.
TO USE SPIN HOLD
1. Select wash cycle and wash options.
2. Select SPIN HOLD.
3. Press START / PAUSE.
When you have selected Spin Hold, your Smart Drive
will pause at the end of rinse, beep and the spin light
will flash to tell you that it is waiting for another
instruction. Press START / PAUSE to begin the spin.
14
Page 17

FAVORITE CYCLE
Favorite cycle lets you design a wash cycle to suit
your needs.
Favorite cycle can be any wash cycle with any of its
wash options and it can start from any point along
the wash progress lights.
For instance, your Favorite cycle may be set up to
wash your gym gear or it may be a rinse and spin to
finish washing diapers.
Whatever you program as your Favorite cycle, your
Smart Drive will remember it even when it is
unplugged.
PROGRAMMING YOUR FAVORITE CYCLE
1. Press FAVORITE and hold down for 2 seconds.
2. The machine will give two quick beeps and the
Favorite light will flash telling you that you are in
the programming mode.
3. Select the wash cycle and wash options you want
for your Favorite cycle.
(Use ADVANCE if you want only part of a cycle
eg spin only.)
4. Press FAVORITE again to store your Favorite
cycle.
To change your Favorite cycle repeat these four steps.
TO USE FAVORITE CYCLE
1. Press FAVORITE.
(Your Favorite cycle and wash options will be
automatically selected.)
2. Press START / PAUSE.
15
Page 18

CUSTOMIZING THE WASH
CYCLES
All the wash cycles can be partially customized. You
can program your Smart Drive to automatically set
the wash options and agitation time you want, when
you select each wash cycle.
For instance, you may want to set the Regular cycle
to cold wash or set Heavy Duty to include a soak.
Once you have programmed the wash cycles, your
Smart Drive will remember them, even when it is
unplugged.
TO CUSTOMIZE THE WASH CYCLES
1. Press the wash cycle you wish to customize and
hold down for 2 seconds.
2. The machine will give two quick beeps and the
wash cycle light will flash telling you that you are
in the programming mode.
3. Select your wash options.
4. If you would like to decrease the agitation time,
press ADVANCE until the required number of
green lights remain. (Each green light in the wash
progress represents 3 minutes of agitation.)
To increase the agitation time keep pressing
ADVANCE until all the green lights are displayed
again.
Note: On Heavy Duty and Wool you can only
decrease the wash time.
5. Press the wash cycle again to store your
customized cycle.
To change your customized wash cycle repeat these
steps.
Note: The customized wash cycles cannot be set to
start at the rinse or spin stage.
16
Page 19

WASHING WOOLLENS
The Wool Cycle is for washing
MACHINE WASHABLE WOOLLENS.
The fibers of these woollens have been specifically
modified to prevent felting when they are machine
washed. Most handknitted garments are not made of
machine washable wool and we recommend that
you hand wash them.
• Before washing your woollens check the care
label for the washing instructions.
• When washing woollens use a mild detergent
recommended for washing wool.
• Hand washed woollens may be spun in a washing
machine to reduce the time they take to dry.
• To dry woollens lay them flat on a towel and pat
into shape. Dry woollens out of direct sunlight.
(The heat and tumble action of a dryer may cause
shrinkage or felting of woollen garments).
• Some wool underlays and sheepskin products can
be washed in a washing machine but may
produce excessive amounts of lint that may cause
pump blockages. (Ensure that the whole article is
suitable for machine washing and not just the
backing material.) You may wish to handwash
these articles and place them in the machine to
spin dry.
17
Page 20

BEFORE YOU WASH
BEFORE YOU WASH
SORTING
Some fabrics are “scavengers”. They absorb soil,
color and lint given off by other garments.
So it is important to sort clothes carefully before
washing.
Hand Wash
CARE LABELS
• Look for a care label on your clothes. This will
tell you about the fabric content of your garment
and how it should be washed.
• Sort clothes into loads that can be washed with
the same wash cycle, water temperature and spin
speed.
SOIL
• Separate clothes according to the type and
amount of soil. Some soils suit warmer washes
eg oily soils, while others are best washed in cold
water eg mud, blood.
• Heavily soiled clothes may need to be soaked.
COLOR
• Separate white fabrics from colored fabrics.
• Any fabric that has a strong bold color may
bleed, especially when new. It is much safer to
wash it separately, until you are sure that it
will not lose any more of the color.
LINT
• Wash lint givers and lint collectors separately.
• Where possible, turn lint collectors inside out.
• If lint transfer is a problem:
* Wash light clothes separately to dark clothes.
* Use a little more detergent
* Avoid overloading
Do not bleach
Do not tumble dry
Medium iron
Dryclean
Lint Givers Lint Collectors
Terry cloth Synthetics
Chenille Corduroy
Towels Permanent Press
Diapers Socks
18
Page 21

LOADING
BEFORE WASHING
• CHECK POCKETS Things such as nails, hairclips,
matches and pens can damage both your
washer and your clothes.
• CLOSE ZIPPERS, HOOKS AND EYES This is to
make sure that these items do not snag on other
clothes.
• MEND ANY TORN GARMENTS OR LOOSE
BUTTONS Tears or holes may become larger
during washing. Remove any loose bra wires as
they can damage your washing machine and/or
dryer.
• PRE-TREAT ANY STAINS
• FOR A BALANCED LOAD:
* Place unfolded clothes firmly and evenly
around the agitator.
* Do not wrap large items, such as sheets,
around the agitator.
* A mixture of small and large items will wash
the best.
• DO NOT OVERLOAD THE MACHINE Ensure
that the load does not extend above the dispenser
as splashing may occur.
A MAXIMUM WASH LOAD
15.4 lb (7kg)
For example
2 queen sheets
4 standard pillow cases
2 medium tablecloths
6 medium bath towels
8 wash cloths
5 men’s hankerchiefs
3 men’s short sleeve shirts
4 t-shirts
7 pairs of shorts
WASHING BULKY ITEMS
• Forcing large items into the machine may result in
them being damaged during washing. Ensure
there is sufficent room in the machine for items to
move when being washed.
• Some items float up during the wash, (eg duvets,
pillows). If they sit too high they may come into
contact with stationary parts of the machine during
agitate or spin. To minimize the chance of this
happening, bulky items should be pushed down
below the water level after fill and pushed to sit
below the medium high water level mark on the
agitator before spinning. Select a slow spin.
• We recommend washing these items on the
Delicate cycle. If you wish to re-spin the load at a
faster speed ensure the load is sitting below the
medium high mark before spinning.
Bulky items should sit below the
medium high water level mark.
19
Page 22

DETERGENT
CHOOSING THE RIGHT DETERGENT
We recommend the use of domestic detergents, (powder,
liquid or concentrated).
Soap flakes or granulated soap powders should not be
used in your Smart Drive.
When washing woollens remember to use a detergent
suitable for woollens.
HOW MUCH DETERGENT?
For liquid and concentrated detergents, follow the
recommendations of the detergent manufacturer.
Note: To check you are using the correct amount of
detergent, lift the lid of your machine about half-way
through the wash. There should be a thin layer of foam
over the surface of the water. Lots of foam may look good
but does not contribute to cleaning your clothes. No foam
means not enough detergent has been used: soil and lint
can settle back on the clothes or the washing machine.
ADDING THE DETERGENT
1. Remove the fabric softener dispenser.
2. Pour detergent down the center of the agitator.
• Some detergents MUST be fully dissolved before
adding to your machine to get the best wash results.
Check the instructions on the detergent packet.
• Pre-dissolving detergent when washing in cold
water can improve its performance.
3. Replace the fabric softener dispenser. (This prevents
small articles falling down the center of the agitator.)
SCRUD
Scrud is the name given to the waxy build-up that can occur within washers when the
fabric softener comes into contact with detergent. This build-up is not brought about by a
fault in the machine. If scrud is allowed to build-up in the machine it can result in stains on
your clothes or an unpleasant smell in your washer.
If you wish to use fabric softener we recommend:
• Using fabric softener sparingly.
• When filling the dispenser, do not splash or overfill.
• Clean dispenser as soon as the cycle has finished.
• Clean your machine regularly (refer page 28).
• Cold water washing increases the chance of this build-up occurring. We recommend a
warm or hot wash at regular intervals eg approximately every 5th wash.
• Fabric softener of a thinner consistency is less likely to leave residue on the
dispenser and contribute to a build-up.
20
Page 23

FABRIC SOFTENER
HOW THE FABRIC SOFTENER IS DISPENSED
The fabric softener goes into the dispenser on the
top of the agitator. During rinse the machine spins
to release the fabric softener, delivering it down the
agitator stem as the machine fills for the final deep rinse.
Note: The Water Saver option is not designed to be used
with fabric softener. Water Saver does not use a deep
rinse so it cannot dispense fabric softener correctly.
HOW MUCH FABRIC SOFTENER?
The ring on the dispenser cup is a guide for the
amount of fabric softener to add for a full load.
Smaller loads require less fabric softener.
CLEANING THE DISPENSER
When using fabric softener, rinse your dispenser at
the end of each wash.
1. Separate the cup from the dispenser body by
pushing downwards on the base of the cup.
2. Rinse both parts of the dispenser using warm
soapy water.
TO REMOVE CUP
BLEACH
To use liquid chlorine bleach:
1 Check clothing care labels for special instructions.
2 Measure liquid bleach carefully, following
instructions on package.
3 Dilute liquid bleach with water.
4 Remove Fabric Softener Dispenser.
5 Pour diluted liquid bleach down the center
of the agitator stem.
6 Replace the Fabric Softener Dispenser
If you prefer to use powdered bleach, pour into the
agitator with your detergent.
NOTE: Never pour undiluted liquid chlorine bleach
directly onto clothes, into the wash basket, or into
the center of the agitator.
Push cup
through
dispenser
with thumb
21
Page 24

HOW TO REMOVE STAINS
• Treat stains AS SOON AS POSSIBLE. The longer
they are left the harder they are to remove.
• Always consider the type of fabric you are treating
to make sure you do not use a water temperature
that is too hot or a treatment that will alter the
color of the fabric. It pays to test pre-wash
products and solvents on an inconspicuous part of
the garment first.
• Place the garment being treated on an absorbent
cloth (eg on an old towel). Work from the reverse
side of the stain, as this can force the stain off the
fabric instead of through it.
• Use cold or warm water on unknown stains as hot
water can set some stains.
• Some stains are not easily seen when the fabric is
wet. Air dry the stained garment to be sure the
stain has been removed, as heat from a dryer may
set the stain.
• Take care with stain removal treatments as they
are often flammable and highly poisonous. Do not
use them on your washer as they may damage the
paint or plastic components.
• Some pretreatment sprays or liquids can damage
your washer’s control panel.
DIAPER SANITIZERS
Diaper Sanitizers are very corrosive to metal surfaces,
and will cause damage to the paint work and
components of your washer.
DO NOT soak diapers in sanitizer in your washer or
tip the contents of the diaper bucket into your
machine. Rinse and wring diapers out thoroughly
before placing them in the washer.
22
Page 25

CHANGING PRE-SET OPTIONS
CHANGING PRE-SET OPTIONS
OPTION ADJUSTMENT MODE
After using your Smart Drive you may want to
change some of the pre-set options to suit your
wash needs.
You can change the following pre-set options:
• the rinse option on Heavy Duty, Regular and
Wool cycles
• the amount of water used in the Water Saver
option
• the number of beeps at the end of the cycle
• the Out of Balance recovery routine
• the fill level selected by auto water level
To make these changes it is necessary to enter
the “Option Adjustment Mode”.
TO ENTER OPTION ADJUSTMENT MODE
1. Plug the machine in, but do not press POWER.
Press START / PAUSE and hold down.
Press POWER.
2. When the buttons have been pressed correctly the
machine will give two quick beeps and show an
unusual pattern of lights.
In this mode the lights are used to indicate the
different options available. The diagram on page
24 shows how the lights relate to the options you
can change.
Pages 25 - 27 explain the different options in
more detail.
3. Use the buttons on the panel to make your
changes to the pre-set options.
4. Press POWER to return to normal mode.
5. Your Smart Drive will automatically remember
your changes.
6. To make further changes, repeat the above steps.
23
Page 26

1. Press START / PAUSE and
hold down. Press POWER.
2. This diagram below shows how the lights relate to the options you can change in the
Option Adjustment Mode. It also shows what lights will be on when you first enter the
Option Adjustment Mode.
3. Use the buttons on the panel
to change the pre-set options.
24
Page 27

RINSE OPTIONS
On the Heavy Duty, Regular and Wool cycles you
can change the pre-set rinse option.
The pre-set rinse option on these cycles is a spray
rinse followed by a deep rinse. The spray rinse may
be replaced with a short spin or a deep rinse.
If you have a problem with impurities in your water
supply you may get a better wash if you change the
rinse option to two deep rinses. If you want to
conserve water change the rinse option to one deep
rinse.
1. Enter the Option Adjustment Mode as explained
on pages 23 and 24.
2. Use the SPIN SPEED buttons to select the rinse
option you prefer.
MED light on = 2 deep rinses
SLOW light on = Short spin and
1 deep rinse
HOLD light on = Spray rinse and
1 deep rinse
3. Press POWER to return to normal mode.
RINSE OPTIONS
MED spin Deep Deep
light on rinse rinse
SLOW spin Short Deep
light on spin rinse
HOLD Spray Deep
light on rinse rinse
VOLUME OF WATER USED IN THE
WATER SAVER OPTION
You can increase or decrease the volume of water
added during the shower rinse on the Water Saver
option.
1. Enter the Option Adjustment Mode as explained
on pages 23 and 24.
2. Use the WATER LEVEL buttons to select the
volume of water you wish to be used in the
shower rinse.
HIGH light on = more water
MED light on = factory set water volume
LOW light on = less water
3. Press POWER to return to normal mode.
25
Page 28

END OF CYCLE BEEPS
The beeps signaling the end of the cycle can be
increased or decreased.
1. Enter the Option Adjustment Mode as explained
on pages 23 and 24.
2. Use the Wash Option button to select the
number of beeps you prefer.
TIME SAVER light on = 15 beeps
SOAK light on = 5 beeps
WATER SAVER light on = no beeps
3. Press POWER to return to normal mode.
OUT OF BALANCE RECOVERY
ROUTINE
When your Smart Drive is spinning it can sense when
the wash load is out of balance and will stop and
retry spinning. If the machine still senses an
unbalanced load there are two options the machine
can take.
• Automatic Recovery Option:
Your Smart Drive tries to automatically correct
the out of balance load. If it detects an unbalanced
load, it will fill with water and agitate to redistribute
the load before trying to spin up again.
• Machine Stops Option
Your Smart Drive will stop, giving a short burst of
beeps every five seconds and the first RINSE or
SPIN light, as well as the SPIN SPEED light will flash.
You must redistribute the load more evenly yourself.
Use this option if you wish to conserve water.
1. Enter the Option Adjustment mode as explained
on pages 23 and 24.
2. Use the Heavy DUTY button to select the Out of
Balance recovery option you prefer.
HEAVY DUTY light on = automatic
HEAVY DUTY light off = stops
3. Press POWER to return to normal mode.
26
Page 29

AUTO WATER FILL LEVEL
If you are not satisfied with the level that your Smart
Drive fills to on Auto water level, you can increase or
decrease the fill level that Auto will select.
Note: If you feel there is not enough water for the
load, we recommend you check by pausing the
machine and pushing the clothes down to see how
much water is under the clothes. Clothes often float
and your Smart Drive can sense the water under the
clothes.
1. Enter the Option Adjustment Mode as explained
on pages 23 and 24.
2. Use the cycle buttons to increase or decrease the
amount of water selected.
FAVORITE light on = less water
PERMANENT PRESS light on = factory set level
WOOL light on = more water +
DELICATE light on = more water ++
REGULAR light on = more water +++
3. Press POWER to return to normal mode.
27
Page 30

MACHINE INFORMATION
MACHINE INFORMATION
CARE AND CLEANING
WHEN YOU HAVE FINISHED
• Turn off the faucets to prevent any chance of flooding
should a hose burst.
• Unplug the machine from the wall socket.
COLD WATER WASHING
If you always use cold water, we recommend that a
warm or hot wash be used at regular intervals eg every
fifth wash should be at least a warm wash.
CLEANING YOUR SMART DRIVE
• Use a damp cloth or warm soapy water and wipe
dry. Do not use chemical or scouring cleaners as
they can damage the paint and plastic surfaces.
• Clean the fabric softener dispenser regularly using
warm soapy water.
• You can remove the lid for cleaning. Open the lid
fully, hold one side with one hand and gently tap
the other side with an upward motion.
To replace the lid, hold the lid vertically and align
both hinges before pushing down firmly.
• To remove the agitator for cleaning, unscrew the nut
down the center of the agitator by turning anti-clockwise.
CAUTION:The agitator must be fully pushed on to
the shaft when refitting. Tighten the nut firmly by
hand. Ensure the agitator is not loose.
CLEANING THE INSIDE OF YOUR SMART DRIVE
If you use fabric softener or do regular cold water
washing, it is important that you occasionally clean
the inside of your machine.
• Fill your machine with hot water. Add about
two cups of a powdered detergent.
• Let it agitate for several minutes.
• Stop the machine, open the lid, and leave it to
soak overnight.
• After soaking, drain the machine and run the
machine through a regular cycle.
We do not recommend that you wash clothes during
this procedure.
28
Page 31

PRODUCTS THAT MIGHT
DAMAGE YOUR SMART DRIVE
• Concentrated bleaches and diaper sanitizers will
cause damage to the paintwork and components of
your washer.
• Hydrocarbon solvents ie gasoline, paint thinners and
lacquer thinners, etc. can dissolve plastic and blister
paint. (Do not wash or dry garments stained
with these solvents as they are flammable.)
• Some pretreatment sprays or liquids can damage
your washer’s control panel.
• Use of dyes in your washer may cause staining
of the plastic components. The dye will not damage
the machine but we suggest you thoroughly clean
your washer afterwards. We do not recommend
the use of dye strippers in your washer.
• Do not use your washer lid as a work surface.
SMART DRIVE SOUNDS AND BEEPS
Your Smart Drive will make sounds that you will not
have heard from other washers.
• The motor will pulse before agitate and while
draining before spin. This may sound like several
low thuds. Your machine is checking if there is
enough water in the machine before agitating and
that the water has drained before spinning.
• Your Smart Drive will beep at the end of the cycle
and if you have used Spin Hold.
• When AUTO is selected your Smart Drive will
alternate between filling and agitating to check that
it has the right amount of water for the load.
• If your machine is beeping continuously or giving
short bursts of beeps refer to If Your Smart Drive
Beeps For Help page 35.
29
Page 32

SPECIFICATIONS
lid clearance
Height
Allowing for
adjustable feet
Hot
Cold
⁄4” (1150mm)
1
⁄2” - 47”
1
Standpipe
45
33
(850-1200mm)
Minimum height of faucets
to clear the top of machine
Inlet water pressure
Max 150 psi (1MPa)
Min 3 psi (20kPa)
Depth
DIMENSIONS
MODEL L08
1
DEPTH 25
WIDTH 25
HEIGHT
TO TOP OF CONSOLE
1
⁄2” (900mm)-
35
1
⁄2” (1000mm)-
39
LID CLEARANCE 18
⁄2” (650mm)
1
⁄2” (650mm)
1
⁄2” (930mm)
36
1
⁄2” (1030mm)
40
” (460mm)
WATER CONSUMPTION (RINSE OPTIONS)
CYCLE (L08)
Water Saver Rinse
Spray & Deep Rinse
1 Deep Rinse
2 Deep Rinses
Gallons - Litres
39 gal (145l)
45 gal (170l)
44 gal (165l)
58 gal (220l)
30
Width
(Please note these are
approximate figures for
High water levels with a
15.5 lb load.)
Page 33

PROBLEM SOLVING
PROBLEM SOLVING
SAVING WATER
• FULL LOADS Full loads use water more
efficiently than part loads.
• WATER SAVER The Water Saver option minimizes
the amount of water used in the rinse. (Refer to
Water Saver page 12.)
• SINGLE DEEP RINSE You can adjust the rinse
option on Regular, Heavy Duty and Wool cycles
to have one deep rinse only. (Refer to Rinse
Options page 25.)
• AUTO WATER LEVEL You can adjust Auto water
level to fill with less water. (Refer to Auto Water
Fill Level page 27.)
Your Smart Drive also offers several ways of reusing
the wash and rinse water.
RECYCLING THE WASH WATER
1. Select SOAK on the first wash cycle.
2. Remove the clothes at the end of the wash phase
and add the second load to the wash water.
3. Select the wash cycle for the second load.
You may need to add extra detergent.
4. Remove the second load at the end of the cycle.
5. Replace the first load, select rinse and complete
the wash cycle.
RECYCLING THE WATER FROM DEEP RINSE
1. Select SPIN HOLD on the first wash cycle.
(You cannot use the Water Saver option when
recycling the water from deep rinse.)
2. Remove the clothes at the end of the rinse and
add the second load to the rinse water.
3. Select the wash cycle for the second load.
4. Remove the second load at the end of the cycle.
5. Replace the first load and spin dry.
31
Page 34

MANUAL SUDS SAVE WITH SIPHON BACK
If you have a large tub near your washing machine
and a separate drain outlet you can set up another
method of reusing the water.
(The tub should hold a minimum of 27 gallons (100
litres) or have an overflow.)
1. Select SOAK on the first wash cycle.
2. At the end of the wash phase place the drain hose
in the tub.
3. Cancel SOAK (press ADVANCE button). The suds
water will be pumped into the tub. Do not leave
your machine until pump out is completed.
4. ONCE YOUR TUB IS FILLED RETURN THE
DRAIN HOSE TO THE DRAIN. THIS MUST BE
DONE BEFORE THE MACHINE STARTS
SPINNING.
5. Allow the machine to complete the rest of the
cycle. Remove the first wash load and place the
second load in the machine.
6. To siphon back the suds place the end of the
drain hose in the tub, ensure that the end is near
the bottom of the tub.
7. Advance to SPIN and allow the machine to pump
for a few seconds to clear air from the drain hose,
then press POWER to turn the machine off.
8. The suds water will siphon back into the machine.
It will take several minutes to siphon back the
water.
9. RETURN HOSE TO DRAIN.
10.Select second wash cycle.
Note: You will only be able to
siphon back into the machine
until the water level is equal to
that in the tub.
The above method can also be used to recycle the
water from a deep rinse. Select SPIN HOLD in place
of SOAK.
Note: For any of the above methods, manually
select the water level for the second wash load.
Auto water level may fill to a level too high for the
clothes load if there is already water in the washing
machine.
32
Page 35

WASH PROBLEMS
PROBLEMS POSSIBLE CAUSES and SOLUTIONS
Creasing
• Overloading the washer or dryer.
• Choose a Permanent Press or Delicate cycle as these cycles have been
designed to minimize creasing.
• Try selecting a slower spin speed.
• Do not leave wet clothes to sit in the washer or laundry basket.
Poor soil
removal
Linting
Residue
detergent
• Not enough detergent for load size or amount of soil.
• White clothes are better washed separately. Separate light and heavily
soiled items, as clothes can pick up soil from dirty wash water.
• Select the wash temperature according to soil type. For example, blood
and mud are better washed in cold water, while oily soils wash better in
warmer water.
• Cold water wash too cold.
• Overloading the washer.
• Loads made up of articles of varying sizes will wash better (eg full loads
of sheets may not wash as well).
• Hard water requires more detergent than soft water.
• Wash lint givers eg towels, flannelette sheets, separately from lint collectors
eg synthetic fabrics.
• Overloading the washer.
• Not enough detergent to hold the lint in suspension.
• Overdrying in a dryer can cause a build-up of static electricity in
synthetic fabrics and cause them to attract lint.
• Overloading the washer.
• Try using less detergent.
• Some detergents need to be pre-dissolved, check the detergent instructions.
• Cold ambient temperatures, cold washes or short agitation times may
not let the detergent dissolve properly. Try pre-dissolving the detergent.
Black marks
on clothes
Dye transfer
Tangling
• A build-up caused by the interaction of fabric softener and detergent can
flake off and mark clothes. (Refer to Scrud page 20)
• Insufficient detergent, for the amount of soil on the clothes, can result in
black marks on clothes. (Refer to Detergent page 20)
• Wash and dry non-colorfast clothes separately.
• Non colorfast clothes left sitting in a washer or laundry basket can transfer
dye to other clothes.
• Washing with too much water (ie underloading) can cause the clothes to
tangle around one another.
• Do not load the washer by wrapping clothes around the agitator.
33
Page 36

OPERATING PROBLEMS
If your Smart Drive is not operating properly use the checklists on the following pages to
find the possible solution. If the problem persists contact your Fisher & Paykel Dealer or
Authorized Service Agent.
SYMPTOMS POSSIBLE SOLUTIONS
Pressing POWER does not turn
the machine on.
Pressing START / PAUSE does
not start the wash cycle.
Machine will not spin.
Clothes still wet at end of cycle.
Machine is continually going
out of balance.
Too much or too little water
when filling on Auto water
level.
1. Is the power switched on?
2. Unplug machine from the wall. Wait 15 seconds, plug
back in and operate the machine.
3. Could your household power supply be at fault? Try
plugging in another electrical appliance.
1. Have you closed the lid?
2. Are both hot and cold faucets turned on?
3. Are the inlet hoses kinked?
4. Try pressing START / PAUSE again.
1. Have you closed the lid?
2. Is the spin light flashing? If so press START / PAUSE.
3. Is the machine draining?
4. Are the clothes out of balance?
5. Check machine is level. (See separate INSTALLATION
INSTRUCTIONS).
1. Are the clothes out of balance?
1. Check the machine is level.
2. Are the clothes out of balance?
1. If there was water already in the basket before Auto water
level was selected it may cause the machine to overfill.
2. Some loads do not suit Auto water level eg pillows,
bedding, large bulky, garments. Manually select the
water level. Refer to page 27 to adjust the Auto fill level.
Small puddle of water coming
from under the machine.
Spin speed sounds slower
than it should.
1. The water level is too high for the amount of clothes.
This has caused excessive splashing. Use a lower
water level.
2. Too much detergent for the level of soil in the clothes.
This has caused excessive suds to splash over the tub.
When the suds dissolve they can form a puddle that
can be mistaken as a leak. Check the amount of
detergent used.
1. The clothes are unevenly distributed in the wash
basket, your Smart Drive has compensated by lowering
the spin speed.
Page 37

IF YOUR SMART DRIVE BEEPS FOR HELP
Your Smart Drive is capable of diagnosing its own troubles. If your Smart Drive gives a short
burst of beeps every 5 seconds it is telling you that it has a problem which YOU can solve
using the checklist below.
MACHINE IS GIVING A SHORT
BURST OF BEEPS* AND... POSSIBLE SOLUTIONS
* The short burst of beeps is the same sound your washer makes when you plug your machine in.
HOT water temperature
light is flashing
1. Hot faucet has not been turned on.
2. Inlet hose screens may be blocked.
3. Hot water supply is not hot enough to maintain the
wash temperature you have selected. Select a lower
wash temperature.
4. Inlet hoses connected the wrong way around.
COLD water temperature
light is flashing
HOT and COLD water
temperature lights are flashing
HIGH water level light is
flashing
First rinse light or spin light
is flashing
First RINSE or SPIN light is
flashing as well as the SPIN
SPEED light.
IF THE MACHINE BEEPS
CONTINUOUSLY
1. Cold faucet has not been turned on.
2. Inlet hose screens may be blocked.
3. Faucets connected the wrong way around.
4. Cold water temperature exceeds recommended
limits (See separate INSTALLATION INSTRUCTIONS).
1. The inlet hoses have not been turned on.
2. The drain hose is too low & the water is siphoning
out of the machine. (See separate INSTALLATION
INSTRUCTIONS).
3. Water flow is very low. Check screens on inlet hoses and
water valves for any blockage.
1. The machine is overloaded and can not agitate.
Ensure the machine is stationary. Remove clothes
until the remaining clothes can move freely.
2. Remove the agitator. Check that no foreign object is
trapped under the agitator
1. The machine has a suds build-up. (Too much
detergent may have been used for the amount of soil
in the load.) Wait for suds to dissolve. Rinse clothes
using a deep rinse.
1. Wash load is out of balance. Ensure the machine is
stationary. Manually redistribute the load. Check
machine is level. (See separate INSTALLATION
INSTRUCTIONS).
1. Unplug machine from the wall. Wait 15 seconds,
plug back in and operate machine.
2. If the fault re-occurs repeat step 1.
3. If the machine still will not work call your Authorized
Service Agent or Fisher & Paykel Dealer.
35
Page 38

WASHER WARRANTY
WHAT IS COVERED BY THE WARRANTY
FULL TWO-YEAR WARRANTY
For two years from the date of original purchase, we will provide, free of charge, parts and
service labor in your home to repair or replace
a manufacturing defect.
This warranty is extended to the original purchaser and any succeeding owner for products
purchased for ordinary home use in the 48 mainland states, Hawaii and Washington. D.C. In
Alaska the warranty is the same except that is is LIMITED because you must pay to ship the
product to the service shop or for the service technician’s travel costs to your home.
All warranty will be provided by a Fisher & Paykel Authorized Service Agent during normal
working hours.
Should your appliance need service, during the warranty period or beyond, call
TOLL FREE 888 9FNP USA (888 936 7872)
WHAT IS NOT COVERED BY THE WARRANTY
• Service trips to your home to teach you how to use the product or change the set-up of
the product.
Read your USE & CARE book. If you then have any questions about operating the
product, please contact your dealer or call 888 9FNP USA (888 936 7872)
• Improper installation.
If you have an installation problem, contact your dealer or installer. You are responsible
for providing adequate electrical, exhausting and other connection facilities.
• Replacement of house fuses or resetting of circuit breakers.
• Failure of the product if it is misused, or used for other than the intended purpose or
used commercially.
• Damage to product caused by accident, fire, floods or Acts of God.
• Correction of unauthorized repairs.
• Normal recommended maintenance as set out in the products USE & CARE book.
WASHER WARRANTY
any part of the washer
that fails because of
WARRANTOR IS NOT RESPONSIBLE FOR CONSEQUENTIAL DAMAGES
Some states do not allow the exclusion or limitation of incidental or consequential
damages, so the above limitation or exclusion may not apply to you. This warranty gives
you specific legal rights, and you may also have other rights which vary from state to state.
To know what your legal rights are in your state, consult your local or state consumer
affairs office or your state’s Attorney General.
Warrantor: Fisher & Paykel Appliances Inc.
If further help is needed concerning this warranty write:
Fisher & Paykel Appliances Inc., 22982 Alcalde Drive, Suite 100, Laguna Hills, CA 92653.
Page 39

Page 40

WASHER WARRANTY (continued)
PROOF OF PURCHASE
Proof of original purchase date is required to obtain service under warranty. Attach your
sales receipt or cancelled check here.
Write down the model, serial number and purchase information below.
Model Number _ _ _ _ _ _ _ _ _ _ _ _ _ _ _ _ _ _ _ _ _ _ _ _ _ _ _ _ _ _ _ _ _ _ _ _ _ _ _ _ _ _ _ _ _ _ _ _ _ _ _ _ _
Serial No. _ _ _ _ _ _ _ _ _ _ _ _ _ _ _ _ _ _ _ _ _ _ _ _ _ _ _ _ _ _ _ _ _ _ _ _ _ _ _ _ _ _ _ _ _ _ _ _ _ _ _ _ _ _ _ _ _
Purchaser _ _ _ _ _ _ _ _ _ _ _ _ _ _ _ _ _ _ _ _ _ _ _ _ _ _ _ _ _ _ _ _ _ _ _ _ _ _ _ _ _ _ _ _ _ _ _ _ _ _ _ _ _ _ _ _ _ _
Date of Purchase / /
Dealer _ _ _ _ _ _ _ _ _ _ _ _ _ _ _ _ _ _ _ _ _ _ _ _ _ _ _ _ _ _ _ _ _ _ _ _ _ _ _ _ _ _ _ _ _ _ _ _ _ _ _ _ _ _ _ _ _ _ _ _
Address _ _ _ _ _ _ _ _ _ _ _ _ _ _ _ _ _ _ _ _ _ _ _ _ _ _ _ _ _ _ _ _ _ _ _ _ _ _ _ _ _ _ _ _ _ _ _ _ _ _ _ _ _ _ _ _ _ _ _ _
_ _ _ _ _ _ _ _ _ _ _ _ _ _ _ _ _ _ _ _ _ _ _ _ _ _ _ _ _ _ _ _ _ _ _ _ _ _ _ _ _ _ _ _ _ _ _ _ _ _ _ _ _ _ _ _ _ _ _ _ _ _ _ _ _ _
_ _ _ _ _ _ _ _ _ _ _ _ _ _ _ _ _ _ _ _ _ _ _ _ _ _ _ _ _ _ _ _ _ _ _ _ _ _ _ _ _ _ _ _ _ _ _ _ _ _ _ _ _ _ _ _ _ _ _ _ _ _ _ _ _ _
SERVICE
For your local Fisher & Paykel Authorized Service Agent,
please call
888 9FNP USA (888 936 7872)
or contact us through our web site,
www.fisherpaykel.com
Copyright © Fisher & Paykel 1999 Part No. 426442E
Printed In New Zealand
 Loading...