


GC36, GC901, GC901M models
Gas cooktop
User guide
Anafe a gaz
US
Guía del Usuario ES
Plaque de cuisson au gaz
Manuel d’utilisation
FR

WARNING!
If the information in this manual is not followed exactly,
a fire or explosion may result causing property damage,
personal injury or death.
Do not store or use gasoline or other flammable vapors
and liquids in the vicinity of this or any other appliance.
WHAT TO DO IF YOU SMELL GAS
Do not try to light any appliance.
Do not touch any electrical switch.
Do not use any phone in your building.
Immediately call your gas supplier from a neighbor’s phone.
Follow the gas supplier’s instructions.
If you cannot reach your gas supplier, call the fire
department.
Installation and service must be performed by a
qualified installer, service agency or the gas supplier.

Contents
Introducing your cooktop 3
Cooktop safety 4
Temperature control 6
Cookware 8
Cleaning 10
Frequently asked questions 12
Trouble shooting 13
Limited warranty 14
US
Contenido
Familiarizandose con su anafe 19
Seguridad del anafe 20
Controles 22
Ollas y sartenes 24
Cuidado y limpieza 26
Preguntas frecuentes 28
Reparación de averías 29
Garantia limitada 30
Table des matieres
Vous familiariser avec votre plaque de cuisson 35
Utilisation en toute securite 36
Boutons de contrôle 38
Ustensiles 40
Entretien et nettoyage 42
Questions fréquemment posées 44
En cas de problèmes 45
Garantie limitee 46
ES
FR
1

2

Introducing your cooktop
Now that your new cooktop is installed and ready to use, you will want to know everything
about it to ensure excellent results right from the start.
This booklet will introduce you to the features and special talents of your cooktop/hob. We
recommend you read the whole book before you start using your cooktop, for the sake of safety
as well as success.
Location of features
US
1
4
1
2
1. Semi-Rapid burner
2. Rapid burner
3. Griddle burner
4. Triple-ring burner
5. Auxiliary burner
6. Cooktop controls
3
4
GC901, GC901M
1
5
6
GC36
2
5
6
Important!
It is important that the User Guide should be retained with the appliance for future reference.
Should the appliance be sold or transferred to another owner, always ensure that the User
Guide is left with the appliance in order that the new owner can familiarize themselves with
the appliance and the relevant warnings.
3

Cooktop safety
Your safety is important to us
This guide contains safety statements under warning symbols. Please pay special attention to
these symbols and follow instructions.
WARNIN G!
This symbol alerts you to hazards such as fire, electrical shock, or other injuries.
Important safety instructions
General
Be sure to have the installer show you how and where to turn off the gas and electrical supply.
Use this appliance for its intended purpose as described in this User Guide.
To avoid risk of burns and/or fire keep loose clothing, pot holders or any other flammable
materials well clear of the burner flame.
Always use a pot holder when removing cookware from the cooktop. Do not use wet or damp
pot holders as these can cause steam burns. Do not use towels or similar cloths for removing
cookware.
Use cookware of the appropriate size and construction for the type of cooking. Cookware must
be matched to the size of the cast iron grate.
While deep frying fat, be sure the pan is large enough not to cause an overflow from bubbling of
the fat. Do not deep fry foods with a high moisture content or food covered with frost.
Turn the pot handles to the side or the back of the cooktop away from the reach of children.
Handles should not be positioned over adjacent burners.
Always check that the control knobs are in the ‘off’ position when you have finished cooking.
Light each burner before placing cookware over the burner. Turn each burner off before
removing cookware.
Keep ventilation filters clean to avoid grease fires.
Cookware should be placed carefully on the burner and balanced on the grate.
While using the cooktop, surfaces can become hot enough to cause burns.
Do not leave children alone or unattended near the cooktop. Never allow children to stand, sit
or play near, on or with the cooktop.
Keep any items that may be of interest to children away from the vicinity of the cooktop.
Do not leave the cooktop unattended when in use.
Do not use the cooktop to heat unopened food containers, such as cans. This will cause the
container to burst and potentially result in injury.
4

Operational
Do not use water on grease fires. A violent steam explosion may result.
Do not store or use flammable materials, gasoline or other flammable vapors and liquids in the
vicinity of the cooktop, or any other appliance.
Do not operate the burner without all burner parts in place.
Always keep flammable wall coverings, curtains or drapes a safe distance from your cooktop.
For safety reasons the burner flame size should be adjusted so it does not extend
beyond the edge of the cookware.
Do not spray aerosols in the vicinity of this appliance while it is in operation.
In the interest of personal safety, this gas cooktop must not be used as a space heater.
Do not stand on this gas cooktop.
Maintenance
Do not let cooking grease or other flammable materials accumulate near the cooktop.
Do not repair or replace any part of the appliance unless specifically recommended in
this manual. All other servicing should be referred to a qualified technician.
Unplug the cooktop from the electrical supply and turn off the gas supply at the shut-off valve
before servicing this appliance.
US
5

Using your cooktop
This section tells you how to successfully operate your cooktop
Choose the control knob for the burner you want to use. Press down and turn the knob counter
clockwise to the Hi symbol (see below). All the igniters will spark until the gas ignites on the
selected burner.
GC36
GC901 & GC901M
Adjusting the flame
The flame adjusts anywhere between the Hi and Lo symbol, do not regulate the flame between
High and Off.
Temperature control
Your cooktop offers a wide range of temperature settings from delicate slow cooking to the
intense high temperatures needed for boiling and searing. As the control knob is turned
clockwise, the heat is increased.
For general cooking purposes turn the control knob to the Hi setting to begin cooking or bring
food to the boil and adjust as necessary. Once your pan is hot, reduce the temperature to
maintain a steady heat to cook your food through. This will reduce cooking times.
Results will vary due to the type of pans used and the quantities being cooked. You will need to
experiment with the temperature settings to match your desired cooking result. Different types
of cooking utensils will vary in efficiency.
6

Auto re-ignition
Auto Re-ignition is for your convenience and safety. The auto re-ignition feature means that the
igniters will spark automatically if a flame blows out or if the flame is severely distorted by a draft
or a cooktop ventilation system.
Constant sparking
The igniters must be kept clean and dry to work correctly. Dirty or wet igniters will produce
constant sparking, even if a flame is present. (See trouble shooting guide).
If the burner does not light
If the gas does not ignite within four seconds, turn off the knob. Allow at least two minutes
for the gas to disperse before trying again.
Check that the power to the electronic ignition is switched on.
Check that the burner parts are placed correctly.
Power failure
In the event of a power failure, turn all burner control knobs to Off. The burners can be lit by
holding a lighted match close to the side of the burner and turning the control knob to Hi. Wait
until the flame is burning all the way around the burner cap before adjusting.
US
7
Cookware
CAUTION!
Never use plastic or aluminum foil dishes on the burners.
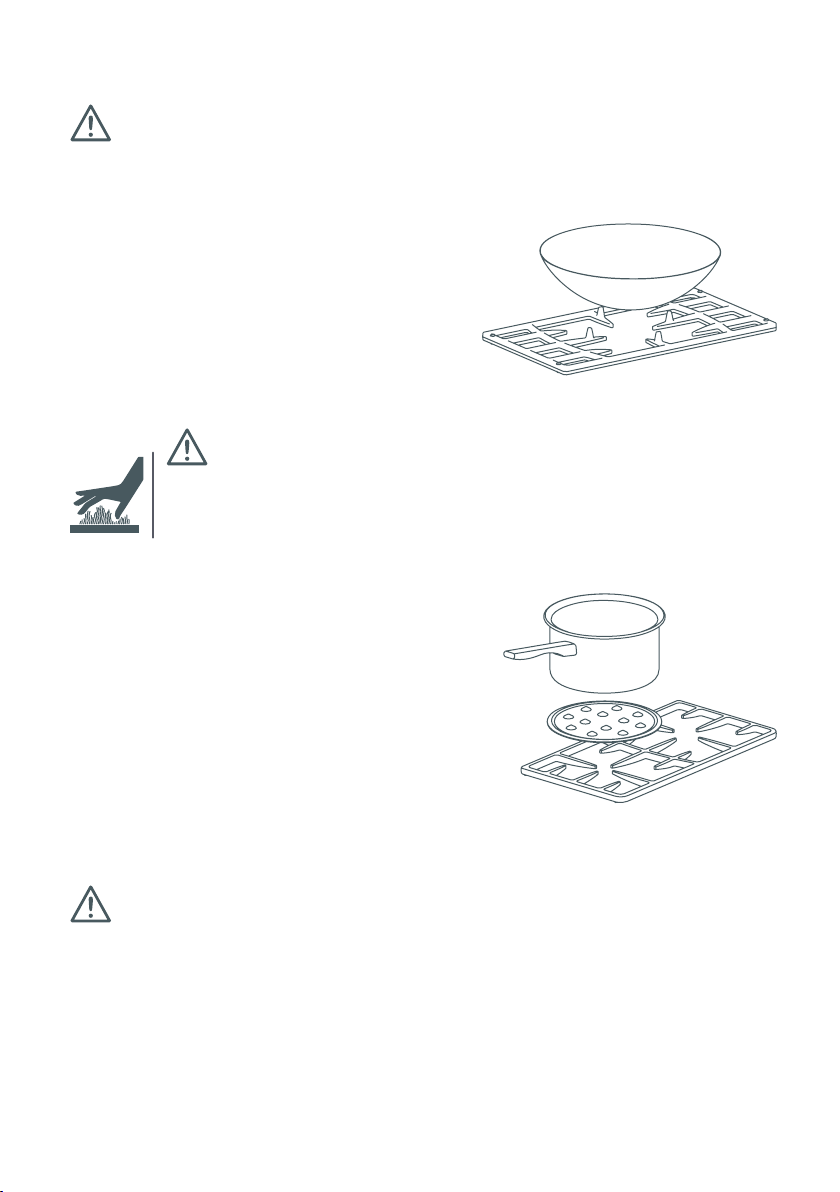
Using a wok (GC901, GC901M models only)
When using a wok on the center burner, turn over
the grate to provide a support for the wok (stems
upwards). To avoid burns, do not do this when the
grate is hot. The maximum recommended wok
size for this cooktop is 18”. Care needs to be taken
when using a wok approaching this size that other
pots are not pushed sideways enough to become
unstable or deflect heat onto nearby walls.
WARNIN G!
To avoid burns or scalds, do not attempt to handle the pan support while it is
hot. Wait until the pan support is cool before turning it over.
Using the simmermat
The Simmermat helps you control the
temperature of your cooking surface to ensure
the long slow simmering that is needed for
successfully cooking delicate foods. Use at low
heat only.
To use the simmermat
1
First cook the food, or bring to a boil, over high heat.
2
Turn the burner off and carefully place the
Simmermat on the grate with the points facing
upward. Re-ignite the burner, turn to Lo and put
your saucepan on top of the points and simmer.
Flip top wok
(GC901 models only)
Simmermat
WARNIN G!
Always turn the burner off before moving the simmermat and handle the hot simmermat
with a pot holder to prevent burns.
Do not use an asbestos mat or decorative covers between the flame and the saucepan as
this may cause serious damage to your cooktop.
8

Using saucepans
Do not let large saucepans or frying pans overlap the countertop as this can deflect heat onto
your countertop and damage the surface.
Hold the handle of the saucepan to prevent movement of cookware when stirring.
Saucepans should have thick flat bottoms. Food in a saucepan with an uneven base will take
longer to cook.
Extremely heavy saucepans may bend the grate or deflect the flame.
Match the bottom of your saucepans with the cooking zone and be sure that they are stable.
This will give you the most efficient cooking.
Using the skillet/griddle
Your griddle will offer you a quick, hot method of
cooking ideal for pancakes, vegetables and eggs.
CAUTION!
Prolonged cooking may damage the griddle
and the cooktop, which could lead to control
and wiring damage.
Before using the griddle for the first time, wash it in hot soapy water, rinse, then dry thoroughly.
If using a GC36 cooktop, the griddle is best placed directly on the center grate only.
If using the GC901 & GC901M cooktop, the griddle should be place over the grate on the left-
hand side.
Do not cook with the flames on high. A medium flame will produce best results.
After using the griddle, wash it in hot soapy water to avoid stains from a build up of grease. To
avoid burns do not do this when the griddle or grate is hot. Remove stubborn spots with a nonabrasive plastic mesh pad. Do not use abrasive cleaners.
Skillet/griddle
US
9

Care and cleaning
Apply soapy water with a soft sponge or cloth only when the cooktop is cool.
Soaking stubborn stains under the soapy cloth for a few minutes will help make them easier to
remove.
Do not use steel soap pads or harsh or abrasive cleaners as this will dull the appearance of the
appliance over time.
Pan supports are dishwasher safe.
The burner parts can be cleaned in hot water, it is important that the holes/slots are kept clear.
Dry the parts before reassembling and using the burner.
When replacing the burner rings after cleaning, turn the rings until the positioning teeth are
placed correctly.
Clean electrodes with a toothbrush and rubbing alcohol.
Important!
Do not use harsh/abrasive cleaning agents to clean your cooktop as they will damage the
stainless steel finish and the knobs.
Important!
Commercial stainless steel cleaner containing chlorine compounds are corrosive and may
damage the appearance of your cooktop.
Brushed stainless steel
Brushed Stainless Steel can be cleaned with a chlorine-free stainless steel cleaner (see
‘Important’) or wiped with a clean damp cloth and dried with a lint free cloth.
Regular use of a stainless steel cleaner will reduce fingerprints and other marks.
Do not use abrasive cleaners on stainless steel, as they will permanently damage the surface.
Iridium stainless steel (Matt stainless steel)
This easy clean surface requires only a mild dish washing detergent and warm water.
Rinse and then dry with a lint free cloth.
Regular use of a stainless steel cleaner will reduce fingerprints and other marks.
Do not use abrasive cleaners on Iridium as they will permanently damage the surface.
Cleaning the pan supports
Pan supports are best cleaned immediately after use - before spills get burnt on.
They are dishwasher safe and can be cleaned with a cream cleaner and a nylon scourer.
For stubborn stains, soaking in a solution of biological clothes washing detergent for a couple of
hours may help.
10

Repositioning the pan supports
GC901 models
The Flip top wok support goes in the center
over the wok burner. The other two pan
supports are interchangeable but need to be
rotated to match the rounded corners of the
base insert and the burner sizes.
GC36 models
The pan supports above the wok burner are
different from the other burners. Note the
raised area for the wok on the pan support.
US
Rounded corners
Correct pan support orientation - GC901 models
Re-assembling your wok burner
Correct pan support orientation - GC36 models
(GC901M Iridium models only)
Raised area on wok support
Each part of your wok burner has locating pins to help you to assemble it correctly after cleaning.
Incorrect assembly can cause dangerous irregular flames and ignition problems. Refer to this
diagram for the correct order of assembly. Note: The brass parts of your wok burner will change
color with use. This is normal and will not affect performance.
Inner cap
Outer cap (small holes)
Trim ring
Vent ring with locater pins
(large holes)
Align and insert pin
Side view
Rotate vent ring to align locater
pin with hole in burner base.
11

Frequently asked questions
Q
What is the best way to clean stainless steel?
A
See cleaning instructions.
Q
How do I clean the pan supports and burners?
A
Supports can be washed in the dishwasher or alternatively with a cream cleaner and a nylon
scourer. Burners are best washed in warm water (see cleaning instructions).
Q
All the burners spark at once when I go to light one, is this ok?
A
Yes, they are designed to do this.
Q
Why doesn’t my cooktop light?
A
Firstly, check it is plugged in and the gas is turned on. Alternatively, the gas igniters may be dirty.
These are easily cleaned with a toothbrush and rubbing alcohol. (Also check Trouble shooting).
Q
Will the graphics on my cooktop come off?
A
No, these are etched by laser (see stainless steel cleaning instructions).
Q
My burner flames are yellow / slow to start, is something wrong?
A
Yes, there are a number of factors which could be causing this
1. If you use bottled gas this may indicate you are getting near the end of the bottle.
2. Your cooktop may not be suited to the gas you are using, check with your service
person/installer.
3. The gas pressure may not be at the correct level, check with your service person/installer.
4. See Trouble shooting.
Q
One of my burners has an uneven flame, what can I do?
A
Check the burner parts are assembled correctly.
Q
What size pots should I use?
A
Generally larger pots are more energy efficient (see Cookware).
Q
Do I need special pans for a gas cooktop?
A
Regular pans are fine. We recommend thick based pans for efficient, even heat.
Q
Can I install my cooktop above my Fisher & Paykel DishDrawer® or oven?
A
Yes, with a standard counter height.
12

Trouble shooting
Problem Possible solutions
My cooktop does not
light
My burner flames are
yellow/slow to start
One of my burners has
an uneven flame
My cooktop is sparking
The flame goes out at
low settings
Check it is plugged in and there is power to the wall socket.
The gas igniters may be dirty. These can be easily cleaned
with a toothbrush and rubbing alcohol.
The burner parts may not be located properly. Check the
assembly and make sure the burner cap is sitting flat.
Check the gas supply valve is turned on and the supply to
the house is working. Gas should be heard when you turn a
burner on.
The burner parts may not be located properly. Check the
assembly and make sure the burner cap is sitting flat.
If you use bottled gas this may indicate you are getting near
the end of the bottle.
Check that the burner parts are not blocked with water.
The gas pressure may not be at the correct level, check with
your service person/installer.
Check the burner parts are assembled correctly and that the
burner cap is sitting flat on the burner.
Your cooktop thinks that the flame has gone out. This could
be caused by drafts disturbing the flame.
Check that the igniter is clean and dry.
Your power supply may not be properly grounded or, in an
older house, the correct wiring polarity may not have been
observed.
Gas supply pressure may be low, check with service person/
installer.
Low setting may have been adjusted incorrectly, check with
your service person/installer.
US
13

Limited warranty
When you purchase any new Fisher & Paykel whiteware Product for personal or consumer use
you automatically receive a two year Limited Warranty covering parts and labor for servicing
within the 48 mainland United States, Hawaii, Washington D.C and Canada. In Alaska the Limited
Warranty is the same except that you must pay to ship the Product to the service shop or the
service technician’s travel to your home. Products for use in Canada must be purchased through
the Canadian distribution channel to ensure regulatory compliance.
If the Product is installed in a motor vehicle, boat or similar mobile facility, you receive the same
two year Limited Warranty, but you must bring the vehicle, boat or mobile facility containing the
Product to the service shop at your expense or pay the service technician’s travel to the location
of the Product.
Fisher & Paykel undertakes to:
Repair without cost to the owner either for material or labor any part of the Product, the serial
number of which appears on the Product, which is found to be defective. In Alaska, you must
pay to ship the Product to the service shop or for the service technician’s travel to your home.
If the Product is installed in a motor vehicle, boat or similar mobile facility, you must bring it to
the service shop at your expense or pay for the service technician’s travel to the location of the
Product. If we are unable to repair a defective part of the Product after a reasonable number of
attempts, at our option we may replace the part or the Product, or we may provide you a full
refund of the purchase price of the Product (not including installation or other charges).
This warranty extends to the original purchaser and any succeeding owner of the Product for
products purchased for ordinary single-family home use.
All service under this Limited Warranty shall be provided by Fisher & Paykel or its Authorized
Service Agent during normal business hours.
How long does this Limited Warranty last?
Our liability under this Limited Warranty expires TWO YEARS from the date of purchase of the
Product by the first consumer.
Our liability under any implied warranties, including the implied warranty of merchantability
(an unwritten warranty that the Product is fit for ordinary use) also expires ONE YEAR (or such
longer period as required by applicable law) from the date of purchase of the Product by the first
consumer. Some states do not allow limitations on how long an implied warranty lasts, so this
limit on implied warranties may not apply to you.
14
 Loading...