

Page 1
Installation instructions
https://producthelp.fisherpaykel.com/nz/Wash/Top_Loaders/CleanSmart/WL1068P1/User_Guide_WL1068P1/02_Installation_…
Updated: Sat, 16 Nov 2019 03:22:08 GMT
Powered by
Unpacking
To ensure the best performance from your new CleanSmart™ clothes washer please follow the instructions below.
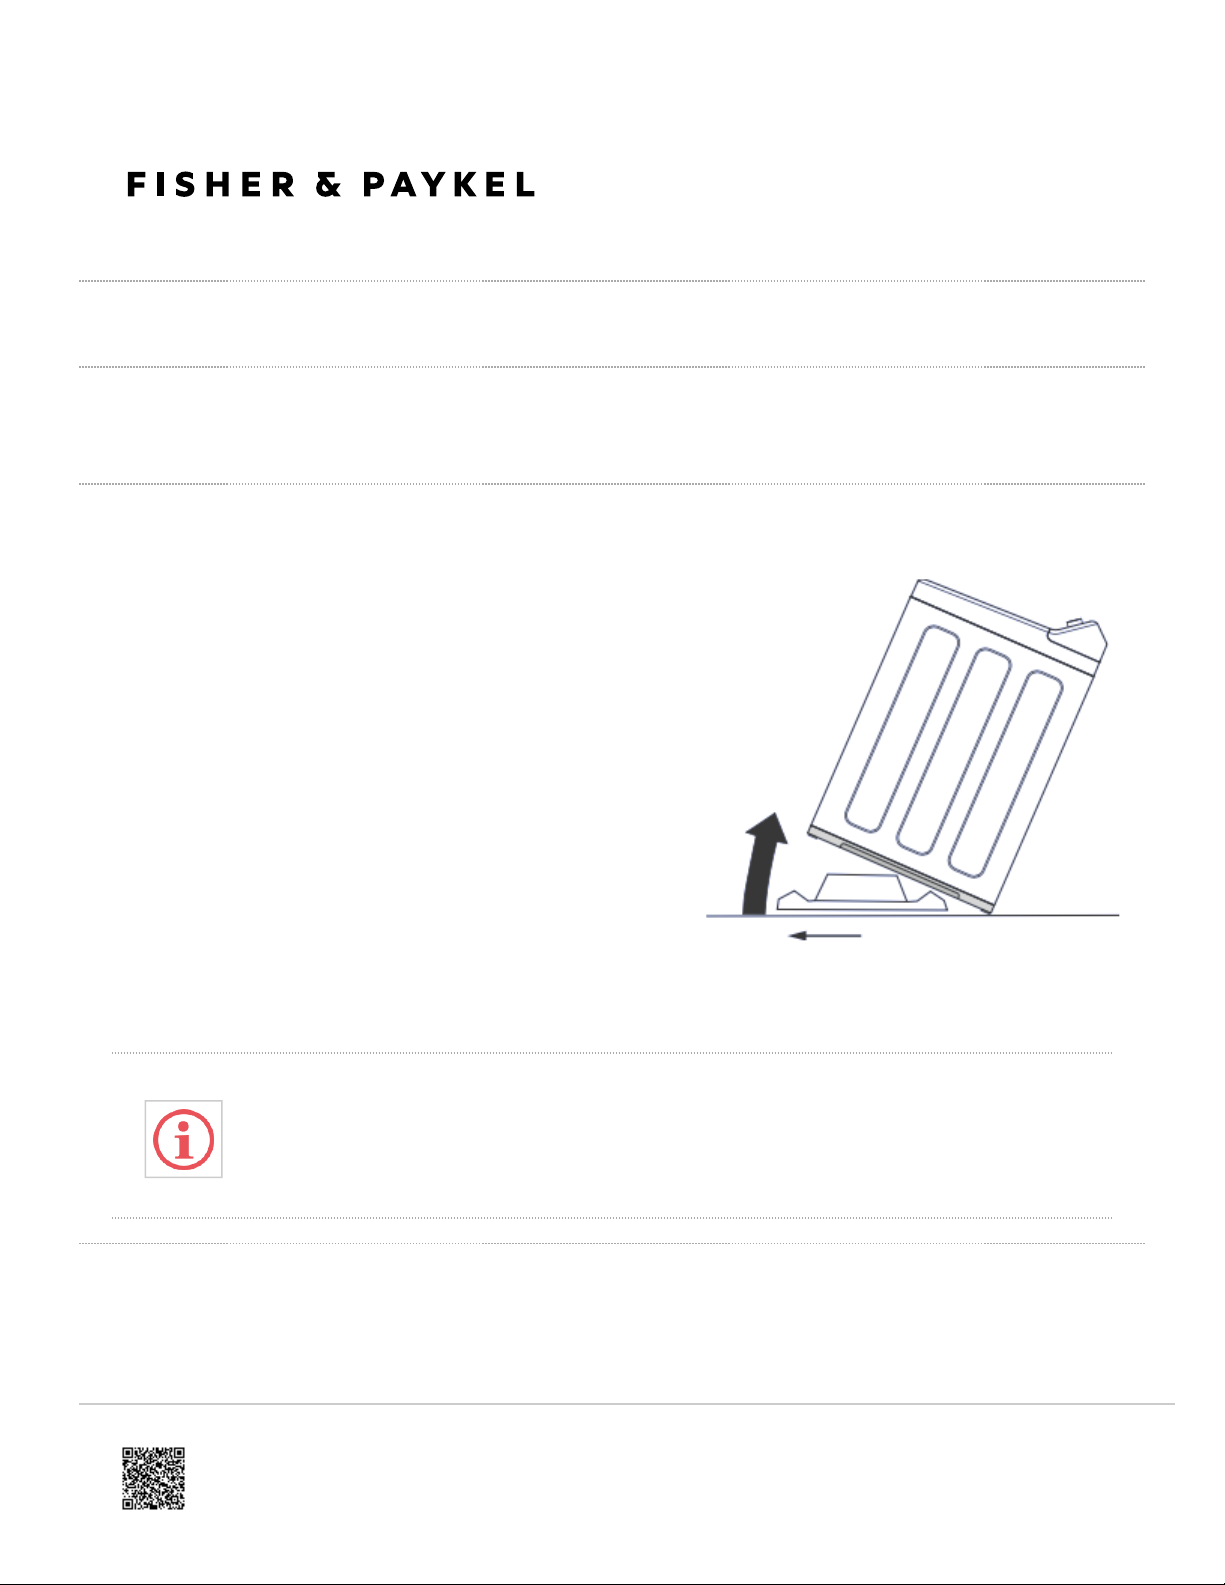
Removing the packaging
1. Remove the outer packaging.
2. Tilt the machine backwards and walk it off the base
packer one foot at a time (ensure the lid is still taped
down).
3. Remove the base packer from under the machine by
pulling it out the front.
4. Remove the tape, lift the lid and remove the bowl
packer from the bowl.
5. Remove the hoses and accessories.
6. Keep the base packer and bowl packer in case they are
required for future transit.
Fig. 1 Tilt washer backwards to remove
packer
Ensure that the bottom packer has been removed BEFORE OPERATING your machine.
Location
Your washer must be installed on a level surface, not on any textured floor coverings (eg carpet, rugs) to ensure the
opening at the bottom of the machine is not obstructed.
1
Page 2
In your clothes washer you will find:
https://producthelp.fisherpaykel.com/nz/Wash/Top_Loaders/CleanSmart/WL1068P1/User_Guide_WL1068P1/02_Installation_…
Updated: Sat, 16 Nov 2019 03:22:08 GMT
Powered by
• hose guide.
• inlet hoses.
• rubber foot inserts (if not already inserted into the feet).
Drain hose
1. Carefully pull the drain hose out from the back of
the machine by pulling the exposed part of the
hose downwards and outwards.
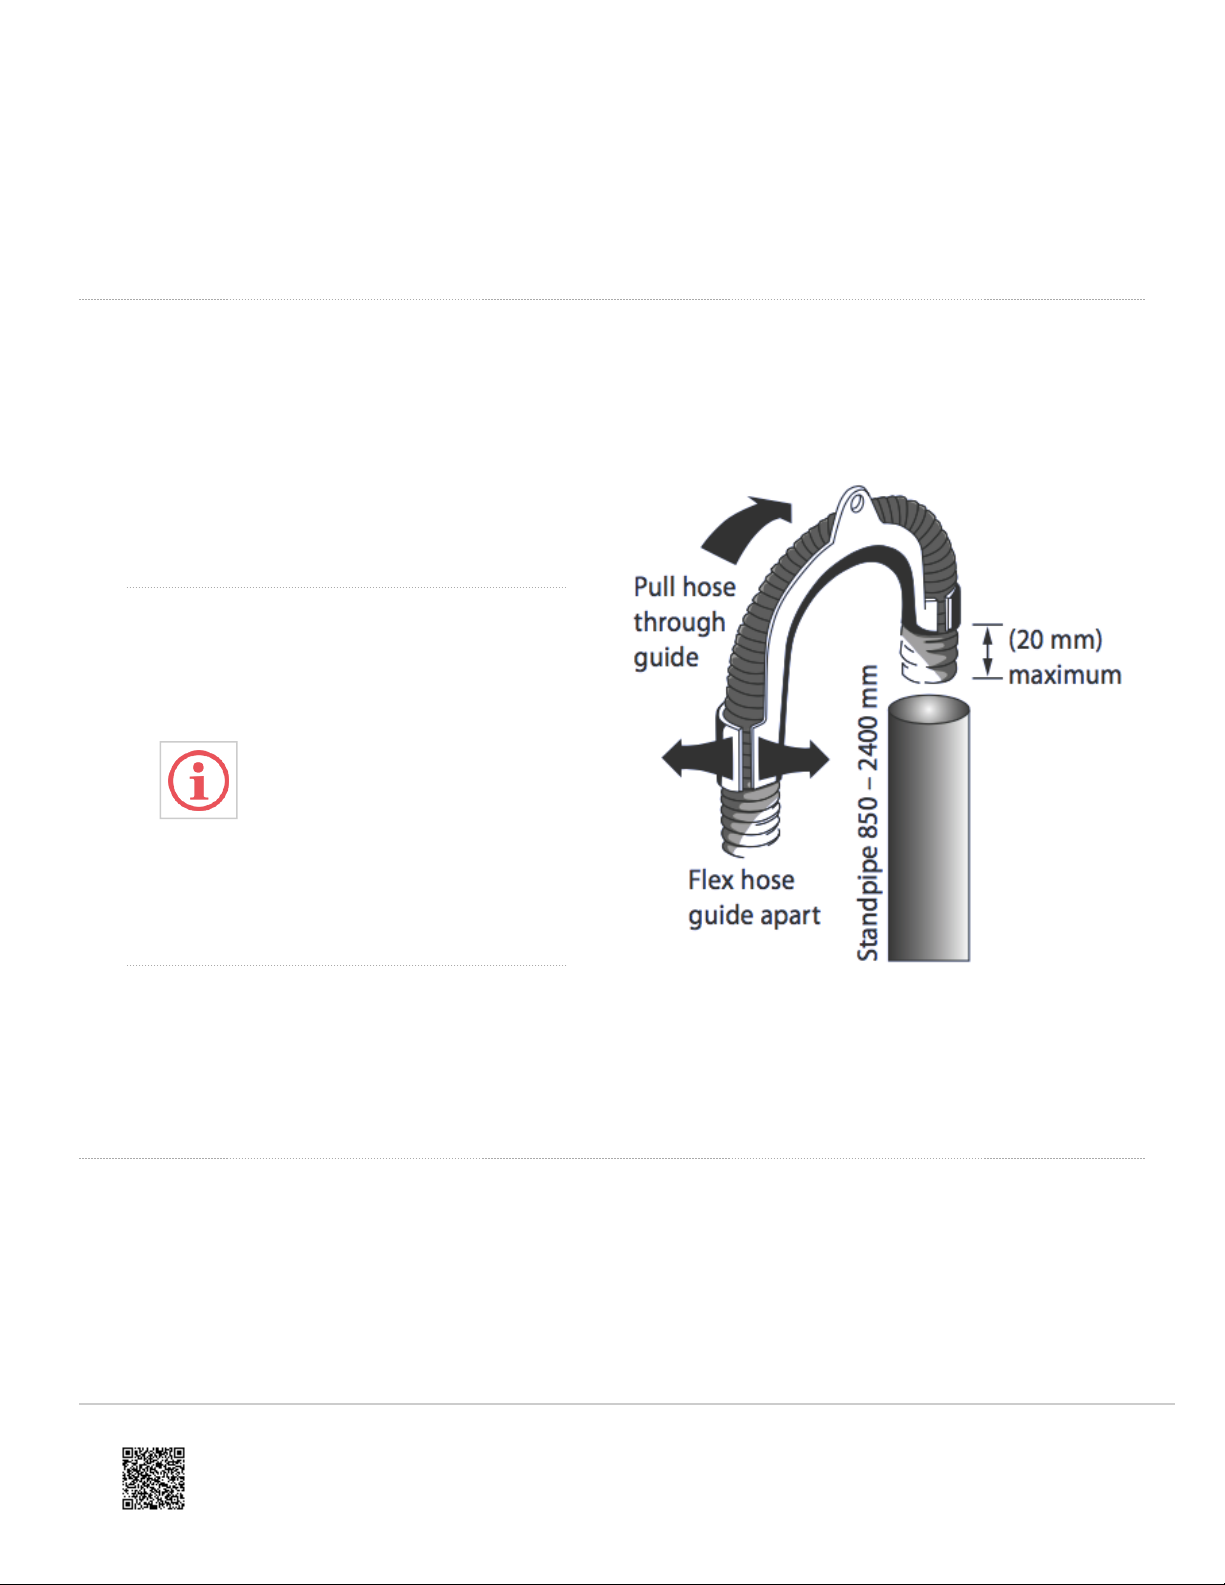
2. To guide the drain hose over the tub or standpipe
the hose guide MUST be fitted to the drain hose.
To prevent siphoning the
drain hose should not
extend more than 20 mm
from the end of the guide.
The height of the standpipe
or tub should be between
850 – 2400 mm. The drain
hose can be trimmed to
length.
3. Place the drain hose in the tub or standpipe.
Do not fit the hose to a drain spigot. Drainage must
not be airtight in order to prevent siphoning.
Fig. 2 Fitting the drain hose guide
Draining
• Regularly check that your standpipe or tub is free from lint or other obstructions which may affect how your
machine works or may cause flooding.
• In multi-storey apartments or any upper floor the machine should be installed on a floor that is equipped with a
drain.
• Draining must comply with local by-laws.
2
Page 3
Water supply
https://producthelp.fisherpaykel.com/nz/Wash/Top_Loaders/CleanSmart/WL1068P1/User_Guide_WL1068P1/02_Installation_…
Updated: Sat, 16 Nov 2019 03:22:08 GMT
Powered by
• This clothes washer should be plumbed into both a hot and cold water supply otherwise some cycles may not
function correctly.
Your washer does not have an internal heater to heat water.
• Your hot water should not exceed 65 C and your cold water should not exceed 35 C. Temperatures above these
may cause a fault or cause damage to the machine.
• If you have an uncontrolled water-heating source (eg a wet back or solar heating) you should have a tempering
device fitted (eg a safe valve). This will ensure the hot water temperature remains within safe limits. For the most
suitable type of tempering device we recommend you contact a local plumber or plumbing supply merchant.
• Inlet Water Static Pressure of between 34 kPa (5 psi) and 1 MPa (150 psi) is required.
• Minimum flow rate from the tap supplying the clothes washer should be greater than 6 litres / min (assumes 12.7
mm ( inch) diameter pipes).
Hot ‘N’ Safe Valves available are:
RMC TVA 50HF
RMC TVA 75HFS
Adjustable between 35°C – 55°C
RMC TVA 50HP
For instantaneous gas hot water supply
Inlet hoses
• New hose sets provided with the washer shall be used to connect the washer to the water
mains.
• Old hose sets should not be re-used.
3
Page 4

1. Connect the straight ends of the inlet hoses to the
https://producthelp.fisherpaykel.com/nz/Wash/Top_Loaders/CleanSmart/WL1068P1/User_Guide_WL1068P1/02_Installation_…
Updated: Sat, 16 Nov 2019 03:22:08 GMT
Powered by
taps (there are washers fitted in both ends). Connect
the red connector hose to hot, and white connector
hose to cold (if your hoses are colour-coded).
2. Connect the elbow ends of the inlet hoses to the
machine inlet valves. Inlet valves are marked on the
back of the machine. Ensure the hot valve is
connected to the hot tap and the cold valve is
connected to the cold tap.
Inlet hose replacement
The inlet hoses should be replaced every 5 years. Hoses should be checked from time to time and replaced if any
wear, cuts, bulges, kinks or leaks are found.
Fig. 3 Inlet hose ends
Electrical
This appliance must be supplied with a 220 V – 240 V, 50 Hz, sinusoidal, 10 A electrical supply.
Leveling Instructions
It is IMPORTANT to level the machine to ensure good spin performance and effective
detergent and fabric softener dispensing.
A spirit level is provided with your machine. Use this to level your machine, always placing it on a clean, flat surface. The
machine is level when the bubble sits in the centre, within the two lines.
Your washer is equipped with self-locking feet to ensure they do not move once you have levelled your machine. To
adjust the feet, pull down then twist to move them up or down.
4
Page 5

After levelling, the corners of the washer should be clear of the floor and the machine must
https://producthelp.fisherpaykel.com/nz/Wash/Top_Loaders/CleanSmart/WL1068P1/User_Guide_WL1068P1/02_Installation_…
Updated: Sat, 16 Nov 2019 03:22:08 GMT
Powered by
not rock in any direction.
1. If not already installed, fit the rubber inserts into all
4 feet on the base of the machine.
2. Move the machine to its final position using the top
corners to manoeuvre the product into place (do
not push on the centre front of the machine). We
recommend a minimum clearance of 20 mm each
side and 50 mm at the rear of the machine.
Fig. 4 Levelling - Step 1
3. With the lid closed, place the spirit level at the
centre back of the lid (near the control panel). Pull
the machine out and adjust the rear feet (wind
down) until the machine is level side to side when
in position.
Fig. 5 Levelling - Step 3
5
Page 6

4. Open the lid. Place spirit level on the flat surface
https://producthelp.fisherpaykel.com/nz/Wash/Top_Loaders/CleanSmart/WL1068P1/User_Guide_WL1068P1/02_Installation_…
Updated: Sat, 16 Nov 2019 03:22:08 GMT
Powered by
on the left side, inline with the centre of the bowl.
Adjust the front left foot (wind down) until the
machine is level.
5. Move the spirit level to the right side, in line with
the centre of the bowl. Adjust the front right foot
(wind down) until the machine is level, and does
not rock. There should be equal weight on both
front feet so that neither can be turned by hand
when the machine is in position.
Fig. 6 Levelling - Step 4
Fig. 7 Levelling - Step 5
6. Place the spirit level at the centre front of the
topdeck, forward of the lid lock slot. Check the
machine is level. Move the spirit level around to all
positions once more, checking the machine is level
in all areas. Check the machine does not rock side
to side, front to back, or corner to corner.
Fig. 8 Levelling - Step 6
• Keep your spirit level for the next time you move or reposition your washer.
• If moving or transporting your washer in the future, ensure you tape the lid down beforehand.
Completing your installation
• Turn on the water and check all hose connections for leaks. Make sure there are no kinks in the hoses. Check
the hose connections for leaks again after 24 hours.
6
Page 7

• Uncoil the power cord, remove and discard the plastic pin cover, and plug into wall socket and turn the power
https://producthelp.fisherpaykel.com/nz/Wash/Top_Loaders/CleanSmart/WL1068P1/User_Guide_WL1068P1/02_Installation_…
Updated: Sat, 16 Nov 2019 03:22:08 GMT
Powered by
on.
Installation test cycle
Your washer must be correctly installed before use. Check the machine’s installation and operation using the following
procedure:
1. Touch POWER to activate your washer.
2. Touch both the KEYLOCK and OPTIONS buttons at the same time, and hold for three seconds.
3. Touch START/PAUSE to start the installation test cycle.
4. The machine will beep to signal the end of the installation test cycle. Any faults will be displayed on the screen
(refer 'Troubleshooting' to identify faults). If you need further assistance, please contact a Fisher & Paykel
Customer Care Representative. Refer to 'Customer Care' for contact details.
If there are no faults found, the washer will automatically turn off at the end of the
installation test cycle.
Clothes washer safety
• This clothes washer is not intended for use by persons (including children) with reduced physical, sensory or
mental capabilities, or lack of experience and knowledge, unless they have been given supervision or instruction
concerning use of the appliance by a person responsible for their safety.
• The lid will be locked from the start of the cycle until the cycle is complete for safety reasons. To open the lid
during operation, you must touch START /PAUSE.
• Supervise children at all times to ensure they do not play with the washer.
• The only user-removable parts of the washer are the inlet hoses and dispenser funnels. No other parts are
designed to be removed by anyone other than a Fisher & Paykel Authorised Repairer.
If you are using an extension cord or a portable electrical outlet device (eg multi-socket
outlet box), ensure that it is positioned so that it does not come into contact with water or
moisture.
7
Page 8

Accessories and spare parts
https://producthelp.fisherpaykel.com/nz/Wash/Top_Loaders/CleanSmart/WL1068P1/User_Guide_WL1068P1/02_Installation_…
Updated: Sat, 16 Nov 2019 03:22:08 GMT
Powered by
Available from your Fisher & Paykel Dealer or a Fisher & Paykel Authorised Repairer.
Hose Inlet
Long (2 m)
Hose Inlet
Large Bore
Drain Hose
Extension
Power
Cord
Part No. 422680P
Part No. 426123P
Part No. 425627P
If the power cord of your clothes washer is damaged it must be replaced by a Fisher & Paykel
Authorised Repairer in order to avoid a hazard, as it is not a standard power cord.
8
 Loading...