

Fisher & Paykel E522B, RF201A, Active Smart E522B, Active Smart RF201A Installation Instructions And User Manual
Page 1
Page 2
P4g 45 _88
Page 3
_ntroduction
Safety and warnings
_nstallation instructions
Before you start using your Ice & Water refrigerator
AH about the display
Using your water dispenser
Using your ice maker
Using the display options
Bottle Chl!
Fast Freeze
The temperature of your refr gerator and freezer
Active Smart _' special features
Water filter
Active Smart _' maintenance
Cleaning and caring for your refrigerator
On vacat on/hoIiday
Refrigerator sounds
Storing food in your refrigerator
Storing food in your freezer
Limited warranty
Filter performance data sheet
2
3
5
15
16
18
19
21
21
22
22
23
24
25
27
29
30
33
34
35
36
38
42
133
SAVE THESEINSTRUCTIONS
sut_j_,(t to ch(_g_ st (;£ytim_.fbr curmt_tdelcJ[Isc;t_ou8modelcmd p_d_co8io£
c;w[/ob[/[ty [r7your courttG p/_os_visitour/occ;/webs[t_.,/M_.'don thebookcover
or contc_ctyour /occ;/Usher&P;_ykelde(;le_
Page 4
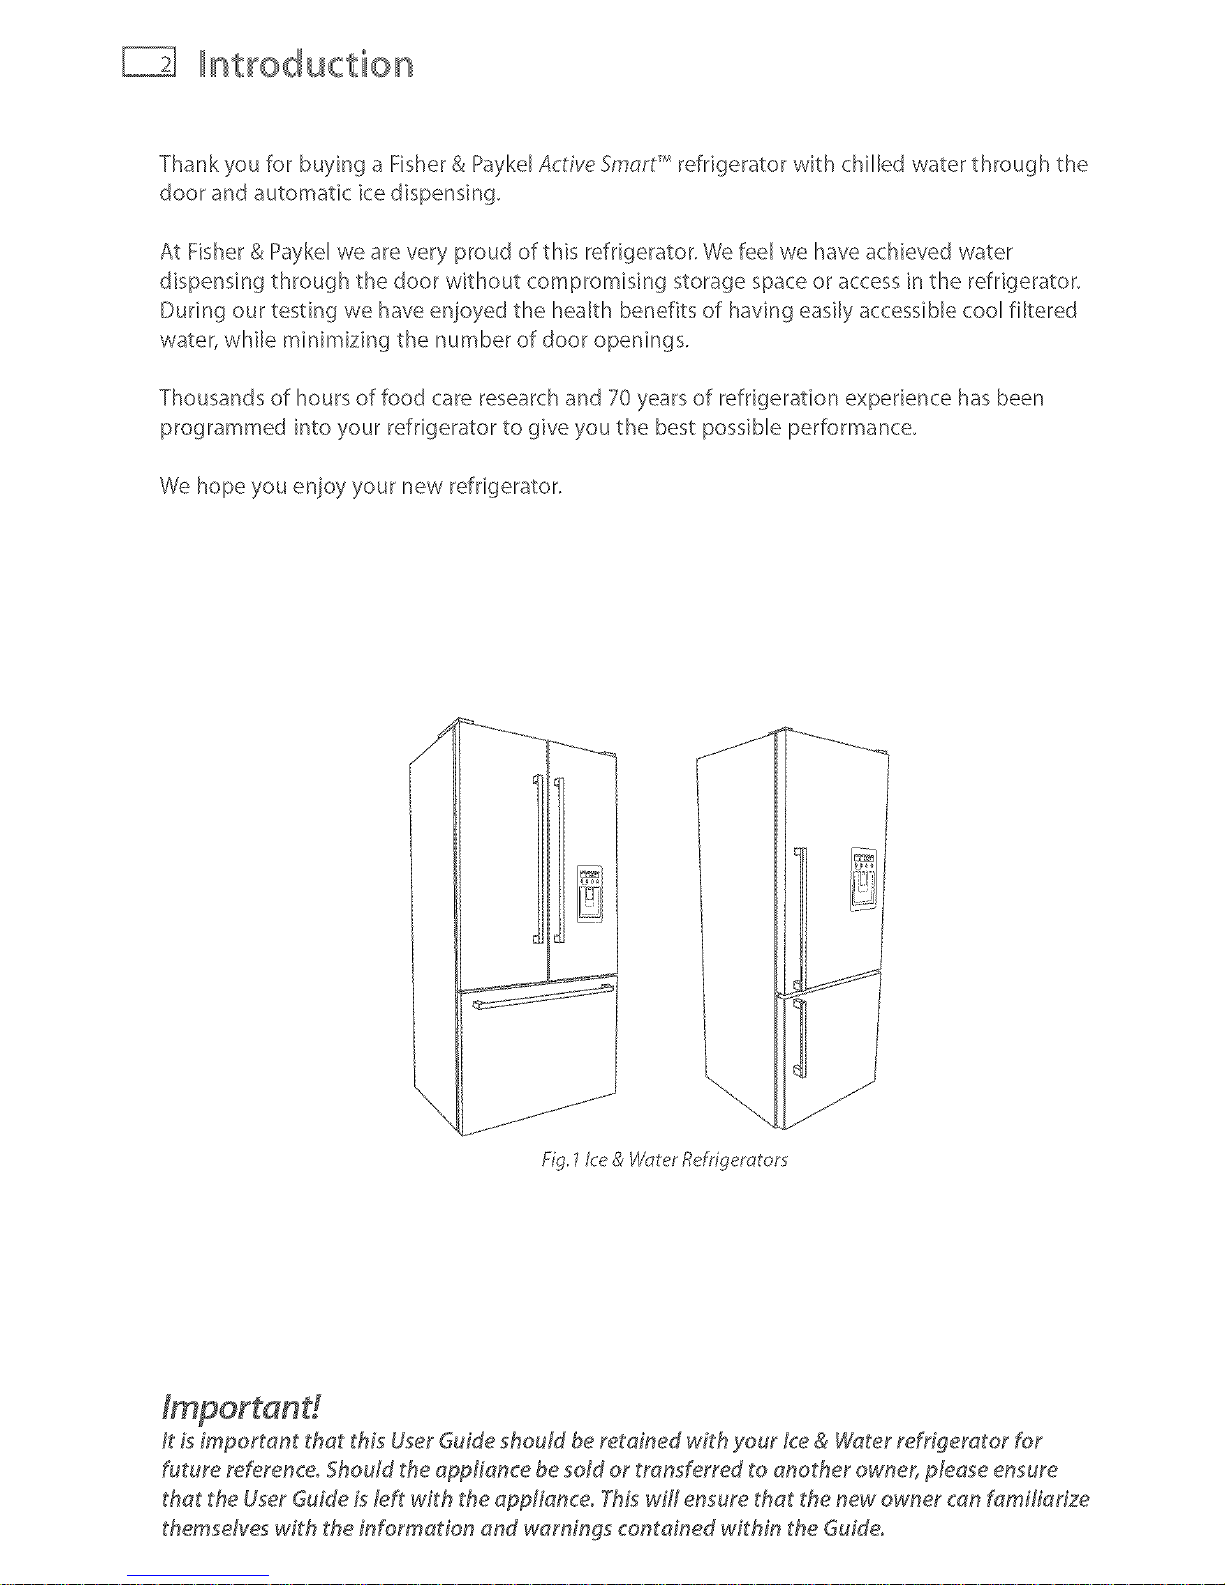
Thank you for buying a Fisher & Paykd Active Smart '_refrigerator with chilled water through the
door and automatic ice dispensing.
At Fisher & Paykel we are very proud of this refrigerator. We feel we have achieved water
dispensing through the door without compromising storage space or access in the refrigerator.
During our testing we have enjoyed the health benefits of having easily accessible cool filtered
water, while minimizing the number of door openings.
Thousands of hours of food care research and 70 years of refrigeration experience has been
programmed into your refrigerator to give you the best possible performance,
We hope you enioy your new refrigerator,
Fig, 7Ice & Water Refrigerators
It Lsimportant that this User Guide shoMd be retained with your £e & Water refrigerator for
future reference° Should the appfiance be sold or transferred to another owner, please ensure
that the User Guide Lste# with the applianCeo ThL_wilt ensure that the new owner can familiarize
themsdves with the information and warnings contained within the Guide.
Page 5
Safety and warnings
Electdc Shock Hazard
Read and follow the SAFETYAND WARNINGSoutlined in this User Guide
before operating this app[ianceo
Failure to do so can result in death, electric shock fire or injury to persons°
Use this appliance only for its intended purpose as described in this User Guide,
When using this appliance Mways exercise basic safety precautions including the foflowing:
This appliance is not intended for use by chitdren or infirmed persons without supervision° This
is espedally important when using the freezer drawer compartment. Young children shoMd be
supervised to ensure they do not play with the appliance.
Risk of ch#d entrapment° Before you throw away your old refr@erator or &eezer:
- Take offthe doors
- Leave the shrives in place so that children may not easily climb inside°
Extreme care must be taken when disposing of your old appliance to avoid hazards° The
re&@erant gas must be safdy removed and for the safety of young children, remove doors.
}&ourFisher & Paykd Appliances Authorized Service Center wifl be abte to give advice on
env#onmentaNy &iendly methods of disposing of your old refrigerator or freezer,
Electrical
This appJiance must be property instafied in accordance with the instafladon instructions before
it is used°
Never unplug your refrigerator or freezer by pulting on the power cord,
Always grip the plug firmly and pun straight out from the oudet socket°
Do not plug in any other appliance at the same power point oudet socket as your refrigerator or
freezer is using° Do not use extension cords or douMe adapters with these products°
Repair or replace immediately aft dectric service cords that have become frayed or otherwise
damaged, Do not use a cord that shov_s cracks or abrasion Mong its tength or at either the plug
or appliance an&
if the power supply cord is damaged) it must only be replaced by your Fisher & Paykel Appliances
Authorized Service Center because speda_ purpose too_s are required.
Page 6
Safety and warnings
When moving your appliance away from the wall, be careful not to roll over or damage the
power cord,
Unplug your refrigerator or freezer before cleaning or repladng the interior t@htbutb.
Storing food and drinks
Never store volatile or flammable materials in your refrigerator or freezer as they may explode.
Never freeze tiquids in glass containers. Liquid expands during #eezin¢ which may cause the
container to expk_de.
Never freeze carbonated drinks. They may explode.
Do not consume food ff it is too cold, Food removed f_om the freezer compartment may be cold
enough to cause damage when brought into contact with bare skin, eg. frozen ice cubes.
Power failure - food safety
Do not regeeze gozen foods that have thawed completely, Follow the recommendations below ff
_ou discover food in your geezer has thawed:
1)ice crystals still visible - food may be refrozen but should be stored for a shorter period than
recommended.
2) Thawed but refrigerator cold ,- refreezing generally not recommended, Fruits and some
cooked food can be refrozen but use as soon as possible. Meat, fish, poultry ,_use immediately or
cook then refreeze. Vegetables - discard as they usually go limp and soggy,
3) Thawed and warmer than 41 °F (5°G. Discard a# food,
Do not refreeze frozen foods that have thawed completely, The food may be dangerous to eat.
Many commercially available cleaning products contain solvents wh£h may attack plastic
components of your refrigerator or freezer and cause them to crack° Please refer to the cleaning
care section of this booklet for further advice.
Page 7
_nsta_ation instructions
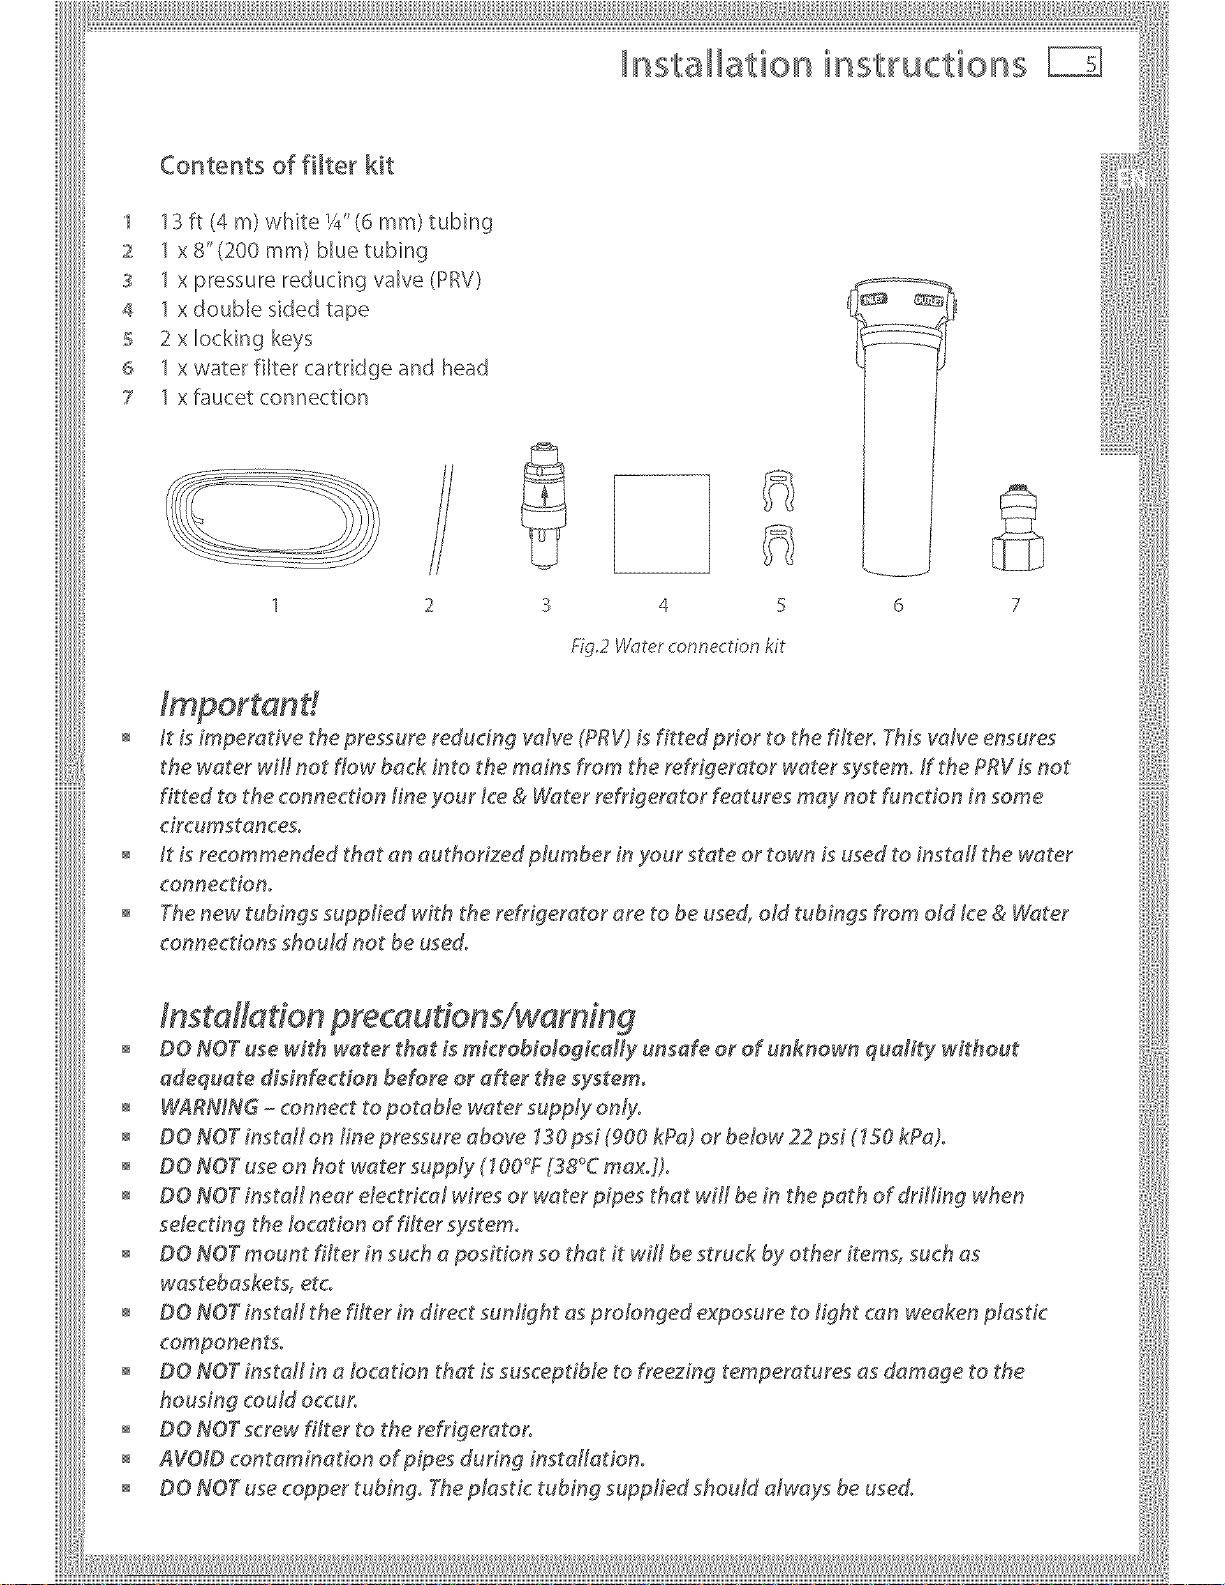
Contents of filter kit
1 13 ft (4 m) white ¼"(6 ram) tubing
2 1 x8"(200 ram) bluetubing
s 1 x pressure reducing valve (PRV)
4 1 x double sided tape
s 2 xlocking keys
6 1 x water filter cartridge and head
7 1 xfaucet connection
It is imperative the pressure redudng vaIve (PR_ js _tted p_r t_ the _Iter° Thjs vaIve ensures
the water will not flow back into the mains from the retTigerator water system, ff the PRV is not
fitted to the connection tine your ice & Water retTigerator t_atures may not funcdon in some i
circumstances.
it L_recommended thatan authorizedplumber inyour stateor town L_used toinstallthewater
connection.
, The new tubings suppliedwith the refrigerator are to be used, old tubings from old Ice & Water
connectionsshodd not beused.
o InstaHadonprecaudon#waming
DO NOT use with wa_er that is microbiologicaHy unsafe or of unknown quality without
.dequate disinfection before or after the system.
o WARNING-connecttopotabtewatersupptyonly.
o Do.oTinstaNontinepressuroaho_J30£_i(_00kPa_orbeto.,22psi,:_50k_a_. i
o DONOTuseonhotwatersupply(looFr38cma_4_.
o DONOTinstaNnearelectricalwiresorwaterpipesthatwittbeinthepathofdriNingwhen
selectingthelocationoffiltersystem, ii[
DO NOT mount fitter in such a position so that it wilt be struck by other items, such as
wastebaskets,etc. _/
, DO NOT instatl the filter in direct sunlight as prolonged exposure to light can weaken plastic
components. //:
o DONOTinstaNinatocationthatissusceptibletofreezingtemperaturesasdamagetothe _:
housingcoutdoccur.
o DO,OTscre,,filtertotherefrigerator.
AVOID contamination of pipes during installation.
DO NOT use copper tubing. The plastic tubing supplied should always be used.
Page 8
Installation instructions
Installation instructions:
1 Ensure that refrigerator is not plugged into a power supply.
2 Locate a cold water supply/feed only suitable for a water
connection.]ee & tap fitting is not suppled. If you can't find
the connection faucet, contact an authorized plumber in
your state or town to fit your water connection.
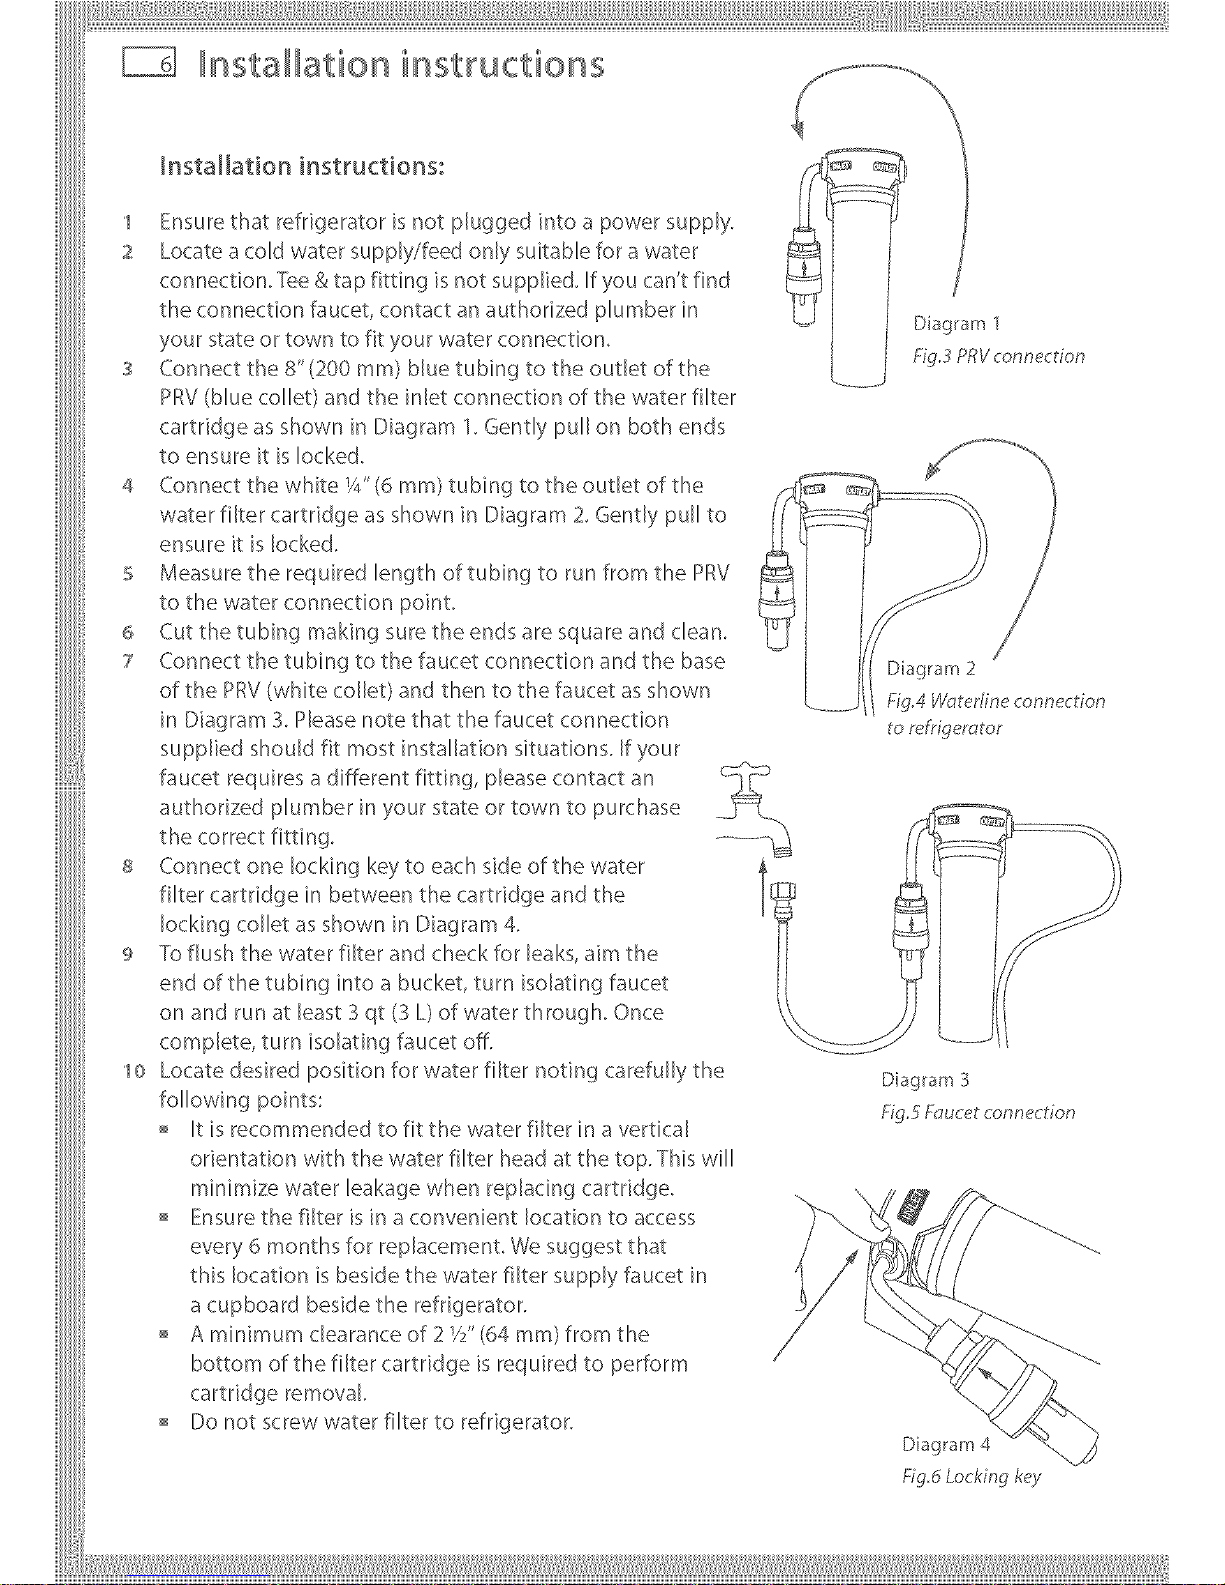
s Connect the 8" (200 ram) blue tubing to the outlet of the
PRV (blue collet) and the inlet connection of the water filter
cartridge as shown in Diagram 1. Gently pull on both ends
to ensure it is locked.
4 Connect the white ¼"(6 ram) tubing to the outlet of the
water filter cartridge as shown in Diagram 2. Gently pull to
ensure it is locked.
5 Measure the required length of tubing to run from the PRV
to the water connection point.
6 Cut the tubing making sure the ends are square and dean.
7 Connect the tubing to the faucet connection and the base
of the PRV (white toilet) and then to the faucet as shown
in Diagram 3. Please note that the faucet connection
supplied should fit most installation situations. If your
faucet requires a different fitting, please contact an
authorized plumber in your state or town to purchase
the correct fitting.
s Connect one locking key to each side of the water
filter cartridge in between the cartridge and the
locking collet as shown in Diagram 4.
To flush the water filter and check for leaks, aim the
end of the tubing into a bucket, turn isolating faucet
on and run at least 3 qt (3 L) of water through. Once
complete, turn isolating faucet off.
lo Locate desired position for water filter noting carefully the
following points:
It is recommended to fit the water filter in a vertical
orientation with the water filter head at the top. This will
minimize water leakage when replacing cartridge.
Ensure the filter is in a convenient location to access
every 6 months for replacement. We suggest that
this location is beside the water filter supply faucet in
a cupboard beside the refrigerator.
A minimum clearance of 2 V£'(64 ram) from the
bottom of the filter cartridge is required to perform
cartridge removal.
Do not screw water filter to refrigerator.
Diagram 2
Fig4 Waterline connection
to reg_igemtor
t
Diagram 3
F-ig.5Faucetconnection
Page 9
Page 10
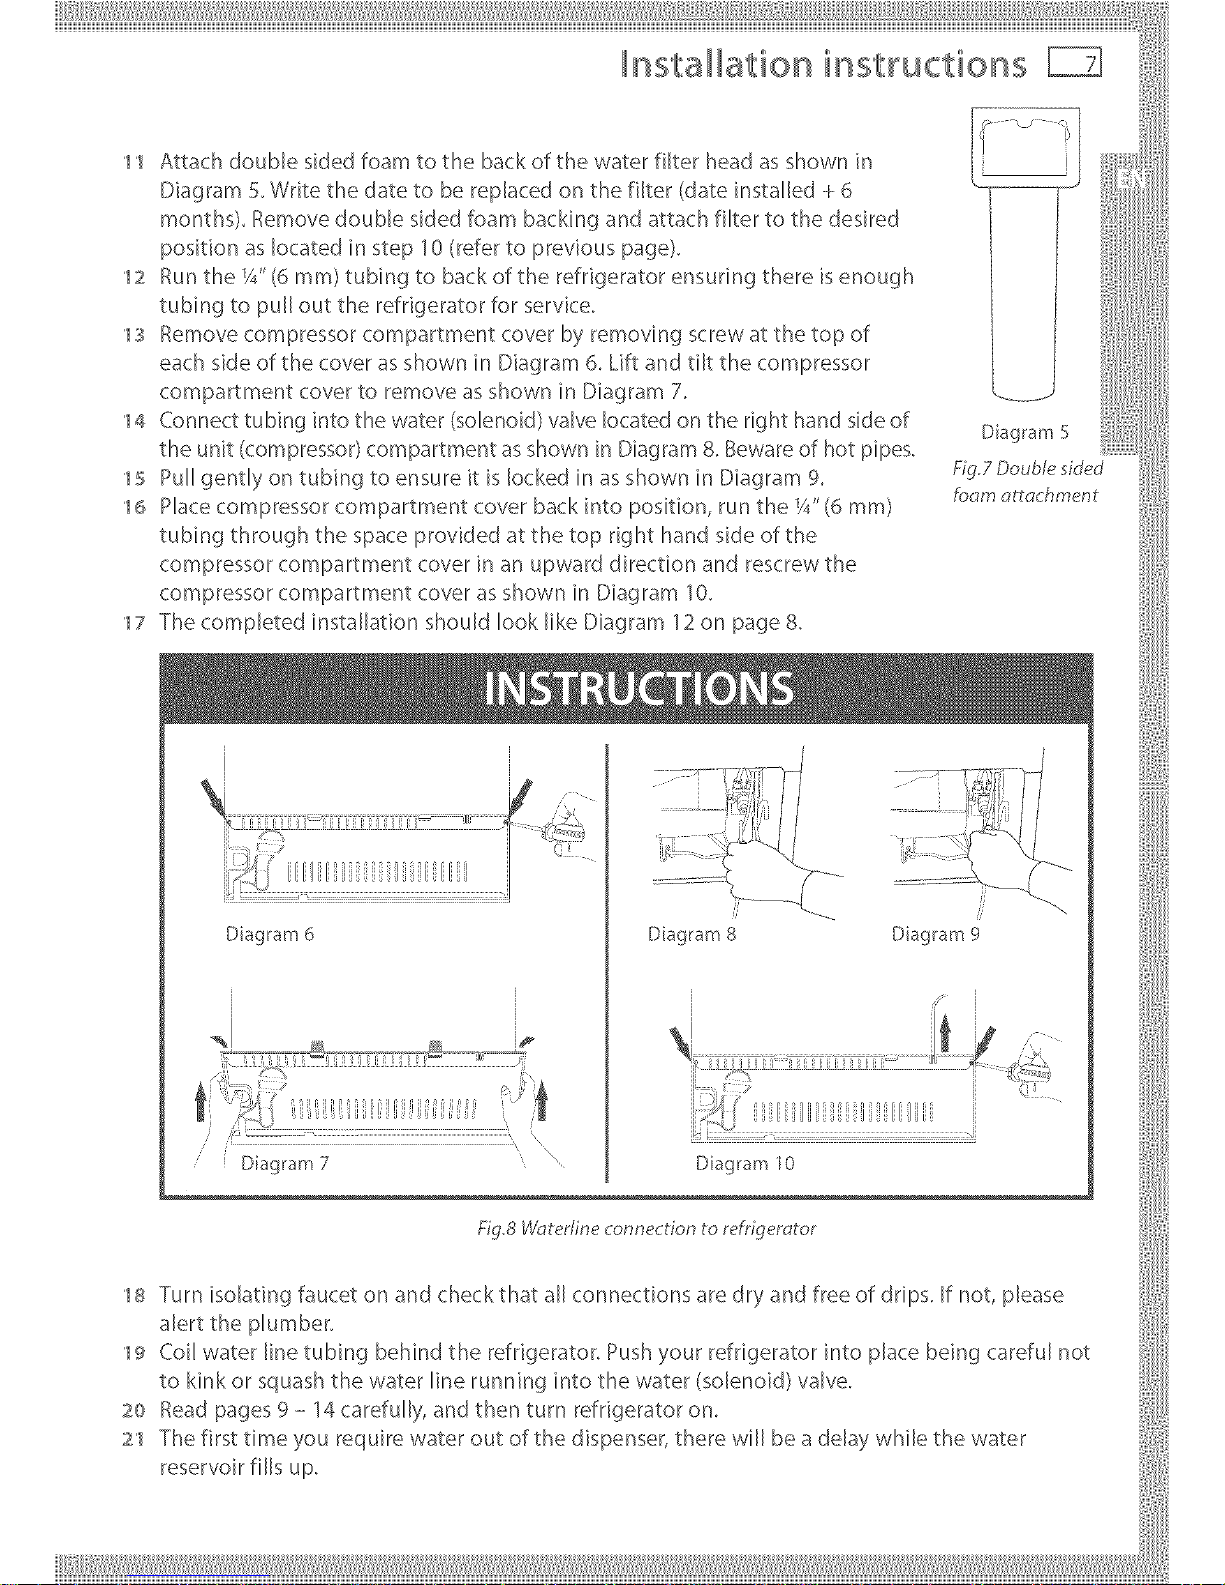
Installation i structions
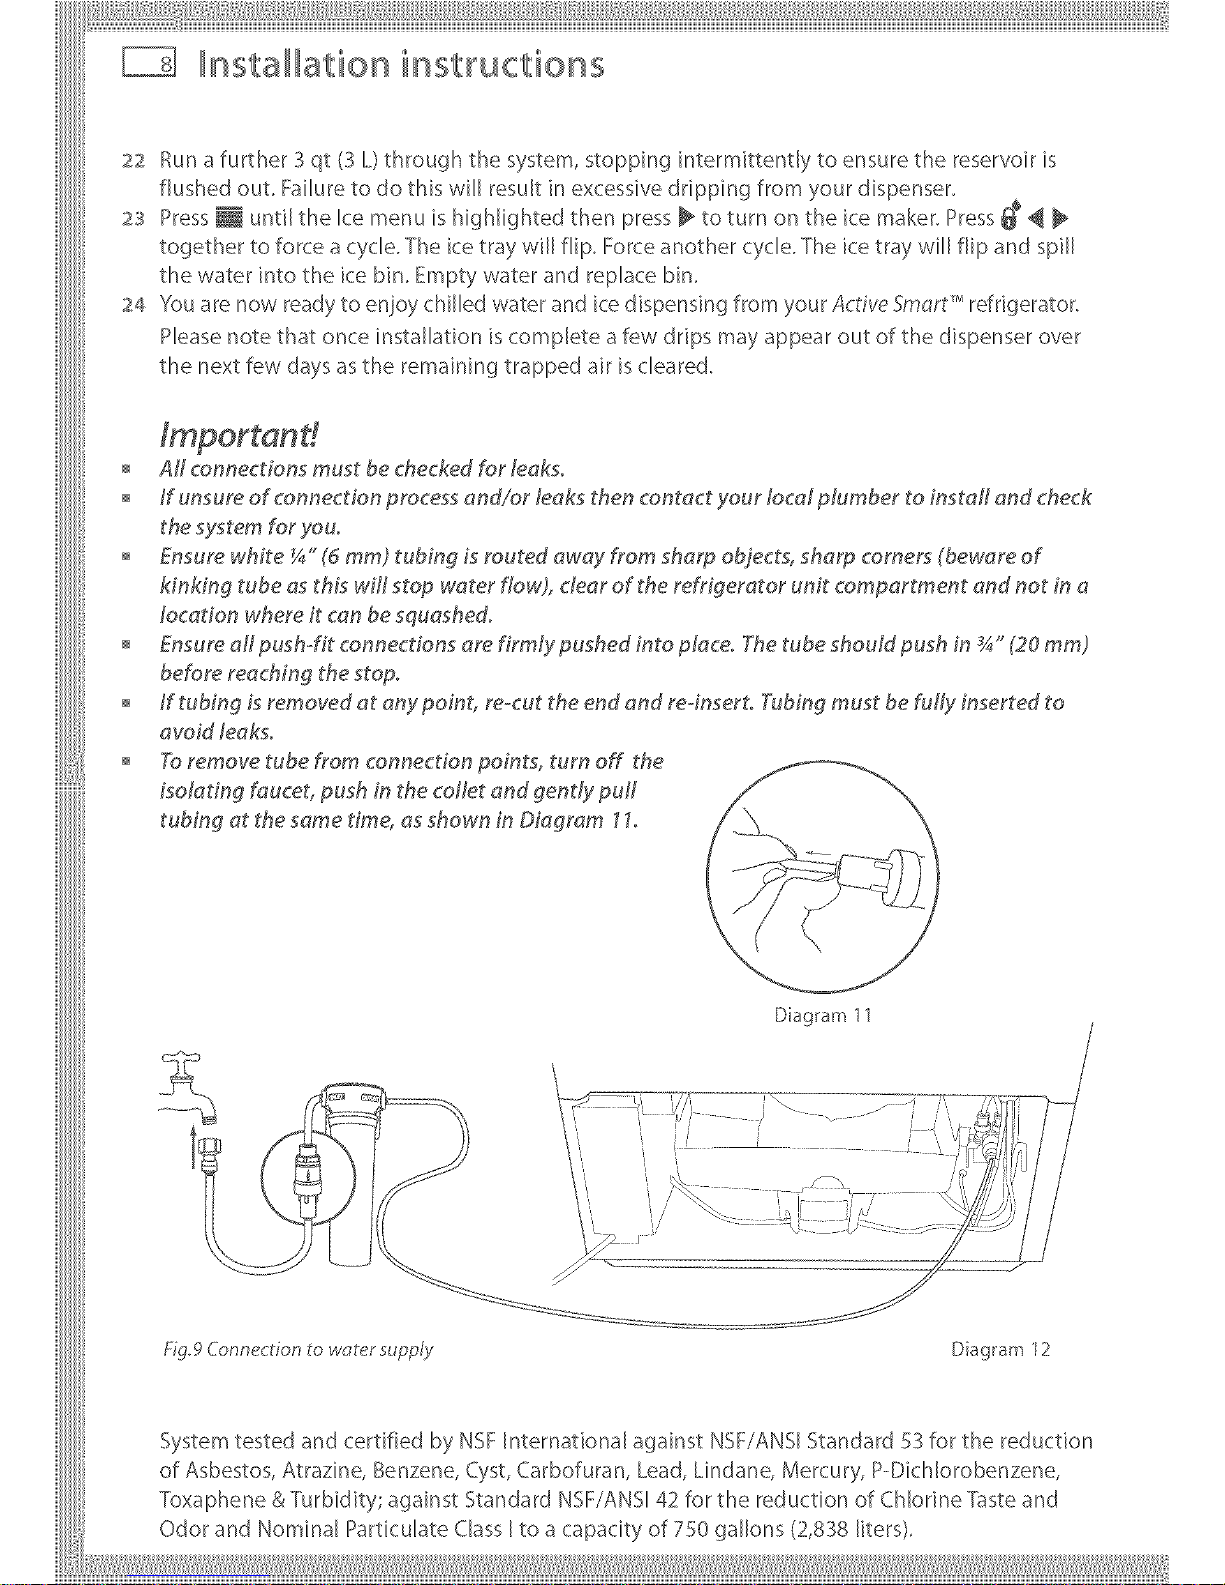
22 Run a further 3 qt (3 L) through the system, stopping intermittently to ensure the reservoir is
flushed out. Failure to do this will result in excessive dripping from your dispenser.
23 Press _ until the Ice menu is highlighted then press _ to turn on the ice maker. Press _ _
together to force a cycle. The ice tray will flip. Force another cycle. The ice tray will flip and spill
the water into the ice bin. Empty water and replace bin.
24 You are now ready to enjoy chilled water and ice dispensing from your Active 5murt _rdrigerator.
Please note that once installation is complete a few drips may appear out of the dispenser over
the next few days as the remaining trapped air is cleared.
o All connections must be checked for leaks,
if unsure of connection process and/or leaks then contact your tocM plumber to instafl and check
the system for you°
Ensure white W' (6 ram) tubing is routed away from sharp objects, sharp corners (beware of
kinking tube as this wifl stop water flow), dear of the refrigerator unit compartment and not in a
tocation where it can be squashed°
Ensure Mt push-fit connecdons are firmty pushed into placeo The tube should push in ¾" (2Omm)
before reaching the stop,
if tubing is removed at any point, re-cut the end and re,dnsert. Tubing must be fully inserted to
avoid leaks.
To remove tube from connection points, turn off the
isolating faucet, push in the coffer and gendy puff
tubing at the same time, as shown in Diagram 11.
Diagram 11
",,, iLi /
Fig,9 Connection to w¢_tersupply Diagram "l2
System tested and certified by NSF International against NSF/ANS[ Standard 53 for the reduction
of Asbestos, Atrazine, Benzene, Cyst, Carbofuran, Lead, Lindane, Mercury, P-Dich[orobenzene,
Toxaphene &Turbidity; against Standard NSF/ANS[ 42 for the reduction of Ch[odne Taste and
Odor and Nominal Particulate Class [to a capacity of 750 gallons (2,838 liters).
Page 11
nsta ation instructions
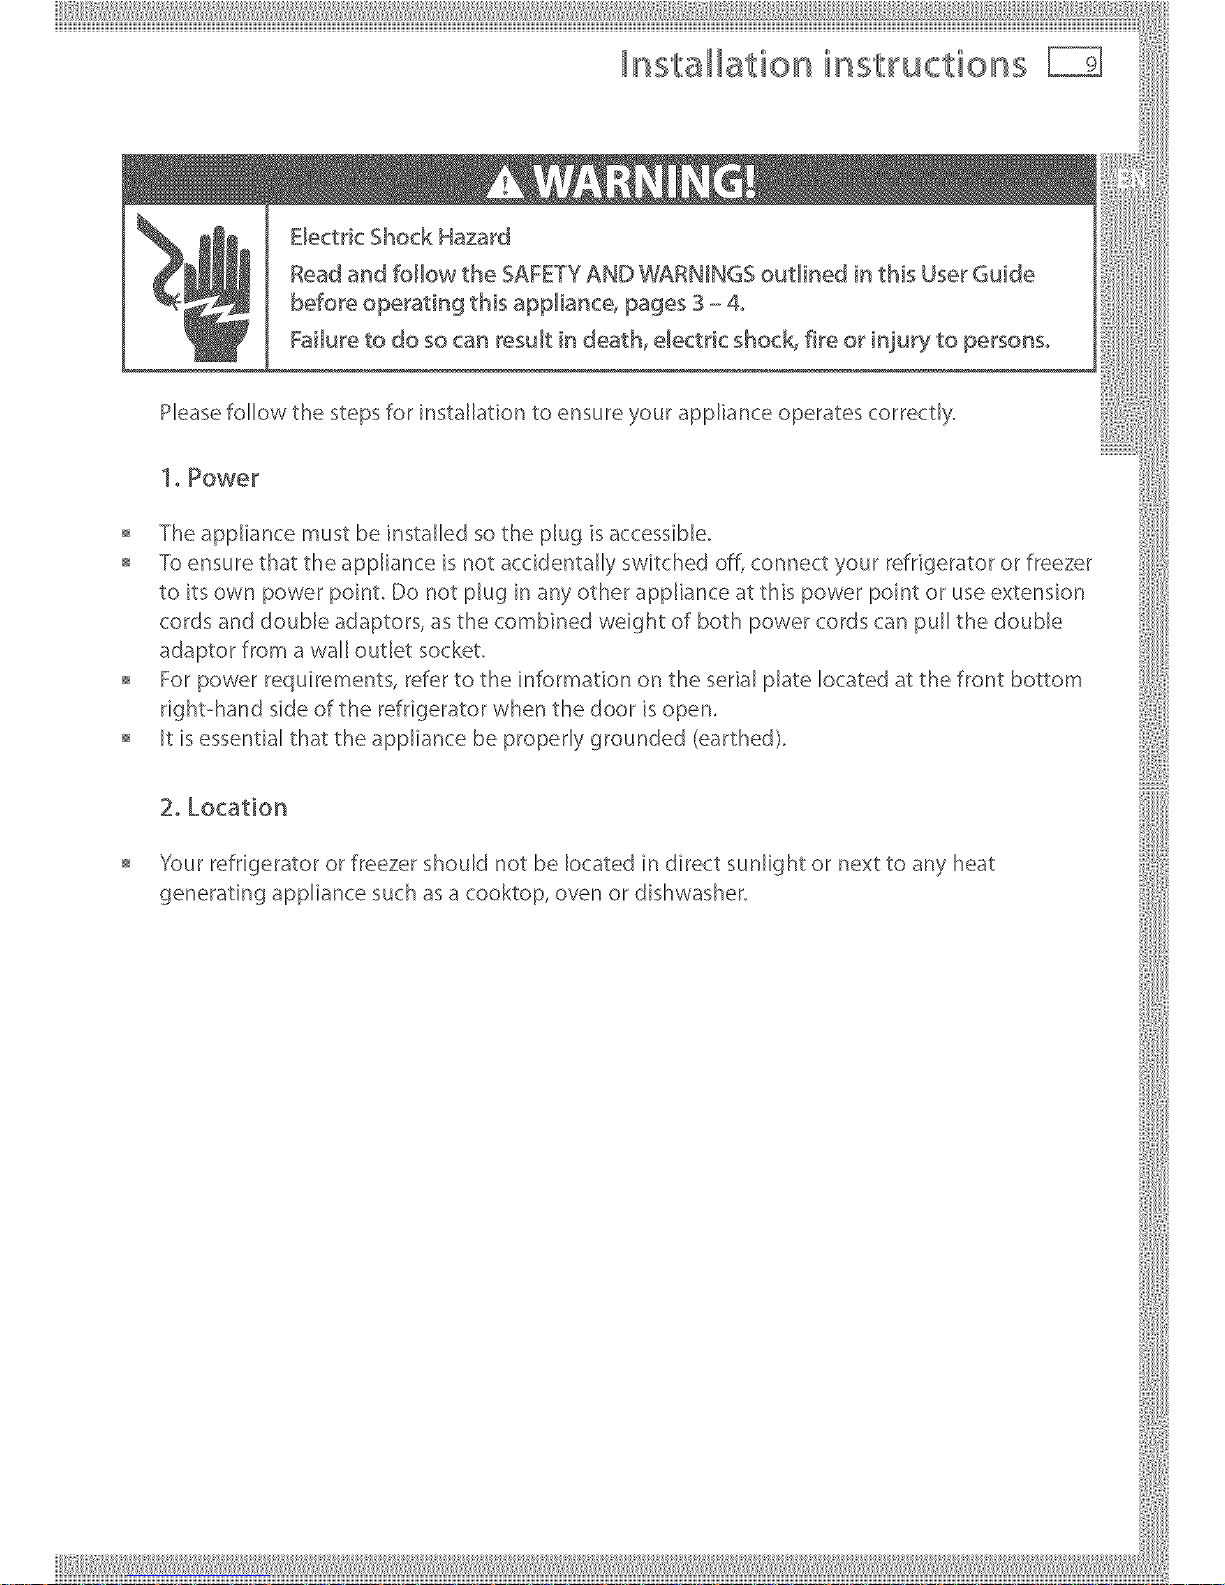
Electric Shock Hazard
Read and follow the SAFETYAND WARNINGSoutlined in this User Guide
before operating this appliance, pages 3- 4o
Failure to do so can result in death, electric shock fire or injury to persons°
Please follow the steps for installation to ensure your appliance operates correctly.
1oPower
o The appliance must be installed so the plug is accessible.
To ensure that the appliance is not accidentally switched off, connect your refrigerator or freezer
to its own power point. Do not plug in any other appliance at this power point or use extension
cords and double adaptors, as the combined weight of both power cords can pull the double
adaptor from a wall outlet socket.
For power requirements, refer to the information on the serial plate located at the front bottom
right-hand side of the refrigerator when the door is open.
It is essential that the appliance be properly grounded (earthed).
2, Location
generating appliance such as a cooktop, oven or dishwasher.
Page 12
_nsta_ation instructions
E522B
::::::::::::::::::::::::
_ ii _
[t
[
_iLM
Flush wth refrigerator chassis - full door rotation
,I _Idi-
Flush with refrigerator door - 90° door rotation (for full
drawer/shelf access, the doors need to be open past 90 °)
i D I
:::::::::::::::::::::::::::::::::::::
M
[E/r
Fush wth refrigerator door - fuji door rotation
, J- G -.i
i P!- -1 L i..
L
" s
RF201A
AI • iY
N
[lilly
iili _T
[
I[M
Flush wth refrigerator chassis - full door _otation
Flush with refrigerator door - g0 ° door rotation (for full
drawer/shelf access the doors need to be open past 90 °)
I D i
i _!KI_ -IKi--
i_...............?C_--
'i•_ "• Li¸¸'
Hush with refr gerator door - full door _otation
i L .I
\• / s
Page 13
_nsta_ation instructions
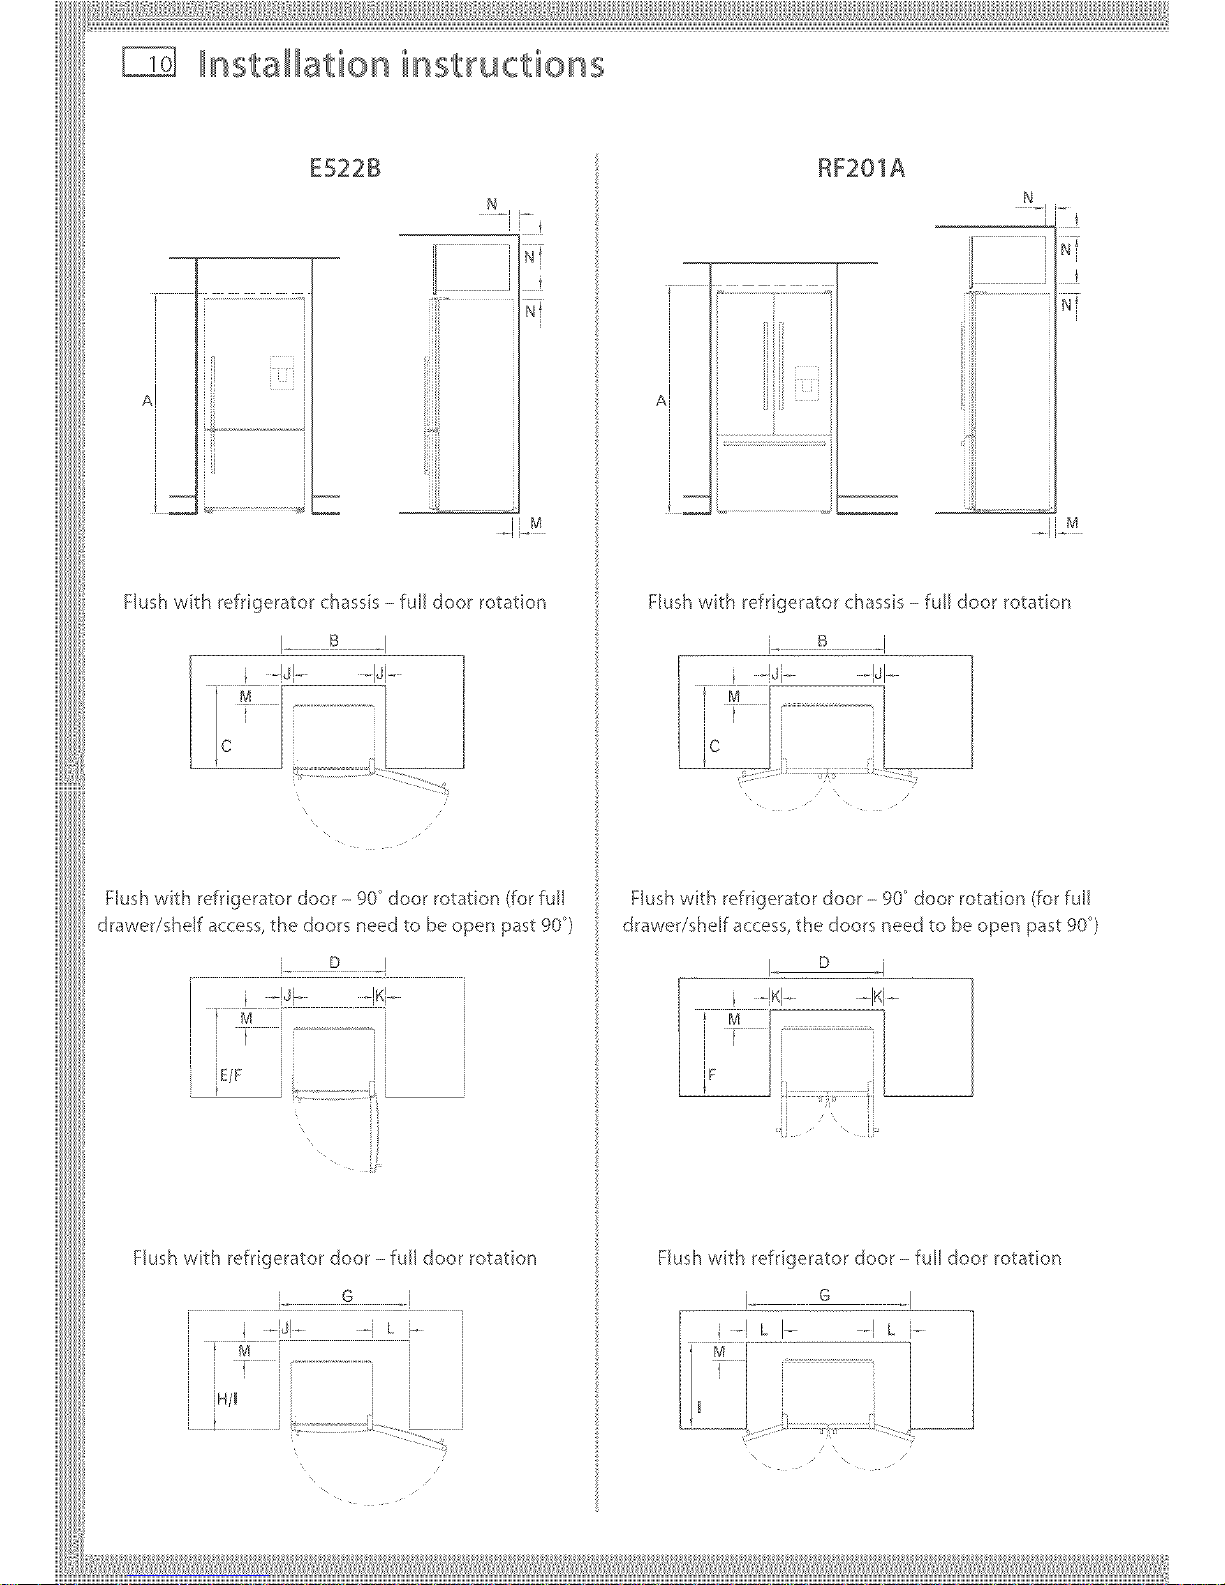
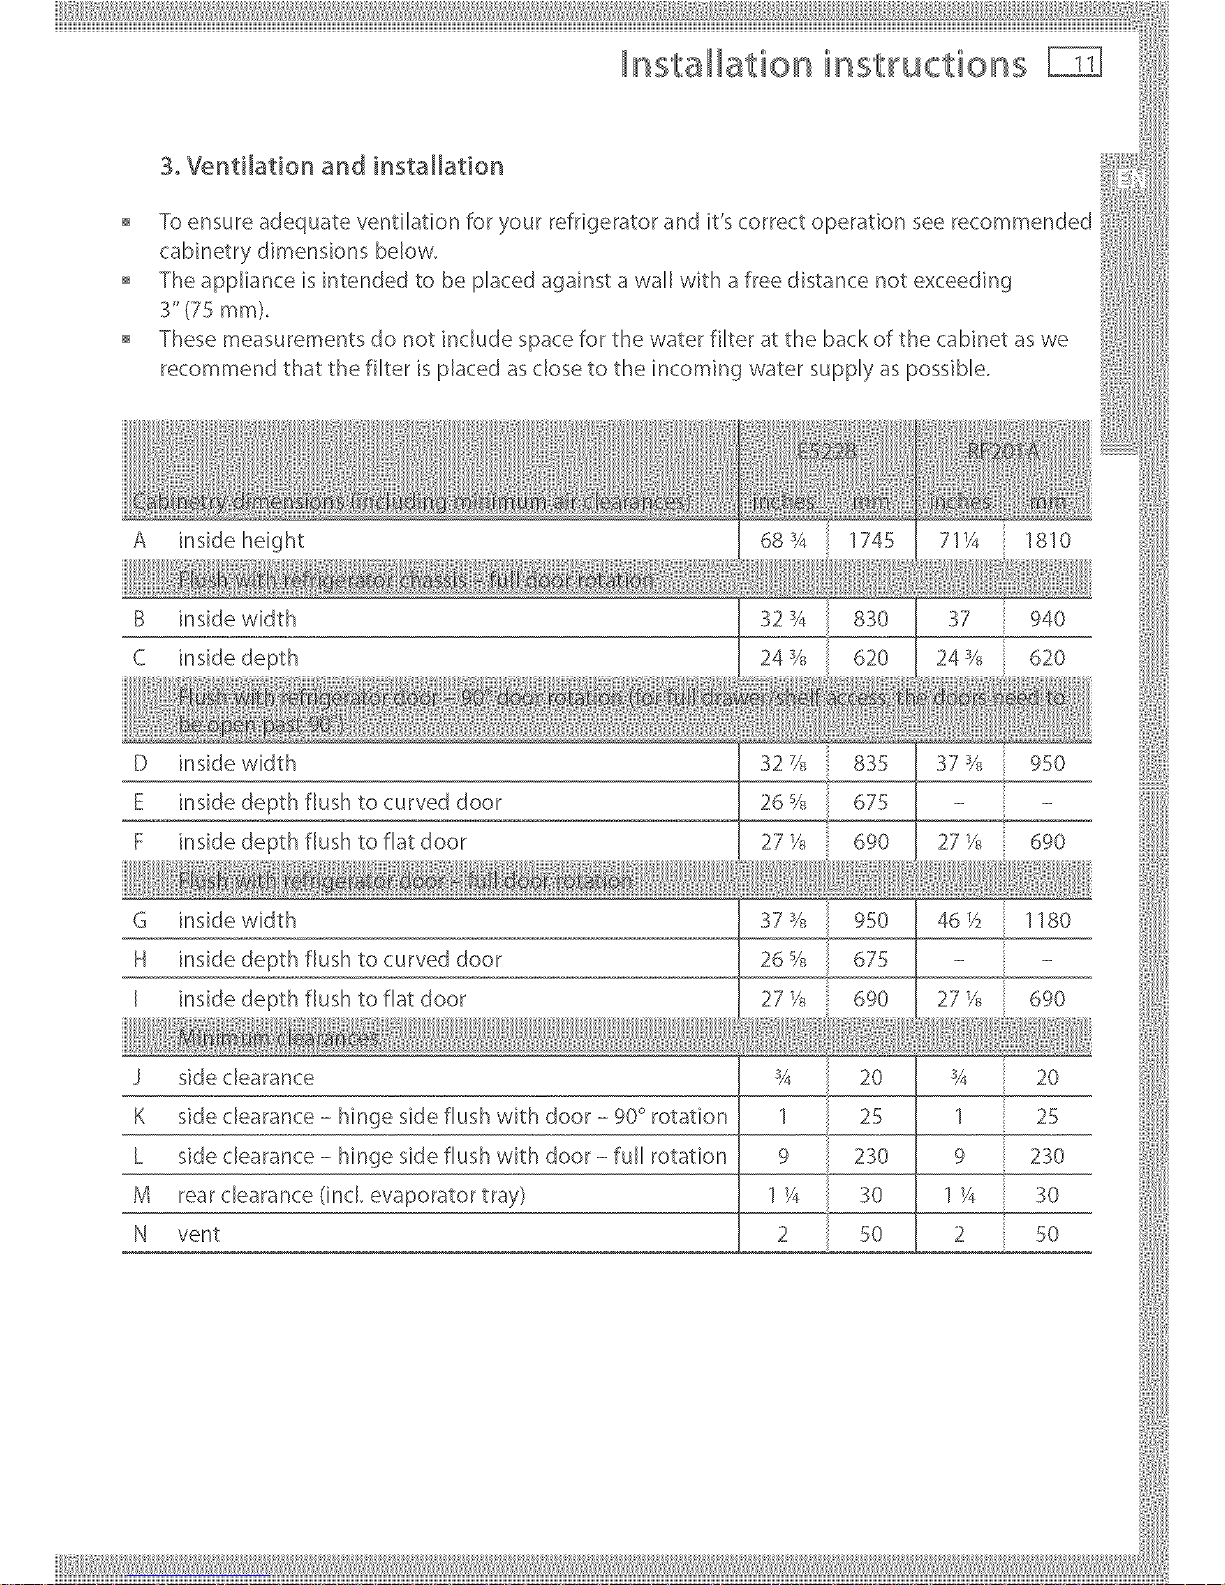
3, Ventilation and installation
To ensure adequate ventilation for your refrigerator and it's correct operation see recommended
cabinetry dimensions below.
The appliance is intended to be placed against a wall with a free distance not exceeding
3" (75ram),
These measurements do not include space for the water filter at the back of the cabinet as we
recommend that the filter is placed as close to the incoming water supply as possible.
A inside height
71¼ 1810
B inside width 37
C inside depth 24 %
940
620
D inside width 32 7/_ 835 37 s/6 950
f insidedepthflushto curved door 22_ 675 _ :
F inside depthflush tOflatdoor 27 Y8 690 27 It 690 _::
G inside width 37% 950 46_A 1180 ]
H insidedepth flush tO curved door 26 % 675 - : -
I insidedepthflushtoflatdoor 690
J s_dedearance _ _ 20 _ 20
K sideclearance- hinge side flush with door - 90 rotation 1 25 1 25
L sideclearance- hinge sideflushwith door- fullrotation 9 230 9 i: 230 $:
P,/1rear clearance(ind.evaporatortray) It_ 30 1_ _ 30 :
N vent 2 50 2 : 50 :
Page 14
nsta ation instructions
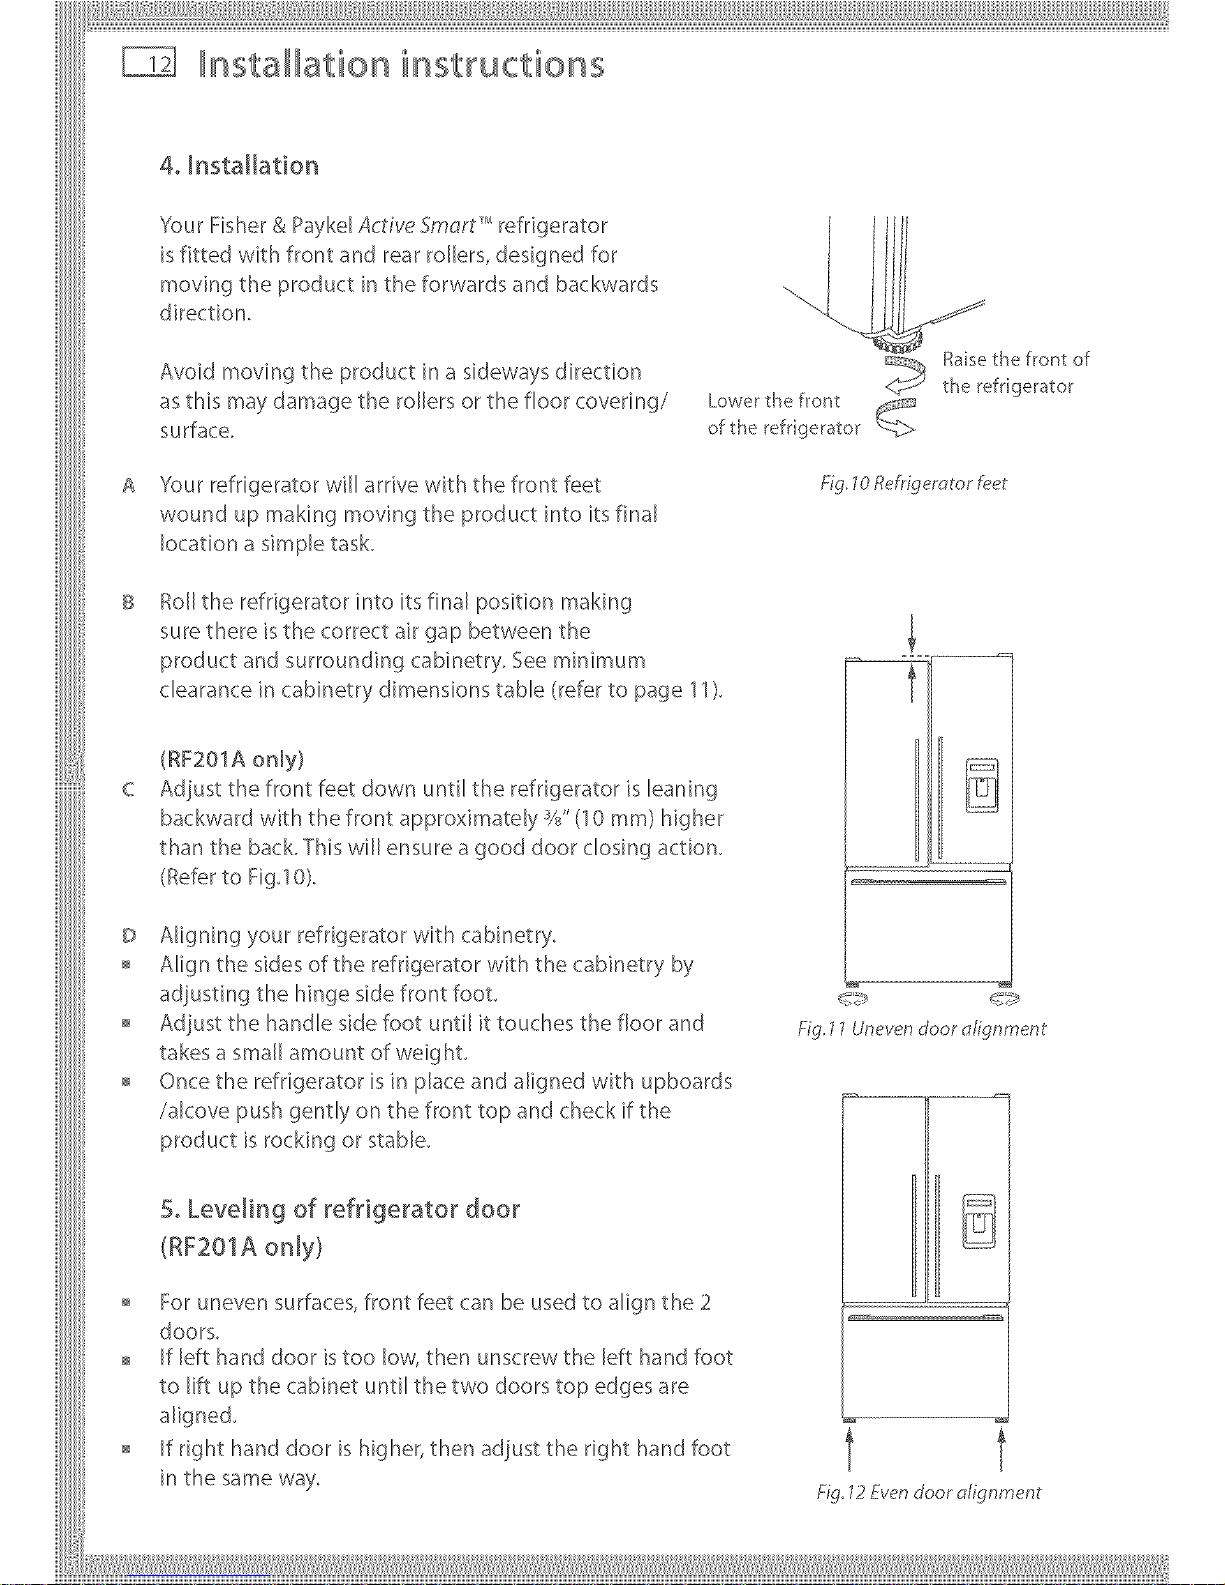
4oinstallation
",/our Fisher & Payke[ Active Smart _refrigerator
is fitted with front and rear railers, designed for
moving the product in the forwards and backwards
direction.
Avoid moving the product in a sideways direction
as this may damage the rollers or the floor covering/
surface.
Lower the front
of the _efdge{ato{
Raise the front of
the _eflige{ator
",,!our refrigerator will arrive with the front feet
wound up making moving the product into its final
location a simple task.
Fig, l ORefrigerator feet
Roll the refrigerator into its final position making
sure there is the correct air gap between the
product and surrounding cabinetry. See minimum
clearance in cabinetry dimensions table (refer to page 11).
(RF2OIA only}
Adjust the front feet down until the refrigerator is leaning
backward with the front approximately %" (10 ram) higher
than the back. This will ensure a good door closing action.
(Refer to Fig.lO).
D Aligning your refrigerator with cabinetry,
Align the sides of the refrigerator with the cabinetry by
adiusting the hinge side front foot,
Adjust the handle side foot until it touches the floor and
takes a small amount of weight,
Once the refrigerator is in place and aligned with upboards
/alcove push gently on the front top and check if the
product is rocking or stable.
5oLeveling of refrigerator door
(RF201A only)
For uneven surfaces, front feet can be used to align the 2
doors_
If left hand door is too low, then unscrew the left hand foot
to lift up the cabinet until the two doors top edges are
aligned,
If right hand door is higher, then adjust the right hand foot
in the same way,
c_ C_
Fig 71 Uneven door alignment
t
Fi .12Evendoor alignment
Page 15
iiiliiii,I=IIII' ilii_iii'liilii=i_illiiiiliiiil¸liiil¸liiiliiliiliiilll¸Iililiiil¸Iiliiil¸Iiliiil¸Iiliiil¸II iiiiIiliiiiliiil¸Iiliiil¸Iiliiil¸IIII iiliiii!!il
Ilstallatiol instructions i_:i
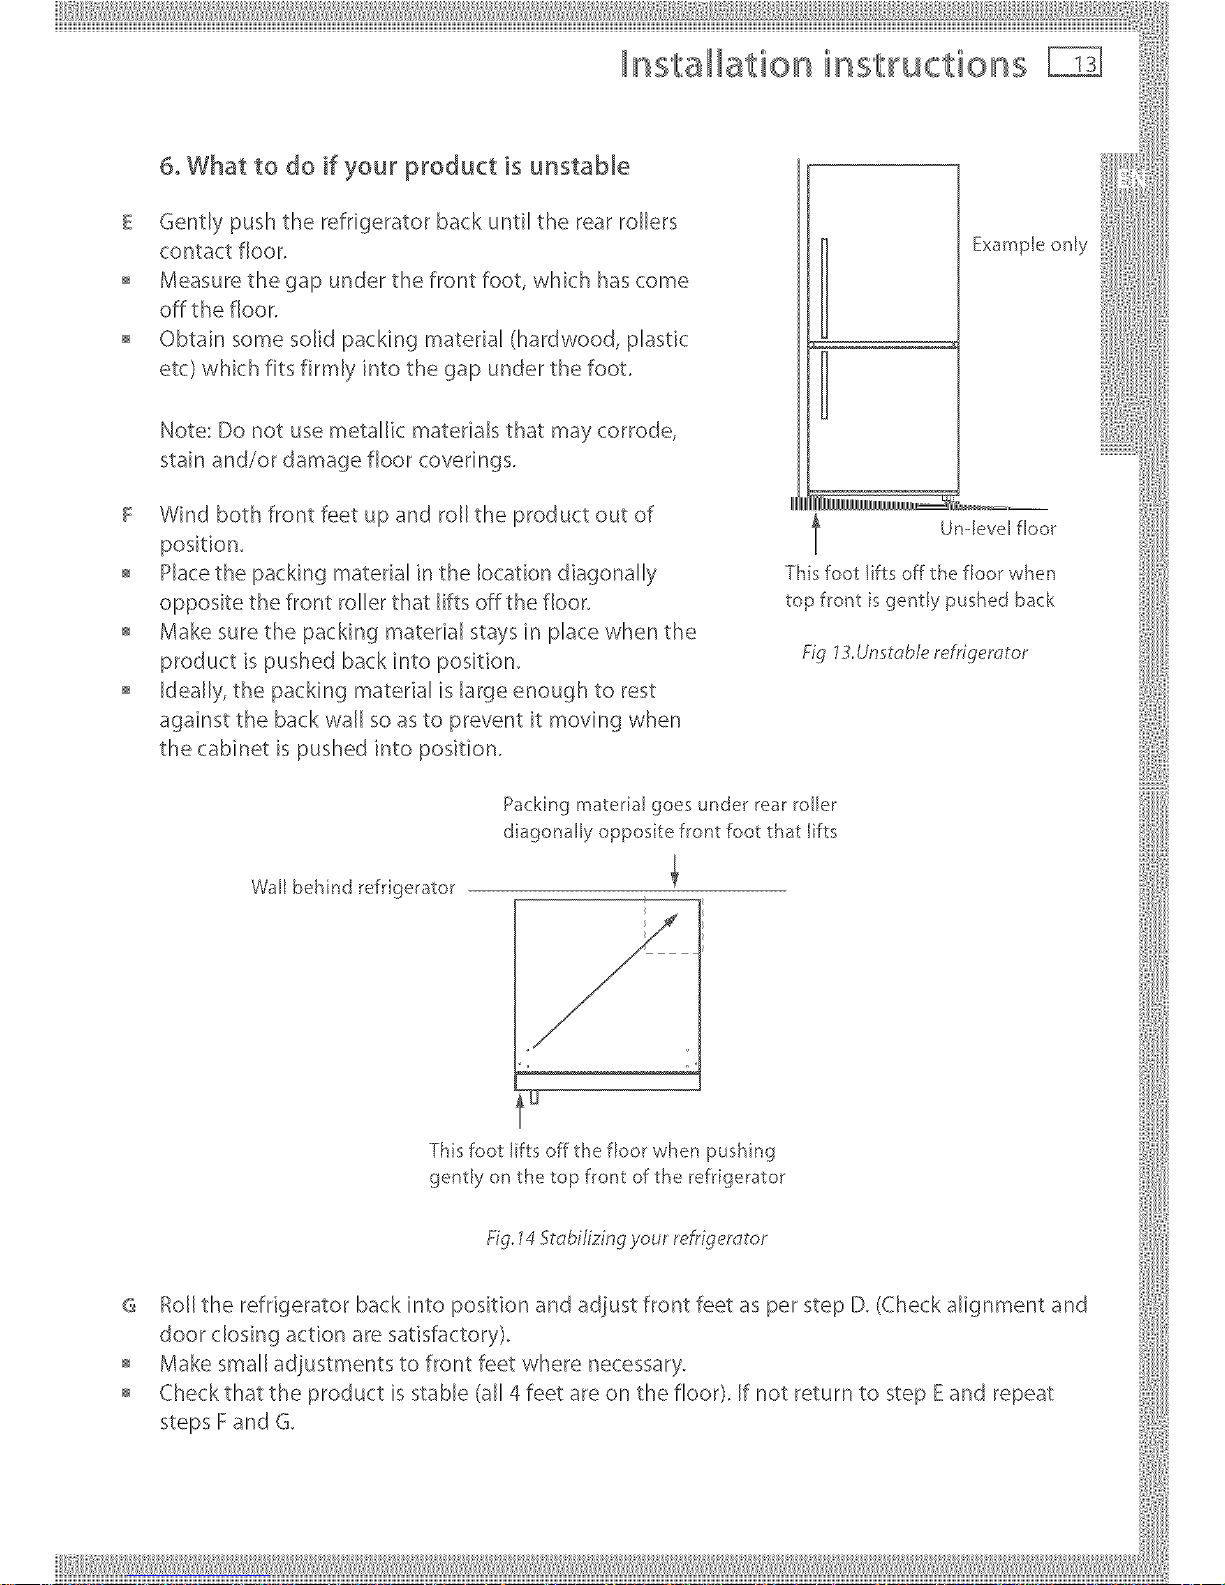
E Gently push the refrigerator back untilthe rear rollers I I }!::} i
contact=oor. II Examp_on,y
= Measurethegapunderthefrontfoot,whichhascome II
offthe floor. I I
Obtain some solid packing material (hardwood, plastic I
etc>,,.,h_chf_tsf_rm_;,_ntothegapunderthefoot. /
1
Note:Donotuse_etaU,cmater,a_sthatma;,'corrode, II I
stainandJordamagef_oorco,,er_nr_s. .........................
W_ndbothfrontfeetupandrolltheproductoutof '"="""___
position. T un- eve Too_
Place the packing material in the location diagonally ThBfoot lifts off the floo_ when ::
opposite the front roller that lifts off the floor, top font isgently pushed back
o Make sure the packing material stays in place when the
productispushedback into position, y,_ 7.:_.Unst_b/erdr,_er_tor
= IdeaUy,thepackinr_materialislargeenouU_torest
against the back wall so as to prevent it moving when
the cabinet is pushed into position.
Packing matedal goes unde_rear _olIer
diagonal y oppos te fiont foot that lifts
wallb_h_dr_frig_rator
liiii
G fioll the refrigerator back into position and adjust front feet as per step D. (Check alignment and
doorclosingactionaresatisfactory>.
= MakesmaUadiustmentstofron_feetwherenecessary.
Check that the product is stable (all 4 feet are on the floor). If not return to step Eand repeat
stepsFandQ.
Page 16
_nsta_ation instructions
Before placing food in the fresh food or freezer compartments
Remove all packaging. Ensure that all transit clips are removed from the refrigerator. These are
small rubber stops located at the back of the shelves.
Clean the inside of the appliance with a mix of warm water, a little liquid detergent and a soft
cloth to remove manufacturing and transportation dust.
Allow the refrigerator and freezer to run empty for 2 - B hours to allow each compartment to
cool to the appropriate temperature.
The appliance may have an odor on its initial operation, but this will go when the refrigerator
and freezer have cooled sufficiently.
Energy efficiency
Do not cover your appliances with any material that will prevent air from flowing around the
cabinet sides.
Do not leave the door open for any longer than is necessary.
Allow good clearances in front of the air ducts within the cabinet for maximum cold air
distribution.
Moving or storing your refrigerator
........................If your refrigerator or freezer is turned off for any reason, wait 10 minutes before turning it back }
On. This will allow the refrigeration sy'stem pressures to equalize before restarting.
,/
oo,,oto,
Turn Off the appliance and unplug from the power point. Remove all food.
Turn the adjustable feet to the right as far as they will turn (refer to page 12).
Ease the refrigerator out of its position. Tuck the power cord away and tape the doors closed.
Tape the shelves in [)lace. If the cabinet needs to be placed at an angle or laid down, carefully
layitonitsside(therighthandsidewhenviewedfromthefront/,
o RelocateandinstaU.Iftheappliancehasbeenleftor,itssideforanyh_gthoftime,leaveit
standinguprightforatleast10minutesbeforeturningon.
s_or_,,gyourrefrigeratororfreezer :i
o Whenstoring;,'ourcleanedappliance,leavethedoorsopen.Th_sallowsa_rtoc_rculateand 1i
prevents the build up of bacteria and moulds.
Before using again, clean well using a mixture of warm water and baking soda (add 1teaspoon
of baking soda to each 1 pint (500 ml)of water). Rinse with clean water.
Holiday time
WerecommendyouleaveyourrefrigeratororfreezeroperatingwhUeyouareor,holiday.
Page 17
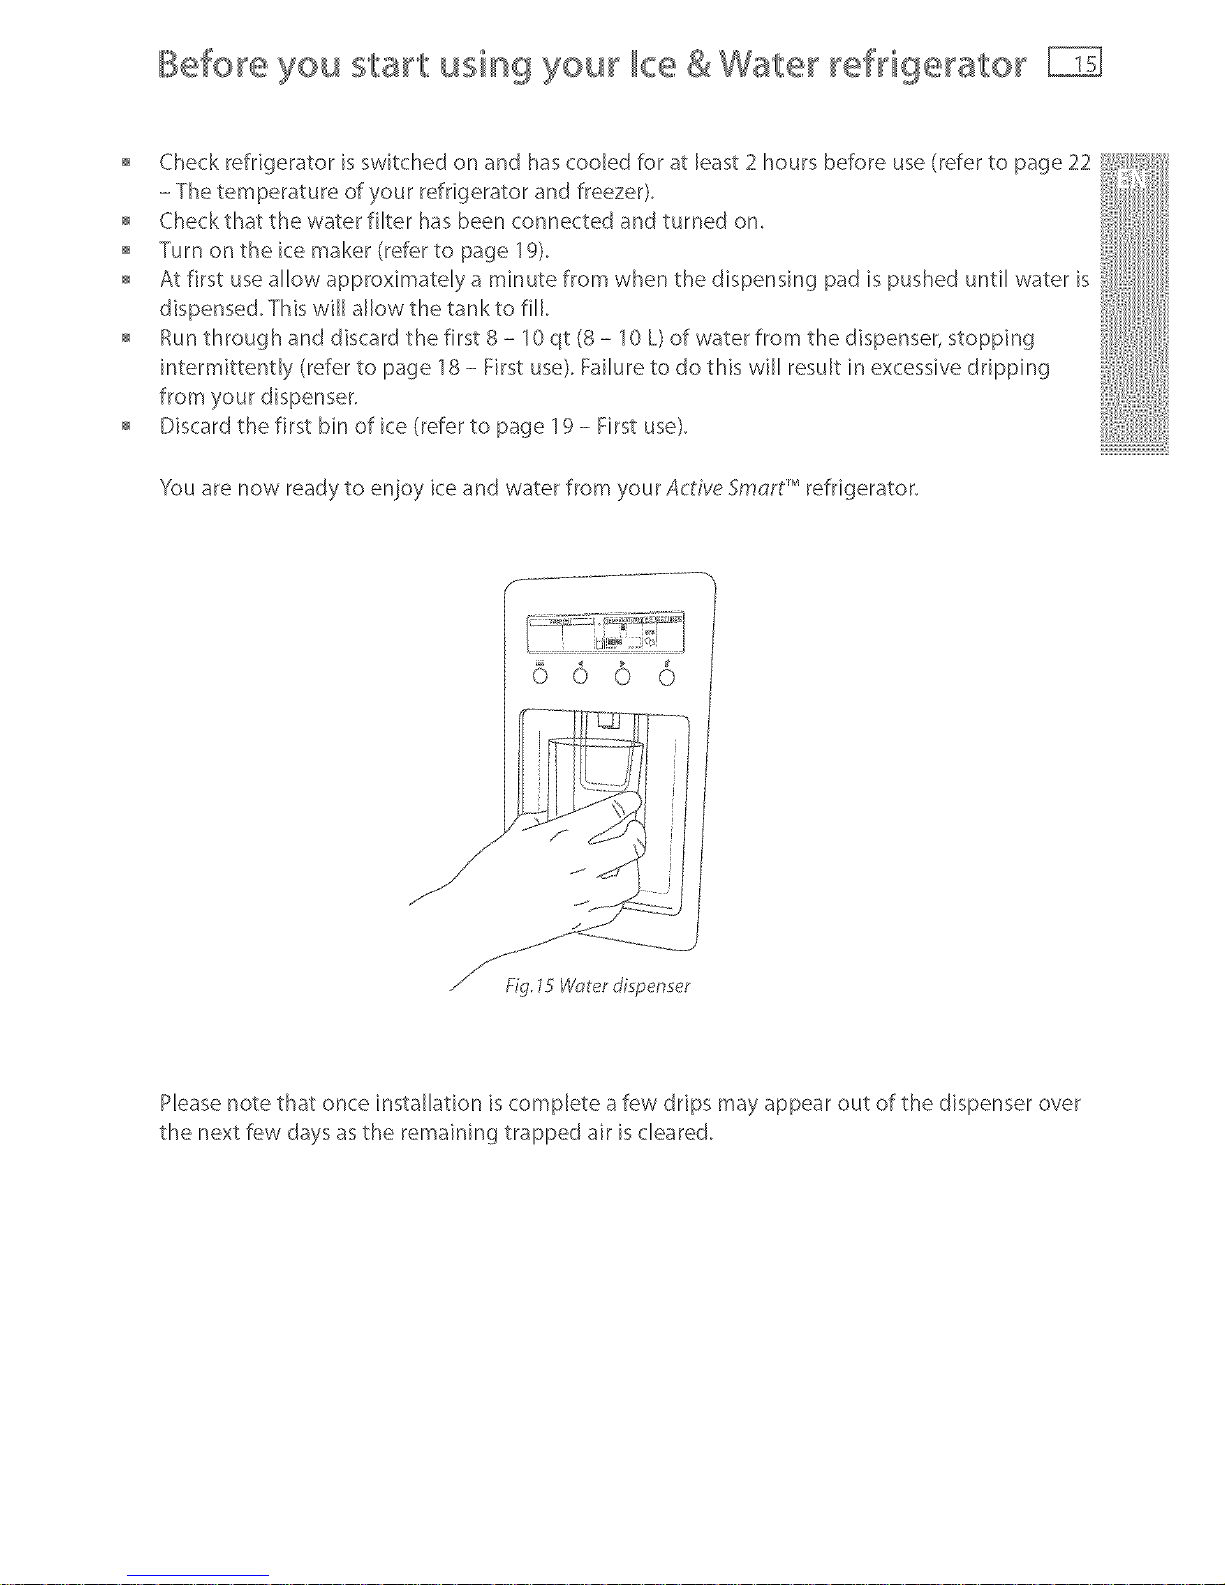
Before you start using your ke & Water refrigerator
Check refrigerator is switched on and has cooled for at least 2 hours before use (refer to page 22
- The temperature of your refrigerator and freezer).
Check that the water filter has been connected and turned om
Turn on the ice maker (refer to page 19).
At first use allow approximately a minute from when the dispensing pad is pushed until water is
dispensed. This will allow the tank to fi&
Run through and discard the first 8 - 10 qt (8 - 10 L) of water from the dispenser, stopping
intermittently (refer to page 18 - First use). Failure to do this will result in excessive dripping
from your dispenser.
Discard the first bin of ice (refer to page 19 - First use).
You are now ready to enjoy ice and water from your Active 5mart r'' refrigerator.
6
_"<q_ l F W_rerdispenser
Please note that once installation is complete a few drips may appear out of the dispenser over
the next few days as the remaining trapped air is cleared.
Page 18
A_ about the display
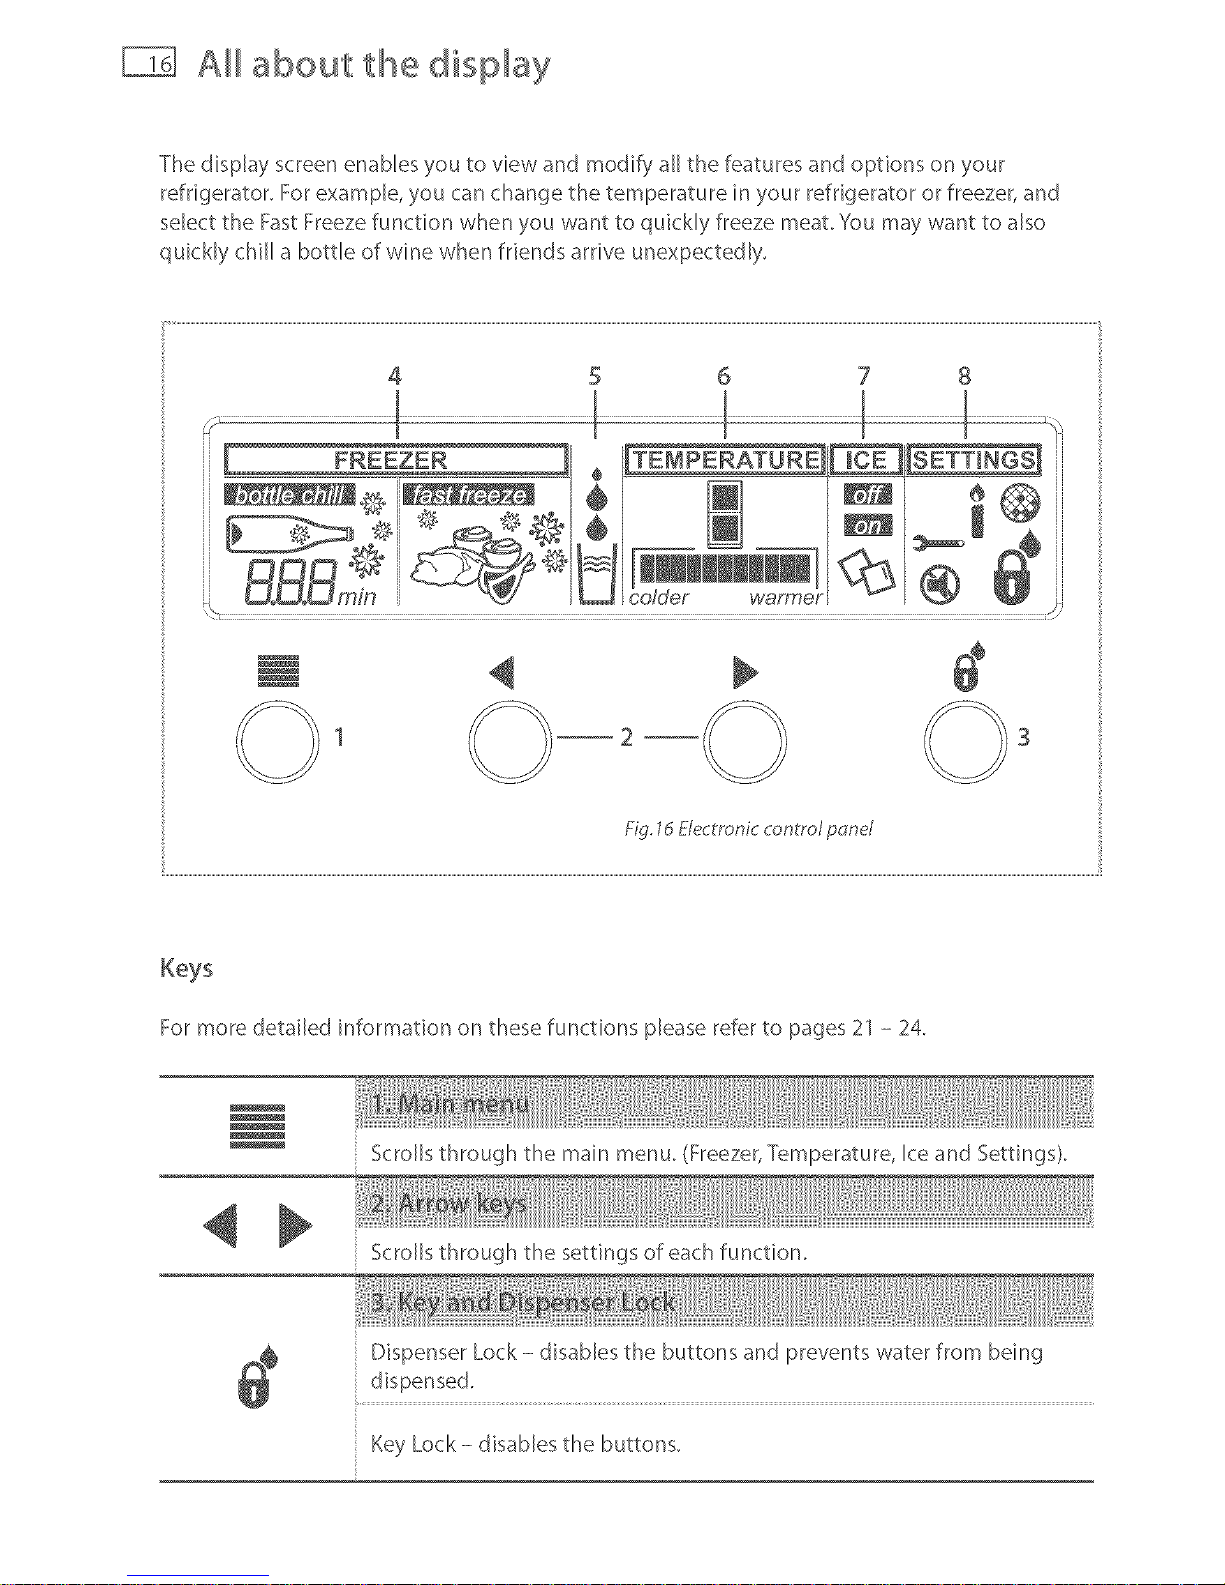
The display screen enables you to view and modify all the features and options on your
refrigerator. For example, you can change the temperature in your refrigerator or freezer, and
select the Fast Freeze function when you want to quickly freeze meat. You may want to also
quickly chill a bottle of wine when friends arrive unexpectedly.
4 5 6 7 8
t .l. J ,
_::::::::::::::::::::::::::::::::::::::::::::::::::::::::::::::::::::::::::::::::::::::::::::::::::::::::::::::::::::::::::::::::::::::::::::::::::::::::::::::::::::::::::::::::::::::::::::::::::::::::::::::::::::::::::::::::::::::::::::::::::::::::::::::::::::::::::::::::::::::::::::::::::::::::::::::::::::::::::::::::::::::::::::::::::::::::::::::::::::::::::::::::::::::::::::::::::::::::::::::::7::::::::::::::::::::::::_:
3
Fig. ?6 Electronic control panel
For more detailed information on these functions please refer to pages 21 - 24.
Scrolls through the main menu, (Freezer, ]emperature, Ice and Settings),
Scrolls through the settings of each function,
Dispenser Lock - disables the buttons and prevents water from being
dispensed.
Key Lock- disables the buttons,
Page 19
about the display
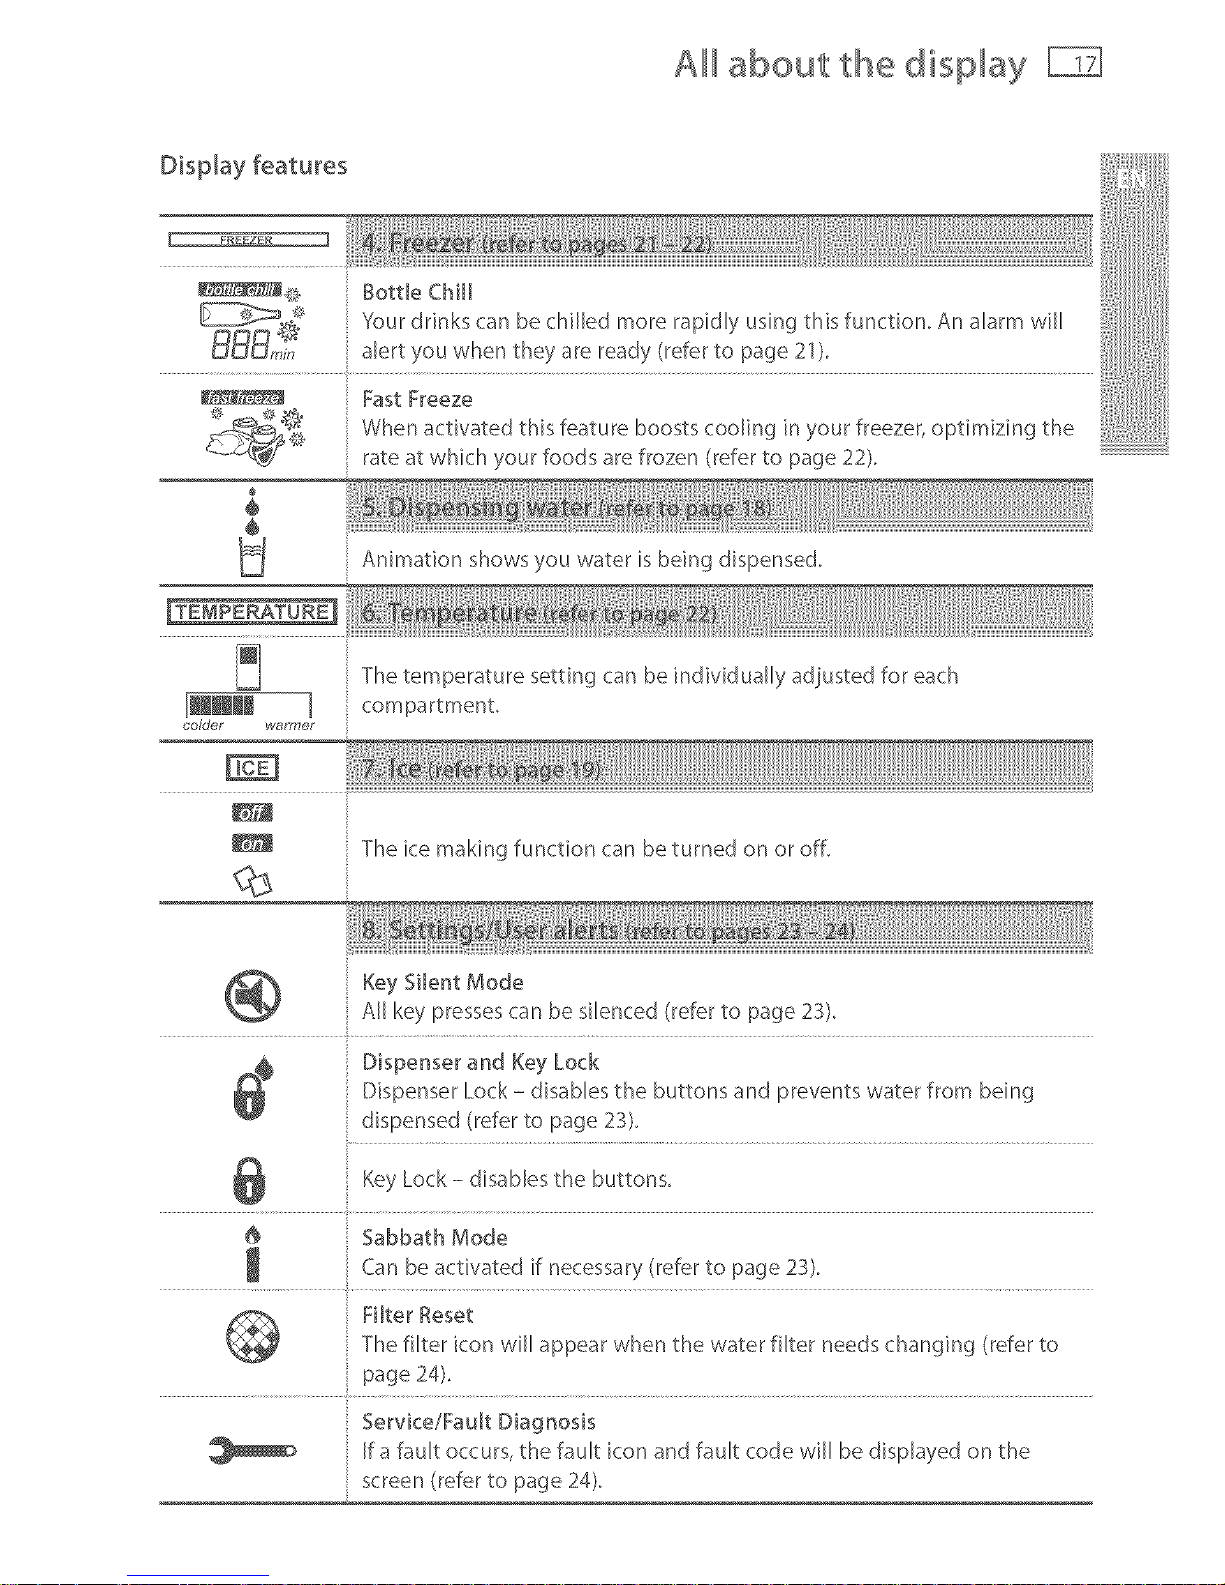
Display features
l _EEZER ]
@ Botde Chill
Your drinks can be chilled more rapidly using this function. An alarm will
£££,_uW alert you when they are ready (refer to page 21).
Fast Freeze
When activated this feature boosts cooling in your freezer, optimizing the
rate at which your foods are frozen (refer to page 22).
$
÷
colder wag'met
Animation shows you water is being dispensed.
The temperature setting can be individually adjusted for each
compartment.
The ice making function can be turned on or off.
Key Silent Mode
All key presses can be silenced (refer to page 23).
Dispenser and Key Lock
Dispenser Lock - disables the buttons and prevents water from being
dispensed (refer to page 23).
Key Lock - disables the buttons.
6 Sabbath Mode
Can be activated if necessary (refer to page 23).
Filter Reset
The filter icon will appear when the water filter needs changing (refer to
page 24).
Service/Fault Diagnosis
If a fault occurs, the fault icon and fault code will be dispByed on the
screen (refer to page 24).
Page 20

Using you wate dispense
Dispensing pad
",,!ourwater dispenser has been designed for one handed operation. Simply push your glass up
against the dispenser pad located at the back of the dispenser area. This pad requires only a
gentle press to activate.
Please remember that pressing very hard against the dispensing pad will not make the
dispenser operate faster or produce greater quantities of water.
First use
After installation, on the first use, allow approximately a one minute delay while the dispensing
pad is pushed until water is dispensed. This will allow the tank to fill completdy.
After you fill the tank for the first time, dispense and discard approximately 8 - 10 qt (8 - 10 L)
stopping intermittently to flush the tank out.
$
¢
Dispensing
To dispense water push the dispensing pad gently, using 5 6 (_ _}
a glass or container,
When you dispense water, a light will appear above the
dispensing area, and on the display screen, The water fill
icon tl will also appear.
To stop the flow of water, simply pull your glass away
from the dispensing pad.
To avoid damage to property or per.sonal injury do not
put hand.s, fingers or objects up the dLspenser opening.
_i_i_/, 17 Wc,ter di pen er
Please note that once installation is complete a few drips may appear out of the dispenser over
the next few days as the remaining trapped air is cleared.
Page 21
Using you ice make
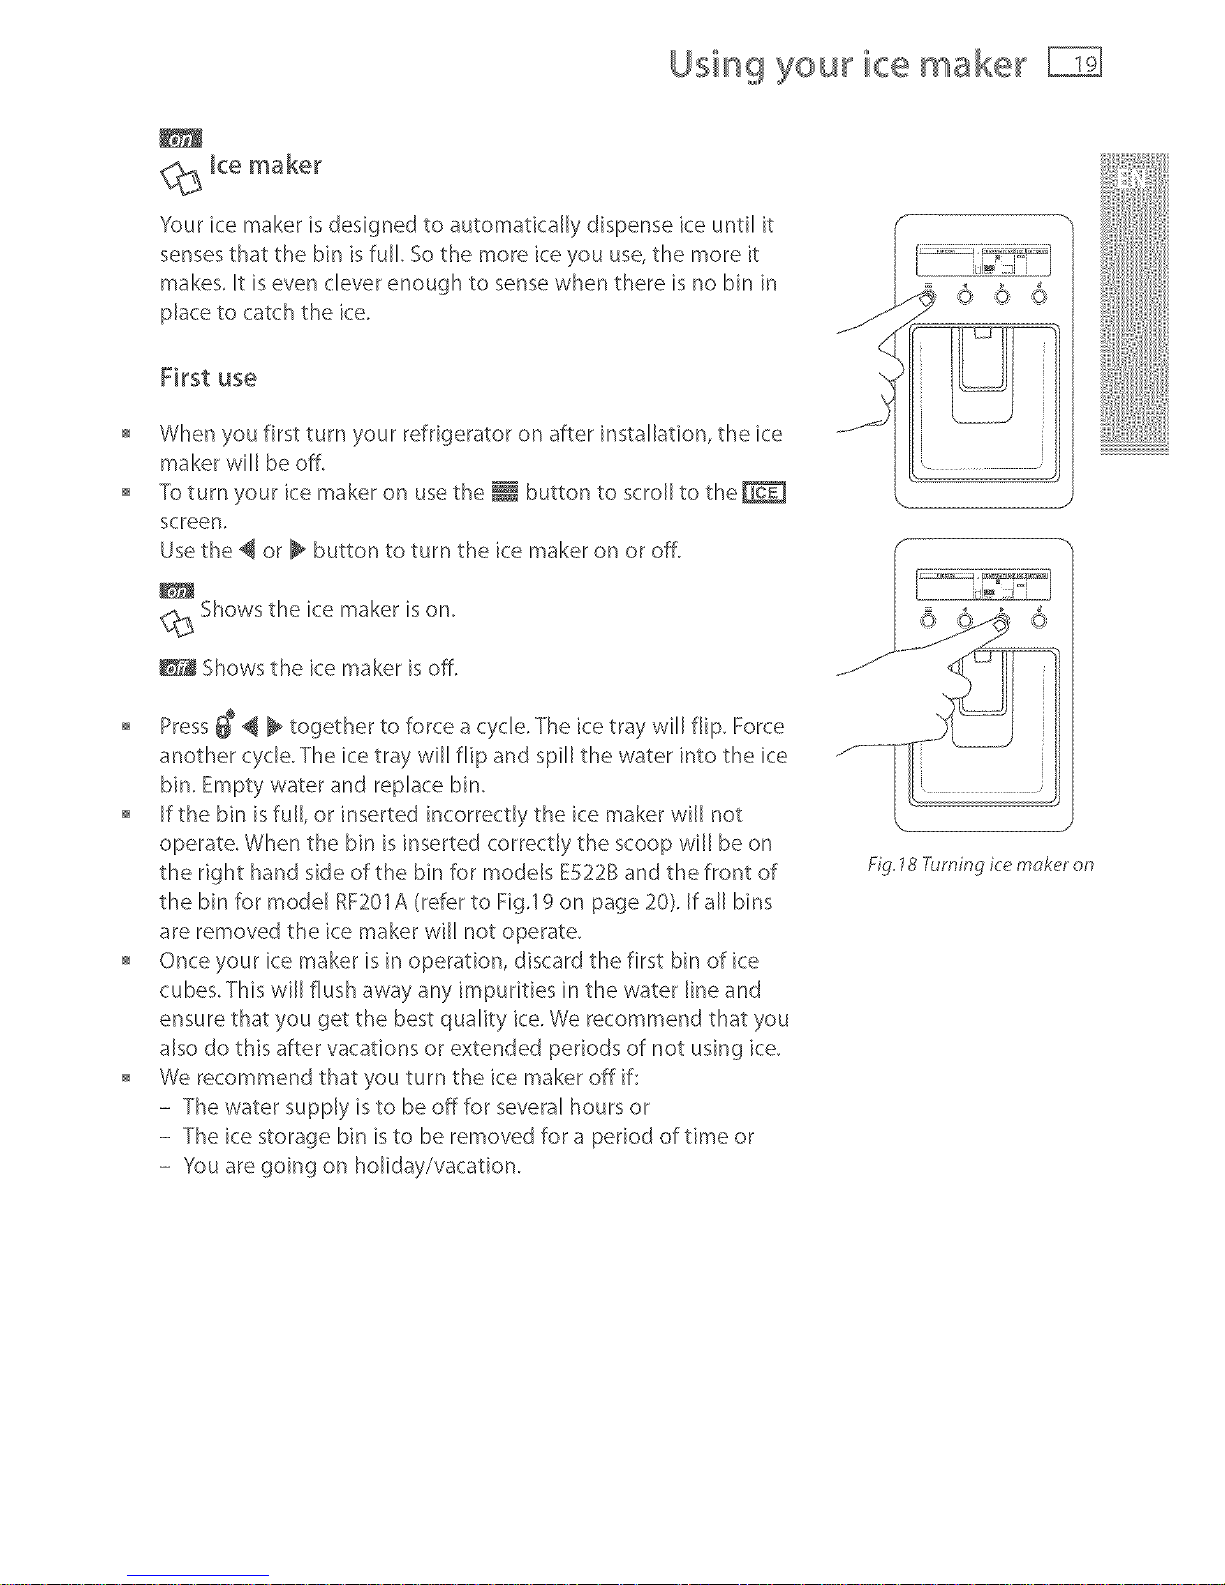
Ice maker
"!our ice maker is designed to automatically' dispense ice until it
senses that the bin is full. So the more ice you use, the more it
makes, It is even clever enough to sense when there is no bin in
place to catch the ice.
First use
When you first turn your refrigerator on after installation, the ice
maker will be oE
To turn your ice maker on use the _ button to scroll to the
screen,
Use the _ or _ button to turn the ice maker on or oE
Shows the ice maker is on_
Shows the ice maker is oE
Press _ < _ together to force a cycle, The ice tray will flip. Force
another cycle.The ice tray will flip and spill the water into the ice
bin. Empty water and replace bin.
If the bin is full, or inserted incorrectly the ice maker will not
operate, When the bin is inserted correctly the scoop will be on
the right hand side of the bin for models E522B and the front of
the bin for model RF201A (refer to FigJ 9 on page 20). If all bins
are removed the ice maker will not operate.
Once your ice maker is in operation, discard the first bin of ice
cubes, This will flush away any impurities in the water line and
ensure that you get the best quality ice. We recommend that you
also do this after vacations or extended periods of not using ice.
We recommend that you turn the ice maker off if:
- The water supply is to be off for several hours or
- The ice storage bin is to be removed for a period of time or
- You are going on holiday/vacation.
(
6 6
i
Fig 18 #uming ice moker on
Page 22

Using your ice maker
information about your ice maker
",,!ourautomatic ice maker will produce approximately eight cubes of ice every 2 - 3 hours,
dependent on freezer compartment temperature and number of door openings,
The ice cube tray will fill with water once the freezer has reached the correct temperature.
The first cubes will normally freeze after several hours,
When cubes are frozen, they will be ejected from the mould into the ice storage bin,
Ice making will continue until the storage bin is full.
Ice making will resume when the ice is used,
For maximum ice storage, level the stored cubes with the ice scoop provide&
Your ke & Water product comes with a smaller ke bin inside the Brger freezer bin, Attached to
this is the scoop for the ice This scoop provides hygienic access to the ice
If a large amount of ice is required, remove the smaller storage bin and allow ice to fall into the
larger bin,
If ice is not used often, old cubes will become cloudy, taste stale, will shrink and may stick
together. Empty the ice storage bin periodically, wash in lukewarm water, dry thoroughly and
place back in the correct position.
E522B fiF201A
Fig. 19 Ice storage bin cTndscoop in correct po ition
Avoid contact with the moving parts of the ice maker ejector mechanism, and do not place your
fingers on the automatic ice making mechanism while the ref@erator is in operation°
Do not use ice cubes that may have become dLscolored) usually with a green-blue color. If such
discolouration Ls noted, discard the ice cubes and contact your Nsher & Payket Appliances
Authorized Service denter,
Ensure the ice maker is connected to the filter and only to a drinkable water supply,
Instafiatlon of the water connection to the ice maker must be completed by a qualified service
technician or a qualified plumber (see installation instructions).
Page 23
Using the display options
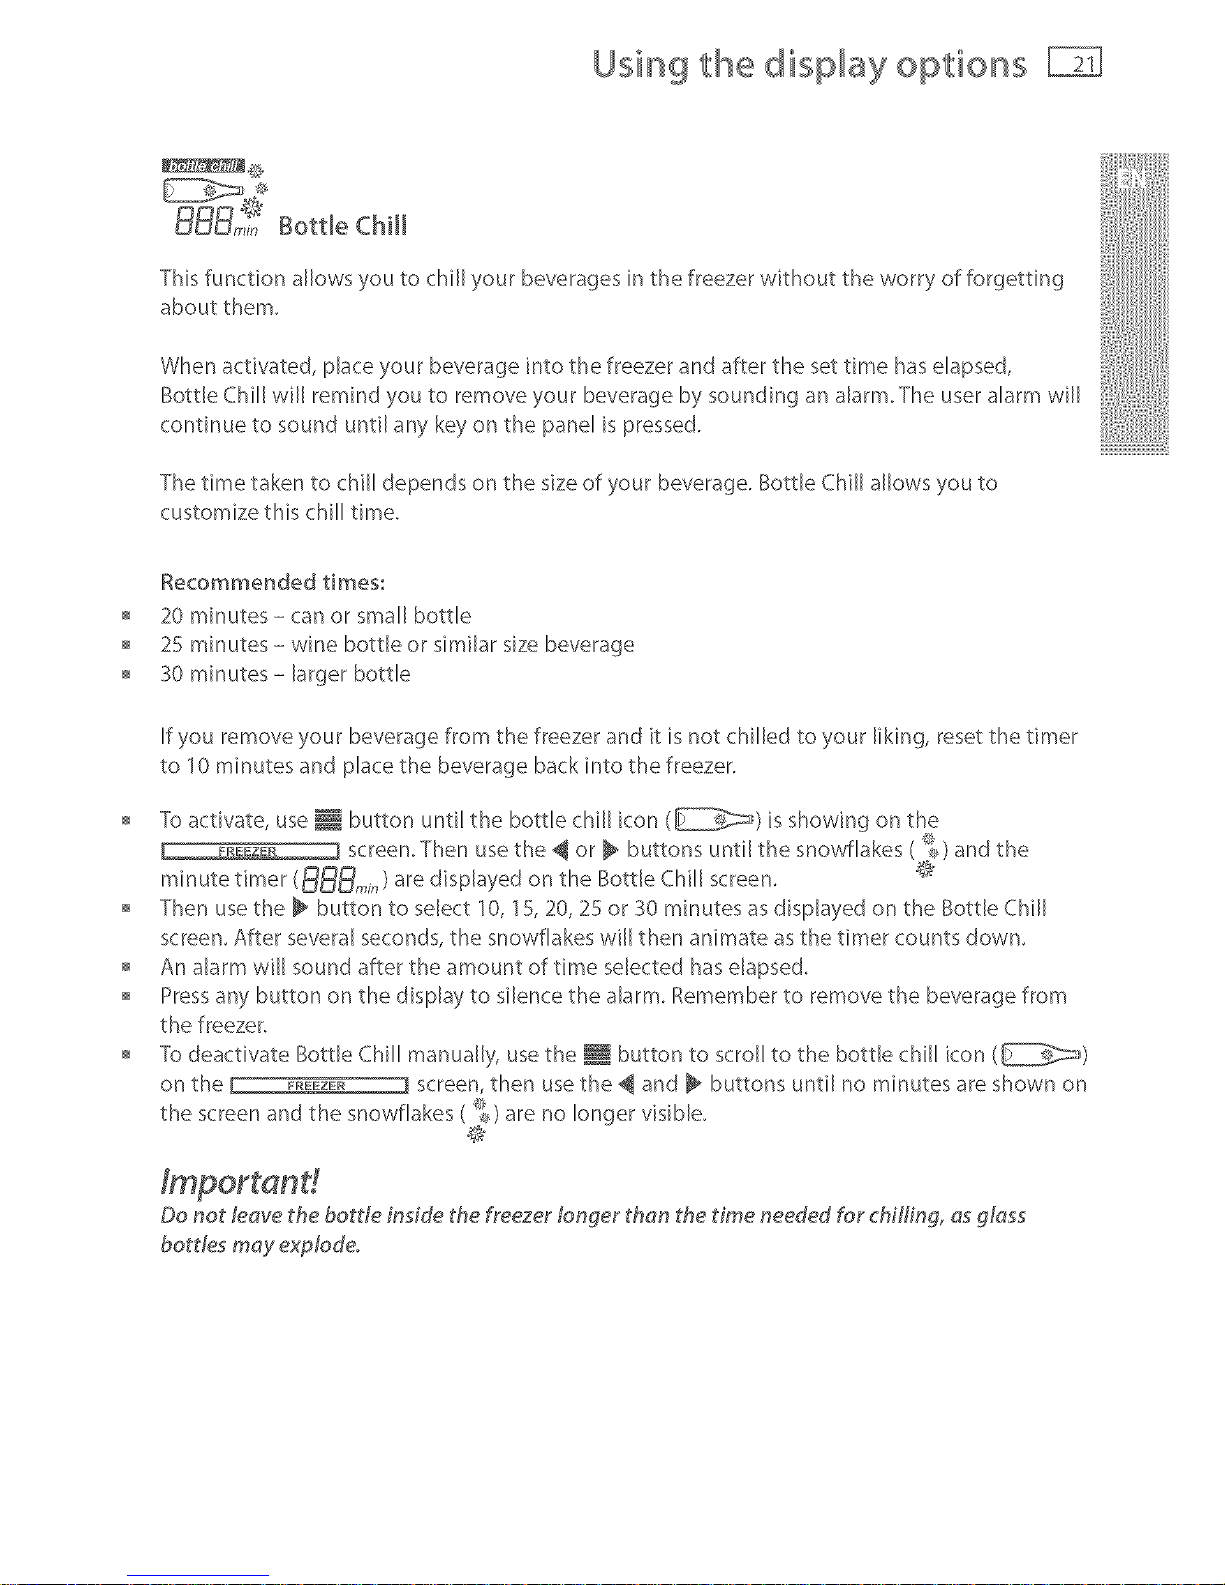
BottJe Chill
This function allows you to chill your beverages in the freezer without the worry of forgetting
about them.
When activated, place your beverage into the freezer and after the set time has elapsed,
Bottle Chili will remind you to remove your beverage by sounding an alarm.The user alarm will
continue to sound until any key on the panel is pressed.
The time taken to chili depends on the size of your beverage. Bottle Chill allows you to
customize this chill time.
Recommended times:
20 minutes - can or small bottle
25 minutes - wine bottle or similar size beverage
30 minutes - larger bottle
If you remove your beverage from the freezer and it is not chilled to your liking, reset the timer
to 10 minutes and place the beverage back into the freezer,
To activate, use _ button until the bottle chili icon ( ) is showing on the
[ FREEZER ] screen. Then use the < or _ buttons until the snowflakes (_) and the
minute timer (BBB,,u,) are displayed on the Bottle Chili screen.
Then use the @ button to select 10, 15, 20, 25 or 30 minutes as displayed on the Bottle Chill
screen. After several seconds, the snowflakes wi[[ then animate as the timer counts down.
An alarm wi[[ sound after the amount of time selected has elapsed.
Press any button on the display to silence the alarm. Remember to remove the beverage from
the freezer.
To deactivate Bottle Chill manually, use the _ button to scroll to the bottle chili icon ( )
on the I FREEZER ] screen, then use the _ and _ buttons until no minutes are shown on
the screen and the snowflakes (q_) are no longer visible.
@
Do not leave the botde indde the freezer longer than the time needed for chilling, as glass
botdes may e×plode.
Page 24
Using the display options
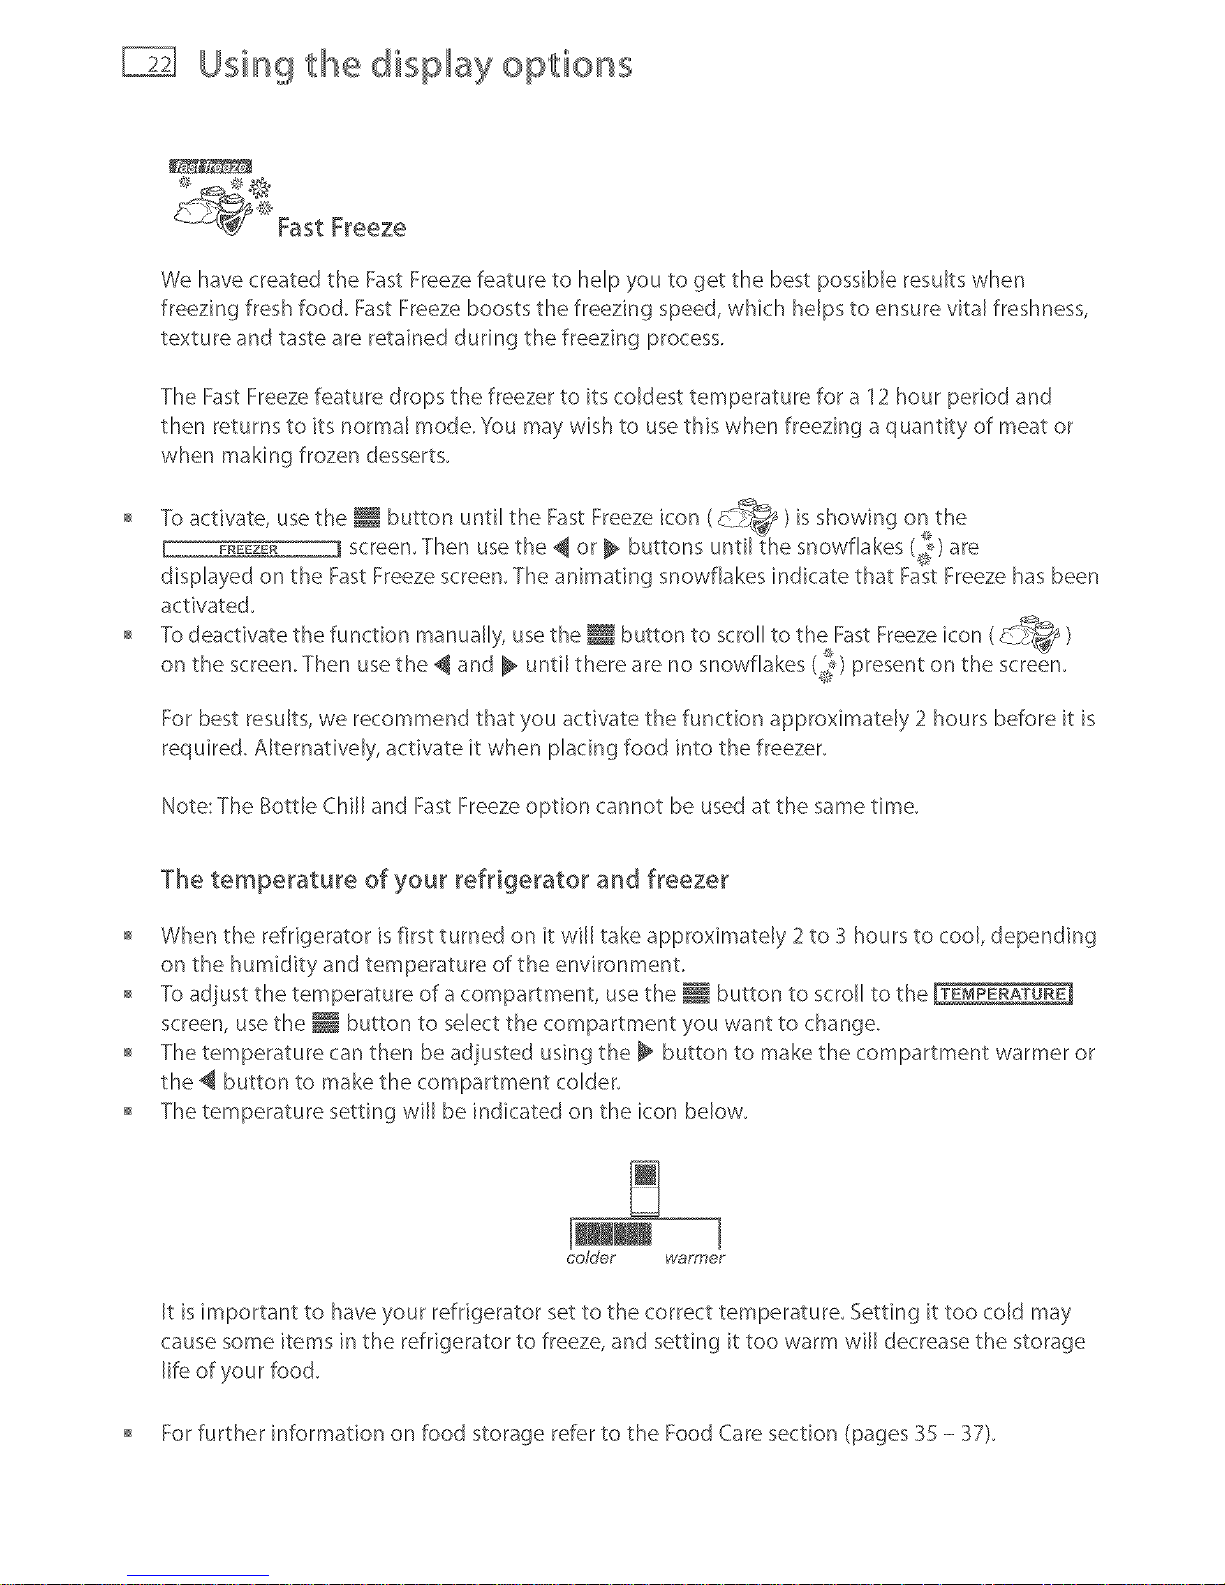
Fast Freeze
We have created the Fast Freeze feature to help you to get the best possible results when
freezing fresh food. Fast Freeze boosts the freezing speed, which helps to ensure vital freshness,
texture and taste are retained during the freezing process.
The Fast Freeze feature drops the freezer to its coldest temperature for a 12 hour period and
then returns to its normal mode. You may wish to use this when freezing a quantity of meat or
when making frozen desserts.
To activate, use the E button until the Fast Freeze icon ( ) is showing on the
[ FREZER ] screen. Then use the _ or _ buttons until the snowflakes (_) are
displayed on the Fast Freeze screen. The animating snowflakes indicate that Fast Freeze has been
activated.
To deactivate the function manually, use the _ button to scroll to the Fast Freeze icon ( )
on the screen. Then use the _ and _ until there are no snowflakes (_) present on the screen.
For best results, we recommend that you activate the function approximately 2 hours before it is
required. Alternatively, activate it when placing food into the freezer.
Note: The Bottle Chill and Fast Freeze option cannot be used at the same time.
The temperature of your refrigerator and freezer
When the refrigerator is first turned on it will take approximately 2 to 3 hours to cool, depending
on the humidity and temperature of the environment.
To adiust the temperature of a compartment, use the _ button to scroll to the ITEMPERATURE]
screen, use the _ button to select the compartment you want to change.
The temperature can then be adjusted using the _ button to make the compartment warmer or
the _ button to make the compartment colder.
The temperature setting will be indicated on the icon below.
m
calder warmer
It is important to have your refrigerator set to the correct temperature. Setting it too cold may
cause some items in the refrigerator to freeze, and setting it too warm will decrease the storage
life of your food.
For further information on food storage refer to the Food Care section (pages 35 - 37).
Page 25
Using the display options
Settings
Key Silent Mode
The Key Silent Mode allows you to silence a[[ key presses.
It can be activated or deactivated by using the _ button to scroll to the screen and
then pressing the _ or _ buttons.
When the Key Silent Mode is on _ wi[[ appear.
When this function is off _ wi[[ appear.
Note: Faults, Bottle Chili timer and the door alarm wi[[ still sound when the refrigerator is set on
Key Silent Mode.
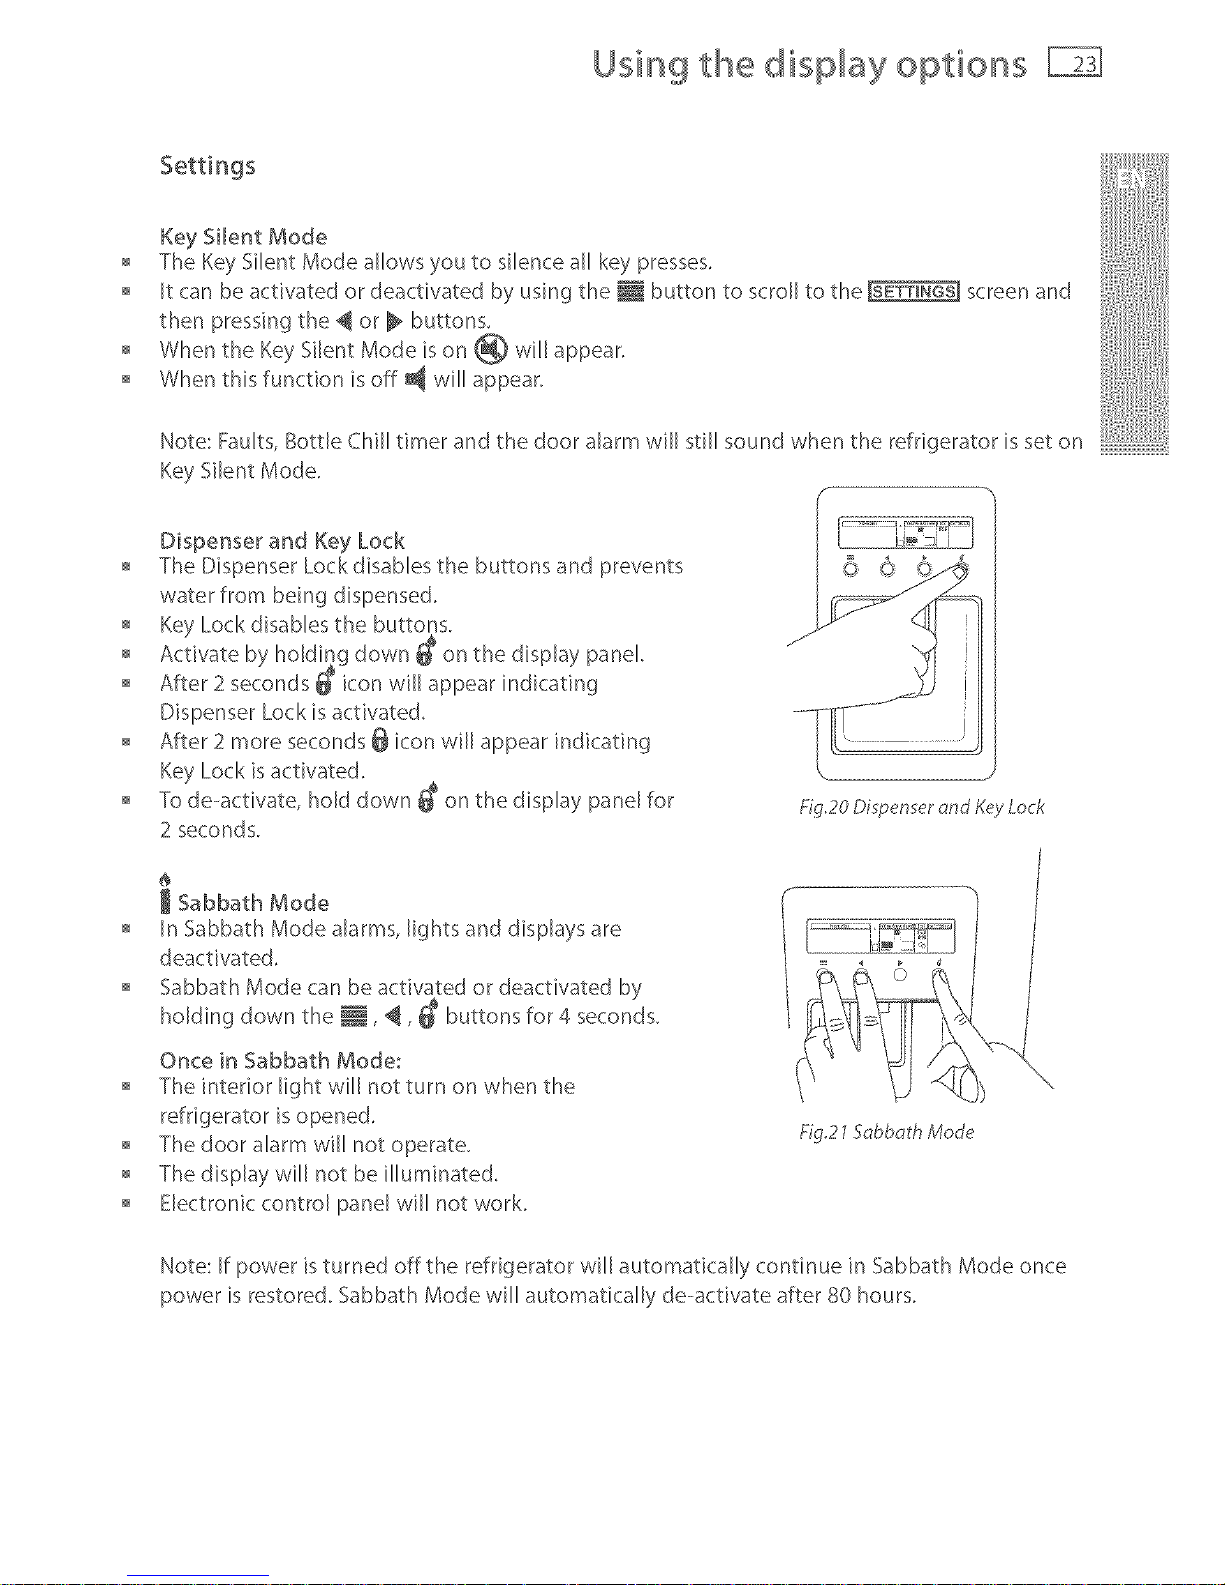
Dispenser and Key Lock
The Dispenser Lock disables the buttons and prevents
water from being dispensed.
Key Lock disables the buttons.
Dispenser Lock is activated.
After 2 more seconds _ icon will appear indicating
Key Lock is activated.
To de--activate, hold down _ on the display pane[ for
2 seconds.
Fig,20 Dispenser and Key Lock
Sabbath Mode
In Sabbath Mode alarms, lights and displays are
deactivated.
Sabbath Mode can be activated or deactivated by
holding down the _, 4, _ buttons for 4 seconds.
Once in Sabbath Mode:
The interior light wi[[ not turn on when the
refrigerator is opened.
The door alarm wi[[ not operate.
The display wi[[ not be illuminated.
Electronic control panel will not work.
Fig21 Sabbath _,/Iode
Note: If power is turned off the refrigerator will automatically continue in Sabbath Mode once
power is restored. Sabbath Mode wi[[ automatically de--activate after 80 hours.
Page 26
Using the display options
User warnings
Your refrigerator is clever enough to diagnose its own problems. It will alert you when there is
a fault.
FHter reset
The filter reset icon Q will appear when the water filter needs changing. This will flash when
dispensing water. ]b change the filter and reset the filter icon refer to pages 27 - 28.
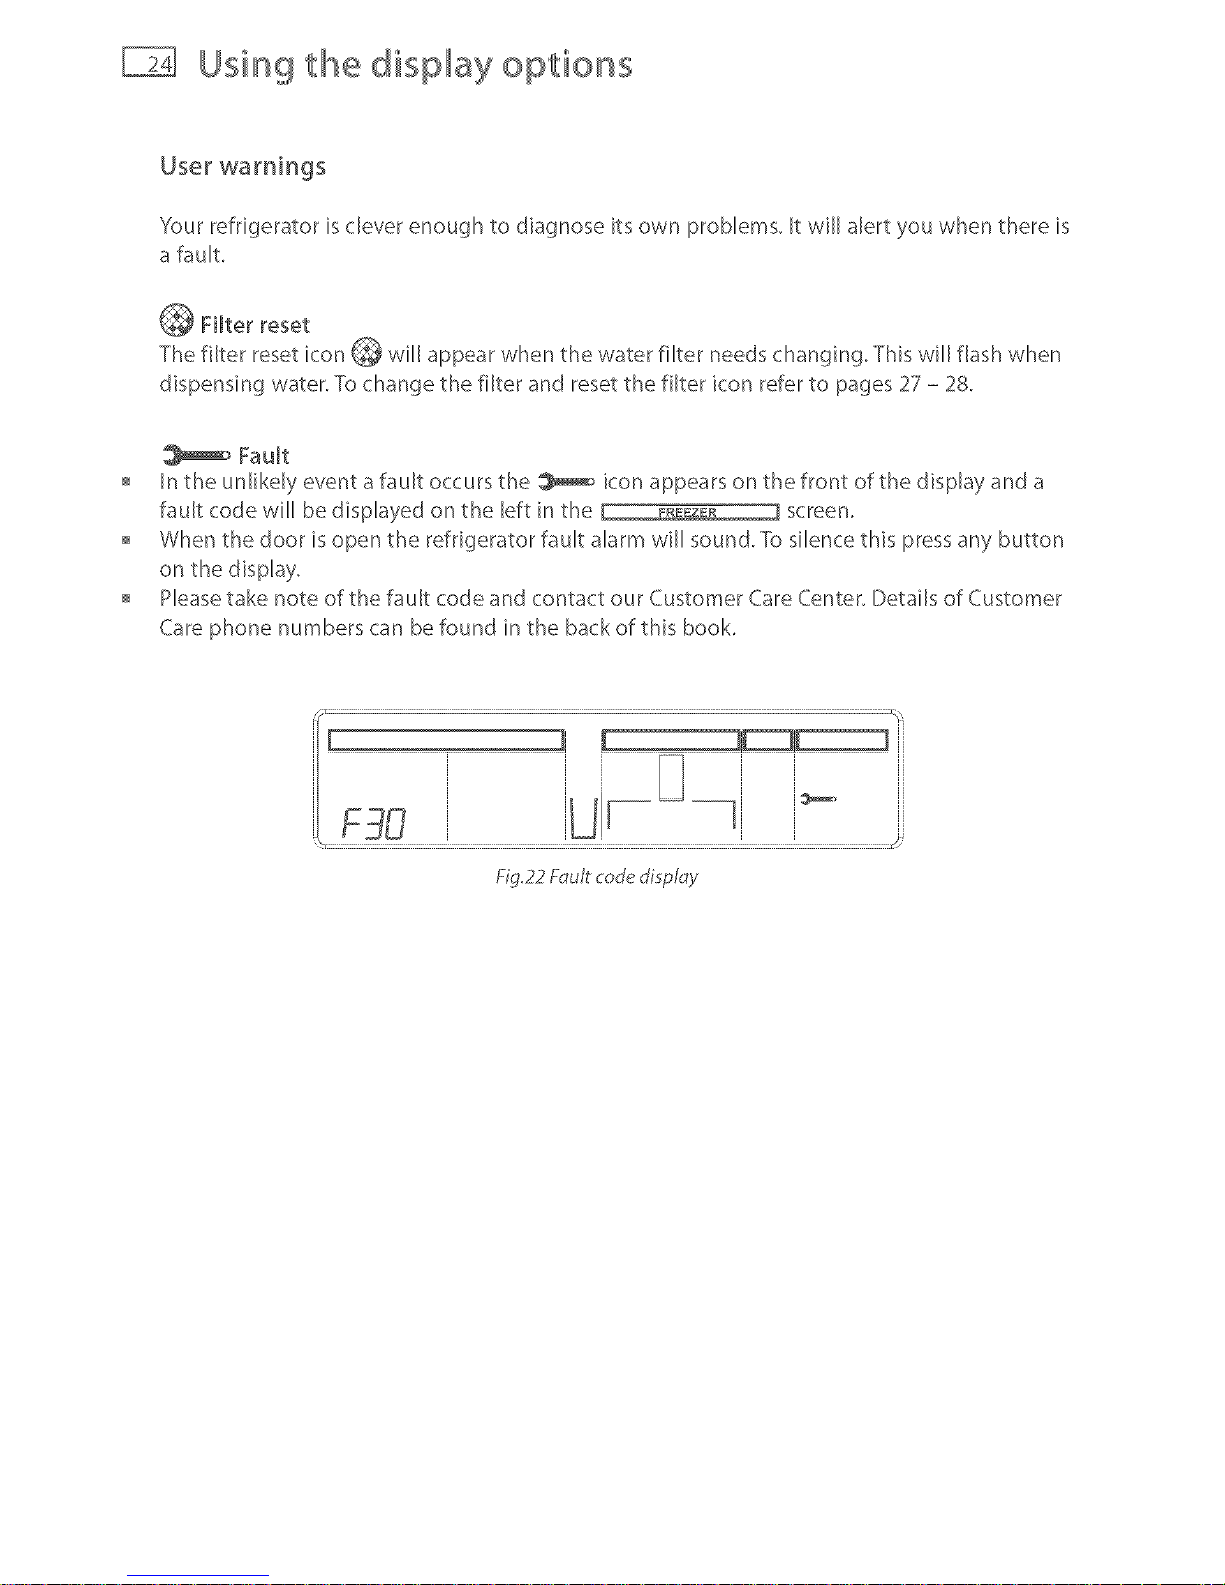
Fault
In the unlikely event a fault occurs the _ icon appears on the front of the display and a
fault code will be displayed on the left in the [ _R_ZER ] screen.
When the door is open the refrigerator fault alarm will sound.]_o silence this press any button
on the display.
Please take note of the fault code and contact our Customer Care Center. DetaiB of Customer
Care phone numbers can be found in the back of this book.
Page 27
Active Smart specia features
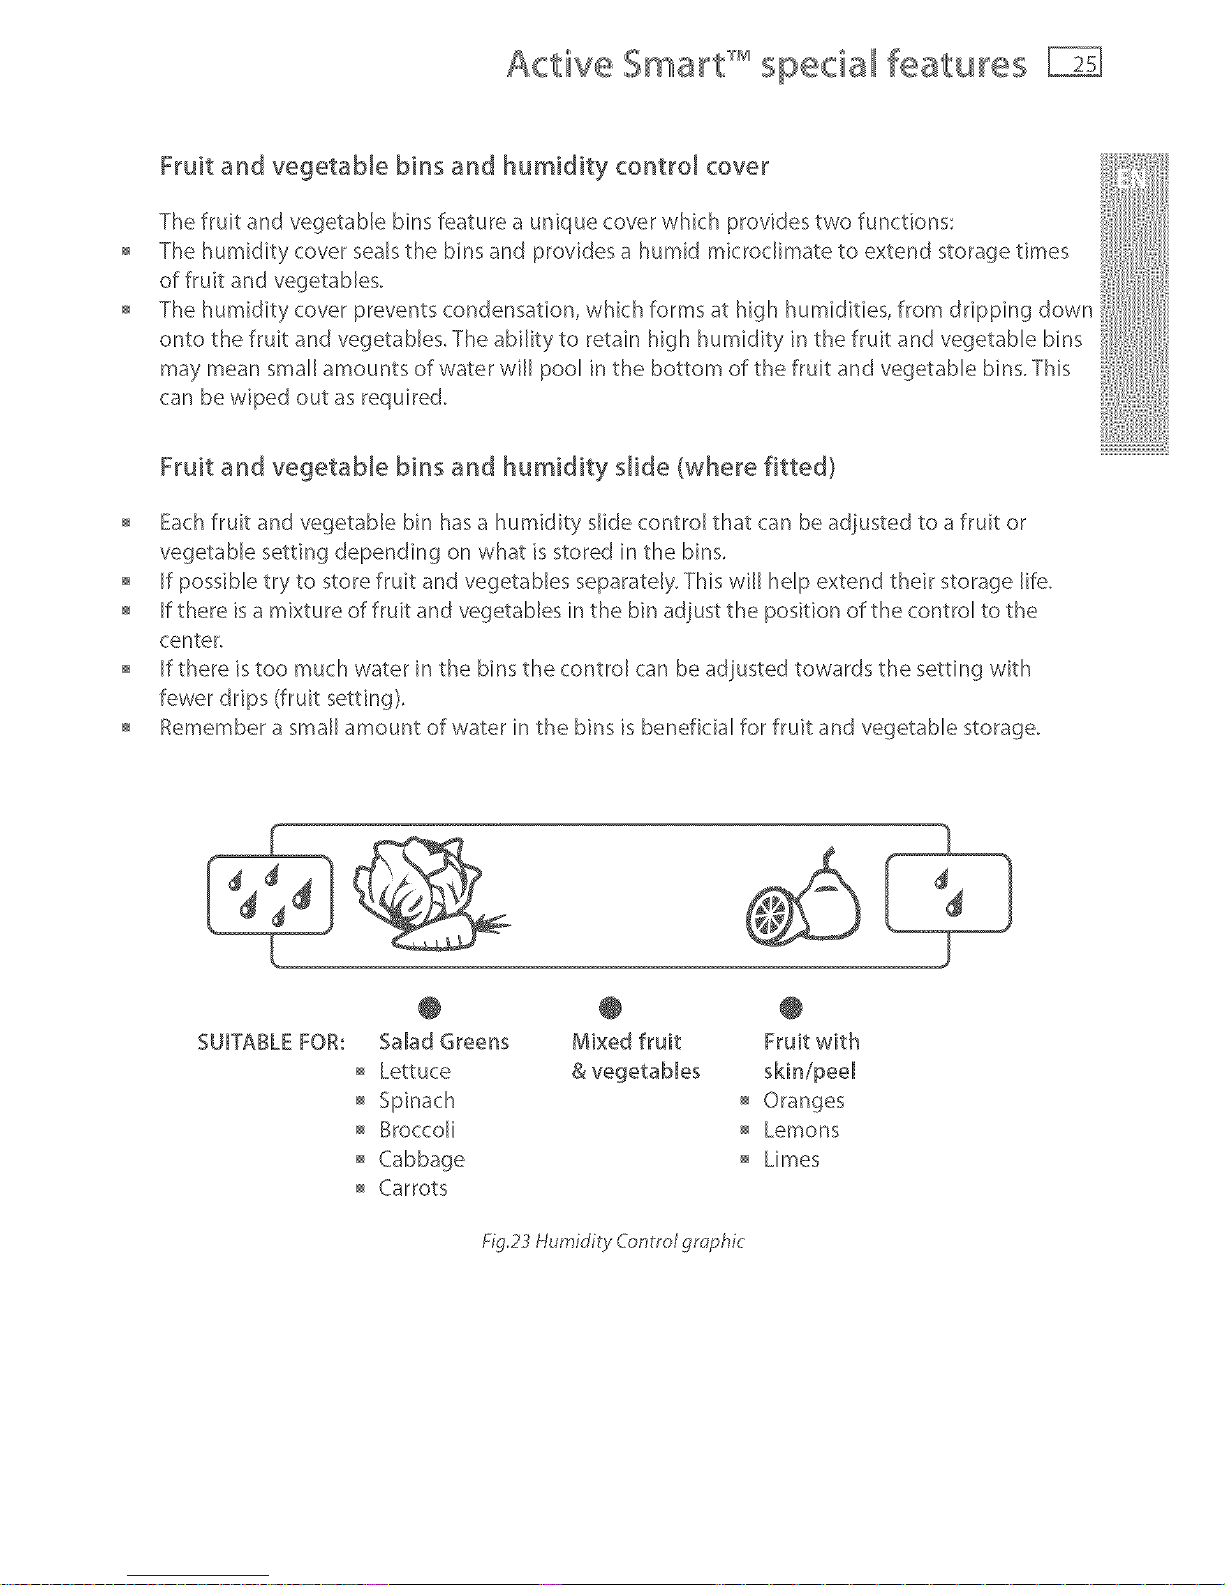
Fruit and vegetable bins and humidity control cover
The fruit and vegetable bins feature a unique cover which provides two functions:
The humidity cover seals the bins and provides a humid microdimate to extend storage times
of fruit and vegetables.
The humidity cover prevents condensation, which forms at high humidities, from dripping down
onto the fruit and vegetables. The ability to retain high humidity in the fruit and vegetable bins
may mean small amounts of water will pool in the bottom of the fruit and vegetable bins. This
can be wiped out as required.
Fruit and vegetable bins and humidity slide (where fitted)
Each fruit and vegetable bin has a humidity slide control that can be adjusted to a fruit or
vegetable setting depending on what is stored in the bins.
If possible try to store fruit and vegetables separately. This will help extend their storage life.
If there is a mixture of fruit and vegetables in the bin adiust the position of the control to the
center.
If there is too much water in the bins the control can be adjusted towards the setting with
fewer drips (fruit setting}.
Remember a small amount of water in the bins is beneficial for fruit and vegetable storage.
SUITABLE FOR:
@ @ @
Salad Greens Mixed fruit Fruit with
Lettuce & vegetables skin/peel
Spinach _ Oranges
Broccoli _ Lemons
Cabbage _ Limes
Carrots
Fig.23 Humid/b' Conrro/groph£
Page 28
Active Smart specia features
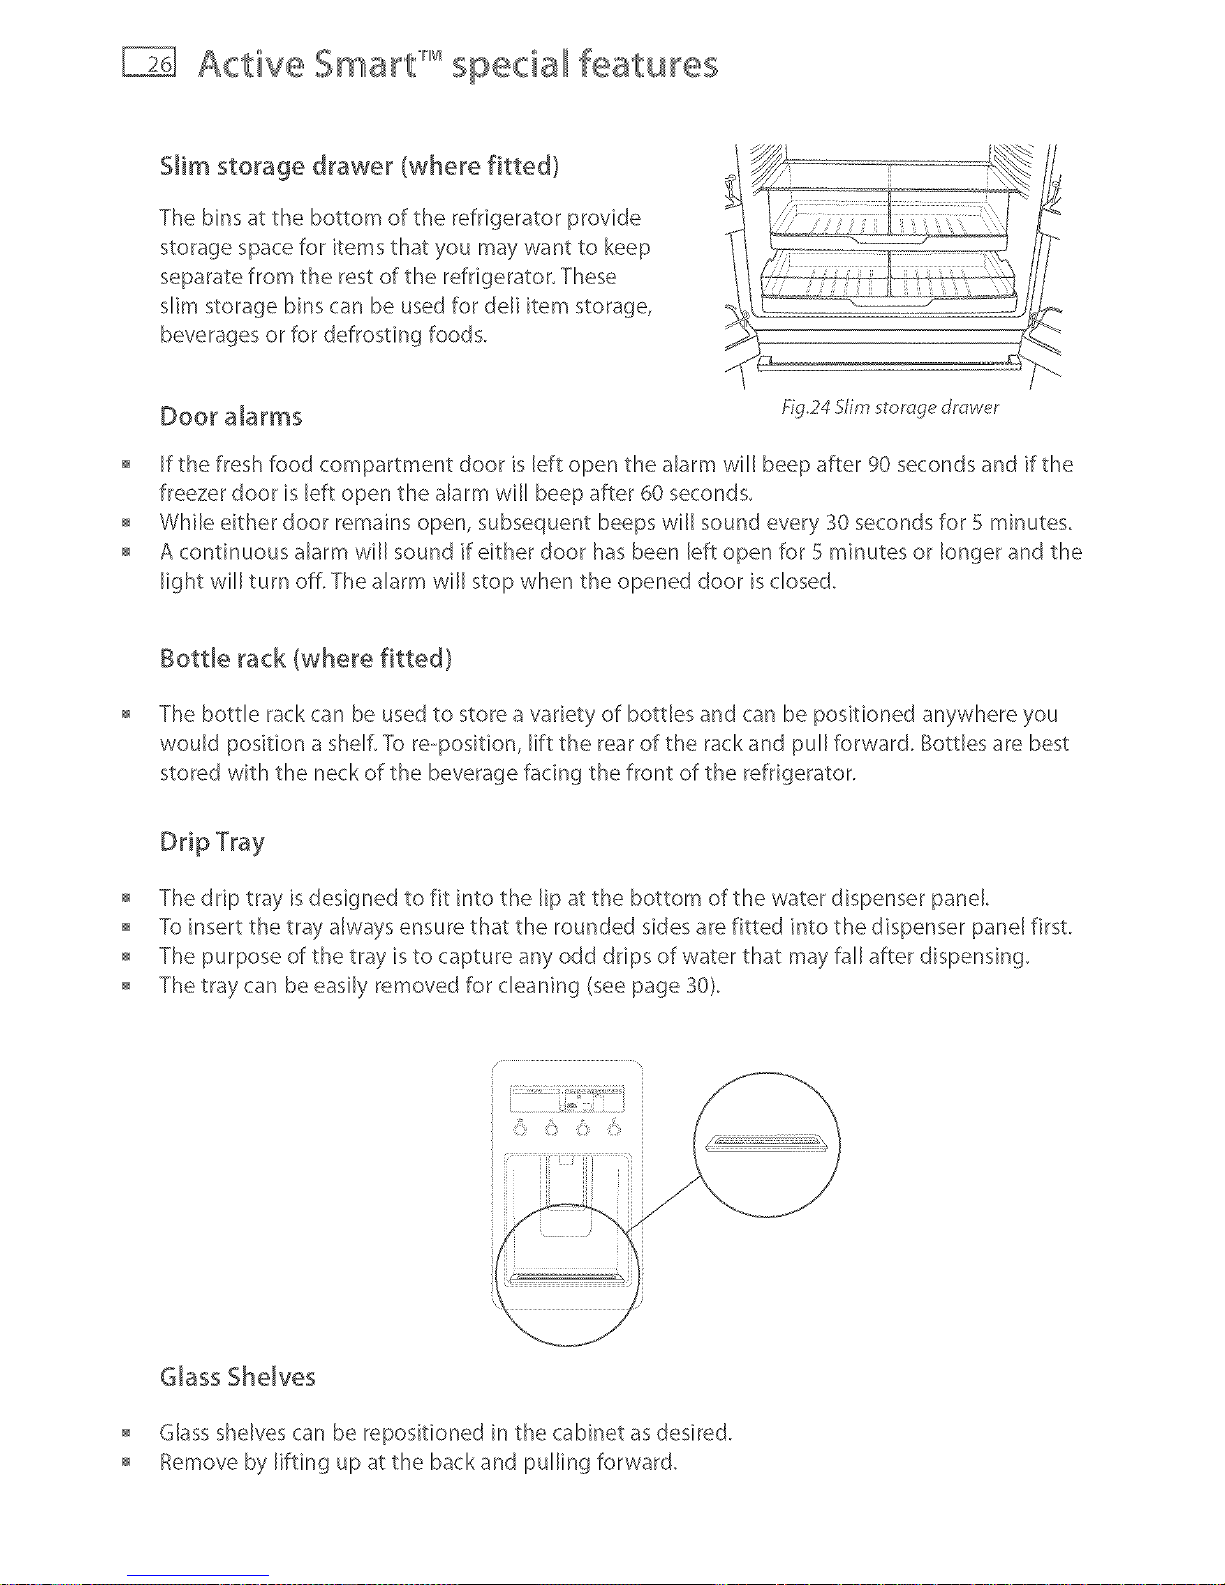
Slim storage drawer (where fitted)
The bins at the bottom of the refrigerator provide
storage space for items that you may want to keep
separate from the rest of the refrigerator. These
slim storage bins can be used for deli item storage,
beverages or for defrosting foods.
Door alarms
Fig.24 Slim torage drawer
If the fresh food compartment door is [eft open the alarm will beep after gO seconds and if the
freezer door is left open the alarm will beep after 60 seconds.
While either door remains open, subsequent beeps will sound every 30 seconds for 5 minutes.
A continuous alarm will sound if either door has been left open for 5 minutes or longer and the
light will turn off. The alarm will stop when the opened door is closed.
Bottle rack (where fitted)
The bottle rack can be used to store a variety of bottles and can be positioned anywhere you
would position a shelf. To reoposition, lift the rear of the rack and pull forward. Bottles are best
stored with the neck of the beverage facing the front of the refrigerator.
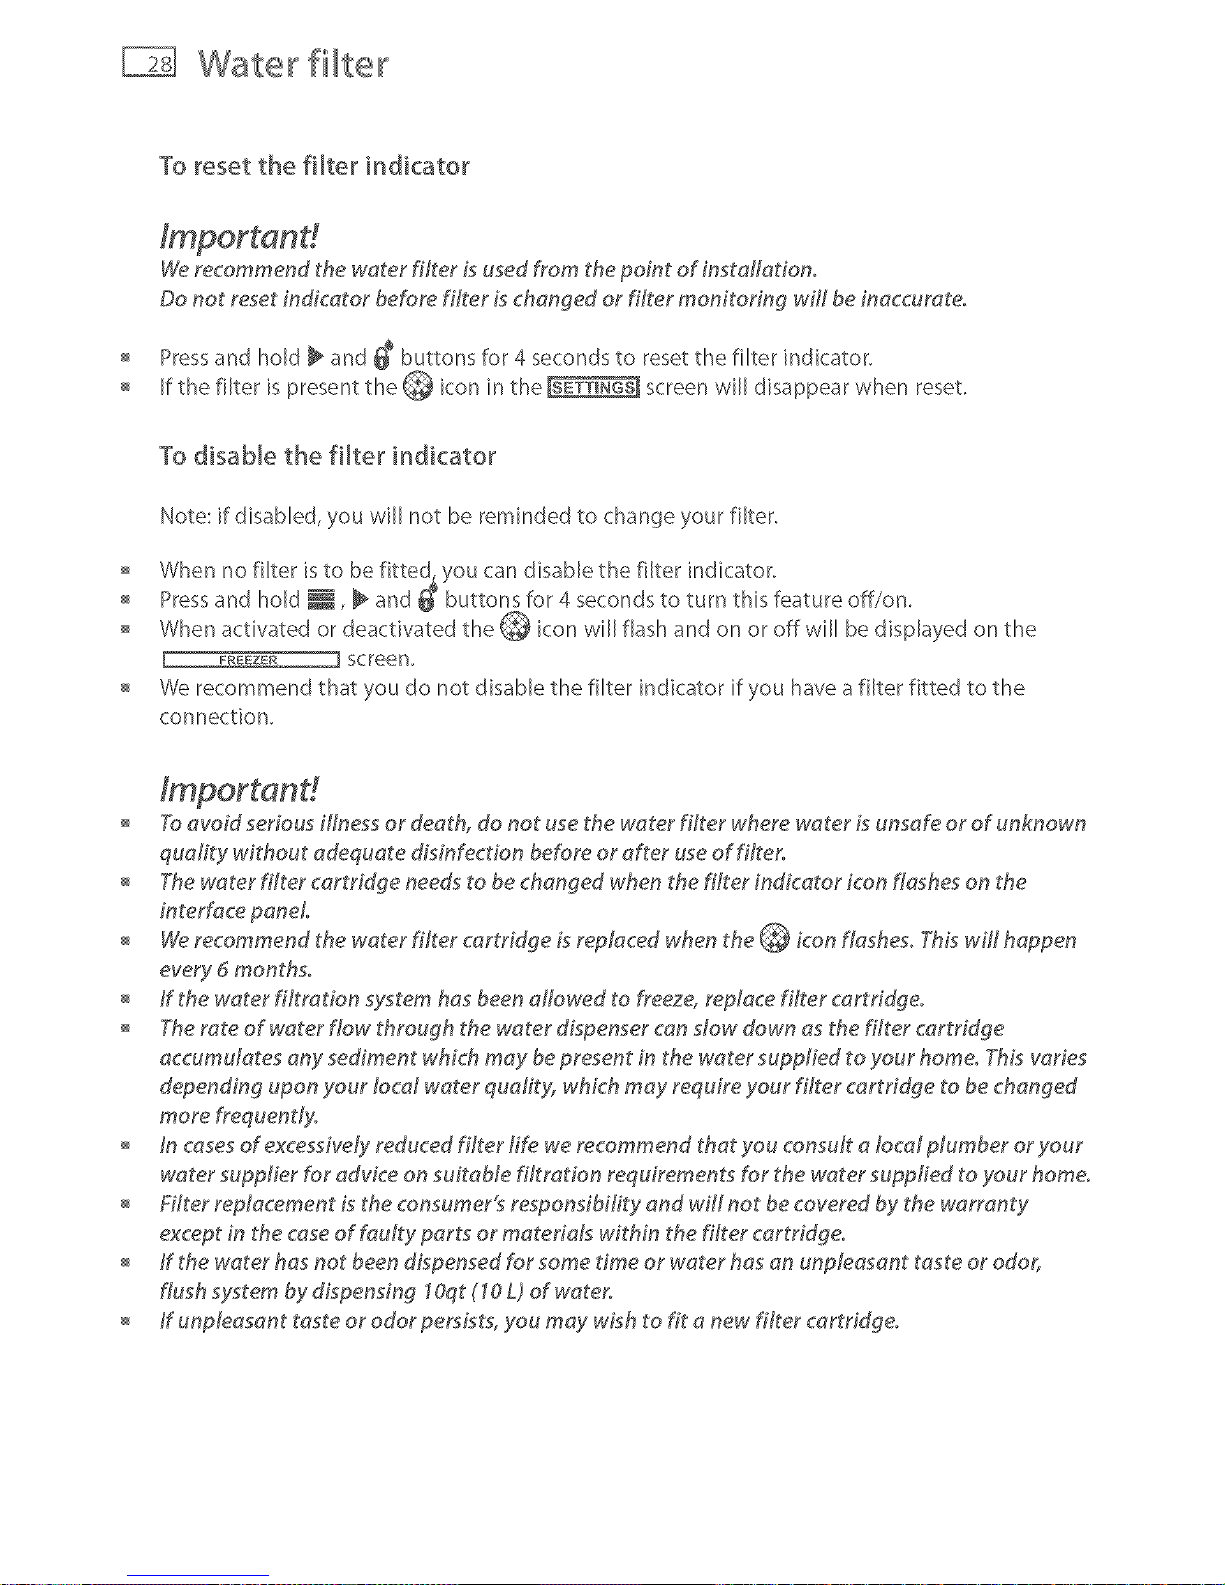
The drip tray is designed to fit into the lip at the bottom of the water dispenser panel.
To insert the tray always ensure that the rounded sides are fitted into the dispenser panel first.
The purpose of the tray is to capture any odd drips of water that may fall after dispensing.
The tray can be easily removed for cleaning (see page 30).
Glass Shelves
Glassshelvescan be repositioned in the cabinet asdesired.
Remove by lifting up atthe back and pulling forward.
Page 29
Water fi ter
All the water to your fridge is filtered to remove impurities through a cartridge located in a
position of your choice outside the refrigerator. This will need changing approximately every
6 months.
There is a replacement indicator icon Q on the control panel which will appear when the filter
needs replacing, It will flash, as a reminder, when water is dispensed,
Replacement cartridges are available from your authorized Fisher & Paykel Dealer. The details of
the replacement cartridge are on the label on the cartridge.
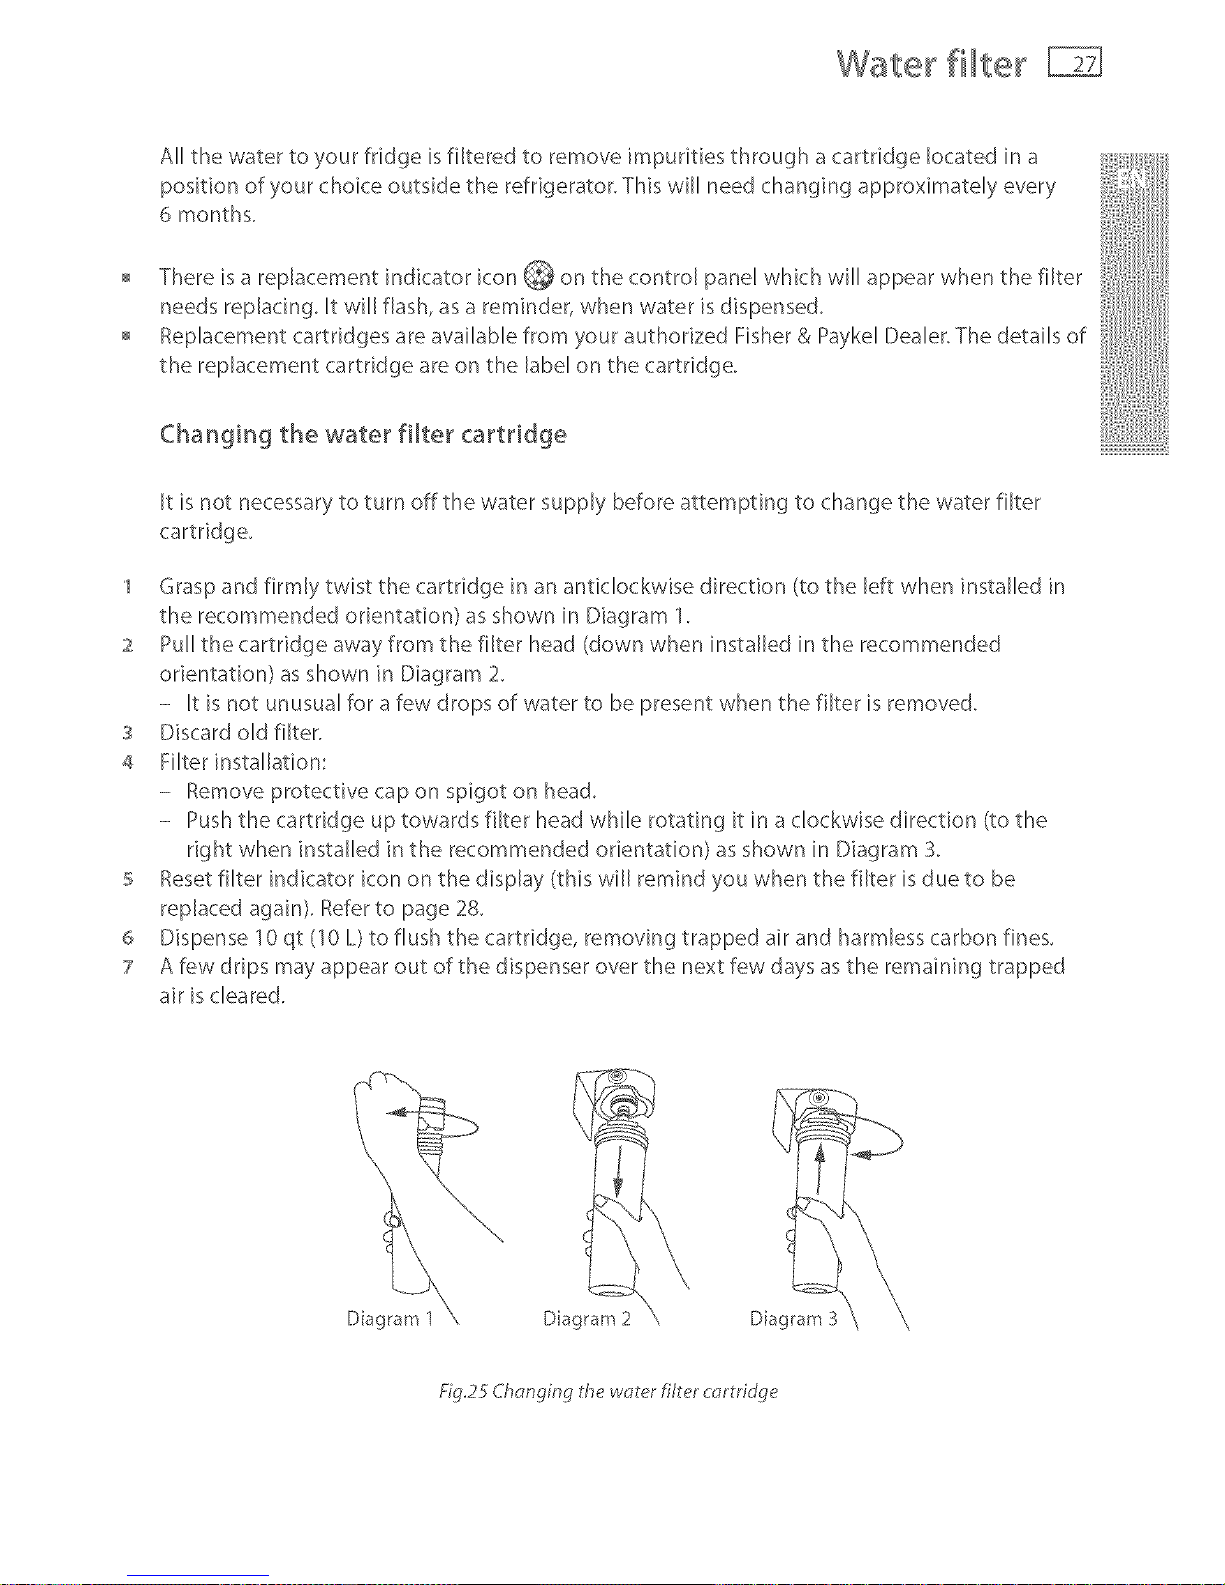
Changing the water filter cartridge
It is not necessary to turn offthe water supply before attempting to change the water filter
cartridge.
1 Grasp and firmly twist the cartridge in an anticlockwise direction (to the left when installed in
the recommended orientation} as shown in Diagram 1.
2 Pull the cartridge away from the filter head (down when installed in the recommended
orientation} as shown in Diagram 2.
- It is not unusual for a few drops of water to be present when the filter is removed.
s Discard old filter.
4 Filter installation:
- Remove protective cap on spigot on head,
- Push the cartridge up towards filter head while rotating it in a clockwise direction (to the
right when installed in the recommended orientation) as shown in Diagram 3.
5 Reset filter indicator icon on the display (this will remind you when the filter is due to be
replaced again), Refer to page 28,
6 Dispense 10 qt (10 L) to flush the cartridge, removing trapped air and harmless carbon fines,
7 A few drips may appear out of the dispenser over the next few days as the remaining trapped
air is cleared.
Diagram 1 Diagram 3
Fig.25 ChcTnging the woter filter cortridge
Page 30
Water fi te
To reset the filter indicator
We recommend the water fitter is used from the point of installation.
Do not reset indicator before fitter is changed or filter monitoring wilt be inaccurate.
Press and hold _ and _ buttons for 4 seconds to reset the filter indicator.
If the filter is present the Q icon in the screen will disappear when reset.
To disable the filter indicator
Note: if disabled, you will not be reminded to change your filter.
When no filter is to be fitted, you can disable the filter indicator.
Press and hold i, _ and _ buttons for 4 seconds to turn this feature ofF/on.
When activated or deactivated the Q icon will flash and on or off will be displayed on the
[ _RE_ZE_ ] screen.
We recommend that you do not disable the filter indicator if you have a filter fitted to the
connection.
T_ _v_id seri_us fllness _r death_ d_ n_t use the water fiiter where water is unsafe _r _f unkn_wn
quMity without adequate disinfection before or after use of fi#ero
The water fFTtercartridge needs to be changed when the fFTterindicator icon flashes on the
interface panel
We recommend the water fitter cartridge is replaced when the _ icon flashes, This wilt happen
every 6 months,
ff the water fi#ration system has been aflowed to #ooze, replace filter cartfl@e,
The rate of water flow through the water dispenser can dow down as the fitter cartridge
accumulates any sediment which may be present in the water supptied to your home. This varies
depending upon your IocM water quafity, which may requ#e your f\flter cartfi@e to be changed
more #equendyo
In cases of excessively reduced filter #fe we recommend that you consu# a tocM plumber or your
water supplier for advice on suitable fi#radon requirements for the water supplied to your home,
Filter replacement is the consumer,s responsibifty and wilt not be covered by the warranty
except in the case of faMty par% or matedals within the filter cartn\dge,
ff the water has not been dispensed for some time or water has an unpleasant taste or odor,
flush s_stem by dispensing I Oqt (10 L) of water°
ff unpleasant taste or odor persists, you may wish to fit a new tiger cartridge,
Page 31

Active Smart mai tena ce
Replacement of the interior light (Halogen light bulb)
Turn the power off at the wall socket before replacing the bulb. The light bulb is located on the
top roof of the cabinet at the fronL
Remove the lens cover using a small screwdriver, Insert the screwdriver in the front center of the
lens cover and gently lever down. Pull out old bulb.
Do not touch the new bulb with your hand. Leave it in the plastic bag whilst slotting into
position,
Remove plastic bag when bulb is in position.
Replace lens cover,
Turn power on. Light bulb should now glow.
Note: The replacement halogen bulb must not exceed 12 Volt/lO Watt. Bulbs are available from
your Fisher & Paykel Appliances Customer Care Center.
:::::: :
//
Fig.2d Halogen fight replacement
}gut refrigerator is designed to operate for many years without the need for service checks°
However, if your refrigerator is maffuncdoning, have it attended to by your Fisher & Paykd
Appliances Authorized Service Center as soon as possiMe° Att electrical repairs must be carded
out bYan adequately trained service technician or qua#fled electddan.
Page 32

C eaning and caring for your refrigerator
Exterior
Stainless exterior doors (Mdium or EZK[een finishes)
It is important when cleaning the exterior door surface of your refrigerator, to only use liquid
dishwashing detergent dissolved in warm water and a soft cloth,
Dry the door with a dean, lint free c[otL
The use of any abrasive or stainless steel cleaners and solvents w[[[ damage the door surface.
Water dispenser pad and interface
We have incorporated a Dispenser and Key Lock function in your refrigerator to make cleaning
easier (refer to page 23). This wi[[ help you to avoid accidental water dispensing while you dean.
Clean the pad and interface pane[ with a soft damp cloth.
Other exterior surfaces
Clean all other exterior surfaces with a mix of warm water and detergent and a soft cloth.
If necessary, dean the magnetic door gasket and the center door gaskets with an old
toothbrush, warm water and liquid dishwashing detergent.
Water evaporator tray
The water evaporator tray is found above the compressor at the
back of the refrigerator or freezer. The tray may require infrequent
cleaning,
Carefully move the refrigerator or freezer out from the wail
Switch off the appliance
We do not recommend that you remove the evaporator tray. If
cleaning is required, excess water can be soaked up from the
evaporator tray using a sponge. Wipe out with warm water and
detergent or disinfectant.
Reassemble taking care not to over--tighten the fasteners.
Switch on the appliance.
\
J
\
To dean, take the tray out of the dispenser panel
and pu[[ the two halves of the tray apart
Clean in warm water with a mild detergent Dry the
tray and dip backtogether.
Reinsert the tray back into the dispenser pane[.
, {.....................
t, / 4
Page 33

C eaning and caring yeu ef ige ate
Interior
It is important to keep the interior of the refrigerator and freezer clean to help prevent food
from becoming contaminated during storage
The amount and types of food stored determines how often cleaning should be carried out in
the refrigerator (ideally once every 1 to 2 weeks).
Remove the shelves from cabinet and door, Wash shelves and storage bins in warm water and
detergent; rinse in clean water and dry before replacing,
Wipe over the interior surfaces with warm water and detergent or baking soda dissolved in warm
water (add 1 teaspoon of baking soda to each Y2qt (500 ml) of water), Rinse with dean water.
To help remove"old stale refrigerator" smells add a few drops of vanilla essence or vinegar to
the water before cleaning,
Clean exterior surfaces with warm water and detergent Use a toothbrush for the magnetic
door gasket
Do not use harsh, abrasive cloths or cleaners or highly perfumed, strong smelling cleaners or
solvents on any part of the refrigerator or freezer.
Glass shelves
Clean with warm water and detergent or a glass cleaner. If cleaning the shelves without
removing from the cabinet, use only warm water and detergent as a glass cleaner can damage
the plastk components of your refrigerator.
BottJe rack
Clean with warm water and detergent. The use of abrasive cleaners and solvents may cause
damage.
Automatic ice dispenser
We do not recommend you clean the ice maker componentry, but it is important to clean the
bins occasionally_
The storage bin should be cleaned regularly and the old ice in the bottom of the bin discarded.
Wash bin in lukewarm water, dry thoroughly and replace.
When replacing the bin ensure that the scoop is on the right hand side (B22B only), and at the
front on RF210A.
Many commerdaHy available cleaning products contain solvenS that may attack the plastic
components of your refrigerator and cause them to crack, it LsLmportant to use onty warm water
and a smalt amount of l@uid d£shwashing detergent on any plastic components inside and
outside your refrigerator, Avoid using anti-bacterial cleaning products on either the interior or
exterior of the cabinet as they may cause rusting of metal components and cracking of plastic
components.
Page 34

C eaoiog and cariog you ef ige ate
Humidity Control System
When cleaning the shdf above the vegetahh bins,
we recommend that you do not disassembh the
Humidity Control System from the shell
In the event that the plastic lid and humidity slides
become separated from the glass shelf, follow these
instructions to reassemble.
..............Rer[in//e!(/ ,.
"-"'" Hum d ty Slides /
'I
2
1
Turn shelf upside down _,_,
To attach humidi%,' slides onto ...... ...... !!!!!!
shelf front corners, fit bottom dips
into shelf front trim, Next, slide _i%_--_-,,,
clipsSidewaySontot°WardSglass,shelf until arm ..........._-'_;"=,_ -'>, ::_\ ,\
/ (/, ',,
i
)iu?' _\'\\:'\
- iJl )
To attach humidity control lid - with
text facing you, align lid with front
of shelf. Hold lid vertically and fit
front end into retainer on shell
Ensure lid fits into retainer as well as
underneath humidity slides.
4 At the sides of the shelf, adjust
humidity slide tabs so that the plastic
lid is between the shelf and the tabs.
s Ifclipson back of shelf are present,
fasten lid with rear clips, Ensure that
the cover is fully secure at front and
back of shelf.
\, \
>;'A-%i
_14ii f . - ....;i
/ t /,';_ /Y._
,. / J:7
!r
Fig27 Humidity Control System deanMg
Page 35

C eaning and caring fer yeur refrigerater
To remove trays or fixed bins
For ease of removal, empty food from tray/bin first.
Hold the center front of the tray/bin handle.
Lift vertkallyto undip from the runners and pull
tray/bin towards you to remove
Push both runners back into refrigerator.
To replace trays or fixed bins: £_.2s 7:_e.removal
With the runners pushed back into the refrigerator, place the tray/bin on top of the runners.
Push the tray/bin back slowly until you feel it clip back onto the runners.
Ensure that trays and bins are securdy dipped onto the runners before use°
Bin and tray runners are pre,4ubricated_ and vdfl not need to be redubricated during their lifeo Do
not attempt to dean grease from the runners, as this wilt affect their ability to function. Do not
immerse runners in water°
Permanently fixed bins and trays (model RF201A only)
The freezer bins and trays in this model are permanently fixed. They cannot be removed from
the freezer compartment. To clean simply wipe with a soft, damp cloth.
On vacation/holiday
Switch the ice maker to off on the interface panel (refer to page 1g).
Shut off the water supply to the refrigerator.
On your return, turn on the water supply to the refrigerator.
Dispense 10 qt (10 L) of water and discard to ensure the tank is refilled with fresh water.
Turn on the ice maker (refer to page 1g).
Throw away the first bin of ice cubes.
Page 36

Ref [ge ate sounds
Normal refrigerator sounds
Active 5mart _ refrigerators, with their excellent energy ratings and cooling performance, can
produce sounds somewhat different to your old refrigerator,
Normal operational sounds include:
Fan air flow sound, Active 5mort _ refrigerators have fans which change speed depending on
demand, During coding periods, such as after frequent door openings, fans circulate the cold
air in the refrigerator and freezer compartments producing some air flow sound, This is quite
normal
Cracking or popping whkh may sound like ice coming offthe evaporator, This occurs when the
defrost function is operating,
Running water sound, This is the liquid refrigerant in the system and can be heard as a boiling
or gurgling noise.
An audible hissing sound after closing the freezer door, This is due to the pressure difference
between the warm air that has entered the cabinet and suddenly cooled, and the outside air
pressure
Other strange sounds may be heard for the following reasons:
- Cabinet not [evd
- Floor uneven or weak
- Bottles or iars rattling on shelves
If this is your first refrigerator with an ke maker, you will hear occasional sounds that may be
unfamiliar, They are normal ice making sounds and are not cause for concern,
The following sounds are normal with the operation of an ice maker:
- Motor operation (low humming),
- Running water as the ice maker and/or water tankfills,
- Water valve opening and dosing (hissing sound),
- Ice being loosened from the ice moulding tray (cracking),
- kedropping into bin (clunking),
Page 37

Storing feed in your refrigerator
Red meat
Place fresh red meat on a plate and loosely cover with waxed paper,
plastic wrap or foil
Store cooked and raw meat on separate plates. This will prevent any
juices lost from the raw meat contaminating the cooked product
Delicatessen meats should be used within the recommended storage time.
Po@try
o Fresh whole birds should be rinsed inside and out with cold running
water. Dry and @ace on a @ate Cover loosely with p[astk wrap or foil
Poultry pieces should also be stored this way. Whole poultry should never
be stuffed until just before cooking, otherwise food poisoning may result.
Coo[ and refrigerate cooked poultry quickly. Remove stuffing from
poultry and store separately.
Fish and seafood
o Whole fish and fillets should be used on the day of purchase. Until
/7
required, refrigerate on a plate loosely covered with plastic wrap, waxed
paper or foil.
If storing overnight or longer, take particular care to select very fresh fish.
Whole fish should be rinsed in cold water to remove loose scales and
dirt and then patted dry with paper towels. Place whole fish or fillets in a
sealed pIastk bag_
Keep shellfish chilled at all times. Use within 1 - 2 days.
Precooked foods and leftovers
These should be stored in suitable covered containers so that the food
wi[[ not dry out
Keep for only 1- 2 days.
Reheat leftovers only once and until steaming hot.
Fruit and vegetable bins
Although most fruit and vegetables keep best at low temperatures, take
care not to store the following at temperatures of less than 47°F (7°C) for
long periods: citrus fruit, tropical fruit, tomatoes, cucumbers.
Undesirable changes will occur at low temperatures such as softening of
the flesh, browning, accelerated decaying and or loss of flavor.
Do not refrigerate avocados (until they are ripe), bananas, mangoes
or pepinos.
If possible store fruit and vegetables separately, Le. fruit in one bin and
vegetables in the other.
Each fruit and vegetable bin has a humidity control slide that can be
adjusted depending on what is stored in the bins. For more information
on using the Humidity Control refer to page 25.
Page 38

St©ring feed in your freezer
The use of temperatures of O_'F(18°C) or colder to store food means that the food can be kept
for longer periods than when refrigeration temperatures are used. This is because the growth
of bacteria, moulds and yeasts are stopped, and chemical and physical reactions are severely
restricted at such low temperatures.
Frozen food care
For best results:
Choose only high quality foods that freeze well.
Store at d'F (-18°C) or colder. fake care to maintain this low storage "C /
temperature, eg. try to avoid opening the freezer door unnecessarily. (
If your ice cream is soft you are running your freezer too warm.
Leave space at the top of containers, glass iars or plastic bags containing liquids or semi-solid
foods. These expand as they freeze. Usually 1"(20 - 50 ram) head space is recommended. Seal.
Ideally, remove all the air from the package after food is frozen.
Packages or containers of solid foods should have the air removed from them and be sealed
tightly before freezing.
Use the Fast Freeze function when freezing fresh food. This helps to speed up the freezing
process, giving optimum freezing results. It is recommended that the function is activated
approximately 2 hours before required. For more information refer to page 22.
Freeze immediately or as qukkly as possible. Freeze only small quantities of food at any one time.
For best results we recommend that only 2.2 Ib (1 kg) of food be frozen per 0.9 cu.ft (25 L) of
freezer storage volume at any one time. (About 7 Ib (3 kg) in small freezers and 9 Ib (4 kg) in larger
freezers). For faster freezing in Active Sn'mt't _ models, we recommend that fresh food is placed at
the top of the freezer compartment close to the air vent.
Do not pile frozen food around the fan cover. It can prevent adequate air circulation.
Thaw foods preferably in a refrigerator, or using a microwave oven or mukifunction oven.
Keep a constant turnover of food. Use older items of food first. Do not exceed recommended
storage times.
Use good quality freezer proof packaging to maintain food quality.
If food is only covered in plastic film place inside a freezer--proof plastic bag.
Recommended freezer storage times
Thesetimes should not be exceeded.
?
.......................................... i{
¢&<} O
_a prepared shellfish, oily fish
3 Non oily fish, shellfish, pizza, scones and muffins
m 4 Ham, cakes, biscuits, beef and lamb chops,
o poultry pieces
6 Butter, vegetables (blanched), eggs whole and yolks,
cooked crayfish, minced meat (raw), pork (raw)
12 Fruit (dry or in syrup), egg whites, beef (raw), whole
chicken, lamb (raw), fruit cakes
Page 39

Storing food in your freezer
Meat, pouJtry and game
Do not try to freeze more than 22 [b (1 kg) meat per 0_9cu.ft (25 L) of
freezer storage volume at any one time. Meat must be frozen quickly in
order to maintain its texture.
Do not stuff poultry before freezing.
Red meat can be cooked from frozen, or from the partly or corn p[ete[y
thawed states. Remember to allow extra cooking time if cooking from frozen.
Always thaw poultry completely before cooking.
Fish
Fish is best frozen commercially. If however you do want to freeze fish
at home, make sure the fish is very fresh and of high quality.
Clean, scale and preferably leave whole. A[[ fish should be wrapped in
two layers of packaging as depending on the type offish, odors and
flavors can be readily transferred either to or from it. Sea[ we[[.
For best results, cook from either the frozen or partly thawed state.
Most vegetables freeze we[[, although 'sa[ad' vegetables [ose their
crispness. Other vegetables, eg. celery, onion and tomatoes, should only
be used in cooked dishes as they soften on freezing.
Freeze only high quality, mature, ready<o-oeat vegetables.
Sort and discard any vegetables that are damaged.
It is necessary to blanch most raw vegetables prior to freezing°
Blanching involves a short cooking period during which vegetable
enzymes are destroyed. If these enzymes are not destroyed they cause
undesirable physical and chemical changes during freezer storage.
Vegetables can be blanched in boiling water, steam or microwave oven.
If using boiling water, boil vegetables for 2 - 4 minutes and coo[ quickly.
In genera[ frozen vegetables are best cooked from their frozen state.
Prepared and cooked foods
Most cooked foods can be frozen but it is not recommended to freeze
the following:
Cooked egg white, custards, cream fillings and milk puddings, gelatin
or ie[[y--[ike dishes, mayonnaise and similar sa[ad dressings, meringue
toppings. These tend to separate on thawing.
Fruit
o Choose high qua[ity, mature, and ready to eat fruit. Preferably select
varieties recommended for freezing.
Avoid unripe and over-ripe fruit.
The way fruit is packed depends on how it is to be used. Fruits packed
in syrup are idea[ for desserts, whereas fruits packed without sugar are
better used for cooking. Most fruits can be stored for 8 - 12 months.
Page 40

Ifthereisaproblemwithyourappliance,pleasecheckthefollowingpointsbeforecontacting
yourlocalFisher&PaykelAppliancesAuthorizedServiceCenterDealerorCustomerCareCenter.
AppEiancedoes
notoperate,
Noelectricityatpoweroutlet. Check that the plug iscorrectly
connected and power switched on.
Check another appliance at the
same outlet
Check house fuse.
Blown light bulb(s). Change light bulb(s) (refer to page 29).
Refrigerator not working. Check refrigerator is turned on at wall.
If problem continues refer to page 44.
Product in Sabbath Mode. Refer to Sabbath Mode page 2S.
Light not working.
Light and display
not working.
Motor operates
for long periods,
Storage
compartments
too warm.
Food freezing in
the refrigerator.
Unfamiliar noises,
Water in the
vegetaMe bins.
Hot weather. Minimize door openings to allow
Frequent door openings, temperature to stabilise.
Large amount of food
Temperature control set too low. SeeTemperature control section (page 22)_
Doors not sealing properly. Checkthat cabinet is level and gasket
seals are clean_
Temperature setting not correct_ See Temperature control section (page 22)_
Frequent door openings. Minimize door openings to allow
Large amount of food temperature to stabilise.
recently added.
Temperature setting not correct. See Temperature control section (page 22).
Food placed directly in front of Move chill sensitive foods away from the
air outlets, center back of the shelves.
Cabinet not stable or levek See Installation section (pages 12 - 13) or
refer to Sounds (page 34).
Freezer is defrosting.
Condensation is formed by the
water produced by fruit and
vegetables.
A small amount of condensation is
beneficial for fruit and vegetable storage.
If there is too much water, store fruit and
vegetables loosely in plastic bags.
Wipe out water with a cloth.
Set humidity slide to
low humidity setting.
Page 41

Sidesofcabinet
T oubleshootin9
are warm,
Warm area on
central door sea[,
Condensation
on outside of
refrigerator/
freezer.
Condensation
inside fresh food
compartment.
This is normal.
This is normal.
Not unusual during periods of
high humidity.
Wipe d ry.
Frequent or long door openings. _ Minimize door openings.
Door gasket leaking. Checkthat gasket is sitting flat and
sealing tightly.
Not unusual during periods of Wipe dry.
high humidity.
Ice buildup Freezer door not closing tightly. Move items in freezer so door can close
inside freezer tightly.
compartment.
Check and clean door gasket seal.
Transfer of odor/taste from Wrap or cover strong smelling foods.
strong smelling foods.
Taste or odor in
ice cubes.
Door handles out
of alignment°
Tray/bin does not
slide in and out
evenly,
With time and usage, movement See Installation instructions Stability
I
may occur, instructions (pages 12 - 13).
Packaging trapped. Check to ensure no food or packaging is
trapped behind the tray/bin.
Runners not extending fully. HoMing onto sides of tray/bin, extend the
runners fully by using a firm pull - this
will reset the runner.
Page 42

Icemakermakes
unfamiliarsounds
orseemstoobud,
Automaticice
makerdoesnot
work,
Icecubes have
odor/taste°
Slow ice cube
freezing°
Warm spot on
central door sea[°
Wet ice/ice
dumping.
Normal ice maker operation. Refer to refrigerator sounds (refer to
page 34).
Ice maker has not been Switch on ice maker (refer to page 1%.
switched on,
Bin is in the wrong way or there Place bin so scoop is on the right side.
is no bin in place. Ice bin sits directly under ice maker on
top [eft side of freezer.
Water supply turned off or not Connect water supply.
connected,
Freezer compartment not Contact Customer Care.
working.
Water pressure too low. Check water pressure_
Water line kinked/squashed. Check water line for kinks/squashing.
Filter clogged. Water filter may need replacing.
Unsealed packages may be Old cubes need to be discarde&
transmitting odorAaste. Ensure food packaging is sealed.
Interior of freezer needs cleaning. Ice storage bin needs to be emptied
and washed,
Clean refrigerator (refer to pages 31 - 33).
Poor taste from incoming water. Filter may need changing,
A new filter may need to be installed,
Force 2 - 3 lee tray flips (refer to page 1%
Door may have been left aiar Close door.
Freezer compartment too warm. Turn temperature to a colder setting
You may fee[ a warm spot at times
on the central sea[ between the
two refrigerator doors.
Low water pressure.
(refer to page 22).
This is perfectly normal and is part of
the normal refrigerator operation,
Check water pressure.
Filter blocked. Replace filter (refer to pages 27 - 28).
Long freezer door openings.
High ambient temperature.
Ice bin left out of freezer
compartment for a long length
of time.
Ice will stick together over time.
Gently tap ice with scoop to unstick
or, if large clumps occur, empty ice bin
and make new ice.
Page 43

Waterhaspoor
taste/odor,
T oubleshooting
Water dispenser
does not work.
Supply line may be blocked. Check supply for kinks or leaks.
On first installation there may be [b remove air, run a liter or a quart of
air in water system, water through the dispenser.
Filter may be blocked and need Replace filter (see back of this booklet
rephcing, for Customer Care contact details).
Dispenser lock activated_ Hold down the _ button for 2 seconds.
Water frozen in tank. Increase temperature to a warmer
setting in fresh food compartment and
freezer.
Water in first glass Water dispenser not used for Discard first glass of water dispensed.
is warm. extended period.
Tank capacity used recently. Allow water time to cool.
Filter warning light Filter needs replacing. Replace filter as soon as possible (refer
to pages 27 - 28).
Drips overflow Air trapped in tanL Hush 3 qt (3 L) water through
driposhemf, dispenser, stopping intermittendy_
New filter installed, Hush 3 qt (3 L) water through filter and
then Sqt (S L) through dispenser,
Water flow rate has Filter cartridge is restricted, Replace water filter as soon as possible
slowed down. (refer to pages 27 - 28),
Page 44

Limited warranty
When you purchase any new Fisher & Paykel whiteware product for personal or consumer use
you automatically receive a one year limited warranty covering parts and labor for servicing
within the 48 mainland United States, Hawaii, Washington DC and Canada. In Alaska the limited
warranty is the same except that you must pay to ship the product to the service shop or the
service technician's travel to your home. Products for use in Canada must be purchased through
the Canadian distribution channel to ensure regulatory compliance.
If the product is installed in a motor vehicle, boat or similar mobile facility, you receive the same
one year limited warranty, but you must bring the vehicle, boat or mobile facility containing the
product to the service shop at your expense or pay the service technician's travel to the location
of the product
You receive an additional four year Limited Warranty (for a total of five years) covering parts
and labor for sealed refrigeration system (compressor, evaporator, condenser, filter dryer, and
connecting tubing} within the 48 mainland United States, Hawaii, Washington D.C. and Canada.
In Alaska the Limited Warranty for the sealed refrigeration system is the same except that you
must pay to ship the product to the service shop or the service technician's travel to your home.
Fisher & Paykel undertakes to:
Repair without cost to the owner either for material or labor any part of the product, the serial
number of which appears on the product, which is found to be defective. In Alaska, you must
pay to ship the product to the service shop or for the service technician's travel to your home.
If the product is installed in a motor vehicle, boat or similar mobile facility, you must bring it to
the service shop at your expense or pay for the service technician's travel to the location of the
product. If we are unable to repair a defective part of the prod uct after a reasonable number of
attempts, at our option we may replace the part or the product, or we may provide you a full
refund of the purchase price of the product (not including installation or other charges).
This warranty extends to the original purchaser and any succeeding owner of the product for
products purchased for ordinary singb-family home use.
All service under this limited warranty shall be provided by Fisher& Paykd or its Authorized
ServiceAgent during normal business hours.
How long does this limited warranty last?
Our liability under this limited warranty expires ONE YEAR from the date of purchase of
the product by the first consumer.
Our liability under any implied warranties, including the implied warranty of merchantability
(an unwritten warranty that the product is fit for ordinary use) abo expires ONE YEAR (or such
longer period as required by applicable law) from the date of purchase of the product by the
first consumer. Some states do not allow limitations on how long an implied warranty lasts, so
this limit on implied warranties may not apply to you.
Page 45

Limited warranty
c
D
F
G
This warranty does not cover:
Service calls that are not related to any defect in the product. The cost of a service call will be
charged if the problem is not found to be a defect of the product For example:
1. Correct faulty installation of the product.
2. Instruct you how to use the product.
3. Replace house fuses, reset circuit breakers, correct house wiring or plumbing, or replace
light bulbs.
4. Correct fault(s) caused by the user.
S.Change the set-up of the product.
6. Unauthonzed modifications of the product.
7. Noise or vibration that is considered normal, for example, drain/fan sounds, refrigeration
noises or user warning beeps.
8. Correcting damage caused by pests, for example, rats, cockroaches etc.
Defects caused by factors other than:
1. Normal domestic use or
2. Use in accordance with the product's User Guide.
Defects to the product caused by accident, neglect, misuse, fire, flood or Act of GoG
The cost of repairs carried out by non-authorized repairers or the cost of correcting such
unauthorized repairs.
Travel fees and associated charges incurred when the product is installed in a location with
limited or restricted access. (e% airplane flights, ferry charges, isolated geographic areas).
Normal recommended maintenance as set forth in the product's User Guide.
Filter replacement except in the case of faulty parts or materials within the filter cartridge.
This product has been designed for use in a normal domestic environment. [t is not intended
for commercial use. Doing so may affect product warranty.
If you have an installation problem contact your dealer or installer. You are responsible for
providing adequate electrical, exhausting and other connection facilities.
We are not responsible for consequential or incidental damages (the cost of repairing or
replacing other property damaged if the product is defective or any of your expenses caused
if the product is defective). Some States do not allow the exclusion or limitation of incidental
or consequential damages, so the above limitation or exclusion may not apply to you.
Page 46

Limited warranty
How to get service
Please read your User Guide. If you then have any questions about operating the product,
need the name of your local Fisher & Paykel Authorized Service Agent, or believe the product is
defective and wish service under this limited warranty, please contact your dealer or call us at:
USA
TOLL FREE 1.888.9.FNRUSA (1.888.936.7872)
or contact us through our web site: www.fisherpaykd.com
Canada
TOLL FREE 1.888.9.FNRUSA (1.888.936.7872)
or contact us through our web site: www.fisherpaykeLca
You may be required to provide reasonable proof of the date of purchase of the product before
the product will be serviced under this limited warranty_
No other warranties
This limited warranty is the complete and exclusive agreement between you and Fisher & Paykel
regarding any defect in the product, None of our employees (or our Authorized Service Agents)
are authorized to make any addition or modification to this limited warranty_
Warrantor: Fisher & Paykd Appliances, Inc_
If you need further help concerning this limited warranty, please call us at above number, or
write to:
Fisher & Paykd Appliances, Inc_
5900 Skylab Road
Huntington Beach
CA 92647
This limited warranty givesyou specific legal rights, and you may also have other rights which
vary from state to state,
Page 47

_ntroducci6n
SeguridadyAdvertencias
_nstruccionesdeinstalaci6n
Antesdequeempieceautilizarsurefrigerador_ce&Water
Todoacercadelapantalla
Usodesudispensadordeagua
Usodesuequipoparafabricarhie[o
Usode[asopdonesde[apanta[[a
Enfradordebotel[as
Congeiaci6nr@da
Temperaturadesurefligeradorycongeador
Advertencias parae[ usuario
CaracteHsticas espedales deActive Smart _'
Filtro de agua
Mantenimiento de suActive Smart _'
Limpieza y cuidados de su refrige_ador
Durante lasvacaconeso paseos
Sonidos del refrigerador
Almacenar a[imentos en su refrigerador
Almacenar alimentos en su congelador
Resoluci6n de problemas
Garant_a limitada
Ficha t6cnica del rendimiento del filtro
46
47
49
59
6O
62
63
65
65
66
66
67
68
69
71
73
74
77
78
79
80
82
86
133
GUARDE ESTE h_JSTRUCT!VO
Losrr_oddo que s_,i/u£rcu'_#/'_e:stc;G/i_ dd I/£/c_rio/x/d£¢_i'_/'_oest_;rdispoi'_M_,_/'_roc/os/os
/oct;/que vitae e£/(;co£_rc;f_>oric;U(;,o f_>dn_c;see£co£&_;c£ocons/; #is/ri_'.>/;idor/oct;/fisher6 P,;ykeL
Page 48

Gracias pot adquirir un refrigerador Fisher & Paykel Actiye Smart _'_con dispensador autom4_tico de
hielo y agua fria a trav6s de la puerta.
En Fisher & Paykel estamos muy orgullosos de este refrigerador. Sentimos que hemos
Iogrado diseF_ar un dispensador de agua a trav6s de la puerta sin comprometer el espacio de
almacenamiento, o el acceso al refrigerador. Durante nuestro periodo de pruebas, disfrutamos los
beneficios que aporta a la salud el contar con agua filtrada de manera tan accesible, y al mismo
tiempo, haber minimizado el nOmero de veces que hay que abrir B puerta del refrigerador.
Miles de horas de investigaci6n en el cuidado de los alimentos y 70 afros de experiencia en
refrigeraci6n fueron programados dentro de su refrigerador para ofrecerb el meior desempe¢/o
posible.
Esperamosque disfrute su nuevo refrigerador.
Dibc;io I Rehigemdores Ice & Wat_r
Es importante que conserve esta Gu[a @ Usuario junto con su refroerador £e & Water para
referenda futura° Si vende et etectrodom#st£o o pasa a manos de otto propietario, favor de
asegurar_e que la Gu[a de Usuario permanezca con et dectrodom#st£o° Esto permitir4 al nuevo
propietario familJarizarse con ta Jnformad6n y tas advertendas que esta Gu[a contiene.
Page 49

Segu idad y Advertencias
Peligro de Descarga El_ctrica
Lea y siga las ADVERTENCIAS Y LAS MEDIDAS DE SEGURIDAD
que se induyen en ÷sta Guia de Usuario antes de operar est÷
÷lectrodom_sticoo
E_no haceHo puede provocar _amuerte, una descarga e_6ctrica, un
incendio o causar daSos persona_eso
Haga uso de este e[ectrodom6stico para e[ prop6sito con que fue disePiado, ta[ como sedescribe
en esta Guia de Usuario.
Medidas de seguridad importantes
Advertencia
Cuando util£e este dectrodom_stico tenga siempre en cuenta tas precaudones de seguridad
bdsicas #_duyendo to s@uiente:
£ste dectrodom_st£o no fue concebido para que to utificen nJ_os o personas enfemffZaS
sin supervisi6n° Lo anterior es part£ularmente importante at utilizar d compartffniento dd
caj6mcongdadoro 5e deber_ supervL_ar a tos ni_os para asegurar que no jueguen con d
electrodom_st£o°
Rie.sgo de que un nJ_o quede atrapado° Ante.s de de.sechar su refr@erador o congdador fuera de
USO_
- Ou_te_es_aspuertas
- Deje _os estantes en su _ugar de maner_ que _o.sni_os no puedan meterse f_d_mente°
Desecho
Deber# tenet cuidado extremo a_desechc_r su dectrodom#st£o v_ejo para ev_tar pefigros. H g_s
refn_gerante deberd_ sacarse de manera segura, y pot _aseguHdad de sus n_os, qu_tde _as puertas°
Su Centro de Servido de E_ectrodom_st£os Autofiz_do F_sher & Paykd estar5 en cond£_ones de
ofientafle en cuanto a m_todos de desecho eco_g£amente re._pon._ab_es par_ su refr_ger_dor o
congd_doro
EI6ctrico
£ste dectrodom@st£o deberd_ insta_arse apropiadamente de acuerdo con e_instructivo de
insta_aci6n, antes de su uso°
Jam4s desconecte su refroemdor o conge_ador jc@ndo dd cord6n el4ctfico.
5iempre sujete firmemente _ d_vija y sOque_ de_ tomacorriente.
Page 50

Seguddad y Advertencias
No conecte ningQn otto dectrodom_sdco en el mL_mo tomacorHente que utflice su rdrigerador o
congdadoro No utiL_ce extensiones o ad@tadores dobtes con estos productos°
Repare o susdtuya _nmediatamente cucdquier cord6n et_ctrico que se haya desgastado o do#ado°
No udtice un corddn et_ctHco que muestre cuarteaduras o abrasi6n a todo to largo de su extension,
en ta davija, o end e×tremo dd dectrodom_sdco°
Sid cord6n de Mimentaddn d_ctHca est6 do#ado, deberO solicitor M Ontro de Servido de
Hectrodom_sdcos Autorizado Fisher & Payket m4s cercano que se to repongan, ya que se
requferen hermmientas espedales pare clio,
Cuando mueva et etectrodom_sdco lejos de la pared_ tenga cuLdado de no girar o dahar el corddn
d@ctdco°
Desconecte su rdrigerador o congdador antes de timpiar o cambiar et foco _nterior°
A[macenar a[imentos y bebidas
Nunca Mmacene matedales vol6tfles o _nflamaMes en su refrigerador o congdador, ya que
pueden exptotaro
Nunca congete t[quidos en redpientes de vidHo° EH[quido se expande durante et proceso de
congdad6n, Io cuat pudJera hacer explotar M contenedoro
Nunca congde bebidas carbonatadas° Pud_eran exptotar°
No consuma a?#nentos que est_n muy fr[os° Los Mknentos que saque dd congelador pudJeran
esmr _osufidentemente #los como para causar dories cuando entren en contacto con _a p_eL p. e]o
_os cub_tos de h_e_o.
Falla en el suministro el_ctrico - seguridad alimentada
No vudva a congdar Mirnentos que se hayan descongdado tota#nente. S_ga _as recomendodones
a condnuad6n s_ descubre a_#nentos en su congdador que se hayan descongdado°
1)CHstMes de h_do ann v_s_b_es: _os a_imentos pueden vo_verse a congdar, pero deberdn
a_macenarse durante un periodo de t_empo rods corto de _o recomendado°
2) Desconge_ados, ann estando d refdgerador fn\o: no se recom_enda genera_mente vogler a
congdados° Los frutas y a_gunos a_imentos coddos pueden vo_verse a conge_ar, pero consg_mMos
tan pronto como sea podb_e° (ame, pescado, ayes: consuma _nmed_atamente o codne y _uego
vudva a congdaro Vegetates: des_chdos ya que norma#nente se ponen _ados y se pasan°
3) Descongdados y con temperatura superior a ?os 41 ° F (5_"d)° Deseche todos _os Mimentos°
No vudva a congdar a_#nentos que se hayan descongdado tota_mente° Puede set pdigroso
consumir esos Mimentos°
Muchos productos de timpieza disponib_es end mercado condenen so]ventes que pudieran atacar
a _os componentes p_6sdcos de su refrigerador o congdador y agdetaHos° Favor de remitirse a _a
secd6n de cuidados de _impieza de este fofleto pare obtener m6s odentad6n.
Page 51

nstruccienes de insta aci6n
Contenido del Kit del Filtro
1 Manguera blanca de 13 pies (4 m) y B_de pulgada (6 ram)
2 1 Manguera azul de 8 pulgadas (200 ram)
s 1 v_lvula de reducci6n de presi6n (PRV,por sus siglas en ingl6s)
a 1 cinta de doble vista
s 2 Ilavesde bloqueo
6 1 cartuchodefiltrodeaguaycabezal
7 1 conexi6n de Ilave para agua
3 4 5
Dibujo 2 Kit de conexidn deAgua
Es irnperativo qua la v61vula de reducd6n de pre._i6n (PRV) se instale antes qua el filtro. Esta v61vMa
asegura que d _:_guano fluya de regreso hada la red de suministro dd sistema de _:_guadd refrigerador, Si
M v61vMa PRY no se ins tMa a la Hnea de cenexi6n, las fundones de su refrigerador ice & Water pudieran
ne fundonar en determinadas drcuns rarities.
Le recornendarnes qua la instMaci6n de conexi6n de ague la haga un plornero autorizade de su IocMidad.
Debar6 udlizar la nueva tuberia qua viene con el rdrigerador y desechar [a tuberfa de [as conexiones
antiguas pare hide y ague.
Precaudones y advertendas de instMaddn
NO 5E UTIMCE con agua qua no sea ap_a pera d consume desde d pun_o de vista
mic¢oMol6gico o de calided dudesa dn dednfec_eda adecuademente antes o despu_s del
ds_eme.
AD VERTENOA- cenectard surninistro de*ague potable6nicarnente,
NO insta_ar en I[nea de presidn pot endma de los 130 psi (900 kPa) o pot debajo de los 22 psi (150 kPa),
NO SE UTIiICE en el surninLstro de agua caliente (rn6xolOO°F [38°Cl )
N_ _ jN_T_L_ ce_`ca de cables e_ctHc_s _ _ub_s de agua que _udiemn sufrir dai_s p_r el tMad_`_ M
memento de selecdonar la ubkad6n dd sisterna de fi_tmdo
_O _ONT_ e_ fi_tro de fonna qua pueda _'edbk golpes de oh'as art[culos, roles coma bote.s de basum, etc
N_ _N_T_LE e_ fikr_ a la _uz _irecta del s_l_ ya que _a exp_sici6n pr_ngada a _a _uz puede debi_itaH_s
carnponentes de pl6s ticoo
_ L_ _T_LE en un _ugar d_nde se exp_nga a temperaturas baj_ cer_ que pudieran da#arla carcasa_
_0 atomiNe el fi]tro a_ refrigerador.
EV_T_ _a contaminad6n de _a tuber[a durante la instalad6n
NO udfice tuber[a de cobre° Deber6 utifizar siempre la tuberia de p_dsdco suministrada°
Page 52

nstruccienes de insta aci6n
Instructivo de insta[aci6n
1 AsegOrese que el refrigerador no est6 conectado a la corriente
el6ctrka,
2 Ubique una entrada/suministro de agua fria que sea adecuada
exdusivamente para una conexi6n hidr_@ica, No se induyen ni
la uni6n en T ni la uni6n macho, Si no puede encontrar la Ilave de
conexi6n, p6ngase en contacto con un plomero autorizado en su
estado o ciudad para que le instale la conexi6n de agua,
s Conecte la manguera azul de 8 p@gadas (200 ram) a la salida de la
v_lvula PRV (boquilla azul) y a la conexi6n de entrada del cartucho
del filtro de agua, tal como Io ilustra el Diagrama 1,Jale ligeramente
ambos extremos para asegurarse de que est6 bien conectada,
4 Conecte la manguera Nanca de ¼ de pulg, (6 mm) a la salida del
cartucho del fikro de agua, tal como se ilustra en el Diagrama 2, Jab
suavemente para asegurarse que est6 bien conectada,
5 Mida la Iongitud requerida para la manguera que va desde la
v_ilvula PRV hasta el punto de conexi6n de agua,
6 CoRe la manguera asegura'ndose que los extremos queden a nivel,
y limpios,
7 Conecte la manguera a laconexi6n de agua y a la base de la v_lv@a
PRV (boquilla Nanca), y despu6s a la Ilave de agua, tal como se
ilustra en el Diagrama 3, Favor de tomar nota que la conexi6n a
la IBve de agua que se induye, deber_ encajar en la mayoria de
los casos de instalaci6n, Si su Ilave de agua requiere de otto tipo
de conexi6n, favor de contactar a un plomero autonzado en su
Iocalidad para comprar el accesorio correcto,
8 Conecte una Ilave de Noqueo en cada hdo del cartucho del fikro
de agua entre el cartucho y la boquilB de Noqueo, tal como se
ilustra en el Diagrama 4,
9 Para limpiar con agua el fikro y verificar cualquier fuga, ponga el
extremo de la manguera dentro de una cubeta, abra la Ilave de
agua independiente y deie fluir al menos 3 qt (3 litros) de agua, Tan
pronto como haya terminado, cierre la Ilave de agua,
lo Ubique la poski6n deseada para el fikro de agua y tome en cuenta
Io siguiente:
Se recomienda instaBr el fikro de agua de forma vertical con el
cabezal de 6ste en la parte superior, Esto minimizar_ Bs fugas
de agua al cambiar el cartucho,
AsegOrese de que el fikro est6 en un lugar adecuado para tenet
acceso a 61y poder cambiarlo cada 6 meses, Le sugerimos que
quede ubkado junto a la Ilave de suministro del fikro de agua
en un gabinete junto al refrigerador,
Se necesita un minimo de 2 1/2pulg, (64 ram) de espacio libre
del suelo al cartucho del fikro para poder cambiar el cartucho sin
proNema,
No atornille el fikro de agua al refrigerador,
Dibujo 3 Conexidn
de la vd,lvula PRY
Diag,area 2
Dibujo,4 Conexi6n
de la Ifnea de agua
al reffigemdor
Diag,area 3
Dibujo 5 Conexidn de la
Llave de agua
D agrama 4
Dibujo 6 Llave de b/oqueo
Page 53

nstrucciones de insta aci6n
'I'I
'I2
'IS
14
15
16
'I7
Adhiera la espon]a de done vista a [a parte trasera de[ cabeza[ del fikro de
agua, tal como se ilustra en el Diagrama 5, Escriba la fecha en que el filtro
deba cambiarse (fecha de instalaci6n + 6 meses). Quite el protector de la
espon]a de done vista y cNoque el filtro en la poski6n deseada, tal como se
indka en el paso 10 (rem[tase a la p_gina anterior),
[nstale la manguera de ¼ de pulg. (6 ram) en la pare trasera del refrigerador,
asegur_ndose que tenga la Iongitud adicional suficiente como para sacar el
refrigerador y darle servkio.
Quite la tapa del compartimiento del compresor separando los tornillos en
la parte superior de cada Bdo de la tapa, tal como Io ilustra el Diagrama 6.
Levante e incline la tapa del compartimiento del compresor para quitada, tal
como Io ilustra el Diagrama 7.
Conecte la manguera a la v_lvula de agua (solenoide) ubkada a la derecha del compartimiento de
la unidad (compresor), tal como se ilustra en el Diagrama 8,Tenga cuidado con los tubos calientes.
Jale suavemente la manguera para asegurarse que est6 bien cNocada, tal como se muestra en el
Diagrama 9,
Vuelva a poner la tapa del compartimiento del compresor en su lugar, meta la tuber[a de
¼ pulg, (6 ram) a trav6s del espacio para ello en el Bdo derecho superior de la tapa del
compartimiento del compresor en direcci6n hacia arriba y vuelva a atornillar la tapa del
compartimiento del compresor, tal como se ilustra en el diagrama 10.
La instaBci6n ya terminada deber_ verse tal como seilustra en el Diagrama 12, p_gina 52.
Dbgrama 5
Dibujo 7 Dspositivo de
e%oor(m,de doble @sin,
D agrama 6
Diagrama 7
Diagrama 8 Diagrama 9
Diagrama 10
Ditsu)o8donexidn de la I[r_eade agua al reirigemdc,r
"IS Abra [a IBve de agua independiente y verifique que todas Bs conexiones est6n secas y sin fugas.
Si no, av[sele al plomero.
19 Enrolle la manguera de la I[nea de agua detr_s del refrigerador. Ponga su refrigerador de nuevo en
su lugar, teniendo cuidado de no enroscar o aphstar la ffnea de agua que va a la v_lv@a de agua
(solenoide),
2o Lea las p_ginas 53 a 58 con detenimiento y despu6s eche a andar el refrigerador,
iiii_
Page 54

nstrucciones de insta aci6n
21 Habr4 una pequeF_a demora la primera vez que desee tomar agua del dispensador mientras el
tanque de agua se Ilena.
22 Deie fluir otros 3 qt o 3 litros atrav6s del sistema para asegurarse que el tanque se haya Bvado
completamente. El no hacer esto ocasionar4 un goteo excesivo del dispensador.
2s Presione _ hasta que aparezca el MenO del hielo y despu6s presione _ para encender el equipo
÷
para fabricar hielo. Presione _ _ _ al mismo tiempo para activar un ciclo_ La charola de hielos
se voltear& Active un nuevo ciclo. LacharoB de hielo se voltear4 y derramar4 el agua dentro del
dep6sito de hielos_ \iac[e el agua y vudva a poner el dep6sito en su lugar.
24 Ahora ya podr4 disfrutar del agua fria y del dispensador de hielo de su refngerador Active Smart _.
Favor de tomar en cuenta que tan pronto como la instalaci6n haya conduido, pudiera haber algOn
goteo fuera del dispensador durante los siguientes dias mientras el aire restante atrapado seescapa.
Diagrama 11
Dibujo 9 Conexidn a la alimentacid, n de agua Diag,area 12
El sistema ha sido probado y certificado por NSF International en contraste con el Est_ndar 53 de
la NSF/ANSI para la reducci6n de asbesto, atrazina, benceno, quistes, carbofurano, plomo, lindano,
mercurio, diclorobenc6nico, toxafeno y turbiedad; en contraste con el Est_ndar NSF/ANS142 para
la reducci6n del sabot y olor a doro y B Chse de ParticuBs Nominal 1 a una capacidad de 750
galones (2,838 litros),
Page 55

pBcaserial,ubicadaenlapartedelanterainferiorderechadelrefrigeradoralabrirlapuerta_
Esimportantequeelelectrodom6sticoest6aterrizadoatierraadecuadamente_
2oUbicaci6n
No deber_ colocar su refrigerador o congelador a B luzdirecta del sol oiunto a un
ebctrodom6stico que genere calor como pudiera ser una parrillapara cocinar, homo o lavavaiillas,
Page 56

_nstruccienes de insta_aci6n
E522g
i i
_ ii _
N
i
iiiii
iiiii
iM
Montaje al ras con e[ chasis dd refdgerador:
_otaci6n totaJ de Japuerta
,I dJi-i -IJ,_
A[ ras de b puerta de[ refdgerador: 90°de rotaci6n de
a puerta (paPa que haya un acceso total al ca]6n o los
estantes, as puertas deber_n poder abr rse m_s de 90')
I D -I
-iJi--
i " -IKi-
iEjF j i_:=::=::::_i:ii
Monta]e al ras con b puerta de[ refrigerador:
rotac 6n total de la puerta
RF201A
[l
iili i
i M
Montaje al ras con el chasis de[ refdgerador:
rotaci6n total de la puerta
i _ 4
A[ ras de b puerta de[ refrigerador: 90" de rotaci6n de
a puerta (para que haya un acceso total al caj6n o los
estantes, bs puertas debergn poder abr rse mgs de 90')
I D i
i dKi_ -iKi_
,_,ii ' , [,i:_
Montaje a[ ras con la puerta de[ refr gerador:
rotaci6n total de [a puerta
Page 57

Page 58

nstrucciones de insta aci6n
4o[nstaJad6n
Su refrigerador Fisher & Payke[ Active Smart _est_ provisto
de ruedas dehnteras y traseras diseF_adas para mover la
unidad hacia adeBnte y hacia atr_s.
Evitemover [a unidad hacialos [ados,yaque esto puede
da_ar Bs ruedaso rayarel piso.
Su refngerador [[egar_ con [aspatas de[anteras
enroscadas, [o cual permitir_ que mueva el producto de
manera sencilla a su lugar final.
Haga rodar el refrigerador a su posici6n final, asegurando
que exista e[ hueco de aire correcto entre el producto y los
gabinetes adyacentes, Vea la tab[a de espacios minimos
con re[aci6n a las dimensiones de los gabinetes (remftase
a [a pa'gina 55).
(Modelo RF201A 8nicamente)
Ajuste [as patas delanteras hacia abajo hasta que el
refrigerador se incline hacia atr_s con [a parte de[antera
a % de pulg, (10 ram) rags a[ta que [a parte trasera, Esto
permitir_ que [a puerta del refngerador cierre bien.
(Remitase al Dibuio.lO).
D Alinear su refrigerador con los gabinetes,
o Alinee los costados de[ refrigerador con los gabinetes,
ajustando la pata de[antera de[ [ado de [a bisagra.
Aiuste [a pata de[ [ado de la manija hasta que toque el piso
y adopte una pequeF_a cantidad de peso.
Una vez que e[ refrigerador est6 en su [ugar y a[ineado
con los gabinetes y el hueco, empuje [igeramente la parte
de[antera superior y verifique si la unidad se mueve, o
qued6 en posici6n estable.
5oNive[aci6n de [a puerta de[ refdgerador
(Mode[o RF201A 8nicamente)
o En superficies desniveBdas, [as patas deBnteras pueden
uti[izarse para a[inear ambas puertas,
Si [a puerta de la izquierda queda muy baja, desatorni[[e
entonces la pata izquierda para [evantar e[ gabinete hasta
que los cantos superiores de las dos puertas queden
a[ineados.
Si [a puerta derecha estg rags alta, aiuste entonces la pata
derecha de [a misma manera,
Baje [a paite
delantera de[
_efr gerador
Levante [aparte
ddantera del
refrigerador
Dibu/Io 10 PatcTsdel
ref,dgemdor
_t"7i dTp.
Dibu/io 11 Alineacidn di parejc7
de 14_puerto;
rT_w_4
t
Dibu]o 12Alineaci@ p_r_i_;
dela puerta
Page 59

Iongitud adecuada para que descanse contra la pared
trasera, y que no se mueva cuando el gabinete se coloque
en su posici6n original,
La pared det_4s dd
refdge_ador
Elmaterial de empaque vadebajo de la rueda trasera
d agona mente opuesto a a pata delante_a que seevanta
Esta pata se levanta del piso al pres onar suavemente
a pate supedor delantera del refrigerado_
Dibujo 14Estabilizar elreffig_*.mdc,r
G Haga rodar el refrigerador de regreso a su posici6n y ajuste Bs patas delanteras de acuerdo con el
paso D_(Revise que la alineaci6n y la acci6n del cierre de la pue_a sean satisfactorios)_
Haga pequeflos ajustes a las patas delanteras si fuera necesario_
Revise que el producto quede en posici6n estabb (que las 4 patas toquen el piso)_ Si no, regrese al
paso Ey repita los pasos Fy G
Page 60

_nstruccienes de insta_aci6n
Antes de meter alimentos dentro de los compartimientos de alimentos frescos o
Retire cua[quier tipo de empaque. AsegOrese de quitar todos los dips de transporte del refdgerador.
Setrata de pequeflos topes de hule ubicados en la parte trasera de los estantes.
Limpie la parte interior del electrodom6stico con una mezcla de agua tibia, un poco de
detergente liquido y un patio suave para limpiar el polvo de fabricaci6n y transportaci6n,
Deje el refrigerador y el congelador funcionar vacios de 2 a 3 horas para que cada compartimiento
se enfrie a la temperatura adecuada.
El electrodom6stico pudiera despedir un olor en su funcionamiento inicial, el cual desaparecer_
cuando el refngerador y el congelador hayan enfnado Io suficiente.
Eficienda energ_tica
No cubra el electrodom6stico con ningOn material que pudiera evitar el flujo de aire alrededor de
los costados del gabinete.
No deje la pueRa abierta m_s de Io necesario,
Deje suficientes espacios libres frente a los ductos de aire dentro del gabinete para una m_xima
distdbuci6n del aire frio.
Mover o acomodar su reffigerador
encender.Estopermiti_quelasp_esionesdelsistemade_ef_igerad6nseigualenantesde_einicia_.
Moversorefr_geroaor
Apague el dectrodom6stico y desconecte del tomacordente. Saque todos los alimentos.
D6 vuelta a las paras ajustables hacia la derecha hasta su m_ximo (rem[tase a B p_gina 56). :}(/
Mu6valo con cuidado fuera de su posici6n. Pliegue el cord6n el6ctrico y cierre las puertas con cinta
aa_esiva.Ase_u_elosestantes_oncintaensulu_ja_,sinecesita_olo_arelgabineteen_nf_uloo }:::
acostar[o, inc[ine[o de costado cuidadosamente (dd [ado derecho visto de frente). 11'i
o Reubi_ueeinstale.Siaei_alele_t,odom_sti_oae_ostadoau,anteunaete,_inadolapsoaetiempo,
d_ielopa_adoenposici6nverticalpo_Iomenosdu_ante10minutosantesdee_ha_loaandar. _}
Al,,,o enorsorefr gerodoro ongelodor
i:q almacenar su electrodom6stico ya limpio, deje las puertas abiertas. Esto permitir_ que el aire
o Antes_eu_l_a_lo_enuevo,l_p_e_en_onuname_da_ea_uat_a;,'_a_ona_o_esod_o
(armada1 cucharita de bicarbonato por cada pinta(500ml)de agua. Enjuague con agua limpia.
Durante [as vacaciones
_e_e_omen_amos_uedeiesu_d_erado_o_on_elado__undonanaom_ent_asest__ew_adones,i
Page 61

Antes de que empiece a uti_iza_ su _ef_ige_ado_ Ice & Wate_
Revise que el refrigerador est6 conectado y haya enfriado al menos durante 2 horas antes de
usarlo (rem[tase a la p4gina 66: La temperatura de su refrigerador y congeBdor).
Revise que el filtro de agua est6 conectado y encendido.
Encienda el equipo de fabricaci6n de hielo (rem[tase a la p4gina 63).
AI utilizarlo pot primera vez, deje aproximadamente pasar 1 minuto a partir del momento en
que presione el despachador hasta que fluya el agua. Esto permitir4 que el tanque se Ilene.
Deje fluir y deseche los primero 8 a 10 qt (8 - 10 L)de agua del dispensador, deteni6ndolo de
forma intermitente (rem_'tase a la p4gina 62: Primer uso). El no hacer esto ocasionar4 un goteo
excesivo del dispensador.
Deseche el primer caj6n de hielo (rem[tase a la p4gina 63: Primer uso).
Usted est4 listo ahora para disfrutar del hielo y el agua de su refrigerador Active Smart _'_.
Favor de tomar en cuenta que tan pronto como la instalaci6n haya conduido, pudiera haber
algOn goteo fuera del dispensador durante los siguientes d[as mientras el aire restante atrapado
se escapa.
Page 62

Todo acerca de panta a
La pantalla [e permite vet y modificar todas [as funciones y opciones de su refdgerador. Pot
ejemp[o, puede cambiar [atemperatura de su refrigerador o congeBdor y se[eccionar la funci6n
de Fast Freeze [conge[aci6n r_pida] cuando desee conge[ar came r_pidamente. Ta[ vez desee
tambi6n enfriar ra'pidamente una bote[[a de vino cuando sus amigos [e caigan de sorpresa.
4 5 6 7 8
Dib_LjoIdPanelelectrdnicodecontrol
TecJas
Param_sinformac[6n sobre estasfunciones, favor de remidrse a [asp4g[nas65 a68.
Despiiega el menQprincipal. (Freezer[congelador], Temperature
[temperatura], lee[hielo] y Settings [configuraci6n]).
Despliega B configuraci6n de cada funci6n_
Dispenser lock[bloqueo de[ dispensador]: desactiva los botones y evita
que el aguafluya a trav6s de[ dispensador.
Key lock [bloqueo del teclado]: desactiva los botones.
Page 63

Todo ace ca de la pantalla
Fundones de [a santa[[a
FA£EER ]
@ Bottle Chili [enfriador de boteIIas]
Sus bebidas pueden enfnarse m4s r£pidamente al utilizar esta funci6n.
Una aIarma [e aIertar4 cuando est6n listas (remitase a la p4gina 65}.
Fast Freeze [congeIaci6n r_pida]
A[ act[varse, esta fund6n aumenta e[ proceso de enfnamiento en su
conge[ador, Io cual optimiza [a ve[ocidad a la cual se congelan los
alimentos (remitase a la p4gina 66).
$
÷
W
Hmmu I
colder wamler
La animaci6n le muestra que e[ agua se est_ surtiendo.
Key SHentMode [Modo de tedado sitencioso]
Sepueden si[endar todas Bs pulsaciones de tedas (remitase a [ap4gina 67).
Key lock [b[oqueo del tedado]: desactiva los botones.
Sabbath Mode [Modo sab_tico]
Puede activarse si fuera necesario (rem[tase a [a p_gina 67).
Reajustar Fi[tro
El icono de[ filtro aparecer_ cuando el filtro de agua necesite cambiarse
(remitase a [a p_gina 68).
Service/Fault Diagnosis [servicioidiagn6sticos de error]
Si ocurre un error, el icono de errores y el c6digo de error se desplegar_n
en B pantalB (rem_tase a B p4gina 68).
Page 64

Use de su d[spensader de agua
Su dispensador de agua fue disePiado para operarse con una sob mano. Simplemente presione
con el vaso el despachador que se encuentra en la parte trasera del 4tea del dispensador. El
despachador requiere Onkamente de una presi6n ligera para activarlo.
Por favor recuerde que a[ )resionar muy fuerte el despachador no hara"que 6ste opere m_s r4pido
o que surta cantidades mayores de agua.
Primer use
Despu6s de la instahci6n y durante el primer uso, d@e que pase un minuto desde que haya
oprimido el despachador hasta que 6ste le surta el agua. Esto permitira" que el tanque se Ilene
totalmente
Despu6s de que Ilene el tanque pot primera vez, deje fluir y deseche aproximadamente 8qt o
10 litros deteniendo intermitentemente para lavar el tanque
$
Surtir e[ agua
Para surtir agua, presione [igeramente el despachador
utilizando un vaso o un recipiente. $ 6 (_} 6
Cuando desee que le suRa agua, una luz aparecer4 encima
del 4rea del dispensador, as[ como en la pantalB. Tambi6n
. , ¢¢
aparecera el icono de Ilenado de agua I:1'
Para detener el fl@o de agua, sim@emente aleje el vaso dd
despachador.
/fi
Para evitar cualquier daSo personal o material no ponga
manes, dedos u objetos en ta abertura dd dLspensadoro
deagua
Favor de tomar en cuenta que tan pronto como la instalaci6n haya conduido, pudiera haber
akjOn goteo fuera del dispensador durante los siguientes d[as mientras el aire restante atrapado
se escapa.
Page 65

Use de su equipo papa fab icar hie o
Equipo pafa fabficaf hielo
Su equipo para fabrkar hielo fue disef_ado para despachar hido
autom_tkamente, hasta que detecte que el caj6n est6 Ileno.
Mientras mAs hielo utilke, mAs fabrkar& Es Io suficientemente
intdigente como para detectar si el caj6n no est_ en su lugar
para recibir el hido.
Primer uso
AI encender pot primera vez su refrigerador despu6s de la
instaBci6n, el equipo para fabrkar hielo estar_ apagado.
Para encender su equipo para fabrkar hielo, utilice el bot6n
para des@azarse a la pantalla .
Uti[ice e[ bot6n @ o el bot6n _ para encender o apagar el equipo
para fabrkar hielo.
Muestra que el equipo para fabrkar hielo est_Sencendido.
'4j_
Muestra que el equipo para fabrkar hielo est_ encendido.
j Jr
(
Presione _ <_ } al mismo tiempo para activar un cido. La charoh
de hielos sevokear& Active un nuevo cido. La charola de hielo (
se vokear_ y derramar_ el agua dentro del dep6sito de hielos.
Vacie el agua y vuelva a poner el dep6sito en su lugar. Dibup 18Fncendere/
Si el dep6sito est_ Ileno o no est_ bien puesto en su lugar, el _quipopaJ'_@bfic_rhi_._/o
equipo para fabrkar hielo no funcionar& Cuando el dep6sito
se mete correctamente, el cuchar6n quedar_ a mano derecha
del dep6sito para los modelos E522B y delante del dep6sito
para el modelo RF201A (remi'tase al Dib@ol 9 de la p_gina 64)_
Si se sacan todos los caiones, el equipo para fabrkar hielo no
funcionar&
Tan pronto como su equipo para fabrkar hielo est6 en operaci6n, deseche el primer dep6sito de
cubitos de hielo_ Esto lavar_ y liberar_ de cualquier impureza la linea de agua, con la seguridad de
que usted obtendr_ la meior calidad de hielo. Le recomendamos que haga Io mismo al regresar de
vacaciones o cuando no haya utilizado el hielo pot periodos prNongados de tiempo.
Le recomendamos que apague su equipo para fabrkar hielo:
- Si el suministro de agua se interrumpe durante algunas horas o
- Si el dep6sito para almacenar el hielo se saca durante un determinado periodo de tiempo o
- Si usted se va de vacaciones o paseo.
Page 66

Usedesuequipoparafabrica hie]o
Informad6n acerca de[ equipo para fabrkar hie[o
Suequipo automgtko para fabrkaci6n de hie[o producir_ aproximadamente ocho cubitos
de hie[o en [@sos de 2 a 3 horas, dependiendo de [atemperatura del compartimiento del
congelador y de[ nOmero de veces que abra [a puerta.
La charo[a de los hielitos se Ilenar_ con agua despu6s de que el congelador haya akanzado la
temperatura correcta.
Los primeros hie[itos seconge[ar_n norma[mente despu6s de varias horas.
Cuando los hie[itos est6n congelados, ser_n exp@sados del molde al dep6sito de
almacenamiento.
Lafabrkaci6n de hie[o continuarg hasta que el dep6sito de almacenamiento est6 Ileno.
Lafabrkaci6n de hielo se reanudarg cuando el hielo se utilice
Para obtener un m_ximo a[macenaje de hielo, nivele los cubitos dentro del dep6sito con el
cuchar6n que viene con el equipo.
Su producto ke & Water viene con un dep6sito para hie[o rags pequeflo, dentro del dep6sito--
congelador rags grande El cuchar6n para hielo viene junto con el dep6sito. Este cuchar6n sirve
para man£iar el hie[o de manera higi6nica.
Si se requiere de un vo[umen de hielo m_Ssgrande, saque el dep6sito rags pequeflo y deje que el
hie[o caiga en el m_s grande
Si no uti[iza el hielo con frecuencia, los viejos cubitos se vo[vergn opacos, tendrgn un sabot
rancio, se encoger_n y probaNemente se pegargn uno con otto. Vacie el dep6sito de hielo
peri6dkamente, lave con agua tibia, seque totalmente y vuelva a colocarlo en su lugar.
E522B fiF201A
Dibujo 19D@dsitod_*.almac_*.namientod_*.hkdoy el cuchard,nen la posicidn correcta
Evlte el contacto con tas partes movlbles del mecanismo de exputsl6n, y no ponga los dedos en el
mecanL_mo de fabricad6n de hido automdtlco mJentras et refroerador estd conectado°
No consuma hiefitos que est_n descolor_os, o que normalmente tengan un color azul-verdoso°
Sl nota esta decolomd6n, des%chelos y p6ngase en contacto con su Centro de Servido de
Electrodom%sticos Autofizado Fisher & PaykeL
Aseg_rese que el equ_ p_r_ fubr£_r h_el_ estd c_nect_d_ _l _tr_ y _l sumin_str_ de _gu_ p_t_ble
_nicumente°
Lu lnstulud6n de _ conexf6n de uguu ul productor de hieto deber_ re_fiz_fl_ un t_cnfco de
servldo calific_doo un plomero cafificado(yea el ;nstructlvo de ;nstal_d6n),
Page 67

Use de opcienes de panta a
@
BottJe Chili [enfriador de bote[[as]
Esta funci6n le permite enfriar bebidas en el congelador sin la preocupaci6n de olvidarse de elias.
AI activar[o, ponga su bebida dentro del congelador y despu6s de haber transcurrido e[ tiempo
configurado, Bottle Chili [enfriador de bote[[as] [e recordarg sacar [a bebida pot medio de una
alarma sonora. La alarma del usuario continuar_ sonando hasta que se presione cualquier tecla
en el panek
El tiempo que toma para enfriar depende del tama_io de su botelB. Bottle Chill [enfriador de
botdhs] le permite personalizar este tiempo de enfriamiento.
Tiempos recomendados:
20 minutos - lata o botella pequeF_a
25 minutos - bote[[a de vino o bebida de tama_io similar
30 minutos - botella rags grande
Si saca su bebida del congelador y no est_Sfria tal como Io desea, vuelva a configurar el
temporizador a 10 minutos, y meta de nuevo la bebida al congdador.
Para activarlo, utilice el bot6n _ hasta que el icono de bottle chill [enfriador de botelBs]
( _)aparezca en B pantalla [ FREEZE_ I. Despu6s utilice los botones _ o _ hasta
que aparezcan los copos de nieve (¢;_,)yel temponzador de minutos (BBBm,.>en la pantalB de
Bottle Chill [enfnador de botellas].
Despu6s utilice el bot6n _ para sdeccionar 10, 15, 20, 25 o 30 minutos, tal como aparece en la
pantalB de Bottle Chill [enfriador de botdlas]. Despu6s de varios segundos, los copos de nieve
aparecer_n en una animaci6n, a medida que el temporizador realiza la cuenta regresiva.
Sonar_ una alarma despu6s de que el tiempo seleccionado haya transcurrido.
Presione cualquier bot6n de la pantalB para silenciar la ahrma. Recuerde sacar la botella del
congelador.
Para desactivar Bottle Chill [enfriador de botellas] manualmente, utilice el bot6n
para despBzarse al icono de bottle chill [enfriador de botdBs] ( ) en la pantalla
[ FREEZER ] y despu6s utilice los botones _ y _ hasta que ya no aparezcan minutos en la
pantalh y los copos de reeve (_5_)ya no puedan verse.
No deje la botefia @ntro dd congdador durente m4s tiempo del necesafio para enffiar, ya que
/as boteHas de vidfio pueden explotar.
Page 68

Use de epciones de panta a
Fast Freeze [conge[ad6n rapida]
Creamos la funci6n Fast Freeze [congelaci6n r@ida] para ayudarle a obtener el mejor resultado
al congelar alimentos frescos, Fast Freeze [congelaci6n r_pida] aumenta B velocidad de
congelaci6n que ayuda a garantizar que B frescura vital, B textura y el sabot se mantengan
durante el proceso de congeBci6n,
La funci6n Fast Freeze [congelaci6n rgpida] hace caer la temperatura del congelador a su
temperatura rags fria durante un periodo de 12 horas y despu6s regresa a su modo normak Ta[
vez desee utilizar esta funci6n cuando congele una cantidad de came o cuando prepare postres
congelados.
Para activarlo, utilice el bot6n i hasta que el icono de Fast Freeze [congelaci6n r_Spida]
( ) aparezca en la pantalla _ FREEZE_ S"Despu6s, utilice los botones _ o _ hasta
que los copos de nieve (_}) aparezcan en la pantalB de Fast Freeze [congehci6n r@ida], La
animaci6n de copos de nieve indica que Fast Freeze [congdaci6n r_pida] ya ha sido activada,
Para desactivar la funci6n manualmente, utilice el bot6n _ para desplazarse hacia el icono de Fast
Freeze [congelaci6n r@ida] ( ) en la pantalh. Despu6s utilice _ y _ hasta que ya no haya
copos de nieve (_) en a panta a.
Para obtener meiores resultados, recomendamos que active la funci6n aproximadamente 2
horas antes de que Io requiera. Activela alternativamente cuando meta alimentos al congeBdor.
Nota: las opciones de Bottle Chill [enfnador de botdhs] y Fast Freeze [congeBci6n ra'pida] no
pueden utilizarse simult4_neamente.
Temperatura de su refdgerador y congelador
Cuando encienda el refrigerador pot pnmera vez, tomar_ aproximadamente de 2 a 3 horas para
enfriar, dependiendo de la humedad y la temperatura ambientak
Para ajustar B temperatura de un compartimiento, utilice el bot6n _ para desplazarse a la
pantaIB [TEMPERATURE],utilice el bot6n i para seleccionar el compartimiento que desee cambiar,
Podr_ entonces aiustar B temperatura utilizando el bot6n _ para hacer que el compartimiento se
entibie o el bot6n _ para enfriado.
La configuraci6n de temperatura se indicar_ en el icono m4_sabaio.
Es importante que configure su refngerador a la temperatura correcta. Si la pone muy fria puede
provocar que algunos aRiculos se congelen en el refrigerador, y si la configura demasiado cdiente
disminuir_i B vida Otil de almacenamiento de sus alimentos.
Param_sinformaci6n sobreel almacenamiento de alimentos, remftase a la secci6n de Cuidado de
Alimentos (p4ginas 79a 81),
Page 69

Use de epciones de panta a
Key SHent Mode [modo de tedado sHencioso]
El modo Key Silent Mode [modo de tecBdo silencioso] le permite silenciar el sonido que emiten las
teclas al operadas.
Se puede activar o desactivar mediante el bot6n _ para despBzarse a la pantalla y
despu6s presione los botones _ o }.
Cuando Key Silent Mode [modo de teclado silencioso] est6 encendido, aparecer_ @.
Cuando esta funci6n est6 apagada, aparecer_ _.
Nota: las fallas, el temporizador del enfnador de botellas y la alarma de la puerta continuara'n
sonando cuando el refngerador seconfigure al modo Key Silent Mode [modo de tedado
sibncioso].
Dispenser and Key Lock [B_oqueo demdispensador y
tedado]
Dispenser lock [bloqueo del dispensador] desactiva
los botones y evita que el agua fluya a trav6s del
dispensador.
Key lock [bloqueo del teclado] desactiva los botones.
Active presionando _ en el panel de la pantalh.
Despu6s de 2 segundos, el icono _ aparecer_ indicando
que Dispenser Lock [bloqueo del dispensador] est_S
activado.
Despu6s de 2 segundos, el icono _ aparecer_ indicando
durante 2 segundos.
_Sabbath Mode [Modo sab4tico]
Enel modo sab_tico, Bs aBrmas, luces y pantalBs se
desactivan.
Sabbath Mode [modo sab_tico] puede activarse o
desactivarse presionando los botones i,_, _ durante
4 segundos.
Si ya est4 en Sabbath Mode [modo sab4tico]:
La luz interior no encender_ cuando se abra el
refdgerador.
La alarma de la puerta no funcionar_.
La pantalla no se iluminar_.
El panel de control electr6nico no funcionar_.
DiSujo 20 81oqueo del
dispensador y teclado
Dibujo 21 _/Iodosab4tico
Nota: si se apaga, el refrigerador automAticamente continuar_ en el Sabbath Mode [modo
sab_tico] tan pronto como se reanude el fluido d6ctdco. El modo sab_itico se desactivar_
autom_ticamente despu6s de 80 horas.
Page 70

Use de opciones de panta a
Advertendas a[ usuado
Su refrigerador es [o suficientemente inteligente como para diagnosticar sus propios }roblemas,
Le alertar_ si hubiera una falla,
Reajustar Fi[tro
El icono de reajustar fi[tro Q aparecer_ cuando e[ fi[tro de agua necesite cambiarse, Este
parpadear_ al momento de surtir agua, Para cambiar el filtro y restaurar el icono del filtro,
remitase alas p_ginas 71 - 7Z
Error
Enel caso poco probable de que ocurra un error, e[ icono _ aparece al frente de la pantalla
y tambi6n aparecer_ un c6digo de error a la izquierda de [a misma [ S_EEZER 1
Cuando [a puerta est6 abieRa, sonar_ la alarma de error del refrigerador, Para silenciarla, presione
cualquier bot6n de la panta[[a,
Favor de tomar nota de[ c6digo de error y p6ngase en contacto con nuestro Centro de Servicio al
Cliente, La informaci6n sobre los nOmeros telef6nicos del Servicio al Cliente los encontrar_ en la
pare trasera de este folleto,
i:i;
il i
Dibujo 22 P_nr_.71k.7deodd/go @error
Page 71

Caracter sticas especia es de Active Smart
Dep6sitos de frutas y verduras y tapa de control de humedad
Los dep6sitos de frutas y verduras cuentan con una tapa Onica que tiene dos funciones:
La tapa de humedad se[[a los dep6sitos y ofrece un microdima hOmedo para prolongar los
tiempos de a[macenamiento de frutas y verduras,
La tapa de humedad evita que la condensaci6n que se produce a nive[es altos de humedad,
caiga en forma de goteo sobre frutas y verduras, La capacidad de retener un alto contenido de
humedad en el dep6sito de frutas y verduras pudiera provocar [a acumu[aci6n de pequeF_as
cantidades de agua en el rondo de los dep6sitos de frutas y verduras. Esto puede limpiarse
r_pido sin problema.
Dep6sitos de frutas y verduras y adaptador de control de humedad (donde est_
Cada cai6n de frutas y verduras tiene un control de humedad detizante que puede aiustarse a
una configuraci6n para frutas y verduras, dependiendo de [o que se guarde en los cajones_
En la medida de [o posib[e trate de a[macenar frutas y verduras separadamente Esto ayudar_ a
pro[ongar su vida de a[macenamiento_
Si hay una mezda de frutas y verduras en el dep6sito, ajuste [a poski6n del control a[ centro.
Si hay demasiada agua en los dep6sito% el control puede aiustarse hacia la configuraci6n que
indique un menor goteo (configuraci6n para fruta),
Recuerde que una pequeffa cantidad de agua dentro de los dep6sitos es bueno para a[macenar _.....................................................
frutas y verduras_
}
[DEALPARA:
@ @ @
H@as de Frutas mi×tas Fruta con
[echugas y verduras c_scara
Lechuga _ Naranias
Espinacas _ Limones
Br6cNi _ Limas
Cob
Zanahorias
Dib@o 23 Gr4ficc7de control de humedod
Page 72

Ca actedsticas especiales de Active Smart
Caj6n delgado para almacenar (donde est_
Los cajones de la parte inferior son para guardar
art[culos que usted desee mantener separados del
resto del refrigerador, Esto cajones delgados pueden
utilizarse para guardar charcuter% bebidas o para
descongehr alimentos.
Alarmas en puertas
Oibu)o24 Qs'j6nddgado p_s,malm_s,cencTr
Si [a puerta de[ compartimiento de a[imentos frescos se deja abieRa, [a aBrma pitarg despu6s
de !)0 segundos y si la puerta del congeBdor se deja abierta, la alarma pitar_ despu6s de 60
segundos,
Si cua[quiera de [as puertas permanece abierta, habr_ pitidos subsecuentes cada 30 segundos
durante 5 minutos,
Una aBrma continua sonarg si cua[quiera de [as puertas esta abierta durante 5 minutos o m_s, y
la luz se apagara'. La alarma se detendr_ cuando la puerta abierta quede cerrada.
Estante para boteJJas(donde est6 habiJitado}
El estante para botellas puede utilizarse para guardar vanos tipos de botellas y puede colocarse
en cualquier lugar donde usted pueda poner un estante. Para volvedo a colocar, levante la parte
trasera del estante y jale hacia adelante. Es mejor guardar Bs botellas con el cuello mirando hacia
la parte dehntera del refrigerador.
Charola de escurdmiento
Fue diseBada para encajar dentro del reborde en la parte inferior del panel del despachador de agua_
Para meter lacharola, asegOrese siempre de que los bordes redondeados entren primero dentro
del panel del despachador.
El obietivo de la charola es captar cualquier escurrimiento espor4dico de agua que pudiera
derramarse despu6s de despachar.
La charola puede quitarse f4cilmente para limpiarla (vea la pa'gina 74).
Estantes de vidrio
Los estantes de vidrio pueden colocarse en otras posiciones dentro del gabinete como sedesee.
S4quelos subi6ndolos de la parte de atr4s y jalando hacia usted.
Page 73

Fi tro de agua
Toda el agua que [[ega a su refrigerador se filtra para quitar [as impurezas a trav6s del cartucho
ubicado en el [ugar de su preferencia, fuera del refrigerador. Necesitar_i cambiarlo cada 6 meses
aproximadamente.
Existe un icono indicador de cambio Q en el panel de control que aparecer4 cuando deba
cambiar el fi[tro. Parpadear4 como recordatorio cuando despache el agua.
Los cartuchos est4n disponib[es con su Distribuidor Autorizado Fisher & Paykel. La informaci6n del
cartucho de cambio est4_en la etiqueta en el mismo cartucho.
Cambiar el cartucho de[ fi[tro de agua
No ser4 necesario cerrar el suministro de agua antes de intentar cambiar el cartucho del filtro de
agua.
"l Suiete y d6 vuelta con firmeza el cartucho contrario a [as manecillas de[ re[oi (a [a izquierda cuando
se instale de acuerdo con [a orientaci6n recomendada), ta[ como se i[ustra en el Diagrama 1.
2 Jale el cartucho de[ cabeza[ de[ fi[tro hacia afuera (presione hacia abaio cuando se instale de
acuerdo con [a orientaci6n recomendada), ta[ como se i[ustra en el Diagrama Z
- No es raro que haya a[gunas gotas de agua cuando se quite el filtro_
s Desechee[fi[tro antiguo_
4 [nsta[aci6n de[filtro:
----Quite [atapa protectora de [a cani[[a de[ cabezaL
- Empuie el cartucho hacia arriba en direcci6n a[ cabeza[ de[ fi[tro, mientras [e da vue[ta en el
sentido de [as maneci[[as de[ re[o] (hacia [a derecha cuando se instale de acuerdo con [a
orientad6n recomendada) ta[ como sei[ustra en el Diagrama 3_
5 Reestabiezca el icono de[ indicador de[ fiitro en [a pantalla (esto [e recordar_ cuando el fiitro
deba cambiarse de nuevo)_ Rem['tase a [a p_gina 7Z
6 Deie fluir 10 qt / 10 [itros de agua para Bvar el cartucho con el fin de sacar el aire atrapado y [as
particu[as finas de carb6n no daFqnas_
7 Aparecer_ un goteo fuera de[ dispensador en los pr6ximos dias mientras el aire atrapado sale
totalmente_
\
Diagrama _\ Diagrama
Dibujo 25 Cambiar el cartuchodel filtro deagua
Page 74

Fi tro de agua
Para restaurar e[ indicador de[ fikro
Recomendamos qua utilice el filtro de ague desde d punto de la instaladdn,
No restaure d ind£ador antes de cambiar d ffltro, o d monitoreo dd relume set6 poco exacto.
Presione y mantenga presionado } y los botones _÷ durante 4 segundos pare restaurar el
indkador del filtro,
Si hay un fikro, el kono @ en la pantalla desaparecer_ al restaurar.
Para inhabilitar el indicador del fikro
Nota: si Io desactiva no habr_ recordatorio que le indique que el fikro necesita cambiarse.
Cuando no haya que instalar un fikro usted podr_ desactivar el indkador del fikro,
Presione y mantenga presionado _, _ y los botones _ durante 4 segundos pare encender o
apagar esta funci6n,
AI activar o desactivar, el kono _ parpadear_ y aparecer_ on [encendido] y off [apagado] en la
pantalB [ FREEZER 1.
Le recomendamos que no desactive el indkador dd fikro si tiene un fikro puesto en la conexi6n.
o Pare eviter enfermededes series o induso ta muerte, no utilice d tTItro de ague en donde d ague
no sea apta pare d consume o sea de cetided dudose, sin d adecuado proceso de deskffecddn,
antes o despu@sdd use dd fiitro,
H certucho dd fi[tro de ague necesita cam bierse cuando et £ono de ind£edor det tTItro parpadee
end penal de le inter/ese,
Le recomendemos qua cembie et certucho det f_Ttro cuendo parpadee et £ono Q. Esto suceder6
cede 6 mesas,
Si et sLsteme de fi[tred6n de ague se congde per e[guna drcunstande, entonces cembie et
cartucho dd filtro,
Le vdocJdad dd flujo de ague e trev6s dd despachador de ague puede eminorar e medide que
et certucho dd f_Ttro ecumule sedimentos qua pudieren ester presentes en et suministro de ague
qua t[ega e su case. Esto var[e dependiendo de la celidad det ague toceL per to cuel tel vez se
requiem cembier el certucho dd fittro con m6s frecuende.
En case de una vide (_tfl exce.dvemente redudde dd fittro, le recomendemos qua consulte e
un plomero tocet o e su dLstribuidor de ague pare que to orienten en cuento e tos requLdtos
edecuados de fittred6n pare el ague qua redbe en su case.
El cam Die de fittro es responsebilided dd consumidor y no Io cubrird te garent[a, excepto en
cases de pertes defectuoses o meterietes dentro det certucho dd fittro,
5i no se ha utilizedo d ague det despachedor dumnte e@_n tiempo o si _sta tiene un saber u
otor desagredabt6 deje fluir 10qt (I0 L) de ague.
Si persisten el reel saber u olor, tel vez sea major poner un nueve certucho en el filtro.
Page 75

Mantenimiento de su Active Smart
Cambio de [a [uz interior (foco de ha[6geno)
Desconecte del tomacorriente de pared antes de cambiar el foco. Elfoco est_Subicado en la
cubierta superior de[ gabinete a[ frente.
Quite [acubierta de [ente con un desarmador peque¢_o, [nserte e[ desarmador en e[ centro
de[antero de [a cubierta de [ente y apa[anque [igieramente hacia abajo. Saque e[ foco fundido,
No toque e[ foco nuevo con [a mano, Detje[o en su bo[sa de p[_istico mientras [o co[oca,
Quita la boBa de pl_stico cuando ya [o haya colocado.
Vue[va a co[ocar [a cubierta de [ente,
Encienda. Elfoco deber_ prender.
Nota: e[ nuevo foco de ha[6geno no deber_ exceder los 12 Vo[tios/10 Watts, Puede adquirir los
focos en su Centro de Atenci6n de Electrodom6sticos Fisher & PaykeL
/
/
i / /
Dibt,;io26 Cambiode/foco dehaldgeno
5u refr@erador rue dLse_ado para fundonar durante m uchos a_os sin nece.sidad de revLsiones
de servJdo° Sin embc_rgo, s_no fundona bien, pida que su Ontro de ServJdo Autorizado de
Electrodom_sticos Fisher & Paykd te haga una revLsi6n a la brevedad° Cua@uier reparation
el4ctrica deber4 reaflzada un t4cnico caflficado de servido o un electricista.
Page 76

Limpieza y cuidados de su ef ige ado
Exterior
Puertas de acero [noxidable (acabados de Irid[o o EZKleen}
A[ [impiar [a superficie exterior de [as puertas de su refrigerador, es importante utilizar s61o
detergente liquido para trastes disuelto en agua tibia y un paF_osuave.
Sequela puerta con un trapo limpio que no suelte pelusa.
El uso de cualquier limpiador abrasivo o para acero inoxidable, o solventes daF_ara la superficie de
la puerta.
Despachador de agua e [nterfase
Hemos incorporado una funci6n de Dispensador [Dispenser] y Bloqueo de Teda [Key Lock] en el
refrigerador para faci[itar su limpieza (remftase a [a pggina 67). Esto le ayudar_ a evitar que el agua
fluya accidenta[mente fuera del dispensador mientras [o limpia.
Limpie el despachador y el panel de interfase con un trapo suave, ligeramente hOmedo.
Otras superficies exteriores
Limpie todas las demos superficies exteriores con una mezda de agua tibia y detergente y un
patio suave.
Si fuera necesario, limpie el empaque magn6tico de la puerta y los empaques centrales de 6sta
con un cepillo de dientes vieio, agua tibia y detergente liquido para trastes.
/
Charo[a de evaporaci6n de agua
La charola de evaporaci6n de agua estg encima del compresor
en [a parte trasera de[ refrigerador o conge[ador. La charo[a no _---- .J
necesita limpiarse con frecuencia.
z
Separe con cuidado e[ refrigerador o el congeBdor de la pared.
Desconecte [a unidad.
No le recomendamos que quite lacharola de evaporaci6n. Si
necesitara limpiarla, utilice una esponia para que absorba el
agua de [acharo[a de evaporaci6n. Limpie con agua tibia y
detergente o desinfectante.
Vue[va a co[ocarla teniendo cuidado de no apretar los
suietadores demasiado.
Conecte la unidad.
Charo[a de escurrimiento
o Para [impiar, sa'quela del panel del despachador y
separe las dos mitades de [a charo[a.
La've[a en agua tibia con un detergente suave.
S6quela y 8na[a de nuevo.
Vuelva a ponerla dentro del panel del despachador.
Page 77

Limpieza y cuidades de su refrigerade
Interior
Esimportante mantener el interior del rdrigerador y del congdador limpio para evitar que los
alimentos se contaminen durante el almacenamiento,
La cantidad y tipo de alimentos que guarde determinar_ lafrecuencia en que deber_ limpiado
@oideal es una vez cada 1 a 2 semanas).
Saque los estantes del gabinete y de la puert& Lave los estantes y los dep6sitos de almacenamiento
en agua tibia y detergente; enjuague en agua limpia y seque antes de volver a colocarlos,
Limpie las superficies interiores con agua tibia y detergente o bicarbonato de sodio disuelto en
agua tibia (a_iada 1cucharita de bicarbonato a cada 1/2qt (500 ml) de agua). Eniuague con agua
limpia.
Para sacar esos "olores a rancio" del refrigerador, aF_adaunas cuantas gotas de esencia de vainilh o
vinagre al agua antes de limpiar.
Limpie las superficies exteriores con agua tibia y detergente Utilke un cepillo de dientes para los
empaques magn6tkos de la pueR&
No utilke trapos o limpiadores agresivos, abrasivos, altamente perfumados, limpiadores con Notes
fuertes o sNventes en ninguna parte dd refrigerador o congeBdor.
Estante para bote[[as
Limpie[o con aguatibia y detergente Elusode limpiadores abrasivos o solventes pudiera
ocasionade daF_os.
Dispensador automatico de hie[o
No recomendamos que limpie los componentes del equipo de fabrkaci6n de hielo, pero si es
importante limpiar los dep6sitos de vez en cuando,
El dep6sito de almacenamiento deber_ limpiado reguBrmente y desechar el hielo viejo del rondo
del mismo_
Lave el dep6sito en agua tibia, seque bien y vu61valo a colocar.
Cuando vuelva a colocar el dep6sito, asegOrese que el cuchar6n quede a mano derecha (modelo
E522B exdusivamente) y al frente en el modelo RF210A,
Mu@os producto.s de I#npieza dLsponibles end mercado condenen solventes que pueden atacar
los componente.s pl4.sdco.s de su reffigerador y provocartes agrietamientO.So Esimportante utflJzar
s61o agua tibia y una pequeha doris de detergente liquido para trastes en cuatquier componente
pl4sdco dentro y fuera de su ref@eradoro Evite d uso de productos timpJadores anthbactedMes
en cuMquJer parte _nteHor o exterior dd gabinete, ye que pueden oxidar los componentes
met4flcos, y agrietar los pl4sdcos.
Page 78

Limpieza y cuidados de su efdge ado
Sistema de Control de Humedad
Cuando /Jmpie d estante ub£ado endma de ?os
dep6Mtos de verdura% le recomendamos que
no desarme d 5L_tema de Control de Humedad
de_estanteo
Encaso de que la tapa pBtica y los
adaptadores de control de humedad se
separen del estante de viddo, siga las
instrucciones a continuaci6n para volvedo a
armaR
Adaptadores de control de humedad
'I
2
Voltee el estante al rev6s
Para fijar los adaptadores de control de
humedad en los _ngulos deBnteros del
estante, coloque los clips del rondo en el ribete
deBntero del estante. Prosiga deslizando los
laterales hacia el estante, hasta que el brazo
encaje en el vidrio.
Para fiiar latapa de control de humedad - con
el texto viendo hacia usted -, alinee la tapa con
la pare delantera del estante. Ponga la tapa en
forma vertical y fije la pare deBntera dentro
del sujetador. AsegOrese que la tapa encaie
dentro del sujetador, asi como pot debaio de
los adaptadores de control de humedad.
4 En los costados del estante, ajuste las pesta_ias
de adaptadores de control de humedad para
que la tapa pbSstica quede entre el estante y las
pesta{_as,
5 Si hay clips en la parte trasera del estante,
su.jete B tapa con los clips traseros. AsegOrese
que la tapa quede totalmente fija en la pare
ddantera y trasera del estante.
Dibc;io 27 Limpieza del 5istema de Control de Humedad
Page 79

Limpieza y cuidados de su refdgerador
Para sacar [ascharolas o los dep6sitos fijos
Para un %all manejo, vacie pnmero los alimentos de [a
charo[a o dep6sito_
Sujete [a parte central delantera de la charola o
dep6sito.
Eleve vertka[mente para afioiar de las guias y iale la
charo[a o dep6sito hacia usted para sacar,
Presione ambas guias de nuevo dentro del refrigerador.
Dibujo 28 Quitar la charola
Para sacar [ascharo[as o los dep6sitos fijos:
Con [as guias ya dentro de[ rdrigerador, co[oque la charola o el dep6sito sobre 6stas. Meta
despacio la charola o el dep6sito hasta que sienta que queda fija sobre las guias.
Aseg4rese que las @arolas y los depdsitos queden bien fijos en tas gu[as antes de usafloso
Las guias de [os dep6sitos y la charola est4n predubricados y no set4 necesario volveflos a lubricar
durante su vida (_lo No trate de Iimpiade la grasa a tas gu[as ya que afectar4 su capaddad de
fundonamiento. No sumerja tas gu[as en agua.
Charo[as y dep6sitos fijos permanentemente (mode[o RF201Aexclusivamente)
Los dep6sitos del conge[ador y [as charoB de este modelo estAn @os permanentemente No
podr_n sacarse del compartimiento del congelador. Para limpiar, limpie simplemente con un
trapo suave y hOmedo.
Durante [asvacaciones o paseos
Apague el equipo para fabrkar hielo en el pane[ de interfase (remftase a la pa'gina 63).
Cierre e[ suministro de agua que va a[ refrigerador.
A su regreso, abra [a [[ave de[ suministro de agua de[ refrigerador.
Saque del dispensador 10 qt o 10 litros de agua y des6chela, con el fin de que el tanque se rellene
de agua fresca.
Encienda e[ equipo de fabricaci6n de hie[o (remftase a la p_igina 63).
Tire el primer dep6sito de cubitos de hielo.
Page 80

Sonidos del efdge ador
Sonidos normales de[ refdgerador
Los refrigeradores Active Smart _ con sus exce[entes capacidades nomina[es de energia y
rendimiento enfriador, pueden producir sonidos due son de alguna manera distintos a su
refrigerador anterior.
Los sonidos de funcionamiento normales incluyen:
S_n_d_ de _u]_ de a_rede[ vent_[ad_r. L_s refdgerad_res Ac_b_ 5mart _t_enen vent_[ad_res que
cambian de ve[ocidad dependiendo de [a demanda. Durante los pedodos de enfriamiento como
sucede despu6s de abnr [aspueRas con frecuencia, los venti[adores circu[an e[ aire fr[o en los
compartimientos del refrigerador y congelador, Io cual produce un determinado sonido de flu]o
de aire. Esto es muy normal.
Chasquidos o pequeflas explosiones due pudieran sonar como si el hielo estuviera saliendo del
evaporador. Esto ocurre cuando la funci6n de descongelaci6n est_Sen operaci6n.
Sonido de agua corriente. Se trata del Iiquido rddgerante en el sistema y puede oirse como el
ruido del agua al hervir o gorgotear.
Un siseo despu6s de cerrar la puerta del congelador. Esto sedebe a ladiferencia de presi6n entre
el aire caliente que ingresa al gabinete y se enfria de repente, y a la presi6n externa del aire.
Podr_ percibir otto tipo de ruidos extraflos debido a Io siguiente:
- El gabinete no estA nivelado
- El piso est_Sdesnivelado o no es muy firme
- El golpeteo entre botellas y ]arras en los estantes
Si este es su primer refrigerador con equipo para fabricar hielo, escucharg sonidos ocasionales que
podrgn parecer[e poco fami[iares, Son ruidos normales que produce el equipo para fabncar hielo y
por ningOn motivo son causa de a[arma.
Los siguientes sonidos son norma[es a[ operar un equipo de fabricaci6n de hielo:
- Operaci6n de[ motor (zumbido ba]o).
- Agua corriente cuando e[ equipo de fabricaci6n de hielo o el tanque de agua se Ilenan.
- La vg[vu[a de agua que se abre y se derra (siseo),
- El hie[o que se desprende de [acharo[a de los moldes de hielo (chasquido).
- El hielo al caer dentro del cai6n (sonido sordo).
Page 81

A macenar a imentos en su refrigerado
tames re, as
Co[oque [as carnes r@as frescas en un @at6n y sin apretar, cQbralas con papel encerado, de
a[uminio o plgsqco transparente.
Guarde [a carne cocinada y cruda en p[atones separados. Esto evkar_ que los iugos que
desprenda [a carne cruda contaminen a[ producto ya cocinado_
Los embutidos deber_n consumirse dentro del plazo de aknacenamiento recomendado.
....,%%
Ayes _,: },'3
kas ayes frescas y enteras deberg eniuagar[as por dentro y fuera con agua corriente de [a [[ave.
Seque y co[oque en un p[at6n, Cubra sin apr@ar con p[_s@:o transparente o pape[ de aluminio.
Guarde de manera similar las piezas de ayes, No rellene las aves enteras hasta antes de cocinarlas
ya que esto pudiera provocar intoxicaci6n,
Enfr} y refrigere lag aves cocinadas de inmediato. S_queles el relleno y gu_rdelas de manera
separada.
El pescado entero y los filetes deber_ consumirlos el d[a que los compr6. Hasta que sea necesario
refrigere en un @at6n cubie_o, sin apretar, con pb%tico transparente, papel encerado o de
aluminio.
Si los almacena de un dia para otto o durante mAs tiempo, tenga paRicuBr cuidado de seleccionar
pescado muy fresco. El pescado entero deber_ e@uagarlo en agua fria para quitarle las escamas
sueltas y la sudedad, y despu6s s6quelo a palmadkas con toalBs de pap& Guarde pescados
enteros o filetes en bolsas de pBtko selladas.
Mantenga los mariscos frios en todo momento. ConsQmalos entre 1 a 2 dias.
A[imentos precocidos y sobras
Deber_ guardar[os en recipientes adecuados con tapa para que los alimentos no sesequen.
Guarde s6[o de 1 a 2 d[as.
Recaliente Bs sobras sNo una vez y hasta que humeen de caliente.
Dep6sitos para frutas y verduras
Aunque la mayor[a de las frutas y verduras se conservan re@or a bajas temperaturas, tenga
cuidado de no almacenar los siguientes productos a temperaturas menores a los 47°F (7°C)
durante periodos prolongados: c[trkos, frutas, frutas tropkales, tomates y pepinos.
Ocurrir_n cambios indeseables a baias temperaturas como ablandamiento de la pid,
oscurecimiento, descomposki6n acelerada y/o p6rdida de sabot.
No refrigere aguacates (hasta que est6n maduros), pl_tanos, mangos o pepinos.
En la medida de Io posible, almacene frutas y verduras separadamente, es deck, frutas en un
dep6sito y las verduras en otto.
Cada dep6sito de frutas y verduras estA provisto de un adaptador de control de humedad que
puede aiustarse alas frutas y verduras dependiendo de Io que se almacene en los dep6sitos. Para
m_s informaci6n sobre el uso del Control de Humedad, remitase a la paigina 69.
Page 82

A macenar a imentos en su conge ader
El uso de temperaturas de O°F(-18°C) o m_s frias para a[macenar a[imentos significa que 6stos
pueden conservarse pot periodos m5s pro[ongados, que cuando se uti[izan temperaturas de
refrigeraci6n, Esto es debido a que [a reproducci6n de bacterias, moho y [evaduras se detiene y a
que se reducen fuertemente [as reacciones quimicas y fisicas a tales temperaturas bajas.
Cuidado de los a[imentos coHge[ados _
Para mejores resultados:
Elija Onicamente a[imentos de a[ta ca[idad que puedan conge[arse bien,
A[macene a d'F (-18°C) o rags fifo, Tenoa cuidado de mantener esta baja temperatura de a[macenaje, es
decir, evite abrir [a puerta de[ conge[ador [nnecesariamente. Siel helado se pone suave, su congelador
e£A funcionando atemperatura muy ca[iente,
Deje espac[o en [a superficie de los recipientes, jarras de vidrio o bo[sas de pbSstico que contengan
I[quidos o a[imentos semi- s6[idos. Estos se expanden a[ momento de congeBrse, Pot Io tanto, se
recomienda generalmente deiar 1pu[o, (20 - 50 ram) de espacio [ibre entre [atapa y e[ producto,
Cierre herm_tico. Lo rags recomendable es que saque todo el aire del paquete despu6s de congelar los
a[imentos.
Los paque]es o recipientes de alimentos s61idos deber_n quedar sin aire y selBdos firmemente antes
de congeBr[os,
Uti[ice [afunci6n Fast Freeze [conge[aci6n r_Spida] a[ conge[ar a[imentos frescos. Esto ayudar_ a
ace[erar e[ proceso de conge[aci6n con 6ptimos resu[tados. Se recomienda que active [a funci6n
2 horas aproximadamente antes de [o requerido. Para obtener mAs informaci6n, remftase a [a
p_glna 66.
Conge[e de inmediato o [o m_s pronto posib[e Conge[e s6[o peq ueflas cantidades de a[imentos a[
mismo tiempo, Para obtener mejores resu[tados, [e recomendamos que conge[e Onicamente 22 [b
(1 kg) de a[imentos pot 0.9 pies cuadrados (25 L) de vo[umen de a[macenamiento de conge[aci6n
al mismo tiempo. (Cerca de 7 [b (3 ko) en conge[adores pequeflos y 9 Ib (4 ko) en congeladores mAs
grandes), Paraconge[ar m_s r_pido en los mode[os Active 5m(£t _,recomendamos que meta los
a[imentos frescos en [a parte superior de[ compartimiento de[ conge[ador cerca de [a reji[[a de aire.
No api[e a[imentos conge[ados a[rededor de [atapa de[ venti[ador. Puede impedir [a [ibre circu[aci6n
de aire,
Desconoe[e los a[imentos de preferencia en e[ refrigerador o en un homo de microondas u homo
mu[tifuncionaL
Mantenga una rotaci6n constante de a[imentos. Uti[ice primero los a[imentos mAs vieios. No exceda los
tiempos de a[macenamiento recomendados,
Uti[ice empaques a prueba de conge[aci6n de buena ca[idad para mantener [aca[idad de los a[imentos.
Si mantiene los a[imentos cubiertos s6[o con pe[icu[a p[4_stica,p6nga[os dentro de una bo[sa pbistica a
prueba de conge[aci6n,
Tiempos recomendados de a[macenamiento en el congelador
No deber_ excederlos
:: 2 Pars,'_e[ado,sa[chkha,tartas(decameyfruta),mari cospreparados,pescadoconaeite
3 Pescado sin aceite, mariscos, pizza, bo[Jos y rro[[etes
4 Jam6n, paste[es, gal etas, came de res y c'_uletas de camero, piezas de aves
6 MantequiHa, verdura (bBnqueadas), '_uevos ente_os y yemas, cang_ejo coc do, came moida (cruda), came de puerco (cmda)
'12 Frutas (secas o en jarabe), tiaras de huevo, came de res (cmda), polio entero, camero (credo), pasteles de frutas
i
Page 83

A_macenar a_imentes en su cenge_ade_
fe.>_
/ c<W :
Came, ayes y anima[es de caza ,? ,
No k_tente conge[ar inks de 2.2 [b (1 kg) de carne [:)or 0.9 @es cuadrados (25 L) de vo[umen de
a[macenam[ento de congeBd6n a[ mismo tiempo. La came debera conge[ar[a r_ipidamente a fin
de mantener su textura.
No rellene las aves antes de congelarlas,
La came roja la puede cocinar directamente a partlr de su estado congelado, semi<ongelado o
totalmente descongelado. Recuerde dade un tiempo extra de cocci6n si cocina a partir del estado
congelado,
Descongele siempre las aves antes de cocinarBs.
Pescado ....< "¢ 1J¢
El meior pescado congeBdo es el comercial. Sin embargo, si desea congelarlo en casa, asegOrese
de que sea muy fresco y de aka calidaG
Limpie, retirele las escamas y d_elo de preferencia entero. Todo el pescado deber_ envolverse
en dos capas de empaque, ya que, dependiendo del tipo de pescado, 6ste puede contaminarse o
contaminar con olores y sabores r_pidamente Selle bien,
Para mejores resukados, cocine a partir de su estado congelado o semi-congelado.
Verduras ,'( ,, ,,,,,,,,,,,....
Lama,,or adelasverdorassecongdanb en,aonqoelasde'ensalada'p erdensofrescora.O ras:?
verduras (:o[ilo el apio, la (:ebolla y' los tomates deber_n utilizarse s61oen rtafillos (:ocinados y'a que iiiii
se aguadan a[ congelarse.
Conge[e sNo verduras de aka ca[idad, maduras y [istas para comer.
Clasifique y deseche las verduras que est6n makratadas.
Es necesario Manquear a [a mayoda de [as verduras crudas antes de conge[ar°
El blanqueado supone un codm[ento coRo durante el cua[ se destruyen [as enz[mas de [as
verduras, Si estas enzimas no se destruyen, provocan cambios indeseables de tipo fisko y qulmlco
durante su aimacenamiento en el congelador.
Las verduras pueden bianquearse en agua hirviendo, en vaporera u homo de microondas.
Si utiliza agua hirviendo, cu6zalas de 2 a 4 minutos y enfr[elas de inmediato.
Engeneral las verduras congeladas se cocinan meior a partir de su estado congelado.
A[imentos preparados y cocidos
La mayoria de los alimentos cocidos pueden congeBrse pero no se recomienda congeBr
Io siguiente:
CBras de huevo cocidas, cremas, natillas, rdlenos de crema y pudines de leche, gelatinas o pBtillos
que la contengan, mayonesa y aderezos para ensaBda simihres, coberturas de merengue. Estos
tienden a separarse al momento de la descongehci6n.
Elija fruta de alta calidad, madura y lista para comer. De preferencia sdeccione las variedades que
se recomiendan para congelar.
Evite [a fruta que no est6 madura y la que est# muy madura.
Dependiendo de c6mo se empaque, es el uso que se[e dar& La fruta en jarabe es ideal para los
postres, mientras que B fruta empacada sin az8car es mejor para cocinar. La mayoria de las frutas
pueden almacenarse de 8 hasta 12 meses.
Page 84

Reso uci6n de prob emas
Si tiene problemas con su electrodom#stico, favor de revisar los siguientes puntos antes de
ponerse en contacto con su Distribuidor Autorizado de[ Centro de Servicio de Ebctrodom6sticos
local o con su Centro de Atenci6n a Clientes Fisher & Payk&
La unidad no
fundona°
La luz no prende.
La [uz y [a pantaJJa
no fundonan°
El motor fundona
durante periodos
pro[ongadoso
Los
compardmientos
de aJmacenambnto
est_n muy caJienteso
Los aJimentos se
congeJan en eJ
refdgeradoro
Ruidos extra_oso
No hay electricidad en e[ Revise que [a clavUa est6 bien conectada y que
tomacor iente, haya suminBt o e[6cttico.
Ptuebe con otto decttodom6sdco en el mismo
tomaco_riente
Revise el fusible dom_stico.
Foco(s) fundido(s) Cambie [0(9 foco(s) (remitase a [a peSgina73),
El tefrigerador no funciona, Revise que el reftigerador est_ conectado a[
La unidad est_Sen Modo Sab4tico
[Sabbath Mode],
Tempo ca[utoso.
Aperturas f_ecuentes de puertas.
Se meti6 una gran cantidad de
at mentos rec entemente,
tomacorriente de payed
Si persiste d probJema, remitase a [a p&gina 88.
Remitase at Modo Sab4tico en [a p4gina 67
Minimice las aperturas de b puetta para
perm tit que la temperatura se estabil ce.
t............................................................................................................ i ......................................................................................................................................................................................
El control de temperatura esta Yea b secci6n de Control de Temperature
bs!o............... (P_'!!n_66).......................................................
Las pue_tas no se[bn bien. Revise que d gabinete est@ nivebdo y los
empaques [impios.
El ajuste de temperatura no es Yea b secc 6n de Control de Tempetatuta
correcto, (p_gina 66),
Apertura flecuente de puertas Procure abrit menos [a puetta para dejar que la
Se meti6 una gran cantidad de temperatu_a se estabi[ice.
aJimentos tecientemente.
El aiuste de tempetatu_a no es Yea b secci6n de Control de Tempetatura
correcto. (pSgina 66).
Los alimentos estgn puestos
directamente ffente a bs saJidas de
a_te.
El gabinete no estg estabIe o
El congeBdor est4 en proceso de
descongdaci6n.
Mueva los alimentos sensibbs a b
refdgeraci6n lejos de [a parte centraPtrasera
de los ent epaf_os
Vea b secci6n de Instabci6n (p_g has 56 a 57) o
temitase a Sonidos en la p_gina 78
Page 85

Reso uci6n de p ob emas
Hay agua en los
dep6sitos de
verdura°
Los costados de[
gabinete est_n
ca[ienteso
Hay un _rea ca[iente
en e[ empaque
central de [a puerta
Condensaci6n
formada fuera
de[ refrigerador/
congeladon
Condensad6n
dentro de[
compartimiento de
aHmentos frescos°
Formaci6n de
hielo dentro de[
compartimiento de[
conge[ador.
Sabot u olor en los
cubitos de hie[oo
Las manijas de
[a puerta est_n
desaHneadas.
La charo[a o
dep6s[to no des[iza
un[formemente
hada adentro o
hada afuera°
: Hubo condensaci6n provocada pot el
B
agua de la fruta y la verdura
Esto es normal.
Esto es normal.
No es taro durante periodos de a[ta
humedad.
Aperturas frecuentes o prolongadas
de [a puerta.
Una pequel_a cantidad de condensaci6n es
buena Data el aimacenaje de frutas y vetdutas.
Si hay mucha agua, guarde las frutas y
w_rdutas sin apretar en bo[sas de pl_stico.
Limpie e[ agua con un trapo.
Ajuste e[ adaptador de humedad en
la configuraci6n de baja humedad
Seque,
Procure abrir poco la puerta.
El empaque de [a puerta 9otea. Revise que el empaque quede piano y selle
firmemente,
No es taro durante periodos de a[ta Seque.
humedad.
La puerta del congelador no derta
firmemente.
Contaminaci6n cruzada de o[ores y
sabores de aIimentos con olor fuerte.
Mueva los art[culos hacia adentro de[
conge[ador pata que [a puerta cierre
fitmemente.
Revise y limpie e[ empaque de [a puerta.
Envudva o cubra los aJimentos de olor fuerte.
Con e[ tiempo y et uso pudiera haber Yea instructivo de InstaBci6n - Instructivo de
movimiento. Estabi[idad (p_ginas 56 a 57),
Empaques de alimentos atrapados Revise para asegurarse que no haya aIimentos
o empaques de 6stos atrapados detrgs de la
chatola o e[ dep6sito,
Las guias no estAn totalmente Sosteniendo los costados de la charoIa o
extendidas dep6sito, extienda [as guias tota[mente
mediante un ja[6n fitme, [o cua[ reajustar_ [a
Page 86

Resoluci6n de proMemas
E[ equipo para
fabrkar hie[o hate
ruidos extraF_os o
parece muy ruidoso°
EI equipo autom_tico
para fabdcar hielo no
funciona°
Operac[6n dd equipo para fabdca_ fiemitase a sonidos de[ _efdgerador
hielo normal. (p_g[na 78).
El equipo para fabricar hie[o no se ha Encienda el equipo de fabricaci6n de hkAo
encendido. (rem[tase a [a p_g[na 63).
El caj6n est4 real puesto o no hay Coloque e[ dep6sito de manera que d
cucha_6n quede del lado derecho.
El dep6s[to del hie[o se encuentra
directamente bajo el equipo para fabdcar
hie[o en la parte izquie_da dd conge[ador,
Sum[nistro cerrado de agua, o sin Conectar el sum[nistro de agua,
COf]ectaL
El compart[miento del congelador no P6ngase en contacto con Atenc 6n a C[ientes.
func[ona.
Vedficar Ia pres[6n del agua.
La I[nea de agua enroscada o ap[astada. Verifique que [a [[nea de agua no est6
enroscada o aplastada,
F[Itro tapado, El fi[tro de agua pudie_a necesitar _epuesto,
Los paquetes sin se/ar pud[eran estar Los hielitos v[ejos neces[tan desecharse,
transm t[endo olores o sabores Aseg@ese de que los paquetes de aIimentos
est6n se/ados,
E[ [nterio_ del congelado[ neces[ta El cai6n del h[do necesita vaciarse y lavarse,
I[mpieza, Limpiar refdgerador ( em[tase a las pgginas
Los cubitos de hielo
tienen olor y/o sabot
CongeIamiento lento
de los hielitos.
Hielo hQmedo o
pegados en masa°
Mar sabot del agua entrante, Puede set que el filtro necesite cambiarse.
Tal vez tenga que instalar un nuevo
filtro,
i Impulse 2 - 3 vok:aduras de chardas de hido
(remitase a [a p_gina 63).
La puerta pudo haberse quedado Cierre la puerta.
entreabierta.
Compartimiento del conge[ador muy Ponga a temperatura m_s ilia (remitase a la
ca[iente, p_g[na 66),
Baja pres[6n de agua, Vedficar a presi6n de[ agua
Fitro tapado
71 - 72)
Abe turas de la puerta del congelador D6 unos golpeteos suaves con e[ cuchar6n
largo, para despegar los cuaddtos de hie[o, o s[ est_n
Temperatura de ambiente alta. pegados en masa, vade eJdep6sito y fabr que
hido nuevo.
El dep6sito deJ hielo permaneci6 fuera
de[ compartimiento de[ congelado_
du_ante mucho tiempo,
E[ hido se pega peri6dicamente,
Page 87

Reso uci6n de p ob emas
Hay un _rea caliente en
el empaque central de
[a puerta.
Podr4 sentr un Jugar caJiente de
vez en cuando en el empaque
central, entre ambas puertas del
refrigerador
i El refdgerador no ha sido udlizado
durante un periodo prdongado de
Elagua tiene real sabot
y oJoro
El dispensador de agua
no fundonao
El agua de[ primer vaso
sale calienteo
{
Suministro cerrado de agua, o sin
conectar.
Esto es totalmente normal yes parte de[
funcionamiento normal del refdgerador.
Saque 10qt o 10 [itros de agua de[
dispensador para que se vudva a [lenar de
agua fresca.
AMa el agua,
Pres one e[ despachador durante 1 minuto
para saca_ e[ aire atrapado de [a [inea de
agua y para Henar el s sterna de agua
La Fnea de suministros pudiera estar Verifique que e[ suministro no est# enroscado
b[oqueada, o tenga fugas
Du_ante [a pdme_a instaIaci6n Para sacar e[ ake, deie fIuir un [it_o o un
pudiera haber quedado aie cuarto (qt) de agua a t_av6s de[ dispensador.
El filtro pudiera estar tapado y Cambie el fiItro (vea la parte de atre_s de
neces ta cambio, este fol[eto para m_s informaci6n sobre
c6mo pone_se en contacto con Atenc 6n a
Clientes) .....................................................
E b oqueo de d spensador est_
P_es one e boton _ durante 2 segundos
activado.
El agua est_ congdada en el tanque Inc_emente Jatemperatura a una
configuraci6n m_s tibia dentro dd
compart miento de los aIimentos frescos y el
congdadon
El dispensador de agua no se ha Deseche e[ primer vaso de agua que sirva
del despachador
La [uz de advertencia
de[ fi[tro @ parpadeao
El goteo rebosa el
estante de goteoo
E[ nivel del flujo de
agua ba]6°
La capacidad de[ tanque se uti iz6 D61e tiempo a[ agua para que se enfrie
:Elf lt onece tacamb a e Sostto;,ael Iorn sprontopos ble(,,ea
i p4gir_as 71 - 72).
Aire atrapado en el tanque. Deie fluir 3 qt o3 Jitros de agua a trave's del
dispensador, parando rite mitentemente,
: Nuevo fi[t_o insta[ado, Deje fluir 3 qt o 3 [itros de aguaa trav6s dd
fikro y despu6s 3 qt o 3 litros a trav6s dd
dispensadon
El cartucho deJ filt_o estg limitado. Sustituya eJfilt_o Jo m4s pronto posibJe
: (remitase a Jasp4ginas 71 - 72).
Page 88

6arant[a [m[tada
Cuando usted adquiere cualquier producto electrodom6stico nuevo Fisher & Paykd para
uso personal o dom6stico, usted recibe automAticamente una garant[a limitada vAlida por
un afro que cubre partes y mano de obra para reparaciones dentro de los 48 Estados Unidos
continentales, Hawai, Washington D.C. y CanadA. En Alaska, la garant[a limitada es la misma
excepto que usted debe pagar para enviar el producto al servicio t6cnico, o pagar el viaje del
t6cnico de reparaciones a su casa. Los productos, para ser utilizados en CanadA, deben set
adquiridos a trav6s del canal de distribuci6n canadiense para asegurar el cumplimiento de
las normas.
Si el producto se instala en un veh[culo motorizado, bote o instalaci6n m6vil similar, usted
recibe la misma garant[a limitada pot un afro, pero debe hacerse cargo, de su propio peculio, de
Ilevar el veh[culo, bote o instahci6n m6vil que contiene el producto al servicio t6cnico, o pagar
el viaje dd t6cnico de reparaciones hasta el lugar donde se encuentre el producto.
Usted recibe una Garant[a Limitada adicional pot cuatro a_ios (por un total de cinco aflos) que
cubre partes y mano de obra para el sistema sellado de refrigeraci6n (compresor, evaporador,
condensador, secador de filtro y tuber[a de conexi6n) dentro de los 48 Estados Unidos
continentales, Hawai, Washington D.C. y CanadA. En Alaska, la Garant[a Limitada para el sistema
sellado de refrigeraci6n es la misma excepto que usted deberA pagar el env[o del producto al
taller o el viaie del t6cnico a su casa.
Fisher & Paykel se compromete a:
Reparar sin costo para el dueF_o, tanto en materiales como mano de obra, cualquier parte
del producto que est6 defectuosa, y cuyo nOmero de serie aparece en el mismo. En Alaska,
usted debe pagar por el env[o del producto al servicio t6cnico, o pagar el viaje del t6cnico de
reparaciones a su casa. Si el producto se instala en un veh[culo motorizado, bote o instalaci6n
m6vil similar, usted debe hacerse cargo de Ilevarlo al servicio t6cnico, de su propio peculio, o
pagar el viaje del t6cnico de reparaciones hasta el lugar donde estA el producto. Si no podemos
reparar una parte defectuosa del producto despu6s de una cantidad razonable de intentos,
podemos reemplazar la parte o el producto, o podemos devolverle la totalidad del precio de
compra del producto (sin induir costos de instahci6n u otros costos) a nuestra total discreci6n.
Esta garant[a es vAlida para el comprador original, as[ como para cualquier dueF_o subsecuente
del producto, para productos adquiridos para uso dom6stico normal de una sob familia.
Cualquier servicio en los t6rminos de esta garant[a limitada Io deberA proporcionar
Fisher & Paykel o su Agente de Servicio ]_cnico Autorizado, durante el horario comercial normal.
_Cu8nto dura esta garant[a I[mitada?
Nuestra responsabilidad en los t6rminos de esta garant[a limitada caduca al A/_{_Oposterior a la
fecha de compra del producto por el primer consumidor.
Nuestra responsabilidad en los t6rminos de cualquier garant[a impl[cita, incluyendo la garant[a
impl[cita de comerciabilidad (una garant[a no escrita de que el producto es adecuado para uso
normal) tambi6n caduca al AI(_O(o per[odo de duraci6n mAs largo tal como sea requerido pot
la ley vigente) a partir de la fecha de compra del producto pot el primer consumidor. Algunos
estados no permiten limitaciones acerca de cuAnto tiempo dura una garant[a impl[cita, as[ que
este I[mite sobre las garant[as impl[citas pudiera no aplicarse a usted.
Page 89

6arantia imitada
Esta garantia no cubre:
A Visitas del servicio t#cnko que no estAn relacionadas con defectos en el producto.
Se le cobrar_ el costo del servkio t6cnko si no se encuentra que el proNema sea un defecto del
producto. Por ejemplo:
1. Corregir una instalaci6n defectuosa dd producto.
2. EnseF_arle a utilizar el producto.
3. Cambiar fusiNes de la casa, resetear disyuntores de circuitos, corregir el caNeado o
@omeria de la casa, o cambiar focos.
4. Corregir fallas ocasionadas por el usuario.
5. Cambiar la configuraci6n del producto.
6. Modifkaciones no autorizadas del producto.
7. Ruidos o vibraci6n que se consideran normales, pot ejemplo, sonidos de drenaje o ventihdor,
ruidos de rdrigeraci6n o pitidos de advertencia al usuado.
8. Correcci6n de da_ios ocasionados por pBgas, p. ej., ratas, cucarachas, etc.
B Fallas ocasionadas pot factores que no sean:
1. Uso dom6stico normal o
2. Uso de acuerdo con la Gu[a del Usuario del producto.
@
C Fallas del producto ocasionadas por accidente, negligencia, real uso, fuego, inundaciones o por
causas de fuerza mayor.
D El costo de hs reparaciones Ibvadas a cabo por t6cnicos no autodzados, o el costo de corregir .....................................................
tales reparaciones no autorizadas.
E Gastos de viaje y otros gastos relacionados, cuando se instale el producto en una zona de
acceso limitado o restringido (es decir, vudos de aviones, tarifas de ferry, _reas geogr_ficas
aitadas).
F Mantenimiento normal recomendado segOn se estaNece en la Guia del Usuario del producto.
6 Reemplazo del fikro excepto en el caso de partes defectuosas o materiales dentro del cartucho
del fikro.
Este producto fue diseF_ado para su uso en un entorno normal dom6stico. No est_Sprevisto para
uso comercial. El hacerlo puede afectar la garantia del producto.
Si tiene un proNema de instaBci6n, favor de ponerse en contacto con su proveedor o t6cnico.
Usted es responsable de que existan las conexiones el6ctricas, de escape y otras instaBciones
de conexi6n adecuadas.
No nos hacemos responsables por da_ios consecuenciales o fortuitos (el costo de reparaci6n o
sustituci6n de cualquier otto daF_oa la propiedad en caso de que el producto est6 defectuoso, o
cualquier otto gasto en que usted haya incurrido en caso de que el producto est6 defectuoso).
Algunos estados no permiten la exdusi6n o limitaci6n de daF_osfortuitos o consecuenciabs,
por Io que la limitaci6n o exdusi6n arriba descrita pudiera no ser aplicabb en su caso.
Page 90

6a a st[a [m[tada
C6mo obtener servicio t_cnico
Pot favor lea su Gu[a del Usuario. Si tuviera alguna pregunta acerca de c6mo operar el producto,
si necesita el hombre de su THcnico local de Servicio THcnico Autorizado pot Fisher & Paykd,
o siente que e[ producto est_ defectuoso y necesita algOn servicio en los t@minos de esta
garant[a limitada, favor de ponerse en contacto con su concesionario, o Ibimenos sin costo ak
EEoUUo
LLAMADA SIN COSTO 1o888o9oFNPoUSA(1°888°936°7872)
o cont_ctenos a trav6s de nuestro sitio en [r/ternet www.fisherpaykd.com
Canad_
LLAMADA SIN COSTO 1oS88o9oFNPoUSA(1o888o936o7872)
o cont_ctenos a trav#s de nuestro sitio en [nternet: www.fisherpaykd.ca
Pudi@amos solicitarle el presentar una prueba razonable de [a fecha de compra de[ producto,
antes de proporcionarle el servicio que solicite, en los t6rminos de esta garant[a limitada.
Ninguna otra garanda
Esta garant[a limitada constituye e[ acuerdo total y exdusivo entre usted y Fisher & Paykd
en rehci6n a cualquier defecto en el producto. Ninguno de nuestros empleados (o nuestros
Agentes de Servicio Tecnico Autorizados) est4n autorizados para anexar daOsuhs o hater
modificaciones a esta garant[a limitada.
Garante: Fisher & Paykd Appliances, Inc.
Si necesita m_s informaci6n en reBci6n con esta garant[a limitada, favor de Ihmarnos al
nOmero teIefOnico descrito mAs arriba, o escr[banos a:
Fisher & Paykd Appliances, [nc
5900 Skylab Road
Huntington Beach
CA 92647
Esta garant[a [imitada le otorga derechos [ega[es espec[ficos, y usted puede contar tambi6n con
otros derechos que var[an de estado a estado.
Page 91

Table des mati res
_ntroduction
S_curit_ et raises en garde
_nstructions dqnstaHation
Avant d_utiliser votre r_frig_rateur ke & Water
A propos de I_afficha9e
Uti[isation de votre distributeur d'eau
Utilisation de votre appareil _ 9[a_ons
UtHisation des options d_affichage
Fonction Bottle Chll (refro d ssement de bouteHle)
Fonction Fast Freeze (cong_4at on rapide)
V_erf cat on de a tempd_ratu_ede votre rd_frig_;_ateu_et de votre cong_%teu_
Fonctions sp_ciales du r_frig_rateur Active Smarff _'
FiRre _ eau
Entretien de votre r_frig_rateur Active Smarff _'
Nettoyage et entretien de votre r_frig_rateur
Pendantlesvacancesetlescong_s
Sons_mis par ler_frig_rateur
Conservation desaliments dans votre r_frig_rateur
Conservation desaliments dans votre cong_lateur
Garantie limit_e
Donn_es de rendement du filtre
90
91
93
103
104
106
107
109
109
110
110
111
112
113
115
117
118
121
122
123
124
126
130
133
Page 92

Nous vous remercions d'avoir achet6 un rdrig@ateur Active Smart T'_de Fisher & Paykd pourvu
d'un distdbuteur a gB_ons et d'eau froide int6gr6 a B pore.
Chez Fisher & Paykel, nous sommes tr6s tiers de ce r#frig@ateur. Nous pensons avoir trouv6 la
bonne fagon d'installer un distributeur d'eau int6gr6 a la porte sans compromettre I'espace de
rangement ni Facc6s au r6frig@ateur. Pendant nos essais, nous avons pu appr6cier la facilit6 avec
laquelle on peut avoir acc6s a de Feau froide, bonne pour la sant6, tout en minimisant le nombre
d'ouveRure de la pore.
Des milliers d'heures d'exp@ience en conservation des aliments et une expertise de 70 ann6es
de recherche sur les r6frig@ateurs ont 6t6 incorpor6es a votre r6frig@ateur, cela afin que vous
puissiez pleinement profiter d'un produit haute performance.
Nous esp@ons que vous appr6cierez votre nouveau r6frig@ateur.
Fig, 1R_£dgdmteurs Ice & Water
fl est important de consenter ce guide de Yutfl_sateur avec votre r#fdg#rateur £e & Water a dtre
de r#f@ence u#dfieureo 5i votre @parch est vendu ou cdd## un autre propfidtaire, veuiflez vous
assurer de laisser le guide de Yutflisateur avec le rdfig#rateUro AJn.d,le nouveau propfi#ta#e
pourra consu#er tes renseignements et tes raises en garde inclus dans teguide.
Page 93

S6cuHt6 et raises en garde
Risque de choc 6bctrique
Lisez et observez _es CONSIGNES DE SECURITE ET LES MISES EN GARDE
contenues darts ce guide de ['utilisateur avant d'utHiser cot appareiL
Le d6faut de se conformer _ ces instructions peut causer [a mort, un
choc _[ectrique, un incendie ou des b[essureso
Utilisez uniquement ce r6frig6rateur aux fins pour lesquelles il a 6t6 congu, comme le stipule le
pr6sent guide de Futilisateur.
Cons@nes de s cuHt fmportantes
Mise en garde
Lots @ I'utffisadon @ cet appare£ observez to@uts des pt@caudons @ bas6 notamment :
o Cetappare#n'apas4t_congupour_treut#is4pardejeuneseMantsnipardespersonnes
band£ap@s sans aide° <ette precaution est d'autant plus importante si votte r&fdg4rateur est
pourvu d'un cong&lateut_titOito Lesjeunes enfants doh,ent %tie supetvis%s afin de s'assuret qu'iIs ne
jouent pas avec FappareK
Les enfants fisquent de s'enfetmet dans M tdr@_tateuto Avant de mettte au rebut votte anden
t_ffig_rc_teur ou votte anden cong&Mteur :
- Redrez le._portes
- Laissez Ms taMettes en pMce afin d'4viter que Ms enfants puissent facffement y p_n_trero
Mise au rebut
Afin d_vite_ Ms dangets_ v_us devez %tte v@iIant lots de M mjse au tebut de v_t_e anden appateiL
Le t@uMe ft@ong@e &£t _tre tedt_ de fagon s4cutitaite, et le._portes doivent _tte tedt@s pour
assurer la s%curit_ des ]eunes enfantso
Le centre de setv£e autoHs% FLsher& Paykd de votte t%g_on est en mesute de vous consent;or sut
des m_thodes pour mettre au rebut votre ancfen tdr@_tateur ou votte anden cong_Mteut pour
quq_s soMnt sans danger pour Yemdtonnemento
Syst_me _lectrique
Cet appare# dolt %tre#_staff_ conform_ment aux _nstrucdons d'_nstaffadon avant de pouvo;t _tte
udf_S4o
Ne d#branchez jama_s votre tdr@#rateur ou votre cong#Mteur en t#ant sut _ecordon
d"af_menmdono
Sa_s;sseztoujouts _apt;se pour d4btanchet _ecordon de _aprise mutate.
Page 94

S6cu it6 et raises en 9arde
+ Ne branchez aucun autre appareil sur le re#me circuit que cdui de votre r#fgg#rateur ou de votre
cong#lateur, N'utifisez aucune raflonge ni aucun adaptateur pour brancher votre appareiL
+ R#parez ou rempfacez imm#diatement tous tes cordons d'afimentation s'ils sont #railt#s ou
endommag6s, N'utifisez pas un cordon d'afimentadon pr#sentant des craqudures ou des traces
d'abrasion bun endro# qudconque sur te cOble.
5i le cordon d'afimentadon est endommag#, Hdolt #tre remplac# par un centre de service autoris#
FL_her & Paykd qui dispose des outHs sp#daux n#cessaires,
+ Lorsquevousd#gagezvotreappareHdumur, assurez-vousdenepasroulersurlecordon
d'afimentadonpour ne pas /'endommagero
+ O#branchez votre r#frig#rateur ou votre cong#tateur avant de nettoyer ou de remplocer t'ampou_e
int#rieure+
Conservation des aliments et des breuvages
+ N'entreposezjamaL_ de mad#res volatHes ou inflammables dana votre r#fgg#rateur ou votre
cong#tateur ; ces derniers pourraient exptosero
+ Ne congdez jamais de liquide dana des contenants en verre+ Les fiquides prennent de Ye×pansion
en gdan5 Msquant ainsi de provoquer I'exptosion du contenant+
+ Ne congdezjamaLs de boissons gazeuses, EHespeuvent exptosero
+ Ne consommezjamaL_ d'afiments trop goids, Les afimen% sords du cong#tateur peuvent #tre
suffisamment #oids pour causer des t#sions au contact de ta peau (p. ex. :cubes de gta_ons).
Panne d'_lectMdt_ - conservation des aliments
+ Necongetezpasdenouveaudesafimentsqu_ontend#rementd#conget#+Observezles
recommandadons d-dessous s_vous constatez que les ailments de votre cong#lateur ont
d#congd_ :
1)Ne conge[ez pas de nouveau des ailments qui ont end_rement d_conge[#,
2) Ailment d#congel#, maL_r##ig#rateur encore #oid- # n"est hab#ueHement pas recommand#
de congeler ces ailments de nouveau, Les gu#s et certa#_s M[men% cuits peuvent #tre congd#s
de nouveau, mais pour un taps de temps tr&_ court, I,qande, poisson et votaHte - consommez
imm#diatement ces Miments, ou faites4es cuire, puis congeiez4es de nouveau, L#gumes - mettez=
tea au rebut; ces M[ments seramoHissent et sont g#n#ratement d#tremp#s+
3) Ailments d#congel#s et temp#rature sup#Meure b 41 °F (5 °CL Jetez tousles afimentso
+ NecongelezpasdenouveaudesMimen%quiontend#rementd#conget#oCesM_mentspeuvent
#tre _mpr@res b la consommadono
De nombreux d#tergents offerts sur le march# condennent des soivants qui peuvent endommager
les composantes en p_asdque de votre r#fMg#rateur ou de votre cong#_ateur, et causer des
craqudures+ VeuH_ezconsu#er la section sur te nettoyage et _'entreden du pr#sent guide pour
obten# davantage de renseignements.
Page 95

nstructions d'insta ation
Contenu de 1'ensemble de filtre
1 Tuyau blanc de 6 mm (_/_po), de 4 m (13 pi) de long
2 1 tuyau bleu de 200 mm (8 po)
s 1 vanne de r6glage de pression
4 1 rubandoubleface
5 2 cl6s deverrouillage
6 1 cartouche de filtre a eau/t6te de filtre
7 1 raccord de robinet
4 5
Fig2 Ndcess_s,irede mccordement
II est tr_s important d'instMler ia vanne de r_glage de pression avant ie fi#reo La vanne de
r_glage de presdon emp_che I'eau de retourner vers te syst_me d'alimentadon principal
depuis ie syst_me d'Mimentadon en eau du r&frig_rateuro Si ia vanne de pression n' est pas
raccord_e au syst_me d'alLmentation pHndpal, la distribution d'eau et de gla_ons de votre
r&frTg&rateur Ice & Water peut ne pas foncdonner
II est recommand_ de faire appe/ _ un plombier qualifi_ de votre r_gion pour ce raccordemenL
Los nouveaux tuyaux Iivr_s avec le r_fro_rateur doivent _tre uti/L_s° Los anciens tuyaux utilis_s
pour los raccordements du r_frO_rateur Ice & Water ne doivent pas _tre utflis_s°
Precautions/raises en garde pour FinstM/adon
N'UTIUSEZ PAS de Yeau impropre _ la consommadon ou dont la qua/it_ est inconnue sans utiL_ser
un syst_me de d_sinfection en amont ou en avM du fi#re°
MISE EN GARDE,- raccordez los conduites _ un syst_me d'a/imentadon en eau potable
seulement.
NE RACCORDEZ PA5 ta conduite _ un syst_me d'Mimentation dent la pression est sup_rieure
130 psi (900 kPa) ou inf#fieure # 22 psi (150 kPa).
NE RAddORDEZ PAS cet appareil aux conduites d'eau chaude ( lOO°F [38°d max.])o
N'INSTALLEZ PAS cat apparei/ # proximit# de ills #lectriques ou de condu#es d'eau qui
Hsqueraient d'etre performs lots de Hnstalladon du syst_me de filtration°
INSTALLEZ/e filtre afin qu"i/ ne soit percut_ par aucun objet comma une poubeHe, un bac de
r4cup_radon, etc.
N'_NSTALLEZPAS/e fi#re _ un endroit expos_ directement aux rayons du sdeil ; /'exposition
pro/ong_e au soteil pout compromettre Hntdgdtd des composantes en plasdque.
N'INSTALLEZ PAS /"apparei/ _ un endroit soumis _ des tempdratures sous le point de
congdtadon pour dviter d"endommager le bolder.
NE WSSEZ pas /e filtre au rdfrig_rateur_
EWTEZ ta contamination des condu#es pendant P_nstallationo
N'UTIUSEZ PAS de tuyaux de cuivre° Los tuyaux de plasdque Iivr_s avec le r_frigdrateur doivent
toujours _tre ud/is_s°
Page 96

nstructions d'insta ation
'I
2
Sch6ma l
Fig.3 Raccordement
d_*.la vanne de
rdglage de pression
contactez un plombier certifi6 pour qu'il effectue le raccord_
s Raccordez le tuyau bleu de 200 mm (8 po) _ la sortie de la vanne
de r6glage de pression (collier de serrage bleu) et au raccord
d'entr6e du bottler de filtre _ eau, comme le montre le sch6ma 1.
Tirez 16g@ement sur les deux extr6mit6s pour vous assurer que
le tuyau est fix6 solidement.
4 Raccordez le tuyau blanc de 6 mm (1/€po) _ la sortie du boltier
de filtre _ eau, comme le montre le sch6ma Z Tirez 16g@ement
sur le tuyau pour vous assurer qu'il est fix6 solidement.
s Mesurez la Iongueur totale de tuyau depuis la vanne de r6glage
de pression jusqu'au point de raccordement du syst_me
d'alimentation en eau.
6 Coupez le tuyau en vous assurant que les extr6mit6s sont d roites
et propres.
7 Raccordez le tuyau au raccord de robinet eta la base de la vanne
de r6glage de pression (collier de serrage blanc), pub au robinet,
comme le montre le sch6ma 3. Veuillez noter que le raccord
de robinet compns dans I'ensemble convient _'sla plupart des
installations. Si votre robinet exige Futilisation d'un raccord
diff@ent, veuillez faire appel a un plombier qualifi6 de votre
r6gion pour obtenir un raccord qui convienL
s Ins6rez une cl6 de verrouillage a chaque extr6mit6 du boitier
de filtre a eau entre lefiltre et le collier de serrage, comme le
montre le sch6ma 4.
9 Pour purger lefiltre _ eau et v@ifier la pr6sence de fuites,
placez Fextr6mit6 du tuyau dans un seau, ouvrez le robinet
d'isolement, puis laissez au moins 3 litres d'eau s'6couler. Apr_s
la v@ification, fermez le robinet d'isolemenL
'I0 Rep@ez Fendroit oQ vous souhaitez installer le filtre _ eau en
observant les points suivants :
II est recommand6 de raccorder le filtre _ eau verticalement,
avec la t6te de filtrage au sommeL CeB minimisera les fuites
d'eau Iorsque vous effectuerez le remplacement de la cartouche.
Assurez-vous d'installer le filtre dans un emplacement
accessible, afin de pouvoir le remplacer a tous les 6 mois.
Nous sugg@ons de Finstaller iuste a c6t6 du robinet
de I'approvisionnement en eau, dans Farmoire a c6t6 du
r6frig@ateu r.
Un d@jagement d'au moins 64 mm (2 V2po) sous le boltier
de filtre est n6cessaire afin de pouvoir rempBcer le filtre.
Ne vissez pas le filtre a eau au r6frig@ateur,
Sch6ma 2
Fig.4 Raccor@ment
de lacc, nduit_*,d'eou
au rdffigdmteur
SchemaS
Fi?,FRaccordem_¢ntdu robinet
Schema4
Fig.dCIgdevermuillage
Page 97

Page 98

nstructions d'insta ation
22 Laissez 3 litres d'eau s'6couler, en art@ant le d6bit a intermittence, afin de vous assurer que
le r6servoir a 6t6 enti6rement vidang6. Le ddaut de se conformer a cette recommandation
entrafnera 1'6gouttement excessif de votre distdbuteur.
2S Appuyez sur _ jusqu'_ ce que le menu GBce (Ice) soit en surbrillance, puis appuyez sur _ pour
mettre Fappareil a gla_ons en marche. Appuyez sur les touches g _ _ simultan6ment pour
forcer le cycle de fonctionnement. Le plateau _ gla_ons se retourne. Effectuez un autre cycle. Le
plateau a gla{ons se retourne, puis Feau se d6verse dans le compartiment a gB_ons. Videz Feau
et remettez le compartiment en place.
24 Vous pouvez maintenant profiter de I'eau et des gla_ons de votre r6frig@ateur Active Smart _,
Veuillez noter qu'apr6s Finstallation, quelques gouttes peuvent s'6couler du distdbuteur dans les
quelques jours suivants, au fur et _amesure que Fair emprisonn6 est 6vacu6.
Fig.9 Raccordement au 9/st#_me d'afimenrafion en eau
Schema l 2
Syst6me tests et certifi6 par la NSF International en vertu de la norme NSF/ANS153 portant sur
la r6duction de I'amiante, de I'atrazine, du benz6ne, des spores, du carbofurane, du plomb, du
lindane, du mercure, du para-dichlorobenz6ne, du toxaph6ne et de la turbidit6; et en vertu de la
norme NSF/ANS142 portant sur la r6duction du goOt et de I'odeur du chlore et des particules de
grosseurs nominales de cat6gorie I a 2 838 litres (750 gallons).
Page 99

iiiiillliiiiil,I, _ ____@_'I' li_i_liiii_lili_lili_lili_lii_li_li_iii,i_i_li_iliiii_lili_lili_lili_lili_lili_lili_lili_lii_ll_iliiii_li_i_lili_liii:iiiiiliill¸ lili_II_I_li__i_iiiiii_lili_lili_lili_lili_lili_lili_lii_i_ll__i_liiii_i_lii_li_ll_!iiiiiiiil¸iliiiiiiii!_il
_nstructions d'insta_ation
I I!
!
/
!
[ choc _ectrique, un incendie ou des Messureso
VeuiIlez observer les 6tapes de I'instalhtion afin d'assurer le bon fonctionnement de votre i
appar_l.
1oA limentation
o Uappar_ildoit_tr_install6_pro×imit__'un_pris_a_tri_u_.
Afin de s'assurer que ['apparei[ n'est pas d6branch6 par erreur, branchez [e r6frig6rateur ou [e
conf_aateur_sapropreprisedecourant.Nebranchezpasunautreappareil_lam_eprise
d'aIimentation et n'utiIisez aucun adaptateur double ni aucune raIIonge, car le poids des deux
cordons dectriques risquerait de d@:)rancher I'adaptateur double de [a prise muraIe.
sur la pattie avant inf@rieure droite du r6frig6rateur Iorsque la porte est ouverte.
11est imp6ratif que I'appareil soit correctement misa la terre.
2oEmplacement
Votre r6frig6rateur ou congdateur ne doit pas 6tre expos6 directement aux rayons du soleil ni
proximit6 d'un appareil g6n6rant de la chabur comme une cuisini6re, un four ou un lave--vaissdb.
Page 100

_nstructions d'insta_ation
E522B
[/
IZT,
i.... Ni
i
iiiii
ijM
Bgti du r_fr g@ateur affleurant
- Ouverture comp[@e de [a porte
II
i -IJ,- dab
Au m6me niveau que [a porte du r6fr 96rateur -
rotation de [a porte de 90 ° (pour ut_ acces total au trot
et g [a tablette, la porte doit @re ouverte _ plus de 90 °)
-IJi-i , i -IKb
i _ !!................................i
iE'Fiii_, _i
Porte du r6fdg@ateu aff[eurante
- Ouverture complete de la porte
i ]
i i , ,
[ [
RF201A
_I • Ei
Bgt du r_frig@ateur aff[eurant
- Ouverture complete de la porte
IZT]
_f
i
i[M
Au m_me niveau que la porte du r6frig@ateur -
rotation de la porte de 90 ° (pour un acc6s total au tiroir
et _ a tablette, la porte doit {!tre ouverte _ plus de 90 °)
Porte du r6fdg@ateur affleurante
- Ouverture compl6te de la porte
 Loading...