

Page 1

Wireless Bluetooth
USB Dongle
User’s Guide
1
Page 2

Table of Content
CHAPTER 1 INTRODUCTION.................................................................................................. 5
INTRODUCTION TO BLUETOOTH...................................................................................... 5
INTRODUCTION TO THE WIRELESS BLUETOOTH USB DONGLE................................. 5
CHAPTER 2 CONTENTS OF PACKAGE................................................................................. 7
CHAPTER 3 INSTALLING BLUETOOTH SOFTWARE........................................................... 8
3.1 U
NINSTALLING PREVIOUS VERSION OF BLUETOOTH SOFTWARE............................................. 8
3.2 INSTALLING THE BLUETOOTH SOFTWARE (FIRST-TIME INSTALLATION) .................................. 10
3.3 STAR T USING BLUETOOTH ............................................................................................... 15
CHAPTER 4 SETUP DIAGNOSTICS................................................................................. 19
4.1 H
ARDWARE DIAGRAM ...................................................................................................... 19
4.2 VERIFYING HARDWARE AND SOFTWARE INSTALLATION ...................................................... 19
CHAPTER 5 INTRODUCTION TO BLUETOOTH SOFTWARE............................................. 21
5.1 INTRODUCTION TO BLUETOOTH SOFTWARE........................................................ 21
5.2 BLUETOOTH DEVICE IDENTITY ................................................................................ 22
5.3 BLUETOOTH TRAY ...................................................................................................... 22
5.4 ACCESS MY BLUETOOTH PLACES........................................................................... 23
5.5 ICONS USED FOR BLUETOOTH DEVICES AND SERVICES.................................... 23
CHAPTER 6 BASIC OPERATIONS ....................................................................................... 28
6.1 START OR STOP BLUETOOTH................................................................................... 28
6.2 CREATE A CONNECTION FROM THE BLUETOOTH ICON IN THE SYSTEM TRAY 28
6.3 CREATE A CONNECTION USING THE BLUETOOTH SETUP WIZARD.................... 29
6.4 CREATE A CONNECTION FROM BLUETOOTH EXPLORER .................................... 30
6.5 FIND BLUETOOTH DEVICES ...................................................................................... 32
6.5.1 Periodic Search for Devices .................................................................................. 32
6.6 FIND A SERVICE .......................................................................................................... 33
6.7 BLUETOOTH CONNECTION STATUS ........................................................................ 35
6.8 SEND TO BLUETOOTH ............................................................................................... 37
6.9 PAIRING BLUETOOTH DEVICES AND ACCESS THE INTERNET ............................ 38
CHAPTER 7 CONFIGURATION PANEL ............................................................................... 43
7.1 ACCESS THE BLUETOOTH CONFIGURATION PANEL............................................. 43
7.2 GENERAL CONFIGURATION SETTINGS................................................................... 44
7.3 ACCESSIBILITY SETTINGS......................................................................................... 45
2
Page 3

7.4 DISCOVERY SETTINGS .............................................................................................. 48
7.5 BLUETOOTH LOCAL SERVICES ................................................................................ 50
7.5.1 Audio Gateway....................................................................................................... 51
7.5.2 Bluetooth Serial Port.............................................................................................. 52
7.5.3 Dial-up Networking Service ................................................................................... 53
7.5.4 Fax Service............................................................................................................ 54
7.5.5 File Transfer Service.............................................................................................. 55
7.5.6 Headset Service..................................................................................................... 57
7.5.7 Network Access..................................................................................................... 58
7.5.8 PIM Item Transfer.................................................................................................. 64
7.5.9 PIM Synchronization.............................................................................................. 67
7.5.10 NOTIFICATION.................................................................................................... 69
7.6 BLUETOOTH CLIENT APPLICATIONS
7.6.1 Audio Gateway....................................................................................................... 72
7.6.2 Bluetooth Serial Port.............................................................................................. 73
7.6.3 Dial-up Networking................................................................................................. 75
7.6.4 Fax.........................................................................................................................76
7.6.5 Headset.................................................................................................................. 77
7.6.6 File Transfer........................................................................................................... 79
7.6.7 Network Access..................................................................................................... 81
7.6.8 PIM Synchronization.............................................................................................. 82
7.6.9 PIM Item Transfer.................................................................................................. 84
7.6.10 Printer ..................................................................................................................86
7.7 HARDWARE SETTINGS .............................................................................................. 88
CHAPTER 8 SECURITY .................................................................................................... 91
8.1 AUTHENTICATION ....................................................................................................... 91
8.2 AUTHORIZATION ......................................................................................................... 91
8.3 ENCRYPTION............................................................................................................... 91
OVERVIEW................................................... 71
8.4 LINK KEY ...................................................................................................................... 91
8.5 PAIRING DEVICES ....................................................................................................... 91
8.6 PASSKEY ...................................................................................................................... 94
8.7 SECURE CONNECTION .............................................................................................. 94
8.8 SECURITY REQUEST DIALOG BOX .......................................................................... 94
CHAPTER 9 ............................................................................................................................ 95
TROUBLESHOOTING ............................................................................................................ 95
3
Page 4

FCC Statement
This device complies with Part 15 of the FCC Rules.
Operation is subject to the following two conditions:
(1) this device may not cause harmful interference, and (2) this device must accept any
interference received, including interference that may cause undesired operation.
This equipment has been tested and found to comply with the limits for a Class B digital device,
pursuant to part 15 of the FCC Rules. These limits are designed to provide reasonable
protection against harmful interference in a residential Installation. This equipment generates,
uses and can radiate radio frequency energy and, if not installed and used in accordance with
the instructions, may cause harmful interference to radio communications. However, there is
no guarantee that interference will not occur in a particular installation. If this equipment does
cause harmful interference to radio or television reception, which can be determined by turning
the equipment off and on, the user is encouraged to try to correct the interference by one or
more of the following measures:
-Reorient or relocate the receiving antenna.
-Increase the separation between the equipment and receiver.
-Connect the equipment into an outlet on a circuit different from that to which the receiver is
connected.
-Consult the dealer or an experienced radio/ TV technician for help.
Changes or modifications not expressly approved by the party responsible for
compliance could void the user's authority to operate the equipment.
1) This transmitter must not be co-located or operating in conjunction with any other antenna
or transmitter.
Licensed Software
Bluetooth for Windows (BTW) is the licensed software owned by Widcomm,Inc.
Trademark(s) ™ and Registered Trademark(s) ®
Bluetooth and the Bluetooth logos are trademarks owned by Bluetooth SIG, Inc., U.S.A.
Microsoft, Windows, are registered trademarks of Microsoft Corporation. Other brand and
product names may be registered trademarks or trademarks of their respective holders.
4
Page 5

Chapter 1
Introduction
INTRODUCTION TO BLUETOOTH
The term “Bluetooth” refers to a worldwide standard for the wireless exchange of data
between two devices.
In order to exchange data, two Bluetooth devices must establish a connection.
Before a connection is established, one device must request a connection with another.
The second device accepts (or rejects) the connection.
The originator of the request is known as the client.
The device that accepts (or rejects) the request is known as the server.
Many Bluetooth devices can act as both client and server.
A client Bluetooth device runs a software program that requests a connection to another
device as part of its normal operation. For example, the program may request a
connection to a remote computer, a printer, or a modem.
Becoming a Bluetooth client normally requires an action by the device operator, such as
an attempt to browse a remote computer, print a file, or dial out on a modem.
Every Bluetooth device that provides a service must be prepared to respond to a connection
request. Bluetooth software is always running in the background on the server, ready to
respond to connection requests.
INTRODUCTION TO THE WIRELESS BLUETOOTH USB
DONGLE
The Bluetooth USB Dongle is specifically designed to plug into an available USB port
connecting to a desktop or laptop. It is the best solution for quick and easy connection and
access to your Ethernet Local Area Network (LAN) and other shared resources without cables
or wires.
We provide both low power (class 2/3) and high power (class 1) Bluetooth USB Dongle. Each
Bluetooth Dongle is bundled with Widcomm Bluetooth Software. The significant difference
between the high power and low power is the transmission range. The transmission range of
class 1 (high power) is up to 50 meters; however, the class 2/3 (low power) is about 10-20
meters. You can choose a suitable Bluetooth USB Dongle depends on your working
5
Page 6

environment.
The PC configured as the Bluetooth server can support up to 7 Bluetooth client devices with IP
addresses automatically assigned when they connect. The bundled Bluetooth Software also
provides Internet sharing and security access between the server and clients.
After finishing these steps outlined in this manual, you will have the ability to share information,
Network Access and take the full advantage of a “connected” environment.
6
Page 7
Chapter 2
Contents of Package
After opening the box, check what’s in the box, and then refer to the Quick Installation Guide
for the fastest way to get up and running with the wireless Bluetooth USB Dongle.
What ships in the box
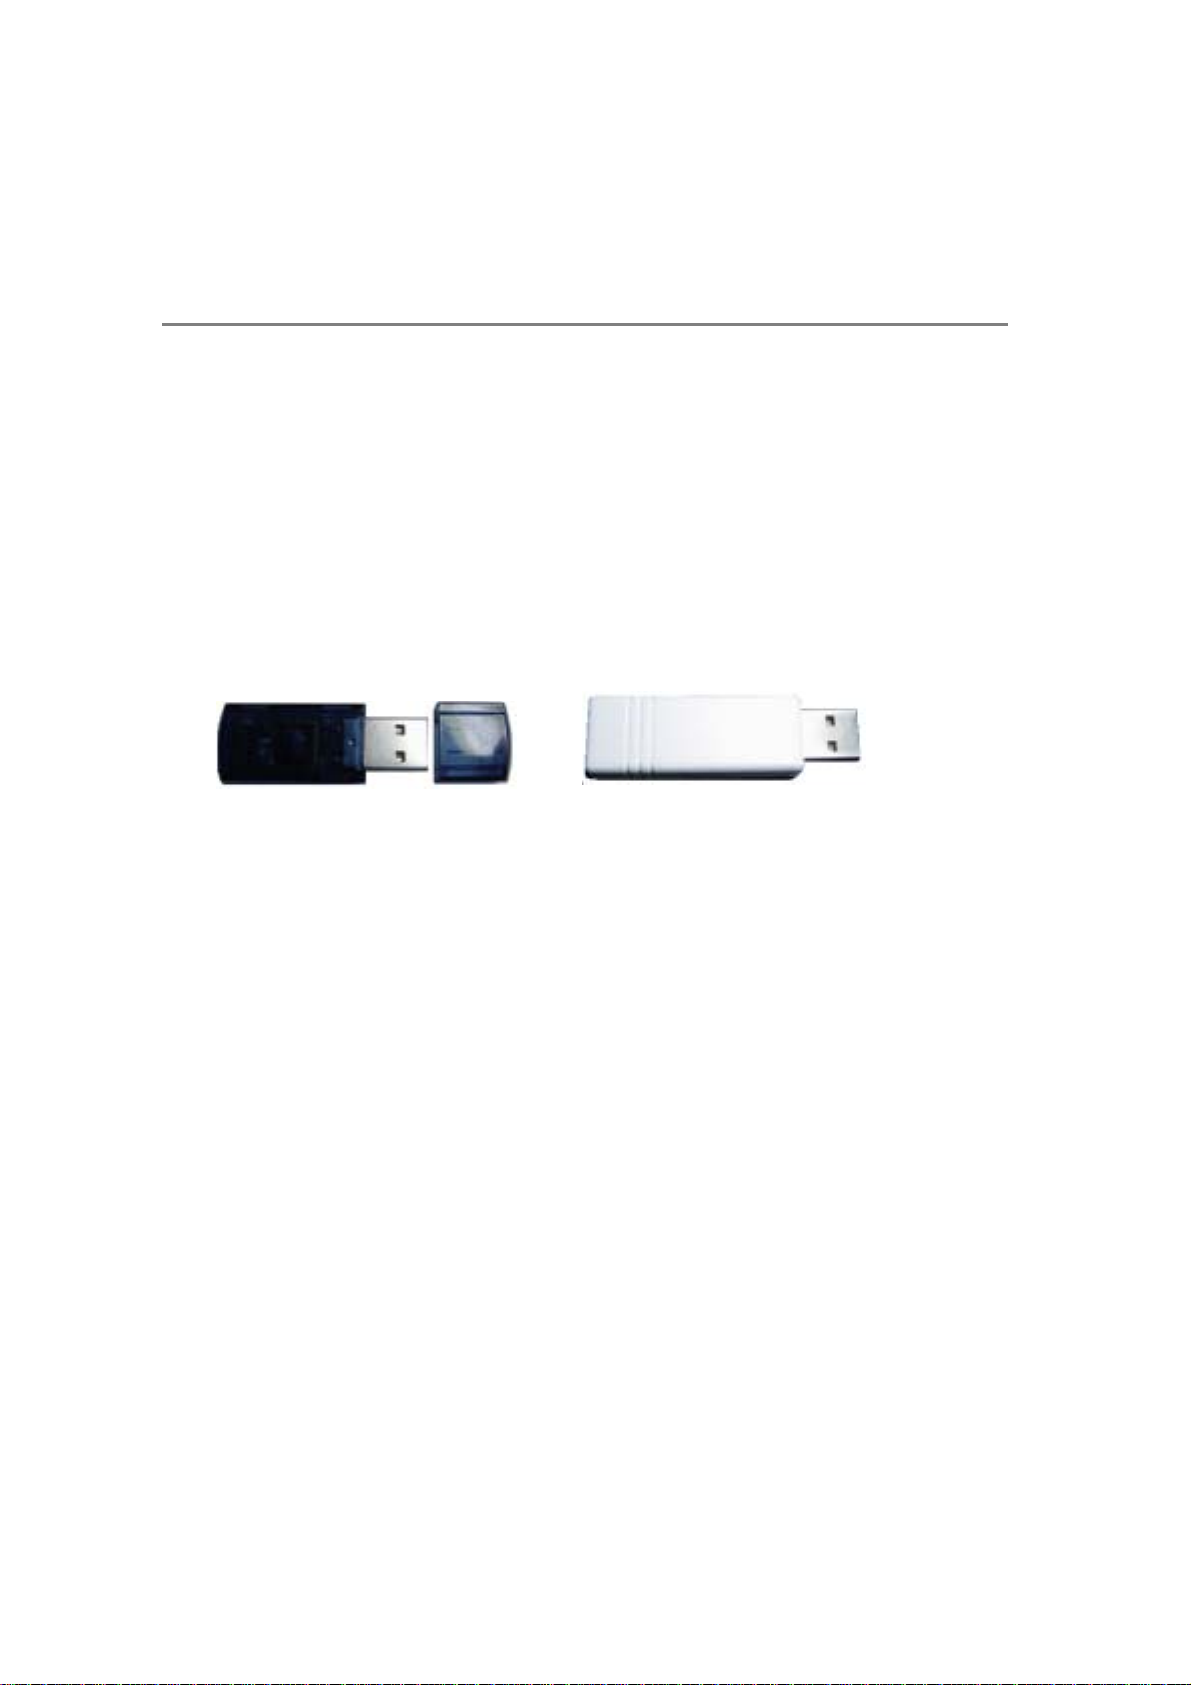
The following items should be found in the Bluetooth USB Dongle box:
Bluetooth USB Dongle
Class 2/3
Low Powe
Utility CD (containing Bluetooth Software and Manual)
Quick Installation Guide
r
Class 1
High Power
7
Page 8

Chapter 3
Installing Bluetooth Software
3.1 Uninstalling previous version of
Bluetooth software
If you are installing the Bluetooth software for the first time, please skip this section.
Any previous versions of the Bluetooth software must be uninstalled before installing an
upgraded version.
Note:
Before start to uninstall the previous version of BTW software, please unplug the wireless
Bluetooth Dongle from computer’s USB port first.
Please uninstall the software by completing these steps:
1) Close any open programs and insert the utility CD into your CD-ROM Drive.
2) The Autorun function should start and will automatically detect that the previous version of
BTW software has been installed on you PC. (If the Autorun function does not automatically
start, please open the Installation CD to find the Setup.exe file and double click the Setup.exe
icon to continue.)
3) The Welcome screen informs that the InstallShield Wizard will guide you to Modify, Repair
or Remove the software. Click on the Next button to continue.
8
Page 9
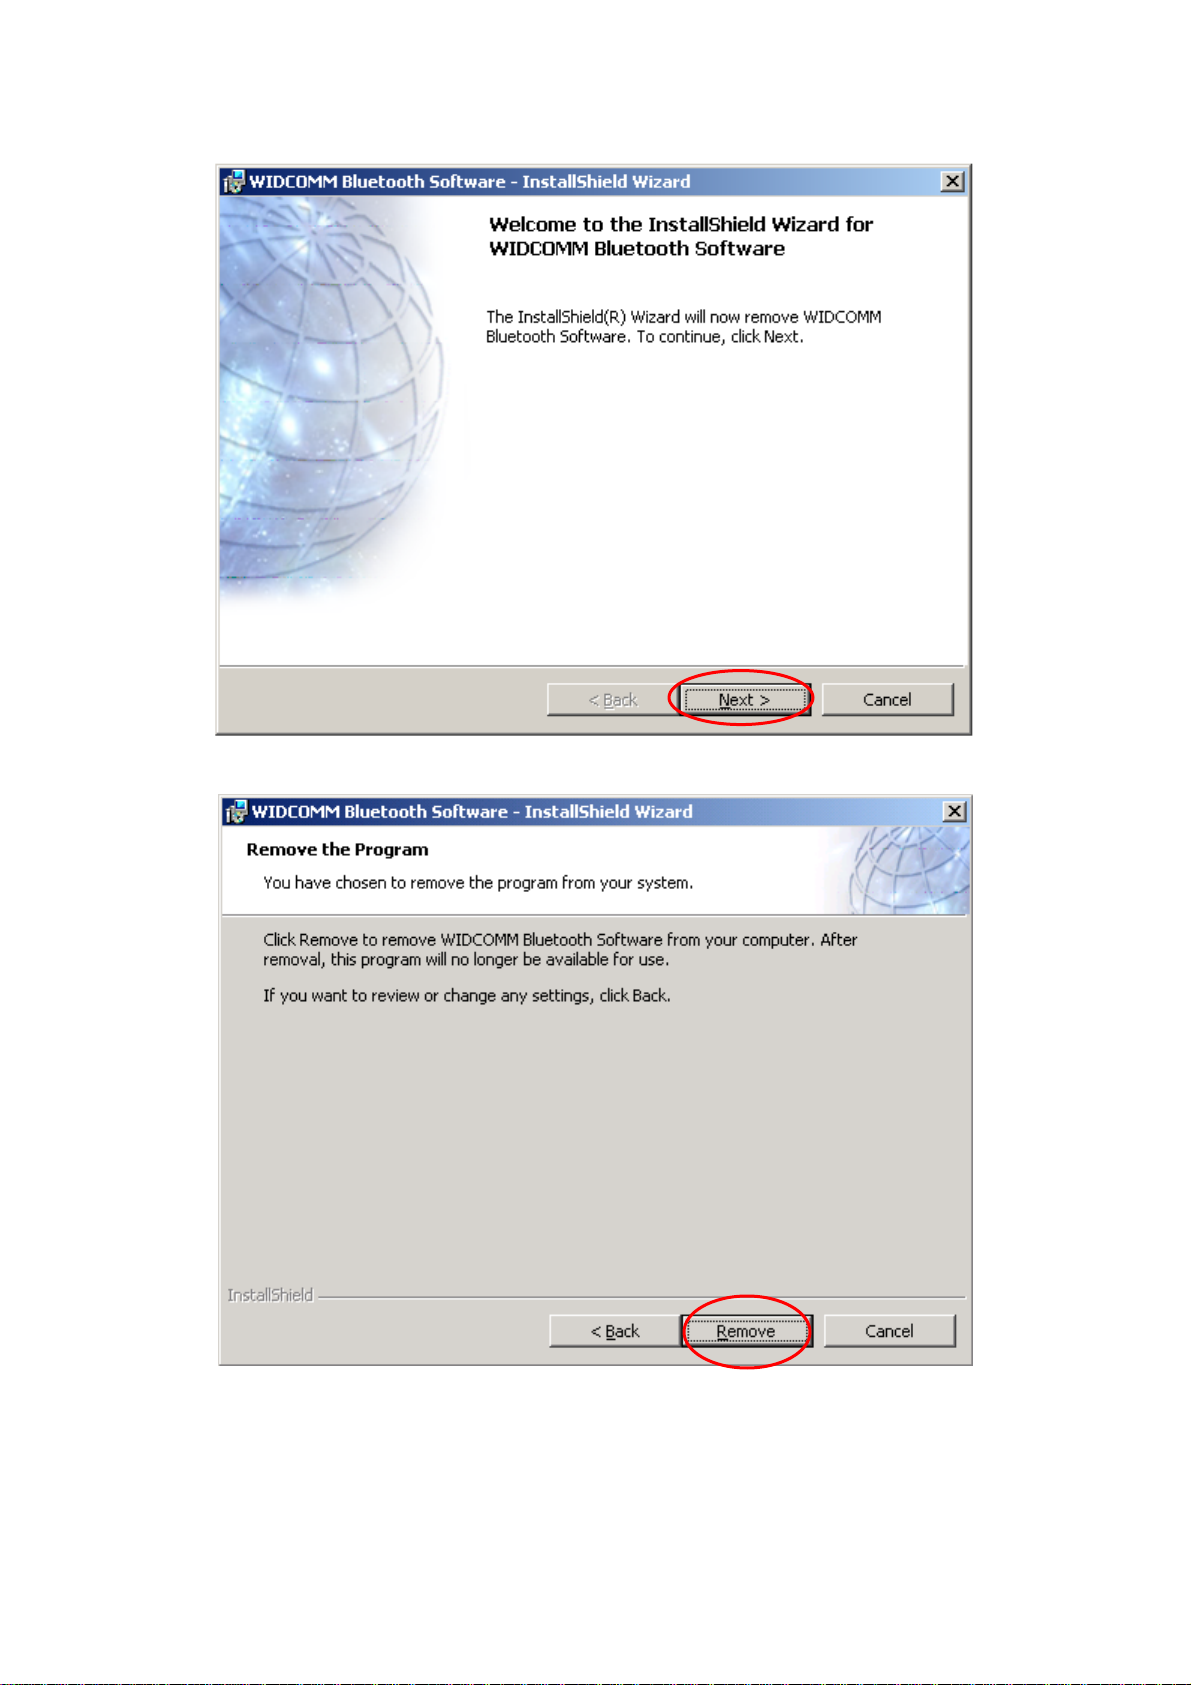
4) Click on the Remove button from “Remove the Program” screen.
5) When the files have been removed, you will be presented with a screen informing of its
completion. Click on the Finish button.
9
Page 10
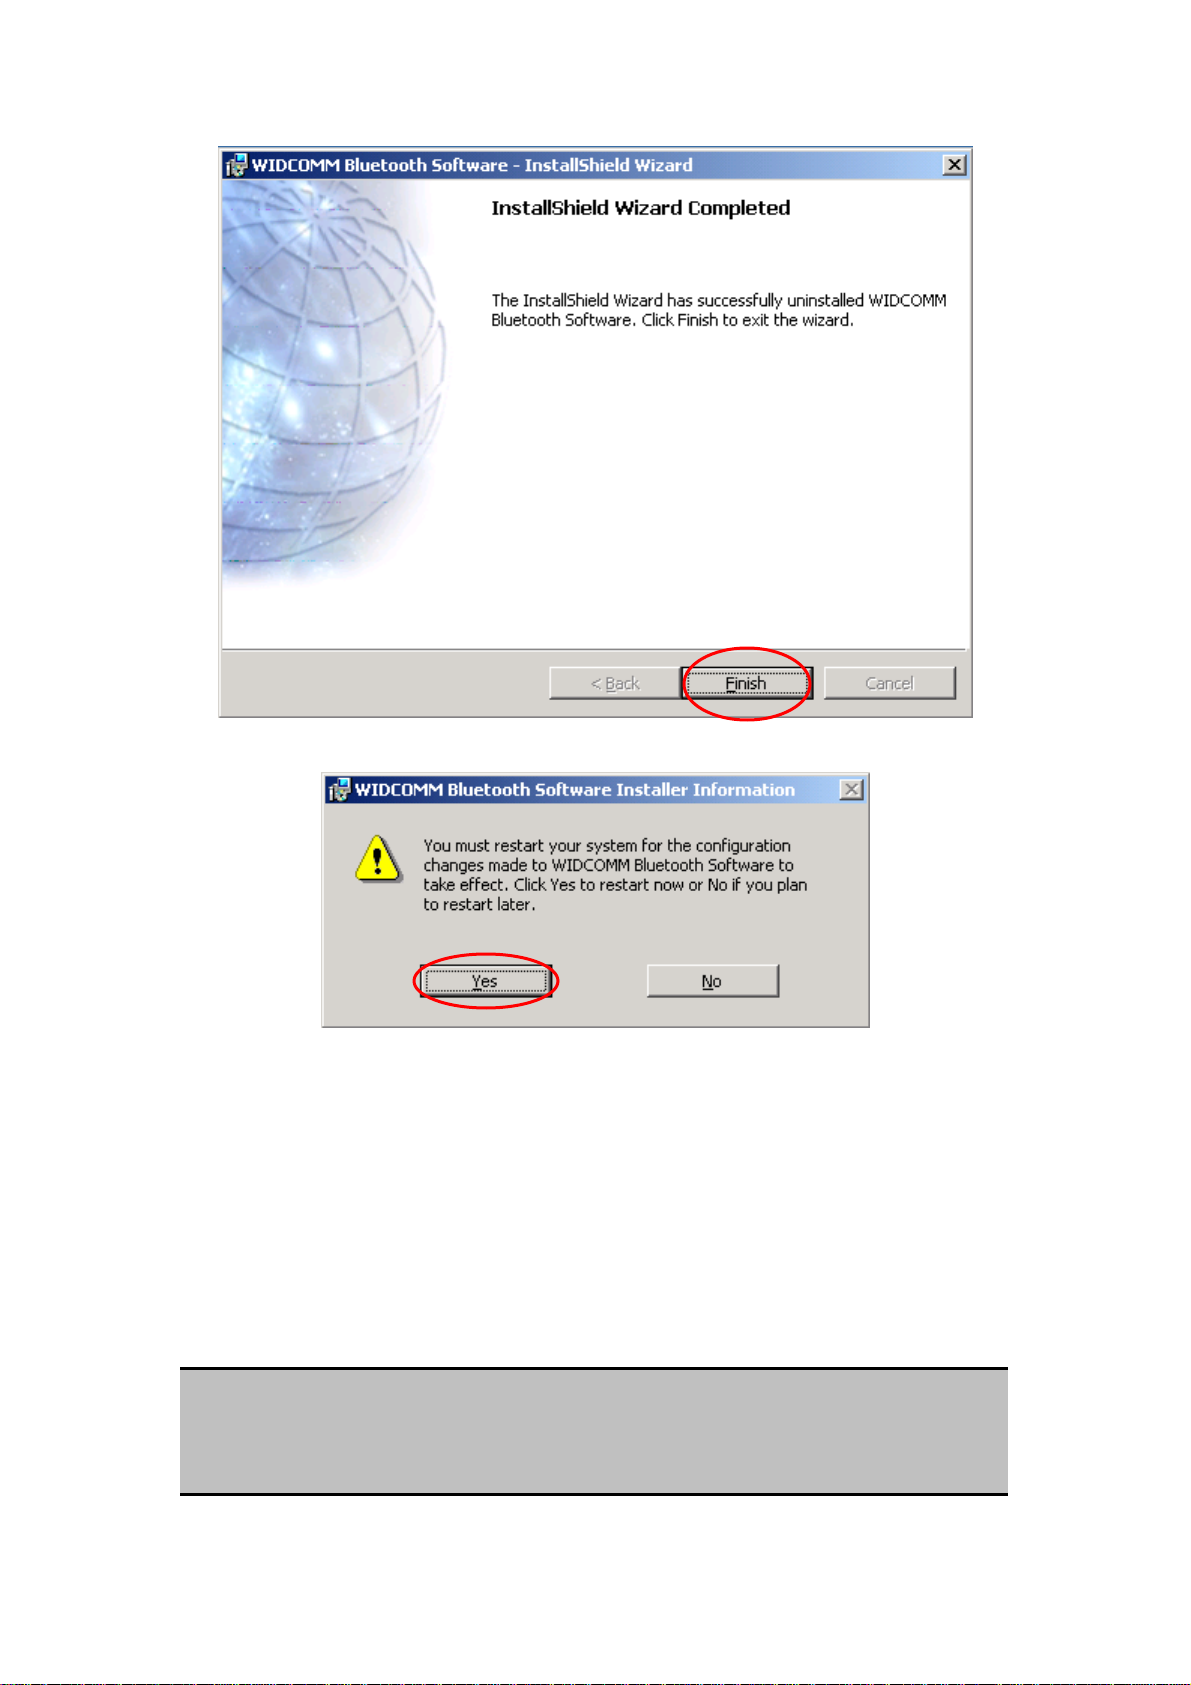
6). Click on the Yes button to reboot your PC.
You have completely uninstalled the previous version of the Bluetooth software. You may go
further to install the upgrade version as described in the following section.
3.2 Installing the Bluetooth software
(First-time installation)
Note:
Plug in the USB Dongle firmly to an available USB port only whenyou are prompted
during the installation process.
10
Page 11
If you have connected the Bluetooth Dongle to your computer, please remove it, cancel
any hardware wizard that may show up, and start here.
1) Close any open programs and insert the utility CD into your CD-ROM Drive. The
Autorun function will automatically guide you to start the software installation. (If the
Autorun function does not automatically start, please open the Installation CD to find
the Setup.exe file and double click the Setup.exe icon to continue.)
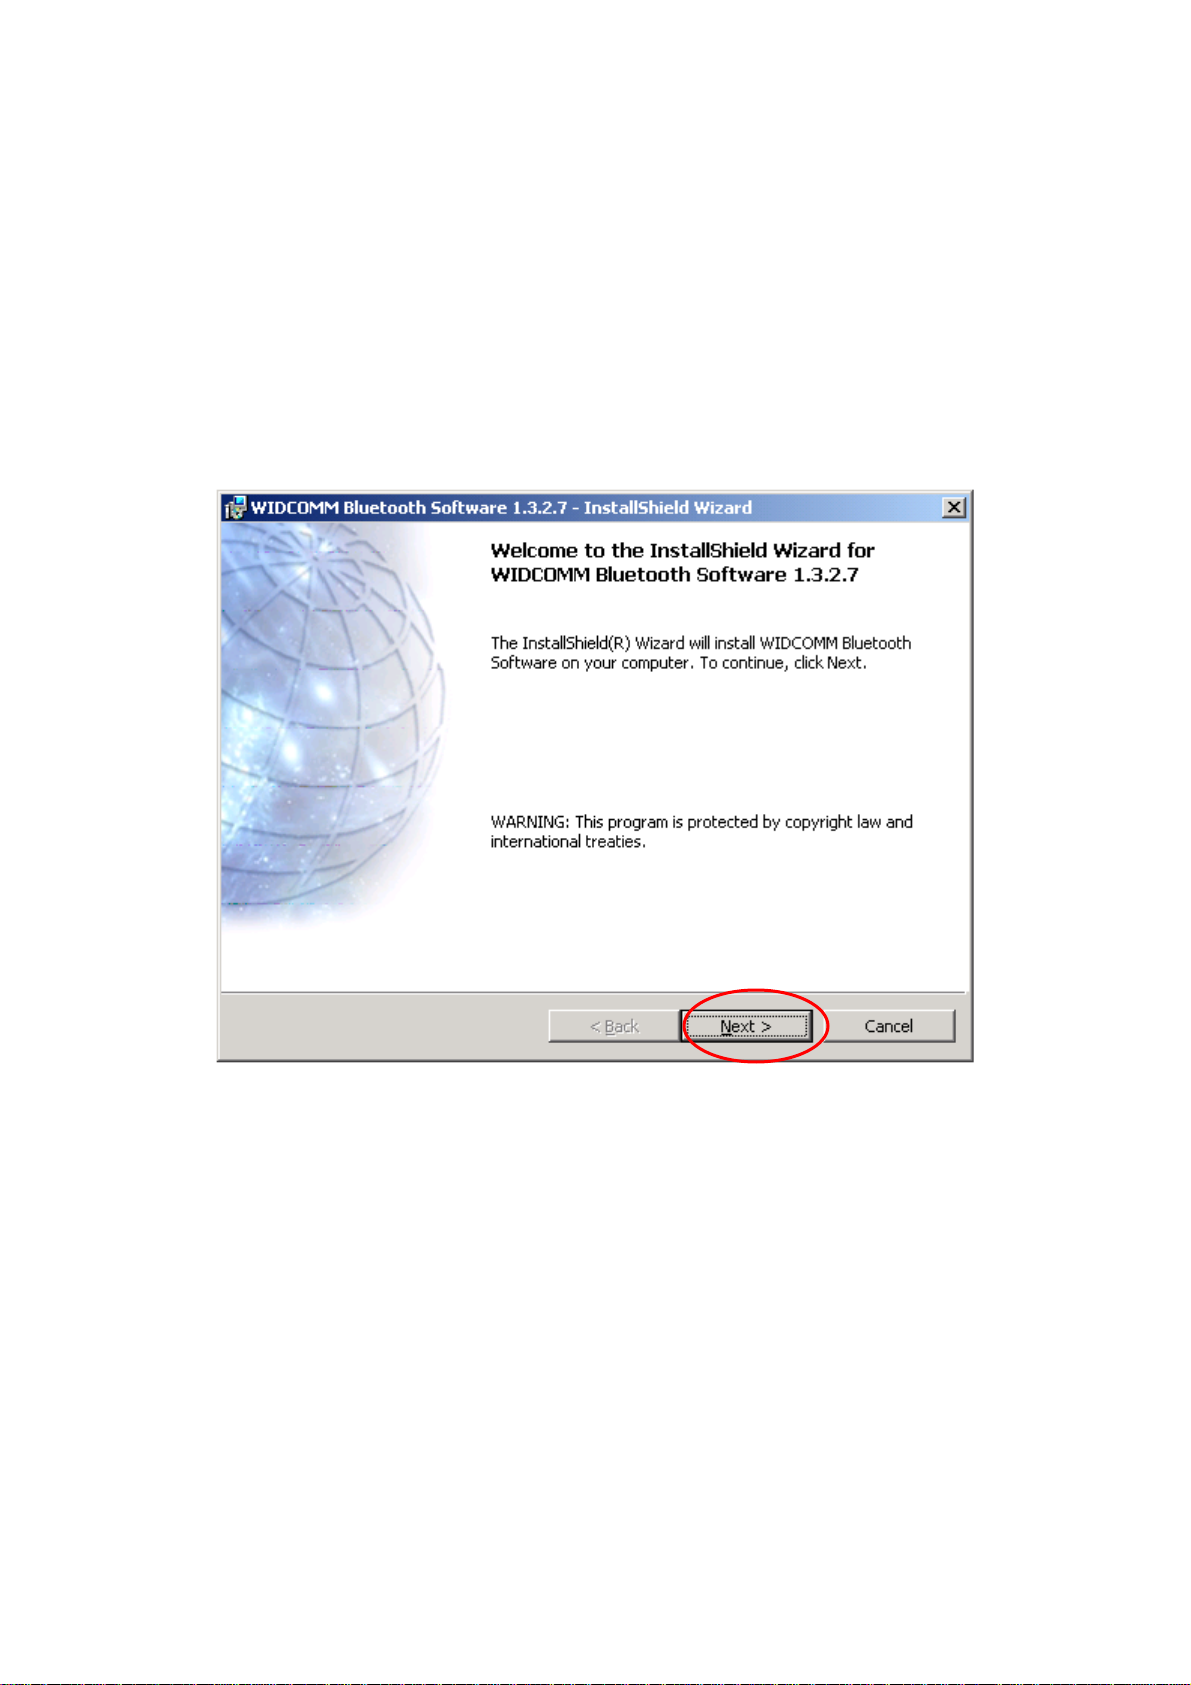
2) The Welcome screen informs you that the WIDCOMM Bluetooth Software Setup
program is ready to begin. Click on the Next button.
3) In the License Agreement screen, click on the radio button to the left of I accept the
terms in the license agreement. Click on the Next button.
11
Page 12
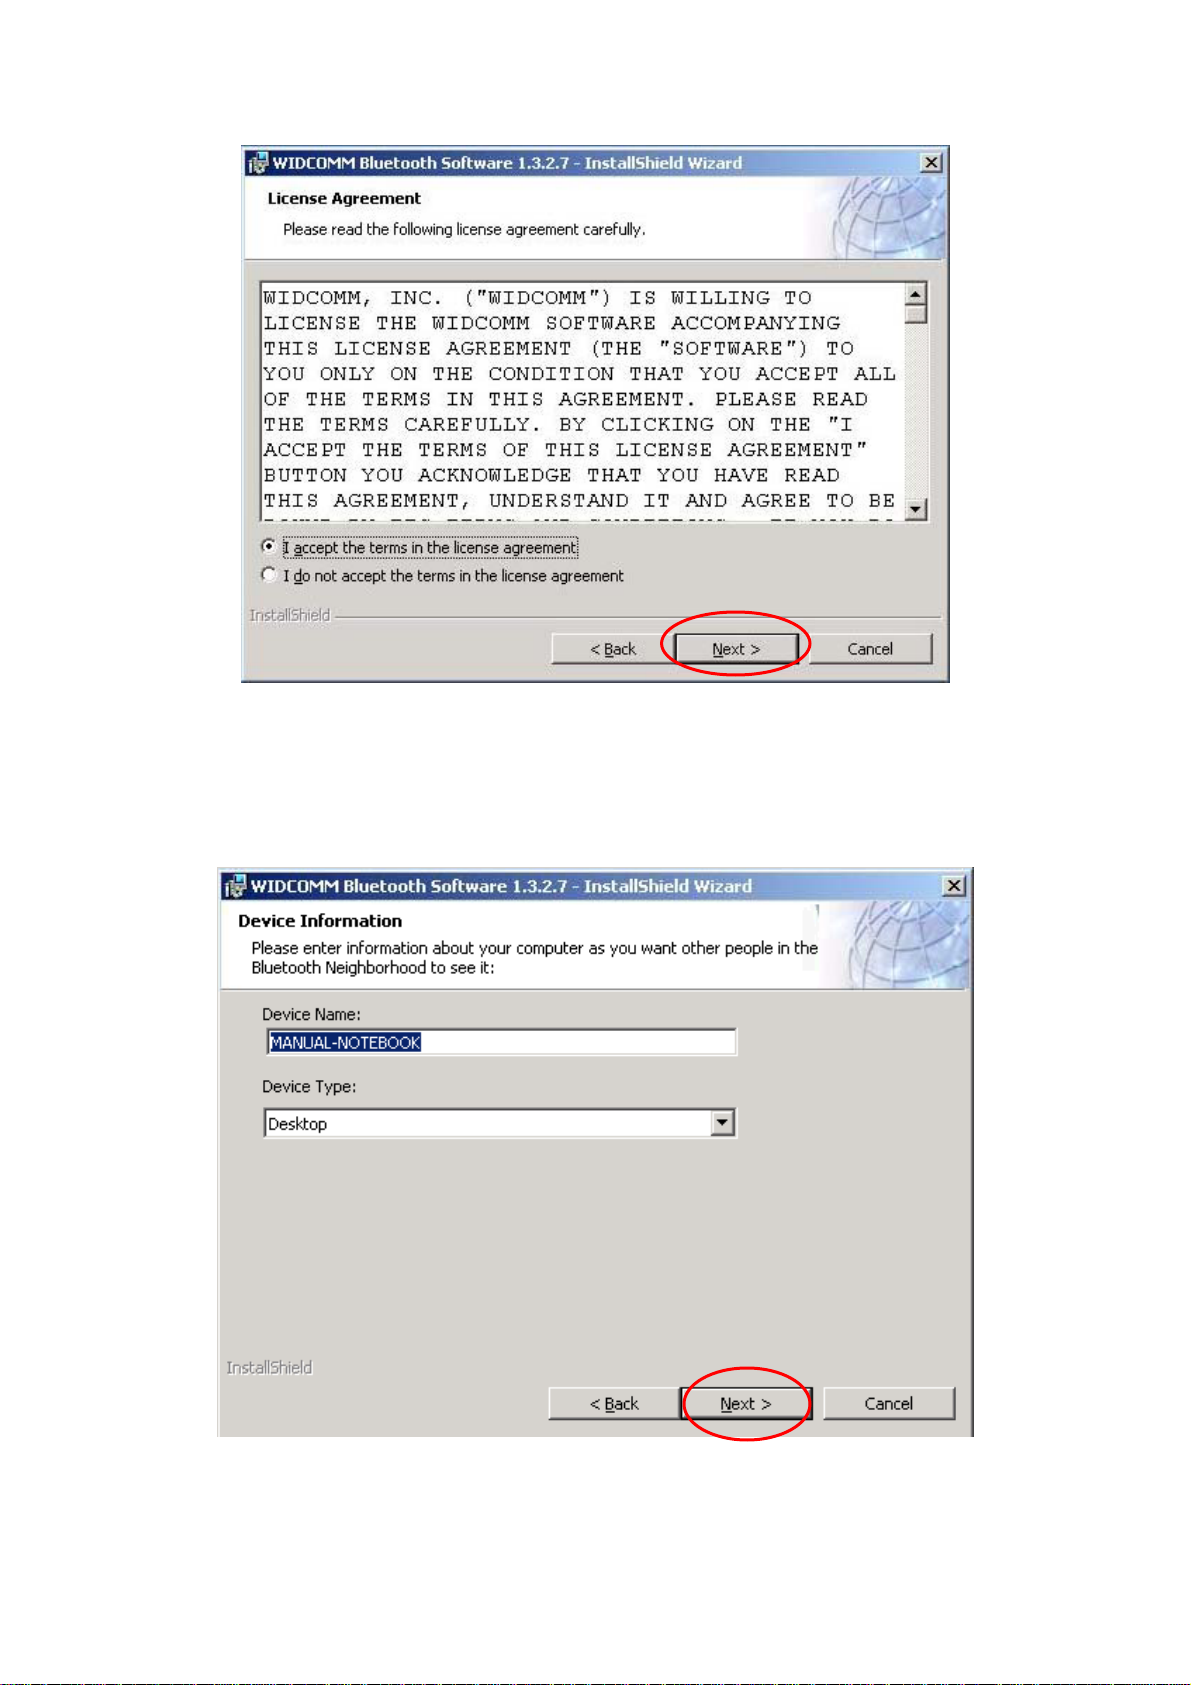
4) In the Device Information screen: (The screen won’t be displayed if you re-installed
the BTW software.)
a. Enter a device name
b. Select a device type
c. Click on the Next button.
5) In the Destination Folder screen you are asked to confirm the Destination Folder for
the application software. If you would like, you may change the destination folder to
12
Page 13
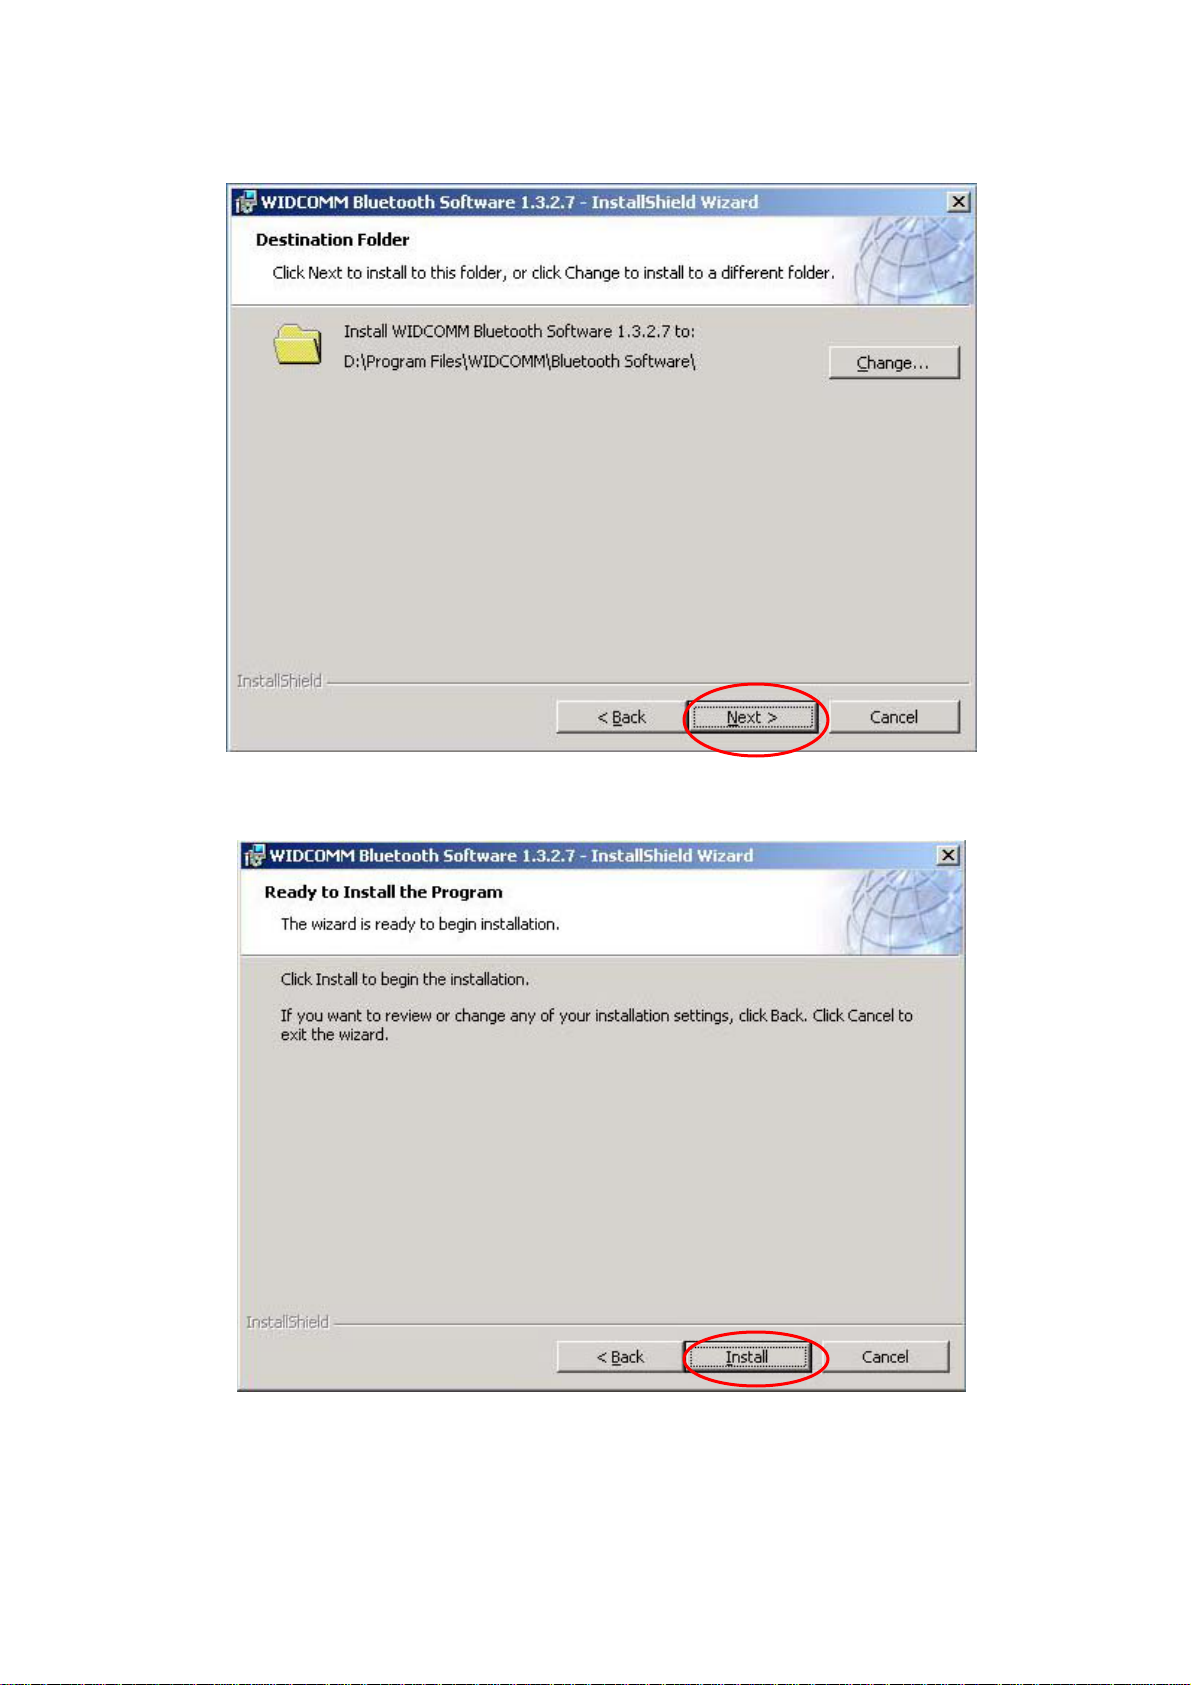
another location as the directory.
6) The Ready to Install the Program screen informs you that the driver is ready for
installation. Click on the Install button to continue.
a. For Windows 2000 & XP users, please click on OK button from the
following “Driver Signature Notice” dialog box to proceed with drive
installation.
13
Page 14

b. Windows 98 Users, you will be asked to specify the directory of Windows
98 source files path during installation. Please enter the location of the
Windows98 setup files and follow the on-screen description.
7) Plug the Bluetooth Dongle to an available USB port firmly and click OK to continue
with software installation.
14
Page 15
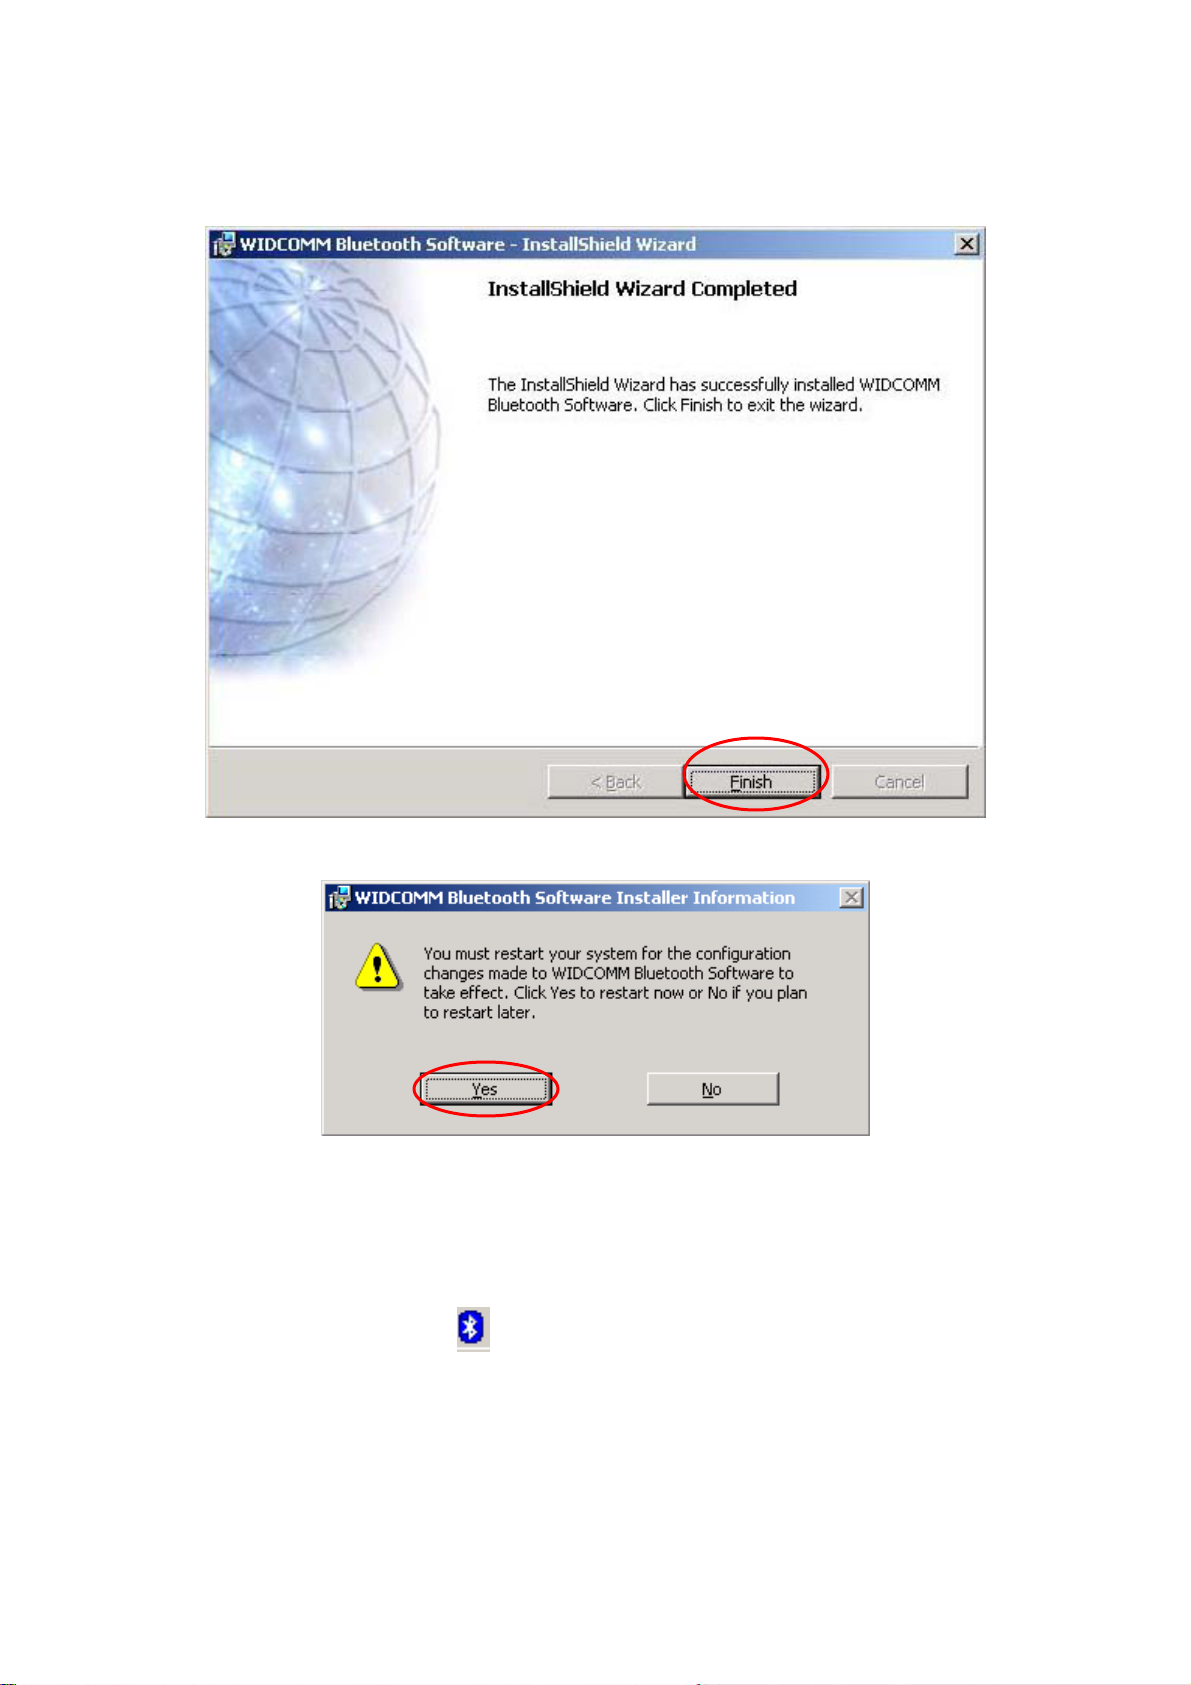
8) When the files have been copied, you will be presented with a screen informing of its
completion. Click on Finish button to finish the installation process.
9). Click on Yes button to reboot your PC.
3.3 Start Using Bluetooth
After you have the Bluetooth software installed and reboot your PC for the first time, please
right-click on the Bluetooth icon
Bluetooth. The wizard to will help you quickly configure your Bluetooth Dongle step by step. If
on the system tray and highlight Starting Using
you don’t want to follow the wizard, you just click Start Using Bluetooth and configure
Bluetooth Dongle later.
15
Page 16
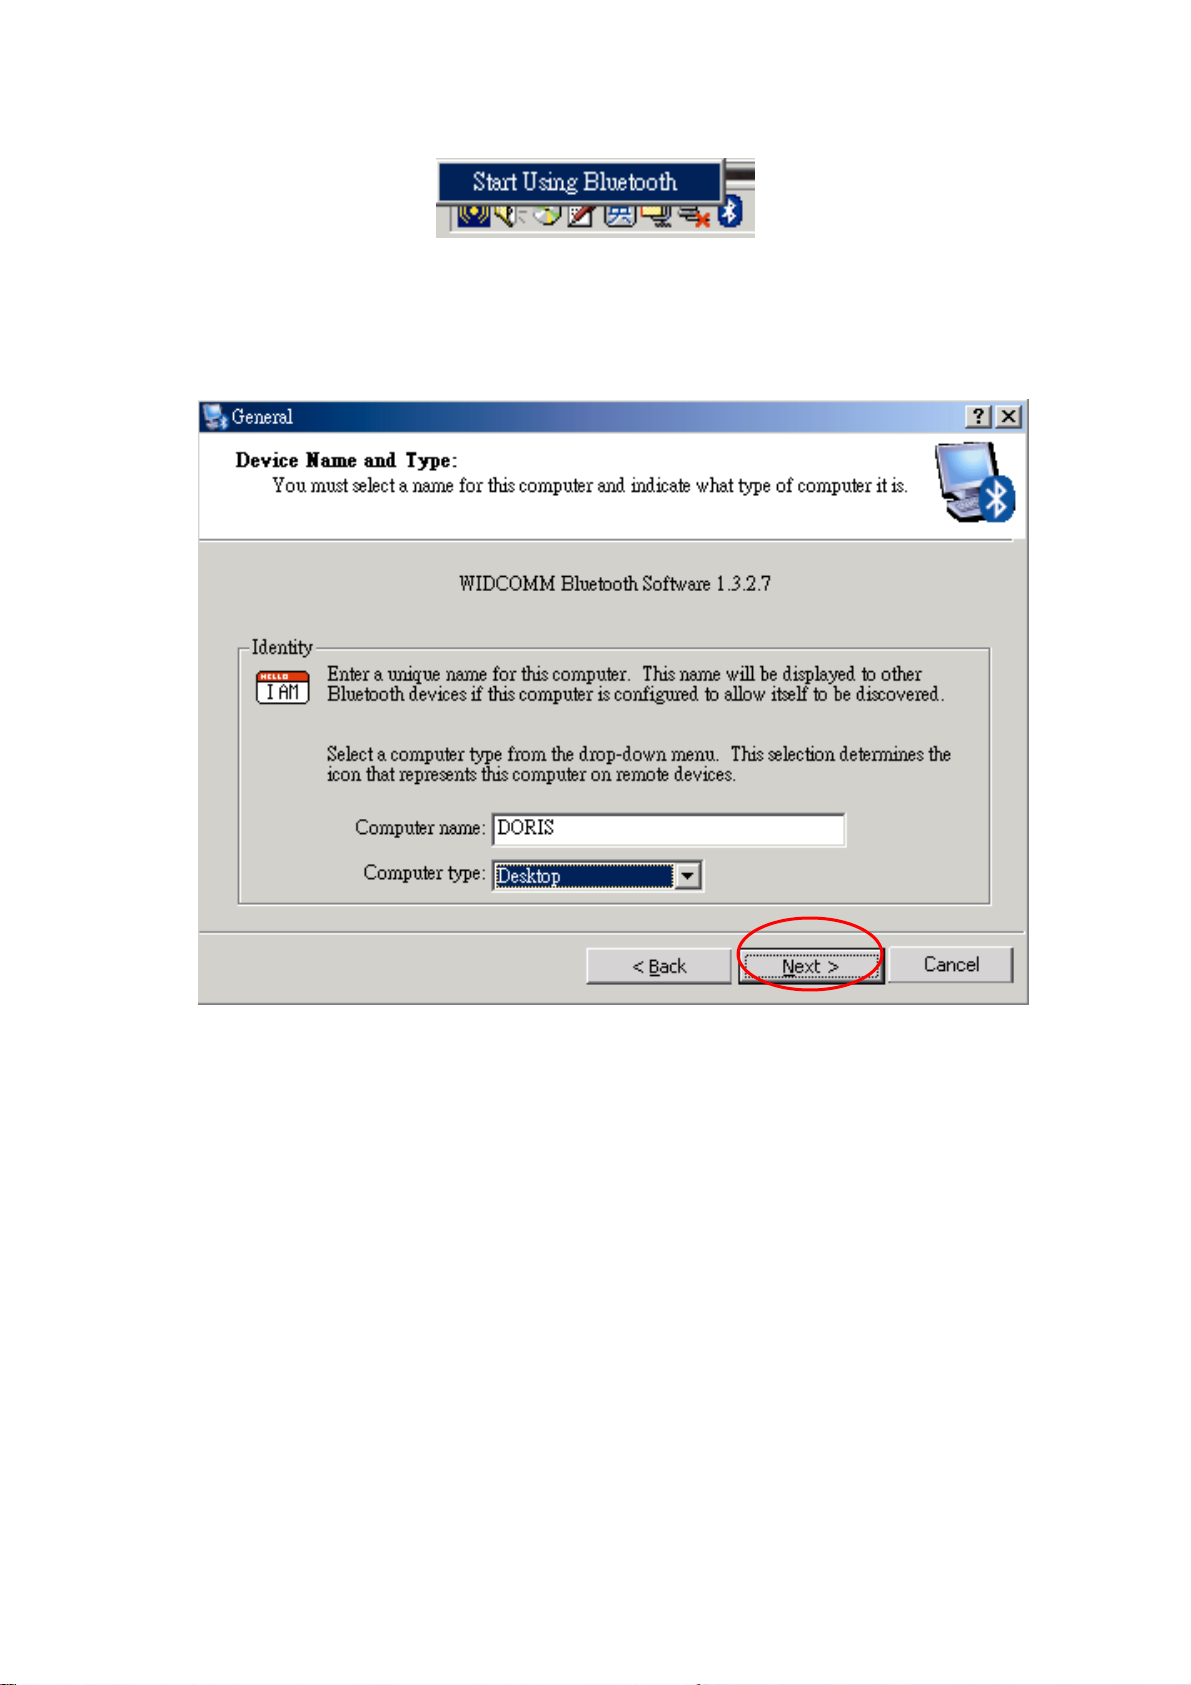
Steps
Check the box if you want to access the Bluetooth Software from the three options. Click
Next.
Input your computer’s name and select its type. Click Next.
Click Next button will guide you to make the Bluetooth services of your computer
available to other Bluetooth devices. If you click Skip, and then you can configure
these Bluetooth Services later via Bluetooth Configuration Panel.
16
Page 17
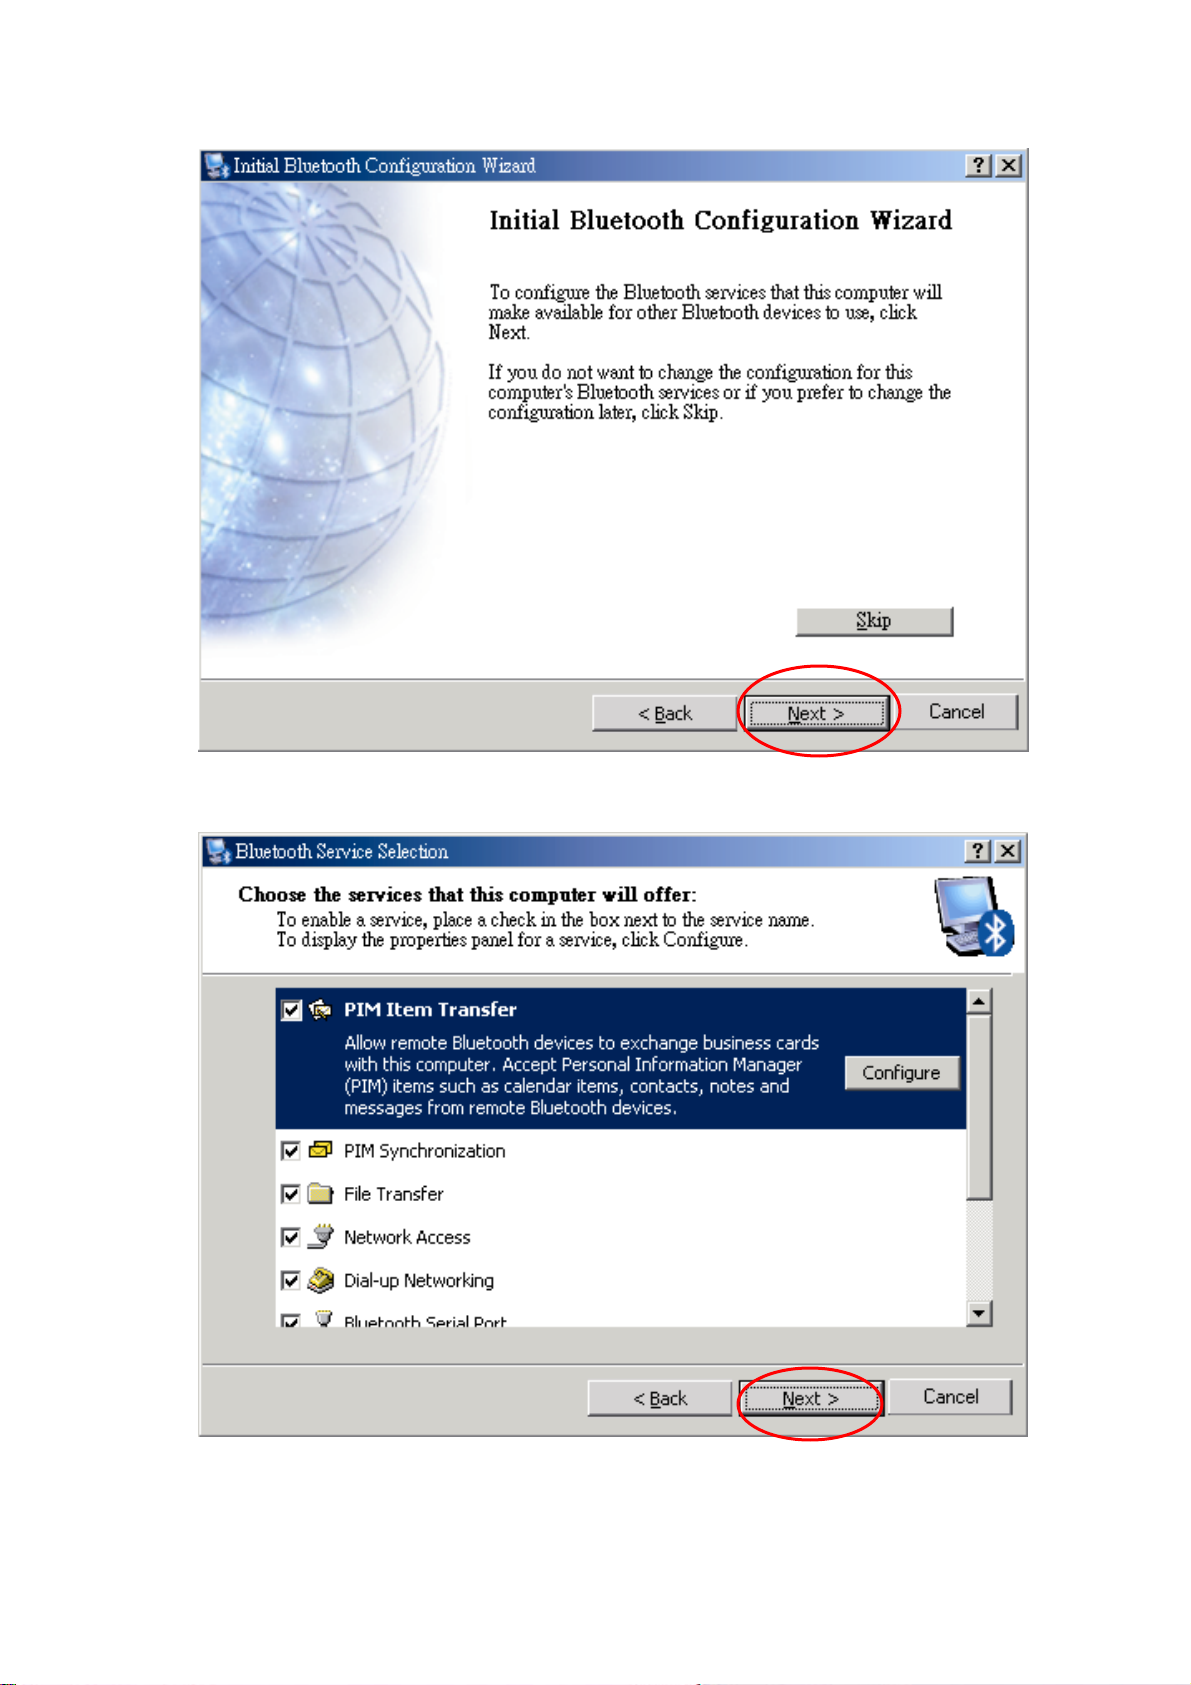
Decide which Bluetooth service that your computer will offer and check the box of it to
enable it. You can also click Configure button to modify each service’s property.
17
Page 18
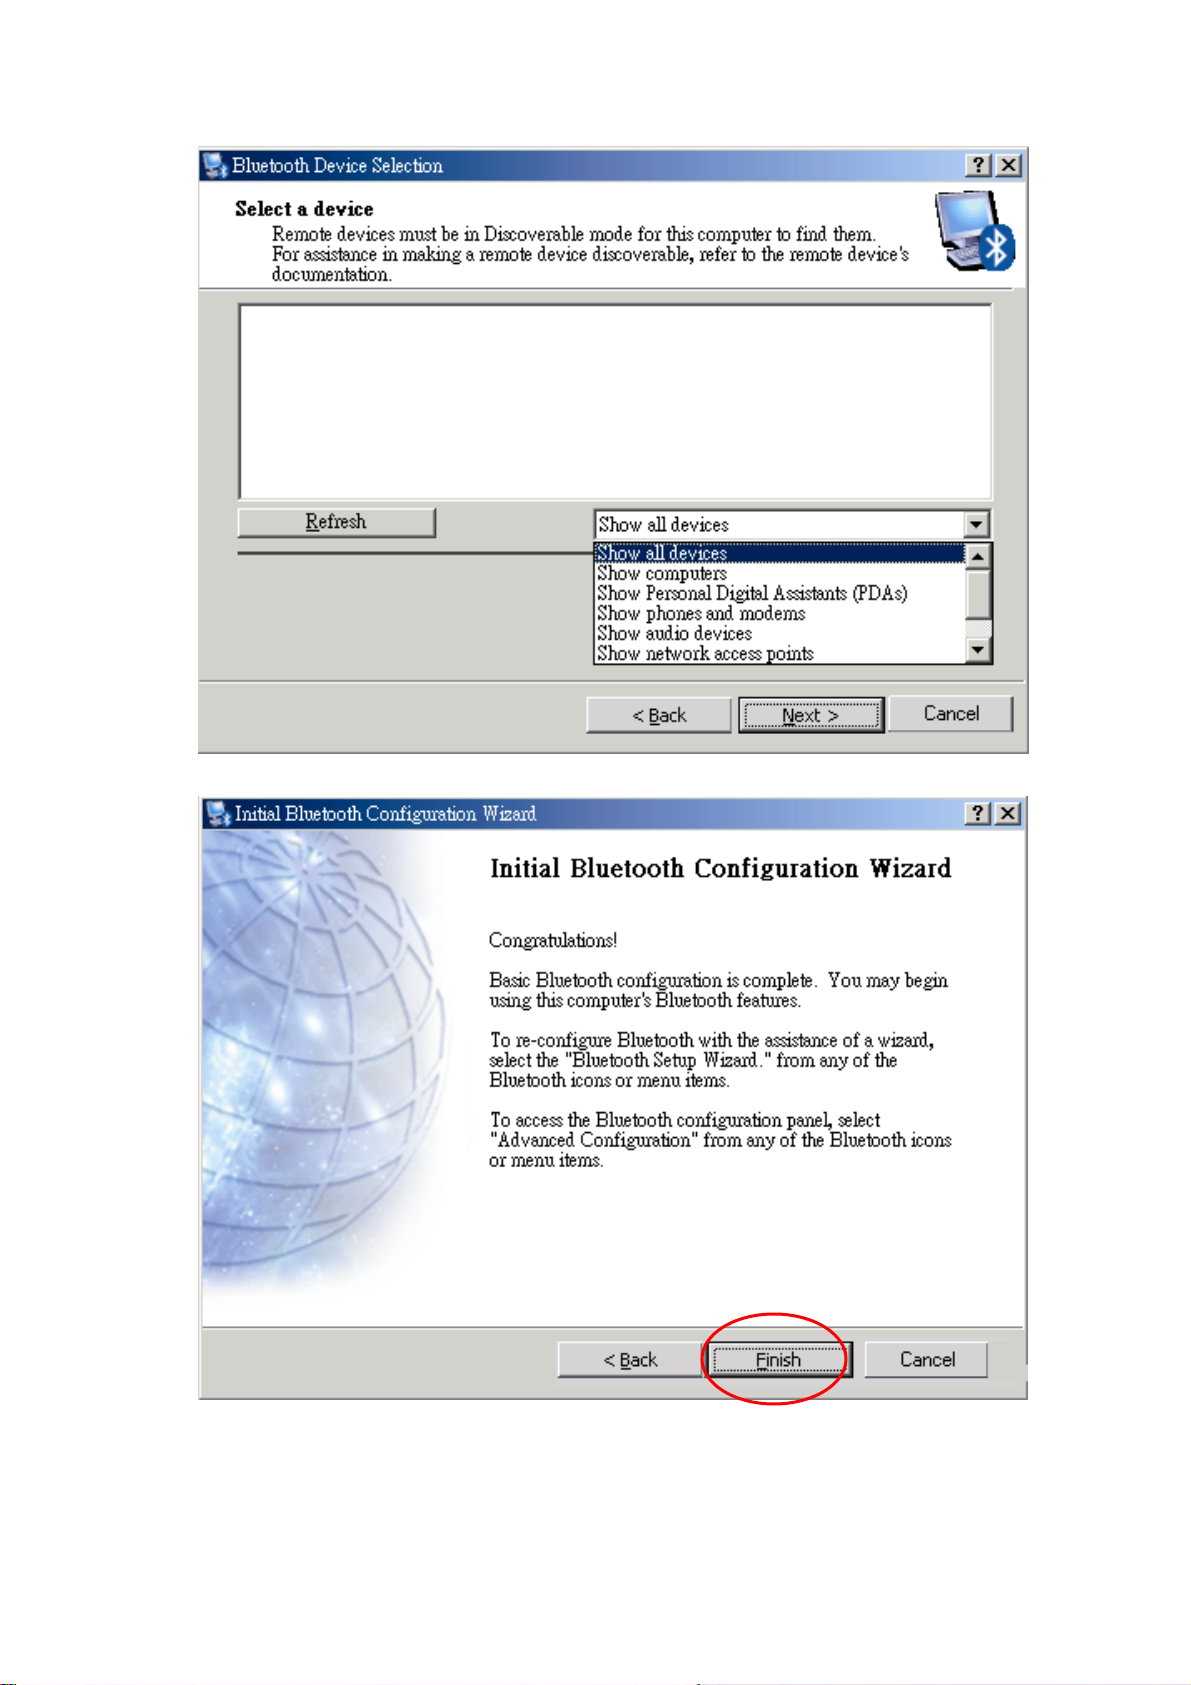
Click Finish button to complete the basic Bluetooth configuration.
If you want to re-configure the Bluetooth services, you can right-click the Bluetooth icon on
the system tray and highlight Bluetooth Setup Wizard.
18
Page 19
Chapter 4
Setup Diagnostics
4.1 Hardware Diagram
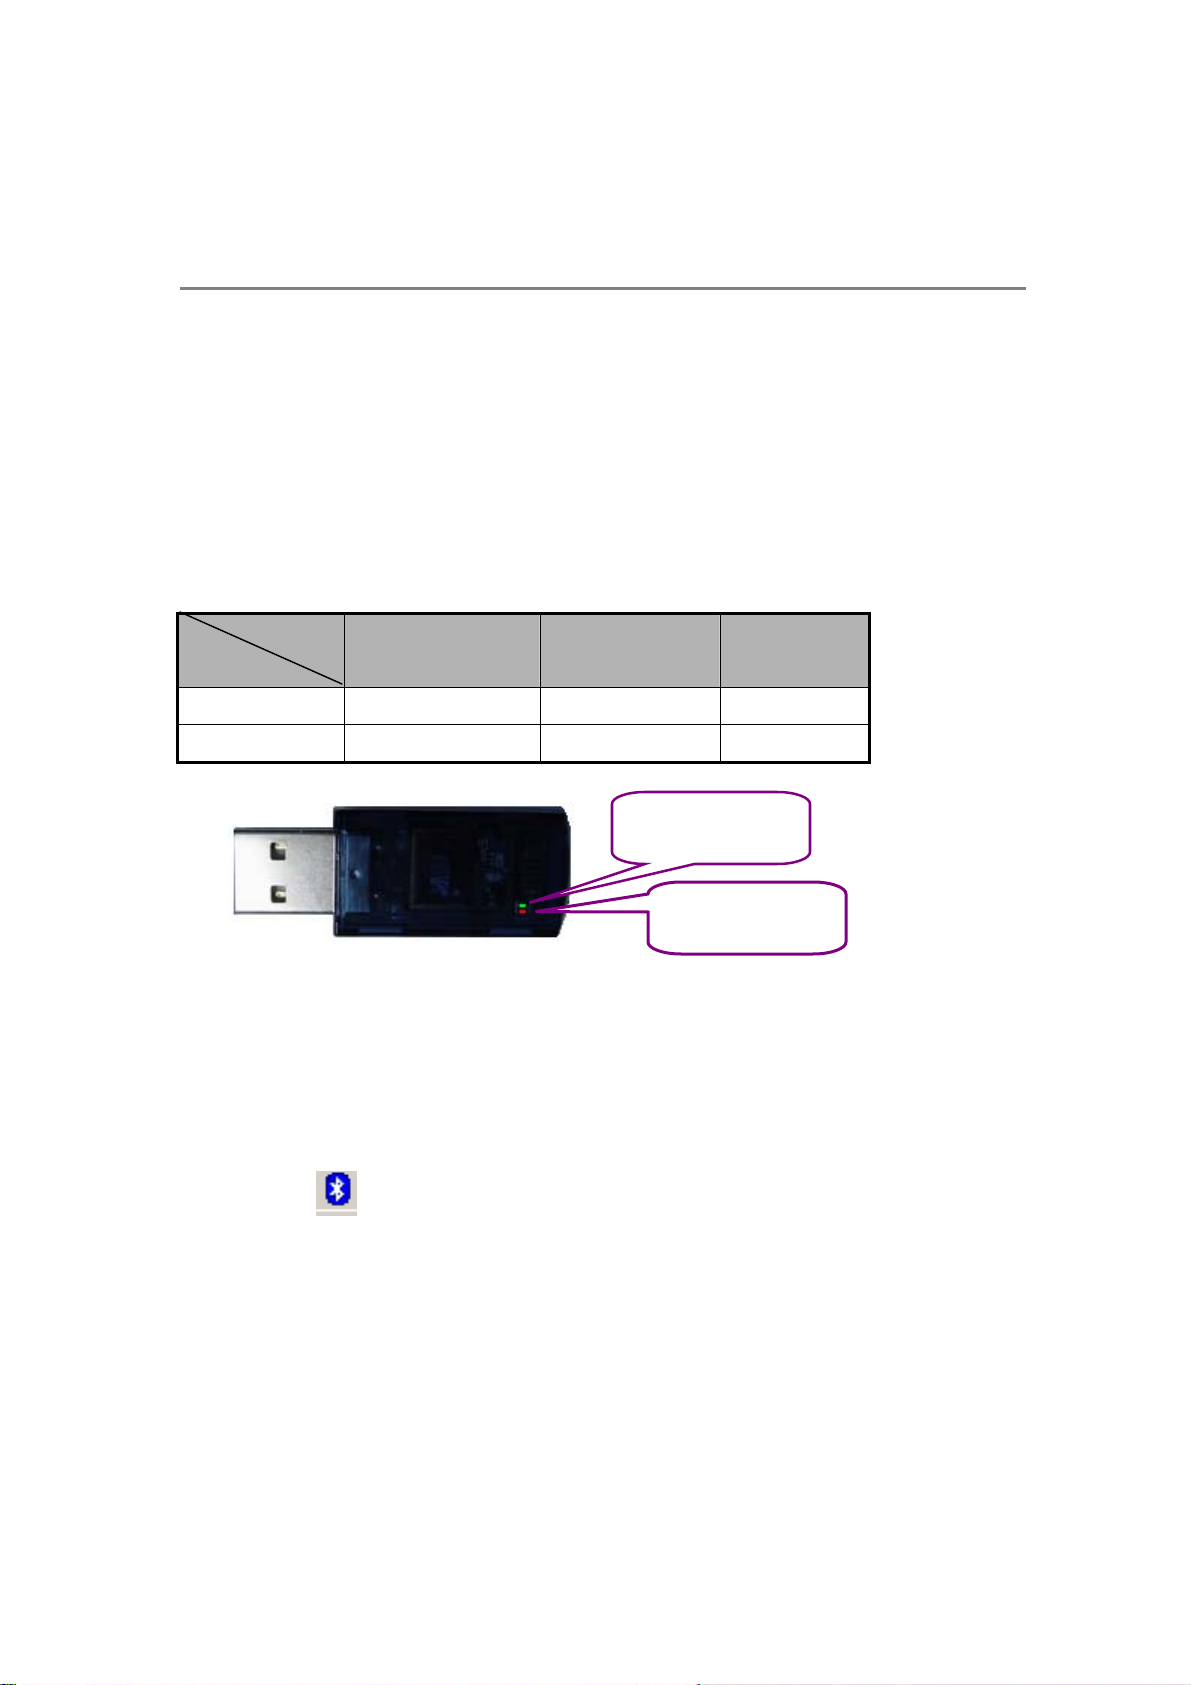
The Bluetooth USB Dongle is plug-and-play. During the software installation process, you wi ll
be prompted to plug in the USB dongle to an available USB port. When you plug in the USB
Dongle to the USB port, the green Rx LED and the red Tx LED on the USB dongle should light
up. See the diagram below. The Bluetooth Dongle LEDs illuminate during connection or data
transfer to indicate that the dongle is functioning. Refer to the following table.
Status
LED
Rx Indicator Green (quick flash) Solid Green Solid Green
Tx Indicator Solid Red Red (quick flash) Red (blinking)
Receiving Transmitting Ready
Rx Indicator
Tx Indicator
4.2 Verifying Hardware and Software Installation
Once you have the Bluetooth software installed and plug in the Bluetooth USB dongle, the
Bluetooth icon
will be displayed on the system tray. To check that the wireless Bluetooth
USB dongle drivers and software are loaded properly:
Right-click on the Bluetooth icon on the system tray and select “Advanced
Configuration” from the shortcut menu.
19
Page 20
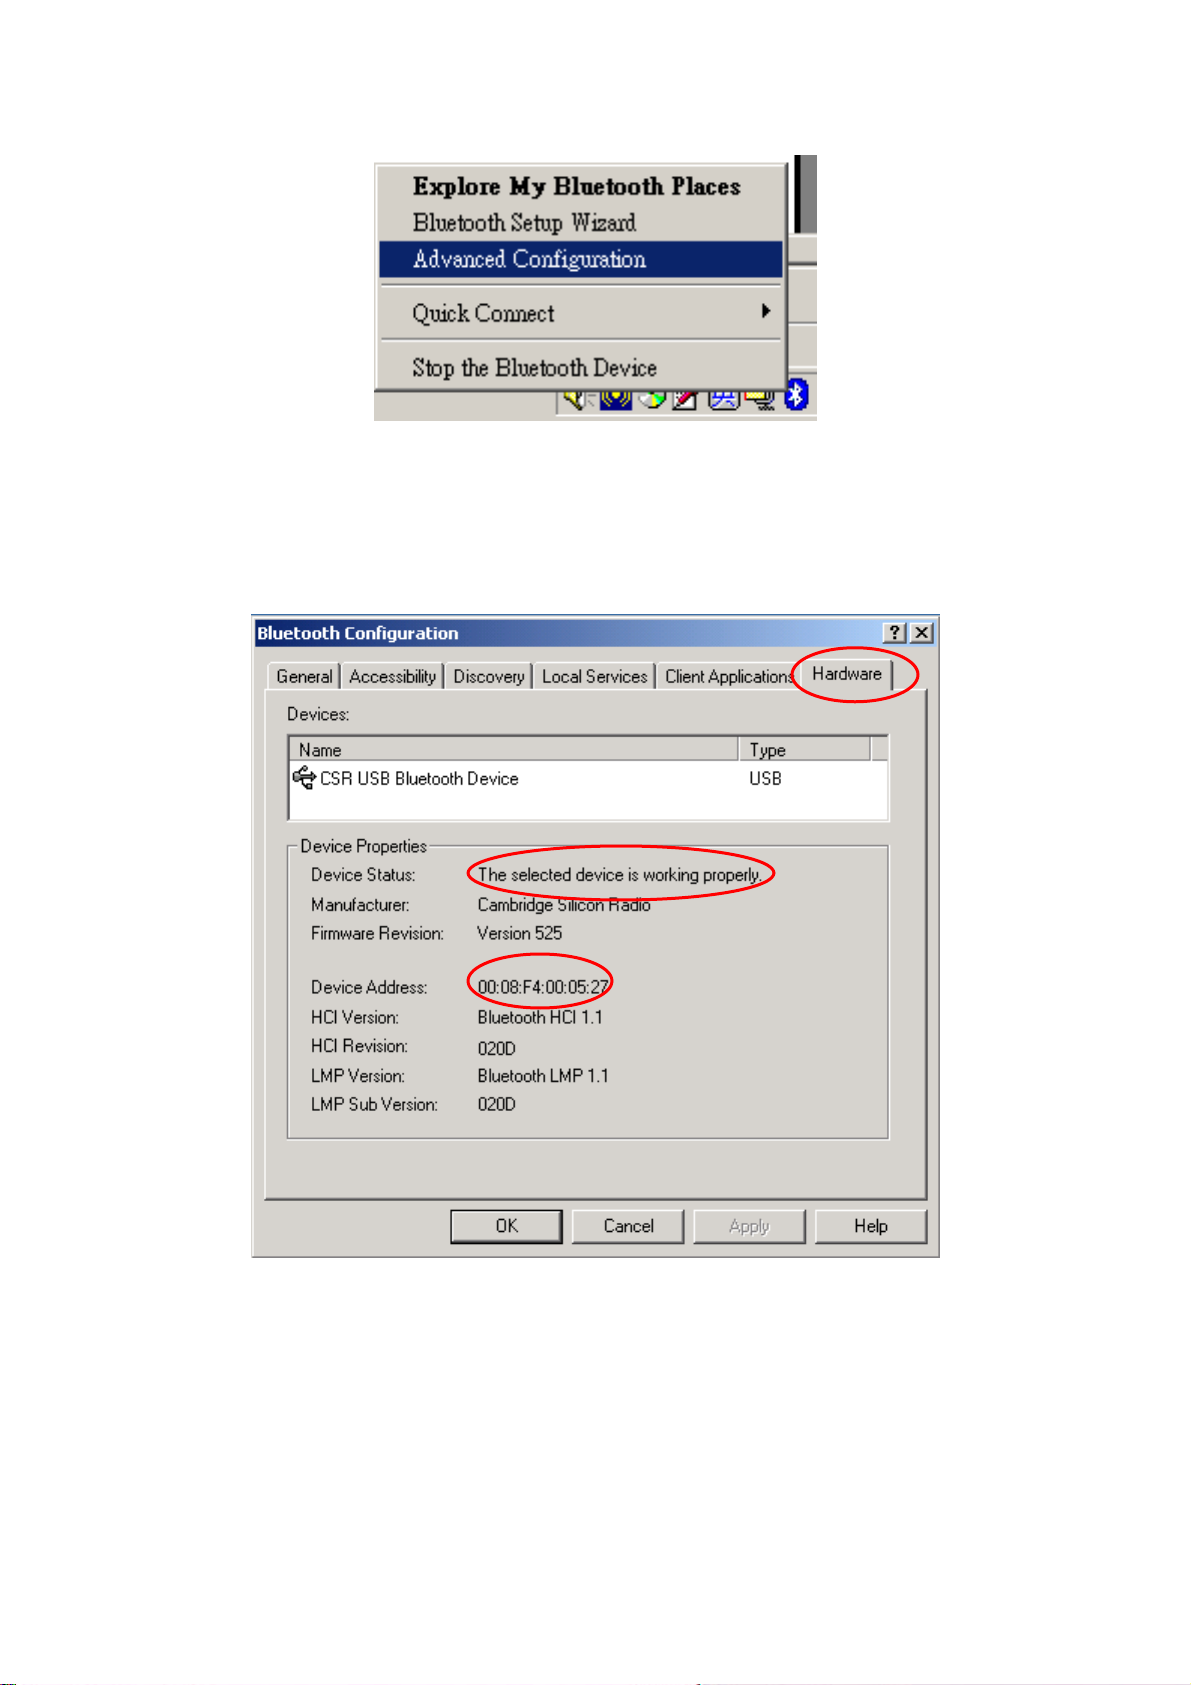
The Bluetooth Configuration window will be displayed. Click the Hardware tab. Please
refer to the following picture and check if the Device Status field reports “The device is
working properly.” and the “Device Address” is correctly displayed. If yes, it means that
the Bluetooth dongle drivers and software have been installed successfully.
20
Page 21

Chapter 5
Introduction To Bluetooth Software
The wireless Bluetooth USB Dongle is bundled with Widcomm Bluetooth Software as the
management software. The Bluetooth Software is the solution for the seamless integration of
Bluetooth technology into personal computers. The software provides the user an easy
interface to manage the Bluetooth Dongle.
5.1 INTRODUCTION TO BLUETOOTH SOFTWARE
Most Bluetooth-enabled devices have the capability to act as:
A Bluetooth server—these devices provide one or more services, such as access
to the Internet, to other Bluetooth devices.
A Bluetooth client—these devices use the service(s) provided by Bluetooth servers.
Bluetooth devices that can act as both server and client can often do both at the same time.
The Bluetooth software provides:
Clients with the means:
To locate other Bluetooth devices in the immediate vicinity (inquiry)
Discover the services that those devices offer (discovery)
Connect to, use, and disconnect from those services.
Servers with the means to include/exclude individual services in the list of services they
provide to clients.
Extensive security, including:
Authorization
Authentication
Encryption.
To determine the services provided by a Bluetooth device:
1. On the client, in the Folders pane of My Bluetooth Places, select Entire Bluetooth
Neighborhood.
2. In the right pane of Entire Bluetooth Neighborhood, right-click anywhere except
on a device name and select Refresh from the pop-up menu.
3. In the Folders pane of My Bluetooth Places, right-click a device and select Discover
Available Services from the pop-up menu to update the available services list. The
available services will be displayed in the right pane of My Bluetooth Places.
21
Page 22
5.2 BLUETOOTH DEVICE IDENTITY
Every Bluetooth device has a unique 48-bit binary Bluetooth Device Address (BDA)
burned into its EEPROM. This address cannot be changed by the end-user.
A device’s BDA is usually displayed in hexadecimal format; 00:D0:B7:03:2E:9F is a
valid BDA. You can find the BDA from the Bluetooth Configuration Panel -> Hardware tab
-> Device Address.
Each Bluetooth device also has an operator-configurable, user-friendly name to help
distinguish it from other Bluetooth devices. The user-friendly name may be up to 99
alphanumeric characters in length and may contain spaces. My Personal Computer is a
valid user-friendly name.
5.3 BLUETOOTH TRAY
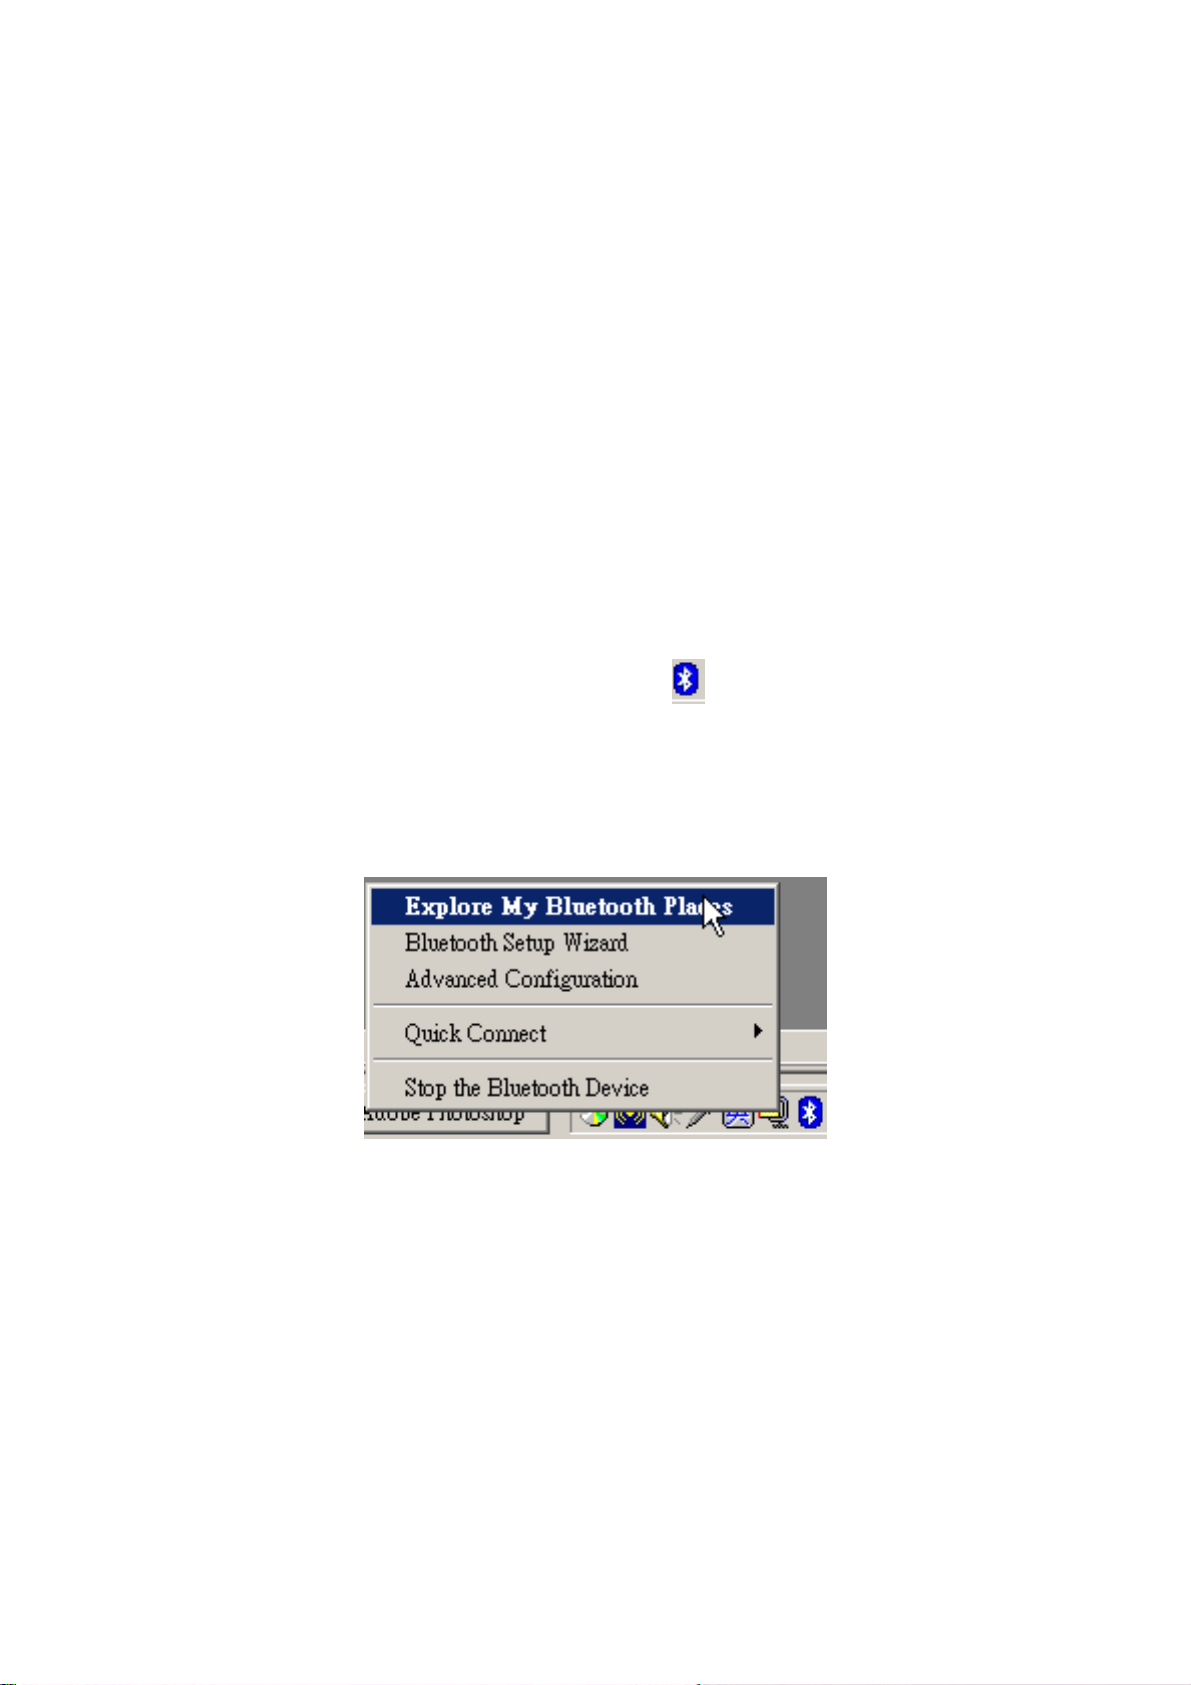
The Bluetooth tray resides in the Windows system tray , which is normally located in the
lower-right corner of the screen. The Bluetooth tray provides fast access to most
Bluetooth operations.
From the Bluetooth tray you can:
Access My Bluetooth Places—double-click the Bluetooth icon, or right-click the
Bluetooth icon and then select Explore My Bluetooth Places.
Access the Bluetooth Setup Wizard. This wizard will help you:
Configure how this computer accesses a service on another Bluetooth device
Locate remote Bluetooth devices
Configure the way that this computer provides services to remote Bluetooth
devices
Set the name and type of this Bluetooth device, e.g., “Peter’s PC” and
“Desktop.”
22
Page 23
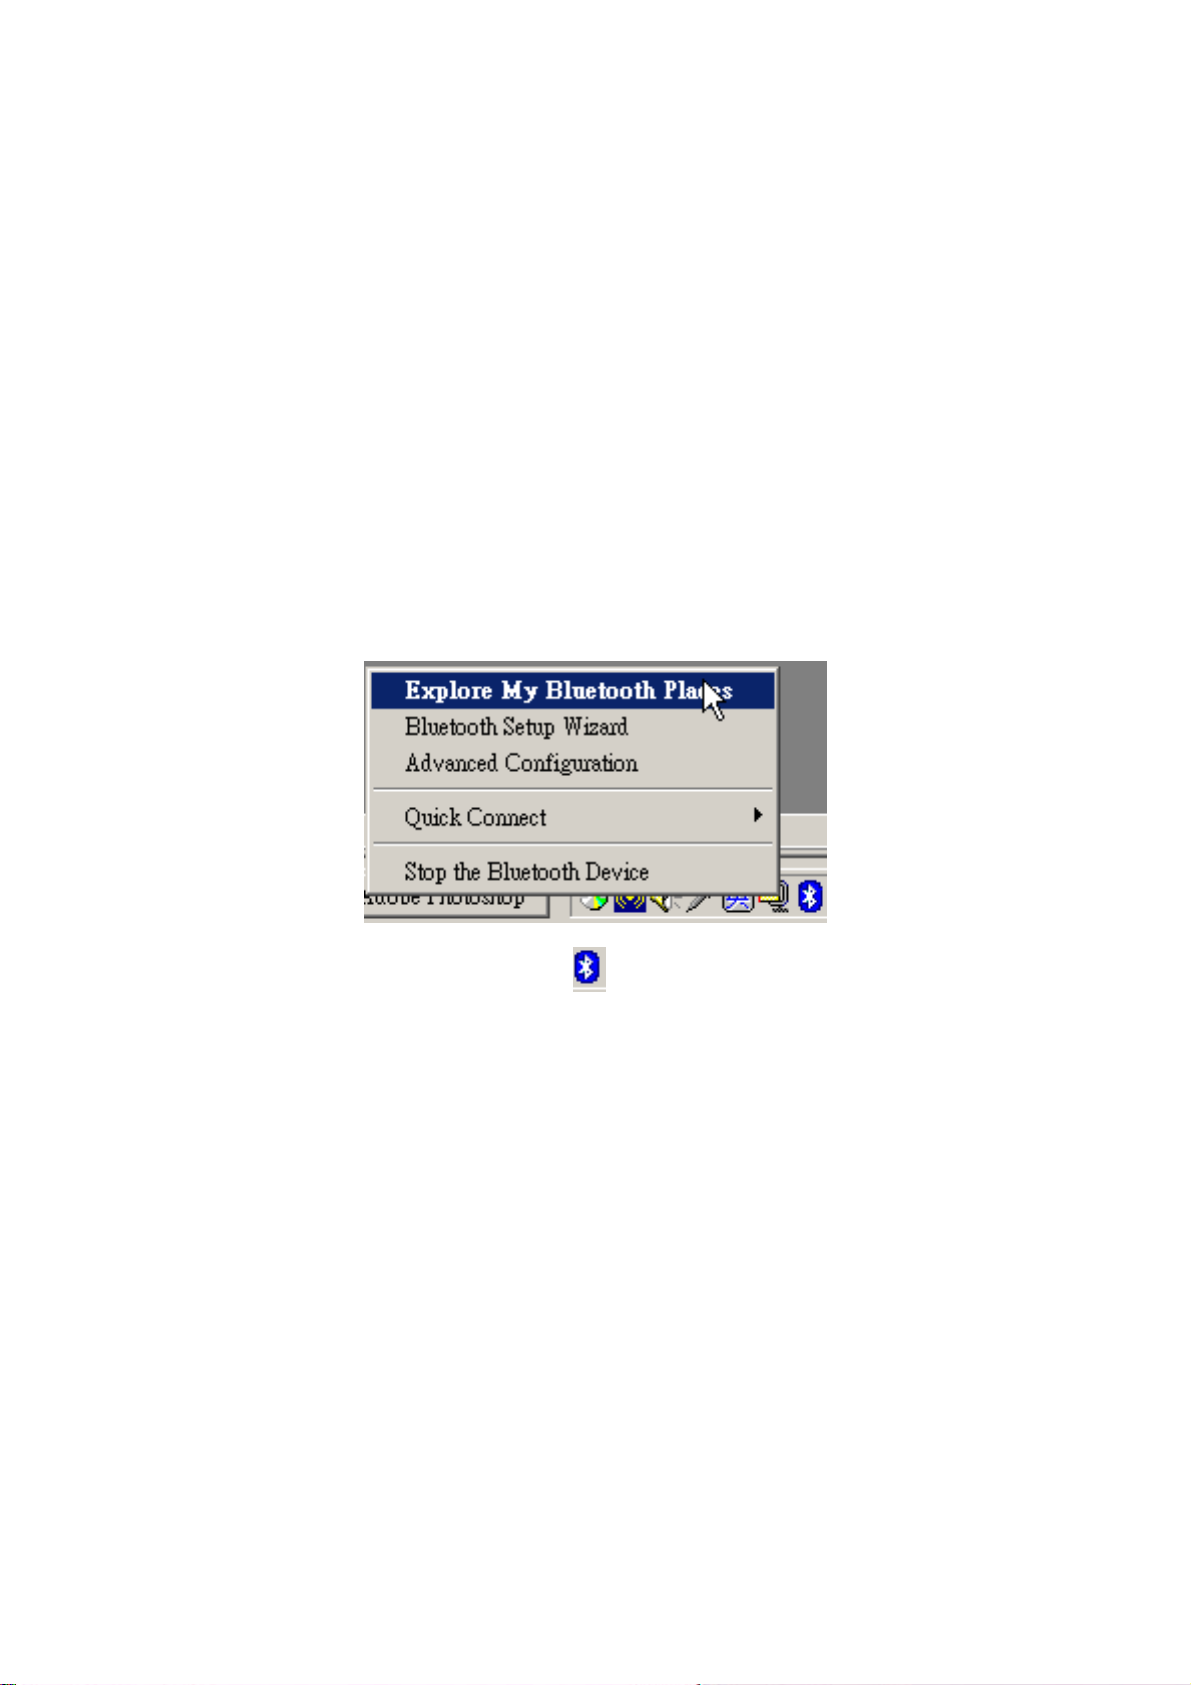
Access the Bluetooth Configuration Panel—right-click the Bluetooth
icon, and then select Advanced Configuration.
Access the Quick Connect option—right-click the Bluetooth icon, select Quick
Connect, and then select the type of service to which you wish to connect.
Start/Stop Bluetooth on this computer.
5.4 ACCESS MY BLUETOOTH PLACES
My Bluetooth Places is part of Windows Explorer. There are multiple ways to access My
Bluetooth Places:
In the Windows system tray,
Right-click the Bluetooth icon and select Explore My Bluetooth Places. Or
Double-click the Bluetooth icon
On the desktop, double-click My Bluetooth Places icon.
Open Windows Explorer and select My Bluetooth Places in the Folders pane or from the
Address shortcut menu.
on the system tray.
5.5 ICONS USED FOR BLUETOOTH DEVICES AND
SERVICES
Bluetooth icons provide at-a-glance feedback about a device or service's status by
changing appearance.
The Bluetooth icon in the Windows system tray provides feedback about Bluetooth
status.
23
Page 24
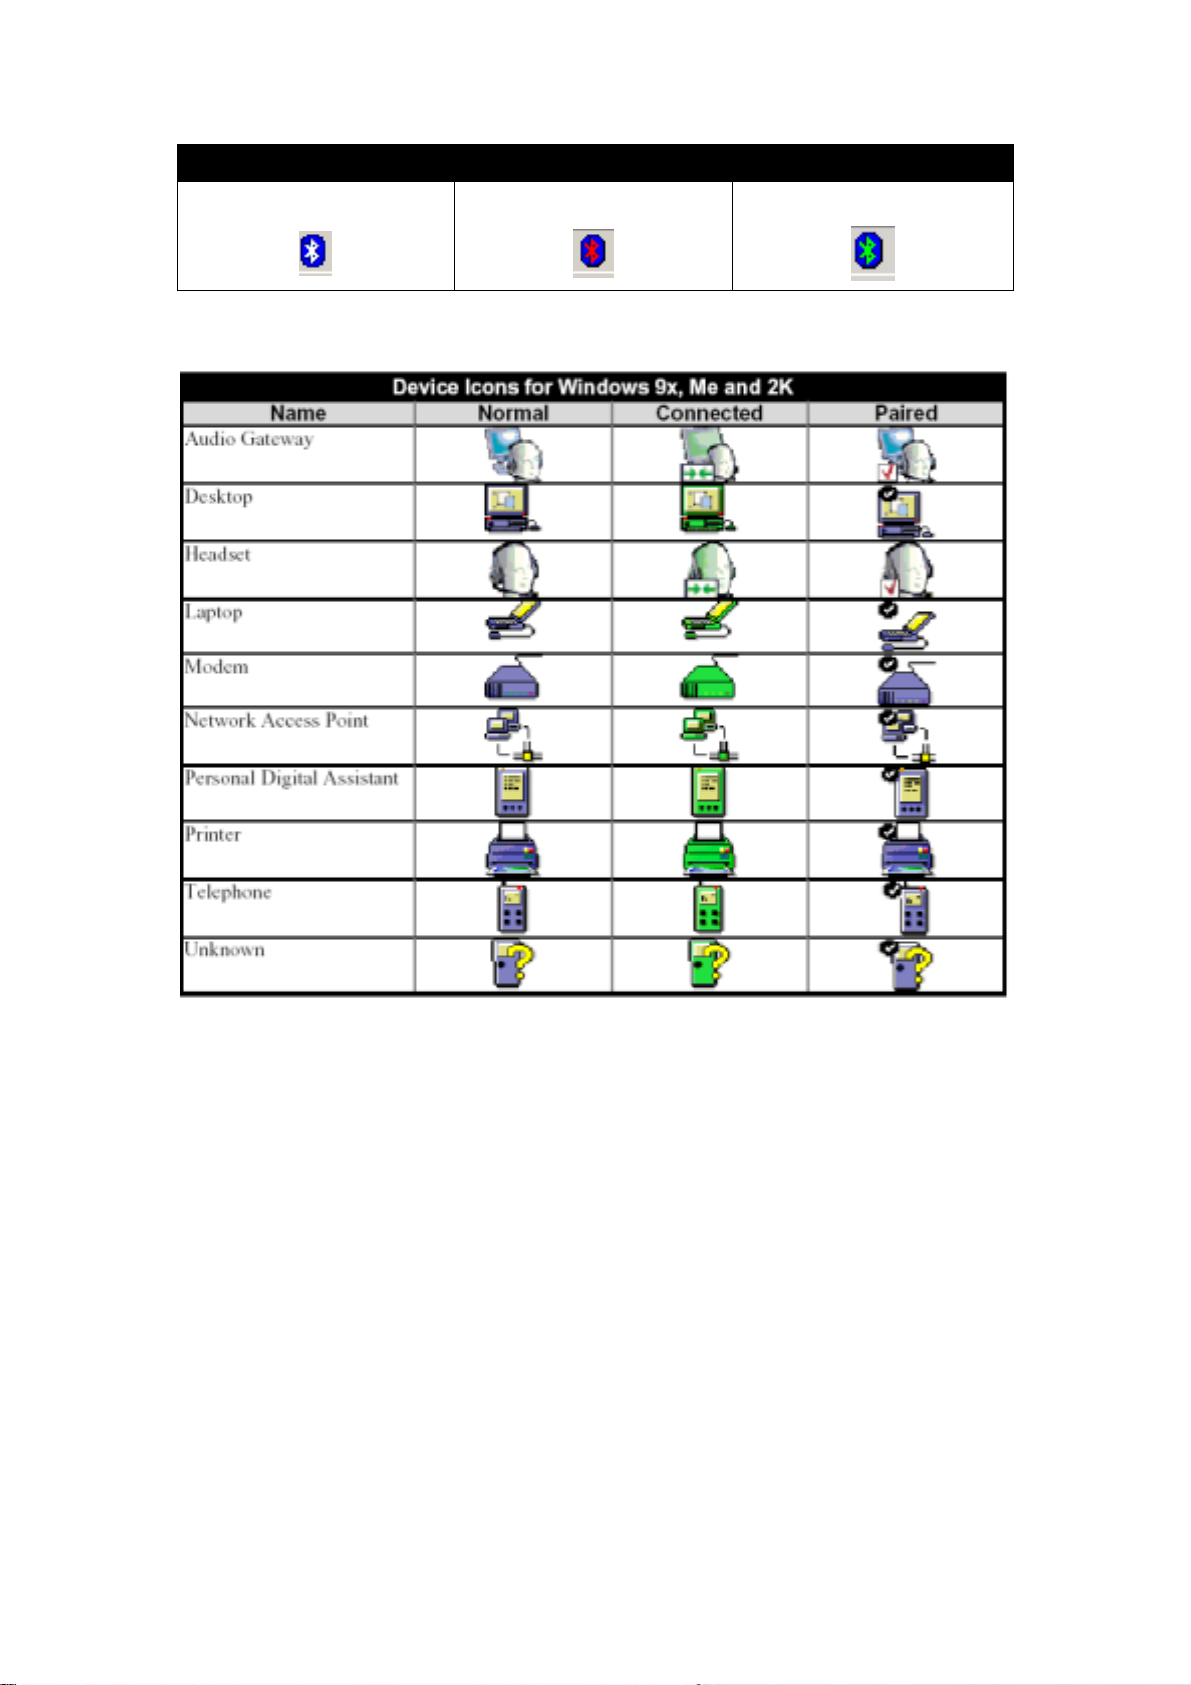
Enabled Disabled Connected
Blue with White
Bluetooth Icon Indicates Bluetooth Status
Blue with Red
Figure 1: Bluetooth Icon
Blue with Green
Figure 2: Device Icons for Windows 9x, Me and 2K
24
Page 25
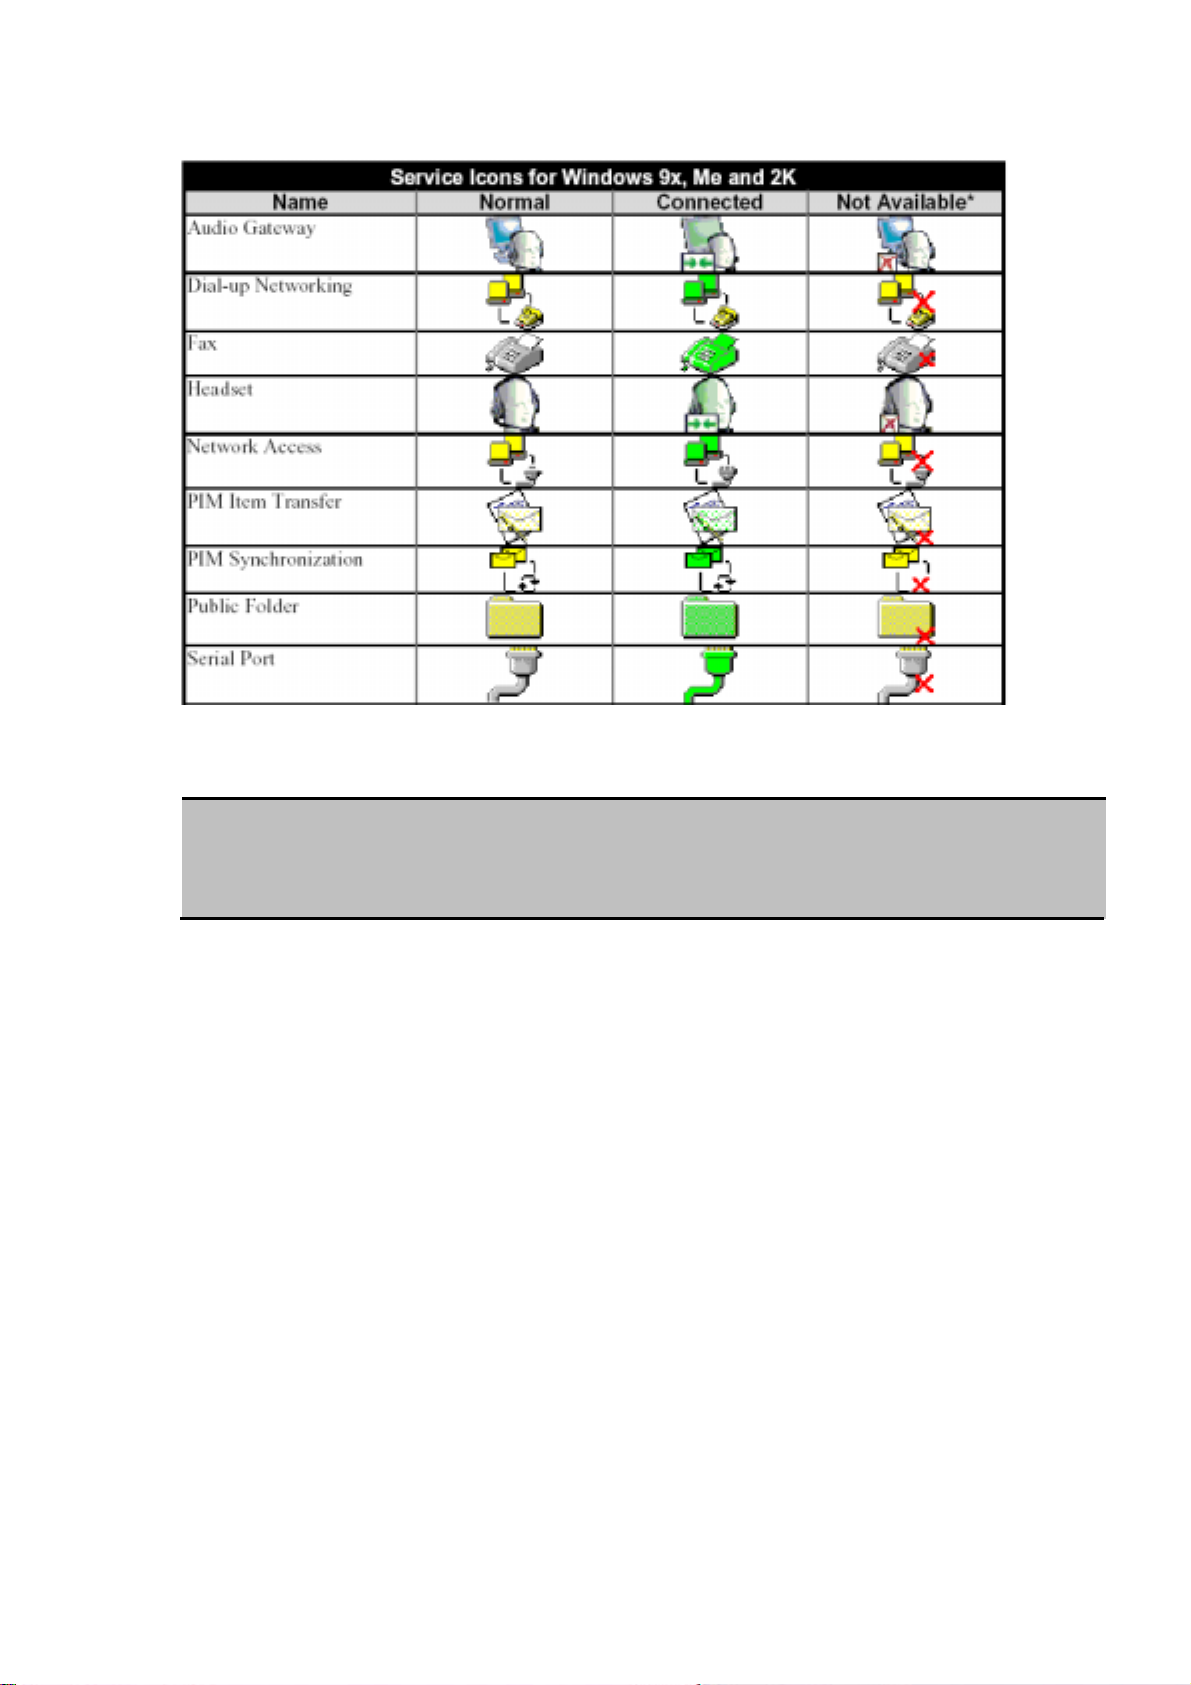
Figure 3: Service Icons for Windows 9x, Me and 2K
Service Icons for Windows 9x, Me and 2K
Note:
Services may be unavailable because they are in use or because the necessary hardware is not
installed.
25
Page 26
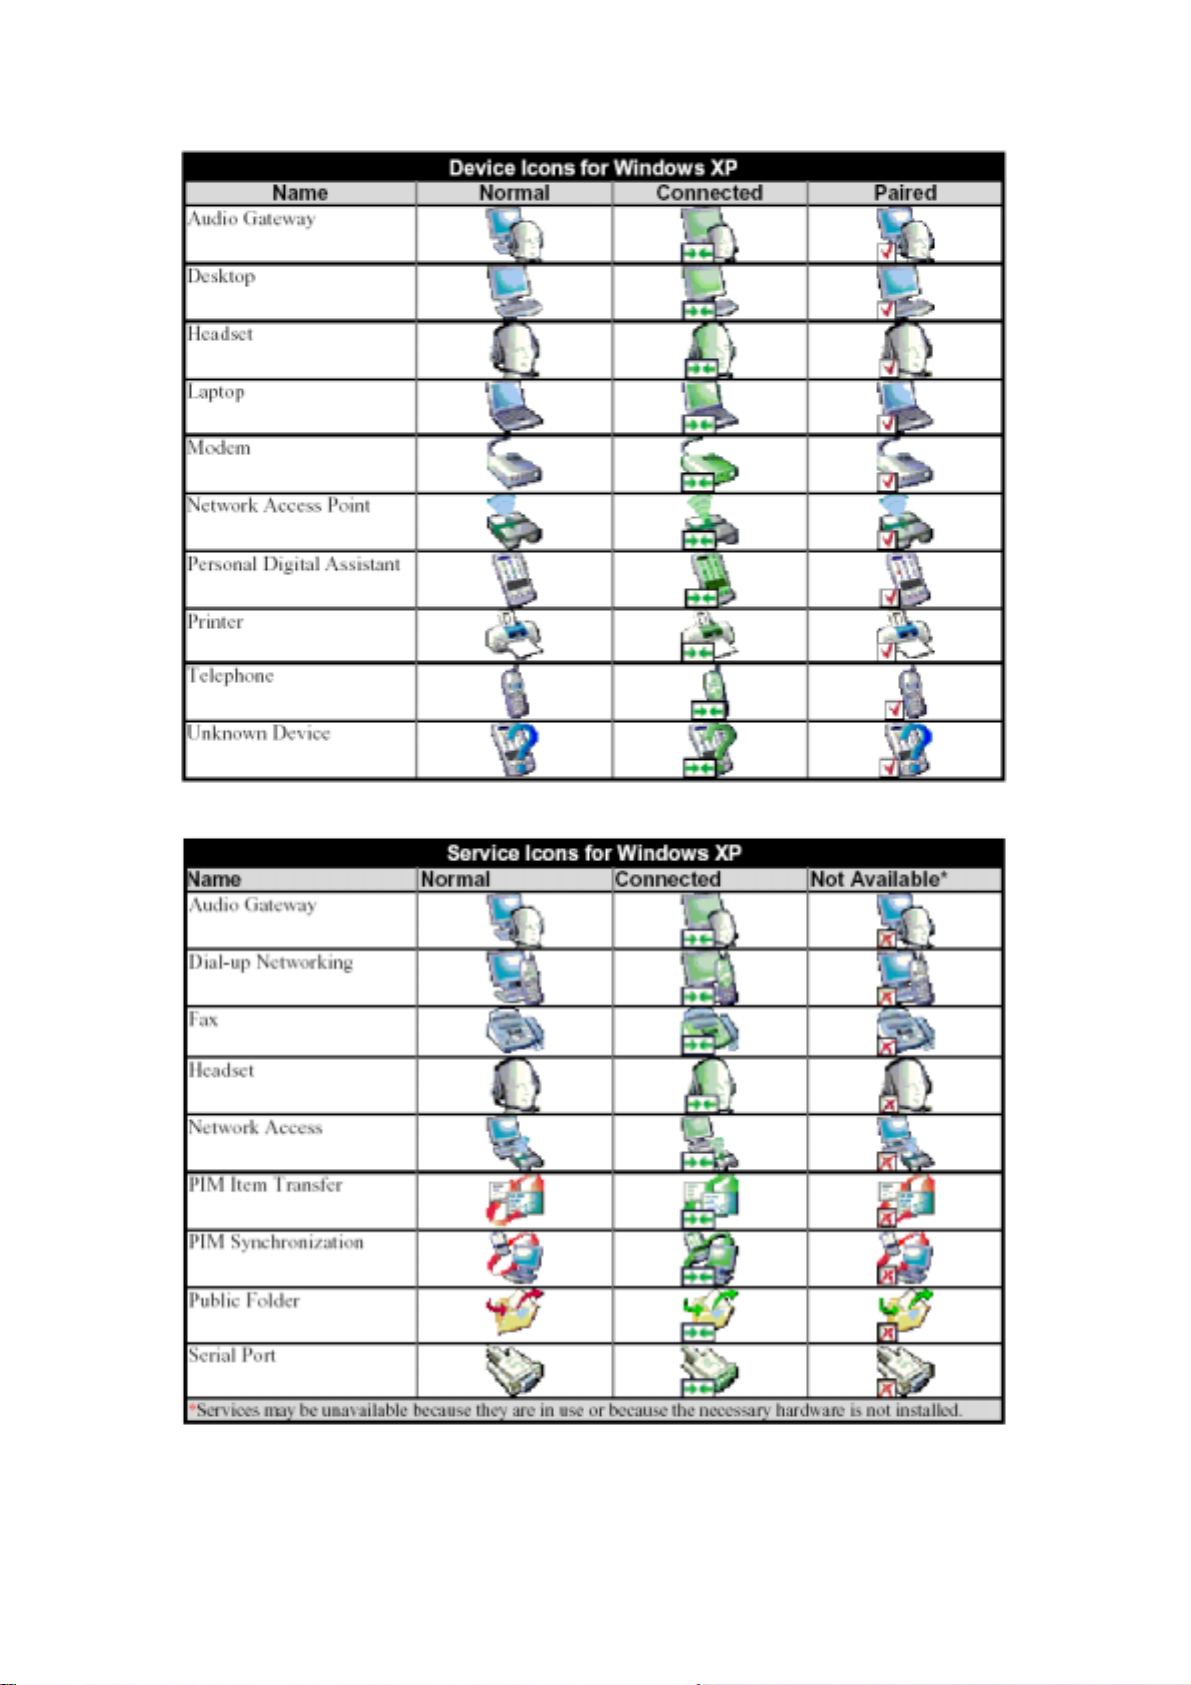
Figure 4: Device Icons for Windows XPDevice Ions for Windows
Figure 5: Service Icons for Windows XP
26
Page 27

NOTE:
Services may be unavailable because they are in use or because the necessary hardware is not
installed.
27
Page 28
Chapter 6
Basic Operations
6.1 START OR STOP BLUETOOTH
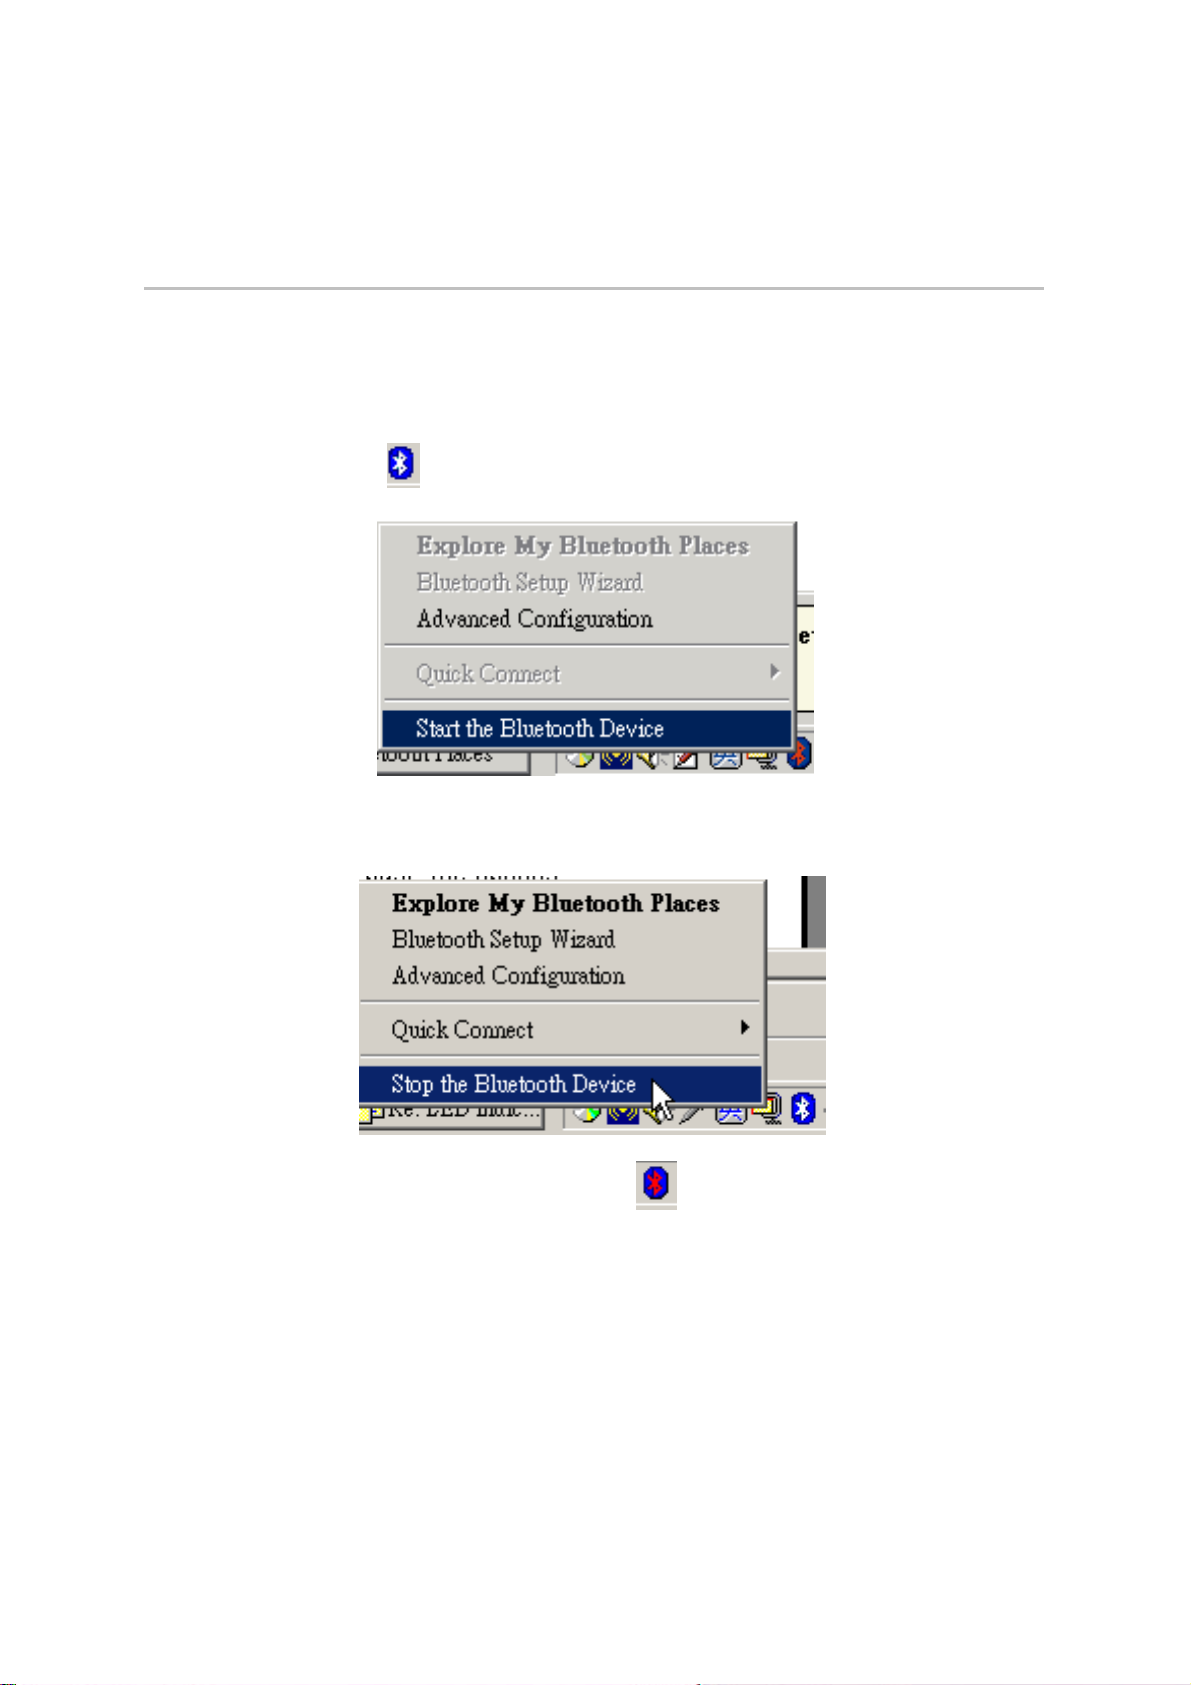
To start Bluetooth: In the Windows system tray, right-click the Bluetooth icon and
select “Start the Bluetooth Device”. The Bluetooth icon is blue in color with a
white insert
To stop Bluetooth: In the Windows system tray, right-click the Bluetooth icon and
select “Stop the Bluetooth Device”.
when Bluetooth is running.
.
The Bluetooth icon is blue in color with a red insert when Bluetooth is stopped.
6.2 CREATE A CONNECTION FROM THE BLUETOOTH
ICON IN THE SYSTEM TRAY
In the Windows system tray, right-click the Bluetooth icon, select “Quick Connect” and then
the Bluetooth service that you wish to use.
28
Page 29
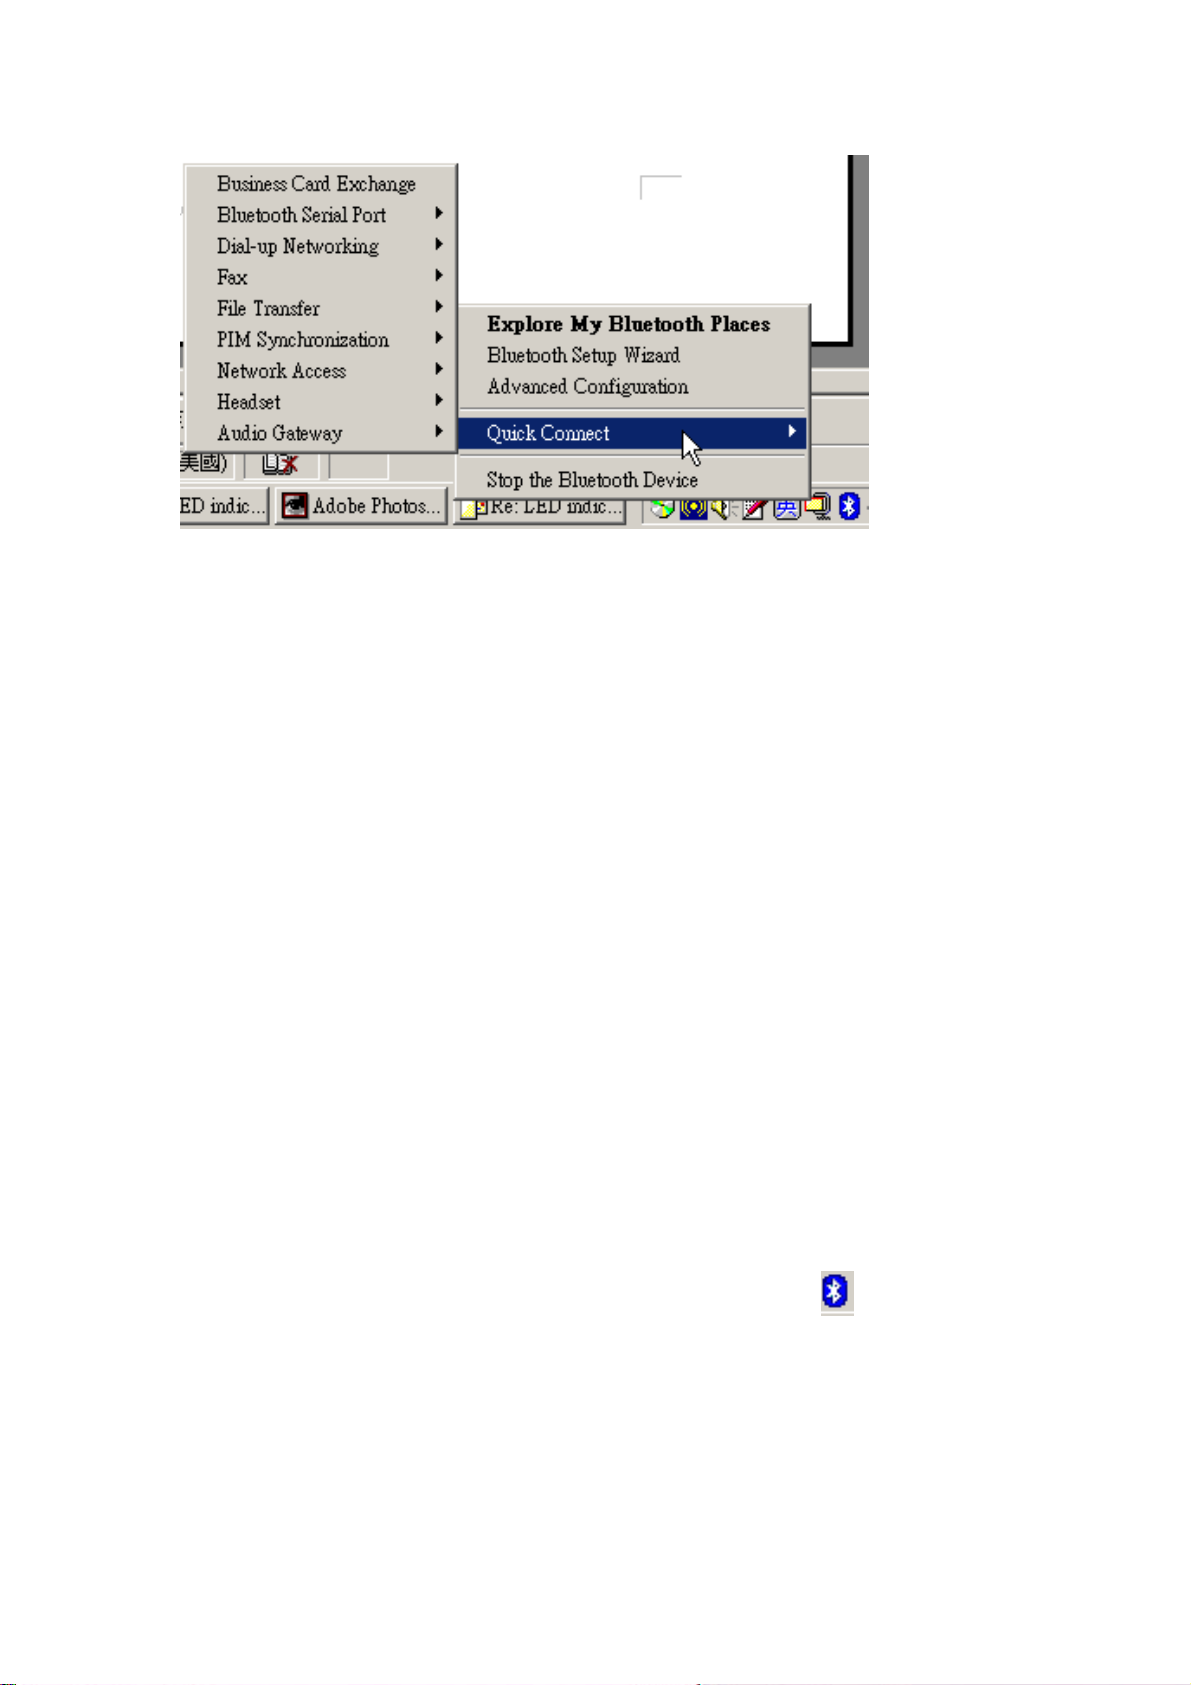
If this computer has created a connection to the desired type of service in the past, the options
on the shortcut menu are:
The name(s) of any device(s) with which prior connections to this type of service
have been established. Select a name from the list to re-establish connection.
Other Devices …Select this option to search for additional devices that potentially
provide the desired service, select a device from the list, and then click Connect.
If this computer has never created a connection to this type of service, the only option on the
shortcut menu is “Find Devices….” Select this option to search for devices that potentially
provide the desired service, select a device from the list, and then click “Connect”.
6.3 CREATE A CONNECTION USING THE BLUETOOTH
SETUP WIZARD
From Bluetooth Explorer
Right-click My Bluetooth Places and select Bluetooth Setup Wizard
Or
From the Bluetooth menu, select Bluetooth Setup Wizard
Or
From the Windows system tray: right-click the Bluetooth icon
Bluetooth Setup Wizard. The Bluetooth Setup Wizard will be displayed.
29
and select
Page 30
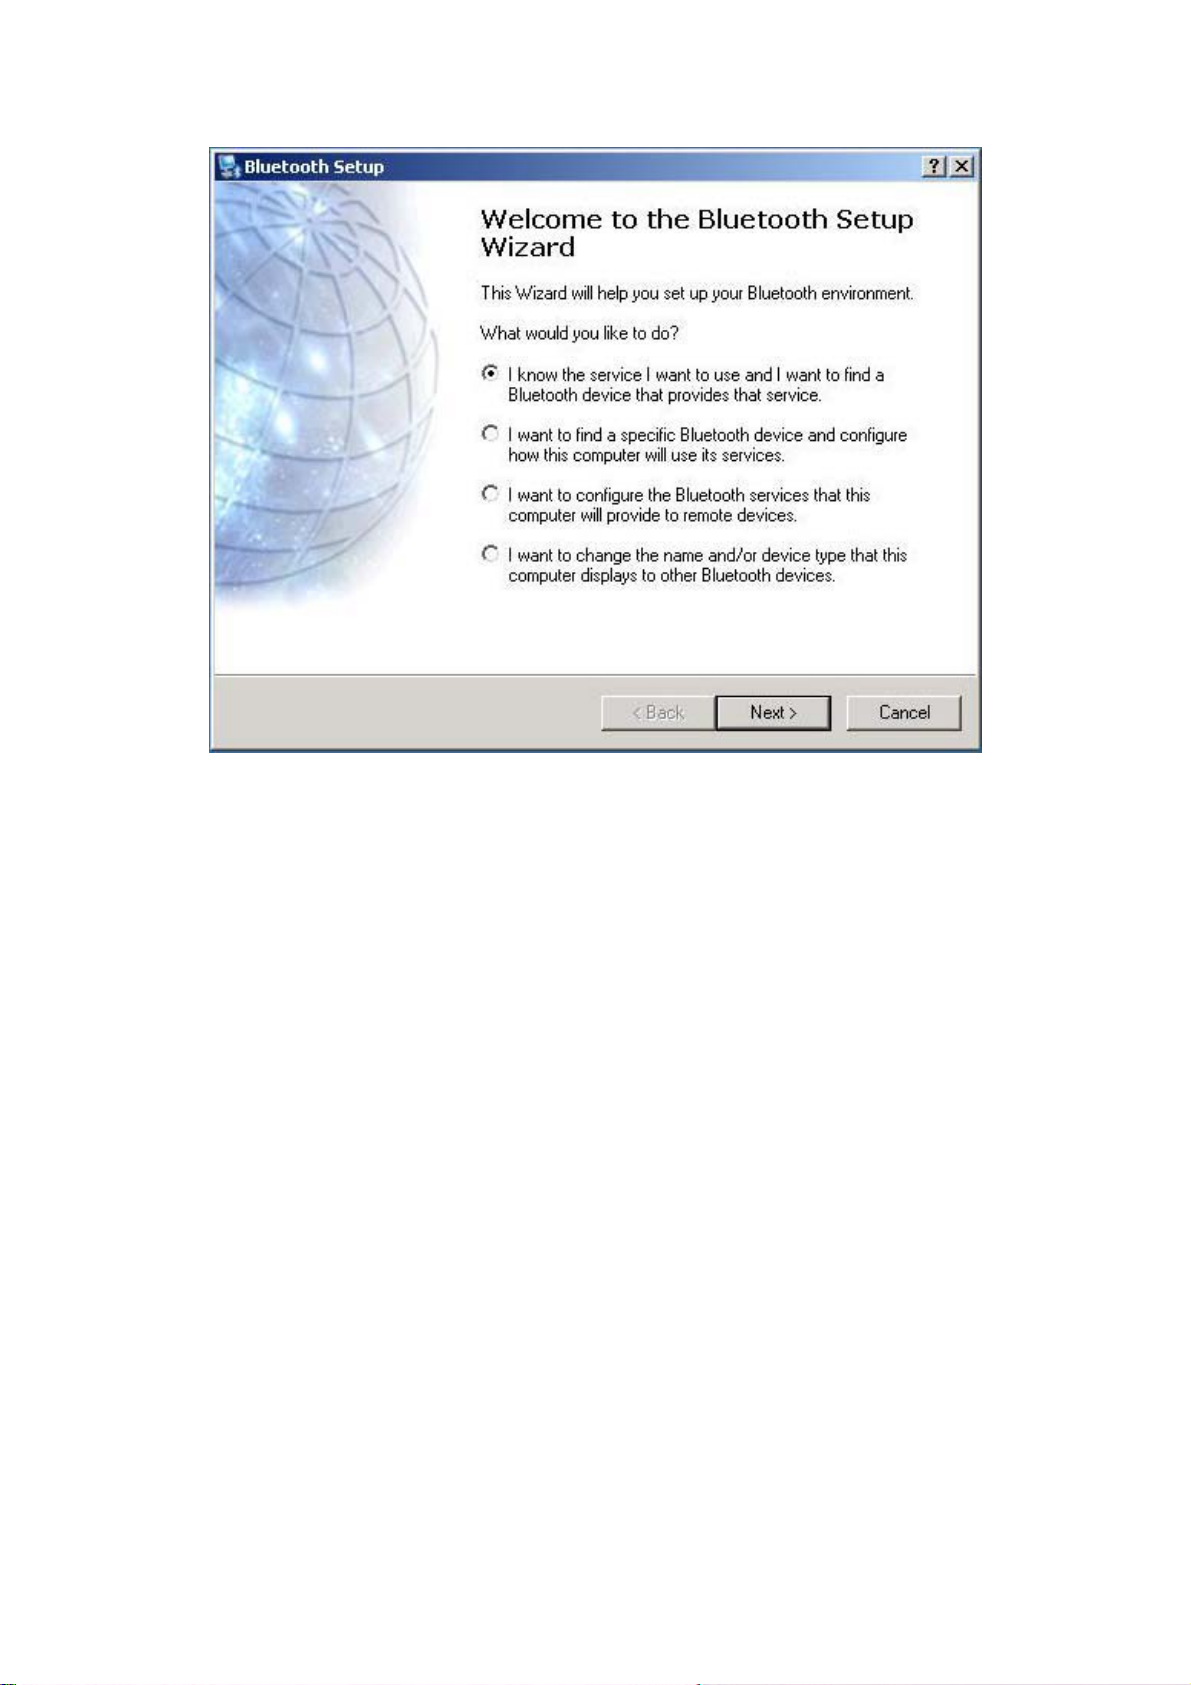
You can click the radio button of each item and follow the wizard's on-screen instructions.
6.4 CREATE A CONNECTION FROM BLUETOOTH
EXPLORER
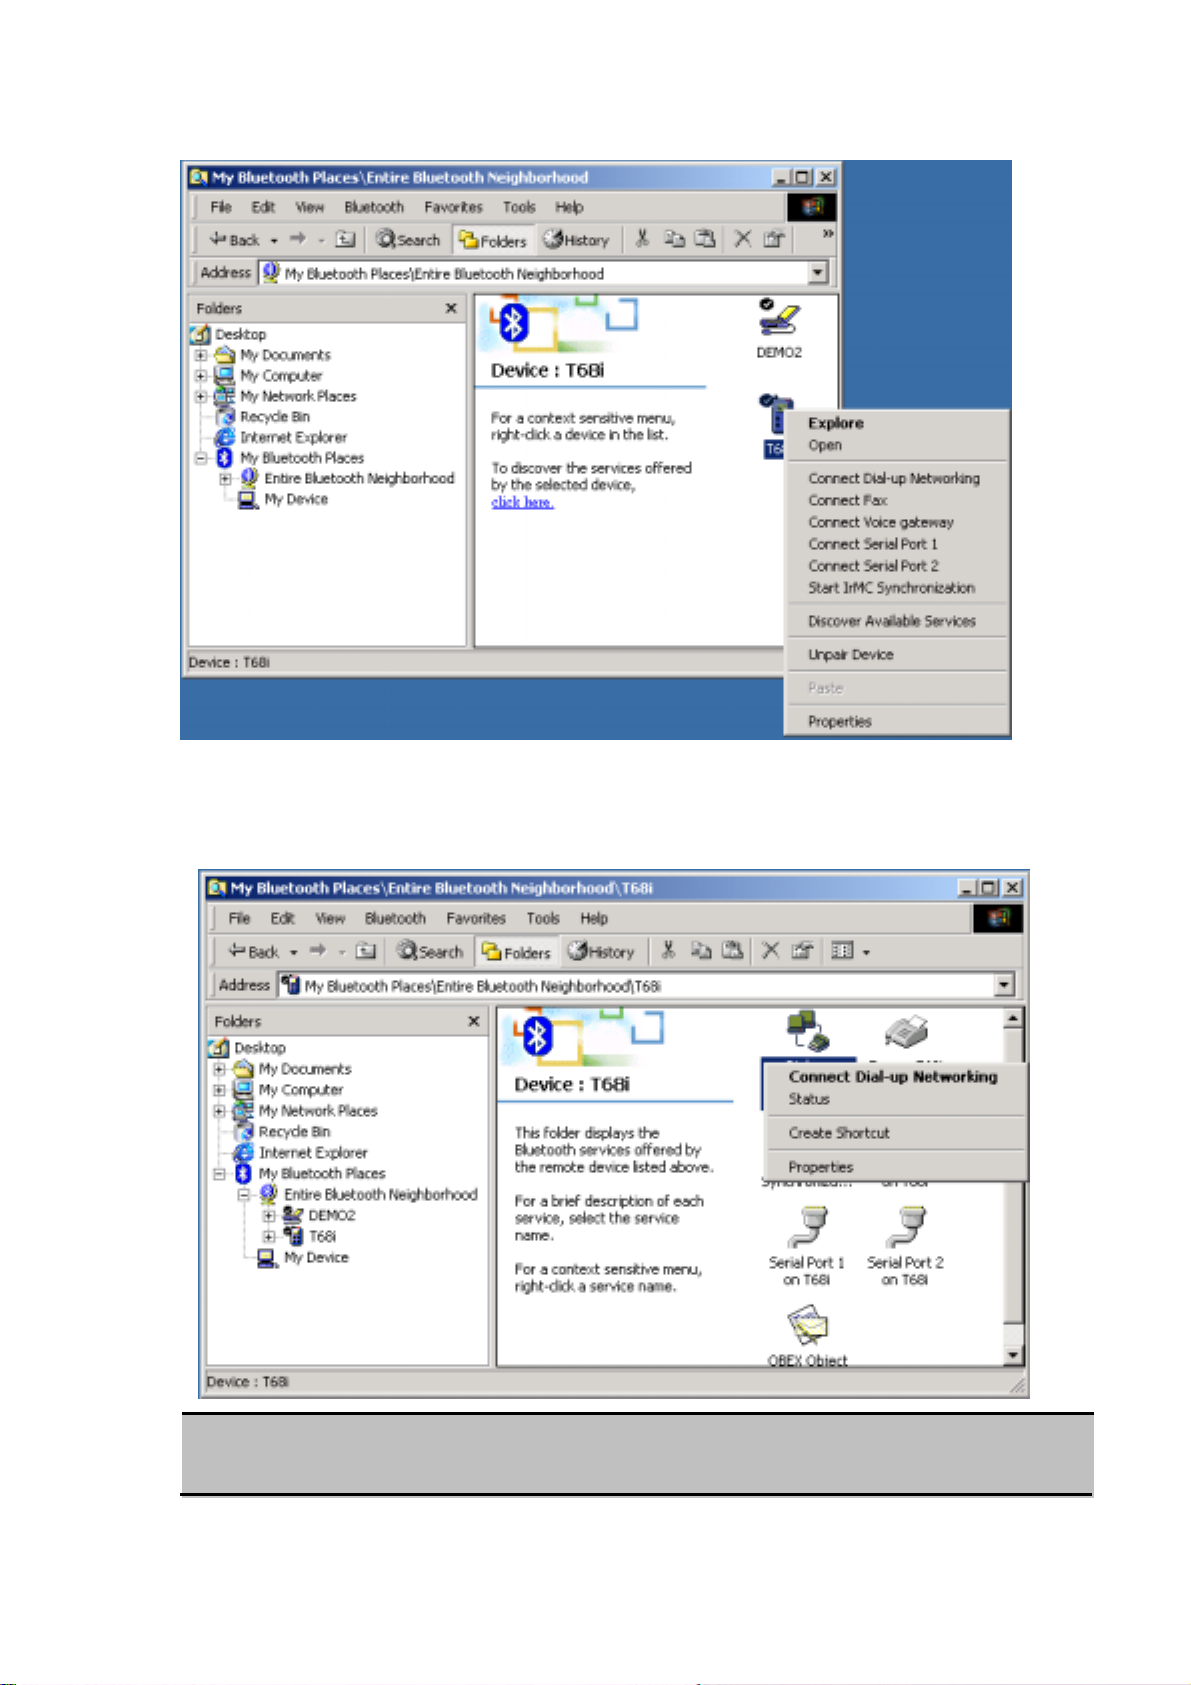
From Bluetooth Explorer
Right-click a device name and select “Connect to…” the desired service.
30
Page 31
or
In the Folders pane, select a device, and then, in the right pane, right-click a
service provided by that device and select “Connect.”
NOTE:
Only available services are displayed in the menus.
31
Page 32
6.5 FIND BLUETOOTH DEVICES
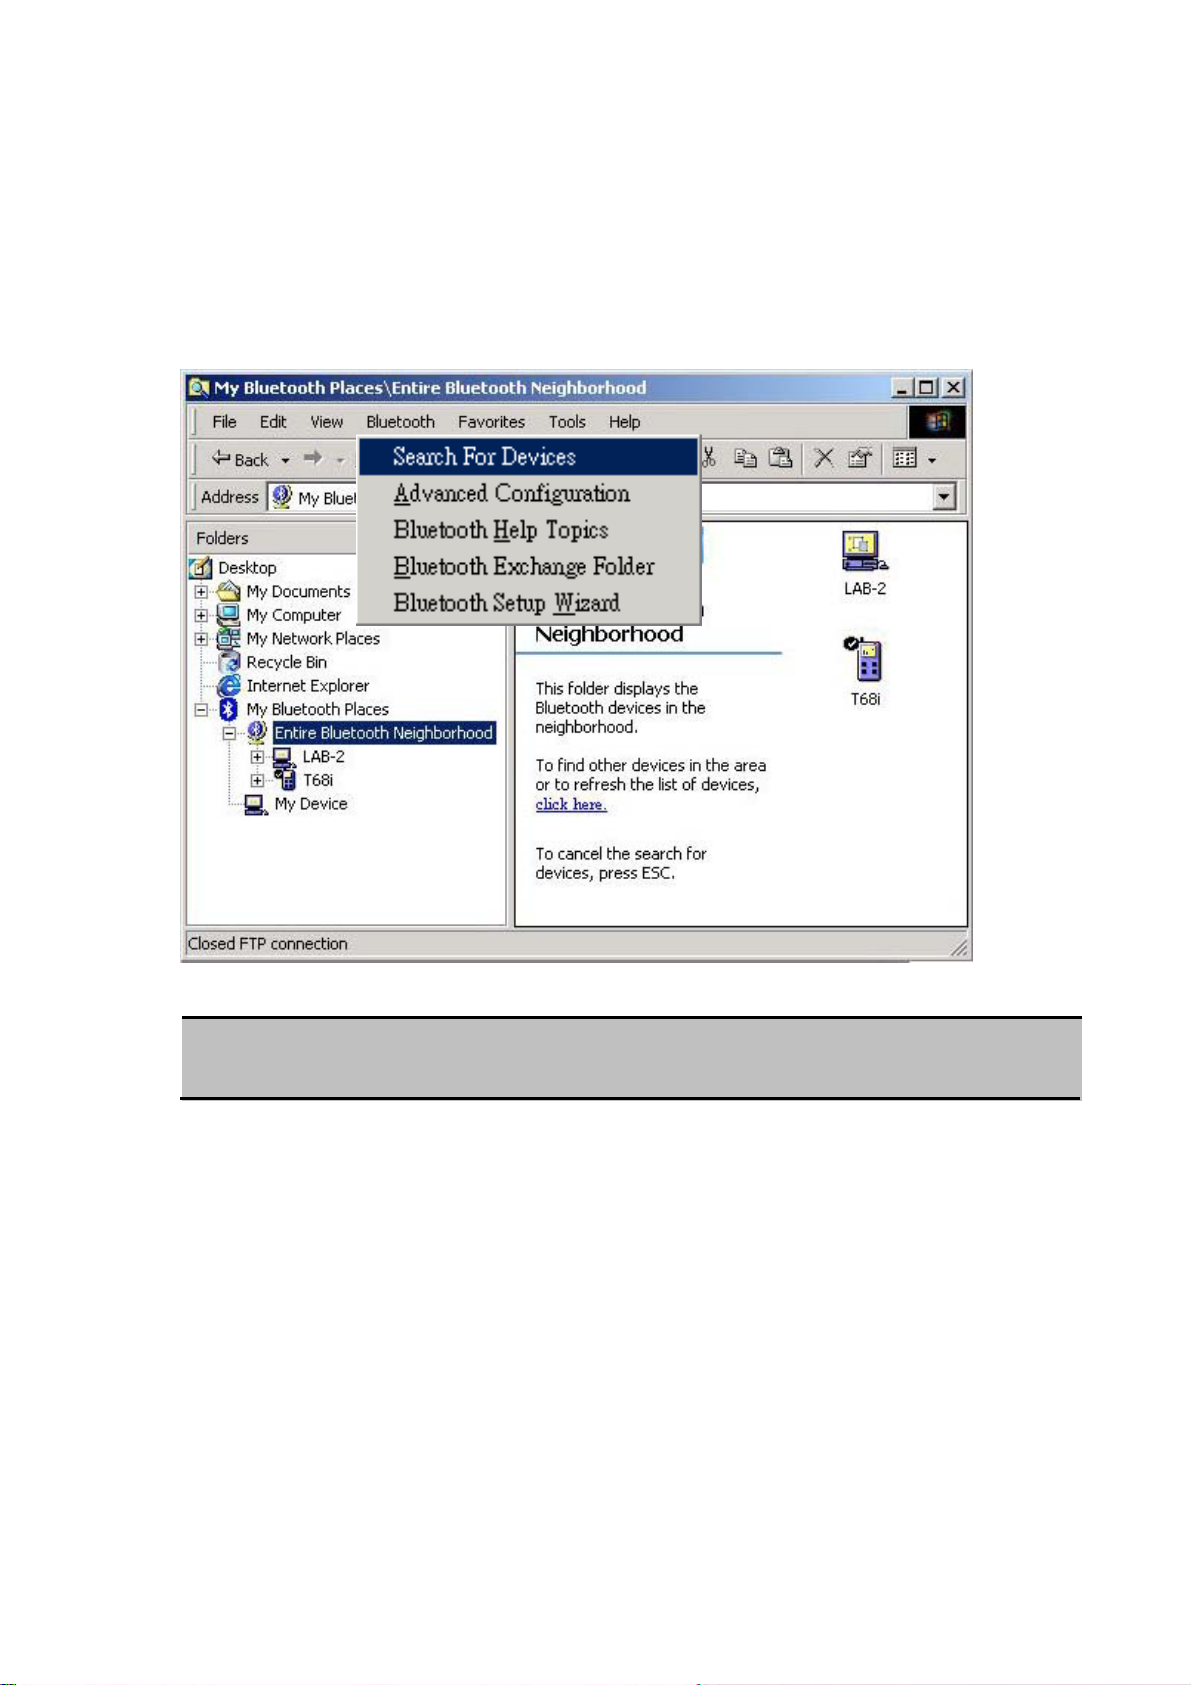
Search for Devices looks for Bluetooth devices in the vicinity and displays the devices that it
finds in My Bluetooth Places.
To start a search for devices, in the Folders pane of My Bluetooth Places, select Entire
Bluetooth Neighborhood, and then, from the Bluetooth menu, select Search for Devices.
NOTE:
The Bluetooth menu is only visible when My Bluetooth Places is active.
6.5.1 Periodic Search for Devices
Bluetooth can be configured to automatically search for devices on a regular basis
(Bluetooth Configuration Panel > Discovery tab). One of the advantages of Bluetooth is the
mobility that the wireless connections allow. However, mobility means that devices may move
in or out of connection range during the time between the automatic updates performed by
Bluetooth. To be certain that the displayed list of devices in the neighborhood is current, or if
automatic periodic inquiry is not enabled, force an update of the device list using the technique
described in Search for Devices, above.
You may follow the following steps to enable this function:
Right-click the Bluetooth icon on the system tray and select “Advanced
Configuration” from the shortcut menu.
32
Page 33
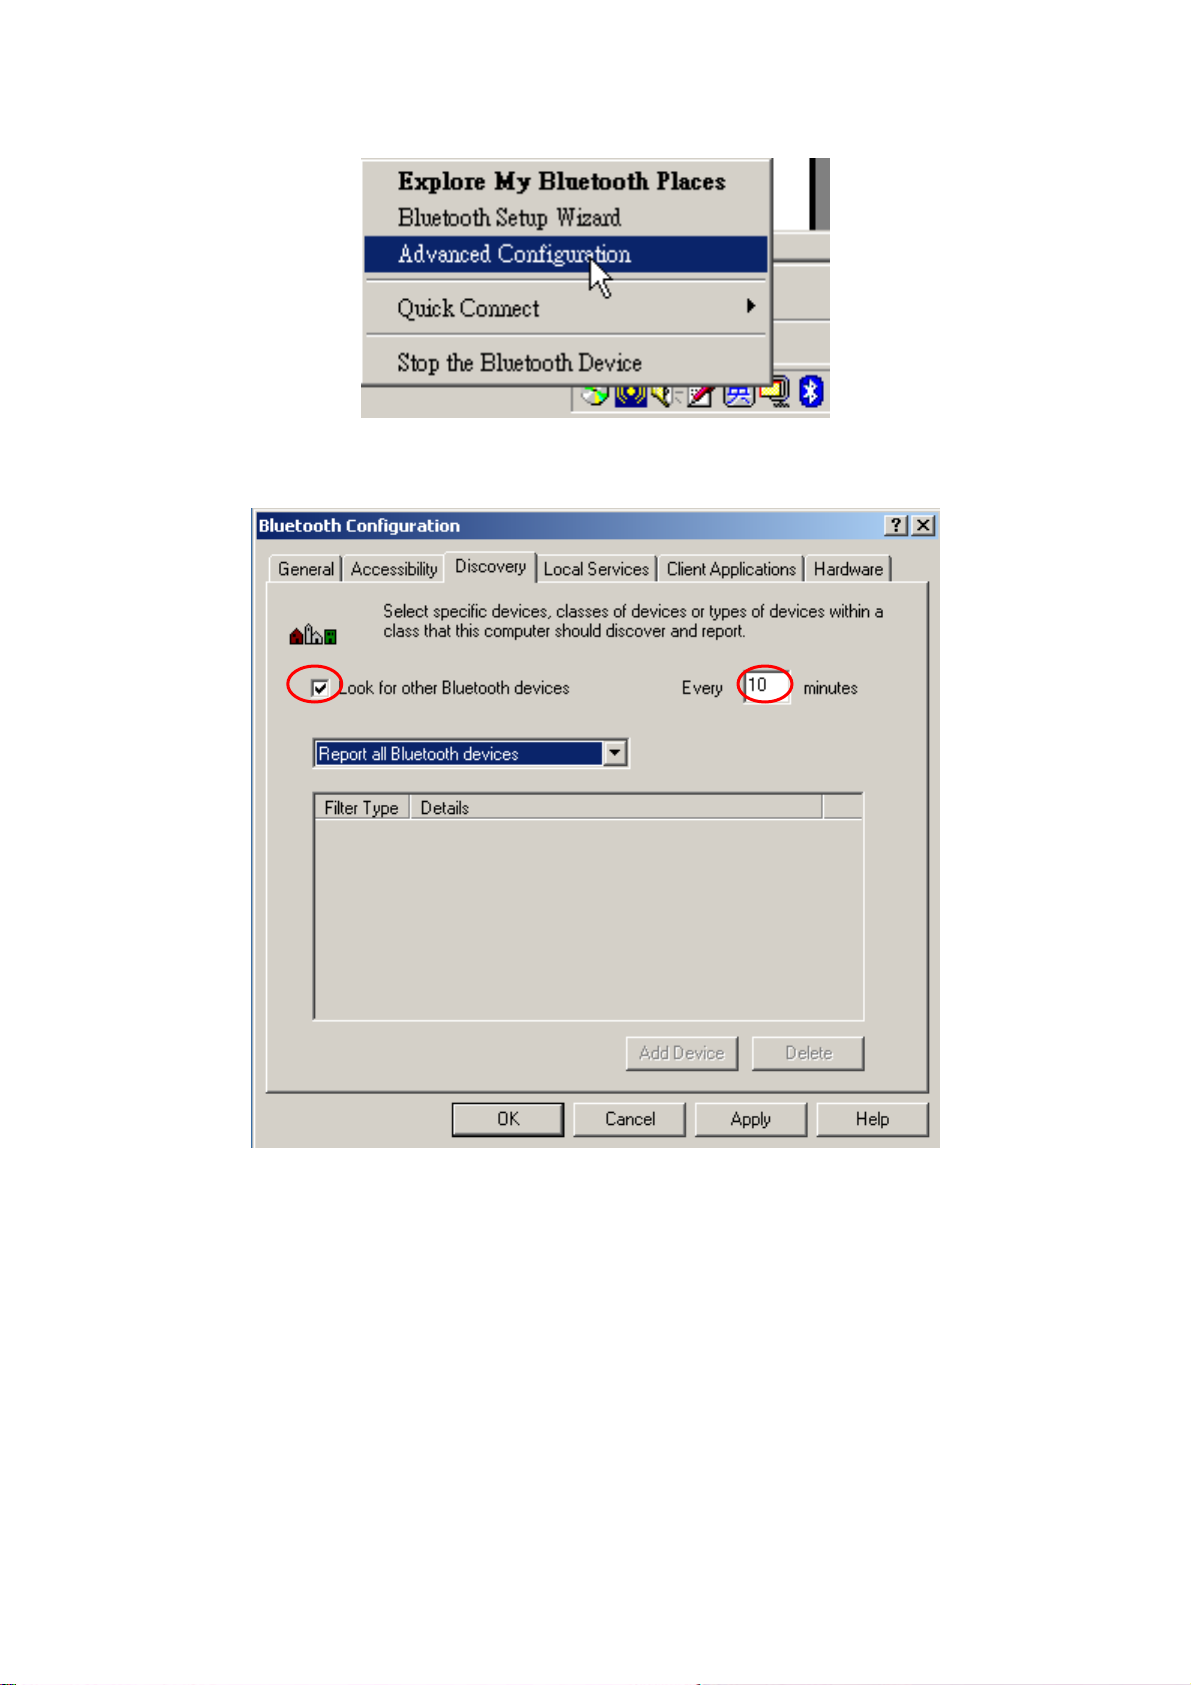
From the Bluetooth Configuration screen, click “Discovery” Tab. Check the box of
“Look for other Bluetooth devices” and input the interval.
Some devices within connection range may not show up in the list of devices found
because:
Your device is configured to report only specific types or classes of devices
(Bluetooth Configuration Panel > Discovery tab, on your device).
The unlisted device is configured to be non-discoverable (Bluetooth
Configuration Panel > Accessibility tab, on the un-listed device).
6.6 FIND A SERVICE
The process of determining the services that a device provides is called Service
33
Page 34
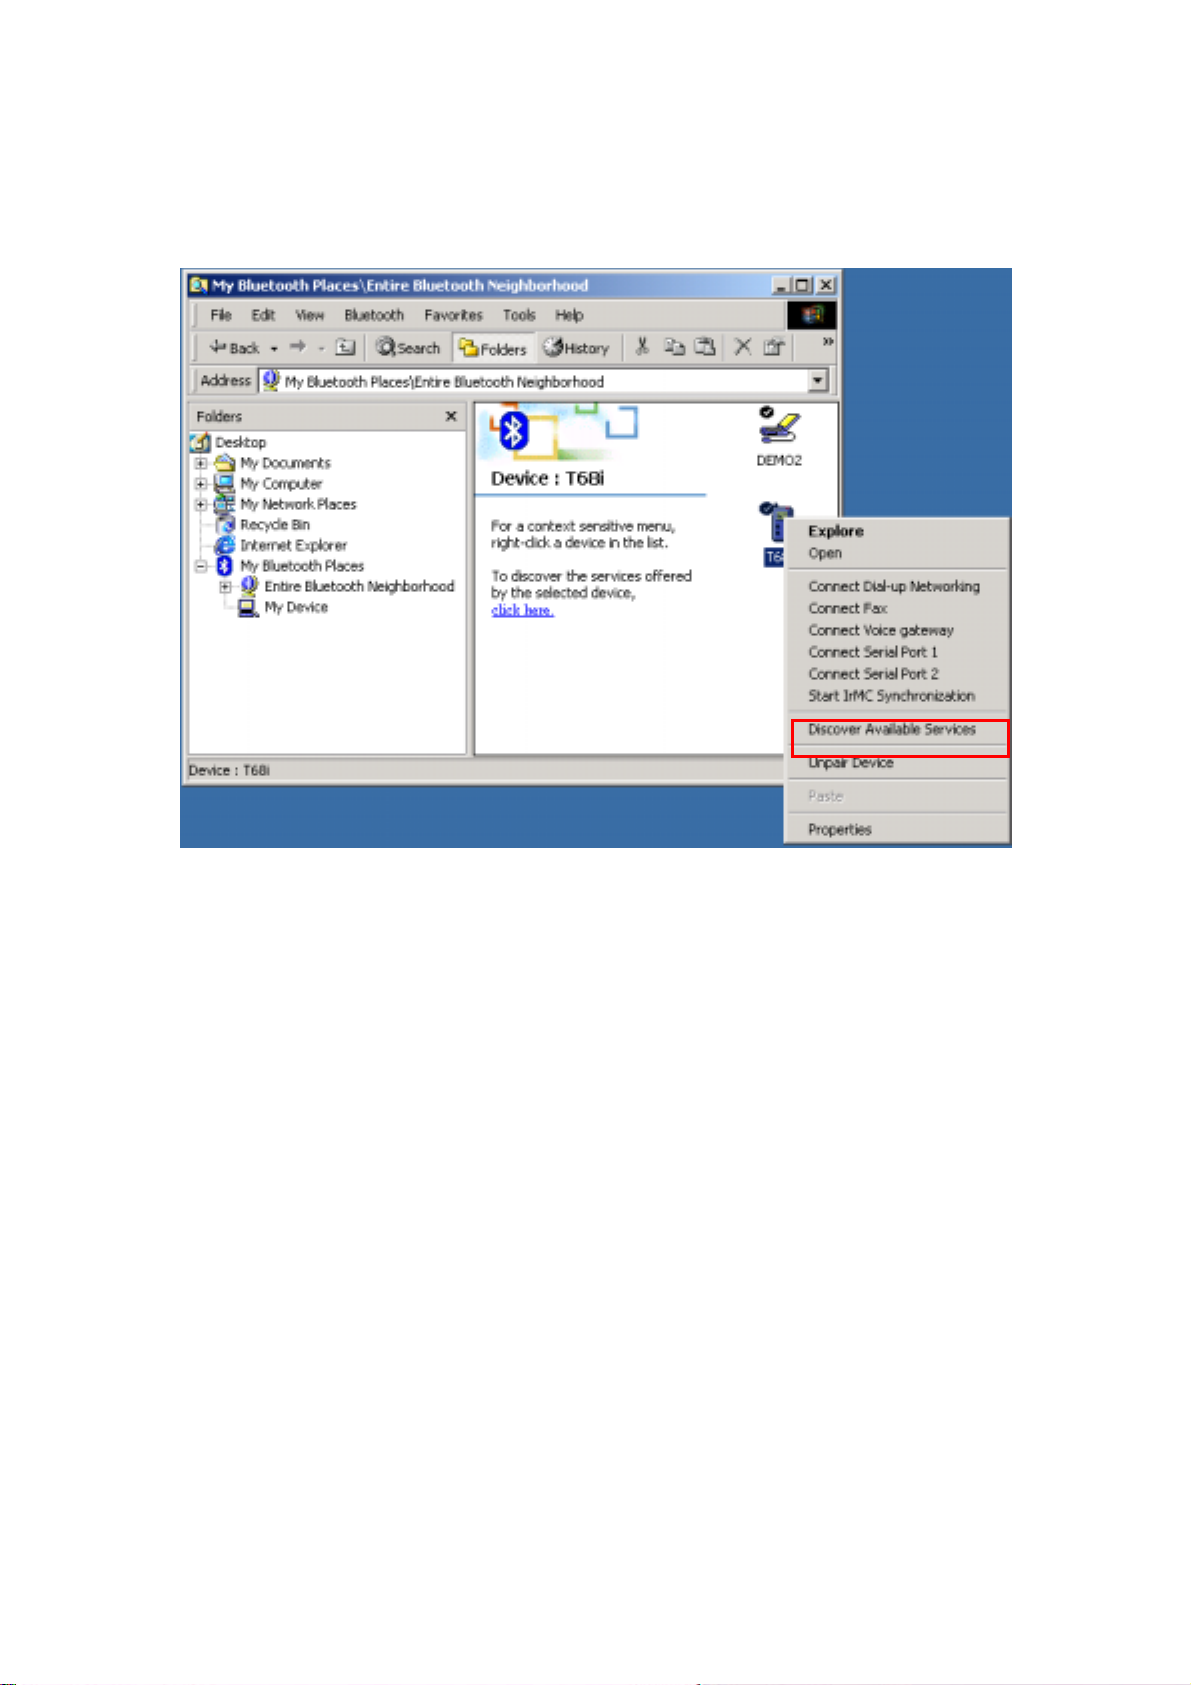
Discovery.
To initiate a Service Discovery, in the Folders pane of My Bluetooth Places, right-click a
device name and select Discover Available Services from the shortcut menu.
Bluetooth services are those things that this computer can do for remote Bluetooth
devices. For example, if this computer allows a remote Bluetooth device to send a fax using a
fax modem that is physically attached to this computer, then this computer is providing the
Bluetooth fax service.
Some services are hardware dependant; this computer cannot provide the fax service unless it
has a physical fax modem, for example. Some Bluetooth services use virtual “hardware.” The
Bluetooth Serial Port service, for example, does not use a physical port on this computer.
Instead, it creates virtual serial ports that Windows applications can see and use as if they
were actual physical ports. Each Bluetooth service that this computer is capable of providing
can be started automatically when Bluetooth starts. Each service can be setup to require
security measures before allowing a remote Bluetooth device to connect. Bluetooth services
require a Bluetooth application on the remote device; services and applications usually have
coinciding names; i.e., there is a Bluetooth Fax Service and a Bluetooth Fax Application.
The services supported by Bluetooth are:
Bluetooth Serial Port—a wireless connection between two devices. This
connection can be used by applications as though a physical serial cable
34
Page 35

connected the devices.
Dial-up Networking—allows a device to use a modem that is physically attached
to another Bluetooth device.
Fax—allows a device to send a fax using a remote Bluetooth cell phone, modem, or
computer.
File Transfer—allows a device to perform file system operations on another
Bluetooth device; browse, open, copy, etc.
Headset—allows a Bluetooth headset to be used as the audio input/output
mechanism for another Bluetooth device, such as a computer or cell phone.
PIM Item Transfer—allows two Bluetooth devices to exchange Personal
Information Manager data such as business cards, calendar items, email
messages, and notes.
PIM Synchronization—allows two Bluetooth devices to synchronize Personal
Information Manager data.
Network Access—allows a device to access a Local Area Network via a second
Bluetooth device that is physically connected to the network or allows a remote
device to become part of an ad hoc network provided by the Bluetooth server.
Audio Gateway—allows the microphone/speakers on Bluetooth device (typically a
computer) to be used as the audio input/output mechanism for a remote Bluetooth
device, such as a cell phone.
All Bluetooth servers do not necessarily provide all of these services. For example,
network gateways may provide only the Network Access service.
6.7 BLUETOOTH CONNECTION STATUS
The Bluetooth Connection Status dialog box displays information about the state of a
connection and provides a means to disconnect an active connection.
Display the Connection Status dialog box: in My Bluetooth Places, from the Folders pane,
select a device, and then, in the right pane of My Bluetooth Places, right-click a service name
and select Status from the shortcut menu.
35
Page 36
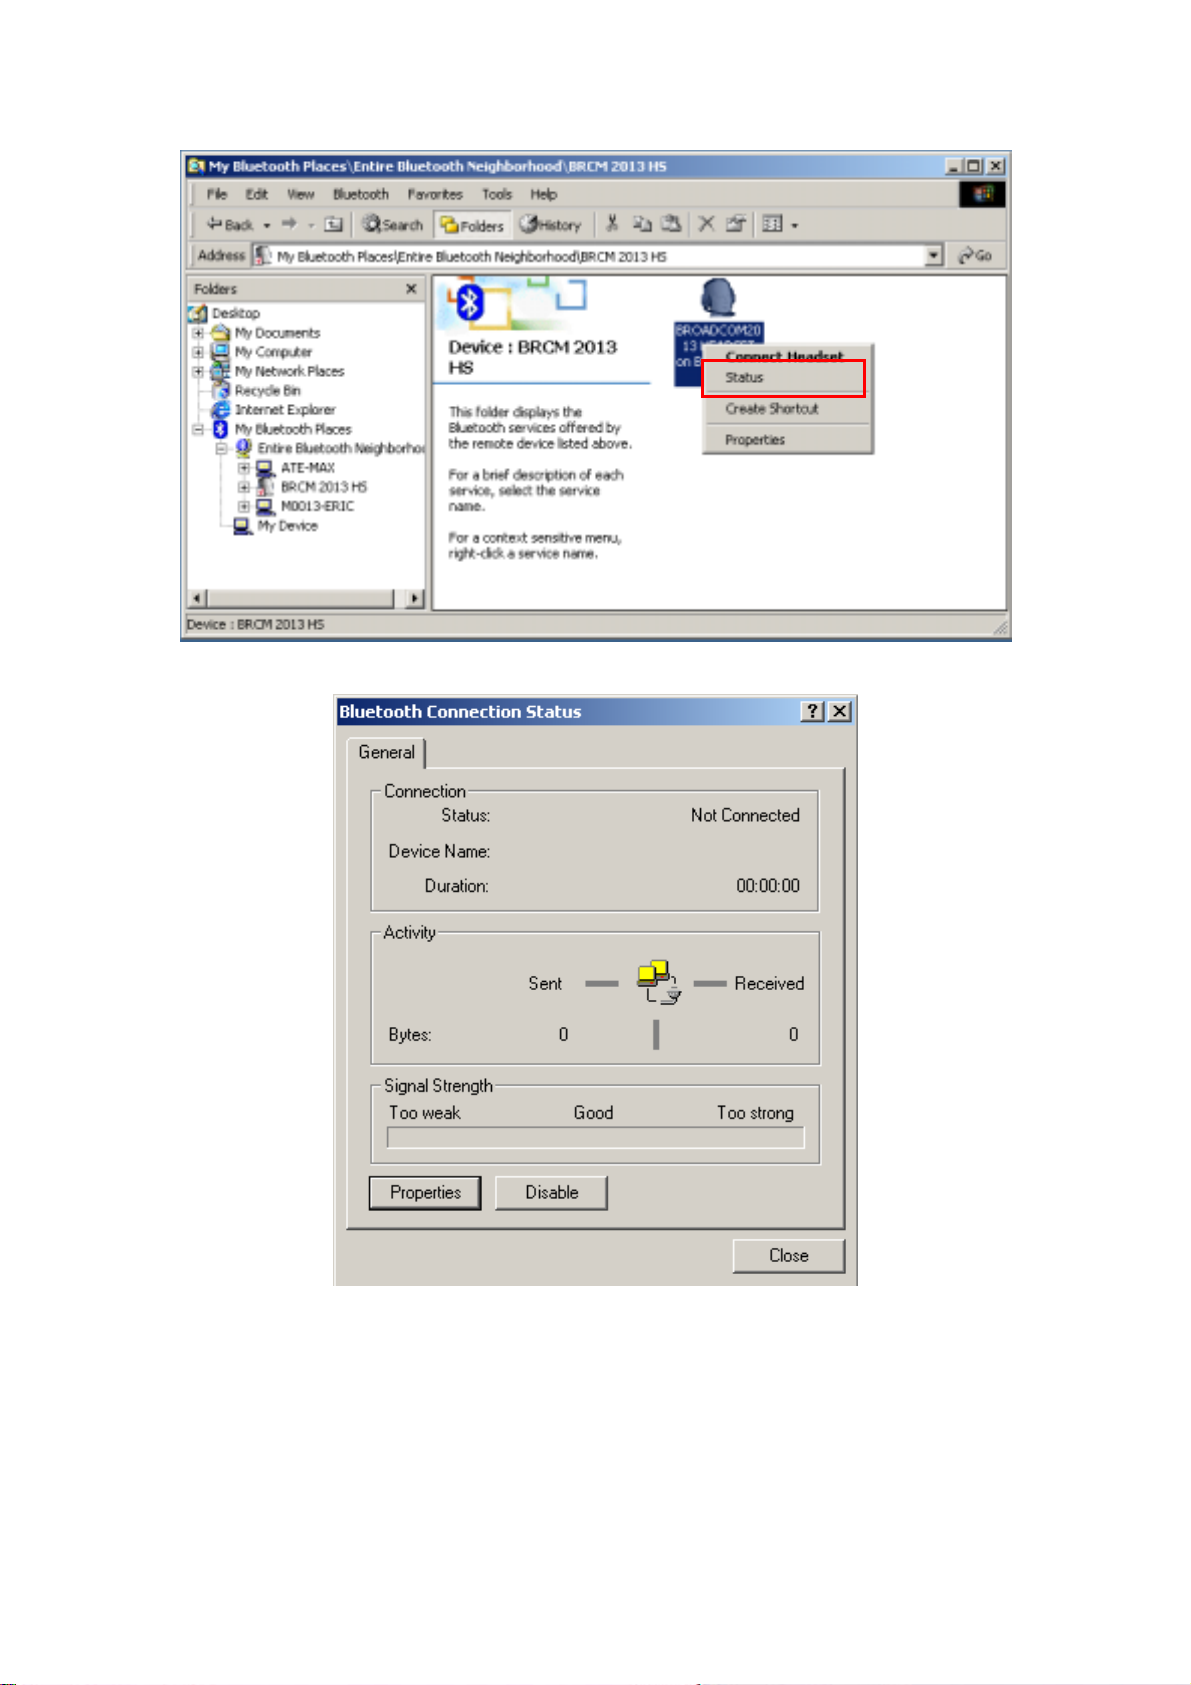
The Information provided is:
Status: “Connected” or “Not Connected”
Device Name: the name of the device to which this computer is connected.
Duration: the length of time that this connection has been established, displayed
in hours, minutes and seconds. Depending on the service, the connection may
36
Page 37

time out (automatically disconnect) after a specific period of inactivity.
Activity: the number of bytes sent and received over the connection.
Signal Strength: a graphic indicator that ranges from Too Weak through Good
to Too Strong.
NOTE:
To change the power transmission level of this computer: from the Bluetooth
Configuration Panel, Hardware tab, click the Advanced button, and then change the setting in
the Maximum Power Transmission drop-down list. The Advanced button is not available in all
countries.
The controls in the Bluetooth Connection Status dialog box are
Properties button: displays the Bluetooth Properties dialog box for this
connection.
Disconnect button: closes this connection.
Close button: closes the Bluetooth Connection Status dialog box.
6.8 SEND TO BLUETOOTH
This feature is used to send information to another Bluetooth device. Data types include:
Files from Microsoft Explorer
Documents from Microsoft Office applications, including:
Word
Excel
Access
PowerPoint.
Microsoft Outlook items, including:
Contacts
Appointments
Tasks
Messages
Notes.
To use Send to Bluetooth
1. In the application:
a) Microsoft Explorer—select one or more files to be transferred. Folders
cannot be transferred.
37
Page 38

b) Microsoft Office—only the document in the active window can be
transferred.
c) Microsoft Outlook—select one or more items to be transferred.
2. From the application's File menu, select Send To, and then select Bluetooth from
the shortcut menu.
3. Select a device from the shortcut menu to send the data
or
Select Other..., choose a device from the list, and then click OK to send the data.
6.9 PAIRING BLUETOOTH DEVICES AND ACCESS THE
INTERNET
You have to pair Bluetooth devices to establish the connection between them if the secure
connection is enabled. The example illustrated here is the pairing procedure between a
Bluetooth-enabled notebook and a cellular phone with Bluetooth and GPRS functions. After
the pairing process is complete, your Bluetooth-enabled notebook can access the Internet
through your GPRS cellular phone. The following procedures will guide you how to configure
your notebook and cellular phone.
Steps 1 – Pairing
Double click the Bluetooth icon resides on the system tray.
From the Bluetooth Explorer, click Bluetooth menu and select Search for devices.
The Bluetooth devices in range should be shown on the right pane. In this example, the
cellular phone –Nokia7650 with Bluetooth and GPRS function is displayed on the right pane.
38
Page 39
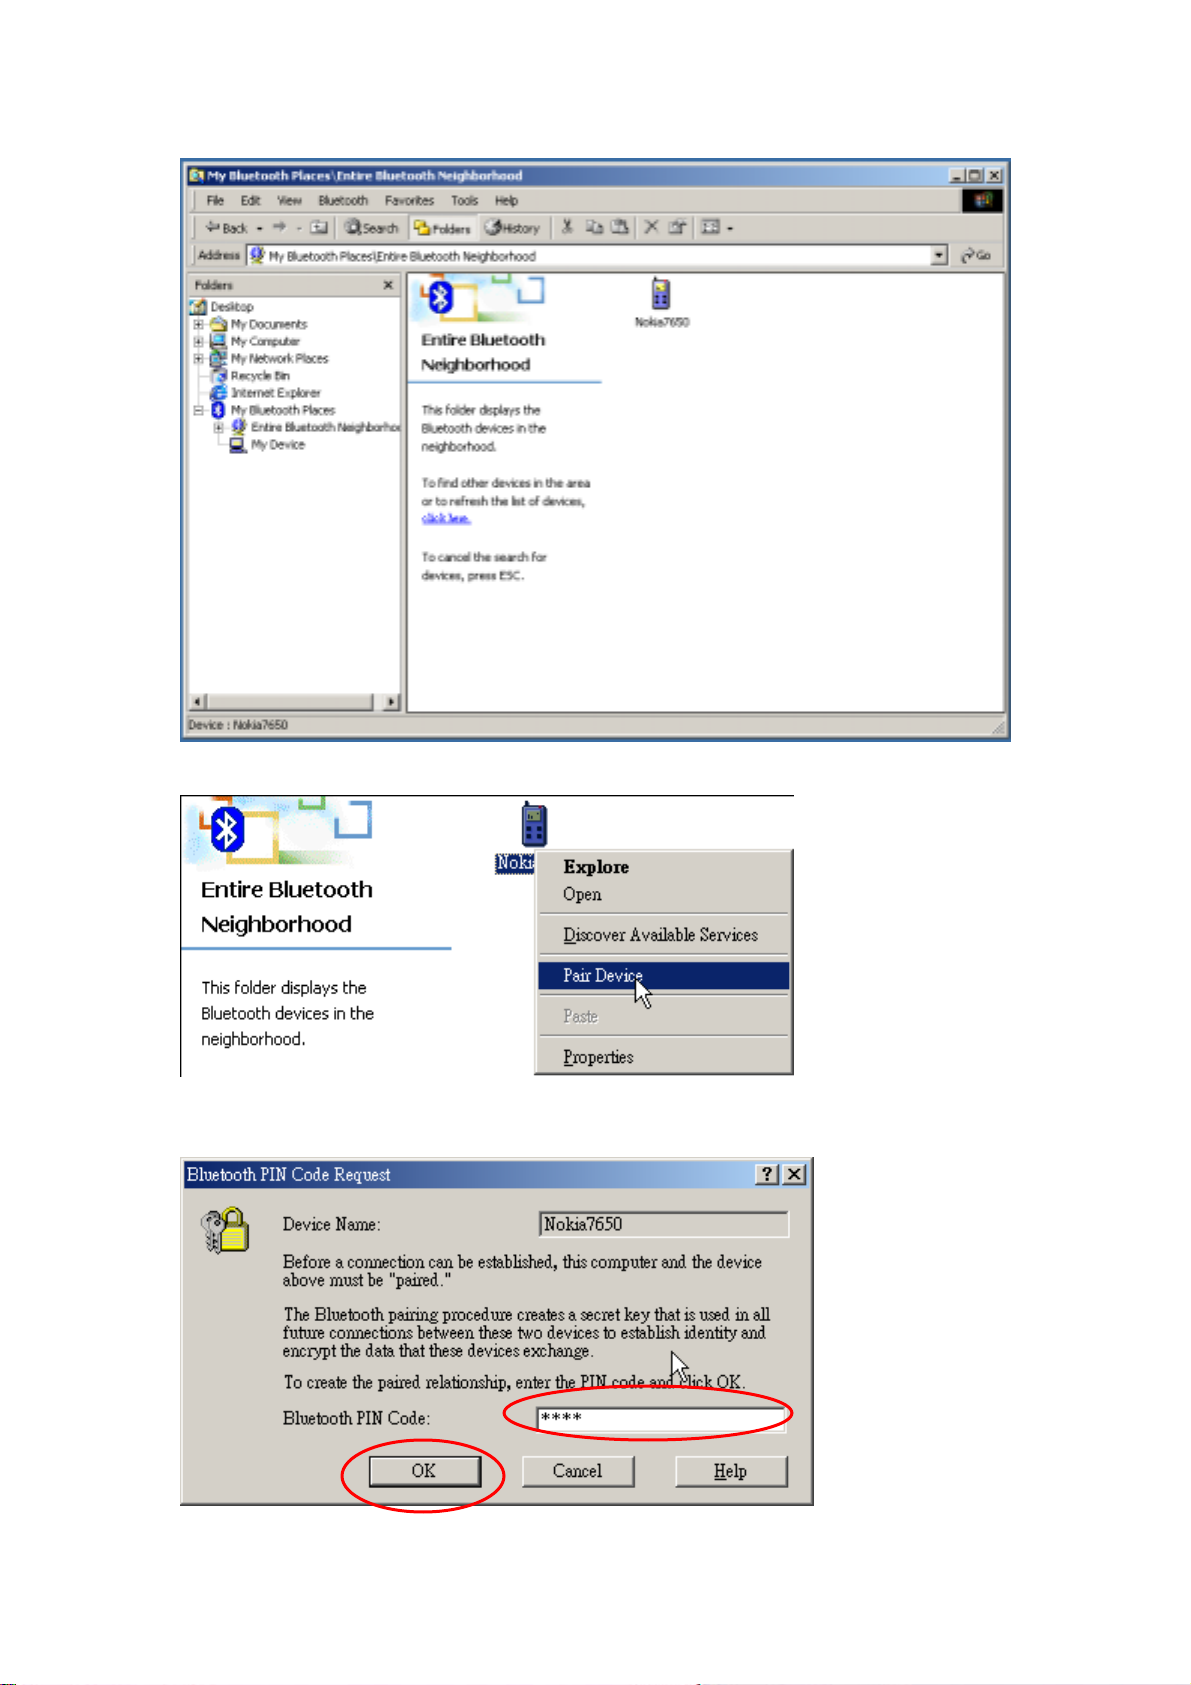
Right-click the cellular phone icon and select Pair Device from the shortcut menu.
The following Bluetooth PIN Code Request dialog box will be pop-up. Please enter the
Bluetooth PIN Code and click OK.
39
Page 40
Meanwhile, the remote device - cellular phone screen will prompt a message for you to
enter the Bluetooth PIN code. The Bluetooth PIN code you type here should be the same
between these paired devices.
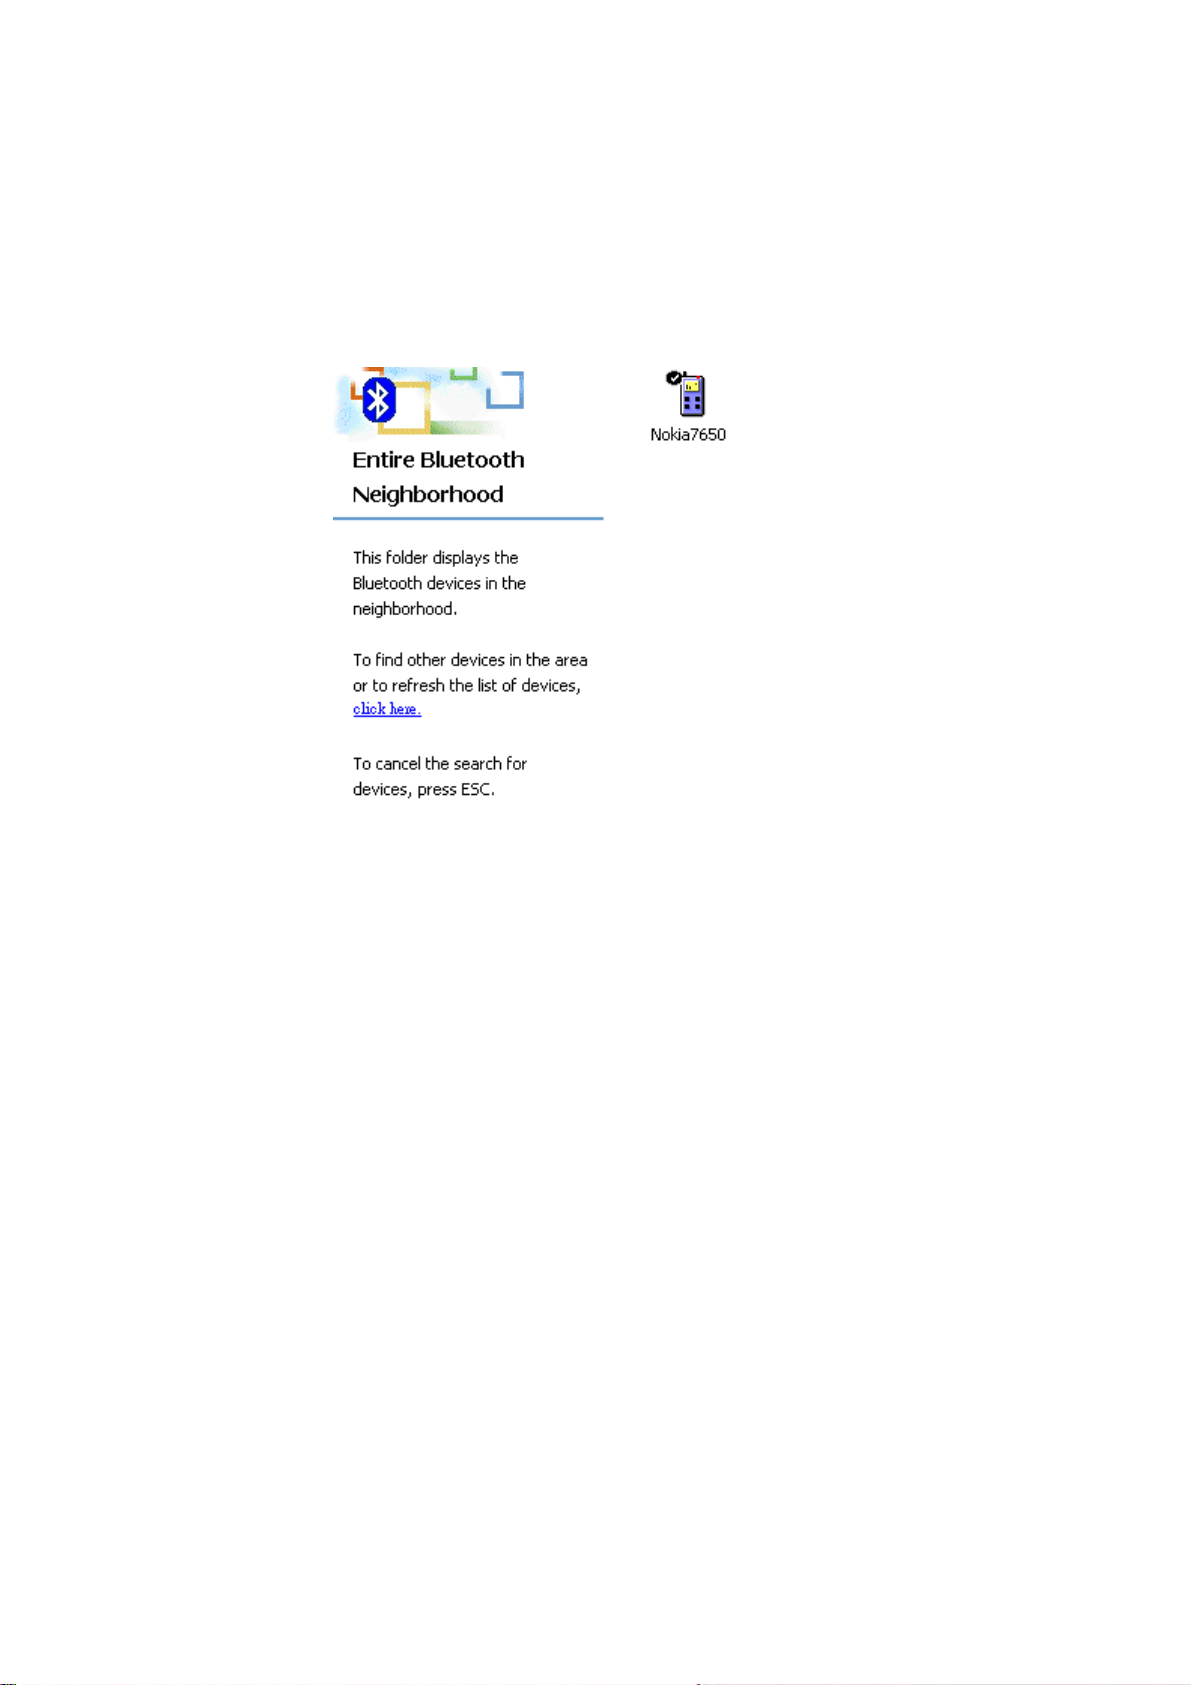
The system starts to pair these two devices and the process will take a few seconds. If
the pairing process is complete, there will be a check on the top of the cellular phone
icon.
Steps 2 – Connect to the Internet
The following procedures will guide you how to connect to Internet from your notebook through
your cellular phone.
Double-click the cellular phone icon to find services it provides and right-click the Dial-up
Networking. Select “Connect Dial-up Networking” from the shortcut menu.
40
Page 41
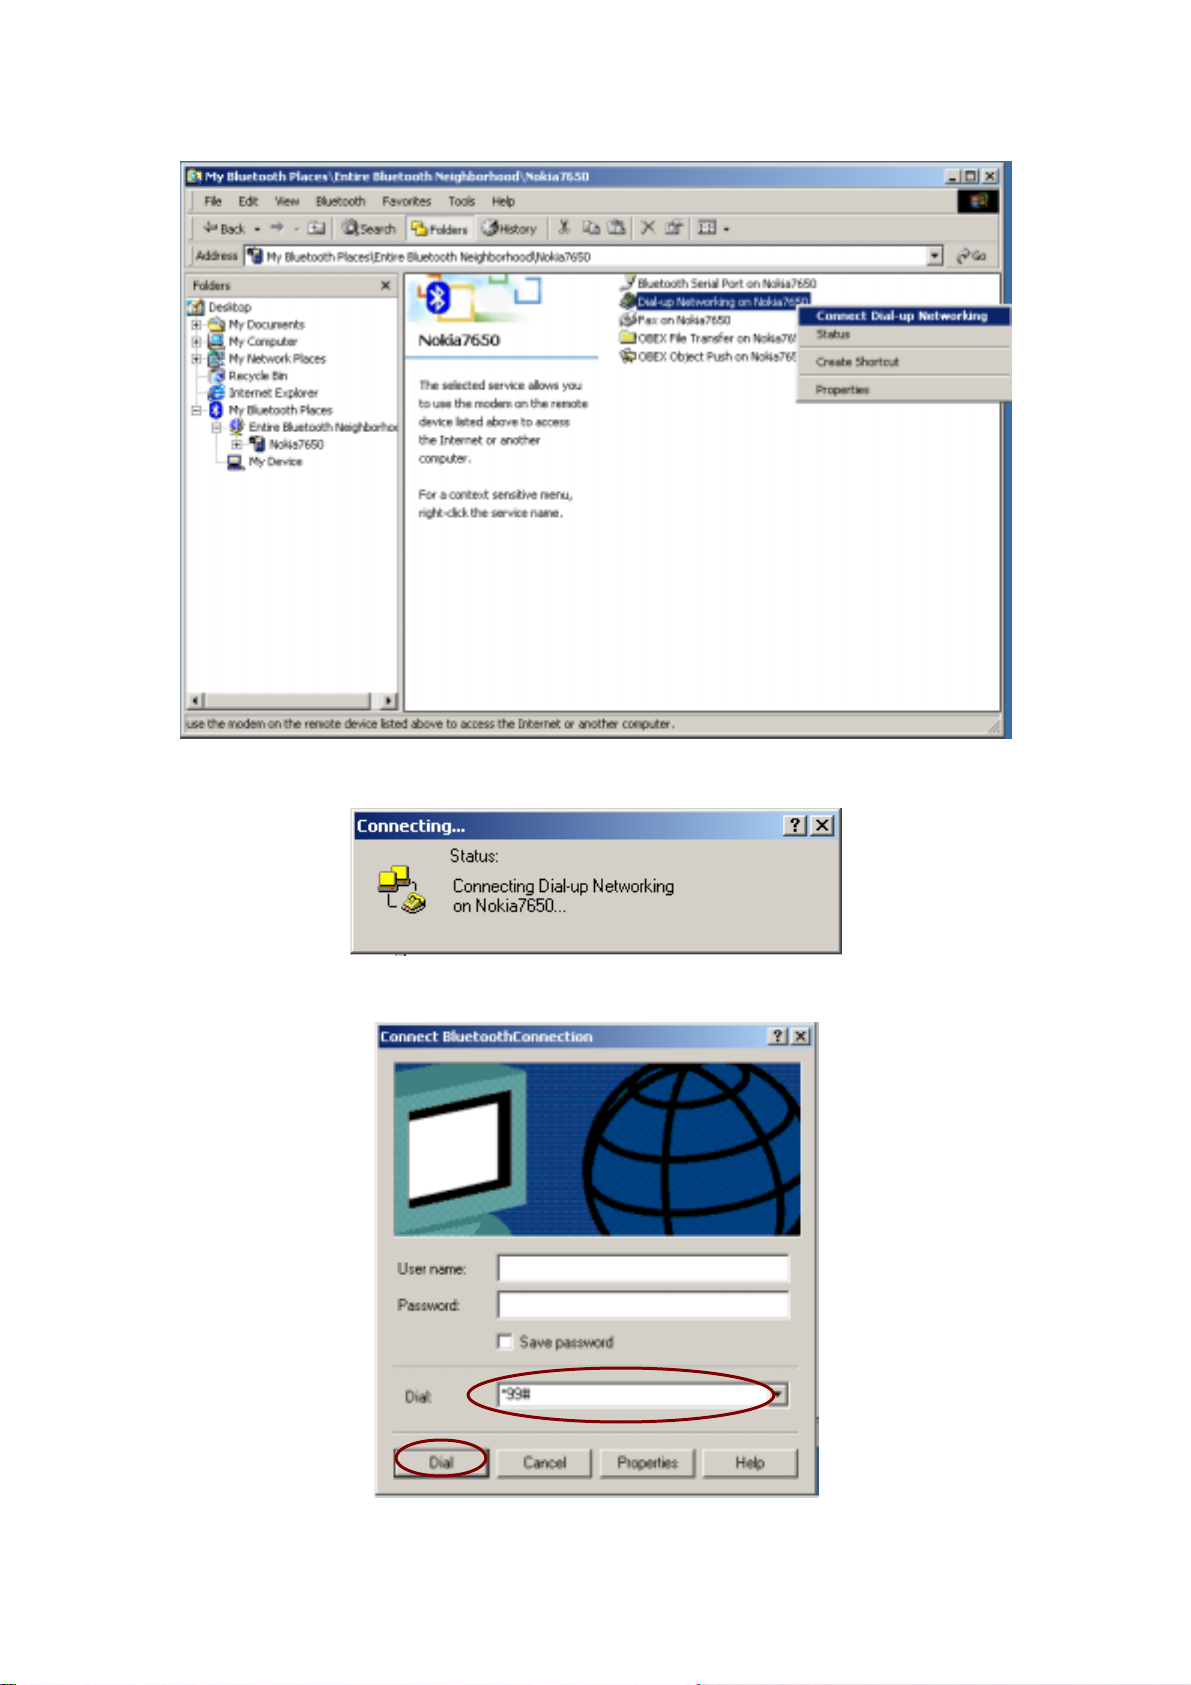
The following screen shows that the system starts to connect to the cellular phone.
Please type the number your GPRS cellular phone provides and click Dial.
41
Page 42
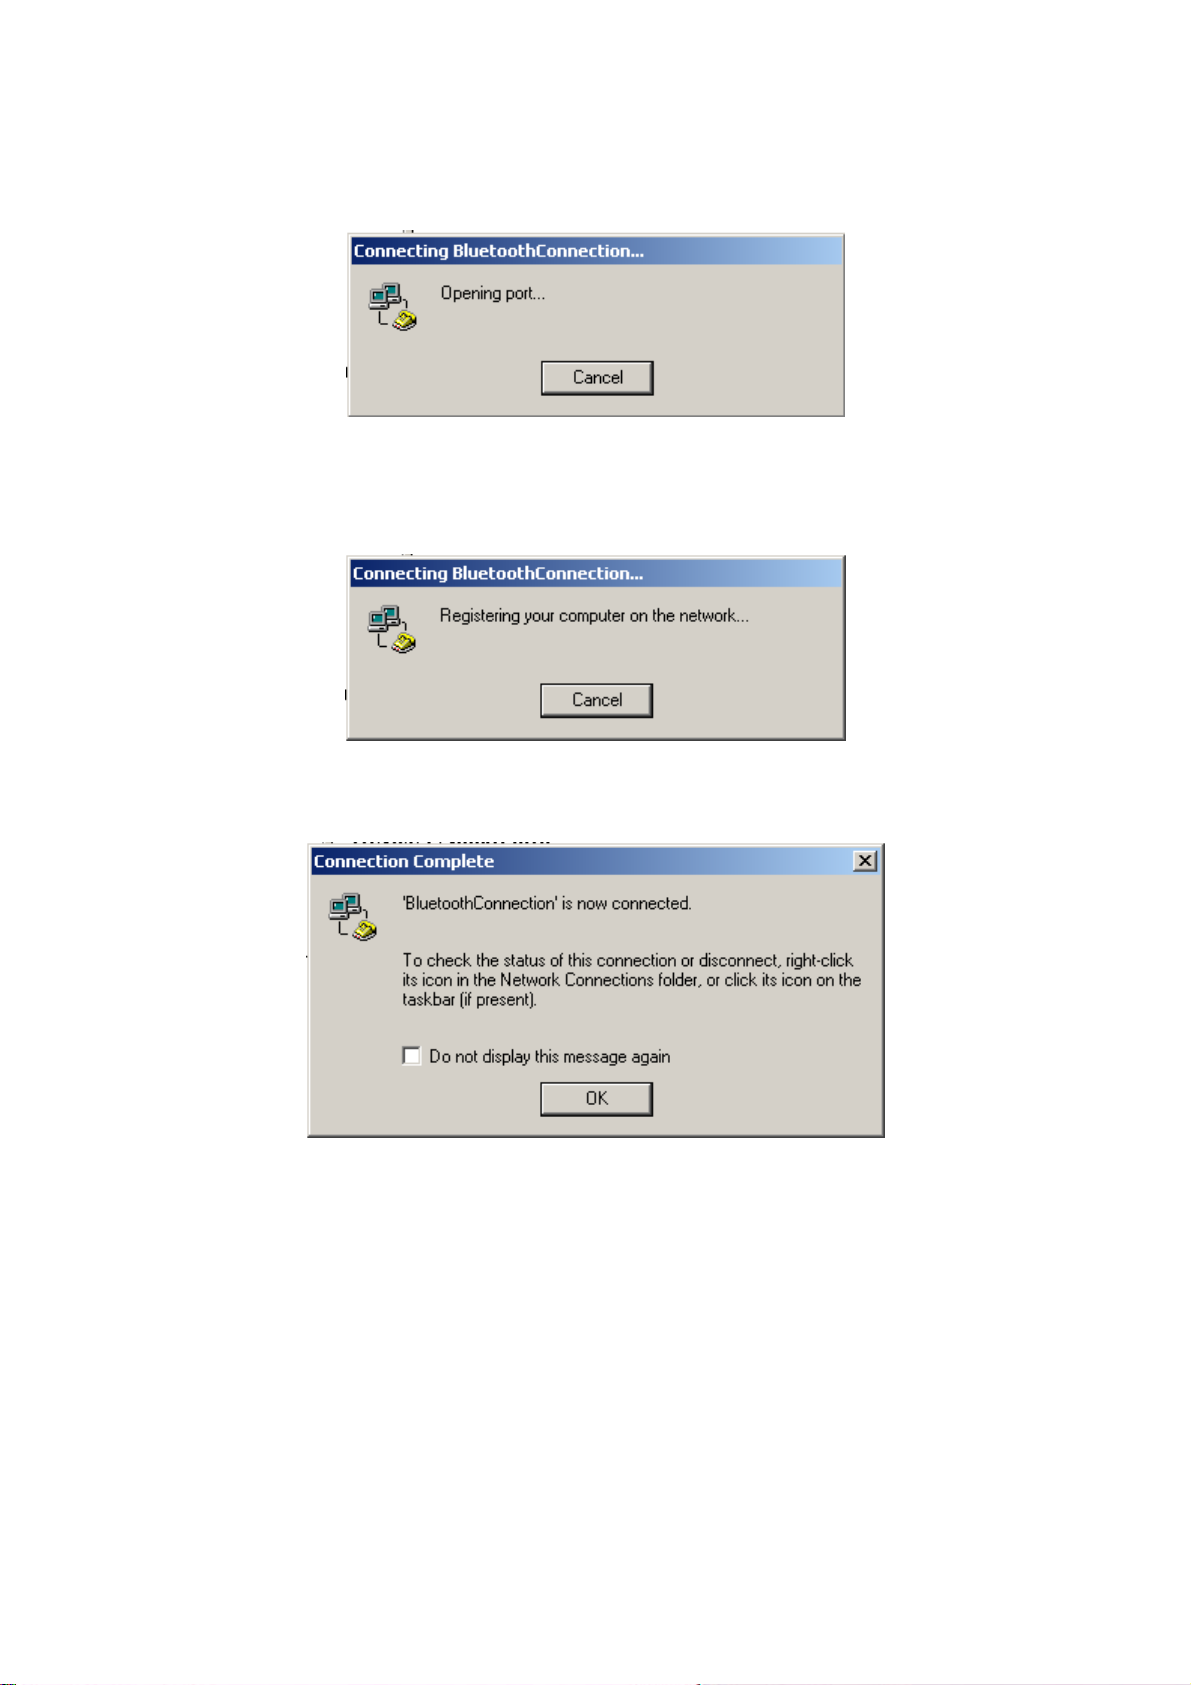
The following screen will be shown on your notebook screen indicating the connection
process.
Meanwhile, the remote device - your cellular phone, will prompt a request message
indicating the notebook is requesting the service. Please click OK to accept the request.
The following screen will be present on your notebook indicating the connection process.
If the connection is established successfully, then the following screen will be displayed.
Now, you can open an Internet Browser and surf the Internet from your notebook.
42
Page 43
Chapter 7
Configuration Panel
7.1 ACCESS THE BLUETOOTH CONFIGURATION
PANEL
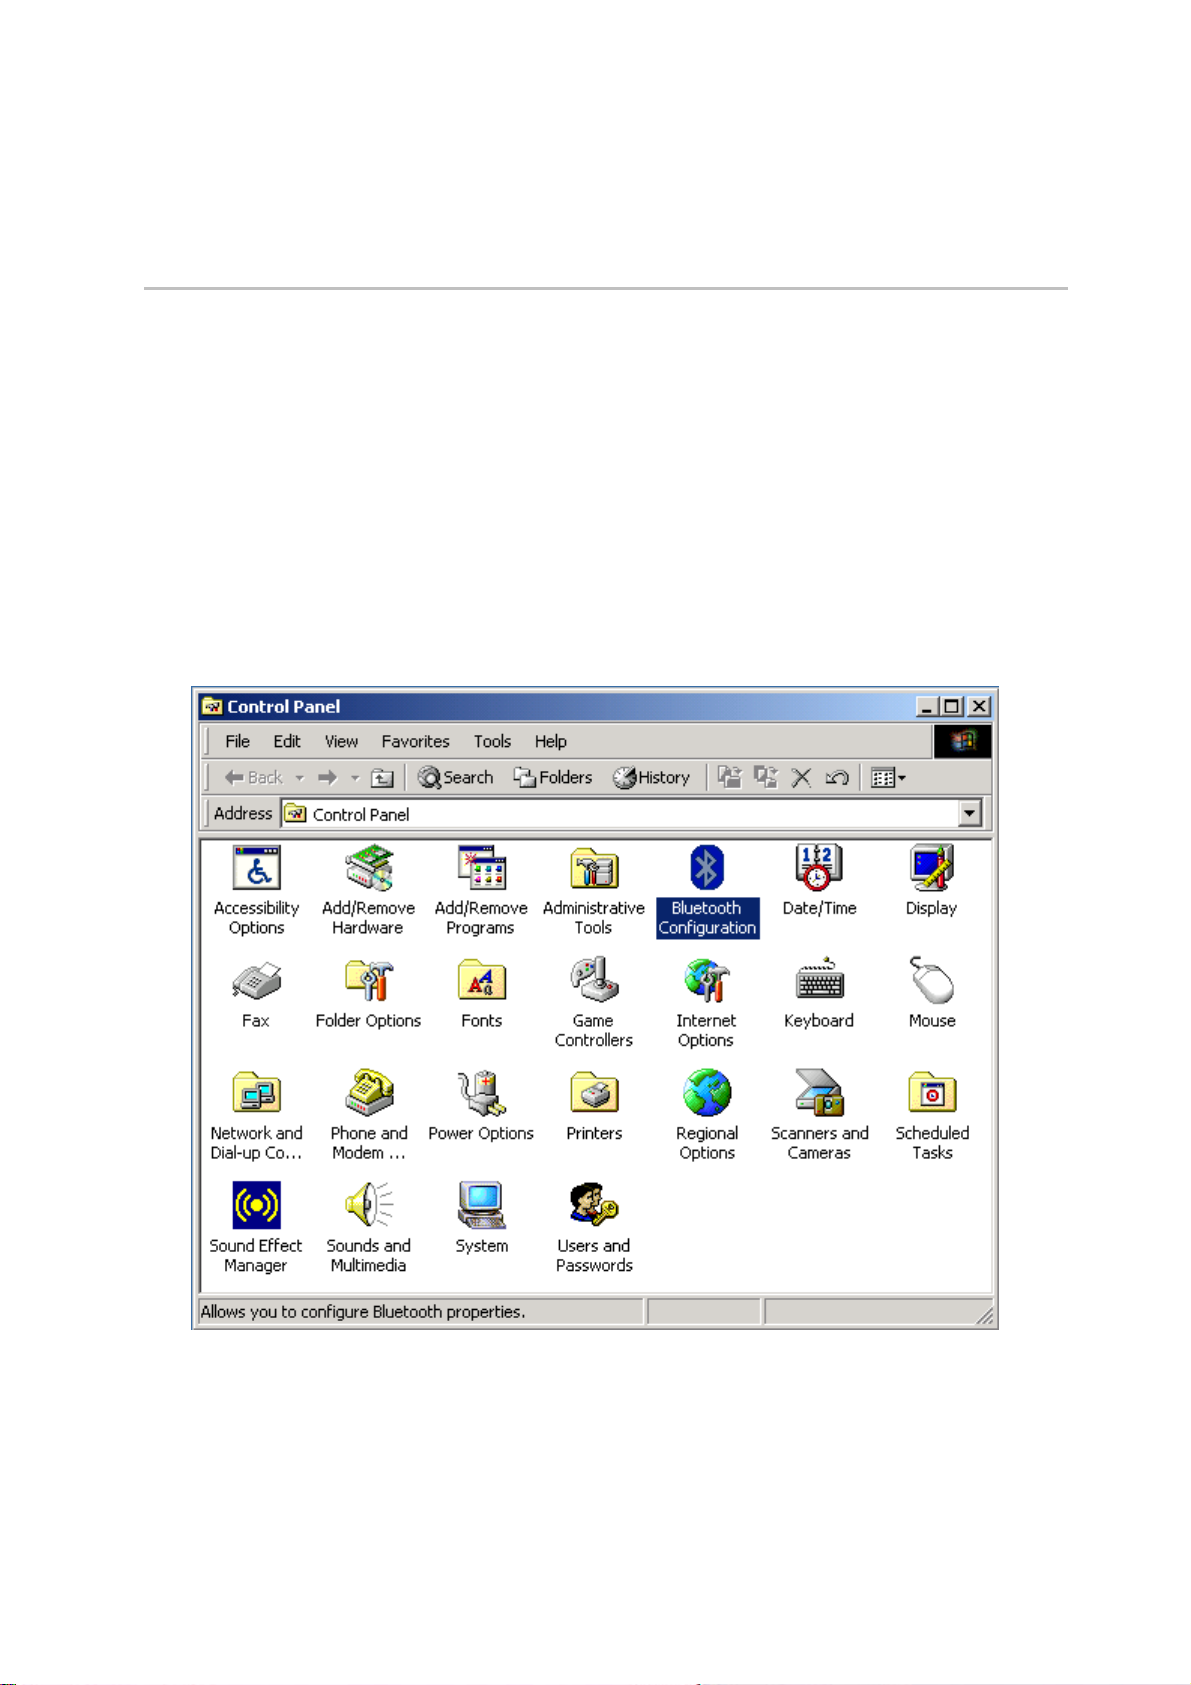
The Bluetooth Configuration Panel provides access to settings for Bluetooth services, client
applications, hardware, security, discovery, accessibility, default paths, event
notification and other Bluetooth related items.
To Open the Bluetooth Configuration Panel
From the Windows Control Panel, select Bluetooth Configuration.
Or
In the Windows System Tray, right-click the Bluetooth icon, and select
Advanced Configuration from the shortcut menu.
43
Page 44
7.2 GENERAL CONFIGURATION SETTINGS
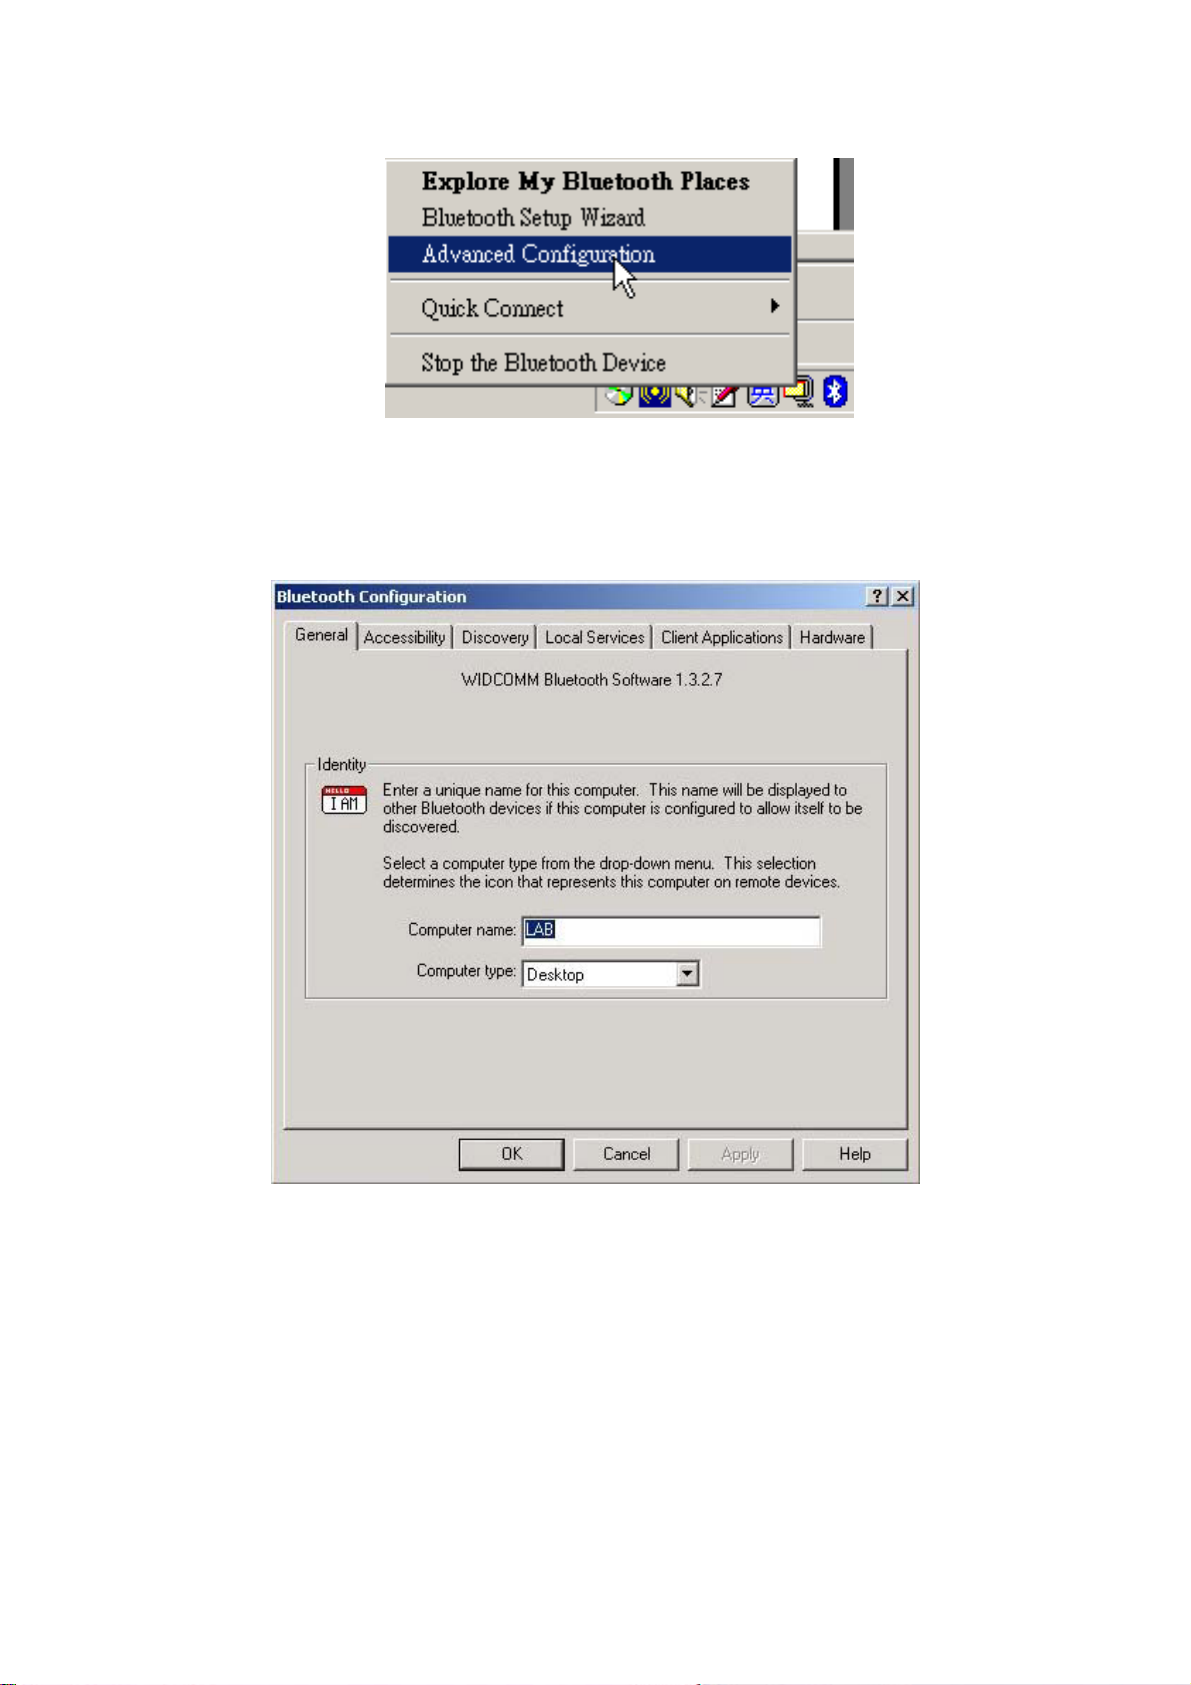
The settings on the General tab of the Bluetooth Configuration Panel determine
information that is displayed to remote devices.
Identity
Computer Name-enter a unique name to identify this computer to other
Bluetooth devices in the vicinity; this field cannot be left blank.
Computer type-select either Desktop or Laptop from the shortcut menu to set
the type of icon remote devices will use to represent this computer.
44
Page 45
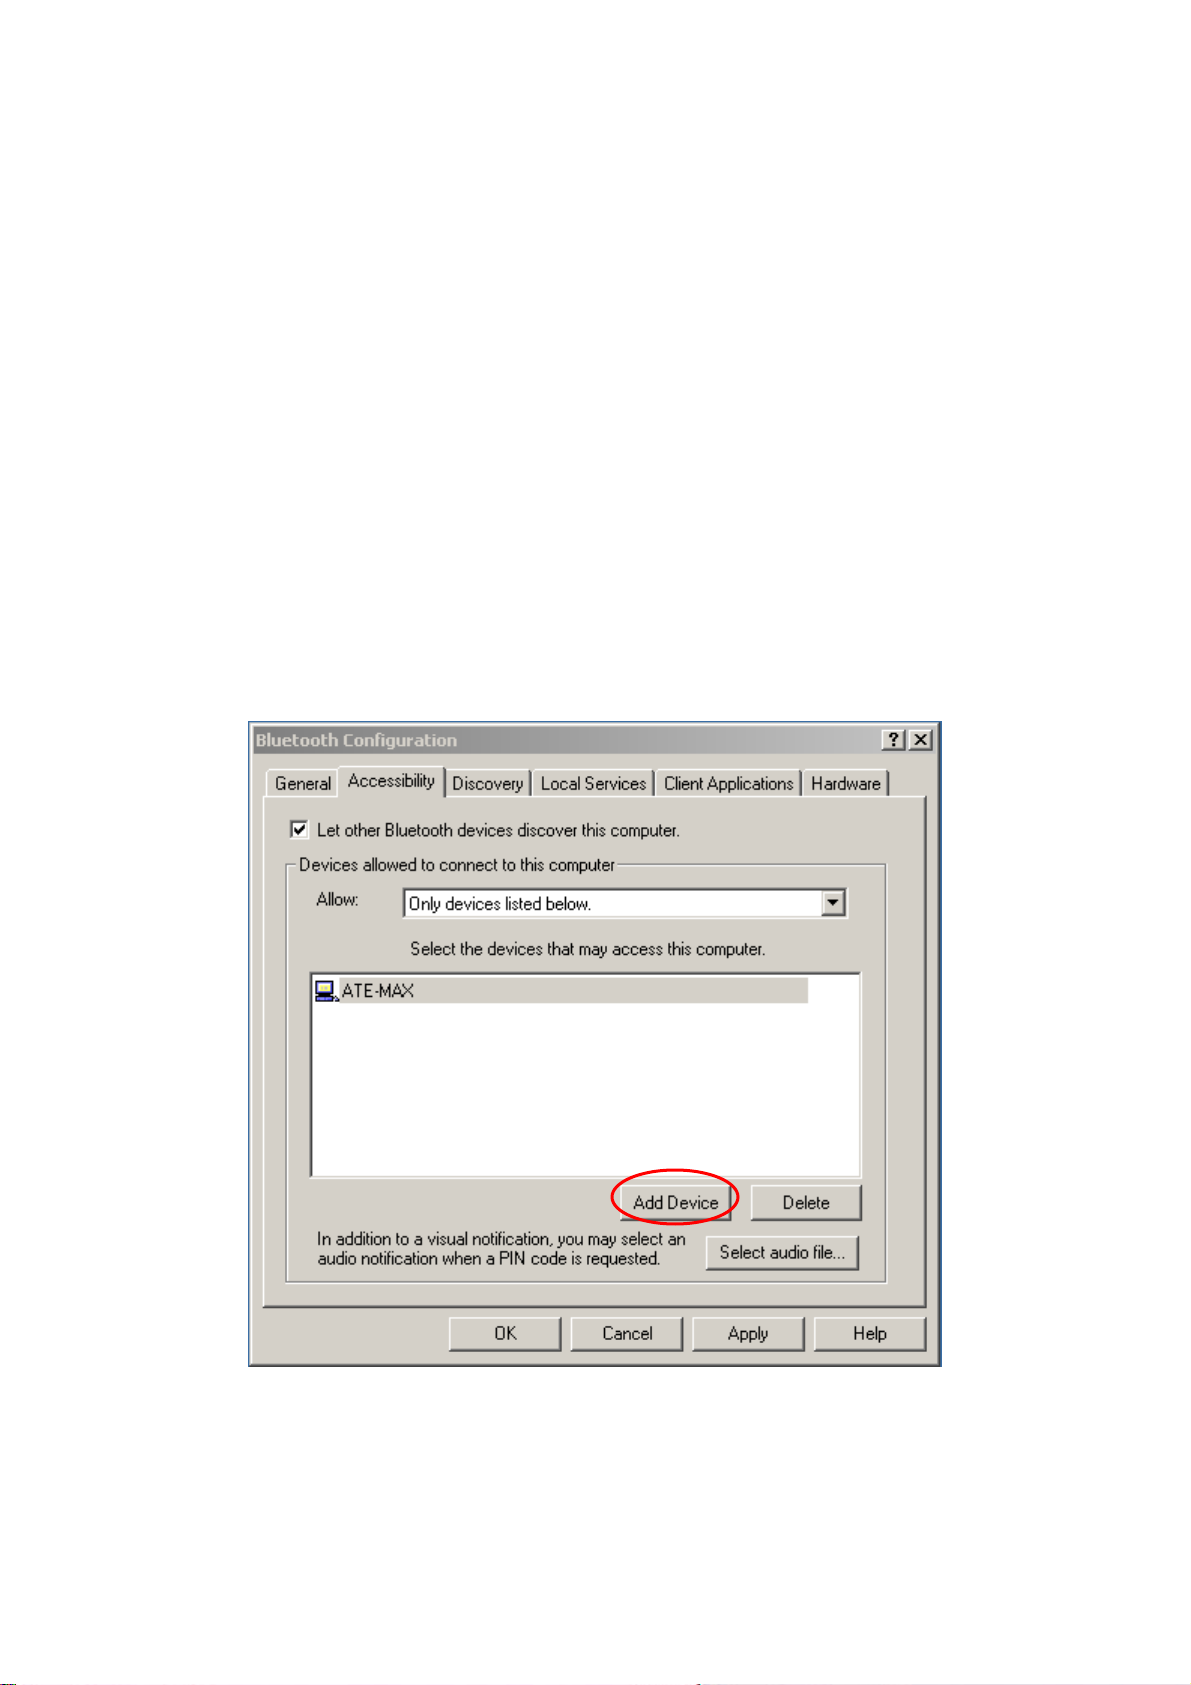
7.3 ACCESSIBILITY SETTINGS
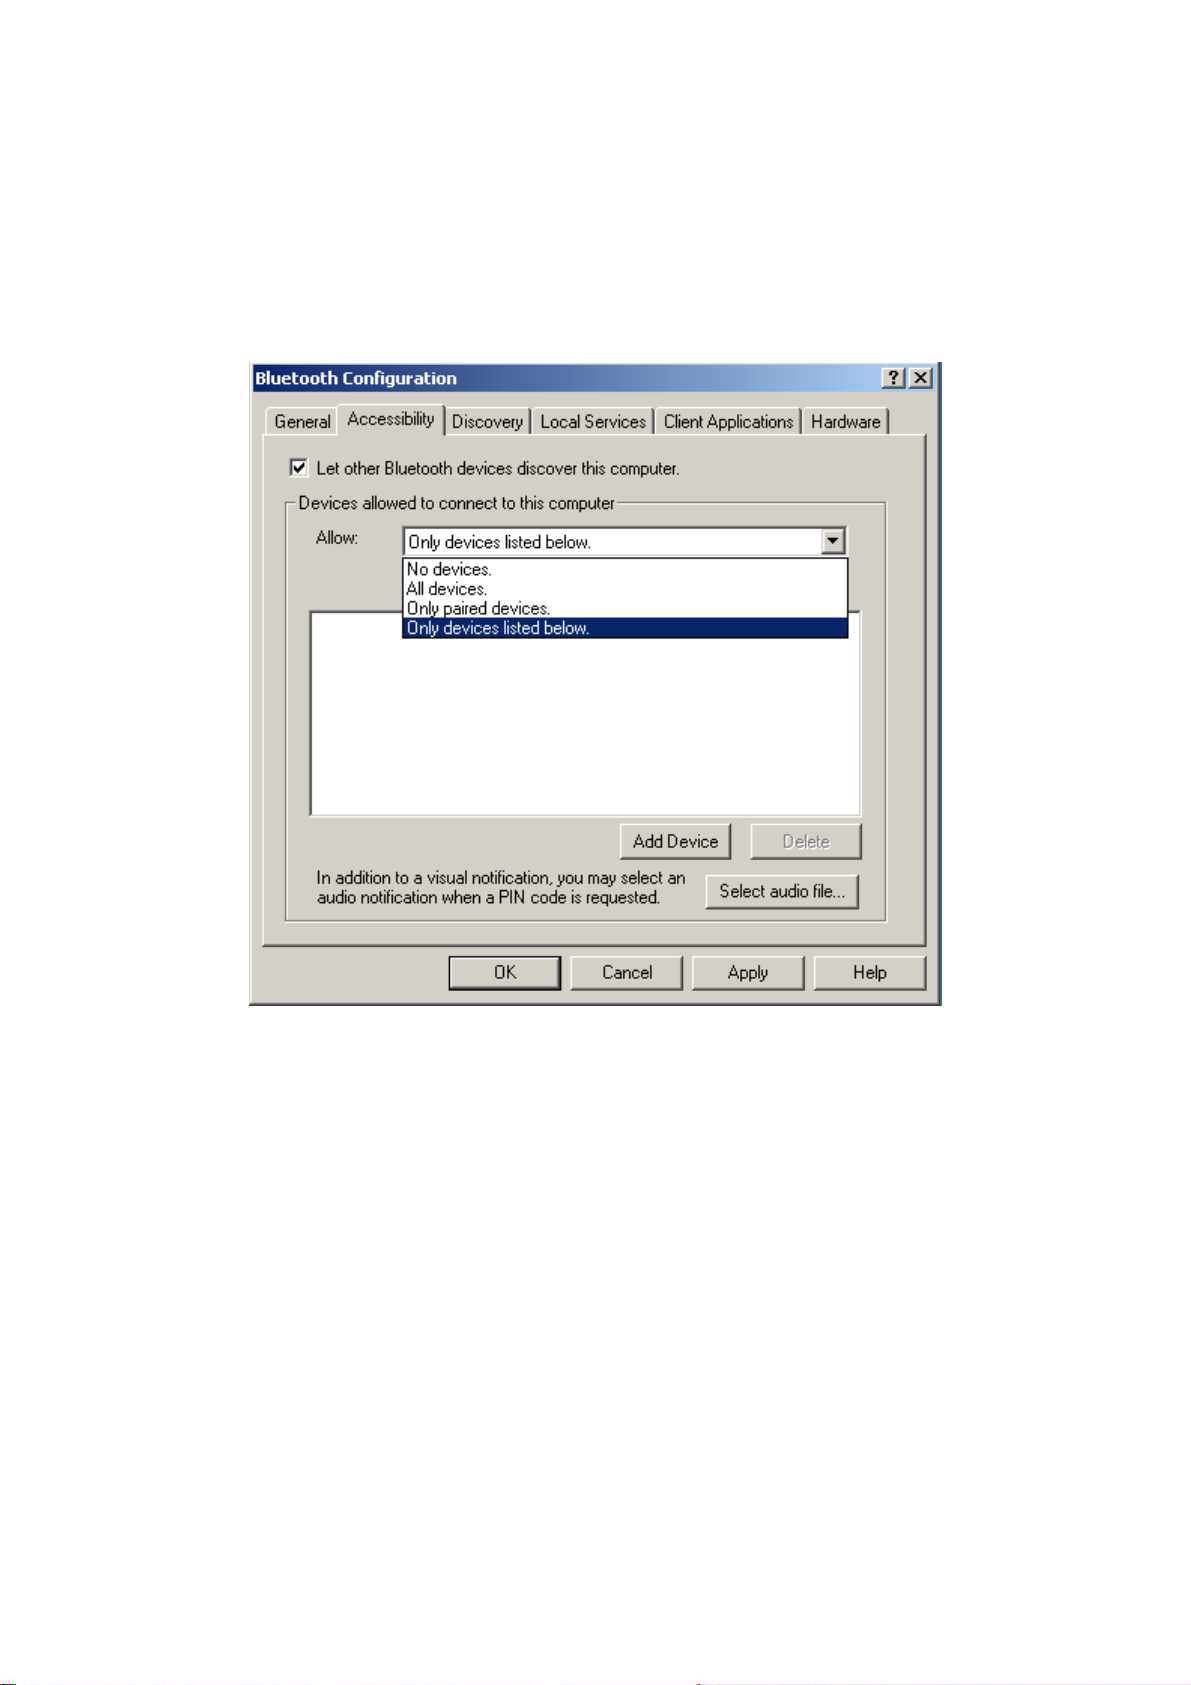
The Accessibility tab of the Bluetooth Configuration Panel lets you specify whether
remote devices may access this computer, which remote devices have access, and
whether an audio warning is played when a Personal Identification Number (PIN code) is
required.
Allow other devices to discover this computer
Select “Let other Bluetooth devices discover this computer” to permit remote Bluetooth
devices to find and report this computer. If “Allow No devices” (below) is selected, this option
is not available.
Control the types of devices that are allowed to connect to this computer
From the “Devices allowed to connect to this computer” shortcut-menu, select:
No devices—no remote devices are permitted to initiate a connection with this
computer. However, this computer can still initiate connections with remote
Bluetooth devices.
All devices—all remote devices are permitted to connect to this computer.
Connections are subject to additional security restrictions, such as authentication
and authorization, that may be required by the individual services provided by
this computer.
45
Page 46
Only paired devices—only devices that have been paired with this computer are
allowed to connect to it.
Only devices listed below—only the listed devices are allowed to connect to
this computer (see Accessibility, adding and deleting devices)
.
Choose an audio notification file
When Secure Connection is enabled for any of the Bluetooth Services on this computer a
PIN code is required before that service can be accessed. To chose a notification sound
that will play when a remote device attempts to access a service that requires a secure
connection, click Select audio file... and select the sound (*.wav) file to be played.
Limit access to this computer to specific remote devices
From the Bluetooth Configuration Panel, Accessibility tab, in the Allow shortcut menu,
select “Only devices listed below”.
Add a device to the list
1. Click Add Device.
2. In the Devices with access... dialog box select the desired device(s) and click
OK.
46
Page 47
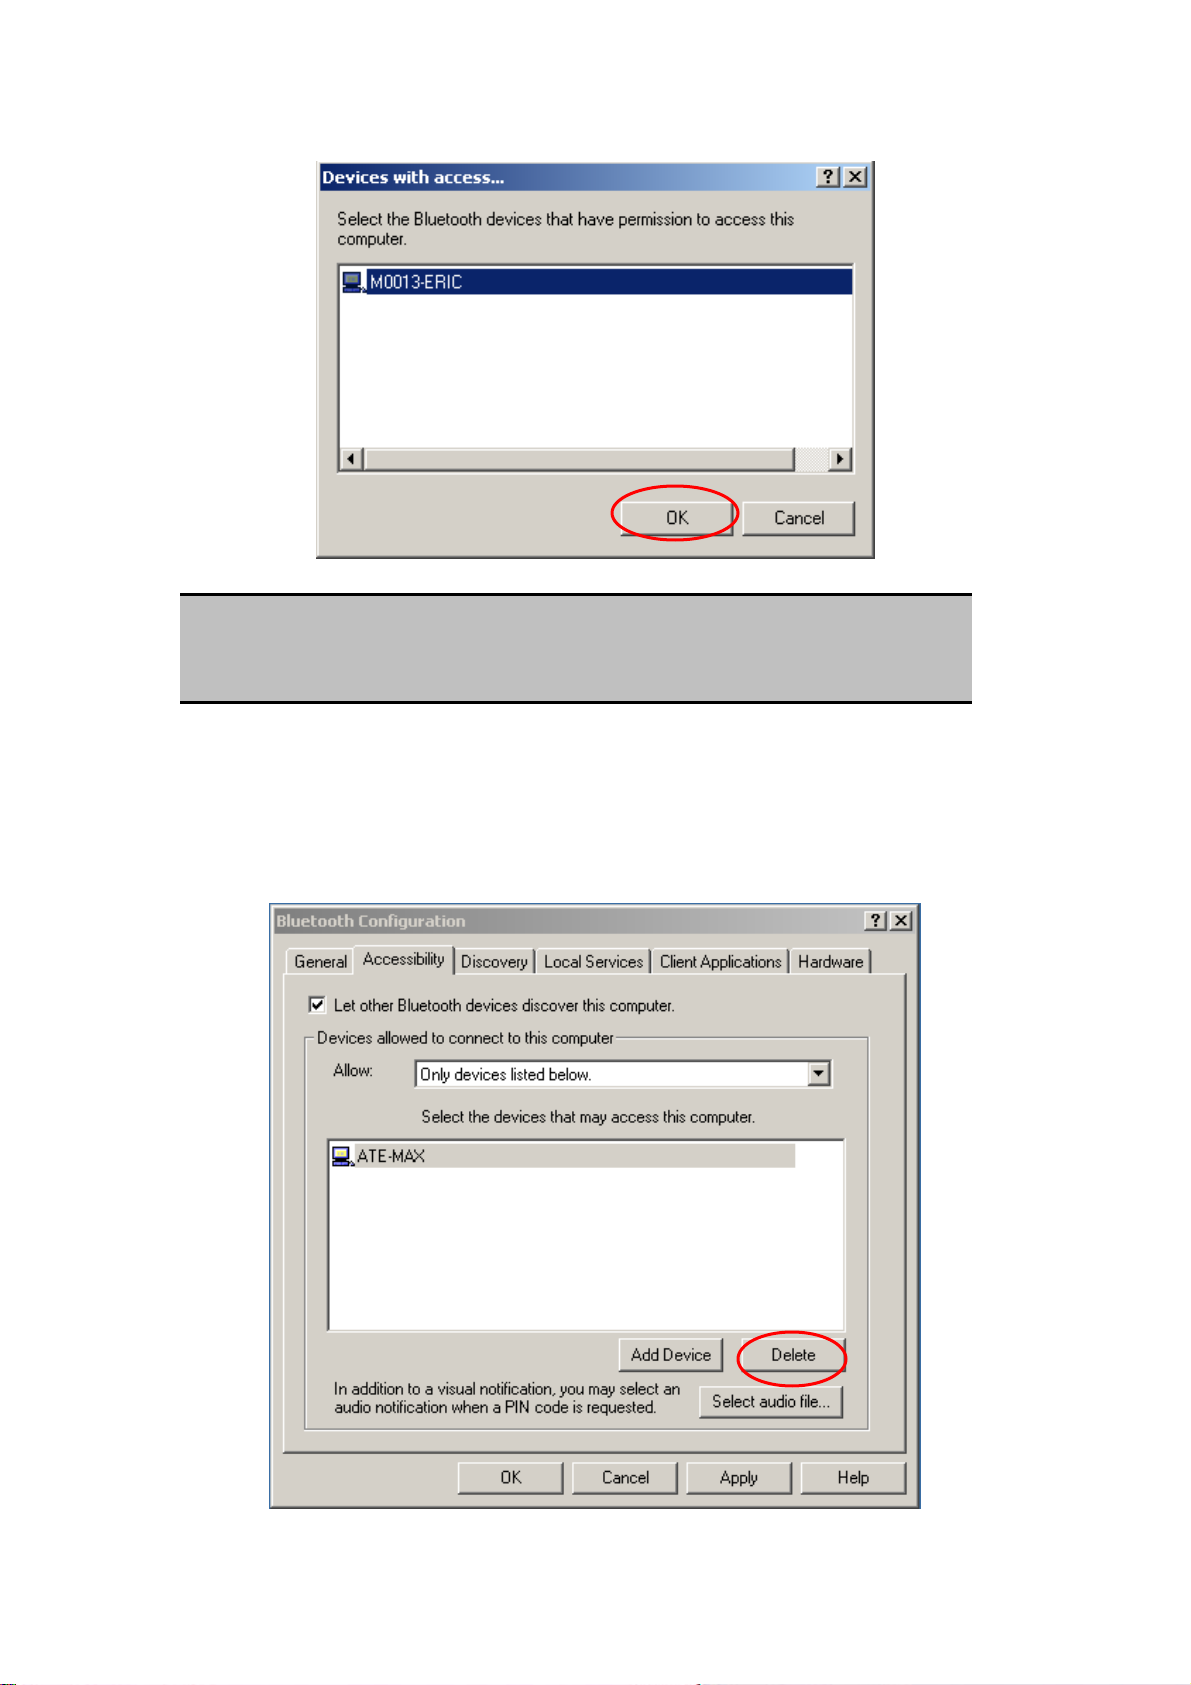
NOTE:
Multiple devices may be selected using SHIFT + click and/or CTRL + click.
Delete a device from the list
In the list of devices allowed to access this computer, select the device to be removed
from the list, and then click Delete.
47
Page 48
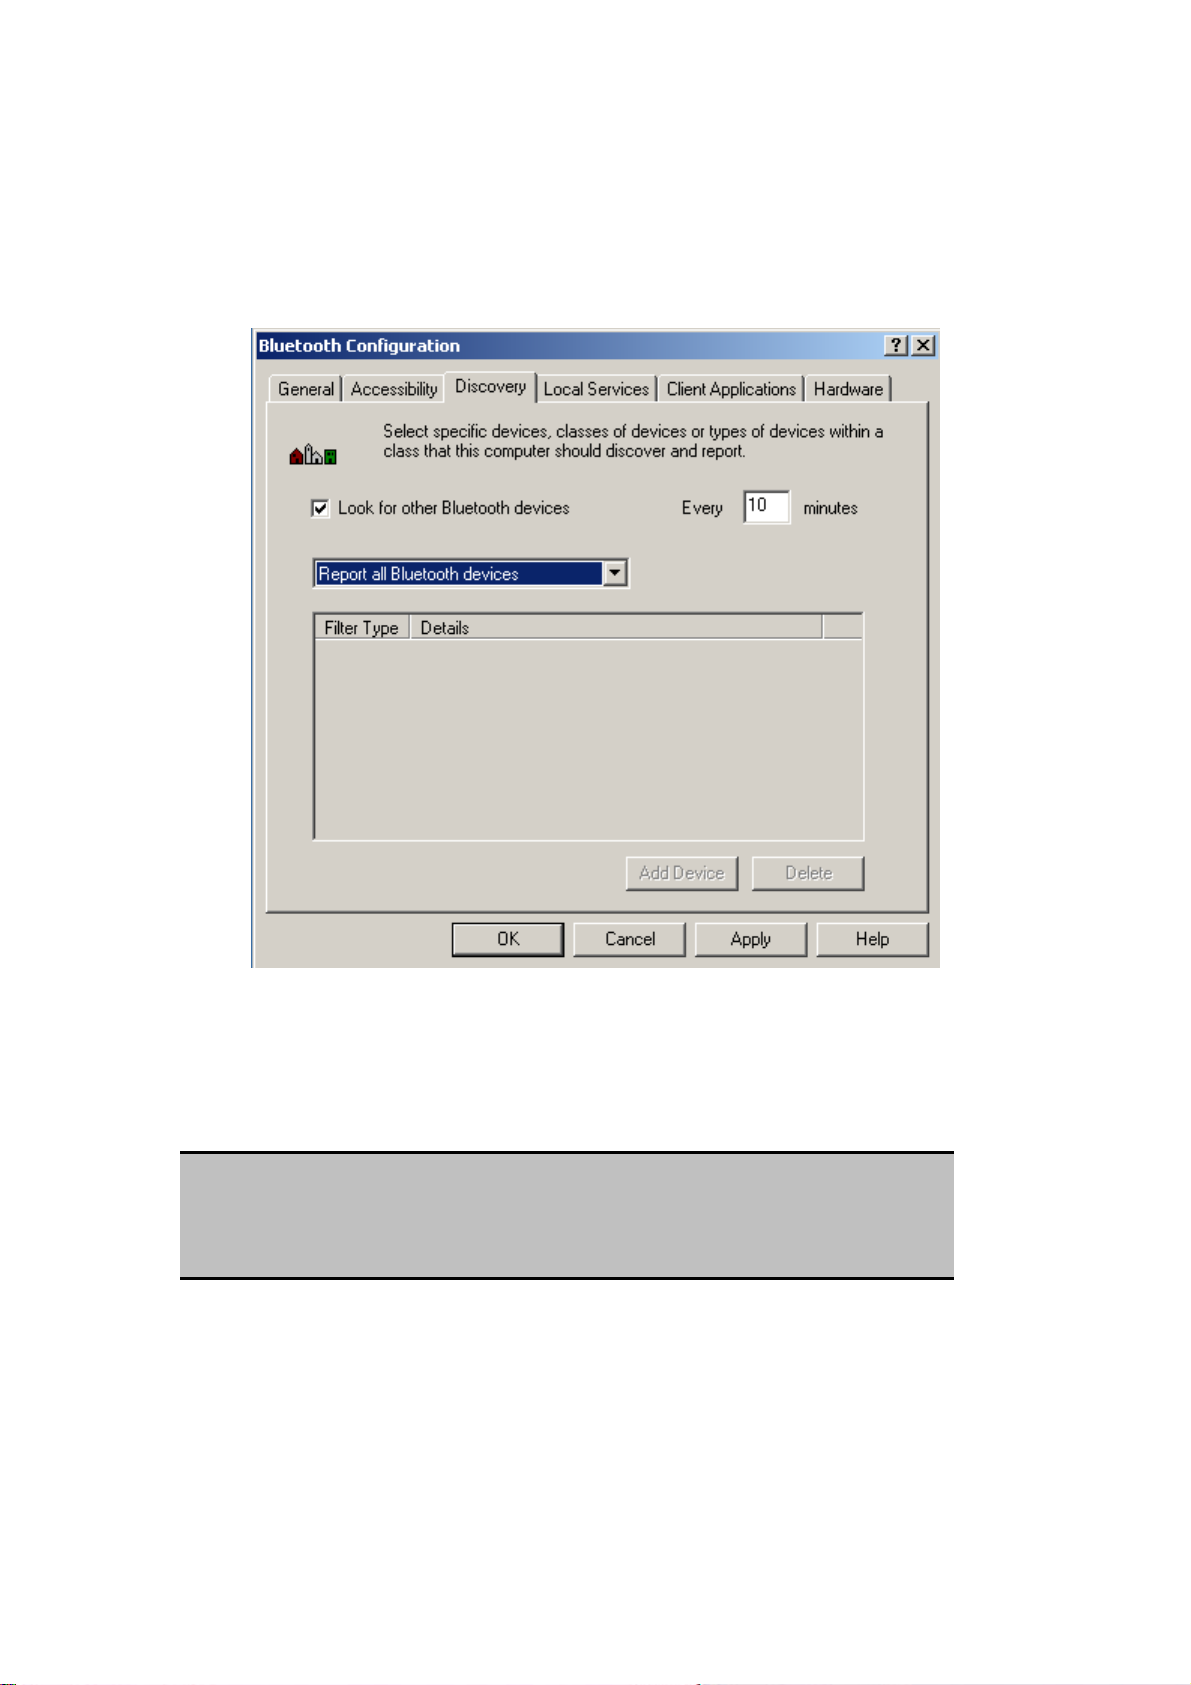
7.4 DISCOVERY SETTINGS
The settings on the Discovery tab of the Bluetooth Configuration Panel determine
whether this computer looks for other Bluetooth devices automatically, how often it looks
and what type of devices it looks for.
Periodic Search for Devices
When “Look for other Bluetooth devices” is selected, Bluetooth automatically searches
for devices every X minutes. X is an whole number between 1 and 60. To change the
time between auto inquiries, highlight the existing time and enter the new time.
NOTE:
When My Bluetooth Places is first opened it performs an initial automatic
search for devices even if “Look for other Bluetooth devices” is not enabled.
Determine the devices that will be reported
Bluetooth can screen out devices that you do not need access to.
The options are:
Report all Bluetooth devices
Report only selected Bluetooth devices (see Discovery, Adding Specific Devices
48
Page 49

and Discovery, Deleting Specific Devices).
Discover Specific Devices
The type of device(s) that this computer looks for and reports when it is searching for
other Bluetooth devices can be limited.
Limit the remote devices reported
Bluetooth can report only specific devices, specific class(es) of device(s), or specific
type(s) of device(s) within a class.
Specific devices: an individual computer or Bluetooth cellular telephone are
examples of specific devices.
Specific class of device: “computer” is an example of a class of devices
Specific type of device within a class: “laptop” is an example of a specific type
of device within the “computer” class of devices.
The devices to be discovered can be mixed-and-matched; you can discover one or more
specific devices, classes of devices and types of devices within a class at the same time.
Remove a device from the list of devices to be discovered
In the Bluetooth Configuration Panel, from the Discovery tab, select the device to be
removed and click the Delete button.
NOTE:
If “Report only selected Bluetooth devices” is not selected the Delete button will
not be available.
Temporarily override the discovery of specific devices
In the Bluetooth Configuration Panel, from the Discovery tab, select “Report all
Bluetooth devices.” The specifically selected devices will be discovered along with all
other devices.
To re-enable specific device discovery re-select “Report only selected Bluetooth
devices.”
NOTE:
When all devices are deleted an error message will appear if “Report all
Bluetooth devices” is not selected.
49
Page 50
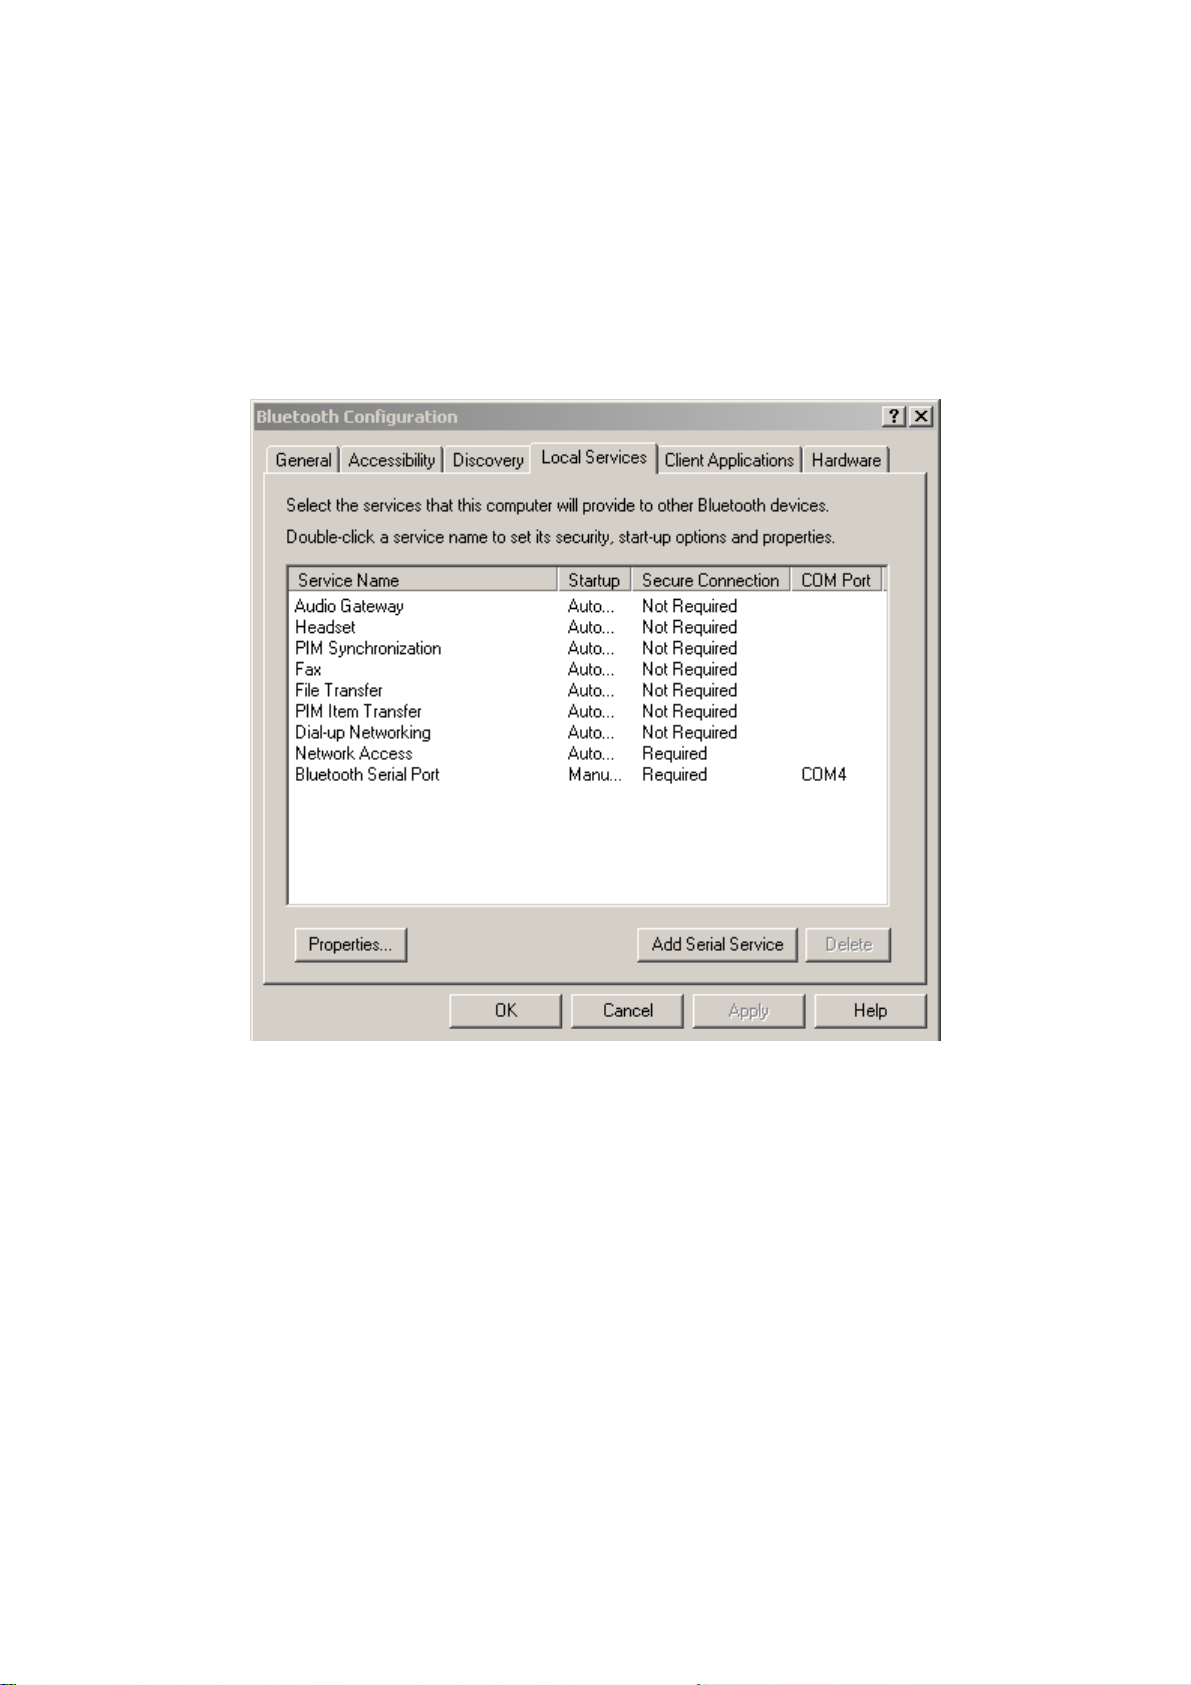
7.5 BLUETOOTH LOCAL SERVICES
Common Configuration Settings
The settings on the Local Services tab of the Bluetooth Configuration Panel determine the
configuration of the services provided by your computer to remote devices. Each service can
be configured individually for security, name, and other settings. The Local Services tab also
includes options to add and delete user-defined serial services.
These properties can be set individually for each Bluetooth service.
Service Name - the default name of each service can be changed.
Secure Connection - requires that remote devices provide proof of identity and
that all data be encrypted.
Startup Automatically - starts the service automatically when Bluetooth is
started.
Notifications - provides visual and/or audio notification that a remote device is
attempting to connect (or has connected) to a service on this computer.
Bluetooth for Windows Local Service Names
• Audio Gateway
• Headset
• Bluetooth Serial Port
50
Page 51
• Dial-Up Networking
• Fax
• File Transfer
• PIM Item Transfer
• PIM Synchronization
• Network Access
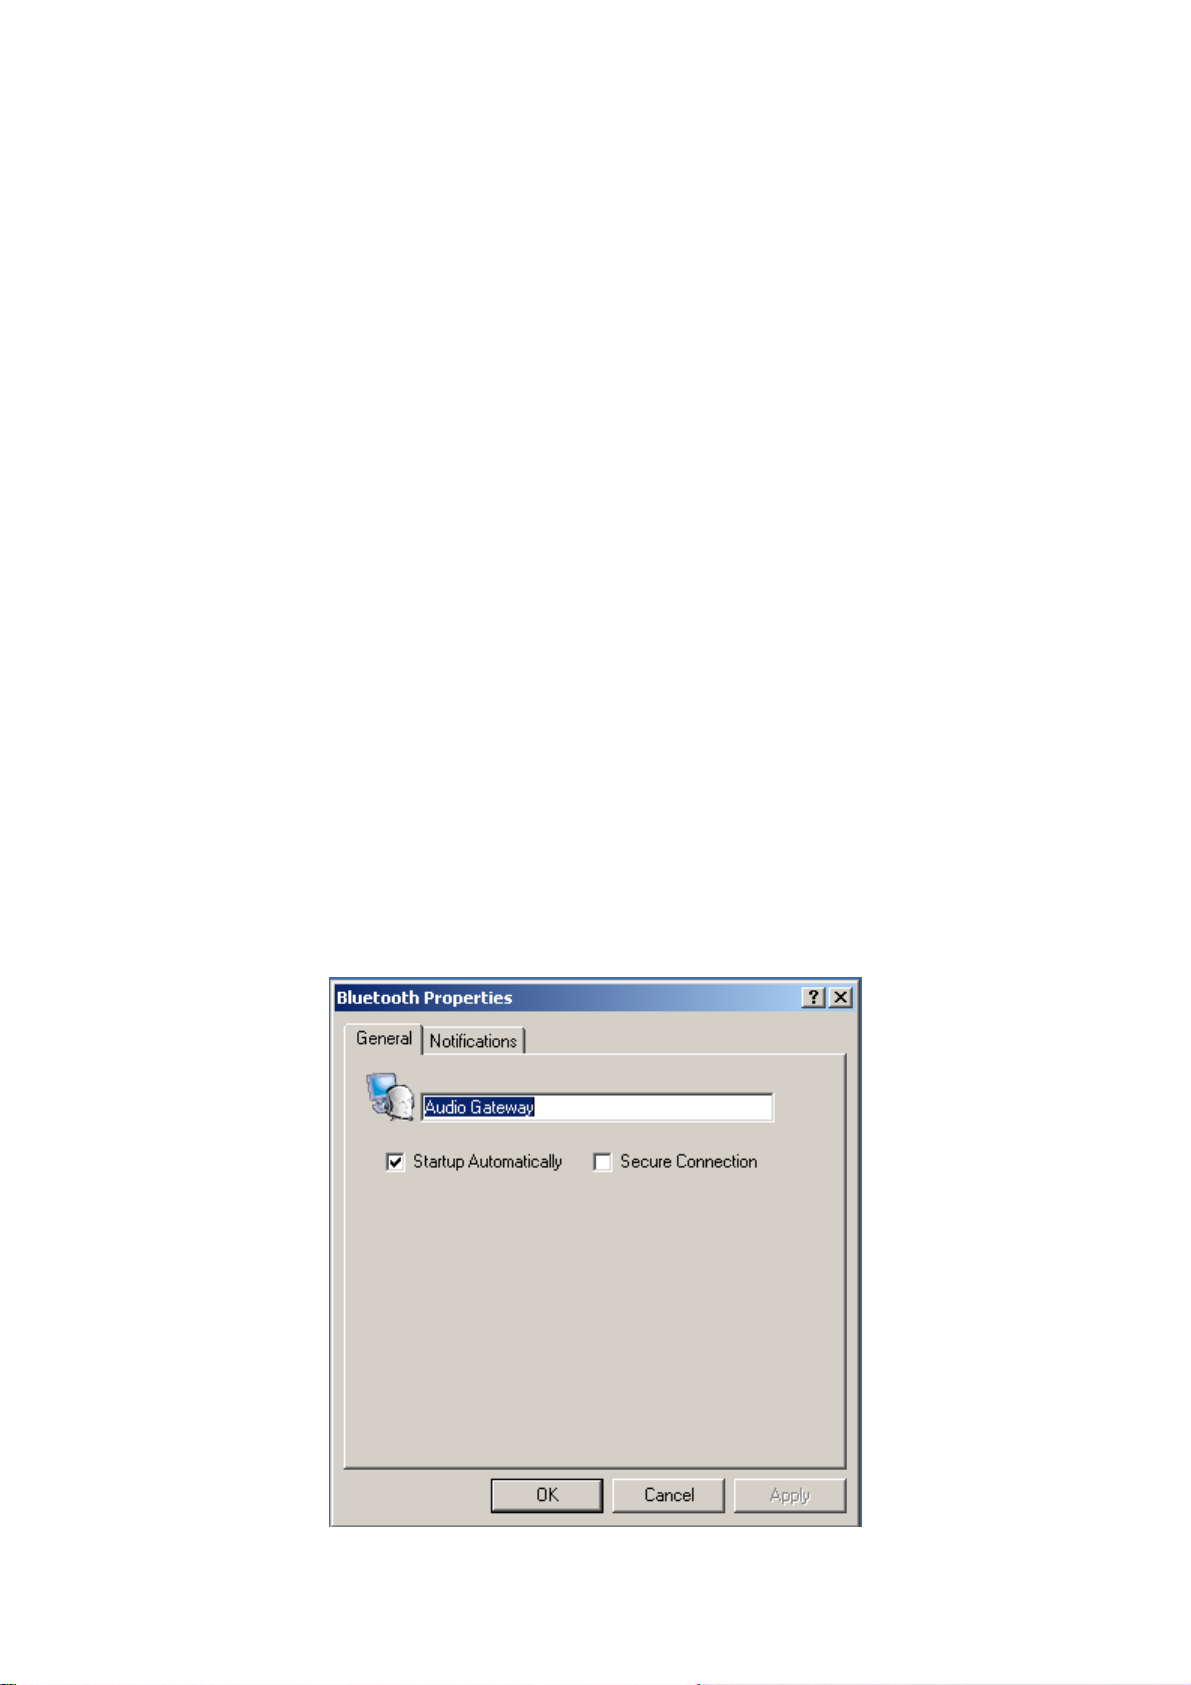
7.5.1 Audio Gateway
The Bluetooth Audio Gateway service allows this computer to use a remote Bluetooth
device’s microphone and speakers as this computer’s input and output devices.
For example, if this computer has voice recognition capabilities, a Bluetooth headset
might be used as the audio input device.
Hardware Requirements
The Bluetooth radio on both this computer and the remote device must support
audio.
The remote device handles both audio input and output for this computer;
therefore, this computer does not require a sound card, microphone, or speakers.
Configure the Audio Gateway Service
Double-click the Audio Gateway service from the Local Service Tab.
51
Page 52

Set the common configuration properties of the service from General and Notification Tabs,
and then click OK.
7.5.2 Bluetooth Serial Port
The Bluetooth Serial Port service allows a remote Bluetooth device to establish a wireless
serial connection with this computer. The wireless serial connection may be used by
applications as though a physical serial cable connected the devices.
Bluetooth for Windows has one pre-configured Bluetooth Serial Port, but additional Bluetooth
Serial Ports can be added when needed.
To establish a Bluetooth Serial Port connection
The connection must be initiated from the remote device by the Bluetooth Serial Port
application.
Determine the communications port being used by this computer for the
Bluetooth Serial Port
The COM port assigned to this service is the last item in the Bluetooth Serial Port service row.
Configure the application on this computer that will use this service to send its data to this
COM.
To add a port
1. From the Bluetooth Configuration Panel, Local Services tab, click Add Serial
Service.
52
Page 53
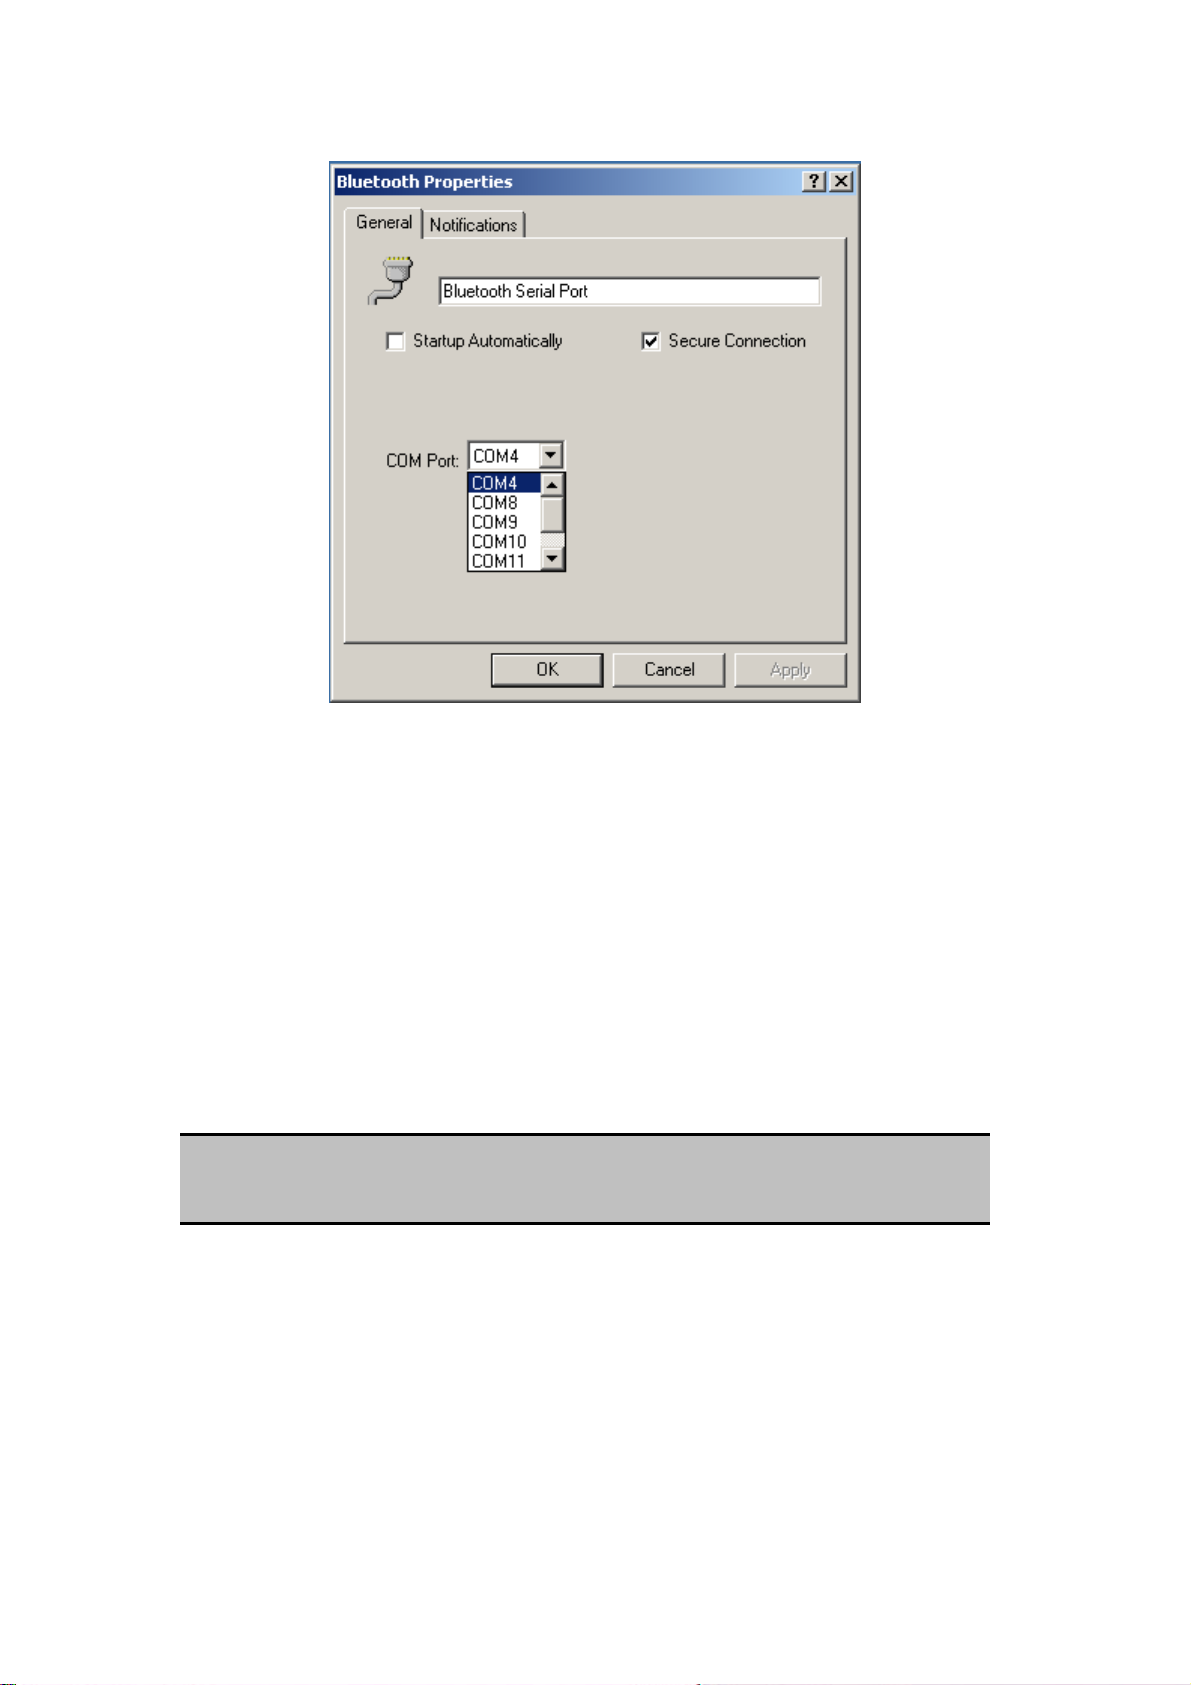
2. In the properties dialog box, modify the properties:
Enter a unique name (less than 99 alphanumeric characters).
Select secure connection, if desired.
Select Startup Automatically, if desired
From the COM Port shortcut menu select a communications port that is not
assigned to any other service.
3. Click OK.
To remove a Bluetooth Serial Port
From the Bluetooth Configuration Panel, Local Services tab, select the port to be
removed and then click Delete.
NOTE:
The Delete button is only available when a Bluetooth Serial Port is selected.
7.5.3 Dial-up Networking Service
The Bluetooth Dial-up Networking service makes it possible for a remote Bluetooth
device to use a modem that is physically connected to this computer. The remote device
can then access the Internet or log on to a remote network.
Configure the Dial-up Networking service:
53
Page 54
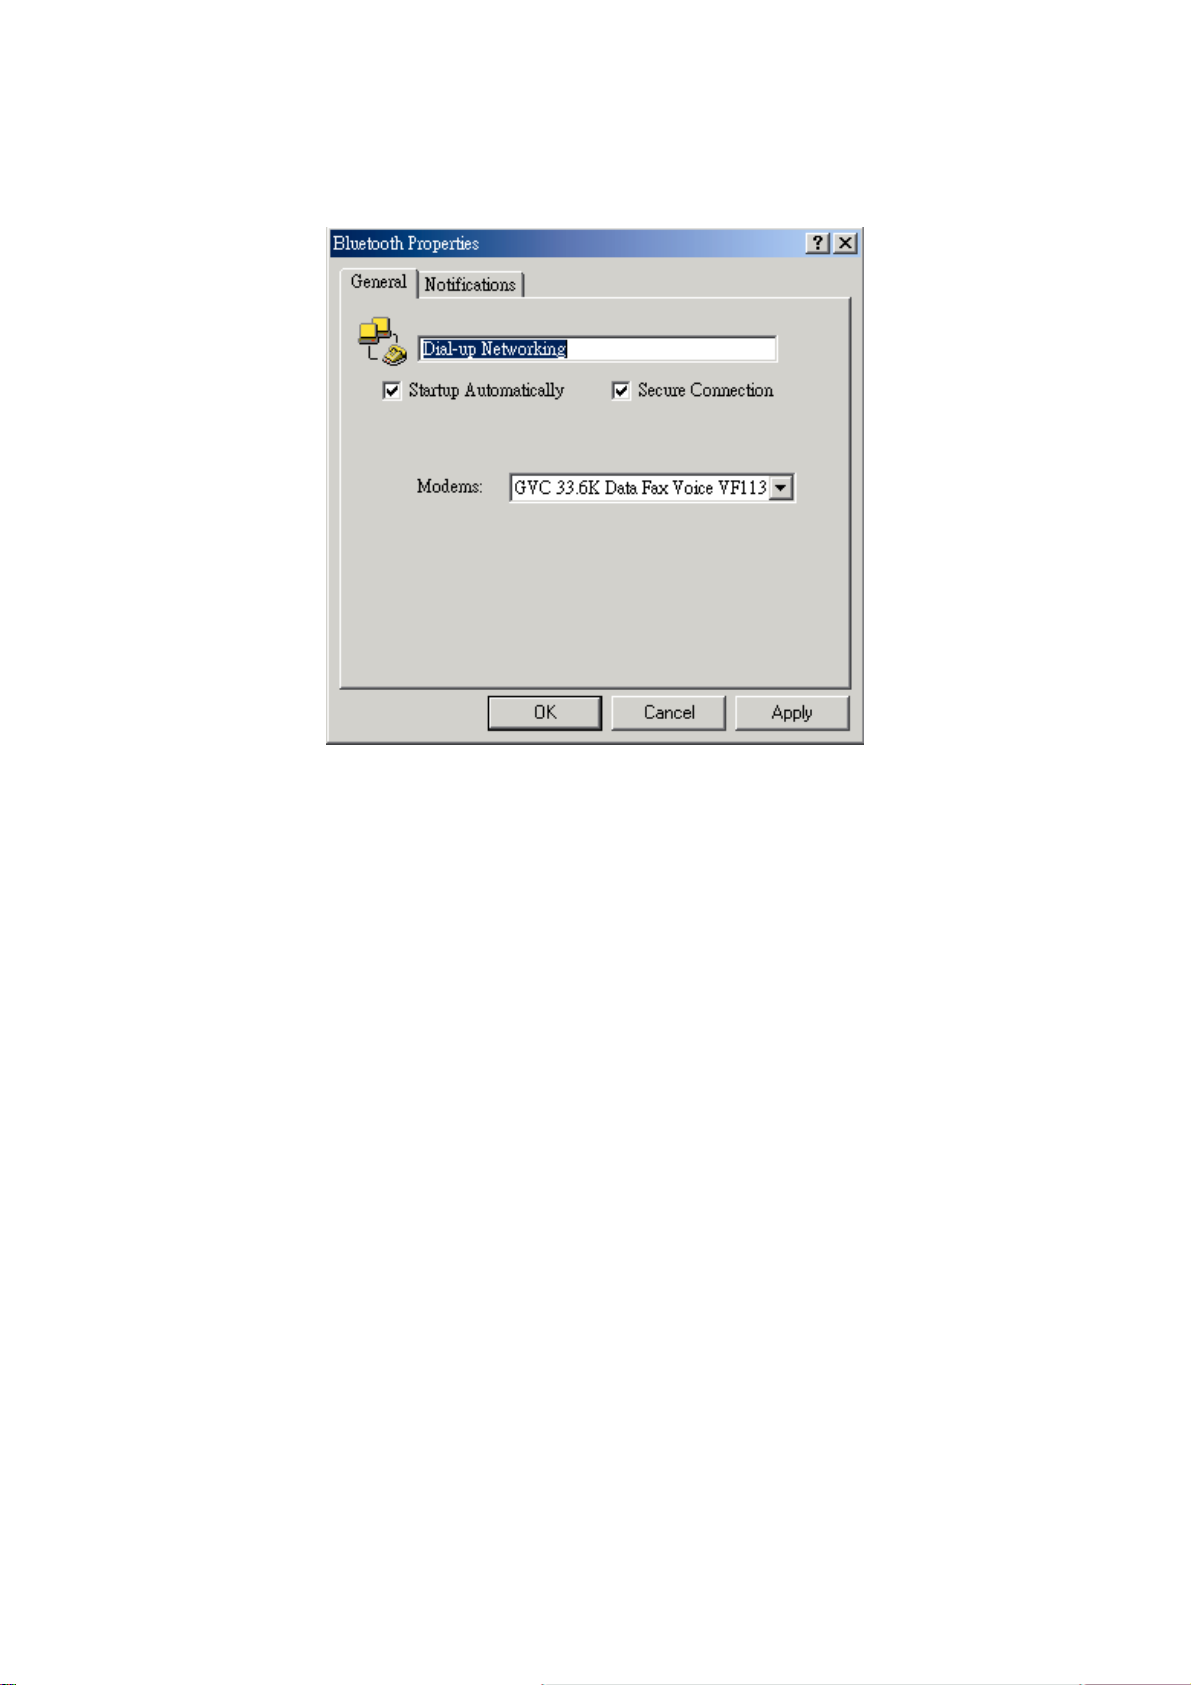
From the Windows system tray, right-click the Bluetooth icon, select Advanced
Configuration > Local Services, and then double-click the Dial-up Networking service.
Select the physical modem to be used from the Modems: drop-down menu.
Set the common configuration properties of the service, and then click OK.
7.5.4 Fax Service
The Fax service allows a remote Bluetooth device to send a Fax via a modem that is
physically attached to this computer.
Configure the Fax service:
From the Windows system tray, right-click the Bluetooth icon, select Advanced
Configuration > Local Services, and then double-click the Fax service.
54
Page 55
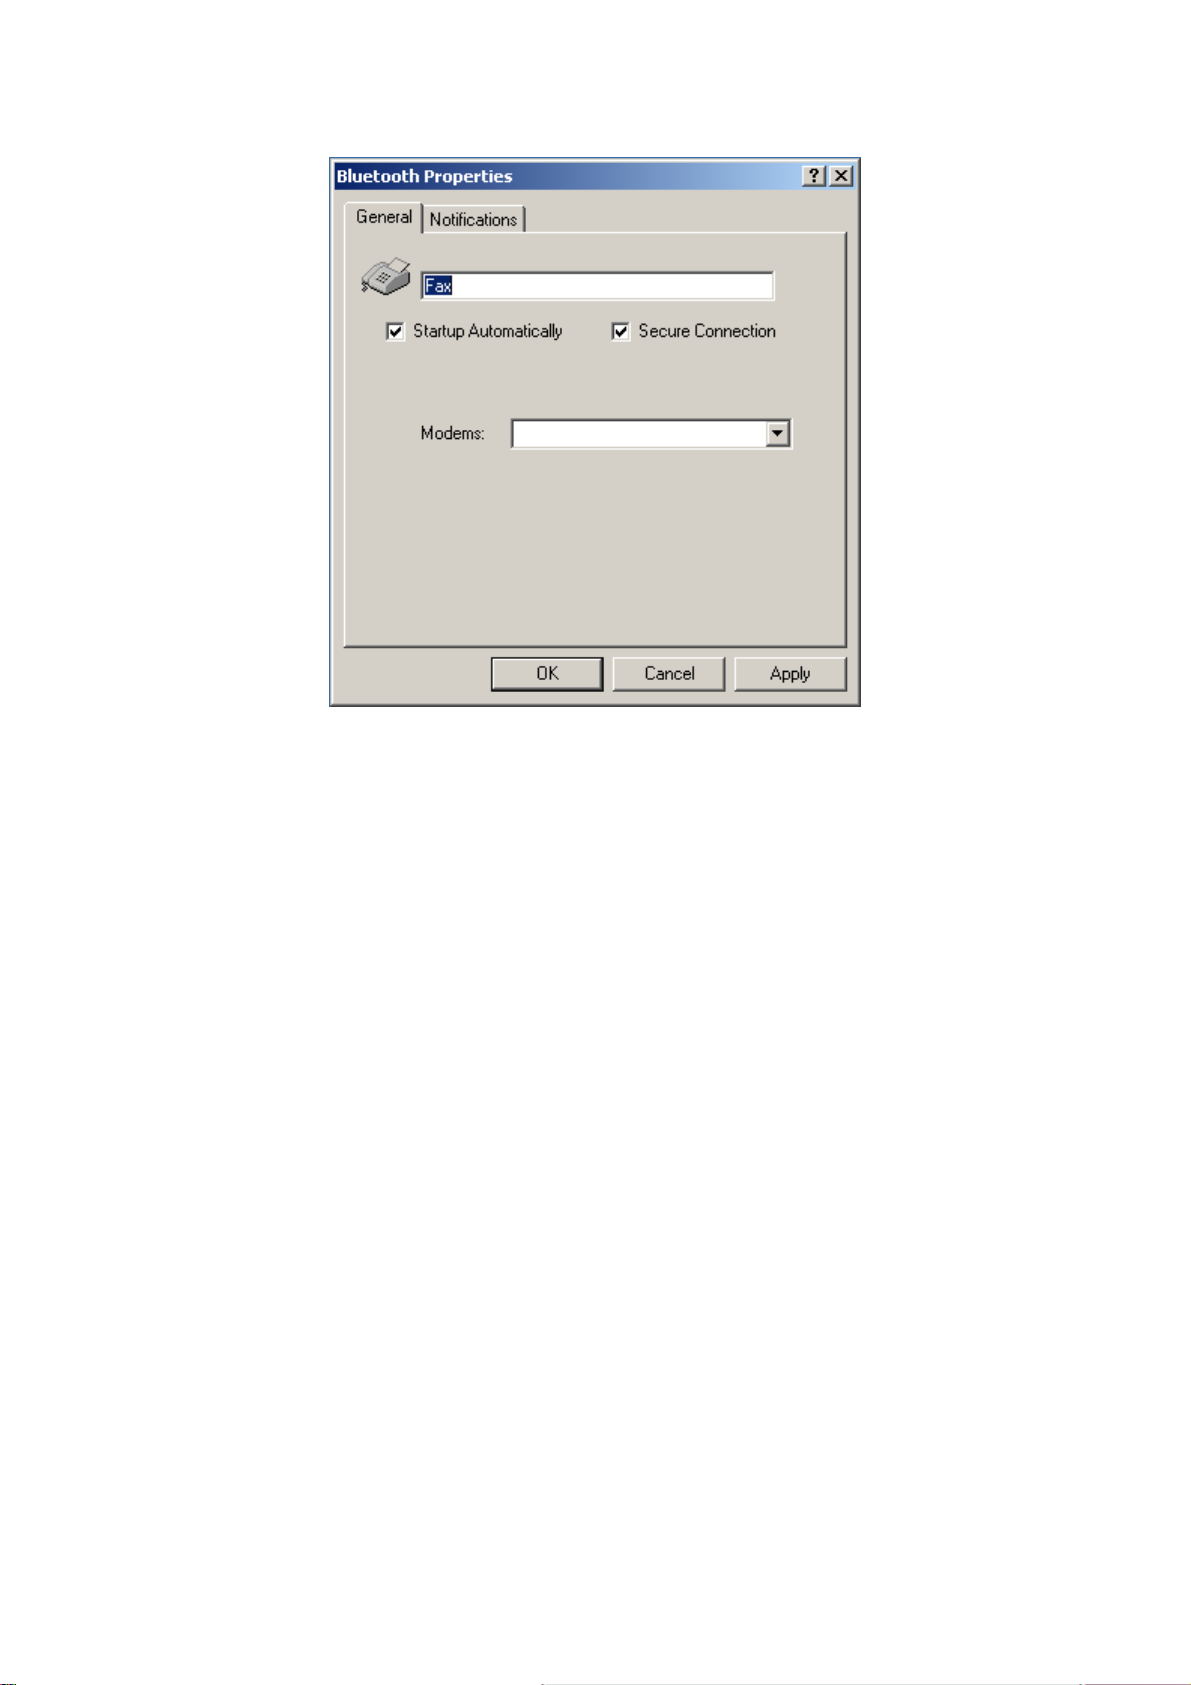
Select the physical modem to be used from the Modems: drop-down menu.
Set the common configuration properties of the service, and then click OK.
7.5.5 File Transfer Service
Configure the File Transfer Service
From the Windows system tray, right-click the Bluetooth icon, select Advanced
Configuration > Local Services, and then double-click the File Transfer Service.
55
Page 56
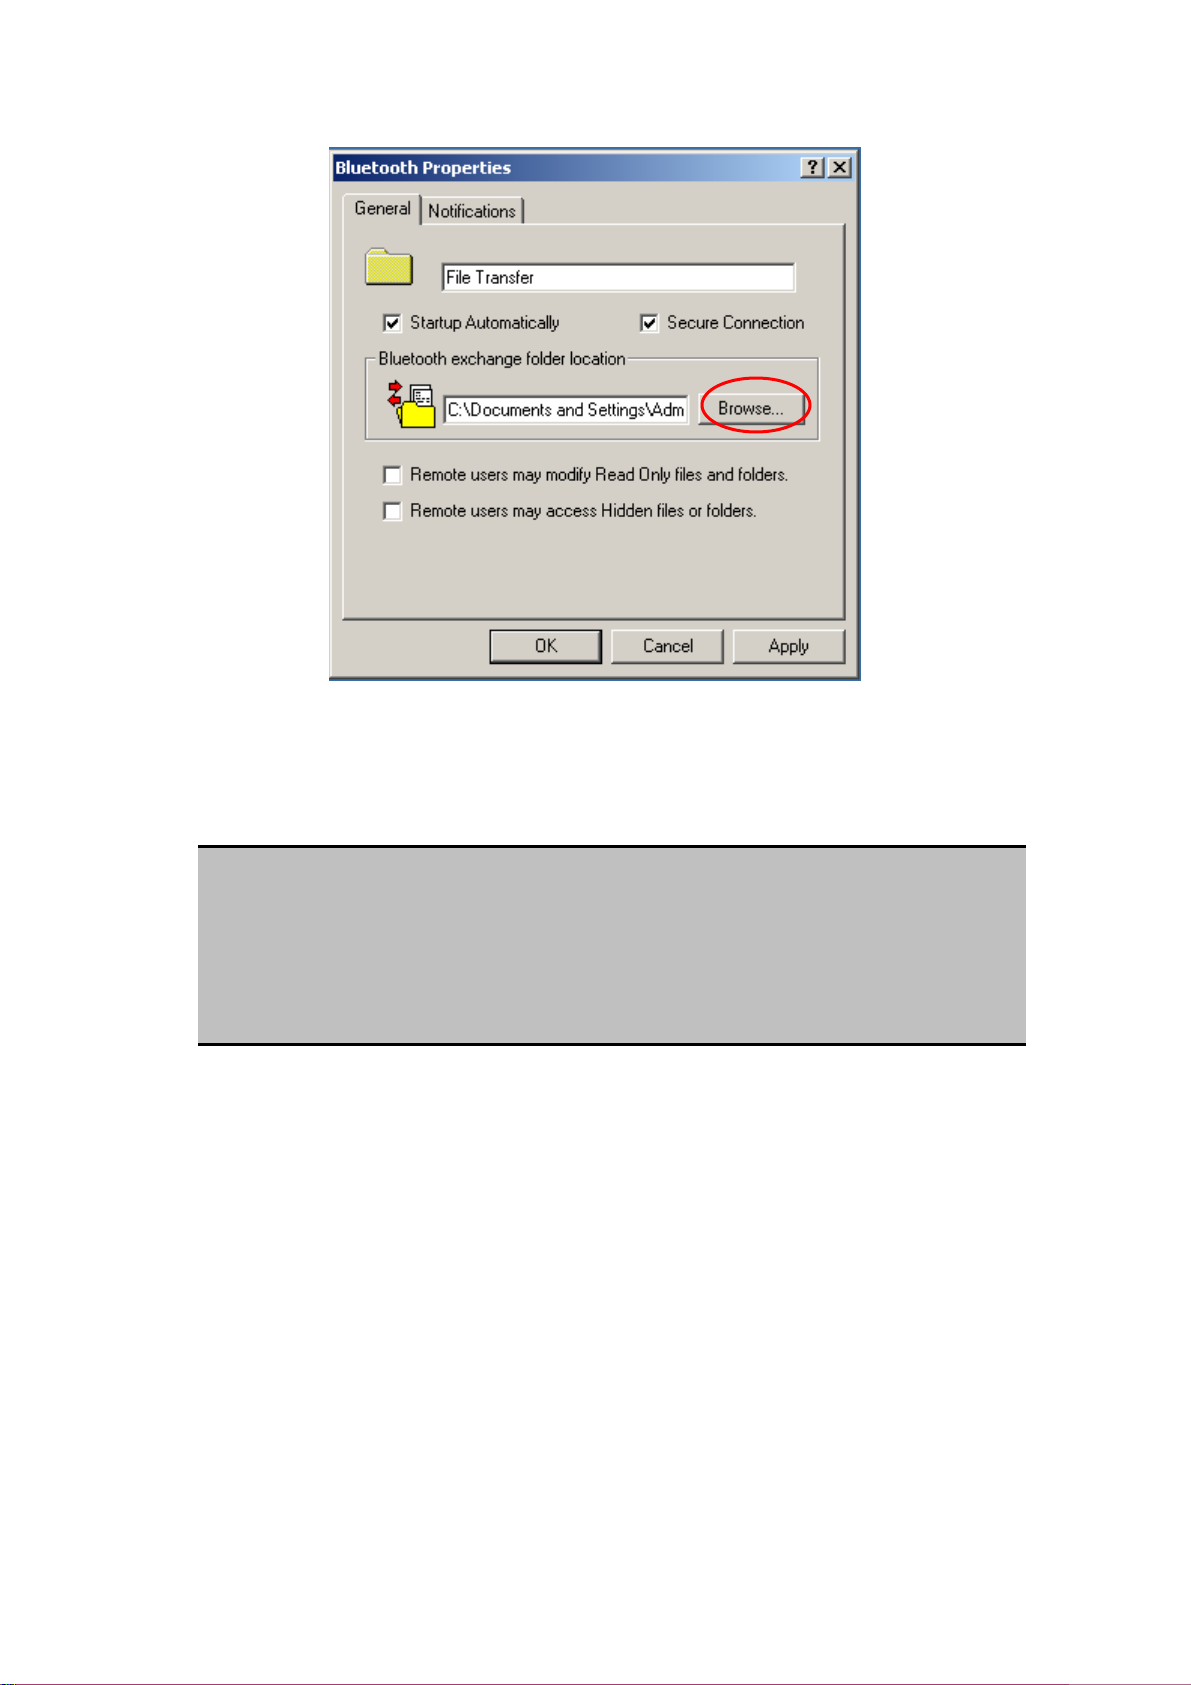
Bluetooth exchange folder location: the directory configured in this section is
the highest-level directory to which a remote Bluetooth computer has access.
This directory and its sub directories are displayed in the remote device's My
Bluetooth Places.
NOTE:
The Bluetooth Exchange Folder is shared by the PIM Item Transfer and the File
Transfer services and can be configured from the Properties page of either of
those services. When the Bluetooth Exchange Folder is re-configured for either of
these services, the other service will be updated to use the new location.
Click the Browse button and navigate to the directory that will be used as
“Bluetooth exchange folder location.
Set the common configuration properties of the service, and then click OK.
Basic File Transfer setup procedure
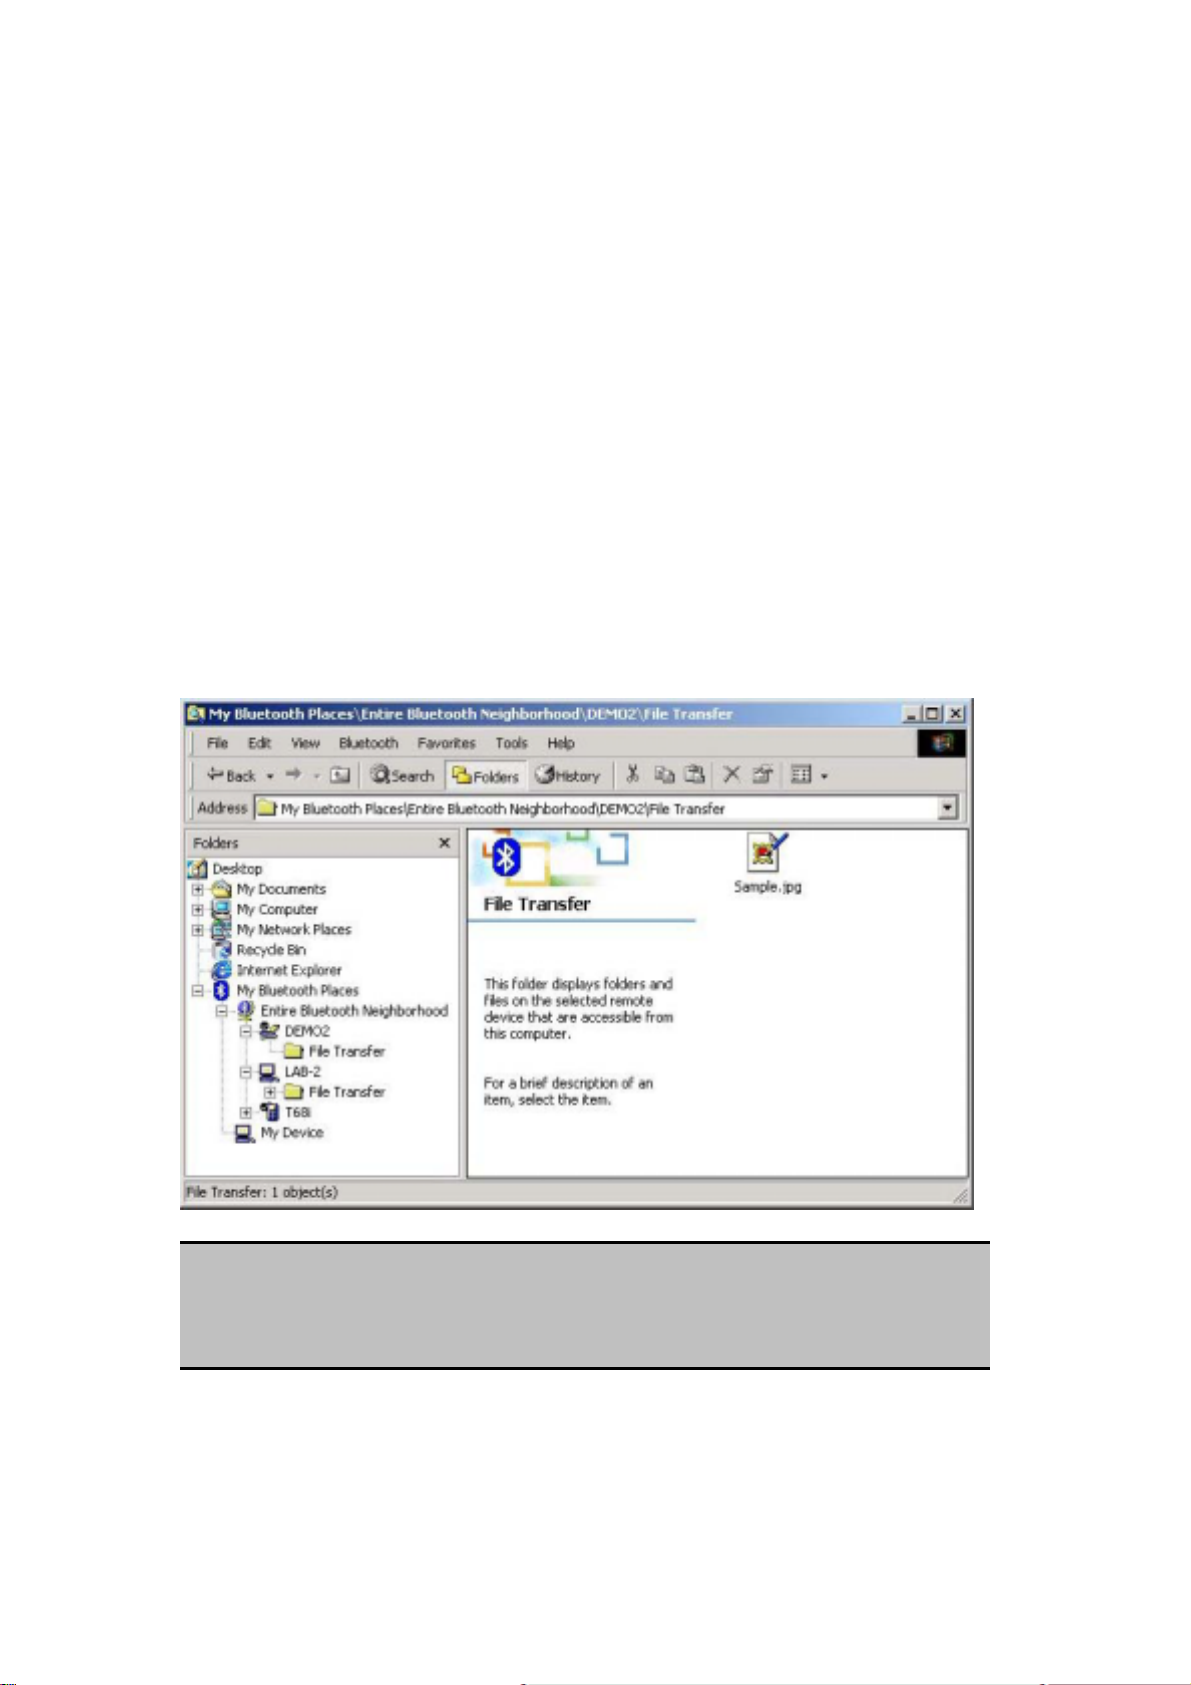
Right-click the Bluetooth icon and select Explore My Bluetooth Places.
Configure Explorer so that the Folders pane is visible (View > Explorer Bar >
Folders).
In the Folders pane, select Entire Bluetooth Neighborhood and then, on the menu
bar, select Bluetooth > Search For Devices.
In the Folders pane, expand Entire Bluetooth Neighborhood to show the devices in
the
vicinity.
56
Page 57

Copy to/from a remote device
In the Folders pane of Explorer, from the Entire Bluetooth Neighborhood branch,
select a device and expand that branch to view the Bluetooth Exchange Folder of
the remote device.
NOTE:
“Public Folder” is not available, the remote device is not configured to allow
remote file operations.
Use drag-and-drop to copy any file or folder contained in the Public Folder of the
remote device to the desired folder on this computer.
You can also drag-and-drop files or folders from this computer to the Public Folder
(and its sub-folders) of the remote device.
Other file operations
Right-click a file or folder in the remote device’s Public Folder for a context sensitive
menu. All potential menu options may not be available at all times.
Potential menu options include:
Open—opens the selected file on this computer, using the default application for
this type of file.
Print—sends the selected file to this computer’s default printer.
Send To
3 ½ floppy (A)—the 3 ½ inch floppy drive on this computer
Public Folder on My Device—the Public Folder on this computer.
Rename—applies only to empty folders; file names and the names of folders that
contain objects cannot be changed using this technique.
Cut, Copy, Paste, Delete, Refresh, View & New—standard Windows functions.
7.5.6 Headset Service
The Bluetooth Headset Service allows this computer to provide audio input/output for
remote Bluetooth devices.
For example, if the remote device is a Bluetooth telephone, this computer’s microphone
and speakers can be used as speakerphone input and output for that device.
NOTE:
Please refer to Chapter 9 – Troubleshooting for Windows 98 limitation.
57
Page 58
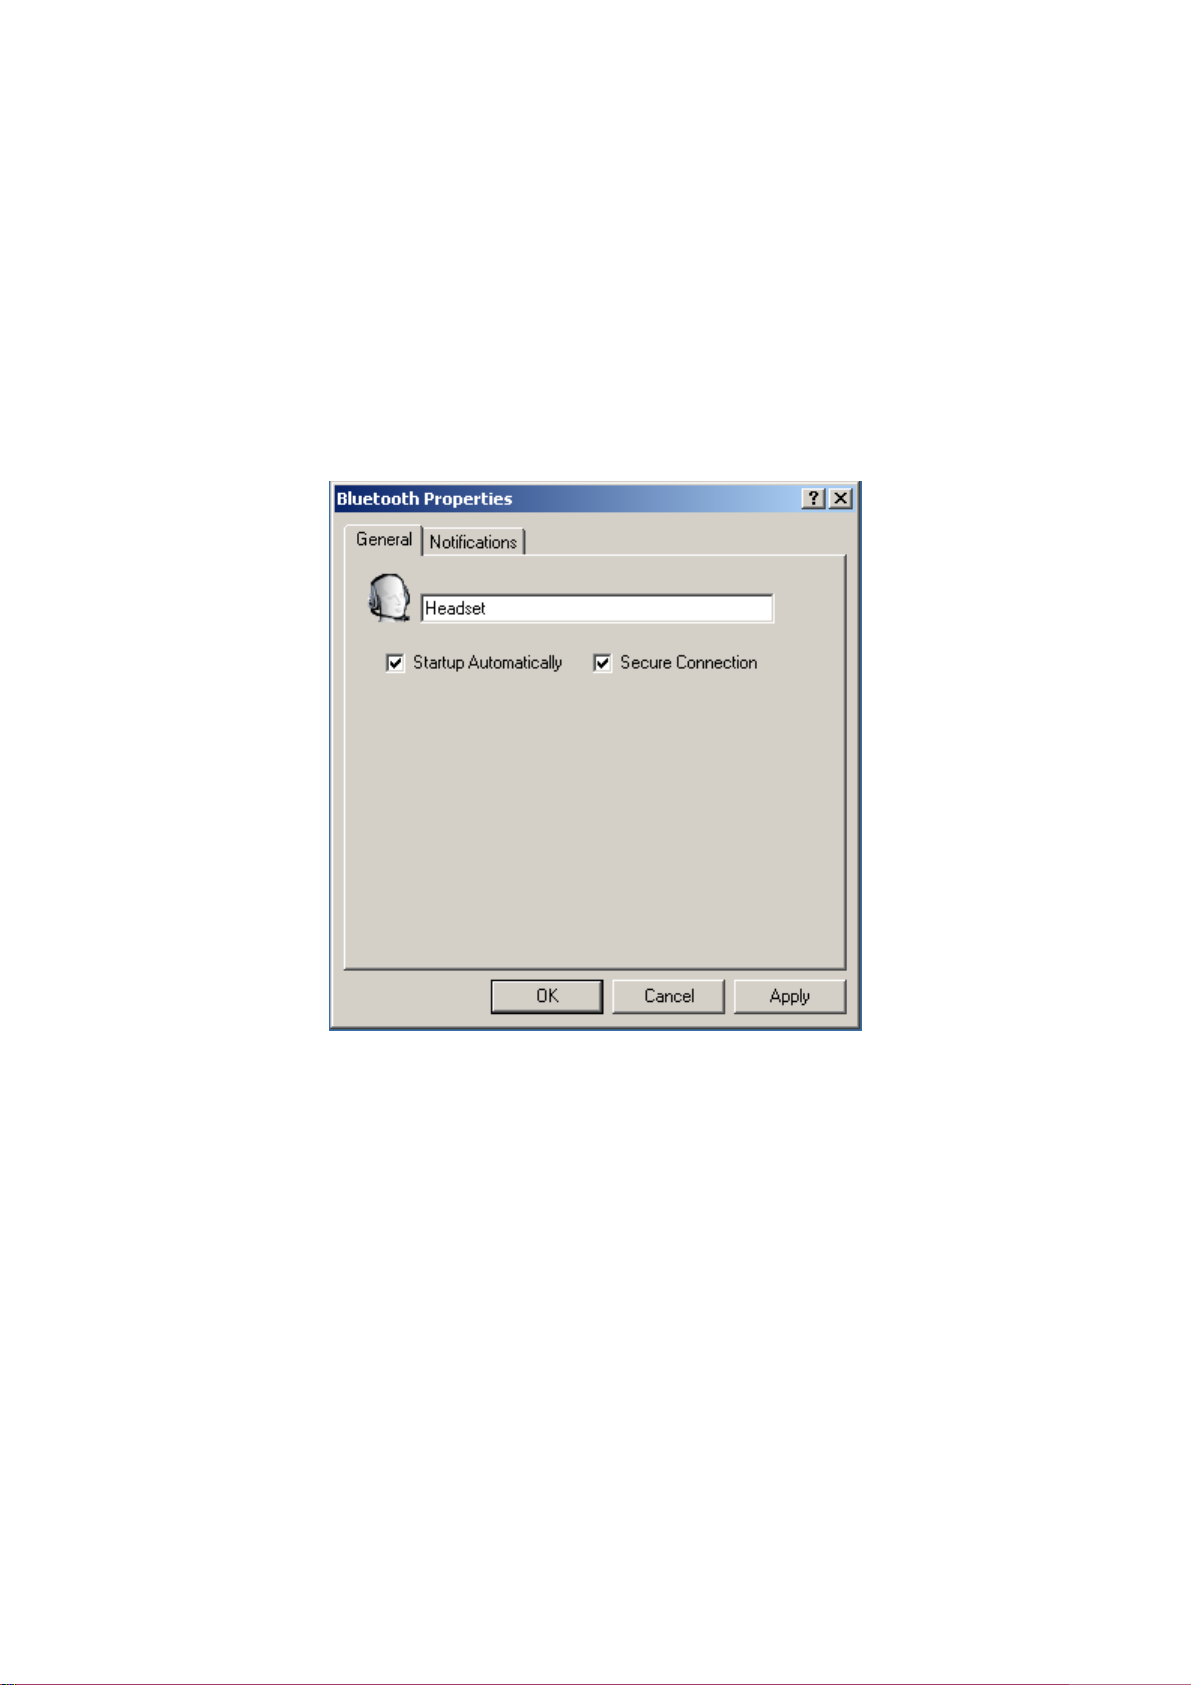
Hardware Requirements
This computer must have a sound card, microphone, and speakers installed.
The Bluetooth radio on both on this computer and the remote device must
support audio.
Configure the Headset Service
From the Windows system tray, right-click the Bluetooth icon, select Advanced
Configuration > Local Services, and then double-click the Headset service.
Set the common configuration properties of the service, and then click OK.
7.5.7 Network Access
The Bluetooth Network Access service makes it possible for a remote Bluetooth device
to use the Local Area Network connection that is physically attached to this computer.
After this computer has been configured to provide the Network Access service to other
Bluetooth devices, it will not be able to use the Bluetooth Network Access service
provided by another Bluetooth device without being re-configured. Put another way, this
computer cannot be both a Bluetooth Network Access server and a Bluetooth Network
Access client at the same time.
58
Page 59
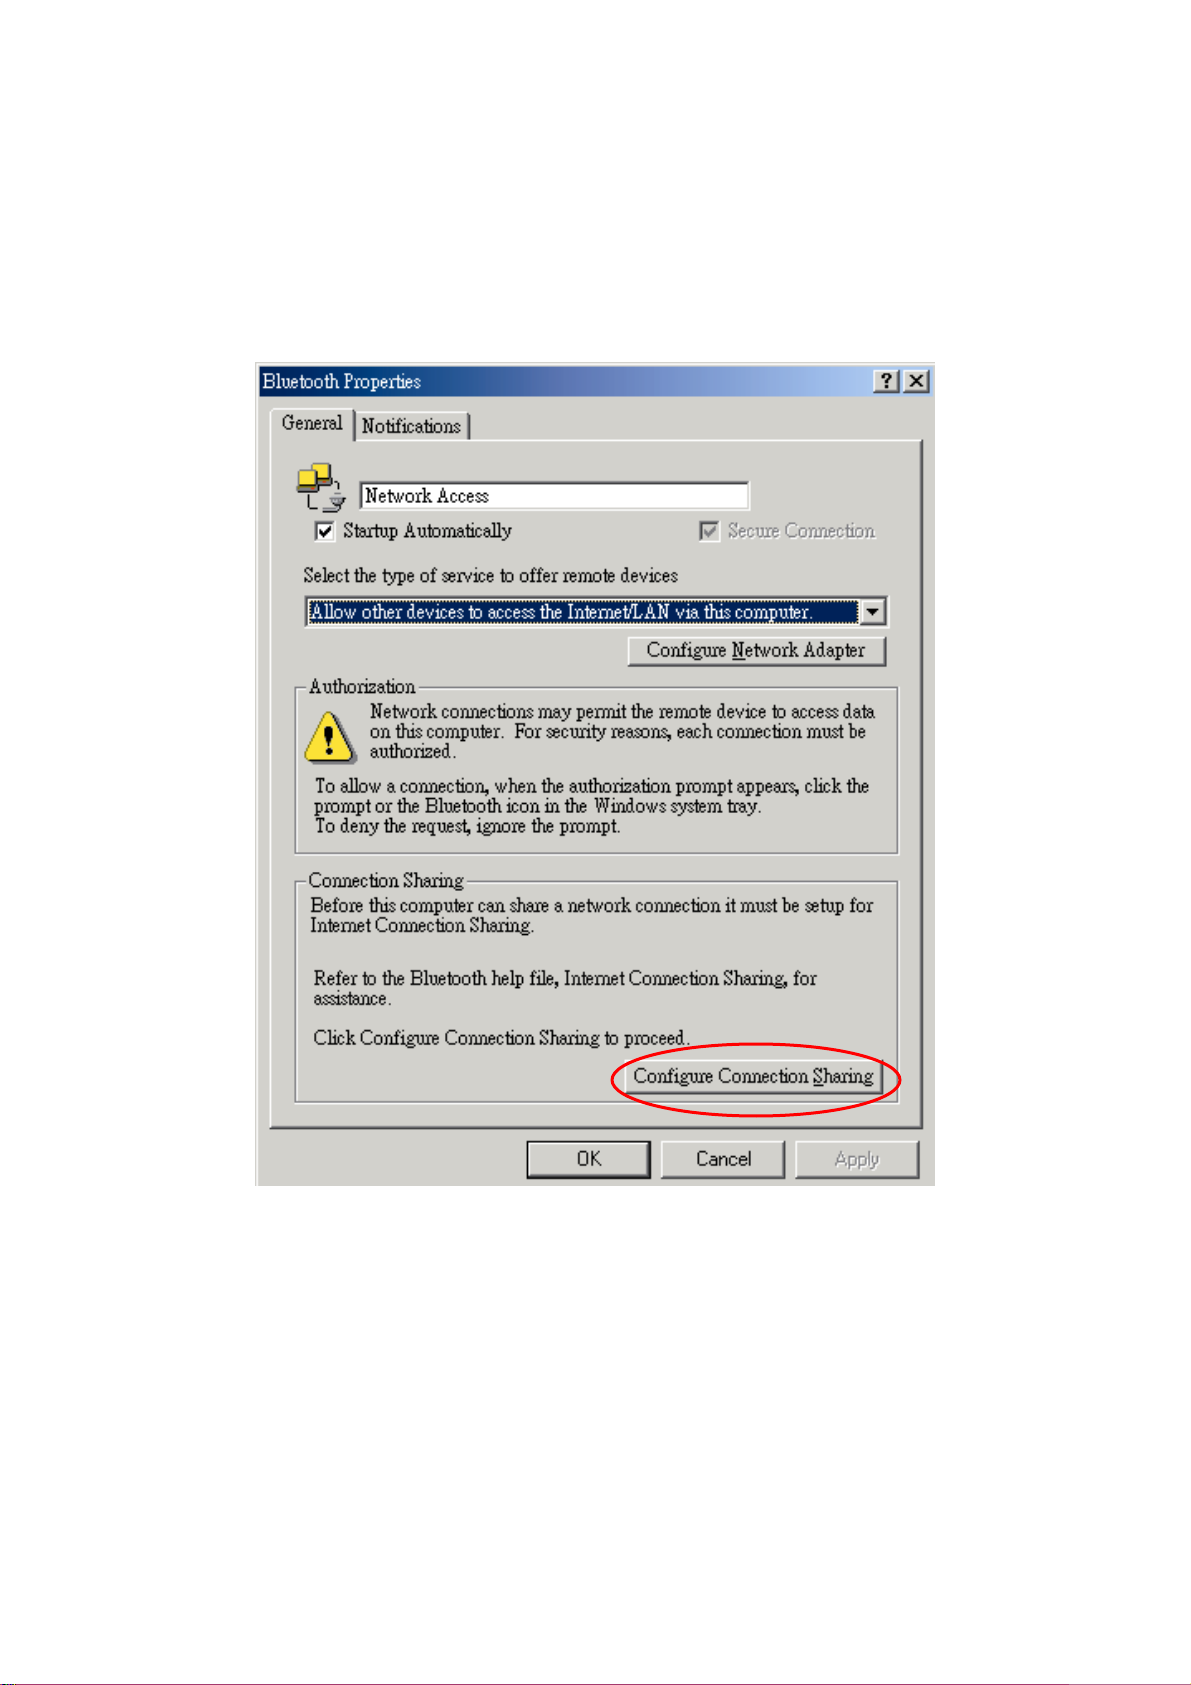
7.5.7.1 Setup for Windows 2000 and Windows XP
Steps
From the Windows system tray, right-click the Bluetooth icon and select
Advanced Configuration from the shortcut menu.
In the Bluetooth configuration panel, select the Local Services tab, Network
Access and then click Properties....
From the Network Access, General properties page, in the Type of service
shortcut menu, select “Allow other devices to access the Internet/LAN via this
computer,” and then click Configure Connection Sharing.
Right-click Local Area Connection, select Properties and then select the Sharing
tab.
Select Enable Internet Connection Sharing for this connection, click OK, and
then click YES in the confirmation dialog box.
7.5.7.2 Network Access Server-side Setup for Windows 98SE &
59
Page 60
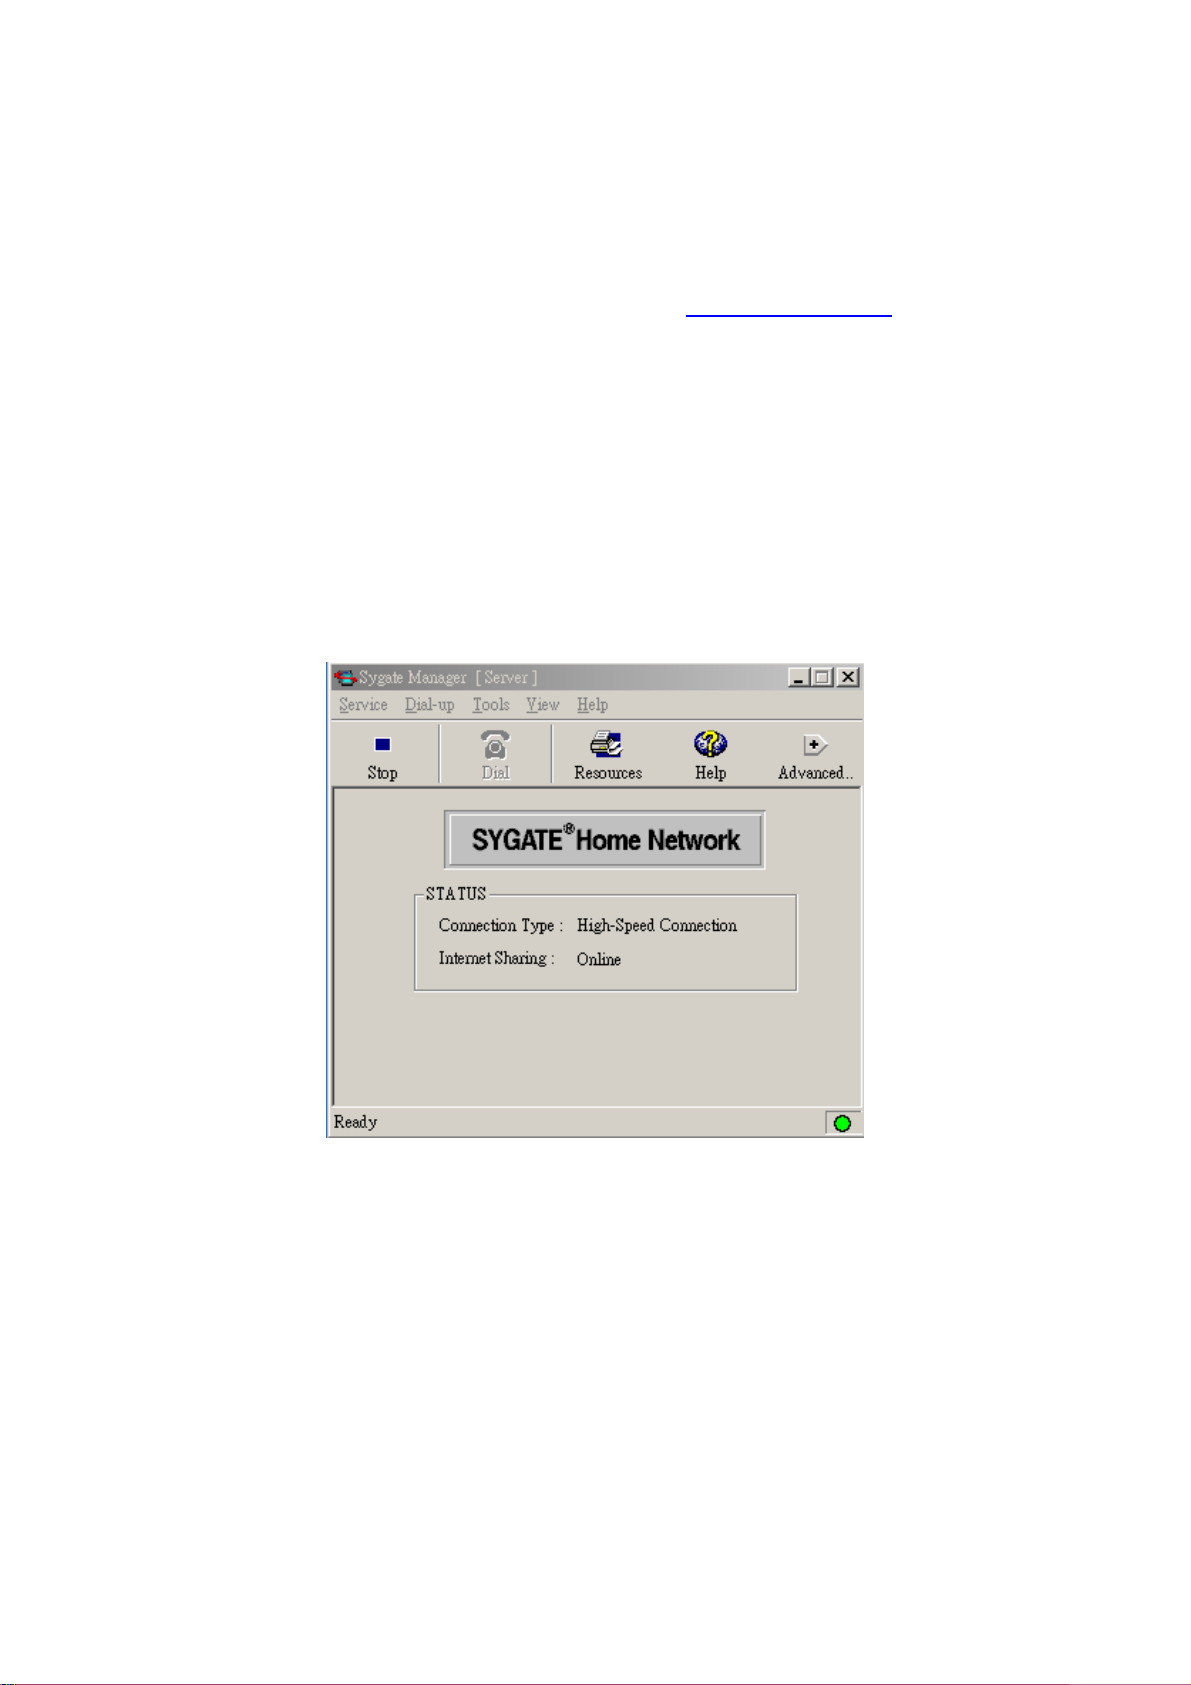
Windows ME:
If the Bluetooth sever is running in Windows 98SE or Windows ME, you have to install an
Internet Protocol Routing software. There are lots of trial versions of Internet Protocol Routing
software in the Internet. For example: A downloadable trail version of Sygate Home Network is
available on the Sygate Technologies Inc. The website is http://www.sygate.com/
.
Installing and configuring the Sygate Home Network :
Please follow the on-screen descriptions to install the Sygate Home Network. Note
that check the box of Server Mode on the Installation Setting dialog box during
installation.
Click on the OK button from the Sygate Network Diagnostics screen.
Click on the Yes button from the Reboot dialog box to restart your computer. After
you reboot your PC, click on the OK button from the Thank You For Trying Sygate
screen. The Sygate Manager screen will show up.
Click on the Advanced button from the Sygate Manager screen and click on the
Configuration icon. The Configuration screen will show up.
60
Page 61
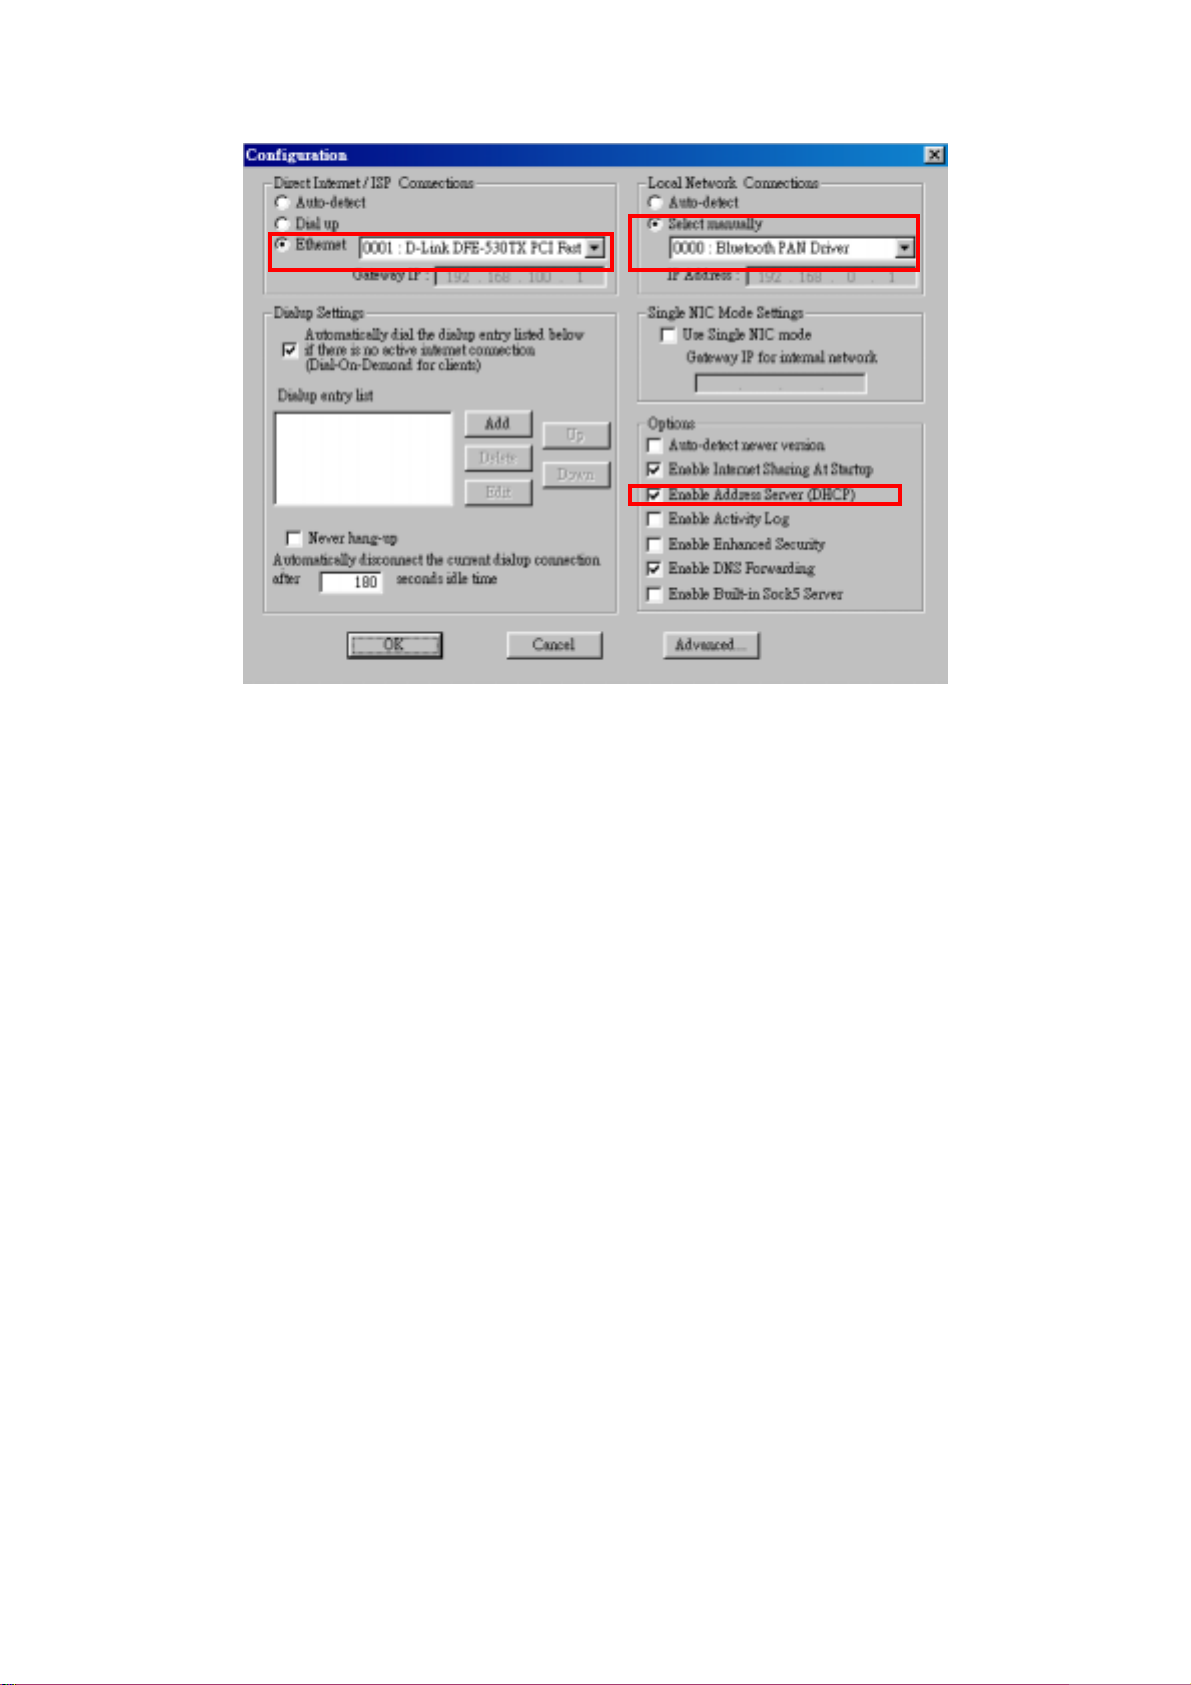
In the right panel of the Configuration screen, check the radio button Select
manually from Local Network connections and select the 0000:Bluetooth PAN
Driver. Be sure to check the Enable Address Server (DHCP) from the Options
item.
On the left side of the Configuration screen, check the radio button of Ethernet
and select the LAN card the PC is using.
Now, you have successfully configured your PC or laptop to the Bluetooth server. So Bluetooth
client devices in the vicinity can link to the Bluetooth server.
7.5.7.3 Share Printer via Network Access
After you configure a desktop or laptop as a Bluetooth server, the Bluetooth client can surf the
Internet and print documents through the Bluetooth server. Follow the following steps to enjoy
this convenient application.
Steps (Bluetooth Server)
Open My Bluetooth Places.
Pairing Device. (You can pair these two devices either from Bluetooth Server or
Bluetooth client.)
From Bluetooth menu, click Search for Devices. On the right pane of Entire
Bluetooth neighborhood, right-click the Bluetooth device you want to pair. Refer to
Chapter 8 for pairing procedures.
Enable the Network Access Sharing Function.
Please refer to section 7.5.7.1 or 7.5.7.2 to enable this function.
61
Page 62

Share a printer.
From Windows Start menu -> Settings -> Printers, right-click the printer icon you
want to share and select Sharing from the shortcut menu. Click the Sharing tab
from the Printer Properties dialog box and click the radio button of “Shared as” to
share this printer.
Enable Guest Account.
Right-click “My computer” icon on your desktop and select “Manage”. From the
“Computer Management” window, click the + icon in front of “Local Users and
Groups” to extend sub-menus. Click Users, right-click Guest item and select
“Properties”. Click the General Tab from the Guest Properties dialog box and
remove the check of “Account is disabled”. Click OK to confirm your settings.
Steps (Bluetooth client)
Open My Bluetooth Places.
Pairing device. (You can pair these two devices either from Bluetooth Server or
Bluetooth client.)
From Bluetooth menu, click Search for Devices. On the right pane of Entire
Bluetooth neighborhood, right-click the Bluetooth device you want to pair. Refer to
Chapter 8 for pairing procedures.
Build a network access connection with the Bluetooth server.
Right-click the pairing device and select “Discover Available Services”.
Double-click the Network Access icon.
Add a network printer.
From Windows Start menu -> Settings ->Printers, and double-click the Add Printer
icon. Click Next. Click the radio button of Network printer and click Next.
62
Page 63
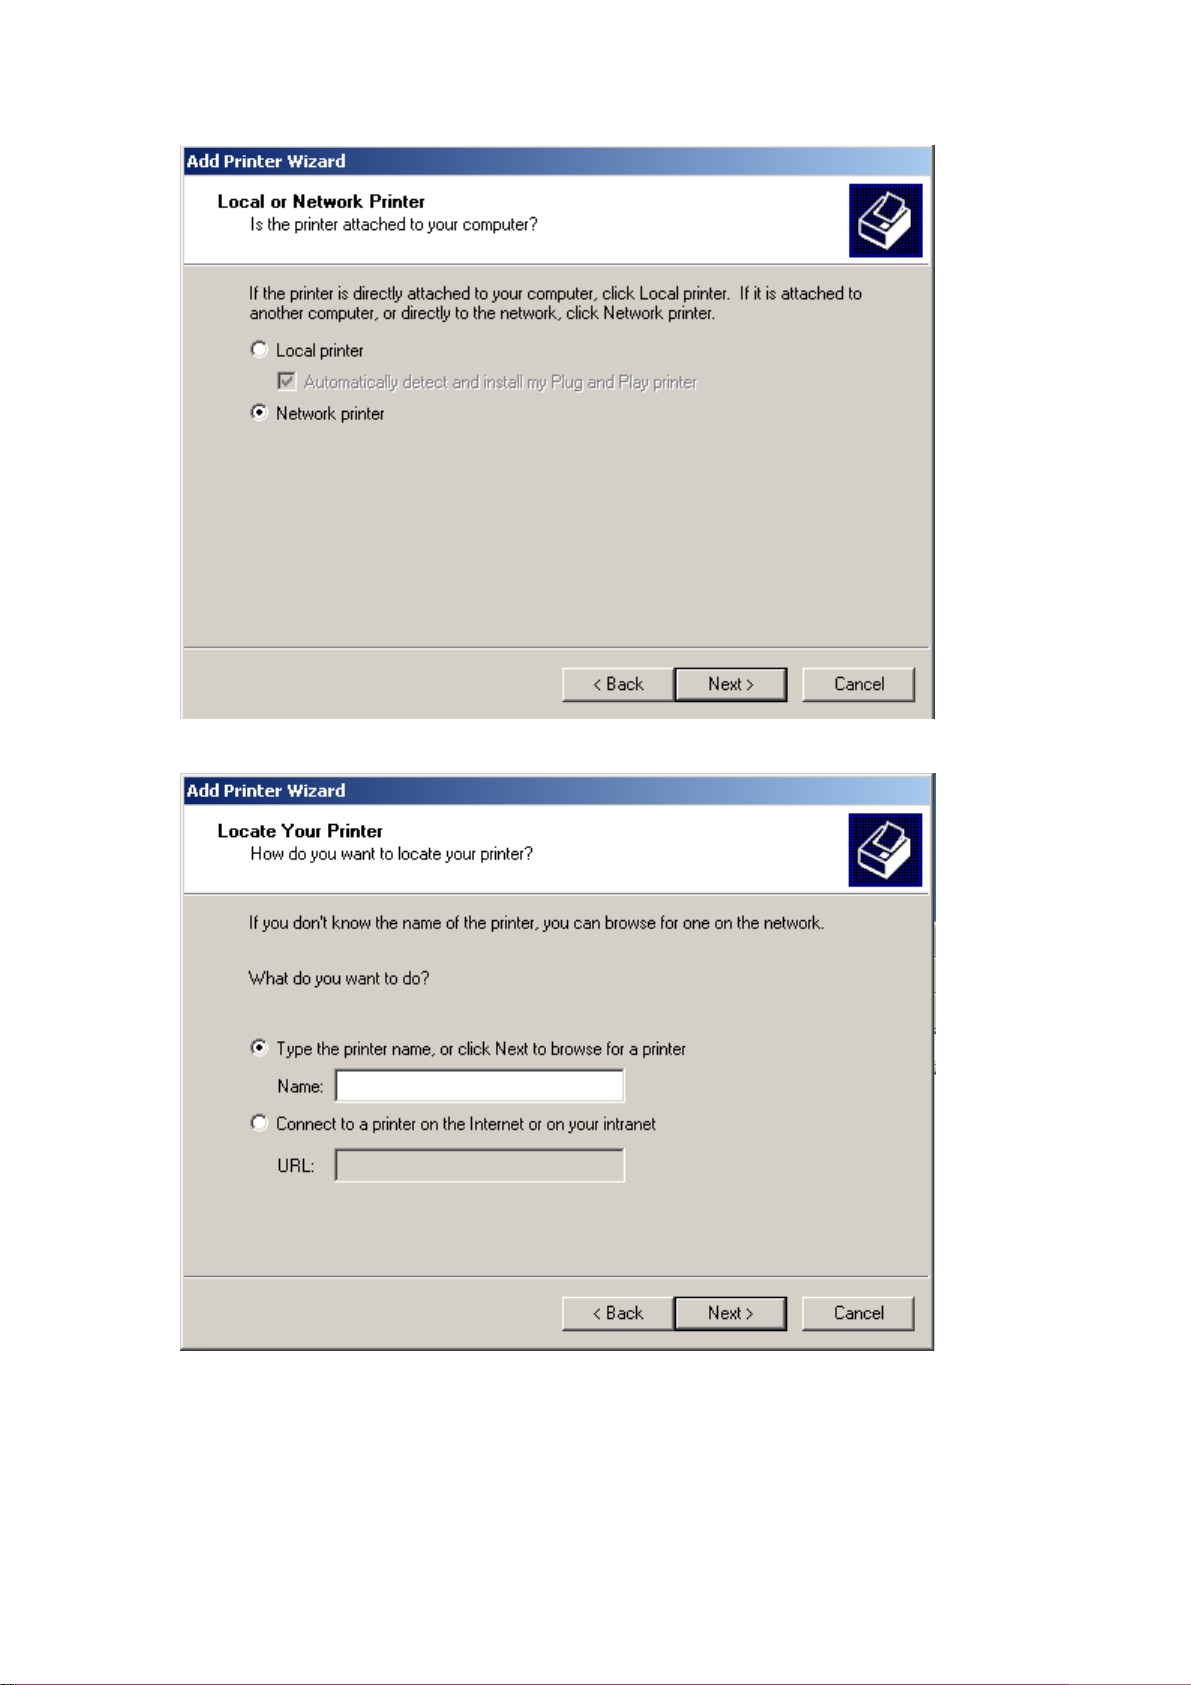
Click Next to find the printer.
Select the Bluetooth server, select the shared printer and click Next.
63
Page 64
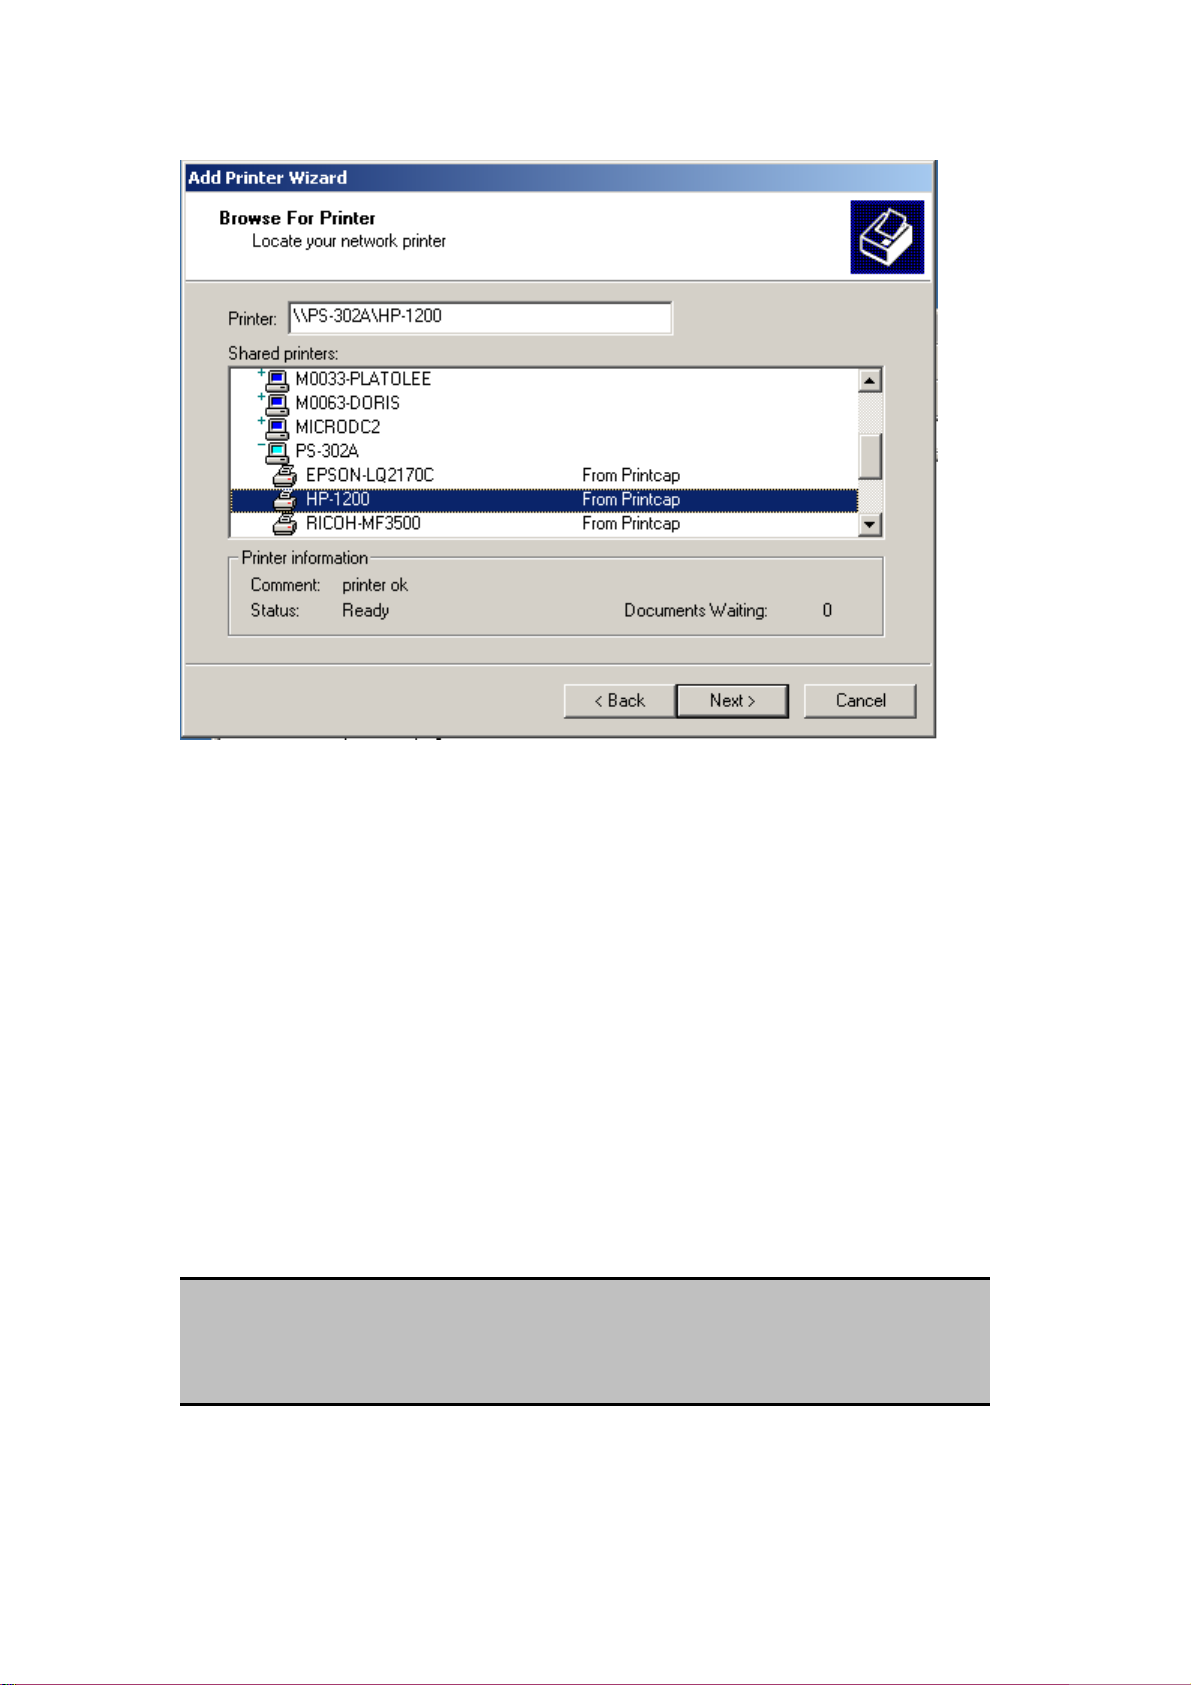
Click Finish button to complete the installation.
7.5.8 PIM Item Transfer
Overview
The PIM Item Transfer service allows Personal Information Manager items to be
transferred between this computer and a remote Bluetooth device.
Four data types are supported:
Business Cards
Calendar Items
Email Messages
Notes
Each data type can be saved in any of the supported and installed PIMs.
NOTE:
PIMs which are not installed on this computer will not appear in the shortcut
menus.
When the PIM that is associated with an individual data type is changed on the PIM Item
Transfer page, that data type is also changed for the PIM Synchronization service.
64
Page 65
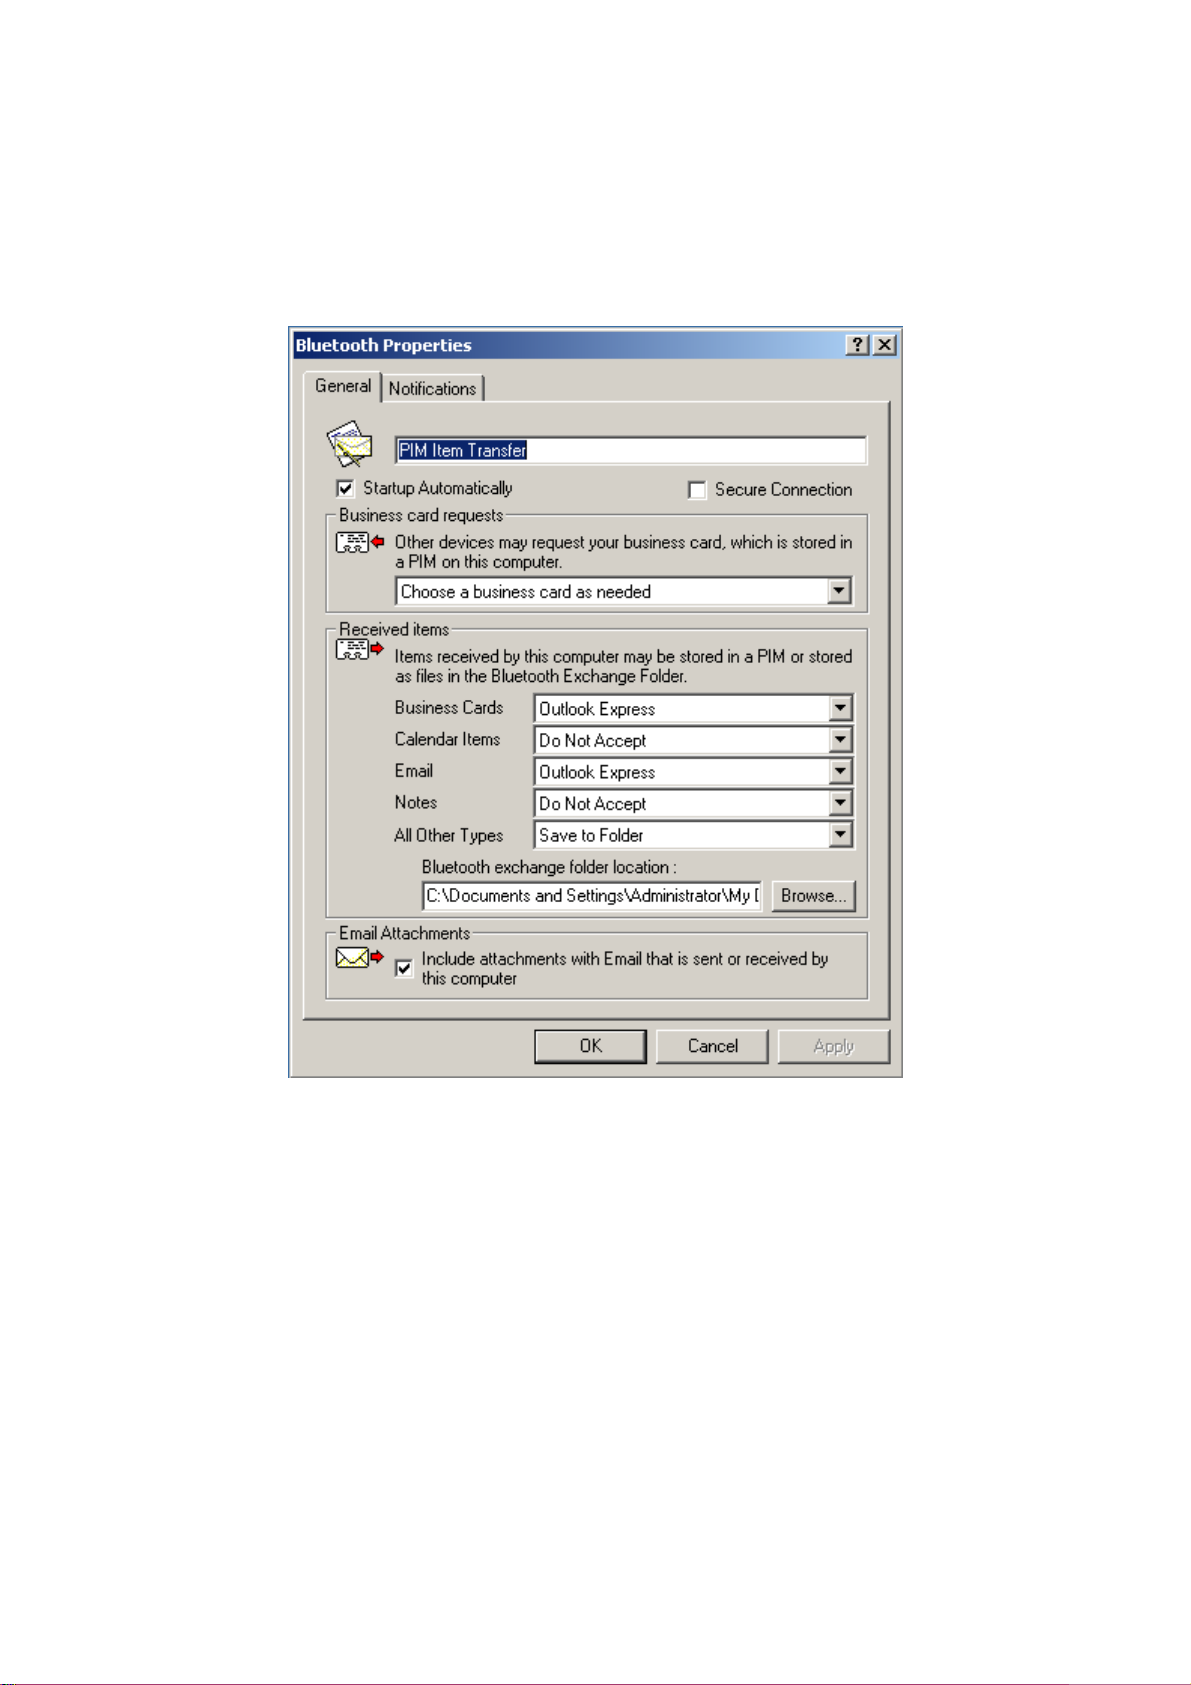
Configure
From the Windows system tray, right-click the Bluetooth icon and select Advanced
Configuration from the shortcut menu. In the Bluetooth configuration panel, select the Local
Services tab, and double click PIM Item Transfer.
In addition to the configuration options common to all Bluetooth services, this service
also has settings that determine:
How business card requests are handled. The options are:
Never send my business card—ignore the request
Choose a business card as needed—when prompted, select a business card to
be sent to the requester.
Always send the same business card—when a request is received always
send the same business card. When this option is selected, a dialog box
appears from within which an installed Personal Information Manager (if
more than one is installed on this computer) and an existing business card
can be selected.
Previously sent business cards—once a card is selected using the “Always
65
Page 66

send the same business card” option, above, that card will be added to the
shortcut menu as an option.
NOTE:
Previously sent business card additions to the menu are limited to ten, after which the oldest
contact will be replaced.
Where to store inbound data items, on an individual basis. Options include (not
all options apply to all items):
Do Not Accept
Any of the installed PIMs on this computer
Save to Folder
The Bluetooth Exchange Folder location—the directory on this computer where
inbound items that are not to be saved in a PIM will be kept.
NOTE:
This is also the folder where the File Transfer service stores inbound items. If this folder is
reconfigured here, it will also be reconfigured in that service
automatically.
Whether to send/receive attachments with email. Check or clear this option, as
appropriate.
Close a PIM Item Transfer connection
PIM Item Transfer connections close automatically when the data transfer is complete.
Default Business Card Selection
When the “Always send the same business card” option is selected, a dialog box appears
to allow the selection of a default business card.
The first time the dialog box appears it provides a way to choose the Personal
Information Manager that stores the default business card. Click the down-arrow in the
PIM shortcut menu and select the PIM to be used.
On subsequent appearances of this dialog box, the PIM selection option is not available.
Change the selected PIM
On the PIM Item Transfer properties page, “Received items” section, there is a Business
Cards shortcut menu. When a PIM was selected during initial setup the selected item in
this menu was set to the same PIM. To change the PIM used for the default business card,
66
Page 67

open this shortcut menu and select a new PIM.
NOTE:
A new default business card must be selected from the database of the newly
selected PIM.
Choose a default business card
1. In the Select a Bluetooth Business Card dialog box that appears when “Always
send the same business card” is selected, highlight the card.
NOTE:
Once a card is highlighted, if you “hover” the mouse pointer over that selection, a balloon
appears with additional information about that contact.
2. Click OK to choose a highlighted business card and return to the PIM Item
Transfer Properties page. The chosen contact now appears in, and is selected in,
the “Business card requests” shortcut menu.
If the “Always send the same business card” option is selected again, and a different
contact chosen, the properties page will display both contacts in the shortcut menu.
NOTE:
In addition to the default menu options, the shortcut menu can hold up to ten contact
names.
7.5.9 PIM Synchronization
The PIM Synchronization service can be used by a remote device to synchronize its
Personal Information Manager (PIM) database with the PIM database of this computer..
Four data types are supported:
Business cards
Calendar items
Email messages
Notes.
Configure
From the Windows system tray, right-click the Bluetooth icon and select Advanced
Configuration from the shortcut menu. In the Bluetooth configuration panel, select the Local
67
Page 68
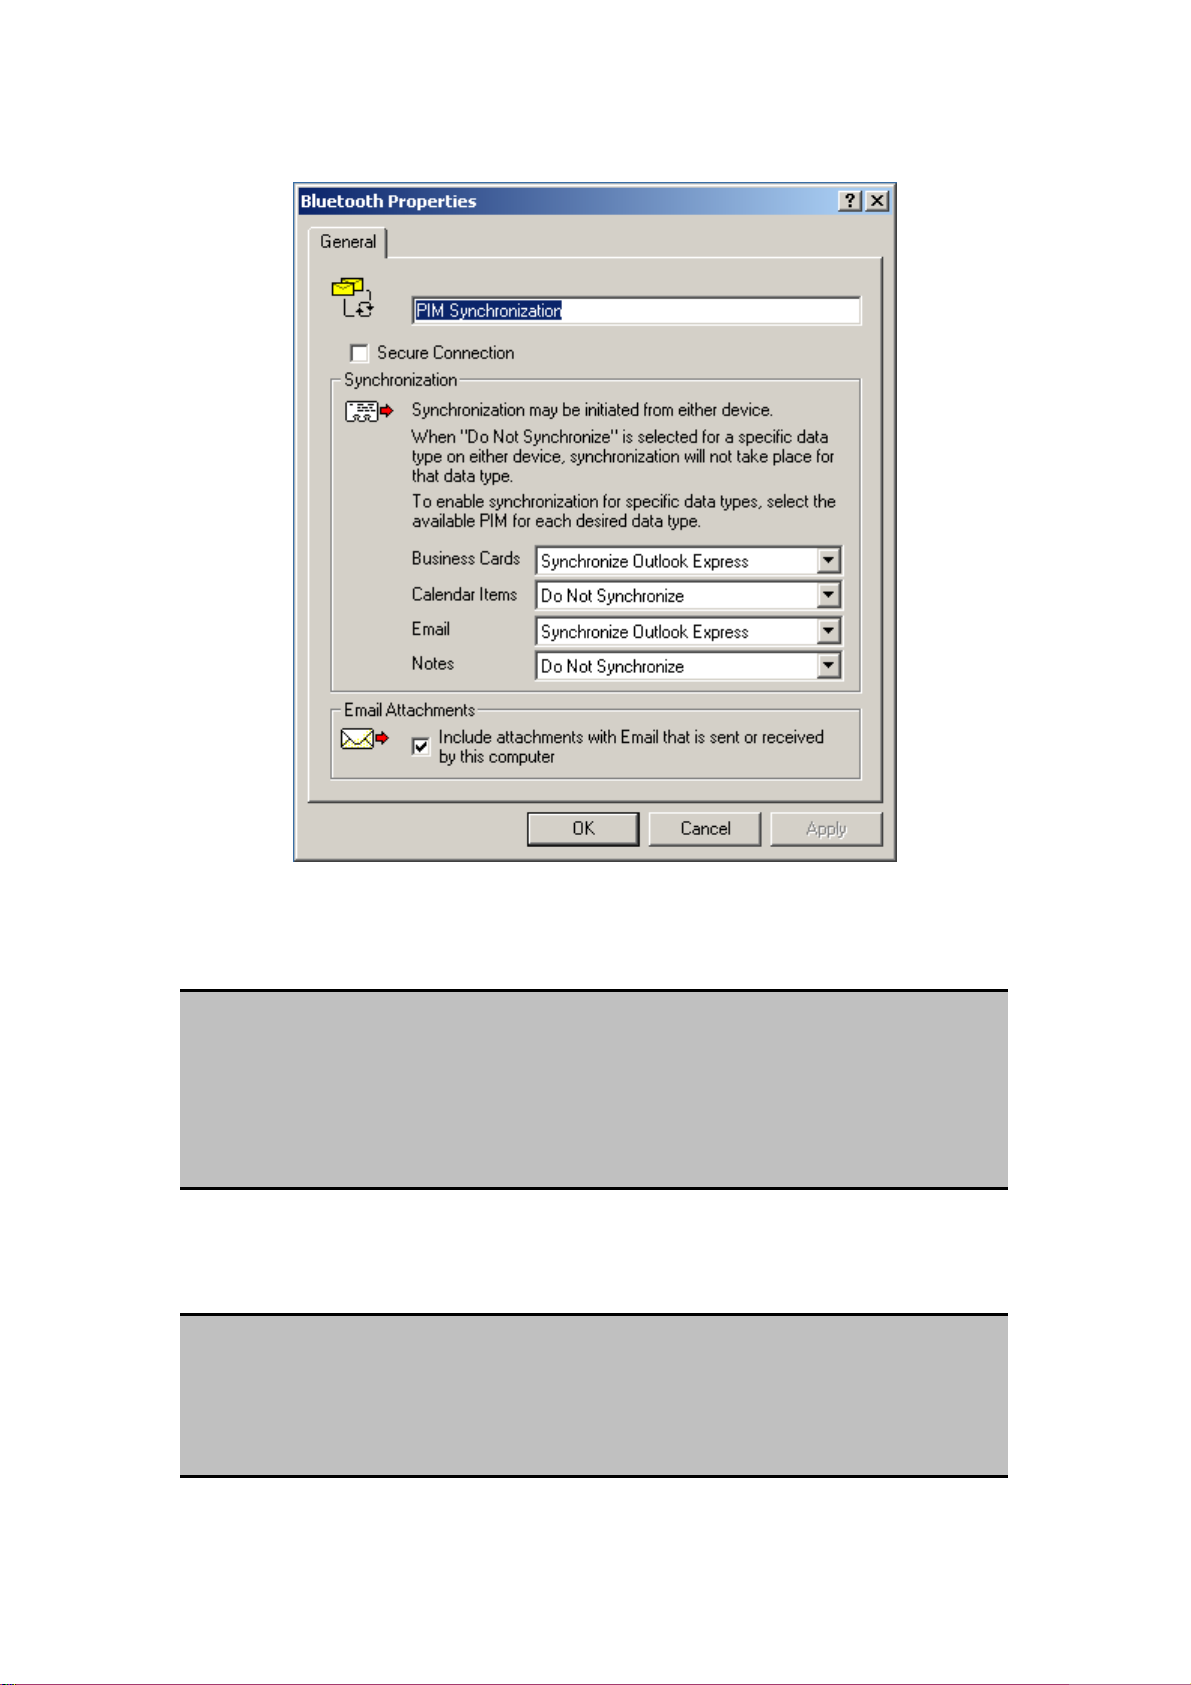
Services tab, and double click PIM Synchronization.
Whether an individual item is accepted and where it is stored, when accepted, is
configured in the PIM Item Transfer service. If that service is not configured to store a
particular data type in Outlook, then that data type cannot be synchronized.
NOTE:
Data types that will be synchronized must be saved in the PIM database (this is
configured in the PIM Item Transfer service); otherwise, that data type will not be
available for selection (it will be grayed out) in the PIM Synchronization
configuration settings.
Microsoft Outlook permits duplicate entries, so all duplicates may not be exchanged in
the synchronization process.
NOTE:
Only Outlook’s default contacts folder is synchronized. Items in sub-folders are
not synchronized. Items that are moved from the default folder to a sub-folder will
appear to have been deleted the next time synchronization takes place.
68
Page 69

7.5.10 NOTIFICATION
Overview
There are three types of notification:
Authentication request, also called a PIN code request — this notification appears
automatically in a balloon over the Windows system tray if a Personal Identification Code is
required before a connection can proceed. An audio file can also be associated with the
notification.
Authorization request, also called a connection request—this type of notification
can be visual, audio, or both. It notifies you of attempts to access a Bluetooth service on this
computer; the connection will not proceed until you click the balloon that appears over the
Windows system tray. If the notification balloon is ignored, the connection request will time out
and fail.
Notification only—this type of notification does not effect access in any way; it
is solely for information purposes to let you know that a connection has been established.
Example
Both Authentication and Authorization request notifications are controlled by whether
Secure Connection is enabled for an individual service.
An example of how notifications might work when a remote device attempts to access a
service on this computer, if all notifications are enabled:
1. Authentication: a balloon notification (audio optional) appears to prompt for a
PIN code. If the PIN code does not match the code entered on the remote device,
the connection will not be allowed. Once the remote device has been
authenticated this notification will not appear again, unless the paired
relationship is broken and the devices must re-pair.
2. Authorization: a balloon notification appears and/or a sound file provides audio
notification that a remote device is attempting to access a Bluetooth service on
this computer. Click the balloon to proceed. A dialog box appears that offers the
option of letting the connection proceed this time only or to always allow this
particular remote device to use the service it is attempting to access.
3. Once a connection has been authorized, an additional visual and/or audio
notification may appear (if enabled). This notification is for information only to
inform the operator that a connection has been established.
After two devices are paired (step 1, above), the authentication notification will no longer
appear when a connection is attempted.
If “Always allow…” is enabled during the authorization process (step 2, above), the
authorization notification will not appear on future connection attempts.
69
Page 70
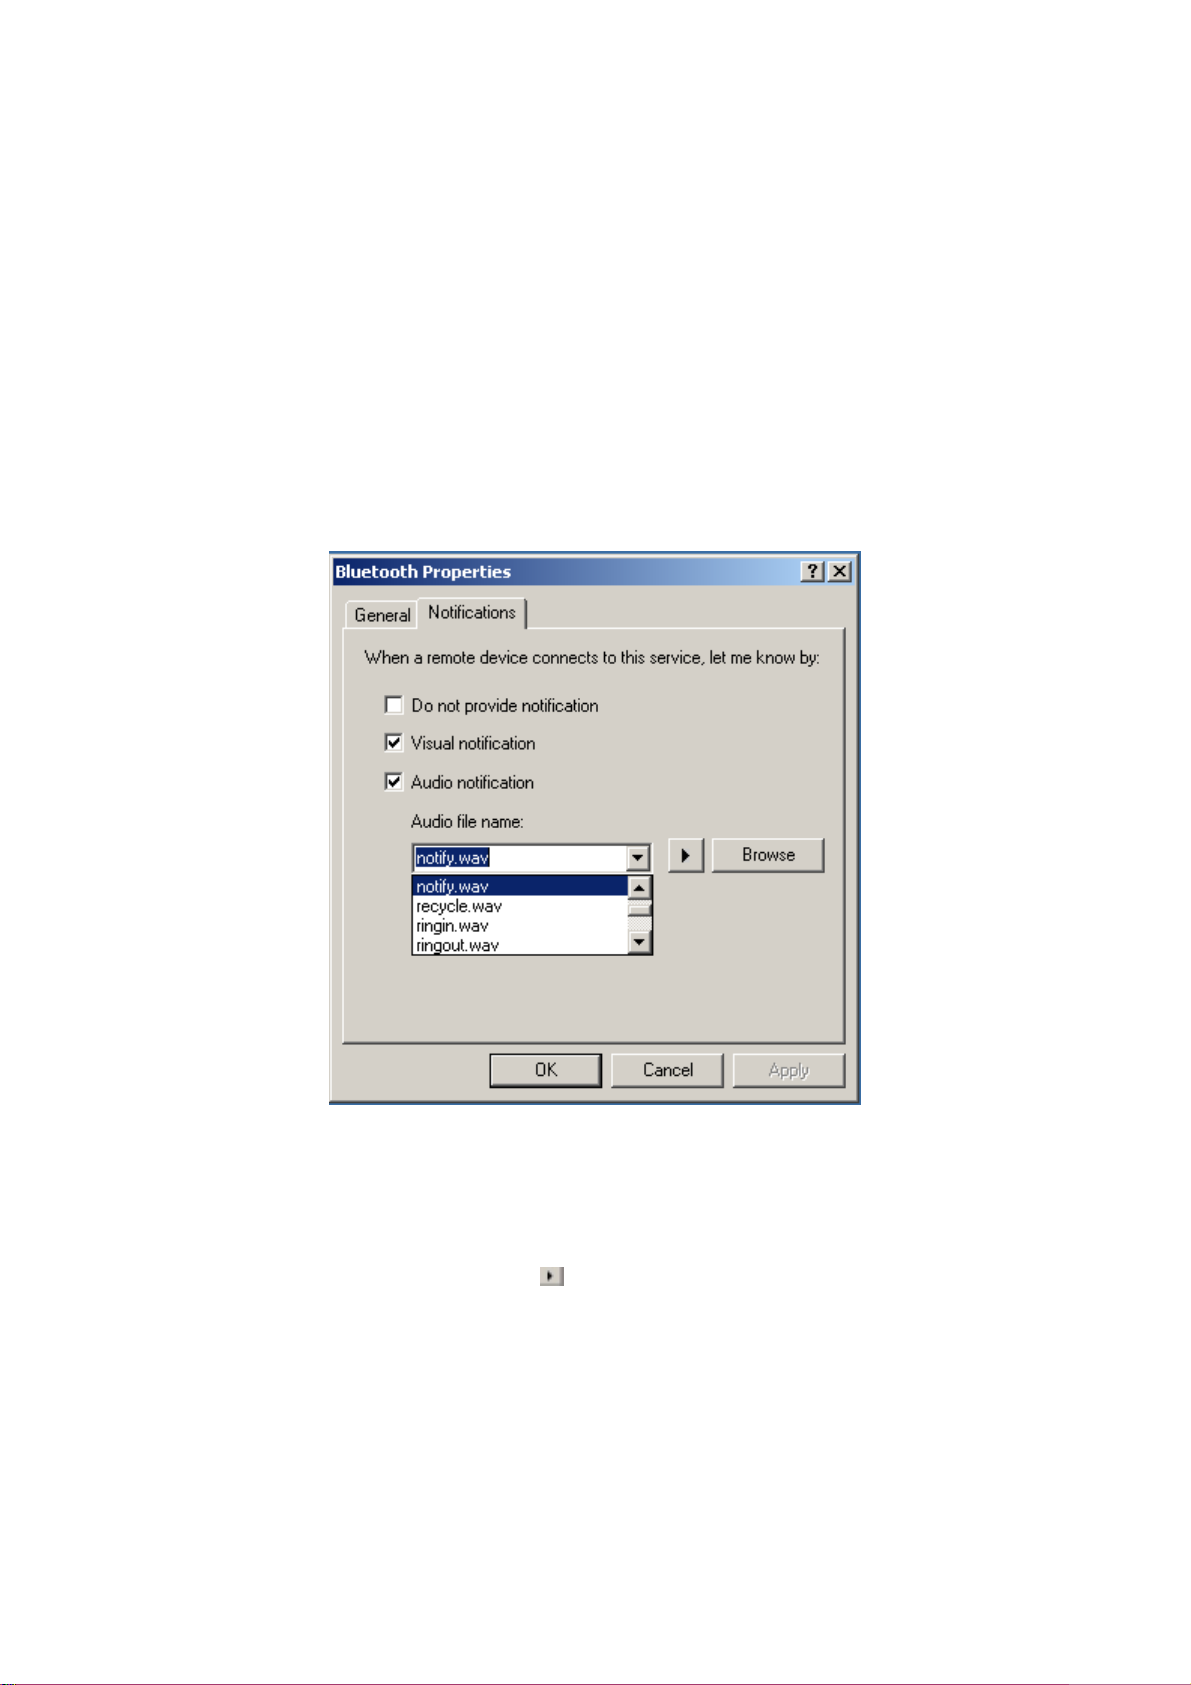
Connection notification (step 3, above) only happens if it has been enabled on the
Notifications tab of the individual service being accessed.
Service Access Notification
“Notifications” lets you associate a sound (Windows *.wav file) and/or a visual
indication with access attempts by remote devices.
A different notification sound can be associated with each local Bluetooth service.
Associate a sound with service access
From the Bluetooth Configuration Panel, Local Services tab:
1. Double-click a service name and then select the Notifications tab.
2. Check the desired options; visual and sound may both be selected for a single
event.
3. Choose a sound; click the Browse button and navigate to the sound file (*.wav)
to be used for notification.
To preview the sound file, click the play (
4. Click OK to close the service's property dialog box.
70
) button.
Page 71

7.6 BLUETOOTH CLIENT APPLICATIONS
Overview
Some built-in Bluetooth applications provide full functionality for a specific task, such as
locating other Bluetooth devices or synchronizing two Personal Information Managers.
Other built-in Bluetooth applications provide a way for standard Windows applications to
accomplish their tasks wirelessly. For example, a Bluetooth application may create a
wireless serial connection between computers or provide wireless access to the Internet.
The difference between Bluetooth Applications and Bluetooth Services
Bluetooth Applications are software programs on this computer that allow this
computer to use the Bluetooth services that are provided by other devices. In the
Bluetooth configuration panel, these programs are referred to collectively as
“Client Applications.”
Bluetooth Services are software programs on this computer that provide a
service to other devices. In the Bluetooth configuration panel, these applications
are referred to collectively as “Local Services.”
Note:
Client Applications and Local Services usually have coinciding names; e.g., there may be a
Fax service and a Fax application.
3.5.2 General Configuration
All of the built-in Bluetooth applications allow you to rename the application and to
require a secure connection when using the application.
To access the configuration properties page for a built-in Bluetooth
application
In the Windows system tray, right-click the Bluetooth icon and select Advanced
Configuration from the shortcut menu. In the Bluetooth configuration panel, Client
Applications tab, highlight the application to be configured and then click Properties (or
double-click the application).
71
Page 72
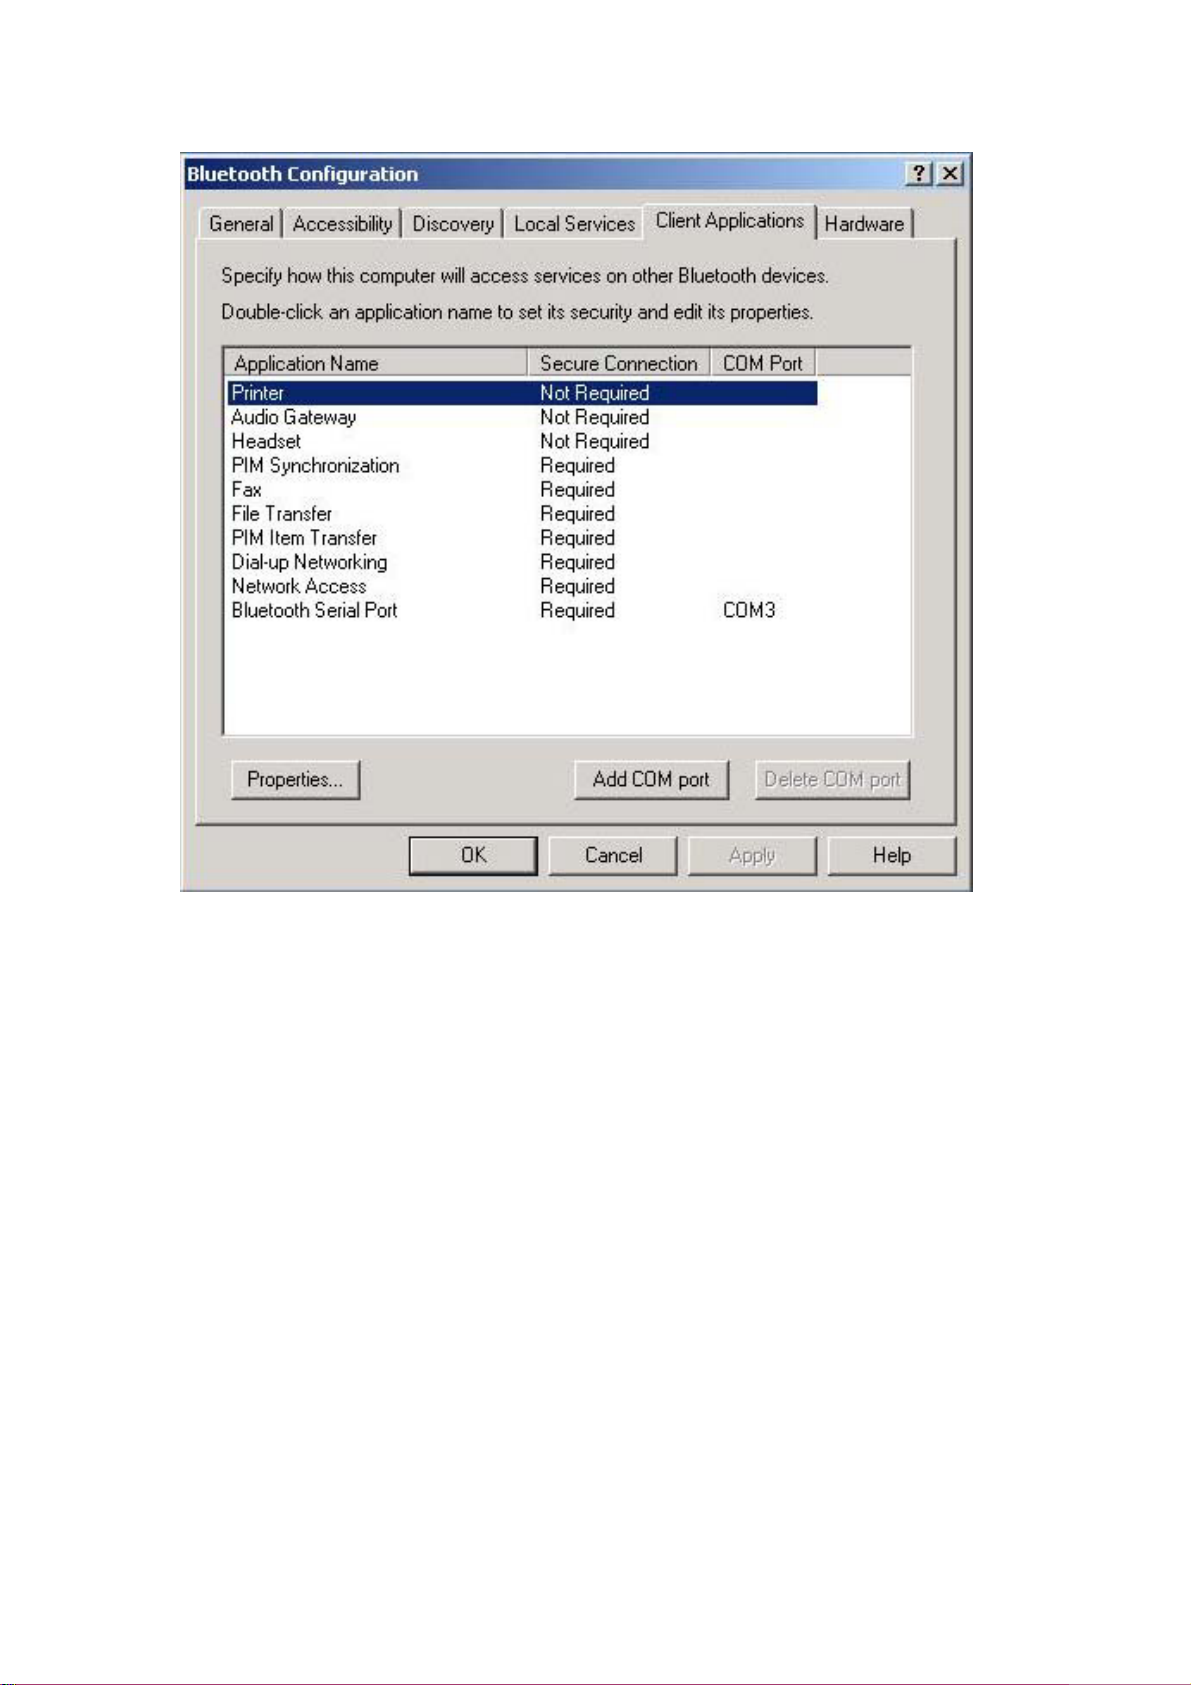
7.6.1 Audio Gateway
Configure
The Bluetooth Configuration Panel > Client Applications > Audio Gateway > General
tab provides options to configure:
72
Page 73
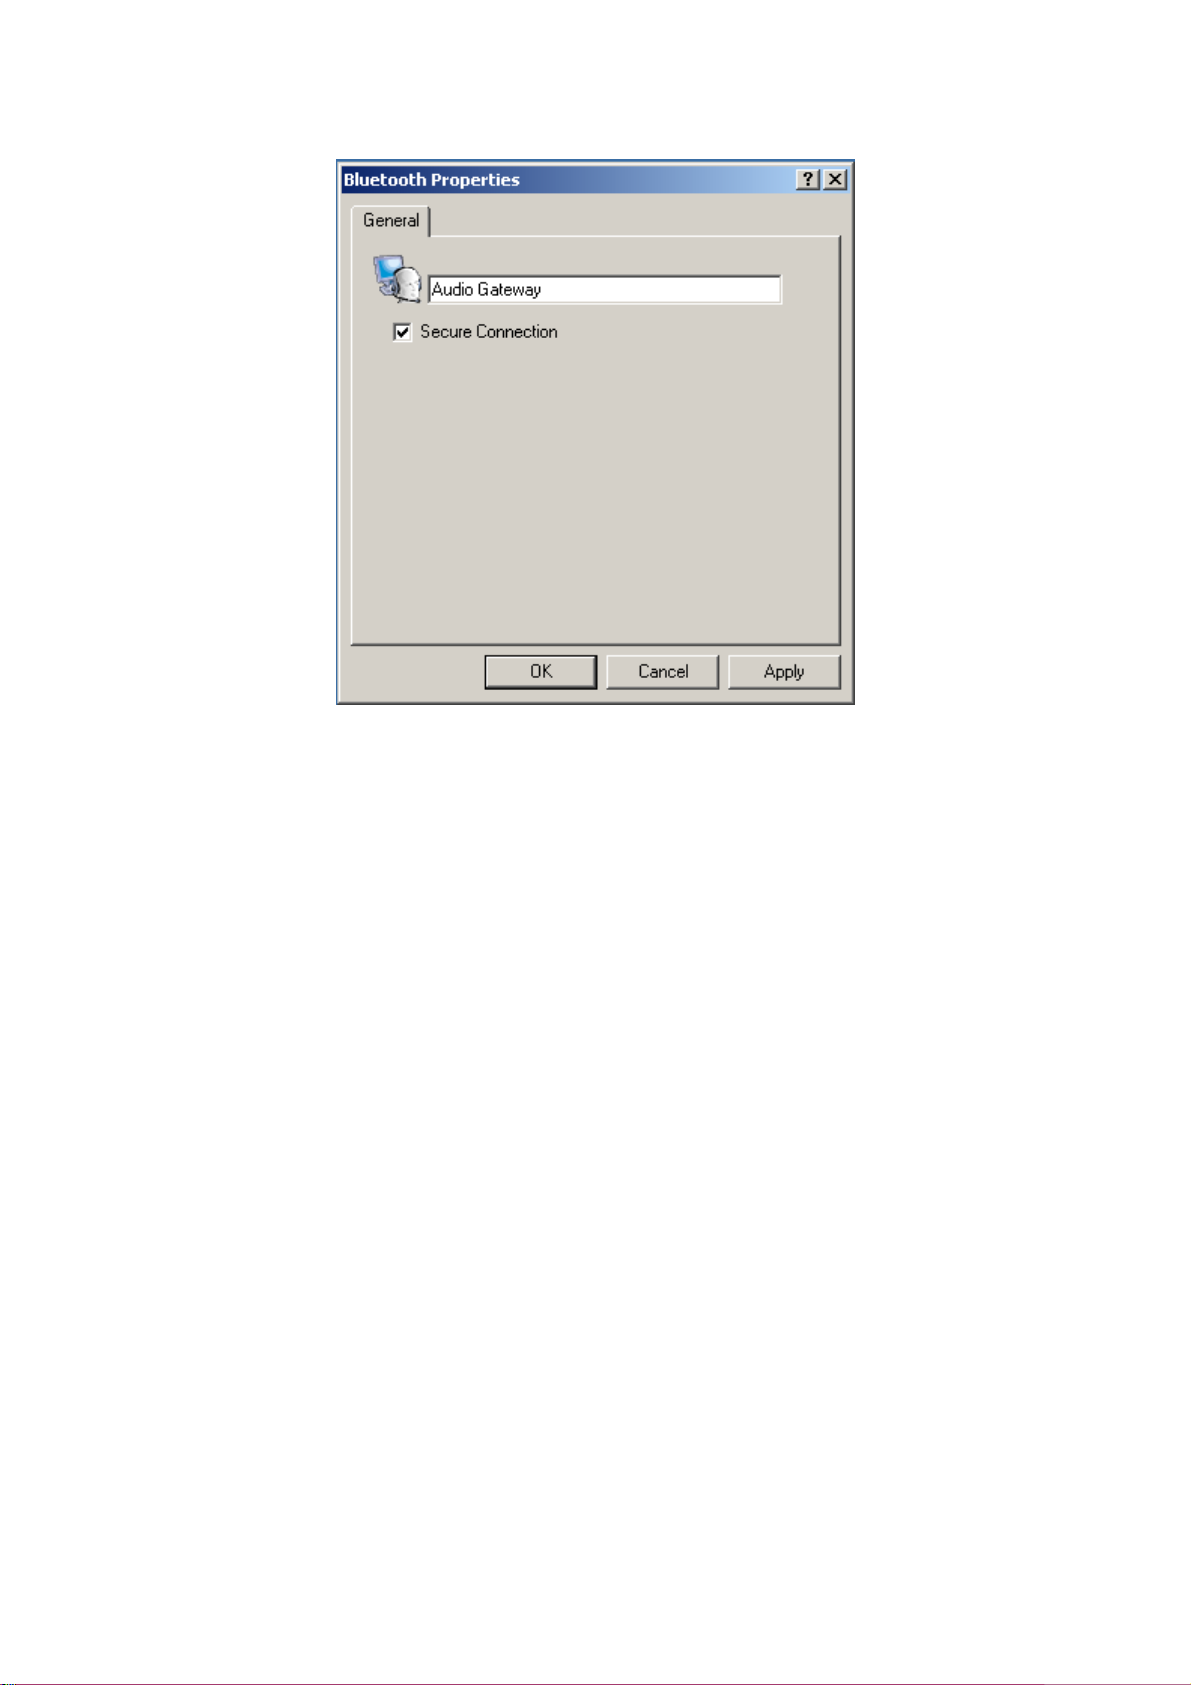
The application name• —to change it, highlight the existing name and enter the
new name.
Enable or disable secure connection. To enable secure connection, place a•
checkmark in the box.
Close an audio gateway connection
If the connection was established via the Bluetooth icon in the Windows system tray;
click the Bluetooth icon, select Quick Connect, Audio Gateway and then select the device
that is providing the service (active connections have a checkmark in front of them).
or
No matter how the connection was created, In My Bluetooth Places, right-click the
service name and select Disconnect.
7.6.2 Bluetooth Serial Port
Overview
The Bluetooth Serial Port application allows this computer to establish a wireless serial
connection with a remote Bluetooth device.
The applications on both this computer and the remote device must be configured to send
and receive data to and from the respective communications port (COM port) assigned to
the Bluetooth serial port. The wireless serial connection may then be used by the
applications as though a physical serial cable connected the devices.
73
Page 74
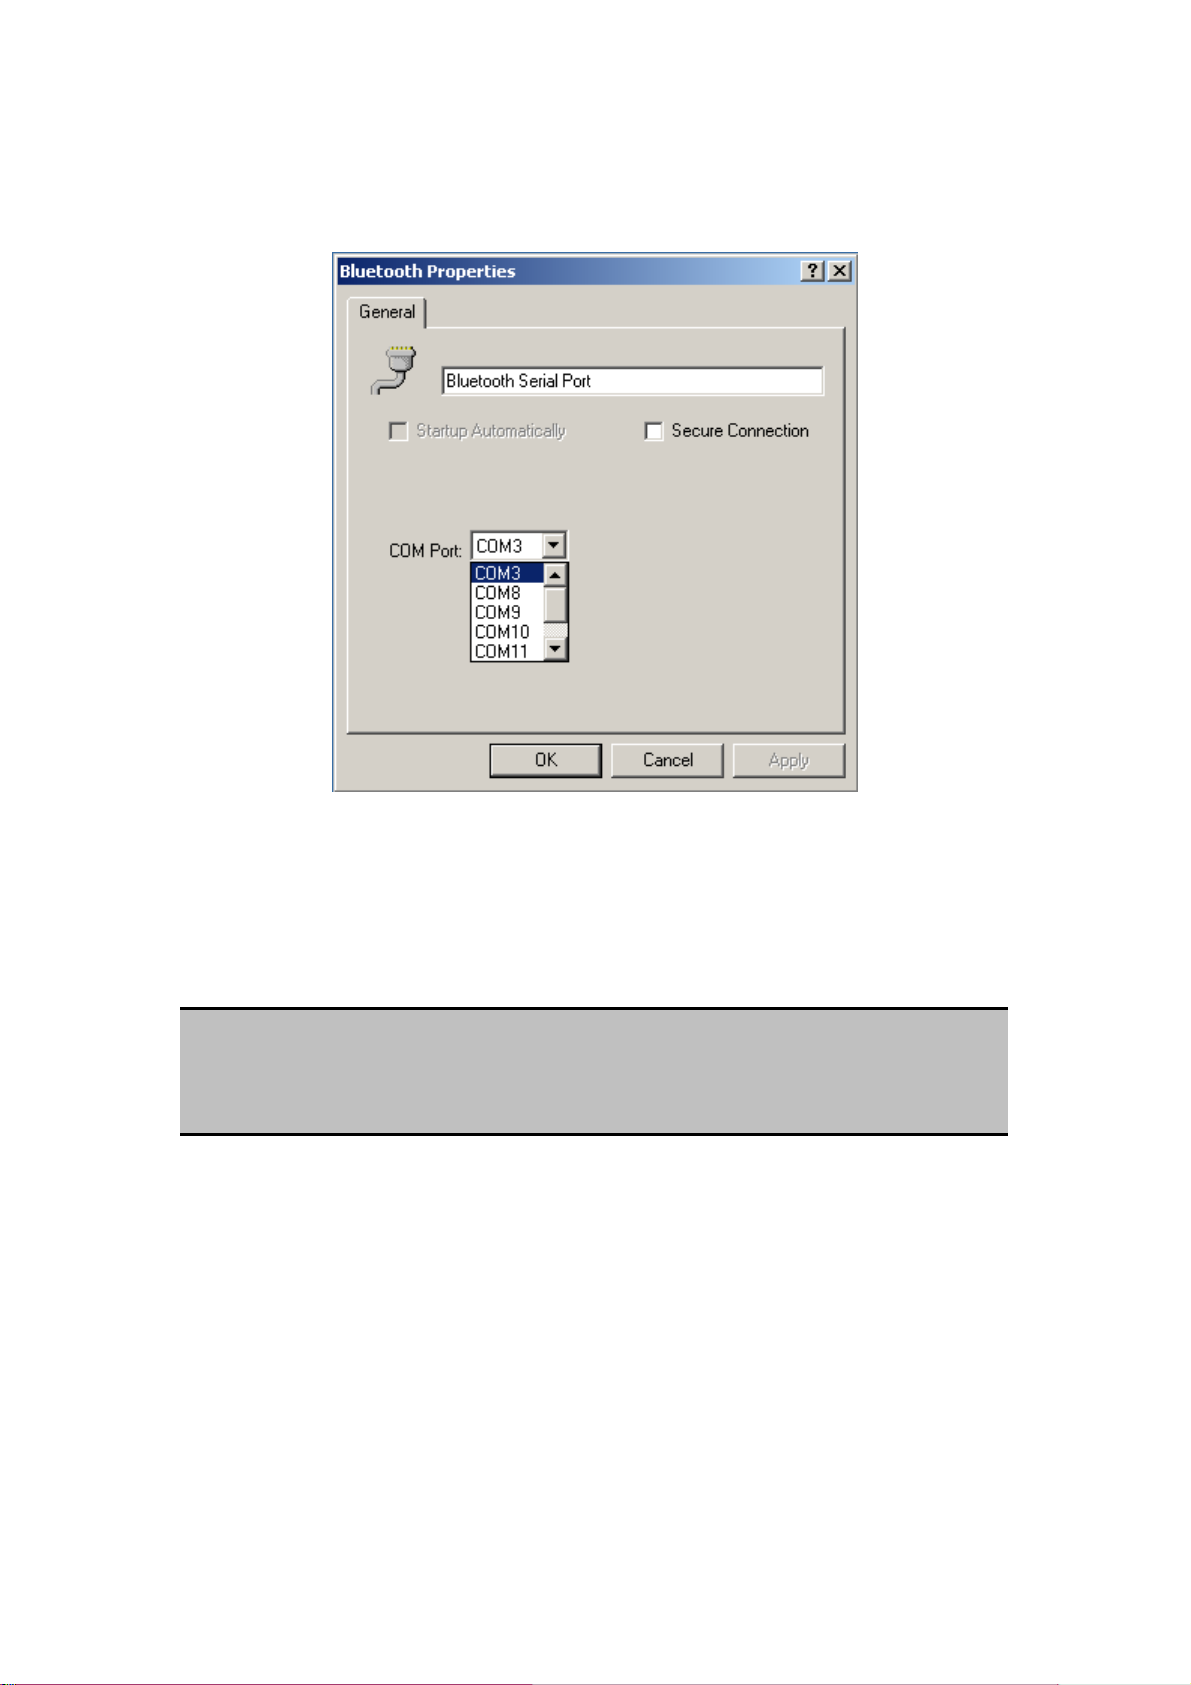
Configure
The Bluetooth Configuration Panel > Client Applications > Bluetooth Serial Port >
General tab provides options to configure:
The application name—to change it, highlight the existing name and enter the
new name.
Enable or disable secure connection. To enable secure connection, place a
checkmark in the box.
The communications port (COM port) to be used.
NOTE:
Unless you have a specific reason to do so, DO NOT CHANGE the default COM Port
setting.
Close a Bluetooth Serial Port connection
If the connection was established via the Bluetooth icon in the Windows system
tray; click the Bluetooth icon, select Quick Connect, Bluetooth Serial Port and
then select the device that is providing the service (active connections have a
checkmark in front of them).
or
No matter how the connection was created, In My Bluetooth Places, right-click
the service name and select Disconnect.
74
Page 75
7.6.3 Dial-up Networking
Overview
The Bluetooth Dial-up Networking application allows this computer to use a modem that
is physically connected to a remote device to access the Internet, log on to a remote
network.
Open a connection to the Dial-up Networking service that is provided by another
Bluetooth device using one of these techniques:
Windows system tray, Bluetooth icon
From Bluetooth Explorer
Using the Bluetooth Setup Wizard
After the Bluetooth dial-up networking connection is established it can be used the same
way as any other networking connection. For example, you can open a browser and
explore the World Wide Web, if the remote computer has Internet access.
Configure
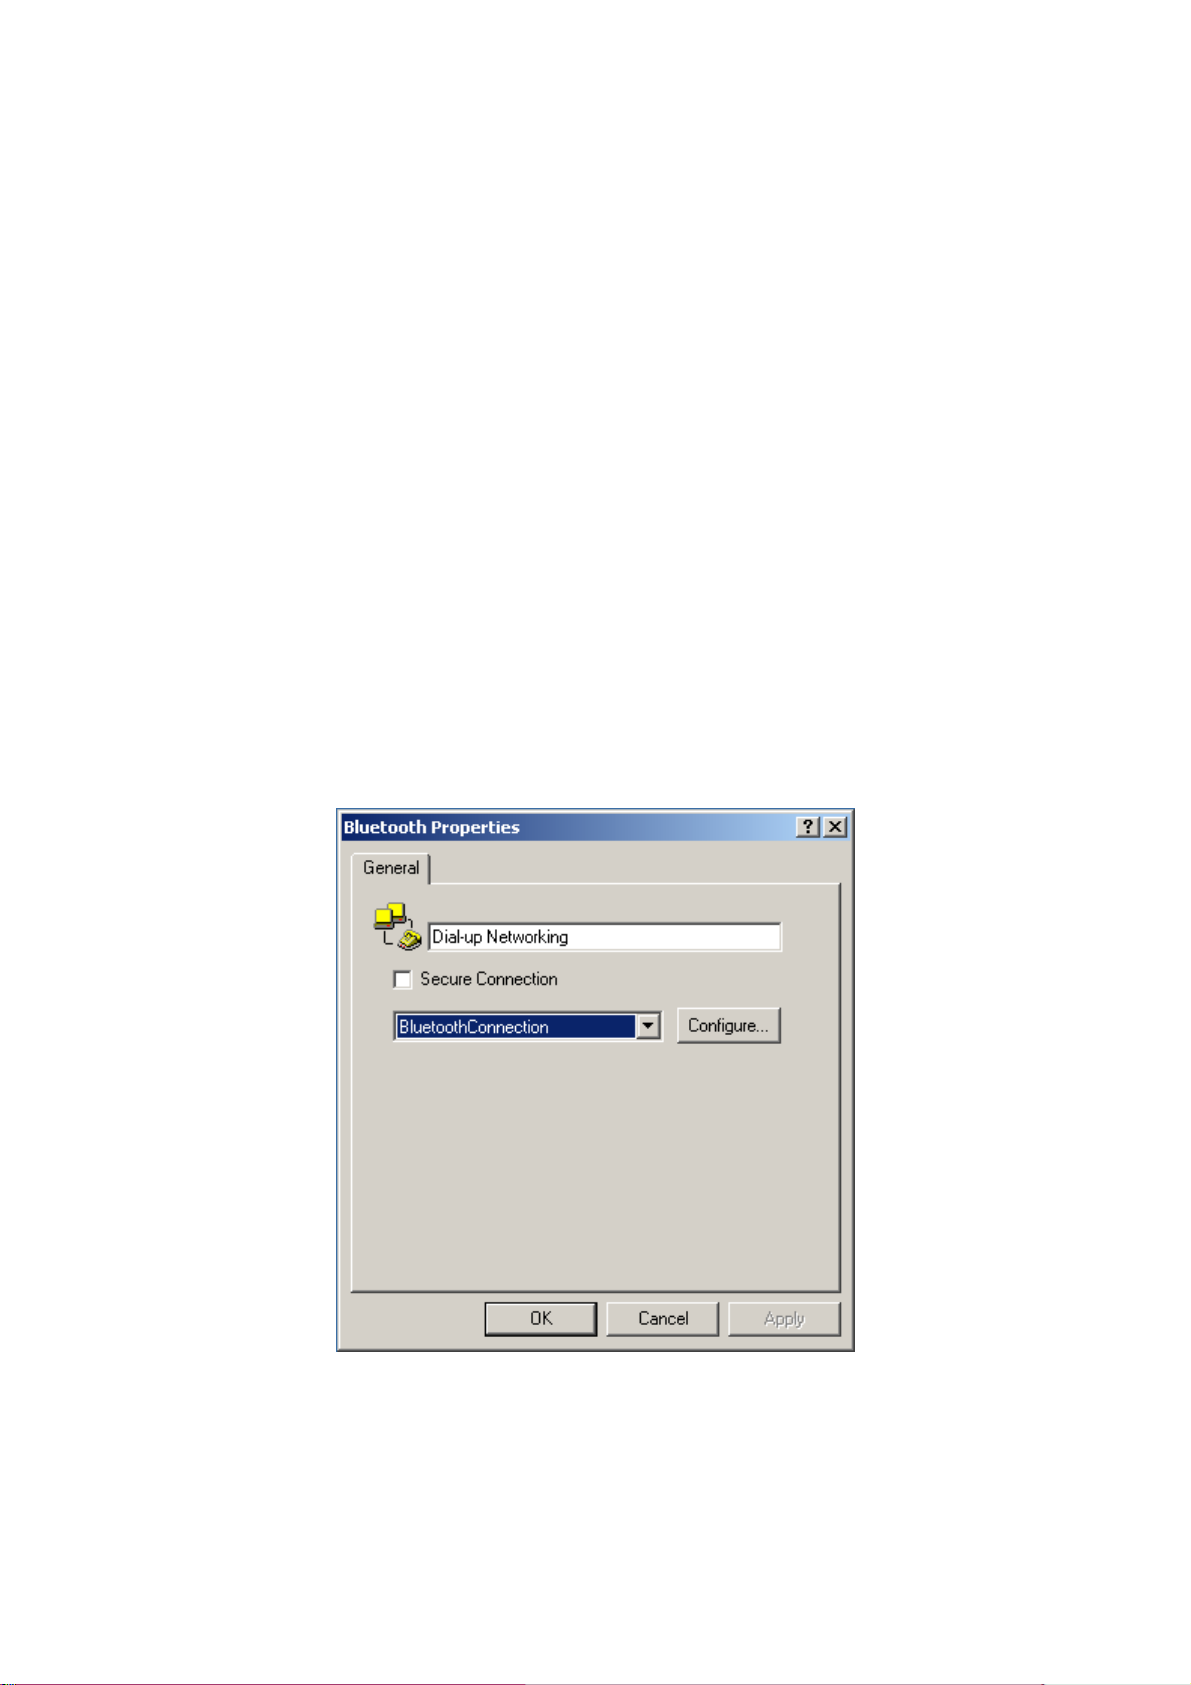
The Bluetooth Configuration Panel > Client Applications > Dial-up Networking >
General tab provides options to configure:
The application name—to change it, highlight the existing name and enter the
new name.
Enable or disable secure connection. To enable secure connection, place a
checkmark in the box.
75
Page 76

The Bluetooth virtual device to be used.
NOTE:
Unless you have a specific reason to do so, DO NOT CHANGE the default
Bluetooth device or alter the device's configuration.
Close a Dial-up Networking connection
If the connection was established via the Bluetooth icon in the Windows system
tray; click the Bluetooth icon, select Quick Connect, Dial-up Networking and
then select the device that is providing the service (active connections have a
checkmark in front of them).
or
No matter how the connection was created, In My Bluetooth Places, right-click
the service name and select Disconnect.
7.6.4 Fax
Overview
The Bluetooth Fax service allows this computer to send a fax using a Fax/Modem that is
physically connected to a remote device.
To Send a Fax
1. Open a connection to the Fax service that is provided by another Bluetooth
device, using one of these techniques:
Windows system tray, Bluetooth icon
From Bluetooth Explorer
Using the Bluetooth Setup Wizard
2. Open or create the document to be faxed and select the “Print,” “Send to Fax
Recipient” or similar command that is available in most applications.
Configure
The Bluetooth Configuration Panel > Client Applications > Fax > General tab provides
options to configure:
76
Page 77
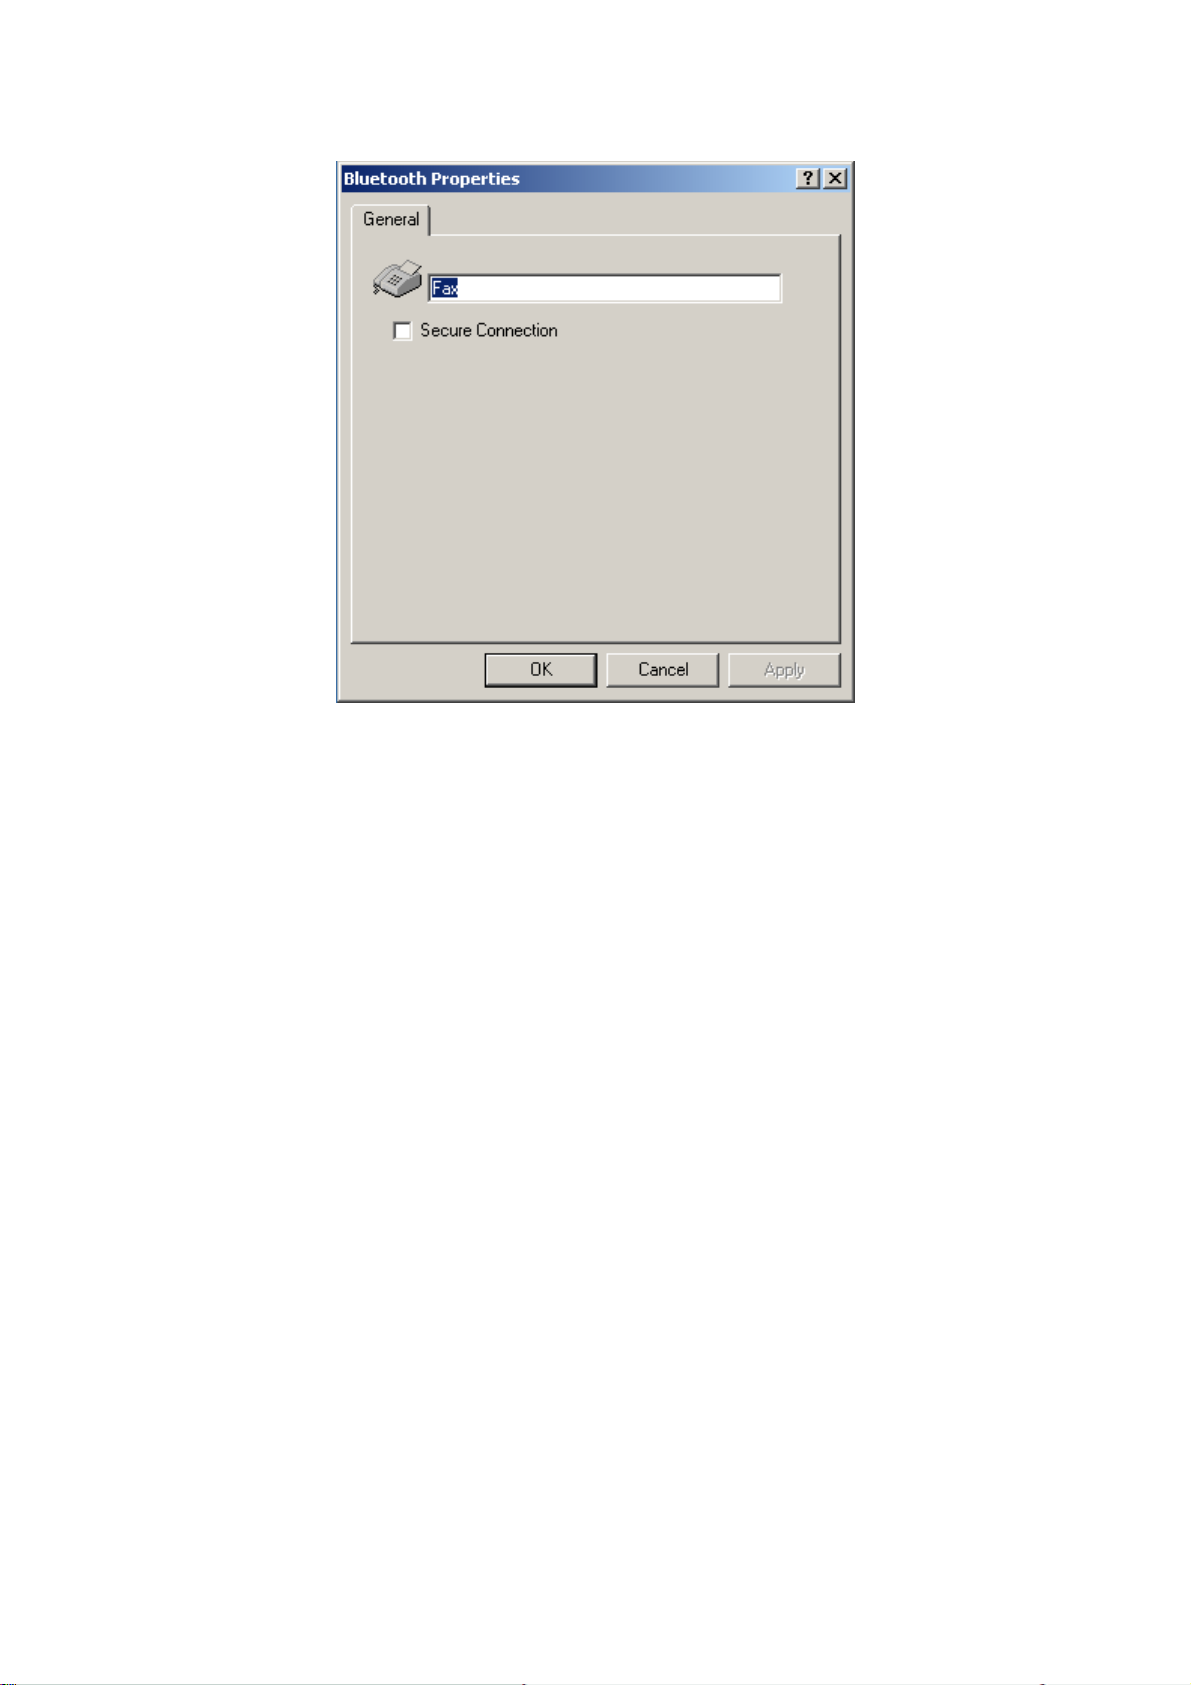
The application name—to change it, highlight the existing name and enter the
new name.
Enable or disable secure connection. To enable secure connection, place a
checkmark in the box.
Close a Fax Connection
Fax connections close automatically when the Fax transmission is complete.
7.6.5 Headset
Overview
The Headset application allows this computer to use a Bluetooth headset (or any other
device that offers the Bluetooth headset service) as the audio input and output device for
this computer.
Possible uses include:
If this computer has on-board telephone hardware, a Bluetooth headset might be
used as the audio input/output device to make/receive telephone calls.
If this computer has voice recognition capabilities, a Bluetooth headset might be
used as the audio input device.
Any other scenario that requires audio input/output can potentially take advantage of a
Bluetooth headset to replace a hardwired microphone and/or speakers.
77
Page 78
Create a Headset connection
Establish a connection using one of these techniques:
Windows system tray, Bluetooth icon
From Bluetooth Explorer
Using the Bluetooth Setup Wizard
NOTE:
Most Bluetooth headsets “ring” when a connection is attempted; answer the ring to
complete the connection and begin using the headset as the audio input/output device
for this computer.
Close a Headset connection
If the connection was established via the Bluetooth icon in the Windows system
tray; click the Bluetooth icon, select Quick Connect, Headset and then select the
device that is providing the service (active connections have a checkmark in front
of them).
or
No matter how the connection was created, in My Bluetooth Places, right-click
the service name and select Disconnect.
Configure
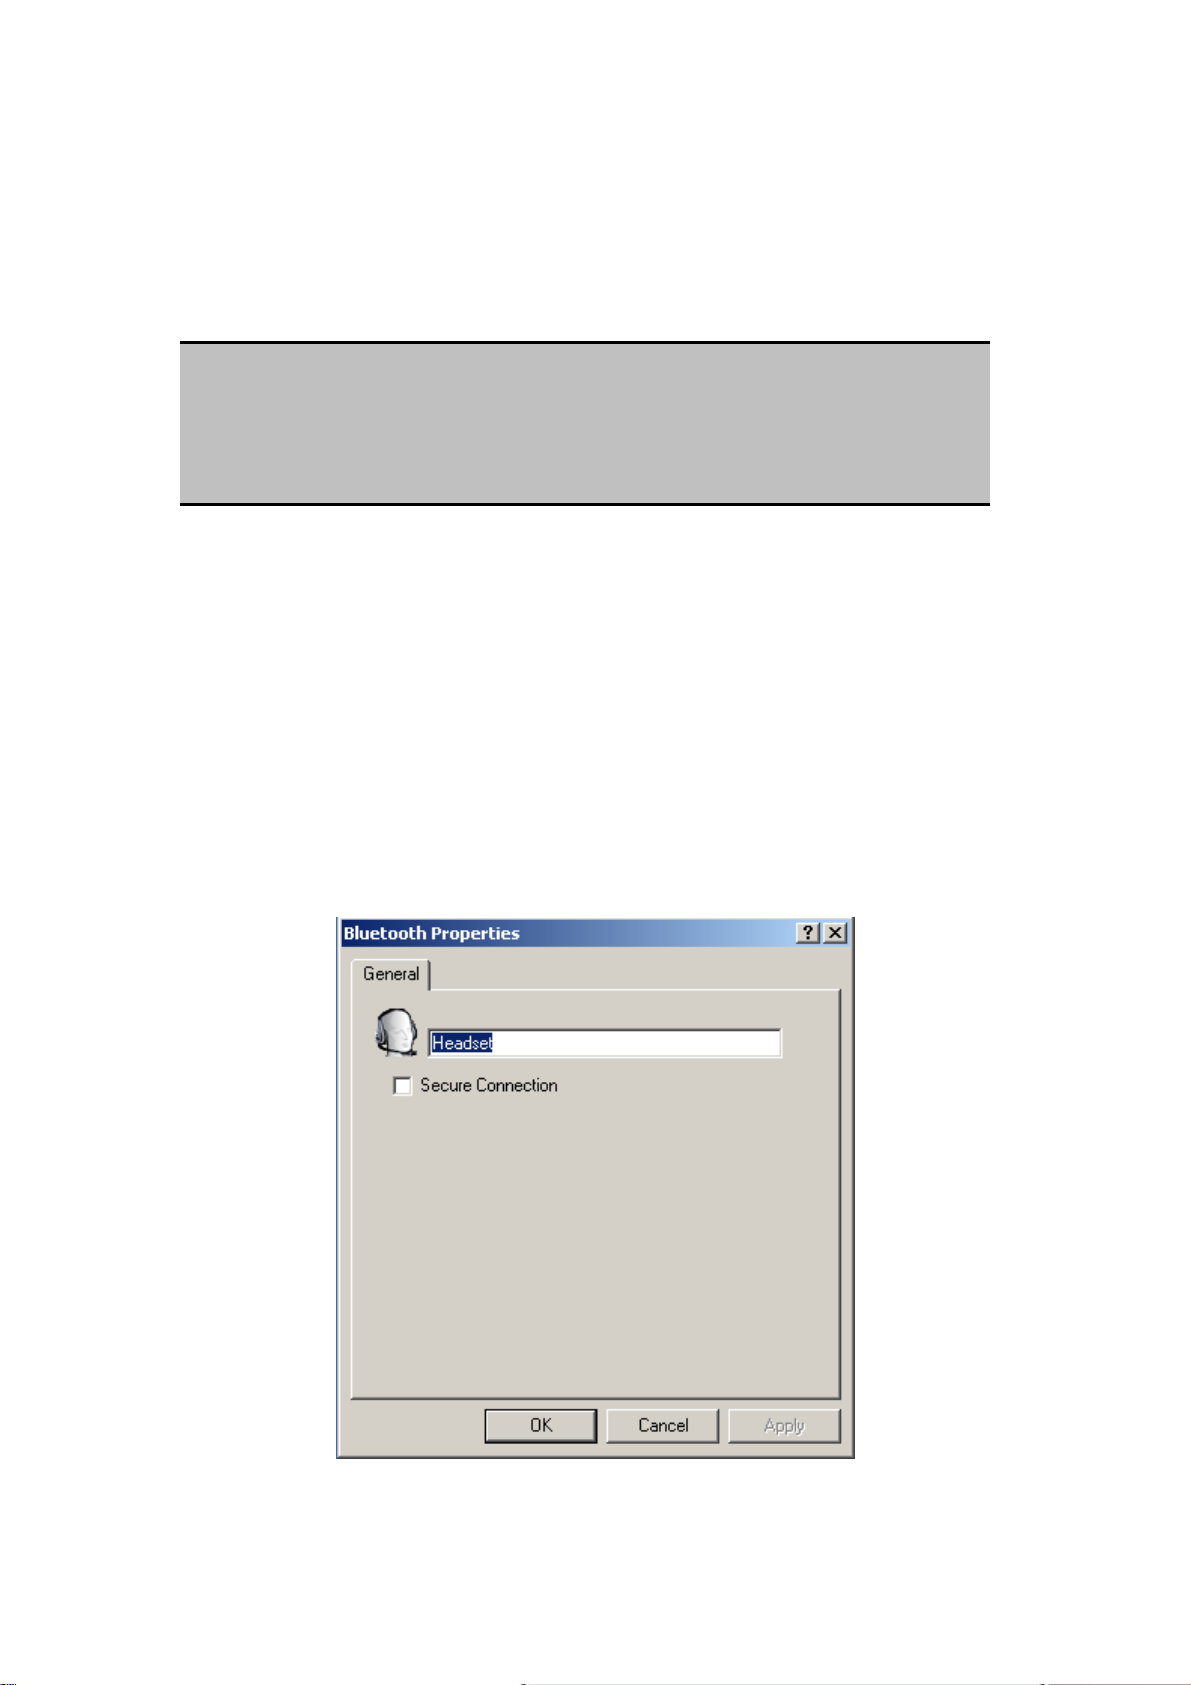
The Bluetooth Configuration Panel > Client Applications > Headset > General tab
provides options to configure:
The application name—to change it, highlight the existing name and enter the
78
Page 79
new name.
Enable or disable secure connection. To enable secure connection, place a
checkmark in the box.
7.6.6 File Transfer
Overview
The Bluetooth File Transfer application allows this computer to perform file operations
on the Bluetooth Exchange Folder (and the folders and files it contains) of a remote
device.
Copy to/from a remote device
In the Folders pane of Explorer, from the Entire Bluetooth Neighborhood branch, select a
device and expand that branch to view the Bluetooth Exchange Folder of the remote
device.
NOTE:
If “Public Folder” is not available, the remote device is not configured to allow
remote file operations.
Use drag-and-drop to copy any file or folder contained in the Public Folder of the remote
device to the desired folder on this computer.
You can also drag-and-drop files or folders from this computer to the Public Folder (and
79
Page 80
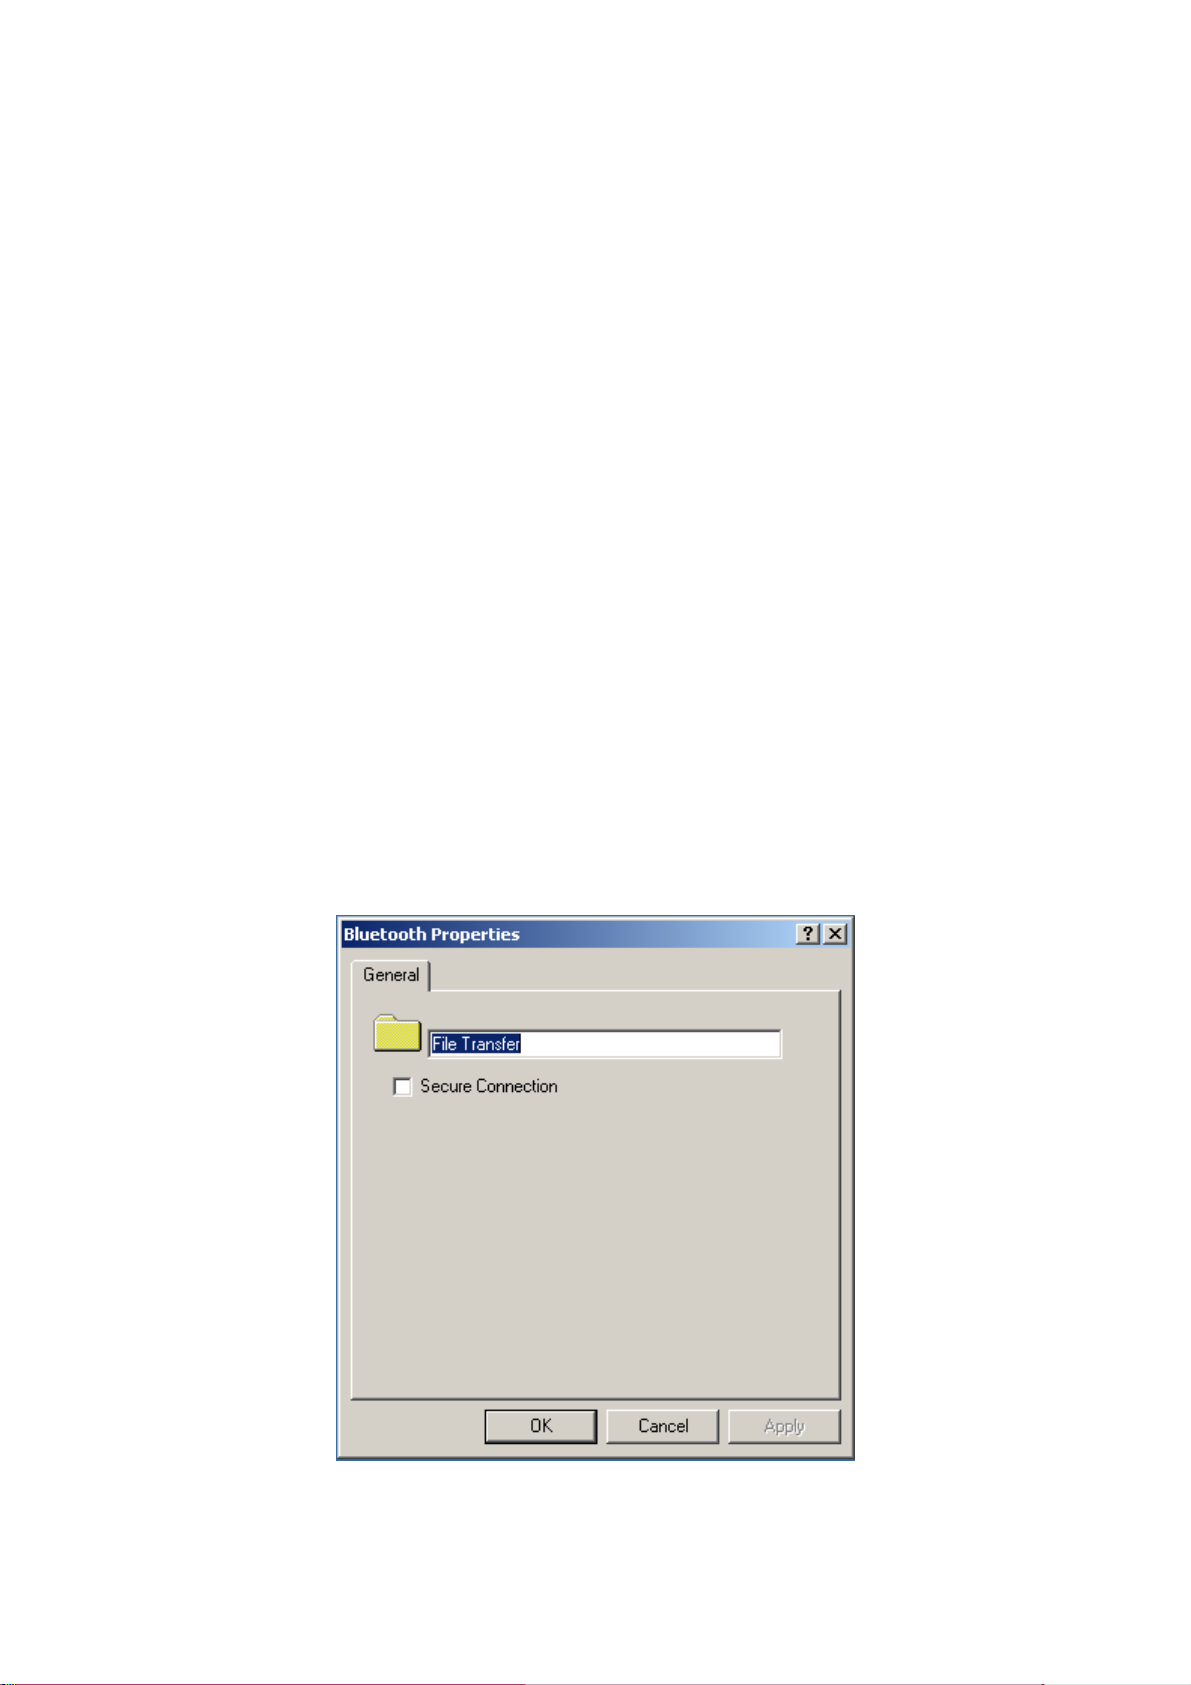
its sub-folders) of the remote device.
Other file operations
Right-click a file or folder in the remote device’s Public Folder for a context sensitive
menu. All potential menu options may not be available at all times.
Potential menu options include:
Open—opens the selected file on this computer, using the default application for
this type of file.
Print—sends the selected file to this computer’s default printer.
Send To
3 ½ floppy (A)—the 3 ½ inch floppy drive on this computer
Bluetooth Exchange Folder—the Bluetooth Exchange Folder on this computer.
Rename—applies only to empty folders; file names and the names of folders that
contain objects cannot be changed using this technique.
Cut, Copy, Paste, Delete, Refresh, View & New—standard Windows functions.
Configure
The Bluetooth Configuration Panel > Client Applications > File Transfer > General tab
provides options to configure:
The application name—to change it, highlight the existing name and enter the
80
Page 81

new name.
Enable or disable secure connection. To enable secure connection, place a
checkmark in the box.
7.6.7 Network Access
Overview
The Bluetooth Network Access application makes it possible for this computer:
To connect to a Local Area Network via a physical connection on a remote
Bluetooth device.
or
To connect to an ad hoc network provided by a remote Bluetooth device.
The type of network connection that is available is determined by the configuration of the
remote Bluetooth device.
Create a Network Access connection
Establish a connection using one of these techniques
Windows system tray, Bluetooth icon
From Bluetooth Explorer
Using the Bluetooth Setup Wizard
Close a Network Access connection
If the connection was established via the Bluetooth icon in the Windows system
tray; click the Bluetooth icon, select Quick Connect, Network Access and then
select the device that is providing the service (active connections have a
checkmark in front of them).
or
No matter how the connection was created, in My Bluetooth Places, right-click
the service name and select Disconnect.
Configure
The Bluetooth Configuration Panel > Client Applications > Network Access > General
tab provides options to configure:
81
Page 82
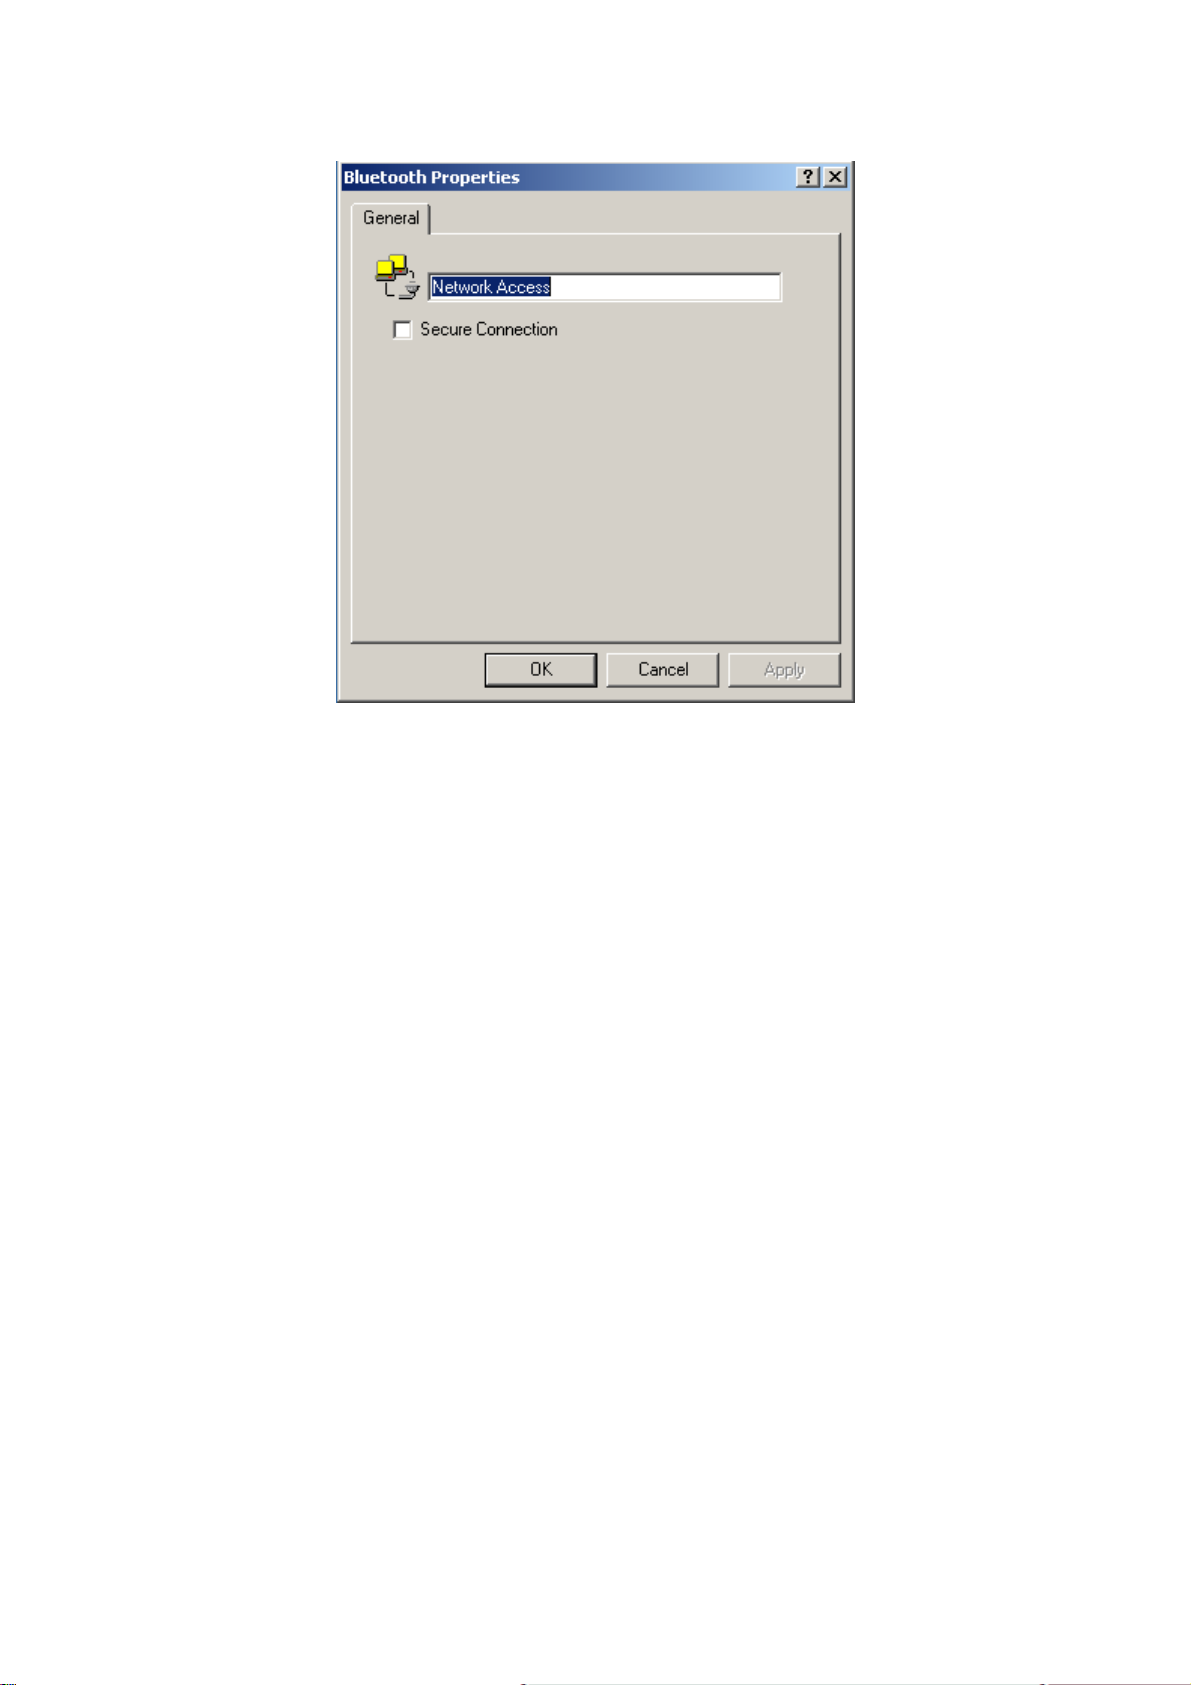
The application name—to change it, highlight the existing name and enter the
new name.
Enable or disable secure connection. To enable secure connection, place a
checkmark in the box.
7.6.8 PIM Synchronization
Overview
The PIM Synchronization Application is used to synchronize the Personal Information
Manager (PIM) database of this computer with the PIM database of a remote Bluetooth
device.
The supported PIMs are:
Microsoft Outlook
Microsoft Outlook Express
Lotus Notes.
The supported data types are:
Business cards
Calendar items
Email (with or without attachments)
Notes.
82
Page 83
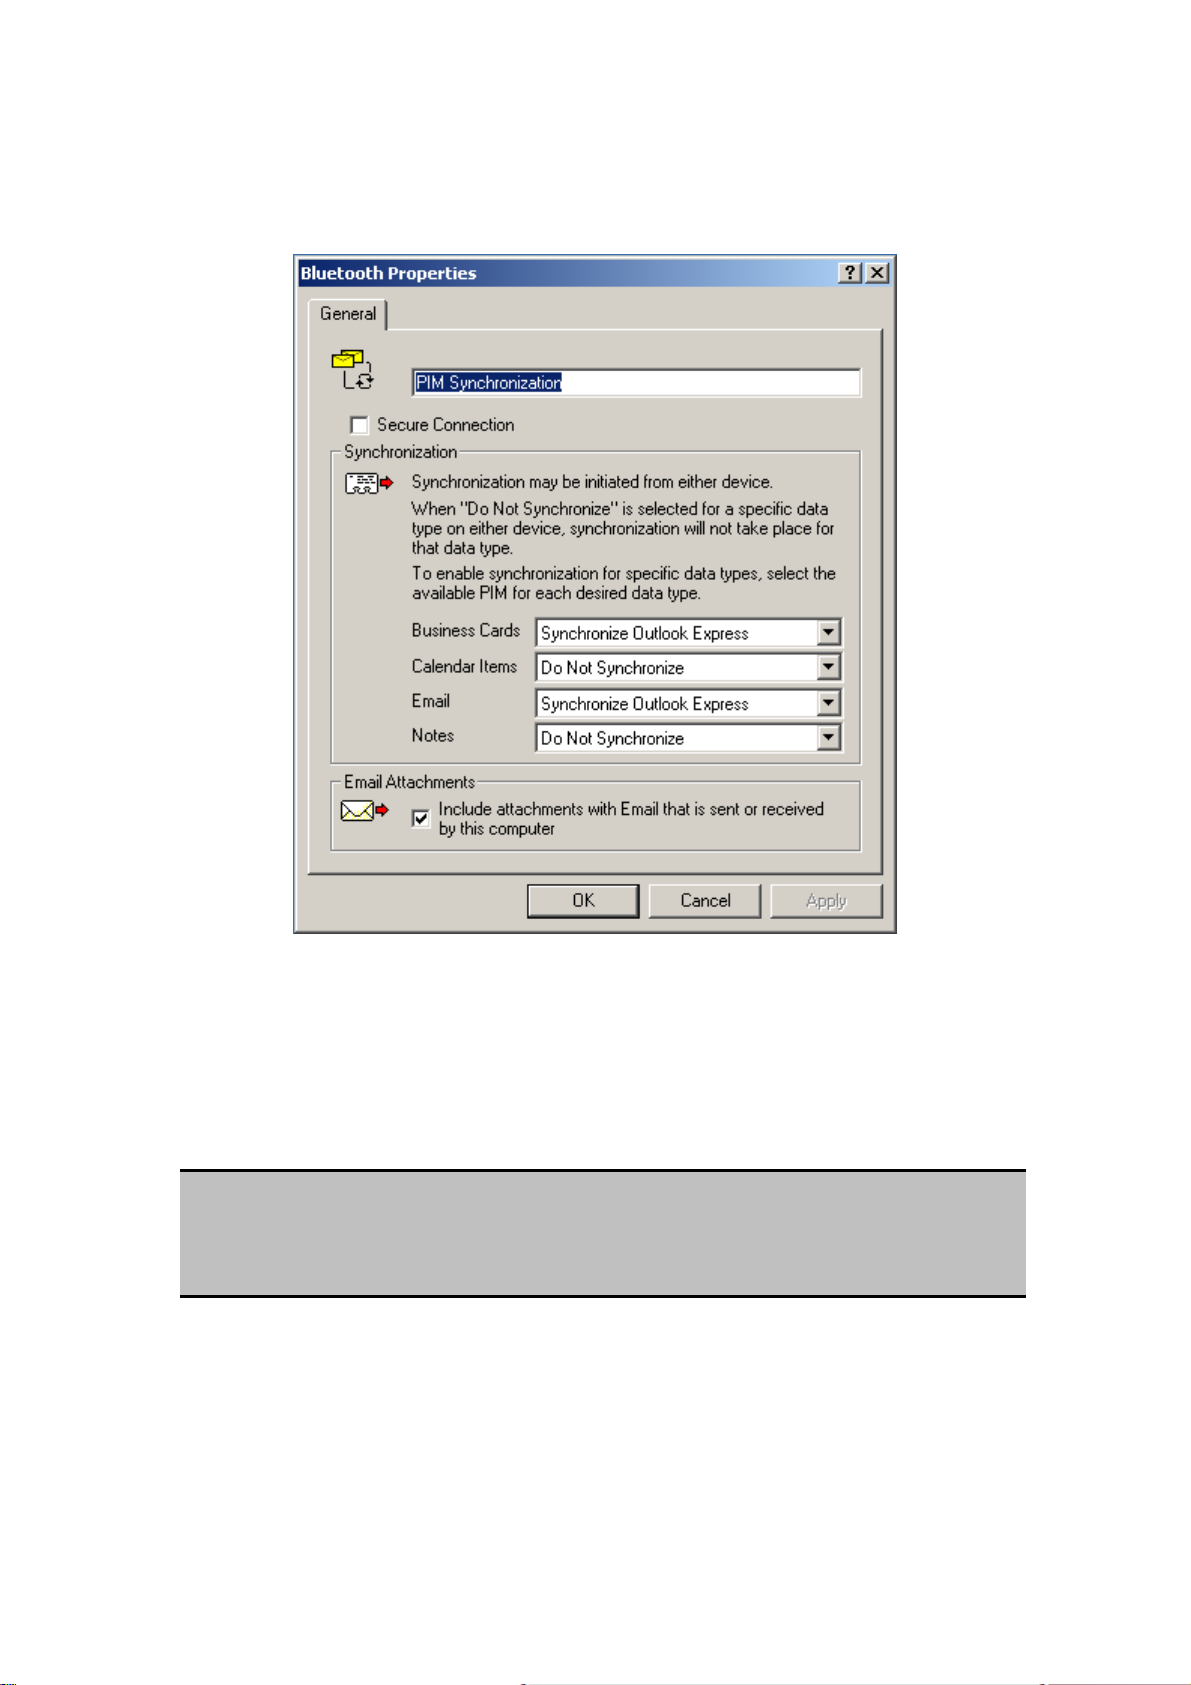
Configure PIM Synchronization
The Bluetooth Configuration Panel > Client Applications > PIM Synchronization >
General tab provides options to configure:
The application name—to change it, highlight the existing name and enter the
new name.
Enable or disable secure connection. To enable secure connection, place a
checkmark in the box.
The PIM items to be synchronized and the PIM on this computer with which
those items should be synced.
NOTE:
If synchronization is enabled for a specific item type, but is not enabled for that
item type on the remote device, synchronization WILL NOT take place for that item.
The data item types which can be synchronized are:
Business cards
Calendar items
Email (with or without attachments-see below)
Notes
83
Page 84

Possible synchronization options for each of these data item types include:
Do Not Synchronize-this item type will not be synchronized.
Synchronize Microsoft Outlook-this item type will be synced with its
matching entry in Microsoft Outlook, regardless of the PIM that contains this
entry on the remote device. If a matching Outlook entry does not exist, it will
be created.
Synchronize Outlook-Express-this item type will be synced with its
matching entry in Express, regardless of the PIM that contains this entry on
the remote device. If a matching Express entry does not exist, it will be
created
Synchronize Lotus Notes-this item type will be synced with its matching
entry in Lotus Notes, regardless of the PIM that contains this entry on the
remote device. If a matching Notes entry does not exist, it will be created.
NOTE:
All choices are not available for all items. For example, “Notes” items can only be
synchronized in Microsoft Outlook, therefore Lotus Notes and Outlook Express do
not appear as options in the “Notes” item shortcut menu.
Personal Information Managers that are not installed on this computer do not
appear as options in the shortcut menus.
Email attachments. The only option is include or do not include attachments with
email that is sent or received on this computer using this service.
7.6.9 PIM Item Transfer
Overview
The Bluetooth PIM Item Transfer application allows this computer to send and receive
Personal Information Manager items to-and-from a remote Bluetooth device. Item
transfer can be accomplished several ways:
To send, receive or exchange business cards:
1. From Windows Explorer, My Bluetooth Places, right-click the PIM Item
Transfer service on a remote device and select the appropriate option.
or
In the Windows system tray, right-click the Bluetooth icon, select Quick Connect
> Business Card Exchange, select a device from the list, select the appropriate
option from the shortcut menu, and then click OK.
84
Page 85
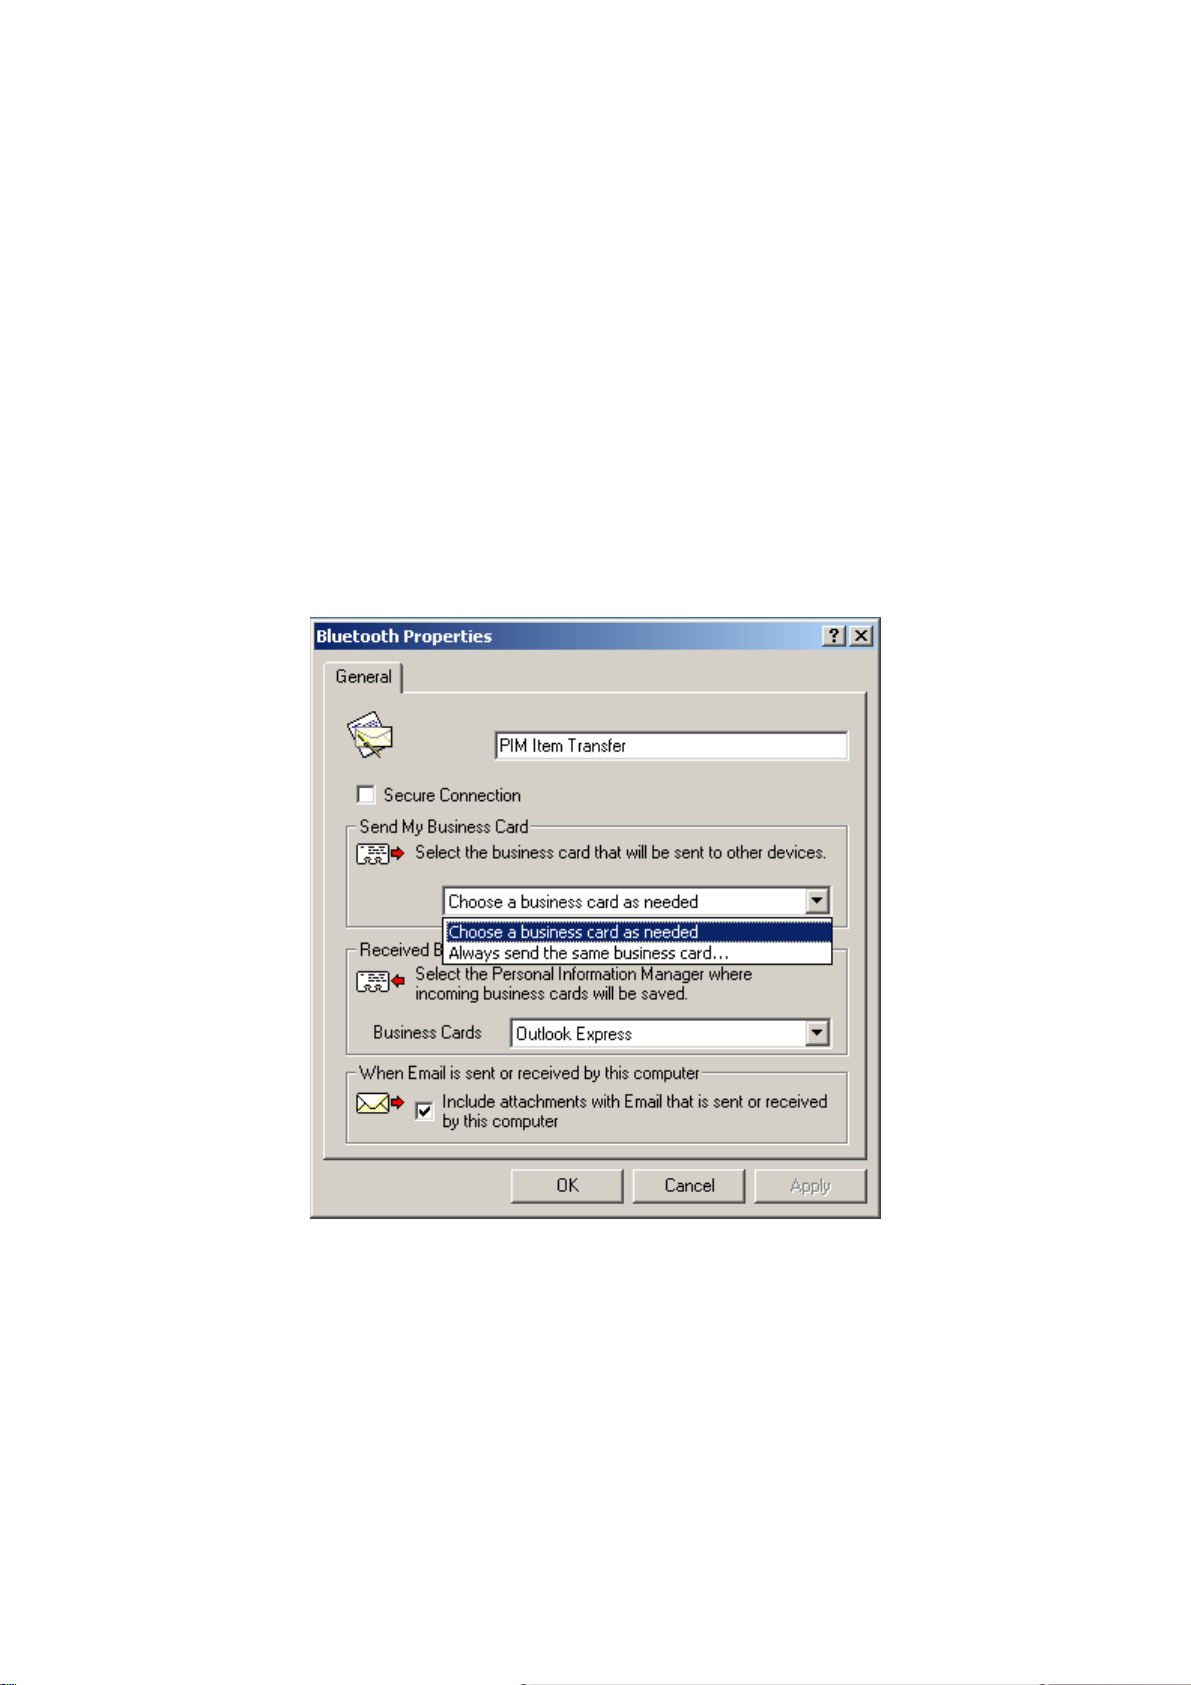
2. From Windows Explorer, My Bluetooth Places, highlight the PIM Item Transfer
service on a remote device, and then, from the Bluetooth menu on the Windows
menu bar, select the appropriate action.
In addition to the business card options listed above, you can also send Notes
(*.vnt), Email (*.vmg) and Calendar (*.vcs) items from this menu.
3. From within a supported Personal Information Manager, select one or more items
and then, from the PIM's File menu, select Send to Bluetooth.
Whether sent items are accepted by the remote device is determined by how the remote
device's PIM Item Transfer service is configured.
Configure PIM Item Transfer
The Bluetooth Configuration Panel > Client Applications > PIM Item Transfer > General
tab provides options to configure:
The application name—to change it, highlight the existing name and enter the
new name.
Enable or disable secure connection. To enable secure connection, place a
checkmark in the box.
How your business card is handled when it is requested by a remote device. The
Send My Business Card options are:
Choose a business card as needed - each time a remote device requests your
business card you must select a card from your PIM. If you ignore the request the remote
85
Page 86

device will receive a timeout notice.
r
Always send the same business card - when this option is selected a dialog appears
that allows you to set a default business card, which will be sent automatically when
requests are received.
Where to store received business cards. The Received Business Cards options are:
Microsoft Outlook
Outlook Express
Lotus Notes
NOTE:
The selected Received Business Cards option does not influence the settings on othe
PIM-related property pages.
For example, even if the PIM Item Transfer service business card option on this
computer is configured to “Do Not Accept,” the PIM Item Transfer application will still
accept business cards that the application has specifically requested via its “Receive”
or “Exchange” functions.
Email attachments. The only option is include or do not include attachments with
email that is sent or received on this computer using this service.
Close a PIM Item Transfer Connection
This application closes the open connection automatically when its task is complete.
7.6.10 Printer
Overview
The Bluetooth Printer application allows this computer to use a Bluetooth printer.
Once a Bluetooth printer has been properly installed it can be used from this computer in
the same way as any other printer would be.
Configure
The Bluetooth Configuration Panel > Client Applications > Printer > General tab
provides options to configure:
86
Page 87
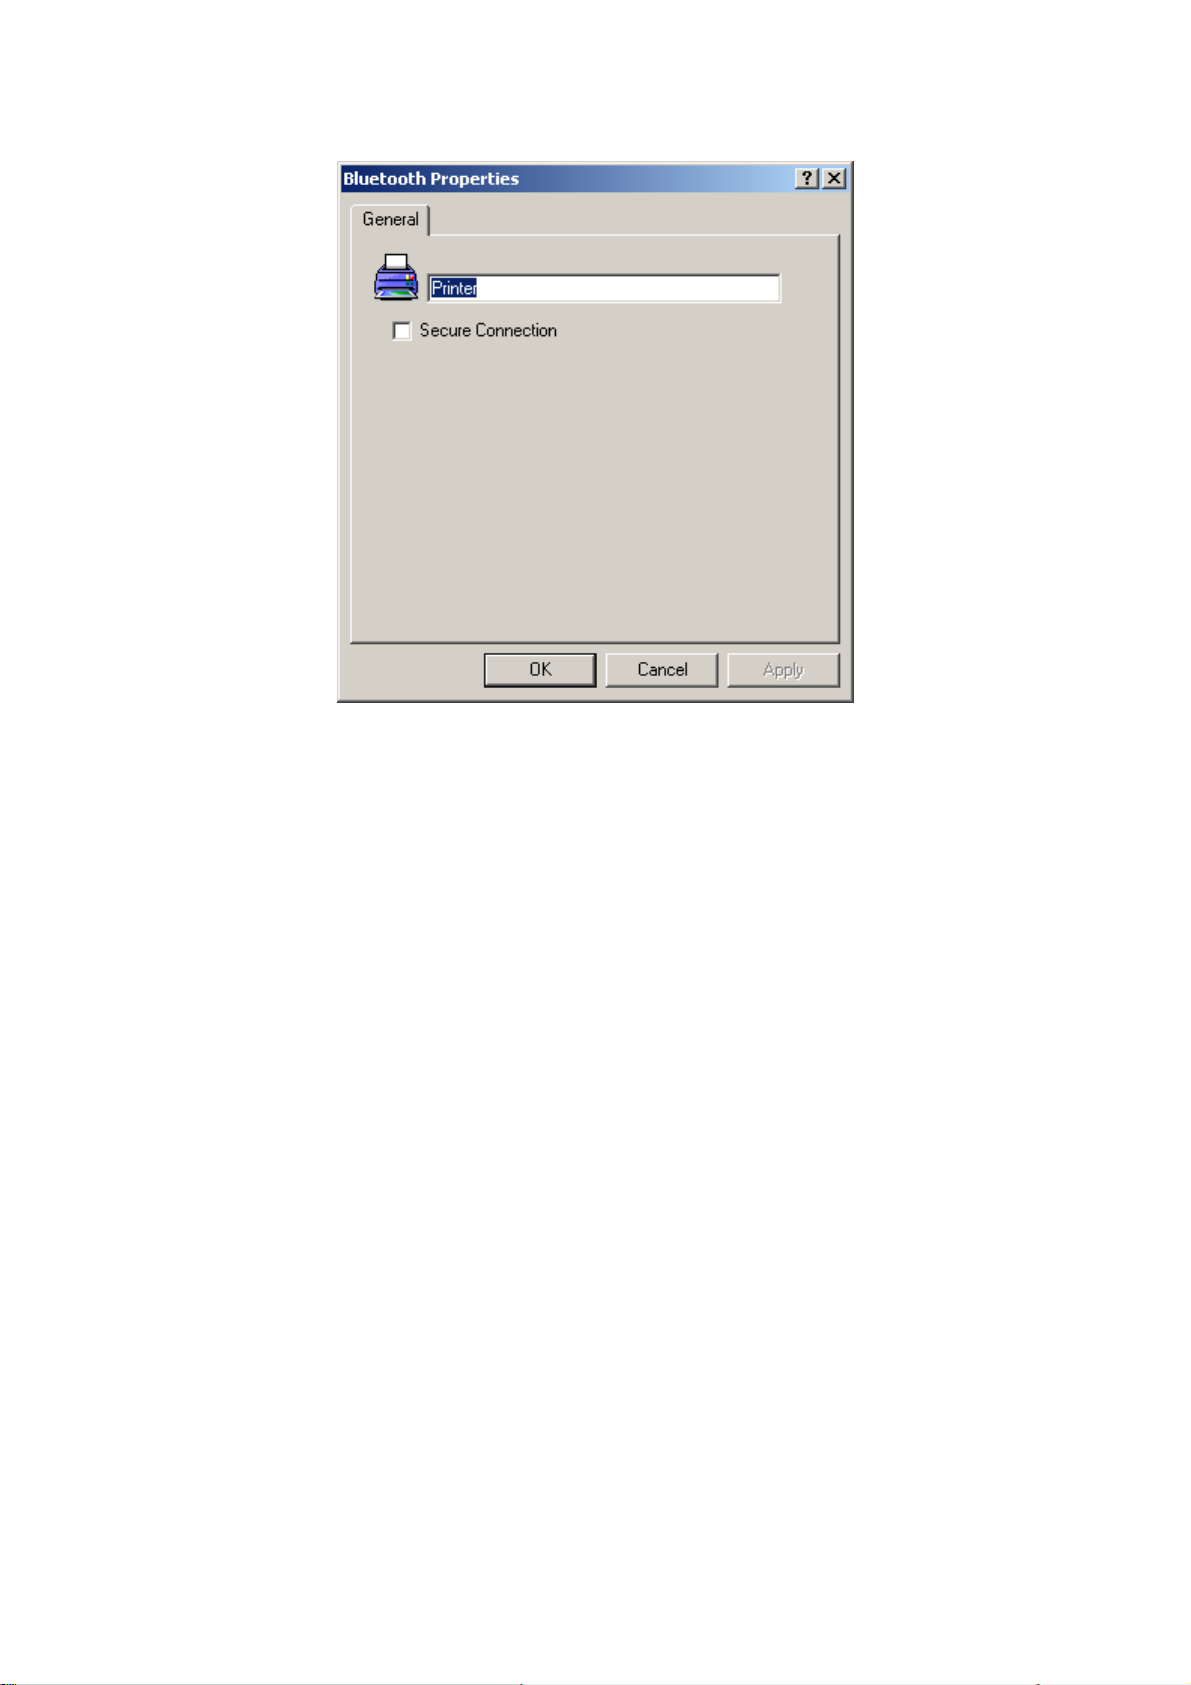
The application name—to change it, highlight the existing name and enter the
new name.
Enable or disable secure connection. To enable secure connection, place a
checkmark in the box.
Install a Bluetooth Printer
Option One:
1. Perform a search for devices and then, from Entire Bluetooth Neighborhood,
right-click a Bluetooth printer, select Add Printer from the shortcut menu and
follow the on-screen instructions.
2. When the wizard asks you to select a printer make and model, do so.
If your printer is not in the list of options, click Have Disk…, insert the driver
disk for the printer, and then navigate to the drive and directory that contains the
driver initiation file (*.inf) for the printer.
3. To complete the installation, follow the on-screen instructions.
Option Two:
1. From the Windows Control Panel, select Printers > Add Printer > Next > Local
printer > Next
2. On the Select the Printer Port screen of the wizard:
a) Select Create a new port.
b) In the Type shortcut menu, select Bluetooth Printer Port, and then click Next
87
Page 88
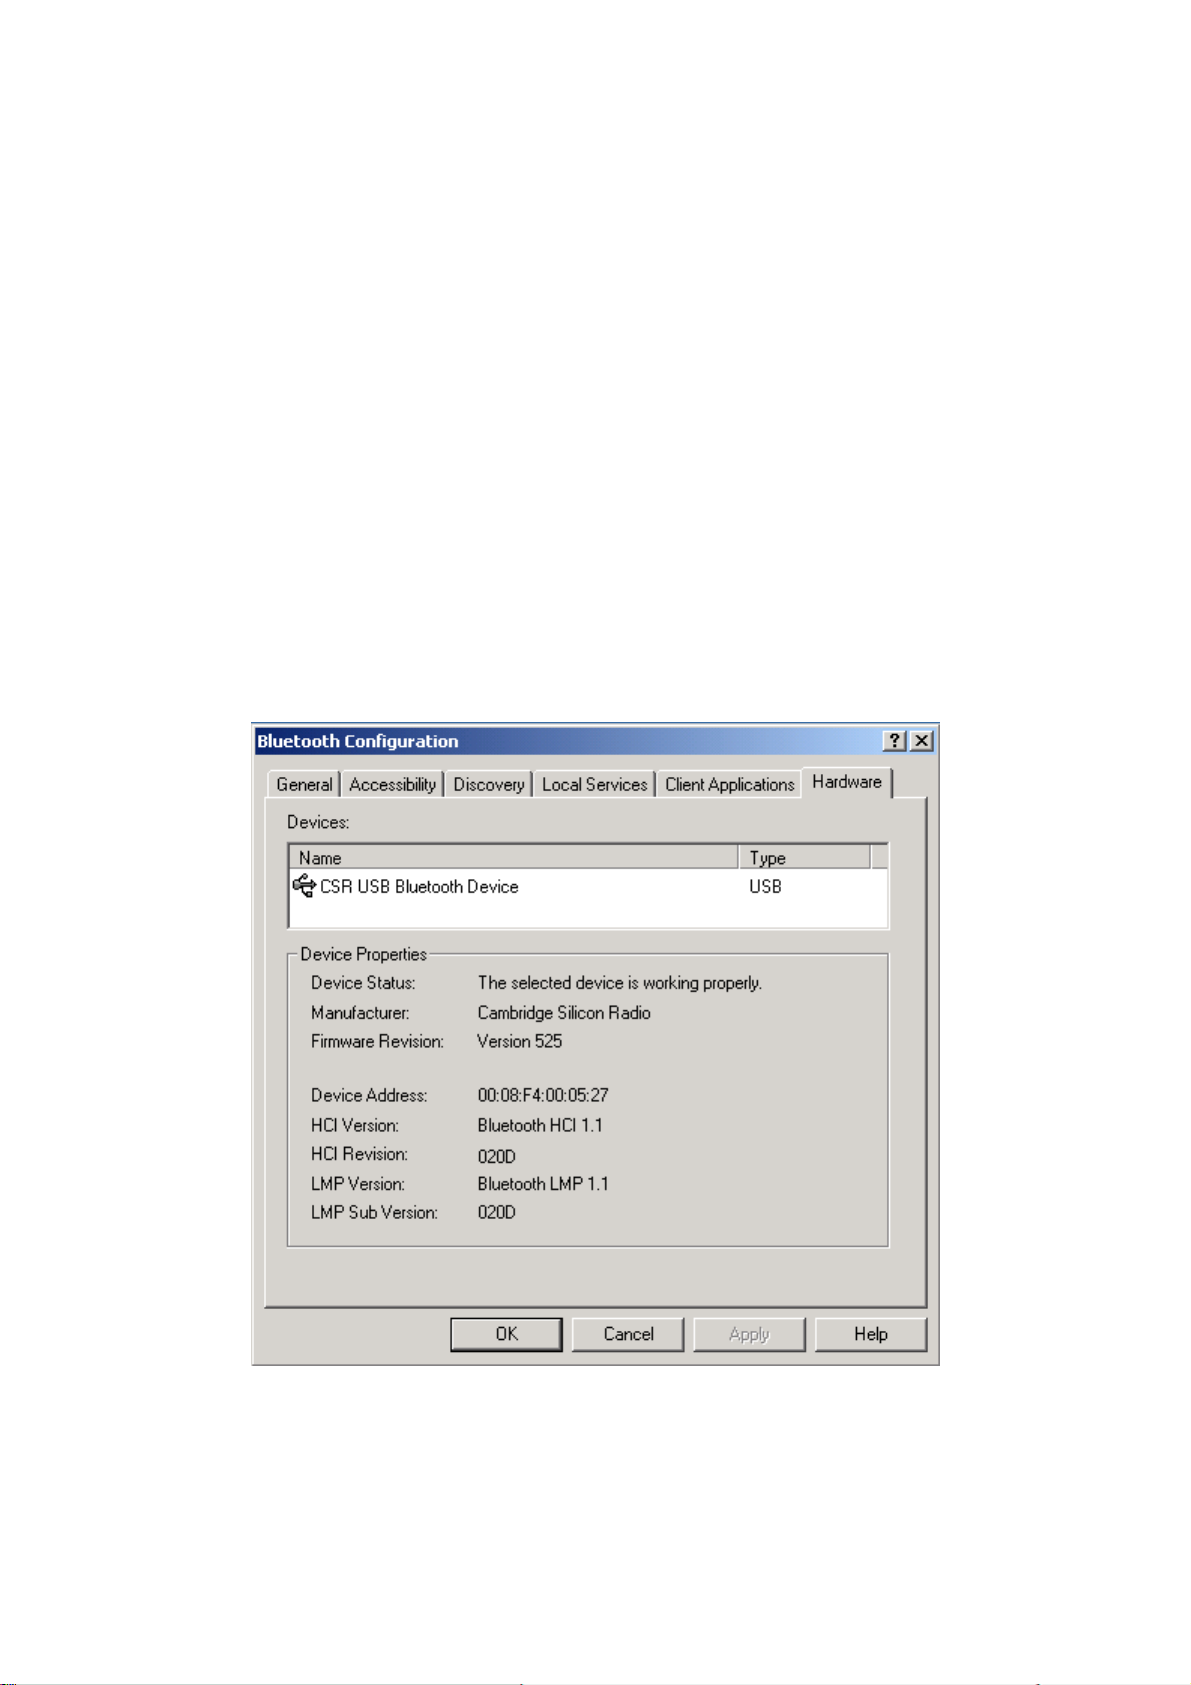
3. On the next screen, select the printer by name, and then click Connect.
4. Install the driver: when asked to select a printer make and model, do so.
If your printer is not in the list of options, click Have Disk…, insert the driver
disk for the printer, and then navigate to the drive and directory that contain the
driver initiation file (*.inf) for the printer.
5. To complete the installation, follow the on-screen instructions.
To delete a printer, click Start > Settings > Printers, right-click the printer to be deleted,
and then select Delete from the shortcut menu.
7.7 HARDWARE SETTINGS
The Hardware tab of the Bluetooth Configuration Panel provides basic information about
the Bluetooth hardware installed on this computer and access to the Advanced Settings
dialog box, if required:
Devices:
Name: the name of the device, e.g., CSR USB Bluetooth Device
Type: the type of device, e.g., USB.
88
Page 89

Device Properties:
Device status: indicates that the device is operating properly or that there is a
problem/conflict.
Manufacturer: the name of the company that manufactured the device
selected in the Devices section of this dialog box.
Firmware Revision: the manufacturer's firmware version number.
Device Address: the Bluetooth Device Address (BDA or BD_Addr)
assigned to this device when it was manufactured.
HCI Version: the version number of the Bluetooth Specification that the
Host Controller Interface complies with.
HCI Revision: the revision number of the Bluetooth Specification that the
Host Controller Interface complies with.
LMP Version: the version number of the Bluetooth Specification that the
Link Manager Protocol complies with.
LMP Sub Version: the sub-version number of the Bluetooth Specification
that the Link Manager Protocol complies with.
The Advanced button: displays the Advanced Settings dialog box, which allows
you to select the country code and transmission power settings. This option is not
available on all systems.
7.7.1 Advanced Settings
When available, this dialog box is reached from the Hardware tab of the Bluetooth
Configuration Panel.
NOTE:
Depending on the country in which the hardware is sold and/or in which it will be
used, the Advanced button may not be present.
From this dialog box you can set the:
Country Code:
North America, Europe (except France), and Japan, France and China
Maximum Transmission Power:
High
Medium
Low.
Click Apply to implement the changes. A dialog box appears with notification that the
Bluetooth device attached to this computer must be reset before the change(s) will take
effect.
89
Page 90

Click Yes to reset the Bluetooth device now—all open Bluetooth connections will be
closed.
Click No to save the changes—the changes will be applied the next time the Bluetooth
device is reset or restarted.
90
Page 91

Chapter 8
Security
8.1 AUTHENTICATION
Authentication is used to verify identity; it requires a passkey or link key from the remote
device. When a remote device attempts access, a visual and/or audio warning notifies the
local operator.
If the notification is ignored, access is denied after a preset timeout.
When devices are “paired,” those devices automatically exchange a Link Key and
Authentication is carried out without operator intervention.
8.2 AUTHORIZATION
Authorization is Yes-or-No security that requires operator intervention to avoid having
the connection time out and fail.
Authorization is limited to:
Yes, you may connect (click the balloon to proceed)
No, you may not connect (ignore the balloon prompt and the connection will
fail).
8.3 ENCRYPTION
Encrypting data translates it into an unreadable format using a secret key or password.
Decrypting the data requires the same key or password that was used to encrypt it.
8.4 LINK KEY
A unique, internally generated, access code based on a passkey, the Bluetooth Device
Address and an internally generated random number. Link Keys are generated
automatically when devices Pair.
After a link key is generated, manual entry of the passkey is not required.
8.5 PAIRING DEVICES
Pairing allows you to avoid entering access information each time a connection is
attempted. Paired devices share a unique Link Key, which they exchange each time they
91
Page 92
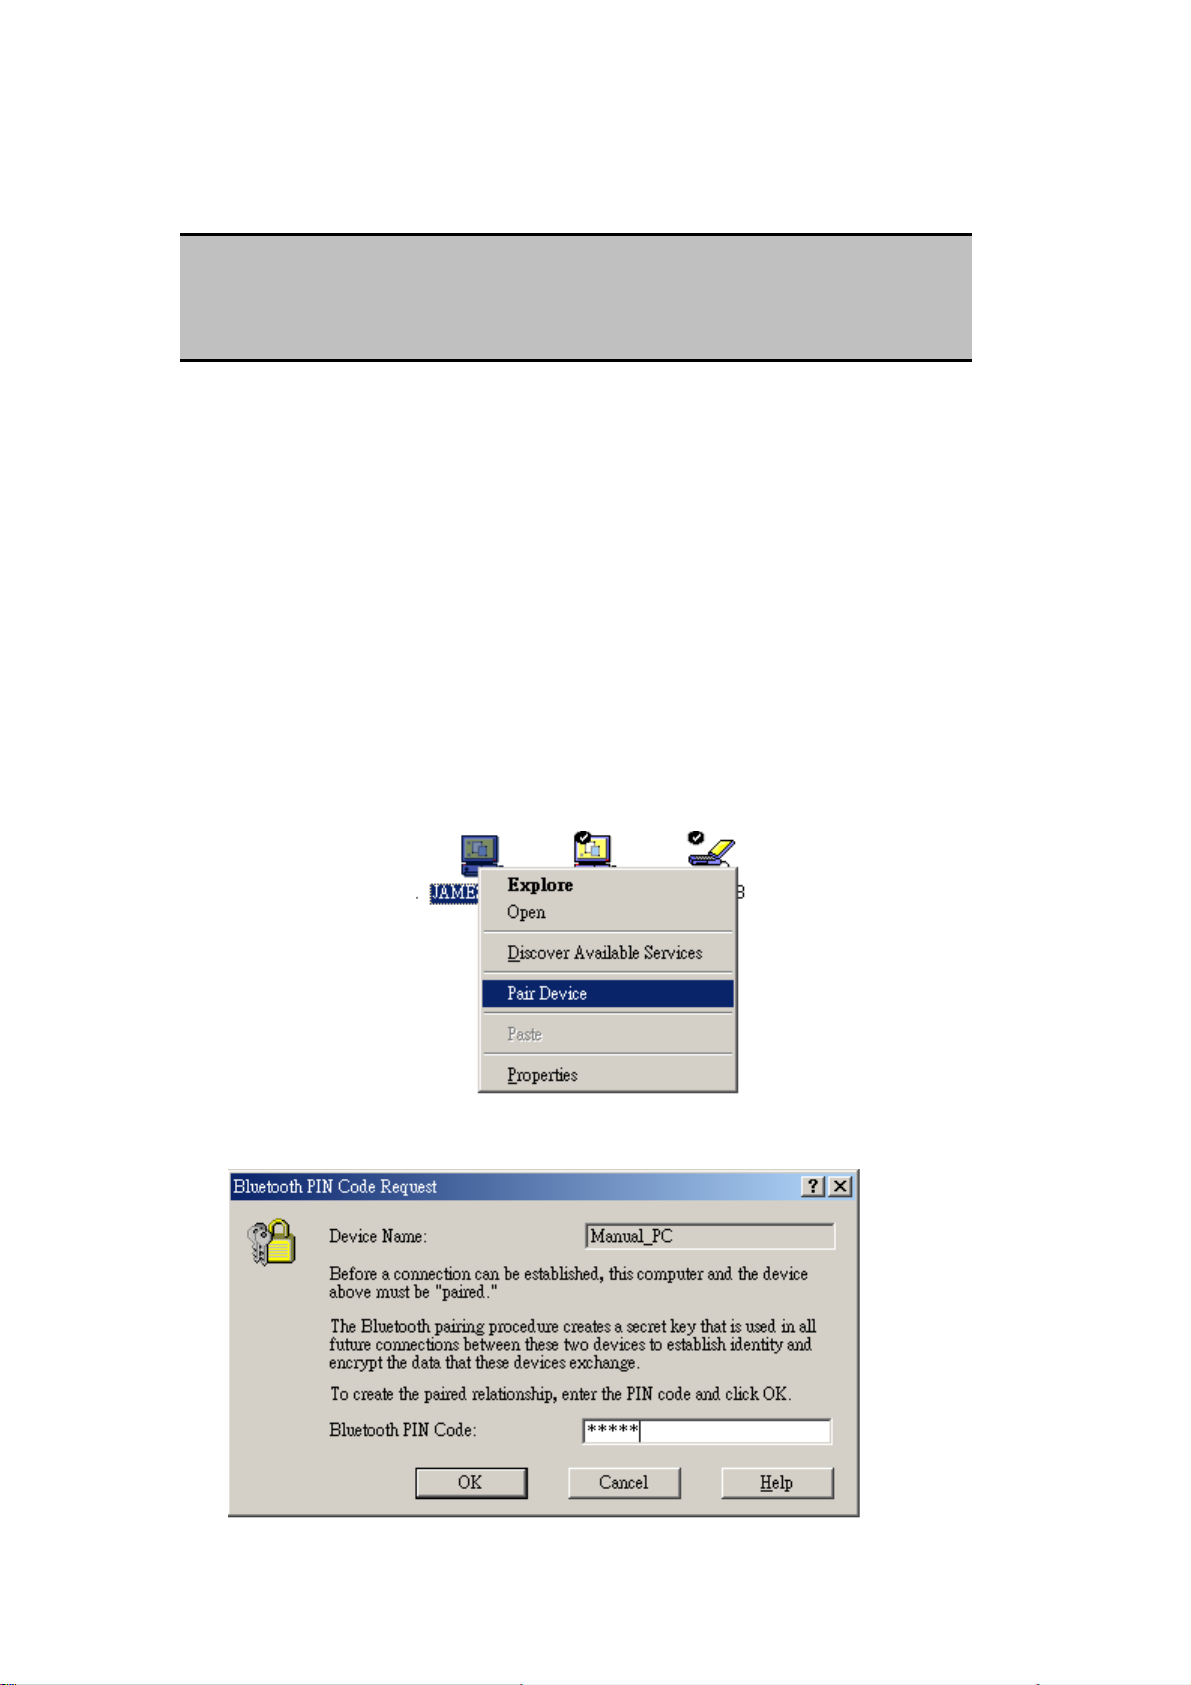
connect. You can initiate the pairing from your own PC or accept a request for pairing from the
other device.
NOTE:
The mate of a pair always appears in My Bluetooth Places, even if the mate is not
turned on or is out of connection range.
Paired devices remain paired even when
One of the devices is not on
A service connection is interrupted or the service stopped
One or both devices are rebooted.
To Pair with another device
If Secure Connection is enabled, devices will pair automatically the first time they
connect (a passkey must be successfully exchanged).
To pair with a device manually:
In the Folders pane of My Bluetooth Places, right-click a device, select Pair Device
from the shortcut menu.
You will be asked to enter the Bluetooth PIN code.
92
Page 93
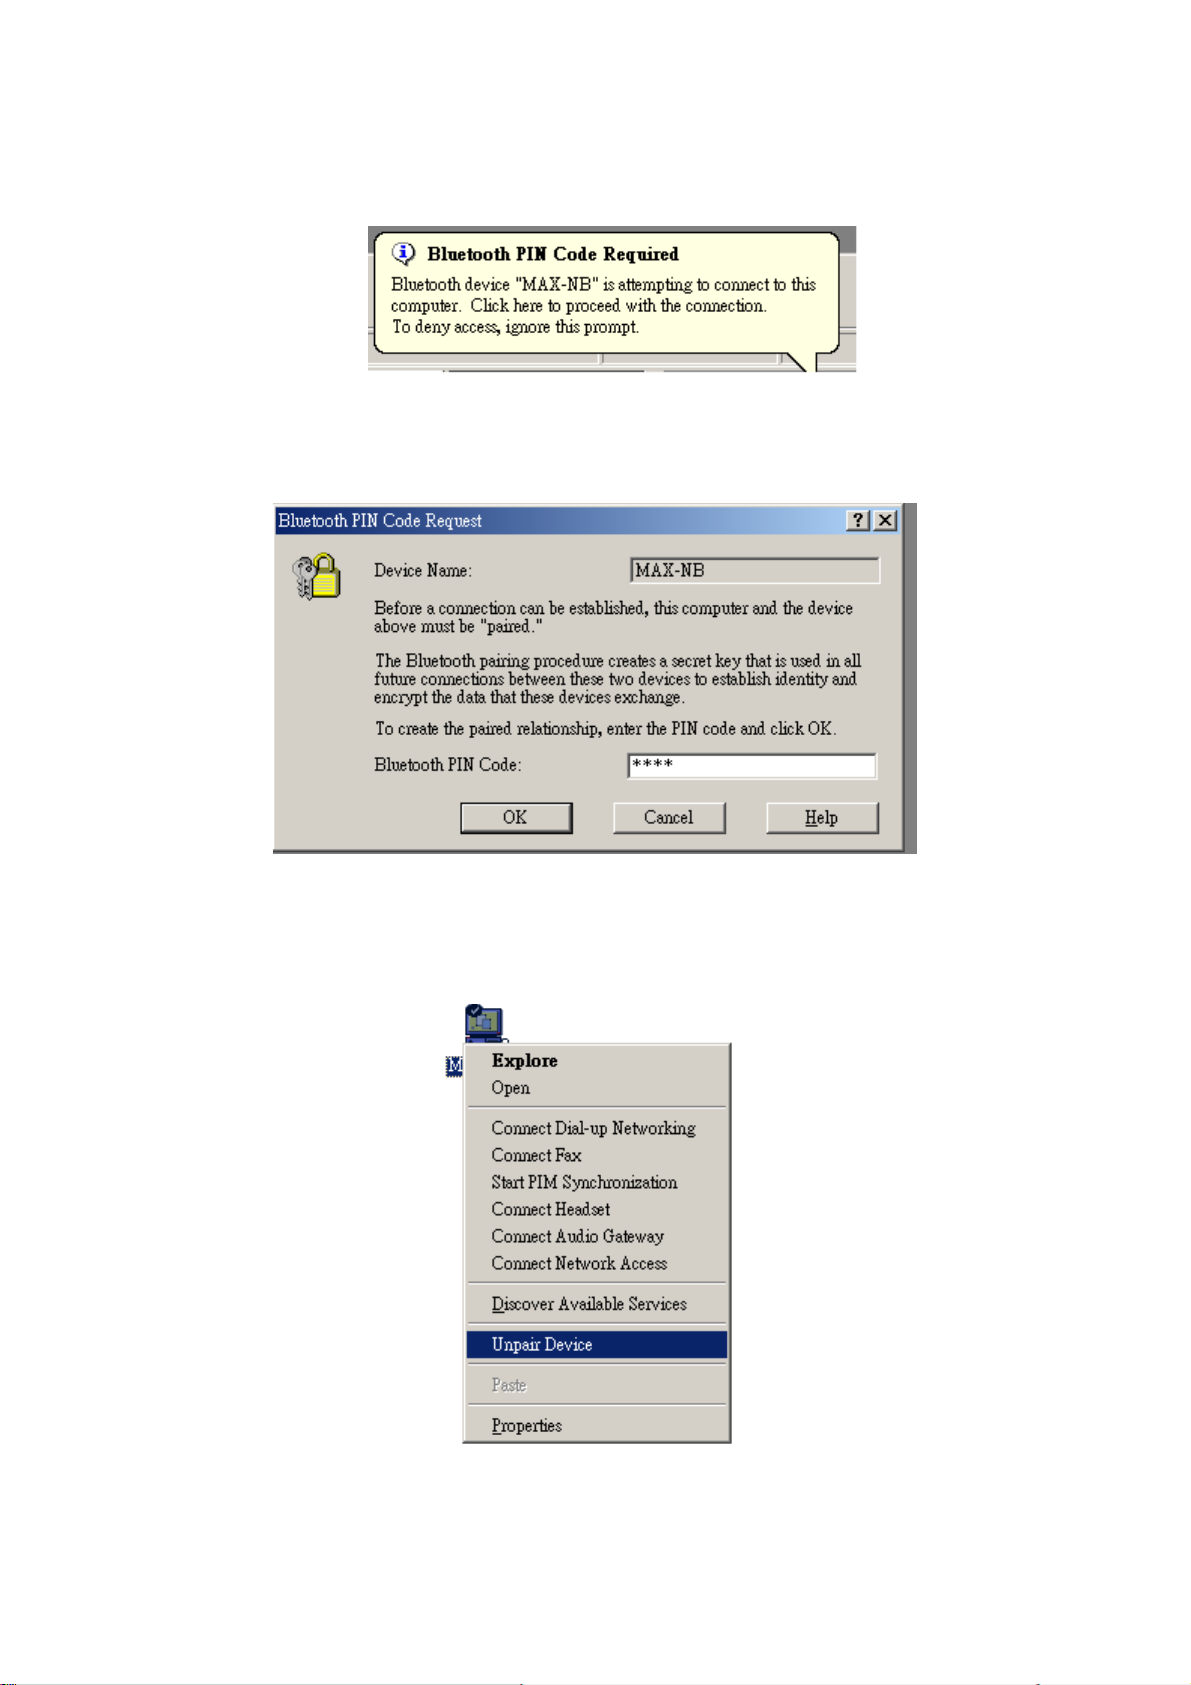
Meanwhile, there will be a bubble message shown on the remote device’s system
tray to indicate you to enter the PIN code. Click this bubble message.
Enter the PIN code. The Bluetooth PIN code should be the same between paired
devices.
Remove Pairing
In the Folders pane of My Bluetooth Places, right-click a paired device and select Unpair
Device from the shortcut menu.
93
Page 94

8.6 PASSKEY
An alphanumeric string up to 16 characters in length. Passkeys are also called Personal
Identification Numbers, or PIN codes.
A passkey may be required if the Secure Connection option is enabled for a Bluetooth
service or application.
8.7 SECURE CONNECTION
A passkey or link key is required each time a connection is attempted.
All data exchanged over the Bluetooth connection is encrypted.
Depending on other configuration options, authorization may also be required.
8.8 SECURITY REQUEST DIALOG BOX
A Bluetooth passkey request and/or Bluetooth Authorization request balloon may appear over
the Windows system tray when a connection is attempted if Secure Connection is
enabled. Click the balloon to proceed.
94
Page 95

Chapter 9
Troubleshooting
CANNOT CONNECT TO A PAIRED DEVICE
Paired devices are always displayed in My Bluetooth Places, even if the remote device is
out of range or not powered up.
Verify that the remote member of the pair is within radio range, and powered up, and
then attempt the connection again.
CANNOT DISCOVER SERVICES ON AN UN-PAIRED REMOTE DEVICE
The remote device may not be powered up or may be out of range.
Verify that the remote device is powered up.
Verify that the remote device is in Connectable mode (Bluetooth Configuration
Panel > Accessibility tab).
Perform a Search for Devices to verify that the device is within range.
DIAL-UP NETWORKING SERVICE DOES NOT START
The Dial-up Networking service will not start unless a properly configured modem is
attached to the server.
Verify that the modem is usable as a local device on the computer to which it is
attached.
In the Bluetooth Configuration Panel, Local Services tab, double-click the
Dial-up Networking service:
Click the down arrow in the Modem field and select the modem that will be
used to dial out
Click the OK button
Click the OK button to close the Bluetooth Configuration Panel.
DETERMINE THE BLUETOOTH DEVICE ADDRESS (BDA) OF MY
HARDWARE DEVICE
In the Bluetooth Configuration Panel, on the Hardware tab, in the Devices section, select
the device you want to determine the address of. In the Device Properties section of the
dialog box, the fourth entry, Device Address, is the BDA of the selected Bluetooth
device.
DETERMINE THE VERSION OF THE HOST CONTROLLER INTERFACE
95
Page 96

(HCI)
In the Bluetooth Configuration Panel, on the Hardware tab, in the Device Properties
section, the fifth entry provides Bluetooth Specification compliance information for the
Host Controller Interface.
The sixth entry contains the Specification Revision information for the Host Controller
Interface, if appropriate.
DETERMINE THE VERSION OF THE LINK MANAGER PROTOCOL (LMP)
In the Bluetooth Configuration Panel, on the Hardware tab, in the Device Properties
section, the seventh entry provides Link Manager Protocol version number information.
The eighth entry contains the Link Manager Protocol sub-version number information, if
appropriate.
FIND INFORMATION ABOUT THE BLUETOOTH HARDWARE ATTACHED
TO MY COMPUTER
In the Bluetooth Configuration Panel, select the Hardware tab.
TEST A NETWORK ACCESS CONNECTION
If the client is hardwired to the LAN, unplug the hardwired connection to ensure that the
test checks the wireless connection rather than the hardwired connection.
If the server has access to the Internet, open a browser on the client and connect to the
World Wide Web.
You may also Ping the server from the DOS prompt.
UNKNOWN PORT MESSAGE WHEN USING A BLUETOOTH SERIAL
PORT
The “Unknown Port” error message usually means an attempt was made to connect a port
that was in use.
Additional Bluetooth Serial Ports can be added if they are required.
BLUETOOTH HEADSET DOESN’T ALWAYS FUNCTION UNDER WIN 98
Windows 98 cannot convert audio files with the extension m3u (e.g., myfile.m3u) into
the Pulse Code Modulation (PCM) audio format used by Bluetooth headsets; this is a
limitation of Windows 98.
Other versions of Windows (2000, ME and XP) can translate m3u audio files into the
PCM format.
Possible solutions are:
96
Page 97

Upgrade to a newer version of Windows
Use an m3u-to-mp3 conversion utility to convert the file(s) into a format that is
supported by Windows 98. (Conversion utilities are available as freeware or
shareware on the Internet.)
97
 Loading...