

Page 1

Winchester Model 1300 Pump Shotgun Owner’s Manual
Licensee
Page 2

Important instructions for
Winchester Model 1300
Pump Shotgun
U.S. Repeating Arms Company, Inc.
275 Winchester Ave.
New Haven, CT, U. S. A. 06511-1970
Winchester trademarks licensed from Olin Corporation.
Use the space below to record information about your
new Model 1300 shotgun.
Model _________________________________________
Serial Number __________________________________
Purchased From _________________________________
Date of Purchase ________________________________
We sincerely hope that you are pleased with your new
Winchester Model 1300. We at U.S. Repeating Arms
Company thank you for the privilege of crafting this
shotgun for you. We are especially proud of the many
years of enjoyment it is certain to provide for you and
your family. The Model 1300 is another shotgun in an
over 130 year-old tradition of producing quality firearms
for the World’s sportsmen. Quality of manufacture,
design, craftsmanship and function are of utmost con-
cern to us. We believe you’ll find that your new 1300
meets the Winchester tradition of quality in every way.
If you have any questions or comments regarding your
new firearm, please feel free write to us.
Page 3

1
Contents . . . . . . . . . . . . . . . . . . . . . . . . . . . . . . . .Page
Gun safety warnings . . . . . . . . . . . . . . . . . . . . . . . . . . .2 - 3
General description . . . . . . . . . . . . . . . . . . . . . . . . . . .3 - 4
Terminology and descriptions . . . . . . . . . . . . . . . . . . . . . .4
Serial number . . . . . . . . . . . . . . . . . . . . . . . . . . . . . . . . . .4
Ammunition . . . . . . . . . . . . . . . . . . . . . . . . . . . . . . . . . . .5
Magazine capacity . . . . . . . . . . . . . . . . . . . . . . . . . . . . . . .5
General operation/special reminders . . . . . . . . . . . . . .5 - 8
Initial cleaning/Oiling the action . . . . . . . . . . . . . . . . . . .8
Operation of the safety . . . . . . . . . . . . . . . . . . . . . . . . . . .9
Installing/removing the bolt . . . . . . . . . . . . . . . . . . . . . . .9
Initial Assembly . . . . . . . . . . . . . . . . . . . . . . . . . . . . . . .10
Loading/unloading procedures . . . . . . . . . . . . . . . .11 - 12
Firing procedures . . . . . . . . . . . . . . . . . . . . . . . . . . . . . . .13
In the case of a misfire . . . . . . . . . . . . . . . . . . . . . . . . . .13
Removing the 3-shot plug . . . . . . . . . . . . . . . . . . . . . . . .14
Full Disassembly . . . . . . . . . . . . . . . . . . . . . . . . . . . .16 - 21
Sight adjustments . . . . . . . . . . . . . . . . . . . . . . . . . .21 - 22
Winchoke
®
System . . . . . . . . . . . . . . . . . . . . . . . . .22 - 25
Cleaning and maintenance suggestions . . . . . . . . .25 - 27
Ordering parts . . . . . . . . . . . . . . . . . . . . . . . . . . . . . . . . .27
Service or Repair . . . . . . . . . . . . . . . . . . . . . . . . . . . . . . .28
No pump is faster than today’s Winchester Model 1300. And
there’s no pump shotgun with more modern advantages. The 1300
has an overall design that is uniquely durable, drawing on nearly a
century of Winchester firearms pump shotgun experience.
The Model 1300 is a gun for these times. It stands comparison
with every other slide action on the market past and present. The
reasons are many, but avid slide gunners know that the big advantage of a 1300 is speed. A 1300 is so fast, we like to think of it as
the “Speed Pump.”
In more ways than one it’s “the pump that thinks it’s a semi-auto.”
Here’s why: a fraction of a second after you pull the trigger and fire
a 1300, the lugs of the ultra-strong rotary bolt begin disengaging
from the barrel extension. Recoil forces still present in the gun
then assist the slide rearward. You can feel the slight rearward
force on the forearm as you shoot, which makes it much easier to
begin your pumping action. And you’ll find that you will complete
the pumping action forward quickly and without conscious effort.
In a brief instant you’ve cycled a shell and are ready for a second
shot. Speed like this makes a big difference allowing you to set up
for a second shot more quickly and concentrate on your target —
not just on pumping.
With the 1300’s rotary bolt design, the lugs engage directly in the
lug recesses in the barrel extension. This is an unusually strong,
consistent and reliable lockup design used on many military
firearms.
Every design feature works together to make what many consider
the most reliable pump shotgun on the market today.
Page 4

2
GUN SAFETY WARNINGS
IT IS ESSENTIAL THAT THESE OPERATING
INSTRUCTIONS BE THOROUGHLY STUDIED
BEFORE USING THIS FIREARM TO ASSURE
PROPER AND SAFE GUN HANDLING. FAILURE
TO FOLLOW THESE INSTRUCTIONS OR FAILURE TO OBEY ANY SAFETY WARNING MAY
RESULT IN INJURY TO YOURSELF OR OTHERS, OR CAUSE DAMAGE TO YOUR GUN.
As a gun owner, you accept a set of demanding responsibilities. How seriously you take these responsibilities can
be the difference between life and death. There is no
excuse for careless or abusive handling of any firearm.
At all times handle your rifle and any other firearm with
intense respect for its power and potential danger.
PLEASE READ AND UNDERSTAND ALL OF
THE CAUTIONS, PROPER HANDLING PROCEDURES AND INSTRUCTIONS OUTLINED IN
THIS BOOKLET BEFORE USING YOUR NEW
FIREARM.
1. Do not carry a loaded gun with a live round in the
chamber while walking, running, climbing a tree, crossing
a fence or anywhere you might slip or fall, drop the gun or
otherwise bump or jar the gun. A gun that is dropped,
bumped, or jarred with a chambered round might accidentally discharge even with the safety on, causing serious
injury to you or someone else. When a round is chambered keep the safety on until you are ready to shoot.
2. Do not rely on the safety to prevent accidental discharge. Many safeties merely block the trigger and prevent
firing by pulling the trigger. The safety may not prevent
an accidental discharge due to dropping, jarring, or bumping a gun.
3. Use only ammunition for which the gun is chambered
as indicated on the barrel, to prevent excessive pressure
and possible serious personal injury.
4. Incorrectly reloaded ammunition can cause serious personal injury and damage to the firearm due to excessive
pressure. Reload only after proper instruction and in strict
compliance with instruction and data contained in current reloading manuals.
5. Never point a gun at anything you do not intend to
shoot. Always keep it pointed in a safe direction in case of
accidental discharge.
6. Always check to ensure that the barrel is free of
obstructions before loading and using the gun. If you
experience light recoil or off sound, check the barrel for
an obstruction.
Page 5

3
7. Before firing, clean any grease or oil out of barrel with
cleaning rod and patch. Grease or heavy accumulation of
oil can cause excessive pressure and result in serious
personal injury.
8. Keep barrel, chamber and action free of rust. Rust in the
barrel and chamber can cause excessive pressures resulting
in serious injury. A rusted, pitted or eroded barrel should
be replaced.
9. Use hearing protection to prevent ear damage from
repeated exposure to gunfire.
10. Always use proper shooting glasses to prevent eye
injury from flying particles.
11. Never carry a loaded gun in a motor vehicle or carry
one into a dwelling. Always carefully unload the gun
before entering a motor vehicle, a dwelling or an area such
as a camp. Always point a gun in a safe direction while
loading or unloading to prevent serious injury in case of an
accidental discharge. Never load in the house or in your
vehicle.
12. Never shoot at a hard, flat surface or at the surface of
water to avoid a ricochet and possible serious personal
injury to yourself or a bystander.
13. Store gun in a clean dry place out of reach of children
and separated from stored ammunition.
14. Never alter any parts of your gun. Any alterations or
adjustments that may become necessary to the operating
mechanism should be performed by a qualified gunsmith.
15. Hunting from elevated surfaces such as tree stands is
dangerous. Doing so may increase the risk of handling any
firearm. Always make certain that the stand being used is
safe, sturdy and stable. Always make certain your firearm is
unloaded when it is being taken up and down from the
stand. Always make certain that your firearm is not
dropped from the stand or dropped while it is being taken
up or down from the stand.
Be Careful!
GENERAL DESCRIPTION
Your new Model 1300 is one of a number of different versions and configurations offered. The basic operating procedures are the same for nearly all of them. Where there
are differences they are pointed out in this booklet for your
convenience.
The Model 1300 is a pump action design that allows the
shooter to load a round by cycling the action and moving
a shell from a loaded magazine tube to the chamber.
Page 6
This can be repeated until the magazine is empty. A single
round can also be inserted into the chamber manually.
TERMINOLOGY
AND DESCRIPTIONS
Descriptions in this booklet generally refer to the gun in
the horizontal position. That is, in the normal firing position. For example, the muzzle is forward or front; the butt
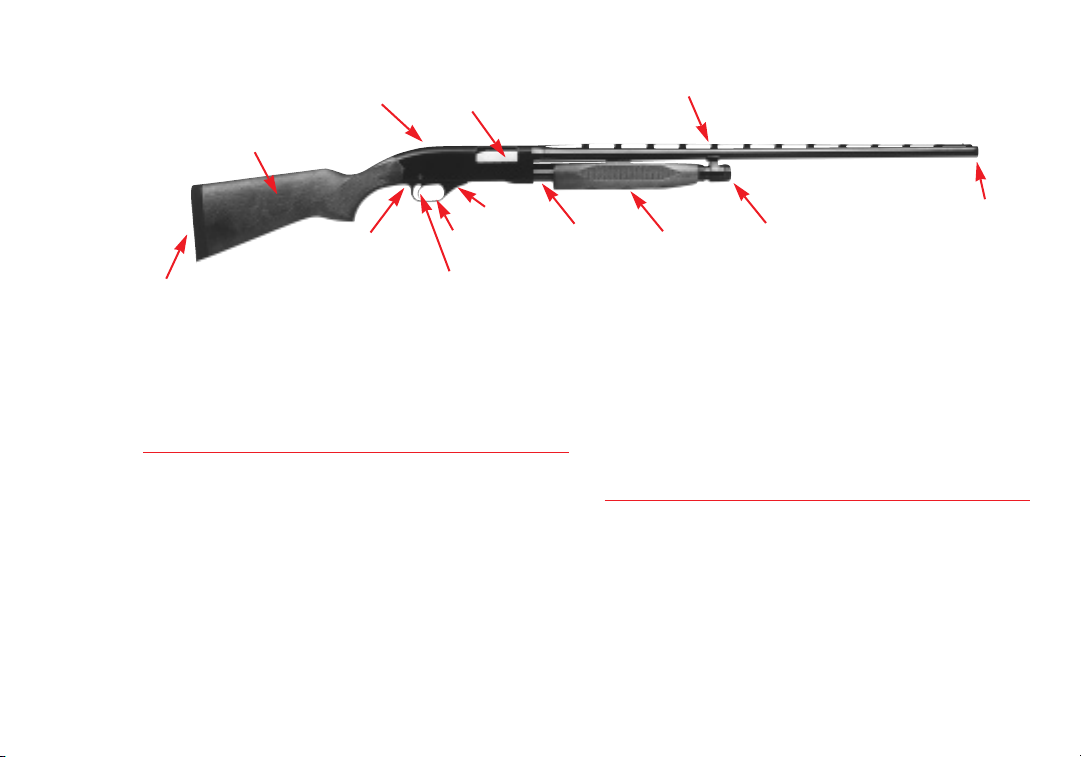
stock is rearward or rear; the trigger is downward or underneath; the sight is upward or on top. For general parts terminology, refer to Figure 1.
The Winchester Model 1300 is also shown disassembled
to the extent necessary in order to follow instructions
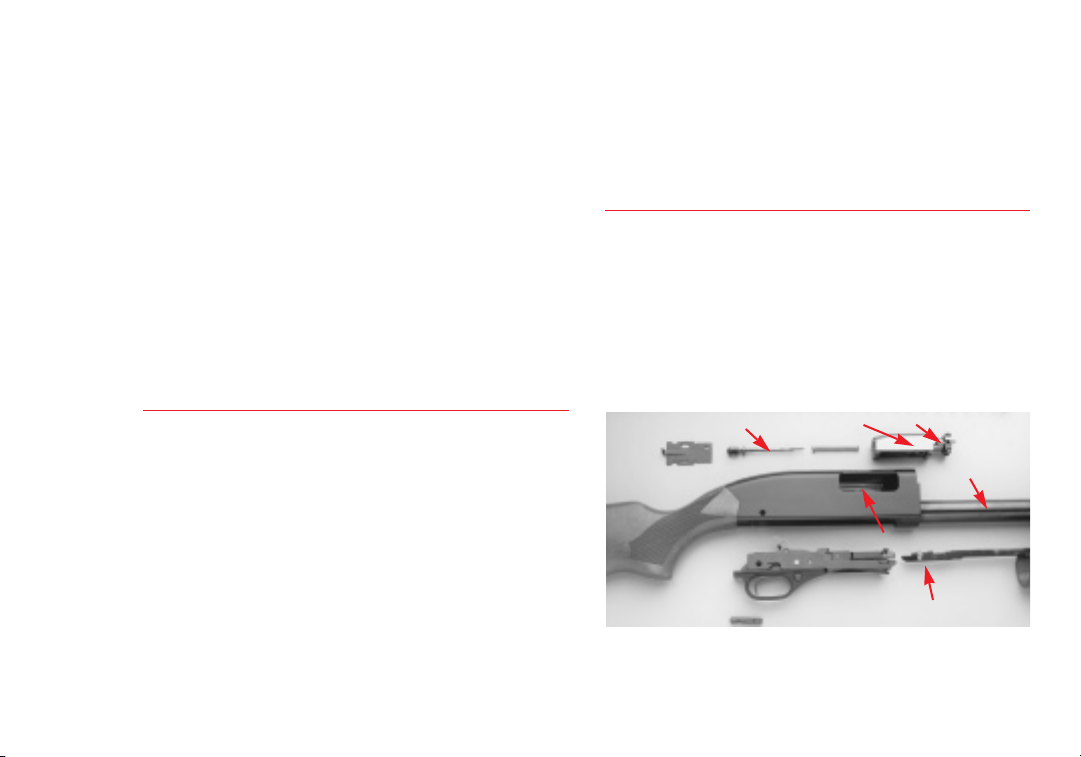
contained in this book (see Figure 9). Figure 2 covers the
general features and benefits of the Model 1300 design.
Throughout this manual the “action” refers to the mechanism of this shotgun which loads and secures the shells in
the chamber.
SERIAL NUMBER
The serial number is located on the left side of the
receiver, just above the trigger guard. Record the serial
number at the front of this book for future reference.
4
FIGURE 1
WinChoke®
Magazine Cap
Forearm
Magazine
Disconnector
release button
(Reverse Side)
Trigger Guard
Recoil Pad
Receiver
Ejection Port
Vent Rib
Safety
Trigger
Buttstock
Page 7

AMMUNITION
All current 12 and 20 gauge Model 1300s have a 3-inch
chamber and are designed to shoot with all factory loads
such as 3" Magnum, 2 3/4" Magnum, 2 3/4" High Velocity,
2 3/4" Field and Target loads. This Winchester proof steel
barrel can safely shoot both lead and steel shot. Special
rifled choke tubes and rifled barrels are designed for shooting sabot-type slugs. U.S. Repeating Arms Co. can assume
no responsibility for incidents which occur through use of
cartridges of nonstandard dimension or those developing
pressures in excess of SAAMI (Sporting Arms and
Ammunition Manufacturer’s Institute) established standards.
MAKE SURE YOU USE ONLY THE EXACT
AMMUNITION/GAUGE AS LISTED ON THE
LEFT SIDE OF THE BARREL.
Incorrectly reloaded ammunition can cause serious personal injury and damage to the firearm due to excessive pressure. Reload only after proper instruction and in strict
compliance with instructions and data contained in current reloading manuals.
DISCHARGING FIREARMS IN POORLY
VENTILATED AREAS, CLEANING FIREARMS,
OR HANDLING AMMUNITION MAY RESULT IN
EXPOSURE TO LEAD AND OTHER
SUBSTANCES KNOWN TO CAUSE BIRTH
DEFECTS, REPRODUCTIVE HARM AND OTHER
SERIOUS PHYSICAL INJURY. HAVE ADEQUATE VENTILATION AT ALL TIMES. WASH
HANDS THOROUGHLY AFTER EXPOSURE.
MAGAZINE CAPACITY
It is extremely important that you know the magazine
capacity of your Model 1300. It is listed on the hang tag
supplied with your Model 1300. Under appropriate
circumstances — at a range or other suitable shooting
location — load your magazine to full capacity and make
note of the number of cartridges. Remember, “total”
capacity includes an additional round which can be loaded
manually in the chamber in addition to a full magazine.
GENERAL OPERATION/ SPECIAL REMINDERS
IMPORTANT: ALWAYS KEEP THE MUZZLE
POINTED IN A SAFE DIRECTION.
Prior to using live ammunition, familiarize yourself thoroughly with these operating instructions. Get accustomed
to the feel of your new gun — know the forces required to
operate the action. Learn how to pull the trigger and,
5
Page 8
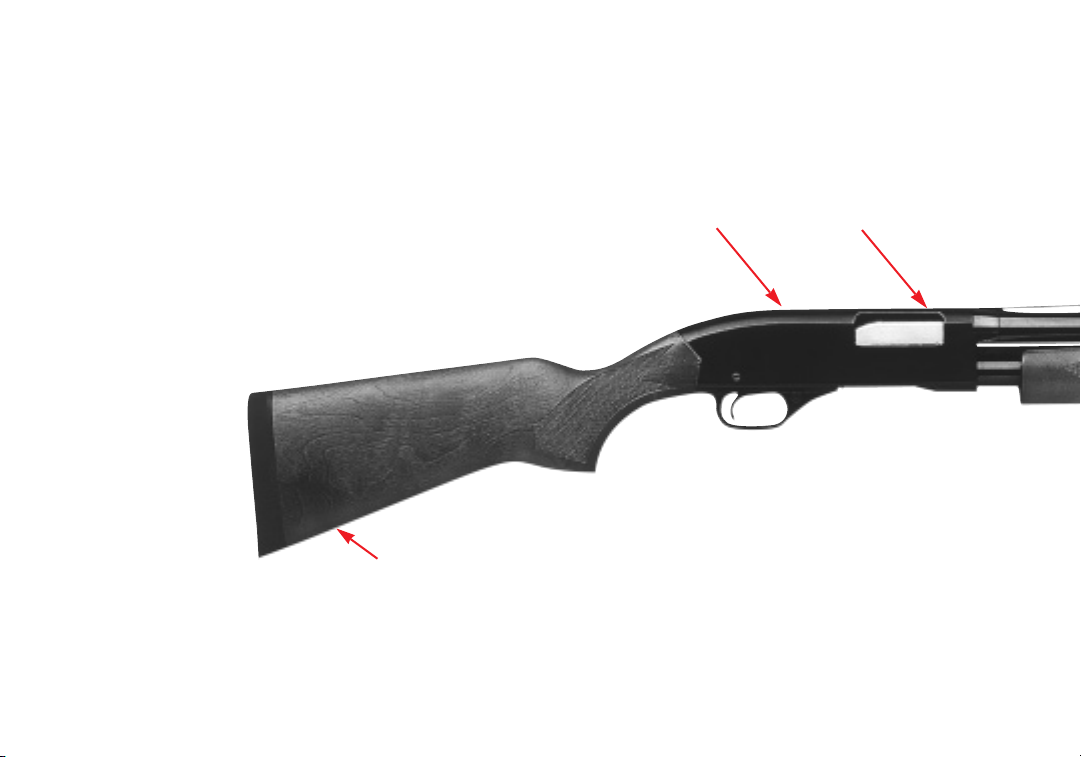
6
The advanced high-strength alloy
receiver is much lighter than steel.
The rugged rotary bolt design
engages the barrel extension
instead of the top of the receiver.
No other company offers you more
choices of stock materials.
Deluxe recoil pad for maximum comfort.
MODEL 1300 FEATURES
Page 9
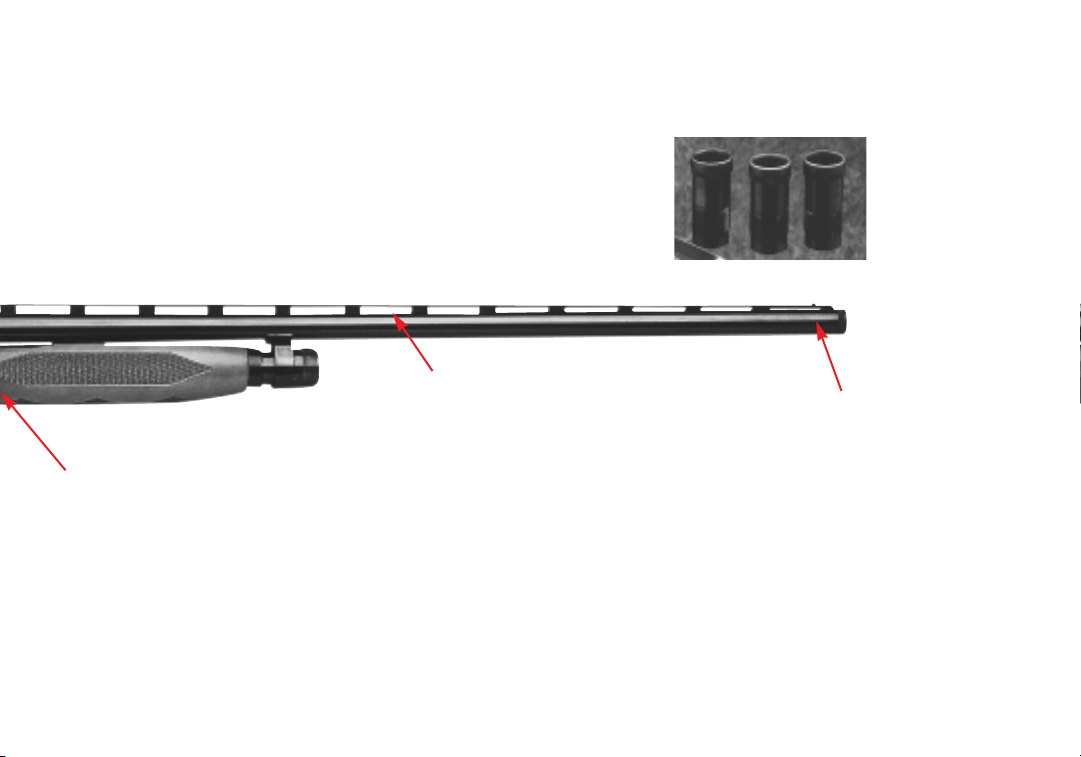
FIGURE 2
7
Choice of barrels. Choose standard ventilated rib models
with WinChokes; rifled barrels with rifle sights for shooting
slugs; smoothbore barrels with rifle sights; and shorter,
smoothbore barrels for protection uses.
Many Model 1300 hunting models are fitted
with the WinChoke system. It allows you to
change choke constriction to the demands of the
game being hunted. You can easily change the
pattern size and density by simply switching
tubes. Also available is an accessory rifled choke
tube for shooting sabot-type slugs.
Model 1300 field guns feature our fully
floating, ventilated rib. On all barrels, as
the barrel heats with shooting, dimensions can vary slightly. The 1300's floating rib design allows the rib to move
without distorting your sight plane.
Faster, power-assisted pumping. The rotary bolt
disengages from the barrel fractions of a second
after the shell fires. The bolt is forced rearward
by inertia, actually assisting you as you pump
the forearm rearward for the next shot.
WinChoke®threaded choke system.
Page 10
8
above all, know the location and operation of the safety.
Procedures for disassembly and operation of various components are outlined in the sections below. Please read
and study them thoroughly. In addition, always remember:
USE THE CORRECT AMMUNITION REFERENCED BY THE INSCRIPTION ON THE
BARREL.
BEFORE LOADING YOUR GUN BE SURE ALL
GREASE AND OIL HAVE BEEN REMOVED
FROM THE BARREL AND CHAMBER, AND
THERE ARE NO OBSTRUCTIONS.
INITIAL CLEANING
Some metal parts of your new Model 1300 have been
coated at the factory with a rust preventative compound.
Before using your Model 1300, clean the anti-rust compound from the inside of the barrel, receiver, breech bolt
mechanism and the action/chamber areas. A high quality,
light weight gun oil should be used to remove this compound and to give your new gun its first lubrication.
Clean the barrel using a cleaning rod and patch as
explained under “Cleaning and Maintenance
Suggestions” found later in this booklet. First lubrication
suggestions are outlined below.
If your new Model 1300 is to be stored for an extended
period of time, it is permissible to leave the rust preventative compound in place and keep your Model 1300 in its
box for maximum protection during long-term storage.
OILING THE ACTION
Before beginning assembly of your Model 1300 you should
first wipe the mechanism clean and apply a few drops of
quality oil on the following surfaces
(see Figure 3):
Avoid applying too much oil. Only a light film is necessary. Excessive oil should be wiped off.
Oil lightly at these points
FIGURE 3
Ejector
Mag tube
Firing pin
Bolt
Lugs
Page 11
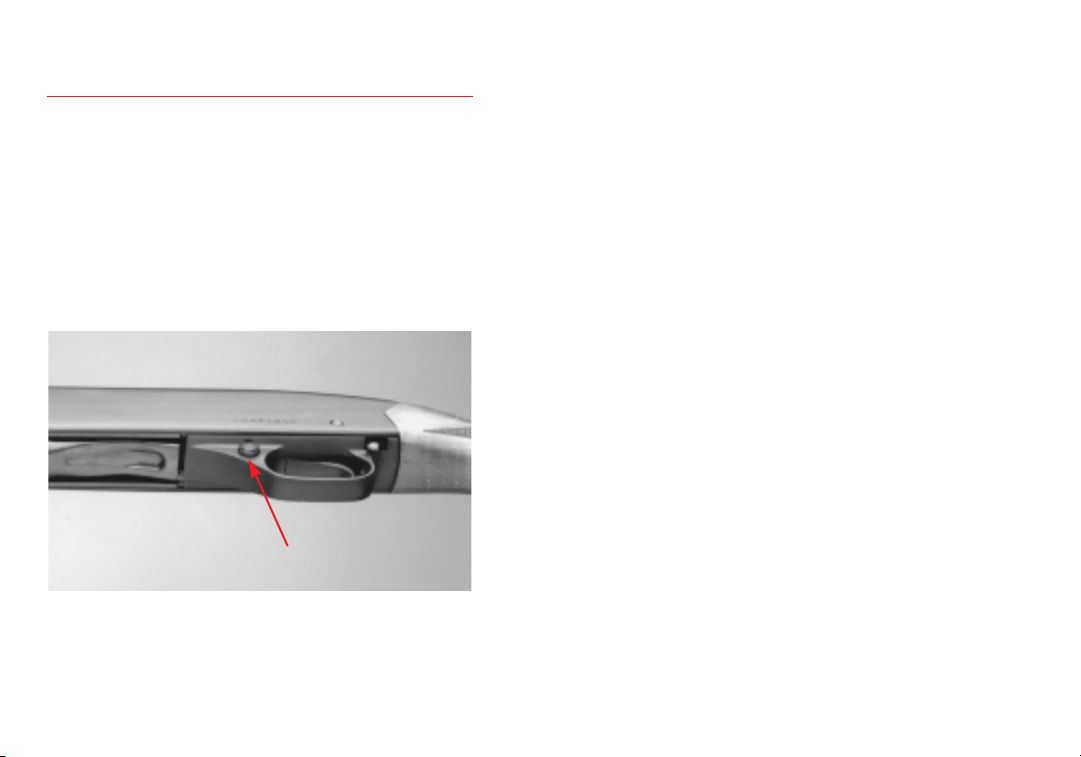
9
OPERATION OF THE SAFETY
Your new Model 1300 Winchester shotgun is designed
with a cross bolt type safety. It is located just forward of
the trigger on the trigger guard: convenient for gloved or
ungloved fingers (see Figure 4). It is essential that you
become very familiar with the feel, look and operation of
the safety on this shotgun before attempting to load and
shoot.
With the safety in the “ON SAFE” position the trigger
and hammer are blocked and the shotgun cannot be fired.
In the “OFF SAFE” position — if your gun is loaded with
a round in the chamber — the chambered round can be
fired by simply pulling the trigger.
• “ON SAFE”. The safety button is pushed fully to the
right. The red band on the left side is not showing.
• “OFF SAFE”. The safety button is pushed fully to the
left. A large red band is exposed on the button as it protrudes on the left side. The red band is an added aid to
safe gun handling. However, with time and exposure to
the elements it can wear off.
Never rely totally on your gun’s safety button. It is merely
an aid to safe gun handling. Like any mechanical device
the safety can possibly fail: it can be jarred or inadvertently manipulated into an unsafe condition. Always keep
your shotgun pointed in a safe direction.
At all times in the field keep the safety in the “ON SAFE”
position and the barrel pointed in a safe direction. It is a
good idea never to load your shotgun until you are in the
field and shooting is imminent or until you are at your station and it is your turn to shoot when you are shooting at
a range. For extra safety, and as a courtesy to others, fully
unload and place the action in the open position at all
times other than when shooting is immediately imminent.
FIGURE 4
“Off Safe” position. Red band showing.
Page 12
10
INITIAL ASSEMBLY
Remove the barrel assembly and receiver/stock section
from the carton. Be sure you have wiped them clean and
oiled them. Unscrew the magazine cap from the magazine
tube. Because the magazine spring is held in place by a friction-type magazine spring retainer always be careful with
which direction the end of the magazine is pointed.
ALWAYS KEEP THE MAGAZINE POINTING
AWAY FROM YOU AND OTHERS WHEN
REMOVING THE MAGAZINE CAP.
Your shotgun will usually come out of the box with the
bolt assembly in the closed position (forward) with the
trigger assembly already in place in the receiver. The barrel
can be assembled with the action closed, but it is usually
much easier if the action has been opened slightly.
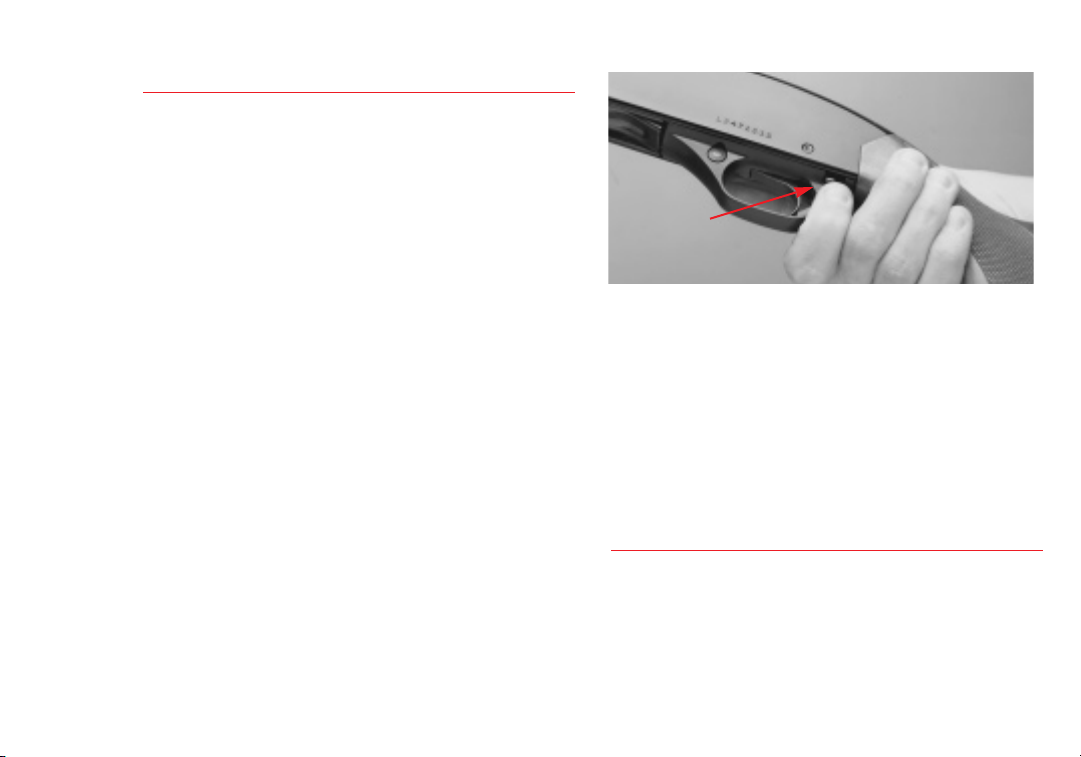
To unlock the action and then open the action — without
pulling the trigger — push up on the disconnector release
button at rear of the trigger guard (see Figure 5) on the left
side and pull back on the forearm. Do this then:
1. Grasp the barrel ahead of the magazine tube bracket.
2. Position the barrel over and in line with the magazine
tube.
3. Slide the barrel rearward.
4. Guide the magazine tube bracket over the end of the
magazine tube and guide the barrel extension into the
receiver. Be sure that the slot in the barrel aligns with the
ejector. As a guide in assembly, align the rib on the barrel
assembly with the grooves on the top of the receiver
5. Slide the barrel rearward until it seats in the receiver.
6. Immediately replace the magazine cap and tighten it
hand tight at least 3 threads.
TAKING DOWN THE BARREL
1. Depress the disconnector release button, found behind
the trigger guard on the left side, to unlock the action
without releasing the hammer.
Press the disconnector
release button to unlock
the action
FIGURE 5
Page 13

2. Open the action and place the safety in the “ON
SAFE” position. (The red warning band must not
be
visible.)
3. With the magazine pointed in a safe direction, unscrew
and remove the magazine cap. Be careful, the magazine
spring and magazine plug are retained by a friction-type
retainer.
ALWAYS KEEP THE MAGAZINE POINTING
AWAY FROM YOU AND OTHERS WHEN
REMOVING THE MAGAZINE CAP.
4. Carefully disengage the barrel from the receiver while
sliding the magazine from the barrel ring.
DO NOT USE
EXCESSIVE FORCE.
Immediately replace the maga-
zine cap and hand tighten at least three threads.
Reassembly of the barrel to the action was explained earlier under “Initial Assembly.”
LOADING PROCEDURES
Use the correct ammunition referenced by the inscription
on the barrel. Before loading your gun, be sure all grease
and oil has been removed from the barrel and chamber
and there is no obstruction.
1. Depress the disconnector release button found behind
the trigger guard on the left side. This unlocks the action
without releasing the hammer.
2. Open the action and push the safety in the “ON SAFE”
position. The chamber is now ready to be loaded.
3. To operate your Model 1300 in a single-shot mode a
shell can now be placed directly into the chamber.
IMPORTANT: When the slide is moved forward with a
shell placed directly into the chamber the gun is now
ready to fire.
LOADING THE MAGAZINE
Before loading, make sure your shotgun is pointed in a safe
direction and you are in an appropriate location for loading and that shooting will be imminent.
1. Place the safety in the “ON SAFE” position and close
the action.
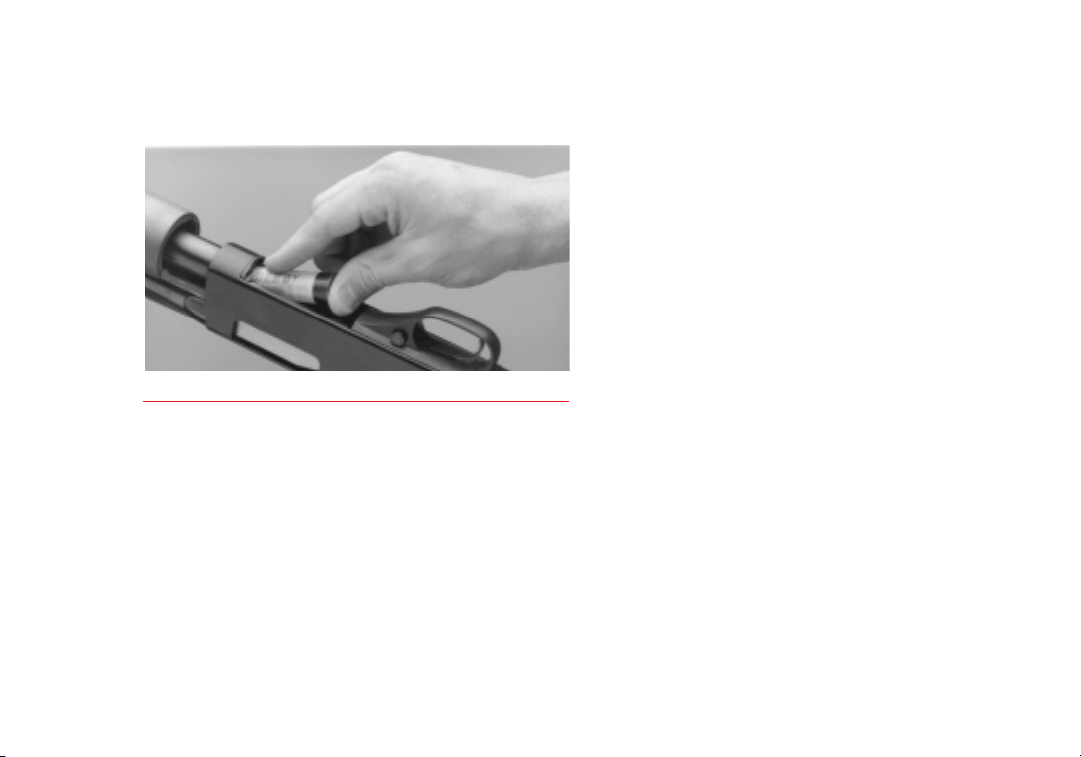
2. Depress the carrier with the forward end of the nose of
the shell.
3. With your thumb on the base of the brass push the shell
into the magazine until the carrier returns to the original
position (see Figure 6).
4. Repeat the procedure until the magazine is fully loaded.
11
Page 14
12
DO NOT CARRY A GUN WITH A SHELL IN THE
CHAMBER TO AVOID ACCIDENTAL
DISCHARGE.
UNLOADING PROCEDURES
Perform the following steps to remove shells from the
chamber and magazine on all Model 1300s.
1. Point the muzzle in a safe direction.
2. The safety should be in the “ON SAFE” position (the
red warning band will not be visible).
3. Hold the disconnector release button inward to release
the slide.
4. Slide the forearm through a complete cycle of the
action and repeat the process until all the shells in the
magazine have been transferred to the chamber and then
ejected.
5. When the last shell in the magazine has been cycled
through the chamber and out the ejection port, leave the
action open.
6. Using your index finger, feel the entry of the magazine
to make sure there are no longer any shells unejected.
ALTERNATE WAY TO UNLOAD —
The shells can also be removed from the magazine by
following these steps:
1. Place the safety in the “ON SAFE” position, make sure
the action is closed and keep the muzzle pointing in a safe
direction.
2. Turn the gun over so the trigger guard is facing up, then
push the carrier down as far as it will go.
3. Push inward on the right of the cartridge cutoff releasing the shell from the magazine. Press the cutoff again to
release the second shell. The cartridge cutoff is located on
the inside-right of the ejection port. When a shell is in
the magazine the cutoff rests on the brass of the shell.
4. With the safety still in the “ON SAFE” position, press
the disconnector release button and move the forearm all
the way rearward to remove the shell from the chamber.
FIGURE 6
Loading the magazine
Page 15

IMPORTANT— ALWAYS VISUALLY CHECK
AND KNOW FOR SURE THAT YOUR SHOTGUN
IS NOT LOADED.
FIRING PROCEDURES
1. When ready to shoot, and with a loaded shell in the
chamber, the safety “ON SAFE”, and your finger off the
trigger, push the safety to the “OFF SAFE” position (with
the red warning band fully visible). Your shotgun is now
ready to fire with a pull of the trigger.
REMEMBER, THE RECOIL FROM A
SHOTGUN, ESPECIALLY MAGNUM LOADS,
WILL BE SOMEWHAT HEAVIER THAN MOST
OTHER GUNS, SO FIRMLY SHOULDER YOUR
MODEL 1300, TAKE AIM, AND — WHEN ON
TARGET — SQUEEZE THE TRIGGER.
2. Pull the forearm fully rearward until the fired shell is
ejected out the ejection port.
3. Push the forearm fully forward, transferring a new shell
from the magazine into the chamber. Your Model 1300 is
again cocked and ready to fire. Immediately put the safety
in the “ON SAFE” position (with the red warning ring
hidden) until you are ready to fire again.
IN THE CASE OF A MISFIRE
Only rarely will modern factory ammunition experience a
misfire. If this ever happens to you when shooting your
Model 1300, please follow these instructions carefully.
CAUTION: IN CASE OF MISFIRE, KEEP THE
BARREL POINTED IN A SAFE DIRECTION,
CAREFULLY OPEN THE ACTION WHILE
AVOIDING DIRECT EXPOSURE TO THE
BREECH BY YOURSELF AND OTHERS.
REMOVE THE SHELL FROM THE CHAMBER.
FULLY UNLOAD YOUR SHOTGUN, REMOVING
ALL SHELLS FROM THE MAGAZINE.
Carefully inspect the ejected shell. If the primer is indented, the shell should be disposed of in a manner that would
prevent accidental injury to you, others, or the environment. If there is no indentation, your gun has malfunctioned and should be serviced by a qualified gunsmith, or
by the U. S. Repeating Arms Company Service Center in
New Haven, Connecticut, or by an Authorized U.S.
Repeating Arms Company Repair Station.
13
Page 16
REMOVING THE MAGAZINE PLUG
When hunting migratory birds, Federal Law mandates the
use of a magazine restriction devise that allows only a total
of three shells to be held in your shotgun at one time.
WHEN REMOVING THE PLUG BE CERTAIN
THERE ARE NO SHELLS IN THE MAGAZINE OR
CHAMBER AND KEEP THE BARREL AND MAGAZINE POINTED IN A SAFE DIRECTION AT ALL
TIMES.
REMEMBER, THE PLUG IS UNDER SPRING
PRESSURE SO CARE MUST BE TAKEN FOR
SAFE REMOVAL. ALWAYS POINT THE END OF
THE MAGAZINE AWAY FROM YOUR FACE AND
IN A SAFE DIRECTION.
ALWAYS WEAR EYE PROTECTION WHEN
REMOVING AND REINSTALLING THE MAGAZINE’S 3-SHOT PLUG.
The magazine plug is spring loaded and can thrust out of
the magazine when the friction-type magazine retainer is
removed too quickly. Never look directly down into the
cap end of the open magazine.
1. Remove the magazine cap.
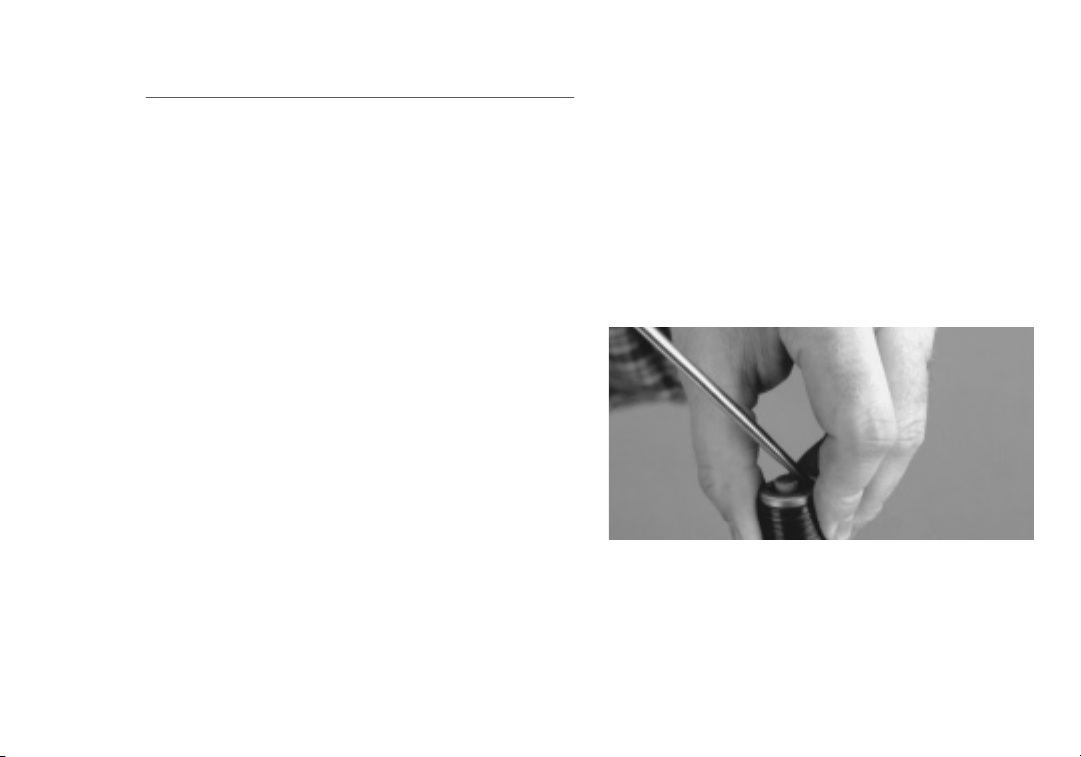
2. Place one hand over the retainer and pry it up slowly
with a screw driver using your other hand (see Figure 7).
When the retainer releases you will feel the pressure of the
friction ring and plug on the palm of your hand.
3. Slowly raise your hand and let the magazine spring
relax. Capture the parts in your hand as they spring out.
4. With the spring relaxed, the friction ring, plug, spring
and follower can be removed. To reinstall, reverse this
procedure.
14
FIGURE 7
Carefully pry up on the
magazine spring retainer.
Catch the components as
they spring out.
Page 17
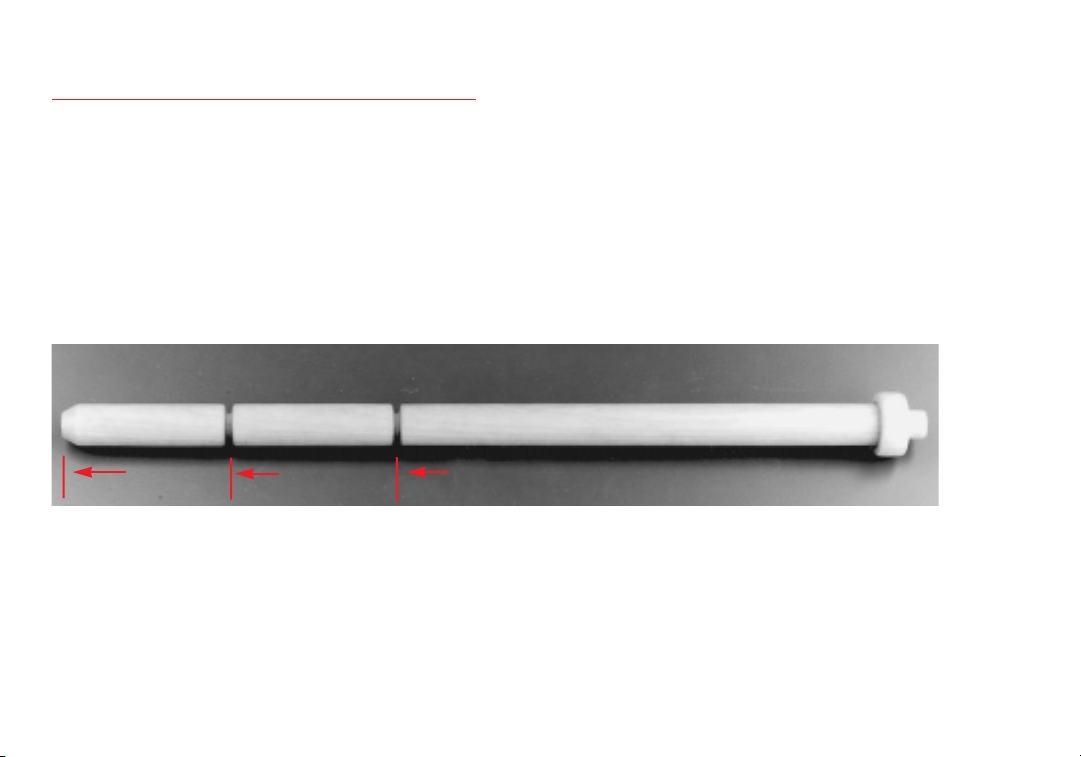
RANGER LADIES/YOUTH MODELS ONLY
The Ranger Ladies/Youth 1300s are specially equipped
with a segmented plug that can be cut to adjust the number of shells that can be loaded into the magazine. A full
length plug with no segments removed turns this Model
1300 into a single shot when installed into the magazine.
As a new shooter becomes more experienced with his or
her Model 1300, the first section of the plug can be cut off
at the segment notch allowing one shell to be held in the
magazine (see Figure 8).
Eventually, with more experience other notches can be
removed to facilitate more shells in the chamber. When
the entire plug is removed, four shells can be loaded into
the magazine with one also in the chamber.
15
FIGURE 8
3 shots total
Single shot
2 shots total
Magazine plug for Ladies/Youth Models
Page 18
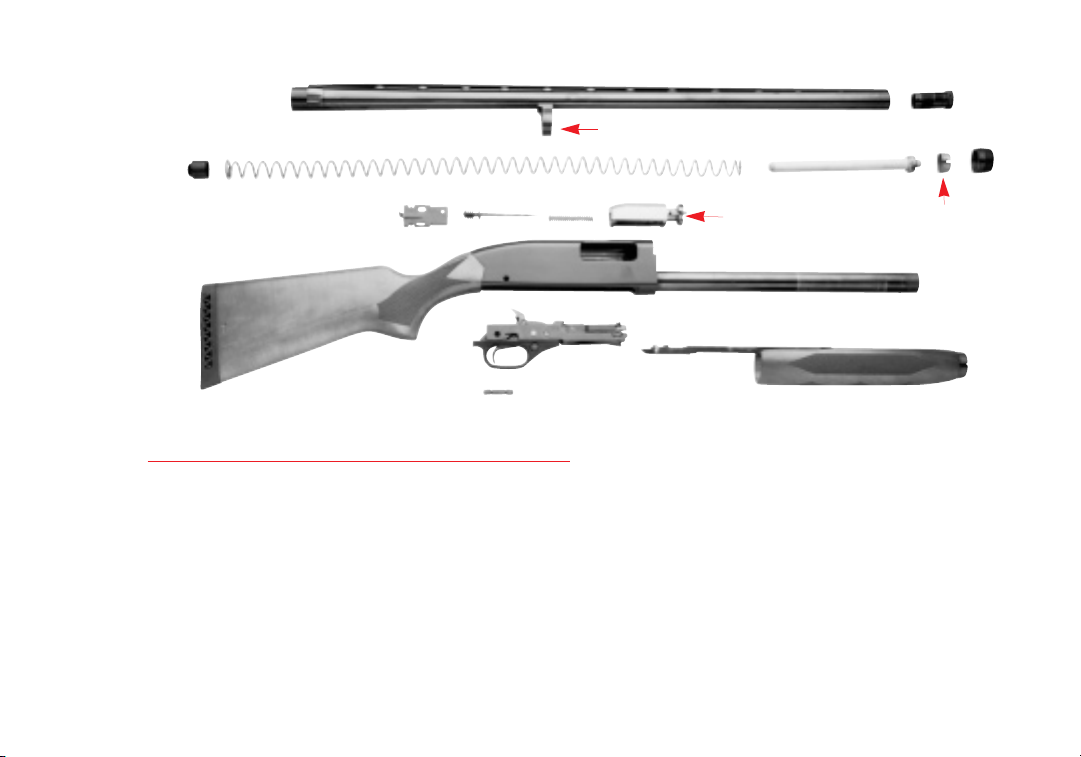
FULL DISASSEMBLY
One of the advantages of a Model 1300 is the ability to
disassemble the action for cleaning. Under very harsh
weather conditions and in dirty environments just knowing that parts are clean and lightly oiled can add an extra
measure of confidence to your hunt.
Make sure you have a clean place to work and a good
place to put the components as they are disassembled.
Wear eye protection at all times. Never disassemble
beyond what is explained and shown in this manual
(see Figure 9).
Disassembling the action can be done in the field, but
remember, there are small parts involved, some of which
are under spring tension.
FIRST, BE CERTAIN THERE ARE NO SHELLS
IN THE MAGAZINE OR CHAMBER.
16
Magazine Tube
Magazine Spring
Trigger Guard Pin
Trigger Guard Group
Slide Arms
Barrel
WinChoke®
Firing Pin
Firing
Pin Spring
Breech Bolt Slide
Plug
Magazine
Cap
Magazine
Follower
Magazine Spring
Retainer
Slide Arm Bridge
FIGURE 9
Breech Bolt
Forearm
Magazine Bracket
Page 19

HOW TO TAKE DOWN THE BARREL
1. Open the action and make sure the gun is not loaded.
2. Close the action and place the safety in the
“ON SAFE” position.
3. Unscrew and remove the magazine cap. Remember,
always keep the end of the magazine pointed in a safe
direction.
4. Slide the barrel forward withdrawing the barrel from
the receiver and disengaging the magazine bracket from
the front end of the magazine.
5. Immediately screw the magazine cap back onto the
magazine.
HOW TO REMOVE THE TRIGGER GUARD GROUP FROM
THE RECEIVER
Removing the trigger guard group is another necessary
procedure in performing thorough maintenance of your
shotgun. It is easy to do, and removing it allows you to
perform cleaning and maintenance whenever and wherever required. Make sure the gun is unloaded. With both
the trigger guard group and bolt assembly removed, it is
easy to wipe out any debris or moisture that sometimes
accumulates in the receiver. The trigger guard group
should be removed before you attempt to remove the bolt
assembly. The action should be cycled by sliding the fore-
arm forward and then rearward. This puts the hammer in
the cocked position. Place the safety in the “ON SAFE”
position.
1. If the barrel assembly has been removed, always be sure
to replace the magazine cap on the end of the magazine
tube to prevent accidental disengagement of the magazine
spring retainer.
2. Place your gun with the trigger guard facing up, on a
suitable surface that will protect the receiver finish and
stock.
3. Remove the trigger guard pin by pushing it out from
the LEFT side of the receiver, side opposite the ejection
port. Any sturdy pushing tool that is smaller in diameter
than the pin, and that will not mar the finish, is acceptable. Make sure you can maintain a good grip on the
pushing tool and on your shotgun while you push.
4. Push the pin through sufficiently until it can be grasped
with your fingers. Pull it the rest of the way out. If it cannot be removed with fingers, make sure your pushing tool
or punch has a diameter small enough so that it will push
the pin completely through without the tool damaging
the hole.
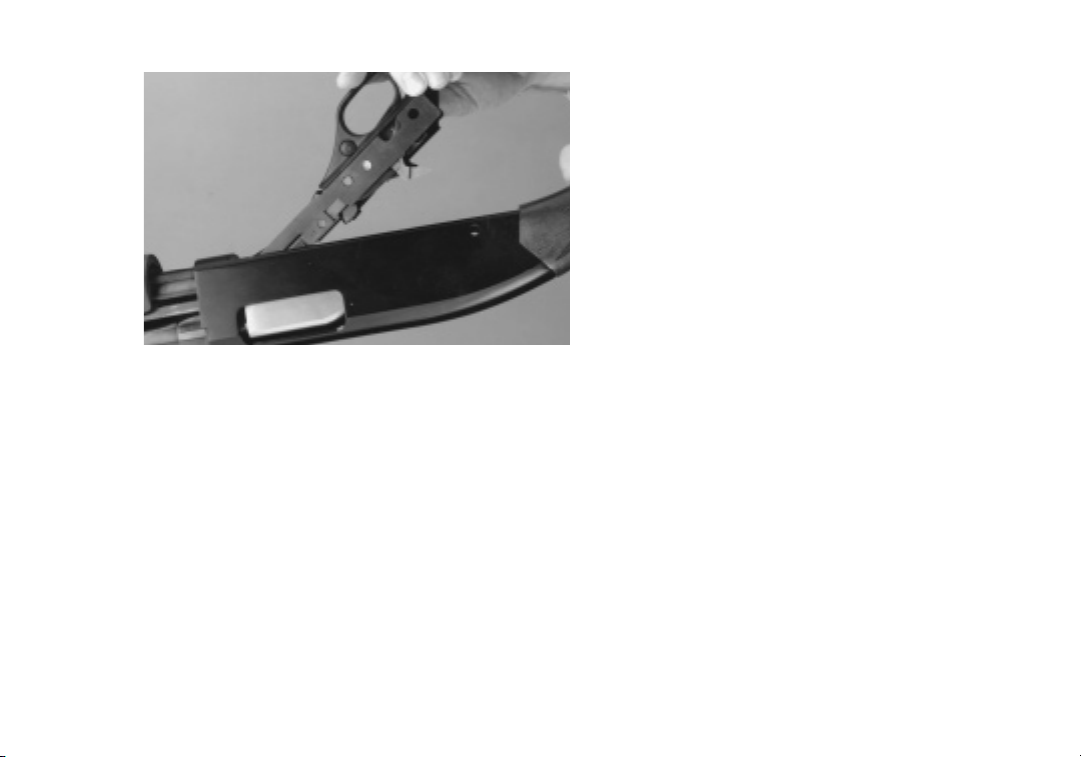
5. With the pin removed, lift the trigger guard group out
of the receiver by lifting upward and pulling rearward.
(see Figure 10)
17
Page 20
HOW TO DISASSEMBLE THE SLIDE AND BREECH BOLT
(12 GAUGE ONLY).
1. Remove the barrel and trigger guard group as explained
earlier, but do not replace the magazine cap.
2. With the action slide arms still attached to the slide
arm bridge, simultaneously slide both assemblies forward
and out of the front of the receiver. Note, that as the
breech bolt assembly passes by the ejection port, there
may be some resistance from the ejector spring. Carefully
work it past.
HOW TO DISASSEMBLE THE SLIDE AND BREECH BOLT
(20 GAUGE ONLY).
1. Refer to step one of disassembling a 12 gauge above.
2. You must disengage the slide arms from the slide arm
bridge. Remove the slide arms through the front of the
receiver. Remove the bolt slide assembly through the trigger guard group opening. (This procedure is necessary
because the bolt will not extract out through the front of
the receiver as it does on the 12 gauge model.)
HOW TO REMOVE THE FIRING PIN.
Begin with the breech bolt assembly removed from the
gun.
1. Grasp the breech bolt assembly, bottom side up (flat
side), and push the rear of the firing pin forward with your
forefinger. While holding the firing pin in this position,
take your other hand, tilt the front end of the slide arm
bridge and move it slightly forward. Lift up on the slide
arm bridge and disengage the curved tongue on the slide
arm bridge from the groove in the firing pin. This will
detach the slide arm bridge from the breech bolt slide.
2. The firing pin is under spring tension and will snap out
the rear of the breech bolt when your forefinger releases
it. Control the pin as you remove the firing pin and spring.
For cleaning purposes no further dismantling is necessary
or recommended. Do not disassemble your Model 1300
further than shown in Figure 9. Doing so may void your
warranty. For repairs that require further disassembly con-
18
FIGURE 10
After removing the
pin, tilt the rear of
the trigger guard
group up, then lift it
out.
Page 21
tact your local Service Representative or U.S. Repeating
Arms Co.
HOW TO REASSEMBLE THE FIRING PIN, BREECH BOLT
AND SLIDE
. (12 GAUGE ONLY)
1. Reinstall the firing pin spring over the firing pin. Either
end can go on first.
2. Insert the firing pin (with spring) into the rear opening
of the bolt slide, pin end first.
3. To reinstall the bolt assembly on the slide arm bridge
push or compress the “knob end” of the firing pin sufficiently into the hole in the bolt slide so that the large
space between the grooved “knob” and the flange on the
firing pin is centered in the round hole in the bolt slide.
4. Place the curved tongue, located on the slide arm
bridge, into the space between the knob and flange and
slowly release pressure on the end of the firing pin. Let
the flange on the pin pull the tongue toward the rear of
the bolt assembly. This should hold the breech bolt
assembly and the slide arm bridge together during further
assembly.
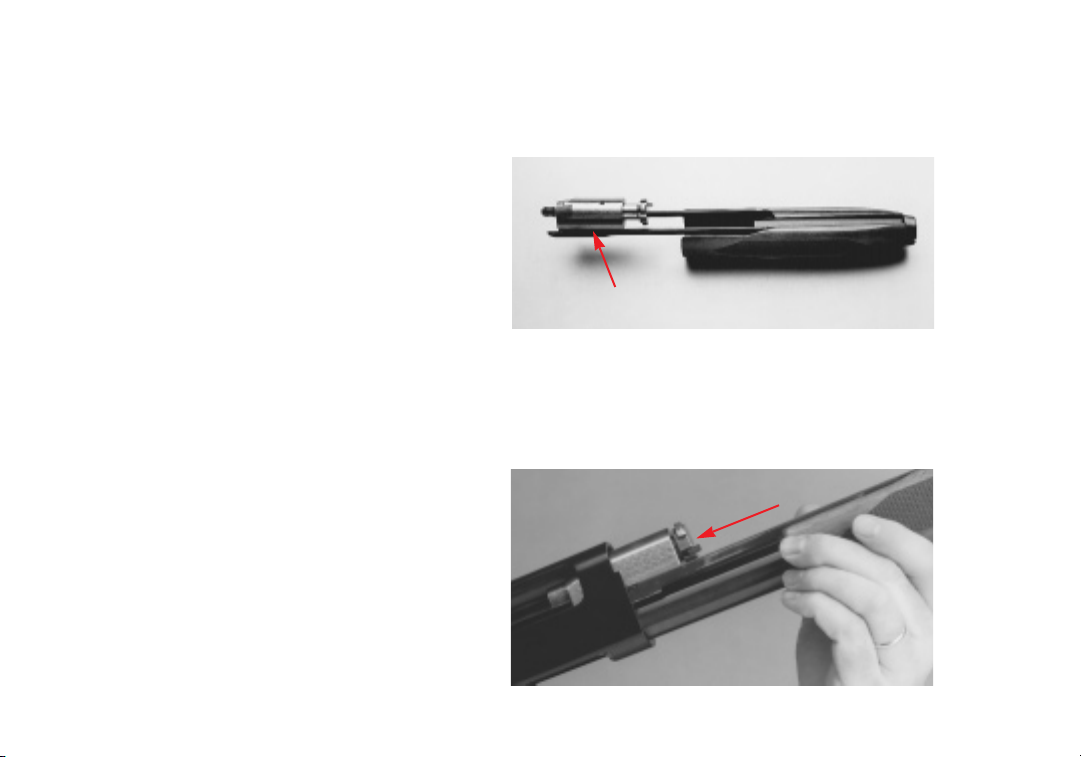
5. With the firing pin and breech bolt now assembled,
engage the slide arm bridge into the matching cuts on the
slide arms (see Figure 11).
6. Hold the slide arms and bolt/slide arm bridge assemblies
together. Start the forearm assembly onto the magazine
tube.
7. Remove the magazine cap and carefully guide the slide
arms and bolt/slide arm bridge assemblies into the front of
the receiver. As the assemblies enter the receiver, slide
them fully rearward (see Figure 12).
19
FIGURE 12
Carefully guide the bolt
assembly — on the slide
arms — into the receiver.
FIGURE 11
Position the bolt assembly on the
slide arms.
Page 22

HOW TO REASSEMBLE THE FIRING PIN, BREECH BOLT
AND SLIDE
. (20 GAUGE ONLY)
1. Reinstall the firing pin spring over the firing pin. Either
end can go on first.
2. Insert the firing pin (with spring) into the rear opening
of the bolt slide, pin end first.
3. To reinstall the bolt assembly on the slide arm bridge
push or compress the “knob end” of the firing pin sufficiently into the hole in the bolt slide so that the large space
between the grooved “knob” and the flange on the firing
pin is centered in the round hole in the bolt slide.
4. Place the curved tongue, located on the slide arm bridge,
into the space between the knob and flange and slowly
release pressure on the end of the firing pin . Let the flange
on the pin pull the tongue toward the rear of the bolt
assembly. This should hold the breech bolt assembly and
the slide arm bridge together during further assembly.
5. With the trigger guard group removed, insert the bolt
assembly through the trigger guard opening up into the
receiver. The front face and extractor of the bolt assembly
should be facing the barrel or front of the shotgun. The
slide arm bridge should be facing down toward the trigger
guard group opening.
6. While holding the bolt assembly in place, insert the
slide arm bars into the breech and connect them to the
slide arm bridge.
HOW TO REINSTALL THE TRIGGER GUARD GROUP.
Be careful when reinstalling the trigger group. Never force
parts into position. Normally the bolt assembly, slide arms
and barrel should be attached before installing the trigger
guard group. The hammer should be in the cocked position and the safety in the “ON SAFE” position. Carefully
insert the trigger guard group into place. It may be necessary to slide the forearm into different positions until the
trigger guard group fits flush into the receiver. When it is
properly installed it will fit easily and the pin will slide in
without excessive force.
Installing the bolt assembly after the trigger guard group is
installed should not be attempted. Consequently, make
sure you have already installed the bolt assembly before
installing the trigger guard group. It is not necessary that
the barrel already be attached to install the trigger group.
Install the trigger group by as follows:
1. Turn your shotgun over with the open bottom of the
receiver facing upward. Hold the trigger guard group at an
angle to the receiver (about 45 degrees) and then engage
the front tabs on the trigger guard group with the corre-
20
Page 23

sponding slots in the magazine throat at the forward end
of receiver opening as shown earlier in Figure 10.
2. Rotate the trigger guard group towards and into the
receiver opening, until it is parallel with the receiver.
3. Align the trigger guard group with the hole in the
receiver and install the trigger guard pin from the RIGHT
side of the receiver (ejection port side) until it is flush
with both sides of the receiver. The pin should pass
through easily with little force. If significant resistance is
felt, remove the trigger group and repeat step one above.
Your Model 1300 shotgun is now fully assembled.
Immediately confirm that the safety is in the “ON SAFE”
position. Take time to wipe down and clean all external
surfaces as explained under Cleaning and Maintenance
Suggestions later in this manual.
SIGHT ADJUSTMENTS
Some Model 1300 shotguns are fitted with rifle-type open
sights. The style and adjustment system may vary
between models and grades. The proper procedure is to
shoot a group with the sights set as they come from the
factory (intermediate position on both elevation and
windage), and then make incremental adjustments to
move the sight blade and blade holder to position the
group on your target. The procedures below are for the
most common type of open sights found on Model 1300
shotguns.
BEFORE MAKING ANY SIGHT ADJUSTMENTS,
MAKE SURE YOUR SHOTGUN IS FULLY
UNLOADED AND THE MUZZLE IS POINTED IN
A SAFE DIRECTION. PLACE THE SAFETY IN
THE “ON SAFE” POSITION.
UP OR DOWN ELEVATION ADJUSTMENTS.
Adjusting elevation on your Model 1300 requires you to
lift up the rear notch blade on your shotgun’s rear sight
with your fingers and move the notched elevator either
forward or backward. To raise point of impact, use your
fingers to lift up on the blade and slide the elevator rearward. Adjusting the sight to make your gun shoot lower is
just the opposite — move the elevator forward.
Remember:
• Move the blade up to shoot higher.
• Move the blade down to shoot lower.
RIGHT OR LEFT WINDAGE ADJUSTMENTS.
On most Model 1300 sights, the entire rear sight blade
holder is dove-tailed in the rear sight base. To adjust for
windage, gently move the rear sight blade to the right by
tapping at the dove-tail using a wood dowel or similar
21
Page 24
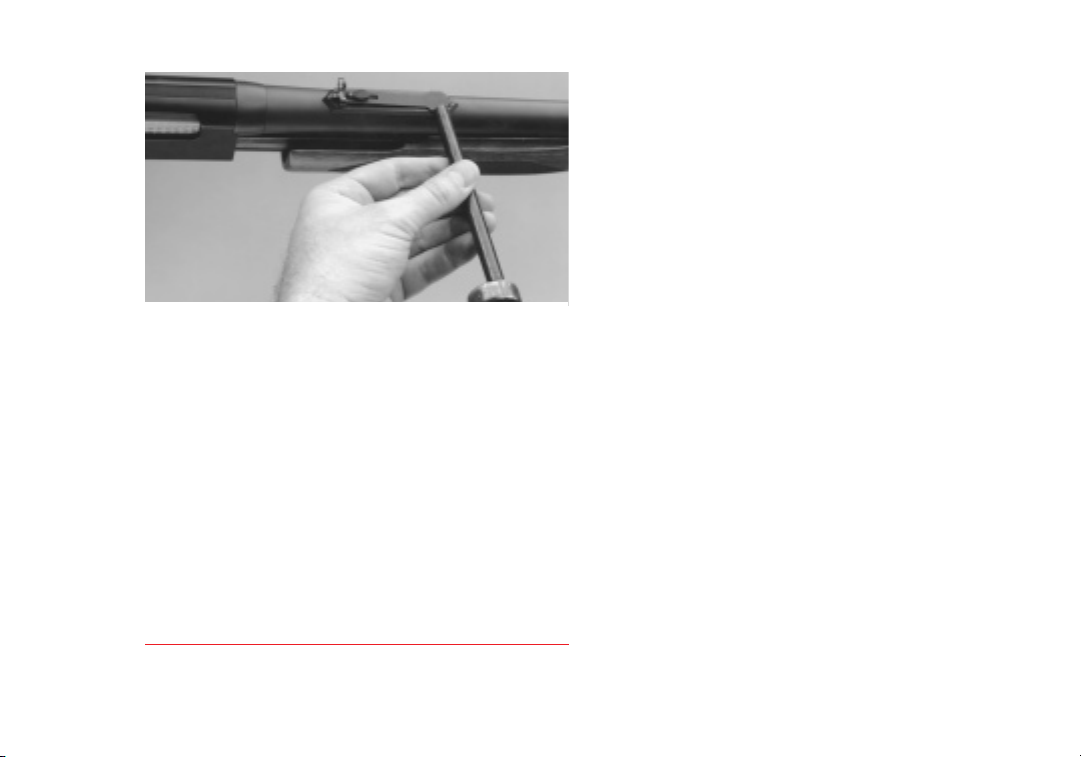
material that will not mar the sight (see Figure 13). Your
gun will now shoot more to the right. Moving the blade
holder to the left is just as easily done. Note how much
you adjust the sight as you sight in your Model 1300.
Remember:
• Move the rear sight to the right to shoot farther to
the right on the target.
• Move the rear sight to the left to shoot farther to the
left on the target.
Care should be taken not to mar the finish or bend sights
when adjustments are made.
WINCHOKE
®
THREADED CHOKE TUBE SYSTEM
Some Model 1300s are fitted with the interchangeable
WinChoke choke tube system. If your shotgun has the
words “WinChoke” inscribed on the side of the barrel
then you have the system.
The WinChoke system allows you to configure your
Model 1300 for the pattern and/or choke constriction
your hunt demands. It also offers versatility when using
slugs or sabots. And allows the use of an accessory 5"
rifled choke tube for use with sabot-type slugs.
Your Model 1300 is provided with the WinChoke
screw-in choke tube system. This gives you the finest
possible patterns for target and field situations. Plus, it
is extremely easy to switch choke constrictions to
match your shooting conditions. WinChoke tubes are
fully steel and lead shot compatible. A special choke
tube spanner wrench is provided to remove and
tighten these tubes.
CAUTION: DO NOT USE WINCHOKE TUBES IN
ANY SHOTGUN BARRELS NOT SUPPLIED BY
U. S. REPEATING ARMS COMPANY (THE MAKERS OF WINCHESTER BRAND FIREARMS).
ALSO, DO NOT USE ANY OTHER CHOKING
DEVICE IN ANY SHOTGUN BARRELS SUPPLIED BY U. S. REPEATING ARMS. USE ONLY
THE APPROPRIATE GAUGE AND TYPE OF
CHOKE TUBES MARKED WINCHOKE IN YOUR
MODEL 1300 SHOTGUN.
22
FIGURE 13
Carefully tap on the
dove-tail to change
windage.
Page 25
CAUTION: WHENEVER HANDLING ANY SHOTGUN FOR THE PURPOSE OF REMOVING OR
INSTALLING A CHOKING DEVICE, MAKE
ABSOLUTELY CERTAIN THE GUN IS FULLY
UNLOADED, AND THE ACTION IS LOCKED
OPEN! NEVER ATTEMPT TO REMOVE OR
INSTALL A SHOTGUN CHOKING DEVICE ON A
LOADED FIREARM!
DO NOT FIRE THIS SHOTGUN WITHOUT HAVING THE WINCHOKE CHOKE TUBE
INSTALLED. PERMANENT DAMAGE MAY
RESULT TO THE THREADS.
FAILURE TO FOLLOW THESE WARNINGS MAY
CAUSE DAMAGE TO YOUR GUN AND CAUSE
INJURY TO YOURSELF AND OTHERS.
TUBE REMOVAL
1. Fully unload your Model 1300. Place the safety in
the “ON SAFE” position.
ALWAYS UNLOAD YOUR MODEL 1300 COMPLETELY. INSPECT THE CHAMBER, MAGAZINE AND FEED MECHANISM TO MAKE SURE
THEY DO NOT CONTAIN ANY SHELLS.
2. Open the action.
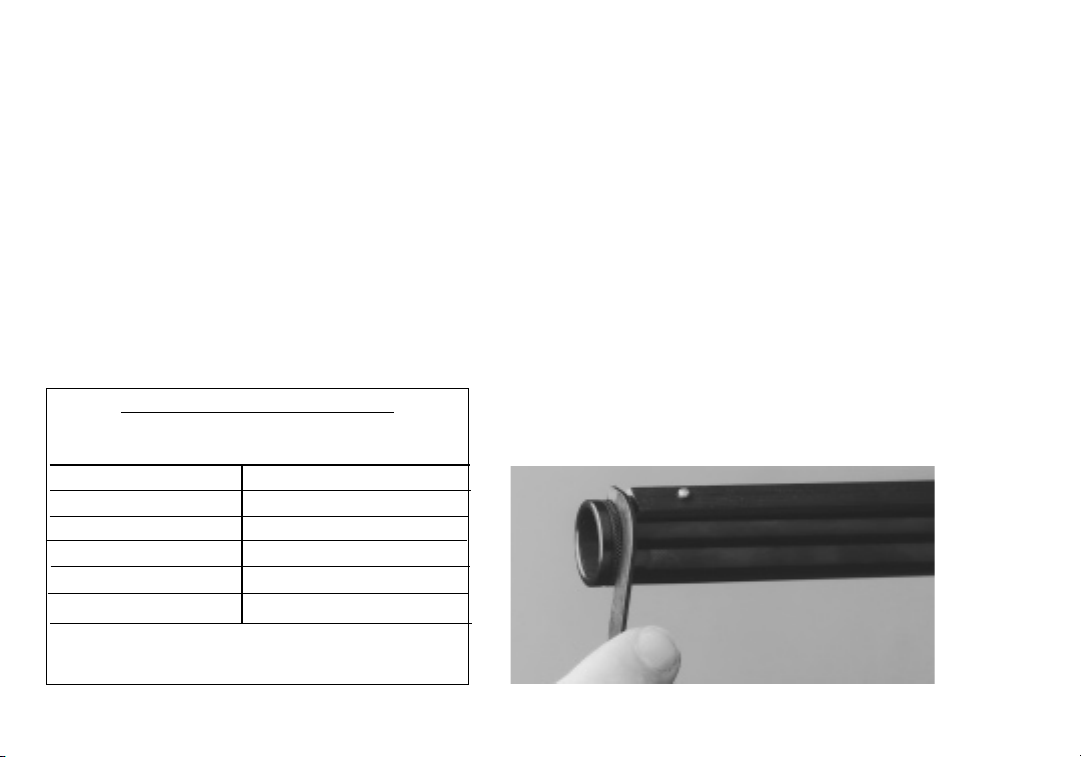
3. Use the WinChoke spanner wrench to loosen the tube,
turning it counterclockwise (see Figure 14). Finger twist
the tube the rest of the way out of the barrel.
SHOT CONVERSION CHART
Lead Steel
Full *
Improved Modified Full
Modified Full
Improved Cylinder Modified
Skeet Improved Cylinder
Cylinder Cylinder
*not for use with steel shot
Use the spanner tool to remove or
tighten WinChoke tubes
FIGURE 14
23
Page 26

24
TUBE INSTALLATION
1. Fully unload your Model 1300. Place the safety in the
“ON SAFE” position.
ALWAYS UNLOAD YOUR MODEL 1300 COMPLETELY. INSPECT THE CHAMBER, MAGAZINE AND FEED MECHANISM TO MAKE SURE
THEY DO NOT CONTAIN ANY SHELLS.
2. Open the action and lock it open as explained
previously.
3. Before installing a tube, check the internal choke tube
threads in the muzzle, as well as the threads on the
WinChoke choke tube to be sure they are clean. Lightly
oil the threads with quality light gun oil.
4. Using your fingers, screw the appropriate tube into the
muzzle end of the barrel, tapered end first, notched end
outward. When it becomes finger-tight, use the
WinChoke choke tube spanner-type wrench to firmly seat
the tube. DO NOT OVER TIGHTEN or forcefully tighten with wrench.
CHOKE TUBES SHOULD BE PERIODICALLY
CHECKED TO ASSURE THAT THEY ARE
TIGHT AND FIRMLY SEATED. BEFORE
CHECKING, FOLLOW THE SAFETY GUIDELINES OUTLINED ABOVE.
Replacement and additional tubes and wrenches are
available from your Winchester firearms dealer.
WINCHOKE CHOKE IDENTIFICATION
To identify individual WinChoke choke tubes, refer to
the abbreviated indications on the outside rim of each
tube.
SELECTING THE CORRECT WINCHOKE TUBE
The WinChoke choke system is fully compatible with
factory lead or steel shot loads. The chart includes
both lead and steel shot information. Lead and steel
shot perform differently in tubes with the same choke
constriction. For this reason, both lead and steel designations have proven necessary. In fact, even larger
steel shot diameters result in different patterns than
smaller steel shot sizes. Each designation is inscribed
on each choke tube.
SPECIAL NOTE ON SHOTGUN SLUGS
Cylinder or Improved Cylinder WinChokes are suitable for shooting rifled slugs or sabot-type slugs. A special 5-inch rifled choke tube (#1820143) is available
from your dealer that is specially made for shooting
sabot slugs in WinChoke barrels. Never shoot slugs or
sabots in any WinChoke barrel with the choke tube
removed.
Page 27

SPECIAL CARE OF CHOKE TUBES AND CHOKE TUBE
THREADS
1. If your gun is equipped with WinChoke choke
tubes, do not use a brass brush to clean your gun unless
a choke tube is installed in the barrel. Bristles could
break off and lodge in the threads, making installation
and removal difficult.
2. Regularly remove your gun’s tube in order to clean
and oil the threads inside the barrel, as well as on the
choke tube itself. This will protect the threads from
being damaged and also prevent a dirt build up that
would cause the choke tube to become difficult to
remove from the barrel. Clean the threads with solvent
and a small, soft brush like a toothbrush. Wipe completely clean and leave a thin film of clean oil on the
threads: both on the tube and in the barrel. The
threads of the choke tube and the internal threads of
the barrel should be cleaned after each use and before
the installation of a tube.
3. Be careful when removing/installing a tube. Use the
specially designed WinChoke spanner wrench.
Damage can result to both choke tube and barrel when
attempting to remove sticky choke tubes.
4. Never fire your shotgun or run cleaning tools
through the barrel of any choke-tubed gun without
having the choke tube installed.
CLEANING AND MAINTENANCE SUGGESTIONS
Your Model 1300 will function better and more reliably
over a longer period of time if it is properly maintained
and kept clean.
BEFORE PERFORMING ANY CLEANING PROCEDURES, ALWAYS MAKE CERTAIN THERE
ARE NO SHELLS IN THE CHAMBER, MAGAZINE OR ACTION/FEED AREAS.
You should clean your Model 1300 after every day of
shooting and more often if it becomes excessively
dirty.
A minimum cleaning includes wiping down the action
and oiling key parts. Most regular maintenance will
also include cleaning the barrel. If you encounter a
function problem (tight action when working the forearm) be sure to give your gun a thorough cleaning to
see if it solves the problem before seeking the services
of our service facility or a competent gunsmith. To
clean your firearm, adhere to the following general
guidelines.
25
Page 28

26
CLEANING PROCEDURES
BE CERTAIN YOUR GUN’S CHAMBER AND
MAGAZINE ARE UNLOADED. ALWAYS WEAR
PROTECTIVE SAFETY GLASSES DURING
ALL CLEANING PROCEDURES. KEEP
AMMUNITION AWAY FROM THE CLEANING
AREA. DO NOT TEST THE FUNCTION OF
YOUR FIREARM WITH LIVE AMMUNITION.
Always place the safety in “ON SAFE” position before
beginning any cleaning procedure.
1. Use a cleaning rod with a tip and patch suitable for the
size of your Model 1300’s bore. Make sure the patch is
large enough for a snug fit in the bore. Insert the rod and
patch into the barrel at the receiver end and run it back
and forth several times.
2. Inspect the chamber and bore for lead and powder fouling. A normal amount of powder residue can be expected
and is not serious. It can usually be removed by repeating
step one, using a patch saturated with solvent. If or when
fouling should become heavy, it can be removed with a
brass bore brush. Dip or spray the brush with solvent and
scrub the chamber and bore until the fouling is removed.
To prevent brass bristles from breaking off, the brush
should be pushed completely through the bore before
being withdrawn.
3. After fouling has been removed the bore should be
wiped dry. Then pass a slightly oiled patch through
the bore, for preservation. A fine, light gun oil
is recommended.
4. Wipe all exposed metal surfaces of the receiver, forearm
and barrel with a clean rag. Finger marks should be
removed because they provide a place where moisture can
accumulate. Any dried oil in the receiver area should also
be removed.
5. Lightly oil your gun at the points described under
“Oiling the Action” explained earlier in this manual.
Ordinary good judgment will, of course, indicate that the
metal of the gun should receive a light film of oil any time
the rifle has been exposed to weather or handling. This is
very important and must be done with every gun — even
stainless steel models. Remember, the polished, finely fitted surfaces of the receiver and action mechanisms must
always have a thin film of oil. Make sure that the surfaces
of the breech bolt are especially clean and lightly oiled
with a high quality gun oil.
6. Inspect the barrel and chamber. Make certain that no
patches have been inadvertently left in them. Remove
any that remain.
7. Wipe all wood surfaces with a soft cloth.
Page 29

8. When transporting only, store your Model 1300 in a
quality protective case to prevent scratches and dents.
Store in a dry place to prevent corrosion. Store away from
children.
MAKE SURE YOUR SHOTGUN IS UNLOADED
AND ALWAYS STORE AMMUNITION
SEPARATELY.
OTHER CLEANING SUGGESTIONS
• Never pour large quantities of oil into the receiver or
other parts. It can drain down to the wood and soften it —
and cause permanent damage and loosening of the stock.
• After extended periods of heavy use, your shotgun
should be taken to a qualified gunsmith to have the action
disassembled for professional cleaning and lubrication.
• Camouflage models require the same care and cleaning
as non-camouflage. Use the same oils and solvents as
described previous in this manual.
NEVER ATTEMPT TO TAKE YOUR MODEL 1300
APART FURTHER THAN EXPLAINED IN THIS
MANUAL.
This is a specialized, finely fitted mechanism. You may
permanently mar it by attempting to disassemble the inner
mechanism assemblies. If further disassembly for
service or cleaning is required, take your gun to a U. S.
Repeating Arms Company recommended Service Center
or a competent gunsmith as explained under “Service
or Repair.”
ORDERING PARTS
To order parts, please write our parts department and
furnish the following: your name, address, and telephone
number. Also specify the model and serial number of your
Winchester Model 1300. When we receive your request,
we will send an order form and a parts breakdown with
prices.
Write to:
Parts Department
U.S. Repeating Arms Company, Inc.
275 Winchester Avenue
New Haven, Connecticut 06511-1970
CAUTION: PARTS ARE MADE FOR
WINCHESTER BRAND FIREARMS MANUFACTURED BY U.S. REPEATING ARMS COMPANY,
INC., AND SHOULD NOT BE USED IN OTHER
GUNS EVEN THOUGH MODELS MAY BE SIMILAR. IMPROPERLY FITTED PARTS MAY BE
DANGEROUS.
27
Page 30

28
SERVICE OR REPAIR
If your Winchester Model 1300 shotgun should ever need
repair or service, please utilize one of the world-wide network of U.S. Repeating Arms Company Authorized
Repair Centers for Winchester firearms. If you have any
questions about how to obtain service for your
Winchester Model 1300 shotgun, call or write the
Authorized Repair Center (ARC) nearest you. A list of
ARCs is packaged with your new 1300. If you need to
obtain a new list of ARCs call us at:
1-800-945-1392
If you have other questions about Winchester rifles and
shotguns, call or write our Customer Service Department:
Customer Service
U. S. Repeating Arms Company, Inc.
275 Winchester Avenue
Morgan, Utah 84050-9333
Phone: 1-800-945-5237
Page 31

Page 32

U.S. Repeating Arms Company, Inc.
275 Winchester Avenue
New Haven, Connecticut, U.S.A. 06511-1970
Administrative Offices:
275 Winchester Avenue, Morgan, Utah 84050-9333
Winchester trademarks licensed from Olin Corporation.
 Loading...