

Page 1
G01-LBL-01
R01
deki Reader v200 User Manual
Release
Document - Released
Labeling
10 Oct 2017
10 Oct 2017
RZ
RZ
DCO-MC-04OCT2017-001
DOCUMENT NUMBER:
Revision:
DOCUMENT TITLE:
Change Number:
DOCUMENT NOTES:
Document Information
Doc Type:
Vault:
Date Information
Effective Date:
Release Date:
Control Information
Author:
Owner:
Status:
Page 2
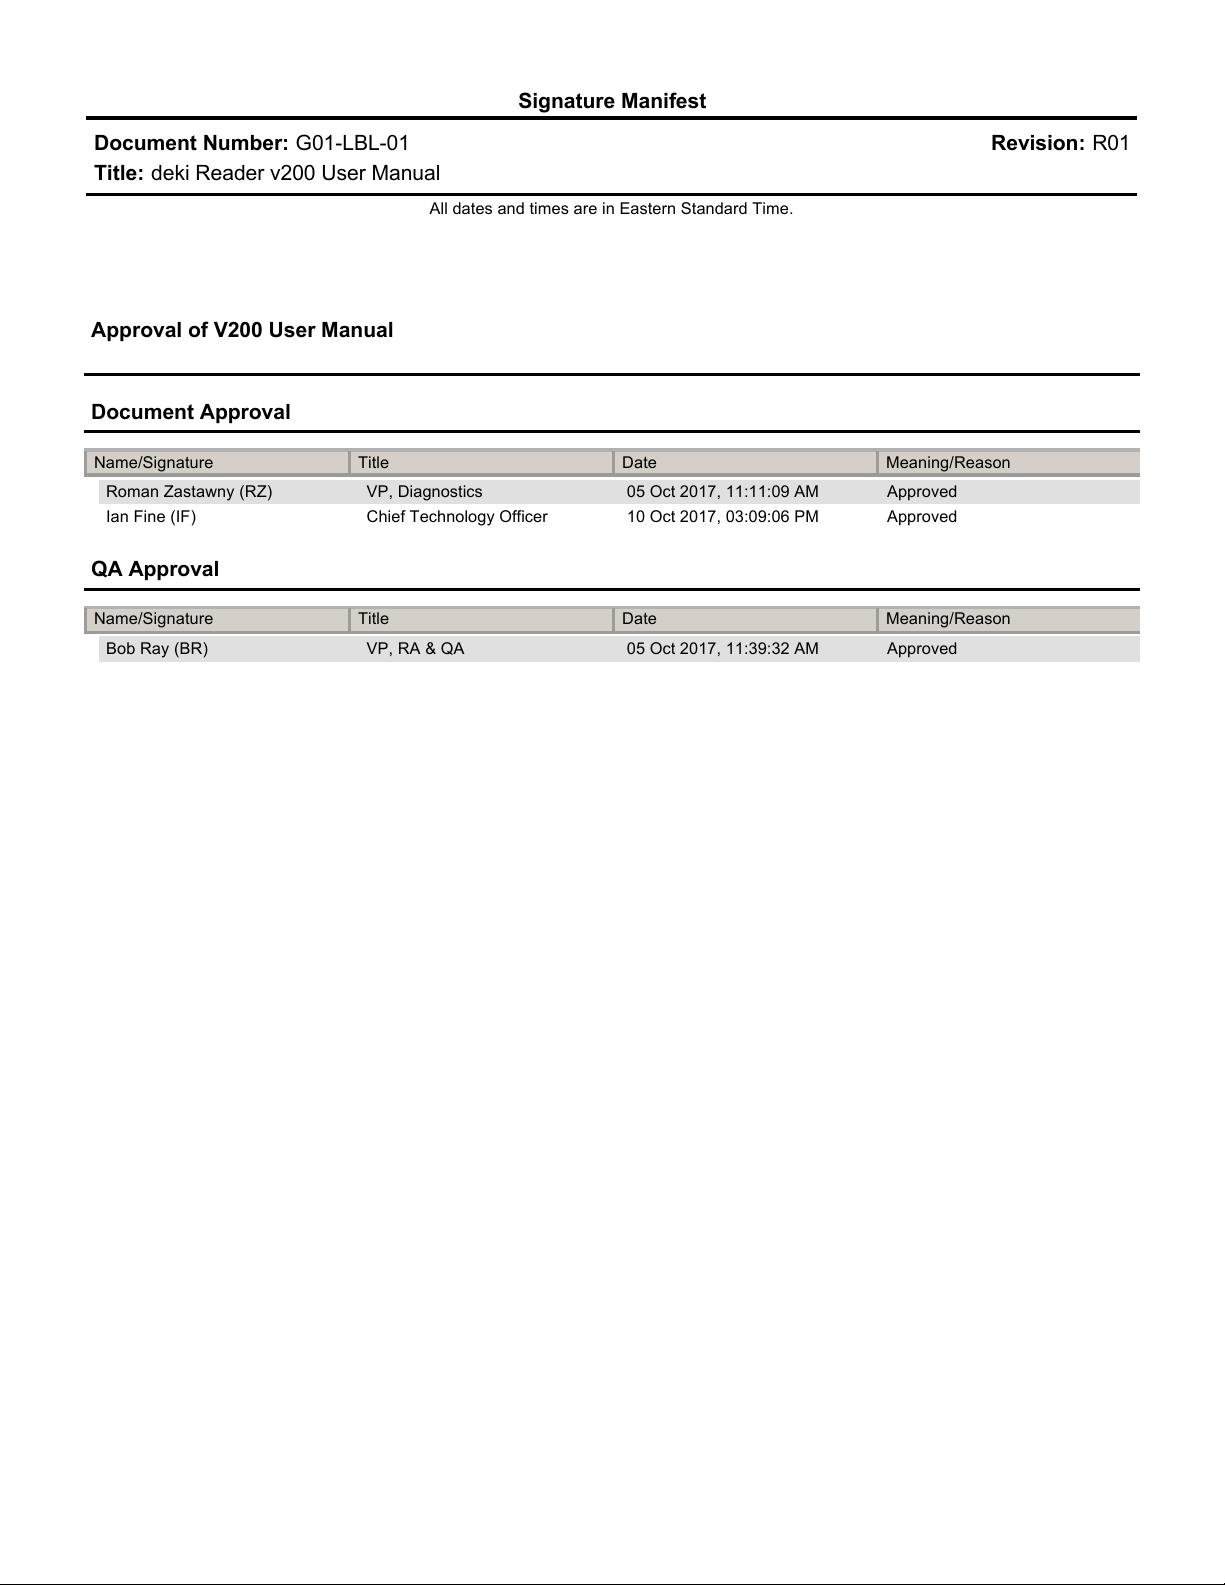
Signature Manifest
Document Number: G01-LBL-01 Revision: R01
Title: deki Reader v200 User Manual
All dates and times are in Eastern Standard Time.
Approval of V200 User Manual
Document Approval
Name/Signature Title Date Meaning/Reason
Roman Zastawny (RZ) VP, Diagnostics 05 Oct 2017, 11:11:09 AM Approved
Ian Fine (IF) Chief Technology Officer 10 Oct 2017, 03:09:06 PM Approved
QA Approval
Name/Signature Title Date Meaning/Reason
Bob Ray (BR) VP, RA & QA 05 Oct 2017, 11:39:32 AM Approved
Page 3
Deki™ Reader v200
User Manual
Page 4
Emergo Europe
Prissessegracht 20
2541 AP The Hague
The Netherlands
Fio Corporation
111 Queen Street East, Suite 500, Toronto, Ontario, M5C 1S2 Canada
Office: 1.416.368.8882 | Email: [email protected]
Fio.com
Local Contact for Support:
© 2017 Fio Corporation. All rights reserved.
Fio is a registered trademark.
Deki and Fionet are trademarks of Fio Corporation.
Android and Google are trademarks of Google Inc. Adobe and Acrobat are trademarks
of Adobe Systems Inc.
Page 5
Contents
General Information ............................................................................. 1
Warning and precautions ...................................................................... 1
Environmental Precautions.................................................................... 1
Labels and Symbols ............................................................................... 2
Training requirements ........................................................................... 3
Introduction ......................................................................................... 4
Product description ............................................................................... 4
Intended Use......................................................................................... 4
Unpacking and Setup............................................................................. 4
Deki Reader and Accompanying Components ........................................ 4
Transporting the Deki Reader ................................................................ 5
Device at a Glance ................................................................................ 5
Deki Reader - Front View ....................................................................... 5
Deki Reader - Back View ........................................................................ 6
Operating the Deki Reader.................................................................... 6
Deki Reader setup ................................................................................. 6
Powering and charging the Deki Reader................................................. 7
Power and status indicators................................................................... 7
Powering on the Deki reader ................................................................. 8
Waking up the touchscreen ................................................................... 9
Hardware status icons ........................................................................... 9
Using the touchscreen..........................................................................10
Using the on-screen keyboard ..............................................................10
Logging in.............................................................................................11
Updating the date and time settings .....................................................11
Fio Launcher Screen .............................................................................13
Action Bar ............................................................................................13
Locking the Deki Reader during use ......................................................13
Logging out after use............................................................................13
Powering off the Deki Reader ...............................................................13
Page 6
Test Drawer .........................................................................................14
Using Rapid Diagnostic Tests with the Deki Reader ............................. 15
About the Analyzer Application.............................................................15
Managing Tests on the Worklist............................................................15
Adding Tests to the Worklist.................................................................16
Interpreting and Documenting Tests .....................................................18
Errors and Device Failures ....................................................................21
Error and Warnings............................................................................. 21
Errors...................................................................................................21
Warnings .............................................................................................21
Maintenance and Cleaning.................................................................. 22
Maintenance........................................................................................22
Cleaning...............................................................................................22
Cleaning the Deki Reader control strip .................................................22
Software Updates ............................................................................... 23
Appendices......................................................................................... 24
Appendix A: Analytical performance characteristics..............................24
Appendix B: Technical Specifications....................................................25
Appendix C: Operating, Storage and Handling Conditions .....................25
Appendix D: Recycling and disposal......................................................26
Appendix E: Notices.............................................................................26
Appendix E: Accessories .......................................................................27
Index .................................................................................................. 28
Page 7
General Information
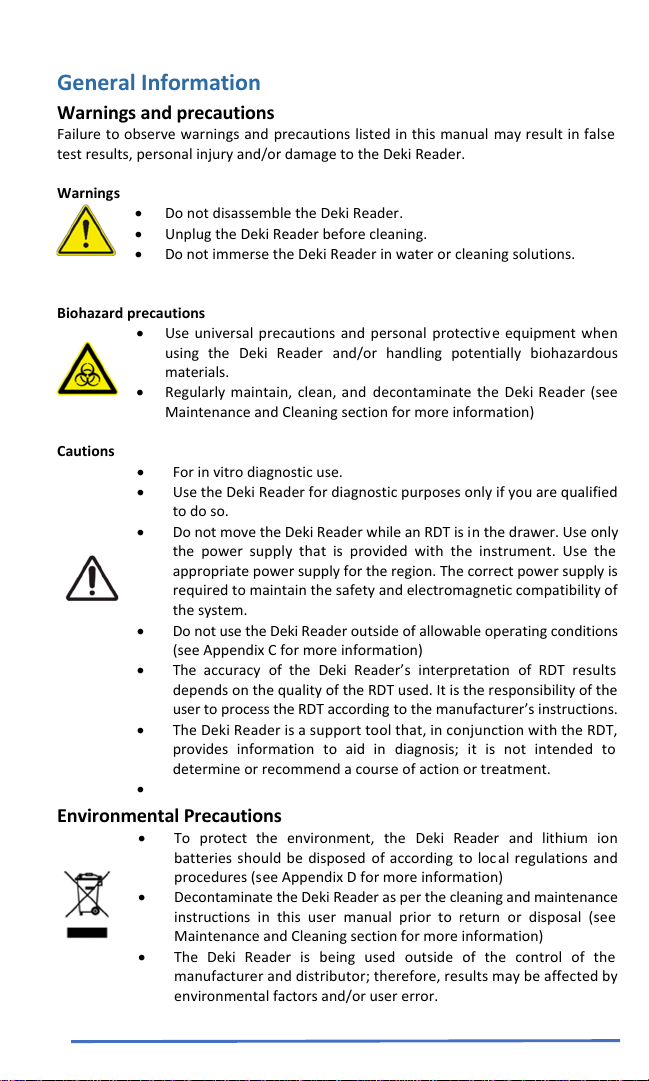
Warnings and precautions
Failure to observe warnings and precautions listed in this manual may result in false
test results, personal injury and/or damage to the Deki Reader.
Warnings
Do not disassemble the Deki Reader.
Unplug the Deki Reader before cleaning.
Do not immerse the Deki Reader in water or cleaning solutions.
Biohazard precautions
Use universal precautions and personal protective equipment when
using the Deki Reader and/or handling potentially biohazardous
materials.
Regularly maintain, clean, and decontaminate the Deki Reader (see
Maintenance and Cleaning section for more information)
Cautions
For in vitro diagnostic use.
Use the Deki Reader for diagnostic purposes only if you are qualified
to do so.
Do not move the Deki Reader while an RDT is in the drawer. Use only
the power supply that is provided with the instrument. Use the
appropriate power supply for the region. The correct power supply is
required to maintain the safety and electromagnetic compatibility of
the system.
Do not use the Deki Reader outside of allowable operating conditions
(see Appendix C for more information)
The accuracy of the Deki Reader’s interpretation of RDT results
depends on the quality of the RDT used. It is the responsibility of the
user to process the RDT according to the manufacturer’s instructions.
The Deki Reader is a support tool that, in conjunction with the RDT,
provides information to aid in diagnosis; it is not intended to
determine or recommend a course of action or treatment.
Environmental Precautions
To protect the environment, the Deki Reader and lithium ion
batteries should be disposed of according to loc al regulations and
procedures (see Appendix D for more information)
Decontaminate the Deki Reader as per the cleaning and maintenance
instructions in this user manual prior to return or disposal (see
Maintenance and Cleaning section for more information)
The Deki Reader is being used outside of the control of the
manufacturer and distributor; therefore, results may be affected by
environmental factors and/or user error.
1
Page 8
Labels and Symbols
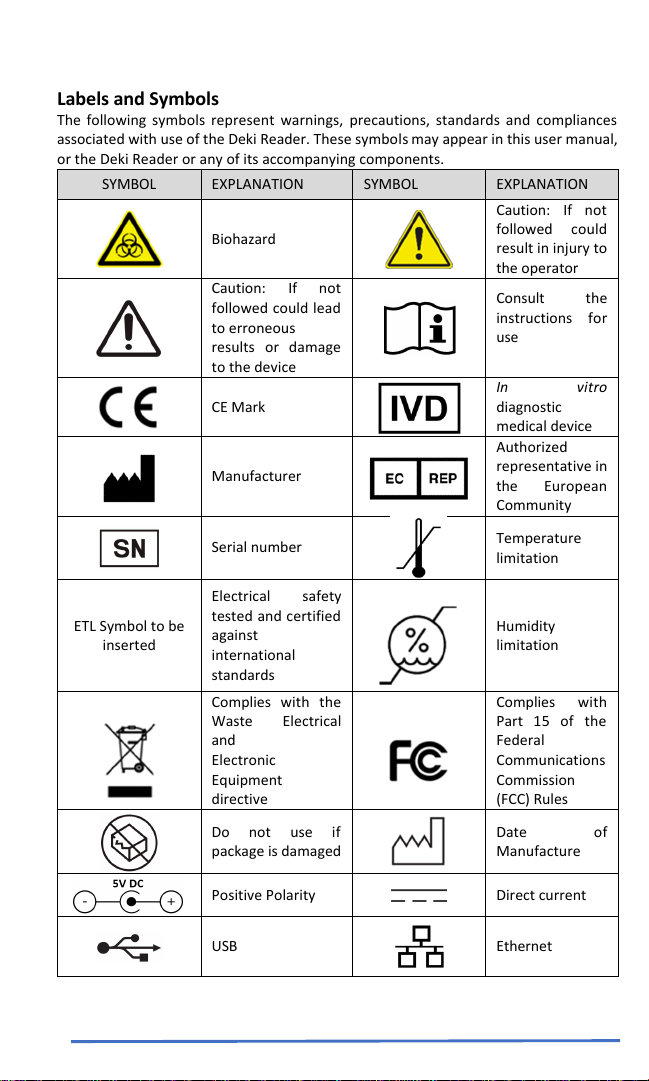
The following symbols represent warnings, precautions, standards and compliances
associated with use of the Deki Reader. These symbols may appear in this user manual,
or the Deki Reader or any of its accompanying components.
SYMBOL EXPLANATION SYMBOL EXPLANATION
Caution: If not
followed could
result in injury to
the operator
Consult the
instructions for
use
In vitro
diagnostic
medical device
Authorized
representative in
the European
Community
Temperature
limitation
Humidity
limitation
Complies with
Part 15 of the
Federal
Communications
Commission
(FCC) Rules
Date of
Manufacture
ETL Symbol to be
inserted
Biohazard
Caution: If not
followed could lead
to erroneous
results or damage
to the device
CE Mark
Manufacturer
Serial number
Electrical safety
tested and certified
against
international
standards
Complies with the
Waste Electrical
and
Electronic
Equipment
directive
Do not use if
package is damaged
Positive Polarity Direct current
USB Ethernet
2
Page 9
Training requirements
Read this entire user manual before using the Deki Reader. Practice with the Deki
Reader before using its results for diagnostic purposes. Failure to comply with these
training requirements may lead to inaccurate results.
Contact Support if you require additional Deki Reader training.
Users are expected to be proficient in the use of RDTs
3
Page 10
Introduction
Product description
The Deki Reader is a battery -powered, camera-based instrument that aids in the
interpretation of rapid diagnostic tests (RDTs). It can be used in laboratory and non -
laboratory settings (i.e. point of care settings). The Deki Reader’s Analyzer application
helps manage and document patient or samples IDs and allows the user to process a
RDT in various modes including a step-by-step guidance mode.
Following the insertion of a rapid test in the Deki Reader drawer a digital image of the
RDT is captured. Image analysis algorithms are used to perform RDT identification
followed by detection and analysis of control and test line are analyzed according to
the validated configuration for the identified RDT. The reader also has the ability to
detect certain RDT processing errors. In the end, the reader displays the results
(positive, negative, invalid or error detected) on the display screen and stores the
results in instrument memory. In addition, the results can be uploaded to the Fionet™
data management system. Once the results are uploaded they are no longer available
on the reader. The Deki Reader operates using the Android™ platform and can host
other non-medical apps.
Intended Use
The Deki Reader is an in vitro diagnostic device that captures, interprets, and transmits
results from validated rapid diagnostic tests.
The Deki Reader is intended to be used as an aid to the interpretation of rapid tests
that have been validated for use with the instrument. The Deki Reader is suitable for
use in laboratory and non-laboratory (i.e. point of care) settings.
The Deki Reader is for professional use only.
The Deki Reader is intended to be used in accordance with the indications and
instructions for use of its compatible rapid tests. Refer to each specific package insert
for details on running the individual tests.
Unpacking and Setup
Unpack the Deki Reader and its accompanying components on a clean, flat, level and
stable surface. Ensure that all accompanying components have been provided with the
Deki Reader (see list below) or contact Support if any items are missing or damaged.
Visually inspect the outer packaging, the Deki Reader, and its accompanying
components, and immediately report any obvious signs of damage to Support. Store
the Deki Reader’s packaging for later use.
Deki Reader and Accompanying Components
Check to make sure that the following components are included in the packaging:
Deki Reader
Deki Reader rechargeable battery
USB power adapter with international plugs
6 ft. (1.8m) cable
Deki Reader User Manual
Deki Reader Quick Start Guide
4
Page 11
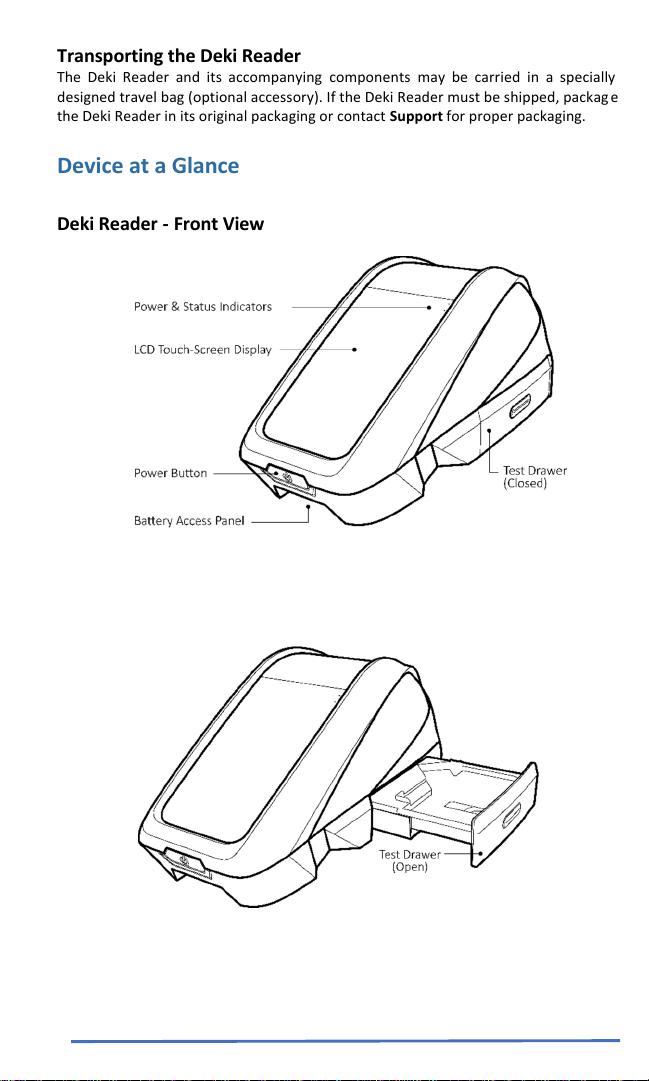
Transporting the Deki Reader
The Deki Reader and its accompanying components may be carried in a specially
designed travel bag (optional accessory). If the Deki Reader must be shipped, packag e
the Deki Reader in its original packaging or contact Support for proper packaging.
Device at a Glance
Deki Reader - Front View
5
Page 12
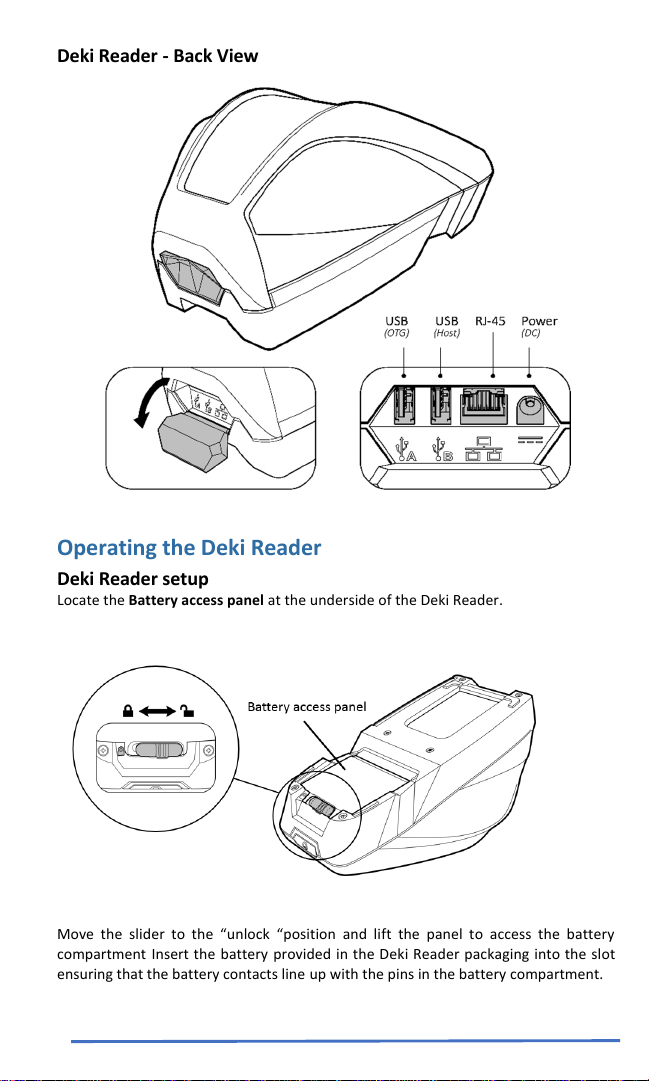
Deki Reader - Back View
Operating the Deki Reader
Deki Reader setup
Locate the Battery access panel at the underside of the Deki Reader.
Move the slider to the “unlock “position and lift the panel to access the battery
compartment Insert the battery provided in the Deki Reader packaging into the slot
ensuring that the battery contacts line up with the pins in the battery compartment.
6
Page 13
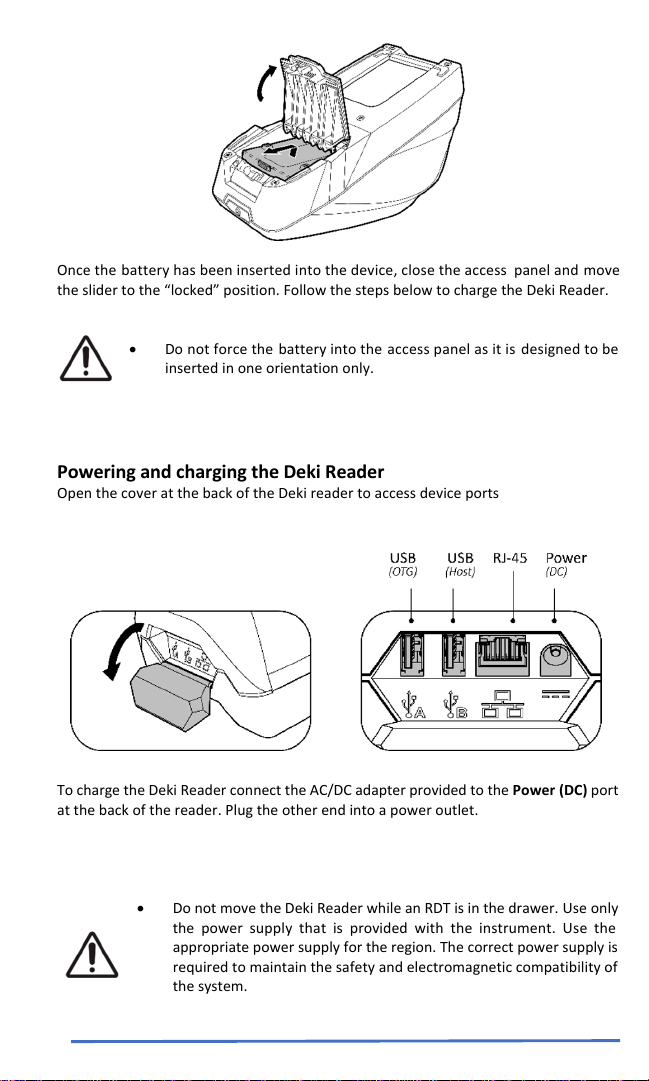
Once the battery has been inserted into the device, close the access panel and move
the slider to the “locked” position. Follow the steps below to charge the Deki Reader.
Do not force the battery into the access panel as it is designed to be
inserted in one orientation only.
Powering and charging the Deki Reader
Open the cover at the back of the Deki reader to access device ports
To charge the Deki Reader connect the AC/DC adapter provided to the Power (DC) port
at the back of the reader. Plug the other end into a power outlet.
Do not move the Deki Reader while an RDT is in the drawer. Use only
the power supply that is provided with the instrument. Use the
appropriate power supply for the region. The correct power supply is
required to maintain the safety and electromagnetic compatibility of
the system.
7
Page 14
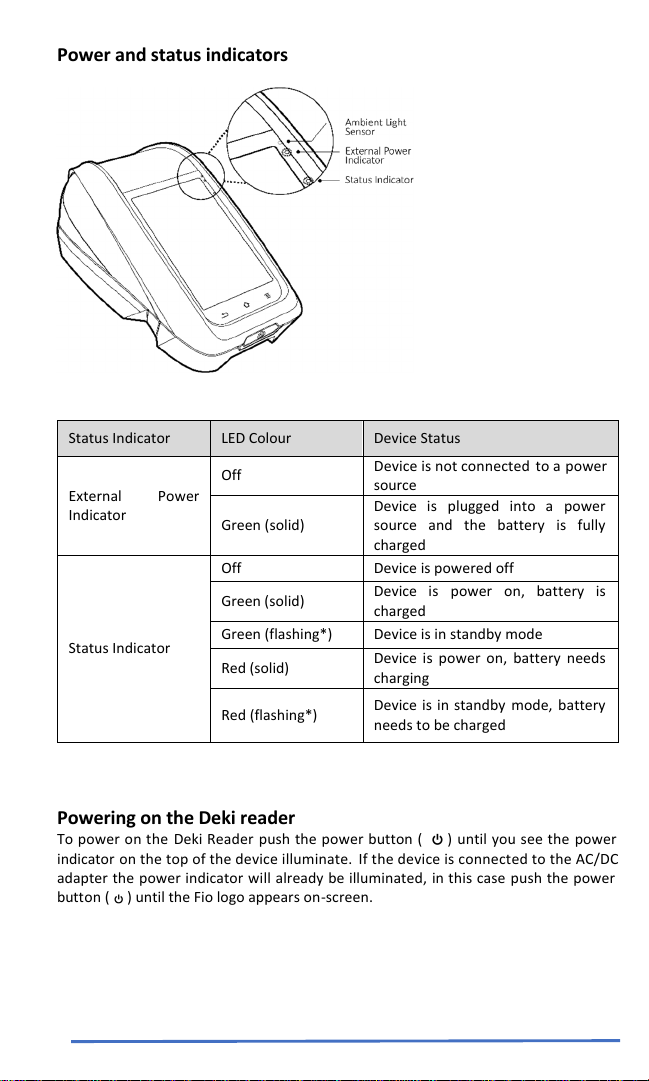
Power and status indicators
Status Indicator LED Colour Device Status
Device is not connected to a power
source
Device is plugged into a power
source and the battery is fully
charged
Device is power on, battery is
charged
Device is power on, battery needs
charging
Device is in standby mode, battery
needs to be charged
External Power
Indicator
Status Indicator
Off
Green (solid)
Off Device is powered off
Green (solid)
Green (flashing*) Device is in standby mode
Red (solid)
Red (flashing*)
Powering on the Deki reader
To power on the Deki Reader push the power button ( ) until you see the power
indicator on the top of the device illuminate. If the device is connected to the AC/DC
adapter the power indicator will already be illuminated, in this case push the power
button ( ) until the Fio logo appears on-screen.
8
Page 15
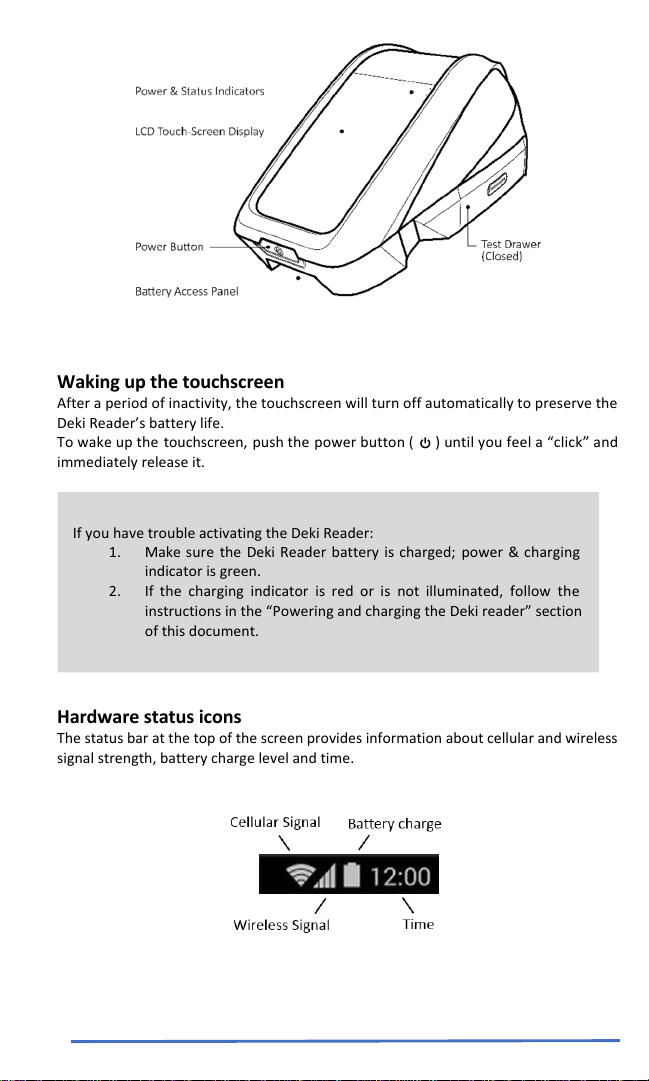
Waking up the touchscreen
After a period of inactivity, the touchscreen will turn off automatically to preserve the
Deki Reader’s battery life.
To wake up the touchscreen, push the power button ( ) until you feel a “click” and
immediately release it.
If you have trouble activating the Deki Reader:
1. Make sure the Deki Reader battery is charged; power & charging
indicator is green.
2. If the charging indicator is red or is not illuminated, follow the
instructions in the “Powering and charging the Deki reader” section
of this document.
Hardware status icons
The status bar at the top of the screen provides information about cellular and wireless
signal strength, battery charge level and time.
9
Page 16
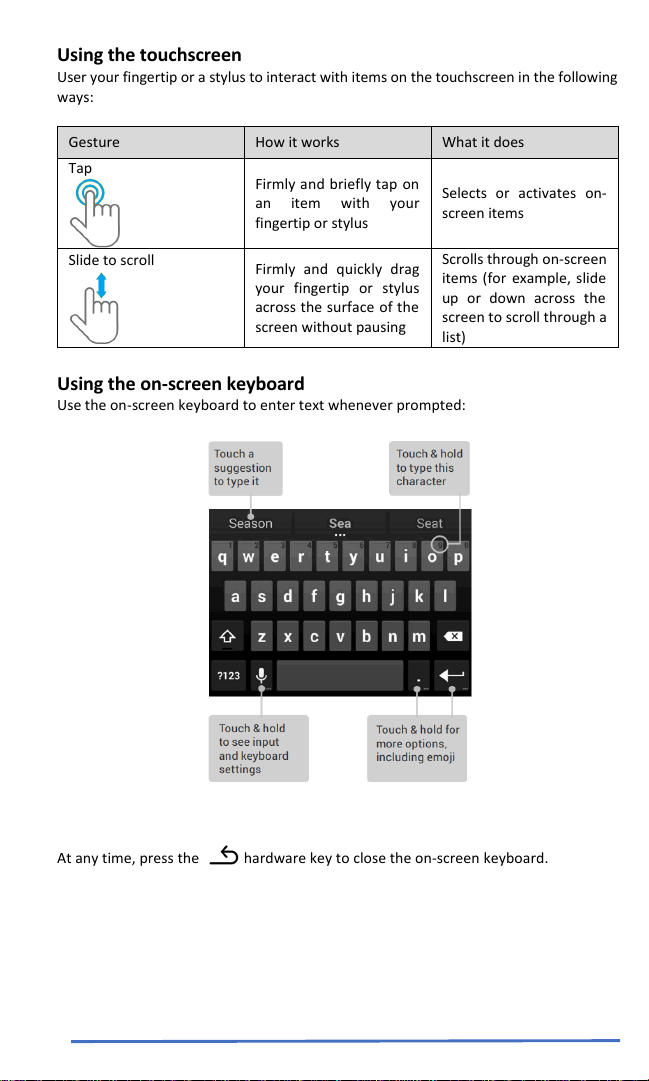
Using the touchscreen
User your fingertip or a stylus to interact with items on the touchscreen in the following
ways:
Gesture How it works What it does
Tap
Firmly and briefly tap on
an item with your
fingertip or stylus
Selects or activates on-
screen items
Slide to scroll
Firmly and quickly drag
your fingertip or stylus
across the surface of the
screen without pausing
Scrolls through on-screen
items (for example, slide
up or down across the
screen to scroll through a
list)
Using the on-screen keyboard
Use the on-screen keyboard to enter text whenever prompted:
At any time, press the hardware key to close the on-screen keyboard.
10
Page 17
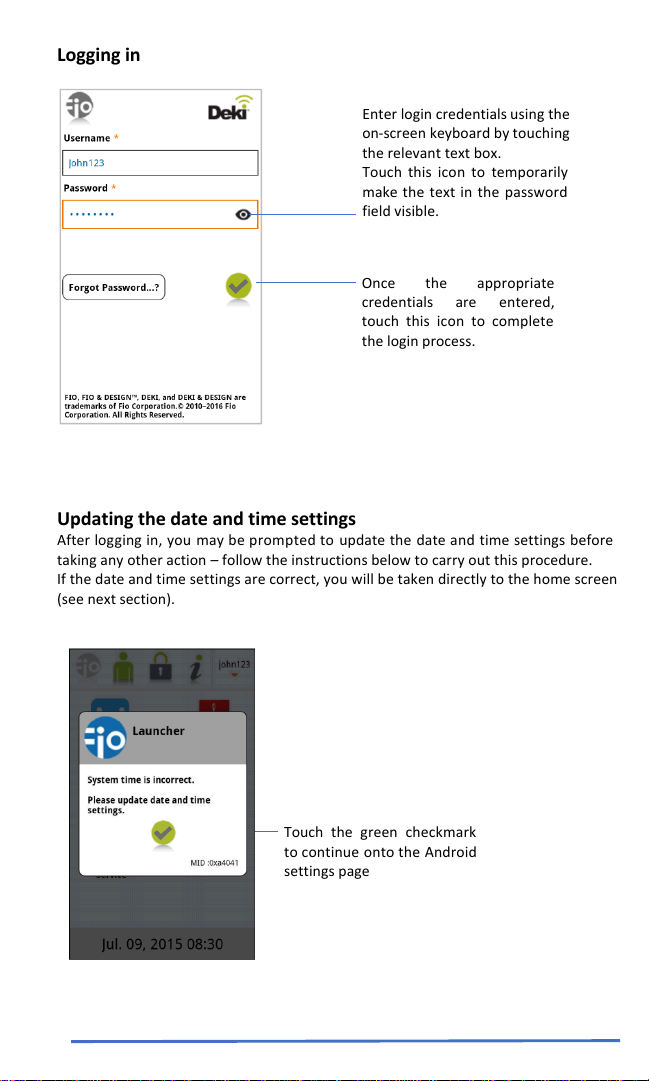
Logging in
Enter login credentials using the
on-screen keyboard by touching
the relevant text box.
Touch this icon to temporarily
make the text in the password
field visible.
Once the appropriate
credentials are entered,
touch this icon to complete
the login process.
Updating the date and time settings
After logging in, you may be prompted to update the date and time settings before
taking any other action – follow the instructions below to carry out this procedure.
If the date and time settings are correct, you will be taken directly to the home screen
(see next section).
Touch the green checkmark
to continue onto the Android
settings page
11
Page 18
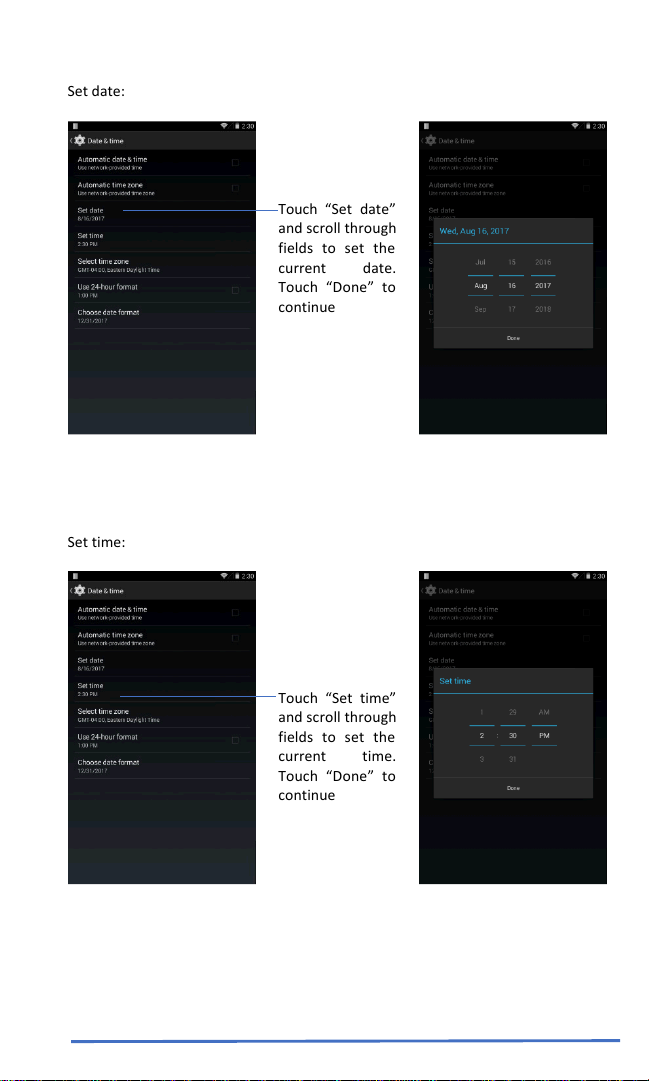
Set date:
Set time:
Touch “Set date”
and scroll through
fields to set the
current date.
Touch “Done” to
continue
Touch “Set time”
and scroll through
fields to set the
current time.
Touch “Done” to
continue
12
Page 19
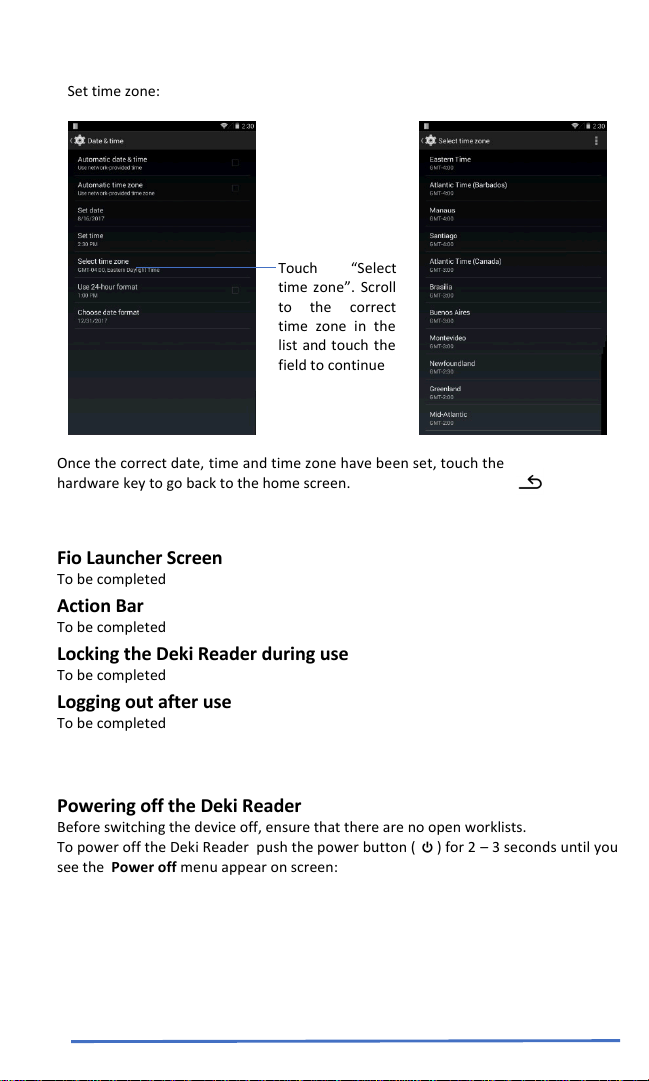
Set time zone:
Touch “Select
time zone”. Scroll
to the correct
time zone in the
list and touch the
field to continue
Once the correct date, time and time zone have been set, touch the
hardware key to go back to the home screen.
Fio Launcher Screen
To be completed
Action Bar
To be completed
Locking the Deki Reader during use
To be completed
Logging out after use
To be completed
Powering off the Deki Reader
Before switching the device off, ensure that there are no open worklists.
To power off the Deki Reader push the power button ( ) for 2 – 3 seconds until you
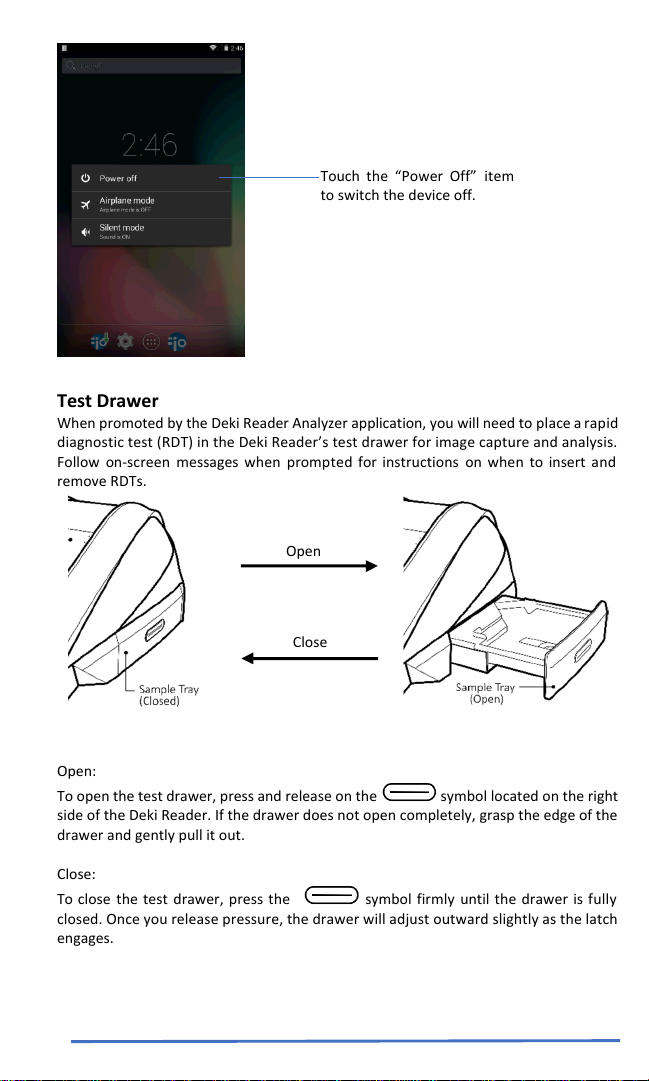
see the Power off menu appear on screen:
13
Page 20
Close
Open
Touch the “Power Off” item
to switch the device off.
Test Drawer
When promoted by the Deki Reader Analyzer application, you will need to place a rapid
diagnostic test (RDT) in the Deki Reader’s test drawer for image capture and analysis.
Follow on-screen messages when prompted for instructions on when to insert and
remove RDTs.
Open:
To open the test drawer, press and release on the symbol located on the right
side of the Deki Reader. If the drawer does not open completely, grasp the edge of the
drawer and gently pull it out.
Close:
To close the test drawer, press the symbol firmly until the drawer is fully
closed. Once you release pressure, the drawer will adjust outward slightly as the latch
engages.
14
Page 21
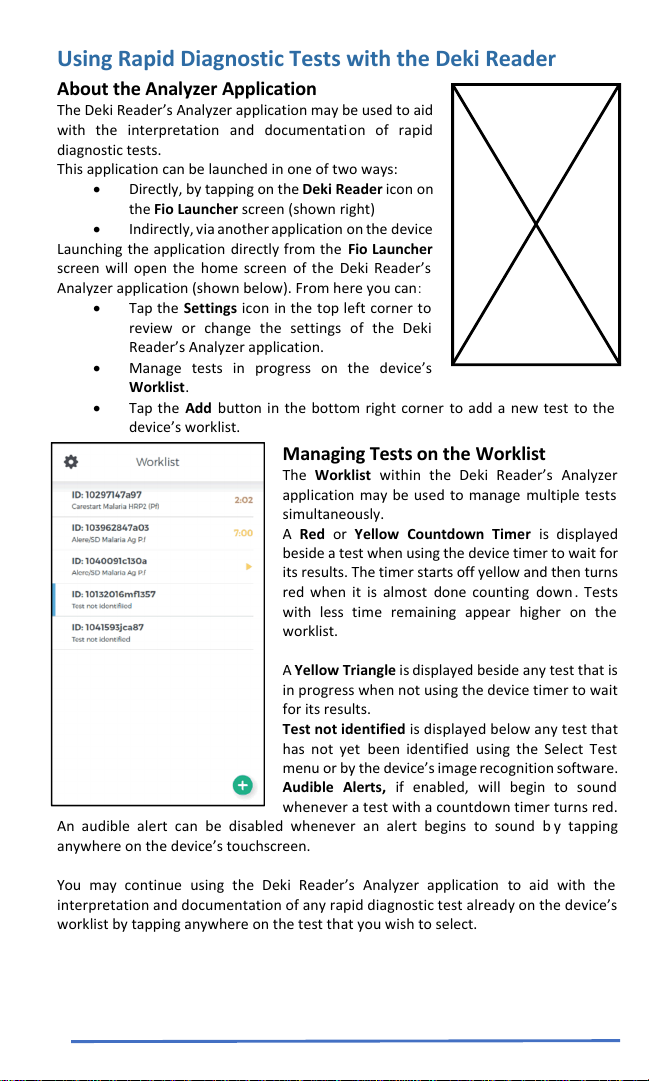
Using Rapid Diagnostic Tests with the Deki Reader
About the Analyzer Application
The Deki Reader’s Analyzer application may be used to aid
with the interpretation and documentati on of rapid
diagnostic tests.
This application can be launched in one of two ways:
Directly, by tapping on the Deki Reader icon on
the Fio Launcher screen (shown right)
Indirectly, via another application on the device
Launching the application directly from the Fio Launcher
screen will open the home screen of the Deki Reader’s
Analyzer application (shown below). From here you can:
Tap the Settings icon in the top left corner to
review or change the settings of the Deki
Reader’s Analyzer application.
Manage tests in progress on the device’s
Worklist.
Tap the Add button in the bottom right corner to add a new test to the
device’s worklist.
Managing Tests on the Worklist
The Worklist within the Deki Reader’s Analyzer
application may be used to manage multiple tests
simultaneously.
A Red or Yellow Countdown Timer is displayed
beside a test when using the device timer to wait for
its results. The timer starts off yellow and then turns
red when it is almost done counting down . Tests
with less time remaining appear higher on the
worklist.
A Yellow Triangle is displayed beside any test that is
in progress when not using the device timer to wait
for its results.
Test not identified is displayed below any test that
has not yet been identified using the Select Test
menu or by the device’s image recognition software.
Audible Alerts, if enabled, will begin to sound
An audible alert can be disabled whenever an alert begins to sound b y tapping
anywhere on the device’s touchscreen.
You may continue using the Deki Reader’s Analyzer application to aid with the
interpretation and documentation of any rapid diagnostic test already on the device’s
worklist by tapping anywhere on the test that you wish to select.
whenever a test with a countdown timer turns red.
15
Page 22
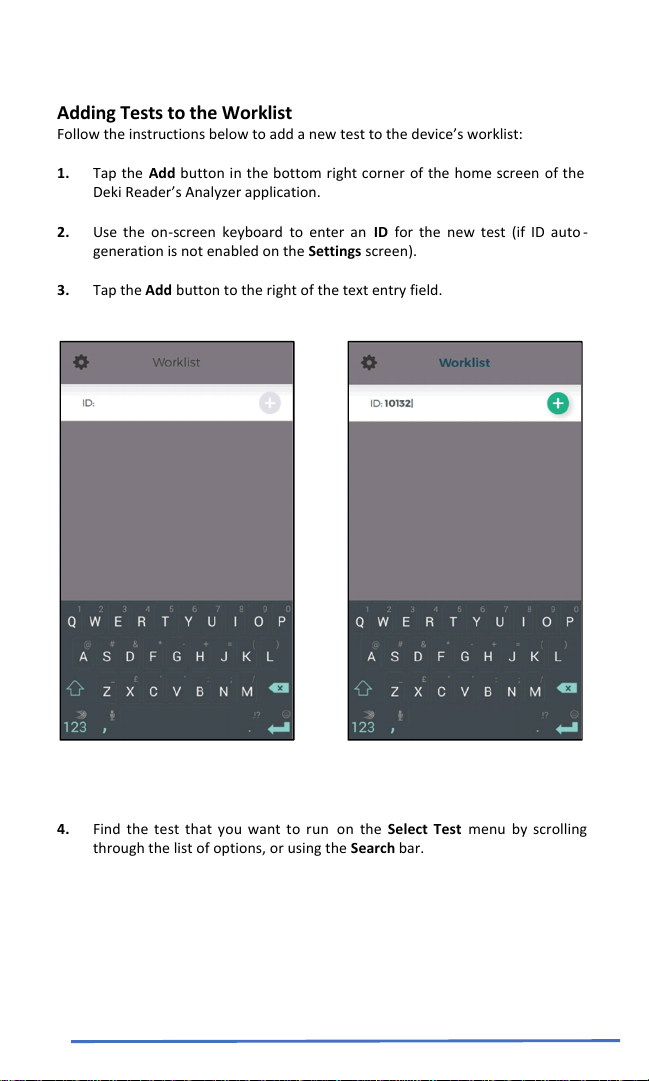
Adding Tests to the Worklist
Follow the instructions below to add a new test to the device’s worklist:
1. Tap the Add button in the bottom right corner of the home screen of the
Deki Reader’s Analyzer application.
2. Use the on-screen keyboard to enter an ID for the new test (if ID auto -
generation is not enabled on the Settings screen).
3. Tap the Add button to the right of the text entry field.
4. Find the test that you want to run on the Select Test menu by scrolling
through the list of options, or using the Search bar.
16
Page 23
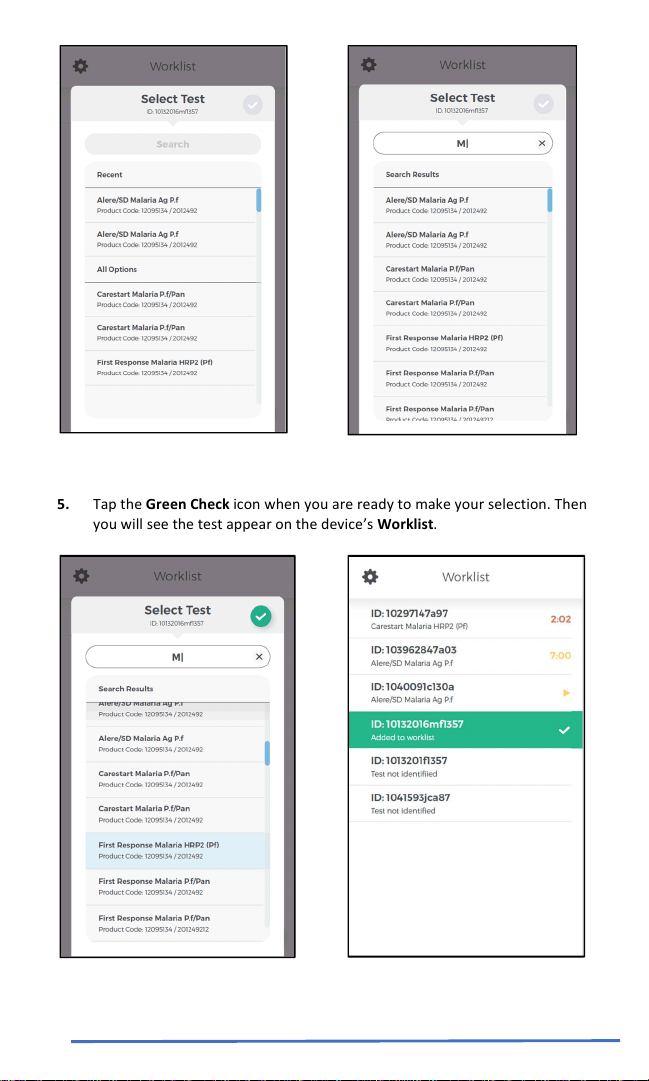
5. Tap the Green Check icon when you are ready to make your selection. Then
you will see the test appear on the device’s Worklist.
17
Page 24
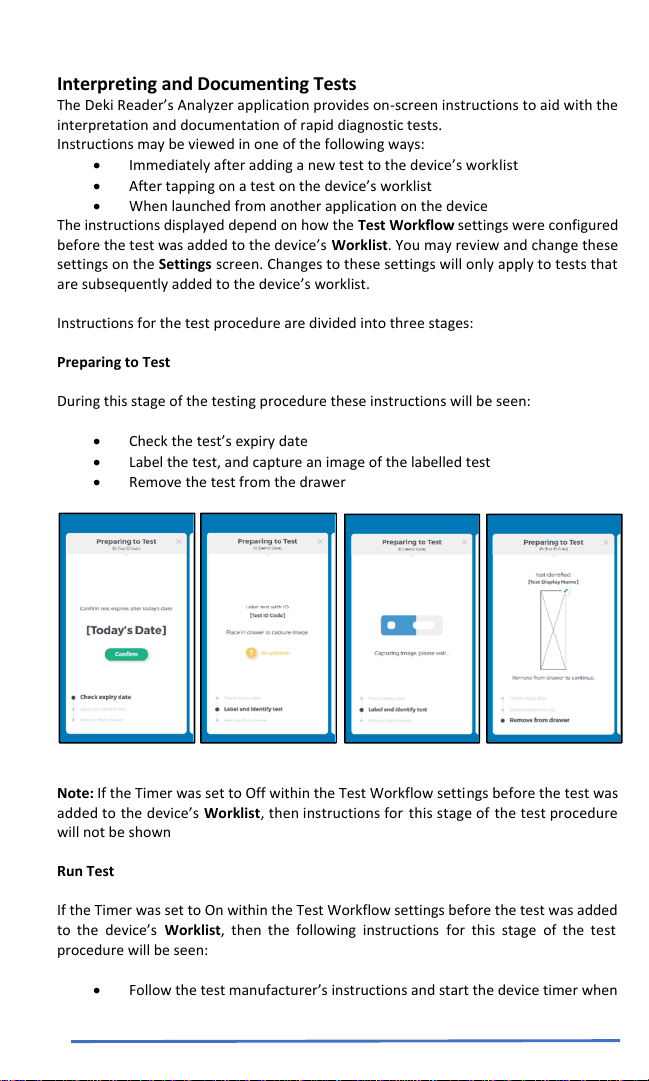
Interpreting and Documenting Tests
The Deki Reader’s Analyzer application provides on-screen instructions to aid with the
interpretation and documentation of rapid diagnostic tests.
Instructions may be viewed in one of the following ways:
Immediately after adding a new test to the device’s worklist
After tapping on a test on the device’s worklist
When launched from another application on the device
The instructions displayed depend on how the Test Workflow settings were configured
before the test was added to the device’s Worklist. You may review and change these
settings on the Settings screen. Changes to these settings will only apply to tests that
are subsequently added to the device’s worklist.
Instructions for the test procedure are divided into three stages:
Preparing to Test
During this stage of the testing procedure these instructions will be seen:
Check the test’s expiry date
Label the test, and capture an image of the labelled test
Remove the test from the drawer
Note: If the Timer was set to Off within the Test Workflow settings before the test was
added to the device’s Worklist, then instructions for this stage of the test procedure
will not be shown
Run Test
If the Timer was set to On within the Test Workflow settings before the test was added
to the device’s Worklist, then the following instructions for this stage of the test
procedure will be seen:
Follow the test manufacturer’s instructions and start the device timer when
ready to wait for the test’s results
18
Page 25
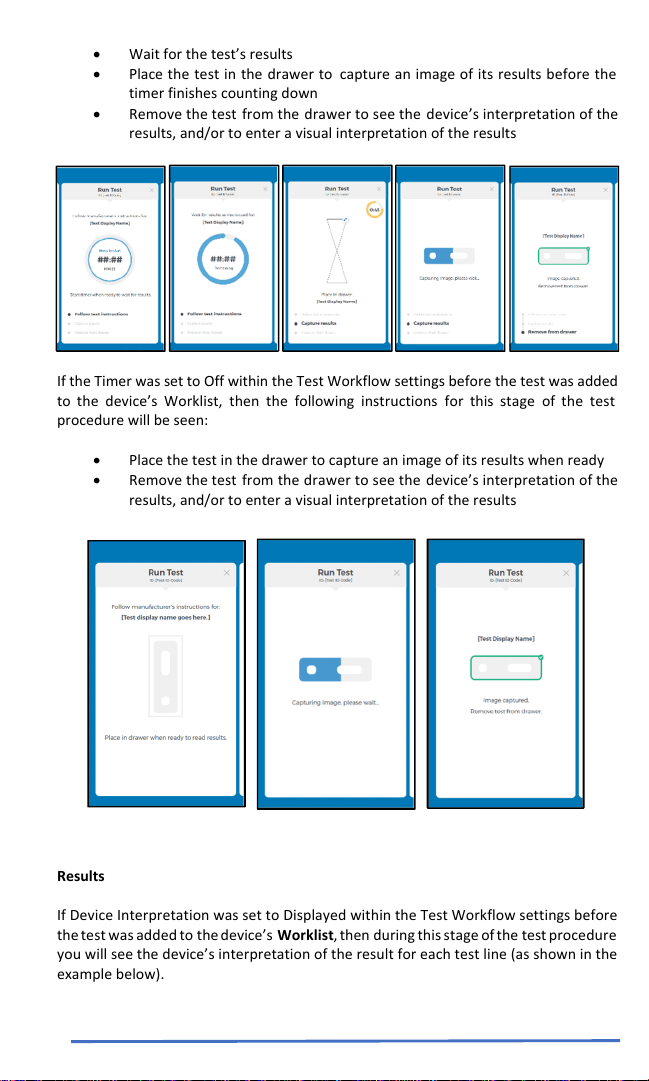
Wait for the test’s results
Place the test in the drawer to capture an image of its results before the
timer finishes counting down
Remove the test from the drawer to see the device’s interpretation of the
results, and/or to enter a visual interpretation of the results
If the Timer was set to Off within the Test Workflow settings before the test was added
to the device’s Worklist, then the following instructions for this stage of the test
procedure will be seen:
Place the test in the drawer to capture an image of its results when ready
Remove the test from the drawer to see the device’s interpretation of the
results, and/or to enter a visual interpretation of the results
Results
If Device Interpretation was set to Displayed within the Test Workflow settings before
the test was added to the device’s Worklist, then during this stage of the test procedure
you will see the device’s interpretation of the result for each test line (as shown in the
example below).
19
Page 26
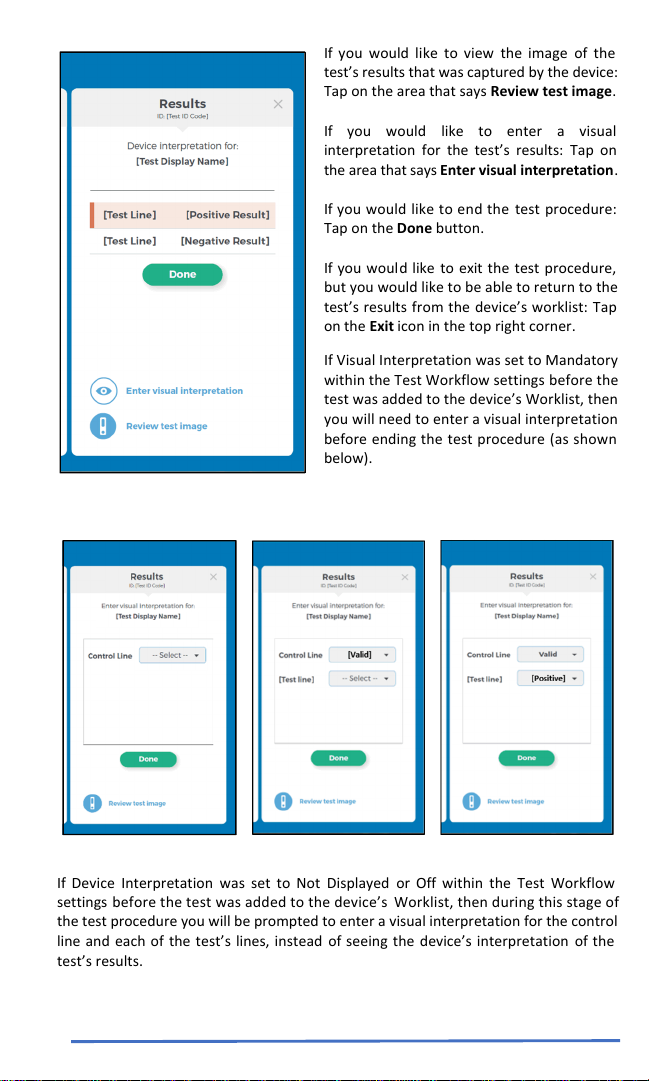
If you would like to view the image of the
test’s results that was captured by the device:
Tap on the area that says Review test image.
If you would like to enter a visual
interpretation for the test’s results: Tap on
the area that says Enter visual interpretation.
If you would like to end the test procedure:
Tap on the Done button.
If you would like to exit the test procedure,
but you would like to be able to return to the
test’s results from the device’s worklist: Tap
on the Exit icon in the top right corner.
If Visual Interpretation was set to Mandatory
within the Test Workflow settings before the
test was added to the device’s Worklist, then
you will need to enter a visual interpretation
before ending the test procedure (as shown
below).
If Device Interpretation was set to Not Displayed or Off within the Test Workflow
settings before the test was added to the device’s Worklist, then during this stage of
the test procedure you will be prompted to enter a visual interpretation for the control
line and each of the test’s lines, instead of seeing the device’s interpretation of the
test’s results.
20
Page 27
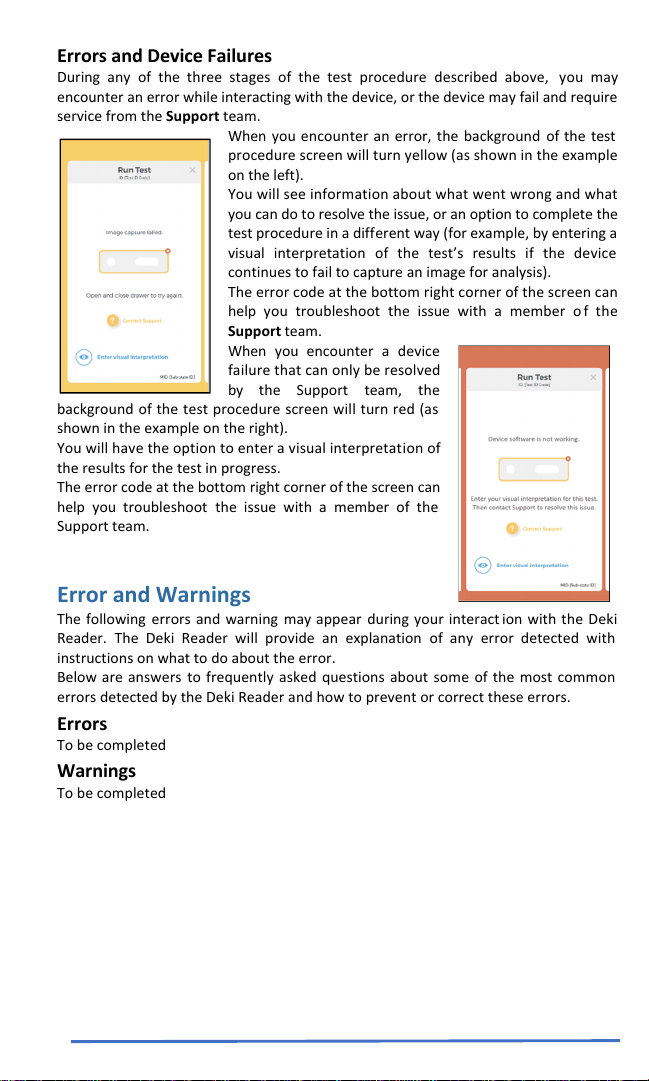
Errors and Device Failures
During any of the three stages of the test procedure described above, you may
encounter an error while interacting with the device, or the device may fail and require
service from the Support team.
background of the test procedure screen will turn red (as
shown in the example on the right).
You will have the option to enter a visual interpretation of
the results for the test in progress.
The error code at the bottom right corner of the screen can
help you troubleshoot the issue with a member of the
Support team.
When you encounter an error, the background of the test
procedure screen will turn yellow (as shown in the example
on the left).
You will see information about what went wrong and what
you can do to resolve the issue, or an option to complete the
test procedure in a different way (for example, by entering a
visual interpretation of the test’s results if the device
continues to fail to capture an image for analysis).
The error code at the bottom right corner of the screen can
help you troubleshoot the issue with a member o f the
Support team.
When you encounter a device
failure that can only be resolved
by the Support team, the
Error and Warnings
The following errors and warning may appear during your interact ion with the Deki
Reader. The Deki Reader will provide an explanation of any error detected with
instructions on what to do about the error.
Below are answers to frequently asked questions about some of the most common
errors detected by the Deki Reader and how to prevent or correct these errors.
Errors
To be completed
Warnings
To be completed
21
Page 28
Maintenance and Cleaning
Maintenance
The Deki Reader is maintenance-free and has no user-serviceable parts. Only the drawer
and battery are user-removeable. In the case of device failure or damage, contact
Support.
Cleaning
The Deki Reader can be cleaned using 70% ethanol or 0.5% bleach, app lied using a damp,
lint free cloth. Do not spray or pour solution directly onto the Deki Reader when cleaning.
Ensure no excess liquid is used when cleaning as it may damage the device.
Fio recommends that the exterior instrument surfaces and the drawer interior surfaces
be cleaned on a regular basis. The drawer can be removed for more extensive cleaning.
Ensure no excess liquid is used when cleaning as it may damage the device.
Clean the Deki Reader and surrounding areas immediately after possible patient sample
contamination.
Biohazard: Wear personal protective equipment and use universal
precautions while performing these procedures.
Do not disassemble the Deki Reader.
Unplug the Deki Reader before cleaning.
Do not immerse the Deki Reader in water or cleaning solutions.
Do not spray or pour solution directly onto Reader when cleaning.
Do not immerse the Deki Reader in water or cleaning solutions.
Do not clean with soap, other solutions or other wipes.
Do not use laboratory wipes, such as Kimwipes®, as they may scratch
the display.
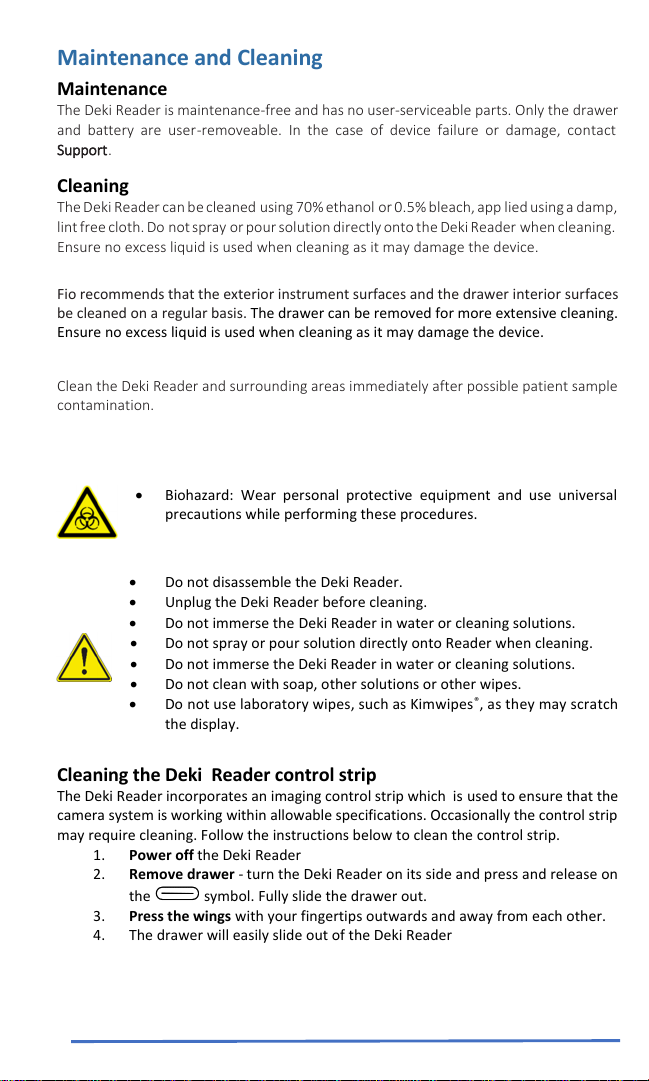
Cleaning the Deki Reader control strip
The Deki Reader incorporates an imaging control strip which is used to ensure that the
camera system is working within allowable specifications. Occasionally the control strip
may require cleaning. Follow the instructions below to clean the control strip.
1. Power off the Deki Reader
2. Remove drawer - turn the Deki Reader on its side and press and release on
the symbol. Fully slide the drawer out.
3. Press the wings with your fingertips outwards and away from each other.
4. The drawer will easily slide out of the Deki Reader
22
Page 29
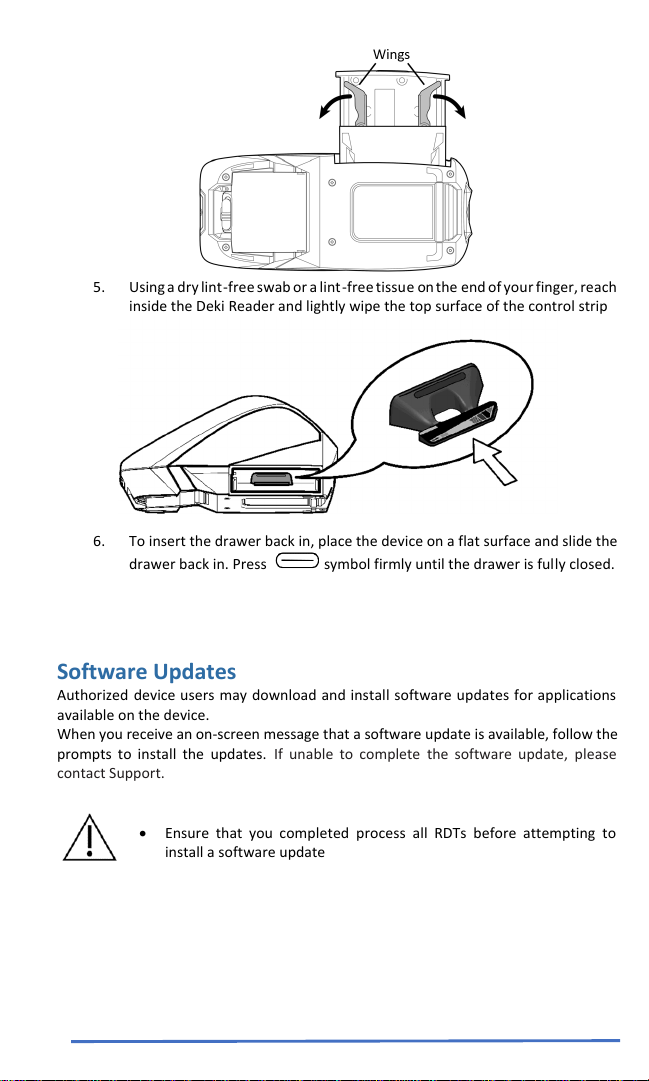
5. Using a dry lint-free swab or a lint-free tissue on the end of your finger, reach
inside the Deki Reader and lightly wipe the top surface of the control strip
6. To insert the drawer back in, place the device on a flat surface and slide the
drawer back in. Press symbol firmly until the drawer is fully closed.
Software Updates
Authorized device users may download and install software updates for applications
available on the device.
When you receive an on-screen message that a software update is available, follow the
prompts to install the updates. If unable to complete the software update, please
contact Support.
Ensure that you completed process all RDTs before attempting to
install a software update
23
Page 30
Appendices
Appendix A: Analytical performance characteristics
Method Comparison
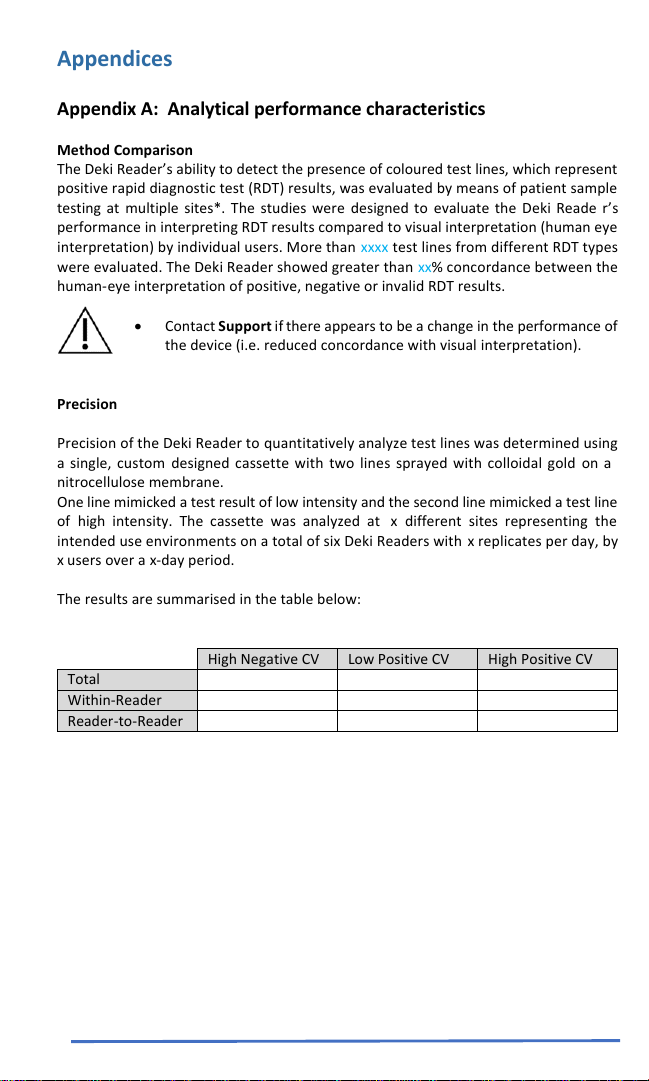
The Deki Reader’s ability to detect the presence of coloured test lines, which represent
positive rapid diagnostic test (RDT) results, was evaluated by means of patient sample
testing at multiple sites*. The studies were designed to evaluate the Deki Reade r’s
performance in interpreting RDT results compared to visual interpretation (human eye
interpretation) by individual users. More than xxxx test lines from different RDT types
were evaluated. The Deki Reader showed greater than xx% concordance between the
human-eye interpretation of positive, negative or invalid RDT results.
Contact Support if there appears to be a change in the performance of
the device (i.e. reduced concordance with visual interpretation).
Precision
Precision of the Deki Reader to quantitatively analyze test lines was determined using
a single, custom designed cassette with two lines sprayed with colloidal gold on a
nitrocellulose membrane.
One line mimicked a test result of low intensity and the second line mimicked a test line
of high intensity. The cassette was analyzed at x different sites representing the
intended use environments on a total of six Deki Readers with x replicates per day, by
x users over a x-day period.
The results are summarised in the table below:
Total
Within-Reader
Reader-to-Reader
High Negative CV Low Positive CV High Positive CV
24
Page 31
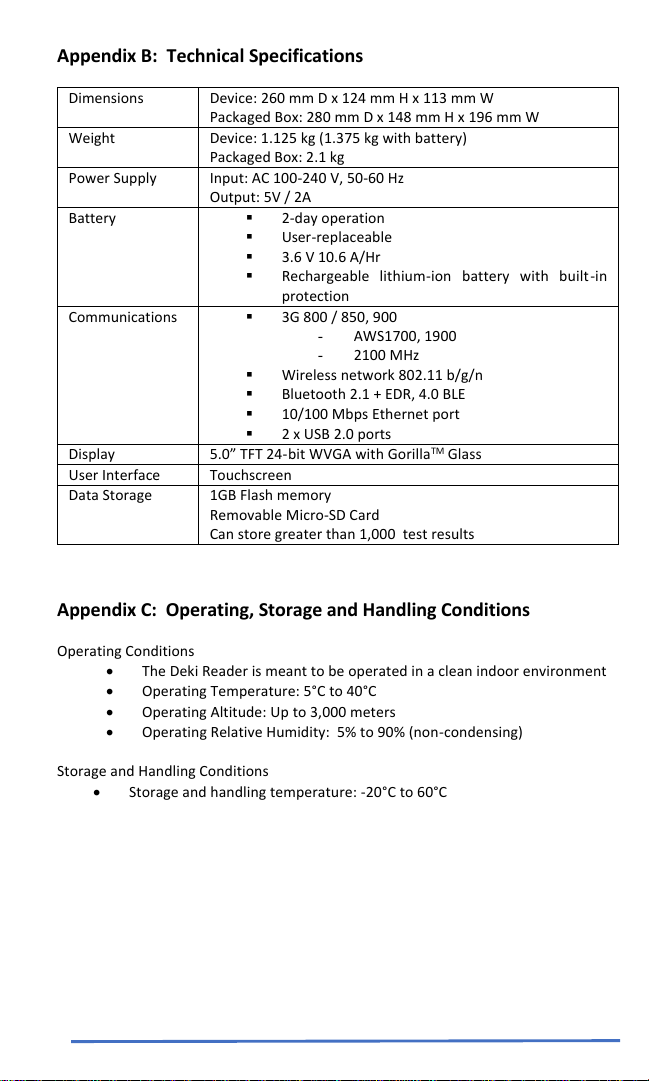
Appendix B: Technical Specifications
Dimensions Device: 260 mm D x 124 mm H x 113 mm W
Weight Device: 1.125 kg (1.375 kg with battery)
Power Supply Input: AC 100-240 V, 50-60 Hz
Battery 2-day operation
Communications 3G 800 / 850, 900
Display 5.0” TFT 24-bit WVGA with GorillaTMGlass
User Interface Touchscreen
Data Storage 1GB Flash memory
Packaged Box: 280 mm D x 148 mm H x 196 mm W
Packaged Box: 2.1 kg
Output: 5V / 2A
User-replaceable
3.6 V 10.6 A/Hr
Rechargeable lithium-ion battery with built-in
protection
- AWS1700, 1900
- 2100 MHz
Wireless network 802.11 b/g/n
Bluetooth 2.1 + EDR, 4.0 BLE
10/100 Mbps Ethernet port
2 x USB 2.0 ports
Removable Micro-SD Card
Can store greater than 1,000 test results
Appendix C: Operating, Storage and Handling Conditions
Operating Conditions
The Deki Reader is meant to be operated in a clean indoor environment
Operating Temperature: 5°C to 40°C
Operating Altitude: Up to 3,000 meters
Operating Relative Humidity: 5% to 90% (non-condensing)
Storage and Handling Conditions
Storage and handling temperature: -20°C to 60°C
25
Page 32
Appendix D: Recycling and disposal
The Deki Reader operates on lithium-ion batteries and contains electronic components
that should be recycled. Contact Support for proper disposal of the Deki Reader and/or
its lithium-ion batteries.
Disposal of old electrical and electronic equipment: The Waste Electrical and Electronic
Equipment (WEEE) mark applies only to countries within the European Union and other
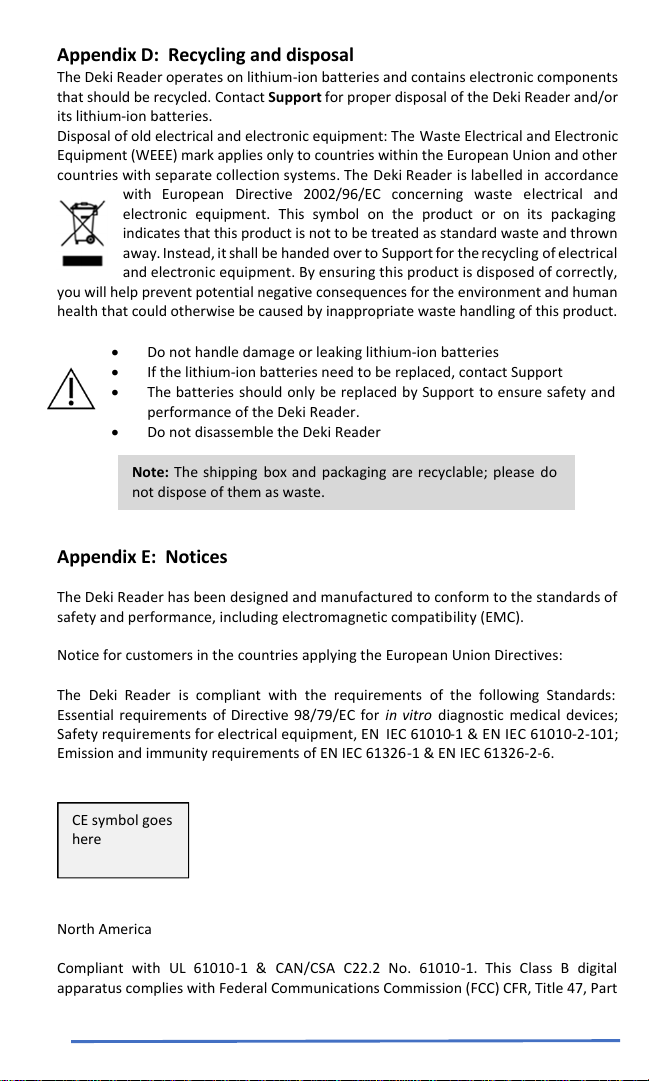
countries with separate collection systems. The Deki Reader is labelled in accordance
you will help prevent potential negative consequences for the environment and human
health that could otherwise be caused by inappropriate waste handling of this product.
with European Directive 2002/96/EC concerning waste electrical and
electronic equipment. This symbol on the product or on its packaging
indicates that this product is not to be treated as standard waste and thrown
away. Instead, it shall be handed over to Support for the recycling of electrical
and electronic equipment. By ensuring this product is disposed of correctly,
Do not handle damage or leaking lithium-ion batteries
If the lithium-ion batteries need to be replaced, contact Support
The batteries should only be replaced by Support to ensure safety and
performance of the Deki Reader.
Do not disassemble the Deki Reader
Note: The shipping box and packaging are recyclable; please do
not dispose of them as waste.
Appendix E: Notices
The Deki Reader has been designed and manufactured to conform to the standards of
safety and performance, including electromagnetic compatibility (EMC).
Notice for customers in the countries applying the European Union Directives:
The Deki Reader is compliant with the requirements of the following Standards:
Essential requirements of Directive 98/79/EC for in vitro diagnostic medical devices;
Safety requirements for electrical equipment, EN IEC 61010-1 & EN IEC 61010-2-101;
Emission and immunity requirements of EN IEC 61326-1 & EN IEC 61326-2-6.
CE symbol goes
here
North America
Compliant with UL 61010-1 & CAN/CSA C22.2 No. 61010-1. This Class B digital
apparatus complies with Federal Communications Commission (FCC) CFR, Title 47, Part
15 subpart B and with Canadian ICES-003.
26
Page 33
ETL symbol
goes here
NOTE:
This equipment has been tested and found to comply with the limits for a Class B digital
device, pursuant to part 15 of the FCC Rules.
These limits are designed to provide reasonable protection against harmful
interference in a residential installation. This equipment generates, uses and can
radiate radio frequency energy and, if not installed and used in accordance with the
instructions, may cause harmful interference to radio communications. However, there
is no guarantee that interference will not occur in a installation. If this equipment does
cause harmful interference to radio or television reception, which can be determined
by turning the equipment off and on, the user is encouraged to try to correct the
interference by one or more of the following measures:
Reorient or relocate the receiving antenna.
Increase the separation between the equipment and receiver.
Connect the equipment into an outlet on a circuit different from that to
which the receiver is connected.
Consult the dealer or an experienced radio/TV technician for help.
NOTICE:
This device complies with Part 15 of the FCC Rules and with Industry Canada licence-
exempt RSS standard(s).
Operation is subject to the following two conditions:
1. This device may not cause harmful interference;
2. This device must accept any interference rec eived, including interference
that may cause undesired operation.
Le présent appareil est conforme aux CNR d'Industrie Canada applicables aux appareils
radio exempts de licence. L'exploitation est autorisée aux deux conditions suivantes:
1. l'appareil ne doit pas produire de brouillage, et
2. l'appareil doit accepter tout brouillage radioélectrique subi, même si le
brouillage est susceptible d'en compromettre le fonctionnement
NOTICE:
Changes or modifications made to this equipment not expressly approved by
(manufacturer name) may void the FCC authorization to operate this equipment.
Appendix E: Accessories
Accessories for use with the Deki Reader can be ordered separately. Contact your Fio
representative for a complete list.
27
Page 34

Index
28
Page 35

Inside
Back
Cover
Intentionally
left blank
Page 36

Back
Cover
Fio Corporation
111 Queen Street East, Suite 500, Toronto, Ontario, M5C 1S2 Canada
Office: 1.416.368.8882 | Email: [email protected]
Fio.com
G01-LBL-01 R01
 Loading...