

FineTek PT-8320 Series Operating Manual
CODE
:
G
:
Q
:
B
:
L
:
V
:
H
:
R
:
C
:
M
:
W
:
O
:
E
:
Y
:
T
:
J
:
A
:
K
:
U
:
F
:
P
:
Z
:
I
:
S
:
N
:
D
:
X
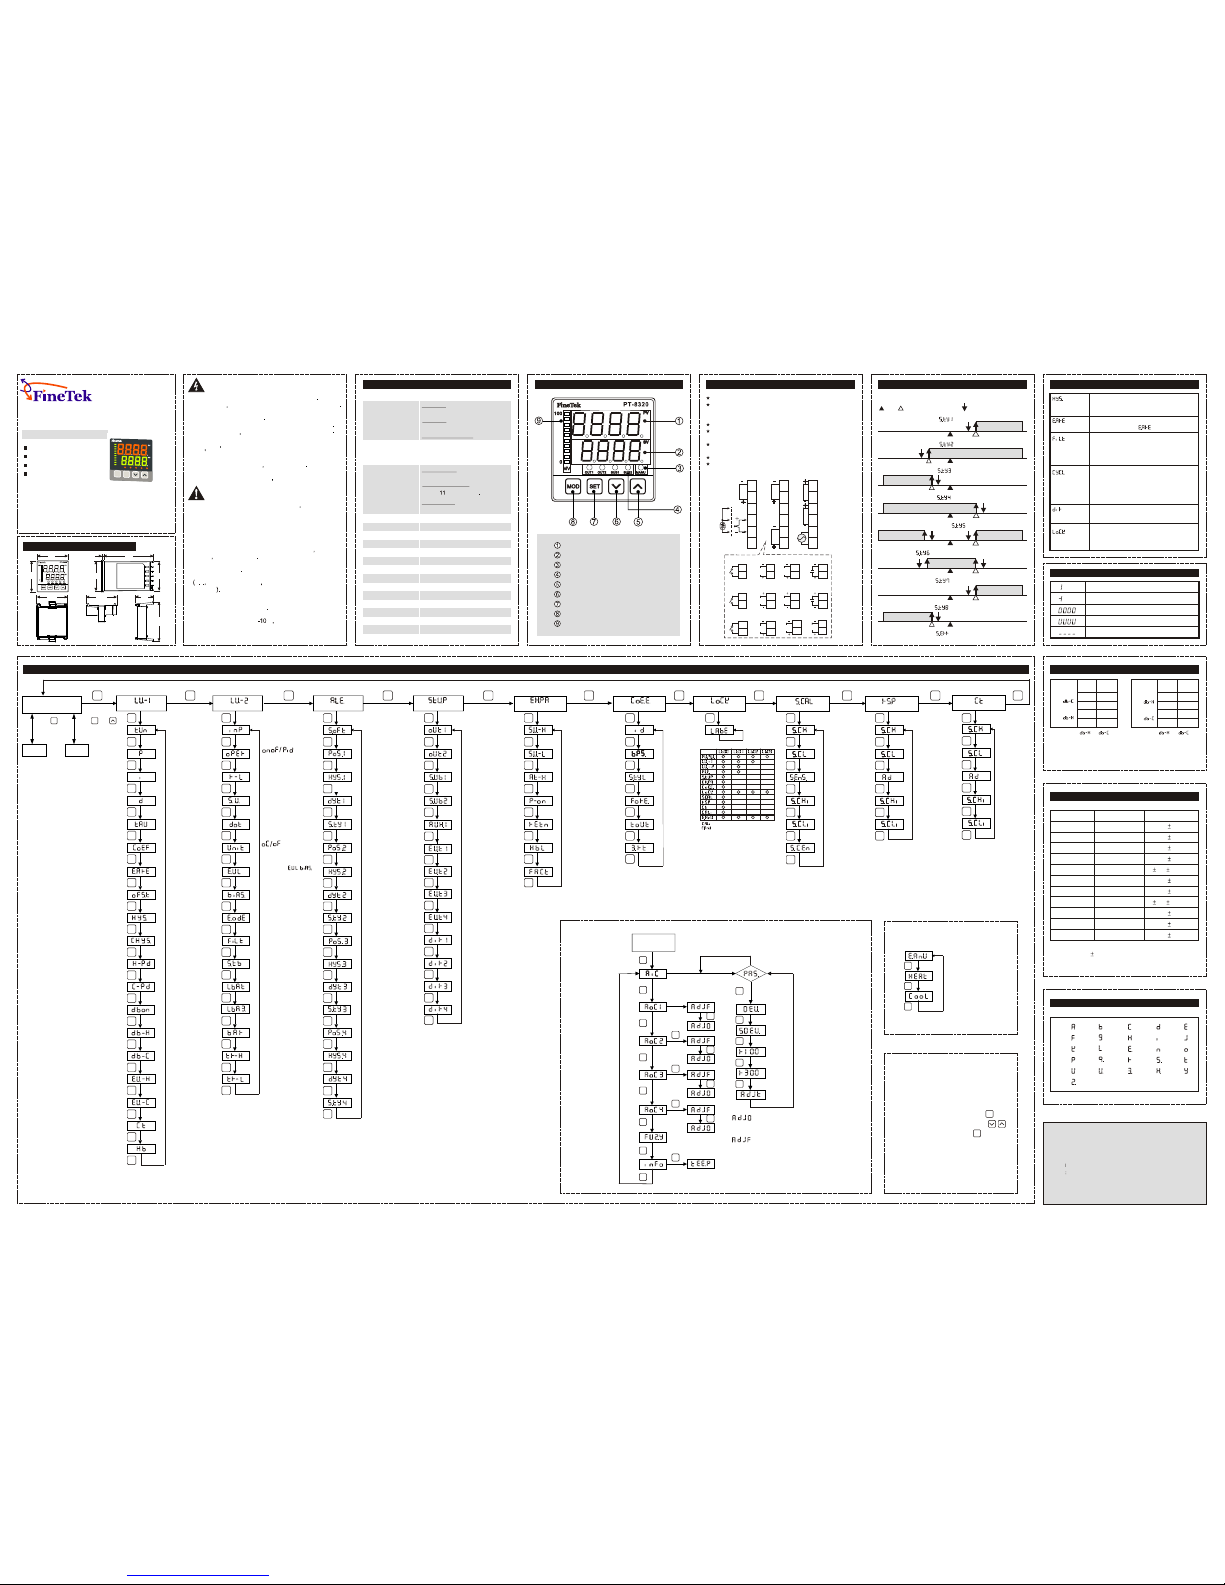
SPECIFICATIONS
Power Supply: 85~265VAC 50/60Hz
Display: Upper row: (red)
4 digits 7 segment
Lower row: (green)
4 digits 7 segment
10 segment bar graph
Input Signal: Thermocouple: J, K, B, N, R, S, T, E
DC Voltage: 0~230mV
Control Output: Output Relay 1: (resistive load)
SPST-NO, 5A/250VAC
Voltage pulse output: (for SSR drive)
NPN, > VDC with max 20mA
Analog Output: 4~20mA, 2~10VDC
(Allowable load resistive: Max. 600W)
Alarm Relay: SPST-NO, 3A/250VAC (resistive load)
Dwell Timer: 00~99s
Hysteresis: 0~999.9C ( F)
Communication: RS485 (MODBUS)
Operating Conditions: 0~50 (20~85%RH)
Control Output Cycle: 0~50s
Decimal Point: 0~3 digits
Digital Filter: 1~100
Control method: ON/OFF or PID+Fuzzy (Auto Tuning)
Input Offset: -199.9~999.9
Fraction Value: 0.0~999.9
Settings Range: -1999~9999
Accuracy: 0.3%FS 1 digit
Sampling Time: 400ms
Memory: EEPROM
RTD: PT100, JPT100
A
BB
BC
All can with Hysteresis and de-energized function for
ON/OFF control
: Alarm Setting Value
ALARM MODE SETTING
: Hysteresis Setting Value
: SV
DESCRIPTION OF PARAMETERS
Control output
hysteresis
Manual reset
PV input filter
Control output
cycle time
Function list
lock
You can set a hysteresis around the set
point to prevent chattering
In PID control, I=0, PV=SV, reset the
control output to " " value
This function should be used the PV
display value may fluctuate greatly, for
example, when the measured input signal
contains noise. If a larger time constant is
set, the filter can remove more noise.
The cycle time is the period of on/off
repetitions of a relay or voltage pulse
output in time proportional PID control.
The ratio of the ON time to the cycle time
is proportional to the control output value.
If output for the relay, setting more than 10.
Direction of relay
You can set the mode of function lists
which can be displayed and edited.
TROUBLESHOOTING
Display over scale
Display under scale
PV over scale
PV under scale
Sensor break
1. Assure the end terminal screw is tightlyscrewed If the
screw fell off it may cause fire or mechanical breakdown
2. Please do not apply this product inflammable application
to avoid possibleexplosion
3. Life-span of the relay is relative to how the user uses it
When using relay itmust follow specified load and life
span of the electronics as labeled. If the use of relay
overloads contactsmay melt or it may cause fire.
4. Dont disassemble, repair or modify the products without
factory consultation. Such change may cause circuit
shortage of theelectronics breakage or fire
5. Do not drop metal chipsor wire chips inside the product to
avoid possible circuitshortage breakage or fire.
WARNING!
Please strictly follow the instructionsbelow it can guarantee
the safeoperation of the controller:
CAUTION!
* Use the product within the ratings specified for submerging
in water and exposure to oil.
* Do not use the product in locations subject to vibrations or
shocks. Using the product in such locations over a long
period may result in damage due to stress.
* Do not use the product in applications with dust corrosive
gasses ordirect sunlight
* Separate the power cable and signal cable to avoid static
signal interference
* Keep the product awayfrom the source of static electricity
e g Forming compounds pipes that transport liquid
materials
* Organic solvents (such as pain thinner), as well as strong
acidic or alkalinesolutions might damage the outer casing
of the Temperaturecontroller
* Store at specified temperature. If the Temperature
controller is storedunder BC please allow the
temperature controller to stand at room temperature for at
least 3 hours before use.
* Allow 30 minutes of warm-up for best performance.
TEMPERATURE RANGE
Type R and S 9BC for 0 to 500BC
Type B accuracy is not guaranteed for 0 to 400BC
K TYPE
J TYPE
R TYPE
S TYPE
B TYPE
E TYPE
N TYPE
T TYPE
PT100
DC
JPT100
0.3% 1digit
0.3% 1digit
0.3% 1digit
0.3% 1digit
0.3% 1digit
0.3% 1digit
0.3% 1digit
0.3% 1digit
0.3% 1digit
8BC 1digit
2BC 1digit
INPUT TYPE ACCURACYRANGE
-200~1370BC
-210~1200BC
-50~1760BC
-50~1760BC
250~1820BC
-200~1000BC
-200~1300BC
-200~400BC
-200~850BC
-200~850BC
0~350mV
FINETEK CO., LTD.
No.16, Tzuchiang Street, Tucheng Industrial Park,
Taipei Hsien, Taiwan
TEL 886-2-22696789
FAX 886-2-22686682
E-mail: info@fine-tek.com
http://www.fine-tek.com/
Made in Taiwan
Disable : Inhibit output
Enable : Enable control output to follow PID / ON-OFF
control algorithm
Disable
Heater Cooler
Enable
Disable
Disable
Enable
Disable
Disable
Disable
SV
SV+
SV+
>0<0,
Disable
Heater Cooler
Enable
Enable
Disable
SV
SV+
SV+
Enable
EnableEnable
Enable
<0>0,
PARAMETERS OF HYSTERESIS LIST
Cooler's output
energy Display
CT current display
Heater Break
Alarm setting
Auto-tuning
Main Menu
Display PV,SV
Calibration
mode
Manual
mode
Press five
seconds enter
into Calibrating
mode
Press and
five seconds enter
into Manual mode
PID setting
Proportional Gain
Differentiation
Unit:second
Integration
Unit:second
Fuzzy parameter
Cooling
parameter
Manual reset
SV Offset during
Auto-tuning
Hysteresis for
Heater output
(ON / OFF )control
Hysteresis for
Cooler output
(ON / OFF )control
Control Cycle time
for Heater output
Control Cycle time
for Cooler output
Enable / Disable of
Dead Band control
Dead Band
interval for Heater
Dead Band interval
for Cooler
Heater's output
energy Display
Advance Setting
Select Input Signal
Set value
SV Enable / Disable
Remote
Decimal point setting
Bias of PV input
Heater major /
Cooler major
Digital filter
Startup delay time
(min)
LBA detection time
(sec)
LBA temperature
differentiation
Bar graph display
setting
High Limit for
Retransfer SV.
Low Limit for
Retransfer SV.
Alarm setting
Alarm set point 1
Alarm delay time
Adjustment 1
(second)
Alarm hysteresis
Adjustment 1
Alarm mode 1
Alarm soft activation
Frame setting
Auxiliary output
Control / Alarm 1
Auxiliary signal
input 1
Auxiliary
command input 1
Output direction (Hi or Lo) 1
Output Control /
Alarm 1
Expand setting
Auto-tuning
hysteresis
Operation at
Power-ON
Automatic return
SV / PV screen
(second)
HBA alarm Latch
Restore Factory
default setting
High Limit for SV
Low Limit for SV
Communication setting
Transmission
type
Transmission
mode
Time-out
setting
Allow communication
writing
Device ID
identification
Baud rate
Security selection
Menu locking
Advanced setting for PV
Maximum
Voltage input
Minimum
Voltage input
Input A / D switch
High Limit for
PV display
Low Limit for
PV display
Display voltage
from Sensor AD
converter
Advanced setting for SV
Span Voltage
setting
Zero Voltage
setting
High Limit for
SV (RSP)
Low Limit for
SV (RSP)
Display Voltage
of AD converter
CT input setting
Setting Span
Voltage
Setting Zero
Voltage
High Limit
display for
CT current
Low Limit
display for
CT current
Select
control mode
PV Multiplier
PV=PV*
+
:Calibration menu
:Manual control menu
Temperature
Unit
Manual mode:
Percentage of Heater
Control Output
Percentage of Cooling
Control Output
Display PV value
Input Correct Password
for following menu
: Full (0~10V)
(4~20mA)
Calibrating Output
Current
:Calibrating Zero Output(0~10V)
Current(4~20mA)
Display PV,SV
Password error, resetting Input
Calibrating for
Sensor Input
st
1 Calibrating
for Analog Output
nd
2 Calibrating
for Analog Output
rd
3 Calibrating
for Analog Output
th
4 Calibrating
for Analog Output
Fuzzy Switch
Display the
temperature of
cold junction
Quick setting for SV:
Calibration mode:
*Calibrating 100 W, 300 W,
please use 3 wire input
Calibrating OmV Input
Calibrating 50mV Input
Password
correct
Calibrating for cold
junction compensation
Calibrating 300 W Input
Alarm set point 2
Alarm set point 3
Alarm set point 4
Alarm hysteresis
Adjustment 2
Alarm hysteresis
Adjustment 3
Alarm hysteresis
Adjustment 4
Alarm delay time
Adjustment 2
(second)
Alarm delay time
Adjustment 3
(second)
Alarm delay time
Adjustment 4
(second)
Alarm mode 2
Alarm mode 3
Alarm mode 4
Output Control /
Alarm 2
Auxiliary output
Control / Alarm 2
Output direction (Hi or Lo) 2
Output direction (Hi or Lo) 3
Output direction (Hi or Lo) 4
Calibrating 100 W Input
PROGRAM SETTING FLOWCHART
Auxiliary
command input 2
Auxiliary
command input 3
Auxiliary
command input 4
MOD MOD
MOD
SET
MOD
MOD
MOD
MOD
MOD
MOD
MOD
MOD
MOD
MOD
MOD
MOD
MOD
MOD
MOD
MOD
MOD
MOD
MOD
MOD MOD MOD MOD MOD MOD MOD MOD MOD MOD
SET
MOD
MOD
MOD
MOD
MOD
MOD
MOD
MOD
MOD
MOD
MOD
MOD
MOD
MOD
MOD
MOD
SET
MOD
MOD
MOD
MOD
MOD
MOD
MOD
MOD
MOD
MOD
MOD
MOD
MOD
MOD
MOD
MOD
MOD
SET
MOD
MOD
MOD
MOD
MOD
MOD
MOD
MOD
MOD
MOD
MOD
MOD
MOD
SET
MOD
MOD
MOD
MOD
MOD
MOD
MOD
SET
MOD
MOD
MOD
MOD
MOD
MOD
SET SET
MOD
MOD
MOD
MOD
MOD
MOD
SET
MOD
MOD
MOD
MOD
MOD
SET
MOD
MOD
MOD
MOD
MOD
MOD
MOD
MOD
MOD
MOD
MOD
MOD
MOD
SET
SET
SET
SET
MOD
MOD
MOD
MOD
MOD
MOD
MOD
MOD
MOD
MOD
MOD
MOD
Under PV / SV main screen, press button
one second enter SV setting mode,
please adjust SV value, press button for
saving setting value
SET
SET
FRONT PANEL
Measured Value (PV) display
Set Value (SV) display
Indicator for Manual Operation
Indicator for Output
"UP" key
"DOWN" key
Set key
MOD key
Bargraph indicator
PT-8320 SERIES
Content of the packaging
Thank you for please read the User's manual first
before buying Fine-Tek products and using And is
familiar with product performance and every function,
please keep the user's manual so that consult in future.
Modbus communication can be downloaded from
http: //www.fine-tek.com
TEMPERATURE CONTROLLER
OPERATION MANUAL
1
0
01
0
0
0
0
O
U
T1
O
U
T1
O
UT
2
O
UT
2
S
UB
1
S
UB
1
SUB2
SUB2
M
AN
U
M
AN
U
MV
MV
P
T
-
83
2
0
P
T
-
83
2
0
M
O
D
M
O
D
SE
T
SE
T
Noumenon
Washer
User's manual
Bracket
unit:(mm)
DIMENSION/PANEL CUTOUT
FK-PT-A0-E-M,11/08/2007
28.8
63
48.2 48.2
48
48
75
3
44.5
44.3
4~20mA
0~10V
12DC
4~20mA
0~10V
12DC
RS485
RSP
0~10V
4~20mA
RSP
AUX1
OUT1/2
SUB1/2
TERMINAL ASSIGNMENT
12
9
11
7
8
10
2
3
4
5
1
AC85
~265V
RTD
TC/mV
A
B
b
14
13
16
15
17
18
OUT1
AUX1
OUT2
SUB1
SUB2
Please use proper terminal.
If Electro-magnetic interference exists, please separate wire
cable between sensor and power line or shield sensor's wire
to ground.
Please use filter when there is power interference.
Stay away from Hi - frequency signal while using the
equipment.
It is recommended to install power switch or circuit breaker
near the equipment to control power of controller.
Fuse can be applied to prevent over-current.
Please use proper temperature compensation lead wire for
termocouple transmission.
ONOFF
( )
Deviation high alarm
ONOFF
( )
Deviation high alarm
ON OFF
Deviation low alarm
( )
ON OFF
( )
Deviation low alarm
ON ONOFF
Deviation high/low alarm ( )
OFF
OFF
ON
Band alarm
( )
ONOFF
Process high alarm
( )
( )
ON OFF
Process low alarm
Sensor error alarm ( )
Set alarm while sensor break or out of measuring range.
Display
Voltage of AD
converter
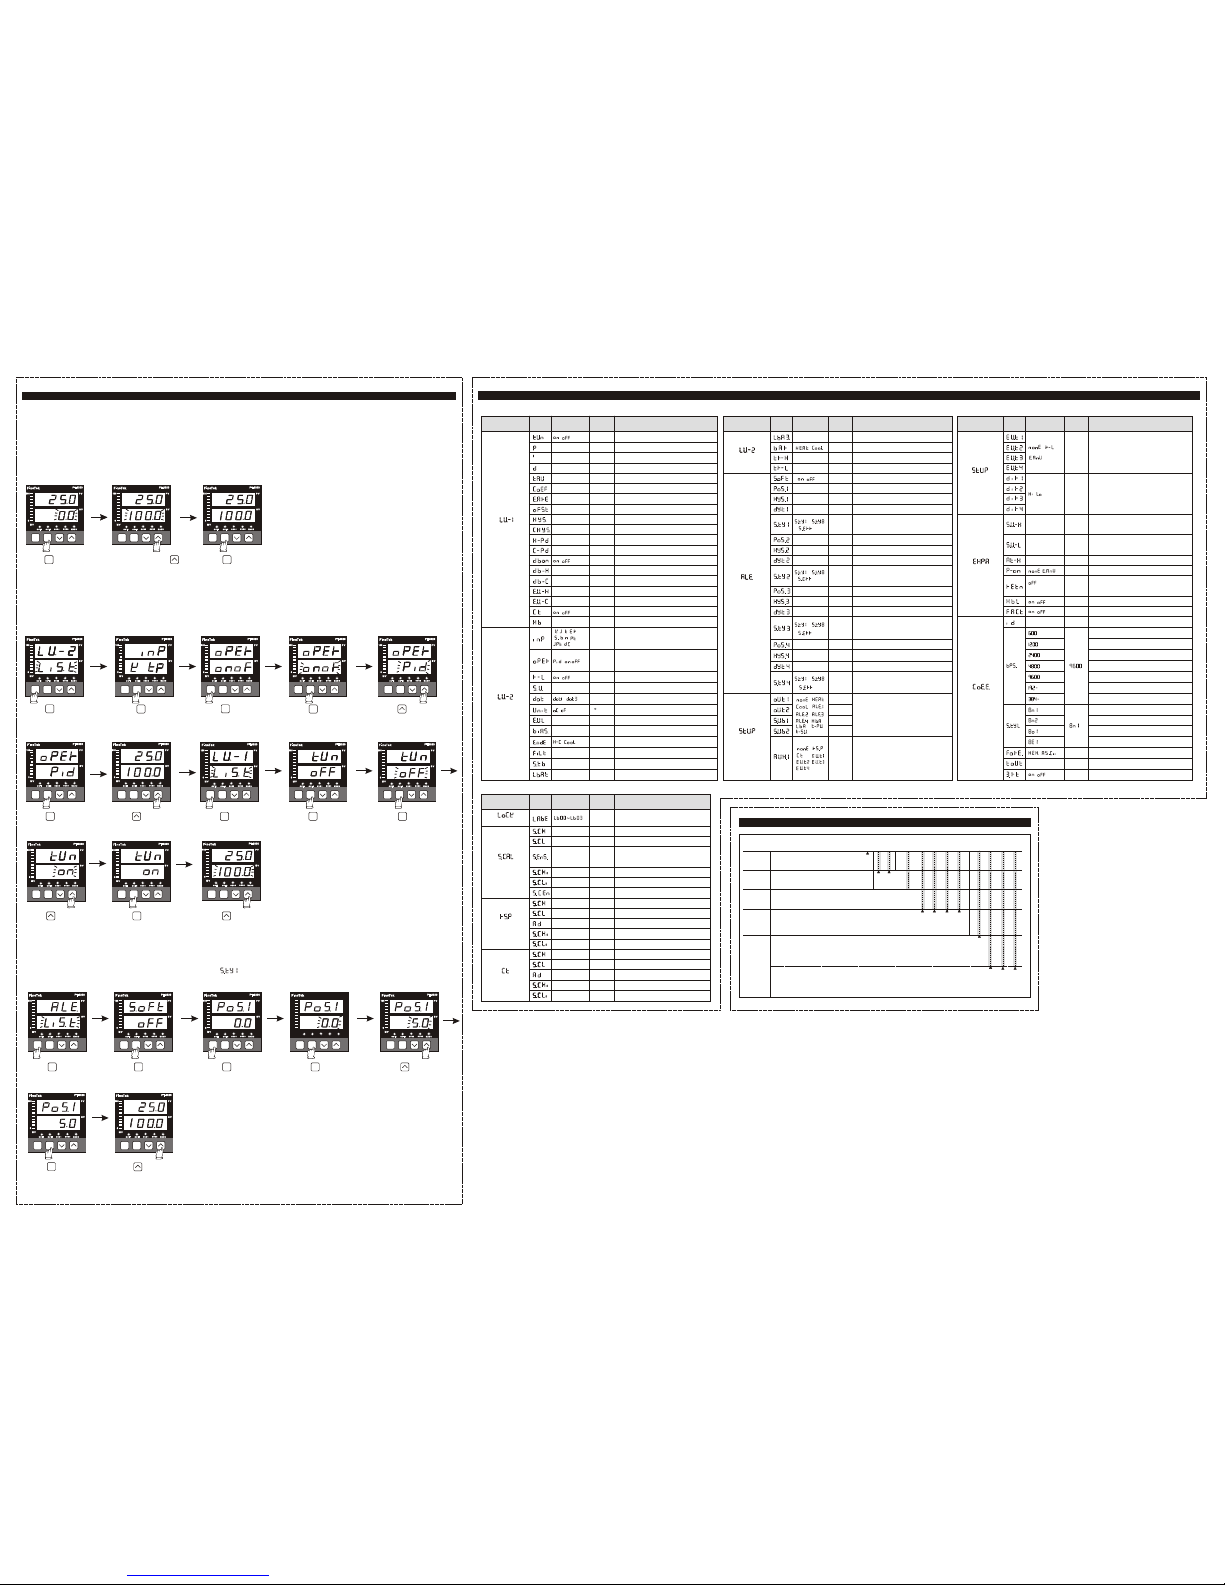
SETTING MODE
Press one second
and enter into SV setting
Press and holding
for accumulating
continue till 100.0
Press for setting
finish
1.Quick setting, For examples; Set SV=100
Parameters programming as following:
Press twice to
display LV-2
Press for display
control mode
Press enter into
LV-2 Sub item
Press enter into
edit mode
Press in order to
choose PID mode
Press for setting
finish
Press twice to
come back Main menu
Press one time
to display LV-1
Press enter into
LV-1 Sub item
Press enter into
edit mode
Press in order to
choose on
Press for setting
finish
S VS V
Press twice to
come back Main menu
*SV flash for operating Auto Tune
2.Auto Tuning
Press three times
to display ALM
Press enter into
ALM Sub item
PT-8320PT-8320
Press to display
alarm position setting
S U B 2S U B 2
S U B 1S U B 1
M A N UM A N U
O U T1O U T1
O U T 2O U T 2
PT-8320PT-8320
P VP V
S VS V
M VM V
00
100100
Press enter into
edit mode
Press and holding
for accumulating continue
up to 5.0
Press for setting
finish
Press twice to
come back Main menu
3.
Set alarm for pre-set deviation High-Alarm mode for
Alarm starting when PV more than SV+5
*Totally nine alarm mode, please refer to introduction of Alarm mode
FUNCTION LIST
Sty1
Heat
Cool
ALM1
ALM2
None
HEAT
1.0
100.0
0
Sty1
OFF
0.0
0.0
0
0.0
0.0
0
Sty1
0.0
0.0
0
Sty1
0.0
0.0
0
,
,
,
,
,
,
,
,
,
~
0~9999
-1999~9999
-1999~9999
-1999~9999
0000~9999
-1999~9999
0~99
0000~9999
0~99
-1999~9999
0000~9999
0~99
-1999~9999
0000~9999
/
/
0~99
~
~
~
Output Control / Alarm
Auxiliary signal input
Temperature differentiation
High Limit for Retransfer SV.
Bar graph display setting
Alarm set point 1
Low Limit for Retransfer SV.
Alarm soft activation
Alarm hysteresis Adjustment 1
Alarm delay time Adjustment 1(second)
Alarm mode 1
Alarm mode 2
Alarm set point 2
Alarm set point 3
Alarm set point 4
Alarm hysteresis Adjustment 2
Alarm hysteresis Adjustment 3
Alarm hysteresis Adjustment 4
Alarm delay time Adjustment 2(second)
Alarm delay time Adjustment 3(second)
Alarm delay time Adjustment 4(second)
Alarm mode 3
Alarm mode 4
Advance Setting
Alarm setting
Description
Main Item
Sub
Item
Data Range
Default
Value
Advance Setting
Setting
PID
Auto-tuning
Proportional Gain
SV Offset during Auto-tuning
Integration(unit:second)
Differentiation(unit:second)
Fuzzy parameter
Cooling parameter
Manual reset
Hysteresis for Heater output
Hysteresis for Cooler output
Control Cycle time for Heater output
Control Cycle time for Cooler output
Enable / Disable of Dead Band control
Dead Band interval for Heater
Dead Band interval for Cooler
Heater's output energy Display
Cooler's output energy Display
CT current display
Select Input Signal
Heater Break Alarm setting
Decimal point setting
Select control mode
SV Enable / Disable Remote
Set value
Temperature Unit
PV Multiplier
Bias of PV input
Heater major / Cooler major
Digital filter
Startup delay time(min)
Detection time(sec)
OFF
10
0
100
2.0
0
0.060
1.00
0
0
5.0
5.0
0
0
0
-1
0
0
K tp
onoF
oFF
1.000
dot1
0.0
C
0.0
5
H-C
0
0
, , ,
,
,
,
,
,
,
/
/
/
/
/
~
0~999.9
-1999~9999
0~9999
0~9999
0.001~9.999
0.01~99.99
0.0~100.0
0~9999
0~9999
0.1~50.0
0.1~50.0
-1999~9999
-1999~9999
0.0~100.0
0.0~100.0
0~55.0
-1999~9999
-1.999~9.999
-1999~9999
1~100
0~9999
0~9999
/
/
OFF
/
/
/
,10,20,30
40,50,60
/
,
-1999~9999
-1999~9999
0.0~100.0
1~255
/
100~999
0.5
9999
-1999
OFF
OFF
1
None
Hi
None
OFF
ON
100
Hex
ORDERING INFORMATION
OUT/SUB
select
0---None
1---5A RELAY
2---4~20mA DC
Optional
Dimension
20---48x48
30---96x48
3---0~10VDC Output
4---Voltage pulse output (12Vdc)
5---0~5VDC
31---48x96
40---72x72
50---96x96
Input
Signal
0---T/C & PT & 0~230mV
1---4~20mA
2---0~10VDC
6---0~20mA DC
OUT1OUT2 SUB1 SUB2
AUX1
AUX2 AUX3 AUX4
48*48 is available for AUX 1 only
( 9 PT-89 9 9 -S 9 - 9 9 9 9 - 9 9 9 )
Operating
mode
3:Standard mode
8:8 pattern Ramp Soak
Device ID identification
Auxiliary command input
Output direction ( Hi or Lo )
Auto-tuning hysteresis
Automatic return PV / SV screen
HBA alarm Latch
Restore Factory default setting
High Limit for SV
SV-H>SV-L
Low Limit for SV
SV-L<SV-H
Operation at Power-ON
8 Bytes size, No Parity, 1 stop Bits
Transmission mode
Time-out setting
Allow communication writing
Baud rate:600
Baud rate:1200
Baud rate:2400
Baud rate:4800
Baud rate:9600
Baud rate:19200
Baud rate:38400
8 Bytes size, No Parity, 2 stop Bits
8 Bytes, Odd Parity, 1 stop Bits
8 Bytes, Even Parity, 1 stop Bits
Description
Main Item
Sub
Item
Data Range
Default
Value
Description
Main Item
Sub
Item
Data Range
Default
Value
Menu locking
Maximum Voltage input
Minimum Voltage input
Input A/D switch
High Limit for PV display
Low Limit for PV display
Display voltage from Sensor
AD converter
Span Voltage setting
Zero Voltage setting
High Limit for SV (RSP)
Low Limit for SV (RSP)
Display Voltage of AD converter
-1999~9999
-1999~9999
10.0
-1.999~9.999
-1.999~9.999
-1999~9999
-1999~9999
-1.999~9.999
-1.999~9.999
100.0
0.0
0.25
0.1
0.0
2.264
0.072
LB00
Span Voltage setting
Zero Voltage setting
High Limit display for CT current
Display Voltage of AD converter
Low Limit display for CT current
-1.999~9.999
-1999~9999
-1999~9999
-1.999~9.999
35.0
2.5
0.1
0.0
Advanced
setting for PV
CT input setting
Advanced
setting for SV
Description
Main Item
Sub
Item
Data Range
Default
Value
0---RS485
1---CT
2---RSP(0~10V)
3---RSP(0~20mA)
4---Event
1---CT
2---RSP(0~10V)
3---RSP(0~20mA)
4---Event
Frame setting
Frame setting
Expand setting
Communication
setting
SET
MOD MOD
SET
SET
MOD
SET SET
SET
MOD
SET
MOD
SET
SET
SET SET
SET
MOD
SET
MOD
SET
MOD
SET
MOD
SET
MOD
SET
MOD
SET
MOD
SET
MOD
SET
MOD
SET
MOD
SET
MOD
SET
MOD
SET
MOD
SET
MOD
SET
MOD
SET
MOD
SET
MOD
SET
MOD
SET
MOD
SET
MOD
SET
MOD
SET
MOD
SET
MOD
Security selection
 Loading...