

PROFESSIONAL WEATHER STATION
Model no.: WA21A+WA5300
Operation Manual
About this manual
Thank you and congratulations on selecting this professional weather station! We are positive you will
enjoy the benefits of accurate weather readings and the precise radio controlled time information that
our instruments offer.
This manual will guide you step-by-step through setting up your device. Use this manual to become
familiar with your professional weather station, and save it for future reference.
Safety
y Do not expose the main unit to rain or moisture
y Use only recommended batteries
y Remove the batteries if the weather station is not to be used for a long time. Old batteries can begin
to leak and damage the product.
y Remember to insert the batteries according to the markings in the battery compartment. The wrong
polarity (+/-) can damage the weather station.
y Damage that has occurred by careless handling is not covered by the guarantee
Production Description.
y Display of indoor and outdoor temperature, wind speed, wind direction, humidity, rainfall amounts,
time and date
y Alarm function for certain weather conditions as well as records of all minimum and maximum
values alo ng with time and date of their recordings
y Radio control time and date (DCF/WWVB/MSF version optional
y Save the data when batteries is changed
y Operates on 5x LR6/AA alkaline batteries (not included)
Contents
y Main unit
y Transmitter(thermo-hygro sensor)
y Rain collector
y Sensor for wind speed and wind direction
y Sensor bracket
y Adjustable hoops
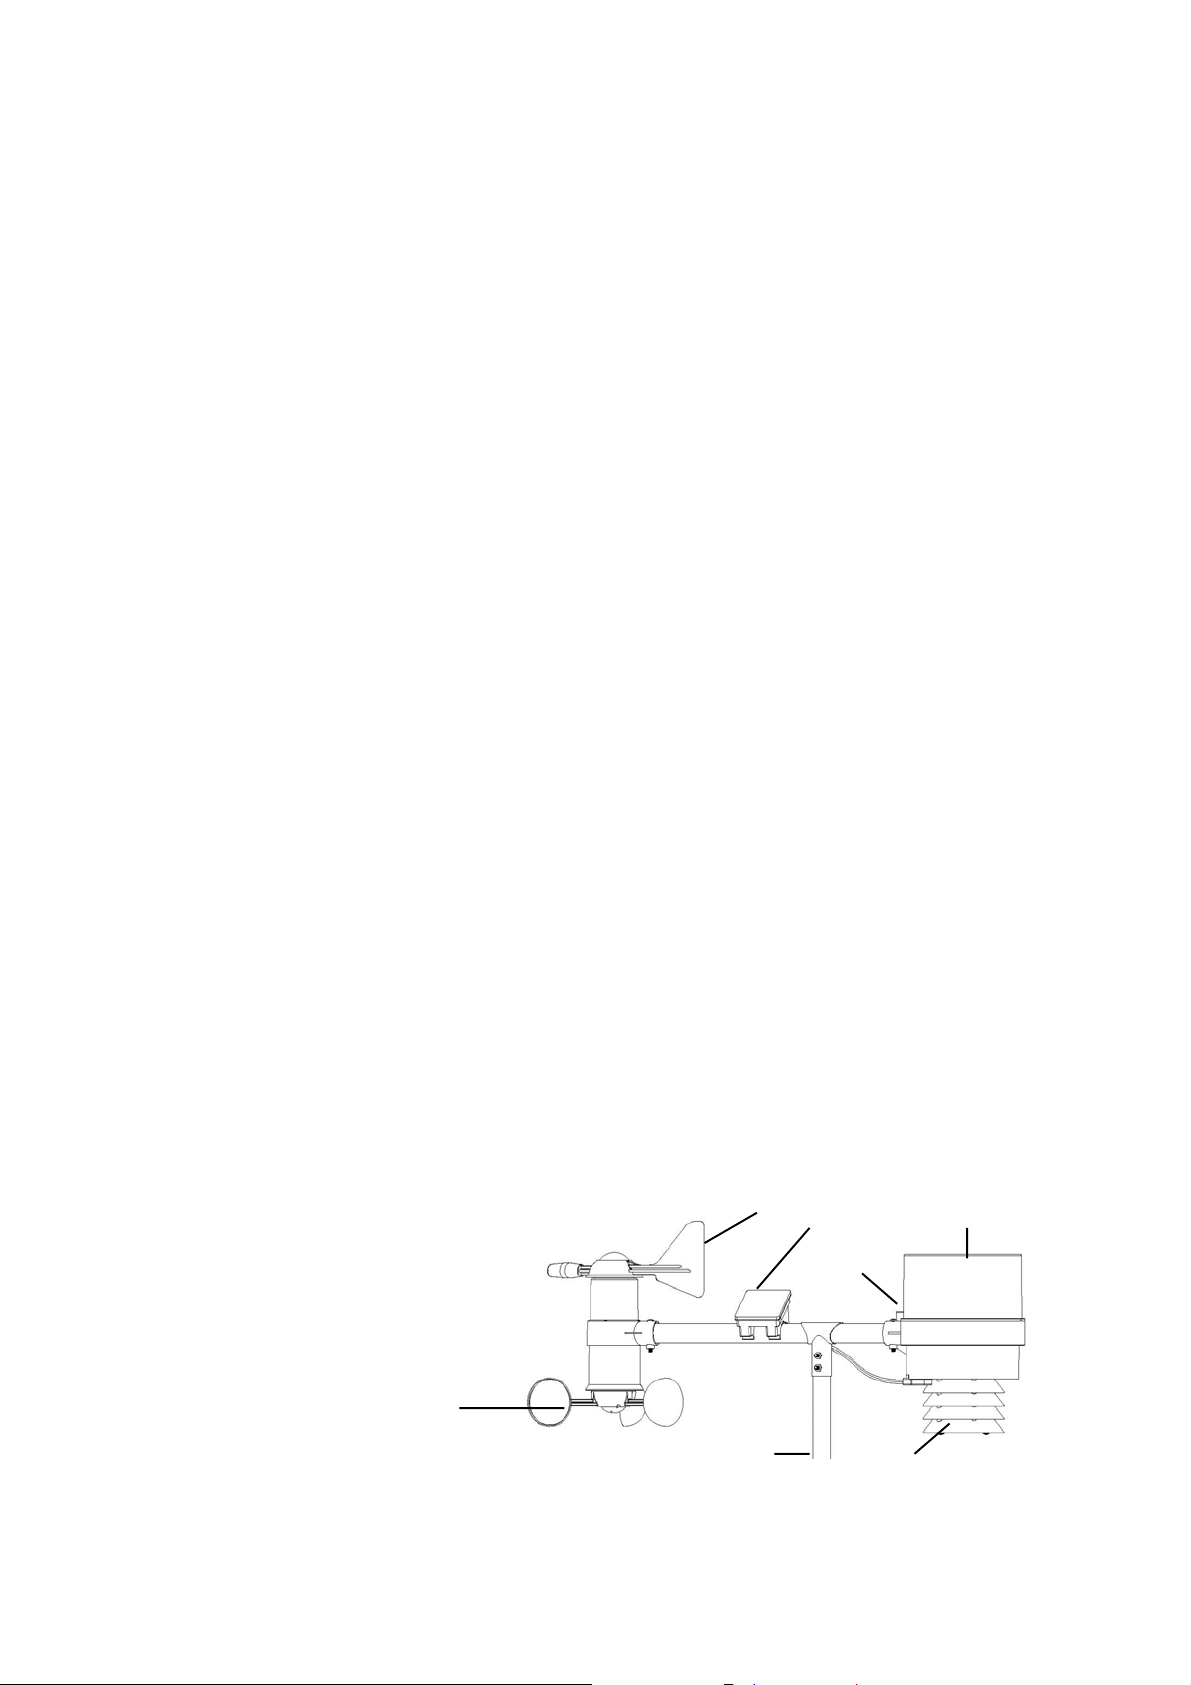
c Transmitter (thermo-hygro sensor) inside a radiation shield
d Rain collector
e Sensor for wind speed
f Sensor for wind direction
gSensor bracket
h Bubble level
i Solar panel
e
but only one)
f i d
h
g
c
- 1 -
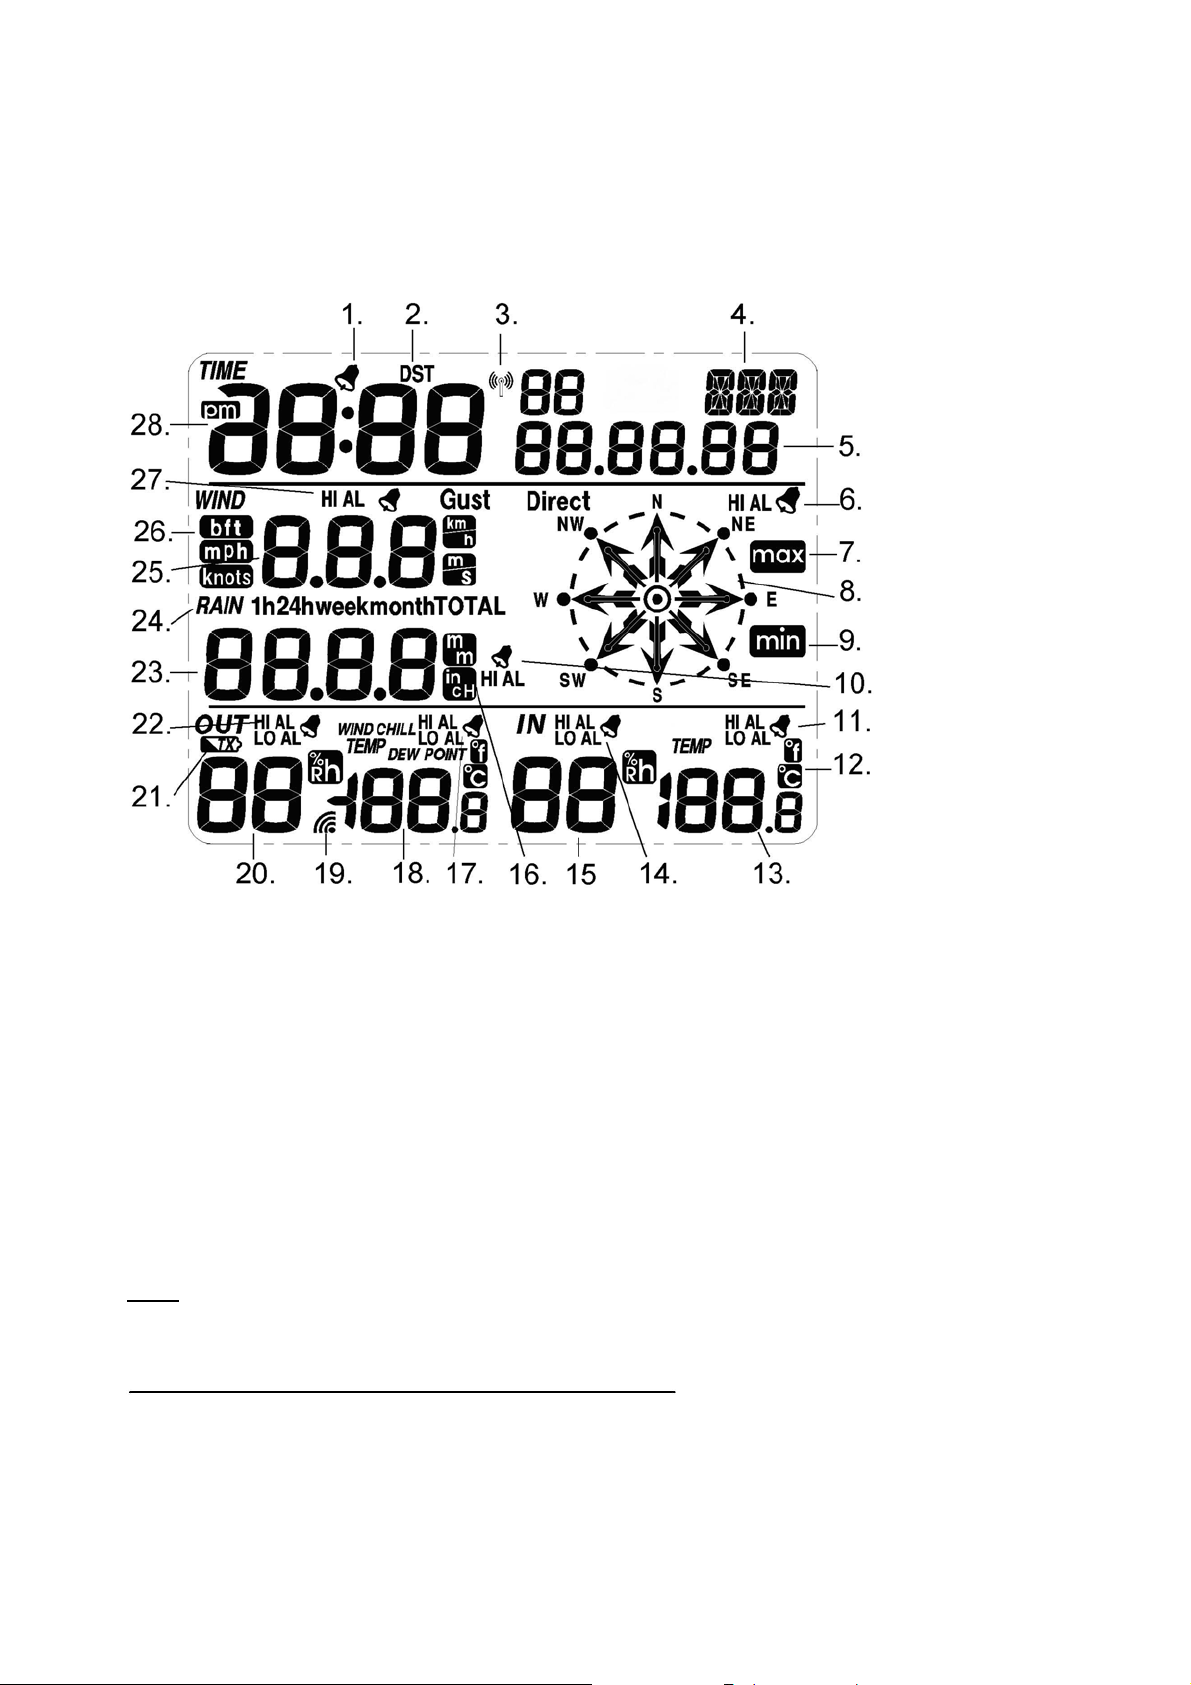
LCD Display
The following illustration shows the full segments of the LCD for description purpose only and will not
appear like this during normal operation and use.
1. Time alarm on icon
2. DST icon (only available on WWVB version)
3. RCC tower icon for time reception
4. Date of the week/time zone
5. Date
6. Wind direction alarm
7. General Max record
8. Wind direction
9. General Min. record
10. Rainfall high alarm
11. Indoor temperature high alarm and low alarm
12. Temperature unit
13. Indoor temperature
14. Indoor humidity high alarm and low alarm
The presence of the "Alarm-On icon" in the section means that the particular alarm has been
Note:
enabled.
15. Indoor humidity
16. Rainfall unit
17. Outdoor temperature high alarm and low alarm
18. Outdoor temperature
19. Outdoor reception signal
20. Outdoor Humidity
21. Outdoor transmitter low battery indicator
22. Outdoor humidity high alarm and low alarm
23. Rainfall
24. Rainfall 1h,24h, week, month or total display
25. Wind speed
26. Wind speed unit
27. Wind speed high alarm
28. Time
Set up Guide
Inserting the batteries
- 2 -
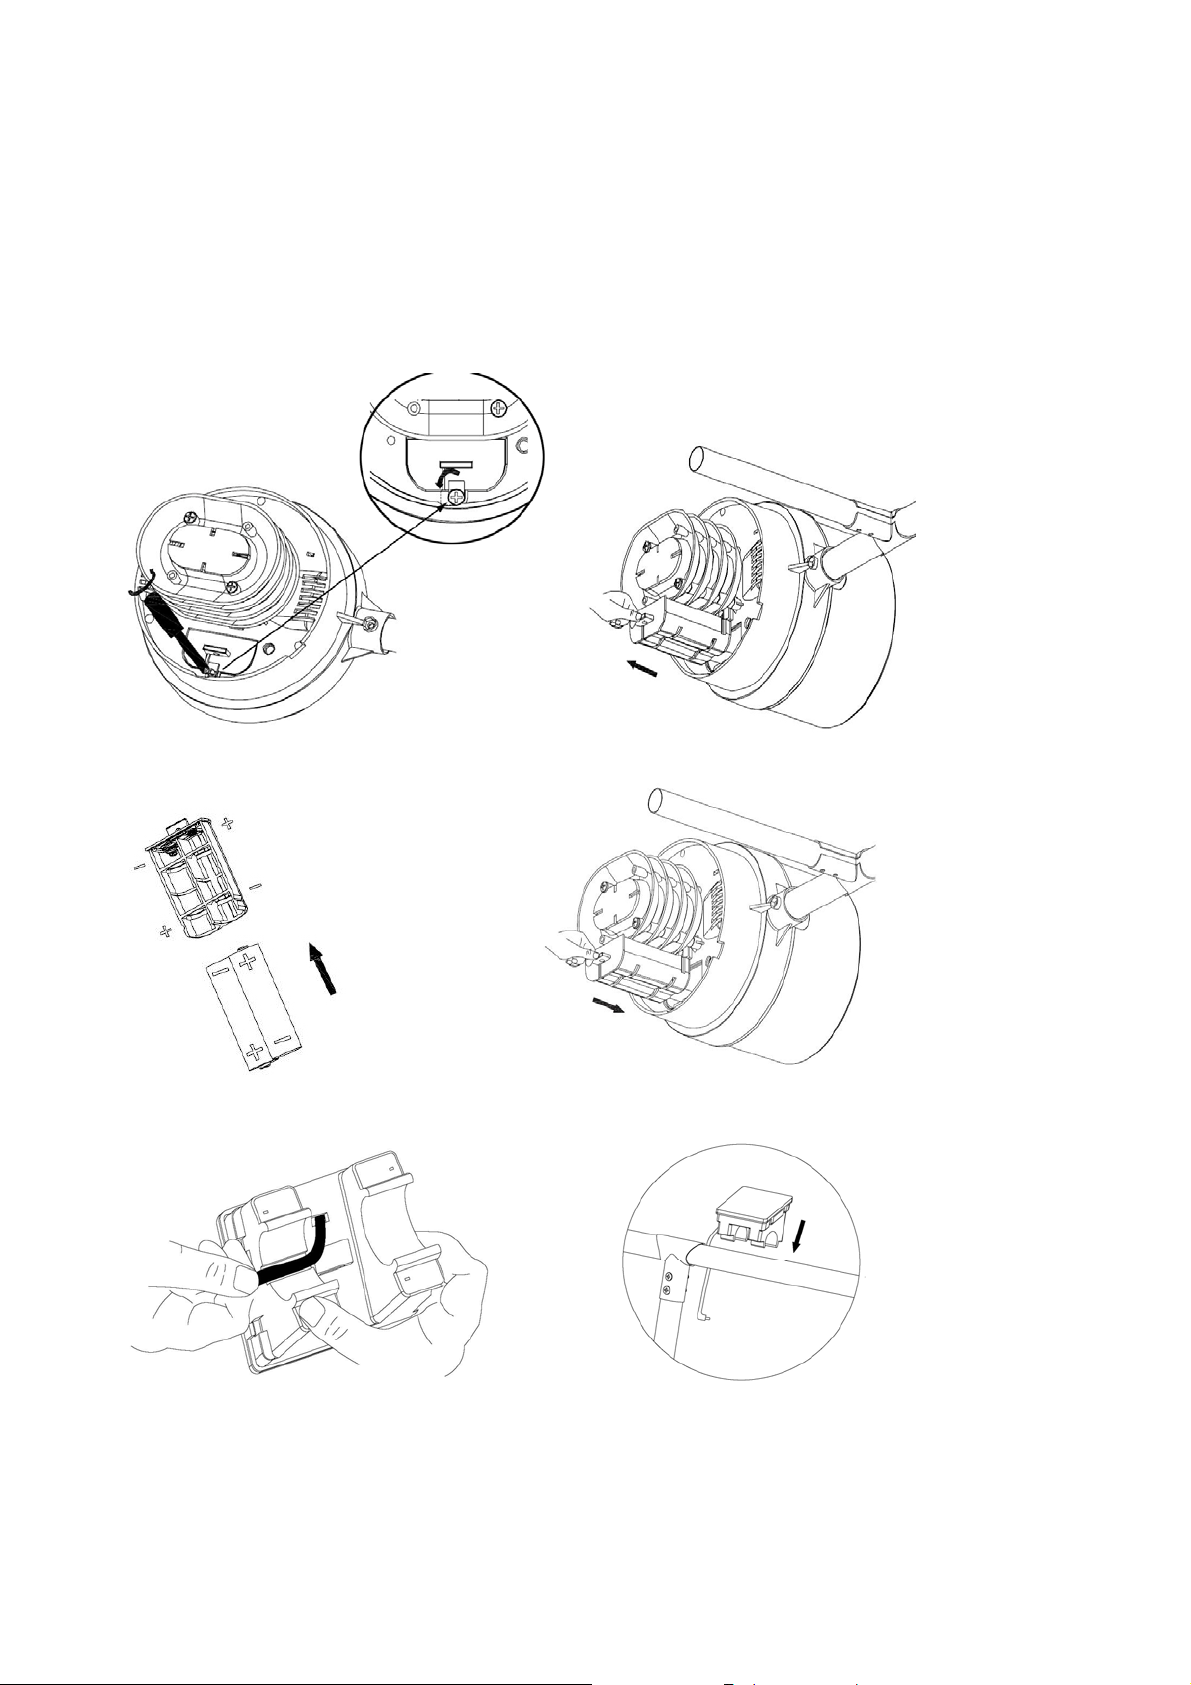
Transmitter/outdoor unit
1. Turn the screwdriver counter clockwise to loosen t he s c rew, turn aside the sheet metal (Figure 1)
2. Pull out the battery compartment (Figure 2)
3. Insert 2xAA rechargeable battery in the battery compartment. (Figure 3) Push the battery
compartment into the rain collector unit.
4. The solar panel’s cable is connected to the input beside the battery compartment. (Figure 5,6,7)
Figure1 Figure 2
Figure 3 Figure 4
Figure 5 Figure6
- 3 -
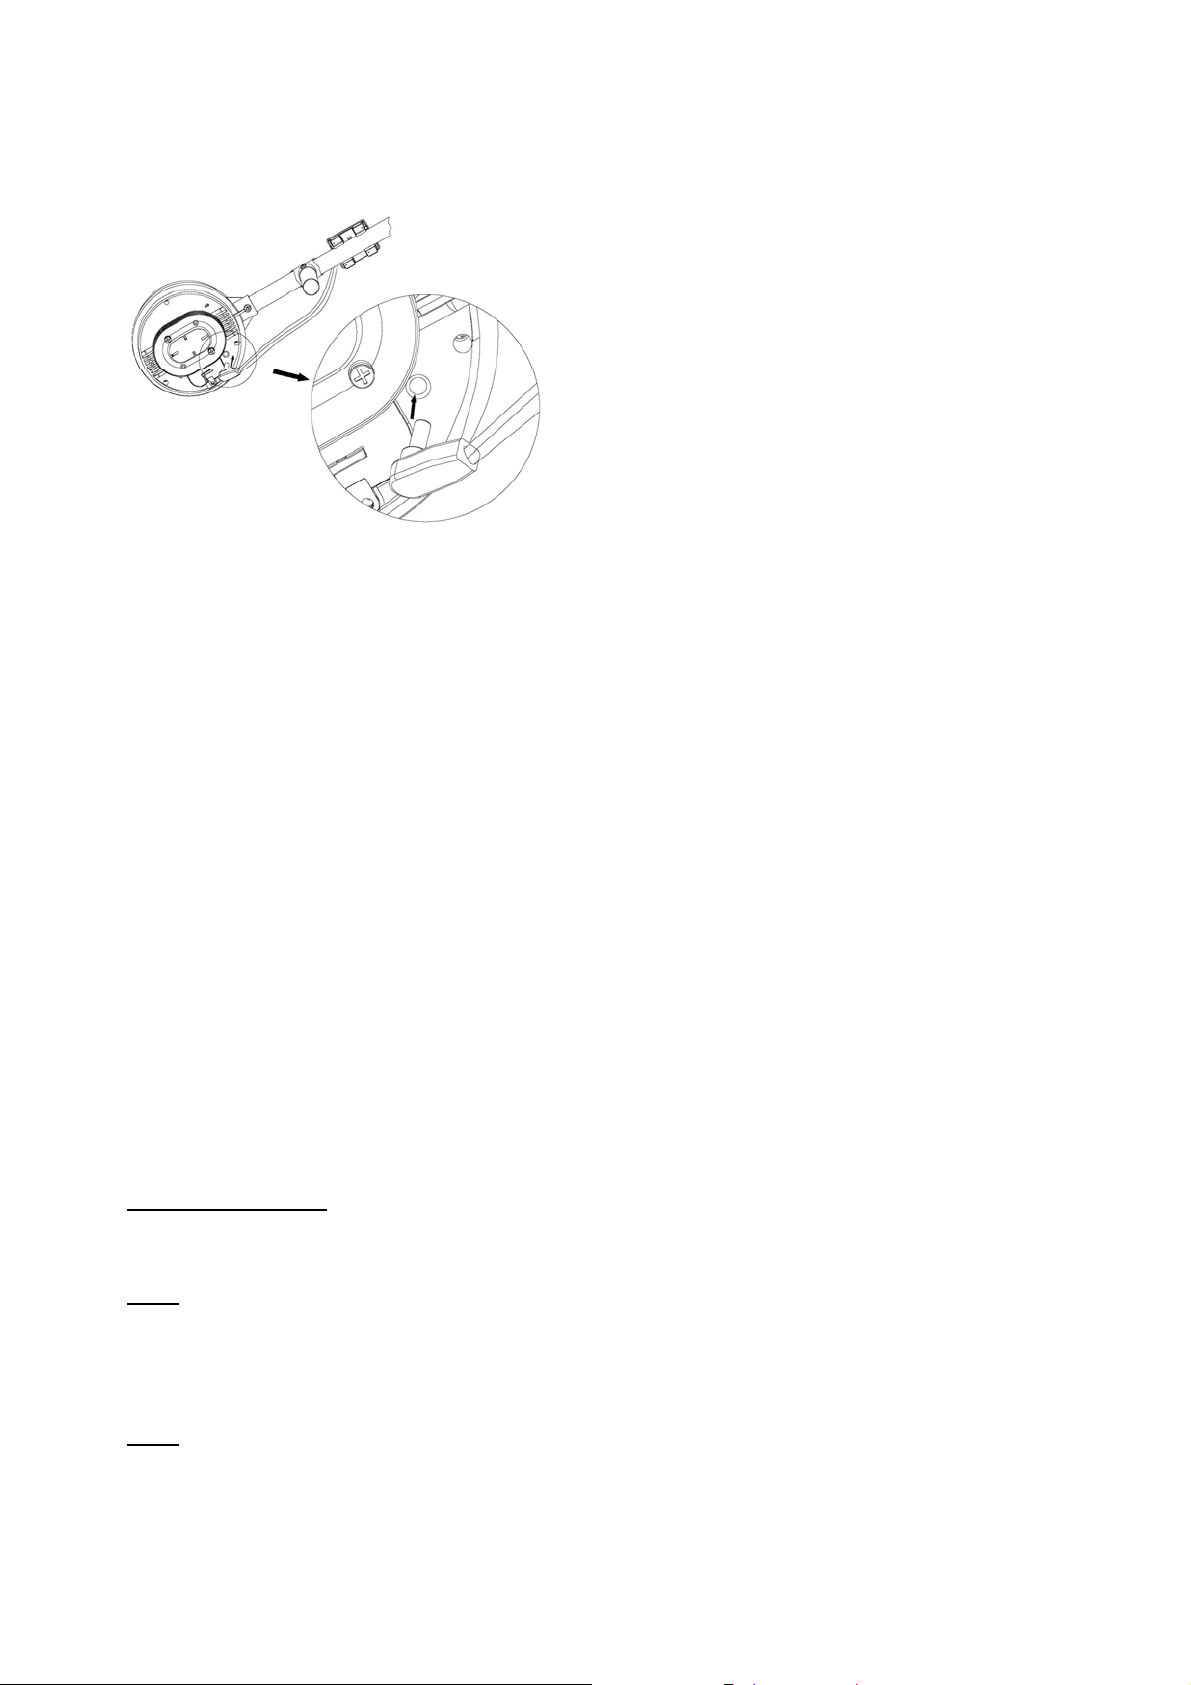
Figure 7
Insert 2xLR6 (AA size) batteries into the transmitter, the LED located in the back of raincollector will be
turned on for 4 seconds, then it will be off and start to work normally. The transmitter will make a data
transmission and then start radio controlled time reception routine. If time signal can be detected
correctly, the LED will start to flash 5 times, and then the LED will be on for 20s,
has been found correctly. When time signal is bad and reception is not possible, the transmitter will
terminate radio controlled time reception within one minute and resume normal mode. When there is a
data transmission happened, the LED will be on for 20ms. During radio controlled time reception period,
there is no transmission and normal transmission will only resume after time reception routine is
complete. The longest time for radio controlled time reception is 5 mi nutes.
Receiver /Indoor unit
After inserting the batteries into the Weather Station, all LCD segments will be turned o n for a few
seconds, all possible display segments are turned on for checking.
After this, the weather station will make initial measurement and start to register t he transmitter (the
radio reception icon will be turned on). Do not press any key before outdoor sensor data received,
otherwise the outdoor sensor learning mode will be terminated. When outdoor transmitter has been
registered, the base station will automatically switch to the normal display mode from which all further
settings can be performed by the user.
If no RCC signal is detected in the initial setup, the transmitter will try once every two hours to get an
RCC signal until a signal is received. Once the transmitter receives the RCC signal it will transmit the
signal to the monitor. On the monitor the RCC tower icon will be displayed, if the monitor doesn’t receive
the RCC signal or loses the signal continuously for 12 hours the RCC icon will not be display.
Note for RCC signal:
The best condition for reception is at night, between midnight and 6:00am – when there is less
atmospheric interference.
Note:
If a battery change on the transmitter side happened, the receiver will be resynchronized to the
transmitter again within the next 3 hours. If you want to shorten the receiving data time, the base station
has to re-install the battery so that it can have the new security code learnt right way, but the previous
weather data and alarm value settings in receiver will be lost.
Note:
Commonly the radio communication between receiver and transmitter in the open field can reach a
indicating time signal
- 4 -

distance of up to 330 feet providing that there are no interfering obstacles such as buildings, trees,
vehicles, high voltage lines, etc.
Radio interferences such as PC screens, radios or TV sets can, in bad cases, entirely cut off radio
communication. Please take this into consideration when choosing standing or mounting locations.
Mounting
Before placing and installing all components of the weather station at there final destination, please set
up the weather station with all parts being nearby for testing the correct function. If e.g. there appear to
be problems with the 433 MHz radio transmission, they can mostly be overcome by moving the
mounting locations.
Transmitter (thermo-hygro sensor), rain collector, wind direction sensor have been mounted onto the
mast. You just need to assemble the wind cups attached.
Attaching the Wind Cups
1. Push the wind cups onto the anemometer’s stainless steel shaft.
2. Use the Allen wre nch provided to tighten the set screw on the side of the wind cups.
3. Spin the wind cups. If the wind cups spin freely, the anemometer is ready and can be installation.
Tighten screw
with Allen wrench
Push cups onto
stainless steel
shaft
Figure5
Note
On the edge of wind direction sensor , there are four alphabet letter of “N”,”E”,”S”and “W” r epresenting for
the direction of North, East, South and West. Wind direction sensor has to be adjusted so that the
directions on the sensor are matching with your real location. Permanent wind direction error will be
introduced when the wind direction sensor is not positioned correctly during installation.
Level the sensors
Use the bubble level on the rain sensor as a guide to verify that sensors are level.
- 5 -

Program Mode
The base station has five keys for easy operation: SET key, + key, HISTORY key, ALARM key,
MIN/MAX key
Note:
When setting certain units in the manual setting mode, hold the + or MIN/MAX key for 2s will
increase/decrease digits in greater steps.
The setting procedure can be exited at any time by either pressing the HISTORY key or waiting for the
30-second time-out to take effect.
Quick Display Mode
- While in normal display, Press the SET key to enter the Quick Display Mode as follow:
y Wind speed / Gust speed (press the + key or MIN/MAX key shifts the display between the wind
speed and gust speed)
y 1 hour / 24 hour / week / month / total rainfall quantity (press the + key or MIN/MAX key shifts the
display between the selectable rainfall quantities), while display the rainfall total quantity, pressing
the SET key for 2 seconds will reset the rainfall total value to zero.
y Outdoor Temperature / Wind chill / Dew point (press the + key or MIN/MAX key shifts the display
between outdoor temperature, wind chill and dew point)
Press the SET key to accept the chan ge and advance to the next display mode. Continue to press the
SET key to toggle through the display mode until return to the normal Mode
Setting Mode
- Press the SET key for 2 second while in normal mode to enter the Setting mode, LCD contrast digits
will start flashing. You can skip over any setting by press the SET key. Press + key or MIN/MAX key to
select the units or scrolls the value. Holding the + key or MIN/MAX key for 2 second will
increase/decrease digits in great steps. To exit the Setting mode at any time, press the HISTORY key.
y Time Zone Setting (-12Æ12)
Note: At Europe, 0 for GMT+1 time zone, 1 for GMT+2 time zone, -1 for GMT time zone. At America,
-4 for Atlantic Time zone, -5 for Eastern Time zone, -6 for Central Time zone, -7 for Mountain Time
zone, -8 for Pacific time zone, -9 for Alaska time zone, -10 for Hawaii time zone.
y 12/24h time display select.
y Manual time setting (hours/minutes)
y Select DD-MM or MM-DD format.
y Calendar setting(year /month/ date)
y Wind speed and gust display units in km/h, m/s, bft, mph, knots
y Wind direction
y Rainfall display units in mm or inch
y Temperature display unit degree Celsius or Fahrenheit
Calibration Mode
- Press the HISTORY key for 8 second while in normal mode to enter the Calibration Mode, and the
wind factor digits will start flashing. You can skip over any setting by press the SET key. Press + key
or MIN/MAX key to select the units or scrolls the value. Holding the + key or MIN/MAX key for 2
second will increase/decrease digits in great steps. To exit the Calibration mode at any time, press
the HISTORY key.
- 6 -

y Wind Speed Calibration (default is 1.0, adjustment rang 0.75 to 1.25)
y Rainfall data Calibration (default is 1.0, adjustment rang 0.75 to 1.25)
y History rainfall Calibration
y Outdoor humidity Calibration
y Outdoor temperature Calibration
y Indoor humidity Calibration
y Indoor temperature Calibration
Wind Speed Calibration
Wind speed is the most sensitive to installation constraints. The weather station should not be located
close to buildings, trees or other obstructions.
Many installations are not perfect and installing the weather station on a roof can be difficult. Thus, you
can calibrate for this error with a wind speed multiplier.
In addition to the installation challenges, wind cup bearings (moving parts) wear over time.
Without a calibrated source, wind speed can be difficult to measure. We recommend using a calibrated
wind meter and a constant speed, high speed fan.
Temperature Calibration
Temperature errors can occur when a sensor is placed too close to a heat source (such as a building
structure, the ground and when placed in direct sunlight without proper shielding in hot weather
environments).
To calibrate temperature, we recommend a mercury or red spirit (fluid) thermometer. Bi-metal (dial) and
other digital thermometers are not a good source and have their own margin of error. Using a local
weather station in your area is also a poor source due to changes in location, timing (airport weather
stations are only updated once per hour) and possible calibration errors (many official weather stations
are not properly installed and calibrated).
Place the sensor in a shaded, controlled environment next to the fluid thermometer, and allow the sensor
to stabilize for 48 hours. Compare this temperature to the fluid thermometer and adjust the console to
match the fluid thermometer.
Humidity Calibration
Humidity is a difficult parameter to measure accurately and drifts over time. Humidity errors can occur
when placed too close to the ground, near grass or other sources of humidity.
The hygrometer sensor utilizes a capacitor, which varies as a function of humidity . Due to manufac turin g
tolerances, the accuracy of the sensor is ± 5%. To improve on this accuracy, the indoor and outdoor
humidity readings can be adjusted or calibrated from the display console.
To calibrate humidity, you will need an accurate source, such as a sling psychrometer or Humidipaks
One Step Calibration kit.
Rainfall calibration
The Rain Collector is calibrated at the factory so the bucket tips (and records rainfall) for each 0.01" (or
0.3 mm) of rain. To calibrate rainfall, we recommend a tube type rain gauge. Use a rain gauge with an
aperture of at least 4 inches. Any smaller and the readings obtained may not be accurate. Place the tube
type rain gauge directly next to the rain collector . Compare the totals on three storms. Based on this,
- 7 -

develop an average for how far off the readings are.
Do not compare rainfall readings to reading obtained from television, radio, newspapers, or neighbors’
readings. Such readings are not located in your specific environment and therefore are not an accurate
measurement of the weather readings taking place in your surroundings. The rain collect or is carefully
tested at the factory to conform to the specifications listed in the back of this manual.
The history rainfall calibration factor is applied to the running total, not individual tips. All of the rainfall
figures are calculated from the total number of tips recorded by the station since it was reset. The total is
multiplied by 0.3 to get a total in mm. This is then converted to inches if necessary by multiplying by
0.0393700787. The calibration multiplier is then applied to this, and this is the figure that remembers and
compares each time a new total is read from the station.
History Modes
- While in Normal Mode, press the HISTORY key to enter the History Mode.
- In the histor y m ode, press SET key will trigger the history clear procedure: the word of “CLEAR” will
be flashing, hold the SET key for 2 seconds will clear all the history records.
- In the history mode, press the MIN/MAX key to select the record over the past 24hours at increments
of -3 hours, -6 hours, -9 hours, -12 hours, -15 hours, -18 hours, -21 hours, -24 hours.
Press the HISTORY key or key idle 30 second to return to Normal Mode
Alarm Modes
- While in Normal Mode press the ALARM key to enter the High Alarm Mode, Press the ALARM key
again to enter Low Alarm mode, press the ALARM key the third time to return the Normal Mode.
Remark: after the initial pressing of ALARM key, the display will be refreshed to show current high, low
alarm values. Normal alarm value will be displayed only for those already activated, all other not
activated values will be displayed with “- - -“or “- -“instead.
-In the High Alarm Mode press the SET key to select the following alarm modes:
1. Time alarm
2. Wind speed high alarm (0-50m/s)
3. Gust speed high alarm (0-50m/s)
4. Wind direction alarm
5. 1Hour rain high alarm (0-999.9mm)
6. 24 hour rain high alarm (0-999.9mm)
7. Outdoor humidity high alarm (1%-99%)
8. Outdoor temperature high alarm (
9. Wind chill high alarm (
10. Dew point high alarm (
-40˚C--60˚C)
-40˚C--60˚C)
11. Indoor humidity high alarm (1%-99%)
12. Indoor temperature high alarm (
-In the Low Alarm Mode press the SET key to select the following alarm modes:
1. Time alarm
2. Outdoor humidity low alarm (1%-99%)
3. Outdoor temperature low alarm (
4. Wind chill low alarm (
5. Dew point low alarm (
-40˚C--60˚C)
-40˚C--60˚C)
6. Indoor humidity low alarm (1%-99%)
7. Indoor temperature low alarm (
-40˚C--60˚C)
-9.9˚C--60˚C)
-40˚C--60˚C)
-9.9˚C--60˚C)
- 8 -

- In the alarm modes, press + key or MIN/MAX key to change or scroll the alarm value.
Hold the + key or MIN/MAX key for 2 second will increase/decrease digits in great steps. Press the
ALARM key to select the alarm on or off (if alarm is enabled, the speaker icon on the LCD will be turned
on indicating the alarm function has been enabled).
- Press the SET key to toggle through each alarm mode until it returns to the normal display mode.
-Press HISTORY key or key idle 30 second at any time, the alarm mode will return to Normal Mode
Canceling the Temperature Alarm While Sounding
a. When a set weather alarm condition has been triggered, that particular alarm will sound for 120
second and flash until the weather condition doesn’t meet the user set level. Press any key to mute the
alarm. When weather alarm condition was activated again within 3 hours, alarm will not sound but will
continue to flash until weather conditions have become more steady. This feature is useful to avoid
repeated triggering for the same alarm value.
b. The alarm will reactivate automatically once the value has fallen below the set value.
Min/Max Mode
- While in Normal Mode, press the MIN/MAX key to enter the maximum mode
- Press MIN/MAX key again to enter the minimum mode
- Press MIN/MAX key again to return the Normal Mode.
- In the maximum reading Mode, press the + key to display the following maximum values together with
the time and date stamp when these values were recorded, if hold the SET key for 3s in the following
individual maximum value will be reset to current reading together with the current time and date.
1. Wind speed maximum
2. Gust speed maximum
3. 1Hour rain maximum
4. 24 hour rain maximum
5. Week rainfall maximum
6. Month rainfall maximum
7. Outdoor humidity maximum
8. Outdoor temperature maximum
9. Wind chill temperature maximum
10. Dew point temperature maximum
11. Indoor humidity maximum
12. Indoor temperature maximum
- In the minimum reading Mode, press the + key to display the following minimum values together with
the time and date at which these values were recorded, if hold the SET key for 3s in the following
individual minimum value will be reset to current reading together with the current time and date.
1. Outdoor humidity minimum
2. Outdoor temperature minimum
3. Wind chill temperature minimum
4. Dew point temperature minimum
5. Indoor humidity minimum
6. Indoor temperature minimum
- Press the HISTORY key or key idle 30 second, the MIN/MAX mode will return to Normal Mode
Reset To Factory Default Settings
While in normal display, press and hold the + key for 20s to reset all settings to the manufacturer default
setting
- 9 -

Specifications
Outdoor data
Transmission distance in open field : 100m(300 feet)
Frequency : 433MHz
Temperature range : -40˚C--65˚C (-40℉ to +149℉)
Accuracy : + / - 1 °C
Resolution : 0.1˚C
Measuring range rel. humidity : 1%~99%
Accuracy : +/- 5%
Rain volume display : 0 – 9999mm (show --- if outside range)
Accuracy : + / - 10%
Resolution : 0.3mm (if rain volume < 1000mm)
1mm (if rain volume > 1000mm)
Wind speed : 0-180km/h (0~110mph) (show --- if outside range)
Accuracy: +/- 1m/s (wind speed< 10m/s)
+/-10% (wind speed > 10m/s)
Measuring interval thermo-hygro sensor: 48 sec
Water proof level : IPX3
Indoor data
Measuring interval temperature/humidity : 30 sec
Indoor temperature range : -9.9˚C--60˚C (14℉ to + 140℉) (show --- if outside range)
Resolution : 0.1˚C
Measuring range rel. humidity : 1%~99%
Resolution : 1%
Alarm duration : 120 sec
Power consumption
Base station : 3XAA 1.5V LR6 Alkaline batteries (not included)
Remote sensor : 2xAA 1.5V LR6 Alkaline batteries (included)
Battery life : Minimum 12 months for base station
Minimum 24 months for thermo-hygro sensor
Remark:
Be sure to use 1.5V rechargeable battery for solar transmitter.
Where outdoor temperature is lower than -20˚C, make sure proper type of batteries to be used to assure that
the device can get enough power to maintain its function properly. Normal alkaline batteries is not allow to be
used since when outdoor temperature is lower than -20 ˚C, the battery’s discharging capability is greatly
reduced.
All rights reserved. This handbook must not be reproduced in any form, even in excerpts, or duplicated or processed using electronic,
mechanical or chemical procedures without written permission of the publisher.
This handbook may contain mistakes and printing errors. The information in this handbook is regularly checked and corrections made in
the next issue. We accept no liability for technical mistakes or printing errors, or their consequences.
All trademarks and patents are acknowledged.
Please help in the preservation of the environment and return used batteries to an authorized depot.
- 10 -

Appendix
How to replace the sensor
Replace Rain collector and thermo-hygro sensor
c
d
e
- 11 -

f
g
- 12 -

Replace wind sensor
Before replace the wind sensor, need to unplug the cable from rain sensor as illustration
.
f
Changes or modifications not expressly approved by the party responsible for compliance could void the user ’s
authority to operate the equipment.
This device complies with Part 15 of the FCC Rules. Operation is subject to the following two
conditions:
(1) this device may not cause harmful interference, and
(2) this device must accept any interference received, including interference that may cause
undesired operation.
- 13 -
 Loading...