

Page 1
(Note: X3 Mark III will be called X3 for short in the below Instruction)
All the below illustrating pictures are for reference only.
X3 Complete User Manual
(Applies to FW1.0.0 and later)
Foreword:
Thank you for purchasing FiiO's X3, our 192 kHz/32 bit high resolution lossless
music player. To let you better utilize the X3 to enjoy high-quality music, we have
prepared this complete user manual and collected and answered some frequently
asked questions by users. We hope this manual will help you get to know the X3 and
unleash its full potential.
1
Page 2

Contents
A. Introduction .............................................................................................. 3
B. Buttons and Ports .................................................................................... 3
1. Buttons/Ports Diagram ............................................................................. 3
2. Buttons and ports introduced ................................................................... 4
C. Visual Guide to Menu Operation ........................................................ 6
1. Main Menu ............................................................................................... 6
2. Key-Lock Settings ...................................................................................... 7
D. Menu Operation ...................................................................................... 8
1 .Turning On/Off .......................................................................................... 8
2. Now Playing .............................................................................................. 8
3. Category .................................................................................................... 8
4. Browse Files .............................................................................................. 9
5. Play Settings .............................................................................................. 9
6. System Settings ....................................................................................... 11
E. Firmware update ................................................................................... 16
F. Tips on usage ........................................................................................... 18
G. Frequently Asked Questions....................................................................................... 19
1. About charging ...................................................................................... 19
2. Transferring songs ................................................................................. 20
3. Firmware upgrades ................................................................................ 21
4. Storage .................................................................................................. 21
5. Other operations ................................................................................... 24
6. Connecting to other audio devices ........................................................ 25
2
Page 3
① ② ⑤
④
③
⑩ ⑧ ⑦ ⑥ ⑫ ⑮ ⑭ ⑬ ⑪
⑨
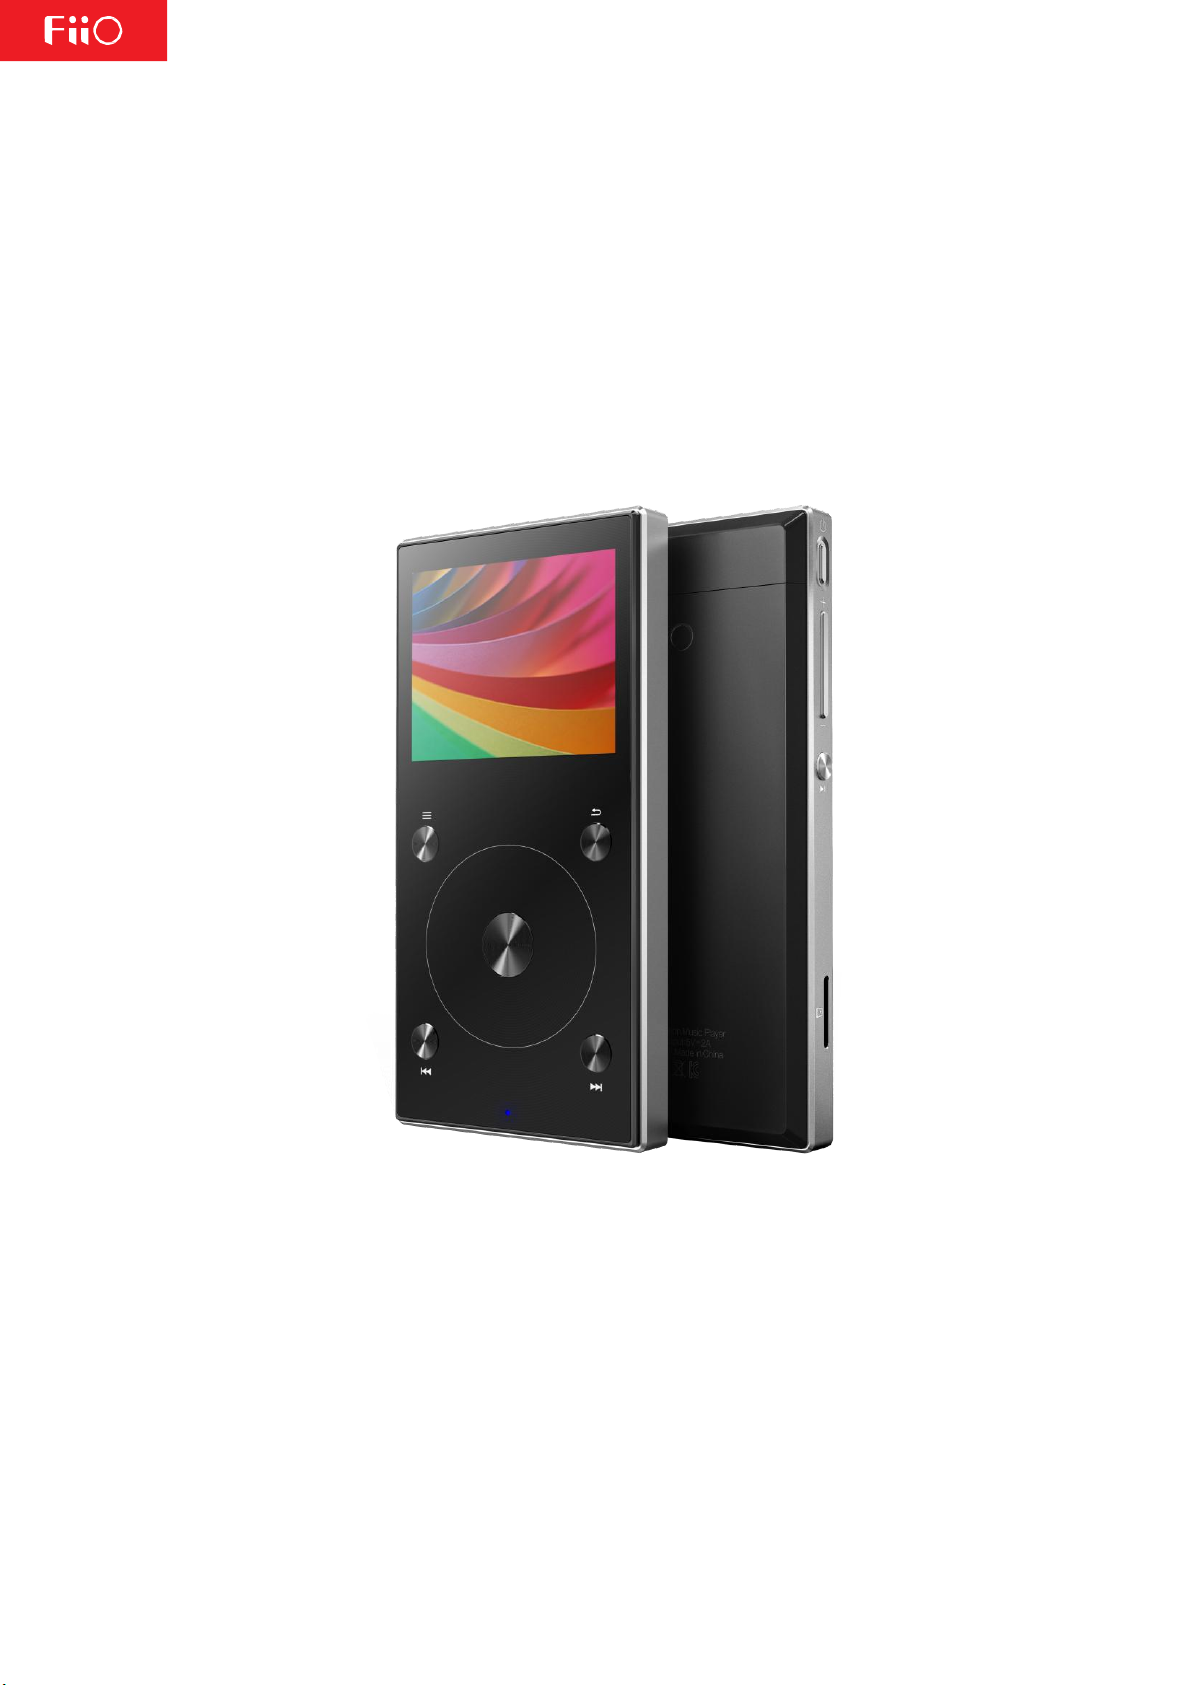
A. Introduction
The X3 is a high resolution digital audio player, supporting lossy and lossless music formats
including MP3, WAV, WMA, APE, FLAC, AAC and Ogg Vorbis. A maximum sample rate of 192kHz/32
bit is supported and other features include Bluetooth and CUE sheets. The X3 also can support
headphone output, Lineout, digital coaxial output and 2.5mm balanced output.
It's a portable high-performance music player.
The following sections are an illustrated guide to using the X3.
B. Buttons and Ports
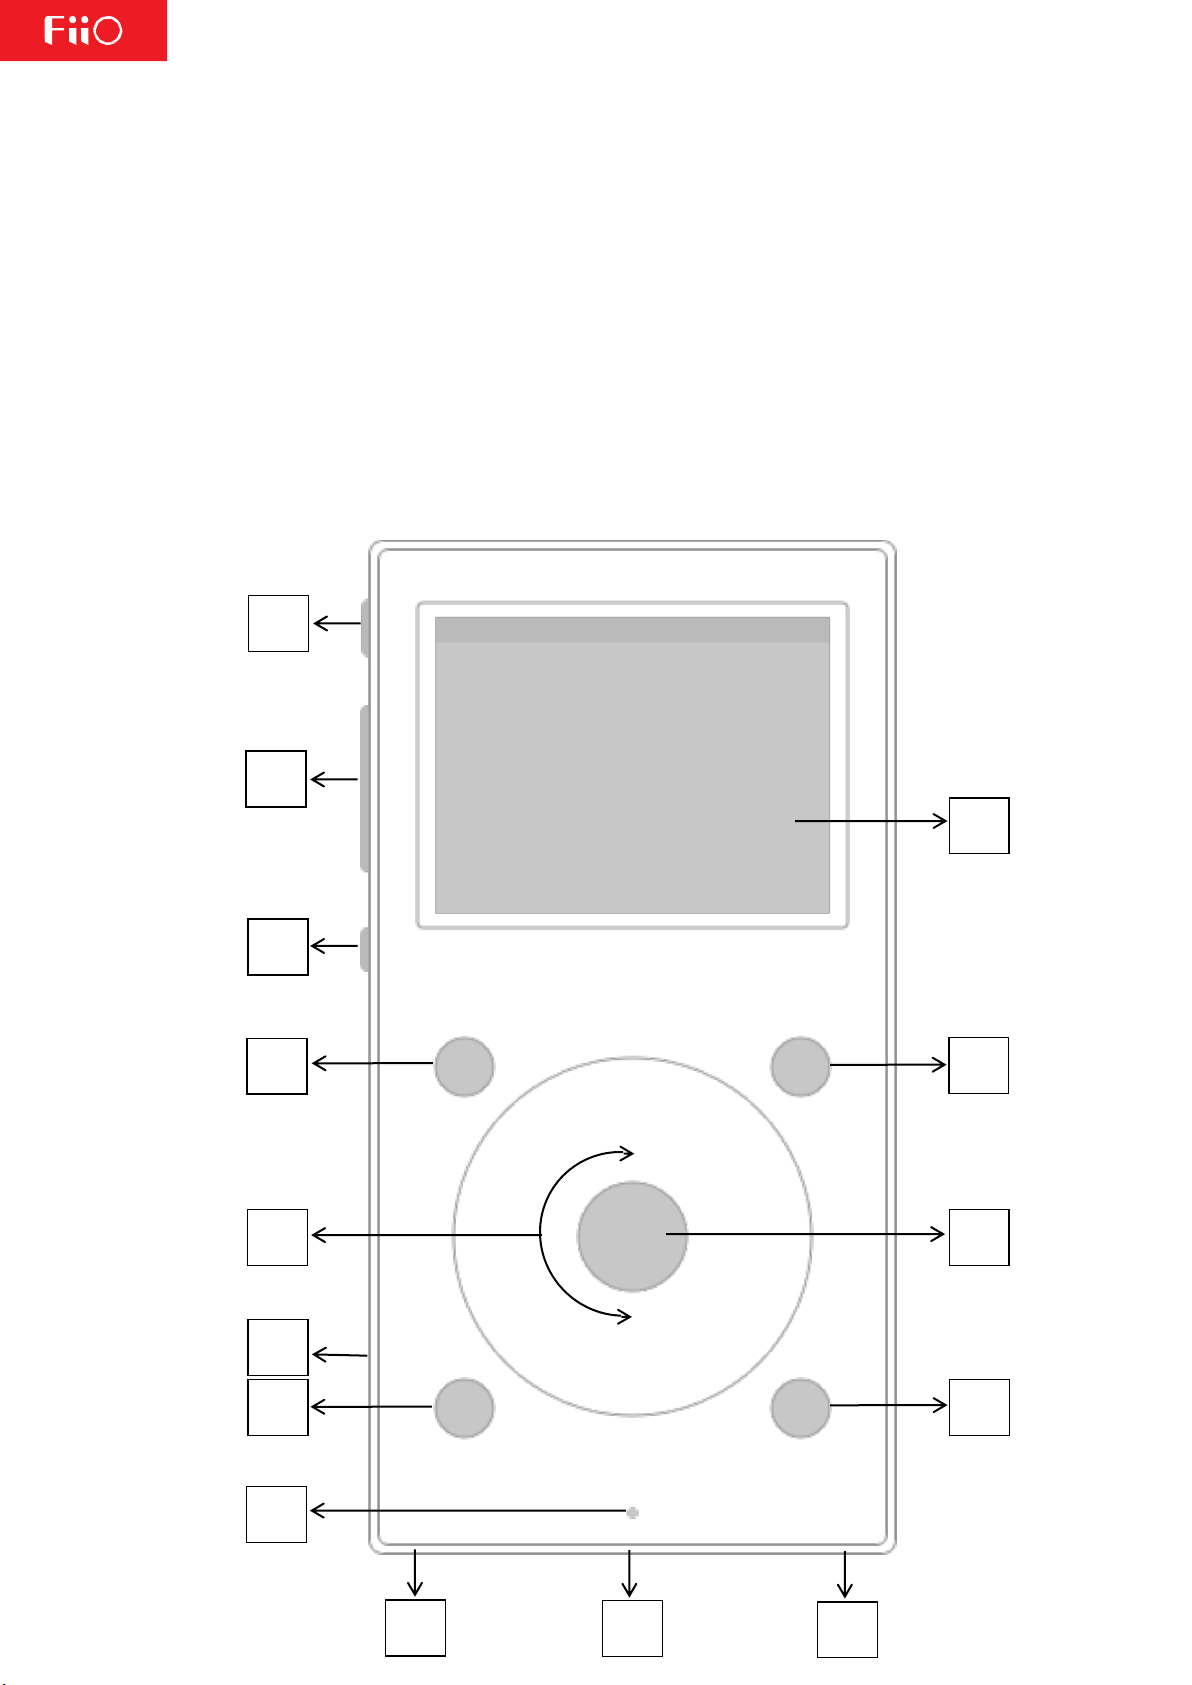
1. Buttons/Ports Diagram:
3
Page 4

2. Buttons and ports introduced
1) Power/Lock button: When the unit is powered off, hold the button for 2 seconds and release it
and the X3 will power on (after a brief pause); when the unit is on, press the button briefly to lock /
unlock the player, or hold the button for about 3 seconds to power off (hold for 10 seconds for a
forced shutdown).
2) Volume "+" Volume "-": Press briefly to change volume by one increment, hold down to change
volume continuously until the maximum volume ("+"button) is reached or the player is muted ("-
"button)
3) 262K Color TFT Display (320×240 resolution): Displays the user interface and other information;
for operating the unit in conjunction with buttons on the unit.
4) Multifunction Button: The Multifunction Button setting includes 4 options: Playback control, EQ,
Jump list and Theme. To use the touch wheel or previous/next track to see different options and
corresponding operation instructions, then press the "OK" button in the middle to confirm.
5) Shortcuts Key: The Shortcuts key will display different menu depending on which of the menus
you are currently in as well as how long you press the key for. For instance, press briefly in the Now
Playing menu to enable/disable the Shortcuts bar; press briefly in the Main menu to enter the Play
setting menu; long press in a track/file list menu to enable the first-letter search function; long
press in any menu except for a track/file list menu while playing music to enter the Now Playing
menu.
6) Back / main menu: Press briefly to go back up one menu level each time until you reach the main
menu; pressing Back while you're in the main menu when music is playing takes you to the "Now
Playing" screen. Hold this button to return directly to the main menu.
7) Scroll wheel: Freely rotatable (360° rotation), turn the wheel clockwise to scroll down / right,
choose the next item on the menu or adjust the level / value / choice etc. for the selected menu
item; turn the wheel counter-clockwise to scroll up / left, choose the previous item on the menu or
adjust the level / value / choice etc. for the selected menu item in the other direction
8) OK/Play/Pause/Volume adjustment:
In "Now Playing" screen: press briefly to play / pause;
In menus: press briefly to enter the submenu of the selected item, adjust the level / value / choice
of the selected item (using the scroll wheel for items with numerical value or many choices, or
alternating between choices using the OK button directly for other items);
In other dialogs: press briefly to confirm actions (press other buttons to cancel);
Volume control: Hold down this button at any time to pop up the volume control dialog and adjust
the volume using the scroll wheel.
4
Page 5

9) Micro SD card slot: Standard micro SD card slot, supporting micro SD cards up to 256GB
10) Up / Previous track / Rewind: In"Now Playing" screen: press briefly to select the previous song
for playback, hold down to rewind the current song;
In menus: press briefly to choose the previous item (up) in menus.
11) Down / Next track / Fast forward: In "Now Playing" screen: press briefly to select the next song
for playback, hold down to fast forward through the current song;In menus: press briefly to choose
the next item (down) in menus.
12) Indicator light: Blue while working, red while charging, green when fully charged.
13) 3.5mm Headphone /Line/Coaxial output:The headphone out, line out and coaxial output
share the same port. You can toggle which mode you want to use under the "Select output" option
in the System Settings menu.
The headphone out also supports the use of CTIA standard (e.g. most smartphones) in-line
headsets. When using in-line controls, you can do the following:
Volume Up/Down:Briefly press the volume buttons to increase or decrease the volume by one
step. Hold to continually increase/decrease the volume until maximum volume/mute is set.
Play/Pause:Press the middle button once to pause. Press again to resume playing.
Skip to next track:Quickly press the middle button twice.
Skip to previous track:Quickly press the middle button 3 times.
Fast Forward:Quickly press the middle button 2 times, holding down the last press. Release the
button to resume playing.
Rewind:Quickly press the middle button 3 times, holding down the last press. Release the button
to resume playing.
14) Micro USB port (11 pin):
For data exchanging, battery charging and connection to docking FiiO devices
15) 2.5mm balanced headphone output: Supports 2.5mm TRRS balanced headphone
5
Page 6

Now Playing:
The shortcuts key
shows/hides the shortcuts
menu. Use the scroll wheel to
navigate and the Enter key to
select items in the shortcuts
menu.
Category:
After updating the media library,
music files will be sorted into
categories based on their tags.
Scroll to choose between playing by
song, album, artist, or genre.
Favorites and playlists are
Browse Files:
Displays all of the folder and subfolders within your micro SD card,
allowing you to browse through
your music files. Navigate using
the scroll wheel, Enter, and Back
buttons.
Play Settings:
If an option does not have a
submenu, adjust directly using the
Enter or Previous/Next buttons. If
an option does have a submenu,
press Enter then adjust using the
scroll wheel or Previous/Next
buttons.
System Settings:
If an option does not have a
submenu, adjust directly using the
Enter or Previous/Next buttons. If
an option does have a submenu,
press Enter and adjust using the
scroll wheel or Previous/Next
buttons.
Status Bar:
1. Current Volume
2. Current Output Mode
3. Gain (High/Low)
4. Playing Indicator
5. Bluetooth Indicator
6. Sleep timer Indicator
7. Micro SD Card Inserted
8. Battery Level Indicator
C. Visual Guide to Menu Operation
1. Main Menu
Buttons and Dials:
Scroll Wheel: Scrolls through menu
items, changes values of selected items
Shortcuts: Shows/hides shortcuts
Context menu
Back:Goes up one menu level
Up / Prev | Down / Next : Moves through
menu items, changes values of select
6
Page 7
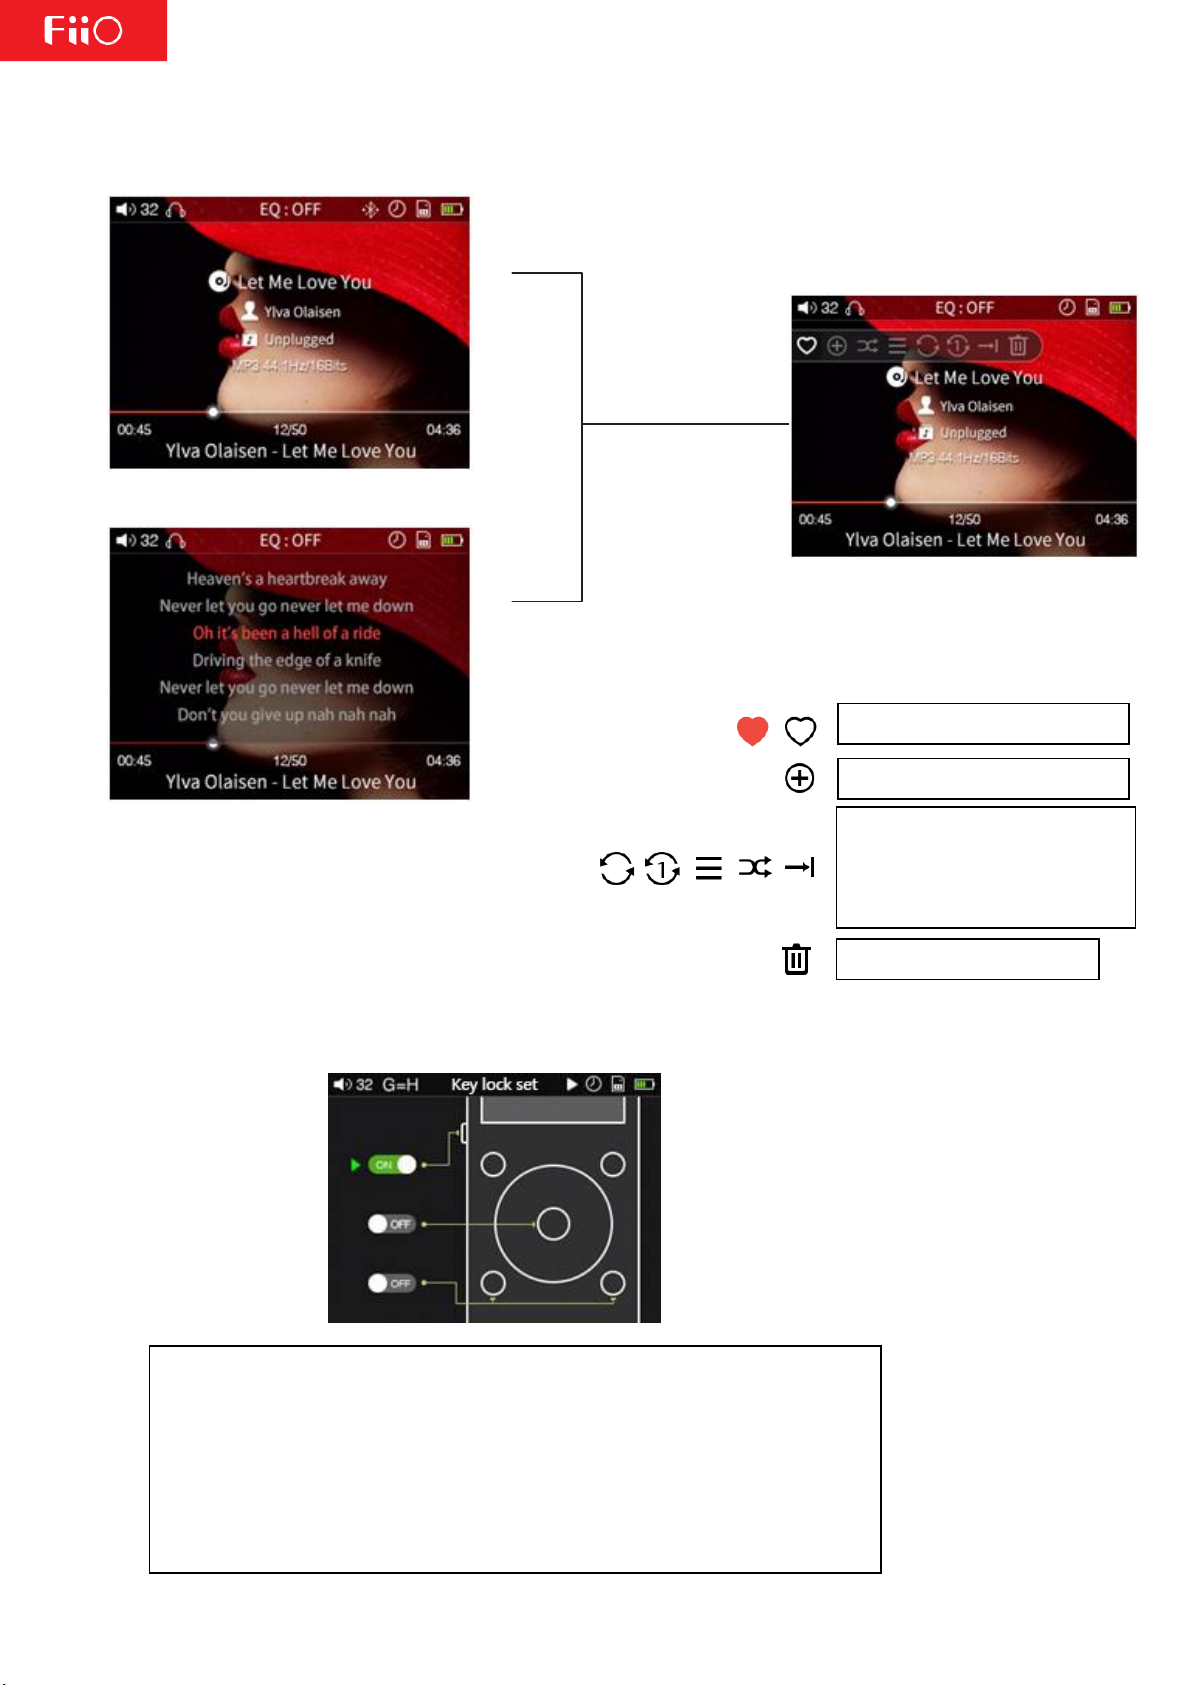
Key-lock settings: Go to "System settings>Key-lock settings" and you could
see three button settings: Multifunctional button, OK button and Prev/Next
button. You could use the scroll wheel and confirm button to set the button
on/off to your preference.
When the button is set to ON, under lock-screen, this button could work;
when it's set to OFF, this button couldn't work under lock-screen.
Note: under lock-screen, click the volume button to adjust volume and long
press the volume button to switch.
Add/r emo ve f rom favorit es
Creat e or add to Playlist
Select between loop all, lo op
single song, sequen tial,
shuffle, and single play
modes respectively
Delet es the curr ent son g
Cover
Lyrics
Bri e f ly p re ss
the short c ut k ey
Use the scroll whe el or t he
"Previou s" and "Ne xt" but tons
to sw itc h b etwe en shortcu ts
2. Key-Lock Settings
7
Page 8

10
8
D. Menu Operation
1 .Turning On/Off
When the X3 is powered off, press and hold the power button for 2 seconds to turn it on (you will
see the language selection dialog the first time it is turned on). When the X3 is powered on, press
and hold the power button to turn it off. After turning on, the X3 displays the main menu. Use the
scroll wheel or Previous and Next buttons to choose between the five different options of the main
menu – Now Playing, Category, Browse Files, Play Settings, and System Settings. Press the shortcut
key while in the main menu to quickly jump to Play Settings.
2. Now Playing
When in the main menu, highlight Now Playing and press the Enter button to enter the Now Playing
screen. If no song is playing, you will be presented with a list of songs to choose from – after
selecting a song you will enter the Now Playing screen.
Note: If you do not set the X3 to automatically update the media library, you need to do so
manually in the System Settings menu.
3.Category
While in the main menu, select the Category icon and press the Enter button to get to this menu.
From here, you can use the scroll wheel or Previous/Next buttons to select from sorting by: All
Songs, Album, Artist, Genre, Favorite, Playlists, and Recently Added. Press the Enter key to go into
any of these sub-menus, where you will be presented with a list of songs sorted by your chosen
category. While in any sub-menu, pressing the Shortcuts key will allow you to quickly switch to the
other types of sorting.
Favorites need to manually added/removed through the following methods:
(1) Individually add/remove favorite songs through the shortcut context menu in the Now Playing
Screen.
(2) Batch add/remove favorite songs: To add/remove multiple favorite songs at a time, you first
need to have at least one favorite song. After doing so, you will be able to enter the Favorites sub-
menu. While here, press the Shortcuts key and select the "Add to Favorites" icon. You will be
presented with a list of songs. Use the scroll wheel to highlight between different songs. Once you
have highlighted a song, press the Next button to add it as a favorite or press the Previous button
to remove it as a favorite. Once you have finished selecting which songs to add/remove as favorites,
press the Enter button to confirm changes.
The X3 supports both externally-created (M3U and M3U8 formats) playlists as well as natively-
created playlists. To learn how to externally create playlists for the X3, please see the FiiO Support
website at http://fiio.net/en/supports/46. To directly create playlists from the X3, press the
Page 9

10
9
Shortcuts key while in the Now Playing Screen. Select the + icon in the context menu, which will
then allow you to create new playlists or add tracks to an existing playlist. To delete a playlist, while
in the playlist sub-menu press the Shortcuts button then the Enter button. To delete individual
songs from playlists, while highlighting a song in a playlist press the Shortcuts button to bring up
the confirm dialog then press the Previous button to select Yes, after that press the Enter button.
4. Browse Files
From the main menu, use the scroll wheel to highlight Browse Files and press Enter to go into the
menu. If a micro SD card is not inserted, the message "SD Card Not found…" will appear. If a micro
SD card is inserted, you can browse through the folders and files on your micro SD card. Use the
scroll wheel, Enter, and Back buttons to navigate through and select the music files to be played.
5. Play Settings
When in the Play Settings menu, use the scroll wheel to choose between the different settings
items in the menu. Use the Enter and Previous/Next buttons to choose from the different options
for each setting.
a) Play Mode
Choose from the following playback modes: Shuffle, Sequential, Loop through all songs, Loop single
song, and Single play.
b) Resume Mode
Choose from 3 different options: Off, Song, or Position. In Song mode, when turned on again the X3
will resume playing at the beginning of the song being last played before being turned off. In
Position mode, when turned on again the X3 will resume playing from the exact position of the last
song being played before being turned off.
c) Playback Gap
Choose from either None, Fade in/Fade out and Gapless playback options(Gapless playback
function will implement by future update). With the Fade in/Fade out option, there is a fade effect
when switching tracks. That is, when starting to play a new track the volume will start very low and
gradually get louder, while at the end of a track the volume will gradually decrease until silence.
d) Max Volume
After pressing Enter to get into this submenu, use the scroll wheel to set the maximum volume limit
anywhere from 30 to 100. You cannot set the maximum volume to 0 to prevent there being no
sound output after turning the X3 on.
Page 10

10
10
e) Default Volume and f) Fixed Volume Setting
For the Default Volume setting, choose between the Memory and Custom options. With memory,
when turned on the X3 will be set at the volume that it was at before being turned off. With Custom,
you can choose a particular volume level to be set to when the X3 turns on in the Fixed Volume
Setting option (press Enter on that option to enter the sub-menu to specify the desired volume with
the scroll wheel). The Fixed Volume Setting is not available when Default Volume is set to Memory.
g) Equalizer
You can choose from a variety of preset EQ settings (Rock, Classical, Jazz, Pop, Dance, Vocal, Metal
and ACG) or define your own EQ (Custom). Each of these EQ settings may be modified. To modify
any EQ, highlight the desired EQ and press Enter. Then use the scroll wheel to select which
frequency you want to change, and press Enter. After doing so, use the scroll wheel again to change
the frequency to your desire. Press the Enter button when finished. After repeating for all other
frequencies that you want to change, press Back to save your changes to the EQ preset. Pressing
the shortcut key at any time in this menu will display a prompt to reset the currently highlighted EQ
to its default settings.
h) Line Out Mode
Choose from Fixed Level or Volume Adjustable. If Fixed Level is selected, the output will be fixed
with the maximum level.. If Volume Adjustable is selected, you can use the volume buttons to
adjust the line-out volume (the Fixed Level option will not be available in this case).
(Note: Please be careful when the Line Out mode is set to fixed level and the output mode is set to
Line Out. You will not be able to adjust the loud volume and you may damage your hearing if you
plug in headphones when set to this mode.)
i) Balance
Press the Enter button to adjust channel balance. Use the scroll wheel to make the sound louder
either through the left or right channels. There are 10 steps of adjustment for either direction, with
the 10th step being about 5dB louder in that direction.
j) Play Through Folders
If this is set to On, the X3 will start playing tracks in the current folder. Once it has finished playing
the last song in the current folder, it will begin to play the first song in the next folder. If there are
any sub-folders within the folder, it will also play those before playing the next folder. If this is set
to Off, only the tracks in the current folder will be played and the X3 will not play songs from other
folders.
k) Multifunctional Button
The setting includes 4 options: Playback control, EQ, Jump list and Theme. To use the touch wheel
Page 11

10
11
or previous/next track to see different options and corresponding operation instructions, then
press the "OK" button in the middle to confirm.
6. System Settings
When in the System Settings menu, use the scroll wheel to choose between the different settings
items in the menu. Use the Enter and Previous/Next buttons to choose from the different options
for each setting.
a) Update Media Library
Press enter, then choose between Automatic and Manual modes. In Manual mode, you must
update the media library yourself after transferring new songs onto the X3 by pressing Enter on this
option and selecting "Manual" in the sub-menu. In Automatic mode, the X3 will automatically
update the media library database after being disconnected from a computer or after having
inserted a new micro SD card.
When updating the media library, please do not press any buttons. Doing so will cause the media
library update to fail. Pressing the back button during the media library update, however, will
cancel the update. A prompt will come up after successfully updating the media library.
b) Bluetooth and c) Bluetooth Settings
If this is set to OFF, Bluetooth will be disabled and the Bluetooth Settings sub-menu will not be
available. If this is set to ON, Bluetooth will be enabled and the Bluetooth Setting sub-menu will be
available. Press Enter after highlighting the Bluetooth Settings option to enter that sub-menu,
where you will find the following settings:
Search for Bluetooth Devices: When this is selected, a prompt indicating the X3 is searching for
Bluetooth devices will appear. Please put your Bluetooth device into pairing mode at this time. The
X3 will then search for nearby Bluetooth devices and display a list of the devices it found. Select the
device you want to connect to by highlighting and pressing Enter. If the X3 successfully connects,
you will be taken back to the Bluetooth settings menu with your device showing up. If the
connection is not successful, the prompt "Connection failed. Please try to reconnect" will appear. If
no nearby Bluetooth devices are found, a prompt indicating that will show.
Currently connected device: Displays the currently connected Bluetooth device.
Manage added devices: You can connect to, disconnect from, switch between, and delete added
Bluetooth devices.
Automatic connection on startup: You can choose the X3 to automatically pair or not automatically
pair to your Bluetooth device when your player is turned on.
Page 12

10
12
d) Key-lock setting
There are three button settings on the Key-lock setting interface: Multifunctional button, OK button
and Prev/Next button. You could use the scroll wheel and confirm button to set the button on/off
to your preference.
When the button is set to ON, under lock-screen, this button could function; when it's set to OFF,
this button couldn't function under lock-screen.
Note: under lock-screen, click the volume button to adjust volume and long press the volume button
to switch.
e) Screen Timeout
The X3's screen will be turned off and its buttons disabled (according to the key lock option) if the
buttons have not been touched after the period of time specified here. You can choose between 30,
40, 50, 60, 90, and 120 seconds as well as ON (the screen and buttons are never turned off). Press
the Enter key to enter this sub-menu and use the scroll wheel to adjust this setting.
f) Brightness
Press Enter to enter this sub-menu. Use the scroll wheel and Enter button to choose from 10
different levels of brightness.
g) Idle Standby and h) Idle Standby Timer
If ON is selected for the Idle Standby setting, then the player will automatically turn itself off if it
has not been playing music and has not been touched after a set amount of time. To change this set
amount of time, highlight the Idle Standby Timer option and press Enter to reach a sub-menu
where you can choose from 1 minute to 8 minutes.
Page 13

10
13
If OFF is selected, this power-saving feature is disabled and the Idle Standby Timer setting cannot
be changed.
i) Sleep and j) Sleep Timer
If this is turned ON, the player will automatically go into deep sleep after a set amount of time of
playing music with no user operation. Adjust the set amount of time by highlighting the Sleep Timer
option and press Enter to reach a sub-menu where you can choose from 10 minutes to 120 minutes.
After turning this option on and setting a Sleep Timer, a small clock icon will appear in the top
status bar.
Note: The Sleep Timer takes effect only once. After it has been triggered, the Sleep Timer will be
turned off upon turning on the X3 again.
k) Select Output
This option changes the output mode of the 3.5mm bottom-facing headphone jack. Choose
between Line Out (arrow symbol) , Headphone Out (headphone symbol) and Coaxial Out
modes(RCA jack symbol). Line Out mode is used to connect the X3 to external amplifiers, the
Headphone Out mode is suitable for driving headphones, while the Coaxial out mode is used to
connect your equipment’s coaxial input by the appropriate coaxial cable.
Music must not be playing at the moment to change this setting.
l) SPDIF out
There are two modes of using the SPDIF Out: D2P (DSD to PCM) and DOP (DSD over PCM).
Under D2P mode, you play the PCM signal and will get the original PCM signal out. When playing
the DSD signal, system will convert the DSD signal to PCM signal and output. Under DoP mode,
PCM signal can be directly outputted and so does DSD signal. However, to have the signal output,
the coaixal device connecting with the DAP needs to support DSD. It can only support up to DSD64
signal when SPDIF Out, higher specs format like DSD 128 is not supported.
Note: this option only takes effect on Coaxial output.
m) USB mode
The X3 may be set to Storage or DAC mode when connected to the computer via USB. In
Storage mode, the X3 acts as a standard USB storage device; any micro SD card inserted in
the X3 will appear on the computer as a removable drive and you can then drag and drop
e.g. music files into it to add music and otherwise manage your music library on the X3. In
DAC mode, the X3 will act as an external USB sound card and you may play music directly
from your computer through the X3 and enjoy the X3’s superior sound quality on your
computer.
Note: driver installation required for DAC mode on windows computers. Storage / DAC mode
Page 14

10
14
switch needs to be performed while the X3 is not connected to the computer.
n)Theme
Press the Enter button to reach the Theme sub-menu where you can choose from between 6
different themes by using the scroll wheel.
o) Supports In-line Headphone Control
Either turn ON or OFF in-line controls on the X3. When set to ON, you can play, pause, and change
tracks using a CTIA standard headset. When set to off, in-line controls are disabled.
p) File Name Display
Press Enter when highlighting this option to choose from displaying the song's File Name or the
song Title at the bottom of the Now Playing screen.
q) Cover Display
This option can be switched between the OFF, Normal, and Full Screen modes. In OFF mode, the
song's album art is not displayed in the Now Playing screen. In Full Screen mode, the status and
playback bars are hidden and only the cover is shown in the Now Playing screen.
r) Lyrics Display
This can be set to OFF or ON. When set to ON, lyrics will be shown in the Now Playing screen if the
lyrics file is found.
s)Scroll Wheel Prompt Tone
This can be set to either OFF or ON. If set to ON, the scroll wheel will produce sounds when turned.
If set to OFF, the scroll wheel is silent when turned.
t) Rotary Sensitivity:
There're three types of settings: Low, Medium and High. The default setting is Medium, and you
could adjust the sensitivity to your preference.
u) Reset Media Library
Press Enter to reset the media library database, which stores information on classifying songs that
is used for the Category sub-menus. Resetting the media library database will not delete anything
from the micro SD card.
v) About X3
Press Enter to view the player's model name, serial number, NB code, the currently inserted micro
SD card's total and available capacity, and the total number of songs. You can also use the scroll
wheel or Previous/Next buttons to view a quick start guide as well as copyright information
Page 15

10
15
w) Language
This player supports multiple languages – Simplified Chinese, Traditional Chinese, English, Japanese,
Korean, French, German, Spanish, Thai, and Russian. Press Enter to access this sub-menu, use the
scroll wheel to highlight the desired language, and press Enter to confirm.
x) Font Size
Choose between displaying large (Big) or small font in the menus.
y) Storage Formatting
If this option is chosen when a micro SD card is inserted, a prompt will appear asking to confirm to
delete the contents of the micro SD card. After formatting, all files in the micro SD card will be
deleted, and the micro SD card will be formatted into the FAT32 format. Please back up the desired
files before choosing this option.
z) Factory Restore
If the unit fails to work properly or you need to just restore the factory default settings, pressing
Enter here will restore all settings to their defaults.
Page 16

10
16
E. Firmware update
Firmware update may update the player with new features and optimize the playback experience;
not upgrading to the latest firmware does not affect current operation of the unit. The unit
supports firmware upgrades via update files loaded into micro SD cards. Improper operation during
firmware updates may cause the unit to malfunction! Please read the following instructions for
firmware updates carefully before proceeding.
To check the current firmware version:
From the main menu, navigate to System Settings->About X3 to see the current firmware version
loaded on your X3.
Preparations / Precautions before firmware update:
•A micro SD card formatted in FAT32 is required for firmware updates. This may be obtained by
formatting a card using the X3's built in formatting function (System settings ->Storage formatting).
CAUTION: all data and music on a card will be erased by formatting.
•A firmware update should not affect data on the micro SD card (other than any formatting
required, see above). Nevertheless, please back up any important data on your card to protect
against accidents.
•Make sure the X3 is adequately charged (preferably fully charged) for the update process to
prevent power failure during the update;
•Do not operate other buttons and dials on the player during the update process.
•If the update process fails, hold the power button for 10 seconds for a forced shutdown and turn
the player on in update mode again to resume the update.
Summary of procedure for upgrading firmware using micro SD card:
1.Copy the X3_Mark_Ⅲ.fw file provided by FiiO into the root directory of a micro SD card in FAT32
format;
2.Turn off the X3 and insert the card into X3's micro SD card (if not already inserted);
3. Hold the power button while holding the Shortcuts key (upper left key of the X keygroup) to turn
on the X3 in firmware update mode. The following firmware update dialogs will appear and after
the update is complete, the player will restart automatically.
Firmware update in progress Update successful
Page 17

10
17
After the update process is complete, please delete the X3_Mark_Ⅲ.fw file from the micro SD card
and update the media library (System settings->Update Media Lib).
In case of firmware update failure:
•If "update file not found" is shown, please check to make sure that the micro SD card is formatted
in FAT32 and that the X3_Mark_Ⅲ.fw file within the firmware update package was extracted and
placed in the root directory of the card (e.g. by dragging the file directly onto the drive icon of the
card on your computer).
•Otherwise, if the update process fails and error messages are shown, please hold the power
button for 10 seconds for a forced shutdown and turn the player on in update mode again to
resume the update.
•If the update process fails repeatedly, please try putting the X3_Mark_Ⅲ.fw file in a micro SD card
of 32GB or under, formatted using the X3's built in formatting function (System settings->Format).
CAUTION: all data and music on a card will be erased by formatting.
•There is no need to update each firmware, and please just load the latest firmware and
upgrade the X3 directly.
Page 18

10
18
F. Tips on usage
This section contains some useful tips for you to get the most out of your X3.
How to update the media library quickly?
A: It is recommended to set System Settings->Update Media Lib to Auto, so that the X3 will update
the media library automatically each time after you connect it to the PC or insert/remove a micro
SD card.
How to play your favorite songs quickly?
A: When in the Category sub-menus or when browsing files, hold the Shortcuts key to search by the
first letter of the song/file to quickly jump to the song you want to hear. Go to the Favorites menu
to add a batch of your favorite songs (or favorite individual songs as they are played in the Now
Playing screen) and then enter the favorites menu to enjoy all your favorite songs. The X3 supports
addition and removal of songs defined in .cue files to favorites as well for your enjoyment of
lossless rips of CDs/DVDs/etc.
How to cut over to the song you want to listen to and adjust volume quickly?
A: Turn the scroll wheel in the Now Playing screen to pop up a list of songs before and after the
current playing song. Turn the scroll wheel to choose between songs, press OK to select and start
playing the new song.
Hold the Play button and Volume adjustment dialogue pops up, then use the wheel to adjust
volume.
4. If you have something to attend to while listening, how do you leave the X3 on while saving
power, so that you can later continue listening where you left off?
A: If you are listening to music as you fall asleep at night, you can set a sleep timer so that the X3
automatically enters deep sleep after a certain amount of time of playing music and not being
operated. (Note: The sleep timer is reset and turned off after being triggered once.)
If something suddenly comes up and you cannot listen to music, by default the Idle Standby option
is turned on so that after a set amount of time, music playback stops, which saves battery power.
Page 19

10
19
G. Frequently Asked Questions
1. About charging
Q: What power sources may be used to charge the X3?
A: The X3 may be charged by any USB charger with 5V output voltage like computer, power bank,
and adapter. It's recommended to use the 5V/2A charger.
Q: What is the charging current of the X3 while charging?
A: Less than 500mA through a computer USB port or approximate 1.3A through a dedicated USB
charger as recommended (DC 5V 2A).
Q: How long does it take to charge up the X3?
A: A full charge through a dedicated USB charger as recommended (DC 5V, 2A) takes about 3 hours.
Q: Can the X3 be charged by a power bank?
A: Yes, as long as the current is higher than 1A.
Q: Can the X3 play songs while charging?
A: Yes; no harm will come to the X3 if you use it while charging, in which case it is normal for the X3
to get warm. The reason we recommend turning the X3 off for charging is so that charging
completes more quickly.
Q: What to do if the X3 gets a little hot when playing songs while charging?
A: It is normal for the X3 to get a bit hot in these conditions and this does not endanger the X3 or
the listener in any way. If you are worried about this, it is better to take off any casing to expose the
X3 to air for cooling down. If you're still worried, turn down the volume on the X3 or turn off the
player for charging.
Q: Can the X3 be connected to chargers via other micro USB cables?
A: Yes, but the micro USB cable that comes with the X3 is specially constructed with thick power
line conductors to minimize power loss while charging. Using other micro USB cables may lead to
slower charging; very poor quality USB cables may cause so much power loss through the cable as
to fail to charge the X3 altogether.
Q: Why does the X3 charge so slowly or not at all through a front USB port on a desktop
computer?
A: The front USB ports on a desktop computer are connected to the motherboard through long thin
Page 20

10
20
cables, which cause too much voltage drop when connected to high current draw equipment like
the X3.
Q: Why does the battery capacity indication not accurate?
Because X3 will judge the battery capacity by the voltage of the battery, so it's not very accurate.
Also the battery voltage might differ while playing music. Therefore, the battery capacity indication
is for reference only.
Q: How to judge the X3's charging status?
A: On the bottom of the front panel, there is a charging indicator LED, which lights up red while
charging and green when fully charged. The battery level of the onscreen battery gauge (on the
upper right corner while the player is on, or taking up the whole screen if the player is off) moves to
indicate battery charging.
Q: How to tell whether the X3 is fully charged or not?
A: When X3 gets fully charged, the status indicator LED on the power button lights up green and the
onscreen battery gauge (on the upper right corner while the player is on, or taking up the whole
screen if the player is off) stops moving and holds steady at full.
2. Transferring songs
Q: What operating systems does the X3 support (for transferring songs)?
A: It supports 32bit and 64bit Windows XP, Windows 7 and above, as well as Mac OS 9, X, and most
versions of Linux and Unix.
Q: What USB ports are the X3 compatible with?
A: The X3 is compatible with USB 2.0 (and all later standards that are backwards compatible with
2.0, including 3.0 and 3.1).
Q: How quickly does the X3 transfer songs?
A: This is dependent on the size of files / songs transferred and the Class of the micro SD card;
average read / write speeds are about 5MB/s.
Q: Why does it transfer so slowly through a front USB port on a desktop computer?
A: The front USB ports on a desktop computer are connected to the motherboard through long thin
cables, which may degrade the signal quality and hence reduce the speed of transfers; it is
recommended to connect to a rear USB port on a desktop computer to transfer data.
Page 21

10
21
Q: Does the X3 support deleting or copying files by dragging through the computer's File Manager?
A: Yes.
Q: Is a driver required for connecting the X3 to computer?
A: No driver is required for connecting the X3 to a computer for file transfers.
Q: Does the X3 support Linux?
A: Theoretically it is supported (as a generic mass storage device), but we cannot guarantee support
through actual testing of all the various OSes out there.
3. Firmware upgrades
Q: How to know what firmware version is on my X3 and what is the newest version?
A: The current firmware version can be viewed via System Settings->About X3. All firmware
versions for the X3 may be downloaded via http://www.fiio.net/en/supports/46.
More ways to keep updated with the latest firmware versions of X3:
1. Facebook: www.facebook.com/FiiOAUDIO
2. Official website: www.fiio.net
3. Forum: http://www.head-fi.org/forum/list/180/
http://fiio.me/forum.php
4. Email us at support@fiio.net
Q: How to update the X3 firmware?
A: Please refer to Section E. Firmware Update in this user manual.
Q: Is it possible to brick the X3 while upgrading the firmware? What to do if my X3 is bricked?
A: It should not be possible to brick the X3 in the normal course of upgrading its firmware. If you
somehow manage to brick
4. Storage
Q: What cards does the X3 support?
A: The X3 supports TF cards (also known as micro SD cards), including SDHC and SDXC.
Q: Is the X3 picky about cards?
A: The X3 has been tested to support major brands such as Sandisk and Kingston very well. It is
beyond our ability to test every other brand out there, but any genuine card from a reputable
brand should work with the X3. To prevent slow card speeds causing the X3 to stall while playing or
Page 22

10
22
be unable to play high bitrate lossless tracks (such as 192k/24bit APE files or DSD
files), please use micro SD cards of Class 6 or above.
Q: What size of cards does the X3 support?
A: The X3 is currently tested to support micro SD cards up to 128GB. It is recommended to format
the card in FAT32 format.
Q: How to format the micro SD card into FAT32 format?
A:
1. Simply insert the card into the micro SD card slot in the X3, go to System Settings->Storage
formatting, press OK to select and OK again to confirm formatting the card to FAT32 format. or
2. Insert the micro SD card to a card reader to connect to your computer, right-click on the micro SD
card shown and choose "Format…" and follow the prompts to format the card to
FAT32 format.But please do not choose 64K under the Allocation unit size when formatting the
micro SD card. Also, Micro SD cards in 64G or 128G sizes cannot be formatted into FAT32 by the
windows system, please try to use third party tool (such as Guiformat or smdk_fat32) to format.
Warning: all data and existing songs on the card will be deleted, please make backups on your
computer first as necessary.
Q: Nothing from the micro SD card shows on the X3?
A:
1. Play by Category will not show any songs from a card unless and until a media library update has
been performed. Go to System Settings->Update Media Lib, press OK and select "Manual" to
perform a manual media library update.
Or use Browse Files to confirm that the files on your card are recognized by the X3.
2. If neither of the above works to show you the songs on your card:
i. Go to System Settings->About X3 and check that the Available Capacity of the micro SD card you
inserted is shown correctly (comparing it to the info shown on your computer); if not, try
formatting the card using the X3 (this deletes all files on the card; please back up your data and
music first) and putting your files back on the card;
ii. If this does not help, you may try formatting the card into NTFS format using Windows;
iii. If none of the above helps, it is recommended that you try another card with the X3.
Q: Some songs on the micro SD card don't show on the X3?
A:
Page 23

10
23
1. Have you performed a media library update after you last loaded songs onto the card? Go to
System Settings->Update Media Lib, press OK and select "Manual" to perform a manual media
library update.
2. If songs are still missing in "Play by category" (while they all appear in Browse files), try to reset
the media library (System settings->Reset media library) then update the X3 to the latest firmware.
3. After updating to the latest firmware, try updating the media library again.
Q: Why does my .wav files not play?
A: Please check using Foobar2000 or other capable software on the computer to see whether the
wave file is actually DTS or Dolby encoded multichannel audio, or perhaps a wave file of bit depth
over 32 bits (8bit below and 32Above bit files are not always supported).
Q: Why does my .ape files not play?
A: APE comes in 5 levels of compression, including Fast, Normal, High, Extra High and Insane.
Extra High and Insane encoded APEs are not supported while Normal and High encoded APEs are
only supported at 96k/24bit or below.
Q: Does the X3 support cue sheets?
A: The X3 supports external cue sheets for identifying and playing a cue'd music file as separate
tracks.
Q: Why is my cue sheet not supported?
A: Embedded cue sheets are not supported. Also please make sure that the .cue file is named the
same as the music file that it cues and they are put under the same directory.
Q: Why does X3 not show the cue file in the micro SD card when browsing files?
A: Since it has been already been used by the X3 to split the cue'd file into multiple tracks (which
are shown).
Q: How do you set it to shuffle play across different folders?
A: Set the “Play mode” to shuffle and “Play through folders” to ON. Then after updating the media
library, enter the All Songs list in the Category menu and choose any song to start playing.
Q: Why do my lyrics not show?
A: The X3 only supports external .lrc files, named after the music file it lyricizes. And please confirm
the Lyrics display setting is set to ON.
Page 24

10
24
Q: Why am I seeing rubbish characters?
A: Only ANSI, Unicode and UTF-8 (with and without BOM) encodings are supported for ID3 tags
and .lrc files to be read by the X3. If the ID3 tags and / or lyrics files are encoded in an unsupported
format, rubbish characters will be shown.
Q: Why do my new songs not appear under any category?
A: The X3 can only sort your new songs into these categories after they have been added into the
media library database. Please set the Update Media Library setting to automatic, or manually
update the media library after adding your new songs.
Q: Why does the total number of files displayed by X3 differ from the actual number of files that I
copied into the micro SD card?
A: The total number displayed by the X3 indicates the total number of files playable by the X3.
5. Other Operations
Q: How to get longer battery life for the X3?
A: 1. Turn on "Idle standby". When this is set to on, the player will enter standby after the set time
when no music is playing and the user does not press any buttons on the player.
2. Lower the backlight brightness to reduce power consumption.
3. Set the "Screen timeout" timer, so that the player turns off the screen and locks the keys
automatically after the set delay when no buttons have been pressed and the scroll wheel hasn't
been turned.
Q: Why is the X3 sometimes sluggish in responding?
A: 1. High bitrate lossless tracks, particularly 192k/24bit APEs or DSD files, take more hardware
resources to decode, possibly causing slowdowns in the player UI. You may convert such APEs to
FLACs or uncompressed WAVs using programs such as foobar2000 on the computer first to make it
easier on the player. The sound quality will be the same.
2. Placing too many songs on the X3 may also contribute to slowdowns. Please limit the number of
songs on the X3's micro SD card where possible.
3. Placing non-music related files on X3's micro SD cards, such as videos and pictures, may cause
the X3 to slow down while sifting through them looking for music files. It is recommended to
dedicate the micro SD card on the X3 to music.
4. Playing high bitrate files or DSD files from slow micro SD card may cause stuttering. Class 6 or
above genuine micro SD cards are recommended.
Page 25

10
25
5. Unpredictable ordering of files, such as placing several .ape and .cue files in the same directory.
The following directory structure is recommended: create separate folders for albums by the same
artist, and open subfolders within each artist folder to hold single albums in separate subfolders.
6. A mixture of music files of several different codecs and sample rates may also slow down the
player. It is recommended to place files of different codecs and sample rates into separate folders
and to play files of the same type in sequence from these folders, to prevent the X3 from having to
switch between different decoders frequently.
Q: Why does the X3 get a bit hot in operation?
A:The X3 utilizes an SoC with high clock speed, a separate DAC, and (also separately) a high power
headphone amplifier and independent analog volume control in the amplification stage, thus
dissipating way more power than consumer DAPs typically performing computation, DAC and
amplification all on the SoC. Apart from outputting more power to your headphones, a lot of this
power is also dissipated as heat, thus causing the X3 to heat up slightly in operation; but this does
not endanger the X3 or the listener in any way.
6. Connecting to other audio devices
Q: How do you connect the X3's line output (LO) to other audio devices?
A: The X3's LO is a standard line out that is designed to be connected to external headphone
amplifiers, car audio systems, home theater systems, powered speakers, etc. The LO provides
sound at a very high volume when either set to a fixed-level output or at the higher levels of the
adjustable output option, which can damage your hearing if you listen to headphones in this output
mode. Please set the output mode to Headphone output before listening to headphones with the
X3.
Q: How to utilize the X3’s coaxial digital output?
A: 1. Set the X3’s Select ouput to “Coax out” mode.
2. Use the provided 3.5mm coaxial adapter cable to obtain a standard RCA coaxial output port and
connect to the coaxial input of your S/PDIF coaxial digital-compatible receiving device using a
standard coaxial RCA cable.
Q: Could X3 be used with FiiO's docking station?
A: X3 could be used with FiiO's docking station DK1 and desktop amplifier K5 via Micro USB
connection.
 Loading...