


 Loading...
Instructions
Feurio!
http://www.feurio.com
Contents
1 |
Instructions |
3 |
|
|
1.1 |
Introduction |
3 |
|
1.2 |
Layout of this manual |
3 |
|
1.3 |
Program components |
4 |
|
1.4 |
How can I ...? |
4 |
|
1.5 |
Launching the program |
4 |
|
1.6 |
Working with Feurio! |
5 |
2 |
Installation |
6 |
|
|
2.1 |
Installation |
6 |
|
2.2 |
Registering Feurio! |
9 |
|
2.3 |
Updates |
10 |
|
2.4 |
Upgrade to the professional version |
10 |
|
2.5 |
Deinstallation |
11 |
3 |
Burning a CD |
12 |
|
|
3.1 |
Introduction |
12 |
|
3.2 |
Launching CD-Manager |
13 |
|
3.3 |
Selecting a source |
13 |
|
3.3.1 |
CD-ROM |
14 |
|
3.3.2 |
Database |
15 |
|
3.3.3 |
Hard disk |
16 |
|
3.4 |
Setting up a project |
17 |
|
3.4.1 Adding audio tracks to a project |
19 |
|
|
3.4.2 Monitoring the content of the project |
21 |
|
|
3.5 |
Burning a project |
22 |
|
3.6 |
Creating CD covers |
24 |
4 |
CD-Manager |
27 |
|
|
4.1 |
Introduction |
27 |
|
4.2 |
Launching CD-Manager |
27 |
|
4.3 |
Copy source |
28 |
|
4.3.1 |
CD-ROM |
29 |
|
4.3.2 |
Database |
32 |
|
4.3.3 |
Hard disk |
33 |
|
4.4 |
Project list |
35 |
|
4.4.1 |
Project list buttons |
36 |
|
4.5 |
Project contents |
37 |
|
4.5.1 |
Project contents buttons |
38 |
|
4.5.2 Adding audio tracks from the database |
39 |
|
|
4.5.3 Adding audio tracks from a CD-ROM |
42 |
|
|
4.5.4 Adding audio tracks from the hard drive |
46 |
|
|
4.5.5 Copying audio tracks from different sources |
48 |
|
|
4.5.6 Deleting audio tracks from a project |
49 |
|
|
4.5.7 Regrouping audio tracks in a project |
50 |
|
Kurzanleitung |
Contents • i |
5 |
CD-Writer |
52 |
||
|
5.1 |
|
Introduction |
52 |
|
5.2 |
|
Launching CD-Writer |
52 |
|
5.3 |
|
Burn selection |
53 |
|
5.3.1 |
Burning a project |
53 |
|
|
5.3.2 |
Copying a CD |
53 |
|
|
5.4 |
|
Burn settings |
54 |
|
5.4.1 |
Writer settings |
54 |
|
|
5.4.2 |
Multiple write settings |
56 |
|
|
5.4.3 |
Buffer settings |
57 |
|
|
5.4.4 |
CD text |
58 |
|
|
5.5 |
Burning projects with a CD writer |
58 |
|
|
5.5.1 |
Speed test |
61 |
|
|
5.5.2 |
Testing |
61 |
|
|
5.5.3 |
Testing and burning |
62 |
|
|
5.6 |
Copying projects with one CD writer |
64 |
|
|
5.7 |
Burning projects with a number of CD writers |
66 |
|
6 |
Track Editor |
69 |
|
|
6.1 |
Introduction |
69 |
|
6.2 |
Recording audio data |
70 |
7 |
Cover editor |
72 |
|
|
7.1 |
Introduction |
72 |
8 |
Wave player |
74 |
|
|
8.1 |
Introduction |
74 |
9 |
CD player |
76 |
|
|
9.1 |
Introduction |
76 |
10 |
Important terms |
77 |
|
|
10.1 |
Copying "on-the-fly" |
77 |
|
10.2 |
Image copying |
77 |
|
10.3 |
Buffer under-run |
78 |
11 |
Index |
79 |
|
Kurzanleitung |
Contents • ii |

1 Instructions
1.1 Introduction
These instructions are intended to help you quickly create your on audio project and burn it on a CD. Feurio! has been specially developed for the professional creation of audio CDs.
Feurio! satisfies both the layman's and expert's requirements. Feurio's default settings allow inexperienced users to 'burn' their own CDs quickly and easily. The variety of options available give the practised user complete control over every parameter while burning audio CDs.
To describe all the components of the program here would far exceed the scope of these instructions. Therefore, only those functions and parameters that are needed as standard features are explained in this document. You can find more detailed information on Feurio! in the context-sensitive online help function. You can call this up at any time by pressing the F1 key. You will then be given a help-text relating to the window currently visible on the screen.
You can also obtain up-to-date information on Feurio! on the www.feurio.com Web site.
1.2 Layout of this manual
Section 1 provides a brief description of the 'philosophy' of this manual. Section 2 explains how to install Feurio! - and uninstall it again if necessary. Section 3 shows you how to create your own CD - from launching the program up through to producing a CD cover. This section is aimed above all at users who want to start using the program straightaway without having to do too much reading first.
In section 4 and later, the individual components of the program and their specific elements and functions are explained in more detail. In these sections, the keen user will learn how to customize Feurio! so he or she can produce exactly those CDs that are required.
Kurzanleitung |
Instructions • 3 |
1.3 Program components
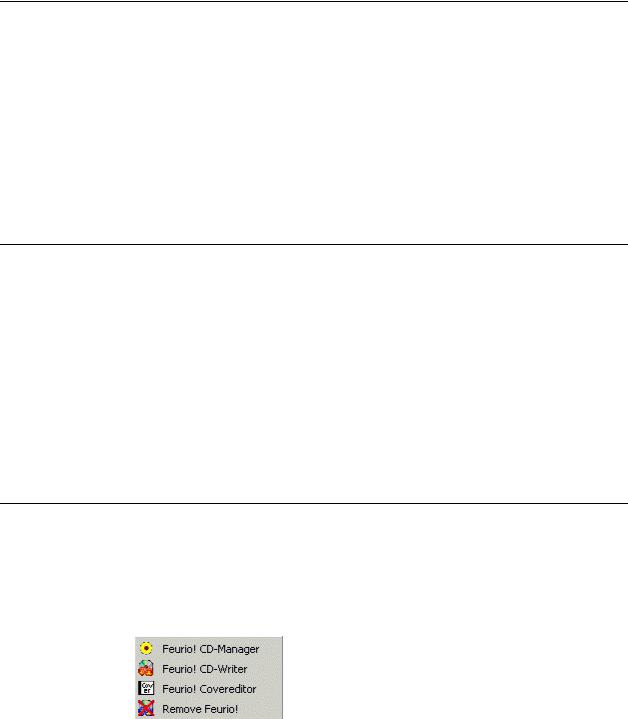
Feurio comprises four powerful programs:
!Feurio! CD-Manager
!Feurio! CD-Writer
!Feurio! Cover editor
!Feurio! Track Editor (this program can only be started via Feurio! Feurio! CD-Manager)
In addition, the package also contains a Wave player and a CD player.
1.4 How can I ...?
Users who have already got some experience with Feurio! and who want to know exactly what to do will find the following sections more than useful:
How can I copy a CD? see Section 5.3.2 'Copying a CD
How can I compile a CD from a number of different ones? see Section 4.5.5 'Copying audio tracks from different sources'.
How can I compile a CD from MP3 files ? see Section 4.5.4 'Adding audio tracks from the hard drive'.
How can I record audio data, for example from a record player? see Section
6.2'Recording audio data'.
1.5Launching the program
Following installation, you can call up each of the individual Feurio! programs very simply.
1.Select START -> PROGRAMS -> FEURIO! and click on the desired program.
Feurio! CD-Manager
Compiling your own CDs (project administration). see Section 4 'CDManager
Feurio! CD-Writer
Copying CDs and writing finished projects. see Section 5 'CD-Writer
Feurio! Cover editor
Printing CD covers. see Section 3.6 'Creating CD covers'.
Feurio! Deinstallation
Remove Feurio! from your computer. see Section 2.5 'Deinstallation'.
Kurzanleitung |
Instructions • 4 |

1.6 Working with Feurio!
Feurio! is very user-friendly and the procedure for writing a CD is very simple, as shown below:
!Launch 'Feurio! CD-Manager
!Select the source from which you wish to copy
!Set up a project
!Add tracks
!Burn the CD (to help you burn a CD, 'Feurio! CD-Writer' is automatically launched from within 'Feurio! CD-Manager')
!Create the cover
After first explaining the installation of the program, this manual traces all these steps. That means that once you have read Section 3 'Burning a CD', you will know all you need to write your own CD.
The use of the supplementary programs 'Feurio! Cover Manager' and 'Feurio! Track Editor' are described briefly in the corresponding sections.
Kurzanleitung |
Instructions • 5 |
2 Installation
2.1 Installation
Feurio! can be installed under the Windows 95/98, Windows Millennium, Windows NT 4.0 and Windows 2000 operating systems.
You must have administrator rights to install the program under Windows Millennium, Windows NT 4.0 or Windows 2000.
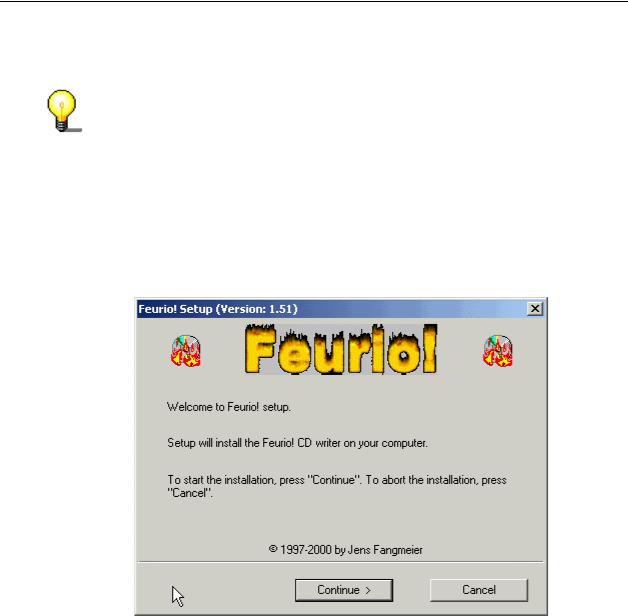
1.Close down all the Windows programs that you do not currently need.
2.Place the Feurio! CD in the CD-/DVD drive.
3.The setup program will start automatically. Click on the 'Feurio' button.
4.If the Setup program does not start automatically, you must select the drive in Explorer where the program is and double-click first on the 'Feurio.exe' program in the root directory and then on the 'Feurio' button.
5.Click on 'Next' to start the installation.
6.Read the license conditions carefully and click on 'Yes' if you agree to them.
Kurzanleitung |
Installation • 6 |
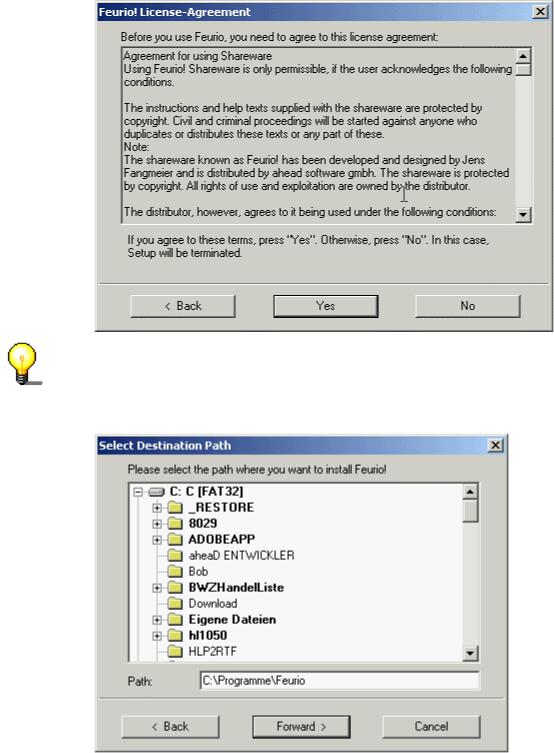
Feurio! cannot be installed if you do not agree to the license conditions.
7.Specify the directory where the program is to be installed and click on the 'Next' button.
8.Specify the languages to be installed by selecting the appropriate check boxes and clicking on the 'Next' button.
Kurzanleitung |
Installation • 7 |
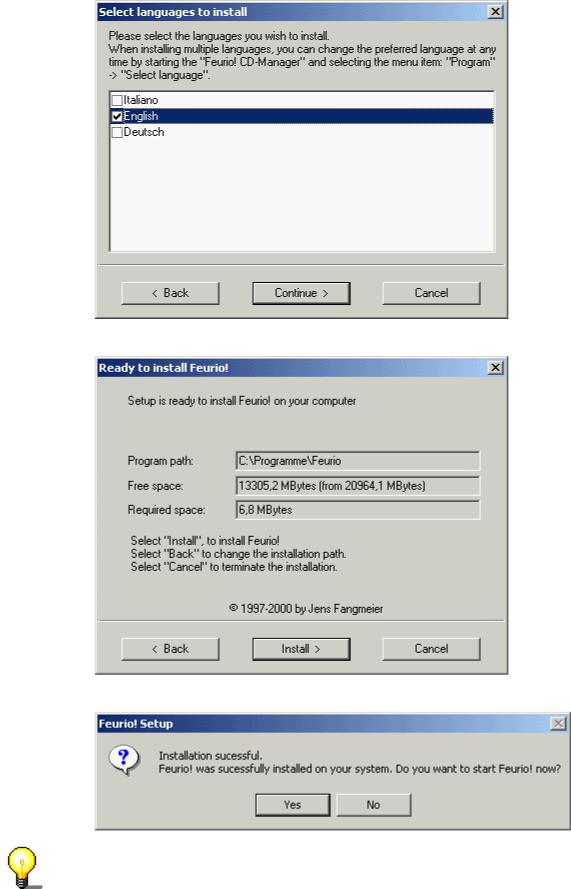
9. Click on the 'Install' button to start the installation.
10. You will be able to start Feurio! as soon as installation is complete.
The software is registered the first time you start Feurio!
Kurzanleitung |
Installation • 8 |
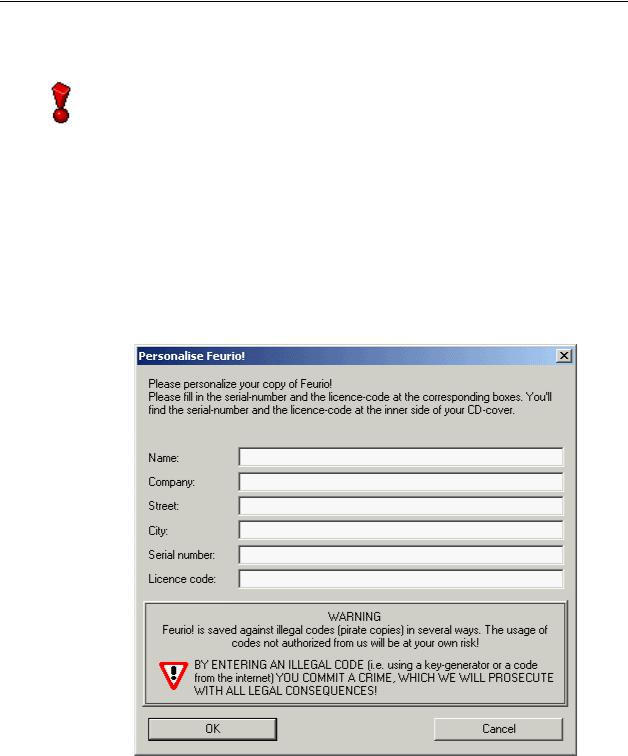
2.2 Registering Feurio!
It is illegal for you to pass on your personal registration data on to other people. It represents a breach of the license agreements - it may lead to your Feurio! license being taken away and/or other legal action being taken.
If you enter an illegal code, you are committing a criminal offense that will be combated by all lawful means.
The first stage does not apply if you launch Feurio! directly after installation.
1.Select START -> PROGRAMS -> FEURIO! -> Feurio! CD-Manager.
2.Enter your personal details in the appropriate fields.
3.Enter the serial number and license code in the 'Serial number' and 'license code' fields.
4.The serial number and license code can be found on the inside of the cover of the Feurio! packaging CD.
5.Click on the 'OK' button to complete the personalization procedure.
6. Click on 'OK' to complete registration.
Kurzanleitung |
Installation • 9 |
2.3 Updates
Feurio! is being developed and improved all the time. New features are being added - and any defects discovered are being ironed out.
On average, a new version is created every 4 to 8 weeks.
The license number and license code you were given when you bought Feurio! are valid for all future 1.X versions. You can obtain the latest version on the Feurio! homepage at www.feurio.com in the download area.
Click on the appropriate file to install the update. The installation program will automatically recognize the existing version of Feurio! and update it - without your settings, projects, etc. being lost.
2.4 Upgrade to the professional version
If you want to upgrade your existing version of Feurio! to the Professional version, so that you can burn on a number of different CD writers at the same time for instance, you will find all the information you need at our Internet site: http://www.feurio.com/Professional/upgrade.shtml.
Kurzanleitung |
Installation • 10 |
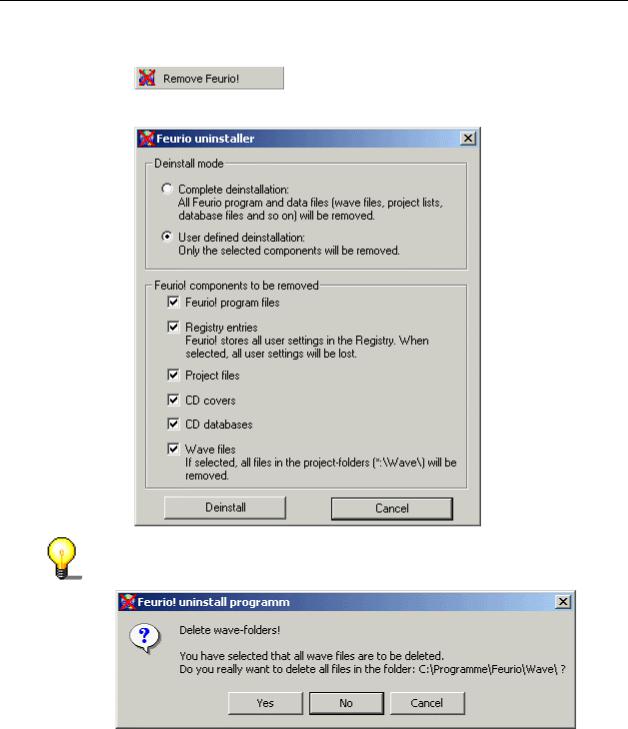
2.5Deinstallation
1.Select START -> PROGRAMS -> FEURIO! -> Feurio! deinstallation.
2.Select the desired deinstallation option and click on 'Deinstall'.
If you have chosen to deinstall Wave files, the folder where they are saved must be deleted separately.
Kurzanleitung |
Installation • 11 |

3 Burning a CD
3.1 Introduction
Your can make your own, individual CDs easily with Feurio!
This section is aimed at users who want to burn their own CDs without first having to spend much time learning all about the program. It will show you how to compile your own CD and introduce you to the different Feurio! elements. The individual components and their specific elements and functions are described in section 4 and later.
When you compile your own CD, first a project is set up, the audio tracks are then copied into the project and finally the CD is burned.
The audio tracks to be burned may have different formats (CDA, wav or MP3 files) and originate from different sources (CDs, a hard disk, or a database). Compressed MP3 files can be decompressed when they are copied into the project (this calls for sufficient hard disk memory but it does permit burning at very high speed) or only at the moment they are burned onto the CD (in this case no additional hard disk memory is required, but the burning process can only be performed at a slower speed because the computer has to work to decompress the files).
Kurzanleitung |
Burning a CD • 12 |
3.2Launching CD-Manager
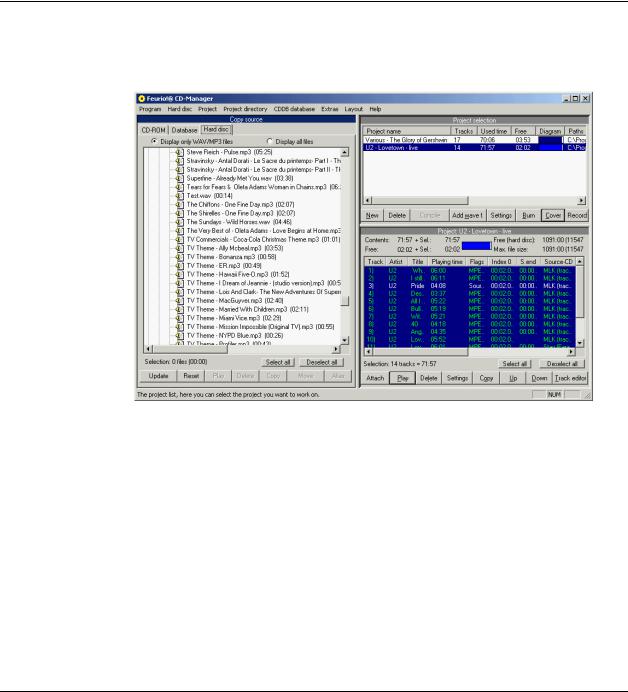
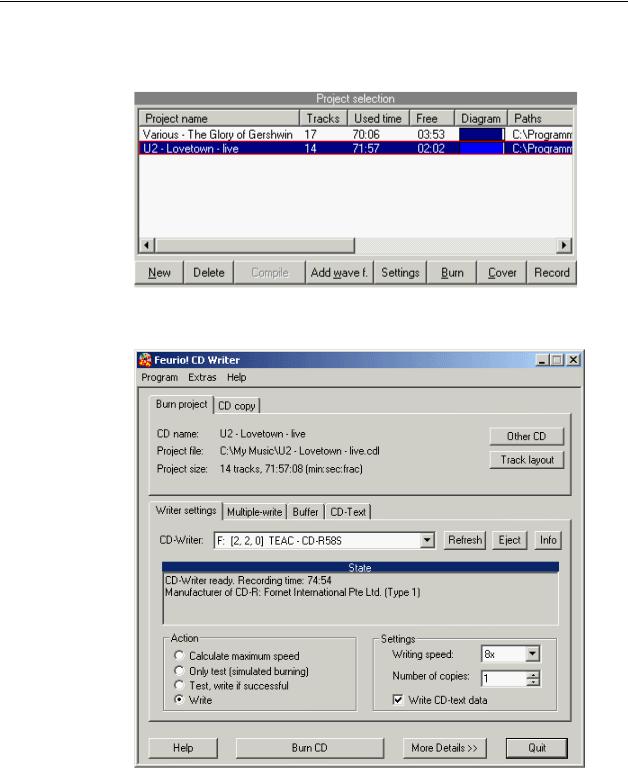
1.Select START -> PROGRAMS -> FEURIO! -> Feurio! CD-Manager. The program will start and the main window will appear.
The main window comprises three parts of the screen:
!Copy source (left)
The copy source includes the tracks that can be inserted into the project.
!Project - selection (right, above) with the project list
The project selection contains all the available projects (i.e. those already set up). It is also possible to set up new projects.
The Feurio! CD-Writer and Feurio! Cover Editor can also be started from this part of the program.
!Project - table of contents (right, below) with the content of the highlighted project
The table of contents contains all the tracks that are located in the highlighted project.
The Feurio! Track Editor can also be started.
3.3Selecting a source
Located on the left-hand side of the main window are the source selection choices.
Copy source |
Notes |
CD-ROM |
The audio tracks are selected from a CD-ROM. |
Database |
The audio tracks are located in a database on the |
|
computer's hard disk. |
Hard disk |
The audio tracks are located on the computer's hard disk. |
Kurzanleitung |
Burning a CD • 13 |
3.3.1CD-ROM
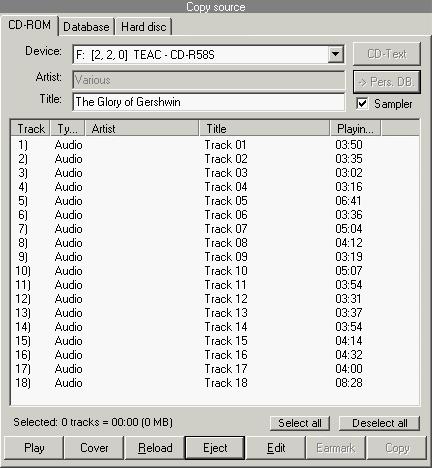
!Click on the 'CD-ROM' tab if the audio tracks to be copied are on a CD.
Kurzanleitung |
Burning a CD • 14 |
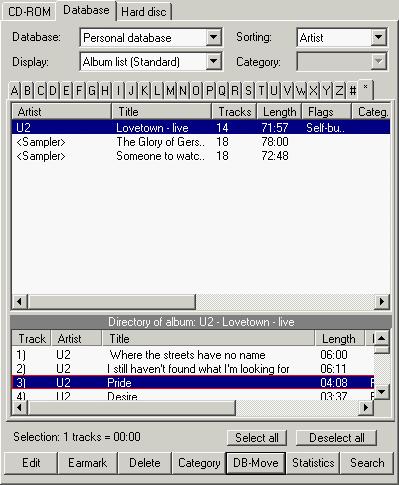
3.3.2Database
!Click on the 'Database' tab if the audio tracks to be copied are stored in a database.
Kurzanleitung |
Burning a CD • 15 |

3.3.3Hard disk
!Click on the 'Hard disk' tab if the audio tracks to be copied are stored on the hard disk.
The two option buttons specify which files are to be displayed:
!'Only show WAV / MP3 files'
Only files in these formats appear in the window
!'Show all files'
All files appear in the window
Kurzanleitung |
Burning a CD • 16 |
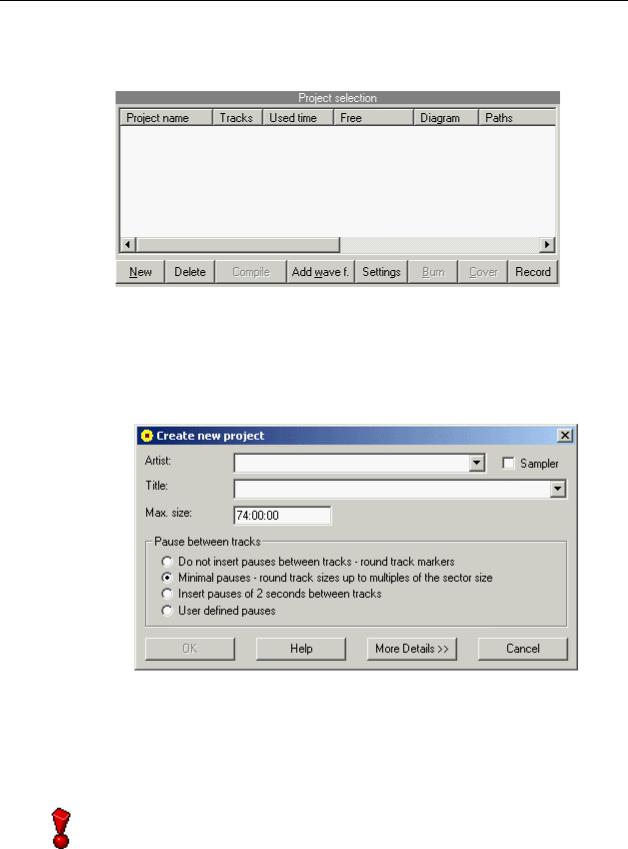
3.4 Setting up a project
A project is set up and edited in the 'Project selection' area which contains all the existing projects.
1.Click on the 'New' button to set up a project.
If the project only contains songs from one musician, enter his or her name in the 'Artist' text box or select the 'Sampler' text box, if the project includes a number of different artists.
You will not be able to make any entries in the 'Artist' field if the 'Sampler' field has been activated.
2.Enter the title of the project in the 'Title' text box.
3.Specify the maximum size of the project. You can store 74 minutes of music on a 'normal' CD-ROM, though some are available that can take up to 80 minutes.
4.Select the desired option from the 'Pause between the tracks' option buttons.
When you select one option, you are ruling out all the others.
Kurzanleitung |
Burning a CD • 17 |

5.Click on 'OK' to complete setting up the project. The project name will then appear in the 'Project selection'.
Kurzanleitung |
Burning a CD • 18 |
3.4.1 Adding audio tracks to a project
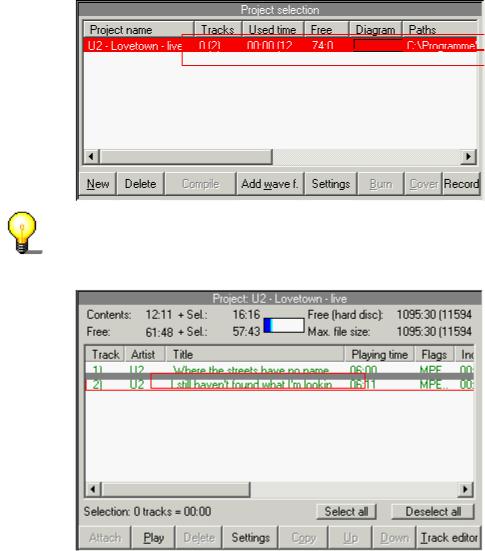
In the 'Copy source' area, highlight the tracks you want, hold down the lefthand mouse button and drag the audio track into the chosen project - the color of the project will change to red. The new tracks will be added at the end of the project.
You can also 'drag' the audio tracks into the table of contents of the highlighted project.
This procedure has the advantage that you can insert the new tracks anywhere you want
In this example, a new track has been inserted between tracks 1 and 2.
If you include MP3 files in the project, you can decide whether the files should be accepted in compressed or decompressed form.
If the file is to be decompressed, please mark the 'Decompress MP3 files' box. The audio track will be converted to a WAV file. Roughly speaking, one minute's music playing time occupies around 10 MB.
When you work with Feurio! it does not matter if you have the files compressed or decompressed. Feurio! automatically decompresses MP3 files when burning a CD.
Kurzanleitung |
Burning a CD • 19 |
If you choose the decompression option, a window will appear and inform you of the progress of the action.
The audio tracks belonging to the project will appear in the 'Project - Table of contents' area.
Kurzanleitung |
Burning a CD • 20 |
3.4.2 Monitoring the content of the project
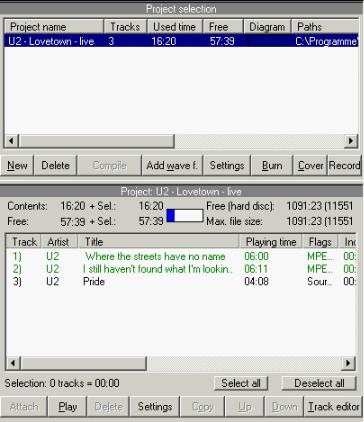
The project's audio tracks will be shown in the 'Project table of contents' area, highlighted in the project selection (against a blue background).
The compressed MP3 files appear in green text in the table of contents - the names of the decompressed WAV files are shown in black.
Kurzanleitung |
Burning a CD • 21 |
3.5Burning a project
1.In the 'Project selection' area, highlight the project to be burned so that it appears against a blue background.
2.Click on the 'Burn' button or double-click on the project. The 'CD-Writer' program will be launched automatically.
3.Select the 'Write' option from the 'Action' buttons and click on the 'Burn CD' button to burn a CD immediately.
4.After the CD has been successfully recorded, a window will appear with the burn parameters.
If you want to burn the project again, click on the 'Yes' button, if not then choose 'No'.
Kurzanleitung |
Burning a CD • 22 |
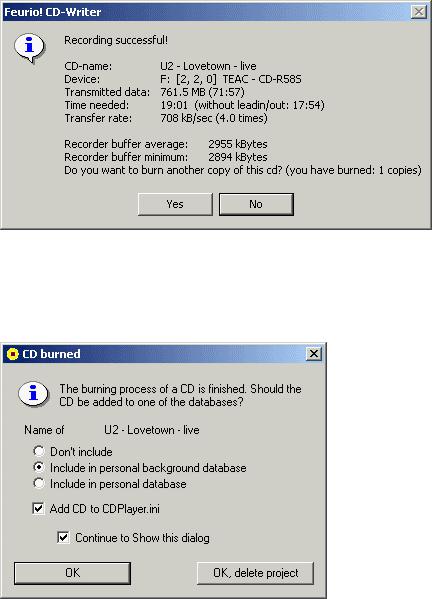
5.After you have finished burning you will be able to decide whether you wish to include the CD in the database.
Highlight the option you prefer.
Click on the 'OK' button if the project is to be recorded.
Click on the 'OK, delete project' button if you want to delete the project.
Kurzanleitung |
Burning a CD • 23 |
3.6Creating CD covers
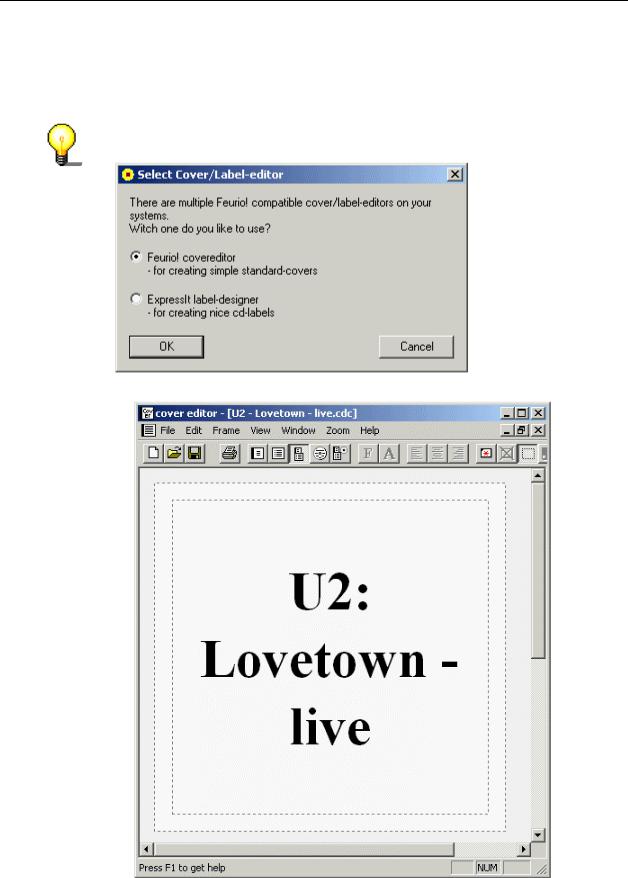
1.Highlight the project you want in the project list and click on the 'Cover' button in the project list.
The cover of the chosen project will appear, consisting of the title of the project and the name of the artist.
If a number of editors have been installed, you can decide which you want to use by selecting one of the available options!
In the following example, the Feurio! Cover editor is used.
Kurzanleitung |
Burning a CD • 24 |
Loading...