


Instructions
Feurio!
http://www.feurio.com

Contents
1 Instructions 3
1.1 Introduction 3
1.2 Layout of this manual 3
1.3 Program components 4
1.4 How can I ...? 4
1.5 Launching the program 4
1.6 Working with Feurio! 5
2 Installation 6
2.1 Installation 6
2.2 Registering Feurio! 9
2.3 Updates 10
2.4 Upgrade to the professional version 10
2.5 Deinstallation 11
3 Burning a CD 12
3.1 Introduction 12
3.2 Launching CD-Manager 13
3.3 Selecting a source 13
3.3.1 CD-ROM 14
3.3.2 Database 15
3.3.3 Hard disk 16
3.4 Setting up a project 17
3.4.1 Adding audio tracks to a project 19
3.4.2 Monitoring the content of the project 21
3.5 Burning a project 22
3.6 Creating CD covers 24
4 CD-Manager 27
4.1 Introduction 27
4.2 Launching CD-Manager 27
4.3 Copy source 28
4.3.1 CD-ROM 29
4.3.2 Database 32
4.3.3 Hard disk 33
4.4 Project list 35
4.4.1 Project list buttons 36
4.5 Project contents 37
4.5.1 Project contents buttons 38
4.5.2 Adding audio tracks from the database 39
4.5.3 Adding audio tracks from a CD-ROM 42
4.5.4 Adding audio tracks from the hard drive 46
4.5.5 Copying audio tracks from different sources 48
4.5.6 Deleting audio tracks from a project 49
4.5.7 Regrouping audio tracks in a project 50
Kurzanleitung Contents •••• i

5 CD-Writer 52
5.1 Introduction 52
5.2 Launching CD-Writer 52
5.3 Burn selection 53
5.3.1 Burning a project 53
5.3.2 Copying a CD 53
5.4 Burn settings 54
5.4.1 Writer settings 54
5.4.2 Multiple write settings 56
5.4.3 Buffer settings 57
5.4.4 CD text 58
5.5 Burning projects with a CD writer 58
5.5.1 Speed test 61
5.5.2 Testing 61
5.5.3 Testing and burning 62
5.6 Copying projects with one CD writer 64
5.7 Burning projects with a number of CD writers 66
6 Track Editor 69
6.1 Introduction 69
6.2 Recording audio data 70
7 Cover editor 72
7.1 Introduction 72
8 Wave player 74
8.1 Introduction 74
9 CD player 76
9.1 Introduction 76
10 Important terms 77
10.1 Copying "on-the-fly" 77
10.2 Image copying 77
10.3 Buffer under-run 78
11 Index 79
Kurzanleitung Contents •••• ii

1 Instructions
1.1 Introduction
These instructions are intended to help you quickly create your on audio
project and burn it on a CD. Feurio! has been specially developed for the
professional creation of audio CDs.
Feurio! satisfies both the layman's and expert's r equirements. Feurio's def ault
settings allow inexperienced users t o 'burn' their own CDs quickly and easily.
The variety of options available give the practised user complet e control over
every parameter while burning audio CDs.
To describe all the components of the program here would far exceed the
scope of these instructions. Therefore, only those functions and parameters
that are needed as standard featur es are explained in this document. You can
find more detailed information on Feurio! in the context-sensitive online help
function. You can call this up at any time by pressing t he F1 k ey. You will then
be given a help-text relating to the window currently visible on the screen.
You ca n also obtai n up-t o-da te inf orm atio n on Feur io! on the www.f euri o.com
Web site.
1.2 Layout of this manual
Section 1 provides a brief description of the 'philosophy' of this manual.
Section 2 explains how to install Feurio! - and uninstall it again if necessary.
Section 3 shows you how to create your own CD - from launching t he program
up through to producing a CD cover. This section is aim ed above all at users
who want to start using the program straightaway without having to do too
much reading first.
In section 4 and later, the individual components of the program and their
specific elements and functions are explained in more detail. In these sections,
the keen user will learn how to customize Feurio! so he or she can produce
exactly those CDs that are required.
Kurzanleitung Instructions •••• 3

1.3 Program components
Feurio comprises four powerful prog rams:
! Feurio! CD-Manager
! Feurio! CD-Writer
! Feurio! Cover editor
! Feurio! Track Editor (this program can only be started via Feurio! Feurio!
CD-Manager)
In addition, the package also contains a Wave player and a CD player.
1.4 How can I ...?
Users who have already got some experience with Feurio! and who want to
know exactly what to do will find the following sections more than useful:
How can I copy a CD? see Section 5.3.2 'Copying a CD
How can I compile a CD from a number of different ones? see Section 4. 5.5
'Copying audio tracks from different sources'.
How can I compile a CD from MP3 files ? see Section 4.5.4 'Adding audio
tracks from t he hard drive'.
How can I record audio data, for example fr om a record player? see Section
6.2 'Recording audio data'.
1.5 Launching the program
Following installation, you can call up each of the individual Feurio! programs
very simply.
1. Select START -> PROGRAMS -> FEURIO! and click on the desired
program.
Feurio! CD-Manager
Compiling your own CDs (project administration). see Section 4 'CDManager
Feurio! CD-Writer
Copying CDs and writing finished projects. see Section 5 'CD-W riter
Feurio! Cover editor
Printing CD covers. see Section 3.6 'Creat ing CD covers'.
Feurio! Deinstallation
Remove Feurio! from your computer. see Sect ion 2.5 'Deinstallation'.
Kurzanleitung Instructions •••• 4

1.6 Working with Feurio!
Feurio! is very user-fr iendly and the procedure for writing a CD is very simple,
as shown below:
! Launch 'Feurio! CD-Manager
! Select the source from which you wish to copy
! Set up a project
! Add tracks
! Burn the CD (to help you burn a CD, 'Feurio! CD-W riter' is automatically
launched from within 'Feurio! CD-Manager')
! Create the cover
After first explaining the installation of the program, this manual traces all
these steps. That m eans that once you have read Section 3 'Burning a CD',
you will know all you need to write your own CD.
The use of the supplementary program s 'Feurio! Cover Manager' and 'Feurio!
Track Editor' are described briefly in the corresponding sections.
Kurzanleitung Instructions •••• 5

2 Installation
2.1 Installation
Feurio! can be installed under the Windows 95/98, Windows Millennium,
Windows NT 4.0 and Windows 2000 operating systems.
You must have administrator rights to install the program under Windows
Millennium, Windows NT 4.0 or Windows 2000.
1. Close down all the Windows programs t hat you do not currently need.
2. Place the Feurio! CD in the CD-/DVD drive.
3. The setup program will start aut omatically. Click on the 'Feurio' butt on.
4. If the Setup prog ram does not st art aut omat ically, you must select t he drive
in Explorer where the program is and double-click first on the 'Feurio.exe'
program in the root direct or y and then on t he ' Feur io' button.
5. Click on 'Next' to start the installation.
6. Read the license conditions carefully and click on 'Yes' if you agree to
them.
Kurzanleitung Installation •••• 6
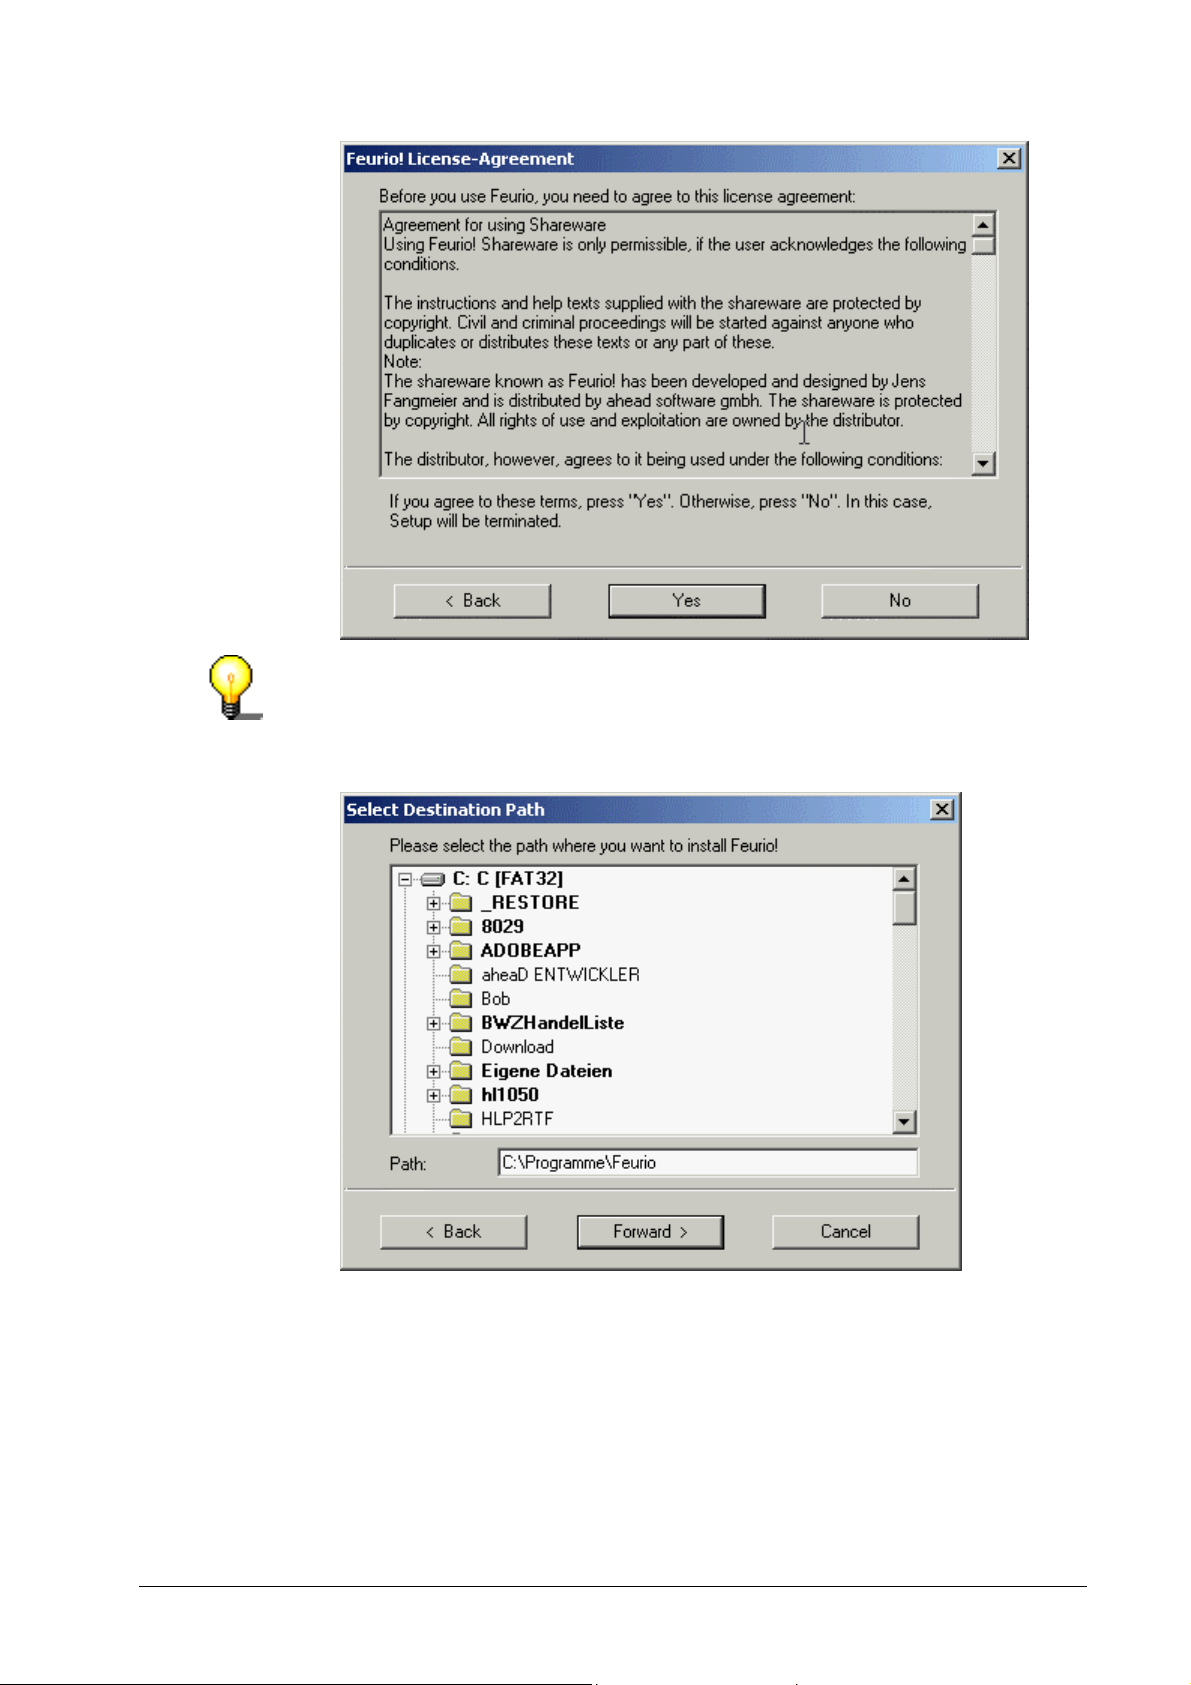
Feurio! cannot be installed if you do not agree to the license conditions.
7. Specif y the directory where the program is to be installed and click on the
'Next' button.
8. Specify the languages to be installed by selecting the appropriate check
boxes and clicking on the 'Next' button.
Kurzanleitung Installation •••• 7

9. Click on the 'Install' butt on to start the installation.
10. You will be able to start Feurio! as soon as installation is complete.
The software is registered the first time you start Feurio!
Kurzanleitung Installation •••• 8
2.2 Registering Feurio!
It is illegal for you to pass on your personal registration data on to other
people. It represents a breach of the license agreem ents - it may lead to your
Feurio! license being taken away and/or other leg al act ion being taken.
If you enter an illegal code, you are commit ting a criminal off ense that will be
combated by all lawful means.
The first stage does not apply if you launch Feurio! directly after installation.
1. Select START -> PROG RAMS -> FEURI O ! -> Feurio! CD-Manager.
2. Enter your personal details in the appropriate fields.
3. Enter the serial number and license code in the 'Serial number' and 'license
code' fields.
4. The serial number and license code can be found on t he inside of the cover
of the Feurio! packag ing CD.
5. Click on the 'OK' button t o com p let e the personalization procedure.
6. Click on 'OK' to complete r e gistration.
Kurzanleitung Installation •••• 9
2.3 Updates
Feurio! is being developed and improved all the time. New features are being
added - and any defects discovered are being ironed out.
On average, a new version is created every 4 to 8 weeks.
The license number and license code you were given when you bought
Feurio! are valid for all fut ure 1.X versions. You can obtain the latest version
on the Feurio! homepage at www.feurio.com
Click on the appropriate file t o install the update. The installat ion program will
automatically recognize the existing version of Feur io! and update it - without
your settings, projects, etc. being lost.
in the download area.
2.4 Upgrade to the professional version
If you want to upgrade your existing version of Feurio! to the Professional
version, so that you can burn on a number of diff erent CD writers at the same
time for instance, you will find all the information you need at our Internet sit e:
http://www.feurio.com/Professional/upgrade.shtml
.
Kurzanleitung Installation •••• 10
2.5 Deinstallation
1. Select START -> PROGRAMS -> FEURIO! -> Feurio! deinstallation.
2. Select the desired deinstallation option and click on ' Deinst all' .
If you have chosen to deinstall Wave files, the folder where they are saved
must be deleted separately.
Kurzanleitung Installation •••• 11

3 Burning a CD
3.1 Introduction
Your can make your own, individual CDs easily with Feurio!
This section is aimed at users who want to burn their own CDs without first
having to spend much time learning all about the program. It will show you
how to compile your own CD and introduce you to the different Feurio!
elements. The individual components and their specific elements and
functions are described in section 4 and later.
When you com pile your own CD, first a proj ect is set up, the audio track s are
then copied into the project and f inally the CD is burned.
The audio tracks to be burned may have diff erent form ats (CDA, wav or MP3
files) and originate f rom different sources (CDs, a hard disk, or a database).
Compressed MP3 files can be decompressed when they are copied into the
project (this calls for suf ficient hard disk memory but it does permit bur ning at
very high speed) or only at the moment they are burned onto the CD (in this
case no additional hard disk memory is required, but the burning process can
only be performed at a slower speed because the computer has to work to
decompress the files).
Kurzanleitung Burning a CD •••• 12

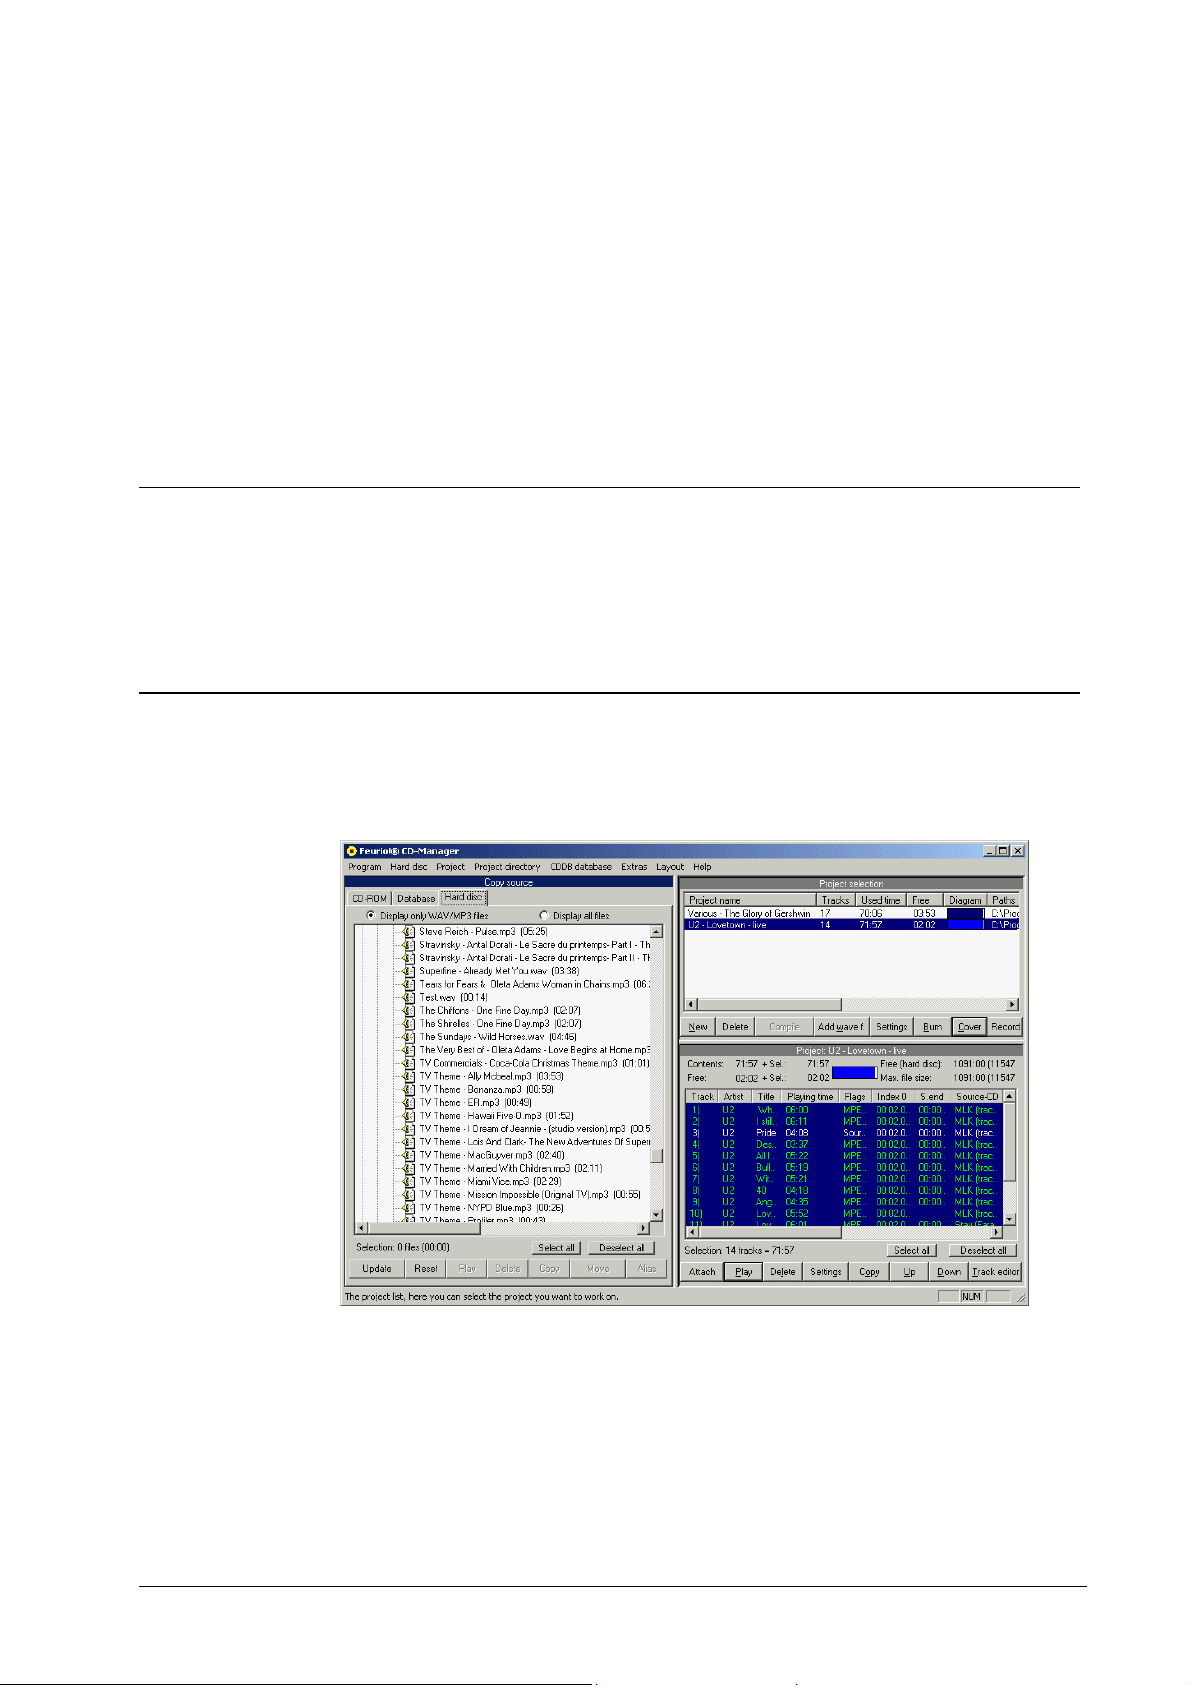
3.2 Launching CD-Manager
1. Select START -> PROG RAMS -> FEURI O ! -> Feurio! CD-Manager.
The program will start and the m ain window will appear.
The main window comprises three parts of the screen:
! Copy source (left)
The copy source includes the tracks that can be insert ed into the project.
! Project - selection (right , above) with the project list
The project selection contains all t he available projects (i.e. those already
set up). It is also possible to set up new projects.
The Feurio! CD-W riter and Feurio! Cover Editor can also be started from
this part of the prog r am .
! Project - table of content s (right, below) with the content of the highlighted
project
The table of contents contains all the tracks that are located in the
highlighted project.
The Feurio! Track Editor can also be started.
3.3 Selecting a source
Located on the left-hand side of the main window are the source selection
choices.
Copy source Notes
CD-ROM The audio tracks are selected from a CD-ROM.
Database
Hard disk The audio tracks are located on the com put er 's hard disk.
Kurzanleitung Burning a CD •••• 13
The audio tracks are located in a database on the
computer's hard disk.

3.3.1 CD-ROM
! Click on the 'CD-ROM' tab if the audio tracks to be copied are on a CD.
Kurzanleitung Burning a CD •••• 14

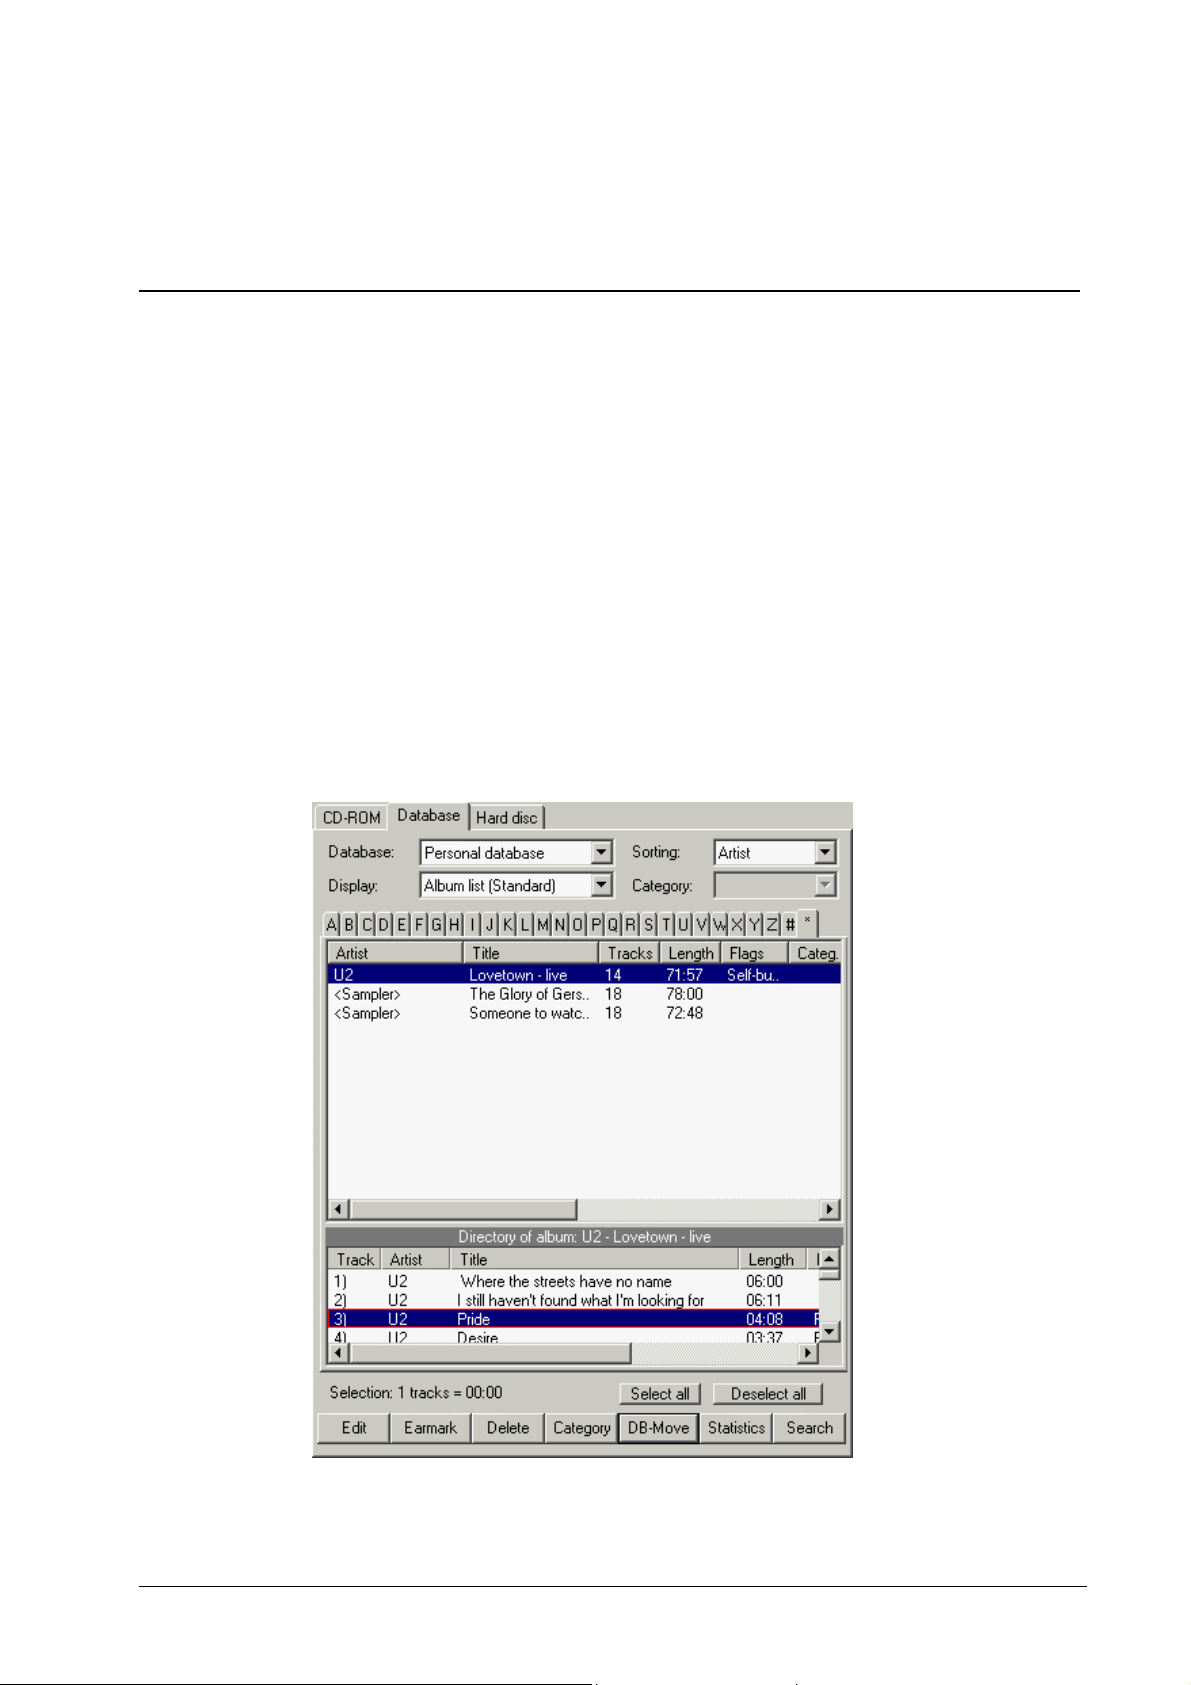
3.3.2 Database
! Click on the 'Database' tab if the audio tracks to be copied are stored in a
database.
Kurzanleitung Burning a CD •••• 15

3.3.3 Hard disk
! Click on the 'Hard disk' tab if the audio tracks to be copied are stored on the
hard disk.
The two option buttons specify which files are to be displayed:
! 'Only show WAV / MP3 files'
! 'Show all files'
Only files in these format s appear in the window
All files appear in the window
Kurzanleitung Burning a CD •••• 16

3.4 Setting up a project
A project is set up and edited in the 'Project selection' area which contains all
the existing projects.
1. Click on the 'New' button to set up a project .
If the project only contains songs f rom one musician, enter his or her name
in the 'Artist' text box or select the ' Sampler' t ext box, if the pr oject includes
a number of diff er ent artists.
You will not be able to make any entries in the 'Artist' field if the 'Sampler'
field has been activated.
2. Enter the title of the pr oj ect in the 'Title' text box.
3. Specify the maximum size of the project. You can store 74
'normal' CD-ROM, though some ar e available that can take up to 80
on a
minutes.
4. Select the desired option from the 'Pause between the tracks' option
buttons.
When you select one option, you are r uling out all the others.
Kurzanleitung Burning a CD •••• 17
minutes of music

5. Click on 'OK' to complete setting up the proj ect. The pr oject name will then
appear in the 'Project selection'.
Kurzanleitung Burning a CD •••• 18

3.4.1 Adding audio tracks to a project
In the 'Copy source' area, highlight the tracks you want, hold down the lefthand mouse button and drag the audio track into the chosen project - the color
of the project will change to red. The new tracks will be added at the end of the
project.
You can also 'drag' the audio tracks into the table of contents of the
highlighted project.
This procedure has the advantage that you can insert the new tracks
anywhere you want
In this example, a new track has been inserted between tracks 1 and 2.
If you include MP3 files in the project , you can decide whether the files should
be accepted in compressed or decompressed form .
If the file is to be decom pr essed, please m ark the 'Decompress MP3 files' box.
The audio track will be converted to a WAV file. Roughly speaking, one
minute's music playing time occupies around 10 MB.
When you work with Feurio! it does not matter if you have the files
compressed or decompressed. Feurio! automatically decompresses MP3
files when burning a CD.
Kurzanleitung Burning a CD •••• 19

If you choose the decompression option, a window will appear and inform
you of the progress of the act ion.
The audio tracks belonging to the project will appear in the 'Project - Table
of contents' area.
Kurzanleitung Burning a CD •••• 20

3.4.2 Monitori ng the content of the pr oj ect
The project's audio track s will be shown in the 'Project table of contents' area,
highlighted in the project select ion (against a blue background).
The compressed MP3 files appear in green text in the table of contents - the
names of the decompressed WAV files are shown in black.
Kurzanleitung Burning a CD •••• 21

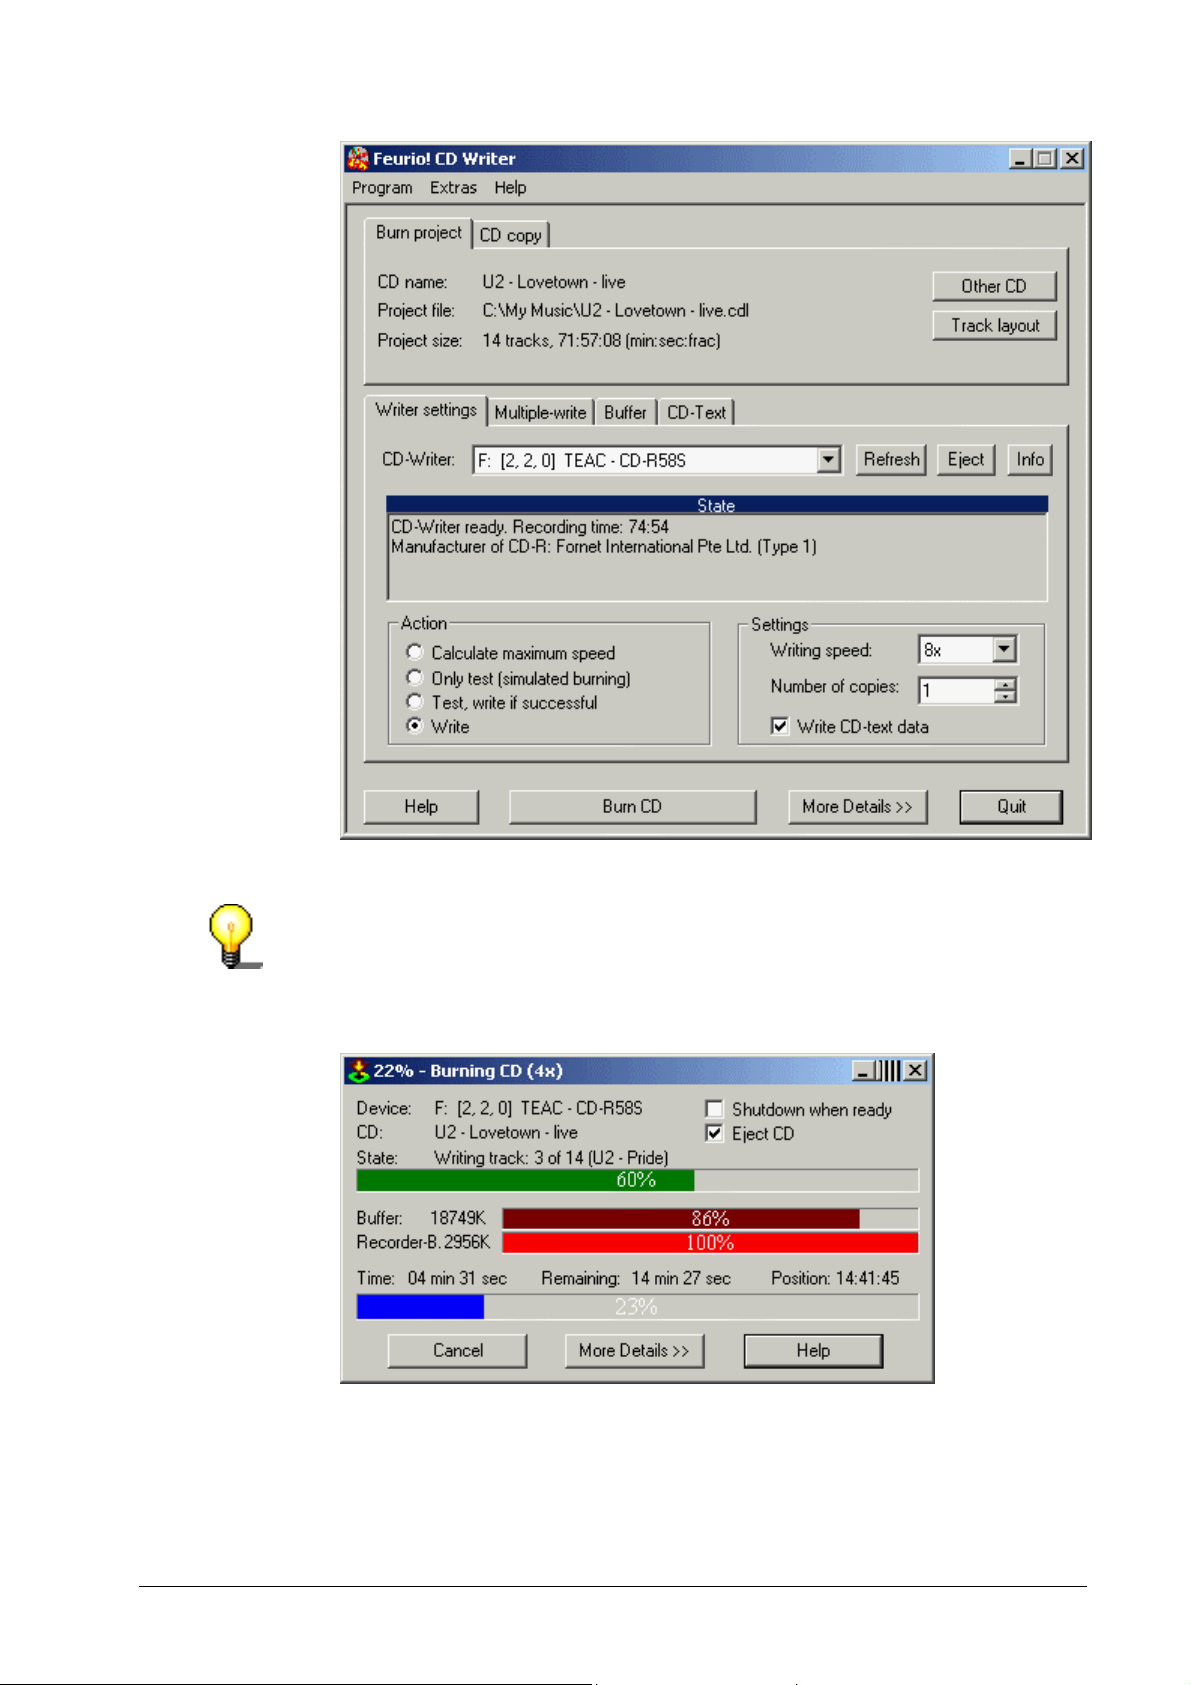
3.5 Burning a project
1. In the 'Project selection' area, highlight the pr oject to be burned so that it
appears against a blue background.
2. Click on the 'Burn' button or double-click on the project. The 'CD-Writer'
program will be launched automatically.
3. Select the 'Write' option fr om t he 'Action' butt ons and click on t he 'Bur n CD'
button to burn a CD immediately.
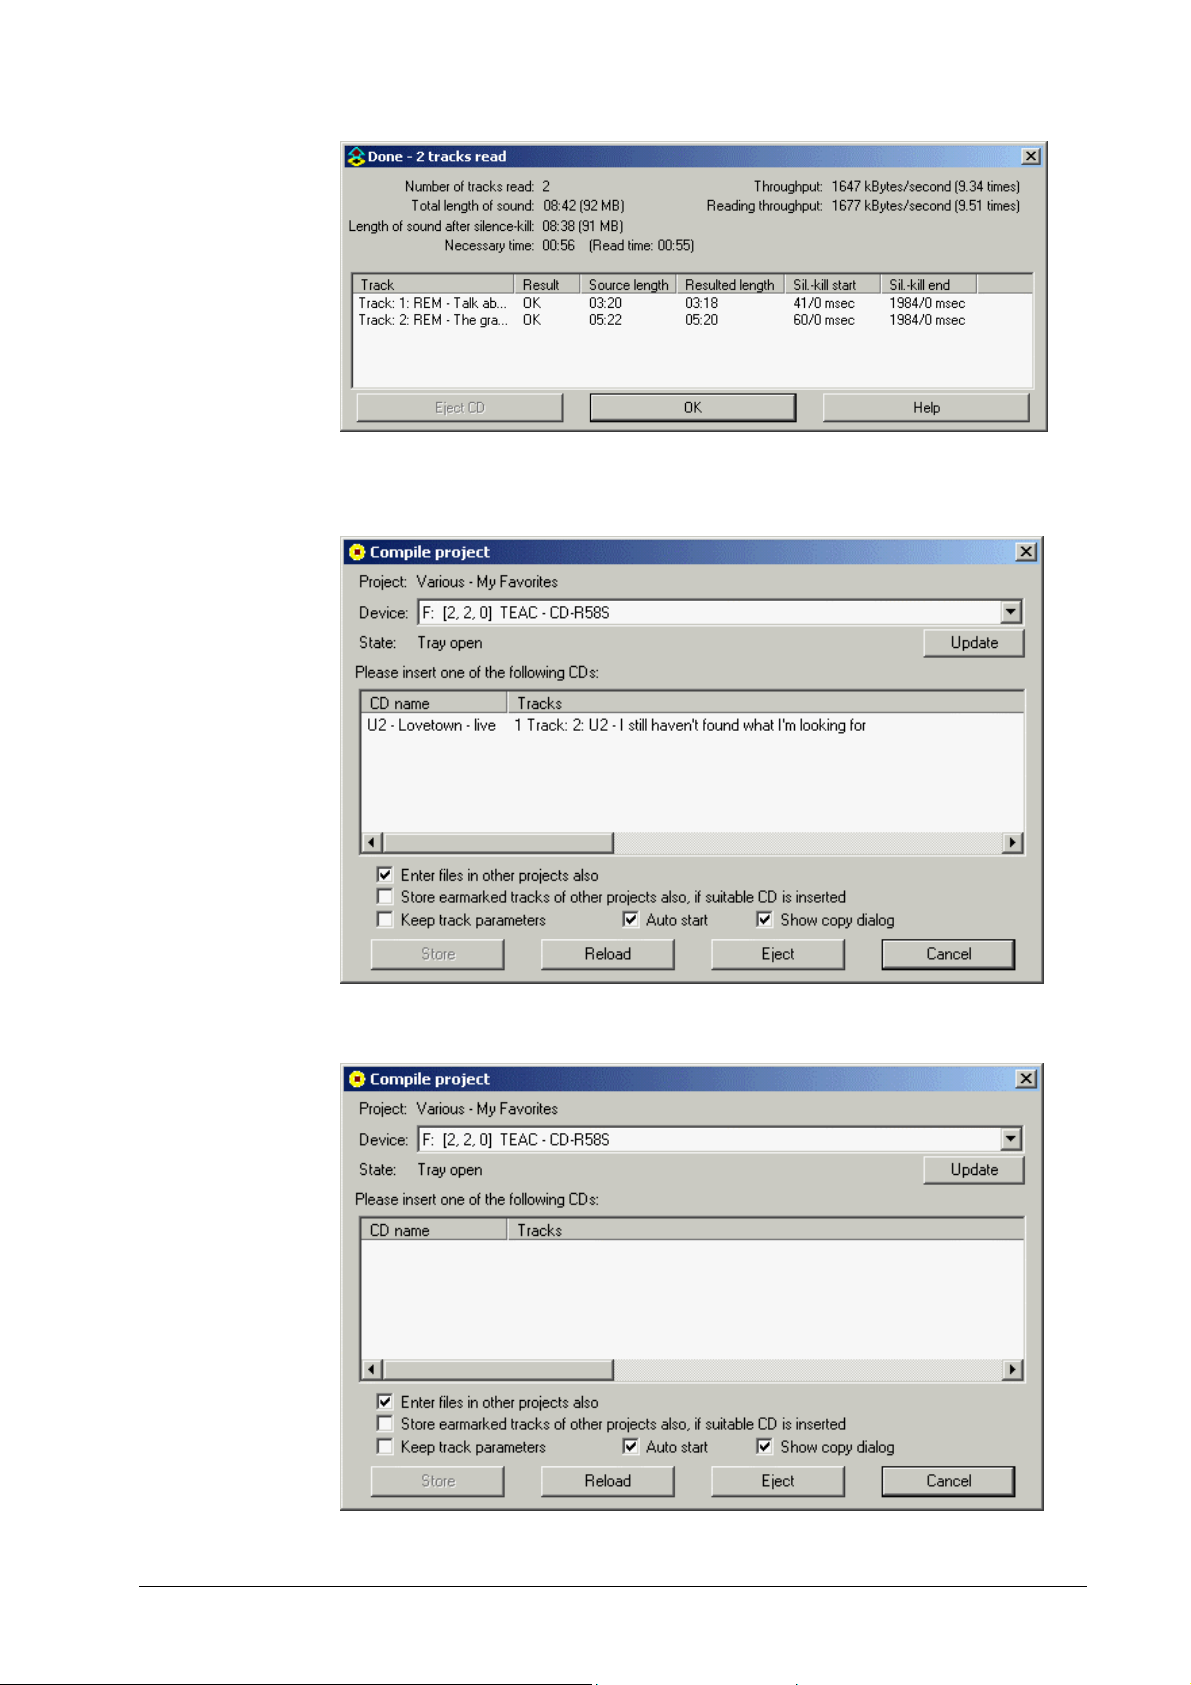
4. After the CD has been successfully recor ded, a window will appear with the
burn parameters.
If you want to burn the project ag ain, click on the 'Yes' button, if not then
choose 'No'.
Kurzanleitung Burning a CD •••• 22

5. After you have finished burning you will be able to decide whether you wish
to include the CD in the database.
Highlight the option you pref er .
Click on the 'OK' button if the project is to be recorded.
Click on the 'OK, delete proj ect ' button if you want to delete the project .
Kurzanleitung Burning a CD •••• 23

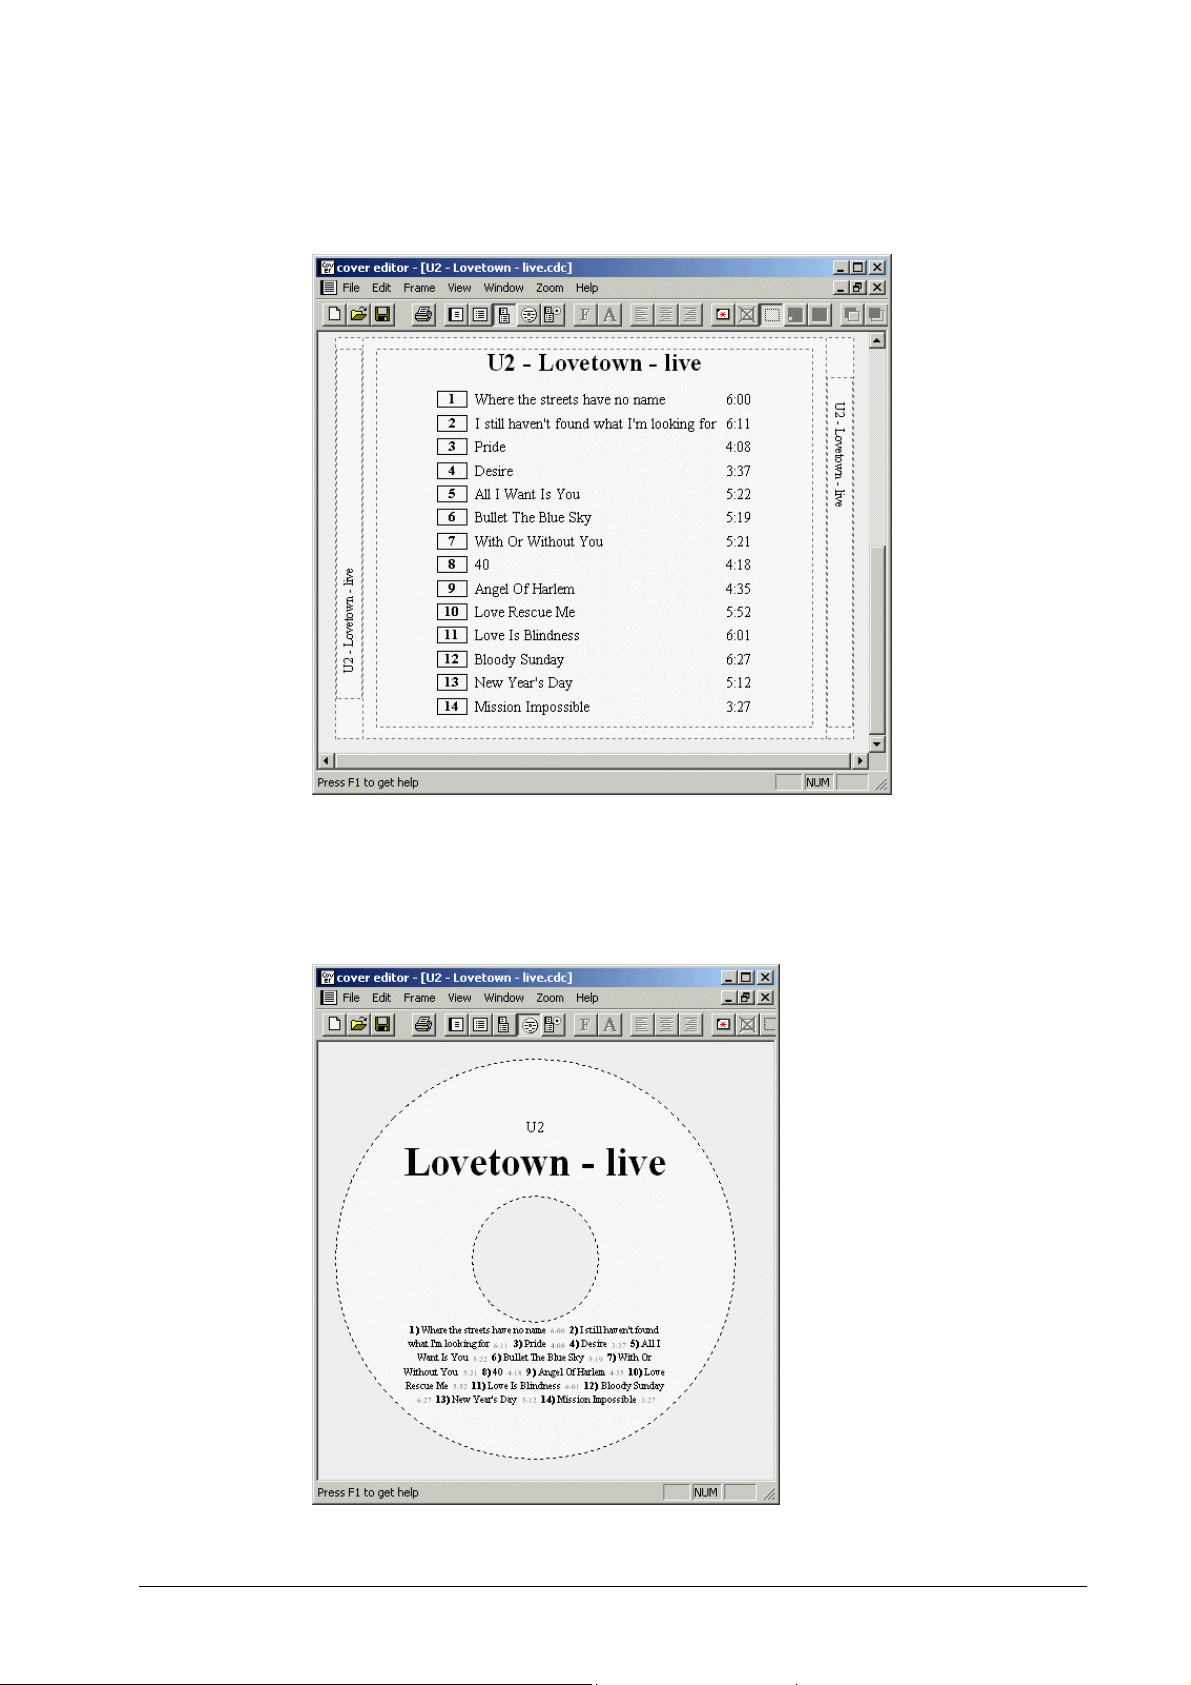
3.6 Creating CD covers
1. Highlight the project you want in the project list and click on the 'Cover'
button in the project list.
The cover of the chosen project will appear, consisting of the title of the
project and the name of the ar t ist .
If a number of edit ors have been installed, you can decide which you want to
use by selecting one of the available options!
In the following example, the Feurio! Cover editor is used.
Kurzanleitung Burning a CD •••• 24
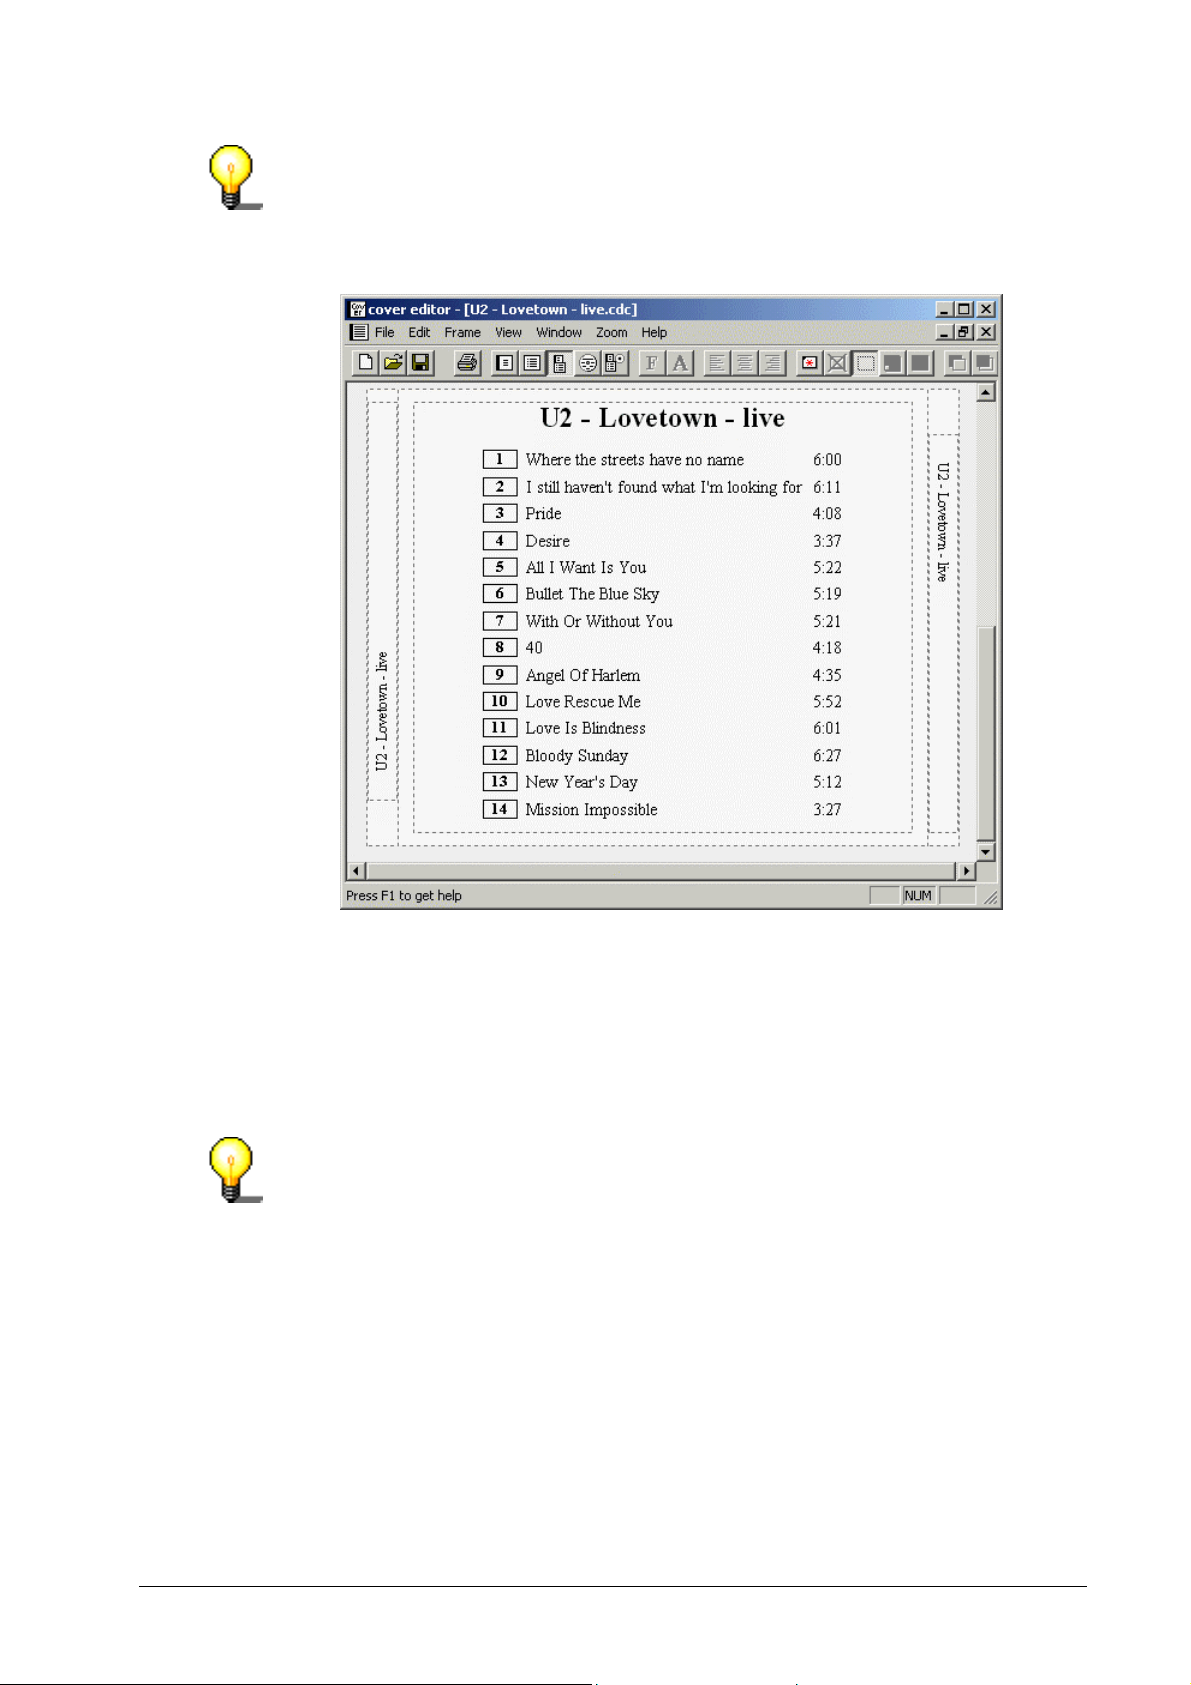
In the 'View' menu, you can decide which cover elements are to be shown.
In the standard display format, the cover and the inlay are shown.
2. Use the mouse to run down the horizontal scroll bar . The text of the inlay
will appear.
3. If you also want to add a background image in addition to the, proceed as
follows:
Highlight the cover element you wish to edit. It will then have a red border.
The previously inactive program elements (which had been grayed) can
now be used.
4. In the 'Frame' menu, select t he 'Load image as background' com m and
You may only select BMP files.
If the desired picture is only available in a different format, you must first
convert it before you can insert it with the 'Feur io! Cover edit or '.
5. Click on the 'Browse' button and choose the BMP file you want.
6. Select the desired option from t he 'Enlargement mode' option butt ons.
Kurzanleitung Burning a CD •••• 25

7. Click on the 'OK' button t o load t he background picture.
8. Mark t he cover element you want to print and select the 'Print' command
from the 'file' menu. Then select the type of printer, define the print
characteristics and click on 'OK'.
Kurzanleitung Burning a CD •••• 26
4 CD-Manager
4.1 Introduction
In effect, the 'Feurio! CD-Manager' is the 'command center' of Feurio!
Using the CD-Manager, you compile the project s from which a CD is burned,
and you can also easily call up and start all the other program elements such
as the Feurio! CD-Writer.
4.2 Launching CD-Manager
1. Select START -> PROG RAMS -> FEURI O ! -> Feurio! CD-Manager.
The program will start and the m ain window will appear.
The main window comprises three parts of the screen:
! Copy source (left)
The source includes the tracks that can be inser ted into the project.
! Project - selection (right , above) with the project list
The project selection contains all the available (i.e. already saved) projects.
It is also possible to set up new projects.
The Feurio! CD-W riter and Feurio! Cover Editor can also be started from
this part of the prog r am .
Kurzanleitung CD-Manager •••• 27
! Project - table of content s (right, below) with the content of the highlighted
project
The table of contents contains all the tracks that are located in the
highlighted project. The Feurio! Track Editor can also be st ar ted.
4.3 Copy source
In the 'Feurio! CD-Manager' standard type of view, all the elements, i.e. copy
source, project list and project cont ents are visible. Depending on the column
width, the content of the copy source from which you intend to copy may be
longer than the screen. You will be able to see the rest of the screen by
moving the mouse along the scroll bar. You can change the width of the
columns at the top. You can choose between three sources to copy from:
'CD-ROM', 'Database' and 'Hard disk ' .
Copy source Notes
CD-ROM The audio tracks are selected from a CD-ROM.
Database
Hard disk The audio tracks are located on the com put er 's hard disk.
The audio tracks are located in a database on the
computer's hard disk.
In order to display t he selected source, hit the F3 k ey. You can switch back to
standard display format by touching F2.
Kurzanleitung CD-Manager •••• 28
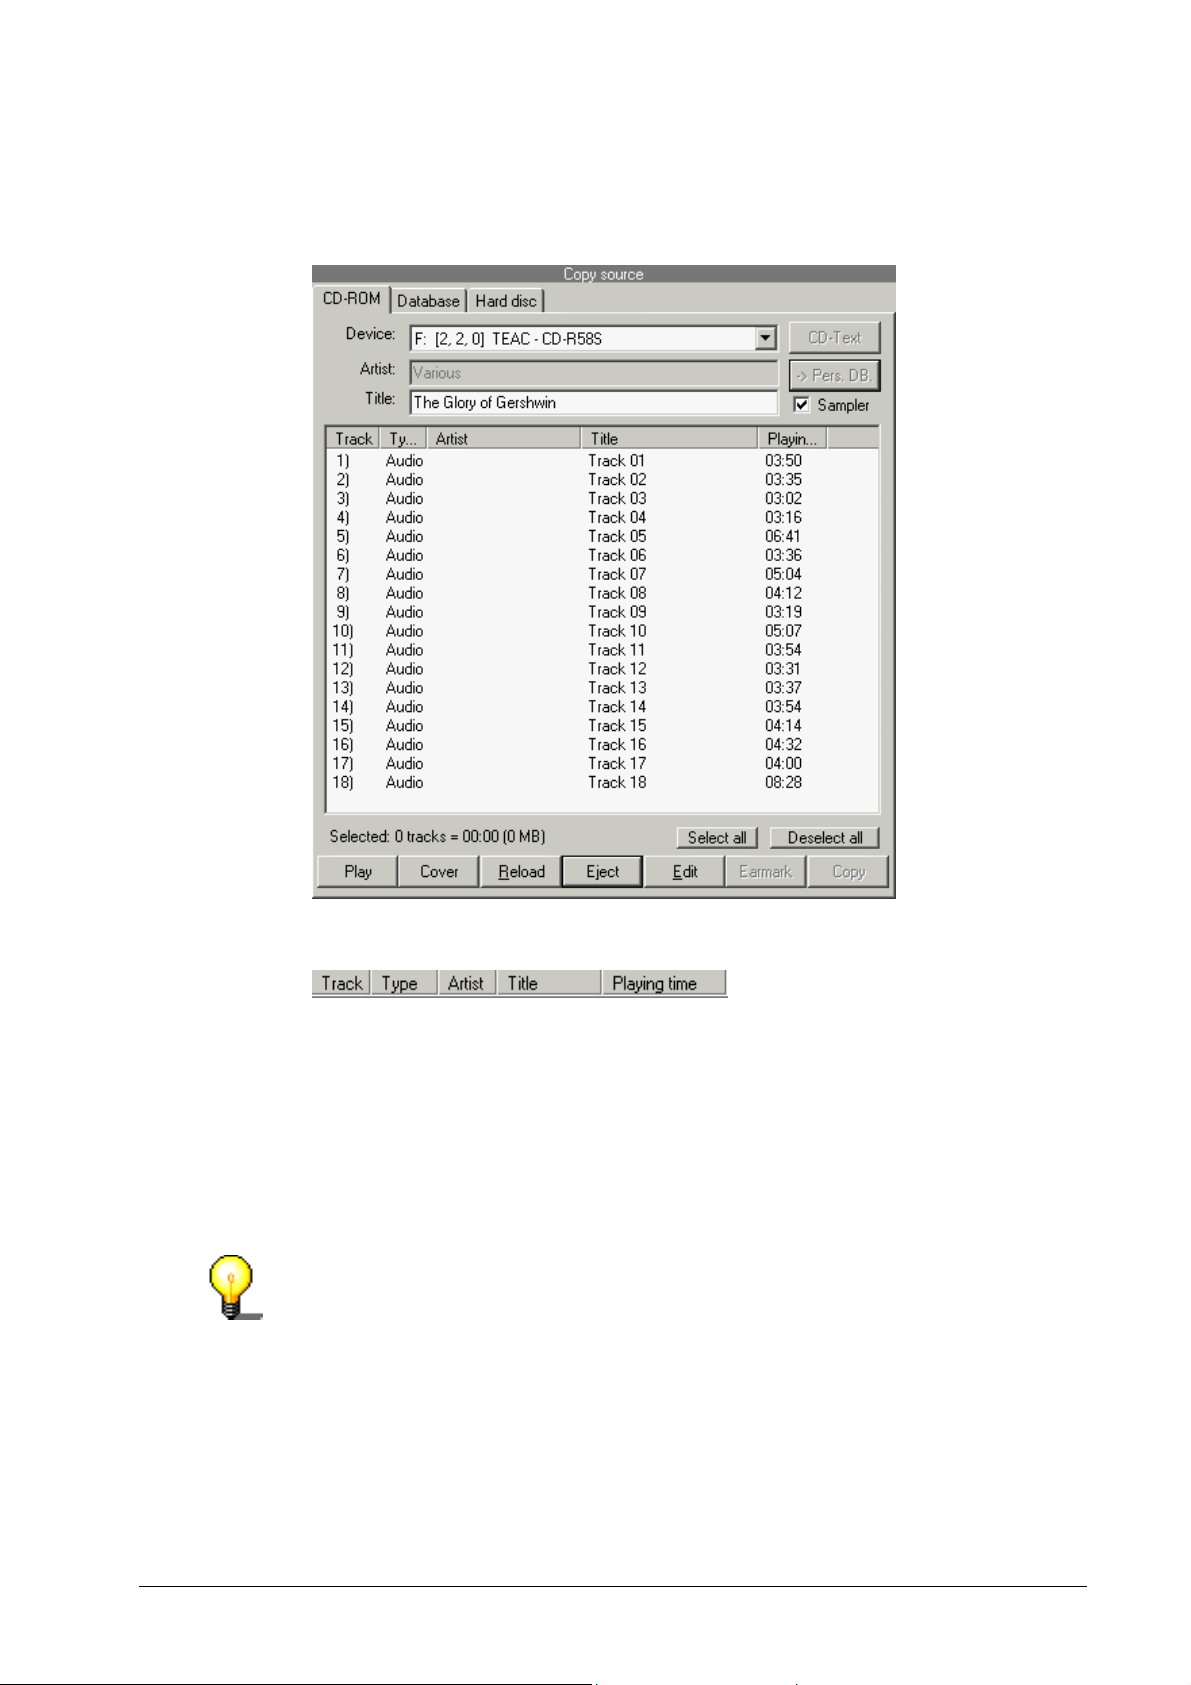
4.3.1 CD-ROM
The source 'CD-ROM' shows the information on the CD that has been
inserted.
The column elements show details of the CD's contents.
Track Number of the track
Type Type of tracks
Artist Name of the musician(s) on the track
Title Title of the track
Playing time Playing time of the track
4.3.1.1 The CD-ROM copy source buttons
Only those buttons are active that have a direct function – all the others are
grayed out.
If no CD has been inserted, only the 'Reload' and ' Ej ect' buttons will be active.
When you highlight an audio track, all the buttons will be active and can be
used.
Kurzanleitung CD-Manager •••• 29
Button Function
Transfers the CD into t he personal database.
This button is only active if t he CD has not yet been entered
in the personal database.
Selects all the tracks.
A file must first be m arked in the directory before you can
use this function.
Deselects all the tracks.
A file must first be m arked in the directory before you can
use this function.
Opens the 'CD player' and star ts playing back the CD from
the highlighted audio track onward.
Opens the 'Feurio! Cover editor' program.
Reloads the CD.
If the CD drive is open, this command will automatically
close it.
Ejects the CD from t he drive.
Opens CD-Editor.
Makes a note of t he highlighted tracks so that they can be
copied into the current project at a later time.
The tracks will appear in the project list .
Copies the highlighted track s int o the current project.
The tracks will appear in the project list .
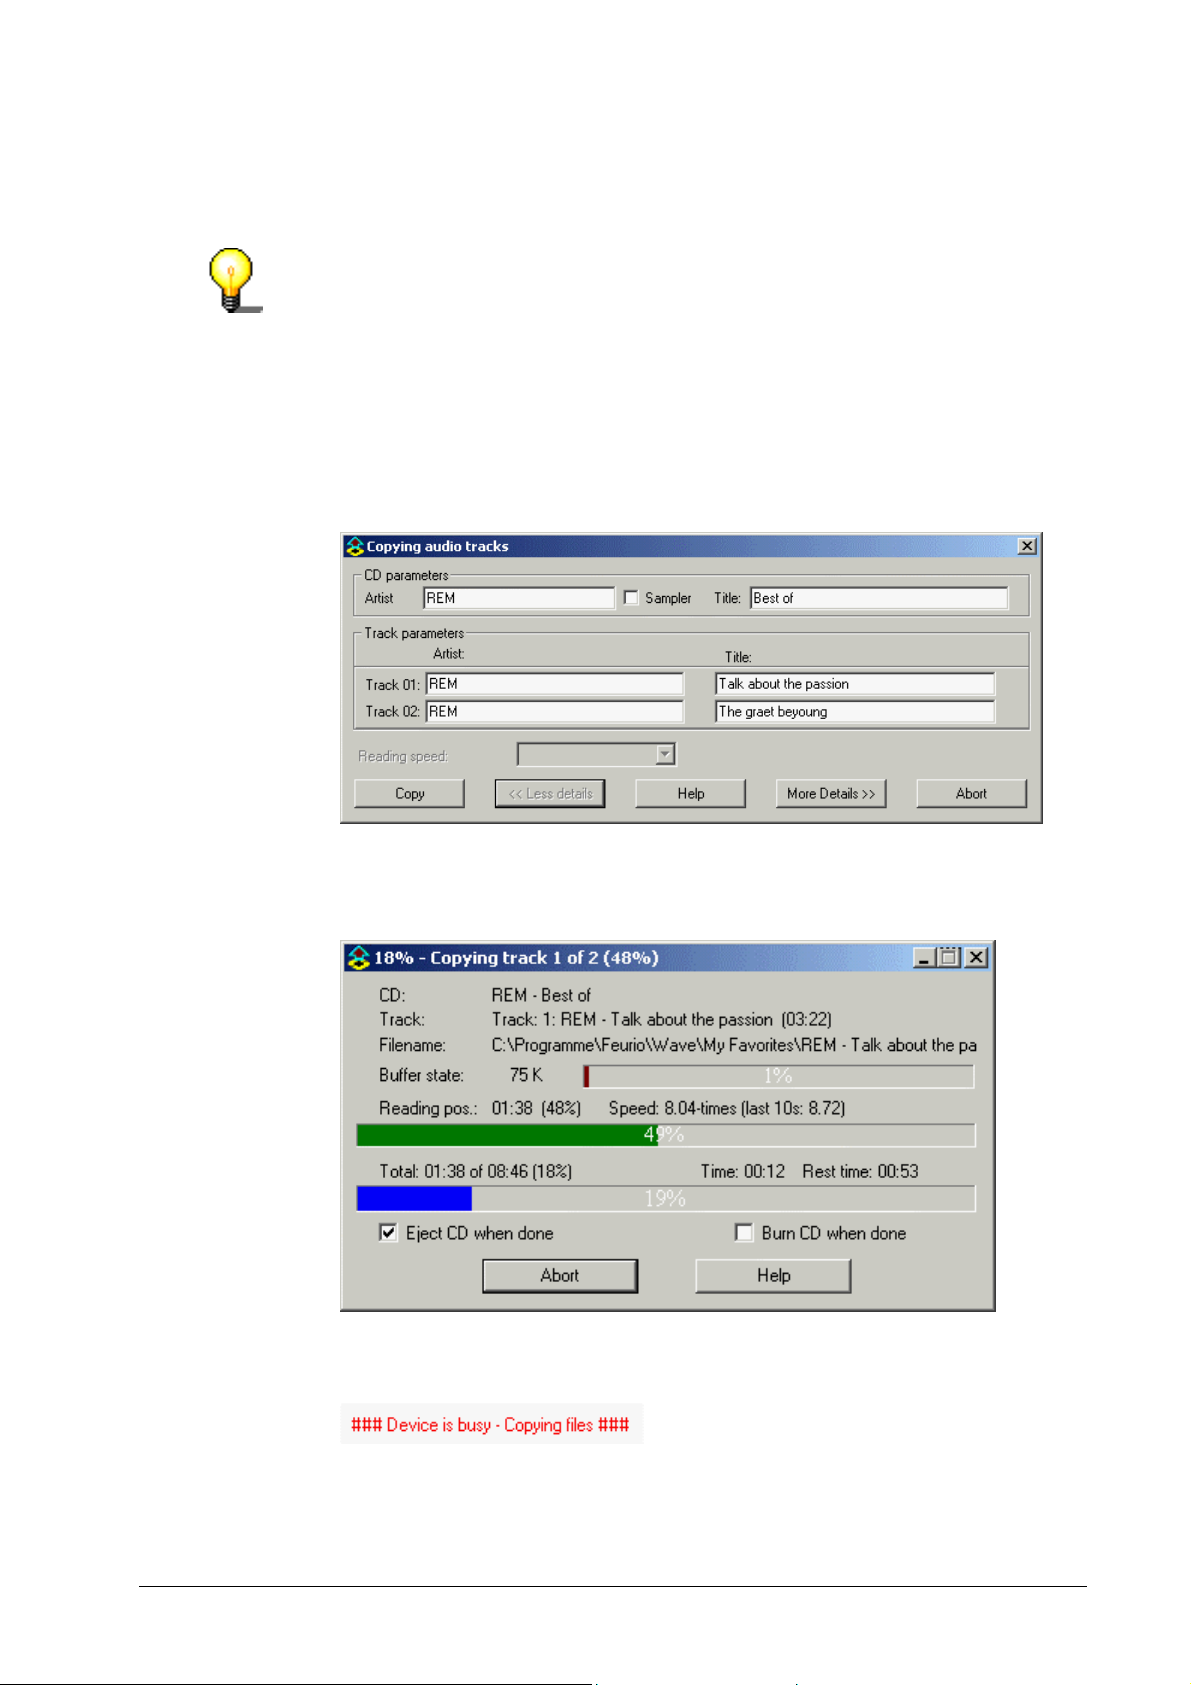
After you have clicked on the 'Copy' button, the 'Copy audio tracks' window
will open and offer a number of options for copying. Two particularly
interesting options will only become visible after you have clicked on the
'Advanced' button.
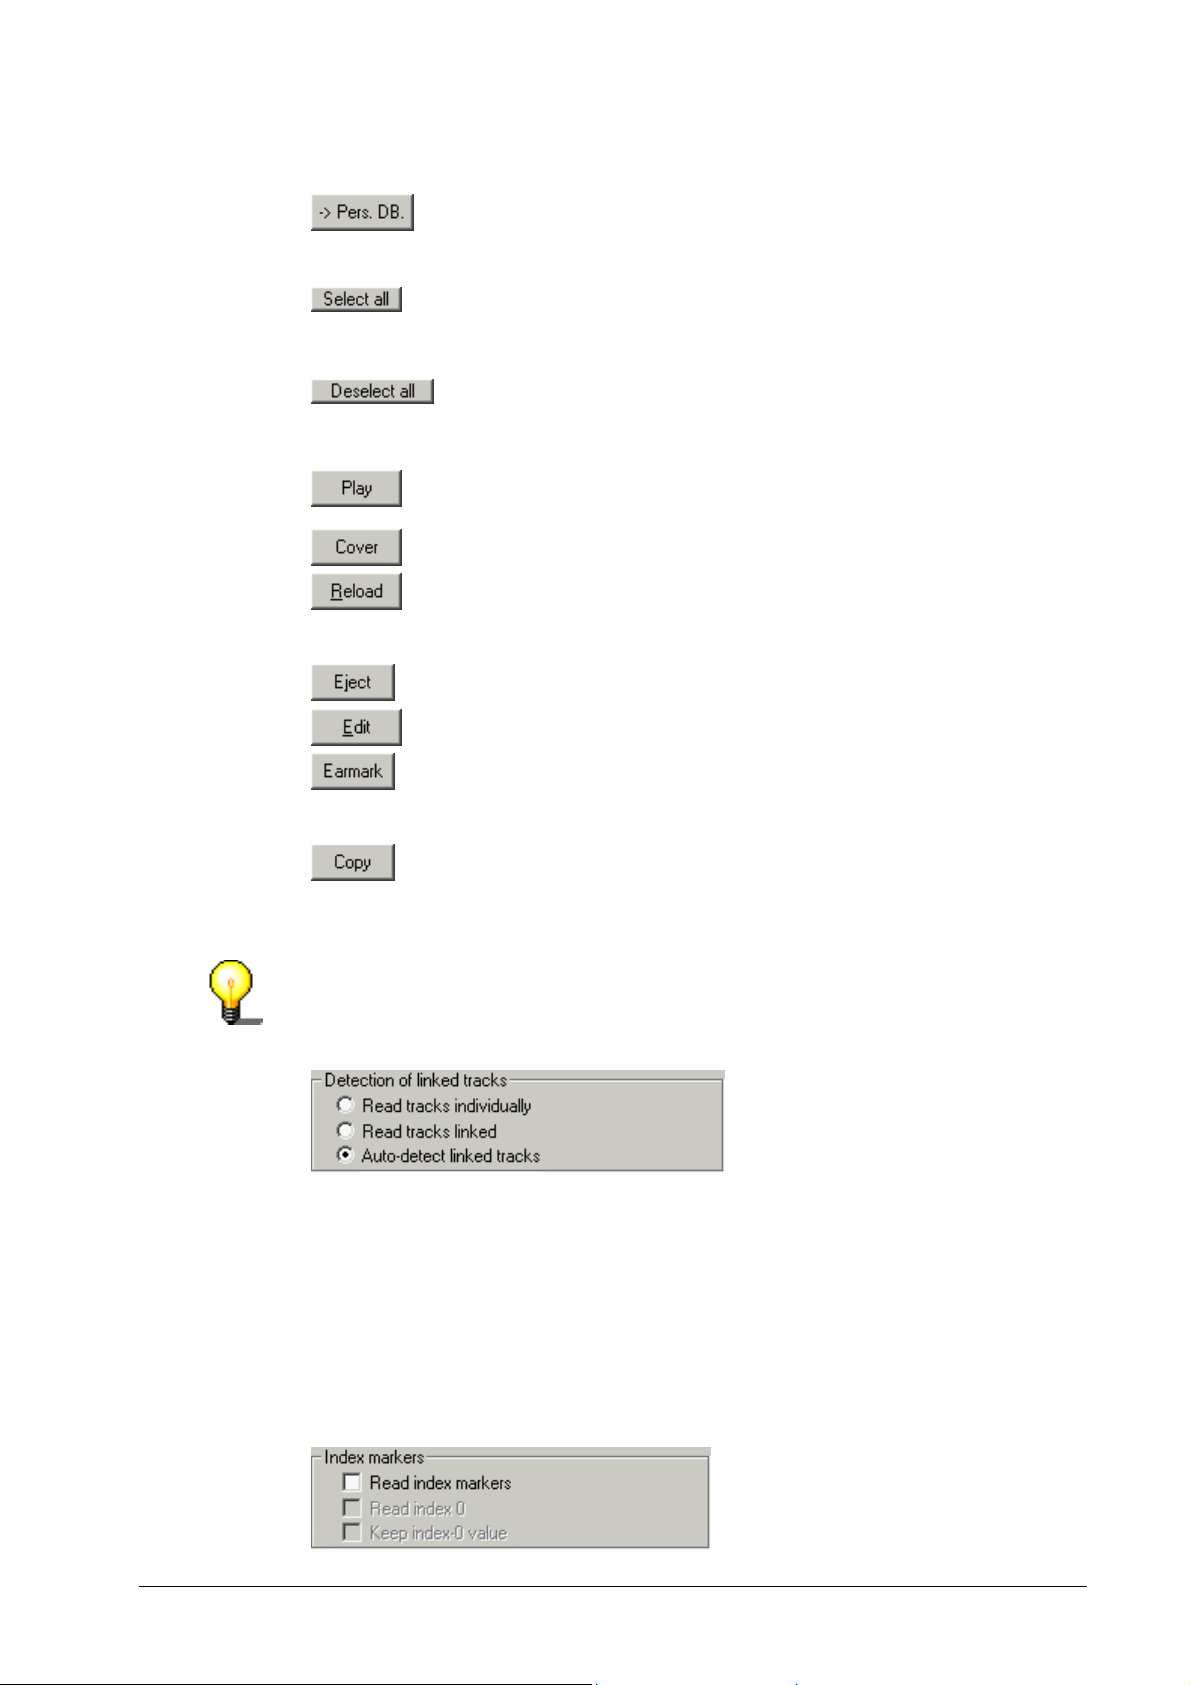
Read tracks individually
Each track is read as an individual file. This means that (even with live
recordings) there are no link ed t r acks and disturbing pauses.
Read tracks linked
All the tracks are read without a pause and a wave file is created.
Auto-detect linked tracks
With this option, Feurio! automatically recognizes the correct mode. Feurio!
checks to see if there is a pause bef ore copying and the tracks are put down
either as linked or non-linked tr acks.
Kurzanleitung CD-Manager •••• 30

Read index markers
If the control box is checked, Feurio! will try to read the index marks of the
Wave files as well (unfortunately, not all CD drives can correctly read the
index marks).
Read index 0
This control box is only active if the 'read index marks' box has been marked.
If the control box is not checked, Feurio! will insert an index 0 value as set
value (i.e. a pause between the tracks).
If the control box is checked, Feurio! is instructed to read the index 0 data as
and burn it on t he CD in exactly this form . On some CDs a ' bonus track ' or an
'intro' is hidden away in the index 0 area.
Keep index 0 value
This control box is only active if the 'read index markers' box has been
marked.
The control box is check ed, Feurio! will try to select the existing index 0 value
and adopts this as the index 0 value. In this case, only the length of the Index
0 value is read, but not the content.
Kurzanleitung CD-Manager •••• 31

4.3.2 Database
The 'Database' source shows the information in t he existing dat abases.
The appearance of this are depends on the display option chosen. In the
following example, the 'Album list (Standar d) ' display type is shown.
The column elements show details of the CD's contents.The most important
are:
Artist Name of the musician(s) on the track
Title Title of the track
Tracks Number of tracks
Length Playing time of the album
Flags Flag information
Category Selected album category
Kurzanleitung CD-Manager •••• 32

4.3.2.1 The database copy source buttons
r
Only those buttons are active that have a direct function – all the others are
grayed out. You will not be able to play an audio track or copy it into a project
as long as you have not selected it.
When you highlight an audio track, all the buttons will be active and can be
used.
Button Function
Selects all the tracks.
A file must first be m arked in the directory before you can
use this function.
Deselects all the tracks.
A file must first be m arked in the directory before you can
use this function.
Edits the selected database entry.
Moves the highlighted tracks into the curr ent project.
The tracks will appear in the project list .
Deletes the highlighted CD f rom the database.
Make it possible to enter a category designat ion for the CD.
Already available categories will be shown in a dropdown
list.
Moves the highlighted CD (e.g. from the 'Personal
database'' to another database (e.g . a 'W indows CD playe
database').
The CD thus moved will no longer be visible in the window.
It will appear when the corresponding database is selected.
Shows statistical information on the selected database,
such as the number of CDs, of tracks, total playing time,
etc..
Opens the search function.
4.3.3 Hard disk
The 'hard disk' source shows the information in the files stored on the hard
disk.
The two option buttons specify which files are displayed:
! 'Only display WAV/MP3 files'
Only files in this format appear in the window
! 'Display all files'
All the files will appear in the window
Kurzanleitung CD-Manager •••• 33

4.3.3.1 The hard disk copy source buttons
Only those buttons are active that have a direct function – all the others are
grayed out. You will not be able to play an audio track or copy it into a project
as long as you have not selected it.
When you highlight an audio track, all the buttons will be active and can be
used.
Button Function
Selects all the files in t he open directory. A file m ust first be
marked in the directory befor e you can use this function.
De-selects all the files in the open direct ory.
A file must first be marked in the directory before you can
use this function.
Kurzanleitung CD-Manager •••• 34
Updates the directory displayed (the files are read again).
Closes the open directory and displays the computer's
directory structure.
Opens the 'Wave player' and plays the highlighted audio
tracks.
Deletes the highlighted f iles.

f
4.4 Project list
In the 'Feurio! CD-Manager' standard display format, all the areas, i.e. sources
from which you want to copy, the project list and the project contents are
visible. Depending on the width of column, the content of the project list may
be longer than the screen. The remainder of the list can be seen if you use the
mouse to run down the horizontal scroll bar. The width of the colum ns can be
changed (at the head of the column).
Copies the selected files into the highlighted project.
Moves the selected files into the highlighted project and
deletes them from the source.
Creates a link between the highlighted files and the
highlighted project - the file will not be deleted at the source.
If you only want to see the project list, press the F5 key. You can switch back
to standard display format by touching F2.
The project list comprises the following elements:
! Project name
! Tracks
! Used time
! Free
! Diagram
! Paths
Project name Name of the project
Tracks
Used time
Free
The number of tracks in the project. T he number in brackets
shows the number of tracks in the proj ect and the number o
tracks currently highlighted.
The playing time in minutes of the t racks in the project. The
number in brackets shows the playing time of t he tr acks in t he
project and the playing time of the currently highlighted tracks.
The time remaining on the CD (in minutes). The number in
brackets shows the time remaining for the tracks in the project
Kurzanleitung CD-Manager •••• 35

and the time remaining (including the currently highlighted
tracks).
Diagram
Paths Details of the paths of the individual projects.
Graphic image of the re lationship between the content of the
project and the space still available on the CD.
Bar – dark blue: Project
Bar – light blue: Highlighted tracks
Bar – white: Time remaining
4.4.1 Project list buttons
The buttons of the proj ect list area have the following functions:
Button Function
You can find detailed information on this section of the CD-Manager in the
online help. You can call up the context-sensitive help by pressing the F1 key.
Sets up a new project.
Deletes the highlighted project.
Copies the tracks noted into the highlighted project.
Adds an audio track to the highlig ht ed project.
Shows the parameters of the highlighted projects and
makes it possible to edit the project parameters.
Opens the 'Feurio! CD-Writer' pr ogram.
Opens the 'Feurio! Cover manager' program.
Kurzanleitung CD-Manager •••• 36

4.5 Project contents
In the 'Feurio! CD-Manager' standard view, all the areas, i.e. sources from
which you want to copy, the project list and the project contents are visible.
Depending on the width of column, the content of the project may be longer
than the screen. The r em ainder of the list can be seen if you use the mouse to
run down the horizontal scroll bar. The width of the columns can be changed
(at the head of the column).
If you only want to see the project contents, press t he F5 key. You can switch
back to standard display format by touching F2.
The project contents consist of different column elements which are not all
necessarily visible. Only those columns are displayed where a value has been
assigned for at least one track.
Track Number of the track
If there is a '<' symbol in f ront of the track num ber, this means
that the track is linked to the previous one without a break.
Breaks between tracks are particular annoying on live
recordings.
Artist Name of the musician(s) on the track
Title Title of the track
Playing time Playing time of the track
Flags Flag information
Index 0 Lengt h of the index 0 silence
S. end Length of the additional silence at the end of the track
Source CD Information on the source CD
Wave file Name and path of the wave file
Kurzanleitung CD-Manager •••• 37

4.5.1 Project contents buttons
The buttons of the proj ect cont ents area have the following functions:
Button Function
Opens the 'Wave player' and plays the highlighted track.
Deletes the highlighted track from the project .
Sets the parameters for the highlighted audio tracks .
Copies the highlighted audio track into another project.
Moves the highlighted tracks one place up in the playlist.
Moves the highlighted tracks one place down in the playlist.
Opens the 'Feurio! Track edit or ' program.
You can find detailed information on this progr am in the online
help. You can call up the help by pressing the F1 key.
Selects all the files in the project.
De-selects all the highlighted files in the project.
You can find detailed information on this section of the CD-Manager in the
online help. You can call up the context-sensitive help by pressing the F1 key.
Kurzanleitung CD-Manager •••• 38

4.5.2 Adding audio tracks from the database
1. Open the 'database' source by clicking on the appr opr iate tab.
2. Select the database in which the tracks ar e located. The standard display
format is 'Album list (s tandard)'. If this display type has been selected (or
'Track list (standar d) ' ), you can sort according to different search criteria.
If you sort according to 'Ar tist' or 'Tit le', an alphabetical bar will appear limiting
your search to a particular first letter.
If you click on the
tab, all the entries will be shown.
If you click on the
be shown.
3. Hig hlight the chosen tracks and click on the ' Earmark' button ( or move the
tracks into the desired proj ect – the project color will change to red). The
tracks noted will appear in the project cont ent s.
4. In the 'Project selection' area, click on the 'compile' button.
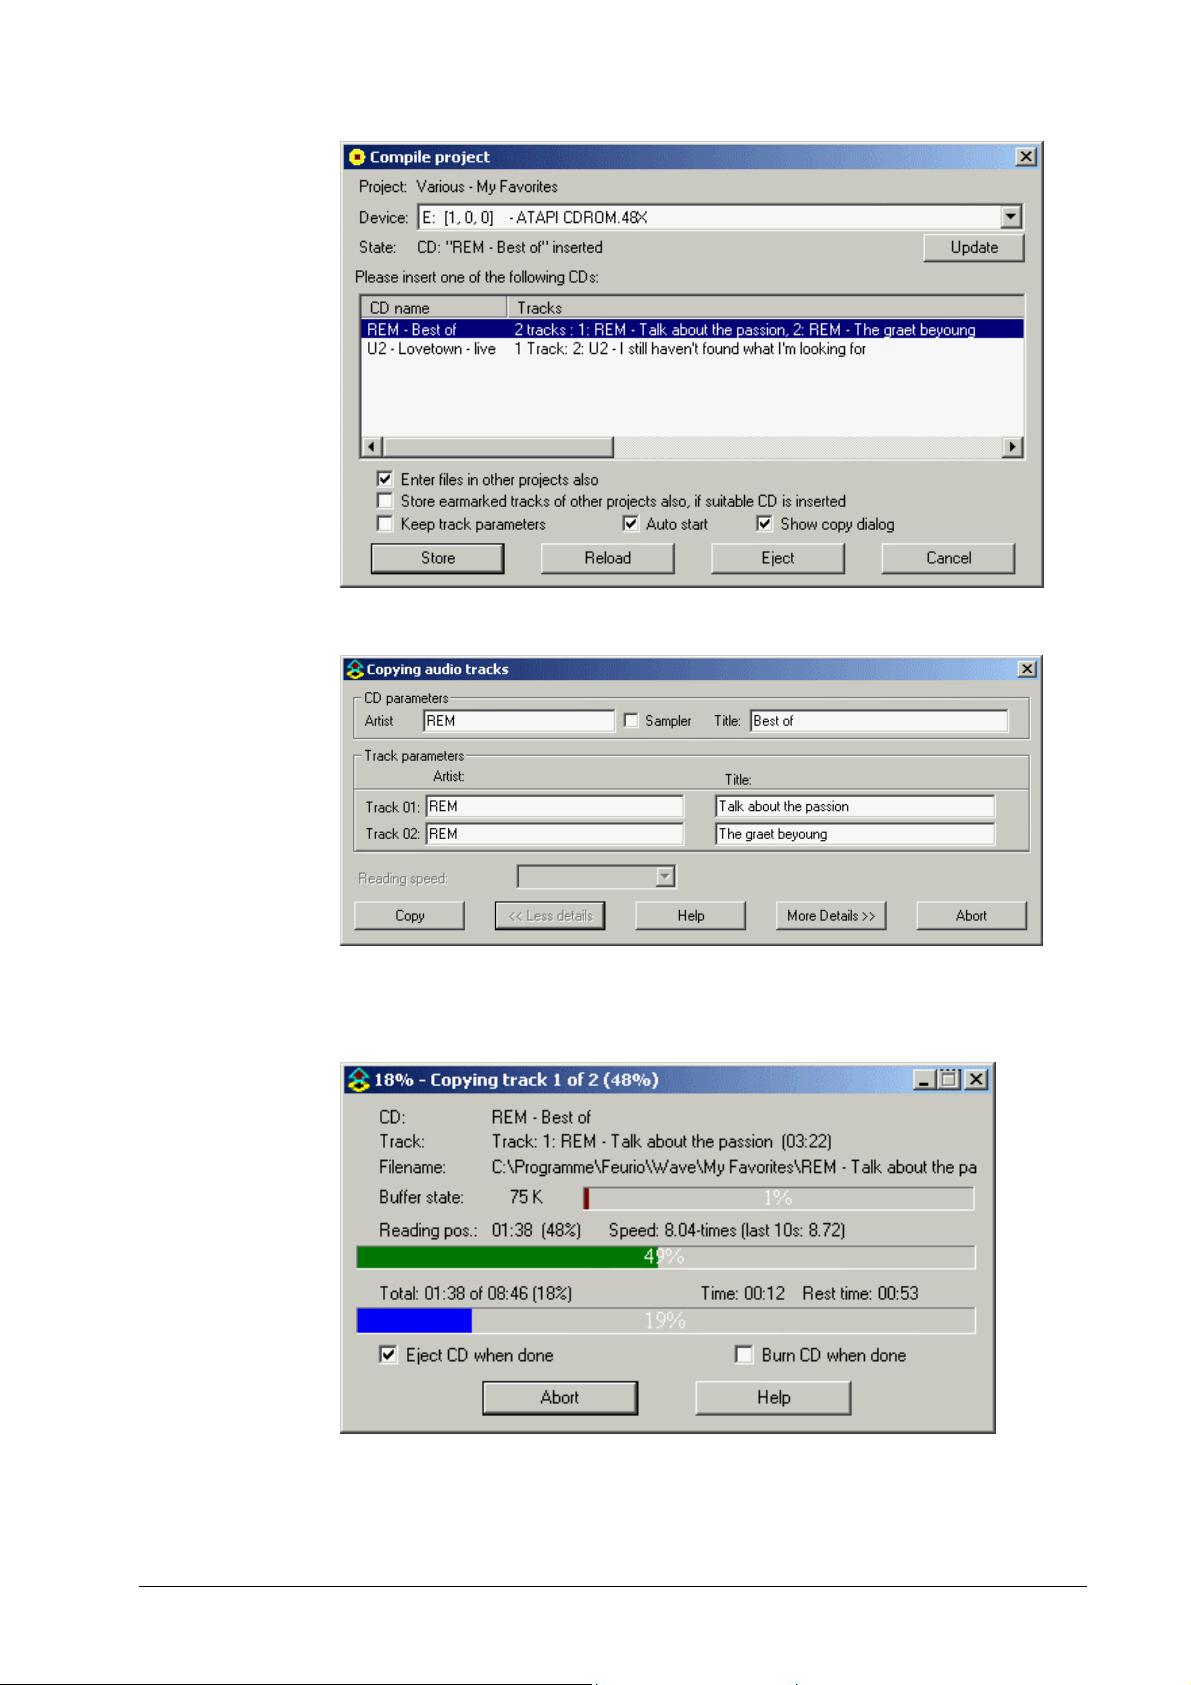
A window will open and show the CDs needed to burn the project.
tab, only those entries that do not begin with a lett er will
5. Insert the CD required.
If the 'Auto st art' control box has been marked, the tracks needed will be
stored immediately. If it is inact ive, click on the 'Store' button.
The copy window will open.
Kurzanleitung CD-Manager •••• 39

6. Click on the 'Copy' button.
The window that opens will inform you about the progress of the copying
procedure.
A display window will tell you that the copying has been successfully
completed once the copying procedure is finished.
7. Click on the 'Eject CD' butt on to change the CD.
The window will be closed and the project contents (with details of the CDs
that have to be inserted) will appear again.
Kurzanleitung CD-Manager •••• 40
8. Repeat steps 5 through to 7 until all t he tracks have been copied and the
window contains no more entries.
9. Click on the 'Cancel' button to close the window.
10. Click on the 'Bur n' button or double-click on the project. T he 'Feurio! CD–
Writ er ' program will be launched automatically. See section 5 'CD Writer '.
Kurzanleitung CD-Manager •••• 41
4.5.3 Adding audio tracks from a CD-ROM
There are two alternative ways that you can add audio tracks f r om a CD.
You can either copy the tracks straight into the project of your choice or 'note'
the tracks, i.e. the track s will still have to be copied. They will only be copied
when the CD is compiled.
4.5.3.1 Copying audio tracks
1. Open the 'CD-ROM' source by clicking on the appropriate tab.
2. Highlight the chosen tracks and click on the 'Copy' button (or move the
tracks into the desired proj ect – the project color will change to red).
The copy window will open.
3. Click on the 'Copy' button.
The window that opens will inform you about the progress of the copying
procedure.
At the same time, the text in the copy source f rom which you are copying
will change.
Once the copying procedure is finished, a window will tell you that the
copying has been successfully completed.
Kurzanleitung CD-Manager •••• 42

4. Click on the 'OK' button t o close the window.
If you want to copy tracks from ot her CDs, proceed as follows:
! Click on 'Eject' to expel the CD.
! Insert the new CD and click on 'Reload'.
! Repeat steps 2 to 4 until all the track s have been included in the pr oject.
5. Click on the 'Burn' button or double-click on the project. T he 'Feurio! CD–
Writ er ' program will be launched automatically. See section 5 'CD- Writer'.
4.5.3.2 Earmarking audio tracks
1. Open the 'CD-ROM' source by clicking on the appropriate tab.
2. Highlight the chosen track s and click on the 'Earmark' but ton.
The noted tracks will appear in the project contents.
If you want to earmark tracks from other CDs, pr oceed as follows:
! Click on 'Eject' to expel the CD.
! Insert the new CD and click on 'Reload'.
! Repeat step 2 until all the tracks ar e pr esent in the project.
3. In the 'Project selection' area, click on the 'compile' button.
A window will open and show the CDs needed to burn the project.
The CD from which the last audio tracks were earmarked is highlighted.
Kurzanleitung CD-Manager •••• 43
4. Click on the 'Store' butt on. The copy window will open.
5. Click on the 'Copy' button.
The window that opens will inform you about the progress of the copying
procedure.
Once the copying procedure has been successfully completed, a window
will tell you that it .
Kurzanleitung CD-Manager •••• 44
6. Click on the 'Eject CD' butt on to change the CD.
The window will be closed and the project contents (with details of the CDs
that have to be inserted) will appear again.
7. Repeat steps 3 through 6 until all the tracks have been copied and the
window contains no more entries.
8. Click on the 'Cancel' button to close the window.
Kurzanleitung CD-Manager •••• 45
9. Click on the 'Burn' button or double-click on the project. The ' Feurio! CD–
Writ er ' program will be launched automatically. See section 5 'CD- Writer'.
4.5.4 Adding audio tracks from the hard drive
1. Open the 'hard disk' source by clicking on t he appropriate tab.
2. Select the directory in which the tracks are located.
3. Highlight the chosen tracks and click on the 'Copy' button (or move the
tracks into the desired proj ect – the project color will change to red). The
new tracks will be placed at the end of the project.)
You can also drag the audio tracks into the table of contents of the highlighted
project.
This procedure has the advantage that you can insert the new tracks
anywhere you want.
In this example, the new track have been inserted between tracks 1 and 2.
In case you are including MP3 files in the project, you can decide whether the
files should be accepted in compressed or decompressed form.
If the file is to be decom pr essed, please m ar k the 'Decompress MP3 files' box.
The audio track will be converted to a WAV file. Roughly speaking, one
minute's music playing time will require around 10 MB of m emory.
Kurzanleitung CD-Manager •••• 46

If you choose the decompression option, a window will appear and inform you
of the progress of t he act ion.
The audio tracks belonging t o the project will appear in the ' Project - Table of
contents' area.
Kurzanleitung CD-Manager •••• 47

4.5.5 Copying audio tracks from different sources
Naturally enough, it is also possible to create proj ect s with Feurio! in which the
audio tracks originate f rom different sour ces. Here an example of a project is
provided in which the tracks are copied firs t fr om a CD, then ear mark ed in the
database, and finally copied from the har d disk.
The description given here is not as detailed as that provided in the relevant
individual sections. If you are not sure about how to proceed further , please
read the appropriate text in the section concerned.
1. Open the 'CD-ROM' source by clicking on the appropriate tab.
2. Highlight the chosen track s and click on the 'Copy' button.
3. In the window that now opens, click on 'Copy' to replicate the tracks.
4. Click on the 'OK' button to close t he window informing you of the progress
of the copying procedure.
Repeat steps 2 to 4 unt il all the tracks from t he CD have been included in
the project.
5. Click on the 'Database' tab.
6. Select the database in which the tracks are located.
7. Highlight the chosen track s and click on the 'Earmark' but ton.
8. Click on the 'Compile' button.
9. Insert the appropriate CD and click on ' Store'.
10. Click on 'Copy' to start the copying procedur e.
11. Click on the 'OK' button t o close the window.
Repeat steps 6 to 11 until all the track s have been included in the pr oject.
12. Click on the 'Cancel' button when all the tracks from the database have
been included in the project.
13. Click on the 'Hard disk' tab.
14. Highlight the chosen track s and click on the 'Copy' button.
Once all the tracks are in the pr oj ect, you can burn it straightaway.
Repeat the appropriate steps if you want to add f ur ther tracks from a source.
15. Click on the 'Burn' button. The 'Feurio! CD–Writer' program will be launched
automatically.
Kurzanleitung CD-Manager •••• 48

4.5.6 Deleting audio tracks from a project
You can remove tracks from a pr oject just as easily as adding them.
1. Highlight the project you want in the project selection fr om which the track s
are to be deleted.
All the corresponding audio tracks will appear in the table of contents.
The compressed MP3 files will appear in green text in the table of contents
- the names of the decompressed WAV files ar e in black.
2. In the table of contents, highlight the tracks that you wish to have removed.
3. Click on the 'Delete' button.
Kurzanleitung CD-Manager •••• 49

4. Click on 'Delete' to remove the highlighted audio tracks. The window will
close automatically once you have deleted the tracks and the remaining
ones will remain in the project's table of cont ents.
4.5.7 Regrouping audio tracks in a pr oject
You can regroup tracks in a proj ect just as easily as you can add them.
1. Highlight the project in which the tracks are to be regrouped.
All the corresponding audio tracks will appear in the table of contents.
2. In the table of contents, highlight the tracks that you wish to regroup.
Kurzanleitung CD-Manager •••• 50

3. Click on the 'Up' (or ' Down') buttons to move the tracks one place upward
or downward.
You can also move the tracks manually.
! Highlight the track s that you wish to reposition.
! Press the left-hand mouse-button and move the tracks to the desired
position.
The new position of the tracks can be recognized by the gray bar. In the
example shown, the two tracks following track No. 4 have been placed at the
end.
Kurzanleitung CD-Manager •••• 51
5 CD-Writer
5.1 Introduction
The 'Feurio! CD-Writer' is the t ool used for burning the projects that have been
compiled - or for mak ing copies of CDs.
It can be launched as described below or via the 'Feurio! CD-Manager'.
5.2 Launching CD-Writer
1. Select START -> PROGRAMS -> FEURIO! -> Feurio! CD-Writer.
The program will start and the m ain window will appear.
Kurzanleitung CD-Writer •••• 52

The main window comprises the two screen sections:
! Burn selection (top)
In the burn selection area, you deter mine what is to be bur ned: A pr oject or
a copy of a CD.
! Burn settings (below)
In the burn settings area, you determine which actions are to be carried out.
5.3 Burn selection
Burn selection comprises the two tabs - 'Burn project ' and 'CD copy'.
5.3.1 Burning a project
The 'Burn project' tab (on the left) provides detailed information on the
selected project.
The two buttons on the right-hand side have the f ollowing functions:
5.3.2 Copying a CD
If you click on the dropdown button in the upper par t of the 'CD Copy' tab, you
can select the source, i.e. the CD drive f rom which the data are copied, as well
as the reading speed.
The control boxes have the following functions:
Control box Function
Opens a window so you can select another project.
Shows the project track layout.
Active: Index 0 mark is copied as well
Inactive: The index 0 value of all tracks is set at zero
Active: All the index marks are copied as well
Inactive: Index marks are not copied
Kurzanleitung CD-Writer •••• 53

f
f
f
Active: Quick routine for recognizing the CD
Inactive: Slower routine for recognizing the CD
Active: ISRC and UPC codes are also copied
Inactive: ISRC and UPC codes are not copied
Active: An on-the-fly copy is created
Inactive: An image copy is made
5.3.2.1 Buttons on the 'CD Copy' tab
The buttons on this tab have the following f unctions:
Button Function
structure
structure
5.4 Burn settings
The burn settings consist of the three or four tabs: 'W riter settings', 'Multiple
write', 'Buff er', and 'CD text' (assuming a CD writer is available that can write
CD text data and that the CD text data are available).
5.4.1 Writer settings
Creates an image of the CD. The image is saved as a
Feurio! project and can later be burned or f urther processed
in the CD-Manager.
Refreshes the progress indicator, i.e. the CD's table o
contents is re-read. If the tray is open, it will be retracted
(provided this function is supported by the CD-ROM drive).
Analyzes the layout (i.e. the position of the index marks) o
the CD that has been inserted. T he 'Read CD layout' dialog
appears. Once the layout has been analyzed, the layout
determined is shown in the 'Track layout' dialog .
Ejects the CD from t he drive.
If you click on the dr opdown button in t he upper par t of the 'Writer settings' t ab
you can select the CD writer. The adjacent buttons have the following
functions:
Button Function
In the status field below, information on the selected blank CD is shown.
Kurzanleitung CD-Writer •••• 54
Updates the progress indicator, i.e. the CD's table o
contents is re-read. If the tray is open, it will be retracted
(provided this function is supported by the CD-ROM drive).
Ejects the CD from t he drive.
Shows the characteristics of the selected CD writer.

The option selected in the 'Action' f ield has a direct influence on the button
below - the second button (from the left) will change.
Selected option Button that appears
Determine maximum speed
Test (simulated burning)
Test and burn
Burn CD
The buttons have the following functions:
Button Function
Calls up the online help feature
Conducts a speed test
Simulates burning
Simulates burning and (following a successful
test) starts the burning pr ocedur e
Starts the burning procedure
Shows additional, 'professional' options
Quits 'Feurio! CD-Writer'
Kurzanleitung CD-Writer •••• 55

5.4.2 Multiple write settings
The 'W r iter set ting s' t ab mak es it possible t o burn with a number of CD writers
simultaneously. The adjacent buttons have the f ollowing functions:
Button Function
Updates the status of the CD writers.
Selects all the available CD writers.
Loads the selected CD writers. If the tray is open, it will be
retracted (provided this function is supported by the CD-ROM
drive).
Ejects the CD from t he selected CD writers.
Details about the CD writers and their status appear in t he display field.
The option selected in the 'Action' f ield has a direct influence on the button
below - the second button (from the left) will change.
Selected option Button that appears
Test (simulated burning)
Test and burn
Burn CD
Kurzanleitung CD-Writer •••• 56
The buttons have the following functions:
Button Function
5.4.3 Buffer settings
The 'Buffer' tab makes it possible to correct the software buffer used by
Feurio!
Calls up the online help
Simulates burning
Simulates burning and (following a successful
test) starts the burning pr ocedur e
Starts the burning procedure
Adds 'professional' options to the display
Quits 'Feurio! CD-Writer'
This tab should only be used by very experience users. You should not
normally change the Feurio! default set tings.
Kurzanleitung CD-Writer •••• 57

5.4.4 CD text
The 'CD text' only appears when the selected CD writer is capable of writing
CD text data and when CD text data is available.
If a CD which has been written on with CD text is inserted in a CD player that
can read CD text, the player will be able to display (for instance) t he name of
the title and artist as well as show of the track being played. The 'CD text' tab
provides several options for writing CD text.
5.5 Burning projects with a CD writer
1. Launch Feurio! CD-Manager and insert a blank CD in the CD writ er .
2. In the 'Project selection' area, highlight the pr oject to be burned so that it
appears against a blue background.
You can also start 'Feurio! CD-W riter' directly and open a project by clicking
on the 'Other CD' button in t he ' Bur n pr oject' tab.
3. Click on the 'Burn' button or double-click on the project . The 'Feurio! 'CDWrit er ' program will be launched automatically.
4. Click on the 'W riter set tings' t ab. Inf ormat ion on the current CD will appear.
If no CD which can be burned has been inserted, you will receive the
message that no writable medium is present.
Kurzanleitung CD-Writer •••• 58
5. Select the 'Write' option in the 'Action' field.
The other three options will be explained in the subsequent sections.
6. Click on the 'Burn CD' button - the inserted blank CD will be written on
immediately.
7. After the CD has been successfully recor ded, a window will appear with the
burn parameters.
If you want to burn the project ag ain, click on the 'Yes' button, if not then
click on 'No'.
Kurzanleitung CD-Writer •••• 59

8. After you have finished burning you will be able to decide whether you wish
to include the CD in the database.
Highlight the option you pref er .
Click on the 'OK' button if the project is to be recorded.
Click on the 'OK, delete proj ect ' button if you want to delete the project .
Kurzanleitung CD-Writer •••• 60
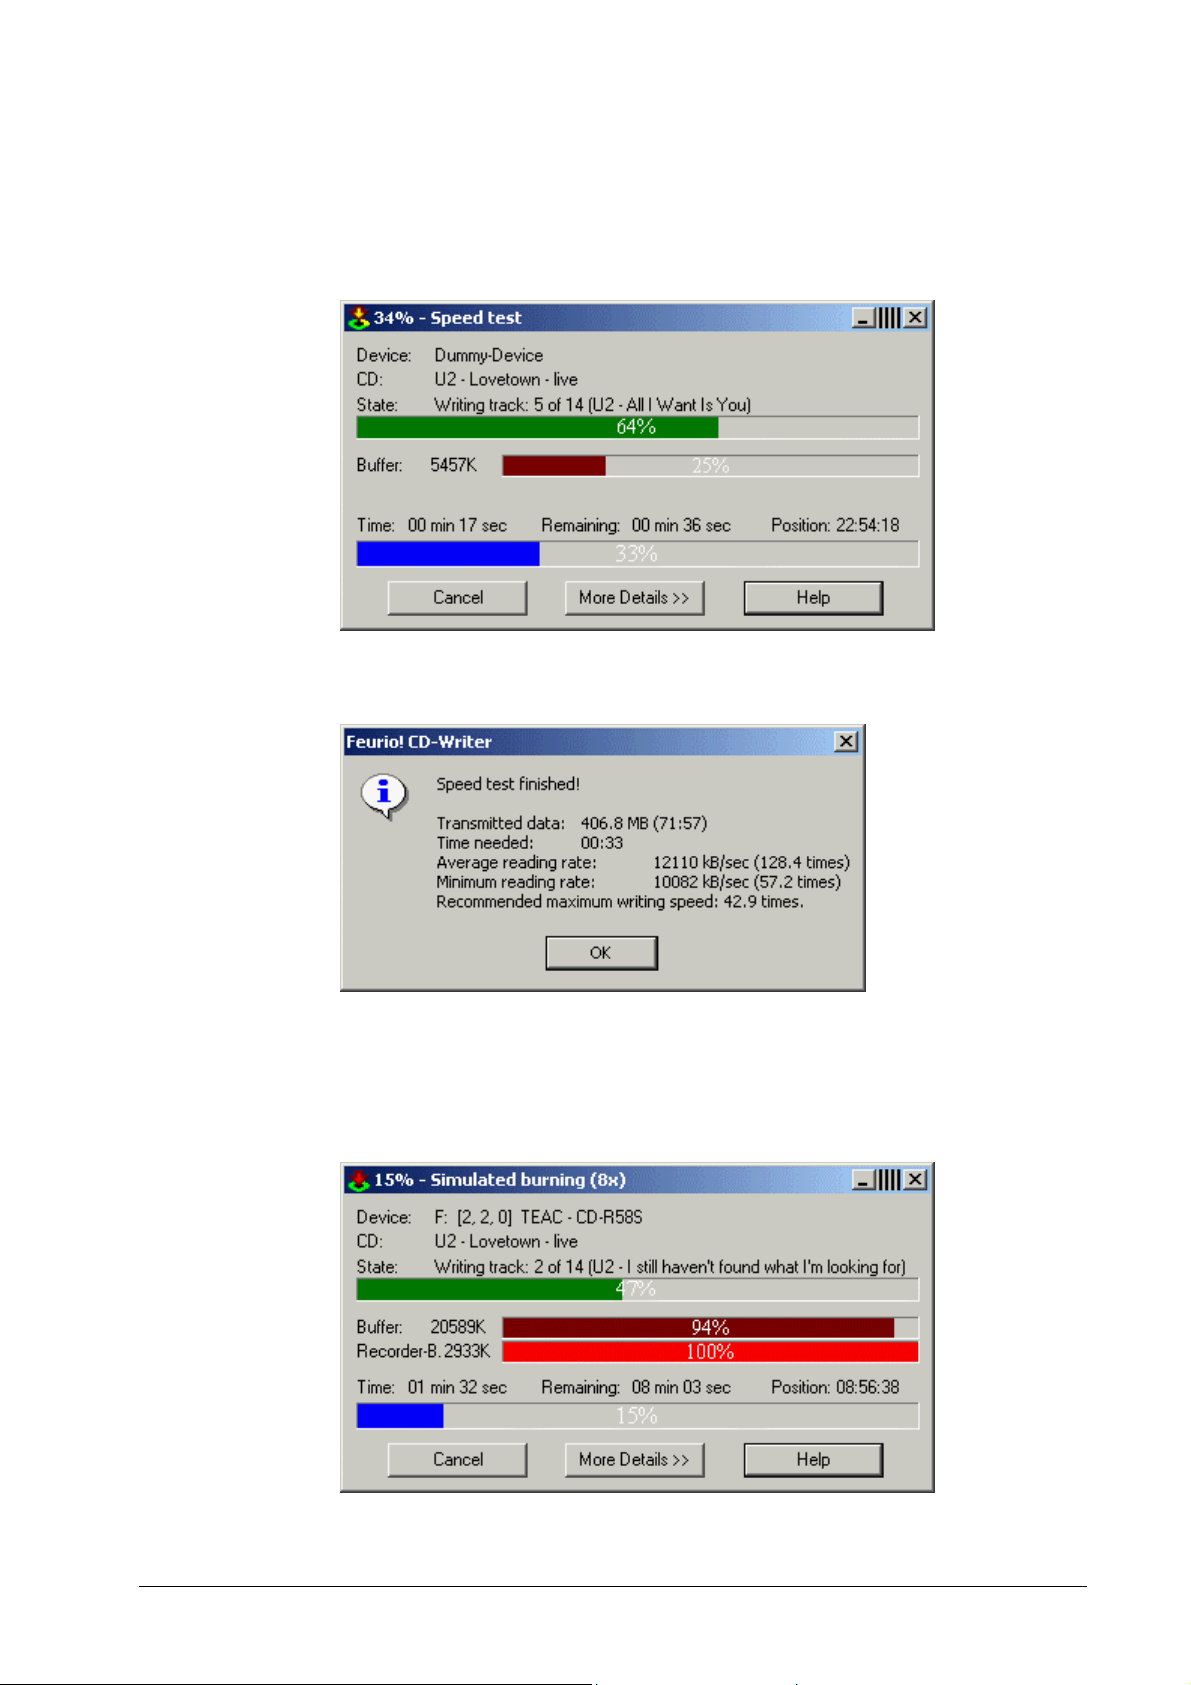
5.5.1 Speed test
! If you click on the ' Speed test' butt on, a t est will be conducted that pr ovides
information on important burn parameters.
Once the test has been com pleted, a window will appear and show you the
parameters.
Pay particular attention to the maximum recomm ended speed.
5.5.2 Testing
! If you click on the 'Only test (simulated burning)' button, the writing
procedure will be simulated.
Once the writing t est has been completed, a window will appear and show
you the parameters.
Kurzanleitung CD-Writer •••• 61
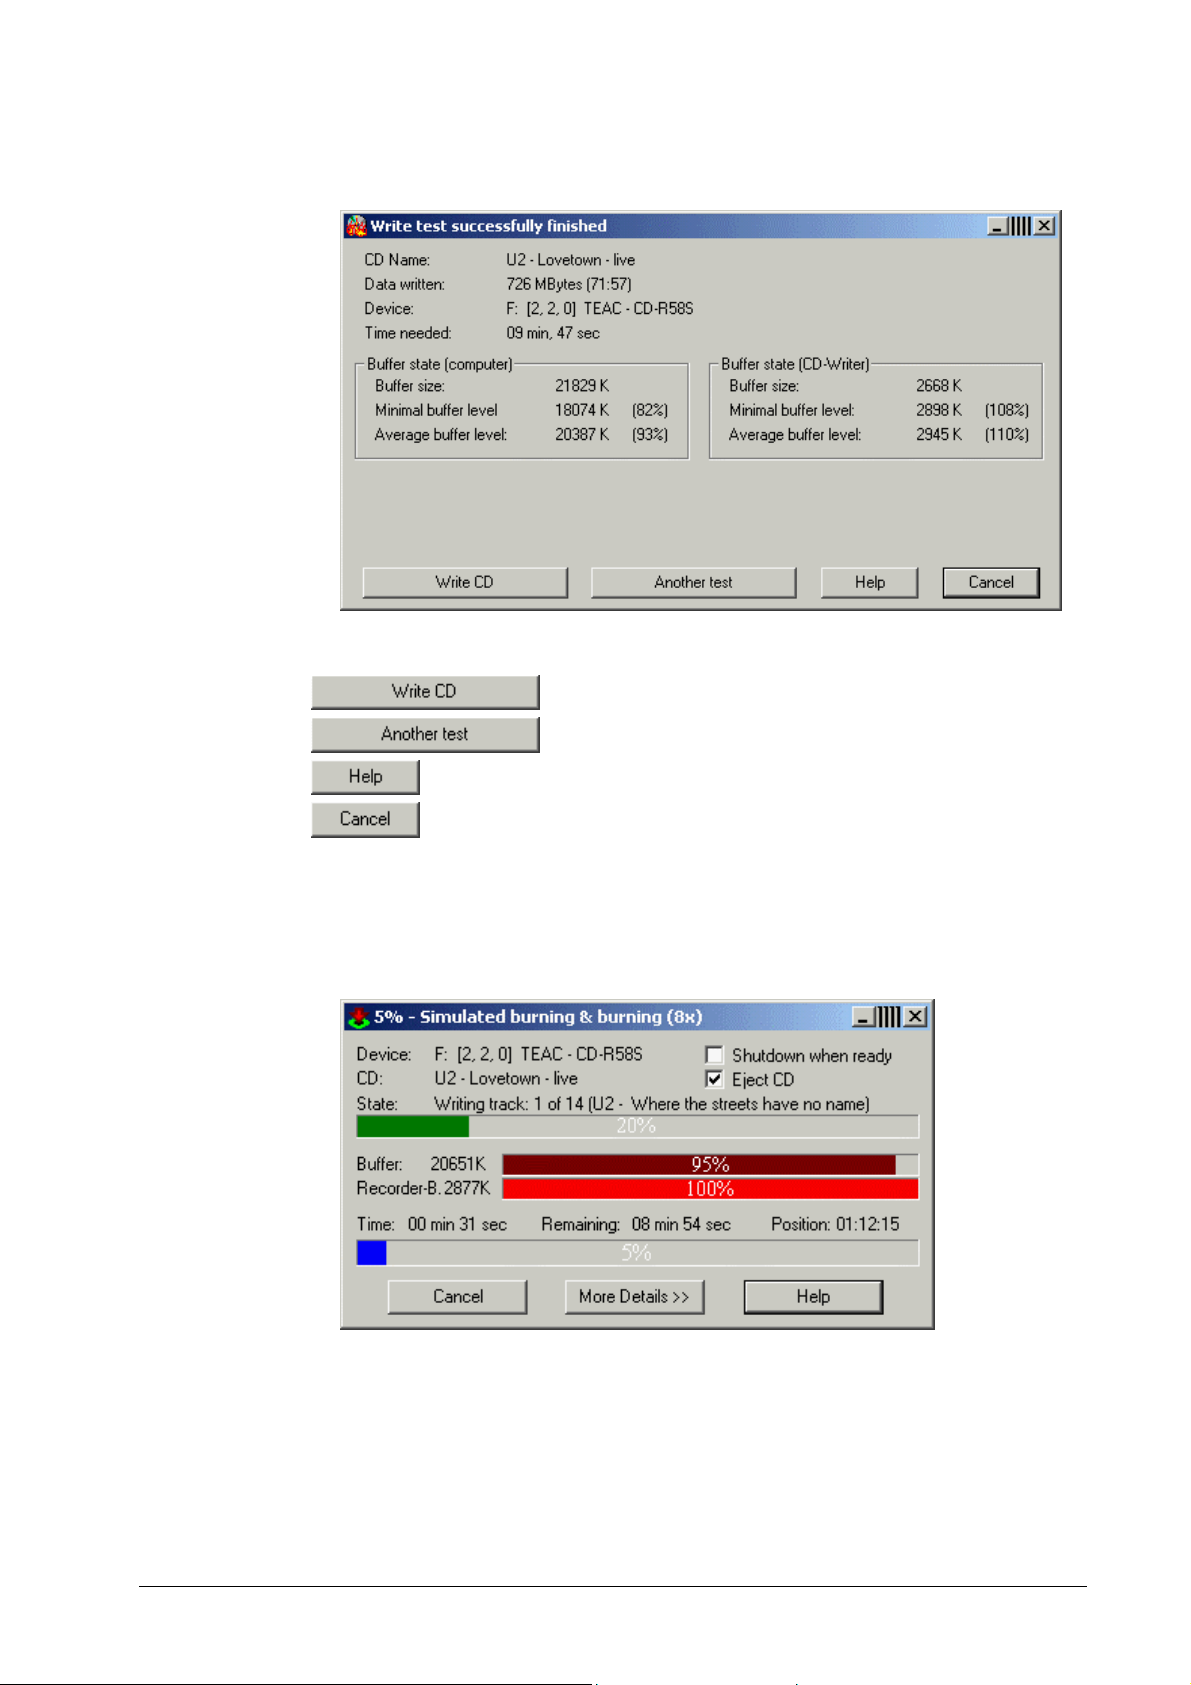
The 'Minimum filling' is particularly important. It should be above 50% - both
for the computer and CD writer.
Button Function
Starts the burning procedure
Starts another writing test .
Calls up the online help
Close the window.
5.5.3 Testing and burning
! If you click on the 'Test and burn' button, the program will first simulate
burning and then (following a successful t est) start the burning procedur e.
! After the CD has been successf ully recorded, a window will appear with the
burn parameters.
If you want to burn the project ag ain, click on the 'Yes' button, if not then
click on 'No'.
Kurzanleitung CD-Writer •••• 62

! After you have finished burning you will be able to decide whether you wish
to include the CD in the database.
Highlight the option you pref er .
Click on the 'OK' button if the project is to be recorded.
Click on the 'OK, delete proj ect ' button if you want to delete the project .
Kurzanleitung CD-Writer •••• 63

5.6 Copying projects with one CD writer
Note: CDs are generally subject to COPYRIGHT.
Making illegal copies is an offence and can re sult in severe penalt ies!
Observe the laws that apply in your country and (where appropriate) any
software license agreements you may have signed.
1. Place a blank CD in the CD writer and start 'Feurio! CD-W riter'.
2. Click on the 'CD Copy' tab.
3. Select the desired control box.
4. Select the 'Write' option in the 'Action' field.
The other three opt ions have been explained in previous sections. These will
not be described again at this point, as the f unctions are just the same when
you copy a CD.
5. If you Click on t he 'Burn CD' button, the inserted blank CD will be burned
immediately.
The structure of t he CD is analyzed befor e it is copied.
Kurzanleitung CD-Writer •••• 64

6. After the CD has been successfully recor ded, a window will appear with the
burn parameters.
If you want to bur n the project again, click on the 'Yes' button, if not then on
'No'.
7. If the CD is not yet in the database, a window will appear allowing you to
record.
Highlight the option you pref er .
Click on the 'OK' button if the project is to be recorded.
Click on the 'OK, delete proj ect ' button if you want to delete the project .
Kurzanleitung CD-Writer •••• 65

5.7 Burning projects with a number of CD w riters
You will need the professional version of Feur io! if you want to simultaneously
burn CDs with a number of CD writers.
1. Place a blank CD in the CD writer and start 'Feur io! CD-Manager'..
2. In the 'Project selection' area, highlight the pr oject to be burned so that it
appears against a blue background.
You can also start 'Feurio! CD-W riter' directly and open a project by clicking
on the 'Other CD' button in t he ' Bur n pr oject' tab.
3. Click on the 'Burn' button or double-click on the project . The 'Feurio! 'CDWrit er ' program will be launched automatically.
4. Click on the 'Burn project' tab.
5. Click on the 'Multiple write' tab. Inf ormation on the blank CD that you have
inserted will appear. If no writable CD has been inserted, you will receive
the message that no writable medium is in t he writer .
6. Highlight the desired CD writer, pressing the control key at the sam e t im e.
7. Select the 'Write' option in the 'Action' field.
The other two options have been explained in previous sections.
Kurzanleitung CD-Writer •••• 66

8. Click on the 'Burn CD' button - the blank CDs you have inserted will be
burned immediately.
9. After the CD has been successfully recor ded, a window will appear with the
burn parameters.
If you want to burn the project ag ain, click on the 'Yes' button, if not then
click on 'No'.
10. If the CD is not yet in the database, a window will appear allowing you to
record.
Highlight the option you pref er .
Click on the 'OK' button if the project is to be recorded.
Click on the 'OK, delete proj ect ' button if you want to delete the project .
Kurzanleitung CD-Writer •••• 67

Kurzanleitung CD-Writer •••• 68

6 Track Editor
6.1 Introduction
'Feurio! Track Editor' is program supplied with 'Feurio! that acts as a wave
editor. You can use it to edit a track, make fade- ins or fade-outs, and adjust
the volume. Start the progr am by clicking on the 'Track Editor' in the project
table of contents if an audio t r ack is available.
If there is no audio track in the pr oject , click ing on t he 'T rack Edit or' button will
record audio data via the soundcard.
You can find detailed information on t his program in the online help. You can
call up the help by pressing the F1 key.
Kurzanleitung Track Editor •••• 69

6.2 Recording audio data
Feurio! allows you to record audio data from an external source (for example a
record player or cassette recorder) connected to the soundcard of your
computer.
You can only record audio data this way if you start a new project.
1. Connect the external audio source with the computer's soundcard.
2. Select START -> PROGRAMS -> FEURIO! -> FEURIO! CD-MANAGER.
3. In the 'Project selection' area, click on the 'new' button and enter the
appropriate data.
4. In the 'Project selection' area, click on the 'Track Editor' button.
5. St art the source of the audio sig nals (record player or a cassette recorder,
etc) and click on 'Start recording'.
Kurzanleitung Track Editor •••• 70

6. Enter the data corresponding to the audio track and click on the 'Stop
recording' button, when you want to finish recording .
7. Click on the button you want in order to decide what is to be done with the
recording.
If you click on 'OK (save)', the tracks will be saved, the window closed and
the Track Editor called up.
Kurzanleitung Track Editor •••• 71

7 Cover editor
7.1 Introduction
Cover editor is a program that comes along with 'Feurio! and which is used f or
creating individual cover elements for the CDs you have produced. The
program is launched by clicking on the 'Cover' but t on in project selection or via
START -> PROGRAMS -> FEURIO! -> Feurio! Cover editor.
A CD cover consists of three elements:
! The cover
! The inlay
! The label
Cover
The cover is the covering sheet within the hard plastic CD case, it is squar e in
shape and inserted in the front flap.
Kurzanleitung Cover editor •••• 72
Inlay
The inlay (bak-panel) is on the outside of the hard CD case. It is inserted
under the carrier and, besides the square sect ion, also has two long spines so
that the CD can be identified when it is on a shelf.
Label
The label is glued onto the CD itself and ident ifies the CD. In order to stick it to
the disk you will need a CD label kit that centers the label right in the middle of
the CD. The CD may be unusable if this in not performed cor rectly. The retail
version of Feurio! contains a CD label kit with a label applier and t hree sheets
of labels.
You can find detailed inf ormation on the Cover editor in the program' s online
help feature. You can call up the help by pressing the F1 key.
Kurzanleitung Cover editor •••• 73

8 Wave player
8.1 Introduction
Wave player is supplied with Feurio! T his program lets you play MP3 or W AV
files. The program opens automatically when you double-click on an audio
track. The track will then start automatically.
In the top part of the r ight-hand window there is a slider which you
can use to alter the volume of the connected loudspeak er s.
In contrast to the sound level adjustment, this slider does not have
any effect on the data later burned on the CD.
Kurzanleitung Wave player •••• 74
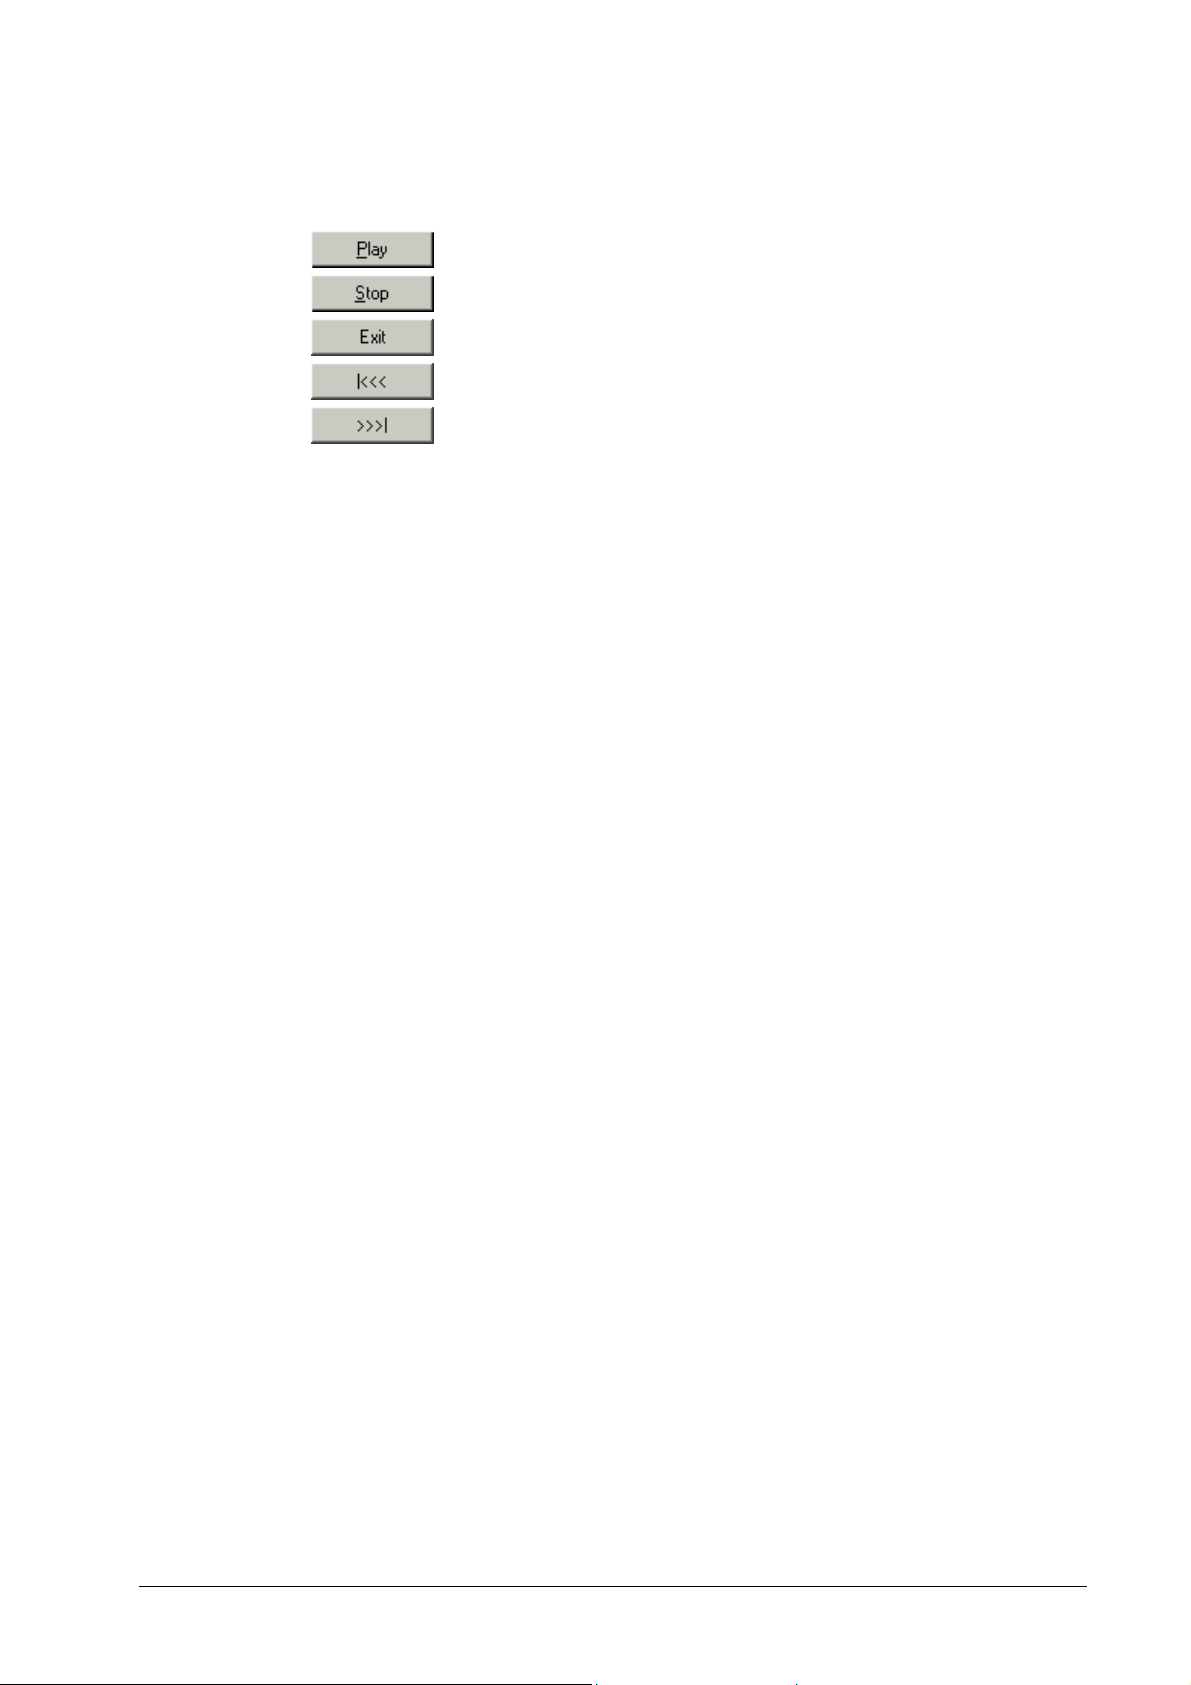
The most important Wave player buttons are:
Button Function
Plays the last track again.
Stops the play-back.
Quits the program.
Plays the previous track.
Plays the next track.
You can find detailed inform ation on the Wave player in the prog ram's online
help feature. You can call up the help by pressing the F1 key.
Kurzanleitung Wave player •••• 75

9 CD player
9.1 Introduction
CD player is supplied along with Feurio! and enables you to play audio CDs.
The program opens automat ically when you double-click on an audio track.
The track will start automatically.
The most important CD player butt ons ar e:
Button Function
Plays the last track again.
Stops playing the current t rack. The track returns to its start
position.
Interrupts the current tr ack. You can then restart the track at
the position where it was stopped.
Quits the program.
Ejects the CD from t he drive.
Plays the previous track.
Plays the next track.
You can find detailed information on the CD player in the program's online
help feature. You can call up the help by pressing the F1 key.
Kurzanleitung CD player •••• 76

10 Important terms
10.1 Copying "on-the-fly"
Advantages:
! 'On-the-fly' copying is quick er as ' Imag e copying' because you can start the
burning process without having to wait for the end of the reading procedure.
! No hard disk memory is needed for the copy.
Disadvantages:
! If the CD is scratched or if errors occur during reading, the reading speed
will drop and with it the transfer rate, so t hat a buffer under-run m ay occur.
You should only use the 'On-the-fly' copy featur e if (f or example) you have no
hard drive memory available for an image. Not e: making a copy via an image
file is always much safer.
10.2 Image copying
In the case of an image copy (unlike an 'on-the-fly' copy) the CD is first
completely read and then an imag e of the CD is cr eated on t he hard disk . T he
burning process is only started after t he im age has been completed.
Advantages:
! You will not have a 'burned' blank CD if any problems occur when reading
and/or if the reading speed of the drive is temporarily reduced.
! There are no 'conf licts' between the CD-ROM drive and CD writer drive. (In
particular with IDE CD writers / CD-ROM drives.)
! Many CD-ROMs only supply correct data while reading continuously; this is
the case with an image copy.
! The image can be used for addit ional writing if it is not deleted, i.e. further
copies can be burned without the source CD having to be present.
Disadvantages:
! The burning process takes long er because an imag e f irst has to be created
and then burned.
! With a 70 minut e CD, around 650 MB of hard disk memory is needed for
filing the image.
Kurzanleitung Important terms •••• 77

10.3 Buffer under-run
A continuous stream of data is required when you write on a CD. In other
words, the data flow must not be interrupted. For example, data is written at a
rate of 352 kB / per second at a 2x writing speed.
Because the computer does not supply a constant flow of data (the data is
transferred in blocks), a CD recorder has a buffer (intermediate memory) in
which the data transmitted by the computer is temporarily stored and then sent
to the writing laser at the correct rate.
If the computer does not succeed in k eeping the buffer f ull during the writing
process (i.e. the buff er becomes com pletely empty), the writing laser does not
have any more data and the burning procedure has to be broken of f. This is
known as 'buffer under-r un' .
It is normally impossible to write any more on a CD following a buffer underrun - the compact disk is def ective. (However, as a rule, it will be possible to
play those parts of the CD that have already been written on).
Kurzanleitung Important terms •••• 78

11 Index
A
Copy source 15
Personal 30, 33
Datenbank
Windows CD player 33
Deinstallation 11
E
Earmarking
Tracks 43
F
Feurio Cover editor 30
Feurio Track Editor 38, 69
Adding tracks
CD 42
Database 39
Different sources 48
Hard disk 46
B
Buffer under-run 78
Burning
Burning 59, 64, 67
Project 22, 58, 66
Simulation 61
Speed test 61
Testing and burning 62
With a number of writers 66
C
CD
Add tracks 42
Copy source 14
Copying 64
CD player 30, 76
CD-Cover
Create 24
CD-Manager
Launch 9, 13, 27, 52
Copy source 13, 27
CD 14
Database 15
Hard disk 16
Selection 13, 28
Copying
On-the-fly 77
Create
CD-Cover. 24
D
Database
Add tracks 39
H
Hard disk
Add tracks from 46
Copy source 16
I
Installation 6
Installation directory 7
Instructions 3
L
Launching
CD-Manager 9, 13, 27, 52
Launching the program 4
License conditions 6
O
On-the-fly 77
P
Personal database 30, 33
Project
Burning 22, 58, 66
Deleting tracks 49
Setup 17
Table of contents 21
Project contents 21, 37
Project list 13, 27, 35
Project selection 13, 27, 35
Project table of contents 13, 28
R
Registration 9
S
Selection
Kurzanleitung Index •••• 79

Copy source 13, 28
Setup
Project 17
Starting 4
T
Tracks
Earmarking 43
Regrouping 50
U
Updates 10
W
Wave player 34, 38, 74
Kurzanleitung Index •••• 80
 Loading...