

Page 1

Mighty Quick Start Guide
Page 2

What’s inside
Step 1. Unpack the box 4
Important Tips 5
Step 2. Connect to your Broadband Modem 6
Step 3 . Connect to your TV Antenna 10
Step 4. Connect to your TV 11
Step 5. Power up your Fetch Mighty 12
Step 6. Start up your Fetch Mighty 13
Fetch Mobile App 14
Remote Control 15
Fetch Mighty 17
Troubleshooting 19
Specifications 21
2
Page 3

All your entertainment in one place
Welcome to Fetch – an exciting new television experience that brings you the best TV, latest movies and popular
applications all together in one easy place.
There are 6 easy steps to get you started:
Unpack the box
1
Connect the Fetch box to your broadband modem
2
Connect the Fetch box to your TV Antenna
3
Connect the Fetch box to your TV
4
Power up your Fetch Mighty
5
Start up your Fetch Mighty
6
This guide tells you all you need to know about setting up and turning on your Fetch Mighty. It also has
important safety and usage information.
It’s Fetch and it’s ready when you are.
3
Page 4

Step 1. Unpack the box
Before you install your Fetch Mighty, check that all the accessories you need have been supplied using this page
as a checklist.
What’s in the box:
4
Page 5

Important Tips
• Activate your first box by going to fetch.com.au/activate. To activate additional
boxes go to fetch.com.au/account and add the additional boxes to your account.
• Place the Fetch box on a level surface.
• Don’t stack it on anything that vibrates or generates heat.
• Make sure there’s 5cm of space around the Fetch box for airflow.
• The remote control works up to 6m away from the Fetch box in Infrared mode.
The voice remote control works up to 10m away in Bluetooth mode.
• Unplug the Fetch box from the power source before cleaning.
• Clean using a dry cloth only - don’t use water or chemicals.
• Don’t try to open the Fetch box - it’s dangerous and will void your warranty.
• Use only with a 100V-240V 50Hz AC power source.
• Use only the power supply provided.
• Keep liquid, children and pets away from the Fetch box at all times.
• For any problems with your Fetch box, go to fetch.com.au/account.
5
Page 6

Step 2. Connect to your Broadband
Modem
Fetch is delivered by broadband Internet, so you need to connect your Fetch Mighty to the modem.
There are various ways to do this:
Option 1 Option 2
Connect your Modem to your Fetch Mighty via Wi-Fi
Use this option if:
• Your modem is not close to your TV, and
• You have reliable Wi-Fi in the room where your TV is.
If you’re using this connection option you can go straight to Step
3 on Page 10 now. You will set your Wi-Fi up later when you get
to Step 6.
Connect your Modem to your Fetch Mighty via Ethernet cable
This is the most reliable connection option. Use this option if:
• You can run an Ethernet cable directly from your Modem to
your Fetch Mighty.
To connect, follow these steps:
Plug one end of an Ethernet cable into a free port on your
1
broadband modem.
Plug the other end into the port labelled INTERNET on the
2
back of your Fetch Mighty.
6
Page 7
Option 3
Outside
Broadband
Connection
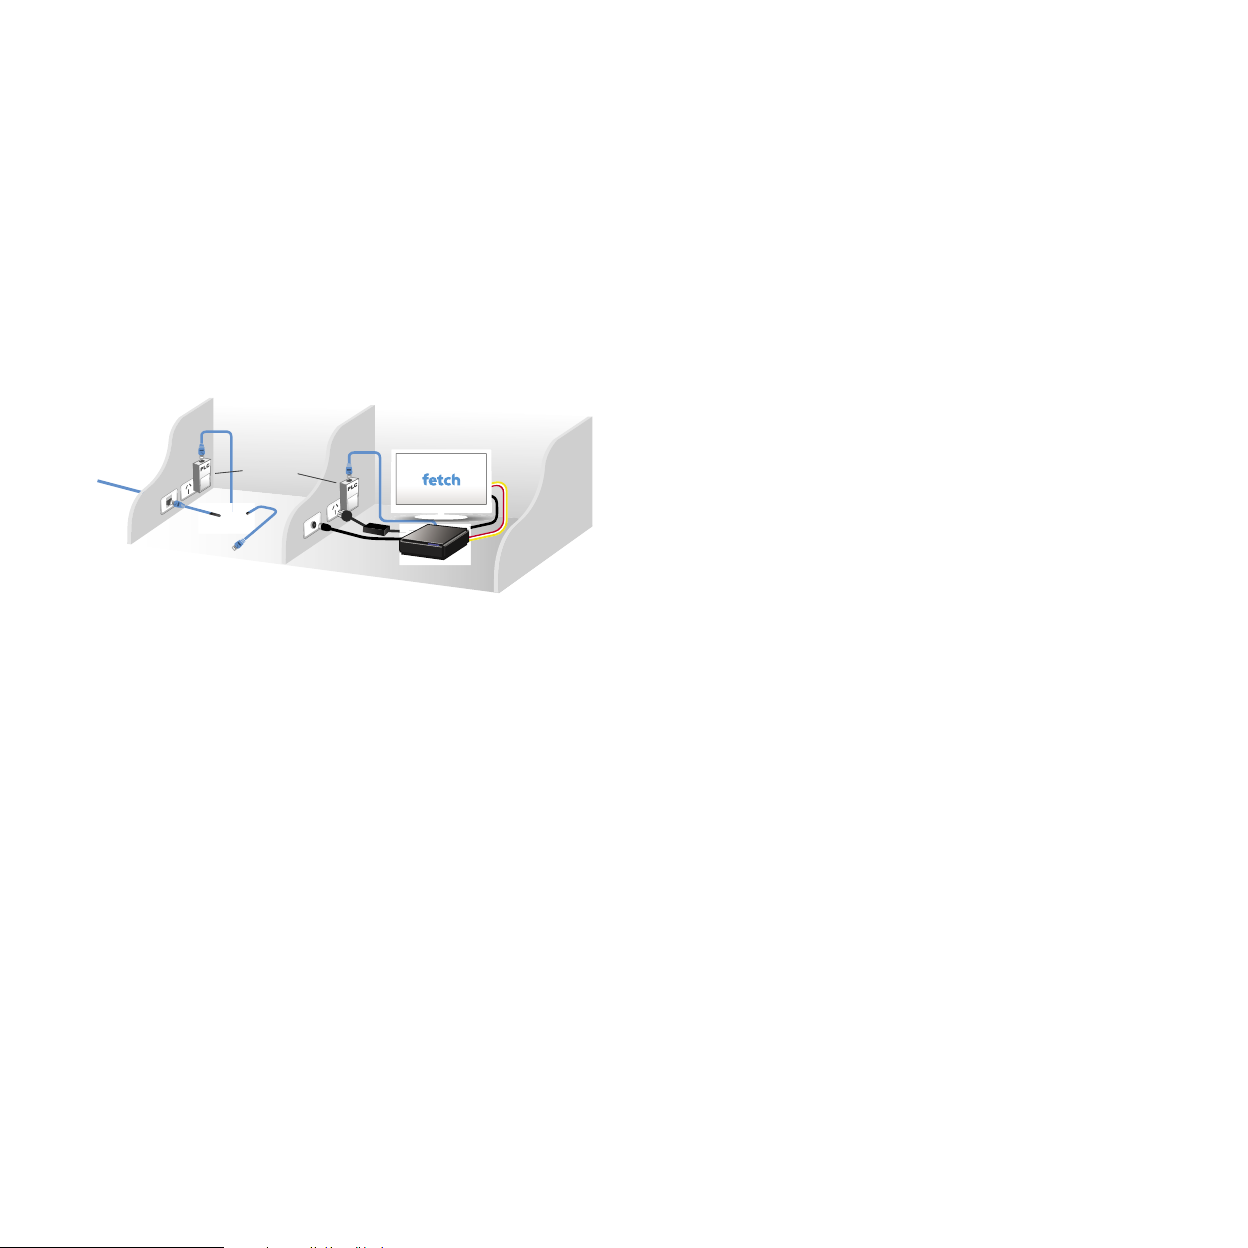
Connect your Modem to your Fetch Mighty with Power Line Adapters
Use this option if:
• Your modem is not close to your TV, and
• Your Wi-Fi is not reliable in the room where your TV is.
Power Line Adapters (called PLA devices) transmit the signal from your modem to your Fetch Mighty box using
the power cables inside your walls. You can purchase them from any Fetch retailer.
Room 1
Fetch
Signal
PLA Device
Broadband
Modem
Normal
Broadband
Use
Plug one Power Line Adapter into an electrical socket near
1
TV Aerial
Fetch
Signal
Room 2
your broadband modem.
Plug one end of an Internet Ethernet cable into the port on
2
the Power Line Adapter unit.
Plug the other end into a free port on your broadband
3
modem.
Plug the other Power Line Adapter into an electrical socket
4
near your TV and your Fetch Mighty.
Plug one end of an Internet Ethernet cable into the port on
5
the Power Line Adapter unit.
Plug the other end into the port labelled INTERNET on the
6
back of your Fetch Mighty.
AV
Cable
Some more information on Power Line Adapters
• Only use Power Line Adapter units on the same electrical
circuit. Most homes have one circuit for lighting and another
for electrical outlets, but large homes may have two circuits
for electrical outlets.
• Power Line Adapters should be plugged directly into the
wall outlet.
• Each Power Line Adapter needs at least 5cm below the
power outlet to plug in the Ethernet cable so won’t suit very
low mounted wall outlets.
• Plugging Power Line Adapters into a double adapter or a
power board isn’t recommended as these can prevent the
Power Line Adapters from connecting and working properly,
and affect the speed and quality of your Fetch service.
• If you have to use an adapter/power board, because there
is no other wall outlet available, make sure that: the double
adapter/power board does not have surge protectors or
noise filtering, and the Power Line Adapter is plugged into
the first outlet (the one nearest the cord) on the double
adapter/power board.
• In some houses, the configuration of the wiring in the
house may mean the Power Line Adapters can’t establish
a connection due to multiple circuits or 3-phase power
configurations.
7
Page 8
Option 4
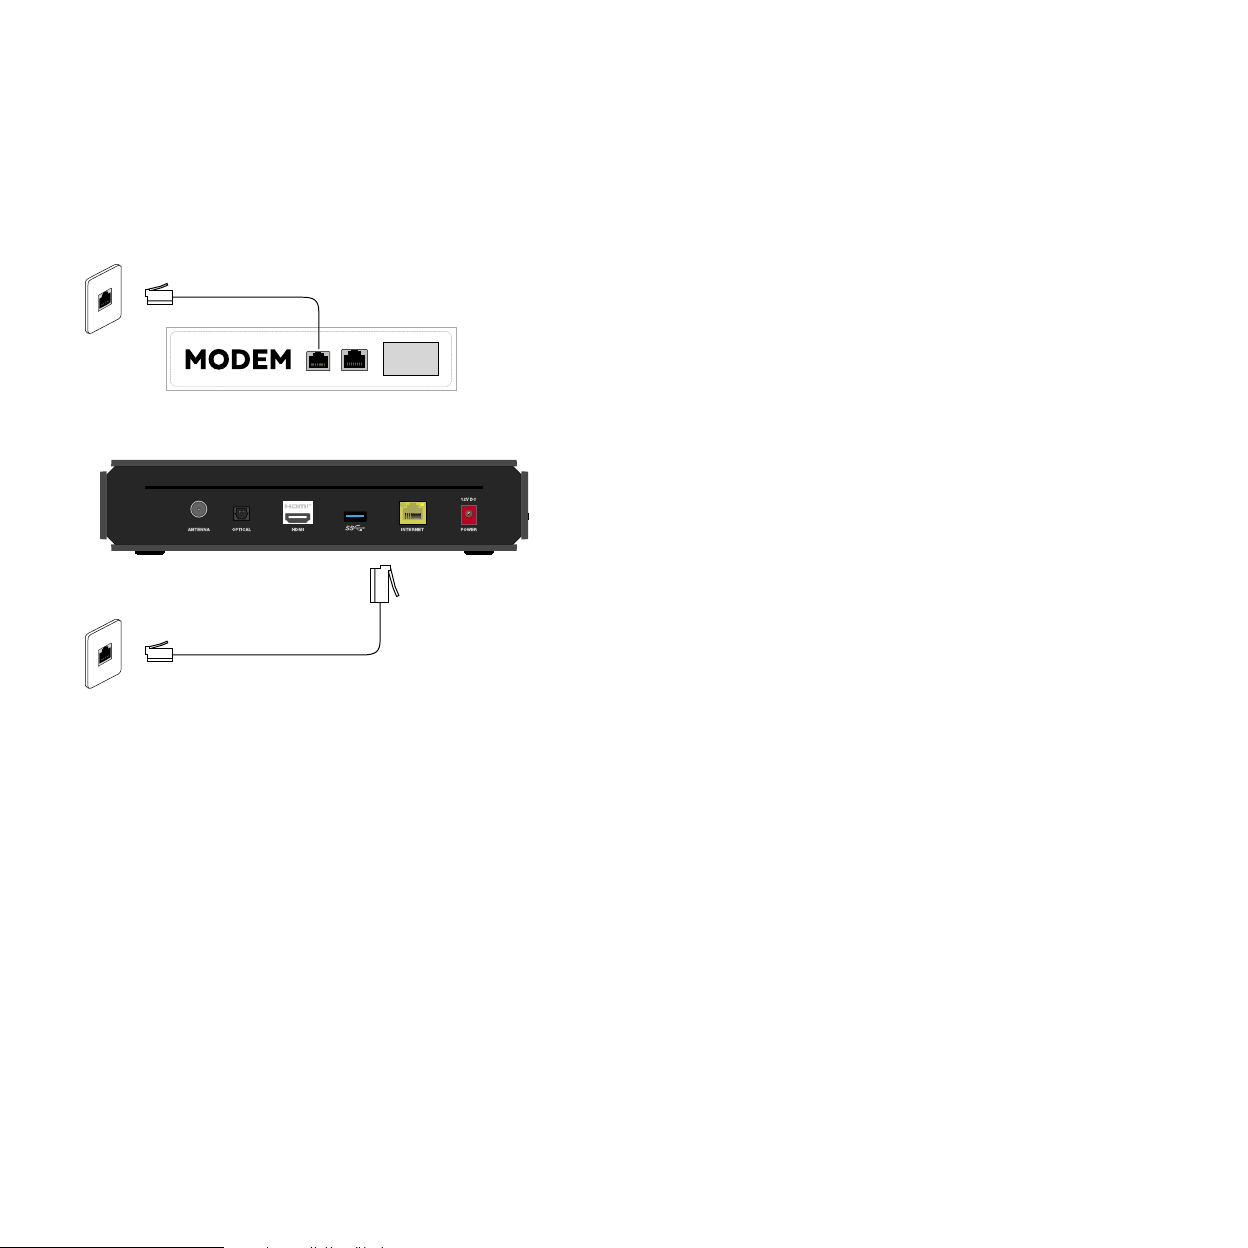
Connect your Modem to your Fetch Mighty using data cabling
Use this option if:
• Your modem is not close to your TV, and
• Your installation location has cabling with an Ethernet port nearby.
To connect, follow these steps:
1
Plug one end of an Internet Ethernet cable into a free port on your broadband modem.
Plug the other end into the Internet Ethernet wall socket nearest to your broadband modem.
2
Plug one end of a second Internet Ethernet cable into the port labelled INTERNET on the back of your
3
Fetch Mighty.
Plug the other end into the Internet Ethernet wall socket nearest your TV and Fetch Mighty.
4
8
Page 9
Option 5
Room 1Outside Room 2
Broadband
Connection
Fetch Signal
Fetch
Signal
Broadband
Modem
Normal
Broadband
Use
TV Aerial
AV
Cable
Wireless
Bridge
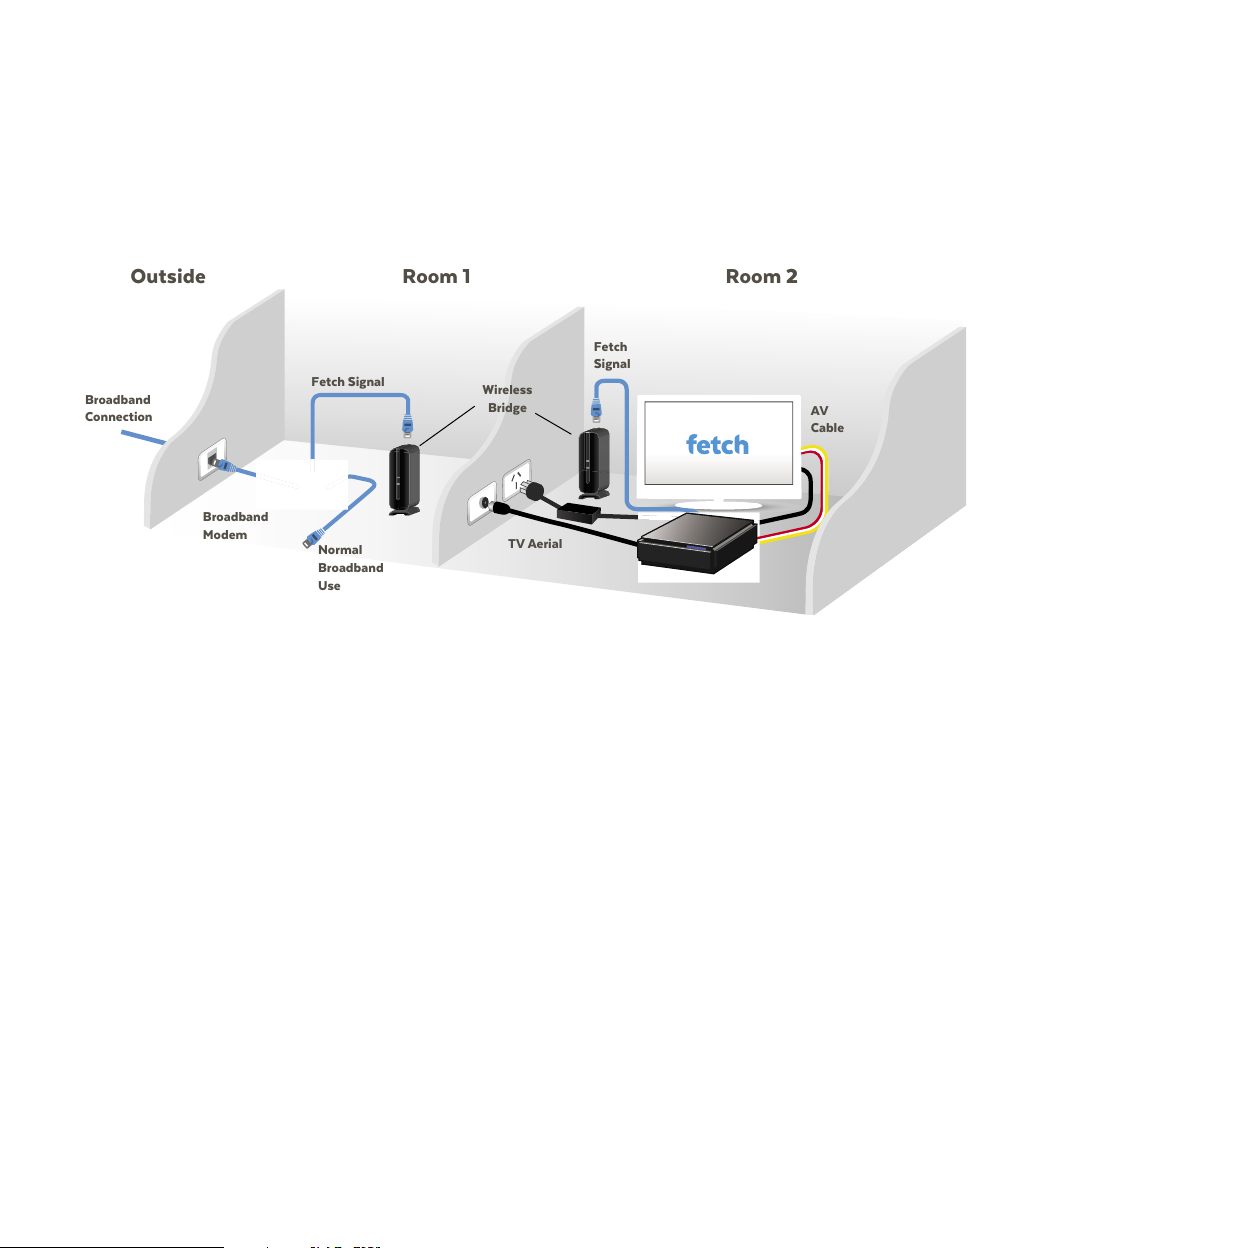
Connect your Modem to Fetch Mighty by Wireless Bridge
Use this option if you prefer to use a Wireless Bridge. Install the Wireless Bridge using the instructions supplied
with it. Put one device near your broadband modem and the other near your Fetch Mighty.
To connect, follow these steps:
1
Plug one end of an Internet Ethernet cable into the port on the Wireless Bridge near your broadband modem.
Plug the other end into a free port on your broadband modem.
2
Plug one end of an Internet Ethernet cable into the port on the Wireless Bridge located near your Fetch Mighty.
3
Plug the other end into the port labelled INTERNET on the back of your Fetch Mighty.
4
9
Page 10

Step 3. Connect to your TV Antenna
You get your Free-to-Air Digital TV channels using your normal TV antenna. They are not delivered over broadband Internet.
You’ll need your existing TV antenna cable, so unplug it from the back of your TV.
1
Plug one end of the existing antenna cable into the antenna wall socket, or leave if already
connected to the wall.
Plug the other end of the antenna cable into the socket labelled Antenna on the back of your
2
Fetch Mighty.
10
Page 11

Step 4. Connect to your TV
The Fetch Mighty connects to your TV using HDMI (High Definition Multimedia Interface). Only the HDMI cable
is needed.
1
Plug the HDMI cable into the port labelled HDMI on the back of the Fetch.
Plug the other end into a free HDMI port on your TV.
2
To watch content in 4K on your Fetch Mighty, you’ll need:
• A connected 4K HDR TV
• A steady home broadband speed of 15-25 Mbps
• Video setting set to Auto (4K – 2160P) on your Fetch Mighty (you can do this later on Fetch at Menu >
Manage > Settings > Audio & Visual > Video)
Your TV and home theatre equipment such as audio video receiver or sound bar if using, also need HDMI
inputs that support 4K and HDMI 2.0/HDCP 2.2 signals. Check your TV manual for more info.
To watch High Dynamic Range (HDR), you’ll need to enable the option on your TV if supported and then
later on your Fetch Mighty at Menu > Audio & Visual > Advanced > HDR Mode. Different TVs may use other
names like “Ultra” or “Deep Colour”.
11
Page 12
Step 5. Power up your Fetch Mighty
Once you’ve completed all the steps and put the batteries in your remote control it’s time to turn everything on.
Connect your Fetch Mighty to power Check the Fetch Mighty Connection
Plug the red end of the power supply unit into the Fetch Mighty.
1
Plug the power supply unit into the wall power socket.
2
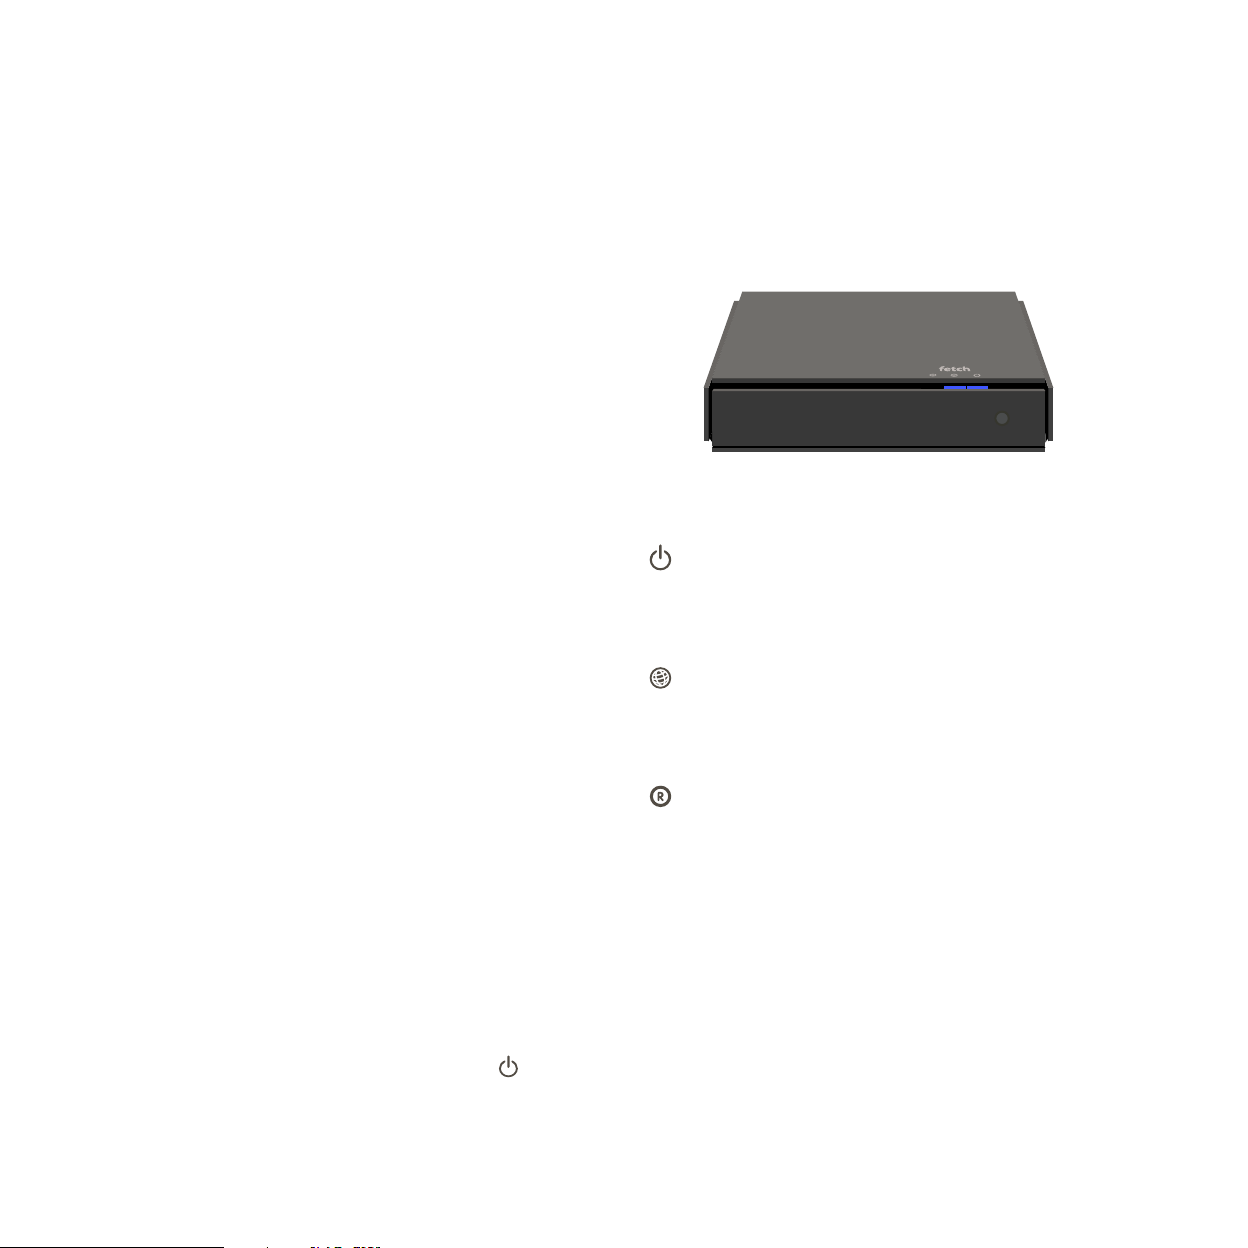
Standby light is blue when your Fetch Mighty is powered
on. If it is red, the box is in standby mode and you should
Select Source / Input on TV
press the power button on the remote control to turn it on.
Internet light on your Fetch Mighty is blue when you
have a broadband connection. If it is red, there is no live
connection. During initial start-up it will change from red to
blue.
Turn on your TV.
1
On your TV remote press Source/Input or AV Select.
2
Select the HDMI port you plugged your Fetch Mighty into.
3
Turn on your Fetch Mighty
Turn on the Power at the wall socket. The power light on your
Fetch Mighty will light up.
Recording light on your Fetch Mighty will flash when you
press any button on the remote. If it doesn’t flash the box
is not responding to the remote.
12
Page 13

Step 6. Start up your Fetch Mighty
This is the home stretch where you activate your Fetch service and get it all happening. It will take a few minutes for your Fetch Mighty to
move through three loading screens and the screen may go black between each one. Don’t worry, this is normal. Once finished simply
follow the instructions on the Welcome Screen.
Pair your Fetch Voice Remote
If using a Fetch Voice Remote (Page 15) your Fetch Mighty will prompt you to pair the remote during the start-up process. You can also
do this later at Menu > Manage > Settings > Remote Control.
Connect to your home Wi-Fi network
Your Fetch Mighty will check your connection to the Internet and prompt you if you need to connect. If you are already connected there is
no need to set up Wi-Fi. If you are connecting using Wi-Fi:
Choose ‘Wi-Fi Connection’ and follow the prompts.
1
Select your home network from the list of in range networks. If needed, confirm the security settings.
2
Your Fetch Mighty will let you know once you’re connected then continue to start up.
3
Welcome Screen
• Use your remote to enter the Activation Code you got from fetch.com.au/activate if this is your first box, or fetch.com.au/account if
you are adding additional boxes to your account. Your code (which is case-sensitive) will then be checked and confirmed.
• If the feature is available to you, you can choose another Name for your Fetch Mighty.
• The box will next try set up the remote to control your TV. Do this now or later at Menu > Manage > Settings > Remote Control.
• Choose 5.1 Surround Sound for Fetch, if your sound system supports this Audio Setting.
• Next you can set up your Parental PIN. Do this now or later at Menu > Manage > Settings > User > PIN Change. If you’ve already set
your PIN then you’ll just need to confirm it.
• Your PIN is used for many things on Fetch such as renting movies, buying TV shows, adding channel packs, and watching restricted
content. It’s a good idea to write it down in case you forget it but make sure you always keep it secure. (You may want to keep it a
secret from your children too).
• The box will then do a Channel Scan which may take up to 5 minutes. The box will check Diagnostics then show the location of the
Fetch TV Privacy Policy. Select Finish to restart and load the Fetch main menu.
Do not turn off or reboot your Fetch Mighty at any time during set up. Software updates can take up to 5 minutes.
Visit fetch.com.au/guides to download the Fetch Mighty User Guide and get the most from your service.
13
Page 14

Fetch Mobile App
Control your Fetch Mighty with your tablet or mobile phone at home or when you’re out and about, using the Fetch Mobile app.
• Download to go.
• Set recordings from anywhere.
• Handy second remote control.
• Watch channels, movies and TV Store shows.
To start go to the App Store or Google Play and install the Fetch app on your phone or tablet.
Pair the app with your Fetch Mighty
Once you’ve installed the app on your phone or tablet you need to pair it with your Fetch Mighty.
For more information, go to Menu > Manage > Settings > Mobile & Tablet on your Fetch Mighty or visit fetch.com.au/guides and
download the Mobile App Guide.
14
Page 15

Remote Control
The remote control brings Fetch to life every time you use it. It has all the functions you need
for quick and easy viewing. To make your remote control work, remove the battery cover,
insert the two batteries supplied, and replace the cover.
Set Up Universal Remote
You can use the Fetch remote to operate your TV as well as your Fetch Mighty. Your Fetch
Mighty will try to set up your remote for you when you first set up your box but if that didn’t
work, you can set it up by going to Menu > Manage > Settings > Remote Control.
For more information go to fetch.com.au/guides and download the Universal Remote
Instructions.
Note
Your remote may look
different to the image
but the functionality
remains the same.
15
Page 16

Note
The included remote varies depending
on where you got your Fetch Mighty.
The Voice Remote is available for
purchase at www.fetchtv.com.au/voice.
Your Fetch Mighty will pair your remote
for you using Bluetooth when you first
set up your box or you can do it later
at Menu > Manage > Settings > Remote
Control.
For voice control, hold down and
speak into the microphone at the top
of the remote.
16
Page 17
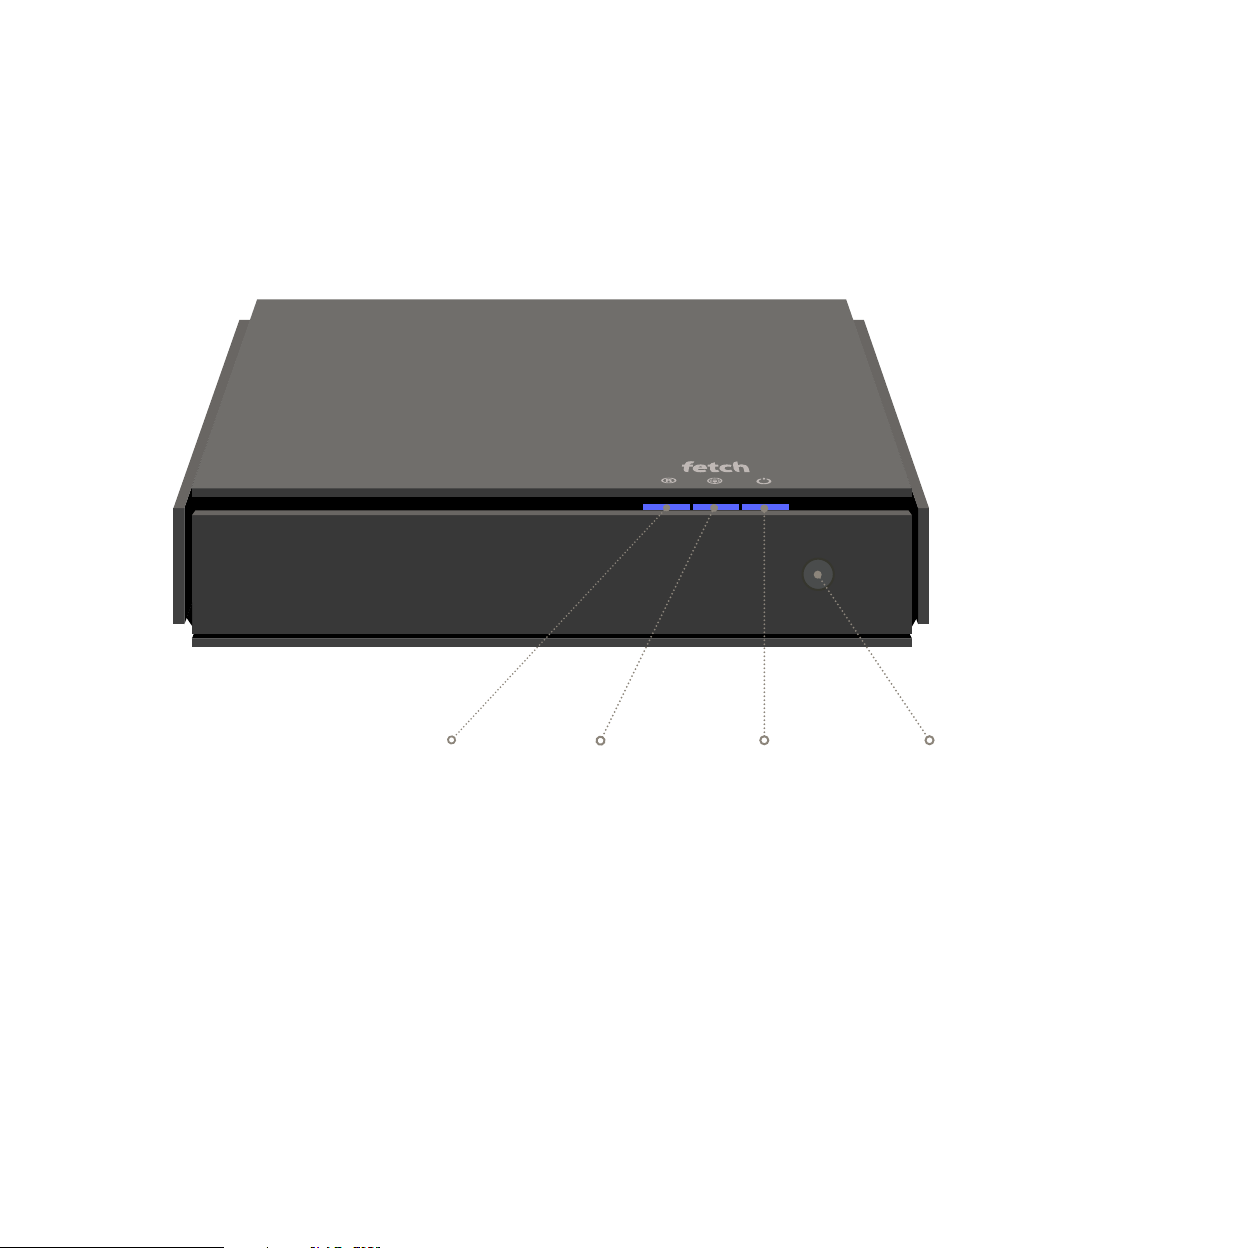
Fetch Mighty
Front Panel
IR SensorRecording Internet Standby & Power
17
Page 18
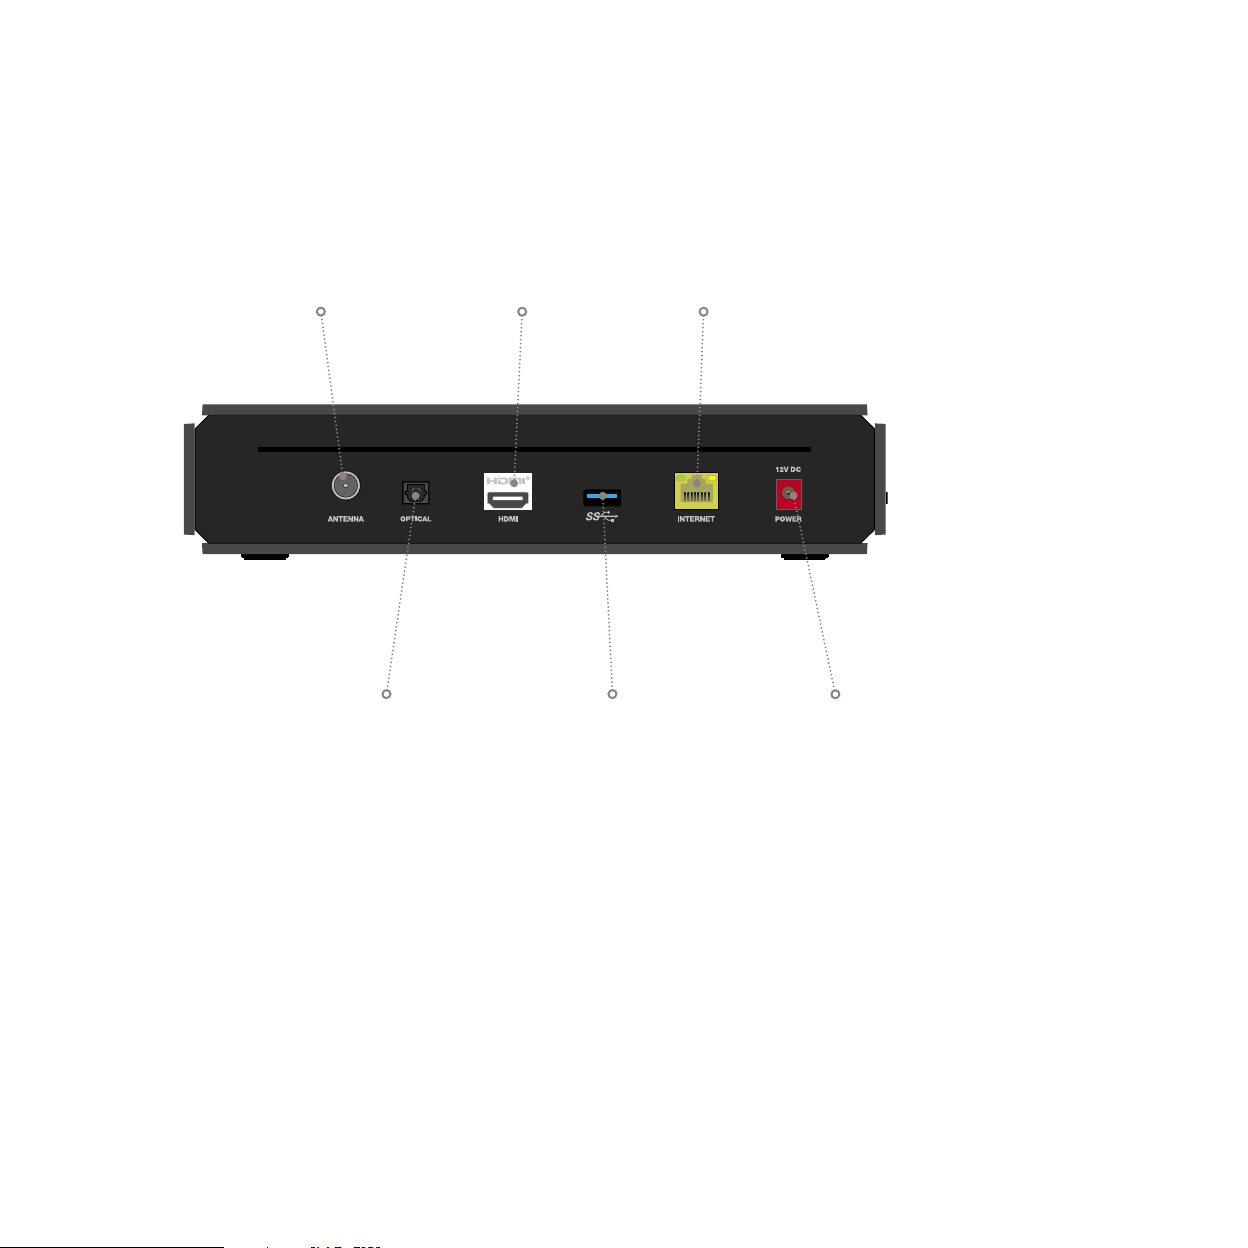
Back Panel
Antenna Input
HDMI Output
Ethernet Cable
Connection
SPDIF Jack Output
(Optical)
USB Input
Power Input
18
Page 19

Troubleshooting
If you’re having trouble getting your Fetch Mighty to work check some of the tips below before you contact your
Service Provider for help.
Audio Visual Settings
• If your TV image appears out of proportion or stretched you may need to change the Display Resolution,
Aspect Ratio and Display Mode. Go to Main Menu > Manage > Settings > Audio & Visual > Visual
• If you have issues watching 4K or HDR, make sure your cabling and TV are 4K-capable (Page 11). You
may need to change the Display Resolution in Audio & Visual > Video or HDR Mode at Audio & Visual >
Advanced.
Cabling and TV
• Make sure the power supply unit is correctly connected (Page 12), and there is power available at the wall
power point.
• Check that the AV connections are secure and, if needed, try another connection mode (Page 11).
• Make sure the TV is set to the right AV input source and mode (Page 12).
Power cycle
• If you are having issues sometimes a box restart is all that’s needed. You can restart at Menu > Manage >
Settings > Device Info > Options > Fetch Box restart.
• Or restart by pressing then on your Fetch remote.
• If your menu isn’t working try turning the power to the box off for 10 seconds before turning it back on.
19
Page 20

Internet connection
• Double-check that the broadband connection is active.
The LED on the your Fetch Mighty should be lit blue. If using an Ethernet connection, also check that
the indicator lights on your modem are on. If using Power Line Adapters, check the status lights on the
adapters.
• If there’s no broadband connection, check you can browse the internet on a computer or smartphone
connected to the same router as your Fetch Mighty. If not, contact your broadband provider. If you can,
power cycle your Fetch Mighty.
• If connecting through Wi-Fi and you don’t see your home network in the list of available networks, try
refreshing the list of networks or restart your modem and wait a few minutes to see if your home network
appears. Alternatively try to add your home network manually (you’ll need the network name and
password).
Remote Control
• Use the voice remote control (Page 16) within 10 metres of the Fetch Mighty when paired in Bluetooth
mode.
• For non-Bluetooth remote controls (Page 15), use the remote within 6 metres of the Fetch Mighty.
• If the LED at the top of the remote control does not light up when a button is pressed, change the
batteries.
• For issues with voice search through the voice remote, check the remote is paired. Press any button and
make sure the LED is green. If the LED is red, press and hold while pointing at your Fetch Mighty to pair
or go to Menu > Manage > Settings > Remote Control. If that doesn’t help, press and hold and at
the same time while pointing at your Fetch Mighty, to re-pair the remote.
20
Page 21

Specifications
Input
Power
Antenna
Broadband
Data
Output
Digital Video + Digital Audio
Surround Audio
Connector
DC Male jack (5.5mm diameter)
RF Connector
RJ-45
2 x USB
Connector
HDMI 2.0
TOSLINK
Specification
Input 220V AC
Output 12V DC 2A
50 Ohms
Ethernet
USB 2.0, USB 3.0
Specification
HDCP 2.2 content protected
S-P/DIF
Signal
Channel Bandwidth 7 or 8 MHz
IPv4
Host
Signal
720p50, 1080i60, 1080p50,
1080p60, 4Kp60
Optical
21
Page 22

Other
Dimensions
Max Weight
Max Power Consumption
Operating Temperature Range
Storage Temperature Range
Humidity
Hard Drive Capacity
RAM
Flash
Tuners
Video Decode
Audio Decode
Surround Sound Support
Wi-Fi
Bluetooth
4K Capability
HDR
260(W) x 260(L) x 60mm(H)
3.43kg (inc. packaging)
Up to 20W
+5 to +45 deg C
-20 to +70 deg C
10 to 90% NC
1TB
3GB SDRAM
4GB eMMC
4 x DVB-T
MPEG4 HD, H.264 AVC, H265 HEVC
MPEG4 AAC, MPEG 4 HE-AAC v2
Dolby Digital Surround 5.1 (AC3), Dolby Digital Plus (Enhanced AC3) and Dolby Atmos
802.11/b/g/n/ac. 2.4 GHz/5 GHz
4.1 LE
Yes
HDR10
22
Page 23

Compliance
Product Code M616T
This product complies with the following Standards:
Electrical Safety
RF Emissions
C-Tick Supplier Code
Contact
Fetch
[email protected]
ABN: 36 130 669 500
fetch.com.au
AS/NZS 60065.1-2008
AS/NZS CISPR 13 and 22
N25670
23
Page 24

Keep in touch
Like our Facebook page facebook.com.au/fetchtv to get all of our updates.
If you have an account directly with Fetch please log in to fetch.com.au/account to access the online
troubleshooting.
User Guides
You can download the following User Guides from fetch.com.au/guides
Fetch Mighty User Guide.
1
Universal Remote Instructions.
2
Mobile App Guide.
3
My Media Hub User Guides.
4
Wi-Fi User Guide.
5
Multiroom User Guide.
6
24
Page 25

fetch.com.au
© Fetch TV Pty Limited. ABN 36 130 669 500. All rights reserved. Fetch TV Pty Limited is the owner of the
trade marks Fetch. The set top box and the Fetch service may only be used lawfully and in accordance with
relevant terms of use of which you are notified by your service provider. You must not use the electronic
program guide, or any part of it, for any purpose other than private and domestic purposes and you must not
sub-licence, sell, lease, lend, upload, download, communicate or distribute it (or any part of it) to any person.
Version: August 2021
 Loading...