

Page 1
1
Page 2

Getting The Most From The Festool VS-600 Jointing System
By: Jerry Work
Table of Contents
Page
3 Anatomy of a Dovetail Joint
9 The desired outcome – a perfect drawer every time
10 How the VS-600 system works
14 A perfect drawer using half blind dovetail joints
23 A perfect drawer using through dovetail joints
29 Perfect finger joints
31 Conclusion
32 One time setup
36 Using the metric system
40 Continuous improvement
41 What you need to know about the Festool templates
42 How to calculate drawer height for properly centered joints
43 Table of drawer heights for properly centered joints
43 Metric to approximate inch conversion
44 Meet the author
2
Page 3
Getting The Most From The Festool VS-600
Jointing System
Few things in woodworking invoke the image of quality more than well cut dovetails
joining the sides of a drawer, box or cabinet. For thousands of years this simple, elegant
joint has been employed by the finest craftsmen for its inherent strength as well as for
its pleasing aesthetics. Watch a person who sees a fine piece of furniture for the first
time. Their hands will invariably rub over the dovetail joints as though to confirm that
this is truly a well crafted piece.
Anatomy of a
Dovetail Joint
There are several different
types of joints that are all
called “Dovetail Joints”. They
get their name from a fan
shaped male piece that looks a
bit like the tail on a dove. That
fan shaped male fits into a
female recess of the same
shape.
By: Jerry Work
breaking the surrounding
wood.
The strength of the joint does
not rely on glue, nails or
screws. It comes from the
interference fit of the male and
female fan shapes. You simply
cannot pull them apart
without breaking the wood.
A dovetail joint requires at
least one fan shaped male tail
and at least one female fan
shaped recess. It may have
two, three or many more fan
shaped male tails and
corresponding female recesses,
but it must have at least one to
be a joint at all.
Once in place the joint cannot
be pulled apart without
3
Page 4
Before we start learning to use
dovetail joints to build perfect
drawers, boxes and cabinets
far faster than you ever
thought possible, let’s spend a
few moments discussing how
these different joints, all called
“dovetail joints,” differ one
from another.
All can be used to securely join
two pieces of wood end to end
or at right angles to one
another, but that is about
where the similarities end and
the differences begin.
The Sliding Dovetail
Joint
called a dovetail joint is where
the male fan shape is cut
laterally along an edge or an
end of one work piece and the
female recess is grooved into
the other.
- The simplest joint
If these are both cut with
exactly the same slope on the
sides and to the same depth
the two pieces can slide
together to form a very strong,
self-locking joint called a
“sliding dovetail” joint.
These are most often cut with
a router bit with sloped sides
(called a “dovetail cutter”)
where the router is guided
past stationary work pieces in
a straight line. Sometimes this
is accomplished using a guide
rail (my favorite) and
sometimes by holding the
router stationary while the
work pieces slide by in a
straight line guided by a fence.
They also can be cut on jigs
which hold the work piece
stationary and slide the router
past the work piece.
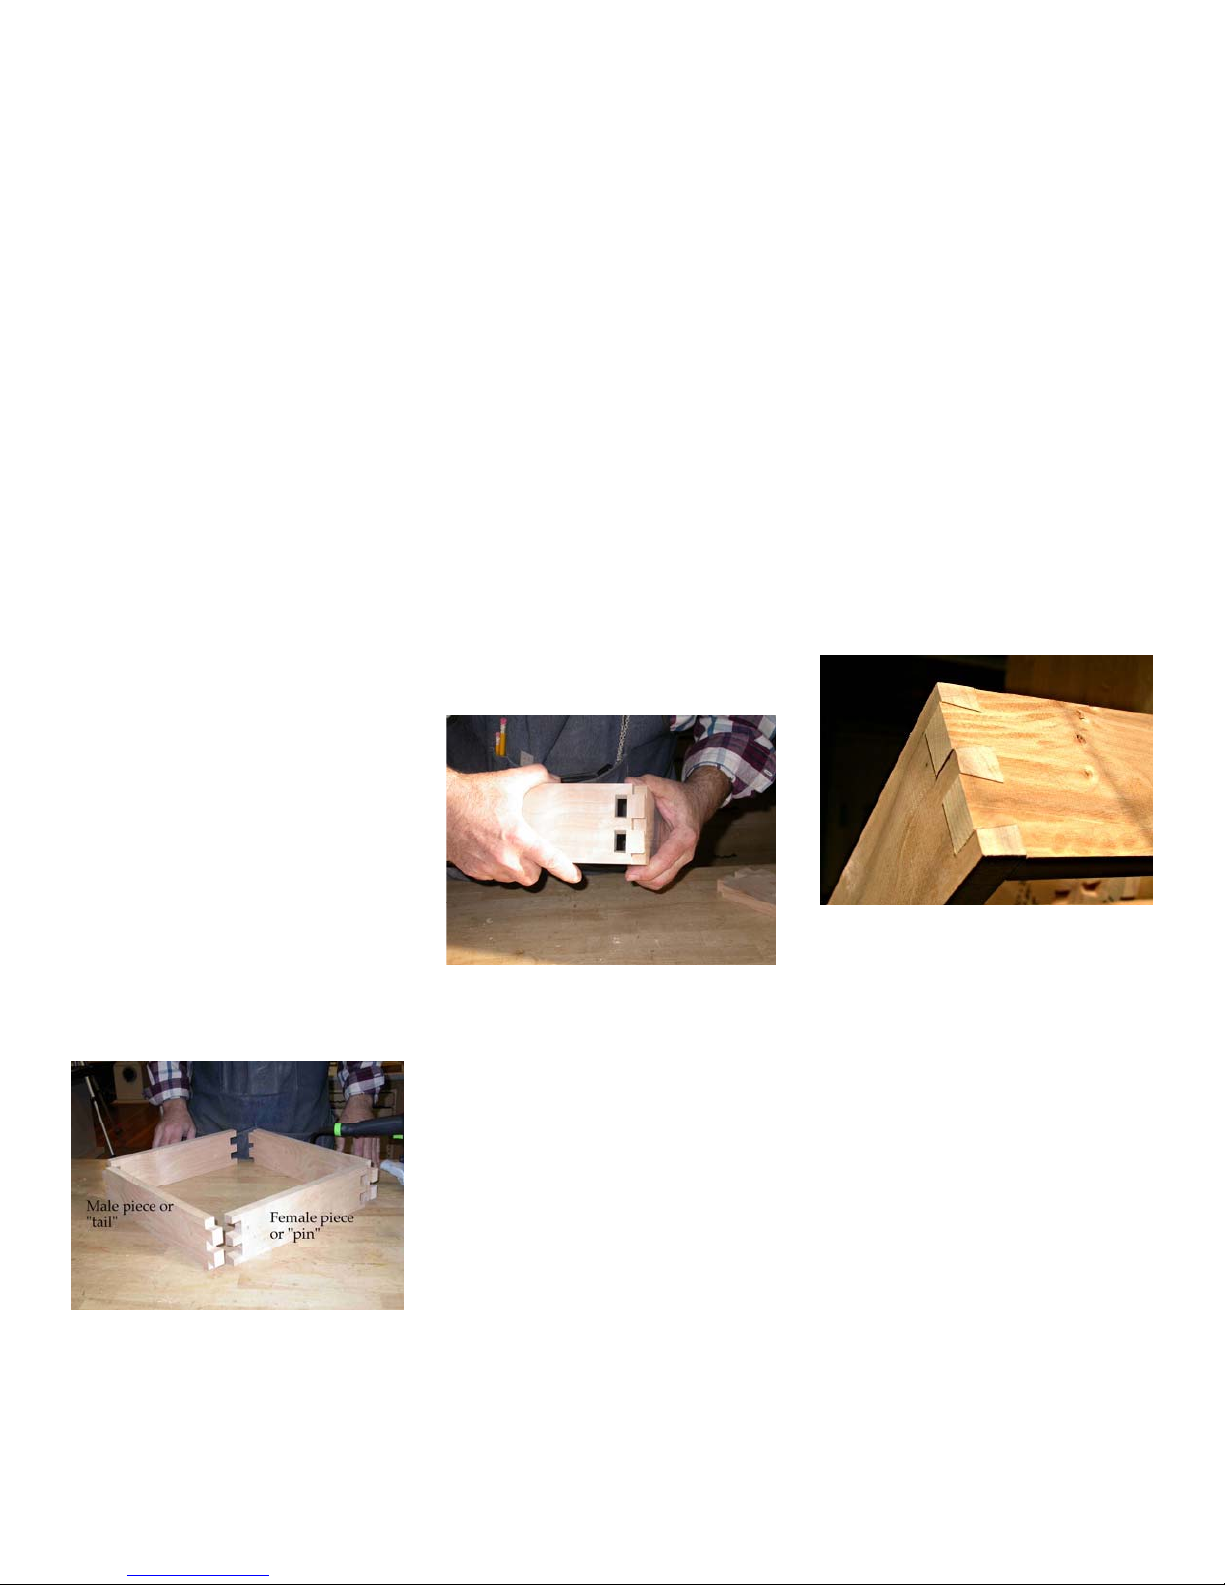
I regularly use sliding
dovetails instead of dados to
join the two sides of a cabinet
together to form the door or
drawer openings as in the
picture above, or to hold
shelves that tie the two sides
together. I also use it for
fastening drawer guides to the
sides of a drawer opening, for
fastening the toe kick across
the bottom of a cabinet, to hold
the top to the sides, and for a
variety of situations when I
need two pieces joined at right
angles to one another in a very
secure and self-squaring joint.
4
Page 5
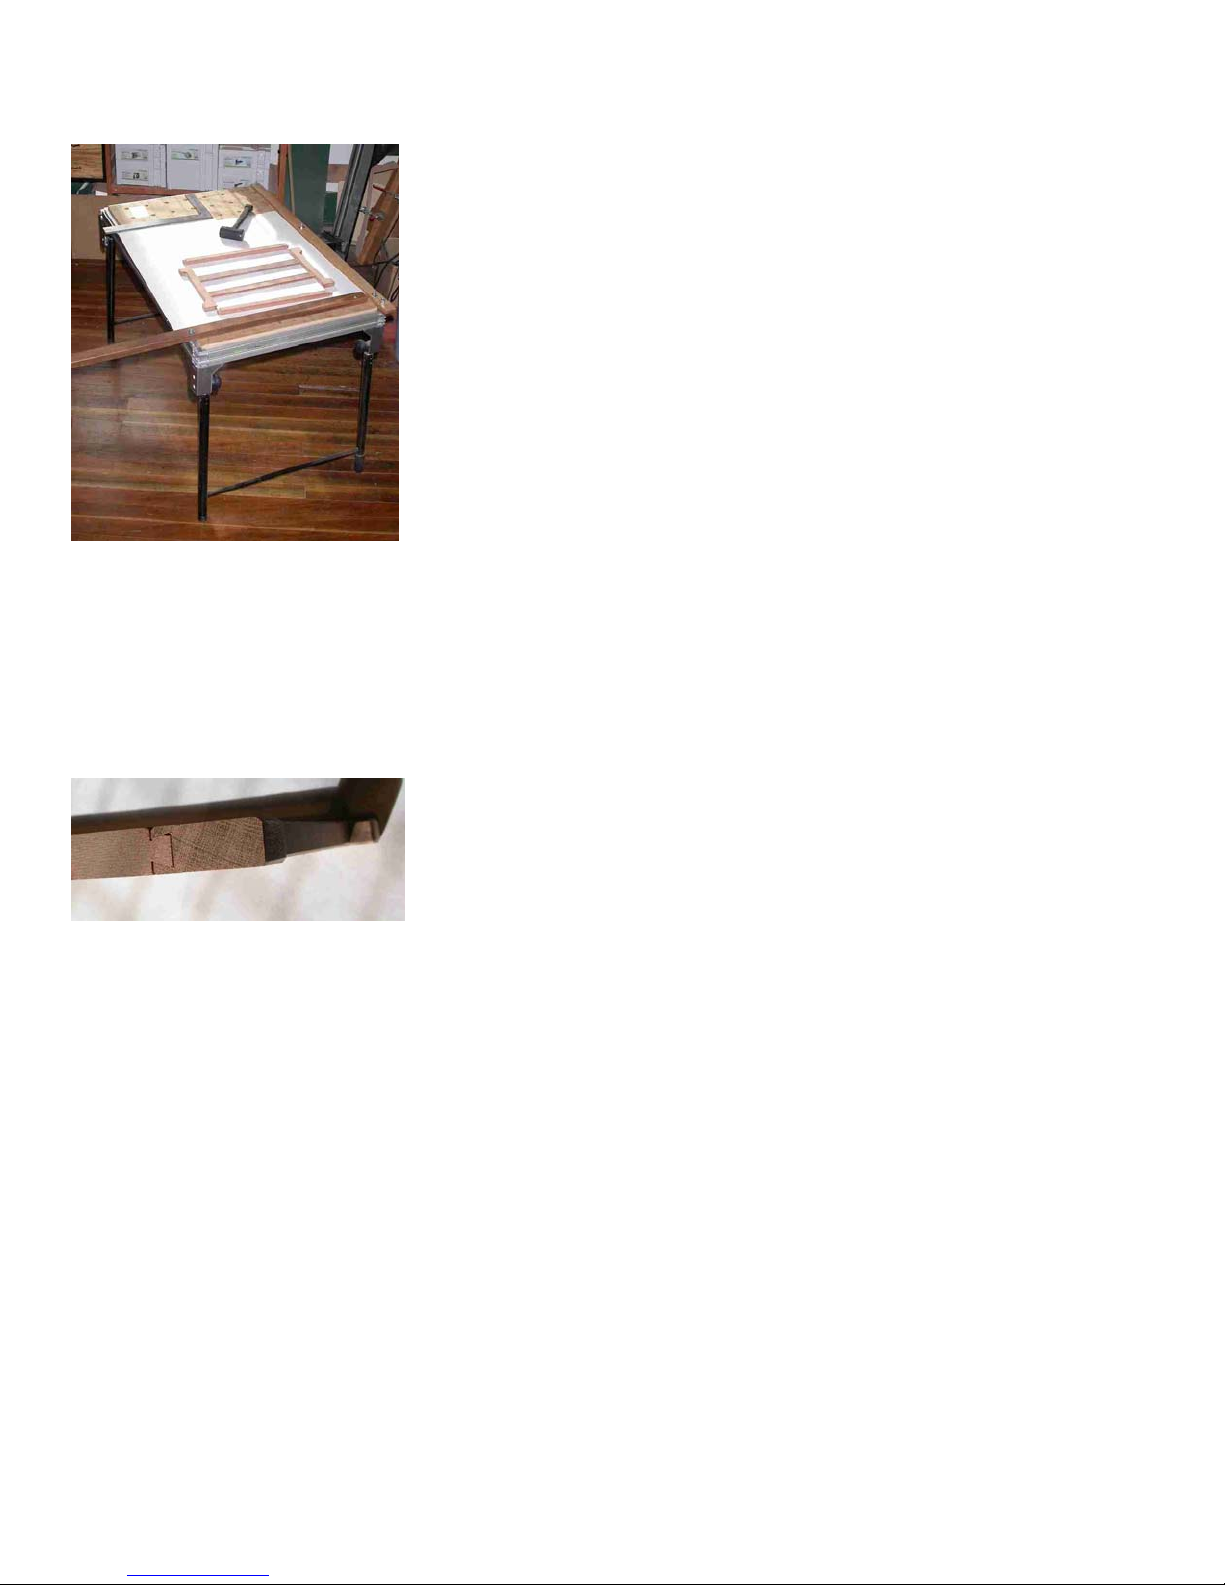
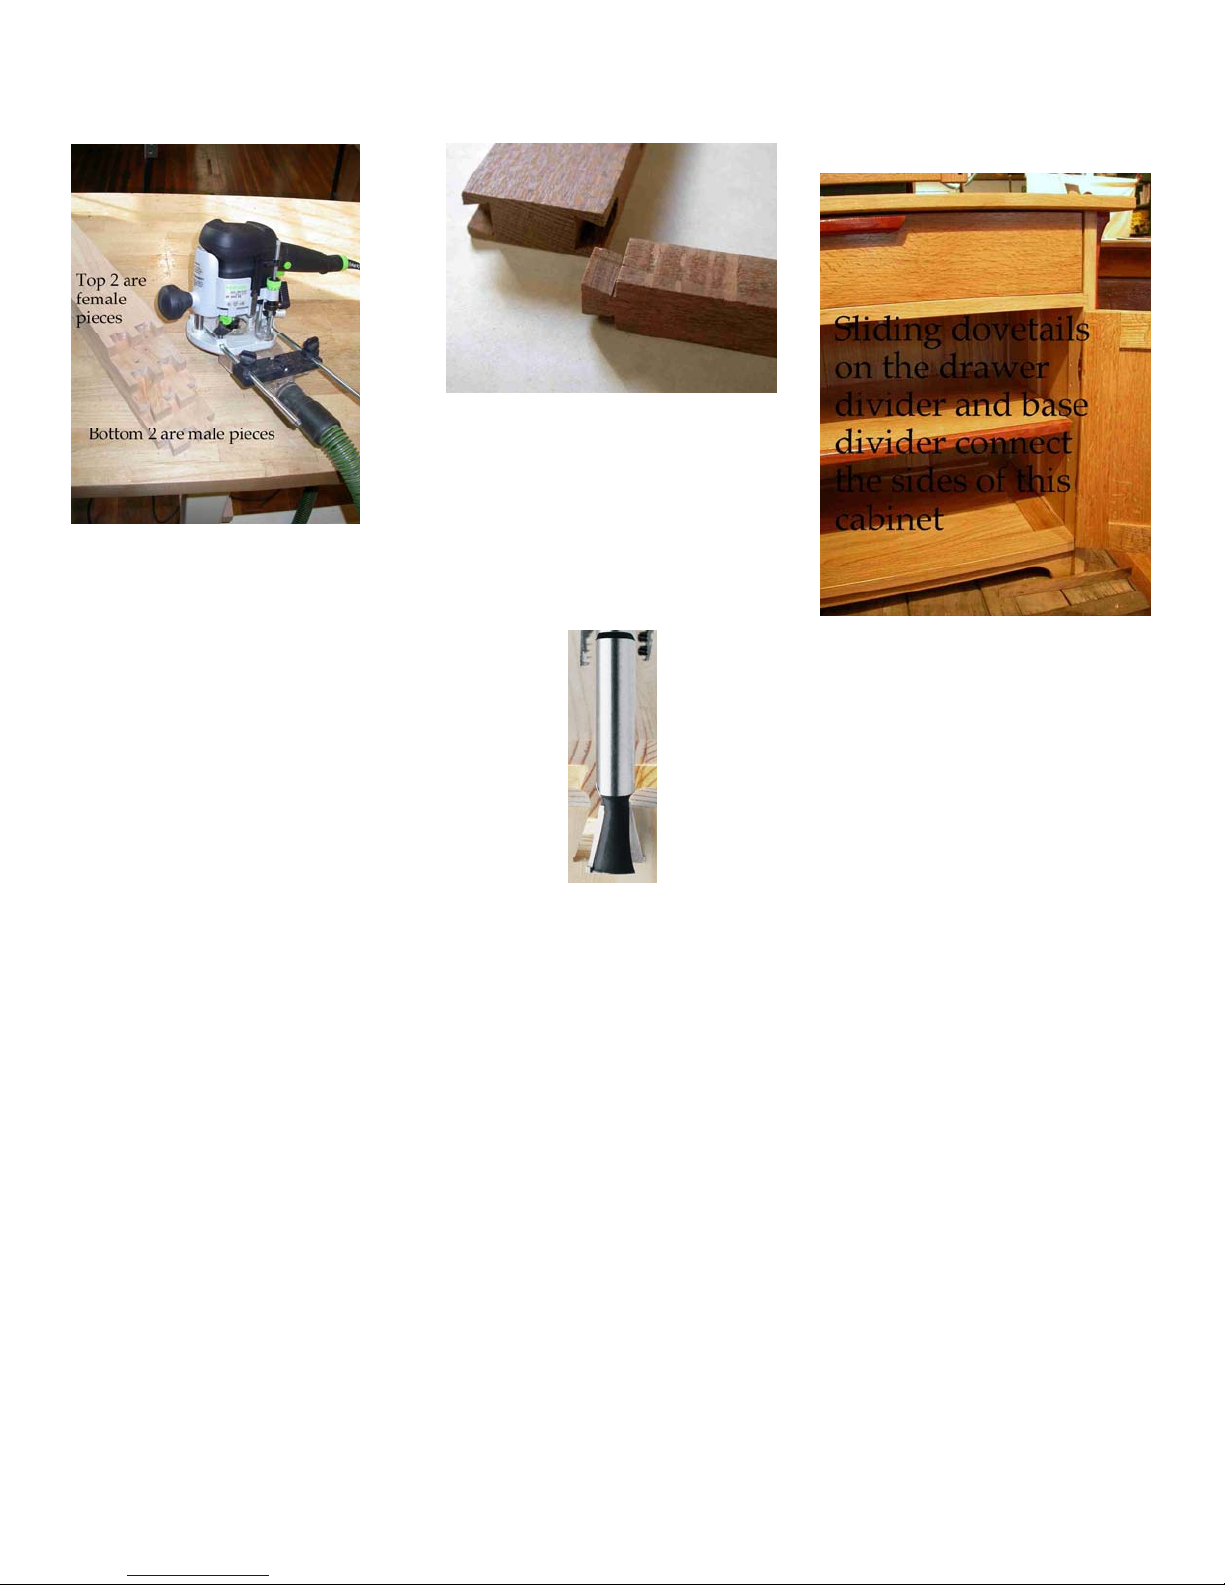
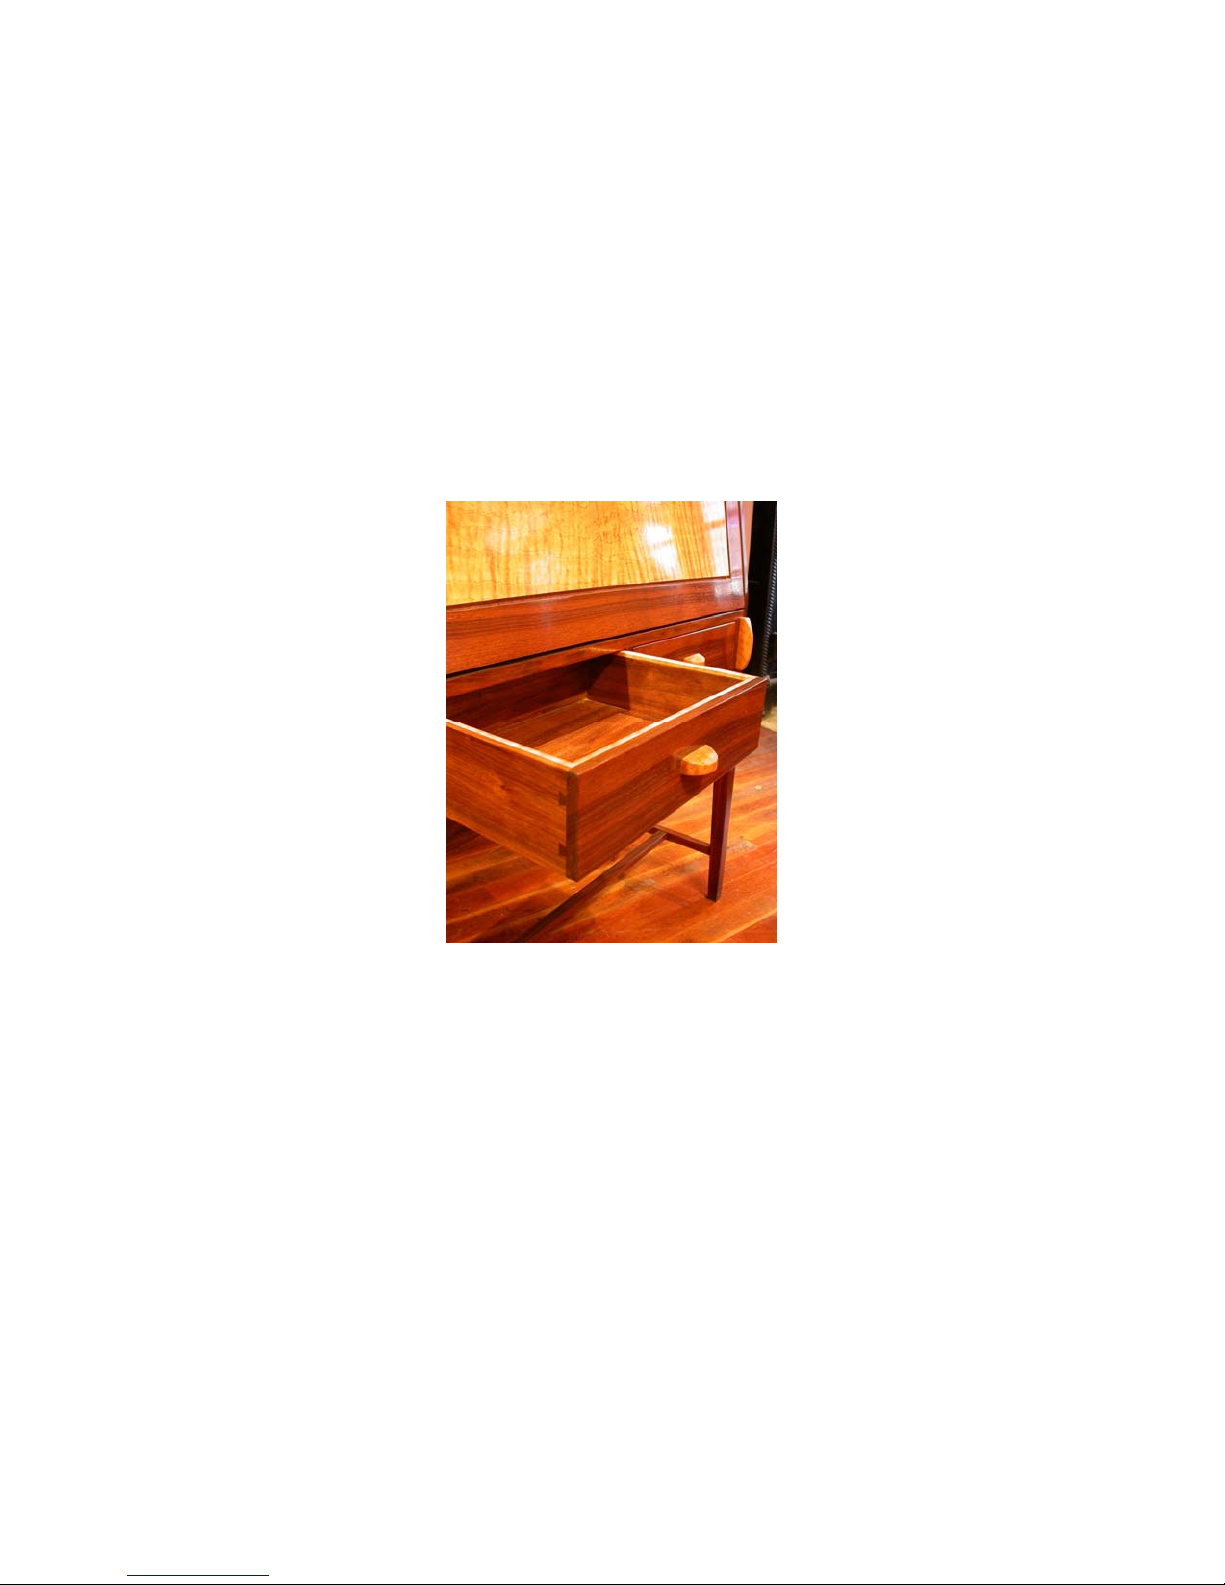
The pictures above and below
show a side slat assembly for a
large bookcase that is held
together with sliding
dovetails.
Once you start using sliding
dovetails you will rarely revert
to simple dados again.
5
Page 6
The Half-Blind Dovetail
Joint
joint that is called a “dovetail
joint” is where the female
recess is cut on the end of one
work piece and only part way
through the thickness of that
work piece forming a socket
into which the male fan shape
cut in the other work piece is
trapped.
Since the joint can only be seen
from the side where the fan
shape is cut, it is most
commonly called a “half
blind” dovetail joint. These
are most often cut by a
dovetail shaped router bit
guided by a template where
the male fan shape is cut with
that work piece held vertically
and the female socket cut with
that work piece held
horizontally.
- The second kind of
Often, like with the VS-600,
both parts of the joint can be
cut simultaneously, and the
joints in two sides of a drawer
or box can be set up and cut at
the same time. The manual for
the Festool VS-600 refers to
this as simply a “dovetail
joint”. We will talk a lot more
later about how to do these
joints quickly and accurately.
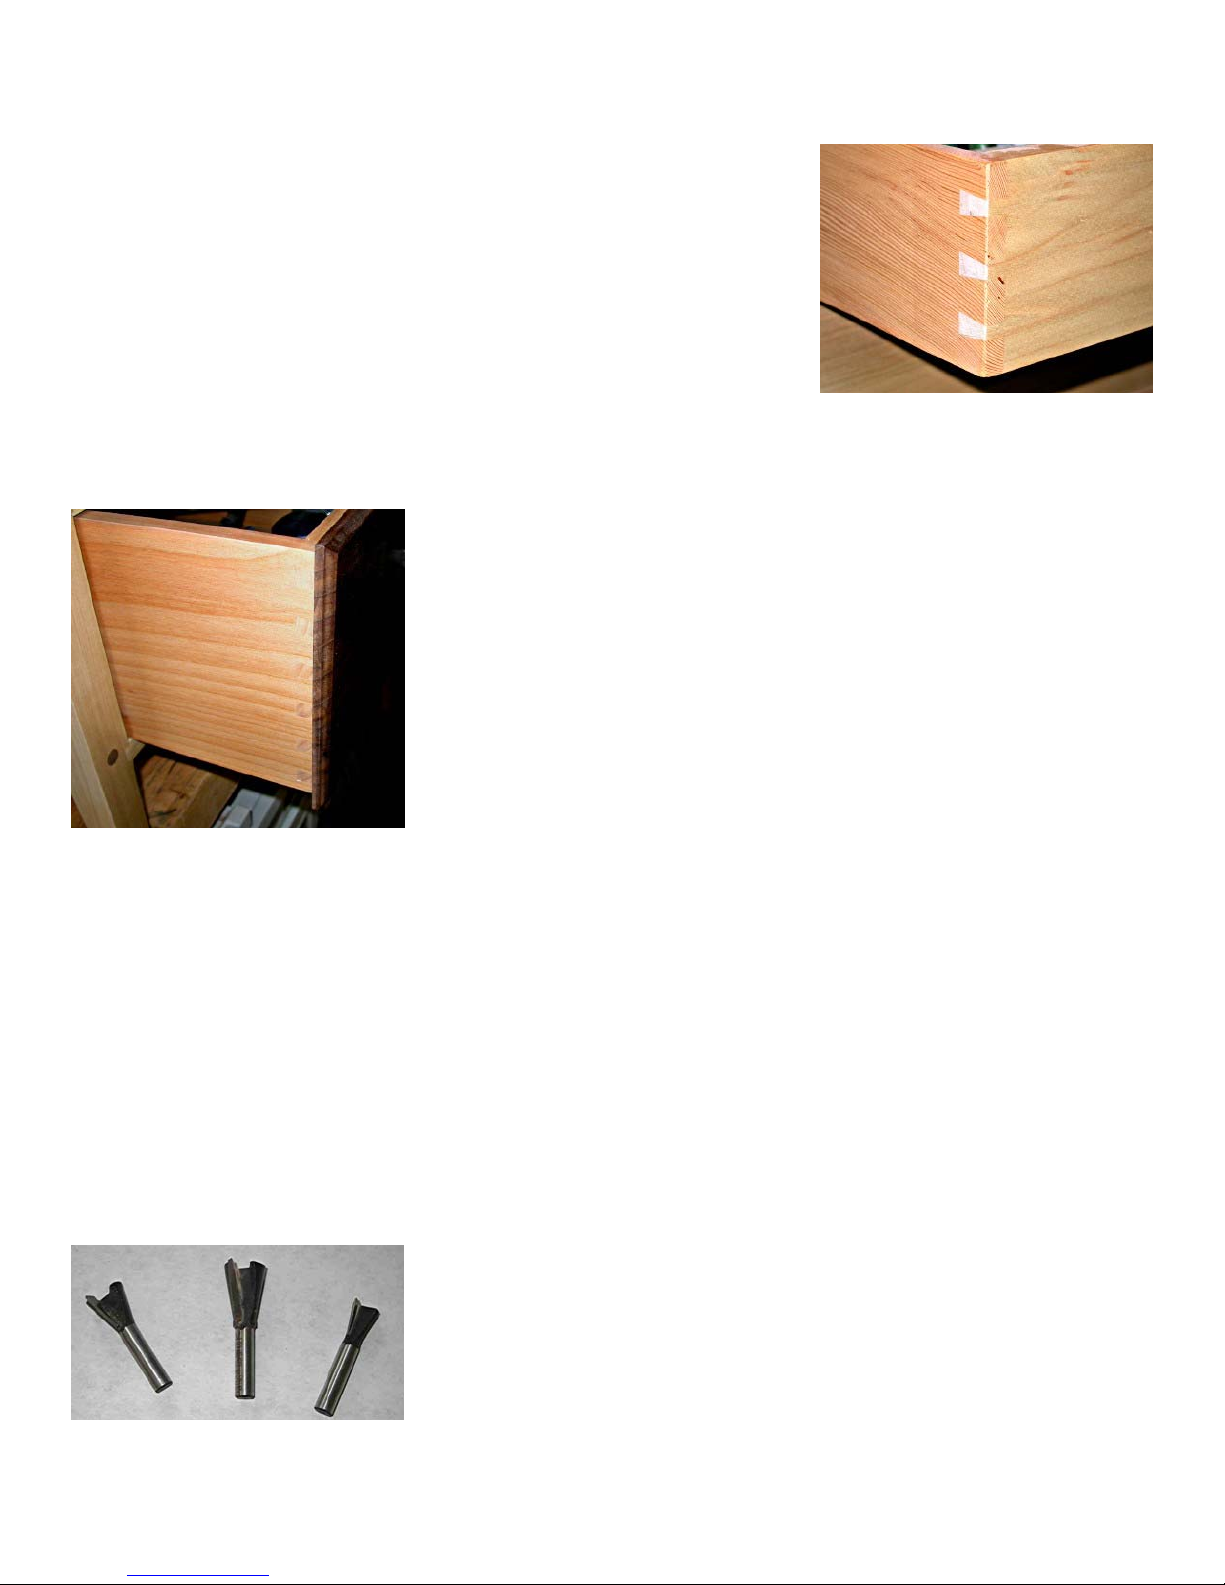
The Through Dovetail
Joint
“dovetail” joint is where the
male and female parts of the
joint are cut all the way
through the thickness of each
work piece. This is commonly
called a “through dovetail”
although the Festool VS-600
manual refers to this as an
“open dovetail tenon”. It is a
far more complex and
confusing joint to machine
than either a sliding dovetail
or a half blind dovetail. The
male fan shaped portion of the
joint is normally cut with a
dovetail shaped router bit with
the router guided by a
template with straight sides on
each finger of the template.
- The third kind of
The female recess portion of
the joint is normally cut with a
straight router bit guided by a
template where the sides of
each finger are angled at
exactly the same angle
designed into the dovetail
router bit.
The angle machined into the
template and the angle
machined on the router bit
must be exactly the same or
the two halves of the joint
simply will not fit together.
This is one reason I always
recommend using ONLY
router bits manufactured by
the same company that
produces the through dovetail
template.
Nothing can ruin your day
faster than to be frustrated by
the fact that the angle actually
cut by an off brand router bit is
slightly different from how it
is marked, and that is slightly
different from the angle on the
fingers of the template. No
matter how hard you try, you
will never get a good fitting
6
Page 7
joint out of a mismatched
combination.
The through dovetail can also
be a confusing joint to cut
because when you look at the
work piece with the female
recesses you can either see the
recesses, or you may instead
see the uncut portion between
two recesses that are called the
“pins”. If those uncut portions
are between one side of the
outboard most recess and the
edge of the work piece, they
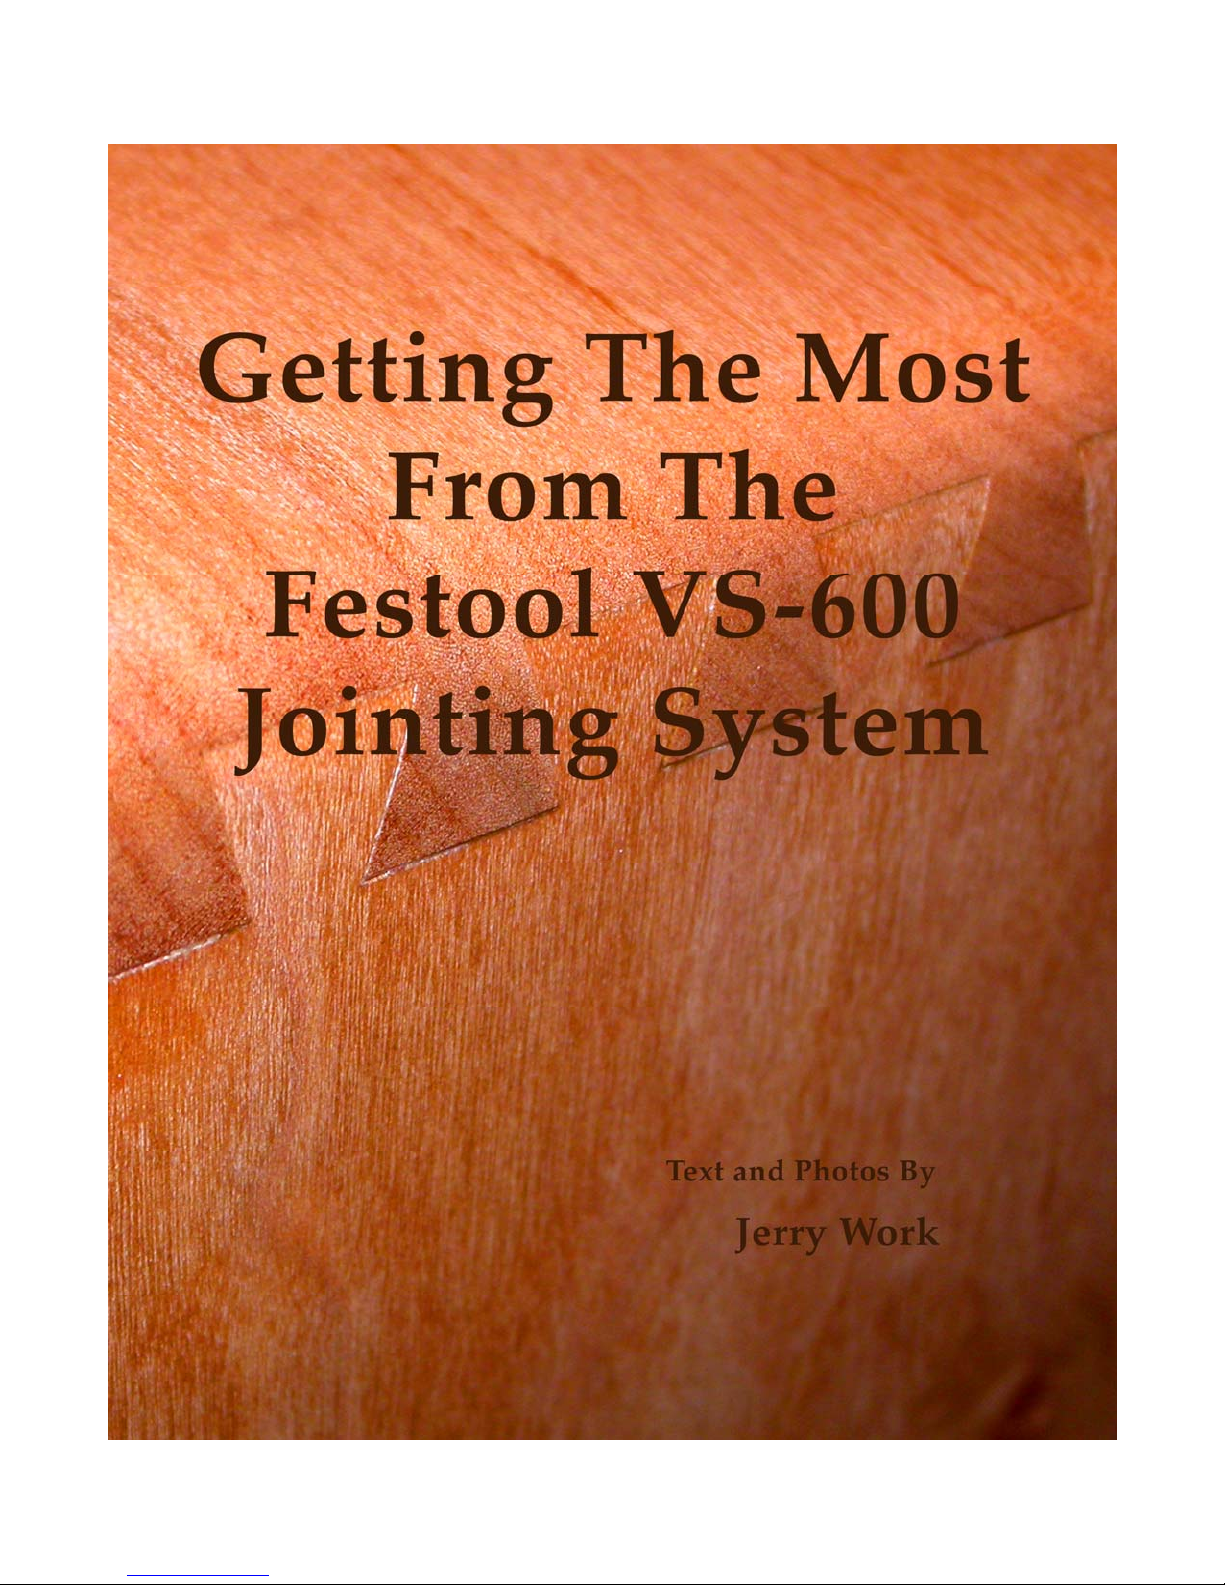
are called “half pins”. It is
hard, especially at first, to keep
straight which work piece is
the male (most often called the
“tail board”) and which is the
female (most often called the
“pin” board).
I’ll try to take a bit of the
confusion out of this when we
talk about how to cut perfect
through dovetails using the
Festool VS-600. The Festool
manual talks about the male
fan shaped portion as the
“dovetail” and the female
recess or pin board as the
“tenons”, terminology I find
confusing myself.
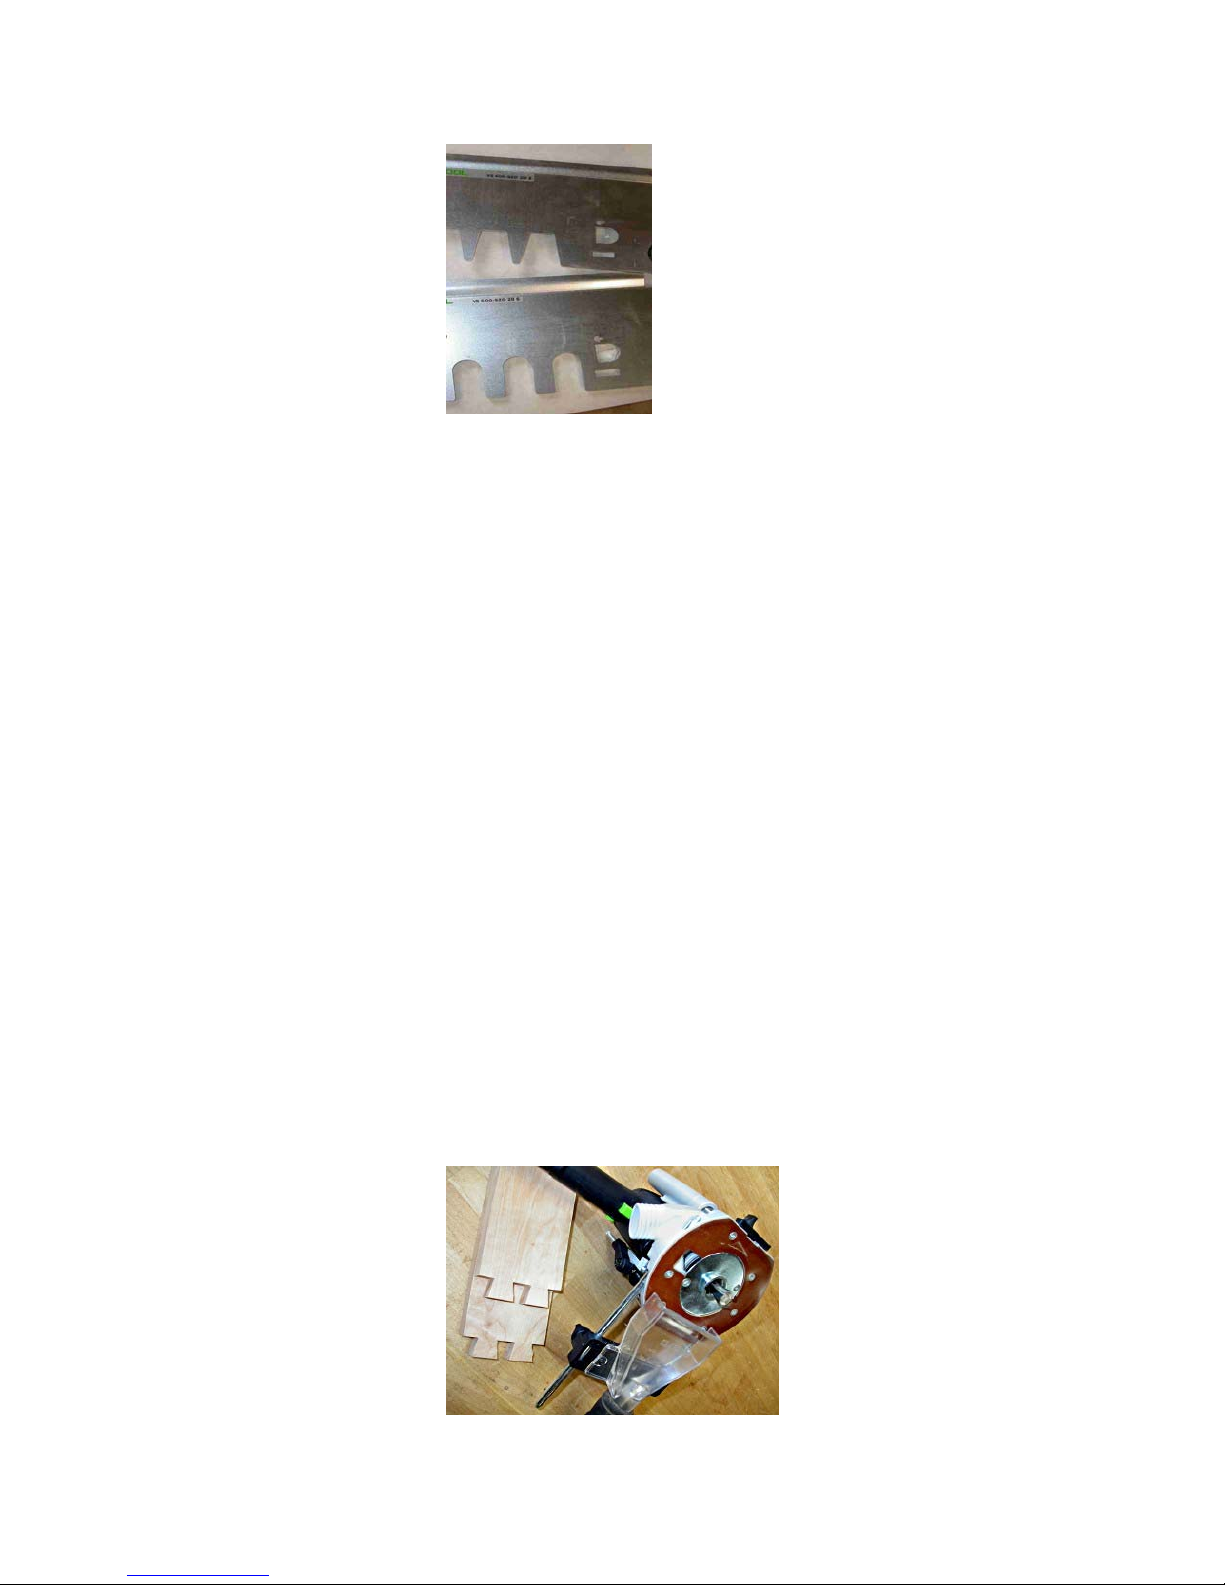
Fortunately, it is easy to see
the difference by looking at the
template used for these two
portions of the joint.
The male
portion is cut using a template
where the sides of the guide
fingers are straight while the
female portion is cut using a
template where the sides of the
guide fingers are angled.
In Festool speak, the template
for cutting the male fan shape
is labeled as an SZO-14-S or
SZO-20-S, while the template
with the angled fingers for
cutting the female recesses is
labeled as an SZO-14-Z or an
SZO-20-Z.
It really doesn’t matter what
you call these two as long as
you are clear that you will use
the S for cutting the fan
shaped male “tails,” as shown
in the picture above right, and
the Z for cutting the female
recesses separated by “pins.”
Throughout this manual I will
refer to the male and female
parts of the joint trying to
avoid the confusing tail and
pin descriptions.
Other joints also called
“dovetail” joints
are a few other joints that also
trap one work piece to another
by a male with angled sides
mating with a female recess
with the same angled sides. If
the male and female portions
are cut in the ends of two work
pieces they can be joined flat,
end to end and are usually
called a “flat dovetail” joint. If
the female portion is cut into
the ends of both work pieces
and a separate male piece is
machined with the fan shape
at each end, that joint is
usually called a “butterfly”
dovetail joint. We will not be
discussing these flat or
butterfly dovetail joints in this
manual.
– There
Advantages - Besides the
inherent strength of any of
these kinds of dovetail joints,
another great advantage of a
well machined dovetail joint is
that they are inherently selfaligning. The bottom of the
fan shaped male protrusion
ends in flats which are exactly
the same level as the surface
into which the female grove or
socket is cut in the mating side
of the joint. The flat on one
7
Page 8

piece is held tight against the
surface of the other thereby
holding the two parts
perpendicular to one another
on half-blind, through and
sliding dovetails, and exactly
end to end on flat dovetail or
butterfly joints.
If your cuts are made with
precision, when you assemble
your piece it will be nearly
perfectly square just from the
dovetail joints themselves.
So why are dovetail
joints so intimidating
for many?
Since these are self-aligning,
self-squaring joints of extreme
strength, why is it that they are
not regularly used by all
woodworkers as the preferred
method of joining two work
pieces together? And, why is
it that the term “dovetail joint”
also can strike such fear and
intimidation in so many
woodworkers?
One part of the answer is that
for the joint to work well both
the male and the female
portions of the joint have to be
cut with extreme precision. If
the angles and sizes of the
male fan shapes and the
corresponding female recesses
are not exactly the same the
joint will either not go together
at all or it will be so loose as to
be nearly useless.
Another part of the answer lies
in just how difficult it is to cut
these perfectly matching fan
shapes when you do more
than one of each on each of the
two parts to the joint. Now the
requirement for precision is
amplified since even if the
male and female fan shapes
are exactly the same size and
same angle, if they are not also
exactly the same distance
apart, the joint simply will not
go together no matter how
hard you try.
Given the requirements for
perfection in cutting these
highly useful joints, there is
little wonder why the dovetail
joint is considered so difficult
to cut properly and also why
there have been so many
techniques, jigs and fixtures
offered by different
manufacturers to cut them.
Each requires the user to learn
a specific, different set of steps
and techniques. Often the
steps and techniques are far
from intuitive and can involve
a rather long or steep learning
curve.
Maybe that is why you can go
into most any woodworking
shop and you are likely to find
at least one and often two or
more dovetail jigs stacked in
the corner unused, gathering
dust. The owner tried to learn
the steps and techniques
outlined in the manuals that
accompanied the jig or fixture,
and may even have done so at
one time. But, the next time
they tried to use the jig they
got confused and felt like they
had to start all over again from
scratch. Frustrated, they
tossed the jig into the corner
and there it sits today.
In this manual I am going to
try to reverse this trend by
showing you how to use the
exceptionally well engineered
Festool VS-600 dovetail jig to
make perfect drawers, boxes
and cabinets every time with
little or no “relearning”
required.
8
Page 9
Start with the desired
outcome in mind
Most manufacturers manuals,
including the Festool VS-600
manual, tell you a lot about
how to set up and adjust their
jig but do little to tell you how
to achieve the outcome you
want. Here we will start with
the outcome you want – a
perfect drawer, box or cabinet
– and show how to use the VS600 to achieve that outcome
quickly and easily every time.
In fact, by the time you finish
with this manual, I hope you
will find the VS-600 is in use
every day in your shop or
studio just like it is in mine.
When it becomes the best,
fastest and easiest way to
achieve your perfect drawer,
box or cabinet it will be the
“go-to” tool of choice for this
purpose and, believe me, will
gather no dust in your shop.
Making a “perfect”
drawer in less than
five minutes
Let’s start with what
constitutes a “perfect” drawer,
box or cabinet. Since the side
joints on all three are the same,
to save my typing and your
reading, from this point
onward I will use the term
“drawer” to mean either a
drawer, a box, or a cabinet
carcass. A little later on I will
also cover what else you need
to do besides the dovetailed
side joints that differentiate
one from another. And, still
further on we will talk a bit
about using the VS-600 to also
make slotted or box joints as
well as dovetail joints.
A “perfect” drawer is one that
is exactly the length, width
and depth you want, is
absolutely square, sits flat and
invokes an image of fine
craftsmanship from the minute
you assemble it -
No sanding to fit, no “make it
a bit bigger and cut it to fit
afterwards” and no “put a bit
of filler into the gaps to make
it look like it fits” even when it
doesn’t. Just perfectly made in
the first place.
A “perfect” drawer is also one
you can make day-in and dayout with beautifully cut half
blind dovetail corners in less
than 5 minutes. Yes, that is
right, five minutes from the
time you have the properly
prepared stock in front of you
to the time you are ready to
assemble.
Stock preparation and the
precise engineering of the VS600 base unit, template, guide
bushing and cutter are the
keys to your perfect box in five
minutes every time.
But, before we start we need to
understand how the system
works which we will do in the
next section.
9
Page 10

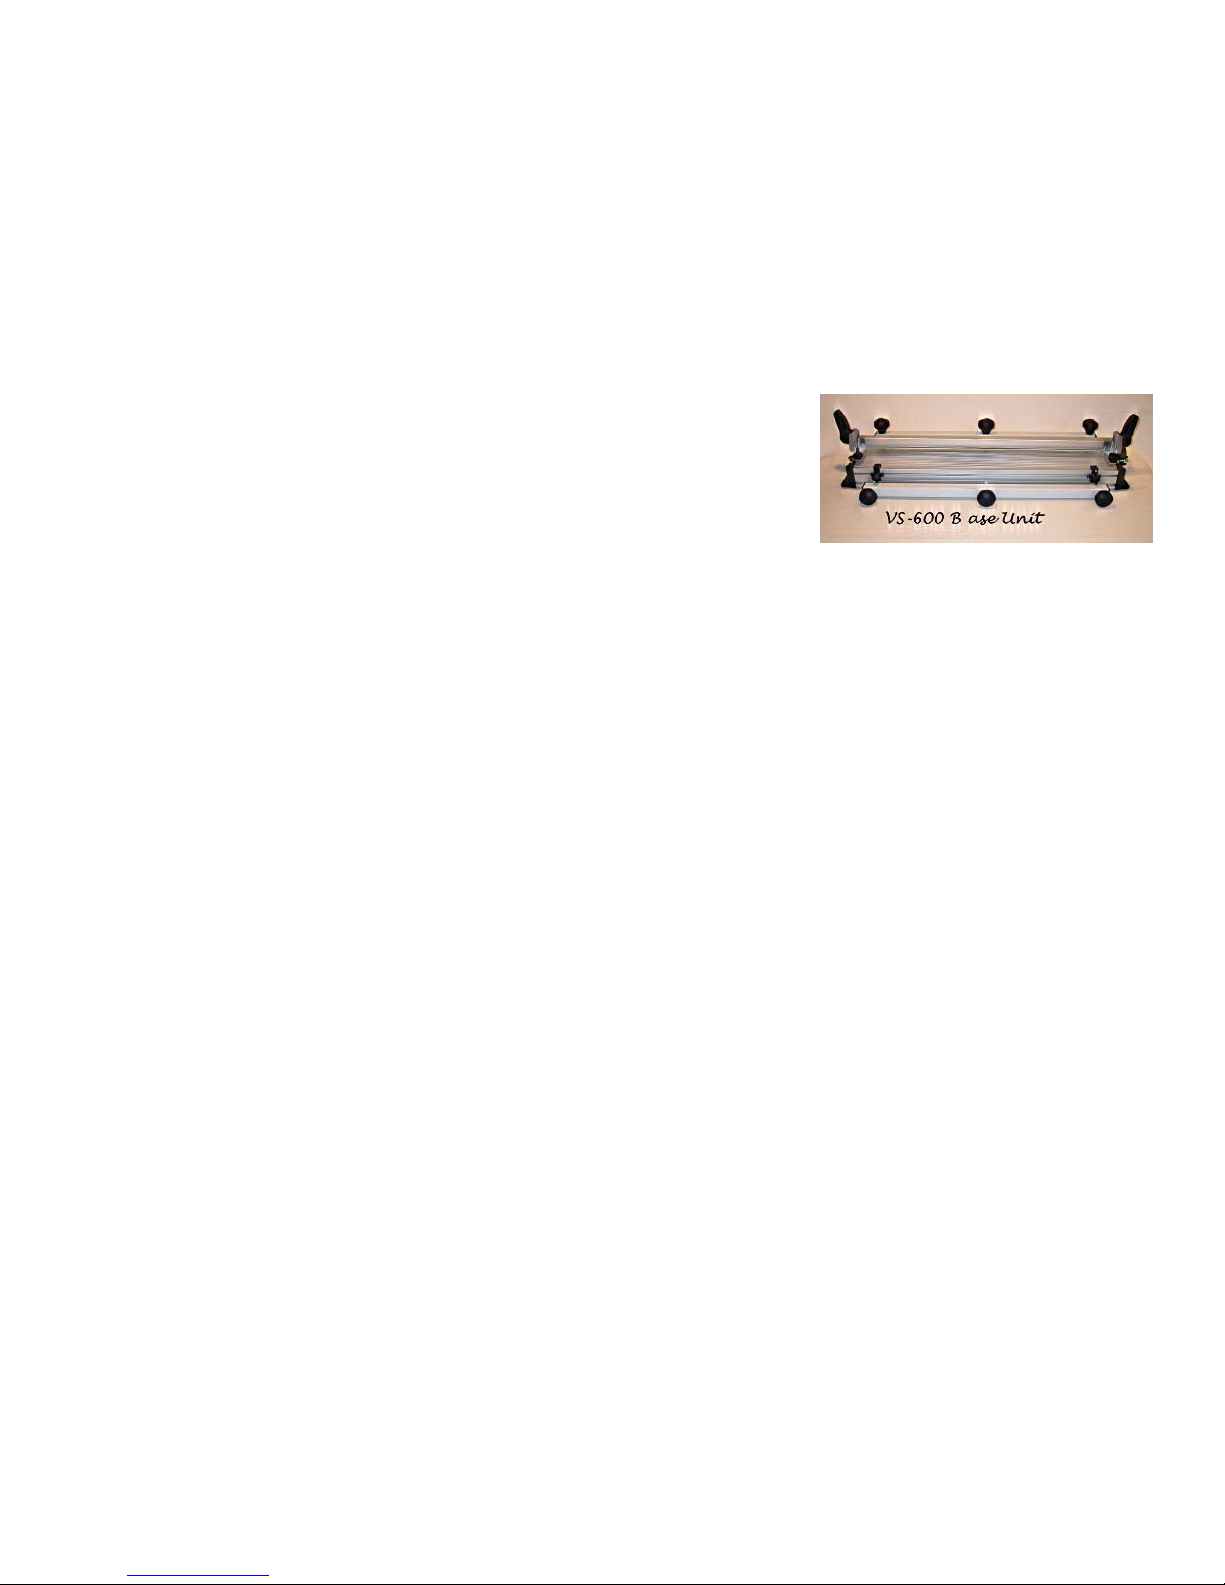
How the VS-600
System Works
The VS-600 is designed around
a base unit
which will hold your properly
prepared stock in exactly the
right location while you make
your cuts, a set of heavy,
machined metal templates
which will guide your router
to make the cuts in exactly the
right places,
a guide bushing which you
will attach to your router to
exactly follow the contours of
each template, and a cutter
that is of the exact size and
angles for which the template
was designed.
The templates mount on the
base unit. The guide bushing
and router bit mount on the
router.
Every part of a VS-600 system
is shown in the picture below.
While it may look a bit
intimidating, the pieces all
relate to one another quite
simply and you don’t need to
buy them all at the same time.
One of the beauties of the
Festool VS-600 system is that
you only need to do your set
up one time. And, all that
amounts to is (a) setting the
template in or out to get the
edges of the finished cut
perfectly flush with one
another and (b) setting the
router bit depth to get the fit of
the joint exactly as tight as you
want it.
From that point on, you only
need to mount the bit in your
router, set the depth the same
as on your test piece, and cut
away so long as the
component parts are within
the range each template is
designed to handle.
See the sidebar on “One Time
Setup” on page 32.
I have found that in most cases
the factory settings for in/out
on the templates and the
factory bit depth
recommendations for each
template are right on and little
adjustment is required. One or
at most two test cuts is all you
need to make.
When you get the fit you
want, keep the test pieces as
your depth gauge for all the
subsequent uses of that
template/bit combination,
perfect drawer after perfect
drawer.
I strongly recommend the use
of Festool guide bushings and
cutters to be sure these match
the templates properly. I also
recommend the use of the
excellent Festool routers.
They are lighter in weight than
most other routers to give you
ease of control. They are far
more powerful than their
small size would suggest. I
have yet to bog one down no
matter what I was cutting.
And, they offer excellent
chip/dust collection so you
can concentrate on producing
your perfect drawer in five
minutes, rather than worrying
about trying to work around
the mess most other routers
and jigs produce.
10
Page 11
Decoding the Festool
Catalog
Festool, like many tool
manufacturers who service a
world market, design their
tools around the metric
system. The numbers they use
are all in millimeters which I
will shorten in this manual to
“mm.” See “Using the Metric
System” on page 36.
As that note suggests, you
don’t have to think in the
metric system to gain all the
advantages of measuring in
the metric system.
But, to decode the Festool
catalog you will need to at
least understand that one inch
is a bit over 25 mm, and one
mm is a bit less than .040.”
Festool offers four different
combinations of templates,
guide bushings and cutters for
the VS-600 to allow you to cut
perfect half-blind and through
dovetails in stock of a range of
thicknesses.
In addition they also offer two
different templates, guide
bushings and cutters to allow
you to cut equally perfect box
joints in stock of different
widths, and even a doweling
jig to allow you to joint two
pieces of wood or man-made
materials with multiple
dowels if you wish.
The first time you look at their
catalog or web site, the section
on the “VS-600 jointing
system,” as they call it, will
appear to be a bit intimidating.
Let’s decode it.
The Base Unit
(item number 488-876) is the
base unit. You need one of
these no matter which/how
many templates you also buy.
The templates are all sold
separately. None come with
the base unit and the base unit
cannot be used to cut any joint
without at least one template.
The 600 refers to the maximum
width of work piece that you
can mount into the VS-600.
600mm is a bit less than 24” so
you can work on very large
drawers, boxes and cabinet
carcasses.
- The VS-600
Half-Blind Dovetail
Templates
half-blind dovetail templates.
They are given model
numbers beginning with the
letters SZ followed by a
number which refers to the
diameter of cutter expressed in
millimeters that template is
designed to use.
- There are two
11
Page 12
Do NOT try to use any cutter
other than the one specified. If
you do, your joints simply will
not work. Each of these two
templates is designed to cut
perfect half-blind dovetail
joints into stock that is within a
specified range of thicknesses.
Do NOT try to use stock of a
thickness outside of these
ranges. If you do, your joints
simply will not work.
Template SZ-14 shown below
left is designed to cut halfblind dovetail joints in stock
from 15 to 20mm in thickness.
This is about 9/16” to a bit
over 3/4”. If you try to cut
half-blind dovetail joints in
stock outside this range, the
female recesses (sockets as
they are called) will either
bottom out too close to the
front or back of the drawer
leaving a thin, weak area, or
the male fan shaped tails will
be too short to be strong
enough.
You can cut half-blind dovetail
joints in stock where the front
and back components are
more than 20mm thick so long
as the sides are no more than
20mm. If you do, however,
most will think the joints
simply look shallow and out of
scale. So, stay within a stock
width of 15 to 20mm with this
template.
The proper guide bushing
(designed to fit only on Festool
routers) comes with each
template so you do not need to
buy these separately. Festool
calls guide bushings, “copy
rings”.
You can use other routers and
guide bushings so long as the
guide bushings have exactly
the same outside diameter as
their Festool counterparts.
You also need to buy the
cutters separately. Festool
calls their carbide tipped bits
HW while the high speed steel
bits are called HSS. I only use
the HW or carbide bits. I find
the Festool router bits to be
among the best I own and use
them every day. They are very
well machined, finely
polished, sharp right out of the
box, and have large carbides
which seem to stay sharp
longer than most bits. They
also are very well balanced
and centered so your cuts are
vibration free and “dead on”
accurate in both size and
angle.
The right cutter to use with
template SZ-14 is 490-992.
This has an overall diameter of
14.3mm with a cutting height
of 13.5mm set at a 15 degree
angle.
The shank diameter is 8mm
which I find ideal. It is much
stiffer than the ¼” shank bits
you might have used before,
yet small enough to produce a
pleasing dovetail size and
geometry. A ½” to 8mm collet
adapter is available from
Festool and others.
Template SZ-20 is designed to
cut half-blind dovetail joints in
stock from 21 to 28mm (26/32”
to 1 3/32”). The same caveats
on stock thickness apply. Use
cutter 490-996 which is 20mm
in overall diameter, has a
17mm long cutting height set
at 15 degrees.
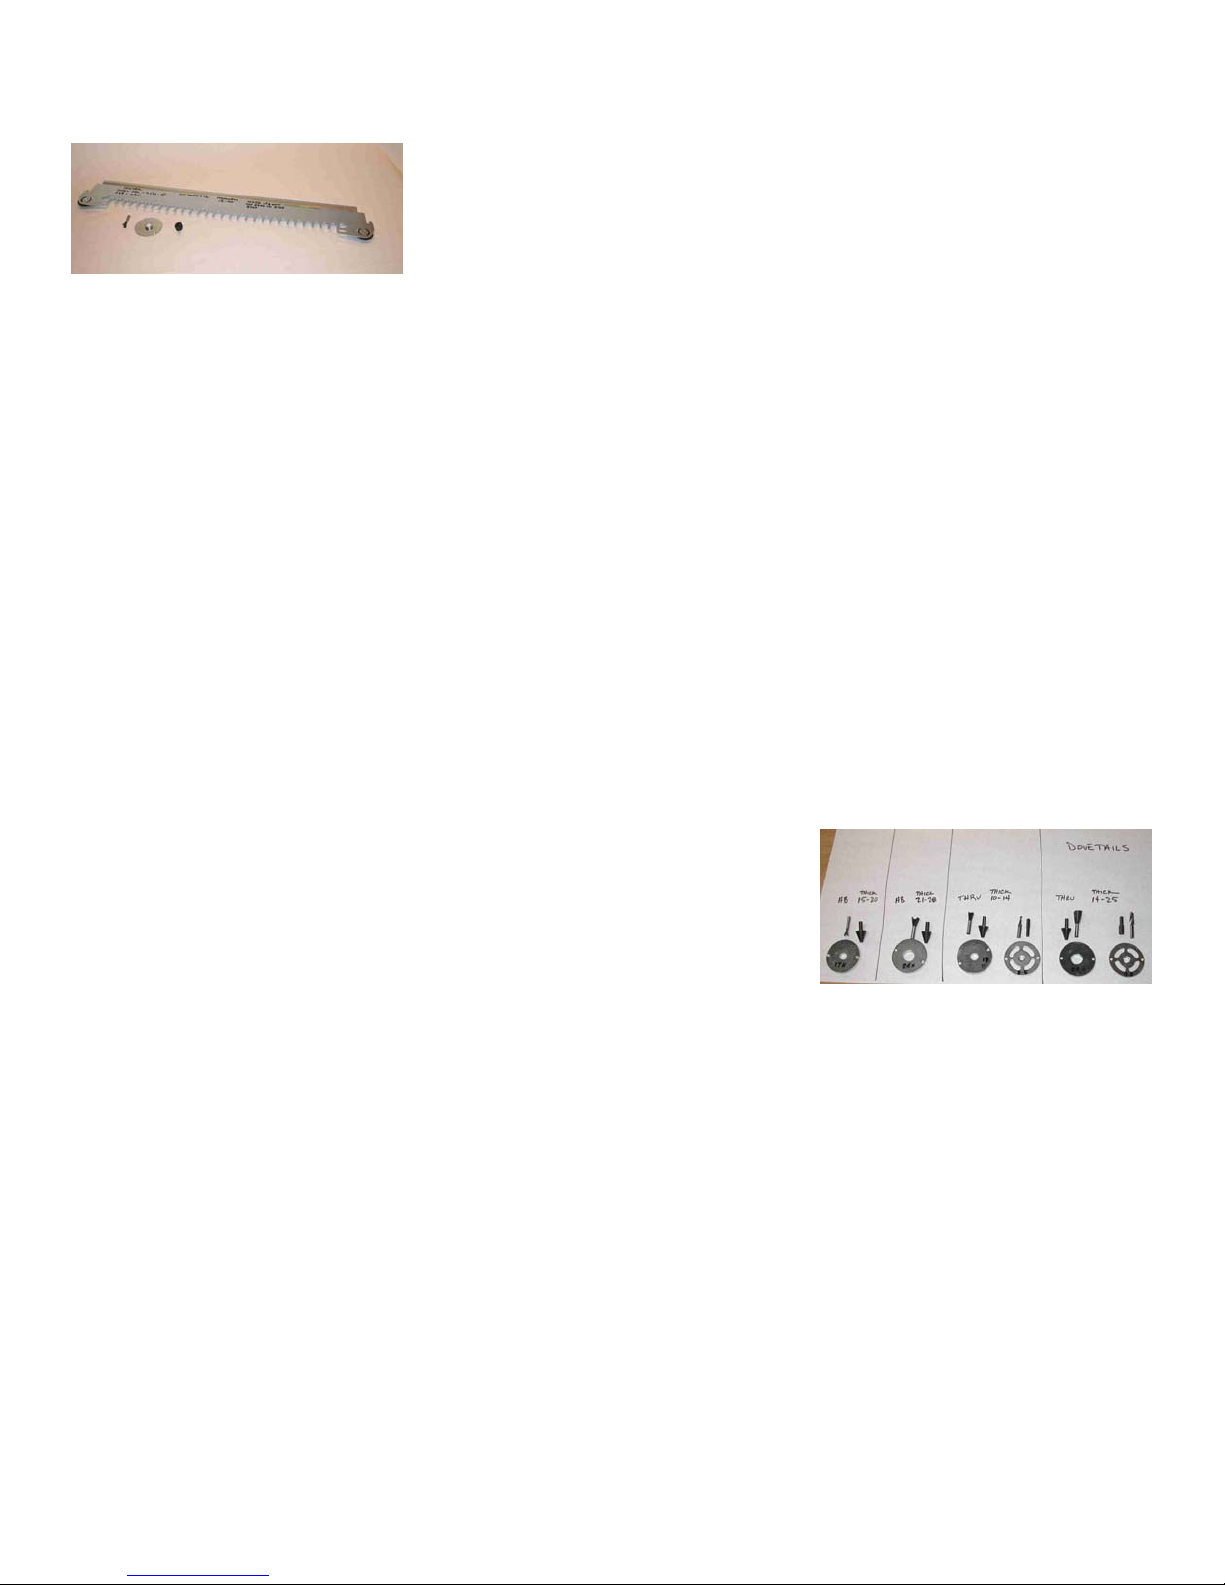
All of the cutters, guide
bushings and alignment pins
used for all the Festool VS600 dovetail joints are shown
above with their guide
bushing centering mandrels.
The two groups on the left are
for half blind dovetails and the
two on the right are for
through dovetails. We will
cover the templates for
through dovetails in that
section.
12
Page 13

All the rest of the templates
and cutters are designed for
either box joints or dowel
joints. We will cover these
later in the manual.
For now, let’s concentrate
on building your perfect
drawer with half-blind
dovetail joints in under
five minutes.
These are the most commonly
used dovetail joints for
drawers and boxes and are
also quite useful for cabinet
carcasses.
Once you master half-blind
dovetails and consistently
produce a perfect drawer in
under five minutes, then you
can branch out to the other
types of joints as you wish.
Don’t make this
Just don’t make the mistake I see
first time users of dovetail jigs
make all the time. They pull their
new purchase out of the box, do a
cursory glance through the jig
manufacturers manual and start
butchering wood. They cut a few
poor half-blind dovetail joints,
then several really poor through
dovetail joints and maybe an illfitting box joint or two. When
they see the mayhem they have
created, they usually give up in
frustration. Stay with the halfblind dovetail joint until it
becomes almost automatic for
you. Then, and only then, branch
out to also learn to cut the other
types of joints.
mistake
13
Page 14
A Perfect Drawer
Using Half-Blind
Dovetail Joints
Earlier I said stock
preparation, along with the
precise engineering of the
Festool VS-600 templates,
guide bushings and cutters
was the key to achieving the
desired outcome of creating a
perfect drawer with half blind
dovetails in under five
minutes.
I use primarily solid woods for
all my furniture so will spend
some time outlining how to
get properly prepped solid
wood components.
If you want to use man-made
materials, stick to a good
grade of multi-ply plywood
like Baltic Birch. That usually
comes in 5’ x 5’ sheets. The
plain old softwood plywood
sold in 4’ x 8’ sizes has too few
plys and too many interior
voids to make for anything
approaching a perfect drawer.
Hardwood plywood is usually
much better and can be used
with some success.
Don’t try to use chip board or
compressed board as they
generally are too weak to work
well.
MDF can be used but know
that the male fan shapes can be
quite fragile until the piece is
assembled and glued up.
Once assembled with a good
quality wood glue, MDF
makes for a strong drawer, box
or cabinet carcass. Without
glue the joints in MDF are
simply too weak to be useful.
Half blind dovetail joints cut in
solid wood are strong with or
without glue.
To prep solid wood you
almost must have a jointer
and a planer.
Seldom is the wood you buy
pre-surfaced really straight,
flat or of equal thickness over
its length. It may look that
way in the store but often will
have some cupping, twist,
warp or curve.
You can see it if you look at
the end of the board to see if it
is flat side to side or whether it
bows across its width
somewhere along the length.
That bow up or down is called
“cupping.” The board often
also will have some twist. This
is where the flat face of the
board is not parallel along its
entire length. Or, it may be
warped enough that
individual components are not
flat over their length.
The only way to effectively
take out cupping, twist or
warp is with a jointer. If you
run a warped, twisted or
cupped board through a
planer, the pinch rollers will
temporarily flatten the board
right under the planner knives.
The warp, cup or twist will
reappear again as it exits,
leaving you with a warped,
cupped or twisted board that
is simply thinner.
14
Page 15
If you joint one face flat first,
you will take out the warp,
cup or twist. Now, when you
run it through the planer to get
it the thickness you want, it
will come out still flat.
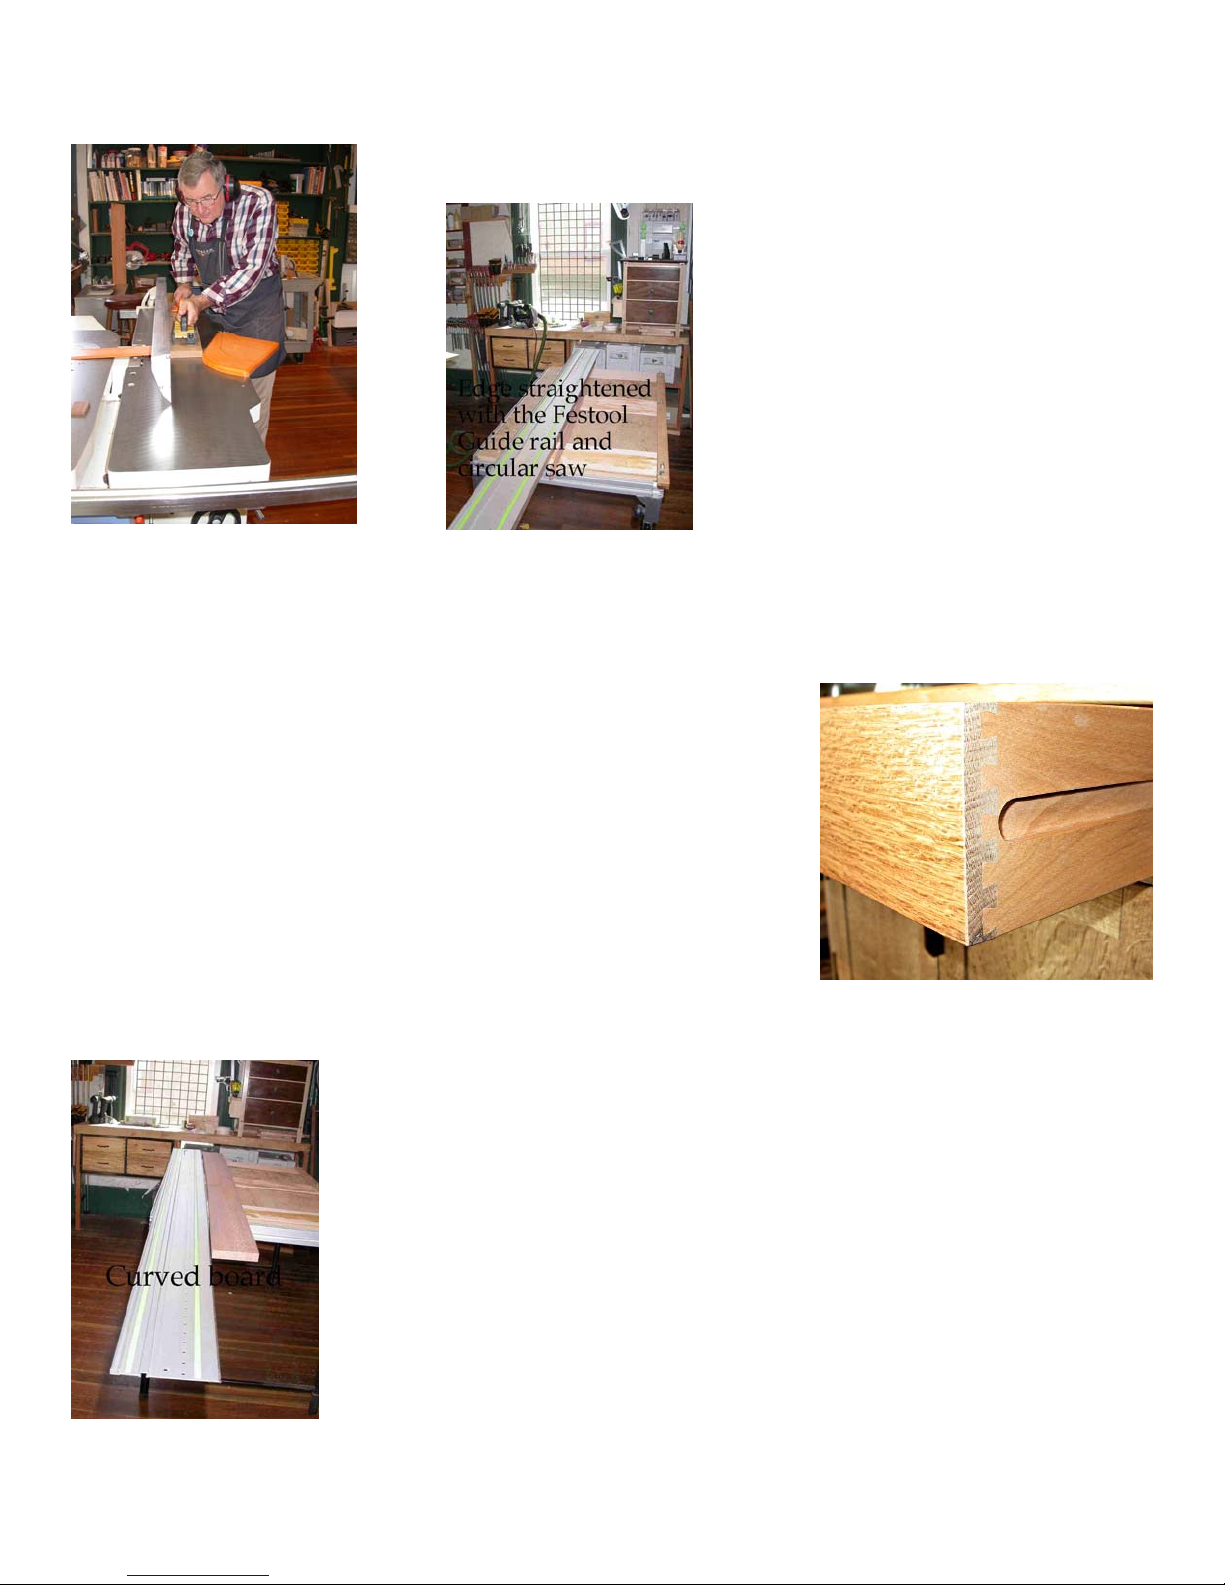
Don’t worry too much if a
board is flat but not straight. It
is easy to cut the curve out of
one edge and then cut/plane
the other edge to be straight
and parallel to the first and of
the width you want as shown
in the before & after shots
below.
Cutting the drawer
components to the
proper size
Height - Centered
Dovetails Look Best
with the height
want.
All fixed template half blind
dovetail jigs, including the
Festool VS-600, are inherently
designed around drawers of a
height that is an even
increment of twice the finger
spacing.
In the case of the SZ-14
template, the distance between
each finger is exactly 22mm. If
your dovetails are properly
centered on the drawer side,
when you look at the finished
drawer from the side you will
see an 11mm half pin at both
the top and the bottom edges
and all the other dovetails will
be exactly 22mm apart.
Hence, the set of dovetails will
be centered over the height of
the drawer.
of drawer you
– Start
15
Page 16

This is the most pleasing
arrangement to the eye and
also the strongest joint.
If your drawer height is not an
even increment of twice the jig
finger spacing, you will still
have an 11mm half pin at the
top and either more or less
than that at the bottom edge of
the drawer. That unbalanced
arrangement looks awkward
to most people and the lower
pin can become so small as to
be weak and break off during
assembly or use.
The easiest way to calculate
the height of a drawer on
which half blind dovetails will
be properly centered is simply
to multiply the template
spacing (22mm for the SZ-14)
times twice the number of the
male fan shaped tails or female
recesses showing. If your
drawer will show only one
male fan shaped tail when
viewed from the side, the
drawer will have an 11mm
half pin at the top and bottom
and one 22mm female recess in
the middle so it will be 44mm
high (about 1 ¾”). This is
about as small as it is practical
to make a drawer and still
leave room for a bottom.
Drawer height for
template SZ-14 = 44 x t
Drawer height for
template SZ-20 = 64 x t
where t = the number of tails
(and female recesses) showing
from the side.
See the “Table of Drawer
Heights Which Will Result in
Properly Centered Joints” on
page 43 for these calculations
from one tail showing to the
maximum size drawer which
can be built on the VS-600
using these templates.
One more note on drawer
height: The slot you will cut
into the inside of the front,
back and drawer sides to
receive the drawer bottom will
be centered on one half the
template spacing up from the
bottom of the drawer
components (11mm for the
22mm spacing on the SZ-14
and 16mm for the 32mm
spacing on the SZ-20).
So, the actual inside depth of
your perfect drawer cut with
the SZ-14 template will be
11mm plus one half of the
thickness of the drawer bottom
less than the overall height of
your drawer. The distance
from the bottom edge of the
drawer sides, front and back to
the underside of the drawer
bottom will be 11mm less one
half of the thickness of the
drawer bottom -- nice and
strong while still maximizing
inside depth for your prefect
drawer.
Cutting the slot on a center
line that is 11mm from the
bottom edge will put the
drawer bottom slot (or dado as
some might prefer to call it)
exactly in the center of the
male fan shaped tails and
female recesses so it will not
show from the outside of the
drawer and will be as strong
as possible.
So, pick a drawer height that
is an even increment of twice
the template finger spacing,
44mm (2 x 22mm) for the SZ-14
template & 64mm (2 x 32mm)
for the SZ-20 template. Cut
all your flat stock to that
width.
Thickness - The two sides
must be the same thickness,
which can be of any thickness
within the range of thicknesses
16
Page 17

available for each template (15
to 20mm for the SZ-14
template). The front and back
can be of a different thickness
than the sides but the front
and the back pieces need to
each be the same thickness and
within the 15-20mm range. A
very pleasing drawer to the
eye, and also a very common
size, is one where front and
back are 19mm (about ¾”) and
the sides are 15mm (about
9/16”).
The fastest, easiest thing is to
simply make all four drawer
components the same
thickness, but you do not have
to.
Length of the Front and
Back Pieces
and back pieces to be exactly
the length you want for the
finished width of your drawer.
If your perfect drawer would
be 400mm wide (a bit under
16”), cut the front and back
pieces to that length.
- Cut the front
Length of the Side Pieces
The length of each drawer side
piece will be the desired
overall depth front to back of
your perfect drawer less the
thickness of the front piece,
less the thickness of the back
piece plus twice the depth
setting for your router bit
which is 12mm for the SZ-14
and 15mm for the SZ-20.
Side piece length = desired
front to back dimension – 2
times (thickness of F or B –
depth of router bit)
If you want a drawer that
measures 500mm (about 20”)
front to back using the SZ-14
(which calls for a router bit
depth setting of 12mm) and
want to use front/back
components that are 20mm
thick, cut each side component
to be 484mm long.
484 = 500 – 2(20 – 12) or 484 =
500 – 2(8) or 484 = 500 - 16
This is really easy to calculate
using the metric system but
can be a bit confusing if you
insist on staying with the base
eight “inch” system where you
will have to add and subtract
some fractions.
See “Sidebar on Using the
Metric System” on page 36 of
this manual for my take on
this question.
Now cut the half blind
dovetails at each corner
If you prepare your stock as
indicated, the cutting of the
half blind dovetail joints to
make a perfect box in less than
five minutes every time is
really simple. With the Festool
VS-600 you only need to
mount the work pieces into the
jig twice to make all eight
parts of the dovetail joints on
the four corners. That is
because for half-blind dovetail
joints made on the VS-600 you
can cut two different corners at
the same time. And, you only
need to set up and align the
template once so there is little
chance for error.
Once you have done your one
time set up procedure to adjust
the template to the VS-600,
mounting it and starting to
make your perfect drawer is
simple and fast.
See the sidebar note on “One
Time Setup” on page 32.
Mount the SZ-14 or SZ-20
template into the VS-600 base
17
Page 18

unit with the in/out adjusting
wheels at each end against the
front edge of the VS-600.
Loosen the rotary knobs on the
two sides stops. Drop the
template down and align the
side stops to the inside of the
“D” shaped hole cut in each
side of the template.
Tighten the two rotary knobs
to hold the side stops in place.
Turn the side stop fingers so
SZ-14 or SZ-20 is facing
INWARD, towards the center
of the VS-600. The jig is now
ready to use.
So, how do you know
which piece goes where
and how they are
oriented on the VS-600?
Start by ignoring the drawings
and piece numbering text on
page 21 of the Festool VS-600
manual. I will show you a
much simpler method that you
can far more easily remember.
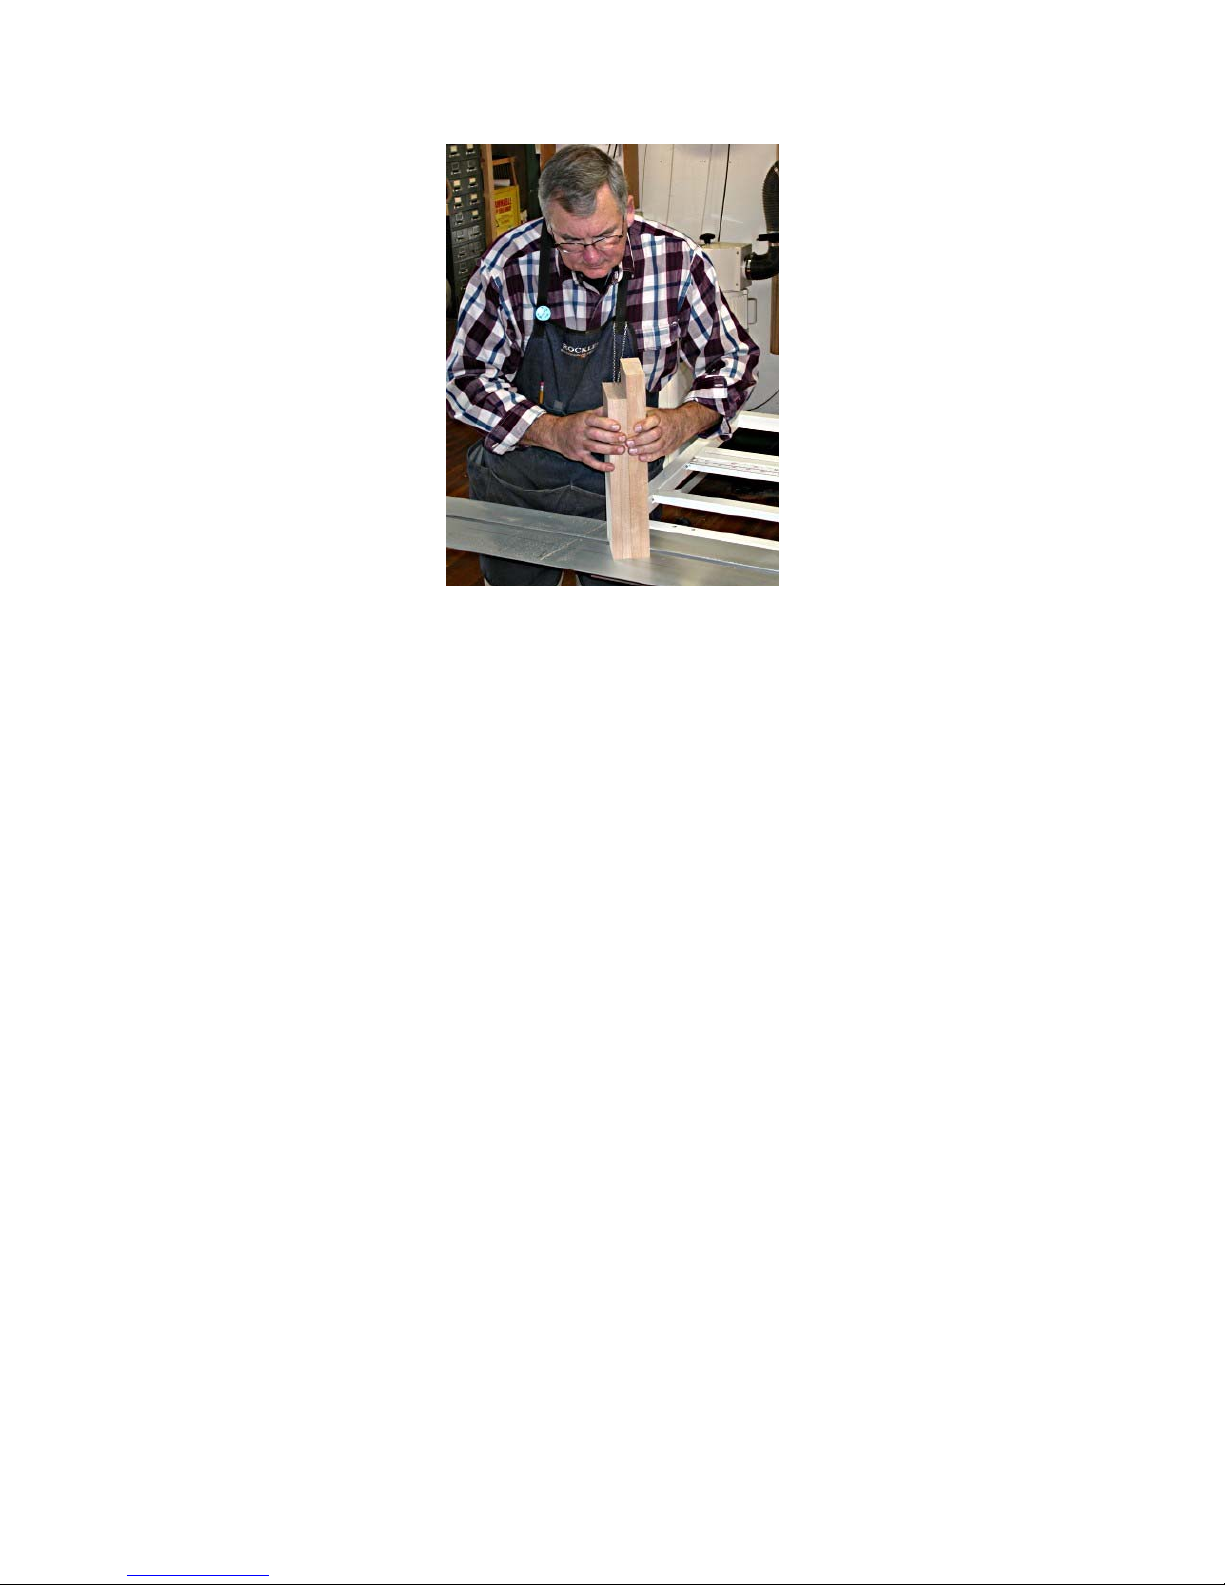
Place the drawer components
in front of you, standing
upright just like they will be
on your finished drawer with
the front of the drawer facing
you. Take a moment to look at
grain patterns and any defects
to determine the inside and
outside faces for each
component and which edge
should be the top of your
drawer. When you like the
arrangement, mark the
INSIDE FACE of each
component and mark the edge
that is to be the TOP. I do this
by drawing a triangle with the
point up on the inside of each
component. Mark which is the
FRONT piece and which is the
BACK piece of your perfect
drawer. I write “f” or a “b”
inside the triangle to indicate
that to myself.
All of the cuts will take place
with the INSIDE face of each
component facing out, away
from the VS-600, and with the
TOP edge against the side
stops on the VS-600. The
Front and Back will be cut
horizontally clamped under
the top clamp bar. The sides
will be cut vertically clamped
under the front clamp bar.
You can’t go wrong if you
always have the inside face
away from the jig with the top
edge aligned with a side stop.
The front and back of your
drawer will always be cut
horizontally clamped by the
top clamp bar. The sides will
always be cut vertically
clamped by the bar on the
front of the VS-600. The order
in which you make your cuts
18
Page 19

is not important so long as the
inside face is away from the
VS-600 and the top edge is
against a side stop.
I am in the habit of first raising
the template all the way up to
get it out of the way. Now I
slide the front piece
horizontally into the upper
clamp on the left side of the
VS-600 with its TOP edge
against the left side stop.
600 with this template) and
slide it vertically under the
front clamp and clamp it
lightly.
Since the template pivots even
when clamped in place, it is
easy to pivot it out of the way
while you line up the end of
the vertical piece to be exactly
flush with the top of the
horizontal piece that will
become the front or back of
your drawer.
Now I place the router on top
of the template and plunge the
cutter to the exact depth of the
test piece. That is all the router
set-up you need to do.
vertical work pieces are flush
with the top edge of the
horizontal work pieces as
shown in the picture to the left
and clamp them down.
Recheck to make sure
everything is nice and square
and securely clamped in place.
The horizontal work pieces
that will become the front and
back of your drawer should
butt tightly up against the
vertical pieces that will
become the sides of your
drawer.
I then place the back piece
horizontally into the upper
clamp on the right side of the
VS-600 with its top edge
against the right side stop.
Clamp those down.
Set the template on top of
these two components snugly
and clamp it in place. Then I
take the router bit depth gauge
(the female component from
the test piece we made when
originally setting up the VS-
Remove the router bit depth
test piece from the clamp bar
on the front of the VS-600 and
replace it with the two side
components. One will clamp
to the right side of the VS-600
and one will clamp to the left
side. Make sure the INSIDE
face is away from the VS-600
pointing towards you with the
TOP edge against the side
stop. Use a flat piece of scrap
to make sure the ends of these
The end of the vertical work
pieces (the sides) should be
exactly flush with the upward
face of the horizontal work
pieces (the front/back pieces).
All pieces should have their
INSIDE face away from the
VS-600 and their top edge
aligned with a side stop. Pivot
the template down and into
place. Make the cuts.
Now simply rearrange the
work pieces to cut the other
two corners. As before, the
top and bottom are held under
19
Page 20

the upper clamp bar with their
top edges against the side stop
and the inside face is away
from the VS-600 and pointing
up at you. The side pieces are
mounted under the front
clamp bar with their top edge
against the side stops and
inside faces pointing away
from the VS-600 and facing
you with their upper edge
flush with the top (inside) face
of the front/back components.
Make the second set of
cuts and you are done!
The reality is this all takes
less time to do than to
describe. Practice a few times
and you will make a perfect
drawer with finely machined
half blind dovetail corners in
less than five minutes, and you
will do it every time.
The drawer sides will come
out exactly the size you
wanted and will be square,
and the piece will be ready to
receive the admiring looks
from your customers, friends
or family who enjoy this
hallmark of fine
craftsmanship.
Machine the Dado to
Receive the Drawer
Bottom Before Assembly
Before you assemble your
drawer, take a few moments to
machine the dado which will
hold the drawer bottom in
place. Center it up from the
bottom edge of the drawer
one-half of the template
spacing (11mm in the case of
the SZ-14 template which uses
a 22mm finger spacing and
16mm for the SZ-20 which
uses a 32mm finger spacing).
That way the dado will not
show from the outside of the
drawer.
If you want the bottom to be
removable, cut the bottom of
the BACK piece off at the
height of the top edge of the
drawer bottom dado. Now the
bottom can slide in from the
back side and can be held in
place by a screw through a slot
cut into the back edge of the
bottom piece.
I recommend making your
bottom 2mm smaller than the
inside measurement of the
dado both side to side and
front to back. That way the
1mm spacing all around will
take up any shrinking or
swelling of the drawer sides
due to normal seasonal
changes in humidity. If you
use a solid wood drawer
bottom, allow 2mm on each
edge across the grain since
wood moves far more across
its grain than with its grain.
I nearly always use solid wood
for the drawer bottom and like
to keep it from rattling by
putting a dollop of waterbased contact adhesive or
caulk in the middle of the
three trapped sides (and the
back if it is also trapped).
Neither contact adhesive nor
caulk sets up solid so the
components can still move
relative to one another, but
they do prevent the bottom
from rattling when in very dry
climatic conditions.
20
Page 21

If your drawer components are
all made from man-made
materials which move either
not at all or far less than solid
woods, you can safely glue the
drawer bottom in place if you
wish.
21
Page 22

Here is a quick
summary of the steps
to make your perfect
half blind dovetailed
drawer using the
Festool VS-600
One time only for each
template you will do a test cut
to determine the proper router
bit depth setting and the
template in/out setting to get
the fit you want. Save the test
pieces to use as a router depth
gage for all subsequent uses of
that template. From then on:
• Prep your stock to be
flat, true and exactly the
thickness you want.
The front and back
components must be
the same thickness and
within the range of the
template you are using
(15-20mm for the SZ-14
and 21-28mm for the
SZ-20). The side
components can be a
different thickness so
long as that is also
within the range of the
template you are using.
• Cut all components to a
width that is an even
increment of twice the
half blind template
spacing if you want
properly centered
dovetails. For the SZ-14
the template spacing is
22mm and for the SZ-20
32mm.
• Cut the front and back
component to exactly
the width you want the
finished drawer to be.
Cut the side
components shorter
than the depth you
want your drawer to be
by 2 times the thickness
of the front/back
components less the
specified router bit
depth of cut (12mm for
the SZ-14 and 15mm for
the SZ-20).
• Mark the top edge and
inside face of each
component.
• Cut the joints in any
sequence, but always
align the top edge
against the side stop
with the inside face
away from the VS-600.
Always clamp the front
and back components
horizontally under the
top clamp bar and the
side components
vertically under the
front clamp bar.
• Dado the groove for the
drawer bottom centered
up from the bottom
edge of the drawer by
one half the template
spacing (11mm for the
SZ-14 and 16mm for the
SZ-20).
• Cut the drawer bottom
2mm to 4mm smaller
than the opening from
the bottom of the dados
both side to side and
front to back to allow
for expansion and
contraction of the
components with
normal seasonal
changes in humidity.
Do not rigidly glue the
bottom in place. Let it
float in the dados. A
dollop of rubber cement
or soft caulk will
prevent rattling.
• Brush glue onto the
long grain portions of
both sides of the
dovetail joints, assemble
and square it up.
You’re done! A
perfect drawer with
half blind dovetail
joints in less than five
minutes, time after
time.
22
Page 23

Making Your Perfect
Drawer Using
Through Dovetail
Joints
Through dovetails are
considerably more
sophisticated and complicated
joints to cut than are half blind
dovetails. The male fan shape
has to be cut by a dovetail
shaped router bit guided by a
template with straight fingers
with the work piece held
vertically.
The female recesses are cut
with the work piece held
vertically using a straight
router bit guided by a
template with angled fingers.
To fit, the angle on the dovetail
bit and the angle on the pin
template fingers must be
exactly the same. Also, the
spacing must be exactly the
same.
Fortunately, the superbly
engineered Festool VS-600
does most of the work for you
once you prep your work
pieces as described above and
determine the correct sizes to
cut your component parts.
As discussed earlier, I strongly
recommend the use of Festool
router bits and guide bushings
when cutting through
dovetails on this jig.
Length - Determining the
correct lengths for your perfect
drawer sides, front and back is
easy. Just cut them to the
exact length you want for the
outside width of the drawer
and for its depth, front to back.
Height - centered
dovetails look best
Calculating the correct height
for your drawer to make sure
your dovetails are properly
centered is a bit more
involved.
You want half pins at the
upper and lower sides of your
–
drawer.
This drawer has the dovetail
shaped male pieces shown
from the front, normally they
would show from the side.
These are the outboard most
sides of the female recess at
the top and the bottom of the
drawer no matter how many
female recesses there are in the
drawer side. If you get an
equal sized half pin top and
bottom, you will automatically
have evenly spaced, centered
dovetails that will look good
and hold tight for generations.
The trick is understanding the
template spacing, the side
offset and the maximum
diameter of the dovetail cutter
used to cut the male fan
shapes.
These male fan shapes or tails
are usually cut in the sides of
the drawer using the template
SZO-14-S or SZO-20-S. The
female recesses and pins are
usually cut in the front and
back of the drawer using
template SZO-14-Z or SZO-20Z.
23
Page 24

Page 25

pieces, you need to make sure
they are within the thickness
range of the SZO-14 (10mm to
14mm) or the SZO-20 (14mm
to 25mm). Be sure the front
and back pieces are the SAME
thickness and the side pieces
are the SAME thickness. The
front/back can be a different
thickness than the sides.
Make your cuts
Now you are ready to cut. For
strength you want the male
fan shape tails to be cut on the
sides of the drawer and the
female recesses to be cut in the
front and back work pieces.
Once you get the hang of
through dovetails don’t be
afraid of experimenting by
reversing these to get a
different look to your joints.
In the traditional trough
dovetail the characteristic fan
or tail shape shows only from
the side of the drawer. From
the front it looks like a simple
box joint. If you reverse these
and put the male fan shaped
tails on the front and back
work pieces, the characteristic
dovetail shape will show from
the front and back. From the
sides it will look like a simple
box joint.
You will always cut the male
fan shaped tail pieces held
vertically under the front
clamp bar with the OUTSIDE
face pointing out away from
the VS-600.
Work pieces set to cut the
male fan shapes in the “tail
board”
The female recesses cut with
the angled template will
always be held vertically
under the front clamp bar with
the OUTSIDE face pointing
out away from the VS-600. In
all cases the top edge of the
drawer components will be
against the side stops as you
make your cuts. The order or
sequence does not matter.
Work pieces set to cut the
female recesses in the “pin
board”.
Cut the Male Fan Shaped
Tails (normally in the
pieces that will be the
sides of your drawer) –
I am in the habit of cutting the
male fan shaped tail pieces
first. To do so, mount the
straight fingered template
SZO-14-S or SZO-20-S on the
VS-600. It is self aligning and
needs no adjustment. Lower it
down and align the side stops
to the opening in the template
just as you did before with the
half blind templates. Be sure
to turn the SZO-14 or SZO-20
side stop fingers inwards
towards the center of the VS600 ON BOTH SIDES of the
template. Mount the correct
guide bushing and the correct
dovetail shaped cutter in the
router.
Place scrap pieces that are at
least 5mm THICKER than the
pieces which will have the
25
Page 26

female recesses cut in them
(usually the front and back
components) horizontally
under the top clamp bar
against the side stops and snug
them down. Be sure they are
wider than the pieces you
intend to cut the male fan or
tail into. These scrap pieces
will hold the male work piece
high enough that the bottom of
the dovetail shaped router bit
will not hit the base of the VS600 and they will help prevent
tear out on what will become
the inside of your drawer.
receive the female recesses.
Since the scrap is at least 5mm
thicker, this will allow your
router bit to miss the
aluminum bed of the V
S-600 as
you make your cuts.
ote that the proper depth of
N
cut is the thickness of the piece
into which this piece will
mate.
the picture below, the router
In
is zeroed to the top of the
work piece. Now set the
proper depth, plunge and
make the cuts in both piece
s.
ealign the work pieces by
R
rotating them side-to-side an
d
cut the male fan or dovetail
shapes on the other end.
end flush with the top of the
scrap piece.
ou are finished with the male
Y
fan shaped tail components.
Align the top edge of the
pieces which will have the
male fan or tail shape cut in
them (usually the side pieces)
with the TOP face of your
scrap piece, outside face
pointing out away from the
VS-600 and the top edge
against the side stop.
Set Router Bit Depth of
Cut
– With the template
lowered onto the scrap pieces,
place the router on the top of
the template. Set your router
depth of cut to be exactly the
width of the pieces which will
.
sure the OUTSIDE face
Be
points away from the VS-60
the top edge of your drawer is
against the side stop, and the
0,
26
Page 27

Cut the Female Recesses
or Pins (normally in the
front & back pieces of
your drawer)–
Remove the SZO-14-S or SZO20-S and mount the SZO-14-Z
or SZO-20-Z template with the
in/out adjustment wheels on
each end against the bed of the
VS-600.
Align the side stops with the
inside of the “D”shaped hole
stamped into each end of the
template and lock them down.
The very first time you use
either the SZO-14-Z or SZO20-Z you will make a test cut
to set the proper in/out setting
on the two depth setting
wheels on either end of the
template. After that you only
need to mount the template,
align your work pieces and
make the cuts.
Fit the proper guide bushing
and straight router bit into the
router. As you did for the
male tail cuts, mount a scrap
piece at least 5mm THICKER
than the router bit depth of cut
horizontally under the top
clamp bar so you do not hit the
body of the VS-600 while
cutting the female recesses.
Mount the work pieces under
the front clamp bar with the
OUTSIDE facing away from
the VS-600, the top of the
drawer against the side stops,
and the ends flush with the
top edge of the scrap pieces.
Drop the template on top of
the scrap pieces and clamp it
in place. Place the router on
top of the template and set the
depth of cut to be exactly the
thickness of the pieces into
which you just cut the male
fan shaped tails.
Make your cuts following the
angled sides of the template
fingers. Be sure to also route
out the area between the
angled sides of each template
finger.
Note that the proper depth of
cut is the thickness of the piece
into which this piece will
mate.
Reset the work pieces to cut
the other two sides of the joint
and you are done.
27
Page 28

A perfect drawer with through
dovetails in under fifteen
minutes.
Because you have to use two
different templates, two
different guide bushings, two
different router bits and do
two set-ups to make through
dovetail joints, it will take
about fifteen minutes per
drawer instead of the five
minutes per drawer required
for half blind dovetail joints.
In both cases your drawer will
be “perfect” right out of the
VS-600 joining system. It will
be exactly the length, width
and depth you want it to be,
will be absolutely square, sit
flat and invoke an image of
fine craftsmanship from the
minute you assemble it.
No sanding to fit, no “make it
a bit bigger and cut it to fit
afterwards” and no “put a bit
of filler into the gaps to make
it look like it fits” even when it
doesn’t.
28
Page 29

Perfect Finger Joints
Are Also Easy and
Fast
A finger joint is simply a series
of male fingers and female
recesses of the same size and
spacing cut all the way across
the ends of the work piece. By
cutting these so the male
fingers on one piece fit into the
female recesses on the other a
strong corner joint with a
relatively large gluing area can
be established quite quickly.
Some, including Festool, also
call this a “box” joint because
it is very easy to automate for
rapid assembly of functional
boxes.
On the VS-600, finger or box
joints of two sizes can be
quickly cut in work pieces
from 6mm to 28mm in
thickness and up to 600mm
wide. The joint will look the
same from either side. If you
like the look of finger joints,
they can be cut very quickly
and accurately every time.
Two corners can be cut with
each set up (so long as the
pieces are less than 300mm
wide) and only one template,
one guide bushing and one
cutter are required for all the
cuts.
The only set-up required is
setting the depth of cut made
by the straight router bit to be
equal to the thickness of the
work pieces.
Prep your stock just as you did
for the dovetail joints. You
want stock that is uniform in
thickness, flat, square, of the
size you want and within the
thickness range of the template
you are using.
Centering the Fingers - As
with dovetail joints, the best
looking finger joints are when
the fingers are centered over
the height of the box. You will
have one half finger at the top
of the box and one half finger
at the bottom of the box.
Avoid boxes with less than or
more than half a finger at the
bottom as these tend to be
quite weak as well as
awkward looking.
The proper height of the box to
have centered fingers is any
even increment of twice the
template spacing.
Festool sells two different
finger joint templates, FZ-6
and FZ-10. The numbers refer
to both the size in mm of the
straight router bit used to
make the cuts and also to the
side spacing. The template
spacing is twice the diameter
of the router bit so calculating
the height of a box with
centered fingers is quite easy.
It is any even increment of
twice the template spacing, ie:
12, 24, 36, etc. for the FZ-6 and
20, 40, 60, etc. for FZ-10.
Width and Length – With
finger joints the fingers go all
the way through each piece so
simply cut the front, back, and
side work pieces to exactly the
lengths you want for your
finished box.
Set up is similar to what you
did for through dovetails.
Mount scrap pieces under the
top clamp bar that are at least
5mm THICKER than your
work pieces to allow the router
bit to pass above the bed of the
VS-600 when you make your
cuts.
All four work pieces will be
mounted vertically under the
front clamp bar. Two work
29
Page 30

pieces will be clamped on top
of each other with their
OUTSIDE faces TOGETHER
and what will be the TOP edge
of the box against each of the
two side stops. The top edge
of these pieces will be flush
with the top of the scrap pieces
and up against the bottom of
the template.
Where this gets a bit tricky is
that one piece will stop against
the side stop finger while the
other will stop against the
round portion outboard from
the side stop finger.
In the pictures above I have
removed the scrap piece from
behind the two work pieces to
make it easier to see.
Once the four work pieces are
mounted under the front
clamp bar and flush with the
top of a scrap piece that is at
least 5mm thicker than the
router bit depth of cut, rotate
the template down and place
the router on top of the
template. Set the depth of cut
to be equal to the thickness of
the work pieces.
Make the cuts. If the thickness
of your work pieces is greater
than the diameter of the router
bit, make the cuts in multiple
passes with each pass cutting
no more than the diameter of
the router bit.
Rearrange the work pieces
under the front clamp bar
stacked with the OUTSIDE
faces together and the TOP
against the side stops.
Make the cuts and you are
done. A perfect box with
finger joints in less than five
minutes!
The concept of centering a box
joint is a bit different from
centering dovetail joints. A
properly centered box or
finger joint will show a certain
number of whole fingers on
one side with one fewer than
that number of whole fingers
plus two half fingers on the
other side.
An unbalanced, yet still
considered centered by some,
finger joint will show the same
number of whole fingers on
each side. On one side there
will be a half finger at the top
and on the other side a half
finger at the bottom.
Which you prefer is a matter of
taste. I like the properly
centered finger joints the best.
30
Page 31

Conclusion
At the beginning of this manual we talked about how the dovetail joint is recognized the world over
as one of the hallmarks of fine craftsmanship. We also talked a bit about how difficult many find it is
to cut perfect dovetail joints or to get a dovetailed drawer, box or cabinet carcass just the size you
want it in the first place. And, we touched on why so very many dovetail jigs sit gathering dust in
the corner because they can be far from intuitive to set up and use properly when you only use them
once in a while.
I hope that you now have far more confidence that you, too, can make a perfect drawer with half
blind dovetails (or finger joints) in less than five minutes and with through dovetail joints in under
fifteen minutes using the well engineered Festool VS-600 jointing system. Once this becomes your
preferred means of creating perfect drawers, boxes and cabinet carcasses you will be amazed at how
often you find yourself doing so. Day in, day out there simply is no better way I know of to add
value and longevity to your furniture projects.
Whether you make your living doing so, as I do, or whether you build furniture for family and
friends just because you love to, adding a Festool VS-600 jointing system to your shop or studio will
prove to be one of the best investments you can make in working faster, better and more efficiently.
Enjoy!
Jerry
31
Page 32

One-Time Set-Up
All four of the Festool VS-600
dovetail templates require a
one time set-up to make sure
the in/out adjustment wheels
are set to cut a perfectly flush
joint and to establish a router
depth setting that will provide
the tightness of fit you want.
You only need to do this the
first time you use a particular
template. After that, the
template will clamp in place
with the correct in/out setting
and, if you save the test pieces,
you can quickly set the correct
bit depth.
This one time set-up is fast and
easy to do since you really
don’t care what length and
width the work pieces are or
how thick they are so long as
they are within the range for
which each template is
designed. For the two half
blind dovetail templates, SZ-14
and SZ-20, just mount the
template with the cam shaped
underside of the black in/out
adjustment wheel against the
front edge of the VS-600. Start
with the wheel set to the zero
position.
Loosen the holding screw to
turn the wheel while the rotary
knob that holds the template is
loose enough that the template
can slide in and out. When
you have the in/out
adjustment wheel at BOTH
sides of the template set to the
same zero mark, tighten the
holding screws.
Now push the template
towards the VS-600 so the cam
shape on the under side of the
black in/out adjustment wheel
is against the front edge of the
VS-600 and tighten the rotary
knobs which fasten the
template to the VS-600.
Next, move the two side stops
to fit the inside of the “D”
shaped opening stamped into
the template. Turn the side
stop so the fingers matching
the template face inward,
toward the center on both ends
of the VS-600.
Mount one scrap piece
horizontally under the top
clamp bar and another
vertically under the front
clamp bar. Be sure each piece
is within the thickness range
specified for the template you
are adjusting. Also, make sure
each piece is against the side
stop and the end of the
vertically mounted piece is
flush with the top of the
horizontally mounted piece.
The pivot action of the
templates makes this easy to
do if you hold a scrap piece on
top of the horizontal work
piece while you push the
vertical work piece up against
it.
32
Page 33

Position the template on top of
these two and clamp it down.
Set your router depth of cut to
the factory specified 12mm for
the SZ-14 and 15mm for the
SZ-20. Festool routers are easy
to adjust by zeroing the router
bit on top of the horizontal
work piece while the router is
in cutting position on top of
the template. Then you can
simply move the depth
indicator to the 12mm or
15mm mark, plunge the router
and you are ready to cut.
Be careful here. Note that this
is NOT 12mm from the base of
the router, it is 12mm lower
than the bit when it is
positioned on top of the
horizontal work piece with the
router sitting in cutting
position on top of the
template.
If you use some other brand of
router be sure you can set the
depth of cut from a bit zeroed
on top of the work piece. Do
not try to set the bit depth of
cut with the router on the
bench as it will not be correct
and your joints will be way off.
Once the router bit depth is
set, make the cuts. Remove
the pieces and try the fit.
Usually the depth setting will
produce a properly tight fit,
but if it is off a bit lower the bit
to make it tighter and raise the
bit to loosen the joint fit.
Check how flush the joint is
when driven all the way home.
If the vertical piece (what will
normally be the side of your
drawer) stands proud of the
edge of the horizontal piece
(which normally will be the
front or back of your drawer),
then loosen the two holding
screws and turn each in/out
adjusting wheel to the same
mark in the + direction. Note
that the well engineered VS600 is calibrated so each mark
represents an 0.1mm
movement. If your edge
stands proud by 0.2mm, move
the wheels two marks and
tighten them down. If the
sides go in too far, move both
wheels in the – direction by
the proper amount.
It is a good idea to do one
more test cut if you needed to
adjust either the router bit
depth setting or the template
in/out setting. You only need
to do this once and that
template will forever be set to
produce your prefect drawer
no matter what length, width
or thickness of work pieces
you use (so long as the
thickness is within the range
specified for each template
and you continue to use the
same router bit).
When you have the fit you
want, save the pieces to use as
a router depth of cut gauge for
all subsequent uses of this
template.
The “right” fit is a matter of
personal taste. I like the joint
to go together with only a light
tapping with my hand or a
mallet. That will provide a
good bonding surface for the
glue and still show a tight,
artful joint. If the joint is
33
Page 34

overly tight and requires
heavy blows to get it together
then the glue will either get
scraped off when you
assemble, or will get trapped
in the bottom of the female
recesses and lock the joint
open, or you will break
something during assembly.
While many of my colleagues
will disagree with me on this
point, with today’s glues I
think it is better to error on the
side of being too loose than too
tight for half blind dovetails.
The one time adjustment for
the SZO-14 and SZO-20
through dovetail template sets
is very much the same. You
will, however, have to cut the
two test pieces separately. The
template with the straight
fingers will cut the male fan
shaped tails using the
specified dovetail cutter and
the template with the angled
fingers will cut the female
recesses and surrounding pins
with the specified straight
cutter.
Be sure you place a scrap piece
under the top clamp bar that is
at least 5mm thicker than your
horizontally mounted test
work piece to avoid cutting
into the VS-600!
As before, once you make your
test cuts put the two pieces
together and observe the fit.
proud from the end of your
drawer front/back (the piece
you cut with the angled finger
template), loosen the securing
screws and turn the two
in/out adjustment wheels to
create a perfectly flush joint.
If the ends of one or the other
of the two pieces protrude
beyond the outside edge of the
joint, reduce the depth of cut
setting until they are both
exactly flush. Since you have
to adjust the depth of cut for
both templates and the in/out
on one, plan on doing a couple
of test cuts.
Remember, you are only going
to do this once for each
through dovetail template set
so take your time and do it
right.
If the edge of what would
normally be your drawer side
(the piece cut with the straight
fingered template) stands
34
Once you have a correct fitting
joint the template in/out
setting will be correct for all
further use of that template.
Save BOTH test pieces to use
in setting the correct router bit
depth whenever you use this
template set in the future.
Page 35

You are done with set up and
your templates are all ready to
use at a moment’s notice. Just
mount the template making
sure the cam on the bottom of
the black in/out adjustment
wheels is against the VS-600
when you tighten the two
rotary knobs to secure the
template in place. Position
your work pieces under the
clamps as outlined in this
manual, set the router bit
depth using the test pieces you
saved and you are “good to
go.”
From this point
forward, you will
cut perfect halfblind dovetailed
drawers in under
five minutes and
through-dovetailed
drawers in under
fifteen minutes.
Cut the work pieces
to the proper size,
mount them as
indicated and make
perfect joints every
time.
35
Page 36

My Take On Using
the Metric System
Most of the tools we use every
day were designed for a world
market. Most everywhere but
in the US the metric system is
employed for weights and
measures. So, it is no surprise
that many tool manufacturers
design their tools around the
metric system and then
convert them to show inch
scales for the US market.
While few of us in the USA
grew up with the metric
system, and certainly do not
think in metric length terms,
learning to measure using the
metric system is far easier than
using the base 8 “inch” system
for building furniture. There,
everything is a fraction of an
even multiple of 8; one eighth,
one sixteenth, one thirty
second, etc. While we have
learned to add and subtract
odd fractions over the years,
the process is still very time
consuming and error prone.
On the other hand, measuring
using the base 10 metric
system is very straight
forward. You never deal with
fractions, only whole numbers.
The process is much faster and
far less error prone. As an
example, lets say you want to
build a rail, stile and panel
door for a project. You want
the door to be 19 3/8” wide.
The rail and stile pieces are 2
5/8” wide by ¾” thick and all
the groves are 3/8” deep. You
want to know how long to cut
the top rail piece. Lets see, it
will be 19 3/8” less 5 1/4” (the
width of the two stiles on
either side) plus ¾” for the
tenons on each end. Think
you can do that one in your
head every time without error?
Now try the same thing using
the metric system. The door is
500mm wide. Rails and stile
pieces are 50mm wide by
20mm thick with 10mm
groves. Now the calculation is
500 less 100 plus 20. Easy to
do that one in your head
without making a mistake,
isn’t it?
From my experience the best
thing you can do to improve
the accuracy, quality and
speed of building your
woodworking projects is to
spend the couple of weeks it
takes to convert to using the
metric system for your
measurements. You don’t
need to learn to think or
visualize in the metric system,
just use it for your
measurements.
The easiest way is to buy an
inexpensive tape from a big
box store that shows both, like
the one in the picture.
Do your thinking in the inch
system and measure using the
metric system. A couple of
weeks later you will find
yourself thinking in the metric
system more and more, and
liking it far better.
I splurged and also bought a
couple of rigid steel metric
rules with a matt finish that I
really like. They are easy to
read in any light and “dead
on” accurate. One is 150mm
long (about 6”) that lives in my
apron pocket. It’s great for all
those shorter measurements
like setting the fence to blade
distance on my large band saw
where you can put the end up
against the fence and read in
mm the exact dimension to the
inside tooth on the carbide
blade. The other rule is
500mm long (around 18”) that
is always nearby on the layout
bench.
A cheap metric/inch digital
caliper rounds out the
36
Page 37

measuring tools I use every
day.
The Festool VS-600 jointing
system and their routers are all
designed around the metric
system. While you can
convert back and forth, you
don’t need to and doing so just
introduces error and
frustration. In this manual I
am using the metric units of
measure as those are the
markings on the Festool VS600 and routers. It is not
important that you can
visualize the length of say,
300mm, only that you know it
is twice 150mm or ten times as
much as 30mm. It is all
relative.
37
Page 38

Continuous
Improvement
Two of the things I like most
about the products coming
from companies with a strong
engineering tradition is that
their products reflect a systems
approach where multiple
components all work
seamlessly together to achieve
the desired outcome and they
seem to have a fetish for
continuous improvement.
Both are evident in the Festool
VS-600 and in their routers.
The VS-600 joinery system
replaced the original VS-500.
The OF-1010 router replaced
the OF-1000. The photographs
show the differences, some
subtle some major. The photos
also show the careful attention
to systems design rather than
individual tool or jig design.
Take the two jointing systems,
for example. The VS-500 was
about as simple and reliable as
a template based dovetail jig
can get. There were only three
templates available: one for
cutting half blind dovetail
joints, one for cutting simple
box joints and one for
doweling. Each template
would only service work
pieces of a limited range of
thicknesses. Every time you
needed to set work pieces into
the VS-500 you had to remove
the template by unscrewing
two wing nuts which hold the
template in place. The side
stops were fixed in place and
were simply barrel-headed
machine screws threaded into
holes tapped into the top and
front edges of the VS-500. The
adjustment for moving the
template in or out to achieve
the correct joint fit was just a
threaded collar on the same
stud used to hold the template
to the fixture. Not very
elegant, not very flexible, but
certainly precise and very
repeatable to use once
properly set up.
When Festool designed the
VS-600 (on my dovetail work
station above) to replace the
VS-500 (on the bench to the
right) they did not simply
make a few cosmetic or
incremental changes to the old
unit, they started with a clean
sheet of paper, learning well
from the limitations and use
frustrations inherent in the VS-
500.
They designed the VS-600 to
cut two sizes of half blind
dovetails, two sizes of through
dovetails, two sizes of box
joints and three sizes of dowel
joints. These multiple sizes
and types cover joinery in
work pieces from 6mm to
28mm thick, a range that
covers the vast majority of
furniture making operations.
They replaced the quirky wing
nut template holder of the VS500 with an elegant pivoting
template carrier to which you
can quickly and accurately
affix whichever template you
need.
Since it pivots to clear the
work pieces without removing
the template, it is easy to load
and square up the work pieces
repeatedly, time after time
with little room for error. The
adjustment for joint depth is a
well engineered eccentric
wheel on each end of the
templates requiring such
adjustment capability. The
two wheels have index
markings to make it easy to set
them to exactly the same joint
depth on both ends of the
template. No more rotating
threaded collars by guess. You
set up each template only once
and it will produce joints of
38
Page 39

exactly the right depth for all
subsequent use of that
template.
They designed adjustable
rather than stationary side
stops so each template can
have a different side set back
to properly match the
geometry of that template.
Setting the proper side stop
depth is done easily each time
you change templates.
The clamp bars on the VS-600
are not only 100mm longer
allowing for a wider
combination of work pieces,
they also feature a center
clamp which more securely
holds the work pieces in place.
The not very elegant, not very
flexible, but very precise VS500 was replaced by a very
elegant, very flexible, equally
precise and faster to use VS-
600. Nice generation-togeneration continuous
improvement. But, they did
not stop there.
Festool also looked to the
routers and guide bushings
which would be used with the
VS-600. On the VS-500 the
guide bushing had a smaller
inside diameter than the
dovetail router bit. So, to
mount a dovetail router bit
with the guide bushing in
place, you had to fully plunge
the router base, insert the
dovetail cutter from the
bottom side, and then
somehow manage to fit one
hand into the limited space
between the bottom of the
router body and the top of the
plunged base to depress the
spindle lock and also fit the
other hand into that same
limited space to tighten or
loosen the collet nut. It could
be done, but it was at best
awkward.
For the VS-600 they
redesigned the guide bushings
with an inside diameter larger
than the corresponding
dovetail cutter so you can now
easily place or remove the
cutter with the base fully
extended away from the router
body. The router to the left in
the picture above shows the
new VS-600 guide bushing and
cutter while the router to the
right shows the old VS-500.
Both of these set-ups cut
exactly the same shape and
size of half blind dovetail, the
14mm series.
Festool also took another
important continuous
improvement step. They
machined a collar into the
guide bushings used with
dovetail router bits which fully
traps the fingers on the
template so it is not possible to
inadvertently lift or tilt the
router while moving it into
and out of the fingers while
forming the male fan shaped
dovetail portion of the joint, a
nice touch that all template
based router jig manufacturers
should emulate. All of us who
have cut a zillion drawers on
templates without this very
39
Page 40

important feature have ruined
more than a few when a
momentary lapse of
concentration resulted in
lifting or tilting the router.
Simply put, the VS-600 is in all
ways a vastly superior joinery
system than the VS-500 it
replaced. This is continuous
improvement at its best.
The OF-1000 and OF-1010
routers also show attention to
detail and a penchant for
continuous improvement.
While they are in the same
power range and intended for
the same kinds of applications,
detail changes are evident.
The power (wattage) is up a
bit in the OF-1010 over the OF1000, but the electronic speed
control on both makes that
hard for me to feel in every
day use.
The power cord is removable
on the OF-1010 and the speed
control dial moved to the back
where it can easily be seen and
adjusted.
The base appears unchanged
so all the same great
attachments and fixtures fit
either. The plunge, lock, and
depth setting mechanisms
appear to be the same so both
exhibit a superior feeling of
control over any other routers
I use for hand held
applications.
In truth, since buying my first
Festool router (the OF-1000
you see pictured) I have not
touched any other brand for
hand held use. The light
weight, ability to control and
plunge with one hand, the
guide rail system, built in dust
collection and other features
are simply superior to
anything else on the market
from my perspective as a one
person furniture maker.
Now with the addition of the
OF-1010 shown in most of the
pictures in this manual, the
midsized OF-1400 with .25”,
8mm and .5” collets and the
large OF-2000 production
router Festool has covered the
field. It would be hard to
imagine a routing situation in
which you would not
naturally reach for your
Festool router first.
40
Page 41

What You Need to Know About the Festool Templates
Joint
Type
Half
Blind
Half
Blind
Through
DT
Through
DT
Finger
Joint
Finger
Joint
Front and back work pieces must always be the same thickness and within the thickness range
specified above. Cut them to be as long as the overall desired drawer width.
Sides must always be the same thickness and within the thickness range specified above. Sides can
be a different thickness than the front and back work pieces, usually thinner.
Center the dado for the drawer bottom one half of the template spacing up from the bottom edge of
the drawer. Make the dado one half as deep as the thinnest of the work pieces.
Cut the bottom 2mm less than the measurement from dado bottom to dado bottom front to back and
side to side. Hold in place only by a dollop of rubber cement or caulk in dado in the center of each
work piece. Do not glue firmly in place as the sides, front and back will expand and contract with
normal seasonal changes in humidity.
th = thickness of work piece
DDL = Desired Drawer Length front to back.
TMP = Thickness of Mating Piece. If cutting the drawer sides, set the router depth while on top of the
template and zeroed to the work piece to cut the thickness of the front/back work pieces.
Template Thickness
Range
SZ-14 15 – 20 22 DDL - 2 x
SZ-20 21-28 32 DDL - 2 x
SZO-14 10-14 28 DDL TMP Outside
SZO-20 14-25 40 DDL TMP Outside
FZ-6 6-10 12 DDL TMP Outside
FZ-10 10-28 20 DDL TMP Outside
Template
Spacing
Side
Length
(th -12)
(th-15)
Router
Depth
of Cut
12 Inside Out Yes
15 Inside Out Yes
Orientation
While
Cutting
Out
Out
Out
Out
One Time
Setup?
Yes
Yes
No
No
41
Page 42

Page 43

Page 44

Meet the Author
Hi, I’m Jerry Work.
Welcome to my studio. I
build fine furniture in the
1907 Masonic Temple
building in historic Kerby,
Oregon. Nestled along the
Redwood Highway a scant
20 miles from the California
border in Oregon’s great
southwest, Kerby was once
the center of commerce for a
large region of northern
California and southern
Oregon. When the railroads
bypassed Kerby for a
passable route through the
mountains near what today
is Grants Pass, OR, like the
story of the American west,
the commerce followed the
railroad and Kerby faded
from prominence.
During it’s heyday as the
county seat for Josephine
County, the Masons decided
to build what was for the
time to be one of the
grandest buildings right in
the center of town, the corner
of Sixth and Main. Today,
Main Street is US-199, the
Redwood Highway that
connects the I-5 at Grants
Pass with US-101 at Crescent
City, CA. My wife and I
would hardly call our 5,000
square foot two story
building “grand,” but it is a
perfect setting for my studio
on the first floor and our loft
style living quarters on the
second.
The studio reflects both my
former background in
technology management and
my fetish for precision and
standards in my furniture
making. In consultation
with the client, I first fully
engineer a piece for function
so I will know how the
owner will interact with it,
how the doors will hinge,
latch and swing, how the
drawers will slide and stop,
and how all the other
functional aspects of the
piece will work.
Then, I design the piece for
aesthetics taking design
queues from many periods
and styles and bring them
into a modern decorating
idiom. At that point a set of
standards for sizing all the
component parts and joints
takes over.
These standards allow me to
easily calculate the sizes of
all the component parts by
knowing only the overall
dimensions of the piece.
Long ago I found that using
metric measurements made
these calculations far easier
and far less error prone.
See the sidebar on “Using
the Metric System.”
I work almost exclusively
with solid woods so I can
resaw and book match all of
the panels, even those like
drawer dust blocks that sit
inside the drawer dividers.
44
Page 45

Most cabinets, like the black
walnut and maple burl
bathroom vanity shown
above, are built to what I call
a 20 x 50 x 10mm or 20 x 65 x
10mm standard. That means
that all the rails and stiles
and the drawer, shelf and
bottom divider components
are 20mm thick by either
50mm or 65mm wide and
the sliding dovetail joints
and the slots for panels are
10mm deep. I seldom use
dados, finding sliding
dovetails to be vastly
superior as they are self
locking, self aligning and self
squaring.
design, and precision
manufacturing standards
before I agreed to write
manuals such as this one for
Festool.
Simply put, their tools
provide a high return on
investment for me as they
allow me to work faster,
more consistently and to
tighter production
tolerances, all critical aspects
To cut a matched set of
mirrored, stopped sliding
dovetails for the dividers
and drawer guides on a
chest with multiple drawers
can be a challenge if not
done with great precision.
Thanks to Festool Multi
Function Tables and rail
guided routers, this
previously complicated
operation can be done easily
and repeatably.
As you look at the pictures
of my studio you will see a
number of excellent Festool
hand power tools and
Festool Multi-Function tables
which greatly simplify
achieving the accuracy
required for the way I build
which allow me to sell my
pieces at prices far below
what I would have to charge
if I worked in more
traditional ways.
Better value for my customer
and higher margins for me, a
true win-win situation.
My studio is organized
around what I do the most
and then I let form follow
function. In my work, the
things I do more than any
others are to sand, finish,
assemble and polish. So, the
very best spot in the studio is
devoted to those tasks. This
work station is a large solid
wood topped table with
heavy welded steel square
tube legs with large leveler
feet. The top is perfectly flat
and square.
fine furniture. I purchased
most of these myself and
became quite impressed with
the level of systems
engineering, intelligent
45
Page 46

To one side is a Festool
multi-function table on
which most assemblies are
held, squared, and made
plumb in one way or
another. On the other side is
the dovetailing station which
houses the complete Festool
VS-600 jointing system you
saw in the pictures
accompanying this manual,
an earlier generation Festool
VS-500 joining system, and
two other dovetailing
systems from different
manufacturers.
Between these different
dovetailing systems I can cut
just about any kind of
dovetail or other joint
required for the design and
aesthetics of the piece.
The one that is always
mounted on top ready for
immediate use is the Festool
VS-600. It is simply the
fastest, most accurate and
easiest to use to build perfect
drawers, boxes and case
carcasses.
Under the sanding, polishing
combination machine
(300mm J/P, 300mm sliding
table saw with scoring unit,
spindle shaper and slot
mortiser,) a 24” band saw
which nearly always wears a
one inch carbide blade, a
scroll saw for fine work and
a 16” open end wide belt
sander.
and assembly station is a
Festool dust collector that
can easily be attached to the
Festool routers while
dovetailing and edge
routing, to the Festool
sanders while sanding, to the
Festool saws while cutting
and to the plate jointer while
cutting the slots for those
joints. A pair of Festool
drills and a set of excellent
Festool chucks, bits, and
drivers are at hand on the
wall behind this work
station.
Each one of these Festool
products displaced other
Around the edges are the
drills, sanders and other
power and hand tools one
would expect. The wood
ready for use is stored on
racks around the edges of
the studio.
well known, high-end
brands because they were
simply superior tools for my
use and they make more
money for me day in and
day out than the tools I used
before. A nice bonus is that
they last far longer and are
more pleasing to use as well.
Down the middle of the
studio are the major stock
prep and cutting tools. They
include a European style
46
Page 47

A large Festool style table
(made from one standard
MFT plus two additional top
plates and a pair of two
meter side rails) sitting on
cast iron legs sits flanking
the combination machine
and the support table for the
band saw.
This unit replaced the
traditional European style
workbench that I previously
used. I still make and sell
traditional European style
workbenches for people who
really want them, but, for the
kind of work I do, the large
Festool style work table just
can’t be beat. The precisely
machined and accurately
placed 20mm holes across
the whole surface are ideal
mounting points for a whole
variety of clamps, jigs and
fixtures, both those sold by
Festool and those I make
myself. Seldom a day goes
by that both the Festool work
surfaces are not in use.
It is hard to keep many
pieces on hand as spec built
pieces tend to sell quickly.
I hope you have enjoyed this
manual on how to get the
most out of the excellent
Festool VS-600 jointing
system and this brief tour of
my studio.
If you are ever in the area,
please stop by for a visit. I
would enjoy showing you
around
and answering any
questions you might have
about the Festool products I
use every day.
To the front of the studio is a
small gallery where a few
pieces are always on display.
47
 Loading...