

Page 1
Festool Group GmbH & Co. KG
Wertstrasse 20
73240 Wendlingen
Germany
www.festoolusa.com
Instruction manual Orbit Sander
Page 3
IMPORTANT: Read and understand all instructions before using.
Guide d’utilisation Ponceuse vibrante
Page 12
IMPORTANT: Lire et comprendre toutes les instructions avant de
démarrer les travaux.
Manual de instrucciones Lijadora vibratoria
Pagina 22
IMPORTANTE: Lea y comprende todas las instrucciones antes de
usar.
Instruction manual
Guide d’utilisation
Manual de instrucciones
RS 2
RS 2E
701027_006
Page 2

Page 3

Contents
lose control.
SAFETY INSTRUCTIONS ................................. 3
General Power Tool Safety Warnings ............. 3
Machine-related safety instructions .............. 4
Technical data ................................................ 5
Symbols .......................................................... 5
Intended use .................................................. 5
Electrical connection and operation ...............5
Electronics (RS 2 E) ........................................ 6
Dust extraction .............................................. 6
Inboard extraction ........................................... 6
External extraction by an extraction unit ....... 6
Sanding pad ................................................... 7
Abrasives ....................................................... 7
Stickfix abrasives ........................................... 7
Clamped sandpaper ....................................... 7
Working with the machine .............................. 8
Metalworking .................................................. 8
Speed adjustment (RS 2 E).............................. 8
Maintenance and care ..................................... 9
Accessories, tools ........................................... 9
Additional handle ........................................... 9
Systainer ....................................................... 10
Warranty ...................................................... 10
2) Electrical safety
a) Power tool plugs must match the outlet.
Never modify the plug in any way. Do not use any
adapter plugs with earthed (grounded) power
tools. Unmodifi ed plugs and matching outlets will
reduce risk of electric shock.
b) Avoid body contact with earthed or grounded
surfaces, such as pipes, radiators, ranges and
refrigerators. There is an increased risk of electric
shock if your body is earthed or grounded.
c) Do not expose power tools to rain or wet con-
ditions. Water entering a power tool will increase the
risk of electric shock.
d) Do not abuse the cord. Never use the cord for
carrying, pulling or unplugging the power tool.
Keep cord away from heat, oil, sharp edges or
moving parts. Damaged or entangled cords in-
crease the risk of electric shock.
e) When operating a power tool outdoors, use
an extension cord suitable for outdoor use. Use of
a cord suitable for outdoor use reduces the risk of
electric shock.
f) If operating a power tool in a damp location is
unavoidable, use a residual current device (RCD)
protected supply. Use of an RCD reduces the risk
of electric shock.
SAFETY INSTRUCTIONS
General Power Tool Safety Warn-
ings
WARNING! Read all safety warnings and
all instructions. Failure to follow the warn-
ings and instructions may result in electric shock,
fi re and/or serious injury.
Save all warnings and instructions for future
reference.
The term “power tool” in the warnings refers
to your mains-operated (corded) power tool or
battery-operated (cordless) power tool.
1) Work area safety
a) Keep work area clean and well lit. Cluttered or
dark areas invite accidents.
b) Do not operate power tools in explosive at-
mospheres, such as in the presence of fl ammable
liquids, gases or dust. Power tools create sparks
which may ignite the dust or fumes.
c) Keep children and bystanders away while op-
erating a power tool. Distractions can cause you to
3) Personal safety
a) Stay alert, watch what you are doing and use
common sense when operating a power tool. Do
not use a power tool while you are tired or under
the infl uence of drugs, alcohol or medication. A
moment of inattention while operating power tools
may result in serious personal injury.
b) Use personal protective equipment. Always
wear eye protection. Protective equipment such
as a dust mask, non-skid safety shoes, hard hat, or
hearing protection used for appropriate conditions
will reduce personal injuries.
c) Prevent unintentional starting. Ensure the
switch is in the off-position before connecting to
power source and/or battery pack, picking up or
carrying the tool. Carrying power tools with your
fi nger on the switch or energising power tools that
have the switch on invites accidents.
d) Remove any adjusting key or wrench before
turning the power tool on. A wrench or a key left
attached to a rotating part of the power tool may
result in personal injury.
e) Do not overreach. Keep proper footing and
balance at all times. This enables better control of
3
Page 4
the power tool in unexpected situations.
f) Dress properly. Do not wear loose clothing or
jewellery. Keep your hair and clothing away from
moving parts. Loose clothes, jewellery or long hair
can be caught in moving parts.
g) If devices are provided for the connection of
dust extraction and collection facilities, ensure
these are connected and properly used. Use of
dust collection can reduce dustrelated hazards.
h) Do not let familiarity gained from frequent
use of tools allow you to become complacent and
ignore tool safety principles. A careless action can
cause severe injury within a fraction of a second.
4) Power tool use and care
a) Do not force the power tool. Use the correct
power tool for your application. The correct power
tool will do the job better and safer at the rate for
which it was designed.
b) Do not use the power tool if the switch does
not turn it on and off. Any power tool that cannot be
controlled with the switch is dangerous and must
be repaired.
c) Disconnect the plug from the power source
and/or the battery pack from the power tool
before making any adjustments, changing accessories, or storing power tools. Such preventive
safety measures reduce the risk of starting the
power tool accidentally.
d) Store idle power tools out of the reach of chil-
dren and do not allow persons unfamiliar with
the power tool or these instructions to operate
the power tool. Power tools are dangerous in the
hands of untrained users.
e) Maintain power tools and accessories. Check
for misalignment or binding of moving parts,
breakage of parts and any other condition that
may affect the power tool’s operation. If damaged,
have the power tool repaired before use. Many
accidents are caused by poorly maintained power
tools.
f) Keep cutting tools sharp and clean. Properly
maintained cutting tools with sharp cutting edges
are less likely to bind and are easier to control.
g) Use the power tool, accessories and tool bits
etc. in accordance with these instructions, taking
into account the working conditions and the work
to be performed. Use of the power tool for opera-
tions different from those intended could result in
a hazardous situation.
h) Keep handles dry, clean and free from oil
and grease. Slippery handles do not allow for safe
handling and control of the tool in unexpected situ-
ations.
5) Service
a) Have your power tool serviced by a qualifi ed
repair person using only identical replacement
parts. This will ensure that the safety of the power
tool is maintained.
Machine-related safety instruc-
tions
– Harmful/toxic dusts can be produced during
your work (e.g. lead-containing paint, some
types of wood and metal). Contact with these
dusts, especially inhaling them, can represent
a hazard for operating personnel or persons in
the vicinity. Comply with the safety regulations
that apply in your country. Connect the electric
power tool to a suitable extraction system.
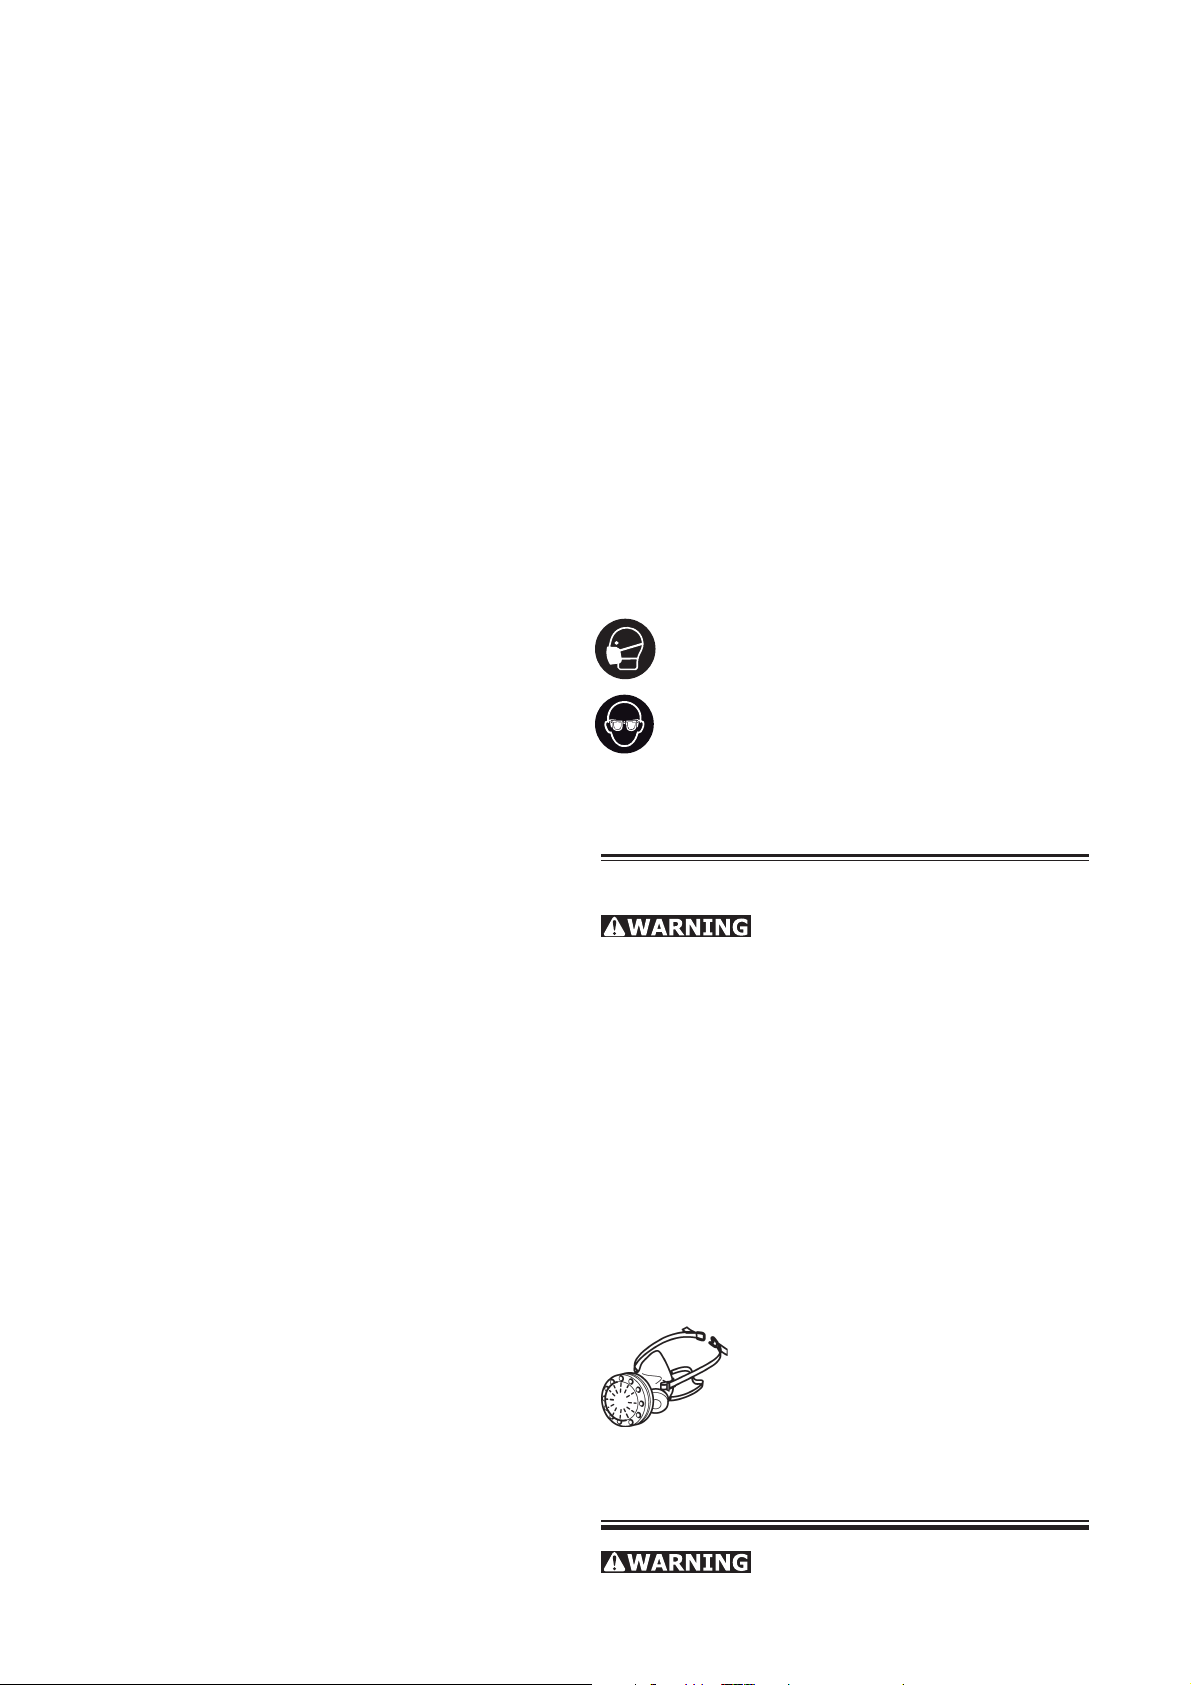
To protect your health, wear a P2 protective
mask.
Always wear protective goggles to protect
against sanding hazards.
Health hazard by dust
Various dust created by power
sanding, sawing, grinding, drilling and other
construction activities contains chemicals known
(to the State of California) to cause cancer, birth
defects or other reproductive harm. Some examples of these chemicals are:
• Lead from lead-based paints,
• Crystalline silica from bricks and cement and
other masonry products,
• Arsenic and chromium from chemically-
treated lumber.
The risk from these exposures varies, depending
on how often you do this type of work.
To reduce your exposure to these
chemicals work in a well ventilated area and use approved safety equipment, such as dust masks
that are specially designed to fi lter out microscopic particles. Wash
hands after handling.
TO REDUCE THE RISK OF INJU
RY, USER MUST READ INSTRUCTION MANUAL.
4
Page 5

Technical data
Symbols
RS 2
Wattage W 330
No load speed rpm 10 000
No. of strokes spm 20 000
Sanding stroke mm (in.) 2.4 (0.1)
Sanding base mm (in.) 115 x 225 (4.53 x 8.86)
Weight kg (lbs) 2.5 (5.5)
Safety
/ II
RS 2 E
Wattage W 330
No load speed rpm 4 000 - 10 000
No. of strokes spm 8 000 - 20 000
Sanding stroke mm (in.) 2.4 (0.1)
Sanding base mm (in.) 115 x 225 (4.53 x 8.86)
Weight kg (lbs) 2.5 (5.5)
Safety
/ II
Warning of general danger
Read the Operating Instructions/
Notes!
Wear protective goggles
Wear a dust mask
V Volts
A Amperes
Hz Hertz
W Watt
~ Alternating current
n
No load speed
0
Class II Construction
rpm Revolutions per minute
spm Strokes per minute
Intended use
The sanders are designed for sanding wood,
plastic, metal, stone, composite materials, paint/
varnish, fi lling material and similar materials.
Materials with an asbestos content must not be
processed with these tools.
The machines must not be damp nor operated in
a damp environment for electrical safety reasons.
The machines may only be used for dry sanding.
The user bears sole responsibil-
1.21.1
ity for any damage or accidents resulting from
incorrect use.
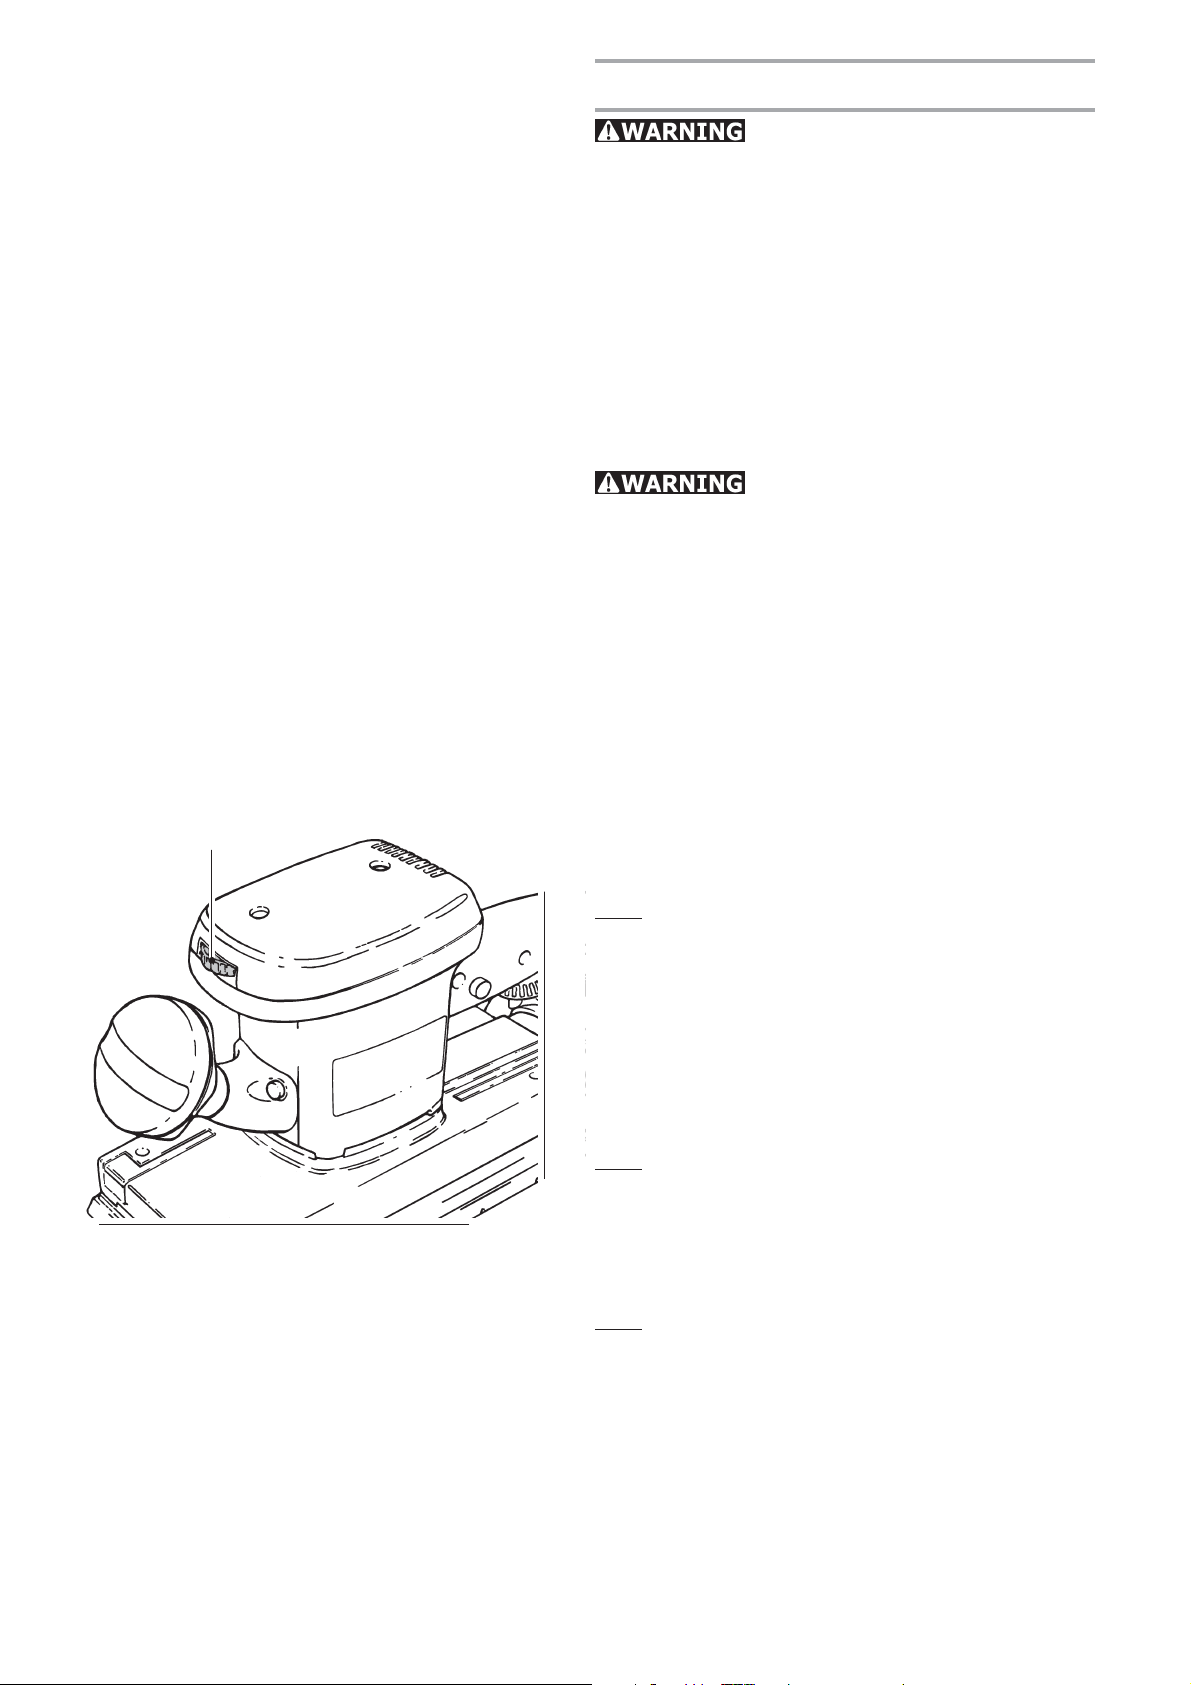
Electrical connection and opera-
tion
The mains voltage must be the same as that
specifi ed on the ratings plate!
The switch (1.1) is used to switch the tool on and
off. The switch can be locked with the button (1.2)
on the side for continuous operation. The switch
can be released by pressing again.
5
Page 6
2.1
Electronics (RS 2 E)
The RS 2 E has an electronic control with which
the rotational speed can be varied step-free. This
allows the sanding speed to be adapted to the optimum level according to the material concerned.
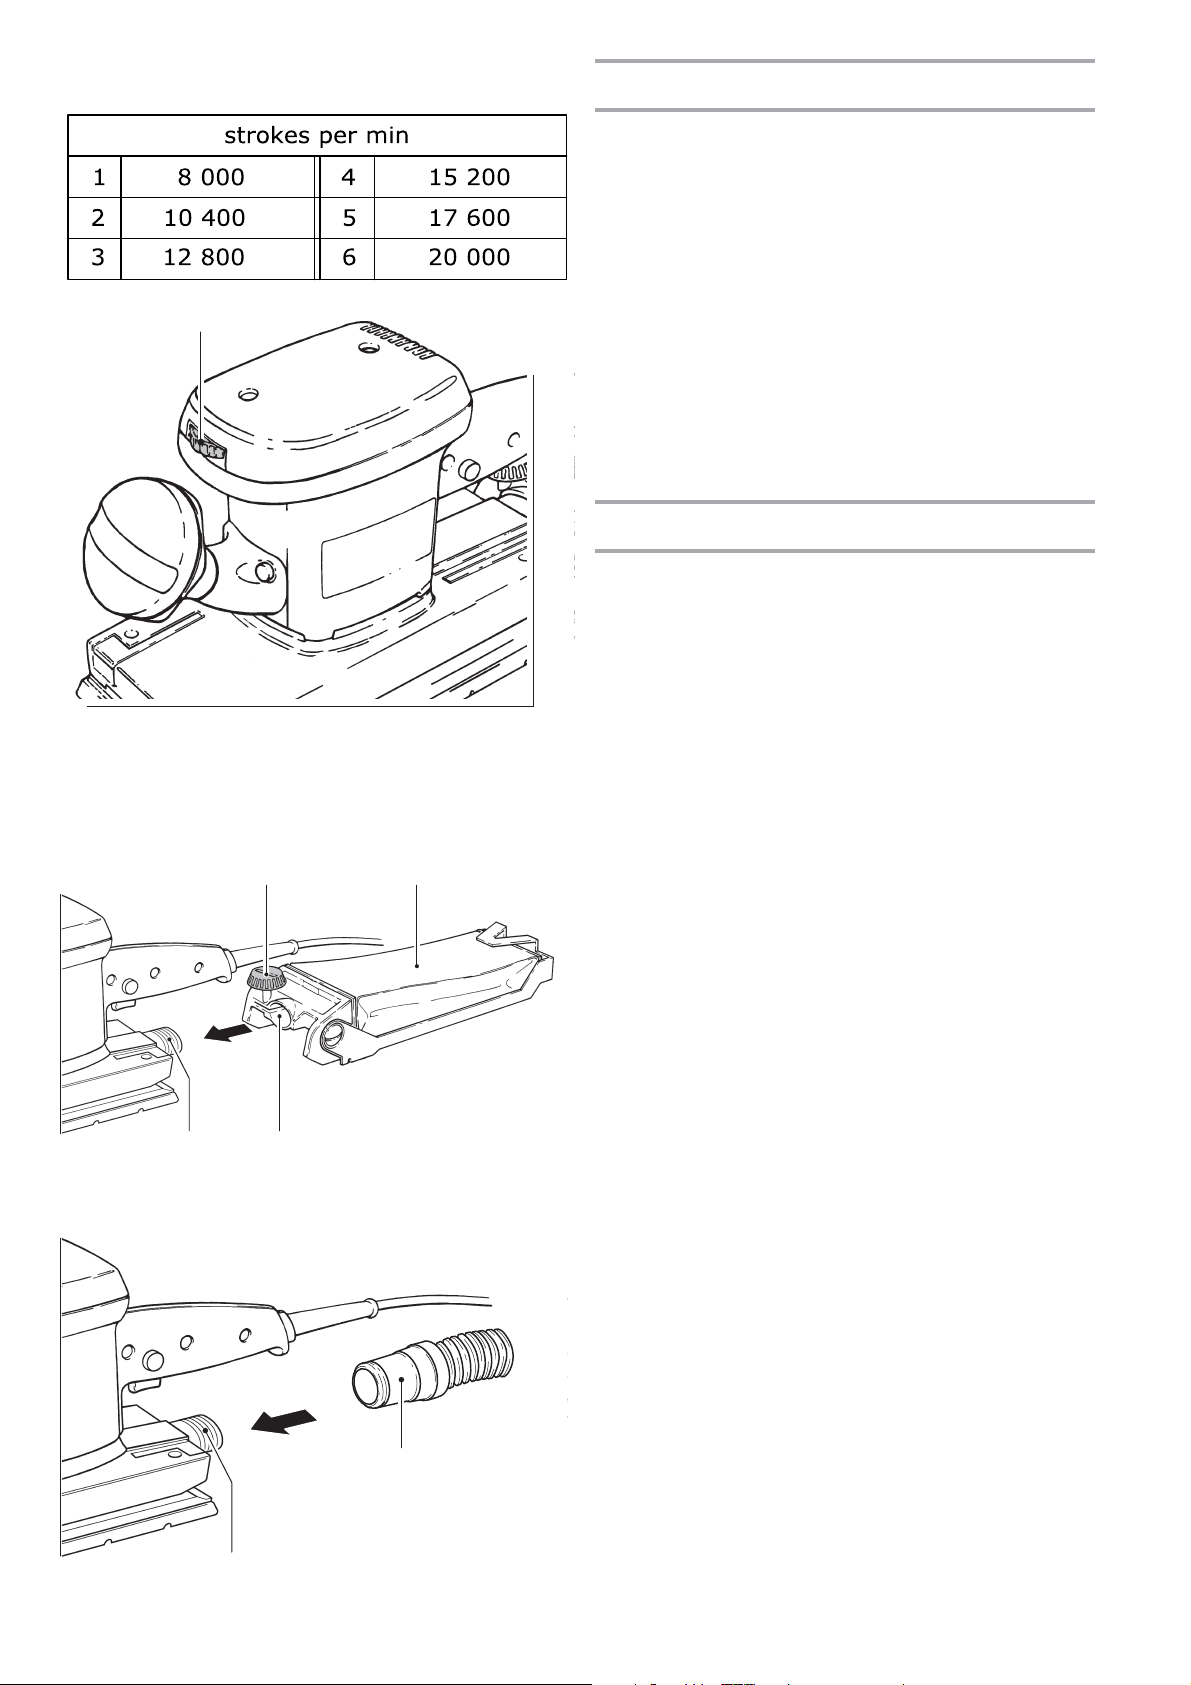
The speed is set using the rotary control button
(2.1). The numbers on the rotary control button
represent approximately the following stroke/
orbit speeds:
Dust extraction
Dust extractors prevent large accumulations of
dust in the air in the working environment and
dirt collecting in the workplace.
3.1 3.2
3.33.4
Inboard extraction
The machines are fi tted with inbuilt extraction as
standard. Push the fi lter holder (3.3) with its opening as far as it will go onto the extraction nozzle
(3.4) of the machine and clamp tight by turning
rotary knob (3.1).
The sanding dust is extracted through suction
openings in the sanding base and trapped in
the turbo-fi lter (3.2). The turbo-fi lter has to be
changed when it is so full of dust that the extraction power diminishes.
External extraction by an extrac-
tion unit
4.2
4.1
In order to avoid frequent changing of the turbofi lter when carrying longer sanding jobs, it is
possible to connect a Festool extractor to the unit
instead of using inbuilt extraction. Connect the
hose (Ø 27 mm (4.1) from a Festool dust extractor
to the extraction outlet on the tool (4.2).
6
Page 7
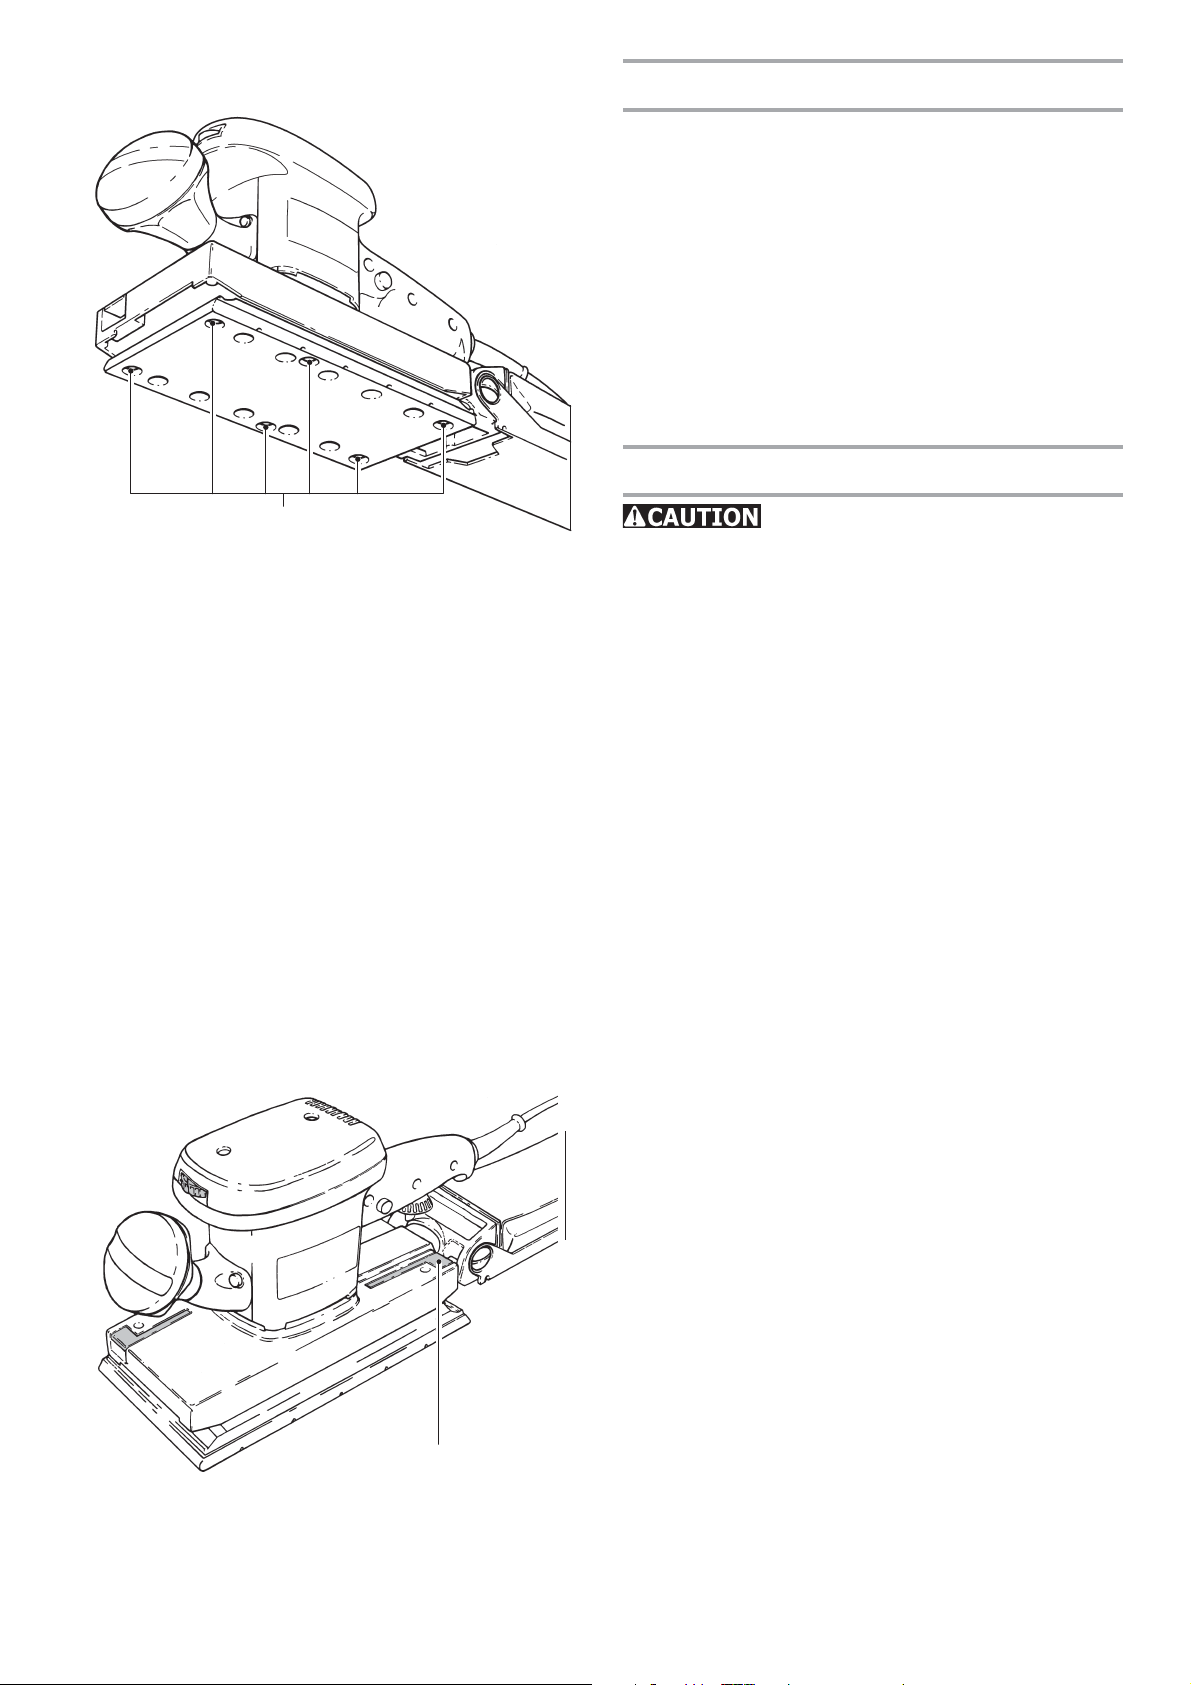
Sanding pad
The standard STF 115 x 225 mm Stickfi x sanding
pad can be exchanged for the 115 x 225 mm sanding pad for use with clamping paper. Loosen the
six fastening screws (5.1).
Both sanding pads (with and without Stickfi x covering) are also available with an edge protector
(KS) to protect the edge of the pad from premature
damage.
Abrasives
5.1
Always use original Festool sanding
materials!
Stickfi x abrasives
Self-adhesive abrasives such as Stickfi x sanding
disks and sheepskin polishers can be attached to
the Stickfi x sanding pads. Simply press the abrasives onto the sanding pads and remove after use.
Please note: Only use sanding pads with an
undamaged Stickfi x coating. Before use, check
whether the adhesive layer has been damaged
due to improper use (e.g. melting)
Clamped sandpaper
6.1
In addition to the Stickfi x abrasives, Festool also
offers perforated abrasives for clamp-fitting.
Unperforated sandpaper can be perforated with
the Festool “Lochfi x” punching device.
Start clamping the abrasive on the back of the
tool by raising the clamping lever (6.1) and thus
opening the clamping device. Insert abrasive up
to limit stop and lower clamping lever into initial
position. Place the abrasive on the sanding pad,
pull taught and clamp on the front.
7
Page 8
Working with the machine
Never overload the tool by using
too much pressure! The best sanding results are
achieved when applying moderate pressure.
The sanding performance and quality depend
mainly on the choice of the right sanding material.
Festool offers the appropriate sanding material
for all applications (see Festool catalogue).
Metalworking
The following precautions are to be
taken when processing metals for safety reasons:
- connect a residual current operated device in
series before the tool,
- connect tool to a suitable dust extractor,
- clean tool regularly of dust accumulations in the
motor housing.
7.1
Speed adjustment (RS 2 E)
We recommend the following settings on the rotary control (7.1) for electronic machines:
5 - 6
- sanding with max. drive
- sanding old paint
- sanding wood and veneer prior to painting
- interim sanding of paint on surfaces
- removing rust from surfaces using sanding cloth
- partial sanding of V2A steel/sheet metal using
sanding cloth
4 - 5
- sanding of thinly applied primer
- sanding of wood with sanding vlies
- sanding edges on wooden parts
- smoothing primed wooden surfaces.
3 - 4
- sanding full wooden and veneer edges
- sanding in the grooves/rebates of windows and
doors
- interim paint sanding on edges
- pre-sanding natural wood windows with sand-
ing vlies
- smoothing wood surfaces with sanding felt prior
to staining
8
Page 9
- rubbing down stained surfaces with sanding
vlies
- rubbing down or removing excess lime paste
with sanding vlies
2 - 3
- interim paint sanding on stained surfaces
- cleaning natural wood window grooves with
sanding felt
1 - 2
- sanding stained edges
- sanding thermoplastic synthetics
Maintenance and care
Any maintenance or repair work
requiring the motor housing to be opened (including power cord replacement) may only be
carried out by an authorised service workshop.
Maintenance or repair work carried out by an
unauthorised person can lead to the wrong connection of the power leads or other components,
which in turn can lead to accidents with serious
consequences.
Always remove the plug from the
mains supply socket before carrying out any work
on the machine!
Always keep the machine and the ventilation slots
clean.
Accessories, tools
For safety reasons, only use original Festool accessories and tools!
The accessory and tool order number can be found
in the Festool catalogue or on the Internet under
www.festoolusa.com.
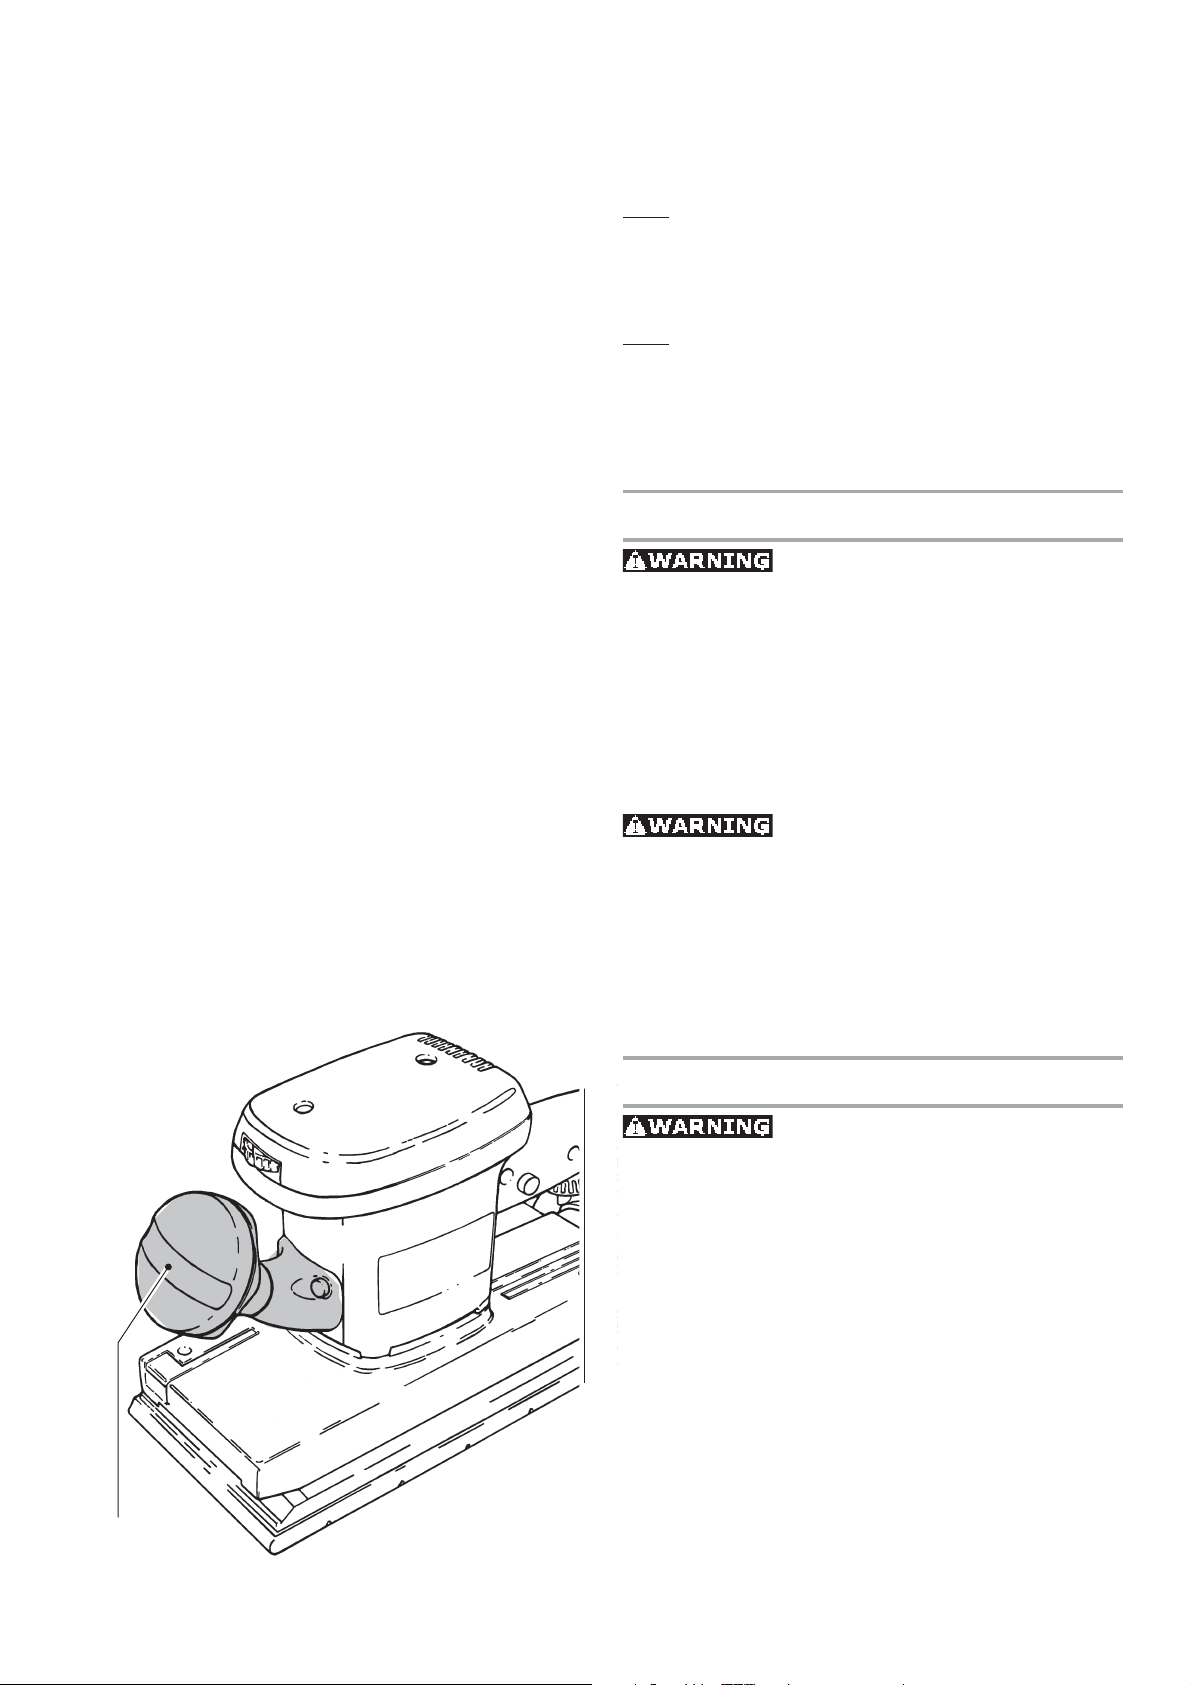
Additional handle
8.1
The additional handle (8.1) can be removed by unscrewing in an anticlockwise direction when sanding close to walls the front edge of the sanding pad.
9
Page 10
9
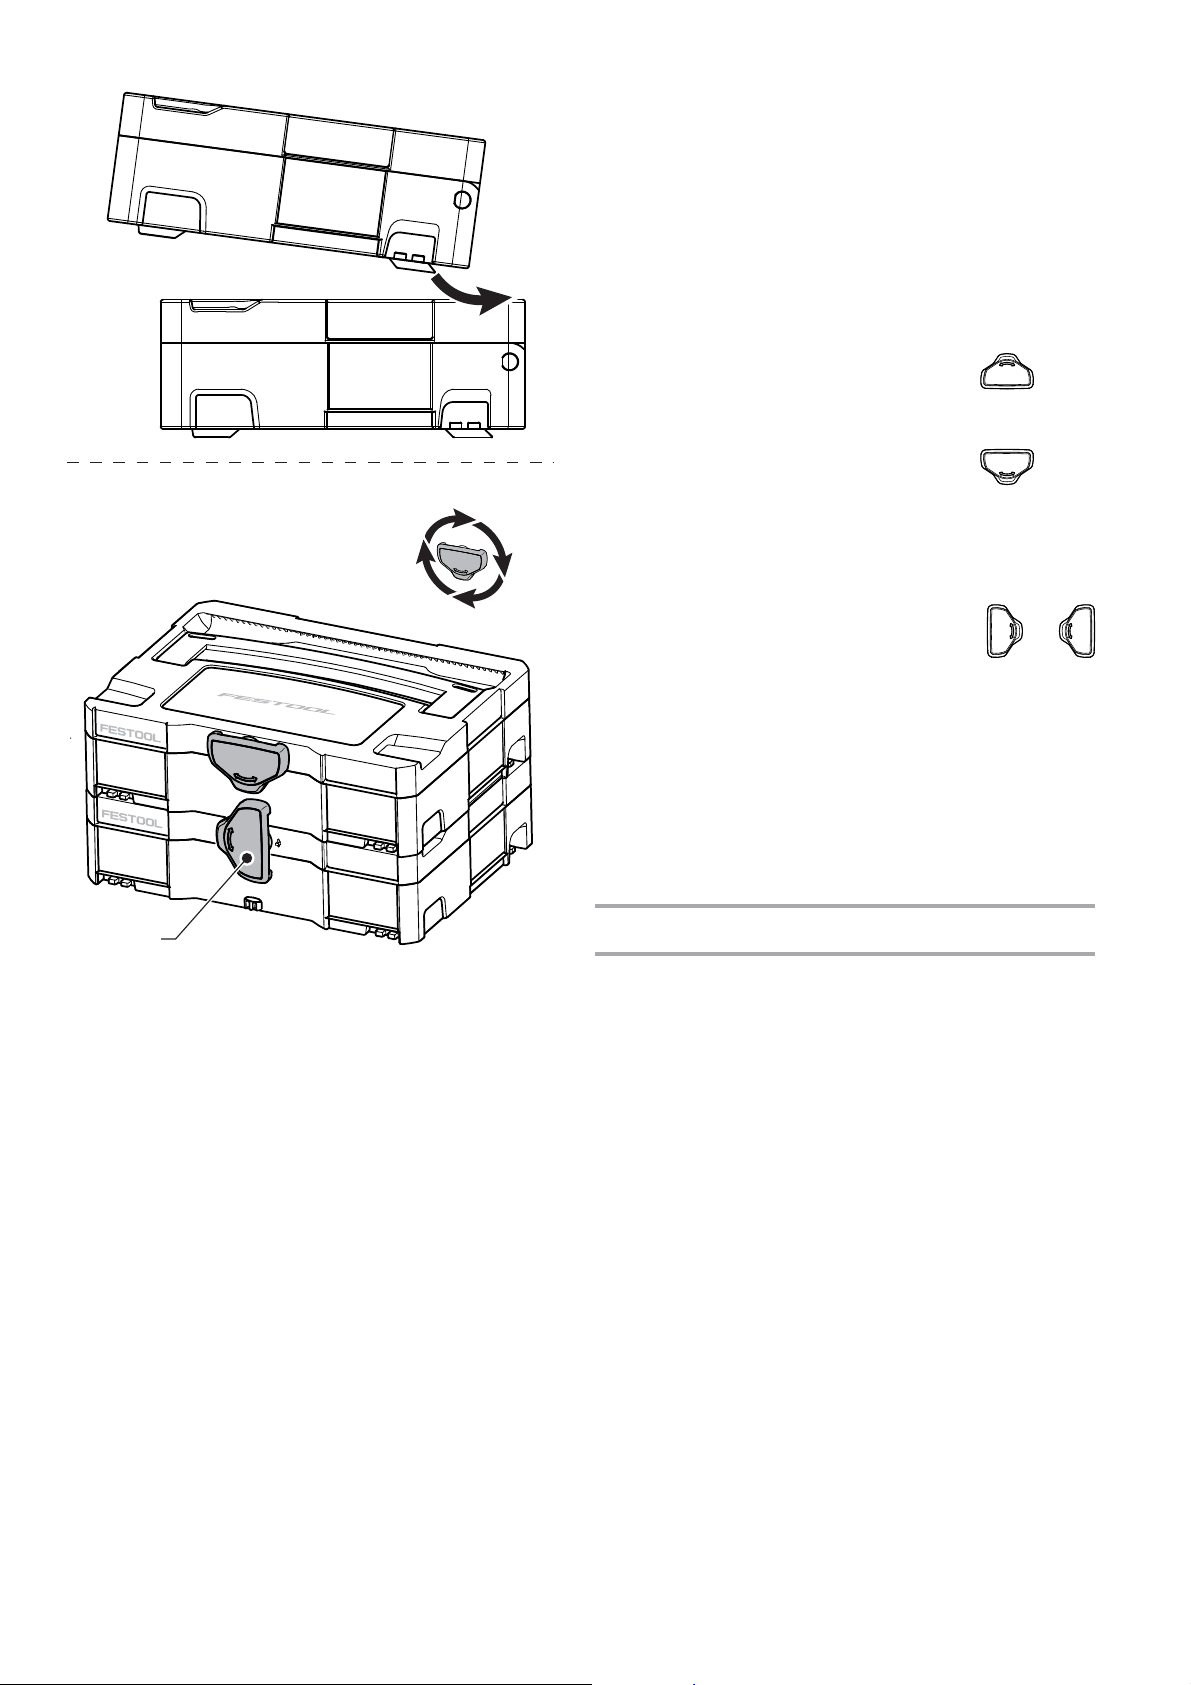
Systainer
Many Festool products are shipped in a unique
system container, called "Systainer".
This provides protection and storage for the tool
and accessories. The Systainers are stackable
and can be connected together. They also can be
conntected atop Festool CT dust extractors.
To open the Systainer:
A
B
9.1
connect
open
T-loc
lock
connect
– Turn the T-loc [9.1] to the position
.
To lock the Systainer:
– Turn the T-loc [9.1] to the position
.
To connect two Systainers:
– Place one Systainer on the top of the other
(Fig.9 A).
– Turn the T-loc [9.1] to the position
or
(Fig. 9 B).
The Systainers are connected and locked.
A new generation Systainer is connectable on
top of a previous generation Systainer by the
four latches of the previous Systainer.
Warranty
Festool offers a 3 year limited warranty, one of the
strongest in the industry. This warranty is valid on
the pre-condition that the tool is used and operated in compliance with the Festool operating
instructions. Festool warrants that the specifi ed
tool will be free from defects in materials and
workmanship for a term of 3 years from the date
of purchase.
Conditions of 1 + 2 warranty
All customers receive a free extended limited
warranty (1 year + 2 years = 3 Years) on new Festool power tools purchased from an authorized
retailer. Festool is responsible for all shipping
costs during the fi rst year of the warranty. During the second and third year of the warranty the
customer is responsible for shipping the tool to
Festool. Festool will pay for return shipping to the
customer using UPS Ground Service. All warranty
service is valid 3 years from the date of purchase
10
Page 11

on your receipt or invoice. Proof of purchase may
be required.
Excluded from the coverage under this warranty
are: normal wear and tear, damages caused by
misuse, abuse, or neglect; damage caused by
anything other than defects in material and
workmanship. This warranty does not apply to
accessory items such as circular saw blades, drill
bits, router bits, jigsaw blades, sanding belts, and
grinding wheels. Operating a tool at a voltage
or frequency different from the tool’s rating will
void the warranty. This includes the usage of the
tool in combination with a transformer. Festool
does not condone nor support the use of any nonFestool engineered, designed, and manufactured
accessories or consumables with Festool products. Use of any non-Festool products may affect
performance or void the warranty. Festool is not
responsible for any damages or losses incurred
and user assumes all risk and responsibility with
non-Festool derived products. Also excluded are
"wearing parts," such as carbon brushes, lamellas of air tools, rubber collars and seals, sanding
discs and pads, and Festool gear (hats and shirts).
The obligations of Festool in its sole discretion
under this warranty shall be limited to repair or
replacement or a refund of the purchase price
for any Festool portable power tool that is found
to have a defect in materials or workmanship
during the warranty period. FESTOOL SHALL
NOT BE LIABLE FOR ANY CONSEQUENTIAL, INCIDENTAL OR SPECIAL DAMAGES REGARDLESS
OF THE THEORY OF LAW ON WHICH THE CLAIM
IS BASED. ALL WARRANTIES IMPLIED BY STATE
LAW, INCLUDING THE IMPLIED WARRANTIES
OR MERCHANTABILITY AND FITNESS FOR A
PARTICULAR PURPOSE ARE HEREBY LIMITED
TO THE DURATION OF THREE YEARS.
Some states in the U.S. and some Canadian provinces do not allow the limitations on how long an
implied warranty lasts, so the above limitation
may not apply to you. This warranty gives you
specifi c legal rights, and you may also have other
rights that vary from state to state in the U.S. and
from province to province in Canada.
With the exception of any warranties implied by
state or province law as limited above, the foregoing express limited warranty is exclusive and in
lieu of all other warranties, guarantees, agreements, and similar obligations of Festool. Festool
makes no other warranty, express or implied, for
Festool portable power tools. This warranty policy
is only valid for tools that are purchased in the US
and Canada. Warranty policies of other countries
may vary when obtaining warranty service outside
the US and Canada.Some countries do exclude
warranty for products bought outside their territory. Festool reserves the right to reject the repair of any tool that is not part of the US/Canada
product line. No agent, representative, distributor,
dealer, or employee of Festool has the authority
to increase or otherwise change the obligations
or limitations of this warranty.
11
Page 12

Sommaire
RÉGLES DE SÉCURITÉ .................................. 12
Régles de sécurité générales ...................... 12
Consignes de sécurité spécifiques à la
machine ......................................................... 14
Caracteristiques techniques ......................... 14
Symbole ........................................................ 14
Utilisation conforme aux prescriptions ........ 15
Raccordement électrique et mise en service 15
Electronique (RS 2 E) .................................... 15
Aspiration des poussières ........................... 16
Dispositif d’auto-aspiration .......................... 16
Aspiration extérieure à l’aide d’un aspirateur 16
Patins de ponçage spéciaux ......................... 16
Abrasifs ....................................................... 17
Abrasifs Stickfix ............................................ 17
Papiers de ponçage à tendre ....................... 17
Travailler avec la machine ........................... 17
Traitement des métaux : ............................... 18
Réglage de régime (RS 2 E) .......................... 18
Entretien et maintenance ............................. 19
Accessoires, outils........................................ 19
Poignée supplémentaire .............................. 19
Systainer ....................................................... 20
Garantie ........................................................ 20
RÉGLES DE SÉCURITÉ
Régles de sécurité générales
ATTENTION ! Lire toutes les consignes de
sécurité et indications. Le non-respect
des avertissements et instructions indiqués ciaprès peut entraîner un choc électrique, un incendie et/ou de graves blessures.
Conserver tous les avertissements et toutes les
instructions pour pouvoir s'y reporter ultérieurement.
Le terme "outil" dans les avertissements fait
reference à votre outil électrique alimenté par
le secteur (avec cordon d'alimentation) ou votre
outil fonctionnant sur batterie (sans cordon d'alimentation).
1 PLACE DE TRAVAIL
a) Maintenez l'endroit de travail propre et bien
éclairé. Un lieu de travail en désordre ou mal
éclairé augmente le risque d'accidents.
b) N'utilisez pas l'appareil dans un environne-
ment présentant des risques d'explosion et où
se trouvent des liquides, des gaz ou poussières
infl ammables. Les outils électroportatifs génèrent
des étincelles risquant d'enfl ammer les poussières ou les vapeurs.
c) Tenez les enfants et autres personnes éloi-
gnés durant l'utilisation de l'outil électroportatif. En cas d'inattention vous risquez de perdre le
contrôle sur l'appareil.
2 SECURITE RELATIVE AU SYSTEME
ELECTRIQUE
a) La fi che de secteur de l'outil électroportatif
doit être appropriée à la prise de courant. Ne
modifi ez en aucun cas la fi che. N'utilisez pas de
fi ches d'adaptateur avec des appareils avec mise
à la terre. Les fi ches non modifi ées et les prises de
courant appropriées réduisent le risque de choc
électrique.
b) Evitez le contact physique avec des surfaces
mises à la terre tels que tuyaux, radiateurs, fours
et réfrigérateurs. Il y a un risque élevé de choc élec-
trique au cas où votre corps serait relié à la terre.
c) N'exposez pas l'outil électroportatif à la pluie
ou à l'humidité. La pénétration d'eau dans un outil
électroportatif augmente le risque d'un choc électrique.
d) N'utilisez pas le câble à d'autres fins que
celles prévues, n'utilisez pas le câble pour porter
l'appareil ou pour l'accrocher ou encore pour le
débrancher de la prise de courant. Maintenez le
câble éloigné des sources de chaleur, des parties
grasses, des bords tranchants ou des parties de
l'appareil en rotation. Un câble endommagé ou
torsadé augmente le risque d'un choc électrique.
e) Au cas où vous utiliseriez l'outil électropor-
tatif à l'extérieur, utilisez une rallonge autorisée
homologuée pour les applications extérieures.
L'utilisation d'une rallonge électrique homologuée
pour les applications extérieures réduit le risque
d'un choc électrique.
f) Si l'usage d'un outil dans un emplacement
humide est inévitable, utiliser une alimentation
protégée par un dispositif à courant différentiel
résiduel (RCD). L'usage d'un RCD réduit le risque
de choc électrique.
3 SECURITE DES PERSONNES
a) Restez vigilant, surveillez ce que vous faites.
Faites preuve de bon en utilisant l'outil électroportatif. N'utilisez pas l'appareil lorsque vous
êtes fatigué ou après avoir consommé de l'alcool,
12
Page 13

des drogues ou avoir pris des médicaments.
Un moment d'inattention lors de l'utilisation de
l'appareil peut entraîner de graves blessures sur
les personnes.
b) Portez des équipements de protection. Por-
tez toujours des lunettes de protection. Le fait de
porter des équipements de protection personnels
tels que masque anti-poussières, chaussures de
sécurité antidérapantes, casque de protection ou
protection acoustique suivant le travail à effectuer,
réduit le risque de blessures.
c) Evitez une mise en service par mégarde. As-
surez-vous que l'interrupteur est effectivement
en position d'arrêt avant de retirer la fi che de la
prise de courant. Le fait de porter l'appareil avec
le doigt sur l'interrupteur ou de brancher l'appareil
sur la source de courant lorsque l'interrupteur est
en position de fonctionnement, peut entraîner des
accidents.
d) Enlevez tout outil de réglage ou toute clé
avant de mettre l'appareil en fonctionnement.
Une clé ou un outil se trouvant sur une partie en
rotation peut causer des blessures.
e) Ne surestimez pas vos capacités. Veillez à
garder toujours une position stable et équilibrée.
Ceci vous permet de mieux contrôler l'appareil
dans des situations inattendues.
f) Portez des vêtements appropriés. Ne portez
pas de vêtements amples, ni de bijoux. Gardez les
cheveux et les vêtements à distance des pièces
mobiles. Des vêtements amples, des bijoux ou des
cheveux longs peuvent être happés par les pièces
en mouvement.
g) Si des dispositifs servant à aspirer ou à re-
cueillir les poussières doivent être utilisés, vérifi ez que ceux-ci soient effectivement raccordés
et qu'ils sont correctement utilisés. L'utilisation
de tels dispositifs réduit les dangers dus aux poussières.
h) Ne devenez pas trop sûr de vous, par habitude
suite à une utilisation fréquente de l'appareil, de
manière à ne pas respecter les principes de sécurité de base de l'appareil. Une action imprudente
peut occasionner de graves blessures en l'espace
d'une fraction de seconde.
4 UTILISATION ET EMPLOI SOIGNEUX
DE L'OUTIL ELECTROPORTATIF
a) Ne surchargez pas l'appareil. Utilisez l'outil
électroportatif approprié au travail à effectuer.
Avec l'outil électroportatif approprié, vous travaillerez mieux et avec plus de sécurité à la vitesse
pour laquelle il est prévu.
b) N'utilisez pas un outil électroportatif dont
l'interrupteur est défectueux. Un outil électroportatif qui ne peut plus être mis en ou hors fonctionnement est dangereux et doit être réparé.
c) Retirer la fi che de la prise de courant avant
d'effectuer des réglages sur l'appareil, de changer les accessoires, ou de ranger l'appareil. Cette
mesure de précaution empêche une mise en fonctionnement par mégarde.
d) Gardez les outils électroportatifs non utilisés
hors de portée des enfants. Ne permettez pas
l'utilisation de l'appareil à des personnes qui ne
se sont pas familiarisées avec celui-ci ou qui n'ont
pas lu ces instructions. Les outils électroportatifs
sont dangereux lorsqu'ils sont utilisés par des personnes non initiées.
e) Prenez soin des outils électroportatifs. Véri-
fi ez que les parties en mouvement fonctionnent
correctement et qu'elles ne soient pas coincées, et contrôlez si des parties sont cassées ou
endommagées de telle sorte que le bon fonctionnement de l'appareil s'en trouve entravé. Faites
réparer les parties endommagées avant d'utiliser l'appareil. De nombreux accidents sont dus à
des outils électroportatifs mal entretenus.
f) Maintenez les outils de coupe aiguisés et
propres. Des outils soigneusement entretenus avec des bords tranchants bien aiguisés se
coincent moins souvent et peuvent être guidés plus
facilement.
g) Utilisez les outils électroportatifs, les acces-
soires, les outils à monter etc. conformément à
ces instructions et aux prescriptions en vigueur
pour ce type d'appareil. Tenez compte également
des conditions de travail et du travail à effectuer.
L'utilisation des outils électroportatifs à d'autres
fi ns que celles prévues peut entraîner des situations dangereuses.
h) Gardez les poignées dans un état sec, propre
et exempt d'huile et de graisse. Des poignées
glissantes ne permettent pas une prise en main
sûre et le contrôle de l'outil électrique dans des
situations inattendues.
5 SERVICE
a) Ne faites réparer votre outil électroportatif
que par un personnel qualifi é et seulement avec
des pièces de rechange d'origine. Ceci permet
d'assurer la sécurité de l'appareil.
13
Page 14

Consignes de sécurité spécifi ques
à la machine
Caracteristiques techniques
– Au cours du travail, des poussières nocives/
toxiques peuvent être générées (comme les
poussières de peintures au plomb ou certaines
poussières de bois ou de métal). Le contact ou
l'inhalation de ces poussières peut présenter
un danger pour l'utilisateur ou les personnes
se trouvant à proximité. Veuillez respecter les
prescriptions de sécurité en vigueur dans votre
pays. Raccordez l'outil électrique à un dispositif
d'aspiration adapté.
Pour votre santé, portez un masque de
protection respiratoire de classe P2.
Portez systématiquement des lunettes de
protection pour vous protéger des risques
inhérents au ponçage.
La poussière, un risque pour la
santé
Certaines poussières
créées par le ponçage mécanique, le sciage, le
meulage, le perçage et autres activités reliées
à la construction contiennent des substances
chimiques connues (dans l’État de la Californie)
comme pouvant causer le cancer, des anomalies
congénitales ou représenter d’autres dangers pour
la reproduction. Voici quelques exemples de telles
substances:
• plomb provenant de peintures à base de plomb,
• silice cristallisée utilisée dans les briques, le
ciment et autres matériaux de maçonnerie, et
• arsenic et chrome du bois d’œuvre traité avec
un produit chimique.
Le risque d’exposition à de tels produits varie
selon la fréquence à laquelle vous faites ce genre
de travail.
Pour réduire les risques d’exposition
à ces substances chimiques : travaillez dans un endroit adéquatement
ventilé et utilisez un équipement de
sécurité approuvé, tel que masques
antipoussières spécialement conçus
pour fi ltrer les particules microscopiques.
RS 2
Puissance absorbée W 3 3 0
Vitesse à vide tr/min 10 000
Nombre d'oscillations tr/min 20 0 00
Amplitude mm (in.) 2.4 (0.1)
Patin de ponçage mm(in.) 115 x 225 (4.53 x 8.86)
Poids kg (lbs) 2.5 (5.5)
Classe de protection
/ II
RS 2 E
Puissance absorbée W 3 3 0
Vitesse à vide tr/min 4 000 – 10 000
Nombre d'oscillations tr/min 8 000 – 20 000
Amplitude mm (in.) 2.4 (0.1)
Patin de ponçage mm(in.) 115 x 225 (4.53 x 8.86)
Poids kg (lbs) 2.5 (5.5)
Classe de protection
/ II
Symbole
Avertissement de danger
Lire les instructions / les remarques !
Porter des lunettes de protection
Débrancher la fi che secteu
V Volt
A Ampère
Hz Hertz
W Watt
~ Tension alternative
n
Vitesse de rotation à vide
0
Classe II conception
tr/min Tours par minute
POUR RÉDUIRE LE RISQUE
DE DOMMAGES, L'UTILISATEUR DOIT LIRE LE
MANUEL D'INSTRUCTION
14
Page 15

Utilisation conforme aux prescrip-
tions
Les ponceuses sont destinées à poncer le bois,
les matières plastiques, le métal, la pierre, les
matériaux composites, la peinture et la laque, le
mastic et des matériaux semblables.
Du matériau comportant de l’amiante ne doivent
pas être usinés.
Pour des raisons de sécurité électrique, les machines ne doivent pas être humides ni fonctionner
dans un environnement humide. Il ne faut utiliser
les machines que pour un ponçage sec.
En cas d’une utilisation
non conforme, la responsabilité des dommages
1.21.1
et accidents incombe à l’utilisateur.
2.1
Raccordement électrique et mise
en service
La tension du réseau électrique doit correspondre
à l’indication fi gurant sur la plaque signalétique!
Un commutateur (1.1) fait offi ce d’interrupteur
Marche/Arrêt. Pour une utilisation en continu, le
commutateur peut être bloqué en position Marche
par l’intermédiaire d’un bouton de verrouillage
latéral (1.2). En actionnant de nouveau le commutateur, le verrouillage est de nouveau libéré.
Electronique (RS 2 E)
La ponceuse RS 2 E possède un réglage lectronique permettant une variation progressive de la
vitesse de rotation. Ceci permet une adaptation
optimale de la vitesse du ponçage aux différents
matériaux.
La vitesse de rotation est réglée par la molette
(2.1). Les chiffres de la molette correspondent
approximativement aux nombres de courses ciaprès:
15
Page 16

3.1 3.2
3.33.4
Aspiration des poussières
L’aspiration de la poussière empêche des lourdes
charges de l’air environnant par des poussières
et des fortes salissures du lieu de travail.
Dispositif d’auto-aspiration
Les machines sont équipées en série d’un dispositif d’auto-aspiration. Placer le porte-fi ltre
(3.3) avec l’orifi ce jusqu’à l’arrêt sur le manchon
d’aspiration (3.4) de la machine et serrer à l’aide
du bouton tournant (3.1).
La poussière de ponçage est aspirée à travers
les orifi ces d’aspiration du patin de ponçage puis
collectée dans le fi ltre turbo (3.2). Lorsque le fi ltre
turbo est rempli de poussières, la performance
d’aspiration baisse et il faut le remplacer.
4.2
5.1
4.1
Aspiration extérieure à l’aide d’un
aspirateur
Afi n d’éviter d’avoir à remplacer souvent le fi ltre
turbo, on peut raccorder un aspirateur Festool à
la place du dispositif d’auto-aspiration. A cet effet,
il convient d’enfi cher le tuyau fl exible (Ø 27 mm
(4.1)) d’un appareil d’aspiration Festool sur la
tubulure d’aspiration de l’appareil (4.2).
Patins de ponçage spéciaux
Le patin de ponçage faisant partie du matériel
fourni d’origine STF 115 x 225 mm peut être
remplacé par le patin de ponçage 115 x 225 mm
destiné à des papiers de ponçage à tendre. Pour
cela, il faut dévisser les six vis de fi xation (5.1) au
moyen d’un tournevis.
Les deux patins de ponçage (avec et sans revêtement Stickfi x) sont également disponibles avec
un protecteur latéral de chants afi n de protéger
le plateau contre une détérioration prématurée
lors du ponçage de chants.
16
Page 17

Abrasifs
N’utilisez que des produits
abrasifs originaux Festool!
Abrasifs Stickfi x
Sur le patin de ponçage Stickfi x, on peut monter
de l’abrasif auto-adhésif tel que Stickfi x en papier
et en texture de Nylon. L’abrasif est simplement
posé sur le patin de ponçage et retiré après utilisation.
Veuillez observer ce qui suit: Utilisez uniquement des patins de ponçage dont le revêtement
adhérant Stickfi x n’est pas endommagé. Avant
l’utilisation, contrôlez si le revêtement Velcro n’a
pas été détérioré par une utilisation non conforme
(par exemple parties fondues).
6.1
Papiers de ponçage à tendre
Outre les abrasifs Stickfi x, Festool présente également des abrasifs non perforés. Le papier abrasif non perforé peut être perforé avec le gabarits
Festool «Lochfi x».
Commencez à tendre le papier abrasif au dos de
l’appareil en ouvrant le dispositif de fi xation en
rabattant le levier de serrage (6.1). Poussez le
papier abrasif jusqu’à la butée puis rabattez le
levier sur sa position d’origine. Déposez le papier
abrasif sur le patin de ponçage, tirez-Ie bien vers
l’avant puis tendez-Ie sur la partie avant.
Travailler avec la machine
Ne surchargez pas la
machine en appuyant trop fort! Vous obtiendrez
le meilleur résultat de ponçage avec une pression
d’application moyenne.
Le rendement et la qualité du ponçage dépendent
essentiellement de la sélection de l’abrasif adéquat. Festool propose l’abrasif approprié à chaque
cas d’utilisation (cf. le catalogue Festool).
17
Page 18

7.1
Traitement des métaux :
Lors du traitement des
métaux, il est indispensable de respecter les
mesures suivantes afin de travailler en toute
sécurité :
- un interrupteur de sécurité (FI) doit être monté
en amont,
- la machine doit être raccordée à un aspirateur
convenable,
- la machine doit régulièrement être nettoyée
pour éliminer les dépôts de poussières accumulées dans le corps du moteur.
Réglage de régime (RS 2 E)
Pour des machines électroniques nous pré-conisons les réglages ci-après de la molette (7.1):
5 – 6
- Ponçage à entraînement max.
- Ponçage d’anciennes peintures
- Ponçage de bois et de contreplacage avant
application du vernis
- Ponçage intermédiaire du vernis de surfaces
- Dérouillage sur surface avec texture Nylon
- Ponçage de tôle d’acier V2A avec texture Nylon
4 – 5
- Ponçage d’un enduit appliqué en fi ne couche
- Ponçage de bois à l’aide du non-tissé de ponçage
- Réalisation de chants sur des pièces en bois
- Lissage de surfaces en bois à enduit
3 – 4
- Ponçage de bordures en bois massif et contre-
plaquées
- Ponçage dans la rainure de fenêtres et de portes
- Ponçage intermédiaire du vernis de chants
- Ponçage de fenêtres en bois nature à l’aide du
non-tissé de ponçage
- Lissage de la surface en bois avant le décapage
à l’aide du non-tissé de ponçage
- Ponçage de surfaces décapées à l’aide du non-
tissé de ponçage
- Ponçage ou enlèvement de la pâte de chaux
superfl ue à l’aide du non-tissé de ponçage
2 – 3
- Ponçage intermédiaire de vernis de surfaces
décapées
- Nettoyage de rainures de fenêtres en bois à l’aide
18
Page 19

du non-tissé de ponçage
1 – 2
- Ponçage de chants décapés
- Ponçage de matières synthétiques thermoplastiques
Entretien et maintenance
Les travaux d’entretien et
de réparation nécessitant une ouverture du carter moteur (incluant le remplacement du câble
d'alimentation) ne doivent être effectués que
par le personnel d’un atelier autorisé du service
après-vente. La maintenance ou la réparation
de la machine par des personnes non autorisées
peut entraîner un branchement incorrect de
câbles électriques ou d’autres composants, ce
qui peut provoquer des accidents avec de graves
blessures.
Avant toute intervention
sur la machine il faut retirer la fi che de la prise
de courant!
La machine et ses ouïes de refroidissement doivent toujours rester propres.
Accessoires, outils
Pour des raisons de sécurité, il faut utiliser exclusivement des accessoires
et outils d’origine Festool!
Les références des accessoires et outils fi gurent
dans le catalogue Festool ou sur Internet sous
www.festoolusa.com.
8.1
Poignée supplémentaire
Au cas il serait nécessaire de poncer avec le bord
avant de la plaque de ponçage à proximité d’un
mur, il est possible de dévisser la poignée supplémentaire (8.1) en la tournant vers la gauche.
19
Page 20

9
Systainer
De nombreux produits Festool sont fournis dans
une caisse exclusive, appelée "Systainer". Celle-ci
permet de protéger et de ranger des outils et des
appareils complémentaires. Les Systainer sont
empilables et peuvent être solidarisés. En outre,
il se fi xent sur les aspirateurs CT Festool.
Pour ouvrir le Systainer:
A
B
9.1
connecter
ouvrir
T-loc
fermer
connecter
– Tournez le T-loc (9.1) à la position
.
Pour fermer le Systainer:
– Tournez le T-loc (9.1) à la position
.
Pour connecter deux Systainers:
– Placez un Systainer au dessus de l’autre
(Fig.9A).
– Tournez le T-loc (9.1) à la position
ou
(Fig.9B).
– Les Systainers sont combinés.
Un Systainer de la nouvelle génération peux
être attaché au dessus d’ un Systainer de
l’ancienne génération par les quatre loquets
de l’ancien Systainer.
Garantie
Festool offre une garantie restreinte de trois ans,
une des plus longues de l’industrie. La présente
garantie est valide à la condition préalable que
l’outil soit utilisé et exploité en conformité avec
les consignes d’utilisation de Festool. Festool
garantit que l’outil spécifi é sera exempt de vices
de matériel ou de malfaçon durant une période
de 3 ans à compter de la date d’achat.
Conditions de la garantie1 + 2
Tous les clients reçoivent une extension de garantie restreinte gratuite (1an+ 2ans= 3ans) pour
tous les outils électriques achetés auprès d’un
détaillant agréé. Festool est responsable de tous
les frais d’expédition durant la première année
de la garantie. Durant la deuxième et la troisième
année de la garantie, le client a la responsabilité
d’expédier l’outil à Festool. Festool paiera les frais
d’expédition de retour au client en utilisant le service terrestre d’UPS. Tout service de garantie est
20
Page 21

valide 3ans à compter de la date d’achat indiquée
sur votre reçu ou votre facture. La preuve d’achat
peut être exigée.
Sont exclus de la couverture au titre de la présente garantie: usure normale, dommage causé
par un usage impropre, un usage abusif ou de
la négligence ; dommage causé par toute autre
chose qu’un vice de matériel ou de malfaçon. La
présente garantie ne s’applique pas aux articles
accessoires tels que lames de scie plongeante,
forets de perceuse, forets de défonceuse, lames
de scie sauteuse, bandes abrasives et meules.
L’utilisation d’un outil à une tension ou fréquence
différente de la puissance nominale de l’outil
annule la garantie. L’annulation de garantie inclut
l’utilisation de l’outil avec un transformateur.
Festool ne tolère ni n’approuve aucune utilisation
d’accessoires ou de consommables d’ingénierie,
de conception et de fabrication autres que Festool sur des produits Festool. Toute utilisation
de produits autres que Festool peut affecter
le rendement de l’outil et annuler la garantie.
Festool ne peut être tenu responsable de tous
dommages ou pertes subis, l’utilisateur assumant
tous les risques et l’entière responsabilité liés à
l’utilisation de produits qui ne sont pas d’origine
Festool.Sont également exclues toutes les «
pièces d’usure » telles que les balais de carbone,
les lamelles de l’outillage pneumatique, les manchons et joints de caoutchouc, les disques abrasifs
et les patins de ponçage, ainsi que les vêtements
Festool (chapeaux et t-shirts).
Certains états américains et certaines provinces
canadiennes ne permettent pas de restrictions
quant à la durée d’une garantie implicite, de sorte
que la restriction qui précède peut ne pas s’appliquer à vous. La présente garantie vous confère
des droits légaux spécifi ques, et il se peut que
vous ayez d’autres droits variant d’un état à l’autre
aux É.-U. et d’une province à l’autre au Canada.
En dehors de toute garantie imposée par une loi
d’état ou une loi provinciale telle que restreinte
ci-dessus, la garantie restreinte qui précède
est exclusive et aux lieu et place de toute autre
garantie, engagement formel, entente et autre
obligation similaire de Festool. Festool ne fait
aucune autre garantie, expresse ou implicite,
à propos des outils électriques. La présente
garantie est valide uniquement pour les outils
achetés aux É.-U. et au Canada. Les régimes de
garantie d’autres pays peuvent varier pour les
cas de service obtenus en dehors des É.-U. et
du Canada.Certains pays peuvent exclure de la
garantie les produits achetés en dehors de leur
territoire. Festool se réserve le droit de refuser la
réparation de tout outil ne faisant pas partie de la
gamme de produits des É.-U. et du Canada. Aucun
agent, représentant, distributeur, concessionnaire
ou employé de Festool n’a l’autorité d’augmenter
ou d’autrement modifi er les obligations ou les
restrictions de la présente garantie.
Les obligations de Festool aux termes de la présente garantie se limitent, à sa seule discrétion, à
la réparation ou au remplacement ou au remboursement du prix d’achat de tout outil électrique
Festool portable jugé comme faisant montre
d’un vice de matériel ou de malfaçon durant la
période de la garantie. FESTOOL NE PEUT ÊTRE
TENU RESPONSABLE DE QUELQUE DOMMAGE
CONSÉCUTIF, ACCESSOIRE OU PARTICULIER
INDÉPENDAMMENT DU PRINCIPE DE DROIT SUR
LEQUEL SE FONDE LA DEMANDE. TOUTES LES
GARANTIES IMPLICITES AUX TERMES DE LA LOI
ÉTATIQUE, Y COMPRIS LES GARANTIES IMPLICITES DE QUALITÉ MARCHANDE ET D’ADAPTATION À UN USAGE PARTICULIER, SONT PAR
LES PRÉSENTES RESTREINTES À UNE DURÉE
DE TROIS ANS.
21
Page 22

Índice de contenidos
NORMAS DE SEGURIDAD .............................. 22
Indicaciones de seguridad generales .......... 22
Normas de seguridad específicas ............... 23
Datos técnicos .............................................. 24
Símbolos ....................................................... 24
Uso conforme a la destinación ..................... 25
Conexión eléctrica y puesta en servicio ....... 25
Electronic (RS 2 E) ....................................... 25
Aspiración .................................................... 25
Dispositivo autoaspirador ............................. 26
Dispositivo de aspiración externa, con
aspirador ....................................................... 26
Tacos esmeriladores ................................... 26
Materia abrasiva .......................................... 27
Materia abrasiva Stickfix .............................. 27
Papel abrasivo para tensar .......................... 27
Trabajo con la máquina................................. 27
Elaboración de metal: ................................... 28
Ajuste de la velocidad (RS 2 E) ...................... 28
Mantenimiento y conservación ..................... 29
Accesorios, herramientas ............................ 29
Asidero adicional .......................................... 29
Systainer ....................................................... 30
Garantiá ........................................................ 30
NORMAS DE SEGURIDAD
Indicaciones de seguridad genera-
les
¡ATENCIÓN! Lea íntegramente las instrucciones e indicaciones de seguridad. El
incumplimiento de dichas instrucciones e indicaciones puede dar lugar a descargas eléctricas,
incendios o lesiones graves.
Guardar todas las advertencias de peligro e
instrucciones para futuras consultas.
El término herramienta eléctrica empleado en
las siguientes advertencias de peligro se refi ere a
herramientas eléctricas de conexión a la red (con
cable de red) y a herramientas eléctricas accionadas por acumulador (o sea, sin cable de red).
1 PUESTO DE TRABAJO
a) Mantenga limpio y bien iluminado su puesto
de trabajo. El desorden y una iluminación defi -
ciente en las áreas de trabajo pueden provocar
accidentes.
b) No utilice la herramienta eléctrica en un en-
torno con peligro de explosión, en el que se encuentren combustibles líquidos, gases o material
en polvo. Las herramientas eléctricas producen
chispas que pueden llegar a infl amar los materiales en polvo o vapores.
c) Mantenga alejados a los niños y otras perso-
nas de su puesto de trabajo al emplear la herramienta eléctrica. Una distracción le puede hacer
perder el control sobre el aparato.
2 SEGURIDAD ELÉCTRICA
a) El enchufe del aparato debe corresponder a la
toma de corriente utilizada. No es admisible modifi car el enchufe en forma alguna. No emplear
adaptadores en aparatos dotados con una toma
de tierra. Los enchufes sin modifi car adecuados
a las respectivas tomas de corriente reducen el
riesgo de una descarga eléctrica.
b) Evite que su cuerpo toque partes conecta-
das a tierra como tuberías, radiadores, cocinas
y refrigeradores. El riesgo a quedar expuesto a
una sacudida eléctrica es mayor si su cuerpo tiene
contacto con tierra.
c) No exponga las herramientas eléctricas a la
lluvia y evite que penetren líquidos en su interior.
Existe el peligro de recibir una descarga eléctrica
si penetran ciertos líquidos en la herramienta eléctrica.
d) No utilice el cable de red para transportar o
colgar el aparato, ni tire de él para sacar el enchufe de la toma de corriente. Mantenga el cable
de red alejado del calor, aceite, esquinas cortantes o piezas móviles. Los cables de red dañados o
enredados pueden provocar una descarga eléctrica.
e) Al trabajar con la herramienta eléctrica en la
intemperie utilice solamente cables de prolongación homologados para su uso en exteriores. La
utilización de un cable de prolongación adecuado
para su uso en exteriores reduce el riesgo de una
descarga eléctrica.
f) Si fuese imprescindible utilizar la herramien-
ta eléctrica en un entorno húmedo, es necesario
conectarla a través de un fusible diferencial. La
aplicación de un fusible diferencial reduce el riesgo
a exponerse a una descarga eléctrica.
3 SEGURIDAD DE PERSONAS
a) Esté atento a lo que hace y emplee la herramienta eléctrica con prudencia. No utilice la
herramienta eléctrica si estuviese cansado, ni
22
Page 23

tampoco después de haber consumido alcohol,
drogas o medicamentos. El no estar atento du-
rante el uso de una herramienta eléctrica puede
provocarle serias lesiones.
b) Utilice un equipo de protección y en todo caso
unas gafas de protección. El riesgo a lesionarse se
reduce considerablemente si, dependiendo del tipo
y la aplicación de la herramienta eléctrica empleada, se utiliza un equipo de protección adecuado
como una mascarilla antipolvo, zapatos de seguridad con suela antideslizante, casco, o protectores
auditivos.
c) Evite una puesta en marcha fortuita del apa-
rato. Cerciorarse de que el aparato esté desconectado antes conectarlo a la toma de corriente.
Si transporta el aparato sujetándolo por el interruptor de conexión/desconexión, o si introduce
el enchufe en la toma de corriente con el aparato
conectado, ello puede dar lugar a un accidente.
d) Retire las herramientas de ajuste o llaves
fi jas antes de conectar la herramienta eléctrica.
Una herramienta o llave colocada en una pieza
rotante puede producir lesiones al ponerse a funcionar.
e) Sea precavido. Trabaje sobre una base fi rme
y mantenga el equilibrio en todo momento. Ello le
permitirá controlar mejor la herramienta eléctrica
en caso de presentarse una situación inesperada.
f) Utilice ropa adecuada. No utilice ropa ancha
ni objetos de joyería o bisutería. Mantenga el pelo
y la ropa alejada de las piezas en movimiento. La
ropa suelta o el pelo largo pueden quedar atrapados por piezas en movimiento.
g) Siempre que sea posible utilizar unos equipos
de aspiración o captación de polvo, asegúrese
que éstos estén montados y que sean utilizados
correctamente. El empleo de estos equipos reduce
los riesgos derivados del polvo.
h) No debe jamás confi arse por el uso frecuente
de las máquinas e ignorar los principios de seguridad de la herramienta. Un manejo imprudente
puede ocasionar lesiones graves en fracciones de
segundo.
4 TRATO Y USO CUIDADOSO DE HERRA-
MIENTAS ELÉCTRICAS
a) No sobrecargue el aparato. Use la herramienta prevista para el trabajo a realizar. Con la
herramienta adecuada podrá trabajar mejor y más
seguro dentro del margen de potencia indicado.
b) No utilice herramientas con un interruptor
defectuoso. Las herramientas que no se puedan
conectar o desconectar son peligrosas y deben
hacerse reparar.
c) Saque el enchufe de la red antes de realizar
un ajuste en el aparato, cambiar de accesorio o al
guardar el aparato. Esta medida preventiva reduce
el riesgo a conectar accidentalmente el aparato.
d) Guarde las herramientas fuera del alcance de
los niños y de las personas que no estén familiarizadas con su uso. Las herramientas utilizadas por
personas inexpertas son peligrosas.
e) Cuide sus aparatos con esmero. Controle si
funcionan correctamente, sin atascarse, las partes móviles del aparato, y si existen partes rotas
o deterioradas que pudieran afectar al funcionamiento de la herramienta. Si la herramienta eléctrica estuviese defectuosa haga repararla antes
de volver a utilizarla. Muchos de los accidentes se
deben a aparatos con un mantenimiento defi ciente.
f) Mantenga los útiles limpios y afi lados. Los
útiles mantenidos correctamente se dejan guiar y
controlar mejor.
g) Utilice herramientas eléctricas, accesorios,
útiles, etc. de acuerdo a estas instrucciones y en
la manera indicada específi camente para este
aparato. Considere en ello las condiciones de
trabajo y la tarea a realizar. El uso de herramien-
tas eléctricas para trabajos diferentes de aquellos
para los que han sido concebidas puede resultar
peligroso.
h) Mantenga las empuñaduras secas, limpias y
libres de aceite y grasa. Las empuñaduras resbaladizas no permiten una manipulación y un control
seguros de la herramienta eléctrica en situaciones
inesperadas.
5 SERVICIO
a) Únicamente haga reparar su herramienta
eléctrica por un profesional, empleando exclusivamente piezas de repuesto originales. Solamen-
te así se mantiene la seguridad de la herramienta
eléctrica.
Normas de seguridad específi cas
– Al trabajar puede generarse polvo perjudicial/
tóxico (p. ej., de pintura de plomo, algunos tipos
de madera y metal). El contacto o la inhalación
de este polvo puede suponer una amenaza para
la persona que realiza el trabajo o para aquellas
que se encuentren cerca. Observe las normativas de seguridad vigentes en su país. Conecte la
herramienta eléctrica a un equipo de aspiración
apropiado.
23
Page 24

Utilice por el bien de su salud una masca-
rilla de protección respiratoria con fi ltro
P2.
Ante el peligro que supone el lijado, lleve
siempre gafas de protección.
Riesgos para la salud producidos
por el polvo
Algunos polvos creados por
lijadoras motorizadas, aserraderos, trituradores,
perforadoras y otras actividades de construcción
contienen sustancias químicas que se sabe (en el
Estado de California) causan cáncer, defectos de
nacimiento u otros daños al sistema reproductivo.
Algunos ejemplos de estas sustancias químicas
son:
• Plomo de las pinturas con base de plomo
• Sílice cristalino de los ladrillos y cemento y
otros productos de mampostería, y
• Arsénico y cromo de madera tratada con sus-
tancias químicas
El riesgo de exposición a estas sustancias varía,
dependiendo de cuantas veces se hace este tipo
de trabajo.
Datos técnicos
RS 2
Potencia absorbida W 330
Velocidad sin carga rpm 10 000
Orbitas por minuto opm 20 000
Orbita de lijado mm (in.) 2.4 (0.1)
Plato de lijado mm(in.) 115 x 225 (4.53 x 8.86)
Peso kg (lbs) 2.5 (5.5)
Clase de protección
/ II
RS 2 E
Potencia absorbida W 330
Velocidad sin carga rpm 4 000 - 10 000
Orbitas por minuto opm 8 000 - 20 000
Orbita de lijado mm (in.) 2.4 (0.1)
Plato de lijado mm (in.) 115 x 225 (4.53 x 8.86)
Peso kg (lbs) 2.5 (5.5)
Clase de protección
/ II
Símbolos
Para reducir el contacto con estas
sustancias químicas: trabaje en un
área con buena ventilación y trabaje
con equipo de seguridad aprobado,
como mascarillas para el polvo diseñadas espe cí fi camente para fi ltrar
partículas microscópicas.
PARA REDUCIR EL RIESGO
DE LESIÓN, EL USUARIO DEBE LEER EL MAN
UAL DE INSTRUCCIÓN.
Aviso ante un peligro general
¡Leer las instrucciones e indicaciones!
Utilizar gafas de protección
Utilizar protección respiratoria
V voltios
A amperios
Hz hertzios
W vatios
~ rensión alterna
n
revoluciones por minuto en vacío
0
Clase II Construcción
rpm revoluciones por minuto
opm orbitas por minuto
24
Page 25

Uso conforme a la destinación
En cuanto a su determinación de uso, las lijadoras están previstas para el lijado de madera,
plástico, metal, piedra, materiales compuestos,
pintura / barniz, masilla de emplaste y materiales
similares.
Con este útil no se deben trabajar materiales que
contengan amianto.
A causa de la seguridad eléctrica, las máquinas no
deben ser operadas estando húmedas y tampoco
1.21.1
en un ambiente húmedo. Las máquinas solamente se deben emplear para un lijado en seco.
El usuario se responsa bilizará
en el caso de daños y accidentes durante un uso
no conforme a lo predeterminado.
Conexión eléctrica y puesta en
2.1
servicio
¡La tensión de red debe coincidir con la indicación
de tensión en la placa indicadora de potencia!
Un interruptor (1.1) sirve para activar y desactivar.
Para el servicio permanente se puede enclavar el
interruptor con el botón de fi jación lateral (1.2).
Volviendo a activar el interruptor se desenclava
la fi jación.
Electronic (RS 2 E)
Para elaborar las diferentes superfi cies es conveniente adaptar la velocidad de esmerilado al
material correspondiente.
Las cifras indicadas en el regulador del número
de revoluciones (2.1) corresponden aproximadamente a los valores de marcha en vacío siguientes:
Aspiración
El dispositivo de aspiración de polvo evita altas
cargas de polvo en el aire de trabajo y ensuciamientos considerables en el puesto de trabajo.
25
Page 26

Dispositivo autoaspirador
3.1 3.2
3.33.4
Las máquinas están equipadas como equipo de
serie con un dispositivo autoaspirador. Meter el
soporte del fi ltro (3.3) con la abertura hasta el
tope sobre la tubuladura de aspiración (3.4) de
la máquina y fi jarlo con el botón giratorio (3.1).
El polvo de lijado es aspirado por las aberturas
de aspiración que se encuentran en el plato de
lijado y es recogido en el turbofi ltro (3.2). Cuando
el turbofi ltro se ha llenado hasta el punto de que
se nota una merma de la capacidad de aspiración,
se deberá proceder a su cambio.
Dispositivo de aspiración externa,
4.2
con aspirador
A fi n de evitar un frecuente cambio del turbofi ltro
durante trabajos de lijado relativamente largos,
en lugar del dispositivo autoaspirador se puede
conectar un aspirador Festool. Para ello se coloca
el tubo fl exible (Ø 27 mm (4.1)) de un aparato de
aspiración Festool sobre la tubuladura de empalme del aparato de aspiración (4.2).
4.1
Tacos esmeriladores
El taco esmerilador de serie Stickfi x STF 115 x 225
mm puede ser sustituido por el taco esmerilador
115 x 225 mm para papeles tensados. Para ello
se requieren seis tornillos de sujeción (5.1) que
se fi jan con un destornillador de ranura.
Ambos tacos (con y sin capa de Stickfi x) también
están disponibles con protección de cantos lateral (KS) para evitar el deterioro prematuro de la
superfi cie esmeriladora al pulir cantos.
5.1
26
Page 27

Materia abrasiva
¡Emplee únicamente material
abrasivo original de Festool !
Materia abrasiva Stickfi x
En los tacos esmeriladores Stickfi x se pueden
fijar materiales abrasivos adherentes, como,
por ejemplo, papel abrasivo Stickfi x y la lámina
abrasiva. Las materias abrasivas simplemente se
colocan presionando sobre el taco esmerilador y,
tras su uso, se sacan inmediatamente.
Atención: Utilice Vd. sólo tacos esmeriladores con
capa adhesiva de Stickfi x que no esté deteriorada. Controle antes de su uso si la capa de motas
no ha tomado daño por causa de una utilización
adecuada (p. ej., confundición).
6.1
Papel abrasivo para tensar
Junto a las materias abrasivas Stickfi x Festool
ofrece también materias abrasivas no perforadas.
Papel abrasivo sin agujeros puede perforarse con
el perforador Festool ”Lochfi x”.
Comience tensando el papel en el lado posterior
del aparato tras abrir el dispositivo de fi jación
girando la palanca de tensión (6.1). Introduzca el
papel hasta el tope y vuelva a poner la palanca
en la posición inicial. Coloque el papel sobre el
taco, estírelo hasta delante hasta quedar tensado
y engánchelo aliado anterior.
Trabajo con la máquina
No sobrecargue la máquina
presionándola demasiado sobre el objeto a lijar.
Un resultado óptimo de lijado lo conseguirá trabajando con una presión de apriete moderada.
La capacidad y calidad de lijado dependen esencialmente de la elección del material abraviso
correcto. Festool ofrece material adhesivo apropiado para todo caso de aplicación (ver el catálogo
Festool).
Page 28

7.1
Elaboración de metal:
Por motivos de seguridad
deberán tomarse las medidas siguientes al elaborar metal:
- conexión previa de un interruptor protector de
corriente de defecto (FI),
- conexión de la máquina a un aparato de aspira-
ción adecuado,
- limpieza periódica en la máquina para eliminar
las aglomeraciones de polvo en el cárter del
motor.
Ajuste de la velocidad (RS 2 E)
Para máquinas con sistema electrónico recomendamos realizar los siguientes ajustes de la rueda
de ajuste (7.1):
5 - 6
- Lijado con accionamiento máximo
- Lijado de pinturas viejas
- Lijado de madera y de enchapados antes del
barnizado
- Lijado intermedio de barniz sobre superfi cies
- Quitar óxido de superfi cies con lámina esmeri-
ladora
- Pulir acero/chapa V2A con lámina esmeriladora
4 - 5
- Lijado de barnizado previo de aplicación fi na
- Lijado de madera con velo de lijar
- Redondeado de cantos en piezas de madera
- Alisado de superfi cies de madera con pintura
de imprimación
3 - 4
- Lijado de cantos de madera maciza y de madera
enchapada
- Lijado de encajes de ventanas y puertas
- Lijado intermedio de barniz en cantos
- Lijado inicial de ventanas de madera natural
con velo de lijado
- Alisado de la superfi cie de madera antes del
barnizado, empleando velo de lijado
- Frotado de superfi cies barnizadas empleando
velo de lijado
- Abrasión o desprendimiento de pasta de cal
sobrante empleando el velo de lijado
2 - 3
- Lijado intermedio de pinturas sobre superfi cies
28
Page 29

barnizadas (coloreadas con nogalina)
- Limpieza de encajes de ventanas de madera
natural con velo de lijado
1 - 2
- Lijado de cantos pintados/coloreados con nogalina
- Esmerilado de termoplásticos.
Mantenimiento y conservación
Todos los trabajos de mantenimiento y de reparación, para los que se tiene
que abrir la carcasa del motor (incluido el reemplazo del cable de red), sólo deben ser llevados a
cabo por un taller de servicio de asistencia técnica
autorizado. Un mantenimiento o reparación de la
máquina por personas no autorizadas puede ser
la causa de una conexión errónea de los cables
conductores de corriente eléctrica o de otros componentes, lo cual puede ser la causa de accidentes
con lesiones graves.
¡Desenchufar el enchufe de
la toma de corriente antes de realizar trabajos
en la máquina!
Mantener siempre limpias las ventanas de refrigeración.
Accesorios, herramientas
¡Por razones de seguridad,
solamente deben emplearse accesorios y herramientas originales de Festool!
Los números de pedido para los respectivos
accesorios y herramientas se encuentran en su
catálogo Festool o en la dirección de Internet
www.festoolusa.com.
8.1
Asidero adicional
Si hay que pulir/lijar hasta una posición cercana
a la pared por la parte delantera del aparato, se
puede desenroscar el asidero adicional girándolo
a la izquierda (8.1).
29
Page 30

9
Systainer
Muchos de los productos Festool se entregan en
un embalaje exclusivo denominado "Systainer"
que sirve de protección a la herramienta y sus
complementos, además de facilitar su almacenamiento. Los Systainer pueden apilarse y encajan
unos con otros. Además se adaptan sin problema
a cualquier aparato de aspiración CT de Festool.
Para abrir el Systainer:
– Gire el T-loc [9.1] a la posición
A
abrir
encajar
T-loc
cerrar
encajar
Para cerrar el Systainer:
– Gire el T-loc [9.1] a la posición
Para encajar dos Systainer:
– Ponga el Systainer sobre un otro (Fig. 9 A).
– Gire el T-loc [9.1] a la posición
.
.
o
(Fig.9B).
– Los Systainers estan encajados y cerrados.
Un Systainer de la nueva generación es enca-
jable encima de un Systainer de la generación
anterior con los cuatro enganches del Systainer
anterior.
9.1
B
Garantiá
Festool ofrece una garantía limitada de 3 años,
una de las más sólidas de la industria. Esta garantía será válida con la condición previa de que la herramienta se utilice conforme a las instrucciones
de funcionamiento de Festool. Festool garantiza
que la herramienta especifi cada no presentará
defectos de material o de acabado durante un
periodo de 3 años a partir de la fecha de compra.
Condiciones de la garantía 1+2
Al adquirir una herramienta eléctrica nueva de
Festool en un distribuidor autorizado, todos los
clientes recibirán de forma gratuita una garantía
limitada ampliada (1 año + 2 años = 3 años). Festool será responsable de todos los gastos de envío
durante el primer año de vigencia de la garantía.
Durante el segundo y tercer año, el cliente será
responsable del envío de la herramienta a Festool.
Festool pagará la devolución al cliente utilizando
el servicio UPS Ground. Todos los servicios de ga-
30
Page 31

rantía serán válidos durante 3 años a partir de la
fecha de compra que fi gura en el recibo o factura.
Puede que se precise una prueba de compra.
Quedan excluidos de la cobertura de la presente
garantía el desgaste normal, los daños ocasio-
nados por un uso indebido, abuso o negligencia;
los daños provocados por otra causa que no sea
un defecto de material o de acabado. La presente
garantía no es aplicable a elementos accesorios
tales como hojas de sierra circulares, brocas,
puntas de fresadora, hojas de calar, bandas lijadoras y ruedas de amolar.El hecho de utilizar
la herramienta a una tensión o una frecuencia
diferentes de los valores nominales anulará la
garantía. Esto incluye el uso de la herramienta
combinada con un transformador. Festool no
aprueba ni apoya el uso, con productos Festool, de
accesorios o consumibles que no hayan sido construidos, diseñados y fabricados por Festool.La
utilización de cualquier producto que no sea de
Festool puede afectar al rendimiento o anular la
garantía.Festool no se responsabilizará de ningún
daño o pérdida y el usuario asumirá los riesgos
y la responsabilidad por el uso de productos no
derivados de Festool.Se excluyen asimismo las
“piezas de desgaste” como, por ejemplo, cepillos
de carbón, láminas de herramientas neumáticas,
abrazaderas y juntas de caucho, platos lijadores y
artículos de ropa de Festool (gorras y camisetas).
Las obligaciones de Festool, según su propio
criterio y de acuerdo con la presente garantía, se
limitarán a la reparación, sustitución o reembolso
del precio de compra de cualquier herramienta
eléctrica portátil de Festool en la que se haya
detectado un defecto de material o de acabado
durante el periodo de garantía. FESTOOL NO
SERÁ RESPONSABLE DE NINGÚN DAÑO CONSECUENCIAL, INCIDENTAL O ESPECIAL, INDEPENDIENTEMENTE DEL FUNDAMENTO LEGAL
EN EL QUE SE BASE LA RECLAMACIÓN. TODAS
LAS GARANTÍAS IMPLÍCITAS DE ACUERDO CON
LA LEGISLACIÓN ESTATAL, INCLUIDAS LAS DE
COMERCIALIZACIÓN Y ADECUACIÓN PARA UN
FIN PARTICULAR, SE LIMITARÁN POR LA PRESENTE A UNA DURACIÓN DE TRES AÑOS.
En determinados estados de EE.UU. y provincias
de Canadá, las limitaciones de duración de una
garantía implícita no están permitidas, de modo
que es posible que la limitación anterior no sea
aplicable en su caso. La presente garantía le
otorga derechos legales específi cos; además, es
posible que goce de otros derechos que varíen
en los diferentes estados de EE.UU. y provincias
de Canadá.
A excepción de cualquier garantía implícita de
acuerdo con la legislación estatal o provincial y
limitada según lo expuesto anteriormente, la garantía limitada expresa precedente será exclusiva
y sustituirá a todas las demás garantías, acuerdos
y obligaciones similares de Festool. Festool no
concede ninguna otra garantía, ya sea expresa o
implícita, para sus herramientas eléctricas portátiles.Esta póliza de garantía únicamente será
válida para aquellas herramientas que se hayan
adquirido en EE.UU. y Canadá. Las pólizas de
garantía de otros países podrán diferir al acudir
al servicio de garantía fuera de EE.UU. y Canadá.Determinados países excluyen de la garantía
los productos adquiridos fuera de su territorio.
Festool se reserva el derecho de rechazar la reparación de cualquier herramienta que no forme
parte de la línea de productos de EE.UU./Canadá.
Ningún agente, representante, distribuidor, proveedor o empleado de Festool estará autorizado
a incrementar o modificar las obligaciones o
limitaciones estipuladas en la presente garantía.
31
Page 32

 Loading...