

Page 1

Festool GmbH
Wertstraße 20
73240 Wendlingen
Germany
www.festoolusa.com
Instruction manual
Page 6
IMPORTANT: Read all instructions before using.
Guide d’utilisation
Page 17
IMPORTANT: Lire toutes les instructions avant de démarrer les travaux.
Manual de instrucciones
Página 29
IMPORTANTE: Lea todas las instrucciones antes de usar.
707353_004
Instruction manual
Guide d’utilisation
Manual de instrucciones
LEX 3 77
LEX 3 150
Page 2

Page 3

Page 4
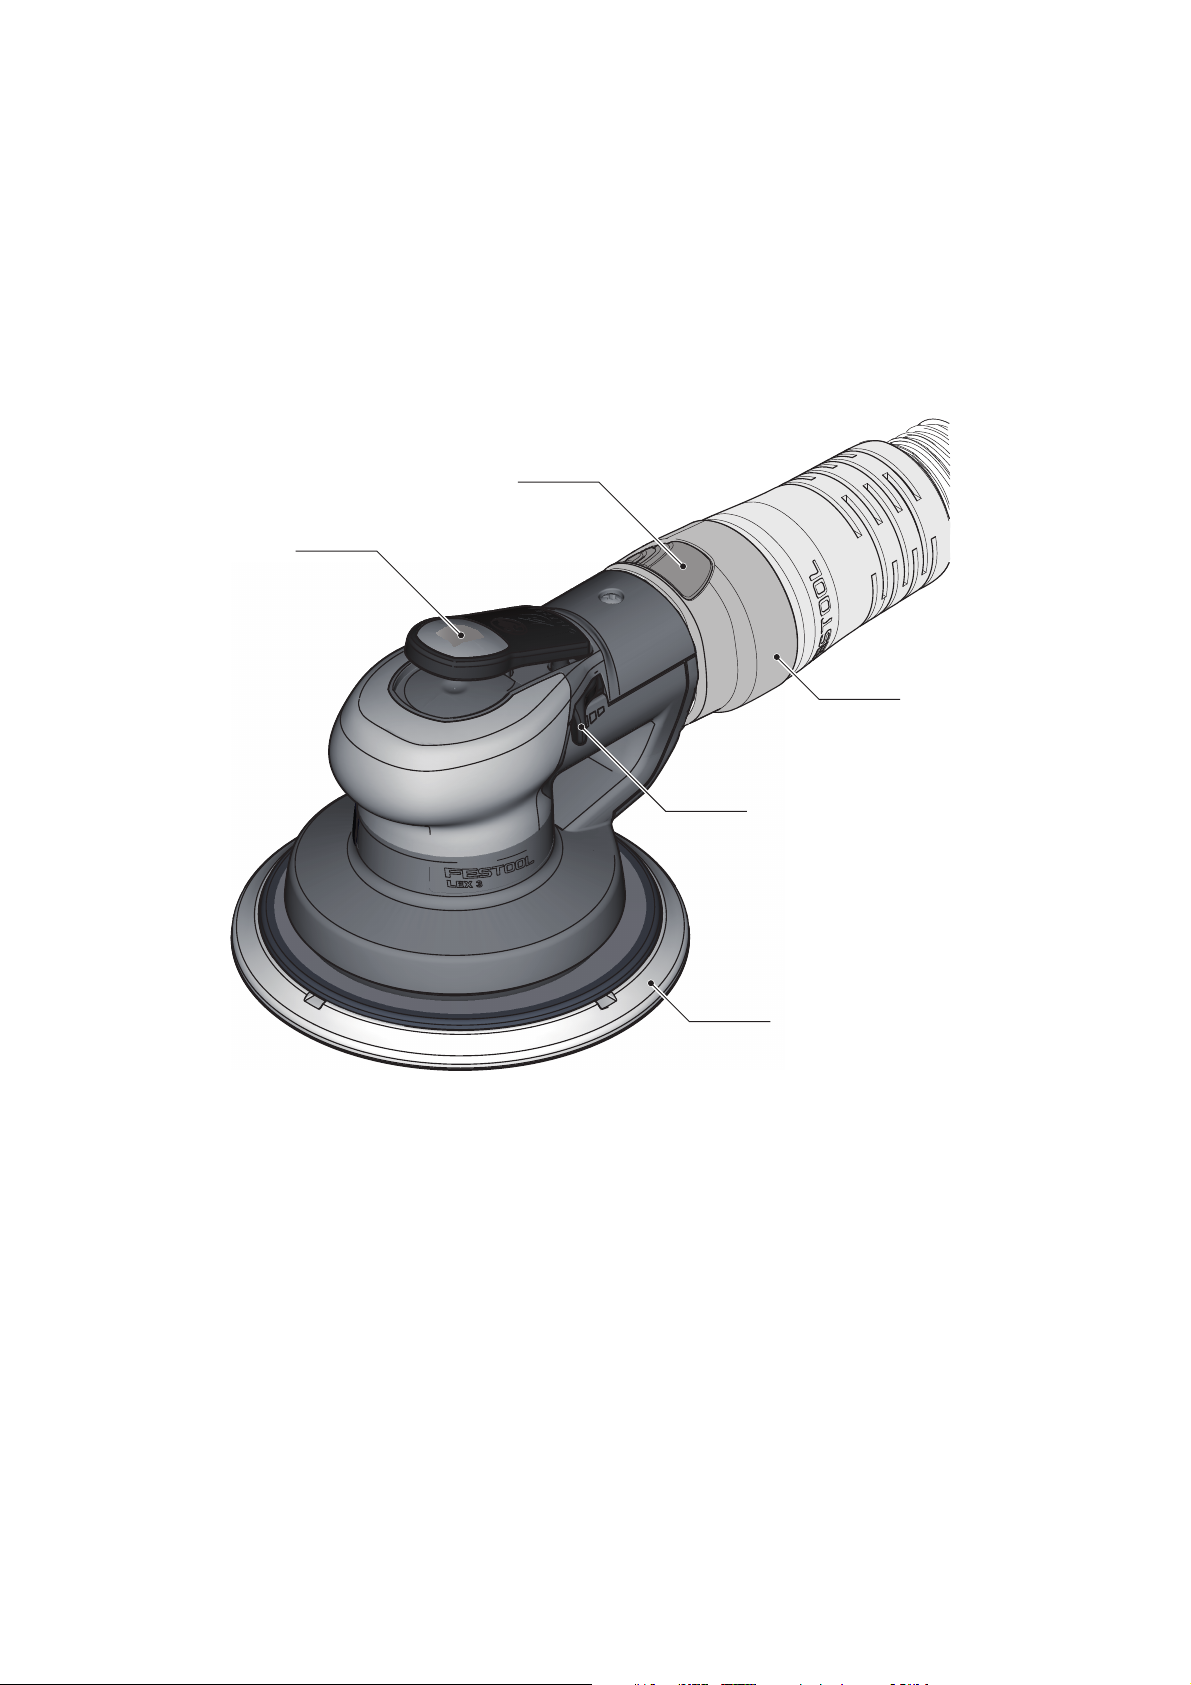
1-1
1-2
1-3
1-4
1-5
LEX 3 150
Page 5

Page 6
Contents
Settings................................................. 14
About this manual................................ 6
IMPORTANT SAFETY INSTRUCTIONS . 6
INSTRUCTIONS PERTAINING TO A
RISK OF FIRE, ELECTRIC SHOCK, OR
INJURY TO PERSONS .......................... 6
Other risks ........................................... 10
Health hazard by dust.......................... 10
Symbols ............................................... 11
Intended use ........................................ 11
Technical data...................................... 11
Functional description......................... 12
Compressed-air supply and commissioning 12
Compressed air preparation................ 12
Connection for IAS hose system.......... 12
Switch on/off ........................................ 13
Setting and adjusting the speed........... 14
Replacing the sanding pad [4].............. 14
Attaching sanding accessories using
StickFix [5]............................................ 14
Dust extraction..................................... 14
Working with the machine ................... 15
Service and maintenance..................... 15
Vanes .................................................... 15
Replacing the silencer.......................... 15
Sanding pad brake................................ 15
Cleaning the extraction channels ........ 15
Accessories .......................................... 16
Environment......................................... 16
About this manual
Save these instructions
It is important for you to read and understand this manual. The information it contains relates to protecting
your safety
and
preventing problems
DANGER Description of imminent haz-
ard and failure to avoid hazard
will result in death.
WARNING Description of hazard and
possible resulting injures or
death.
CAUTION Description of hazard and
possible resulting injuries.
. The symbols below are used to help you recognize this information.
NOTICE Statement including nature of
hazard and possible result.
HINT Indicates information, notes,
or tips for improving your success using the tool.
IMPORTANT SAFETY INSTRUCTIONS
INSTRUCTIONS PERTAINING TO A RISK OF
FIRE, ELECTRIC SHOCK, OR INJURY TO
PERSONS
WARNING! When using tools, basic precautions should always be followed, including
the following:
SAVE THESE INSTRUCTIONS
6
General
a.
To reduce the risks of electric shock, fire, and
injury to persons, read all the instructions before using the tool.
The term “power tool” in the warnings refers to
your mains-operated (corded) power tool or battery-operated (cordless) power tool.
– Only trained and qualified persons are permitted
to set up, adjust and operate this compressed air
Page 7

tool. Persons without the relevant qualifications
and training are more likely to cause accidents.
– This compressed air tool may not be modified.
Modifications may reduce the effectiveness of
safety devices and pose a greater risk to operating personnel.
– Keep all of the attached documents and pass on
the documentation if the machine changes own-
ership.
– Never use a damaged compressed air tool.
– Regularly inspect compressed air tool. The com-
pressed air tool must be marked with clearly leg-
ible rated values and markings. Replacement
signs can be ordered from the manufacturer.
1 WORK AREA
a.
Keep the work area clean and well lighted.
Cluttered benches and dark areas increase the risks
of electric shock, fire, and injury to persons.
b.
Do not operate the tool in explosive atmospheres, such as in the presence of flammable
liquids, gases, or dust.
The tool is able to create
sparks resulting in the ignition of the dust or
fumes.
c.
Keep bystanders, children, and visitors away
while operating the tool.
Distractions are able to
result in the loss of control of the tool.
2 PERSONAL SAFETY
a.
Stay alert. Watch what you are doing and use
common sense when operating the tool. Do not
use the tool while tired or under the influence of
drugs, alcohol, or medication.
A moment of inattention while operating the tool increases the risk
of injury to persons.
b.
Dress properly. Do not wear loose clothing or
jewelry. Contain long hair. Keep hair, clothing,
and gloves away from moving parts.
Loose
clothes, jewelry, or long hair increases the risk of
injury to persons as a result of being caught in
moving parts.
c.
Avoid unintentional starting. Be sure the switch
is off before connecting to the air supply.
Do not
carry the tool with your finger on the switch or
connect the tool to the air supply with the switch
on.
d.
Remove adjusting keys and wrenches before
turning the tool on.
A wrench or a key that is left
attached to a rotating part of the tool increases
the risk of personal injury.
e.
Do not overreach. Keep proper footing and balance at all times.
Proper footing and balance en-
ables better control of the tool in unexpected
situations.
f.
Use safety equipment.
A dust mask, non-skid
safety shoes and a hard hat must be used for the
applicable conditions.
g.
Always wear eye protection.
h.
Always wear hearing protection when using the
tool.
Prolonged exposure to high intensity noise
is able to cause hearing loss.
i.
Hold tool by insulated gripping surfaces when
performing an operation where the cutting tool
may contact hidden wiring.
Contact with a "live"
wire will also make exposed metal parts of the
tool "live" and shock the operator.
j.
Avoid body contact with grounded surfaces such
as pipes, radiators, ranges and refrigerators.
There is an increased risk of electric shock if your
body is grounded.
k.
Explore the workpiece to avoid contact with hidden wiring.
Thoroughly investigate the workpiece
for possible hidden wiring before performing
work. Contact with live wiring will shock the operator.
3 TOOL USE AND CARE
a.
Use clamps or another practical way to secure
and support the workpiece to a stable platform.
Holding the work by hand or against the body is
unstable and is able to lead to loss of control.
b.
Do not force the tool.
Use the correct tool for the
application. The correct tool will do the job better
and safer at the rate for which the tool is designed.
c.
Do not use the tool if the switch does not turn
the tool on or off.
Any tool that cannot be controlled with the switch is dangerous and must be
repaired.
d.
Disconnect the tool from the air source before
making any adjustments, changing accessories,
or storing the tool.
Such preventive safety measures reduce the risk of starting the tool unintentionally.
e.
Store the tool when it is idle out of reach of children and other untrained persons.
A tool is dan-
gerous in the hands of untrained users.
f.
Maintain the tool with care.
Keep a cutting tool
sharp and clean. A properly maintained tool, with
sharp cutting edges reduces the risk of binding
and is easier to control.
g.
Check for misalignment or binding of moving
parts, breakage of parts, and any other condition that affects the tool’s operation.
If damaged,
have the tool serviced before using. Many acci-
7
Page 8

dents are caused by poorly maintained tools.
There is a risk of bursting if the tool is damaged.
h.
Use only accessories that are identified by the
manufacturer for the specific tool model.
Use of
an accessory not intended for use with the specific tool model, increases the risk of injury to
persons.
4 SERVICE
a.
Tool service must be performed only by qualified repair personnel.
b.
When servicing a tool, use only identical replacement parts. Use only authorized parts.
c.
Use only the lubricants supplied with the tool or
specified by the manufacturer.
5 AIR SOURCE
a.
Never connect to an air source that is capable of
exceeding 200 psi.
Over pressurizing the tool is
able to result in bursting, abnormal operation,
breakage of the tool or serious injury to persons.
Use only clean, dry, regulated compressed air at
the rated pressure or within the rated pressure
range as marked on the tool. Always verify prior
to using the tool that the air source has been adjusted to the rated air pressure or within the rated
air-pressure range.
b.
Never use oxygen, carbon dioxide, combustible
gases or any bottled gas as an air source for the
tool.
Such gases are capable of explosion and se-
rious injury to persons.
Danger from ejected parts
– In the event the workpiece, accessory or machine
parts break parts may be ejected at high speed.
– Wear impact-resistant protective goggles.
– Wear a helmet when doing overhead work. Also
assess the risks for other people.
– Secure the workpiece. Use clamping devices or a
vice to hold the workpiece firmly.
Risk of getting caught
– Wear suitable protective clothing! Do not wear
loose clothing or jewellery. They can be caught by
moving parts. Wear a hair net if you have long
hair.
Risks during operation
– Wear protective gloves.
– Operating and maintenance personnel must be
physically strong enough to handle the size,
weight and power of the machine.
– Hold the machine correctly. Prepare to counter-
act normal or sudden movements - hold the machine with both hands.
– Avoid abnormal posture. Ensure secure stance
and keep your balance at all times.
– Enable the command device for starting and
shutting down in case of an interruption to the
energy supply.
– The machine can only be operated with abrasives
which were developed for this purpose.
– Use only lubricants recommended by the manu-
facturer.
– Check sanding pad before each use. Do not use
the sanding pad if it is torn, broken or has fallen.
– Avoid direct contact with the sanding pad. Wear
suitable gloves as protection.
– Never use without an abrasive.
– Risk of an electrostatic discharge if the com-
pressed air tool is used on plastic and other non-
conductible materials.
– Potentially explosive atmosphere: If explosive or
self-igniting dust is produced during sanding of
certain materials, the processing instructions of
the material manufacturer must be observed un-
der all circumstances.
Risk through repeated movements
– The use of the compressed air tool may cause
unpleasant sensations in the hands and arms of
the operator, as well as in the neck and shoulder
area or other body parts.
– Adopt a comfortable posture. Change posture if
working continuously.
– If symptoms such as malaise, complaints, throb-
bing, pain, tingling, numbness, burning or stiff-
ness occur inform your employer and consult a
doctor.
Risk as a result of accessory parts
– Disconnect the compressed air hose from the
compressed air supply. In the event of non-use of
the compressed air tool, before maintenance and
when changing insertion tools.
– Avoid contact with the insertion tool during and
after use.
– Always use original accessories.
– Grinding wheels and cutting-off wheels are not
permitted.
– The permissible rotational speed of the accesso-
ry must be at least 1,000 rpm higher than the
maximum speed specified on the machine. Ac-
8
Page 9

cessories that rotate faster than the permissible
level can rupture.
– Self-adhesive abrasives must be attached con-
centrically on the sanding pad.
Risk at work station
– Slipping and tripping hazard! Pay attention to
slippery surfaces and tripping hazards as a result
of air pressure hoses.
– Not intended for use in explosive atmospheres
and not insulated against contact with electrical
power sources.
– Proceed with caution in unfamiliar surroundings
that may contain electrical or other supply cables
that harbour hidden dangers. Ensure that there
are no electrical cables, gas pipelines or similar
that, if damaged, could pose a hazard when the
machine is used.
Hazard as a result of dust and vapours
– If hazardous dust is produced during sanding, the
machine should be connected to an appropriate
extractor and the safety regulations that apply to
the working material should be observed.
– A risk assessment in relation to this hazard must
be carried out and corresponding control mechanisms implemented. Arising dust must be factored in.
– Connect the dust extractor. Make sure that avail-
able dust extraction equipment is connected and
used correctly. Observe the regional safety regulations for hazardous dusts and vapours. Operate
and service the compressed air tool as described
in the recommendations included in these instructions and use accessories and attachments
from Festool to minimise the release of dust and
vapours into the atmosphere. In dusty environments, make sure that the dissipation of exhaust
air does not disturb the dust.
– If necessary arising dust or vapours must be con-
trolled at the place of their release.
– All components must be fitted correctly and meet
all requirements to ensure that the compressed
air tool operates correctly.
– Select, maintain and replace accessories and
consumables according to these operating instructions.
– Wear a dust mask. Observe instructions from the
employer or occupational and health regulations.
Noise hazard
– Higher noise level can lead to permanent hearing
damage, loss of hearing or other problems if in-
adequate hearing protection is not worn or available.
– A risk assessment in relation to this hazard must
be carried out and corresponding control mechanisms implemented, e.g. the use of insulating
materials.
– Wear ear protection. Observe instructions from
the employer or occupational and health regulations.
– Operate and maintain compressed air tool ac-
cording to these operating instructions.
– Select, maintain and replace accessories and
consumables according to these operating instructions.
– Assure function of the silencer at the com-
pressed air tool.
Vibration hazard
– Vibrations can cause damage to nerves and prob-
lems with blood circulation in hands and arms.
– When working in cold environments wear warm
clothing and keep hands warm and dry.
– In the event of numbness, tingling or pains in fin-
gers or hands or white colouration of the fingers
or hands, cease work, inform employer and consult a doctor.
– Operate and maintain compressed air tool ac-
cording to these operating instructions.
– Do not hold the compressed air tool too tight, but
with a secure grip while observing the necessary
hand reaction forces. The vibration risk is greater
with increasing gripping strength.
Additional safety information for pneumatic machines
– Compressed air can cause serious injuries.
– Disconnect the compressed air hose from
the compressed air supply. In the event of
non-use of the compressed air tool, before
maintenance and when changing insertion tools.
– Never direct the air flow towards yourself
or other persons.
– Hoses flapping around can cause serious inju-
ries. Check whether hoses and their fixing devices have not suffered damage or become loose.
– The operating pressure should not exceed 6.2 bar
(90 psi).
– The machine must not be operated at a higher
speed than 6500 min
-1
– Never carry the compressed air tool by the com-
pressed air hose.
9
Page 10

Further safety information
–
Keep your work area tidy.
area can cause accidents.
–
Take into consideration environmental influences.
the rain.
–
Keep away from children!
touch the compressed air tool or the compressed
air hose. Keep others away from your work area.
–
Store your compressed air tools safely.
compressed air tools should be stored in a dry,
inaccessible or locked location, out of the reach
of children.
–
Do not use the compressed air hose for purposes for which it was not intended.
compressed air hose from heat, oil and sharp
edges. Check the compressed air hose regularly
and if it becomes damaged, have it replaced by an
approved specialist. The compressed air hose
cannot be used for application devices such as
atomising and spraying equipment as the safety
requirements against electrical hazards cannot
be satisfied.
–
Take good care of your tools.
sharp and clean to enable better and safer work.
Follow the maintenance regulations and the information about tool replacement. Keep handles
dry and free of oil and grease.
–
Do not leave any tool key inserted.
switching on check that key and adjustment tools
are removed.
–
Avoid unintended start-up
pressed air tool that is connected to a compressed air supply with your finger on the trigger.
When connecting the compressed air hose to a
compressed air supply, make sure that the switch
is not activated.
–
Be alert!
ways work with care.
Do not use the compressed air tool if you are not
able to concentrate properly.
–
Have
qualified specialist.This compressed air tool corresponds to the relevant safety regulations. Repairs should only be carried out by a qualified
specialist. The operator is otherwise at risk of an
accident.
–
Only work with correctly processed compressed
air.
this.
–
If the compressed air tool is dropped or falls,
check for damage to the machine and sanding
Do not leave compressed air tools out in
Pay attention to what you are doing. Al-
your compressed air tool repaired by a
Using the Festool supply unit VE guarantees
Untidiness in the work
Do not allow others to
Unused
Protect the
Keep the tools
Before
. Do not carry a com-
pad. Remove the sanding pad for closer inspec-
tion. Repair damaged parts before using again.
Broken sanding pads and damaged machines
can cause injuries and machine instability.
–
Clean work equipment soaked in oils, for exam-
ple sanding pad or polishing felt, with water and
allow to dry.
combust spontaneously.
–
Always use anti-static hoses and an earthed ex-
traction system. The system components of-
fered by Festool satisfy these requirements.
unearthed extractor system or hoses that are not
anti-static may cause electric shocks and severe
injuries.
Work equipment soaked in oil may
An
Other risks
In spite of compliance with all relevant design regulations, dangers may still present themselves
when the machine is operated, e.g.:
– Workpiece parts being thrown off,
– Parts of damaged tools being thrown off,
– Noise emissions,
–Dust emissions.
Health hazard by dust
WARNING!
sanding, sawing, grinding, drilling and other
construction activities contains chemicals
known (to the State of California) to cause cancer,
birth defects or other reproductive harm. Some examples of these chemicals are:
• lead from lead-based paints,
• crystalline silica from bricks and cement and
other masonry products, and
• arsenic and chromium from chemically treated
lumber.
proved safety equipment, such as dust masks that
are specially designed to filter out microscopic particles. Wash hands after handling.
Various dust created by power
The risk from these exposures
varies, depending on how often
you do this type of work. To reduce your exposure to these
chemicals: work in a well ventilated area, and work with ap-
WARNING
TO REDUCE THE RISK OF INJURY, USER MUST
READ INSTRUCTION MANUAL.
10
Page 11
Symbols
Warning of general danger
Risk of electric shock
Read the Operating Instructions/Notes!
Wear ear protection.
Wear eye protection.
Wear a dust mask.
Do not throw in the household waste.
n
0
.../min
-1
min
min minutes
lliter
bar bars
lb. pound
mm millimetre
’’ inch
kg kilograms
l/min liter per minute
psi pounds per square inch
°F degree Fahrenheit
Intended use
no-load speed
revolutions per minute
The compressed air eccentric sanders are suitable
for sanding wood, plastic, metal, stone, composites, acrylic-based mineral materials, paint/clear
coats, fillers and similar materials.
Materials containing asbestos must not be processed
Only
use with Festool hose system IAS 2 or IAS 3
and Festool sanding pads!
The user is liable for improper or non-intended use.
.
Technical data
Compressed air eccentric sander LEX 3 LEX 3 LEX 3 LEX 3
77/2.5 150/3 150/5 150/7
Drive Compressed-air vane motor
Sanding pad Ø 77 mm (3") 150 mm (6")
Sanding stroke 2.5 mm (3/32") 3 mm (1/8") 5 mm (3/16") 7 mm (9/32")
Idle engine speed n
0
Air consumption at rated load* 270 l/min 290 l/min 310 l/min
Air pressure
Max. inlet pressure 6.2 bar (90 psi)
10,500 rpm 10,000 rpm
Recommended minimum 5 bar (72.5 psi)
Compressed air quality i.a.w. DIN ISO
Class 5
8573-1
Recommended storage temperature
0° - 60° C / 10° - 40° C (0 °F - 140 °F / 50 °F - 104 °F)
/ operating temperature
Weight 0.7 kg (1.5 lbs) 1.0 kg (2.0 lbs)
* at 6 bar (87 psi) inlet pressure; n0, load 30N
11
Page 12
Functional description
2-1
2-2
2-3
IAS-3/IAS-2
2-1
2-2
2-3
IAS-3 light
The pictures for the functional description are on a
fold-out page at the beginning of the instruction
manual. When reading of the manual you can fold
out this page for having always an overview of the
machine.
Accessories shown or described are sometimes not
included in the scope of delivery.
Compressed-air supply and commissioning
CAUTION
Risk of injury
Make sure that the pneumatic tool is switched
off when you connect the compressed-air supply.
[1-1]
[1-2]
[1-3]
[1-4]
[1-5]
On/Off switch
Button for loosening the IAS connection
IAS connection adapter
Speed control
Sanding pad
Compressed air preparation
The machine is designed for lubricated operation
and must be operated with the Festool service unit.
Comprising a filter, controller, condensate outlet
and oiler, it ensures clean, oiled compressed air
free of condensation. The oiler must be adjusted so
that approx. every 15 minutes a drop of oil is added
to the compressed air. The correct setting depends
on the daily usage time.
Damage that occurs as a result of incorrect
compressed air processing is excluded from
warranty claims.
We recommend a service unit with a 3/8" connector,
when up to two Festool compressed air tools are
used.
A compressor that supplies at least 350 l/min at an
operating pressure of 6 bar (87 psi) should be used
to supply compressed air.
The diameter of the piping system must be sufficiently large (at least 9 mm (3/8")).
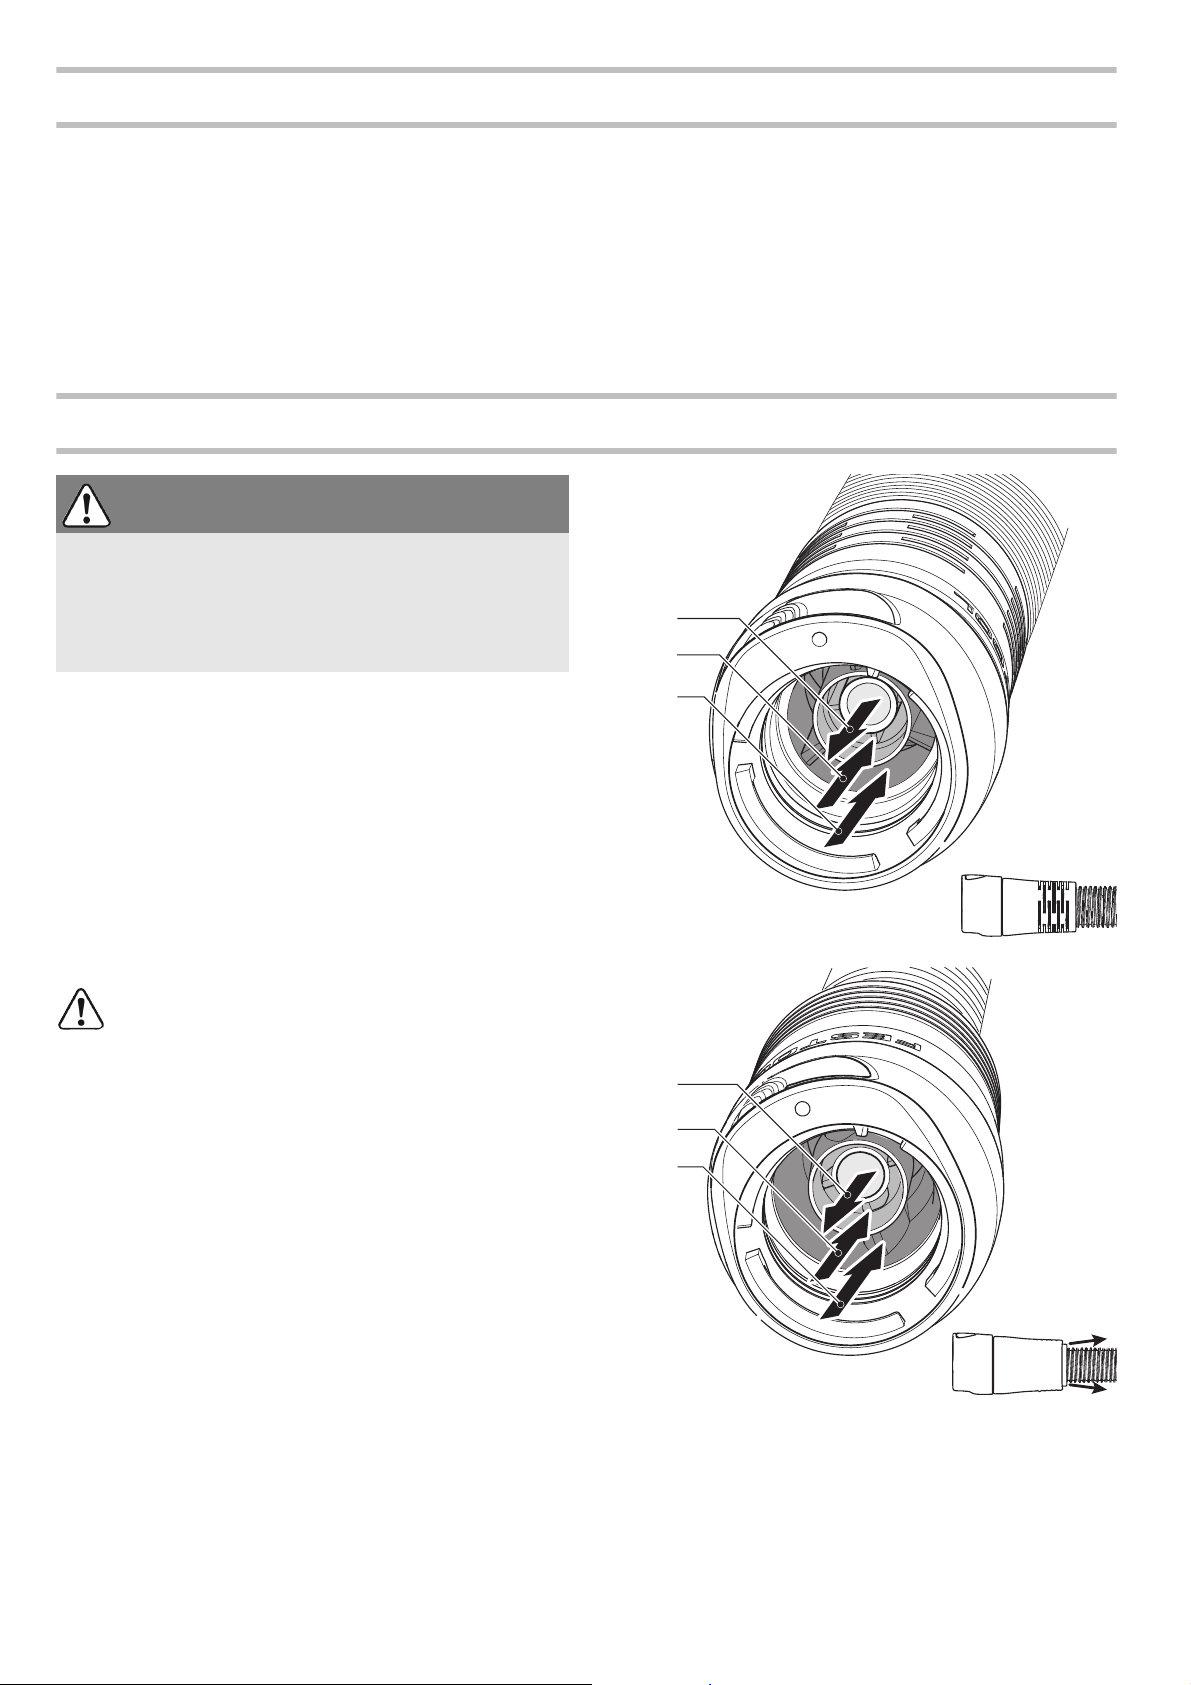
Connection for IAS hose system
The IAS hose system combines several functions in
one hose depending on the version:
– Compressed air supply
– Exhaust air extraction
– Dust extraction
12
[2-3]
[2-1]
[2-2]
Page 13
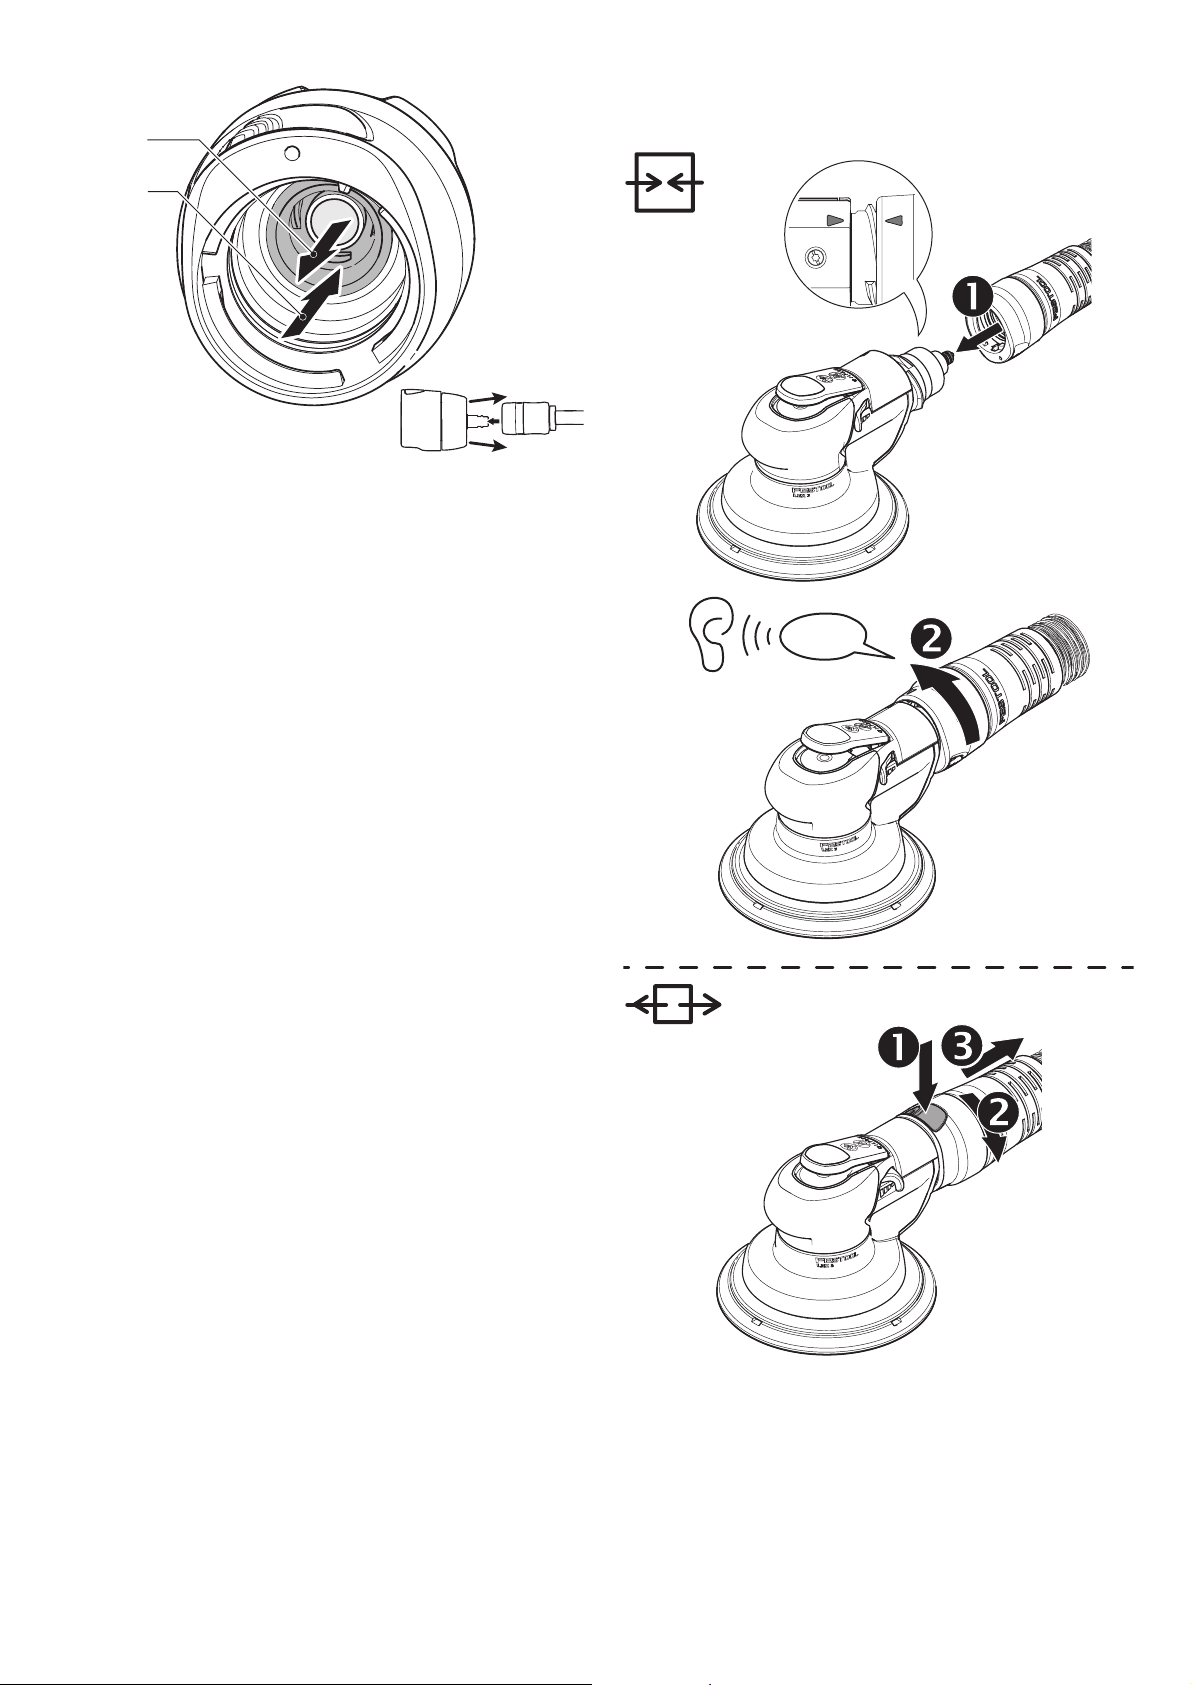
Connection and disconnection
2-1
2-2
IAS-3 SD
Click
see Fig.
[3]
.
3
Switch on/off
Switching-on: Press
Switching off: Release
[1-1]
switch.
[1-1]
switch.
13
Page 14
CAUTION
4
5
StickFix
Risk of injury
The machine should always be disconnected
from the compressed air supply before any work
is carried out on the machine.
Settings
Tuned to the surface being processed, the machine
can be equipped with three sanding pads of different hardnesses.
Hard:
ing edges.
Soft:
and convex surfaces.
Coarse and fine sanding on surfaces. Sand-
Universal for coarse and fine sanding, for flat
Setting and adjusting the speed
Can be adjusted at the control lever
LEX 3 77/2,5 7.800 - 10.500 rpm
LEX 3 150/3, 150/5, 150/7 7.000 - 10.000 rpm
This enables you to optimise the material removal
capacity to suit the respective material or application.
[1-4]
between
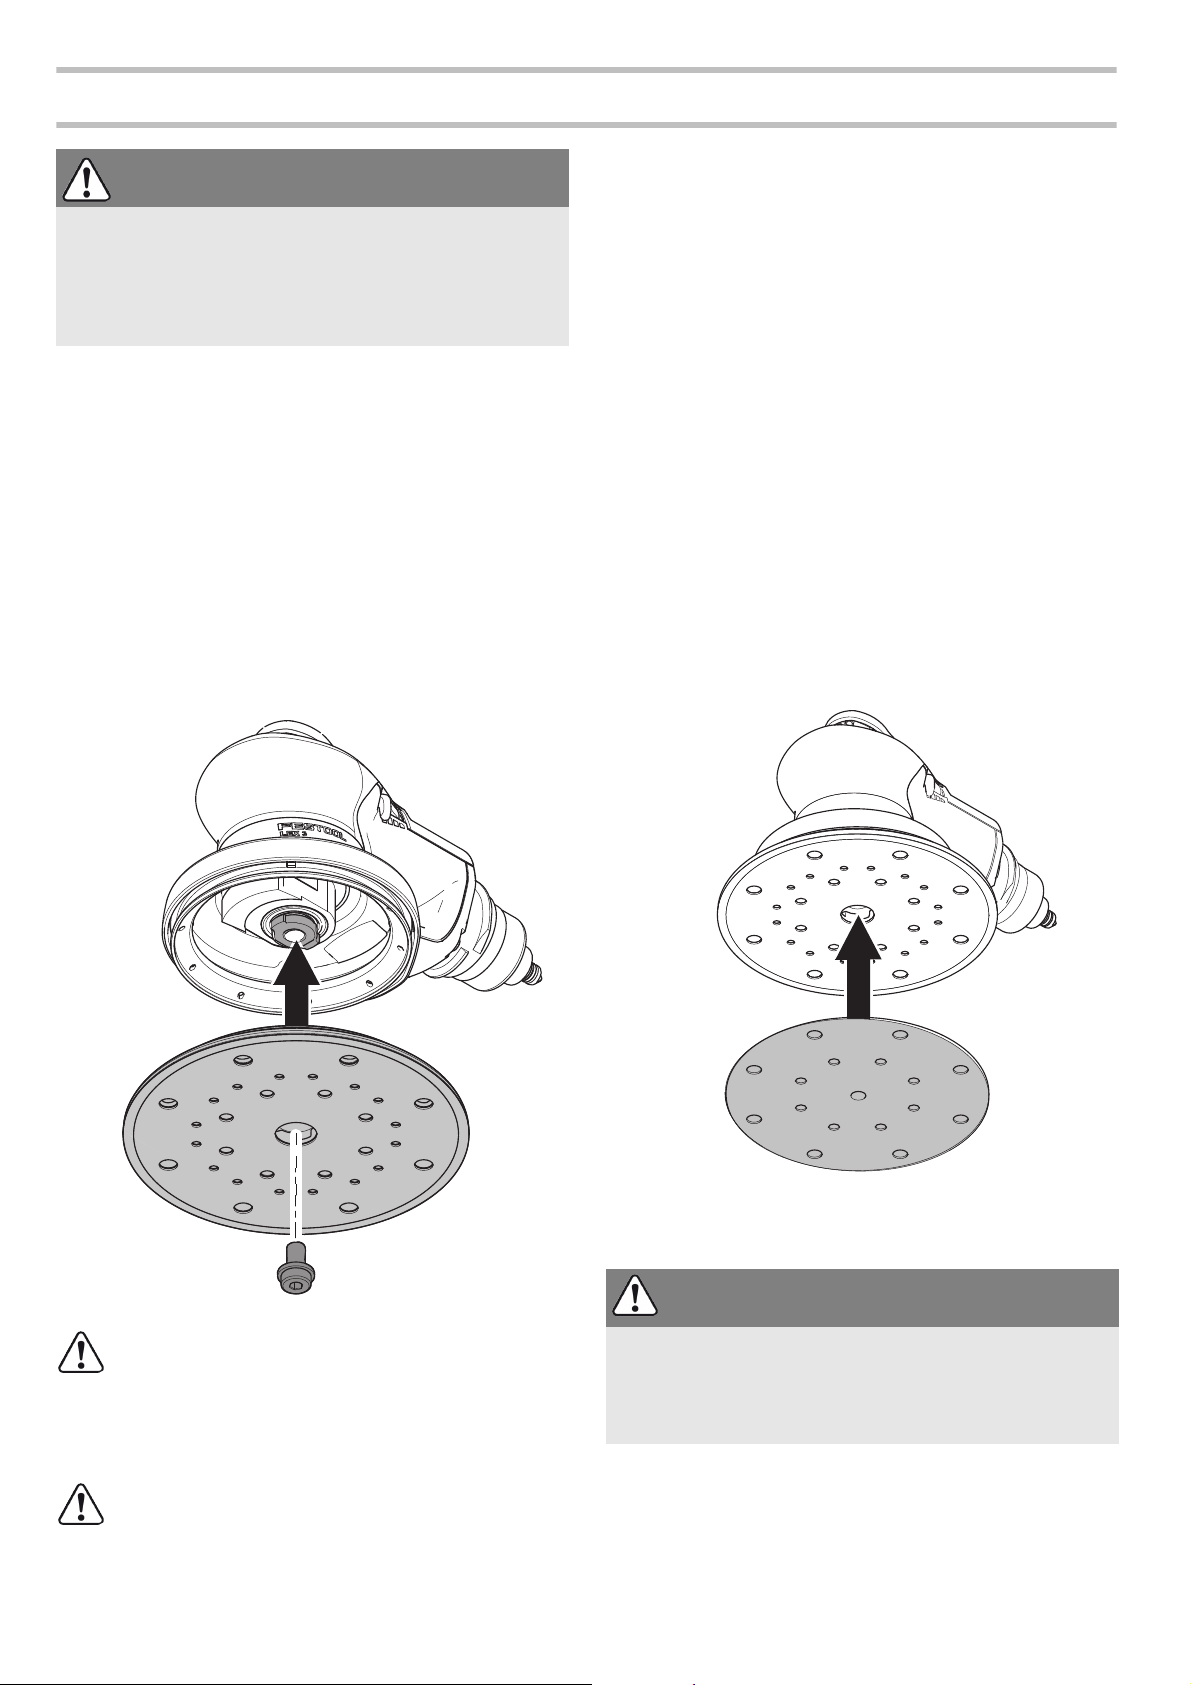
Replacing the sanding pad [4]
Extra-soft:
radii. Do not use on edges.
Fine sanding of moulded parts, arches,
Attaching sanding accessories using Stick-
Fix [5]
The suitable StickFix sandpaper and StickFix sanding cloth can be attached quickly and simply to the
StickFix sanding pad.
Press the self-adhesive sanding accessory onto
the sanding pad
[1-5]
.
An optimal work result can only be achieved
using original accessories and consumables.
The use of non-original accessories or consumables invalidates the right to claim under warranty.
Health risk: Fitting sanding pads of incorrect
size causes excessive vibration of the ma-
chine.
14
Dust extraction
WARNING
Dust hazard
Always work with a dust extractor.
Always observe country-specific regulations.
For use of a Festool mobile dust extractor
flow sensor
dust extractor to Ø 27 mm (1-1/16").
To guarantee optimal dust extraction, we recom-
: Adjust hose diameter of mobile
with
Page 15

mend using Festool extractors with automatic
6-2
6-1
6
switch-on/switch-off device for compressed air
machines.
Working with the machine
In order to prevent damage to the pneumatic
motor, dust extraction must not be carried
out on the pneumatic tool when it is at standstill.
Please observe all mentioned safety informations and the following rules when working:
– Always secure the workpiece in such a manner
that it cannot move while being processed.
Service and maintenance
WARNING
Risk of injury
The machine should always be disconnected
from the compresses air supply before any work
is carried out on the machine.
All maintenance and repair work which requires
the motor casing to be opened may only be carried out by an authorised service centre.
For work that generates dust, wear a dust
mask.
ing pad. This must be replaced if the braking effect
decreases.
Customer service and repair
through manufacturer or service
workshops: Please find the nearest
address at:
www.festoolusa.com/service
EKAT
4
Use only original Festool spare parts!
Order No. at:
5
3
2
1
www.festoolusa.com/service
Vanes
We recommend that the vanes on the motor be replaced after approx. 2000 operating hours.
Replacing the silencer
In order to maintain the power and performance of
the compressed air tool, replace the silencer on the
IAS hose systems at regular intervals.
Sanding pad brake
The rubber sleeve
pad and prevents uncontrolled turning of the sand-
[6-1]
brushes off the sanding
only
Cleaning the extraction channels
We recommend cleaning the extraction channels in
the machine roughly once a week (particularly if
sanding synthetic resin, in the case of wet sanding
and if sanding plaster)
brush or a cloth.
[6-2]
using a small flat
15
Page 16

Accessories
Use only original Festool accessories and Festool
consumable material intended for this machine because these components are designed specifically
for the machine. Using accessories and consumable material from other suppliers will most likely
affect the quality of your working results and limit
any warranty claims. Machine wear or your own
personal workload may increase depending on the
Environment
Do not dispose of the device together with domestic waste!
Dispose of machines, accessories and
application. Protect yourself and your machine, and
preserve your warranty claims by always using
original Festool accessories and Festool consumable material!
The order numbers of the accessories and tools can
be found in the Festool catalogue or on the Internet
under "www.festoolusa.com".
packaging at an environmentally responsible recycling centre. Observe the valid national regulations.
16
Page 17

Sommaire
Marche/Arrêt ....................................... 25
À propos de ce manuel ........................ 17
CONSIGNES DE SÉCURITÉ IMPORTANTES 17
INSTRUCTIONS CONCERNANT UN
RISQUE D'INCENDIE, DE CHOC ÉLECTRIQUE OU DE BLESSURES POUR
LES PERSONNES................................. 17
Autres risques...................................... 22
La poussière, un risque pour la santé. 22
Symboles.............................................. 22
Utilisation en conformité avec les instructions 23
Caractéristiques techniques................ 23
Description fonctionnelle..................... 23
Raccordement pneumatique et mise en ser-
vice ....................................................... 24
Traitement de l'air comprimé.............. 24
Raccord pour système de flexibles IAS 24
Réglages............................................... 26
Réglage de la vitesse........................... 26
Remplacement du plateau de ponçage
[4] ......................................................... 26
Fixation des accessoires de ponçage
avec StickFix [5]................................... 26
Aspiration............................................. 27
Travail avec la machine........................ 27
Entretien et maintenance..................... 27
Palettes................................................ 28
Remplacement du silencieux.............. 28
Frein de plateau................................... 28
Nettoyage des canaux d'aspiration ..... 28
Accessoires........................................... 28
Environnement ..................................... 28
À propos de ce manuel
Conservez ces instructions
Il est important pour vous de lire et de comprendre ce manuel. Les informations qu'il contient, se rapporte
à la protection
vous aider à reconnaître cette information.
DANGER Description du risque immi-
AVERTISSEMENT
ATTENTION
de votre sécurité
nent et l'incapacité à éviter
tout risque qui peut entraîner
la mort.
Description des dangers possibles et des blessures qui en
résultent ou la mort.
Description des dangers et
des éventuelles blessures qui
en résultent.
et
de prévention des problèmes
. Les symboles suivants sont utilisés pour
AVIS Déclaration incluant le type de
danger et conséquences possibles.
CONSEIL Indique des informations, des
notes ou des conseils pour
améliorer votre succès en utilisant l'outil.
CONSIGNES DE SÉCURITÉ IMPORTANTES
INSTRUCTIONS CONCERNANT UN RISQUE
D'INCENDIE, DE CHOC ÉLECTRIQUE OU DE
BLESSURES POUR LES PERSONNES
AVERTISSEMENT! Lors de l'utilisation d'outils, les précautions de base doivent tou-
jours être suivies, notamment ce qui suit:
CONSERVEZ CES INSTRUCTIONS
Général
a.
Pour réduire les risques de choc électrique,
d'incendie et de blessures, lire toutes les ins-
17
Page 18

tructions avant d'utiliser l'outil.
Le terme « outil électrique » utilisé dans les avertissements se réfère à votre outil électrique alimenté par secteur (câblé) ou par batterie (sans fil).
– Cet outil à air comprimé ne doit être mis en
place, réglé et utilisé que par des personnes formées et qualifiées. Sans qualification et formation, le risque d'accident augmente.
– Il est interdit de modifier cet outil à air comprimé.
Toute modification peut limiter l'efficacité des
mesures de sécurité et augmenter les risques
pour l'opérateur.
– Conservez précieusement tous les documents
fournis. En cas de cession de la machine, transmettez-les au nouveau propriétaire.
– N'utilisez jamais l'outil à air comprimé s'il est
endommagé.
– Inspectez régulièrement l'outil à air comprimé.
L'outil à air comprimé doit porter des marquages
et des autocollants bien lisibles indiquant les valeurs nominales. Il est possible de se procurer
des autocollants de rechange auprès du fabricant.
1 POSTE DE TRAVAIL
a.
Le poste de travail doit toujours être propre et
bien éclairé.
Le désordre et le manque de lumière augmentent le risque de choc électrique,
d'incendie et de blessures.
b.
N'utilisez pas l'outil dans des atmosphères explosives, par exemple en présence de liquides,
gaz ou poussière inflammables.
L'outil peut produire des étincelles et provoquer ainsi l'inflammation des poussières ou des vapeurs.
c.
Tenir les personnes tierces, les enfants et les
visiteurs à l'écart pendant l'utilisation de l'outil.
Le relâchement de l'attention peut entraîner une
perte de contrôle de l'outil.
2 SÉCURITÉ PERSONNELLE
a.
Restez vigilant. Concentrez-vous sur votre travail et faites preuve de bon sens durant l'utilisation de l'outil. N'utilisez pas l'outil si vous êtes
fatigué ou sous l'emprise de drogues, de l'alcool ou de médicaments.
Un moment d'inattention pendant l'utilisation de l'outil suffit pour
augmenter le risque de blessures.
b.
Portez des vêtements appropriés. Ne portez
pas de vêtements amples ni de bijoux. Si vous
avez des cheveux longs, attachez-les. Veillez à
tenir vos cheveux, vêtements et gants à distance des pièces mobiles.
Les vêtements
amples, les bijoux et les cheveux longs augmen-
tent le risque de blessures étant donné qu'ils
peuvent être happés par des pièces mobiles.
c.
Évitez un démarrage accidentel. Avant le branchement à l'alimentation pneumatique, assurez-vous que l'interrupteur est en position
Arrêt.
Ne portez pas l'outil en laissant votre doigt
sur l'interrupteur et ne branchez pas l'outil à
l'alimentation pneumatique lorsque l'interrupteur est en position Marche.
d.
Retirez les clés et outils de réglage avant de
mettre l'outil en marche.
Les clés ou outils de
réglage restés fixés à une pièce rotative de l'outil
augmentent le risque de blessures.
e.
Ne prenez aucun risque. Veillez à toujours avoir
une position stable et à rester bien en équilibre.
Une position stable et un bon équilibre permettent de mieux contrôler l'outil dans les situations inattendues.
f.
Utilisez un équipement de protection.
Un
masque antipoussières, des chaussures de sécurité antidérapantes ainsi qu'un casque de protection doivent être utilisés lorsque les conditions
d'utilisation l'exigent.
g.
Portez toujours une protection oculaire.
h.
Portez toujours une protection auditive lorsque
vous utilisez l'outil.
Une exposition prolongée à
un niveau sonore élevé peut entraîner une perte
auditive.
i.
Lors d'opérations impliquant un risque de
contact avec des câbles invisibles à l'œil nu, tenez l'outil par les parties isolées.
En cas de
contact avec un câble sous tension« actif », les
parties métalliques non isolées de l'outil sont
elles aussi « activées » et l'opérateur subit un
choc électrique.
j.
Évitez tout contact avec des objets mis à la terre
tels que tuyaux, radiateurs, cuisinières et réfrigérateurs.
Si votre corps est mis à la terre, le
risque de choc électrique augmente.
k.
Contrôlez la surface à travailler afin d'éviter un
contact avec des câbles invisibles à l'œil nu.
Avant de commencer à travailler, inspectez soigneusement la surface concernée afin de vous
assurer de l'absence de câbles invisibles à l'œil
nu. En cas de contact avec des câbles sous tension, l'opérateur subit un choc électrique.
3 UTILISATION DE L'OUTIL ET PRÉCAUTIONS À
PRENDRE
a.
Utilisez des mors de serrage ou autres accessoires pour fixer la pièce à un support stable et
la soutenir.
Maintenir la pièce à la main ou contre
18
Page 19

soi ne permet pas d'obtenir une stabilité suffisante et peut entraîner une perte de contrôle.
b.
Ne forcez pas sur l'outil.
Utilisez l'outil adapté à
l'application concernée. L'outil adapté permet
d'obtenir de meilleurs résultats et de travailler
dans des conditions plus sûres lorsqu'il est utilisé
à la vitesse pour laquelle il est conçu.
c.
N'utilisez pas l'outil s'il ne peut pas être mis en
marche ou à l'arrêt avec l'interrupteur.
Un appareil qui ne réagit pas à l'actionnement de l'interrupteur est dangereux et doit être réparé.
d.
Débranchez l'outil de l'alimentation pneumatique avant de procéder à des réglages ou à un
changement d'accessoires ou de ranger l'appareil.
Les mesures de sécurité préventive de ce
genre réduisent le risque de démarrage accidentel de l'outil.
e.
Si vous n'utilisez plus l'outil, conservez-le hors
de portée des enfants et autres personnes non
qualifiées.
Un outil est dangereux pour toutes les
personnes qui n'ont pas été formées à son utilisation.
f.
Entretenez l'outil avec soin.
Veillez à ce que les
outils de coupe soient toujours affûtés et propres.
Un outil bien entretenu, avec des arêtes de coupe
affûtées, réduit le risque de grippage et peut être
mieux contrôlé.
g.
Vérifiez la mobilité et le bon positionnement
des pièces mobiles ainsi que l'absence de
pièces cassées et de toute autre anomalie compromettant le bon fonctionnement de l'outil.
cas de dommages, faites réparer l'outil avant de
l'utiliser. De nombreux accidents sont dus à des
outils mal entretenus. L'endommagement de
l'outil provoque un risque de déflagration.
h.
Utilisez uniquement les accessoires indiqués
par le fabricant pour le modèle spécifique de
l'outil.
L'utilisation d'accessoires qui ne sont pas
destinés au modèle spécifique de l'outil augmente le risque de blessures.
4 ENTRETIEN
a.
L'entretien de l'outil doit uniquement être
confié au personnel de réparation qualifié.
b.
Pour l'entretien de l'outil, utilisez uniquement
des pièces de rechange identiques. Utilisez uniquement des pièces autorisées par le fabricant.
c.
Utilisez uniquement les lubrifiants fournis avec
l'outil ou indiqués par le fabricant.
En
5 ALIMENTATION PNEUMATIQUE
a.
Ne branchez jamais l'outil à une alimentation
pneumatique pouvant dépasser 200 psi.
Sous
l'effet d'une pression excessive, l'outil peut exploser, présenter des dysfonctionnements, se casser
ou provoquer des blessures graves. Utilisez uniquement de l'air comprimé propre, sec et régulé,
à la pression nominale ou dans la plage de pression nominale, comme indiqué sur l'outil. Avant
d'utiliser l'outil, vérifiez toujours que l'alimentation pneumatique est réglée sur la pression d'air
nominale ou dans la plage de pression d'air nominale.
b.
N'utilisez jamais d'oxygène, de dioxyde de carbone, de gaz combustibles ou de gaz en bouteille quelconques pour alimenter l'outil.
Ces
gaz peuvent exploser et provoquer des blessures
graves.
Danger de projections
– En cas de rupture de la pièce à usiner, de parties
de l'accessoire ou de l'outil, des pièces peuvent
être projetées à très grande vitesse.
– Portez des lunettes de protection résistant aux
chocs.
– Lors de travaux en hauteur, portez un casque. À
cette occasion, évaluez le danger pour les personnes tierces.
– Mettez la pièce à usiner en sécurité. Utilisez des
dispositifs de serrage ou un étau pour fixer la
pièce.
Danger lié à des vêtements amples
– Portez des vêtements de travail ! Ne portez pas
de vêtements amples ou de bijoux. Ils pourraient
se prendre dans les pièces en mouvement. Portez un filet à cheveux si vous avez des cheveux
longs.
Dangers pendant le fonctionnement
– Portez des gants de protection.
– L'utilisateur et le personnel de maintenance
doivent être physiquement capables de manipuler la taille, le poids et la puissance de l'outil
– Tenez l'outil correctement. Soyez prêt à accom-
pagner tout mouvement, habituel ou soudain ;
ayez les deux mains disponibles.
– Évitez toute position de travail anormale. Veillez
à maintenir une position stable et un bon équilibre à tout moment.
– En cas de coupure d'alimentation, déconnectez
le dispositif de commande pour la mise en
marche et l'arrêt.
19
Page 20

– Cet outil doit être utilisé uniquement avec un
abrasif prévu à cet effet.
– Utiliser uniquement le lubrifiant recommandé
par le fabricant.
– Portez des lunettes, des gants et des vêtements
de protection.
– Contrôler le plateau de ponçage avant chaque
utilisation. Ne l'utilisez pas s'il est fendu, cassé
ou tombé.
– Évitez le contact direct avec le plateau de pon-
çage. Portez des gants adaptés pour votre pro-
tection.
– Ne jamais utilisez l'outil sans abrasif.
– Risque de décharge électrostatique si l'outil
pneumatique est utilisé sur plastique ou sur tout
autres matériaux non conducteurs.
– Atmosphères potentiellement explosives : si le
ponçage de certains matériaux génère des pous-
sières explosives ou inflammables, il convient
impérativement d'observer les consignes d'usi-
nage du fabricant du matériau.
Danger lié à des mouvements répétés
– L'utilisation de l'outil pneumatique peut provo-
quer chez l'utilisateur des sensations désa-
gréables dans les mains et les bras ainsi qu'au
niveau de la nuque et des épaules ou d'autres
parties du corps.
– Adoptez une position de travail confortable.
Changez de position de travail lors d'un travail de
longue durée.
– En cas de sentiment de mal à l'aise, de troubles,
de battements, de douleurs, de fourmillements,
de surdité, de brûlures ou de raideurs, informez
votre employeur et consultez un médecin.
Danger lié aux accessoires
– Séparez le tuyau d'air comprimé de l'alimenta-
tion en air comprimé. En cas de non utilisation de
l'outil pneumatique, avant la maintenance et lors
du changement de l'accessoire de travail.
– Évitez le contact direct avec l'accessoire pendant
et après son utilisation.
– Utilisez uniquement les accessoires d'origine.
– Les meules ou les disques à tronçonner ne sont
pas admis.
– La vitesse admissible de l'accessoire doit être
supérieure de 1 000 tr/min minimum par rapport
à la vitesse maximale indiquée sur l'outil. Les ac-
cessoires dépassant la vitesse admise peuvent
se briser.
– Posez les abrasifs autocollants de manière
concentrique sur le plateau de ponçage.
Danger sur le poste de travail
– Danger de glisser et de trébucher ! Soyez vigilant
sur les surfaces glissantes et veillez à ne pas trébucher sur les tuyaux d'air comprimé.
– Ne convient pas pour une utilisation en atmos-
phère explosive. N'est pas isolé contre le contact
avec une source électrique.
– En environnement inconnu, procédez avec pru-
dence. Des dangers au niveau de l'alimentation
électrique ou de toute autre conduite peuvent
être cachés. Assurez-vous qu'aucune conduite
électrique, de gaz, etc. n'est présente qui pourrait constituer un danger en cas d'endommagement par l'utilisation de l'outil.
Danger lié aux poussières et aux vapeurs
– Si le ponçage dégage des poussières nocives,
l'outil doit être raccordé à un dispositif d'aspiration approprié et les prescriptions de sécurité
applicable à cette substance doivent être respectées.
– Évaluez les risques liés à ce danger et adoptez
des mesures correspondantes. Tenez compte
des poussières formées.
– Raccordez l'aspirateur à poussières. Assurez-
vous que les dispositifs d'aspiration des poussières présents sont bien raccordés et correctement employés. Respectez les consignes de
sécurité régionales sur les poussières et vapeurs
nocives. Utilisez et effectuez la maintenance de
cet outil pneumatique conformément aux recommandations contenues dans cette notice d'utilisation et utilisez les pièces et accessoires
proposés par Festool pour réduire au minimum
la génération de poussières et de vapeur. Détournez l'air évacué de façon à ce que le tourbillon de
poussière soit maintenu aussi faible que possible
dans les lieux poussiéreux.
– Contrôlez le cas échéant les poussières et va-
peurs formées sur le lieu de leur émission.
– Toutes les parties doivent être correctement
montées et toutes les conditions doivent être
remplies pour un parfait fonctionnement de l'outil pneumatique.
– Sélectionnez, effectuez la maintenance et rem-
placez les accessoires et les consommables de
cette notice d'utilisation de façon appropriée.
– Portez une protection respiratoire ! Respectez
les consignes de l'employeur ou les directives
sur la santé au travail.
Danger lié au bruit
– Un niveau sonore élevé peut entraîner des dom-
mages et pertes auditives ou d'autres problèmes
20
Page 21

en l'absence de protection auditive non appropriée.
– Évaluez les risques liés à ce danger et adoptez
des mesures correspondantes telles que l'utilisation de matériaux isolants.
– Portez une protection auditive ! Respectez les
consignes de l'employeur ou les directives sur la
santé au travail.
– Utilisez et effectuez la maintenance de l'outil
pneumatique décrit dans cette notice d'utilisation de façon appropriée.
– Sélectionnez, effectuez la maintenance et rem-
placez les accessoires et les consommables de
cette notice d'utilisation de façon appropriée.
– Vérifiez l'état de fonction du silencieux de l'outil
pneumatique.
Danger lié aux vibrations
– Les vibrations peuvent provoquer des dommages
nerveux ou perturber la circulation sanguine
dans les mains et les bras.
– Lors de travaux en milieux froids, portez des vê-
tements chauds et veillez à ce que vos mains
restent chaudes et sèches.
– En cas de surdité, de fourmillements ou de dou-
leurs dans les doigts ou les mains, ou encore si
vos doigts ou mains deviennent blancs, cessez le
travail, informez votre employeur et consultez un
médecin.
– Utilisez et effectuez la maintenance de l'outil
pneumatique décrit dans cette notice d'utilisation de façon appropriée.
– Ne maintenez pas l'outil pneumatique avec trop
de force mais veillez à bien le tenir de façon à
maîtriser les mouvements brusques des mains.
Le risque de vibrations augmente en fonction de
la force appliquée sur l'outil.
Consignes de sécurité supplémentaires relatives
aux outils pneumatiques
– L'air comprimé peut provoquer des blessures
graves.
– Séparez le tuyau d'air comprimé de l'ali-
mentation en air comprimé. En cas de non
utilisation de l'outil pneumatique, avant la
maintenance et lors du changement de
l'accessoire de travail.
– N'orientez jamais le flux d'air vers vous ou
vers d'autres personnes.
– Les tuyaux sous pression peuvent provoquer de
sérieuses blessures. Vérifiez que les tuyaux et
leurs fixations ne sont pas endommagés ou ne se
sont pas ouvert.
– La pression de service ne doit pas dépasser 6,2
bars (90 psi).
– La machine ne doit pas fonctionner avec un ré-
gime supérieur à 6500 tr/min.
– Ne suspendez jamais l'outil pneumatique au
tuyau d'air comprimé.
Autres consignes de sécurité
–
Maintenez votre poste de travail en ordre.
Un
poste de travail en désordre peut être la cause
d'accidents.
–
Tenez compte des facteurs externes.
Ne laissez
pas d'outils pneumatiques sous la pluie.
–
Maintenez les enfants à distance !
Ne laissez
pas d'autres personnes manipuler l'outil pneumatique ou le tuyau d'air comprimé. Maintenez
les autres personnes à distance de votre poste de
travail.
–
Conservez vos outils pneumatiques dans un endroit sûr.
Les outils pneumatiques non utilisés
doivent être rangés dans un endroit surélevé, sec
et fermé, hors de portée des enfants.
–
N'employez pas le tuyau d'air comprimé à des
fins pour lesquelles il n'est pas prévu.
Protégez
le tuyau d'air comprimé contre la chaleur, l'huile
et les arêtes tranchantes. Contrôlez régulièrement le tuyau d'air comprimé et faites-le remplacer par un technicien compétent en cas
d'endommagement. Le tuyau d'air comprimé ne
doit pas être utilisé sur des dispositifs tels que
des pulvérisateurs. En effet, les consignes de sécurité relatives aux dangers électriques ne
peuvent dans ce cas pas être respectées.
–
Prenez soin de vos outils.
Maintenez les outils
affûtés et propres pour garantir un travail sûr et
de qualité. Observez les consignes d'entretien et
de remplacement de l'outil. Veillez à ce que les
poignées soient sèches et exemptes d'huile ou de
graisse.
–
Ne laissez pas de clé insérée.
Avant la mise en
marche, vérifiez que les clés et les outils de réglage ont été retirés.
–
Évitez tout démarrage involontaire
. Ne portez
pas un outil pneumatique raccordé à l'alimentation en air comprimé avec le doigt sur la gâchette. Assurez-vous que l'interrupteur est sur
la position Arrêt lors du raccordement du tuyau à
l'alimentation en air comprimé.
–
Soyez attentif !
Maintenez votre attention sur la
tâche accomplie. Travaillez dans un esprit de bon
sens.
21
Page 22

N'utilisez pas l'outil pneumatique si vous n'êtes
pas concentré.
–
Faites réparer votre outil pneumatique par un
technicien spécialisé.
pond aux dispositions de sécurité en vigueur. Les
réparations doivent être réalisées exclusivement
par un technicien spécialisé, des accidents
peuvent se produire pour l'utilisateur dans le cas
contraire.
–
Travaillez uniquement avec de l'air comprimé
correctement traité.
utilisation de l'unité de conditionnement Festool
VE.
–
En cas de chute, vérifiez que l'outil pneumatique et le patin de ponçage ne sont pas endommagés. Démontez le patin de ponçage pour un
examen minutieux. Faites réparer les pièces
endommagées avant toute utilisation.
tins de ponçage cassés et des machines endommagées peuvent causer des blessures et
compromettre la sûreté de la machine.
–
Nettoyez à l'eau les accessoires imprégnés
d'huile, comme par ex. le patin de ponçage ou le
feutre de polissage, et laissez-les sécher en les
étalant convenablement.
bés d'huile sont susceptibles de s'enflammer
spontanément.
–
Utilisez toujours des tuyaux antistatique et un
système d'aspiration mis à la terre. Les composants système proposés par Festool sont
conformes à ces exigences.
système d'aspiration non raccordé à la terre ou
de tuyaux non antistatiques peut aboutir à un
choc électrique et à des blessures graves.
Cet outil pneumatique ré-
Ceci est assuré pour une
Des pa-
Les accessoires imbi-
L'utilisation d'un
– projection de morceaux de pièce,
– projection de morceaux de pièce en cas d'outils
endommagés,
– émission acoustique,
– émission de poussières.
La poussière, un risque
pour la santé
AVERTISSEMENT!
créées par le ponçage mécanique, le sciage,
le meulage, le perçage et autres activités reliées à la construction contiennent des substances
chimiques connues (dans l’État de la Californie)
comme pouvant causer le cancer, des anomalies
congénitales ou représenter d’autres dangers pour
la reproduction. Voici quelques exemples de telles
substances:
• plomb provenant de peintures à base de plomb,
• silice cristallisée utilisée dans les briques, le ci-
ment et autres matériaux de maçonnerie, et
• arsenic et chrome du bois d’oeuvre traité avec un
produit chimique.
Le risque d’exposition à de tels
produits varie selon la fréquence à laquelle vous faites
ce genre de travail. Pour réduire les risques d’exposition à
ces substances chimiques :
travaillez dans un endroit adéquatement ventilé et
utilisez un équipement de sécurité approuvé, tel
que masques antipoussières spécialement conçus
pour filtrer les particules microscopiques.
Certaines poussières
Autres risques
Certains risques restent inhérents à la conduite de
la machine, malgré le respect de toutes les prescriptions de sécurité, comme par exemple :
Symboles
Avertissement de danger général
Risque d'électrocution
Lire les instructions / les remarques !
Portez une protection auditive !
22
AVERTISSEMENT
POUR RÉDUIRE LE RISQUE DE DOMMAGES,
L'UTILISATEUR DOIT LIRE LE MANUEL D'INSTRUCTION.
Portez une protection des yeux !
Porter un masque de protection !
Ne pas jeter dans la poubelle domestique!
n
Vitesse à vide
0
Page 23

.../min
-1
min
tours par minute
mm millimètre
’’ pouce
min minute
llitre
bar bar
lb. livre
Utilisation en conformité avec les instructions
Les ponceuses excentriques pneumatiques
conviennent au ponçage des matériaux suivants :
bois, plastique, métal, pierre, aggloméré, matériaux minéraux à liant acrylique, peinture/laque,
mastic et matériaux similaires.
L'usinage de l'amiante est formellement interdit.
Caractéristiques techniques
kg kilogramme
l/min litre par minute
psi livre par pouce carré
°F degrés Fahrenheit
Utilisez
uniquement
avec les systèmes de flexibles
Festool IAS 2 ou IAS 3 et les plateaux de ponçage
Festool !
L'utilisateur est responsable des dommages
provoqués par une utilisation non conforme.
Ponceuse excentrique pneumatique LEX 3 LEX 3 LEX 3 LEX 3
77/2.5 150/3 150/5 150/7
Entraînement Moteur pneumatique à piston rotatif à palettes
Ø plateau de ponçage 77 mm (3") 150 mm (6")
Course de ponçage 2.5 mm (3/32") 3 mm (1/8") 5 mm (3/16") 7 mm (9/32")
Vitesse de rotation à vide n
0
Consommation d’air à charge nominale*
10,500 tr/min 10,000 tr/min
270 l/min 290 l/min 310 l/min
Pression d'air
Pression d'entrée max. 6.2 bar (90 psi)
Minimum conseillée 5 bars (72.5 psi)
Catégorie de qualité de la pression d'air
classe 5
selon DIN ISO 8573-1
température de stockage conseillée /
0° - 60° C / 10° - 40° C (0 °F - 140 °F / 50 °F - 104 °F)
température de fonctionnement
Poids 0.7 kg (1.5 lbs) 1.0 kg (2.0 lbs)
* pression d'entrée de 6 bars (87 psi) ; n0, charge 30N
Description fonctionnelle
Des eléments fournis sont disponibles sur le volet
qui se trouve au début de cette notice d'utilisation.
Vous pouvez ainsi déplier cette page et visualiser
en permanence les différentes parties de l'outil
lorsque vous lisez la notice.
Les accessoires illustrés ou décrits ne sont partiel-
lement pas contenus dans le volume de livraison.
23
Page 24

[1-1]
2-1
2-2
2-3
IAS-3/IAS-2
2-1
2-2
2-3
IAS-3 light
[1-2]
Interrupteur de marche/arrêt
Touche d'extraction du raccord IAS
[1-4]
[1-5]
Régulation de la vitesse
Plateau de ponçage
[1-3]
Adaptateur pour raccord IAS
Raccordement pneumatique et mise en service
ATTENTION
Risque de blessures
Lors du raccordement à l'alimentation en air
comprimé, veillez à ce que l'outil pneumatique
soit hors service.
Traitement de l'air comprimé
La machine est conçue pour un fonctionnement
avec huile et avec l'unité d'alimentation VE Festool.
Composée d'un filtre, d'un régulateur, d'un purgeur
de condensat et d'un huileur, l'unité d'alimentation
délivre un air comprimé propre, sans condensat et
huilé. L'huileur doit être réglé de sorte qu'une
goutte d'huile soit ajoutée à l'air comprimé env.
toutes les 15 minutes. Le réglage correct dépend
de l'utilisation au quotidien.
Les dommages résultant d'un traitement
inapproprié de l'air comprimé sont exclus de
la garantie.
En cas d'emploi de deux outils pneumatiques Festool au maximum, nous recommandons l'unité
d'alimentation avec un raccord 3/8“.
Pour l'alimentation en air comprimé, choisir un
compresseur délivrant au moins 350 l/min à une
pression de service de 6 bars (87 psi).
La canalisation doit avoir un diamètre suffisamment grand (9 mm (3/8") min.).
Raccord pour système de flexibles IAS
Ce système de flexible regroupe plusieurs fonctions dans un seul flexible selon le modèle :
– Alimentation en air comprimé
– Évacuation de l’air
– Aspiration des poussières
[2-2]
[2-1]
[2-3]
24
Page 25

Branchement et débranchement
2-1
2-2
IAS-3 SD
Click
voir figure.
[3]
.
3
Marche/Arrêt
Mise en marche : appuyer sur l'interrupteur
[1-1]
Arrêt : relâcher l'interrupteur
.
[1-1]
.
25
Page 26

ATTENTION
4
5
StickFix
Risque de blessures
Avant toute intervention sur l'outil, il faut toujours débrancher l'outil de l'alimentation en air
comprimé.
Réglage de la vitesse
Réglages
Le réglage se fait au moyen du levier de réglage
4]
entre
LEX 3 77/2,5 7.800 - 10.500 min
LEX 3 150/3, 150/5, 150/7 7.000 - 10.000 min
Vous pouvez adapter de façon optimale la puissance d'enlèvement à chaque matériau ou chaque
application.
Remplacement du plateau de ponçage [4]
Pour obtenir un résultat exceptionnel, utiliser uniquement les accessoires et consom-
mables d'origine. En cas de non-utilisation
des accessoires et consommables d'origine, les
dommages qui pourraient s'ensuivre ne sont pas
couverts par la garantie.
Risque pour la santé :
teau de ponçage de taille inappropriée
conduit à des vibrations inadmissiblement
élevées sur l'outil.
En fonction de la surface à traiter, cet outil peut être
équipé de trois plateaux de ponçage de duretés différentes.
Surfaces dures :
çage fin sur des surfaces. Ponçage des chants.
ponçage dégrossissant et pon-
le montage d'un pla-
-1
-1
[1-
Fixation des accessoires de ponçage avec
StickFix [5]
Le plateau de ponçage StickFix permet de fixer des
abrasifs et des feutres StickFix adaptés de manière
simple et rapide.
Placez l'accessoire de ponçage auto-agrippant
sur le plateau de ponçage
[1-5]
et appuyez bien.
Surfaces tendres :
çage dégrossissant et ponçage fin, pour surfaces
planes et incurvées.
Surfaces super tendres :
pièces de forme, bombages, rayons. Ne pas employer sur chant !
26
accessoire universel pour pon-
pour ponçage fin sur
Page 27

Aspiration
AVERTISSEMENT
Risques pour la santé dus aux poussières
Ne travaillez jamais sans aspiration.
Respectez toujours les prescriptions nationales
en vigueur.
Travail avec la machine
Pour l'utilisation d'un aspirateur mobile Festool
avec contrôle du débit
: régler le diamètre du
flexible sur l'aspirateur sur Ø 27 mm (1-1/16").
Pour assurer une aspiration des poussières optimale, nous recommandons l'emploi d'aspirateurs
Festool dotés d'une commande marche/arrêt automatique pour outils pneumatiques.
Pour éviter des dommages sur le moteur à
air comprimé, l'outil pneumatique ne doit
pas être aspiré à l'arrêt.
Lors des travaux, observez toutes les
consignes de sécurité indiquées en introduction ainsi que les règles suivantes :
– Fixez la pièce à usiner de manière à ce qu'elle ne
puisse pas bouger pendant l'usinage.
Entretien et maintenance
AVERTISSEMENT
Risque de blessures
Avant toute opération de réparation ou d'entretien sur l’outil, il faut toujours débrancher l’outil
de l’alimentation en air comprimé.
Toute opération de réparation ou d'entretien nécessitant l'ouverture du carter moteur ne peut
être entreprise que par un atelier de service
après-vente agréé.
EKAT
1
Utilisez un masque pour les travaux dégageant de la poussière.
Seuls le fabricant et un atelier homologué sont habilités à effectuer
réparation ou service
. Les adresses à
toute
proximité sont disponibles sur:
www.festoolusa.com/service
4
Utilisez uniquement des pièces de rechange Festool d‘origine. Référence
5
3
2
sur: www.festoolusa.com/service
27
Page 28

Palettes
6-2
6-1
6
Il est recommandé de faire changer les palettes du
moteur après 2000 heures de service environ.
Remplacement du silencieux
Pour préserver la performance de l'outil pneumatique, remplacer à intervalles réguliers le silencieux sur les systèmes de flexibles IAS.
Frein de plateau
Le manchon en caoutchouc
teau de ponçage et évite ainsi une montée en vitesse incontrôlée du plateau de ponçage. Il doit être
remplacé lorsque l'effet de freinage se fait moins
efficace.
[6-1]
effleure le pla-
Nettoyage des canaux d'aspiration
Nous recommandons de nettoyer environ une fois
par semaine (surtout en cas de ponçage de mastic
synthétique, de ponçage à l'eau ou de plâtre) les canaux d'aspiration dans l'outil
brosse plate ou avec un chiffon en tissu.
Utilisez uniquement les accessoires Festool et
consommables Festool d'origine prévus pour cette
machine, car ces composants systèmes sont parfaitement adaptés les uns par rapport aux autres.
Si vous utilisez des accessoires et consommables
d'autres marques, la qualité du résultat peut être
dégradée et les recours en garantie peuvent être
soumis à des restrictions. L'usure de la machine ou
votre charge personnelle peuvent augmenter selon
[6-2]
avec une petite
Accessoires
chaque application. Pour cette raison, protégezvous, votre machine et vos droits à la garantie en
utilisant exclusivement des accessoires Festool et
des consommables Festool d'origine !
Les références des accessoires et des outils figurent dans le catalogue Festool ou sur Internet
sous "www.festoolusa.com".
Environnement
Ne jetez pas l'appareil avec les ordures ménagères !
emballages de façon compatible avec l'environne-
28
Eliminez l'appareil, les accessoires et les
ment. Respectez les prescriptions nationales en vigueur.
Page 29

Índice
Sobre este manual............................... 29
INSTRUCCIONES DE SEGURIDAD IMPOR-
TANTES ................................................ 29
INSTRUCCIONES RELACIONADAS
CON UN RIESGO DE INCENDIO, DESCARGA ELÉCTRICA O LESIONES A
PERSONAS ........................................... 29
Riesgos residuales............................... 34
Riesgos para la salud producidos por
el polvo ................................................. 34
Símbolos .............................................. 35
Uso conforme a lo previsto.................. 35
Datos técnicos...................................... 35
Descripción de las funciónes............... 36
Conexión de aire comprimido y puesta en ser-
vicio ...................................................... 36
Preparación del aire comprimido........ 36
Conexión al sistema de mangueras
IAS........................................................ 36
Conexión y desconexión....................... 37
Ajustes .................................................. 38
Regular el número de revoluciones.... 38
Cambiar el plato lijador [4].................. 38
Fijar los accesorios de lijado con Stic-
kFix [5] ................................................. 38
Aspiración............................................ 38
Trabajo con la máquina ........................ 39
Mantenimiento y cuidado ..................... 39
Lamas .................................................. 39
Cambio del silenciador........................ 39
Freno de plato...................................... 40
Limpieza de los canales de aspiración 40
Accesorios ............................................ 40
Medio ambiente.................................... 40
Sobre este manual
Guarde estas instrucciones
Es importante que usted lea y entienda este manual. La información que contiene se relaciona con la protección de
a reconocer esta información.
su seguridad
PELIGRO Descripción de peligro inmi-
ADVERTENCIA
PRECAUCIÓN
y
la prevención de problemas
nente y fracaso para evitar
riesgos que podran causar la
muerte.
Descripción de peligro y posibles lesiones resultantes o la
muerte.
Descripción de peligro y posibles lesiones resultantes.
. Los símbolos que siguen se utilizan para ayudarlo
AVISO Declaración incluyendo el tipo
de riesgo y posible resultados.
CONSEJO Indica informaciónes, notas, o
consejos para mejorar su
éxito con la herramienta.
29
Page 30

INSTRUCCIONES DE SEGURIDAD IMPORTANTES
INSTRUCCIONES RELACIONADAS CON UN
RIESGO DE INCENDIO, DESCARGA ELÉC-
TRICA O LESIONES A PERSONAS
ADVERTENCIA! Cuando se utilizan herramientas, se deben seguir siempre las pre-
cauciones básicas, incluyendo las siguientes:
CONSERVE ESTAS INSTRUCCIONES
General
a.
Para reducir los riesgos de descarga eléctrica,
incendio y lesiones personales, lea todas las
instrucciones antes de usar la herramienta.
Cuando en los avisos aparece el término «herramienta eléctrica», se hace referencia tanto a las
herramientas que funcionan enchufadas a la red de
suministro eléctrico (con cable) como a las que funcionan con baterías (sin cable).
– Esta herramienta de aire comprimido debe ser
instalada, ajustada y utilizada exclusivamente
por personal cualificado y que cuente con la formación apropiada. Las personas sin cualificación
ni formación son más propensas a causar accidentes.
– Se prohíbe modificar esta herramienta de aire
comprimido. Su modificación podría reducir la
efectividad de las medidas de seguridad y aumentar los riesgos para las personas que utilicen la máquina.
– Todos los documentos adjuntos se deben con-
servar. Si la máquina cambia de propietario, junto con esta se debe entregar toda la
documentación.
– Si la herramienta de aire comprimido presenta
algún daño, no se debe usar en ningún caso.
– Inspeccionar con regularidad la herramienta de
aire comprimido. La herramienta de aire comprimido debe estar identificada con sus valores nominales (que deben ser claramente legibles) y
con marcas. Se pueden pedir al fabricante señales de repuesto.
1 ÁREA DE TRABAJO
a.
El área de trabajo se debe mantener limpia y
bien iluminada.
trabajo y las zonas oscuras aumentan el riesgo
de descarga eléctrica, incendio y lesiones personales.
b.
No hacer funcionar la herramienta en atmósferas explosivas, ni tampoco en presencia de lí-
El desorden en los bancos de
quidos, gases o polvo de naturaleza inflamable.
La herramienta puede generar chispas, con el
riesgo consiguiente de ignición del polvo o los gases.
c.
Los espectadores, niños y visitantes se deben
mantener apartados durante el funcionamiento
de la herramienta.
provocar la pérdida de control de la herramienta.
2 SEGURIDAD PERSONAL
a.
Es imprescindible estar alerta. Mientras se maneja la herramienta, es preciso fijarse en lo que
se está haciendo y usar el sentido común. No
usar la herramienta si se está cansado o bajo
los efectos de las drogas, el alcohol o algún medicamento.
el manejo de la herramienta aumenta el riesgo
de lesiones personales.
b.
Usar prendas de vestir apropiadas. No usar
ropa holgada ni joyas. Si se lleva melena, mantenerla recogida. El cabello, las prendas y los
guantes se deben mantener apartadas de las
piezas móviles.
y la melena pueden ser atrapadas por las piezas
móviles, lo que aumenta el riesgo de lesiones
personales.
c.
Evitar que la herramienta se ponga en marcha
inadvertidamente. Antes de conectar la herramienta al suministro de aire, es imprescindible
asegurarse de que el interruptor esté desconectado.
apoyado en el interruptor ni conectar la herramienta al suministro de aire con el interruptor
conectado.
d.
Retirar las llaves de ajuste antes de poner en
marcha la herramienta.
a una pieza rotativa aumenta el riesgo de lesiones
personales.
e.
No forzar la postura. Mantener el equilibrio y un
buen apoyo en todo momento.
librio y un buen apoyo permite controlar mejor la
herramienta en situaciones inesperadas.
f.
Usar el equipo de protección individual.
prescindible usar una máscara antipolvo, calzado
de seguridad antideslizante y un casco de seguridad que sean apropiados para las condiciones
aplicables.
g.
Usar siempre un sistema de protección ocular.
h.
Siempre que se use la herramienta es imprescindible usar un sistema de protección auditiva.
Un momento de distracción durante
No llevar la herramienta con el dedo
Las distracciones pueden
Las prendas holgadas, las joyas
Dejar una llave acoplada
Mantener el equi-
Es im-
30
Page 31

La exposición prolongada a ruido de alta intensidad puede provocar una pérdida de audición.
i.
Cuando se lleve a cabo una operación en la que
la herramienta de corte pueda entrar en contacto con cableado oculto, sujetar la herramienta por las superficies de agarre aisladas.
herramienta entrase en contacto con un cable
sometido a tensión eléctrica, las piezas metálicas
descubiertas de la herramienta también quedarían sujetas a dicha tensión eléctrica y el operador sufriría una descarga.
j.
Evitar que el cuerpo entre en contacto con superficies conectadas a tierra, como tuberías,
radiadores, cocinas y frigoríficos.
Si el cuerpo
está conectado a tierra, el riesgo de descarga
eléctrica aumenta.
k.
Inspeccionar la pieza de trabajo para evitar el
contacto con cables ocultos.
Antes de llevar a
cabo ningún trabajo, investigar a fondo la pieza de
trabajo para detectar posibles cables ocultos. Entrar en contacto con un cable sometido a tensión
eléctrica provoca que el operador sufra una descarga eléctrica.
3 USO Y CUIDADOS DE LA HERRAMIENTA
a.
Sujetar la pieza de trabajo a una plataforma estable usando bridas o algún otro elemento que
ofrezca la seguridad suficiente.
Sostener la pieza de trabajo con la mano o contra el cuerpo es
muy inestable y puede dar lugar a una pérdida de
control.
b.
No forzar la herramienta.
Usar la herramienta
adecuada para la aplicación. La tarea en cuestión
siempre se resuelve mejor y con más seguridad si
se usa la herramienta apropiada y se hace funcionar a la potencia para la que ha sido diseñada.
c.
No usar la herramienta si el interruptor no permite encenderla o apagarla.
Si la herramienta
no se puede controlar con el interruptor, su uso
representa un peligro y se debe reparar sin falta.
d.
Antes de hacer algún ajuste en la herramienta,
de cambiar accesorios en esta o de guardarla,
desconectarla del suministro de aire.
Estas medidas de seguridad preventivas reducen el riesgo
de poner la herramienta en marcha inadvertidamente.
e.
Cuando la herramienta no esté en uso, guardarla fuera del alcance de los niños y otras personas que no dispongan de la formación
adecuada.
El uso de la herramienta por parte de
Si la
personas que no dispongan de la formación adecuada es un peligro.
f.
La herramienta debe ser objeto de un mantenimiento cuidadoso.
Las herramientas de corte se
deben mantener afiladas y limpias. Una herramienta cuyo mantenimiento sea correcto y que
tenga los cantos de corte bien afilados reduce el
riesgo de agarrotamiento y es más fácil de controlar.
g.
Comprobar si hay alguna pieza móvil desalineada o agarrotada, así como alguna pieza rota u
otras alteraciones que puedan afectar al funcionamiento de la herramienta.
Si la herramienta
está dañada, es imprescindible solicitar su revisión al servicio técnico antes de usarla. Muchos
accidentes tienen su origen en un mantenimiento
deficiente de las herramientas. Si la herramienta
está dañada, existe riesgo de explosión.
h.
Únicamente se deben usar los accesorios que el
fabricante haya identificado como adecuados
para el modelo concreto de herramienta.
plear un accesorio que no esté destinado a ser
usado con el modelo concreto de herramienta
aumenta el riesgo de lesiones personales.
4 SERVICIO TÉCNICO
a.
El servicio técnico de las herramientas debe ser
prestado exclusivamente por personal de reparación que cuente con una cualificación apropiada.
b.
Para llevar a cabo el servicio técnico de las herramientas, emplear únicamente piezas de repuesto que sean idénticas. Usar
exclusivamente piezas autorizadas.
c.
Los únicos lubricantes que está permitido utilizar son los suministrados junto con la herramienta y los especificados por el fabricante.
5 SUMINISTRO DE AIRE
a.
La herramienta no se debe conectar en ningún
caso a suministros de aire que sean capaces de
superar un valor de 200 psi.
Si la herramienta se
sometiera a una presión excesiva, podría llegar a
explotar, funcionar de manera anómala, romperse y hasta ocasionar lesiones personales de carácter grave. Usar exclusivamente aire
comprimido limpio y seco regulado a la presión
nominal o a una presión que se encuentre dentro
del rango de presiones indicado en la propia herramienta. Antes de usar la herramienta, es imprescindible asegurarse de que el suministro de
aire esté ajustado a la presión de aire nominal o
dentro del rango de presiones nominal.
Em-
31
Page 32

b.
No usar en ningún caso oxígeno, dióxido de carbono, gases combustibles ni cualquier otro tipo
de gas envasado a modo de suministro de aire
para la herramienta.
Estos gases podrían explo-
tar y causar lesiones personales graves.
Peligro debido a piezas que salen despedidas
– En el caso de que se rompa la pieza de trabajo,
pueden salir despedidos a altas velocidades
fragmentos de los accesorios o de las piezas de
la máquina.
– Utilice gafas de protección.
– Para realizar trabajos por encima de la cabeza
utilice un casco. Evalúe también los riesgos para
terceras personas.
– Asegure la pieza de trabajo. Utilice dispositivos
de sujeción o un tornillo de banco para sujetar la
herramienta.
Peligro por enredo
– Utilice ropa de trabajo adecuada. No utilice ropa
ancha ni objetos de joyería o bisutería, pues pue-
den quedar enganchados en las piezas móviles.
Si tiene el cabello largo, utilice una red para re-
cogerlo.
Peligros durante el funcionamiento
– Utilice guantes de protección.
– La persona que maneja la herramienta y el per-
sonal de mantenimiento deben ser capaces físi-
camente de controlar el tamaño, la masa y la
potencia de la máquina
– Sujete la máquina correctamente. Debe estar
preparado para contrarrestar los movimientos tí-
picos o repentinos y tener listas ambas manos.
– Evite una posición anormal del cuerpo. Procure
un apoyo seguro y mantenga el equilibrio en todo
momento.
– En caso de una interrupción de la alimentación
de energía, suelte el mecanismo de control para
la puesta en marcha y la parada.
– La máquina solo debe utilizarse con abrasivos
desarrollados para este fin.
– Utilice solamente lubricantes que estén reco-
mendados por el fabricante.
– Utilice gafas, guantes y ropa de protección.
– Antes de cada utilización compruebe el plato lija-
dor. No utilizarlo si presenta grietas, roturas o se
ha caído.
– Evite el contacto directo con el plato lijador. Utili-
ce guantes apropiados para proteger las manos.
– Nunca utilice la herramienta sin abrasivo.
– Riesgo de descarga electrostática cuando se uti-
liza la herramienta neumática con plástico y
otros materiales no conductores.
– Atmósfera potencialmente explosiva: si durante
el lijado de materiales específicos se genera polvo explosivo o autoinflamable, deberán observarse obligatoriamente las indicaciones del
fabricante relativas al trabajo con dicho material.
Peligro por movimientos reiterados
– Debido a la utilización de la herramienta neumá-
tica, el operario puede tener sensaciones desagradables en manos y brazos, así como en la
zona del cuello y los hombros u otras partes del
cuerpo.
– Adopte una postura cómoda. Cuando realice tra-
bajos largos, vaya cambiando la postura.
– Con síntomas como indisposición, malestar, pal-
pitaciones, dolores, cosquilleos, sordera, quemazón o rigidez, informe al empresario y
consulte al médico.
Peligro debido a los accesorios
– Separe el tubo flexible neumático de la alimenta-
ción de aire comprimido. Si no se utiliza la herramienta neumática, antes del mantenimiento y al
cambiar las herramientas.
– Evite el contacto con la herramienta durante la
utilización y después de ella.
– Utilice únicamente accesorios originales.
– No está permitido el empleo de muelas abrasi-
vas ni discos tronzadores.
– El número de revoluciones admisible del acceso-
rio debe ser como mínimo 1.000 rpm mayor que
el número de revoluciones máximo indicado en la
máquina. Las piezas que sobrepasen la velocidad
permitida pueden reventar.
– Los abrasivos autoadhesivos deben colocarse de
forma concéntrica sobre el plato lijador.
Peligro en el lugar de trabajo
– ¡Riesgo de resbalar y tropezar! Preste atención a
las superficies resbaladizas y los posibles tropie-
zos debidos a los tubos flexibles de aire compri-
mido.
– No utilizar en atmósferas con riesgo de explo-
sión; no está aislado contra el contacto con fuen-
tes de corriente.
– Proceda con precaución en entornos desconoci-
dos. Pueden existir riesgos ocultos a causa de lí-
neas de corriente o de otros suministros.
Asegúrese de que no hay cables eléctricos, tube-
rías de gas, etc. que puedan suponer un peligro
en caso de dañarse debido al uso de la máquina.
32
Page 33

Peligro debido a polvo y vapores
– Si al lijar se producen polvos perjudiciales para la
salud, la máquina deberá conectarse a un dispositivo de aspiración apropiado y deberán tenerse
en cuenta las normativas de seguridad vigentes
para el material de trabajo.
– Debe llevarse a cabo una valoración de los ries-
gos relacionados con este peligro e implementar
los mecanismos de regulación correspondientes. Los polvos que se generen deben incluirse.
– Conecte el dispositivo de aspiración de polvo.
Asegúrese de que los dispositivos de aspiración
de que se disponga se conectan y utilizan correctamente. Tenga en cuenta las indicaciones de seguridad regionales sobre polvos y vapores
perjudiciales para la salud. Utilice y mantenga la
herramienta neumática según las recomendaciones contenidas en estas instrucciones y use
los accesorios y las piezas de montaje ofrecidas
por Festool para reducir al mínimo la liberación
de polvo y vapores. Derive el aire de salida de tal
manera que los remolinos de polvo y los entornos
con polvo queden reducidos a la mínima expresión.
– Los polvos o vapores que puedan producirse de-
ben controlarse en el lugar en que se liberan.
– Todas las piezas deben estar correctamente
montadas y cumplir todas las condiciones para
garantizar el buen funcionamiento de la herramienta neumática.
– Seleccione los accesorios y materiales de consu-
mo y realice el mantenimiento y las sustituciones
de acuerdo con estas instrucciones.
– ¡Utilice protección respiratoria! Observe las ins-
trucciones del empresario o del reglamento de
trabajo y sanitario.
Peligro debido al ruido
– En el caso de una protección insuficiente de los
oídos, el alto nivel de ruido puede provocar daños
permanentes del oído, pérdida de audición u
otros problemas.
– Debe llevarse a cabo una valoración de los ries-
gos relacionados con este peligro e implementar
los mecanismos de regulación correspondientes,
por ejemplo la utilización de materiales aislantes.
– ¡Utilice protección para los oídos! Observe las
instrucciones del empresario o del reglamento
de trabajo y sanitario.
– Utilice y realice el mantenimiento de la herra-
mienta neumática de acuerdo con estas instrucciones.
– Seleccione los accesorios y materiales de consu-
mo y realice el mantenimiento y las sustituciones
de acuerdo con estas instrucciones.
– Asegure el funcionamiento del silenciador en la
herramienta neumática.
Peligro debido a oscilaciones
– Las oscilaciones pueden provocar daños en los
nervios y alteraciones de la circulación sanguínea en manos y brazos.
– Durante los trabajos en entornos fríos, utilice
ropa abrigada y mantenga las manos calientes y
secas.
– En el caso de que tenga sensación de sordera,
cosquilleo o dolores en los dedos o las manos, o
se queden blanquecinos los dedos o las manos,
suspenda el trabajo, informe al empresario y
consulte al médico.
– Utilice y realice el mantenimiento de la herra-
mienta neumática de acuerdo con estas instrucciones.
– No mantenga la herramienta neumática de for-
ma muy firme, pero sujétela con seguridad de
acuerdo con las fuerzas de reacción necesarias
de la mano. El riesgo de oscilaciones aumenta a
medida que se incrementa la fuerza de agarre.
Indicaciones de seguridad adicionales para máquinas neumáticas
– El aire comprimido puede provocar lesiones gra-
ves.
– Separe el tubo flexible neumático de la
alimentación de aire comprimido. Si no se
utiliza la herramienta neumática, antes
del mantenimiento y al cambiar las herramientas.
– No dirija nunca el caudal de aire contra sí
mismo o contra otras personas.
– Los tubos flexibles que golpean en el entorno
pueden provocar lesiones graves. Compruebe
que los tubos flexibles y sus sujeciones no estén
dañados o no se hayan soltado.
– La presión de servicio no debe superar los 6,2 bar
(90 psi).
– La máquina no puede accionarse con un número
de revoluciones superior a 6500 rpm.
– No transporte nunca la herramienta neumática
ayudándose del tubo flexible.
33
Page 34

Otras indicaciones de seguridad
–
Mantenga ordenada la zona de trabajo.
de orden en la zona de trabajo puede provocar
accidentes.
–
Tenga en cuenta las influencias del entorno.
exponga las herramientas neumáticas a la lluvia.
–
¡Mantenga alejados a los niños!
otras personas manipulen la herramienta o el
tubo flexible neumático. Mantenga a las demás
personas alejadas de su área de trabajo.
–
Guarde sus herramientas neumáticas de manera segura.
se utilicen deben guardarse en un lugar seco,
elevado o cerrado, fuera del alcance de los niños.
–
No utilice el tubo flexible neumático para usos
no establecidos.
tico del calor, el aceite y de los cantos afilados.
Controle periódicamente el tubo flexible neumático y encargue que lo sustituya un especialista
acreditado en caso de que se deteriore. El tubo
flexible de aire comprimido no debe utilizarse
para dispositivos aplicadores como pulverizadores ya que no pueden cumplirse las disposiciones de seguridad contra peligros eléctricos.
–
Cuide las herramientas con esmero.
las herramientas limpias y afiladas para poder
trabajar mejor y con más seguridad. Respete las
disposiciones de mantenimiento y las indicaciones para el cambio de herramienta. Mantenga
las empuñaduras secas y limpias de aceite y grasa.
–
No deje insertada ninguna llave en la herramienta.
han retirado las llaves y las herramientas de
ajuste.
–
Evite un encendido involuntario
una herramienta neumática conectada a la alimentación de aire comprimido con el dedo en el
botón interruptor. Asegúrese de que el interruptor esté desconectado al acoplar el tubo flexible
neumático al suministro de aire comprimido.
–
¡Preste atención!
el sentido común al realizar su trabajo.
No utilice la herramienta neumática si no está
concentrado.
–
Encargue la reparación de su herramienta neumática a personal especializado.
mienta neumática cumple las disposiciones
correspondientes. Las reparaciones solo deben
llevarse a cabo por personal especializado, de lo
Las herramientas neumáticas que no
Proteja el tubo flexible neumá-
Antes de conectarla, compruebe que se
Observe lo que hace. Aplique
No permita que
. No transporte
La falta
Mantenga
Esta herra-
No
contrario pueden producirse accidentes que
afecten al usuario.
–
Trabaje solo con aire comprimido correctamen-
te preparado.
unidad de alimentación Festool VE.
–
Tras la caída, compruebe si se han dañado la
herramienta neumática y el plato lijador. Des-
monte el plato lijador para realizar una com-
probación exacta. Haga reparar las piezas
deterioradas antes de usar la herramienta.
plato lijador roto y las herramientas dañadas
pueden provocar lesiones e incertidumbre al uti-
lizar la máquina.
–
Limpie los medios de trabajo impregnados en
aceite, como p. ej. almohadillas para lijar o fiel-
tros de pulido, con agua y déjelos secar.
dios de trabajo empapados en aceite pueden
inflamarse.
–
Utilice siempre tubos flexibles antiestáticos y
un sistema de aspiración con conexión a tierra.
Los componentes del sistema suministrados
por Festool cumplen estos requisitos.
ma de aspiración sin puesta a tierra o unos tubos
flexibles que no sean antiestáticos pueden provo-
car una descarga eléctrica y lesiones graves.
Esto está garantizado si utiliza la
El
Los me-
Un siste-
Riesgos residuales
A pesar de cumplir todas las normas de construcción relevantes, al usar la máquina pueden derivarse peligros, p. ej. debidos a:
– partes de la pieza de trabajo que salgan despedi-
das;
– partes de la pieza de trabajo que salgan despedi-
das como consecuencia de herramientas daña-
das;
– emisión de ruidos;
–emisión de polvo.
Riesgos para la salud producidos por el
polvo
ADVERTENCIA!
lijadoras motorizadas, aserraderos, tritura-
dores, perforadoras y otras actividades de
construcción contienen sustancias químicas que se
sabe (en el Estado de California) causan cáncer, defectos de nacimiento u otros daños al sistema reproductivo. Algunos ejemplos de estas sustancias
químicas son:
Algunos polvos creados por
34
Page 35

• Plomo de las pinturas con base de plomo
• Sílice cristalino de los ladrillos y cemento y otros
productos de mampostería, y
• Arsénico y cromo de madera tratada con sustancias químicas
contacto con estas sustancias químicas: trabaje en
un área con buena ventilación y trabaje con equipo
de seguridad aprobado, como mascarillas para el
polvo diseñadas específicamente para filtrar partículas microscópicas.
El riesgo de exposición a estas
sustancias varía, dependiendo
de cuantas veces se hace este
tipo de trabajo. Para reducir el
Aviso ante un peligro general
Peligro de electrocución
¡Leer las instrucciones e indicaciones!
¡Usar protección para los oídos!
¡Usar protección para los ojos!
PARA REDUCIR EL RIESGO DE LESIÓN, EL USUARIO DEBE LEER EL MANUAL DE INSTRUCCIÓN.
Símbolos
n
0
.../min
min
min minuto
llitero
bar bars
lb. libras
mm milímetro
’’ pulgada
ADVERTENCIA
Nº de revoluciones marcha en vacío
revoluciones por minuto
-1
¡Utilizar protección respiratoria!
No pertenece a los residuos comunales.
Uso conforme a lo previsto
Las lijadoras excéntricas de aire comprimido pueden utilizarse para lijar madera, plástico, metal,
piedra, materiales compuestos, materiales minerales ligados con acrílico, pintura/barnices, emplaste y materiales semejantes.
La máquina no debe emplearse para el tratamiento
Datos técnicos
Lijadora excéntrica de aire comprimido
LEX 3 LEX 3 LEX 3 LEX 3
77/2.5 150/3 150/5 150/7
kg kilogramo
l/min litros por minuto
psi libra-fuerza por pulgada cuadrada
°F grados Fahrenheit
de materiales que contengan amianto.
solo
Utilizar
IAS 3 de Festool o el plato lijador Festool.
con el sistema de mangueras IAS 2 o
El usuario será responsable de cualquier utilización indebida.
Accionamiento Motor de lamas de aire comprimido
Plato lijador Ø 77 mm (3") 150 mm (6")
Órbita 2.5 mm (3/32") 3 mm (1/8") 5 mm (3/16") 7 mm (9/32")
35
Page 36

Lijadora excéntrica de aire comprimido
Número de revoluciones en vacío 10,500 rpm 10,000 rpm
Consumo de aire con carga nominal* 270 l/min 290 l/min 310 l/min
Presión del aire:
Presión de entrada máx 6.2 bar (90 psi)
Mínimo recomendado 5 bar (72.5 psi)
LEX 3 LEX 3 LEX 3 LEX 3
77/2.5 150/3 150/5 150/7
Calidad de aire comprimido según DIN
ISO 8573-1
temperatura de almacenamiento / de funcionamiento recomendada
Peso 0.7 kg (1.5 lbs) 1.0 kg (2.0 lbs)
* con una presión de entrada de 6 bar (87 psi); n0, carga 30N
0° - 60° C / 10° - 40° C (0 °F - 140 °F / 50 °F - 104 °F)
clase 5
Descripción de las funciónes
Las imágenes con la dotación de suministro se encuentran en una hoja desplegable al comienzo de este
manual de instrucciones. Cuando lea este manual, le
recomendamos que despliegue esta página para disponer fácilmente de una vista general de la máquina.
Los accesorios representados o descritos no forman parte íntegra de la dotación de suministro.
[1-1]
[1-2]
[1-3]
[1-4]
[1-5]
Interruptor de conexión y desconexión
Tecla para aflojar la conexión IAS
Adaptador de conexión IAS
Regulación del número de revoluciones
Plato lijador
Conexión de aire comprimido y puesta en servicio
ATENCIÓN
Peligro de lesiones
Asegúrese de que al conectar el suministro de aire
comprimido, la herramienta está desconectada.
Preparación del aire comprimido
La máquina ha sido diseñada para funcionar con
lubricación y debe trabajarse con la unidad de alimentación VE de Festool. La unidad de alimentación, compuesta por filtro, regulador, evacuación de
agua de condensación y lubricador, suministra aire
comprimido limpio, sin agua de condensación y lubricado. Para ello, el lubricador deberá ajustarse
de tal modo que aprox. cada 15 minutos añada una
gota de aceite al aire comprimido. El ajuste correcto dependerá del tiempo de uso diario.
Para emplear hasta dos herramientas neumáticas
Festool, recomendamos utilizar la unidad de alimentación con una conexión de 3/8".
Para la alimentación de aire comprimido deberá
elegirse un compresor capaz de impulsar como mínimo 350 l/min con una presión de servicio de 6 bar
(87 psi).
El sistema de conductos debe disponer de un diámetro lo suficientemente grande (al menos 9 mm
(3/8")).
Conexión al sistema de mangueras IAS
Dependiendo de la versión, el sistema de mangueras IAS reúne varias funciones en un tubo flexible::
– Alimentación de aire comprimido
– Realimentación de aire de salida
– Aspiración del polvo
[2-3]
[2-1]
[2-2]
36
Los daños que puedan ocasionarse por una
preparación deficiente del aire comprimido
quedarán excluidos del derecho de garantía.
Page 37

Conexión y desconexión
2-1
2-2
2-3
IAS-3/IAS-2
2-1
2-2
2-3
IAS-3 light
2-1
2-2
IAS-3 SD
Click
ver figura
[3]
.
3
Conexión y desconexión
Encender: pulsar interruptor
Apagar: soltar interruptor
[1-1]
[1-1]
.
.
37
Page 38

ATENCIÓN
4
5
StickFix
Ajustes
correcto tiene como consecuencia un nivel de vibraciones de la máquina superior al admisible.
Peligro de lesiones
Antes de realizar cualquier trabajo en la máquina, ésta deberá desconectarse siempre del suministro de aire comprimido.
Regular el número de revoluciones
Regulable con la palanca de posición
LEX 3 77/2,5 7.800 - 10.500 rpm
LEX 3 150/3, 150/5, 150/7 7.000 - 10.000 rpm
De este modo, el rendimiento de arranque de material puede adaptarse de manera óptima a cada
material o aplicación
[1-4]
entre
Cambiar el plato lijador [4]
La máquina se puede equipar con platos lijadores
de tres durezas diferentes adaptados a la superficie
de trabajo.
Duro:
lijado basto y lijado fino sobre superficies. Li-
jado de cantos.
Blando:
no, para superficies planas y abombadas.
Superblando:
curvaturas, radios. ¡No lo aplique en cantos!
Universal para el lijado basto y el lijado fi-
Lijado fino de piezas preformadas,
Fijar los accesorios de lijado con StickFix
[5]
El abrasivo StickFix y el vellón de lijar StickFix correspondientes se pueden fijar de forma rápida y
sencilla en el plato lijador StickFix.
Presione el accesorio de lijado autoadhesivo sobre el plato
[1-5]
lijador.
Solo se conseguirá un resultado óptimo si se
utilizan los accesorios y material de consu-
mo originales. Si no se instalan accesorios o
material de consumo originales, se extinguirá el
derecho a la garantía.
Consecuencias perjudiciales para la salud:
El montaje de un plato lijador de tamaño in-
38
Aspiración
ADVERTENCIA
Consecuencias perjudiciales para la salud a causa del polvo
Nunca trabaje sin aspiración.
Siga siempre las disposiciones nacionales.
Page 39

Al utilizar un sistema de aspiración móvil
control del volumen de aire
Festool: ajuste el
con
diámetro del tubo del sistema de aspiración a Ø
27 mm (1-1/16").
Para garantizar una aspiración óptima del polvo,
recomendamos emplear los sistemas de aspira-
Trabajo con la máquina
ción móvil Festool con sistema automático de conexión y desconexión para máquinas neumáticas.
Para evitar posibles daños en el motor de
aire comprimido, no deberá aspirarse la herramienta neumática cuando esté detenida.
Durante el trabajo, tenga en cuenta todas
las indicaciones de seguridad mencionadas
al principio de este documento, así como las
normas siguientes:
– Fije la pieza de trabajo siempre de forma que no
se pueda mover cuando se trabaje con ella.
Mantenimiento y cuidado
ADVERTENCIA
Peligro de lesiones
Antes de realizar cualquier trabajo de mantenimiento y reparación, ésta deberá desconectarse
siempre del suministro de aire comprimido!
Todos los trabajos de mantenimiento y reparación que exijan abrir la carcasa del motor tan
sólo pueden ser llevados a cabo por un taller autorizado.
En caso de trabajos que produzcan polvo,
utilice una mascarilla.
reparación. Encuentre la dirección más próxima a
usted en:
www.festoolusa.com/service
EKAT
4
Utilice únicamente piezas de recambio
Festool originales. Referencia en:
5
3
2
1
www.festoolusa.com/service
Lamas
Tras aprox. 2000 horas de servicio, recomendamos
sustituir las lamas del motor.
El
Servicio de atención al cliente y re-
paraciones
solo está disponible por
parte del fabricante o de los talleres de
Cambio del silenciador
Para mantener el rendimiento de la herramienta
neumática cambie periódicamente el silenciador
del sistema de mangueras IAS.
39
Page 40

Freno de plato
6-2
6-1
6
El manguito de goma
impide que aumente de forma incontrolada el número de revoluciones del plato lijador. Debe sustituirlo cuando disminuya el efecto de frenado.
[6-1]
roza el plato lijador e
Limpieza de los canales de aspiración
Recomendamos limpiar los canales de aspiración
de la máquina
semana (sobre todo al lijar espátula con resina artificial, con afilado húmedo o de yeso) con un pequeño cepillo plano o un paño.
[6-2]
aproximadamente una vez por
Utilice únicamente los accesorios Festool originales y el material de consumo Festool diseñados
para esta máquina, puesto que los componentes de
este sistema están óptimamente adaptados entre
sí. La utilización de accesorios y material de consumo de otros fabricantes puede afectar a la calidad
de los resultados de trabajo y conllevar una limitación de los derechos de la garantía. El desgaste de
la máquina o de su carga personal puede variar en
Medio ambiente
No deseche la herramienta junto con los residuos
domésticos.
Recicle las herramientas, accesorios y
Accesorios
función de la aplicación. Utilice únicamente accesorios originales y material de consumo de Festool
para su propia protección y la de la máquina, así
como de los derechos de la garantía.
Los números de pedido para los respectivos accesorios y herramientas se encuentran en su catálogo Festool o en la dirección de Internet "www.festoolusa.com".
embalajes de forma respetuosa con el medio ambiente. Respete la normativa vigente del país.
40
Page 41

Page 42

Page 43

Page 44

Page 45

Page 46

 Loading...