

Page 1
LEX 2 150/3
LEX 2 150/7
LEX 2 185/7
Instruction manual
Page 2 - 6
IMPORTANT: Read and understand all instructions
before using.
Guide dutilisation
Page 7 - 11
IMPORTANT: Lire et comprendre toutes les
instructions avant de démarrer les travaux.
Manual de instrucciones
Página 12 - 16
IMPORTANTE: Lea y comprende todas las
instrucciones antes de usar.
464 111_001
Eccentric sander
Ponceuse excentrique
Lijadora excéntrica
Page 2

GENERAL SAFETY RULES
Read and understand all
instructions. Failure to follow all instructions
listed below may result in electric shock, fire and/
or serious personal injury.
SAVE THESE INSTRUCTIONS
Work area
1 Keep your work area clean and well lit.
Cluttered benches and dark areas invite
accidents.
2 Keep bystanders, children, and visitors
away while operating a tool. Distractions can
cause you to lose control.
Personal safety
3 Stay alert, watch what you are doing
and use common sense when operating a
tool. Do not use while tired or under the
influence of drugs, alcohol, or medication.
A moment of inattention while operating tools
may result in serious personal injury.
4 Dress properly. Do not wear loose
clothing or jewelry. Contain long hair. Keep
your hair, clothing, and gloves away from
moving parts. Loose clothes, jewellery, or long
hair can get caught in moving parts.
5 Avoid accidental starts. Before
connecting the air supply make sure that
the tool is switched off. Carrying tools with
your finger on the switch or plugging in tools
that have the switch on invites accidents.
6 Remove adjusting keys or tools before
turning the tool on. A wrench or key that is left
attached to a rotating part of the tool may result
in personal injury.
7 Do not overreach. Stand on both feet
and keep proper footing and balance at all
times. Proper footing and balance enables better
control of the tool in unexpected situations.
8 Use safety equipment. Always wear eye
protection. Dust mask, non-skid safety shoes,
hard hat, or hearing protection must be used for
appropriate conditions.
Tool use and care
9 Do not abuse the hose. Never carry or
pull the tool by the hose. Keep hose away
from heat, sharp edges or moving parts.
Replace damaged hoses immediately.
Damaged hoses increase the risk of accidents.
10 Use clamps or other suitable means to
secure and support the workpiece to a
stable platform. Holding the work by hand or
against your body is unstable and may lead to
loss of control.
11 Do not force tool. Use the correct tool
for your application. The correct tool will do
the job better and safer at the rate for which it is
designed.
12 Do not use tool if switch does not turn
it on or off. Any tool that cannot be controlled
with the switch is dangerous and must be
repaired.
13 Disconnect the compressed-air hose
from the tool before making any
adjustments, changing accessories, or
storing the tool. Such preventive safety
measures reduce the risk of starting the tool
accidentally.
14 Store idle tools out of reach of children
and other untrained persons. Tools are
dangerous in the hands of untrained users.
15 Maintain tools with care. Keep cutting
tools sharp and clean. Properly maintained
tools with sharp cutting edges are less likely to
bind and are easier to control.
16 Check for misalignment or binding of
moving parts, breakage of parts, and any
other condition that may affect the tools
operation. If damaged, have the tool
serviced before using. Many accidents are
caused by poorly maintained tools.
17 Use only accessories that are
recommended by the manufacturer for your
model. Accessories that may be suitable for one
tool may become hazardous when used on
another tool.
Service
18 Tool service may be performed only by
qualified repair personnel. Service or
maintenance performed by unqualified personnel
could result in a risk of injury.
19 When servicing a tool, use only identical
replacement parts. Follow instructions in
the Maintenance section of this manual. Use
of unauthorized parts or failure to follow the
Maintenance instructions may create a risk of
injury.
2
Page 3
arsenic and chromium from chemically-treated
Various dust created by power sanding, sawing,
grinding, drilling and other construction activities
contains chemicals known (to the State of
California) to cause cancer, birth defects or other
reproductive harm. Some examples of these
chemicals are:
lead from lead-based paints,
crystalline silica from bricks and cement and
other masonry products, and
lumber.
The risk from these exposures varies, depending
on how often you do this type of work.
To reduce your exposure to these chemicals:
Work in a well ventilated area,
and work with approved safety
equipment, such as dust masks
that are specially designed to
filter out microscopic particles.
Technical data
Sanding pad diameter: - LEX 2 150 150 mm / 6
- LEX 2 185 185 mm / 7
Drive Compressed-air vane motor
Operating pressure (flow pressure) 87 psi
No load speed 4,000 - 8,000 rpm
Orbits per minute 8,000 - 16,000 opm
Sanding stroke: - LEX 2 150/3 3 mm
- LEX 2 150/7, LEX 2 185/7 7 mm
Air consumption at nominal load 14 cfm
Weight: - LEX 2 150 1.3 kg / 2.8 lbs
- LEX 2 185 1.4 kg / 3 lbs
Symbols
n
0
rpm revolutions per minute
opm orbits per minute
no load speed (revolutions)
Use for intended purpose
As specified, the machines are designed for
sanding wood, plastic, metal, stone, composite,
paintwork, filler and similar materials. Material
containing asbestos must not be processed with
these tools.
The user is liable for any damage
and injury resulting from incorrect usage!
Functional description
Connection and start-up
Make sure that the pneumatic
tool is switched off when you connect the
compressed-air supply.
Compressed-air treatment
The Festool service unit should always be used
to ensure that Festool pneumatic tools function
correctly. Consisting of a filter, control unit,
condensation drain and lubricator, the service
unit cleans and lubricates the compressed air
and keeps it free of condensation.
For thios tool, the lubricator should be set so
that a drop is applied to the compressed air
approx. every 7-10 minutes.
Damage that occurs as a result of incorrect
compressed-air treatment is excluded from
warranty claims.
We recommend a service unit with a 3/8"
connector for up to two Festool pneumatic tools.
The compressor used to supply the compressed
air should supply at 20 cfm and an operating
pressure of 87 psi. The diameter of the piping
system must be sufficiently large (at least 9mm
/ 1/2).
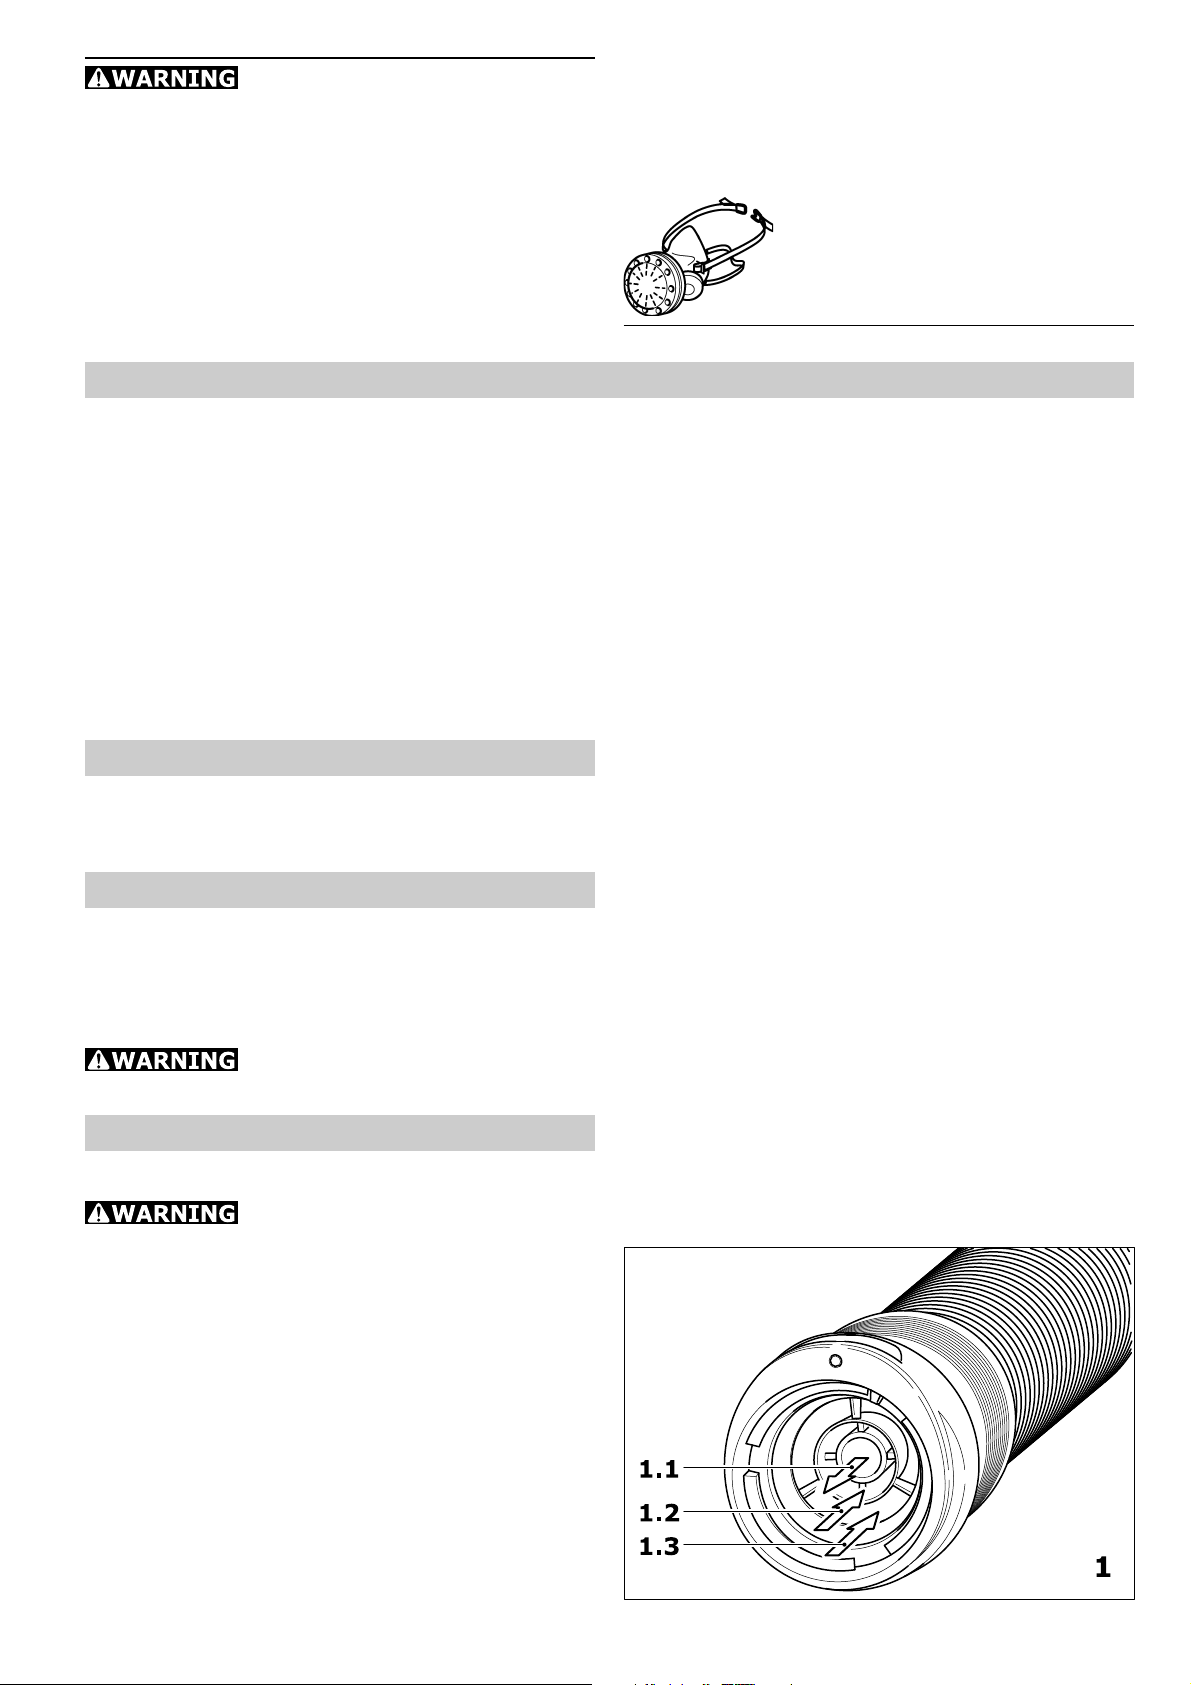
IAS 2 hose connector
The eccentric sander is a pneumatic tool for
connection to the Festool IAS 2 system.
This hose system combines three functions in
one hose:
- Compressed air supply (1.1)
- Exhaust air extraction (1.2)
- Dust extraction (1.3)
3
Page 4
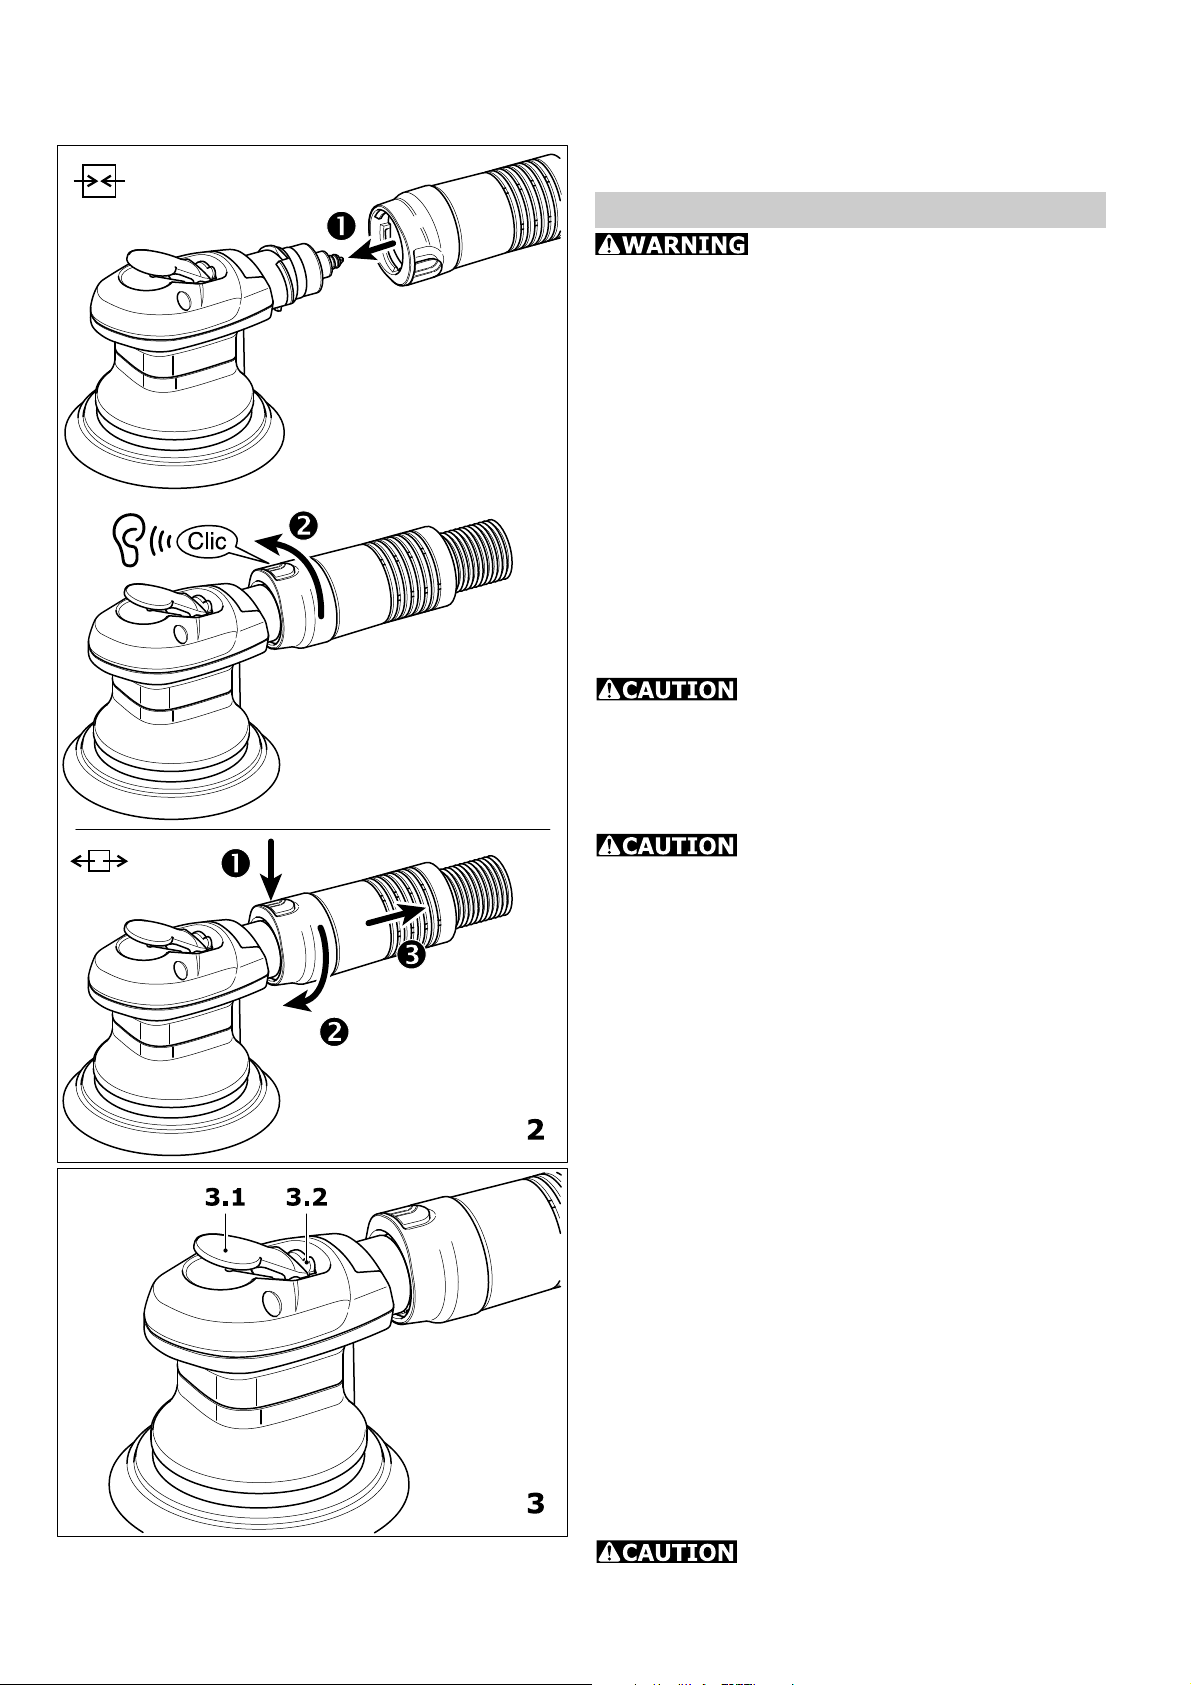
Connection and disconnection see Fig. 2.
IAS 2 connecting system see accompanying
instruction sheet.
Starting
Pressing the lever (3.1) switches on the
pneumatic tool. Releasing the lever switches
the tool off again.
Tool settings
Always disconnect the tool from
the compressed air supply before doing any
work on the tool.
Speed adjustment
You can regulate the sanding speed steplessly
between 4,000 and 8,000 rpm using the
adjusting wheel (3.2). This enables you to
optimize the speed to suit the material.
Suction unit
Sanding dust is extracted through the extraction
channels in the sanding pad and taken di-rectly
to the material removal point. To ensure
optimized dust extraction, we recommend using
a Festool dust extractor with automatic switchon/switch-off device for compressed-air tools.
In order to prevent damage to the
pneumatic motor, dust extraction must be
allowed to run through the pneumatic tool when
it is at standstill.
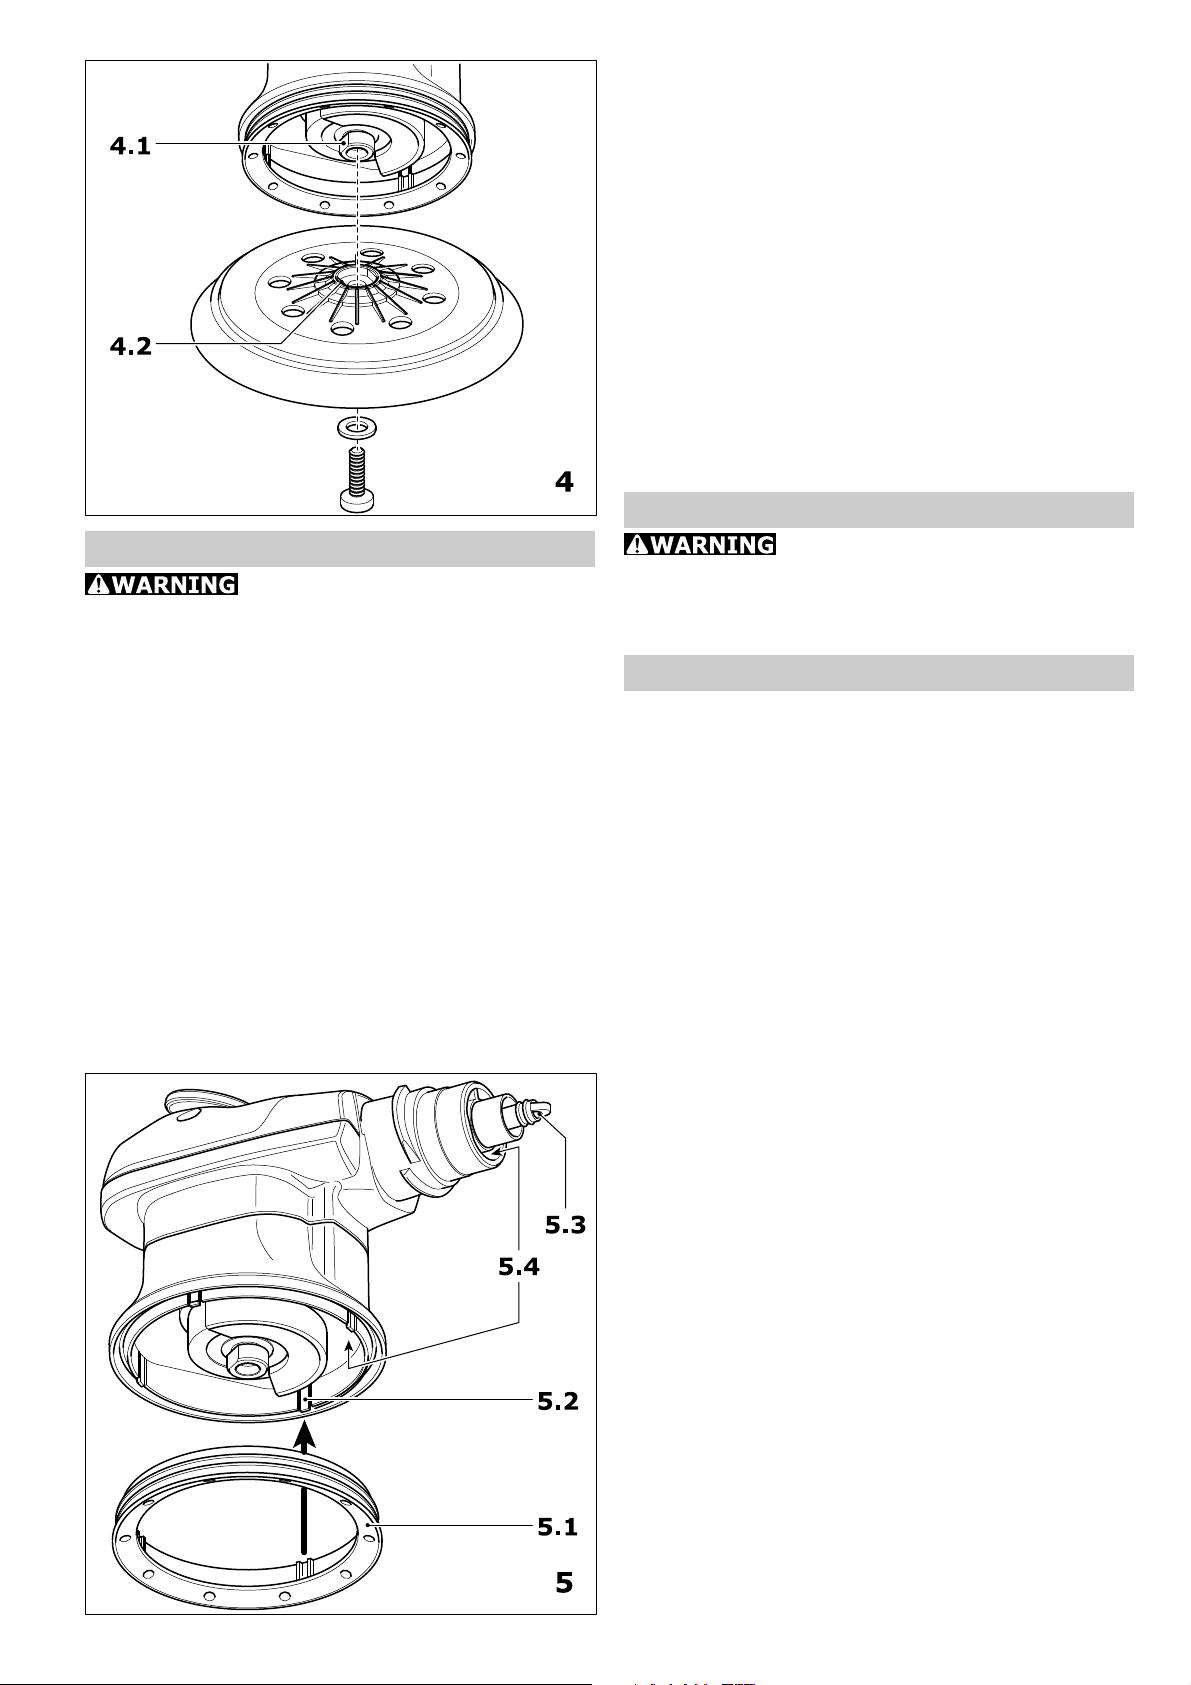
Sanding pads
Sanding pads have different
weights depending on their diameter. Using a
sanding pads of the incorrect size will cause
excessive vibration of the tool.
Only use sanding pads with an undamaged burr
layer.
Sanding pads are available in three degrees of
hardness to suit the type of application:
- Hard: high edge strength, for removing coarse
material from surfaces and for sanding edges.
- Soft: universal for coarse and fine sanding,
with elastic structure for even and curved
surfaces.
- Super soft: high elasticity, for smooth fine
sanding of moulded parts, curves, radii. Do
not use on edges.
Assembly - see Fig. 4. Make sure the positivefit supports on the sanding pad (4.1) are flush
with the ones on the tool (4.2).
Abrasive
Self-adhesive abrasives, such as Stickfix
sandpaper, and sanding cloths can be affixed
to the Stickfix sanding pads.
To affix the abrasive, simply press it onto the
sanding pad and remove it after use.
The abrasive must be centered on
the pad and the holes aligned with those on
the sanding pad.
4
Page 5
Lubrication
If the tool has not been used for an extended
period, such as a weekend, introduce 1 or 2
drops of lubricating oil into the compressed-air
supply (5.3) on the tool prior to use.
Replacing the silencer
The silencer on the IAS 2 connecting piece must
be replaced at regular intervals to maintain the
power of the pneumatic tool.
Cleaning the extraction channels
We recommend that the extraction channels in
the tool (5.4) be cleaned once a week using a
small pipe-cleaner brush or a cloth (especially
when sanding resin filler).
Accessories, tools
Maintenance and care
Always disconnect the tool from
the compressed air supply before doing any
work on the tool.
Any maintenance or repair work requiring the
motor housing to be opened may only be carried
out by an authorized service workshop.
Vanes
We recommend that the vanes on the motor
be replaced after approx. 500 operating hours.
Sanding pad brake
The collar (5.1) makes contact with the sanding
pad, thus preventing uncontrolled vibration of
the sanding pad. This collar wears out over time
and must be replaced should brake fading occur.
The sanding pad must be removed for this. You
can then remove the collar from the snap-on
fastener (5.2) and replace it with a new one.
For safety reasons, only use
original Festool accessories and tools!
Accessory and tool order numbers can be found
in your Festool catalog.
Warranty
Conditions of 1+2 Warranty
You are entitled to a free extended warranty (1
year + 2 years = 3 years) for your Festool power
tool. Festool shall be responsible for all shipping
costs during the first year of the warranty. During
the second and third year of the warranty the
customer is responsible for shipping the tool to
Festool. Festool will pay for return shipping to
the customer using UPS Ground Service. All
warranty service is valid 3 years from the date
of purchase on your receipt or invoice.
Festool Limited Warranty
This warranty is valid on the pre-condition that
the tool is used and operated in compliance with
these Festool operating instructions. Festool
warrants, only to the original consumer
purchaser, that the specified tool will be free from
defects in materials and workmanship for a term
of one year from the date of procurement. Festool
makes no other warranty, express or implied,
for Festool portable power tools. No agent,
representative, distributor, dealer or employee
of Festool has the authority to increase or
otherwise change the obligations or limitations
of this warranty. The obligations of Festool in its
sole discretion under this warranty shall be
limited to the repair or replacement of any Festool
portable power tool that is found to be defective
as packaged with this User Manual.
Excluded from coverage under this warranty are:
normal wear and tear; damages caused by
misuse, abuse or neglect; damage caused by
anything other than defects in material and
workmanship. This warranty does not apply to
5
Page 6

accessory items such as circular saw blades, drill
bits, router bits, jigsaw blades, sanding belts,
and grinding wheels. Also excluded are wearing
parts, such as carbon brushes, vanes of air tools,
rubber collars and seals, sanding discs and pads,
and batteries.
Festool portable power tools requiring
replacement or repair are to be returned with
the receipt of purchase to Festool (call 800-5548741 for address details).
IN NO EVENT SHALL FESTOOL BE LIABLE
FOR ANY CONSEQUENTIAL OR
INCIDENTAL DAMAGES FOR BREACH OF
THIS OR ANY OTHER WARRANTY,
EXPRESSED OR IMPLIED WHATSOEVER.
ALL WARRANTIES IMPLIED BY STATE
LAW, INCLUDING THE IMPLIED
WARRANTIES OF MERCHANTABILITY AND
FITNESS FOR A PARTICULAR PURPOSE,
ARE HEREBY LIMITED TO THE DURATION
OF THREE YEARS.
Some states in the U.S. and some Canadian
provinces do not allow the limitations on how
long an implied warranty lasts, so the above
limitation may not apply to you. With the
exception of any warranties implied by state or
province law as hereby limited, the foregoing
express limited warranty is exclusive and in lieu
of all other warranties, guarantees, agreements
and similar obligations of Festool.
This warranty gives you specific legal rights and
you may also have other rights which vary from
state to state in the U.S. and province to province
in Canada.
6
Page 7

RÉGLES DE SÉCURITÉ GÉNÉRALES
Assurez-vous que
vous lisez et comprenez bien toutes les
instructions. Le non-respect, même partiel, des
instructions ci-dessous entraîne un risque
d'électrocution, d'incendie et/ou de blessures
graves.
CONSERVEZ CES INSTRUCTIONS
Aire de travail
1 Veillez à ce que laire de travail soit
propre et bien éclairée. Le désordre et le
manque de lumière favorisent les accidents.
2 Tenez à distance les curieux, les enfants
et les visiteurs pendant que vous travaillez
avec un outil. Ils pourraient vous distraire et
vous faire une fausse manoevre.
Sécurité des personnes
3 Restez alerte, concentrez-vous sur
votre travail et utilisez votre bon sens.
Nutilisez pas loutil si vous êtes fatigué ou
sous linfluence de drogues, dalcool ou de
médicaments. Un instant dinattention peut
causer des blessures graves.
4 Portez des vêtements appropriés. Ne
portez pas de vêtements flottants ni de
bijoux. Confinez les cheveux longs.
Napprochez jamais les cheveux, les
vêtements ou les gants des pièces en
mouvement. Les vêtement flottants, les bijoux
ou les cheveux longs risquent dêtre happés par
les pièces en mouvement.
5 Attention aux démarrages accidentels.
Assurez-vous que loutil nest pas sous
tension quand l air comprimé est branché.
Ne portez pas loutil avec le doigt sur la gâchette
et ne branchez-pas un outil dont linterrupteur
est à la position MARCHE car c,est une source
daccident.
6 Enlevez les clés de réglage ou les
accessoires avant de mettre loutil en
marche. Une clé laissée dans une pièce tournante
de loutil peut provoquer des blessures.
7 Ne vous penchez pas trop en avant.
Gardez toujours une position stable et bien
équilibrée. Un bonne stabilité vous permet de
mieux réagir à une situation inattendue.
Utilisez des accessoires de sécurité. Portez
toujours des lunettes ou un masque de
sécurité. Selon les conditions, portez aussi un
masque antipoussière, des chaussures de
sécurité antidérapantes, un casque protecteur
et/ou une protection acoustique.
Utilisation et entretien des outils
9 Ne maltraitez pas le tuyau. Évitez de
tirer ou de porter lappareil par le tuyau.
Nexposez pas le tuyau à la chaleur, à des
arêtes vives ou à des pièces en
mouvement. Remplacez immédiatement le
tuyau sil est endommagé. Un tuyau
endommagé augmente le risque daccident.
10 Immobilisez la pièce de travail avec un
serre-joint ou tout autre moyen approprié
sur une surface stable . Ne tenez pas la pièce
avec la main ou contre votre corps car ce nest
pas stable et cela peut causer un dérapage de
loutil.
11 Ne forcez pas . Utilisez loutil appropríé
à la tâche. Un bon outil fonctionne mieux et de
façon plus sécuritaire. Respectez aussi la vitesse
de travail qui lui est propre.
12 Nutlisez pas un outil si son interrupteur
est bloqué. Un outil dont linterrupteur ne
fonctionne pas est dangereux et doit être réparé.
13 Débranchez la fiche de loutil avant
deffectuer un réglage, de changer
daccessoire ou de ranger loutil. Ces
mesures préventives de sécurité réduisent le
risque de démarrage accidentel de loutil.
14 Rangez les outils hors de portée des
enfants et des personnes inexpérimentées.
Les outils sont dangereux dans les mains de
novices.
15 Entretenez bien les outils. Les outils de
coupe doivent toujours être bien affûtés et
propres. Des outils bien entretenus, dont les
arêtes sont bien tranchantes, sont moins
susceptibles de coincer et plus faciles à contrôler.
16 Soyez attentif à tout désalignement ou
coincement des pièces en mouvement, à
tout bris ou à toute autre condition
préjudiciable au bon fonctionnement de
loutil. Si loutil est endommagé, faites-le
réparer avant de vous en servir. De
nombreux accidents ont pour cause le mauvais
état des outils
17 Nutilisez que des accessoires
recommandés par le fabricant pour votre
modèle doutil. Certains accessoires peuvent
convenir à un outil, mais être dangereux avec un
autre.
Réparation
18 Faites réparer les outils par un
réparateur qualifié. Lentretien ou la réparation
dun outil électrique par un amateur peut avoir
des conséquences graves.
19 Pour la réparation dun outil,
nemployez que des pièces de rechange
dorigine. Suivez les directives données à
la section Réparation de ce manuel.
Lemploi de pièces non autorisées ou le nonrespect des instructions dentretien peut créer
des blessures.
7
Page 8

arsenic et chrome du bois d'uvre traité avec
Les poussières provenant du sablage, dusciage,
du meulage, du perçage et des autres activités
reliées à la construction contiennent des
substances chimiques reconnues (dans l'État de
la Californie) comme pouvant causer le cancer,
des anomalies congénitales ou d'autres dangers
pour la reproduction. Voici quelques exemples
de telles substances:
plomb provenant de peintures à base de
plomb,
silice cristallisée utilisée dans les briques, le
ciment et autres matériaux de maçonnerie, et
un produit chimique.
Le risque d'exposition à de tels produits varie
selon la fréquence du travail.
Pour réduire les risques
d'exposition à ces substances
chimiques : travaillez dans un
en-droit bien ventilé et utilisez
un équipement de sécurité
approuvé, tel que des masques
antipoussières spécialement
conçus pour filtrer les particules
microscopiques.
Données techniques
Diamètre du plateau de sablage: - LEX 2 150 150 mm / 6
- LEX 2 185 185 mm / 7
Entraînement Moteur pneumatique à piston rotatif à palettes
Pression de service (pression découlement) 87 psi
Vitesse à vide 4,000 8,000 tr/min
Mouvements orbitaux 8,000 - 16,000 tr/min
Course de sablage: - LEX 2 150/3 3 mm
- LEX 2 150/7, LEX 2 185/7 7 mm
Débit dair en charge nominale 14 cfm
Poids: - LEX 2 150 1.3 kg / 2.8 lbs
- LEX 2 185 1.4 kg / 3 lbs
Symboles
n
0
tr/min tours par minute
Vitesse de rotation à vide
Utilisation
Ces outils sont conçus par principe pour le
sablage des matériaux suivants : bois, plastique, métal, pierre, composite, peinture, vernis,
enduit et similaires. Il est interdit de poncer
des matières contenant de l'amiante avec
l'appareil.
L'utilisateur est responsable de tout dommage ou accident dû à
l'utilisation on conforme des machines.
Description fonctionnelle
Branchement et mise en route
Lors du raccordement à
l'air comprimé, veillez à ce que l'outil pneumatique n'est pas sous tension.
Traitement de lair comprimé
Pour assurer le bon fonctionnement des outils
pneumatiques Festool, il faut toujours utili-ser
l'appareil Festool VE. Composé d'un filtre, d'un
régulateur, d'un purgeur de conden-sat et d'un
huileur, l'appareil de conditionnement fournit
un air comprimé propre, sans condensat et
huilé. L'huileur doit être réglé de façon à ajouter
une goutte d'huile à l'air comprimé toutes les
7 à 10 minutes.
Les dommages résultant d'un mauvais
traitement de l'air comprimé sont exclus de la
garantie. En cas d'emploi de deux outils
pneumatiques Festool au maximum, nous recommandons el raccord de 3/8. Pour l'air
comprimé, il faut choisir un compresseur
fournissant au moins 20 cfm à une pression de
service de 87 psi. La canalisation doit avoir un
diamètre suffisamment grand (9 mm / 1/2
mini).
Raccordement Tuyau IAS 2
La sableuse excentrique est un outil pneumatique se raccordant au système Festool IAS 2.
Ce système à flexibles regroupe trois fonctions
dans un seul flexible :
- Air comprimé (1.1)
- Extraction de lair (1.2)
- Aspiration des poussières (1.3)
8
Page 9

Branchement et débranchementvoir figure 2.
Système de raccordement IAS 2voir fiche
technique jointe.
Mise en marche
Appuyez sur le levier (3.1) pour mettre l'outil
pneumatique en marche. Relâchez l'outil pour
arrêter l'outil.
Réglages de loutil
Débranchez toujours l'air
comprimé avant de travailler sur l'outil.
Réglage de la vitesse
Vous pouvez régler la vitesse en continu entre
4 000 et 6 000 tr/min au moyen de la molette
(3.2) pour la meilleure vitesse correspondant
au travail.
Aspiration
La poussière du sablage est aspirée directement à son point de production par les canaux
d'aspiration dans le plateau de sablage. Pour
assurer une aspiration optimale des poussières,
nous recommandons l'emploi d'aspirateurs
Festool dotés d'une commande marche/arrêt
automatique pour outils pneu-matiques.
Pour éviter des dommages
du moteur à air comprimé, ne laissez pas l'outil
pneumatique tourner à vide.
Plateau de sablage
Suivant leur diamètre, les
plateaux sablage sont plus ou moins lourds.
Un tampon de sablage de la mauvaise taille
produit des vibrations excessives.
Nutilisez que des tampons de sablage laissant
une surface uniforme non éraflée.
Selon leur utilisation, les panneaux de sablage
ont trois grains:
- Dur : résistance élevée du bord, pour le
dégrossissage des surfaces et le sablage sur
chant.
- Souple : universel pour sablage grossier et
fin, à structure élastique pour surfaces planes
et bombées.
9
Page 10

- Extra-souple : élasticité élevée, pour sablage
fin soigné sur pièces moulées, bom-bages,
rayons. À ne pas employer sur chant!
Montage - Figure 4. Assurez-vous que le
tampon de sablage (4.1) et l'outil (4.2) sont
bien encliquetés!
Abrasifs
Il est possible d'utiliser des abrasifs autoadhésifs comme le papier sablé Stickfix et des
toiles emery qui peuvent être collés au tampon
de sablage.
Il suffit de poser l'abrasif sur le tampon de
sablage et de le décoller après usage.
Les abrasifs doivent être
centrés sur le tampon et les trous doivent être
alignés sur ceux du tampon. appliqués de façon
concentrique et leur perforation doit concorder
avec celle du plateau de ponçage.
Entretien
Débranchez toujours l'air
comprimé avant de travailler sur les outils.
Les travaux d'entretien et de réparation
nécessitant l'ouverture du logement du moteur
ne doivent être effectués que par le personnel
d'un atelier autorisé du service après-vente.
Palettes
Il est recommandé de faire changer les palettes
du moteur après 500 heures de service environ.
Lubrification
Si l'outil n'a pas été utilisé pendant un certain
temps, une fin de semaine, par exemple,
mettez 1 ou 2 gouttes d'huile dans le raccord
d'arrivée de l'air comprimé avant de le mettre
en marche.
Remplacement du silencieux
Pour préserver la performance de loutil
pneumatique, il faut remplacer à intervalles
réguliers le silencieux sur le raccord IAS 2.
Nettoyage des canaux daspiration
Nous recommandons de nettoyer une fois par
semaine (surtout en cas de sablage de mastic
de résine) les canaux d'aspiration dans l'outil
(5.4) avec une petite brosse plate ou avec un
chiffon en tissu.
Accessoires, outils
Pour des raisons de
sécurité, il faut utiliser exclusivement des
accessoires et outils d'origine Festool!
Les références des accessoires et outils figurent
dans le catalogue Festool.
Garantie
Frein du tampon
Le collier (5.1) qui assure le contact avec le
tampon de sablage évite l'accroissement excessif de la vitesse. Il s'use et doit être remplacé
quand le freinage diminue. Pour cela, il faut
enlever le tampon, enlever le collier de la
fixation encliquetable (5.2) et mettre un collier
neuf.
Conditions de la garantie (1+2 ans)
Vous avez droit à une prolongation de garantie
gratuite (1 an + 2 ans = 3 ans) pour votre outil
Festool. Festool assumera tous les coûts
dexpédition pendant la première année de la
garantie alors que les deuxième et troisième
années, les coûts devront être assumés par le
client. Festool paiera les frais de retour de loutil
au client par service de livraison terrestre UPS.
10
Page 11

La garantie est valable pour une période de 3
ans à compter de la date dachat indiquée sur
votre reçu ou votre facture.
Garantie limitée de Festool
Cette garantie est valable à condition que loutil
soit utilisé conformément aux instructions de
Festool. Festool garantit, à lacheteur initial
seulement, que loutil indiqué sera exempt de
tout défaut de matériau et de fabrication
pendant un an à compter de la date dachat.
Festool ne donne aucune garantie
supplémentaire, implicite ou explicite, sur les
outils portables Festool. Aucun agent,
représentant commercial, distributeur, vendeur
ou employé de Festool nest autorisé à
prolonger ou à modifier les obligations ou
restrictions de la présente garantie. Les
obligations de Festool sont, à son entière
discrétion, limitées à la réparation ou à
léchange des outils portables Festool trouvés
défectueux dans le présent emballage, tels que
fournis avec le présent Guide dutilisation.
Cette garantie exclut lusure normale, les
dommages causés par un usage impropre, les
abus ou la négligence, ou tout dommage autre
que ceux attribuables à des défauts de matériau
et de fabrication. Cette garantie ne sapplique
pas aux accessoires tels que lames de scie
circulaire, mèches de perceuse et vilebrequin,
lames de scie sauteuse, bandes abrasives et
meules. Sont également exclues les pièces
dusure, telles que balais de charbon, lamelles
pour outils à air comprimé, joints et manchons
de caoutchouc, disques et patins ponceurs, ainsi
que les piles.
Les outils portables Festool à remplacer ou à
réparer doivent être retournés avec le reçu
dachat à Festool (appelez au 800-554-8741
pour connaître ladresse dexpédition).
FESTOOL NEST EN AUCUN CAS
RESPONSABLE DES DOMMAGES DIRECTS
OU INDIRECTS, IMPLICITES OU
EXPLICITES, DÉCOULANT DE LA RUPTURE
DE CETTE GARANTIE OU DE TOUTE AUTRE
GARANTIE. TOUTES LES GARANTIES
IMPLICITES, Y COMPRIS LES GARANTIES
IMPLICITES DE QUALITÉ MARCHANDE ET
DADÉQUATION À UN USAGE
PARTICULIER, SONT LIMITÉES À UNE
PÉRIODE DE TROIS ANS.
Certains états américains et certaines provinces
canadiennes ne permettent pas la limitation des
garanties implicites; il se pourrait donc que les
limites indiquées ci-dessus ne sappliquent pas
dans votre cas. À lexception de certaines
garanties implicites des provinces ou des états
indiquées ici, la présente garantie est exclusive
et remplace toute autre garantie, convention
et obligation similaire de Festool.
Cette garantie vous confère des droits légaux
spécifiques, et vous pouvez aussi avoir dautres
droits pouvant varier dun état à lautre, ou
dune province à lautre au Canada.
11
Page 12

NORMAS GENERALES DE
SEGURIDAD
Lea y entienda todas las
instrucciones. El incumplimiento de una sola
de las instrucciones aquí listadas, puede tener
como resultado una descarga eléctrica, fuego y/
o lesiones personales serias.
CONSERVE ESTAS INSTRUCCIONES
Área de trabajo
1 Mantenga su espacio de trabajo limpio
y bien iluminado. Bancos de trabajo
desordenados y áreas oscuras facilitan
accidentes.
2 Mantenga espectadores, niños, y
visitantes fuera del alcance mientras
maneje herramientas. Distraccio-nes pueden
causarle la pérdida del control.
Seguridad personal
3 Manténgase atento, observe lo que está
haciendo y use el sentido común cuando
use una herramienta. No trabaje estando
cansado o bajo influencia de drogas,
alcohol, o medicamentos. Un momento sin
prestar atención mientras maneja una
herramienta puede tener como resultado serias
lesiones personales.
4 Vístase apropiadamente. No lleve ropa
suelta o joyas. Sujete pelo largo. Mantenga
su pelo, ropa y guantes fuera del alcance
de partes movibles. Ropa, joyas y pelo suelto
pueden pillarse en partes movibles.
5 Evite accidentes al iniciar. Asegúrese de
que, al conectar el suministro del aire, la
herramienta está desconectada. Transportar
herramientas con el dedo en el interruptor o
enchufar las herramientas con el interruptor
encendido puede provocar accidentes.
6 Quite llaves de ajuste o conmutadores
antes de encender la herramienta. Una llave
inglesa u otra llave que se deja puesta en partes
rotatorias de la herramienta pueden causar
lesiones personales.
7 No exceda límites. Mantenga
estabilidad y balance apropiado en todo
momento. Estabilidad y balance apropiado
posibilitan el mejor control de la herramienta en
situaciones inesperadas.
8 Use equipo de seguridad. Lleve siempre
gafas protec-toras. Mascarilla de polvo,
zapatos de seguridad antirresbaladizos, casco, o
protección de los oídos deben ser utilizados en
condiciones adecuadas.
Uso y cuidado de la herramienta
9 No abuse de la manguera. No tire de la
herramienta ni la arrastre tomándola por
la manguera. Mantenga la manguera fuera
de calor, filos agudos o partes movibles.
Reemplace las mangueras dañadas
inmediatamente. Las mangueras dañadas
aumentan el riesgo de accidentes.
10 Use abrazaderas u otras formas
prácticas de sujetar y asegurar la pieza de
trabajo en una plataforma estable. Sujetar
la pieza de trabajo con la mano o contra el cuerpo
es inestable y puede causar la pérdida de control.
11 No fuerce la herramienta. Use la
herramienta correcta para su aplicación. La
herramienta correcta hará su trabajo de manera
mejor y más segura al nivel para el cual está
diseñada.
12 No use la herramienta si el interruptor
no la enciende y apaga. Cualquier herramienta
que no se pueda controlar por el interruptor es
peligrosa y debe ser reparada.
13 Desconecte la manguera de aire
comprimido de la herramienta antes de
realizar cualquier ajuste, cambiar
accesorios, o guardar la herramienta. Estas
medidas preventivas de seguridad reducen el
riesgo de poner en funcionamiento la
herramienta accidentalmente.
14 Guarde herramientas desocupadas
fuera del alcance de niños u otras personas
sin experiencias. Las herramientas son
peligrosas en manos de personas inexpertas.
15 Mantenga las herramientas con
cuidado. Mantenga herramientas para
cortar afiladas y limpias. Herramientas
mantenidas correctamente, con filos afilados,
difícilmente se traban y se controlan con mayor
facilidad.
16 Compruebe si hay alineación incorrecta
o trabadura de partes movibles, rotura de
partes, o cualquier otra condición que
puedan afectar el funcionamiento de la
herramienta. En caso de daños, arregle la
herramienta antes de usarla. Muchos
accidentes son causados por herramientas con
mal mantenimiento.
17 Use solo accesorios que recomiende el
fabricante para su modelo. Accesorios que
funcionen en una herramienta pueden ser
peligrosos al usarlos en otra.
Mantenimiento
18 El mantenimiento de la herramienta
solo se podrá realizar por personal de
mantenimiento calificado. Revisión o
mantenimiento realizado por personal no
calificado puede resultar en el riesgo de lesión
19 Cuando se revise una herramienta, use
solo repuestos idénticos. Siga las instrucciones en la sección de mantenimiento
12
Page 13

de este manual. El uso de repuestos no
autorizados o el incumplimiento de las
instrucciones de mantenimiento pueden
conllevar el riesgo de lesión.
Algunos polvos creados por lijadoras mecánicas, aserraderos, trituradores, perforadoras y
otras actividades de construcción contienen
sustancias químicas que se sabe (en el Estado
de California) causan cáncer, defectos de
nacimiento u otros daños al sistema reproductivo. Algunos ejemplos de estas sustancias
químicas son:
Plomo de las pinturas con base de plomo
Sílice cristalino de los ladrillos y cemento y
otros productos de mampostería, y
Arsénico y cromo de madera tratada con
sustancias químicas
El riesgo de exposición a estas sustancias varía,
dependiendo de cuantas veces se hace este tipo
de trabajo.
Para reducir el contacto con
estas sustancias químicas:
trabaje en un área con buena
ventilación y trabaje con equipo
de seguridad aprobado, como
mascarillas para el polvo
diseñadas específicamente para
filtrar partículas microscópicas.
Datos técnicos
Diámetro del plato lijador: - LEX 2 150 150 mm / 6
- LEX 2 185 185 mm / 7
Accionamiento Motor de paletas de aire comprimido
Presión de servicio (presión de flujo) 87 psi
Velocidad sin carga 4,000 - 8,000 rpm.
Órbitas por minuto 8,000 - 16,000 opm.
Carrera de lijado: - LEX 2 150/3 3 mm
- LEX 2 150/7, LEX 2 185/7 7 mm
Consumo de aire con carga nominal 14 cfm
Peso: - LEX 2 150 1.3 kg / 2.8 lbs
- LEX 2 185 1.4 kg / 3 lbs
Símbolos
n
0
rpm revoluciones por minuto
opm orbitas por minuto
revoluciones sin carga
Uso conforme a la destinación
Conforme a las especificaciones, las máquinas
están diseñadas para lijar madera, plástico,
metal, piedra, material compuesto,
recubrimientos de pintura, emplaste y
materiales similares. No se deberá procesar
material que contenga asbesto.
¡El usuario es responsable
por cualquier daño o lesión que resulte del uso
incorrecto de esta herramienta!
Descripción del funcionamiento
Conexión y puesta en servicio
Asegúrese de que la
herramienta neumática está apagada cuando
conecta al suministro de aire comprimido.
Preparación del aire comprimido
Siempre se deberá utilizar una unidad de
servicio Festool para asegurar que las
herramientas neumáticas Festool funcionan
correctamente. Esta unidad consta de un filtro,
una unidad de control, un drenaje de
condensados y un lubricador, y sirve para
limpiar y lubricar el aire comprimido así como
para mantenerlo libre de condensados. Para
ello, el lubricador deberá ajustarse de tal modo
que cada 7-10 minutos aprox. añada una gota
de aceite al aire comprimido.
Los daños que puedan ocasionarse por un
tratamiento deficiente del aire comprimido
quedarán excluidos del derecho de garantía.
Recomendamos que se utilicen hasta dos
herramientas Festool con una unidad de servicio
con un conector de 3/8. Para el suministro de
aire comprimido, deberá elegirse un compresor
capaz de suministrar como mínimo 20 cfm con
una presión de servicio de 87 psi. El sistema
de conductos debe disponer de un diámetro lo
suficientemente grande (al menos 9mm / 1/2).
Conexión de la manguera IAS 2
La lijadora excéntrica es una herramienta
neumática que va conectada al sistema Festool
IAS 2. Este sistema combina tres funciones en
una sola manguera:
13
Page 14

- Suministro de aire comprimido (1.1)
- Extracción de aire de escape (1.2)
- Extracción de polvo (1.3)
Conexión y desconexión ver figura 2.
Sistema de conexión IAS 2 ver hoja de
indicaciones adjunta.
Puesta en marcha
La herramienta neumática se pone en marcha
al ejercer presión en la palanca (3.1). Si se
suelta la palanca, la máquina se apaga.
Ajustes de la máquina
Antes de realizar cualquier
trabajo en la máquina, ésta deberá
desconectarse siempre del suministro de aire
comprimido.
Regulación del número de revoluciones
Las revoluciones pueden regularse de modo
continuo con la rueda de ajuste (3.2) entre
4,000 y 8,000 rpm.
De esta forma, la velocidad se puede adaptar
de forma óptima a cada material.
Aspiración
El polvo resultante del lijado se aspira
directamente en el plato de lijado a través de
los canales de aspiración del plato lijador. Para
garantizar una aspiración óptima del polvo,
recomendamos emplear los aspiradores Festool
con dispositivo automático de arranque / paro
para máquinas neumáticas.
Para evitar posibles daños al
motor de aire comprimido, no se deberá
permitir la aspiración a través de la herramienta
neumática cuando está detenida.
Platos lijadores
Los platos lijadores tienen
diferente peso en función de su diámetro. El
uso de un plato lijador de tamaño incorrecto
provocará un nivel de vibración excesivo para
la herramienta.
Utilice sólo platos lijadores con el revestimiento
intacto.
Los platos lijadores están disponibles en tres
niveles de dureza en función del tipo de uso:
14
Page 15

- Duro: gran solidez en cantos, para la remoción
de material grueso de las superficies y al lijar
sobre cantos.
- Blando: universal para lijado grueso y fino,
con estructura elástica para superficies planas
y curvas.
- Superblando: gran elasticidad, para lijado
fino de piezas pre-formadas, formas convexas
y radios. ¡No lo aplique en cantos!
Ensamble - ver figura 4. Asegúrese de que los
soportes de arrastre positivo en la forma del
plato lijador (4.1) y la máquina están alineados
(4.2).
Freno del plato de lijado
El collarín (5.1) hace contacto con el plato
lijador e impide con ello una vibración
incontrolable del plato de lijado. En
consecuencia, el collarín se desgasta con el
tiempo y debe sustituirse por uno nuevo cuando
su efecto de frenado empieza a disminuir. Para
ello, deberá retirarse el plato lijador. Entonces
podrá desmontar el collarín de la conexión
rápida (5.2) y sustituirlo por uno nuevo.
Abrasivos
Los abrasivos autoadheribles, como la lija
Stickfix, y los vellones de lija se pueden fijar a
los platos de lijado Stickfix.
Los abrasivos se adhieren fácilmente al plato
lijador y se despegan después de usarlos.
Los abrasivos deben
colocarse concéntri-camente y sus
perforaciones deben coincidir con las del plato
lijador.
Mantenimiento y cuidado
Antes de realizar cualquier
trabajo en la máquina, ésta deberá
desconectarse siempre del suministro de aire
comprimido.
Todos los trabajos de mantenimiento y de
reparación, para los que se tiene que abrir la
carcasa del motor, sólo deben ser llevados a
cabo por un taller de servicio de asistencia
técnica autorizado.
Paletas
Recomenda-mos sustituir las lamas del motor
después de aprox. 500 horas de servicio.
Lubricación
Tras un largo período de inactividad, por
ejemplo, después de un fin de semana, deberán
aplicarse antes de su puesta en marcha 1 ó 2
gotas de aceite lubricante en la conexión de
aire comprimido (5.3) de la máquina.
Cambio del silenciador
El silenciador en la pieza de conexión IAS 2
deberá reemplazarse en intervalos regulares
para mantener la potencia de la herramienta
neumática.
Limpieza de los canales de aspiración
Recomendamos limpiar una vez por semana
(en especial al lijar emplastes de resina
sintética) los canales de aspiración de la
máquina (5.4) con un pequeño cepillo
limpiatubos o con un trapo.
Accesorios, herramientas
¡Por razones de seguridad,
solamente deben emplearse accesorios y
herramientas originales de Festool!
15
Page 16

Los números de pedido para los respectivos
accesorios y herramientas se encuentran en su
catálogo Festool.
Garantía
Condiciones de la Garantía 1 + 2
Usted tiene derecho a una garantía extendida
gratuita (1 año + 2 años = 3 años) para su
herramienta mecánica Festool. Festool se hará
responsable por los costos de envío durante el
primer año de garantía. Durante el segundo y
tercer año de garantía el cliente es responsable
por el costo del envío de la herramienta a
Festool. Festool pagará el embarque de regreso
al cliente usando UPS Ground Service. Todo el
servicio de garantía es válido por 3 años desde
la fecha de la compra de acuerdo a la fecha de
su recibo o factura de compra.
Garantía limitada de Festool
Esta garantía es válida con la condición previa
de que la herramienta se usa y opera de
conformidad con las instrucciones de operación
de Festool. Festool garantiza, sólo al comprador
original, que la herramienta especificada estará
libre de defectos de fabricación y materiales
durante un periodo de un año a partir de la
fecha de compra. Festool no otorga otras
garantías, ni explícitas ni implícitas para
ninguna de las herramientas mecánicas
portátiles Festool. Ningún agente,
representante, distribuidor, comerciante o
empleado de Festool está autorizado para
extender o modificar de cualquier manera las
obligaciones o limitaciones de esta garantía.
Las obligaciones de Festool, a su propia entera
discreción, están limitadas a la reparación o
sustitución de cualquier herramienta portátil
Festool que se encuentre estar defectuosa en
el momento de ser embalada junto con el
manual de usuario.
Quedan excluidos de la cobertura en esta
garantía: el desgaste normal; los daños
causados por uso indebido, el abuso o
negligencia; los daños causados por cualquier
otra causa que no sean defectos del material o
de la fabricación. Esta garantía no aplica a
accesorios como cuchillas de sierras circulares,
brocas de taladro, barrenas de buriladora,
cuchillas de sierra, cuchillas para sierras de
calado, correas de lijadoras y ruedas de esmeril.
También se excluyen las partes que se
desgastan como cepillos de carbón, laminillas
de herramientas de aire, collarines de hule y
sellos, discos y cojines de lijado, y baterías.
Las herramientas mecánicas portátiles Festool
que requieran de reemplazo o reparación deben
devolverse con el recibo de compra a Festool
(llame al 800-554-8741 para los detalles de la
dirección).
EN NINGÚN CASO FESTOOL SE HARÁ
RESPONSABLE POR LOS DAÑOS SECUNDARIOS O CONSECUENTES OCASIONADOS
POR LA VIOLACIÓN DE ESTA O
CUALUQUIER OTRA GARANTÍA, SEA
EXPLÍCITA O IMPLÍCITA. TODAS LAS
GARANTÍAS IMPLICADAS POR LEYES
ESTATALES, INCLUYENDO LAS GARANTÍAS
IMPLICADAS DE COMERCIALIZACIÓN Y
ADECUACIÓN A UN PROPÓSITO PARTICULAR, QUEDAN LIMITADAS A TRES AÑOS
DE DURACIÓN.
Algunos estados de EE.UU. y algunas provincias
de Canadá no permiten las limitaciones en
cuanto a la duración de las garantías implícitas,
de modo que la limitación arriba indicada puede
que no le afecte. A excepción de algunas
garantías implicadas por leyes estatales o
provinciales, limitadas por la presente, la
anteriormente citada garantía, expresamente
limitada, es exclusiva y sustituye a cualquier
otra garantía, acuerdo u obligación similar de
Festool.
Esta garantía le concede derechos legales
específicos y usted podría tener otros derechos
legales que varían de estado a estado en EE.UU.
y de provincia a provincia en Canadá.
16
 Loading...