

Page 1
Festool GmbH
Wertstraße 20
D-73240 Wendlingen
Tel.: +49 (0)7024/804-0
Telefax: +49 (0)7024/804-20608
www.festool.com
Originalbetriebsanleitung - Handkreissäge 6
Original operating manual - Circular saw 15
Notice d’utilisation d’origine - Scie circulaire à main 23
Manual de instrucciones original - Sierra circular 32
Istruzioni per l'uso originali - Sega circolare 41
Originele gebruiksaanwijzing - Handcirkelzaag 50
Originalbruksanvisning - Cirkelsåg 59
Alkuperäiset käyttöohjeet - Käsipyörösaha 67
Original brugsanvisning - Rundsav 75
Originalbruksanvisning - Håndsirkelsag 83
Manual de instruções original - Serra circular manual 91
Оригинал Руководства по эксплуатации - дисковая пила 100
Originál návodu k obsluze - Ruční okružní pila 110
Oryginalna instrukcja eksploatacji - Ręczna pilarka tarczowa 118
HK 55 EBQ
HK 55 EQ
706990_003
Page 2

1
1-1
1-2
1-3
1-4
1-6
1-5
1-1
1-17
1-7
1-15
1-8
1-9
1-10
1-11
1-12
1-13
1-14
1-16
HKC 55 EB
www.festool.com
Page 3
2
3
+FS
3-1
Page 4
HK 55
www.fe
s
t
o
ol.co
m
HKC 55 EB
www.
fes
t
oo
l
.
com
GB
Original operating manual
1 Symbols................................................ 15
2 Safety instructions ............................... 15
3 Intended use......................................... 18
4 Technical data ...................................... 18
5 Machine features ................................. 18
6 Operation.............................................. 18
7 Settings ................................................ 19
8 Working with the electric power tool... 20
9 Service and maintenance..................... 21
10 Accessories .......................................... 21
11 Environment......................................... 22
12 EU Declaration of Conformity .............. 22
The illustrations specified are located at the beginning and end of the operating manual.
1 Symbols
Symbol Significance
Disconnect from the power supply!
Risk of pinching fingers and hands!
Danger of injury by free-moving saw
blade
Circular saw with unprotected saw blade,
do not lay down
pendulum guard closed
Parking position
Lay down circular saw with closed pendulum guard only
Electro-dynamic rundown brake
STOP
Symbol Significance
Warning of general danger
Risk of electric shock
Read operating instructions and safety
notices!
Wear ear protection.
Wear protective gloves.
Wear a dust mask.
Wear protective goggles.
Do not dispose of as domestic waste.
Direction of rotation of saw and the saw
blade
a
Saw blade dimensions
a ... Diameter
b
b ... Locating bore
Tip or advice
Handling instruction
Safety class II
Hazardous area! Keep hands away!
2 Safety instructions
2.1 General safety instructions
WARNING!
structions, illustrations and specifications
provided with this power tool.
instructions listed below may result in electric
shock, fire and/or serious injury.
Save all warnings and instructions for future reference.
The term "power tool" in the warnings refers to
your mains-operated (corded) power tool or battery-operated (cordless) power tool.
2.2 Safety instructions for specific circular
saws
Cutting procedures
a.
ting area and the blade. Keep your second hand
on auxiliary handle, or motor housing.
hands are holding the saw, they cannot be cut by
the blade.
b.
Do not reach underneath the workpiece.
guard cannot protect you from the blade below
the workpiece.
c.
Adjust the cutting depth to the thickness of the
workpiece.
teeth should be visible below the workpiece.
d.
Never hold the workpiece in your hands or
across your leg while cutting. Secure the work-
DANGER!
Less than a full tooth of the blade
Read all safety warnings, in-
Failure to follow all
Keep hands away from cut-
If both
The
15
Page 5

HK 55
GB
piece to a stable platform.
It is important to support the work properly to minimize body
exposure, blade binding, or loss of control.
e.
Hold the power tool by insulated gripping surfaces, when performing an operation where the
cutting tool may contact hidden wiring or its
own cord.
Contact with a "live" wire will also
make exposed metal parts of the power tool
"live" and could give the operator an electric
shock.
f.
When ripping, always use a rip fence or straight
edge guide.
This improves the accuracy of cut
and reduces the chance of blade binding.
g.
Always use blades with correct size and shape
(diamond versus round) of arbour holes.
Blades
that do not match the mounting hardware of the
saw will run off-centre, causing loss of control.
h.
Never use damaged or incorrect blade washers
or bolt.
The blade washers and bolt were specially designed for your saw, for optimum performance and safety of operation.
i.Wear suitable protective equipment such as ear protection,
safety goggles, a dust mask for
work which generates dust, and
protective gloves when working
with raw materials and when
changing tools.
Kickbacks causes and related warnings
– kickback is a sudden reaction to a pinched,
jammed or misaligned saw blade, causing an uncontrolled saw to lift up and out of the workpiece
toward the operator;
– when the blade is pinched or jammed tightly by
the kerf closing down, the blade stalls and the
motor reaction drives the unit rapidly back toward the operator;
– if the blade becomes twisted or misaligned in the
cut, the teeth at the back edge of the blade can
dig into the top surface of the wood causing the
blade to climb out of the kerf and jump back toward the operator.
Kickback is the result of saw misuse and/or incorrect operating procedures or conditions and can be
avoided by taking proper precautions as given below.
a.
Maintain a firm grip with both hands on the saw
and position your arms to resist kickback forces. Position your body to either side of the
blade, but not in line with the blade.
Kickback
could cause the saw to jump backwards, but
kickback forces can be controlled by the operator,
if proper precautions are taken.
b.
When blade is binding, or when interrupting a
cut for any reason, release the trigger and hold
the saw motionless in the material until the
blade comes to a complete stop. Never attempt
to remove the saw from the work or pull the saw
backward while the blade is in motion or kickback may occur.
Investigate and take corrective
actions to eliminate the cause of blade binding.
c.
When restarting a saw in the workpiece, centre
the saw blade in the kerf so that the saw teeth
are not engaged into the material.
If a saw blade
binds, it may walk up or kickback from the workpiece as the saw is restarted.
Support large panels to minimise the risk of
d.
blade pinching and kickback.
Large panels tend
to sag under their own weight. Supports must be
placed under the panel on both sides, near the
line of cut and near the edge of the panel.
Do not use dull or damaged blades.
e.
Unsharpened or improperly set blades produce narrow
kerf causing excessive friction, blade binding and
kickback.
f.
Blade depth and bevel adjusting locking levers
must be tight and secure before making the cut.
If blade adjustment shifts while cutting, it may
cause binding and kickback.
g.
Use extra caution when sawing into existing
walls or other blind areas.
The protruding blade
may cut objects that can cause kickback.
Function of the lower guard
a.
Before using the machine, check whether the
lower guard closes correctly. Do not use the saw
if the lower guard does not move freely or close
immediately. Never clamp or secure the lower
guard in an open position.
If the saw is dropped
or accidentally falls to the ground, the lower
guard may become bent. Open the guard using
the retraction lever and make sure that the guard
can move freely and does not make contact with
the saw blade or other components at every cutting angle and depth.
b.
Check the function of the springs for the lower
guard. If the lower guard or springs show any
signs of a defect, have the saw serviced before
using it again.
Damaged parts, sticky deposits or
accumulated chips may result in delayed operation of the lower guard.
c.
Open the lower guard by hand only for special
cuts, such as plunge cuts and angled cuts. Open
the lower guard using the retractor lever and
release it as soon as the saw blade plunges into
the workpiece.
The lower guard should work au-
tomatically for all other sawing work.
16
Page 6

d.
Make sure the lower guard is covering the saw
blade before placing the saw on a worktop or on
the ground.
An unprotected, rotating saw blade
placed on any surface will move the saw against
the cutting direction and cut anything in its path.
Therefore, always make sure the saw blade has
stopped rotating.
Function of the guide wedge [1-5]
a.
Use the correct saw blade for the guide wedge,
where possible. The function of the guide wedge
is restricted if using saw blades with a thicker
blade core.
To ensure that the guide wedge functions properly, make sure the blade core of the
saw blade is thinner than the guide wedge and
that the tooth width is greater than the thickness
of the guide wedge. Expect increased risk of
kickback when using a thicker saw blade.
b.
Do not operate the saw if the guide wedge is
bent.
Even the slightest problem can cause the
guard to close more slowly.
Further safety instructions
–
This electric power tool cannot be installed in a
work bench.
The electric power tool may become
unsafe and cause serious accidents if installed in
benches from other manufacturers or self-manufactured work benches.
–
Never place your hands into the chip ejector.
You
may injure yourself on rotating parts.
–
Use suitable detectors to determine if utility
lines are hidden in the work area or call the local utility company for assistance.
Contact with
electric lines can lead to fire and electric shock.
Damaging a gas line can lead to explosion. Penetrating a water line causes property damage or
may cause an electric shock.
Wait until the power tool stops completely until
–
placing it down.
The tool can become entangled
and lead to a loss of control of the power tool.
– Do not use the machine for overhead work.
–
Harmful/toxic dust may be produced during
your work (e.g. paint containing lead, certain
types of wood and metal).
Inhaling or coming
into contact with this dust may represent a hazard for operating personnel or persons in the vicinity. Comply with the safety regulations that
apply in your country.
Wear a P2 dust mask to protect your
health.
Ensure that enclosed spaces are adequately ventilated and, if necessary, connect a mobile dust extractor.
HK 55
GB
2.3 Residual risks
In spite of compliance with all relevant design regulations, hazzards while operating the machine still
occur e.g.:
– Touching the saw blade in the area of the front
opening below the saw table,
– Touching the parts of the saw blade that protrude
below the saw table while cutting,
– Touching rotating parts from left and right sides:
saw blade, clamping flange, flange screw.,
– Kickback of machine due to jamming in the
workpiece,
– Touching live parts when the casing is opened
and the mains plug is in the socket,
– the flying off of parts,
– the flying off of machine parts from a damaged
machine,
– noise emission,
– dust emission.
2.4 Aluminium processing
When sawing aluminium, the following measures must be taken for safety reasons:
– Install an upstream residual-current circuit
breaker (FIG, PRCD).
– Connect the machine to a suitable dust extractor.
– Regularly remove dust deposits from the motor
housing.
– Use an aluminium saw blade.
– Close the viewing window/chipguard.
Wear protective goggles.
– When sawing panels, they must be lubricated
with paraffin but thin-walled profiles (up to 3
mm) can be sawed without lubrication.
2.5 Emission levels
Levels determined in accordance with EN 60745 are
typically:
Sound pressure level L
= 84 dB(A)
PA
Noise level LWA = 95 dB(A)
Measuring uncertainty allow-
K = 3 dB
ance
CAUTION
Operating noise
Damage to hearing
Use ear protection!
17
Page 7

HK 55
GB
Vibration emission value ah (vector sum for three
directions) and uncertainty K measured in accordance with EN 60745:
Vibration emission level (3 directions)
Cutting wood ah < 2,5 m/s
Cutting metal ah = 3,0 m/s
Uncertainty K = 3 m/s
2
2
2
The specified emission values (vibration, noise)
– are used to compare machines.
– They are also used for making preliminary esti-
mates regarding vibration and noise loads during
operation.
– They represent the primary applications of the
power tool.
Increase possible for other applications, with other
insertion tools or if not maintained adequately. Take
note of idling and downtimes of machine!
Portable circular saw HK 55
Weight (without mains cable) 4,4 kg
Safety class /II
1.
Max. speed in the event of faulty electronics.
5 Machine features
[1-1]
[1-2]
[1-3]
[1-4]
[1-5]
[1-6]
[1-7]
[1-8]
[1-9]
Handles
Switch-on lock
Lever for changing blades
Retractor lever for pendulum guard
Guide wedge
Pendulum guard
On/Off switch
Lever for plunge function
Split scale for cutting depth stop (with/
without guide rail)
3 Intended use
Portable circular saw designed for sawing
– wooden materials and wood-based materials,
– plaster and cement compoud fibres,
– plastic materials,
– aluminium (only with a special saw blade for alu-
minium offered by Festool)
Only saw blades with the following specifications
can be used: saw blade diameter 160 mm; recommended cutting width 1,8 mm, max. 2.2 mm with
restricted function of guide wedge; locating bore
20 mm; recommended steel blade thickness
1,5 mm, max. 1.8 mm; suitable for speeds up to
9500 rpm. Never use machine with any sanding
disc.
The machine is designed and approved for use by
trained persons or specialists only.
The user is liable for improper or non-intended use.
4 Technical data
Portable circular saw HK 55
Power 1200 W
No-load speed 2000 - 5200 rpm
Max. speed
Inclination 0 - 50°
Cutting depth at 0° 0 - 55 mm
Cutting depth at 50° 38 mm
Saw blade measurement 160 x 1,8 x 20 mm
1
7300 rpm
[1-10]
[1-11]
[1-12]
[1-13]
[1-14]
[1-15]
[1-16]
Extractor connector
Angle scale
Knob for angle setting
Cutting depth adjuster
Mains power cable
Adjustable jaws
Insulated gripping surfaces (grey shaded
area)
[1-17]
Speed control
6 Operation
WARNING
Unauthorised voltage or frequency!
Risk of accidents
Observe the specifications on the machine’s
name plate.
Observe country-specific regulations.
Always switch the machine off before connecting or disconnecting the mains power
cable!
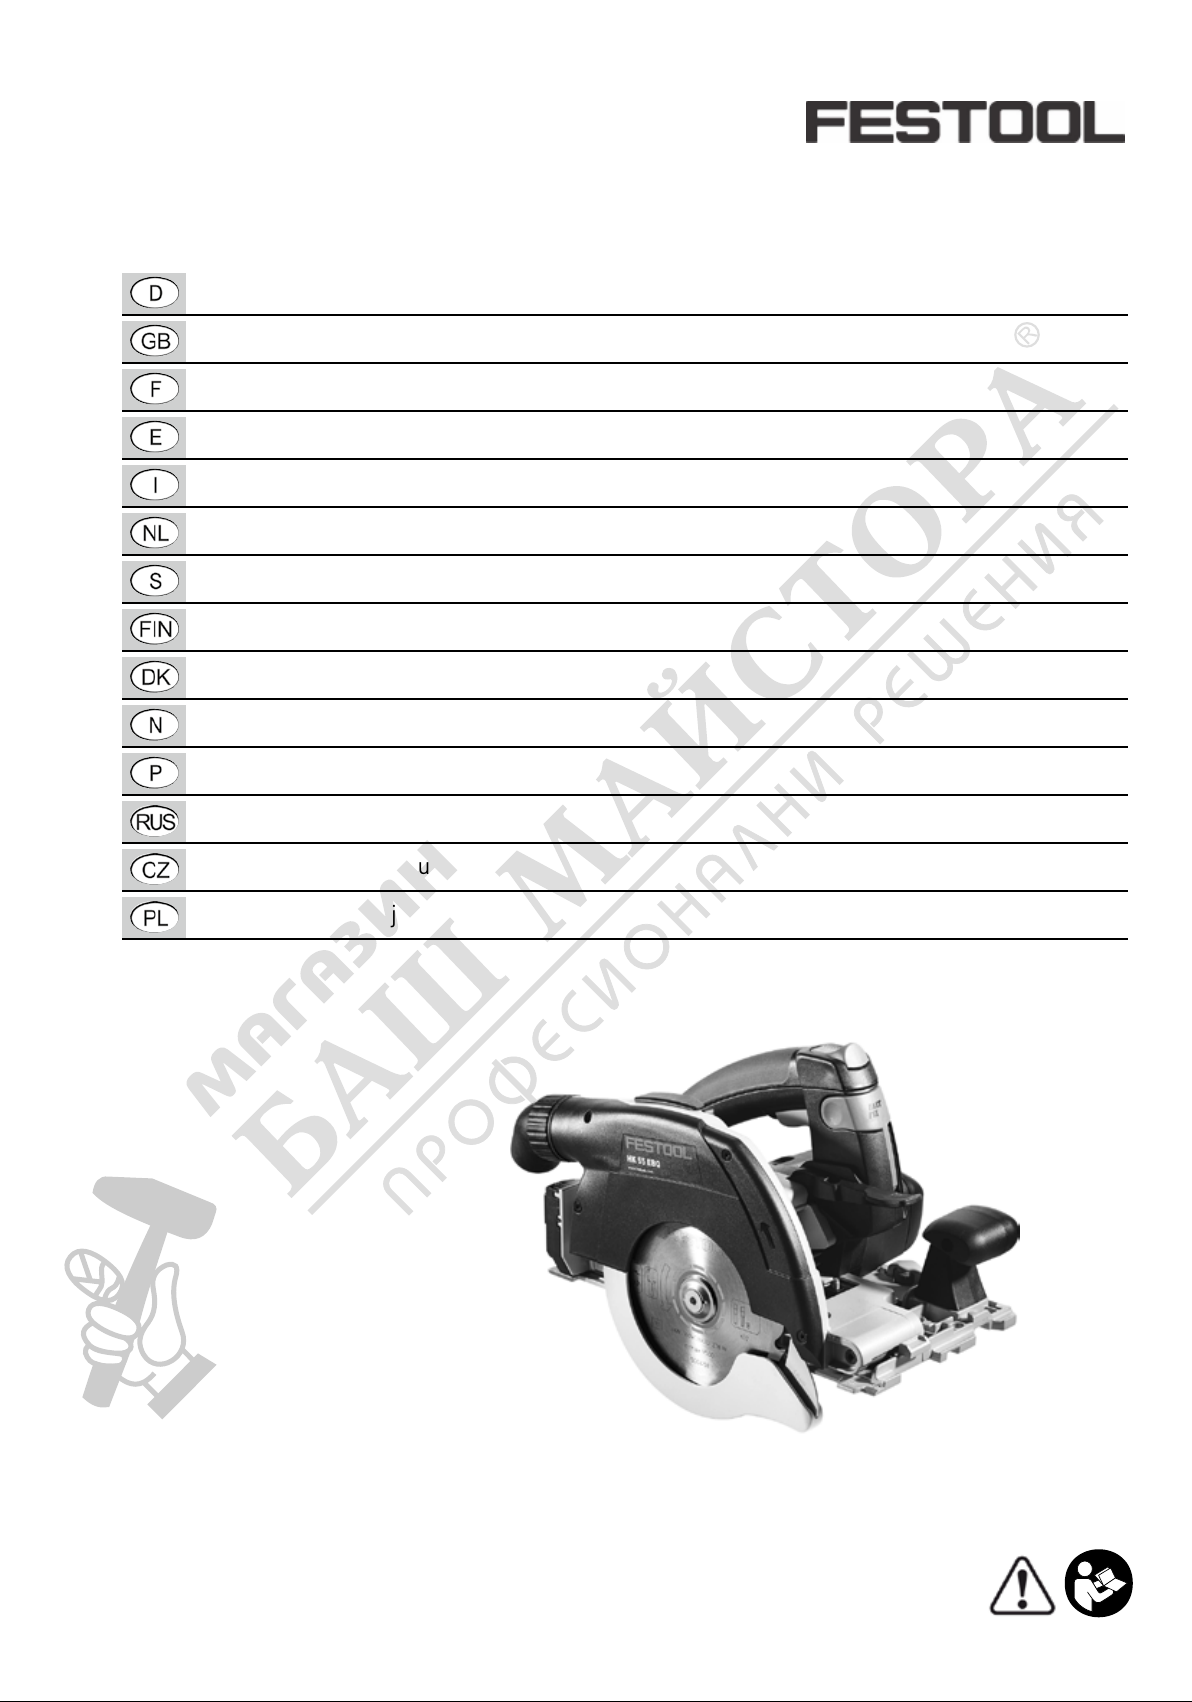
Connecting and detaching the mains power cable
[1-14]
6.1 Switch on/off
see Fig.
Slide switch-on lock
[2]
.
[1-2]
Press the ON/OFF switch
Press = ON
Release = OFF
upwards.
[1-7]
.
18
Page 8

HK 55
GB
7 Settings
WARNING
Risk of injury, electric shock
Always pull the mains plug out of the socket before performing any type of work on the machine!
7.1 Electronics
Smooth start-up
The electronically controlled smooth start-up ensures that the machine starts up jolt-free.
Speed control
You can regulate the speed steplessly within the
speed range using the adjusting wheel
Technical data). This enables you to optimise the
cutting speed to suit the surface (see table 1).
Current limiting
Current limiting prevents excessive current consumption under extreme overload, which can lead
to a decrease in the motor speed. The motor immediately restarts after the load is removed.
Brake
The HK 55EBQ is fitted with an electronic brake.
When the saw is switched off, the saw blade slows
to a stop electronically within approx. 2 seconds.
[1-17]
(see
+FS
Cutting depth with guide rail/cross cutting
guide rail
max. 51 mm
7.3 Adjusting the cutting angle
The saw table must be on an even surface when
adjusting the cutting angle.
between 0° and 50°:
Open knob
Swivel sawing unit to the desired cutting angle
[4-1]
.
Close knob
Both positions (0° and 50°) are set at the factory
[4-2]
[4-2]
.
.
and can be readjusted by the after-sales service
team.
For angled cuts, the cutting depth is smaller
than the value displayed on the cutting depth
scale.
7.4 Adjust pendulum guard
Risk of injury! Sharp edges!
The pendulum
guard swings back quickly in the event of
sudden release.
[1-6]
The pendulum guard
with the retractor lever
must only be opened
[1-4].
7.5 Changing the saw blade
WARNING
Restart protection
The integral restart protection prevents the electric
power tool from automatically starting up again after an interruption in power when the ON/OFF
switch is pressed. In this case the electric power
tool must be switched off and then switched back
on again.
Temperature cut-out
When exceeding a certain engine temperature level, the machine power supply and speed are
capped. The power tool continues operating at reduced power to allow the ventilator to cool the motor rapidly. The power tool resumes to full performance automatically once the motor has cooled
sufficiently.
7.2 Adjusting the cutting depth
The cutting depth can be set at 0 – 55 mm.
Press cutting depth adjustment
Pull up or push down saw at main handle.
[3-1]
.
Cutting depth without guide rail/cross cutting guide rail
max. 55 mm
Risk of injury, electric shock
Always pull the mains plug out of the socket before performing any type of work on the machine!
CAUTION
Hot and sharp tools
Risk of injury
Do not use insert tools that are blunt or defective.
Wear protective gloves.
Swivel saw to 0° position before replacing the
saw blade and set maximum cutting depth.
Position saw on motor cover when replacing
2]
.
Turn lever
Open the screw
Hold the pendulum guard open
retractor lever
[5-4]
as far as stop.
[5-10]
[5-5]
using the Allen key
.
[5-11]
only with
[5-
[5-3]
.
19
Page 9

HK 55
GB
Remove saw blade
Insert new saw blade.
[5-9]
.
The direction of rotation of the saw blade
[5-7]
and saw
Insert the outer flange
[5-6]
must match.
[5-8]
so that the pin en-
gages in the recess on the inner flange.
Release retractor lever
dulum guard to swivel back
[5-5]
and allow the pen-
[5-11]
to its final
position.
Tighten screw
Reposition lever
Risk of injury!
[5-10]
[5-4]
.
.
Whenever you replace a saw
blade, always check that it is securely in
place. If a clamping flange is loose, the cut-
ting edges of the saw blade may break off, and if a
screw is loose, the saw blade may become detached.
7.6 Dust extraction
WARNING
– Check the function of the pendulum guard prior
to use and do not use the electric power tool if it
does not slide in and out easily.
– Always secure the workpiece in such a manner
that it cannot move while being processed.
– Always hold the machine with two hands at the
handles
[1-1]
when performing work. This reduces the risk of injury and is a prerequisite for
precise work.
– Always push the saw forwards
[8-9]
, and never
towards yourself.
– Adapt the infeed speed to prevent the cutters on
the saw blade from overheating and prevent
plastic materials from melting during cutting.
– Make sure that the knob
[1-12]
is tightened be-
fore starting work.
– Do not use the machine when the electronics are
faulty because the machine may operate at excessive speeds. An absence of the smooth startup function or speed control indicates that the
electronics are faulty.
Dust hazard
Dust can be hazardous to health. Always work
with a dust extractor.
Always read applicable national regulations before extracting hazardous dust.
Festool mobile dust extractor
A Festool mobile dust extractor with an extractor
hose diameter of 27 mm or 36 mm (36 mm is recommended due to the reduced risk of clogging) can
be connected to the extractor connector
[1-10]
at
the elbow.
– Static charge may occur if an anti-static suction
hose is not used. The user may suffer an electric
shock.
Independent extraction
Secure the connection piece
collection bag
[6-3]
at the extractor connector
with a clockwise rotation
To empty remove the connection piece
the dust collection bag
[6-3]
connector with an anti-clockwise rotation
[6-2]
of the dust
[6-1]
.
from the extractor
[6-2]
[6-1]
of
8 Working with the electric power tool
Please observe all mentioned safety informations and the following rules when working:
– Only guide the machine against the workpiece
when it is switched on.
8.1 Sawing along the scribe mark
The cut indicators display the cutting sequence
without a guide rail:
0° cuts:
45° cuts:
[7-1]
[7-2]
8.2 Cutting sections
Position the saw with the front part of the saw table
on the workpiece, switch on saw and push forward
in cutting direction.
8.3 Sawing cut-outs (plunge cuts)
In order to avoid kickbacks, the following instructions must be observed without fail
when plunge cutting:
– Always position saw with the rear edge of the saw
table against a fixed stop.
– When working with the guide rail, place the saw
against the kickback stop FS-RSP (accessories)
[8-6]
clamped to the guide rail.
Caution! Danger of crushing!
Always keep a firm grip on the machine with
your free hand when adjusting plunge cuts. Never
.
position your fingers behind or below the saw
blade.
Procedure
Adjusting cutting depth,
Press lever
[8-1]
down.
see section 7.2
Sawing unit swivels upwards to plunge-cut position.
.
20
Page 10

Hold retractor lever
[8-2]
downwards as far as
stop.
Pendulum guard
[8-4]
opens and the saw blade
is exposed.
Position saw on workpiece and position against
a stop (kickback stop).
Switch on saw.
Slowly press down saw to the set cutting depth
until the saw engages, release retractor lever
[8-2]
and push forward in cutting direction
9]
.
The notch
[8-3]
indicates the absolute rear cutting
[8-
point of the saw blade (Ø 160 mm) when using the
saw at maximum cutting depth with the guide rail.
9 Service and maintenance
WARNING
HK 55
GB
10 Accessories
The order numbers of the accessories and tools can
be found in the Festool catalogue or on the Internet
under "www.festool.com".
In addition to the accessories described, Festool
also provides a comprehensive range of system accessories that allow you to use your saw more effectively and in diverse applications, e.g.:
• Parallel stop, extension table PA-HKC 55
• Kickback stop FS-RSP
• Parallel stop FS-PA and guide extension FS-PAVL
• Side-mounted cover, false joint ABSA-TS 55
10.1 Saw blades, other accessories
In order to saw different materials quickly and
cleanly, Festool offers saw blades for all applications that are specially designed for your Festool
portable circular saw.
Risk of injury, electric shock
Always disconnect the mains plug from the
socket before performing maintenance work on
the machine!
All maintenance and repair work which requires
the motor housing to be opened must only be
carried out by an authorised service workshop.
Customer service and repair
through manufacturer or service
workshops: Please find the nearest
address at: www.festool.com/service
EKAT
4
Only use original Festool spare parts!
Order No. at: www.festool.com/service
5
3
2
1
Regular cleaning of the machine, above all
the adjustment devices and the guides, is an
important safety factor.
Observe the following instructions:
To ensure constant air circulation, always keep
the cooling openings in the housing unobstructed and air accessible.
Use an extractor on all openings of the power
tool to remove chips and splinters.
The pendulum guard must always be able to
move freely and close independently. Always
keep the area around the pendulum guard
clean. Clear from dust and chippings by blowing
out with compressed air or using a brush.
only
10.2 Guide rail
The guide rail enables you to make clean, accurate
cuts while simultaneously protecting the surface of
the workpiece from damage.
In conjunction with the extensive range of accessories, exact angled cuts, mitre cuts and fitting work
can be completed with the guide system. The option
of attaching the guide rail securely using clamps
[8-7]
ensures safer working conditions.
Adjust the guide play between the saw table and
the guide rail using the two adjustable jaws
8]
.
[8-
The splinterguard [8-5] requires breaking in before first usage:
Position saw at the very end of the guide rail, so
that the guide plate is level.
Swivel saw to 0° position and set to maximum
cutting depth.
Switch on saw.
Slowly push saw along the entire length of the
rail.
The edge of the splinterguard now corresponds exactly to the cutting edge.
10.3 Cross cutting guide rail
The cross cutting guide rail's intended use is sawing wood and panel materials.
It allows precise and clean cuts, especially angled
cuts can be carried out easily and a high repeat accuracy. The saw retreats automatically into the inital position.
21
Page 11

HK 55
w
w
w
.
f
est
ool
.
c
om
H
K
C
5
5 EB
w
w
w
.
f
e
s
t
o
o
l
.
c
o
m
GB
The splinterguard must be broken in before
first use,
see chap. 10.2
.
Every time before use, check that the cross cutting guide rail is retracted correctly
and have it
repaired, if necessary. Never use if automatic retraction is not operating correctly.
Connect saw to the cross cutting guide rail
Slide saw onto the cross cutting guide rail in
sawing direction.
The saw engages in the sliding block
The quick fastener
[9-1]
locks in behind the saw ta-
[9-2]
.
ble.
The saw is securely connected to the cross cutting
guide rail.
Loosen saw from the cross cutting guide rail.
Push saw forward slightly in sawing direction.
Turn quick fastener
Remove saw towards the rear against the saw-
[9-1]
to the front.
ing direction.
Cutting with the compound mitre saw
Open knob at adjustable stop
Adjust angle at the scale
Close knob at adjustable stop
Adjust depth and angle of the saw,
and 7.3
The saw’s play on the cross cutting guide rails
.
can be set with the two setting jaws
[10-1]
[10-3]
[10-1]
.
.
.
see ch. 7.3
[10-2]
.
The saw must slide easily across the rail.
Place the adjustable stop
[10-1]
and the fixed
stop against the work piece and position the
cross cutting guide rail.
Switch saw on.
Push saw in direction of cutting.
Pendulum guard opens. Sawing commences.
WARNING
Protruding rotating saw blade
Risk of injury
Do not position hands near cutting area and saw
blade.
Do not place hands below the work piece.
Do not hold the workpiece in hand or place it on
your leg.
piece.
EB
5
KC 5
H
m
co
.
l
o
sto
e
f
www.
WARNING! Risk of
injury! Saw with
exposed saw
blade; do not place down.
If the saw or the pendulum guard fails to return to its initial position, stop
the sawing process, disconnect the mains plug,
check whether the tool is functioning properly and
remove any trapped wood splinters.
Parked position – pendulum guard closed.
The saw
with cross cutting guide rail
may be placed down when in this position.
11 Environment
Do not dispose of the device in household waste!
Recycle devices, accessories and packaging. Observe applicable national regulations.
EU only:
In accordance with European Directive on
waste electrical and electronic equipment and implementation in national law, used electric power tools
must be collected separately and handed in for environmentally friendly recycling.
Information on REACh:
www.festool.com/reach
12 EU Declaration of Conformity
Portable circular saw Series no.
HK 55 EBQ 10008474
HK 55 EQ 200162
Year of CE mark: 2015
We declare under sole responsibility that this product
complies with all the relevant requirements in the following directives, standards and normative documents:
2006/42/EG, 2004/108/EG (until 19.04.2016), 2014/
30/EU (from 20.04.2016), 2011/65/EU, EN 607451:2009+A11:2010, EN 60745-2-5:2010, EN 550141:2006+A2:2011, EN 55014-2:1997+Corrigendum
1997+A1:2001+A2:2008, EN 61000-3-2:2006+
A1:2009+A2:2009, EN 61000-3-3:2013.
Festool GmbH
Wertstr. 20, D-73240 Wendlingen, Germany
Wolfgang Zondler
After cutting, switch off saw.
Pull back saw into initial position.
Remove cross cutting guide rail from work
22
Head of Research, Development and Technical
Documentation
2015-07-13
 Loading...