

Page 1
Originalbetriebsanleitung/Ersatzteilliste 6
Original operating manual/Spare parts list 9
Notice d’utilisation d’origine/Liste de pièces de rechange 12
Manual de instrucciones original/Lista de piezas de repuesto 15
Istruzioni per l’uso originali/Elenco parti di ricambio 18
Originele gebruiksaanwijzing/Lijst met reserveonderdelen 21
Originalbruksanvisning/Reservdelslista 24
Alkuperäiset käyttöohjeet/Varaosaluettelo 26
Original brugsanvisning/Reservedelsliste 29
Originalbruksanvisning/Reservedelsliste 32
Manual de instruções original/Lista de peças sobresselentes 35
Оригинал Руководства по эксплуатации/Перечень запасных частей 38
Originál návodu k obsluze/Seznam náhradních dílù 41
Oryginalna instrukcja eksploatacji/Lista części zamiennych 44
ETS 125 Q
ETS 125 EQ
468061_007
Page 2

Exzenterschleifer
Eccentric sander
Ponceuse excentrique
Serien-Nr.
Serial no.
N° de série
ETS 125 Q 493526
ETS 125 EQ 493527
Jahr der CE-Kennzeichnung:
2006
Year of CE mark:
Année du marquage CE :
EG-Konformitätserklärung. Wir erklären in alleiniger
Verantwortung, dass dieses Produkt mit den folgenden Normen
oder normativen Dokumenten übereinstimmt: EN 60745-1, EN 607452-4, EN 55014-1, EN 55014-2, EN 61000-3-2, EN 61000-3-3 gemäß den
Bestimmungen der Richtlinien 2006/42/EG, 2004/108/EG, 2011/65/EU.
EC-Declaration of Conformity: We declare at our sole
responsibility that this product is in conformity with the following
standards or standardised documents: EN 60745-1, EN 60745-2-4, EN
55014-1, EN 55014-2, EN 61000-3-2, EN 61000-3-3 in accordance with
the regulations 2006/42/EC, 2004/108/EC, 2011/65/EU.
CE-Déclaration de conformité communautaire. Nous déclarons
sous notre propre responsabilité que ce produit est conforme
aux normes ou documents de normalisation suivants: EN 60745-1,
EN 60745-2-4, EN 55014-1, EN 55014-2, EN 61000-3-2, EN 61000-3-3
conformément aux prescriptions des directives 2006/42/CE, 2004/108/
CE, 2011/65/UE.
CE-Declaración de conformidad. Declaramos bajo nuestra
exclusiva responsabilidad que este producto corresponde
a las siguientes normas o documentos normalizados: EN
60745-1, EN 60745-2-4, EN 55014-1, EN 55014-2, EN 610003-2, EN 61000-3-3 conforme a las prescripciones estipuladas
en las directrices 2006/42/CE, 2004/108/CE, 2011/65/UE.
CE-Dichiarazione di conformità. Dichiariamo sotto la nostra
esclusiva responsabilità che il presente prodotto è conforme alle
norme e ai documenti normativi seguenti: EN 60745-1, EN 60745-2-4,
EN 55014-1, EN 55014-2, EN 61000-3-2, EN 61000-3-3 conformemente
alle normative delle direttive 2006/42/CE, 2004/108/CE, 2011/65/UE.
EG-conformiteitsverklaring. Wij verklaren op eigen
verantwoordelijkheid dat dit produkt voldoet aan de volgende
normen of normatieve documenten:
EN 60745-1, EN 60745-2-4, EN 550141, EN 55014-2, EN 61000-3-2, EN 61000-3-3 conform de richtlijnen 2006/42/
EG, 2004/108/EG,
2011/65/EU
.
EG-konformitetsförklaring. Vi förklarar i eget ansvar, att denna
produkt stämmer överens med följande normer och normativa
dokument: EN 60745-1, EN 60745-2-4, EN 55014-1, EN 55014-2, EN
61000-3-2, EN 61000-3-3 enligt bestämmelserna i direktiven 2006/42/
EG, 2004/108/EG, 2011/65/EU.
Page 3
EY-standardinmukaisuusvakuutus. Vakuutamme
yksinvastuullisina, että tuote on seuraavien standardien ja
normatiivisten ohjeiden mukainen: EN 60745-1, EN 60745-2-4, EN
55014-1, EN 55014-2, EN 61000-3-2, EN 61000-3-3 direktiivien 2006/42/
EY, 2004/108/EY, 2011/65/EU määräysten mukaan.
EF-konformitetserklæring: Vi erklærer at have alene ansvaret
for, at dette produkt er i overensstemmelse med de følgende
normer eller normative dokumenter: EN 60745-1, EN 60745-2-4,
EN 55014-1, EN 55014-2, EN 61000-3-2, EN 61000-3-3 i henhold til
bestemmelserne af direktiverne 2006/42/EG, 2004/108/EG, 2011/65/EU.
CE-Konformitetserklæring. Vi erklærer på eget ansvar at
dette produktet er i overensstemmelse med følgende normer
eller normative dokumenter: EN 60745-1, EN 60745-2-4, EN 550141, EN 55014-2, EN 61000-3-2, EN 61000-3-3 iht. Bestemmelsene i
rådsdirektivene 2006/42/EF, 2004/108/EF, 2011/65/EU.
CE-Declaração de conformidade: Declaramos, sob a nossa
exclusiva responsabilidade, que este produto corresponde às
normas ou aos documentos normativos citados a seguir: EN 607451, EN 60745-2-4, EN 55014-1, EN 55014-2, EN 61000-3-2, EN 610003-3 segundo as disposições das directivas 2006/42/CE, 2004/108/CE,
2011/65/UE.
Декларация соответствия ЕС. Мы заявляем с исключительной
ответственностью, что данный продукт соответствует
следующим нормам или нормативным документам: EN 60745-1, EN
60745-2-4, EN 55014-1, EN 55014-2, EN 61000-3-2, EN 61000-3-3 в
соответствии с положениями директив 2006/42/ EG, 2004/108/EG,
2011/65/EU.
ES prohlášení o shodě. Prohlašujeme s veškerou
odpovědností, že tento výrobek je ve shodě s následujícími
normami nebo normativními dokumenty: EN 60745-1, EN 607452-4, EN 55014-1, EN 55014-2, EN 61000-3-2, EN 61000-3-3 podle
ustanovení směrnic, 2006/42/ES, 2004/108/ES, 2011/65/EU.
Oświadczenie o zgodności z normami UE. Niniejszym
oświadczamy na własną odpowiedzialność, że produkt ten
spełnia następujące normy lub dokumenty normatywne: EN 60745-1,
EN 60745-2-4, EN 55014-1, EN 55014-2, EN 61000-3-2, EN 61000-33 zgodnie z postanowieniami wytycznych 2006/42/EG, 2004/108/EG,
2011/65/EU.
Dr. Martin Zimmer 18.12.2012
Leiter Forschung, Entwicklung, technische Dokumentation
Head of Research, Development and Technical Documentation
Directeur recherche, développement, documentation technique
Festool Group GmbH & Co. KG
Wertstr. 20
D-73240 Wendlingen
Page 4
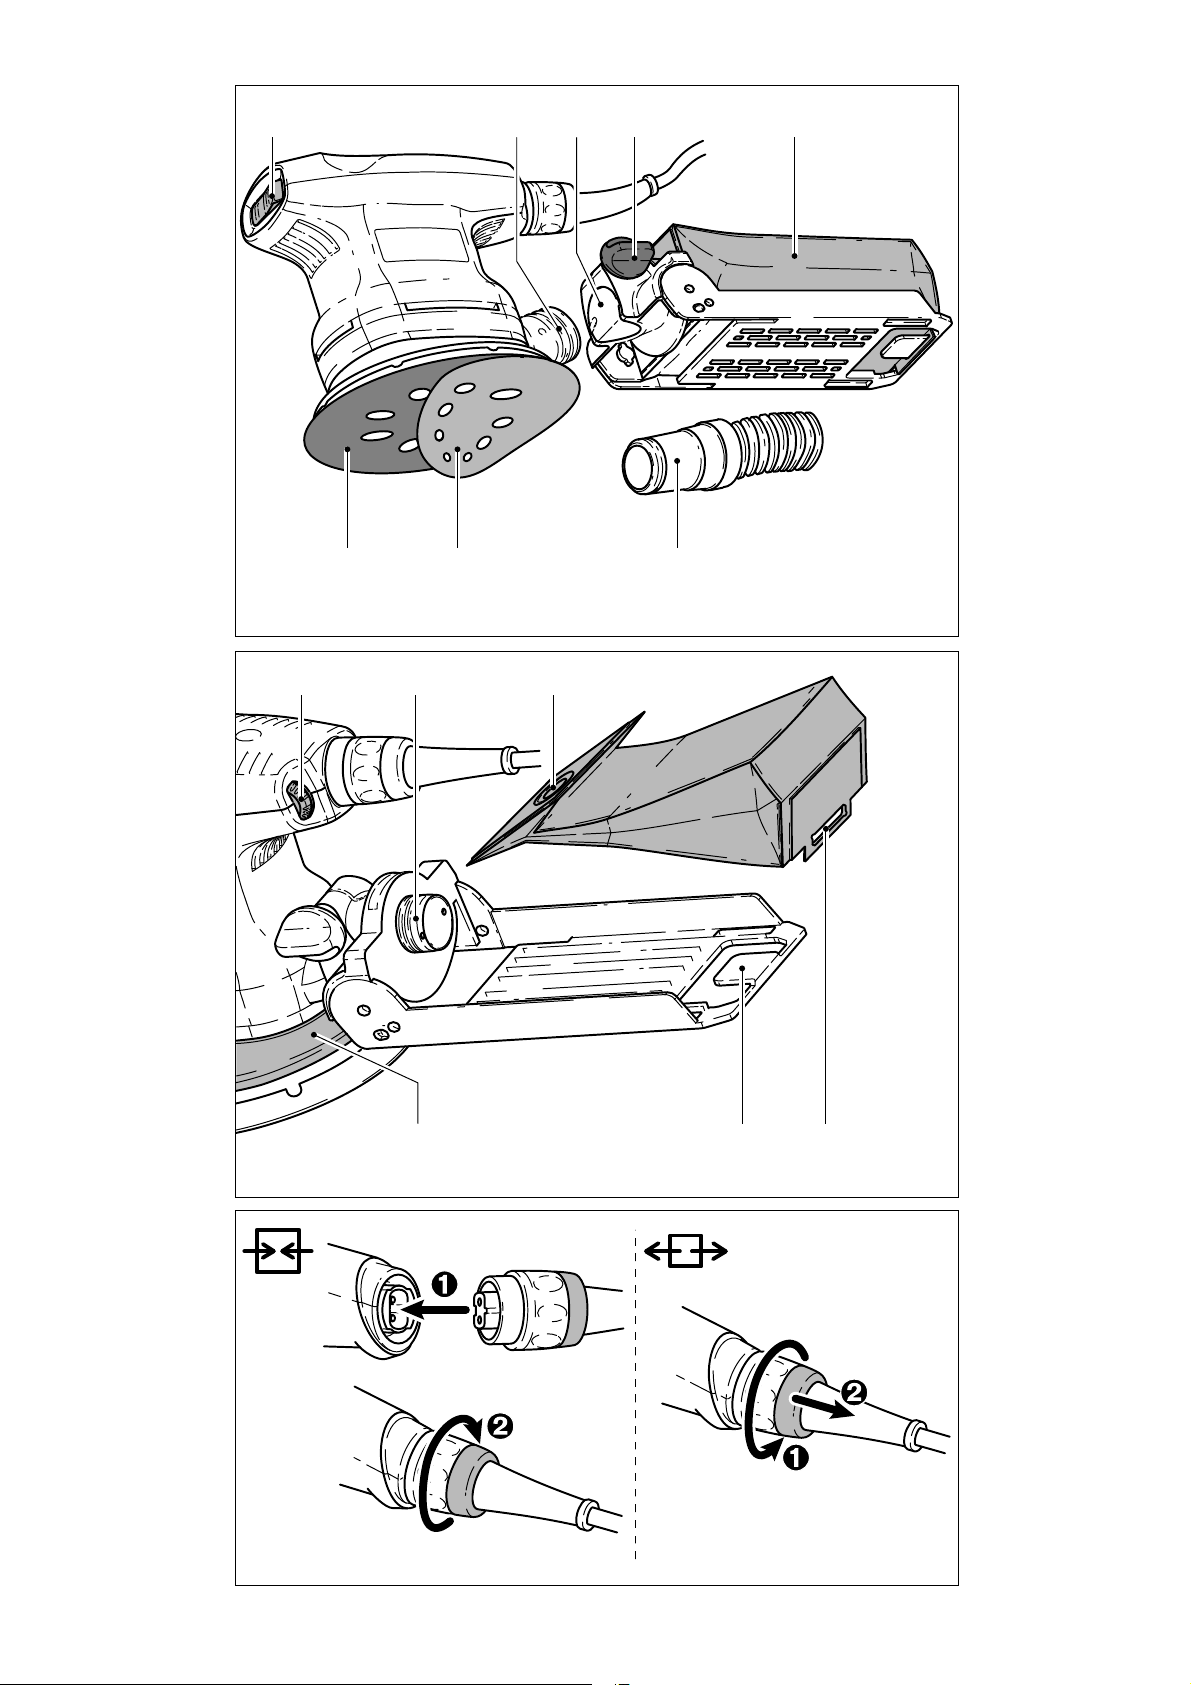
1.1 1.51.41.31.2
1
2.1 2.2 2.3
1.61.71.8
2
3
2.5 2.42.6
Page 5

Page 6
Exzenterschleifer
Technische
Daten
ETS 125 Q ETS 125 EQ
Leistung 200 W
Drehzahl 14.000 min
Arbeitshübe 28.000 min
-1
-1
5.000 -
14.000 min
10.000 -
28.000 min
-1
-1
Schleifhub 2,0 mm
Schleifteller Durchmesser 125 mm
Gewicht 1,1 kg (ohne Kabel)
Schutzklasse
/ II
Die angegebenen Abbildungen befi nden sich am
Anfang der Bedienungsanleitung.
Symbole
Warnung vor allgemeiner Gefahr
Gehörschutz tragen!
Atemschutz tragen!
Schutzbrille tragen!
sungen können elektrischen Schlag, Brand und/
oder schwere Verletzungen verursachen.
Bewahren Sie alle Sicherheitshinweise und Anweisungen für die Zukunft auf.
Der in den Sicherheitshinweisen verwendete
Begriff „Elektrowerkzeug“ bezieht sich auf netzbetriebene Elektrowerkzeuge (mit Netzkabel)
und auf akkubetriebene Elektrowerkzeuge (ohne
Netzkabel).
2.2 Maschinenspezifi sche Sicherheitshinweise
Tragen Sie, wegen den beim Schleifen
auftretenden Gefahren, stets eine Schutzbrille.
- Entstehen beim Schleifen explosive oder selbst-
entzündliche Stäube, so sind unbedingt die Bearbeitungshinweise des Werkstoffherstellers zu
beachten.
- Beim Arbeiten können schädliche/giftige Stäu-
be entstehen (z. B. bleihaltiger Anstrich, einige
Holzarten und Metall). Das Berühren oder
Einatmen dieser Stäube kann für die Bedienperson oder in der Nähe befi ndliche Personen
eine Gefährdung darstellen. Beachten Sie die
in Ihrem Land gültigen Sicherheitsvorschriften.
Schließen Sie das Elektrowerkzeug an eine geeignete Absaugeinrichtung an.
Anleitung/Hinweise lesen!
1 Bestimmungsgemäße Verwendung
Die Maschine ist bestimmungsgemäß vorgesehen zum Schleifen von Holz, Kunststoff, Stein,
Verbundwerkstoffen, Farbe/Lacke, Spachtelmasse und ähnlichen Werkstoffen. Metall und
asbesthaltige Werkstoffe dürfen nicht bearbeitet
werden. Aufgrund ihrer Größe, ihres Gewichtes
und ihrer Leistung, ist die Maschine insbesondere zur Bearbeitung kleiner Flächen sowie für
Überkopfarbeiten geeignet.
Wegen der elektrischen Sicherheit darf die Maschine nicht feucht sein und nicht in feuchter
Umgebung betrieben werden. Die Maschine darf
nur für Trockenschliff verwendet werden.
Für Schäden und Unfälle bei nicht be-
stimmungsgemäßem Gebrauch haftet
der Benutzer.
2 Sicherheitshinweise
2.1 Allgemeine Sicherheitshinweise
Warnung! Lesen Sie sämtliche Sicherheitshinweise und Anweisungen. Fehler
bei der Einhaltung der Warnhinweise und Anwei-
Tragen Sie zum Schutz Ihrer Gesundheit
eine P2-Atemschutzmaske.
2.3 Emissionswerte
Die nach EN 60745 ermittelten Werte betragen
typischerweise:
Schalldruckpegel 70 dB(A)
Schallleistungspegel 81 dB(A)
Messunsicherheitszuschlag K = 3 dB
Gehörschutz tragen!
Schwingungsgesamtwerte (Vektorsumme dreier
Richtungen) ermittelt entsprechend EN 60745:
Schwingungsemissionswert
(3-achsig) ah = 4,5 m/s
Unsicherheit K = 2,0 m/s
2
2
Die angegebenen Emissionswerte (Vibration,
Geräusch) wurden gemäß den Prüfbedingungen
in EN 60745 gemessen, und dienen dem Maschinenvergleich. Sie eignen sich auch für eine
vorläufi ge Einschätzung der Vibrations- und Geräuschbelastung beim Einsatz. Die angegebenen
Emissionswerte repräsentieren die hauptsächlichen Anwendungen des Elektrowerkzeugs.
Wird jedoch das Elektrowerkzeug für andere
6
Page 7
Anwendungen, mit anderen Einsatzwerkzeugen
oder ungenügend gewartet eingesetzt, kann dies
die Vibrations- und Geräuschbelastung über den
gesamten Arbeitszeitraum deutlich erhöhen. Für
eine genaue Abschätzung während einem vorgegebenen Arbeitszeitraum sind auch die darin
enthaltenen Leerlauf- und Stillstandszeiten der
Maschine zu beachten. Dieses kann die Belastung
über den gesamten Arbeitszeitraum erheblich
verringern.
3 Elektrischer Anschluss und Inbetrieb-
nahme
Die Netzspannung muss mit der Angabe
auf dem Leistungsschild übereinstimmen.
Schalten Sie die Maschine vor dem An-
schließen oder Lösen der Netzanschluss-
leitung stets aus!
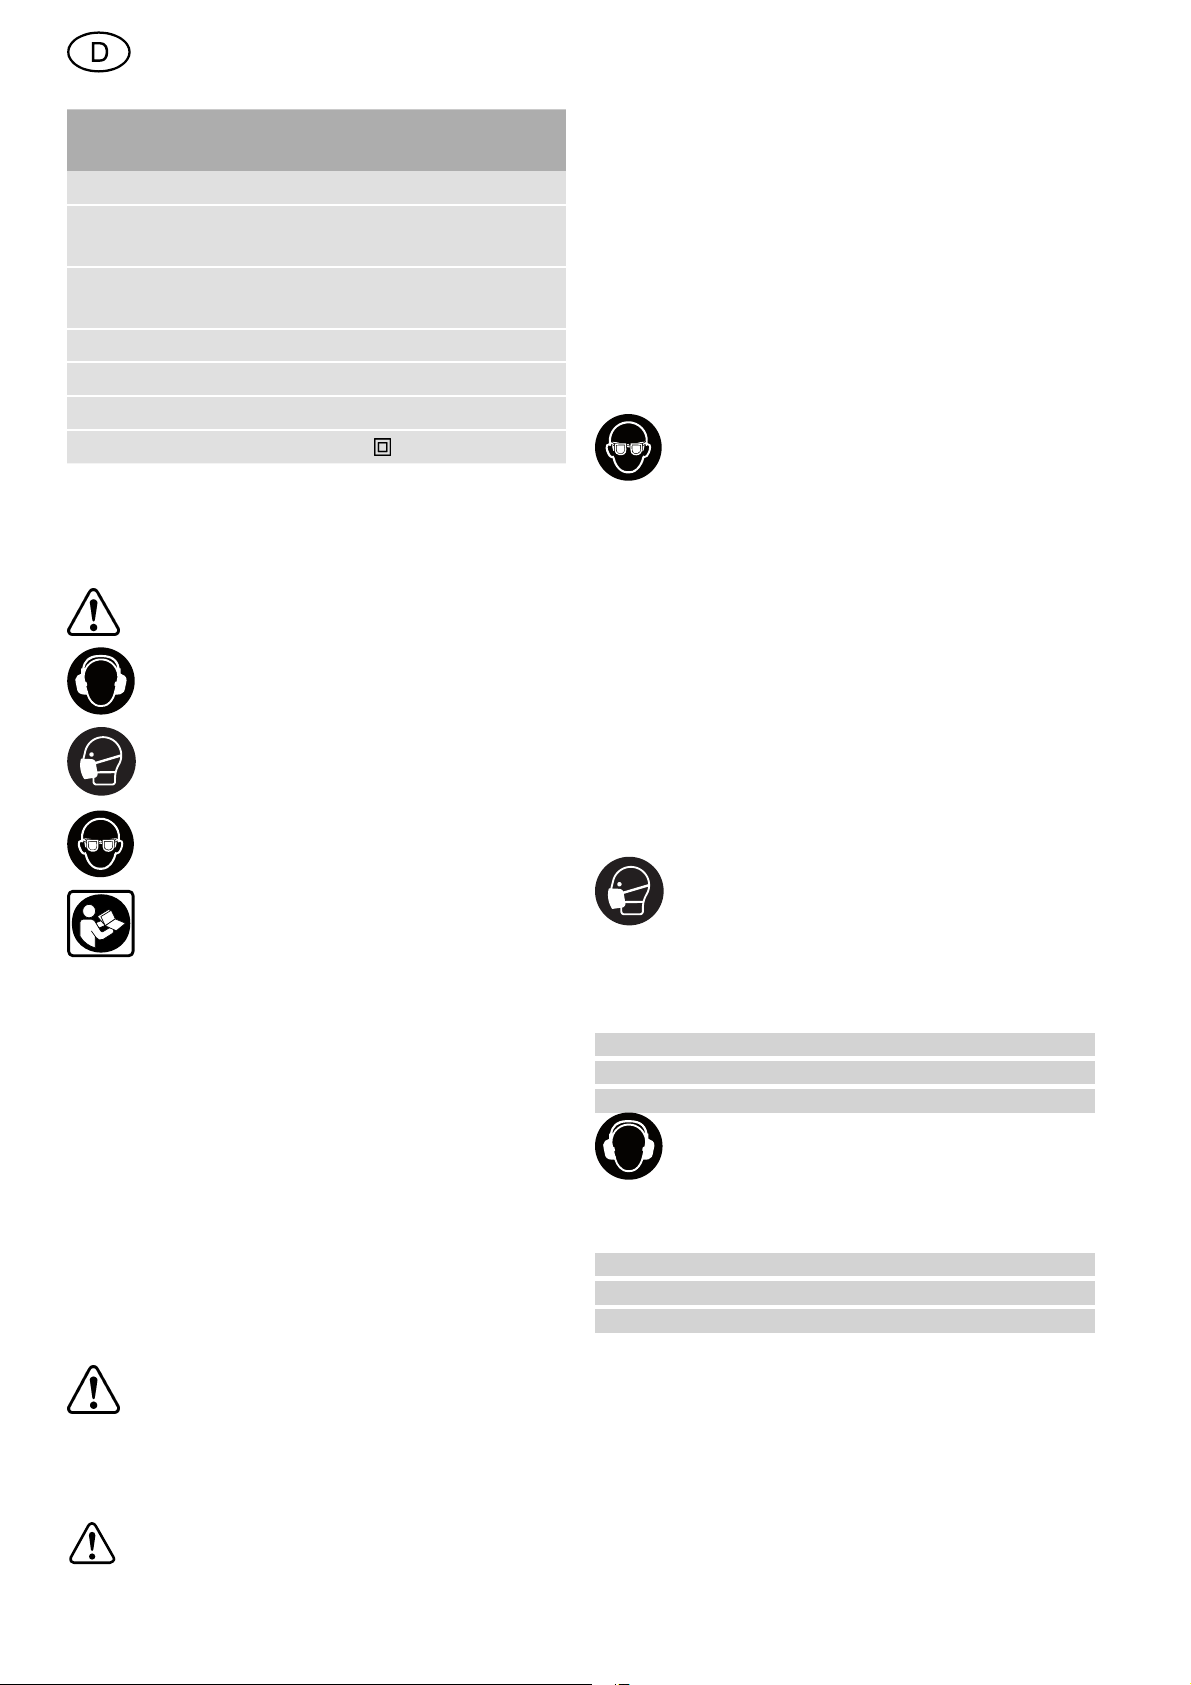
Anschließen und Lösen der Netzanschlussleitung
siehe Bild 3. Der Schalter (1.1) dient als Ein-/AusSchalter (I = Ein/0 = Aus).
4 Elektronik
Der ETS 125 EQ besitzt eine elektroni-
sche Regelung, mit der sich die Drehzahl
stufenlos variieren lässt.
Dadurch können Sie die Schleifgeschwindigkeit
dem jeweiligen Werkstoff optimal anpassen (siehe
Kapitel 6). Stellen Sie die Drehzahl am Stellrad
(2.1) ein.
5 Einstellungen an der Maschine
Ziehen Sie vor allen Arbeiten an der
Maschine stets den Netzstecker aus der
Steckdose.
5.1 Staubabsaugung
Schließen Sie die Maschine stets an
eine Absaugung an. Die Staubab-
saugung verhindert hohe Staubbelastungen in der Arbeitsluft und größere Verschmutzungen am Arbeitsplatz. Der Schleifstaub
wird durch die Absaugkanäle im Schleifschuh
direkt an der Abriebstelle abgesaugt.
a) Eigenabsaugung
Die Maschinen sind serienmäßig mit einer Eigenabsaugung ausgestattet. Der Schleifstaub wird
durch Absaugöffnungen im Schleifschuh (1.8)
abgesaugt und im Turbofi lter (1.5) aufgefangen.
Wenn der Turbofi lter so weit mit Schleifstaub
gefüllt ist, dass die Absaugleistung nachläßt, ist
dieser zu wechseln.
Montage eines Turbofi lters
- Vorderes Kartonteil des Turbofi lters mit Dicht-
lippe (2.3) auf den Absaugstutzen (2.2) des Filterhalters schieben,
- hinteres Kartonteil mit Schlitz (2.4) auf die Halterippe (2.5) des Filterhalters stecken,
- Filterhalter mit der Öffnung (1.3) bis zum Anschlag auf den Absaugstutzen (1.2) der Maschine
stecken und mit Drehknopf (1.4) festklemmen.
b) Fremdabsaugung mit Absauggerät
Um bei längeren Schleifarbeiten einen häufi gen
Wechsel des Turbofi lters zu vermeiden, kann,
anstelle der Eigenabsaugung, ein Festool-Absauggerät angeschlossen werden. Dazu wird der
Absaugschlauch (Ø 27 mm (1.6)) des Absauggerätes auf den Absaugstutzen (1.2) gesteckt.
5.2 Schleifmittel befestigen
Verwenden Sie nur originale Festool-
Schleifmittel!
Auf den Stickfi x-Schleifschuhen können selbsthaftende Schleifmittel wie Stickfi x-Schleifpapiere
und Schleifvliese befestigt werden. Die Schleifmittel (1.7) werden einfach auf den Schleifschuh
(1.8) aufgedrückt und nach Gebrauch wieder
abgezogen.
6 Arbeitshinweise
Überlasten Sie die Maschine nicht, indem Sie
diese zu stark andrücken! Sie erreichen das beste Schleifergebnis, wenn Sie mit mäßig starkem
Anpressdruck arbeiten. Die Schleifl eistung und
-qualität hängen im wesentlichen von der Wahl
des richtigen Schleifmittels ab. Für Maschinen mit
Elektronik empfehlen wir folgende Einstellungen
des Stellrades (2.1):
Stellrad-Stufe
- Schleifarbeiten
5 - 6
- Schleifen mit max. Abrieb
- Abschleifen alter Farben
- Schleifen von Holz und Furnier vor der Lackie-
rung
- Lackzwischenschliff auf Flächen
4 - 5
- Schleifen von dünn aufgetragenem Vorlack
- Schleifen von Holz mit Schleif-Vlies
- Kantenbrechen an Holzteilen
- Glätten von grundierten Holzfl ächen
3 - 4
- Schleifen von Vollholz- und Furnierkanten
- Schleifen im Falz von Fenstern und Türen
- Lackzwischenschliff an Kanten
- Anschleifen von Naturholzfenstern mit Schleif-
Vlies
- Glätten der Holzoberfl äche vor dem Beizen mit
7
Page 8

Schleif-Vlies
- Abreiben gebeizter Flächen mit Schleif-Vlies
- Abreiben oder Abheben der überfl üssigen Kalkpaste mit Schleif-Vlies
2 - 3
- Lackzwischenschliff auf gebeizten Flächen
- Säubern von Naturholz-Fensterfälzen mit
Schleif-Vlies
1 - 2
- Schleifen von gebeizten Kanten
- Schleifen von thermoplastischen Kunststoffen.
Weitere interessante Informationen zum Arbeiten
mit Ihrem Festool Werkzeug fi nden Sie auf der Internetseite www.festool.de/fuer-zu-hause, z. B.:
· Anwendungsbeispiele – Tipps und Tricks,
· Maschinenkunde,
· Kostenlose Baupläne zum Download,
· Wissenswertes rund ums Holz - Holzlexikon
7 Zubehör
Verwenden Sie zu Ihrer eigenen Sicher-
heit nur original Festool-Zubehör und
Ersatzteile.
Festool bietet für jeden Anwendungsfall das
passende Zubehör, Schleif- und Poliermittel an.
Die Bestellnummern für Zubehör und Werkzeuge fi nden Sie in Ihrem Festool-Katalog oder im
Internet unter „www.festool.com“.
8 Wartung und Pfl ege
Ziehen sie vor allen Arbeiten an der
Maschine stets den Netzstecker aus der
Steckdose!
Alle Wartungs- und Reparaturarbeiten,
die ein Öffnen des Motorgehäuses erfor-
dern, dürfen nur von einer autorisierten
Kundendienstwerkstatt durchgeführt
werden.
Zur Sicherung der Luftzirkulation müssen die
Kühlluftöffnungen im Motorgehäuse stets frei und
sauber gehalten werden.
Das Gerät ist mit selbstabschaltbaren Spezialkohlen ausgerüstet. Sind diese abgenutzt, erfolgt
eine automatische Stromunterbrechung und das
Gerät kommt zum Stillstand.
Schleifteller-Bremse
Um ein unkontrolliertes Hochdrehen des Schleiftellers zu verhindern, wird dieser durch eine
Manschette (2.6) abgebremst. Da sich die Manschette im Laufe der Zeit abnützt, muss sie bei
nachlassender Bremswirkung durch eine neue
(489190) ersetzt werden.
9 Entsorgung
Werfen Sie Elektrowerkzeuge nicht in den
Hausmüll! Führen Sie die Geräte, Zubehör und
Verpackungen einer umweltgerechten Wiederverwertung zu. Beachten Sie dabei die geltenden
nationalen Vorschriften.
Nur EU: Gemäß Europäischer Richtlinie 2002/96/
EG müssen verbrauchte Elektrowerkzeuge getrennt gesammelt und einer umweltgerechten
Wiederverwertung zugeführt werden.
10 Gewährleistung
Für unsere Geräte leisten wir auf Material- oder
Fertigungsfehler Gewährleistung gemäß den
länderspezifi schen gesetzlichen Bestimmungen,
mindestens jedoch 12 Monate. Innerhalb der
Staaten der EU beträgt die Gewährleistungszeit 24
Monate (Nachweis durch Rechnung oder Lieferschein). Schäden, die insbesondere auf natürliche
Abnützung/Verschleiß, Überlastung, unsachgemäße Behandlung bzw. durch den Verwender
verschuldete Schäden oder sonstige Verwendung
entgegen der Bedienungsanleitung zurückzuführen sind oder beim Kauf bekannt waren, bleiben
von der Gewährleistung ausgeschlossen. Ebenso
ausgeschlossen bleiben Schäden, die auf die
Verwendung von nicht-originalem Festool Zubehör und Verbrauchmaterial (z. B. Schleifteller)
zurückzuführen sind. Beanstandungen können
nur anerkannt werden, wenn das Gerät unzerlegt an den Lieferanten oder an eine autorisierte
Festool-Kundendienstwerkstätte zurückgesendet
wird. Bewahren Sie Bedienungsanleitung, Sicherheitshinweise, Ersatzteilliste und Kaufbeleg
gut auf. Im übrigen gelten die jeweils aktuellen
Gewährleistungsbedingungen des Herstellers.
Anmerkung
Aufgrund der ständigen Forschungs- und Entwicklungsarbeiten sind Änderungen der hierin
gemachten technischen Angaben vorbehalten.
REACh für Festool Produkte, deren Zubehör und
Verbrauchsmaterial:
REACh ist die seit 2007 in ganz Europa gültige
Chemikalienverordnung. Wir als „nachgeschalteter Anwender“, also als Hersteller von Erzeugnissen sind uns unserer Informationspfl icht unseren
Kunden gegenüber bewusst. Um Sie immer auf den
neuesten Stand halten zu können und über mögliche Stoffe der Kandidatenliste in unseren Erzeugnissen zu informieren, haben wir folgende Website für Sie eingerichtet: www.festool.com/reach
8
Page 9
Eccentric sander
Technical
data
ETS 125 Q ETS 125 EQ
Power 200 W
Speed 14,000 rpm
Working
strokes
28,000 rpm
Sanding
stroke
2.0 mm
5,000 -
14,000 rpm
10,000 -
28,000 rpm
Sanding pad diameter 125 mm
Weight 1.1 kg (excluding cable)
Degree of
protection
/ II
The specifi ed illustrations can be found at the
beginning of the operating instructions.
Symbols
Warning of general danger
Wear ear protection!
Wear a dust mask.
Save all warnings and instructions for future
reference.
The term „power tool“ in the warnings refers
to your mains-operated (corded) power tool or
battery-operated (cordless) power tool.
2.2 Tool-specifi c safety rules
Always wear protective goggles because
of possible dangers when sanding.
- The manufacturer’s handling and processing
instructions must be observed without fail if
explosive or self-igniting dusts are likely to occur during sanding.
- Harmful/toxic dusts can occur during your work
(e.g. lead-containing paint, some types of wood
and metal). Contact with these dusts, especially inhaling them, can represent a hazard for
operating personnel or persons in the vicinity.
Comply with the safety regulations that apply in
your country. Connect the electric power tool to
a suitable extraction system.
To protect your health, wear a P2 protec-
tive mask.
- Only for AS/NZS: The tool shall always be supplied via residual current device with a rated
residual current of 30 mA or less.
Wear protective goggles.
Read the Operating Instructions/Notes!
1 Intended use
As specifi ed, the machines are designed for sanding wood, plastic, stone, composite materials,
paint/varnish, fi ller and similar materials.
Metal and materials containing asbestos must
not be processed.
The machine is particularly suitable for processing smaller surfaces and overhead work because
of its size, its weight and its output.
For reasons of electrical safety the machine must
not be damp nor operated in a humid environment.
The machine may only be used for dry sanding.
The user is liable for damage and injury
resulting from incorrect usage!
2 Safety instructions
2.1 General Safety Rules
WARNING! Read all safety warnings and
all instructions. Failure to follow the warn-
ings and instructions may result in electric shock,
fi re and/or serious injury.
2.3 Noise and vibration information
The typical values determined in accordance with
EN 60745 are:
Sound-pressure level 70 dB(A)
Sound-power level 81 dB(A)
Measuring uncertainty allowance K = 3 dB
Wear ear protection!
Overall vibration levels (vector sum for three
directions) measured in accordance with EN
60745:
Vibration emission level
(3 directions) a
= 4,5 m/s
h
Uncertainty K = 2,0 m/s
The emission values specifi ed (vibration, noise)
were measured in accordance with the test conditions stipulated in EN 60745 and are intended
for machine comparisons. They are also used for
making preliminary estimates regarding vibration
and noise loads during operation. The emission
values specifi ed refer to the main applications for
which the power tool is used. If the electric power
tool is used for other applications, with other tools
or is not maintained suffi ciently prior to operation, however, the vibration and noise load may be
higher when the tool is used. Take into account any
9
2
2
Page 10
machine idling times and downtimes to estimate
these values more accurately for a specifi ed time
period. This may signifi cantly reduce the load during the machine operating period.
3 Power supply and start-up
The mains voltage must correspond to
the specifi cation on the rating plate.
Always switch the machine off before
connecting or disconnecting the mains
lead!
See Fig. 3 for connection and disconnection of the
power cable.
Switch (1.1) serves as an On/Off switch (I = On/0
= Off).
4 Electronics
The ETS 125 EQ has an electronic control
with which the rotational speed can be
varied step-free.
This allows the sanding speed to be adapted to
the optimum level according to the material concerned (see Chapter 6).
The speed is set using the rotary control button
(2.1).
5 Machine settings
Always remove the power supply plug
from the socket before carrying out any
work on the machine.
5.1 Dust extraction
Always connect the machine to a dust
extractor. Dust extractors prevent large
accumulations of dust in
the air in the working environment and dirt collecting at the workplace. Sanding dust is extracted
through the extraction channels in the sanding
pad directly to the material removal point.
a) Inboard extraction
The machines are fi tted with inboard extraction as
standard. The sanding dust is extracted through
suction openings in the sanding base (1.8) and
trapped in the turbo-fi lter (1.5). The turbo-fi lter
has to be changed when it is so full of dust that
the extraction power diminishes.
Inserting a turbo-fi lter
- Push the front cardboard section of the turbo-
fi lter with the sealing lip (2.3) onto the extraction
nozzle (2.2) of the fi lter holder
- Insert rear cardboard section with slot (2.4) onto
the retaining strip (2.5) of the fi lter holder
- Push the fi lter holder with its opening (1.3) as
far as it will go onto the extraction nozzle (1.2)
of the machine and clamp tight by turning rotary
knob (1.4).
b) External extraction by an extraction
unit
In order to avoid frequent changing of the turbofi lter when carrying longer sanding jobs, it is
possible to connect a Festool extractor to the unit
instead of using inboard extraction. In this case,
the extraction pipe (Ø 27 mm (1.6)) of the extraction unit is connected to the suction nozzle (1.2).
5.2 Attaching sanding material
Always use original Festool sanding ma-
terials!
Self-adhesive abrasives such as Stickfi x sandpaper and sanding fl eeces can be attached to
Stickfi x sanding shoes. The abrasives (1.7) are
simply pressed onto the sanding shoe (1.8) and
pulled off after use.
6 lnstructions on application
Never overload the tool by using too much pressure!
The best sanding results are achieved when applying moderate pressure.
The sanding performance and quality depend
mainly on the choice of the right sanding material.
We recommend the following settings on the rotary control (2.1) for electronic tools:
Rotary control setting
- sanding work
5 - 6
- sanding with max. drive
- sanding old paint
- sanding wood and veneer prior to painting
- interim sanding of paint on surfaces
4 - 5
- sanding of thinly applied primer
- sanding of wood with sanding vlies
- sanding edges on wooden parts
- smoothing primed wooden surfaces.
3 - 4
- sanding full wooden and veneer edges
- sanding in the grooves/rebates of windows and
doors
- interim paint sanding on edges
- pre-sanding natural wood windows with sanding
vlies
- smoothing wood surfaces with sanding felt prior
to staining
- rubbing down stained surfaces with sanding
vlies
10
Page 11

- rubbing down or removing excess lime paste
with sanding vlies
2 - 3
- interim paint sanding on stained surfaces
- cleaning natural wood window grooves with
sanding felt
1 - 2
- sanding stained edges
- sanding thermoplastic synthetics
7 Accessories
For your own safety, use only original
Festool accessories and spare parts.
Festool offers the appropriate accessories, sanding and polishing attachments for every application. The accessory and tool order number can be
found in the Festool catalogue or on the Internet
under “www.festool.com”.
8 Maintenance and care
Always remove the power supply plug
from the socket before carrying out any
work on the machine.
All maintenance and repair work which
requires the motor casing to be opened
may only be carried out by an authorised
service centre.
The cool air openings in the motor casing must
always be kept clean and unobstructed to ensure
air circulation.
The tool is fi tted with special motor brushes with
an automatic cut-out. When the brushes become
worn the power supply is shut off automatically
and the tool comes to a standstill.
EU only: European Directive 2002/96/EC stipulate
that used electric power tools must be collected
separately and disposed of at an environmentally
responsible recycling centre.
10 Warranty
Our equipment is under warranty for at least 12
months with regard to material or production
faults in accordance with national legislation.
In the EU countries, the warranty period is 24
months (an invoice or delivery note is required
as proof of purchase). Damage resulting from, in
particular, normal wear and tear, o-verloading,
improper handling, or caused by the user or other
damage caused by not following the operating
instructions, or any fault acknowledged at the
time of purchase, is not covered by the warranty.
Damage caused by the use of non-original accessories and consumable material (e.g. sanding
pads) is also excluded.
Complaints will only be acknowledged if the
equipment has not been dismantled before being sent back to the suppliers or to an authorised Festool customer support workshop. Store
the operating instructions, safety notes, spare
parts list and proof of purchase in a safe place.
In addition, the manufacturer‘s current warranty
conditions apply.
Note
We reserve the right to make changes to the technical data contained in this information as a result
of ongoing research and development work.
Sanding base brakes
The sanding base is braked by a collar (2.6) in order to prevent any uncontrolled excessive speed of
the sanding base. Because the collar wears down
in the course of time, it has to be replaced by a new
one (489190) as soon as there is any reduction in
the braking effect.
9 Disposal
Do not throw the power tool in your household
waste! Dispose of machines, accessories and
packaging at an environmentally-responsible
recycling centre. Observe the valid national regulations.
REACH for Festool products, their accessories
and consumables
REACh is a European Chemical Directive that
came into effect in 2007. As “downstream users”
and product manufacturers, we are aware of our
duty to provide our customers with information.
We have set up the following website to keep you
updated with all the latest news and provide you
with information on all the materials used in our
existing products: www.festool.com/reach
11
Page 12
Ponceuse excentrique
Données
techniques
ETS 125 Q ETS 125 EQ
Puissance 200 W
5.000 -
Rotation 14.000 min
Courses de travail 28.000 min
Course de ponçage
Plateau de ponçage
Diamètre 125 mm
-1
14.000 min
-1
28.000 min
2,0 mm
-1
10.000 -
-1
Poids 1,1 kg (sans câble)
Classe de protec-
tion
/ II
Les illustrations indiquées se trouvent au début
du mode d‘emploi.
Symboles
Avertissement de danger
Munissez-vous de casques anti-bruit!
Porter une protection respiratoire !
Porter des lunettes de protection !
Lire la notice / les instructions !
1 Utilisation conforme
La machine est conçue pour le ponçage des matériaux suivants : bois, plastique, métal, pierre,
aggloméré, peinture/laque, mastic et matériaux
similaires.
Les métaux et du matériau comportant de
l‘amiante ne doivent pas être traités.
En raison de sa taille, de son poids et de sa
puissance, la machine est adaptée notamment
au traitement de petites surfaces ainsi qu‘aux
travaux au-dessus de la tête.
Pour des raisons de sécurité électrique, cette
machine ne doit pas être humide ni être utilisée
dans un environnement humide. Cette machine ne
doit être utilisée que pour un polissage à sec.
L‘utilisateur est responsable des dégâts
ou accidents qu‘il peut provoquer en ne
respectant pas les dispositions de sécurité.
2 Informations de sécurité
2.1 Indications générales de sécurité
ATTENTION ! Lire toutes les consignes de
sécurité et indications. Le non-respect des
avertissements et instructions indiqués ci-après
peut entraîner un choc électrique, un incendie et/
ou de graves blessures. Conservez toutes les
consignes de sécurité et notices pour une référence future.
Le terme « outil » dans les avertissements fait reference à votre outil électrique alimenté par le secteur
(avec cordon d’alimentation) ou votre outil fonctionnant sur batterie (sans cordon d’alimentation).
2.2 Consignes de sécurité spécifi ques à la
machine
Portez toujours des lunettes de protection
contre les dangers du ponçage.
- En cas de poussières explosives ou auto-infl am-
mables dues au ponçage, il faut absolument respecter les indications du fabricant du matériau
concernant l’usinage.
- Pendant le travail, des poussières nocives/
toxiques peuvent apparaître (p.ex. peinture
contenant du plomb, certaines essences de bois,
métal). Le contact ou l‘inhalation de ces poussières peut présenter un danger pour l‘utilisateur ou les personnes se trouvant à proximité.
Veuillez respecter les prescriptions de sécurité
en vigueur dans votre pays. Raccordez l‘outil
électrique à un dispositif d‘aspiration adapté.
Pour votre santé, portez un masque de
protection respiratoire de classe P2.
2.3 Information concernant le niveau sonore
et les vibrations
Les valeurs typiques obtenues selon EN 60745
sont les suivantes :
Niveau de pression acoustique 70 dB(A)
Niveau de puissance sonore 81 dB(A)
Majoration pour incertitude
de mesure K = 3 dB
Munissez-vous de casques anti-bruit!
Valeurs vibratoires globales (somme vectorielle
tridirectionnelle) déterminées selon NE 60745 :
Valeur d‘émission vibratoire
(tridirectionnelle) a
= 4,5 m/s
h
Incertitude K = 2,0 m/s
2
2
Les valeurs d‘émission indiquées (vibration, bruit)
ont été mesurées conformément aux conditions
d‘essai selon EN 60745 et sont destinées à des fi ns
de comparaisons entre les machines. Elles permettent également une estimation provisoire de la
12
Page 13
charge de vibrations et de la nuisance sonore lors
de l‘utilisation. Les valeurs d‘émission indiquées
représentent les principales applications de l‘outil
électrique. Cependant, si l‘outil électrique est utilisé pour d‘autres applications, avec d‘autres outils
de travail ou est insuffi samment entretenu, la
charge de vibrations et la nuisance sonore peuvent
être nettement supérieures sur la globalité de la
période. Pour une évaluation précise pendant une
période prédéfi nie, les temps de vidage et d‘immobilisation de la machine doivent également être
respectés. Ceci peut réduire considérablement la
charge sur la globalité de la période.
3 Raccordement électrique et mise en
route
La tension du réseau doit correspondre
aux indications de la plaque signalétique.
Avant de brancher ou de débrancher le
câble de raccordement secteur, il est
absolument indispensable de toujours
mettre la machine hors marche !
Voir en fi gure 3 la connexion et la déconnexion du
câble de raccordement au secteur.
L‘interrupteur (1.1) sert d‘interrupteur marche,
arrêt (I = Marche/ 0 = Arrêt).
4 Électronique
La ETS 125 EQ possède un réglage
électronique permettant une variation
progressive de la vitesse de rotation.
Ceci permet une adaptation optimale
de la vitesse du ponçage aux différents
matériaux (cf. chapitre 6). La vitesse de
rotation est réglée par la molette (2.1).
5 Réglages de la machine
Avant d‘entreprendre une quelconque
intervention sur la machine, débrancher
la prise de courant !
5.1 Aspiration de la poussière
Raccorder toujours la machine à une
aspiration. L‘aspiration de la poussière
empêche des lourdes charges
de l‘air environnant par des poussières et des
fortes salissures du lieu de travail.
La poussière de ponçage est aspirée directement
à son point de production par les canaux d‘aspiration du patin de ponçage.
a) Dispositif d‘auto-aspiration
Les machines sont équipées en série d‘un dispositif d‘auto-aspiration. La poussière de ponçage
est aspirée à travers les orifi ces d‘aspiration du
patin de ponçage (1.8) puis collectée dans le fi ltre
turbo (1.5). Lorsque le fi ltre turbo est rempli de
poussières, la performance d‘aspiration baisse et
il faut le remplacer.
Montage d‘un fi ltre turbo
- Faire glisser la partie avant du fi ltre avec la lèvre
d‘étanchéité (2.3) sur le manchon d‘aspiration
(2.2) du porte-fi ltre,
- placer la partie arrière du carton avec la fente
(2.4) sur la nervure de maintien (2.5) du portefi ltre,
- placer le porte-fi ltre avec l‘orifi ce (1.3) jusqu‘à
l‘arrêt sur le manchon d‘aspiration (1.2) de la
machine et serrer à l‘aide du bouton tournant
(1.4).
b) Aspiration extérieure à l‘aide d‘un aspi-
rateur
Afi n d‘éviter d‘avoir à remplacer souvent le fi ltre
turbo, on peut raccorder un aspirateur Festool à
la place du dispositif d‘auto-aspiration. Pour ce
faire, le fl exible d‘aspiration (Ø 27 mm (1.6)) de
l‘aspirateur est monté sur le manchon d‘aspiration (1.2).
5.2 Fixer l‘abrasif
N‘utilisez que des produits abrasifs ori-
ginaux Festool !
Sur les patins de ponçage Stickfi x, on peut fi xer
des abrasifs auto-agrippants comme les toiles
émeri et les feutres de polissage Stickfi x. Les
abrasifs (1.7) sont simplement appliqués à la
main sur le patin de ponçage (1.8) et retirés de la
même façon après usage.
6 Informations de travail
Ne surchargez pas la machine en appuyant trop
fort ! Vous obtiendrez le meilleur résultat de ponçage avec une pression d‘application moyenne.
Le rendement et la qualité du ponçage dépendent essentiellement de la sélection de l‘abrasif
adéquat.
Pour des machines électroniques nous pré-conisons les réglages ci-après de la molette (2.1):
Position de la molette
- Travaux de ponçage
5 - 6
- Ponçage à entraînement max.
- Ponçage d‘anciennes peintures
- Ponçage de bois et de contreplacage avant ap-
plication du vernis
- Ponçage intermédiaire du vernis de surfaces
4 - 5
- Ponçage d‘un enduit appliqué en fi ne couche
- Ponçage de bois à l‘aide du non-tissé de ponçage
- Réalisation de chants sur des pièces en bois
- Lissage de surfaces en bois à enduit
13
Page 14
3 - 4
- Ponçage de bordures en bois massif et contreplaquées
- Ponçage dans la rainure de fenêtres et de portes
- Ponçage intermédiaire du vernis de chants
- Ponçage de fenêtres en bois nature à l‘aide du
non-tissé de ponçage
- Lissage de la surface en bois avant le décapage
à l‘aide du non-tissé de ponçage
- Ponçage de surfaces décapées à l‘aide du nontissé de ponçage
- Ponçage ou enlèvement de la pâte de chaux
superfl ue à l‘aide du non-tissé de ponçage
2 - 3
- Ponçage intermédiaire de vernis de surfaces
décapées
- Nettoyage de rainures de fenêtres en bois à
l‘aide du non-tissé de ponçage
1 - 2
- Ponçage de chants décapés
- Ponçage de matières synthétiques thermo-plastiques
7 Accessoires
Pour votre propre sécurité, n‘utiliser que
des accessoires et pièces de rechange
Festool d‘origine.
Festool propose pour chaque application les
accessoires ainsi que les produits de ponçage et
de polissage correspondants. Les références des
accessoires et outils fi gurent dans le catalogue
Festool ou sur Internet sous „www.festool.com“.
8 Entretien et maintenance
Avant d‘entreprendre une quelconque
intervention sur la machine, débrancher
la prise de courant !
Tout entretien ou réparation qui nécessite
l‘ouverture du capot du moteur ne doit
être entrepris que par un atelier auto-
risé.
Pour assurer une bonne circulation de l‘air de refroidissement, il faut que les ouvertures du carter
du moteur soient propres et non encrassées.
La machine est équipée de charbons spécifi ques à
coupure automatique. Si ces charbons sont usés,
il y a coupure de courant automatique et arrêt du
fonctionnement de la machine.
Blocage du patin de ponçage
Le patin de ponçage est bloqué par une collerette
(2.6) afi n d‘éviter qu‘il ne monte de façon incontrôlée. La collerette étant soumise à l‘usure dans
le temps, l‘effet de blocage s‘affaiblit, et elle doit
être remplacée par une neuve (489190).
9 Elimination
Ne jetez pas les outils électriques avec les
ordures ménagères ! Eliminez les appareils,
les accessoires et les emballages de façon
compatible avec l’environnement. Respectez
en cela les dispositions nationales en vigueur.
Uniquement UE : conformément à la directive
européenne 2002/96/CE, les outils électriques
usagés doivent être collectés séparément et recyclés de façon compatible avec l’environnement.
10 Garantie
Nos appareils sont couverts par une garantie couvrant les défauts de matière ou de fabrication variable selon les dispositions légales en vigueur dans le
pays d’utilisation, mais en tous cas non inférieure à
12 mois. A l’intérieur des pays de la Communauté
Européenne, la durée de la garantie est de 24 mois
(la facture ou le bon de livraison faisant foi). Ne sont
pas couverts par la garantie les dommages résultant d’une usure naturelle, d’une surcharge, d’une
utilisation non conforme, ou causés par l’utilisateur,
ou qui proviennent d’une utilisation non prévue
dans la notice d’utilisation, ou qui étaient connus
au moment de l’achat. Sont également exclus les
dommages résultant de l‘utilisation d‘accessoires
et de consommables (patins de ponçage par exemple) qui ne sont pas d‘origine. Les réclamations
ne sont recevables qu’à la condition que l’appareil
soit retourné non démonté au fournisseur ou à un
service après-vente agréé Festool. Conservez soigneusement la notice d’utilisation, les instructions
de sécurité, la liste de pièces de rechange, ainsi
qu’une preuve de l’achat. Pour le reste, ce sont les
conditions de garantie du fabricant en vigueur qui
s’appliquent selon le cas.
Remarque: Les démarches continues en recherche et développement peuvent entrainer des modifi cations dans les caractéristiques techniques
fi gurant ici, et qui sont donc données sous toutes
réserves.
REACh pour les produits Festool, leurs accessoires et les consommables
REACh est le nom de la directive sur les produits
chimiques applicable à l’ensemble de l’Europe
depuis 2007. En notre qualité d’«utilisateur en
aval», en l’occurrence de fabricant de produits,
nous sommes tenus à un devoir d’information
vis-à-vis de notre clientèle. Afi n de vous tenir
systématiquement informés des dernières nouveautés ainsi que des substances susceptibles de
fi gurer sur la liste des candidats et rentrant dans
la composition de nos produits, nous avons créé
le site Internet suivant: www.festool.com/reach
14
Page 15

Lijadora excéntrica
Datos técnicos ETS 125 Q ETS 125 EQ
Potencia 200 W
5.000 -
Velocidad 14.000 min
Movimientos de
trabajo
28.000 min
-1
14.000 min
10.000 -
-1
28.000 min
-1
-1
Órbita 2,0 mm
Platos lijador Diámetro 125 mm
Peso 1,1 kg (sin cable)
Clase de protec-
ción
/ II
Las fi guras indicadas se encuentran al comienzo
del manual de instrucciones.
Símbolos
Aviso ante un peligro general
¡Usar protectores auditivos!
¡Utilizar protección respiratoria!
¡Utilizar gafas de protección!
¡Leer las instrucciones e indicaciones!
dios o lesiones graves.
Guarde todas las indicaciones de seguridad e instrucciones para futuras referencias.
El término herramienta eléctrica empleado en las
siguientes advertencias de peligro se refi ere a herramientas eléctricas de conexión a la red (con cable
de red) y a herramientas eléctricas accionadas por
acumulador (o sea, sin cable de red).
2.2 Indicaciones de seguridad específi cas de
la máquina
Debido a los peligros que se pueden pre-
sentar, lleve siempre puestas unas gafas
de protección durante el trabajo con la
lijadora.
- Cuando durante el lijado se produzcan polvos
explosivos o autoin-fl amables, se deberán observar imprescindiblemente las instrucciones
de trabajado /mecanizado de la casa pro-ductora
del material que está siendo trabajado.
- Al trabajar puede producirse polvo perjudicial/
tóxico (p. ej. de pintura de plomo, algunos tipos
de madera y metal). El contacto o la inhalación
de este polvo puede suponer una amenaza para
la persona que realiza el trabajo o aquellas que
se encuentren cerca. Observe las normativas
de seguridad vigentes en su país. Conecte la
herramienta eléctrica a un equipo de aspiración
apropiado.
Utilice por el bien de su salud una masca-
rilla de protección respiratoria con fi ltro
P2.
1 Uso conforme a la destinación
Conforme a las especifi caciones, la máquina está
prevista para lijar madera, plástico, piedra, materiales compuestos, pintura / barniz, emplaste
y materiales similares. Con este útil no se deben
trabajar metales ni materiales que contengan
amianto. Debido a su tamaño, su peso y su potencia, la máquina es especialmente apropiada para
el trabajado de superfi cies pequeñas, así como
para realizar trabajos por encima de la cabeza.
Por motivos de seguridad eléctrica, la máquina
no puede estar húmeda ni trabajar en entornos
húmedos. La máquina sólo puede usarse para el
lijado en seco.
El usuario responde de los daños y acci-
dentes que puedan derivarse de un uso no
conforme a lo previsto.
2 Instrucciones de seguridad
2.1 Instrucciones generales de seguridad
¡ATENCIÓN! Lea íntegramente las instruc-
ciones e indicaciones de seguridad. El in-
cumplimiento de dichas instrucciones e indicaciones puede dar lugar a descargas eléctricas, incen-
2.3 Información relacionada con el ruido y
vibraciones
Los valores obtenidos según la norma EN 60745
alcanzan normalmente:
Nivel de intensidad sonora 70 dB(A)
Potencia sonora 81 dB(A)
Factor de inseguridad de medición K = 3 dB
¡Usar protectores auditivos!
Valores totales de oscilaciones (suma de los vectores de las tres direcciones) determinados según
EN 60745:
Valor de emisión de oscilaciones
(3 ejes) a
= 4,5 m/s
h
Factor de inseguridad K = 2,0 m/s
Los valores de emisión indicados (vibración, ruido) se midieron conforme a las condiciones de la
norma EN 60745 y sirven para la comparación de
máquinas. Son adecuados para una evaluación
provisional de los valores de vibración y ruido en
la aplicación. Los valores de emisión indicados
representan las aplicaciones principales de la
herramienta eléctrica. No obstante, si se emplea
15
2
2
Page 16

la herramienta eléctrica para otras aplicaciones,
con otras herramienta o con un mantenimiento
insufi ciente, puede aumentar notablemente los
valores de vibración y ruido en todo el tiempo de
trabajo. También se tienen que tener en cuenta
los tiempos de marcha en vacío y de inactividad
de la máquina para obtener una evaluación exacta
durante un tiempo fi jado, pues el valor obtenido
en la medición incluyendo estos tiempos puede
resultar mucho más bajo.
3 Conexión eléctrica y puesta en funciona-
miento
La tensión de la red debe coincidir con los
datos que fi guran en la placa indicadora
de potencia.
¡Apague siempre la máquina antes de
conectar o sacar el cable de conexión a
la red!
Ver la fi gura 3 para enchufar y desenchufar el cable
de conexión a la red.
El interruptor (1.1) sirve de interruptor de conexión/
desconexión (I = conectado/0 = desconectado).
4 Sistema electrónico
La lijadora ETS 125 EQ dispone de una
posibilidad de regulación electrónica, con
la que se puede variar el número de revo-
luciones en progresión continua. De este
modo es posible adaptar óptimamente la
velocidad de lijado al respectivo material
(véase capítulo 6).
El número de revoluciones se ajusta en la rueda
de ajuste (2.1).
5 Ajustes en la máquina
¡Antes de realizar cualquier trabajo en la
máquina se debe retirar el enchufe de la
caja de contacto!
5.1 Dispositivo de aspiración de polvo
Conecte siempre la máquina a la aspira-
ción. El dispositivo de aspiración de polvo
evita altas cargas de polvo en el aire de
trabajo y ensuciamientos considerables
en el puesto de trabajo.
El polvo resultante del lijado se aspira directamente en la zona de abrasión a través de los canales
de aspiración de la zapata.
a) Dispositivo autoaspirador
Las máquinas están equipadas como equipo de
serie con un dispositivo autoaspirador. El polvo de
lijado es aspirado por las aberturas de aspiración
que se encuentran en el plato de lijado (1.8) y es
recogido en el turbofi ltro (1.5). Cuando el turbofi ltro se ha llenado hasta el punto de que se nota una
merma de la capacidad de aspiración, se deberá
proceder a su cambio.
Montaje de un turbofi ltro
- Desplazar la parte delantera de cartón del turbofi ltro con labio de hermetización (2.3) sobre
la tubuladura de aspiración (2.2) del soporte del
fi ltro,
- meter la parte trasera de cartón con ranura (2.4)
sobre la aleta de retención (2.5) del soporte del
fi ltro,
- meter el soporte del fi ltro con la abertura (1.3)
hasta el tope sobre la tubuladura de aspiración
(1.2) de la máquina y fi jarlo con el botón giratorio
(1.4).
b) Dispositivo de aspiración ajena con aspi-
rador
A fi n de evitar un frecuente cambio del turbofi ltro
durante trabajos de lijado relativamente largos,
en lugar del dispositivo autoaspirador se puede
conectar un aspirador Festool. Para ello se cala el
tubo fl exible de aspiración (Ø 27 mm (1.6)) del aspirador sobre la tubuladura de aspiración (1.2).
5.2 Fijación del material abrasivo
¡Emplee únicamente material abrasivo
original de Festool!
En la zapata Stickfi x se pueden fi jar abrasivos con
adhesivo incorporado como las hojas abrasivas
Stickfi x y vellones de lijar. Los abrasivos (1.7) se
adhieren fácilmente a la zapata (1.8) y se despegan
después de usarlos.
6 Indicaciones de trabajo
No sobrecargue la máquina presionándola demasiado sobre el objeto a lijar. Un resultado óptimo
de lijado lo conseguirá trabajando con una presión
de apriete moderada. La capacidad y calidad de
lijado dependen esencialmente de la elección del
material abraviso correcto.
Para máquinas con sistema electrónico recomendamos realizar los siguientes ajustes de la rueda
de ajuste (2.1):
Escalón de la rueda de ajuste
- Trabajos de lijado
5 - 6
- Lijado con accionamiento máximo
- Lijado de pinturas viejas
- Lijado de madera y de enchapados antes del
barnizado
- Lijado intermedio de barniz sobre superfi cies
4 - 5
- Lijado de barnizado previo de aplicación fi na
- Lijado de madera con velo de lijar
- Redondeado de cantos en piezas de madera
- Alisado de superfi cies de madera con pintura de
imprimación
16
Page 17

3 - 4
- Lijado de cantos de madera maciza y de madera
enchapada
- Lijado de encajes de ventanas y puertas
- Lijado intermedio de barniz en cantos
- Lijado inicial de ventanas de madera natural con
velo de lijado
- Alisado de la superfi cie de madera antes del
barnizado, empleando velo de lijado
- Frotado de superfi cies barnizadas empleando
velo de lijado
- Abrasión o desprendimiento de pasta de cal sobrante empleando el velo de lijado
2 - 3
- Lijado intermedio de pinturas sobre superficies barnizadas (coloreadas con nogalina)
- Limpieza de encajes de ventanas de madera
natural con velo de lijado
1 - 2
- Lijado de cantos pintados/coloreados con nogalina
- Esmerilado de termoplásticos.
7 Accesorios
Para su seguridad utilice únicamente ac-
cesorios y piezas de recambio originales
de Festool.
Festool ofrece para cada uso el accesorio, agente
de pulir y abrasivo adecuado. Los números de pedido para los respectivos accesorios y herramientas se encuentran en su catálogo Festool o en la
dirección de Internet „www.festool.com“.
8 Mantenimiento y conservación
¡Antes de realizar cualquier trabajo en la
máquina se debe retirar el enchufe de la
caja de contacto!
Los trabajos de mantenimiento y repa-
ración que requieran abrir la carcasa del
motor, deben llevarse a cabo únicamente
en un taller autorizado.
Para asegurar la circulación de aire, deben mantenerse siempre limpias y despejadas las aberturas para el aire de refrigeración en la carcasa
del motor.
La máquina está provista de carbones activos especiales para la desconexión automática. cuando
estos carbones activos se han desgastado, se interrumpe automáticamente la toma de corriente
y la máquina se para.
Freno del plato de lijado
A fi n de evitar una aceleración incontrolada del
plato de lijado, ésta es frenada por medio de una
guarnición (2.6). Debido a que esta guarnición se
desgasta con el tiempo, ésta tiene que ser renovada cuando se registre una merma en el efecto
de frenado (489190).
9 Eliminación de residuos
Nunca deseche las herramientas eléctricas junto
con los residuos domésticos. Recicle los aparatos,
accesorios y embalajes de forma respetuosa con
el medio ambiente. Tenga en cuenta la normativa
vigente del país.
Sólo UE: De acuerdo con la Directiva europea
2002/96/CE, las herramientas eléctricas usadas
se someterán a una recogida selectiva y a una
reutilización compatible con el medio ambiente.
9 Prestación de garantía
Ofrecemos para nuestros aparatos una garantía
por defectos de material o fabricación en virtud de
las disposiciones legales específi cas de cada país,
pero como mínimo de 12 meses. Para los países
de la UE, el periodo de prestación de garantía es
de 24 meses (se determinará por la factura o el
albarán). Quedan excluidos de la prestación de
garantía los daños originados por el desgaste
natural, la sobrecarga, o el uso inadecuado, o
los daños ocasionados por el usuario o cualquier
empleo contrario al manual de instrucciones o que
ya eran conocidos en el momento de la compra.
También quedan excluidos los daños provocados a
raíz de la utilización de accesorios y materiales de
consumo no originales (p. ej. platos lijadores). Sólo
se reconocerán reclamaciones cuando se remita
el aparato sin desmontar al proveedor o a un taller
de servicio al cliente autorizado de Festool. Conserve el manual de instrucciones, las indicaciones
de seguridad, la lista de piezas de recambio y el
comprobante de compra en un lugar seguro. Por
lo demás rigen las condiciones de prestación de
garantía actuales del fabricante.
Nota
Debido a los constantes trabajos de investigación
y desarrollo nos reservamos el derecho de realizar modifi caciones respecto a los datos técnicos
indicados en el presente documento.
Normativa REACh para productos Festool, incluyendo accesorios y material de consumo
La normativa REACh, vigente desde 2007 en toda
Europa, regula el uso de productos químicos.
Nosotros, como „usuarios intermedios“, es decir,
como fabricantes de productos, somos conscientes de nuestra obligación de mantener informados
a nuestros clientes. A fi n de mantenerle siempre
al día de nuestras novedades y de informarle sobre las posibles sustancias utilizadas en nuestros
productos, hemos creado para usted la siguiente
página web: www.festool.com/reach
17
Page 18

Levigatrici orbitali
Dati tecnici ETS 125 Q ETS 125 EQ
Prestazione 200 W
5.000 -
Numero di giri 14.000 min
Corse utili 28.000 min
-1
14.000 min
10.000 -
-1
28.000 min
-1
-1
Corsa di levigatura 2,0 mm
Platorello Diametro 125 mm
Peso 1,1 kg (senza cavo)
Grado di protezione
/ II
Le fi gure indicate nel testo si trovano all’inizio delle
istruzioni per l‘uso.
Simboli
Avvertenza di pericolo generico
Utilizzare le cuffi e di protezione!
Indossare una mascherina!
Indossare gli occhiali protettivi!
Leggere le istruzioni/avvertenze!
nell’adempimento delle avvertenze e delle istruzioni qui di seguito riportate potranno causare
scosse elettriche, incendi e/o lesioni gravi.
Conservare tutte le avvertenze di sicurezza e i
manuali per riferimenti futuri.
Il termine «elettroutensile» utilizzato nelle avvertenze di pericolo si riferisce ad utensili elettrici
alimentati dalla rete (con linea di allacciamento)
ed ad utensili elettrici alimentati a batteria (senza
linea di allacciamento).
2.2 Indicazioni di sicurezza specifi che per la
macchina
A causa dei pericoli che possono insorgere
durante la levigatura si raccomanda di
indossare sempre occhiali di protezione.
- Se nella levigatura si sviluppano polveri esplosive
o infi ammabili si devono osservare scrupolosamente le norme di lavorazione del produttore del
materiale.
- Durante la lavorazione vengono prodotte polve-
ri dannose/velenose (ad es. pitture contenenti
piombo, alcuni tipi di legno e metallo). Il contatto
o l‘inalazione di tali polveri possono costituire
un pericolo per gli utenti o per le persone che si
trovano nelle vicinanze. Osservare le disposizioni
di sicurezza valide nei rispettivi paesi. Collegare
l‘utensile ad un dispositivo adeguato di aspirazione della polvere.
Per proteggere la salute, indossare una
maschera di protezione delle vie respiratorie P2.
1 Utilizzo conforme
L‘utensile è progettato per la levigatura di legno,
plastica, pietra, materiali stratifi cati, colori/vernici,
stucco e simili.
Non sono previste per la lavorazione di metalli e
di materiali contenenti amianto.
Grazie alle sue dimensioni, al suo peso ed alla sua
potenza, la macchina è particolarmente adatta
alla lavorazione di piccole superfi ci e per lavori
sopratesta.
A causa della sicurezza elettrica, la macchina
non dev‘essere umida, né dev‘essere utilizzata in
ambienti umidi. La macchina può essere utilizzata
solamente per operazioni di lucidatura a secco.
L‘utilizzatore è responsabile di eventuali
danni o infortuni causati da un utilizzo
improprio.
2 Informazioni per la sicurezza
2.1 Istruzioni generali di sicurezza
ATTENZIONE! È assolutamente necessario
leggere attentamente tutte le avvertenze
di sicurezza e le istruzioni. Eventuali errori
2.3 Informazioni sulla rumorosità e sulle
vibrazioni
I valori rilevati in base alla norma EN 60745 riportano caratteristicamente:
Livello di pressione acustica 70 dB(A)
Potenza sonora 81 dB(A)
Supplemento per incertezza
di misura K = 3 dB
Utilizzare le cuffi e di protezione!
Valori complessivi sulle vibrazioni (somma vettoriale di tre direzioni) rilevati secondo la norma EN
60745:
Valore di emissione delle vibrazioni
(su 3 assi) a
= 4,5 m/s
h
Incertezza K = 2,0 m/s
2
2
I valori di emissione indicati (vibrazioni, rumori)
sono stati misurati secondo le condizioni di prova
contenute in EN 60745 e servono per il confronto fra le macchine. Sono utilizzabili anche per
una valutazione provvisoria del carico vibratorio
e di rumore durante il funzionamento. I valori
18
Page 19

di emissione indicati sono rappresentativi delle
principali applicazioni dell’utensile elettrico. Se
però l’utensile elettrico viene utilizzato per altre
applicazioni, con altre attrezzature aggiunte o se
non viene sottoposto a regolare manutenzione, i
carichi vibratori e di rumore possono aumentare
decisamente durante tutto il periodo di lavoro. Per
un’esatta valutazione durante un periodo di lavoro
prestabilito, si deve anche tener conto dei tempi di
funzionamento a vuoto e di arresto della macchina
in esso compresi. Questo può ridurre notevolmente
il carico durante l’intero periodo di lavoro.
3 Allacciamento elettrico e messa in fun-
zione
La tensione di rete deve corrispondere a
quella indicata sulla targhetta riportante
i dati della macchina.
Disinserire sempre la macchina prima di
collegare o scollegare il cavo di alimenta-
zione!
Per collegare e scollegare il cavo di alimentazione
elettrica vedi la fi g. 3.
L‘interruttore (1.1) funziona come interruttore On/
Off (I = On/0 = Off).
aspirazione e quindi captata nel turbofi ltro (1.5).
Il turbofi ltro deve essere sostituito quando è così
pieno di polvere da causare la diminuzione della
potenza aspirante.
Montaggio di un turbofi ltro
- infi lare la parte anteriore di cartone del turbofi ltro con labbro di tenuta (2.3) sul bocchettone
di aspirazione (2.2) del portafi ltro;
- inserire la parte posteriore con occhiello (2.4)
sulla linguetta di fermo (2.5) del portafi ltro;
- spingere il portafi ltro con l‘apertura (1.3) sul
bocchettone di aspirazione (1.2) della macchina
fi no alla battuta fi nale e bloccare con la manopola
(1.4).
b) Aspirazione esterna con apparecchio di
aspirazione
Per evitare di cambiare frequentemente il turbofi ltro quando si eseguono lavori di levigatura
prolungati, al posto del sistema di aspirazione
propria si può collegare un apparecchio di aspirazione Festool. A questo scopo, il tubo fl essibile
di aspirazione (Ø 27 mm (1.6)) dell‘apparecchio
di aspirazione viene inserito sul bocchettone di
aspirazione (1.2).
4 Elettronica
La ETS 125 EQ possiede un sistema di re-
golazione elettronica con cui si può variare
con continuità il numero di giri, il quale
può essere adattato in maniera ottimale
al tipo di materiale da levigare (v. capitolo
6).
Il numero di giri viene regolato con la manopola
(2.1).
5 Impostazioni della macchina
Prima di eseguire qualsiasi lavoro sulla
macchina staccare sempre la spina dalla
presa di corrente!
5.1 Aspirazione della polvere
Allacciate sempre la macchina ad un
dispositivo di aspirazione. Il sistema di
aspirazione della polvere impedisce la
formazione di alte concentrazioni di polvere nell‘aria di lavoro e grandi accumuli
di sporco sul posto di lavoro.
La polvere generata durante la levigatura viene
aspirata, mediante i canali di aspirazione presenti
nel platorello, direttamente nel punto in cui avviene
l‘asportazione del materiale.
a) Aspirazione propria
Le macchine sono dotate di serie con un‘aspirazione propria. La polvere di levigatura viene aspirata
nel cuffi a di levigatura (1.8) attraverso aperture di
5.2 Fissaggio dell‘elemento levigante
Utilizzare solo elementi di levigatura ori-
ginali Festool!
Sulle cuffi e di levigatura Stickfi x possono essere
fi ssati abrasivi autoaderenti come ad esempio le
carte abrasive Stickfi x ed i velli di levigatura. Gli
abrasivi (1.7) vengono semplicemente collocati a
pressione sulla cuffi a di levigatura (1.8) e nuovamente rimossi dopo l‘uso.
6 Istruzioni di lavoro
Non sovraccaricare la macchina pre-mendola in
modo eccessivo al materiale da levigare! Il miglior
risultato di levigatura si ottiene quando si lavora
con una pressione sulla macchina moderata.
La potenza e la qualità di levigatura dipendono
essenzialmente dalla scelta del giusto elemento
levigante. Per macchine con sistema elettronico
consigliamo la seguente regolazione della rotella
(2.1):
Posizione della rotella
- Lavori di levigatura
5 - 6
- Levigatura con la massima potenza
- Asportazione di vernici vecchie
- Levigatura di legno ed impiallacciatura prima
della verniciatura
- Levigatura intermedia di vernici
4 - 5
- Levigatura di strati di mani di fondo
19
Page 20

- Levigatura di legno con dischi Vlies
- Smussatura di elementi di legno
- Lisciatura di superfi ci di legno con mano di fondo
3 - 4
- Levigatura di legno massello e di bordi impiallacciati
- Levigatura di battute su fi nestre e porte
- Levigatura intermedia di vernici su bordi
- Levigatura di fi nestre di legno naturale con dischi
Vlies
- Lisciatura di superfi ci di legno con dischi Vlies
prima della verniciatura
- Abrasione di superfici verniciate con dischi
Vlies
- Abrasione o rimozione di masse calcaree con
dischi Vlies
2 - 3
- Levigatura intermedia di vernice su superfi ci
verniciate
- Pulizia di battute su fi nestre di legno naturale
con dischi Vlies
1 - 2
- Levigatura di bordi verniciati
- Levigatura di materiali termoplastici
7 Accessori
Per garantire la sicurezza personale uti-
lizzare esclusivamente accessori e parti
di ricambio Festool.
Festool offre, per ogni applicazione, l‘accessorio,
i dispositivi di levigatura e di lucidatura più adatti.
I numeri d’ordine degli accessori e degli utensili
sono riportati nel catalogo Festool o su Internet,
al sito “www.festool.com”.
8 Manutenzione e cura
Prima di eseguire qualsiasi lavoro sulla
macchina staccare sempre la spina dalla
presa di corrente!
Tutti i lavori di manutenzione e riparazione
per i quali sia necessario aprire la scatola
del motore devono essere eseguiti esclu-
sivamente da un Centro Assistenza Clienti
autorizzato.
Per garantire la circolazione dell‘aria, le aperture per l‘aria di raffreddamento nella scatola del
motore devono essere tenute sempre sgombre e
pulite.
L’apparecchio è munito di spazzole autoestinguenti. Quando questi risultano consumati, viene
interrotta automaticamente la corrente e l’apparecchio si arresta.
Freno del platorello
Per impedire l‘aumento incontrollato del numero
di giri del platorello di levigatura, quest‘ultimo
viene frenato da un anello (2.6). Poiché l‘anello si
consuma col passare del tempo, quando l‘azione
frenante diminuisce, esso deve essere sostituito
con uno nuovo (489190).
9 Smaltimento
Non gettare gli elettroutensili nei rifi uti domestici!
Provvedere ad uno smaltimento ecologico degli
elettroutensili, degli accessori e degli imballaggi!
Osservare le indicazioni nazionali in vigore.
Solo UE: la Direttiva europea 2002/96/CE prevede che gli elettroutensili usati vengano raccolti
separatamente e smaltiti in conformità con le
disposizioni ambientali.
10 Garanzia
Per i nostri apparecchi offriamo, in caso di difetti
di materiale o di fabbricazione, in conformità alle
disposizioni legislative vigenti nei diversi stati, una
garanzia della durata minima di 12 mesi. Negli stati
dell’UE, la durata della garanzia è di 24 mesi (fa
fede la fattura o la bolla di consegna). Sono esclusi
dalla garanzia i danni riconducibili a naturale logoramento/usura, a sovraccarico, a trattamento
non idoneo e/o provocati dall’utilizzatore oppure
dovuti a un impiego diverso da quello indicato
nellle istruzioni d’uso oppure già noti al momento
dell’acquisto. Si escludono anche i danni derivanti
dall‘impiego di accessori e materiali di consumo
(ad es. platorelli) non originali. Eventuali reclami
possono essere accettati soltanto se l’apparecchio è rispedito non smontato ai fornitori o a un
centro di assistenza clienti Festool autorizzato. Le
istruzioni d’uso, le indicazioni sulla sicurezza, la
lista dei pezzi di ricambio e la ricevuta d’acquisto
devono essere conservate in buono stato. Per il
resto valgono le attuali condizioni di garanzia del
costruttore.
Nota
Dati i costanti lavori di ricerca e sviluppo i dati
tecnici qui forniti potrebbero subire variazioni.
REACh per prodotti Festool, gli accessori e il
materiale di consumo
REACh è l’ordinanza sulle sostanze chimiche
valida in tutta Europa dal 2007. Noi, in quanto
„utenti finali“, ovvero in quanto fabbricanti di
prodotti, siamo consapevoli del nostro dovere di
informazione nei confronti dei nostri clienti. Per
potervi tenere sempre aggiornati e per informarvi
delle possibili sostanze appartenenti alla lista di
candidati e contenute nei nostri prodotti, abbiamo
organizzato il seguente sito web per voi: www.
festool.com/reach
20
Page 21

Excenterschuurmachine
Technische
gegevens
ETS 125 Q ETS 125 EQ
Vermogen 200 W
Toerental 14.000 min
Werkslag 28.000 min
-1
-1
5.000 -
14.000 min
10.000 -
28.000 min
-1
-1
Schuuruitslag 2,0 mm
Steunschijf Diameter 125 mm
Gewicht 1,1 kg (zonder kabel)
Bescher-
mingsklasse
/ II
De vermelde afbeeldingen staan aan het begin
van de handleiding.
Symbolen
Waarschuwing voor algemeen gevaar
Draag oorbeschermers!
Draag een zuurstofmasker!
Draag een veiligheidsbril!
men, kan dit een elektrische schok, brand of
ernstig letsel tot gevolg hebben.
Bewaar alle veiligheidsinstructies en handleidingen om ze later te kunnen raadplegen.
Het in de waarschuwingen gebruikte begrip
„elektrisch gereedschap” heeft betrekking op
elektrische gereedschappen voor gebruik op het
stroomnet (met netsnoer) en op elektrische gereedschappen voor gebruik met een accu (zonder
netsnoer).
2.2 Machinespecifi eke veiligheidsinstructies
Draag, in verband met mogelijke gevaren
bij het schuren, altijd een veiligheidsbril.
- Wanneer bij het schuren explosieve of zelfont-
brandende stoffen ontstaan, dan moeten zonder
meer de bewerkingsinstructies van de fabrikant
van het materiaal in acht worden genomen.
- Tijdens het werken kunnen schadelijke/giftige
stoffen ontstaan (bijv. bij loodhoudende verf, enkele houtsoorten en metaal). Voor degene die de
machine bedient of voor personen die zich in de
buurt van de machine bevinden kan het aanraken of inademen van deze stoffen gevaarlijk zijn.
Neem de veiligheidsvoorschriften in acht die in
uw land van toepassing zijn. Sluit het gereedschap aan op een geschikte afzuiginstallatie.
Handleiding/aanwijzingen lezen!
1 Reglementair gebruik
De machine is bestemd voor het schuren van
hout, kunststof, steen, combinatiemateriaal, verf/
lak, plamuur en soortgelijk materiaal. Er mag
geen asbesthoudend materiaal worden bewerkt.
Op grond van de afmetingen, het gewicht en het
vermogen, is de machine in het bijzonder geschikt
voor kleine oppervlakken alsmede voor bovenhandse werkzaamheden.
Om veiligheidsredenen mag deze elektrische machine niet vochtig zijn en niet in een vochtige omgeving worden gebruikt.De machine mag alleen
worden gebruikt voor droge werkzaamheden.
Voor schade en letsel bij gebruik dat niet
volgens de voorschriften plaatsvindt, is
de gebruiker aansprakelijk.
2 Veiligheidsinstructies
2.1 Algemene veiligheidsvoorschriften
LET OP! Lees alle veiligheidsvoorschrif-
ten en instructies. Wanneer de waarschu-
wingen en instructies niet in acht worden geno-
Draag ter bescherming van uw gezond-
heid een P2-mondmasker.
2.3 Informatie over geluidsoverlast en trilling
De volgens EN 60745 bepaalde waarden bedragen
gewoonlijk:
Geluidsdrukniveau 70 dB(A)
Geluidsvermogensniveau 81 dB(A)
Meetonzekerheidstoeslag K = 3 dB
Draag oorbeschermers!
Totale trillingswaarden (vectorsom van drie richtingen) bepaald volgens EN 60745:
Trillingsemissiewaarde
(3-assig) ah = 4,5 m/s
Onzekerheid K = 2,0 m/s
De aangegeven emissiewaarden (trilling, geluid)
zijn gemeten volgens de testvoorwaarden in EN
60745 en dienen voor de machinevergelijking. Aan
de hand van deze waarden kan ook een voorlopige
inschatting van de trillings- en geluidsbelasting
tijdens het gebruik worden gemaakt. De aangegeven emissiewaarden gelden voor de belangrijkste
toepassingen van het elektrische gereedschap.
21
2
2
Page 22

Wordt het elektrisch gereedschap echter voor andere toepassingen of met ander inzetgereedschap
gebruikt, of is het onvoldoende onderhouden, dan
kan hierdoor de trillings- en geluidsbelasting
gedurende de hele werktijd aanzienlijk worden
verhoogd. Met het oog op een vastgelegde werkperiode dienen voor een juiste beoordeling ook
de hierin optredende vrijloop- en stilstandtijden
van de machine in acht te worden genomen. De
belasting over de totale werkperiode kan op deze
manier aanzienlijk worden verminderd.
3 Elektrische aansluiting en inbedrijfstel-
ling
De netspanning dient overeen te komen
met de indicatie op de kenplaat
Schakel de machine vóór het aansluiten
of loskoppelen van de aan-sluiting op het
elektriciteitsnet altijd uit!
Zie fi guur 3 voor het aansluiten en ontkoppelen
van het netsnoer.
De schakelaar (1.1) dient als aan-/uit-schakelaar
(I = aan/0 = uit).
4 Elektronica
De ETS 125 EQ heeft een elektronische
regeling, waarmee het toerental trap-
loos kan worden geregeld. Hierdoor kan
de schuursnelheid optimaal aan het te
schuren materiaal worden aangepast (zie
hoofdstuk 6).
Het toerental wordt met het stelwieltje (2.1) ingesteld.
5 Instellingen aan de machine
Als aan de machine wordt gewerkt, dient
altijd de stekker uit het stopcontact te
worden gehaald!
5.1 Stofafzuiging
Sluit de machine altijd aan op een af-
zuiging. De stofafzuiging voorkomt hoge
stofbelastingen in de omgevingslucht en
grotere verontreiniging op de werkplek.
Het schuurstof wordt door de afzuigkanalen in
de schuurschoen rechtstreeks van de werkplek
weggezogen.
a) Eigen afzuiging
De machines zijn standaard voorzien van een
eigen afzuiging. Het schuurstof wordt via de
aanzuigopeningen in de schuurschoen (1.8) afgezogen en in het turbofi lter(1.5) opgevangen.
Wanneer het turbofi lter zover met schuurstof is
gevuld dat het zuigvermogen vermindert, moet
dit fi lter worden vervangen.
Montage van een turbofi lter
- Het voorste kartonnen gedeelte van het turbofi lter met het afdichtlipje (2.3) op de afzuigaansluiting (2.2) van de fi lterhouder schuiven,
- het achterste kartonnen gedeelte met de gleuf
(2.4) over de bevestigingslip (2.5) van de fi lterhouder schuiven,
- de fi lterhouder met de opening (1.3) tot de
aanslag op de afzuigaansluiting (1.2) van de
machine steken en met de draaiknop (1.4) vastklemmen.
b) Externe afzuiging met afzuigapparaat
Om bij intensieve schuurwerkzaamheden te
voorkomen dat u het turbofilter steeds moet
vervangen, kan in plaats van de eigen afzuiging,
een Festool-afzuigapparaat worden aangesloten.
Hiervoor wordt de aanzuigslang (Ø 27 mm (1.6))
van het afzuigapparaat op de afzuigaansluiting
(1.2) gestoken.
5.2 Schuurmiddelen bevestigen
Gebruik alleen originele Festool-schuur-
middelen!
Op de Stickfix-schuurzolen kan zelfklevend
schuurmateriaal, zoals Stickfi x-schuurpapier en
schuurvliezen worden, bevestigd. Het schuurmateriaal (1.7) wordt gewoon op de schuurzool (1.8)
gedrukt en na gebruik weer verwijderd.
6 Werkinstructies
De machine niet overbelasten door te veel druk
uit te oefenen! U bereikt het beste schuurresultaat, wanneer u gelijkmatig druk uitoefend.
Het schuurvermogen en de kwaliteit hangen in
belangrijke mate af van de keuze van het juiste
schuurmiddel.
Voor elektronische machines adviseren wij de
volgende instellingen van het stelwieltje (2.1):
Niveau stelwieltje
- Schuurtoepassing
5 - 6
- Schuren met maximaal vermogen
- Afschuren van oude verfl agen
- Schuren van hout en fi neer voor het lakken
- Tussenschuren van gelakte vlakken
4 - 5
- Schuren van dun aangebrachte grondverf
- Schuren van hout met schuurvlies
- Schuren van randen op hout
- Fijnschuren van met grondverf behandeld
hout
3 - 4
- Schuren van volledige houten en fi neerranden
- Schuren in de hoeken van deuren en ramen
22
Page 23

- Tussenschuren van gelakte randen
- Aanschuren van houten kozijn met schuurvlies
- Fijnschuren van houten vlakken voor het beitsen
met schuurvlies
- Afwrijven van gebeitste oppervlakken met
schuurvlies
- Afwrijven of verwijderen van overvloedige kalkpasta met schuurvlies
2 - 3
- Tussenschuren van gebeitste vlakken
- Reinigen van houten kozijnhoeken met schuurvlies
1 - 2
- Schuren van gebeitste randen
- Schuren van thermoplastische kunststoffen.
7 Accessoires
Gebruik voor uw eigen veiligheid alleen
originele Festool accessoires en reser-
veonderdelen.
Festool biedt voor elke toepassing de juiste accessoires en het meest geschikte schuur- en polijstmateriaal. De bestelnummers voor accessoires en
gereedschap vindt u in de Festool-catalogus of op
het Internet onder „www.festool.com“.
8 Onderhoud
Als aan de machine wordt gewerkt, dient
altijd de stekker uit het stopcontact te
worden gehaald!
Alle onderhouds- en reparatiewerk-
zaamheden, waarvoor het vereist is de
motorbehuizing te openen, mogen alleen
door een geautoriseerde onderhouds-
werkplaats worden uitgevoerd.
Ter bescherming van de luchtcirculatie dienen de
koelluchtopeningen in de motorbehuizing steeds
vrij en schoon te worden gehouden.
Het apparaat is voorzien van zichzelf uitschakelende koolborstels. Als deze versleten zijn, wordt
de stroom automatisch onderbroken en komt het
apparaat tot stilstand.
Slijpschoenrem
Om te voorkomen dat de schuuzzool steeds snellen gaat draaien, wordt deze door een manchet
(2.6) afgeremd. Omdat de manchet na verloop van
tijd slijt, moet deze bij een slechtere remwerking
door een nieuwe (489190) worden vervangen.
9 Afvalverwijdering
Geef elektrisch gereedschap niet met het huisvuil
mee! Voer de apparaten, accessoires en verpakkingen op milieuvriendelijke wijze af! Neem daarbij de geldende nationale voorschriften in acht.
Alleen EU: Volgens de Europese richtlijn 2002/96/
EG dienen oude elektroapparaten gescheiden te
worden ingezameld en op milieuvriendelijke wijze
te worden afgevoerd.
10 Garantie
Overeenkomstig de wettelijke voorschriften van
het betreffende land, maar minimaal 12 maanden
geven wij voor onze apparaten garantie op materiaal- en fabricagefouten. Binnen de staten van
de EU bedraagt de garantieperiode 24 maanden
(op vertoon van een rekening of bon). Schade die
met name te herleiden is tot natuurlijke slijtage,
overbelasting of ondeskundige bediening, dan wel
tot schade die door de gebruiker zelf veroorzaakt
is of door ander gebruik tegen de handleiding in,
of die bij de koop reeds bekend was, blijven van
de garantie uitgesloten. Ook schade die is terug
te voeren op het gebruik van niet-originele accessoires en verbruiksmateriaal (bijv. steunschijf)
wordt niet in aanmerking genomen.
Klachten kunnen alleen in behandeling worden
genomen wanneer het apparaat niet-gedemonteerd aan de leverancier of een geautoriseerde
Festool-klantenservice wordt teruggestuurd.
Berg de handleiding, de veiligheidsvoorschriften,
de onderdelenlijst en het koopbewijs goed op. Voor
het overige zijn de geldende garantievoorwaarden
van de producent van kracht.
Opmerking
Vanwege de voortdurende research- en ontwikkelingswerkzaamheden zijn wijzigingen in de hier
gegeven technische specifi catie voorbehouden.
REACh voor producten, accessoires en verbruiksmateriaal van Festool
REACh is de sinds 2007 in heel Europa toepasselijke chemicaliënverordening. Wij als „downstreamgebruiker“, dus als fabrikant van producten, zijn
ons bewust van onze informatieplicht tegenover
onze klanten. Om u altijd over de meest actuele
stand van zaken op de hoogte te houden en over
mogelijke stoffen van de kandidatenlijst in onze
producten te informeren, hebben wij de volgende
website voor u geopend: www.festool.com/reach
23
Page 24

Excenterslipmaskin
Tekniska data ETS 125 Q ETS 125 EQ
Effekt 200 W
Varvtal 14.000 min
Arbetsrörelser 28.000 min
-1
-1
5.000 -
14.000 min
10.000 -
28.000 min
-1
-1
Sliprörelse 2,0 mm
Slipplatta diameter 125 mm
Vikt 1,1 kg (utan kabel)
Skyddsklass
/ II
De angivna fi gurerna befi nner sig början på bruksanvisningen.
Varning för allmän risk!
drivna elverktyg (sladdlösa).
2.2 Maskinspecifi ka säkerhetsanvisningar
Använd alltid skyddsglasögon, på grund av
farorna vid slipning.
- Om vid slipning explosivt eller självantändligt
damm uppstår, bör ovillkorligen material-tillverkarens bearbetningsanvisningar följas.
- Under arbetet kan skadligt/giftigt damm uppstå
(exempelvis blyhaltig färg, några träsorter och
metall). Att komma i kontakt med eller andas in
detta damm kan utgöra en risk för operatören eller
för personer som befi nner sig i närheten. Beakta
säkerhetsföreskrifterna som gäller för resp land.
Anslut elverktyget till en lämplig dammutsugningsanordning.
Bär en P2-andningsskyddsmask som skydd
för hälsan.
Använd andningsskydd!
Använd hörselskydd!
Använd skyddsglasögon!
Läs bruksanvisningen/anvisningarna!
1 Bestämmelser för maskinens användning
Maskinen är avsedd för slipning av trä, plast, sten,
kompoundmaterial, färg/lack, spackelmassa och
liknande material. Metall och asbesthaltigt material
får inte bearbetas. Tack vare sin storlek, vikt och effekt, är maskinen speciellt lämpad för bearbetning
av små ytor och för arbeten ovanom huvudnivå.
För att elsäkerheten skall kunna säkerställas får
maskinen inte vara fuktig eller användas i fuktiga
utrymmen. Maskinen får bara användas för torrslipning.
Användaren ansvarar för skador och olyckor
som uppkommit på grund av att maskinen
använts på ett otillåtet sätt.
2 Säkerhetsanvisningar
2.1 Allmänna säkerhetsanvisningar
OBS! Läs alla säkerhetsföreskrifter och
anvisningar. Om du inte rättar dig efter var-
ningarna och anvisningarna kan det leda till elektriska överslag, brand och/eller allvarliga kroppsskador.
Förvara alla säkerhetsanvisningar och bruksanvisningar för framtida bruk.
Nedan använt begrepp ”Elverktyg” hänför sig till
nätdrivna elverktyg (med nätsladd) och till batteri-
2.3 Information om buller och vibrationer
De enligt EN 60745 fastställda värdena uppgår till:
Ljudtrycksnivå 70 dB(A)
Ljudeffektnivå 81 dB(A)
Mätosäkerhetstillägg K = 3 dB
Använd hörselskydd!
Totala vibrationsvärden (vektorsumman för tre riktningar) fastställda enligt EN 60745:
Svängningsemissionsvärde
(3-axligt) a
= 4,5 m/s²
h
Osäkerhet K = 2,0 m/s²
De angivna emissionsvärdena (vibrationer, ljud) har
uppmätts i enlighet med provvillkoren i EN 60745,
och används för jämförelse av maskiner. De kan
även användas för preliminär uppskattning av vibrations- och bullernivån under arbetet. De angivna
emissionsvärdena avser elverktygets huvudsakliga
användningsområden. Om elverktyget används
för andra ändamål, med andra insatsverktyg eller
efter otillräckligt underhåll, kan vibrations- och
bullernivån öka kraftigt under hela arbetsintervallet. För att få en exakt uppskattning av ett visst
arbetsintervall måste man även ta hänsyn till den
tid maskinen går på tomgång och står stilla.Det
kan sänka belastningen avsevärt under hela arbetsintervallet.
3 Elektrisk anslutning och idrifttagning
Nätspänningen måste stämma överens
med märkskylten.
Frånkoppla alltid maskinen innan du an-
sluter den eller drar ut nätanslutnings-
ledningen ur eluttaget.
För anslutning och löstagning av nätanslutningsledningen, se bild 3.
Kontakten (1.1) fungerar som till-/frånkoppplare (I
24
Page 25

= Till/0 = Från).
4 Elektronik
ETS 125 EQ har en elektronisk reglering,
med vilken varvtalet steglöst kan regleras.
Därigenom kan sliphastigheten för varje
material anpassas optimalt (se kapitel 6).
Varvtalet ställes in med ställhjulet (2.1).
5 Inställningar på maskinen
Nätkontakten skall alltid dras ut ur väggut-
taget före allt arbete på maskinen!
5.1 Dammutsugning
Anslut alltid maskinen till en utsugnings-
anläggning. Dammutsugningen förhindrar
en hög dammbelastning i arbetsluften och
större nedsmutning av arbetsplatsen.
Slipdammet sugs ut direkt vid slipstället via utsugskanalerna i slipplattan.
a) Egenuppsugning
Maskinerna är seriemässigt utrustade med en
egenuppsugning. Slipdammet suges upp genom
sugöppningar i slipplattan (1.8) och fångas upp i turbofi ltret (1.5). Då turbofi ltret är så fyllt med damm,
att uppsugningen minskar, bör detta bytas ut.
Montering av turbofi lter
- Skjut turbofi ltrets kartongdel med tätningsläppen
(2.3) på fi lterhållarens uppsugningsstuds (2.2),
- fäst den bakre kartongdelen med slits (2.4) i fi l-
terhållarens hållarribba (2.5),
- stick fi lterhållaren med öppningen (1.3) ända till
uppsugningsstudsens (1.2) anslag och kläm fast
den med vridknoppen (1.4).
b) Yttre uppsugning med uppsugningsapparat
Vid längre slipningsarbeten kan, för att undvika täta
byten av turbofi ltret, en Festool-uppsugningsapparat anslutas istället för egenuppsugningen. Härvid
anslutes uppsugningsapparatens uppsugningsslang
(Ø 27 mm (1.6)) till uppsugningsstudsen (1.2).
5.2 Fastsättning av slipmedel
Använd enbart Festool original-slipme-
del!
På Stickfi x-slipskorna kan man fästa självhäftande
slipmedel som Stickfix-slippapper och slipduk.
Slipmedlen (1.7) trycks helt enkelt fast på slipskon
(1.8) och dras sedan bort efter användandet.
6 Arbetsråd
Överbelasta inte maskinen genom för stark antryckning! Det bästa slipresultatet uppnås med lagom
antryckning. Slipeffekten och -kvaliteten beror
huvudsakligen på valet av rätt slipmedel. För maskiner med elektronik rekommen-derar vi följande
inställningar på ställhjulet (2.1):
Reglerhjulsläge
- Sliparbeten
5 - 6
- Slipning med maximal drivning
- Avslipning av gammal färg
- Slipning av trä och fanér före lackering
- Mellanslipning vid ytlackering
4 - 5
- Slipning av tunnt pålagd förlack
- Slipning av trä med slipduk
- Kantslipning av trädelar
- Polering av grundmålade träytor
3 - 4
- Slipning av helträ- och fanérkanter
- Slipning i fals av fönster och dörrar
- Mellanslipning vid lackering av kanter
- Slipning av naturträfönster med slipduk
- Polering med slipduk av träytor före betsning
- Avslipning av betsade ytor med slipduk
- Avslipning eller borttagning av överfl ödig kalkpasta med slipduk
2 - 3
- Mellanslipning vid lackering av betsade ytor
- Rengöring med slipduk av naturträfönsterfalsar
1 - 2
- Slipning av betsade kanter
- Slipning av termoplastiska plaster.
7 Tillbehör
Använd endast Festools originaltillbehör
och originalreservdelar för din egen säker-
hets skull.
Festool erbjuder passande tillbehör, slip- och polermedel för alla användningstillfällen. Beställnumren
för tillbehör och verktyg fi nns i Festool-katalogen
eller på Internet ”www.festool.com”.
8 Underhåll och skötsel
Nätkontakten skall alltid dras ut ur vägg-
uttaget före allt arbete på maskinen!
Allt underhålls- och reparationsarbete, som
kräver att motorhöljet öppnas, får endast
utföras av en auktoriserad serviceverk-
stad.
För att luftcirkulationen skall kunna säkras, måste
öppningarna för kylluft i motorns hölje alltid hållas
öppna och rena.
Maskinen är utrustad med självfrånkopp-lande specialkol. Är dessa slitna bryts strömmen automatiskt
och maskinen stannar.
Slipplattebroms
För att förhindra en okontrollerad uppvridning av
slipplattan, bromsas den av en manschett (2.6).
Emedan manschetten slites med tiden, bör den
vid sjunkande bromsverkan bytas ut mot en ny
(489190).
25
Page 26

9 Skrotning
Kasta inte elverktygen i hushållsavfallet! Lämna
maskiner, tillbehör och förpackningar till återvinning. Följ gällande nationella föreskrifter.
Gäller bara EU-länder: Enligt EU-direktiv 2002/96/
EG ska uttjänta elverktyg källsorteras för miljövänlig återvinning.
10 Garanti
Vi lämnar garanti på våra produkter vad gäller
material- och tillverkningsfel enligt landsspecifi ka
lagenliga bestämmelser, dock i minst 12 månader.
Inom EUs medlemsländer uppgår garantin till
24 månader (ska kunna styrkas av faktura eller
följesedel). Skador som framför allt kan härledas
till normalt slitage, överbelastning, ej fackmässig
hantering resp. skador som orsakats av användaren
eller som uppstått på grund av användning som
strider mot bruksanvisningen eller skador som
var kända vid köpet, innefattas inte av garantin.
Undantag gäller även vid skador som uppkommer
till följd av att tillbehör och förbrukningsmaterial
(t.ex. slipskivor) som inte är original har använts.
Reklamationer godkänns endast om produkten
återsänds till leverantören eller till en auktoriserad Festool-serviceverkstad utan att ha tagits isär.
Spara bruksanvisningen, säkerhetsföreskrifterna,
reservdelslistan och köpebrevet. I övrigt gäller
tillverkarens garantivillkor för respektive produkt.
Anmärkning: På grund av det kontinuerliga forsknings- och utvecklingsarbetet förbehåller vi oss rätten till ändringar vad gäller de tekniska uppgifterna
i detta dokument.
REACh för Festool-produkter, tillbehör och förbrukningsmaterial
REACh är den kemikalieförordning som sedan
2007 gäller i hela Europa. I egenskap av ”nedströmsanvändare”, dvs tillverkare av produkter,
är vi medvetna om den informationsplikt som
vi har gentemot våra kunder. För att hela tiden
hålla kunderna uppdaterade och informera om
eventuella ämnen i våra produkter som återfi nns
på den sk kandidatlistan, har vi tagit fram denna
webbsida: www.festool.com/reach
Epäkeskohiomakone
Tekniset tiedot ETS 125 Q ETS 125 EQ
Teho 200 W
Kierrosluku 14.000 min
Courses de
travail
28.000 min
-1
-1
5.000 -
14.000 min
10.000 -
28.000 min
-1
-1
Hiomaisku 2,0 mm
Hiomalautasen halkaisija 125 mm
Paino 1,1 kg (ilman kaapelia)
Suojausluokka
/ II
Tekstissä viitataan kuviin, jotka löytyvät käyttöohjekirjan alusta.
Symbolit
Varoitus yleisestä vaarasta
Käytä kuulosuojaimia!
Käytä hengityssuojainta!
Käytä suojalaseja!
Lue ohjeet/huomautukset!
1 Käyttötarkoituksen mukainen käyttö
Kone on määräysten mukaisesti tarkoitettu puun,
muovin, kiven, yhdistelmämateriaalien, maalin/
lakan, pohjustusaineen ja vastaavien materiaalien
hiomiseen.
Metalleja tai asbestipitoisia materiaaleja ei saa
käsitellä.
Kokonsa, painonsa ja tehonsa ansiosta kone on
erityisen soveltuva pienten pintojen käsittelyä ja
pään yläpuolella tapahtuvien töiden suorittamista
varten.
Sähköiskujen vaaran poistamiseksi laitetta ei saa
käyttää, jos se on kostea; laitetta ei myöskään saa
käyttää kosteissa olosuhteissa. Laitetta saa käyttää
vain kuivahiontaan.
Käyttäjä vastaa itse vaurioista ja tapatur-
mista, jotka johtuvat väärästä käytöstä!
2 Turvallisuusohjeita
2.1 Yleiset turvallisuusohjeet
HUOMIO!: Kaikki turvaohjeet ja ohjeet täytyy
lukea. Alla olevien turvaohjeiden ja ohjeiden
noudattamisen laiminlyönti saattaa johtaa sähköiskuun, tulipaloon ja/tai vakavaan loukkaantumiseen. Säilytä kaikki turvaohjeet ja käyttöohjeet
huolellisesti.
Turvallisuusohjeissa käytetty käsite ”sähkötyökalu”
käsittää verkkokäyttöisiä sähkötyökaluja (verkkojohdolla) ja akkukäyttöisiä sähkötyökaluja (ilman
verkkojohtoa).
26
Page 27

2.2 Konekohtaiset turvaohjeet
mena (I = päällä/0 = ei päällä).
Käytä hionnan vaarojen vuoksi aina suo-
jalaseja.
- Jos hiottaessa syntyy räjähtävää tai itsesyttyvää
pölyä, on ehdottomasti noudatettava materiaalinvalmistajan ohjeita.
- Työstettäessä saattaa syntyä terveydelle haitallisia/
myrkyllisiä pölyjä (esimerkiksi lyijypitoisia maaleja
tai joitakin puulaatuja ja metalleja työstettäessä).
Joutuminen kosketuksiin näiden pölyjen kanssa
tai näiden pölyjen hengittäminen saattaa aiheuttaa
vaaran koneen käyttäjälle ja välittömässä läheisyydessä oleville henkilöille. Noudata maakohtaisia
turvallisuus- ja työturvallisuusmääräyksiä. Liitä
koneeseen aina pölyn poistoimu.
Käytä oman terveytesi vuoksi P2-luokan
hengityssuojainta.
2.3 Äänten ja värinöiden vaimennus
Normin EN 60745 mukaisesti määritetyt tyypilliset
arvot ovat:
Käyttöäänitaso 70 dB(A)
Äänitaso max. 81 dB(A)
Mittausepätarkkuuslisä K = 3 dB
Käytä kuulosuojaimia!
Värähtelyn kokonaisarvot (kolmen suunnan vektorisumma) määritetty EN 60745 mukaan:
Värähtelyarvo (3-akselinen) a
= 4,5 m/s
h
Epävarmuus K = 2,0 m/s
Ilmoitetut päästöarvot (tärinä, melu) on mitattu
normin EN 60745 tarkastusedellytysten mukaisesti, ja nämä arvot on tarkoitettu koneiden vertailuun.
Ne soveltuvat myös tärinä- ja melukuormituksen
väliaikaiseen arviointiin työtehtävää suoritettaessa. Ilmoitetut päästöarvot koskevat sähkötyökalun
pääasiallisia käyttötarkoituksia. Jos sähkötyökalua
käytetään muihin käyttötarkoituksiin, muiden koneeseen liitettävien työkalujen käytön yhteydessä
tai huonosti huollettuna, se saattaa johtaa tärinä- ja
melukuormituksen selvään nousuun koko työskentelyajan aikana. Koko työskentelyajan aikaista
kuormitusta arvioitaessa on otettava huomioon
myös koneen joutokäyntiajat ja pysäytettynä olon
ajat. Tämä voi vähentää huomattavasti työskentelyajan kokonaiskuormitusta.
3 Sähköliitäntä ja käyttöönotto
Verkkojänniteen täytyy olla sama kuin te-
honilmoituskilvessä.
Kytke kone aina pois päältä, ennen kuin
liität tai irrotat sähköliitän-täjohdon!
Katso kuvaa 3 verkkoliitäntäjohdon liittämistä ja
irrotusta varten.
Katkaisin (1.1) toimii päälle/pois päältä -katkaisi-
4 Elektroniikka
Hiomakoneessa ETS 125 EQ on elektroninen
säädin, jonka avulla kierroslukua voidaan
säätää portaattomasti. Siten hiomanopeus
voidaan sovittaa jokaiselle materiaalille
sopivaksi (ks. luku 6).
Kierrosluku säädetään säätöpyörän (2.1) avulla.
5 Säädöt koneella
Irrota laite verkkojännitteestä aina ennen
kuin teet mitään laitteeseen kohdistuvia
töitä!
5.1 Pölyn poistoimu
Liitä koneeseen aina pölynpoisto. Pölyn
poistoimu estää työilman liian suuren
pölykuormituksen syntyä sekä työpaikan
likaantumisen.
Hiomapöly imetään suoraan hiomakohdasta hiontatasossa olevan imukanavan kautta.
a) Omaimu
Koneet on sarjavalmisteisina varustettu omaimulla. Hiontapöly imetään hiomatasossa (1.8) olevien
imuaukkojen kautta ja kerääntyy turbosuodattimeen
(1.5). Turbosuodattimen täyttyessä kerääntyneestä
pölystä ja imutehon huonontuessa, on se vaihdettava.
Turbosuodattimen asennus
2
- työnnä turbosuodattimen kartonkiosa tiivistyshuu-
2
lineen (2.3) suodatinpitimen imuistukkaan (2.2),
- aseta taaemman kartonkiosan korvake (2.4) suo-
datinpitimen pidinkielekkeeseen (2.5),
- työnnä suodatinpidin aukkoineen (1.3) imuistukan
(1.2) vasteeseen ja purista se paikoilleen kääntönupin (1.4) avulla.
b) Ulkopuolinen imu imulaitteen avulla
Pidempiä hiontatöitä varten voidaan liittää Festoolimulaite omaimun tilalle, jotta vältyttäisiin tiheistä
suodatinvaihdoista. Tällöin imulaitteen imuletku (Ø
27 mm (1.6)) imuistukkaan (1.2).
5.2 Hiontavälineen kiinnitys
Käytä ainoastaan Festooln alkuperäisiä
hiontavälineitä!
Stickfi x-hiomatalloihin voidaan kiinnittää itseliimautuvia hiomatarvikkeita kuten Stickfi x-hiomapyöröt
ja karhunkielet. Hiomatarvikkeet (1.7) painetaan
yksinkertaisesti hiomatallaan (1.8) kiinni ja vedetään
taas käytön jälkeen irti.
6 Työohjeita
Älä ylikuormita konetta liian voimakkaalla painamisella!
Paras hiontatulos saavutetaan sopivan painamisen
avulla.
27
Page 28

Hiontateho ja -laatu riippuu pääasiassa oikean hiontavälineen valinnasta.
Elektroniikalla varustettuihin koneisiin suosittelemme seuraavia asetuksia säätöpyörälle (2.1):
Säätöpyörän asetus
- Työ
5 - 6
- Hiotaan suurinta tehoa käyttäen
- Hiotaan pois vanhaa maalia
- Hiotaan puuta tai vaneria ennen lakkausta
- Välihiotaan pintalakkauksen yhteydessä
4 - 5
- Hiotaan ohutta esilakkaa
- Hiotaan puuta hiomakuitukankaan avulla
- Hiotaan puuosien reunoja
- Kiilloitetaan pohjamaalattuja puupintoja
3 - 4
- Hiotaan täyspuu- ja vanerireunoja
- Hiotaan ikkunoiden ja ovien huulloksia
- Välihiotaan reunojen lakkauksia
- Hiotaan luonnonpuuikkunoita hiomakuitu-kankaan avulla
- Hiomakuitukankaan avulla kiilloitetaan puupintoja
ennen petsausta
- Petsattuja pintoja puhtaaksihiotaan hiomakuitukankaan avulla
- Hiomakuitukankaan avulla hiotaan pois ylimääräistä kalkkipastaa
2 - 3
- Välihiotaan lakattaessa petsattuja pintoja
- Hiomakuitukankaan avulla puhdistetaan luonnonpuuikkunoiden huulloksia
1 - 2
- Hiotaan petsattuja reunoja
- Hiotaan lämpömuovattavia muoveja.
7 Lisätarvikkeet
Käytä oman turvallisuutesi varmistamiseksi
vain alkuperäisiä Festool-tarvikkeita ja va-
raosia.
Festoolin tuotevalikoimasta löydät jokaiseen käyttötarkoitukseen oikeat varusteet sekä hionta- ja
kiillotustarvikkeet. Tarvikkeiden ja työkalujen tilausnumerot löydät Festool-luettelosta tai internetistä
osoitteesta „www.festool.com“.
8 Huolto ja ylläpito
Irrota laite verkkojännitteestä aina ennen
kuin teet mitään laitteeseen kohdistuvia
töitä!
Kaikki sellaiset huolto- ja korjaustyöt, jotka
edellyttävät moottorin kotelon avaamista,
on suoritettava valtuutetussa huoltokor-
jaamossa.
Laitteen riittävän jäähdytysilman määrän varmistamiseksi pidä kotelon jäähdytysilma-aukot aina
puhtaina.
Laitteessa on itsekatkaisevat erikoishiilet. Kun nämä
ovat kuluneet, virransyöttö keskeytyy automaattisesti ja laite pysähtyy.
Hiontatasojarru
Jotta hiontataso ei hallitsemattomasti karkaisi ylös,
se jarrutetaan kauluksen (2.6) avulla. Koska kaulus
ajan mittaan kuluu, on se jarrutehon laskiessa vaihdettava uuteen (489190).
9 Hävittäminen
Sähkötyökaluja ei saa hävittää talousjätteen mukana! Toimita käytöstä poistetut koneet, lisätarvikkeet
ja pakkaukset ympäristöä säästävään kierrätykseen. Noudata maakohtaisia määräyksiä.
Koskee vain EU-maita: EU-direktiivin 2002/96/EY
mukaan käytöstä poistetut sähkötyökalut ovat lajitelt avaa jätettä, joka on asianmukaisesti ohjattava
ympäristöä säästävään kierrätykseen.
10 Käyttöturva
Myönnämme valmistamillemme laitteille materiaali- ja valmistusviat kattavan käyttöturvan, joka
vastaa maakohtaisia määräyksiä, ja jonka pituus
on vähintään 12 kuukautta. Käyttöturvan pituus on
EU-maissa 24 kuukautta (laskun tai toimituslistan
päiväyksestä lukien). Käyttöturva ei kata vaurioita,
jotka ovat syntyneet luonnollisen kulumisen, ylikuormituksen tai epäasianmukaisen käytön seurauksena, ovat käyttäjän aiheuttamia tai syntyneet
käyttöohjekirjan ohjeiden noudattamatta jättämisen
seurauksena, tai jotka olivat tiedossa jo laitteen ostohetkellä. Poissuljettuja ovat myös vahingot, jotka
johtuvat ei-alkuperäisten tarvikkeiden ja kulutusmateriaalien (esim. hiomalautanen) käytöstä.
Käyttöturvaan voidaan vedota vain kun laite toimitetaan purkamattomana myyjälle tai valtuutettuun Festool-huoltoon. Säilytä laitteen käyttöohje,
turvallisuusohjeet, varaosaluettelo ja ostokuitti
huolellisesti. Muilta osin ovat voimassa valmistajan
antamat, ajantasalla olevat käyttöturvaehdot.
Huomautus: Jatkuvan tutkimus- ja tuotekehittelytyön seurauksena tässä annettuihin teknisiin
tietoihin saattaa tulla muutoksia.
REACh Festool-tuotteille, niiden tarvikkeille ja
kulutusmateriaaleille
REACh on vuodesta 2007 lähtien koko Euroopassa voimassaoleva kemikaaleja koskeva asetus.
Käytämme kemikaaleja tuotteidemme valmistuksessa ja olemme tietoisia tiedotusvelvollisuudestamme asiakkaillemme. Olemme avanneet
asiakkaitamme varten seuraavan Web-sivuston,
josta voit aina katsoa viimeisimmät tiedot tuotteissamme mahdollisesti käytettävistä aineista:
www.festool.com/reach
28
Page 29

Excentersliber
Tekniske data ETS 125 Q ETS 125 EQ
Effekt 200 W
Omdrejningstal 14.000 min
Arbejdsslag 28.000 min
-1
-1
5.000 -
14.000 min
10.000 -
28.000 min
-1
-1
Slibebevægelse 2,0 mm
Slibetallerkener diameter 125 mm
Vægt 1,1 kg (uden kabel)
Beskyttelses-
klasse
/ II
De angivne illustrationer fi ndes i starten af betjeningsvejledningen.
Symboler
Advarsel om generel fare
Brug høreværn.
Åndedrætsværn påbudt!
Beskyttelsesbriller påbudt!
Læs vejledning/anvisninger!
1 Bestemmelsesmæssig anvendelse
Bestemmelsesmæssigt er maskinen beregnet
til slibning af træ, kunststof, sten, kompositmateriale, maling/lak, spartelmasse og lignende
materialer.
Metal og asbestholdige materialer må ikke bearbejdes.
På grund af maskinens vægt og effekt er den
særlig egnet til bearbejdning af små fl ader og for
at arbejde over hovedet.
Maskinen må ikke være fugtig eller anvendes
i fugtige rum af sikkerhedsmæssige årsager.
Maskinen må udelukkende anvendes til tørslibning.
Brugeren har ansvaret for skader og
ulykker i tilfælde af, at den bestemmelsesmæssige brug ikke overholdes.
2 Sikkerhedshenvisninger
2.1 Generelle sikkerhedsinstrukser
OBS! Læs alle sikkerhedsanvisninger og
instrukser. I tilfælde af manglende over-
holdelse af advarslerne og instrukserne er der
risiko for elektrisk stød, brand og/eller alvorlige
personskader.
Opbevar alle sikkerhedsanvisninger og vejledninger til senere brug.
Det i advarselshenvisningerne benyttede begreb
„el-værktøj“ refererer til netdrevet el-værktøj
(med netkabel) og akkudrevet el-værktøj (uden
netkabel).
2.2 Maskinspecifi kke sikkerhedshenvisnin-
ger
På grund af de under slibning optrædende
farer anbefales det, generelt at bruge
sikkerheds-briller.
- Hvis man under slibning må regne med eksplo-
sivt eller selvantændeligt støv, skal man tage
hensyn til materialeleverandørens henvisninger
for bearbejdning.
- Under arbejdet kan der dannes skadeligt/giftigt
støv (f.eks. blyholdig maling, visse træsorter og
metal). Berøring eller indånding af dette støv
kan være til fare for operatøren eller personer,
som opholder sig i nærheden. Overhold de til
enhver tid gældende nationale sikkerhedsforskrifter. Forbind el-værktøjet med et passende
udsugningsanlæg.
Brug en P2-åndedrætsmaske for at undgå
skade på helbredet.
2.3 Larm- og vibrationsoplysninger
Værdierne, der er registreret i henhold til EN
60745 udgør typisk:
Lydniveau 70 dB(A)
Lydeffekt 81 dB(A)
Måleusikkerhedstillæg K = 3 dB
Brug høreværn.
Samlet vibration (vektorsum af tre retninger) målt
iht. EN 60745:
Vibrationsemission (3-akset) a
= 4,5 m/s
h
Usikkerhed K = 2,0 m/s
2
2
De angivne emissionsværdier (vibration, støj) blev
målt i henhold til prøvebetingelserne i EN 60745
og tjener til sammenligning af maskiner. De kan
også bruges til foreløbig bedømmelse af vibrations- og støjbelastningen ved brug. De angivne
emissionsværdier gælder ved almindelig brug
af elværktøjet. Hvis elværktøjet bruges til andre
29
Page 30

opgaver eller med andre værktøjer, eller hvis det
vedligeholdes utilstrækkeligt, kan vibrations- og
støjbelastningen stige betragteligt over tid. For
at opnå en præcis vurdering inden for et angivet
tidsrum skal maskinens anførte tomgangs- og
stilstandstider også tages med i betragtning.
Det kan nedsætte belastningen over det samlede
arbejdstidsrum betydeligt.
3 Elektrisk tilslutning og idrifttagning
Netspændingen skal svare til angivelsen
på typeskiltet.
Maskinen skal altid være slukket, før
nettilslutningsledningen tilsluttes eller
løsnes!
For tilslutning og frakobling af netkablet se fi gur
3. Kontakten (1.1) fungerer som til-/frakobler (I
= til/0 = fra).
4 Elektronik
Slibemaskinen ETS 125 EQ er udstyret
med en elektronisk styring, med hvilken
omdrejningstallet kan varieres trinløst.
Dette muliggør at tilpasse slibehastigheden optimalt til materialet (se kapitel
6).
Omdrejningstallet kan indstilles v. hj. a. stillehjulet
(2.1).
maskinens udblæsningsstuds (1.2) indtil anslag
og klemmes fast med drejeknappen (1.4).
b) Afsugning med støvsuger
For at undgå hyppige fi lterskift, kan man i stedet
for at benytte sig af selvafsugningen tilslutte en
Festool-støvsuger. Dertil tilsluttes støvsugerens
sugeslange (Ø 27 mm (1.6)) på maskinens udblæsningsstuds (1.4).
5.2 Påsætning af slibepapir
Anvend kun originale Festool slibemid-
ler!
På Stickfi x-slibesålene kan der fastgøres selvhæftende slibemidler som Stickfix-slibepapir
og slibevlies. Slibemidlerne (1.7) trykkes ganske
enkelt på slibesålen (1.8) og trækkes af igen efter
brug.
6 Arbejdshenvisninger
Overbelast ikke maskinen ved at trykke for hårdt
under slibningen!
De bedste resultater opnås, hvis man arbejder
med jævnt og kontinuerligt tryk.
Slibeeffekten og -kvaliteten er i høj grad afhængig
af det anvendte slibemiddel.
For maskiner med elektronik anbefaler vi følgende indstillinger på stillehjulet (2.1):
5 Indstillinger på maskinen
Træk altid stikket ud af stikdåsen før ar-
bejde påbegyndes med maskinen!
5.1 Støvsugning
Slut altid maskinen til en udsugning. Af-
sugning af slibestøvet forhindrer større
støvbelastning og tilsmudsninger i ar-
bejdspladsens direkte omgivelse.
Slibestøvet suges væk direkte ved slibestedet
gennem udsugningskanalerne i slibesålen.
a) Selvafsugning
Maskinerne er seriemæssigt udstyret med en
selvafsugning. Slibestøvet afsuges gennem dertil
beregnede åbninger i slibesålen (1.8) og opfanges
i et turbofi lter (1.5). Når turbofi ltret er så meget
fyldt, at slibeeffekten bliver ringere, skal fi ltret
skiftes.
Montering af turbofi lter
- Turbofi ltrets forreste papdel sættes med tæt-
ningslæben (2.3) på filterholderens indsugningsstuds (2.2),
- den bageste papdel sættes med slidsen (2.4) på
fi lterholderens holderibbe (2.5),
- fi lterholderen sættes med åbningen (1.3) på
Stillehjul trin
- Slibearbejder
5 - 6
- Slibning med maks. omdrejning
- Afslibning af gamle farvelag
- Slibning af træ og fi nér før lakering
- Slibning af laklag på fl ader før næste lakering
4 - 5
- Slibning af tyndt lag grunderingslak
- Slibning af træ, med slibelærred
- Kantslibning af træ
- Glatslibning af grunderede træfl ader
3 - 4
- Slibning af massive trækanter og fi nérkanter
- Slibning i kanter på vinduer og døre
- Slibning af laklag på kanter før næste lakering
- Grundslibning af trævinduer, med slibelærred
- Glatslibning af træoverfl ader før bejdsning, med
slibelærred
- Afslibning af bejdsede fl ader, med slibelærred
- Afslibning af overfl ødig kalkpasta, med slibelærred
2 - 3
- Slibning af bejdsede fl ader, med slibelærred
- Renslibning af kanter i trævinduer, med slibelærred
30
Page 31

1 - 2
- Slibning af bejdsede kanter
- Slibning af temroplastiske kunststoffer.
7 Tilbehør
Af hensyn til din egen sikkerhed må der
kun anvendes Original Festool-tilbehør
og reservedele.
Festool har det passende tilbehør, slibe- og polermiddel til enhver anvendelse. Bestillingsnumrene
for tilbehør og værktøjer kan De fi nde i Festoolkataloget eller på internettet under „www.festool.
com“.
8 Service og vedligeholdelse
Træk altid stikket ud af stikdåsen før ar-
bejde påbegyndes med maskinen!
Alt service- og vedligeholdelsesarbejde,
hvor man skal åbne motorkabinettet, må
udelukkende gennemføres af et autorise-
ret kundeservice-værksted.
For at sikre en luftcirkulation, skal køleluftåbningerne i motorkabinettet altid holdes tilgængelige
og rene.
Polereren er udstyret med selvafbrydende kul,
som afbryder for strømmen, når de skal skiftes.
Slibesål-bremse
For at forhindre, at slibesålen kører ukontrolleret
op i omdrejningstallet, bliver denne bremset ved
hjælp af en manchet (2.6). Manchetten vil slide
hen af vejen og bår derfor udskiftes til en ny
(489190) når bremsevirkningen bliver ringere.
9 Bortskaffelse
Elværktøj må ikke bortskaffes med almindeligt
husholdningsaffald! Maskiner, tilbehør og emballage skal tilføres en miljøvenlig form for genbrug!
Overhold de gældende nationale regler.
Kun EU: I henhold til det europæiske direktiv
2002/96/EF skal brugt el-værktøj indsamles særskilt og tilføres en miljøvenlig form for genbrug.
10 Garanti
I henhold til de respektive landes lovbestemmelser yder vi en garanti for materiale- eller
produktionsfejl – dog mindst på en periode af 12
måneder. Inden for EU-medlemsstaterne udgør
denne garantiperiode 24 måneder (bevis via faktura eller leveringsformular).
Skader, der især kan føres tilbage til naturlig
slitage, overbelastning, faglig ukorrekt omgang
i modstrid med betjeningsvejledningen og skader, der forårsages af brugeren eller en anden
anvendelse, der er i modstrid med betjeningsvejledningen, eller der var kendt ved købet, er
udelukket af garantien. Vi frasiger os ligeledes ethvert ansvar for skader, som skyldes anvendelse
af ikke-originalt tilbehør og forbrugsmaterialer
(f.eks. bagskiver).
Krav fra kundens side kan udelukkende accepteres, hvis maskinen/værktøjet sendes tilbage
til leverandøren eller et serviceværksted, der er
autoriseret af Festool. Opbevar betjeningsvejledningen, sikkerhedsanvisningerne, reservedelslisten og bonen. Derudover gælder fabrikantens
aktuelle garantibetingelser.
Bemærkning
På grund af konstant forsknings- og udviklingsarbejde forbeholdes retten til at gennemføre
ændringer af de tekniske oplysninger.
REACh til Festool produkter, tilbehør og forbrugsmateriale
Kemikalieloven REACH trådte i kraft i 2007 og
er gældende i hele Europa. Som ”downstreambruger” af kemikalier, dvs. producent af produkter,
tager vi vores informationspligt over for kunderne
alvorligt. På følgende hjemmeside fi nder du altid
aktuelle informationer om de stoffer fra kandidatlisten, som vores produkter kan indeholde: www.
festool.com/reach
31
Page 32

Eksentersliper
Tekniske data ETS 125 Q ETS 125 EQ
Effekt 200 W
Turtall 14.000 min
Arbeidsløft 28.000 min
-1
-1
5.000 -
14.000 min
10.000 -
28.000 min
Slipeslag 2,0 mm
Støtteron-
deller
diameter 125 mm
Vekt 1,1 kg (uten kabel)
Verneklasse
/ II
2 Sikkerhetshenvisninger
2.1 Generelle sikkerhetsinformasjoner
OBS! Les gjennom alle anvisningene. Feil
ved overholdelsen av nedenstående anvis-
-1
ninger kan medføre elektriske støt, brann og/
eller alvorlige skader.
-1
Oppbevar alle sikkerhetsmerknader og anvisninger for fremtidig bruk.
Det nedenstående anvendte uttrykket «elektroverktøy» gjelder for strømdrevne elektroverktøy
(med ledning) og batteridrevne elektroverktøy
(uten ledning).
2.2 Maskinspesifi kke sikkerhetsanvisninger
De oppgitte illustrasjoner fi nnes ved begynnelsen
av bruksanvisningen.
Symboler
Advarsel mot generell fare
Bruk øreklokker!
Bruk åndedrettsvern!
Bruk vernebriller!
Anvisning/les merknader!
1 Forskriftsmessig bruk
Maskinen er tiltenkt til sliping av tre, plast, stein,
komposittmaterialer, maling/lakk, sparkelmasse
og lignende materialer.
Metall og asbestholdige materialer må ikke bearbeides.
På grunn av den kompakte størrelsen, er sliperen
særlig egnet for bearbeiding av mindre fl ater og
for arbeid ved vanskelig atkomst som oppunder
fl ater.
På grunn av den elektriske sikkerheten skal maskinen ikke brukes når den er fuktig eller et sted
med høy fuktighet. Maskinen skal bare brukes til
tørrsliping.
Brukeren er selv ansvarlig for skader og
ulykker som skyldes annen bruk enn det
som er beskrevet som defi nert bruk.
Bruk alltid vernebriller for å hindre at par-
tikler som løsrives kommer i øynene.
- Dersom slipestøvet kan være brannfarlig el-
ler selvantennende, må en ubetinget følge
sikkerhets-anvisningene fra produsenten av
materialet.
- Når du arbeider, kan det avgis skadelig/giftig
støv (for eksempel fra blyholdig maling, enkelte
treslag og metall). Berøring eller innånding av
dette støvet kan utgjøre en fare for operatøren
eller personer som befi nner seg i nærheten.
Følg sikkerhetsforskriftene som gjelder for
ditt land. Koble elektroverktøyet til en egnet
avsugsanordning.
Bruk P2-åndedrettsvern som beskyt-
telse.
2.3 Opplysninger om støy og vibrasjoner
Typiske verdier (beregnet etter EN 60745):
Lydtrykknivå 70 dB(A)
Lydnivå 81 dB(A)
Tillegg for usikkerhet ved måling K = 3 dB
Bruk øreklokker!
Totale svingningsverdier (vektorsum fra tre retninger) beregnet i henhold til EN 60745:
Svingningsemisjonsverdi
(treakset) a
= 4,5 m/s
h
Usikkerhet K = 2,0 m/s
2
2
De angitte utslippsverdiene (vibrasjon, støy) er
målt i samsvar med EN 60745, og brukes ved
sammenligning av maskiner. De er også egnet til
en midlertidig vurdering av vibrasjons- og støybelastning under bruk. De angitte utslippsverdiene
representerer de viktigste brukstypene til elektroverktøyet. Dersom elektroverktøyet brukes på
annen måte eller med andre innsatsverktøy eller
32
Page 33

etter utilstrekkelig vedlikehold, kan vibrasjons- og
støybelastningen bli merkbart høyere i løpet av det
totale arbeidstidsrommet. Man må også ta hensyn
til maskinens tomgangs- og stillstandsperioder
når man skal gjøre en nøyaktig vurdering for et gitt
arbeidstidsrom. Dette kan redusere belastningen
betraktelig i løpet av totalt arbeidstidsrom.
3 Elektrisk tilkobling og igangsetting
Nettspenningen må stemme med spesi-
fi kasjonene på effektskiltet!
Slå maskinen alltid av før du tilkopler el-
ler trekker ut nettkabelen!
For å tilslutte og frakople nettledningen se Fig.
3.
Bryter (1.1) er en på-/av-bryter (I = på/0 = av).
4 Elektronikk
Sliperen ETS 125 EQ har elektronisk regu-
lering av turtallet. Dette gjør det mulig å
tilpasse slipehastig-heten til det aktuelle
materialet på en optimal måte (se kapittel
6).
Turtallet reguleres med reguleringsbryteren
(2.1).
inn på avsugningsstussen (1.2) og festes med
klemskruen (1.4).
b) Avsugning med ekstern innretning
For å unngå hyppig bytte av turbofi lteret ved større
slipearbeider, kan maskinens avsugningsinnretning erstattes med et eksternt avsug fra Festool.
Innretningens sugeslange (Ø 27 mm (1.6)) festes
også her på avsugningsstussen (1.2).
5.2 Påsetting av slipemiddel
Bruk bare originale Festool slipemidler!
Du kan feste selvklebende slipemiddel som Stickfi x-slipepapir og slipefi ber på Stickfi x-slipeskoene. Slipemidlene (1.7) trykkes ganske enkelt på
slipeskoen (1.8) og tas av igjen etter bruk.
6 Arbeidsanvisninger
Unngå overbelastning av maskinen gjennom å
legge for mye press på den. Du får det beste resultatet ved å trykke middels hardt mot underlaget.
Slipeytelsen og kvaliteten på resultatet avhenger i
det vesentlige av at en velger riktig slipemiddel.
For maskiner med elektronikk anbefaler vi følgende innstillinger på regulerings-bryteren (2.1):
5 Innstillinger på maskinen
Trekk alltid støpselet ut av stikkontakten
før du utfører (reparasjons)arbeid på
maskinen .
5.1 Støvavsug
Koble alltid maskinen til et avsugssystem.
Bruk av støvavsug forhindrer belastning
av arbeidsmiljøet og nestøving av ar-
beidsplassen.
Slipestøvet suges vekk der de oppstår via hullene
i slipeplaten.
a) Maskinenes egne avsugningsinnretnin-
ger
Maskinene er i standardutførelse utstyrt med en
egen avsugningsinnretning. Slipestøvet suges ut
gjennom åpninger i sålen (1.8) på slipeskoen og
fanges opp i turbofi lteret (1.5). Når turbofi lteret
er så fullt at sugeevnen reduseres, må fi lteret
byttes.
Montasje av et turbofi lter
- Fremre kartongdel av turbofi lteret med tet-
ningsleppe (2.3) skyves over filterholderens
avsugningsstuss (2.2),
- bakre kartongdel med slisse (2.4) settes på tap-
pen (2.5) bakerst på fi lterholderen,
- filterholderen med åpningen (1.3) tres helt
Trinn på dreieknappen
- Slipearbeid
5 - 6
- Sliping med maksimal avvirkning
- Fjerning av gammel maling
- Sliping av tre og fi nér før lakkering
- Sliping mellom påføring av lakklagene
4 - 5
- Sliping av tynne lakklag
- Sliping av tre med slipetekstil
- Brekking av kanter på gjenstander av tre
- Glatting av grunning på gjenstander av tre
3 - 4
- Sliping av kanter, heltre og fi nér
- Sliping av falser i dører og vinduer
- Sliping mellom påføring av lakklag på kanter
- Sliping med slipetekstil av vinduer av naturtre
- Glatting av trefl ater med slipetekstil før beising
- Rasping av beisete fl ater med slipetekstil
- Rasping eller fjerning av kalkrester med slipetekstil
2 - 3
- Sliping mellom påføring av nytt lag på beisete
fl ater
33
Page 34

- Rensking med slipetekstil av falser i vinduer av
naturtre
1 - 2
- Sliping av kanter på beisete detaljer
- Sliping av termoplastiske kunststoffer
7 Tilbehør
Av hensyn til din egen sikkerhet bør du
alltid bruke original Festool-tilbehør og
reservedeler.
Festool tilbyr passende tilbehør, slipe- og poleringsmiddel til alle bruksområder. Bestillingsnumrene til tilbehør og verktøy fi nner du i
Festool-katalogen eller på Internett under „www.
festool.com“.
8 Vedlikehold og pleie
Trekk alltid støpselet ut av stikkontakten
før du utfører (reparasjons)arbeid på
maskinen.
Alt vedlikeholds- og servicearbeid som
krever at motorhuset åpnes skal alltid
utøres på et autorisert kundeserviceverk-
sted.
For å sikre luftsirkulasjonen må kjøleluftåpningene på motorhuset alltid være åpne og rene.
Maskinen er utstyrt med spesialkull som slås
automatisk av. Dersom disse er slitt ut skjer et
automatisk strømavbrudd og maskinen stanses.
10 Ansvar for mangler
For våre apparater er vi ansvarlig for material- eller produksjonsfeil i samsvar med gjeldende nasjonale bestemmelser, i minst 12 måneder. Denne
tiden 24 måneder innenfor EU-stater (bevises
med regning eller følgeseddel). Skader som spesielt skyldes slitasje, overbelastning, ufagmessig
håndtering, eller skader forårsaket av brukeren
eller annen bruk i strid med bruksanvisningen,
eller skader som var kjent ved kjøp av apparatet
omfattes ikke av dette ansvaret. I tillegg unntas
skader som kan føres tilbake til bruk av ikkeoriginalt tilbehør og forbruksmaterialer (f.eks.
slipetallerken).
Reklamasjoner kan bare godtas hvis apparatet
ikke ble demontert og returneres til leverandøren
eller et autorisert Festool-serviceverksted. Ta
godt vare på bruksanvisningen, sikkerhetsforskrifter, reservedelsliste og kvittering. Dessuten
gjelder produsentens aktuelle betingelser for
ansvar ved mangler.
Anmerkning
På grunn av kontinuerlige forsknings- og utviklingsarbeid tas det forbehold om endringer av de
tekniske spesifi kasjonene i dette dokumentet.
Slipeplatebremse
For å hindre ukontrollert øking av slipeplatens
hastighet, blir denne bremset av en sørskilt
mansjett (2.6). Da denne mansjetten etter hvert
blir slitt, må en ved redusert virkning sette på en
ny (489190).
9 Avhending
Kast aldri elektroverktøy i husholdningsavfallet!
Returner maskin, tilbehør og emballasje til et
miljøvennlig gjenvinningsanlegg. Følg bestemmelsene som gjelder i ditt land.
Kun EU: I henhold til EU-direktiv 2002/96/EF
må elektroverktøy som ikke lenger skal brukes,
samles separat og returneres til et miljøvennlig
gjenvinningsanlegg.
REACh for Festool-produkter, tilbehør og forbruksmateriell
REACh har siden 2007 vært gjeldende kjemikalievedtekt over hele Europa. Som produsent av produkter som inneholder kjemikalier, er vi bevisst
på vår informasjonsplikt overfor kundene. For at
vi alltid skal kunne holde deg oppdatert og gi deg
informasjon om mulige stoffer i våre produkter
som fi nnes på listen, har vi opprettet følgende
nettside: www.festool.com/reach
34
Page 35

Lixadora excêntrica
Dados técnicos ETS 125 Q ETS 125 EQ
Potência 200 W
Número de ro-
tações
Cursos de trabal-
ho
14.000 min
28.000 min
5.000 -
-1
14.000 min
10.000 -
-1
28.000 min
-1
-1
Curso de lixar 2,0 mm
Prato de lixar Diâmetro 125 mm
Peso 1,1 kg (sem cabo)
Classe de protecção
/ II
As fi guras indicadas encontram-se no início das
instruções de operação.
Símbolos
Perigo geral
Utilizar protectores de ouvido!
Usar máscara de protecção respirató-
ria!
Usar óculos de protecção!
eléctricos, incêndios e/ou ferimentos graves.
Guarde todas as indicações de segurança e instruções para futura referência.
O termo “Ferramenta eléctrica” utilizado a seguir
nas indicações de advertência, refere-se a ferramentas eléctricas operadas com corrente de rede
(com cabo de rede) e a ferramentas eléctricas
operadas com acumulador (sem cabo de rede).
2.2 Indicações de segurança específi cas da
máquina
Sempre coloque óculos de protecção, por
causa dos riscos inerentes na esmerilagem.
- Caso pós explosivos ou de infl amação instantâ-
nea possam ser gerados pela esmerilagem, é
indispensável respeitar as prescrições de maquinagem do fabricante do material a ser tratado.
- Durante os trabalhos, podem ser produzidas poei-
ras nocivas/tóxicas (p.ex., pintura com chumbo, alguns tipos de madeiras e metal). Tocar ou respirar
estas poeiras pode representar um perigo para o
utilizador ou para as pessoas que se encontrem nas
proximidades. Observe as normas de segurança
válidas no seu país. Conecte a ferramente eléctrica
a um dispositivo de aspiração adequado.
Para proteger a sua saúde, use uma más-
cara de protecção P2.
Ler indicações/notas!
1 Utilização em conformidade
Conforme as disposições, a máquina está preparada para lixar madeiras, plásticos, pedras,
materiais compostos, tintas/vernizes, massas de
aparelhar e materiais semelhantes. Não podem
ser tratados metais e materiais contendo amianto. Graças ao seu tamanho, ao seu peso e ao seu
rendimento, a máquina é apropriada sobretudo
para esmerilar superfícies pequenas. Igualmente
é ideal para trabalhos no tecto.
Por razões de segurança eléctrica, a máquina
não deve estar húmida nem deve ser colocada em
funcionamento num ambiente húmido. A máquina
só pode ser utilizada para polir a seco.
O utilizador é responsável por danos
e acidentes devidos a uma utilização
não própria conforme as disposições.
2 Avisos de segurança
2.1 Regras gerais de segurança
ATENÇÃO! Leia todas as indicações de segurança e instruções. O desrespeito das
advertências e instruções pode ocasionar choques
2.3 Informação relativa a ruído e vibração
Os valores determinados de acordo com a norma
EN 60745 são, tipicamente:
Nível de pressão acústica 70 dB(A)
Potência do nível acústico 81 dB(A)
Factor de insegurança de medição K = 3 dB
Utilizar protectores de ouvido!
Níveis totais de vibrações (soma vectorial de três
sentidos) determinados em função da EN 60745:
Nível de emissão de vibrações
(3 eixos) a
= 4,5 m/s
h
Incerteza K = 2,0 m/s
Os valores de emissão (vibração, ruído) indicados
foram medidos de acordo com as condições de
ensaio na NE 60745 e servem de comparativo de
ferramentas. São também adequados para uma
avaliação provisória do coefi ciente de vibrações
e do nível de ruído durante a aplicação. Os níveis
de emissão indicados representam as aplicações
principais da ferramenta eléctrica. No entanto,
se a ferramenta eléctrica for utilizada para outras aplicações, com outros acessórios ou com
uma manutenção insufi ciente, tal pode aumentar
claramente o coefi ciente de vibrações e o nível de
ruído durante todo o período de funcionamento.
Para uma avaliação precisa durante um determi-
35
2
2
Page 36

nado período de funcionamento, devem também
observar-se os tempos de trabalho em vazio e
de paragem da ferramenta abrangidos. Tal pode
reduzir consideravelmente o esforço durante todo
o período de funcionamento.
3 Ligação eléctrica e colocação em funcio-
namento
A tensão da rede deve estar sempre de
acordo com a indicação na chapa de potência.
Antes de inserir a fi cha na tomada da rede
ou sacá-la da mesma, a máquina sempre
deve ser desligada!
Para ligar e desligar o cabo de conexão à rede,
veja ilustração 3.
O interruptor (1.1) serve como interruptor para ligar/desligar (ON/OFF) (I = ligado/0 = desligado).
4 Sistema electrónico
A esmeriladora ETS 125 EQ possui uma
regulação electrónica que permite variar
as rotações progressivamente. Assim
a velocidade de esmerilagem pode ser
adaptada ao respectivo material da me-
lhor forma possível (ver capítulo 6).
A rotação é ajustada na roda reguladora (2.1).
5 Ajustes na máquina
Antes de se efectuar qualquer trabalho na
máquina retirar sempre a fi cha de ligação
da tomada de corrente!
5.1 Aspiração de pó
Ligue sempre a máquina a um sistema de
aspiração. A aspiração do pó evita maior
incomodidade devida ao pó no ar ambien-
tal e maior acúmulo de sujidade do local
de trabalho.
A amoladura é aspirada directamente no local de
abrasão, através dos canais de aspiração na base
para lixas.
a) Auto-aspiração
Como padrão, as máquinas estão equipadas com
uma auto-aspiração. O pó proveniente da esmerilagem é aspirado através de orifícios na sapata
(1.8) e retido no turbofi ltro (1.5). Quando o turbofi ltro estiver cheio de pó ao ponto que o rendimento
diminuir, o mesmo deve ser trocado.
Colocação de um turbofi ltro
- Passar a parte frontal de cartolina do turbofi ltro
com os ressaltos vedadores (2.3) na tubuladura
de aspiração (2.2), do suporte do fi ltro,
- Introduzir a parte traseira de cartolina com a
fenda (2.4) na alheta detentora (2.5) do suporte
do fi ltro,
- encaixar o suporte do fi ltro com a abertura (1.3)
na tubuladura de aspiração (1.2) da máquina.
Passar adiante até encostar e apertar mediante
o botão rotativo (1.4).
b) Aspiração externa com aspirador
Para livrar-se da troca frequente do turbofi ltro,
por ocasião de trabalhos de esmerilagem mais
extensos, um aspirador Festo pode ser ligado à
máquina, em lugar da auto-aspiração. Para tanto,
a mangueira de aspiração (Ø 27 mm (1.6)) do aspirador é ligada à tubuladura de aspiração (1.2).
5.2 Como fi xar o abrasivo
Use apenas abrasivos originais da Festo-
ol!
Nas bases para lixas Stickfi x podem ser montados
materiais abrasivos auto-aderentes como lixas
Stickfi x e lixas de velo de fi bras. Os materiais
abrasivos (1.7) são simplesmente aplicados por
pressão sobre a base para lixas (1.8), voltando a
ser separados após a utilização.
6 Instruções de serviço
Não sobrecarregue a máquina, aplicando uma
pressão forte demais! O melhor resultado de esmerilagem o Senhor consegue ao trabalhar com
uma força ponderada de pressão. Basicamente,
o rendimento de esmerilagem e a sua qualidade
dependem da selecção do abrasivo correcto.
Para as máquinas com regulação electrónica
recomendamos os seguintes ajustes da roda reguladora (2.1):
Posição da roda reguladora
- Trabalhos de esmerilagem
5 - 6
- Esmerilagem com accionamento máximo
- Remoção de tintas velhas por esmerilagem
- Esmerilar madeira e folheado anterior ao enver-
nizamento
- Esmerilagem intermediária entre duas demãos
de verniz, em superfícies
4 - 5
- Esmerilagem de uma fi na película de verniz de
base
- Esmerilagem de madeira com a tela
- Chanfrar os cantos de peças de madeira
- Polir superfícies de madeira impregnada
3 - 4
- Esmerilar os cantos de madeira maciça e folhe-
ada
- Esmerilar no rebaixo de janelas e portas
- Esmerilagem intermediária entre duas demãos
de verniz, em cantos
- Esmerilagem preparatória de janelas em
madeira maciça com a tela de esmerilagem
- Polir a superfície de madeira anterior à causti-
36
Page 37

cação com a tela de esmerilagem
- Esfregar superfícies causticadas com a tela de
esmerilagem
- Esfregar ou remover a pasta cálcica supérfl ua
por meio da tela de esmerilagem
2 - 3
- Esmerilagem intermediária entre duas demãos
de verniz, em superfícies
- Limpar os rebaixos de janelas em madeira maciça com a tela de esmerilagem
1 - 2
- Esmerilar cantos causticados
- Esmerilar materiais termoplásticos
7 Acessório
Para a sua própria segurança, utilize ape-
nas acessórios e peças sobresselentes
originais da Festool.
A Festool oferece para cada aplicação os acessórios, produtos de lixar e de polir adequados.
Os números de encomenda para acessórios e
ferramentas podem ser encontrados no catálogo
Festool ou na Internet sob ‘www.festool.com’.
8 Conservação e cuidados
Antes de se efectuar qualquer trabalho na
máquina retirar sempre a fi cha de ligação
da tomada de corrente!
Todos os trabalhos de manutenção e repa-
ração, que exigem a abertura da carcaça
do motor, só podem ser efectuadas por
uma ofi cina autorizada do serviço após-
venda.
Para ser garantida uma circulação do ar, as aberturas do ar de refrigeração na carcaça do motor
devem estar sempre livres e limpas.
A máquina está equipada com escovas de carvão
especial de interrupção automática. Quando estão
gastas actua uma interrupção automática de corrente e desliga a máquina.
Apenas países da UE: De acordo com a Directiva
Europeia 2002/96/CE, as ferramentas electrónicas
usadas devem ser recolhidas separadamente e
ser sujeitas a uma reciclagem que proteja o meio
ambiente.
10 Prestação de garantia
Os nossos aparelhos estão ao abrigo de prestação de garantia referente a defeitos do material
ou de fabrico de acordo com as regulamentações
nacionalmente legisladas, todavia no mínimo 12
meses. Dentro do espaço dos estados da EU o
período de prestação de garantia é de 24 meses
(prova através de factura ou recibo de entrega).
Danos que se devem em especial ao desgaste
natural, sobrecarga, utilização incorrecta ou danos
por culpa do utilizador ou qualquer outra utilização que não respeite o manual de instruções ou
conhecidos aquando da aquisição, estão excluídos
da prestação de garantia. Também se excluem os
danos causados pela utilização de acessórios que
não sejam originais e materiais de desgaste (p. ex.,
pratos de lixar).
Reclamações só podem ser reconhecidas caso o
aparelho seja remetido todo montado (completo)
ao fornecedor ou a um serviço de assistência ao
cliente Festool autorizado. O manual de instruções,
instruções de segurança, lista de peças de substituição e comprovativo de compra devem ser bem
guardados. São válidas, de resto, as actuais condições de prestação de garantia do fabricante.
Nota
Devido aos trabalhos de investigação e desenvolvimento permanentes, reserva-se o direito às alterações das instruções técnicas aqui produzidas.
Freio da sapata esmeriladora
No intuito de evitar que a sapata esmeriladora
gire para cima, de uma maneira descontrolada, a
mesma é travada por uma guarnição (2.6). Visto
que esta guarnição está sujeita ao desgaste no decorrer do tempo, deve ser substituída por uma nova
(489190), quando o efeito de travagem diminuir.
9 Remoção
Não deite as ferramentas eléctricas no lixo doméstico! Encaminhe as ferramentas, acessórios e
embalagens para um reaproveitamento ecológico!
Nesse caso, observe as regulamentações nacionais em vigor.
REACh para produtos Festool, respectivos acessórios e material de desgaste
REACh é, desde 2007, o regulamento relativo a
produtos químicos, válido em toda a Europa. Nós,
enquanto “utilizadores subjacentes”, ou seja,
fabricante de produtos, estamos conscientes do
nosso dever de informar os nossos clientes. Para
o manter sempre actualizado e para o informar
sobre possíveis materiais da lista de candidatos
aos nossos produtos, criámos o seguinte website
para si: www.festool.com/reach
37
Page 38

Эксцентриковая шлифмашинка
Техническиеданные
ETS 125 Q ETS 125 EQ
мощность 200 Вт
Число оборотов
(от/мин)
Число оборотов
(от/мин)
14.000
28.000
5.000 -
14.000
10.000
-28.000
Ход шлифо-вания 2,0 мм
Опорные тарелки Диаметр 125 мм
Масса 1,1 кг (без кабеля)
Безопасность
/ II
2 Указания по технике безопасности
2.1 Общие указания по безопасности
ВНИМАНИЕ! Прочтите все указания по
технике безопасности и рекомендации.
Ошибки при соблюдении приведенных указаний
и рекомендаций могут привести к поражению
электрическим током, пожару, и/или вызвать тяжелые травмы. Сохраняйте все указания по тех-
нике безопасности и Руководства по эксплуатации в качестве справочного материала.
Использованное в настоящих инструкциях и
указаниях понятие «электроинструмент» распространяется на электроинструмент с питанием
от сети (со шнуром питания от электросети) и на
аккумуляторный электроинструмент (без шнуром
питания от электросети).
Прилагаемые иллюстрации находятся в начале
руководства по эксплуатации.
Символы
Предупреждение об общей опасности
Носить защиту органов слуха!
Используйте респиратор!
Работайте в защитных очках!
Соблюдайте руководство по эксплуатации/
инструкции!
77
ME
1 Применение по назначению
Данная шлифмашина предназначена для выполнения шлифовальных работ по дереву, пластмассе,
камню, композитам, лакокрасочным покрытиям,
шпаклевке и иным материалам с аналогичными
свойствами.
Нельзя обрабатывать металл и материал, содержащий асбест. Из за своих размеров, веса и мощности машинка особенно пригодна для обработки
небольших поверхностей, а также для работ над
головой.
По соображениям электрической безопасности
машина должна быть сухой, ее нельзя применять
во влажной среде. Машину можно применять
только для сухого шлифования.
Инструмент сконструирован для профес-
сионального применения.
За ущерб и несчастные случаи, связанные
с применением не по назначению, отвечает Пользователь.
2.2 Специфические правила техники безо-
пасности
Из за опасностей, которые могут возник-
нутц во время шлифования, необходимо
постоянно носитц защитные очки.
- Если во время шлифования образуется взры-
воопасная или самовоспламеняющаяся пылц,
то необходимо соблюдатц указания по обработке
изготовителя материала.
- Во время работы может образовываться вредная
для здоровья/токсичная пыль (напр. от свинецсодержащего покрытия, некоторых пород
дерева и металлов). Контакт с такой пылью или
ее вдыхание представляет собой опасность для
работающего данным инструментом или для
окружающих людей. Соблюдайте действующие
в Вашей стране правила техники безопасности.
Подсоединяйте электроинструмент к соответствующему устройству для удаления пыли.
ля защиты здоровья надевайте респира-
тор P2.
2.3 Данные по шуму и вибрации
Определенные в соответствии с EN 60745 типовые
значения:
Уровень шума 70 дБ(A)
3вуковая мощность 81 дБ(A)
Допуск на погрешность измерения K = 3 дБ
Носить защиту органов слуха!
Общий коэффициент колебаний (сумма векторов
трех направлений) рассчитывается в соответствии
с EN 60745:
Коэффициент эмиссии колебаний (3-осный)
a
= 4,5 м/с²
h
Погрешность K = 2,0 м/с²
Указанные значения уровня шума/вибрации измерены в соответствии с условиями испытаний по EN
60745 и служат для сравнения инструментов. Эти
значения можно также использовать для пред-
38
Page 39

варительной оценки шумовой и вибрационной
нагрузки во время работы. Указанные значения
уровня шума/вибрации отображают основные
области применения электроинструмента. При
использовании электроинструмента в других
целях, с другими сменными (рабочими) инструментами или в случае их неудовлетворительного
обслуживания, шумовая и вибрационная нагрузки могут значительно возрастать на протяжении
всего срока эксплуатации. Для точной оценки
нагрузок в течение указанного срока эксплуатации необходимо также соблюдать приводимые в
настоящем руководстве значения времени работы
на холостом ходу и времени простоя. Это поможет
значительно уменьшить нагрузку в течение всего
срока эксплуатации электроинструмента.
3 Электрическое подключение и ввод в
эксплуатацию
Напряжение в сети должно соответство-
вать значениям, указанным на заводской
табличке машины.
Перед присоединением или отсоедине-
нием сетевого кабеля всегда выключайте
машину!
Соединение и отсое-динение линии сетевого
питания см. рис. 3.
Выключатель (1.1) служит для включения/выключения (I = Вкл./0 = Выкл.).
4 Электронная часть
Шлифовальная машинка ETS 125 EQ
имеет электронное регулирование, при
помощи которого можно бесступенча-
то варьировать скорость вращения. В
результате этого скорость шлифования
можно оптимально подогнать к соответ-
ствующему материалу (см. пункт 6).
Скоростц вращения устанавливается на маховичке (2.1).
5 Настройка машины
Перед началом любой работы с машиной
всегда вынимайте штепсель из розетки!
5.1 Отсасывание пыли
Всегда подключайте машину к вытяжке.
Отсасывание пыли препятствует загряз-
нению рабочей атмосферы и загрязнению
на рабочем месте.
Возникающая при работе пыль отсасывается
через вытяжные каналы в шлифподошве непосредственно на месте шлифования.
a) Самоотсасывание
Машинки серийно снабжены устройством для
самоотсасывания. Пыль, возникшая при шлифовании, отсасывается через вытяжные отверстия в
контактном башмаке (1.8) и улавливается в турбо-
фильтре (1.5). Если турбофильтр наполнен шлифовальной пылью до такой степени, что мощность отсасывания ослабится, то его необходимо заменить.
Монтаж турбофильтра
- Переднюю часть картона турбофильтра с уплотнительной фаской (2.3) надеть на аспирационный патрубок (2.2) держателя фильтра
- заднюю часть картона с шлицем (2.4) вставить в
стопорный рубчик (2.5) держателя фильтра
- держатель фильтра через отверстие (1.3) вставить до упора на аспирационный патрубок (1.2)
машинки и закрепить вращающейся ручкой (1.4).
b) Отсасывание извне при помощи отсасы-
вающего приспособления
Во избежание частой замены турбофильтра при
длительных шлифовальных работах можно вместо устройства для самоотсасывания подключить
Festool отсасывающее приспособление. для этого
необходимо вставить отсасывающий шланг (Ø
27 мм (1.6)) отсасывающего приспособления на
аспирационный патрубок (1.2).
5.2 Закрепление шлифовального материала
Используйте только оригинальный Festool
шлифовальный материал.
На шлифовальные подошвы с системой крепления Stickfi x („липучка“) устанавливаются соответствующие абразивные листы из бумаги или
нетканого материала. Просто прижмите (1.7) такой
абразивный лист к шлифовальной подошве (1.8),
а после использования снимите его.
6 Производственные указания
Не перегружайте машинку путём слишком сильного нажима. Ëучший результат шлифования
достига-ется при умеренно сильном нажатии.
Производите-льность и качество шлифования во
многом зависят от выбора подходящего шлифовального материала. Для машинок с электроникой
мы рекомендуем следующую установку на маховичке (2.1):
Ступень на маховичке
- Жлифовальные работы
5 - 6
- шлифование с макс. приводом
- сошлифовывание старых красок
- шлифование дерева или фанеры перед лакиро-
ванием
- промежуточное шлифование лака на поверх-
ностях
4 - 5
- шлифование тонко нанесенного лака первого
покрытия
- шлифование дерева шлифовальным ваточным
холстом
- снятие фасок на деталях из дерева
- полирование грунтованых деревянных поверх-
ностей
39
Page 40

3 - 4
- шлифование кромок цельной древесины и фанеры
- шлифование пазов в дверях и окнах
- промежуточное шлифование лака на кромках
- подшлифовка окон из натурального дерева шлифовальным ваточным холстом
- полирование деревянных поверхностей перед
бейцеванием шлифовальным ваточным холстом
- затирание протравленных поверхностей шлифовальным ваточным холстом
- затирание или снятие излишней известковой пасты шлифовальным ваточным холстом
2 - 3
- промежуточное шлифование лака на протравленных поверхностях
- очистка пазов на окнах из натурального дерева
шлифовальным ваточным холстом
1 - 2
- шлифование протравленных кромок
- шлифование термопластичных синтетических
материалов
7 Принадлежности
Для собственной безопасности используй-
те только оригинальные приспособления
и запасные части фирмы Festool.
Для любого варианта применения Festool предлагает подходящую оснастку, а также полировальный
и шлифовальный материал. Номера заказа для
принадлежностей и инструментов Вы найдете в
каталоге Festool или в Интернет по адресу „www.
festool.com“.
8 Обслуживание и уход
Перед началом любой работы с машиной
всегда вынимайте штепсель из розетки!
Все работы по обслуживанию и ремонту,
которые требует открывания корпуса
двигателя, могут производиться только
авторизованной мастерской сервисной
службы.
Для обеспечения циркуляции воздуха отверстия
для охлаждения в корпусе двигателя всегда должны быть открытыми и чистыми.
Прибор оснащён специальным углём для автоматического отключения. Когда он изнашивается,
происходит автома-тическое отключение тока, и
прибор прекращает работать.
Тормоз на контактном башмаке
для предотвращения безконтрольного набирания
оборотов контактного башмака, он притормаживается при помощи манжеты (2.6). Так как манжета
в течение времени изнашивается, её необходимо
при ослаблении тормозного действия заменить
новой (489190).
9 Утилизация
Не выбрасывайте электроинструменты вместе с
бытовыми отходами! Обеспечьте безопасную для
окружающей среды утилизацию инструмента,
оснастки и упаковки. Соблюдайте действующие
национальные инструкции.
Только для ЕС: согласно Европейской директиве
2002/96/EG отслужившие свой срок электроинструменты должны утилизироваться отдельно и
направляться на экологичную утилизацию.
10 Гарантия
Для наших приборов мы предоставляем гарантию,
распространяющуюся на дефекты материала и
производства, согласно законодательным предписаниям, действующим в конкретной стране. Минимальный срок действия гарантии 12 месяцев.
Для стран-участниц ЕС срок действия гарантии
составляет 24 месяца (при предъявлении чека
или накладной). Гарантия не распространяется
на повреждения, полученные в результате естественного износа/использования, перегрузки,
ненадлежащего использования, повреждения по
вине пользователя или при использовании вопреки Руководству по эксплуатации, либо известные
на момент покупки (уценка товара). Исключается
также ущерб, вызванный использованием неоригинальной оснастки и расходных материалов
(например, шлифовальных тарелок). Претензии
принимаются только в том случае, если прибор
доставлен к поставщику или авторизованный
сервисный центр фирмы Festool в неразобранном
виде. Сохраняйте Руководство по эксплуатации,
инструкции по технике безопасности и товарный
чек. В остальном действовать согласно соответствующим условиям предоставления гарантии
изготовителя.
Примечание : В связи с постоянными исследованиями и новыми техническими разработками
фирма оставляет за собой право на внесение изменений в технические характеристики.
REACh для изделий Festool, их оснастки и расходных материалов
С 2007 года директива REACh является регламентом по химическим веществам, действующим на
территории всей Европы. Выступая в роли «привлекаемого участника» этого регламента, мы,
как производители изделий, принимаем на себя
обязательство предоставлять соответствующую
информацию нашим клиентам. Чтобы держать
вас в курсе последних событий и предоставлять
информацию о веществах, которые включены в
список вышеупомянутого регламента и которые
могут использоваться в наших изделиях, мы создали специальный веб-сайт: www.festool.com/
reach
40
Page 41

Excentrická bruska
Technické
údaje
Výkon
Otácky 14.000 min
Pracovní
zdvih
Brusný
zdvih
ETS 125 Q ETS 125 EQ
200 W
5.000 -
-1
14.000 min
10.000 -
28.000 min
-1
28.000 min
2,0 mm
-1
-1
Brusný talíř Průměr 125 mm
Hmotnost
Třída
ochrany
1,1 kg (bez kabelu)
/ II
Uváděné obrázky jsou umístěny na začátku návodu k obsluze.
Symboly
Varování před všeobecným nebezpe-
čím
Nosit ochranu sluchu!
Používejte respirátor!
Noste ochranné brýle!
Přečtěte si návod/pokyny!
2 Bezpečnostní pokyny
2.1 Všeobecné bezpečnostní předpisy
POZOR! Čtěte všechna bezpečnostní upozornění a pokyny. Zanedbání níže uvede-
ných výstrah a nedodržování příslušných pokynů
mohou způsobit zkrat, požár, event. těžký úraz
elektrickým proudem.
Všechny bezpečnostní pokyny anávody uschovejte, abyste je mohli použít iv budoucnosti.
Ve varovných upozorněních použitý pojem „elektronářadí“ se vztahuje na elektronářadí provozované
na el. síti (se síťovým kabelem) a na elektronářadí
provozované na akumulátoru (bez síťového kabelu).
2.2 Bezpečnostní pokyny specifické pro
stroj
Kvůli nebezpečím, která se vyskytují bě-
hem broušení noste vždy ochranné brýle.
- Vznikají-li při broušení explozivní anebo samo-
vznětitelné prachy, je třeba bezpod-mínečně
dbát pokynů ke zpracování látek výrobce.
- Při práci může vznikat škodlivý či jedovatý prach
(např. nátěry s obsahem olova, některé druhy
dřeva a kovy). Dotyk nebo nadýchání se tohoto
prachu může pro osoby pracující se strojem
nebo osoby nacházející se v blízkosti představovat ohrožení. Dodržujte bezpečnostní předpisy
platné ve Vaší zemi. Připojte elektrický přístroj
k vhodnému odsávacímu zařízení.
K ochraně Vašeho zdraví používejte
ochrannou dýchací masku P2.
1 Používání k určenému účelu
Nářadí je určené k broušení dřeva, umělých hmot,
kamene, sendvičových materiálů, barev/laků,
tmelů a podobných materiálů.
Kov a materiál obsahující azbest nesmí být obráběný.
Na základě jeho velikosti, jeho váhy a jeho výkonu
je tento přístroj vhodný pro obrábění malých ploch,
jakož i pro práce nad hlavou.
Kvůli bezpečnosti nesmí při manipulaci s elektrickým proudem proniknout do stroje vlhkost - nesmí
se s ním pracovat ve vlhkém prostředí. Stroj se
smí používat pouze k broušení za sucha.
Za škody a úrazy, které vznikly používáním
k jiným účelům, než ke kterým je stroj
určen, ručí uživatel.
2.3 Informace o hlučnosti a vibracích
Hodnoty zjištěné podle normy EN 60745 dosahují
následujících hodnot:
Hladina akustického tlaku 70 dB(A)
Hladina akustického výkonu 81 dB(A)
Přídavná hodnota nespolehlivosti měření
K = 3 dB
Nosit ochranu sluchu!
Celkové hodnoty vibrací (součet vektorů ve třech
směrech) zjištěné podle EN 60745:
Hodnota vibrací (3 osy) ah = 4,5 m/s
Nepřesnost K = 2,0 m/s
2
2
Uvedené hodnoty vibrací ahlučnosti byly změřeny podle zkušebních podmínek uvedených vEN
60745 aslouží pro porovnání nářadí. Jsou vhodné
také pro předběžné posouzení zatížení vibracemi
ahlukem při použití nářadí. Uvedené hodnoty
vibrací ahlučnosti se vztahují khlavnímu použití
elektrického nářadí. Při jiném použití elektrického
41
Page 42

nářadí, sjinými nástroji nebo při nedostatečné
údržbě se zatížení vibracemi ahlukem může během celé pracovní doby výrazně zvýšit. Pro přesné
posouzení během předem stanovené pracovní
doby je nutné zohlednit také dobu chodu nářadí
na volnoběh avypnutí nářadí vrámci této doby.
Tím se může zatížení během celé pracovní doby
výrazně snížit.
3 Elektrické připojení a uvedení do provo-
zu
Síťové napětí musí souhlasit s údaji na
výkonovém štítku.
Před zapojením do sítě nebo vytažením ze
sítě strojek vždy vypněte!
Připojení a odpojení přípojného vedení viz obr. 3.
Spínač (1.1) slouží jako vypínač (I = zapnuto/0 =
vypnuto).
4 Elektronika
Bruska typu ETS 125 EQ vlastní elek-
tronickou regulaci, pomocí které se dá
plynule nastavit počet otáček. Tímto se dá
rychlost broušení optimálně přizpůsobit
právě obráběnému materiálu (viz bod
6).
Počet otáček se nastaví pomocí přepínacího kolečka (2.1).
5 Nastavení na pile
Před každou prací na stroji je nutné vždy
vytáhnout síťovou zástrčku ze zásuvky!
na žebrovou úchytku držáku fi ltru(2.5),
- držák fi ltru zastrčit až na doraz otvorem (1.3) na
odsávací nátrubek stroje(1.2) a otočným knofl íkem (1.4) pevně uchytit.
b) Vnější odsávání pomocí odsávacího pří-
stroje
Častým výměnám turbofi ltru u delšího broušení
se dá předejít tím způsobem, že se na místo vlastního odsávání připojí odsávací přístroj Festool. K
tomuto účelu se nastrčí odsávací hadice odsávacího přístroje (průměr 27 mm (1.6)) na odsávací
nátrubek (1.2).
5.2 Upevnění brusného prostředku
Používejte pouze originální brusné pro-
středky fi rmy Festool!
Na brusné desky Stickfi x lze upevňovat samoulpívající brusné prostředky, např. brusné papíry
Stickfi x a brusné pavučinky. Brusné prostředky
(1.7) se jednoduše přitlačí na brusnou desku (1.8)
a po použití se opět sejmou.
6 Pracovní pokyny
Nepřetěžujte stroj tím, že jej příliž silně přitlačíte!
Nejlepší výsledek docílíte, když pracujete s mírně
silným přítlakem.
Brusný výkon a kvalita závisí hlavně od správné
volby brusného prostředku.
Pro stroje s elektronikou doporučujeme následující nastavení přepínacího kolečka (2.1):
5.1 Odsávání prachu
Nářadí by mělo být trvale připojeno k
odsávacímu zařízení. Odsávání prachu
zabraňuje nadmírnému zatížení pracovního ovzduší prachem a většímu znečištění
pracovního místa.
Brusný prach je odsáván odsávacími kanálky v
brusné desce přímo na místě broušení.
a) Vlastní odsávání
Stroje jsou sériově vybavené vlastním odsáváním.
Brusný prach se odsává pomocí odsávacích otvorů
umístěných v brusné botě (1.8) a v turbofi ltru (1.5)
se zachycuje. Když je turbofi ltr natolik naplněný
brusným prachem, že jeho odsávací výkon není
dostačující, je ho třeba vyměnit.
Montáž turbofi ltru
- Přední kartónovou část turbofi ltru s těsnicí vlož-
kou (2.3) nasunout na odsávací nátrubek (2.2)
držáku fi ltru,
- zadní kartónovou část se štěrbinou (2.4) nasadit
Poloha přepínacího kolečka
- Brusné práce
5 - 6
- Broušení s max. pohonem
- Obroušení starých barev
- Broušení dřeva a dýhy před lakováním
- Plošné mezibroušení laku
4 - 5
- Broušení tence naneseného prvního laku
- Broušení dřeva pomocí brusné pavučinky
- Sražení hran na dřevových dílech
- Vyhlazení dřevěných ploch se základní barvou
3 - 4
- Broušení hran plného dřeva a dýhových hran
- Broušení v drážkách oken a dveří
- Mezibroušení laku na hranách
- Nábrus oken z přírodního dřeva pomocí brusné
pavučinky
- Vyhlazení dřevěné plochy před mořením pomocí
brusné pavučinky
- Otěr namořené plochy pomocí brusné pavučin-
42
Page 43

ky
- Otěr, anebo odstranění přebytečné vápenné
pasty pomocí brusné pavučinky
2 - 3
- Mezibroušení laku na namořených plochách
- Čištění drážek oken z přírodního dřeva pomocí
brusné pavučinky
1 - 2
- Broušení mořených hran
- Broušení termicko-plastických umělých hmot
7 Příslušenství
Pro zajištění vlastní bezpečnosti pou-
žívejte pouze originální příslušenství a
náhradní díly Festool.
Festool nabízí pro každé použití vhodné příslušenství, brousicí a lešticí prostředky. Evidenční čísla
objednání pro příslušenství a nástroje naleznete
ve Vašem katalogu Festool, nebo na internetu pod
“www.festool.com”.
8 Údržba a péče
Před každou prací na stroji je nutné vždy
vytáhnout síťovou zástrčku ze zásuvky!
Všechny úkony prováděné při údržbě a
opravách, které vyžadují otevření krytu
motoru, smí provádět pouze autorizovaná
servisní dílna.
Pro zajištění cirkulace vzduchu musí být pro zajištění cirkulace vzduchu neustále volné a čisté
chladicí otvory v krytu motoru.
Přístroj je vybaven samovypínacími specielními
uhlíky. Pokud se opotřebují, dojde k automatickému přerušení proudu a přístroj se zastaví.
Pouze EU: Podle evropské směrnice 2002/96/ES
musí být stará elektrická zařízení tříděna apředána
kekologické likvidaci.
10 Záruka
Pro naše přístroje poskytujeme záruku na materiální nebo výrobní vady podle zákonných ustanovení dané země, minimálně však 12 měsíců. Ve
státech Evropské unie je záruční doba 24 měsíců
(prokázání fakturou nebo dodacím listem). Škody
vyplývající z přirozeného opotřebení, přetěžování,
nesprávného zacházení, resp. škody zaviněné
uživatelem nebo způsobené použitím v rozporu
s návodem k obsluze, nebo škody, které byly při
nákupu známy, jsou ze záruky vyloučeny. Rovněž
jsou vyloučeny škody, které byly způsobeny použitím neoriginálního příslušenství a spotřebního
materiálu (např. brusné talíře).
Reklamace mohou být uznány pouze tehdy, pokud bude strojek v nerozebraném stavu zaslán
zpět dodavateli nebo autorizovanému servisnímu
středisku Festool. Dobře si uschovejte návod k
obsluze, bezpečnostní pokyny, seznam náhradních dílů a doklad o koupi. Jinak platí vždy dané
aktuální záruční podmínky výrobce.
Poznámka
Díky neustálému výzkumu a vývoji jsou změny zde
uváděných technických údajů vyhrazeny.
Brzda brusné boty
Aby se zabránilo nekontrolovatelnému rozjetí
brusné boty, dá se pomocí manžety (2.6) přibrzdit.
Jelikož se manžeta po určité době opotřebuje,
musí být při nedostatečném brzdném působení
vyměněna za novou (489190).
9 Likvidace
Nevyhazujte elektrická nářadí do domovního
odpadu! Nechte ekologicky zlikvidovat nářadí,
příslušenství aobaly! Dodržujte přitom platné
národní předpisy.
Adresa pro výrobky Festool, jejich příslušenství
aspotřební materiál
REACh je nařízení ochemických látkách, platné
od roku 2007 vcelé Evropě. Jako následný uživatel, tedy jako výrobce výrobků jsme si vědomi své
informační povinnosti vůči zákazníkům. Abychom
vás mohli vždy informovat onejnovějším vývoji
aomožných látkách ze seznamu látek vnašich
výrobcích, vytvořili jsme pro vás následující webovou stránku: www.festool.com/reach
43
Page 44

Szlifi erka mimośrodowa
Dane
techniczne
ETS 125 Q ETS 125 EQ
Moc 200 W
Predkosc obroto-
wa
Liczba suwów ro-
boczych
14.000 min
28.000 min
5.000 -
-1
14.000 min
10.000 -
-1
28.000 min
-1
-1
Suw szlifujący 2,0 mm
Talerze szlifi erskie Średnica 125 mm
Ciężar 1,1 kg (bez kabla)
Klasa ochronna
/ II
Wymienione ilustracje znajdują się na początku
instrukcji eksploatacji.
Symbole
Ostrzeżenie przed ogólnym zagroże-
niem
Stosować osobiste środki ochrony słu-
chu!
Należy stosować ochronę dróg oddecho-
wych!
Należy nosić okulary ochronne!
Instrukcja/przeczytać zalecenia!
Wszystkie zalecenia odnośnie bezpieczeństwa
pracy i instrukcje należy zachować do wykorzystania w przyszłości.
Użyte w poniższym tekście pojęcie „elektronarzędzie“ odnosi się do elektronarzędzi zasilanych energią elektryczną z sieci (z przewodem zasilającym) i
do elektronarzędzi zasilanych akumulatorami (bez
przewodu zasilającego).
2.2 Zalecenia bezpieczeństwa związane z
maszyną
Stosować zawsze okulary ochronne,
ponieważ podczas szlifowania występuje
niebezpieczeństwo wypadku.
- Jeśli podczas szlifowania powstają pyły wybu-
chowe lub samozapłonowe, należy koniecznie
przestrzegać wskazówek producenta obrabianego materiału dotyczące sposobu obróbki.
- W trakcie pracy mogą powstawać szkodliwe/
trujące pyły (np. zawierająca ołów powłoka
malarska, niektóre rodzaje drewna i metalu).
Stykanie się z tymi pyłami lub wdychanie tych
pyłów może stanowić niebezpieczeństwo dla osoby obsługującej maszynę lub osób znajdujących
się w pobliżu. Należy przestrzegać przepisów
bezpieczeństwa obowiązujących w danym kraju.
Elektronarzędzie należy podłączać do odpowiedniego urządzenia odsysającego.
Dla ochrony zdrowia należy nosić maskę
przeciwpyłową P2.
1 Zastosowanie zgodne z przeznaczeniem
Zgodnie z przeznaczeniem urządzenie służy do
szlifowania drewna, tworzywa sztucznego, kamienia, materiałów kompozytowych, farby/lakierów,
masy szpachlowej i temu podobnych materiałów.
Nie wolno obrabiać metali i materiałów zawierających azbest.
Z powodu swojej wielkości, masy i mocy, maszyna
przeznaczona jest szczególnie do obróbki małych
powierzchni, jak również do pracy nad głową.
Z uwagi na bezpieczeństwo instalacji elektrycznych
maszyna nie może być zawilgocona, ani eksploatowana w wilgotnym otoczeniu. Maszyna może być
stosowana wyłącznie do szlifowania na sucho.
Odpowiedzialność za szkody i wypadki po-
wstałe na skutek użytkowania niezgodnego z przeznaczeniem ponosi użytkownik.
2 Uwagi dotyczące bezpieczeństwa
2.1 Ogólne przepisy bezpieczeństwa
UWAGA! Należy przeczytać wszystkie zalecenia bezpieczeństwa i instrukcje. Nieprze-
strzeganie następujących ostrzeżeń i instrukcji
może stać się przyczyną porażenia prądem elektrycznym, pożaru i/lub ciężkiego obrażenia ciała.
2.3 Informacja odnośnie emisji hałasu i wibracji
W typowym przypadku wartości ustalone zgodnie
z normą EN 60745 wynoszą:
Poziom ciśnienia akustycznego 70 dB(A)
Poziom całkowitego ciśnienia
akustycznego 81 dB(A)
Plus różnica w dokładności pomiaru K = 3 dB
Stosować osobiste środki ochrony słu-
chu!
Wartość całkowita wibracji (suma wektorowa w
trzech kierunkach) ustalona zgodnie z normą EN
60745:
Wartość emisji wibracji
(3-osiowo) a
= 4,5 m/s
h
Nieoznaczoność K = 2,0 m/s
2
2
Podane parametry emisji (wibracja, hałas) zostały
pomierzone zgodnie z warunkami pomiarowymi
określonymi w normie EN 60745 i służą do porównywania urządzeń. Nadają się one również do
tymczasowej oceny obciążenia wibracjami i hałasem
podczas użytkowania. Podane parametry emisji
dotyczą głównych zastosowań elektronarzędzia.
Jeśli jednak narzędzie elektryczne zostanie użyte do innych zastosowań, z innymi narzędziami
44
Page 45

mocowanymi lub nieodpowiednio konserwowane,
może to znacznie zwiększyć obciążenie wibracjami
i hałasem całej czasoprzestrzeni roboczej. W celu
dokładnej oceny dla danej czasoprzestrzeni roboczej trzeba uwzględnić również zawarte w niej czasy
biegu jałowego i czasy przestoju urządzenia. Może
to znacznie zmniejszyć obciążenie w całym okresie
czasu pracy.
3 Podłączenie do instalacji elektrycznej i
rozruch
Napięcie sieciowe musi być zgodne z
danymi zamieszczonymi na tabliczce znamionowej.
Przed podłączeniem lub odłączeniem od
przewodu sieciowego maszynę zawsze
wyłączyć!
Podłączanie i odłączanie elektrycznego przewodu
zasilającego patrz rysunek 3.
Włącznik (1.1) służy do załączania i wyłączania
urządzenia (I = zał./0 = wył.).
4 Układ elektroniczny
Szlifi erka ETS 125 EQ wyposażona jest
w elektroniczny system regulacji, który
pozwala na bezstopniową regulację liczby
obrotów. Dzięki temu prędkość szlifowania
można optymalnie dopasować do obrabia-
nego materiału (patrz rozdział 6).
Liczbę obrotów nastawia się za pomocą kółka
nastawnego (2.1).
5 Ustawienia w maszynie
Przed przystąpieniem do wykonywania
jakichkolwiek prac przy maszynie należy
zawsze wyciągać wtyczkę z gniazda!
5.1 Pochłanianie pyłu
Maszynę należy zawsze podłączać do
odkurzacza. Pochłanianie pyłu zapobiega
obciążeniu powietrza pyłem i zmniejsza
zanieczyszczenie na stanowisku pracy.
Pył ze szlifowania jest zasysany kanałami w stopie
szlifi erskiej bezpośrednio w miejscu jego powstawania.
a) Własny system pochłaniania pyłu
Maszyny wyposażone są seryjnie we własny system pochłaniania pyłu. Pył powstający podczas
szlifowania odsysany jest poprzez otwory w tarczy
szlifi erskiej (1.8) i zatrzymywany w fi ltrze turbo
(1.5). Jeśli fi ltr turbo napełniony jest tak pyłem, że
siła ssąca spada, należy wymienić fi ltr.
Montaż fi ltra turbo
- Przednią część tektury fi ltra turbo z kołnierzem
uszczelniającym (2.3) nasunąć na króciec zasysający (2.2) uchwytu fi ltra,
- tylną część kartonu z nacięciem (2.4) nasadzić
na żebro chwytające (2.5) uchwytu fi ltra,
- uchwyt fi ltra z otworem (1.3) nasadzić aż do oporu
na króciec zasysający (1.2) maszyny i zamocować
za pomocą pokrętła (1.4).
b) Zewnętrzny pochłaniacz pyłu
W celu umożliwienia prowadzenia prac szlifi erskich dłuższy czas bez częstej wymiany fi ltra turbo,
można przyłączyć do urządzenia pochłaniacz pyłu
fi rmy Festool, który zastąpi działanie własnego
systemu pochłaniania pyłu. Wąż ssący (Ø 27 mm
(1.6)) pochłaniacza pyłu należy nałożyć na króciec
odsysający (1.2).
5.2 Mocowanie materiału szlifi erskiego
Stosować tylko oryginalne materiały szli-
fi erskie fi rmy Festool!
Do stóp szlifi erskich Stickfi x można mocować samoprzyczepne materiały ścierne, jak np. papiery
ścierne Stickfi x i okładziny ścierne z włókniny. Materiały ścierny (1.7) są po prostu dociskane do stopy
szlifi erskiej (1.8) i po użyciu ponownie ściągane.
6 Wskazówki obsługi
Nie przeciążać maszyny poprzez zbyt duży nacisk
podczas pracy!
Najlepszy wynik osiąga się pracując z równomierną
siłą nacisku.
Wydajność i jakość pracy zależna jest w zasadzie
od doboru właściwego matariału szlifi erskiego.
Dla maszyn wyposażonych w system elektroniczny zaleca się następujące nastawienia kóka
nastawnego (2.1):
Stopnie na kółku
- Rodzaj szlifowania
5 - 6
- Szlifowanie z maksymalnym napędem
- Zdzieranie starych farb
- Szlifowanie drewna i forniru przed lakierowa-
niem
- Szlifowanie pośrednich warstw lakieru na po-
wierzchniach
4 - 5
- Szlifowanie cienkich warstw farby podkładowej
- Szlifowanie drewna przy użyciu włókna szlifi er-
skiego
- ścieranie krawędzi na częściach drewnianych
- Gładzenie zagruntowanych powierzchni drew-
nianych
3 - 4
- Szlifowanie krawędzi drewnianych i fornirowa-
nych
- Szlifowanie wręgów na oknach i drzwiach
- Szlifowanie pośrednich warstw lakieru na kra-
wędziach
- Szlifowanie okien z drewna naturalnego przy
użyciu włókniny
45
Page 46

- Gładzenie powierzchni drewnianych przed bejcowaniem przy użyciu włókniny
- Zdzieranie bejcowanych powierzchni przy użyciu
włókniny
- Zdzieranie lub zdejmowanie nadmiaru pasty
wapiennej przy użyciu włókniny
2 - 3
- Szlifowanie pośrednich warstw lakieru na bejcowanych powierzchniach
- Czyszczenie wręgów na oknach z drewna naturalnego przy użyciu włókniny
1 - 2
- Szlifowanie bejcowanych krawędzi
- Szlifowanie termoplastycznego tworzywa sztucznego
7 Wyposażenie
Dla własnego bezpieczeństwa należy sto-
sować wyłącznie oryginalne wyposażenie
i części zamienne fi rmy Festool.
Firma Festool oferuje do każdego rodzaju pracy
odpowiednie wyposażenie, materiały ścierne i
środki polerskie. Numery do zamówienia wyposażenia i narzędzi znajdziecie Państwo w katalogu Festool lub w internecie pod adresem “www.
festool.com”.
8 Przegląd, konserwacja i czyszczenie
Przed przystąpieniem do wykonywania
jakichkolwiek prac przy maszynie należy
zawsze wyciągać wtyczkę z gniazda!
Wszystkie prace konserwacyjne i napraw-
cze, które wymagają otwarcia obudowy
silnika, mogą być wykonywane wyłącznie
przez upoważniony warsztat serwisowy.
Dla zapewnienia cyrkulacji powietrza, otwory wentylacyjne w obudowie silnika muszą być zawsze
odsłonięte i czyste.
Urządzenie jest wyposażone w specjalne węgle
samoczynnie wyłączające. Jeżeli są one zużyte,
następuje samoczynne odłączenie prądu i maszyna
zatrzymuje się.
Hamulec tarczy szlifi erskiej
Tarcza szlifierska hamowana jest za pomocą
kołnierza (2.6), co uniemożliwia niekontrolowany
rozbieg tarczy. Ponieważ kołnierz zużywa się i z
czasem jego działanie hamujące spada, należy go
wymienić na nowy (489190).
9 Usuwanie
Nie wolno wyrzucać narzędzi elektrycznych wraz
z odpadami domowymi! Urządzenia, wyposażenie
i opakowania należy przekazać zgodnie z przepi-
sami o ochronie środowiska do odzysku surowców
wtórnych. Należy przy tym przestrzegać obowiązujących przepisów państwowych.
Tylko UE: Zgodnie z europejską Wytyczną 2002/96/
EG zużyte narzędzia elektryczne trzeba gromadzić osobno i odprowadzać do odzysku surowców
wtórnych zgodnie z przepisami o ochronie środowiska.
10 Gwarancja
Na urządzenia produkcji naszej fi rmy udzielamy
gwarancji z tytułu wad materiałowych i produkcyjnych zgodnie z przepisami ustawowymi danego kraju
jednakże, co najmniej 12 miesięcy. Na terenie Stanów
Zjednoczonych i Unii Europejskiej, okres gwarancyjny
wynosi 24 miesiące (dowód w postaci rachunku lub
dowodu dostawy). Uszkodzenia, których przyczyną
jest naturalne zużycie / starcie, przeciążenie, nieprawidłowa eksploatacja względnie uszkodzenia, za
które winę ponosi użytkownik lub powstałe w wyniku
użycia niezgodnego z opisem w instrukcji eksploatacji
względnie, które znane były w momencie zakupu, są
wyłączone z roszczeń gwarancyjnych. Nie są również
uwzględniane szkody, powstałe w wyniku stosowania
nieoryginalnego wyposażenia i materiałów użytkowych (np. talerze szlifi erskie). Reklamacje mogą
zostać uznane wyłącznie wtedy, jeśli urządzenie
zostanie odesłane w stanie nierozłożonym do dostawcy lub jednego z autoryzowanych warsztatów
serwisowych fi rmy Festool. Instrukcję eksploatacji,
zalecenia odnośnie bezpieczeństwa pracy, listę części
zamiennych oraz dowód zakupu należy przechowywać w miejscu dobrze zabezpieczonym. Ponadto obowiązują aktualne warunki gwarancyjne producenta.
Uwaga : Ze względu na stały postęp prac eksperymentalnych i rozwojowych zastrzega się możliwość
zmiany zamieszczonych danych technicznych.
Rozporządzenie REACh dla produktów firmy
Festool, ich wyposażenia i materiałów eksploatacyjnych
REACh jest to rozporządzenie o substancjach
chemicznych, które obowiązuje w całej Europie od
2007 r. Firma nasza, jako „użytkownik końcowy“,
a zatem jako producent wyrobów jest świadoma
obowiązku informowania naszych klientów. W
celu dostarczania naszym klientom najnowszych
informacji oraz informowania o możliwych substancjach z listy kandydatów w wyrobach naszej
fi rmy, utworzyliśmy następującą stronę internetową: www.festool.com/reach
46
 Loading...