

Ferroli PEGASUS F2 51, PEGASUS F2 68, PEGASUS F2 85, PEGASUS F2 102 Instructions For Use, Installation And Maintenance
Page 1
INSTALLATION ANDINSTALLATION AND
INSTALLATION AND
INSTALLATION ANDINSTALLATION AND
MAINTENANCE INSTRUCTIONSMAINTENANCE INSTRUCTIONS
MAINTENANCE INSTRUCTIONS
MAINTENANCE INSTRUCTIONSMAINTENANCE INSTRUCTIONS
PEGASUS F2PEGASUS F2
PEGASUS F2
PEGASUS F2PEGASUS F2
Appr. nr. A 9503 A - 0085 AQ 0765
GAS-FIRED CAST-IRON BOILERSGAS-FIRED CAST-IRON BOILERS
GAS-FIRED CAST-IRON BOILERS
GAS-FIRED CAST-IRON BOILERSGAS-FIRED CAST-IRON BOILERS
WITH ELECTRONIC IGNITIONWITH ELECTRONIC IGNITION
WITH ELECTRONIC IGNITION
WITH ELECTRONIC IGNITIONWITH ELECTRONIC IGNITION
AND FLAME RECTIFICATION MONITORINGAND FLAME RECTIFICATION MONITORING
AND FLAME RECTIFICATION MONITORING
AND FLAME RECTIFICATION MONITORINGAND FLAME RECTIFICATION MONITORING
Models 51 - 68 - 85 - 102Models 51 - 68 - 85 - 102
Models 51 - 68 - 85 - 102
Models 51 - 68 - 85 - 102Models 51 - 68 - 85 - 102
cod. 3543463/0 - 01/01
Page 2

ContentsContents
Contents
ContentsContents
1.1.
1. General technical data .............................................................................................................. 3
1.1.
2.2.
2. Dimensions and technical data ................................................................................................. 3
2.2.
3.3.
3. Boiler installation ...................................................................................................................... 7
3.3.
4.4.
4. Wiring and connection diagrams...............................................................................................8
4.4.
5.5.
5. Startup and shutdown ............................................................................................................. 13
5.5.
6.6.
6. Regulating ............................................................................................................................... 15
6.6.
7.7.
7. Fuel conversion (from natural to l.p.g. Gas) ............................................................................. 19
7.7.
8.8.
8. Maintenance and cleaning ...................................................................................................... 20
8.8.
9.9.
9. Fault finding ............................................................................................................................ 21
9.9.
Pegasus F2Pegasus F2
Pegasus F2
Pegasus F2Pegasus F2
2
Page 3
1. GENERAL TECHNICAL DATA1. GENERAL TECHNICAL DATA
1. GENERAL TECHNICAL DATA
1. GENERAL TECHNICAL DATA1. GENERAL TECHNICAL DATA
1.011.01
IntroductionIntroduction
1.01
Introduction
1.011.01
IntroductionIntroduction
Pegasus F2Pegasus F2
The
Pegasus F2, with CE approval, is designed for use with natural gas (G20) or LPG (G31) for indirect
Pegasus F2Pegasus F2
central heating and hot water.
1.021.02
Installation requirementsInstallation requirements
1.02
Installation requirements
1.021.02
Installation requirementsInstallation requirements
Only CORGI registered installers should fit the Pegasus boilers.
The boiler installation should comply with relevant British Standards Specifications, codes of practice,
and Current Building Regulations, together with any special Regional Requirements of the Local
Authorities, gas supplier and Insurance Companies.
2. DIMENSIONS AND TECHNICAL DATA2. DIMENSIONS AND TECHNICAL DATA
2. DIMENSIONS AND TECHNICAL DATA
2. DIMENSIONS AND TECHNICAL DATA2. DIMENSIONS AND TECHNICAL DATA
2.012.01
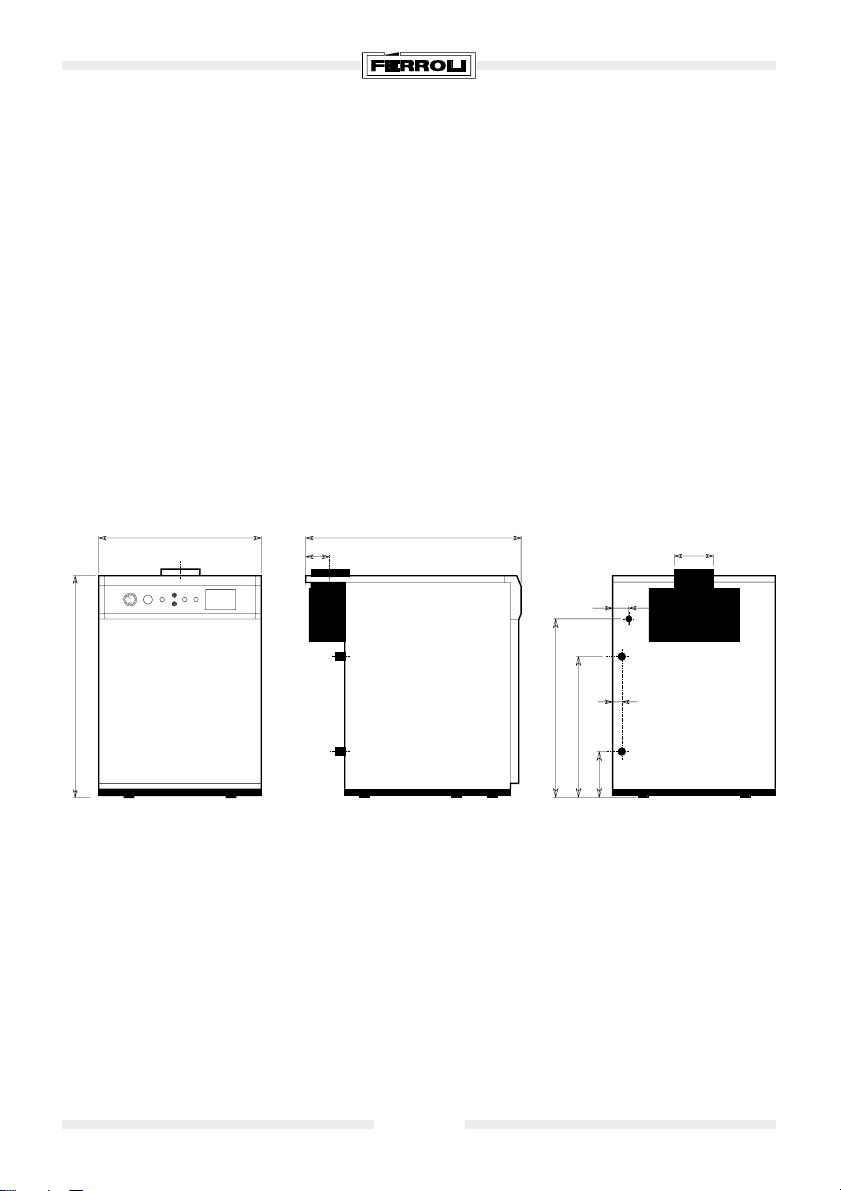
Dimensional data (see fig. 1 and table 2)Dimensional data (see fig. 1 and table 2)
2.01
Dimensional data (see fig. 1 and table 2)
2.012.01
Dimensional data (see fig. 1 and table 2)Dimensional data (see fig. 1 and table 2)
A
1000
a1a1
a1 - Return 1" 1/2
a1a1
a2a2
a2 - flow 1" 1/2
a2a2
a3a3
a3 - Gas inlet 3/4"
a3a3
B
900
D
762
672
222
C
a3
a2
E
a1
Fig. 1
Pegasus F2Pegasus F2
Pegasus F2
Pegasus F2Pegasus F2
3
Page 4

2.022.02
Technical dataTechnical data
2.02
Technical data
2.022.02
Technical dataTechnical data
The standard cast-iron
PEGASUS F2PEGASUS F2
PEGASUS F2 boiler is set to operate on natural gas (G20).
PEGASUS F2PEGASUS F2
The boiler is designed to operate with a flow temperature of 82°C and a maximum ∆t of 20°C.
Pegasus F2 51
Pegasus F2 68
Table 1
Pegasus F2 85
Pegasus F2 102
Pegasus F2 51
Pegasus F2 68
Table 2
Pegasus F2 85
Pegasus F2 102
Pegasus F2 51
Pegasus F2 68
Table 3
Pegasus F2 85
Pegasus F2 102
MODEL
MODEL
MODEL
A
mm
550
640
720
800
No.
OF MAIN
BURNERS
3
4
5
6
C
2,15
2,15
2,15
2,15
HEAT
OUTPUT
D
mm
43
46
44
42
INJECTORS
Nat. G20
0,4
0,4
0,4
0,4
kW
102
51
68
85
PILOT
Ø mm
mm
E
35
38
36
34
RETURN
G.P.L. G31
0,24
0,24
0,24
0,24
NUMBER OF
SECTIONS
4
5
6
7
DIMENSIONS CONNECTIONS
B
mm
Ø mm
96,5
180
96,5
180
106,5
200
106,5
200
PRINCIPALES
INJECTORS
Ø mm
G.P.L. G31
Nat. G20
3,5
3,5
3,5
3,5
a1 Ø
1 1/2"
1 1/2"
1 1/2"
1 1/2"
FLOW
a2 Ø
1 1/2"
1 1/2"
1 1/2"
1 1/2"
GAS SUPPLY
PRESSURE
(mbars)
Nat. G20
15 to 23
15 to 23
15 to 23
15 to 23
HEAT INPUT
(NETT)
kW
56
74,8
93,5
112
GAS
a3 Ø
3/4"
3/4"
3/4"
3/4"
LPG G31
37
37
37
37
WEIGHT
INCLUDING
PACKAGE
GAS PRESS. AT
BURNER MANIFOLD
Nat. G20
13,3
13,3
13,3
13,3
CONTENT
Kg.
260
300
350
400
(mbars)
LPG G31
36
36
36
36
HEAT INPUT
(GROSS)
kW
62,2
83
103,8
124,3
WATER
(liter)
22
26
30
34
GAS FLOW RATE
Nat. G20
m
5,9
7,9
9,9
11,8
MAX
OPERATING
PRESSURE
(bars)
3
/h
4
4
4
4
LPG G31
kg/h
4,34
5,79
7,24
8,68
Pegasus F2Pegasus F2
Pegasus F2
Pegasus F2Pegasus F2
4
Page 5

2.032.03
Main componentsMain components
2.03
Main components
2.032.03
Main componentsMain components
816
75
14
1 2
4
6 3
10
15
11
13
Front view of the boiler without front casing Front view of the boiler without front casing
Front view of the boiler without front casing
Front view of the boiler without front casing Front view of the boiler without front casing
Fig. 2a
5
9
12
KeyKey
Key
KeyKey
11
1 Temperature-pressure gauge
11
22
2 Boiler control thermostat
22
33
3 Ignition lockout re-set botton
33
44
4 Boiler on/off switch
44
55
5 Flue gas safety thermostat
55
66
6 Limit thermostat reset botton
66
77
7 Ignition PCB
77
88
8 Electronic panel (not available UK)
88
6
4
2
1
Control panel Control panel
Control panel
Control panel Control panel
Fig. 2b
99
9 Control panel
99
1010
10 Gas valve
1010
1111
11 Pilot burner assembly
1111
1212
12 Gas burner manifold
1212
1313
13 Gas pressure test point
1313
1414
14 Automatic air vent
1414
1515
15 Drain cock
1515
1616
16 Flue gas sampling point
1616
Pegasus F2Pegasus F2
Pegasus F2
Pegasus F2Pegasus F2
9
8
7
3
5
Page 6
2.042.04
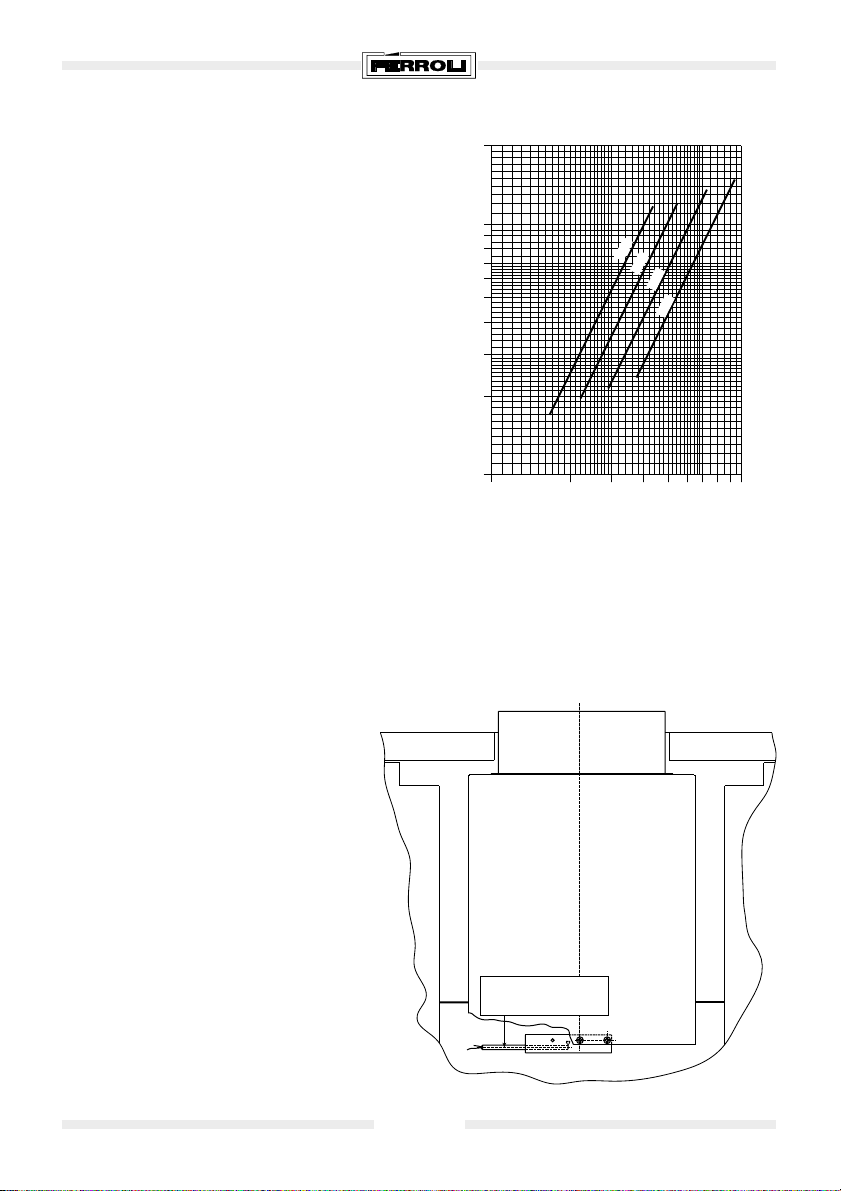
Characteristic pressure drop curveCharacteristic pressure drop curve
2.04
Characteristic pressure drop curve
2.042.04
Characteristic pressure drop curveCharacteristic pressure drop curve
Water pressure drop in all models is shown in fig.
3. The following diagram shows the pressure drop
in the boiler as a function of the water flow rate.
∆P mbar
200
100
90
80
70
60
50
40
30
20
4 EL.
5 EL.
6 EL.
7 EL.
Fig. 3
2.052.05
Safe discharge of combustion productsSafe discharge of combustion products
2.05
Safe discharge of combustion products
2.052.05
Safe discharge of combustion productsSafe discharge of combustion products
10
12345678910
Flow rate
The boiler comes with a FLUE GAS SAFETY THERMOSTAT, which provides a high level of safety and
control over the discharge of combustion products. This thermostat cuts off the supply of gas to the
burner in the event of a faulty flue draft.
If the FLUE GAS SAFETY THERMOSTAT has been activated, you should unscrew the protection cover
(part no. 5 in fig. 2a and 2b) and manually
“reset” the thermostat. After that, the boiler
will return to normal operation.
Boiler rear viewBoiler rear view
Boiler rear view
Boiler rear viewBoiler rear view
If the FLUE GAS SAFETY THERMOSTAT
needs to be replaced, use original
manufacturer’s parts only and make sure
the electric connections and positioning of
the bulb (see fig. 4) are correct; NEVER
UNDER ANY CIRCUMSTANCES LEAVE
THE FLUE GAS SAFETY THERMOSTAT
DISCONNECTED FROM THE ELECTRIC
CIRCUIT.
In case of frequent tripping of the thermostatic switch, contact qualified personnel
only.
During cleaning of the draft diverter, be
careful not to damage the thermostat phial.
Flue gas safety
thermostat phial
Fig. 4
Pegasus F2Pegasus F2
Pegasus F2
Pegasus F2Pegasus F2
6
Page 7

3. BOILER INSTALLATION3. BOILER INSTALLATION
3. BOILER INSTALLATION
3. BOILER INSTALLATION3. BOILER INSTALLATION
(To be performed by qualified personnel only)
3.013.01
General warningsGeneral warnings
3.01
General warnings
3.013.01
General warningsGeneral warnings
The boiler should be installed according to current regulations (see para 1.02).
We suggest fitting isolating valves between the boiler and the heating system to isolate the boiler from
the system if necessary.
The rise in temperature of the heating water (the difference between the water flow and return
temperatures) should not exceed 20°C. This is so as to prevent possible damage caused by
condensation forming in the boiler.
Combustion products should be discharged through a flue with a cross section in accordance with
current standards and not less than the boiler flue outlet connection.
Connect the gas to the boiler in accordance with current regulations. The diameter of the boiler gas
inlet gas pipe does not dictate the choice of diameter for the pipe between the boiler and the gas meter
should be calculated based upon its length and pressure drop.
3.023.02
Boiler water characteristicsBoiler water characteristics
3.02
Boiler water characteristics
3.023.02
Boiler water characteristicsBoiler water characteristics
When the water supply has a hardness of more than 25 - 30 Fr., it should be treated before entering
the heating system to prevent both scaling (caused by hard water) and corrosion (caused by aggressive
water) in the boiler. Please remember that because of their low thermal conductivity, even small scales
just a few millimetres thick cause the boiler walls to overheat considerably with serious consequences.
You must treat the water used for the heating system in the following cases:You must treat the water used for the heating system in the following cases:
You must treat the water used for the heating system in the following cases:
You must treat the water used for the heating system in the following cases:You must treat the water used for the heating system in the following cases:
A) Very large systems (with large volumes of water).A) Very large systems (with large volumes of water).
A) Very large systems (with large volumes of water).
A) Very large systems (with large volumes of water).A) Very large systems (with large volumes of water).
B) Systems where partial or complete draining - and water refilling - are frequent.B) Systems where partial or complete draining - and water refilling - are frequent.
B) Systems where partial or complete draining - and water refilling - are frequent.
B) Systems where partial or complete draining - and water refilling - are frequent.B) Systems where partial or complete draining - and water refilling - are frequent.
Pegasus F2Pegasus F2
Pegasus F2
Pegasus F2Pegasus F2
7
Page 8

4. WIRING AND CONNECTION DIAGRAMS4. WIRING AND CONNECTION DIAGRAMS
4. WIRING AND CONNECTION DIAGRAMS
4. WIRING AND CONNECTION DIAGRAMS4. WIRING AND CONNECTION DIAGRAMS
4.014.01
Electrical connectionsElectrical connections
4.01
Electrical connections
4.014.01
Electrical connectionsElectrical connections
- Electrical connections should be performed according to the diagrams shown here.
- Connect the boiler to a single-phase, phase neutral, 230 V ~ 50 Hz power supply through a standard
terminal block or outlet with 2A max. fuses connected between the boiler and the power support.
Remember that the boiler should always be provided with good earthing.
IMPORTANT:IMPORTANT:
IMPORTANT: If on use a 230 V room thermostat, it must be in II class.
IMPORTANT:IMPORTANT:
The manufacturer disclaims any liability for damage to property or persons caused by
failure to earth the boiler correctly.
General wiring diagram for mod. 51-68-85General wiring diagram for mod. 51-68-85
General wiring diagram for mod. 51-68-85
General wiring diagram for mod. 51-68-85General wiring diagram for mod. 51-68-85
230V
50Hz
L
1
4
5
2
N
3
31
1
42
2
169
3
4
16
32
6
18
17
98
L1
N1
7
129
3
4
1
2
253713
1
83
616
19
S 4561 B
HONEYWELL
118
117
21
8
114
9
10
11
12
13
2
14
20
116
160
72
C
63
1
14
49
15
92
24
X6
9
X5
X4
17
X3
22
82
25
Fig. 5a
KeyKey
Key
KeyKey
116116
116 Gas pressure switch
2424
24 Spark electrode
2424
2525
25 Pilot burner
2525
3232
32 Pump (not supplied)
3232
4949
49 Limit thermostat (manual reset)
4949
6363
63 Boiler control thermostat
6363
7272
72 Room thermostat
7272
Note:Note:
Note:
Note:Note:
8282
82 Ionization probe
8282
8383
83 Ignition PCB
8383
9292
92 Flue gas thermostat
9292
9898
98 Boiler on/off switch
9898
114114
114 Water flow pressure switch
114114
(not supplied)
116116
117117
117 Main gas valve
117117
118118
118 Pilot light gas valve
118118
129129
129 Ignition lockout re-set botton
129129
160160
160 Auxiliary contact
160160
169169
169 Suppression filter
169169
• Dotted lines indicate connections to be performed during installation.
• Terminals L1, N1, 6 are reserved for connecting an electronic compensator (not available in UK)
Pegasus F2Pegasus F2
Pegasus F2
Pegasus F2Pegasus F2
8
Page 9

Electrical connections diagram for mod. 51-68-85Electrical connections diagram for mod. 51-68-85
Electrical connections diagram for mod. 51-68-85
Electrical connections diagram for mod. 51-68-85Electrical connections diagram for mod. 51-68-85
X6
X5
X4
X3
39 171425671
1
3
S 4561 B
HONEYWELL
13 16
2
63
1
C
83
169
3
1
4
2
1
2
98
4
3
2
4
129
3514220191817161514131211 2221987610
N1
L1
N
L
160114
230V
50Hz
116
49
72
32
24
82
25
92
2423
L
N
N
L
118
117
Fig. 5b
KeyKey
Key
KeyKey
116116
116 Gas pressure switch
2424
24 Spark electrode
2424
2525
25 Pilot burner
2525
3232
32 Pump (not supplied)
3232
4949
49 Limit thermostat (manual reset)
4949
6363
63 Boiler control thermostat
6363
7272
72 Room thermostat
7272
Note:Note:
Note:
Note:Note:
8282
82 Ionization probe
8282
8383
83 Ignition PCB
8383
9292
92 Flue gas thermostat
9292
9898
98 Boiler on/off switch
9898
114114
114 Water flow pressure switch
114114
(not supplied)
116116
117117
117 Main gas valve
117117
118118
118 Pilot light gas valve
118118
129129
129 Ignition lockout re-set botton
129129
160160
160 Auxiliary contact
160160
169169
169 Suppression filter
169169
• Dotted lines indicate connections to be performed during installation.
• Terminals L1, N1, 6 are reserved for connecting an electronic compensator (not available in UK)
Pegasus F2Pegasus F2
Pegasus F2
Pegasus F2Pegasus F2
9
Page 10

General wiring diagram for mod. 102General wiring diagram for mod. 102
General wiring diagram for mod. 102
General wiring diagram for mod. 102General wiring diagram for mod. 102
L
230V
50Hz
1
L1
4
N1
5
2
N
3
98
42
3
1
2
1
169
3
4
6
7
1
16
32
18
17
83
22
8
129
3
4
1
2
253713
S 4561 B
HONEYWELL
61617
118
19
117
21
114
9
10
116
11
12
13
2
160
C
63
1
14
49
15
92
X6
9
X5
X4
14
X3
20
24
82
25
Fig. 5c
KeyKey
Key
KeyKey
2424
24 Spark electrode
2424
2525
25 Pilot burner
2525
3232
32 Pump (not supplied)
3232
4949
49 Limit thermostat (manual reset)
4949
6363
63 Boiler control thermostat
6363
8282
82 Ionization probe
8282
8383
83 Ignition PCB
8383
9292
92 Flue gas thermostat
9292
Note:Note:
Note: Dotted lines indicate connections to be performed during installation.
Note:Note:
9898
98 Boiler on/off switch
9898
114114
114 Water flow pressure switch (not supplied)
114114
116116
116 Gas pressure switch
116116
117117
117 Main gas valve
117117
118118
118 Pilot light gas valve
118118
129129
129 Ignition lockout re-set botton
129129
160160
160 Auxiliary contact
160160
169169
169 Suppression filter
169169
Terminals L1, N1, 6 are reserved for connecting an electronic compensator (not available in
UK)
Pegasus F2Pegasus F2
Pegasus F2
Pegasus F2Pegasus F2
10
Page 11

Electrical connections diagram for mod. 102Electrical connections diagram for mod. 102
Electrical connections diagram for mod. 102
Electrical connections diagram for mod. 102Electrical connections diagram for mod. 102
83
169
1
2
1
98
3
3
4
2
4
2
4
3925671
1
3
129
3514220191817161514131211 2221987610
N1L1
S 4561 B
HONEYWELL
63
X6
X5
X4
1714 1613
X3
2
1
C
24
82
25
92
N
L
230V
50Hz
114
116
160
49
32
LNNL
Fig. 5d
KeyKey
Key
KeyKey
2424
24 Spark electrode
2424
2525
25 Pilot burner
2525
3232
32 Pump (not supplied)
3232
4949
49 Limit thermostat (manual reset)
4949
6363
63 Boiler control thermostat
6363
8282
82 Ionization probe
8282
8383
83 Ignition PCB
8383
9292
92 Flue gas thermostat
9292
Note:Note:
Note: Dotted lines indicate connections to be performed during installation.
Note:Note:
9898
98 Boiler on/off switch
9898
114114
114 Water pressure switch (not supplied)
114114
116116
116 Gas pressure switch
116116
117117
117 Main gas valve
117117
118118
118 Pilot light gas valve
118118
129129
129 Ignition lockout reset botton
129129
160160
160 Auxiliary contact
160160
Terminals L1, N1, 6 are reserved for connecting an electronic compensator (not avbailable in
UK)
Pegasus F2Pegasus F2
Pegasus F2
Pegasus F2Pegasus F2
118
117
11
Page 12

4.02 Access to the control panel internal components4.02 Access to the control panel internal components
4.02 Access to the control panel internal components
4.02 Access to the control panel internal components4.02 Access to the control panel internal components
For access to the terminal block and the internal components of the control panel, proceed as follows:
a - Shut off the power supply to the boiler.
b - Lift off the boiler cover (held in place by slot pins).
c - Unscrew the two screws that hold the plastic panel against the side of the boiler .
d - Rotate the panel all the way round to its locked position.
e - Carry out the work and reassemble in reverse order.
Caution:Caution:
Caution: Handle the flame control electronic board (part 4 in fig. 6) and its connections with
Caution:Caution:
particular care.
4.034.03
Exploded view of the control panel (fig. 6)Exploded view of the control panel (fig. 6)
4.03
Exploded view of the control panel (fig. 6)
4.034.03
Exploded view of the control panel (fig. 6)Exploded view of the control panel (fig. 6)
55
5
55
77
7
77
44
4
44
33
3
33
1010
10
1010
11
1
11
88
8
88
KeyKey
Key
KeyKey
1.1.
1. Control panel
1.1.
2.2.
2. Wiring harness protection plate
2.2.
3.3.
3. Terminal block
3.3.
4.4.
4. Ignition PCB
4.4.
5.5.
5. Boiler control thermostat
5.5.
12
66
6
66
99
9
99
22
2
22
Fig. 6
6.6.
6. Limit thermostat (manual reset)
6.6.
7.7.
7. Flue gas thermostat
7.7.
8.8.
8. Boiler on/off switch
8.8.
9.9.
9. Ignition lockout reset
9.9.
10.10.
10. Combined temperature and pressure gauge
10.10.
Pegasus F2Pegasus F2
Pegasus F2
Pegasus F2Pegasus F2
Page 13

5. STARTUP AND SHUTDOWN5. STARTUP AND SHUTDOWN
5. STARTUP AND SHUTDOWN
5. STARTUP AND SHUTDOWN5. STARTUP AND SHUTDOWN
5.015.01
Checks to be carried out at first startupChecks to be carried out at first startup
5.01
Checks to be carried out at first startup
5.015.01
Checks to be carried out at first startupChecks to be carried out at first startup
It is good practice to check the following at first startup: that the cutoff valves between the boiler and
heating system are open; that all is well pressurized and vented; that there are no gas or water leaks
from the water system or boiler; that the electrical connections are correct and the earthing cable
connected to a good earthing system; that there are no inflammable liquids or materials in the
immediate vicinity of the boiler and that the flue is not blocked.
5.025.02
Startup procedureStartup procedure
5.02
Startup procedure
5.025.02
Startup procedureStartup procedure
- Set the boiler control thermostat knob to the desired temperature (not below 50°C).
- Open the gas cock upstream from the boiler.
- Vent gas supply pipework.
- Switch on boiler.
At this point the electronic control unit takes over and after a preset pause sends a command to the pilot
valve to open and triggers off the discharge to the spark electrodes, igniting the pilot burner.
The pilot burner flame, ionizing the detection electrode, sends a signal to the electronic control unit
which in turn sends a command to the main valve to open, igniting the main burner.
The boiler now functions automatically, controlled by the boiler control thermostat and/or by any other
command/control devices (room thermostat, electronic thermostat board, etc.).
Note:Note:
Note: If after having closely followed the startup procedure the burners fail to light and the reset button
Note:Note:
warning light on the electronic control unit is lit, it means that the board has locked out and you
should wait about 10 seconds before pressing the reset button.
After resetting, the board repeats the startup cycle.
If the burners still fail to light after the second attempt, read paragraph 9, “Fault finding”.
In the event of the electric power supply to the boiler being cut off, the burners shut down and
light up again automatically when the power returns.
5.035.03
Temporary shutdownTemporary shutdown
5.03
Temporary shutdown
5.035.03
Temporary shutdownTemporary shutdown
To turn the boiler off temporarily, simply switch off the power supply to the boiler. The electrical
components will be without power and the main and pilot burners will remain off.
5.045.04
Long-term boiler shutdownLong-term boiler shutdown
5.04
Long-term boiler shutdown
5.045.04
Long-term boiler shutdownLong-term boiler shutdown
Turn off inlet gas cock to the boiler and switch off the power supply.
Caution:Caution:
Caution: If the boiler remains unused for long periods during the winter, in order to avoid frost
Caution:Caution:
damages you should pour a suitable anti-freeze into the system or drain it completely.
Pegasus F2Pegasus F2
Pegasus F2
Pegasus F2Pegasus F2
13
Page 14

5.05 Inspections and controls after startup5.05 Inspections and controls after startup
5.05 Inspections and controls after startup
5.05 Inspections and controls after startup5.05 Inspections and controls after startup
At first startup:
- Make sure the gas supply is perfectly leakproof.
- Make sure the pilot light is adequate and well adjusted.
- Test boiler ignition by starting it and turning it off using the control thermostat.
- Check that no flue products escapes from the boiler draft diverter indicating that either the flue is
blocked or the draft is insufficient.
- Check the efficiency of the flue while the boiler is working.
- Check that there are no leaks from the points where the boiler/flue connects to the boiler and the
flue.
- Check that gas consumption, measured by the gas meter, matches the figure indicated in the
technical data table.
- Check that the water is circulating properly between the boiler and heating units.
- Make sure that when the pilot flame is extinguished, the safety devices are activated, shutting off
the main gas burners.
14
Pegasus F2Pegasus F2
Pegasus F2
Pegasus F2Pegasus F2
Page 15

6. REGULATING6. REGULATING
6. REGULATING
6. REGULATING6. REGULATING
As described above, the boiler is set up to operate on natural gas (G20); gas pressure has been tested
and calibrated by the manufacturer.
However, due to possible differences in pressure in the gas supply system, at first startup you should
check and if necessary adjust the pressure at the injectors to match the pressure level shown in table
3 (paragraph 2.02) of the technical data.
6.02 Gas pressure adjustment with the “Honeywell VR 4601 CB” valve in models 51-68-856.02 Gas pressure adjustment with the “Honeywell VR 4601 CB” valve in models 51-68-85
6.02 Gas pressure adjustment with the “Honeywell VR 4601 CB” valve in models 51-68-85
6.02 Gas pressure adjustment with the “Honeywell VR 4601 CB” valve in models 51-68-856.02 Gas pressure adjustment with the “Honeywell VR 4601 CB” valve in models 51-68-85
Adjust the supply pressure at the main burners by turning the stabilizer screw 7 (fig. 7).
To increase the pressure, turn the screw clockwise. To decrease the pressure, turn the screw
anticlockwise.
The pilot light requires no adjustment.
Caution:Caution:
Caution: Pressure measured at pressure test points 1 and 2 (fig. 7) is displayed 30 seconds or more
Caution:Caution:
after making the adjustment.
5
1
3
7
2
6
Key:Key:
Key:
Key:Key:
1.1.
1. Inlet pressure test point
1.1.
2.2.
2. Outlet pressure test point
2.2.
3.3.
3. Screw block stabilizer
3.3.
4.4.
4. Pilot coil electric connections
4.4.
5.5.
5. Main burner coil electric connections
5.5.
6.6.
6. Pilot burner supply
6.6.
7.7.
7. Main burner gas pressure adjustment screw
7.7.
Fig. 7
Pegasus F2Pegasus F2
Pegasus F2
Pegasus F2Pegasus F2
4
15
Page 16

6.036.03
Gas pressure adjustment with the “DUNGS MBDLE 407 BO1” valve in model 102Gas pressure adjustment with the “DUNGS MBDLE 407 BO1” valve in model 102
6.03
Gas pressure adjustment with the “DUNGS MBDLE 407 BO1” valve in model 102
6.036.03
Gas pressure adjustment with the “DUNGS MBDLE 407 BO1” valve in model 102Gas pressure adjustment with the “DUNGS MBDLE 407 BO1” valve in model 102
4
3
1
5
6
Pa
Pe
9
8
7
2
Fig. 8
Key:Key:
Key:
Key:Key:
1.1.
1. Inlet gas pressure test point
1.1.
(Burner pressure is measured at test point on burner manifold)
2.2.
2. Pilot burner supply
2.2.
3.3.
3. Integral gas pressure switch
3.3.
4.4.
4. Gas pressure switch connector (grey)
4.4.
5.5.
5. V1-V2 gas valve power connector (black)
5.5.
6.6.
6. Gas governor
6.6.
7.7.
7. Gas flow rate regulator (valve V2)
7.7.
8.8.
8. Slow startup regulator (under the cover)
8.8.
9.9.
9. Cover protecting the incoming gas filter.
9.9.
Pegasus F2Pegasus F2
Pegasus F2
Pegasus F2Pegasus F2
16
Page 17

Gas pressure adjustment:Gas pressure adjustment:
Gas pressure adjustment:
Gas pressure adjustment:Gas pressure adjustment:
- Move the protective cover by turning it on its hinges.
- Using a small screwdriver (no. 3), turn the regulating screw to
set the required pressure.
Note:Note:
Note: The pilot light requires no adjustments.
Note:Note:
Fig. 8a
Main gas flow rate adjustmentMain gas flow rate adjustment
Main gas flow rate adjustment (valve V2)
Main gas flow rate adjustmentMain gas flow rate adjustment
- Loosen the securing screw using a screwdriver.
- Turn the knob to the required setting, then re-tighten the
securing screw.
Note:Note:
Note: Pressure measured at pressure test points is displayed 30
Note:Note:
seconds or more after performing the adjustment.
Fig. 8b
Slow startup adjustmentSlow startup adjustment
Slow startup adjustment
Slow startup adjustmentSlow startup adjustment
- Unscrew the black plastic cap
- Using the cap as a tool turn the pin under it to the desired
setting.
- Screw the plastic cap back.
Fig. 8c
Pegasus F2Pegasus F2
Pegasus F2
Pegasus F2Pegasus F2
17
Page 18

6.046.04
Pilot burner unit (fig. 9)Pilot burner unit (fig. 9)
6.04
Pilot burner unit (fig. 9)
6.046.04
Pilot burner unit (fig. 9)Pilot burner unit (fig. 9)
KeyKey
Key
KeyKey
11
1 Combustion chamber cover plate
11
22
2 Inspection window
22
33
3 Pilot burner
33
44
4 Ignition electrode
44
55
5 Flame rectification probe
55
66
6 Pilot injector
66
77
7 Ht lead
77
88
8 Pilot gas supply
88
3 ÷ 4 mm
3
4
5
Fig. 9
8
18
Pegasus F2Pegasus F2
Pegasus F2
Pegasus F2Pegasus F2
Page 19

7. FUEL CONVERSION (from natural to L.P.G. Gas)7. FUEL CONVERSION (from natural to L.P.G. Gas)
7. FUEL CONVERSION (from natural to L.P.G. Gas)
7. FUEL CONVERSION (from natural to L.P.G. Gas)7. FUEL CONVERSION (from natural to L.P.G. Gas)
In order to carry out such operation it must replace the main nozzles and that pilot, proceeding in the
following way:
- Turn off the gas and switch off the power supply to the boiler.
- Remove the main gas burners.
- Disassemble the pilot burner (fig. 8).
- Remove the main burners from manifold.
- Replace the main and pilot injectors taking care not to spoil the main injector sealing gaskets. If they
have been damaged, replace them.
- Re-assemble with care.
- Carefully screw in fully the pressure regulating screw 7 (fig. 7) on the “Honeywell VR 4601 CB” gas
valve in models 51-68-85 and the screws (fig. 8a and 8b) on the “DUNGS MBDLE 407 BO1” valve
in model 102.
- Check that the boiler functions correctly and that there are no gas leaks.
Moreover for the version with "Honeywell VR 4601 CB" gas valve (for models 51-68-85) should be
mounted on the body valve the appropriate calibrated adapter of slow ignition (supplied on request),
operating in the following way:
- remove from the body valve gas the plastic protection cover
“M”“M”
“M” (fig. 10)
“M”“M”
- screw the adapter N to the body gas valve
- replace the of protection cover
REMEMBER:REMEMBER:
REMEMBER: The L.P.G. injector kit may be obtained from our Commercial boiler sales department.
REMEMBER:REMEMBER:
“M”“M”
“M” on the adapter.
“M”“M”
Fig. 10
Pegasus F2Pegasus F2
Pegasus F2
Pegasus F2Pegasus F2
19
Page 20

8. MAINTENANCE AND CLEANING8. MAINTENANCE AND CLEANING
8. MAINTENANCE AND CLEANING
8. MAINTENANCE AND CLEANING8. MAINTENANCE AND CLEANING
The following operations are to be performed by qualified personnel only.
8.018.01
Seasonal inspection of the boiler and flueSeasonal inspection of the boiler and flue
8.01
Seasonal inspection of the boiler and flue
8.018.01
Seasonal inspection of the boiler and flueSeasonal inspection of the boiler and flue
Before the beginning of winter you should perform a general inspection of the boiler, heating system
and flue. The inspection should verify:
That the boiler flueways, burner and flue are clean.
That the water in the system is at the correct pressure – or correct level in the case of an open system.
That all control and safety devices operate properly.
That the probeand spark electrode are free of carbon deposits.
That the pilot flame correctly aligns with the probe.
That circulation pumps are free running.
That there are no gas leaks.
That the gas flow rate and pressure are correct.
That the pressure in the expansion vessel is as indicated in table 3 (paragraph 2.02).
8.028.02
Cleaning the boiler and the flueCleaning the boiler and the flue
8.02
Cleaning the boiler and the flue
8.028.02
Cleaning the boiler and the flueCleaning the boiler and the flue
To clean the boiler and the flue, remove the burner bars from the combustion chamber.
For access to the cast-iron exchanger, proceed as follows (fig. 11): Remove the cover of the casing
secured by slot pins; pull out the insulation covering the draft diverter, remove the smoke-box
inspection cover 2 and its insulation, secured with self-threading screws 1.
Now you may clean all the smoke passages in the boiler using a pipe brush 3. Remember you should
check and if necessary clean the flue and its connection to the boiler. Be careful not to damage the Flue
gas safety thermostat phial or capillary.
11
1
ImportantImportant
Important - Do not clean the burners with chemicals or a steel
ImportantImportant
brush, as these might change the air-gas mixture outlet holes.
When cleaning is complete, re-assemble carefully and in the
correct position. Then check the seal along the gas and smoke
11
22
2
22
44
4
44
33
3
33
circuits, functioning of the control and safety devices and gas
pressure and rate of flow.
KeyKey
Key
KeyKey
11
1 Securing screws
11
22
2 Inspection cover with insulation
22
33
3 Flue cleaning brush
33
44
4 Flue gas sampling point
44
20
Fig. 11
Pegasus F2Pegasus F2
Pegasus F2
Pegasus F2Pegasus F2
Page 21

9. FAULT FINDING9. FAULT FINDING
9. FAULT FINDING
9. FAULT FINDING9. FAULT FINDING
FaultFault
Fault
FaultFault
After a few startup attempts,After a few startup attempts,
After a few startup attempts,
After a few startup attempts,After a few startup attempts,
the electronic control unit fails tothe electronic control unit fails to
the electronic control unit fails to
the electronic control unit fails tothe electronic control unit fails to
ignite the boilerignite the boiler
ignite the boiler
ignite the boilerignite the boiler
At startup, there is no electricAt startup, there is no electric
At startup, there is no electric
At startup, there is no electricAt startup, there is no electric
discharge between the electrodesdischarge between the electrodes
discharge between the electrodes
discharge between the electrodesdischarge between the electrodes
No pilot ignitionNo pilot ignition
No pilot ignition
No pilot ignitionNo pilot ignition
Cause and Corrective ActionCause and Corrective Action
Cause and Corrective Action
Cause and Corrective ActionCause and Corrective Action
The pilot burner is clogged or dirty.
Check that the gas flow to the boiler is normal and that air
in the pipes has been removed.
Check that the electrodes are in their correct position and
free from scales (see fig. 9).
Make sure the boiler is connected to the power supply
and is well earthed.
Check that the pilot gas valve is powered up.
Check the connections to the detection and spark electrodes.
Check that the electrodes are in their right
position and free from scales.
Regulating thermostat is set too low.
Check the power supply.
Check the connections to the electronic control unit.
Make sure the NEUTRAL-PHASE connections have not
been reversed and the earth connection is effective.
Check incoming gas pressure and make sure the gas
pressure switch is open.
Reset the Flue gas safety thermostat.
Reset the safety thermostat.
No or little gas
Air is held in the pipes
.
Vent it as described in the chapter on startup.
Pilot injector is clogged or dirty.
Clean the injector with compressed air.
Poor pilot flamePoor pilot flame
Poor pilot flame
Poor pilot flamePoor pilot flame
Poor main burner flame:Poor main burner flame:
Poor main burner flame:
Poor main burner flame:Poor main burner flame:
too high, too low or too yellowtoo high, too low or too yellow
too high, too low or too yellow
too high, too low or too yellowtoo high, too low or too yellow
Smell of unburnt gasSmell of unburnt gas
Smell of unburnt gas
Smell of unburnt gasSmell of unburnt gas
No rise in temperatureNo rise in temperature
No rise in temperature
No rise in temperatureNo rise in temperature
while the boiler is workingwhile the boiler is working
while the boiler is working
while the boiler is workingwhile the boiler is working
Pilot injector is dirty
.
Gas valve filter is dirty.
Check that gas pressure at the burner is normal (see table
3 paragraph 2.02).
Injectors are dirty.
Check the boiler is clean.
Check that draft is sufficient.
Check that gas consumption is not excessive.
Make sure the regulating thermostat works.
Check that gas consumption is not below specifications.
Pegasus F2Pegasus F2
Pegasus F2
Pegasus F2Pegasus F2
21
Page 22

System water temperature isSystem water temperature is
System water temperature is
System water temperature isSystem water temperature is
too high or too lowtoo high or too low
too high or too low
too high or too lowtoo high or too low
Flare-ups at the burnerFlare-ups at the burner
Flare-ups at the burner
Flare-ups at the burnerFlare-ups at the burner
Delayed ignitionDelayed ignition
Delayed ignition
Delayed ignitionDelayed ignition
Regulating thermostat restartsRegulating thermostat restarts
Regulating thermostat restarts
Regulating thermostat restartsRegulating thermostat restarts
with too high a temperaturewith too high a temperature
with too high a temperature
with too high a temperaturewith too high a temperature
differencedifference
difference
differencedifference
Boiler forms condensateBoiler forms condensate
Boiler forms condensate
Boiler forms condensateBoiler forms condensate
Boiler becomes dirty quicklyBoiler becomes dirty quickly
Boiler becomes dirty quickly
Boiler becomes dirty quicklyBoiler becomes dirty quickly
Boiler shuts offBoiler shuts off
Boiler shuts off
Boiler shuts offBoiler shuts off
for no apparent reasonfor no apparent reason
for no apparent reason
for no apparent reasonfor no apparent reason
Check that the boiler is perfectly clean.
Check that the boiler rating is in proportion to the system.
Check the functioning of the regulating thermostat.
Check the pump is not blocked.
Make sure the pump characteristics are in proportion to
the size of the system.
Check that the gas pressure is sufficient
and that the boiler body is not dirty.
Check that the bulb is properly inserted.
Replace the thermostat
.
Check that the boiler is not running at too low a temperature.
Check that gas consumption is normal. Make sure the
burner flame is well adjusted.
Check that the burner flame is adjusted properly and that
gas consumption is in proportion to the boiler power.
Flue gas safety thermostat tripped.
Safety thermostat tripped after safe working temperature
has been exceeded.
Remember:Remember:
Remember: to avoid unnecessary expense, before contacting Service Department, make sure that any
Remember:Remember:
boiler failure is not due to the absence of electric power or gas supply.
Page 23

Page 24

ALL SPECIFICATIONS SUBJECT TO CHANGEALL SPECIFICATIONS SUBJECT TO CHANGE
ALL SPECIFICATIONS SUBJECT TO CHANGE
ALL SPECIFICATIONS SUBJECT TO CHANGEALL SPECIFICATIONS SUBJECT TO CHANGE
Lichfield Road, Branston Industrial Estate, Burton Upon Trent, Staffordshire DE14 3HDLichfield Road, Branston Industrial Estate, Burton Upon Trent, Staffordshire DE14 3HD
Lichfield Road, Branston Industrial Estate, Burton Upon Trent, Staffordshire DE14 3HD
Lichfield Road, Branston Industrial Estate, Burton Upon Trent, Staffordshire DE14 3HDLichfield Road, Branston Industrial Estate, Burton Upon Trent, Staffordshire DE14 3HD
Tel. 08707 282 885 - Fax 08707 282 886Tel. 08707 282 885 - Fax 08707 282 886
Tel. 08707 282 885 - Fax 08707 282 886
Tel. 08707 282 885 - Fax 08707 282 886Tel. 08707 282 885 - Fax 08707 282 886
 Loading...