

Ferrari 458 Italia, 458 Spider User Manual
1. Switching on the vehicle
1.1 Deactivation of the alarm system ..............................................59
1.2 Entering the vehicle ..................................................................61
1.3 Fuel inertia switch ....................................................................62
1.4 Position of battery ...................................................................62
1.5 Battery connection quick release ..............................................64
1.6 Access to the luggage compartment .........................................66
1.7 Access to the engine compartment ...........................................66
1.8 Access to and emergency opening of tank cap ..........................67
1.9 Opening and closing the
458 Spider
retractable hard top...........71
1.10 Emergency closing of the
458 Spider
retractable hard top ........76
1.11 Starting the engine (with battery charged) ..............................85
1.12 Starting the engine (with auxiliary battery) .............................87
2. Moving the vehicle
2.1 Electric parking brake (EPB) operating .....................................90
2.2 Starting and driving the vehicle (DCT gearbox) .........................91
2.3 Plug-in battery conditioner ......................................................97
3. Towing the vehicle
3.0 DIMENSIONS AND WEIGHTS sheet .......................................99
3.1 Position and content of tool bag ......................................... ...100
3.2 Emergency tyre repair and inflation kit ...................................102
3.3 Collapsible spare wheel (if present) ........................................104
3.4 Tow hook ..............................................................................107
3.5 Emergency release of the electric parking brake ......................108
3.6 Emergency release of the Park Lock (DCT gearbox) ................109
3.7 Towing with wheel axle raised ................................................112
3.8 Loading the vehicle onto the trailer ........................................112
3.9 Securing the vehicle to the trailer ............................................113
1 • 59
Switching on the vehicle
1.1 Deactivation of the alarm system
The electronic alarm system performs the following functions:
- remote control for central door locking/unlocking;
- perimeter surveillance, detecting if doors and lids are open;
- motion surveillance, detecting intrusion in the passenger
compartment;
- vehicle movement surveillance.
Activation
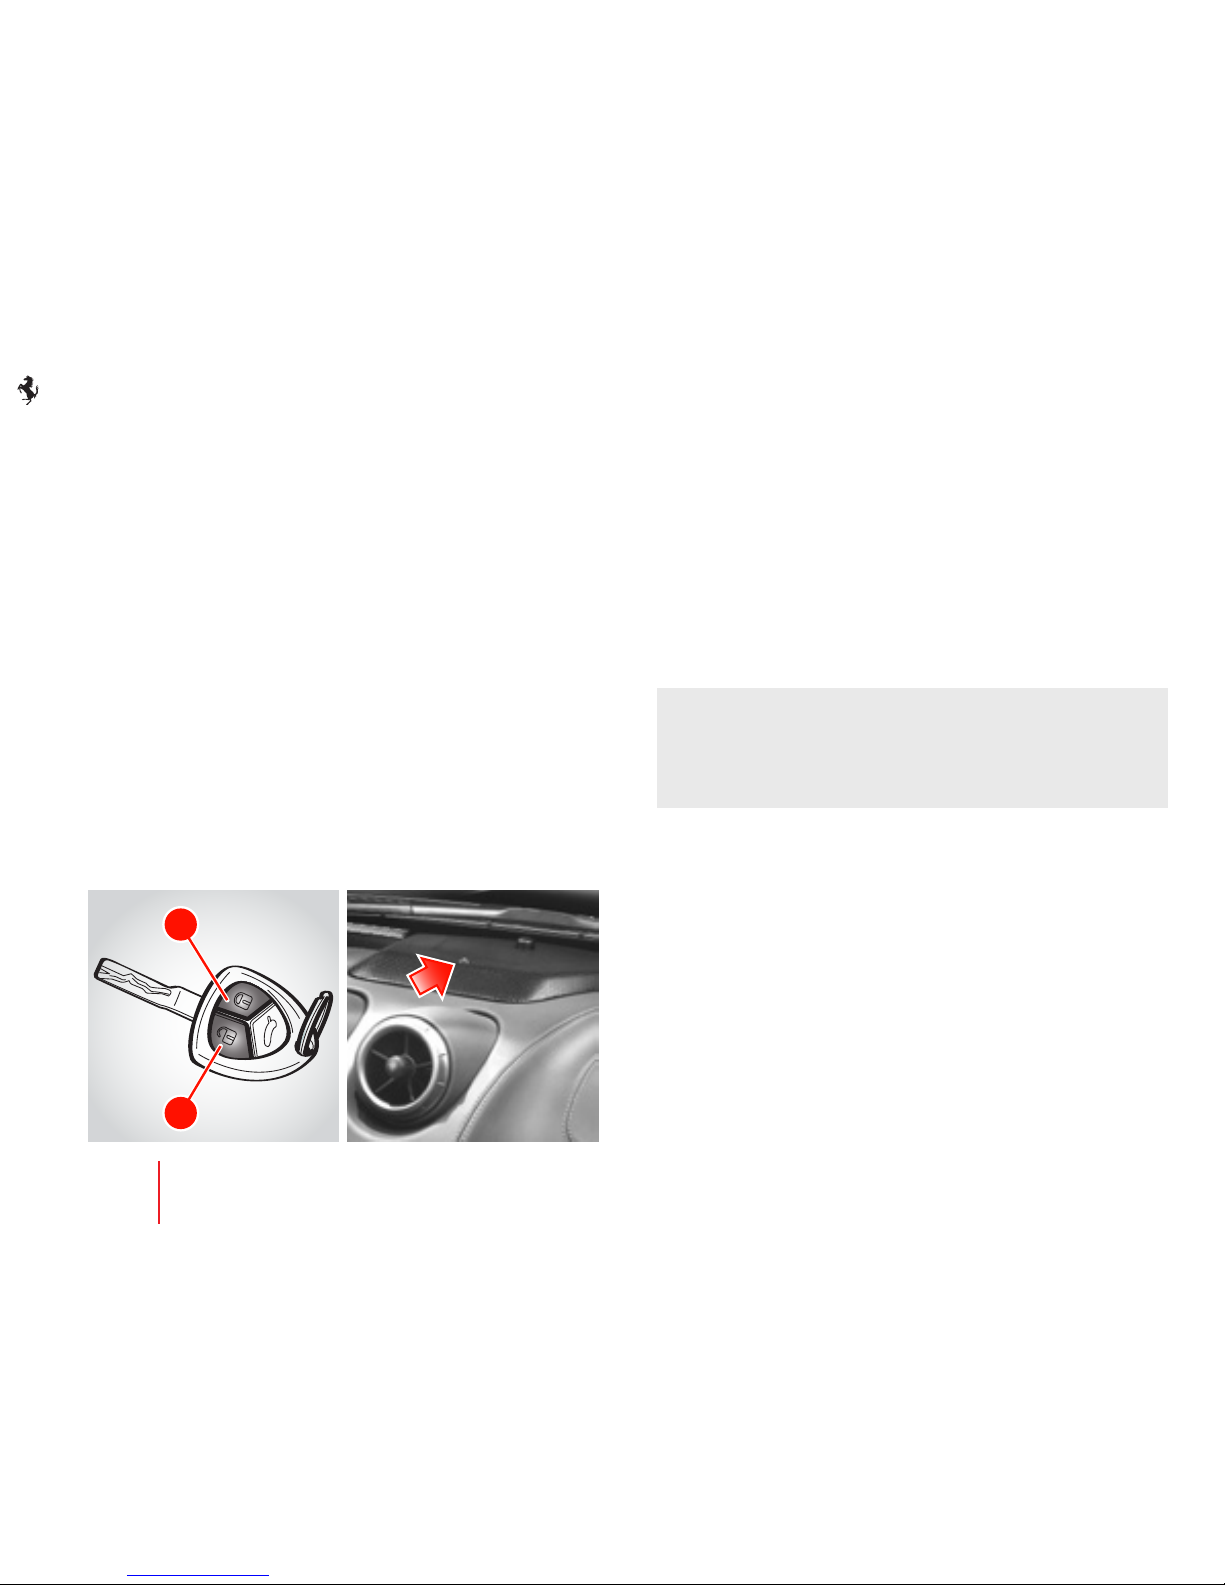
To turn on the alarm system, press button F on the key:
- the turn indicators flash once;
- the system “beeps”;
- the red LED on the dashboard flashes;
- the central door locking system is activated and the doors are
locked.
The system activates after approximately 25 seconds.
When the electronic alarm is activated, the user may request
opening of the luggage compartment; in this case, the motion and
anti-lift sensors are temporarily deactivated.
If the luggage compartment is then closed, the sensors will be
reactivated.
If the turn indicators and the red LED on the dashboard flash
9 times when you activate the alarm system, it means that one of
the doors or the front/rear lid is open or not closed properly and is
therefore not protected by the perimeter surveillance. If this is the
case, check that the doors and front/rear lids are closed properly
and close any door or lid that is open without deactivating the
alarm system: the turn indicators will flash once to indicate that the
door or the front/rear lid is now closed properly and is protected
by the perimeter surveillance.
If the turn indicators and the red LEDs on the dashboard flash
9 times when the alarm system is activated with doors, rear
and front lids properly closed, it means that the self-diagnostic
feature has detected a malfunction in the system. Contact the
Ferrari Service Network to have the system checked.
G
F
1 • 60
Switching on the vehicle
Deactivation
To deactivate the alarm system, press button G on the key:
- the turn indicators flash twice;
- the system beeps twice;
- the red LED on the dashboard goes off;
- the dome lights and the lights under the doors turn on;
- the central door locking system is deactivated and the doors are
unlocked.
Pressing button G twice unlocks the doors and also turns on the
low beams for 30 seconds.
The alarm system is off and you can now get into the vehicle and
start the engine.
To enter the vehicle if the remote control battery is flat, insert the
key into one of the two door locks and turn it to release the lock;
the alarm siren will start to sound.
Start the vehicle following the standard procedures; the alarm siren
will deactivate.
Deactivating the anti-lift alarm
Press button H to deactivate the anti-lift alarm system. When this
function is deactivated, the LED on the button will flash for about
3 seconds and will then turn off.
H
1 • 61
Switching on the vehicle
C
A
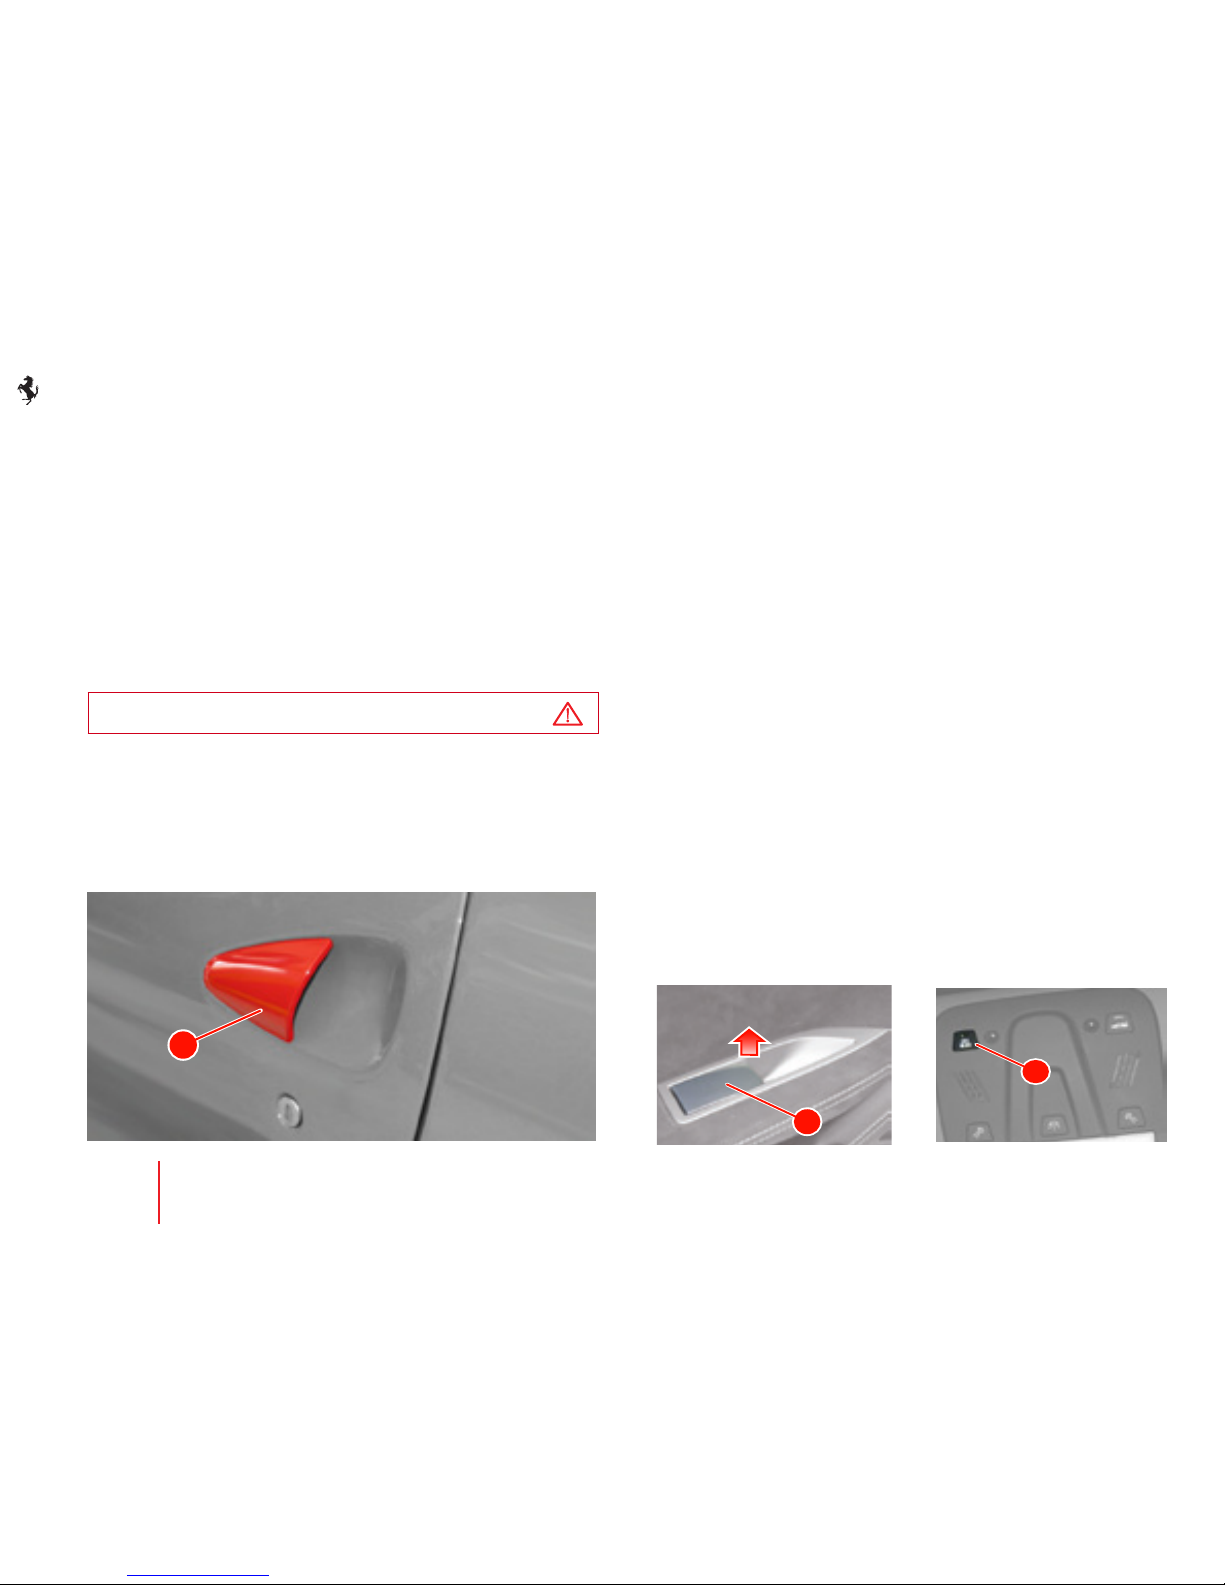
1.2 Entering the vehicle
Opening from the outside
Using the remote control, deactivate the alarm and the central door
locking system, or turn the key in the lock to deactivate the central
door locking system.
When pulling the handle A to open the door, the window moves
down approximately 2 centimetres. When the door is closed, it will
move back up until it meets the upper limit.
Locking and opening the doors from the inside
Warning
Always check that the door is closed properly to prevent it from
opening while driving.
When pulling handle B to open the door, the window will move
down to its “target position”.
When the door is closed, it will move up until it meets the “upper
limit”.
If the handle B is pulled without opening the door, the window will
lower to the “target position” but, after 2 seconds, if the door is not
opened, the window moves up to the “upper limit”.
Therefore, to open the door, release the handle B and pull it again.
Press the “LOCK” C button on the roof to lock both doors and
press the “UNLOCK” C button again to unlock them.
B
458 model
1 • 62
Switching on the vehicle
A
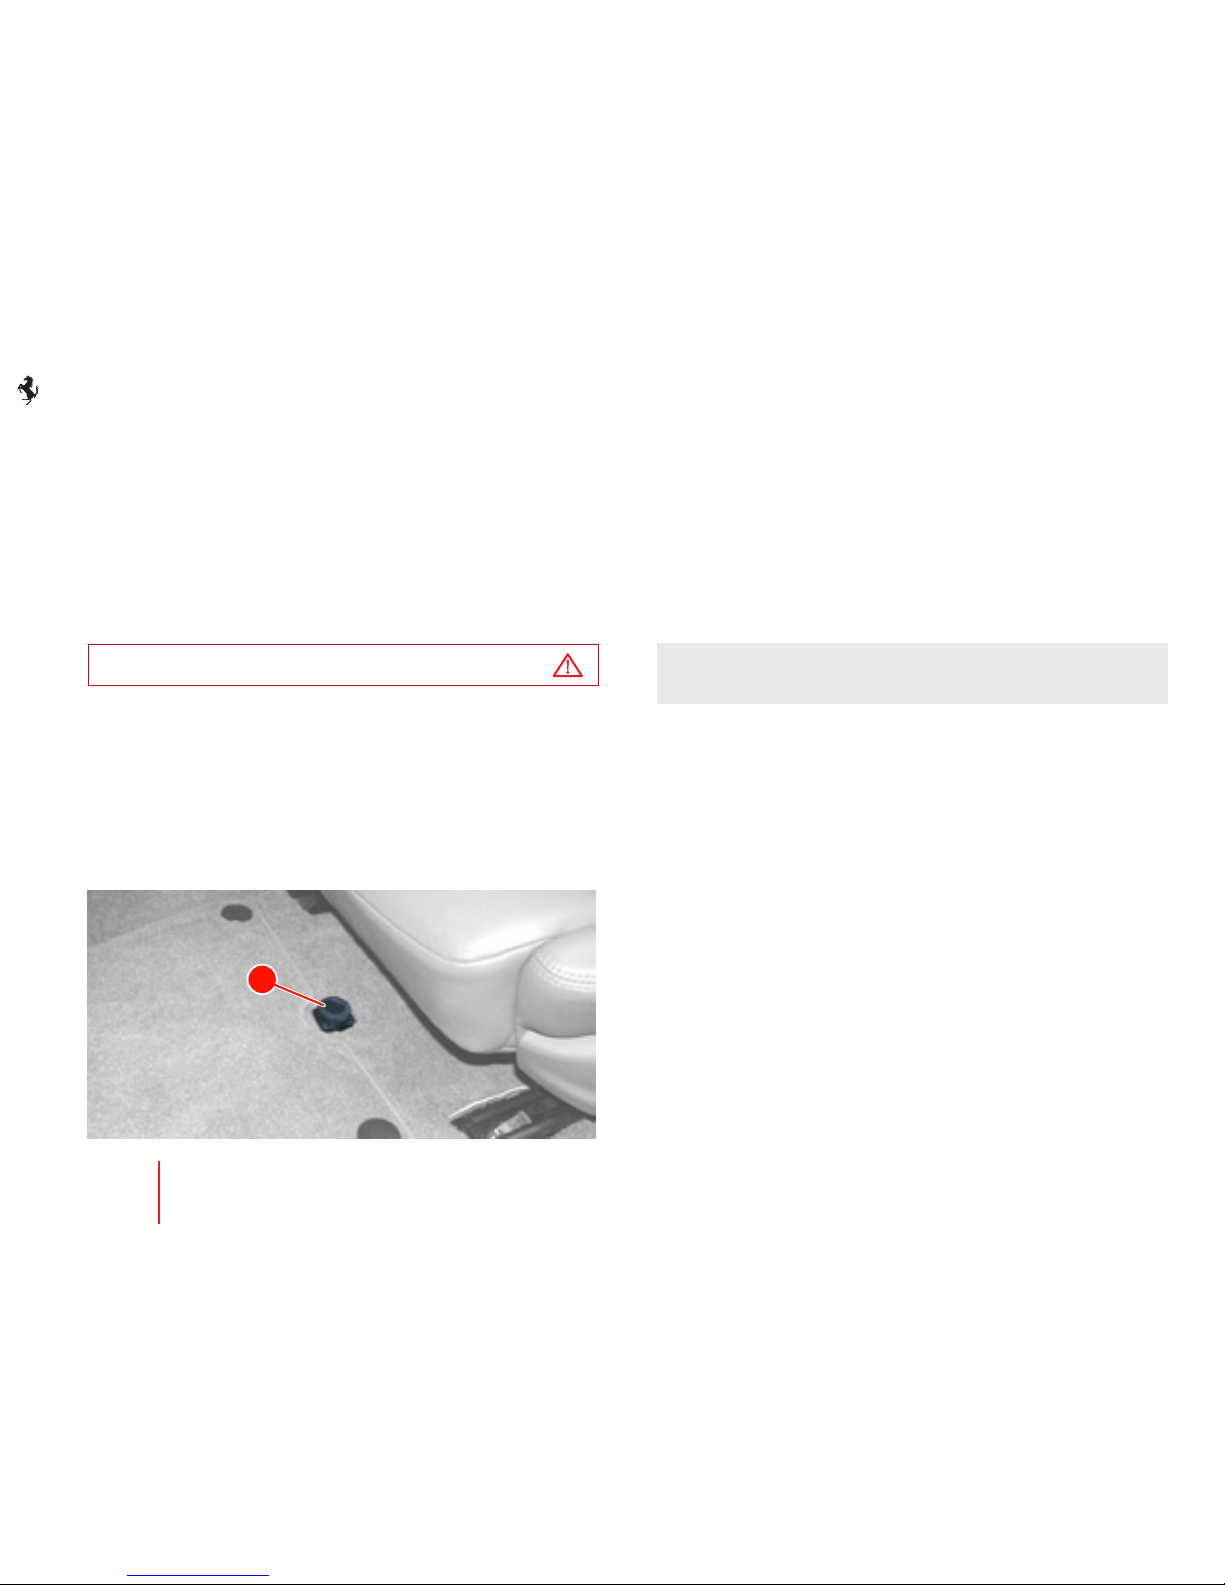
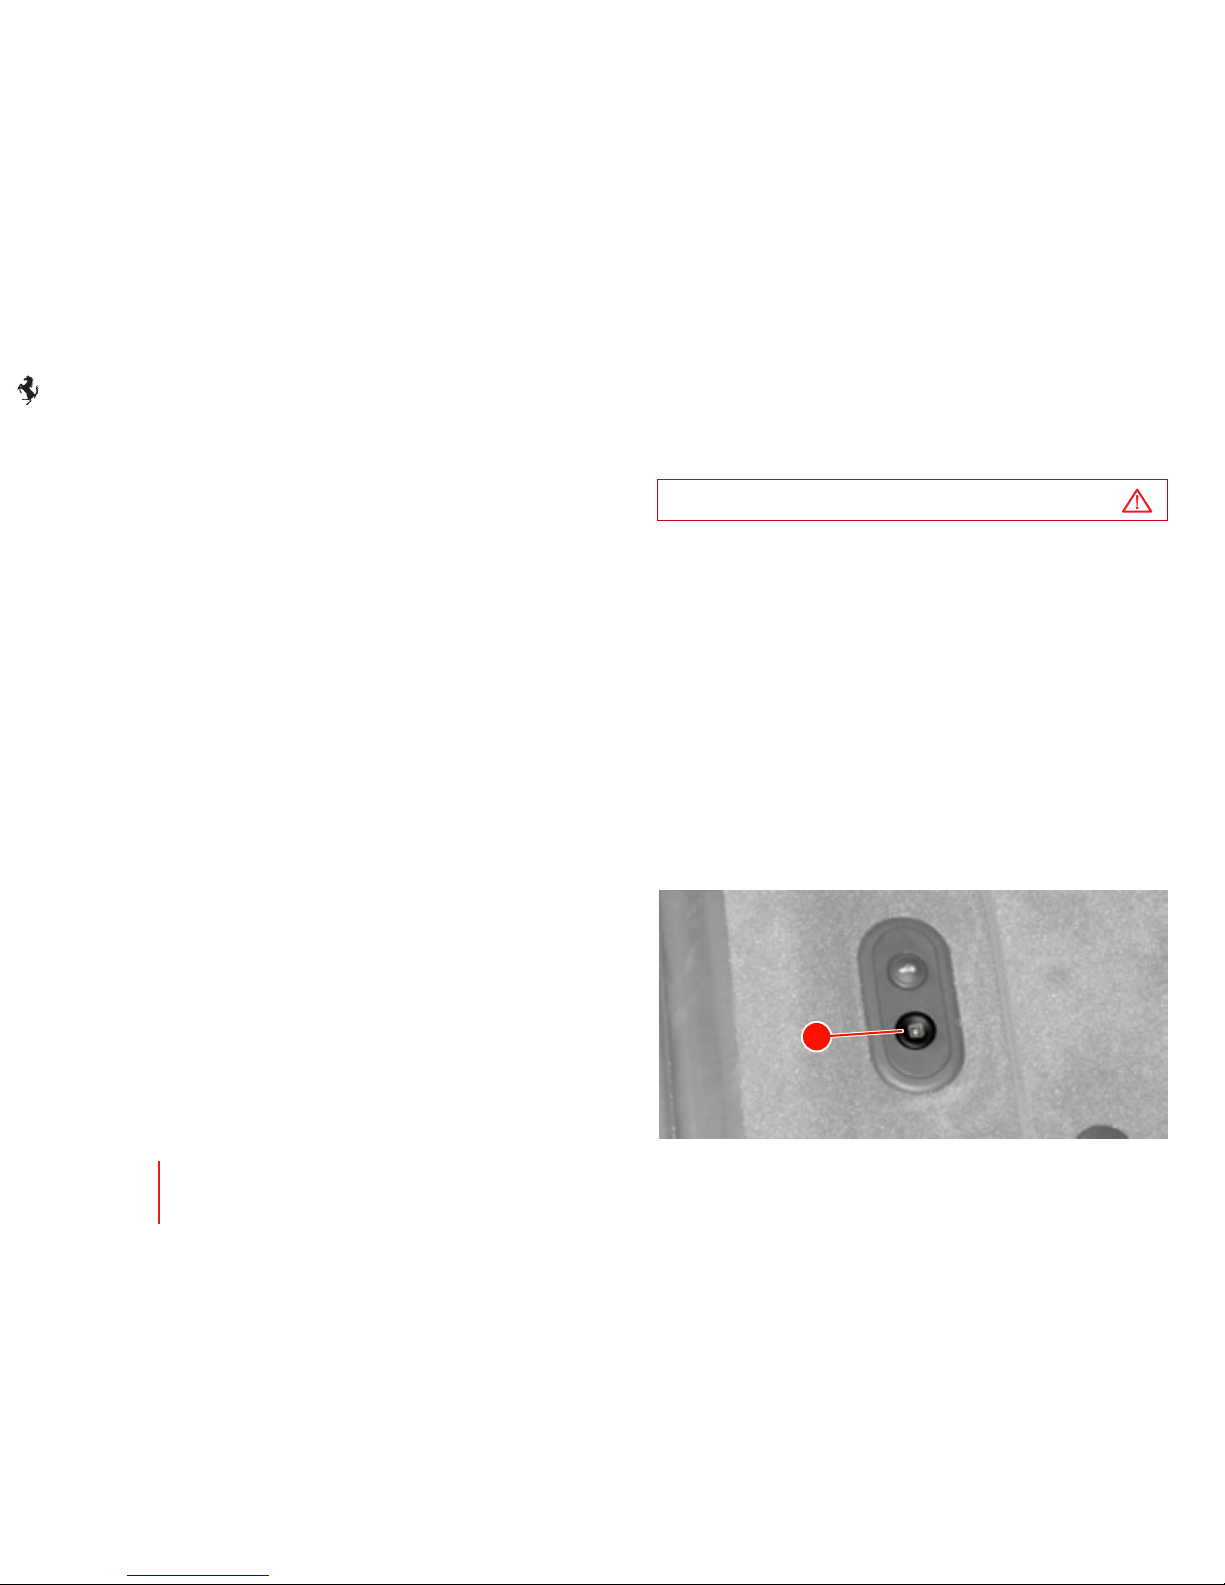
1.3 Fuel inertia switch
This is a safety switch A located in the passenger compartment, on
the floor in front of the driver seat, which deactivates the fuel pump
relays if a collision occurs.
A symbol on the TFT display and the hazard warning lights come
on to indicate that the switch has been activated.
When activated, the doors are also unlocked (if locked) and the
central dome light comes on.
Warning
The system can be reactivated by pressing the button on the top
of the switch.
1.4 Position of battery
On the 458 Italia/Spider model, the battery is located in the
passenger compartment behind the passenger side footrest
To see exactly where the battery is located in the vehicle, refer to
the photograph on page 6.

1 • 63
Switching on the vehicle
Position of battery on the
458 italia
and
458 Spider
models
1 • 64
Switching on the vehicle
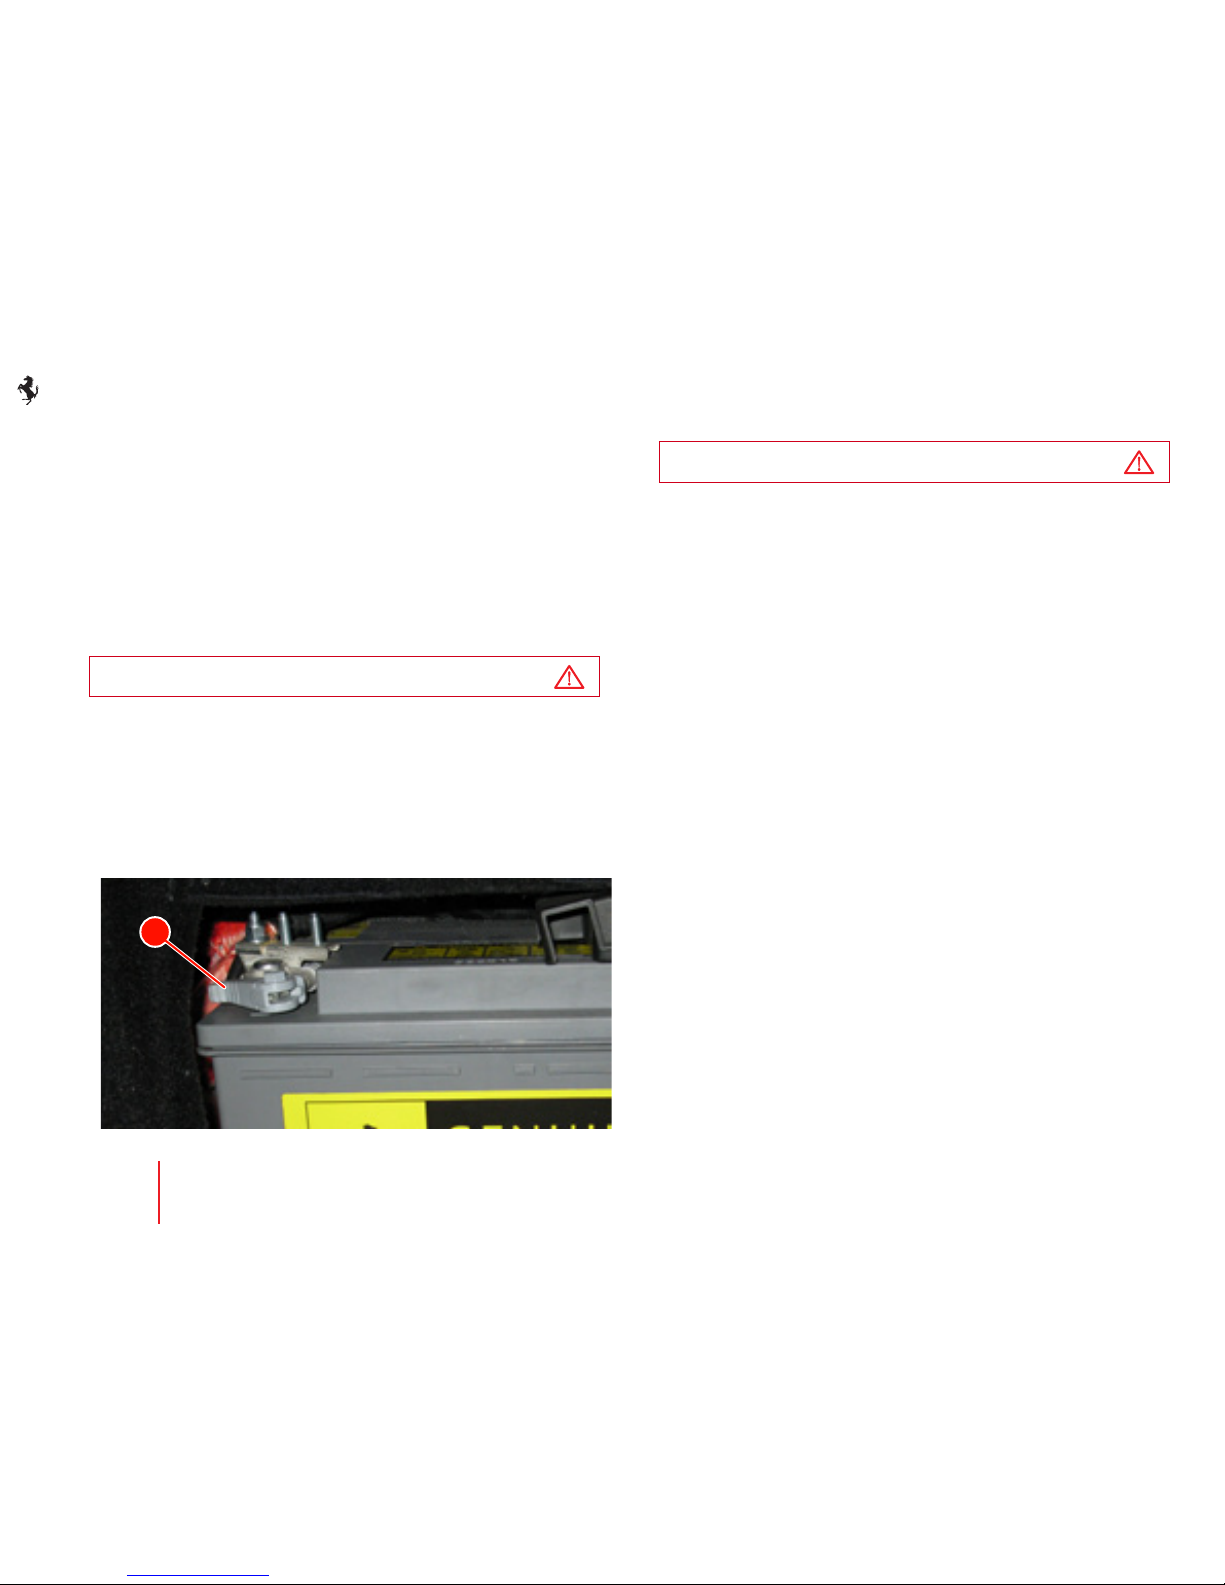
1.5 Battery connection quick release
The quick release lever is located on the negative terminal (black)
of the battery.
Use the locking lever B to loosen the clamp.
Separate the clamp from the battery to disconnect the battery and
the electrical system.
Warning
The battery master switch must only be used if the battery
conditioner cannot be connected.
Warning
Place the clamp so that it does not come into contact with the
battery pole or other metal parts of the vehicle.
On the 458 Italia/Spider model, the battery is located in the
passenger compartment behind the passenger side footrest
B
458 model
1 • 65
Switching on the vehicle
Disconnecting the battery
Before disconnecting the battery, deactivate the electronic alarm
using the remote control.
Warning
Never disconnect the battery from the electrical system when
the engine is running.
Before disconnecting the battery, lower the side windows by at
least 2-3 centimetres (0.8-1.2. in.) to avoid damaging the strips
when opening and closing the doors.
Warning
When the battery is connected and charged, this operation is
automatically performed when the doors are opened and closed.
The windows must remain lowered until the charged battery
is reconnected. If the battery is discharged with the windows
completely raised, only open the door if necessary and use the
utmost caution; do not close the door again until the windows
can be lowered.
We recommend using the battery conditioner if the vehicle is
going to left unused for a long period.
Reconnecting the battery
Place the clamp on the battery and fasten it by closing the locking
lever.
Each time the battery is reconnected, do the following before
starting the engine:
- close both doors and close the luggage compartment lid; unlock
and lock the doors using the remote control; open the luggage
compartment lid using the remote control;
- adjust the clock (date and time on instrument panel);
- close both doors and fully raise the driver side and passenger side
windows to their upper limit; check that the windows move down
to the “target position” when the doors are opened.
Warning
WAIT at least 1 minute before inserting the key in the ignition
switch.
Before starting the engine, wait at least 60 second with the
ignition key in position II to allow the electronic system that
controls the motor-driven valves and the AC ECU to run a selfacquisition process.
During this period, no devices must be activated.
The Motronic ECU self-acquisition cycle will only function correctly
when the intake air temperature is above 5 °C (41 °F).
1 • 66
Switching on the vehicle
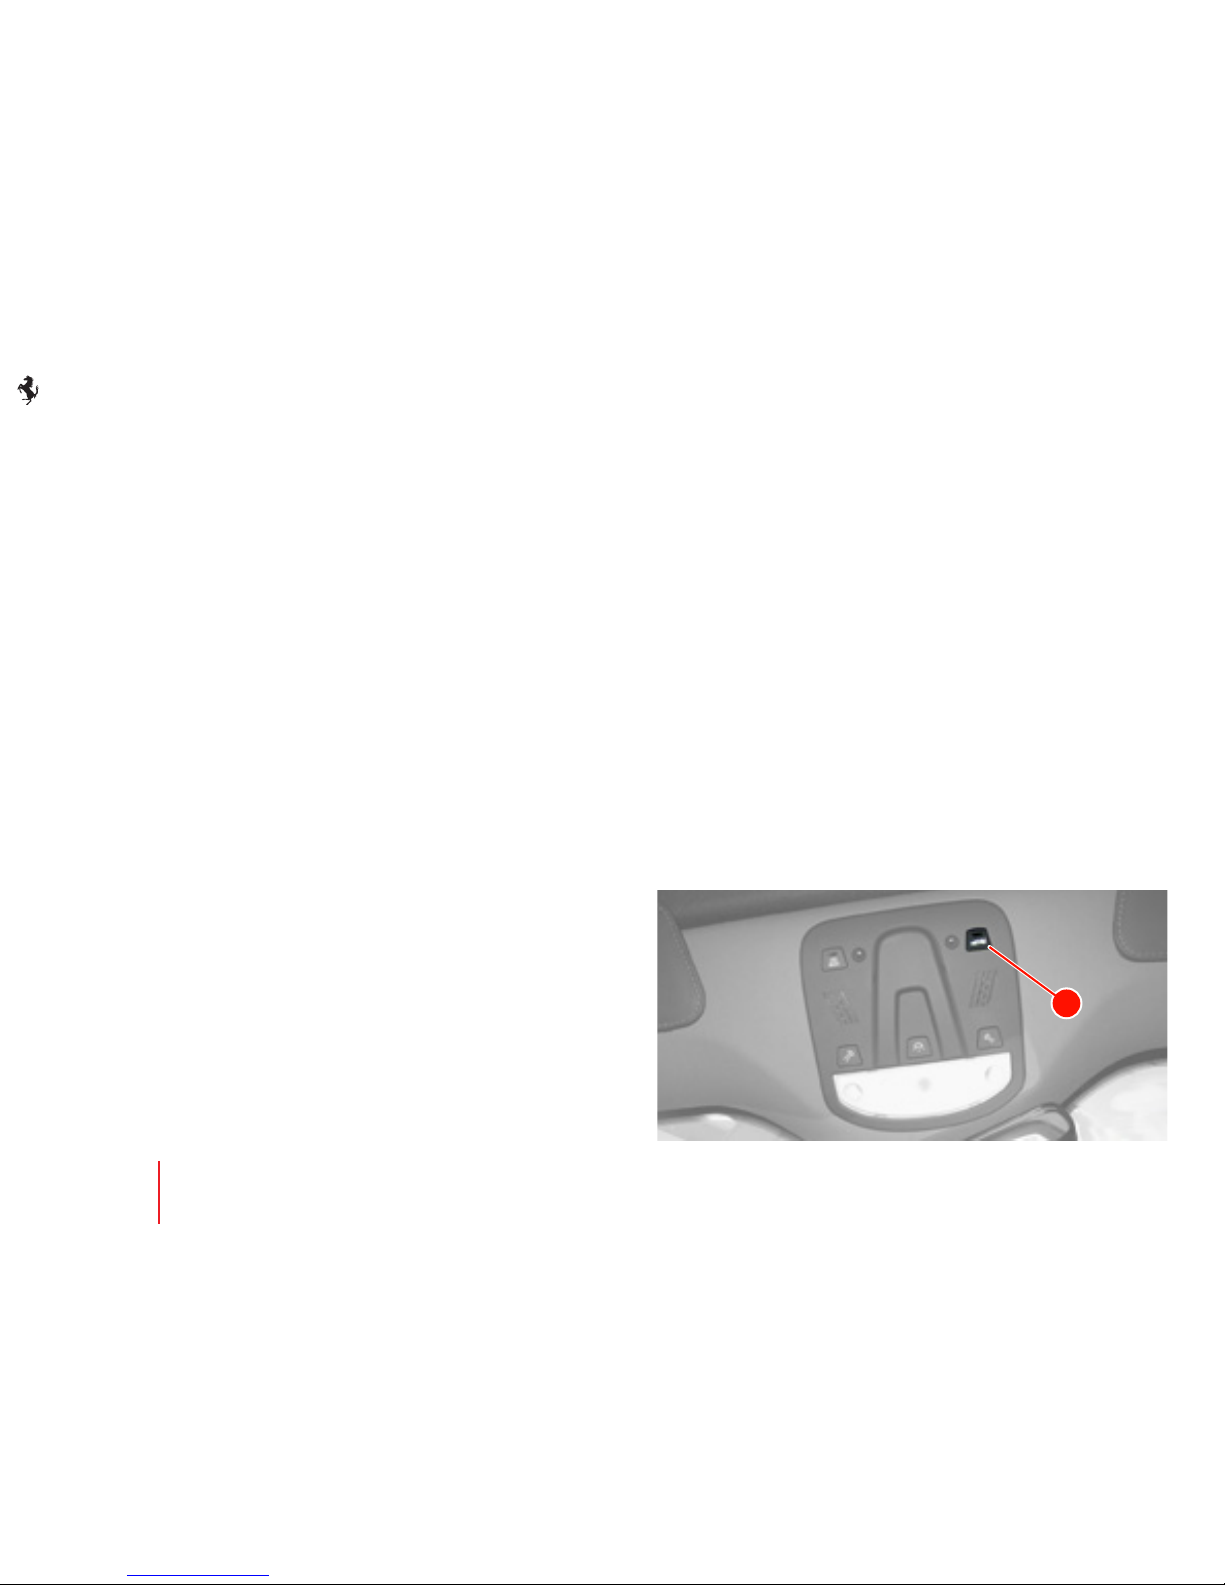
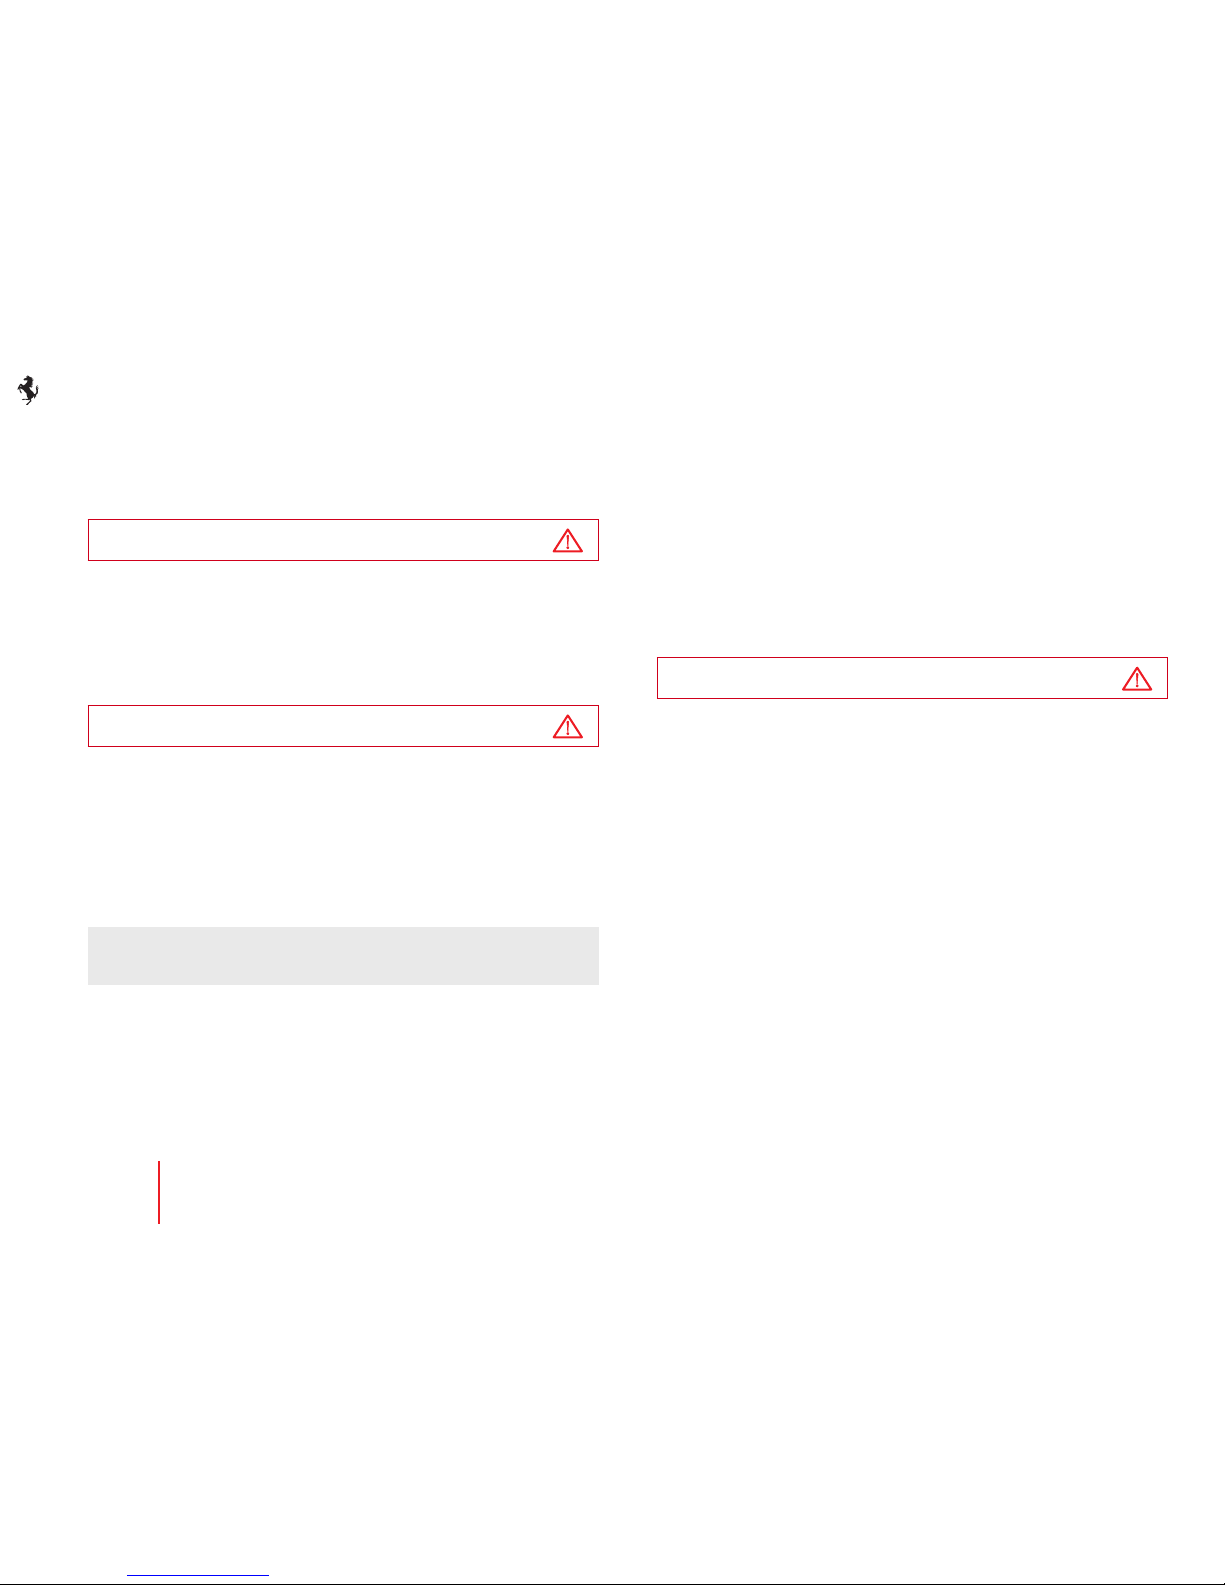
1.6 Access to the luggage compartment
Opening
To open the luggage compartment lid, press button H or button L
on the remote control and hold it for more than 2 seconds.
You can also use the special knob to the right of the number plate
lights.
The luggage compartment is illuminated by an internal light that
comes on automatically when the luggage compartment lid is
opened.
Closing
Using the grip on the inside, lower the luggage compartment lid
until it touches the bodywork.
The lock will pull the lid down until it clicks in place.
Warning
Since the lock closes automatically, always keep your hands
away from the area between the luggage compartment lid and
the bumper.
L
H
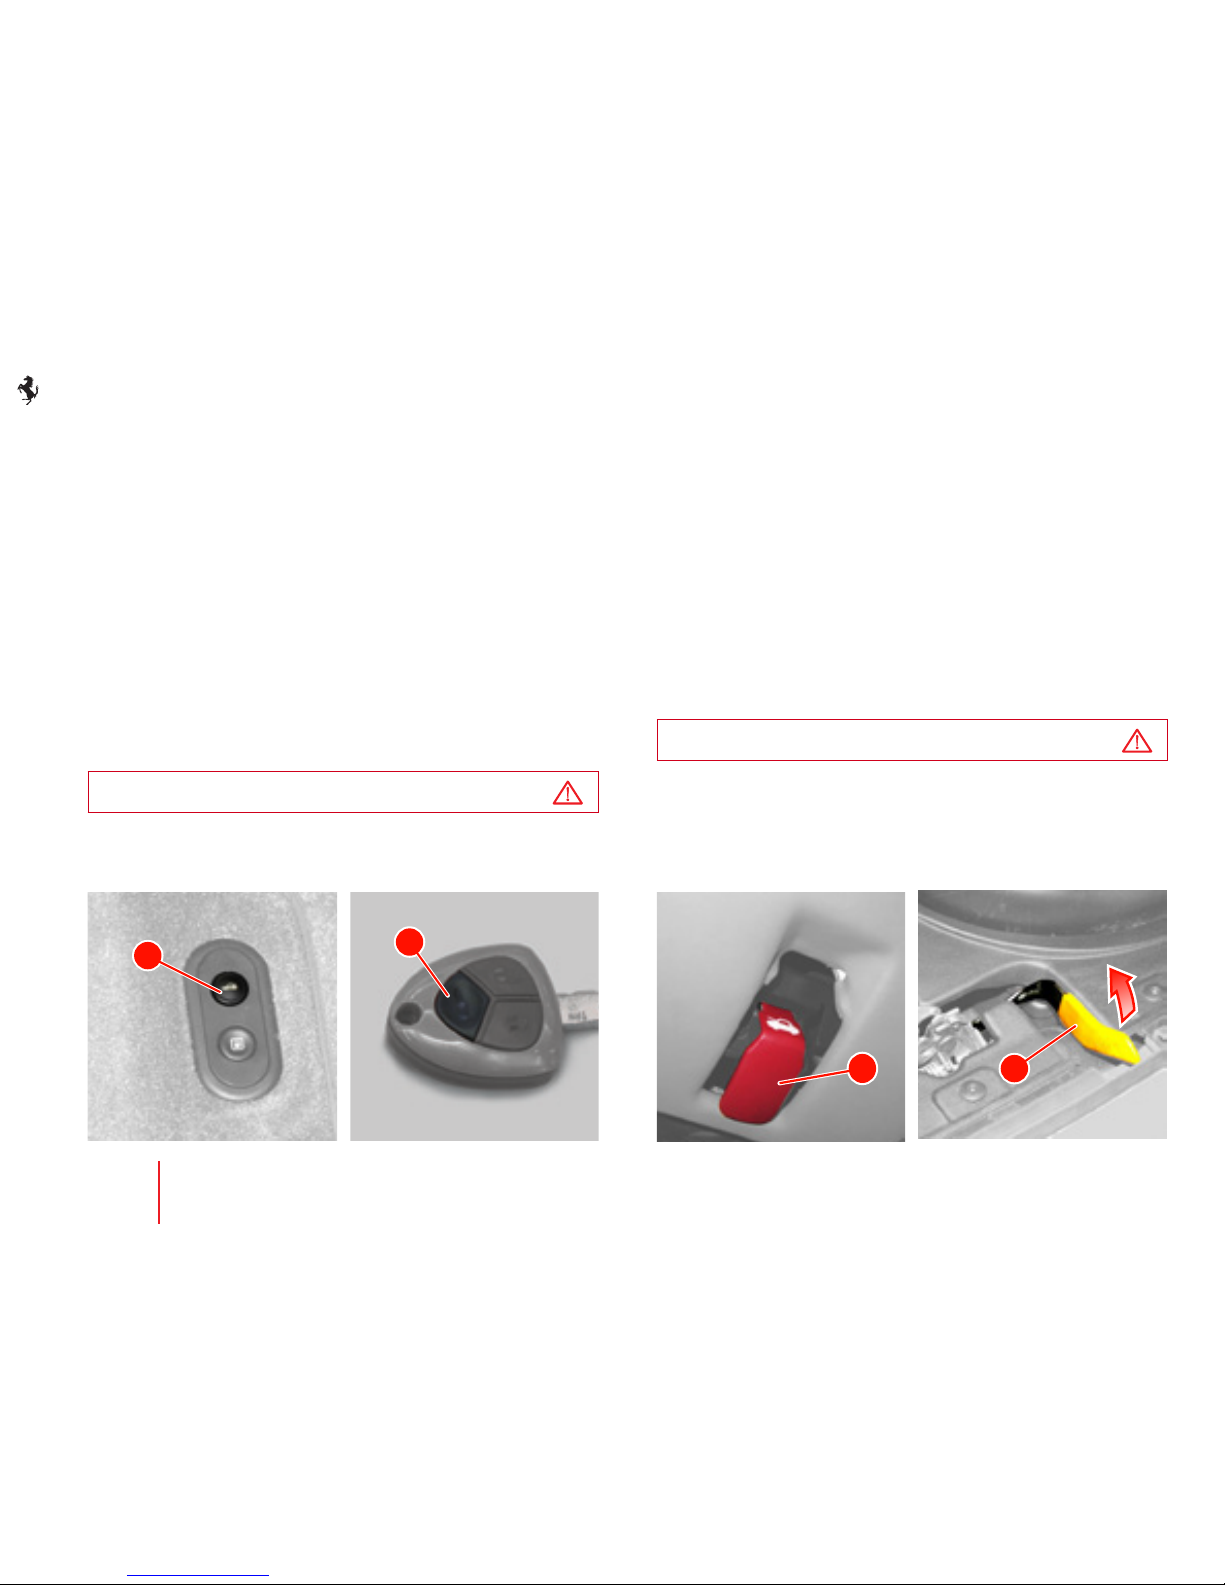
1.7 Access to the engine compartment
Opening
To unlock the engine compartment lid, pull the lever D underneath
the steering column.
Release the lever E retaining the lid. This lever is located in the rear
of the vehicle in a central position.
The lid is held open by two shock absorbers.
Closing
Lower the lid until it is closed and press down near the lock until
you hear it click in place.
Warning
Always check that the lid is closed properly to prevent it from
opening while driving.
D
E
1 • 67
Switching on the vehicle
Emergency Opening
If the lid opening lever does not work, there is a string for manual
emergency opening underneath the dashboard near the foot rest
area on the passenger side.
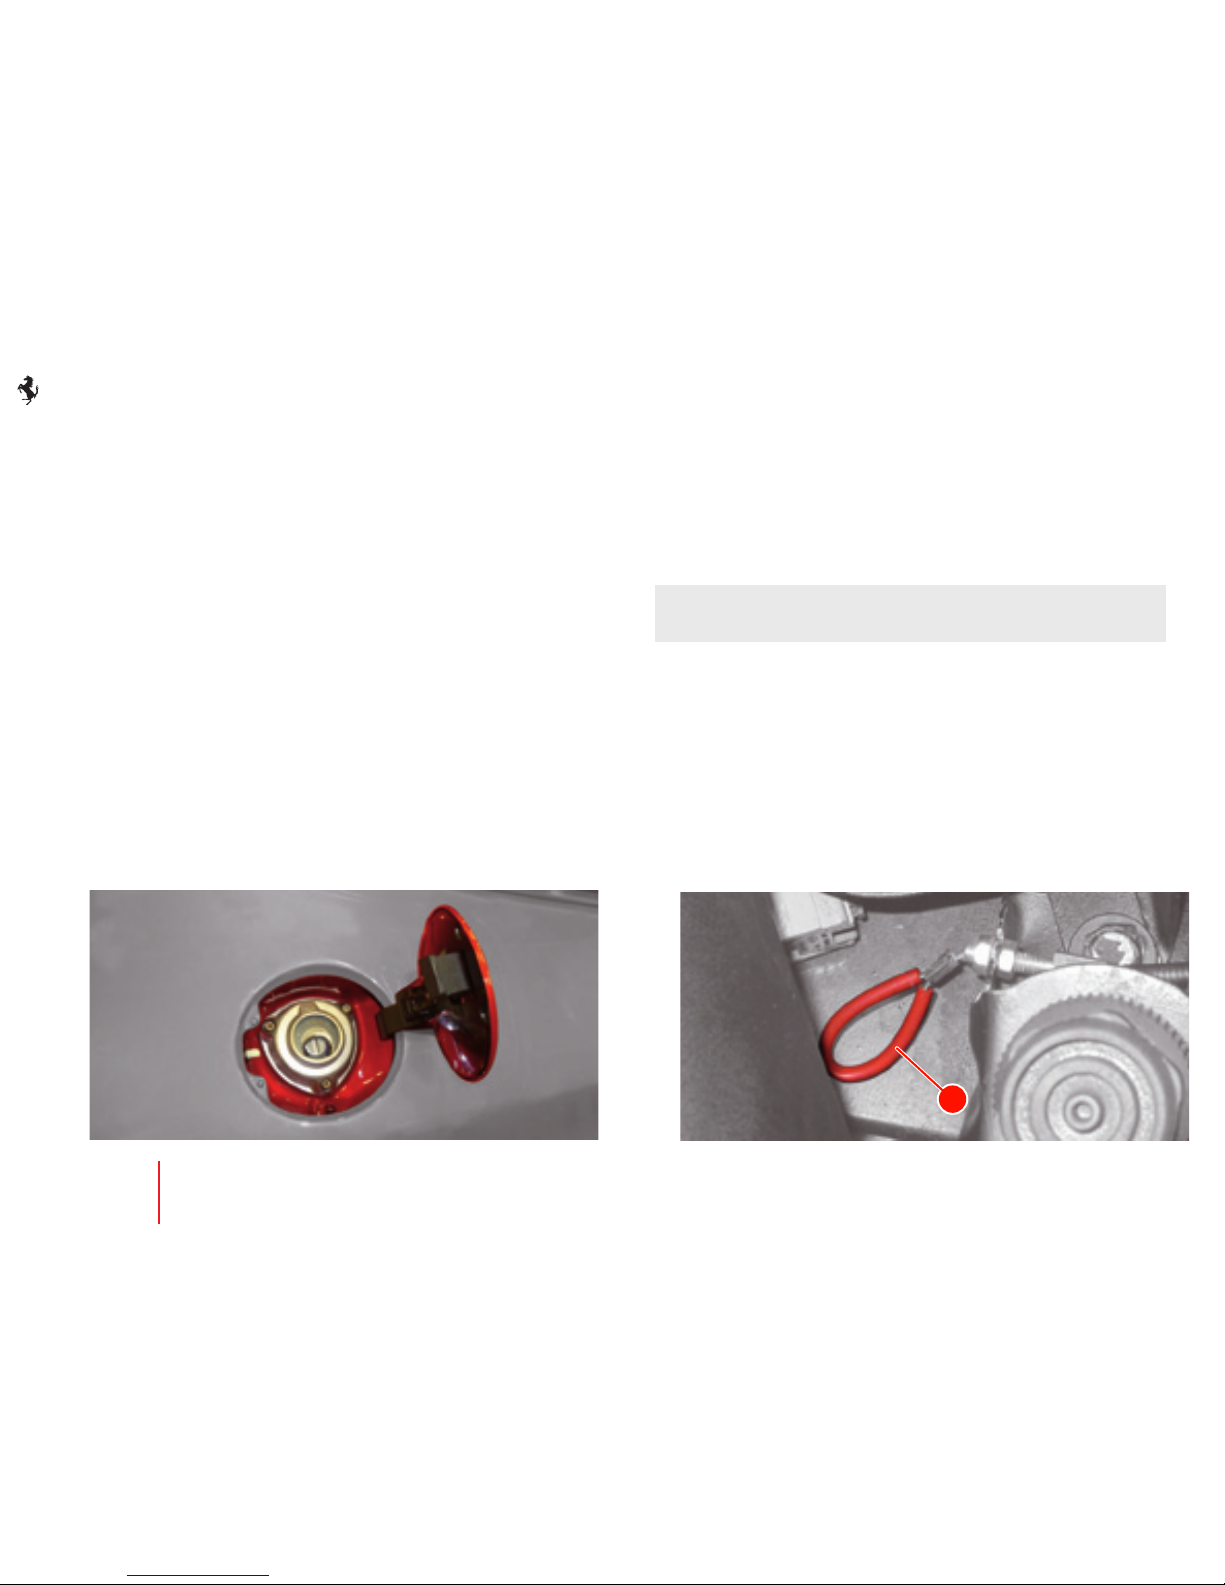
1.8 Access to and emergency opening of tank cap
Warning
Always turn off the engine during refuelling. Take extreme care
when removing the cap.
Do not smoke or use open flames when refuelling.
The following can be harmful for your health:
- fuel coming into contact with your skin;
- inhaling fuel vapours.
Opening
To open the fuel filler flap, press button M to the left of the driverside floor.
On the California model, unscrew the cap P, rotating it
counterclockwise and hang it on the hook Q.
M
1 • 68
Switching on the vehicle
Closing
On the 458 and FF models with a capless fuel filler, you do not
need to unscrew the cap and screw it up again when refuelling.
Capless fuel filler
Emergency Opening
In the event of a failure of the fuel filler flap button, the flap can be
opened manually.
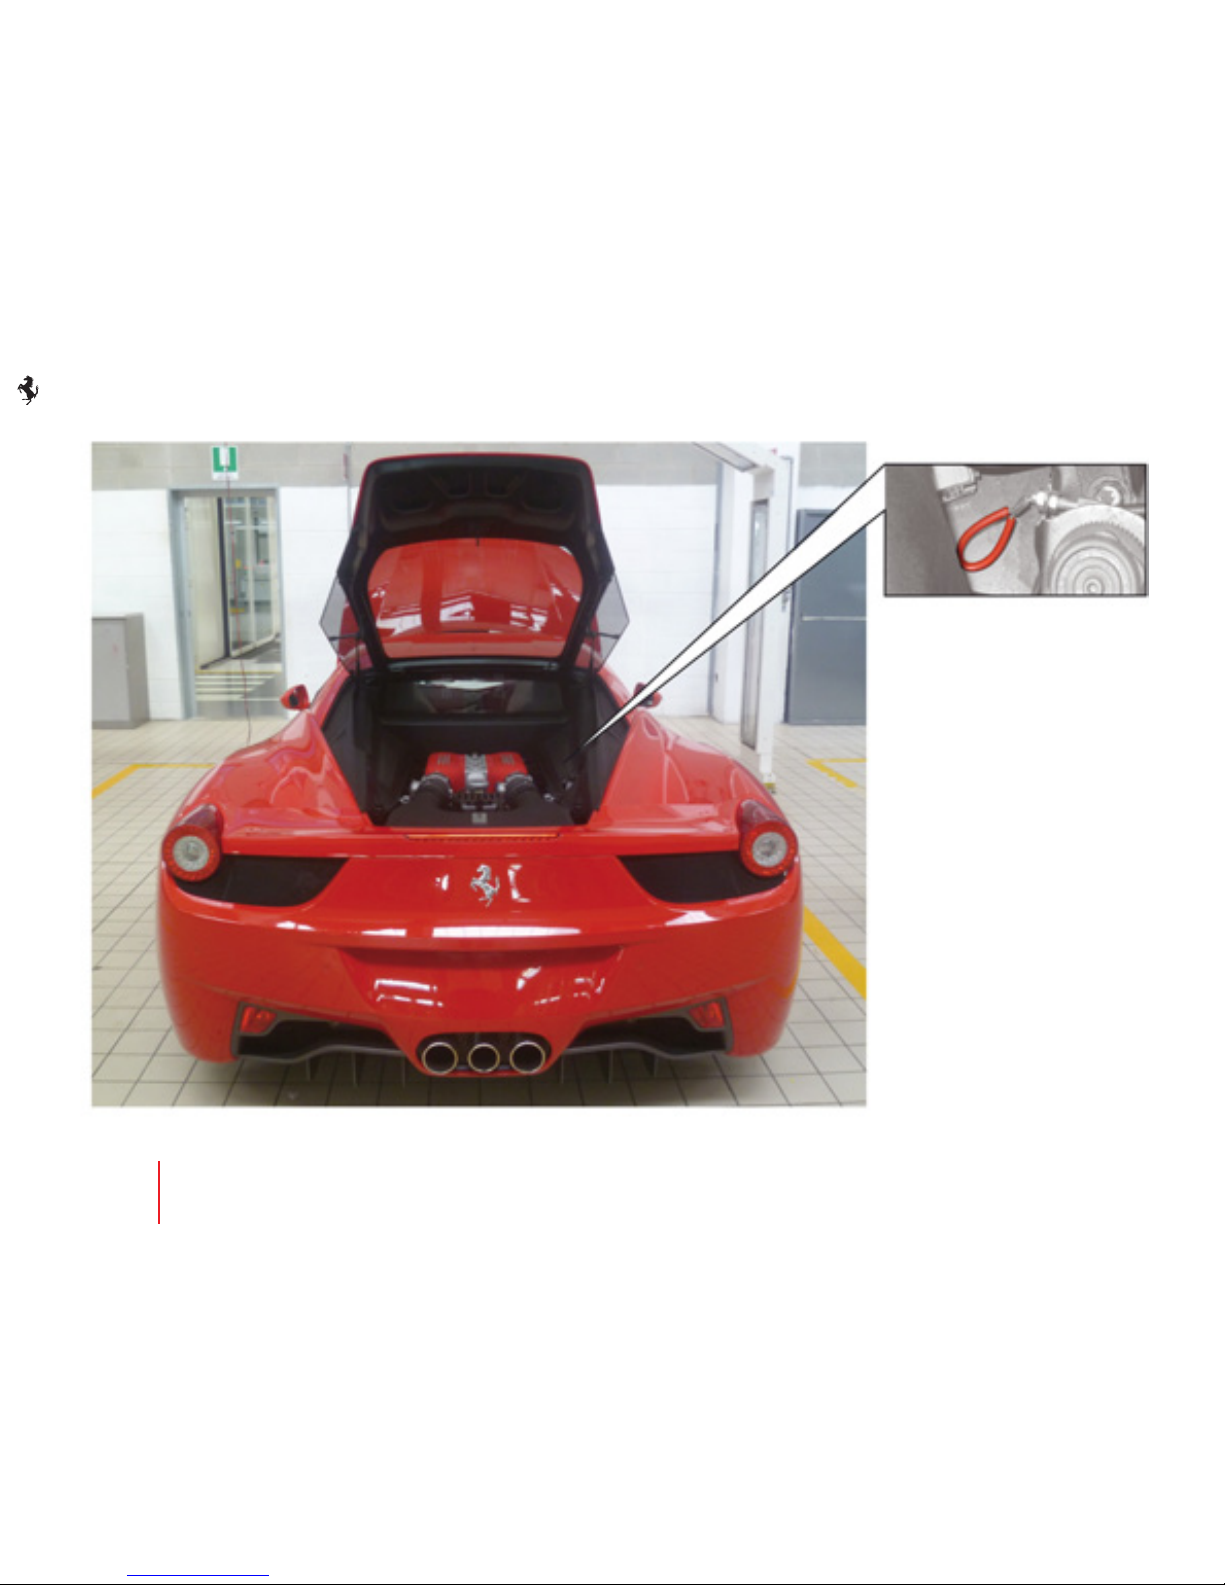
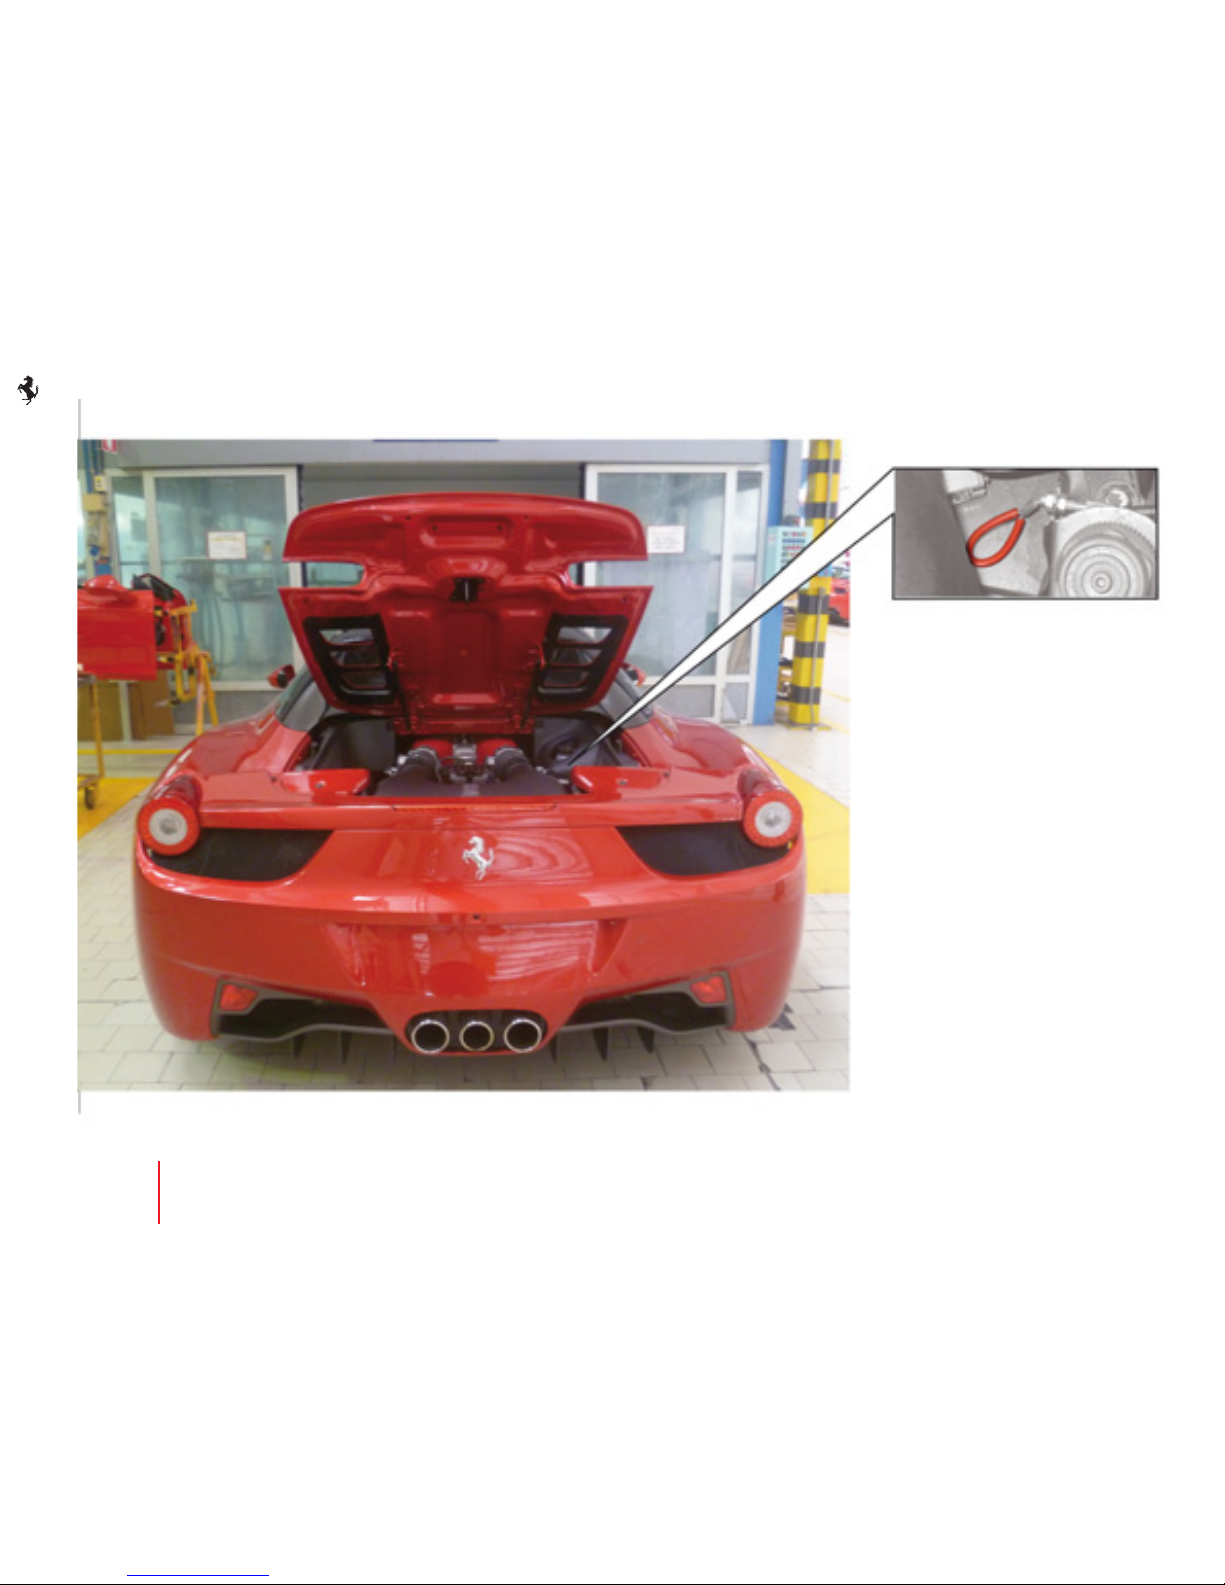
On the 458 model, open the engine compartment and pull cable N
on the right-hand side.
N
458 model
To see exactly where the tank cap emergency opening cable is
located, refer to the photograph on page 12.
1 • 69
Switching on the vehicle
Emergency opening of tank cap on the 458
ItalIa
model
1 • 70
Switching on the vehicle
Emergency opening of tank cap on the 458
SpIder
model

1 • 71
Switching on the vehicle
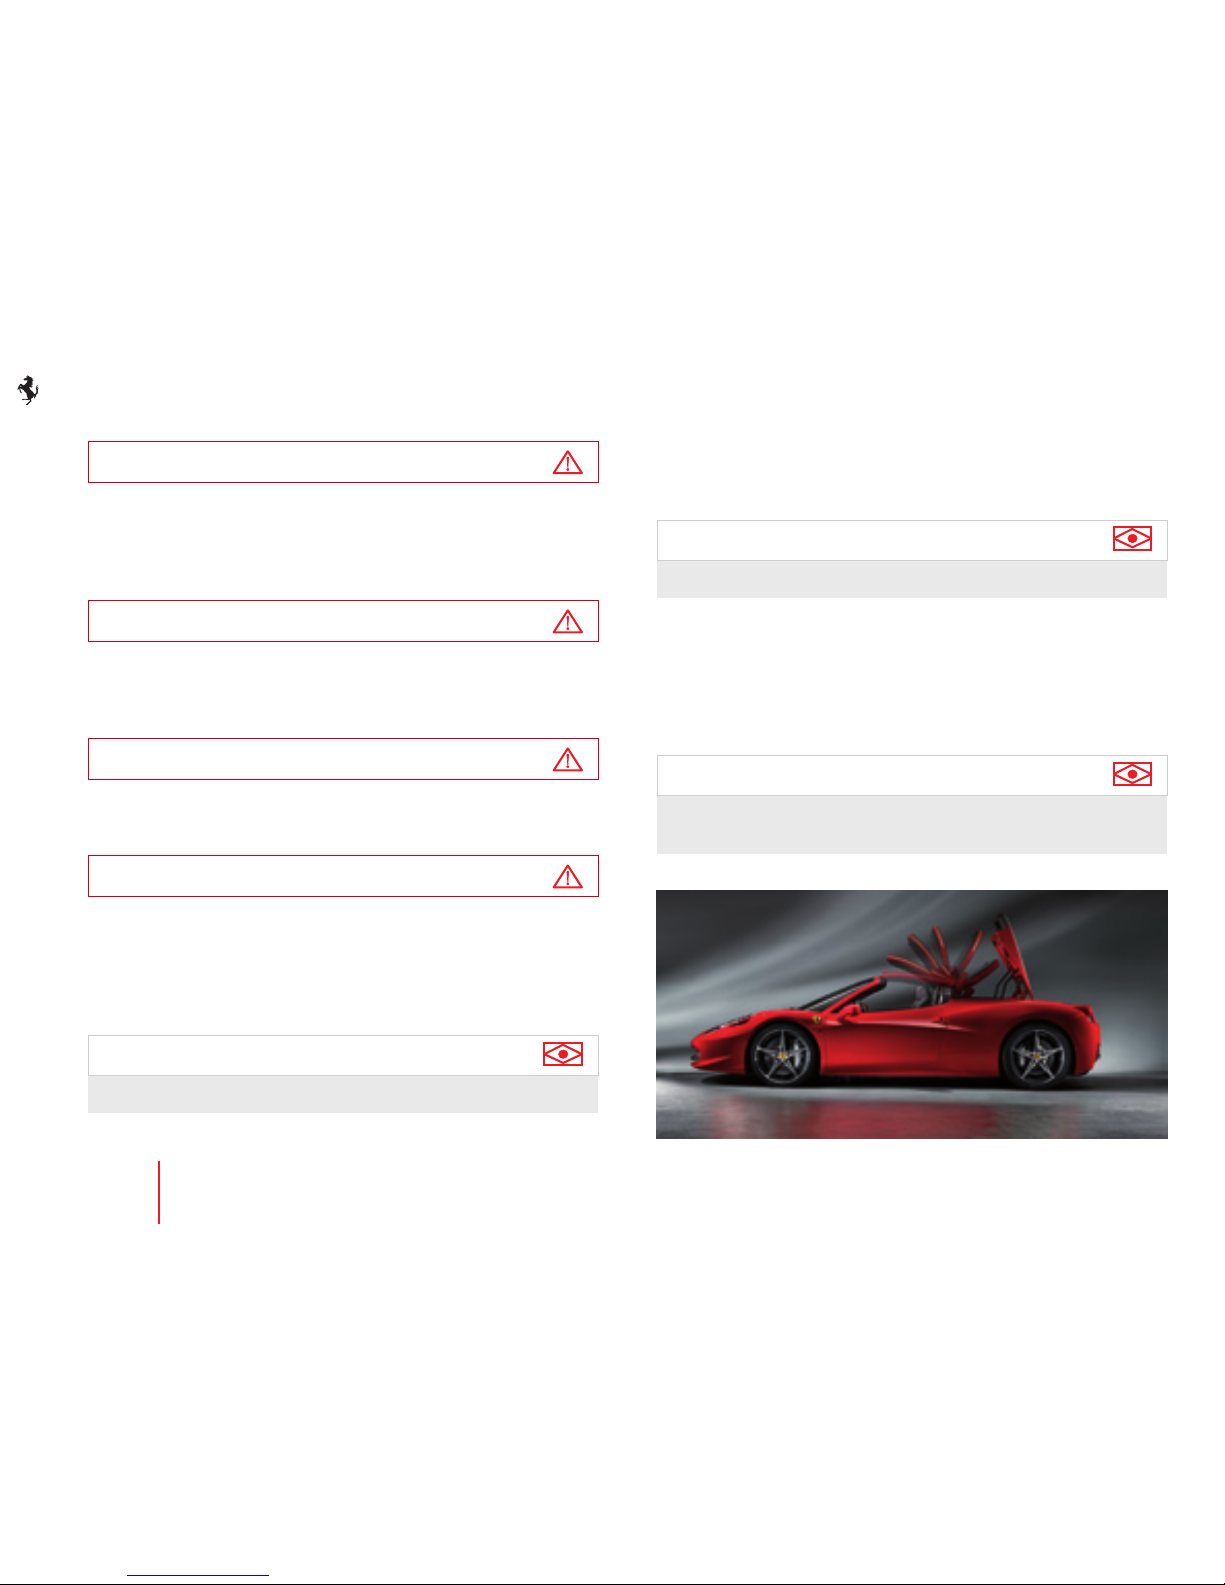
1.9 458
Spider
retractable hard top
The retractable hard top system consists of the following main
moving parts:
- a front element
- a rear element
- a cover
- a Backlite rear screen.
Opening and closing is actuated by a hydraulic system, driven by
a pump and controlled by a number of sensors that check every
opening and closing phase.
Warning
Avoid opening and closing the hard top repeatedly. Prolonged
use of the hydraulic system causes it to overheat and disables
it temporarily. The message “Roof operation inhibited-System
overheating” appears on the TFT display. After a few minutes,
normal operation is resumed.
Warning
Only operate the hard top when the vehicle is stationary and on
level ground.
Warning
The hard top should only be opened or closed when passengers
are correctly seated.
Warning
Do not place or leave items in the hard top compartment V.
Warning
Do not install accessories (ski racks, luggage racks, etc.) on the
hard top.
Roof operation
inhibited
System
overheating
V
1 • 72
Switching on the vehicle
Warning
Before operating the hard top and while it is in motion, always
ensure that all children, persons and objects are a safe distance
away from the moving parts. In the event of danger, release the
hard top switch: all movement will stop immediately.
Warning
While the hard top is in motion, never place your hands, fingers
or objects on the moving parts or on the windscreen cross
member.
Warning
DO NOT open the retractable hard top when the outside
temperature is below -10 °C (14 °F).
Warning
Before operating the hard top, make sure that the engine
compartment lid has been closed correctly. If the engine
compartment lid is open, a vehicle symbol appears on the left
TFT display that indicates that the lid is open together with a
special message.
Important note
We recommend closing the hard top when parking.
The conditions required for opening and closing the retractable
hard top are as follows:
- the ignition key must be in position II;
Important note
We recommend operating the hard top with the engine running.
- the engine compartment lid must be closed properly;
- the battery voltage must not be below 11 volts;
- the hydraulic system must not be overheated.
If one or more conditions are not met, the hard top cannot be
opened or closed and a message appears on the left TFT display.
Important note
Check that there is sufficient vertical clearance to open the hard
top.

1 • 73
Switching on the vehicle
Opening the hard top
Important note
Before opening the hard top, ensure that it is dry to prevent
water entering the passenger compartment or hard top
compartment.
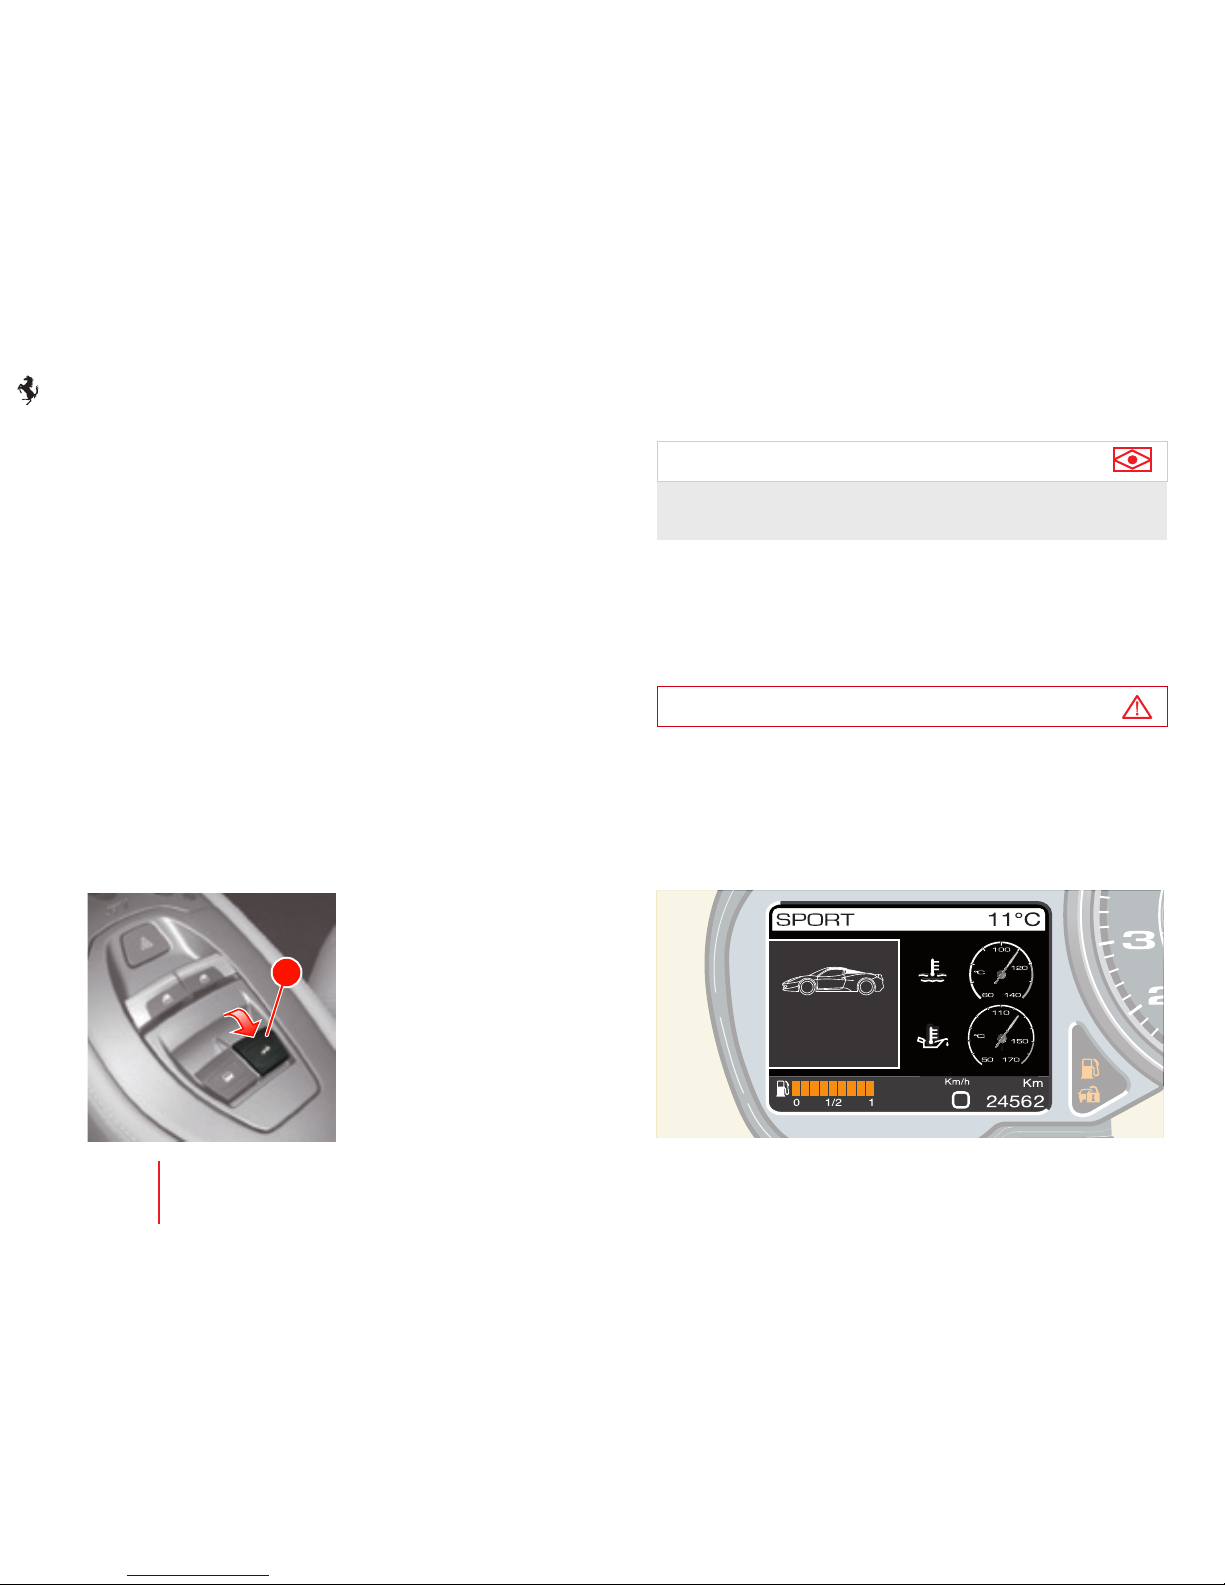
Pull switch A on the centre console and keep it pulled until the
hard top is fully open: the operation in progress is indicated by the
message “Roof opening” on the left TFT display.
When the hard top opens, the following operations take place:
- the side windows and BackLite rear screen are fully lowered
- the hard top compartment cover opens
- the hard top parts are positioned in the hard top compartment
- the hard top compartment cover closes
- the BackLite rear screen is raised until it reaches the set height
- the side windows are raised.
Important note
While the hard top is being opened, you cannot operate the side
windows and the BackLite rear screen.
Once the opening cycle has been completed, the message “Roof
open” is displayed on the left TFT display accompanied by an
acoustic signal.
To raise the side windows completely, keep switch A pulled for
approximately 2 seconds.
Warning
Do not reverse the opening or closing direction when opening
or closing the hard top.
Always complete the cycle until the acoustic signal is emitted.
A
Roof opening
Roof open
1 • 74
Switching on the vehicle
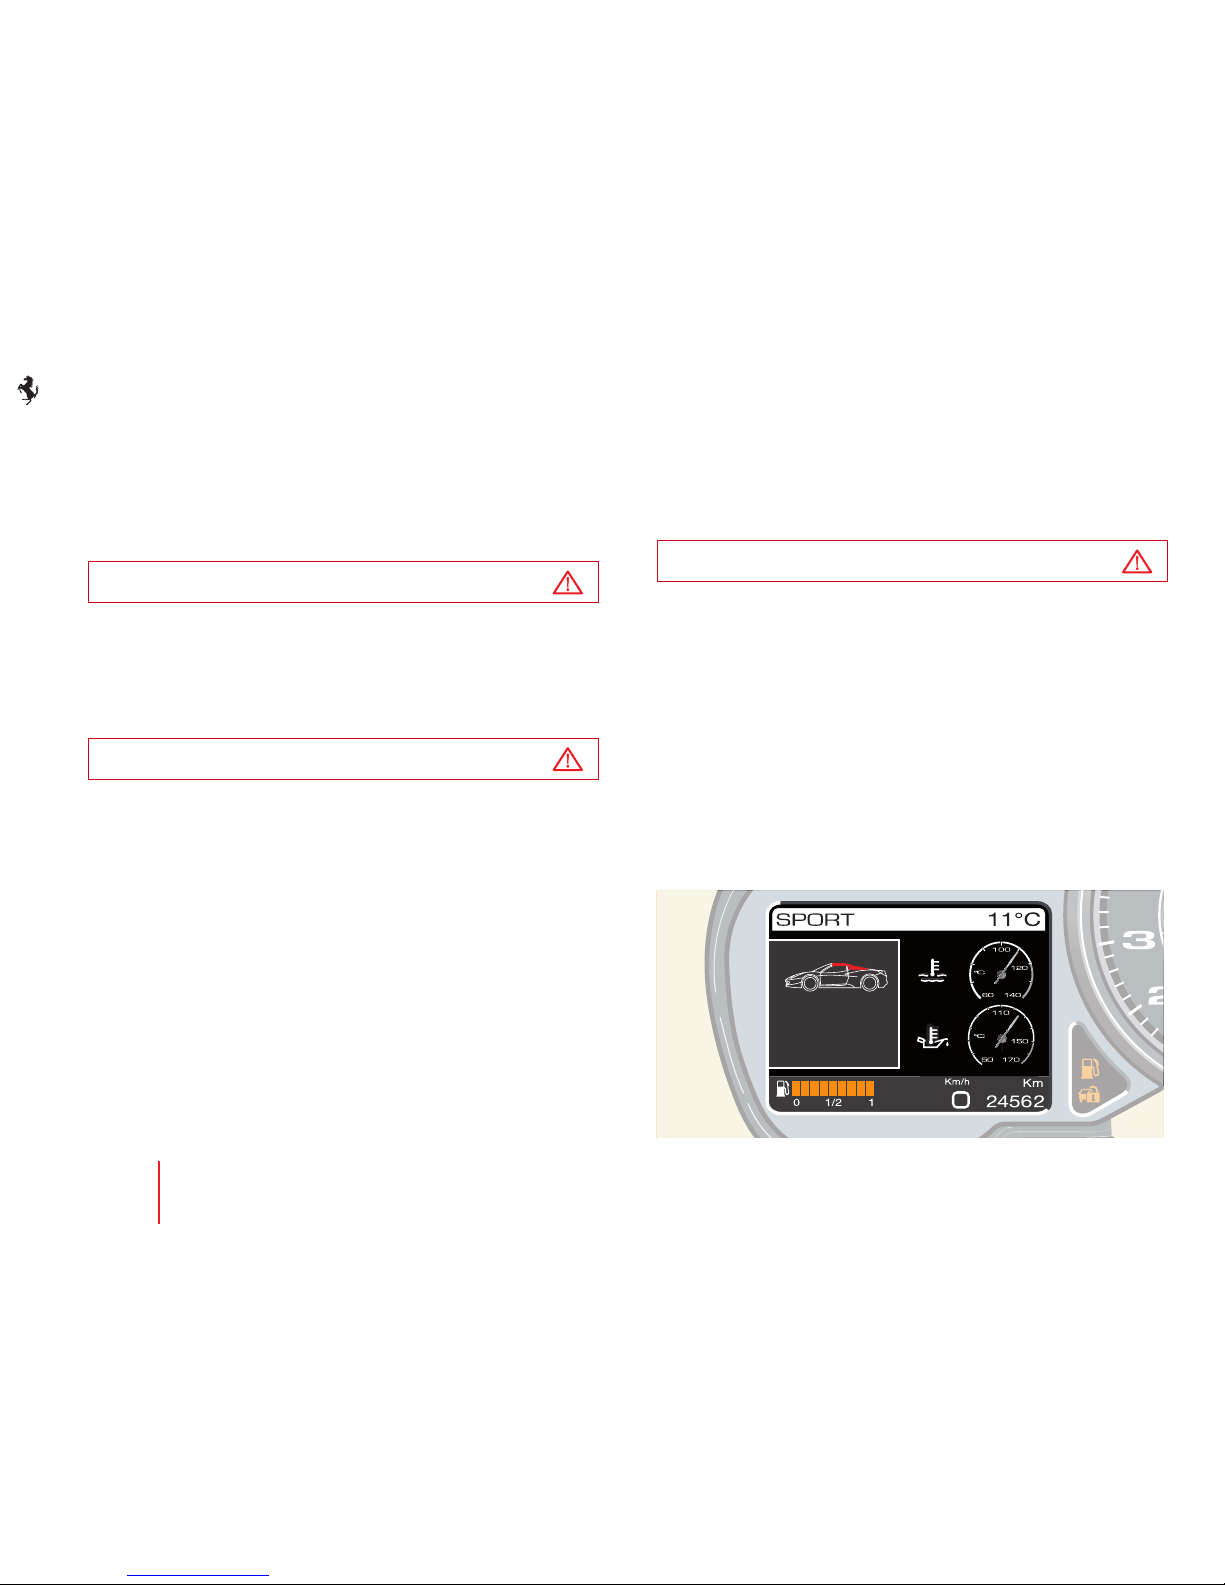
Closing the hard top
Press switch A on the centre console and keep it pressed until the
hard top is fully closed: the operation in progress is indicated by
the message “Roof closing” on the left TFT display.
When the hard top closes, the following operations take place:
- the hard top compartment cover opens
- the side windows and BackLite rear screen are fully lowered
- the two parts of the hard top come out of the hard top
compartment and the front part fits onto the windscreen cross
member
- the hard top compartment cover closes
- the Backlit rear screen is raised
- the side windows are raised.
Important note
While the hard top is being closed, you cannot operate the side
windows and the BackLite rear screen.
Once the closing cycle has been completed, the message “Roof
closed” is displayed on the left TFT display accompanied by an
acoustic signal.
To raise the side windows completely, keep switch A pressed for
approximately 2 seconds.
Warning
Do not reverse the opening or closing direction when opening
or closing the hard top.
Always complete the cycle until the acoustic signal is emitted.
A
Roof closed
1 • 75
Switching on the vehicle
Interrupting the hard top opening/closing cycle
If button A is released before the hard top has been completely
opened or closed, it remains in a stand-by position and the message
“Complete roof cycle” appears on the left TFT display until the
opening or closing cycle is reactivated.
Warning
Do not drive until hard top opening or closing has been fully
completed.
If the hard top is still in standby position after a few minutes, an
acoustic signal will prompt you to complete the operation.
Warning
Try not to interrupt the hard top opening/closing cycle. If you
have to interrupt the opening/closing cycle, do not leave the
hard top in stand-by position for longer than 4 minutes.
Indication of hard top operating system failure
If there is a hard top operating system failure, it is indicated by
a special symbol and the message “Roof failure” on the left TFT
display.
Warning
If there is a hard top operating system failure, contact the
Ferrari Service Network.
Roof failure
 Loading...