

Page 1
Manual / Instrukcja obsługi
RW-770HD
Recorder / Player DVD with hard disc HDD
Nagrywarka / Odtwarzacz DVD z dyskiem twardym HDD
POLSKI . . . . . . 02
ENGLISH . . . . . . 26
DEUTSCH . . . . . . 50
ESPAÑOL . . . . . . 73
Page 2
POLSKI
Wyłączenie odpowiedzialności
Ferguson wyłącza wszelkie gwarancje, zarówno
wyrażone wprost, jak i domniemane, w tym m.in.
domniemane gwarancje dotyczące wartości
rynkowej produktu i dokumentacji oraz ich
przydatności do określonych celów. Uaktualnienia
sprzętu wykonywane są regularnie. Dlatego też
niektóre instrukcje, specyfikacje i ilustracje zawarte
w niniejszej dokumentacji mogą się nieznacznie
różnić od faktycznych. Wszystkie elementy opisane
w tym podręczniku stanowią wyłącznie ilustrację i
nie muszą dotyczyć bezpośrednio sprzętu
posiadanego przez Państwa. Opisy zawarte w tym
podręczniku nie dają żadnych praw ani uprawnień.
Ferguson zastrzega sobie prawo do weryfikacji i
wprowadzania zmian lub poprawek do produktu lub
dokumentacji w każdej chwili, bez obowiązku
powiadamiania kogokolwiek o tego typu
czynnościach. Ferguson nie ponosi
odpowiedzialności za szkody wtórne lub
przypadkowe, w tym m.in. utratę zysków w
interesach lub jakąkolwiek stratę handlową,
spowodowane użyciem tego produktu.
Znaki towarowe
Ferguson jest zastrzeżonym znakiem towarowym
firmy Ferguson Wszystkie pozostałe nazwy firm lub
produktów są znakami towarowymi, zastrzeżonymi
znakami towarowymi lub znakami usługowymi
odpowiednich firm.
DivX®, DivX®Certified i towarzyszące im logo są
znakami towarowymi DivX®, Inc. i wszystkie
używane są na licencji.
Wyprodukowano na licencji Dolby
Laboratories. Dolby i symbol
podwójnego D są znakami towarowymi Dolby
Laboratories.
W tym produkcie wykorzystano technologię ochrony
praw autorskich, chronioną określonymi patentami
amerykańskimi i innymi prawami ochrony własności
intelektualnej, należącą do Macrovision Corporation
oraz do innych właścicieli praw. Użycie technologii
chronionej prawem autorskim musi być
autoryzowane przez Macrovision Corporation i
dozwolone jest tylko w zakresie domowym i innych
ograniczonych zastosowaniach prezentacyjnych,
chyba że Macrovision Corporation wyrazi zgodę na
inne zastosowanie. Stosowanie technik inżynierii
wstecznej lub demontaż są zabronione.
Ostrzeżenie
W celu uniknięcia pożaru lub ryzyka porażenia
prądem nie wkładaj wtyczki do gniazda
przedłużacza, gniazda naściennego lub innego
złącza, jeśli nie można jej dokładnie podłączyć. Nie
wystawiaj urządzenia na działanie deszczu lub
wilgoci.
OSTRZEŻENIE: W CELU OGRANICZENIA RYZYKA
PORAŻENIA PRĄDEM NIE ZDEJMUJ OBUDOWY (LUB
TYLNEJ PŁYTY). WEWNĄTRZ URZĄDZENIA NIE MA
CZĘŚCI, KTÓRE MOGĄ BYĆ NAPRAWIANE PRZEZ
UŻYTKOWNIKA. NAPRAWY POWIERZAJ
WYKWALIFIKOWANYM PRACOWNIKOM SERWISU.
Środki ostrożności
• Przeczytaj i zachowaj te instrukcje.
• Nie używaj urządzenia w pobliżu wody.
• Czyść jedynie suchą ściereczką
• Nie zasłaniaj otworów wentylacyjnych. Zainstaluj
zgodnie z instrukcjami producenta.
• Nie instaluj urządzenia w pobliżu źródeł ciepła,
takich jak kaloryfery, wyloty nawiewów, piece lub
inne instalacje (w tym wzmacniacze), które
generują ciepło.
• Chroń przewód zasilający przed
nadepnięciem lub przebiciem.
• Używaj tylko przystawek/akcesoriów określonych
przez producenta.
• Odłącz urządzenie od sieci podczas burzy lub gdy
nie będzie używane przez dłuższy czas.
Pamiętaj, że gwarancja nie obejmuje uszkodzeń
urządzenia, które są spowodowane uderzeniem
pioruna.
• Serwisowanie powierzaj tylko
wykwalifikowanemu personelowi. Serwisowanie jest
konieczne, gdy urządzenie zostanie w jakikolwiek
sposób uszkodzone, wystawione na deszcz lub
wilgoć, nie działa prawidłowo lub zostało
upuszczone.
• Aby odłączyć urządzenie od zasilania, należy
odłączyć przewód zasilający. Z tego powodu
gniazdko powinno znajdować się blisko urządzenia i
być łatwo dostępne.
- 2 -
Page 3

POLSKI
WPROWADZENIE
Nagrywarka Ferguson potrafi kodować sygnały TV i
AV z urządzeń zewnętrznych lub sygnały cyfrowe z
urządzeń IEEE 1394 oraz nagrywać* dane na
płytach DVD+RW, DVD+R, DVD-RW lub DVD-R w
celu archiwizacji. Nagrywarka funkcjonuje także
jako odtwarzacz DVD i CD.
*Nagrywanie na płytach DVD-R 8X nie jest
obsługiwane.
PODSTAWOWE FUNKCJE
• Funkcje nagrywania na wewnętrznym dysku
twardym to m.in. przesunięcie czasowe i
bezpośrednie kopiowanie
• cyfrowe (Direct Digital Dub). Odtwarzanie
gotowych płyt DVD i płyt kompaktowych
• (Audio CD). Zapisywanie i odtwarzanie
plików multimedialnych
• (muzyki, zdjęć, filmów) na wewnętrznym dysku
twardym. Przenoszenie plików pomiędzy
urządzeniami USB*, DVD i wewnętrznym dyskiem
twardym.
•Obsługa standardu MP3.
Obsługa kodeka DivX® (czyli
kompresji/dekompresji DivX®).
Dźwięk Dolby Digital z 6 ('5.1') osobnymi
kanałami (przód/lewy, przód/środek, przód/prawy,
tył/lewy, tył/prawy i głośnik niskotonowy).
• Nagrywanie permanentne (do 3 godzin)
Nagrywanie programów telewizyjnych i
przenoszenie domowych filmów na DVD.
*Pliki można przenosić tylko z urządzeń USB, nie na
urządzenia USB.
Przesunięcie czasowe
Jednoczesne nagrywanie i odtwarzanie wideo.
• Wstrzymywanie i wznawianie programów
telewizyjnych.
Przewijanie do przodu, do tyłu i
przechodzenie do
dowolnego miejsca nagrania.
• Natychmiastowa powtórka do 3 godzin.
• Odtwarzanie uprzednio nagranych
programów z
jednoczesnym nagrywaniem innego programu.
Odtwarzacz DVD/CD
• Obsługa formatów ekranowych 16:9 i 4:3.
• Funkcje odtwarzania, takie jak program,
powtarzanie, przewijanie do przodu i do tyłu,
powiększenie itp.
Obsługa 34 języków audio, języków napisów i
języków menu płyty. Obsługa 9 kątów ustawienia
kamery oraz innych standardowych funkcji
odtwarzania DVD. Zgodność z płytami DVD, Super
VCD, VCD, CD, CD-R, odtwarzanie plików w
formatach MP3, JPEG i Picture CD. Technologia
ochrony praw autorskich Macrovision.
Nagrywanie programów
Nagrywaj z tunera TV lub analogowego wejścia AV
w formacie MPEG-2.
Odtwarzanie uprzednio nagranego programu z
dysku twardego z jednoczesnym
nagrywaniem innego programu.
Programowany zegar do jednokrotnego lub
cyklicznego nagrywania programu telewizyjnego.
Możliwość zaprogramowania do 20 zdarzeń
nagrywania czasowego z trzema opcjami:
„Jednorazowe",
„Codziennie", „Raz w tygodniu".
OTR - szybkie nagrywanie; nagrywanie
programu
telewizyjnego przez naciśnięcie przycisku.
Archiwizacja DVD ('kopiowanie')
Możliwość archiwizacji nagrań z dysku
twardego na płytach DVD+RW, DVD+R, DVD-RW
lub DVD-R. Płyty DVD nagrane za pomocą
nagrywarki Ferguson RW-770HD można odtwarzać
na większości dostępnych obecnie i w przyszłości
odtwarzaczy DVD.
Archiwizacja własnych nagrań wideo
Przenoszenie nagrań wideo z magnetowidu,
analogowej lub cyfrowej (DV) kamery na płyty DVD
za pomocą funkcji Direct Digital Dub™.
Złącza Cyfrowe wejście wideo (DV) do kamer
cyfrowych; sygnały audio i wideo przesyłane tym
samym przewodem.
Standardowe wyjście wideo (CVBS), wyjście Svideo, wejście/wyjście SCART i złącza wyjść
komponentowych sygnałów wideo (Y, Cb/Pb, Cr/Pr).
Koncentryczne wyjście cyfrowe dźwięku.
Możliwość podłączenia modułów pamięci flash
USB, czytników kart pamięci USB i kamer USB
(urządzenie pamięci masowej musi być
sformatowane w systemie plików FAT32).
Przelot sygnału przez złącza SCART i antenowe TV.
Funkcje dodatkowe
• Technologia przetwarzania obrazu Diamond
Copy zapewniająca znakomitą jakość obrazu.
• System blokady rodzicielskiej.
• Program wygaszacza ekranu zapewniający jego
ochronę.
• Inteligentna aktualizacja oprogramowania.
• Wybieranie kolejnoliniowe tworzy obraz z
dwukrotnie większą ilością linii wybierania niż
w przypadku komponentowych sygnałów wideo.
Powoduje to redukcję migotania obrazu i
artefaktów ruchu oraz zapewnia większą ostrość
obrazu na dużych ekranach.
Nieprawidłowe ustawienie trybu wyjścia moŜe
powodować brak lub niską jakość obrazu. W razie
problemów z jakością obrazu lub jego braku naleŜy
nacisnąć przycisk wybierania kolejnoliniowego w
celu zmiany trybu wyjścia.
- 3 -
Page 4
POLSKI
ZAWARTOŚĆ PUDEŁKA
• Nagrywarka
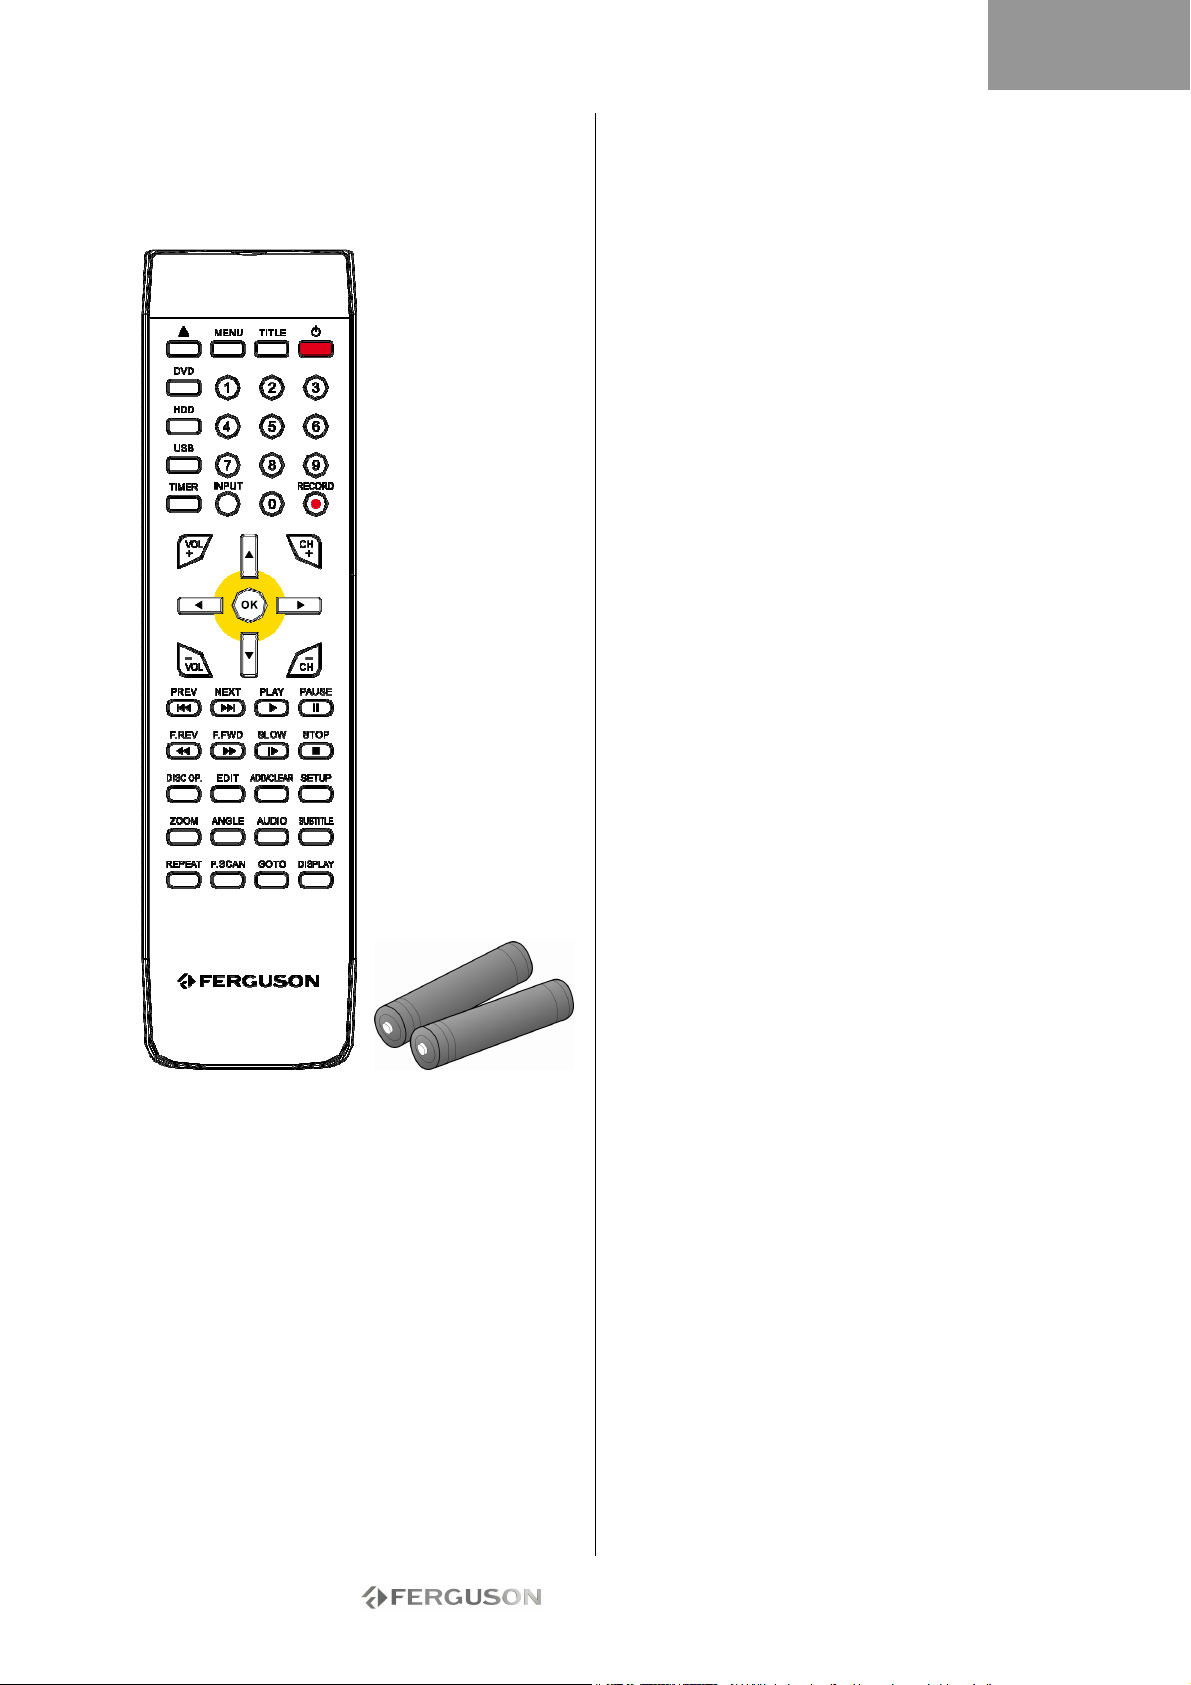
• Pilot zdalnego sterowania i 2 baterie AAA
• Podręcznik użytkownika
• Książka gwarancyjna
RODZAJE PŁYT
DVD
Płyty DVD zawierają jeden lub kilka tytułów. Każdy
tytuł może być dalej podzielony na kilka rozdziałów.
Czasem rozdział może zawierać punkty indeksowe,
które dzielą go na kilka części.
Różne kąty ustawienia kamery
Gdy odtwarzane są filmy lub inne materiały z
obsługą odtwarzania pod wieloma kątami, można
wybrać kąt ustawienia kamery.
Wiele języków audio
Przy odtwarzaniu filmów lub płyt z wieloma
zapisanymi językami i/lub ścieżkami dźwiękowymi
można wybrać odpowiedni język.
Napisy w wielu językach
Przy odtwarzaniu filmów lub płyt z napisami w wielu
językach można wybrać odpowiedni język napisów
lub je wyłączyć.
SVCD/VCD/AUDIO CD
Płyty SVCD/VCD/AUDIO CD podzielone są na
utwory. Utwór może zawierać wiele punktów
indeksowych.
MP3 /JPEG/DivX® (pliki audio/obrazy/wideo)
MP3 to format pliku z kompresją dźwięku z
rozszerzeniem "mp3" lub ".MP3". JPEG to format
pliku z kompresją obrazu z rozszerzeniem ".jpg" lub
".JPG". DivX® to format pliku z kompresją obrazu
wideo z rozszerzeniem ".avi" lub ".AVI".
Nagrywarka Ferguson RW-770HD moŜe
potrzebować trochę czasu na wyświetlenie
zawartości płyty, zwłaszcza jeśli płyta zawiera wiele
danych.
Obsługiwane płyty
• CD Audio i CD EXTRA
• CD-ROM (Tryb 1)
• CD-ROM XA (Tryb 2, Forma 1 i Forma 2)
• CD-I (Tryb 2, Forma 1 i Forma 2) i CD-I Ready
• Photo CD (z jedną lub wieloma sesjami)
• Video CD
• CD-TEXT
• Jednostronna, jednowarstwowa płyta DVD-ROM
(SS-SL)
• Jednostronna, dwuwarstwowa PRZECIWNA płyta
DVD-ROM (SS-DL-OPT), RÓWNOLEGŁA płyta
DVD-ROM (SS-DL-PTP)
• Dwustronna, jednowarstwowa płyta DVD-ROM
(DS-SL)
• Dwustronna, dwuwarstwowa płyta DVD-ROM (DSDL)
• Dwustronna, dwuwarstwowa PRZECIWNA płyta
DVD-ROM (DS-DL-OPT), RÓWNOLEGŁA płyta
DVD-ROM (DS-DL-PTP)
• Jednostronna, jednowarstwowa płyta DVD±R/RW
Nieobsługiwane typy płyt
Niesfinalizowane płyty z innych nagrywarek
DVD/CD. Nie wszystkie płyty CD-R, CD-RW,
DVD-R, DVD-RW, DVD+R, DVD+RW są
obsługiwane, w zależności od typu płyty lub stanu
nagrania.
PŁYTY NAGRYWALNE
• DVD±RW (płyty DVD wielokrotnego zapisu)
DVD±RW to format wymazywalny. Płyty DVD±RW
można zapisać ponad 1000 razy.
• DVD±R (płyty DVD jednokrotnego zapisu)
Dyski DVD±R mogą być zapisane tylko raz. Na
jednej płycie można dokonać kilkukrotnego
nagrywania, dopóki nie zostanie ona sfinalizowana
lub zapełniona.
Jeśli płyta zostanie sfinalizowana, nie moŜna jej
edytować ani na niej nagrywać, nawet jeśli jest
jeszcze wolne miejsce. Na innych odtwarzaczach
moŜna odtwarzać tylko sfinalizowane płyty DVD±R
nagrane za pomocą nagrywarki Ferguson.
Natomiast aby móc odtwarzać na innych
- 4 -
Page 5
odtwarzaczach płyty DVD±RW, naleŜy uŜyć opcji
„zapewnij zgodność".
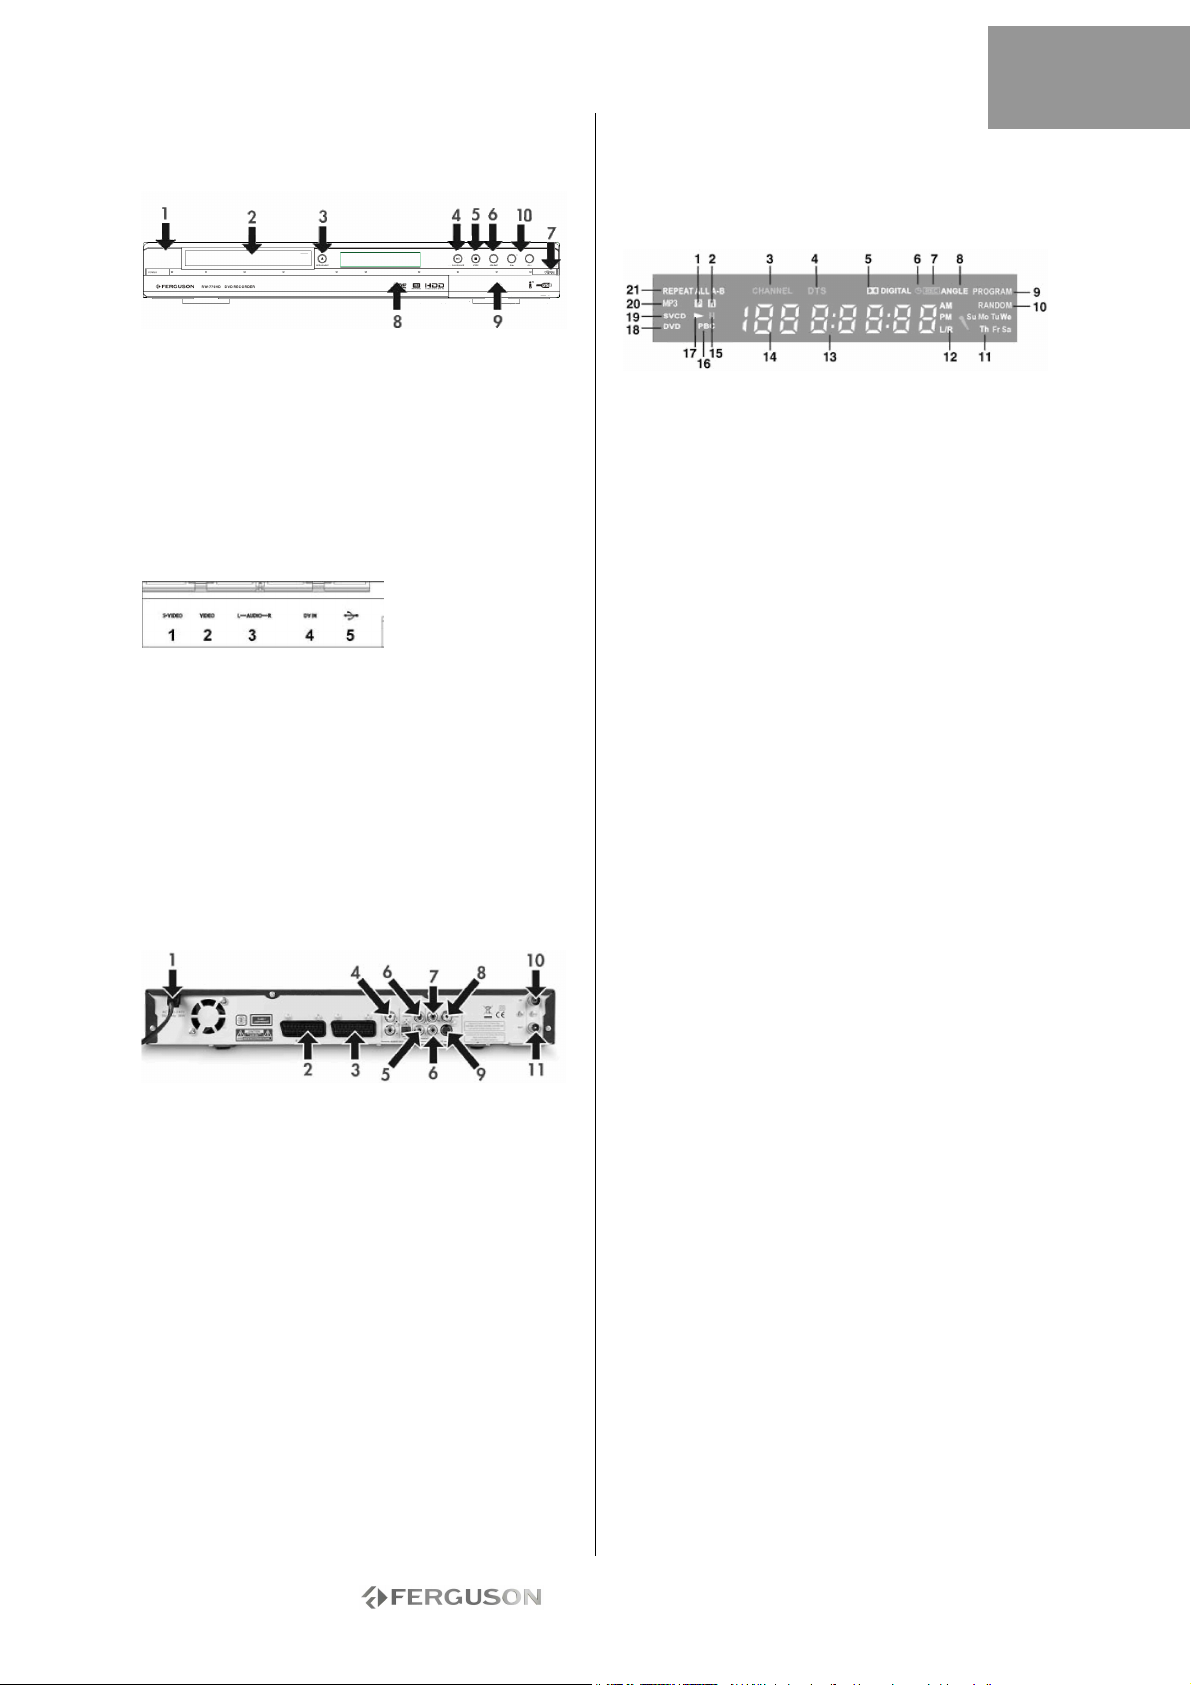
ELEMENTY STEROWANIA I FUNKCJE PANELU
PRZEDNIEGO
POLSKI
10. Wejście antenowe - do podłączenia
przewodu antenowego/telewizji kablowej.
11. Wyjście antenowe - wyjście sygnału
telewizyjnego do telewizora.
Wskaźniki wyświetlacza
1. Przycisk zasilania
2. Podajnik płyty DVD
3. Przycisk Open/Close (Otwórz/Zamknij)
4. Przycisk Odtwarzanie/Pauza
5. Przycisk Stop (Zatrzymanie)
6. Przycisk źródło
7. Przycisk Nagrywanie
8. Wyświetlacz
9. Złącza panelu przedniego
10. Przyciski CH+ / CH-
Złącza panelu przedniego (dostępne po
otwarciu klapki)
1. S-Video: Złącze wejścia S-Video, do podłączenia
odpowiedniego urządzenia wideo.
2. Kompozytowy sygnał wideo: Złącze wejścia
wideo, do podłączenia odpowiedniego
urządzenia wideo.
3. Kompozytowy sygnał audio L/R: Złącza wejścia
audio, służą do podłączenia sygnału audio
z urządzeń podłączonych do wejścia SVideo lub sygnału kompozytowego.
4. DV IN: Złącze wejścia DV (i-Link/IEEE
1394), do podłączenia cyfrowej kamery wideo.
5. USB: Złącze wejścia USB, do podłączenia
urządzenia pamięci masowej USB.
UKŁAD PANELU TYLNEGO
1. Wejście zasilania - złącze przewodu zasilania
sieciowego.
2. Wejście SCART (SCART 2) - do podłączenia
cyfrowego sprzętu AV z wyjściem SCART.
3. Wyjście SCART (SCART 1) - do podłączenia
telewizora lub innego sprzętu z wejściem SCART.
4. Wyjście audio L/R - analogowe wyjście dźwięku
(lewy i prawy kanał).
5. Koncentryczne cyfrowe wyjście audio wyjście cyfrowego sygnału dźwiękowego do
podłączenia wzmacniacza lub amplitunera z
cyfrowym wejściem audio.
6. YUV (Y Cb/Pb Cr/Pr) - do podłączenia
telewizora z wejściami YUV (Y Cb/Pb Cr/Pr). Tryb
wyjścia może być ustawiony na wybieranie
kolejnoliniowe lub z przeplotem.
7. Wyjście wideo CVBS - do podłączenia
telewizora z wejściem CVBS.
8. Optyczne cyfrowe wyjście audio - wyjście
cyfrowego sygnału dźwiękowego zapisanego
na płytach do podłączenia wzmacniacza lub
amplitunera z cyfrowym optycznym wejściem audio.
9. Wyjście S-Video - do podłączenia telewizora z
wejściem S-VIDEO.
1. PAL
2. NTSC
3. Kanał
4. DTS
5. Dolby
6. Zegar
7. Nagrywanie
8. Możliwość wyboru kąta
9. Program
10. Losowo
11. Dzień
12. Kanał audio
13. Czas/tryb (g:mm:ss)
14. źródło/rozdział
15. Pauza
16. PBC
17. Odtwarzanie
18. DVD
19. VCD/SVCD
20. MP3
21. Powtarzanie
- 5 -
Page 6
POLSKI
PODŁĄCZANIE DO TELEWIZORA
(KONFIGURACJA PODSTAWOWA)
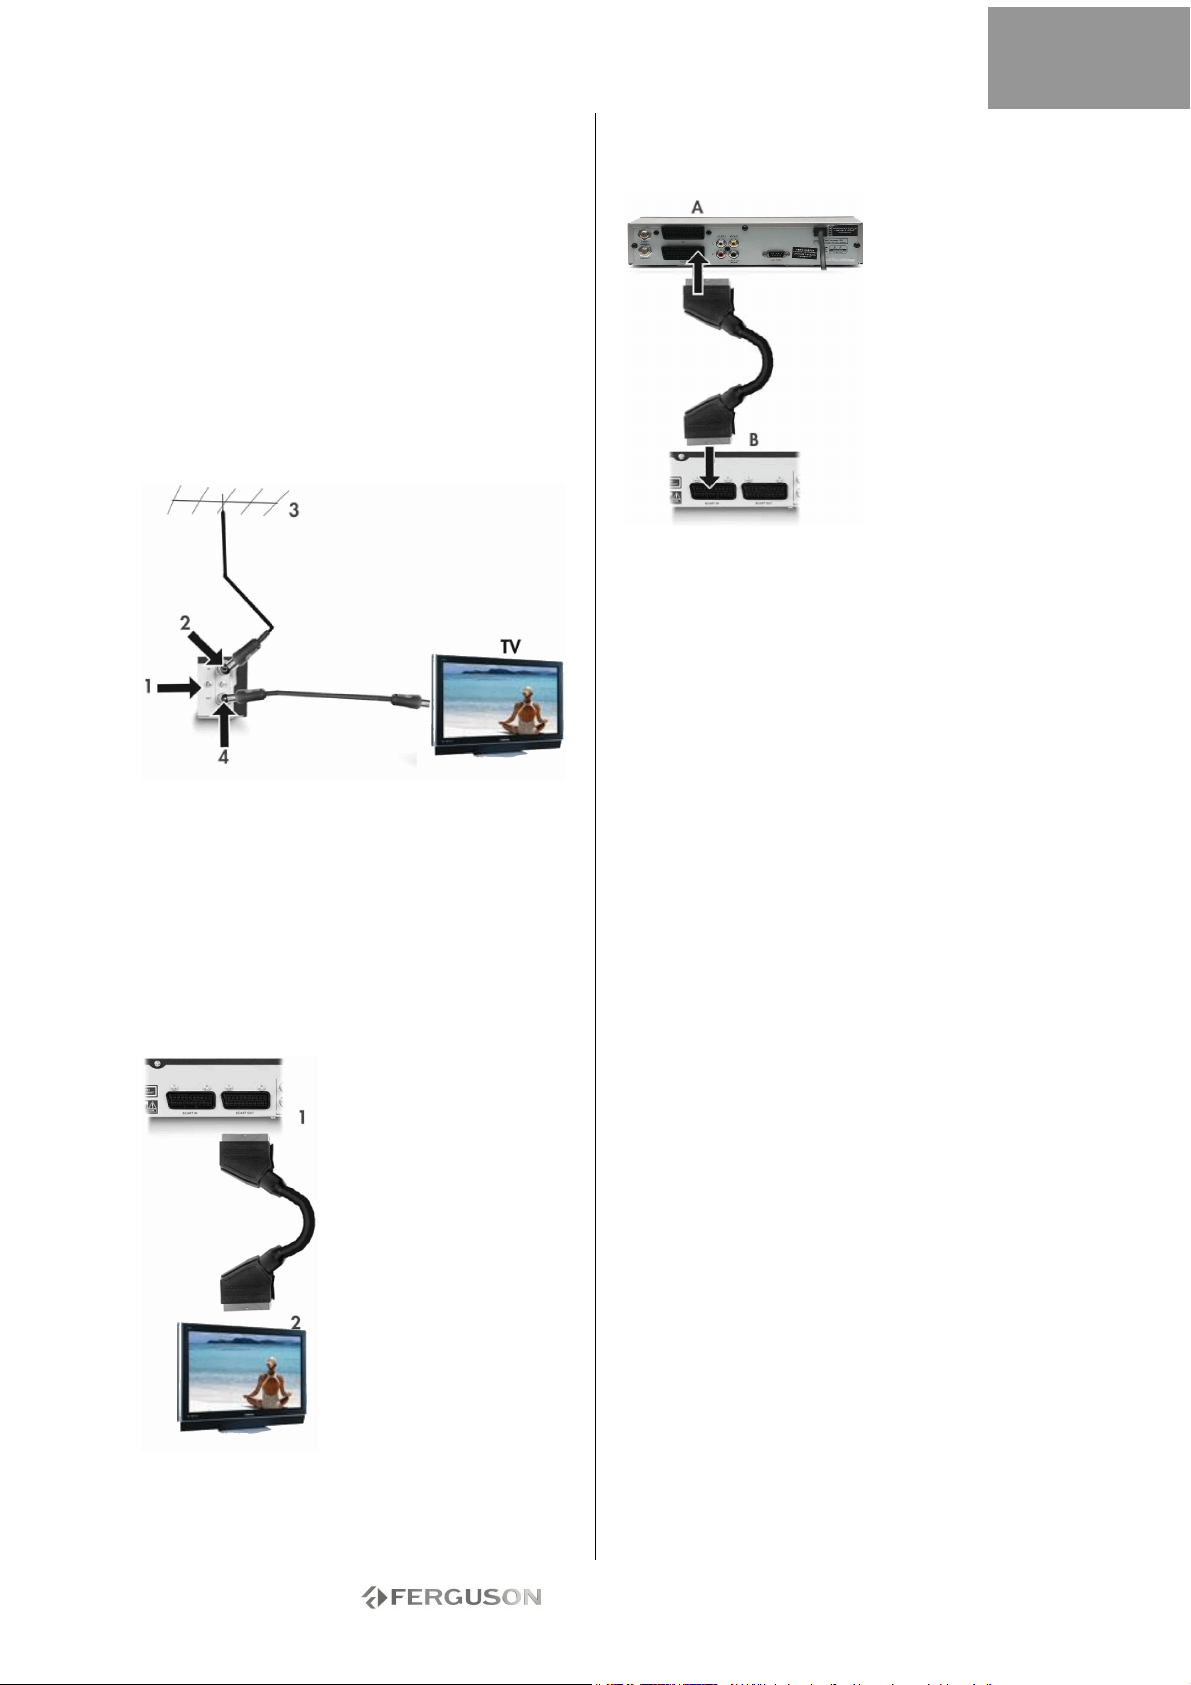
Krok 1: Podłączanie anteny
1. Wyłącz telewizor.
2. Odłącz przewód antenowy z tyłu telewizora i
podłącz go do wejścia antenowego (ANTENNA IN) z
tyłu nagrywarki.
3. Podłącz koncentryczny przewód antenowy do
wyjścia antenowego (ANTENNA OUT) z tyłu
nagrywarki i do wejścia antenowego (ANTENNA
IN) z tyłu telewizora.
4. Musisz przeprowadzić wyszukiwanie w celu
dostrojenia nagrywarki do dostępnych
kanałów telewizyjnych.
1. Panel tylni nagrywarki Ferguson RW-770HD
2. Wejście antenowe
3. Antena (lub telewizja kablowa)
4. Wyjście antenowe; może służyć do
doprowadzenia sygnału TV do wejścia sygnału
RF (częstotliwości radiowej) innego telewizora.
Na wyjście antenowe sygnał TV jest przenoszony
bezpośrednio z wejścia.
Krok 2: Podłączanie do telewizora za pomocą
złącza SCART
1. Podłącz przewód
SCART do wyjścia SCART
(SCART OUT) z tyłu
NAGRYWARKI i do
wejścia SCART (SCART IN)
z tyłu telewizora.
2. Wybierz w telewizorze
źródło sygnału SCART IN.
PODŁĄCZ TELEWIZOR/DEKODER
SATELITARNY
1. Podłącz przewód SCART do wyjścia SCART
(SCART OUT) z tyłu dekodera (A) i do wejścia
SCART (SCART IN) z tyłu nagrywarki Ferguson (B).
2. Musisz przeprowadzić wyszukiwanie w celu
dostrojenia nagrywarki do dostępnych kanałów
telewizyjnych.
- 6 -
Page 7
POLSKI
PODŁĄCZANIE DO TELEWIZORA
(KONFIGURACJA ALTERNATYWNA)
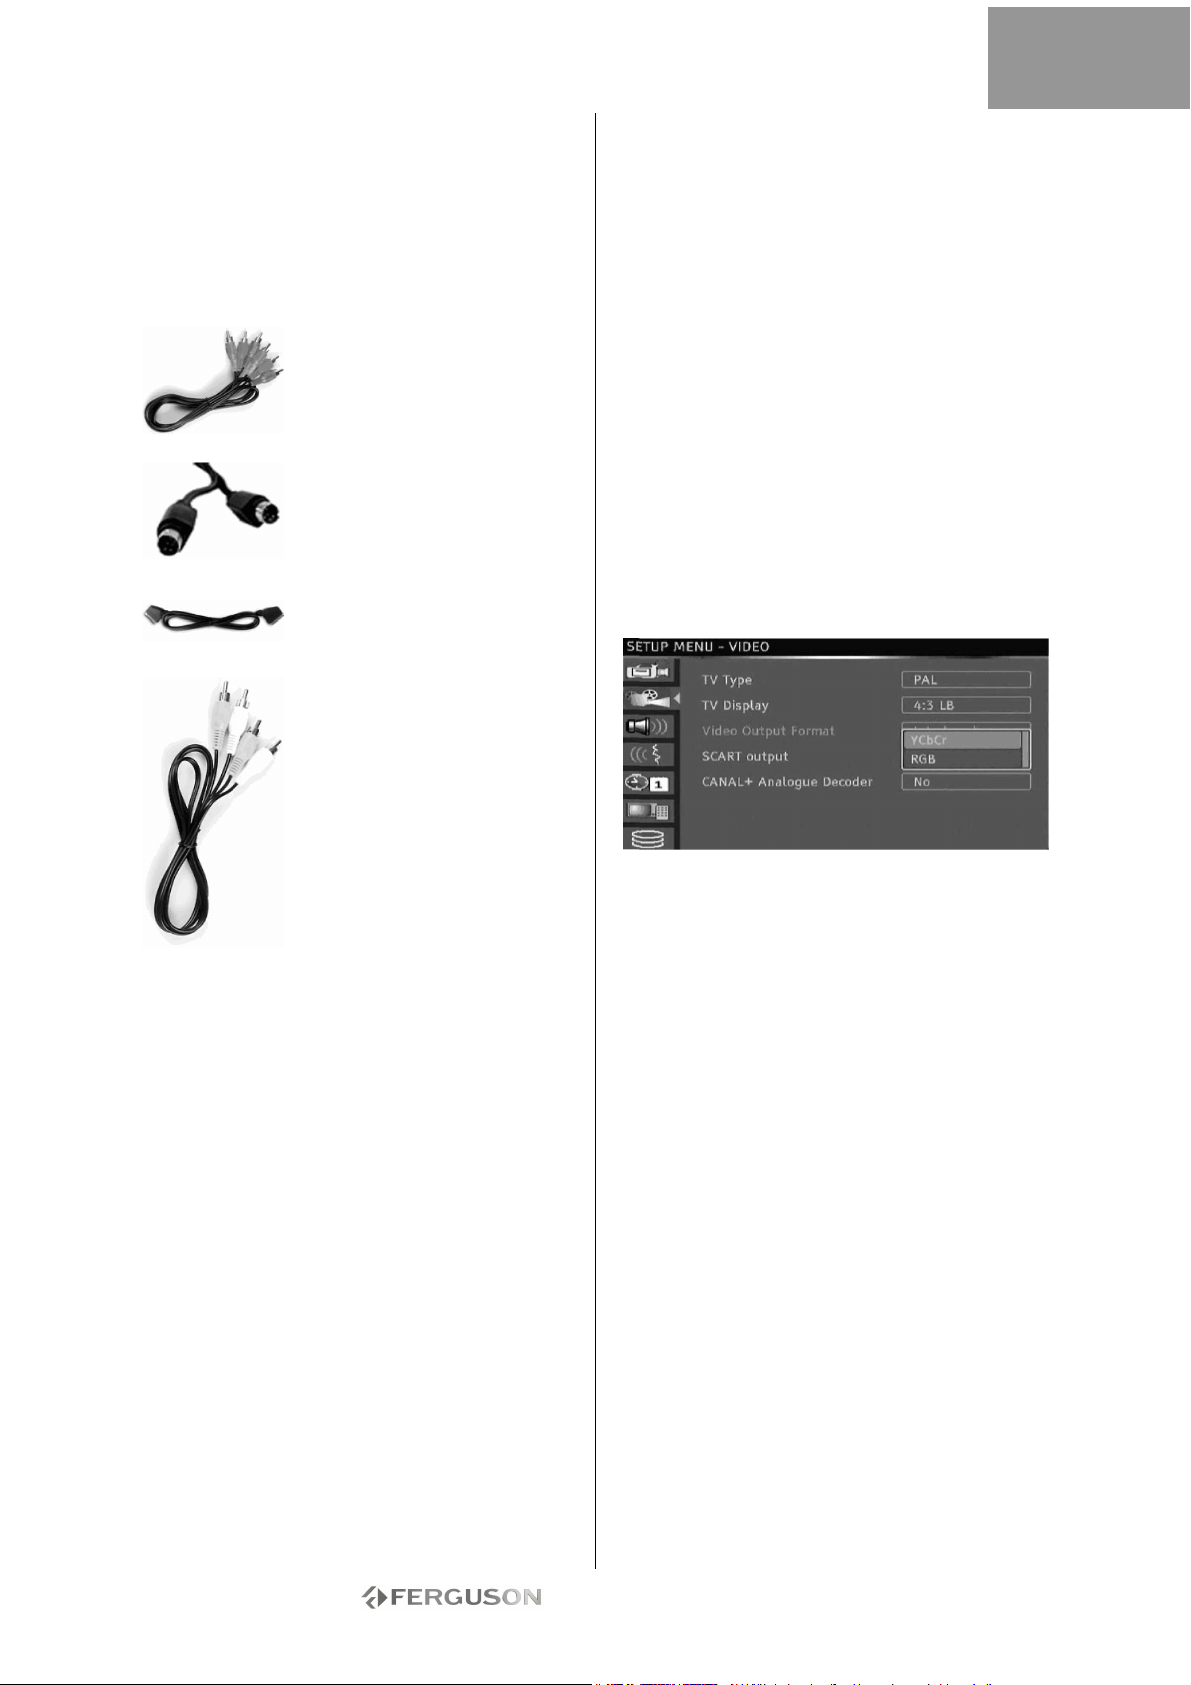
Zamiast połączenia z użyciem przewodu SCART
można wybrać inny sposób połączenia,
wykorzystując jedną z poniższych konfiguracji (nie
zawartych), przedstawionych w kolejności od
najlepszej (pod względem jakości) do najgorszej:
A - Podłączanie do telewizora za pomocą
złącza kompozytowego sygnału wideo
1. Podłącz przewód wideo (żółte wtyczki) do wyjścia
CVBS z tyłu nagrywarki i do wejścia wideo w
telewizorze.
2. Podłącz przewody audio (białe i czerwone wtyczki
cinch) do wyjść audio L/R z tyłu nagrywarki i do
wejść audio L/R w telewizorze.
3. Wybierz w telewizorze źródło sygnału VIDEO
IN lub CVBS.
B - Podłączanie do telewizora za pomocą
złącza S-Video
1. Podłącz przewód S-Video (czarne wtyczki) do
wyjścia S-VIDEO z tyłu nagrywarki i do
wejścia S-VIDEO w telewizorze.
2. Podłącz przewody audio (białe i czerwone wtyczki
cinch) do wyjść audio L/R z tyłu nagrywarki i do
wejść audio L/R w telewizorze.
3. Wybierz w telewizorze źródło sygnału S-VIDEO.
C - Podłączanie do telewizora za pomocą
złącza komponentowych sygnałów wideo (YUV
lub YCbCr)
Komponentowe sygnały wideo zapewniają najlepszą
jakość obrazu w przypadku telewizorów z ekranem
Komponentowe sygnały wideo
(wybieranie kolejno liniowe)
Komponentowe sygnały wideo (z
przeplotem)
S-Video
SCART (RGB)
Kompozytowy sygnał wideo
LCD i ekranem plazmowym. Aby można było użyć
połączenia za pomocą komponentowych sygnałów
wideo, NAGRYWARKA musi zostać wcześniej
podłączona do telewizora za pomocą jednego z
wcześniej opisanych połączeń (zalecane jest
połączenie SCART).
1. Włącz telewizor i wybierz źródło
odpowiadające NAGRYWARCE.
2. Włącz NAGRYWARKĘ.
3. Podłącz 3 przewody komponentowych sygnałów
wideo (czerwony, zielony, niebieski) do wyjść
COMPONENT VIDEO OUT z tyłu NAGRYWARKI i do
wejść COMPONENT VIDEO IN w telewizorze.
4. Podłącz przewody audio do wyjść AUDIO L/R OUT
z tyłu NAGRYWARKI i do wejść AUDIO L/R IN w
telewizorze.
5. Naciśnij przycisk MENU na pilocie.
6. Za pomocą przycisków nawigacyjnych przejdź do
sekcji menu OGÓLNE.
7. Za pomocą przycisków nawigacyjnych i przycisku
OK. zmień ustawienie wyjścia SCART (SCART
Output) na YCbCr. Zmień ustawienie formatu wideo
(Video Output Format) na wybieranie kolejnoliniowe
(Progressive), jeśli telewizor obsługuje taki sposób
wybierania.
8. Wybierz w telewizorze źródło sygnału YUV lub
YCbCr.
9. Można odłączyć przewód SCART.
- 7 -
Page 8
POLSKI
PODŁĄCZANIE DO ZEWNĘTRZNEGO ZESTAWU
AUDIO
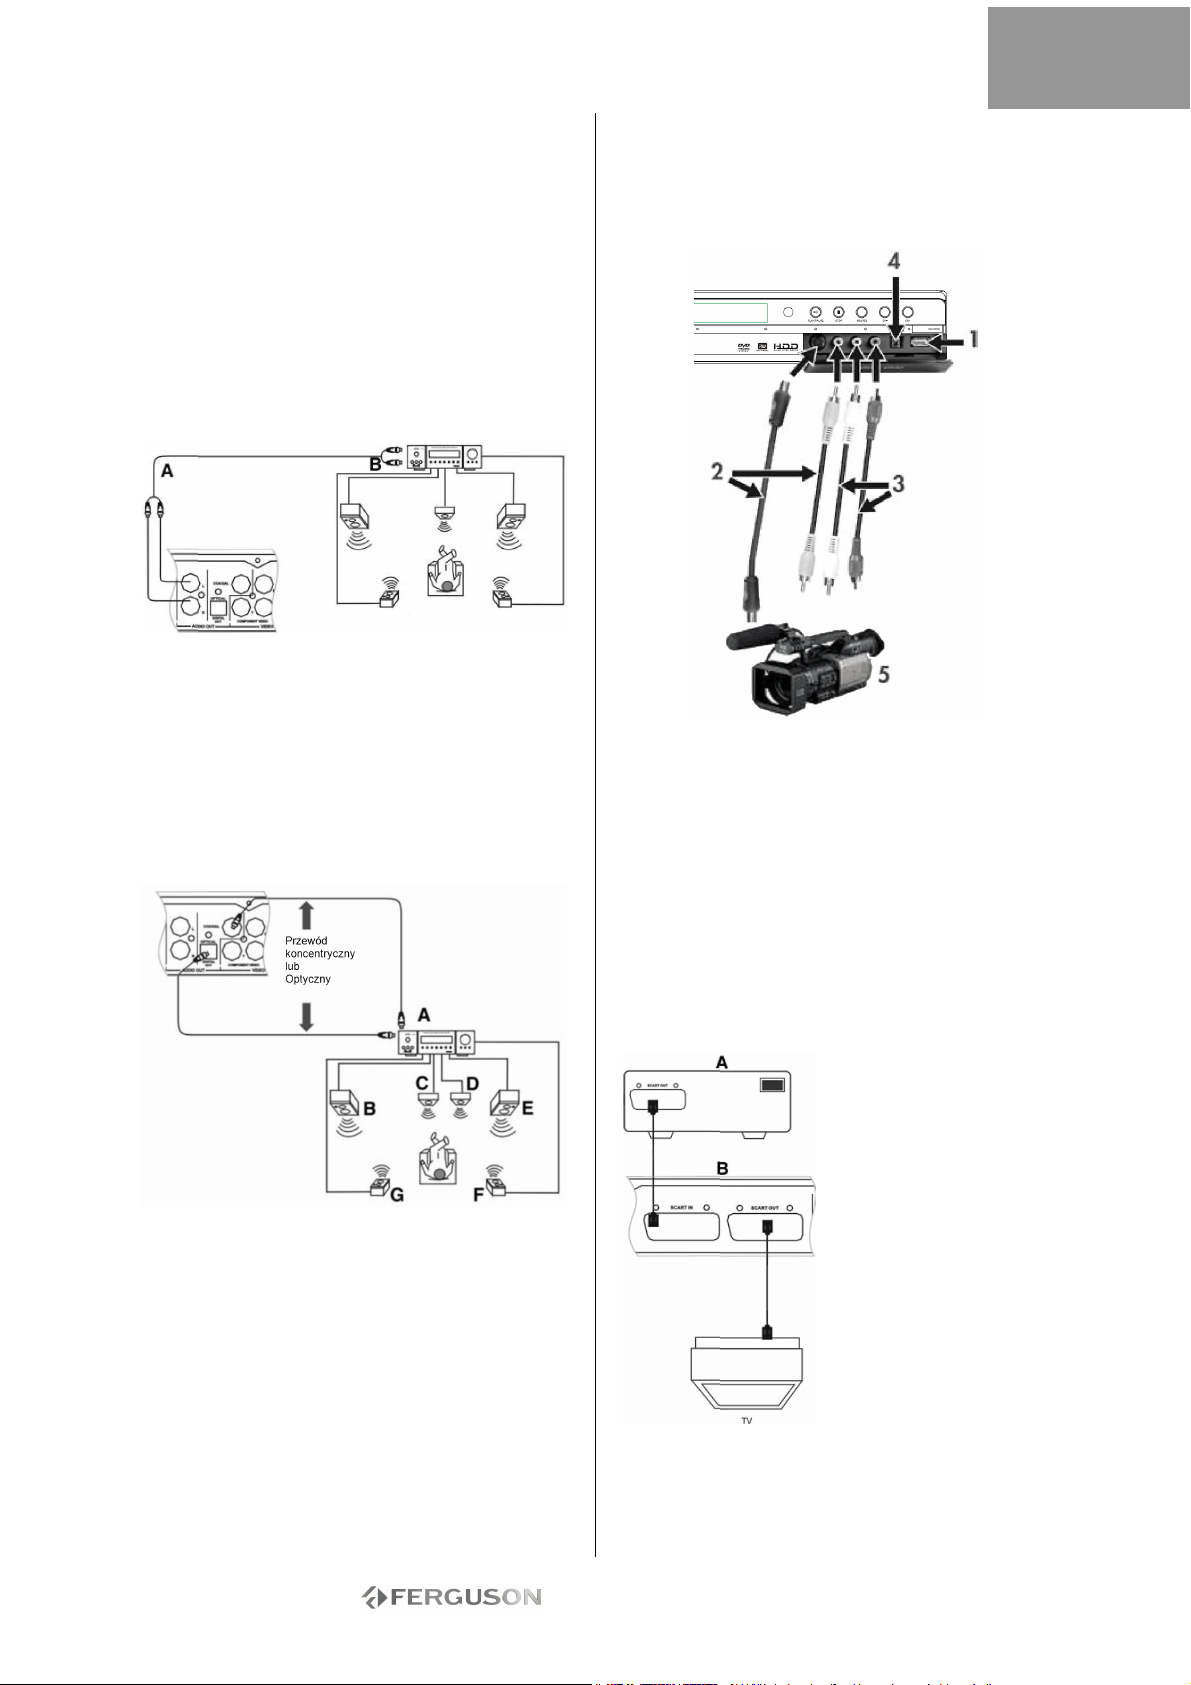
Analogowe połączenie ze wzmacniaczem
Podłącz przewód audio (biały/czerwony) do wyjść
AUDIO L/R OUT z tyłu nagrywarki i do wejść AUDIO
L/R IN (biały/ czerwony) z tyłu wzmacniacza.
Można podłączyć następujące urządzenia:
• Wzmacniacz z dekoderem Dolby Surround Pro
Logic
• Wzmacniacz stereofoniczny
A - Do wyjść audio. B - Do wejść audio.
Cyfrowe połączenie ze wzmacniaczem
Podłącz przewód optyczny do wyjścia OPTICAL OUT
z tyłu nagrywarki i do wejścia OPTICAL IN z tyłu
wzmacniacza.
lub
Podłącz przewód koncentryczny do wyjścia COAXIAL
OUT z tyłu nagrywarki i do wejścia COAXIAL IN z
tyłu wzmacniacza.
A. WZMACNIACZ z dekoderem DOLBY DIGITAL lub
DTS
B. LEWY PRZEDNI
C. ŚRODKOWY
D. GŁOŚNIK NISKOTONOWY
E. PRAWY PRZEDNI
F. PRAWY SURROUND
G. LEWY SURROUND
Można podłączyć następujące urządzenia:
• Wzmacniacz z dekoderem Dolby Digital
• Wzmacniacz z dekoderem DTS
PODŁĄCZANIE SYGNAŁU AV LUB DV PRZEZ
PANEL PRZEDNI
Otwórz klapkę w dół, zgodnie z oznaczeniem OPEN
w prawym rogu.
1. Złącze USB
2. Użyj złącza S-Video lub kompozytowego sygnału
wideo
3. Złącze wejścia audio
4. Złącze IEEE 1394
5. Zewnętrzny sygnał AV
Po podłączeniu urządzenia wybierz prawidłowe
wejście sygnału AV, kolejno naciskając przycisk
źródło na pilocie. Na ekranie telewizora pojawi się
obraz i możesz rozpocząć nagrywanie.
Patrz podręcznik podłączanego urządzenia.
PODŁĄCZANIE SYGNAŁU AV PRZEZ ZŁĄCZE
WEJŚCIA SCART
Można nagrywać sygnał ze złącza wejściowego
SCART IN, np.: Sygnał AV z odtwarzacza DVD.
Naciśnij przycisk źródło na pilocie, aby przełączyć
urządzenie w tryb odpowiedni dla danego rodzaju
połączenia.
A. Zewnętrzne źródło
sygnału AV (np. DVD)
B. Nagrywarka Ferguson
Złącza SCART IN i SCART
OUT pozostają aktywne,
nawet jeśli nagrywarka
Ferguson ustawiona jest
na tryb gotowości.
- 8 -
Page 9
POLSKI
PODŁĄCZANIE URZĄDZEŃ USB
Nagrywarka Ferguson współpracuje z pamięcią USB
flash, czytnikami kart pamięci USB i
aparatami/kamerami USB, które są kompatybilne
z klasą pamięci masowej. Można oglądać jeden lub
wiele obrazów JPEG w kolejności. Podczas pokazu
slajdów można odtwarzać pliki MP3. Po podłączeniu
urządzenia USB do portu USB naciśnij przycisk
Manedżer plików, aby otworzyć menu Menedżer
plików.
Można przeglądać zawartość pamięci urządzenia
USB za pomocą przycisków nawigacyjnych.
Naciśnij przycisk Odtwarzanie/OK, aby wybrać
podświetlone pliki do odtwarzania.
Więcej informacji zawarto w sekcji Menedżer plików
w dalszej części tego podręcznika.
Rozpoznawanie urządzenia USB może zająć kilka
sekund. Urządzenie pamięci masowej musi być
sformatowane w systemie plików FAT32.
ODTWARZANIE PłYTY DVD-VIDEO, SVCD LUB
VCD
1. Naciśnij przycisk otwierania/zamykania na
panelu przednim, aby wysunąć podajnik.
2. Umieść płytę w podajniku.
3. Naciśnij przycisk otwierania/zamykania, aby
wsunąć podajnik.
4. Odtwarzanie powinno rozpocząć się
automatycznie. W przeciwnym razie naciśnij
przycisk DVD.
5. Za pomocą przycisków nawigacyjnych wybieraj
odpowiednie opcje menu i naciśnij przycisk
Odtwarzanie/ OK, aby zatwierdzić wybór.
Opcje odtwarzania
1. Naciśnij przycisk DVD, aby wyświetlić menu płyty
DVD.
2. Naciśnij przycisk DISPLAY, aby wyświetlić lub
ukryć informacje ekranowe.
Odtwarzanie
Naciśnij przycisk Odtwarzanie/OK na pilocie lub
przycisk Odtwarzanie na panelu przednim, aby
rozpocząć odtwarzanie.
Pauza
Naciśnij przycisk PAUSE na pilocie, aby wstrzymać
odtwarzanie.
Przewijanie do przodu i do tyłu
Naciśnij przycisk » (Przewijanie do przodu), aby
włączyć przewijanie do przodu; naciśnij przycisk «
(Przewijanie do tyłu), aby włączyć przewijanie do
tyłu. Naciśnij przycisk kilkakrotnie, aby wybrać
jedną z 4 prędkości przewijania.
Przeskakiwanie
Naciśnij przycisk Next (Następny) , aby przejść do
następnego tytułu/rozdziału, naciśnij przycisk
Previous (Poprzedni), aby przejść do poprzedniego
tytułu/rozdziału.
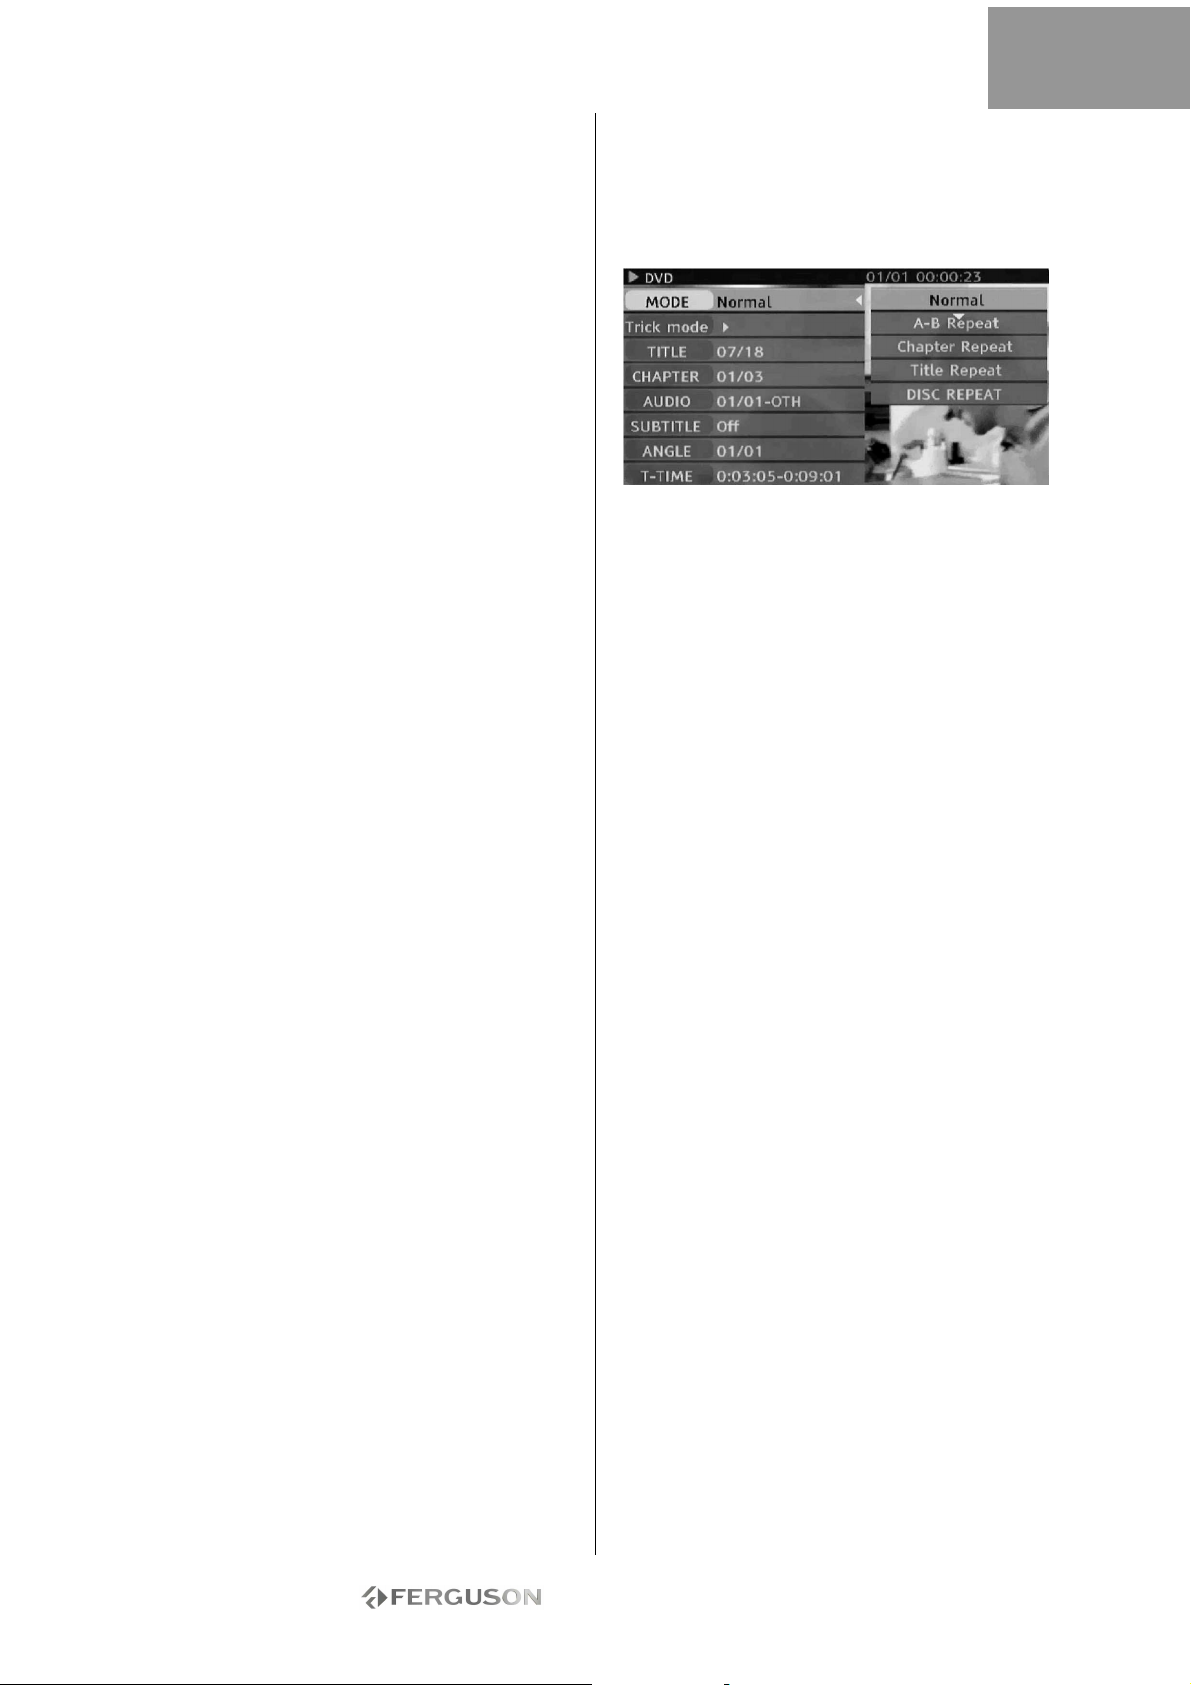
Sterowanie odtwarzaniem za pomocą menu
odtwarzania
1. Naciśnij dwukrotnie przycisk Odtwarzanie/OK,
aby wyświetlić menu sterowania, a następnie
wybierz podmenu:
TRYB: Wybierz tryb odtwarzania, np.: Normalny,
Powtarzanie A-B, Powtarzanie rozdziału itd.
TRICK: Wybierz stan odtwarzania, np.: Stop, F.F.,
F.R., S.F. itp.
TYTUŁ: Naciśnij przycisk Odtwarzanie/OK, a
następnie wprowadź numer tytułu, do którego
chcesz przejść.
ROZDZIAŁ: Wprowadź numer rozdziału, do którego
chcesz przejść.
AUDIO: Wybierz język audio, który chcesz
odtwarzać, np.: FRE (francuski), ENG (angielski) itp.
NAPISY: Wybierz język napisów.
KĄT: Wybierz kąt ustawienia kamery (funkcja musi
być obsługiwana przez daną płytę).
T-CZAS: Pokaż upływający i pozostający czas.
2. Naciśnij przycisk aby wyjść z menu
sterowania.
Powtarzanie
1. Powtarzanie A-B
• Naciśnij przycisk Odtwarzanie/OK. dwukrotnie,
aby wejść do menu konfiguracji podczas
odtwarzania.
• Za pomocą przycisków i w podświetl podmenu
Tryb, a następnie naciśnij przycisk Odtwarzanie/OK.
• Za pomocą przycisków podświetl opcję
POWTARZANIE A-B, naciśnij przycisk
Odtwarzanie/OK, aby zaznaczyć punkt początkowy
(A); ponownie naciśnij przycisk Odtwarzanie/OK,
aby wyświetlić opcję POWTARZANIE A-B, a
następnie naciśnij przycisk Odtwarzanie/OK po
raz trzeci, aby zaznaczyć punkt końcowy (B).
Fragment pomiędzy punktem początkowym i
końcowym będzie powtarzany.
• Naciśnij przycisk aby wyjść z MENU
KONFIGURACJI.
2. Powtarzanie tytułu/rozdziału/płyty - Naciskaj
przycisk REPEAT podczas odtwarzania, aby wybrać
powtarzanie tytułu, rozdziału lub płyty.
3. Naciskaj przycisk REPEAT do momentu
przywrócenia normalnego odtwarzania.
- 9 -
Page 10
POLSKI
Język dwięku
Naciskaj przycisk AUDIO, aby wybrać jeden z
maksymalnie 8 dostępnych języków audio, jeśli
płyta została nagrana w wielu językach.
W przypadku płyt Karaoke naciśnij przycisk AUDIO,
aby przełączyć pomiędzy akompaniamentem i
wokalem.
Dostępne tylko w przypadku płyt DVD/SVCD.
Język napisów
Naciskaj przycisk NAPISY, aby wybrać jeden z
maksymalnie 32 dostępnych języków napisów, jeśli
płyta została nagrana z napisami w wielu językach.
Dostępne tylko w przypadku płyt DVD/SVCD.
Kąt ustawienia kamery (tylko płyty DVD)
Naciskaj przycisk KĄT, aby wybrać jeden z
maksymalnie 9 kątów ustawienia kamery, jeśli
sceny na płycie zostały zarejestrowane z użyciem
wielu różnie ustawionych kamer.
ODTWARZANIE TYTUŁU NAGRANEGO Z
TELEWIZORA NA DYSKU TWARDYM
1. Naciśnij przycisk TV-dysk twardy, tytułów TVdysk twardy.
2. Za pomocą przycisków podświetl
odpowiedni tytuł.
Naciskając przycisk Kąt, moŜna posortować listę
według nazw tytułów lub dat, a za pomocą
przycisków Poprzedni i Następny moŜna przejść do
poprzedniej/następnej strony.
3. Naciśnij przycisk Odtwarzanie/OK, aby
rozpocząć odtwarzanie podświetlonego tytułu.
Podczas odtwarzania:
Przyciski Następny, Poprzedni, Przewijanie do
przodu i Przewijanie do tyłu umożliwiają
nawigację czasową w obrębie tytułu. Naciśnij
przycisk Ekran, aby wyświetlić lub ukryć informacje
ekranowe (OSD).
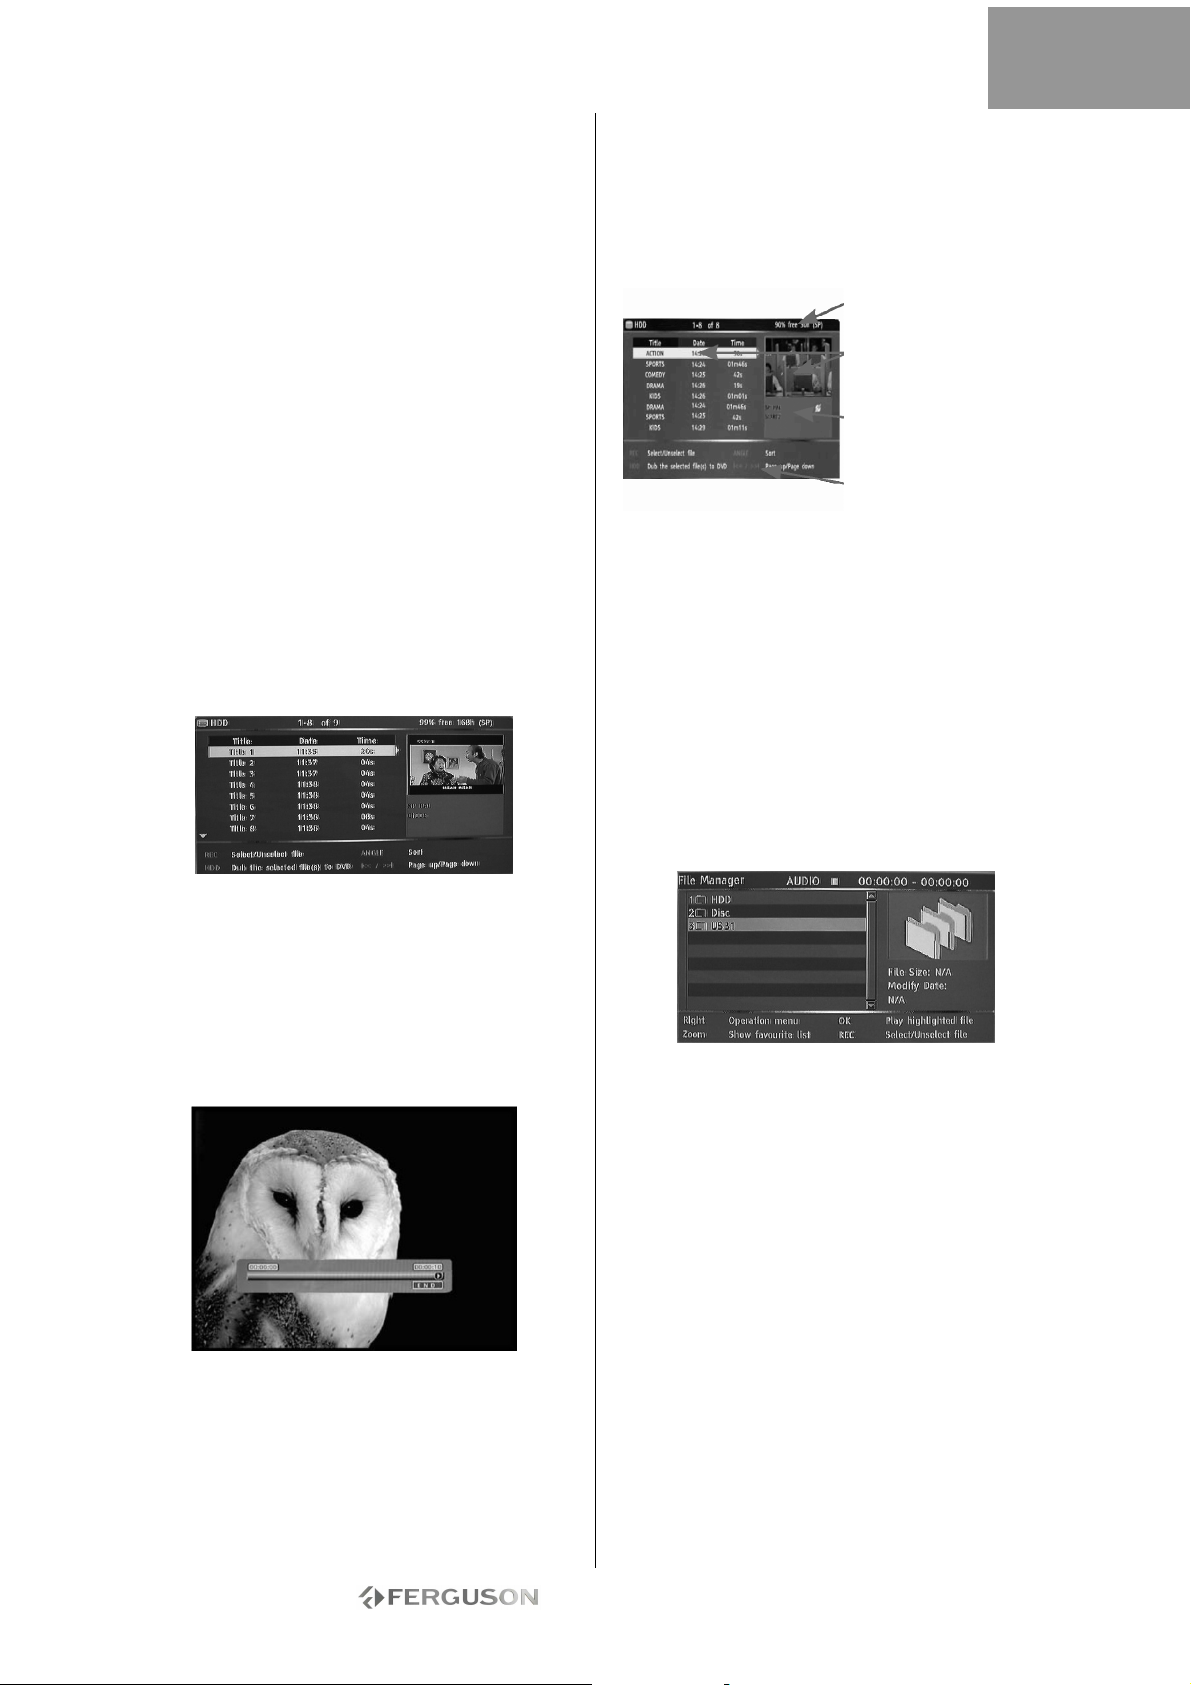
LISTA TYTUŁÓW TV-DYSK TWARDY (TYTUŁY
NAGRANE Z TELEWIZORA)
Naciśnij przycisk TV-dysk twardy, aby
wyświetlić listę tytułów TV-dysk twardy.
Lista tytułów TV-dysk twardy zawiera wszystkie
tytuły zapisane na dysku twardym. Lista obejmuje
informacje o czasie trwania, miniaturę nagrania i
tryb nagrania (HQ, SP itp.) każdego z tytułów.
Lista informuje też, czy dany tytuł jest
zabezpieczony lub zablokowany.
ODTWARZANIE MATERIAŁU Z URZĄDZENIA
USB
1. Podłącz urządzenie USB do przedniego wejścia
USB.
2. Naciśnij przycisk Menedżer plików, aby otworzyć
menu Menedżer plików (rozpoznanie urządzenia
USB może zająć nagrywarce kilka sekund).
3. Za pomocą przycisków nawigacyjnych
podświetl odpowiedni plik.
4. Naciśnij przycisk Odtwarzanie/OK, aby
rozpocząć odtwarzanie pliku.
Jeśli płyta zawiera pliki JPEG i MP3, uŜytkownik
moŜe jednocześnie oglądać obrazy i słuchać muzyki.
ODTWARZANIE PLIKÓW DIVX® LUB XVID Z
NAPISAMI
1. W menu Menedżer plików za pomocą
przycisków nawigacyjnych podświetl plik napisów
(akceptowane są pliki z rozszerzeniem *.SRT, *.SUB
i *.SMI).
2. Naciśnij przycisk Odtwarzanie/OK, aby
wybrać plik napisów.
3. Za pomocą przycisków nawigacyjnych podświetl
plik filmu.
4. Naciśnij przycisk Odtwarzanie/OK, aby
rozpocząć dtwarzanie filmu.
Miejsce pozostałe na
dysku twardym
Aktualnie podświetlony
tytuł
Informacje dotyczące
nagrania aktualnie
Pomoc ekranowa
- 10 -
Page 11
POLSKI
ODTWARZANIE PłYT DVD LUB CD Z PLIKAMI
MP3, JPEG I/LUB DIVX®
1. Naciśnij przycisk otwierania/zamykania na
panelu przednim, aby wysunąć podajnik.
2. Umieść płytę w podajniku.
3. Ponownie naciśnij przycisk otwierania/zamykania,
aby wsunąć podajnik.
4. Automatycznie powinno zostać wyświetlone
menu zawartości płyty. Jeśli tak się nie stanie,
naciśnij przycisk Menedżer plików.
5. Za pomocą przycisków nawigacyjnych podświetl
odpowiedni plik.
6. Naciśnij przycisk Odtwarzanie/OK, aby rozpocząć
odtwarzanie pliku.
7. Naciśnij przycisk Stop, aby powrócić do menu.
1. Aby włączyć pokaz slajdów z muzyką
(JPEG/MP3), wybierz plik MP3, a następnie wybierz
plik JPEG. Pliki MP3 i JPEG będą odtwarzane w
wybranej kolejności.
2. Naciśnij przycisk Zatrzymanie, aby zatrzymać
odtwarzanie. Aby włączyć pokaz slajdów z muzyką
(JPEG/MP3), dwukrotnie naciśnij przycisk
Zatrzymanie.
DIVX VIDEO-ON-DEMAND (VOD)
DivX Video-on-Demand (VOD) to cyfrowa usługa
wideo, która umożliwia pobieranie i korzystanie w
wysokiej jakości materiału wideo od grupy
partnerów DivX, którzy oferują różnorodną treść.
Wymagany jest komputer z szerokopasmowym
połączeniem internetowym i nagrywarką CD.
W celu odtwarzania zawartości DivX VOD należy
także zarejestrować nagrywarkę Ferguson RW770HD. Proces rejestracji jest łatwy i jednorazowy
dla danego urządzenia. W celu zarejestrowania
urządzenia należy wprowadzić ośmioznakowy kod z
odtwarzacza na koncie VOD. Więcej informacji
znaleźć można w serwisie http://www.divx.com/
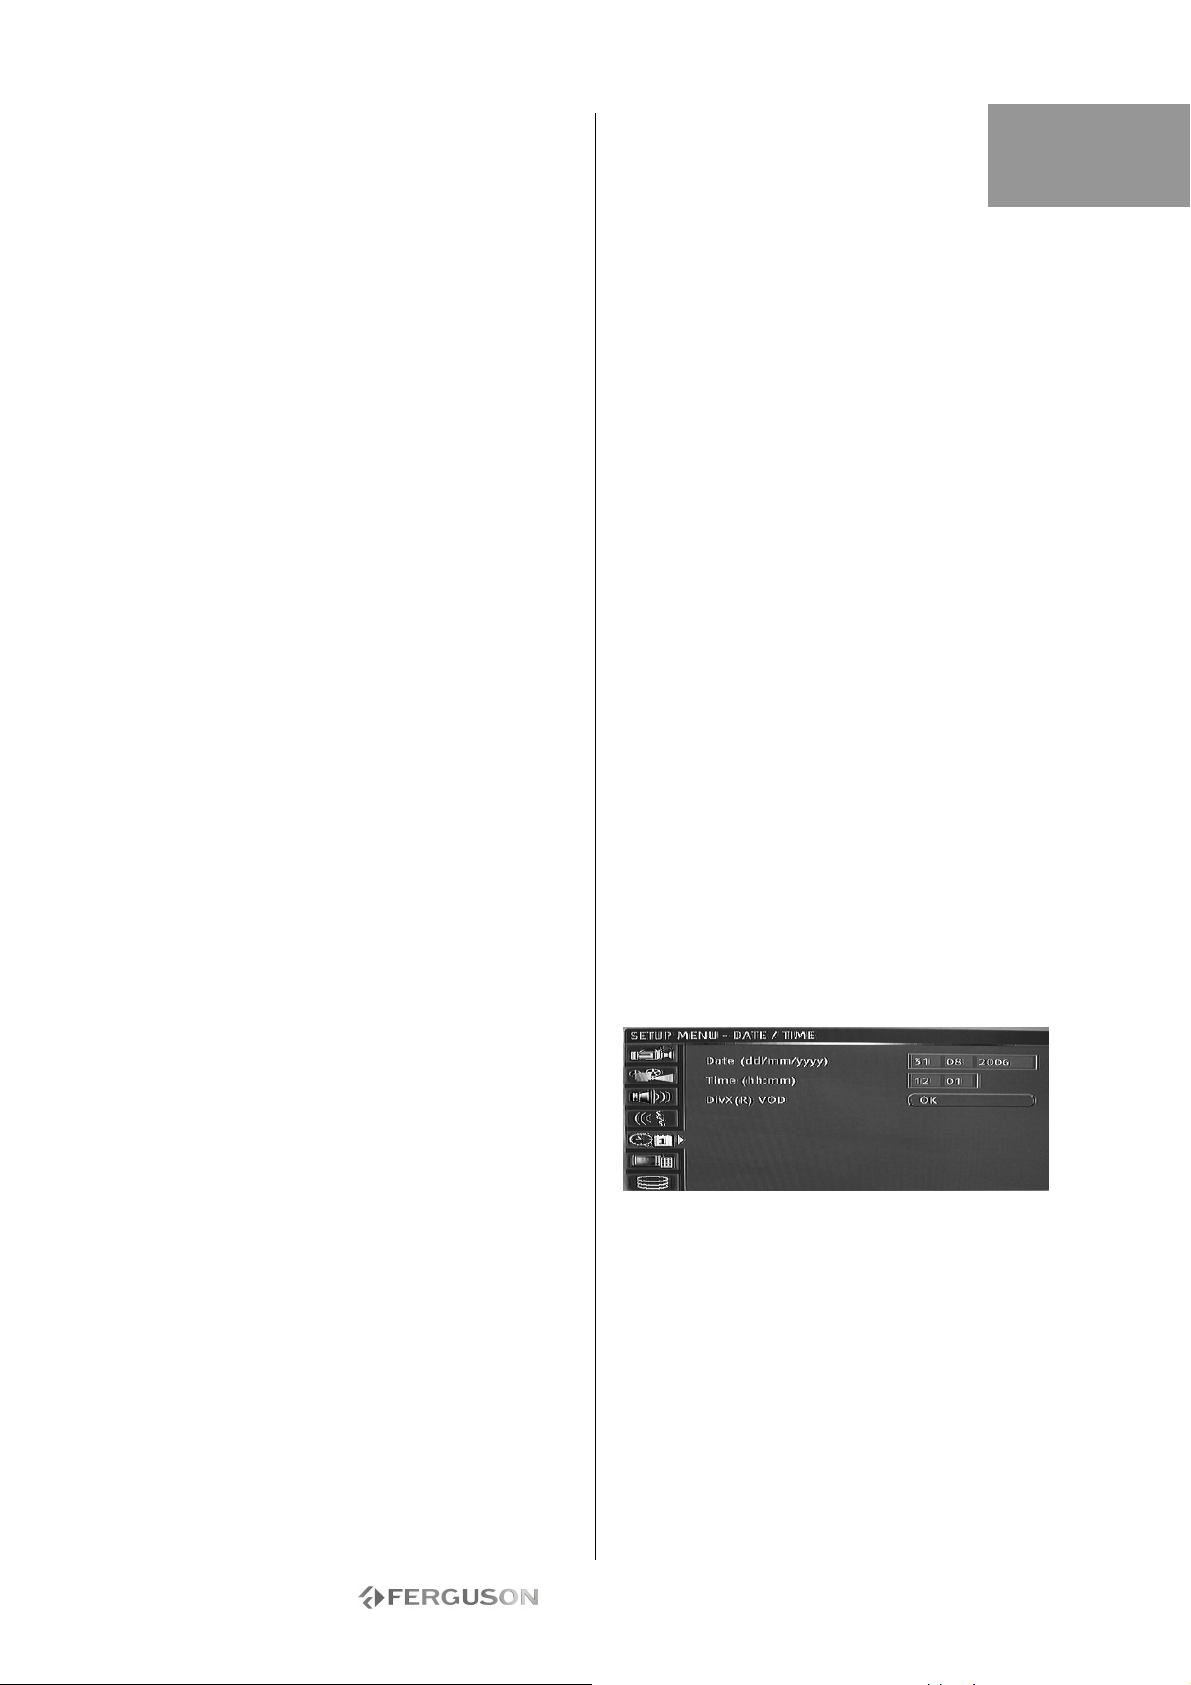
Aby odnaleźć kod rejestracyjny:
1. Naciśnij przycisk Menu na pilocie.
2. Naciśnij przycisk W dół , aby wybrać datę/czas.
3. Naciśnij przycisk W prawo , a następnie przycisk
W dół, aby wybrać DivX(R) VOD.
4. Naciśnij przycisk Odtwarzanie/OK, aby pokazać
kod rejestracyjny.
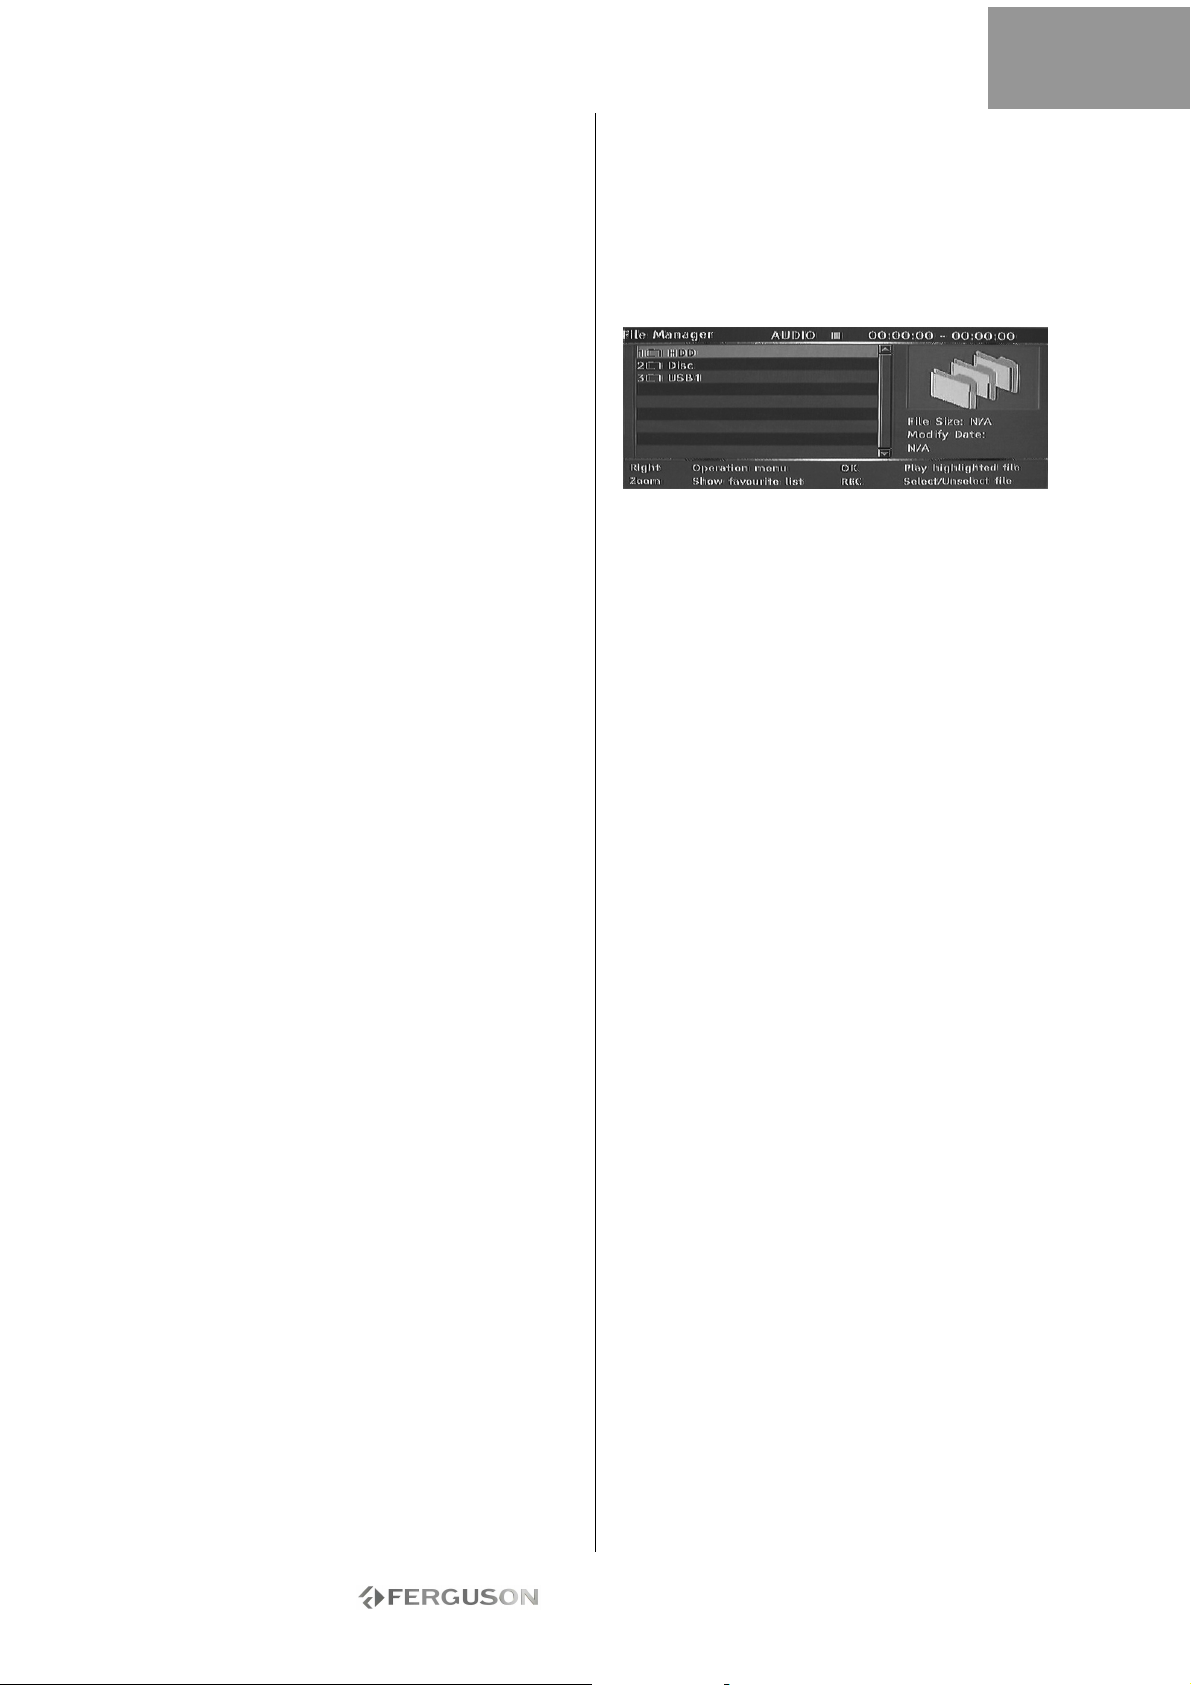
MENEDŻER PLIKÓW
Menu Menedżer plików służy do odtwarzania plików
multimedialnych (muzyki, zdjęć, filmów) na
zewnętrznych urządzeniach USB, DVD i na
wewnętrznym dysku twardym. Menedżer plików
umożliwia także przenoszenie plików pomiędzy
urządzeniami USB*, DVD i wewnętrznym dyskiem
twardym.
*Pliki można przenosić tylko z urządzeń USB, nie na
urządzenia USB.
Pliki nagrywane z telewizji nie mogą zostać zapisane
na tym samym dysku, co pliki multimedialne.
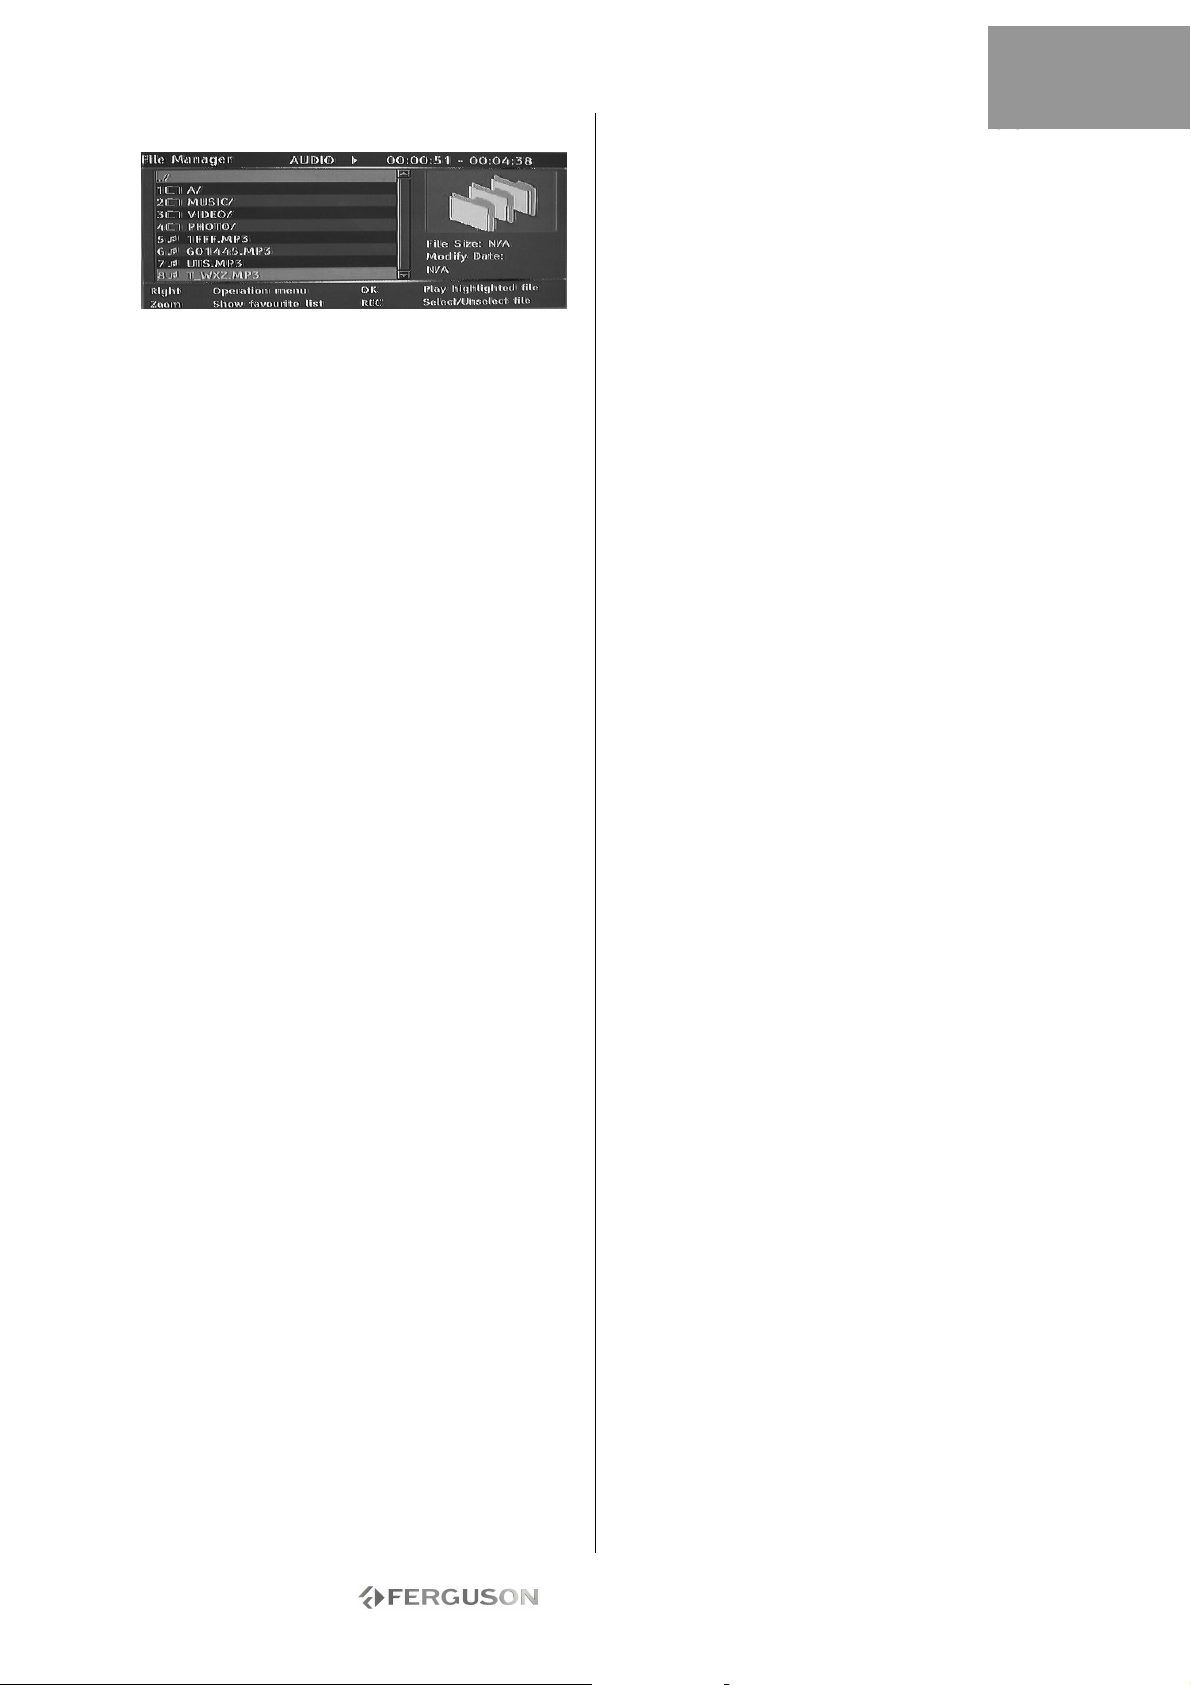
PORUSZENIE SIĘ W MENEDŻERZE PLIKÓW
Poruszanie się w Menedżerze plików jest podobne
do poruszania się po folderach komputera. Istnieją
trzy możliwe foldery główne: HDD (dysk twardy),
USB i DVD. Umieszczono je razem w pojedynczym
folderze głównym. Aby przejść do danego folderu,
użyj przycisków nawigacyjnych (patrz poniżej) w
celu wybrania folderu i naciśnij przycisk
Odtwarzanie/OK. Aby przejść ‘w górę’ z folderu,
wybierz symbol ../ u góry listy i naciśnij przycisk
Odtwarzanie/OK.
1. Naciśnij przycisk Menedżer plików na pilocie, aby
otworzyć menu Menedżer plików.
2. Do nawigacji służą przyciski strzałek skierowanych w lewo prawo w górę i w dół .
3. Do potwierdzania wyboru służy przycisk
Odtwarzanie/OK
ODTWARZANIE PLIKU MULTIMEDIALNEGO W
MENEDŻERZE PLIKÓW
1. Użyj przycisków nawigacyjnych, aby wybrać plik
multimedialny (film, obraz lub dźwięk) i naciśnij
przycisk Odtwarzanie/OK, aby rozpocząć
odtwarzanie.
PRZENOSZENIE PLIKÓW MULTIMEDIALNYCH Z
DYSKU TWARDEGO NA DVD-R/RW
1. Umieść niezamknięty dysk DVD-R/RW na
podajniku dysków.
2. Naciśnij przycisk Menedżer plików, aby otworzyć
Menedżera plików.
3. Użyj przycisków nawigacyjnych, aby wybrać dysk
twardy i naciśnij przycisk Odtwarzanie/OK.
4. Na liście Dysk twardy użyj przycisków W górę/w
dół, aby podświetlić plik, który chcesz skopiować.
5. Aby wybrać plik(i) do przeniesienia, za każdym
razem naciskaj przycisk Nagrywanie. Przy każdym
wybranym pliku pojawi się znak wyboru. Jeśli
chcesz zrezygnować z wyboru danego pliku,
podświetl go i ponownie naciśnij przycisk
Nagrywanie.
- 11 -
Page 12
6. Naciśnij przycisk W prawo, aby otworzyć menu
Obsługa.
7. Wybierz Kopiuj z listy i naciśnij przycisk
Odtwarzanie/OK.
8. Użyj przycisków nawigacyjnych, aby wybrać i
otworzyć DVD.
9. Przy otwartym DVD naciśnij przycisk W prawo,
aby otworzyć menu Obsługa.
10.Wybierz Wklej z listy, aby przenieść kopiowane
pliki na DVD.
11. U dołu menu pojawia się wskaźnik
stanu/postępu.
PRZENOSZENIE PLIKÓW MULTIMEDIALNYCH Z
DVD NA DYSK TWARDY.
1. Umieść w podajniku dysk DVD zawierający pliki
multimedialne, które chcesz skopiować.
2. Naciśnij przycisk Menedżer plików, aby otworzyć
Menedżera plików.
3. Użyj przycisków nawigacyjnych, aby wybrać DVD
i naciśnij przycisk Odtwarzanie/OK.
4. Na liście DVD użyj przycisków W górę/w dół, aby
podświetlić plik, który chcesz skopiować.
5. Aby wybrać plik(i) do przeniesienia, za każdym
razem naciskaj przycisk Nagrywanie. Przy każdym
wybranym pliku pojawi się znak wyboru. Jeśli
chcesz zrezygnować z wyboru danego pliku,
podświetl go i ponownie naciśnij przycisk
Nagrywanie.
6. Naciśnij przycisk W prawo, aby otworzyć menu
Obsługa.
7. Wybierz Kopiuj z listy i naciśnij przycisk
Odtwarzanie/OK.
8. Użyj przycisków nawigacyjnych, aby wybrać i
otworzyć dysk twardy.
9. Przy otwartym dysku twardym naciśnij przycisk
W prawo, aby otworzyć menu Obsługa.
10.Wybierz Wklej z listy, aby przenieść kopiowane
pliki na dysk twardy.
11. U dołu menu pojawia się wskaźnik
stanu/postępu.
PRZENOSZENIE PLIKÓW MULTIMEDIALNYCH Z
ZEWNĘTRZNEGO URZĄDZENIA USB NA DYSK
TWARDY LUB DVD-R/RW
1. Podłącz urządzenie USB z plikami
multimedialnymi, które chcesz skopiować do
przedniego złącza USB.
2. W razie potrzeby umieść niezamknięty dysk DVDR/RW na podajniku dysków.
3. Naciśnij przycisk Menedżer plików, aby otworzyć
Menedżera plików.
4. Użyj przycisków nawigacyjnych, aby USB i
naciśnij przycisk Odtwarzanie/OK.
5. Na liście USB użyj przycisków W górę/w dół, aby
podświetlić plik, który chcesz skopiować.
6. Aby wybrać plik(i) do przeniesienia, za każdym
razem naciskaj przycisk Nagrywanie. Przy każdym
wybranym pliku pojawi się znak wyboru. Jeśli
chcesz zrezygnować z wyboru danego pliku,
podświetl go i ponownie naciśnij przycisk
Nagrywanie.
7. Naciśnij przycisk W prawo, aby otworzyć menu
Obsługa.
8. Wybierz Kopiuj z listy i naciśnij przycisk
Odtwarzanie/OK.
9. Użyj przycisków nawigacyjnych, aby wybrać i
otworzyć dysk twardy lub DVD.
10.Przy otwartym dysku twardym lub DVD naciśnij
przycisk W prawo, aby otworzyć menu Obsługa.
11.Wybierz Wklej z listy, aby przenieść kopiowane
pliki na dysk twardy lub DVD.
12.U dołu menu pojawia się wskaźnik
stanu/postępu.
PRZENOSZENIE PLIKÓW MULTIMEDIALNYCH Z
DYSKU TWARDEGO NA DVD-R/RW
1. Umieść niezamknięty dysk DVD-R/RW na
podajniku dysków.
2. Naciśnij przycisk Menedżer plików, aby otworzyć
Menedżera plików.
3. Użyj przycisków nawigacyjnych, aby wybrać dysk
twardy i naciśnij przycisk Odtwarzanie/OK.
4. Na liście Dysk twardy użyj przycisków W górę/w
dół, aby podświetlić plik, który chcesz skopiować.
5. Aby wybrać plik(i) do przeniesienia, za każdym
razem naciskaj przycisk Nagrywanie. Przy każdym
wybranym pliku pojawi się znak wyboru. Jeśli
chcesz zrezygnować z wyboru danego pliku,
podświetl go i ponownie naciśnij przycisk
Nagrywanie.
6. Naciśnij przycisk W prawo, aby otworzyć menu
Obsługa.
7. Wybierz Kopiuj z listy i naciśnij przycisk
Odtwarzanie/OK.
8. Użyj przycisków nawigacyjnych, aby wybrać i
otworzyć DVD.
9. Przy otwartym DVD naciśnij przycisk W prawo,
aby otworzyć menu Obsługa.
10.Wybierz Wklej z listy, aby przenieść kopiowane
pliki na DVD.
11. U dołu menu pojawia się wskaźnik
stanu/postępu.
TWORZENIE LISTY ULUBIONYCH
Możesz umieścić wszystkie ulubione pliki na
wspólnej liście ulubionych.
1. Naciśnij przycisk Menedżer plików, aby otworzyć
Menedżera plików.
2. Użyj przycisków nawigacyjnych, aby wybrać
folder (dysk twardy, USB lub DVD) i naciśnij
przycisk Odtwarzanie/OK.
3. Na liście folderów użyj przycisków W górę/w dół,
aby podświetlić plik, który chcesz dodać do
ulubionych.
4. Naciśnij przycisk W prawo, aby otworzyć menu
Obsługa.
5. Wybierz Ulubione z listy i naciśnij przycisk
Odtwarzanie/OK.
6. Lista Ulubione zostaje automatycznie podzielona
na audio, filmy i zdjęcia.
7. W calu obejrzenia ulubionych kolejno naciskaj
przycisk Powiększenie, przełączając się pomiędzy
ulubionymi plikami audio, filmami i zdjęciami.
POLSKI
- 12 -
Page 13
PRZESUNIĘCIE CZASOWE
NAGRYWANIE/TRYB PRZESUNIĘCIA
CZASOWEGO
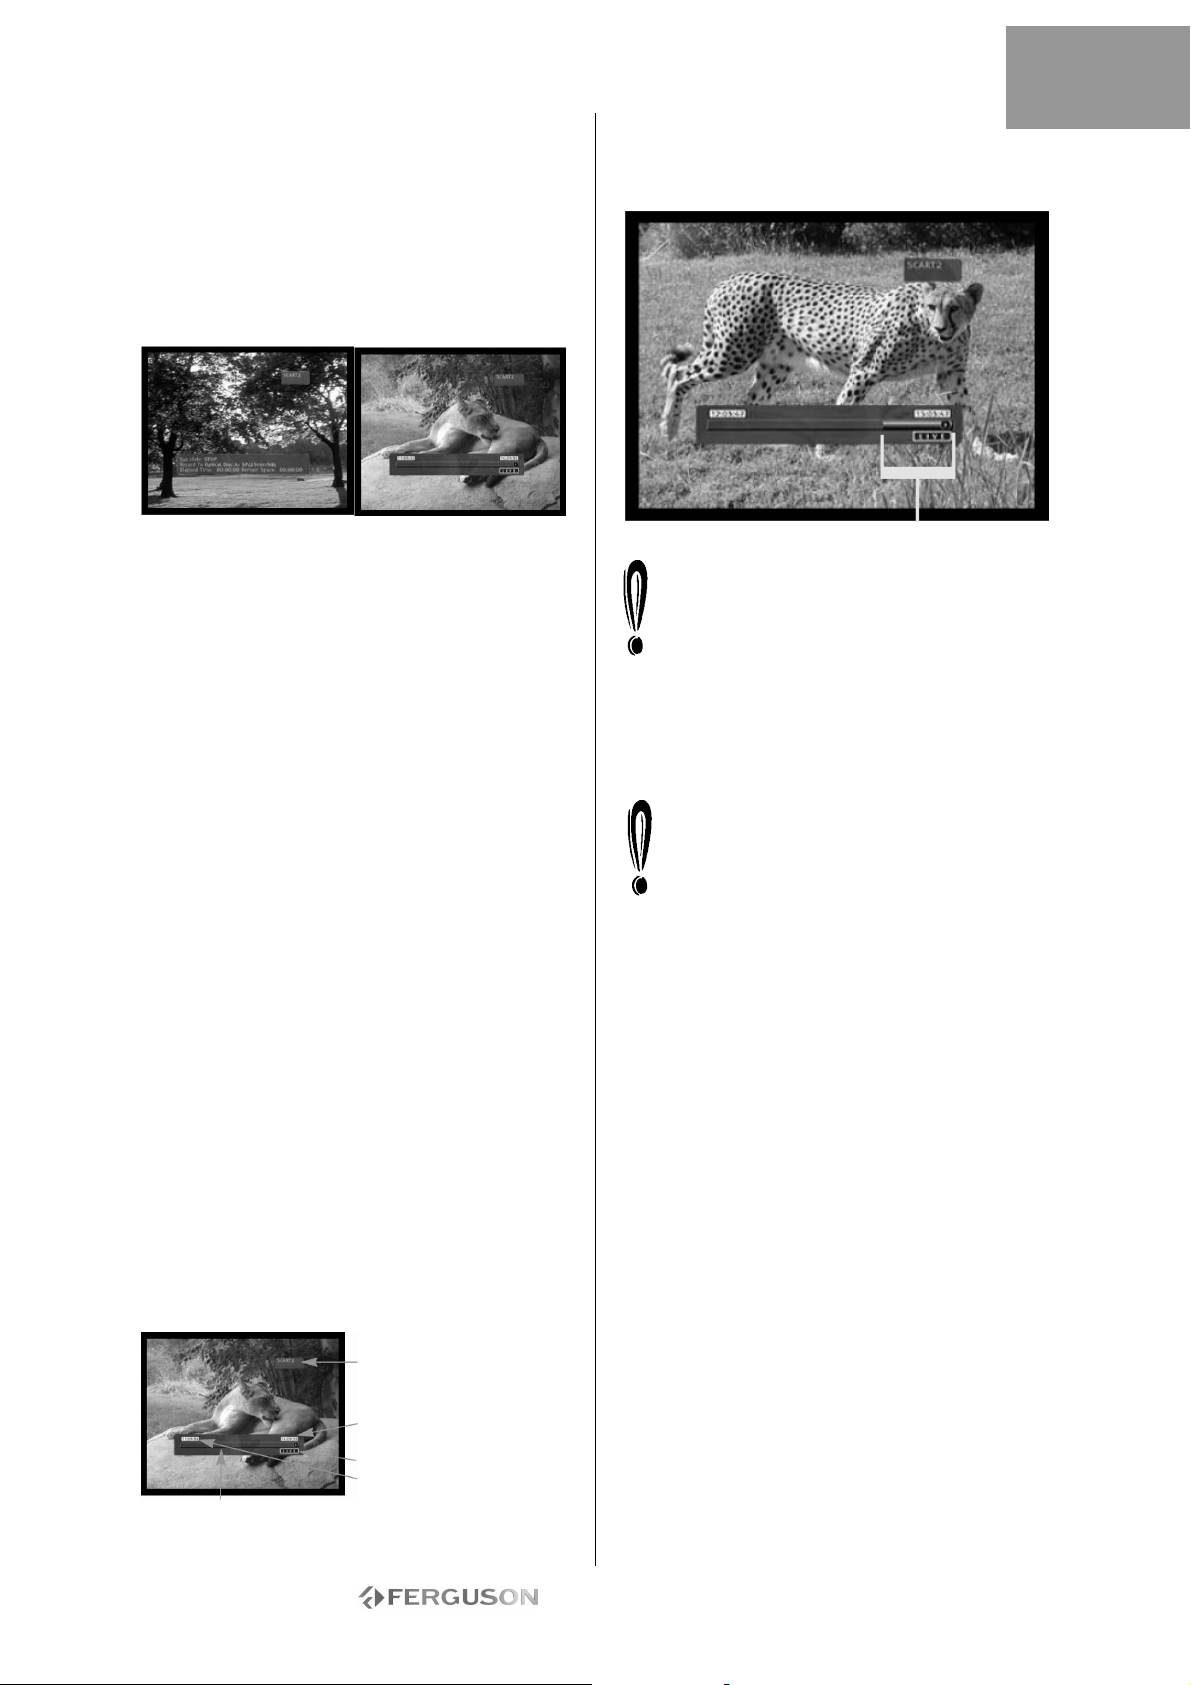
Przy wyświetlaniu obrazu z tunera telewizyjnego lub
zewnętrznego źródła dostępne są dwa tryby: tryb
nagrywania i tryb przesunięcia czasowego.
POLSKI
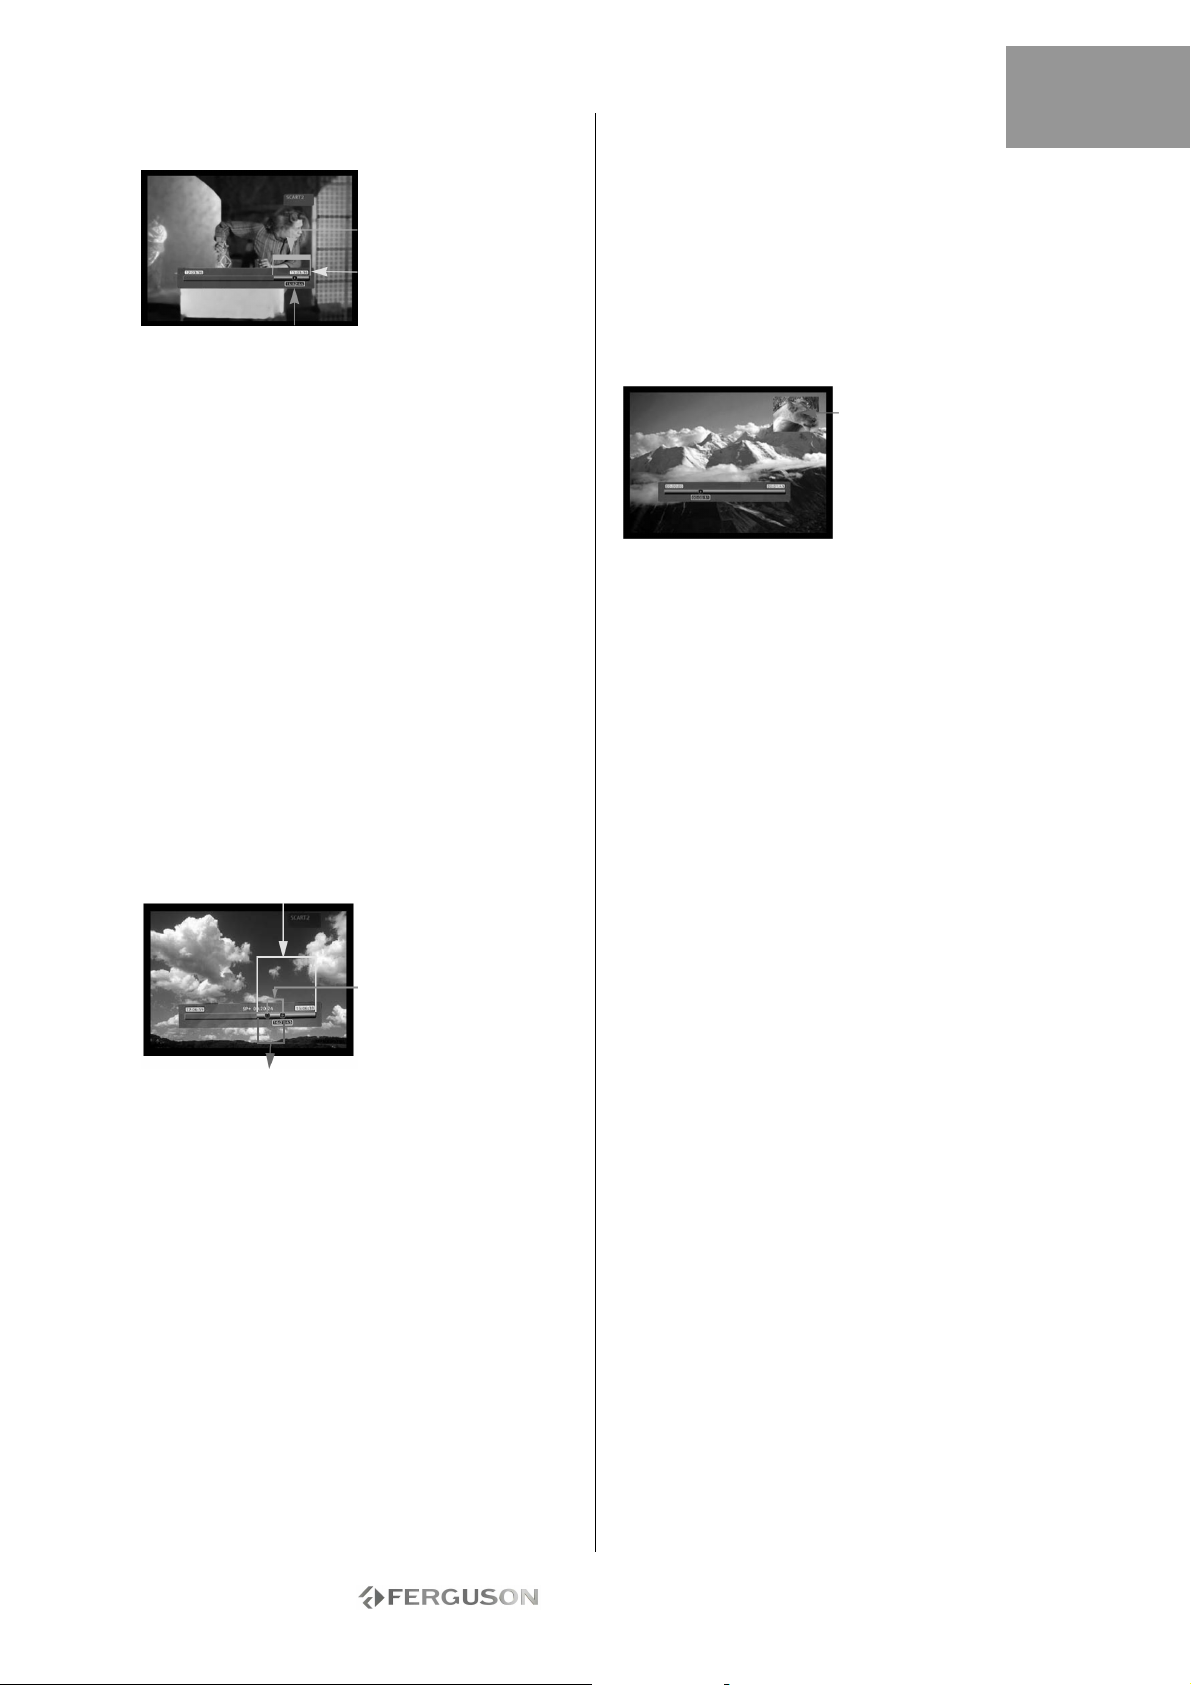
4. Na pasku czasu pokazywana jest zajętość bufora
w miarę upływu czasu.
Tryb nagrywania Tryb przesunięcia
czasowego
• Tryb nagrywania
W trybie nagrywania można nagrywać sygnał ze
źródeł analogowych i z wejścia DV. Nagrania można
zapisywać na dysku twardym oraz na płycie DVD.
• Tryb przesunięcia czasowego
W trybie przesunięcia czasowego można nagrywać
sygnał tylko ze źródeł analogowych. Nagrania
można dokonywać tylko na dysk twardy.
Tryb przesunięcia czasowego daje użytkownikowi
kontrolę nad przekazem telewizyjnym, umożliwiając
jego „wstrzymanie” i wznowienie od tego samego
miejsca. Od momentu włączenia trybu przesunięcia
czasowego nagrywarka Ferguson Recorder w sposób
ciągły zapisuje sygnał ze źródła analogowego (na
przykład przekaz telewizyjny) w swoim 3godzinnym buforze. Daje to użytkownikowi
możliwość obejrzenia i nagrania ostatnich 1, 3
lub 6 godzin przekazu telewizyjnego.
Włączanie trybu przesunięcia czasowego
1. Naciśnij przycisk TV-Dysk twardy.
2. Naciskaj przycisk ródło do momentu wybrania
odpowiedniego źródła. W prawym górnym rogu
pokazywany jest stan źródła.
Uwaga: Przesunięcie czasowe dostępne jest tylko
dla wejścia DV. Dostępne są następujące analogowe
źródła sygnału wideo:
> SCART2
> CHXX (tuner telewizyjny)
> F-COMP (przednie wejście kompozytowego
sygnału wideo)
> F-SV (przednie wejście S-Video)
3. Na ekranie będzie wówczas widoczny pasek
upływu czasu.
Bieżące źródło
Czas odtwarzania
Czas aktualny
3 godziny przed
czasem aktualnym
Pasek upływu czasu
Dostępny bufor do przejrzenia
W trybie przesunięcia czasowego moŜe zostać
aktywowane nagrywanie w ustalonym czasie.
PoniewaŜ nie moŜna oglądać jednego programu
z przesunięciem czasowym i nagrywać innego
kanału, nagrywarka poprosi o potwierdzenie,
czy chcesz zachować bieŜący kanał, czy uruchomić
nagrywanie w ustalonym czasie. W przypadku braku
odpowiedzi nagrywarka zakłada, Ŝe naleŜy
uruchomić nagrywanie w ustalonym czasie. Na 2
minuty przed zaprogramowanym nagrywaniem
zostanie wyświetlony komunikat.
Przesunięcie czasowe zapisywane jest w
buforze, który zawiera 3 godziny nagrania. Po
osiągnięciu limitu czasu nagrywania dane
znajdujące się w buforze będą stopniowo
zastępowane. Jeśli obraz wideo z bufora musi
zostać zachowany na przyszłość, moŜna
zapisać całość lub część bufora (patrz Nagrywanie z
przesunięciem czasowym).
Wstrzymywanie przekazu telewizyjnego
1. Włącz tryb przesunięcia czasowego (patrz
poprzedni punkt).
2. Naciśnij przycisk Pauza, aby wstrzymać przekaz
telewizyjny (lub obraz z wybranego źródła
analogowego).
3. Naciśnij przycisk Odtwarzanie/OK, aby wznowić
przekaz telewizyjny.
Nagrywarka Ferguson Recorder kontynuuje
nagrywanie przekazu telewizyjnego podczas
oglądania wcześniej emitowanego programu.
Przeglądanie zawartości bufora przesunięcia
czasowego (odtwarzanie wcześniejszego
przekazu telewizyjnego)
1. Włącz tryb przesunięcia czasowego.
2. Zawartość bufora przesunięcia czasowego jest
dostępna do przejrzenia.
Użyj przycisków Następny, Poprzedni, Przewijanie
do przodu i Przewijanie do tyłu do nawigacji w
obrębie bufora przesunięcia czasowego i naciśnij
przycisk Odtwarzanie/OK, aby rozpocząć
odtwarzanie.
- 13 -
Page 14
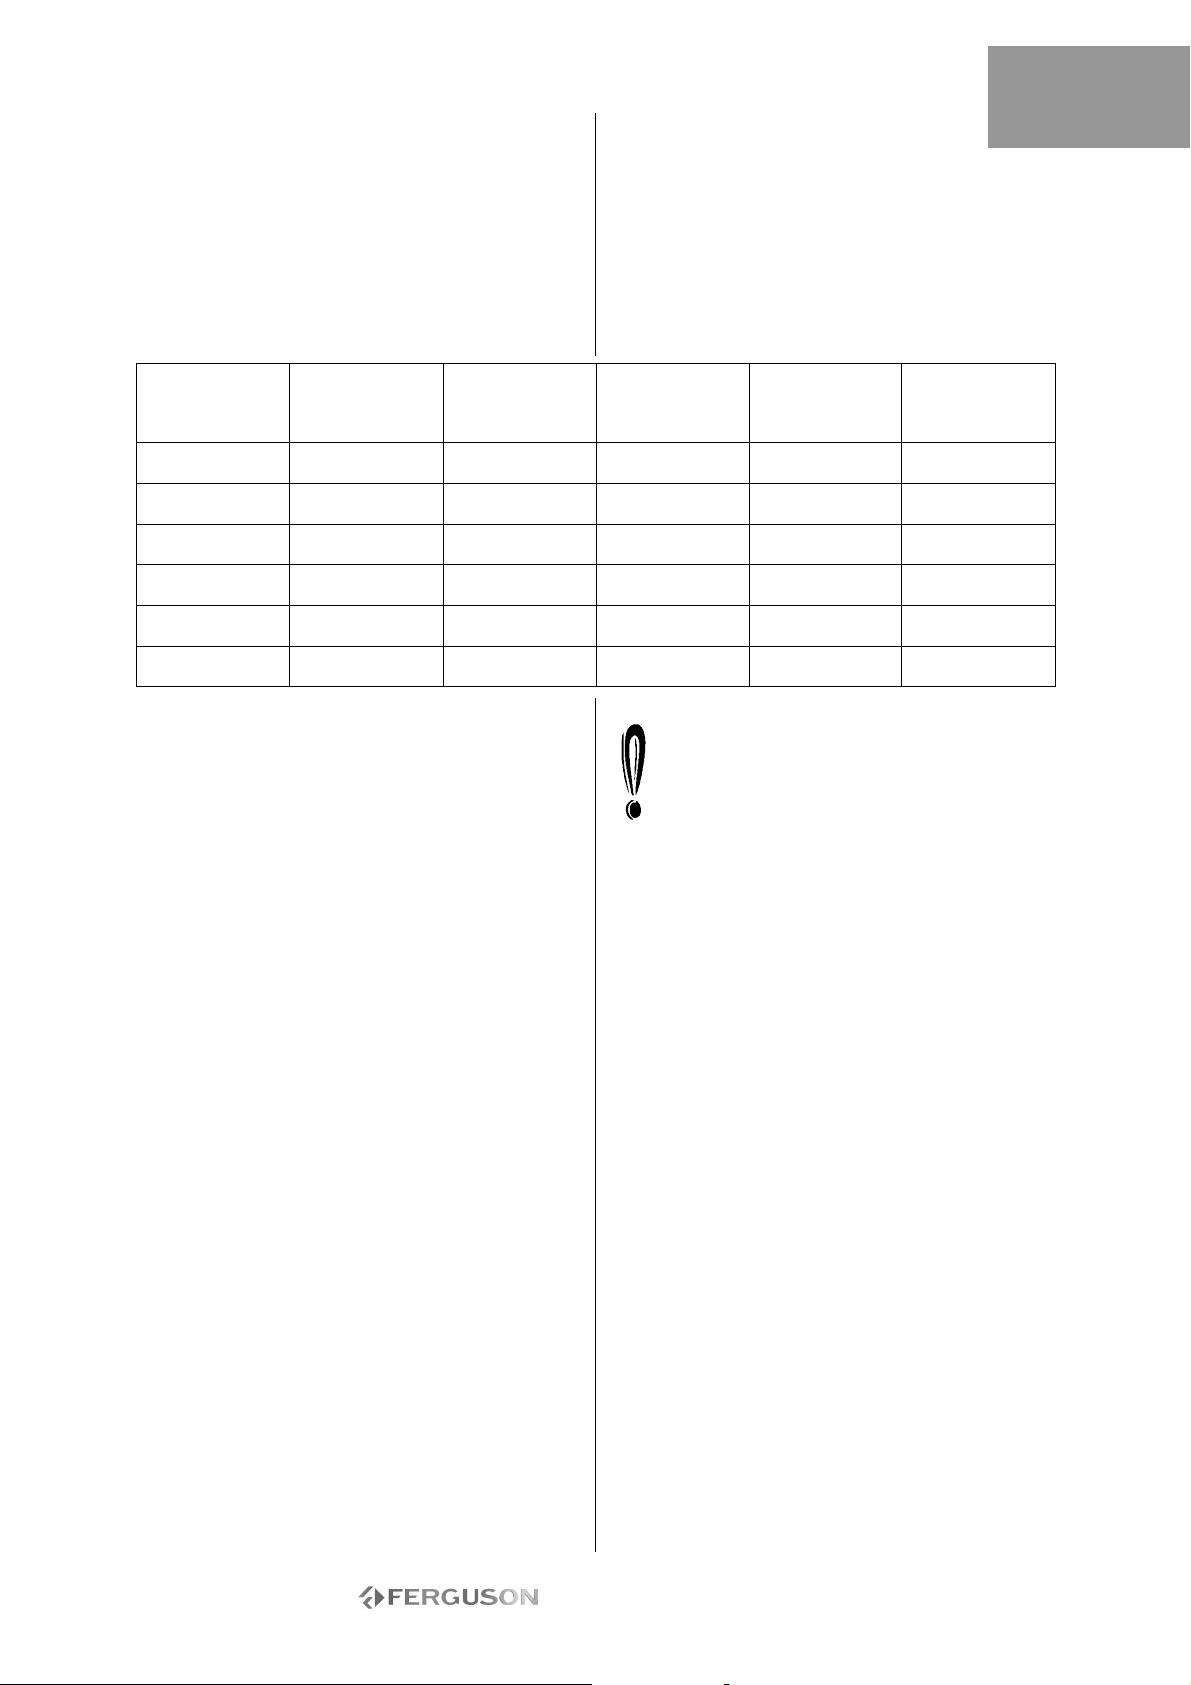
Dostępny bufor do
przejrzenia
Czas aktualny
Czas odtwarzania
Zapisywanie tytułu z bufora przesunięcia
czasowego (nagrywanie z przesunięciem
czasowym)
1. Włącz tryb przesunięcia czasowego.
2. Zawartość bufora przesunięcia czasowego jest
dostępna do zapisania na dysku twardym.
Użyj przycisków Następny, Poprzedni, Przewijanie
do przodu i Przewijanie do tyłu do nawigacji w
obrębie bufora przesunięcia czasowego i przejdź do
początku tytułu, który chcesz zapisać na dysku
twardym.
3. Naciśnij przycisk Nagrywanie.
4. Użyj przycisków Następny, Poprzedni, Przewijanie
do przodu i Przewijanie do tyłu do nawigacji w
obrębie bufora przesunięcia czasowego i przejdź do
końca tytułu, który chcesz zapisać na dysku
twardym.
5. Naciśnij przycisk Zatrzymanie. Tytuł zostanie
zapisany na dysku twardym.
Zapisany tytuł i wszystkie wcześniejsze dane
zostaną usunięte z bufora przesunięcia czasowego.
Dostępny bufor do
Fragment, który
zostanie
Zapisany na dysku
Fragment, który zostanie usunięty z bufora
Zapisywanie całego bufora przesunięcia
czasowego na dysku twardym
1. Włącz tryb przesunięcia czasowego.
2. Naciśnij przycisk Kąt, aby zapisać cały bufor
przesunięcia czasowego na dysku twardym.
Wyłączanie trybu przesunięcia czasowego
Wyłączanie trybu przesunięcia czasowego
Aby wyłączyć tryb przesunięcia czasowego:
1. W widoku źródła analogowego naciśnij przycisk
DVD.
2. Naciśnij przycisk źródła, aby powrócić do widoku
źródła analogowego bez przesunięcia czasowego.
Aby ponownie wyłączyć tryb przesunięcia
czasowego:
1. W widoku źródła analogowego naciśnij przycisk
TV-Dysk twardy.
2. Naciśnij przycisk źródła, aby powrócić do widoku
źródła analogowego z przesunięciem czasowym.
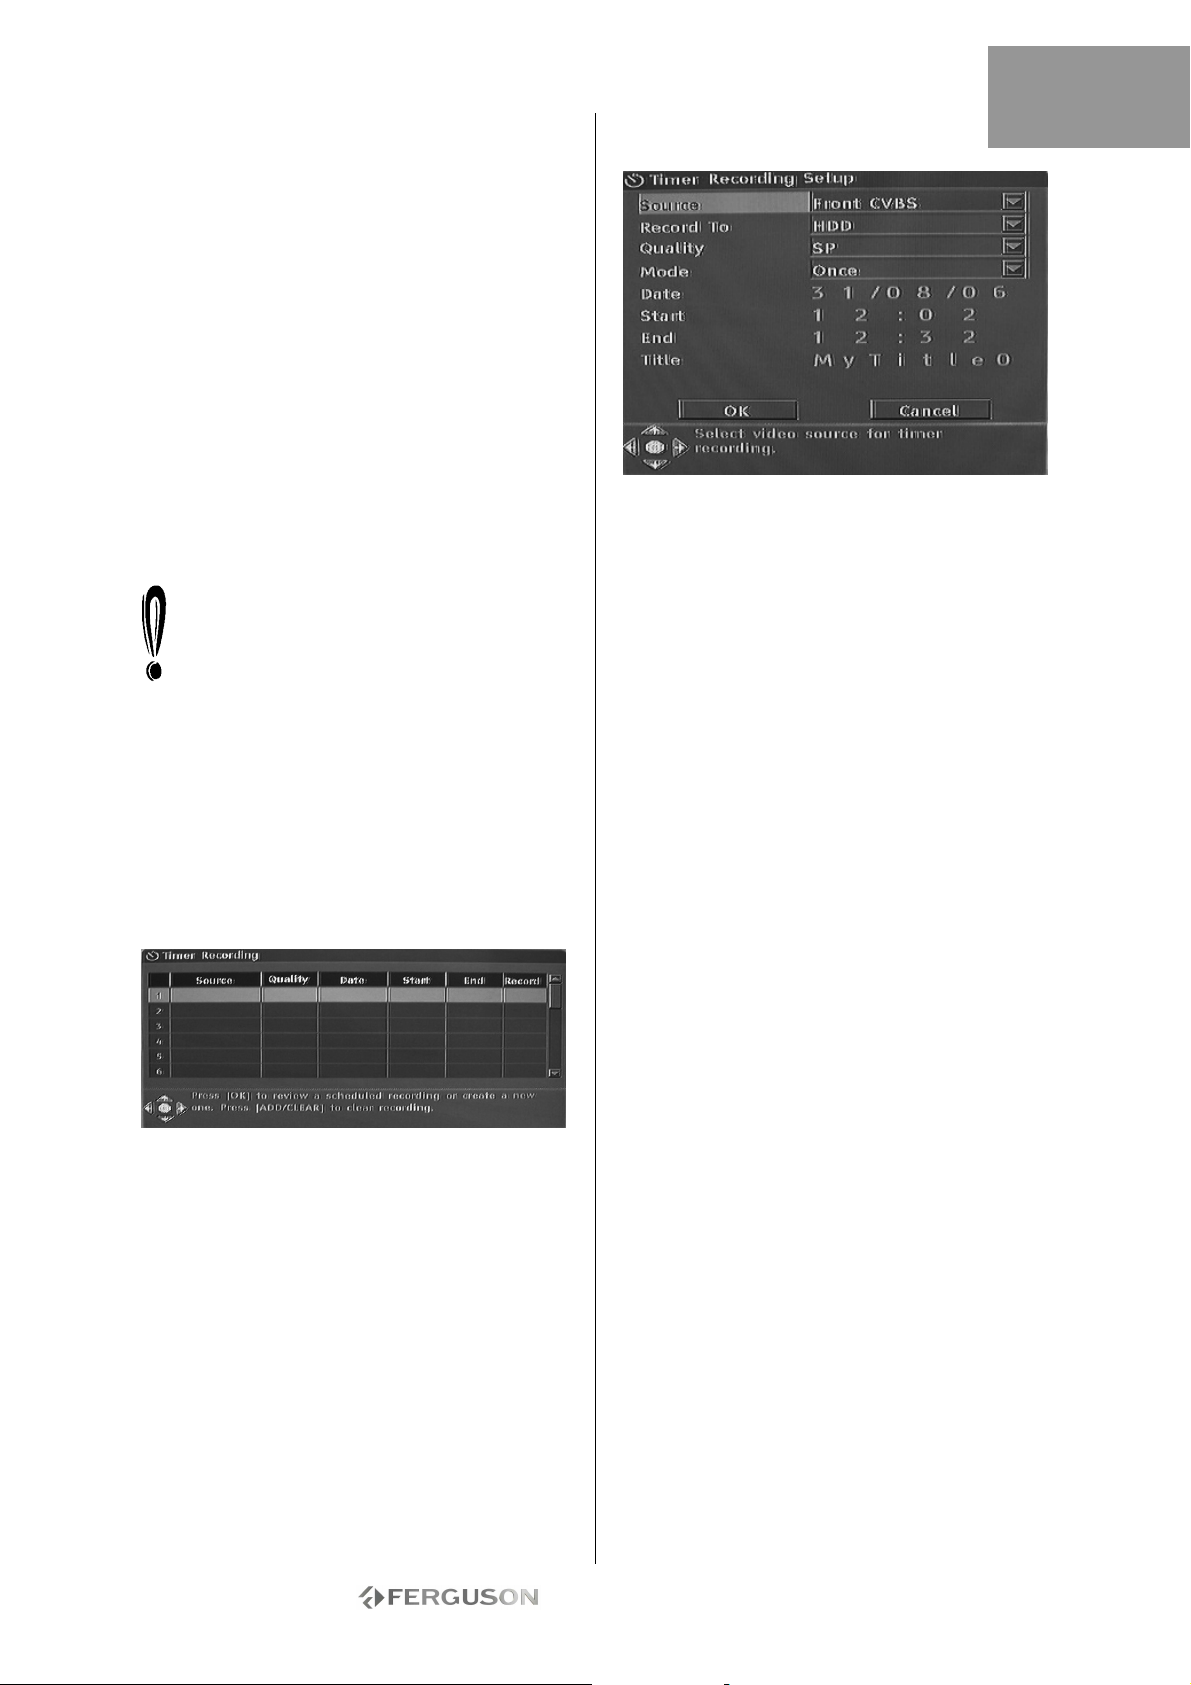
Obraz w obrazie (PIP)
1. Naciśnij przycisk źródło, aby wybrać źródło
wideo, które ma pojawić się jako obraz w obrazie.
2. Podczas odtwarzania poprzednio nagranego pliku
naciśnij przycisk Kąt na pilocie, aby otworzyć obraz
w obrazie.
Obraz w obrazie pojawi się w niewielkim oknie w
prawym górnym rogu ekranu.
Obraz w obrazie
3. Ponownie naciśnij przycisk Kąt, aby wyjść z
obrazu w obrazie.
POLSKI
- 14 -
Page 15
NAGRYWANIE
USTAWIANIE JAKOŚCI NAGRYWANIA
Można ustawić sześć różnych jakości nagrywania.
Wyższa jakość wymaga więcej miejsca na dysku
twardym lub płycie DVD i ogranicza całkowity
dostępny czas nagrania.
Jakość
nagrania
HQ (wysoka
jakość)
SP (standardowe
odtwarzanie)
SP+ (Standard
Play +)
EP (wydłużone
odtwarzanie)
LP (długie
odtwarzanie)
SLP (superdługie
odtwarzanie)
Aby ustawić jakość nagrania, należy wykonać
poniższe czynności:
1. Naciśnij przycisk MENU na pilocie, aby wejść do
MENU KONFIGURACJI.
2. Za pomocą przycisków nawigacyjnych podświetl
ikonę Nagrywanie, a następnie naciśnij przycisk
Odtwarzanie/OK.
3. Za pomocą przycisków podświetl opcję
Jakość nagrania, a następnie naciśnij przycisk
Odtwarzanie/OK.
4. Za pomocą przycisków podświetl
odpowiednie ustawienie jakości, a następnie naciśnij
przycisk Odtwarzanie/OK, aby potwierdzić wybór.
Jakość nagrania naleŜy wybrać z rozwagą, aby
zapewnić dość miejsca na nagranie na dysku
twardym lub płycie DVD.
NAGRYWANIE NA PłYTACH DVD
1. Włóż nagrywalną płytę DVD do urządzenia i
przełącz na tryb DVD, naciskając przycisk DVD.
2. Kolejno naciskaj przycisk ródło, aby wybrać
źródło sygnału do nagrania.
3. Naciśnij przycisk Nagrywanie/OTR, aby rozpocząć
nagrywanie. U dołu ekranu wyświetlony będzie
pasek stanu, wskazujący bieżący stan nagrywania.
4. Naciśnij przycisk Zatrzymanie, aby zatrzymać
nagrywanie.
5. Naciśnij przycisk DVD, aby włączyć tryb DVD i
odnaleźć właśnie nagrany fragment.
Całkowite zatrzymanie procesu nagrywania może
zająć kilka sekund; poczekaj do momentu
wyświetlenia komunikatu Stop na pasku stanu,
zanim przełączysz urządzenie w tryb DVD.
Podczas nagrywania z DVD z użyciem tej metody
nagrywarka zatrzyma nagrywanie na dysku
twardym. Po zakończeniu nagrywania na płycie DVD
naciśnij przycisk TV-Dysk twardy, aby ponownie
uruchomić mechanizm przesunięcia czasowego.
Czas
nagrania (4,7
GB, DVD)
1 godzina 17 godzin 35 godzin 53 godziny 85 godzin
2 godziny 34 godziny 68 godzin 106 godzin 170 godzin
3 godziny 51 godzin 102 godziny 159 godzin 255 godzin
4 godziny 68 godzin 136 godzin 212 godzin 340 godzin
5 godzin 85 godzin 170 godzin 265 godzin 425 godzin
6 godzin 96 godzin 192 godziny 300 godzin 480 godzin
Czas
nagrania (80
GB, dysk
twardy)
Czas
nagrania
(160 GB,
dysk twardy)
Nagrywarka będzie kontynuować nagrywanie
do momentu zapełnienia płyty lub naciśnięcia
przycisku Zatrzymanie. Aby ustawić
nagrywarkę na nagranie jedynie 30 minut,
naciśnij przycisk Nagrywanie/OTR po
rozpoczęciu nagrywania. Po kaŜdym naciśnięciu
przycisku Nagrywanie/OTR czas nagrywania
zostanie zwiększony o kolejne 30 minut. Aby
wstrzymać nagrywanie, naciśnij przycisk Pauza na
pilocie; ponownie naciśnij przycisk Odtwarzanie/OK,
aby wznowić nagrywanie.
W przypadku wybrania tunera telewizyjnego, za
pomocą przycisków wybierz odpowiedni kanał.
NAGRYWANIE NA DYSKU TWARDYM
1. Naciskaj przycisk ródło do momentu wybrania
odpowiedniego źródła.
• Dostępne są następujące źródła wideo:
> DV (cyfrowe wideo)
> SCART2
> CHXX (tuner telewizyjny)
> F-COMP (przednie wejście kompozytowego
sygnału wideo)
> F-SV (przednie wejście S-Video)
2. Jeśli włączony jest tryb przesunięcia czasowego,
naciśnij przycisk Nagrywanie.
3. Jeśli włączony jest tryb nagrywania, upewnij się,
że wybrano Dysk twardy (patrz pasek stanu na
ekranie).
4. W przeciwnym razie naciśnij przycisk TV-Dysk
twardy, aby wybrać dysk twardy, a następnie
naciśnij przycisk Nagrywanie.
5. Naciśnij przycisk Zatrzymanie, aby zatrzymać
nagrywanie.
Czas
nagrania
(250 GB,
dysk twardy)
Czas
nagrania
(400 GB,
dysk twardy)
POLSKI
- 15 -
Page 16
W trybie przesunięcia czasowego nagrywarka
Ferguson RW-770HD dzieli nagranie na kilka 3godzinnych tytułów, jeśli jego czas przekracza 3
godziny.
Podczas nagrywania w trybie przesunięcia
czasowego każde naciśnięcie przycisku
Nagrywanie/OTR powoduje wydłużenie
nagrywanego tytułu o 30 minut, maksymalnie do 3
godzin.
Przesunięcia czasowego nie można używać ze
źródłem DV (cyfrowe wideo). Aby nagrać materiał
DV na dysku twardym, naciskaj przycisk źródło;
nagrywarka zostanie przełączona w tryb DV i pilot
umożliwi sterowanie kamerą DV. Za pomocą pilota
nagrywarki Ferguson RW-770HD można wówczas
wydawać kamerze polecenia przewijania w przód i w
tył, pauzy i odtwarzania.
Nie można zmienić kanału lub źródła, gdy
nagrywanie jest aktywne (jeśli nie
wprowadzono punktu końcowego segmentu
nagrania lub - w przypadku długiego
nagrywania - jeśli nie został on osiągnięty).
Przy próbie zmiany kanału lub źródła
nagrywarka Ferguson RW-770HD poprosi o
zatrzymanie nagrywania. Segment zostanie
zapisany na dysku twardym, a następnie zmieniony
zostanie kanał lub źródło.
NAGRYWANIE W USTALONYM CZASIE
1. Upewnij się, że zegar jest ustawiony zgodnie z
lokalnym czasem. Patrz Ustawianie zegara w dalszej
części niniejszego podręcznika.
2. Naciśnij przycisk Zegar, aby wyświetlić ekran
programowania nagrań.
Aby usunąć zaprogramowane nagranie, za pomocą
przycisków podświetl je i naciśnij przycisk
Nagrywanie/OTR.
3. Za pomocą przycisków podświetl nagranie i
naciśnij przycisk Odtwarzanie/OK. Pojawi się okno
dialogowe Edytor pozycji.
4. Poniżej przedstawiono opis pozycji w oknie
dialogowym:
Źródło: Wybierz źródło sygnału wejściowego.
Nagrywanie na: Wybierz miejsce nagrywania.
Jakość: Wybierz jakość nagrania.
Tryb: Wybierz tryb nagrywania (jednorazowe,
codziennie, raz w tygodniu).
Start: Wybierz godzinę rozpoczęcia nagrywania.
Koniec: Wybierz godzinę zakończenia nagrywania.
Tytuł: Wpisz tytuł nagrania.
5. Przenieś kursor na przycisk OK i naciśnij przycisk
Odtwarzanie/OK, aby zapisać ustawienia.
6. Na kilka minut przed zaprogramowanym
rozpoczęciem nagrywania na ekranie telewizora
pojawi się okno dialogowe, w którym należy
potwierdzić lub anulować sesję. Jeśli nie dokonasz
żadnego wyboru, nagrywanie rozpocznie się zgodnie
z harmonogramem.
Jeśli nagrywarka znajduje się w stanie gotowości,
automatycznie włączy się na dwie minuty przed
zaprogramowanym rozpoczęciem nagrywania.
Na nagrywalnej płycie DVD można nagrać 360
minut programów (z jakością SLP). Programy te
można podzielić na 48 tytułów.
POLSKI
- 16 -
Page 17
EDYCJA I KOPIOWANIE
Edycja tytułów DVD±RW
Poniższe instrukcje dotyczą tylko płyt DVD±RW.
Ponieważ płyty DVD±R nie mogą być nagrywane lub
edytowane ponownie, poniższe operacje ich nie
dotyczą.
1. Włóż zapisaną płytę DVD+RW lub DVD-RW do
podajnika. Pojawi się ekran indeksu DVD (jeśli
ekran nie pojawi się, naciśnij przycisk DVD).
2. Za pomocą przycisków podświetl tytuł do
edycji. Jeśli jest więcej niż 3 tytuły, naciśnij przycisk
, aby przejrzeć pozostałe tytuły.
3. Naciśnij przycisk , aby wyświetlić menu płyty.
Za pomocą przycisków podświetl jedną z
poniższych pozycji (Odtwarzanie tytułu, Edycja
tytułu itd.), a następnie naciśnij przycisk
Odtwarzanie/OK.
nowy tytuł. Jeśli nowa sesja jest dłuższa od
pierwotnego tytułu, proces nagrywania zostanie
automatycznie zatrzymany po dojściu do jego
końca.
Wymazywanie tytułu - Usunięcie bieżącego
tytułu.
Nadpisanie płyty - Nowo zapisany materiał zastąpi
cały poprzedni materiał płyty, kasując wszystkie
tytuły.
Dodanie tytułu - (Ta pozycja pojawia się tylko przy
edycji ostatniego tytułu na płycie.) Dodanie nowego
tytułu po ostatnim tytule na płycie.
Kopiowanie – kopiuje bieżący tytuł na dysk twrdy
HDD.
Po wybraniu opcji Zastąpienie tytułu/Dodanie
tytułu/Nadpisanie płyty i potwierdzeniu
naciśnięciem przycisku Odtwarzanie/OK źródło
sygnału zostanie automatycznie przełączone z
powrotem na źródło używane przed
rozpoczęciem operacji edycji płyty.
Proces nagrywania nie rozpocznie się po
wybraniu pozycji Zastąpienie tytułu/Dodanie
tytułu/Nadpisanie płyty; aby rozpocząć
nagrywanie musisz nacisnąć przycisk
Nagrywanie/OTR na panelu przednim lub na
pilocie.
Edycja płyt DVD±RW
1. Włóż płytę DVD±RW do podajnika.
2. Za pomocą przycisku podświetl górną część
paska informacji o zapisie płyty.
POLSKI
Odtwarzanie tytułu - Odtworzenie bieżącego
tytułu. Edycja tytułu - Edycja bieżącego tytułu, np.
dodanie znaczników rozdziałów, ukrycie lub
pokazanie rozdziału, zmiana obrazu indeksu tytułu,
podział jednego tytułu na dwa itp.
Zmiana nazwy tytułu - Zmiana nazwy bieżącego
tytułu. Po naciśnięciu przycisku Odtwarzanie/OK na
tej pozycji na ekranie telewizora pojawi się
wirtualna klawiatura. Za pomocą przycisków
podświetl literę lub znak, który chcesz wstawić, a
następnie potwierdź, naciskając przycisk
Odtwarzanie/OK. Zaznacz przycisk OK i naciśnij
przycisk Odtwarzanie/OK, aby zapisać nazwę.
Nazwa tytułu moŜe składać się maksymalnie z 12
znaków.
Zastąpienie tytułu - Zastąpienie poprzednio
skopiowanej sesji nowo nagranym materiałem,
który zapisany zostanie w miejsce starego. Jeśli
nowa sesja jest krótsza od pierwotnej, pozostała
część pierwotnej sesji pozostanie na płycie jako
3. Naciśnij przycisk , aby wyświetlić menu płyty.
Za pomocą przycisków podświetl jedną z
powyższych pozycji (Odtwarzanie, Zmiana nazwy
płyty, Wymazywanie płyty, Nagrywanie nowego
tytułu itp.) i naciśnij przycisk Odtwarzanie/OK.
Operacje:
• Odtwarzanie: Kolejne odtwarzanie nagranych
tytułów.
• Zmiana nazwy płyty: Zmiana nazwy płyty patrz Zmiana nazwy tytułu (powyżej).
• Wymazywanie dysku optycznego: Usunięcie
całej zawartości płyty.
• Nagrywanie nowego tytułu: Nagranie nowego
materiału z nowym tytułem.
• Nadpisanie płyty: Zastąpienie wszystkich danych
na płycie, od początku do końca, nowym
materiałem.
Patrz ‘Edycja tytułów DVD+RW lub DVD-RW’, gdzie
opisano operacje Nowy tytuł i Nadpisywanie płyty.
• Blokada płyty: Zablokowanie bieżącej płyty w
celu ochrony zapisanych na niej danych.
Zablokowanej płyty nie można wymazać lub
zapisać, dopóki nie zostanie odblokowana.
- 17 -
Page 18
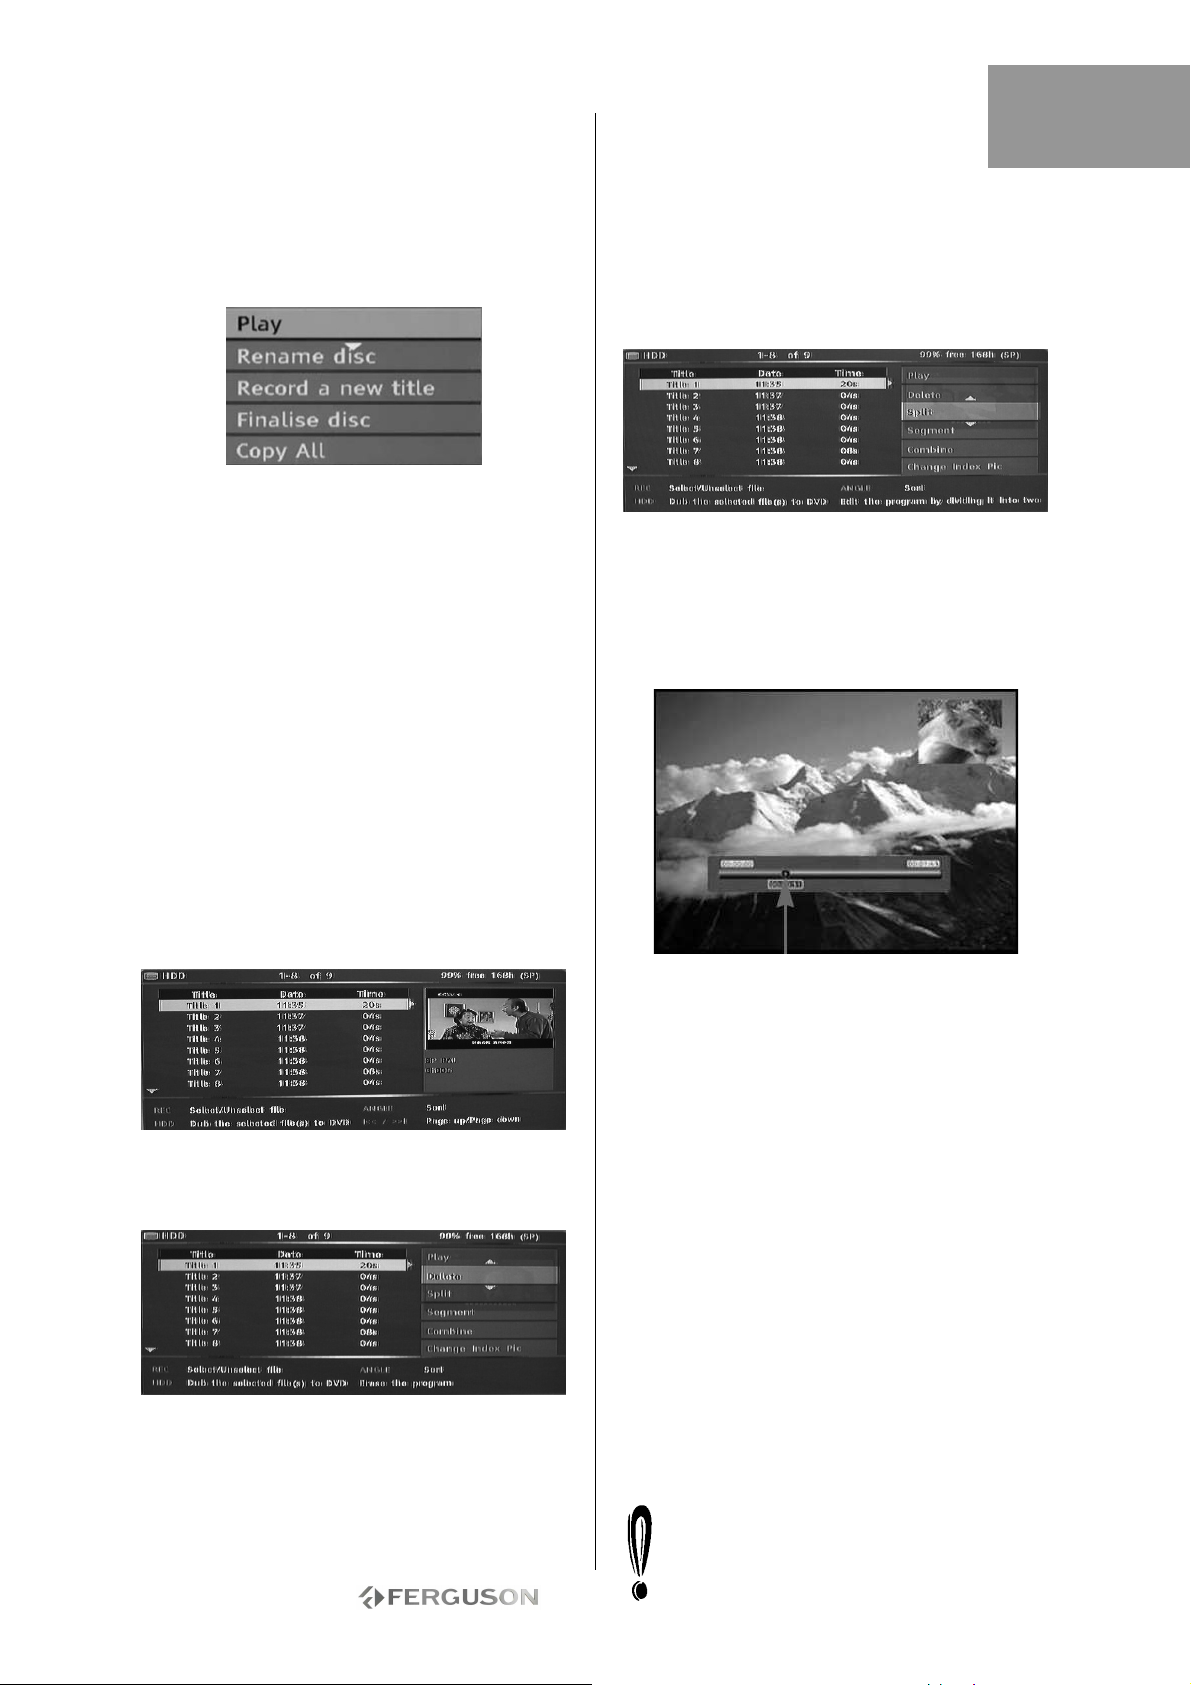
Edycja płyt DVD±R
1. Włóż płytę DVD±R do podajnika.
2. Naciśnij przycisk , aby wyświetlić menu edycji
płyty.
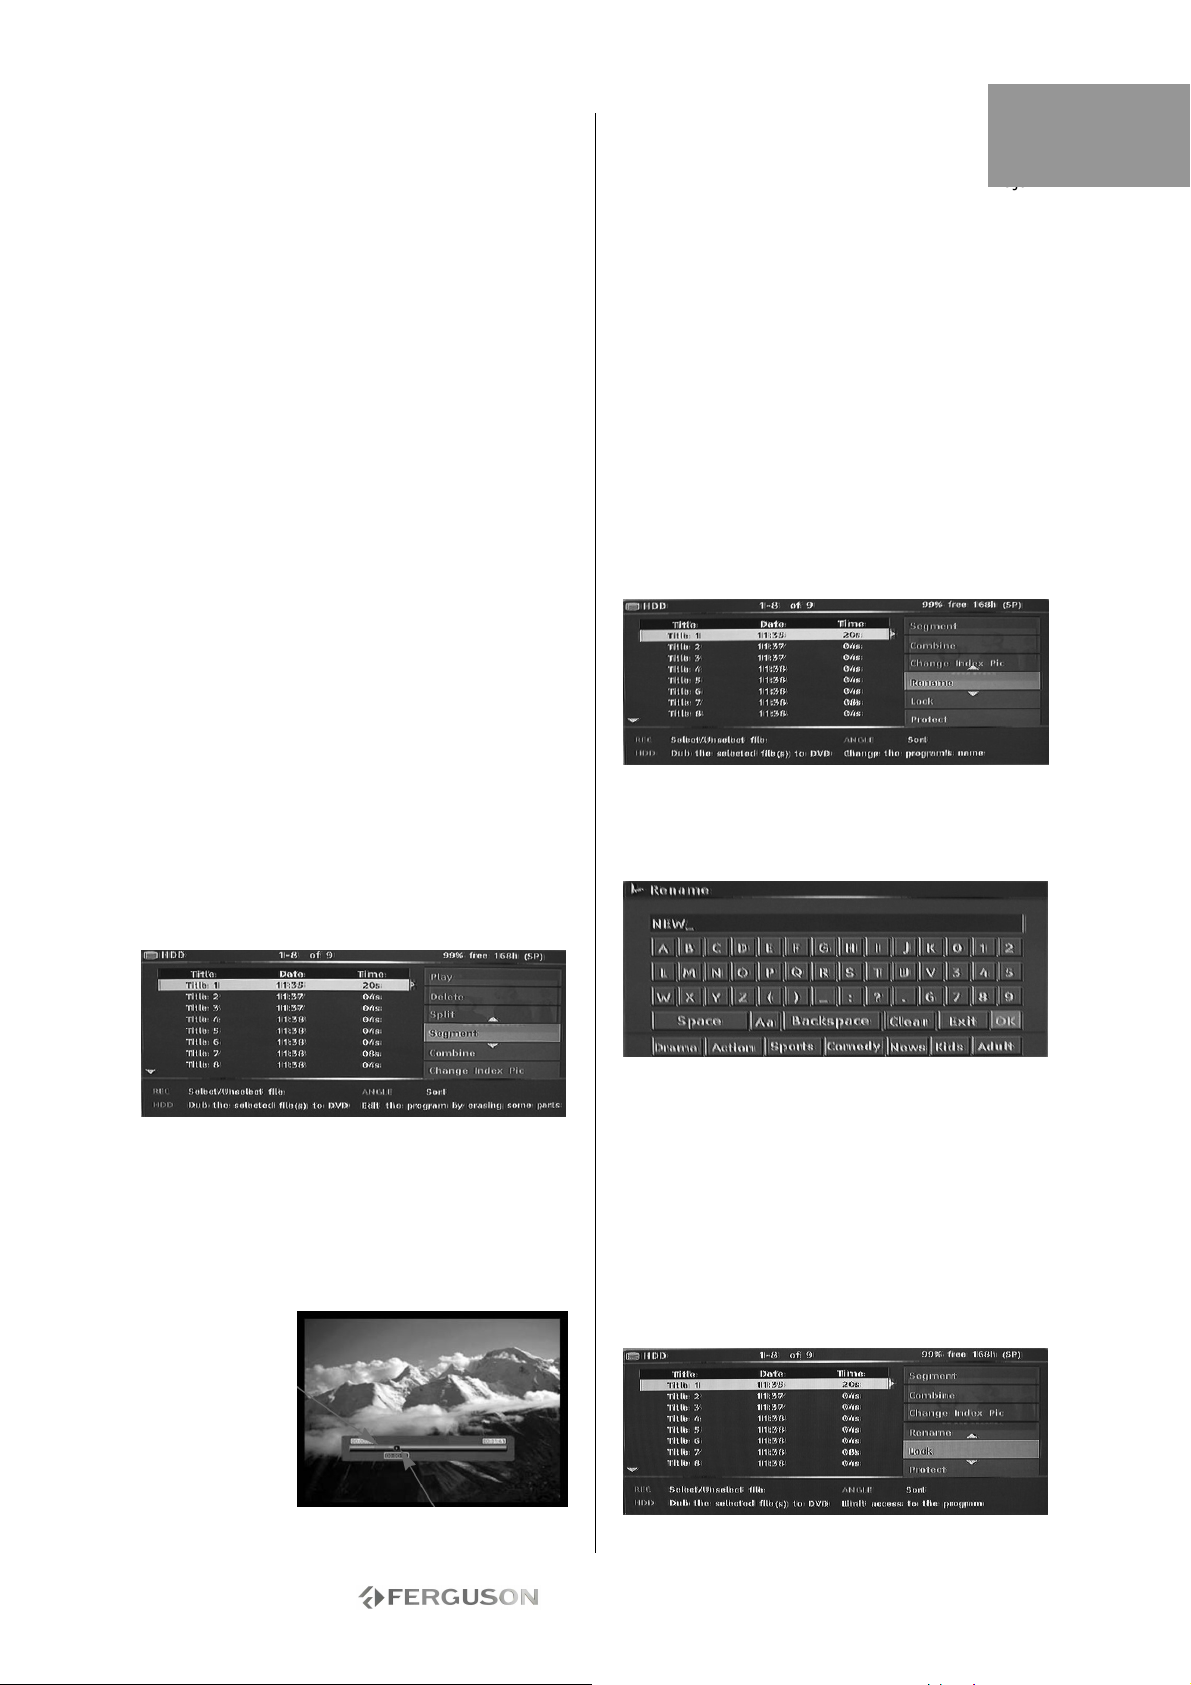
Podział tytułu zapisanego w TV-dysk twardy
1. Naciśnij przycisk TV-dysk twardy, aby wyświetlić
listę tytułów TV-dysk twardy.
2. Za pomocą przycisków podświetl odpowiedni
tytuł.
POLSKI
3. Naciśnij przycisk , aby wyświetlić menu edycji.
Operacje:
• Odtwarzanie: Kolejne odtwarzanie nagranych
tytułów.
• Zmiana nazwy płyty: Zmiana nazwy płyty patrz Zmiana nazwy tytułu (powyżej).
• Nagrywanie nowego tytułu: Nagranie nowego
materiału z nowym tytułem. Ten tytuł będzie
ostatnim na płycie.
• Finalizowanie płyty: Finalizacja płyty DVD+R lub
DVDR. Zanim płytę można będzie odtwarzać na
innych odtwarzaczach DVD, należy ją sfinalizować w
nagrywarce Ferguson. Po zakończeniu tego procesu
nie będzie można dokonywać dalszych nagrań na tej
płycie.
• Kopiuj wszystko: Kopiuje cały dysk na dysk
twardy HDD.
EDYCJA TV-DYSK TWARDY (TYTUłY NAGRANE
Z TELEWIZORA)
Usuwanie tytułu TV-Dysk twardy
1. Naciśnij przycisk TV-dysk twardy, aby wyświetlić
listę tytułów TV-dysk twardy.
2. Za pomocą przycisków
podświetl odpowiedni
tytuł.
3. Naciśnij przycisk , aby wyświetlić menu edycji.
4. Naciśnij przycisk Odtwarzanie/OK, aby wybrać
pozycję Usuń.
5. Wyświetlone zostanie okno potwierdzenia. Za
pomocą przycisków podświetl pozycję Tak.
Naciśnij przycisk Odtwarzanie/OK, aby potwierdzić.
Tytułów zabezpieczonych i zablokowanych nie
moŜna usunąć.
4. Za pomocą przycisków podświetl pozycję
Podziel.
5. Naciśnij przycisk Odtwarzanie/OK, aby wybrać
pozycję Podziel.
6. Za pomocą przycisków Następny, Poprzedni,
Przewijanie do przodu i Przewijanie do tyłu odnajdź
miejsce, w którym ma nastąpić podział tytułu.
7. Naciśnij przycisk Nagrywanie, gdy kursor znajdzie
się w odpowiednim miejscu podziału.
8. Wyświetlone zostanie okno potwierdzenia. Za
pomocą przycisków podświetl pozycję Tak.
9. Naciśnij przycisk Odtwarzanie/OK, aby
potwierdzić.
Tytułów zabezpieczonych i zablokowanych nie
Łączenie dwóch tytułów
1. Naciśnij przycisk Dysk twardy, aby wyświetlić
listę tytułów zapisanych na dysku twardym.
2. Za pomocą przycisków podświetl odpowiedni
tytuł.
3. Naciśnij przycisk , aby wyświetlić menu edycji.
4. Za pomocą przycisków podświetl pozycję
Połącz.
5. Naciśnij przycisk Odtwarzanie/OK, aby wybrać
pierwszą część łączonych tytułów.
6. Użyj przycisków , aby podświetlić tytuł, który
ma być połączony z pierwszym.
7. Naciśnij przycisk Odtwarzanie/OK, aby połączyć
oba tytuły.
8.Po połączeniu dwóch tytułów w jeden plik,
oryginalne, osobne pliki przestają istnieć.
Miejsce podziału
moŜna podzielić.
- 18 -
Page 19
Odtwarzanie zatrzymuje się natychmiast w
momencie minięcia punktu, w którym oba pliki są
połączone.
Zmiana obrazu indeksu
1. Naciśnij przycisk Menu.
2. Za pomocą przycisków nawigacyjnych podświetl
ikonę Preferencje, a następnie naciśnij przycisk
Odtwarzanie/OK.
3. Za pomocą przycisków podświetl pozycję
Podgląd typu, a następnie naciśnij przycisk
Odtwarzanie/ OK.
4. Za pomocą przycisków wybierz Statyczny, a
następnie naciśnij przycisk Odtwarzanie/OK na
pilocie.
• Statyczny powoduje wyświetlenie statycznego
obrazu w menu podglądu indeksu dysku twardego.
• Dynamiczny powtarza odtwarzanie 15 sekund
filmu w menu podglądu dysku twardego.
5. Naciśnij przycisk TV-dysk twardy, aby wyświetlić
listę tytułów TV-dysk twardy.
6. Za pomocą przycisków podświetl odpowiedni
tytuł.
7. Naciśnij przycisk , aby wyświetlić menu edycji.
8. Użyj przycisków , aby podświetlić Zmień
obraz indeksu.
9. Naciśnij ODTWARZANIE/OK, aby rozpocząć
odtwarzanie wybranego tytułu.
10. Podczas odtwarzania wybierz punkt filmu, który
ma być wyświetlany jako statyczny obraz indeksu i
naciśnij Odtwarzanie/OK.
11.Wybierz Tak i naciśnij Odtwarzanie/OK, aby
zakończyć.
Ukrywanie segmentów tytułu (np. reklam)
1. Naciśnij przycisk TV-dysk twardy, aby wyświetlić
listę tytułów TV-dysk twardy.
2. Za pomocą przycisków podświetl odpowiedni
tytuł.
3. Naciśnij przycisk , aby wyświetlić menu edycji.
7. Naciśnij przycisk Nagrywanie, gdy kursor znajdzie
się w odpowiednim miejscu.
8. Za pomocą przycisków Następny, Poprzedni,
Przewijanie do przodu i Przewijanie do tyłu odnajdź
koniec segmentu, który chcesz ukryć.
9. Naciśnij przycisk Nagrywanie, gdy kursor znajdzie
się w odpowiednim miejscu.
10.Powtórz czynności od 6 do 9 dla każdego
segmentu, który chcesz ukryć.
11. Naciśnij przycisk Zatrzymanie lub TV-dysk
twardy, aby powrócić do listy tytułów zapisanych na
liście TV-dysk twardy.
Tytułów zabezpieczonych i zablokowanych nie
moŜna posegmentować.
Zmiana nazwy tytułu zapisanego w TV-dysk
twardy
1. Naciśnij przycisk TV-dysk twardy, aby wyświetlić
listę tytułów TV-dysk twardy.
2. Za pomocą przycisków podświetl odpowiedni
tytuł.
3. Naciśnij przycisk , aby wyświetlić menu edycji.
4. Za pomocą przycisków podświetl pozycję
Zmiana nazwy.
5. Naciśnij przycisk Odtwarzanie/OK, aby wybrać
pozycję Zmiana nazwy.
POLSKI
4. Za pomocą przycisków podświetl pozycję
Segment.
5. Naciśnij przycisk Odtwarzanie/OK, aby wybrać
pozycję Segment.
6. Za pomocą przycisków Następny, Poprzedni,
Przewijanie do przodu i Przewijanie do tyłu odnajdź
początek segmentu, który chcesz ukryć.
Ukryty segment
Pozycja kursora
6. Wprowadź nową nazwę za pomocą przycisków
nawigacyjnych, a następnie naciśnij przycisk
Odtwarzanie/OK.
7. Wybierz pozycję OK, aby wyjść.
Blokowanie tytułu (uniemożliwienie
przeglądania, edycji i usunięcia)
1. Naciśnij przycisk TV-dysk twardy, aby wyświetlić
listę tytułów TV-dysk twardy.
2. Za pomocą przycisków podświetl odpowiedni
tytuł.
3. Naciśnij przycisk , aby wyświetlić menu edycji.
4. Za pomocą przycisków podświetl pozycję
- 19 -
Page 20
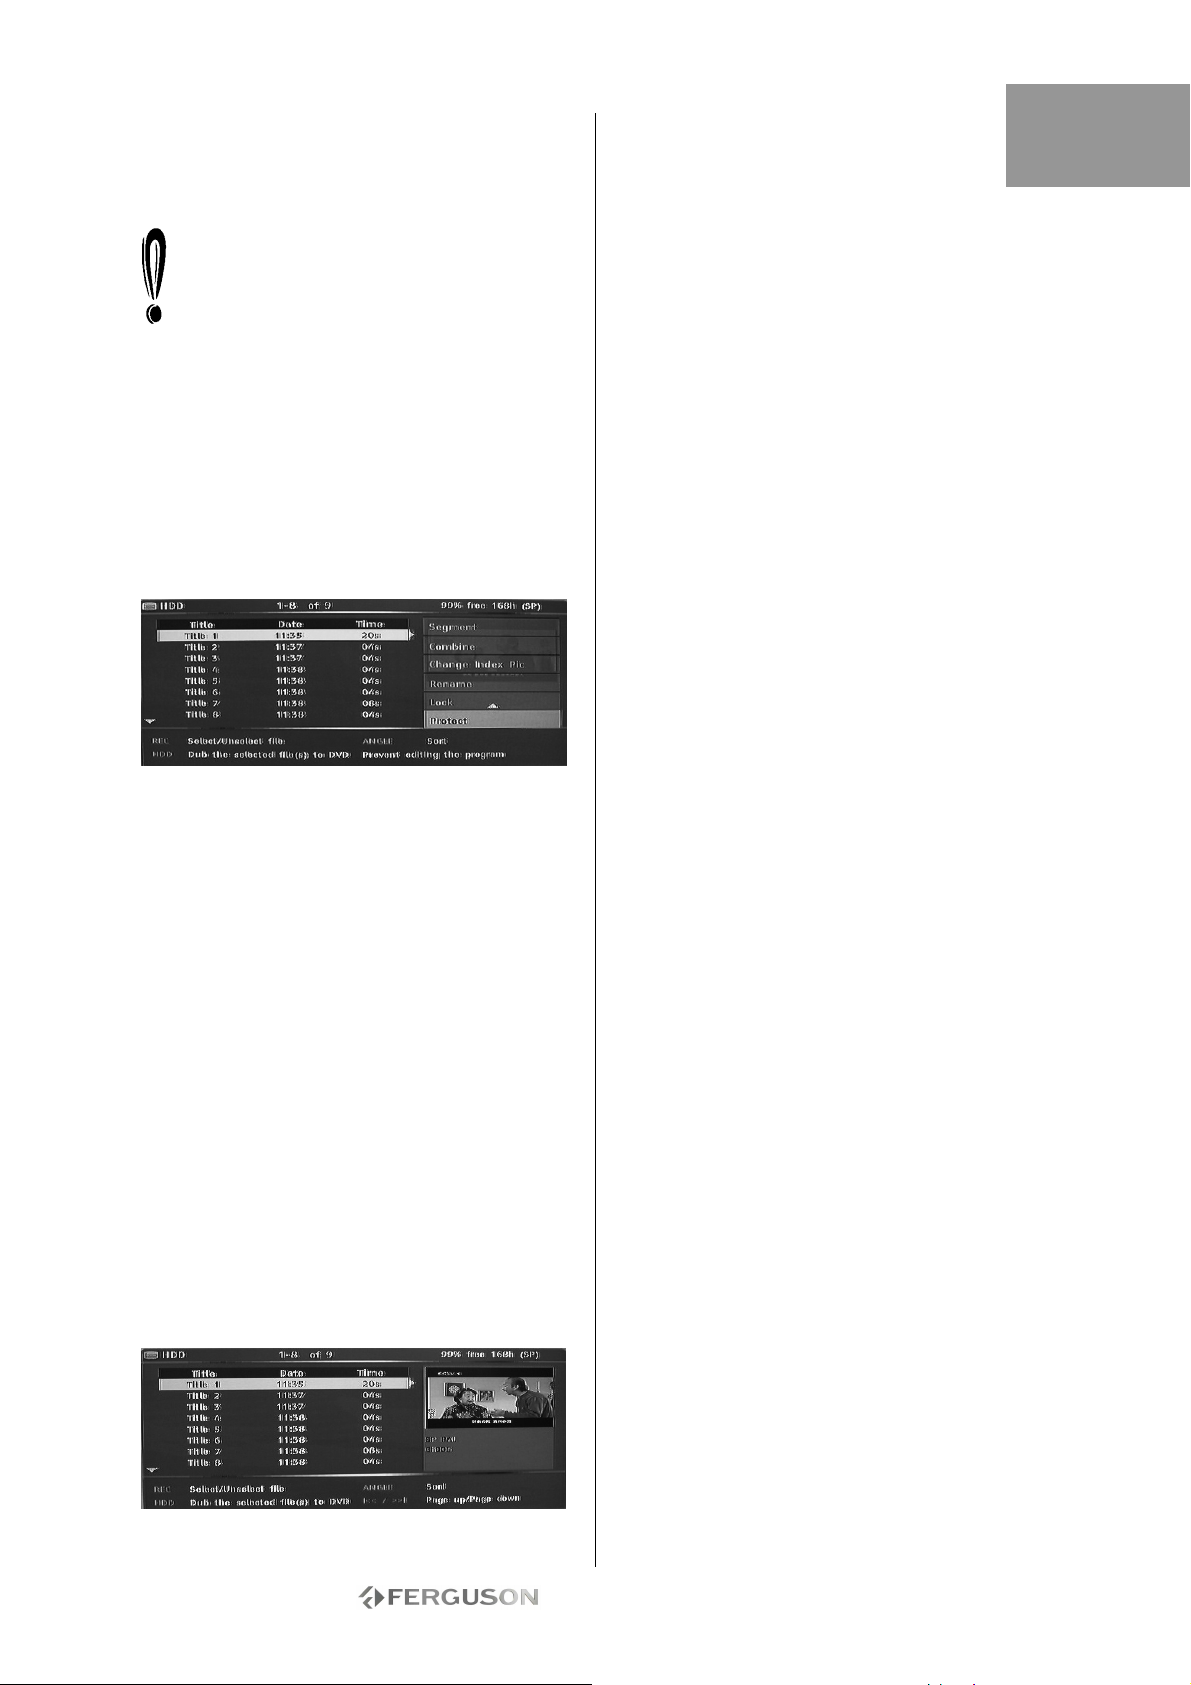
Blokada.
5. Naciśnij przycisk Odtwarzanie/OK, aby wybrać
pozycję Blokada.
Niewielka ikona pod oknem podglądu oznacza,
Ŝe tytuł jest zablokowany (brak moŜliwości
przeglądania/edycji/usunięcia). Przed
odtworzeniem zablokowanego tytułu niezbędne
jest podanie hasła. Hasłem domyślnym jest
0000. MoŜna je zmienić w menu konfiguracji.
Aby odblokować zablokowany tytuł, powtórz
czynności od 1 do 5.
Zabezpieczanie tytułu (uniemożliwienie
edycji)
1. Naciśnij przycisk TV-dysk twardy, aby wyświetlić
listę tytułów TV-dysk twardy.
2. Za pomocą przycisków podświetl
odpowiedni tytuł.
3. Naciśnij przycisk , aby wyświetlić menu edycji.
4. Za pomocą przycisków podświetl pozycję
Zabezpieczenie.
5. Naciśnij przycisk Odtwarzanie/OK, aby wybrać
pozycję Zabezpieczenie.
Niewielka ikona pod oknem podglądu oznacza, że
tytuł jest zabezpieczony (brak możliwości
edycji/usunięcia).
Aby dokonać edycji lub usunąć zabezpieczony tytuł,
usuń zabezpieczenie, powtarzając czynności od
1 do 5.
KOPIOWANIE (Z TV-DYSKU TWARDEGO NA
PŁYTĘ DVD)
1. Przed wybraniem tytułów do skopiowania włóż
nagrywalną płytę do podajnika.
• Jeśli płyta używana jest po raz pierwszy, kilka
sekund może zająć nagrywarce Ferguson RW770HD jej sformatowanie, określenie zgodności i
wolnego miejsca. W tym czasie wyświetlane jest
logo Ładowanie.
• Procent dostępnego miejsca na płycie wyświetlany
jest w prawym dolnym rogu ekranu listy tytułów
zapisanych w TV-dysk twardy.
2. Naciśnij przycisk TV-dysk twardy, aby wyświetlić
listę tytułów TV-dysk twardy.
3. Za pomocą przycisków podświetl tytuł lub
tytuły, które chcesz skopiować na płytę DVD, a
następnie naciśnij przycisk Nagrywanie/OTR, aby
wybrać podświetlony tytuł do skopiowania. Gdy
tytuł zostanie wybrany do skopiowania, obok jego
nazwy pojawi się ikona.
Możesz ponownie nacisnąć przycisk Nagrywanie/
OTR, aby anulować wybór. W miarę wybierania
tytułów lub anulowania wyboru informacje o
pojemności płyty są aktualizowane. Jeśli wybrany
tytuł jest większy od dostępnego miejsca na płycie,
nagrywarka wyświetli komunikat ostrzegawczy.
Jeśli nagranie jest zbyt duże do umieszczenia go na
płycie DVD, może zostać podzielone na mniejsze
części (patrz opis funkcji podziału we wcześniejszej
części niniejszego podręcznika).
Jeśli płyta zostanie wymieniona lub wyjęta przed
skopiowaniem, wybór tytułów do skopiowania
zostanie anulowany.
Zablokowanych tytułów nie moŜna skopiować na
4. Naciśnij przycisk TV-dysk twardy, aby rozpocząć
kopiowanie. Podczas tej operacji wybrane tytuły
zostaną skopiowane na nagrywalną płytę DVD, a
wraz z nimi przeniesione zostaną informacje o
nazwie tytułu, czasie trwania, indeksowaniu lub
znacznikach rozdziałów. Po rozpoczęciu kopiowania
nagrywarka powraca do trybu przesunięcia
czasowego. W trakcie kopiowania możliwe jest
naciśnięcie przycisku TV-dysk twardy i odtworzenie
dowolnego tytułu z TV-dysk twardy, jednak edycja
nie jest możliwa do zakończenia kopiowania.
Jeśli kopiowanie na płytę DVD nie powiedzie się i
zostanie przerwane w dowolnym miejscu, pojawi się
komunikat ostrzegawczy i lista tytułów TV-dysk
twardy zostanie wyzerowana.
KOPIOWANIE TYTUŁÓW DVD±RW NA DYSK
TWARDY
1. Włóż płytę DVD±RW z nagranymi tytułami do
podajnika.
2. Za pomocą przycisków podświetl tytuł, który
chcesz skopiować.
3. Naciśnij przycisk , aby wyświetlić menu płyty.
Zapomocą przycisków podświetl Kopiowanie i
naciśnij przycisk Odtwarzanie/OK.
4. W lewym górnym rogu ekranu pojawi się ikona
przenoszenia pliku, która zniknie po zakończeniu
jego kopiowania na dysk twardy.
płytę DVD.
POLSKI
- 20 -
Page 21
KONFIGURACJA SYSTEMU
Menu systemowe
1. Naciśnij przycisk Menu, gdy odtwarzanie jest
zatrzymane,aby wyświetlić menu systemowe.
2. Za pomocą przycisków nawigacyjnych wybierz
odpowiednią pozycję i naciśnij przycisk
Odtwarzanie/OK, aby potwierdzić wybór.
3. Ponownie naciśnij przycisk Menu, aby wyjść z
menu.
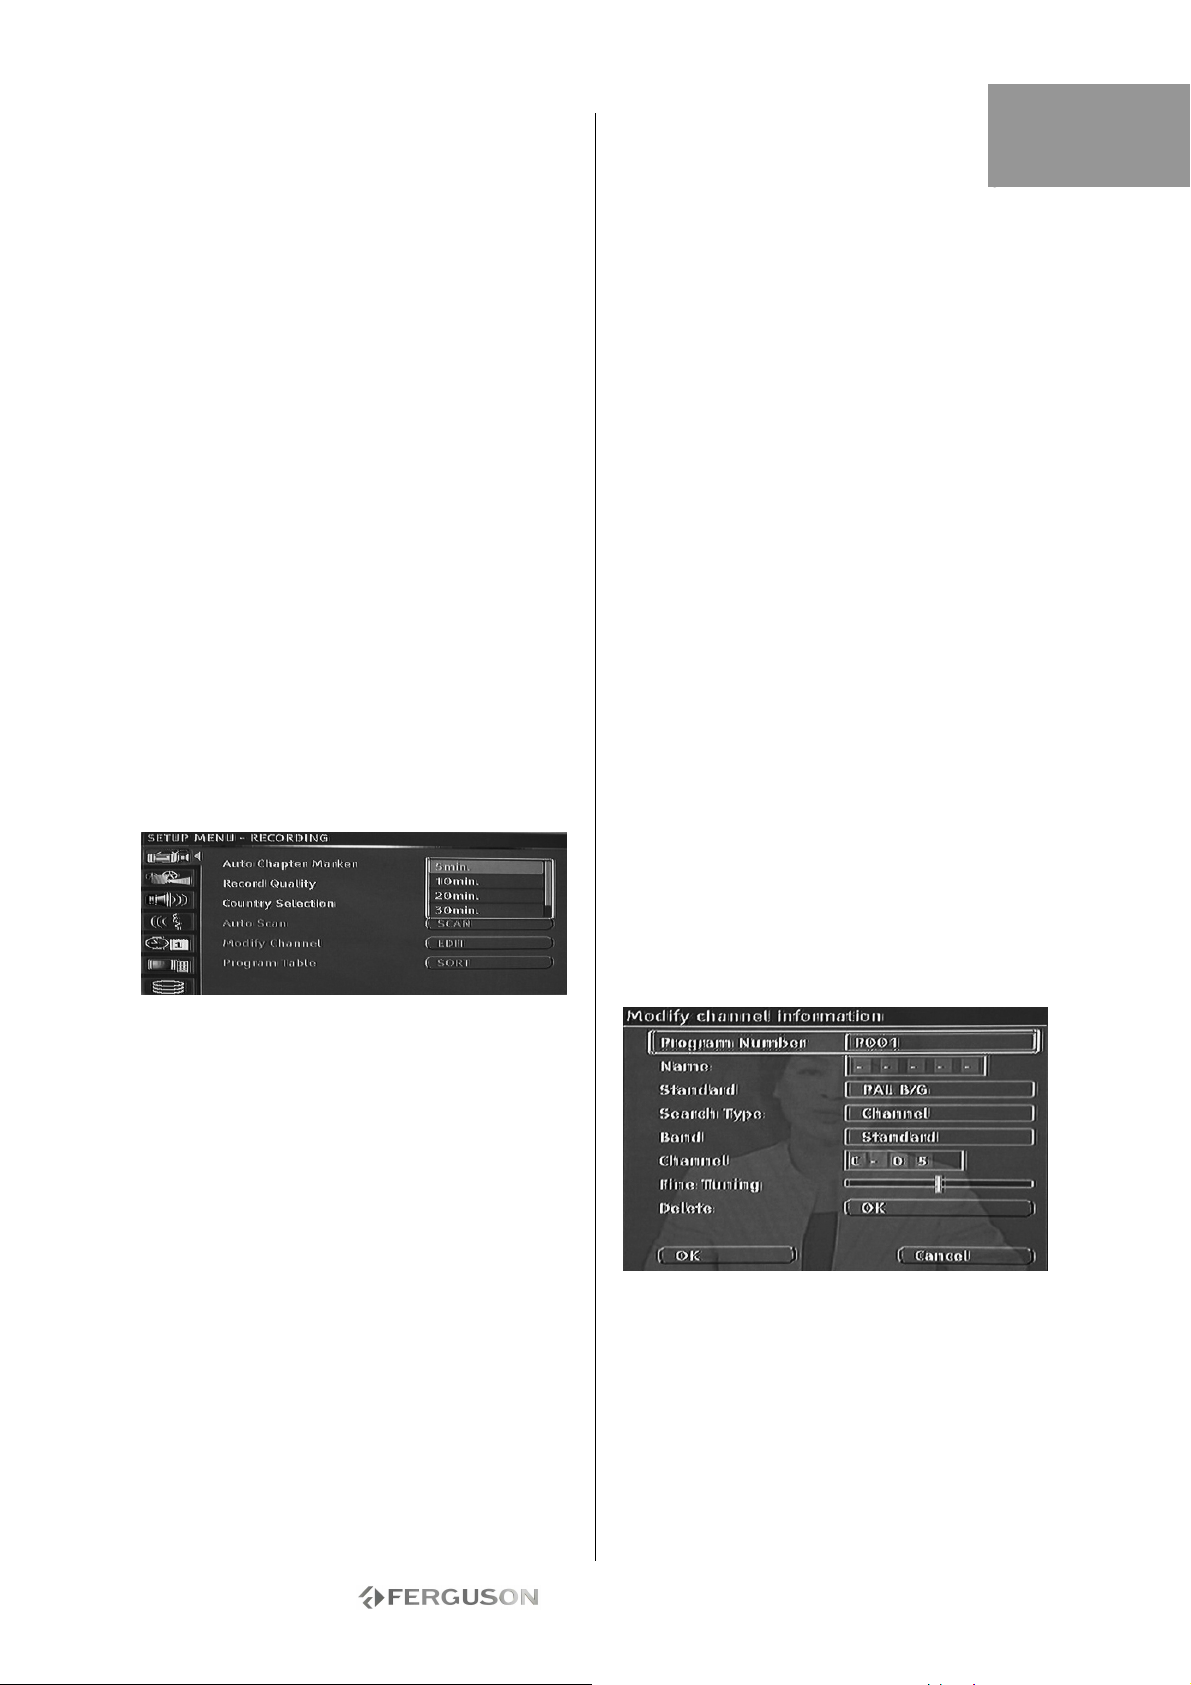
Znaczniki rozdziałów
Można skonfigurować nagrywarkę tak, aby
automatycznie wstawiała znaczniki rozdziałów przy
każdym nagrywaniu programu, co umożliwi szybszą
nawigację podczas odtwarzania. Ta funkcja
automatycznie wstawia znaczniki podczas
nagrywania, w 10-minutowych odstępach. Odstępy
można zmienić w menu Konfiguracja: OFF/WYŁ.
(bez znacznika), 5 min., 10 min. (domyślnie), 20
min. lub 30 min.
1. Naciśnij przycisk Menu na pilocie.
2. Podświetl menu Nagrywanie i naciśnij przycisk
Odtwarzanie/OK.
3. Podświetl pozycję Automatyczne znaczniki
rozdziałów i naciśnij przycisk Odtwarzanie/OK.
4. Wybierz pozycję z listy i naciśnij przycisk
Odtwarzanie/OK.
Wybór kraju
Aby zmienić kraj, należy wykonać poniższe
czynności:
1. Naciśnij przycisk MENU na pilocie, aby wejść do
MENU KONFIGURACJI.
2. Za pomocą przycisków nawigacyjnych podświetl
ikonę Nagrywanie, a następnie naciśnij przycisk
Odtwarzanie/OK.
3. Za pomocą przycisków podświetl pozycję
Wybór kraju, a następnie naciśnij przycisk
Odtwarzanie/OK.
4. Za pomocą przycisków podświetl odpowiedni
kraj, a następnie naciśnij przycisk Odtwarzanie/OK,
aby potwierdzić wybór.
Automatyczne wyszukiwanie kanałów TV
Aby oglądać lub nagrywać programy telewizyjne,
trzeba najpierw przeprowadzić wyszukiwanie
kanałów TV:
Przed rozpoczęciem wyszukiwania kanałów TV
upewnij się, Ŝe do nagrywarki Ferguson RW-770HD
podłączona jest antena telewizyjna. Patrz
Podłączanie do telewizora.
1. Naciśnij przycisk MENU na pilocie, aby wejść do
MENU KONFIGURACJI.
2. Za pomocą przycisków nawigacyjnych podświetl
ikonę Nagrywanie, a następnie naciśnij przycisk
Odtwarzanie/OK.
3. Za pomocą przycisków podświetl pozycję
Automatyczne wyszukiwanie, a następnie naciśnij
przycisk Odtwarzanie/OK, aby rozpocząć
wyszukiwanie.
Tabela programów
Menu Tabela programów umożliwia sortowanie
kanałów TV.
1. Naciśnij przycisk MENU, aby wejść do MENU
KONFIGURACJI.
2. Za pomocą przycisków nawigacyjnych podświetl
ikonę Nagrywanie, a następnie naciśnij przycisk
Odtwarzanie/OK.
3. Za pomocą przycisków podświetl pozycję
Tabela programów, a następnie naciśnij przycisk
Odtwarzanie/OK.
4. Za pomocą przycisków podświetl kanał, który
chcesz przenieść, a następnie naciśnij przycisk ,
aby przenieść go do panelu poza listą.
5. Za pomocą przycisków przenieś kanał na
liście w miejsce, w którym chcesz go wstawić.
6. Naciśnij przycisk , aby ponownie umieścić kanał
na liście.
Modyfikacja informacji o kanale
Za pomocą menu Modyfikacja informacji o kanale
można zmienić informacje dotyczące
poszczególnych kanałów.
1. Naciśnij przycisk MENU na pilocie, aby wejść do
MENU KONFIGURACJI.
2. Za pomocą przycisków nawigacyjnych podświetl
ikonę Nagrywanie, a następnie naciśnij przycisk
Odtwarzanie/ OK.
3. Za pomocą przycisków podświetl pozycję
Modyfikuj kanał, a następnie naciśnij przycisk
Odtwarzanie/OK.
4. Za pomocą przycisków nawigacyjnych
przeprowadź edycję poniższych informacji.
Numer programu: Numer bieżącego kanału; tej
pozycji nie można zmodyfikować.
Nazwa: Za pomocą przycisków nawigacyjnych
wybierz nazwę programu i dokonaj jej edycji.
Standard: Standard transmisji bieżącego kanału.
Należy wybrać prawidłowy standard, zgodny z
lokalnym sygnałem TV.
Typ wyszukiwania: Wybierz typ wyszukiwania
używany podczas wyszukiwania kanałów TV.
Dostępne są dwa tryby: Częstotliwość i Kanał.
Pasmo (nie dotyczy trybu Częstotliwość):
Rodzaj pasma danego kanału. Możesz wybrać opcję
Standard lub Kablowe.
Kanał lub Częstotliwość:
POLSKI
- 21 -
Page 22
• Opcja 1: Po wybraniu tej pozycji naciśnij przycisk
lub , aby wyszukać najbliższy dostępny kanał
TV.
• Opcja 2: Naciśnij przycisk Odtwarzanie/OK i za
pomocą przycisków nawigacyjnych wprowadź numer
kanału lub częstotliwość.
Dostrajanie: Za pomocą przycisków i dostrój
bieżący kanał.
Usuń: Usunięcie bieżącego kanału z listy kanałów.
OK: Potwierdzenie ustawień bieżącego kanału i
zapisanie.
Anuluj: Odrzucenie bieżących ustawień i wyjście z
menu.
Wybór języka systemu
Aby zmienić język systemu, należy wykonać
poniższe czynności:
1. Naciśnij przycisk MENU na pilocie, aby wejść do
MENU KONFIGURACJI.
2. Za pomocą przycisków podświetl pozycję
Language.
3. Naciśnij przycisk , aby podświetlić pozycję
Język systemu, a następnie naciśnij przycisk
Odtwarzanie/OK.
4. Za pomocą przycisków podświetl odpowiedni
język na liście, a następnie naciśnij przycisk
Odtwarzanie/OK, aby potwierdzić wybór.
Bufor przesunięcia czasowego
1. Naciśnij przycisk Menu na pilocie.
2. Podświetl menu Time Shift i naciśnij przycisk
Odtwarzanie/OK.
3. Podświetl pozycję Tryb bufora przesunięcia czasu
i naciśnij przycisk Odtwarzanie/OK.
4. Wybierz z listy pozycję Odśwież lub Zachowaj:
• W przypadku użycia ustawienia Odśwież i zmiany
kanału dane bufora przesunięcia czasowego zostaną
utracone. Nie pojawi się żaden informujący od tym
komunikat.
• W przypadku użycia ustawienia Zachowaj i zmiany
kanału dane bufora przesunięcia czasowego zostaną
zachowane.
Zarządzanie miejscem
Opcja ta umożliwia ręczne lub automatyczne
zarządzanie miejscem na dysku twardym.
1. Naciśnij przycisk Menu na pilocie.
2. Podświetl menu Time Shift i naciśnij przycisk
Odtwarzanie/OK.
3. Podświetl pozycję Zarządzanie miejscem i
naciśnij przycisk Odtwarzanie/OK.
4. Wybierz z listy pozycję Automatyczne lub
Manualne:
• Automatyczne: Jeśli przed zakończeniem
nagrywania na dysku twardym skończy się wolne
miejsce, nagrywarka Ferguson usunie najstarsze
(niezabezpieczone) tytuły z dysku twardego. Nie
usunie tytułów, które wybrano do skopiowania na
płytę DVD. Jeśli pomimo to na dysku twardym nadal
będzie za mało miejsca, nagrywarka zatrzyma
nagrywanie i wyświetli monit o usunięcie niektórych
tytułów i zwolnienie miejsca na dysku.
• Manualne: Jeśli przed zakończeniem nagrywania
na dysku twardym skończy się wolne miejsce,
nagrywarka zatrzyma nagrywanie i wyświetli monit
o usunięcie niektórych tytułów i zwolnienie miejsca
na dysku.
Blokada rodzicielska
Blokada rodzicielska to system ochrony hasłem.
Dzięki niej użytkownik może zablokować
odtwarzanie w nagrywarce Ferguson niektórych
dysków zawierających nieodpowiedni materiał.
Aby włączyć blokadę rodzicielską:
1. Podczas odtwarzania dwukrotnie naciśnij przycisk
Zatrzymanie.
2. Naciśnij przycisk Menu, aby wejść do MENU
KONFIGURACJI systemu.
3. Za pomocą przycisków podświetl pozycję
Preferencje. Naciśnij przycisk Odtwarzanie/OK, aby
potwierdzić wybór.
4. Za pomocą przycisków podświetl pozycję
Dozwolony wiek, a następnie naciśnij przycisk
Odtwarzanie/OK.
5. Za pomocą przycisków podświetl odpowiedni
dozwolony wiek, a następnie naciśnij przycisk
Odtwarzanie/OK.
6. Naciśnij przycisk Menu, aby wyjść.
Wybór języka audio, napisów i menu płyty
Aby zmienić język audio, napisów i menu płyty,
należy wykonać poniższe czynności:
1. Naciśnij przycisk MENU na pilocie, aby wejść do
MENU KONFIGURACJI.
2. Za pomocą przycisków nawigacyjnych podświetl
ikonę Language a następnie naciśnij przycisk
Odtwarzanie/OK.
3. Za pomocą przycisków podświetl pozycję
Audio, Napisy lub Menu dysku, a następnie naciśnij
przycisk Odtwarzanie/OK.
4. Za pomocą przycisków podświetl odpowiedni
język, a następnie naciśnij przycisk
Odtwarzanie/OK, aby potwierdzić wybór.
Ustawianie zegara
1. Naciśnij przycisk Menu, aby wejść do MENU
KONFIGURACJI.
2. Za pomocą przycisków nawigacyjnych podświetl
ikonę DATA/CZAS, a następnie naciśnij przycisk
Odtwarzanie/OK.
3. Zmień systemową datę i godzinę za pomocą
przycisków nawigacyjnych.
Ustawianie czasu systemowego
Nagrywarka Ferguson może automatycznie ustawić
czas systemowy zgodnie z kodem czasu odbieranym
ze stacji telewizyjnej. Urządzenie może wykorzystać
tylko kod czasu zintegrowany z pierwszym kanałem
telewizyjnym. Aby funkcja ta działała, sygnał
telewizyjny musi zawierać kod czasu.
POLSKI
- 22 -
Page 23
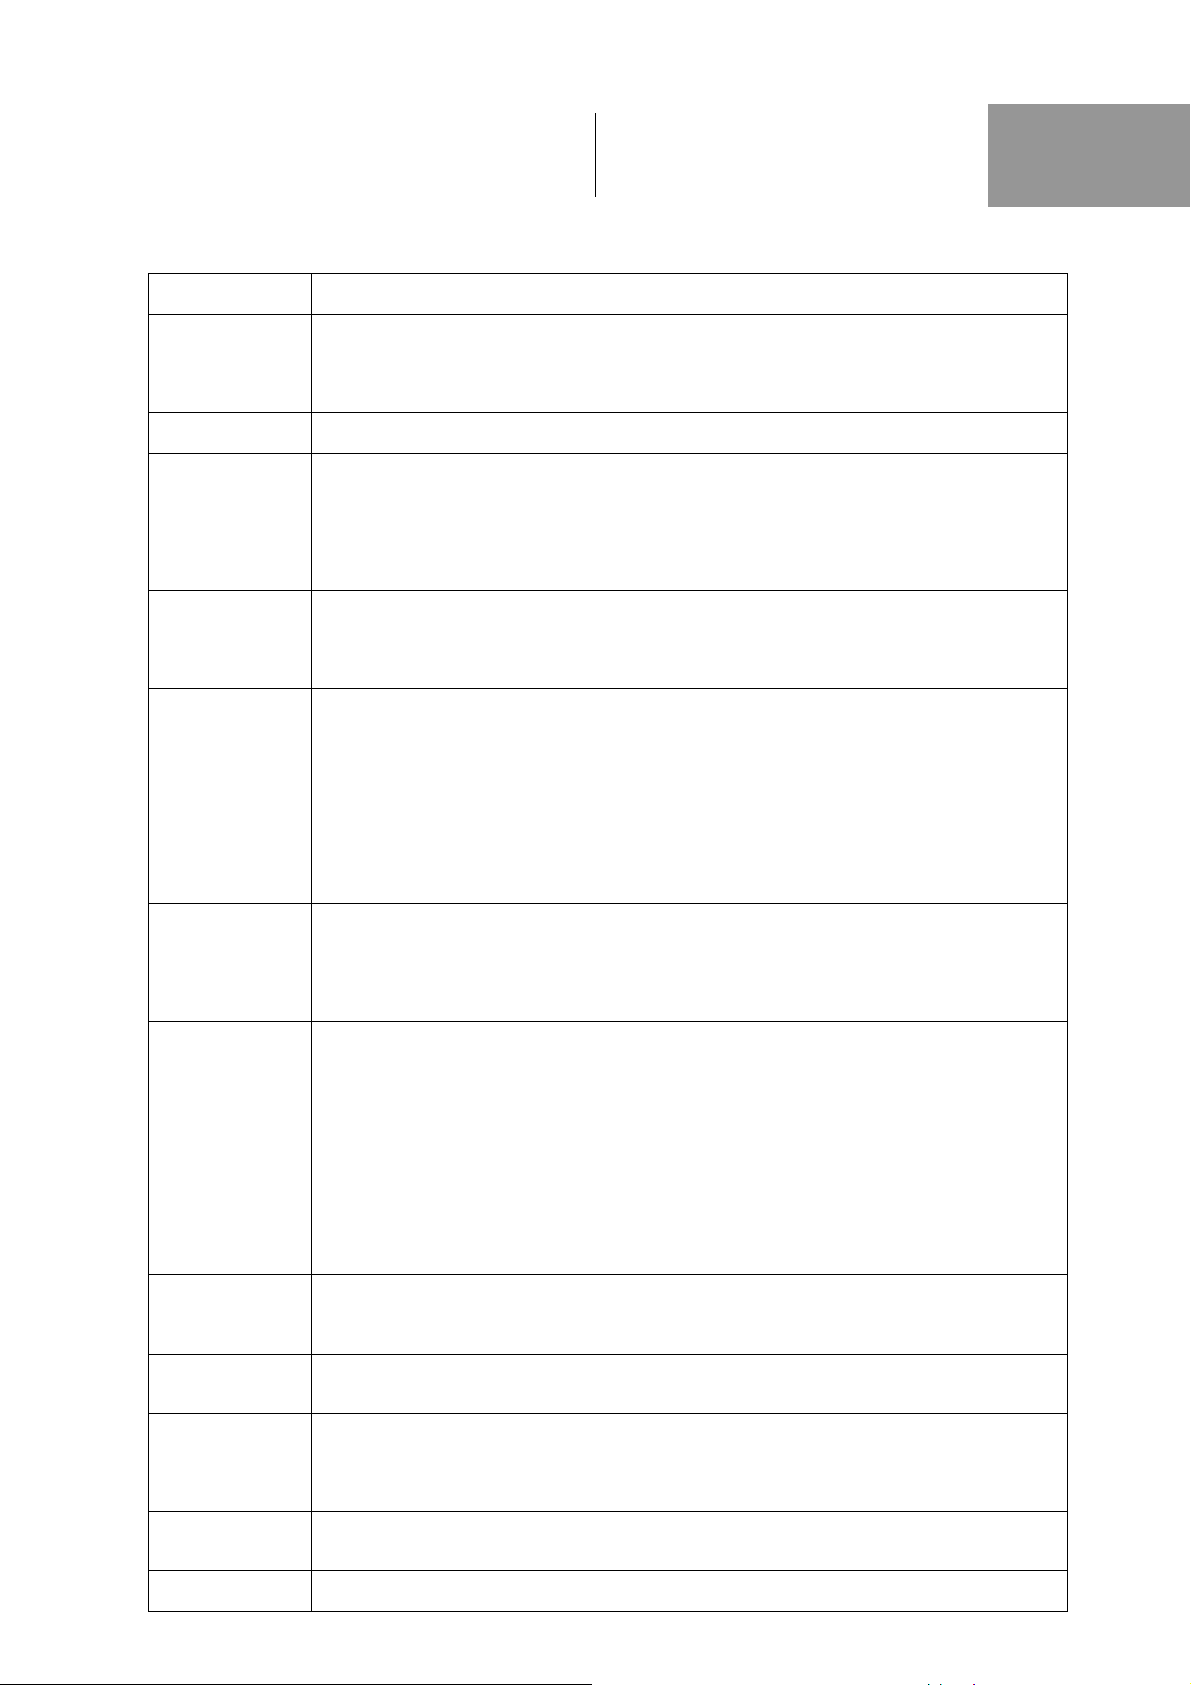
ROZWIĄZYWANIE
PROBLEMÓW
Problem Rozwiązanie
Brak dźwięku • Starannie podłącz przewody audio do gniazd.
Tylko dźwięk,
brak obrazu
Brak odpowiedzi • Dokładnie podłącz wtyczkę przewodu zasilania do gniazdka naściennego.
Pilot nie działa • Pilot nie jest skierowany na nagrywarkę Multimedia Recorder. Pilot musi być skierowany
Nie można
odtworzyć płyty
Słaba jakość
odtwarzania
(zniekształcony
obraz/dźwięk)
Nie można
nagrywać
Nagrywanie w
ustalonym czasie
nie działa
Nie można
edytować płyty
DVD±RW
Sygnał
telewizyjny
z zakłóceniami
obrazu lub
dźwięku
Zniekształcony
obraz lub obraz
czarno-biały
Brak cyfrowego
sygnału audio
• Sprawdź połączenie wyjścia audio DVD i wejścia audio telewizora lub amplitunera.
Upewnij
się, że w telewizorze lub wzmacniaczu wybrano odpowiednie wejście AUDIO.
• Zajrzyj do instrukcji obsługi wzmacniacza audio.
• Nieprawidłowo ustawiony tryb wybierania dla wyjścia wideo. Naciśnij przycisk P/I na
pilocie, aby przełączyć na prawidłowy tryb.
• Aktywne jest nagrywanie w ustalonym czasie. Naciśnij przycisk Zasilanie lub
Zatrzymanie,
aby anulować nagrywanie w ustalonym czasie.
• Urządzenie może być uszkodzone. Odłącz przewód zasilania i odczekaj 30 sekund przed
jego ponownym podłączeniem do gniazdka zasilającego. Jeśli nadal nie działa, spróbuj
przywrócić ustawienia fabryczne nagrywarki Ferguson.
na nagrywarkę Ferguson.
• Baterie są wyczerpane, wymień je na nowe.
• Urządzenie może być uszkodzone. Wyjmij baterie, odczekaj 30 sekund i ponownie włóż je
do pilota.
• Płyta jest pusta, wymień płytę.
• Niezgodna płyta: odwołaj się do listy obsługiwanych płyt na początku podręcznika.
• Płyta została włożona napisami do dołu. Upewnij się, że płyta jest włożona napisami w
górę.
• Nieprawidłowy kod regionu. Kod regionu nie jest zgodny z ustawieniem nagrywarki
Ferguson.
• Włączona jest blokada rodzicielska. Zdejmij blokadę rodzicielską. Domyślne hasło to 0000
lub 3308.
• Wybierz numer kanału w telewizorze. Wybierz prawidłowy numer kanału.
• Połączenie pomiędzy nagrywarką Ferguson i telewizorem jest poluzowane. Sprawdź
połączenie.
• Telewizor nie jest optymalnie wyregulowany.
• Płyta jest zabrudzona; wyczyść płytę.
• Zniekształcenia obrazu mogą być wywołane także zakłóceniami.
• Nieprawidłowe ustawienie trybu wyjścia może powodować brak lub niską jakość obrazu.
Jeśli masz problemy z jakością obrazu na ekranie lub jego brakiem, naciśnij przycisk
wybierania kolejnoliniowego, aby przełączyć tryb wyjścia.
• Kanał telewizyjny, z którego chcesz nagrywać, nie został jeszcze zapisany lub wybrano
nieprawidłowy numer kanału.
• Sprawdź zapisane kanały.
• Płyta jest zabezpieczona przed zapisem. Usuń zabezpieczenie przed zapisem lub zmień
płytę.
• Płyta jest zamkniętą płytą DVD+R lub DVD-R. Zmień płytę.
• Nieprawidłowy system TV. Upewnij się, że płyta nie została nagrana w innym formacie
wideo (np. PAL lub NTSC). Nagrywarka Multimedia Recorder nie obsługuje nagrań w
różnych
formatach wideo na tym samym dysku DVD+R/RW.
• Używana płyta może być niezgodna ze standardami DVD+R/RW lub DVD-R/RW.
• Nagrywarka nie nagrywa na płytach CD-R/RW lub DVD-RAM.
• Upewnij się, że płyta nie była poprzednio używana w komputerze.
• Data lub godzina nie są prawidłowo ustawione; sprawdź datę i godzinę.
• Harmonogram nie jest prawidłowo ustawiony; sprawdź harmonogram.
• Płyta jest zablokowana. Odblokuj płytę.
• Płyta jest zamkniętą płytą DVD+R lub DVD-R. Zmień płytę.
• Płyta jest zablokowana. Naciśnij przycisk DVD na pilocie i wybierz pozycję Odblokuj dysk,
aby odblokować płytę.
• Sprawdź antenę.
• W menu systemowym sprawdź wybrany system telewizyjny. W kontynentalnej Europie
obowiązującym systemem telewizyjnym jest PAL lub SECAM.
• System kolorów płyty nie odpowiada systemowi kolorów telewizora.
• Sygnał nie zawiera informacji o kolorze.
• Sprawdź, czy złącza wejść cyfrowych dopasowano do złącz wyjść urządzenia
zewnętrznego.
- 23 -
POLSKI
Page 24

SŁOWNICZEK
Format (Aspect ratio)
Format to stosunek długości do wysokości ekranu
telewizyjnego. Format standardowego telewizora to
4:3. Format telewizora szerokoekranowego to 16:9.
Tryb ‘letter box’ oferuje szeroki obraz ’ kinowy’.
Rozdział / tytuł
Rozdziały to najmniejsze fragmenty filmu DVD.
Tytuł to największa jednostka podziału dysku DVD.
Wideo komponentowe
Sygnały wideo złożone z trzech osobnych kanałów
informacji, które tworzą kompletny obraz. Istnieje
kilka typów wideo komponentowego, np. R/G/B i
Y/Cb (Pb)/Cr (Pr).
Wideo kompozytowe
Pojedynczy sygnał wideo, który zawiera dane
światła, koloru i synchronizacji. Jest to sygnał
najczęściej używany w produktach konsumenckich.
DivX®
DivX® to popularna technologia medialna
stworzona przez DivX®, Inc. Pliki mediów DivX®
zawierają wideo o wysokiej kompresji i wysokiej
jakości wizualnej, przy względnie niedużej wielkości
pliku. Pliki DivX® mogą zawierać także
zaawansowane funkcje medialne, jak menu, napisy i
kilka ścieżek audio. Wiele plików mediów DivX®
można pobrać z Internetu. Można także stworzyć
własne pliki z prywatną treścią, używając łatwych w
obsłudze narzędzi z serwisu DivX.com.
Dolby Digital®
System odtwarzania dźwięku mono, stereo lub do
5.1 kanałów dyskretnego dźwięku surround: lewo,
środek, prawo, lewy surround, prawy surround i
efekty basowe LFE. Globalny standard dla DVDAudio i DVD-Video.
DTS® (Digital Theatre Systems)
DTS® oznacza Digital Theatre System. DTS to
system dźwięku dookolnego odmienny od Dolby
Digital, który stał się popularnym formatem dźwięku
dookolnego w filmach. “DTS®” i “DTS® Digital Out”
to zastrzeżone znaki towarowe Digital Theatre
Systems, Inc.
JPEG
Popularny format dla nieruchomych obrazów (np.
zdjęć i ilustracji), ich kompresji i zapisywania. JPEG
oznacza “Joint Photographic Experts Group”. Z tego
formatu korzysta większość aparatów cyfrowych.
MP3
MP3 (MPEG1 audio layer 3) to format
skompresowanego dźwięku. Pliki rozpoznawane są
według rozszerzeń “.mp3” lub “.MP3”.
MPEG
MPEG oznacza “Motion Picture Experts Group”. Jest
to międzynarodowy standard formatu dźwięku dla
płyt Video CD i niektórych płyt DVD.
Optyczne wyjście cyfrowe
Złącze, które wysyła cyfrowy dźwięk w formie
impulsów świetlnych. Elementy są łączone za
pomocą światłowodu dostępnego w
specjalistycznych sklepach audio.
PAL (Phase Alternation by Line)
PAL (Phase Alteration Line) to standard emisji
telewizyjnej w Europie Zachodniej.
PBC
Sterowanie odtwarzaniem Specjalna funkcja Video
CD lub Super VCD, która umożliwia poruszanie się
po zintegrowanym menu ekranowym.
S-Video
Sygnał wideo o jakości wyższej od standardowych
połączeń kompozytowych. Używany w urządzeniach
Super VHS, DVD, profesjonalnych monitorach
telewizyjnych itp.
Przesunięcie czasowe
Jednoczesne nagrywanie i odtwarzanie wideo.
Wstrzymywanie i wznawianie programów
telewizyjnych. Przewijanie do przodu, do tyłu i
przechodzenie do dowolnego miejsca nagrania.
Odtwarzanie uprzednio nagranych programów z
jednoczesnym nagrywaniem innego programu.
Ścieżka
Zawartość płyt SVCD, VCD i Audio CD podzielona
jest na ścieżki.
POLSKI
- 24 -
Page 25
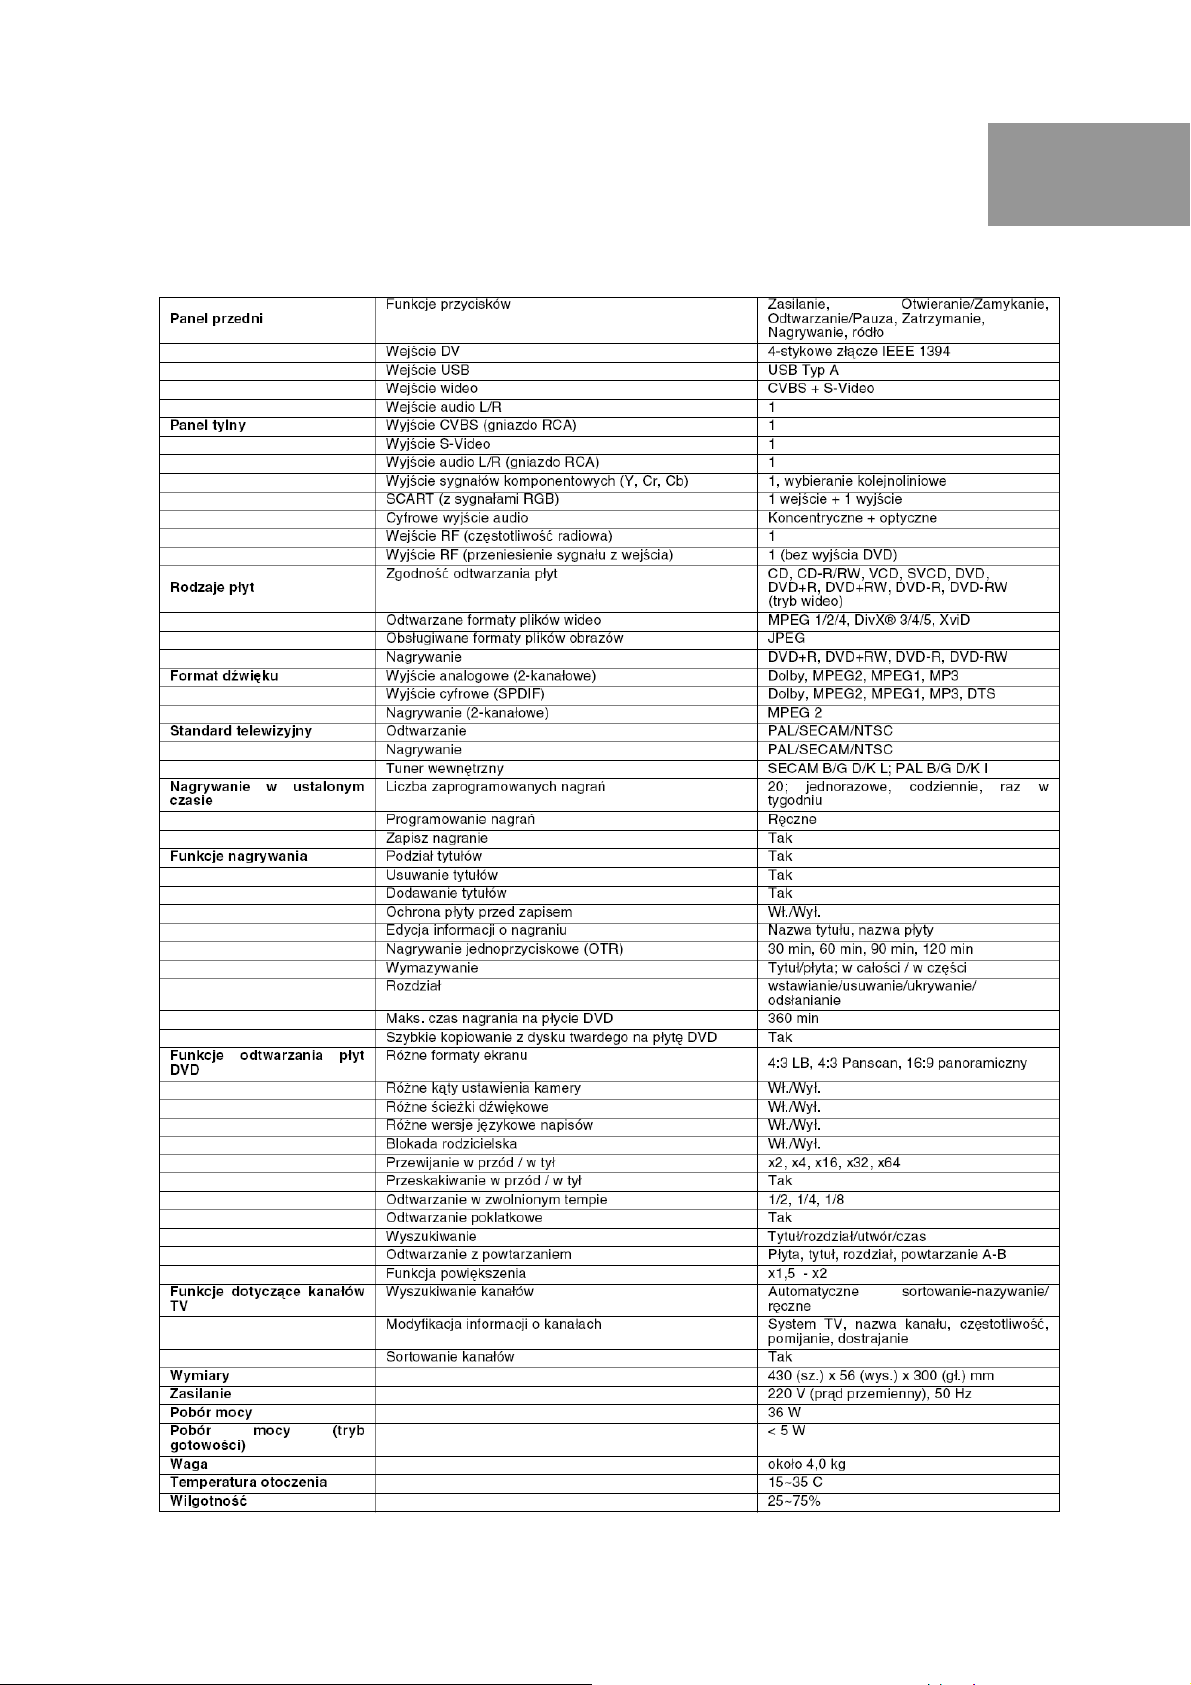
DANE TECHNICZNE
POLSKI
- 25 -
Page 26
ENGLISH
Disclaimer
Ferguson specifically disclaims all warranties, either
express or implied, including, but not limited to,
implied warranties of merchantability and fitness for
a particular purpose with respect to this product and
documentation. Updates to hardware components
are made regularly. Therefore some of the
instructions, specifications and pictures in this
documentation may differ slightly from your
particular situation. All items described in this guide
are for illustration purposes only and may not apply
to your particular situation. No legal rights or
entitlements may be obtained from descriptions
made in this manual.
Ferguson reserves the right to revise or make
changes or improvements to this product or
documentation at any time without obligation to
notify any person of such revisions or
improvements. In no event shall Ferguson be liable
for any consequential or incidental damages,
including but not limited to loss of business profits
or any other commercial damages, arising out of the
use of this product.
Trademarks
Ferguson is a registered trademark of Ferguson All
other company or product names are trademarks,
registered trademarks or service marks of their
respective owners.
DivX®, DivX® Certified, and associated logos are
trademarks of DivX®, Inc. and are used under
license.
Manufactured under license from Dolby
Laboratories. Dolby and the double-D
symbol are trademarks of Dolby Laboratories.
This Product incorporates copyright protection
technology that is protected by method claims of
certain U.S. Patents and other intellectual property
rights owned by Macrovision Corporation and other
rights owners. Use of this copyright protection
technology must be authorized by Macrovision
Corporation, and is intended for home and other
limited viewing uses only unless otherwise
authorized by Macrovision Corporation. Reverse
engineering or disassembly is prohibited.
Warning
To prevent fire or shock hazard, do not use the plug
with an extension cord, receptacle or other outlet
unless the plug can be fully inserted, to prevent fire
or shock hazard. Do not expose this appliance to
rain or moisture.
WARNING: TO REDUCE THE RISK OF ELECTRIC
SHOCK, DO NOT REMOVE THE COVER (OR BACK).
NO USER SERVICEABLE PARTS INSIDE, REFER
SERVICING TO QUALIFIED SERVICE PERSONNEL.
Important Safety Precautions
• Read and keep these instructions.
• Do not use this apparatus near water.
• Clean only with a dry cloth.
• Do not block any ventilation openings. Install in
accordance with the manufacturer's instructions.
• Do not install near any heat sources such as
radiators, heat registers, stoves or other apparatus
(including amplifiers) that produce
heat.
• Protect the power cord from being walked on and
from pinching.
• Only use attachments/ accessories specified by
the manufacturer.
• Unplug this apparatus during lightning storms or
when unused for
long periods of time. Please note that the product
warranty does not apply if damage to the product is
the result of a lightning strike.
• Refer all servicing to qualified service personnel.
Servicing is required when the apparatus has been
damaged in any way, has been
exposed to rain or moisture, does not operate
normally or has been
dropped.
• You must unplug the power supply cord to
disconnect the apparatus from the power supply.
With this in mind, the socket-outlet should be
located close to the apparatus and should also be
readily accessible.
- 26 -
Page 27

ENGLISH
INTRODUCTION
The Ferguson Recorder can record TV signals and
AV signals from external devices or digital signals
from IEEE 1394 devices and can record* on
DVD+RW, DVD+R, DVD-RW or DVD-R discs for the
facility of storage. The Ferguson RW-770HD also
functions as a DVD or CD player.
*Record to 8X DVD-Rs not supported.
MAIN FEATURES
The internal HDD (Hard Disk Drive) record functions
include Time Shifting and Direct Digital Dub. Plays
pre-recorded Movie DVDs and Audio CDs. Store and
play multimedia files (music, photos, videos) on the
internal HDD.
Transfer files between USB devices*, DVDs and the
internal HDD.
MP3 support.
DivX® codec support (short for DivX®
compression/decompres¬sion).
Dolby Digital sound for a total of 6 ('5.1') separate
audio chan¬nels (front-left, front-middle, frontright, rear-left, rear-right and subwoofer).
Permanent recording (up to 3h) Record TV shows
and transfer home videos to DVD
*Files can only be transferred from and not to USB
devices.
Time Shifting
Simultaneous video recording and playback.
• Pause and later resume live TV broadcasts. Fast
forward, fast
rewind and jump to any point in the recording.
• Instant replay of up to 3 hours.
• Play a previously recorded programme while
another pro¬gramme is being simultaneously
recorded.
DVD/CD Player
• 16:9 and 4:3 TV screen aspect ratio support.
• Playback functions including Program, Repeat,
Fast Forward/Reverse, Zoom, etc.
• Supports 34 audio languages, subtitle languages
and disc menu languages. Supports 9 viewing
angles, as well as other normal DVD playback
features.
• Compatible with DVD, Super VCD, VCD, CD, CD-R
discs, can play MP3, JPEG and Picture CD.
• Copy protection technology from Macrovision
Program Recording
• Record from TV tuner or analogue AV input in
MPEG-2 format.
• Play a previously recorded programme from the
HDD while recording another programme.
• Programmable timer for recording a single or
recurring TV pro¬gramme.
• Set up to 20 time-recording events with three
options: "Once", "Daily" and "Weekly".
• OTR (One Touch Record) quick-record; record TV
at the press of a button.
DVD Archiving ('dubbing')
•Archive recordings on the HDD (Hard Disk Drive)
to DVD+RW, DVD+R, DVD-RW or DVD-R discs.
• DVDs recorded using the Ferguson RW-770HD can
be played on most current and future DVD players.
Personal Video Archiving
• Transfer videos from a VCR, analog camcorder or
digital (DV) camcorder to DVD with Direct Digital
Dub™.
Connectors
• Digital input (DV) connector for digital video
cameras; audio and
video signals are transmitted via the same cable.
• Standard video out (CVBS), S-video out, SCART
IN/OUT connectors, and component video out (Y,
Cb/Pb, Cr/Pr) out connectors.
• Coaxial digital audio out connector.
• Connects with USB flash drives, USB memory card
readers and USB cameras (The mass storage device
must be FAT32 formatted).
• Signal pass-through with SCART and TV aerial
connectors.
Additional Features
• Diamond Copy image processing technology,
providing excellent image quality.
• Parental Lock Level control system.
• Screensaver program for screen protection.
• Intelligent software update.
• Progressive Scan creates a picture with twice the
scan lines of traditional Component Video. This
results in reduced picture flickering and motion
artifacts as well as a sharper image on large
screens.
The wrong setting for the output mode can cause a
blank screen or bad quality. If you are experiencing
problems with the quality of your display or have a
blank screen, please press the progressive scan
button to change output mode.
- 27 -
Page 28
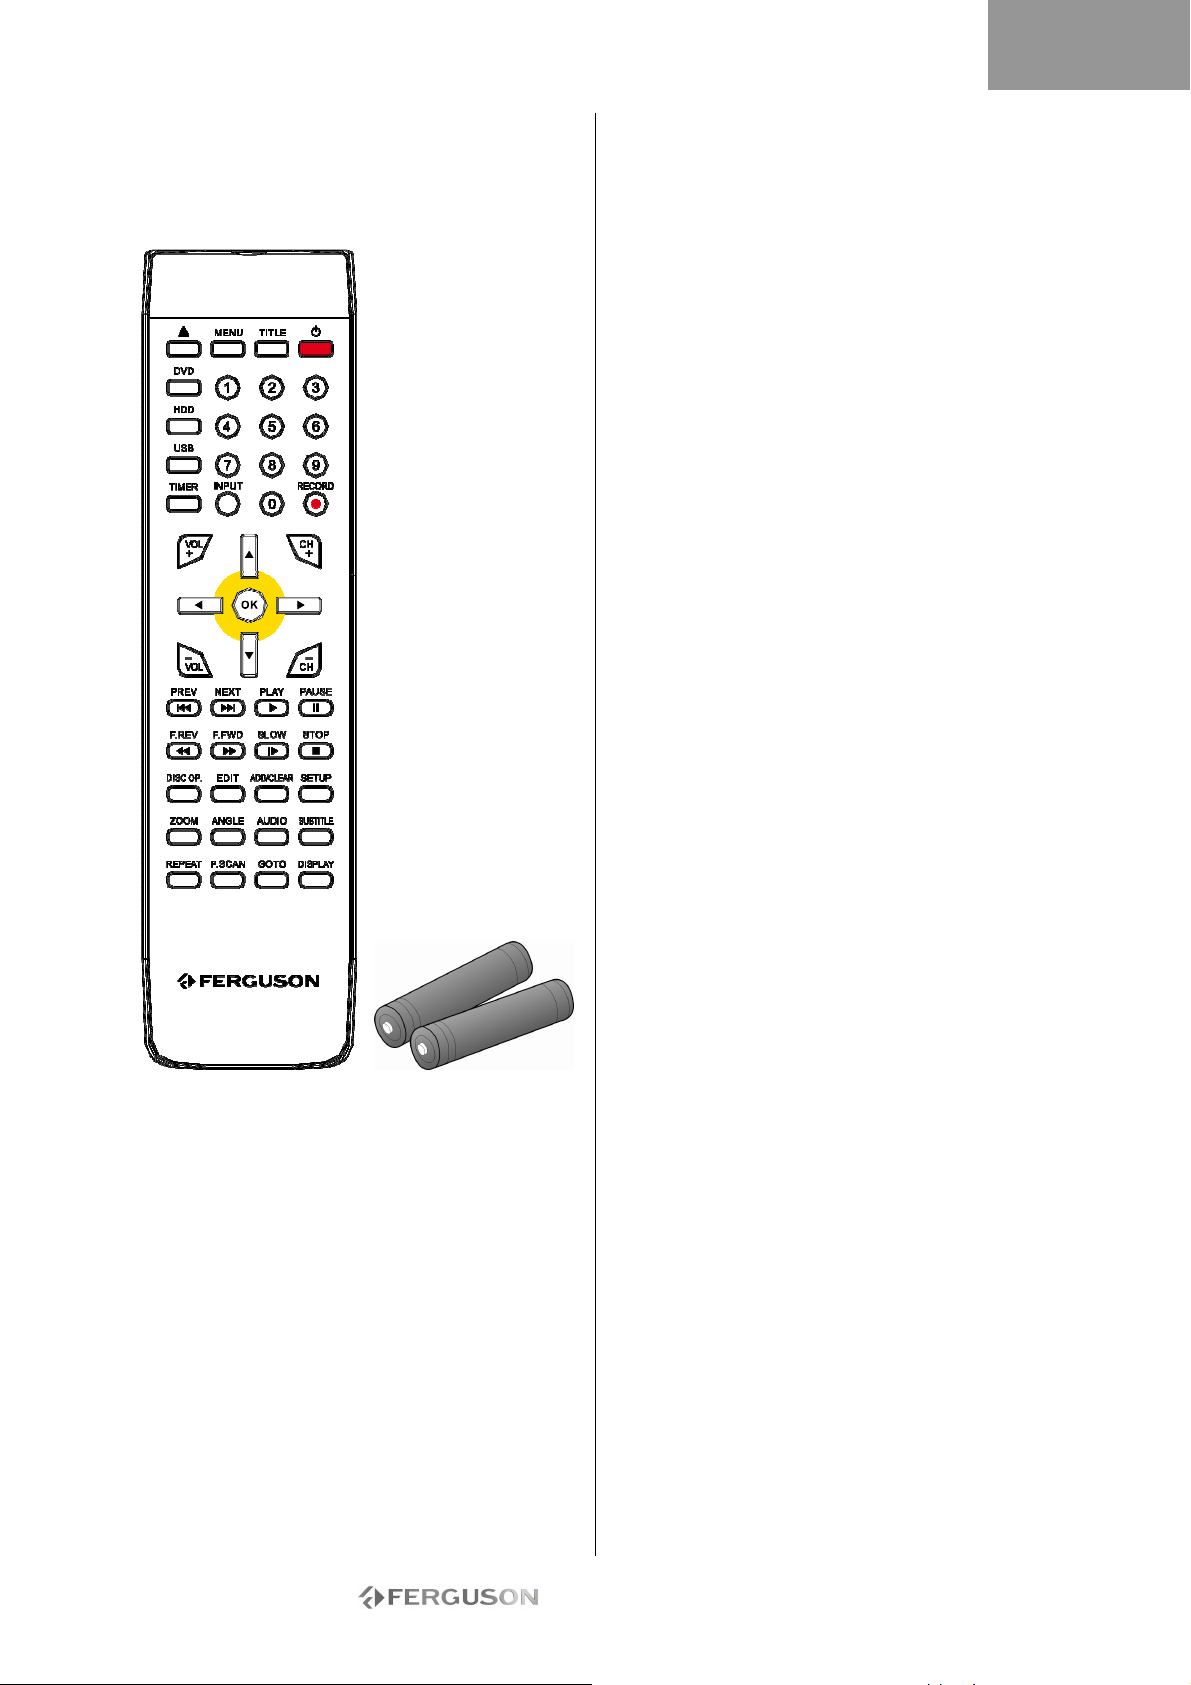
ENGLISH
BOX CONTENTS
• Recorder
• Remote control unit & 2 AAA batteries
• User's guide
• Warranty guide
DISC TYPES
DVDs
DVD discs are divided into one or more titles. Each
title may be further divided into several chapters.
Sometimes a chapter may contain index points
dividing the chapter into several parts.
Multi-Angle
You can view scenes from different camera angles
when watching movies or other media containing
multiple playback angles.
Multiple Audio Languages
You can select the language when watching movies
or discs that have multiple languages and/or audio
soundtracks recorded on them.
Multi-Language Subtitles
You can select the subtitle language or turn
subtitles off when watching movies or discs that
have multi-language subtitles recorded on them.
SVCD/VCD/AUDIO CDs
SVCD/VCD/AUDIO CD are divided into tracks. A
track can sometimes contain a number of index
points.
MP3 /JPEG/DivX® (Audio/Image/Video files)
MP3 is a compressed audio file format that uses the
file extension "mp3" or ".MP3". JPEG is a
compressed image file format that uses the file
extension ".jpg" or ".JPG". DivX® is a compressed
video file format that uses the file extension ".avi"
or ".AVI".
The Ferguson RW-770HD may take some time to
display the list of disc contents, especially if the disc
contains a lot of data.
Supported Discs
• CD Audio and CD EXTRA
• CD-ROM (Mode 1)
• CD-ROM XA (Mode 2, Form 1 and Form 2),
• CD-I (Mode 2, Form 1 and Form 2) and CD-I
Ready
• Photo CD (Single and Multi session)
• Video CD
• CD-TEXT
• Single-sided single layer DVD-ROM (SS-SL)
• Single-sided dual layer OPPOSITE DVD-ROM (SSDL-OPT), PAR¬ALLEL DVD-ROM (SS-DL-PTP)
• Double-sided single layer DVD-ROM (DS-SL)
• Double-sided double layer DVD-ROM (DS-DL)
• Double-sided double layer OPPOSITE DVD-ROM
(DS-DL-OPT), PARALLEL DVD-ROM (DS-DL-PTP)
• Single-sided single layer DVD±R/RW
Un-supported Disc Types
Unfinalised discs from other DVD/CD recorders.
Not all CD-R, CD-RW, DVD-R, DVD-RW, DVD+R,
DVD+RW discs are supported due to the type of
disc or the condition of the recording.
RECORDABLE DISCS
• DVD±RW (rewritable DVD discs)
DVD±RW is an erasable format. DVD±RW discs can
be rewritten more than 1,000 times.
• DVD±R (write-once DVD discs)
DVD±R discs can only be written once. Several
recordings can be made on the same disc as long as
the disc is not finalised or full.
If the disc is finalised, you can not edit or record on
the disc, even though unused capacity may still be
available. If you want to play a DVD±R created with
your Ferguson on another player, please make sure
it has been finalised. Likewise, you must use the
"make compatible" option if you want to play a
DVD±RW disc on another player.
- 28 -
Page 29
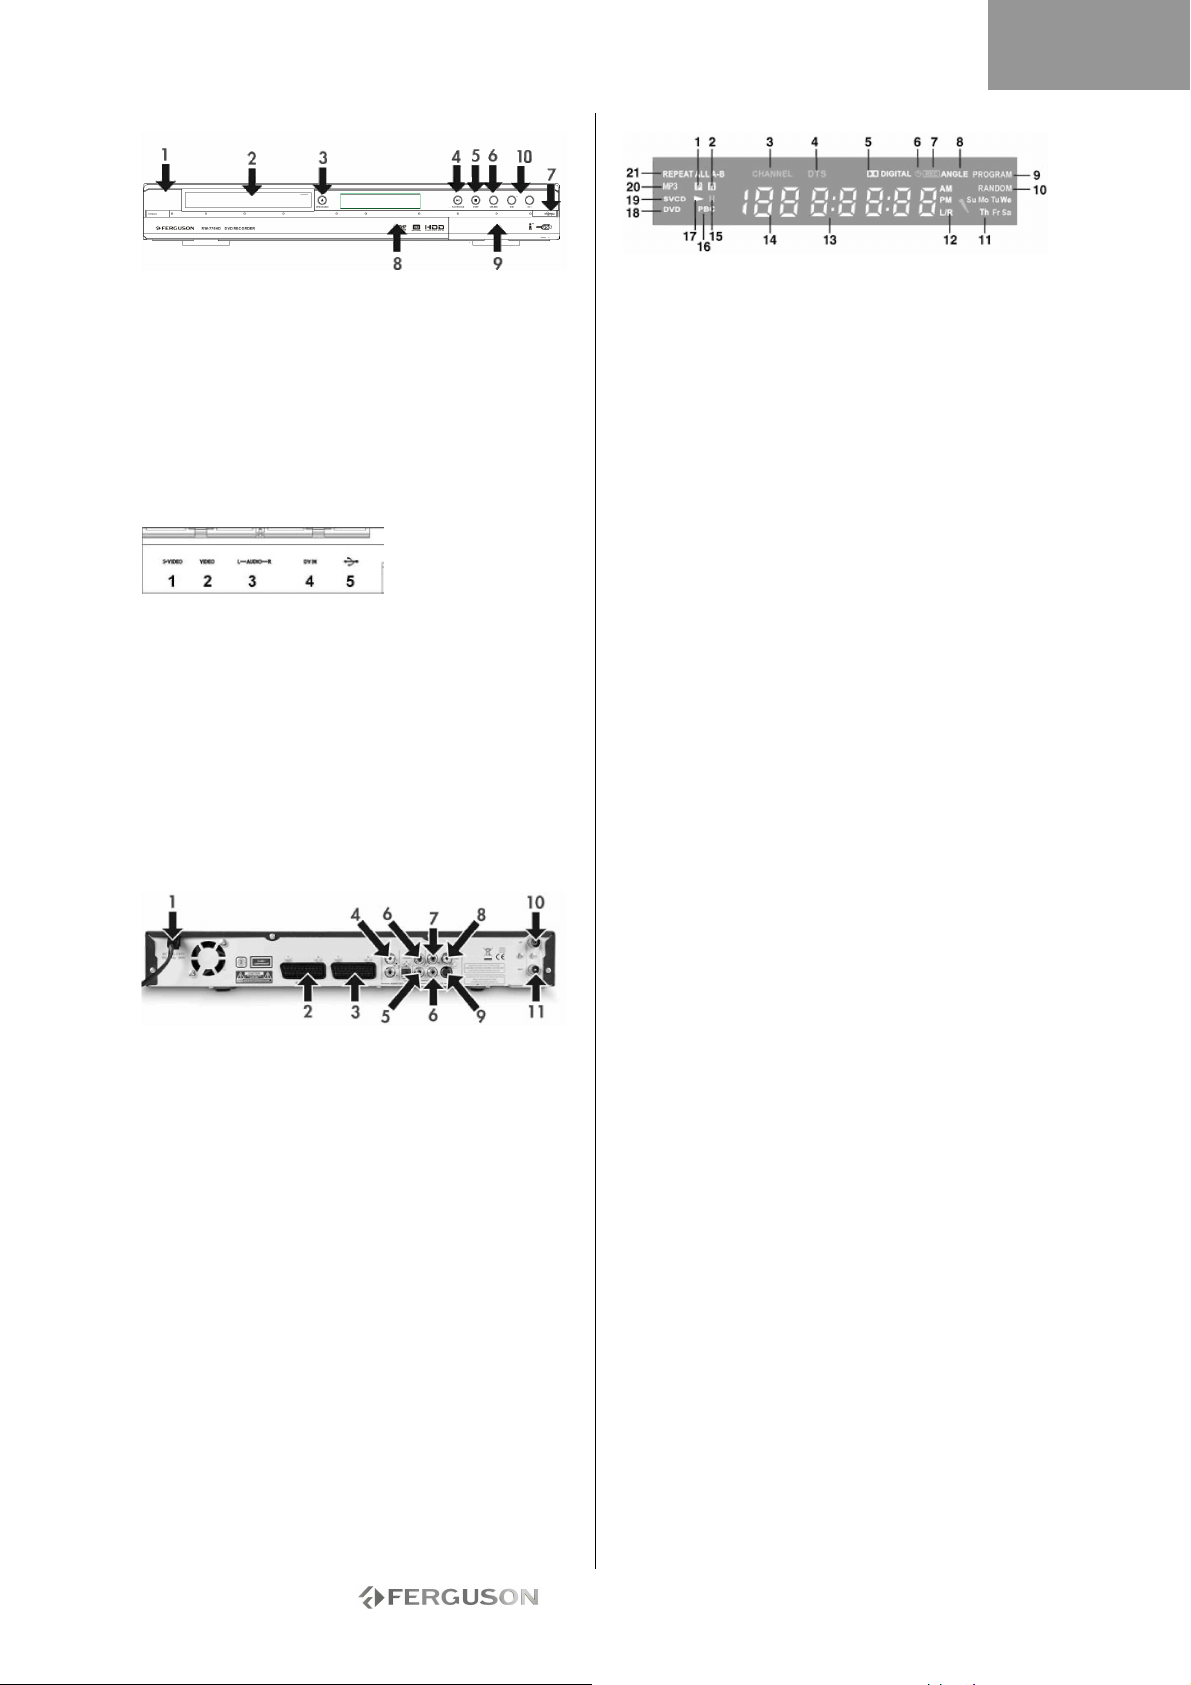
ENGLISH
CONTROLS AND FEATURES
1. Power button
2. DVD disc holder
3. Open/Close button
4. Play/Pause button
5. Stop buton
6. Source button
7. Record button
8. Display
9. Front Panel Connectors
10. Buttons CH+ / CH-
Front Panel Connectors (open flap for access)
1. S-Video: S-Video input connector, use to connect
an appropriate video device.
2. Composite Video: Video input connector, use
to connect an appropriate video device.
3. Composite Audio L/R: Audio input connectors,
use to connect audio from devices connected to the
S-Video or Composite ports.
4. DV IN: DV input connector (i-Link/IEEE 1394),
use to connect a digital video camera.
5. USB: USB input connector, use to connect a USB
Mass Storage Device.
REAR PANEL
DIAGRAM
1. AC IN Power cord connector to mains supply.
2. SCART In (SCART 2) Use to connect to digital AV
equipment with SCART Output capability.
3. SCART Out (SCART 1) Use to connect to TV set
or other equipment with a SCART in connector.
4. Audio output L/R Analog audio output (left and
right).
5. Coaxial Digital Audio Out Use to output digital
audio by connecting to an amplifier or receiver with
digital audio input capability.
6. YUV (Y Cb/Pb Cr/Pr) Use to connect to TV set
with YUV (Y Cb/ Pb Cr/Pr) input connectors. The
output mode can be set as progressive or
interlaced.
7. CVBS Video Out Use to connect to TV set with
video CVBS input connector.
8. Optical Digital Audio Use to output digital audio
recorded on discs by connecting to the optical digital
audio input connector on an AV amplifier or receiver
with digital audio input capability.
9. S-Video Out Use to connect to TV set with SVIDEO input connector.
10. Aerial In Use to connect to aerial/cable TV.
11. Aerial Out Use to output TV signal to TV set.
Display Window Indicators
1. PAL
2. NTSC
3. Channel
4. DTS
5. Dolby
6. Timer
7. Record
8. Multiple Angle
9. Program
10. Random
11. Day
12. Audio Channel
13. Time/Mode (h:mm:ss)
14. Source/Chapter
15. Pause
16. PBC
17. Play
18. DVD
19. VCD/SVCD
20. MP3
21. Repeat
- 29 -
Page 30
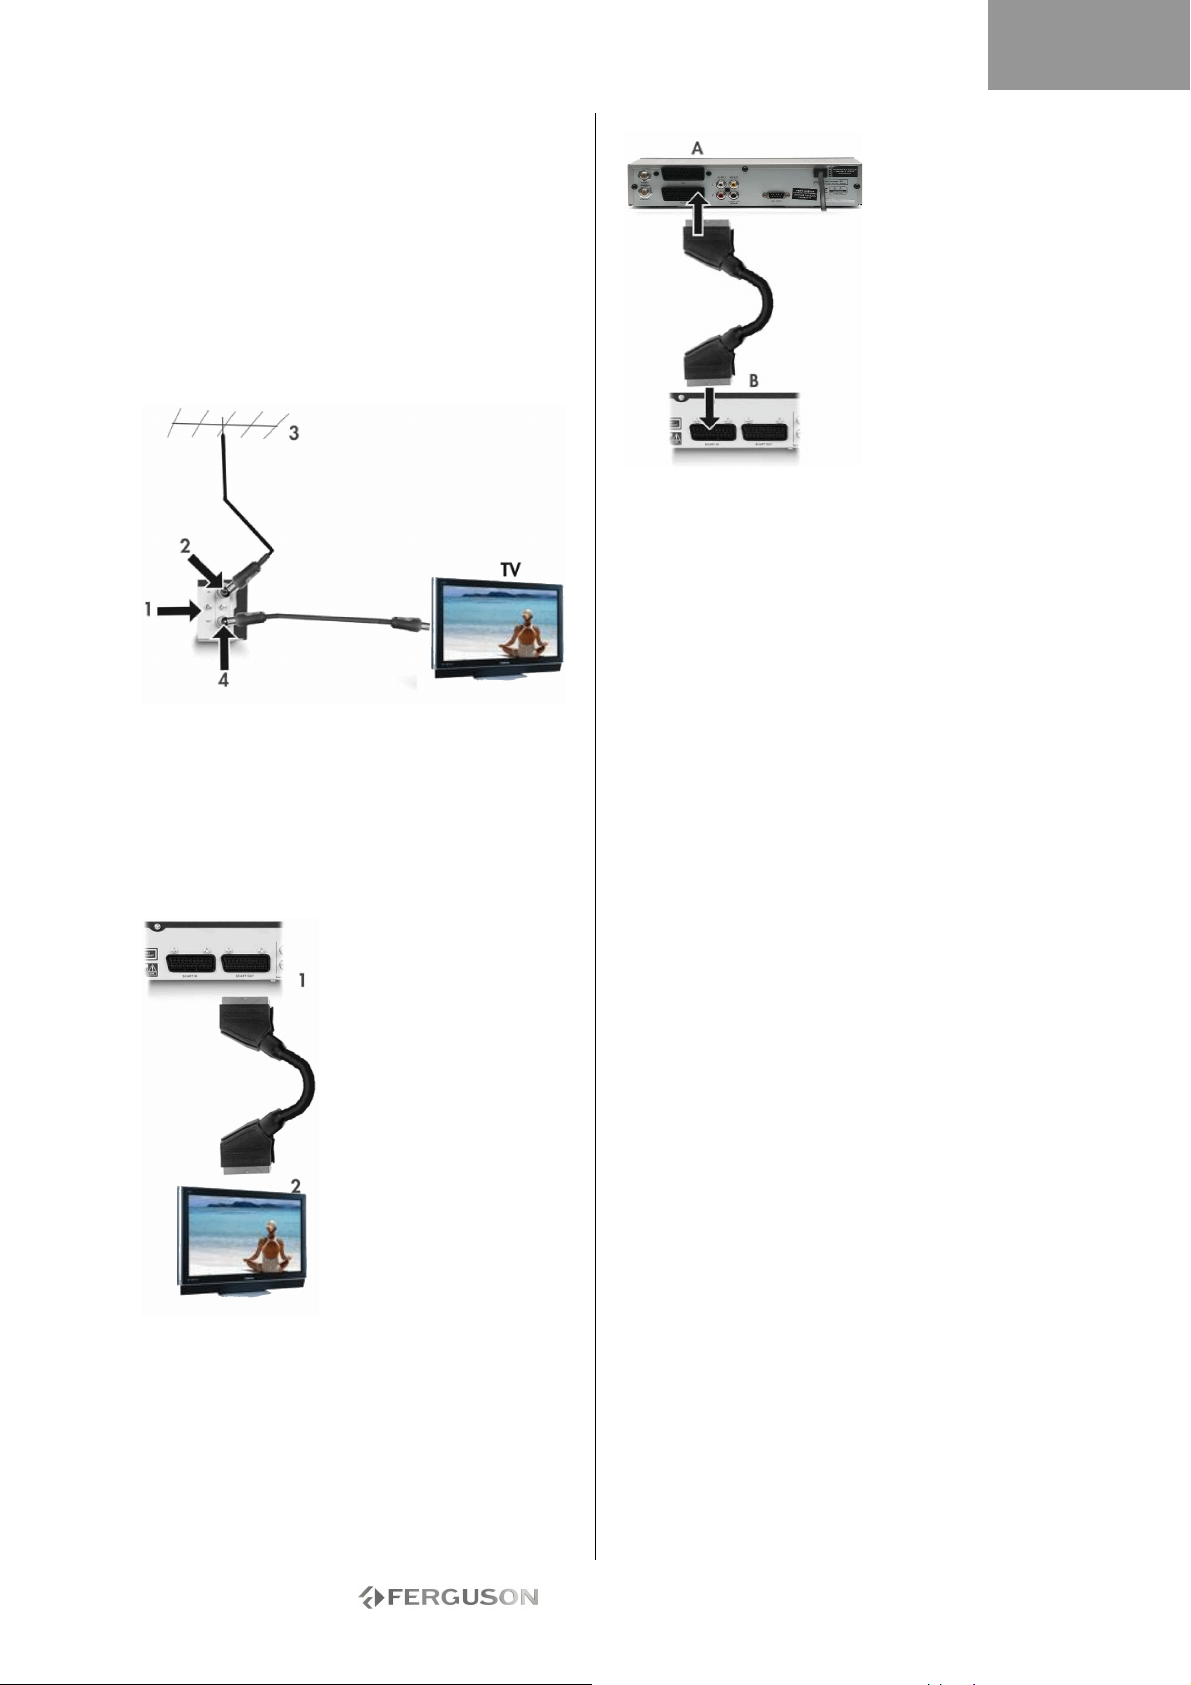
ENGLISH
CONNECT TO A TELEVISION (BASIC
CONFIGURATION)
Step 1: Connect the antenna
1. Turn off your TV.
2. Unplug the antenna cable from the back of your
TV and plug it into the ANTENNA IN connector on
the back of the recorder.
3. Connect a coaxial aerial cable from the ANTENNA
OUT connector on the back of the recorder to the
ANTENNA IN plug on the back of your TV.
4. You will need to perform a scan to tune in the
available TV channels on the recorder.
1. Ferguson RW-770HD back panel
2. Antenna in
3. Aerial (or cable TV)
4. Antenna out, can be used to output TV signal to
another TV set's RF signal input connector.
The TV signal output connector (antenna out) is
only a loop-through of the input signal.
Step 2: Connect to TV using SCART
1. Connect a SCART cable
from the SCART OUT
plug on the back of the
RECORDER to the SCART IN
plug on the back of your TV.
2. Select SCART IN source
on the TV.
CONNECT A TV/SATELLITE DECODER
1. Connect a SCART cable from the SCART
OUT plug on the back of the decoder (A) to the
SCART IN plug on the back of the Ferguson
Recorder (B).
2. You will need to perform a scan to tune in the
available TV channels on the recorder. Please see
Autoscan for TV channels in the System Setup
section later in this guide for more information.
- 30 -
Page 31
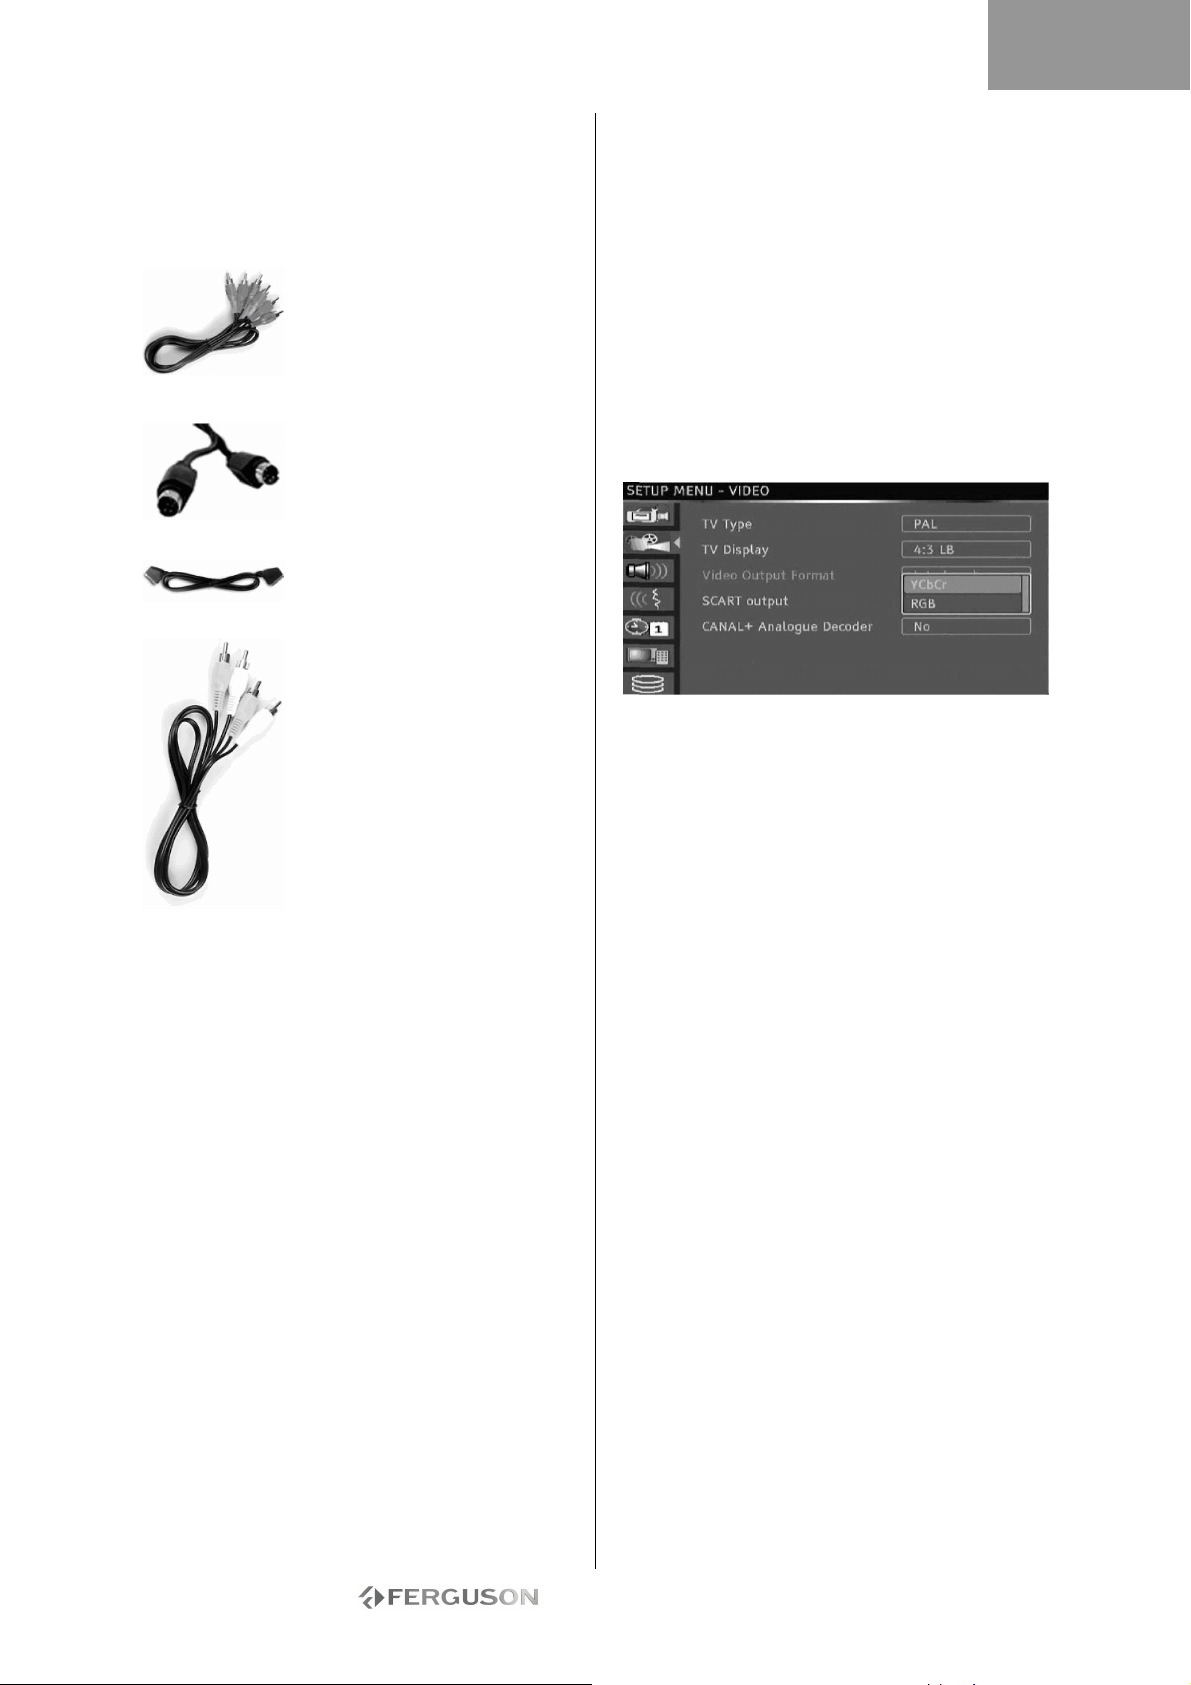
ENGLISH
CONNECT TO A TELEVISION (ALTERNATIVE
CONFIGURATION)
If you wish to use a connection other than the
SCART cable, you can use one of the following
configurations (not included) starting with the best
(in terms of quality) in descending order:
Component Video (Progressive
Scan) Component Video
(Interlace)
S-Video
SCART (RGB)
Composite Video
A - Connect to TV using composite video
1. Connect a video cable from the CVBS out plug
(yellow) on the back of the Recorder to the Video-in
plug (yellow) on the TV.
2. Connect audio cables (cinch) from the Audio L/R
out plugs (white/red) on the back of the Recorder to
the Audio L/R in plugs (white/red) on the TV.
3. Select VIDEO in or CVBS in source on the TV
B - Connect to TV using S-Video
1. Connect an s-video cable from the S-VIDEO out
plug (black) on the back of the Recorder to the SVIDEO in plug (black) on the TV.
2. Connect audio cables (cinch) from the Audio L/R
out plugs (white/red) on the back of the Recorder to
the Audio L/R IN plugs (white/red) on the TV.
3. Select S-VIDEO in source on the TV
C - Connect to TV using video component (YUV
or YCbCr)
Video component gives by far the best image
quality for LCD and plasma TVs. In order to use
video component connection, the RECORDER must
already be connected to the TV using one of the
previous connections (however, SCART is
recommended).
1. Power on the TV and select the source
corresponding to the RECORDER.
2. Power on the RECORDER.
3. Connect the 3 component video cables (red,
green, blue) from the COMPONENT VIDEO OUT
plugs (red, green, blue) on the back of the
RECORDER to the COMPONENT VIDEO IN plug
(red, green, blue) on the TV.
4. Connect audio cables from the AUDIO L/R OUT
on the back of the RECORDER to the AUDIO L/R IN
on the TV.
5. Press MENU on the remote control.
6. Using the Navigation buttons, go to the GENERAL
menu section.
7. Using the Navigation buttons and the OK button,
change the SCART Output setting to YCbCr. Change
the Video output format setting to Progressive if the
TV supports Progressive Scan.
8. Select YUV or YCbCr source on the TV.
9. The SCART cable can be unplugged.
- 31 -
Page 32
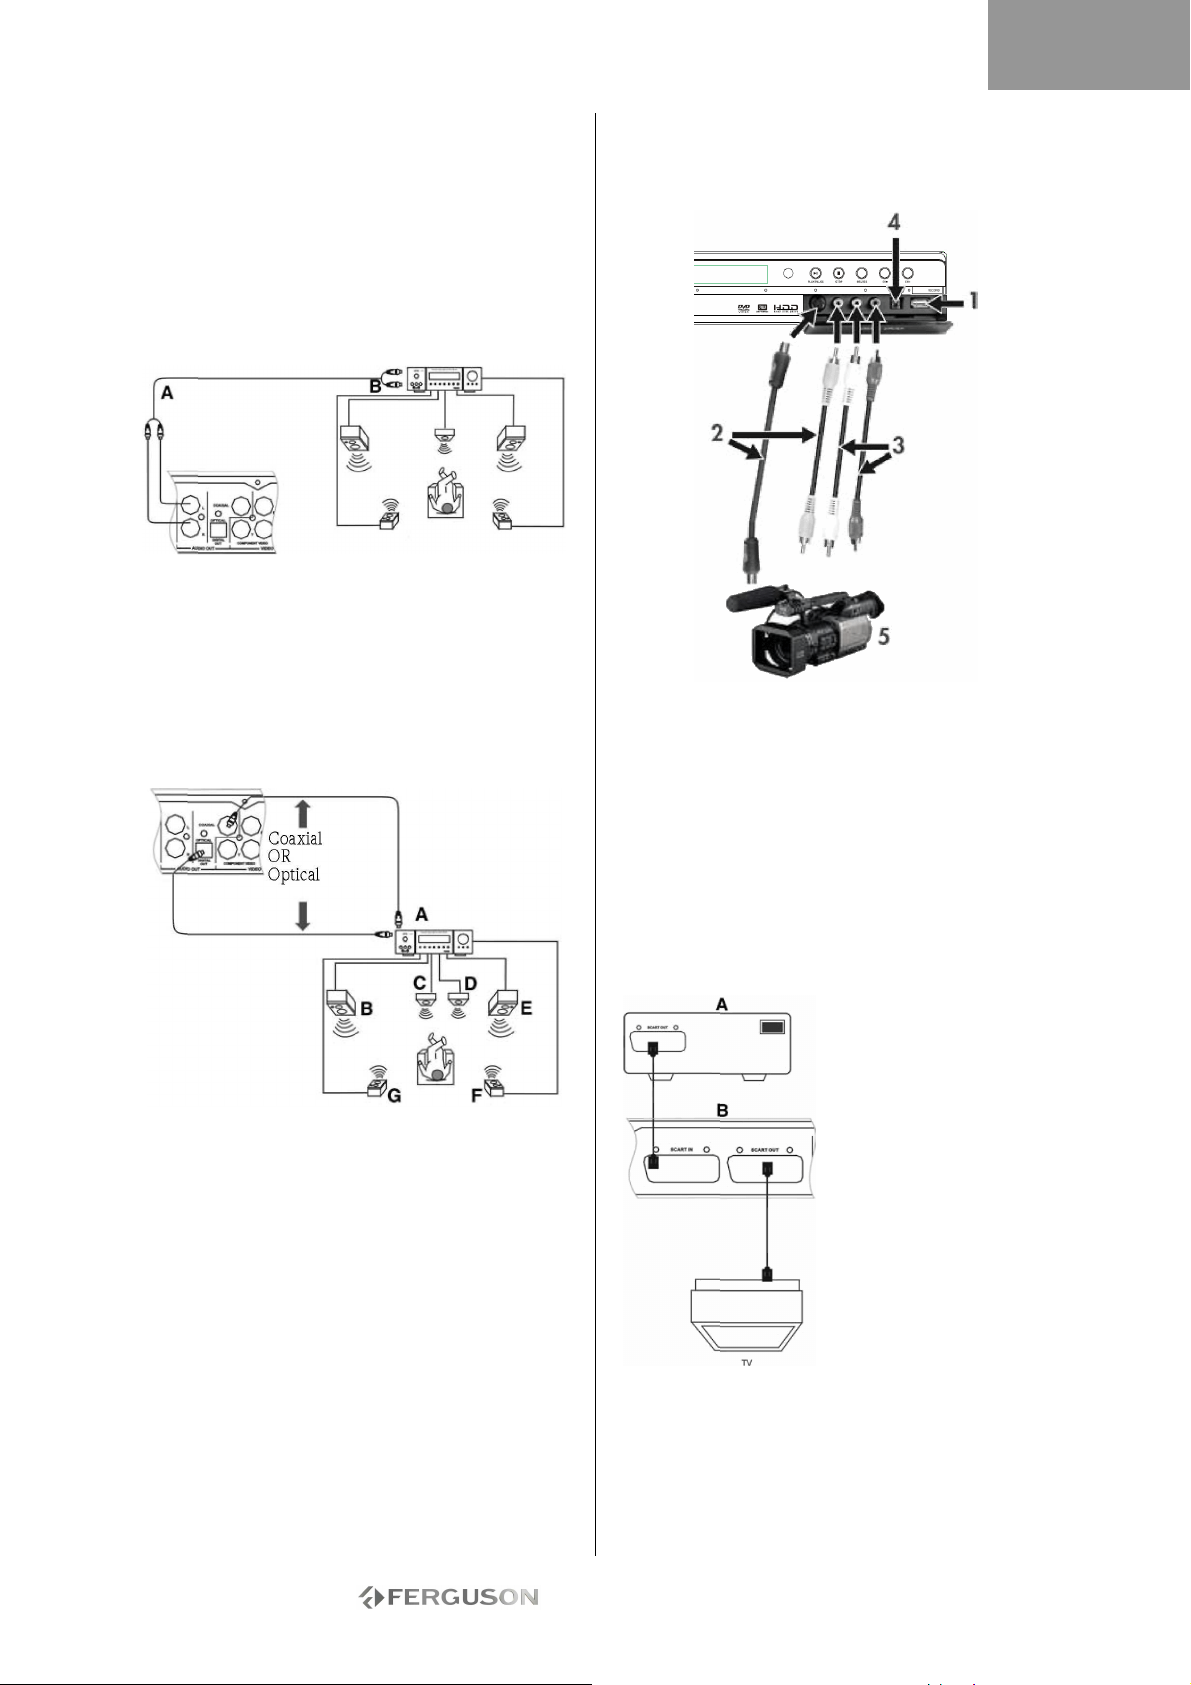
ENGLISH
CONNECT TO AN EXTERNAL AUDIO SYSTEM
Analogue connection to an amplifier
Connect an audio cable from the AUDIO L/R OUT
(white/red) connectors on the back of the recorder
to the AUDIO L/R IN (white/red) connectors on the
back of the amplifier.
The following devices can be connected:
• Amplifier with Dolby Surround Pro Logic decoder
• Stereo amplifier
A - To audio out connectors. B - To audio in
connectors.
Digital connection to an amplifier
Connect an optical cable from the OPTICAL OUT on
the back of the recorder to the OPTICAL IN on the
back of the amplifier.
or
Connect a coaxial cable from the COAXIAL OUT on
the back of the recorder to the COAXIAL IN on the
back of the amplifier.
A. AMPLIFIER with DOLBY DIGITAL or DTS decoder
B. FRONT LEFT
C. CENTER
D. SUBWOOFER
E. FRONT RIGHT
F. SURROUND RIGHT
G. SURROUND LEFT
The following devices can be connected:
• Amplifier with Dolby Digital decoder
• Amplifier with DTS decoder
CONNECT AN AV OR DV SIGNAL VIA THE
FRONT PANEL
Flip down the door as indicated by the OPEN label at
the right hand corner.
1. USB connector
2. Use S-Video jack or composite video connector
3. Audio input connector
4. IEEE 1394 connector
5. External AV Signal
After connecting your device, select the correct AV
signal input by repeatedly pressing the Source
button on the remote control. The picture will
appear on your TV screen and you may start your
recording.
Refer to the manual of the connected system.
CONNECTING AN AV SIGNAL VIA THE SCART
IN CONNECTOR
You can record a signal from the SCART IN
connector, e.g.: The AV signal from a DVD player.
Press the Source button on the remote control to
switch to the appropriate mode according to the
connection type.
A. External AV signal
source (e.g. DVD)
B. Ferguson Recorder
The SCART IN and SCART
OUT ports remain active
even when the Ferguson
RW-770HD is in Standby
mode.
- 32 -
Page 33
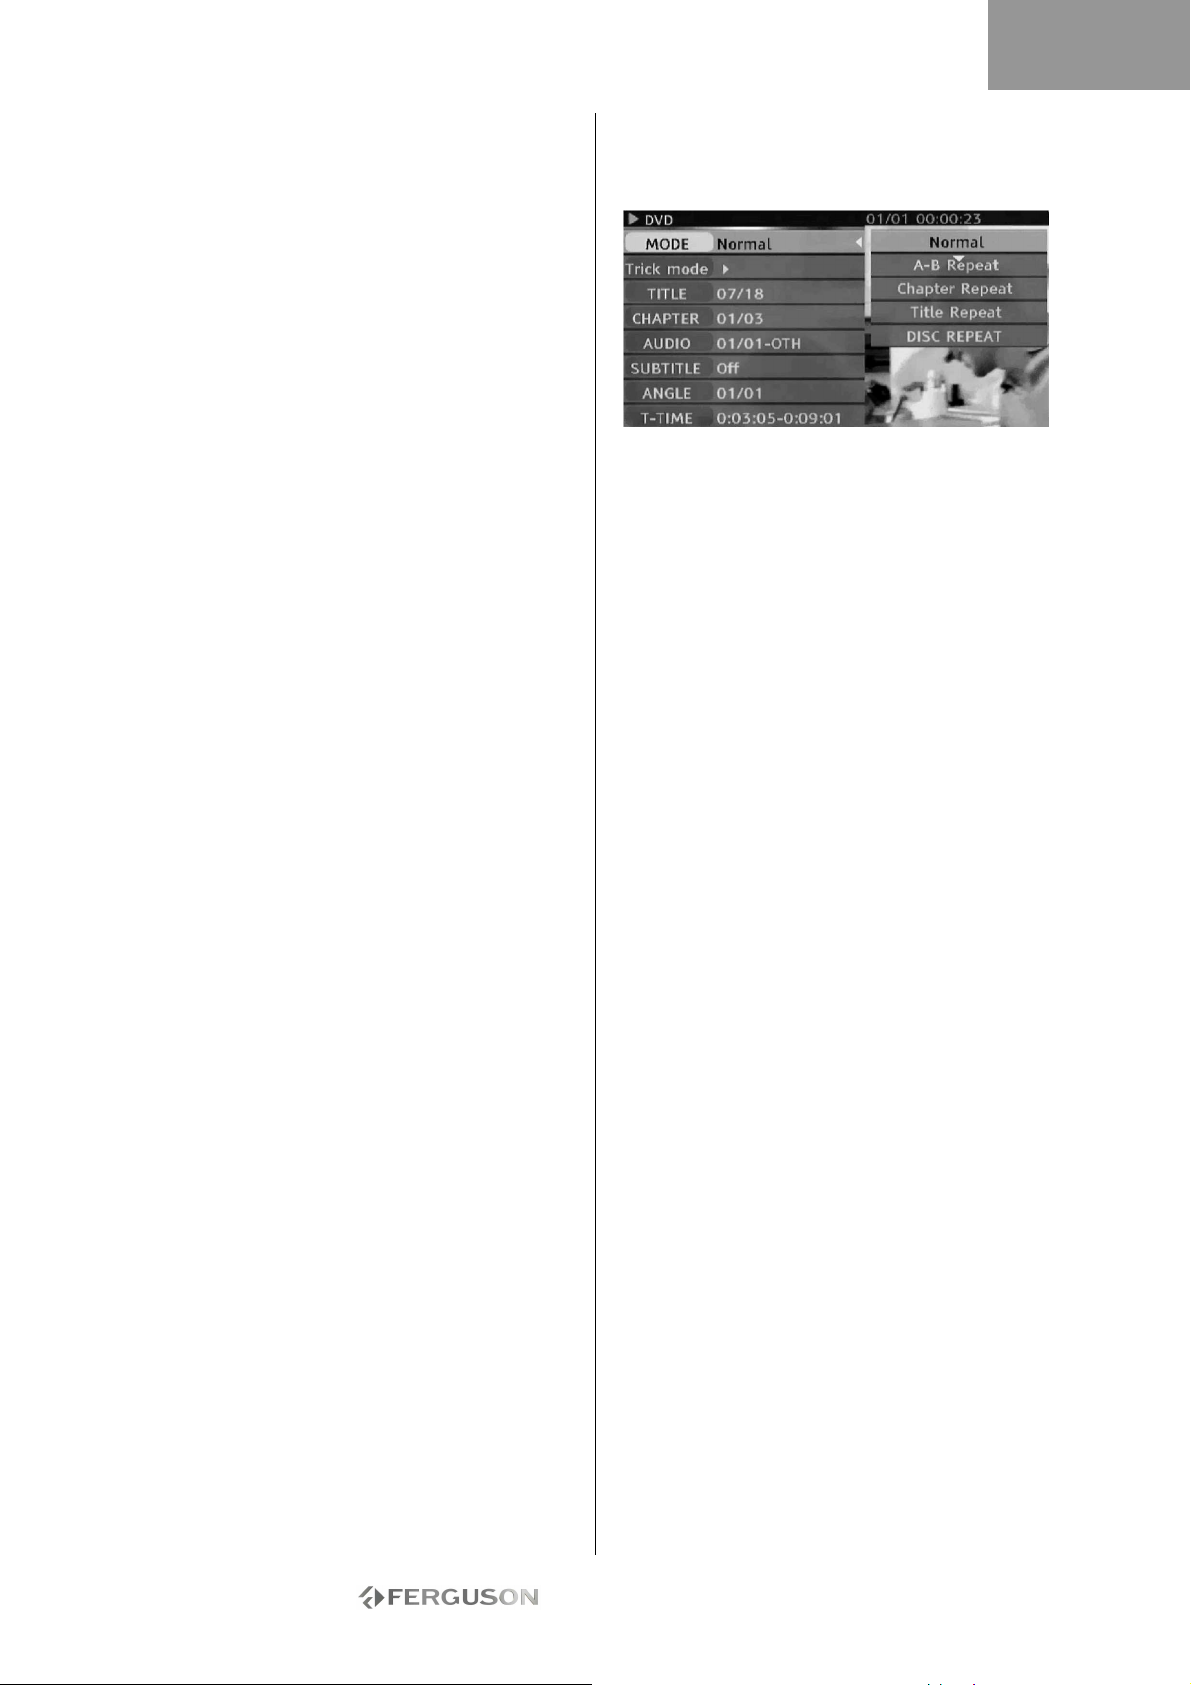
ENGLISH
CONNECT USB DEVICES
The Ferguson RW-770HD can interface with USB
flash drives, USB memory card readers and USB
cameras that are compatible with the Mass Storage
Class. You can view one or many JPEG pictures in
sequence. MP3 files can be played during the
picture slide show. Once the USB device is
connected to the USB port, press the File Manager
button to open the File Manager menu. You can
browse the content of the USB device using the
Navigation buttons. Press the Play/OK button to
select the highlighted files for playback.
See the File Manager section later in this guide for
more information. It may take a few seconds for a
USB device to be recognised.
The mass storage device must be FAT32 formatted.
Not all mass storage devices are compatible.
PLAY A DVD-VIDEO, SVCD OR VCD
1. Press the Open/Close button on the front panel of
the unit to open the tray.
2. Place the disc on the tray.
3. Press the Open/Close button to close the tray.
4. The playback should start automatically. If not,
press DVD.
5. Use the Navigation buttons to navigate in the
menu and press Play/OK to make selection.
Playback Options
1. Press the DVD button to display the DVD Menu.
2. Press the Display button to display or hide onscreen information.
Play
Press the Play/OK button on the remote control or
Play button on the front panel to start playback.
Pause
Press the Pause button on the remote control to
pause.
Fast forward and fast re verse
Press the » (Fast Forward) button to activate fast
forward, press « (Fast Reverse) button to activate
fast reverse. Press repeatedly to toggle through 4
different playback speeds.
Skip
Press the Next button to skip to the next
title/chapter, press the Previous button to skip to
the previous title/chapter.
Controlling Playback with the Playback Menu
1. Press the Play/OK button twice to show the
control menu and select a submenu:
MODE: Set the playback mode, e.g.: Normal, A-B
Repeat, Chapter Repeat, etc.
TRICK: Set the playback status, e.g.: Stop, F.F.,
F.R., S.F., etc.
TITLE: Press Play/OK then enter the desired title
number to jump to a title.
CHAPTER: Enter the desired chapter number to
jump to the chapter.
AUDIO: Select the audio language you want to use,
e.g.: FRE (French), ENG (English), etc.
SUBTITLE: Select the subtitle language.
ANGLE: Select the camera angle (must be
supported by the disc).
T-TIME: Display the elapsed time and remain time.
2. Press button to exit the control menu.
Repeat
1. A-B Repeat
• Press the Play/OK button twice to access the setup
menu during playback.
• Use the buttons to highlight the Mode
submenu, and press the Play/OK button.
• Use the buttons to highlight the A-B REPEAT
item, press the Play/OK button to mark the start
point (A); press the Play/OK button again to display
the A-B REPEAT item and then press the Play/OK
button for the third time to mark the end point (B).
Then the section between the start point and end
point will be repeatedly played.
• Press button to exit the SETUP MENU
2. Title/chapter/disc repeat - Repeatedly press the
Repeat button during playback to repeat
title/chapter/disc.
3. Repeatedly press the Repeat button until normal
playback resumes.
- 33 -
Page 34
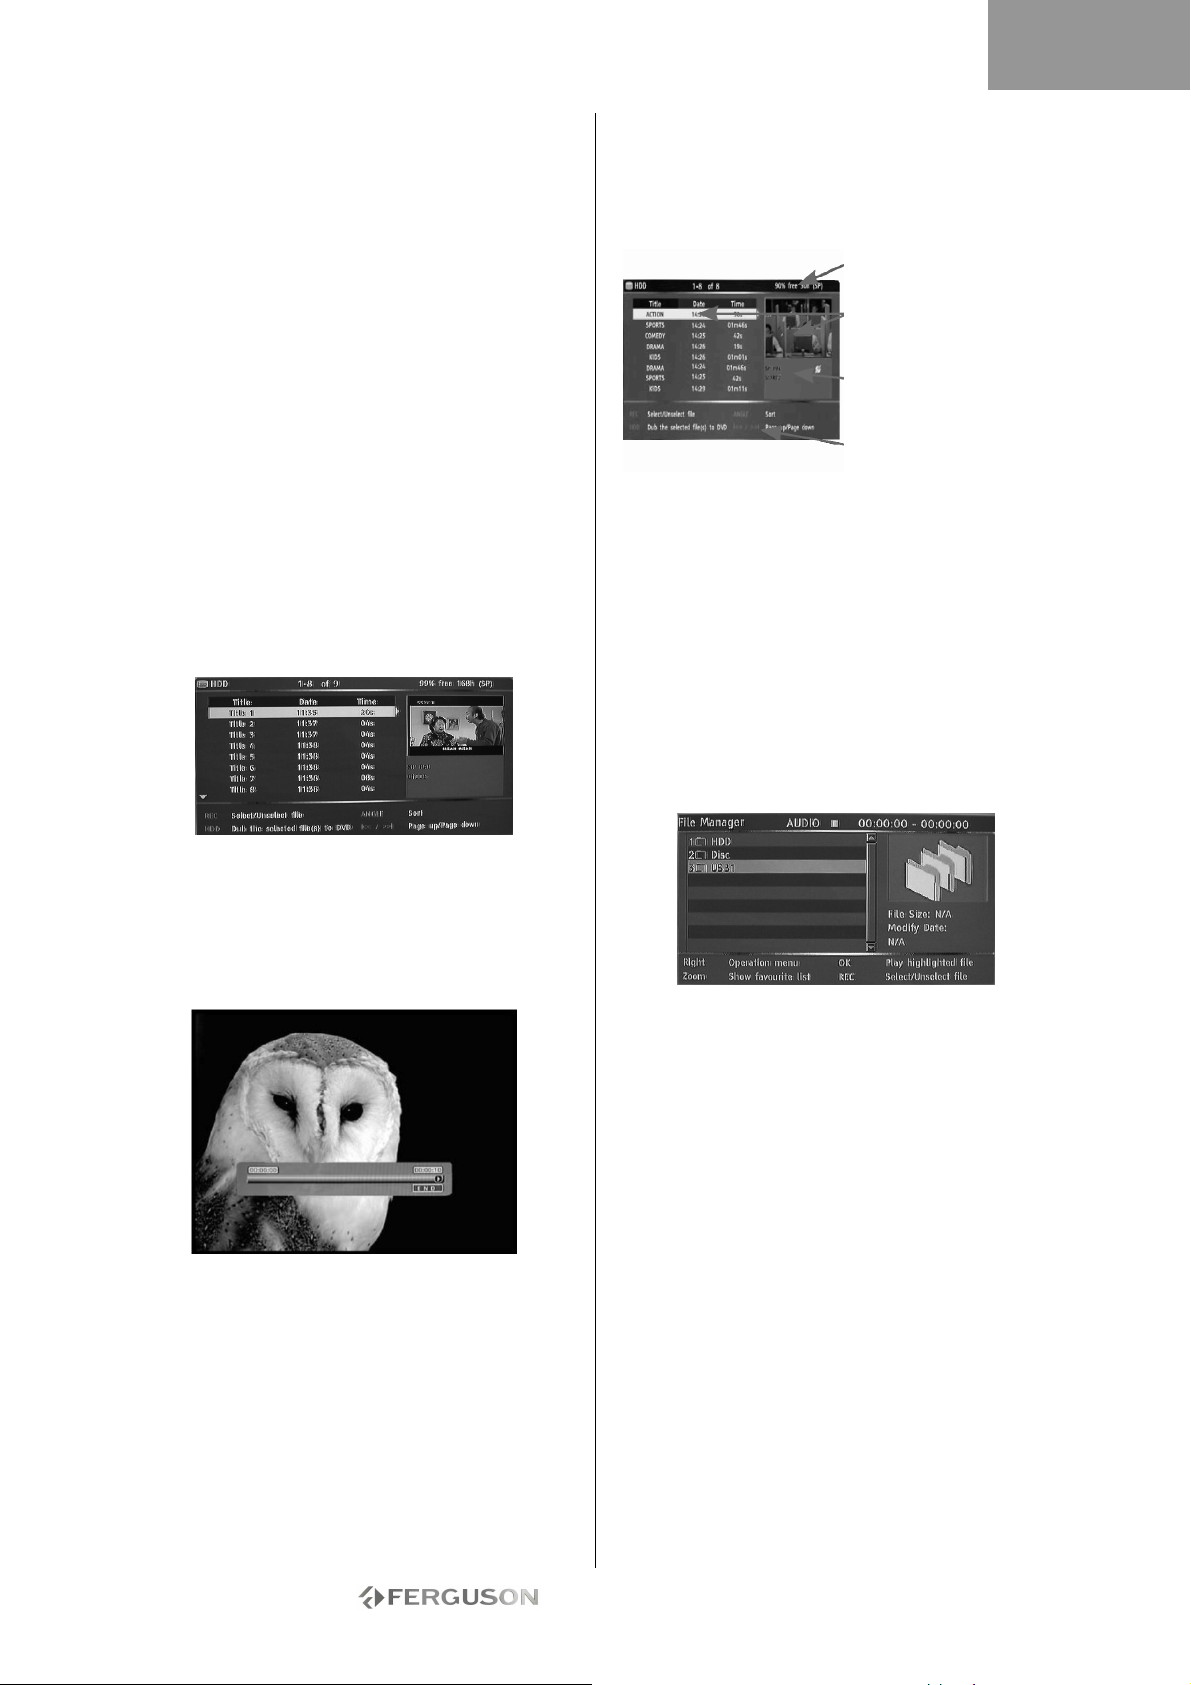
ENGLISH
Audio language
Press AUDIO repeatedly to toggle between up to 8
audio languages or sound when the disc is recorded
with multi-languages. For Karaoke discs, press
AUDIO button to switch between the accompanying
music and vocal.
Only a vailable for DVD/SVCD discs.
Subtitle language
Press SUBTITLE repeatedly to toggle between up to
32 subtitle languages when the disc is recorded with
multi-subtitles.
Only a vailable for DVD/SVCD discs.
Viewing Angle (DVD only)
Press ANGLE repeatedly to toggle between up to 9
viewing angles when scenes recorded in the disc
was shot with multiple cameras from different
angles.
PLAY A TITLE RECORDED FROM TV ON THE
HDD
1. Press the TV-HDD button until the TV-HDD title
list appears.
2. Use the buttons to highlight the desired title.
You can press Angle to sort the list by title name or
date and Previous and Next to go to the
previous/next page.
3. Press Play/OK to play the highlighted title.
During playback:
Use the Next, Previous, FFW and RWD buttons for
time navigation DIVX® FILES inside the title.
Press the Display button to display or hide OnScreen Display (OSD).
TV-HDD TITLE LIST (TITLES RECORDED FROM
TV)
Press the TV-HDD button to show the TV-HDD title
list.
The TV-HDD list presents a list of all the titles you
have saved on the HDD. The list includes the
duration, a thumb¬nail picture and the recording
mode (HQ, SP etc.) for each title. The list also
shows if a title is protected or locked.
PLAY CONTENT FROM A USB DEVICE
1. Connect the USB device to the front USB input
connector.
2. Press the File Manager button to open the File
Manager menu (it may take a few seconds for the
USB device to be recognised by the recorder).
3. Use the Navigation buttons to highlight the
desired file.
4. Press Play/OK to play the file.
H a disc contains JPEG and MP3 contents, the user
can enjoy the pictures and music at the same time.
PLAY A DIVX® OR XVID FILE WITH SUBTITLES
1. From the File Manager menu, use the Navigation
buttons to highlight the subtitle file (*.SRT, *.SUB
and *.SMI are accepted).
2. Press Play/OK to select the subtitle file.
3. Use the Navigation buttons to highlight the movie
file.
4. Press Play/OK to play the movie.
Remaining space
on HDD
Currently highlighted
title
Currently highlighted
title recording
information
On-screen help
- 34 -
Page 35
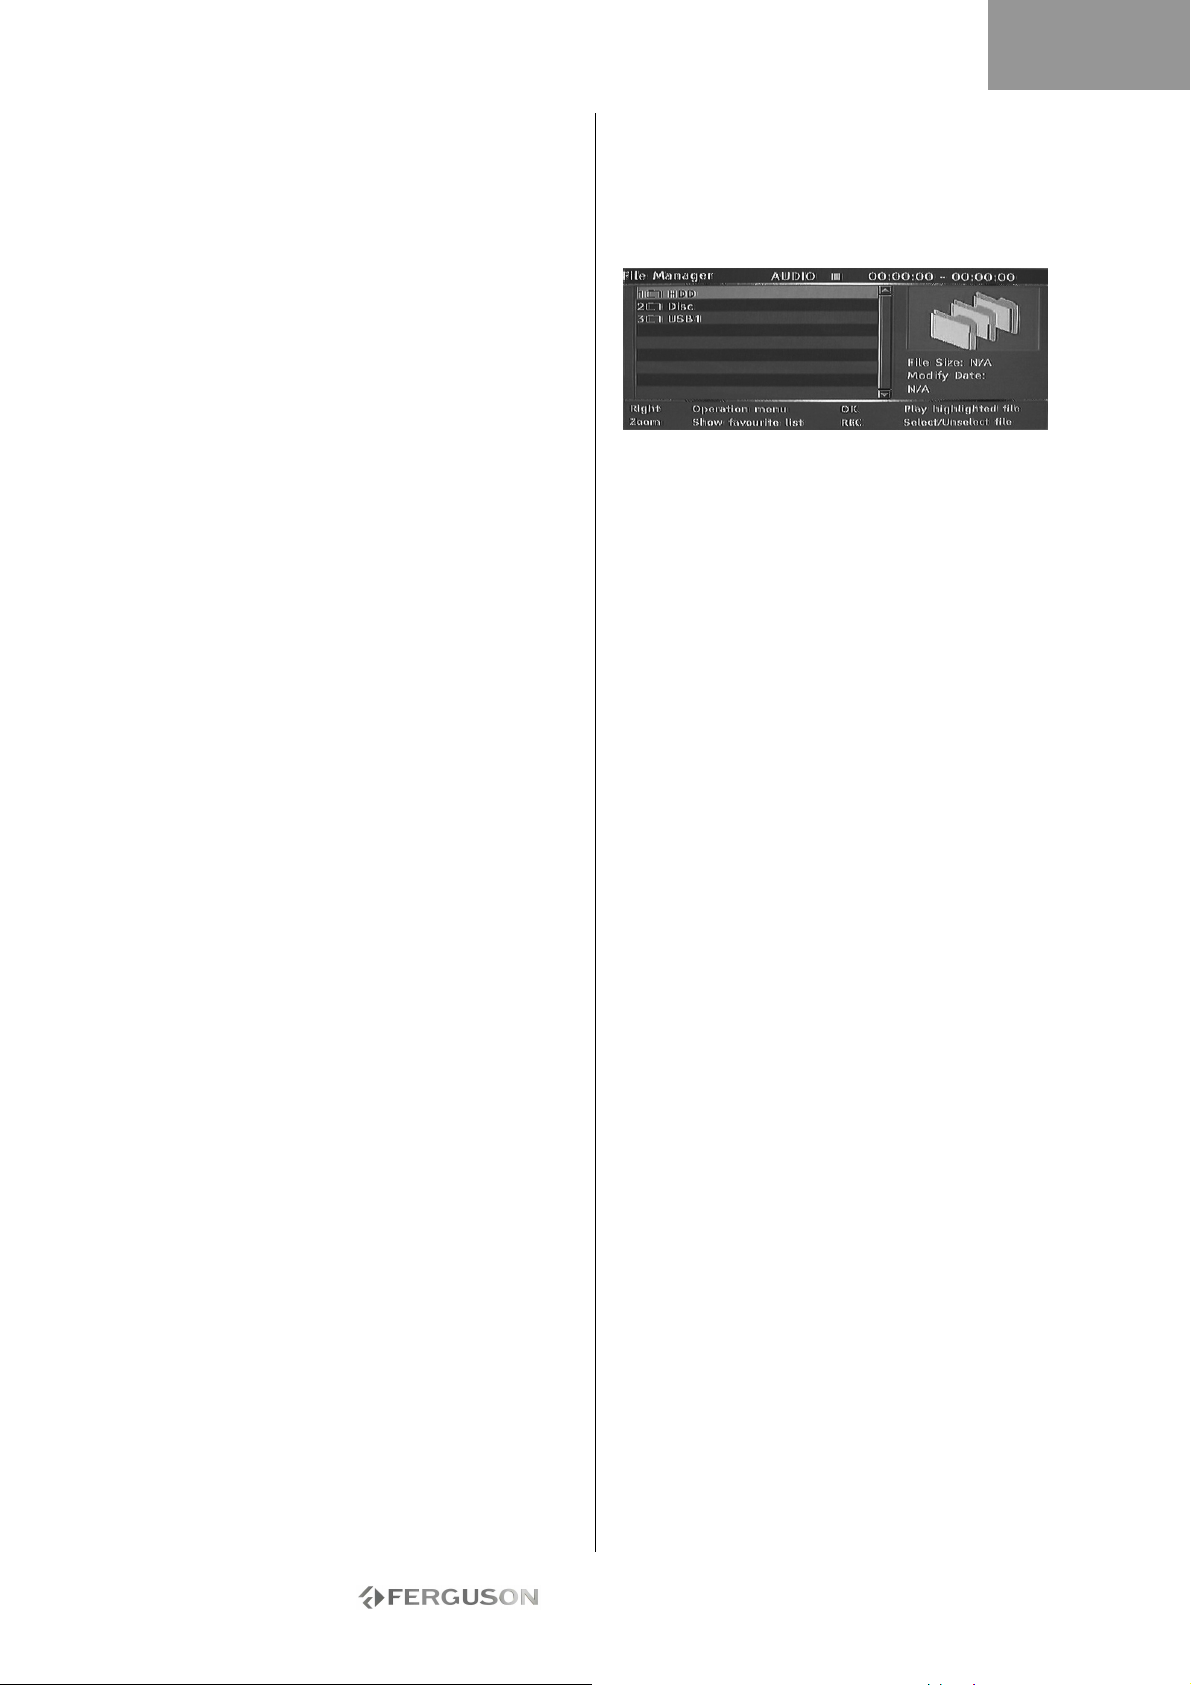
ENGLISH
PLAY A DVD OR CD WITH MP3, JPEG OR/AND
DIVX® FILES
1. Press the Open/Close button on the front panel of
the unit to open the tray.
2. Place the disc on the tray.
3. Press the Open/Close button again to close the
tray.
4. The content menu should appear automatically. If
not, press the File Manager button.
5. Use the Navigation buttons to highlight the
desired file.
6. Press Play/OK to play the file.
7. Press the Stop button to return to the menu.
1. For a JPEG/MP3 Simultaneous Slideshow, select
the MP3 file then select the JPEG file. The MP3 and
JPEG files will playback in the order selected.
2. Press the Stop button to stop playback. For
JPEG/MP3 Simultaneous Slideshow, press the Stop
button twice.
DIVX VIDEO-ON-DEMAND (VOD)
DivX Video-on-Demand (VOD) is a digital video
delivery service that allows you to download and
enjoy high-quality video content from a diverse
group of DivX content partners. You will need a PC
with a broadband Internet connection and a CD
burner. You will also have to register your Ferguson
RW-770HD to play DivX VOD content. The
registration process is easy and needs only be
completed once for each device. To register a
device, simply enter the eight character code from
your player into your VOD account. Please go to
http://www.divx.com/ for more information.
To find your registration code:
1. Press the Menu button on the remote control.
2. Press the Down button to select Date/Time.
3. Press the Right button and then the Down button
to select DivX(R) VOD.
4. Press Play/OK to view your registration code.
FILE MANAGER
The File Manager menu is used to play multimedia
files (music, photos, videos) on external USB
devices, DVDs and on the internal HDD. The File
Manager also allows the transfer of files between
USB devices*, DVDs and the internal HDD.
*Files can only be transferred from and not to an
external USB device.
Files recorded from TV cannot be saved on the
same disc as multimedia files.
NAVIGATING THE FILE MANAGER
Navigating the File Manager is similar to navigating
folders on a computer. There are three possible
main folders, HDD, USB and DVD. These are all
contained together in a single root folder.
To go into a folder use the navigation buttons (see
below) to select the folder and press the Play/OK
button. To go ‘up’ from a folder select the ../ symbol
on the top of the list and press the Play/OK button.
1. Press the File Manager button on the remote
control to open the File Manager menu.
2. Use the Left , Right , Up and Down
buttons to navigate in menus.
3. Use the Play/OK button to make a selection.
PLAY A MULTIMEDIA FILE IN THE FILE
MANAGER
1. Use the navigation buttons to select a multimedia
file (Video, Picture or Audio) and press the Play/OK
button to play/view.
TRANSFER MULTIMEDIA FILES FROM THE HDD
TO A DVD-R/RW
1. Place an unfinalised DVD-R/RW into the disc tray.
2. Press the File Manager button to open the File
Manager.
3. Use the navigation buttons to select HDD and
press Play/OK.
4. In the HDD list use the Up/Down buttons to
highlight the file(s) you want to copy.
5. Press the Record button each time to select the
file(s) for transfer. A tick mark will appear next to
each selected file. If you want to de-select a file,
highlight it and press the Record button again.
6. Press the Right button to open the Operation
menu.
- 35 -
Page 36
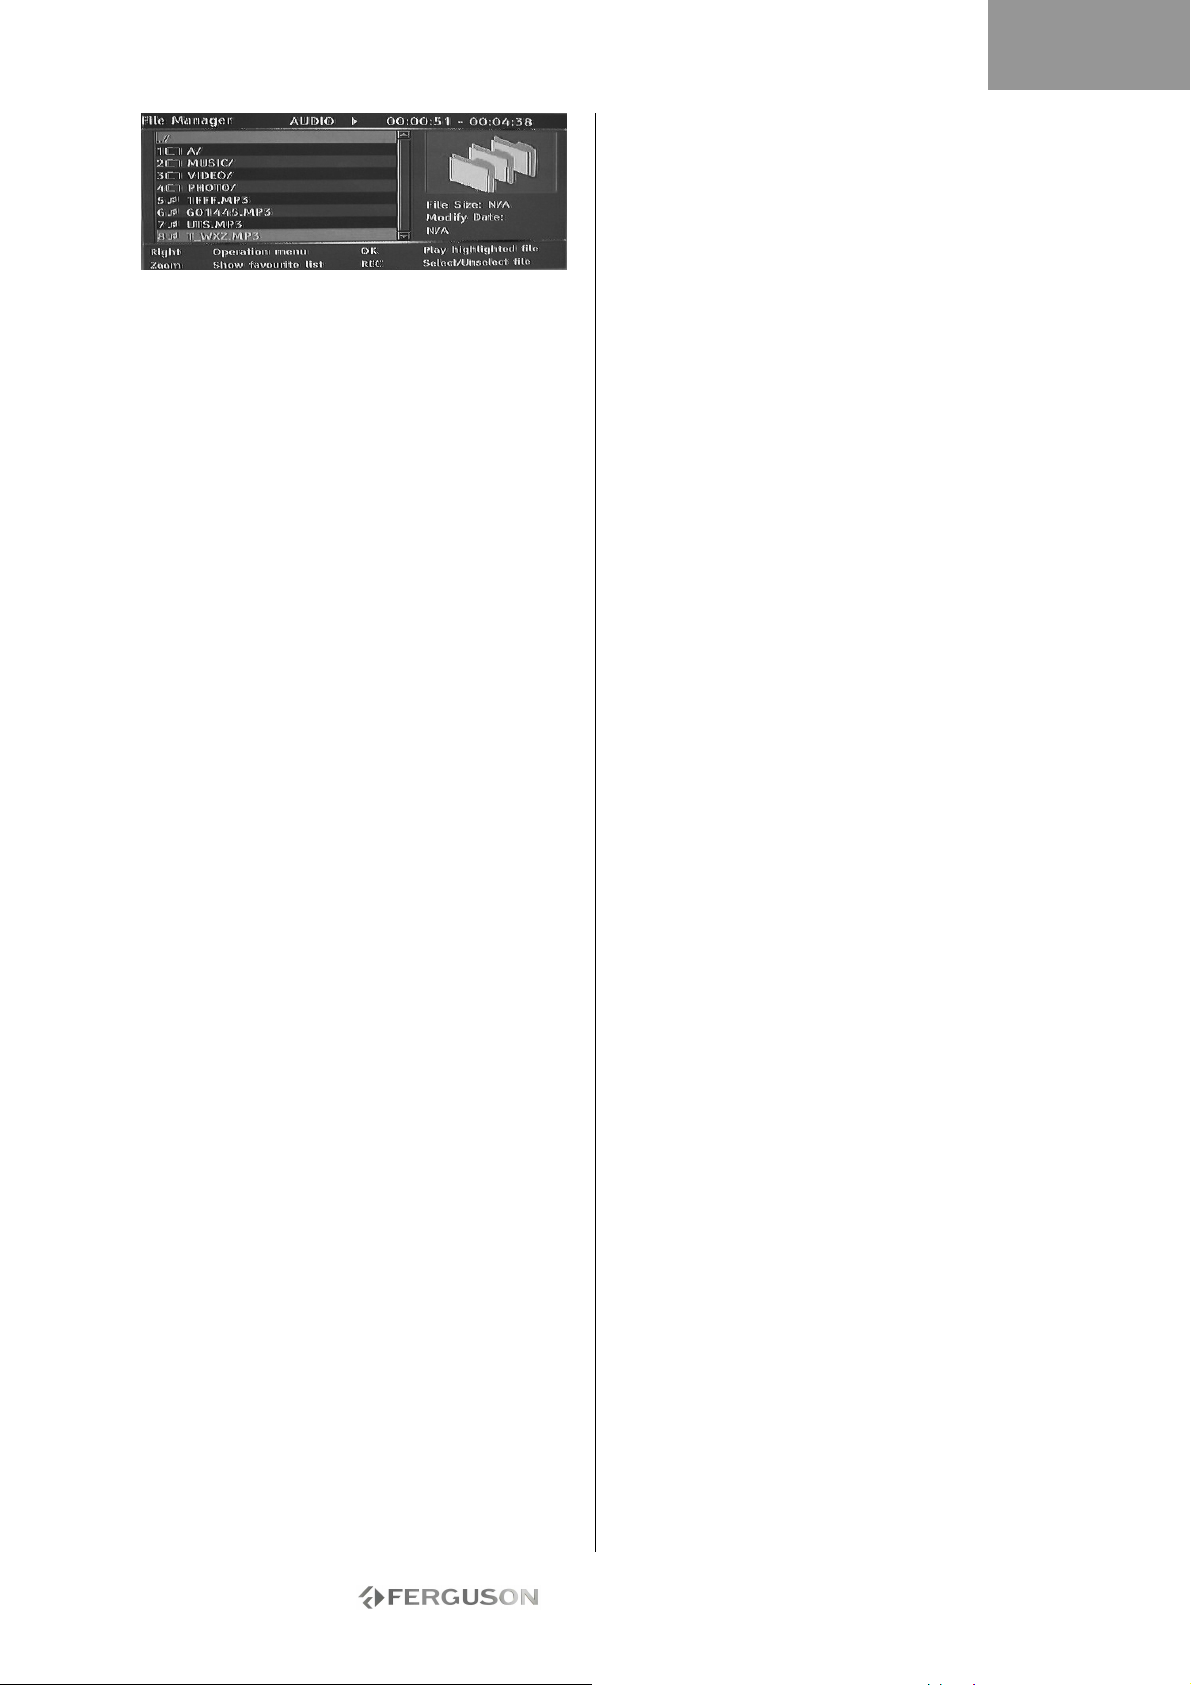
7. Select Copy from the list and press the Play/OK
button.
8. Use the navigation buttons to select and open the
DVD.
9. In the DVD, press the Right button to open the
Operation menu.
10. Select Paste from the list to transfer the copied
file(s) to the DVD.
11. The transfer progress/status will appear at the
bottom of the menu.
TRANSFER MULTIMEDIA FILES FROM A DVD TO
THE HDD
1. Place the DVD containing the multimedia files you
wish to copy into the disc tray.
2. Press the File Manager button to open the File
Manager.
3. Use the navigation buttons to select DVD and
press Play/OK.
4. In the DVD list use the Up/Down buttons to
highlight the file(s) you want to copy.
5. Press the Record button each time to select the
file(s) for transfer. A tick mark will appear next to
each selected file. If you want to de-select a file,
highlight it and press the Record button again.
6. Press the Right button to open the Operation
menu.
7. Select Copy from the list and press the Play/OK
button.
8. Use the navigation buttons to select and open
HDD.
9. In the HDD, press the Right button to open the
Operation menu.
10. Select Paste from the list to transfer the copied
file(s) to the HDD.
11. The transfer progress/status will appear at the
bottom of the menu.
TRANSFER MULTIMEDIA FILES FROM AN
EXTERNAL USB DEVICE TO THE HDD OR A
DVD-R/RW
1. Connect the USB device containing the
multimedia files you wish to copy to the front panel
USB connector.
2. If required, place an unfinalised DVD-R/RW into
the disc tray.
3. Press the File Manager button to open the File
Manager.
4. Use the navigation buttons to select USB and
press Play/OK.
5. In the USB list use the Up/Down buttons to
highlight the file(s) you want to copy.
6. Press the Record button each time to select the
file(s) for transfer. A tick mark will appear next to
each selected file. If you want to de-select a file,
highlight it and press the Record button again.
7. Press the Right button to open the Operation
menu.
8. Select Copy from the list and press the Play/OK
button.
9. Use the navigation buttons to select and open
either the HDD or DVD.
10. In the HDD or DVD, press the Right button to
open the Operation menu.
11. Select Paste from the list to transfer the copied
file(s) to the HDD or DVD.
12. The transfer progress/status will appear at the
bottom of the menu.
TRANSFER MULTIMEDIA FILES FROM THE HDD
TO A
DVD-R/RW
1. Place an unfinalised DVD-R/RW into the disc tray.
2. Press the File Manager button to open the File
Manager.
3. Use the navigation buttons to select HDD and
press Play/OK.
4. In the HDD list use the Up/Down buttons to
highlight the file(s) you want to copy.
5. Press the Record button each time to select the
file(s) for transfer. A tick mark will appear next to
each selected file. If you want to de-select a file,
highlight it and press the Record button again.
6. Press the Right button to open the Operation
menu.
7. Select Copy from the list and press the Play/OK
button.
8. Use the navigation buttons to select and open the
DVD.
9. In the DVD, press the Right button to open the
Operation menu.
10. Select Paste from the list to transfer the copied
file(s) to the DVD.
11. The transfer progress/status will appear at the
bottom of the menu.
CREATE A FAVOURITES LIST
You can place all your favourite files into a common
favourites list.
1. Press the File Manager button to open the File
Manager.
2. Use the navigation buttons to select a folder
(HDD, USB or DVD) and press Play/OK.
3. In the folder list use the Up/Down buttons to
highlight the file you want to add to your favourites.
4. Press the Right button to open the Operation
menu.
5. Select Favourite from the list and press the
Play/OK button. The Favourites list is automatically
divided between Audio, Video and Pictures.
6. To view your favourites press the Zoom button
repeatedly to switch between Audio, Video and
Picture favourites.
ENGLISH
- 36 -
Page 37
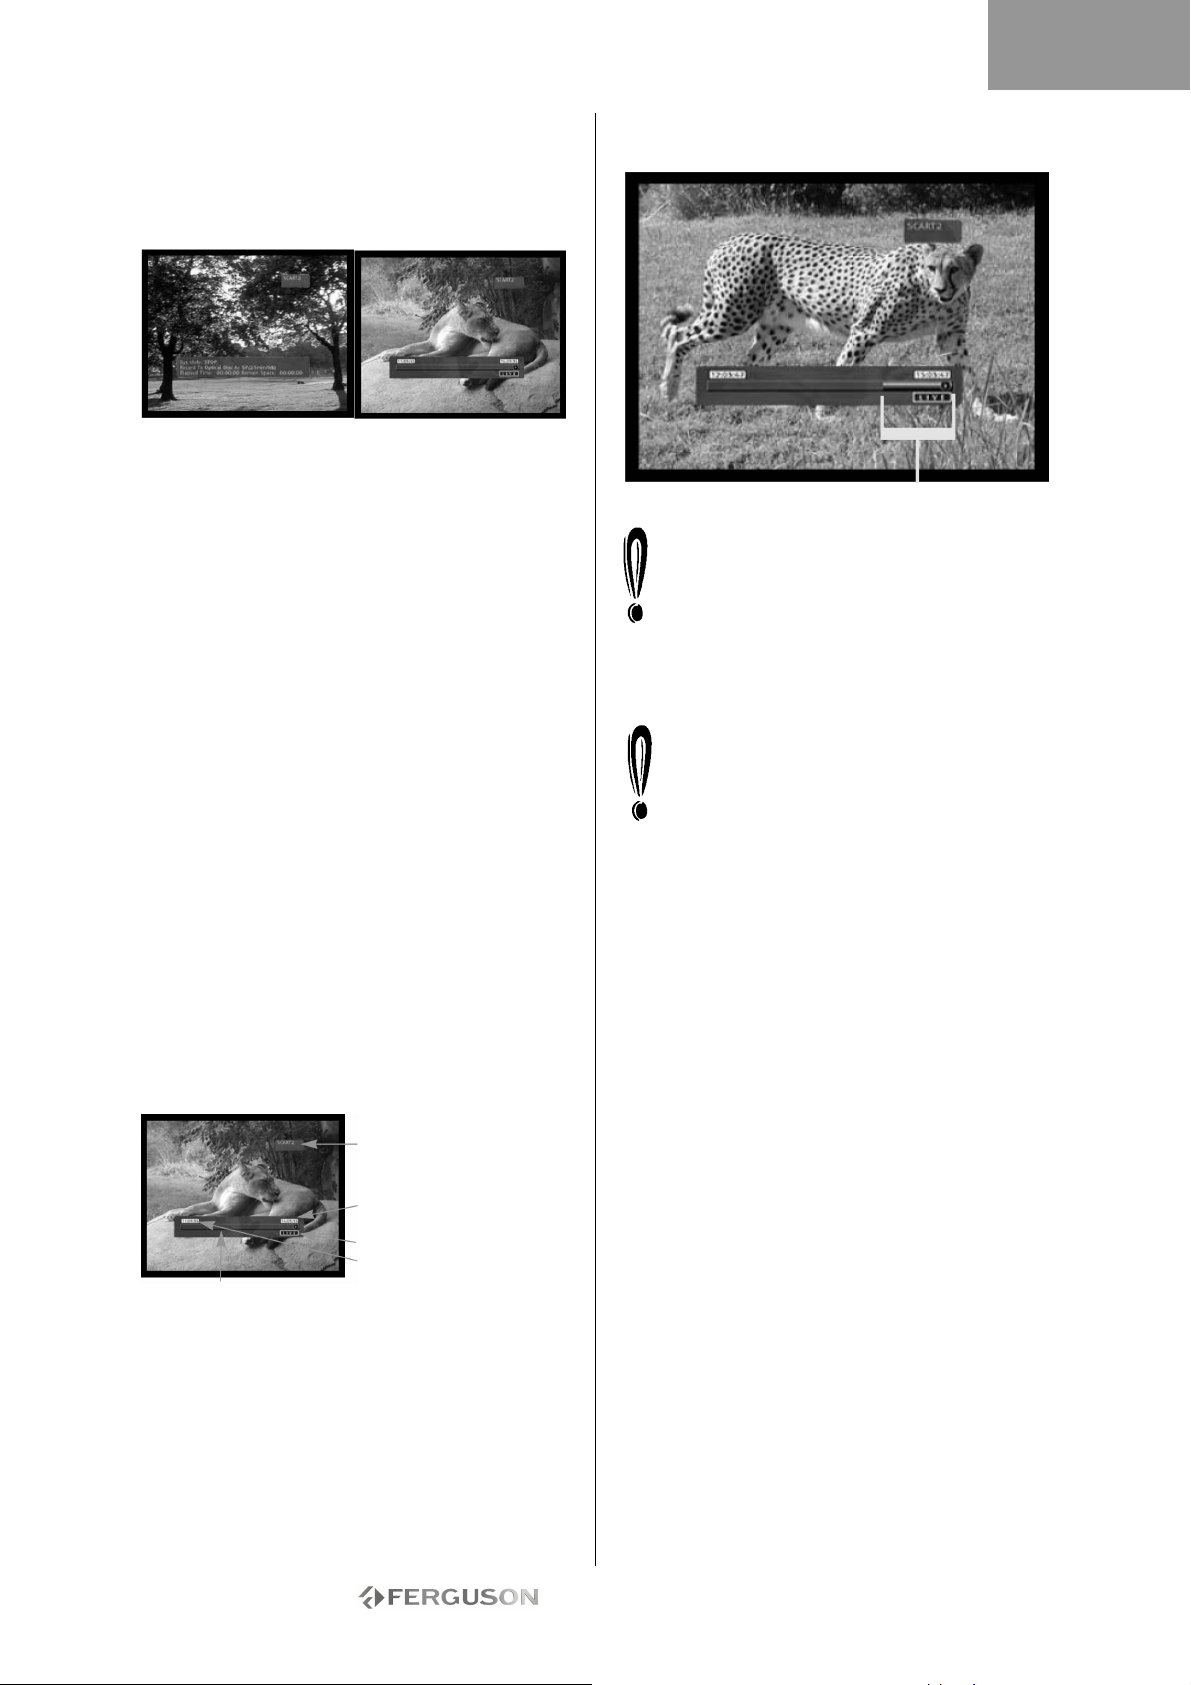
ENGLISH
TIME SHIFTING
RECORDING / TIME SHIFTING MODE
There are two modes when displaying the TV tuner
or an external source: Recording Mode and Time
Shifting mode.
Recording mode Time Shifting mode
• Recording mode - In Recording mode, analogue
sources and DV input can be recorded.
Recordings can be made to the HDD or a DVD.
• Time Shifting mode - In Time Shifting mode, only
analogue sources can be recorded. Recordings can
only be made to the HDD.
The Time Shifting mode enables the user to "pause
and control live TV". From the moment the
Ferguson RW-770HD is in Time Shifting mode, it will
continuously record the analogue source (TV for
example) into its 1, 3 or 6 hours buffer. This gives
the possibility for the user to review and record the
last 1, 3 or 6 hours that have been previously
broadcasted.
Activate the Time Shifting mode
1. Press the TV-HDD button.
2. Repeatedly press the Source button until the
desired source is selected. The source status is
displayed on the top right of the screen.
Note: Time Shifting is not available with a DV input.
The available analogue video sources are as follows:
> SCART2
> CHXX (TV Tuner)
> F-COMP (Front Composite Video)
> F-SV (Front S-Video)
3. The screen will then show the time progression
bar.
Current source
Live time
Playback time 3 hours
before live time
Time progression bar
4. As the time progresses, the time bar will show
the buffer progression.
Available buffer for reviewing
During Time Shifting, a Timer recording may
be displayed. As you cannot watch one
programme in Time Shifting and record
another channel, the recorder will prompt you
to confirm if you want to keep the current
channel or proceed with Timer recording. If
there is no response, the recorder assumes Timer
recording should be started. The message will
appear 2 minutes before the Timer recording is due.
Time shifting is stored in a buffer that contains
3 hours of recording. After the recording time
limit has been reached, the buffer will be
progressively overwritten. If you need to keep
the video contained in this buffer for future
usage, you can sa ve all or part of the buffer
(see Past Capture section).
Pause Live TV
1. Switch to Time Shifting mode (see previous
section).
2. Press Pause to pause live TV (or the selected
analogue source).
3. Press Play/OK to resume.
The Ferguson Recorder will continue to record what
is broadcasted live while you are watching
previously broadcasted programmes.
Review Time Shifting buffer (play back live TV
moments)
1. Switch to Time Shifting mode.
2. The Time Shifting buffer is available for
reviewing.
Use the Next, Previous, FFW and RWD buttons to
navigate through the Time Shifting buffer and press
Play/OK to play.
- 37 -
Page 38
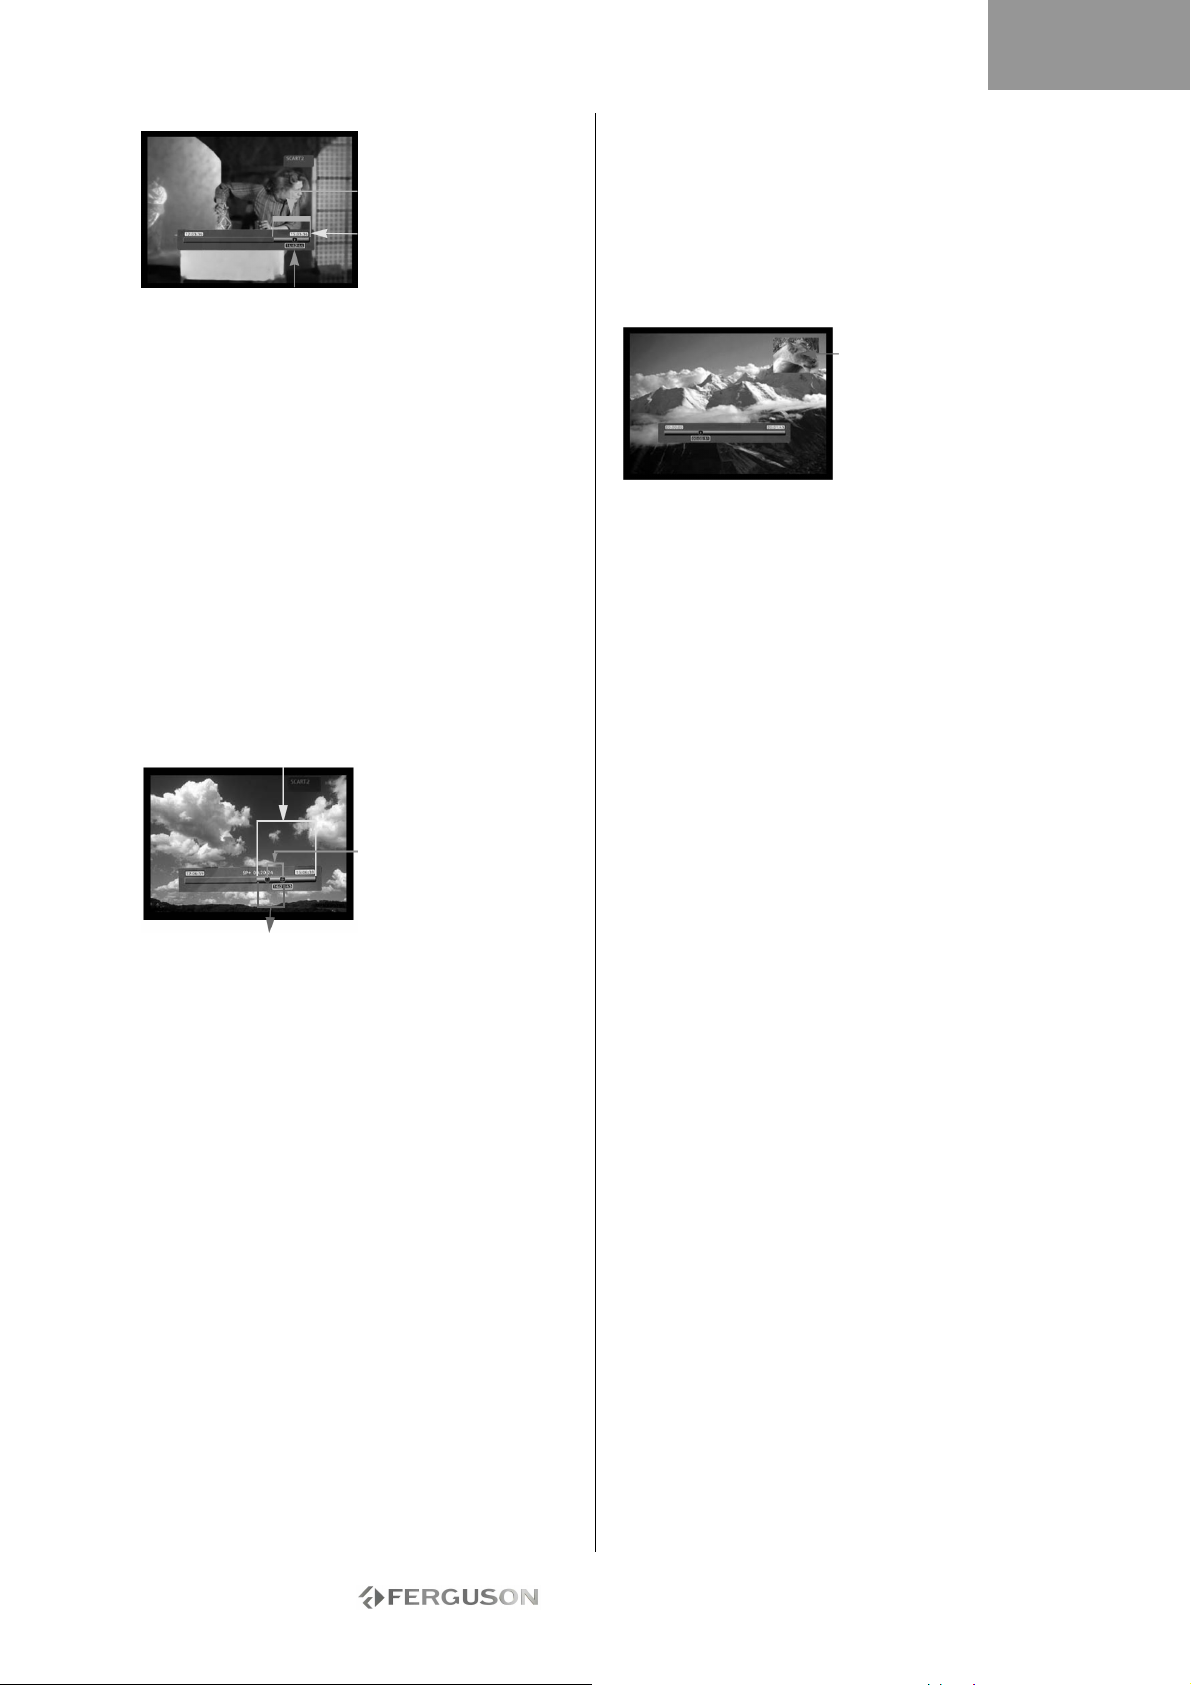
ENGLISH
Available buffer for
reviewing
Live time
Playback time
Save a title from the Time Shifting
buffer (Past Capture)
1. Switch to Time Shifting mode.
2. The Time Shifting buffer is available for saving on
HDD.
Use the Next, Previous, FFW and RWD buttons to
navigate through the Time Shifting buffer and go to
the beginning of the title that you want to save on
the HDD.
3. Press Record.
4. Use Next, Previous, FFW and RWD buttons to
navigate through the Time Shifting buffer and to the
end of the title that you want to save on the HDD.
5. Press Stop. The title is saved on the HDD.
The title saved and all earlier data will be erased
from the Time Shifting buffer.
Available buffer for recording
Section that will be
saved on HDD
Section that will be erased from the buffer
Save The Entire Time Shifting Buffer onto The
HDD
1. Switch to Time Shifting mode.
2. Press the Subtitles button to save the entire Time
Shifting buffer onto the HDD.
Deactivate the Time Shifting mode
To deactivate the Time Shifting mode:
1. From the analogue source view, press the DVD
button.
2. Press the source button to return to analogue
source view without Time Shifting.
To reactivate Time Shifting mode:
1. From the analogue source view, press the TVHDD button.
2. Press the source button to return to analogue
source view with Time Shifting.
Picture in Picture (PIP)
1. Press the Source button to select the video
source you wish to appear in the PIP.
2. During playback of a previously recorded file,
press the Angle button on the remote control to
open the PIP.
The PIP will appear in a small window on the right
top corner of the screen.
Picture in Picture
3. Press the Angle button again to exit the PIP.
- 38 -
Page 39
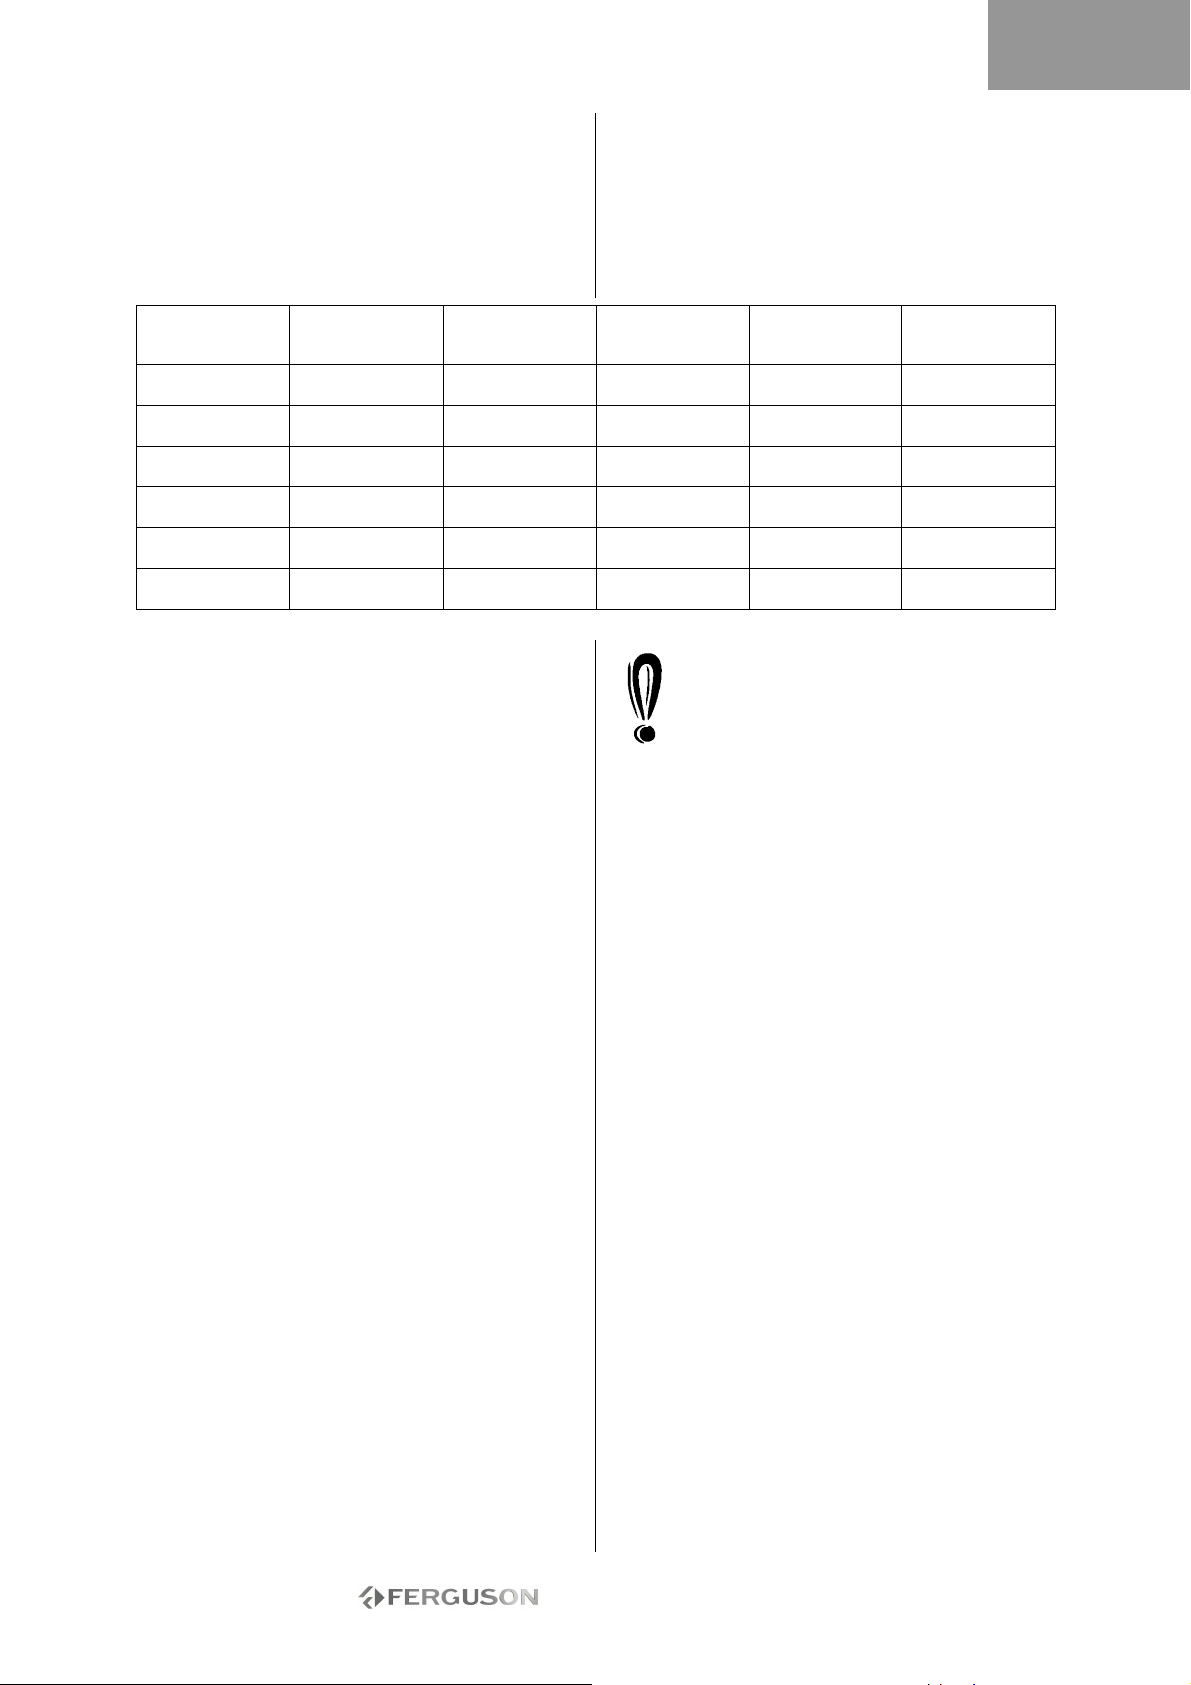
ENGLISH
RECORDING
SET RECORDING QUALITY
Six different record qualities can be set for
recording. Higher quality will consume more space
on HDD or DVD disc, reducing the overall time that
can be recorded.
Record Quality Recording
HQ (High
Quality)
SP (Standard
Play)
SP+ (Standard
Play +)
EP (Extended
Play)
LP (Long Play) 5 hours 85 hours 170 hours 265 hours 425 hours
SLP (Super Long
Play)
To set the recording quality please carry out the
following:
1. Press the MENU button on the remote control to
access the SETUP MENU
2. Use the Navigation buttons to highlight the
Recording icon, and press the Play/OK button.
3. Use the buttons to highlight the Record
Quality item and press the Play/OK button.
4. Use the buttons to highlight the quality
setting you want and press the Play/OK button to
confirm.
Choose the record quality carefully to ensure that
there will be enough space available for your
recording on the HDD orDVD.
RECORD TO DVD
1. Insert a recordable DVD into the unit and switch
to DVD mode by pressing the DVD button.
2. Press the Source button repeatedly to select the
signal source for recording.
3. Press the Record/OTR button to start recording, a
status bar is displayed at the bottom of the screen
to show the current recording status.
4. Press Stop to stop the recording.
5. Press the DVD button to switch to DVD mode to
find the segment just recorded.
It may take a few seconds to completely stop the
recording process, please wait until Stop is
displayed on the status bar to switch to DVD mode.
When recording from a DVD in this manner, the
recorder will stop any recording to the HDD. Once
the DVD recording is finished, press the TV-HDD
button to restart the Time Shifting mechanism.
Time (4.7GB,
DVD)
1 hour 17 hours 35 hours 53 hours 85 hours
2 hours 34 hours 68 hours 106 hours 170 hours
3 hours 51 hours 102 hours 159 hours 255 hours
4 hours 68 hours 136 hours 212 hours 340 hours
6 hours 96 hours 192 hours 300 hours 480 hours
Recording
Time (80GB,
HDD)
Recording
Time (160GB,
HDD)
The recorder will continue to record until the
disc is full or when the Stop button is
pressed. To set the recorder to record for 30
minutes only, press the Record/OTR button
after recording has started. Each time the
Record/OTR button is pressed, an additional
30 minutes will be added to the record time. To
pause the recording, press the Pause button on the
remote control, press the Play/OK button again to
resume recording.
If TV tuner is selected, use the buttons to
select the desired channel.
RECORD TO HDD
1. Press the Source button until the desired source
is selected.
• The following video sources are available:
> DV (Digital Video)
> SCART2
> CHXX (TV Tuner)
> F-COMP (Front Composite Video)
> F-SV (Front S-Video)
2. If you are in Time Shifting mode, press Record.
3. If you are in Recording mode, make sure Hard
Disc (see onscreen status bar) is selected.
4. If not, press the TV-HDD button to select the
HDD and press Record.
5. Press Stop to stop recording.
Recording
Time (250GB,
HDD)
Recording
Time (400GB,
HDD)
- 39 -
Page 40
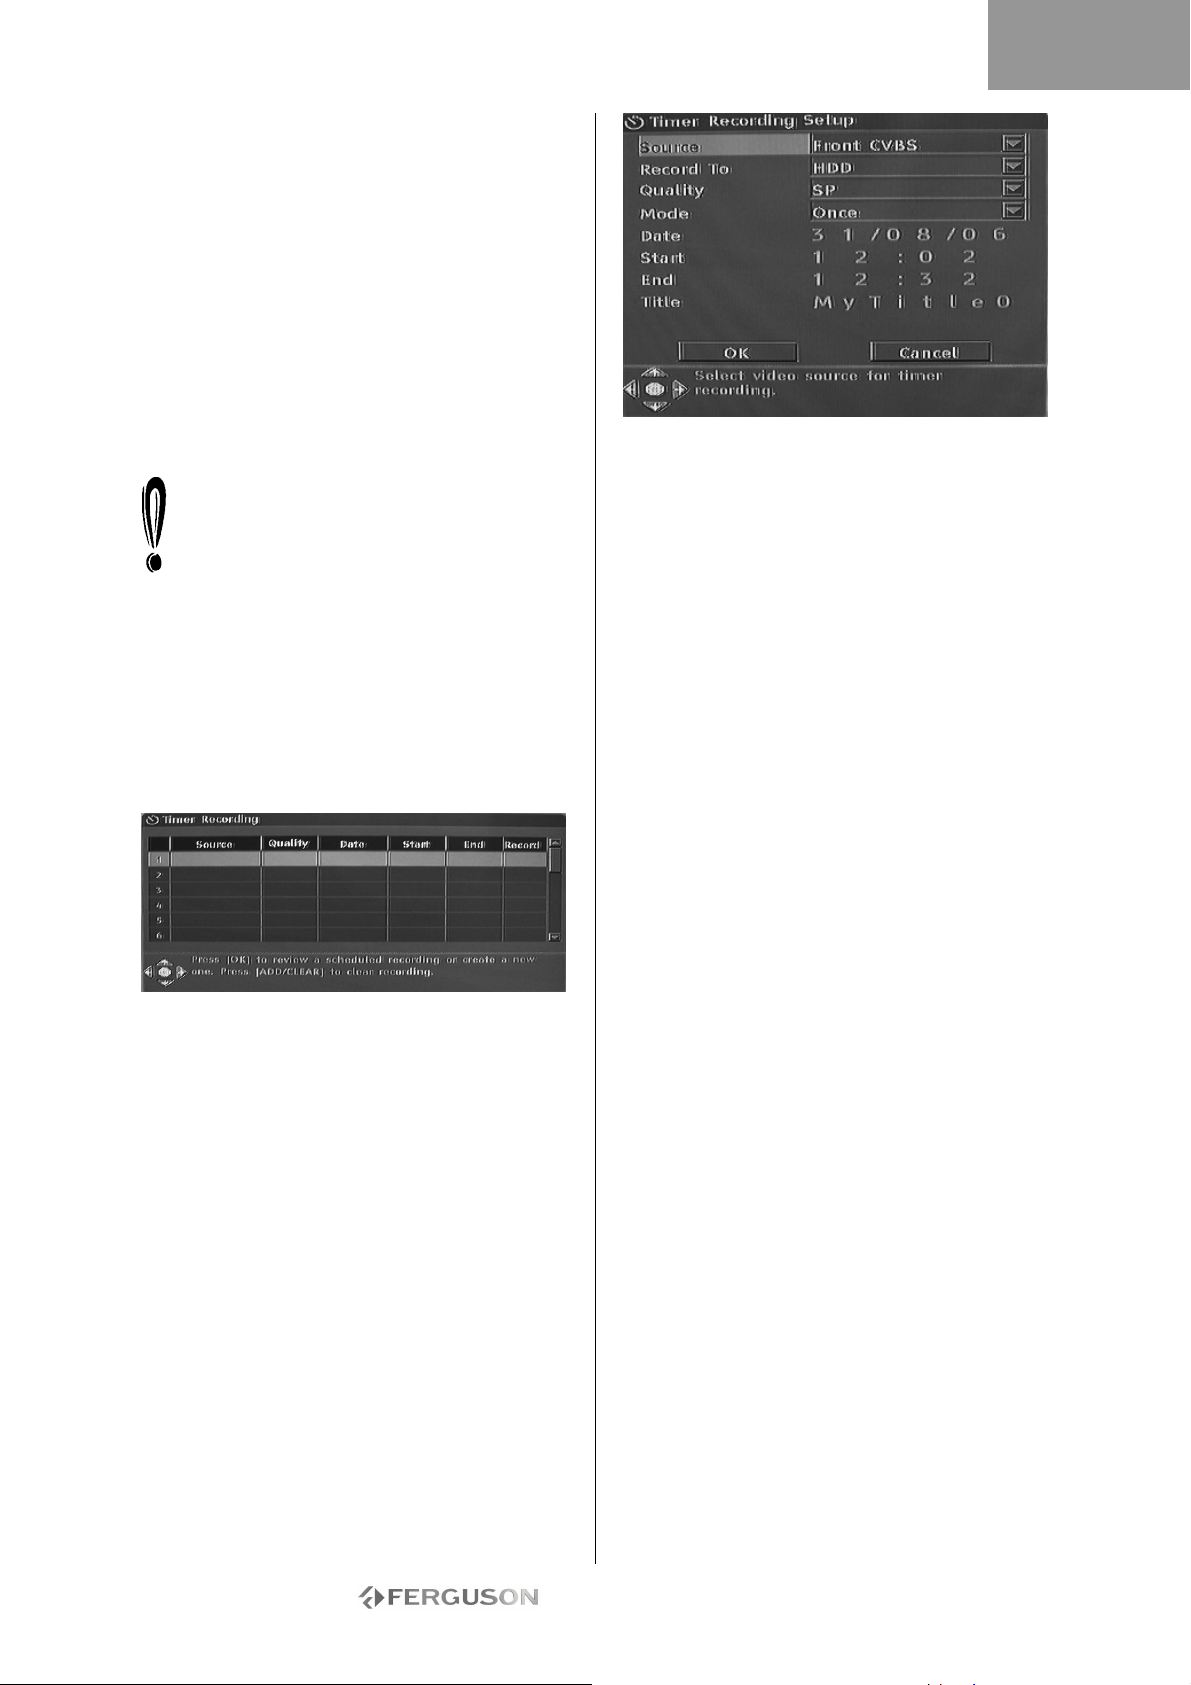
In Time Shifting mode, the Ferguson RW-770HD will
split the recording into several 3-hours titles if the
recording is longer than 3 hours.
In Time Shifting mode, during the recording you can
press the Record/OTR button repeatedly to increase
the length of the title you are saving by 30 minutes
up to a maximum of 3 hours.
Time Shifting cannot be used with a DV (Digital
Video) source. If you want to record your DV
material onto the HDD, repeatedly press the Source
button to switch to DV mode and the remote control
can control the DV camera.
You can issue FF, FR, Pause, Play commands for the
camera using the Ferguson RW-770HD remote
control.
You cannot change the channel or the source if
a recording is active (if the end of the
recording segment has not been entered, or in
the case of long recording, it has not been
reached). If you attempt to change the channel
or source, the Ferguson RW-770HD will prompt
you to stop recording. The segment will be saved on
HDD and then the channel or source will be
changed.
TIMER RECORDING
1. Make sure the clock is set accurately to your local
time. See the Setting the Clock section later in this
guide.
2. Press the Timer button to display the record
scheduler.
To delete a programmed event, use the buttons
to highlight it and press the Record/OTR button.
3. Use the buttons to highlight an event and
press Play/OK. The Item Editor dialogue box
appears.
4. The following are descriptions of the items in the
dialogue box:
Source: Select your input source.
Record To: Select the location for the recording.
Quality: Select the record quality.
Mode: Select the record mode (once, daily or
weekly).
Start: Select the start time of time recording event.
End: Select the end time of time recording event.
Title: Enter a title for the recording.
5. Move cursor to the OK button and press Play/OK
to save your settings.
6. Several minutes before the time recording event
begins, a dialogue box will appear on your TV
screen prompting you to confirm or cancel the
event. If you do not make any selection, the
timer recording will proceed as scheduled.
If the recorder is in standby status, it will
automatically power on two minutes before the start
of the time recording event.
A recordable DVD disc can record 360 minutes of
programs (SLP quality). These programs can be
divided into 48 titles.
ENGLISH
- 40 -
Page 41
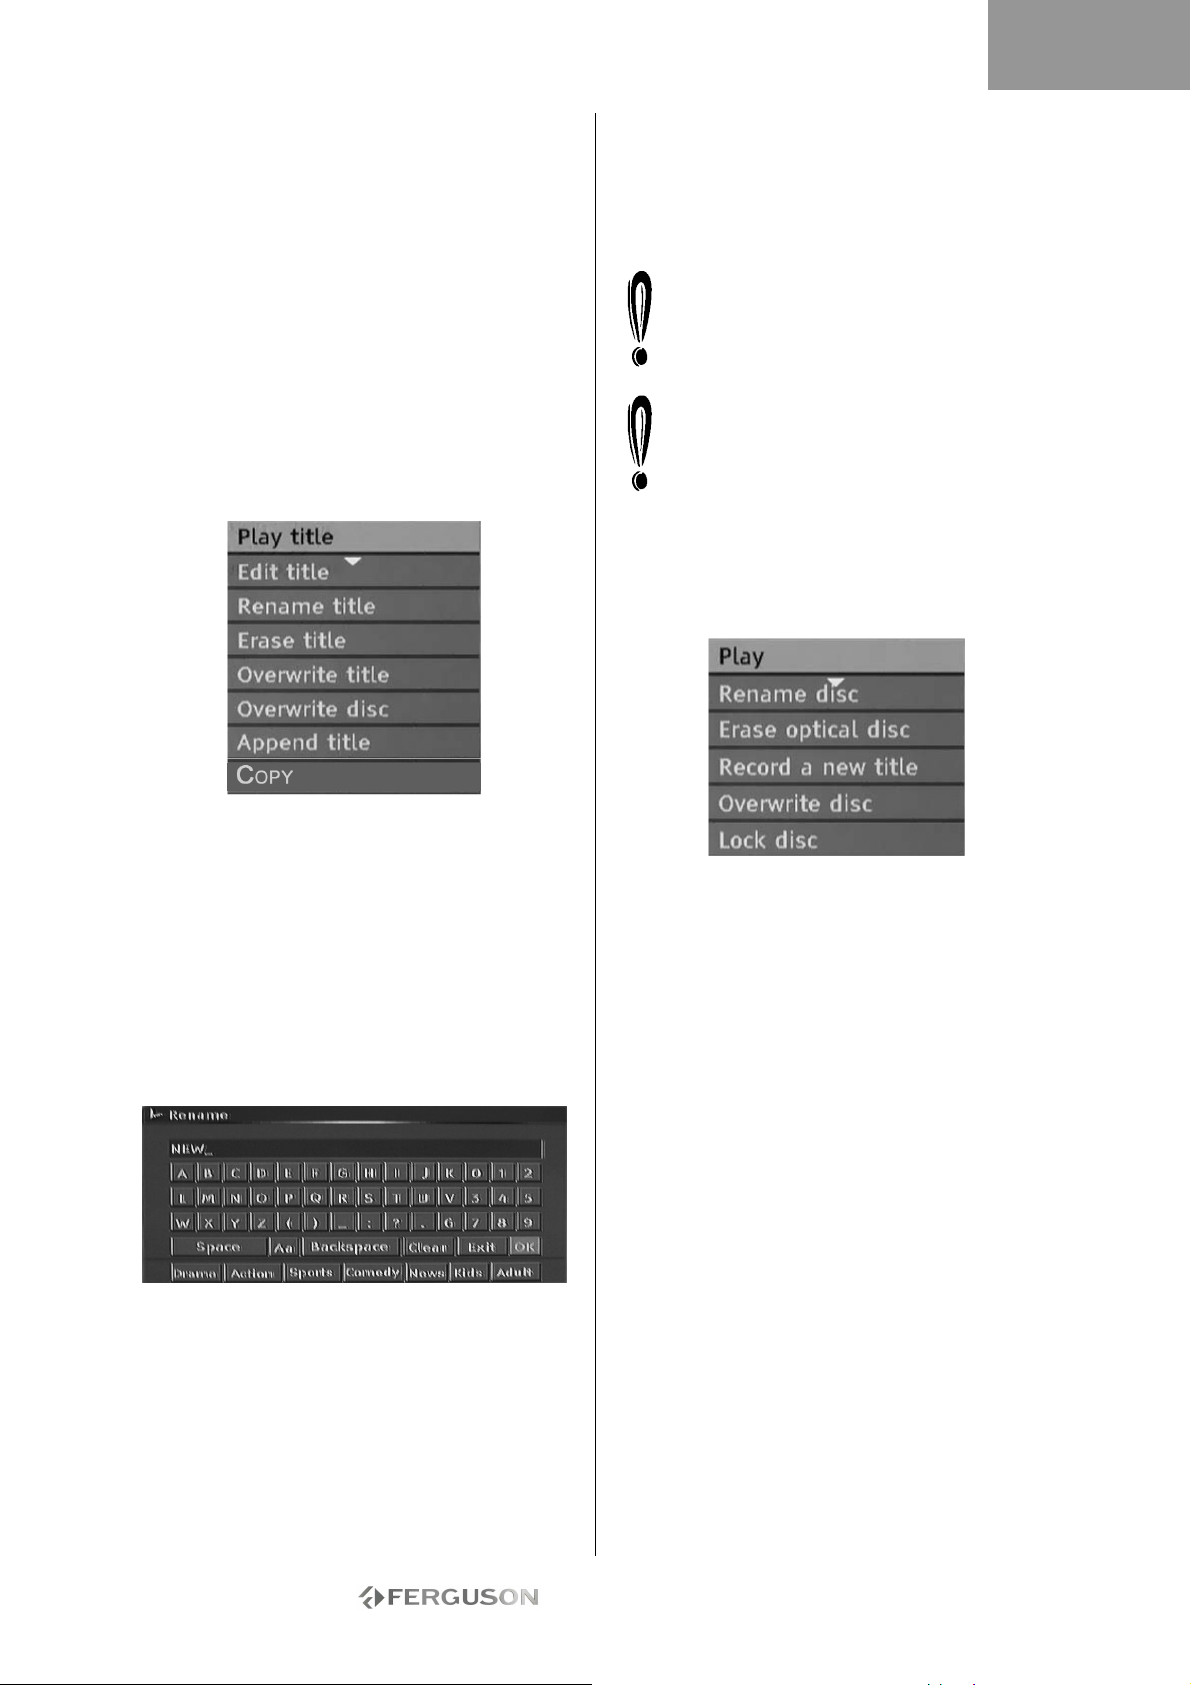
ENGLISH
EDITING AND DUBBING
Editing DVD±RW Titles
The following instructions are only for DVD±RW
discs. Because DVD±R discs cannot be repeatedly
recorded or edited, the operations mentioned below
do not work on these discs.
1. Insert a DVD+RW or DVD-RW disc with recorded
contents into the disc tray. The DVD Index Screen
appears (if the screen does not appear, press the
DVD button.)
2. Use buttons to highlight the title you want to
edit. If there are more than 3 titles, press the
button to view the other titles.
3. Press the button to show the disc menu. Use
the buttons to highlight one of the items shown
below (Play title, Edit title, etc.) and press Play/OK.
Erase title - Erase current title.
Overwrite disc - The newly recorded contents will
overwrite the whole disc, erasing all titles.
Append title - (This item only appears if you are
editing the last title on the disc) Add a new title
after the last title on the disc.
Copy - copy :the content on current disc to HDD.
When you select Overwrite title/Append
title/Overwrite disc, and press the Play/OK
button to confirm, the signal source will
automatically return to the signal source used
before the disc editing operation was started.
The recording process will not start until after
you have selected Overwrite title/Append
title/Overwrite disc, then press the
Record/OTR button on the front panel or the
remote control to start recording.
Editing DVD±RW Discs
1. Insert a DVD±RW disc into the disc tray.
2. Use the button to highlight the top of the disc
recording information bar.
Play title - Play current title.
Edit title - Edit current title. e.g. add chapter
markers, hide or unhide a chapter, replace the
index picture of a title, or split one title into two
titles, etc.
Rename title - Rename current title. Press Play/OK
on this item, a virtual keyboard appears on your TV
screen. Use the buttons to highlight the letter
or character you want to input, and press Play/OK
to confirm it. Select OK and press Play/OK button to
save the name.
The maximum length of a title name is 12
characters.
Overwrite title - To replace a previously dubbed
session with newly recorded contents, overwriting
the session. If the new session is shorter than the
original session, the remainder of the original
session will remain on the disk, as a new title. If the
length of the new session is longer than the original
title, the recording process will automatically stop
when it reaches the end of the original title.
3. Press the button to show the disc menu. Use
the buttons to highlight one of the items shown
above (Play, Rename disc, Erase disc, Record a new
title, etc.) and press Play/OK.
Operations:
• Play: Play recorded titles in sequence.
• Rename disc: Rename the disc. Please refer to
Rename title (above).
• Erase optical disc: Erase all contents on the
disc.
• Record a new title: Record new contents in a
new title.
• Overwrite disc: Overwrite the whole disc from
the start with new contents to be recorded.
Refer to ‘Editing DVD+RW or DVD-RW Titles’ for
New title and Overwrite disc operations.
• Lock disc: Lock the current disc to protect the
data on it. The locked disc cannot be erased or
recorded till it is unlocked.
- 41 -
Page 42
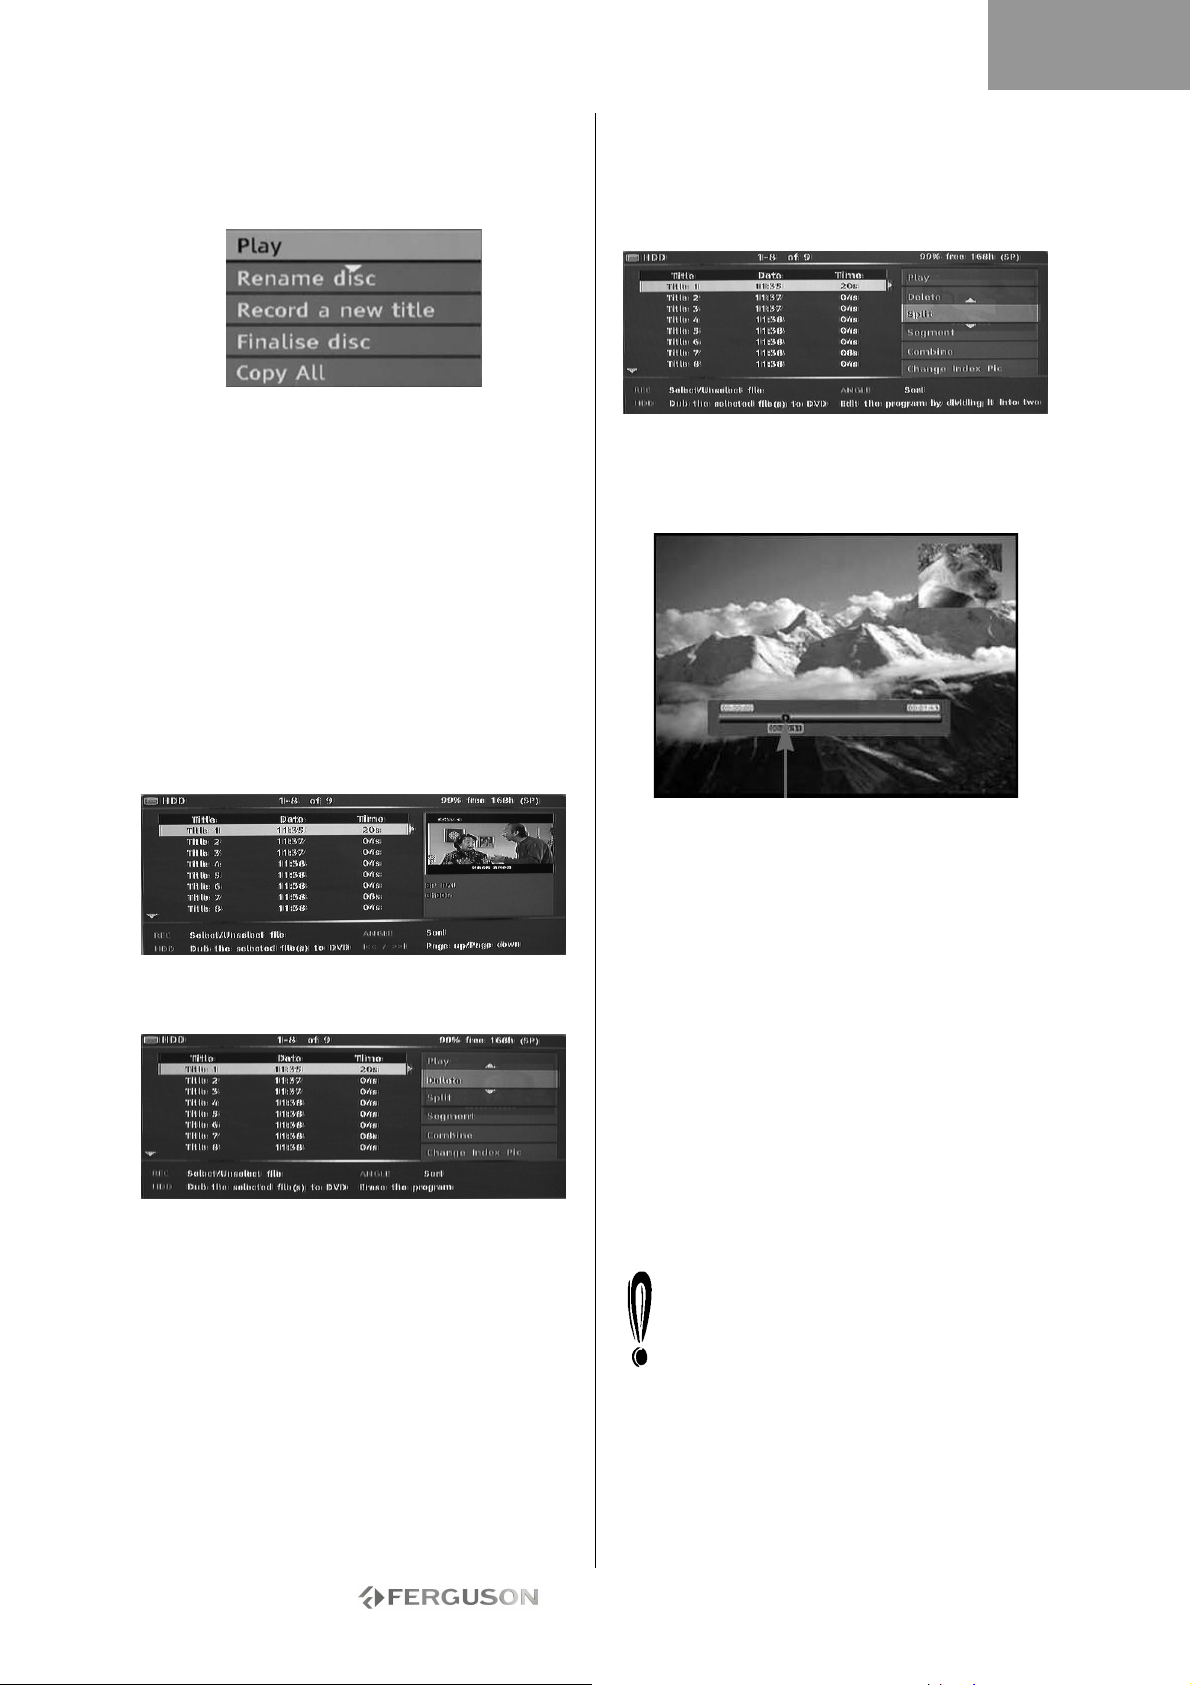
ENGLISH
Edit DVD±R Discs
1. Insert a DVD±R disc into the disc tray.
2. Press the button to display the disc editing
menu.
Operations:
• Play: Play recorded titles in sequence.
• Rename disc: Rename the disc. Please refer to
Rename title (above).
• Record a new title: Record new contents in a
new title. This title will be the last title on the disc.
• Finalise disc: Finalise a DVD+R or DVD-R disc.
Before a disc can be played in other DVD players, it
must be finalised in the Ferguson RW-770HD. Once
this process is completed, no further recordings can
be added.
TV-HDD EDITING (TITLES RECORDED FROM
TV)
Delete a Title from the TV-HDD
1. Press the TV-HDD button until the TV-HDD title
list appears.
2. Use the buttons to highlight the desired title.
3. Press to display the editing menu.
4. Press Play/OK to select Delete.
5. A confirmation window will pop up. Use the
buttons to highlight Yes. Press Play/OK to confirm.
Protected and locked titles can not be deleted.
Split a Title on the TV-HDD
1. Press the TV-HDD button until the TV-HDD title
list appears.
2. Use the buttons to highlight the desired title.
3. Press to display the editing menu.
4. Use the buttons to highlight Split.
5. Press Play/OK to select Split.
6. Use the Next, Previous, FFW and RWD buttons to
locate the position where the title has to be split.
7. Press Record when the cursor is at the desired
splitting position.
8. A confirmation window will pop up. Use the
buttons to highlight Yes.
9. Press Play/OK to confirm.
Protected and locked titles can not be split.
Combine Two Titles
1. Press the HDD button until the HDD title list
appears.
2. Use the buttons to highlight the desired title.
3. Press to display the editing menu.
4. Use the buttons to highlight Combine.
5. Press Play/OK to select the first part of the
combined titles.
6. Use the buttons to highlight the title to
combine with the first.
7. Press Play/OK to combine the two titles.
8. Once the two titles are combined into a
single file, the original individual files will no
longer exist.
Playback will stop momentarily when playback
passes the point at which the two files were
combined.
Splitting position
- 42 -
Page 43
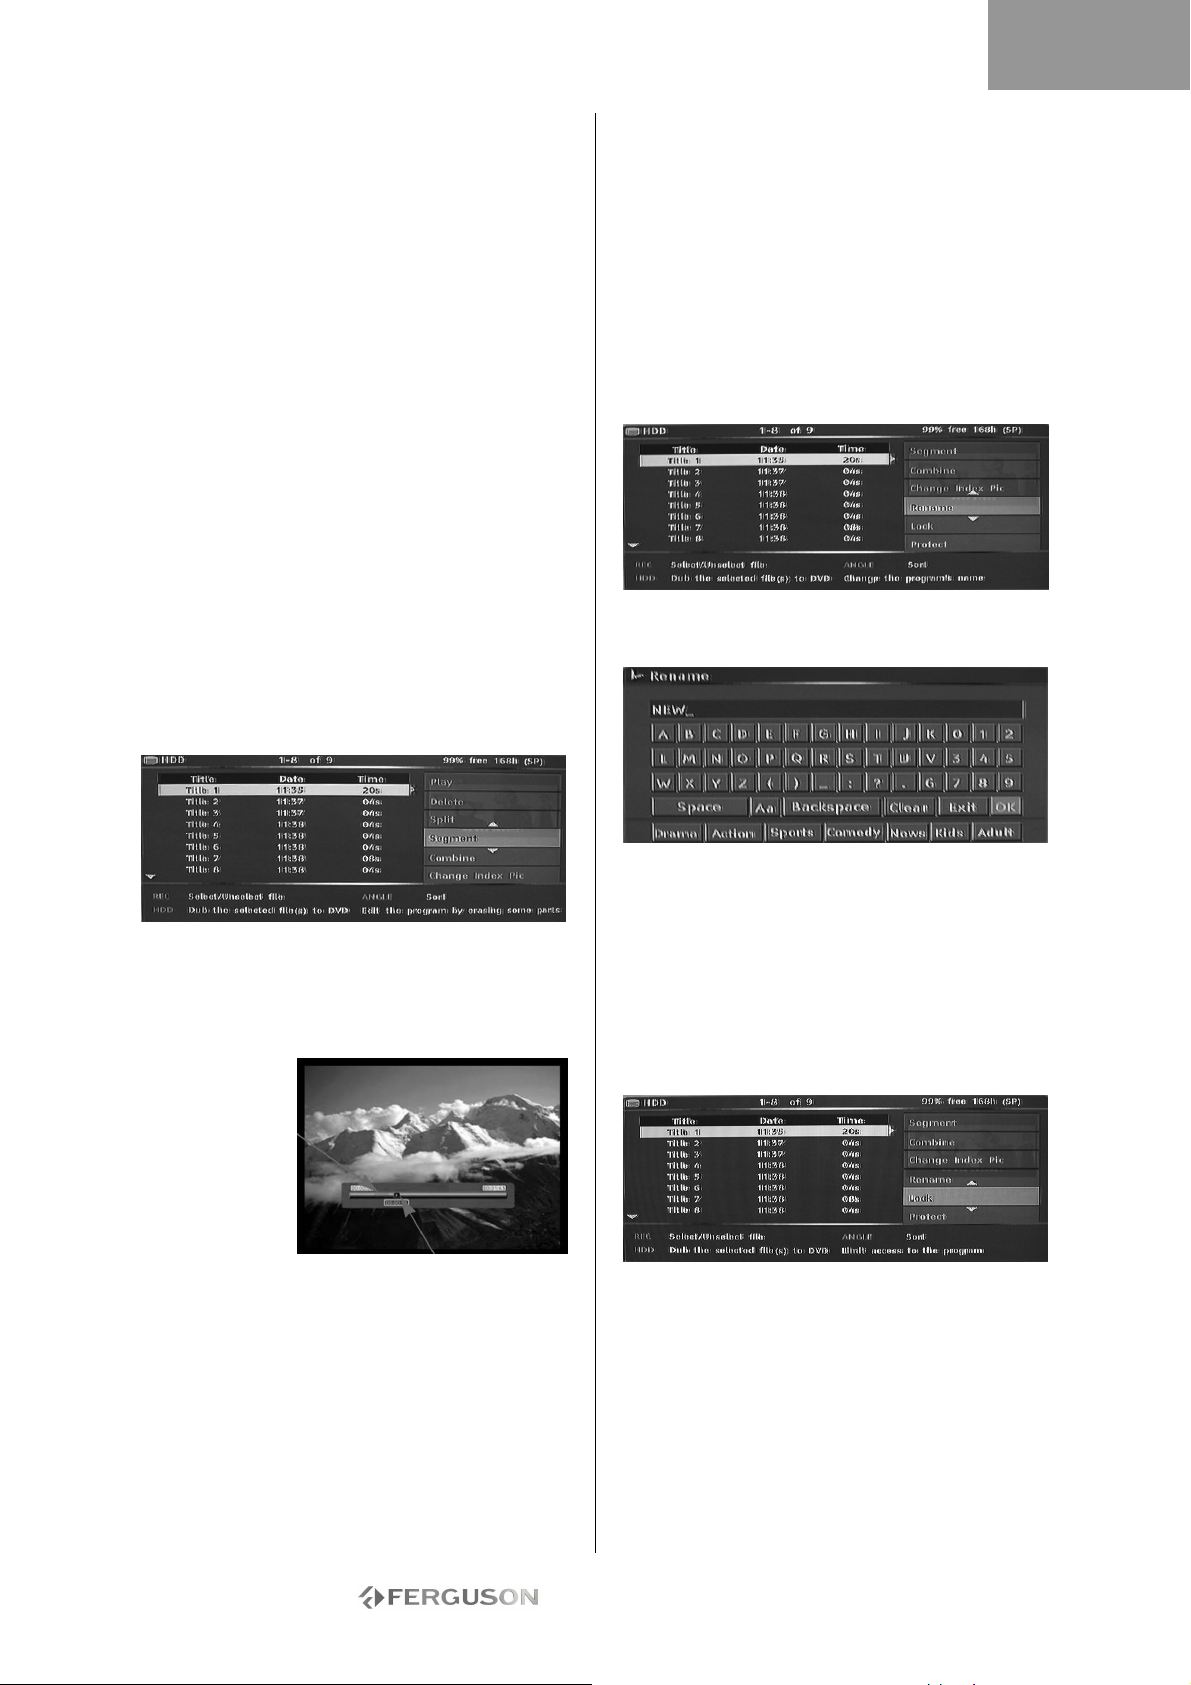
ENGLISH
Change the lndex Picture
1. Press the Menu button.
2. Use the Navigation buttons to highlight the
Preferences icon, and press the Play/OK button.
3. Use the buttons to highlight the Preview Type
item and press the Play/OK button.
4. Use the buttons to select Static and press the
Play/OK button.
• Static displays a static picture in the HDD index
preview menu.
• Dynamic repeatedly plays 15 seconds of video in
the HDD index preview menu.
5. Press the TV-HDD button until the TV-HDD title
list appears.
6. Use the buttons to highlight the desired title.
7. Press to display the editing menu.
8. Use the buttons to highlight Change Index
Pic.
9. Press PLAY/OK and the selected title will begin to
play.
10. During playback, choose a point in the video
you would like to have displayed as the static index
picture and press Play/OK.
11. Select Yes and press Play/OK to finish.
Hide Segments (Ads For Example) Of A Title
1. Press the TV-HDD button until the TV-HDD title
list appears.
2. Use the buttons to highlight the desired title.
3. Press to display the editing menu.
9. Press Record when the cursor is at the desired
position.
10. Repeat 6 to 9 for each segment you want to
hide.
11. Press Stop or TV-HDD to return to the TV-HDD
list.
Protected and locked titles can not be segmented.
Rename a Title on the TV-HDD
1. Press the TV-HDD button until the TV-HDD title
list appears.
2. Use the buttons to highlight the desired title.
3. Press to display the editing menu.
4. Use the buttons to highlight Rename.
5. Press Play/OK to select Rename.
4. Use the buttons to highlight Segment.
5. Press Play/OK to select Segment.
6. Use the Next, Previous, FFW and RWD buttons to
locate the beginning of the segment you want to
hide.
Hidden segment
Cursor position
7. Press Record when the cursor is at the desired
position.
8. Use the Next, Previous, FFW and RWD buttons to
locate the end of the segment you want to hide.
6. Enter the new name using the Navigation buttons
and the Play/OK button.
7. Select OK to exit.
Lock A Title (Prevent From Viewing, Editing
And Erasing)
1. Press the TV-HDD button until the TV-HDD title
list appears.
2. Use the buttons to highlight the desired title.
3. Press to display the editing menu.
4. Use the buttons to highlight Lock.
5. Press Play/OK to select Lock.
- 43 -
Page 44
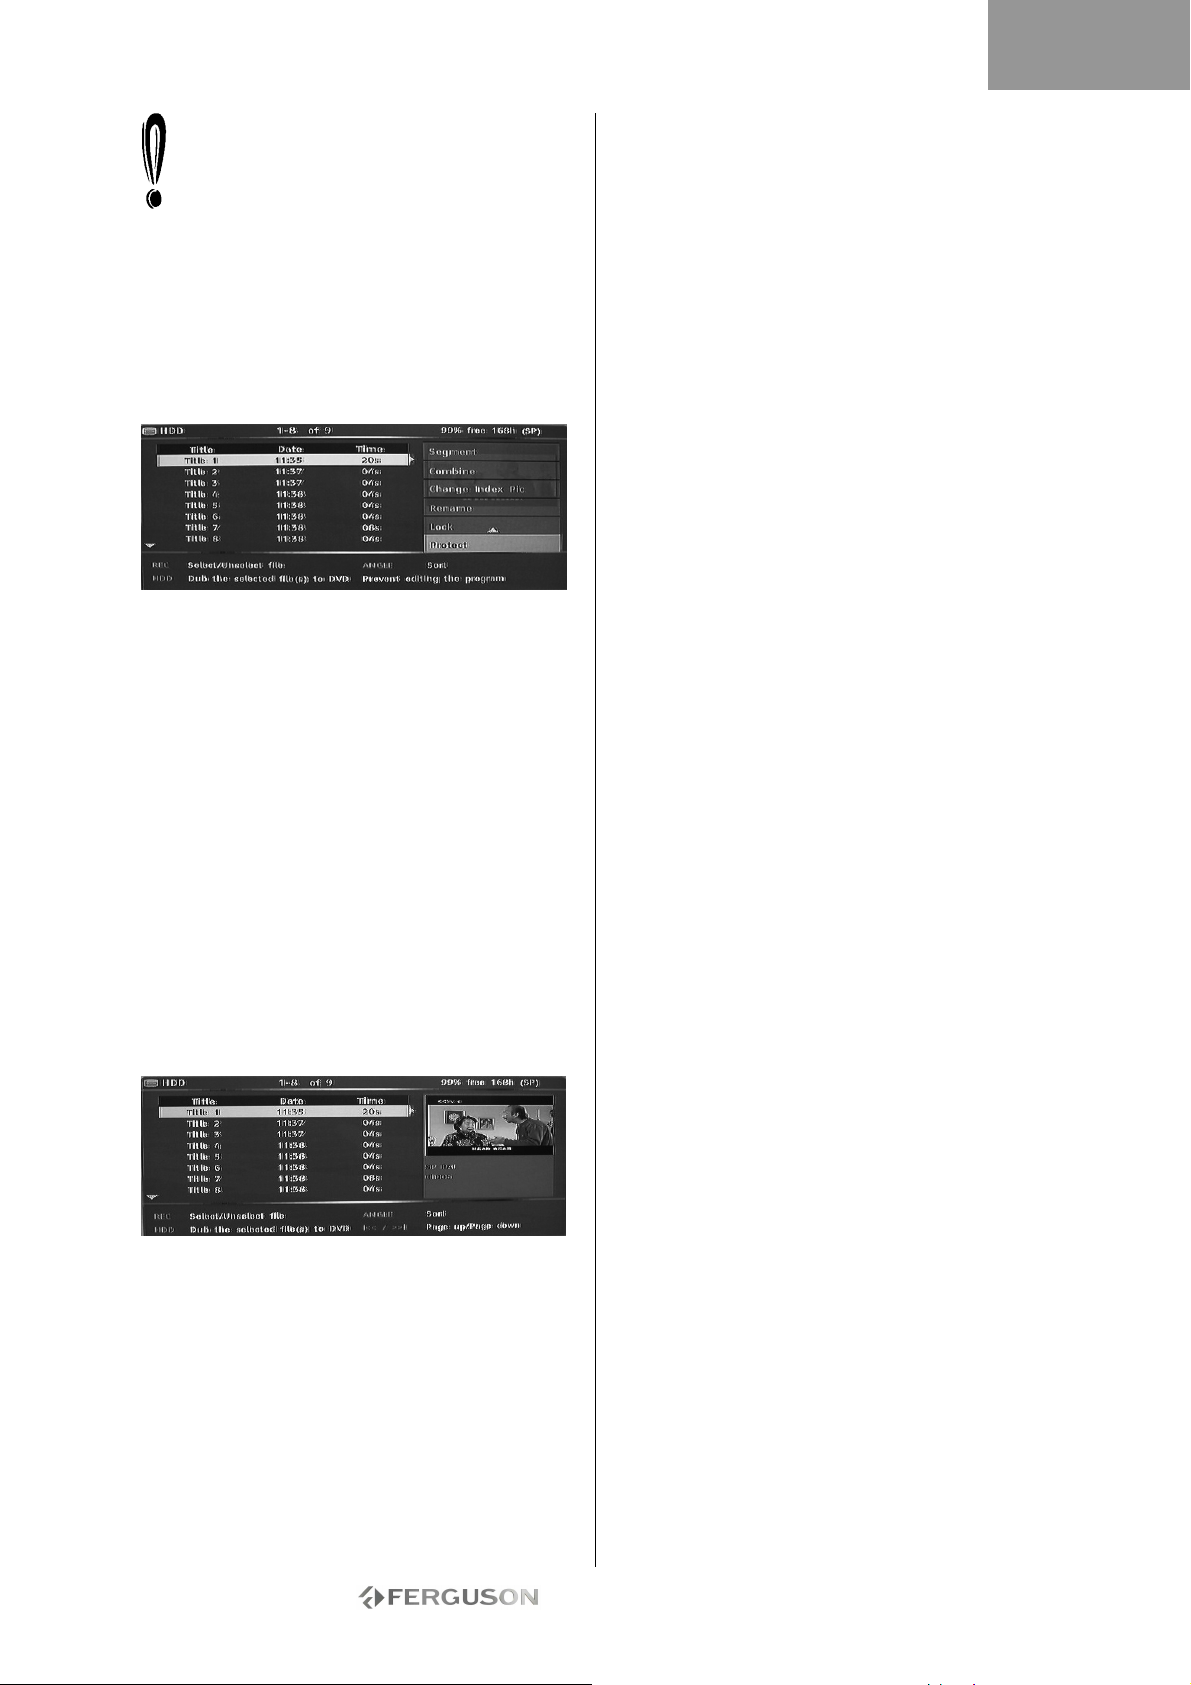
ENGLISH
A small icon under the preview window
indicates that the title is now locked (no
viewing/editing/erasing). Before playing a
locked title, you will be prompt to enter the
password. The default password is 0000. Go to
the setup menu to change the password.
To unlock a locked title, repeat steps 1 to 5.
Protect A Title (Prevent From Editing)
1. Press the TV-HDD button until the TV-HDD title
list appears.
2. Use the buttons to highlight the desired title.
3. Press to display the editing menu.
4. Use the buttons to highlight Protect.
5. Press Play/OK to select Protect.
A small icon under the preview window indicates
that the title is now protected (no editing/erasing).
To edit or delete a protected title, unprotect it by
repeating step 1 to 5.
DUBBING (COPY FROM TV-HDD TO DVD)
1. Before selecting titles for dubbing, insert a
recordable disc into the disc tray.
• If this is the first time the disc has been used the
Ferguson RW-770HD may take a few seconds to
format the disc, determine compatibility and free
recordable space. During this time you will see the
Loading logo.
• The percentage of available disc space is displayed
in the lower right corner of the TV-HDD title list
screen.
2. Press the TV-HDD button until the TV-HDD title
list appears.
3. Use the buttons to highlight the title or titles
you wish to copy to the DVD and press Record/OTR
to select the highlighted title for dubbing. Once a
title is selected for dubbing, an icon will appear next
to the title name.
You can press the Record/OTR button again to
remove the selection. As you select or deselect
titles, the disc capacity information will be updated.
If the title you selected is larger than the space
available on the disc, the recorder will display a
warning message.
If the recording is too big to place on the DVD it can
be split into smaller parts (see Split function earlier
in this guide).
If the disc is replaced or removed prior to dubbing,
all dubbing selections will be cleared.
Locked titles cannot be dubbed to DVD.
4. Press the TV-HDD button to start dubbing.
Dubbing will copy the title(s) selected to the
recordable DVD, including properties such as title
name, duration, index picture or chapter marks.
Once dubbing starts the recorder returns to Time
Shifting mode. It is possible to press the TV-HDD
button and play any title on the TVHDD while
dubbing is in progress., however editing is not
possible until the dubbing has finished.
If the writing to DVD fails at any point during this
operation,a warning message will appear and the
TV-HDD title list will be reset.
COPY DVD±RW TITLES TO HDD
1. Insert a DVD±RW disc containing recorded titles
into the disc tray.
2. Use buttons to highlight the title you want to
copy.
3. Press the button to show the disc menu. Use
the buttons to highlight Copy and press
Play/OK.
4. A file transfer icon will appear in the top left of
the screen and will disappear once the file has
finished being copied to the HDD.
- 44 -
Page 45
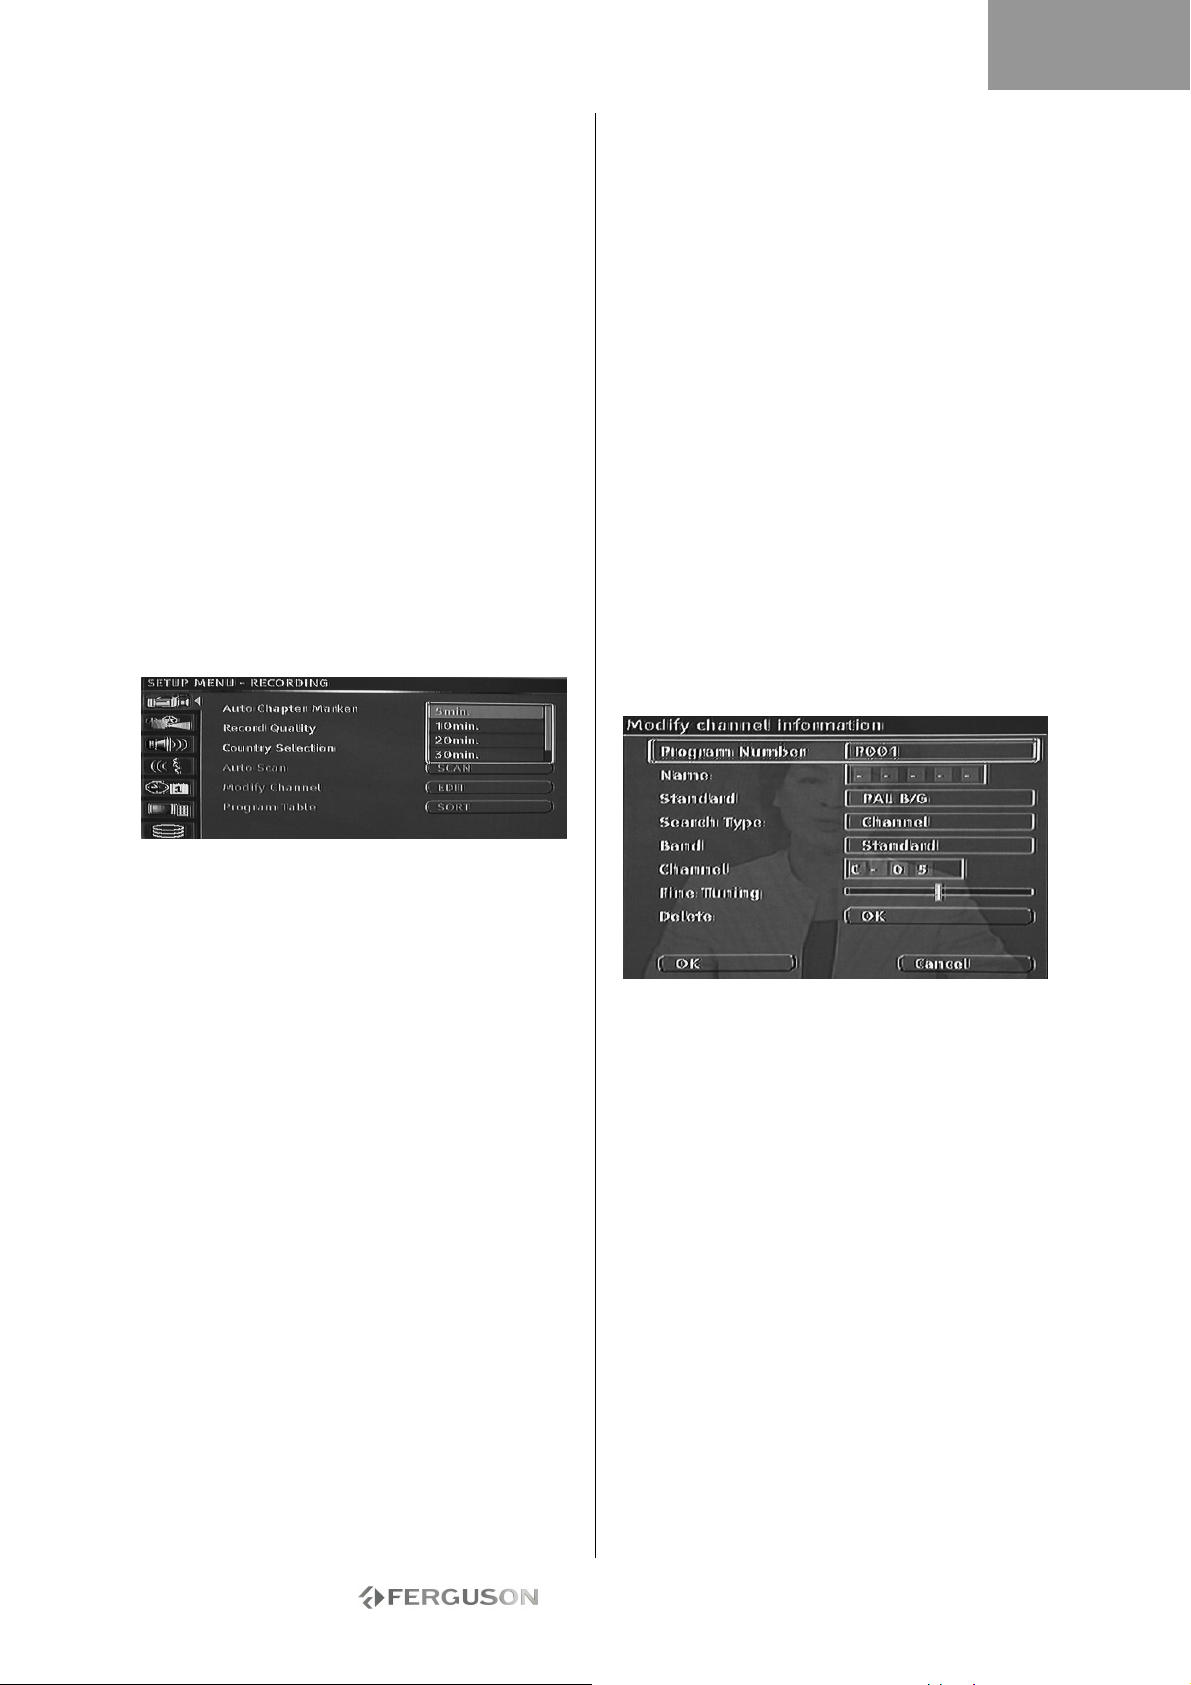
ENGLISH
SYSTEM SETUP
System Menu
1. Press the Menu button when playback is stopped
to show the system menu.
2. Use the Navigation buttons to select your desired
item, press the Play/OK button to confirm your
selection.
3. Press the Menu button again to exit the menu.
Chapter Markers
You can set up the recorder to automatically insert
chapter markers into each program recording to
allow faster navigation during playback. This feature
automatically inserts markers at 10 minute intervals
during recording. The interval can be changed in the
Setup menu: OFF (no marker), 5 min., 10
min.(default), 20 min. or 30 min.
1. Press the Menu button on the remote control.
2. Highlight the Recording menu and press the
Play/OK button.
3. Highlight Auto Chapter Marker item and press the
Play/OK button.
4. Select an item in the list and press the Play/OK
button.
Program Table
The Program Table menu allows you to sort the TV
channels.
1. Press the MENU button to access the SETUP
MENU.
2. Use the Navigation buttons to highlight the
RECORDING icon, and press the Play/OK button.
3. Use the buttons to highlight the Program
Table item and press the Play/OK button.
4. Use the buttons to highlight the channel you
want to move and press the button to move it to
the panel outside the list.
5. Use the buttons to move the channel along
the list to where you want to insert it.
6. Press the button to re-insert the channel into
the list.
Modify Channel Information
You can edit the information details for each
channel via the Modify Channel Information menu.
1. Press the MENU button on the remote control to
access the SETUP MENU.
2. Use the Navigation buttons to highlight the
RECORDING icon, and press the Play/OK button.
3. Use the buttons to highlight the Modify
Channel item and press the Play/OK button.
4. Use the Navigation buttons to edit the following
information.
Country Selection
To change the country selection please carry out the
following:
1. Press the MENU button on the remote control to
access the SETUP MENU.
2. Use the Navigation buttons to highlight the
RECORDING icon, and press the Play/OK button.
3. Use the buttons to highlight the Country
Selection item and press the Play/OK button.
4. Use the buttons to highlight your country and
press the Play/OK button to confirm.
Autoscan for TV channels
To watch or record TV programs, you must first
perform a TV channel scan:
Before scanning for TV channels ensure that there is
a TV antenna connected to the Ferguson RW770HD. See the Connecting to a Television section
for details.
1. Press the MENU button on the remote control to
access the SETUP MENU.
2. Use the Navigation buttons to highlight the
RECORDING icon, and press the Play/OK button.
3. Use the buttons to highlight the Autoscan
item and press the Play/OK button to start
scanning.
Program Number: The number of the current
channel, this item can not be modified.
Name: Use the Navigation buttons to select and
edit the channel name.
Standard: The transmission standard of the current
channel. You should choose the correct standard
according to the local TV signal.
Search type: Select the type of scan to be used
when performing a scan for TV channels. There are
two modes: Frequency and Channel. Band (Not
applicable in Frequency mode): The type of band for
this channel. You can select Standard or Cable.
Channel or Frequency:
• Option 1: With this item selected, press the or
, button to perform a scan for the next available
TV channel.
• Option 2: Press the Play/OK button and use the
Navigation buttons to manually enter the Channel or
Frequency number.
- 45 -
Page 46
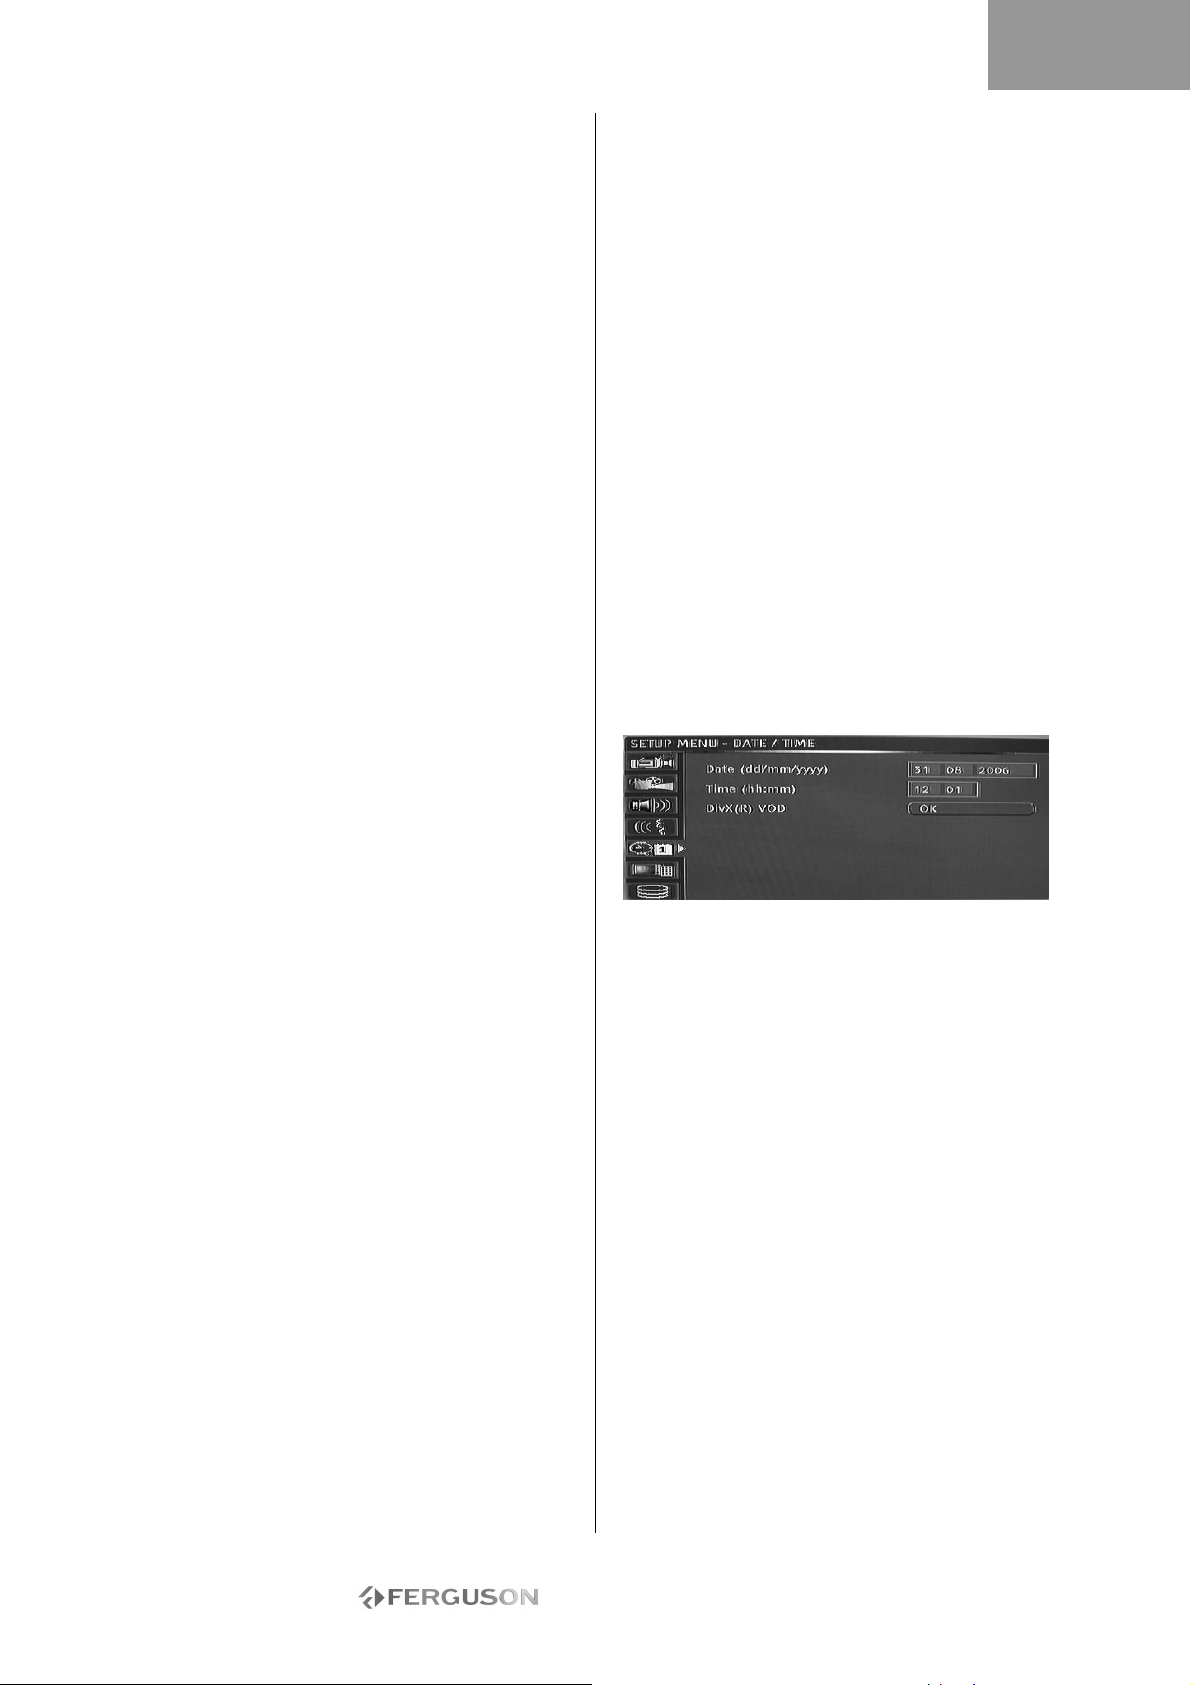
ENGLISH
Fine tuning: Use the or , buttons to fine tune
current channel.
Delete: To delete the current channel from the
channel list.
OK: Confirm the settings for the current channel
and save.
Cancel: Discard current settings and exit the menu.
System Language Selection
To change the system language please carry out the
following:
1. Press the MENU button on the remote control to
access the SETUP MENU
2. Press the buttons to highlight the Language
item.
3. Press the button to highlight the System
Language item, and press the Play/OK button.
4. Use the buttons to highlight the language
you want from the list and press the Play/OK button
to confirm.
Time Shift Buffer
1. Press the Menu button on the remote control.
2. Highlight the Time Shift menu and press the
Play/OK button.
3. Highlight the Time shift buffer mode item and
press the Play/OK button.
4. Select Refresh or Preserve from the list:
• If you use the Refresh setting and change
Channels, the Time Shifting buffer data will be lost.
No message will be provided prior to doing so.
• If you use the Preserve setting and change
channels, the Time Shifting buffer data will be
maintained.
Space Management
Choose to manually or automatically manage the
HDD storage space.
1. Press the Menu button on the remote control.
2. Highlight the Time Shift menu and press the
Play/OK button.
3. Highlight the Space Management item and press
the Play/OK button.
4. Select Automatically or Manually from the list:
• Automatically: If no more space is available on
the HDD before a recording is stopped, the
Ferguson RW-770HD will erase the oldest (unprotected) titles on the HDD. It will not erase titles
that are selected to be copied to DVD. If, despite
this procedure,
there is still no space on the HDD to record, the
recorder will stop recording and display a prompt to
erase some titles and make more room on the HDD.
• Manually: If no more space is available on the
HDD before a recording is stopped, the recorder will
stop recording and display a prompt to erase some
titles and make more room on the HDD.
Parental Lock
Parental lock is a password protecting system. It
enables the user to prohibit the Ferguson RW770HD from playing some discs according to the
information the disc carries.
To set parental lock:
1. Press the Stop button twice during playback.
2. Press the Menu button to access the system
SETUP MENU
3. Press the buttons to highlight the Preferences
item. Press the Play/OK button to confirm the
selection.
4. Press the buttons to highlight the Parental
Level item and press the Play/OK button.
5. Use the buttons to highlight the desired
control level and press the Play/OK button.
6. Press the Menu button to exit.
Audio, Subtitle and Disc Menu Language
Selection
To change the Audio, Subtitle and Disc Menu
languages please carry out the following:
1. Press the MENU button on the remote control to
access the SETUP MENU.
2. Use the Navigation buttons to highlight the
Language icon, and press the Play/OK button.
3. Use the buttons to highlight either the Audio,
Subtitle or Disc Menu items and press the Play/OK
button.
4. Use the buttons to highlight the desired
language and press the Play/OK button to confirm.
Setting the clock
1. Press the Menu button to access the SETUP MENU
2. Use Navigation buttons to highlight the
DATE/TIME icon, and press the Play/OK button.
3. Change the system date and time with the
Navigation buttons.
System Time Adjustment
The Ferguson RW-770HD can automatically adjust
the system time according to the time code it
receives from the television station. Only the time
code integrated in the first TV channel can be used
by the appliance. The TV signal must incorporate a
time code for this function to work.
- 46 -
Page 47
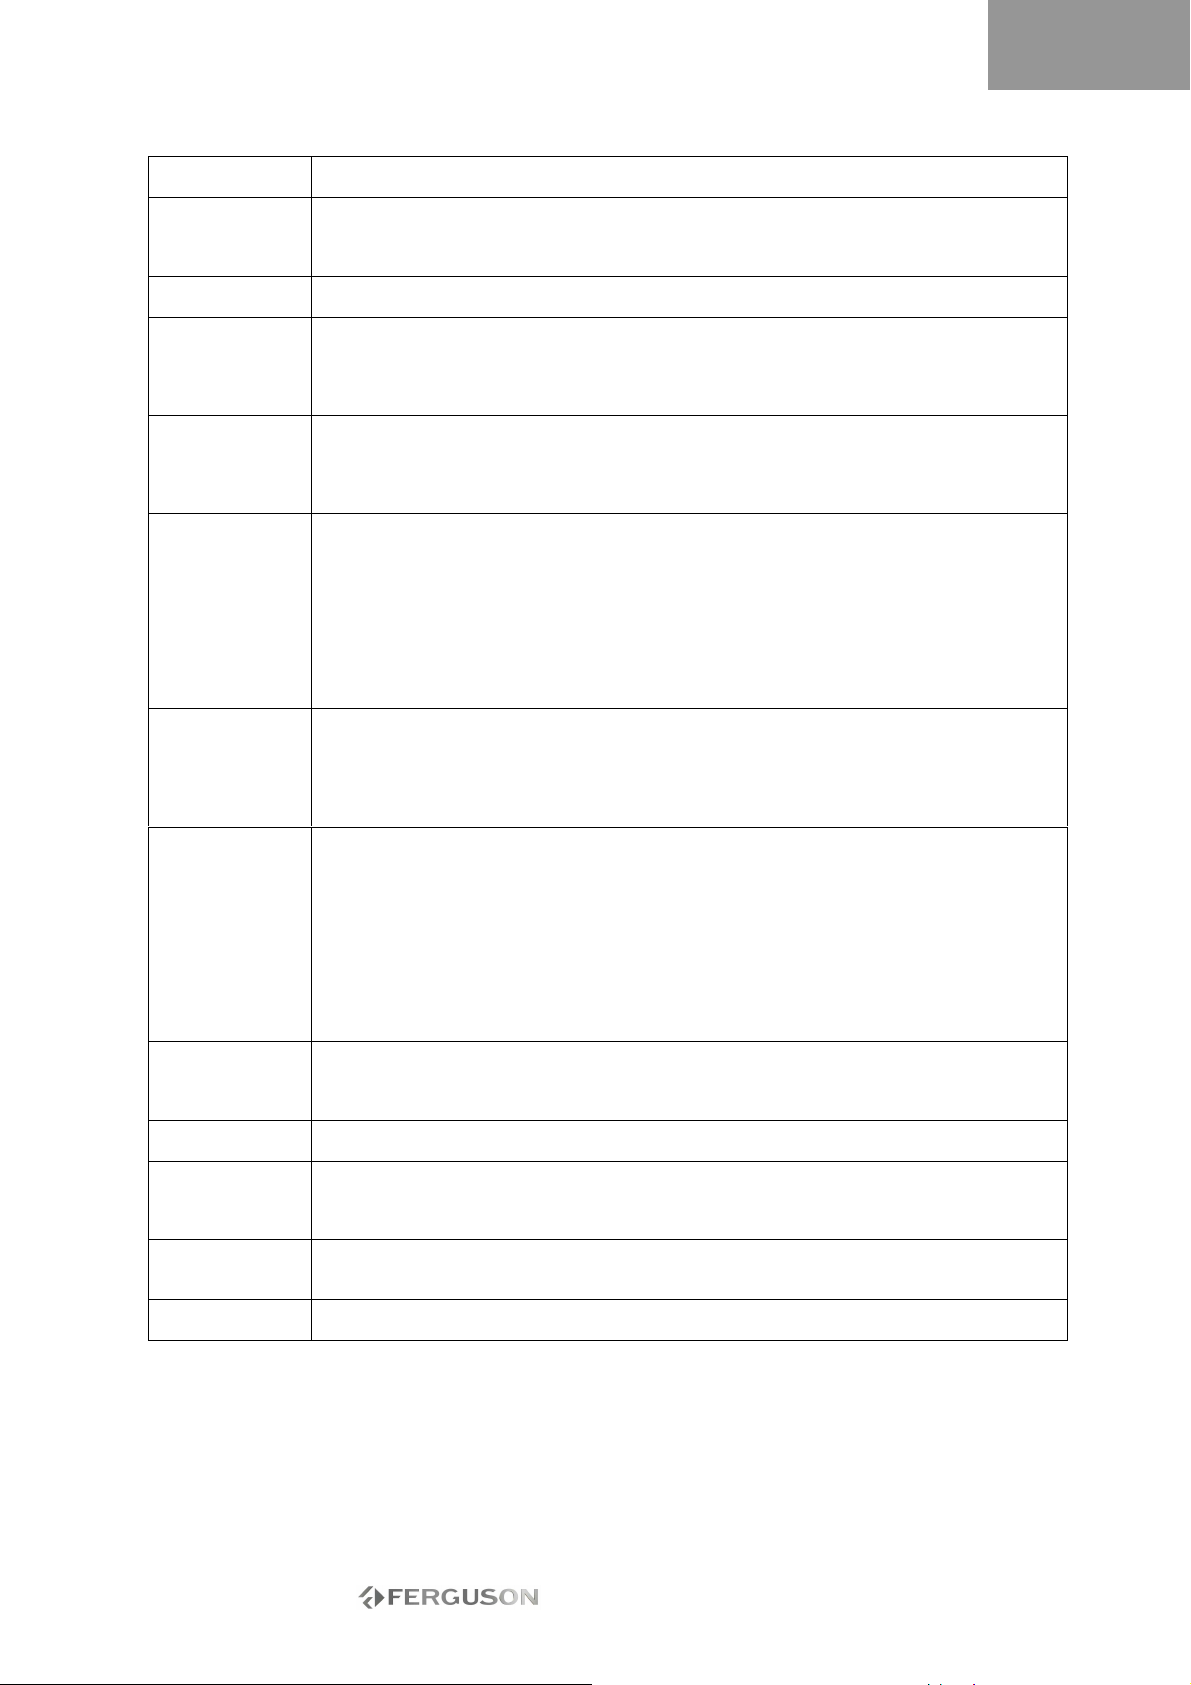
ENGLISH
TROUBLESHOOTING
Problem Solution
No sound • Connect the audio cables into the connectors securely.
Only sound, no
picture
No response • Connect the power plug into the wall outlet securely.
Remote control
does not work
Cannot play disc • Blank disc, replace the disc.
Poor playing
quality (distorted
picture/sound)
Cannot record • The TV channel you want to record is not saved yet, or you have chosen wrong channel
Time recording
does not work
DVD±RW disc
cannot be edited
TV signal has
picture or
sound
interference
Distorted picture
or black and
white picture
No digital audio
output
• Verify the connection from the DVD audio output to the TV or receiver audio input. Make
sure the correct AUDIO input is selected on your TV or amplifier.
• Refer to your audio amplifier owners manual.
• The scan mode of video output is incorrectly set. Press the P/I button on the remote
control to switch to correct mode.
• Timer recording is active. Press Power or Stop to cancel time recording.
• The appliance might encounter a technical failure. Unplug the power supply and wait for
30 seconds before connecting it to the wall outlet again. If it still doesn't work, try to
resume the Multimedia Recorder to factory settings.
• The remote control is not pointing to the Multimedia Recorder. Please aim at the
Multimedia Recorder.
• Batteries are flat, replace batteries.
• The appliance might encounter a technical failure. Unload batteries, wait for 30 seconds
before place them back into the remote control.
• Incompatible disc: please refer to the list of supported disc types at the start of this
guide.
• The disc is loaded with label side down. Make sure to load the disc with label side up.
• Wrong region code. The region code does not match the region setting of the Multimedia
Recorder.
• Parental lock is on. Unlock the parental lock. Default password is 0000 or 3308.
• Choose channel number on the TV set. Choose a correct channel number.
• The connection between the Multimedia Recorder and TV set is loose. Check the
connection.
• The TV set is not adjusted to the best status.
• The disc is dirty, clean the disc.
• Interference may also make the picture distorted.
• The wrong setting for the output mode can cause a blank screen or bad quality. If you
are experiencing problems with the quality of your display or have a blank screen, please
press the progressive scan button to switch output mode.
number.
• Please check the saved channels.
• The disc is write protected. Remove the written protection or change a disc.
• The disc is a closed DVD+R or DVD-R disc. Change a disc.
• TV system mismatch. Please make sure the disc has not been recorded in different video
format (e.g. PAL or NTSC). The Multimedia Recorder does not support recordings of
different video format on the same DVD+R/RW disc.
• The disc you use may not conform to the DVD+R/RW or DVD-R/RW standards.
• The recorder does not record to CD-R/RW or DVD-RAM discs.
• Please make sure the disc has not been used in a computer before.
• The date or time is not correctly set, please check the date and time.
• The time schedule is not correctly set, please check the time schedule.
• The disc is locked. Unlock the disc.
• The disc is a closed DVD+R or DVD-R disc. Change the disc.
• The disc is locked. Press the DVD button on the remote control and select Unlock Disc to
unlock the disc.
• Check the aerial.
• Check the selected TV system in the system menu. In mainland Europe, the TV system
should be PAL or SECAM.
• The disc's colour system does not match the TV's colour system.
• The signal is not a colour signal.
• Check whether the digital input connectors match the external instruments' output
connectors.
- 47 -
Page 48

ENGLISH
GLOSSARY
Aspect ratio
Aspect ratio is the length to height ratio of
Television screens. The ratio of a standard
Television is 4:3. The ratio of a wide TV is 16:9.
Letter box mode provides a widescreen ’ cinematic’
picture.
Chapter / Title
Chapter refers to the smallest section of a DVD
movie. Title is the largest division on a DVD.
Component video
Video signals containing three separate channels of
information that makes up the complete picture.
There are different types of component video, esp;
R/G/B and Y/Cb (Pb)/Cr (Pr).
Composite video
A single video signal containing all light, colour and
synchronization data. This is the most common
signal used by consumer products.
DivX®
DivX® is a popular media technology created by
DivX®, Inc. DivX® media files contain highly
compressed video with high visual quality that
maintains a relatively small file size. DivX® files can
also include advanced media features like menus,
subtitles, and alternate audio tracks. Many DivX®
media files are available for download on-line,
and you can create your own using your personal
content and easyto-use tools from DivX.com.
Dolby Digital®
Delivers mono, stereo, or up to 5.1 discrete
channels of surround sound: Left, Centre, Right,
Left Surround, Right Surround, and lowfrequency
effects (LFE). Global standard for DVD-Audio and
DVDVideo.
DTS® (Digital Theatre Systems)
DTS® stands for Digital Theatre System. DTS is a
surround system different from Dolby Digital that
has become a popular surround
sound format for movies. “DTS®” and “DTS®
Digital Out” are registered trademarks of Digital
Theatre Systems, Inc.
JPEG
A popular file format for still image (such as
photographs and illustrations) compression and
storage. JPEG stands for “Joint Photographic Experts
Group”. Most digital cameras use this format.
MP3
MP3 (MPEG1 audio layer 3) is a compressed audio
file format. Files are recognized by their file
extension “.mp3” or “.MP3”.
MPEG
MPEG stands for “Motion Picture Experts Group”.
This is an international standard audio format used
on Video CDs and some DVD discs.
Optical digital output
A connector that outputs digital audio in the form of
light pulses. Components are connected using
special fibre optic cables available from specialist
audio dealers.
PAL (Phase Alternation by Line)
PAL (Phase Alteration Line) is the colour television
broadcast standard throughout Western Europe.
PBC
Playback Control. A special feature on a Video CD or
Super VCD that enables navigation through an
integrated on-screen menu.
S-Video
A video signal with superior picture quality over
standard composite connections. Used on Super
VHS, DVD, high end TV monitors etc.
Time Shift
Simultaneous video recording and playback. Pause
and later resume live TV broadcasts. Fast forward,
fast rewind and jump to any point in the recording.
Play a previously recorded programme while
another programme is being simultaneously
recorded.
Track
SVCD, VCD, Audio CD discs use tracks to divide up
the content of a disc.
- 48 -
Page 49
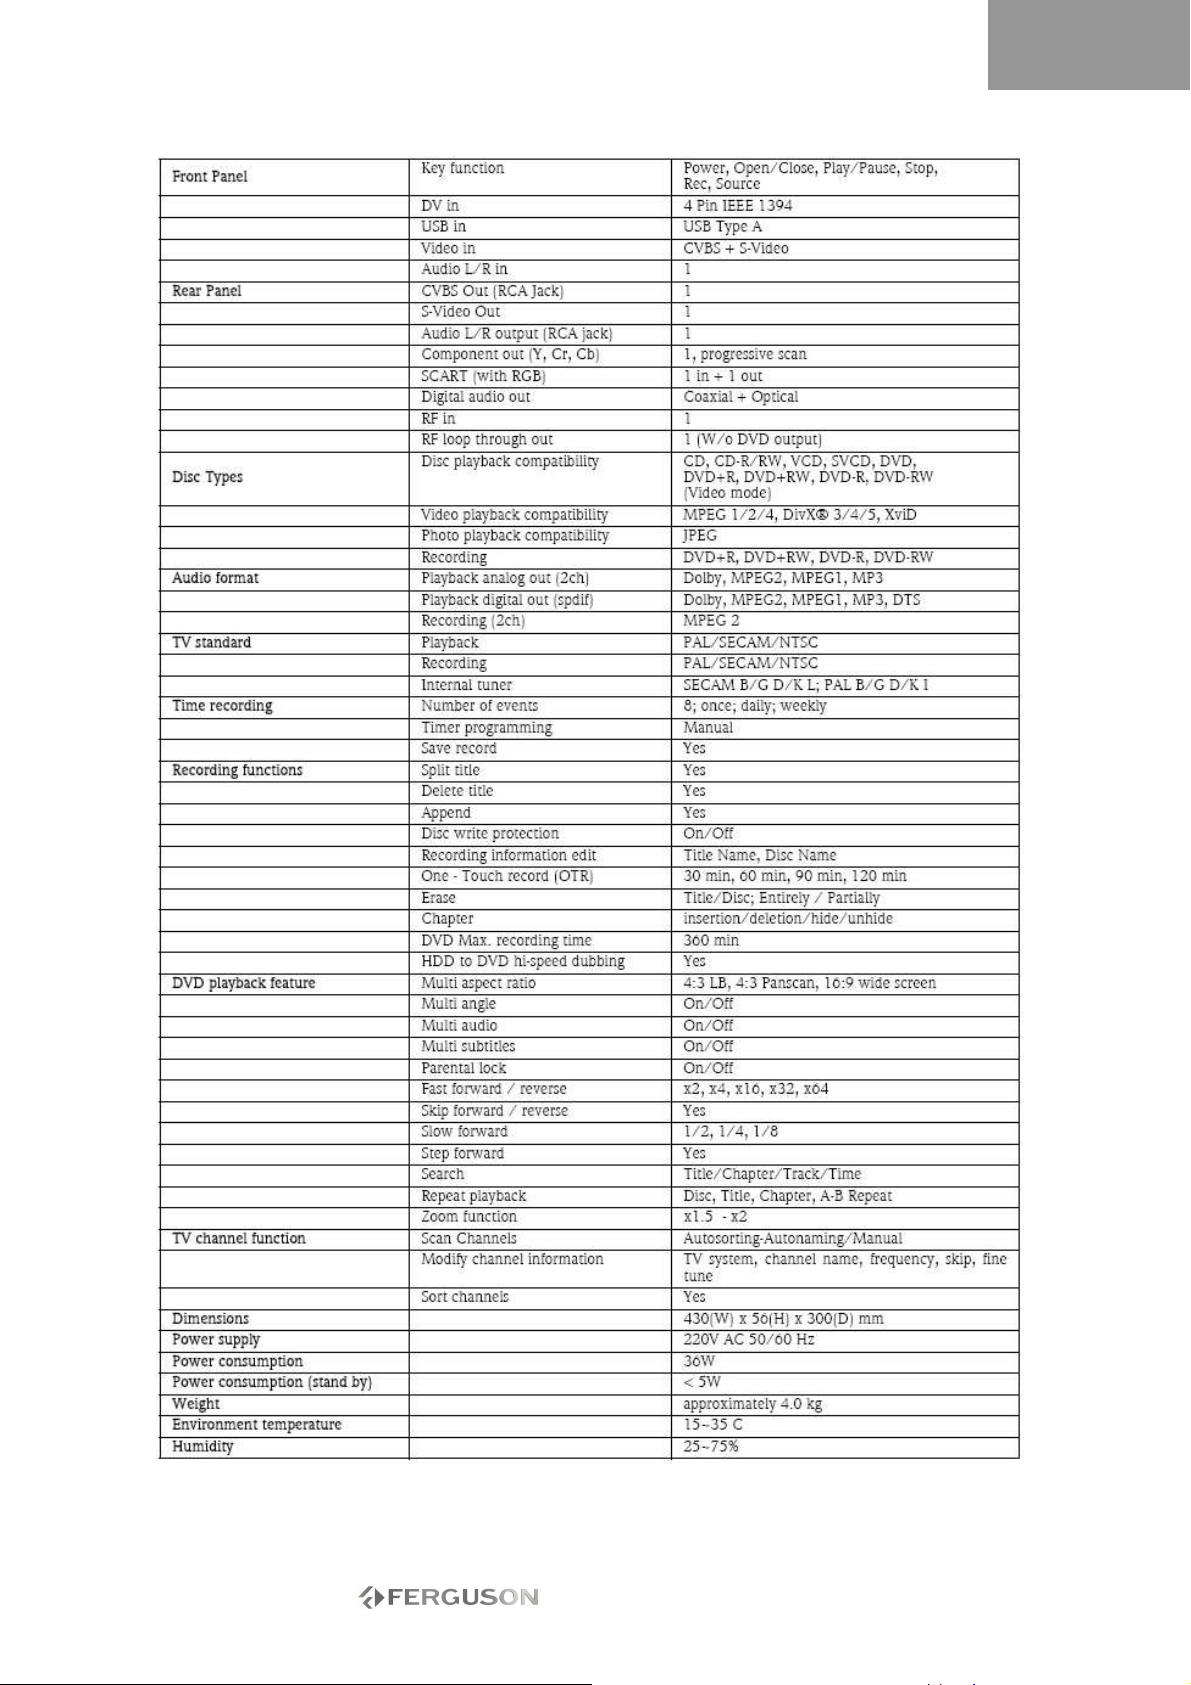
SPECIFICATIONS
ENGLISH
- 49 -
Page 50
DEUTSCH
Haftungsausschluss
Ferguson macht keine Zusicherungen und
übernimmt keine Haftung in Bezug auf den Inhalt
dieser Dokumentation und schließt insbesondere
jegliche gesetzliche Gewährleistung der
handelsüblichen Qualität oder der Eignung für einen
bestimmten Zweck aus. Die Hardwarekomponenten
werden regelmäßig aktualisiert. Daher kann es sein,
dass einige der Anweisungen, technischen Daten
und Abbildungen in dieser Dokumentation nicht
ganz auf Ihre spezielle Situation zutreffen. Alle in
diesem Handbuch beschriebenen Elemente dienen
lediglich der Veranschaulichung und treffen unter
Umständen nicht auf Ihren speziellen Fall zu. Aus
den Beschreibungen in diesem Handbuch können
keine Rechte oder Berechtigungen hergeleitet
werden.
Ferguson behält sich das Recht vor, diese
Veröffentlichung zu revidieren und ihren Inhalt
gelegentlich zu ändern, ohne dadurch in irgendeiner
Form Dritten gegenüber verpflichtet zu sein,
derartige Überarbeitungen oder Änderungen
mitzuteilen. In keinem Fall haftet Ferguson für
Folgeschäden oder Unfallschäden jeglicher Art,
einschließlich, jedoch nicht hierauf beschränkt,
entgangenem Gewinn oder jeglichen sonstigen
geschäftlichen Schäden, die sich unmittelbar durch
das Produkt oder infolge der Benutzung des
Produktes ergeben.
Warenzeichen
Ferguson ist ein eingetragenes Warenzeichen von
Ferguson Alle anderen in diesem Handbuch
erwähnten Firmen- oder Produktnamen sind
Warenzeichen, eingetragene Warenzeichen oder
Dienstleistungsnamen der jeweiligen Rechteinhaber.
DivX®, DivX® Certified und zugehörige Logos sind
Warenzeichen von DivX®, Inc. und werden in Lizenz
verwendet.
Hergestellt in Lizenz von Dolby
Laboratories. Dolby und das Doppel-D-
Symbol sind Warenzeichen von Dolby Laboratories.
Dieses Produkt verfügt über eine
Urheberschutztechnologie, die durch
Verfahrensansprüche bestimmter US-Patente und
andere gewerblichen Schutzrechte als Eigentum der
Macrovision Corporation und anderer Rechteinhaber
geschützt ist. Die Benutzung dieser
Urheberschutztechnologie muss von der Macrovision
Corporation autorisiert sein und ist nur für die
private und eine andere eingeschränkte Nutzung
vorgesehen, soweit nicht von der Macrovision
Corporation anders autorisiert. Zurückentwickeln
oder disassemblieren untersagt.
Warnung
Zur Vermeidung eines Brandes oder Stromschlags
darf der Stecker nur mit einem Verlängerungskabel,
einer Steckdose oder einem anderen Anschluss
verwendet werden, wenn er sich vollständig
hineinstecken lässt. Dieses Gerät darf weder Regen
noch Feuchtigkeit ausgesetzt werden.
WARNUNG: UM DAS RISIKO EINES
STROMSCHLAGS ZU VERRINGERN, DARF DIE
ABDECKUNG (ODER RÜCKSEITE) NICHT ENTFERNT
WERDEN. KEINE BENUTZERSEITIG ZU WARTENDEN
TEILE IM INNEREN. WARTUNGSARBEITEN
QUALIFIZIERTEM SERVICEPERSONAL ÜBERLASSEN.
Wichtige Sicherheitshinweise
• Lesen Sie diese Anweisungen und bewahren Sie
sie auf.
• Benutzen Sie das Gerät nicht in der Nähe von
Wasser.
• Reinigen Sie das Gerät nur mit einem trockenen
Tuch.
• Blockieren Sie keine der Lüftungsöffnungen.
Befolgen Sie die Installationsanweisungen des
Herstellers.
• Installieren Sie das Gerät nicht in der Nähe von
Wärmequellen wie Heizungen, Öfen oder
anderen Geräten (einschließlich Verstärker).
• Achten Sie darauf, dass das Netzkabel weder
gequetscht noch abgeklemmt wird.
• Verwenden Sie ausschließlich vom Hersteller
spezifizierte Zusatzgeräte/Zubehörteile.
• Trennen Sie dieses Gerät bei Gewitter oder
bei lingerer Nichtbenutzung von der
Stromversorgung ab. Beachten Sie bitte,
dass sich die Produktgarantie nicht auf Schäden am
Produkt infolge eines Blitzschlags erstreckt.
• Überlassen Sie sämtliche Servicearbeiten
qualifiziertem Personal. Servicearbeiten sind
erforderlich, wenn das Gerät in irgendeiner
Weise beschädigt wurde, Regen oder Feuchtigkeit
ausgesetzt war, nicht mehr normal funktioniert oder
fallengelassen wurde.
• Um das Gerät von der Stromversorgung zu
trennen, muss der Netzstecker gezogen werden.
Aus diesem Grund sollte sich die Steckdose
möglichst dicht am Gerät befinden und leicht
zugänglich sein.
- 50 -
Page 51

DEUTSCH
EINFÜHRUNG
Der Ferguson Recorder kann Fernsehsignale und
AV-Signale von externen Geräten oder digitale
Signale von IEEE 1394-Geräten codieren und Daten
zwecks Speicherung auf DVD+RWs, DVD+Rs, DVDRWs oder DVD-Rs aufnehmen*. Der Ferguson RW770HD funktioniert auch als DVD- oder CD-Player.
*Das Aufnahmen auf 8X DVD-Rs wird nicht
unterstützt.
HAUPTMERKMALE
• Das integrierte Festplattenlaufwerk (HDD; Hard
Disk Drive) unterstützt unter anderem Funktionen
wie Time Shifting und Direct Digital Dub
• Spielt kommerzielle Film-DVDs und Audio-CDs
• Speichert und spielt Multimediadateien (Musik,
Fotos, Videos) auf der internen Festplatte.
• Überträgt Dateien zwischen USB-Geräten*, DVDs
und der internen Festplatte.
• Unterstützt MP3
• DivX Codec-Unterstützung (kurz für DivX®
Compression/decompression).
• Dolby Digital-Sound für insgesamt sechs
('5.1') separate Audiokanäle (vorn links, vorn
mittig, vorn rechts, hinten links,
hinten rechts und Subwoofer)
• Daueraufnahme (bis zu 3 Std.)
• Nehmen Sie TV-Shows auf und übertragen Sie
Privatvideos auf DVD
*Dateien können nur von, nicht jedoch auf USBGeräte übertragen werden.
Time Shifting
Gleichzeitige Videoaufnahme und -wiedergabe
• Pause und Wiederaufnahme von Live-Sendungen.
Schnell vor, schnell zurück und Direktsprung zu
einer beliebigen Stelle in der Aufzeichnung.
• Bis zu 3 Stunden Sofortwiedergabe
• Gibt ein zuvor aufgezeichnetes Programm wieder,
während gleichzeitig ein anderes Programm
aufgenommen wird.
DVD/CD-Player
• Unterstützt Bildschirmformate 16:9 und 4:3
• Wiedergabefunktionen, einschließlich
Programmieren, Wiederholen, Schnell vor/zurück,
Zoom usw.
• Unterstützt 34 verschiedene Audio-,
Untertitel- und Menüsprachen. Unterstützt
sowohl neun verschiedene Blickwinkel als auch
andere normale DVD-Wiedergabefunktionen
• Kompatibel mit DVDs, Super-VCDs, VCDs, CDs
und CD-Rs und kann MP3, JPEG und Bild-CDs
abspielen
• Kopierschutztechnologie von Macrovision
A ufnahmeprogrammierung
• Nimmt vom TV-Tuner oder einem analogen AVEingang im MPEG-2-Format auf
• Gibt ein zuvor aufgezeichnetes Programm von der
Festplatte wieder, während ein anderes Programm
aufgezeichnet wird
• Programmierbarer Timer zum Aufnehmen von
Einzelsendungen oder Fernsehserien
• Bis zu 20 Zeitaufnahmeereignisse mit drei
Optionen: „Einmalig", „Täglich" und „Wöchentlich"
• OTR (One Touch Record)-Schnellaufnahme;
nimmt Fernsehsendungen per Tastendruck auf
DVD-Archivierung („Dubbing")
• Archiviert auf der Festplatte gespeicherte
Aufzeichnungen auf DVD+RWs, DVD+Rs, DVD-RWs
oder DVD-Rs
• DVDs, die mit diesem Ferguson RW-770HD
aufgenommen wurden, können mit den meisten
heutigen und zukünftigen
DVD-Playern abgespielt werden.
Persönliche Videoarchivierung
• Überträgt Videos von einem VCR, analogen
Camcorder oder digitalen (DV) Camcorder mit
Direct Digital Dub™ auf DVD
Anschlüsse
• Digitaler Eingang (DV) für digitale Videokameras;
Audio- und Videosignale werden über dasselbe
Kabel übertragen
• Standardmäßiger Videoausgang (CVBS), SVideo-Ausgang, SCART EIN/AUS-Anschlüsse und
Component Video-Ausgänge (Y, Cb/Pb, Cr/Pr)
• Koaxialer digitaler Audioausgang
• Anschlüsse für USB-Flash-Laufwerke,
USBSpeicherkartenlesegeräte und USBKameras (das
Massenspeichergerät muss FAT32-formatiert sein)
• Signaldurchleitung mit SCART- und TVAntennenanschlüssen
Zusätzliche Funktionen
• Diamond Copy-Bildverarbeitungstechnologie für
eine exzellente Bildqualität
• Alterstufenkontrollsystem
• Bildschirmschonerprogramm als Bildschirmschutz
• Intelligente Softwareaktualisierung
• Eine progressive Abtastung erzeugt ein Bild mit
der doppelten Anzahl von Abtastzeilen als beim
herkömmlichen Component Video. Dies bedeutet
sowohl geringeres Bildflimmern und weniger
Bewegungsartefakte als auch ein schärferes Bild auf
großen Bildschirmen.
Die falsche Einstellung für den Ausgabemodus kann
einen schwarzen Bildschirm oder eine schlechte
Bildqualität verursachen. Bei Problemen mit der
Bildqualität oder bei einem schwarzen Bildschirm
drücken Sie bitte die Taste „Progressiv", um den
Ausgabemodus zu wechseln.
- 51 -
Page 52
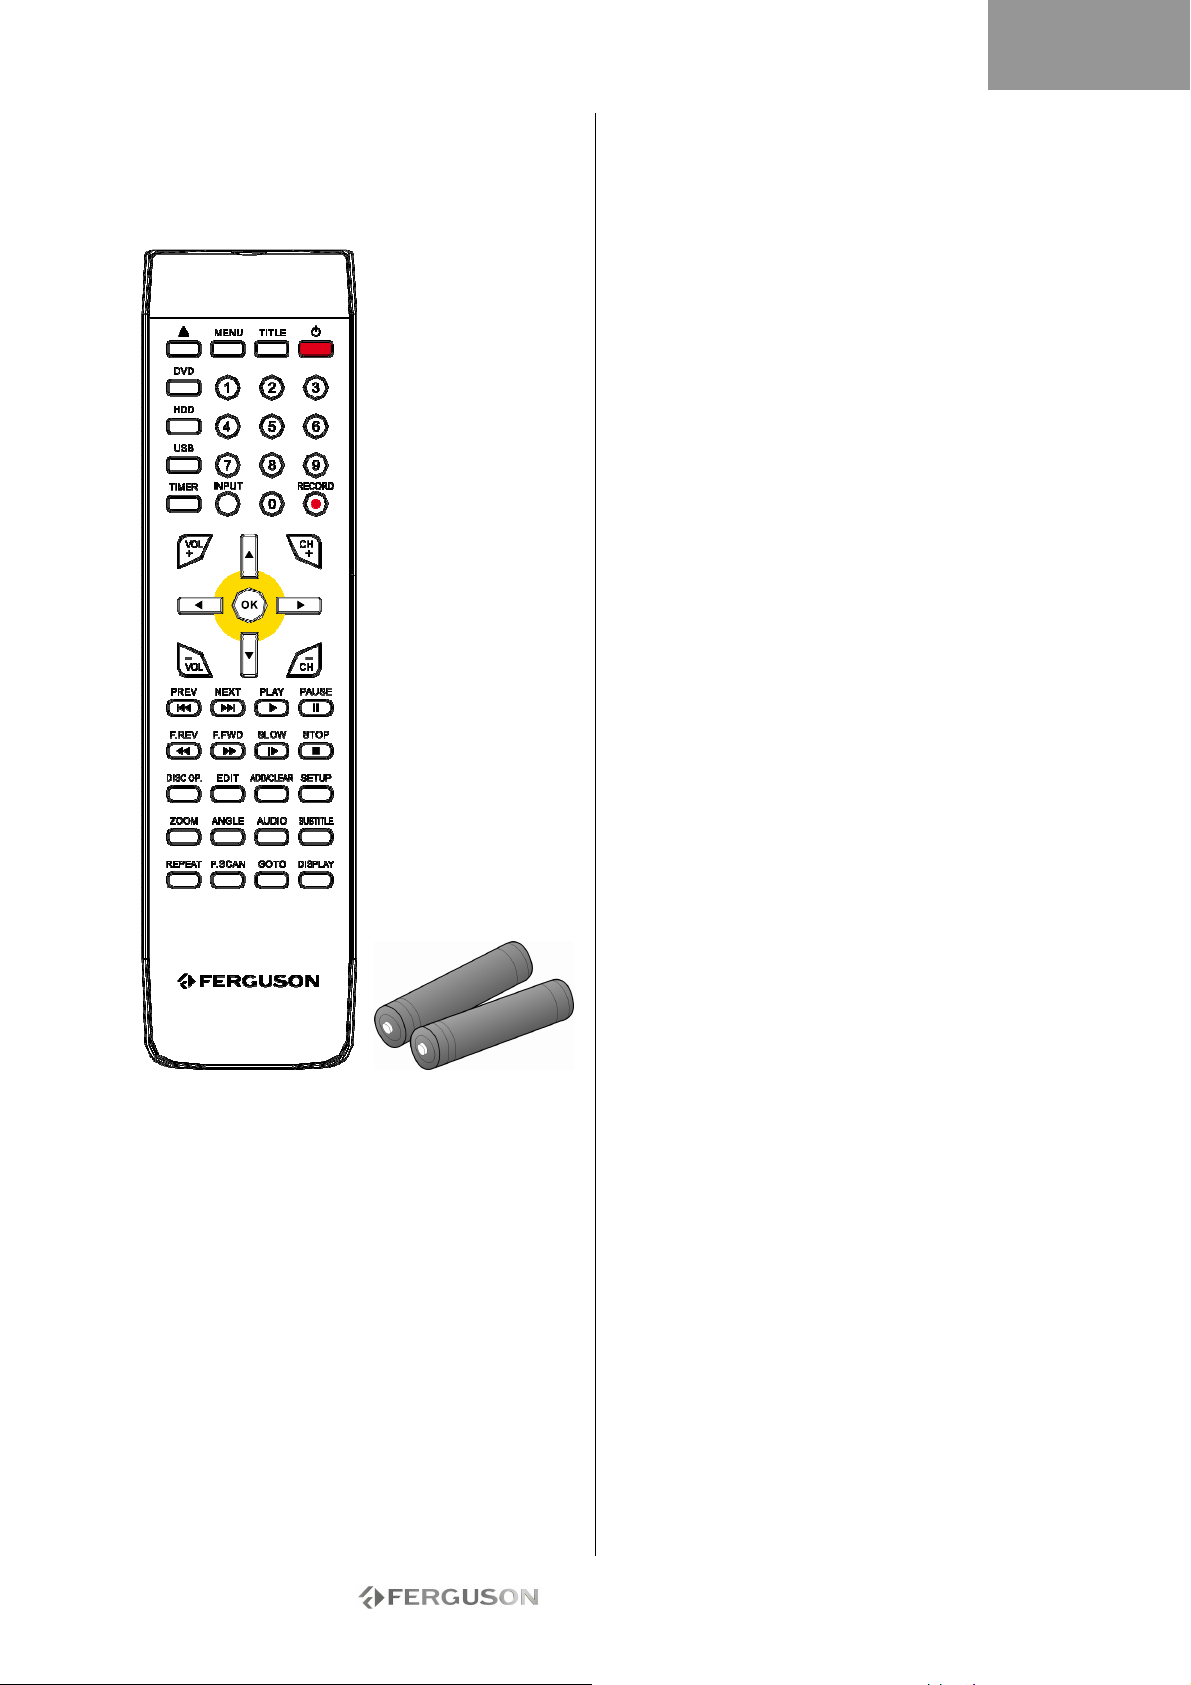
DEUTSCH
LIEFERUMFANG
• Recorder
• Fernbedienung + 2 AAA-Batterien
• Benutzerhandbuch
• Garantieleitfaden
DISC-MEDIEN
DVDs
DVDs sind in einen oder mehrere Titel unterteilt.
Jeder Titel kann wiederum verschiedene Kapitel
aufweisen. Gelegentlich kann ein Kapitel
Indexpunkte enthalten, die das Kapitel in
verschiedene Abschnitte unterteilen.
Mehrfachwinkel
Beim Betrachten von Filmen oder andere Medien mit
Mehrwinkel wiedergabe können Sie sich Szenen aus
verschiedenen Wiedergabewinkeln ansehen.
Mehrere Audiosprachen
Beim Betrachten von Filmen oder Disc-Medien, auf
denen mehrere Sprachen und/oder Musiktitel
aufgenommen sind, können Sie die gewünschte
Sprache wählen.
Mehrere Untertitelsprachen
Beim Betrachten von Filmen oder Disc-Medien, auf
denen sich Untertitel in mehreren Sprachen
befinden, können Sie die gewünschte
Untertitelsprache wählen.
SVCD/VCD/AUDIO-CDs
SVCD/VCD/AUDIO-CDs sind in mehrere Spuren
unterteilt. Eine Spur kann manchmal eine Reihe von
Indexpunkten enthalten.
MP3 /JPEG/DivX® (Audio-/Bild/Videodateien)
MP3 ist ein komprimiertes Audiodateiformat, das die
Dateierweiterung „mp3" oder „.MP3" verwendet.
JPEG ist ein komprimiertes Bilddateiformat, das die
Dateierweiterung „.jpg" oder „.JPG" verwendet.
DivX® ist ein komprimiertes Videodateiformat, das
die Dateierweiterung „.avi" oder „.AVI" verwendet.
Eventuell braucht der Ferguson RW-770HD etwas
Zeit, um die Inhaltsliste des Disc-Mediums
anzuzeigen, insbesondere dann, wenn sich
zahlreiche Daten darauf befinden.
Unterstützte Disc-Medien
• CD-Audio und CD-EXTRA
• CD-ROM (Modus 1)
• CD-ROM/XA Modus 2 (Format 1, Format 2)
• CD-I (Modus 2, Format 1 und Format 2) und CD-I
Ready
• Photo-CD (Single- und Multisession)
• Video-CD
• CD-Text
• Single-Sided Single Layer DVD-ROM (SS-SL)
• Single-Sided Dual Layer OPPOSITE DVD-ROM (SSDL-OPT), PARALLEL DVD-ROM (SS-DL-PTP)
• Double-Sided Single Layer DVD-ROM (DS-SL)
• Double-Sided Double Layer DVD-ROM (DS-DL)
• Double-Sided Double Layer OPPOSITE DVD-ROM
(DS-DL-OPT),
PARALLEL DVD-ROM (DS-DL-PTP)
• Single-Sided Single Layer DVD±R/RW
Nicht unterstützte Disc-Medien
Nicht abgeschlossene Disc-Medien von
anderen DVD/CD-Recordern. Aufgrund des
Medientyps oder der Aufnahmebedingungen kann es
sein, dass sich CD-Rs, CD-RWs, DVD-Rs, DVD-RWs,
DVD+Rs oder DVD+RWs nicht immer abspielen
lassen.
AUFNEHMBARE DISC-MEDIEN
• DVD±RW (beschreibbare DVDs)
DVD±RW ist ein löschbares Format. DVD±RWs
können mehr als 1.000-mal beschrieben werden.
• DVD±R (einmal beschreibbare DVDs)
DVD±R-Disc-Medien können nur einmal beschrieben
werden. Solange die Disc nicht fertig gestellt ist,
können auf ihr mehrere Aufnahmen vorgenommen
werden.
Nachdem ein Disc-Medium einmal fertig gestellt ist,
können Sie es auch dann nicht mehr bearbeiten
oder darauf aufnehmen, wenn noch ungenutzte
Kapazität verfügbar ist. Falls Sie eine mit Ihrem
Ferguson erstellte DVD±R auf einem anderen Player
abspielen wollen, stellen Sie bitte sicher, dass sie
vollständig fertig gestellt wurde. In ähnlicher Form
müssen Sie die Option „Kompatibel machen"
benutzen, falls Sie eine DVD±RW auf einem
anderen Player abspielen möchten.
- 52 -
Page 53
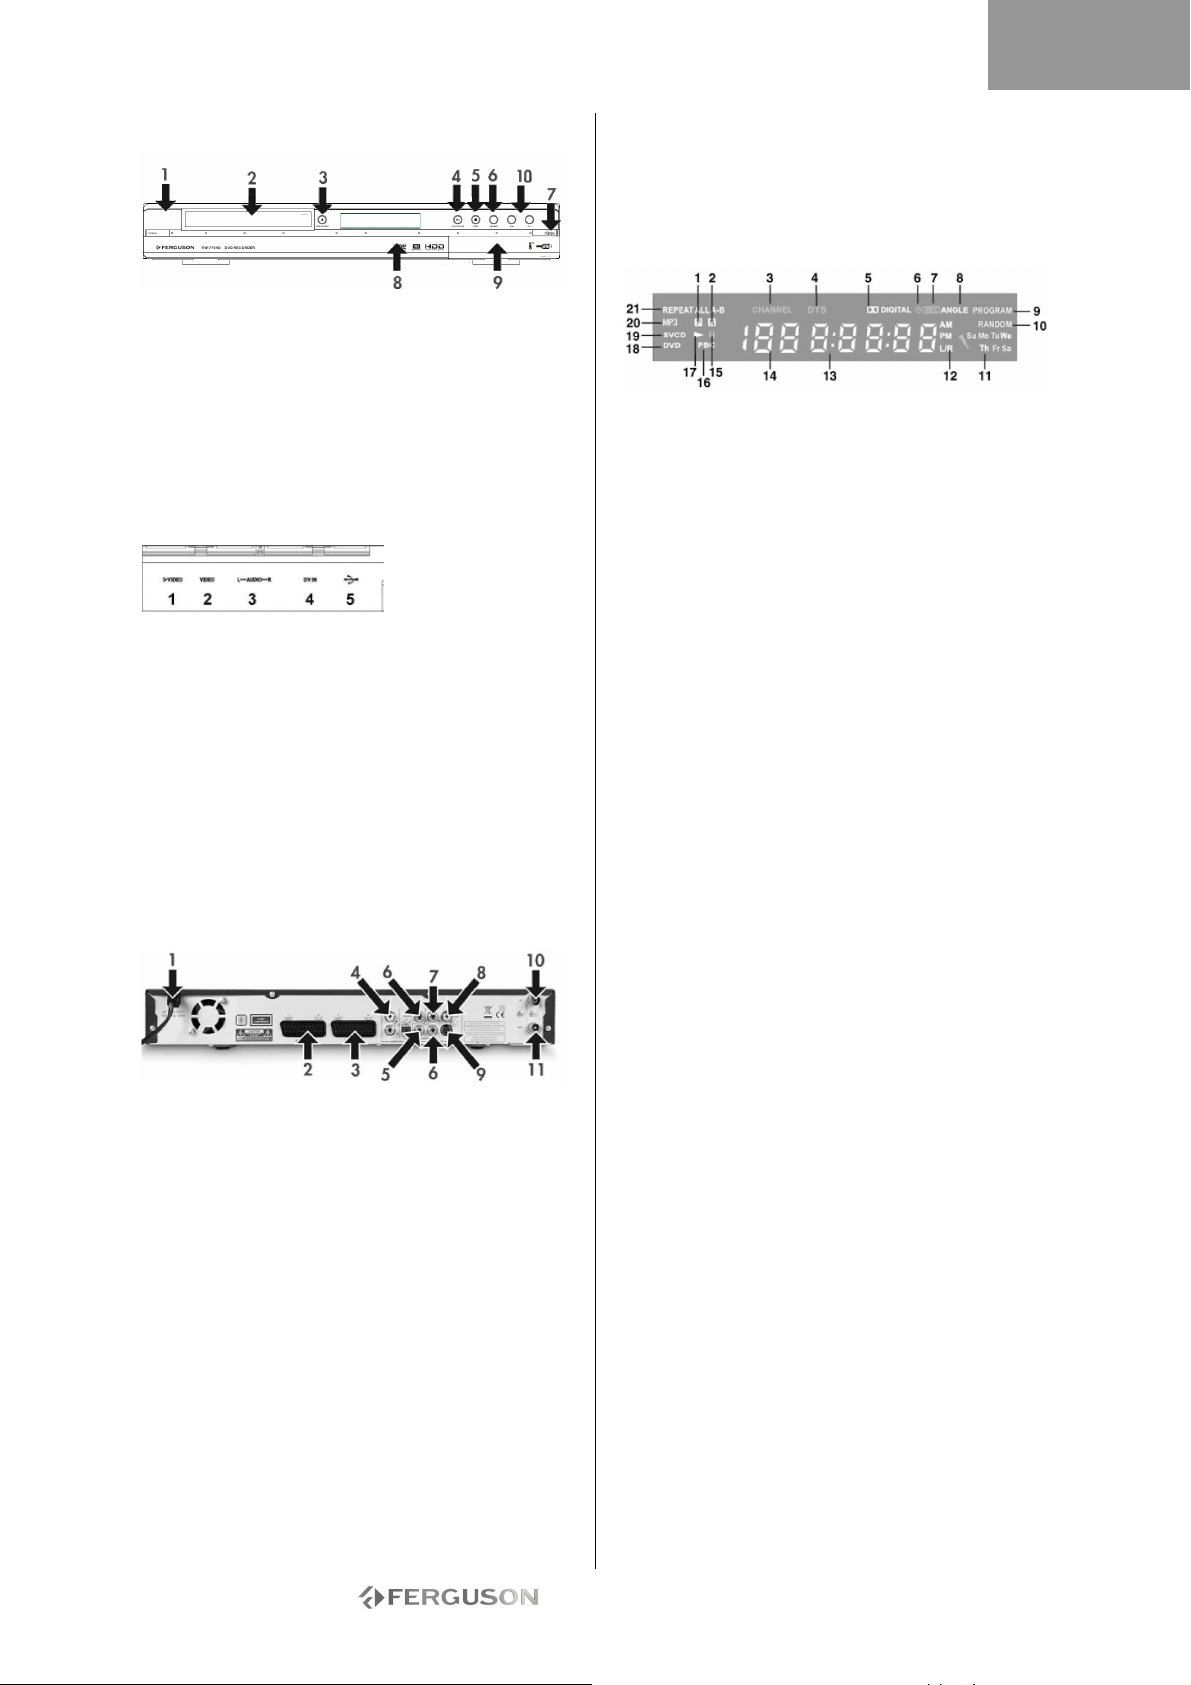
DEUTSCH
BEDIENELEMENTE UND MERKMALE AUF DER
VORDERSEITE
1. Ein/Aus-Taste
2. DVD-Disc-Aufnahme
3. Öffnen/Schließen-Taste
4. Wiedergabe/Pause-Taste
5. Stopp-Taste
6. Quelle-Taste
7. Aufnahmetaste
8. Anzeige
9. Anschlüsse auf der Vorderseite
10. Taste CH+ / CH-
Anschlüsse auf der Vorderseite (Klappe offen)
1. S-Video S-Video-Eingang: Dient zum
Anschließen eines geeigneten Videogeräts.
2. Composite Video Composite Video-Eingang:
Dient zum Anschließen eines geeigneten
Videogeräts.
3. Composite Audio L/R Composite Audio-Eingang
L/R: Dient zum Einspeisen von Audiogeräten, die
am S-Video- oder Composite-Eingang
angeschlossen sind.
4. DV IN DV-Eingang (i-Link/IEEE 1394): Dient zum
Anschließen einer digitalen Videokamera.
5. USB: USB-Eingang: Dient zum Anschließen
eines USB-Massenspeichergeräts.
ABBILDUNG DER
RÜCKSEITE
1. Netzbuchse: Dient zum Anschließen
Netzstromversorgung.
2. SCART-Eingang (SCART 2): Dient zum
Anschließen an ein digitales AV-Gerät mit SCARTAusgang.
3. SCART-Ausgang (SCART 1): Dient zum
Anschließen an ein Fernsehgerät oder andere Geräte
mit einem SCART-Eingang.
4. Audioausgang L/R: Analoger Audioausgang (links
und rechts).
5. Koaxialer digitaler Audioausgang: Dient zur
Ausgabe digitaler Audiosignale durch Anschluss
eines Verstärkers oder Empfängers mit digitalem
Audioeingang.
6. YUV (Y Cb/Pb Cr/Pr): Dient zum Anschließen an
ein Fernsehgerät mit YUV (Y Cb/Pb Cr/Pr)Eingängen. Als Ausgabemodus kann „Progressiv"
oder „Zeilensprung" eingestellt werden.
7. CVBS-Videoausgang: Dient zum Anschließen an
ein Fernsehgerät mit einem Video (CVBS)-Eingang.
8. Optischer digitaler Audioausgang : Dient zur
Ausgabe digitaler Audiosignale auf Disc-Medien,
indem der optische digitale Audioeingang mit
einem AV-Verstärker oder -Receiver mit einem
digitalen Audioeingang verbunden wird.
9. S-Video-Ausgang: Dient zum Anschließen an ein
Fernsehgerät mit einem S-Video-Anschluss.
10. Antenneneingang: Dient zum Anschließen an
eine Antenne/ Kabelfernsehen.
11. Antennenausgang: Dient zum Ausgeben des TVSignals an ein Fernsehgerät.
Hinweise im Anzeigefenster
1. PAL
2. NTSC
3. Kanal
4. DTS
5. Dolby
6. Timer
7. Aufnahme
8. Mehrfachwinkel
9. Programm
10. Zufall
11. Tag
12. Audiokanal
13. Uhrzeit/Modus (h:mm:ss)
14. Quelle/Kapitel
15. Pause
16. PBC (Program Backward Control)
17. Wdg.
18. DVD
19. VCD/SVCD
20. MP3
21. Wiederholen
- 53 -
Page 54
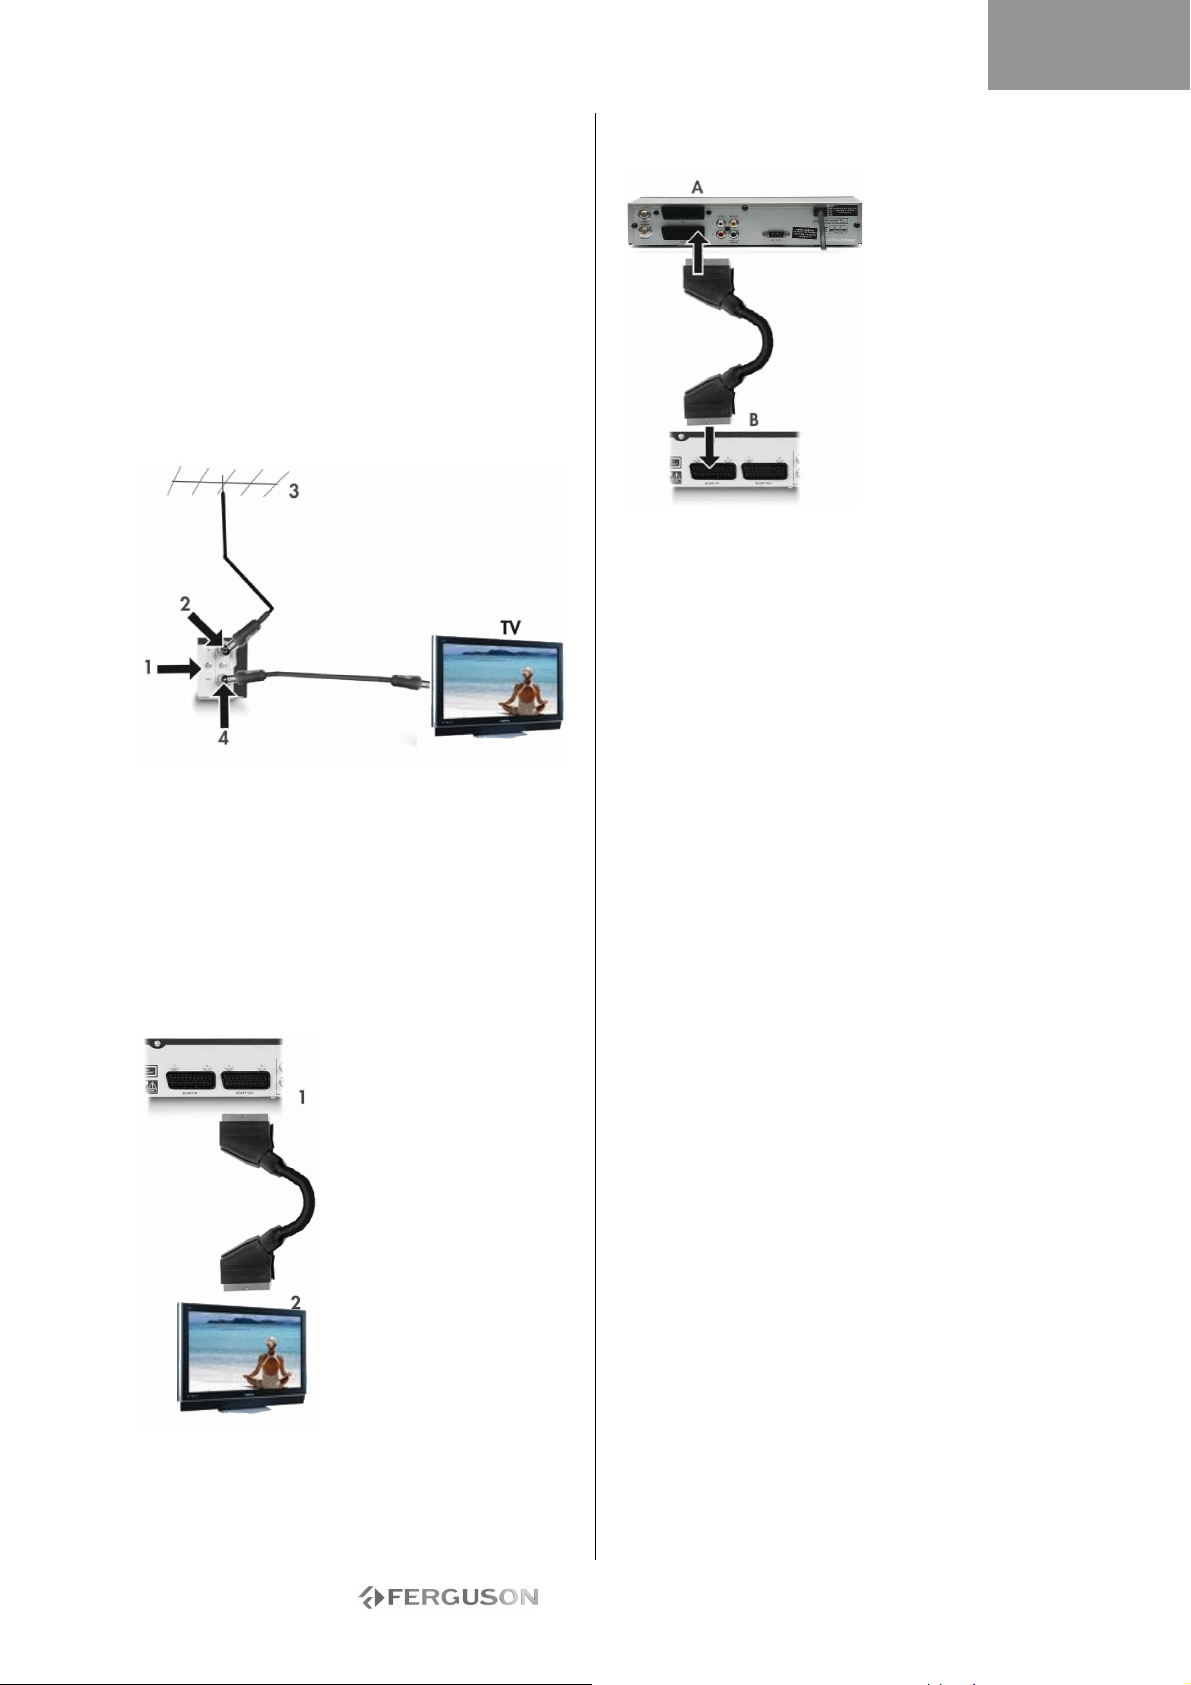
DEUTSCH
ANSCHLUSS AN EIN FERNSEHGERÄT
(BASISKONFIGURATION)
Schritt 1: Anschließen der Antenne
1. Schalten Sie Ihr Fernsehgerät aus.
2. Ziehen Sie das Antennenkabel auf der
Rückseite des Fernsehgeräts ab und schließen Sie
es am Antenneneingang auf der Rückseite des
Recorders an.
3. Schließen Sie ein Koaxialkabel am
Antennenausgang auf der Rückseite des Recorders
und am Antenneneingang auf der Rückseite Ihres
Fernsehgeräts an.
4. Um die verfügbaren Fernsehkanäle im Recorder
einzurichten, müssen Sie zunächst eine
Kanalsuche durchführen.
1. Rückseite des Ferguson RW-770HD
2. Antenneneingang
3. Antenne (oder Kabel-TV)
4. Antennenausgang (kann für die Ausgabe des TVSignals an den HF-Signaleingang eines anderen
Fernsehgerätes benutzt werden)
Der TV-Signalausgang (Antennenausgang) ist
lediglich eine Durchschleifung des eingespeisten
Signals.
Schritt 2: Anschluss an ein Fernsehgerät
mittels SCART
1. Schließen Sie ein SCARTKabel am SCART-Ausgang
auf der Rückseite des
Recorders und am SCARTEingang auf der Rückseite
Ihres Fernsehgeräts an.
2. Wählen Sie am
Fernsehgerät als Quelle
SCART IN.
ANSCHLUSS AN EINEN TV/SATELLITENDECODER
1. Schließen Sie ein SCART-Kabel am SCARTAusgang auf der Rückseite des Decoders (A) und
am SCART-Eingang auf der Rückseite Ferguson
Recorders (B) an.
2. Um die verfügbaren Fernsehkanäle im Recorder
einzurichten, müssen Sie zunächst eine Kanalsuche
durchführen.
- 54 -
Page 55
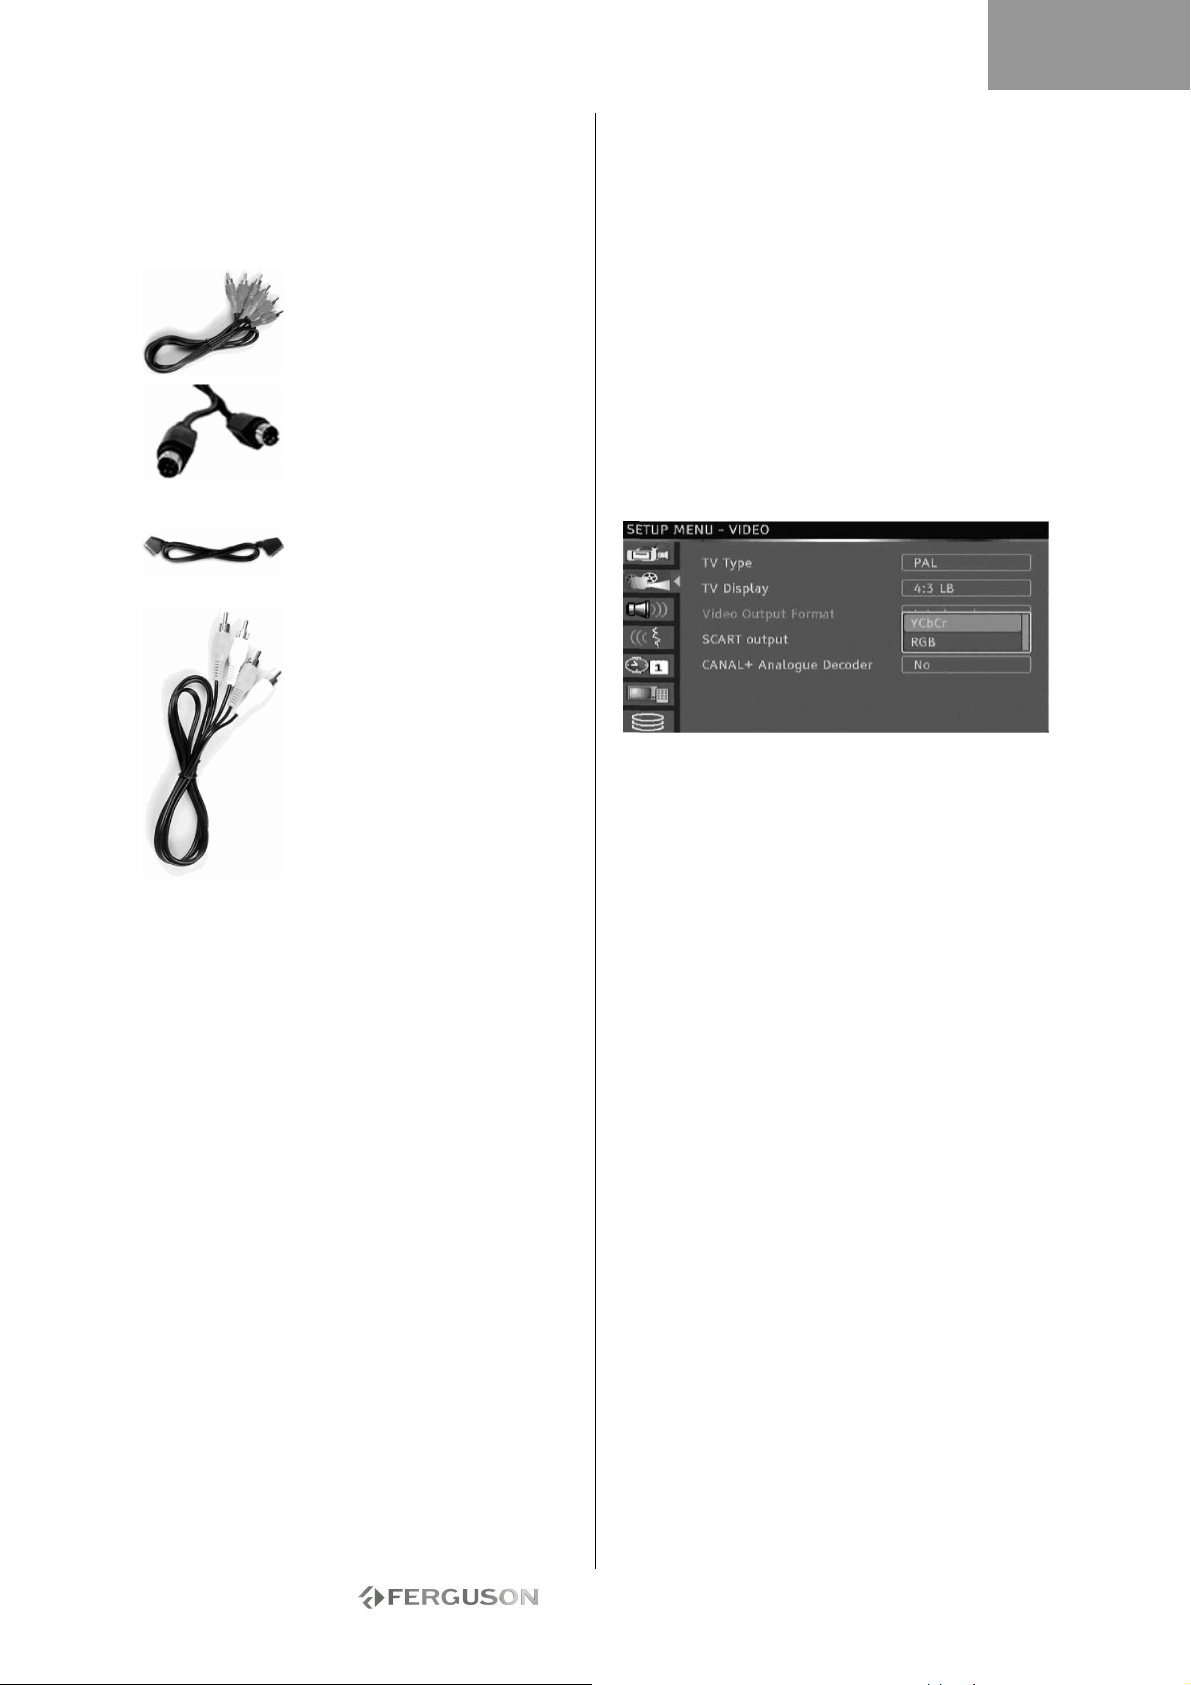
DEUTSCH
ANSCHLUSS AN EIN FERNSEHGERÄT
(ALTERNATIVE KONFIGURATION)
Falls Sie einen anderen Anschluss als das SCARTKabel benutzen möchten, können Sie folgende
Konfigurationen (nicht enthalten) - in absteigender
Reihenfolge, beginnend mit der besten (hinsichtlich
Qualität) - wählen:
A - Anschluss am Fernsehgerät mittels
Composite Video
1. Schließen Sie ein Videokabel am CVBS-Ausgang
(gelb) auf der Rückseite des Recorders am
Videoeingang (gelb) des Fernsehgeräts an.
2.Schließen Sie Audiokabel (Cinch) an den
Audiobuchsen L/R (weiß/rot) auf der Rückseite
des Recorders und an den Audiobuchsen L/R
(weiß/rot) des Fernsehgeräts an.
3. Wählen Sie am Fernsehgerät als Quelle VIDEO In
oder CVBS In.
B - Anschluss am Fernsehgerät mittels S-Video
1. Schließen Sie ein S-Video-Kabel am S-VIDEOAusgang (schwarz) auf der Rückseite des Recorders
am S-VIDEO-Eingang (schwarz) des Fernsehgeräts
an.
2. Schließen Sie Audiokabel (Cinch) an den
Audiobuchsen L/R (weiß/rot) auf der Rückseite
des Recorders und an den Audiobuchsen L/R
(weiß/rot) des Fernsehgeräts an.
3. Wählen am Fernsehgerät als Quelle S-VIDEO.
C - Anschluss am Fernsehgerät mittels Video
Component (YUV oder YCbCr)
Video Component erzielt die bei Weitem beste
Bildqualität bei LCD-und Plasmabildschirmen. Um
den Video Component-Anschluss benutzen zu
können, muss der Recorder bereits über einen der
zuvor genannten Anschlüsse (SCART empfohlen) am
Fernsehgerät angeschlossen sein.
Component Video (progressive
Abtastung) Component Video
(Zeilensprung)
S-Video
SCART (RGB)
Composite Video
1. Schalten Sie das TV-GERÄT ein und wählen Sie
die dem RECORDER entsprechende Quelle.
2. Schalten Sie den RECORDER ein.
3. Schließen Sie drei Component Video-Kabel (rot,
grün, blau) an den COMPONENT VIDEO OUTBuchsen (rot, grün, blau) auf der Rückseite des
RECORDERS und an den COMPONENT VIDEO INBuchsen (rot, grün, blau) des TV-GERÄTS an.
4. Schließen Sie Audiokabel am AUDIOAUSGANG
L/R auf der Rückseite des RECORDERS am
AUDIOEINGANG L/R des TV-GERÄTS an.
5. Drücken Sie an der Fernbedienung die Taste
MENU.
6. Gehen Sie mit Hilfe der Navigationstasten zum
Menüabschnitt GENERAL (Allgemein).
7. Ändern Sie mit Hilfe der Navigationstasten und
der Taste OK die Einstellung des SCART-Ausgangs
zu YCbCr. Ändern Sie das Videoausgabeformat zu
„Progressiv", falls das Fernsehgerät eine progressive
Abtastung unterstützt.
8. Wählen Sie am Fernsehgerät als Quelle YUV oder
YCbCr.
9. Das SCART-Kabel kann abgetrennt warden
- 55 -
Page 56
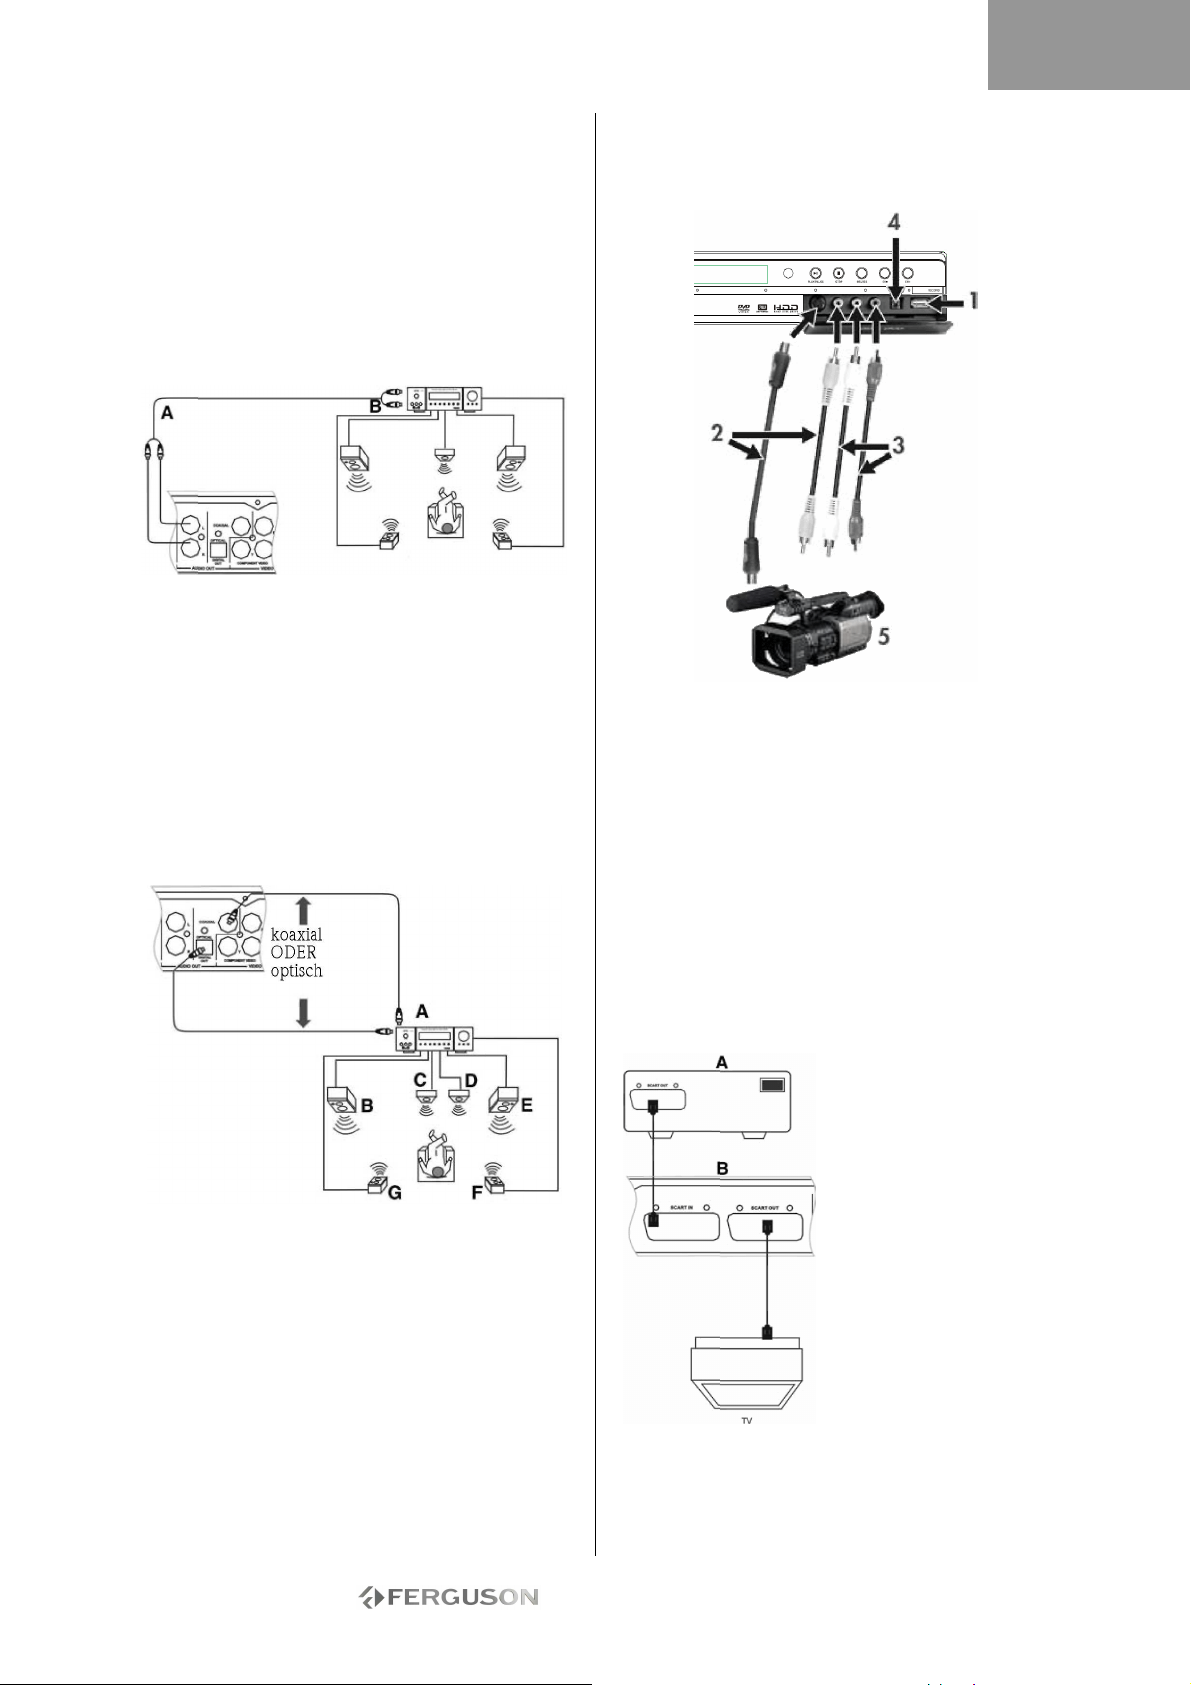
DEUTSCH
ANSCHLUSS AN EIN EXTERNES AUDIOSYSTEM
Analoger Verstärkeranschluss
Schließen Sie die Audiokabel an den
AUDIOAUSGÄNGEN L/R (weiß/rot) auf der Rückseite
des Recorders und an den AUDIOEINGÄNGEN L/R
(weiß/rot) des Verstärkers an.
Folgende Geräte können angeschlossen werden:
• Verstärker mit Dolby Surround Pro Logic-Decoder
• Stereoverstärker
A - Zu den Audioausgängen. B - Zu den
Audioeingängen.
Digitaler Verstärkeranschluss
Schließen Sie ein optisches Kabel am OPTISCHEN
AUSGANG auf der Rückseite des Recorders und am
OPTISCHEN EINGANG auf der Rückseite des
Verstärkers an.
oder
Schließen Sie ein Koaxialkabel am
KOAXIALAUSGANG auf der Rückseite des Recorders
und am KOAXIALEINGANG auf der Rückseite des
Verstärkers an.
A. VERSTÄRKER mit DOLBY DIGITAL- oder DTSDecoder
B. VORNE LINKS
C. MITTE
D. SUBWOOFER
E. VORNE RECHTS
F. SURROUND RECHTS
G. SURROUND LINKS
Folgende Geräte können angeschlossen werden:
• Verstärker mit Dolby Digital-Decoder
• Verstärker mit DTS-Decoder
ANSCHLUSS AN EIN AV- ODER DV-SIGNAL
ÜBER DIE GERÄTEVORDERSEITE
Öffnen Sie die Klappe, wie rechts oben mit „OPEN"
gekennzeichnet.
1. USB-Anschluss
2. Benutzung der S-Video- oder Composite VideoBuchse
3. Audioeingang
4. IEEE 1394-Anschluss
5. Externes AV-Signal
Nachdem Sie Ihr Gerät angeschlossen haben,
wählen Sie den korrekten AV-Signaleingang, indem
Sie an der Fernbedienung wiederholt die Taste
Quelle drücken. Auf dem Fernsehbildschirm
erscheint nun das Bild, und Sie können mit dem
Aufnehmen beginnen.
Informieren Sie sich im Handbuch für das
ANSCHLUSS AN EIN AV-SIGNAL ÜBER DEN
SCART-EINGANG
Sie können ein Signal am SCART-Eingang
aufnehmen, beispielsweise das AV-Signal von einem
DVD-Player. Drücken Sie auf der Fernbedienung die
Taste Quelle, um entsprechend der Anschlussart in
den geeigneten Modus zu wechseln.
angeschlossene System.
A. Externe AVSignalquelle (z.B. DVD)
B. Ferguson Recorder
Die SCART-Ein- und Ausgänge bleiben auch
dann aktiv, wenn sich der
Ferguson Recorder im
Standby-Modus befindet.
- 56 -
Page 57
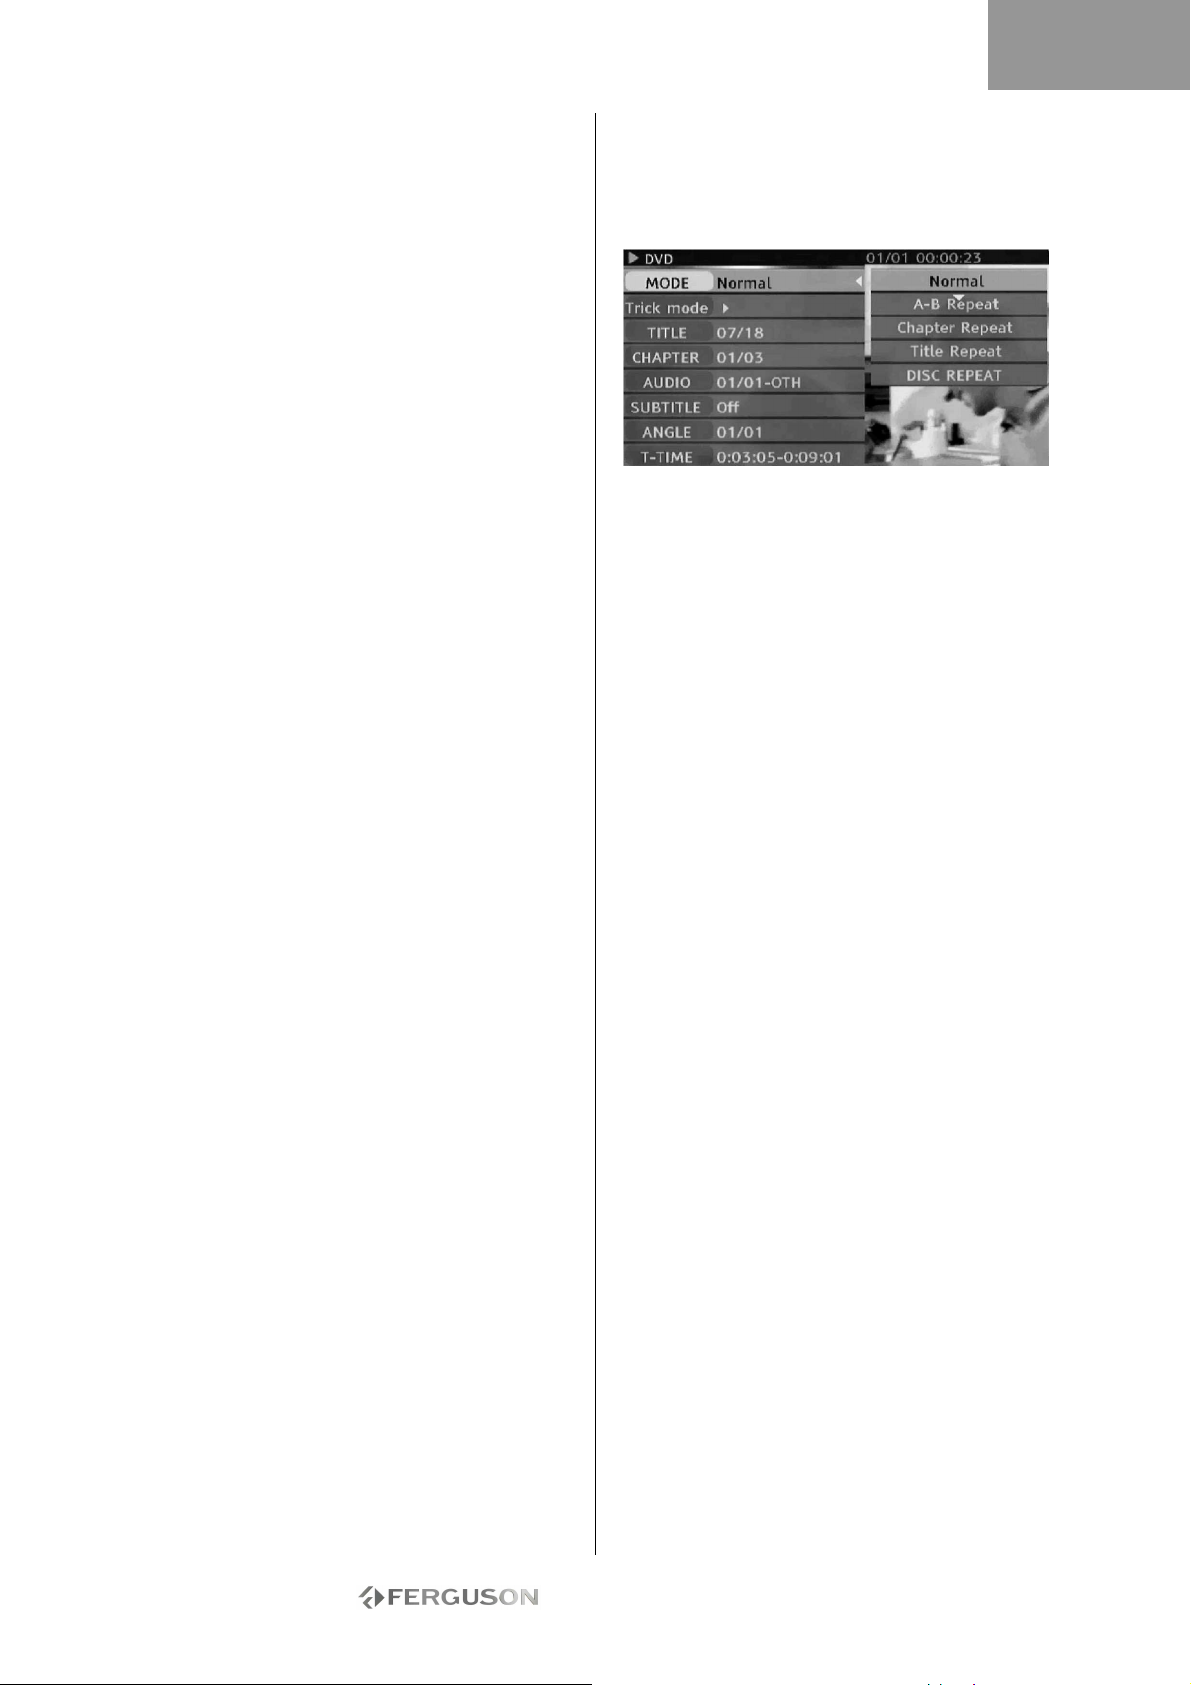
DEUTSCH
ANSCHLUSS VON USB-GERÄTEN
Der Ferguson RW-770HD kann mit USB-FlashLaufwerken, USB-Speicherkartenlesegeräten und
USB-Kameras verbunden werden, die Mass Storage
Class-kompatibel sind. Sie können ein oder mehrere
aufeinanderfolgende JPEG-Bilder betrachten.
Während der Diashow können MP3-Dateien
abgespielt werden. Nachdem ein USB-Gerät am
USB-Port angeschlossen wurde, drücken Sie die
Taste Dateimanager, um das Dateimanager-Menü
aufzurufen. Mit Hilfe der Navigationstasten können
Sie den Inhalt des USB-Geräts durchsuchen.
Drücken Sie die Taste Wiedergabe/ OK, um die
markierten Dateien wiederzugeben. Weitere
Hinweise finden Sie im Abschnitt Dateimanager
später in diesem Handbuch.
Es kann einige Sekunden dauern, bis ein USB-Gerät
erkannt wird.
Das Massenspeichergerät m uss FAT32-formatiert
sein.
Nicht alle Massenspeichergeräte sind kompatibel.
WIEDERGABE EINER DVD-VIDEO, SVCD ODER
VCD
1. Drücken Sie die Taste „Öffnen/Schließen" vorn
am Gerät, um das Laufwerk zu öffnen.
2. Legen Sie das Disc-Medium in den Schlitten.
3. Drücken Sie die Taste „Öffnen/Schließen"
erneut, um das Laufwerk zu schließen.
4. Daraufhin sollte die Wiedergabe automatisch
gestartet werden. Falls nicht, drücken Sie auf DVD.
5. Benutzen Sie die Navigationstasten, um im Menü
zu navigieren, und drücken Sie die Taste
Wiedergabe/OK, um eine Auswahl zu treffen.
Wiedergabeoptionen
1. Drücken Sie die Taste DVD , um das DVD-Menü
aufzurufen.
2. Drücken Sie die Taste Anzeige , um die
Bildschirmanzeige ein- oder auszublenden.
Wiedergabe
Drücken Sie die Taste Wiedergabe/OK auf der
Fernbedienung oder die Taste Wiedergabe vorn am
Gerät, Ljfl um die Wiedergabe zu starten.
Pause
Drücken Sie die Taste Pause auf der Fernbedienung,
um die Wiedergabe anzuhalten.
Schnell vor/zurück
Drücken Sie die Taste » (Schnell vor), um den
schnellen Vorlauf zu aktivieren, und die Taste «
(Schnell zurück), um den schnellen Rücklauf zu
aktivieren. Durch wiederholtes Drücken können Sie
zwischen vier verschiedenen Geschwindigkeiten
wechseln.
Überspringen
Drücken Sie die Taste Weiter, um zum nächsten
Titel/Kapitel weiterzugehen, und die Taste Zurück,
um zum vorherigen Titel/ Kapitel zurückzugehen.
Wiedergabesteuerung mit dem
Wiedergabemenü
1. Drücken Sie die Taste Wiedergabe/OK, um das
Steuerungsmenü aufzurufen und ein Untermenü
auszuwählen:
MODE: Dient zum Einstellen des Wiedergabemodus
(z.B. Normal, A-B-Wiederholung,
Kapitelwiederholung usw.)
TRICK: Einstellen des Wiedergabestatus (z.B.
Stopp, Schnell/ Langsam vor/zurück usw.)
TITLE: Drücken Sie auf Wiedergabe/OK und geben
Sie die gewünschte Titelnummer ein, um zu einem
Titel zu gelangen.
CHAPTER: Geben Sie die gewünschte
Kapitelnummer ein, um zu einem Kapitel zu
gelangen.
AUDIO: Wählt die gewünschte Audiosprache
(z.B. FRE (Französisch), ENG (Englisch) usw.)
SUBTITLE: Wählt die gewünschte
Untertitelsprache.
ANGLE: Wählt den gewünschten Kamerawinkel
(muss vom Disc-Medium unterstützt werden).
T-TIME: Zeigt die verstrichene und die
verbleibende Zeit an.
2. Drücken Sie auf um dieses Menü wieder zu
verlassen.
Wiederholung
1. A-B-Wied.
• Drücken Sie die Taste Wiedergabe/OK während
der Wiedergabe zweimal, um das Setup-Menü
aufzurufen.
• Markieren Sie mit Hilfe der Tasten das
Untermenü Modus, und drücken Sie dann die Taste
Wiedergabe/OK.
• Markieren Sie mit Hilfe der Tasten die Option
A-B-WIEDERHOLUNG, und drücken Sie dann die
Taste Wiedergabe/OK, um den Startpunkt (A)
festzulegen; drücken Sie die Taste Wiedergabe/OK
erneut, um die Option A-B-WIEDERHOLUNG
anzuzeigen, und dann die Taste Wiedergabe/ OK ein
drittes Mal, um den Endpunkt (B) festzulegen. Der
Abschnitt zwischen Start- und Endpunkt wird nun
wiederholt abgespielt.
• Drücken Sie auf um das Einstellmenü wieder zu
verlassen.
2. Titel/Kapitel/Disc-Wiederholung - Drücken Sie
während der Wiedergabe mehrmals die Taste
Wiederholen, um einen Titel, ein Kapitel oder ein
Disc-Medium zu wiederholen.
3. Drücken Sie mehrmals die Taste Wiederholen, bis
Sie zur normalen Wiedergabe zurückkehren.
- 57 -
Page 58
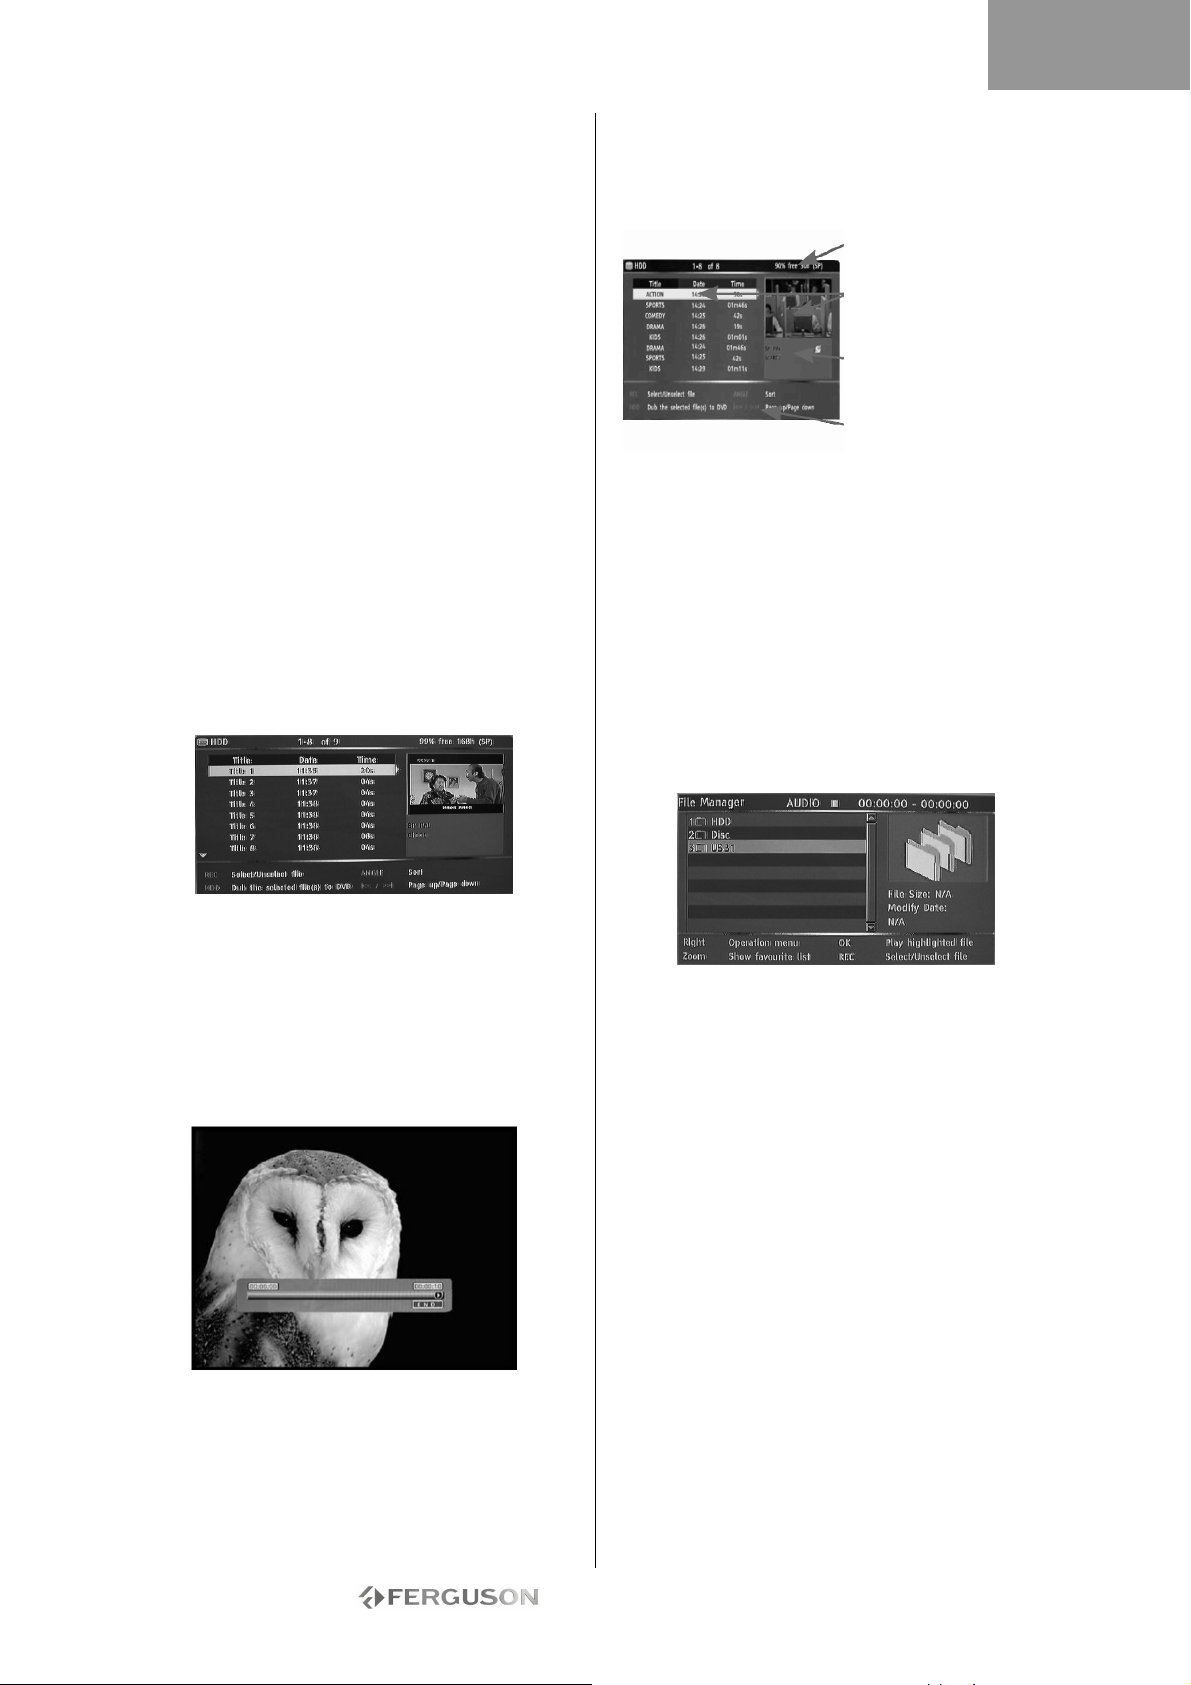
DEUTSCH
Audiosprache
Sofern ein Disc-Medium mehrsprachig
aufgenommen wurde, können Sie mit der Option
AUDIO zwischen bis zu acht Audiosprachen oder
Sound wechseln. Bei Karaoke-Disc-Medien können
Sie mit AUDIO zwischen Musik und Gesang
wechseln.
Nur bei DVDs und SVCDs verfügbar.
Untertitelsprache
Sofern ein Disc-Medium mit mehreren Untertiteln
aufgenommen wurde, können Sie durch
mehrmaliges Drücken der Taste UNTERTITEL unter
bis zu 32 Untertitelsprachen auswählen.
Nur bei DVDs und SVCDs verfügbar.
Blickwinkel (nur DVD)
Bei Disc-Medien mit Szenen, die mit mehreren
Kameras aus verschiedenen Blickwinkeln
aufgenommen wurden, können Sie durch
mehrmaliges Drücken der Taste WINKEL unter bis
zu neun Betrachtungswinkeln auswählen.
WIEDERGABE EINER TV-AUFZEICHNUNG AUF
DER FESTPLATTE
1. Drücken Sie die Taste TV-HDD, bis die TVHDD-Titelliste erscheint.
TV-HDD-TITELLISTE (TV-AUFNAHMEN)
Drücken Sie die Taste TV-HDD, um die
TV-HDD-Titelliste aufzurufen.
Verbleibender Platz auf
der Festplatte
Aktuell markierter Titel
Aktuell markierte
Titelaufnahme
-information
Bildschirmhilfe
In der TV-HDD-Titelliste sind sämtliche Titel
aufgeführt, die Sie auf der Festplatte gespeichert
haben. Sie enthält die Aufzeichnungszeit, eine
Miniatur und den Modus (HQ, SP usw.) für jeden
Titel. Außerdem gibt sie an, ob ein Titel geschützt
oder gesperrt ist.
WIEDERGABE DES INHALTS EINES USBGERÄTS
1. Schließen Sie das USB-Gerät am vorderen USBEingang an.
2. Drücken Sie die Taste Dateimanager, um das
Dateimanager- Menü aufzurufen (es kann einige
Sekunden dauern, bis das USB- Gerät den Recorder
erkennt).
2. Markieren Sie mit Hilfe der Tasten
den gewünschten Titel.
Mit der Taste Winkel können Sie die Liste nach
Name oder Datum sortieren und mit Zurück und
Weiter zur vorhergehenden/nächsten Seite
wechseln.
3. Drücken Sie auf Wiedergabe/OK, um den
markierten Titel wiederzugeben.
Während der Wiedergabe:
Benutzen Sie die TastenWeiter, Zurück, Schnell vor
und Schnell zurück für die Navigation innerhalb des
Titels. Drücken Sie die Taste Anzeige, um die
Bildschirmanzeige ein- oder auszublenden.
3. Markieren Sie mit Hilfe der Navigationstasten die
gewünschte Datei.
4. Drücken Sie auf Wiedergabe/OK, um die Datei
wiederzugeben.
Wenn ein Ordner JPEG- und MP3-Dateien enthält,
können Sie Bilder und Musik gleichzeitig genießen
WIEDERGABE EINER DIVX®- ODER XVIDDATEI MIT UNTERTITELN
1. Markieren Sie im Dateimanager-Menü
mit Hilfe der Navigationstasten die Untertiteldatei
(akzeptiert werden *.SRT, *.SUB und *.SMI).
2. Drücken Sie auf Wiedergabe/OK, um die
Untertiteldatei wiederzugeben.
3. Markieren Sie mit Hilfe der Navigationstasten die
gewünschte Filmdatei.
4. Drücken Sie auf Wiedergabe/OK, um den Film
wiederzugeben.
- 58 -
Page 59
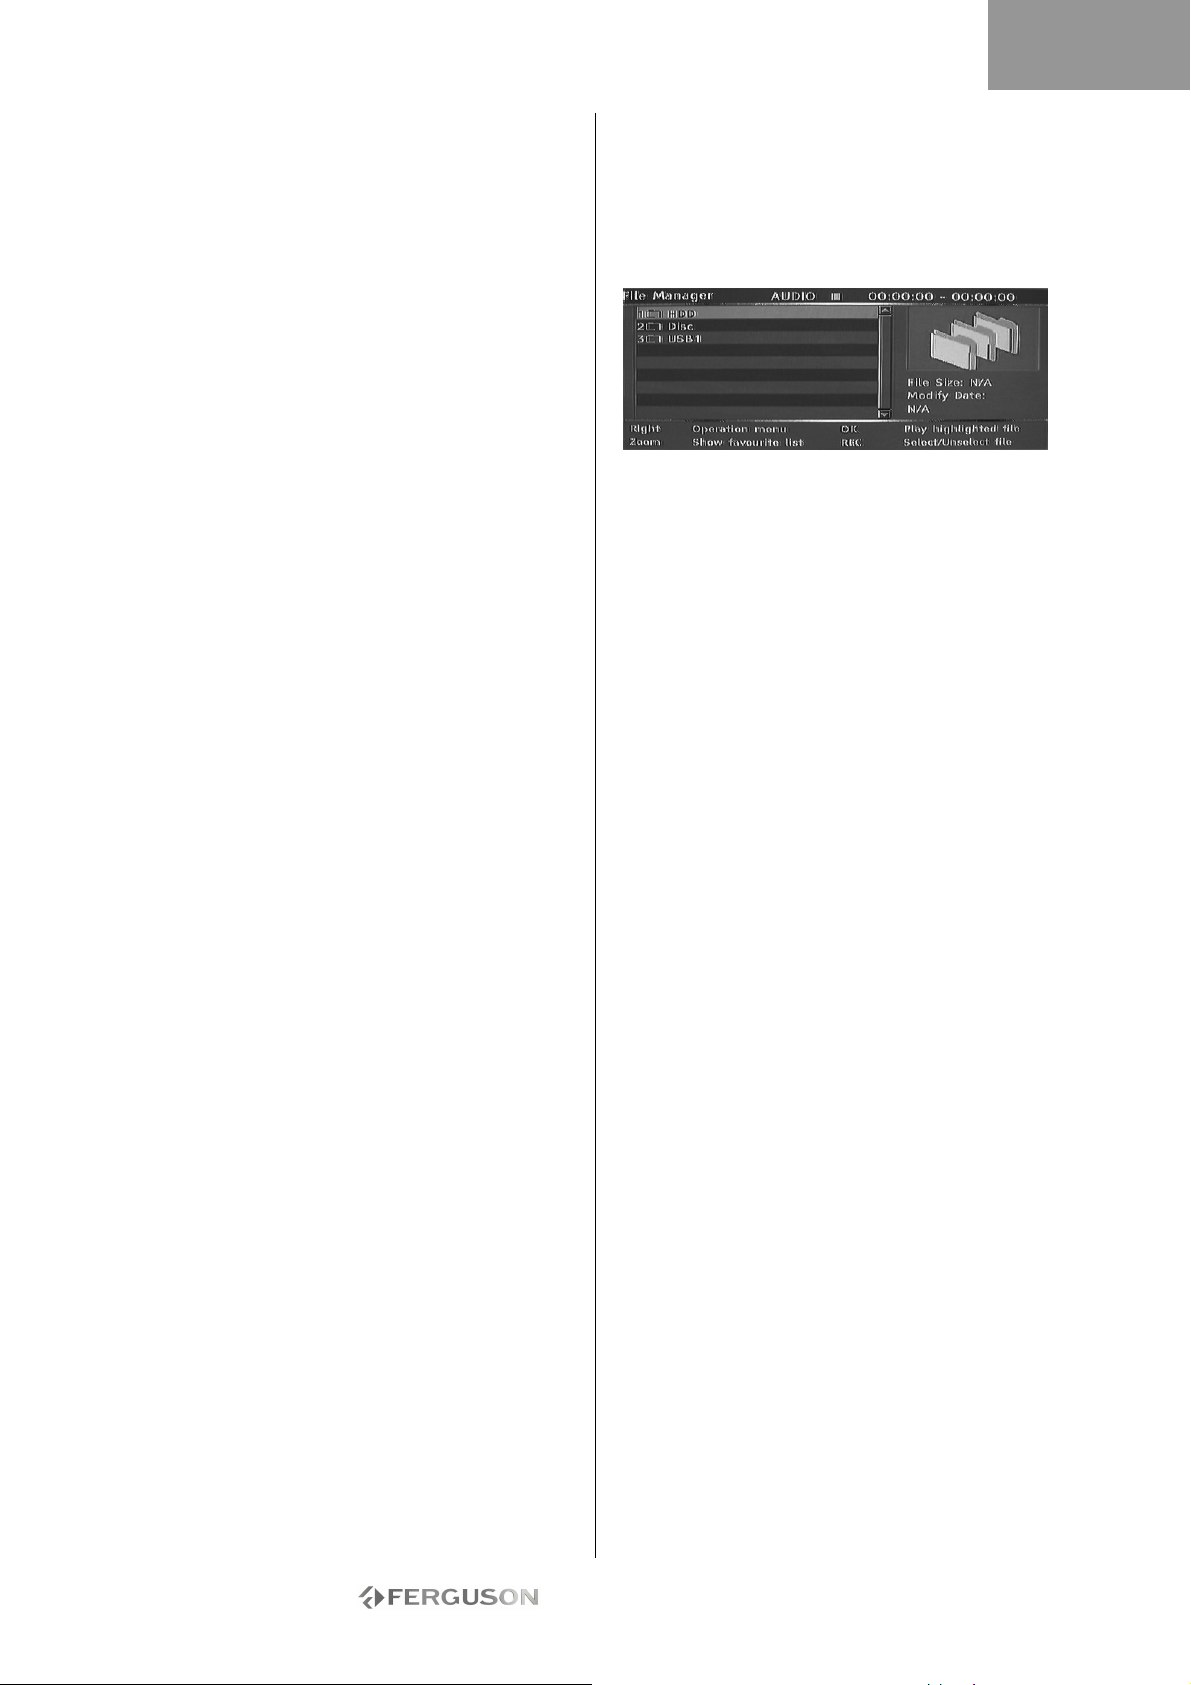
DEUTSCH
WIEDERGABE EINER DVD ODER CD MIT MP3-,
JPEGODER/ UND DIVX®-DATEIEN
1. Drücken Sie die Taste Öffnen/Schließen vorn am
Gerät, um das Laufwerk zu öffnen.
2. Legen Sie das Disc-Medium in den Schlitten.
3. Drücken Sie die Taste Öffnen/Schließen erneut,
um das Laufwerk zu schließen.
4. Daraufhin sollte automatisch das Inhaltsmenü
erscheinen. Andernfalls drücken Sie die Taste
Dateimanager.
5. Markieren Sie mit Hilfe der Navigationstasten die
gewünschte Datei.
6. Drücken Sie auf Wiedergabe/OK, um die Datei
wiederzugeben.
7. Drücken Sie die Taste Stopp, um zum Menü
zurückzukehren.
1. Für eine JPEG/MP3-Simultan-Diashow wählen Sie
die MP3-Datei und dann die JPEG-Datei. Die MP3und JPEG-Dateien werden in der ausgewählten
Reihenfolge wiedergegeben.
2. Drücken Sie auf Stop, um die Wiedergabe zu
stoppen. Bei einer JPEG/MP3-Simultan-Diashow
drücken Sie Taste Stop zweimal.
DIVX VIDEO-ON-DEMAND (VOD)
DivX Video-on-Demand (VOD) ist ein digitaler
Videobereitstellungsdienst, über den Sie
Videoinhalte von verschiedenen DivX-Partnern in
hoher Qualität herunterladen können. Hierzu
benötigen Sie einen PC mit BreitbandInternetanschluss und einen CD-Brenner.
Außerdem müssen Sie Ihren Ferguson RW-770HD
registrieren, um DivX VOD-Inhalte abspielen zu
können. Der Registrierungsvorgang ist einfach und
braucht für jedes Gerät nur einmal vorgenommen
zu werden. Um ein Gerät zu registrieren, geben Sie
einfach den achtstelligen Buchstabencode Ihres
Players in Ihr VOD-Konto ein. Weitere Hinweise
finden Sie unter http://www.divx.com/.
So finden Sie den Registrierungscode:
1. Drücken Sie die Taste Menu auf der
Fernbedienung.
2. Wählen Sie mit Hilfe der Taste Unten
Datum/Uhrzeit.
3. Drücken Sie die Taste Rechts und dann die Taste
Unten, um DivX(R) VOD zu wählen.
4. Drücken Sie die Taste Wiedergabe/OK, um sich
den Registrierungscode anzusehen.
DATEIMANAGER
Das Dateimanager-Menü dient zur Wiedergabe von
Multimediadateien (Musik, Fotos, Videos) auf
externen USBGeräten, DVDs und der internen
Festplatte. Mit dem Dateimanager können Sie auch
Dateien zwischen USB-Geräten*, DVDs und der
internen Festplatte übertragen.
*Dateien können nur von, nicht jedoch auf USBGeräte übertragen werden.
TV-Aufnahmedateien können nicht auf demselben
Disc-Medium wie Multimediadateien gespeichert
werden.
NAVIGATION IM DATEIMANAGER
Das Navigieren im Dateimanager erfolgt wie bei
Ordnern auf einem Computer. Es gibt drei mögliche
Hauptordner: HDD, USB und DVD.Diese befinden
sich alle zusammen in einem einzelnen
Stammordner. Um einen Ordner zu öffnen, wählen
Sie ihn mit Hife der Navigationtasten (siehe unten)
aus und drücken dann die Taste Wiedergabe/OK.
Um einen Ordner „nach oben“ zu gehen, wählenh
Sie das Symbol ../ oben in der Liste und drücken
dann die Taste Wiedergabe/OK.
1. Drücken Sie die Dateimanager-Taste auf der
Fernbedienung, um das Dateimanager-Menü zu
öffnen.
2. Benutzen Sie die Tasten Links , Rechts ,
Oben und Unten , um in den Menüs zu
navigieren.
3. Benutzen Sie die Taste Wiedergabe/OK , um eine
Auswahl zu treffen.
WIEDERGABE EINER MULTIMEDIADATEI IM
DATEIMANAGER
1. Wählen Sie mit Hilfe der Navigationstasten eine
Multimediadatei (Video, Bild oder Audio) und
drücken Sie dann die Taste Wiedergabe/OK, um sie
anzuzeigen bzw. abzuspielen.
KOPIEREN VON MULTIMEDIADATEIEN VON
DER FESTPLATTE AUF EINE DVD-R/RW
1. Legen Sie eine nicht abgeschlossene DVD-R/RW
in das Laufwerk.
2. Drücken Sie die Dateimanager-Taste, um den
Dateimanager aufzurufen.
3. Wählen Sie mit Hilfe der Navigationstasten die
Festplatte, und drücken Sie dann die Taste
Wiedergabe/OK.
4. Markieren Sie mit Hilfe der Tasten Oben/Unten in
der HDDListe die gewünschte(n) Datei(en).
5. Drücken Sie jedes Mal die Aufnahmetaste, um
eine Datei zum Kopieren auszuwählen. Neben jeder
ausgewählten Datei erscheint eine Markierung. Um
die Auswahl einer Datei wieder aufzuheben,
markieren Sie sie und drücken die Taste Aufnahme
erneut.
6. Drücken Sie die Taste Rechts, um das
Betriebsmenü aufzurufen.
- 59 -
Page 60
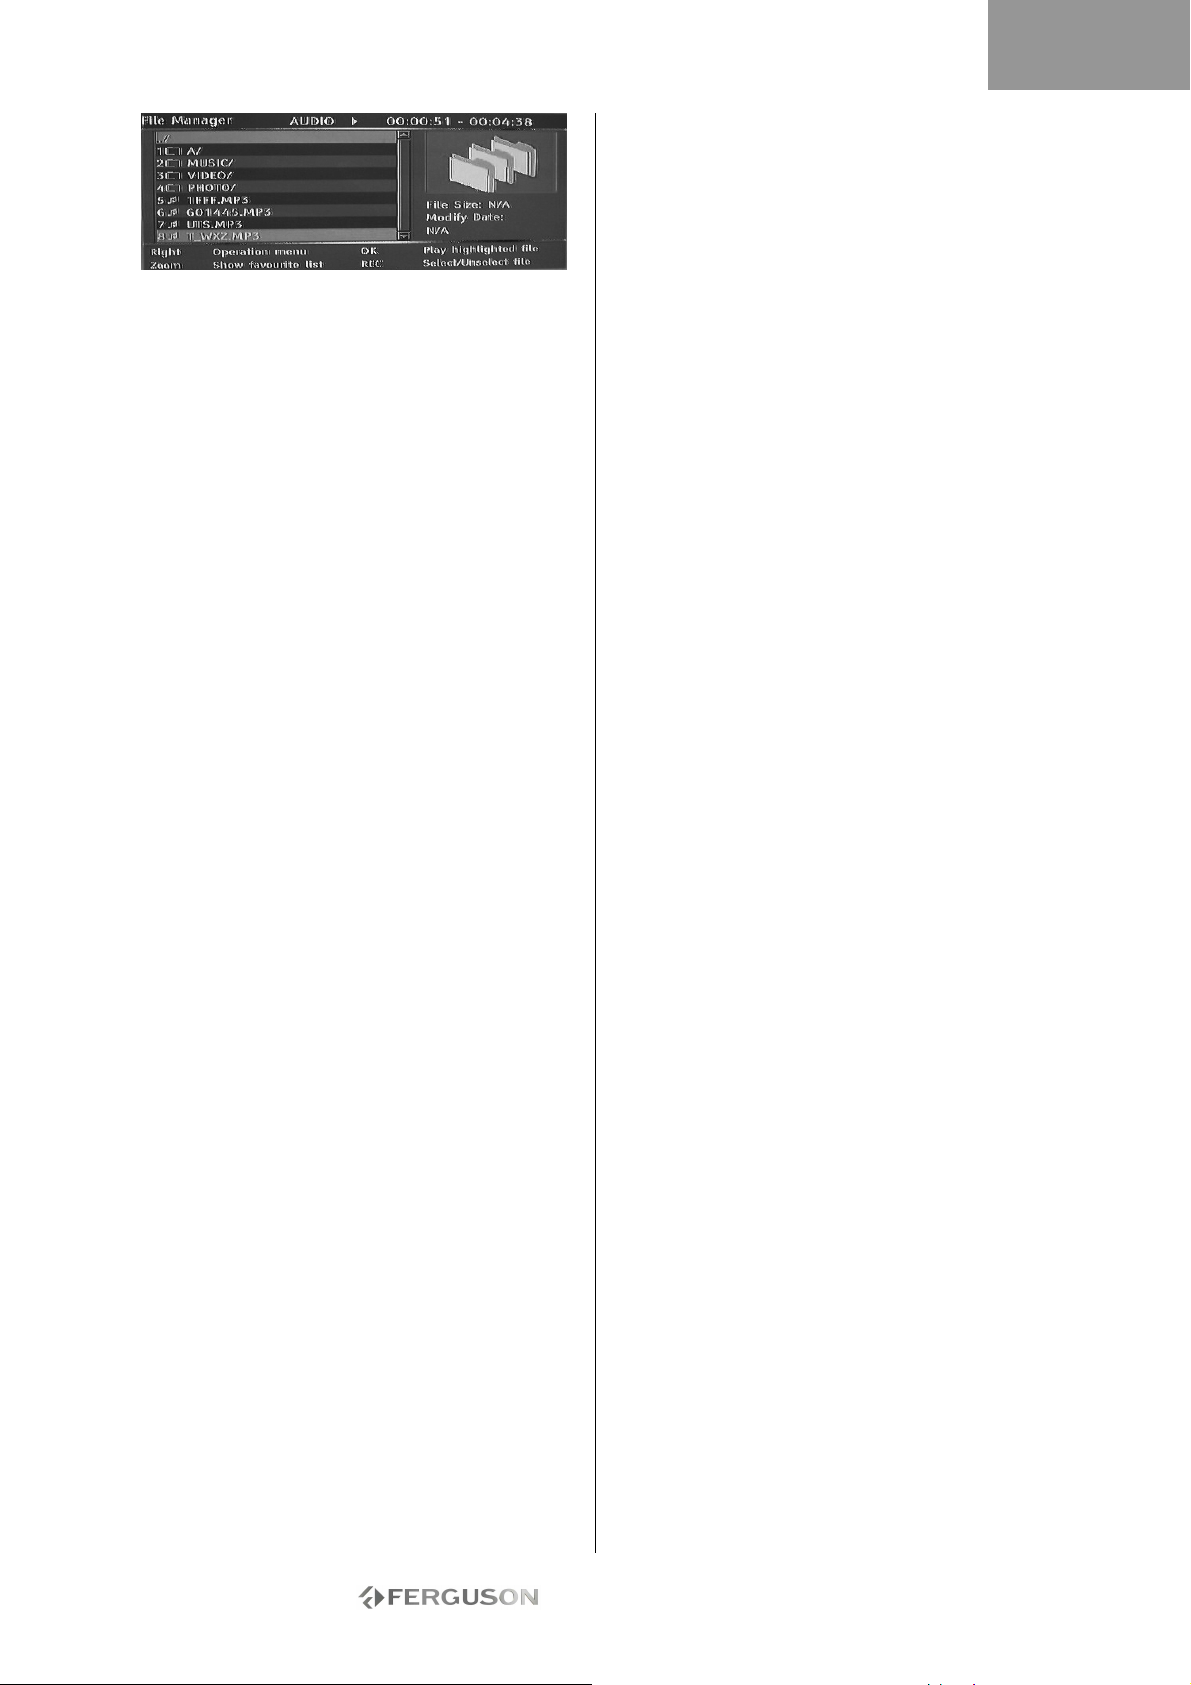
7. Wählen Sie in der Liste die Kopieroption, und
drücken Sie dann die Taste Wiedergabe/OK.
8. Benutzen Sie die Navigationstasten, um die DVD
auszuwählen und zu öffnen.
9. Drücken Sie in der DVD die Taste Rechts, um das
Betriebsmenü aufzurufen.
10. Wählen Sie in der Liste die Einfügeoption, um
die kopierte(n) Datei(en) auf die DVD zu kopieren.
11. Unten im Menü wird der Kopierverlauf/status
angezeigt.
KOPIEREN VON MULTIMEDIADATEIEN VON
EINER DVD AUF DIE HDD
1. Legen Sie die DVD mit den zu kopierenden
Multimediadateien in das Laufwerk.
2. Drücken Sie die Dateimanager-Taste, um den
Dateimanager aufzurufen.
3. Wählen Sie mit Hilfe der Navigationstasten die
DVD, und drücken Sie dann die Taste
Wiedergabe/OK.
4. Markieren Sie mit Hilfe der Tasten Oben/Unten in
der DVDListe die gewünschte(n) Datei(en).
5. Drücken Sie jedes Mal die Aufnahmetaste, um
eine Datei zum Kopieren auszuwählen. Neben jeder
ausgewählten Datei erscheint eine Markierung. Um
die Auswahl einer Datei wieder aufzuheben,
markieren Sie sie und drücken die Taste Aufnahme
erneut.
6. Drücken Sie die Taste Rechts, um das
Betriebsmenü aufzurufen.
7. Wählen Sie in der Liste die Kopieroption, und
drücken Sie dann die Taste Wiedergabe/OK.
8. Benutzen Sie die Navigationstasten, um die
Festplatte auszuwählen und zu öffnen.
9. Drücken Sie in der Festplatte die Taste Rechts,
um das Betriebsmenü aufzurufen.
10. Wählen Sie in der Liste die Einfügeoption, um
die kopierte(n) Datei(en) auf die Festplatte zu
kopieren.
11. Unten im Menü wird der Kopierverlauf/status
angezeigt.
KOPIEREN VON MULTIMEDIADATEIEN VON
EINEM EXTERNEN USB-GERÄT AUF DIE HDD
ODER EINE DVD-R/RW
1. Schließen Sie das USB-Gerät mit den zu
kopierenden Multimediadateien am vorderen USBAnschluss an.
2. Legen Sie gegebenenfalls eine nicht
abgeschlossene DVD-R/RW in das Laufwerk.
3. Drücken Sie die Dateimanager-Taste, um den
Dateimanager aufzurufen.
4. Wählen Sie mit Hilfe der Navigationstasten das
USB-Gerät, und drücken Sie dann die Taste
Wiedergabe/OK.
5. Markieren Sie mit Hilfe der Tasten Oben/Unten in
der USB-Liste die gewünschte(n) Datei(en).
6. Drücken Sie jedes Mal die Aufnahmetaste, um
eine Datei zum Kopieren auszuwählen. Neben jeder
ausgewählten Datei erscheint eine Markierung. Um
die Auswahl einer Datei wieder aufzuheben,
markieren Sie sie und drücken die Taste Aufnahme
erneut.
7. Drücken Sie die Taste Rechts, um das
Betriebsmenü aufzurufen.
8. Wählen Sie in der Liste die Kopieroption, und
drücken Sie dann die Taste Wiedergabe/OK.
9. Benutzen Sie die Navigationstasten, um die HDD
oder DVD auszuwählen und zu öffnen.
10. Drücken Sie in der HDD oder DVD die Taste
Rechts, um das Betriebsmenü aufzurufen.
11. Wählen Sie in der Liste die Einfügeoption, um
die kopierte(n) Datei(en) auf die HDD oder DVD zu
kopieren.
12. Unten im Menü wird der Kopierverlauf/status
angezeigt.
KOPIEREN VON MULTIMEDIADATEIEN VON
DER FESTPLATTE AUF EINE DVD-R/RW
1. Legen Sie eine nicht abgeschlossene DVD-R/RW
in das Laufwerk.
2. Drücken Sie die Dateimanager-Taste, um den
Dateimanager aufzurufen.
3. Wählen Sie mit Hilfe der Navigationstasten die
Festplatte, und drücken Sie dann die Taste
Wiedergabe/OK.
4. Markieren Sie mit Hilfe der Tasten Oben/Unten in
der HDDListe die gewünschte(n) Datei(en).
5. Drücken Sie jedes Mal die Aufnahmetaste, um
eine Datei zum Kopieren auszuwählen. Neben jeder
ausgewählten Datei erscheint eine Markierung. Um
die Auswahl einer Datei wieder aufzuheben,
markieren Sie sie und drücken die Taste Aufnahme
erneut.
6. Drücken Sie die Taste Rechts, um das
Betriebsmenü aufzurufen.
7. Wählen Sie in der Liste die Kopieroption, und
drücken Sie dann die Taste Wiedergabe/OK.
8. Benutzen Sie die Navigationstasten, um die DVD
auszuwählen und zu öffnen.
9. Drücken Sie in der DVD die Taste Rechts, um das
Betriebsmenü aufzurufen.
10. Wählen Sie in der Liste die Einfügeoption, um
die kopierte(n) Datei(en) auf die DVD zu kopieren.
11. Unten im Menü wird der Kopierverlauf/status
angezeigt.
ERSTELLEN EINER FAVORITENLISTE
Sie können alle bevorzugten Dateien in eine
gemeinsame Favoritenliste aufnehmen.
1. Drücken Sie die Dateimanager-Taste, um den
Dateimanager aufzurufen.
2. Wählen Sie mit Hilfe der Navigationstasten einen
Ordner (HDD, ZSB oder DVD), und drücken Sie
dann die Taste Wiedergabe/OK.
3. Markieren Sie mit Hilfe der Tasten Oben/Unten
die Datei, die Sie in Ihre Favoritenliste aufnehmen
wollen.
4. Drücken Sie die Taste Rechts, um das
Betriebsmenü aufzurufen.
5. Wählen Sie in der Liste die Hinzufügeoption, und
drücken Sie dann die Taste Wiedergabe/OK. Die
Favoritenliste unterscheidet automatisch zwischen
Audio, Video und Bildern.
6. Um sich Ihre Favoriten anzusehen, drücken Sie
wiederholt die Zoom-Taste, um zwischen Audio-,
Video- und Bildfavoriten zu wechseln.
DEUTSCH
- 60 -
Page 61
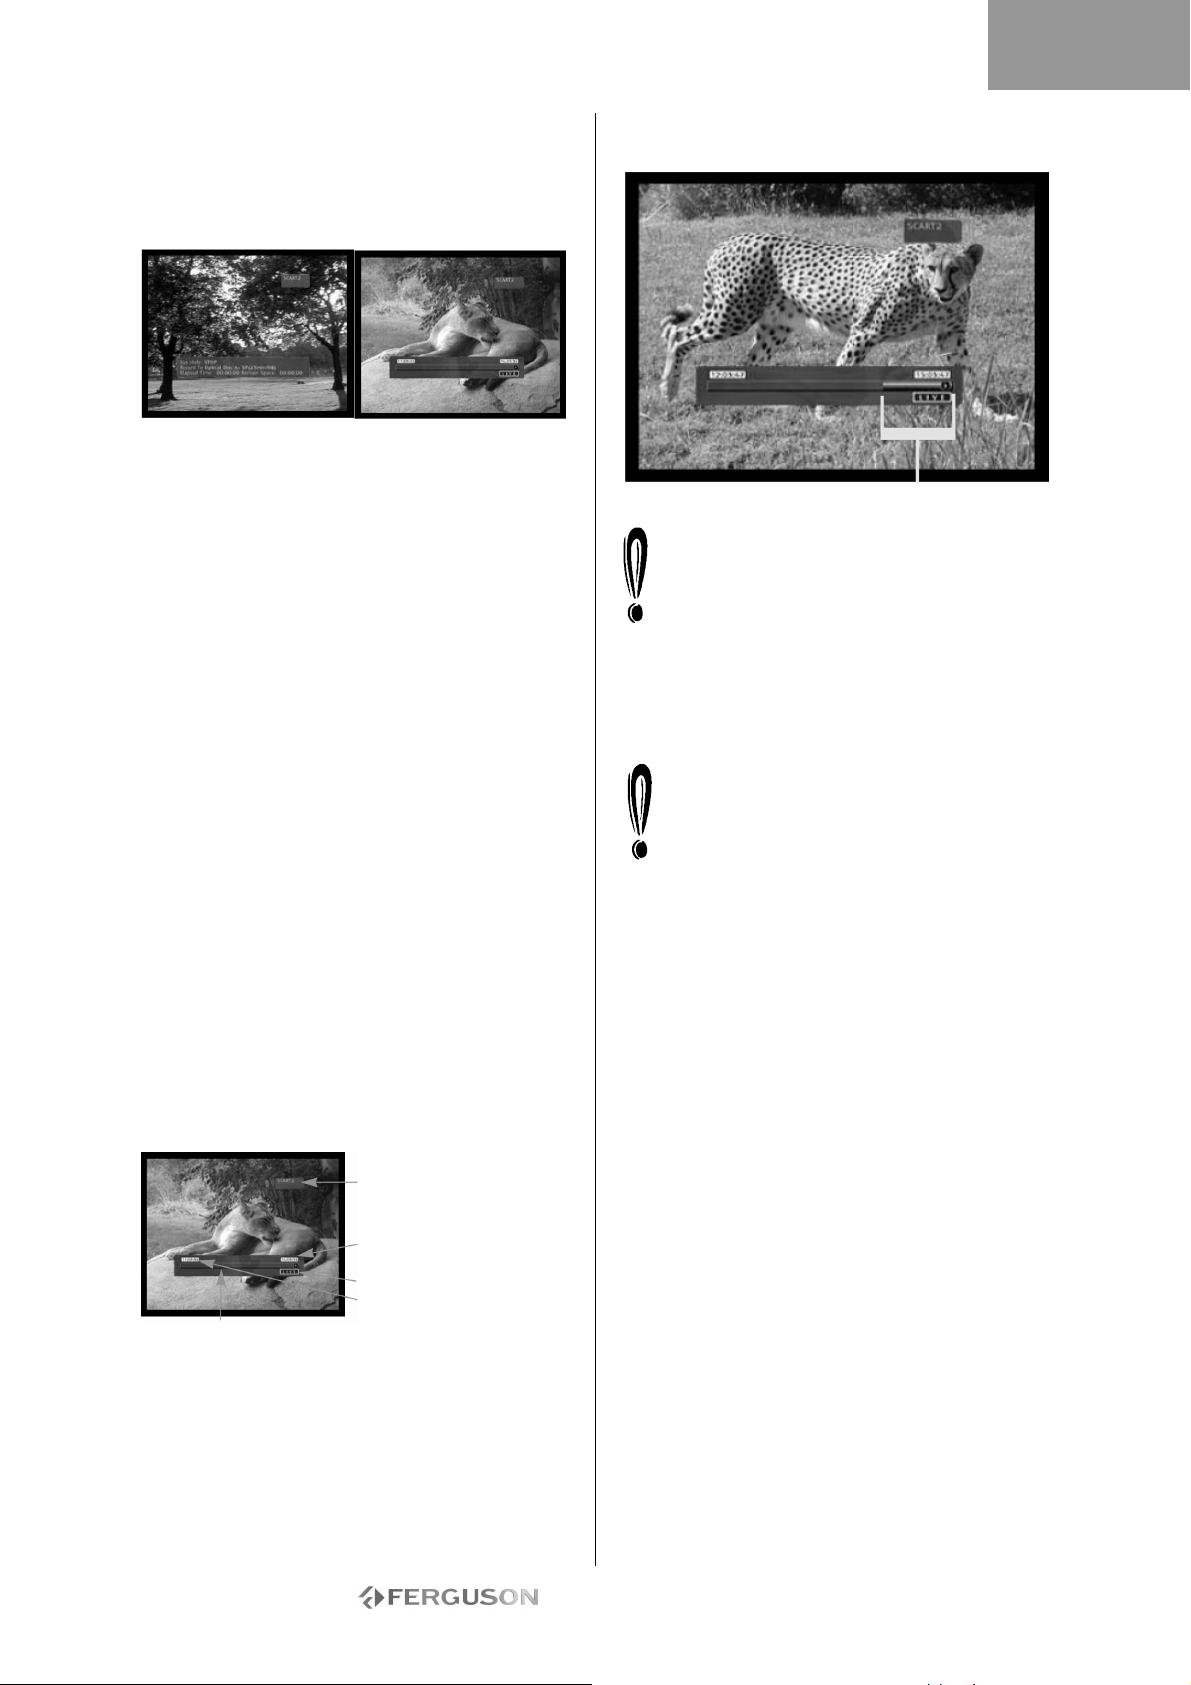
DEUTSCH
TIME SHIFTING
RAUFNAHME/TIME SHIFTING-MODUS
Beim Anzeigen des TV-Tuners oder externer Quellen
gibt es zwei Betriebsarten: Aufnahmemodus und
Time Shifting-Modus.
Aufnahmemodus Time Shifting-Modus
• Aufnahmemodus - Im Aufnahmemodus können
analoge Quellen und ein DV-Eingang aufgenommen
werden. Die Aufnahmen können auf der Festplatte
oder einer DVD erfolgen.
• Time Shifting-Modus - Im Time Shifting-Modus
können nur analoge Quellen aufgenommen werden.
Aufnahmen können nur auf der Festplatte erfolgen.
Der Time Shifting-Modus ermöglicht es, LiveFernsehbilder anzuhalten und zu steuern. Von dem
Moment an, in dem sich der Ferguson RW-770HD
im Time Shifting-Modus befindet, zeichnet er
fortlaufend die analoge Quelle (z.B. einen
Fernsehsender) in seinen 1-, 3- oder 6-StundenSpeicher auf. Auf diese Weise kann man die letzten
1, 3 oder 6 Stunden Sendezeit überprüfen und
aufzeichnen.
Aktivierung des Time Shifting-Modus
1. Drücken Sie die Taste TV-HDD.
2. Drücken Sie mehrmals die Taste Quelle, bis die
gewünschte Quelle ausgewählt ist. Oben rechts auf
dem Bildschirm wird der Quellenstatus angezeigt.
Hinweis: Beim DV-Eingang ist die Time ShiftingFunktion nicht verfügbar. Folgende analoge
Videoquellen sind verfügbar:
> SCART2
> CHXX (TV Tuner)
> F-COMP (Front Composite Video)
> F-SV (Front S-Video)
3. Daraufhin ist auf dem Bildschirm die
Zeitverlaufsleiste zu sehen.
Aktuelle Quelle
Live-Zeit
Wiedergabedau
3 Stunden vor Live-Zeit
Zeitverlaufsleiste
4. Mit fortschreitender Zeit gibt die Zeitleiste die
Speicherentwicklung an.
Verfügbarer Speicherplatz
Im Time Shifting-Modus wird eventuell eine
Timer-Aufzeichnung angezeigt. Da Sie nicht
ein Programm im Time Shifting-Modus ansehen
und einen anderen Kanal aufnehmen können,
fragt der Recorder, ob er den aktuellen Kanal
beibehalten oder mit der Timer-Aufzeichnung
fortfahren soll. Falls er keine Antwort erhält, geht
der Recorder davon aus, dass die TimerAufzeichnung gestartet werden soll. Die Meldung
erscheint zwei Minuten vor Beginn der Tim er-A
ufzeichn ung.
Die Time Shifting-A ufzeichn ung wird in einem
Pufferspeicher gespeichert, der bis zu 3
Stunden an Aufnahmen enthalten kann. Wenn
das Aufnahmezeitlimit überschritten ist, wird
der Pufferspeicher fortschreitend
überschrieben. Falls Sie die Videodaten im
Pufferspeicher für zukünftige Zwecke behalten
möchten, können Sie den Inhalt vollständig oder
teilweise speichern (siehe Abschnitt „Nach der
Aufzeichnung").
Live-TV anhalten
1. Wechseln Sie in den Time Shifting-Modus (siehe
vorherigen Abschnitt).
2. Drücken Sie auf Pause, um die Live-Übertragung
(oder die gewählte analoge Quelle) anzuhalten.
3. Drücken Sie auf Wiedergabe/OK, um
fortzufahren.
Der Ferguson RW-770HD setzt die Aufzeichnung der
Live-Übertragung fort, während Sie sich zuvor
aufgezeichnete Programme ansehen können.
Überprüfung des Time Shifting-Speichers
(Wiedergabe von LiveÜbertragungsmomenten)
1. Wechseln Sie in den Time Shifting-Modus.
2. Der Time Shifting-Speicher ist nun für eine
Überprüfung verfügbar.
Benutzen Sie die Tasten Weiter, Zurück, Schnell vor
und Schnell zurück, um im Time Shifting-Speicher
zu navigieren, und drücken Sie die Taste
Wiedergabe/OK, um die Wiedergabe zu starten.
- 61 -
Page 62
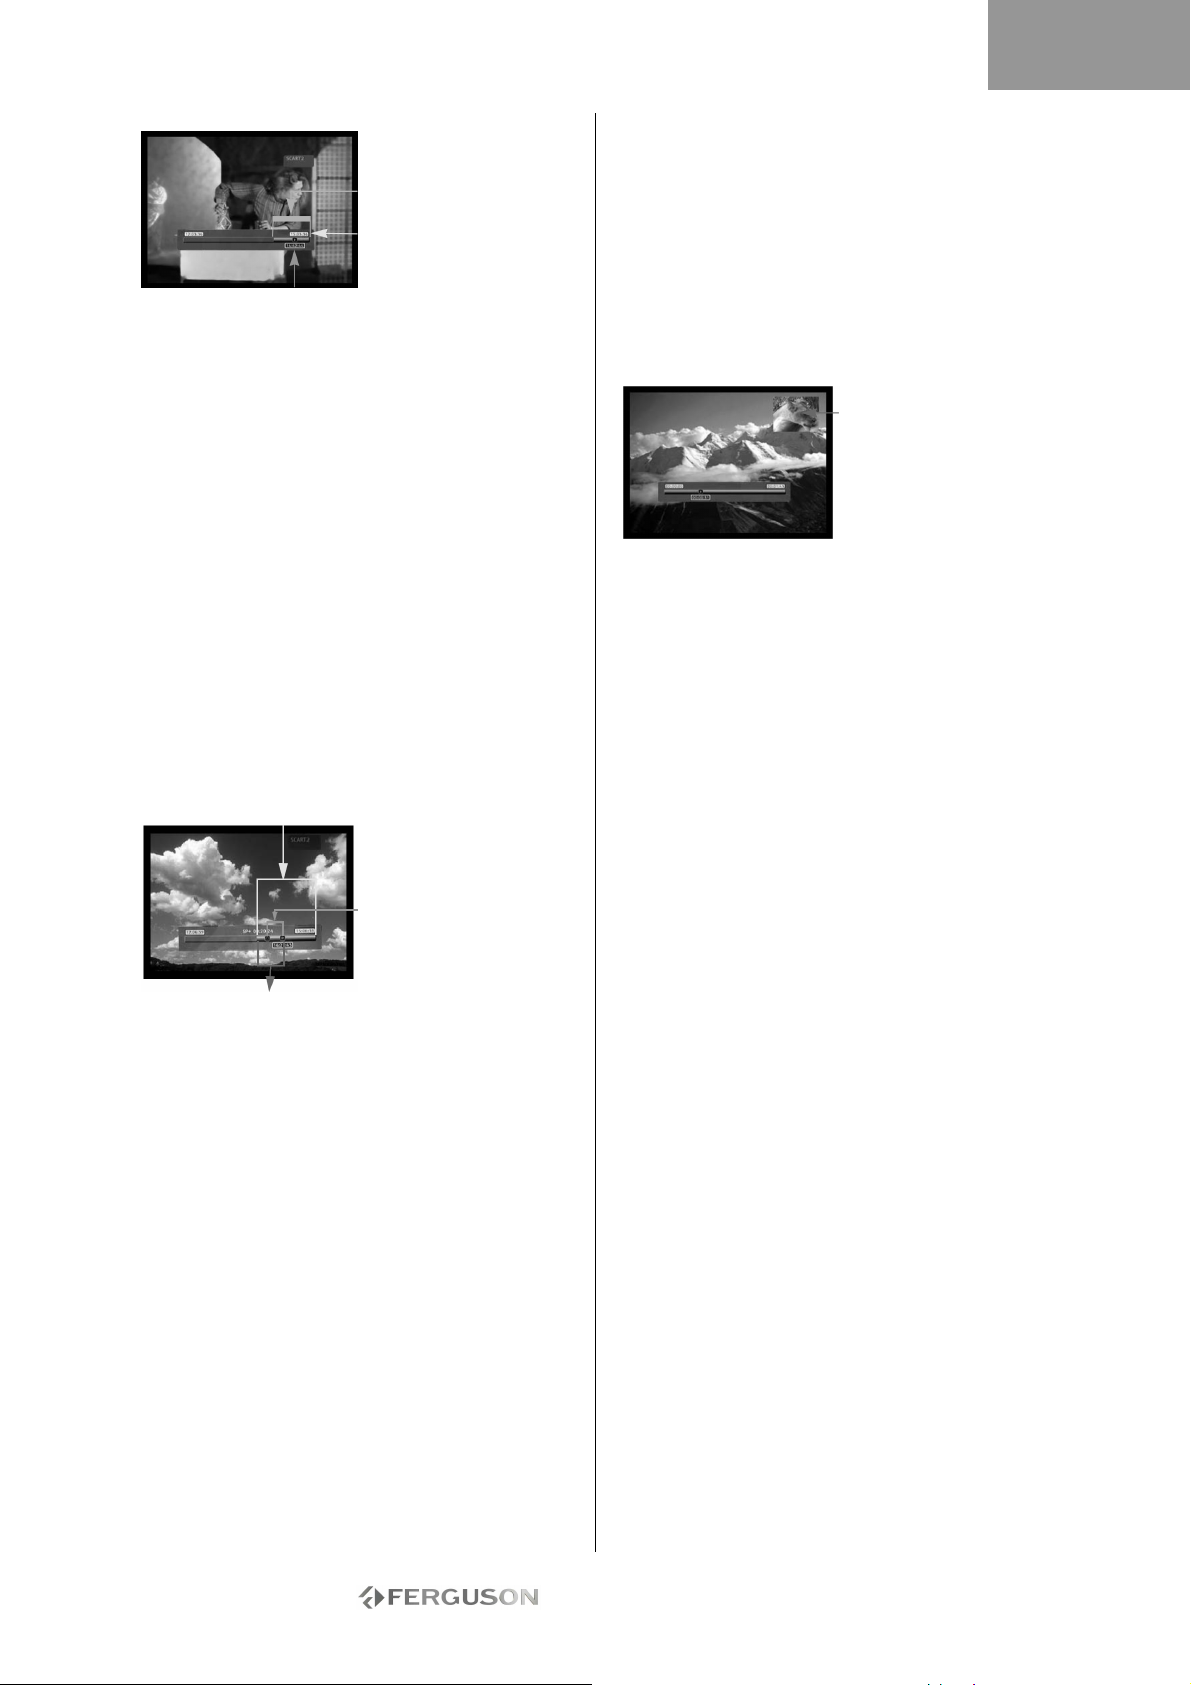
DEUTSCH
Verfügbarer
Speicherplat
Live-Zeit
Wiedergabedauer
Speicherung eines Titels im Time
Shifting-Speicher (Nach der
Aufzeichnung)
1. Wechseln Sie in den Time Shifting-Modus.
2. Der Time Shifting-Speicher ist nun für eine
Speicherung auf der Festplatte verfügbar.
Benutzen Sie die Tasten Weiter, Zurück, Schnell vor
und Schnell zurück, um im Time Shifting-Speicher
zu navigieren, und gehen Sie zum Anfang des Titels,
den Sie auf der Festplatte speichern wollen.
3. Drücken Sie auf Aufnahme.
4. Benutzen Sie die Tasten Weiter, Zurück, Schnell
vor und Schnell zurück, um im Time ShiftingSpeicher zu navigieren, und gehen Sie zum Ende
des Titels, den Sie auf der Festplatte speichern
wollen.
5. Drücken Sie auf „Stopp". Damit ist der Titel auf
der Festplatte gespeichert.
Der gespeicherte Titel sowie frühere Daten werden
aus dem Time Shifting-Speicher gelöscht.
Verfügbarer
Abschnitt, der auf der
Festplatte gespeichert
wird
Abschnitt, der aus dem Speicher gelöscht wird
Speicherung des gesamten Time
Shifting-Speichers auf der HDD
1. Wechseln Sie in den Time Shifting-Modus.
2. Drücken Sie die Taste Untertitel, um den
gesamten Time Shifting-Speicher auf der Festplatte
zu speichern.
Deaktivierung des Time Shifting-Modus
So deaktivieren Sie den Time Shifting-Modus:
1. Drücken Sie in der Ansicht der analogen Quelle
die Taste DVD.
2. Drücken Sie die Quelle-Taste, um zur analogen
Quellenansicht ohne Time Shifting zurückzukehren.
So reaktivieren Sie den Time Shifting-Modus:
1. Drücken Sie in der Ansicht der analogen Quelle
die Taste TV-HDD.
2. Drücken Sie die Quelle-Ttaste, um zur analogen
Quellenansicht mit Time Shifting zurückzukehren.
Bild im Bild (PIP)
1. Drücken Sie die Taste Quelle, um die Videoquelle
zu wählen, die als Bild im Bild erscheinen soll.
2. Während der Wiedergabe einer früher
aufgenommenen Dateien drücken Sie die Taste
Winkel an der Fernbedienung, um die PIP-Funktion
aufzurufen.
Das Bild-im-Bild erscheint in einem kleinen Fenster
rechts unten auf dem Bildschirm.
Bild im Bild
3. Drücken Sie erneut auf Winkel, um das Bild im
Bild wieder zu verlassen.
- 62 -
Page 63
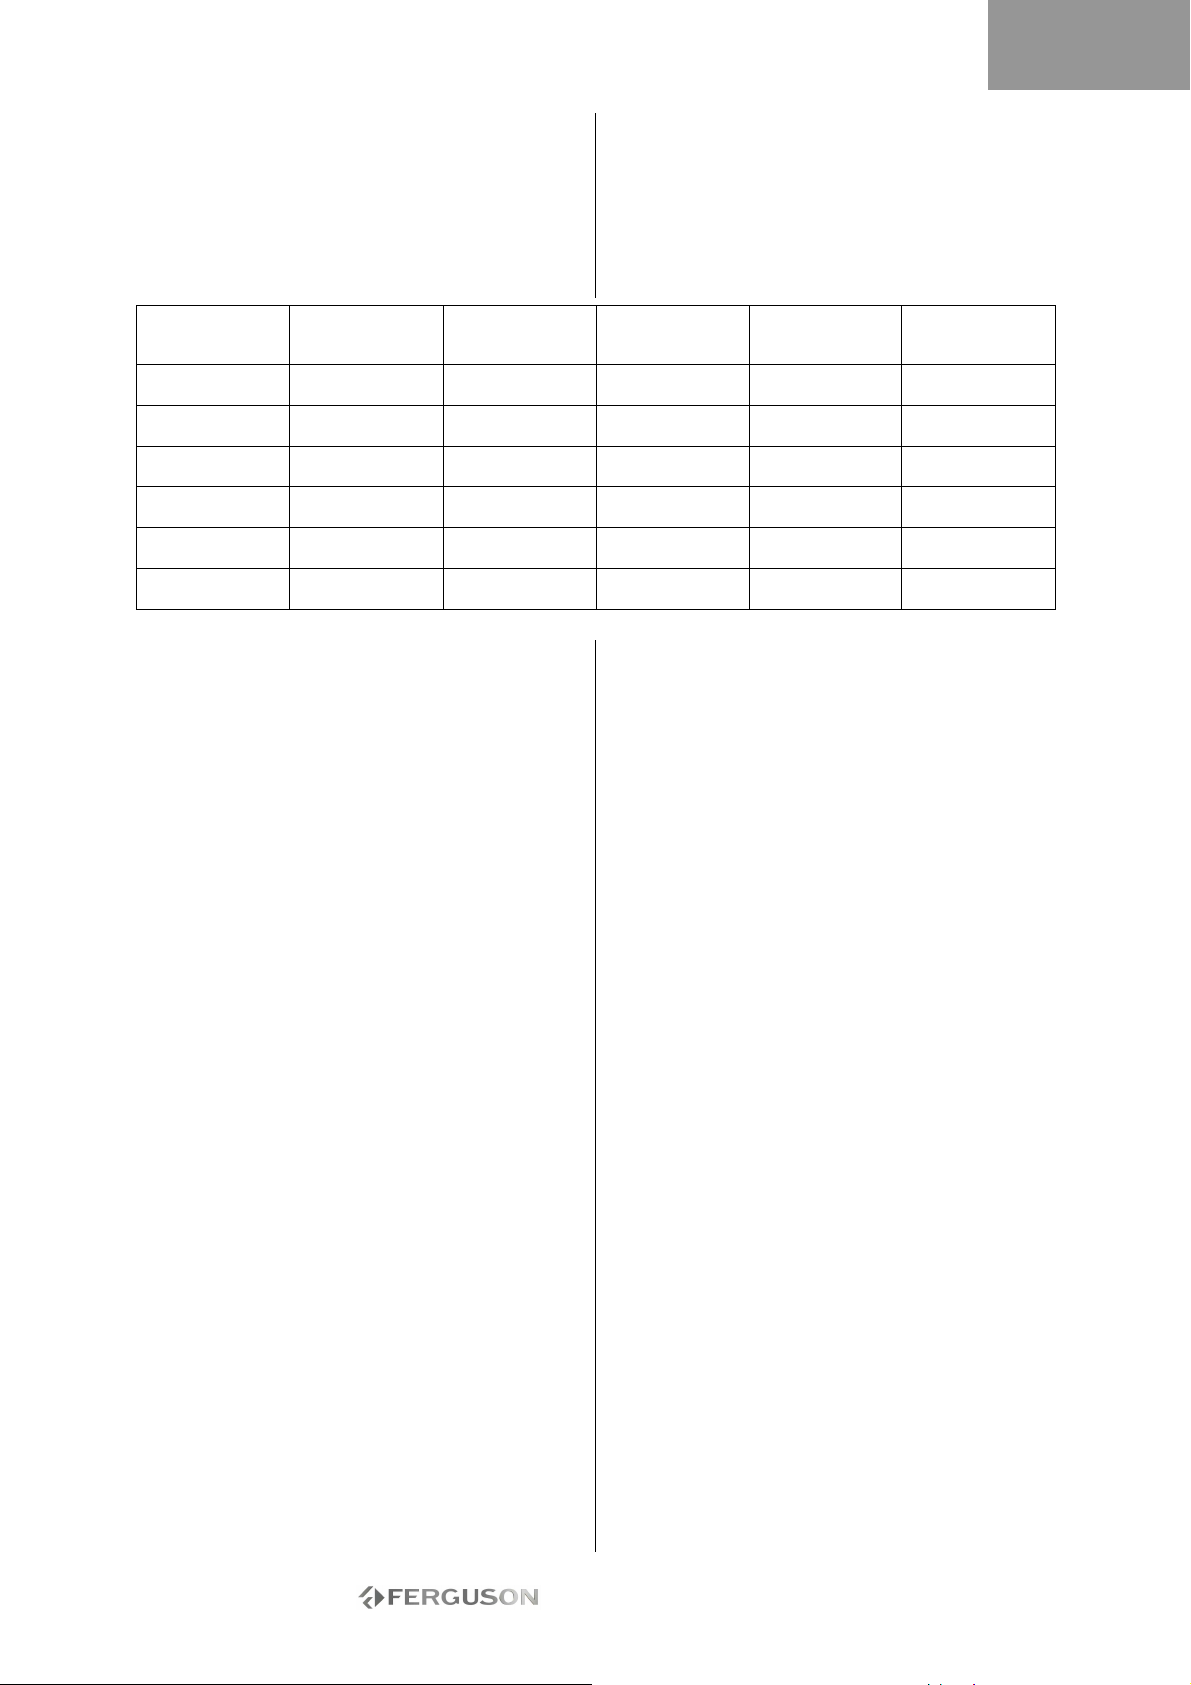
DEUTSCH
AUFNAHME
EINSTELLEN DER AUFNAHMEQUALITÄT
Sechs verschiedene Aufnahmequalitäten stehen zur
Auswahl. Eine höhere Qualität verbraucht mehr
Platz auf der Festplatte oder DVD und verringert die
zur Verfügung stehende Gesamtzeit.
Aufnahmequali
tät
HQ (High
Quality)
SP (Standard
Play)
SP+ (Standard
Play +)
EP (Extended
Play)
LP (Long Play) 5 Stunden 85 Stunden 170 Stunden 265 Stunden 425 Stunden
SLP (Super Long
Play)
Um die Aufnahmequalität zu ändern, tun Sie bitte
Folgendes:
1. Drücken Sie die Taste MENU auf der
Fernbedienung, um das Einstellmenü aufzurufen.
2. Markieren Sie mit Hilfe der Navigationstasten das
Symbol Aufnahme, und drücken Sie die Taste
Wiedergabe/OK.
3. Markieren Sie mit Hilfe der Tasten die Option
Aufnahmequalität, und drücken Sie dann die Taste
Wiedergabe/ OK.
4. Markieren Sie mit Hilfe der Tasten die
gewünschte Aufnahmequalität, und drücken Sie
dann zur Bestätigung die Taste Wiedergabe/OK.
Wählen Sie die Aufnahmequalität mit Bedacht, um
sicherzugehen, dass ausreichend Platz für Ihre
Aufzeichnung auf der Festplatte oder DVD
vorhanden ist.
AUFNEHMEN AUF DVD
1. Legen Sie eine beschreibbare DVD ein, und
drücken Sie die Taste DVD, um in den DVD-Modus
zu wechseln.
2. Drücken Sie wiederholt die Taste Quelle, um eine
Signalquelle zum Aufnehmen zu wählen.
3. Drücken Sie die Taste Aufnahme/OTR, um die
Aufnahme zu starten. Daraufhin erscheint unten auf
dem Bildschirm eine Statusleiste, die den aktuellen
Aufnahmezustand anzeigt.
4. Drücken Sie auf Stopp, um die Aufzeichnung zu
stoppen.
5. Wenn Sie nun die Taste DVD drücken, um in den
DVD-Modus zu wechseln, finden Sie das soeben
aufgenommene Segment.
Es kann einige Sekunden dauern, um den
Aufnahmevorgang vollständig zu beenden. Warten
Sie daher bitte, bis in der Statusleiste „Stop“
angezeigt wird, bevor Sie in den DVDModus
wechseln.
Wenn Sie auf diese Weise von einer DVD
aufnehmen, werden laufende HDD-Aufnahmen vom
Recorder gestoppt. Nachdem die DVD-Aufnahme
abgeschlossen ist, drücken Sie die Taste TV-HDD,
um den Time Shifting-Mechanismus neu zu starten.
Aufnahmedaue
r (4,7 GB,
DVD)
1 Stunden 17 Stunden 35 Stunden 53 Stunden 85 Stunden
2 Stunden 34 Stunden 68 Stunden 106 Stunden 170 Stunden
3 Stunden 51 Stunden 102 Stunden 159 Stunden 255 Stunden
4 Stunden 68 Stunden 136 Stunden 212 Stunden 340 Stunden
6 Stunden 96 Stunden 192 Stunden 300 Stunden 480 Stunden
Aufnahmedaue
r (80 GB,
HDD)
Aufnahmedaue
r (160 GB,
HDD)
Der Recorder nimmt so lange weiter auf, bis das
Disc-Medium voll ist oder die Taste Stopp gedrückt
wird. Damit der Recorder nur 30 Minuten lang
aufnimmt, drücken Sie die Taste Aufnahme/OTR,
nachdem die Aufzeichnung gestartet wurde. Mit
jedem Drücken der Taste Aufnahme/OTR werden
weitere 30 Minuten zur Aufzeichnungsdauer
hinzugefügt. Um die Aufnahme anzuhalten, drücken
Sie die Taste Pause auf der Fernbedienung. Um die
Aufnahme wieder fortzusetzen, drücken Sie die
Taste Wiedergabe/OK erneut.
Falls TV-Tuner ausgewählt ist, wählen Sie mit den
Tasten den gewünschten Kanal.
AUFNEHMEN AUF HDD
1. Drücken Sie die Taste Quelle, bis die gewünschte
Quelle ausgewählt ist.
• Folgende Videoquellen stehen zur Verfügung:
> DV (Digital Video)
> SCART2
> CHXX (TV Tuner)
> F-COMP (Front Composite Video)
> F-SV (Front S-Video)
2. Falls Sie sich im Time Shifting-Modus befinden,
drücken Sie auf Aufnahme.
3. Falls Sie sich im Aufnahmemodus befinden,
müssen Sie darauf achten, dass Hard Disc
(Festplatte; siehe Onscreen-Statusleiste)
ausgewählt ist.
4. Andernfalls drücken Sie die Taste TV-HDD, um
die Festplatte auszuwählen und drücken dann auf
Aufnahme.
5. Drücken Sie auf Stopp, um die Aufzeichnung zu
stoppen.
Aufnahmedaue
r (250 GB,
HDD)
Aufnahmedaue
r (400 GB,
HDD)
- 63 -
Page 64
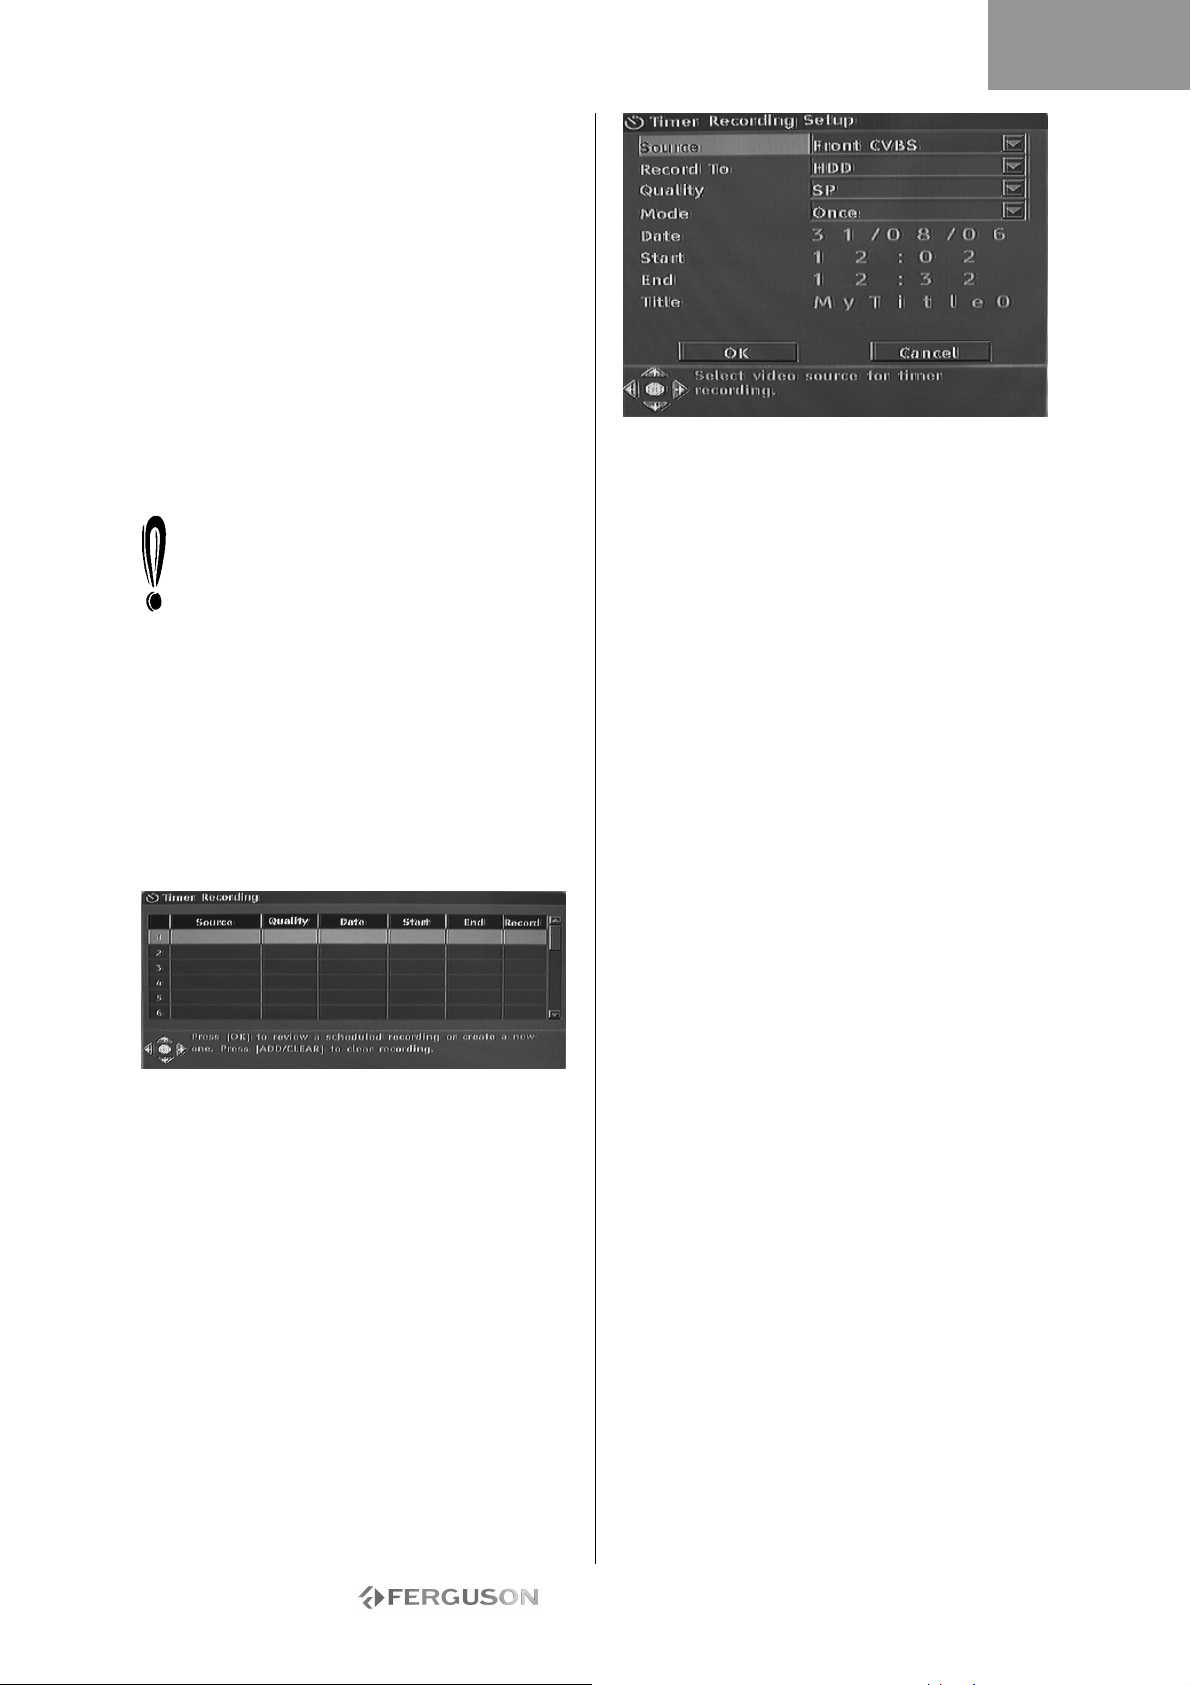
Im Time Shifting-Modus teilt der Ferguson RW770HD die Aufzeichnung in verschiedene 3Stunden-Titel auf, falls die Aufnahmedauer drei
Stunden überschreitet.
Während der Aufzeichnung können Sie durch
wiederholtes Betätigen der Taste Aufnahme/OTR die
Länge des Titels, den Sie speichern, um jeweils 30
Minuten auf maximal 3 Stunden verlängern.
Time Shifting kann nicht in Verbindung mit einer DV
(Digital Video)-Quelle benutzt werden. Um Ihr DVMaterial auf der Festplatte zu speichern, drücken
Sie wiederholt die Taste Quelle. Daraufhin wechselt
der Recorder in den DVModus, und Sie können die
DV-Kamera mit Hilfe der Fernbedienung steuern.
Auf der Fernbedienung des Ferguson RW-770HD
sind Befehle wie „Schnell vor“, „Schnell zurück“,
Pause und Wiedergabe verfügbar.
Sie können nicht den Kanal oder die Quelle
ändern, solange eine Aufnahme läuft (falls das
Ende des Aufzeichnungssegments nicht
eingegeben oder, im Falle von
Langzeitaufnahmen, noch nicht erreicht
wurde). Wenn Sie versuchen, den Kanal oder
die Quelle zu ändern, erhalten Sie vom Ferguson
RW-770HD die Aufforderung, die Aufzeichnung zu
stoppen. Das Segment wird auf der Festplatte
gespeichert und der Kanal oder die Quelle geändert.
TIMERAUFNAHME
1. Achten Sie darauf, dass die Uhr exakt auf Ihre
Ortszeit eingestellt ist. Sieh hierzu den Abschnitt
Einstellen der Uhr weiter hinten in diesem
Handbuch.
2. Drücken Sie die Taste Timer, um die
Aufnahmezeitplanung aufzurufen.
Um eine Programmierung zu löschen, markieren Sie
sie mit Hilfe der Tasten und drücken dann die
Taste Aufnahme/OTR.
3. Markieren Sie mit Hilfe der Tasten ein
Ereignis, und drücken Sie dann auf Wiedergabe/OK.
Daraufhin erscheint das Dialogfeld für die
Aufnahmebearbeitung.
4. Nachfolgend werden die Optionen im Dialogfeld
beschrieben:
Quelle: Wählen Sie die Eingangsquelle.
Aufnehmen auf: Wählen Sie einen Platz für die
Aufnahme.
Qualität: Wählen Sie die Aufnahmequalität.
Modus: Wählen Sie den Aufnahmemodus (Einmalig,
Täglich oder Wöchentlich).
Start: Wählen Sie die Anfangszeit für die
Aufnahme.
Ende: Wählen Sie die Endzeit für die Aufnahme.
Titel: Geben Sie einen Titel für die Aufnahme ein.
5. Stellen Sie den Cursor auf die Schaltfläche OK
und drücken Sie die Taste Wiedergabe/OK, um Ihre
Einstellungen zu speichern.
6. Einige Minuten vor Beginn der Aufnahmezeit
erscheint ein Dialogfeld auf Ihrem
Fernsehbildschirm mit der Aufforderung, die
Programmierung zu stornieren oder zu bestätigen.
Wenn Sie keine Auswahl treffen, erfolgt die
Aufnahme gemäß Zeitplanung.
Wenn sich der Recorder im Standby-Modus
befindet, schaltet er sich zwei Minuten vor Beginn
der Aufnahmezeit automatisch ein.
Eine beschreibbare DVD kann 360 Minuten an
Programmen aufzeichnen (SLP-Qualität). Diese
Programme können in 48 Titel unterteilt werden.
DEUTSH
- 64 -
Page 65
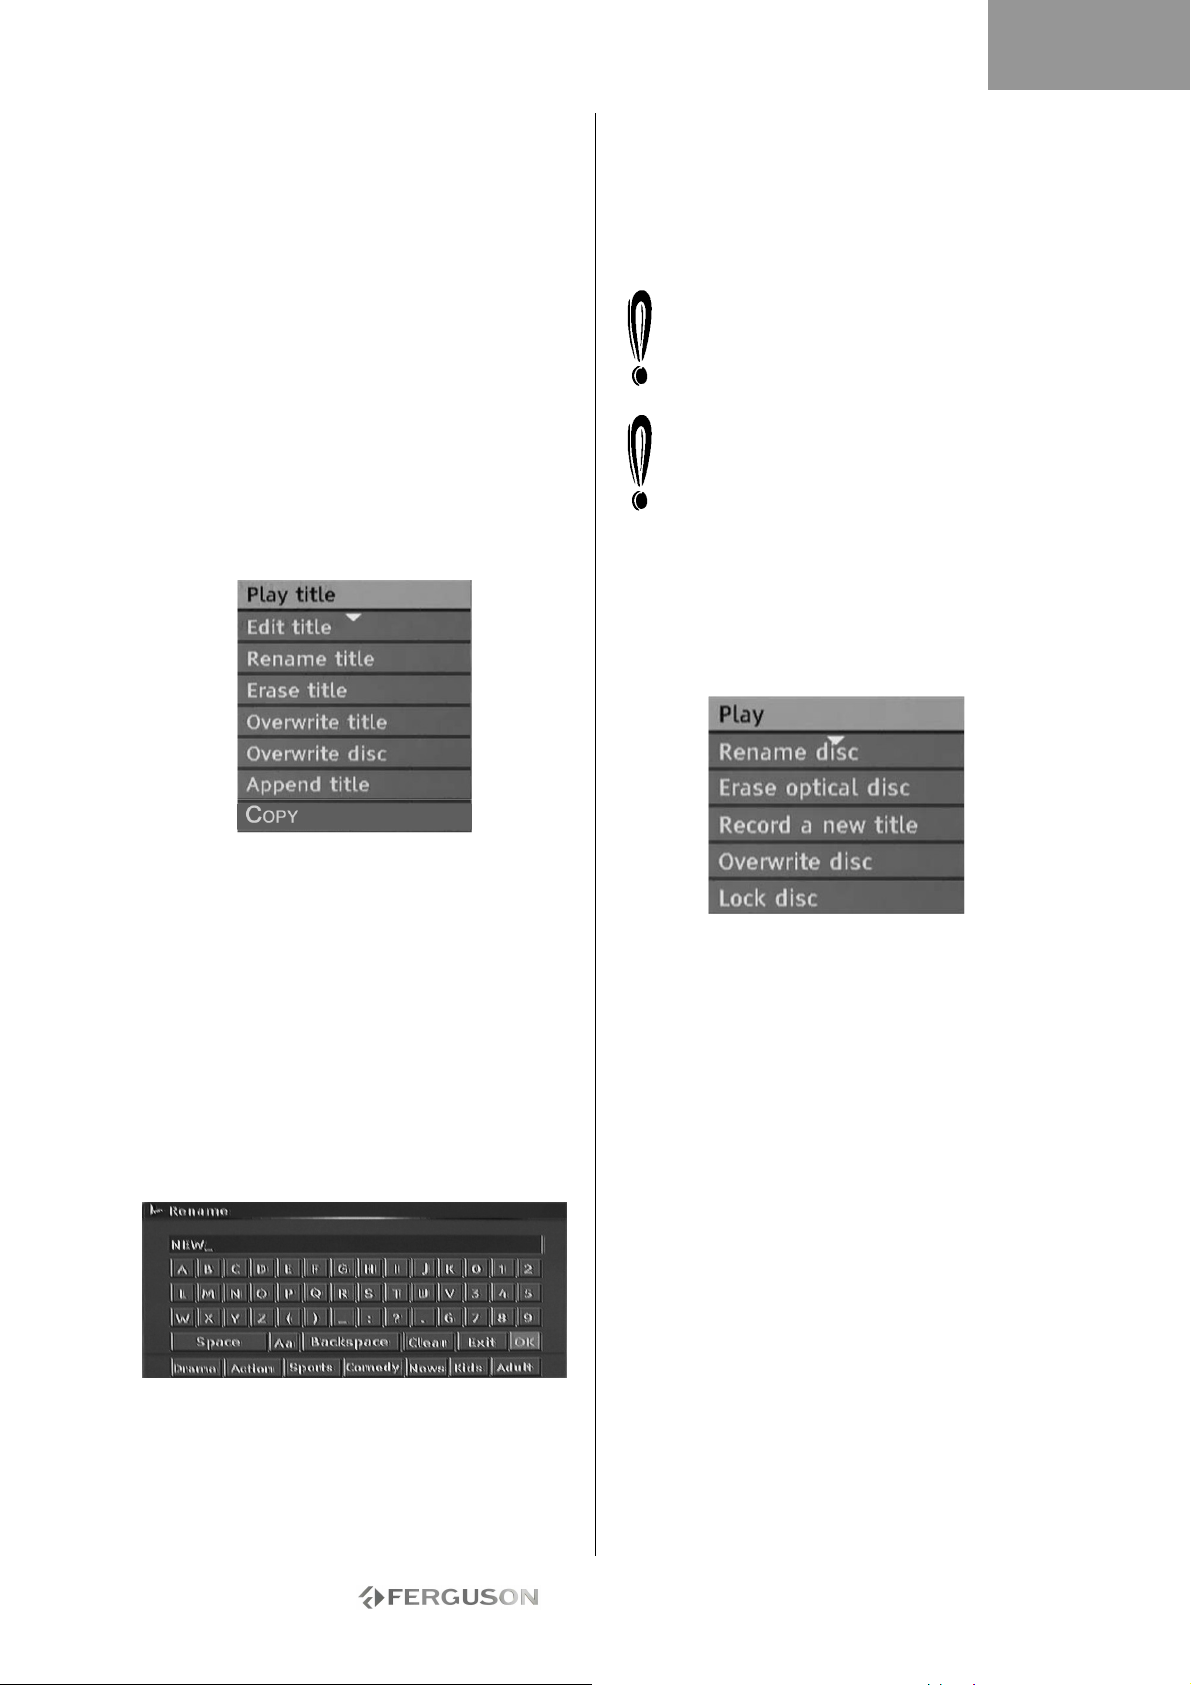
DEUTSCH
BEARBEITUNG UND „DUBBING“
Bearbeiten von DVD±RW-Titeln
Die folgenden Anweisungen gelten nur für
DVD±RWs. Weil DVD±Rs nicht wiederholt
aufgenommen oder bearbeitet warden können,
funktionieren die nachfolgend erwähnten Vorgänge
bei ihnen nicht.
1. Legen Sie eine DVD+RW oder DVD-RW in den
Disc-Schlitten ein. Daraufhin erscheint der DVDIndexbildschirm (andernfalls drücken Sie die Taste
DVD).
2. Markieren Sie mit Hilfe der Tasten den zu
bearbeitenden Titel. Falls mehr als drei Titel
vorhanden sind, drücken Sie die Taste , um sich
weitere Titel anzeigen zu lassen.
3. Drücken Sie die Taste , um das Disc-Menü
aufzurufen. Markieren Sie mit Hilfe der Tasten
eine der unten gezeigten Optionen (Titel
wiedergeben, Titel bearbeiten usw.), und drücken
Sie dann auf Wiedergabe/OK.
Titel löschen - Löscht den aktuellen Titel.
Disc überschreiben - Das gesamte Disc-Medium
wird durch aufgenommene Inhalte überschrieben
und alle Titel gelöscht.
Titel anhängen - Hängt einen neuen Titel an den
letzten Titel auf dem Disc-Medium an (Diese Option
erscheint nur beim Bearbeiten des letzten Titels auf
dem Disc-Medium).
Wenn Sie die Option „Titel anhängen/Titel
überschreiben/“ wählen und zur Bestätigung
die Taste Wiedergabe/OK drücken, wird
automatisch wieder die vor Beginn der
Bearbeitung gewählte Signalquelle benutzt.
Der Aufzeichnungsvorgang beginnt erst,
nachdem Sie die Option „Titel
überschreiben/Titel anhängen/Disc
überschreiben“ ausgewählt und die Taste
Wiedergabe/OTR auf der Gerätevorderseite
oder der Fernbedienung gedrückt haben.
Bearbeiten von DVD±RWs
1. Legen Sie eine DVD±RW in den Disc-Schlitten
ein.
2. Drücken Sie die Taste , um die oberste Option
in der Informationsleiste zu markieren.
Titel wiedergeben - Spielt den aktuellen Titel.
Titel bearbeiten - Ermöglicht das Bearbeiten des
aktuellen Titels, z.B. Kapitelmarker hinzufügen,
Kapitel ein - oder ausblenden, Indexbild eines Titels
ersetzen oder einen Titel in zwei Titel aufteilen usw.
Titel umbenennen - Ermöglicht es, den aktuellen
Titel umzubenennen. Drücken Sie auf
Wiedergabe/OK , um die virtuelle Tastatur auf Ihren
Fernsehbildschirm aufzurufen. Markieren Sie mit
Hilfe der Tasten den gewünschten Buchstaben
bzw. das gewünschte Zeichen, und drücken Sie
dann zur Bestätigung auf Wiedergabe/OK. Wählen
Sie OK und drücken Sie auf Wiedergabe/OK, um
den Namen zu speichern.
Die maximale Länge eines Titelnamens beträgt 12
Zeichen.
Titel überschreiben - Um eine frühere DubbingSession durch Neuaufnahmen zu ersetzen,
überschreiben Sie sie. Sollte die neue Session
kürzer sein als die Originalsession, verbleibt der
Rest als neuer Titel auf der Festplatte. Sollte die
neue Session länger als der Originaltitel sein, wird
der Aufnahmevorgang automatisch gestoppt, wenn
das Ende des Originaltitels erreicht wird.
3. Drücken Sie die Taste , um das Disc-Menü
aufzurufen. Markieren Sie mit Hilfe der Tasten
eine der oben gezeigten Optionen (Wiedergabe,
Disc umbenennen, Disc löschen, Neuen Titel
aufnehmen usw.) und drücken Sie dann auf
Wiedergabe/OK.
Funktionen:
• Wiedergabe: Aufgenommene Titel der Reihe
nach wiedergeben.
• Disc umbenennen: Siehe auch „Titel
umbenennen“ (oben).
• Disc löschen: Den gesamten Inhalt des DiscMediums löschen.
• Neuen Titel aufn.: Neue Inhalte in einem neuen
Titel aufnehmen.
• Disc überschreiben: Das gesamte Disc-Medium
von Anfang an mit neu aufgenommenen Inhalten
überschreiben.
Hinweise zum Erstellen neuer Titel und zum
Überschreiben von Disc-Medien finden Sie unter
„Bearbeiten von DVD+RWs oder DVD-RWs“.
• Disc sperren: Sperrt das aktuelle Disc-Medium,
um die darauf befindlichen Daten zu schützen. Die
gesperrte Disc kann erst gelöscht oder beschrieben
werden, wenn die Sperre aufgehoben wird.
- 65 -
Page 66
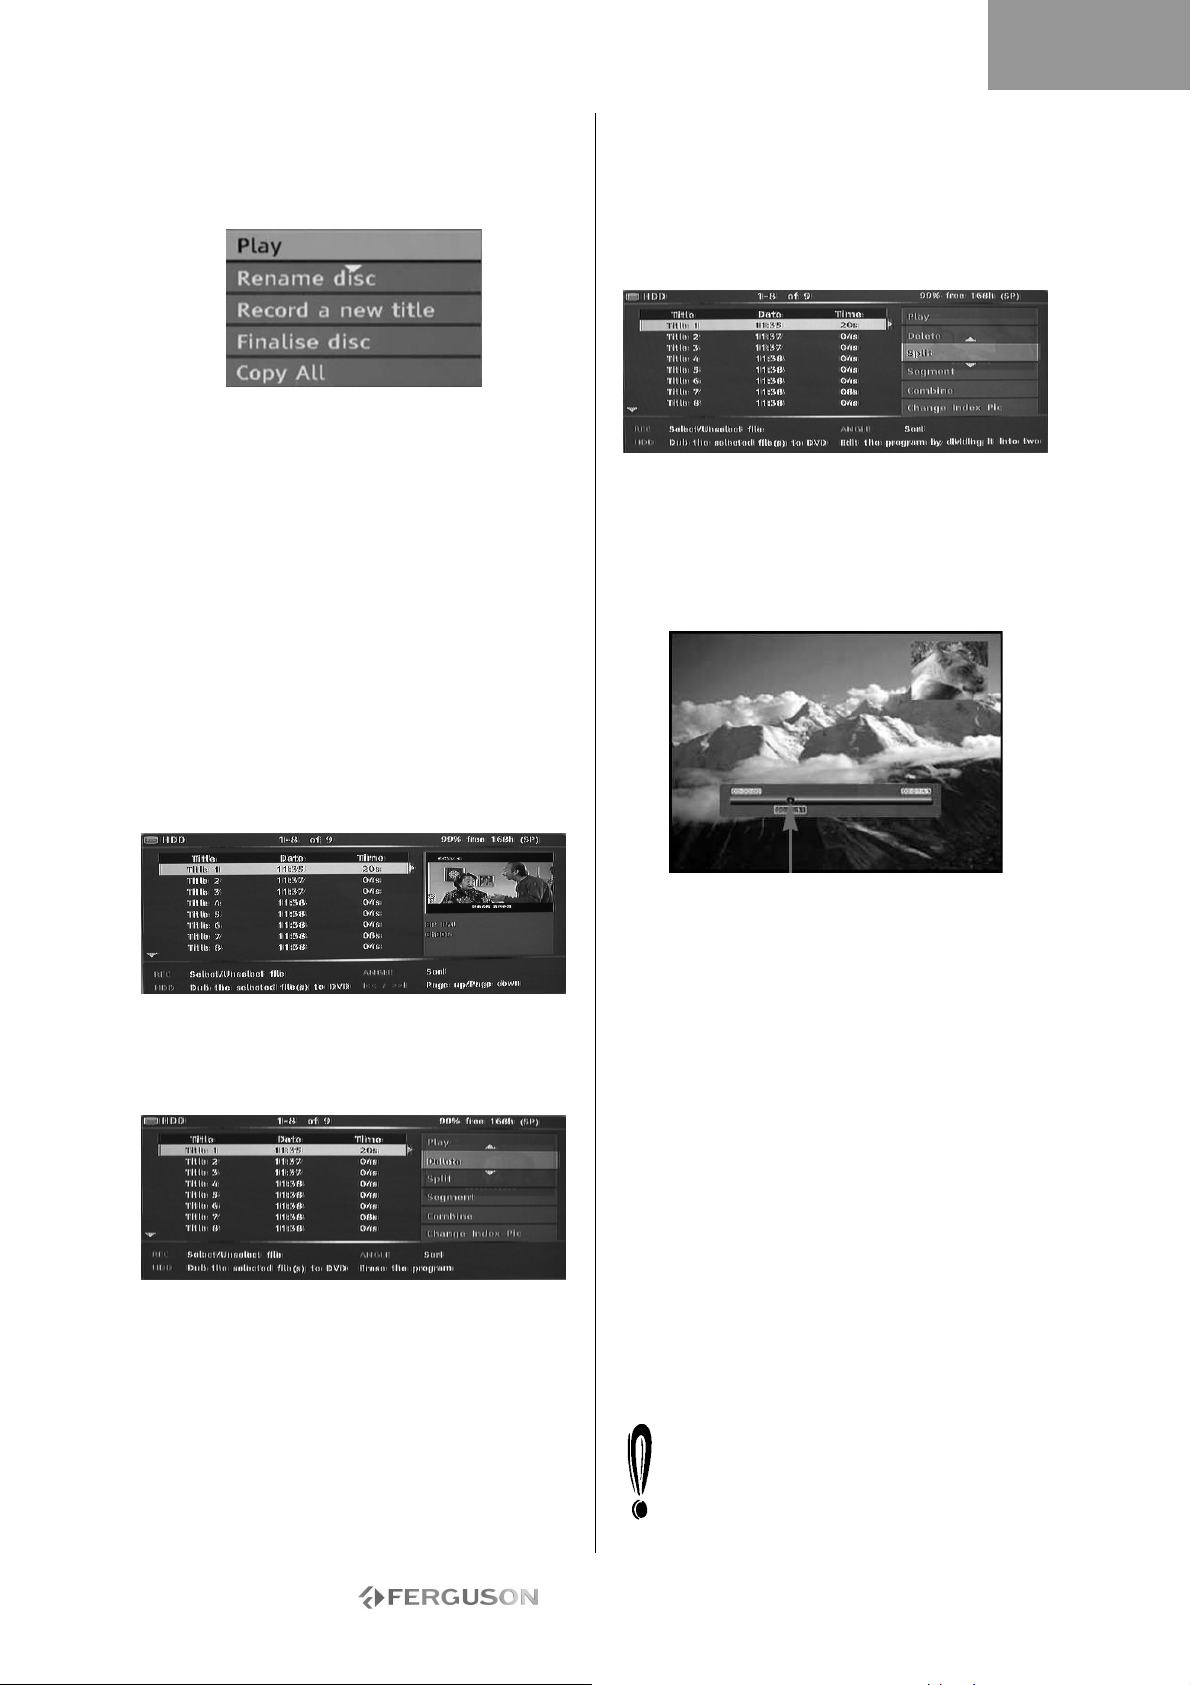
DEUTSCH
Bearbeiten einer DVD±R
1. Legen Sie eine DVD±R in den Disc-Schlitten ein.
2. Drücken Sie die Taste , um das DiscBearbeitungsmenü aufzurufen.
Funktionen:
• Wiedergabe: Aufgenommene Titel der Reihe
nach wiedergeben.
• Disc umbenennen: Siehe auch „Titel
umbenennen“ (oben).
• Neuen Titel aufn.: Neue Inhalte in einem neuen
Titel aufnehmen. Dieser Titel ist der letzte auf der
Disc.
• Disc fertig stellen: Bevor eine DVD+R oder
DVD-R auf anderen DVD-Playern wiedergegeben
werden kann, muss sie im Ferguson RW-770HD
fertig gestellt werden. Nachdem dieser Vorgang
abgeschlossen ist, können keine weiteren
Aufnahmen mehr hinzugefügt werden.
TV-HDD-BEARBEITUNG (TV-AUFNAHMEN)
Einen Titel von der Festplatte löschen
1. Drücken Sie die Taste TV-HDD, bis die TV-HDDTitelliste erscheint.
Unterteilen eines Titels auf der Festplatte
1. Drücken Sie die Taste TV-HDD, bis die TV-HDDTitelliste erscheint.
2. Markieren Sie mit Hilfe der Tasten den
gewünschten Titel.
3. Drücken Sie auf , um das Bearbeitungsmenü
aufzurufen.
4. Benutzen Sie die Tasten , um „Teilen“ zu
markieren.
5. Drücken Sie auf Wiedergabe/OK, um die
Teilungsoption zu wählen.
6. Wählen Sie mit Hilfe der Tasten Weiter, Zurück,
Schnell vor und Schnell zurück die Stelle, an der der
Titel geteilt werden soll.
2. Markieren Sie mit Hilfe der Tasten den
gewünschten Titel.
3. Drücken Sie auf , um das Bearbeitungsmenü
aufzurufen.
4. Drücken Sie auf Wiedergabe/OK, um die
Löschoption zu wählen.
5. Daraufhin erscheint ein Bestätigungsfenster.
Benutzen Sie die Tasten , um „Ja“ zu markieren.
Drücken Sie zur Bestätigung auf Wiedergabe/OK.
Geschützte und gesperrte Titel können nicht
gelöscht werden.
Unterteilungsposition
7. Drücken Sie auf Aufnahme, wenn sich der Cursor
an der gewünschten Unterteilungsposition befindet.
8. Daraufhin erscheint ein Bestätigungsfenster.
Benutzen Sie die Tasten , um „Ja“ zu markieren.
9. Drücken Sie zur Bestätigung auf Wiedergabe/OK.
Geschützte und gesperrte Titel können nicht
Kombinieren von zwei Titeln
1. Drücken Sie die Taste HDD, bis die HDD-Titelliste
erscheint.
2. Markieren Sie mit Hilfe der Tasten den
gewünschten Titel.
3. Drücken Sie auf , um das Bearbeitungsmenü
aufzurufen.
4. Benutzen Sie die Tasten , um die
Kombinieroption zu markieren.
5. Drücken Sie auf Wiedergabe/OK, um den ersten
Teil der kombinierten Titel zu wählen.
6. Benutzen Sie die Tasten , um den Titel zu
wählen, der mit dem ersten kombiniert werden soll.
7. Drücken Sie auf Wiedergabe/OK, um die beiden
Titel zu kombinieren.
8. Sobald die beiden Titel zu einer einzelnen
Datei kombiniert sind, existieren die
ursprünglichen Einzeldateien nicht mehr..
Sowie der Punkt, an dem die beiden Dateien
kombiniert wurden, erreicht ist, stoppt die
Wiedergabe.
unterteilt werden.
- 66 -
Page 67
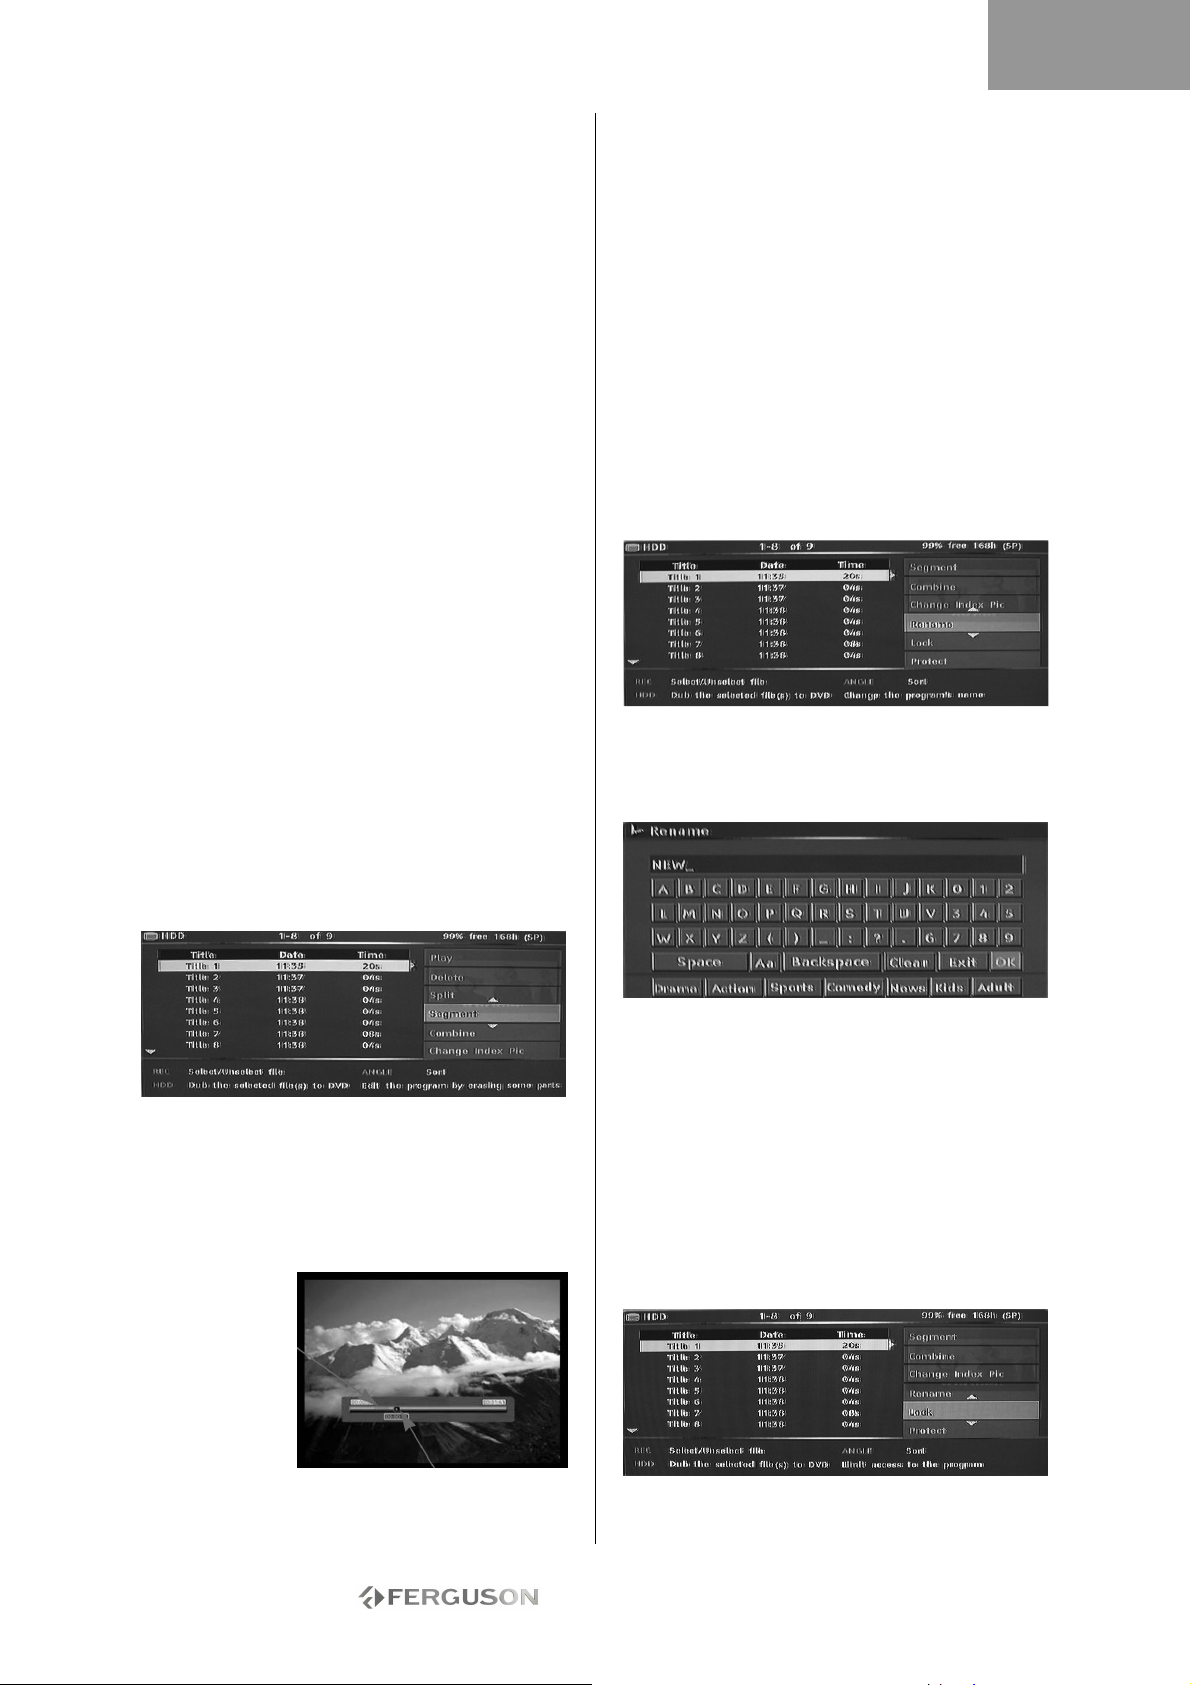
DEUTSCH
Ändern des lndexbilds
1. Drücken Sie die Taste Menü.
2. Markieren Sie mit Hilfe der Navigationstasten das
Symbol Präferenzen, und drücken Sie die Taste
Wiedergabe/OK.
3. Markieren Sie mit Hilfe der Tasten die Option
^Vorschautyp, und drücken Sie dann die Taste
Wiedergabe/OK.
4. Markieren Sie mit Hilfe der Tasten die Option
Statisch, und drücken Sie dann die Taste
Wiedergabe/OK.
• Statisch zeigt ein statisches Bild im HDD-IndexVorschaumenü.
• Dynamisch zeigt wiederholt 15 Sekunden eines
Videos im HDDIndex- Vorschaumenü.
5. Drücken Sie die Taste TV-HDD, bis die TV-HDDTitelliste erscheint.
6. Markieren Sie mit Hilfe der Tasten den
gewünschten Titel.
7. Drücken Sie auf , um das Bearbeitungsmenü
aufzurufen.
8. Markieren Sie mit Hilfe der Tasten die Option
Indexbild ändern.
9. Drücken Sie auf Wiedergabe/OK, um die und
Wiedergabe des gewählten Titels zu starten.
10. Wählen Sie während der Wiedergabe eine Stelle
im Video, die als statisches Indexbild angezeigt
werden soll, und drücken Sie dann auf
Wiedergabe/OK.
11. Wählen Sie „Ja“, und drücken Sie abschließend
auf Wiedergabe/OK.
Titelsegmente (z.B. Werbung) ausblenden
1. Drücken Sie die Taste TV-HDD, bis die TV-HDDTitelliste erscheint.
2. Markieren Sie mit Hilfe der Tasten den
gewünschten Titel.
3. Drücken Sie auf , um das Bearbeitungsmenü
aufzurufen.
8. Wählen Sie mit Hilfe der Tasten Weiter, Zurück,
Schnell vor und Schnell zurück das Ende des
Segments, das ausgeblendet werden soll.
9. Drücken Sie auf Aufnahme, wenn sich der Cursor
an der gewünschten Position befindet.
10. Wiederholen Sie die Schritte 6 bis 9 für jedes
Segment, das ausgeblendet werden soll.
11. Drücken Sie auf „Stopp“ oder TV-HDD, um zur
TV-HDD-Liste zurückzukehren.
Geschützte und gesperrte Titel können nicht
segmentiert werden.
Umbenennen eines Titels auf der Festplatte
1. Drücken Sie die Taste TV-HDD, bis die TV-HDDTitelliste erscheint.
2. Markieren Sie mit Hilfe der Tasten den
gewünschten Titel.
3. Drücken Sie auf , um das Bearbeitungsmenü
aufzurufen.
4. Benutzen Sie die Tasten , um „Umbenennen“
zu markieren.
5. Drücken Sie auf Wiedergabe/OK, um die
Umbenennungsoption zu wählen.
4. Benutzen Sie die Tasten , um das Segment zu
markieren.
5. Drücken Sie auf Wiedergabe/OK, um die
Segementierungsoption zu wählen.
6. Wählen Sie mit Hilfe der Tasten Weiter, Zurück,
Schnell vor und Schnell zurück den Anfang des
Segments, das ausgeblendet werden soll.
Ausgeble ndetes
Cursorposition
7. Drücken Sie auf Aufnahme, wenn sich der Cursor
an der gewünschten Position befindet.
6. Geben Sie mit Hilfe der Navigationstasten den
neuen Namen ein, und drücken Sie dann auf
Wiedergabe/OK.
7. Wählen Sie abschließend „OK“.
Einen Titel sperren (Anzeigen, Bearbeiten und
Löschen verhindern)
1. Drücken Sie die Taste TV-HDD, bis die TV-HDDTitelliste erscheint.
2. Markieren Sie mit Hilfe der Tasten den
gewünschten Titel.
3. Drücken Sie auf , um das Bearbeitungsmenü
aufzurufen.
4. Benutzen Sie die Tasten , um „Sperren“ zu
markieren.
- 67 -
Page 68
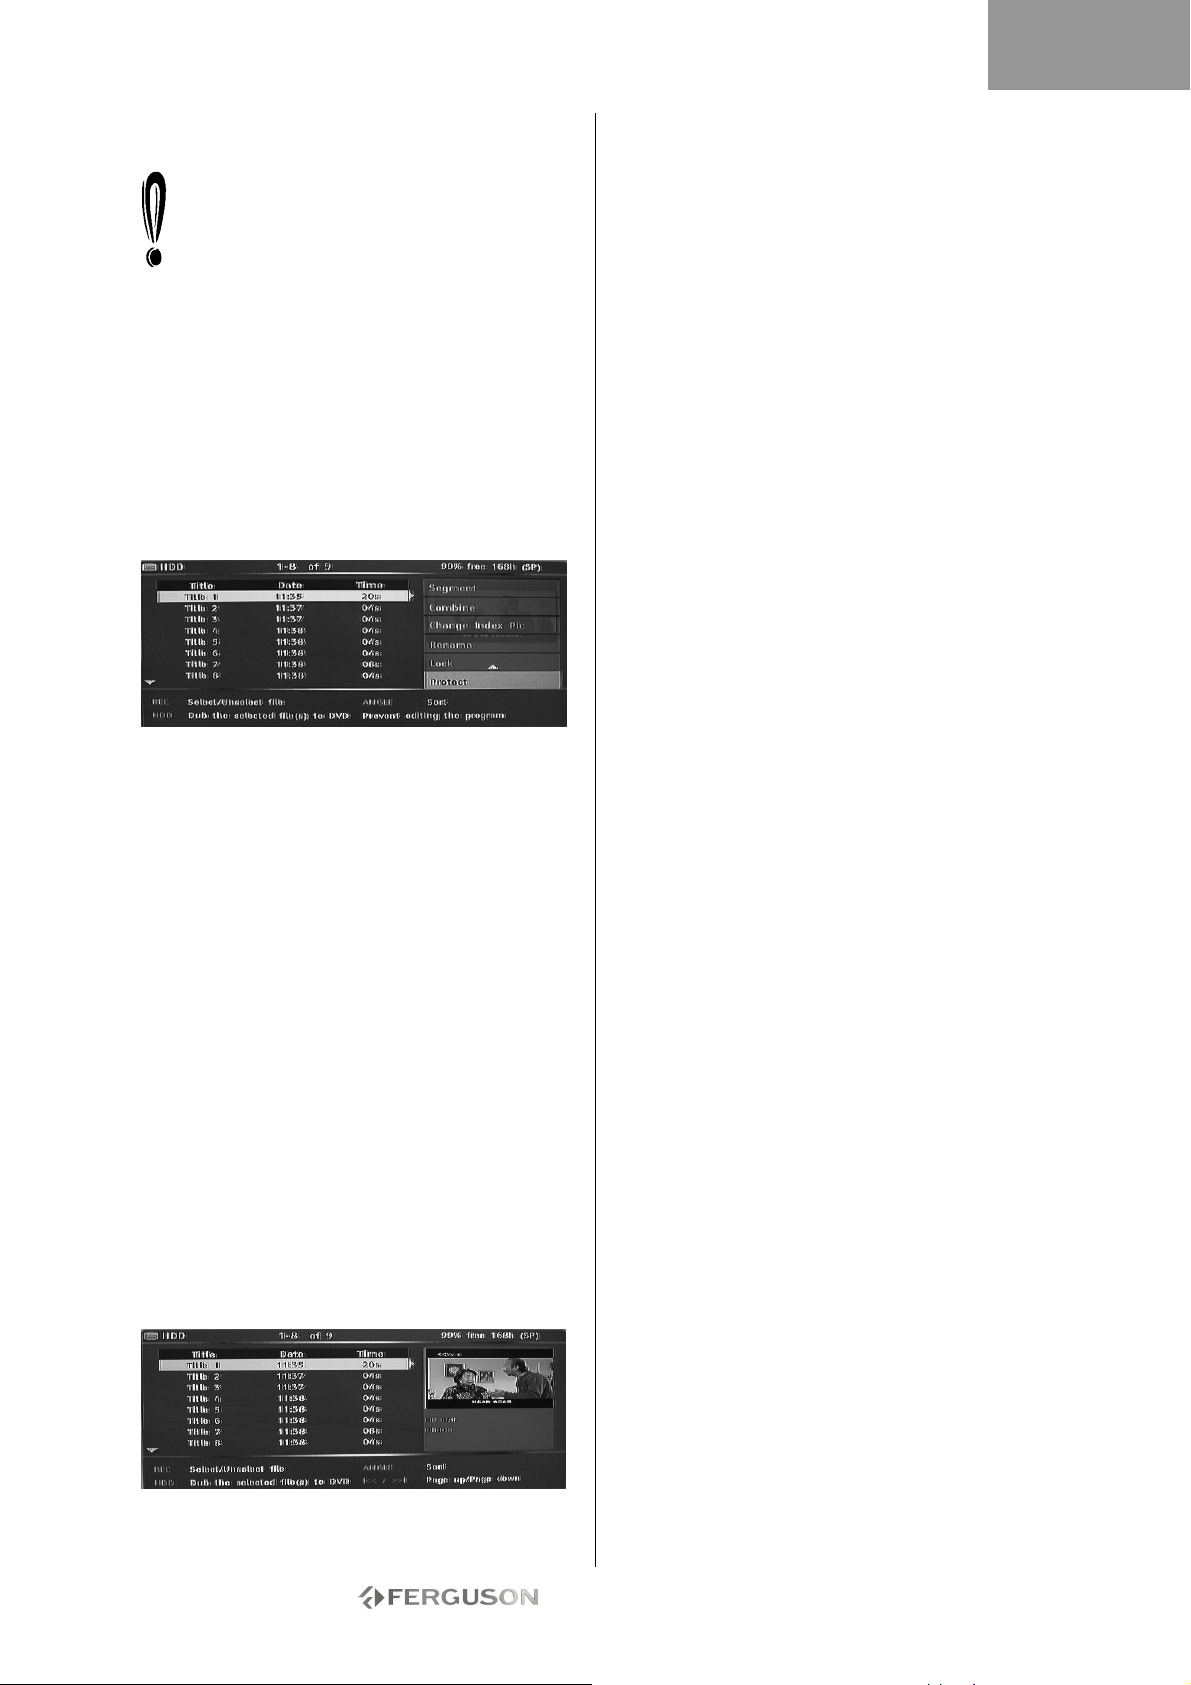
DEUTSCH
5. Drücken Sie auf Wiedergabe/OK, um die
Sperroption zu wählen.
Ein kleines Symbol im Vorschaufenster deutet
an, dass der Titel nun gesperrt ist (kein
Anzeigen/Bearbeiten/Löschen). Bevor Sie einen
gesperrten Titel wiedergeben können, müssen
Sie ein Kennwort eingeben. Das
Standardkennwort lautet „0000“. Wechseln Sie in
das Einstellmenü, um das Kennwort zu ändern.
Um einen gesperrten Titel wieder freizugeben,
wiederholen Sie die Schritte 1 bis 5.
Einen Titel schützen (Bearbeiten verhindern)
1. Drücken Sie die Taste TV-HDD, bis die TV-HDDTitelliste erscheint.
2. Markieren Sie mit Hilfe der Tasten den
gewünschten Titel.
3. Drücken Sie auf , um das Bearbeitungsmenü
aufzurufen.
4. Benutzen Sie die Tasten , um „Schützen“ zu
markieren.
5. Drücken Sie auf Wiedergabe/OK, um die
Schutzoption zu wählen.
Ein kleines Symbol im Vorschaufenster deutet an,
dass der Titel nun geschützt ist (kein
Bearbeiten/Löschen).
Bevor Sie einen geschützten Titel bearbeiten oder
löschen können, müssen Sie ihn durch Wiederholen
der Schritte 1 bis 5 wieder freigeben.
DUBBING (KOPIEREN VON TV-HDD ZU DVD)
1. Bevor Sie ein Sie Titel für das „Dubbing“
auswählen, legen Sie ein beschreibbares DiscMedium ein.
• Falls das Disc-Medium zum ersten Mal benutzt
wird, kann der Ferguson RW-770HD ein paar
Sekunden brauchen, um es zu formatieren und die
Kompatibilität sowie den freien Speicherplatz zu
ermitteln. Während dieser Zeit ist das LadenLogo zu sehen.
• Der prozentual verfügbare Speicherplatz auf dem
Disc-Medium wird in der rechten unteren Ecke auf
dem Bildschirm mit der TV-HDD-Titelliste angezeigt.
2. Drücken Sie die Taste TV-HDD, bis die TV-HDDTitelliste erscheint.
3. Markieren Sie mit Hilfe der Tasten den oder
die Titel, die Sie auf DVD kopieren möchten, und
drücken Sie dann auf Aufnahme/OTR, um den
markierten Titel für das „Dubbing“ auszuwählen.
Nachdem ein Titel für das „Dubbing“ ausgewählt
wurde, erscheint neben dem Titelnamen ein
Symbol.
Um eine Auswahl aufzuheben, drücken Sie die Taste
Aufnahme/OTR erneut. Jedes Mal, wenn Sie einen
Titel hinzufügen oder entfernen, wird die DiscKapazität aktualisiert. Falls ein ausgewählter Titel
größer als der verfügbare Platz auf dem DiscMedium ist, erscheint eine Warnung.
Sollte eine Aufzeichnung zu groß für die DVD sein,
kann man sie in kleinere Abschnitte unterteilen
(siehe hierzu die früher im Handbuch beschriebene
Unterteilungsfunktion).
Wenn das Disc-Medium vor dem „Dubbing“
ausgewechselt oder entfernt wird, werden sämtliche
Auswahlen gelöscht.
Gesperrte Titel können nicht mittels „Dubbing“ auf
4. Drücken Sie die Taste TV-HDD, um den DubbingVorgang zu starten. Beim „Dubbing“ werden der
oder die ausgewählten Titel auf eine beschreibbare
DVD kopiert, einschließlich solcher Eigenschaften
wie Titelname, Dauer, Indexbild oder Kapitelmarker.
Nach dem Starten des Dubbing-Vorgangs kehrt
der Recorder in den Time Shifting-Modus zurück.
Während des Dubbing-Vorgangs können Sie die
Taste TV-HDD drücken und einen Titel auf der
Festplatte abspielen. Ein Bearbeiten ist jedoch
erst wieder möglich, wenn der Vorgang
abgeschlossen ist.
Sollte während des Beschreibens der DVD ein Fehler
auftreten, erscheint eine Warnung und die TVHDDTitelliste wird zurückgesetzt.
KOPIEREN VON DVD±RW-TITELN AUF HDD
1. Legen Sie eine DVD±RW mit aufgenommenen
Titeln in das Laufwerk.
2. Markieren Sie mit Hilfe der Tasten den zu
kopierenden Titel.
3. Drücken Sie die Taste , um das Disc-Menü
aufzurufen. Markieren Sie mit Hilfe der Tasten
die Option Kopieren , und drücken Sie dann auf
Wiedergabe/OK.
4. Daraufhin erscheint links oben auf dem
Bildschirm ein Dateiübertragungssymbol, das wieder
verschwindet, sobald die Datei auf die Festplatte
kopiert worden ist.
eine DVD kopiert werden.
- 68 -
Page 69
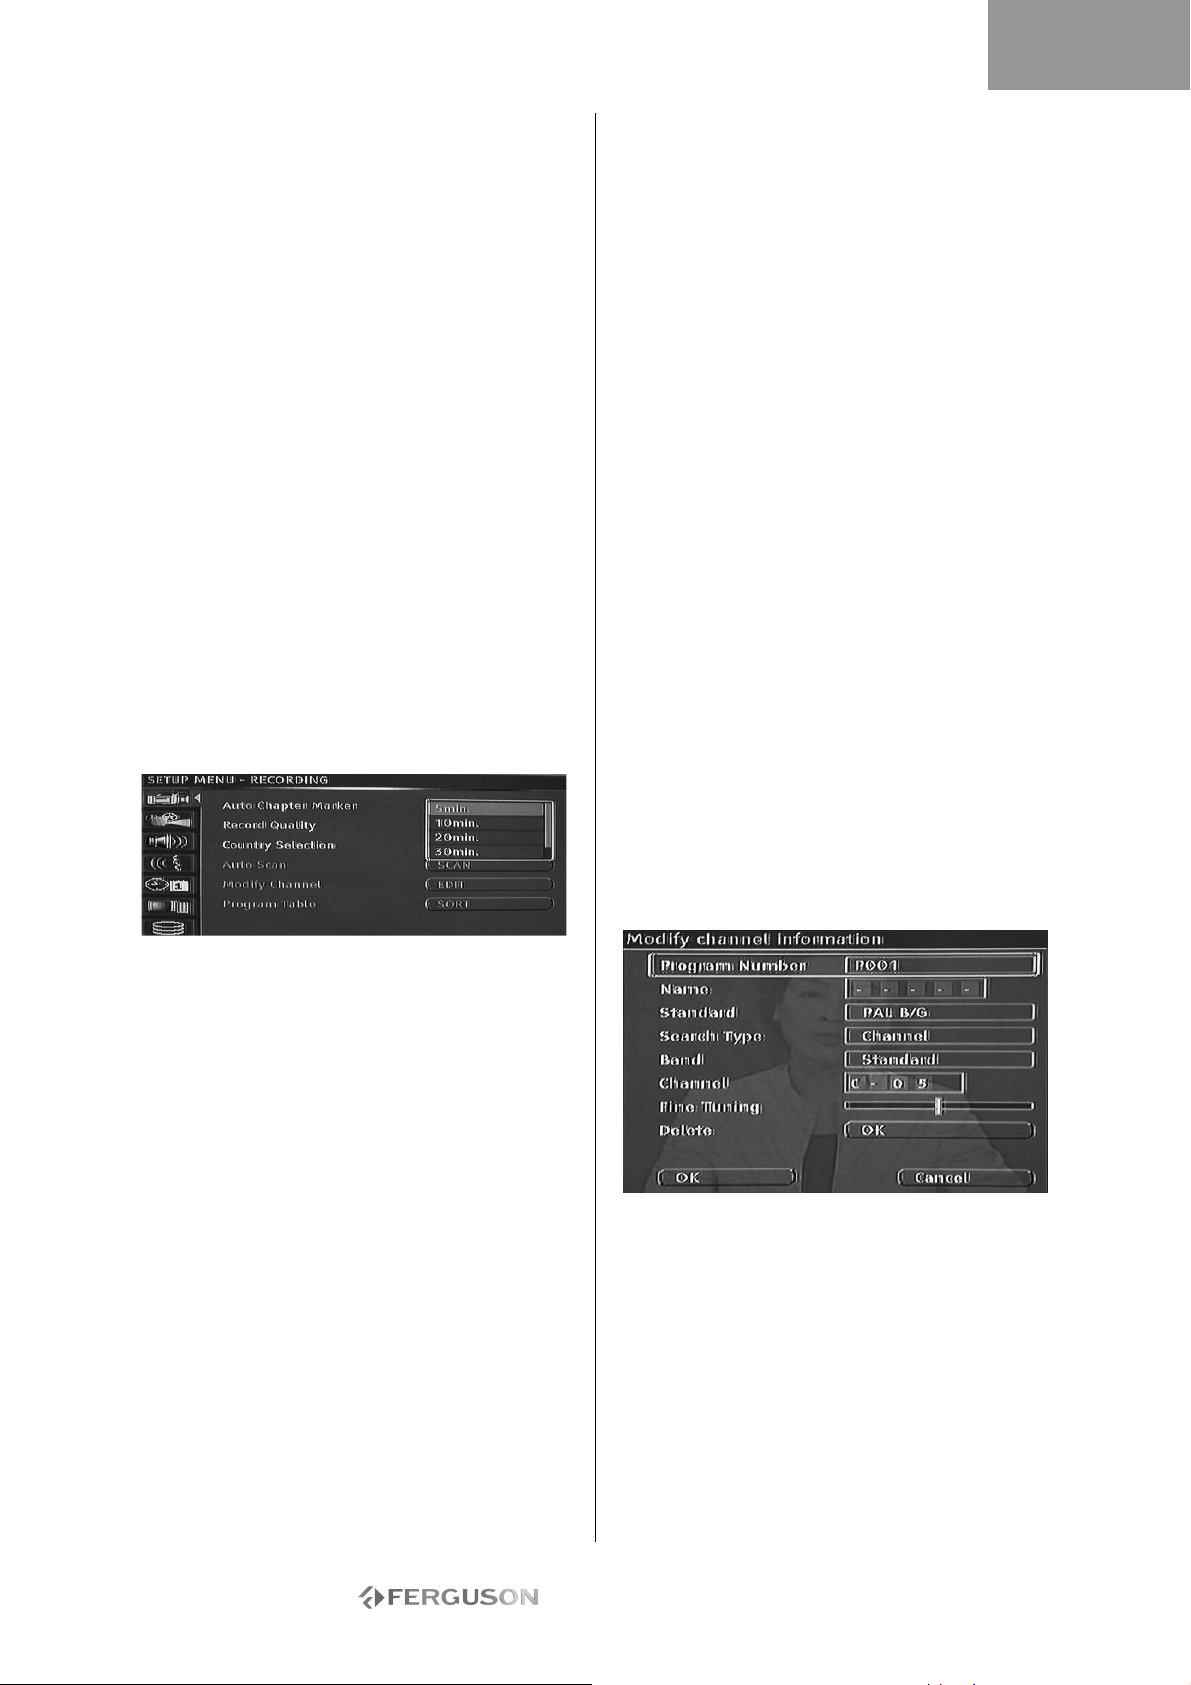
DEUTSCH
SYSTEMEINSTELLUNGEN
Systemmenü
1. Drücken Sie nach dem Stoppen der Wiedergabe
auf Menu, um das Systemmenü aufzurufen.
2. Wählen Sie mit Hilfe der Navigationstasten die
gewünschte Option, und drücken Sie dann die Taste
Wiedergabe/OK, um Ihre Auswahl zu bestätigen.
3. Drücken Sie erneut auf Menu, um das Menü
wieder zu verlassen.
Kapitelmarker
Sie können den Recorder so einstellen, dass er in
jedes aufgezeichnete Programm automatisch
Kapitelmarker einfügt, die eine schnellere
Navigation während der Wiedergabe ermöglichen.
Mit dieser Funktion werden beim Aufnehmen alle 10
Minuten automatisch Marker gesetzt. Das Intervall
kann im Menü Setup geändert werden: AUS (keine
Markierung), 5 Min., 10 Min. (Standard), 20 Min.
oder 30 Min.
1. Drücken Sie die Taste Menu auf der
Fernbedienung.
2. Markieren Sie das Menü Aufnahme, und drücken
Sie die Taste Wiedergabe/OK.
3. Markieren Sie die Option Automatischer
Kapitelmarker, und drücken Sie die Taste
Wiedergabe/OK.
4. Wählen Sie in der Liste eine Option, und drücken
Sie dann die Taste Wiedergabe/OK.
Länderauswahl
Um die Länderauswahl zu ändern, tun Sie bitte
Folgendes:
1. Drücken Sie die Taste MENU auf der
Fernbedienung, um das Einstellmenü aufzurufen.
2. Markieren Sie mit Hilfe der Navigationstasten das
Symbol Aufnahme, und drücken Sie die Taste
Wiedergabe/OK.
3. Markieren Sie mit Hilfe der Tasten die Option
Länderwahl, und drücken Sie dann die Taste
Wiedergabe/OK.
4. Markieren Sie mit Hilfe der Tasten Ihr Land,
und drücken Sie dann zur Bestätigung die Taste
Wiedergabe/OK.
Automatische Kanalsuche
Bevor Sie Fernsehprogramme aufrufen oder
aufzeichnen können, müssen Sie zunächst eine
Kanalsuche durchführen:
Stellen Sie vor einer Kanalsuche sicher, dass eine
Fernsehantenne am Ferguson RW-770HD
angeschlossen ist. Zu Einzelheiten siehe Anschluss
an ein Fernsehgerät.
1. Drücken Sie die Taste MENU auf der
Fernbedienung, um das Einstellmenü aufzurufen.
2. Markieren Sie mit Hilfe der Navigationstasten das
Symbol Aufnahme, und drücken Sie die Taste
Wiedergabe/OK.
3. Markieren Sie mit Hilfe der Tasten die Option
AutoScan, und drücken Sie dann die Taste
Wiedergabe/OK.
Programmtab.
Mit Hilfe der Programmtabelle können Sie die
Fernsehkanäle sortieren.
1. Drücken Sie die Taste MENU, um das
Einstellmenü aufzurufen.
2. Markieren Sie mit Hilfe der Navigationstasten das
Symbol Aufnahme, und drücken Sie die Taste
Wiedergabe/OK.
3. Markieren Sie mit Hilfe der Tasten die Option
Programmtabelle, und drücken Sie dann die Taste
Wiedergabe/OK.
4. Markieren Sie mit Hilfe der Tasten den
gewünschten Kanal, und drücken Sie dann auf ,
um ihn aus der Liste herauszunehmen.
5. Benutzen Sie die Tasten , um den Kanal an
die gewünschte Stelle in der Liste zu verschieben.
6. Drücken Sie die Taste , um den Kanal in die
Liste einzufügen.
Kanalinformationen ändern
Über das Menü „Kanalinformationen ändern“ können
Sie Informationsdetails für jeden Kanal ändern.
1. Drücken Sie die Taste MENU auf der
Fernbedienung, um das Einstellmenü aufzurufen.
2. Markieren Sie mit Hilfe der Navigationstasten das
Symbol Aufnahme, und drücken Sie die Taste
Wiedergabe/OK.
3. Markieren Sie mit Hilfe der Tasten die Option
Kanal ändern, und drücken Sie dann die Taste
Wiedergabe/OK.
4. Benutzen Sie die Navigationstasten, um folgende
Informationen zu bearbeiten.
Programmnummer: Die Nummer des aktuellen
Kanals; dies kann nicht verändert werden.
Name: Benutzen Sie die Pfeiltasten, um einen
Kanalnamen auszuwählen und zu bearbeiten.
Standard: Der Übertragungsstandard des aktuellen
Kanals. Wählen Sie den korrekten Standard
entsprechend des lokalen Fernsehsignals.
Suchart: Hier können Sie wählen, auf welche Weise
die Suche nach Fernsehkanälen durchgeführt
werden soll. Es gibt zwei Modi: Frequenz und Kanal.
Band (nicht im Frequenzmodus anwendbar):
Das Band dieses Kanals. Sie können zwischen
Standard und Kabel wählen.
Kanal oder Frequenz:
• Option 1: Wählen Sie diese Option aus und
drücken Sie dann auf oder , um nach dem
nächsten verfügbaren Fernsehkanal zu suchen.
- 69 -
Page 70
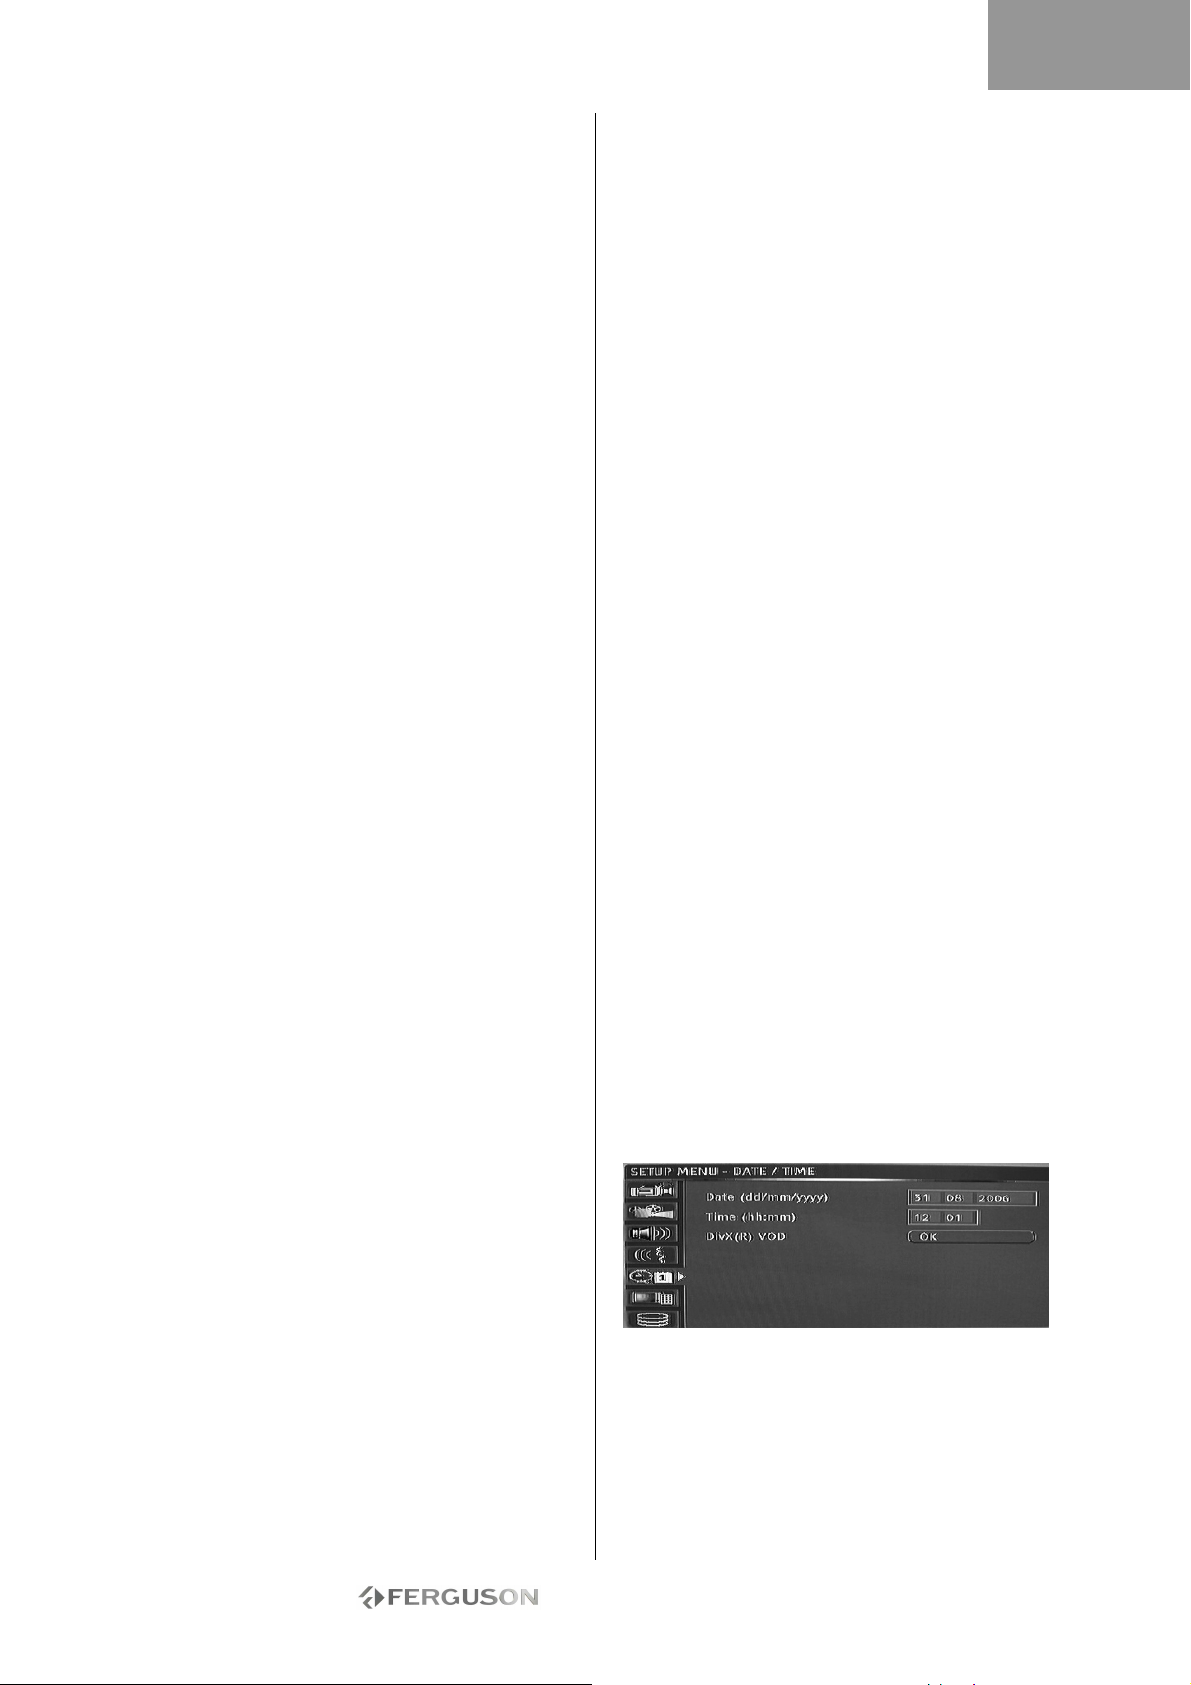
DEUTSCH
• Option 2: Drücken Sie auf Wiedergabe/OK und
benutzen Sie dann die Navigationstasten, um die
Kanal- oder Frequenznummer manuell einzugeben.
Fine tuning: Benutzen Sie die Taste oder , um
eine Feinabstimmung beim aktuellen Kanal
vorzunehmen.
Löschen: Löscht den aktuellen Kanal von der
Kanalliste.
OK: Bestätigt und speichert die Einstellungen für
den aktuellen Kanal.
Abbrechen: Verwirft die aktuellen Einstellungen
und beendet das Menü.
Wahl der Systemsprache
Um die Systemsprache zu ändern, tun Sie bitte
Folgendes:
1. Drücken Sie die Taste MENU auf der
Fernbedienung, um das Einstellmenü aufzurufen.
2. Markieren Sie mit Hilfe der Tasten die Option
Sprache.
3. Markieren Sie mit Hilfe der Taste die Option
Systemsprache, und drücken Sie dann die Taste
Wiedergabe/OK.
4. Markieren Sie mit Hilfe der Tasten die
gewünschte Sprache in der Liste, und drücken Sie
dann zur Bestätigung die Taste Wiedergabe/OK.
Time Shift-Speicher
1. Drücken Sie die Taste Menu auf der
Fernbedienung.
2. Markieren Sie das Menü Time Shift, und drücken
Sie die Taste Wiedergabe/OK.
3. Markieren Sie die Option TimeShift-Puffermodus,
und drücken Sie die Taste Wiedergabe/OK.
4. Wählen Sie in der Liste die Option Aktualisieren
oder Behalten:
• Wenn Sie Aktualisieren wählen und Kanäle
wechseln, gehen die Daten im Time ShiftingSpeicher verloren. Diesem Vorgang geht
kein Hinweis voraus.
• Wenn Sie Behalten wählen und Kanäle wechseln,
bleiben die Daten im Time Shifting-Speicher
erhalten.
Speicherplatzverw.:
Wählen Sie, ob der Speicherplatz auf der Festplatte
manuell oder automatisch verwaltet werden soll.
1. Drücken Sie die Taste Menu auf der
Fernbedienung.
2. Markieren Sie das Menü Time Shift, und drücken
Sie die Taste Wiedergabe/OK.
3. Markieren Sie das Menü Speicherplatzverwaltung,
und drücken Sie die Taste Wiedergabe/OK.
4. Wählen Sie in der Liste die Option Automatisch
oder Manuell:
• Automatisch: Falls kein Platz mehr auf der
Festplatte verfügbar ist, bevor eine Aufzeichnung
gestoppt wird, löscht der
Ferguson RW-770HD die ältesten (nicht
geschützten) Titel auf der Festplatte. Es werden
keine Titel gelöscht, die zum Kopieren auf DVD
ausgewählt wurden. Sollte trotz dieses Verfahrens
kein Platz mehr auf der Festplatte vorhanden sein,
stoppt der Recorder die Aufzeichnung und zeigt den
Hinweis an, dass einige Titel gelöscht werden, um
Platz zu schaffen.
• Manuell: Falls kein Platz mehr auf der Festplatte
verfügbar ist, bevor eine Aufzeichnung gestoppt
wird, stoppt der Recorder die Aufzeichnung und
zeigt an, dass einige Titel gelöscht warden sollten,
um mehr Platz zu schaffen.
Kindersicherung
Die Kindersicherung ist ein kennwortgeschütztes
Sicherungssystem. Damit können Sie verhindern,
dass der Ferguson RW-770HD einige Disc-Medien
entsprechend den darauf vorhandenen
Informationen abspielt.
So stellen Sie die Kindersicherung ein:
1. Drücken Sie während der Wiedergabe auf
zweimal auf Stop.
2. Drücken Sie die Taste Menu, um das
Systemeinstellmenü aufzurufen.
3. Markieren Sie mit Hilfe der Tasten die Option
Präferenzen. Bestätigen Sie Ihre Auswahl mit der
Taste Wiedergabe/OK.
4. Markieren Sie mit Hilfe der Tasten die Option
Elternkontrolle, und drücken Sie dann die Taste
Wiedergabe/OK.
5. Markieren Sie mit Hilfe der Tasten die
gewünschte Einstufung, und drücken Sie dann die
Taste Wiedergabe/OK.
6. Drücken Sie auf die Taste Menu, um den
Bildschirm zu schließen.
Auswahl der Audio-, Untertitel- und DiscMenüsprache
Um die Audio-, Untertitel- und Disc-Menüsprache zu
ändern, tun Sie bitte Folgendes:
1. Drücken Sie die Taste MENU auf der
Fernbedienung, um das Einstellmenü aufzurufen.
2. Markieren Sie mit Hilfe der Navigationstasten das
Symbol Sprache, und drücken Sie die Taste
Wiedergabe/OK.
3. Markieren Sie mit Hilfe der Tasten eine der
Optionen „Audio“, „Untertitel“ oder „Disc-Menü“,
und drücken Sie dann die Taste Wiedergabe/OK.
4. Markieren Sie mit Hilfe der Tasten die
gewünschte Sprache, und drücken Sie dann zur
Bestätigung die Taste Wiedergabe/OK.
Einstellen der uhr
1. Drücken Sie die Taste Menu, um das
Systemeinstellmenü aufzurufen.
2. Markieren Sie mit Hilfe der Pfeiltasten das
Symbol Datum/ Uhrzeit, und drücken Sie die Taste
Wiedergabe/OK.
3. Ändern Sie mit Hilfe der Navigationstasten
Systemdatum und - zeit.
Einstellen der Systemzeit
Der Ferguson RW-770HD kann die Systemzeit
automatisch mit der von der Sendestation
empfangenen Zeitcodierung abgleichen. Nur
der Zeitcode des ersten Fernsehkanals kann vom
Gerät benutzt werden. Damit diese Funktion
funktioniert, muss das Fernsehsignal einen Zeitcode
enthalten.
- 70 -
Page 71
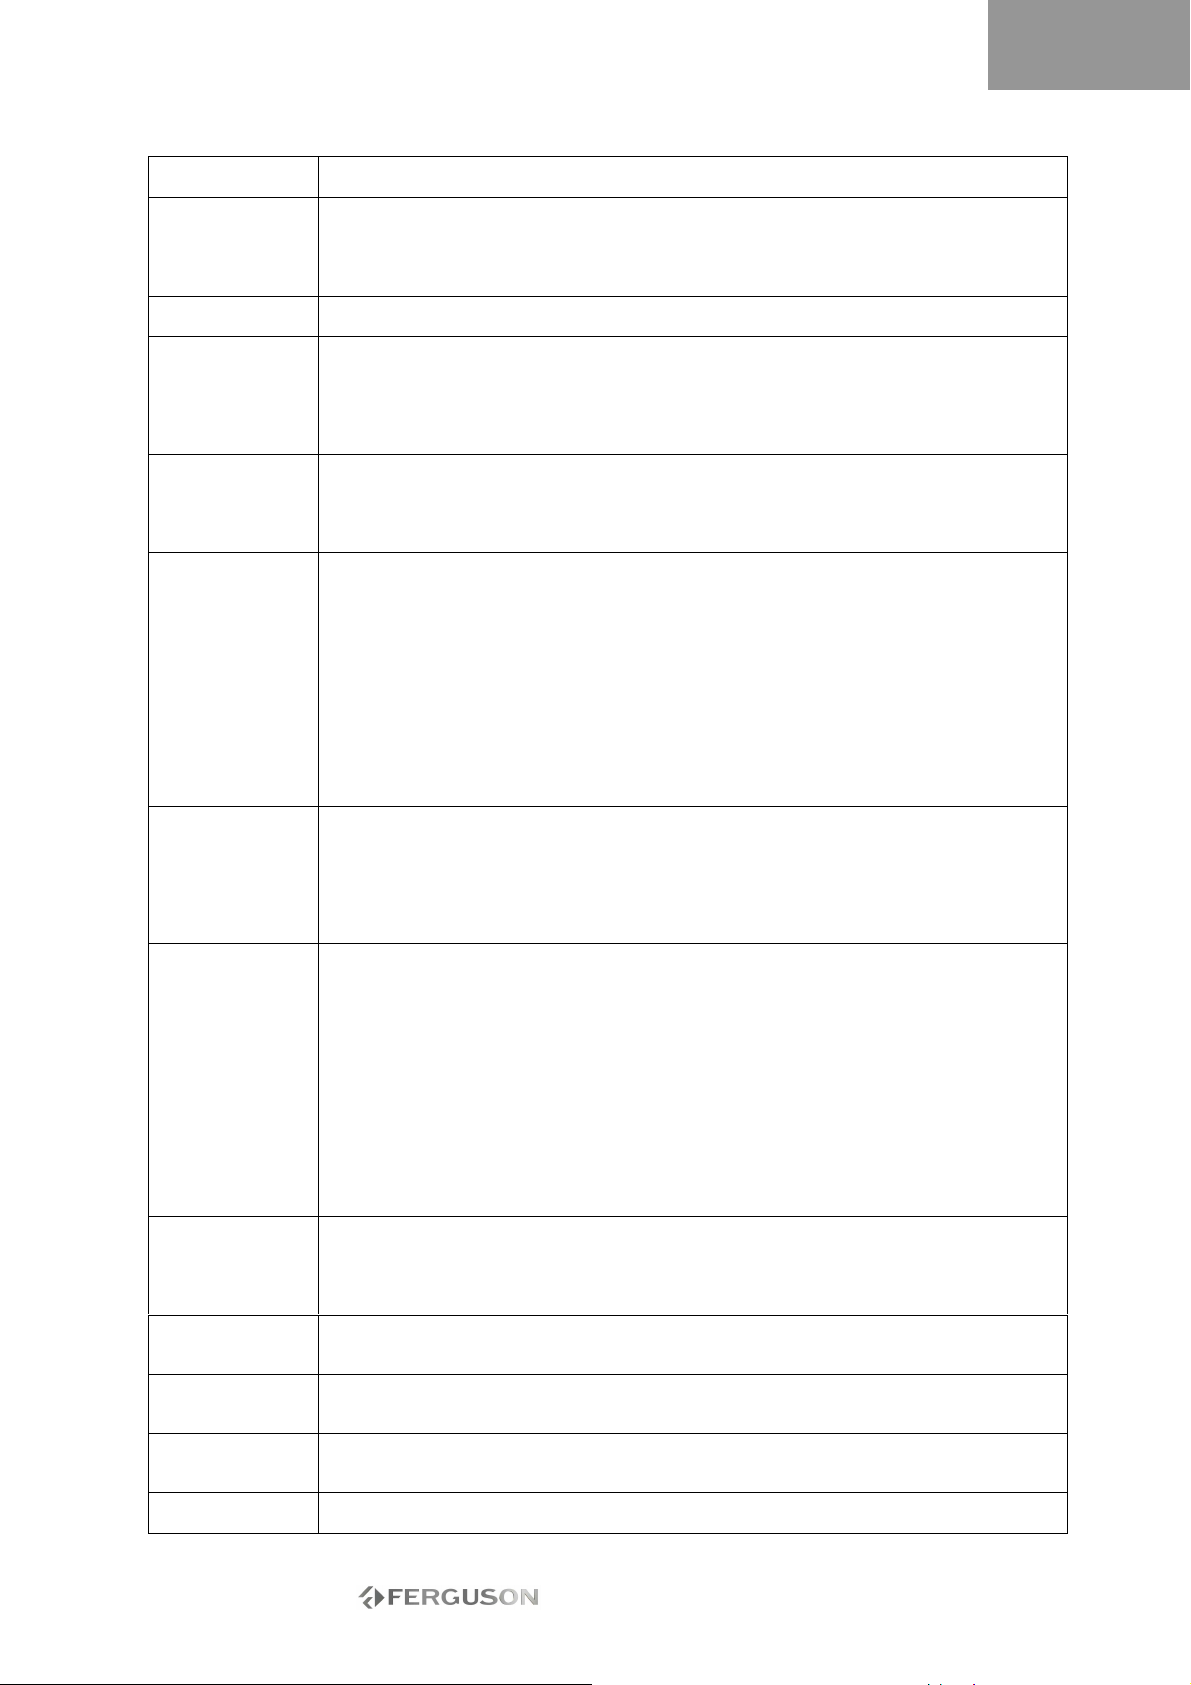
DEUTSCH
STÖRUNGSBESEITIGUNG
Problem Lösung
Kein Ton
Nur Ton, kein Bild • Der Suchmodus des Videoausgangs ist falsch eingestellt. Drücken Sie an der
Keine Reaktion • Schließen Sie das Netzkabel an einer Steckdose an.
Die Fernbedienung
funktioniert nicht
Keine Wiedergabe
einer Disc
Schlechte
Wiedergabequalität
(verzerrtes Bild/
verzerrter Ton)
Keine Aufnahme
möglich
Keine
Zeitplanaufnahmen
möglich
DVD±RW kann
nicht bearbeitet
werden
Das TV-Signal hat
Bildoder
Tonstörungen
Verzerrtes Bild
oder
Schwarzweißbild
Keine digitale
Audioausgabe
• Schließen Sie die Audiokabel fest an den Buchsen an.
• Überprüfen Sie die Verbindung zwischen DVD-Audioausgang und Fernsehgerät oder
Receiver-Audioeingang. Achten Sie darauf, dass an Ihrem Fernsehgerät oder Verstärker
der Audioeingang ausgewählt ist.
• Informieren Sie sich anhand des Benutzerhandbuchs zu Ihrem Audioverstärker.
Fernbebdienung auf „PS/I“, um in den korrekten Modus zu wechseln.
• Die Timer-Aufzeichnung ist aktiv. Drücken Sie auf Power oder Stop, um die Aufnahme
abzubrechen.
• Eventuell liegt eine technische Fehlfunktion vor. Ziehen Sie den Netzstecker und warten
Sie 30 Sekunden, bevor Sie ihn wieder anschließen. Sollte das Problem fortbestehen,
versuchen Sie, den Multimedia Recorder auf die Standardvorgaben zurückzusetzen.
• Die Fernbedienung ist nicht auf den Multimedia Recorder gerichtet. Richten Sie die
Fernbedienung auf den Multimedia Recorder.
• Die Batterien sind leer. Ersetzen Sie sie.
• Eventuell liegt eine technische Fehlfunktion vor. Nehmen Sie die Batterien aus der
Fernbedienung heraus und warten Sie 30 Sekunden, bevor Sie sie wieder einsetzen.
• Das Disc-Medium ist leer. Ersetzen Sie es.
• Inkompatibles Disc-Medium: Siehe die Liste der unterstützten Disc-Medien am Anfang
dieses Handbuchs.
• Das Disc-Medium wurde mit dem Etikett nach unten eingelegt. Legen Sie es mit dem
Etikett nach oben ein.
• Falscher Bereichscode. Der Bereichscode stimmt nicht mit den Einstellungen am
Multimedia Recorder überein.
• Die Kindersicherung ist aktiviert. Heben Sie die Sicherung auf. Das standardmäßige
Kennwort lautet 0000 oder 3308.
• Wählen Sie eine Kanalnummer an Ihrem Fernsehgerät. Wählen Sie eine korrekte
Kanalnummer.
• Die Verbindung zwischen Multimedia Recorder und Fernsehgerät ist nicht sicher.
Überprüfen Sie die Verbindung.
• Das Fernsehgerät ist nicht optimal eingestellt.
• Das Disc-Medium ist schmutzig. Reinigen Sie es.
• Interferenzen verursachen die Bildstörung.
• Die falsche Einstellung für den Ausgabemodus kann einen schwarzen Bildschirm oder
eine schlechte Bildqualität verursachen. Bei Problemen mit der Bildqualität oder bei einem
schwarzen Bildschirm drücken Sie bitte die Taste „Progressiv“, um den Ausgabemodus zu
wechseln.
• Der Fernsehkanal, den Sie aufzeichnen möchten, ist noch nicht gespeichert, oder Sie
haben die falsche Kanalnummer gewählt.
• Überprüfen Sie die gespeicherten Kanäle.
• Das Disc-Medium ist schreibgeschützt. Entfernen Sie den Schutz oder verwenden Sie
eine andere Disc.
• Das Disc-Medium ist eine abgeschlossene DVD+R oder DVD-R. Nehmen Sie ein anderes
Disc-Medium.
• Inkompatibles TV-System. Stellen Sie sicher, dass die Disc nicht mit einem anderen
Videoformat (z.B. PAL oder NTSC) aufgenommen wurde. Der Multimedia Recorder
unterstützt keine Aufnahmen in einem unterschiedlichen Videoformat auf derselben
DVD+R/RW.
• Das verwendete Disc-Medium entspricht nicht der DVD+R/RW- oder DVD-R/RW-Norm.
• Der Recorder nimmt nicht auf CD-R/RW- oder DVD-RAM-Disc-Medien auf.
• Stellen Sie sicher, dass die Disc nicht zuvor auf einem Computer benutzt wurde.
• Falsches Datum oder falsche Uhrzeit eingestellt. Überprüfen Sie dies bitte.
• Der Zeitplan ist nicht korrekt eingestellt. Überprüfen Sie dies bitte.
• Das Disc-Medium ist gesperrt. Heben Sie die Sperre auf.
• Das Disc-Medium ist eine abgeschlossene DVD+R oder DVD-R. Nehmen Sie ein anderes
Disc-Medium.
• Das Disc-Medium ist gesperrt. Drücken Sie die Taste DVD auf der Fernbedienung und
wählen Sie „Disc freigeben“, um die Disc-Sperre aufzuheben.
• Überprüfen Sie den Antennenanschluss.
• Überprüfen Sie im Systemmenü das ausgewählte TV-System. Auf dem europäischen
Kontinent sollte als Fernsehsystem PAL oder SECAM gewählt werden.
• Das Farbsystem des Disc-Mediums passt nicht zum Farbsystem des Fernsehgerätes.
• Das Signal ist kein Farbsignal.
• Überprüfen Sie, ob die digitalen Eingangsbuchsen mit den Ausgangsbuchsen des
externen Gerätes kompatibel sind.
- 71 -
Page 72

DEUTSCH
GLOSSAR
Bildseitenformat
Das Bildseitenformat ist das Verhältnis von Länge zu
Höhe des Fernsehbildschirms. Ein standardmäßiges
Fernsehgerät hat ein Seitenverhältnis von 4:3. Ein
Breitformatgerät hat ein Seitenverhältnis von 16:9.
Der Letter-Box-Modus hat ein Breitbild im
„Kinoformat“.
Kapitel/Titel
Kapitel bezieht sich auf den kleinsten Abschnitt
eines DVD-Films. Titel ist der größte Bereich auf
einer DVD.
Component Video
Videosignal mit drei verschiedenen
Informationskanälen, die das vollständige Bild
ausmachen. Es gibt drei verschiedene Arten von
Component Video: Spezial, R/G/B und Y/Cb (Pb)/Cr
(Pr).
Composite Video
Ein einzelnes Videosignal, dass alle Licht-, Farb- und
Synchronisationsdaten enthält. Dies ist das
gängigste Signal in Konsumentengeräten.
DivX®
DivX ist eine populäre, von DivX, Inc. entwickelte
Medientechnologie. DivX®-Mediendateien enthalten
hochkomprimierte Videodaten mit hervorragender
Qualität bei relativ kleiner Dateigröße. DivX®Dateien können auch fortschrittliche
Medienfunktionen wie Menüs, Untertitel und
wechselnde Audiospuren enthalten. Viele DivX®Mediendateien kann man online herunterladen, oder
mit Hilfe der benutzerfreundlichen
Dienstprogramme von DivX.com eigene Dateien
erstellen.
Dolby Digital®
Bietet Mono, Stereo oder bis zu 5.1 diskrete
Surround Sound-Kanäle: Links, Mitte, Rechts, Links
Surround, Rechts Surround und Low- Frequency
Effects (LFE). Globaler Standard für DVD-Audio und
DVD-Video.
DTS® (Digital Theatre Systems)
DTS® steht für Digital Theatre System. DTS ist
neben Dolby Digital ein weiteres Surround-System,
das als Surround-Sound-Format für Filme populär
geworden ist. DTS® und DTS® Digital Out sind
eingetragene Warenzeichen von Digital Theatre
Systems, Inc.
JPEG
Gängiges Dateiformat zur Komprimierung und
Speicherung von Standbildern (z.B. Fotos und
Illustrationen). JPEG steht für Joint Photographic
Experts Group. Die meisten Digitalkameras
verwenden dieses Format.
MP3
MP3 (MPEG1 Audio Layer 3) ist ein komprimiertes
Audiodateiformat. Dateien werden anhand ihrer
Erweiterung „.mp3“ oder „.MP3“ erkannt.
MPEG
MPEG steht für Motion Picture Experts Group. Dies
ist ein internationales Standardaudioformat bei
Video-CDs und einigen DVD-Disc-Medien.
Optischer digitaler Ausgang
Ein Anschluss, der digitale Audiosignale in Form
pulsierenden Lichts ausgibt. Komponenten werden
mit Hilfe spezieller Glasfaserkabel von
spezialisierten Fachhändlern verbunden.
PAL (Phase Alternation by Line)
PAL (Phase Alteration Line) ist der westeuropäische
Standard bei der Farbfernsehübertragung.
PBC
Playback Control. Eine spezielle
Wiedergabesteuerungsfunktion bei einer Video-CD
oder Super-VCD, die das Navigieren in einem
integrierten On-Screen-Menü ermöglicht.
S-Video
Ein Videosignal mit höherer Bildqualität gegenüber
standardmäßigen Composite-Verbindungen. Wird
bei Super VHS, DVD, High-End-TVMonitoren usw.
verwendet.
Time Shift
Gleichzeitige Videoaufnahme und -wiedergabe
Pause und Wiederaufnahme von Live-Sendungen.
Schnell vor, schnell zurück und Direktsprung zu
einer beliebigen Stelle in der Aufzeichnung.
Gibt ein zuvor aufgezeichnetes Programm wieder,
während gleichzeitig ein anderes Programm
aufgenommen wird.
Titel
SVCD, VCD, Audio CD-Disc-Medien verwenden
Spuren, um den Inhalt einer Disc zu unterteilen.
- 72 -
Page 73
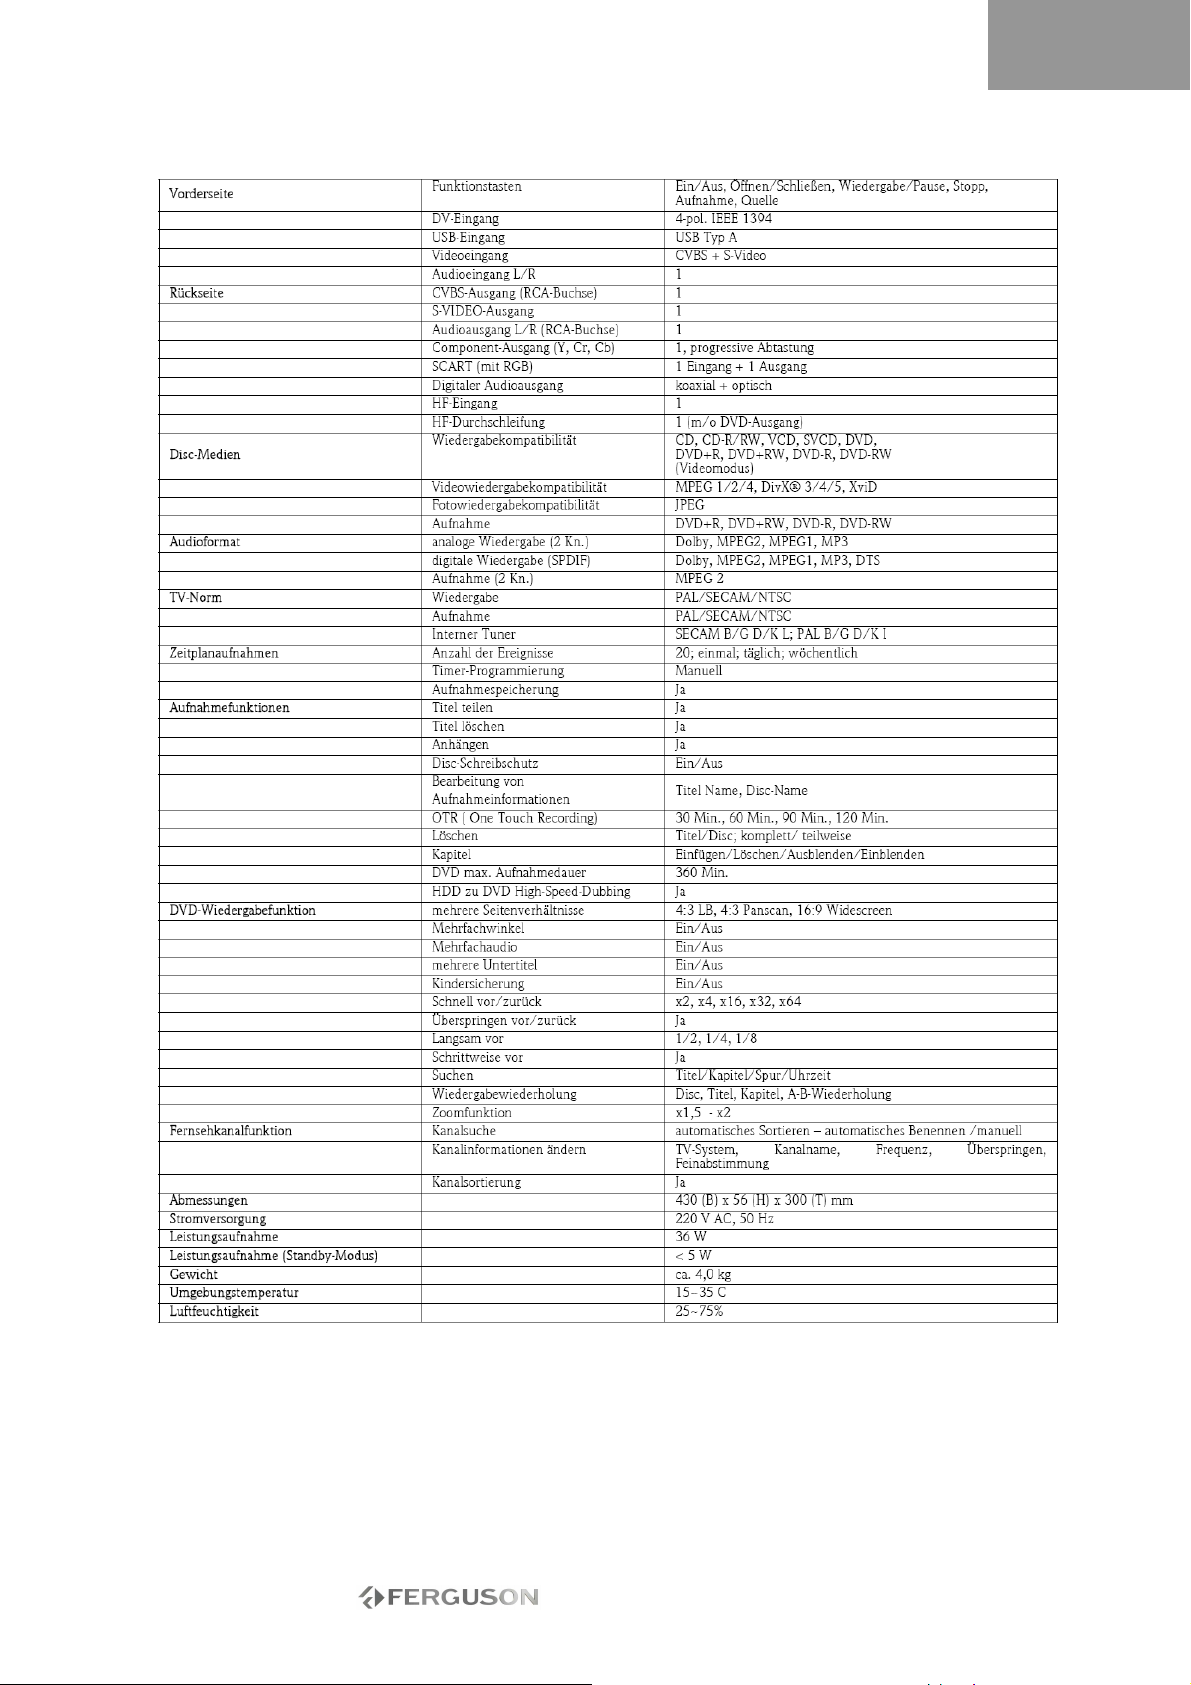
TECHNISCHE DATEN
DEUTSCH
- 73 -
Page 74
ESPAÑOL
Declaración de limitación de responsabilidad
Ferguson renuncia específicamente a toda garantía,
explícita o implícita, incluida pero no limitada
cualquier garantía implícita de comerciabilidad e
idoneidad para un fin determinado en relación con
este producto y su documentación. Los
componentes de hardware del ordenador se
actualizan con regularidad. Por lo tanto, algunas de
las instrucciones, especificaciones e imágenes de
esta documentación pueden variar ligeramente
respecto a su sistema. Todos los elementos
descritos en esta guía son meramente ilustrativos y
puede que no sean aplicables a su situación
concreta. No se pueden obtener derechos de las
descripciones realizadas en este manual.
Ferguson se reserva el derecho a revisar o realizar
cambios o mejoras a este producto o a la
documentación en cualquier momento sin estar
obligado a notificar dichos cambios. En ningún caso
Ferguson será responsable de daños directos o
indirectos, incluyendo pero no limitados a la pérdida
de beneficios comerciales o cualquier otro perjuicio
comercial, que se originen como consecuencia de la
utilización de este producto.
Marcas comerciales
Ferguson es una marca comercial registrada de
Ferguson Los restantes nombres de empresas y
productos son marcas comerciales, marcas
comerciales registradas o marcas de servicios de
sus respectivos propietarios.
DivX®, DivX ®Certified y sus logotipos
son marcas comerciales de DivX®, Inc.
y se utilizan con licencia.
Fabricado con licencia de Dolby Laboratories. Dolby
y el símbolo de la doble D son marcas comerciales
de Dolby Laboratories.
Este producto incorpora tecnología de protección de
la propiedad intelectual protegida por métodos de
algunas patentes de EE.UU. y otros derechos de
propiedad intelectual de Macrovision Corporation y
otros titulares. El uso de esta tecnología de
protección de la propiedad intelectual debe ser
autorizado por Macrovision Corporation, y está
destinado para uso doméstico y otros usos de visión
limitados a no ser que estén autorizados por
Macrovision Corporation. Queda prohibida la
ingeniería inversa o el desensamblaje.
Advertencia
Para evitar el riesgo de incendio o de descarga
eléctrica, no use el enchufe con un cable alargador,
toma de corriente u otra toma si el enchufe no se
puede insertar completamente. No exponga este
aparato a la lluvia o a la humedad.
ADVERTENCIA: PARA REDUCIR EL RIESGO DE
DESCARGA ELÉCTRICA, NO QUITE LA CUBIERTA (O
PANEL POSTERIOR). NO CONTIENE PIEZAS QUE
PUEDA REPARAR EL USUARIO, SOLICITE EL
SERVICIO SÓLO A PERSONAL CUALIFICADO.
Precauciones de seguridad importantes
• Lea y guarde estas instrucciones.
• No utilice este aparato cerca del agua.
• Limpie con un trapo seco.
• No obstruya los orificios de ventilación. Instale
según las instrucciones del fabricante.
• No instalar cerca de fuentes de calor como
radiadores, calefactores, estufas u otros aparatos
que produzcan calor (incluidos los amplificadores).
• Proteja el cable de alimentación para que no sea
pisado ni pellizcado.
• Utilice sólo accesorios especificados por el
fabricante.
• Desenchufe el aparato durante tormentas
eléctricas o cuando no se use durante un período
largo. Tenga en cuenta que la garantía del
producto queda invalidada en los casos en que el
producto resulte dañado por un rayo.
• Solicite el servicio a personal cualificado. Es
necesario reparar el aparato si ha resultado dañado
de cualquier forma, ha estado expuesto a la lluvia o
humedad, no funciona normalmente o se ha
caído al suelo.
• Debe desenchufar el cable de alimentación para
desconectar el aparato de la toma de corriente.
Teniendo esto en cuenta, el enchufe debe estar
cerca del aparato y ser de fácil acceso.
- 74 -
Page 75

ESPAÑOL
INTRODUCCIÓN
La grabadora de Ferguson RW-770HD graba
señales de TV, señales AV de dispositivos externos o
señales digitales de dispositivos IEEE 1394 y realiza
grabaciones* en discos DVD+RW, DVD+R, DVD-RW
o DVD-R para facilitar el almacenamiento. La
Ferguson RW-770HD también funciona como
reproductor de DVD o CD.
*No se pueden grabar discos DVD-R a 8X.
CARACTERÍSTICAS PRINCIPALES
• El disco duro interno admite funciones de
grabación tales como Time Shifting y Doblaje digital
directo.
• Reproduce películas en DVD y CD de sonido
pregrabados.
• Guarde y reproduzca archivos multimedia
(música, fotos, vídeos) en el disco duro interno.
• Transfiera archivos entre dispositivos USB*, DVD
y el disco duro interno.
• Compatibilidad con MP3.
• Compatibilidad con códec DivX® (abreviatura de
compresión/descompresión DivX®).
• Sonido Dolby Digital para un total de 6 ('5.1')
canales de audio individuales (frontal izquierdo,
frontal medio, frontal derecho, posterior izquierdo,
posterior derecho y subwoofer).
• Grabación permanente (hasta 3 h)
• Grabe programas de TV y transfiera vídeos
domésticos a DVD
*Los dispositivos USB sólo admiten la transferencia
de archivos a otros dispositivos y no a la inversa.
Time Shifting
Grabación y reproducción simultáneas de vídeo.
• Pausa y reanudación de emisiones de TV
en directo. Reproducción rápida hacia adelante,
reproducción rápida hacia atrás y salto a cualquier
punto de la grabación.
• Reproducción instantánea de hasta 3 horas.
• Reproducción de un programa previamente
grabado durante la grabación simultánea de otro
programa.
Reproductor de DVD/CD
• Admite una relación de aspecto de pantalla de TV
de 16:9 y de 4:3.
• Funciones de reproducción, incluyendo
Programa, Repetir, Reproducción rápida hacia
delante / atrás, Zoom, etc.
• Admite audio, subtítulos y menús del disco en 34
idiomas. Admite 9 ángulos de visión, así como otras
características normales de reproducción de DVD.
• Es compatible con discos DVD, Super VCD, VCD,
CD y CD-R y reproduce MP3, JPEG y Picture CD.
• Tecnología de protección contra copia de
Macrovision.
Grabación de programas
• Grabación desde sintonizador de TV o entrada AV
analógica en formato MPEG-2.
• Reproducción de un programa grabado
previamente desde el disco duro durante la
grabación de otro programa.
• Temporizador programable para la grabación de
un programa de TV único o recurrente.
• Configuración de hasta 20 eventos de grabación
por tiempo, con tres opciones: "Una vez", "Diaria" y
"Semanal".
• Grabación rápida OTR (grabación de un solo
toque); grabación de TV con sólo pulsar un botón.
Archivado de DVD ('doblaje')
• Archivado de grabaciones del disco duro (Unidad
de disco duro) en discos DVD+RW, DVD+R, DVDRW o DVD-R.
• Los DVD grabados con esta grabadora multimedia
se pueden reproducir en la mayoría de los
reproductores de DVD, tanto actuales como futuros.
Archivado personal de video
• Transferencia de vídeos desde una grabadora de
vídeo, una videocámara analógica o una
videocámara digital (DV) a DVD con Doblaje digital
directo™.
Conectores
• Conector de entrada digital (DV) para cámaras de
vídeo digitales; las señales de audio y vídeo se
transmiten a través del mismo cable.
• Conectores estándar de salida de vídeo (CSB),
salida de S-Video, SCART IN/OUT y salida de vídeo
por componentes (Y, Cb/Pb, Cr/Pr).
• Conector coaxial de salida de audio digital.
• Conecta con unidades flash USB, lectores de
tarjeta de memoria USB y cámaras USB (El
dispositivo de almacenamiento masivo
debe estar formateado con el sistema de archivos
FAT32).
• Paso de señal con conectores SCART y de antena
de TV.
Características adicionales
• Tecnología de procesamiento de imagen Diamond
Copy, que ofrece una excelente calidad de imagen.
• Sistema de control de nivel de restricción.
• Programa de protección de pantalla.
• Actualización inteligente de software.
• La exploración progresiva crea una imagen con el
doble de líneas de exploración que el componente
de vídeo tradicional. El resultado es una reducción
en el parpadeo de la imagen y en los fallos de
movimiento y una mejora de la nitidez de la imagen
en pantallas grandes.
Una configuración errónea del modo de salida puede
provocar una mala calidad de imagen o que la
pantalla aparezca en negro. Si tiene problemas con
la calidad de imagen o la pantalla se ve en negro,
pulse el botón de exploración progresiva
(Progressive Scan) para cambiar el modo de salida.
- 75 -
Page 76
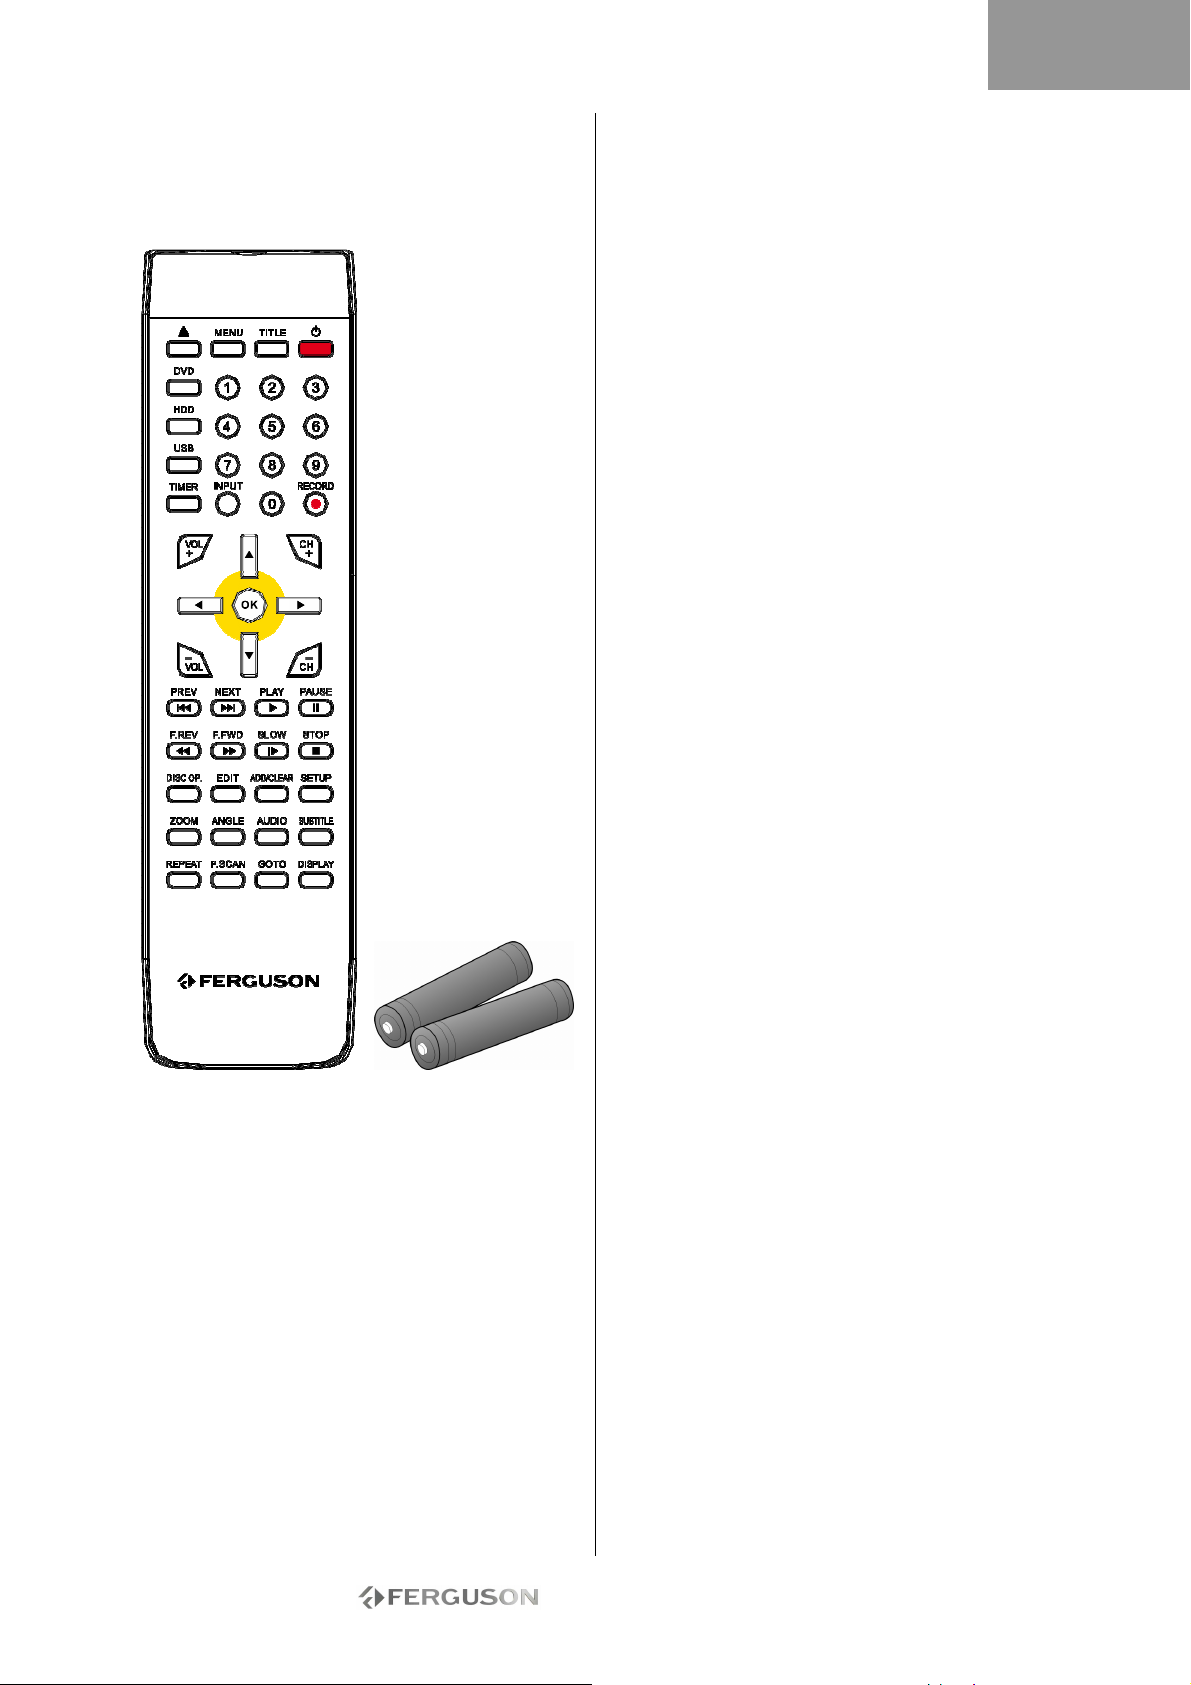
ESPAÑOL
CONTENIDO DE LA CAJA
• Grabadora
• Mando a distancia y 2 pilas AAA
• Guía del usuario
• Guía de garantía
TIPOS DE DISCO
DVD
Los discos DVD están divididos en uno o más títulos.
Cada título puede estar dividido a su vez en varios
capítulos. En ocasiones, un capítulo puede contener
puntos de índice, que lo dividen en varias partes.
Varios ángulos
Puede visualizar escenas desde distintos ángulos de
cámara cuando vea películas u otros medios que
contengan múltiples ángulos de reproducción.
Varios idiomas de audio
Puede seleccionar el idioma cuando vea películas o
reproduzca discos que contengan grabados varios
idiomas y/o bandas sonoras.
Subtítulos en varios idiomas
Puede seleccionar el idioma de subtítulos o
desactivar los subtítulos para ver películas o
reproducir discos con subtítulos grabados en varios
idiomas.
CD de SVCD/VCD/AUDIO
Los SVCD/VCD/AUDIO CD están divididos en pistas.
A veces, una pista puede contener varios puntos de
índice.
MP3 /JPEG/DIVX® (archivos de
sonido/imagen/ vídeo)
MP3 es un formato de archivo de audio comprimido
que utiliza la extensión de archivo "mp3" o ".MP3".
JPEG es un formato de archivo de imagen
comprimido que utiliza la extensión de archivo
".jpg" o ".JPG". DivX® es un formato de archivo de
vídeo comprimido que utiliza la extensión de archivo
".avi" o ".AVI".
La Ferguson RW-770HD puede tardar algún tiempo
en mostrar la lista de contenidos del disco,
especialmente si éste contiene muchos datos.
Discos compatibles
• CD Audio y CD EXTRA
• CD-ROM (modo 1)
• CD-ROM XA (modo 2, forma 1 y forma 2),
• CD-I (modo 2, forma 1 y forma 2) y CD-I Ready
• Photo CD (sesión sencilla y múltiple)
• CD de vídeo
• CD-TEXT
• DVD-ROM (SS-SL) de cara sencilla y una capa
• DVD-ROM OPUESTO (SS-DL-OPT) de cara sencilla
y doble capa, DVD-ROM PARALELO (SS-DL-PTP)
• DVD-ROM (SS-SL) de cara doble y una capa
• DVD-ROM (DS-DL) de cara doble y doble capa
• DVD-ROM OPUESTO (SS-DL-OPT) de cara doble y
doble capa, DVD-ROM PARALELO (SS-DL-PTP)
• DVD±R/RW de cara sencilla y una capa
Tipos de discos no compatibles
Discos sin finalizar de otros grabadores de DVD/CD.
No se admiten todos los CD-R, CD-RW, DVD-R,
DVD-RW, DVD+R, DVD+RW debido al tipo de disco
o a las condiciones de grabación.
DISCOS GRABABLES
• DVD±RW (discos D VD regrabables)
DVD±RW es un formato borrable. Los discos
DVD±RW se pueden regrabar más de 1.000 veces.
• DVD±R (discos DVD grabables una sola vez)
Los discos DVD±R solo se pueden grabar una vez.
Puede realizar varias grabaciones en el mismo disco
siempre que éste no esté finalizado o lleno.
Si el disco está finalizado, no puede editar ni grabar
en el mismo, aunque es posible que tenga
capacidad disponible sin utilizar. Si desea reproducir
un DVD±R creado con su grabadora Ferguson,
asegúrese de que ha sido finalizado. Igualmente,
debe utilizar la opción "hacer compatible" si desea
reproducir un disco DVD±RW en otro reproductor.
- 76 -
Page 77
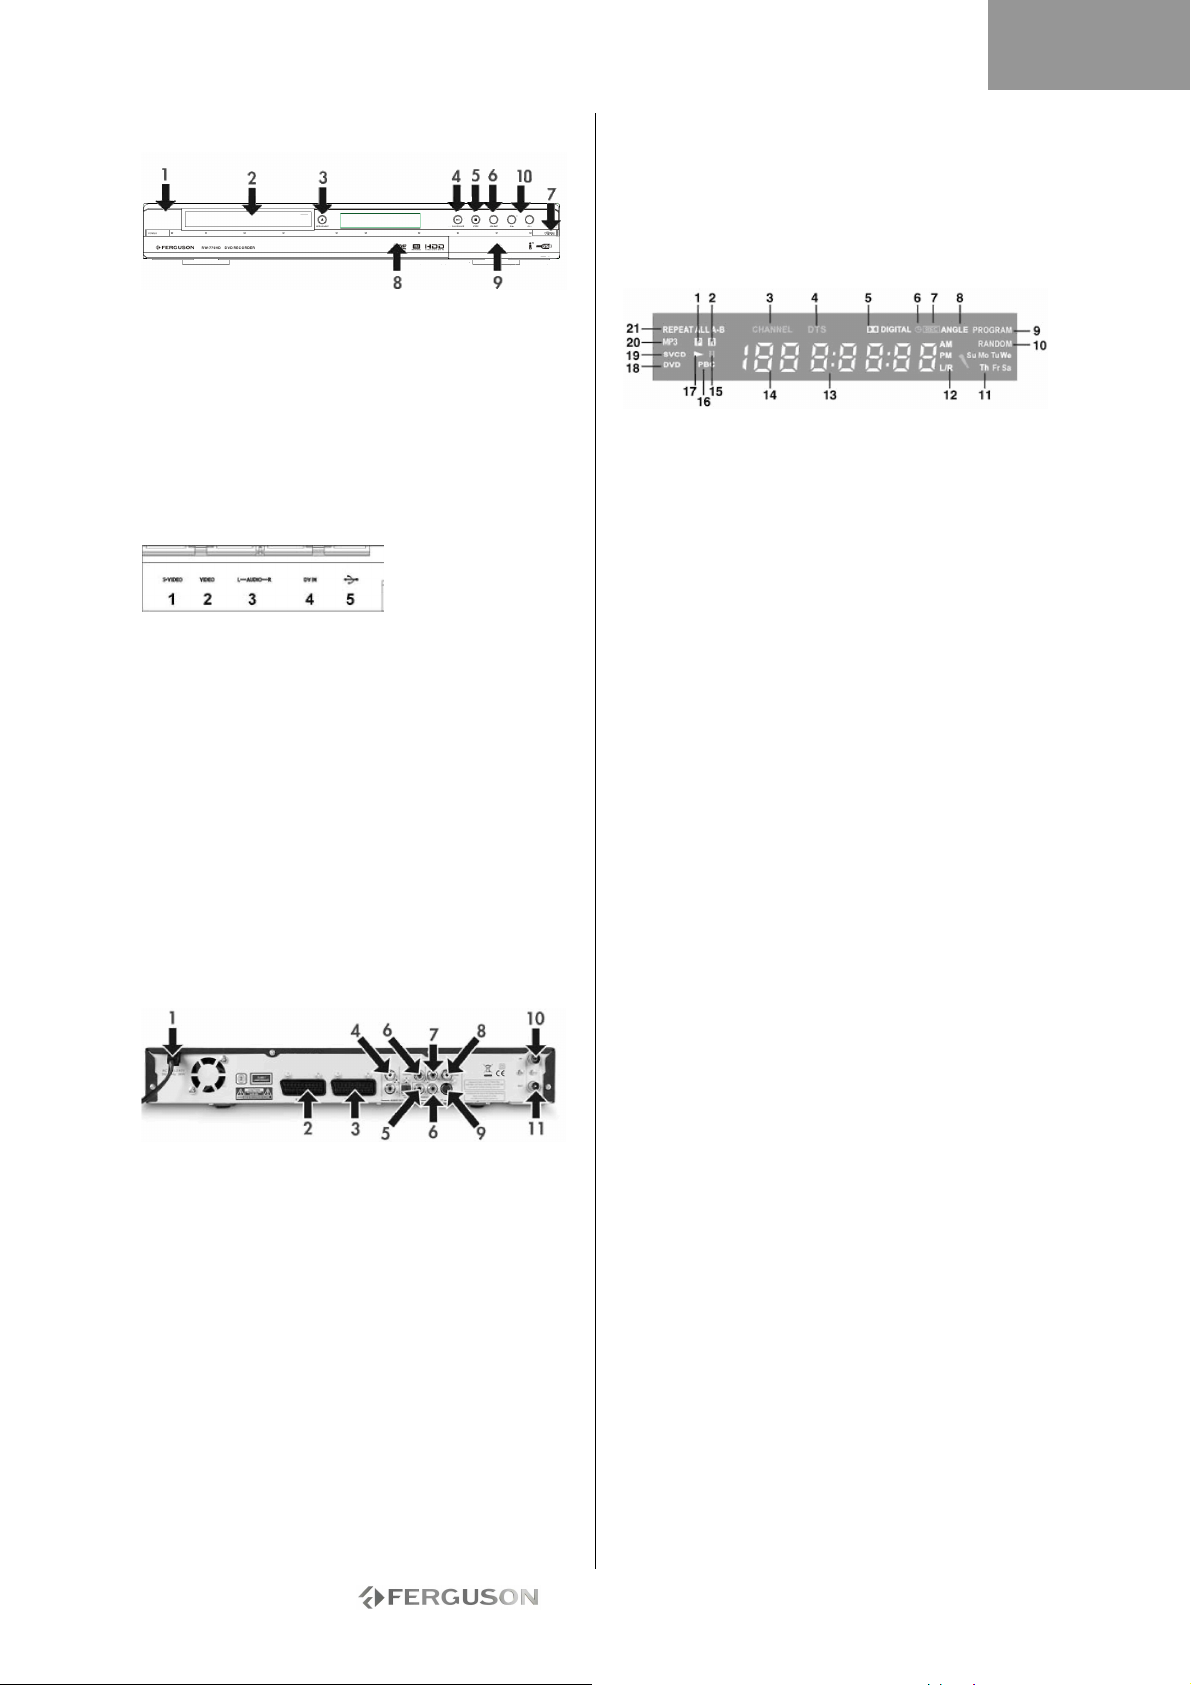
ESPAÑOL
CONTROLES Y CARACTERÍSTICAS DEL PANEL
FRONTAL
1. Botón de encendido
2. Soporte de disco DVD
3. Botón de apertura/cierre
4. Botón Reproducir/Pausa
5. Botón Detener
6. Botón Fuente
7. Botón Grabar
8. Pantalla
9. Conectores del panel frontal
10. Botón CH+ / CH-
Conectores del panel frontal (abrir la solapa
para acceder)
1. S-Video: Conector de entrada de S-Video,
utilícelo para conectar un dispositivo de vídeo
adecuado.
2. Vídeo compuesto: Conector de entrada vídeo,
utilícelo para conectar un dispositivo de vídeo
adecuado.
3. Audio compuesto L/R: Conectores de entrada de
audio, utilícelos para conectar audio desde
dispositivos conectados a los puertos
de S-Video o compuesto.
4. DV IN: Conector de entrada de DV (i-Link/IEEE
1394), utilícelo para conectar una cámara de vídeo
digital.
5. USB: Conector de entrada USB, utilícelo para
conectar un dispositivo de almacenamiento masivo
USB.
DIAGRAMA DEL PANEL
POSTERIOR
1. AC IN Conector del cable de alimentación a la
fuente de alimentación.
2. SCART In (SCART 2) Utilícelo para conectar un
equipo de AV digital con capacidad de salida SCART.
3. SCART Out (SCART 1) Utilícelo para conectar el
televisor u otro equipo a un conector SCART In.
4. Salida de audio L/R Salida de audio analógico
(izquierda y derecha).
5. Salida de audio digital coaxial Utilícelo para la
salida de audio digital mediante la conexión a un
amplificador o un receptor con capacidad de entrada
de audio digital.
6. YUV (Y Cb/Pb Cr/Pr) Utilícelo para conectar el
televisor a conectores de entrada YUV (Y Cb/Pb
Cr/Pr). El modo de salida se puede establecer como
progresivo o como entrelazado.
7. Salida de vídeo CVBS Utilícelo para conectar el
televisor al conector de entrada de vídeo (CVBS).
8. Audio digital óptico Utilícelo para la salida de
audio digital grabado en discos mediante la
conexión al conector de entrada de audio digital
óptico de un amplificador o receptor de AV con
capacidad de entrada de audio digital.
9. Salida de S-Video Utilícelo para conectar el
televisor al conector de entrada de S-VIDEO.
10. Entrada de antena Utilícelo para conectar un
televisor por antena/cable.
11. Salida de antena Utilícelo para enviar la señal
de TV al televisor
Indicadores de la ventana en pantalla
1. PAL
2. NTSC
3. Canal
4. DTS
5. Dolby
6. Temporizador
7. Grabar
8. Ángulo múltiple
9. Programa
10. Aleatorio
11. Day (día)
12. Canal de audio
13. Hora/Modo (hh:mm:ss)
14. Fuente/Capítulo
15. Pausa
16. PBC
17. Repr.
18. DVD
19. VCD/SVCD
20. MP3
21. Repeat
- 77 -
Page 78
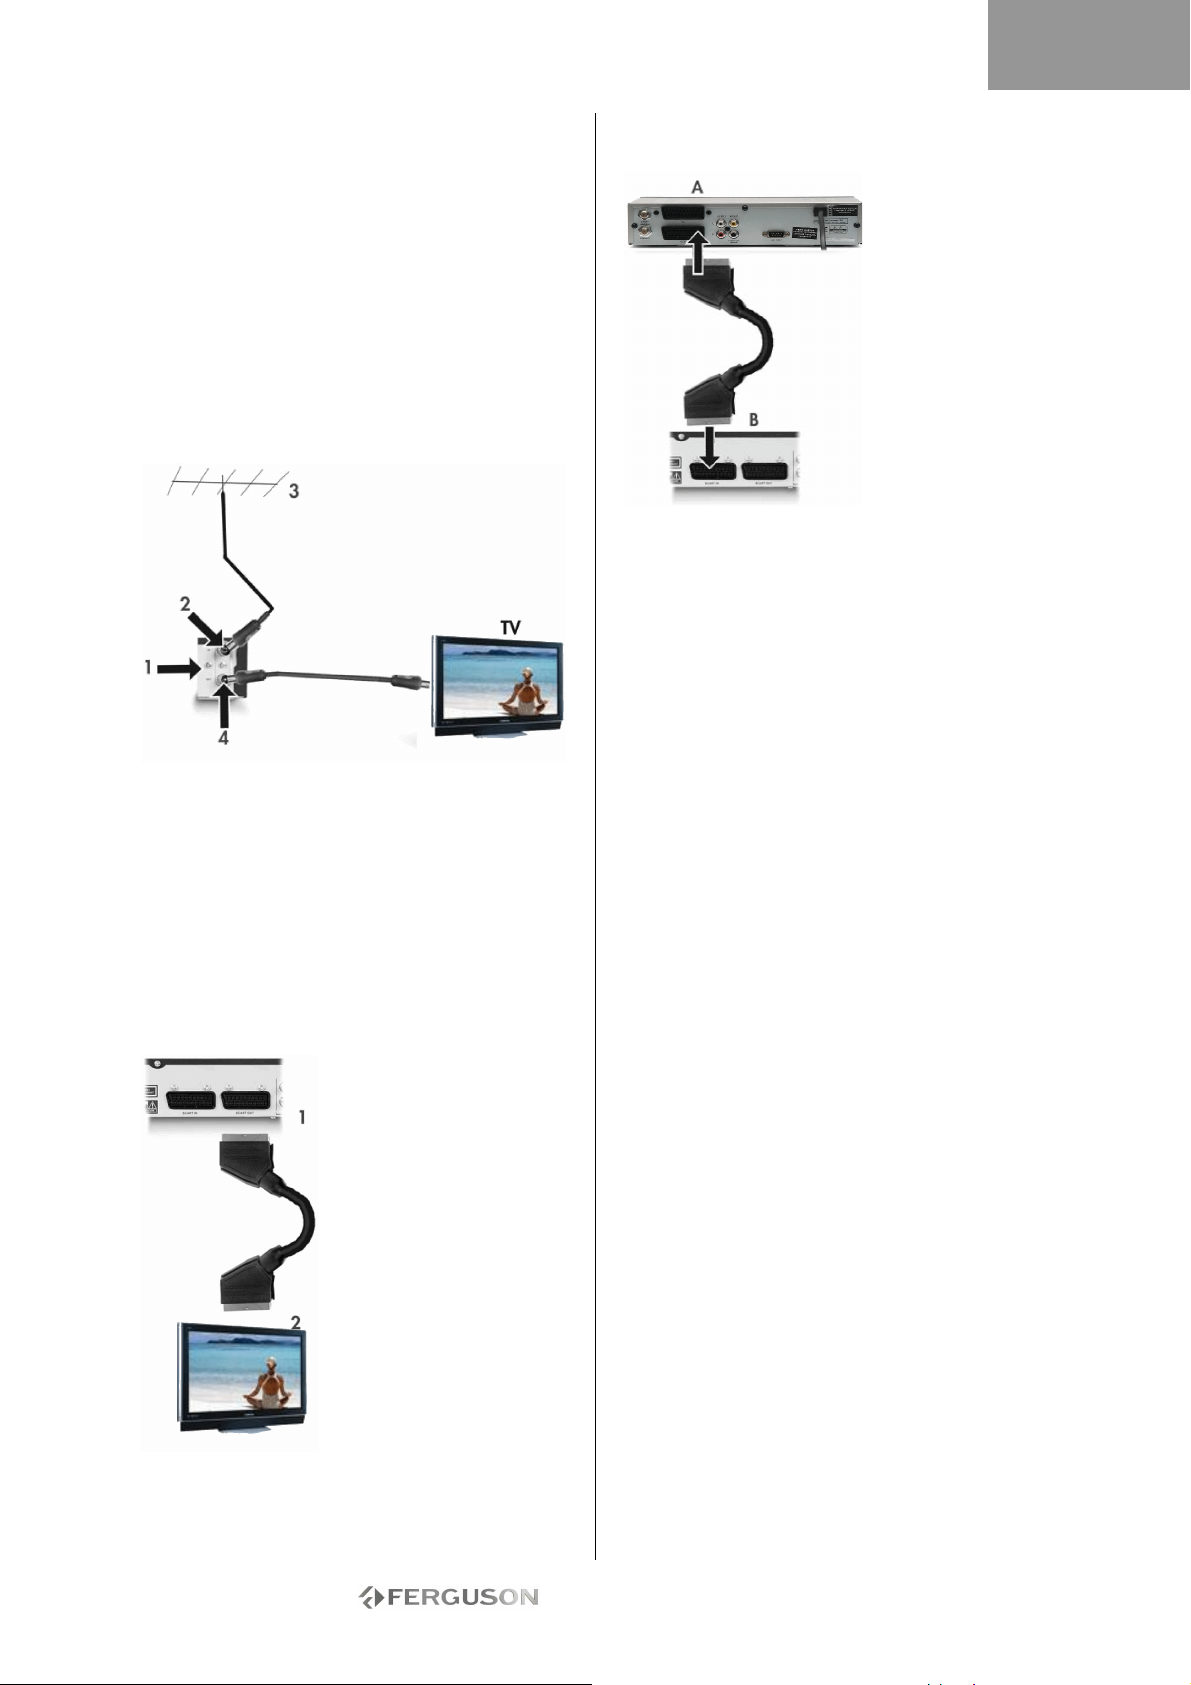
ESPAÑOL
CONEXIÓN A UN TELEVISOR (CONFIGURACIÓN
BÁSICA)
Paso 1: Conectar la antenna
1. Apague el televisor.
2. Desconecte el cable de la antena de la parte
posterior de su TV y conéctelo a la entrada
ANTENNA IN de la parte posterior de la grabadora.
3. Conecte un cable de antena coaxial desde la
salida ANTENNA OUT de la parte posterior de la
grabadora a la entrada ANTENNA IN de la parte
posterior de su TV.
4. Deberá realizar una búsqueda para sintonizar los
canales de TV disponibles en la grabadora.
1. Panel posterior de la Ferguson RW-770HD
2. Entrada Antenna in
3. Antena (o TV por cable)
4. Salida de antena, se puede utilizar para enviar la
señal de TV al conector de entrada de señal RF de
otro televisor.
El conector de salida de señal de TV (antenna out)
es sólo una conexión derivada de la señal de
entrada.
Paso 2: Conectar a la TV mediante SCART
1. Conecte un cable
SCART desde la salida
SCART OUT de la parte
posterior de la GRABADORA
a la entrada SCART IN de la
parte posterior de su TV.
2. Seleccione SCART IN
como fuente en la TV.
CONECTE UN DECODIFICADOR DE
TV/SATÉLITE
1. Conecte un cable SCART desde la clavija
SCART OUT de la parte posterior del
decodificador (A) a la clavija SCART IN de la parte
posterior de la Ferguson RW-770HD (B).
2. Deberá realizar una búsqueda para sintonizar los
canales de TV disponibles en la grabadora.
- 78 -
Page 79
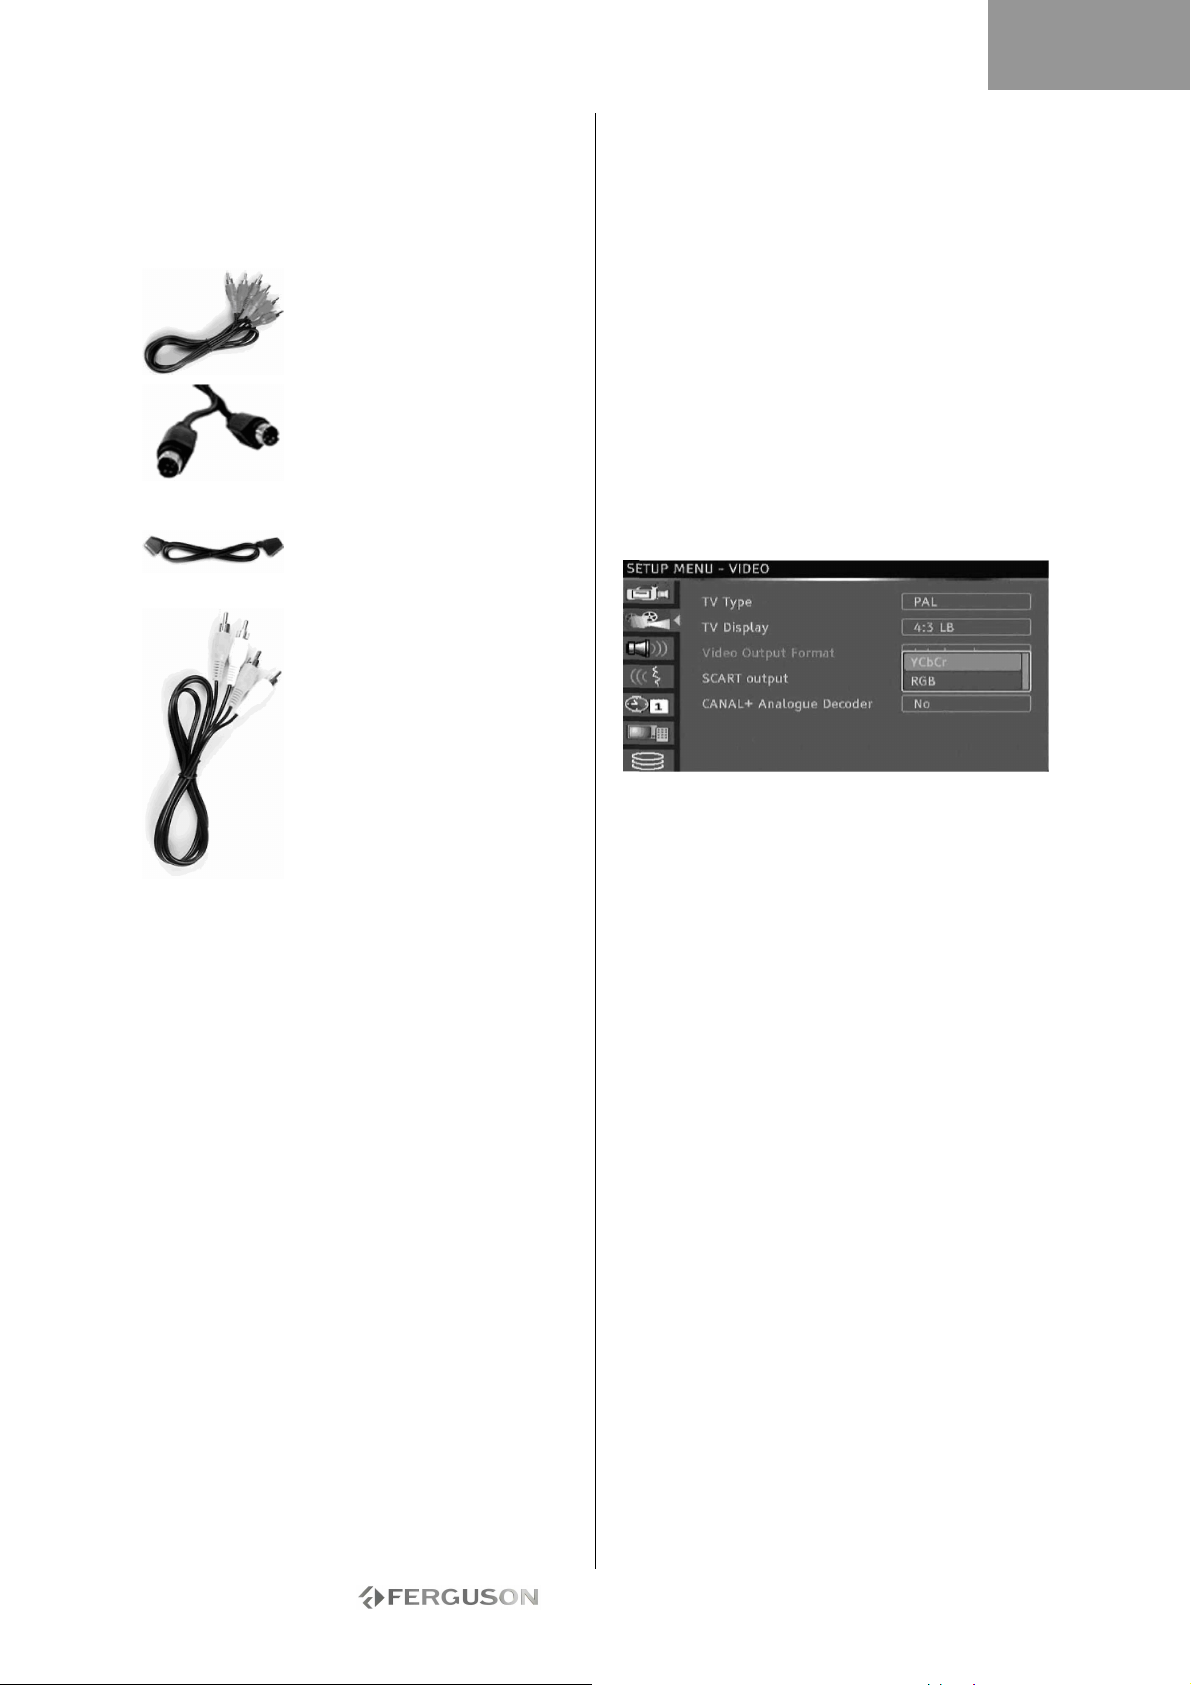
ESPAÑOL
CONEXIÓN A UN TELEVISOR (CONFIGURACIÓN
ALTERNATIVA)
Si desea usar una conexión que no sea un cable
SCART, puede usar una de las siguientes
configuraciones (no incluidas), comenzando por la
mejor en cuanto a calidad, en orden descendente:
A - Conectar al televisor mediante vídeo
compuesto
1. Conecte un cable de vídeo desde la salida CVBS
(amarilla) de la parte posterior de la grabadora a la
entrada de vídeo (amarilla) del televisor.
2. Conecte cables de audio (cinch) desde las salidas
de Audio L/R (blanca/roja) de la parte posterior de
la grabadora a las entradas de Audio L/R
(blanca/roja) del televisor.
3. Seleccione la entrada de VIDEO o CVBS como
fuente en el televisor
B - Conectar al televisor mediante S-Video
1. Conecte un cable de s-video desde la salida SVIDEO (negra) de la parte posterior de la grabadora
a la entrada S-VIDEO (negra) del televisor.
2. Conecte cables de audio (cinch) desde las salidas
Audio L/R (blanca/roja) de la parte posterior de la
grabadora a las entradas Audio L/R (blanca/roja)
del televisor.
3. Seleccione S-VIDEO como fuente en el televisor
C - Conectar al televisor usando vídeo por
componentes (YUV o YCbCr)
El vídeo por componentes proporciona la mejor
calidad de imagen con diferencia en los televisores
LCD y de plasma. Para usar la conexión de vídeo
por componentes, la grabadora debe estar ya
conectada al televisor mediante una de las
Vídeo compuesto (exploración
progresiva) Vídeo compuesto
(entrelazado)
S-Video
SCART (RGB)
Vídeo compuesto
conexiones anteriores (sin embargo, se recomienda
SCART).
1. Encienda el televisor y seleccione la fuente
correspondiente a la GRABADORA.
2. Encienda la GRABADORA.
3. Conecte los 3 cables de vídeo por componentes
(rojo, verde, azul) de las conexiones COMPONENT
VIDEO OUT (roja, verde,azul) de la parte posterior
de la GRABADORA a la entrada COMPONENT VIDEO
IN (rojo, verde, azul) del televisor.
4. Conecte los cables de audio de la salida AUDIO
L/R OUT de la parte posterior de la GRABADORA a
la entrada AUDIO L/R IN del televisor.
5. Pulse el botón MENU del mando a distancia.
6. Mediante los botones de navegación, vaya a la
sección GENERAL del menú.
7. Mediante los botones de navegación y el botón
OK, cambie la configuración de salida SCART a
YCbCr. Cambie la configuración de formato de salida
de vídeo a Progresiva si el televisor admite
exploración progresiva.
8. Seleccione la fuente YUV o YCbCr en el televisor.
9. El cable SCART se puede desconectar.
- 79 -
Page 80
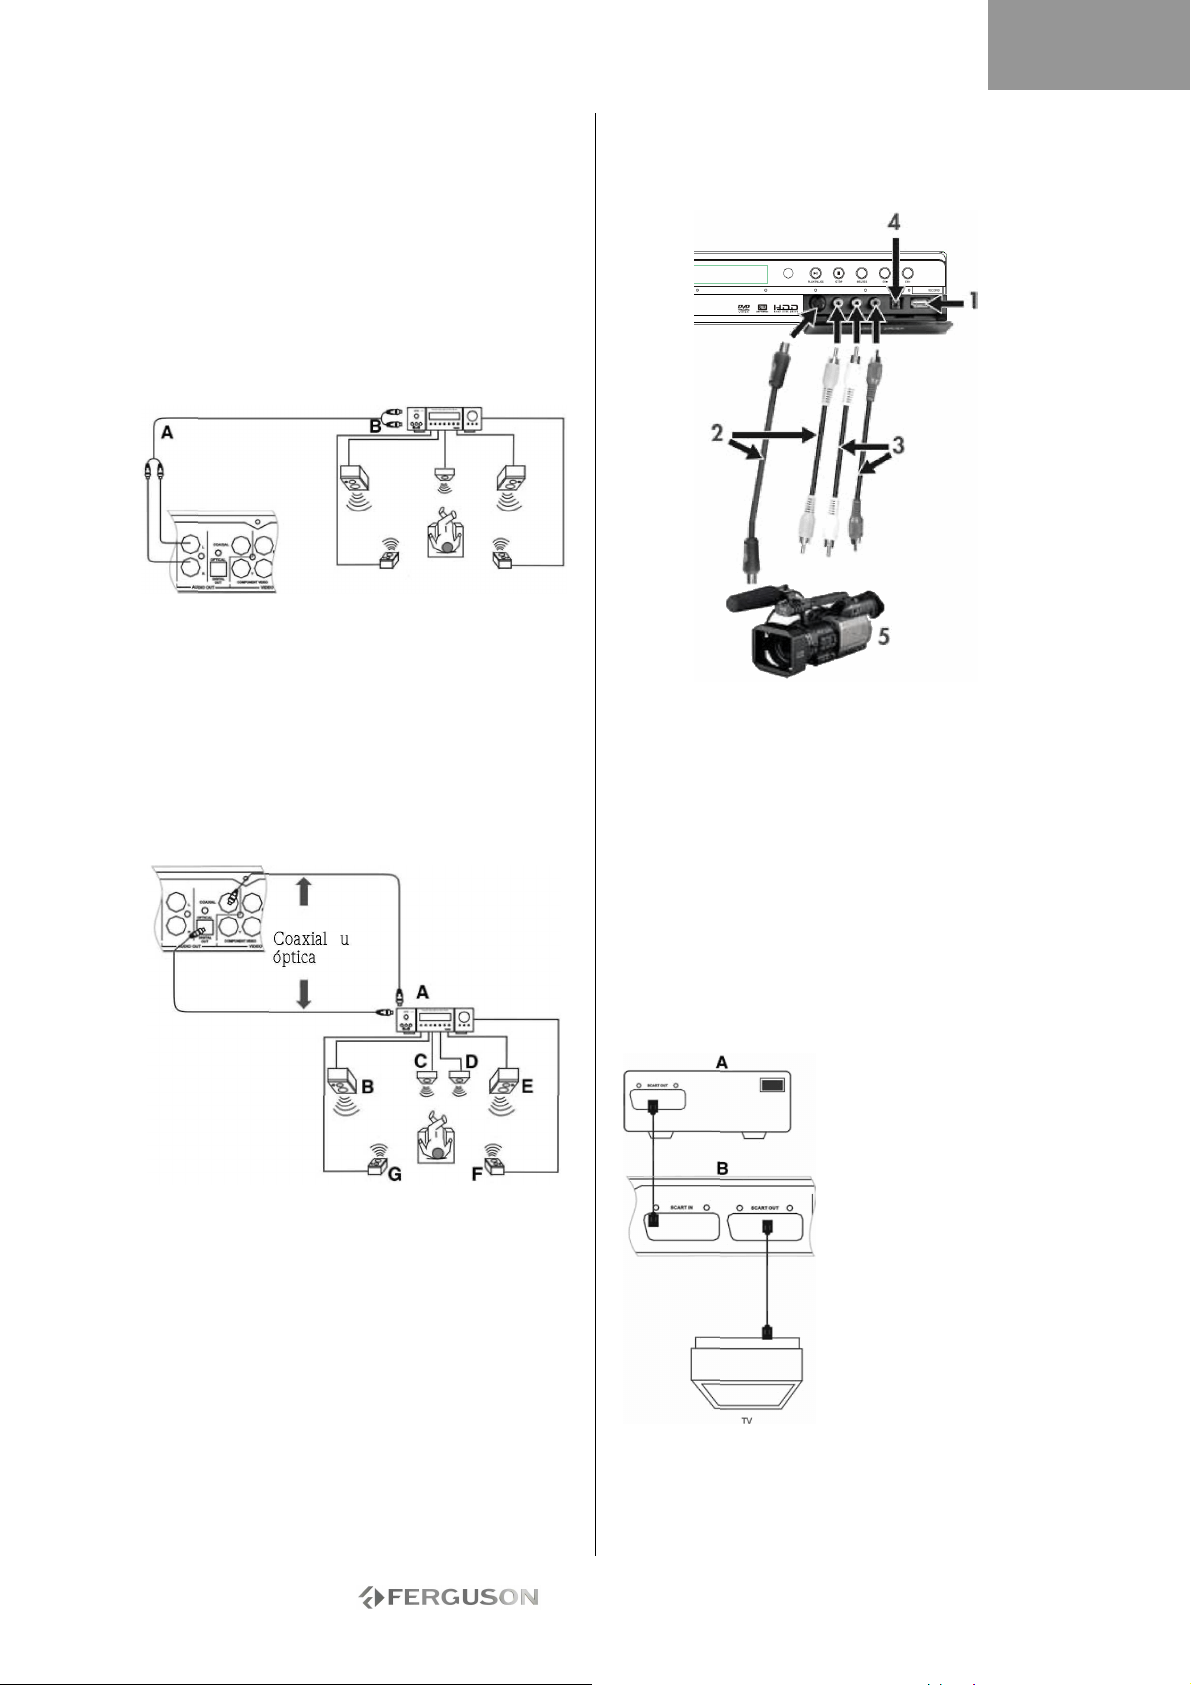
ESPAÑOL
CONEXIÓN A UN SISTEMA DE AUDIO EXTERNO
Conexión analógica a un amplificador
Conecte un cable de audio desde las salidas AUDIO
L/R OUT (blanca/roja) de la parte posterior de la
grabadora a las entradas Audio L/R IN (blanca/roja)
del amplificador.
Se pueden conectar los siguientes dispositivos:
•Amplificador con decofidicador Dolby Surround Pro
Logic
•Amplificador estéreo
A - A salidas de audio. B - A entradas de audio.
Conexión digital a un amplificador
Conecte un cable óptico desde la salida OPTICAL
OUT de la parte posterior de la grabadora a la
entrada OPTICAL IN de la parte posterior del
amplificador.
o
Conecte un cable coaxial desde la salida COAXIAL
OUT de la parte posterior de la grabadora a la
entrada COAXIAL IN de la parte posterior del
amplificador.
A. AMPLIFICADOR con descodificador DOLBY
DIGITAL o DTS
B. FRONTAL IZQUIERDO
C. CENTRAL
D. SUBWOOFER
E. FRONTAL DERECHO
F. SURROUND DERECHO
G. SURROUND IZQUIERDO
Se pueden conectar los siguientes dispositivos:
• Amplificador con decodificador Dolby digital
• Amplificador con decodificador DTS
CONECTAR UNA SEÑAL AV O DV A TRAVÉS DEL
PANEL FRONTAL
Gire la puerta hacia abajo como se indica en la
etiqueta OPEN (Abrir) de la esquina derecha.
1. Conector USB
2. Utilice el conector S-Video o el conector de vídeo
compuesto
3. Conector de entrada de audio
4. Conector IEEE 1394
5. Señal AV externa
Tras conectar su dispositivo, seleccione la señal de
entrada AV correcta pulsando varias veces el botón
Fuente del mando a distancia. La imagen aparecerá
en la pantalla del televisor y puede comenzar la
grabación.
Consulte el manual del sistema conectado.
CONECTAR UNA SEÑAL AV A TRAVÉS DEL
CONECTOR SCART IN
Puede grabar señales desde el conector SCART IN,
p.ej.: la señal AV de un reproductor de DVD. Pulse
el botón Fuente del mando a distancia para cambiar
al modo apropiado de acuerdo con el tipo de
conexión.
A. Fuente externa de
señal AV (p. ej. DVD)
B. Ferguson Grabadora
Los puertos SCART IN y
SCART OUT permanecen
activos incluso cuando la
Ferguson RW-770HD está
en modo de espera.
- 80 -
Page 81
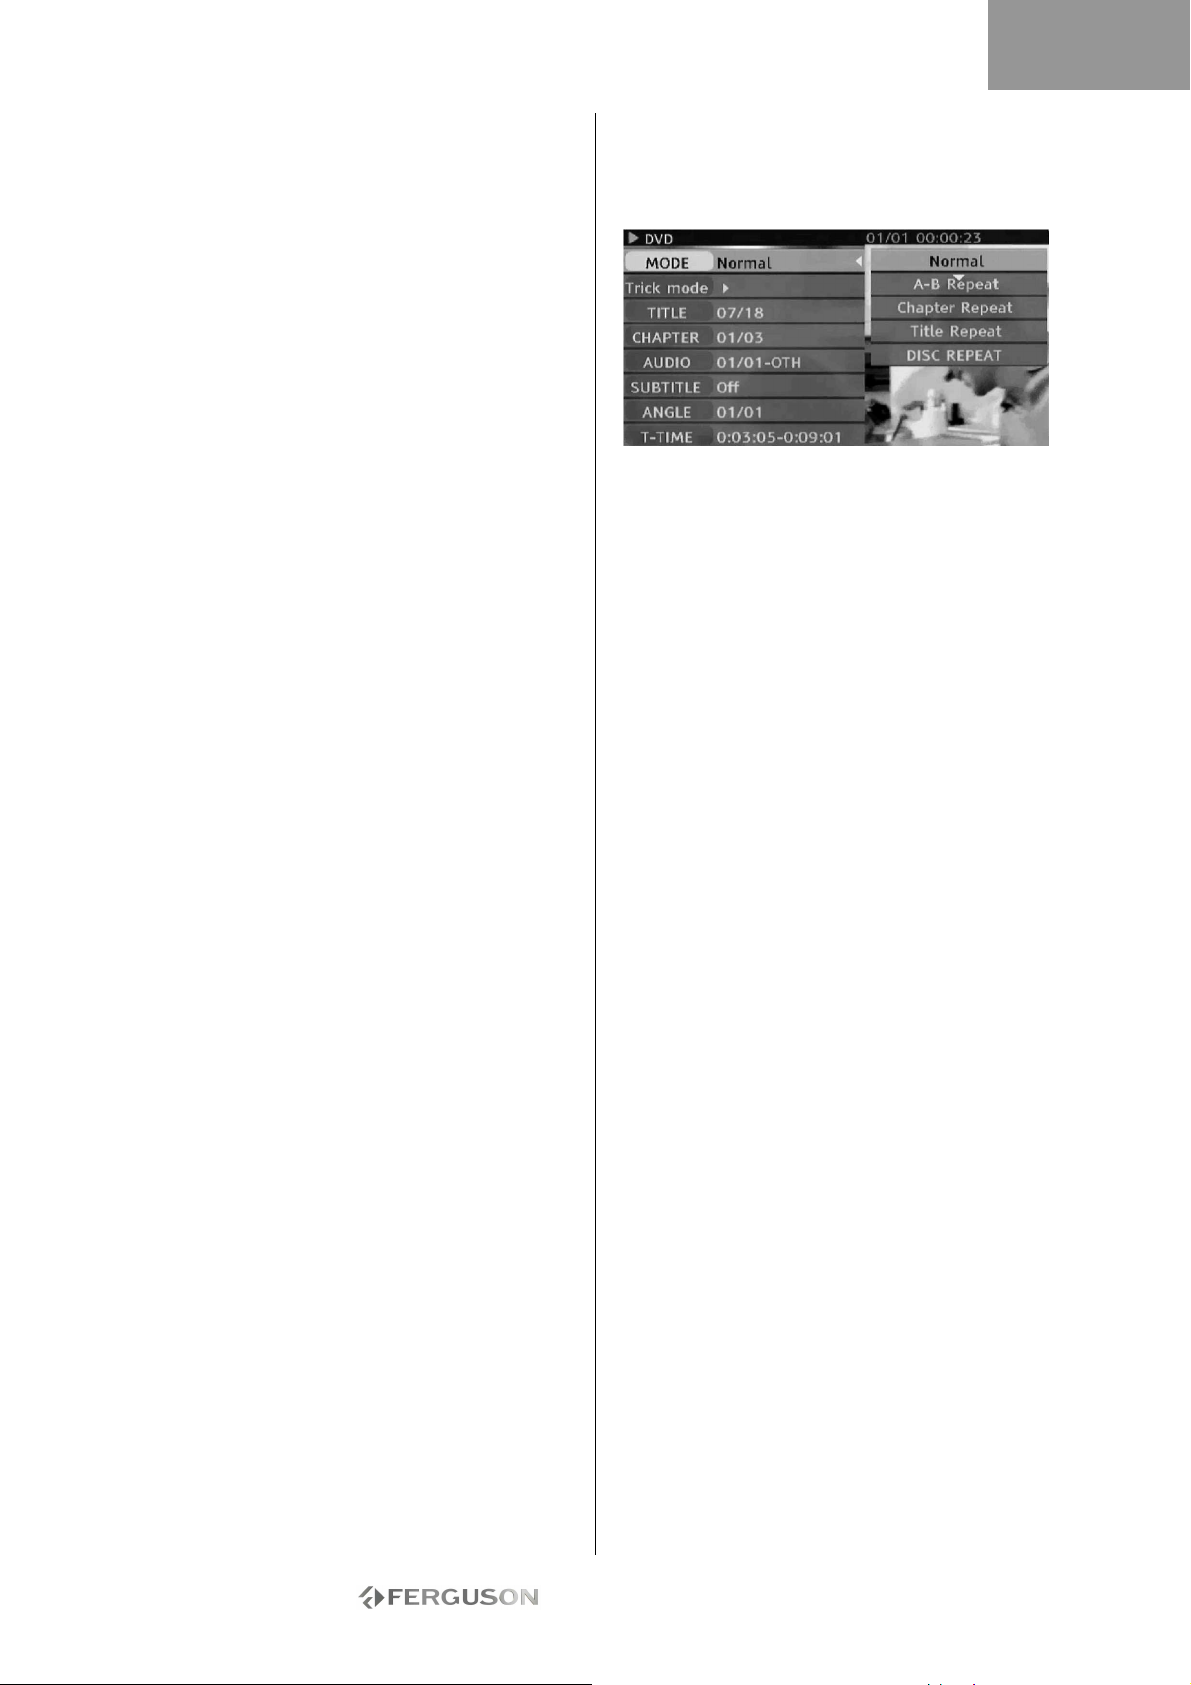
ESPAÑOL
CONEXIÓN DE DISPOSITIVOS USB
La Ferguson RW-770HD puede conectarse con las
unidades flash USB, los lectores de tarjeta de
memoria USB y las cámaras USB compatibles con la
clase de almacenamiento masivo. Puede ver una o
más imágenes JPEG en orden secuencial. Los
archivos MP3 se pueden reproducir durante la
presentación de diapositivas. Una vez conectado el
dispositivo USB al puerto USB, pulse el botón
Administrador de archivos para abrir el menú
Administrador de archivos. Puede explorar el
contenido del dispositivo USB utilizando los botones
de navegación. Pulse el botón Reproducir/OK para
seleccionar la reproducción de los archivos
resaltados. Para obtener más información, consulte
la sección Administrador de archivos que aparece
más adelante en esta guía.
Para reconocer el dispositivo USB, es posible
que transcurran unos segundos.
El dispositivo de almacenamiento masivo debe
estar for mateado con el sistema de archivos FAT32.
No son compatibles todos los dispositivos de
almacenamiento masivo.
REPRODUCCIÓN DE UN DVD DE VÍDEO, SVCD
O VCD
1. Pulse el botón Abrir/Cerrar del panel frontal para
abrir la bandeja.
2. Coloque el disco en la bandeja.
3. Pulse el botón Abrir/Cerrar para cerrar la
bandeja.
4. La reproducción se iniciará de forma automática.
De no ser así, pulse DVD.
5. Use los botones de Navegación para recorrer el
menú y pulse Reproducir/OK para seleccionar.
Opciones de reproducción
1. Pulse el botón DVD para visualizar el menú de
DVD.
2. Pulse el botón Pantalla para mostrar u ocultar la
información en pantalla.
Reproducción
Pulse el botón Reproducir/OK del mando a distancia
o el botón Reproducir del panel frontal para
iniciar laLtifl
Pausa
Pulse el botón Pausa del mando a distancia para
hacer una pausa.
A vance rápido y rebobinado rápido
Pulse el botón » (Avance rápido) para activar la
reproducción rápida hacia adelante, pulse el botón «
(Rebobinado rápido= para activar la reproducción
rápida hacia atrás. Pulse los botones varias veces
para alternar entre 4 velocidades de reproducción
diferentes.
Saltar
Pulse el botón Siguiente para omitir el siguiente
título/capítulo, pulse el botón Anterior para omitir el
título/capítulo anterior.
Control de la reproducción con el Menú de
reproducción
1. Pulse el botón Reproducir/OK para ver el menú
de control y seleccionar un submenú:
MODO: Establezca el modo de reproducción, p.ej.:
Normal, Repetir A-B, Repetir capítulo, etc.
MOVIMIENTO: Establezca el estado de
reproducción, p.ej.: Detener, Rápida hacia delante,
Rápida hacia atrás, Lenta hacia delante, etc.
TÍTULO: Pulse Reproducir/OK e introduzca después
el número del título al que desea acceder.
CAPÍTULO: Introduzca el número del capítulo al
que desea acceder.
AUDIO: Seleccione el idioma de audio que desea
utilizar, p.ej.: FRE (francés), ENG (inglés), etc.
SUBTÍTULOS: Seleccione el idioma de los
subtítulos.
ÁNGULO: Seleccione el ángulo de la cámara (el
disco debe admitir esta función).
TMP-TÍT: Muestra el tiempo transcurrido y el
tiempo restante.
2. Pulse el botón para salir del menú de control.
Repetir
1. Repet. A-B
• Pulse el botón Reproducir/OK dos veces para
acceder al menú de configuración durante la
reproducción.
• Use los botones para resaltar el submenú
Modo, y pulse el botón Reproducir/OK.
• Utilice los botones para resaltar el elemento
REPETIR A-B, pulse el botón Reproducir/OK para
marcar el punto de inicio (A); pulse el botón
Reproducir/OK de nuevo para ver el elemento
REPETIR A-B y, a continuación, pulse el botón
Reproducir/OK por tercera vez para marcar el punto
de fin (B). A continuación, la sección comprendida
entre el punto de inicio y el punto de fin se
reproducirá varias veces.
• Pulse el botón para salir del MENÚ CONTROL.
2. Title/chapter/disc repeat (Repetir el
título/capítulo/disco) - Pulse el botón Repetir varias
veces durante la reproducción para repetir el
título/capítulo/disco.
3. Pulse varias veces el botón Repetir hasta que se
reanude la reproducción normal.
- 81 -
Page 82
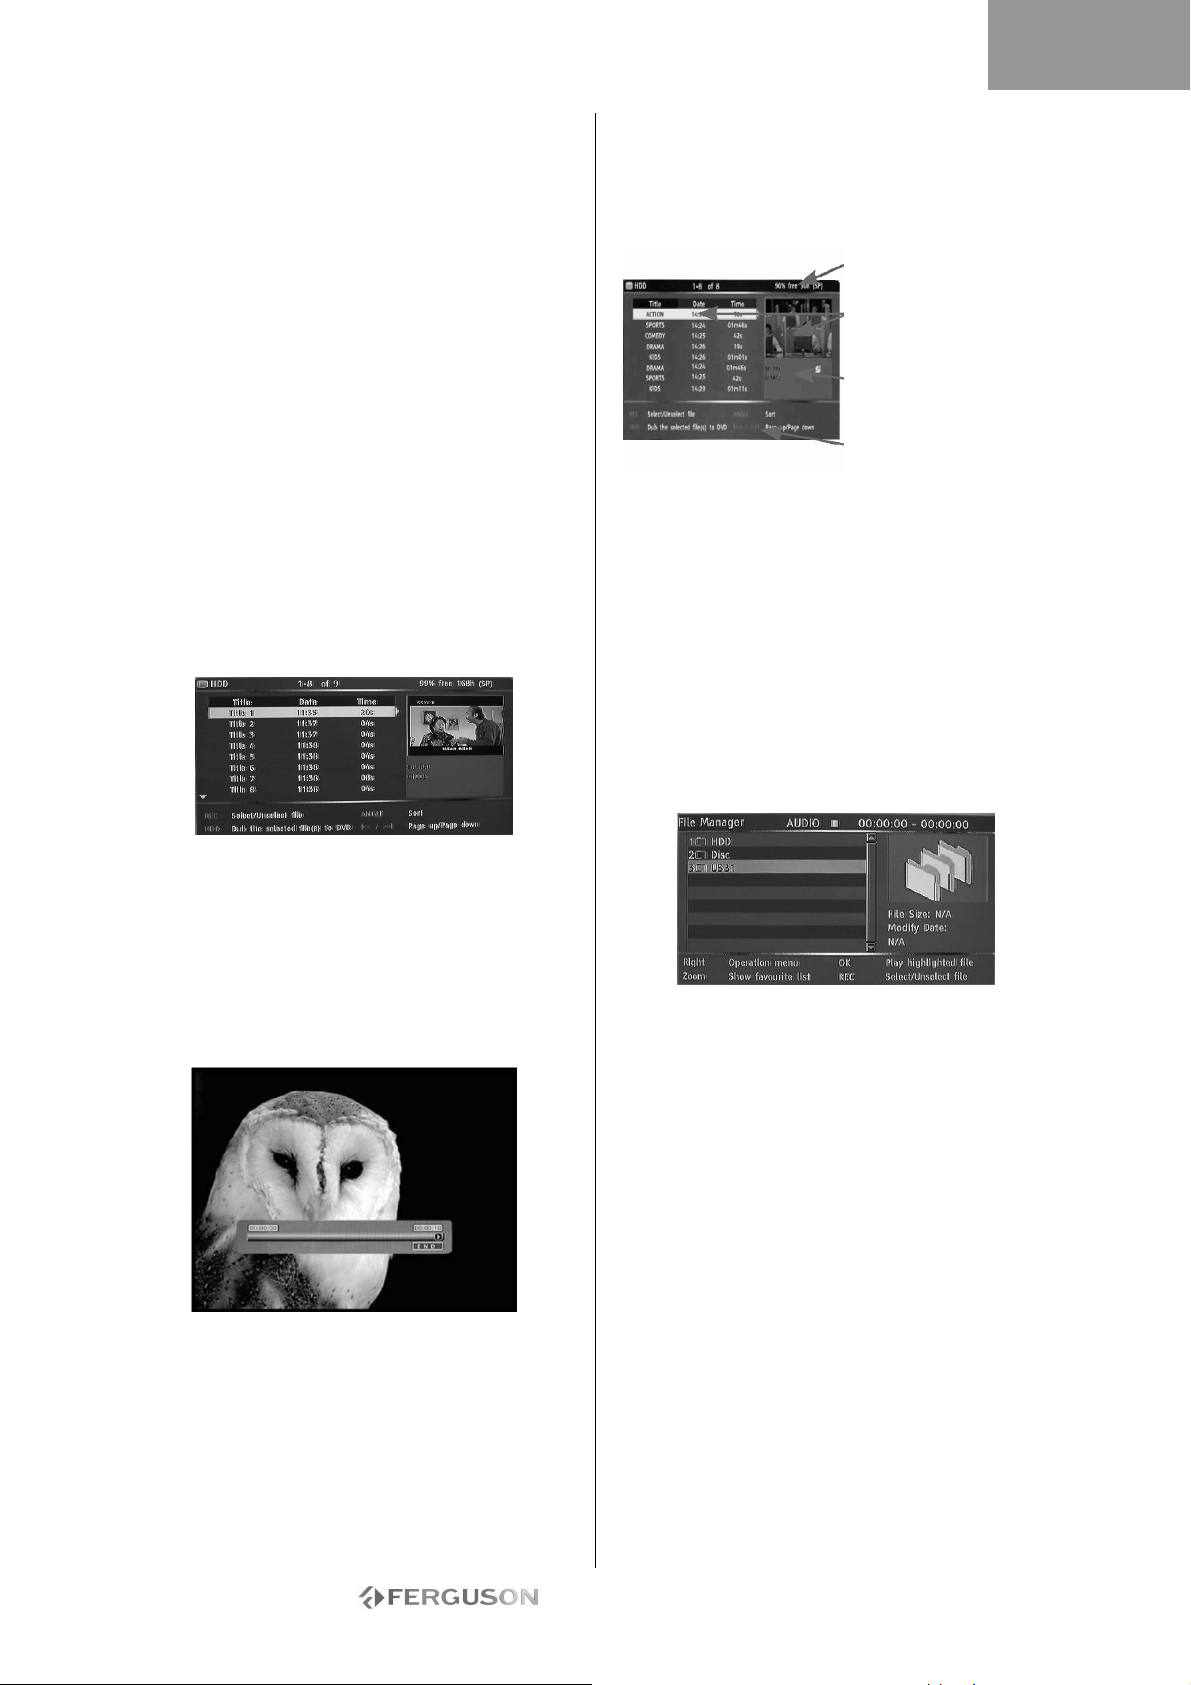
ESPAÑOL
Idioma de audio
Pulse AUDIO varias veces para cambiar entre 8
idiomas de audio o de sonido cuando el disco esté
grabado en varios idiomas. Con los discos de
Karaoke, pulse el botón AUDIO para cambiar entre
la música de acompañamiento y la vocal.
Sólo está disponible para discos DVD/SVCD.
Idioma de subtítulos
Pulse SUBTÍTULOS varias veces para cambiar entre
hasta 32 idiomas de subtítulos cuando el disco esté
grabado con subtítulos en varios idiomas.
Sólo está disponible para discos DVD/SVCD.
Ángulo de visión (sólo DVD)
Pulse ÁNGULO varias veces para alternar entre
hasta 9 ángulos de visualización cuando las escenas
del disco se hayan grabado con varias cámaras
desde ángulos distintos.
REPRODUCIR UN TÍTULO GRABADO DE LA
TELEVISIÓN EN EL DISCO DURO.
1. Pulse el botón TV-HDD hasta que aparezca la
lista de títulos del disco duro de la televisión.
2. Use los botones para resaltar el título que
desee.
Puede pulsar Ángulo para organizar la lista por
nombre de título o fecha y Anterior y Siguiente para
ir a la página anterior/siguiente.
3. Pulse Reproducir/OK para reproducir el archivo
resaltado.
Durante la reproducción:
Use los botones Siguiente, Anterior, Reproducción
rápida hacia adelante y Reproducción rápida hacia
atrás para recorrer la duración del título. Pulse el
botón Pantalla para mostrar u ocultar la información
en pantalla.
LISTA DE TÍTULOS DEL DISCO DURO DE LA
TELEVISIÓN (TÍTULOS GRABADOS DE LA TV)
Pulse el botón TV-HDD para ver la lista de títulos del
disco duro.
La lista de disco duro de la televisión presenta todos
los títulos que haya almacenado en éste. La lista
incluye la duración, una imagen en miniatura y el
modo de grabación (HQ, SP, etc.) de cada título. La
lista también muestra si un título está protegido o
bloqueado.
REPRODUCCIÓN DE CONTENIDO DE UN
DISPOSITIVO USB
1. Conecte el dispositivo USB al conector de entrada
USB frontal.
2. Pulse el botón Administrador de archivos para
abrir el menú del administrador de archivos (la
grabadora puede tardar unos segundos en
reconocer el dispositivo USB).
3. Use los botones de navegación para resaltar el
archivo que desee.
4. Pulse Reproducir/OK para reproducir el archivo.
Si el disco tiene contenidos en JPEG y MP3, el
usuario podrá disfrutar de las imágenes y la música
al mismo tiempo
REPRODUCCIÓN DE UN ARCHIVO DIVX® O
XVID CON SUBTÍTULOS
1. Desde el menú Administrador de archivos, use
los botones de navegación para resaltar el archivo
de subtítulos (se aceptan *.SRT, *.SUB y *.SMI).
2. Pulse Reproducir/OK para seleccionar el archivo
de subtítulos.
3. Use los botones de navegación para resaltar el
archivo de película.
4. Pulse Reproducir/OK para reproducir la película.
Espacio restante en el
disco duro
Título resaltado
actualmente
Información de
grabación de título
resaltado actualmente
Ayuda en pantalla
- 82 -
Page 83
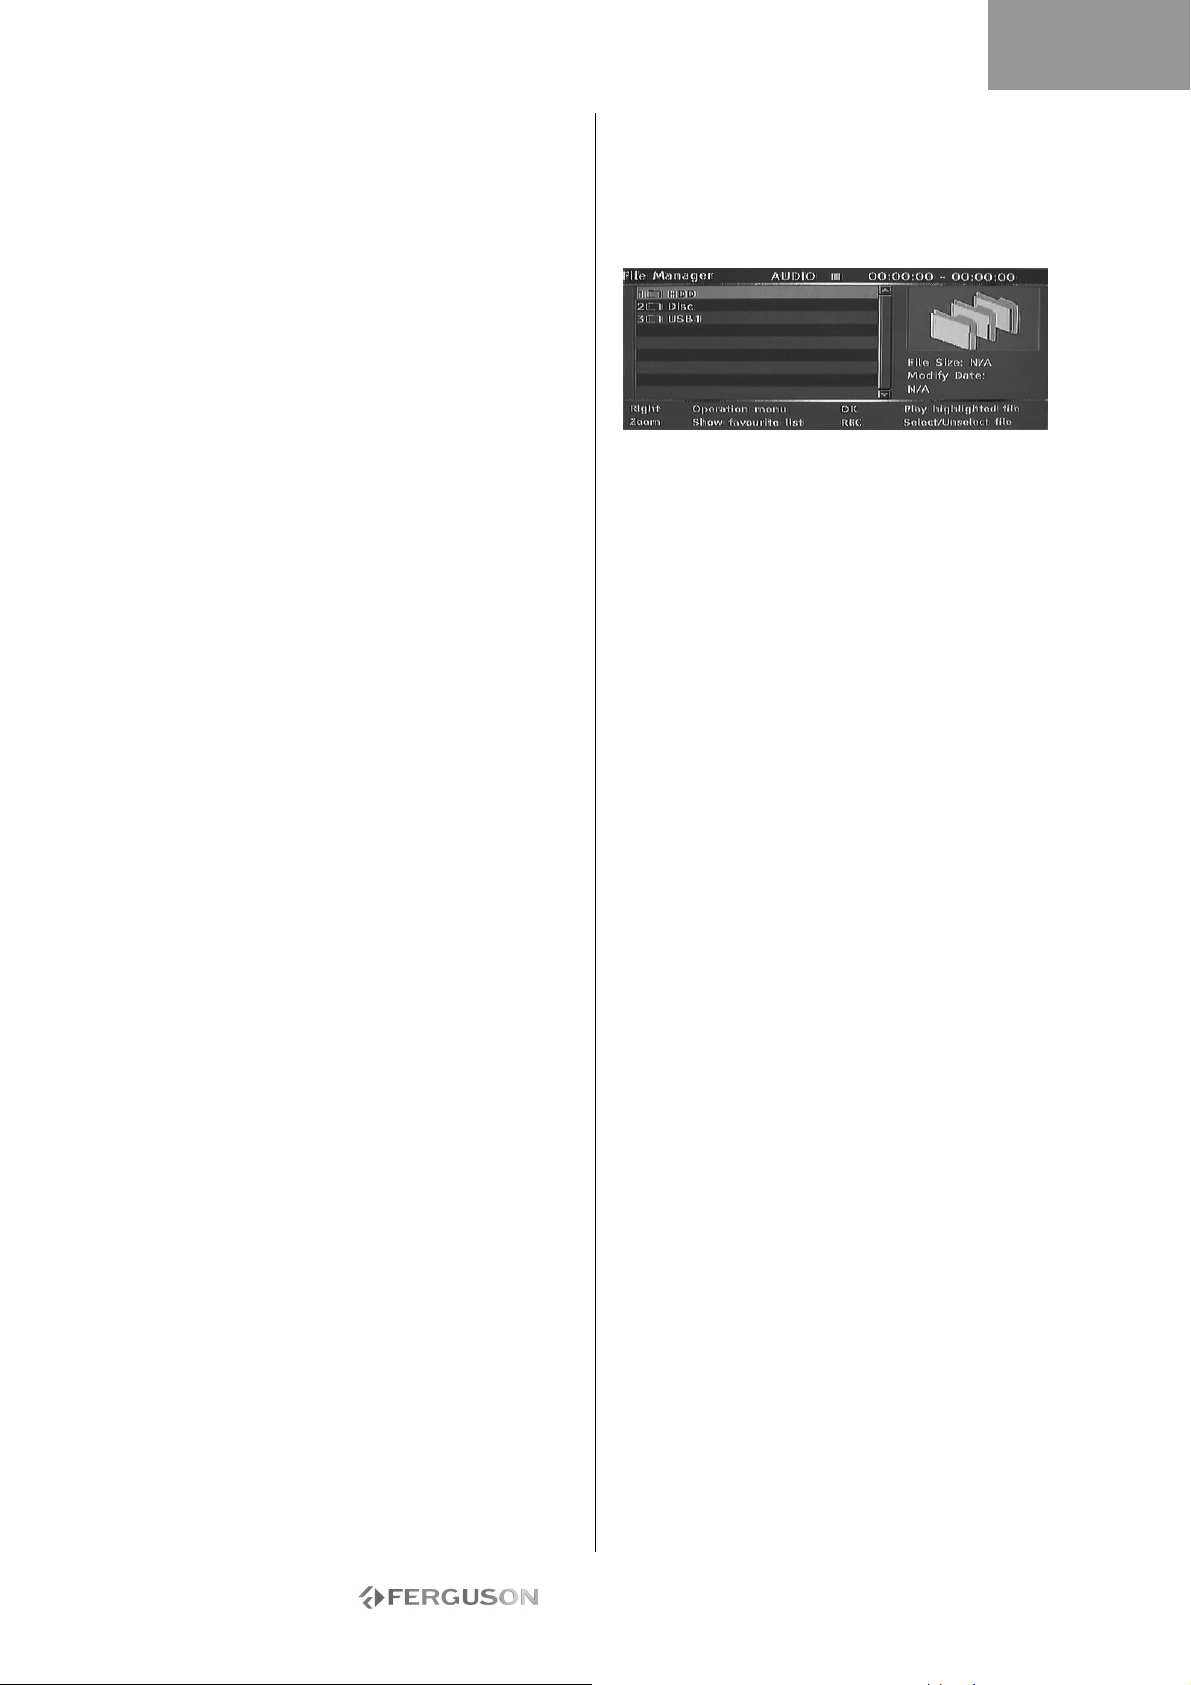
ESPAÑOL
GABE REPRODUCCIÓN DE DVD O CD CON
ARCHIVOS MP3, JPEG Y/O DIVX®
1. Pulse el botón Abrir/Cerrar del panel frontal para
abrir la bandeja.
2. Coloque el disco en la bandeja. Espacio restante
en el disco duro Título resaltado actualmente
Información de grabación de título resaltado
actualmente Ayuda en pantalla
3. Pulse el botón Abrir/Cerrar de nuevo para cerrar
la bandeja.
4. El menú de contenidos debe aparecer
automáticamente. Si no es así, pulse el botón
Administrador de archivos.
5. Use los botones de navegación para resaltar el
archivo que desee.
6. Pulse Reproducir/OK para reproducir el archivo.
7. Pulse el botón Detener para volver al menú.
1. Para una presentación simultánea de diapositivas
en JPEG/MP3, seleccione el archivo MP3 y, a
continuación, el archivo JPEG. Los archivos MP3 y
JPEG se reproducirán en el orden seleccionado.
2. Pulse el botón Detener para detener la
reproducción. Para la presentación simultánea de
diapositivas en JPEG/MP3, pulse el botón Detener
dos veces.
DIVX VIDEO-ON-DEMAND (VOD)
DivX Video-on-Demand (VOD) es un servicio de
entrega de video digital que permite descargar y
disfrutar de contenidos de vídeo de alta calidad de
otro grupo de asociados de contenido DivX.
Necesitará un PC con conexión a Internet de banda
ancha y grabadora de CD. Asimismo, tiene que
registrar su Ferguson RW-770HD para poder
reproducir contenidos DivX VOD. El proceso de
registro es sencillo y sólo es necesario llevarlo a
cabo una vez con cada dispositivo. Registrar un
dispositivo es tan sencillo como introducir el código
de ocho caracteres de su grabadora en la cuenta
VOD. Para obtener más información, visite
http://www.divx.com/.
Para buscar su código de registro:
1. Pulse el botón Menú del mando a distancia.
2. Pulse el botón Abajo para seleccionar la
Fecha/Hora.
3. Pulse el botón Derecha y a continuación el botón
Abajo para seleccionar DivX(R) VOD.
4. Pulse Reproducir/OK para ver su código de
registro.
GESTOR DE ARCH
El menú Administrador de archivos se utiliza para
reproducer archivos multimedia (música, fotos,
vídeos) en dispositivos USB externos, DVD y en el
disco duro interno. El Administrador de archivos
también permite transferir archivos entre
dispositivos USB*, DVD y el disco duro interno.
*Los dispositivos USB sólo admiten la transferencia
de otros dispositivos y no a la inversa.
Los archivos grabados de la televisión no se pueden
guarder en el mismo disco que los archivos
multimedia.
CÓMO DESPLAZARSE POR EL ADMINISTRADOR
DE ARCHIVOS
Desplazarse por el Administrador de archivos es
parecido a desplazarse por las carpetas del
ordenador. Hay tres posibles carpetas principales:
disco duro, USB y DVD. Las tres están incluidas en
una única carpeta raíz. Para ir a la carpeta use los
botones de navegación (ver a continuación) para
seleccionar la carpeta y pulse el botón
Reproducir/OK. Para ir “arriba” en una carpeta
seleccione el símbolo ../ que aparece en la parte
superior de la lista y pulse el botón Reproducir/OK.
1. Pulse el botón Administrador de archivos del
mando a distancia para abrir el menú Administrador
de archivos.
2. Use los botones Izquierda , Derecha , Arriba
y Abajo para recorrer los menús.
3. Use el botón Reproducir/OK para realizar una
selección.
REPRODUCIR UN ARCHIVO MULTIMEDIA EN EL
ADMINISTRADOR DE ARCHIVOS
1. Use los botones de navegación para seleccionar
un archive multimedia (vídeo, imagen o audio) y
pulse el botón Reproducir/OK para
reproducir/visualizar.
TRANSFERIR ARCHIVOS MULTIMEDIA DEL
DISCO DURO AL DVD-R/RW
1. Coloque un DVD-R/RW sin finalizar en la bandeja
de discos.
2. Pulse el botón Administrador de archivos para
abrir el Administrador de archivos.
3. Use los botones de navegación para seleccionar
el disco duro y pulse Reproducir/OK.
4. En la lista del disco duro use los botones
Arriba/Abajo para resaltar el archivo o archivos que
desea copiar.
5. Pulse el botón Grabar cada vez que selecciona el
archivo o archivos que quiere transferir. Aparecerá
una marca al lado de cada uno de los archivos
seleccionados. Si desea anular la selección de un
archivo, resáltelo y pulse el botón Grabar otra
vez.
6. Pulse el botón Derecha para abrir el menú
Operación.
- 83 -
Page 84
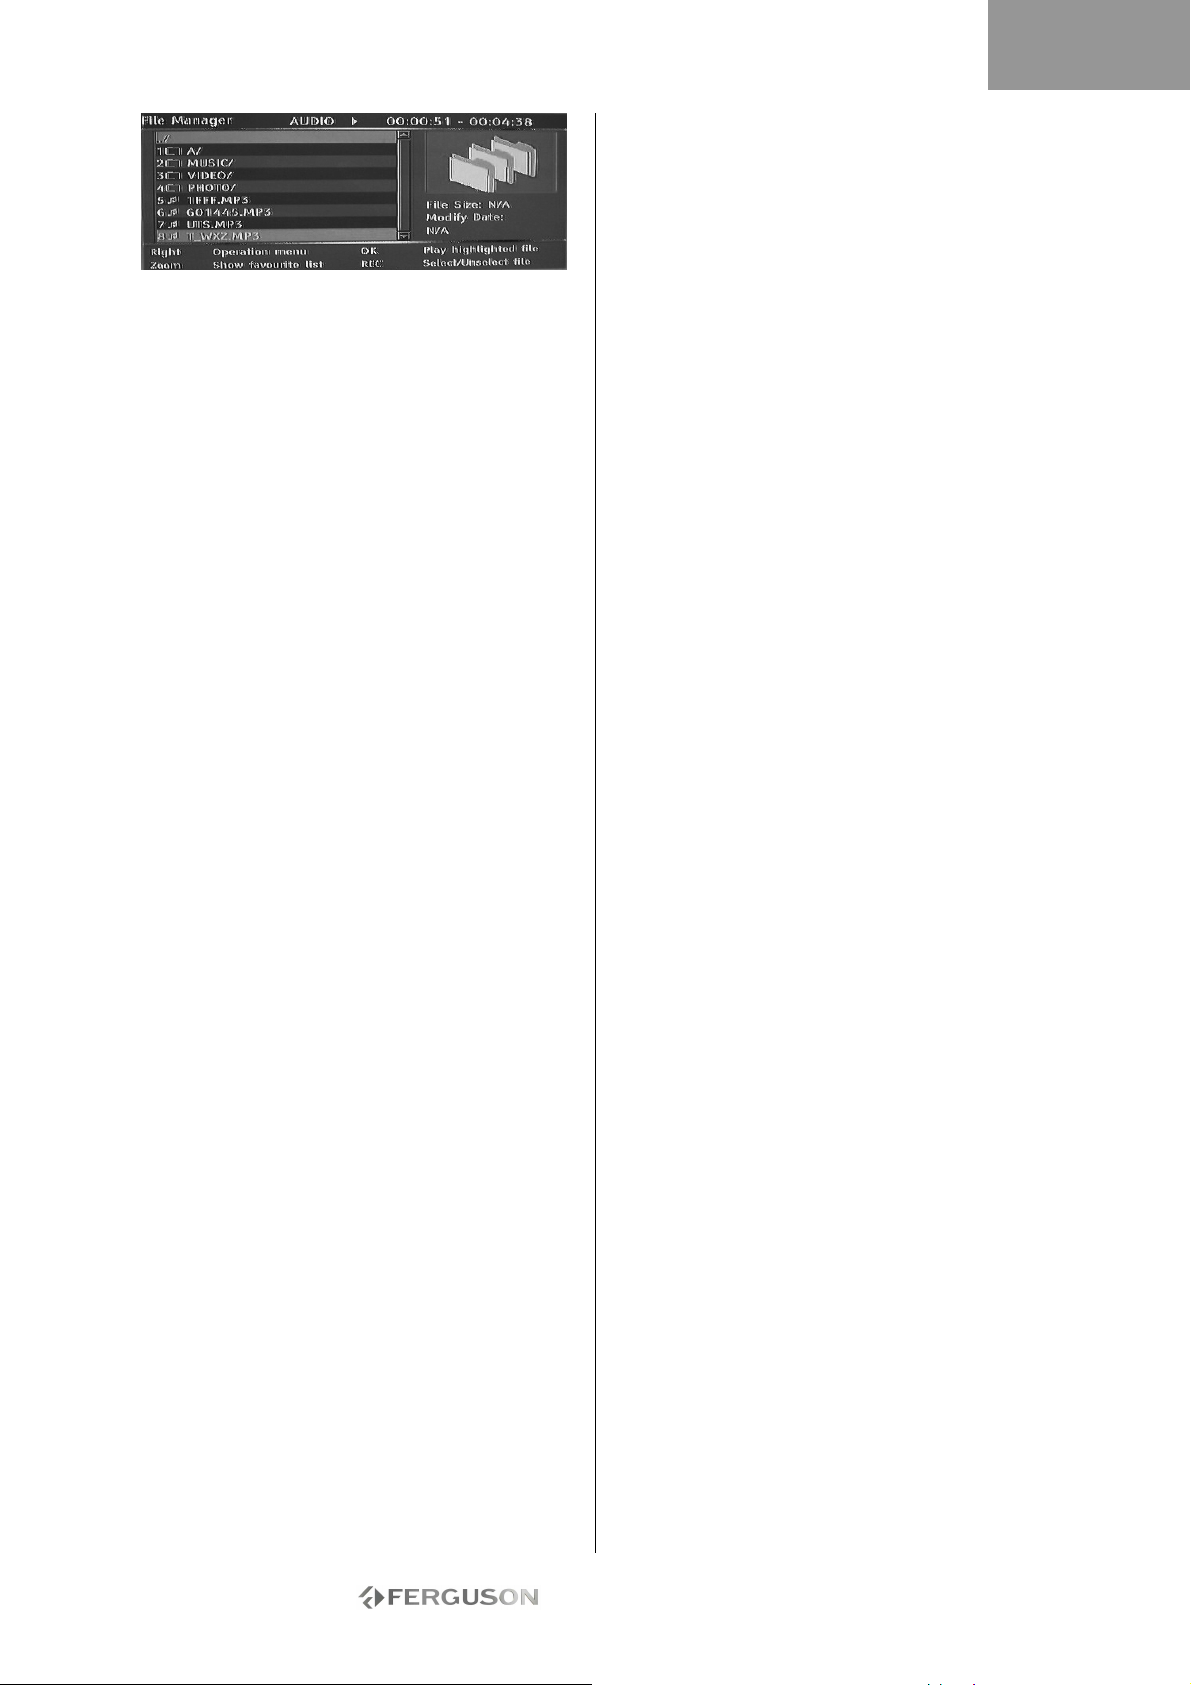
7. Seleccione Copiar de la lista y pulse el botón
Reproducir/OK.
8. Use los botones de navegación para seleccionar y
abrir el DVD.
9. En el DVD, pulse el botón Derecha para abrir el
menú Operación.
10. Seleccione Pegar de la lista para transferir los
archivos copiados al DVD.
11. El progreso/estado de transferencia aparecerá
en la parte inferior del menú.
TRANSFERIR ARCHIVOS MULTIMEDIA DE UN
DVD AL DISCO DURO.
1. Coloque el DVD que contiene los archivos
multimedia que desea copier en la bandeja de
discos.
2. Pulse el botón Administrador de archivos para
abrir el Administrador de archivos.
3. Use los botones de navegación para seleccionar
el DVD y pulse Reproducir/OK.
4. En la lista del DVD use los botones Arriba/Abajo
para resaltar el archivo o archivos que desea copiar.
5. Pulse el botón Grabar cada vez que selecciona el
archivo o archivos que quiere transferir. Aparecerá
una marca al lado de cada uno de los archivos
seleccionados. Si desea anular la selección de un
archivo, resáltelo y pulse el botón Grabar otra
vez.
6. Pulse el botón Derecha para abrir el menú
Operación.
7. Seleccione Copiar de la lista y pulse el botón
Reproducir/OK.
8. Use los botones de navegación para seleccionar y
abrir el disco duro.
9. En el disco duro, pulse el botón Derecha para
abrir el menu Operación.
10. Seleccione Pegar de la lista para transferir los
archivos copiados al disco duro.
11. El progreso/estado de transferencia aparecerá
en la parte inferior del menú.
TRANSFERIR ARCHIVOS MULTIMEDIA DESDE
UN DISPOSITIVO USB EXTERNO AL DISCO
DURO O A UN DVD-R/RW
1. Conecte el dispositivo USB que contiene los
archivos multimedia que desea copiar al conector
USB del panel frontal.
2. Si procede, coloque un DVD-R/RW sin finalizar en
la bandeja de discos.
3. Pulse el botón Administrador de archivos para
abrir el Administrador de archivos.
4. Use los botones de navegación para seleccionar
el USB y pulse Reproducir/OK.
5. En la lista del USB use los botones Arriba/Abajo
para resaltar el archivo o archivos que desea copiar.
6. Pulse el botón Grabar cada vez que selecciona el
archivo o archivos que quiere transferir. Aparecerá
una marca al lado de cada uno de los archivos
seleccionados. Si desea anular la selección de un
archivo, resáltelo y pulse el botón Grabar otra
vez.
7. Pulse el botón Derecha para abrir el menú
Operación.
8. Seleccione Copiar de la lista y pulse el botón
Reproducir/OK.
9. Use los botones de navegación para seleccionar y
abrir el disco duro o el DVD.
10. En el disco duro o DVD, pulse el botón Derecha
para abrir el menú Operación.
11. Seleccione Pegar de la lista para transferir los
archivos copiados al disco duro o DVD.
12. El progreso/estado de transferencia aparecerá
en la parte inferior del menú.
TRANSFERIR ARCHIVOS MULTIMEDIA DEL
DISCO DURO AL DVD-R/RW
1. Coloque un DVD-R/RW sin finalizar en la bandeja
de discos.
2. Pulse el botón Administrador de archivos para
abrir el Administrador de archivos.
3. Use los botones de navegación para seleccionar
el disco duro y pulse Reproducir/OK.
4. En la lista del disco duro use los botones
Arriba/Abajo para resaltar el archivo o archivos que
desea copiar.
5. Pulse el botón Grabar cada vez que selecciona el
archivo o archivos que quiere transferir. Aparecerá
una marca al lado de cada uno de los archivos
seleccionados. Si desea anular la selección de un
archivo, resáltelo y pulse el botón Grabar otra
vez.
6. Pulse el botón Derecha para abrir el menú
Operación.
7. Seleccione Copiar de la lista y pulse el botón
Reproducir/OK.
8. Use los botones de navegación para seleccionar y
abrir el DVD.
9. En el DVD, pulse el botón Derecha para abrir el
menú Operación.
10. Seleccione Pegar de la lista para transferir los
archivos copiados al DVD.
11. El progreso/estado de transferencia aparecerá
en la parte inferior del menú.
CREAR UNA LISTA DE FAVORITOS
Puede colocar todos sus archivos favoritos en una
única lista de favoritos.
1. Pulse el botón Administrador de archivos para
abrir el Administrador de archivos.
2. Use los botones de navegación para seleccionar
una carpeta (disco duro, USB o DVD) y pulse
Reproducir/OK.
3. En la lista de la carpeta use los botones
Arriba/Abajo para resaltar el archivo o archivos que
desea agregar a sus favoritos.
4. Pulse el botón Derecha para abrir el menú
Operación.
5. Seleccione Favorito de la lista y pulse el botón
Reproducir/OK. La lista de favoritos se divide
automáticamente en audio, vídeo e imágenes.
6. Para ver sus favoritos, pulse el botón Zoom
varias veces para cambiar entre sus favoritos de
audio, vídeo o imágenes.
ESPAÑOL
- 84 -
Page 85
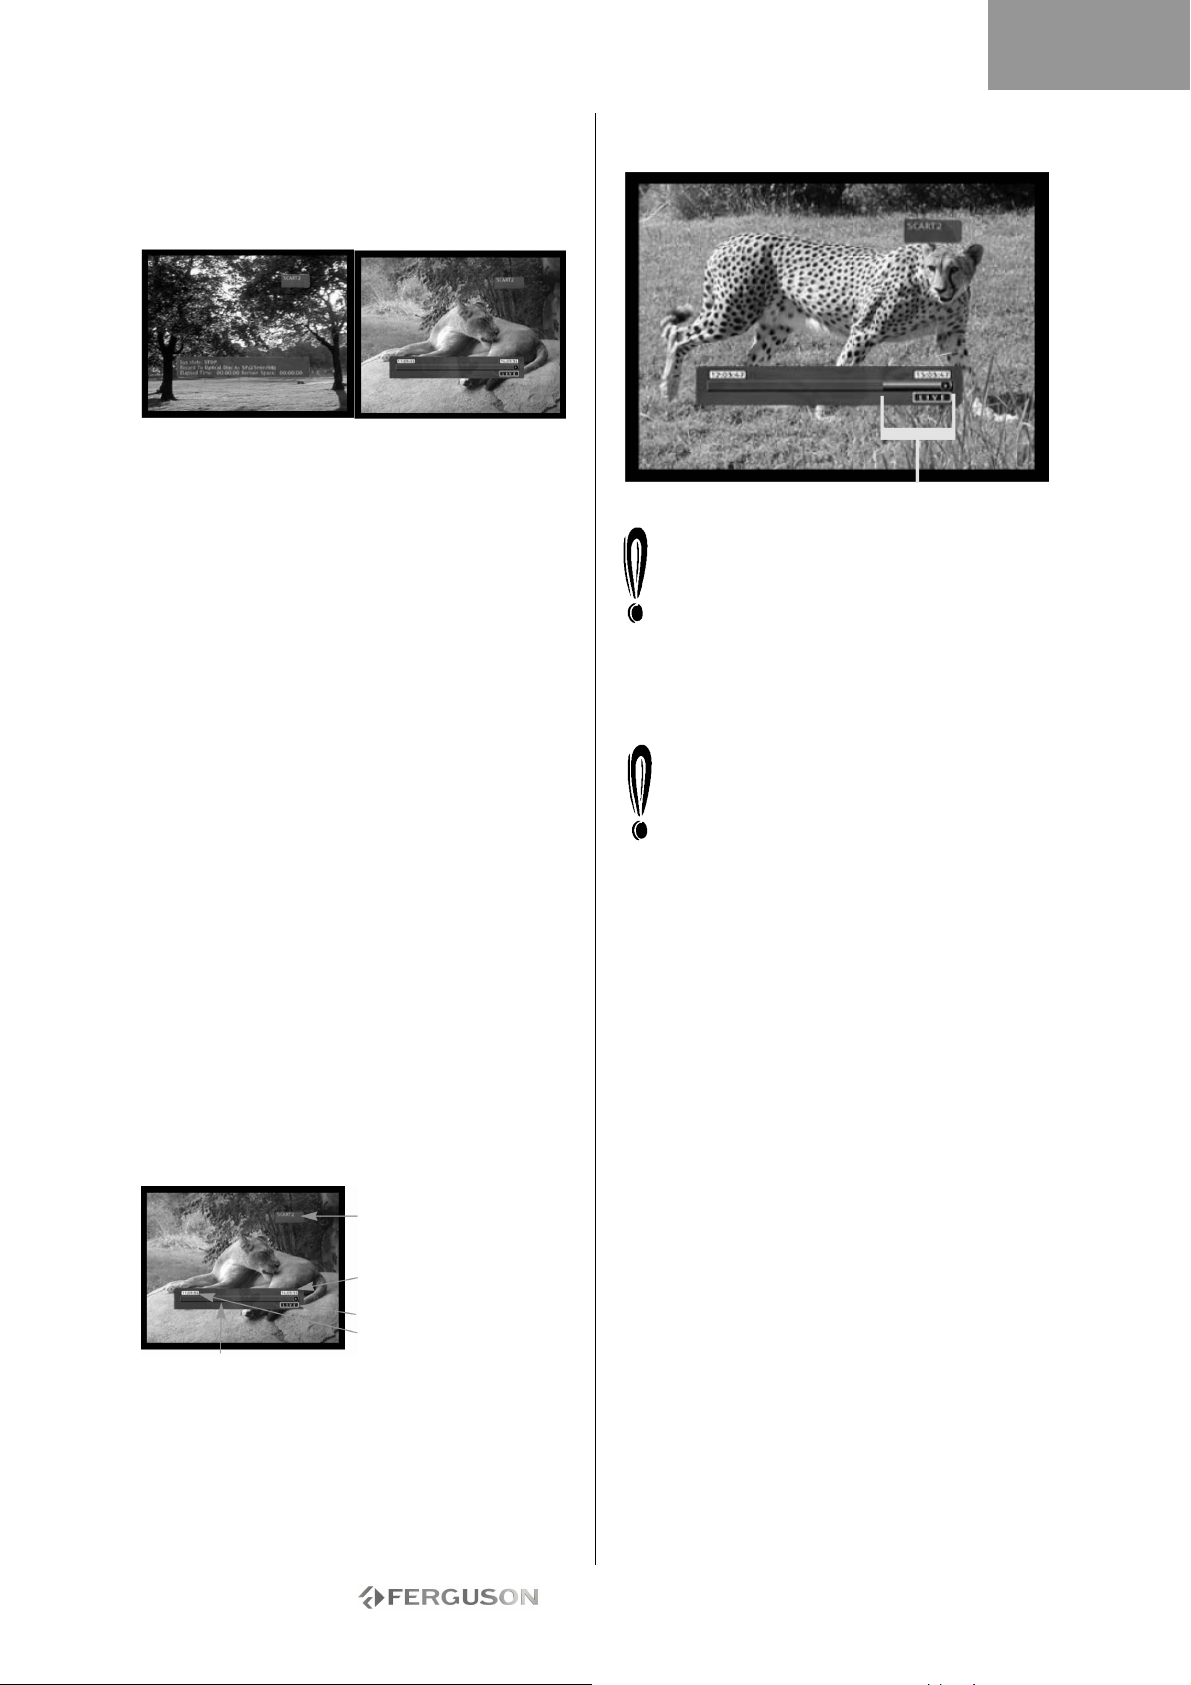
ESPAÑOL
TIME SHIFTING
MODO GRABACIÓN/TIME SHIFTING
A la hora de visualizar el sintonizador de TV o una
fuente externa, hay dos modos: modo grabación y
modo Time Shifting.
Modo de grabación Modo Time Shifting
• Modo de grabación - En modo Grabación, se
pueden grabar fuentes analógicas y de entrada de
DV. Las grabaciones pueden almacenarse en el
disco duro o en un DVD.
• Modo Time Shifting - En modo Time Shifting, sólo
se pueden grabar fuentes analógicas. Sólo se
pueden realizar grabaciones en el disco duro.
El modo Time Shifting permite al usuario "pausar y
controlar la televisión en directo". Desde el
momento en que la Ferguson RW-770HD está en
modo Time Shifting, grabará constantemente la
fuente analógica (TV, por ejemplo) en su búfer de
1, 3 ó 6 horas. Esto ofrece al usuario la posibilidad
de revisar y grabar las últimas 1, 3 ó 6 horas que se
hayan emitido previamente.
Activación del modo Time Shifting
1. Pulse el botón TV-HDD.
2. Pulse varias veces el botón Fuente hasta que
aparezca la fuente que desee. El estado de fuente
se muestra en la parte superior derecha de la
pantalla.
Nota: Time Shifting no está disponible con entrada
de DV. Las fuentes de vídeo analógicas son las
siguientes:
> SCART2
> CHXX (sintonizador de TV)
> F-COMP (vídeo compuesto frontal)
> F-COMP (S-vídeo frontal)
3. A continuación, la pantalla mostrará la barra de
progresión temporal.
Fuente actual
Hora en directo de
Tiempo 3 horas antes
de la hora en
Barra de progresión de
4. A medida que avanza la hora, la barra temporal
mostrará la progresión del búfer.
Búfer disponible para revision
Durante Time Shifting, se puede visualizar una
grabación con temporizador. Dado que no
puede ver un programa en Time Shifting y
grabar otro canal, la grabadora le pedirá que
confirme si desea mantener el canal actual o
continuar con la grabación con temporizador.
Si no obtiene respuesta, la grabadora asumirá que
debe iniciar la grabación con temporizador. El
mensaje aparecerá 2 minutos antes del inicio de la
grabación con temporizador.
El Time Shifting se guarda en un búfer que
contiene 3 horas de grabación. Una vez
alcanzado el límite de tiempo de grabación, el
búfer se sobrescribirá de forma progresiva. Si
necesita conservar el vídeo contenido en este
búfer para utilizarlo en un futuro, puede
guardar todo o parte del búfer (consulte la sección
Captura en pasado).
Pausar la TV en directo
1. Pasar a modo Time Shifting (consulte la sección
anterior).
2. Pulse Pausa para pausar la TV en directo (o la
fuente analogical seleccionada).
3. Pulse Reproducir/OK para reanudarla.
La Ferguson RW-770HD seguirá grabando lo que se
emita en directo mientras usted ve programas
emitidos previamente.
Búfer de revisión de Time Shifting
(reproducción de momentos de TV en directo)
1. Cambie a modo Time Shifting.
2. El búfer de Time Shifting está disponible para
revisión.
Use los botones Siguiente, Anterior, Reproducción
rápida hacia adelante y Reproducción rápida hacia
atrás para recorrer el búfer de Time Shifting y pulse
Reproducir/OK para reproducir.
- 85 -
Page 86
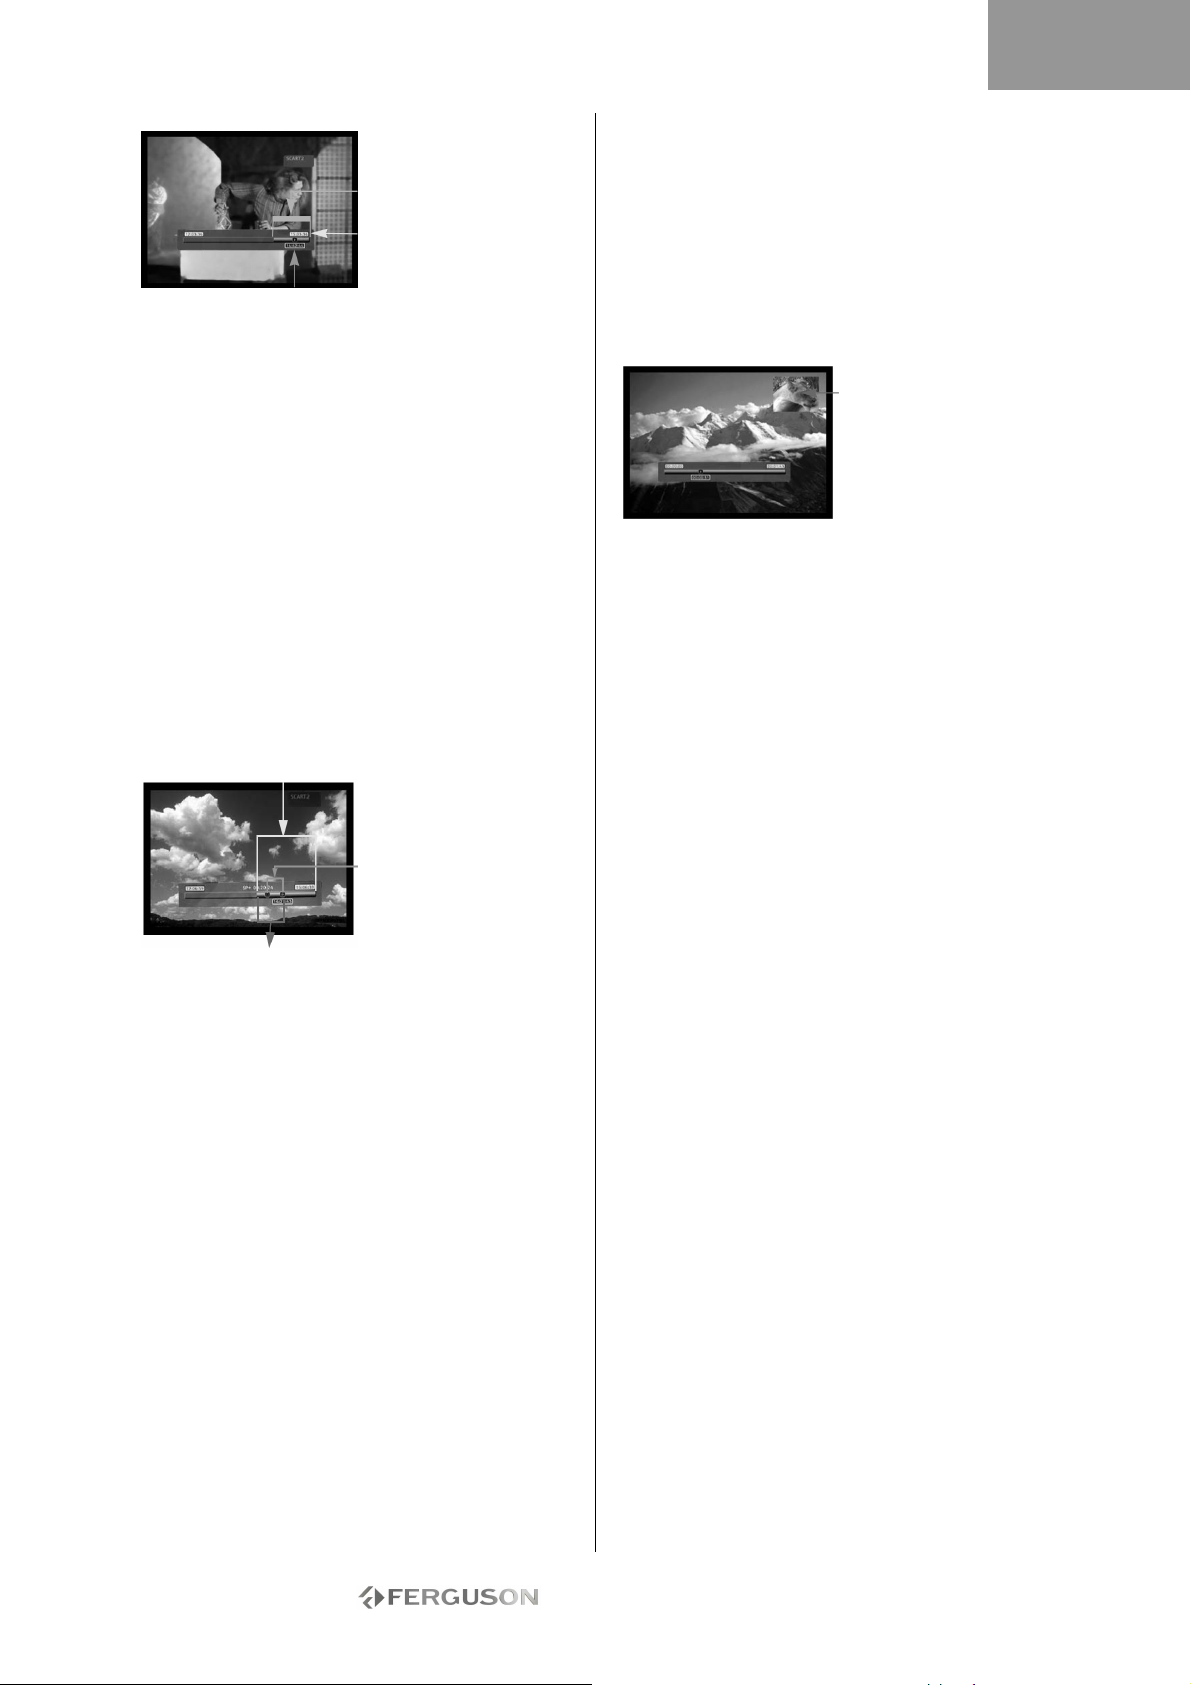
ESPAÑOL
Búfer disponible
Para revisión
Hora en
Tiempo de
Guardar un título del búfer de Time
Shifting (Captura en pasado)
1. Cambie a modo Time Shifting.
2. El búfer de Time Shifting está disponible para
guardar en el disco duro. Use los botones Siguiente,
Anterior, Reproducción rápida hacia adelante y
Reproducción rápida hacia atrás para recorrer el
buffer de Time Shifting e ir al comienzo de título
que desea guardar en el disco duro.
3. Pulse Grabar.
4. Use los botones Siguiente, Anterior,
Reproducción rápida hacia adelante y Reproducción
rápida hacia atrás para recorrer el buffer de Time
Shifting e ir al comienzo de título que desea guardar
en el disco duro.
5. Pulse Detener. El título se guardará en el disco
duro.
El título guardado, y los datos anteriores, se
borrarán del búfer de Time Shifting.
Búfer disponible para grabación
Sección que se
guardará en el disco
duro
Sección que se borrará del buffer
Guardar todo el búfer de Time Shifting
en el disco duro
1. Cambie a modo Time Shifting.
2. Pulse el botón Subtítulos para guardar todo el
búfer de Time Shifting en el disco duro.
Desactivación del modo Time Shifting
Para desactivar el modo Time Shifting:
1. Desde la vista de fuente analógica, pulse el botón
DVD.
2. Pulse el botón fuente para volver a la vista de
fuente analógica sin Time Shifting.
Para volver a activar el modo Time Shifting:
1. Desde la vista de fuente analógica, pulse el botón
TV-HDD.
2. Pulse el botón fuente para volver a la vista de
fuente analogical con Time Shifting.
Imagen en imagen (PIP)
1. Pulse el botón Fuente para seleccionar la fuente
de vídeo que desea que aparezca en PIP.
2. Durante la reproducción de un archivo grabado
con anterioridad, pulse el botón Ángulo del mando a
distancia para abrir PIP.
PIP aparecerá en una ventana pequeña en la
esquina superior derecha de la pantalla.
Imagen en imagen
3. Pulse el botón Ángulo de nuevo para salir de PIP.
- 86 -
Page 87
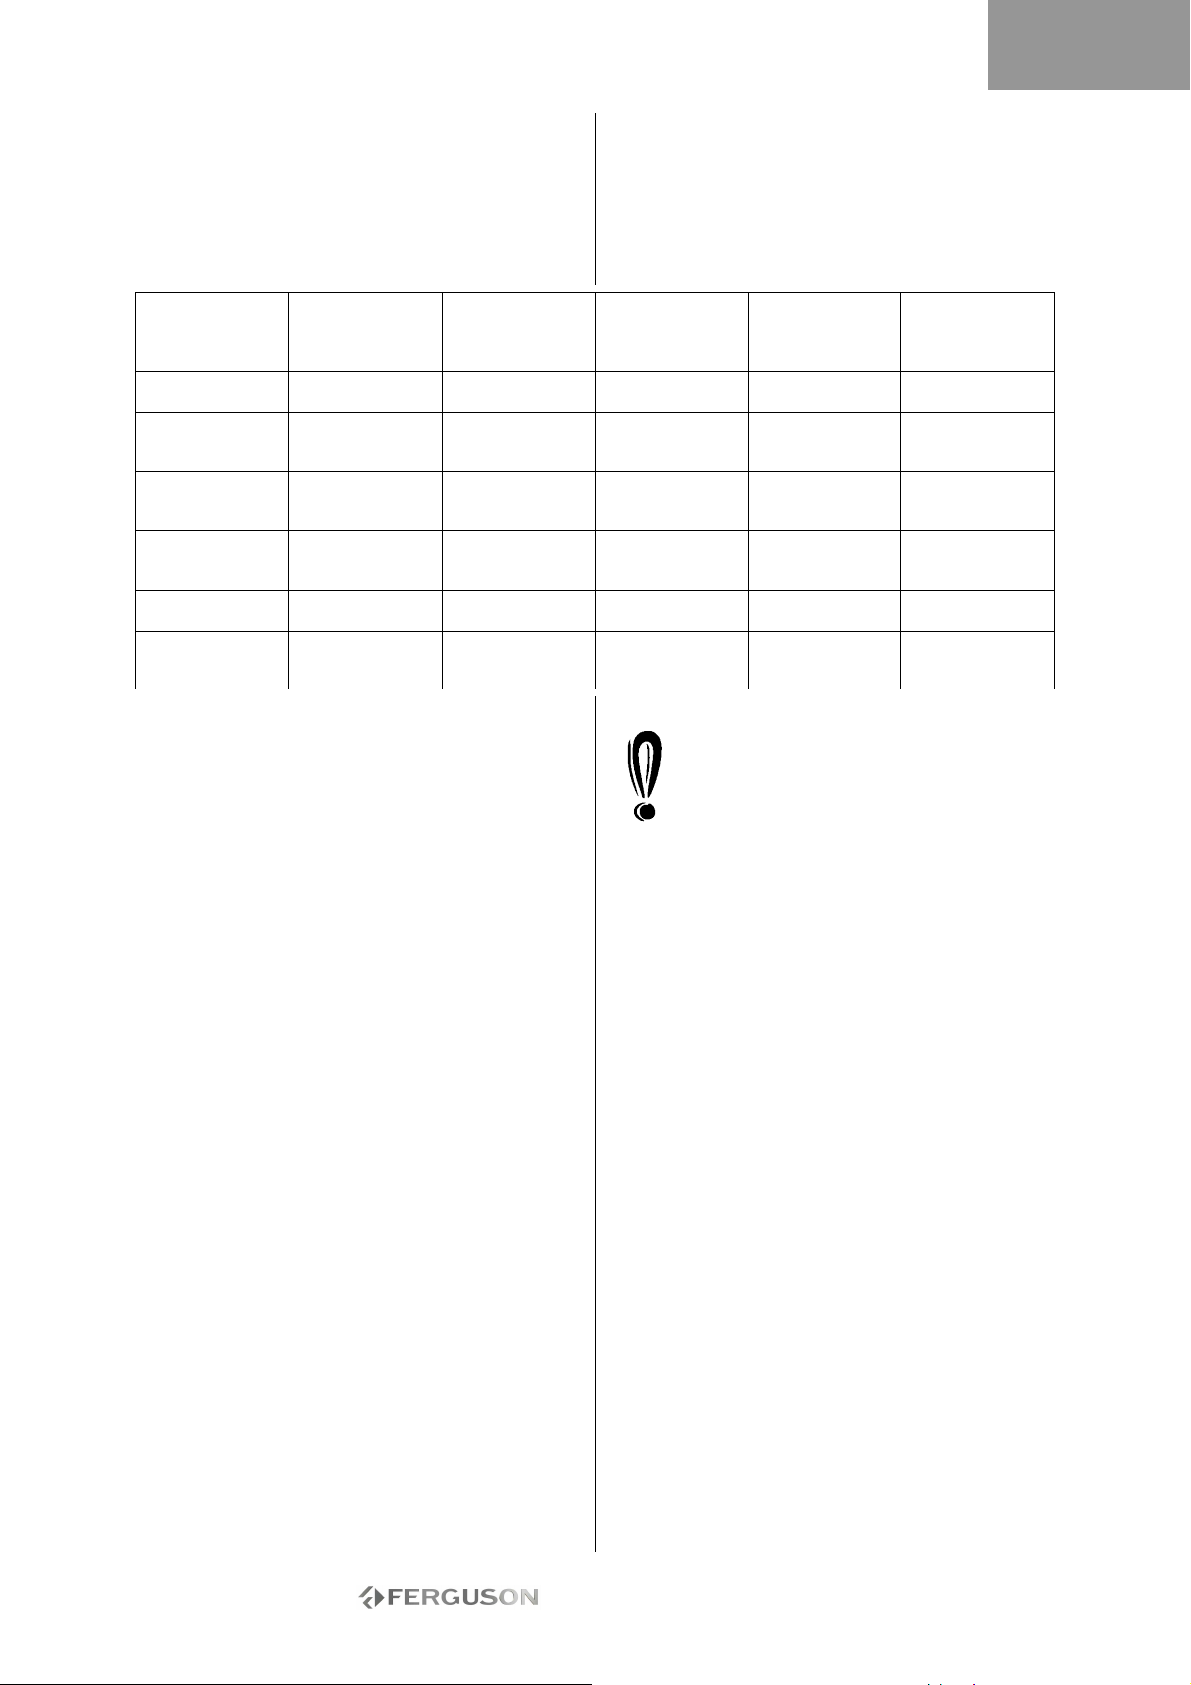
super larga)
ESPAÑOL
GRABACIÓN
SELECCIONAR LA CALIDAD DE GRABACIÓN.
Puede configurar seis calidades de grabación
diferentes. La calidad más alta consumirá más
espacio de disco duro o de disco DVD, lo que
reducirá el tiempo global de grabación.
Calidad de
grabación
HQ (Alta calidad) 1 hora 17 horas 35 horas 53 horas 85 horas
SP
(Reproducción
estándar)
SP+
(Reproducción
estándar+)
EP
(Reproducción
extendida)
LP (Larga
duración)
SLP
(Reproducción
Para cambiar el idioma OSD, realice lo siguiente:
1. Pulse el botón MENÚdel mando a distancia para
acceder al MENÚ DE CONFIGURACIÓN.
2. Utilice los botones de navegación para resaltar el
icono Grabación y pulse el botón Reproducir/OK.
3. Utilice los botones para resaltar el icono
Grabación y pulse el botón Reproducir/OK.
4. Utilice los botones para resaltar la
configuración de calidad y pulse el botón
Reproducir/OK para confirmar.
Elija cuidadosamente la calidad de grabación para
asegurarse de que habrá espacio suficiente
disponible para la grabación en el disco duro o en
DVD.
GRABAR A DVD
1. Inserte un DVD grabable en la unidad y cambie a
modo DVD pulsando el botón DVD.
2. Pulse el botón Fuente varias veces para
seleccionar la fuente de la señal de grabación.
3. Pulse el botón Grabar/OTR para iniciar la
grabación. Aparecerá una barra de estado en la
parte inferior de la pantalla para mostrar el estado
actual de la grabación.
4. Pulse Detener para detener la grabación.
5. Pulse el botón DVD para cambiar a modo DVD.
Ahora puede buscar el segmento que acaba de
grabar.
El proceso de grabación puede tardar unos
segundos en detenerse completamente. Espere
hasta que Detener aparezca en la barra de estado
para cambiar a modo DVD.
Cuando realice una grabación desde un DVD de esta
forma, la grabadora detendrá cualquier grabación
en el disco duro. Una vez que la grabación a DVD
haya finalizado, pulse el botón TV-HDD para
reiniciar el mecanismo Time Shifting.
Tiempo de
grabación
(4,7GB, DVD)
2 horas 34 horas 68 horas 106 horas 170 horas
3 horas 51 horas 102 horas 159 horas 255 horas
4 horas 68 horas 136 horas 212 horas 340 horas
5 horas 85 horas 170 horas 265 horas 425 horas
6 horas 96 horas 192 horas 300 horas 480 horas
Tiempo de
grabación
(80GB, Disco
duro)
Tiempo de
grabación
(160GB, Disco
duro)
La grabadora continuará con la grabación
hasta que el disco esté lleno o hasta que
pulse el botón Detener. Para configurar la
grabadora para que realice una grabación de
30 minutos únicamente, pulse el botón
Grabar/OTR una vez iniciada la grabación.
Cada vez que pulse el botón Grabar/OTR se
agregarán 30 minutos adicionales al tiempo de
grabación. Para hacer una pausa en la grabación,
pulse el botón Pausa del mando a distancia y pulse
el botón Reproducir/OK de nuevo para reanudar la
grabación.
Si se selecciona el sintonizador de TV, use los
botones para seleccionar el canal deseado.
GRABAR A DISCO DURO
1. Pulse varias veces el botón Fuente hasta
seleccionar la fuente que desee.
• Las siguientes fuentes de vídeo están disponibles:
> DV (vídeo digital)
> SCART2
> CHXX (sintonizador de TV)
> F-COMP (vídeo compuesto frontal)
> F-COMP (S-vídeo frontal)
2. Si se encuentra en modo Time Shifting, pulse
Grabar.
3. Si se encuentra en modo de grabación, asegúrese
de seleccionar Disco duro (consulte la barra de
estado en pantalla).
4. En caso contrario, pulse el botón TV-HDD para
seleccionar el disco duro y pulse Grabar.
5. Pulse Detener para detener la grabación.
Tiempo de
grabación
(250GB, Disco
duro)
Tiempo de
grabación
(400GB, Disco
duro)
- 87 -
Page 88
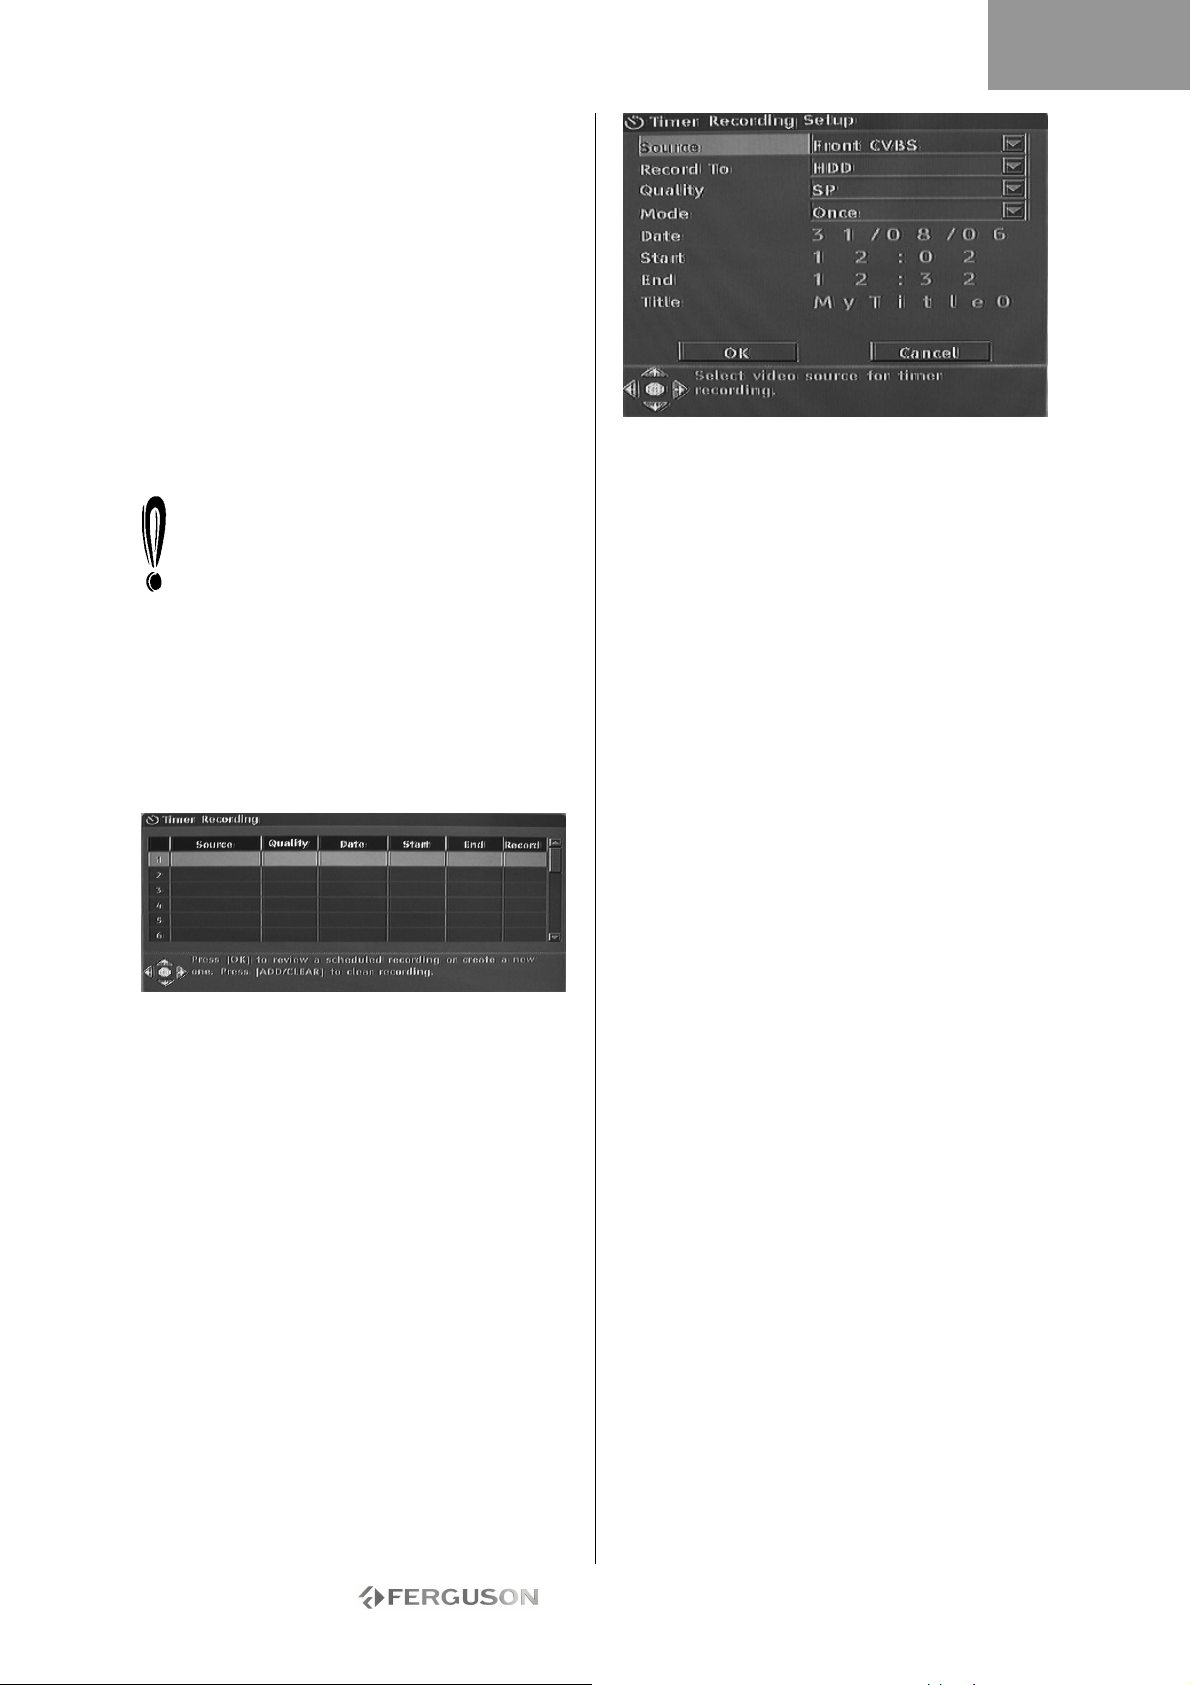
En modo Time Shifting, la Ferguson RW-770HD
dividirá la grabación en varios títulos de 3 horas si
la grabación dura más de 3 horas.
En modo Time Shifting, durante la grabación puede
pulsar el botón Grabar/OTR varias veces para
aumentar la duración del título que está guardando,
desde 30 minutos hasta un máximo de 3 horas.
Time Shifting no se puede utilizar con una fuente de
DV (Vídeo digital). Si desea grabar el material de
DV en el disco duro, pulse varias veces el botón
Fuente para cambiar a modo DV y podrá controlar la
cámara de DV con el mando a distancia. Puede
utilizar los comandos FF (Avance rápido), FR
(Rebobinado rápido), Pausa y Reproducir de la
cámara mediante el mando a distancia de la
Ferguson RW-770HD.
No puede cambiar el canal ni la fuente si la
grabación está activa (si no se ha introducido
el fin del segmento de grabación o, en caso de
una grabación larga, si no se ha llegado al fin).
Si intenta cambiar de canal o de fuente, la
Ferguson RW-770HD le pedirá que detenga la
grabación. El segmento se guardará en el disco duro
y, a continuación, cambiará el canal o la fuente.
GRABACIÓN CON TEMPORIZADOR
1. Asegúrese de que el reloj está correctamente
configurado con su hora local. Consulte la sección
Ajuste del reloj más adelante en esta guía.
2. Pulse el botón Temporizador para ver el
programador de grabación.
Para eliminar un evento programado, utilice los
botones para resaltar y pulse el botón
Grabar/OTR.
3. Use los botones para resaltar un
acontecimiento y pulse Reproducir/OK. Aparece el
cuadro de diálogo Item Editor (Editor de
elementos).
4. Las siguientes son descripciones de los elementos
del cuadro de diálogo:
Fuente: Seleccione la fuente de entrada.
Grabar en: Seleccione la ubicación para la
grabación.
Calidad: Seleccione la calidad de grabación.
Modo: Seleccione el modo de grabación (una vez,
diario o semanal).
Ejecutar: Seleccione la hora de inicio del evento de
grabación por tiempo.
Fin: Seleccione la hora final del evento de grabación
por tiempo.
Título: Introduzca un título para la grabación.
5. Mueva el cursor al botón OK y pulse
Reproducir/OK para guardar la configuración.
6. Unos minutos antes de la hora del evento de
grabación, aparecerá un cuadro de diálogo en la
pantalla del TV pidiéndole que confirme o que
cancele el evento. Si no realiza ninguna selección, la
grabación se realizará a la hora programada.
Si la grabadora está en estado de espera, se
activará automáticamente dos minutos antes del
inicio de la hora del evento de grabación.
Un disco DVD grabable puede grabar 360 minutos
de programas (calidad SLP). Estos programas se
pueden divider en 48 títulos.
ESPAÑOL
- 88 -
Page 89
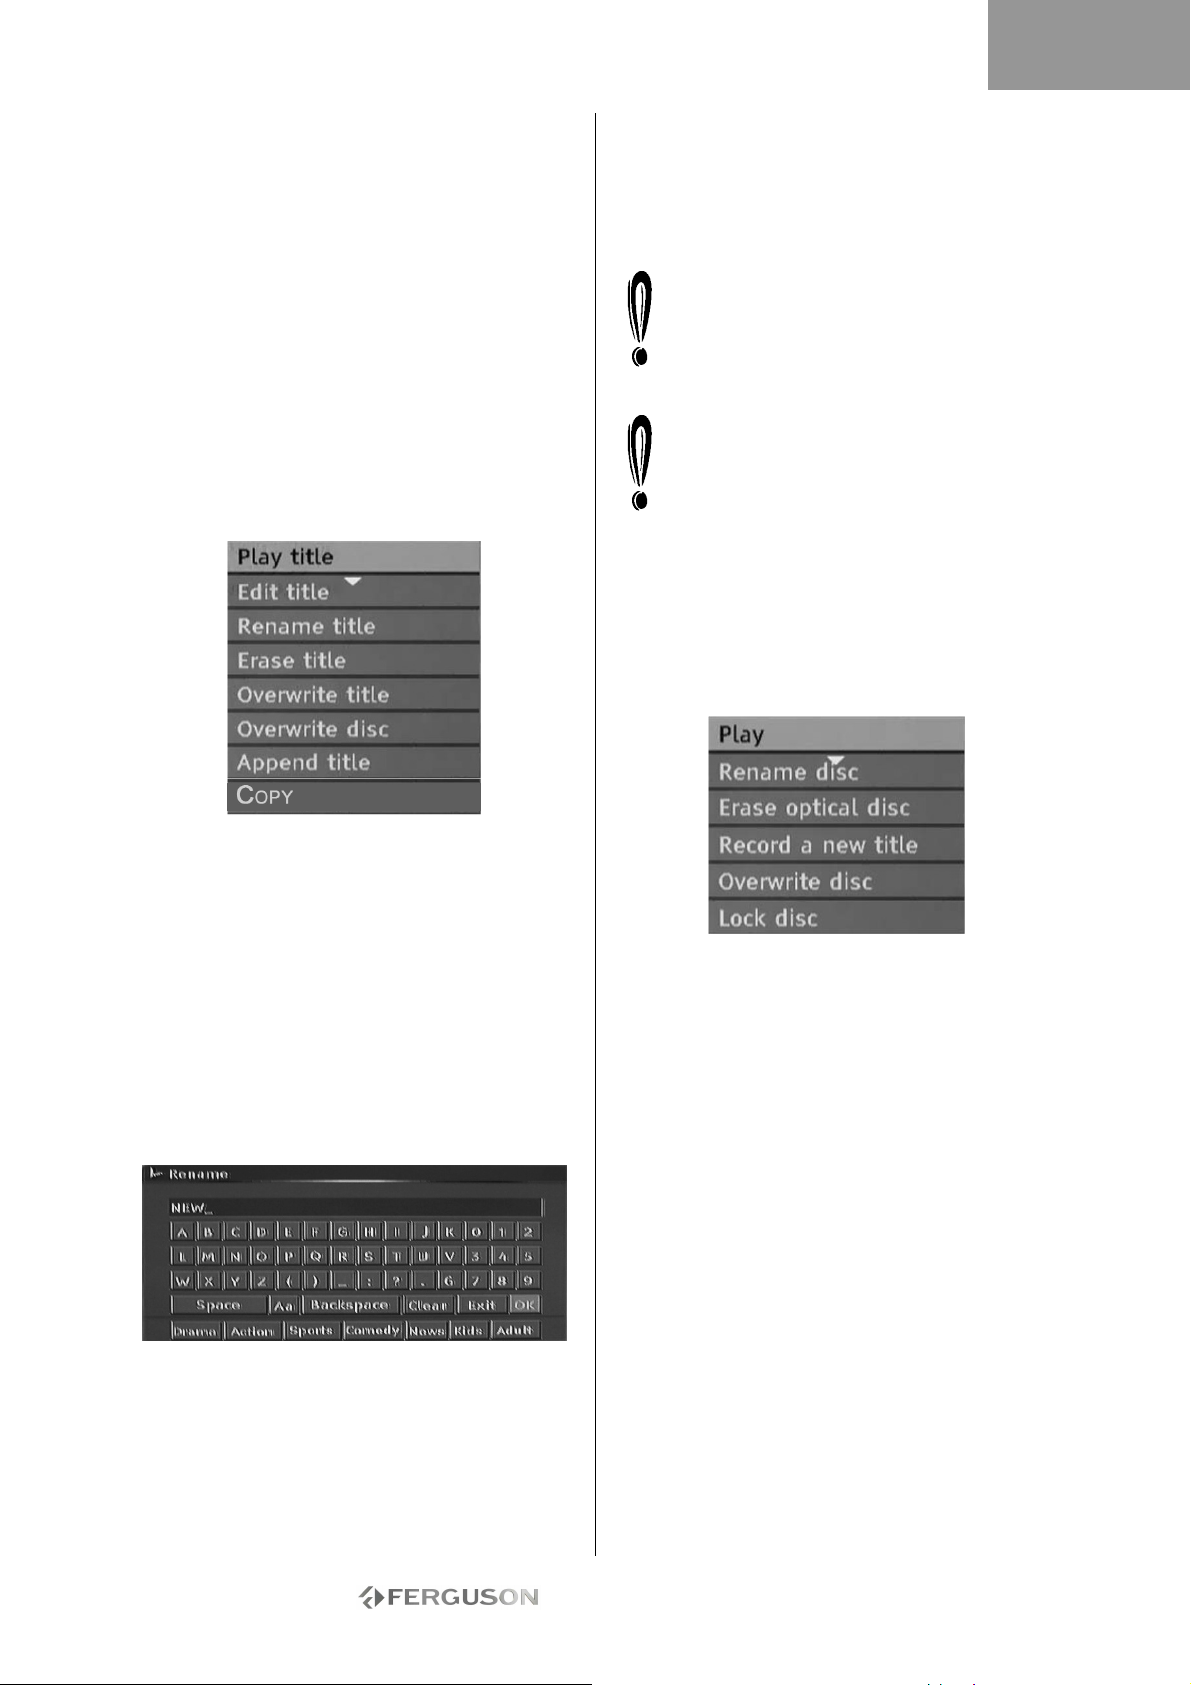
ESPAÑOL
EDICIÓN Y DOBLAJE
Edición de títulos de DVD±RW
Las instrucciones siguientes son para los discos
DVD±RW únicamente. Dado que los discos DVD±R
no se pueden grabar ni editar varias veces, las
operaciones mencionadas abajo no se aplican a
estos discos.
1. Inserte un disco DVD+RW o DVD-RW con
contenidos grabados en la bandeja de disco.
Aparecerá la pantalla del índice del DVD (si no es
así, pulse el botón DVD).
2. Utilice los botones para resaltar el título que
desea editar. Si hay más de 3 títulos, pulse el botón
para ver los otros títulos.
3. Pulse el botón para ver el menú del disco. Use
los botones para resaltar uno de los elementos
que aparecen a continuación (Reproducir título,
Editar título, etc.) y pulse Reproducir/OK.
Borrar título - Borra el título actual.
Sobrescribir disco - El contenido recién grabado
se sobrescribirá en el disco, borrando todos los
títulos.
Adjuntar título - (Este elemento sólo aparece si
está editando el último título del disco) Agrega un
nuevo título después del ultimo título del disco.
Cuando selecciona Sobrescribir título/Adjuntar
título/ Sobrescribir disco y pulsa el botón
Reproducir/OK para confirmar, la fuente de
señal volverá automáticamente a la fuente de
señal utilizada antes de iniciar la operación de
edición del disco.
El proceso de grabación no comenzará hasta
que no haya seleccionado el elemento
Sobrescribir título/Adjuntar título/Sobrescribir
disco, a continuación, pulse el botón
Grabar/OTR del panel frontal o del mando a
distancia para iniciar la grabación.
Edición de discos de DVD±RW
1. Inserte un disco de DVD±RW en la bandeja de
disco.
2. Utilice el botón direccional para resaltar la
parte superior de la barra de información de
grabación de disco.
Reproducir título- Reproduce el título actual.
Editar título - Edita el título actual, p.ej., agrega
marcadores de capítulo, oculta o muestra un
capítulo, sustituye la imagen del índice de un título
o divide un título en dos, etc.
Renombrar título - Cambia el nombre del título
actual. Pulse
Reproducir/OK - en este elemento y aparecerá un
teclado virtual en la pantalla del TV.
Utilice las teclas para resaltar la letra o el
carácter que desea introducir y pulse Reproducir/OK
para confirmarlo. Seleccione OK y pulse el botón
Reproducir/OK para guardar el nombre.
La longitud máxima del nombre de un título es 12
caracteres.
Sobrescribir título - Para sustituir una sesión
doblada previamente por contenidos recién
grabados, sobrescribiendo la sesión. Si la nueva
sesión es más corta que la original, la parte restante
de la sesión original permanecerá en el disco, como
un título nuevo. Si la longitud de la nueva sesión es
más larga que el título original, el proceso de
grabación se detendrá automáticamente cuando
alcance el final del título original.
3. Pulse el botón para ver el menú del disco.
Utilice los botones para resaltar uno de los
elementos mostrados arriba (Reproducir,
Renombrar disco, Borrar disco, Grabar nuevo título,
etc.) y pulse Reproducir/OK.
Operaciones:
• Reproducir: Reproduce los títulos grabados
secuencialmente.
• Renombrar: Cambia el nombre del disco.
Consulte arriba Renombrar título.
• Borrar disco óptico: Borra todo el contenido del
disco.
• Grabar nuevo título: Graba nuevos contenidos
en un nuevo título.
• Sobrescribir disco: Sobrescribe todo el disco
desde su comienzo con los nuevos contenidos a
grabar.
Consulte Edición de títulos DVD+RW o DVD-RW
para las operaciones Título nuevo y Sobrescribir
disco.
• Bloquear disco: Bloquea el disco actual para
proteger los datos que contiene. El disco bloqueado
no se puede borrar ni grabar hasta que se
desbloquee.
- 89 -
Page 90
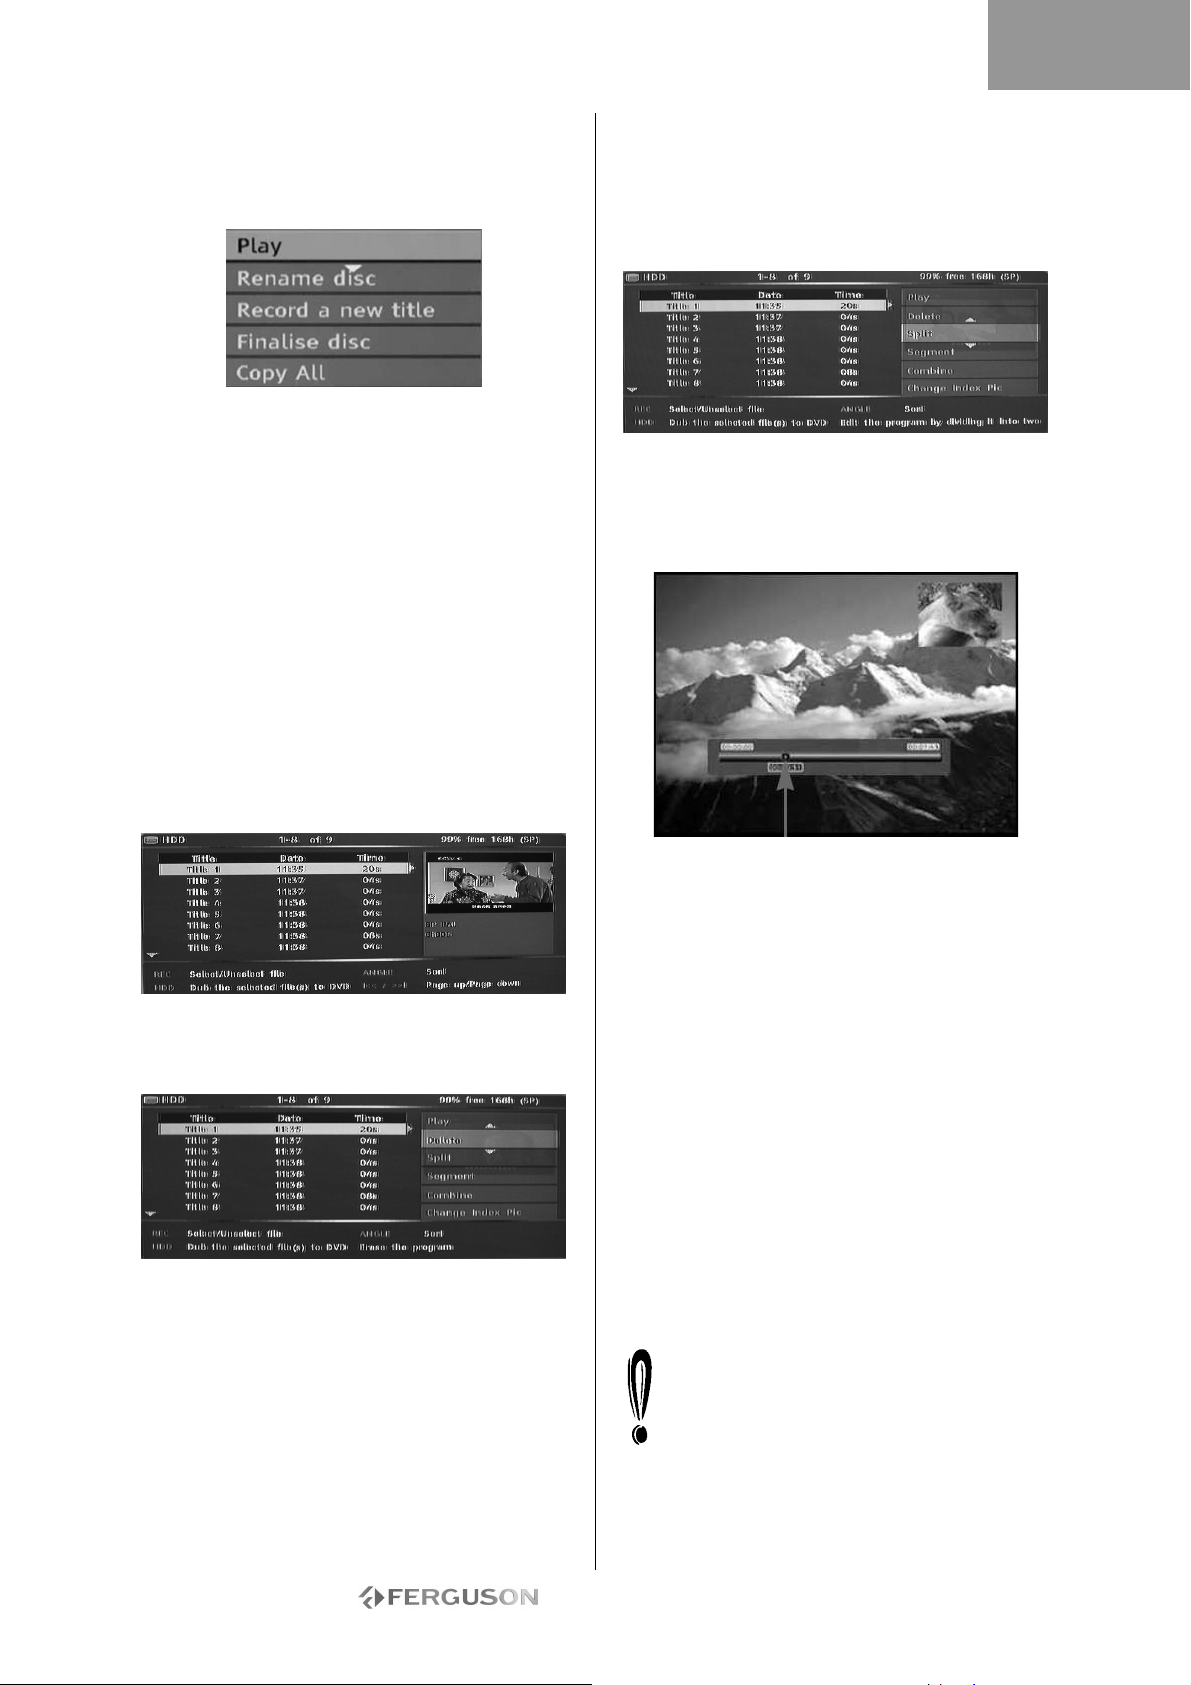
ESPAÑOL
Edición de discos DVD±R
1. Inserte un disco DVD±R en la bandeja de disco.
2. Pulse el botón para ver el menú de edición del
disco.
Operaciones:
• Reproducir: Reproduce los títulos grabados
secuencialmente.
• Renombrar: Cambia el nombre del disco.
Consulte arriba Renombrar título.
• Grabar nuevo título: Graba nuevos contenidos
en un nuevo título. Este título será el último del
disco.
• Finalizar disco: Finaliza un disco DVD+R o DVDR. Para reproducir un disco en otros reproductores
de DVD debe finalizarlo en la Ferguson RW-770HD.
Una vez completado este proceso, no se podrán
añadir más grabaciones.
EDICIÓN DEL DISCO DURO DE LA TELEVISIÓN
(TÍTULOS GRABADOS DE LA TV)
Borrar un título del disco duro de la televisión
1. Pulse el botón TV-HDD hasta que aparezca la
lista de títulos del disco duro de la televisión.
2. Use los botones para resaltar el título que
desee.
3. Pulse para visualizar el menú de edición.
4. Pulse Reproducir/OK para seleccionar Borrar.
5. Aparecerá una nueva ventana de confirmación.
Use los botones para resaltar Sí. Pulse
Reproducir/OK para confirmar.
Los títulos protegidos y bloqueados no se pueden
borrar.
.
Dividir un título del disco duro de la televisión
1. Pulse el botón TV-HDD hasta que aparezca la
lista de títulos del disco duro de la televisión.
2. Use los botones para resaltar el título que
desee.
3. Pulse para visualizar el menú de edición.
4. Use los botones para resaltar Dividir.
5. Pulse Reproducir/OK para seleccionar Dividir.
6. Use los botones Siguiente, Anterior, Avance
rápido y Retroceso rápido para localizar la posición
en la que se dividirá el título.
7. Pulse Grabar cuando el cursor se encuentre en la
posición de división deseada.
8. Aparecerá una nueva ventana de confirmación.
Use los botones para resaltar Sí.
9. Pulse Reproducir/OK para confirmar.
Los títulos protegidos y bloqueados no se pueden
Combinar dos títulos
1. Pulse el botón HDD (Disco duro) hasta que
aparezca la lista de títulos del disco duro.
2. Use los botones para resaltar el título que
desee.
3. Pulse para visualizar el menú de edición.
4. Use los botones para resaltar Combinar.
5. Pulse Reproducir/OK para seleccionar la primera
parte de los títulos combinados.
6. Use los botones para resaltar el título que
quiere combinar con el primero.
7. Pulse Reproducir/OK para combinar los dos
títulos.
8. Una vez combinados los dos títulos en un
solo archivo, los archivos originales
individuales ya no existirán.
La reproducción se detendrá
momentáneamente cuando pase por el punto
donde se combinaron los dos archivos.
Posición de division
borrar.
- 90 -
Page 91
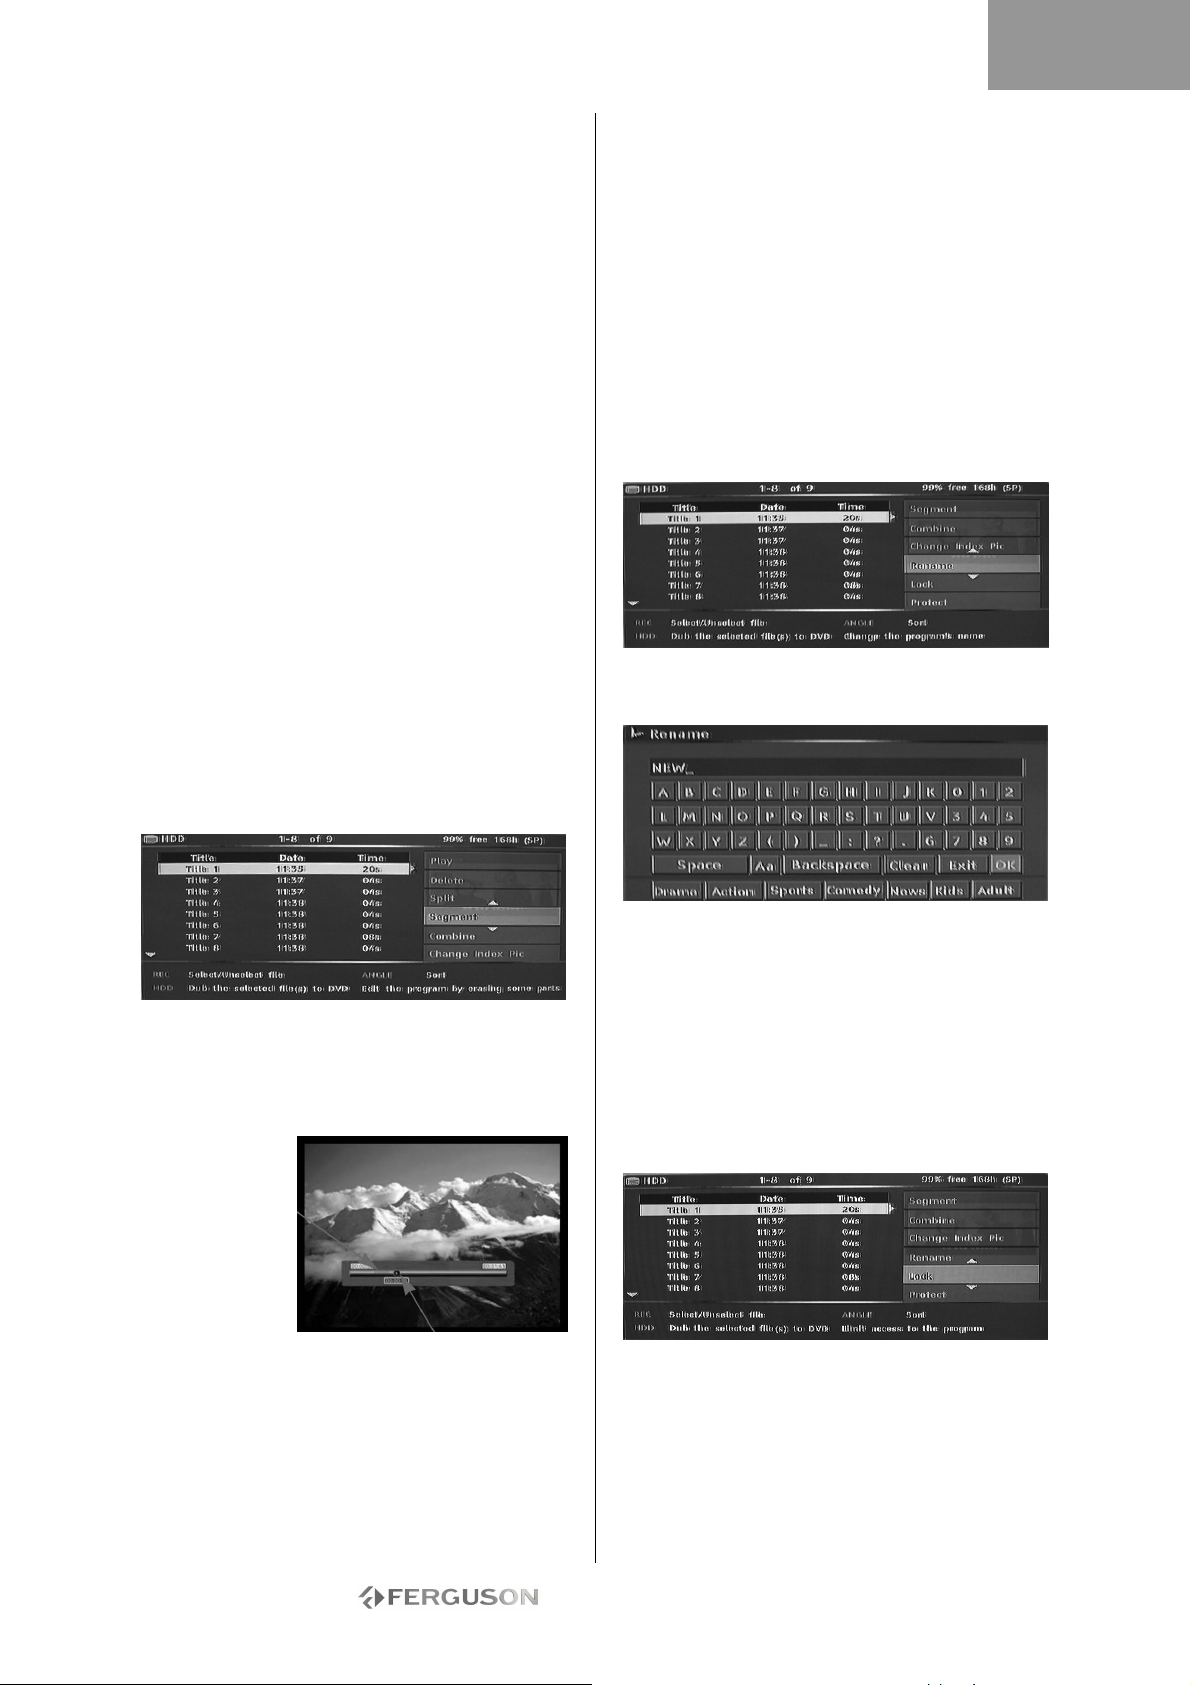
ESPAÑOL
Cambiar la imagen de índice
1. Pulse el botón Menú.
2. Utilice los botones de navegación para resaltar el
icono Preferencias y pulse el botón Reproducir/OK.
3. Utilice los botones para resaltar el icono Tipo
vista previa y pulse el botón Reproducir/OK.
4. Use los botones para seleccionar Estático y
pulse el botón Reproducir/OK.
• Estático muestra una imagen estática en el menú
vista previa de índice del disco duro.
• Dinámico reproduce varias veces 15 segundos de
vídeo en el menu vista previa de índice del disco
duro.
5. Pulse el botón TV-HDD hasta que aparezca la
lista de títulos del disco duro de la televisión.
6. Use los botones para resaltar el título que
desee.
7. Pulse para visualizar el menú de edición.
8. Use los botones para resaltar Cambiar índice.
9. Pulse REPRODUCIR/OK y se empezará a
reproducir el título seleccionado.
10. Durante la reproducción, elija un punto del
vídeo para mostrarlo como imagen de índice
estática y pulse Reproducir/OK.
11. Seleccione Sí y pulse Reproducir/OK para
terminar.
Ocultar segmentos (por ejemplo, anuncios) de
un título
1. Pulse el botón TV-HDD hasta que aparezca la
lista de títulos del disco duro de la televisión.
2. Use los botones para resaltar el título que
desee.
3. Pulse para visualizar el menú de edición.
9. Pulse Grabar cuando el cursor se encuentre en la
posición deseada.
10. Repita los pasos 6 a 9 para cada segmento que
desee ocultar.
11. Pulse Detener o TV-HDD para volver a la lista
del disco duro de la televisión.
Los títulos protegidos y bloqueados no se pueden
segmentar.
Renombrar un título del disco duro de la
televisión
1. Pulse el botón TV-HDD hasta que aparezca la
lista de títulos del disco duro de la televisión.
2. Use los botones para resaltar el título que
desee.
3. Pulse para visualizar el menú de edición.
4. Use los botones para resaltar Renombrar.
5. Pulse Reproducir/OK para seleccionar Renombrar.
4. Use los botones para resaltar Segmento.
5. Pulse Reproducir/OK para seleccionar Segmento.
6. Use los botones Siguiente, Anterior, Avance
rápido y Retroceso rápido para localizar el principio
del segmento que desea ocultar.
Segment o
oculto
Posición del cursor
7. Pulse Grabar cuando el cursor se encuentre en la
posición deseada.
8. Use los botones Siguiente, Anterior, Avance
rápido y Retroceso rápido para localizar el final del
segmento que desea ocultar.
6. Introduzca el nombre nuevo usando los botones
de navegación y el botón Reproducir/OK.
7. Seleccione OK para salir.
Bloqueo de un título (evitar su visionado,
edición y borrado)
1. Pulse el botón TV-HDD hasta que aparezca la
lista de títulos del disco duro de la televisión.
2. Use los botones para resaltar el título que
desee.
3. Pulse para visualizar el menú de edición.
4. Use los botones para resaltar Bloquear.
5. Pulse Reproducir/OK para seleccionar Bloquear.
- 91 -
Page 92
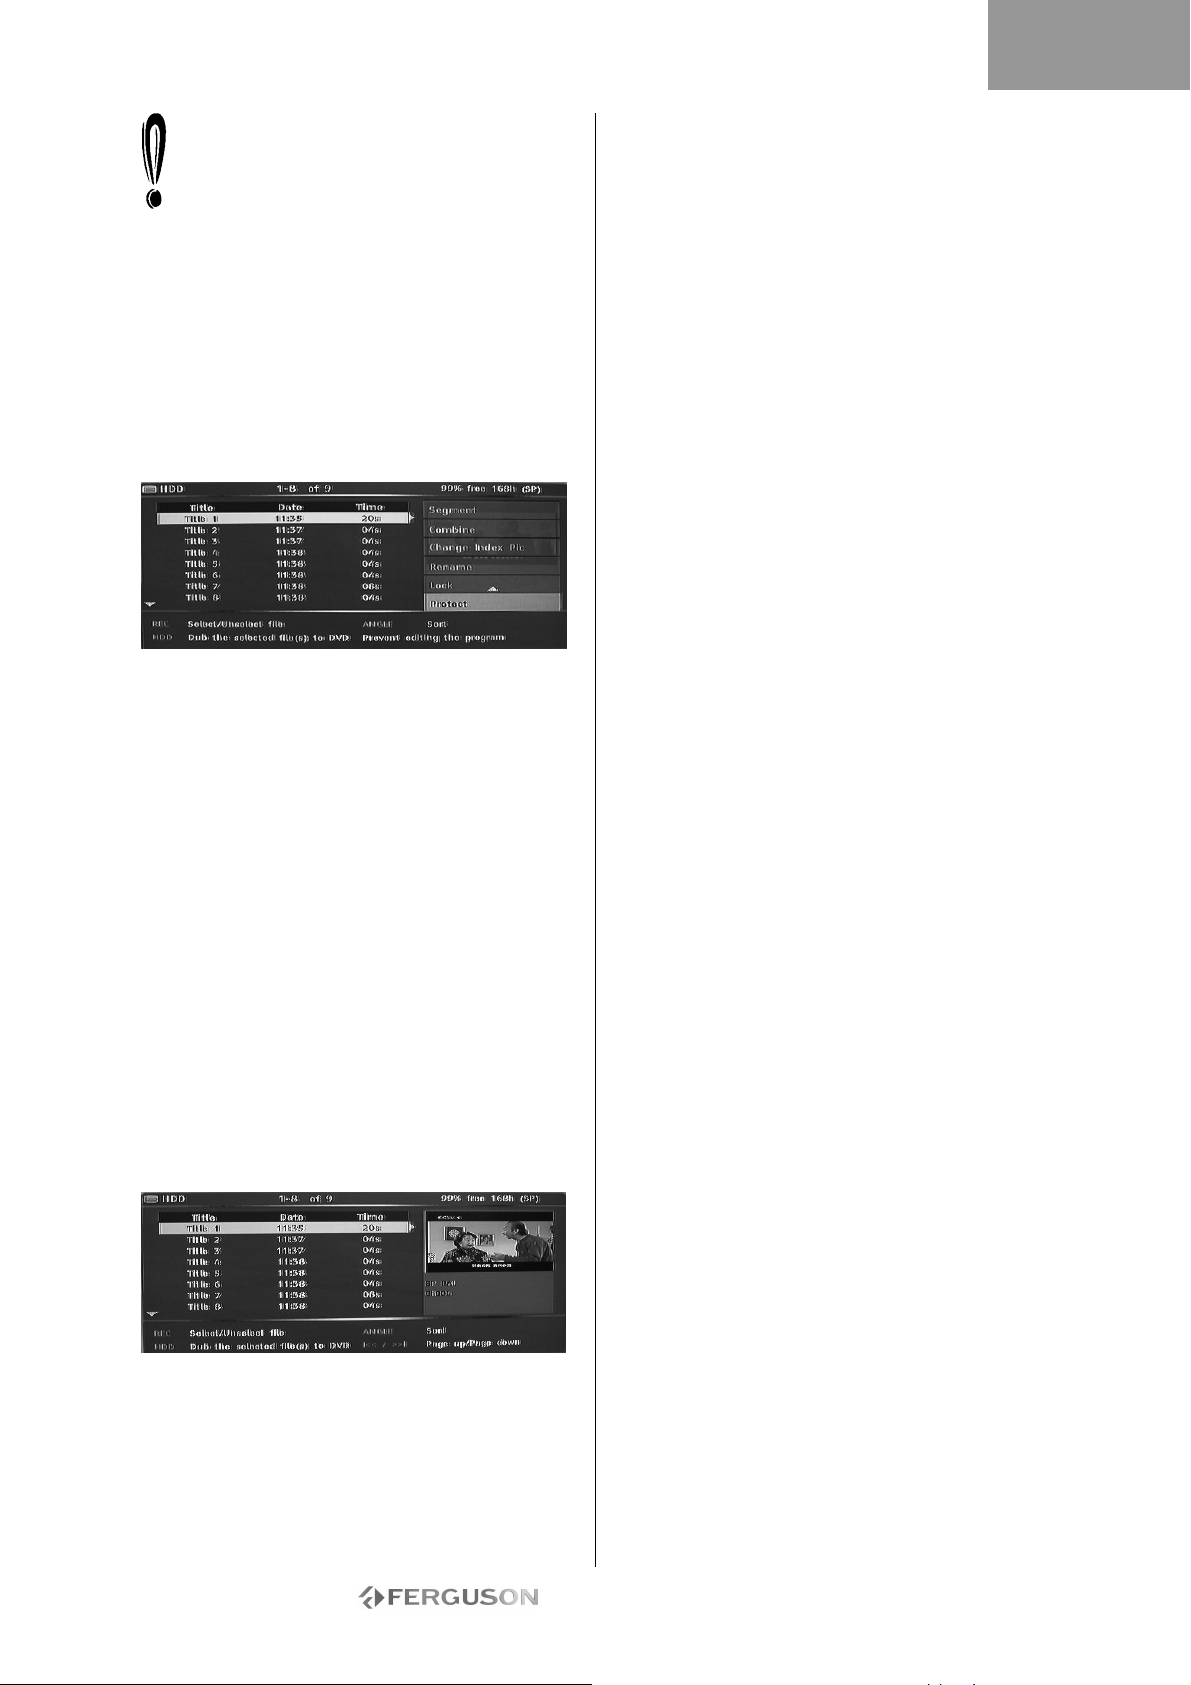
ESPAÑOL
Un pequeño icono situado bajo la ventana de
vista previa indica que el título está bloqueado
(no se puede ver/editar/borrar). Antes de
reproducir un archivo bloqueado, se le pedirá
que introduzca la contraseña. La contraseña
por defecto es 0000. Para cambiarla, vaya al menú
de configuración.
Para desbloquear un título bloqueado, repita los
pasos del 1 al 5.
Proteger un título (evitar su edición)
1. Pulse el botón TV-HDD hasta que aparezca la
lista de títulos del disco duro de la televisión.
2. Use los botones para resaltar el título que
desee.
3. Pulse para visualizar el menú de edición.
4. Use los botones para resaltar Proteger.
5. Pulse Reproducir/OK para seleccionar Proteger.
Un pequeño icono situado bajo la ventana de vista
previa indica que el título está protegido (no se
puede editar/borrar).
Para editar o borrar un título protegido, desprotéjalo
repitiendo los pasos del 1 al 5.
DOBLAJE (COPIAR DEL DISCO DURO DE LA
TELEVISIÓN A DVD)
1. Antes de seleccionar títulos para el doblaje,
inserte un disco grabable en la bandeja de discos.
• Si es la primera vez que utiliza el disco, es posible
que la Ferguson RW-770HD tarde unos segundos en
formatearlo, determinar su compatibilidad y espacio
grabable libre. Durante este intervalo de tiempo
verá el logotipo Cargando.
• El porcentaje de espacio de disco disponible se
muestra en la esquina inferior derecha de la
pantalla de la lista de títulos del disco duro de la
televisión.
2. Pulse el botón TV-HDD hasta que aparezca la
lista de títulos del disco duro de la televisión.
3. Use los botones para resaltar el título o los
títulos que desea copiar al DVD, y pulse Grabar/OTR
para seleccionar el título resaltado para el doblaje.
Una vez seleccionado el tatulo para el doblaje,
aparecerá un icono junto al nombre del título.
Puede pulsar el botón Grabar/OTR de nuevo para
eliminar la selección. A medida que selecciona o
borra la selección de títulos, se irá actualizando la
información sobre la capacidad del disco. Si el título
seleccionado es mayor que el espacio disponible en
el disco, la grabadora mostrará un mensaje de
advertencia.
Si la grabación es demasiado grande para colocarla
en el DVD, se puede dividir en partes más pequeñas
(consulte la sección Dividir, que aparece
anteriormente en esta guía).
Si cambia o extrae el disco antes del doblaje, se
borrarán todas las selecciones de doblaje.
Los títulos bloqueados no se pueden doblar en DVD.
4. Pulse el botón TV-HDD para iniciar el doblaje. El
doblaje copiará los títulos seleccionados en el DVD
grabable, incluidas las propiedades, como el nombre
del título, la duración, la imagen de índice o los
marcadores de capítulo. Una vez que se haya
iniciado el doblaje, la grabadora volverá al modo
Time Shifting. Puede pulsar el botón TV-HDD y
reproducir cualquier título del disco duro de la
televisión durante el doblaje. Sin embargo, la
edición no se realizará hasta que no haya terminado
el doblaje.
Si no se puede realizar la escritura en DVD en algún
momento de esta operación, aparecerá un mensaje
y se restablecerá la lista de títulos del disco duro de
la televisión.
COPIAR LOS TÍTULOS DEL DVD±RW AL DISCO
DURO
1. Inserte un disco de DVD±RW que contenga
títulos grabados en la bandeja de disco.
2. Utilice los botones para resaltar el título que
desea copiar.
3. Pulse el botón para ver el menú del disco. Use
los botones para resaltar un acontecimiento y
pulse Reproducir/OK.
4. En la parte superior izquierda de la pantalla
aparecerá un icono de transferencia de archivos,
que desaparecerá una vez que se haya terminado
de copiar el archivo en el disco duro.
- 92 -
Page 93
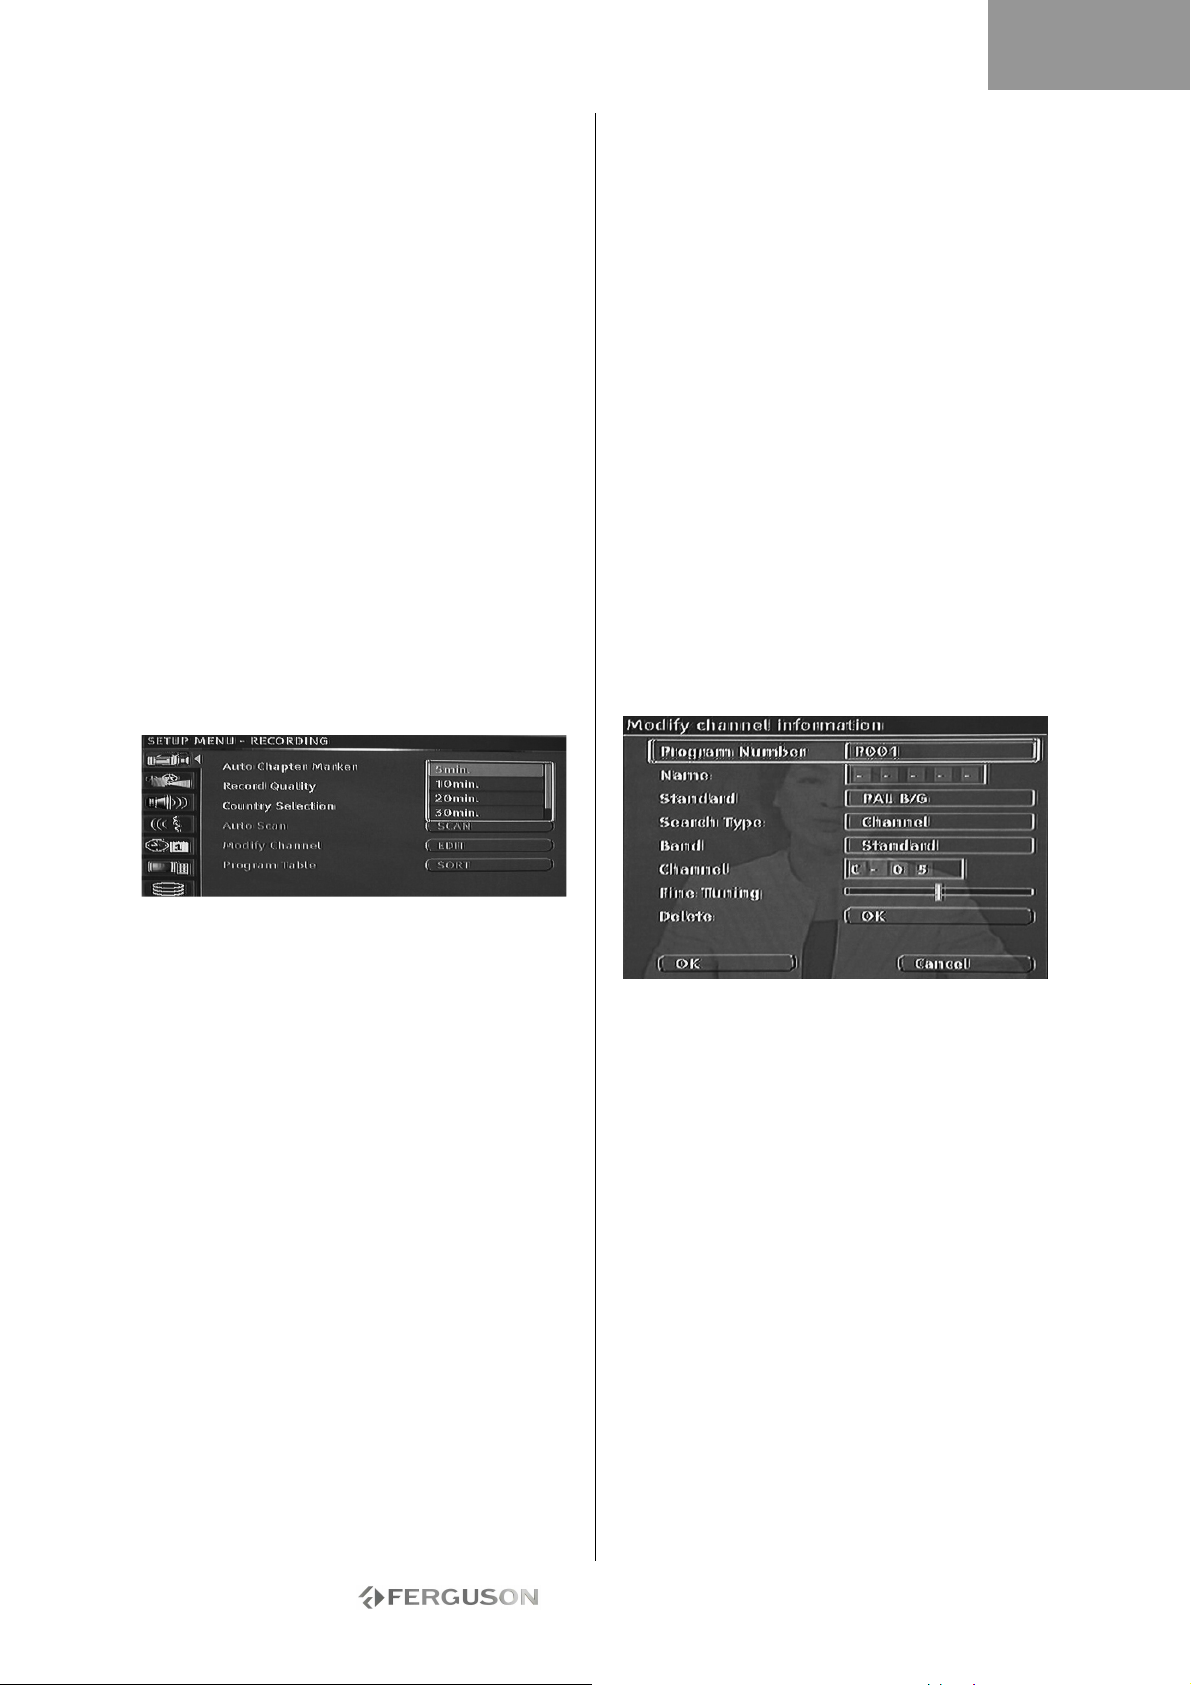
ESPAÑOL
CONFIGURACIÓN DEL SISTEMA
Menú de sistema
1. Pulse el botón Menú mientras está detenida la
reproducción para ver el menú del sistema.
2. Utilice los botones de navegación para
seleccionar el elemento que desee y pulse el botón
Reproducir/OK para confirmar su selección.
3. Pulse el botón Menú de nuevo para salir del
menú.
Marcadores de capítulos
Puede configurar la grabadora para que inserte
automáticamente marcadores de capítulo en cada
grabación de programa para permitir un
desplazamiento más rápido durante la reproducción.
Esta function inserta marcadores automáticamente
en intervalos de 10 minutos durante la grabación.
Puede cambiar los intervalos en el menu
Configuración: OFF (sin marcador), 5 min., 10
min.(predeterminada), 20 min. o 30 min.
1. Pulse el botón Menú del mando a distancia.
2. Resalte el menú Grabación y pulse el botón
Reproducir/OK.
3. Resalte el elemento Auto marcador de cap. y
pulse el botón Reproducir/OK.
4. Seleccione un elemento de la lista y pulse el
botón Reproducir/OK.
Tabla de programas
El menú Tabla programas le permite organizar los
canales de televisión.
1. Pulse el botón MENÚ para acceder alMENÚ DE
CONFIGURACIÓN.
2. Utilice los botones de navegación para resaltar el
icono Grabación y pulse el botón Reproducir/OK.
3. Utilice los botones para resaltar el icono
Tabla programas y pulse el botón Reproducir/OK.
4. Use los botones para resaltar el canal que
desea desplazar, y pulse el botón para
desplazarlo al panel de fuera de la lista.
5. Use los botones para desplazar el canal por
la lista hasta donde desee insertarlo.
6. Pulse el botón para volver a insertar el canal
en la lista.
Modificar información de canal
Puede editar la información para cada canal
mediante el menu Modificar info. de canal.
1. Pulse el botón MENÚ del mando a distancia para
acceder al MENÚ DE CONFIGURACIÓN.
2. Utilice los botones de navegación para resaltar el
icono Grabación y pulse el botón Reproducir/OK.
3. Utilice los botones para resaltar el icono
Selección de país y pulse el botón Reproducir/OK.
4. Use los botones de navegación para editar la
siguiente información.
Selección de país
Para cambiar el país, haga lo siguiente:
1. Pulse el botón MENÚdel mando a distancia para
acceder al MENÚ DE CONFIGURACIÓN.
2. Utilice los botones de navegación para resaltar el
icono Grabación y pulse el botón Reproducir/OK.
3. Utilice los botones para resaltar el icono
Selección de país y pulse el botón Reproducir/OK.
4. Utilice los botones para resaltar su país y
pulse el botón Reproducir/OK para confirmar.
Exploración automática de canales de
televisión
Para ver o grabar programas de televisión, primero
debe realizar una búsqueda de canales de
televisión:
Antes de buscar canales de televisión, asegúrese de
tener conectada una antena de televisión a la
Ferguson RW-770HD. Consulte la sección Conexión
a un televisor para ver más información.
1. Pulse el botón MENÚdel mando a distancia para
acceder al MENÚ DE CONFIGURACIÓN.
2. Utilice los botones de navegación para resaltar el
icono Grabación y pulse el botón Reproducir/OK.
3. Utilice los botones para resaltar el icono
Explor. auto. y pulse el botón Reproducir/OK para
comenzar a buscar.
Número de programa: El número del canal actual.
Este elemento no se puede modificar.
Nombre: Utilice los botones de navegación para
seleccionar y editar el nombre del canal.
Estándar: El estándar de transmisión del canal
actual. Debe elegir el estándar correcto de acuerdo
con la señal de TV local.
Tipo de búsqueda: Seleccione el tipo de
exploración que desea usar al buscar canales de
televisión. Hay dos modos: Frecuencia y Canal.
Banda (no aplicable en modo Frecuencia): El
tipo de banda de este canal. Puede seleccionar
Estándar o Cable.
Canal o frecuencia:
• Opción 1: Con este elemento seleccionado, pulse
el botón o para realizar una búsqueda del
siguiente canal de TV disponible.
• Opción 2: Pulse el botón Reproducir/OK y use los
botones de navegación para introducer
manualmente el canal o el número de frecuencia.
Sinto. exactas: Use los botones o para ajustar
la sintonización del canal actual.
Borrar: Para borrar el canal actual de la lista de
canales.
OK: Confirma la configuración del canal actual y la
guarda.
Cancelar: No guarda la configuración actual y sale
del menú.
- 93 -
Page 94
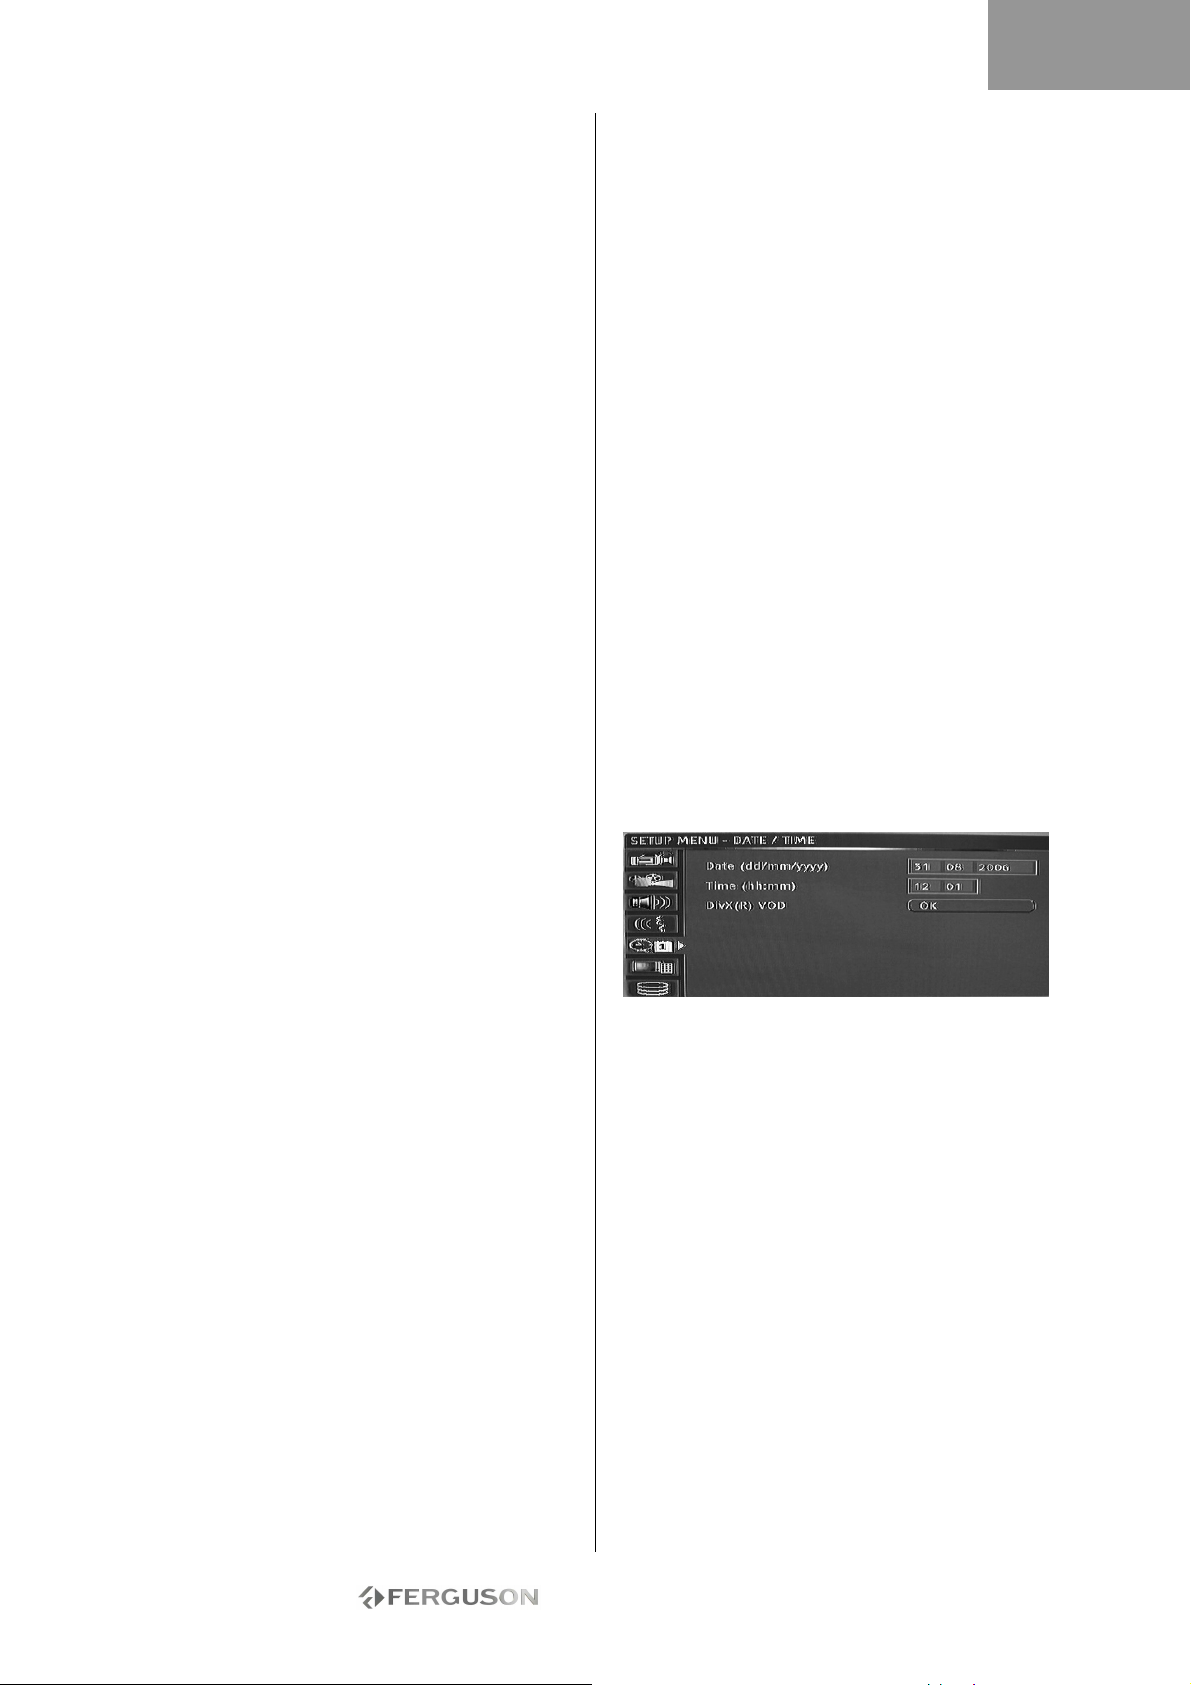
ESPAÑOL
System Language Selection
Selección de idioma de sistema
Para cambiar el idioma del sistema, haga lo
siguiente:
1. Pulse el botón MENÚ del mando a distancia para
acceder al MENÚ DE CONFIGURACIÓN.
2. Pulse los botones para resaltar el elemento
Idioma
3. Pulse el botón para resaltar el elemento Idioma
del sistema, y pulse el botón Reproducir/OK.
4. Utilice los botones para resaltar el idioma en
que desee en la lista y pulse el botón Reproducir/OK
para confirmar.
Búfer de Time Shift
1. Pulse el botón Menú del mando a distancia.
2. Resalte el menú Time Shift y pulse el botón
Reproducir/OK.
3. Resalte el elemento Modo búfer TimeShift y pulse
el botón Reproducir/OK.
4. Seleccione Actualizar o Preservar en la lista:
• Si usa la configuración Actualizar y cambia de
canal, el búfer de Time Shifting se perderá. No
recibirá ningún mensaje antes de hacerlo.
• Si usa la configuración Preservar y cambia de
canal, el búfer de Time Shifting se mantendrá.
Gestión de espacio
Escoja entre gestionar el espacio del disco duro de
forma manual o automática.
1. Pulse el botón Menú del mando a distancia.
2. Resalte el menú Time Shift y pulse el botón
Reproducir/OK.
3. Resalte el menú Gestión de espacio y pulse el
botón Reproducir/OK.
4. Seleccione Automática o Manual en la lista:
• Automática: Si no existe más espacio disponible
en el disco duro antes de detener la grabación, la
Ferguson RW-770HD borrará los títulos más
antiguos (no protegidos) del mismo. No borrará
los títulos seleccionados para su copia a DVD. Si, a
pesar de este procedimiento, el disco duro no
contiene espacio disponible para grabar, la
grabadora detendrá la grabación y mostrará un
mensaje que le pedirá que borre algunos títulos
para liberar espacio en el disco duro.
• Manual: Si no existe más espacio disponible en el
disco duro antes de detener la grabación, la
grabadora detendrá la grabación y mostrará un
mensaje que le pedirá que borre algunos títulos
para liberar espacio en el disco duro.
Control de reproducción
Control de reproducción es un sistema de protección
mediante contraseña. Permite al usuario prohibir la
reproducción de ciertos discos en la Ferguson RW770HD de acuerdo con la información contenida en
dichos discos. Para establecer el control de
reproducción:
1. Pulse el botón Detener dos veces durante la
reproducción.
2. Pulse el botón Menú para acceder al MENÚ DE
CONFIGURACIÓN del sistema.
3. Pulse los botones para resaltar el elemento
Preferencias. Pulse el botón Reproducir/OK para
confirmar la selección.
4. Pulse los botones para resaltar el icono Nivel
de restric. y pulse el botón Reproducir/OK.
5. Utilice los botones para resaltar el nivel de
control deseado y pulse el botón Reproducir/OK.
6. Pulse el botón Menú para salir.
Selección de idioma para audio, subtítulos y
menú del disco
Para cambiar el idioma para audio, subtítulos y
menú del disco, haga lo siguiente:
1. Pulse el botón MENÚ del mando a distancia para
acceder al MENÚ DE CONFIGURACIÓN.
2. Utilice los botones de navegación para resaltar el
icono Idioma y pulse el botón Reproducir/OK.
3. Utilice los botones para resaltar el elemento
Audio, Subtítulos o Menú de disco y pulse el botón
Reproducir/OK.
4. Utilice los botones para resaltar su país y
pulse el botón Reproducir/OK para confirmar.
Ajuste del reloj
1. Pulse el botón Menú para acceder al MENÚ DE
CONFIGURACIÓN.
2. Utilice los botones de navegación para resaltar el
icono FECHA/HORA y pulse el botón Reproducir/OK.
3. Cambie la fecha y la hora del sistema con los
botones de navegación.
Ajuste de la hora del sistema
La Ferguson RW-770HD puede ajustar
automáticamente la hora del sistema de acuerdo
con el código de hora que recibe de la emisora de
televisión. El aparato solo puede utilizar el código de
hora integrado en el primer canal de TV. La señal de
TV debe llevar incorporado un código de hora para
poder utilizar esta función.
- 94 -
Page 95
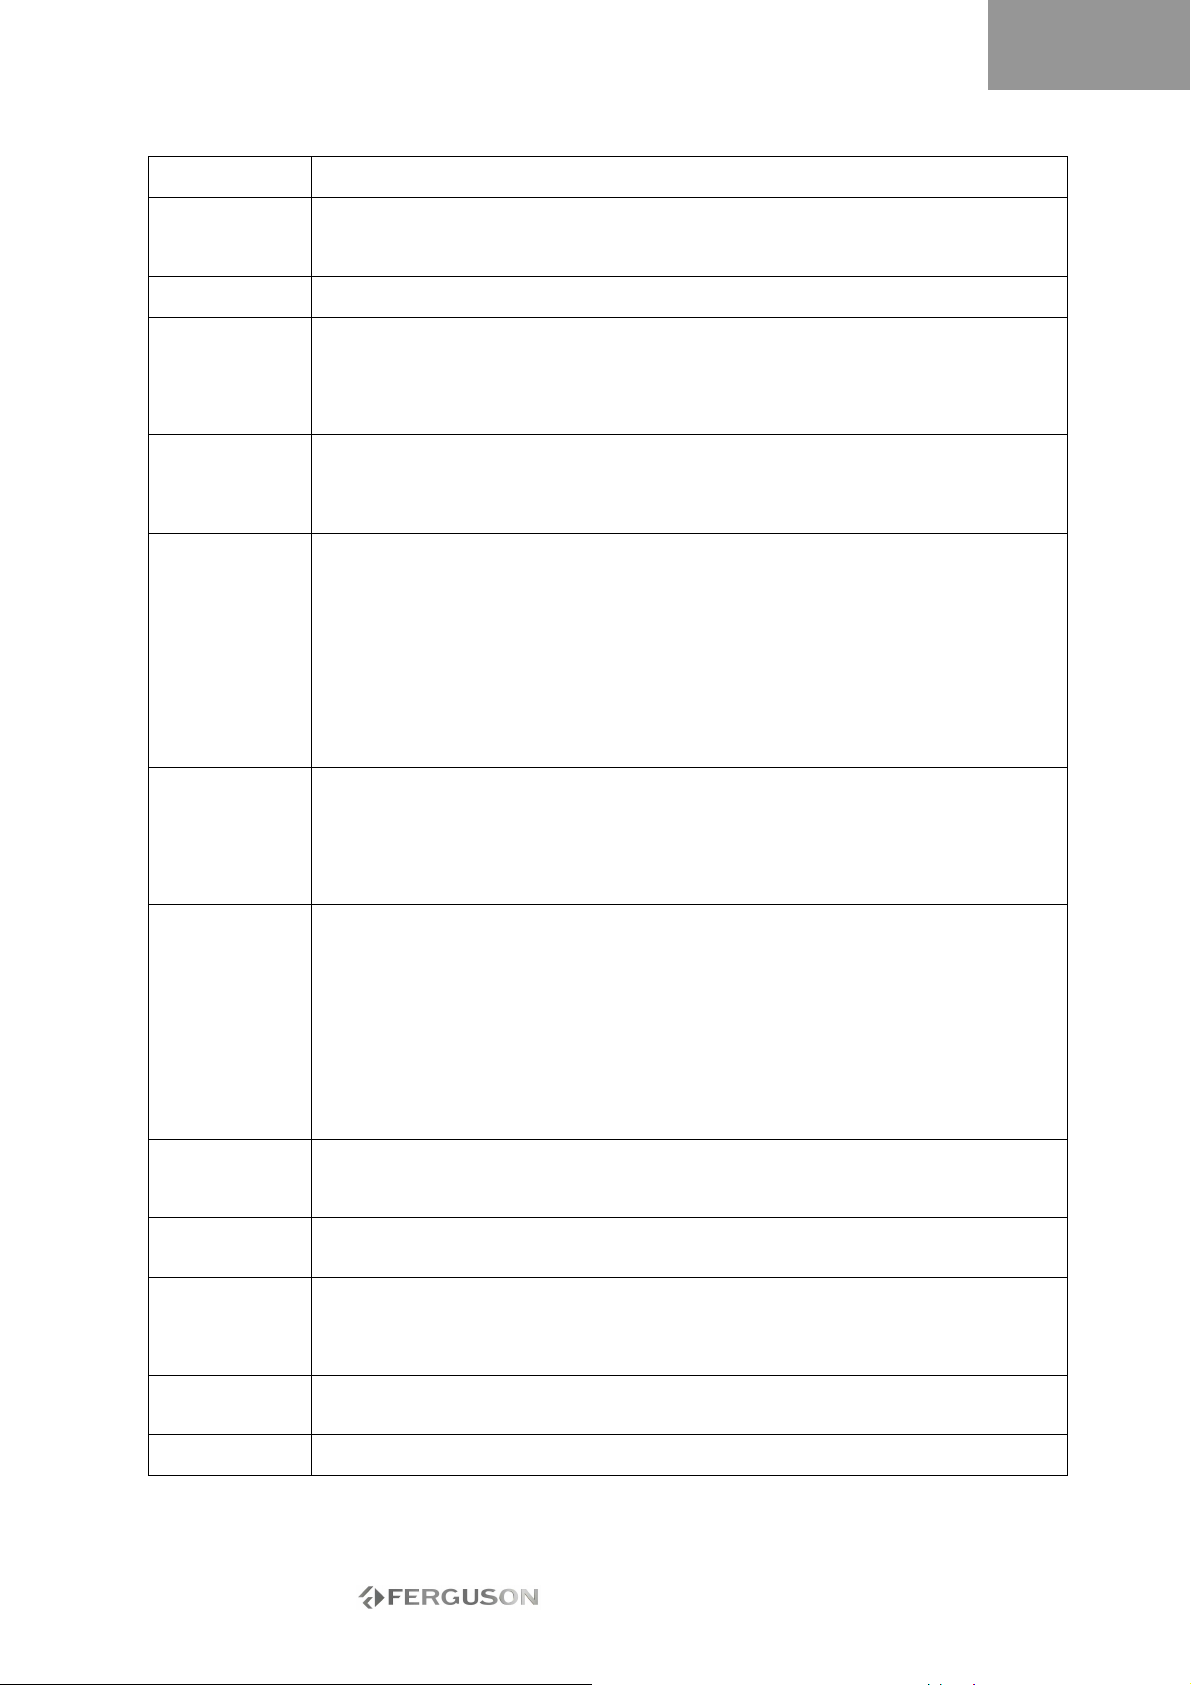
ESPAÑOL
RESOLUCIÓN DE
PROBLEMAS
Problema Solución
No hay sonido • Conecte los cables de audio a los conectores de forma segura.
Solo sonido, sin
imagen
No responde • Conecte el enchufe del cable de alimentación en la toma de corriente de forma segura.
El mando a
distancia no
funciona
No se puede
reproducir
el disco
Calidad de
reproducción
deficiente
(imagen / sonido
distorsionados)
No puede grabar • El canal de TV que desea grabar aún no se ha guardado o ha elegido el número de canal
La grabación por
tiempo no
funciona
No se puede
editar el
disco DVD±RW
Se producen
interferencias en
la imagen o en el
sonido de la señal
de TV
Imagen
distorsionada o
en blanco y negro
No hay salida de
audio digital
• Compruebe la conexión entre la salida de audio del DVD y la entrada de audio del TV o
del receptor. Asegúrese de seleccionar la entrada AUDIO correcta del TV o del amplificador.
• Consulte el manual del propietario del amplificador de audio.
• El modo de exploración de la salida de vídeo no está correctamente configurado. Pulse el
botón P/I en el mando a distancia para cambiar al modo correcto.
• La grabación con temporizador está activa. Pulse Encendido o Detener para cancelar la
grabación con temporizador.
• Puede haberse producido un fallo técnico en el aparato. Desenchufe el cable de
alimentación y espere 30 segundos antes de conectarlo de nuevo a la toma de corriente. Si
aún no funciona, intente restablecer la grabadora multimedia a su configuración de fábrica.
• El mando a distancia no está apuntando a la grabadora multimedia. Diríjalo hacia la
grabadora multimedia.
• Pilas agotadas. Sustitúyalas.
• Puede haberse producido un fallo técnico en el aparato. Extraiga las pilas y espere 30
segundos antes de volver a insertarlas en el mando a distancia.
• Disco vacío. Sustitúyalo.
• Disco incompatible: consulte la lista de tipos de discos compatibles al principio de esta
guía.
• El disco está cargado con la etiqueta hacia abajo. Asegúrese de cargar el disco con la
etiqueta hacia arriba.
• Código de región erróneo. El código de región no coincide con la configuración de región
de la grabadora multimedia.
• Control de reproducción activado. Desbloquee el control de reproducción. La contraseña
predeterminada es 0000 o 3308.
• Elija un número de canal en el televisor. Elija el número de canal correcto.
• La conexión entre la grabadora multimedia y el televisor se ha perdido. Compruebe la
conexión.
• El TV no está ajustado a su estado óptimo.
• El disco está sucio. Límpielo.
• Es posible que las interferencias también distorsionen la imagen.
• Una configuración errónea del modo de salida puede provocar una mala calidad de
imagen o que la pantalla aparezca en negro. Si tiene problemas con la calidad de imagen o
la pantalla se ve en negro, pulse el botón de exploración progresiva (Progressive Scan)
para cambiar el modo de salida.
erróneo.
• Compruebe los canales almacenados.
• El disco está protegido contra escritura. Elimine la protección contra escritura o cambie el
disco.
• El disco es un disco DVD+R o DVD-R cerrado. Cámbielo.
• Sistema de TV incorrecto. Asegúrese de que el disco no se ha grabado en un formato de
vídeo diferente (p. ej. PAL o NTSC). La grabadora multimedia no permite realizar
grabaciones de formatos de video diferentes en el mismo disco DVD+R/RW.
• Es posible que el disco no cumpla con las especificaciones de DVD+R/RW o DVD-R/RW.
• La grabadora no graba en discos CD-R/RW o DVD-RAM.
• Asegúrese de que el disco no se ha utilizado en un PC previamente.
• La fecha o la hora no están ajustadas correctamente. Compruébelas.
• La programación de la hora no es correcta. Compruébela.
• El disco está bloqueado. Desbloquee el disco.
• El disco es un disco DVD+R o DVD-R cerrado. Cámbielo.
• El disco está bloqueado. Pulse el botón DVD del mando a distancia y seleccione
Desbloquear para desbloquearlo.
• Revise la antena.
• Compruebe el sistema de TV seleccionado en el menú del sistema. En Europa continental,
el sistema de TV debe ser PAL o SECAM.
• El sistema de color del disco no coincide con el del TV.
• La señal no es una señal de color.
• Compruebe si los conectores de entrada digital coinciden con los conectores de salida
externa del instrumento.
- 95 -
Page 96

ESPAÑOL
GLOSARIO
Relación de aspecto
La relación de aspecto es la proporción entre la
longitud y la altura de las pantallas de televisión. La
proporción de una television estándar es 4:3. La
proporción de una televisión ancha es 16:9. El modo
Letter box proporciona una imagen con efectos de
cine en pantalla ancha.
Capítulo / Título
Capítulo se refiere a la sección más pequeña de una
película de DVD. Título es la mayor división de un
DVD.
Vídeo por componentes
Señales de vídeo que contienen tres canales de
información independientes que forman la imagen
completa. Existen diferentes tipos de vídeo por
componentes, especialmente, R/V/A y Y/Cb
(Pb)/Cr (Pr).
Vídeo compuesto
Una única señal de vídeo que contiene todos los
datos de luz, color y sincronización. Es la señal más
utilizada por los productos de consumidores.
DivX®
DivX® es una famosa tecnología multimedia creada
por DivX®, Inc. Los archivos DivX® contienen vídeo
muy comprimido con una gran calidad visual y con
un tamaño de archivo relativamente pequeño.
Los archivos DivX® también pueden incluir
características multimedia avanzadas como menús,
subtítulos y pistas de audio alternativas. Existe una
gran variedad de archivos DivX® que se pueden
descargar por Internet, y el usuario puede crear
archivos con su contenido personal y las sencillas
herramientas que encontrará en DivX.com.
Dolby Digital®
Produce sonido mono, estéreo o hasta 5.1 canales
separados de sonido envolvente: izquierdo, centro,
derecho, izquierdo envolvente, derecho envolvente
y efectos de baja frecuencia (LFE). Estándar global
para DVD de audio y DVD de vídeo.
DTS® (Digital Theatre Systems)
DTS® son las siglas en inglés de Digital Theatre
System (sistema de cine digital). DTS es un sistema
envolvente diferente del Dolby Digital que se ha
convertido en un formato de sonido envolvente
muy popular para las películas. “DTS®” y “DTS®
Digital Out” son marcas registradas de Digital
Theatre Systems, Inc.
JPEG
Un formato de archivo popular para imágenes fijas
(como fotografías e ilustraciones) compression y
almacenamiento. JPEG son las siglas en inglés de
“Joint Photographic Experts Group” (grupo de
expertos fotográficos unido). La mayor parte de las
cámaras digitales usan este formato.
MP3
MP3 (MPEG1 audio layer 3) es un formato de
archivo de audio comprimido. Los archivos se
reconocen por su extensión “.mp3” o “.MP3”.
MPEG
MPEG son las siglas en inglés de “Motion Picture
Experts Group” (grupo de expertos de imágenes
dinámicas). Este es un formato de audio estándar
internacional que se utiliza en CD de vídeo y en
algunos discos de DVD.
Salida digital óptica
Un conector que tiene una salida de audio digital en
forma de impulsos luminosos. Los components se
conectan utilizando cables ópticos de fibra especial
que están disponibles en los distribuidores de audio
especializados.
PAL (Phase Alternation by Line)
PAL (Phase Alteration Line) es el estándar de
emisión de la television en color en toda Europa
occidental.
PBC
Control de reproducción. Una característica especial
de los CD de vídeo o de los Super VCD que permite
navegar a través de un menu integrado en pantalla.
S-Video
Señal de vídeo con una calidad de imagen superior
a las conexiones compuestas estándar. Utilizada en
Super VHS, DVD, monitores de televisión de altas
prestaciones, etc.
Time Shift
Grabación y reproducción simultáneas de vídeo.
Pausa y reanudación de emisiones de TV en directo.
Reproducción rápida hacia adelante, reproducción
rápida hacia atrás y salto a cualquier punto de la
grabación. Reproducción de un programa
previamente grabado durante la grabación
simultánea de otro programa.
Pista
SVCD, VCD, discos de CD de audio utilizan pistas
para separar el contenido del disco.
- 96 -
Page 97
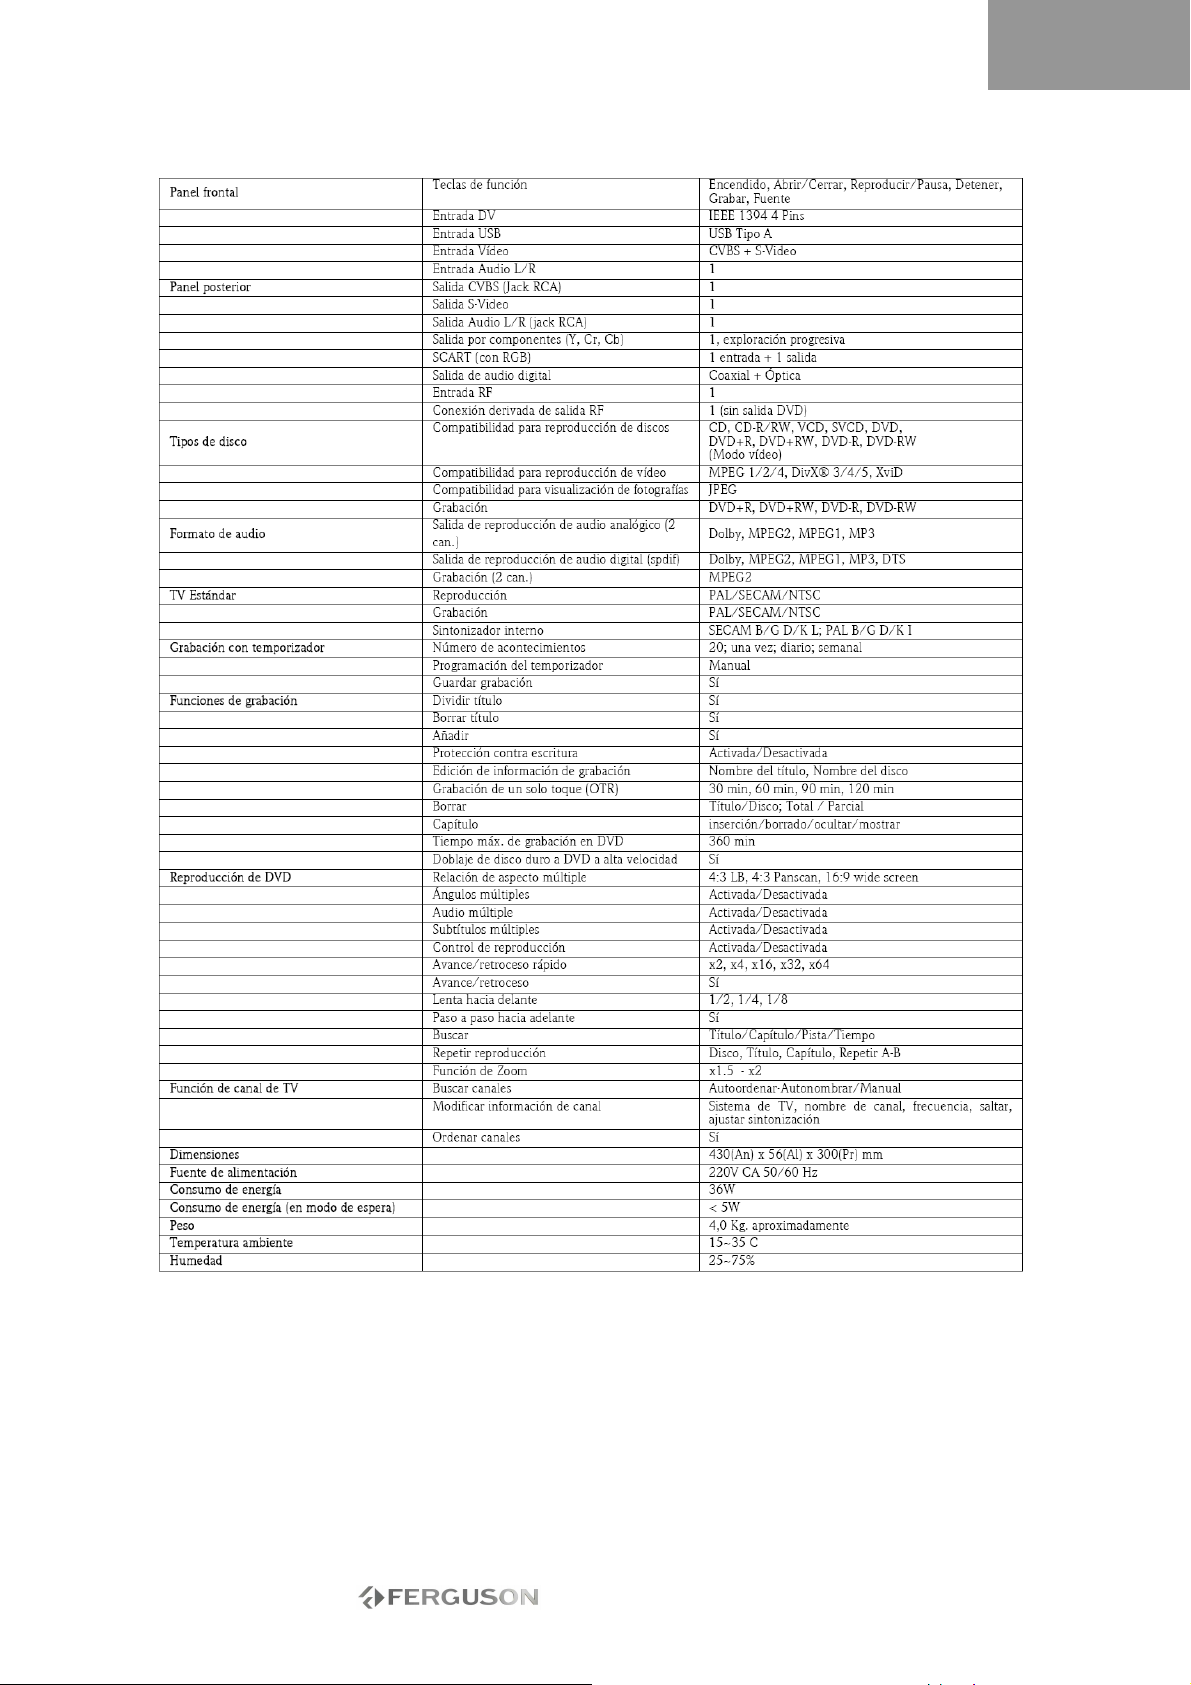
ESPECIFICACIONES
ESPAÑOL
- 97 -
 Loading...