

Page 1
Page 2
PL PL
Wprowadzenie
Wymagania sieciowe
Przed użyciem proszę sprawdzić, czy spełnione są poniższe wymagania:
• Szerokopasmowy dostęp do internetu – za pomocą bezprzewodowego
punktu dostępowego, routera lub podobnego urządzenia sieciowego.
• Komputer lub smartfon zdolny do połączenia z siecią lokalną.
Urządzenia powinny być w tej samej sieci co odbiornik.
Środki bezpieczeństwa
• Prosimy o dokładne zapoznanie się z instrukcją obsługi i zawartymi w niej zaleceniami.
• Prosimy uważnie zapoznać się z instrukcją obsługi przed
pierwszym uruchomieniem sprzętu.
• Aby uniknąć porażenia prądem nie otwieraj nigdy obudowy.
Uszkodzenie plomby gwarancyjnej powoduje utratę gwarancji.
• Odłącz urządzenie od sieci podczas burzy lub gdy nie będzie używane
przez dłuższy czas. Pamiętaj, że gwarancja nie obejmuje uszkodzeń
urządzenia, które są spowodowane uderzeniem pioruna.
• Nie wystawiaj urządzenia na bezpośrednie działanie promieni słonecznych.
Trzymaj z daleka od źródeł ciepła i od wilgotnego otoczenia. Nie zasłaniaj
otworów wentylacyjnych, tak aby zapewnić prawidłową cyrkulację powietrza.
• Ustaw urządzenie w pozycji poziomej na płaskiej, równej i stabilnej powierzchni.
• Jeśli przenosisz urządzenie z ciepłego pomieszczenia do zimnego
i na odwrót, odczekaj min. 1 godzinę przed włączeniem do prądu.
W przeciwnym wypadku mogą wystąpić problemy.
• Urządzenie należy trzymać z daleka od wazonów, butelek, akwariów i innych źródeł wody
w celu uniknięcia uszkodzenia. Nie należy dotykać wtyczki zasilania gołymi rękoma.
• Nie stawiaj żadnych przedmiotów na obudowie urządzenia. Przed
rozpoczęciem czynności konserwacyjnych lub instalacyjnych
należy odłączyć urządzenie od sieci elektrycznej.
• Do czyszczenia urządzenia nie należy stosować alkoholu ani płynów
zawierających amoniak. W razie potrzeby czyścić za pomocą miękkiej,
niestrzępiącej się szmatki zwilżonej łagodnym roztworem wody z mydłem.
• Nie podłączaj żadnych kabli kiedy wtyczka zasilania jest w gniazdku.
• Sprawdź czy masz sprawne kable. Kable uszkodzone mogą spowodować pożar.
• Prosimy o wyłączenie urządzenie z zasilania przy podłączaniu okablowania.
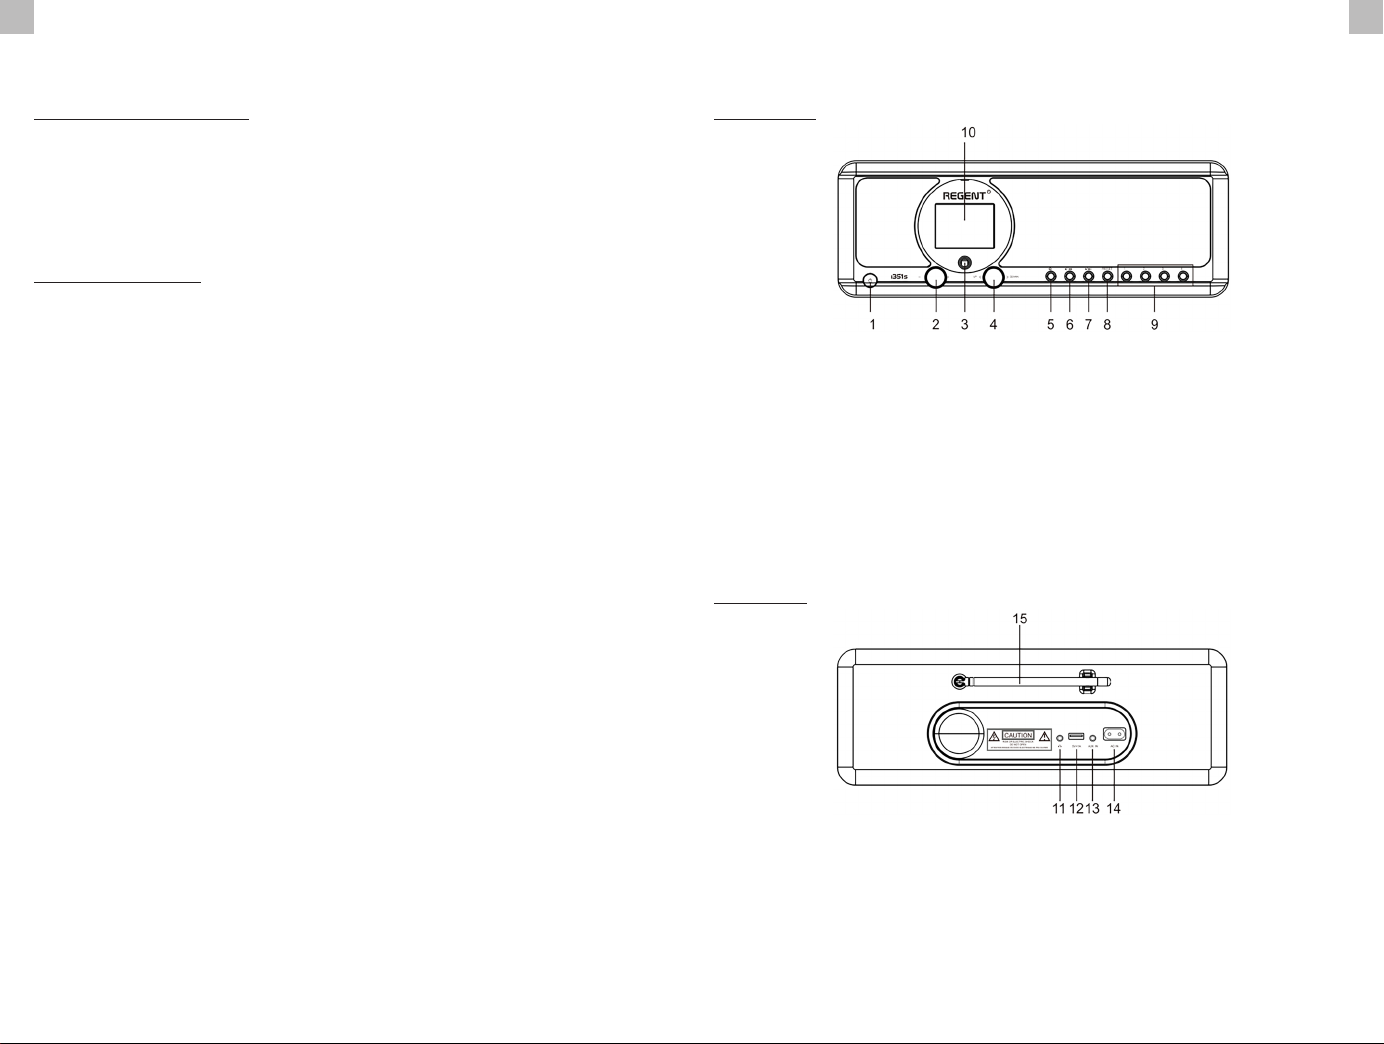
Wygląd i opis przycisków/funkcji
Panel przedni
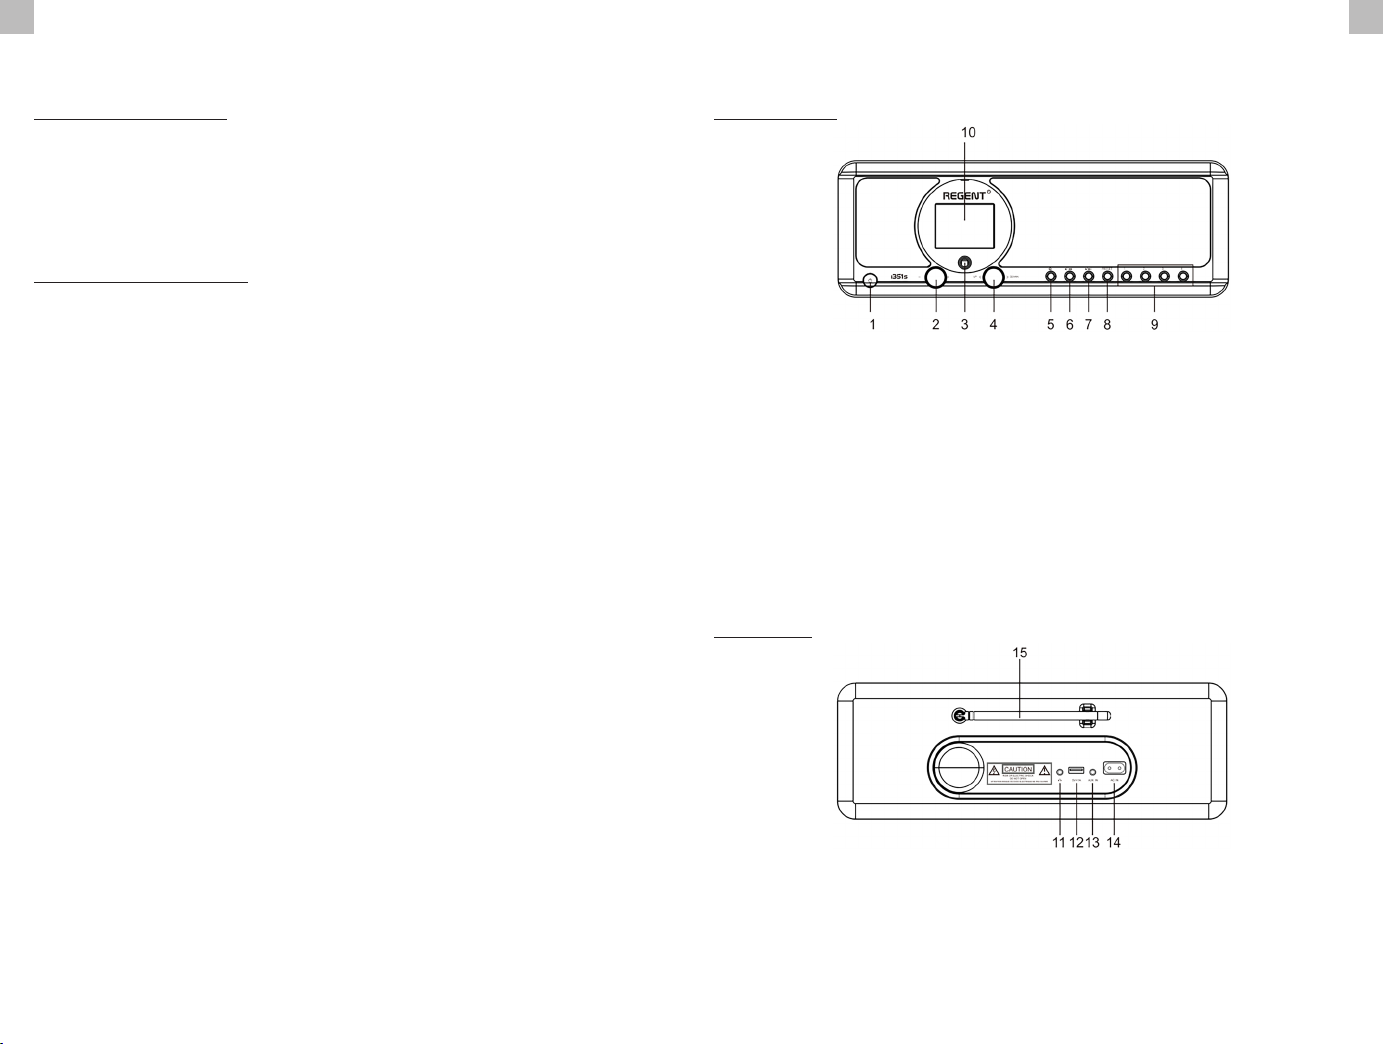
1. Przycisk POWER ON / STANDBY
2. Pokrętło głośności - obracaj by
dostosować poziom głośności;
naciśnij by wyciszyć
3. Sensor podczerwieni
4. pokrętło UP / DOWN i przycisk
OK - obracaj by nawigować lub
przewijać utwór w przód/tył;
naciśnij by potwierdzić wybór
5. Przycisk HOME naciśnij by
wrócić do głównego menu
Panel tylny
6. Przycisk PREVIOUS ◄ - w lewo
/ poprzednia ścieżka
7. Przycisk NEXT ► - w prawo
/ następna ścieżka
8. Przycisk PRESET naciśnij krótko aby
przywołać zapamiętaną stację; naciśnij
i przytrzymaj ten przycisk aby przejść
do trybu zapamiętywania stacji
9. Przyciski PRESET 1, 2, 3, 4
10. Kolorowy wyświetlacz
11. Wejście słuchawkowe 3.5 mm
12. Port USB (Wyjście: 5V, 1A)
13. Wejście 3.5 mm Aux-in Jack
14. Gniazdo zasilania
15. Antena Teleskopowa
Page 3
PL PL
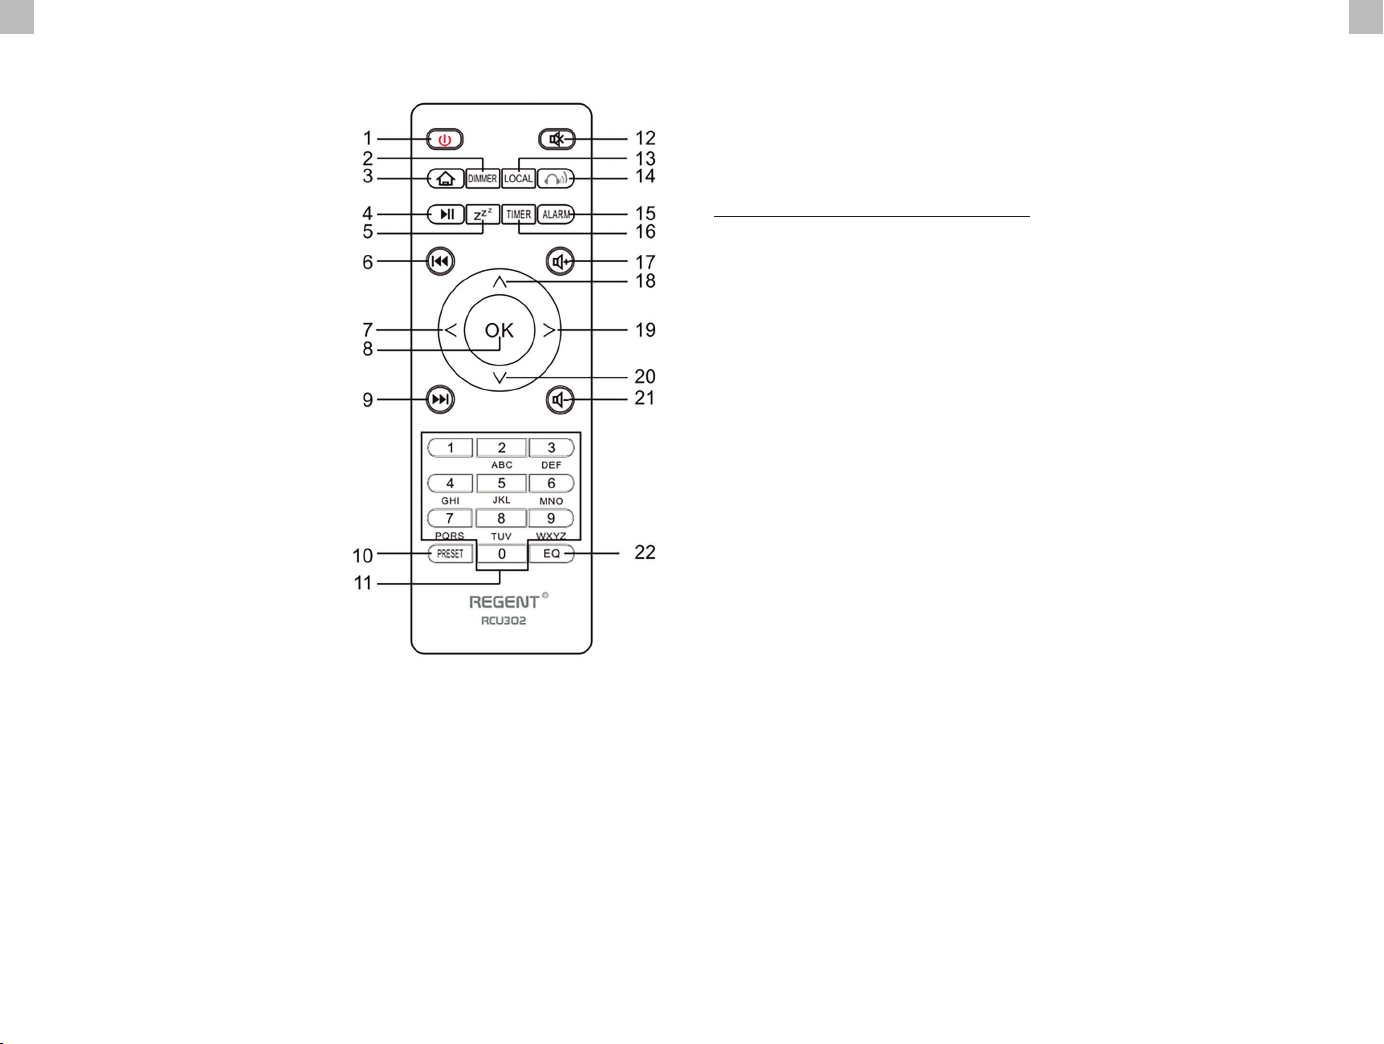
Pilot zdalnego sterowania Pierwsze kroki
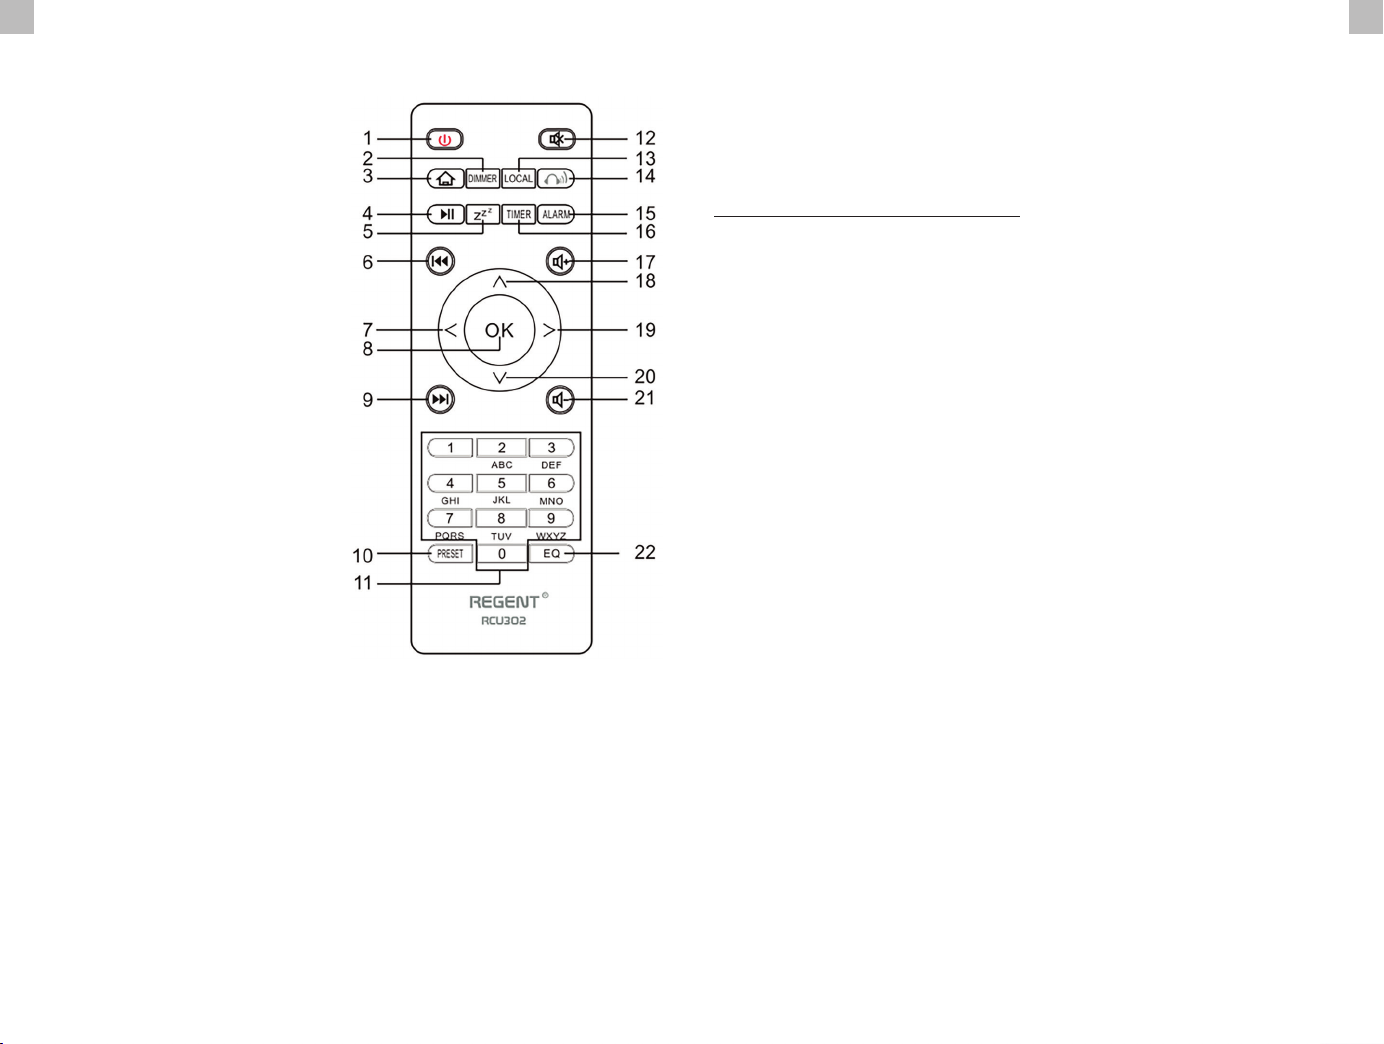
1. Przycisk POWER ON / STANDBY -
włączenie/wyłączenie obiornika
2. Przyciksk DIMMER - ściemniacz
3. Przycisk HOME - naciśnij by
wrócić do menu głównego
4. Przycisk PLAY / PAUSE - naciśnij by
zatrzymać/wznowić transmisję
5. Przycisk SLEEP - ustawia
odbiornk w trybie drzemki
6. Przycisk PREVIOUS - naciśnij
by cofnąć utwór
7. Przycisk < - ruch kursora w lewo
8. Przycisk OK - zatwierdzenie wyboru
9. Przycisk NEXT - naciśnij
by pominąć utwór
10. Przycisk PRESET
11. Przyciksi 0-9 - wybór
ulubionej zapamiętanej stacji,
wprowadzanie znaków
12. Przycisk MUTE - wyciszenie
13. Przycisk LOCAL - naciśnij by
uzyskać dostęp do lokalnych
stacji internetowych
14. Przycisk BT - naciśnij by
włączyć/wyłączyć funkcję
transmisji do słuchawek
15. Przycisk ALARM
16. Przycisk TIMER
17. Przycisk VOLUME + - zwiększ głośność
18. Przycisk ^ - ruch kursora w górę
19. Przyciksk > - ruch kursora w prawo
20. Przycisk v - ruch kursora w dół
21. Przycisk VOLUME - - zmniejsz głośność
22. Przycisk EQ - ustawienia equalizera
Podłącz kabel zasilający do urządzenia oraz do gniazda sieciowego w ścianie.
Radio zapyta czy aktywować sprawdzanie sieci przy włączaniu. <Sprawdź sieć
po włączeniu>. Sugerowane jest by włączyć tę funkcję <Tak>. w tym przypadku
radio zawsze będzie sprawdzało dostępność połączenia sieciowego.
Podłączenie do Twojej sieci Wi-Fi
Kiedy ukaże się ekran konfguracji sieci, możesz wybrać <TAK> by zacząć szukanie dostępnych
sieci Wi-Fi. Jeżeli Twój router posiada WPS, możesz wybrać <WPS> w celu konguracji
sieci. Rozpocznie się skanowanie sieci Wi-Fi. Po przeprowadzeniu skanowania wyświetli się
lista dostępnych sieci. Wybierz swoją sieć z listy i wprowadź hasło swojej sieci. Jeśli Twoja
sieć jest niezabezpieczona po wybraniu jej z listy radio połączy się z nią automatycznie.
Zauważ: Hasło sieciowe mogło być założone przez instalatora lub dostawcę Twojego internetu.
Postępuj według poniższych kroków by wprowadzić hasło sieci Wi-Fi:
• kręć pokrętłem UP / DOWN aby wybrać znak,
• naciśnij przycisk NEXT lub prawego kursora by przejść do następnego wprowadzani,
• po zakończeniu wprowadzania wciśnij pokrętło UP / DOWN OK by potwierdzić.
Wprowadzanie hasła sieci Wi-Fi za pomocą pilota. Pamiętaj: kursor
wskazuje miejsce wprowadzania znaku. Wciskaj kilkukrotnie następujące
numery na pilocie by uzyskać odpowiednie znaki:
1. 1 (space) @ ! # $ % & ( ) + - . / : ; < = > ? [ \ ] ^ { | } ~
2. 2 A B C a b c
3. 3 D E F d e f
4. 4 G H I g h i
5. 5 J K L j k l
6. 6 M N O m n o
7. 7 P Q R S p q r s
8. 8 T U V t u v
9. 9 W X Y Z w x y z
Alternatywnie, użyj klawiszy kursorów by wprowadzić odpowiednie znaki:
• < - idź do poprzedniego pola, pole może zostać nadpisane
• > - idź do następnego pola, ostatnie wpis jest zachowany.
• ^ / v - wybór znaku
• OK - kliknij dwa razy by zatwierdzić wpisane hasło
Radio rozpocznie próbę połączenia do sieci bezprzewodowej. Połączenie
z siecią może potrwać kilka sekund. Po nawiązaniu połączenia wyświetli się menu
główne. Możesz teraz zacząć się cieszyć swoim radiem internetowym.
Page 4

PL PL
Radio internetowe
Wybierz <Radio internetowe> z menu, zobaczysz kilka opcji. Aby rozpocząć słuchanie
stacji radiowych z całego świata, wybierz opcję <Stacja radiowa/Muzyka>.
Moje ulubione
Wyświetlana jest lista Twoich ulubionych radiostacji.
Aby zaprogramować stację:
Podczas odtwarzania ulubionej stacji, długie naciśnięcie przycisku PRESET spowoduje
wyświetlenie menu <Dodaj do ulubionych>. Naciśnij pokrętło, aby potwierdzić.
Odtwarzana stacja zostanie automatycznie dodana do listy zaprogramowanych stacji.
Stacje zostaną zapisane w kolejności rosnącej. Możesz zapisać do 250 stacji radiowych.
Możesz edytować listę ulubionych stacji w dowolnym momencie. Przejdź do <Radio
internetowe> <Moje ulubione> lub naciśnij przycisk PRESET, gdy wyświetli się lista
ulubionych stacji, a następnie naciśnij przycisk NEXT. Wyświetlone zostaną następujące opcje:
Usuń – aby usunąć wybraną stację
W górę - aby przesunąć wybraną stację o jeden poziom w górę w rankingu
W dół – aby przesunąć wybraną stację o jeden poziom w dół w rankingu
Zmień nazwę – aby zmienić nazwę wybranej stacji
Odtwórz – aby odtworzyć wybraną stację
Wybierz za pomocą kursora żądaną akcję i zatwierdź przyciskiem OK.
Aby przywołać zaprogramowaną stację:
Naciśnij krótko przycisk PRESET i wybierz żądaną stację.
Stacja radiowa/Muzyka
Wybierz tę opcję by wybrać żądaną stację radiową według kategorii, gatunku, lokalizacji itp.
Radio lokalne
Jeśli chcesz szybko uzyskać przez Internet dostęp do stacji radiowej znajdującej się w
Twojej okolicy, wybierz tę opcję, a wyświetli się lista dostępnych w Twoim regionie stacji.
Historia
Radio zapamięta 10 ostatnio słuchanych stacji.
Szukaj stacji
Możesz znaleźć żądaną stację radiową, wprowadzając nazwę stacji.
Dodaj nową stację radiową
Jeśli nie możesz znaleźć żądanej stacji na liście stacji radiowych i znasz jej adres URL,
możesz wprowadzić tutaj link i dodać stację do listy ulubionych. Uwaga: link musi
być adresem URL strumieniowego przesyłania dźwięku, aby można było odtwarzać
stację w odbiorniku. Podczas odtwarzania stacji radiowej na wyświetlaczu pojawi się
kolorowy obraz przesyłany ze stacji radiowej (jeśli stacja udostępnia takie informacje).
Bluetooth/Media Center
Bluetooth
Radio odbiera i odtwarza muzykę przesyłaną strumieniowo przez inne urządzenie Bluetooth.
Wybierz <Bluetooth> z menu głównego, aby przejść do trybu Bluetooth. Po przejściu
w tryb Bluetooth będzie można wykryć odbiornik za pomocą innych urządzeń Bluetooth.
1. Włącz Bluetooth na urządzeniu Bluetooth i wyszukaj urządzenie o nazwie
„REGENT i351s” z listy. Wybierz, aby rozpocząć parowanie.
2. Jeśli połączenie się powiedzie, usłyszysz sygnał dźwiękowy, a w międzyczasie
na wyświetlaczu LCD pojawi się komunikat „Połączenie Bluetooth”.
3. Możesz teraz rozpocząć odtwarzanie muzyki z urządzenia Bluetooth.
Krótkie naciśnięcie przycisku PAUSE wstrzymuje lub wznawia odtwarzanie. Obróć pokrętło
UP/DOWN lub przytrzymaj przyciski PREVIOUS/NEXT na jednostce głównej lub naciśnij
przycisk PREVIUS/NEXT na pilocie, aby przejść do poprzedniego/następnego utworu.
Media Center
Odtwarzanie USB
1. Podłącz urządzenie pamięci masowej USB bezpośrednio do portu USB z tyłu urządzenia.
2. Naciśnij przycisk HOME i użyj przycisków UP/DOWN + OK,
aby wybrać opcję Media Center z menu głównego.
3. Wybierz USB, aby uzyskać dostęp do trybu USB, a następnie użyj
pokrętła UP/DOWN + OK na urządzeniu lub przycisków ^/v + OK na
pilocie, aby wybrać folder/muzykę i rozpocząć odtwarzanie.
Krótko naciśnij przycisk PL AY/PAUSE, aby wstrzymać lub wznowić odtwarzanie.
Obróć pokrętło UP/DOWN lub naciśnij i przytrzymaj przyciski PREVIUS/
NEXT na jednostce głównej lub naciśnij przyciski PREVIOUS/NEXT na pilocie
zdalnego sterowania, aby przejść do poprzedniej/następnej ścieżki.
Strumieniowe przesyłanie muzyki
Po skongurowaniu serwera kompatybilnego z UPnP/DLNA do udostępniania plików
multimedialnych Twojemu radiu, możesz rozpocząć strumieniowe przesyłanie muzyki.
1. W menu głównym wybierz <Media Center> i wybierz <UPnP>.
2. Zakończenie skanowania dostępnych serwerów UPnP może zająć urządzeniu kilka
sekund. Jeśli nie zostaną znalezione żadne serwery UPnP, wyświetli się <Pusta lista>.
3. Po udanym skanowaniu wybierz serwer UPnP.
4. Radio pokaże kategorie mediów dostępne z serwera
UPnP, np. „Muzyka”, „Listy odtwarzania” itp.
5. Wybierz pliki multimedialne, które chcesz odtworzyć.
6. Tryb odtwarzania można ustawić w opcji <Konguracja> <Ustawienia odtwarzania>.
Uwaga: Jeśli masz dostępne serwery kompatybilne z DLNA, wykonaj czynności opisane
powyżej, aby przeglądać i odtwarzać pliki audio z urządzenia kompatybilnego z DLNA.
Page 5

PL PL
BT Tx i DLNA
BT Tx (nadajnik Bluetooth)
To radio internetowe oferuje możliwość bezprzewodowego słuchania
za pomocą słuchawek z obsługą Bluetooth lub wkładek dousznych
TWS za pośrednictwem wbudowanego nadajnika Bluetooth.
1. Wciśnij przycisk BT na pilocie podczas słuchania mediów, wyświetlacz
pokaże trzy opcje trybu BT Tx w następujący sposób:
• Włącz (głośnik włączony) - aby włączyć funkcję BT Tx, a dźwięk
nadal będzie dochodził jednocześnie z głośnika radia.
• Włącz (głośnik wyłączony) - aby włączyć funkcję BT
Tx i wyłączyć dźwięk z głośnika radia.
• Wyłącz - aby wyłączyć funkcję BT Tx
2. Wybierz jedną z opcji Włącz, aby włączyć funkcję BT Tx, a następnie włącz słuchawki
z obsługą Bluetooth lub wkładki douszne TWS. Urządzeniu zajmie około 30 sekund, aby
wyszukać i automatycznie podłączyć słuchawki lub wkładki douszne TWS. Po nawiązaniu
połączenia możesz słuchać radia za pomocą słuchawek lub wkładek dousznych.
Uwaga: zasięg nadajnika Bluetooth jest ograniczony do ok. 140 metrów
(otwarta przestrzeń) w zależności od otoczenia i używanego urządzenia.
DLNA
Oprócz UPnP, to urządzenie może również obsługiwać funkcję DLNA. Radio internetowe
może odtwarzać strumień muzyki z urządzenia zgodnego z DLNA pod warunkiem, że radio
internetowe i inne urządzenia DLNA znajdują się w tej samej sieci Wi-Fi. Radio zostanie
wykryte jako „Regent i351s”, gdy spróbujesz je wyszukać na innych urządzeniach.
Uwaga: funkcja DLNA jest kompatybilna i współpracuje z odpowiednimi aplikacjami
innych rm na platformie Android. Urządzenia Apple nie są obsługiwane.
Tryb FM
Rozciągnij antenę teleskopową i dopasuj jej układ, aby zoptymalizować
poziom odbioru. Wybierz FM z menu głównego, aby przejść do trybu FM. Aby
automatycznie przeszukać poprzendią/następną dostępną stację FM, naciśnij
i przytrzymaj przycisk PREVIOUS lub NEXT przez 2 sekundy, radio automatycznie
wyszuka dostępną stację. Jeśli chcesz precyzyjnie dostroić częstotliwość, obróć
pokrętło UP/DOWN na urządzeniu lub naciśnij przyciski ^/v na pilocie.
Automatyczne skanowanie ustawień wstępnych
Istnieje możliwość automatycznego zaprogramowania stacji FM. Naciśnij pokrętło
UP/DOWN + OK (lub przyciski ^/v + OK na pilocie), pojawi się pytanie, czy wykonać
automatyczne skanowanie, czy nie. Wybierz „Tak” i naciśnij OK, aby potwierdzić,
a rozpocznie się skanowanie i zaprogramowanie stacji. Po zakończeniu naciśnij
krótko przycisk PRESET, a wyświetli się pierwsza zaprogramowana stacja.
Śledzenie stacji
Jest to funkcja, która pomaga znaleźć tę samą stację w Internecie, pod warunkiem,
że stacja radiowa ma dostępny strumień internetowy i nadaje się do grania w radiu.
Słuchanie radia internetowego pozwala uwolnić się od szumów, które zwykle są
spowodowane zakłóceniami lub słabym odbiorem w FM. Po zakończeniu skanowania
pasma FM, wybierz kanał do odtwarzania. Jeśli ten sam kanał jest dostępny w Internecie,
pojawi się informacja w postaci ikony w prawym dolnym rogu ekranu. Naciśnij
i przytrzymaj pokrętło UP/DOWN + OK (lub przyciski ^/v + OK na pilocie), odbiornik
przełączy się w tryb radia internetowego, aby odtwarzać odpowiedni kanał.
Tryb DAB
Możesz słuchać zwykłych kanałów DAB bez połączenia z Internetem. Rozciągnij
antenę teleskopową i dopasuj jej układ, aby zoptymalizować poziom odbioru.
Wybierz DAB z menu głównego, aby przejść do trybu DAB. Jeśli po raz pierwszy
używasz trybu DAB, odbiornik automatycznie przeskanuje stacje radiowe DAB. Po
zakończeniu skanowania odbiornik wyświetli listę znalezionych stacji DAB.
Wybierz stację, której chcesz słuchać i naciśnij pokrętło UP/DOWN + OK (lub przycisk
^/v + OK na pilocie), aby potwierdzić odtwarzanie. Naciśnij przycisk PREVIOUS (lub < na
pilocie), aby powrócić do listy stacji. Ponowne naciśnięcie przycisku PREVIOUS (lub < na
pilocie) spowoduje wyświetlenie ostrzeżenia o usunięciu listy stacji. Pozwala to również
na ponowne skanowanie stacji DAB. Wybierz <NIE>, aby zachować istniejącą listę stacji
i wyszukać nowe stacje. Wybierz <TAK>, aby usunąć istniejącą listę stacji i ponownie
przeprowadzić pełne skanowanie. Wybierz <ESC>, aby wyjść z bieżącej operacji.
Aby zatrzymać odtwarzanie stacji, naciśnij przycisk PLAY/PAUSE. Za każdym
razem, gdy chcesz wznowić grę, naciśnij ponownie ten sam przycisk.
Konguracja
Wyświetlanie czasu
Możesz wybrać wyświetlanie czasu w trybie analogowym lub cyfrowym.
Sieć
Konguracja sieci bezprzewodowej
Naciśnij pokrętło UP/DOWN + OK (lub przycisk ^/v + OK na pilocie),
aby przeskanować dostępne sieci bezprzewodowe.
Sieć bezprzewodowa (WPS PBC)
WPS umożliwia połączenie radia z routerem poprzez naciśnięcie jednego
klawisza na odbiorniku i klawisza WPS na routerze w celu połączenia
Wi-Fi, pod warunkiem, że router posiada funkcję WPS.
Konguracja ręczna
Możesz włączyć lub wyłączyć DHCP i wprowadzić nazwę
sieci (SSID) lub usunąć podłączoną sieć (SSID).
Sprawdź sieć po włączeniu
Włącz lub wyłącz sprawdzanie i podłączanie sieci podczas włączania odbiornika.
Data i czas
Czas jest automatycznie ustawiany i dostosowywany do geogracznej lokalizacji
odbiornika. To ustawienie umożliwia ręczną modykację daty i czasu.
Page 6

PL PL
Ustaw format czasu
Ustawienie formatu czasu: 12/24 godziny.
Ustaw format daty
Format daty: RRRR/MM/DD, DD/MM/RRRR i MM/DD/RRRR. Jeśli wybrana jest konguracja
ręczna, na liście pojawi się dodatkowo opcja Ustawienie czasu letniego (DST).
Alarm
Podwójny budzik
Dostępne są 2 budziki i następujące ustawienia:
• Planowanie alarmu: Możesz zaplanować powtarzanie alarmu na każdy
dzień, określony dzień tygodnia lub wybrać tylko pojedynczy alarm.
• Dźwięk alarmu: Budzenie radiem (musi to być zaprogramowana
stacja), Budzenie melodią i Budzenie dźwiękiem.
• Głośność alarmu: wybierz tę opcję, aby dostosować żądany poziom głośności.
Alarm drzemki
Jeśli chcesz się zdrzemnąć lub potrzebujesz budzika w krótkim czasie, możesz
skorzystać z tej funkcji. Możesz wybrać czas od 5 do 120 minut. Funkcja drzemki nie
jest dostępna dla alarmu NAP. Uwaga: Alarm NAP wyda tylko sygnał dźwiękowy.
Drzemka
Gdy zabrzmi alarm, naciśnięcie dowolnego klawisza z wyjątkiem przycisku
Standby spowoduje przejście do trybu <Drzemka>. Alarm włączy się ponownie
5 minut później. Zawsze możesz nacisnąć przycisk Standby, aby anulować
alarm. Uwaga: W przypadku problemów z siecią, które powodują, że wybudzanie
radia nie działa, automatycznie wyda sygnał dźwiękowy po 1 minucie.
Regulator czasowy
Naciśnij ^/v/</> na pilocie, aby ustawić timer, a następnie naciśnij OK, aby potwierdzić.
Ściemniacz
Możesz dostosować podświetlenie wyświetlacza LCD za pomocą poniższych ustawień:
• Oszczędzanie energii - Możesz ustawić przyciemnianie podświetlenia,
gdy przez pewien czas nie jest wykonywana żadna operacja.
• Włącz - Możesz dostosować poziom podświetlenia dla trybu pracy.
• Wyświetlacz - Możesz wybrać wyświetlacz w stylu kolorowym lub monochromatycznym.
Zarządzanie energią
Ta funkcja umożliwia w celu oszczędzania energii przejście odbiornika w tryb gotowości,
jeśli nie jest odbierany sygnał internetowy. Ustawienie domyślne to 15 minut. Gdy odbiornik
nie odbierze żadnego sygnału internetowego, przejdzie w tryb gotowości po 15 minutach.
Dostępne są inne ramy czasowe: 5 minut i 30 minut. Ustawienie można też wyłączyć.
Wyłącznik czasowy
Możesz ustawić wyłącznik czasowy, aby po upływie określonego czasu przełączyć radio w stan
czuwania. DOstępne przedziały czasowe to od 15 minut do 180 minut z krokiem co 15 minut.
Możesz również dokonać ustawień za pomocą przycisku Sleep na pilocie: po naciśnięciu
przycisku Sleep, w prawym górnym rogu wyświetlacza zobaczysz wyłącznik czasowy.
Pogoda
Możesz ustawić wyświetlanie informacji o pogodzie w trybie gotowości, wybierając
różne regiony i jednostkę temperatury. Aby wyłączyć wyświetlanie pogody, przejdź
do Konguracja > Pogoda > Pokaż w trybie Standby > wybierz Wyłączone.
Konguracja radia lokalnego
Radio automatycznie wykryje lokalne stacje - po prostu naciśnij Local na pilocie,
aby uzyskać dostęp do stacji radiowych w Twojej okolicy. To ustawienie możesz
również znaleźć w menu <Radio internetowe>. Jeśli chcesz zmienić stacje lokalne
na inne kraje, możesz wybrać „Konguracja ręczna”, aby dokonać zmiany.
Konguracja odtwarzania
Ustawienia preferencji odtwarzania UPnP. Możesz ustawić odtwarzanie
jako Wyłącz, Powtórz jedno, Powtórz wszystkie, Mieszaj utwory.
Equalizer
Wybierz preferowany korektor dźwięku, aby dopasować go do swoich preferencji.
BT Tx
Wybierz, aby włączyć lub wyłączyć funkcję BT Tx.
Wznów po włączeniu
Jeśli włączone (ON), odbiornik wznowi odtwarzanie ostatnio słuchanej stacji
po ponownym włączeniu. Ustawienie ON jest włączone domyślnie.
Urządzenie
Zmiana nazwy urządzenia
Odbiornik może odtwarzać muzykę z urządzeń kompatybilnych z DLNA,
które są podłączone do tej samej sieci Wi-Fi. Odbiornik zostanie wykryty przez
urządzenia DLNA pod nazwą „REGENT i351s”. Jest to domyślna nazwa. Za pomocą
tego ustawienia można zmienić nazwę odbiornika na dowolną inną.
Aplikacja zdalna – sterowanie AirMusic
Możesz wykorzystać bezpłatną aplikację AirMusic Control do zarządzania
odbiornikiem za pomocą swojego telefonu lub tabletu. Aplikacja dostępna
jest w sklepach Android Google Play i Apple App Store. Zarówno odbiornik jak
i urządzenie z zainstalowaną aplikacją muszą znajdować się w tej samej sieci.
Aktualizacja oprogramowania
Informacja o aktualizacji oprogramowania odbiornika ukaże się na
wyświetlaczu, gdy producent udostępni aktualizację. Aktualizacja pobierania
jest z Internetu i wymaga połączenia z internetem, by doszła do skutku.
Uwaga: ta opcja przeznaczona jest wyłącznie do użytku producenta.
Przywróć ustawienia domyślne
Dzięki tej opcji możesz przywrócić ustawienia odbiornika do stanu pierwotnego. Uwaga:
wszystkie Twoje ustawienia zostaną utracone po przywróceniu ustawień domyślnych.
Wykorzystuj telefon, tablet lub komputer jako pilota, aby sterować aplikacją
Spotify. Wejdź na spotify.com/connect, aby dowiedzieć się, jak to zrobić.
Page 7
PL PL
Rozwiązywanie problemów
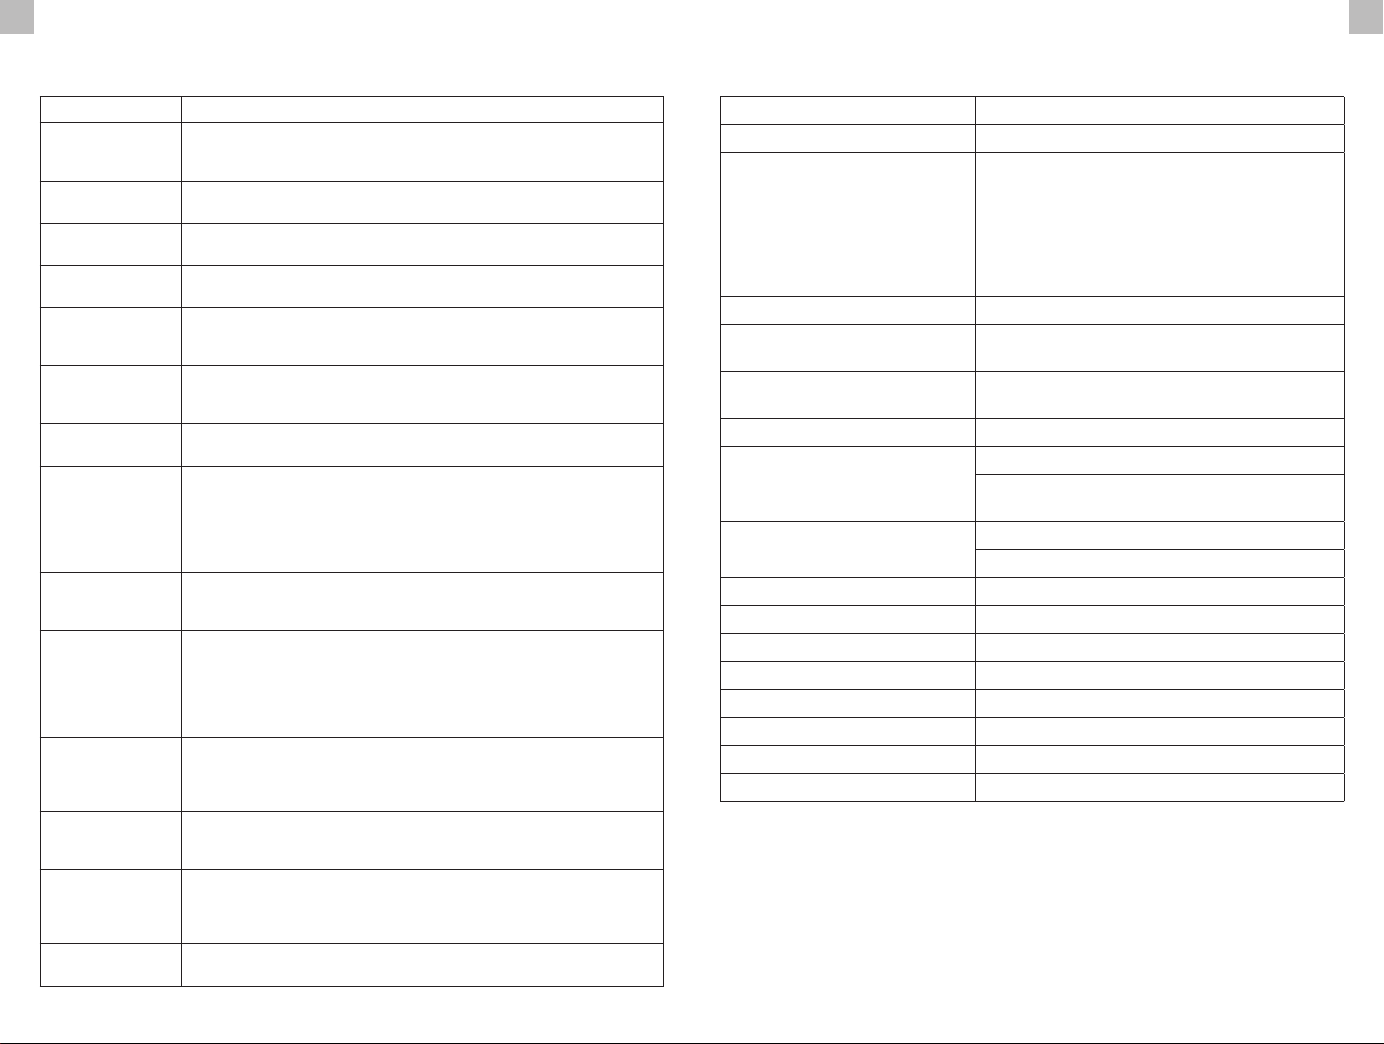
Błąd Rozwiązanie
Brak wskazania wyświetlacza, radio nie
r
eaguje na działanie
Brak możliwości obsługi za pomocą pilota
Słaby odbiór DAB+
Słaby odbiór FM
Niska jakość dźwięku
podczas odtwarzania muzyki
Urządzenie się
nie włącza
Brak dźwięku
Nie można nawiązać
połączenia sieciowego
Nie można nawiązać
połączenia WLAN
Nie znaleziono stacji
Alarm nie działa
Nie można wykonać
przesyłania strumieniowego DLNA
Interferencja elektromagnetyczna
System nagle
się zawiesza
Skonguruj zasilanie zgodnie z instrukcją obsługi i za
pomocą dostarczonych w opakowaniu środków.
Ba
terie rozładowane lub nieprawidłowo włożone. Sprawdź,
czy baterie zostały włożone we właściwym kierunku.
Antena nie w pełni wysunięta. Zmień lokalizację radia
(np. bliżej okna). Powtórz skanowanie stacji.
Antena nie w pełni wysunięta. Zmień lokalizację radia
(np. bliżej okna). Powtórz skanowanie stacji.
P
lik o niskiej przepływności. Sprawdź plik audio. Wskazówka:
w przypadku plików MP3 szybkość transmisji powinna wynosić
192 Kbps lub więcej.
1. Sprawdź, czy zasilacz jest podłączony odpowiednio.
2. Urządzenie może działać nieprawidłowo, gdy jest używane w obszarach o silnych
zakłóceniach radiowych. Usuń przyczynę zakłóceń lub zmień lokalizację urządzenia.
1. Włącz dźwięk, ponieważ może być wyciszony.
2. Zwiększ głośność.
1. Sprawdź funkcję WLAN.
2. Spróbuj ustawić adres IP na urządzeniu.
3. Aktywuj funkcję DHCP na routerze i ponownie nawiąż połączenie z urządzeniem.
4. W sieci aktywowana jest zapora sieciowa – ustaw odpowiedni program
w taki sposób, aby możliwy był dostęp urządzenia do sieci.
5. Uruchom ponownie urządzenie, aby wymusić podłączenie do sieci.
1. Sprawdź dostępność sieci WLAN w punkcie dostępowym.
2. Umieść urządzenie bliżej routera.
3. Upewnij się, że hasło WEP/WPA jest poprawne.
1. Sprawdź sieć oraz punkt dostępu i zaporę.
2. Stacja może być aktualnie niedostępna, spróbuj
ponownie później lub wybierz inną stację.
3. Zmieniono łącze stacji lub stacja nie nadaje – zapytaj dostawcę.
4. Link do stacji dodanej ręcznie jest niepoprawny, upewnij
się, że jest poprawny i wprowadź ponownie.
1. Włącz alarm.
2. Ze względu na ustawienie głośności, zapoznaj się z rozwiązaniami „Brak dźwięku”.
3. Źródło alarmu zostało ustawione jako stacja, ale nie ma połączenia
sieciowego. Zmień źródło alarmu lub ponownie skonguruj połączenie.
1. Spr
awdź połączenie z siecią. REGENT i351s i Twoje urządzenie muszą
znajdować się w tej samej sieci. Sprawdź, czy stan sieci jest dobry.
2. Upewnij się, że ustawienia na Twoim urządzeniu są prawidłowe.
Nor
malne funkcjonowanie produktu może być zakłócone przez
silne pole elektromagnetyczne. Zresetuj zgodnie z instrukcją obsługi
produkt do stanu pierwotnego, aby wznowić normalne działanie.
Jeśli problemy nadal występują, zmień lokalizację odbiornika.
REGENT i351s jest przeciążony, uruchom ponownie urządzenie.
Specykacja
Nazwa modelu REGENT i351s
Wyświetlacz Wyświetlacz kolorowy 2.4" TFT
OPEN, WEP
WPA PSKAES
Obsługiwane sieci
Streaming UPnP, DLNA
Obsługiwane formaty
odtwarzania (UPnP)
Obsługiwane formaty
odtwarzania (USB)
Moc wyjściowa (RMS) 15W x 2
Zasilanie
Częstotliwość FM i DAB
Pobór energii 30W
Pobór energii w trybie czuwania < 2W
Obsługa Bluetooth V5.0
Zasięg działania Bluetooth do 140 metrów (otwarta przestrzeń)
Częstotliwość transmisji 2.4 GHz
Protokoły A2DP 1.2
Temperatura pracy 0°C~35°C
Wilgotność pracy 20%~80%
UPROSZCZONA DEKLARACJA ZGODNOŚCI
Producent: Ferguson Sp. z o.o., ul. Dworska 1, 61-619 Poznań
Nazwa:
Regent i351s
Typ urządzenia: Odbiornik radiowy
W/w produkt jest zgodny z dyrektywą Parlamentu Europejskiego i Rady 2014/53/UE z dnia 16
kwietnia 2014 r. w sprawie harmonizacji ustawodawstw państw członkowskich dotyczących
udostępniania na rynku urządzeń radiowych i uchylającą dyrektywę 1999/5/WE.
Pełna Deklaracja Zgodności do pobrania na stronie: https://ferguson-digital.eu/deklaracjezgodnosci/
WPA PSKAES/TKIP
WPA PSKTKIP
WPA 2 PSK AES
WPA 2 PSK AES/TKIP
WPA 2 PSK TKIP
MP3, WMA, AAC, FLAC, WAV
MP3, WMA, WAV
Wejście: AC 100-240V ~ 50/60Hz
Wyjście USB: DC 5V1A (Tylko do ładowania
telefonu z systemem Android)
FM: 87.5-108MHz
DAB: 174.928-239.2MHz
Page 8
EN EN
Introduction
Network Requirements
Before use, please check that the following requirements are met:
• Broadband Internet Access - using a wireless access
point, router or similar network device.
• A computer or smartphone capable of connecting to the local network.
Devices should be on the same network as the receiver.
Security measures
• Please read the user manual and its recommendations carefully.
• Please read the manual carefully before starting the equipment for the rst time.
• To avoid electric shock, never open the housing. Damage
to the warranty seal will void the warranty.
• Disconnect the device from the mains during lightning storms or when
it is not going to be used for a long time. Remember that the warranty
does not cover damage to the device caused by a lightning strike.
• Do not expose the device to direct sunlight. Keep away from
heat sources and from humid environments. Do not block the
ventilation openings to ensure proper air circulation.
• Place the device in a horizontal position on a at, even and stable surface.
• If you move the device from a warm to a cold room and vice versa, wait at
least 1 hour before powering up. Failure to do so may cause problems.
• Keep the device away from vases, bottles, aquariums and other water sources in order
to avoid damaging the device. Do not touch the power plug with bare hands.
• Do not place any objects on the housing of the device. Before starting any
maintenance or installation work, disconnect the device from the power supply.
• Do not use alcohol or liquids containing ammonia to clean the device. If necessary,
clean it with a soft, lint-free cloth moistened with a mild soap and water solution.
• Do not connect any cables when the power plug is in the socket.
• Check if you have working cables. Damaged cables can cause a re.
• Please disconnect the device from the power supply while making the connections.
The description of buttons/functions
Front panel
1. POWER ON/STANDBY button
2. Volume knob - turn to adjust the
volume level; press to mute
3. Infrared sensor
4. UP/DOWN knob and OK button turn to navigate or rewind the track;
press to conrm the selection
5. HOME button - press to
return to the main menu
Rear panel
6. PREVIOUS ◄ button - left/
previous track
7. NEXT button ► - right/next track
8. PRESET button - short press to
recall the stored station; press
and hold this button to enter the
station memorization mode
9. PRESET 1, 2, 3, 4 buttons
10. Color display
11. 3.5mm headphone jack
12. USB port (Output: 5V, 1A)
13. 3.5mm Aux-in Jack
14. Power socket
15. Telescopic antenna
Page 9
EN EN
Remote control First steps
1. POWER ON/STANDBY button
- turning on/o the pickup
2. DIMMER button - dimmer
3. HOME button - press to
return to the main menu
4. PLAY/PAUSE button - press to
pause/resume transmission
5. SLEEP button - puts the
receiver in the snooze mode
6. PREVIOUS button - press
to go back track
7. < Button - moves the cursor to the left
8. OK button - conrmation
of the selection
9. NEXT button - press to skip a track
10. PRESET button
11. 0-9 buttons - selection of favorite
preset station, entering characters
12. MUTE button - mute
13. LOCAL button - press to access
local internet stations
14. BT button - press to enable/disable
transmission to headphones function
15. ALARM button
16. TIMER button
17. VOLUME + button -
Increase the volume
18. ^ button - move the cursor up
19. > button - moves the cursor to the right
20. v button - downward
movement of the cursor
21. VOLUME - button - decrease the volume
22. EQ button - equalizer settings
Connect the power cord to the device and to the wall socket. The radio will
ask if you want to activate network checking when switching on <Check
Network After Power On>. It is suggested to enable this feature <Yes>. in
this case, the radio will always check for a network connection.
Connecting to your Wi-Fi network
When the network conguration screen appears, you can select <YES> to start searching
for available Wi-Fi networks. If your router has WPS, you can select <WPS> to congure the
network. Scanning of the Wi-Fi network starts. After scanning, a list of available networks
will be displayed. Select your network from the list and enter your network password. If your
network is unsecured after selecting it from the list, the radio will connect to it automatically.
Note: The network password may have been set up by your
installer or your internet service provider.
Follow the steps below to enter your Wi-Fi password:
• turn the UP/DOWN knob to select a character,
• press the NEXT button or the right cursor button to go to the next entry,
• after completing the input, press the UP/DOWN OK dial to conrm.
Entering the Wi-Fi password using the remote control. Remember: the
cursor shows where you enter the character. Press the following numbers
on the remote control several times to get the correct characters:
1. 1 (space) @ ! # $ % & ( ) + - . / : ; < = > ? [ \ ] ^ { | } ~
2. 2 A B C a b c
3. 3 D E F d e f
4. 4 G H I g h i
5. 5 J K L j k l
6. 6 M N O m n o
7. 7 P Q R S p q r s
8. 8 T U V t u v
9. 9 W X Y Z w x y z
Alternatively, use the cursor keys to enter the appropriate characters:
• < - go to the previous eld, the eld may be overwritten
• > - go to the next eld, the last entry is kept.
• ^/v - character selection
• OK - click twice to conrm the entered password
The device will try to connect to the wireless network. It may take a few seconds
to connect to the network. After the connection is established, the main
menu will be displayed. You can now start enjoying your internet radio.
Page 10

EN EN
Internet radio
Select <Internet Radio> from the menu, you will see several options. To start
listening to radio stations around the world, select <Radio Station/Music>.
My favorite
A list of your favorite radio stations is displayed.
To program a station:
While playing your favorite station, long press the PRESET button will bring
up the <Add to Favorites> menu. Press the knob to conrm. The station that
is playing will be automatically added to the preset station list. The stations
will be stored in ascending order. You can save up to 250 radio stations.
You can edit your favorite station list at any time. Go to <Internet Radio> <My
Favorites> or press the PRESET button when the list of favorite stations is displayed,
then press the NEXT button. The following options will be displayed:
Delete - to delete the selected station
Up - to move the selected station one level up in the ranking
Down - to move the selected station one level down in the ranking
Rename - to rename the selected station
Play - to play the selected station
Select the required action with the cursor and conrm with the OK button.
To recall a preset station:
Press the PRESET button briey and select the station you want.
Radio station/Music
Select this option to select the desired radio station by category, genre, location etc.
Local radio
If you want to quickly access a radio station in your area over the Internet, select
this option and a list of stations available in your region will be displayed.
History
The radio will remember the last 10 stations listened to.
Search for a station
You can nd the radio station you want by entering the station name.
Add a new radio station
If you cannot nd the station you want in the list of radio stations and you know
its URL, you can enter a link here and add the station to your favorites list. Note:
The link must be an audio streaming URL in order to play the station on the
receiver. While the radio station is playing, the display will show a color picture
sent from the radio station (if the station provides such information).
Bluetooth/Media Center
Bluetooth
The radio receives and plays music streamed by another Bluetooth device. Select
<Bluetooth> from the main menu to enter Bluetooth mode. After it enters Bluetooth
mode, you will be able to discover the receiver from other Bluetooth devices.
1. Turn on Bluetooth on the Bluetooth device and search for the device
named „REGENT i351s” from the list. Select to start pairing.
2. If the connection is successful you will hear a beep and
meanwhile the LCD will show „Bluetooth connected”.
3. You can now start playing music from your Bluetooth device.
A short press of the PAUSE button pauses or resumes playback. Turn the UP/
DOWN dial or hold the PREVIOUS/NEXT buttons on the main unit or press the
PREVIUS/NEXT button on the remote control to skip to the previous/next track.
Media Center
USB playback
1. Connect the USB storage device directly to the USB port on the back of the device.
2. Press the HOME button and use the UP/DOWN + OK buttons
to select Media Center from the main menu.
3. Select USB to access USB mode, then use the UP/DOWN + OK dial on the unit or ^/v
+ OK buttons on the remote control to select a folder/music and start playing.
Briey press the PLAY/PAUSE button to pause or resume playback. Turn the UP/
DOWN dial or press and hold the PREVIUS/NEXT buttons on the main unit or press the
PREVIOUS/NEXT buttons on the remote control to skip to the previous/next track.
Streaming music
After conguring the UPnP/DLNA compatible server to share media
les with your radio, you can start streaming music.
1. Select <Media Center> from the main menu and select <UPnP>.
2. It may take a few seconds for the device to nish scanning the available UPnP
servers. If no UPnP servers are found, <Empty list> will be displayed.
3. After successful scanning, please select the UPnP server.
4. The radio will show the media categories available from
the UPnP server, e.g. „Music”, „Playlists” etc.
5. Select the media les you want to play.
6. The play mode can be set in <Setup> <Playback Settings>.
Note: If you have DLNA compatible servers available, follow the steps above
to browse and play audio les from a DLNA compatible device.
Page 11

EN EN
BT Tx and DLNA
BT Tx (Bluetooth transmitter)
This internet radio oers you the option of wireless listening with Bluetooth
enabled headphones or TWS earbuds via the built-in Bluetooth transmitter.
1. Press the BT button on the remote control while listening to the media,
the display will show three options for BT Tx mode as follows:
• Enable (speaker on) - to enable the BT Tx function, and the sound
will still come from the radio speaker at the same time.
• On (speaker o) - to enable the BT Tx function and
turn o the sound from the radio speaker.
• Disable - to disable the BT Tx function.
2. Select one of the Enable options to enable BT Tx function, then turn on the
Bluetooth enabled headphones or TWS earbuds. It will take about 30 seconds
to search for and automatically connect the earphones or TWS earbuds. Once
connected, you can listen to the radio with headphones or earbuds.
Note: The range of the Bluetooth transmitter is limited to approx. 140 meters
(open area) depending on the surroundings and the device used.
DLNA
Besides UPnP, this device can also support DLNA function. Internet radio can
play a music stream from a DLNA-compatible device as long as the Internet
radio and other DLNA devices are on the same Wi-Fi network. The radio will be
detected as „Regent i351s” when you try to search for it on other devices.
Note: The DLNA function is compatible and works with the corresponding third
party applications on the Android platform. Apple devices are not supported.
FM mode
Extend the telescopic antenna and adjust its layout to optimize the reception level. Select
FM from the main menu to enter FM mode. To automatically scan the next/available
FM station, press and hold the PREVIOUS or NEXT button for 2 seconds, the radio will
automatically search for an available station. If you want to ne tune the frequency,
turn the UP/DOWN dial on the unit or press the ^/v buttons on the remote control.
Automatic scanning of presets
You can automatically preset FM stations. Press the UP/DOWN + OK dial (or the ^/v + OK
buttons on the remote control), you will be asked whether to perform auto scan or not. Select
“Yes” and press OK to conrm and the scanning and presetting of the stations will start.
When nished, short press the PRESET button, the rst preset station will be displayed.
Station tracking
This is a feature that helps you nd the same station on the Internet, provided the radio
station has an Internet stream available and is suitable for playing on the radio. Listening to
Internet radio allows you to free yourself from noise which is usually caused by interference
or poor FM reception. After scanning the FM band, select the channel to be played. If the
same channel is available on the Internet, an icon will appear in the lower right corner of
the screen. Press and hold the UP/DOWN + OK knob (or ^/v + OK buttons on the remote
control), the receiver will switch to internet radio mode to play the corresponding channel.
DAB mode
You can listen to regular DAB channels without internet connection. Extend the telescopic
antenna and adjust its layout to optimize the reception level. Select DAB from the main menu
to enter DAB mode. If you use DAB mode for the rst time, the receiver will automatically scan
for DAB radio stations. After scanning, the receiver will display a list of found DAB stations.
Select the station you want to listen to and press the UP/DOWN + OK dial (or the ^/v
+ OK button on the remote control) to conrm playback. Press the PREVIOUS button
(or < on the remote control) to return to the station list. Pressing the PREVIOUS button
(or < on the remote control) again will display a warning that the station list is being
deleted. It also allows you to rescan DAB stations. Select <NO> to keep the existing
station list and search for new stations. Select <YES> to delete the existing station
list and perform a full scan again. Select <ESC> to exit the current operation.
To stop playing a station, press the PLAY/PAUSE button. Each time
you want to resume the game, press the same button again.
Conguration
Time display
You can choose to display the time in analogue or digital mode.
Network
Wireless network conguration
Press the UP/DOWN + OK dial (or ^/v + OK button on the remote
control) to scan for available wireless networks.
Wireless network (WPS PBC)
WPS allows the radio to connect to the router by pressing one key on the receiver and the
WPS key on the router for Wi-Fi connection, provided that the router has WPS function.
Manual conguration
You can enable or disable DHCP and enter the network name
(SSID) or delete the connected network (SSID).
Check network after turning on
Enable or disable checking and network connection when turning on the receiver.
Date and time
The time is automatically set and adapted to the geographic location of the
receiver. This setting allows you to manually modify the date and time.
Set the time format
Time format setting: 12/24 hours.
Set the date format
Date format: YYYY/MM/DD, DD/MM/YYYY and MM/DD/YYYY. If manual conguration
is selected, the Summer Time Setting (DST) option will also appear in the list.
Page 12

EN EN
Alarm
Dual alarm clock
There are 2 alarm clocks and the following settings:
• Alarm Scheduling: You can schedule an alarm to repeat for each
day, specic day of the week, or select only a single alarm.
• Alarm tone: Wake up to radio (this must be a preset station),
Wake up to melody and Wake up to sound.
• Alarm Volume: Select this option to adjust the desired volume level.
Snooze alarm
If you want to take a nap or need an alarm clock in a short time, you can use
this feature. You can choose a time from 5 to 120 minutes. The snooze function
is not available for the NAP alarm. Note: The NAP alarm will only beep.
Snooze
When the alarm sounds, pressing any key except the STANDBY button will take
you to <Snooze> mode. The alarm will sound again 5 minutes later. You can always
press the STANDBY button to cancel the alarm. Note: It will automatically beep after
1 minute for network problems that make the wake of the radio not to work.
Timer
Press ^/v/</> on the remote control to set the timer, then press OK to conrm.
Dimmer
You can adjust the backlight of the LCD display with the following settings:
• Power Saving - You can set the backlight to dim when there
is no operation for a certain period of time.
• Enable - You can adjust the backlight level for the working mode.
• Display - You can choose between color and monochrome style display.
Energy management
This feature allows the receiver to go into standby mode to save energy when no
internet signal is received. The default setting is 15 minutes. When the receiver receives
no internet signal, it will go into standby mode after 15 minutes. Other timeframes
to change local stations to other countries, you can select „Manual Setup” to make the change.
Playback conguration
UPnP playback preference settings. You can set the playback
to O, Repeat One, Repeat All, Shue Songs.
Equalizer
Choose your preferred equalizer to suit your preferences.
BT Tx
Select to enable or disable the BT Tx function.
Resume after power on
If turned ON, the receiver will resume playing the last station listened to
when turned on again. The ON setting is enabled by default.
Device
Change the name of the device
The receiver can play music from DLNA-compatible devices that are connected to the same
Wi-Fi network. The receiver will be detected by DLNA devices under the name „REGENT i351s”.
This is the default name. You can use this setting to rename the receiver to anything else.
Remote application - AirMusic control
You can use the free AirMusic Control application to manage the receiver using your phone
or tablet. The application is available in Android Google Play and Apple App Store. Both
the receiver and the device with the application installed must be in the same network.
Software update
Information about updating the receiver’s software will appear on the display when the
manufacturer releases the update. Download update is from the internet and requires
internet connection for it to take eect. Note: This option is for manufacturer use only.
Restore default settings
With this option you can restore the receiver settings to the original state.
Note: All your settings will be lost when you restore default settings.
are available: 5 minutes and 30 minutes. The setting can also be turned o.
Sleep timer
Use your phone, tablet or computer as a remote control for
Spotify. Go to spotify.com/connect to learn how.
You can set a sleep timer to put the radio into standby mode after a certain period of time.
The available time frames are from 15 minutes to 180 minutes in steps of 15 minutes.
You can also make settings with the SLEEP button on the remote control: after pressing
the SLEEP button, you will see the sleep timer in the top right corner of the display.
Weather
You can set to display weather information in standby mode by
selecting dierent regions and temperature unit. To turn o the weather
display, go to Setup> Weather> Show in Standby> select O.
Local radio conguration
The radio will automatically detect local stations - just press LOCAL on the remote to access
radio stations in your area. You can also nd this setting in <Internet Radio> menu. If you want
Page 13
EN EN
Troubleshooting
Error Solution
There is no display,
the radio does not
respond to operation
Cannot be operated
with the remote control
DAB + reception is poor
FM reception is poor
Poor sound quality
while playing music
The device does
not turn on
No sound
Unable to establish
network connection
A WLAN connection
cannot be established
Station not found
The alarm is
not working
DLNA streaming
cannot be performed
Electromagnetic
interference
The system
suddenly freezes
Set up the power supply according to the operating instructions
and using the measures provided in the package.
Batt
eries discharged or inserted incorrectly. Check that the
batteries are installed in the correct direction.
An
tenna not fully extended. Change the location of the radio
(e.g. closer to the window). Repeat station scan.
Antenna not fully extended. Change the location of the radio
(e.g. closer to the window). Repeat station scan.
Low bit rate le. Check the audio le. Tip: For MP3 les,
the bit rate should be 192 Kbps or more.
1. Check that the power adapter is connected properly.
2. The device may malfunction when used in areas with strong radio
interference. Correct the cause of the interference or relocate the device.
1. Turn on the sound as it can be muted.
2. Increase the volume.
1. Check the WLAN function.
2. Try to set the IP address on the device.
3. Activate the DHCP function on the router and reestablish the connection with the device.
4. A rewall is activated in the network - set the appropriate program
in such a way that the device can access the network.
5. Restart the device to force the connection to the network.
1. Check the availability of WLAN on the access point.
2. Move the device closer to the router.
3. Make sure the WEP / WPA password is correct.
1. Check the network as well as the access point and rewall.
2. The station may not be available at the moment,
try again later or select another station.
3. The station link has been changed or the station
is not transmitting - ask your provider.
4. Link to manually added station is incorrect, make sure it is correct and re-enter.
1. Turn on the alarm.
2. Due to the volume setting, see „No Sound” solutions.
3. The alarm source is set as a station, but no network connection.
Change the alarm source or recongure the connection.
1. Check the connection to the network. REGENT i351s and your device
must be on the same network. Check that the network status is good.
2. Make sure the settings on your device are correct.
The normal functioning of the product may be disturbed by strong electromagnetic
elds. Reset the product to its original state according to the user manual
to resume normal operation. If problems persist, relocate the receiver.
REGENT i351s is overloaded, please restart the machine.
Technical Specications
Model name REGENT i351s
Display 2.4” TFT color display
OPEN, WEP
WPA PSKAES
Supported networks
Streaming UPnP, DLNA
Supported Playback
Formats (UPnP)
Supported playback
formats (USB)
Output power (RMS) 15W x 2
Power
FM and DAB frequency
Energy consumption 30W
Standby power consumption < 2W
Bluetooth support V5.0
Bluetooth operating range up to 140 meters (open area)
Transmission frequency 2.4 GHz
Protocols A2DP 1.2
Working temperature 0°C~35°C
Working humidity 20%~80%
SIMPLIFIED DECLARATION OF CONFORMITY
Producer: Ferguson Sp. z o.o., ul. Dworska 1, 61-619 Poznań
Name: Regent i351s
Device type: Radio receiver
The above-mentioned product complies with Directive 2014/53/EU of the European Parliament and
of the Council of 16 April 2014 on the harmonization of the laws of the Member States relating to
the making available on the market of radio equipment and repealing Directive 1999/5/EC.
Full Declaration of Conformity for download at: https://ferguson-digital.eu/deklaracje-zgodnosci/
WPA PSKAES/TKIP
WPA PSKTKIP
WPA 2 PSK AES
WPA 2 PSK AES/TKIP
WPA 2 PSK TKIP
MP3, WMA, AAC, FLAC, WAV
MP3, WMA, WAV
Input: AC 100-240V ~ 50/60Hz
USB output: DC 5V1A (only for
charging Android phone)
FM: 87.5-108MHz
DAB: 174.928-239.2MHz
Page 14
DE DE
Einführung
Aussehen und die Beschreibung der Tasten/Funktionen
Anforderungen an das Netz
Bitte prüfen Sie vor der Verwendung, ob die folgenden Anforderungen erfüllt sind:
• Breitband-Internetzugang - über einen drahtlosen Zugangspunkt,
Router oder ein ähnliches Netzwerkgerät.
• Einen Computer oder ein Smartphone, der/das sich mit dem lokalen Netzwerk verbinden
kann. Die Geräte sollten sich im selben Netzwerk benden wie der Empfänger.
Sicherheitsmaßnahmen
• Bitte lesen Sie die Betriebsanleitung und die Empfehlungen
in dieser Anleitung sorgfältig durch.
• Bitte lesen Sie diese Anleitung sorgfältig durch, bevor
Sie das Gerät zum ersten Mal benutzen.
• Um einen elektrischen Schlag zu vermeiden, önen Sie niemals das Gehäuse.
Eine Beschädigung des Garantiesiegels führt zum Erlöschen der Garantie.
• Trennen Sie das Gerät während eines Sturms oder wenn es längere Zeit
nicht benutzt wird vom Netz. Bitte beachten Sie, dass die Garantie nicht für
Schäden am Gerät gilt, die durch einen Blitzeinschlag verursacht wurden.
• Setzen Sie das Gerät keiner direkten Sonneneinstrahlung aus. Von Wärmequellen
und feuchter Umgebung fernhalten. Die Lüftungsönungen dürfen nicht
blockiert werden, um eine ausreichende Luftzirkulation zu gewährleisten.
• Stellen Sie das Gerät horizontal auf eine ebene, gerade und stabile Fläche.
• Wenn Sie das Gerät von einem warmen in einen kalten Raum
und umgekehrt verlegen, warten Sie auf min. 1 Stunde vor dem
Einschalten. Andernfalls können Probleme auftreten.
• Halten Sie das Gerät von Vasen, Flaschen, Aquarien und anderen Wasserquellen fern,
um Schäden zu vermeiden. Berühren Sie den Netzstecker nicht mit bloßen Händen.
• Stellen Sie keine Gegenstände auf das Gehäuse des Gerätes. Trennen Sie das
Gerät vom Netz, bevor Sie Wartungs- oder Installationsarbeiten durchführen.
• Verwenden Sie zur Reinigung des Gerätes keinen Alkohol oder
ammoniakhaltige Flüssigkeiten. Bei Bedarf mit einem weichen, fusselfreien
Tuch reinigen, das mit einer milden Seifenlauge befeuchtet ist.
• Schließen Sie keine Kabel an, wenn sich der Netzstecker in der Steckdose bendet.
• Überprüfen Sie, ob Sie funktionierende Kabel haben.
Beschädigte Kabel können einen Brand verursachen.
• Schalten Sie das Gerät aus, wenn Sie die Verkabelung anschließen.
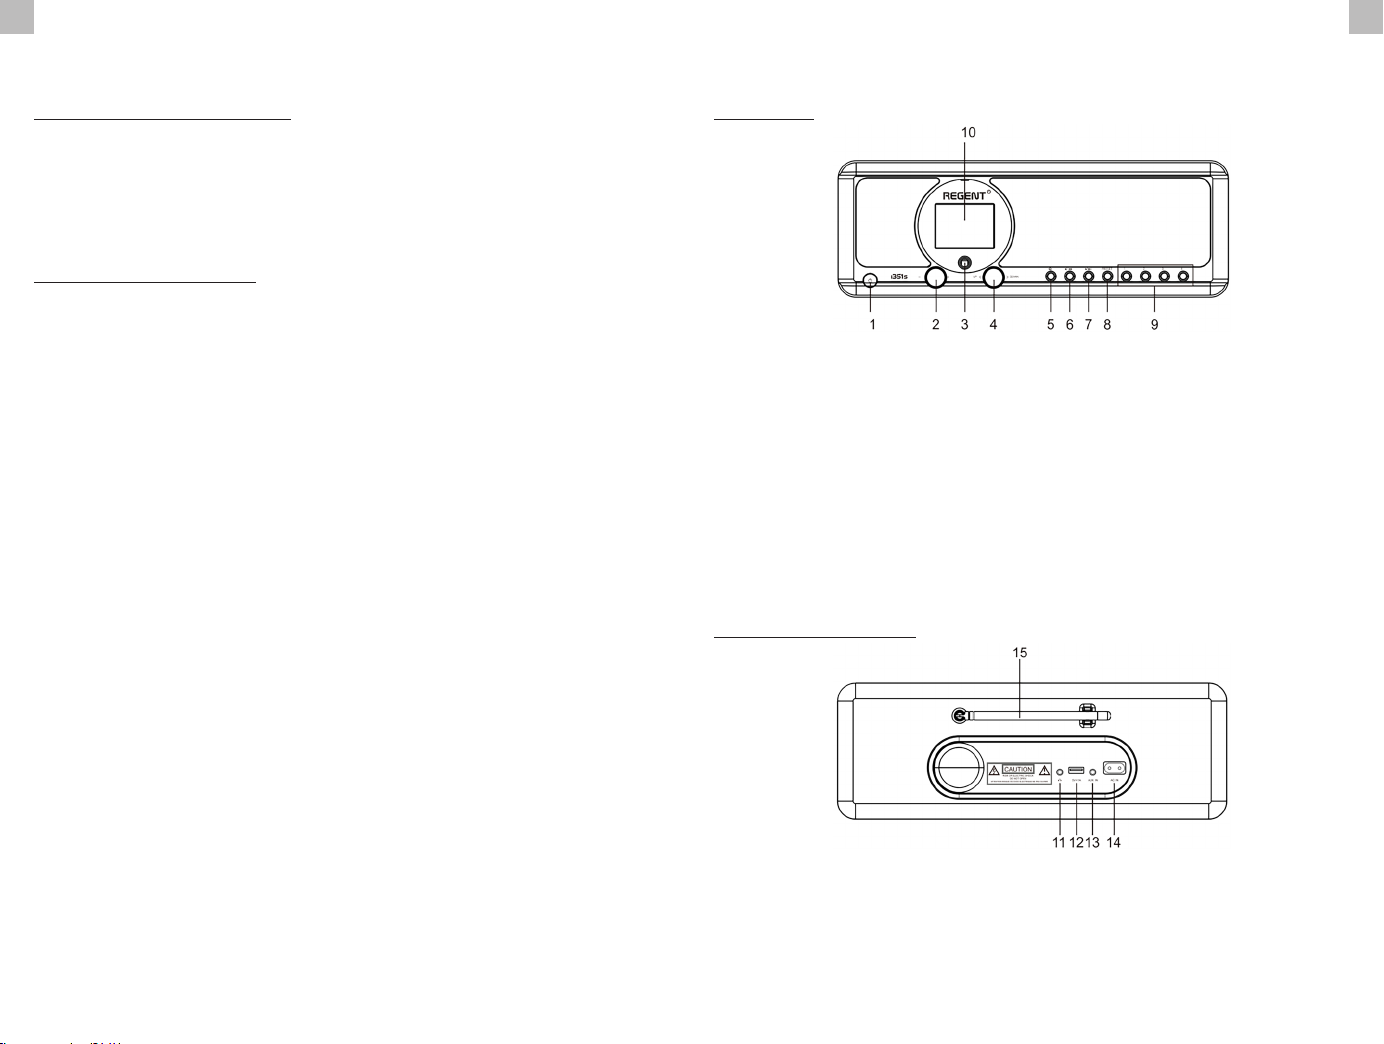
Frontplatte
1. EINSCHALT/STANDBY-Taste
2. Lautstärkeregler - Drehen zur
Einstellung der Lautstärke - Zum
Stummschalten drücken
3. IR-Sensor
4. Drehknopf UP/DOWN und OK-Taste
- zum Navigieren oder zum schnellen
Vorlauf/Schnellvorlauf drehen; drücken,
um die Auswahl zu bestätigen
5. HOME Button - Drücken Sie diese Taste,
um zum Hauptmenü zurückzukehren
Rückseite des Gerätes
11. 3.5mm-Kopfhörereingang
12. USB-Anschluss (Ausgang: 5V,1A)
13. Aux-In Klinkeneingang 3,5 mm
6. PREVIOUS ◄ Taste - links/
vorheriger Titel
7. NEXT ► Taste - rechts/nächster Titel
8. PRESET-Taste - Kurz drücken, um die
gespeicherte Station aufzurufen - Halten
Sie diese Taste gedrückt, um in den
Senderspeichermodus zu gelangen
9. PRESET-Taste 1, 2, 3, 4
10. Farbdisplay
14. Netzteilbuchse
15. Teleskopantenne
Page 15
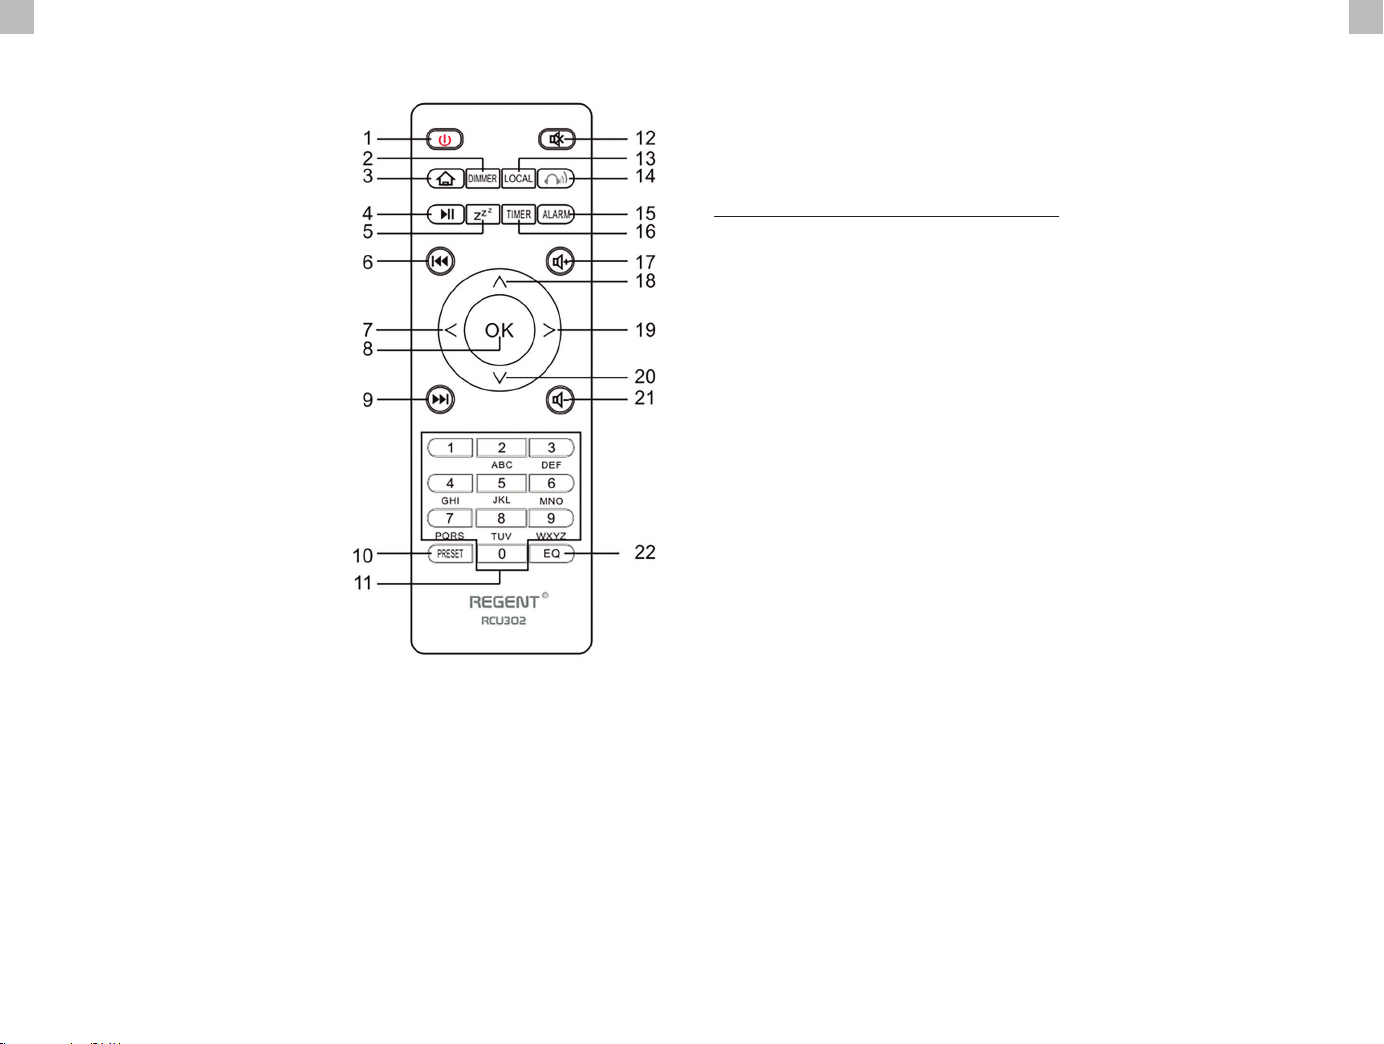
DE DE
Fernbedienung Erste Schritte
1. POWER ON/STANDBY Taste - ein/aus
2. DIMMER-Taste - Dimmer
3. HOME-Taste - drücken, um zum
Hauptmenü zurückzukehren
4. PLAY/PAUSE Taste - zum
Anhalten/Fortsetzen drücken
5. SLEEP-Taste - versetzt den Empfänger
in den Schlummermodus
6. PREVIOUS-Taste - drücken, um
einen Titel zurückzuspulen
7. < Taste - linke Taste
8. OK-Taste - Auswahl bestätigen
9. NEXT-Taste - drücken, um
einen Titel zu überspringen
10. PRESET-Taste
11. 0-9 Tasten - gespeicherten Favoriten-
Sender auswählen, Zeichen eingeben
12. MUTE-Taste - Stummschalttaste
13. LOCAL-Taste - Drücken Sie
diese Taste, um auf lokale
Internet-Sender zuzugreifen
14. BT-Taste - drücken, um die
Übertragung zum Kopfhörer
zu aktivieren/deaktivieren
15. ALARM-Taste
16. TIMER-Taste
17. VOLUME + Taste - Lautstärke erhöhen
18. ^ Taste - Cursortaste nach oben
19. > Taste - Cursor-Taste nach rechts
20. v Taste - Cursortaste nach unten
21. VOLUME - Taste - Lautstärketaste abwärts
22. EQ-Taste - Equalizer-Einstellungen
Schließen Sie das Netzkabel an das Gerät und an die Steckdose an der Wand an. Das
Funkgerät fragt Sie beim Einschalten, ob Sie die Netzwerkprüfung aktivieren möchten.
<Netz beim Einschalten prüfen>. Es wird empfohlen, diese Funktion zu aktivieren
<Ja>. Das Funkgerät prüft immer, ob eine Netzwerkverbindung verfügbar ist.
Verbinden mit Ihrem Wi-Fi-Netzwerk
Um die Suche nach verfügbaren Wi-Fi-Netzwerken zu starten, wählen Sie <JA>, wenn der
Bildschirm zur Netzwerkkonguration angezeigt wird. Wenn Ihr Router über WPS verfügt,
können Sie <WPS> wählen, um das Netzwerk zu kongurieren. Ein Wi-Fi-Netzwerk-Scan
wird gestartet. Es wird eine Liste der verfügbaren Netzwerke angezeigt. Wählen Sie Ihr
Netzwerk aus der Liste aus und geben Sie Ihr Netzwerkpasswort ein. Wenn Ihr Netz
ungesichert ist, stellt das Radio nach Auswahl in der Liste automatisch eine Verbindung her.
Hinweis: Das Netzwerkpasswort wurde möglicherweise vom
Installateur oder Ihrem Internetanbieter festgelegt.
Führen Sie die folgenden Schritte aus, um das Wi-Fi-Passwort einzugeben:
• Drehen Sie den UP/DOWN-Knopf, um ein Zeichen auszuwählen.
• Drücken Sie NEXT oder die rechte Cursortaste, um zum nächsten Eintrag zu gelangen.
• Wenn Sie mit der Eingabe fertig sind, drücken Sie zur
Bestätigung die OK-Taste UP/DOWN.
Eingabe des Passworts für das Wi-Fi-Netzwerk über die Fernbedienung. Zur Erinnerung:
Der Cursor zeigt an, wo ein Zeichen eingegeben werden muss. Drücken Sie die folgenden
Ziern auf der Fernbedienung mehrmals, um die gewünschten Zeichen zu erhalten:
1. 1 (space) @ ! # $ % & ( ) + - . / : ; < = > ? [ \ ] ^ { | } ~
2. 2 A B C a b c
3. 3 D E F d e f
4. 4 G H I g h i
5. 5 J K L j k l
6. 6 M N O m n o
7. 7 P Q R S p q r s
8. 8 T U V t u v
9. 9 W X Y Z w x y z
Alternativ können Sie auch die Cursortasten verwenden,
um die entsprechenden Zeichen einzugeben:
• < - zum vorherigen Feld wechseln. Feld kann überschrieben werden.
• > - Gehe zum nächsten Feld. Der letzte Eintrag wird gespeichert.
• ^ / v - Wahl des Zeichens.
• OK - Doppelklick zur Bestätigung des eingegebenen Passworts.
Das Radio stellt eine Verbindung zu einem drahtlosen Netzwerk her. Die Verbindung
zum Netz kann einige Sekunden dauern. Sobald die Verbindung hergestellt ist,
wird das Hauptmenü angezeigt. Jetzt können Sie Ihr Internetradio genießen.
Page 16

DE DE
Internet Radio
Wählen Sie <Internet-Radio> aus dem Menü, dann sehen Sie mehrere Optionen.
Hören Sie Radiosender aus aller Welt - wählen Sie <Radiosender/Musik>.
Meine Favoriten
Es wird eine Liste Ihrer Favoriten-Radiosender angezeigt.
Programmierung des Senders:
Drücken Sie während der Wiedergabe eines Lieblingssenders lange auf die
PRESET-Taste. Daraufhin wird das Menü <Zu Favoriten hinzufügen> angezeigt.
Drücken Sie den Knopf zur Bestätigung. Der gespielte Sender wird automatisch
in die Voreinstellungsliste aufgenommen. Die Sender werden in aufsteigender
Reihenfolge gespeichert. Sie können bis zu 250 Radiosender speichern.
Sie können die Liste der voreingestellten Sender jederzeit bearbeiten.
Gehen Sie zu <Internetradio> <Meine Favoriten> oder drücken Sie
PRESET, wenn die Liste der Lieblingssender angezeigt wird, und drücken
Sie dann NEXT. Die folgenden Optionen werden angezeigt:
Löschen - zum Löschen des ausgewählten Radiosenders
Nach oben - verschiebt den ausgewählten Radiosender
in der Rangliste eine Ebene nach oben
Unter - verschiebt den ausgewählten Sender in der Rangliste eine Ebene nach unten
Umbenennen - benennt den ausgewählten Sender um
Abspielen - spielt den ausgewählten Sender ab
Wählen Sie mit der Cursortaste die gewünschte Aktion aus und bestätigen Sie mit OK.
Anzeige des voreingestellten Senders:
Drücken Sie kurz die PRESET-Taste und wählen Sie den gewünschten Radiosender.
Radiosender/Musik
Wählen Sie diese Option, um den gewünschten Radiosender
nach Kategorie, Genre, Standort usw. auszuwählen.
Lokales Radio
Zugang (über das Internet) zu einem Radiosender in Ihrer Nähe. Wählen Sie diese
Option, und es wird eine Liste der in Ihrem Gebiet verfügbaren Sender angezeigt.
Geschichte
Das Radio merkt sich die letzten 10 Sender, die Sie gehört haben.
Suche nach Stationen
Sie können den gewünschten Radiosender nden, indem Sie den Sendernamen eingeben.
Hinzufügen eines neuen Radiosenders
Wenn Sie den gewünschten Sender in der Liste der Radiosender nicht nden
können und Sie seine URL kennen, können Sie den Link hier eingeben und den
Sender zu Ihren Favoriten hinzufügen. Hinweis: Der Link muss eine StreamingURL sein. Erst dann können Sie den Sender auf dem Receiver abspielen. Wenn
ein Sender gespielt wird, erscheint das Farbbild des Senders auf dem Display
(sofern der Sender diese Information anbietet) erscheint auf dem Display.
Bluetooth/Medienzentrum
Bluetooth
Das Radio empfängt und spielt Musik, die von einem anderen BluetoothGerät gestreamt wird. Wählen Sie <Bluetooth> aus dem Hauptmenü, um den
Bluetooth-Modus aufzurufen. Sobald Sie sich im Bluetooth-Modus benden,
können Sie den Empfänger mit anderen Bluetooth-Geräten erkennen.
1. Schalten Sie Bluetooth auf Ihrem Bluetooth-Gerät ein und suchen Sie in der Liste nach
einem Gerät namens „REGENT i351s”. Wählen Sie, um die Kopplung zu beginnen.
2. Wenn die Verbindung erfolgreich ist, hören Sie einen Piepton. In der
Zwischenzeit wird auf dem LCD-Display „Bluetooth-Verbindung” angezeigt.
3. Sie können nun die Musikwiedergabe von Ihrem Bluetooth-Gerät starten.
Ein kurzer Druck auf die PAUSE-Taste unterbricht die Wiedergabe oder setzt
sie fort. So springen Sie zum vorherigen/nächsten Titel drehen Sie den UP/
DOWN-Knopf oder halten Sie die PREVIUS/NEXT-Tasten gedrückt oder
drücken Sie die Taste PREVIUS/NEXT auf der Fernbedienung.
Medienzentrum
USB-Wiedergabe
1. Schließen Sie Ihr USB-Stick direkt an den USB-Anschluss auf der Rückseite des Geräts an.
2. Drücken Sie HOME und wählen Sie mit den Tasten UP/DOWN
+ OK die Option Media Center aus dem Hauptmenü.
3. Wählen Sie USB, um den USB-Modus aufzurufen. Verwenden Sie dann den UP/
DOWN + OK-Knopf am Gerät oder die ^/v + OK-Tasten auf der Fernbedienung,
um einen Ordner/Musik auszuwählen und die Wiedergabe zu starten.
Drücken Sie kurz die Taste PLAY/PAUSE, um die Wiedergabe anzuhalten oder
fortzusetzen. Drehen Sie den UP/DOWN-Knopf oder drücken und halten Sie die
PREVIUS/NEXT-Tasten am Hauptgerät oder drücken Sie die PREVIOUS/NEXTTasten auf der Fernbedienung, um zum vorherigen/nächsten Titel zu wechseln.
Streaming von Musik
Sobald Sie einen UPnP/DLNA-kompatiblen Server für die Freigabe von Mediendateien
für Ihr Radio eingerichtet haben, können Sie mit dem Streaming von Musik beginnen.
1. Wählen Sie im Hauptmenü <Mediencenter> und dann <UPnP>.
2. Es kann ein paar Sekunden dauern, bis Ihr Gerät die Suche nach
verfügbaren UPnP-Servern abgeschlossen hat. Wenn keine UPnPServer gefunden werden, wird <leere Liste> angezeigt.
3. Wählen Sie nach einem erfolgreichen Scan einen UPnP-Server aus.
4. Das Radio zeigt die vom UPnP-Server verfügbaren Medienkategorien
an, z. B. „Musik“, „Wiedergabelisten“ usw.
5. Wählen Sie die Mediendateien aus, die Sie abspielen möchten.
6. Sie können den Wiedergabemodus unter <Konguration>
<Wiedergabeeinstellungen> einstellen.
Hinweis: Wenn Sie über DLNA-kompatible Server verfügen, befolgen Sie die obigen Schritte.
Sie können dann Audiodateien von einem DLNA-kompatiblen Gerät anzeigen und abspielen.
Page 17

DE DE
BT Tx und DLNA
BT Tx (Bluetooth-Sender)
Dieses Internetradio bietet kabelloses Hören mit Bluetooth-fähigen Kopfhörern
oder TWS-Ohrhörern über den integrierten Bluetooth-Sender.
1. Drücken Sie die BT-Taste auf der Fernbedienung, während Sie Medien hören. Auf
dem Display werden drei Optionen für den Modus BT Tx wie folgt angezeigt:
• Ein (Lautsprecher ein) - um die BT Tx-Funktion zu aktivieren, wobei der
Ton weiterhin gleichzeitig aus dem Radiolautsprecher kommt.
• Ein (Lautsprecher aus) - um die Funktion BT Tx zu aktivieren
und den Ton aus dem Radiolautsprecher auszuschalten.
• Aus - zum Deaktivieren der BT Tx-Funktion.
2. Wählen Sie eine der Optionen Aktivieren, um die Funktion BT Tx zu aktivieren,
und schalten Sie dann Ihre Bluetooth-fähigen Kopfhörer oder TWS-Ohrstöpsel
ein. Das Gerät benötigt etwa 30 Sekunden, um die Kopfhörer oder TWS-Ohrhörer
zu suchen und automatisch zu verbinden. Sobald die Verbindung hergestellt
ist, können Sie mit dem Kopfhörer oder den Ohrhörern Radio hören.
Hinweis: Die Reichweite des Bluetooth-Senders ist je nach Umgebung und
verwendetem Gerät auf etwa 140 Meter (oene Fläche) begrenzt.
DLNA
Zusätzlich zu UPnP kann dieses Gerät auch DLNA unterstützen. Das Internetradio kann
Musik von einem DLNA-kompatiblen Gerät streamen. Das Internetradio und andere
DLNA-Geräte müssen sich im selben Wi-Fi-Netzwerk benden. Das Radio wird als
„Regent i351s“ erkannt, wenn Sie versuchen, es auf anderen Geräten zu suchen.
Bitte beachten Sie, dass die DLNA-Funktion mit den entsprechenden
Apps von Drittanbietern auf der Android-Plattform kompatibel ist
und funktioniert. Apple-Geräte werden nicht unterstützt.
FM-Modus
Ziehen Sie die Teleskopantenne aus und passen Sie ihre Anordnung an, um den Empfang
zu optimieren. Wählen Sie FM aus dem Hauptmenü. Um automatisch nach dem vorherigen/
nächsten verfügbaren UKW-Sender zu suchen, halten Sie die Taste PREVIOUS oder NEXT
2 Sekunden lang gedrückt. Das Radio sucht automatisch nach einem verfügbaren Sender.
Wenn Sie eine Feinabstimmung der Frequenz vornehmen möchten, drehen Sie den UP/
DOWN-Regler am Gerät oder drücken Sie die Tasten ^/v auf der Fernbedienung.
Automatisches Scannen von Voreinstellungen
Sie können FM-Sender automatisch voreinstellen. Drücken Sie UP/DOWN + OK (oder
^/v + OK auf der Fernbedienung). Sie werden gefragt, ob Sie einen automatischen Scan
durchführen möchten oder nicht. Wählen Sie „Ja” und drücken Sie OK. Es wird mit dem
Scannen und Programmieren der Sender begonnen. Wenn Sie fertig sind, drücken
Sie kurz die PRESET-Taste und der erste voreingestellte Sender wird angezeigt.
Suche nach Sendern im Internet
Diese Funktion hilft Ihnen, denselben Sender im Internet zu nden, vorausgesetzt, der
Radiosender verfügt über einen Internet-Stream und ist im Radio abspielbar. Das Hören
von Internetradio befreit Sie vom Rauschen, das normalerweise durch Interferenzen
oder schlechten Empfang auf UKW verursacht wird. Wenn Sie den Suchlauf im UKWBand beendet haben, wählen Sie einen Kanal zur Wiedergabe aus. Wenn derselbe
Kanal im Internet verfügbar ist, werden Sie durch ein Symbol in der unteren rechten
Ecke des Bildschirms informiert. Halten Sie den UP/DOWN + OK-Knopf (oder die
Tasten ^/v + OK auf der Fernbedienung) gedrückt. Der Empfänger schaltet in den
Internetradio-Modus und beginnt mit der Wiedergabe des entsprechenden Kanals.
DAB-Modus
Sie können reguläre DAB-Sender ohne Internetverbindung hören. Ziehen Sie die
Teleskopantenne aus und richten Sie die Antennengruppe aus. Wählen Sie DAB
aus dem Hauptmenü. Wenn Sie den DAB-Modus zum ersten Mal verwenden,
sucht der Empfänger automatisch nach DAB-Radiosendern. Wenn der Suchlauf
abgeschlossen ist, zeigt der Empfänger eine Liste der gefundenen DAB-Sender an.
Wählen Sie den gewünschten Sender und drücken Sie den UP/DOWN + OK-Knopf
(oder die ^/v + OK-Taste auf der Fernbedienung), um die Wiedergabe zu bestätigen.
Drücken Sie die Taste PREVIOUS (oder < auf der Fernbedienung), um zur Senderliste
zurückzukehren. Wenn Sie die Taste PREVIOUS (oder < auf der Fernbedienung)
erneut drücken, wird eine Warnung angezeigt, dass die Senderliste gelöscht wurde. So
können Sie auch die DAB-Sender neu scannen. Wählen Sie <NEIN>, um die vorhandene
Senderliste beizubehalten und nach neuen Sendern zu suchen. Wählen Sie <JA>,
um die vorhandene Senderliste zu löschen und erneut einen vollständigen Suchlauf
durchzuführen. Wählen Sie <ESC>, um den aktuellen Vorgang zu beenden.
Um die Senderwiedergabe zu beenden, drücken Sie PLAY/PAUSE. Jedes Mal, wenn
Sie die Wiedergabe fortsetzen möchten, drücken Sie die gleiche Taste erneut.
Konguration
Display Uhrzeit
Sie können wählen, ob die Uhrzeit analog oder digital angezeigt werden soll.
Netzwerk
Konguration des drahtlosen Netzwerks
Drücken Sie den UP/DOWN + OK-Knopf (oder die ^/v + OK-Taste auf der
Fernbedienung), um nach verfügbaren drahtlosen Netzwerken zu suchen.
Drahtloses Netzwerk (WPS PBC)
Der Router muss über die WPS-Funktion verfügen. Mit WPS können Sie das Funkgerät
mit Ihrem Router verbinden, indem Sie eine Taste am Empfänger und die WPSTaste am Router drücken. Es wird eine Wi-Fi-Verbindung hergestellt.
Manuelle Konguration
Sie können DHCP aktivieren oder deaktivieren und einen Netzwerknamen
(SSID) eingeben oder ein verbundenes Netzwerk (SSID) löschen.
Überprüfen Sie das Netz nach dem Einschalten
Page 18

DE DE
Aktivieren oder deaktivieren Sie die Überprüfung und Verbindung
des Netzwerks beim Einschalten des Receivers.
Datum und Uhrzeit
Die Uhrzeit wird automatisch eingestellt und an den geograschen Standort des Empfängers
angepasst. Mit dieser Einstellung können Sie das Datum und die Uhrzeit manuell ändern.
Zeitformat einstellen
Stellen Sie das Zeitformat ein: 12/24 Stunden.
Datumsformat einstellen
Datumsformat: JJJJ/MM/TT, TT/MM/JJJJ und MM/TT/JJJJ. Wenn die manuelle Konguration
gewählt wird, erscheint in der Liste zusätzlich die Option Sommerzeit einstellen (DST).
Alarm
Doppelter Wecker
Es stehen 2 Wecker und die folgenden Einstellungen zur Verfügung:
• Alarmplanung: Sie können einen sich wiederholenden Alarm für jeden Tag oder einen
bestimmten Wochentag planen oder nur einen einzelnen Alarm auswählen.
• Weckton: Wecken durch Radiosender (muss ein voreingestellter Sender
sein), Wecken durch Melodie und Wecken durch Ton.
• Alarmlautstärke: Wählen Sie diese Option, um die gewünschte Lautstärke einzustellen.
Alarm schlummern
Wenn Sie ein Nickerchen machen wollen oder kurzfristig einen Wecker brauchen, können Sie diese
Funktion nutzen. Sie können eine Zeit zwischen 5 und 120 Minuten wählen. Die SchlummernFunktion ist für den NAP-Alarm nicht verfügbar. Hinweis: Der NAP-Alarm gibt nur einen Tonsignal ab.
Schlummern
Wenn der Alarm ertönt, können Sie durch Drücken einer beliebigen Taste außer der
STANDBY-Taste in den <Schlummermodus> wechseln. Der Alarm ertönt 5 Minuten später
erneut. Sie können jederzeit die STANDBY-Taste drücken, um den Alarm abzubrechen.
Hinweis: Wenn es Netzwerkprobleme gibt, die dazu führen, dass das Aufwecken des
Radios nicht funktioniert, ertönt nach 1 Minute automatisch ein Signalton.
Einstellung der Zeit/Uhrzeit
Drücken Sie ^/v/</> auf der Fernbedienung, um den Timer
einzustellen, und drücken Sie dann zur Bestätigung OK.
Dimmer
Sie können die LCD-Hintergrundbeleuchtung mit den folgenden Einstellungen anpassen:
• Energiesparen - Sie können die Hintergrundbeleuchtung so einstellen, dass sie
sich abdunkelt, wenn eine bestimmte Zeit lang keine Bedienung erfolgt.
• Ein - Sie können die Beleuchtungsstärke für den Betriebsmodus einstellen.
• Display - Sie können ein Farb- oder Monochrom-Display auswählen.
Energieverwaltung
Wenn kein Internetsignal empfangen wird, kann der Receiver mit dieser Funktion in den
Energiesparmodus wechseln. Die Standardeinstellung ist 15 Minuten. Wenn der Receiver kein
Internetsignal empfängt, geht er nach 15 Minuten in den Standby-Modus über. Andere Zeitrahmen
sind möglich: 5 Minuten und 30 Minuten. Die Einstellung kann auch ausgeschaltet werden.
versetzt. Die verfügbaren Zeitintervalle reichen von 15 Minuten bis 180 Minuten in Schritten von 15
Minuten. Sie können die Einstellungen auch mit der Ruhetaste auf der Fernbedienung vornehmen.
Wenn Sie die Einschlaftaste drücken, sehen Sie den Timer in der oberen rechten Ecke des Displays.
Wetter
Durch Auswahl verschiedener Regionen und Temperatureinheiten können Sie die Anzeige von
Wetterinformationen im Standby-Modus einstellen. Um die Wetteranzeige zu deaktivieren,
gehen Sie zu Einstellungen > Wetter > Im Standby anzeigen > wählen Sie Aus.
Lokales Radio kongurieren
Das Radio erkennt automatisch lokale Sender - drücken Sie einfach die Taste LOCAL
auf der Fernbedienung. Sie nden diese Einstellung auch im Menü <Internetradio>.
Wenn Sie die lokalen Sender auf andere Länder umstellen möchten, können Sie
„Manuelle Einstellung“ wählen, um die Änderung vorzunehmen.
Konguration der Wiedergabe
UPnP-Wiedergabeeinstellungen festlegen. Sie können die Wiedergabe deaktivieren,
einen Titel wiederholen, alle Titel wiederholen oder Lieder mischen.
Equalizer
Wählen Sie Ihren bevorzugten Equalizer aus, der Ihren Klangvorlieben entspricht.
BT Tx
Wählen Sie diese Option, um die Funktion BT Tx zu aktivieren oder zu deaktivieren.
Fortsetzen nach dem Einschalten
Wenn diese Funktion eingeschaltet ist, spielt der Receiver den zuletzt gehörten Sender
weiter, wenn Sie ihn wieder einschalten. Die Einstellung EIN ist standardmäßig aktiviert.
Gerät
Gerät umbenennen
Der Receiver kann Musik von DLNA-kompatiblen Geräten wiedergeben. Die Geräte müssen
sich im selben Wi-Fi-Netzwerk benden. Der Receiver wird von DLNA-Geräten unter dem
Namen „REGENT i351s“ erkannt. Dies ist der Standardname. Sie können den Namen des
Empfängers mit dieser Einstellung in einen beliebigen anderen Namen ändern.
Remote-Anwendung - AirMusic Control
Sie können die kostenlose AirMusic Control App verwenden, um den Receiver von
Ihrem Telefon oder Tablet aus zu steuern. Die App ist in den Android-Shops Google
Play und Apple App Store erhältlich. Sowohl der Empfänger als auch das Gerät,
auf dem die App installiert ist, müssen sich im selben Netzwerk benden.
Software-Aktualisierung
Informationen zur Aktualisierung der Empfängersoftware werden auf dem Display
angezeigt, wenn der Hersteller die Aktualisierung zur Verfügung stellt. Das Update wird
aus dem Internet heruntergeladen und erfordert eine Internetverbindung. Hinweis:
Diese Option ist nur für die Verwendung durch den Hersteller bestimmt.
Standardeinstellungen wiederherstellen
Mit dieser Option können Sie die Einstellungen des Empfängers auf den ursprünglichen
Zustand zurücksetzen. Hinweis: Alle Ihre Einstellungen gehen dabei verloren.
Zeitschalter
Sie können einen Timer einstellen, der das Radio nach einer bestimmten Zeit in den Standby-Modus
Verwende dein Smartphone, Tablet oder deinen Computer als Fernbedienung
für Spotify. Auf spotify.com/connect erfährst du mehr.
Page 19
DE DE
Problemlösungen
Fehler Lösung
Keine Anzeige,
Radio reagiert nicht
Keine Bedienung
per Fernbedienung
Schwacher
DAB+-Empfang
Schlechter
FM-Empfang
Geringe Klangquali
tät beim Abspielen
von M
usik
Gerät lässt sich
nicht einschalten
Kein Ton
Netzwerkverbindung kann nicht
ellt werden
hergest
WLAN-Verbindung kann nicht
ellt werden
hergest
Keine Station
gefunden
Der Alarm funktioniert nicht
DLNA-Streaming
kann nicht durchgeführt werden
Elektromagnetische
Interferenzen
Das System bleibt
plötzlich hängen
Kongurieren Sie die Stromversorgung gemäß der Bedienungsanleitung
und mit den in der Verpackung enthaltenen Hilfsmitteln.
Die Batterien sind entladen oder falsch eingesetzt. Vergewissern Sie
sich, dass die Batterien in der richtigen Richtung eingelegt sind.
Antenne nicht vollständig ausgefahren. Ändern Sie den Standort des
Radios (z. B. näher am Fenster). Wiederholung der Sendersuche.
Antenne nicht vollständig ausgefahren. Standort des Radios ändern
(z. B. näher am Fenster). Wiederholung der Sendersuche.
Datei mit niedriger Bitrate. Audiodatei prüfen. Tipp: Bei MP3-
Dateien sollte die Bitrate 192 Kbps oder höher.
1. Prüfen Sie, ob die Stromversorgung richtig angeschlossen ist.
2. Das Gerät kann bei Verwendung in Gebieten mit starken Funkstörungen nicht richtig
funktionieren. Entfernen Sie die Störungsursache oder stellen Sie das Gerät um.
1. Schalten Sie den Ton ein, da er möglicherweise stummgeschaltet ist.
2. Erhöhen Sie die Lautstärke.
1. Überprüfen Sie die WLAN-Funktion.
2. Versuchen Sie, die IP-Adresse auf Ihrem Gerät einzustellen.
3. Aktivieren Sie die DHCP-Funktion auf Ihrem Router und
verbinden Sie sich erneut mit dem Gerät.
4. In Ihrem Netz ist eine Firewall aktiviert - stellen Sie die entsprechende
Software ein, um Ihrem Gerät den Zugang zum Netz zu ermöglichen.
5. Starten Sie das Gerät neu, um eine Netzwerkverbindung zu erzwingen.
1. Überprüfen Sie die Verfügbarkeit des WLANs am Zugangspunkt.
2. Stellen Sie das Gerät näher an den Router.
3. Stellen Sie sicher, dass das WEP/WPA-Passwort korrekt ist.
1. Überprüfen Sie das Netzwerk, den Zugangspunkt und die Firewall.
2. Der Sender ist derzeit nicht verfügbar. Versuchen Sie es später
noch einmal oder wählen Sie einen anderen Sender.
3. Die Senderverbindung wurde geändert oder der Sender
wird nicht ausgestrahlt - fragen Sie Ihren Anbieter.
3. Die Senderverbindung geändert wurde oder der Sender
nicht sendet - fragen Sie Ihren Anbieter.
4. Der Link zu dem manuell hinzugefügten Sender nicht korrekt ist,
stellen Sie sicher, dass sie korrekt ist und geben Sie sie erneut ein.
en Sie den Alarm ein.
1. Schalt
2. Siehe Lösungen für „Kein Ton“.
3. Die Alarmquelle wurde als Station eingestellt, aber es besteht keine Netzwerkverbindung.
Ändern Sie die Alarmquelle oder kongurieren Sie die Verbindung neu.
en Sie Ihre Netzwerkverbindung. REGENT i351s und Ihr Gerät müssen
1. Überprüf
sich im selben Netzwerk benden. Prüfen Sie, ob der Netzwerkstatus gut ist.
2. Stellen Sie sicher, dass die Einstellungen auf Ihrem Gerät korrekt sind.
Der normale Betrieb des Produkts kann durch starke elektromagnetische
Felder gestört werden. Setzen Sie das Gerät gemäß der Bedienungsanleitung,
um den normalen Betrieb wieder aufzunehmen. Wenn die Probleme
weiterhin bestehen, wechseln Sie den Standort des Empfängers.
REGENT i351s überlastet ist, starten Sie das Gerät neu.
Spezikation
Name des Modells REGENT i351s
Anzeige 2,4” TFT-Farbdisplay
OPEN, WEP
WPA PSKAES
Unterstützte Netzwerke
Streaming UPnP, DLNA
Unterstützte
Wiedergabeformate (UPnP)
Unterstützte
Wiedergabeformate (USB)
Ausgangsleistung (RMS) 15W x 2
Stromversorgung
FM und DAB Frequenz
Stromverbrauch 30W
Leistungsaufnahme im
Standby-Modus
Bluetooth-Unterstützung V5.0
Bluetooth-Reichweite bis zu 140 Meter (oene Fläche)
Sendefrequenz 2.4 GHz
Protokolle A2DP 1.2
Betriebstemperatur 0°C~35°C
Feuchtigkeit im Betrieb 20%~80%
V
EREINFACHTE KONFORMITÄTSERKLÄRUNG
Hersteller: Ferguson Sp z o.o., Ul. Dworska 1, 61-619 Posen
Name: Regent i351s
Gerätetyp: Funkempfänger
Das oben genannte Produkt entspricht der Richtlinie 2014/53/EU des Europäischen Parlaments und
des Rates vom 16. April 2014 zur Angleichung der Rechtsvorschriften der Mitgliedstaaten über die
Bereitstellung von Funkanlagen auf dem Markt und zur Aufhebung der Richtlinie 1999/5/EG.
Vollständige Konformitätserklärung zum Download unter: https://ferguson-digital.eu/deklaracjezgodnosci/
WPA PSKAES/TKIP
WPA PSKTKIP
WPA 2 PSK AES
WPA 2 PSK AES/TKIP
WPA 2 PSK TKIP
MP3, WMA, AAC, FLAC, WAV
MP3, WMA, WAV
Eingang: AC 100-240V ~ 50/60Hz
USB-Ausgang: DC 5V1A (nur zum
Auaden von Android-Handys)
FM: 87.5-108MHz
DAB: 174.928-239.2MHz
< 2W
Page 20
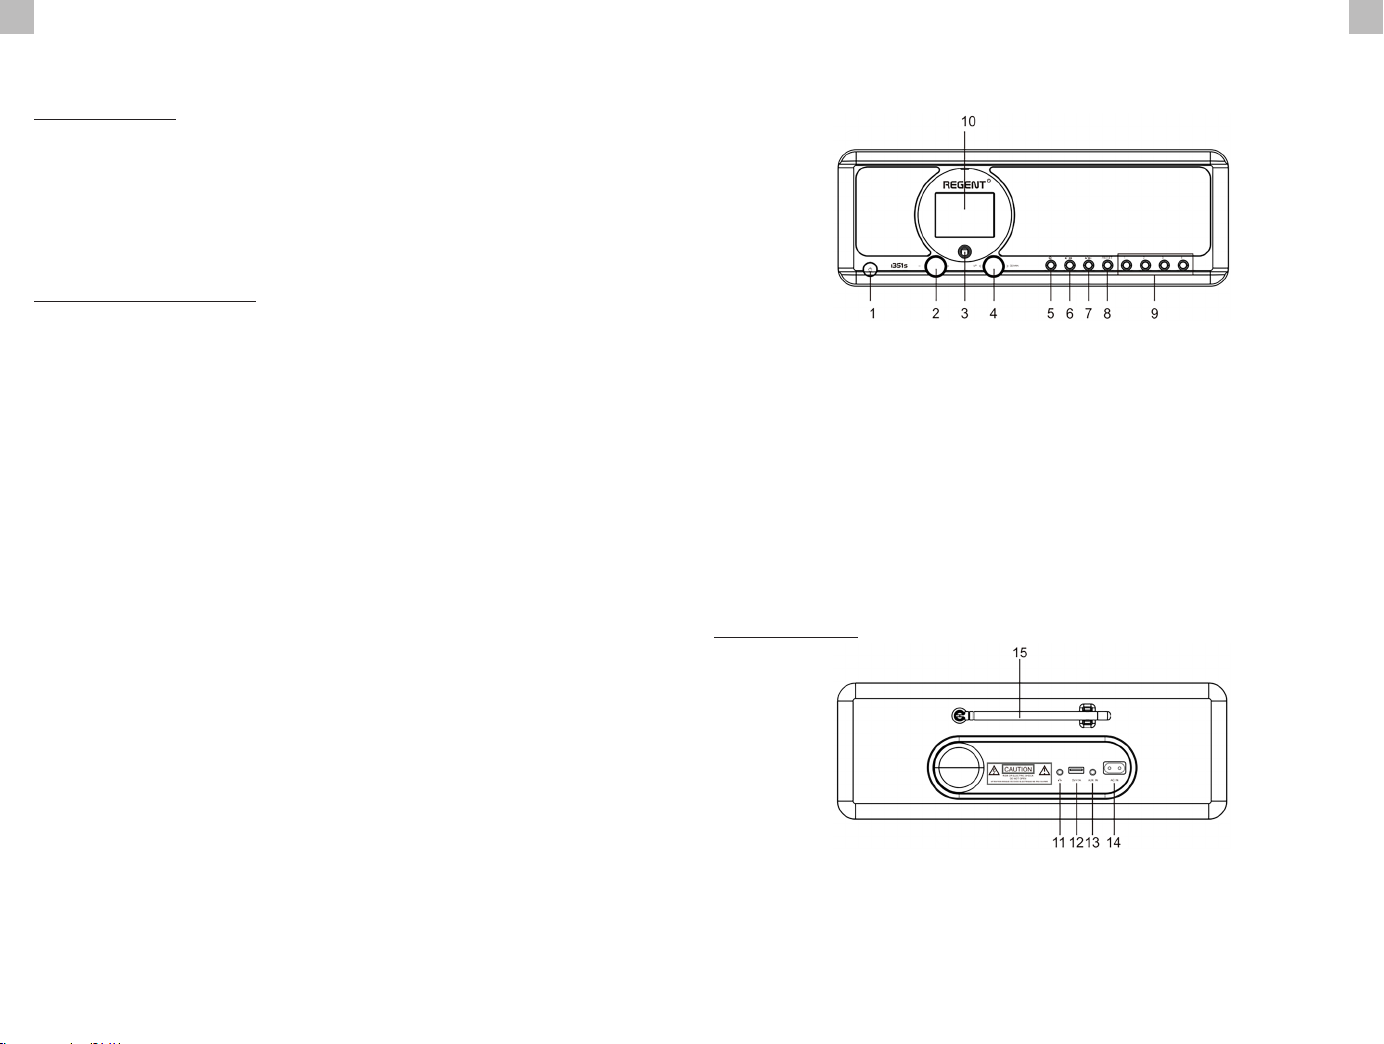
IT IT
Prima di iniziare
Requisiti di rete
Prima di utilizzare il dispositivo, sono necessari i seguenti requisiti:
• Una connessione a banda larga in combinazione con un punto di
accesso wireless, router o un dispositivo simile di rete. Il dispositivo di
rete deve supportare la connessione wireless WiFi (802.11b/g/n).
• Un PC o uno smartphone collegati a una rete. La radio
deve utilizzare la stessa rete di connessione.
Precauzioni di sicurezza
• Non far cadere il dispositivo e non esporlo a liquidi, o umidità.
Questi potrebbero causare danni al dispositivo.
• Se il dispositivo viene spostato da un ambiente freddo a uno più caldo,
lasciare che si adatti alla nuova temperatura prima di utilizzarlo. In caso
contrario, potrebbe formarsi condensa e causare malfunzionamenti.
• Non utilizzare il dispositivo in un ambiente polveroso poiché la polvere può
danneggiare i componenti elettronici interni e causare malfunzionamenti.
• Proteggere il dispositivo da forti vibrazioni e posizionarlo su una supercie stabile.
• Non tentare di smontare il dispositivo.
• La presa di corrente deve essere installata vicino al
dispositivo e deve essere facilmente accessibile.
• Assicurarsi che la tensione elettrica specicata sul dispositivo e sulla sua
spina di alimentazione corrisponda alla tensione della presa di corrente.
• Se il dispositivo non viene utilizzato per un lungo periodo di tempo, scollegare
il cavo di alimentazione. Questo per evitare il rischio di incendio.
• Non utilizzare mai solventi aggressivi o forti per pulire il dispositivo poiché
potrebbero danneggiare la supercie . Un panno morbido e asciutto è appropriato,
tuttavia, se il dispositivo è estremamente sporco, può essere rimosso con un panno
leggermente umido. Assicurarsi che il dispositivo sia asciugato dopo la pulizia.
• Il normale funzionamento del prodotto può essere disturbato da forti interferenze
elettromagnetiche. In tal caso, ripristinare semplicemente il prodotto per riprendere
il normale funzionamento seguendo il manuale di istruzioni. Nel caso in cui la
funzione non possa riprendere, spostare il prodotto in un’altra posizione.
• Quando è necessario spedire l’apparecchio, conservarlo nella sua confezione
originale. Conservare la scatola di imballaggio per questo scopo.
Aspetto e descrizione dei tasti
Vista frontale
1. Pulsante di ACCENSIONE/STANDBY
2. Manopola del volume - Ruotare per
regolare il livello del volume; Premere
questo pulsante per disattivare l’audio
3. Sensore remoto
4. UP/DOWN Manopola + OK - Di
navigazione; Ruotare per navigare con
il cursore; Premere questo pulsante
per confermare la selezione
5. Pulsante HOME - Premere per
tornare al menu principale
Vista posteriore
6. Pulsante PREVIOUS - Cursore
sinistro/traccia precedente
7. Pulsante NEXT - Cursore
destro/traccia successiva
8. Pulsante PRESET - Premere brevemente
per accedere alla modalità di richiamo
delle stazioni radio preimpostate;
Tenere premuto questo pulsante
per accedere alla modalità di
memorizzazione delle stazioni radio.
9. Pulsante PRESET 1, 2, 3, 4
10. 2.4” TFT display a colori
11. 3.5mm Jack
12. Porta USB (per la riproduzione di MP3
e la ricarica di dispositivi esterni)
13. 3.5mm Aux-in Jack
14. AC Presa
15. Antenna telescopica
Page 21
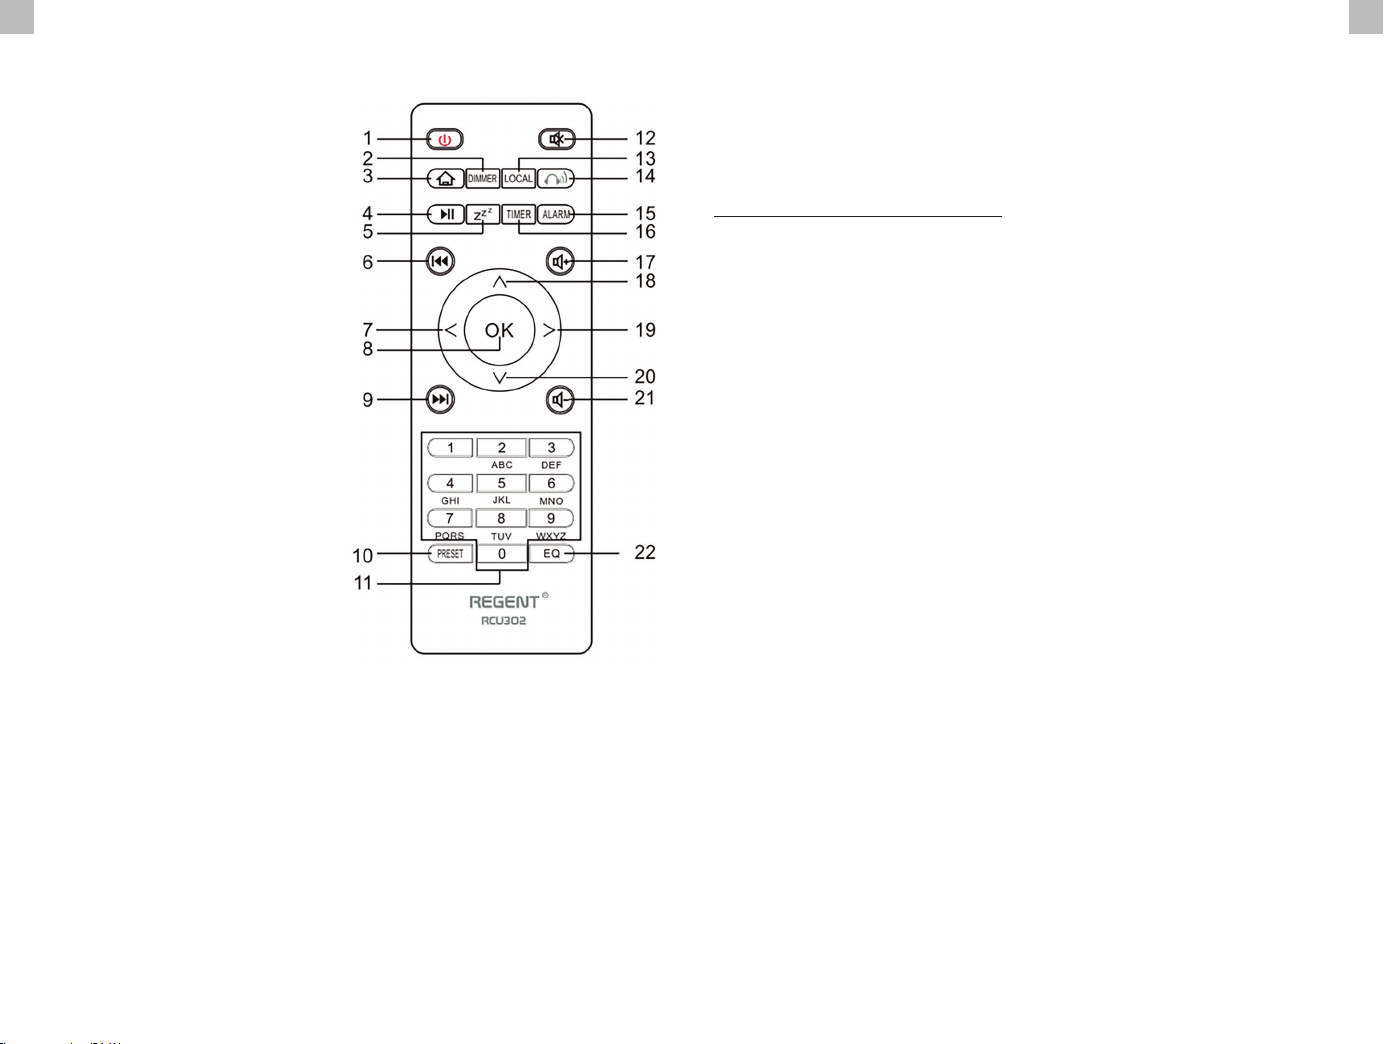
IT IT
Telecomando Iniziare
1. Pulsante POWER ON/STANDBY -
accensione/spegnimento del pickup
2. Pulsante DIMMER - dimmer
3. Pulsante HOME - premere per
tornare al menu principale
4. Pulsante PLAY/PAUSE -
premere per mettere in pausa/
riprendere la trasmissione
5. Pulsante SLEEP - mette il
ricevitore in modalità snooze
6. Pulsante PREVIOUS - premere
per tornare al brano precedente
7. Pulsante < - sposta il cursore a sinistra
8. Pulsante OK - conferma
della selezione
9. Pulsante NEXT - premere
per saltare un brano
10. Pulsante PRESET
11. Pulsanti 0-9 - selezione della
stazione preimpostata preferita,
immissione dei caratteri
12. Pulsante MUTE - muto
13. Pulsante LOCAL - premere per
accedere alle stazioni Internet locali
14. Pulsante BT - premere per abilitare/
disabilitare la trasmissione
alla funzione delle cue
15. Pulsante ALARM
16. Pulsante TIMER
17. Pulsante VOLUME + - aumenta il volume
18. Pulsante ^ - sposta il cursore verso l’alto
19. pulsante > - sposta il cursore a destra
20. Pulsante v - spostamento verso il basso del cursore
21. Pulsante VOLUME - - diminuisce il volume
22. Pulsante EQ - impostazioni dell’equalizzatore
Collegare il cavo di alimentazione alla macchina e alla presa a muro. La
radio chiederà se attivare il controllo rete all’accensione. <Controlla rete
dopo l’accensione>. Si suggerisce di abilitare questa funzione <Sì>. in
questo caso la radio vericherà sempre la connessione di rete.
Connessione alla tua rete Wi-Fi
Apparirà la schermata a lato. Puoi scegliere <Sì>per procedere alla ricerca della rete
WiFi disponibile. Se il router dispone della funzione WPS, è possibile selezionare <WPS>
per procedere. Inizierà quindi la scansione della rete. Al termine della ricerca, verrà
visualizzato un elenco dei router disponibili. Scegli il tuo router dall’elenco, inserisci il
codice WEP (Wired Equivalent Privacy) o WPA (Wi-Fi Protected Access). Se la tua rete non
è abilitata con il codice di sicurezza, l’unità si connetterà automaticamente al router.
Nota: il codice di crittograa sarebbe stato impostato dalla
persona che ha impostato e congurato la rete.
Seguire i passaggi seguenti per inserire il codice di crittograa
del router utilizzando i pulsanti sulla radio:
• Ruotare la manopola UP/DOWN per selezionare il carattere
• Premere cursore tasto destro per passare alla voce successiva
• Dopo aver terminato con le voci, premere la manopola UP/DOWN+OK
per confermare. NON premere nuovamente il tasto destro.
Inserimento della password Wi-Fi tramite il telecomando. Ricorda: il
cursore mostra dove inserisci il carattere. Premere più volte i seguenti
numeri sul telecomando per ottenere i caratteri corretti:
1. 1 (space) @ ! # $ % & ( ) + - . / : ; < = > ? [ \ ] ^ { | } ~
2. 2 A B C a b c
3. 3 D E F d e f
4. 4 G H I g h i
5. 5 J K L j k l
6. 6 M N O m n o
7. 7 P Q R S p q r s
8. 8 T U V t u v
9. 9 W X Y Z w x y z
In alternativa, è possibile inserire numeri e lettere utilizzando solo il pulsante del cursore:
• < - vai allo spazio di immissione precedente, la voce può essere sovrascritta
• > - passa allo spazio di immissione successivo, l’ultima voce viene salvata
• ^/v - seleziona numero/lettera
• OK - premi due volte per confermare
La radio inizierà la connessione alla rete. Potrebbero essere necessari alcuni secondi per
stabilire la connessione alla rete. Dopo che il router è stato connesso correttamente,
verrà visualizzato il menu principale. Ora puoi iniziare a goderti la radio.
Page 22

IT IT
Radio Internet
Scegli <Radio Internet> dal menu, puoi vedere diverse opzioni elencate. Per iniziare ad
ascoltare le stazioni radio di tutto il mondo, selezionare <Stazione radio/Musica>.
My Favorite
Serve per mostrare l’elenco delle stazioni preferite che sono state assegnate alle preselezioni.
Per preimpostare una stazione:
Durante la riproduzione della stazione preferita, premendo a lungo il tasto
PRESET e <Aggiungi a My Favorite> verrà visualizzato il menu. Premere
la manopola per confermare. La stazione di riproduzione verrà aggiunta
automaticamente all’elenco delle preselezioni. I preset verranno memorizzati
in ordine crescente. È possibile memorizzare no a 250 stazioni radio.
Puoi modicare la tua lista dei preferiti in qualsiasi momento. Vai a <Radio Internet>
<I miei preferiti> o premi il tasto PRESET, quando viene visualizzato l’elenco delle
stazioni preferite, premi il pulsante destro. Verranno visualizzate le seguenti opzioni:
Elimina – per eliminare la stazione selezionata.
Sposta in alto - per spostare la stazione selezionata di un livello in alto nella classica.
Sposta in basso - per spostare la stazione in basso di un livello nella classica.
Rinomina – per rinominare la stazione selezionata.
Riproduci - premi e riproduci la stazione selezionata.
Selezionare l’azione richiesta con il cursore e confermare con OK.
Per richiamare una stazione preimpostata:
Premere il tasto PRESET brevemente e scegliere la stazione desiderata.
Stazione Radio/Musica
Seleziona questa opzione, quindi puoi selezionare la stazione
radio desiderata per categoria, genere o posizione ecc.
Radio locale
Se desideri accedere rapidamente alla stazione radio situata nella tua zona tramite
Internet, seleziona questa funzione e visualizzerà l`elenco delle stazioni disponibili.
Cronologia
La radio memorizzerà le ultime 10 stazioni ascoltate.
Cerca una stazione
È possibile trovare la stazione radio desiderata inserendo il nome della radio.
Aggiungi nuova stazione radio
Se non riesci a trovare la stazione desiderata dall’elenco delle stazioni radio
e hai l’indirizzo URL, puoi inserire il collegamento qui e aggiungerlo all’elenco
dei preferiti. Nota: l’URL deve essere un URL di streaming audio per poter
essere riprodotto sulla radio. Quando la stazione radio è in riproduzione, il
display mostrerà un’immagine a colori trasmessa dalla stazione radio.
Bluetooth/Media Center
Bluetooth
La radio riceve e riproduce la musica in streaming da un altro dispositivo Bluetooth.
Scegli Bluetooth dal menu principale per accedere alla modalità Bluetooth. Una
volta entrato in modalità Bluetooth, sarà rilevabile da altri dispositivi Bluetooth.
1. Attiva il Bluetooth sul dispositivo e cerca „REGENT i351s”
dall’elenco. Selezionalo per avviare l’associazione.
2. Se la connessione è andata a buon ne, viene emesso un segnale acustico,
mentre „Bluetooth Connected” sul display LCD viene visualizzato.
3. Puoi iniziare a riprodurre musica dal tuo dispositivo Bluetooth ora.
Premere brevemente il pulsante PLAY/PAUSE per mettere in pausa o riprendere
la riproduzione. Ruotare la manopola UP/DOWN premere a lungo il pulsante
PREVIOUS/NEXT sull’unità principale o premere il pulsante PREVIOUS/
NEXT sul telecomando per passare alla traccia precedente/successiva.
Media Center
Riproduzione USB
1. Collegare un dispositivo di archiviazione USB direttamente
alla porta USB sul retro dell’unità.
2. Premere il pulsante HOME e utilizzare Navigazione UP/DOWN+OK
per selezionare Media Center dal menu principale.
3. Selezionare USB per accedere alla modalità USB, quindi utilizzare la manopola
di navigazione UP/DOWN+OK sull’unità o il pulsante ^/v+OK sul telecomando
per selezionare la cartella della musica per avviare la riproduzione.
Premere brevemente il pulsante PLAY/PAUSE per mettere in pausa o riavviare
la riproduzione. Ruotare la manopola UP/DOWN premere a lungo il pulsante
PREVIOUS/NEXT dell’unità principale o premere il pulsante PREVIOUS/
NEXT sul telecomando per passare alla traccia precedente/successiva.
Streaming musicale
Po skongurowaniu serwera kompatybilnego z UPnP/DLNA do udostępniania plików
multimedialnych Twojemu radiu, możesz rozpocząć strumieniowe przesyłanie muzyki.
1. Una volta che il server compatibile UPnP/DLNA è congurato per condividere
le multimediali con la radio, è possibile avviare lo streaming musicale.
2. Nel menu principale, seleziona [Media Center] e scegli [UPnP].
3. Potrebbero essere necessari alcuni secondi prima che la radio
completi la scansione dei server UPnP disponibili. Se non vengono
trovati server UPnP, verrà visualizzato [Elenco vuoto].
4. Al termine della scansione, seleziona il tuo server UPnP.
5. La radio mostrerà le categorie multimediali disponibili dal server
UPnP, ad esempio “Musica”, “Elenchi di riproduzione” ecc.
6. Scegli i le multimediali che desideri riprodurre. È possibile impostare la
modalità di riproduzione in Congurazione>Impostazione riproduzione.
Nota: Se disponi di server compatibili con DLNA, segui i passaggi descritti sopra per
sfogliare i le audio dal dispositivo compatibile con DLNA sulla radio da riprodurre.
Page 23

IT IT
BT Tx i DLNA
BT Tx (trasmettitore Bluetooth)
Questa radio Internet ore la possibilità di ascoltare utilizzando cue abilitate Bluetooth
o auricolari TWS in modalità wireless tramite il trasmettitore Bluetooth integrato.
1. Preimpostare il pulsante BT sul telecomando durante l’ascolto della
radio, il display mostrerà tre delle opzioni BT Tx come segue:
• Enable (Speaker On) - Per abilitare la funzione BT Tx e il suono proviene
ancora dall’altoparlante della radio contemporaneamente.
• Enable (Speaker O) - Per abilitare la funzione BT Tx e
nessun suono proviene dall’altoparlante della radio.
• Disabilita - Per disabilitare la funzione BT Tx.
2. Scegliere una delle opzioni. Abilita per abilitare la funzione BT Tx, quindi accendere
le cue o gli auricolari TWS abilitati Bluetooth. La radio impiegherà circa 30 secondi
per cercare e collegare automaticamente le cue o gli auricolari TWS. Una volta
completata la connessione, puoi ascoltare la radio con le cue o gli auricolari.
Nota: questo raggio funzionale è limitato a circa 140 metri (area aperta )
a secondo dell’ambiente circostante e del dispositivo utilizzato.
DLNA
Oltre a UPnP, questo dispositivo supporta anche la funzione DLNA. La radio Internet
può riprodurre lo streaming musicale da un dispositivo compatibile DLNA, a condizione
che la radio Internet e altri dispositivi DLNA siano nella stessa rete Wi-Fi. La radio
verrà rilevata come “REGENT i351s” quando si tenta di cercarla su altri dispositivi.
Nota: la funzione DLNA è compatibile e funziona con le corrispondenti app di
terze parti sulla piattaforma Android. I dispositivi Apple non sono supportati.
la banda FM, selezionare il canale da riprodurre. Se lo stesso canale è disponibile su
Internet, nell’angolo in basso a destra dello schermo apparirà un’icona. Tenere premuta
la manopola UP/DOWN+OK (oi pulsanti ^/v+OK sul telecomando), il ricevitore
passerà alla modalità radio Internet per riprodurre il canale corrispondente.
Modalità DAB
È possibile ascoltare i normali canali DAB senza connessione a Internet. Potrebbe
essere necessario estendere l’antenna telescopica o in un’altra direzione/
lunghezza dell’antenna per ottimizzare il livello di ricezione. Scegliere il DAB dal
menu principale per accedere alla modalità DAB. Se è la prima volta che si utilizza
la modalità DAB, la stazione radio DAB verrà scansionata automaticamente. Al
termine della scansione, verrà visualizzato l’elenco delle stazioni DAB.
Scegliere la stazione che si desidera ascoltare e premere la manopola UP/DOWN+OK
(o il tasto ^/v+OK del telecomando) per confermare la riproduzione. Premere il
tasto PREVIOUS (o < sul telecomando) per tornare all’elenco delle stazioni. Se si
preme il pulsante PREVIOUS (o < nuovamente sul telecomando), verrà visualizzato
come segue. Consente una nuova scansione della stazione DAB. Scegliere <NO>
per mantenere l’elenco delle stazioni esistenti e cercare eventuali nuove stazioni.
Scegliere <SI> per eliminare l’elenco delle stazioni esistente ed eseguire nuovamente
una scansione completa. Scegliere <ESC> per uscire dall’operazione in corso.
Per interrompere la riproduzione della stazione, premere la manopola UP/DOWN+OK dal
telecomando. Ogni volta che vuoi ripetere l`operazione, premi di nuovo lo stesso pulsante.
Congurazione
Modalità FM
Estendere l’antenna telescopica o in un’altra direzione/lunghezza dell’antenna potrebbe
essere necessario per ottimizzare il livello di ricezione. Scegli FM dal menu principale per
accedere alla modalità FM. Per eseguire la scansione automatica della successiva stazione
FM disponibile, tenere premuto il pulsante PREVIOUS/NEXT per 2 secondi, la radio cercherà
la successiva stazione disponibile. Se si desidera sintonizzare con precisione la frequenza,
ruotare la manopola UP/DOWN dell’unità o premere il pulsante ^/v sul telecomando.
Scansione di preselezione automatica
È disponibile un’opzione per la preselezione automatica della stazione FM. Premi la
manopola UP/DOWN+OK (o il tasto ^/v+OK sul telecomando), ti verrà chiesto se
eseguire la scansione automatica o meno. Scegli „Sì” e premi OK per confermare,
e inizierà la scansione e la preselezione della stazione. Al termine, premere brevemente
il pulsante PRESET e verrà visualizzata la prima stazione preimpostata.
Servizio successivo
Questa è una funzione che aiuta a trovare la stessa stazione su Internet, a condizione
che la stazione radio disponga di un usso Internet disponibile e sia adatta per la
riproduzione alla radio. L’ascolto della radio Internet consente di liberarsi dal rumore che
di solito è causato da interferenze o da una scarsa ricezione FM. Dopo aver scansionato
Visualizzazione dell’ora
È possibile scegliere la visualizzazione dell’ora su Analogico o Digitale.
Reter
Congurazione del wireless
Premere la manopola SU/GIU+OK (o ^/v+OK sul telecomando)
per eseguire la scansione della rete wireless disponibile.
Rete Wireless (WPS PBC)
Il WPS consente di connettere la radio al router premendo un tasto sulla radio e un tasto WPS
sul router per la connessione Wi-Fi, a condizione che il router disponga della funzione WPS.
Congurazione manuale
È possibile attivare o disattivare il DHCP e immettere il nome SSID o eliminare. l’SSID connesso.
Verica rete all’accensione
Consente di abilitare o disabilitare.
Data e ora
L’ora viene impostata automaticamente sulla propria area locale. Se
lo desideri, puoi scegliere di impostarla manualmente.
Page 24

IT IT
Imposta formato ora
Impostazione formato ora: 12 ore/24 ore.
Imposta data Formato
Formato della data: AAAA/MM/GG, GG/MM/AAAA e MM/GG/AAAA. Se viene selezionata la
congurazione manuale, nell’elenco apparirà anche l’opzione Impostazione ora legale (DST).
Sveglia
Doppia sveglia
Sono disponibili 2 sveglie e le seguenti impostazioni:
• Programmazione sveglia: è possibile programmare la sveglia ripetuta per
ogni giorno, un giorno particolare della settimana o solo una volta.
• Suono sveglia: Sveglia con radio (deve essere la stazione preimpostata),
Sveglia con melodia e Sveglia con segnale acustico.
• Volume allarme: selezionare questa opzione per regolare il livello del volume desiderato.
Sveglia NAP
Se desideri fare un pisolino o hai bisogno di una sveglia che scada in breve
tempo, puoi utilizzare questa funzione. È possibile selezionare il tempo
da 5 minuti no a 120 minuti. Nessuna funzione Snooze disponibile per
l’allarme NAP. Nota: L’allarme NAP rilascerà solo un segnale acustico.
Snooze
Quando suona la sveglia, premere un tasto qualsiasi tranne il tasto STANDBY
per entrare in modalita` <Snooze>. L’allarme si riattiva 5 minuti dopo. È sempre
possibile premere il pulsante STANDBY per annullare l’allarme. Nota: nel caso
in cui un problema di rete renda la riattivazione della radio non funzionante,
rilascerà automaticamente un segnale acustico dopo 1 minuto.
Timer
Premere </>/^/v sul telecomando per impostare il timer, quindi premere OK per confermare.
Dimmer
È possibile regolare la retroilluminazione del display LCD con le seguenti impostazioni:
• Risparmio energetico - È possibile impostare la retroilluminazione in modo che si attenui
quando non viene eseguita alcuna operazione per un determinato periodo di tempo.
• Accensione - È possibile regolare il livello di retroilluminazione
per la modalità di funzionamento.
• Display - È possibile scegliere il display a colori o in bianco e nero.
Gestione alimentazione
Questa funzione consente alla radio di andare in standby se non viene ricevuto alcun segnale
Internet per risparmiare energia. L’impostazione predenita è 15 minuti. Quando la radio non
riceve alcun segnale Internet, la radio entrerà in standby dopo 15 minuti. Sono disponibili
altri intervalli di tempo per 5 minuti e 30 minuti. Puoi anche scegliere di disattivarlo.
Sleep Timer
SLEEP, puoi vedere il timer di spegnimento nell’angolo in alto a destra del display.
Meteo
È possibile impostare la visualizzazione delle informazioni meteo in
modalità standby scegliendo diverse regioni e l’unità di misura della
temperatura. Per disattivare la visualizzazione del meteo, accedere
a Congurazione > Meteo > Mostra in standby > selezionare OFF
Impostazione radio locale
La radio rileverà automaticamente le stazioni locali e premere semplicemente
LOCALE sul telecomando per accedere alle stazioni radio locali la zona. Lo trovi
anche nel <Radio Internet> menu. Se desideri cambiare le stazioni locali in altri
paesi, puoi scegliere „Congurazione manuale” per eettuare la modica.
Congurazione della riproduzione Serve
Per impostare la preferenza della riproduzione UPnP. È possibile impostare
la riproduzione su O, Ripeti uno, Ripeti tutto, Casuale.
Equalizer
Seleziona il tuo equalizzatore preferito in base alle tue preferenze di ascolto.
BT Tx
Selezionare per abilitare o disabilitare la funzione BT Tx.
Riprendi all’accensione
La radio riprenderà a riprodurre l’ultima stazione ascoltata alla successiva
riaccensione se in questa opzione è selezionato ON. L’ON è impostato di default.
Dispositivo
Rinomina
La radio può riprodurre musica da dispositivi compatibili con DLNA collegati alla stessa
rete WiFi della radio. La radio verrà rilevata dai dispositivi DLNA con il nome „REGENT i351s”.
Questo è il nome per impostazione predenita. Puoi cambiare altro nome qui come desideri.
Remote App – AirMusic Control
Usa il tuo smartphone/tablet per controllare la radio installando l’App gratuita „AirMusic
Control”. È disponibile su Android Play Store e iOS App Store. Sia la radio che il dispositivo
con l’app remota installata devono essere sulla stessa rete WiFi per funzionare.
Aggiornamento software
Le informazioni sull’aggiornamento del software del ricevitore verranno
visualizzate sul display quando il produttore rilascia l’aggiornamento. Il download
dell’aggiornamento proviene da Internet e richiede la connessione a Internet anché
abbia eetto. Nota: questa opzione è solo per l’uso da parte del produttore.
Ripristina le impostazioni di default
Con questa opzione è possibile ripristinare le impostazioni del ricevitore allo stato originale.
Nota: tutte le impostazioni andranno perse quando si ripristinano le impostazioni predenite.
È possibile impostare il timer di spegnimento per mettere la radio in standby dopo un
certo tempo trascorso, da 15 minuti a 180 minuti con intervalli di ogni 15 minuti. Puoi
anche eseguire l’impostazione con il tasto SLEEP dal telecomando, quando premi
Usa il tuo cellulare, tablet o computer come telecomando remoto per
Spotify. Vai su spotify.com/connect per scoprire come
Page 25
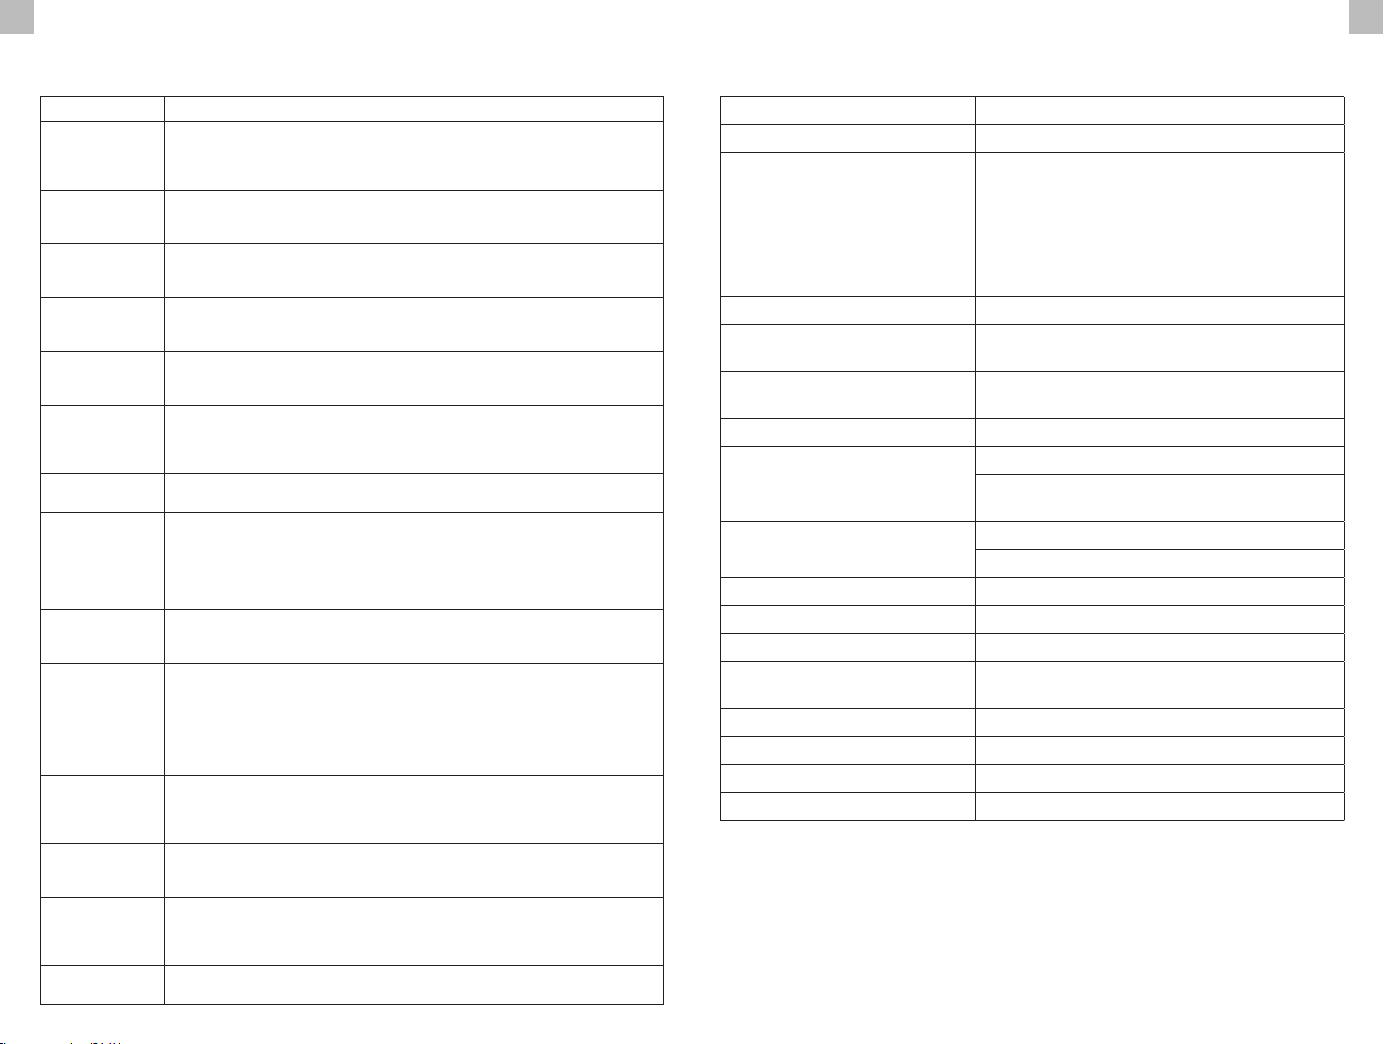
IT IT
Risoluzione dei problemi
Errore Rimedio
Nessuna indicazione
sul display, la
radio non risponde
al funzionamento
Nessuna operazione
tramite telecomando e` possibile
Ricezione DAB+
scadente
Ricezione FM scarsa
Qualità audio scadente durante la riproduzione di musica
Il dispositivo non
si accende
Nessun suono
Non è possibile
stabilire una
connessione di rete
Impossibile stabilire
la connessione WLAN
Nessuna stazione
trovata
L'allarme non
funziona
Impossibile eseguire
lo streaming DLNA
Interferenza
elettromagnetica
Il sistema si blocca
improvvisamente
Collegare il cavo di alimentazione direttamente ad una delle principali prese di elettricita`.
Batterie scariche o inserite in modo errato Vericare se le
batterie sono state inserite nella direzione corretta.
Nessuna stazione trovata, eseguire una scansione della stazione. Antenna
non completamente estesa. Modicare la posizione della radio (ad es.
più vicino alla nestra), ripetere la scansione delle stazioni.
Nessuna stazione trovata, eseguire una scansione della stazione. Antenna
non completamente estesa. Modicare la posizione della radio (ad es.
più vicino alla nestra), ripetere la scansione delle stazioni.
File con bit rate basso. Controlla il le audio. Suggerimento: per i le
MP3, la velocità in bit deve essere di 192K bit o superiore.
1. Vericare che l’adattatore di alimentazione sia collegato correttamente.
2. Il dispositivo potrebbe non funzionare correttamente se utilizzato
in aree con forti interferenze radio. Il dispositivo funzionerà di nuovo
correttamente una volta che non ci saranno più interferenze.
1. Attivare l’audio poiché potrebbe essere disattivato.
2. Aumentare il volume.
1. Controllare la funzione WLAN.
2. Prova a impostare un indirizzo IP sul dispositivo.
3. Attivare la funzione DHCP sul router ed eettuare nuovamente la connessione sul dispositivo.
4. Sulla rete è attivato un rewall – impostare il rispettivo
programma in modo tale che sia possibile l’accesso.
5. Riavviare l’unità per provare.
1. Vericare la disponibilità della rete WLAN sul punto di accesso.
2. Avvicinare il dispositivo al router.
3. Assicurarsi che la password WEP/WPA sia corretta.
1. Controllare la rete, il punto di accesso e il rewall.
2. La stazione potrebbe non essere attualmente disponibile,
riprovare più tardi o selezionare un’altra stazione.
3. Il collegamento della stazione è cambiato o la stazione non
trasmette più – chiedere informazioni al provider.
4. Il collegamento della stazione aggiunta manualmente non è
corretto, assicurarsi che sia corretto e reinserirlo.
1. Accendere l’allarme.
2. A causa dell’impostazione del volume, fare riferimento alle soluzioni di “Nessun suono”.
3. La sorgente dell’allarme è stata impostata come stazione ma non c’è connessione
di rete. Modicare la sorgente dell’allarme o ricongurare la connessione.
1. Vericare la connessione di rete. Il REGENT i351 e il tuo dispositivo devono
essere nella stessa rete. Verica se le condizioni della rete sono buone
2. Assicurati che le impostazioni sul tuo dispositivo siano corrette.
Il normale funzionamento del prodotto può essere disturbato da interferenze
elettromagnetiche. In tal caso, ripristinare semplicemente il prodotto per riprendere
il normale funzionamento seguendo il manuale di istruzioni. Nel caso in cui la
funzione non possa riprendere, utilizzare il prodotto in un’altra posizione.
Il REGENT i351s è sovraccarico, riavviare l’unità.
Speciche
Nome modello REGENT i351s
Display Colori TFT da 2.4”
OPEN, WEP
WPA PSKAES
Rete supportata
Streaming UPnP, DLNA
Formati di riproduzione
supportati (UPnP)
Formati di riproduzione
supportati (riproduzione USB)
Potenza in uscita (RMS) 15W x 2
Alimentazione
FM e DAB Frequenza
Consumo energetico 30W
Consumo energetico in standby < 2W
Supporto V5.0
Bluetooth Portata
operativa Bluetooth
Frequenza di trasmissione 2.4 GHz
Protocolli A2DP 1.2
Funzionante Temperatura 0°C~35°C
Umidità di lavoro 20%~80%
DICHIARAZIONE DI CONFORMITÀ SEMPLIFICATA
Produttore: Ferguson Sp. z o.o., ul. Dworska 1, 61-619 Poznań
Nome:
Reggente i351s
Tipo di dispositivo: Ricevitore radio
Il suddetto prodotto è conforme alla Direttiva 2014/53/UE del Parlamento Europeo e del Consiglio
del 16 aprile 2014 sull'armonizzazione delle legislazioni degli Stati membri relative alla messa a
disposizione sul mercato delle apparecchiature radio e che abroga la Direttiva 1999/5/CE.
Dichiarazione di conformità completa per il download all'indirizzo: https://ferguson-digital.eu/
deklaracje-zgodnosci/
WPA PSKAES/TKIP
WPA PSKTKIP
WPA 2 PSK AES
WPA 2 PSK AES/TKIP
WPA 2 PSK TKIP
MP3, WMA, AAC, FLAC, WAV
MP3, WMA, WAV
Ingresso: AC 100-240V ~ 50/60Hz
Uscita USB: DC 5V1A (Solo per la
ricarica di telefoni Android)
FM: 87.5-108MHz
DAB: 174.928-239.2MHz
no a 140 metri (area aperta)
Page 26
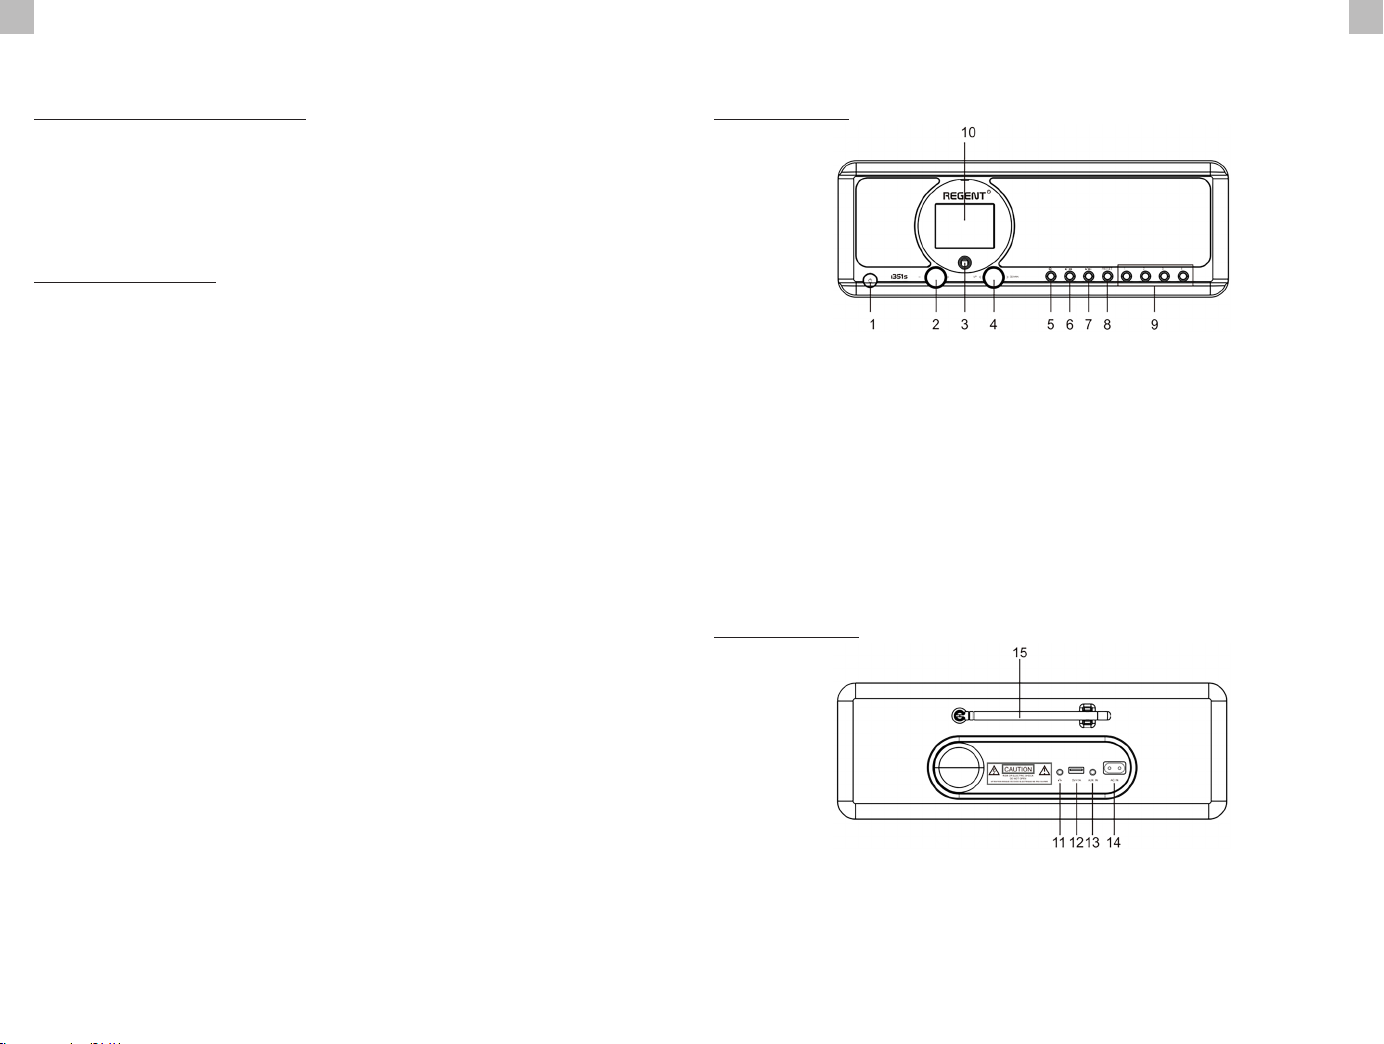
FR FR
Introduction
L’apparence et la description des boutons/fonctions
Conguration réseau requise
Avant utilisation, veuillez vérier que les conditions suivantes sont remplies:
• Accès Internet haut débit - Utilisation d’un point d’accès sans l,
d’un routeur ou d’un périphérique réseau similaire.
• Un ordinateur ou un smartphone capable de se connecter au réseau local.
Les appareils doivent être sur le même réseau que le récepteur.
Mesures de sécurité
• Veuillez lire attentivement le manuel d’utilisation et ses recommandations.
• Veuillez lire attentivement le manuel avant de démarrer
l’équipement pour la première fois.
• Pour éviter les chocs électriques, n’ouvrez jamais le boîtier. Tout
dommage au sceau de garantie annulera la garantie.
• Débranchez l’appareil du secteur pendant les orages ou lorsqu’il ne doit
pas être utilisé pendant une longue période. N’oubliez pas que la garantie
ne couvre pas les dommages causés à l’appareil par la foudre.
• N’exposez pas l’appareil à la lumière directe du soleil. Tenir à l’écart des
sources de chaleur et des environnements humides. Ne bloquez pas les
ouvertures de ventilation pour assurer une bonne circulation de l’air.
• Placez l’appareil en position horizontale sur une surface plane, plane et stable.
• Si vous déplacez l’appareil d’une pièce chaude à une pièce froide ou vice versa, attendez
au moins 1 heure avant de l’allumer. Ne pas le faire peut causer des problèmes.
• Gardez l’appareil éloigné des vases, bouteilles, aquariums et autres
sources de liquide an d’éviter tout dommage. Ne touchez pas
la prise d’alimentation avec les mains non protégées.
• Ne placez aucun objet sur le boîtier de l’appareil. Avant de commencer tout travail de
maintenance ou d’installation, débranchez l’appareil de l’alimentation électrique.
• N’utilisez pas d’alcool ou de liquides contenant de l’ammoniac pour
nettoyer l’appareil. Si nécessaire, nettoyez-le avec un chion doux
non pelucheux imbibé d’une solution d’eau et de savon doux.
• Ne branchez aucun câble lorsque la che d’alimentation est dans la prise.
• Vériez si vous avez des câbles fonctionnels. Des câbles
endommagés peuvent provoquer un incendie.
• Veuillez débrancher l’appareil de l’alimentation électrique pendant les connexions.
Panneau avant
1. Bouton POWER ON/STANDBY
2. Bouton de volume - tournez
pour régler le niveau de volume;
appuyez pour couper le son
3. Capteur infrarouge
4. Bouton UP/DOWN et bouton OK tournez pour naviguer ou avancer/
reculer rapidement; appuyer
pour conrmer la sélection
5. Bouton HOME - appuyez pour
revenir au menu principal
Panneau arrière
6. Bouton PREVIOUS ◄ - à
gauche/piste précédente
7. Bouton NEXT ► - à droite/piste suivante
8. Bouton PRESET - appuyez
brièvement pour rappeler la station
mémorisée; appuyez et maintenez
ce bouton pour entrer dans le mode
de mémorisation de la station
9. Boutons PRESET 1, 2, 3, 4
10. Achage couleur
11. Prise casque 3,5 mm
12. Port USB (Sortie: 5V, 1A)
13. Entrée 3,5mm Aux-in Jack
14. Prise de courant
15. Antenne télescopique
Page 27
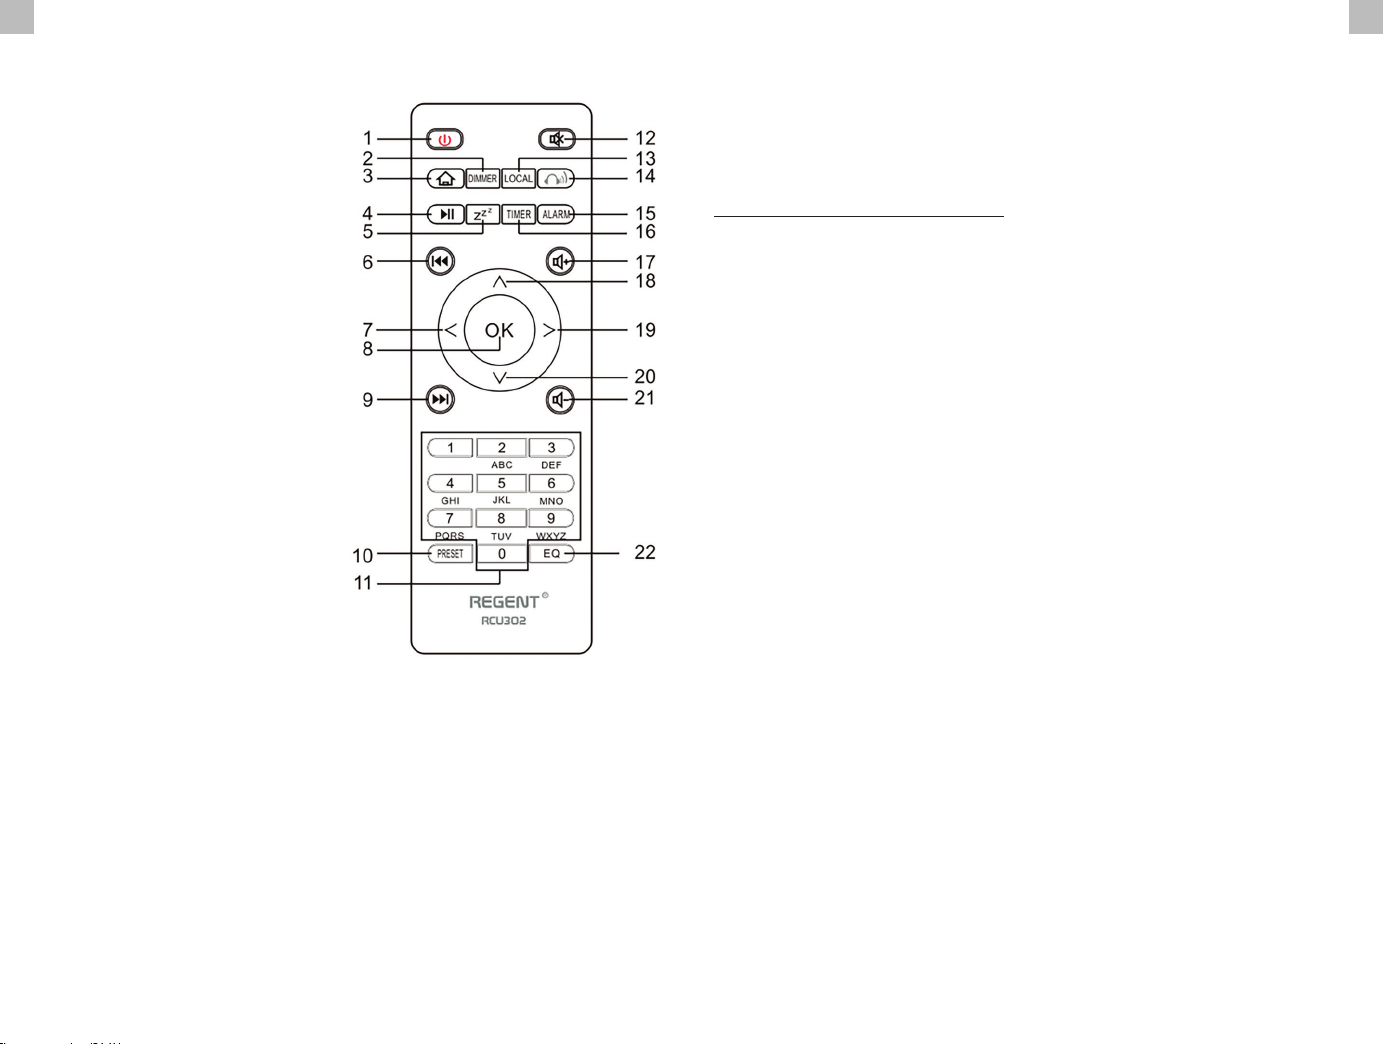
FR FR
Télécommande Premier démarrage
1. Bouton POWER ON/STANDBY
- allumer/ éteindre le micro
2. Bouton DIMMER - gradateur
3. Bouton HOME - appuyez pour
revenir au menu principal
4. Bouton PLAY/PAUSE - appuyez
pour mettre en pause/
reprendre la transmission
5. Bouton SLEEP - met le
récepteur en mode snooze
6. Bouton PREVIOUS - appuyez
pour revenir en arrière
7. Bouton < - déplace le
curseur vers la gauche
8. Bouton OK - conrmation
de la sélection
9. Bouton NEXT - appuyez
pour sauter un chanson
10. Bouton PRESET
11. Boutons 0-9 - sélection de la
station préréglée préférée,
saisie de caractères
12. Bouton MUTE - sourdine
13. Bouton LOCAL - appuyez pour
accéder aux stations Internet locales
14. Bouton BT - appuyez pour activer/
désactiver la transmission au casque
15. Bouton ALARM
16. Bouton TIMER
17. Bouton VOLUME + - Augmenter le volume
18. Bouton ^ - déplacer le curseur vers le haut
19. Bouton > - déplace le curseur vers la droite
20. Bouton v - déplacement vers le bas du curseur
21. Bouton VOLUME - - diminue le volume
22. Bouton EQ - paramètres de l’égaliseur
Branchez le cordon d’alimentation à l’appareil et à la prise murale. La radio vous
demandera si vous souhaitez activer la vérication du réseau lors de la mise en
marche. <Vérier le réseau après la mise sous tension>. Il est suggéré d’activer cette
fonction <OUI>, dans ce cas, la radio vériera toujours une connexion réseau.
Connexion à votre réseau Wi-Fi
Lorsque l’écran de conguration du réseau apparaît, vous pouvez sélectionner <OUI>
pour lancer la recherche des réseaux Wi-Fi disponibles. Si votre routeur dispose du WPS,
vous pouvez sélectionner <WPS> pour congurer le réseau. L’analyse du réseau Wi-Fi
démarre. Après la numérisation, une liste des réseaux disponibles s’achera. Sélectionnez
votre réseau dans la liste et entrez votre mot de passe réseau. Si votre réseau n’est pas
sécurisé après l’avoir sélectionné dans la liste, la radio s’y connectera automatiquement.
Remarque: le mot de passe réseau peut avoir été déni par votre
installateur ou votre fournisseur de services Internet.
Suivez les étapes ci-dessous pour saisir votre mot de passe Wi-Fi:
• tourner le bouton UP/DOWN pour sélectionner un caractère,
• appuyez sur le bouton NEXT ou sur le bouton curseur
droit pour passer à l’entrée suivante,
• après avoir terminé la saisie, appuyez sur la molette UP/DOWN+OK pour conrmer.
Saisie du mot de passe Wi-Fi à l’aide de la télécommande. N’oubliez pas: le
curseur indique où vous entrez le caractère. Appuyez plusieurs fois sur les chires
suivants de la télécommande pour obtenir les caractères appropriés:
1. 1 (space) @ ! # $ % & ( ) + - . / : ; < = > ? [ \ ] ^ { | } ~
2. 2 A B C a b c
3. 3 D E F d e f
4. 4 G H I g h i
5. 5 J K L j k l
6. 6 M N O m n o
7. 7 P Q R S p q r s
8. 8 T U V t u v
9. 9 W X Y Z w x y z
Vous pouvez également utiliser les boutons du curseur pour saisir les caractères appropriés:
• < - passer au champ précédent, le champ peut être écrasé
• > - passer au champ suivant, la dernière entrée est conservée
• ^ / v - sélection de caractères
• OK - cliquez deux fois pour conrmer le mot de passe saisi
La radio essaie de se connecter au réseau sans l. La connexion au réseau peut
prendre quelques secondes. Une fois la connexion établie, le menu principal
s’ache. Vous pouvez maintenant commencer à proter de votre radio Internet.
Page 28

FR FR
Radio Internet
Sélectionnez <Radio Internet> dans le menu, vous verrez plusieurs options. Pour commencer
à écouter les stations de radio du monde entier, sélectionnez <Station Radio/Musique>.
Mon préféré
Une liste de vos stations de radio préférées est achée.
Pour programmer une station:
Pendant la lecture de votre station préférée, appuyez longuement sur le
bouton PRESET pour acher le menu <Ajouter aux préférés>. Appuyez sur le
bouton pour conrmer. La station en cours de lecture sera automatiquement
ajoutée à la liste des stations préréglées. Les stations seront enregistrées dans
l’ordre croissant. Vous pouvez enregistrer jusqu’à 250 stations de radio.
Vous pouvez modier votre liste de stations préférées à tout moment. Allez sur <Radio
Internet> <Mon préféré.s> ou appuyez sur le bouton PRESET lorsque la liste des stations
favorites s’ache, puis appuyez sur le bouton NEXT. Les options suivantes seront achées:
Supprimer - pour supprimer la station sélectionnée
Haut - pour déplacer la station sélectionnée d’un niveau dans le classement
Bas - pour déplacer la station sélectionnée d’un niveau vers le bas dans le classement
Renommer - pour renommer la station sélectionnée
Écouter - pour écouter la station sélectionnée
Sélectionnez l’action requise avec le curseur et validez avec le bouton OK.
Pour rappeler une station préréglée:
Appuyez sur le bouton PRESET brièvement et sélectionnez la station que vous voulez.
Station Radio/Musique
Sélectionnez cette option pour sélectionner la station de radio
souhaitée par catégorie, genre, emplacement, etc.
Radio locale
Si vous souhaitez accéder rapidement à une station de radio de votre région via Internet,
sélectionnez cette option et une liste des stations disponibles dans votre région s’achera.
Histoire
La radio se souviendra des 10 dernières stations écoutées.
Rechercher une station
Vous pouvez trouver la station de radio que vous souhaitez en saisissant le nom de la station.
Ajouter une nouvelle radio
Si vous ne trouvez pas la station souhaitée dans la liste des stations de radio et que
vous connaissez son URL, vous pouvez entrer un lien ici et ajouter la station à votre
liste de favoris. Remarque: Le lien doit être une URL de streaming audio an de jouer
la station sur le récepteur. Alors que la station de radio joue, l’écran ache une image
couleur envoyé par la station de radio (si la station fournit ces informations).
Bluetooth/Media Center
Bluetooth
La radio reçoit et lit la musique diusée par un autre appareil Bluetooth. Sélectionnez
<Bluetooth> dans le menu principal pour entrer en mode Bluetooth. Une fois qu’il est entré
en mode Bluetooth, vous pourrez découvrir le récepteur à partir d’autres appareils Bluetooth.
1. Activez Bluetooth sur l’appareil Bluetooth et recherchez un appareil nommé
„REGENT i351s” dans la liste. Sélectionnez cette option pour démarrer le jumelage.
2. Si la connexion est réussie, vous entendrez un bip et pendant
ce temps l’écran LCD achera „Bluetooth connecté”.
3. Vous pouvez maintenant commencer à écouter de la
musique à partir de votre appareil Bluetooth.
Une brève pression sur le bouton PAUSE interrompt ou reprend la lecture. Tournez la molette
UP/DOWN ou maintenez les boutons PREVIUS/NEXT sur l’unité principale ou appuyez sur
le bouton PREVIUS/NEXT de la télécommande pour passer à la piste précédente/suivante.
Media Center
Lecture USB
1. Connectez le périphérique de stockage USB directement
au port USB situé à l’arrière de l’appareil.
2. Appuyez sur le bouton HOME et utilisez les boutons UP/DOWN+OK
pour sélectionner Media Center dans le menu principal.
3. Sélectionnez USB pour accéder au mode USB, puis utilisez la molette UP/
DOWN+OK de l’appareil ou les boutons ^/v+OK de la télécommande
pour sélectionner un dossier/une musique et lancer la lecture.
Appuyez brièvement sur le bouton PLAY/PAUSE pour mettre en pause ou reprendre
la lecture. Tournez la molette UP/DOWN ou appuyez et maintenez les boutons
PREVIUS/NEXT sur l’unité principale ou appuyez sur les boutons PREVIOUS/
NEXT sur la télécommande pour passer à la piste précédente/suivante.
Musique en streaming
Après avoir conguré le serveur compatible UPnP/DLNA pour partager des chiers
multimédias avec votre radio, vous pouvez commencer à diuser de la musique.
4. Sélectionnez <Media Center> dans le menu principal et sélectionnez <UPnP>.
5. L’appareil peut prendre quelques secondes pour terminer l’analyse des serveurs
UPnP disponibles. Si aucun serveur UPnP n’est trouvé, <Liste vide> sera aché.
6. Après une analyse réussie, veuillez sélectionner le serveur UPnP.
7. La radio achera les catégories de médias disponibles sur le serveur
UPnP, par exemple „Musique”, „Listes de lecture”, etc.
8. Sélectionnez les chiers multimédias que vous souhaitez jouer.
9. Vous pouvez dénir le mode de lecture dans <Conguration> <Réglages de lecture>.
Remarque: Si vous avez des serveurs compatibles DLNA disponibles, suivez les étapes cidessus pour parcourir et lire des chiers audio à partir d’un périphérique compatible DLNA.
Page 29

FR FR
BT Tx et DLNA
BT Tx (émetteur Bluetooth)
Cette radio Internet vous ore la possibilité d’écouter sans l avec un casque
compatible Bluetooth ou des écouteurs TWS via l’émetteur Bluetooth intégré.
1. Appuyez sur la touche BT sur la télécommande tout en écoutant les
médias, l’écran ache trois options pour le mode BT Tx comme suit:
• Activer (haut-parleur allumé) - pour activer la fonction BT Tx et le son
proviendra toujours du haut-parleur de la radio en même temps.
• On (haut-parleur désactivé) - pour activer la fonction BT
Tx et désactiver le son du haut-parleur de la radio.
• Désactiver - pour désactiver la fonction BT Tx.
2. Sélectionnez l’une des options Activer pour activer la fonction BT Tx, puis allumez
les écouteurs Bluetooth ou les écouteurs TWS. Il faudra environ 30 secondes pour
rechercher et connecter automatiquement les écouteurs ou les écouteurs TWS. Une
fois connecté, vous pouvez écouter la radio avec un casque ou des écouteurs.
Remarque: la portée de l’émetteur Bluetooth est limitée à environ 140 mètres
(espace ouvert ) en fonction de l’environnement et de l’appareil utilisé.
DLNA
Outre UPnP, cet appareil peut également prendre en charge la fonction DLNA. La radio
Internet peut lire un ux musical à partir d’un appareil compatible DLNA tant que la radio
Internet et les autres appareils DLNA sont sur le même réseau Wi-Fi. La radio sera détectée
comme „Regent i351s” lorsque vous essayez de la rechercher sur d’autres appareils.
Remarque: la fonction DLNA est compatible et fonctionne avec les applications tierces
correspondantes sur la plate-forme Android. Les appareils Apple ne sont pas pris en charge.
Mode FM
Déployez l’antenne télescopique et ajustez sa disposition pour optimiser le niveau
de réception. Sélectionnez FM dans le menu principal pour entrer en mode FM. Pour
rechercher automatiquement la station FM suivante/disponible, appuyez et maintenez
enfoncé le bouton PREVIOUS ou NEXT pendant 2 secondes, la radio recherchera
automatiquement une station disponible. Si vous souhaitez aner la fréquence, tournez
la molette UP/DOWN de l’appareil ou appuyez sur les boutons ^/v de la télécommande.
Analyse automatique des paramètres prédénis
Vous pouvez prérégler automatiquement les stations FM. Appuyez sur la molette UP/
DOWN+OK (ou les ^/v + boutons OK sur la télécommande), il vous sera demandé si vous
souhaitez eectuer un balayage automatique ou non. Sélectionnez „Oui” et appuyez sur OK
pour conrmer et le balayage et le préréglage des stations commenceront. Une fois terminé,
appuyez brièvement sur le bouton PRESET, la première station préréglée sera achée.
Station de suivi
Il s’agit d’une fonction qui vous aide à trouver la même station sur Internet, à condition
que la station de radio dispose d’un ux Internet disponible et qu’elle puisse être
diusée à la radio. L’écoute de la radio Internet vous permet de vous libérer du bruit qui
est généralement causé par des interférences ou une mauvaise réception FM. Après
avoir balayé la bande FM, sélectionnez le canal à lire. Si la même chaîne est disponible
sur Internet, une icône apparaîtra dans le coin inférieur droit de l’écran. Appuyez et
maintenez enfoncé le bouton UP/DOWN+OK (ou ^/v + boutons OK sur la télécommande),
le récepteur passe en mode radio Internet pour jouer le canal correspondant.
Mode DAB
Vous pouvez écouter les chaînes DAB régulières sans connexion Internet. Déployez
l’antenne télescopique et ajustez sa disposition pour optimiser le niveau de réception.
Sélectionnez DAB dans le menu principal pour entrer en mode DAB. Si vous utilisez le
mode DAB pour la première fois, le récepteur recherchera automatiquement les stations de
radio DAB. Après le balayage, le récepteur achera une liste des stations DAB trouvées.
Sélectionnez la station que vous souhaitez écouter et appuyez sur le bouton UP/
DOWN+OK (ou ^/v + bouton OK de la télécommande) pour conrmer la lecture. Appuyez
sur le bouton PREVIOUS (ou sur la télécommande) pour revenir à la liste des stations.
Il vous permet également de rechercher à nouveau les stations DAB. Sélectionnez
<NON> pour conserver la liste des stations existantes et rechercher de nouvelles
stations. Sélectionnez <OUI> pour supprimer la liste de stations existante et eectuer
à nouveau un balayage complet. Sélectionnez <ESC> pour quitter l’opération en cours.
Pour arrêter la lecture d’une station, appuyez sur le bouton PLAY/PAUSE. Chaque fois
que vous souhaitez reprendre le jeu, appuyez à nouveau sur le même bouton.
Conguration
Achage de l’heure
Vous pouvez choisir d’acher l’heure en mode analogique ou numérique.
Réseau
Conguration du réseau sans l
Appuyez sur la molette UP/DOWN+OK (ou sur le bouton ^/v+OK de la
télécommande) pour rechercher les réseaux sans l disponibles.
Réseau sans l (WPS PBC)
WPS permet à la radio de se connecter au routeur en appuyant sur le
bouton d’appareil et sur le bouton WPS du routeur pour la connexion
Wi-Fi, à condition que le routeur dispose de la fonction WPS.
Conguration manuelle
Vous pouvez activer ou désactiver DHCP et saisir le nom du réseau
(SSID) ou supprimer le réseau connecté (SSID).
Vérier le réseau après la mise sous tension
Activez ou désactivez la vérication et la connexion réseau
lors de la mise sous tension du récepteur.
Date et l’heure
L’heure est automatiquement réglée et adaptée à la situation géographique du
récepteur. Ce paramètre vous permet de modier manuellement la date et l’heure.
Page 30

FR FR
Dénir le format de l’heure
Réglage du format de l’heure : 12/24 heures.
Dénir le format de la date
Format de date : AAAA/MM/JJ, JJ/MM/AAAA et MM/JJ/AAAA. Si la conguration manuelle
est sélectionnée, l’option Réglage de l’heure d’été (DST) apparaîtra également dans la liste.
Alarme
Double réveil
Il y a 2 réveils et les paramètres suivants:
• Programmation d’alarme : vous pouvez programmer une alarme pour qu’elle se répète
pour chaque jour, un jour spécique de la semaine, ou sélectionner une seule alarme.
• Tonalité d’alarme: réveillez-vous à la radio (cela doit être une station
préréglée), réveillez-vous à la mélodie et réveillez-vous au son.
• Volume d’alarme: sélectionnez cette option pour régler le niveau de volume souhaité.
Alarme de répétition (snooze alarm)
Si vous souhaitez faire une sieste ou avez besoin d’un réveil en peu de
temps, vous pouvez utiliser cette fonction. Vous pouvez choisir une durée
de 5 à 120 minutes. La fonction de répétition n’est pas disponible pour
l’alarme NAP. Remarque: L’alarme NAP ne fera qu’émettre un bip.
Snooze
Lorsque l’alarme retentit, appuyez sur n’importe quelle touche, à l’exception du
bouton STANDBY, pour passer en mode <Snooze>. L’alarme sonnera à nouveau
5 minutes plus tard. Vous pouvez toujours appuyer sur le bouton STANDBY pour
annuler l’alarme. Remarque: il émet automatiquement un bip après 1 minute pour
les problèmes de réseau qui empêchent le réveil de la radio de fonctionner.
Minuteur
Appuyez sur ^/v/</> de la télécommande pour régler la
minuterie, puis appuyez sur OK pour conrmer.
Gradateur
Vous pouvez régler le rétroéclairage de l’écran LCD avec les paramètres suivants:
• Économie d’énergie - Vous pouvez régler le rétroéclairage pour qu’il diminue
lorsqu’il n’y a aucune opération pendant une certaine période de temps.
• Activer - Vous pouvez régler le niveau de rétroéclairage pour le mode de travail.
• Achage - Vous pouvez choisir entre un achage de style couleur et monochrome.
Gestion de l’énergie
Cette fonction permet au récepteur de passer en mode veille pour économiser de l’énergie
lorsqu’aucun signal Internet n’est reçu. Le paramètre par défaut est de 15 minutes. Lorsque le
récepteur ne reçoit aucun signal Internet, il passe en mode veille après 15 minutes. D’autres
délais sont disponibles : 5 minutes et 30 minutes. Le paramètre peut également être désactivé.
Minuterie de mise en veille
Vous pouvez régler une minuterie de mise en veille pour mettre la radio en mode veille
vous verrez la minuterie de sommeil dans le coin supérieur droit de l’écran.
Météo
Vous pouvez congurer l’achage des informations météo en mode veille en sélectionnant
diérentes régions et unités de température. Pour désactiver l’achage de la météo,
accédez à Conguration > Météo > Acher en veille > sélectionnez Désactivé.
Conguration radio locale
La radio détectera automatiquement les stations locales - appuyez simplement sur
LOCAL sur la télécommande pour accéder aux stations de radio de votre région.
Vous pouvez également trouver ce paramètre dans le menu <Radio Internet>.
Si vous souhaitez changer les stations locales vers d’autres pays, vous pouvez
sélectionner «Conguration manuelle» pour eectuer le changement.
Conguration de la lecture
Paramètres de préférence de lecture UPnP. Vous pouvez régler la
lecture sur O, Repeat One, Repeat All, Shue Songs.
Égaliseur
Choisissez votre égaliseur préféré en fonction de vos préférences.
BT Tx
Sélectionnez pour activer ou désactiver la fonction BT Tx.
Reprise après mise sous tension
S’il est allumé, le récepteur reprendra la lecture de la dernière station écoutée
lorsqu’il sera rallumé. Le paramètre ON est activé par défaut.
Appareil
Changer le nom de l’appareil
Le récepteur peut lire de la musique à partir d’appareils compatibles DLNA qui
sont connectés au même réseau Wi-Fi. Le récepteur sera détecté par les appareils
DLNA sous le nom «REGENT i351s». C’est le nom par défaut. Vous pouvez utiliser
ce paramètre pour renommer le récepteur en n’importe quoi d’autre.
Application à distance - Contrôle AirMusic
Vous pouvez utiliser l’application gratuite AirMusic Control pour gérer le récepteur à l’aide de
votre téléphone ou tablette. L’application est disponible sur Android Google Play et Apple App
Store. Le récepteur et l’appareil avec l’application installée doivent être sur le même réseau.
Mise à jour du logiciel
Des informations sur la mise à jour du logiciel du récepteur s’acheront à l’écran
lorsque le fabricant publiera la mise à jour. La mise à jour de téléchargement
provient d’Internet et nécessite une connexion Internet pour qu’elle prenne
eet. Remarque : cette option est réservée à l’usage du fabricant.
Restaurer les paramètres par défaut
Avec cette option, vous pouvez restaurer les paramètres du récepteur à leur état d’origine.
Remarque: tous vos paramètres seront perdus lorsque vous restaurez les paramètres par défaut.
après un certain laps de temps. Les plages horaires disponibles vont de 15 minutes à
180 minutes par pas de 15 minutes. Vous pouvez également eectuer des réglages
avec le bouton SLEEP de la télécommande: après avoir appuyé sur le bouton SLEEP,
Utilisez votre téléphone, votre tablette ou votre ordinateur comme une télécommande
pour contrôler Spotify. Accédez à spotify.com/connect pour en savoir plus.
Page 31
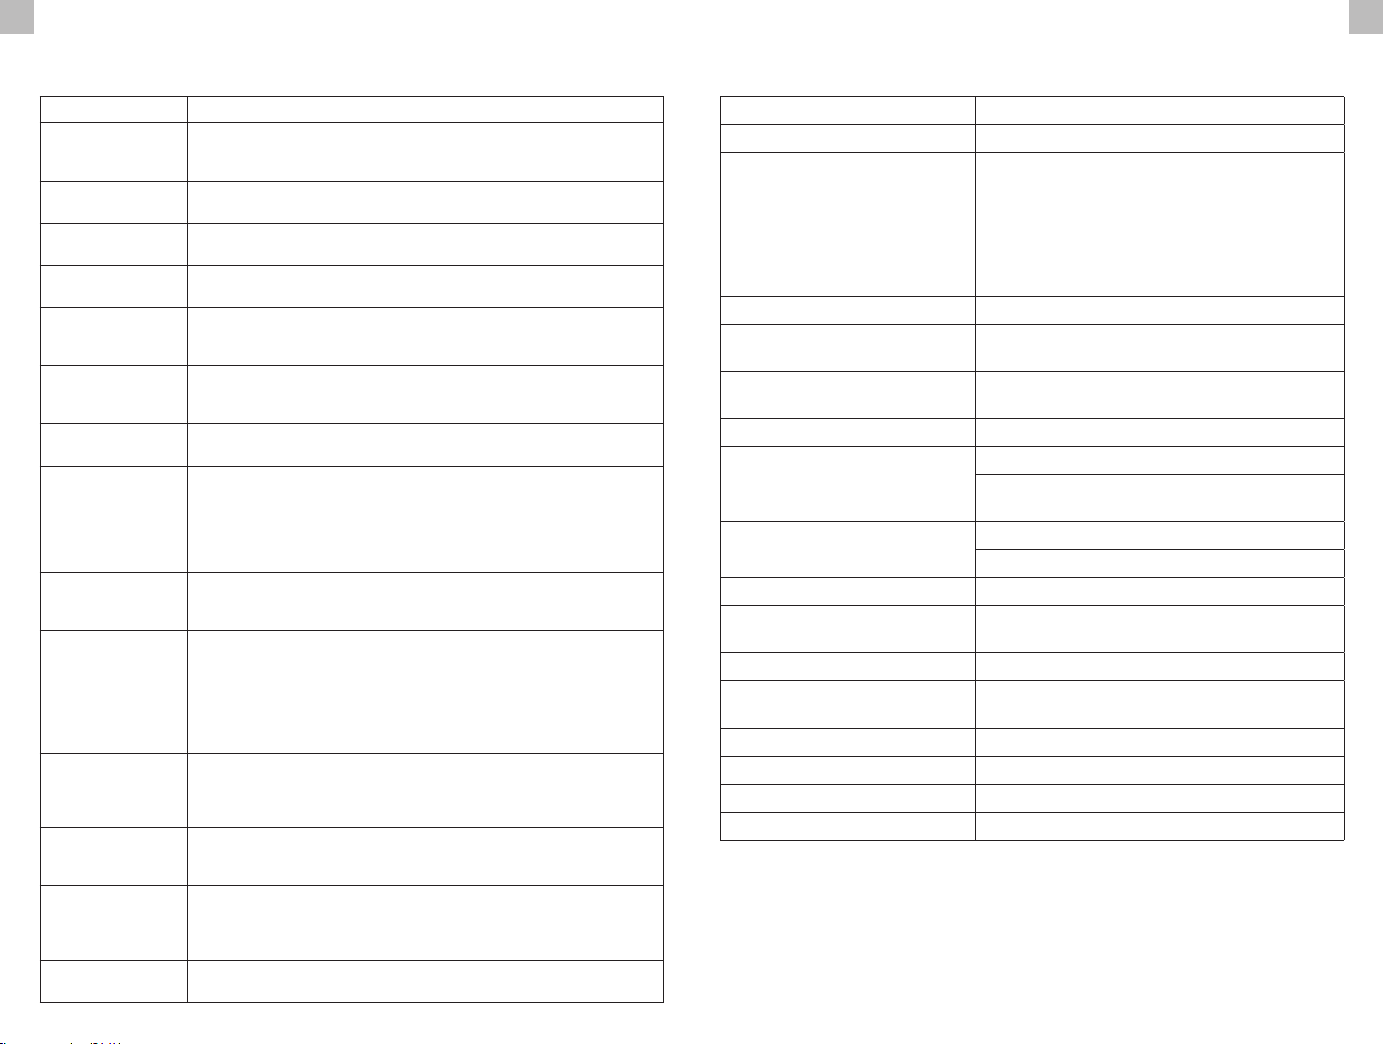
FR FR
Dépannage
Erreur Solution
Il n'y a pas d'achage,
la radio ne répond
pas à l'opération
Ne peut pas être utilisé
avec la télécommande
La réception DAB
+ est mauvaise
La réception FM
est mauvaise
Mauvaise qualité
sonore lors de la
lecture de musique
L'appareil ne
s'allume pas
Pas de son
Impossible d'établir
la connexion réseau
Une connexion WLAN
ne peut pas être établie
Station introuvable
L'alarme ne
fonctionne pas
Le streaming DLNA ne
peut pas être eectué
Interférence électromagnétique
Le système se bloque
soudainement
Congurer l'alimentation selon les instructions d'utilisation
et en utilisant les mesures fournies dans l'emballage.
Piles déchargées ou mal insérées. Vériez que les
piles sont installées dans le bon sens.
Antenne pas complètement déployée. Changez l'emplacement de la radio
(par exemple, plus près de la fenêtre). Répétez le balayage des stations.
Antenne pas complètement déployée. Changez l'emplacement de la radio
(par exemple, plus près de la fenêtre). Répétez le balayage des stations.
Fichier à faible débit. Vériez le chier audio. Conseil: Pour les
chiers MP3, le débit binaire doit être de 192Kbps ou plus.
1. Vériez que l’adaptateur secteur est correctement connecté.
2. L’appareil peut mal fonctionner lorsqu’il est utilisé dans des zones avec de fortes
interférences radio. Corrigez la cause de l’interférence ou déplacez l’appareil.
1. Activez le son car il peut être coupé.
2. Augmentez le volume.
1. Vériez la fonction WLAN.
2. Essayez de dénir l’adresse IP sur l’appareil.
3. Activez la fonction DHCP sur le routeur et rétablissez la connexion avec l’appareil.
4. Un pare-feu est activé sur le réseau - congurez le programme
approprié de manière à ce que l’appareil puisse accéder au réseau.
5. Redémarrez l’appareil pour forcer la connexion au réseau.
1. Vériez la disponibilité du WLAN sur le point d’accès.
2. Rapprochez l’appareil du routeur.
3. Assurez-vous que le mot de passe WEP/WPA est correct.
1. Vériez le réseau ainsi que le point d’accès et le pare-feu.
2. La station peut ne pas être disponible pour le moment,
réessayez plus tard ou sélectionnez une autre station.
3. Le lien de la station a été modié ou la station
n’émet pas - demandez à votre fournisseur.
4. Le lien vers la station ajoutée manuellement est incorrect,
assurez-vous qu’il est correct et saisissez à nouveau.
1. Activez l’alarme.
2. En raison du réglage du volume, consultez les solutions „Pas de son”.
3. La source d’alarme est dénie comme une station mais pas de connexion
réseau. Modiez la source d’alarme ou recongurez la connexion.
1. Vériez la connexion au réseau. „REGENT i351s” et votre appareil
doivent être sur le même réseau. Vériez que l’état du réseau est bon.
2. Assurez-vous que les paramètres de votre appareil sont corrects.
Le f
champs électromagnétiques. Réinitialisez le produit à son état d’origine
conformément au manuel d’utilisation pour reprendre un fonctionnement
normal. Si les problèmes persistent, déplacez le récepteur.
Le „REGENT i351s” est surchargé, veuillez redémarrer l’ appareil.
onctionnement normal du produit peut être perturbé par de forts
Spécication
Nom du modèle REGENT i351s
Acher Écran couleur TFT 2.4”
OPEN, WEP
WPA PSKAES
Réseaux pris en charge
Streaming UPnP, DLNA
Formats de lecture pris
en charge (UPnP)
Formats de lecture pris
en charge (USB)
Puissance de sortie (RMS) 15W x 2
Pouvoir
Fréquence FM et DAB
Consommation d'énergie 30W
Consommation
électrique en veille
Prise en charge Bluetooth V5.0
Portée de fonctionnement
Bluetooth
Fréquence de transmission 2.4 GHz
Protocoles A2DP 1.2
Température de fonctionnement 0°C~35°C
Humidité de fonctionnement 20%~80%
DÉCLARATION DE CONFORMITÉ SIMPLIFIÉE
Producteur: Ferguson Sp. z o.o., ul. Dworska 1, 61-619 Poznan
Nom:
Regent i351s
Type d'appareil: Récepteur radio
Le produit susmentionné est conforme à la directive 2014/53/UE du Parlement européen et du
Conseil du 16 avril 2014 relative à l'harmonisation des législations des États membres concernant la
mise à disposition sur le marché d'équipements hertziens et abrogeant la directive 1999/5/CE.
Déclaration de conformité complète à télécharger sur : https://ferguson-digital.eu/deklaracjezgodnosci/
WPA PSKAES/TKIP
WPA PSKTKIP
WPA 2 PSK AES
WPA 2 PSK AES/TKIP
WPA 2 PSK TKIP
MP3, WMA, AAC, FLAC, WAV
MP3, WMA, WAV
Entrée: AC 100-240V ~ 50/60Hz
Sortie USB: DC 5V1A (uniquement pour
charger un téléphone Android)
FM: 87.5-108MHz
DAB: 174.928-239.2MHz
< 2W
jusqu’à 140 mètres (espace ouvert)
Page 32
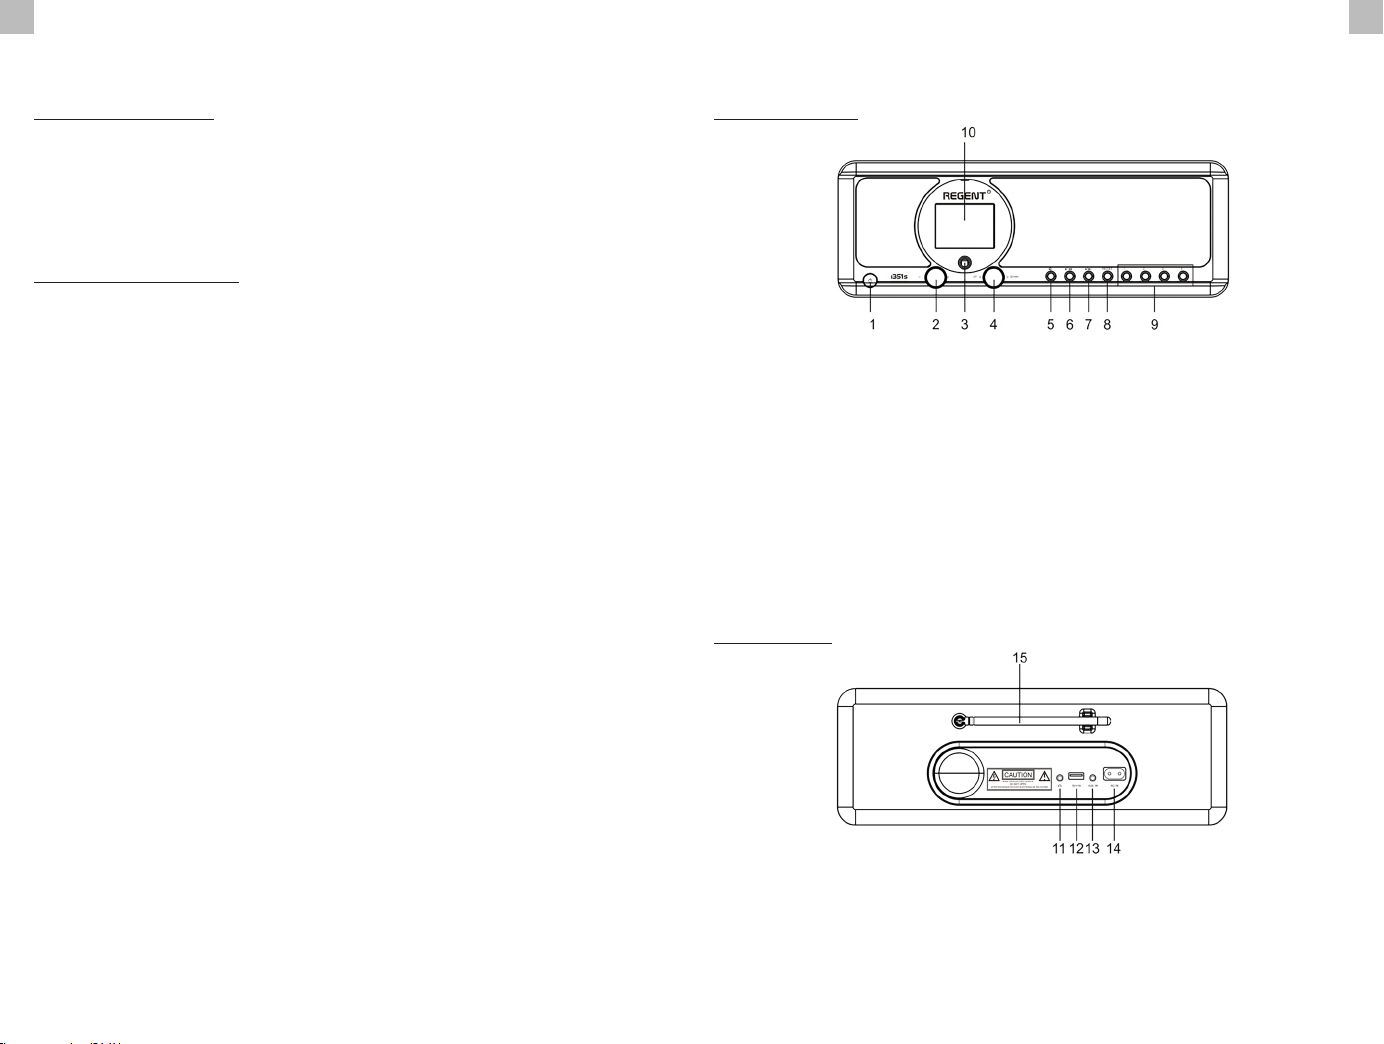
ES ES
Introducción
Aspecto y descripción de los botones/funciones
Requisitos de la red
Por favor, compruebe que se cumplen los siguientes requisitos antes de su uso:
• Acceso a Internet de banda ancha: mediante un punto de acceso
inalámbrico, un router o un dispositivo de red similar.
• Un ordenador o smartphone capaz de conectarse a la red local. Los
dispositivos deben estar en la misma red que radio receptor.
Medidas de seguridad
• Lea atentamente el manual de usuario y sus recomendaciones.
• Lea atentamente el manual antes de poner en marcha el equipo por primera vez.
• Para evitar descargas eléctricas, nunca abra la carcasa. El
daño al sello de garantía anulará la garantía.
• Desconecte el dispositivo de la red eléctrica durante tormentas eléctricas
o cuando no se vaya a utilizar durante un tiempo prolongado. Recuerde que la
garantía no cubre los daños al dispositivo causados por la caída de un rayo.
• No exponga el dispositivo a la luz solar directa. Mantener alejado de
fuentes de calor y de ambientes húmedos. No bloquee las aberturas de
ventilación para garantizar una circulación de aire adecuada.
• Coloque el dispositivo en posición horizontal sobre
una supercie plana, uniforme y estable.
• Si mueve el dispositivo de una habitación cálida a una fría y viceversa, espere
al menos 1 hora antes de encender. No hacerlo puede causar problemas.
• Mantenga el dispositivo alejado de jarrones, botellas, acuarios
y otras fuentes de agua para evitar dañar el dispositivo. No toque
el enchufe de alimentación con las manos desnudas.
• No coloque ningún objeto sobre la carcasa del dispositivo. Antes
de iniciar cualquier trabajo de mantenimiento o instalación,
desconecte el dispositivo de la fuente de alimentación.
• No use alcohol o líquidos que contengan amoníaco para limpiar el
dispositivo. Si es necesario, límpielo con un paño suave sin pelusa
humedecido con una solución de agua y jabón suave.
• No conecte ningún cable cuando el enchufe de alimentación esté en el enchufe.
• Compruebe si tiene cables que funcionen. Los cables
dañados pueden provocar un incendio.
• Desconecte el dispositivo de la fuente de alimentación mientras realiza las conexiones.
Panel delantero
1. Botón POWER ON/STANDBY
2. Perilla de volumen - gire para ajustar el
nivel de volumen; pulse para silenciar
3. Sensor de infrarrojos
4. Perilla UP/DOWN y botón OK - gire
para navegar o avanzar/retroceder;
pulse para conrmar la selección
5. Botón HOME - pulse para
volver al menú principal
6. Botón PREVIOUS ◄
- izquierda/pista anterior
Panel trasero
11. Entrada de auriculares de 3.5 mm
12. Puerto USB (Salida: 5V, 1A)
13. Toma de entrada auxiliar de 3.5 mm
7. Botón NEXT ► - derecha/siguiente pista
8. Botón PRESET (de preajuste) - púlselo
brevemente para recuperar la emisora
guardada; mantenga pulsado este
botón para entrar en el modo de
memorización de la emisora
9. Botones PRESET 1, 2, 3, 4
10. Pantalla en color
14. Toma de corriente
15. Antena telescópica
Page 33
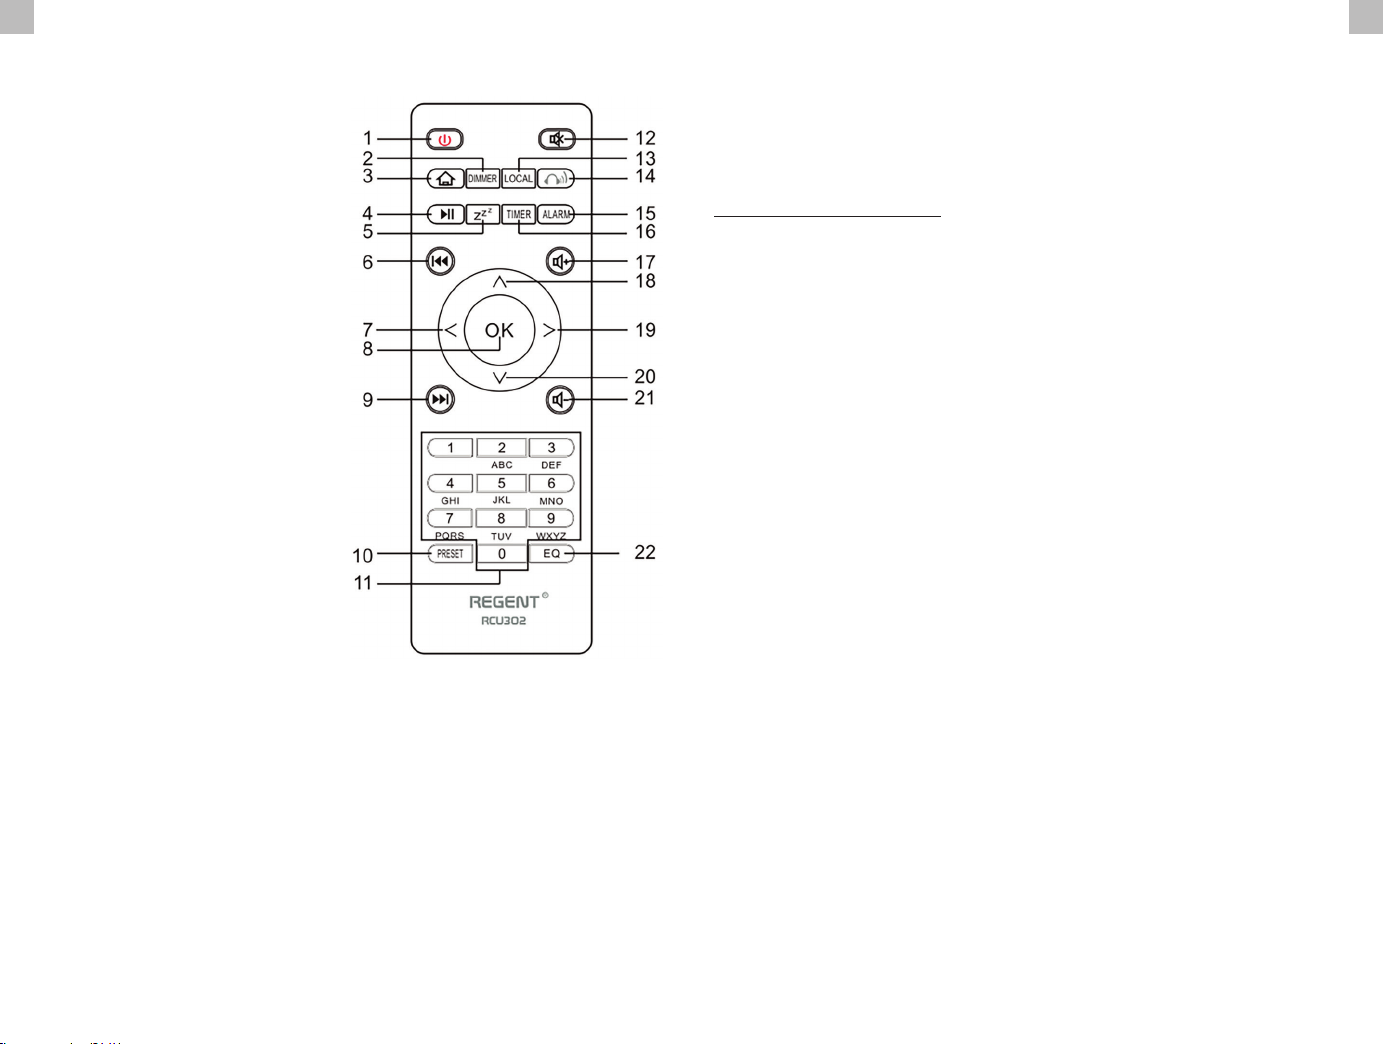
ES ES
Control remoto Primer pasos
1. Botón POWER ON/STANDBY
- encender/apagar el dispositivo
2. Botón DIMMER - regulador
de intensidad
3. Botón HOME - pulse para
volver al menú principal
4. Botón PLAY/PAUSE - pulse para
pausar/reanudar la transmisión
5. Botón SLEEP - pone el
receptor en modo snooze
6. Botón PREVIOUS - púlselo
para rebobinar una pista
7. Botón < - mover el cursor
a la izquierda
8. Botón OK - conrmar la selección
9. Botón NEXT - pulse para
saltar una pista
10. Botón PRESET (de preajuste)
11. Botón 0-9 - seleccionar la
emisora favorita guardada,
introducir caracteres
12. Botón MUTE - silenciar
13. Botón LOCAL - púlselo para acceder
a las emisoras locales de Internet
14. Botón BT - pulse para activar/
desactivar la transmisión
a los auriculares
15. Botón ALARM
16. Botón TIMER
17. Botón VOLUME + - sube el volumen
18. Botón ^ - movimiento del cursor hacia arriba
19. Botón > - movimiento del cursor hacia la derecha
20. Botón v - movimiento del cursor hacia abajo
21. Botón VOLUME - - botón para bajar el volumen
22. Botón EQ - ajustes del ecualizador
Conecte el cable de alimentación al aparato y al enchufe en la pared. La
radio le preguntará si desea activar la vericación de la red al encenderla.
<Comprobar red al encender>. Se sugiere habilitar esta función <Sí>. en este
caso la radio siempre buscará la disponibilidad de una conexión de red.
Conectarse a la red Wi-Fi
Cuando aparezca la pantalla de conguración de la red, puede seleccionar <SÍ>
para iniciar la búsqueda de redes Wi-Fi disponibles. Si su router tiene WPS, puede
seleccionar <WPS> para congurar su red. Se iniciará el escaneo de la red Wi-Fi.
Después de escanear, se mostrará una lista de redes disponibles. Seleccione su
red en la lista e introduzca su contraseña de red. Si su red no es segura después
de seleccionarla en la lista, la radio se conectará automáticamente a ella.
Nota: La contraseña de la red puede haber sido establecida
por el instalador o por su proveedor de Internet.
Siga los siguientes pasos para introducir la contraseña de su red Wi-Fi:
• gire la perilla UP/DOWN para seleccionar un carácter,
• pulse la tecla NEXT o la tecla del cursor derecho para pasar a la siguiente entrada,
• cuando termine de introducirla, pulse el botón OK UP/DOWN para conrmarla.
Introducir la contraseña de la red Wi-Fi con el control remoto. Recuerde: el
cursor indica dónde introducir un carácter. Pulse varias veces los siguientes
números del control remoto para obtener los caracteres deseados:
1. 1 (espacio) @ ! # $ % & ( ) + - . / : ; < = > ? [ \ ] ^ { | } ~
2. 2 A B C a b c
3. 3 D E F d e f
4. 4 G H I g h i
5. 5 J K L j k l
6. 6 M N O m n o
7. 7 P Q R S p q r s
8. 8 T U V t u v
9. 9 W X Y Z w x y z
Alternativamente, utilice las teclas del cursor para introducir los caracteres adecuados:
• < - ir al campo anterior, el campo puede ser sobrescrito
• > - ir al siguiente campo, la última entrada se guarda.
• ^/v - seleccionar carácter
• OK - haga doble clic para conrmar la contraseña introducida
La radio empieza a intentar conectarse a la red inalámbrica. La conexión a la red
puede tardar unos segundos. Una vez establecida la conexión, se mostrará el
menú principal. Ya puedes empezar a disfrutar de tu radio por Internet.
Page 34

ES ES
Radio por Internet
Seleccione <Radio por Internet> en el menú, verá varias opciones. Para empezar
a escuchar emisoras de radio de todo el mundo, seleccione <Emisora de radio/música>.
Mis favoritos
Se muestra una lista de tus emisoras de radio favoritas.
Para preseleccionar una emisora:
Mientras reproduce su emisora favorita, una pulsación larga del botón PRESET
mostrará el menú <Añadir a favoritos>. Pulse el mando para conrmar.
La emisora que se está reproduciendo se añadirá automáticamente a la
lista de emisoras preestablecidas. Las emisoras se almacenarán en orden
ascendente. Puedes almacenar hasta 250 emisoras de radio.
Puedes editar la lista de emisoras preseleccionadas en cualquier momento. Vaya
a <Radio por Internet> <Mis favoritos> o pulse PRESET cuando aparezca la lista de
emisoras favoritas, y luego pulse NEXT. Se mostrarán las siguientes opciones:
Borrar - para eliminar la emisora seleccionada
Subir - para subir la emisora seleccionada un nivel en la clasicación
Abajo - para desplazar la emisora seleccionada un nivel hacia abajo en la clasicación
Renombrar - para cambiar el nombre de la emisora seleccionada
Play - para reproducir la emisora seleccionada
Seleccione con la tecla del cursor la acción deseada y conrme con OK.
Para recuperar una emisora preseleccionada:
Pulse brevemente el botón PRESET y seleccione la emisora deseada.
Emisora de radio/música
Seleccione esta opción para elegir la emisora de radio
deseada por categoría, género, ubicación, etc.
Radio local
Si quieres acceder rápidamente a una emisora de radio de tu zona a través de Internet,
selecciona esta opción y aparecerá una lista de emisoras disponibles en tu región.
Historia
La radio recordará las últimas 10 emisoras que has escuchado.
Búsqueda de estaciones
Puede encontrar la emisora de radio deseada introduciendo el nombre de la emisora.
Añadir una nueva emisora de radio
Si no encuentra la emisora que desea en la lista de emisoras de radio y conoce su
URL, puede introducir el enlace aquí y añadir la emisora a su lista de favoritos. Nota:
El enlace debe ser una URL de streaming para poder reproducir la emisora en el
dispositivo. Al reproducir una emisora de radio, la pantalla mostrará la imagen en
color transmitida desde la emisora (si la emisora proporciona dicha información).
Bluetooth/Centro multimedia
Bluetooth
La radio recibe y reproduce música transmitida a través de otro dispositivo Bluetooth.
Seleccione <Bluetooth> en el menú principal para entrar en el modo Bluetooth. Una
vez en modo Bluetooth, podrá detectar el receptor con otros dispositivos Bluetooth.
1. Active el Bluetooth en su dispositivo Bluetooth y busque un dispositivo llamado
“REGENT i351s” en la lista. Seleccione para comenzar el emparejamiento.
2. Si la conexión se realiza con éxito, oirás un pitido y, mientras
tanto, la pantalla LCD mostrará “Conexión Bluetooth”.
3. Ahora puedes empezar a reproducir música desde su dispositivo Bluetooth.
Una pulsación corta del botón PAUSE detiene o reanuda la reproducción. Gire la perilla
UP/DOWN o mantenga pulsados los botones PREVIOUS/NEXT en pulse el botón
PREVIOUS/NEXT en el control remoto para saltar a la pista anterior/siguiente.
Centro de medios de comunicación
Reproducción de USB
4. Conecta un dispositivo de almacenamiento USB directamente
al puerto USB de la parte trasera de la unidad.
5. Pulse HOME y utilice los botones UP/DOWN + OK para
seleccionar Media Center en el menú principal.
6. Seleccione USB para acceder al modo USB y, a continuación, utilice la perilla
UP/DOWN + OK de la unidad o los botones ^/v + OK del mando a distancia
para seleccionar una carpeta/música e iniciar la reproducción.
Pulse brevemente el botón PLAY/PAUSE para pausar o reanudar la reproducción. Gire la
perilla UP/DOWN o mantenga pulsados los botones PREVIOUS/NEXT del dipositivo o pulse
los botones PREVIOUS/NEXT del mando a distancia para saltar a la pista PREVIOUS/NEXT.
Música en streaming
Una vez que haya congurado un servidor compatible con UPnP/DLNA para
compartir archivos multimedia con su radio, puede empezar a transmitir música.
1. Seleccione <Centro multimedia> en el menú principal y seleccione <UPnP>.
2. El dispositivo puede tardar unos segundos en completar la búsqueda de servidores
UPnP disponibles. Si no se encuentra ningún servidor UPnP, se mostrará <lista vacía>.
3. Después de un escaneo exitoso, seleccione un servidor UPnP.
4. La radio mostrará las categorías multimedia disponibles en el
servidor UPnP, como “Música”, “Listas de reproducción”, etc.
5. Seleccione los archivos multimedia que desea reproducir.
6. Puede ajustar el modo de reproducción en <Conguración> <Ajustes de reproducción>.
Nota: Si dispone de servidores compatibles con DLNA, siga los pasos anteriores para
ver y reproducir archivos de audio desde un dispositivo compatible con DLNA.
Page 35

ES ES
BT Tx y DLNA
BT Tx (transmisor Bluetooth)
Esta radio por Internet ofrece la opción de escuchar de forma inalámbrica con auriculares
con Bluetooth o auriculares TWS a través del transmisor Bluetooth integrado.
1. Pulse el botón BT del mando a distancia mientras escucha los medios de
comunicación, la pantalla mostrará tres opciones para el modo BT Tx como sigue:
• On (altavoz encendido) - para activar la función BT Tx y el sonido
seguirá saliendo simultáneamente por el altavoz de la radio.
• Encendido (altavoz apagado) - para activar la función BT
Tx y el audio del altavoz de la radio se apaga.
• Apagado - para desactivar la función BT Tx.
2. Seleccione una de las opciones de activación para habilitar la función BT Tx
y, a continuación, encienda sus auriculares con Bluetooth o los auriculares
TWS. La unidad tardará aproximadamente 30 segundos en buscar y conectar
automáticamente los auriculares o los audífonos TWS. Una vez establecida
la conexión, puedes escuchar la radio con los auriculares o cascos.
Nota: el alcance del transmisor Bluetooth está limitado a unos 140 metros
(área abierta) en función del entorno y del dispositivo utilizado.
DLNA
Además de UPnP, este dispositivo también puede admitir la función DLNA. La radio por
Internet puede transmitir música desde un dispositivo compatible con DLNA siempre
que la radio por Internet y otros dispositivos DLNA estén en la misma red Wi-Fi. La radio
será detectada como “Regent i351s” cuando intente buscarla en otros dispositivos.
Nota: la función DLNA es compatible y funciona con las correspondientes aplicaciones
de terceros en la plataforma Android. Los dispositivos de Apple no son compatibles.
Modo FM
Extiende la antena telescópica y ajusta para la recepción. Seleccione FM en el menú
principal para entrar en el modo FM. Para buscar automáticamente la siguiente emisora
FM disponible, mantenga pulsado el botón PREVIOUS o NEXT durante 2 segundos, la
radio buscará automáticamente una emisora disponible. Si desea anar la frecuencia,
gire la perilla UP/DOWN de la unidad o pulse los botones ^/v del mando a distancia.
Escaneo automático de preajustes
Puedes preseleccionar automáticamente las emisoras de FM. Pulse la perilla UP/
DOWN + OK (o los botones ^/v + OK en el mando a distancia), aparecerá la pregunta si
desea o no realizar la búsqueda automática. Seleccione „Sí” y pulse OK para conrmar
y se iniciará el escaneo y la programación de emisoras. Cuando haya terminado, pulse
brevemente el botón PRESET y se mostrará la primera emisora preseleccionada.
Seguimiento de las emisoras
Se trata de una función que le ayuda a encontrar la misma emisora en Internet, siempre
que la emisora tenga un ujo de Internet disponible y se pueda reproducir en la radio.
Escuchar la radio por Internet te libera del ruido que suelen causar las interferencias o la
mala recepción de la FM. Cuando haya terminado de escanear la banda de FM, seleccione
una emisora para reproducir. Si la misma emisora está disponible en Internet, se le informará
mediante un icono en la esquina inferior derecha de la pantalla. Mantenga pulsado
la perilla UP/DOWN + OK (o los botones ^/v + OK del mando a distancia), el receptor
cambiará al modo de radio por Internet para reproducir la emisora correspondiente.
Modo DAB
Puede escuchar las emisoras DAB habituales sin conexión a Internet. Extiende la
antena telescópica y ajústala de recepción. Seleccione DAB en el menú principal
para entrar en el modo DAB. Si utiliza el modo DAB por primera vez, la radio
buscará automáticamente las emisoras de radio DAB. Una vez nalizada la
búsqueda, el receptor mostrará una lista de las emisoras DAB encontradas.
Seleccione la emisora que desea escuchar y pulse la perilla UP/DOWN + OK (o ^/v +
OK en el mando a distancia) para conrmar la reproducción. Pulse el botón PREVIOUS
(o < en el mando a distancia) para volver a la lista de emisoras. Si vuelve a pulsar el
botón PREVIOUS (o < en el mando a distancia) aparecerá un aviso de que la lista
de emisoras se ha borrado. Esto también le permite volver a escanear las emisoras
DAB. Seleccione <NO> para mantener la lista de emisoras existentes y buscar nuevas
emisoras. Seleccione <SÍ> para borrar la lista de emisoras existente y realizar de nuevo
una exploración completa. Seleccione <ESC> para salir de la operación actual.
Para detener la reproducción de la emisora, pulse PLAY/PAUSE. Cada vez
que quiera reanudar la reproducción, pulse de nuevo el mismo botón.
Conguración
Visualización de la hora
Puede elegir mostrar la hora en modo analógico o digital.
Red
Conguración de la red inalámbrica
Pulse la perilla UP/DOWN + OK (o ^/v + OK en el mando a distancia)
para buscar las redes inalámbricas disponibles.
Red inalámbrica (WPS PBC)
WPS permite conectar la radio al router pulsando una tecla en la radio y la tecla WPS
en el router para la conexión Wi-Fi, siempre que el router tenga la función WPS.
Conguración manual
Puede activar o desactivar el DHCP e introducir el nombre de
la red (SSID) o eliminar la red conectada (SSID).
Comprueba la red tras el encendido
Activar o desactivar la comprobación y conexión de la red al encender la radio.
Fecha y hora
La hora se ja automáticamente y se ajusta a la ubicación geográca de la
radio. Este ajuste le permite modicar la fecha y la hora manualmente.
Establecer el formato de la hora
Page 36

ES ES
Establece el formato de la hora: 12/24 horas.
Establecer el formato de la fecha
Formato de la fecha: AAAA/MM/DD, DD/MM/AAAA y MM/DD/AAAA. Si se selecciona la
conguración manual, el horario de verano (DST) aparecerá adicionalmente en la lista.
Alarma
Despertador doble
Hay disponibles 2 despertadores de alarma y los siguientes ajustes:
• Programación de alarmas: Puede programar una alarma repetida para cada
día, un día especíco de la semana o seleccionar sólo una alarma.
• Sonido de alarma: Despertar con radio (debe ser una emisora
programada), Despertar con melodía y Despertar con sonido.
• Volumen de la alarma: seleccione esta opción para ajustar el nivel de volumen deseado.
Alarma Snooze (posponer alarma)
Si quiere echarse una siesta o necesita un despertador a corto plazo, puede utilizar esta
función. Puede seleccionar un tiempo de 5 a 120 minutos. La función de repetición no
está disponible para la alarma NAP. Nota: La alarma NAP sólo emitirá una señal acústica.
Snooze
Cuando suene la alarma, al pulsar cualquier tecla, excepto la de reposo,
entrará en el modo <Snooze>. La alarma volverá a sonar 5 minutos después.
Siempre puede pulsar el botón STANDBY para cancelar la alarma. Nota: Si
hay problemas de red que hacen que el despertador de la radio no funcione,
ésta emitirá un pitido automáticamente después de 1 minuto.
Temporizador (Timer)
Pulse ^/v/</> en el mando a distancia para ajustar el temporizador
y, a continuación, pulse OK para conrmar.
Dimmer
Puede ajustar la retroiluminación de la pantalla LCD mediante los siguientes ajustes:
• Ahorro de energía - puede congurar la luz de fondo para que se atenúe
cuando no se realice ninguna operación durante un periodo de tiempo.
• Encendido - Puede ajustar el nivel de luz de fondo para el modo de funcionamiento.
• Pantalla – Puede seleccionar una pantalla en color o monocromática.
Manejo de energía
Esta función permite que la radio pase al modo de espera (Standby) para ahorrar energía si
no se recibe ninguna señal de Internet. El ajuste por defecto es de 15 minutos. Cuando la
radio no recibe ninguna señal de Internet, entra en modo de espera después de 15 minutos.
Hay otros plazos disponibles: 5 minutos y 30 minutos. El ajuste también puede desactivarse.
Interruptor de encendido/apagado
Puede programar un temporizador para poner la radio en modo de espera después
de un determinado período de tiempo. Los intervalos de tiempo disponibles van de
Tiempo (información meteorológica)
Puede ajustar la visualización del tiempo en el modo de espera seleccionando diferentes
regiones y la unidad de temperatura. Para desactivar la visualización del tiempo,
vaya a Conguración > Tiempo > Mostrar en espera > seleccione Desactivado.
Conguración de la radio local
La radio detectará automáticamente las emisoras locales: basta con pulsar LOCAL en
el mando a distancia para acceder a las emisoras de radio de su zona. También puede
encontrar este ajuste en el menú <Radio de Internet>. Si desea cambiar las emisoras
locales a otros países, puede seleccionar “Conguración manual” para realizar el cambio.
Conguración de reproducción
Conguración de las preferencias de reproducción UPnP. Puede congurar la reproducción
como Desactivar, Repetir una, Repetir todas, Reproducción aleatoria de canciones.
Ecualizador
Selecciona el ecualizador que preera según sus preferencias.
BT Tx
Seleccione para activar o desactivar la función BT Tx.
Reanudación tras el encendido
Si está en ON, el receptor reanudará la reproducción de la última emisora que estaba
escuchando cuando lo vuelva a encender. El ajuste ON está activado por defecto.
Dispositivo
Cambiar el nombre del dispositivo
El receptor puede reproducir música de dispositivos compatibles con DLNA que
estén conectados a la misma red Wi-Fi. El receptor será detectado por los dispositivos
DLNA con el nombre “REGENT i351s”. Este es el nombre por defecto. Puede cambiar
el nombre de la radio por cualquier otro nombre utilizando esta conguración.
Aplicación remota - Control de AirMusic
Puedes utilizar la aplicación gratuita AirMusic Control para gestionar el
receptor con tu teléfono o tableta. La aplicación está disponible en las
tiendas de Android Google Play y Apple App Store. Tanto el receptor como
el dispositivo con la aplicación instalada deben estar en la misma red.
Actualización del software
La información sobre la actualización del software del receptor aparecerá en
la pantalla cuando el fabricante ponga a disposición una actualización. La
actualización se descarga de Internet y requiere una conexión a Internet para
ser efectiva. Nota: esta opción es para uso exclusivo del fabricante.
Restaurar la conguración por defecto
Con esta opción puede restaurar la conguración del receptor a su estado original.
Nota: todos sus ajustes se perderán después de restaurar los ajustes por defecto.
15 minutos a 180 minutos en incrementos de 15 minutos. También puede realizar
los ajustes con el botón de reposo del mando a distancia: al pulsar el botón de
reposo, verá el temporizador en la esquina superior derecha de la pantalla.
Usa tu teléfono, tu tablet o tu computadora como control remoto de
Spotify. Para más información, entra a spotify.com/connect
Page 37
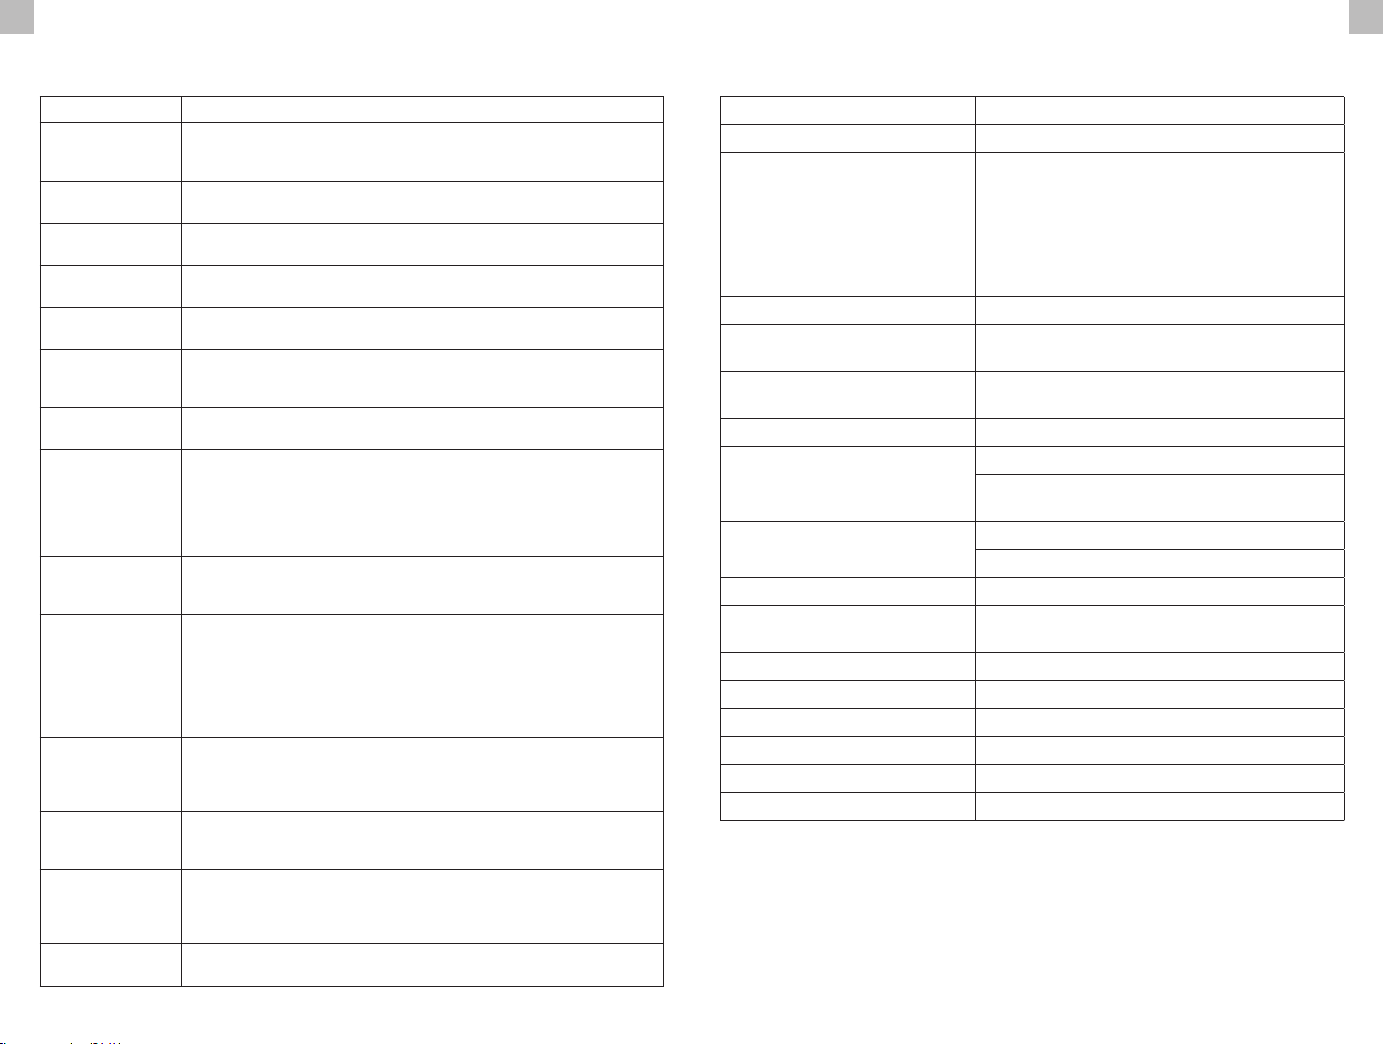
ES ES
Solución de problemas
Error Solución
No hay nada en la
pantalla, la radio no
responde al manejo
No se puede manejar
con el control remoto
Recepción débil
de DAB+
Mala recepción de FM
Baja calidad de sonido
al reproducir música
La radio no se
enciende
No hay sonido
No se puede establecer la conexión de red
No se puede
establecer una
conexión WLAN
No se ha encontrado
ninguna emisora
La alarma no funciona
No se puede realizar
la transmisión DLNA
Interferencias
electromagnéticas
El sistema se congela
de repente
Congure la fuente de alimentación de acuerdo con el manual de
usuario y utilizando los cables proporcionados en la caja.
Pilas descargadas o mal colocadas. Compruebe que las
pilas están insertadas en la dirección correcta.
La antena no está completamente extendida. Cambiar la ubicación de la radio
(por ejemplo, más cerca de la ventana). Repite la búsqueda de emisoras.
La antena no está completamente extendida. Cambiar la ubicación de la radio
(por ejemplo, más cerca de la ventana) Repite la exploración de la estación.
Archivo de baja tasa de bits. Verique el archivo de audio. Sugerencia:
Para los archivos MP3, la velocidad de bits debe ser 192 Kbps o más.
1. Compruebe que la fuente de alimentación está conectada correctamente.
2. La unidad puede funcionar mal si se utiliza en áreas con fuertes interferencias
de radio. Elimine la causa de la interferencia o cambie la ubicación del dispositivo.
1. Active el sonido, ya que puede estar silenciado.
2. Aumente el volumen.
1. V
erique la función WLAN.
2. Intente congurar la dirección IP en su dispositivo.
3. Active la función DHCP en su router y vuelva a conectarse al dispositivo.
4. Hay un cortafuego activado en su red: congure el programa
adecuado para permitir el acceso de su dispositivo a la red.
5. Encender de nuevo el dispositivo para forzar la conexión a la red.
1. Verique la disponibilidad de la WLAN en el punto de acceso.
2. Coloque el dispositivo más cerca del router.
3. Asegúrese de que la contraseña WEP/WPA es correcta.
1. Verique la red y el punto de acceso y el cortafuego.
2. Es posible que la emisora no esté disponible en ese momento,
inténtelo más tarde o seleccione otra emisora.
3. El enlace de la estación ha sido cambiado o la emisora
no está transmitiendo - pregunte al proveedor.
4. El enlace a una emisora añadida manualmente es incorrecto,
asegúrese de que es correcto y vuelva a introducirlo.
1. Encienda la alarma.
2. Debido al ajuste del volumen, consulte “No hay sonido”.
3. La fuente de alarma se ha congurado como emisora, pero no hay
conexión de red. Cambiar la fuente de alarma o recongurar la conexión.
1. Verique la conexión de red. El REGENT i351s y su radio deben
estar en la misma red. Verique que la señal de la red es buena.
2. Asegúrate de que los ajustes de su radio son correctos.
El funcionamiento normal del dispositivo puede verse afectado por campos
electromagnéticos intensos. Restablezca la radio a su estado original de
acuerdo con el manual del usuario para reanudar el funcionamiento
normal. Si los problemas persisten, cambie la ubicación del dispositivo.
REGENT i351s está sobrecargado, enciende de nuevo la radio.
Especicación
Nombre del modelo REGENT i351s
Pantalla Pantalla de color 2.4” TFT
OPEN, WEP
WPA PSKAES
Redes compatibles
Transmisión UPnP, DLNA
Formato de reproducción
admitido (UPnP)
Formatos de reproducción
compatibles (USB)
Potencia de salida (RMS) 15W x 2
Alimentación
Frecuencia FM y DAB
Consumo de energía 30W
Consumo de energía
en modo de espera
Soporte de Bluetooth V5.0
Alcance del Bluetooth hasta 140 metros (área abierta)
Frecuencia de transmisión 2.4 GHz
Protocolos A2DP 1.2
Temperatura de funcionamiento 0°C~35°C
Humedad de funcionamiento 20%~80%
DECLARACIÓN DE CONFORMIDAD SIMPLIFICADA
Productor: Ferguson Sp z o.o., ul. Dworska 1, 61-619 Poznan
Nombre: Regent i351s
Tipo de dispositivo: Receptor de radio
El producto mencionado anteriormente cumple con la Directiva 2014/53/UE del Parlamento
Europeo y del Consejo del 16 de abril de 2014 sobre la armonización de las leyes de los Estados
miembros relacionadas con la puesta a disposición en el mercado de equipos de radio y Directiva
derogatoria 1999/5/CE.
Declaración de conformidad completa para descargar en: https://ferguson-digital.eu/deklaracjezgodnosci/
WPA PSKAES/TKIP
WPA PSKTKIP
WPA 2 PSK AES
WPA 2 PSK AES/TKIP
WPA 2 PSK TKIP
MP3, WMA, AAC, FLAC, WAV
MP3, WMA, WAV
Salida: AC 100-240V ~ 50/60Hz
Puerto USB: DC 5V1A (Sólo para cargar
su móvil con el sistema Android)
FM: 87.5-108MHz
DAB: 174.928-239.2MHz
< 2W
Page 38

notatki / notes / Anmerkungen / appunti / remarques / notas notatki / notes / Anmerkungen / appunti / remarques / notas
Page 39

 Loading...