

Page 1

Regent® i100s
Radio internetowe ze Spotify Connect
Instrukcja obsługi
Prosimy o uważne zapoznanie się z treścią tego podręcznika
przed użyciem urządzenia.
Page 2

Środki ostrożności
• Urządzenia nie należy używać w warunkach wysokiej temperatury lub wysokiej wilgotności.
• Trzymaj radio z dala od płynów. Natychmiast je wyłącz, jeśli wyleje się na nie jakikolwiek płyn.
• Unikaj używania lub przechowywania urządzenia w zakurzonym lub zapylonym otoczeniu.
• Nie otwieraj i nie naprawiaj radia samodzielnie.
• Używaj tylko zasilacza AC dostarczonego z radiem. Podłączenie zasilacza o innym napięciu spowoduje
trwałe uszkodzenie radia i może być niebezpieczne.
• Czyść tylko suchą szmatką.
Symbol błyskawicy wewnątrz trójkąta równobocznego ostrzega użytkownika o obecności wewnątrz
produktu nieizolowanych niebezpiecznych napięć elektrycznych o mocy wystarczającej do powstania
ryzyka porażenia prądem.
Przed uruchomieniem
Upewnij się, że posiadasz:
• szerokopasmowe połączenie internetowe.
• bezprzewodowy (Wi-Fi) router szerokopasmowy (2,4 GHz) pomyślnie podłączony do Internetu.
Regent i100s obsługuje połączenie bezprzewodowe B, G i N (router N może być również używany z
ustawieniem na B lub G).
• kod/hasło szyfrowania danych WEP (Wired Equivalent Privacy) lub Wi-Fi Protected Access (WPA).
Musisz wprowadzić prawidłowy kod, gdy radio jest podłączone do routera bezprzewodowego w celu
połączenia sieciowego. Jeśli nie znasz kodu/hasła, skontaktuj się z osobą/technikiem, który skonfigurował
router/sieć.
Page 3
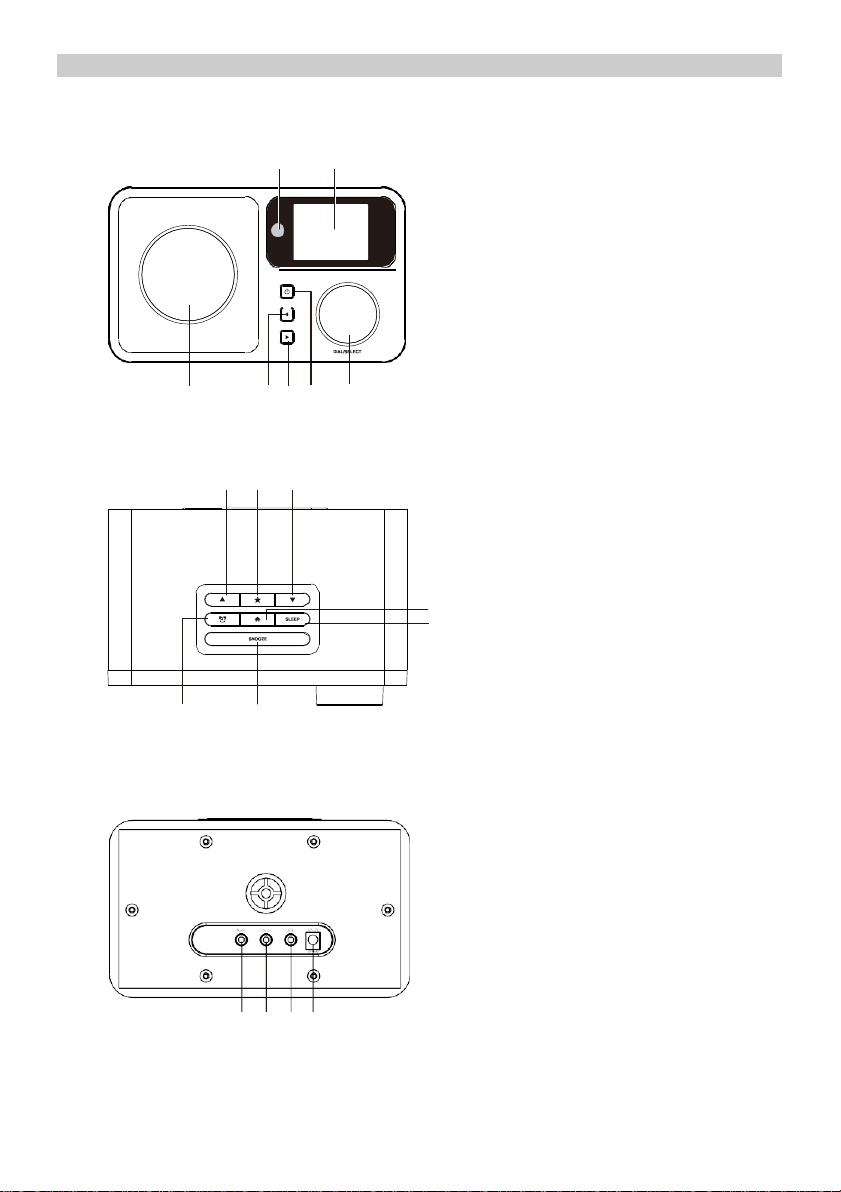
Opis urządzenia
Przód
1 2
3 4 5 6 7
1.
Czujnik podczerwieni
2.
Wyświetlacz LCD
3.
Głośnik
4.
W lewo/Wstecz
5.
W prawo/W przód
6.
Włącz/Wyłącz
7.
Pokrętło głośności/Zatwierdź
(Kręcąc dopasujesz poziom głośności,
naciskając zatwierdzisz wybór)
Góra
8 9 10
11
12
13 14
Tył
8.
W górę
9.
Ulubione
10.
W dół
11.
Menu główne
12.
Automatyczne wyłączanie
13.
Budzik
14.
Drzemka
15.
Wejście 3.5mm
16.
Wyjście liniowe 3.5 mm
17.
Wyjście słuchawkowe
18.
Gniazdo zasilacza
15 16 17 18
Page 4
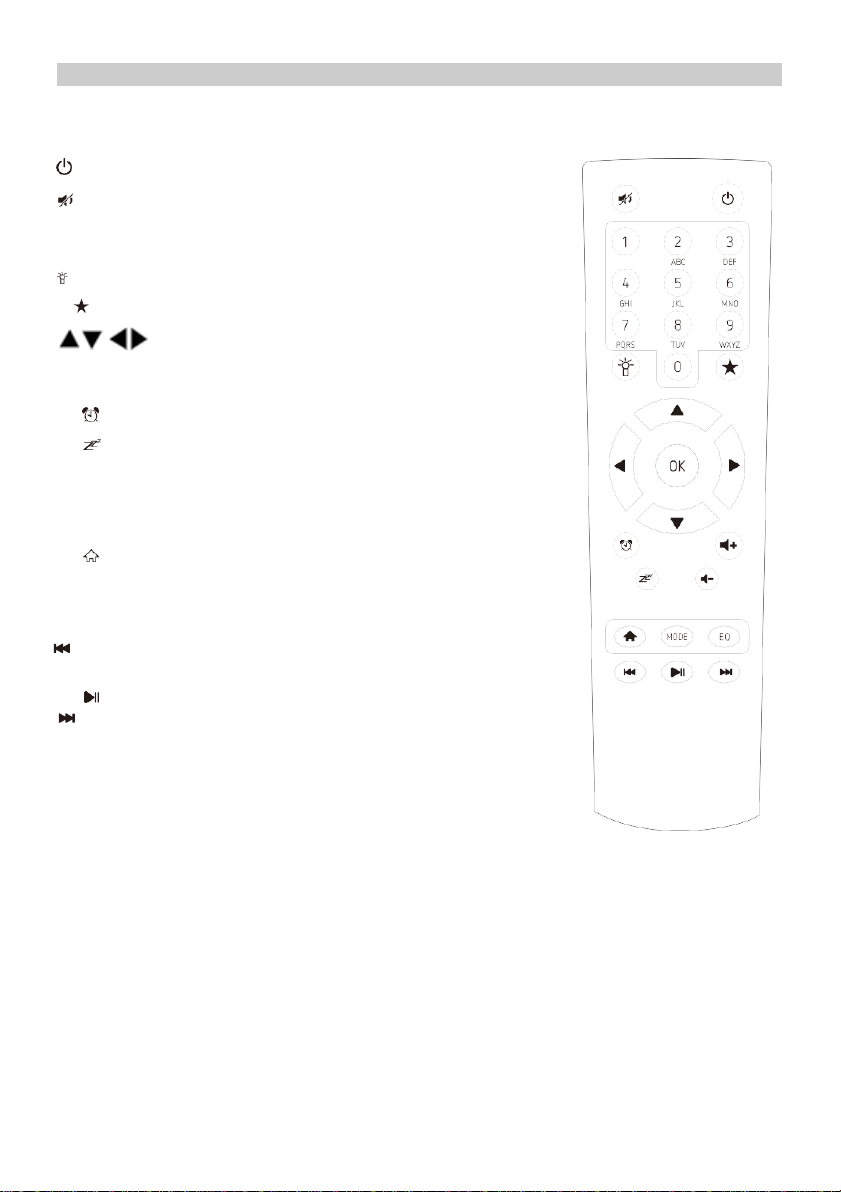
Pilot zdalnego sterowania
Włącz/wyłącz
Wycisz
0-9: Przywołanie ulubionej stacji/wprowadzenie znaków hasła WiFi
Zmiana janości ekranu
Ulubione
- Przyciski nawigacyjne (↑ ↓ ← → )
OK: Zatwierdź
Budzik
Automatyczne wyłączanie
Vol+: Zwiększenie głośności
Vol-: Zmniejszenie głośności
Główne Menu
Mode: Zmiana trybu
EQ: Equalizer
Poprzedni utwór (UPnP/Spotify)
Odtwarzaj/pauza (UPnP/Spotify)
Następny utwór (UPnP/Spotify)
Page 5

Lista znaków wpisywanych pilotem
“0”―― 0,'DEL'
“1”―― '1'->'@'->' '(spacja)->'!'-> “ (cudzysłów) ->
->'#'->'$'->'%'->'&'-> '(apostrof)->'(' ->
->')'->'*'->'+'->','->'-'->'.'->'/'->':'->';'->'<'->'='->'>'->'?'->
->'['->'\'->']'->'^'->'_'->'`'->'{'->'|'->'}'->'~'
“2”―― 2,A,B,C,a,b,c
“3”――3,D,E,F,d,e,f
“4”――4,G,H,I,g,h,i
“5”―― 5,J,K,L,j,k,l
“6”―― 6,M,N,O,m,n,o
“7”―― 7,P,Q,R,S,p,q,r,s
“8”―― 8,T,U,V,t,u,v
“9”―― 9,W,X,Y,Z,w,x,y,z
Naciśnij → by wprowadzić kolejny znak. Całość zatwierdź 'OK'.
Zamiast przycisków 0-9, możesz użyć ↑ / ↓ .
Pierwsze uruchomienie
✓ Podłącz wtyk złącza zasilacza do gniazda z tyłu urządzenia, a drugi koniec adaptera do
gniazdka zasilania.
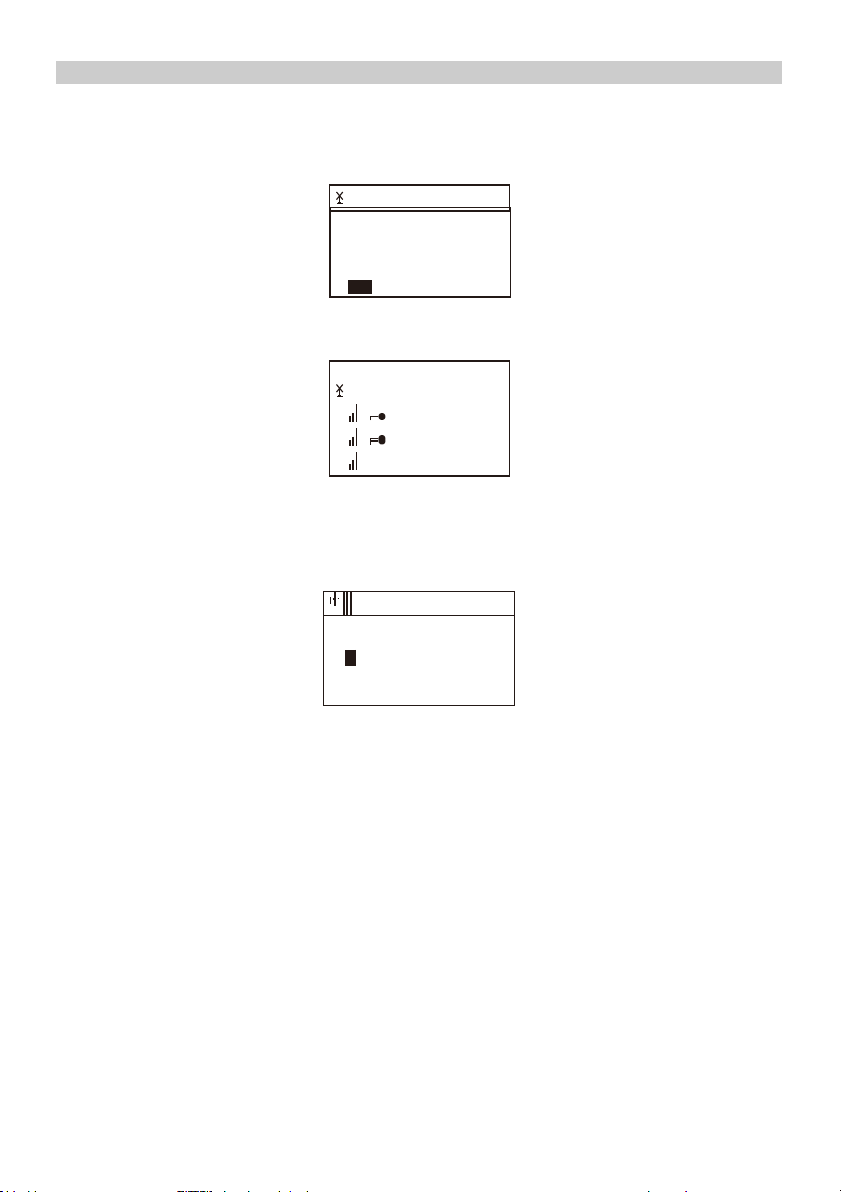
✓ Na wyświetlaczu pojawi się powitanie, a następnie będziesz mógł wybrać język menu.
✓ Regent i100s może przy każdym uruchomieniu sprawdzać dostępność sieci WiFi. Wystarczy,
że odpowiesz twierdząco na wyświetlone na ekranie pytanie.
✓ Kolejne pytanie będzie dotyczyć ustanowienia połączenia z Twoją siecią WiFi. Aby to zrobić,
wybierz „TAK” (jeśli Twój router ma funkcję WPS, możesz wybrać „TAK[WPS]”)
✓ Regent i100s wyszuka dostępne sieci bezprzewodowe i wyświetli je na ekanie.
✓ Wybierz swoją sieć i wpisz hasło używając pilota (patrz „Lista znaków wpisywanych pilotem”
powyżej). Jeśli w danym momencie nie posiadasz pilota, możesz wpisać hasło posługując się
przyciskami kierunkowymi na przednim panelu oraz pokrętłem.
✓ Po zatwierdzeniu hasła (po naciśnięciu OK na pilocie lub pokrętła na przedzie urządzenia)
Regent i100s rozpocznie łączenie z siecią.
✓ Po poprawnym połączeniu na ekranie pojawi się Menu Główne.
Teraz możesz zacząć korzystać z funkcji Twojego Regent i100s.
Page 6

MENU GŁÓWNE
RADIO INTERNETOWE
Wybierz „Radio internetowe”, by uzyskać dostęp do kilkunastu tysięcy rozgłośni internetowych.
Ulubione
Lista Twoich ulubionych stacji.
Zapisanie ulubionej stacji:
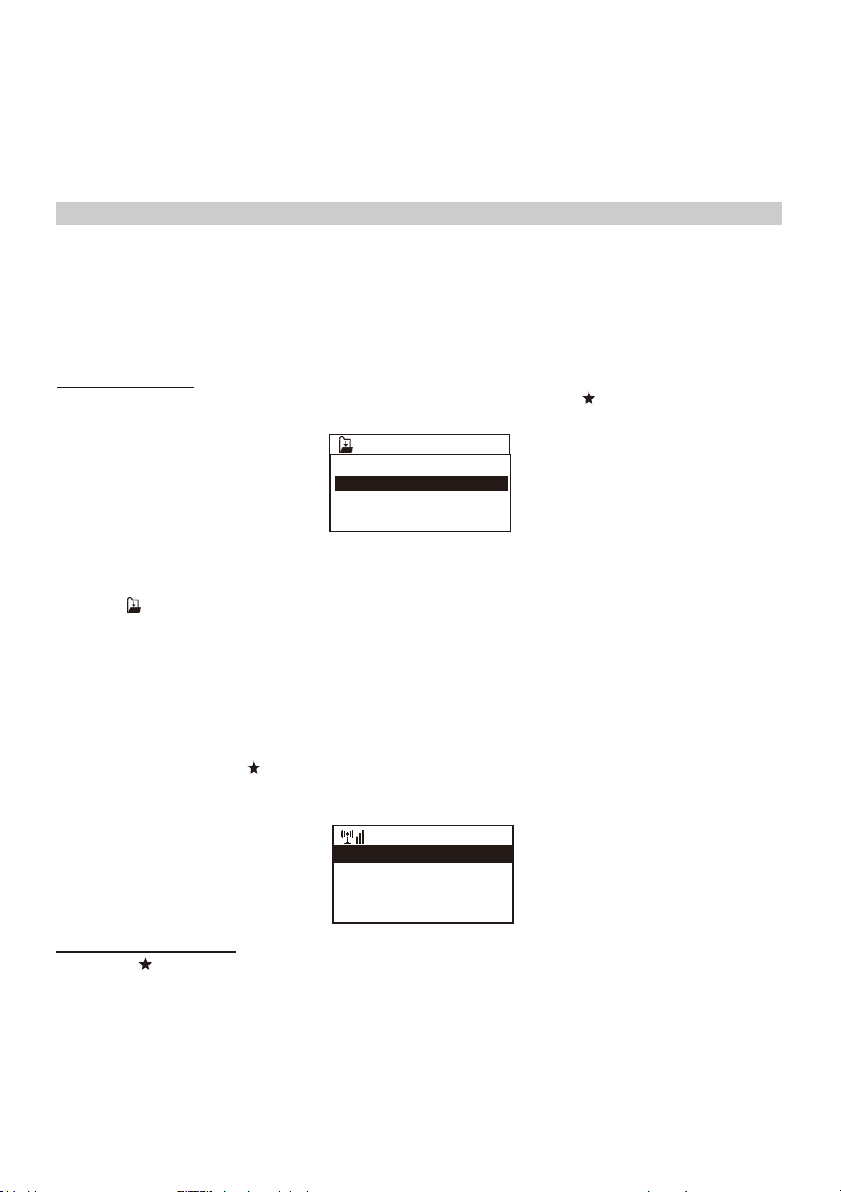
Podczas słuchania danej stacji przytrzymaj , a następnie wybierz, pod którym numerem
na liście ma być ona zapisana.
Pojawienie się
na ekranie oznacza, że stacja została zapisana.
Możesz w ten sposób stworzyć listę składającą się nawet z 250 pozycji!
Możesz zarządzać stworzoną listą:
- Usuń – usunie wybraną stację z listy,
- W górę/W dół – przesunie daną stację na wybraną pozycję,
- Zmień nazwę – zmieni nazwę wybranej stacji,
- Odtwarzaj – zacznie odtwarzanie wybranej pozycji.
Aby wykonać którąś z powyższych operacji, przejdź do listy i na wybranej stacji naciśnij →
Listę przywołasz naciskając
Stacja radiowa/muzyka
Przegląd rozgłośni z całego świata.
Stacja lokalna
Znajdziesz tutaj najpopularniejsze internetowe stacje radiowe i stacje DAB + posortowane według regionu
geograficznego, które można w ten sposób łatwo wywołać.
Radio do snu
Możesz wybrać specjalne radio, przy którym łatwiej zaśniesz. Do wyboru: Ptaki, Fortepian, Deszcz, SPA,
Wszechświat, Fala.
Ostatnio słuchana stacja radiowa
Lista ostatnio wybranych internetowych stacji radiowych. Nie będzie pusta, jeśli wcześniej była słuchana
jakakolwiek internetowa stacja radiowa.
Usługi
Ta pozycja menu umożliwia wyszukiwanie stacji radiowej w Internecie. Aby to zrobić, musisz wprowadzić
nazwę stacji. Wybierz „Wyszukaj stacje radiowe” naciskając OK. Do wprowadzenia nazwy użyj
przycisków nawigacyjnych na pilocie. Po naciśnięciu OK rozpocznie się wyszukiwanie. Możesz także
dodać nowe stacje radiowe, wprowadzając adres internetowy dostawcy radiowego.
AUX
Możesz słuchać muzyki z innych urządzeń audio, podłączając kabel audio do złącza AUX IN z tyłu
urządzenia.
CENTRUM MEDIALNE
UPnP/DLNA
Regent i100s może odtwarzać muzykę z urządzenia sieciowego, które obsługuje funkcję UPnP/DLNA.
Wyszukaj na urządzeniu zgodnym z UPnP/DLNA „Regent i100s” (tę nazwę możesz edytować w
ustawieniach Regent i100s).
Pamiętaj, że oba urządzenia muszą być w tej samej sieci WiFi.
Page 7

Wykorzystuj telefon, tablet lub komputer jako pilota, aby sterować aplikacją Spotify.
Wejdź na spotify.com/connect, aby dowiedzieć się, jak to zrobić.
Licencja:
The Spotify Software is subject to third party licenses found here:
https://www.spotify.com/connect/third-party-licenses
CENTRUM INFORMACYJNE
Informacje o pogodzie
Dostępne są informacje o pogodzie i prognozy dla 20000 miast z całego świata, które mogą być
wyświetlane na ekranie w trybie gotowości.
Informacje finansowe
Wyświetl indeksy giełdowe z całego świata.
Informacje o systemie
Sprawdź wersję systemu i szczegóły sieci.
KONFIGURACJA
Zarządzanie My mediaU
Tutaj możesz aktywować lub dezaktywować funkcję MediaU Management, która umożliwia zapisanie
indywidualnej listy stacji i odtwarzanie tych stacji. Aby skonfigurować i aktywować listę stacji, musisz
zalogować się na stronie http://www.mediayou.net/. Po pomyślnym zalogowaniu możesz zarejestrować
swoje urządzenie, wprowadzając adres MAC jako numer seryjny. Jeśli zaktualizujesz dane na stronie
internetowej, tutaj musisz zsynchronizować zmiany.
Adres MAC swojego Regent i100s znajdziesz w pozycji „Centrum informacyjne”.
Sieć
Konfiguracja sieci bezprzewodowej
Wybierz, by przeskanować otoczenie w poszukiwaniu dostępnych sieci bezprzewodowych.
Sieć bezprzewodowa (WPS PBC)
Jest to opcja umożliwiająca korzystanie z funkcji WPS, jeśli router ma tę funkcję (można ustawić sieć
bezprzewodową bez wprowadzania hasła).
Konfiguracja ręczna
Możesz ustawić DHCP, wprowadzić SSID lub usunąć zapisaną sieć.
Sprawdzanie sieci po włączeniu
Regent i100s może wyszukiwać dostępne sieci WiFi przy każdorazowym uruchomieniu.
Data i godzina
Domyślne ustawienie sprawia, że czas jest aktualizowany automatycznie, jeśli tylko urządzenie jest
podłączone do internetu. Tutaj możesz ręcznie ustawić datę i czas.
Page 8

Budzik
Regent i100s może zadziałać jako radiobudzik.
W tym miejscu możesz ustawić 2 różne alarmy, określając m.in. co ma być źródłem dźwięku.
Naciśnij przycisk “włącz/wyłącz”, by wyłączyć brzmiący alarm. Naciskając dowolny inny, uruchomisz
drzemkę, której czas również możesz określić w tym miejscu.
Minutnik
Naciśnij ← lub →, by ustawić minutnik. Zatwierdź naciskając OK lub pokrętło. Gdy nadejdzie czas,
rozlegnie się sygnał dźwiękowy. Wyłączysz go naciskając pokrętło lub OK.
Zaplanuj odtwarzanie
Możesz tu ustawić, kiedy dana stacja z listy Ulubionych ma być odtwarzana.
Język
Możesz wybrać spośród 17 języków.
Jasność ekranu
W tym miejscu dopasujesz jasność ekranu.
Ekran
Możesz wybrać, czy wyświetlacz ma być kolorowy, czy czarno-biały.
Oszczędzanie energii
Określ, po jakim czasie bezczynności urządzenie ma się wyłączać.
Auto wyłączanie
Określ, po jakim czasie urządzenie ma się wyłączyć.
Pamięć buforowa
Ustaw czas bufora danych.
Pogoda
Możesz ustawić wyświetlanie prognozy pogody w trybie gotowości, jednostki temperatury oraz lokalizację,
dla której pogoda ma być prognozowana.
Ustawienia radia lokalnego
Tutaj możesz ręcznie wprowadzić swoją lokalizację lub aktywować automatyczne wyszukiwanie
lokalizacji, aby ułatwić wyszukiwanie stacji w Twojej okolicy w trybie „Radio internetowe”.
Ustawienia odtwarzania
Wybierz sposób odtwarzania plików z serwera UPnP.
Urządzenie
-
Zmień nazwę
Możesz zmienić nazwę, jaka będzie wyświetlana w sieci, gdy Regent i100s (domyślna nazwa) będzie
używany jako strumieniowy odtwarzacz mediów.
- AirMusic Control App
Znajduje się tu kod QR, dzięki któremu możesz pobrać aplikację umożliwiającą sterowanie urządzeniem.
Equalizer
Dostosuj efekt dźwiękowy.
Wznów po włączeniu
System domyślnie wznawia odtwarzanie radia internetowego, jeśli było ono uruchomione przed
wyłączeniem urządzenia. Jeśli wyłączysz to ustawienie, system pozostanie w głównym menu po
włączeniu urządzenia.
Page 9

Aktualizacja oprogramowania
1)Informacja o dostępnej aktualizacji wyświetli się na ekranie, gdy takowa pojawi się na serwerze.
2)Tutaj możesz ręcznie sprawdzić dostępność aktualizacji.
Przywracanie ustawień fabrycznych
Możesz zresetować Regent i100s do ustawień domyślnych. Pamiętaj, że wszytkie zapisane
ustawienia i Ulubione zostaną wymazane.
Rozwiązywanie problemów
1. Jeśli masz problem z podłączeniem Regent i100s do sieci bezprzewodowej, sprawdź:
- czy inne urządzenie podłączone do tej sieci WiFi ma dostęp do Internetu ;
- czy serwer DHCP jest dostępny/czy skonfigurowałeś statyczny adres IP;
- czy zapora nie blokuje żadnych portów wychodzących.
- czy Twój router wymaga dodania adresu MAC urządzenia. Należy wówczas dodać adres
MAC Regent i100s do listy dozwolonego sprzętu w punkcie dostępu. Adres MAC radia
internetowego można znaleźć za pomocą menu <Centrum informacyjne -> Informacje o
systemie -> Informacje o adresie bezprzewodowym MAC>. Konieczne będzie zapoznanie
się z instrukcją dla punktu dostępu;
- czy wprowadziłeś prawidłowy klucz lub hasło (pamiętaj, że przyciski w formacie tekstowym
uwzględniają wielkość liter).
- Jeśli nazwa sieci bezprzewodowej (ESSID) jest „Ukryta” (ustawienie w punkcie dostępu
bezprzewodowego), możesz włączyć nazwę lub ręcznie wprowadzić nazwę w Regent i100s
i odtwarzaczu multimedialnym, wybierz <Konfiguruj -> Sieć -> Konfiguracja ręczna->
Bezprzewodowa -> Wprowadź ESSID>. Potwierdź, czy sieć jest szyfrowana, np. wymaga
klucza WEP/WPA, a następnie wprowadź nazwę sieci.
2. Jeśli Regent i100s może pomyślnie połączyć się z siecią, ale nie może odtworzyć
poszczególnych stacji, może to być spowodowa ne jedną z następujących przyczyn:
- stacja nie nadaje o tej porze dnia (pamiętaj, że może znajdować się w innej strefie
czasowej);
- serwer danej stacji jest przeciążony;
- stacja zakończyła nadawanie;
- link jest nieaktualny, pomoże ponowne uruchomienie Regent i100s;
- połączenie internetowe między serwerem (często znajdującym się w innym kraju) i Twoim
jest wolne. Niektórzy dostawcy usług internetowych mogą nie przesyłać strumieniowo w
określonych obszarach geograficznych. Spróbuj użyć komputera do odtwarzania strumienia
za pośrednictwem strony internetowej nadawcy. Jeśli możesz odtwarzać stację za pomocą
komputera, napisz na [email protected].
3. Podczas skanowania w poszukiwaniu komputerów w funkcji UPnP, nie można znaleźć
żadnego lub komputer, którego szukasz, nie pojawia się na liście:
- nie masz połączenia z bezprzewodowym punktem dostępu
- masz zaporę na swoim komputerze, która zatrzymuje dostęp do współdzielonych plików
- jeśli komputer jest podłączony do zarządzanej sieci, na serwerze czasami poszukiwany
komputer musi być serwerową grupą roboczą.
4. Możesz zobaczyć komputer, z którego chcesz odtwarzać muzykę, ale nie możesz znaleźć żadnych
folderów na komputerze:
- masz uruchomiony firewall, który uniemożliwia Regent i100s odtwarzanie.
5. Nie mogę udostępnić folderu, ponieważ opcja nie jest podświetlona:
- opcja folderu udostępniania nie będzie dostępna do momentu włączenia prostego udostępniania
plików, uruchom kreatora.
- błąd skanowania.
Page 10

6. Jeśli Regent i100s ponownie buforuje stację radiową:
- Regent i100s przesyła dane ze stacji radiowej za pośrednictwem połączenia
szerokopasmowego, jeśli występuje wysoki poziom błędu w połączeniu szerokopasmowym lub
połączenie jest przerywane, spowoduje to wstrzymanie radia internetowego do momentu
nawiązania połączenia.
Technical Specification
Model: Regent
®
i100s
Power input: 7.5V 1.2A
Power voltage: 100-240V~50/60Hz
Wireless Network: IEEE802.11b/g/n
Security Protocol: WEP/WPA/WPA2
Audio output power: 3W (RMS)
Unit Dimension: 195 x 115 x 115 mm (LxDxH)
Uwaga: Specyfikacja może ulec zmianie.
Zawartość opakowania:
*
Regent® i100s
*
Zasilacz
*
Pilot zdalnego sterowania
*
Instrukcja obsługi
WEEE and Recycling
Produkt jest objęty dyrektywą europejską 2012/19/UE. Prosimy o zapoznanie się z
lokalnym systemem selektywnej zbiórki produktów elektrycznych i elektronicznych oraz
postępowanie zgodnie z nimi. Prawidłowa utylizacja starego produktu zapobiega
potencjalnym negatywnym skutkom dla środowiska i zdrowia ludzkiego..
Page 11

Regent® i100s
Internet Radio with Spotify Connect
User Manual
Please read this user manual carefully before using the receiver.
Page 12

Precautions
•
The radio should not be used in a high temperature or high humidity environment over
prolonged periods of time as this may damage the unit.
•
Keep the radio away from liquids as it may get damaged. Please switch off the radio
immediately if water or liquids is spilled into the radio.
•
Avoid using or storing the unit in dusty or sandy environment.
•
Do not open and repair the radio by yourself.
•
Use only the AC adaptor supplied with the radio.
Connecting a power supply with a different voltage will cause permanent damage to the radio and
may be hazardous.
•
Clean only with dry cloth.
Before you start
Please ensure the following steps are ready:
•
You have a broadband internet connection.
•
A wireless(Wi-Fi) broadband router (2.4GHz) is connected to the internet successfully.
The radio supports Wireless B, G and N connection (Wireless N router can also be used with the
setting on B or G).
•
You know the Wired Equivalent Privacy (WEP) or Wi-Fi Protected Access (WPA) data
encryption code/password. You need to enter the correct code when the radio is connected
to the wireless router for network connection.
If you do not know the code/password, please contact the person/technician who set up the
router/network for you.
Page 13
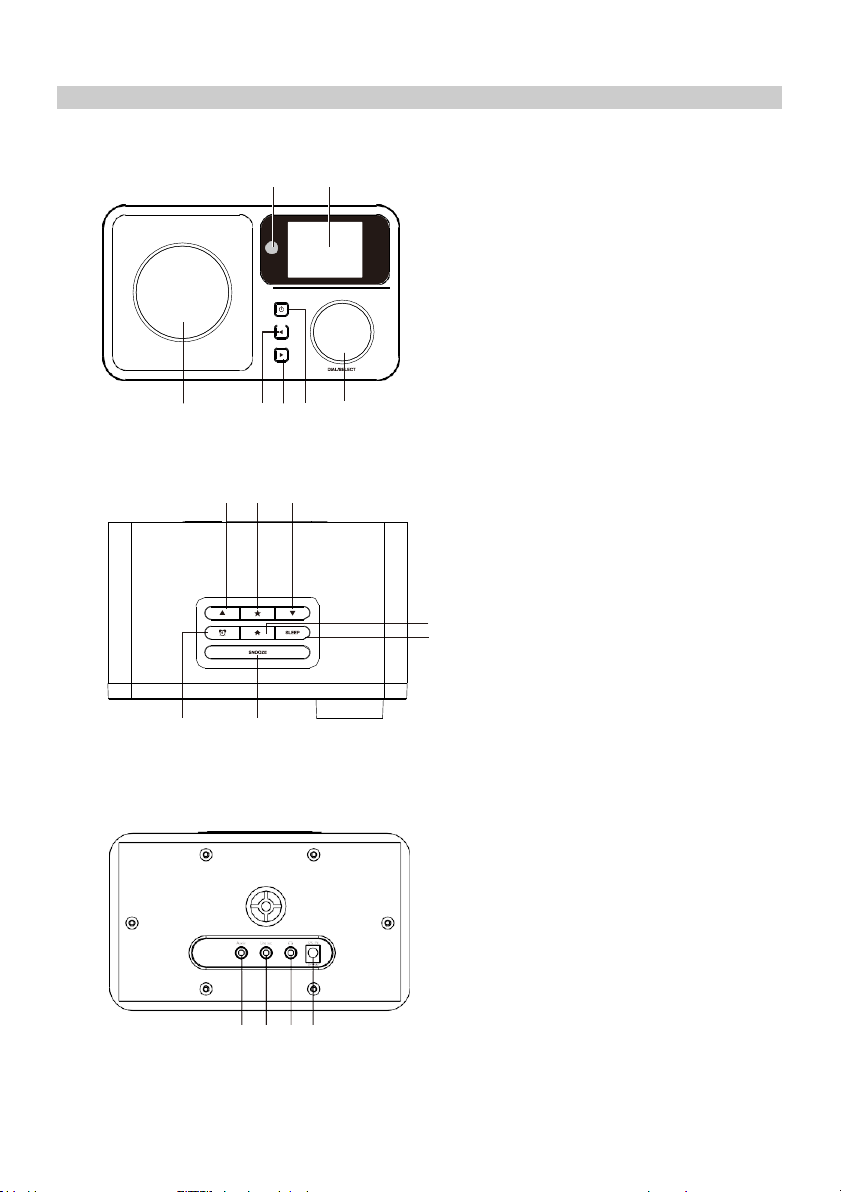
Location of Controls
Front
1 2
3 4 5 6 7
1. Remote control sensor
2. LCD display
3. Speaker
4. Left/Back button
5. Right/Forward button
6. Standby button
7. Volume/Dial/Select rotary knob
(Rotate to adjust the volume or browse
Top
8 9 10
11
12
13 14
Back
the menu. Push down the button to
confirm selection)
8. Up button
9. Favorite button
10. Down button
11. Home button
12. Sleep timer button
13. Alarm button
14. Snooze button
15. 3.5mm Aux-In jack
16. 3.5 mm Line out jack
17. 3.5 mm earphone jack
18. DC jack
15 16 17 18
Page 14
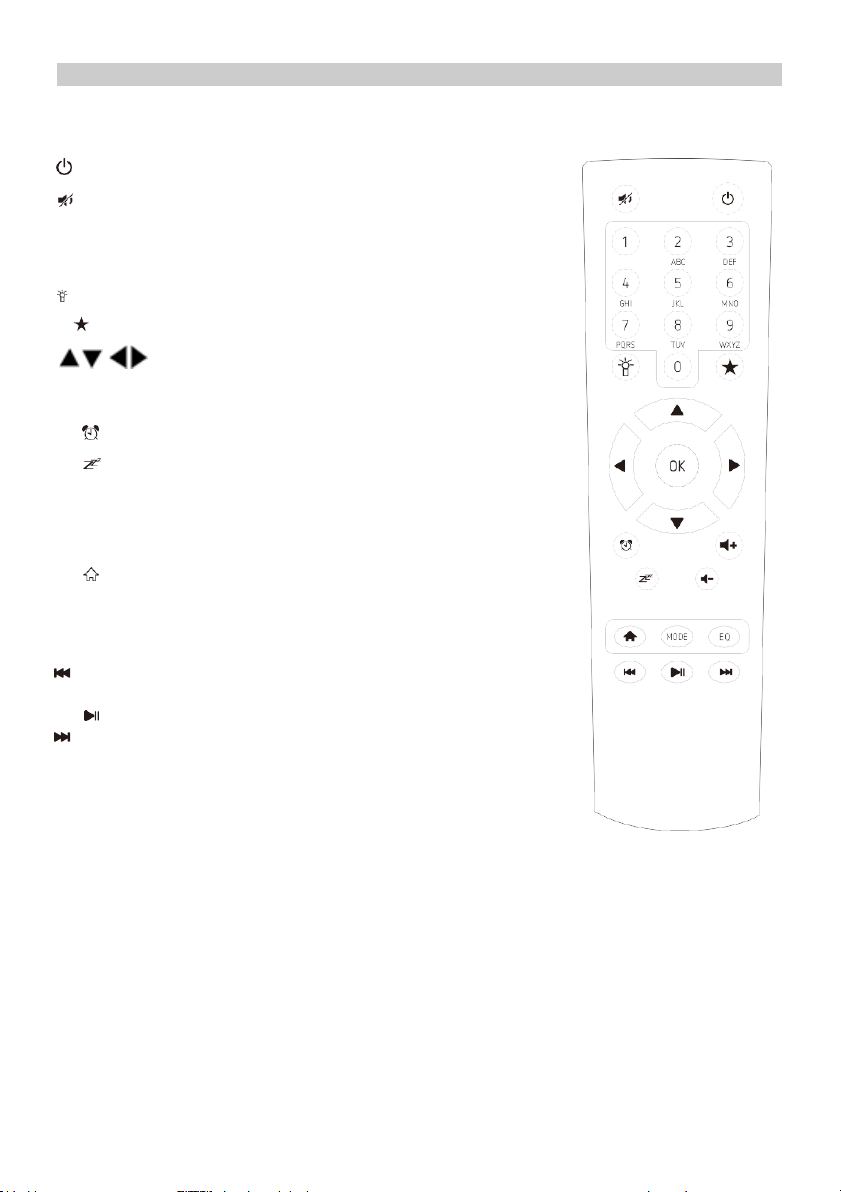
Remote Control
Standby button
Mute
0-9: Favorite station key/input letters and numbers
for WiFi Encryption code
Dim the display
Favorite button, adding station to your favorite list
- navigation keys (↑ ↓ ← → )
OK: confirm button
Alarm button
Sleep Timer
Vol+: Volume up
Vol-: Volume down
Main Menu
Mode: Switch among Internet radio, Aux-in, UPnP, Spotify
EQ: Equalizer
Previous song (for UPnP/Spotify)
Play/pause (for UPnP/Spotify)
Next song (for UPnP/Spotify)
Page 15

Welcome
+
01:44
Remote control character list
Key“0”―― 0,'DEL'
Key“1”―― '1'->'@'->' '(space)->'!'-> “ (double quotes) ->
->'#'->'$'->'%'->'&'-> '(single quotes)->'(' ->
->')'->'*'->'+'->','->'-'->'.'->'/'->':'->';'->'<'->'='->'>'->'?'->
->'['->'\'->']'->'^'->'_'->'`'->'{'->'|'->'}'->'~'
Key “2”―― 2,A,B,C,a,b,c
Key“3”――3,D,E,F,d,e,f
Key“4”――4,G,H,I,g,h,i
Key“5”―― 5,J,K,L,j,k,l
Key“6”―― 6,M,N,O,m,n,o
Key“7”―― 7,P,Q,R,S,p,q,r,s
Key“8”―― 8,T,U,V,t,u,v
Key“9”―― 9,W,X,Y,Z,w,x,y,z
Remark: press → to move to next character and press 'OK' button to confirm.
You can also press ↑ / ↓ to change the character/number, then press the right key to confirm the entry.
After you finish the entry, press the select button to confirm.
Switching on the radio
Plug the connector pin of the mains adaptor into the DC jack on the unit. Connect the other end of the
adaptor to the power socket.
The display on the front of the radio will light up and show:
Then you can select preferred language.
If you want to enable the “Check Network” when Power on”, choose “Yes”. Then the radio will
always check automatically the available WiFi network.
English
Deutsch
Francais
2/7
Page 16
01:01
01:44
Linksys
Homeaudio
Demo
<
1/6
>
Connecting to your WiFi Network
The screen below will appear. You can choose “Yes” to proceed to search for the available WiFi
network. If your router has the WPS function, you can select the “Yes[WPS]” to proceed.
It will start scanning the network. After the search is done, it will display a list of the available routers.
Choose your router from the list, enter the WEP(Wired Equivalent Privacy) or WPA(Wi-Fi Protected
Access) code. If your network is not configured to be with the WEP or a WPA code, the unit will
connect to the router automatically.
16:23
Enter Password
1/1
!
MOVE"INPUT:#$OK8
Note: The encryption code would have been set up by the person who set up and
configured your network.
Please refer to the “Remote control character list” for you to enter the password.
Press the → button to go to the next word, press ← button to delete the wrong word you have
entered.
If you want to enter the password on the main radio unit, you can use the Volume Dial rotary knob.
Follow the steps below:
-
Rotate the knob to select the character
-
Press the button to go to the next entry
-
After you finish the entries, push down the Rotary knob to confirm.
The radio will start connecting to the network.
Would you like to
configure Network now?
YESYes(WPS) NO
Page 17
Add to My Favorite
After the router is connected successfully, it will show “Network OK” and display the main menu
screen.
You can now start enjoying the internet radio.
Main Menu
INTERNET RADIO
Choose “Internet Radio” from the menu, you can see different functions as below: To start listen the
worldwide radio stations, select “Radio Station/Music”,
My Favorite
This is to show the list of your Favorite stations which have been assigned to the presets.
To preset a station:
While you are playing the favorite station, simply press and hold the key until the below
screen appears.
The icon will appear, it means the station is added to the radio preset.
The presets will be stored in ascending order. You can store up to 250 presets.
You can edit your Favorite list with the following options:
Delete – to delete the selected station
Shift up/Shift down – to shift the selected station to a particular ranking on the list
Rename – to rename the selected station
Play – press and play the selected station.
To edit, simply press the button briefly to enter the Preset stations list.
Choose the radio station that you want to make with the above changes. Then press the → button, it
will enter into the list with the options listed above. Then choose one of the option.
To recall a preset station:
Press the button briefly and choose the station.
Radio Station/Music
Select this option, then you can select radio station by Category, Genre or Location, etc.
Local Radio
If you want to access quickly the radio station located in your area, select this function and it will
display the list of the stations available in your area.
1 .977 The 80s Channel
.977 The 90sChanr
MOVE# 2/2 OK8
>
Shift Up
Shift Down
< 1/5
Delete
iRadio
Page 18

Sleep Radio
Use this option to choose the sleeping sound for better sleep, there are various kinds of sounds for
your selection.
History
It will show you the radio stations that you have listened in the past.
Service
Search Stations
You can find radio station by entering the name of the radio.
Add New Radio Station
If you cannot find wanted station from the Radio station list and you have the URL address, you can
input the link here and add to your favorite list.
When the radio station is playing, the display will show a color image transmitted from the radio station.
AUX IN
You can enjoy the music from other audio devices by connecting the audio cable to the AUX IN
connector at the rear of the unit, such as mobile phone, MP3 player, etc.
MEDIA CENTER
UPnP (Universal Plug and Play)
You can stream music from the Networked device which supports UPnP function to the radio to play.
For instance, most of the latest computer laptop supports UPnP, and you can stream music from
Windows Media Player application on the computer and listen on your radio.
Please make sure your computer/laptop is on the same Wi-Fi network as the Regent
i100s before you start using this function.
DLNA
The Internet radio can play music stream from DLNA compatible device, provided that the
Internet radio and other DLNA devices are under the same Wi-Fi network.
The radio will appear as “Regent i100s” when you try to search it on other devices. If you want
to change other name from “Regent i100s”, go to Configuration and DLNA setup to make the
change.
Use your phone, tablet or computer as a remote control for Spotify.
Go to spotify.com/connect to learn how.
The Spotify Software is subject to third party licenses found here:
www.spotify.com/connect/third-party-licenses
Page 19

INFORMATION CENTER
Weather
You can check the weather forecast all over the world
1.
Add to Standby Display
Press “→” to display the “add to standby display”, then press “Enter” to confirm. “Currently
Date & Time” and “Currently Weather” will be on alternation display every 10 seconds under
the standby mode if the weather forecast display is started.
Remark: On standby mode, you also can press “Enter” button for the switching of “Currently
Date & Time” and “Currently Weather”, and you can press “←”/ ”→” buttons to display the
previous/next day weather forecast.
Remark: The weather is just for reference only. It may have deviation to the actual
weather.
Financial Information
You can get the information of Stock Market all over the world.
System Information
You can view the information of the radio such as the Version of the software/WLAN Mac/IP
address, etc.
CONFIGURATION
Manage my mediaU
You can tailor make your own favorite station list using your computer. Firstly
you need to enable “Manage my MediaU” on your radio.
Go to Configuration Manage my MediaU Enable.
Then you will see “My mediaU” appear on the main menu.
On your computer, go to http://www.mediayou.net/web/index.php, this is the radio portal playing
on your radio.
Register as member by selecting “Join now”. After you have become the member, then you can login
and register your radio. Select “Radio” on the following screen and do the radio registration.
You can then organize your own favorite stations or add any new station which is currently not found
on the station list. Once the changes are done, your radio will synchronize the changes immediately
and you will find your favorite list under “My MediaU” on the radio menu.
It allows maximum 5 users to register with the same radio and you can switch to listen the
favorite list under one user at the time.
01:44
My mediaU
Internet Radio
Media Center
2/7
>
Network
Wireless Network Configuration
Press “Enter” to scan for wireless network and list out.
Wireless Network (WPS PBC)
This is the option for you to use WPS function, which means you can set the wireless without
enter any passwords for Wi-Fi protected if your router has the function.
Page 20

Manual Configuration
You can set the DHCP on or off, and enter the SSID as you known, or delete the connected WiFi.
Check network when power on
This is set to enable or disable “Check network when power on”.
Date & Time
Currently Date & Time setting
You can press“↑” “↓”buttons for parameter setting, and move cursor with “←” “→”buttons and press
'Enter' to confirm.
Time Format setting
Time format setting: 12hours / 24hours
Date Format setting
Date format: YY/MM/DD, DD/MM/YY and MM/DD/YY
Daylight Saving Time(DST)
Daylight Saving Time setting: On / Off
GMT: Set the currently time as GMT
Alarm
1.
Alarm Clock types(2 Alarm Clock setting)
You can select your favorite Alarm setting for every day, once or particular day in the week.
2.
Alarm Clock( NAP function): If you would like to take a nap or need the Alarm in short time,
you can use this function. You can select the time from 5 minutes up to 120 minutes. No
Snooze function available for the NAP alarm.
3.
Alarm Volume: You can set the alarm sound level.
Remark: The NAP Alarm is only beeping sound.
4.
Alarm Sounds setting: Beep/Melody/Internet Radio
5.
When the Alarm Clock goes on, press any key except for “Power” button, you can enter the
“Snooze” mode. You can press “Power” button to stop the ringing when the alarm goes on 5
minutes later again.
Remark: You can select any internet radio station or FM station as Alarm tone from the
favorite station. When the internet station doesn't work in 1 minute, it will auto set into Beep.
Timer
Press “←” or “→” button to set the timer, then push down the Rotary knob to confirm. When the
time is due, it will release some beeping sound. Push down the Rotary knob to cancel.
Scheduled Playing
-Turn On: Option to set up a schedule to play any station from favorite station list.
-Turn Off: Turn off the schedule playing setting.
Language
There are 17 Languages available, such as English, German, French, Norwegian, Italian, Svenska,
Dansk and others. You can choose the one which is suitable for you.
Dimmer
You can adjust the backlight of the LCD with below settings:
1.
Power Saving
You can set the backlight to dim down when there is no operation for a certain time of period. There
are 18 levels of the backlight available.
2.
Turn on
You can adjust the backlight level for the operation mode, i.e. when you are operating the radio
or checking on the menu.
Display
You can choose the display show in color or Monochrome.
Power Management
This function is to allow the radio to go to Standby if there is no internet signal received in order to
save power. The default setting is Turn Off. If you set to 30 minutes, the radio will go into Standby
Page 21

after 30 minutes when the radio does not receive any internet signal. Other time frame for 5 minutes
and 15 minutes are available.
Sleep Timer
You can set the timer to put the radio on standby after certain time, from 15 minutes to 180 minutes
with the step of every 15 minute.
You also can do the setting with the “Sleep” button from remote control, when you press “Sleep”,
then you can see the sleep timer on the top right corner of the display.
Buffer
You can select your preferred buffering time.
Weather
You can set the display of weather forecast on the standby mode and the temperature units.
a) You can select Weather Display On/Off and Location
b) Temperature units: Centigrade (℃) or Fahrenheit (℉)
Local Radio Setup
The radio will detect your local area stations automatically and it will display under the
“Internet radio” you will find all the stations under “Internet radio” “Local Radio”.
If you would like to change the Local area stations to other countries, you can choose “Manual setup”
to make the change.
Playback Setup
You can set up the playback as Off, Repeat one, Repeat all, Shuffle.
Device
-
Rename
This is to set the name of your radio when it becomes a media renderer. The name by default is
“Regent i100s”. Choose “Rename” to make the change.
-
AirMusic Control App
A remote control App is available which you can install on your mobile device to control the radio.
Select this option to view the QR code to download the App.
Equalizer
Select your preferred music effect.
Resume When Power On
This is set to ON or OFF of “Resume When Power On”.
Software update
1)Upgrade information will pop up on the display when there is upgrade version on the server.
2)You can do the manual upgrade from the update menu.
Reset to default
You can do this factory reset to empty all of the settings and it comes back to default settings.
**Please note all the Station presets, Settings and configuration will be lost after you have
performed the “Factory Reset”.
Remark: Playing stopps when it comes back to default settings and skip into Language Setting
automatically, after that it will turn to the internet settings.
Page 22

Troubleshooting
1.
If you have trouble with connecting the radio to your wireless network, these steps may
help to resolve the problem:
-
Confirm that a Wi-Fi or Ethernet Wired connected PC can access the internet (i.e. can
browse the web) using the same network.
-
Check that a DHCP server is available, or that you have configured a static IP address on
the radio.
-
Check that your firewall is not blocking any outgoing ports.
-
Some access points may be set so that only equipment with registered MAC addresses can
connect to them. This is one possible cause of the Internet Radio being unable to connect
to the WiFi network, and the Internet Radio display will show Bad ESSID or key. To
overcome this problem you will need to add the Internet Radio's MAC address to the list of
allowed equipment in your access point. The Internet Radio's MAC address can be found
using the menu <Information Center ->System Information ->Wireless Info MAC address>.
You will need to refer to the guide for you Access Point in order to enter the Internet Radio
as an allowed piece of equipment.
-
If you have an encrypted network, check that you have entered the correct key or
pass phrase into the radio. Remember that text-format keys are case sensitive.
-
If your wireless network name (ESSID) is 'Hidden'(a setting on the wireless access point),
then you can either turn on the name, or you can manually enter the name into the internet
radio and media player, Select <Configure ->Network ->Manual Configuration->Wireless
->Enter ESSID>. Confirm if the Network is encrypted, e.g. requires a WEP or WPA key,
then enter the network name.
2.
If your radio can connect to the network successfully, but is unable to play particular
stations, it may be due to one of the following reasons:
-
The station is not broadcasting at this time of the day (remember it may be located in a
different time zone).
-
The station has too many people trying to connect to the radio station server and the
server capacity is not large enough.
-
The station is not broadcasting anymore.
-
The link on the radio is out of date. This is updated automatically everyday, so the next
time you turn on the link will be recognised.
-
The internet connection between the server (often located in a different country) and yours
is slow. Some internet service providers may fail to stream in certain geographical areas.
Try using a PC to play back the stream via the broadcaster's web site. If you can play back
the station with a PC, please report to the customer service where you bought this radio. If
you have a laptop, try connecting it if your Internet Radio cannot find the station.
3.
When you scan for PCs under UPnP function, none can be found, or the PC you
are looking for does not appear in the list:
-
You have not connected to the wireless Access point. On the internet radio, select
'Configuration', 'Network ', 'Wireless network connection' and then select your Wireless
network (You may need to enter a security key to access the network wirelessly).
-
You have a firewall set on your PC which stopps from access shared files.
-
If you have a thirdparty firewall (Like Norton or Zone Alarm) that will have its own control
panel and you will need to consult the manual for your firewall.
-
If your PC is connected to a managed network, with a server sometimes the PC being
searched for needs to be server Workgroup.
4.
You can see the PC you want to play music from, but cannot find any folders on the PC:
-You have a firewall running which is preventing the internet radio from seeing shared folder. You
can disable firewalls like Norton to see if this overcomes the problem, if this resolves the issue
then you can either leave the firewall off, or allow file sharing through the fire wall.
Note: If you firewall is required to provide security for your system, it should not be left off.
5.
I can't share a folder, as the option is not highlighted:
The share folder option will not be available until you have turned simple file sharing on. Run
the wizard.
Scan Error:
When the internet radio is scanning the content of the folders on a PC, it is possible that a scan
Page 23

error may occur if the windows file sharing application times out. This is most likely to occur if both
the PC with the media content and the Internet Radio are connected wirelessly. Try re-connecting
the PC with the media content into the network via cable. This will increase the speed at which the
Internet Radio is able to scan the content of the Media PC.
Playlists:
Some media ripping applications allow 'Playlists' to be created. The Internet Radio is able to detect
and stream these playlists, but they must be stored in the folder with the rest of the Media content
and they must have the file extension.m3u.
Windows Media Player can create suitable playlist, just select 'create new playlist', drag and drop
the tracks you want into the playlist, then use 'Save as' to ensure the file type is .m3u. (Existing play
lists can be opened and re-saved in this format) When the Internet Radio detects you have playlists,
it will enable a new menu option allowing the playlist to be selected and added to the queue.
If you re-connect to another PC of folder, which does not have any Playlists in the .m3u.
format, the playlist option will not be presented in the menu.
6.
If the Internet Radio keeps re-buffering radio station:
-
The Internet Radio is streaming the data from the radio station via your broadband
connection, if there is a high error rate on your broadband connection or the connection is
intermittent, then it will cause the Internet Radio to pause until the connection is
re-established and it has received enough data to start playing again.
-
If your Internet Radio keeps stopping, please check the DSL modem to ensure that the
Broadband line is not suffering a high error rate or disconnections. If you are experiencing
these problems, you will need to contact your broadband supplier.
7.
What is Buffering?
When playing a stream, the Internet Radio/Media player, downloads a small amount of the stream
before it starts playing. This is used to fill in any gaps in the stream that may occur if the internet or
the wireless network is busy.
The Internet Radio streams music data from the PC while you are listening. If a stream gets
blocked or experiences Internet congestion while transferring it may stop/interfere with the quality
of play. If this happens, check your internet connection speed - it must be faster than the speed of
the streams.
Technical Specification
Model: Regent
®
i100s
Power input: 7.5V 1.2A
Power voltage: 100-240V~50/60Hz
Wireless Network: IEEE802.11b/g/n
Security Protocol: WEP/WPA/WPA2
Audio output power: 3W (RMS)
Unit Dimension: 195 x 115 x 115 mm (LxDxH)
Remark: Specification may vary without notice.
What is included in the box
*
Regent® i100s
*
Power adaptor
*
Remote control
*
User manual
WEEE and Recycling
The European laws do not allow any more the disposal of old or defective electric or
electronic devices with the household waste. Return your product to a municipal collection
point for recycling to dispose of it. This system is financed by the industry and the ensures
environmentally responsible disposal and the recycling of valuable raw materials.
 Loading...