

Page 1

Regent® i100
Radio internetowe
z FM/DAB+/Bluetooth
Instrukcja obsługi
Prosimy o uważne zapoznanie się z treścią tego podręcznika
przed użyciem urządzenia.
Page 2

Środki ostrożności
• Urządzenia nie należy używać w wysokiej temperaturze lub wysokiej wilgotności.
• Trzymaj radio z dala od płynów. Natychmiast je wyłącz, jeśli wyleje się na nie jakikolwiek płyn.
• Unikaj używania lub przechowywania urządzenia w zakurzonym lub zapylonym otoczeniu.
• Nie otwieraj i nie naprawiaj radia samodzielnie.
• Używaj tylko zasilacza AC dostarczonego z radiem. Podłączenie zasilacza o innym napięciu
spowoduje trwałe uszkodzenie radia i może być niebezpieczne.
• Czyść tylko suchą ściereczką.
Symbol błyskawicy wewnątrz trójkąta równobocznego ostrzega użytkownika o obecności wewnątrz
produktu nieizolowanych niebezpiecznych napięć elektrycznych o mocy wystarczającej do powstania
ryzyka porażenia prądem.
WEEE and Recycling
Produkt jest objęty dyrektywą europejską 2012/19/UE. Prosimy o zapoznanie się z
lokalnym systemem selektywnej zbiórki produktów elektrycznych i elektronicznych
oraz postępowanie zgodnie z nimi. Prawidłowa utylizacja starego produktu
zapobiega potencjalnym negatywnym skutkom dla środowiska i zdrowia ludzkiego
Page 3
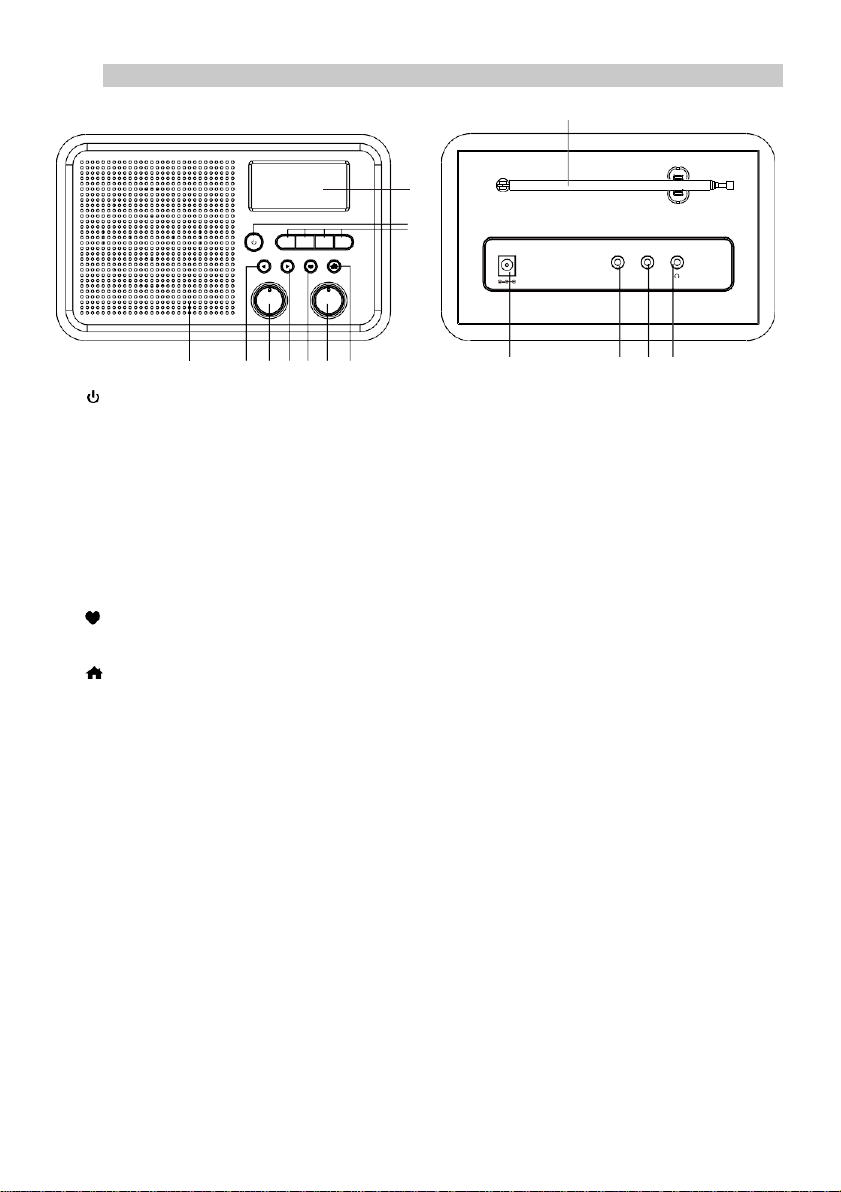
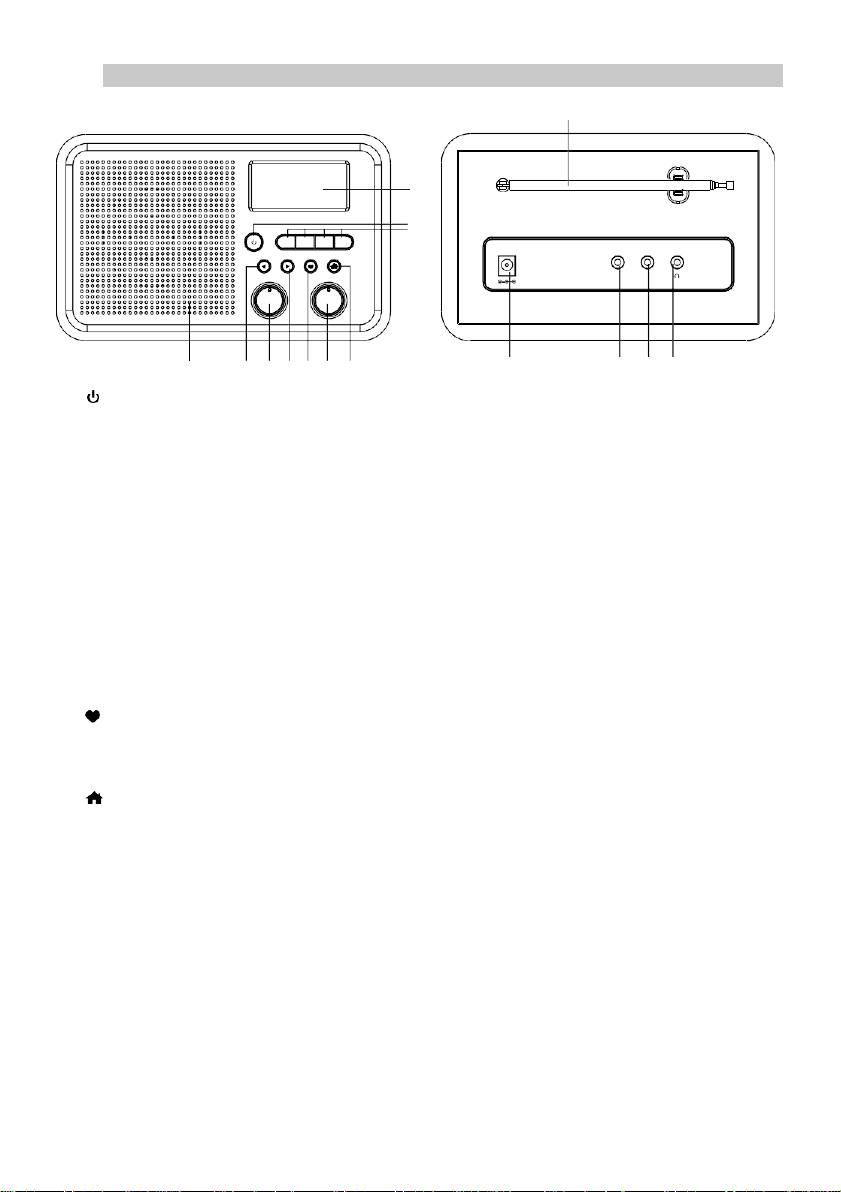
1. Opis urządzenia
11
4 5
1.
: Włącz/Wyłącz
2.
Przyciski Ulubionych
9 6 7 10 8
12 13 14 15
3.
Wyświetlacz
4.
Głośnik
5.
◄
Powrót do poprzedniego menu / W lewo
6. ►
W prawo / Wejście do menu
7.
Ulubione (przytrzymaj, by dodać, naciśnij, by przywołać)
8.
Główne menu
9.
TUNE/SELECT
Obróć, aby przewinąć w górę/dół menu/ Naciśnij, aby potwierdzić/ Wybierz opcje menu/ Naciśnij,
aby zatrzymać/wznowić odtwarzanie kanału radiowego
10.
VOLUME+/-
Obracając dostosujesz głośność
11.
Antena teleskopowa
12.
Wejście zasilacza
13.
Wejście audio 3.5 mm
14.
Wyjście audio 3.5 mm
15.
Wyjście słuchawkowe 3.5 mm
DC IN AUX-IN AUDIO OUT
3
1
2
1 2 3 4
TUNE/SELECT
VOLUME+/ -
Page 4
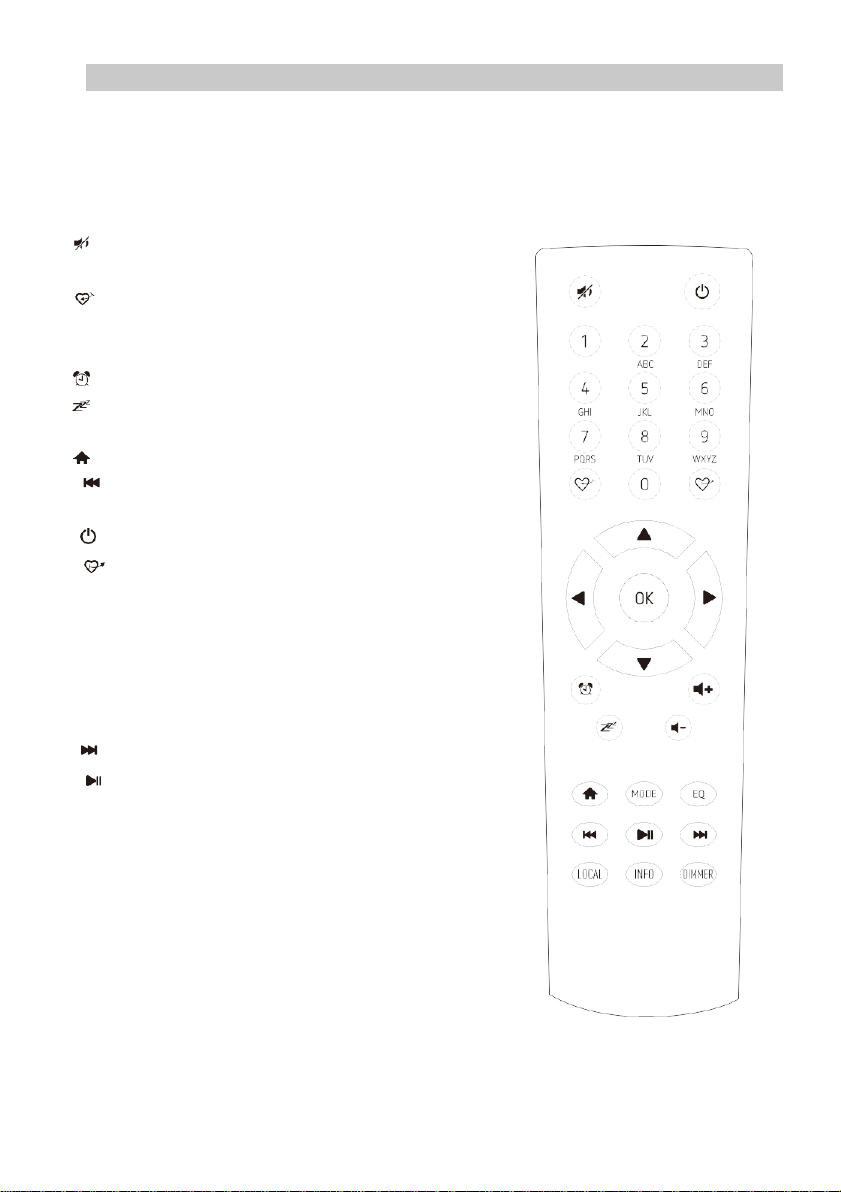
2.
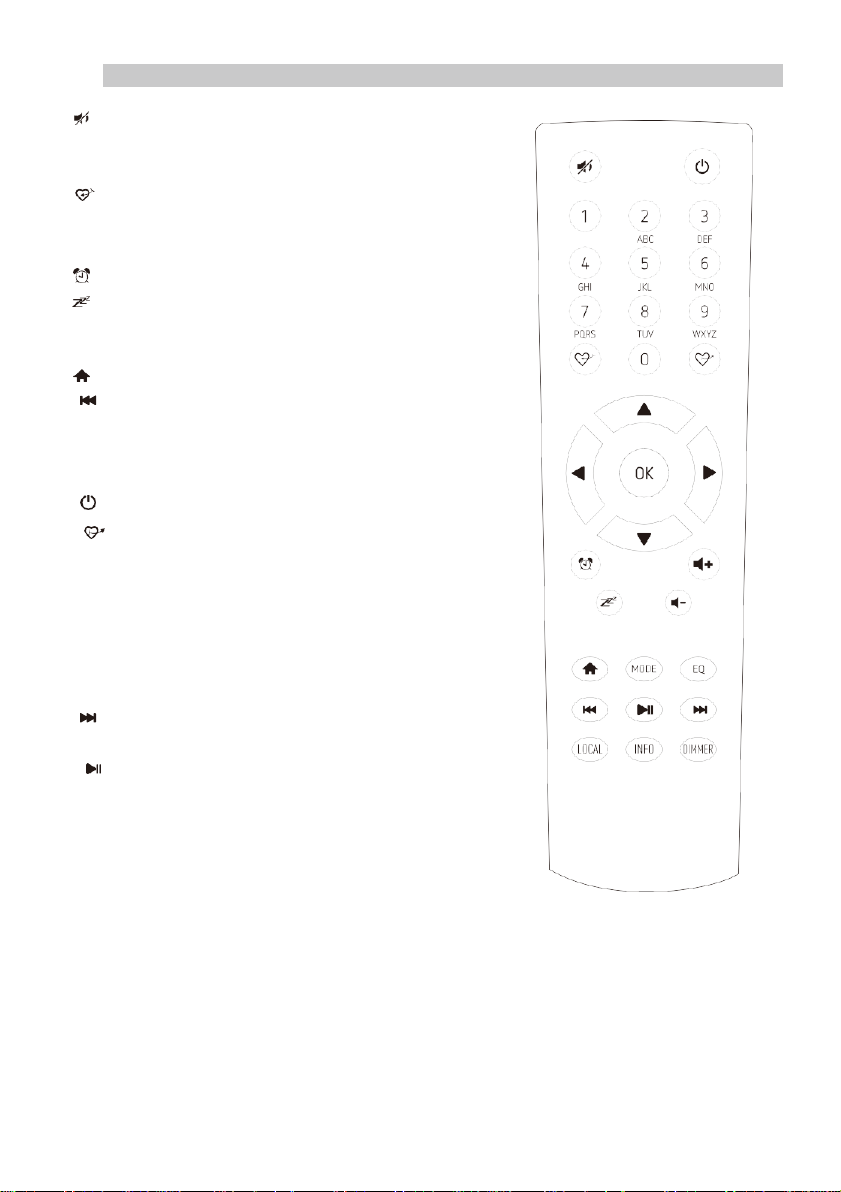
Pilot zdalnego sterowania
1.
: Wycisz
2.
0-9: Wprowadź numer Ulubionej/znak hasła WiFi
3.
: Dodaj słuchaną stację do Ulubionych
4.
▲ : W górę
5.
◄ : W lewo/Powrót do poprzedniego menu
6.
: Budzik
7.
: Automatyczne wyłączenie
8.
Mode: Zmiana trybu
9.
: Menu główne
10.
: Poprzednia stacja z listy/ Poprzedni utwór
11.
Local: Lista lokalnych stacji
12.
: Włącz/Wyłącz
13.
: Pokaż Ulubione
14.
OK: Zatwierdź
15.
► : W prawo
16.
▼: W lewo
17.
Vol+: Głośniej
18.
Vol-: Ciszej
19.
EQ: Equalizer
20.
: Następna stacja z listy/ Następny utwór
21.
: Odtwórz/Pauza
22.
Dimmer: Dostosuj jasność wyświetlacza
23.
Info: Informacje o sieci i systemie
Page 5
Configure Network?
<Yes> No
3.
Przed uruchomieniem
Upewnij się, że posiadasz:
• szerokopasmowe połączenie internetowe.
• bezprzewodowy (WiFi) router szerokopasmowy (2,4 GHz) pomyślnie podłączony do Internetu.
Regent i100 obsługuje połączenie bezprzewodowe B, G i N (router N może być również używany z
ustawieniem na B lub G).
• kod/hasło szyfrowania danych WEP (Wired Equivalent Privacy) lub Wi-Fi Protected Access (WPA).
Musisz wprowadzić prawidłowy kod, gdy radio jest podłączone do routera bezprzewodowego w celu
połączenia sieciowego. Jeśli nie znasz kodu/hasła, skontaktuj się z osobą/technikiem, który
skonfigurował router/sieć.
Jeśli spełniasz powyższe, podłącz wtyk złącza zasilacza do gniazda z tyłu urządzenia, a drugi koniec
adaptera do gniazdka zasilania.
4.
Pierwsze uruchomienie
Zacznij od skonfigurowania połączenia ze swoją siecią bezprzewodową.
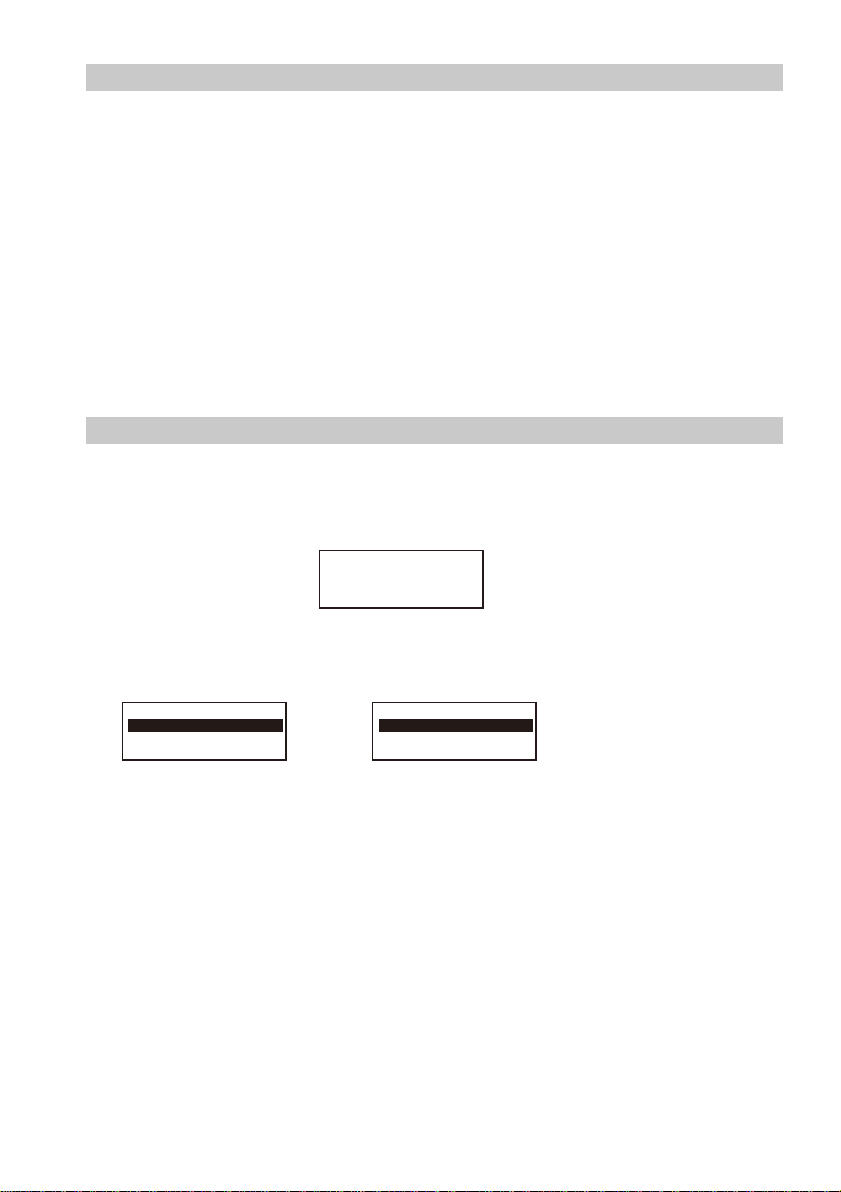
Aby to zrobić, wybierz <YES> (używając ◄ i OK na pilocie lub pokrętła Tune/Select), gdy na
ekranie pojawi się pytanie:
Następnie 2 razy naciśnij OK na pilocie lub pokrętło Tune/Select, aby przeskanować
otoczenie w poszukiwaniu dostępnych sieci bezprzewodowych.
=>
Wybierz swoją sieć (OK lub pokrętłem Tune/Select) i wprowadź hasło. Możesz to zrobić:
a) używając pilota
Na klawiaturze alfanumerycznej naciskaj kolejno każdy przycisk, aby przełączać między literami,
cyframi i symbolami, jak podano poniżej.
1: 1!@#$%^&*()_+[]{};:'”\|,./<>?
2: 2ABCabc
3: 3DEFdef
4: 4GHIghi
5: 5JKLjkl
6: 6MNOmno
7: 7PQRSpqrs
8: 8TUVtuv
9: 9WXYZwxyz
0: 0
Naciśnij ►, aby wprowadzić kolejny znak. Całość zatwierdź [OK].
Add AP
Remove AP
Add/Remove AP
AP:[ ]
Page 6
b) używając przysicków na przednim panelu urządzenia
Użyj pokrętła [Tune/Select] do zmiany znaku. Jeśli jest prawidłowy, przejdź do następnego
naciskając ► . Całość zatwierdź naciskając [Tune/Select].
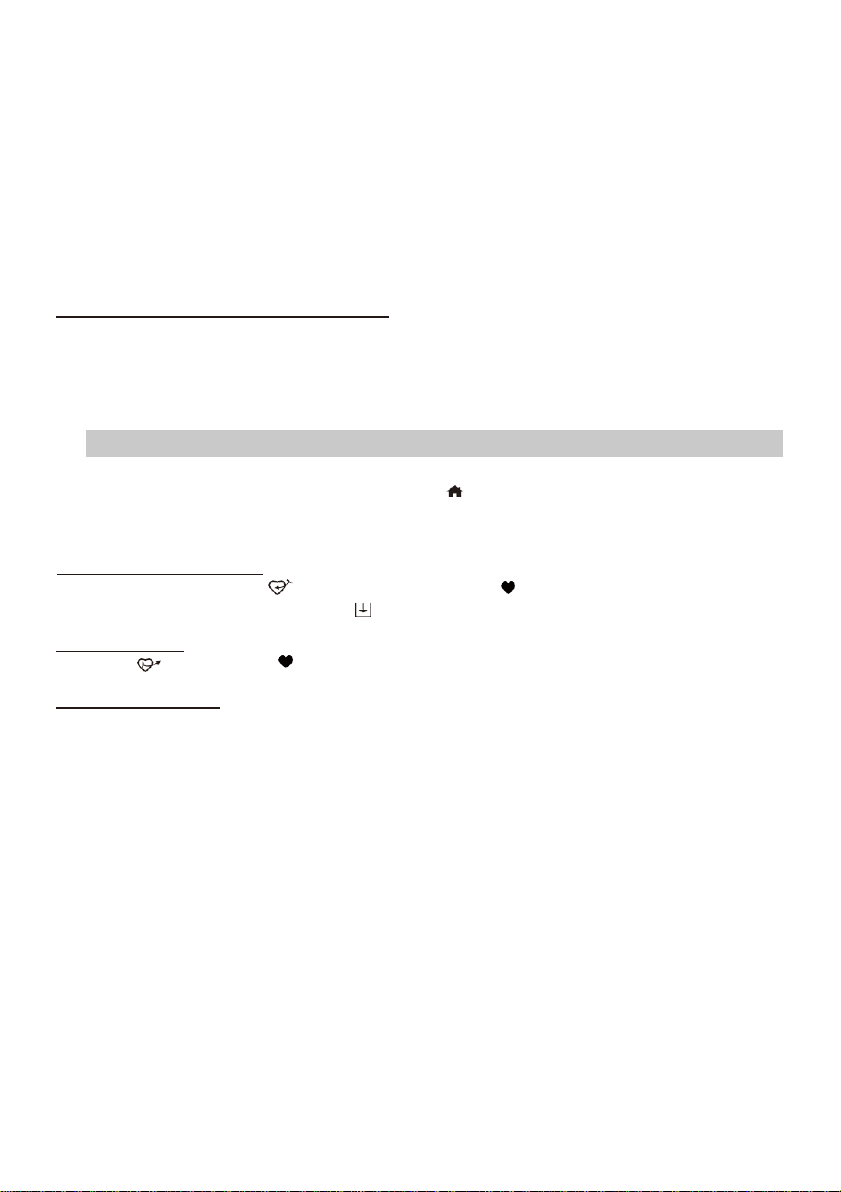
Po połączeniu z siecią WiFi Regent i100 przejdzie do Menu głównego w języku angielskim.
Do poruszania się między poszczególnymi kategoriami służą przyciski nawigacyjne na pilocie lub
pokrętło Tune/Select.
Aby zmienić język menu na polski, wybierz:
Configuration -> Language -> Polski
5.
Funkcje urządzenia
Do głównego menu możesz dostać się naciskając .
5.1. Moje ulubione – lista zapisanych stacji (maksymalnie 99 pozycji)
Dodanie stacji do Ulubionych
Podczas słuchania naciśnij na pilocie lub przytrzymaj na przednim panelu.
Potwierdzeniem będzie pojawienie się na górze ekranu.
Przywołanie stacji
Naciśnij na pilocie lub na przednim panelu.
Edycja listy Ulubionych
Na liście Ulubionych wybierz stację, którą chcesz edytować i naciśnij ►. Możesz wybrać jedną z
trzech opcji:
- Przesuń w dół
- Przesuń w górę
- Usuń
5.2. Radio internetowe
Skytune
Wybierz, by zyskać dostęp do tysięcy internetowych rozgłośni radiowych z całego świata.
Wyszukiwanie (Skytune)
Zamiast przeglądać całą listę stacji radiowych, możesz wprowadzić kilka znaków żądanej stacji, aby
przefiltrować/skrócić listę.
Historia
Regent i100 zapamięta do 99 ostatnio słuchanych przez Ciebie stacji.
Page 7

5.3. Centrum medialne
Regent i100 może odbierać muzykę z podłączonych do Twojej sieci urządzeń zgodnych z
UPnP/DLNA.
UPnP
Po wybraniu tej opcji Regent i100 w ciągu kilku sekund wyszuka wszystkie dostępne urządzenia. Wybierz
preferowany serwer UPnP i dostępne na nim pliki muzyczne, których sposób odtwarzania możesz
edytować w Konfiguracja -> Konfiguracja odtwarzania.
Mój wykaz odtwarzania
Możesz stworzyć własną listę plików z dostępnych na danym serwerze. Na wybranym utworze
przytrzymaj pokrętło Tune/Select lub przycisk OK, aż na ekranie pojawi się .
Wyczyść mój wykaz odtwarzania
Usuwa listę plików, by można było stworzyć nową.
5.4. DAB Radio
Regent i100 może z powodzeniem odbierać sygnał radia cyfrowego DAB/DAB+, jeśli znajduje się w
jego zasięgu. Po uruchomieniu tego trybu zalecamy przeprowadzenie skanowania sieci, by znaleźć
wszystkie rozgłosnie radiowe dostępne w danej lokalizacji. Do słuchania rozgłośni DAB/DAB+ nie
potrzebujesz połączenia z internetem, ale pamiętaj, by rozłożyć znajdującą się z tyłu urządzenia
antenę teleskopową.
Możesz stworzyć listę ulubionych stacji. W tym celu przytrzymaj lub wciśnij pod
czas
słuchania danej radiostacji. Potwierdzeniem będzie pojawienie się na górze ekranu.
5.5. FM Radio
Regent i100 może z powodzeniem odbierać sygnał radia analogowego w paśmie FM, jeśli znajduje
się w jego zasięgu. Po uruchomieniu tego trybu zalecamy przeprowadzenie skanowania sieci, by
znaleźć wszystkie rozgłośnie radiowe dostępne w danej lokalizacji. Do słuchania rozgłośni FM nie
potrzebujesz połączenia z internetem, ale pamiętaj, by rozłożyć znajdującą się z tyłu urządzenia
antenę teleskopową.
Możesz ręcznie dostroić znalezione stacje. Wystarczy, że na danej częstotliwości przytrzymasz
przycisk OK lub pokrętło Tune/Select, a w prawym dolnym rogu ekranu pojawi się napis
TUNING. Dostosuj częstotliwość korzystając z pokrętła lub z przycisków ◄ / ►. Kiedy
skończysz, przytrzymaj OK lub pokrętło Tune/Select.
Możesz stworzyć listę ulubionych stacji. W tym celu przytrzymaj lub wciśnij w trakcie
słuchania danej radiostacji. Potwierdzeniem będzie pojawienie się na górze ekranu.
Page 8

5.6. Bluetooth
Regent i100 może odtwarzać muzykę ze sparowanego z nim urządzenia obsługującego
technologię Bluetooth (np. smartfon)
5.7. AUX-in
Regent i100 może odtwarzać muzykę zapisaną w innym urządzeniu audio lub smartfonie
poprzez połączenie z 3,5-milimetrowym gniazdem Aux-in. Kabel audio minijack 3,5mm podłącz
do gniazda Aux-in z tyłu Regent i100 z jednej strony, a z drugiej do gniazda słuchawkowego lub
gniazda wyjścia liniowego w drugim urządzeniu.
5.8. Alarm
W Regent i100 możesz ustawić 2 budziki:
1) Wybierz Alarm w Menu głównym
2) Wybierz, który Alarm chcesz ustawić
3) Określ:
a. Czas - godzina, o której ma rozbrzmieć alarm
b. Dźwięk – źródło dźwięku alarmu: Brzęczyk, Moje ulubione, Radio FM, Radio DAB
c. Powtarzalność – czy alarm ma się włączyć codziennie, tylko raz czy w wybrane dni
d. Głośność alarmu
4) Po zakończeniu powyższych ustawień naciśnij przycisk ◄, aby wyjść i upewnić się, że alarm jest
włączony. Potwierdza to widniejąca w górnej częsci ekranu ikona budzika.
5.9. Wyłączenie czasowe
Możesz ustawić minutnik, aby Regent i100 przechodził w stan gotowości po upływie wybranego
czasu w zakresie od 15 minut do 180 minut. W tym celu naciśnij przycisk na pilocie. Na ekranie
pojawi się ikona potwierdzająca ustawienie minutnika.
5.10. Konfiguracja – więcej ustawień do personalizacji Regent i100
Sieć – ustawienia sieci bezprzewodowej
Data i czas
Radio automatycznie ustawi czas lokalny po ustanowieniu połączenia internetowego. Tutaj możesz
ustawić czas ręcznie.
Język
Domyślnym językiem menu jest angielski, ale możesz go zmienić na jeden spośród dostępnych:
francuski, hiszpański, włoski, niemiecki, holenderski, polski, rosyjski, uproszczony chiński.
Page 9

Ustawienia DAB
DAB Preset Scan
Wybierając tę opcję, przeprowadzisz nowe skanowanie kanałów DAB. Spowoduje to usunięcie
dotychczas wykorzystywanej listy.
DAB Radio Preset
Możesz tu zarządzać listą stacji DAB. Na danej stacji naciśnij przycisk ►, a następnie wybierz
jedną z dostępnych opcji.
Ustawienia FM
FM Area
Wybierz region według swojej lokalizacji, aby zdefiniować zakres częstotliwości.
FM Preset Scan
Wybierając tę opcję, przeprowadzisz nowe skanowanie częstotliwości FM. Spowoduje to usunięcie
dotychczas wykorzystywanej listy.
FM Radio Presets
Możesz tu zarządzać listą stacji FM. Na danej stacji naciśnij przycisk ►, a następnie wybierz jedną
z dostępnych opcji.
Lokalne stacje radiowe
Regent i100 jest domyślnie ustawiony, by automatycznie wykrywać regionalne stacje radiowe. Stacje
te są dostępne po naciśnięciu przycisku Local na pilocie. Tutaj możesz ręcznie zmienić region.
Konfiguracja odtwarzania
Określ, w jaki sposób mają być odtwarzane pliki w trybie odtwarzacza strumieniowego UPnP/DLNA.
Wznów po włączeniu
Ta funkcja jest domyślnie włączona: Jeśli Regent i100 odtwarzał stację radiową przed wyłączeniem
zasilania, wznowi jej odtwarzanie po ponownym uruchomieniu.
Przyciemnianie
Możesz ustawić poziom podświetlenia ekranu zgodnie ze swoimi preferencjami.
EQ(Equaliser)
Dostosuj efekt dźwiękowy.
Czas buforowania
Jeśli połączenie internetowe jest wolne lub występuje przeciążenie sieci , odtwarzanie może
być przerywane. Aby poprawić sytuację, możesz wybrać dłuższy czas buforowania
(wartość domyślna to 2 sekundy).
Informacja
Szczegółowe informacje o sieci i systemie.
Aktualizacja oprogramowania
Tutaj możesz dokonać aktualizacji oprogramowania, jeśli takowa zostanie wypuszczona.
Resetuj do domyślnego
Możesz usunąć WSZYSTKIE ustawienia i powrócić do ustawień domyślnych.
Page 10
6.
Rozwiązywanie problemów
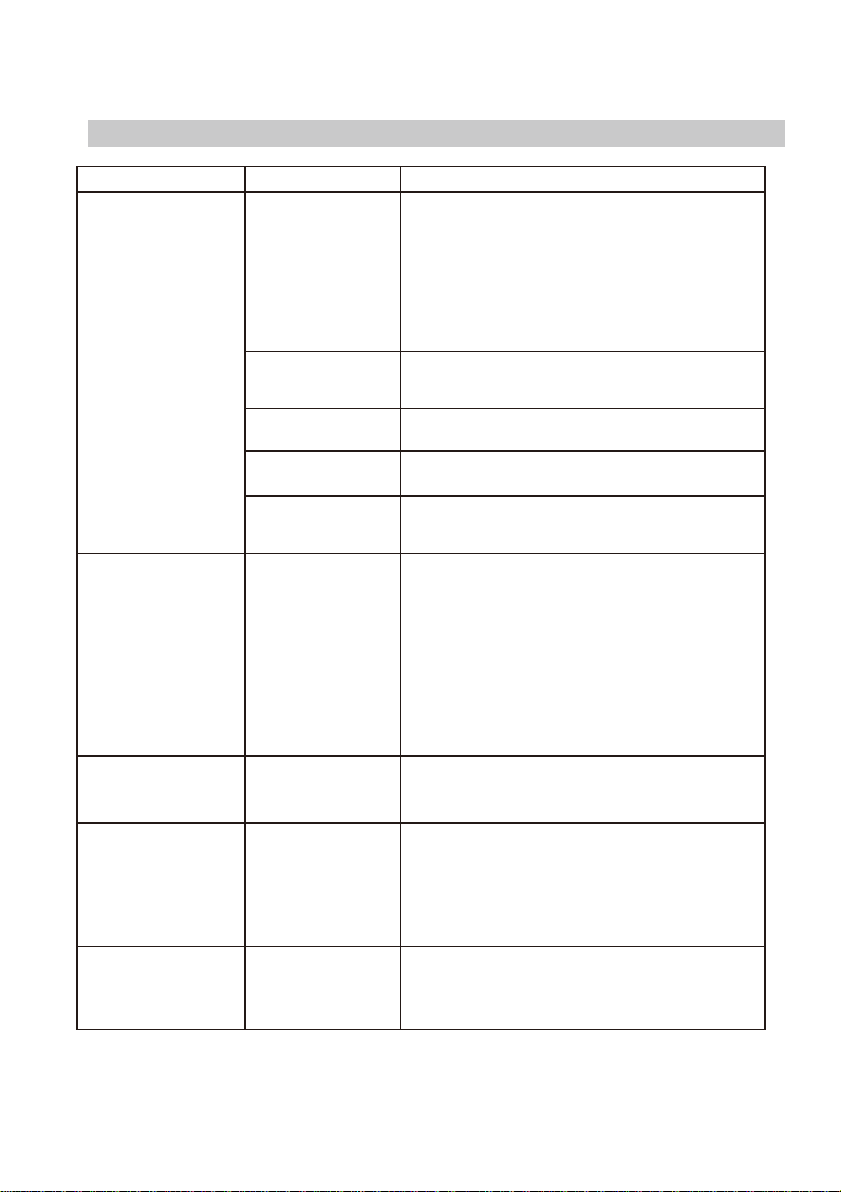
Problem
Przyczyna
Rozwiązanie
Brak połączenia z
siecią
bezprzewodową
Awaria sieci
• S pr awdź, c zy inne podłączone do tej sieci
urządzenie m a dostęp do Internet u.
•
Spra wdź, czy serwer DHCP jest dostępny lub
czy skonfigurowałeś statyczn y adres IP w
Regent i100.
•
Spra wdź, czy zap ora nie blokuje żadn ych
portów wychodzących. Jako minimum
Regent i100 potrzebuje dostępu do portów
UDP i TCP 80,443 i 8008, portu DNS 53.
Router ogranicza dostęp
do wymienionych
adresów MAC
Dodaj adres MAC Regent i100 do listy routera
(Konfiguracja > Informacja > Sieć > Wi-Fi MAC).
Zbyt słaby sygnał WiFi
Zoptymali zuj odległość lokalizacji rout era
Nieznana metoda
szyfrowania
Zmień metodę szyfrowania na routerze. Regent
i100 obsługuje WEP, WPA, WPA2.
Zapora sieciowa
(Firewall) nie
pozwala na dostęp
Sprawdź ustawienia zapory sieciowej w
komputerze.
Regent i100 łączy
się z siecią, ale
nie odtwarza
niektórych stacji
•
Stacja nie nadaje o tej porze dnia (pamiętaj,
że może znajdować się w innej strefie
czasowej).
•
Stacja ma zbyt wiele osób próbujących
dołączyć do serwera, a pojemność serwera
nie jest wystarczająco duża.
•
Stacja osiągnęła maksymalną dozwoloną
liczbę jednoczesnych słuchaczy.
•
Link w radiu jest nieaktualny. Jest to
aktualizowane automatycznie każdego dnia,
więc przy następnym włączeniu link zostanie
rozpoznany.
Brak odbioru DAB/FM
•
Przywróć ustawienia fabryczne i rozłóż ant enę
teleskopową.
•
Ustaw urządzenie przy oknie.
Słaby sygnał
DAB/FM
•
Sprawdź, czy antena jest wysunięta, aby uzyskać
maksymalną siłę sygn ału i wyreguluj kierunek,
aby poprawić odbiór.
•
Sprawdź, czy nie masz innego sprzętu
elek trycznego zbyt blisko radi a, powodując ego
zakłócenia.
Brak dźwięku
•
Dostosuj poziom głoś ności zewnętrznego
głoś nika zasilanego.
•
Sprawdź, czy zasilanie zewnętrznego głośnika
zasilanego j est włączone.
Page 11

Specyfikacja techniczna
➢ Model: Regent
®
i100
➢ Power input: 5V 1A
➢ Power voltage: 100-240V~50/60Hz
➢ Wireless Network: IEEE802.11b/g/n 2,4GHz
➢ Security Protocol: WEP/WPA/WPA2
➢ Bluetooth version: V4.2 BR/EDR compliant
➢ Bluetooth frequency: 2.4 GHz
➢ Bluetooth range: 10 meters (line of sight)
➢ DAB frequency range: 174.928MHz (5A) - 239.200MHz (13F)
➢ Support DAB and DAB+
➢ FM frequency range: 87.5-108MHz
➢ Audio output: Stereo earphone jack 3.5 mm, Stereo audio out
➢ Audio input: Aux in jack 3.5mm
➢ Telescopic antenna
➢ Unit Dimension: 185 x 110 x 115mm
Specyfikacja może ulec zmianie bez uprzedzenia.
Zawartość opakowania
*
Regent® i100
*
Zasilacz
*
Pilot zdalnego sterowania (bez baterii)
*
Instrukcja obsługi
Page 12

Regent® i100
Internet Radio with
FM/DAB+/Bluetooth
User Manual
Please read this user manual carefully before using the receiver.
Page 13

Precautions
The radio should not be used in a high temperature or high humidity environment as this may
damage the unit.
Keep the radio away from liquids as it may get damaged. Please switch off the radio
immediately if water or liquid is spilled into the radio.
Consult with the provider you bought this radio for any questions.
Avoid using or storing the unit in dusty or sandy environment.
Do not open and repair the radio by yourself.
Use only the AC adaptor supplied with the radio. Connecting a power supply with a different
rating will cause permanent damage to the radio and may be hazardous.
Clean only with dry cloth.
Page 14
1. Location of Controls
11
4 5
1.
: Standby on/off
2.
Preset button 1-4
9 6 7 10 8
12 13 14 15
Preset top four favourite stations
Press and hold to preset
Press it briefly to recall
3.
Display
4.
Speaker
5.
◄
Back to previous menu/left cursor
6. ►
Right cursor/Enter edit menu under Favourite list /View the big clock & radio info under
playing screen
7.
Press and hold to preset a particular station
Press to recall the favourite list
8.
Access main menu/press this button to return to the playing screen
9. TUNE/SELECT
Rotate to scroll along, up/down on the menu / Push to confirm / Select menu options / Push to
stop / resume playback of radio channel
10. VOLUME+/-
Rotate to adjust the volume level
11. Telescopic antenna
12. DC IN Jack
13. Auxiliary input jack 3.5 mm
14. Audio output jack 3.5 mm
15. Earphones jack 3.5 mm
DC IN AUX-IN AUDIO OUT
3
1
2
1 2 3 4
TUNE/SELECT
VOLUME+/ -
Page 15
2. Remote Control
24.
: Mute
25.
0-9: Input index number on the list/input
characters for WiFi security code
26.
: Preset the current playing station to Favourite
27.
▲ : Cursor up
28.
◄ : Cursor left / back to previous menu
29.
: Alarm button
30.
: Sleep Timer
31.
Mode: Switch between Internet radio/
/DAB/FM/Bluetooth/Media Centre
32.
: Main Menu
33.
: Previous station on the list/previous track on
Bluetooth/Media Centre
34.
Local: Access the local station list
(Local area set up in Configuration)
35.
: Press to toggle between Standby and Operation
36.
: Recall the favourite list
37.
OK: confirm button
38.
► : Cursor right
39.
▼: Cursor down
40.
Vol+: Volume up
41.
Vol-: Volume down
42.
EQ: Equalizer
43.
: Next station on the list/next track on
bluetooth/Media Centre
44.
: Play/pause for Bluetooth/Media Centre
Play/stop for Internet radio
45.
Dimmer: Access the Dimmer menu to adjust the
brightness of the display
46.
Info: Quick access to Network and System
information
Page 16

3. Before you start
Please ensure the following is ready:
a. You have a broadband internet connection.
b. A wireless broadband router is connected to the internet successfully.
c. The radio supports Wireless B, G and N connection (Wireless N router can also be
used with the setting on B or G). You know the Wired Equivalent Privacy (WEP) or
Wi-Fi Protected Access (WPA) data encryption code/password. You need a key in
the correct code when the radio is connected to the wireless router for network
connection. If you do not know the code/password, please contact the
person/technician who set up the router/network for you. The radio can work via
Wireless network connection (Wi-Fi connection).
Plug it in with the power plug to the outlet and the pin to the DC IN on the rear side of the radio.
4. How to input security code for your wireless network
Using remote control
On the alpha-numerical keypad, press each button repeatedly to cycle through the letters,
numbers and symbols as listed below.
To input a character, scroll to the correct one and when it is highlighted, press the ► button to input
the next character. When it comes to the last character of the password and it is highlighted, press
[OK] to confirm.
Button 1: 1 and different kind of symbols !@#$%^&*()_+[]{};:'”\|,./<>?
Button 2: 2ABCabc Button 3: 3DEFdef
Button 4: 4GHIghi
Button 5: 5JKLjkl
Button 6: 6MNOmno
Button 7: 7PQRSpqrs
Button 8: 8TUVtuv
Button 9: 9WXYZwxyz
Button 0: 0
Using control button on the radio unit
Use the [Tune/Select] knob to scroll through the characters, when the correct one is highlighted,
press [ ► ] button to input the next character. When it comes to the last character of the password
and it is highlighted, press [Tune/Select] to confirm.
Page 17
Configure Network?
<Yes> No
1/10 >
10:11
My Favourite
Internet Radio
Media Centre
5. Network Setup
Internet connection can be setup via Wireless LAN (WiFi).
Your radio requires a broadband Internet connection through wired Ethernet or WiFi. The easiest
way is use a CAT 5 or CAT 6 cable to connect through wired Ethernet to a Wifi router, which
connects to an Adsl modem or a cable modem provided by your ISP.
•
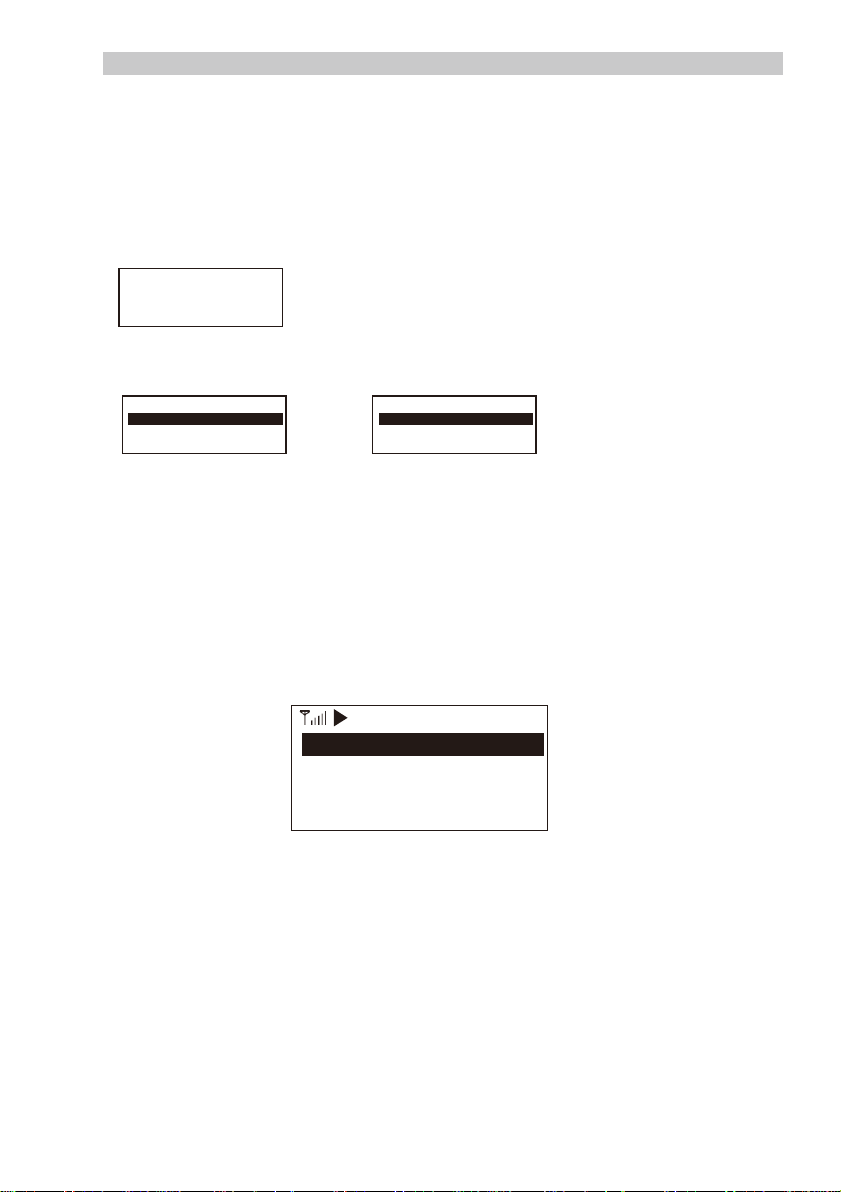
If this is first time use, the Configure Network wizard will be displayed. Choose Yes to start
configuring network. Press the [ ◄ ] button to highlight Yes and press [Tune/Select] to
confirm.
•
Select Add/Remove AP from the list, use the [Tune/Select] knob to scroll and press it to
confirm, then choose Add AP (Scan):
•
It will start scanning the available Wi-Fi routers around. Scroll to your network and press
[OK] to confirm. If your wifi network has a security code protected, it will ask you to enter the
passphrase/password. Please refer to the above section 'How to input security code for
your wireless network' on P.3.
Note: The password is case sensitive. Please consult with the one who setup your network if you
don't know the password.
•
When the Wi-Fi connection is successful, the Association Complete will be shown briefly. The
wifi signal bar will appear on the top left corner of the display:
Add AP
Remove AP
Add/Remove AP
AP:[ ]
Page 18

6. Overview of features and functions
Press [ ] to enter the main menu. Scroll by rotating the [Tune/Select] knob or the [ ◄ / ► ]
button on remote:
My Favourite - To show the list of favourite stations which have been assigned to the presets.
There are up to 99 presets available.
Internet Radio - Start exploring the worldwide radio stations and music here.
Media Centre - You can browse and stream music from your network via UPnP or DLNA
Compatible devices.
DAB+/DAB Radio - Pick up DAB+ and DAB radio signal if available in your local area (no
internet connection required).
FM Radio - Receive ordinary FM radio stations in your local area (no internet connection
required).
Bluetooth - Bluetooth playback, to play audio stream (receive) from another Bluetooth
enabled device after pairing/connected each other.
Alarm - Alarm clock. Two alarm settings available.
Sleep Timer - Enable the timer to turn the radio in standby after the selected time elapsed.
Configuration - More options/settings available to personalize as you desire.
Page 19
Skytune
Search
History
Globe All
Globe By Genre
Globe By Region
Local Radio
< 3/3 0:13
SWR3
My Favourite
i
MP3,128Kbps,48000Hz,
2ch
7. Internet Radio
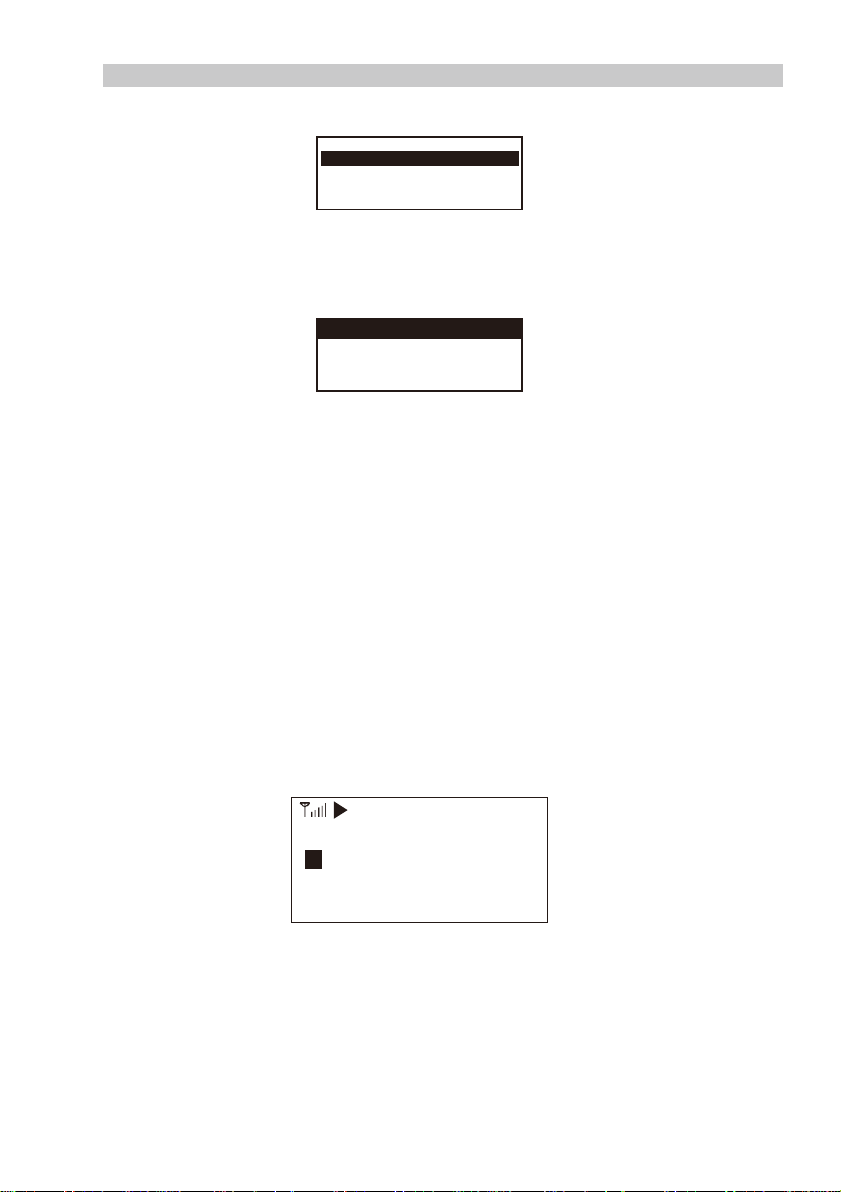
On the main menu, choose Internet Radio and you will find the options below:
Skytune
Select Skytune to start enjoying thousands of radio stations over the world. You can filter your
search by Region, Music genre and talks.
The Local Radio let you access quickly the stations available in your local area through
internet connection.
Note - You can change the Local Radio area under Configuration> Local radio setup. Please refer
to section 12 for the details.
When you scroll along the list of Globe All and want to quickly reach to a certain point of the long
list, input the index number on the remote control to quickly jump to that point. For example, on the
remote control, input 2 8 and press OK, it will highlight the station no. 28.
Search
Instead of browsing the radio station list, you can input a few characters of the desired station to filter
out / short list the stations.
History
The radio memorizes the stations you have listened up to 99 stations.
If you have listened more than 99 stations, it will supersede the first station that you have
listened.
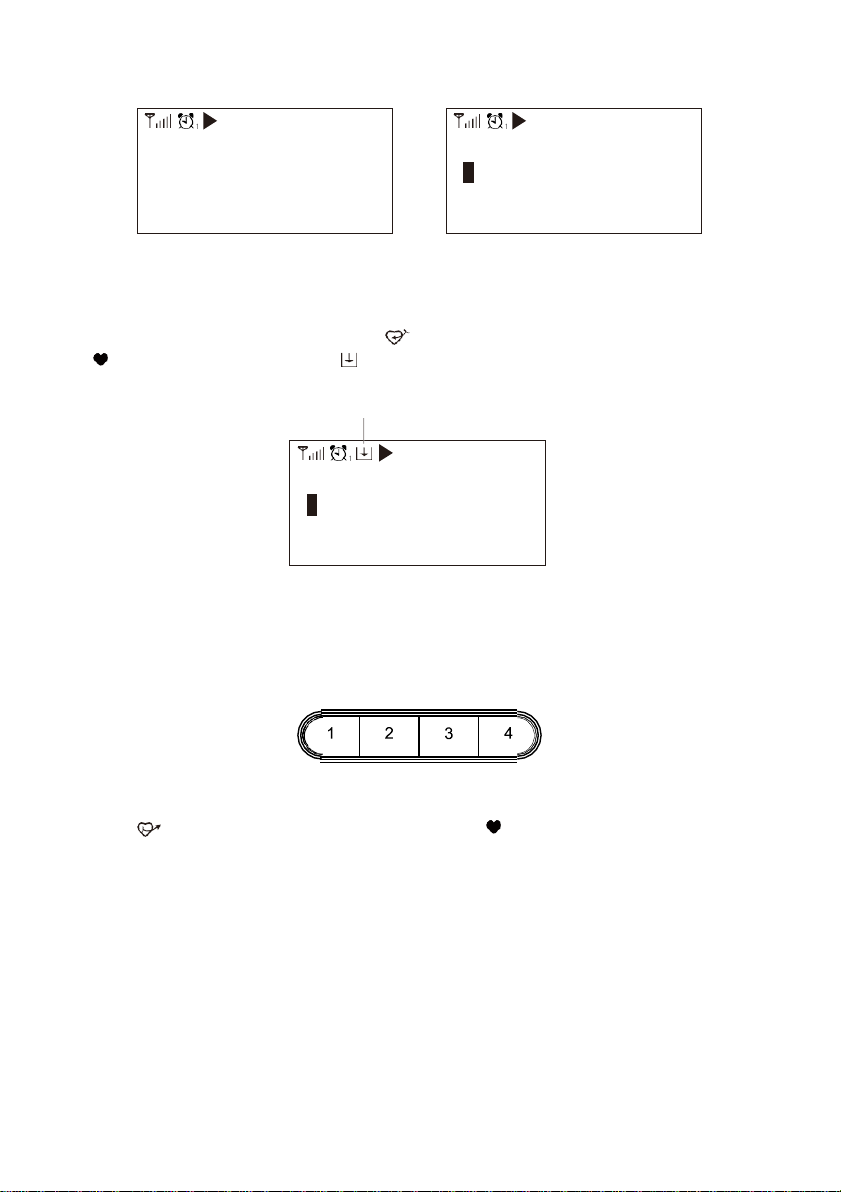
Start playing internet radio
When a radio station starts playing, more radio information can be displayed. Press the ► button
in the state of the playing screen below:
Page 20
5:31pm
5:31PM
25 Oct, 2018 Thu
Every time you press the ► button, it will toggle between the big clock and the radio channel
information:
My Favourite
This is to show the list of your Favourite stations which have been assigned to the presets.
Preset a station
When a radio station is playing, press the button on the remote control or press and hold
the on the unit, you will see the icon appears as below. It means the station is added
to the Favourite list.
Preset icon
The new added station will always show in the last item on the Favourite list. You can store up to 99
presets.
There are 4 dedicated preset buttons to quickly access the top 4 favourite station. Press and hold
the numeric button on the radio unit to preset the channel.
Recall a station
Press the button on the remote control or press the briefly on the radio unit to recall the
list of presets, or navigate to My Favourite on the main menu and select it to confirm.
Edit your favourite list
On the Favourite list, choose the radio station you want to edit then press the [ ► ] button on the
remote control (or press [ ► ] on the unit). It will enter the Edit menu with the following options:
Move down - To move down in the ranking of a stations
Move up - To move up the ranking of a stations
Delete - To delete a particular station
0:30
1/6
T
- Alle Stau-Infos auch
auf swr3.de
<
SWR3
5:31pm
5:31pm
SWR3
T
- Alle Stau-Infos auch
auf swr3.de
<
1/6
0:30
Page 21

8. Media Centre
The device supports UPnP and is DLNA-compatible.
This provides the opportunity to stream music from your network. However, this requires you to have a
compatible device in your network that can function as a server. This can be a network hard drive or a
conventional PC with e.g., Windows 8 via which access to the shared folder or media sharing is
permitted. Folders can then be browsed and played on the radio.
Please make sure your computer laptop is on the same Wi-Fi network as the Radio before you
start using this function.
Music streaming
•
Once the UPnP/DLNA compatible server is configure to share media files with your radio, you
can start music streaming.
•
On the main menu, select Media Centre and choose UPnP.
•
It may take a few seconds for the radio to complete the scan for available UPnP servers. If no
UPnP servers are found, it will show Empty List.
•
After a successful scan is done, select your UPnP server.
•
The radio will show the media categories available from the UPnP server, e.g. 'Music',
'Playlists', etc.
•
Choose the media files that you wish to play.
You can set the mode of playback under Configuration > Playback setup.
My Playlist
You can make your own playlist for the UPnP music files. Choose and highlight the song you
want to add to playlist, press and hold the [Tune/Select] knob or press and hold the [OK]
button on remote, until the sign appears. The song will be added to My playlist.
Clear My Playlist
Remove all songs in “My Playlist” to allow a new playlist to be prepared.
If you have DLNA compatible servers available, follow the steps described above to browse the
audio files from DLNA compatible device on the radio to play.
9. DAB+/DAB Radio (Digital Audio Broadcasting)
If there is Digital Audio Broadcasting (DAB) in your area, the Radio can pick up the DAB stations as
well (no internet connection is required). The Radio supports both DAB and DAB+.
Place the Radio close to the window and extend the antenna as far as it can go to get the best
reception. Sometimes you may need to adjust the direction of the antenna to improve reception.
On the main menu, scroll to DAB Radio or use the [Mode] button on remote to switch to DAB
Radio. Press [OK] to start.
It will ask whether you want to Scan DAB Station. Press OK to start scanning and it will show the
progress on the number of channels received. When it is done, a preset page will be displayed for
your action.
Page 22
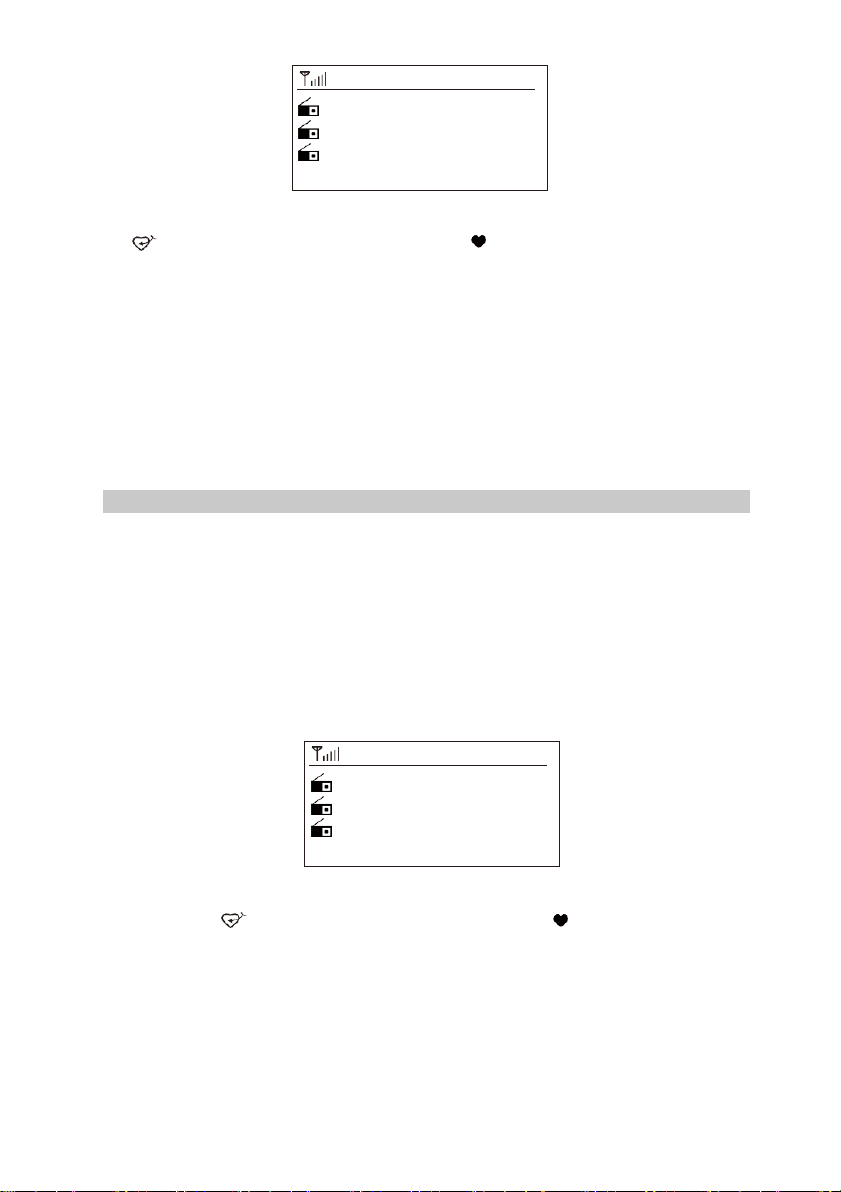
You can select the channel and start listening to it. Whenever you want to add to My Favourite,
press the button on remote or press and hold the button on the unit, and it will add to
the favourite list.
Always press the [ ◄ ] button to return to the Preset list.
Note - When a DAB radio is playing, press the [ ► ] button to view more radio information, each time
you press the [ ► ] button, it will display various information at a time such as radio frequency, rolling
texts (if available) and big time clock.
New digital radio stations should be picked up automatically by the radio if they are part of a
multiplex you already received. Otherwise you need to do the Preset Scan again.
10. FM Radio
To receive the ordinary FM stations (no internet connection is required), place the radio close to the
window and extend the antenna as far as it can go to get the best reception. Sometimes you may
need to adjust the direction of the antenna to improve reception.
On the main menu, scroll to FM Radio or use the [Mode] button on remote to switch to FM Radio.
Press [OK] to start.
It will ask whether you want to Scan FM Station. Press OK to start scanning and it will show the
progress on the number of channels are found. When it is done, it will automatically save the found
channels on presets and display the list for your action.
You can select the channel and start listening to it. Whenever you want to add to My
Favourites, press the button on remote or press and hold the button on the unit, and it
will add to the favourite list.
Always press the [◄] button to return to the Preset list.
Note - When it is playing FM radio, press the [►] button to view more radio information, each time
you press the [►] button, it will display various information at a time such as radio frequency and big
clock display.
10:10
SBS Digital One
2GB
2GB
< 6/9 >
10:10
FM 94.40MHz
FM 96.90MHz
FM 98.90MHz
< 4/8 >
Page 23
Manual Tune
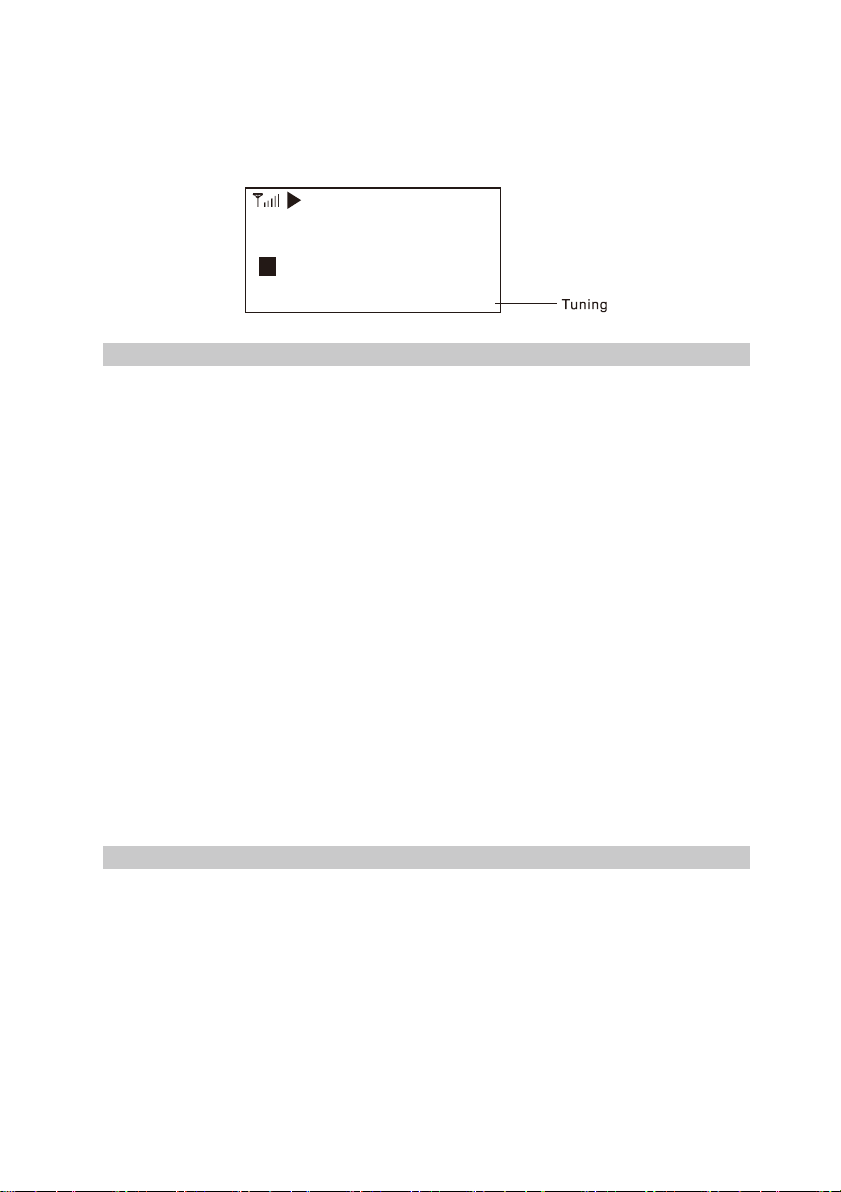
To manual tune to the frequency, long press the [OK] on remote or long press [Tune/Select]
on the unit, until you see the "Tuning" appeared on the display, at the bottom right corner. Use
the <◄ / ►> button on remote to tune the frequency. When done, long press the [OK] button to
exit manual tune.
11. Bluetooth playback
Before transmission between your Bluetooth device and the radio is possible, both devices must be
coupled. This process is called "pairing". The radio is served as a receiver, to receive music stream to
play on the radio.
If you have already coupled to a Bluetooth device before, this connection will be restored
automatically when both devices are in range and Bluetooth operation has been selected on the
radio. "Pairing" does not have to be repeated. This function may need to be activated in your
Bluetooth device, however.
•
Push the Menu button to display the selection menu for the different operating modes.
•
Use the up/down button to select the operating mode Bluetooth and push the dial switch.
•
Switch your Bluetooth device to which you want to connect the radio on and activate the
pairing mode here. The device scans for Bluetooth devices in the reception range.
•
When the radio is found, your bluetooth device shows its name Regent i100-XXXX (the
XXXX is an identification code for your radio unit).
•
Select the radio at your bluetooth device.
•
Start playback on your bluetooth device.
•
Playback now takes place using the radio.
12. Aux-In
You can listen to the music stored in other audio device or smart phone on the radio, through the
connection to the 3.5 mm aux-in jack on the rear side. Use the cable with both ends in 3.5 mm pin,
one end to the aux-in jack on the radio, the other end to the earphone jack on the audio device or if
it has line out socket.
14:30
FM101.80MHz
i
:ic
< PRESET 12 12/13
Tuning
Page 24
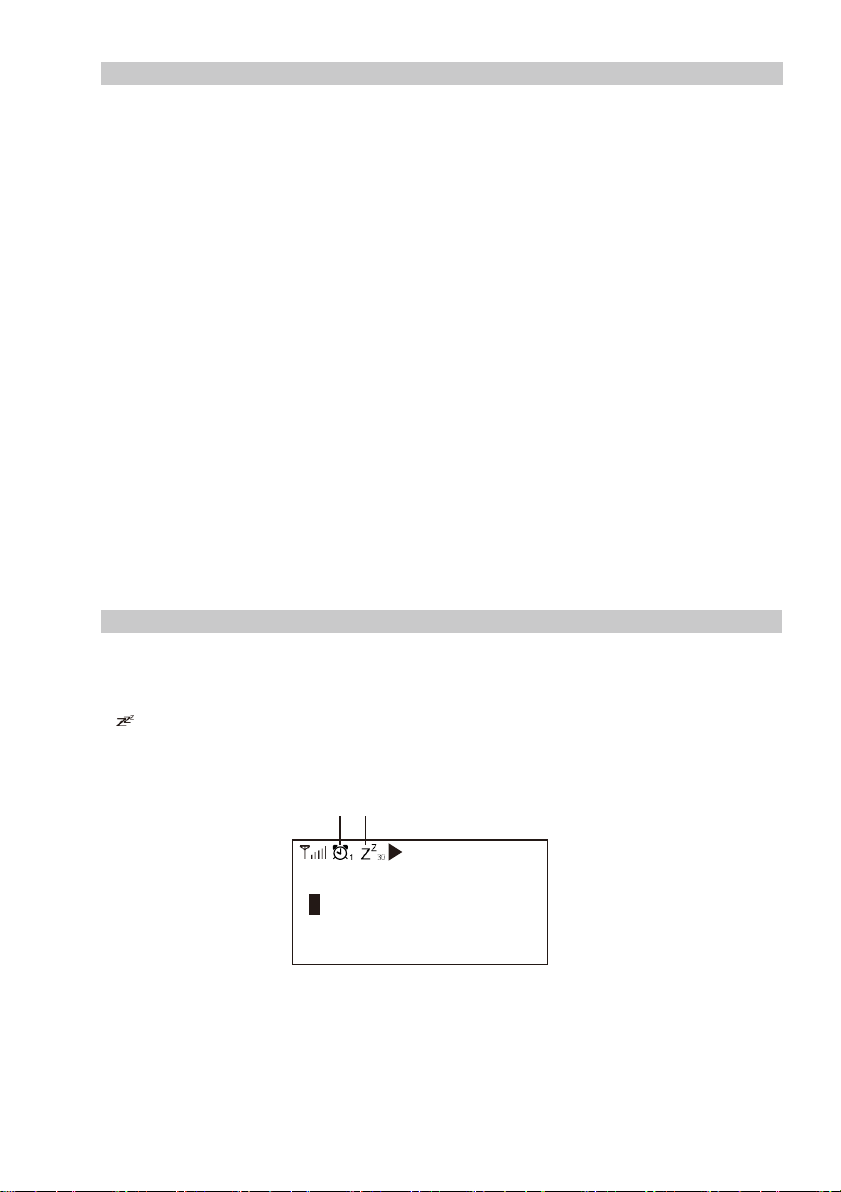
13. Alarm Setting
•
Choose Alarm from the main menu or press the [Alarm] button on the remote control.
•
Select either Alarm 1 or Alarm 2, choose Turn on to activate the Alarm.
•
Follow the alarm wizard instructions to set the alarm.
•
The wizard will guide you through the settings below:
Time - Set the time for the alarm
Sound - You can choose Wake to Tone, My Favourite, Wake to FM Radio or Wake to
DAB Radio as the alarm source.
Note - Wake to FM or Wake to DAB Radio - only the preset stations can be used for
the radio alarm (if the preset scan has been completed).
Wake to My Favourite - Please preset your favourite station before setting this as the
alarm source.
Repeat -You can schedule the alarm as you desire - everyday, once or multiple days.
Alarm Volume - Adjust the volume of the alarm as you like by rotating the [Tune/Select]
knob or [▲/▼] button on remote.
•
After the above settings are completed, press the [◄] button to exit and make sure the Alarm
is turned on. You will see the Alarm icon appeared on the display if it is activated.
14. Sleep Timer Setting
You can set the timer to let the radio goes standby after the selected time elapsed in the range of 15
minutes to 180 minutes.
Press [ ] button on the remote control to set the timer.
You will see the icon appeared on the display if the timer is set.
Alarm
Sleep Timer
0:30
1/6
T
- Alle Stau-Infos auch
auf swr3.de
<
SWR3
5:31pm
Page 25

15. Configuration
Here you can find the complete settings / options available to configure your Regent i100. On the
main menu, navigate to Configuration setting. Press OK and you will see a list of options available.
Network
Wi-Fi Network
•
Add / Remove AP
Add AP - It will scan out a list of routers around.
Remove AP - If you have already added a router and want to remove it, choose this option.
Note: Always bring the radio within 2 meters of the Wi-Fi router for setup.
•
AP: [ ]
If you have added more than one router on the radio and want to switch to another one, select
this option to change.
•
Signal
This is to show the strength of the Wi-Fi Signal of the Wi-Fi router as received by the radio.
Usually signal levels lower than -70dBm is at weaker level and if it affects the reception of your
radio, you may need to optimize the router location or check any problem of the router itself.
•
IP
The IP is set Dynamic by default. Select to change Fixed IP according to your network
condition.
•
DNS
The DNS is set Dynamic by default. Select to change <Fixed> DNS according to your network
condition.
Wi-Fi Channels
Not all of the Wi-Fi channels are available in every country. There may be variation between
different countries. Therefore it is necessary to choose the Wi-Fi channels to ensure the WiFi
performs satisfactory.
We have already set the channels according to the requirement in different countries. Choose the
country you are stay in from the list to get the correct channel.
Date and Time
The radio will set your local time automatically after the internet connection is completed. If you want
to do manual setting, change it by the following options:
•
Time zone
Auto-set Time Zone: This option is set by default.
Manual-set Time Zone: Choose this option if you want to set the time in another region.
Choose and highlight the region/city you prefer and press OK to confirm.
Coupled with NTP (use network time) and DST (Daylight time saving) will
be adjusted automatically if you choose to use network time (NTP).
•
Set Time Format
Choose either 12-hour or 24-hour notation you prefer.
•
Set Date Format
•
DST (Day Light Saving)
Enable on/off
•
NTP (Use network time)
NTP is designed to synchronize a device's clock with a time server. Your radio will synchronize the
time server by default every time it powers up and connects to the Internet. This ensures a very high
degree of accuracy in the radio's clock. You can change to use other time server by inputting the
URL address (see below NTP server).
Page 26

You can also choose “Do not use network time” if you don't want it to. If you choose not to use NTP
for clock synchronization, highlight the NTP (Network Time Protocol) and press OK to make the
change. You will see the Set Date & Time appeared on the menu. Select it and adjust the date and
time as you desire.
•
NTP Server
NTP is designed to synchronize a device's clock with a time server. Here it shows the server being
used for the radio.
Language
The default language is English, you can choose other languages as preferred. Scroll with the
▲▼
buttons on remote or [Tune/Select] knob to the item with and press OK. Scroll to
highlight and press OK to select your language of choice. English, French, Spanish, Italian,
German, Dutch, Polish, Russian and Sim plified Chinese are available.
Local Radio
The radio is set by default to detect the radio stations in your local area automatically through internet
connection and these stations can be accessed by a press of [Local] button on remote. You can also
set Local in another region if you want. Highlight the Local Radio and press OK. Choose Manual-set
Local radio to change the region setting.
DAB set up
•
DAB Preset Scan
You can always carry out a new scanning of DAB channels by selecting this option. All current
presets and channels will be erased.
•
DAB Radio Preset
The scanned DAB stations will be listed here for management. You can move the position or even
delete any station. Scroll to the station and press [ ► ] button. A pop up window will present:
- Move up,
- Move down
- Delete.
FM Setup
•
FM Area
Choose the Region according to your location to define the search range for the radio.
•
FM Preset Scan
You can always carry out a new scanning of FM channels by selecting this option. All current
presets and channels will be erased.
The radio at the lowest frequency of the scanned values will be highlighted. The preset list will be
saved unless a new preset scan is carried out.
Page 27

•
FM Radio Presets
You can adjust the preset ranking by Move down, Move up or Delete it. Highlight one of the preset,
then press the [ ►] button, it will enter into the Edit menu. Always press the [◄] button to return to
the Preset list.
Playback Setup
This is to set the mode of playback under UPnP/DLNA compatible streaming: Repeat All, Repeat
Once or Shuffle.
Resume when Power on
This function is ON by default. The radio will resume to the last state of mode when the radio is power
on next time, e.g. if it was playing radio station before power off, it will resume playing the last listened
station when it is power on the next time.
Dimmer
You can set the backlight level for the display as you prefer. There are two settings: Mode and Level.
•
Mode - Normal or Power Saving
Normal - the display will stay with the same level of brightness all the time without dim down. Dim the display will dim down after 20 seconds if no operation is made on the radio.
•
Level - Bright and Dim
Bright - This is to adjust the level of brightness in Normal mode. Dim
- This is to adjust the level of brightness in Dim mode.
•
Dimmer in Standby
When the radio is in Standby, rotate the [Tune/Select] knob to adjust the backlight level at your
preference which you feel comfortable especially during night time.
EQ(Equaliser)
Various music genres can be set.
Buffer Time
Sometimes you may experience uneven playback of the internet radio. This can happen if the
internet connection is slow or network congestion occurs. To help improving the situation,
you can choose longer buffer time to get a few seconds of radio stream before beginning to play.
The default value is 2 seconds. You can choose 5 seconds if you prefer to have a longer
buffering time.
Information
View the Network and System Information of your radio.
To access quickly to this information, press the [Info] button on the remote control.
When you use your PC to manage the My favourite stations, you have to use the IP address and you
can view this info from here. Then type in the IP address (Configuration > Info > Network > IP) to
your PC's browser input window
Software Update
There may be software release to upgrade features of the radio from time to time. Check the
update regularly to keep your radio up to date with the latest software.
Reset to Default
You can do the reset to clear all the settings and return to default settings.
** Please note all the Station presets, Settings and configuration will be erased after you have
performed the Reset.
Page 28
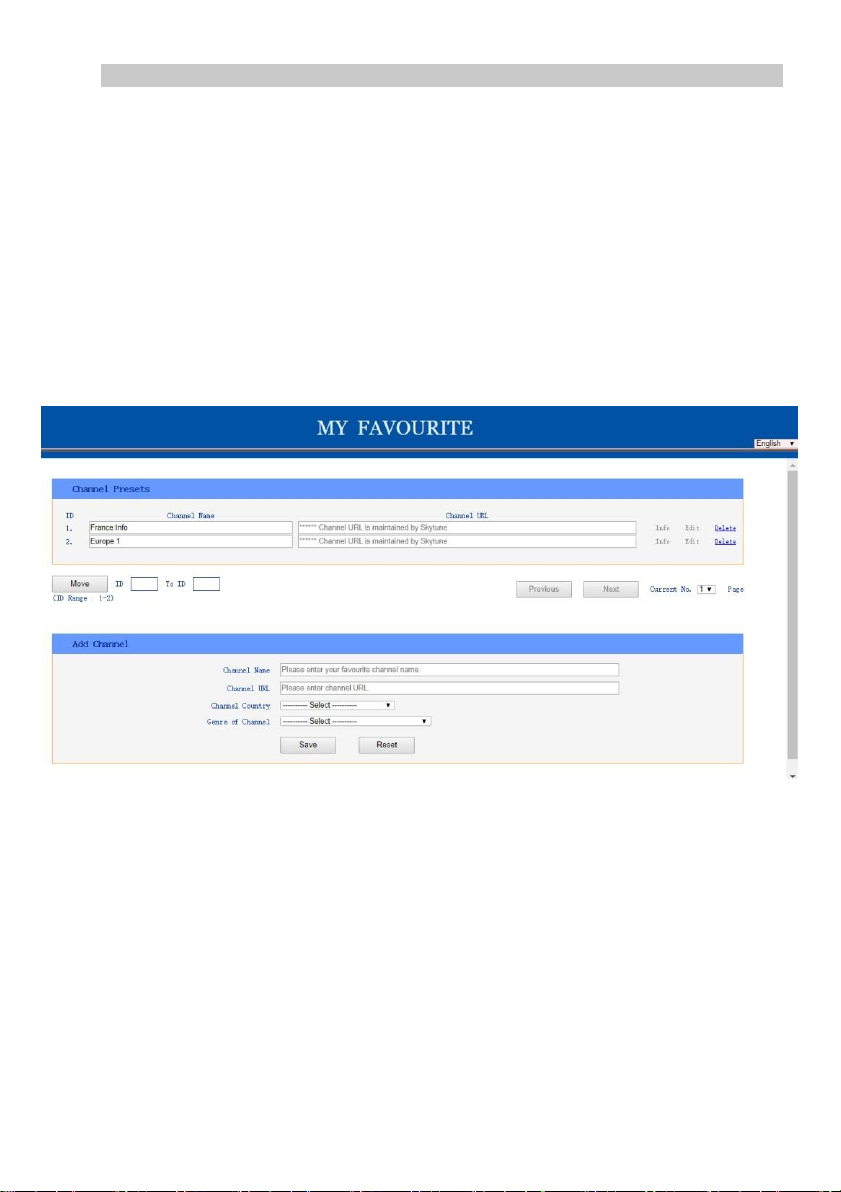
16. Add your favourite URL/ Manage favourite by PC
You can add your favourite radio station if you know the published audio stream URL of the
radio.
We provide an embedded server for your radio and you can manage your favourite stations
anytime to add or edit the list. Follow the steps below to access the embedded server:
•
Connect your PC to the same Wi-Fi network as your radio.
•
Locate the IP address in either way as follow:
•
Press the [Info] button on the remote control, choose Network and scroll to IP to view the IP
address
•
On the main menu, go to Configuration > Information > Network > IP
•
Open the web browser (we support Internet Explorer and Chrome) in your PC and type the IP
address of the radio (e.g. 192.168.1.11). The screen will pop up as below:
•
You can input the name and URL of a new radio station under the Add channel section,
then click “Save”. The new station will sync to the Favourite list of your radio immediately.
You can add up to 99 radio stations.
Page 29
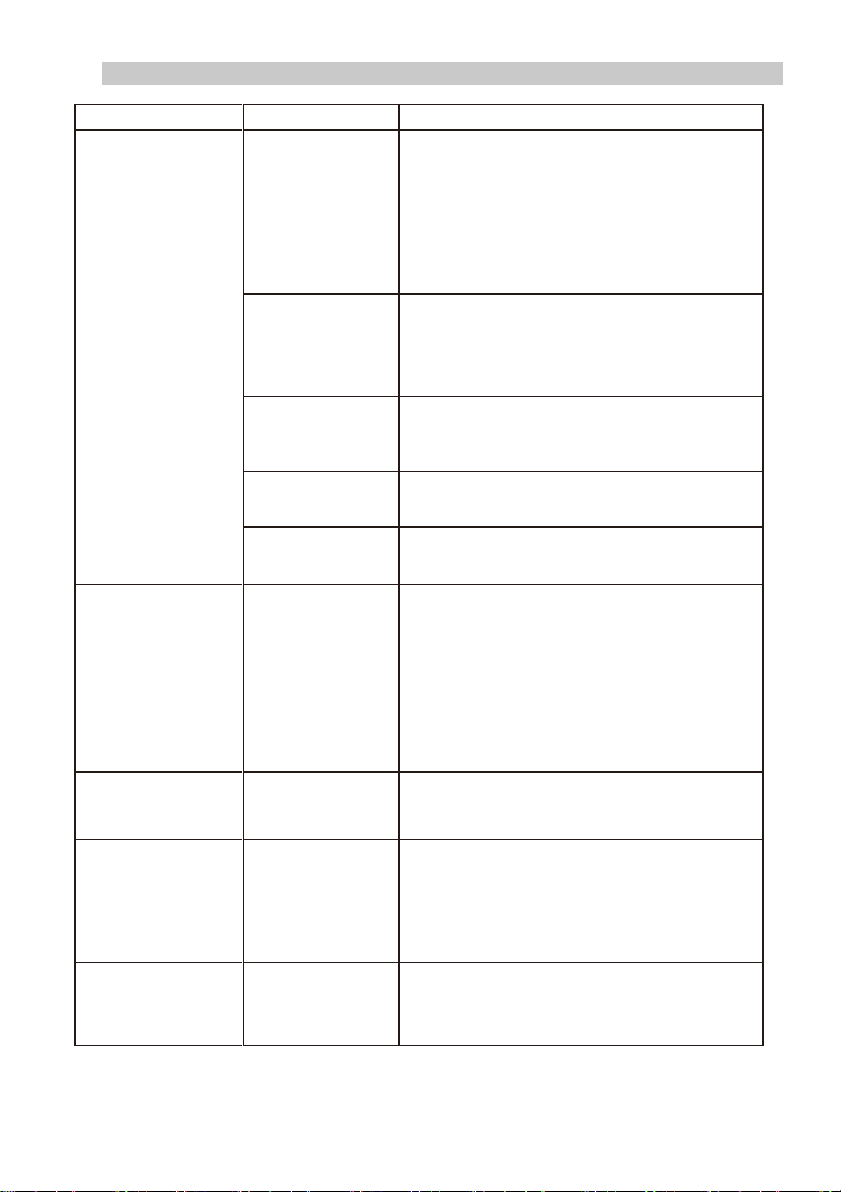
17. Trouble Shooting
Problem
Cause
Solutions
Cannot connect to
Wi-Fi network
Network
down
•
Confirm that a Wi-Fi or Ethernet Wired
connected PC can access the internet (i.e. can
browse the web) using the same network.
•
Check that a DHCP server is available, or that
you have configured a static IP address on
the radio.
•
Check that you firewall is not blocking any
outgoing ports. As a minimum the radio
needs access to UDP and TCP ports 80,443
and 8008, DNS port 53.
Router
restricts
access to
listed MAC
addresses
Obtain the MAC address from Configuration >
Information > Network > Wi-Fi MAC and add to
the allowed equipment list on your access point.
Note: The radio has separate MAC addresses
for wired and wireless networks;
Insufficient
Wi-Fi signal
strength
•
Check distance to router; see if a computer
can connect to the network in this location
•
Optimize the distance of the router ’s
location
Unknown
encryption
method
Change encryption method on router. The radio
supports WEP, WPA, WPA2
Firewall
preventing
access
Windows Media Player: varies —non- Microsoft
firewalls may require configuration for UPnP.
If your radio can
connect to the
network
successfully, but
is unable to play
particular stations
•
The station is not broadcasting at this time
of the day (remember it may be located in a
different time zone).
•
The station has too many people trying to
attach to the radio station server and the
server capacity is not large enough.
•
The station has reached the maximum
allowed number of simultaneous listeners.
•
The link on the radio is out of date. This is
updated automatically every day, so the next
time you turn on the link will be recognised.
No DAB/FM reception
•
Please carry out “Fact ory Res et” on the radio
and extend the antenna.
•
Move the radio close to the window.
DAB/FM Radio
reception is poor
•
Please check that the aerial is extended for the
maximum signal strength and adjust the direction
to improve reception.
•
Check that you do not have other electrical
equipment too close to your radio, causing
interference.
No sound
•
Adjust the volume level of the external
powered speaker.
•
Please check if the power of the external
powered speaker is switched on.
Page 30

1.
If the Internet Radio keeps re-buffering radio station:
The Internet Radio is streaming the data from the radio station via your broadband connection, if
there is a high error rate on your broadband connection, or the connection is intermittent, then it will
cause the Internet Radio to pause until the connection is re-established and it has received enough
data to start playing again.
If your Internet Radio keeps stopping, please check the DSL modem to ensure that the Broadband
line is not suffering a high error rate or disconnections. If you are experiencing these problems, you
will need to contact your broadband supplier.
2.
What is Buffering?
When playing a stream, the Internet Radio/Media player, downloads a small amount of the stream
before it starts playing. This is used to fill in any gaps in the stream that may occur if the internet or
the wireless network is busy.
The Internet Radio streams music data from the PC while you are listening. If a stream gets blocked
or experiences Internet congestion while transferring it may stop/interfere with the quality of play. If
this happens, check your internet connection speed- it must be faster than the speed of the streams.
Page 31
Technical Specification
➢ Model: Regent
®
i100
➢ Power input: 5V 1A
➢ Power voltage: 100-240V~50/60Hz
➢ Wireless Network: IEEE802.11b/g/n 2,4GHz
➢ Security Protocol: WEP/WPA/WPA2
➢ Bluetooth version: V4.2 BR/EDR compliant
➢ Bluetooth frequency: 2.4 GHz
➢ Bluetooth range: 10 meters (line of sight)
➢ DAB frequency range: 174.928MHz (5A) - 239.200MHz (13F)
➢ Support DAB and DAB+
➢ FM frequency range: 87.5-108MHz
➢ Audio output: Stereo earphone jack 3.5 mm, Stereo audio out
➢ Audio input: Aux in jack 3.5mm
➢ Telescopic antenna
➢ Unit Dimension: 185 x 110 x 115mm
Remark: Specification may vary without notice
What's included in the box
*
Regent® i100
*
Power adaptor
*
Remote control (without batteries)
*
User manual
WEEE and Recycling
The European laws do not allow any more the disposal of old or defective electric
or electronic devices with the household waste. Return your product to a municipal
collection point for recycling to dispose of it. This system is financed by the
industry and ensures environmentally responsible disposal and the recycling of
valuable raw materials.
 Loading...