

Page 1
USER MANUAL
Page 2

ABOUT THE INSTRUCTION MANUAL
Ferguson Sp. z o.o. has made every effort to provide the most current
information about its products. Ferguson Sp. z o.o. does not grant any
guarantee as to the contents of the present instruction manual and
disclaims any implied guarantees concerning market value or suitability
for specific purposes. The information contained herein is an
instruction intended to enable the correct usage and maintenance of
the device.
Ferguson Sp. z o.o. reserves itself the right to introduce amendments,
changes or translations of the instruction manual without prior
notification thereof. For this reason, we recommend you regularly visit
our website in order to obtain the latest information.
2
Page 3
MARKINGS AND SIGNS APPLIED TO THE DEVICE
Risk of electric shock - do not open. This notice
warns the user not to open the receiver housing. The
housing may be opened solely by authorized service
technicians.
When this crossed-out wheeled bin symbol is
attached to a product it means that the product is
covered by the European Directive 2002/96/EC.
Please inform yourself about the local separate
collection system for electrical and electronic
products.
Please act according to your local rules and do not
dispose of your old products with your normal
household waste.
Correct disposal of your old product helps to prevent
potential negative consequences for the environment
and human health.
Your product contains batteries covered by the
European Directive 2006/66/EC, which cannot be
disposed with normal household waste. Please
inform yourself about the local rules on separate
collection of batteries because correct disposal helps
to prevent negative consequences for the
environmental and human health.
3
Page 4
Your product is designed and manufactured with high
quality materials and components, which can be
recycled and reused.
CE logo.
The logo informs that the receiver conforms to the
terms and conditions of Directive 2004/108/EC
concerning observance by Member States of
provisions regulating electromagnetic compatibility,
and to the terms and conditions of Directives
2006/95/EC concerning observance by Member
States of provisions regulating low voltage electricity
and safety with relation to the handling and operation
of electrical equipment.
R&TTE Hereby Ferguson Sp. z o.o., declares that the device
is in compliance with the essential requirements and
other relevant provisions of Directive 1999/5/EC. You
can find the Declaration of Conformity on
www.deklaracje.ferguson.pl
This product has been designed, tested and
manufactured according the European R&TTE
directive 1999/5/EC.
Double insulation logo.
This logo informs that the devices an electrically safe
device, provided that it is used in accordance with the
4
Page 5

recommendations set forward in the chapter
concerning safety.
When this logo is attached to a product, it means a
financial contribution has been paid to the associated
national recovery and recycling system.
Before Started
Network Requirement
Before using the device, the following requirements are needed:
A broadband connection in combination with a wireless access point,
router or similar network device.
The network device needs to support WiFi (802.11b/g/n) wireless
connection.
A PC or smart phone with a network ready.This network has to be the
same one as the device equipped with.
Safety Precautions
Do not drop the device, and do not expose it to liquid,moisture or
humidity. These might lead to damage to the device.
If the device is moved from a cold envirement into a warmer one,do
let it adapt to the new temperature before operate the device.
Otherwise,it might lead to condenssation and cause malfunctions in
the device.
Do not us the device in the dust environment as dust can damage the
interior electronic components and lead to malfunctions in the device.
Preotect the device from strong vibrations and place it on stable
surface.
5
Page 6

Do not attempt to disassembly the device.
The scoket outlet should be installed near the device and should be
easily accessible.
Never touch the power cord with wet hands.
Make sure the electrical voltage specified on the device and its power
plug is corresponding to the voltage of the power socket.
If the device is not using for a long period of time, disconnect it from
the power supply by unplugging the power cord.This is to avoid the risk
of fire.
Never use any harsh or strong solvents to clean the device since
these may damage the surface of the device. Dry, soft cloth is
appropriate, however, if the device is extremely dirty, it may be wiped
off with a slightly moist cloth. Make sure the device is dried off after
cleaning.
When you are necessary to ship the appropriate, store it in its original
package. Save the package for this purpose.
6
Page 7
Appearance and Key Description
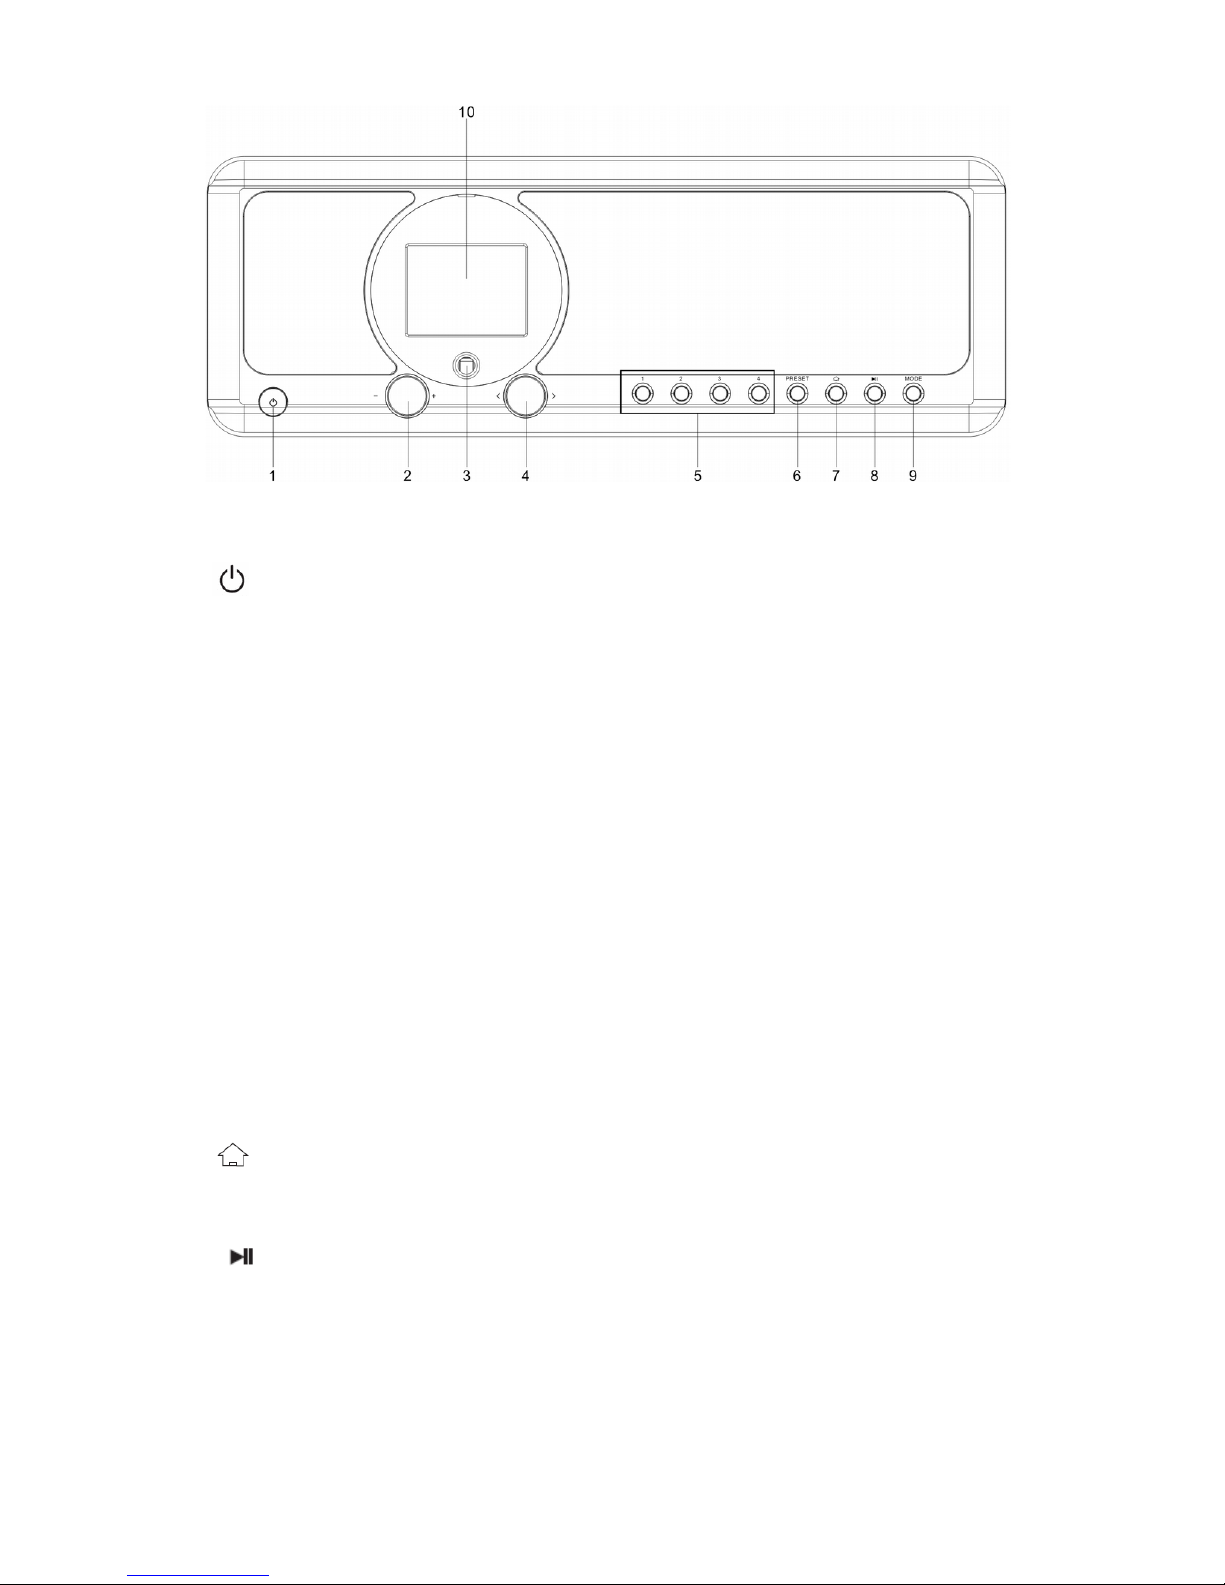
Front View
1. Power on/Standby button
2. Volume Knob
- Rotary to adjust the volume level
- Press this button to mute the sound
3. Remote Sensor
4. < / > Navigate + OK knob
- Rotary to navigate cursor or skip to previous/next track
- Press this button confirm selection
5. Preset 1, 2, 3, 4
6. Preset button
-Short press to enter the radio station presets recalling mode.
-Press and hold this button to enter the radio station storing mode.
7. Home Button
-Press to return to the main menu
8. Play/Pause button
9. MODE button
Switch between audio sources
10. 2.4” TFT full color display
7
Page 8
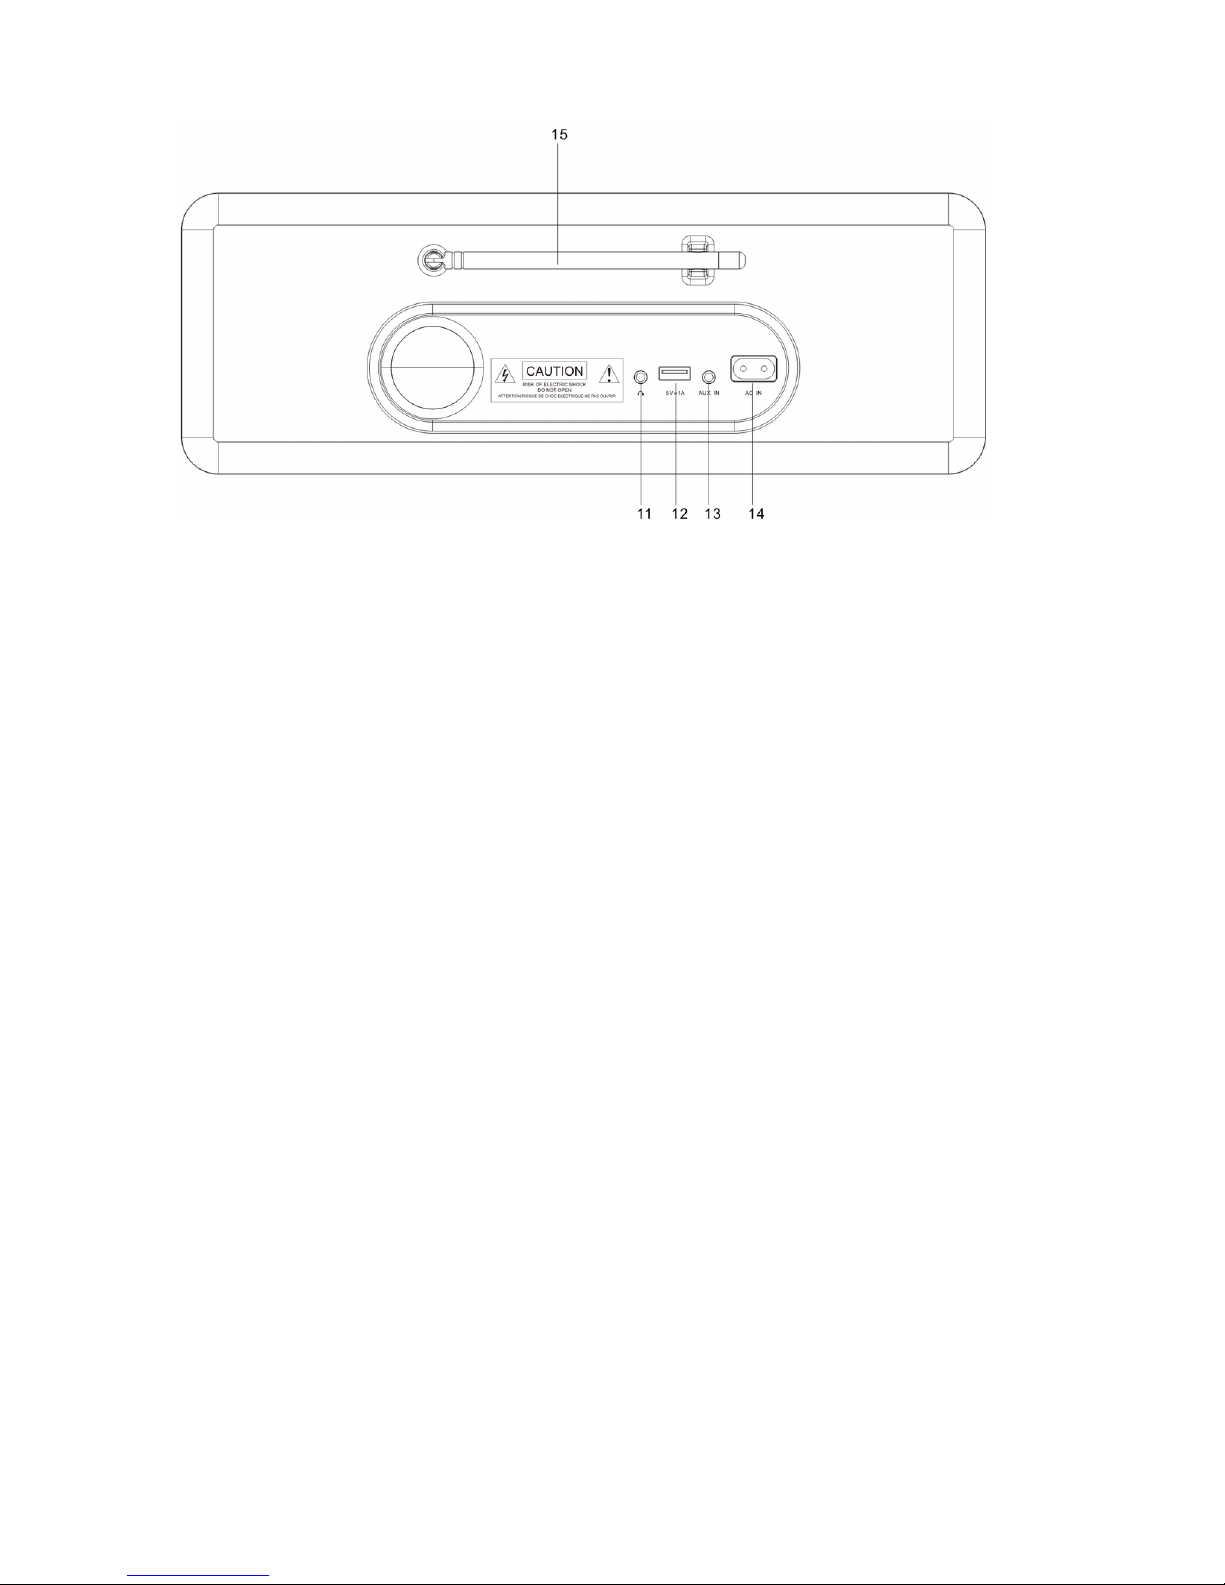
Back View
11. 3.5mm Earphone Jack
12. USB port for charging external device only (Output: 5V,1A)
13. 3.5mm Aux-in Jack
14. AC Socket
15. Telescopic Antenna
8
Page 9
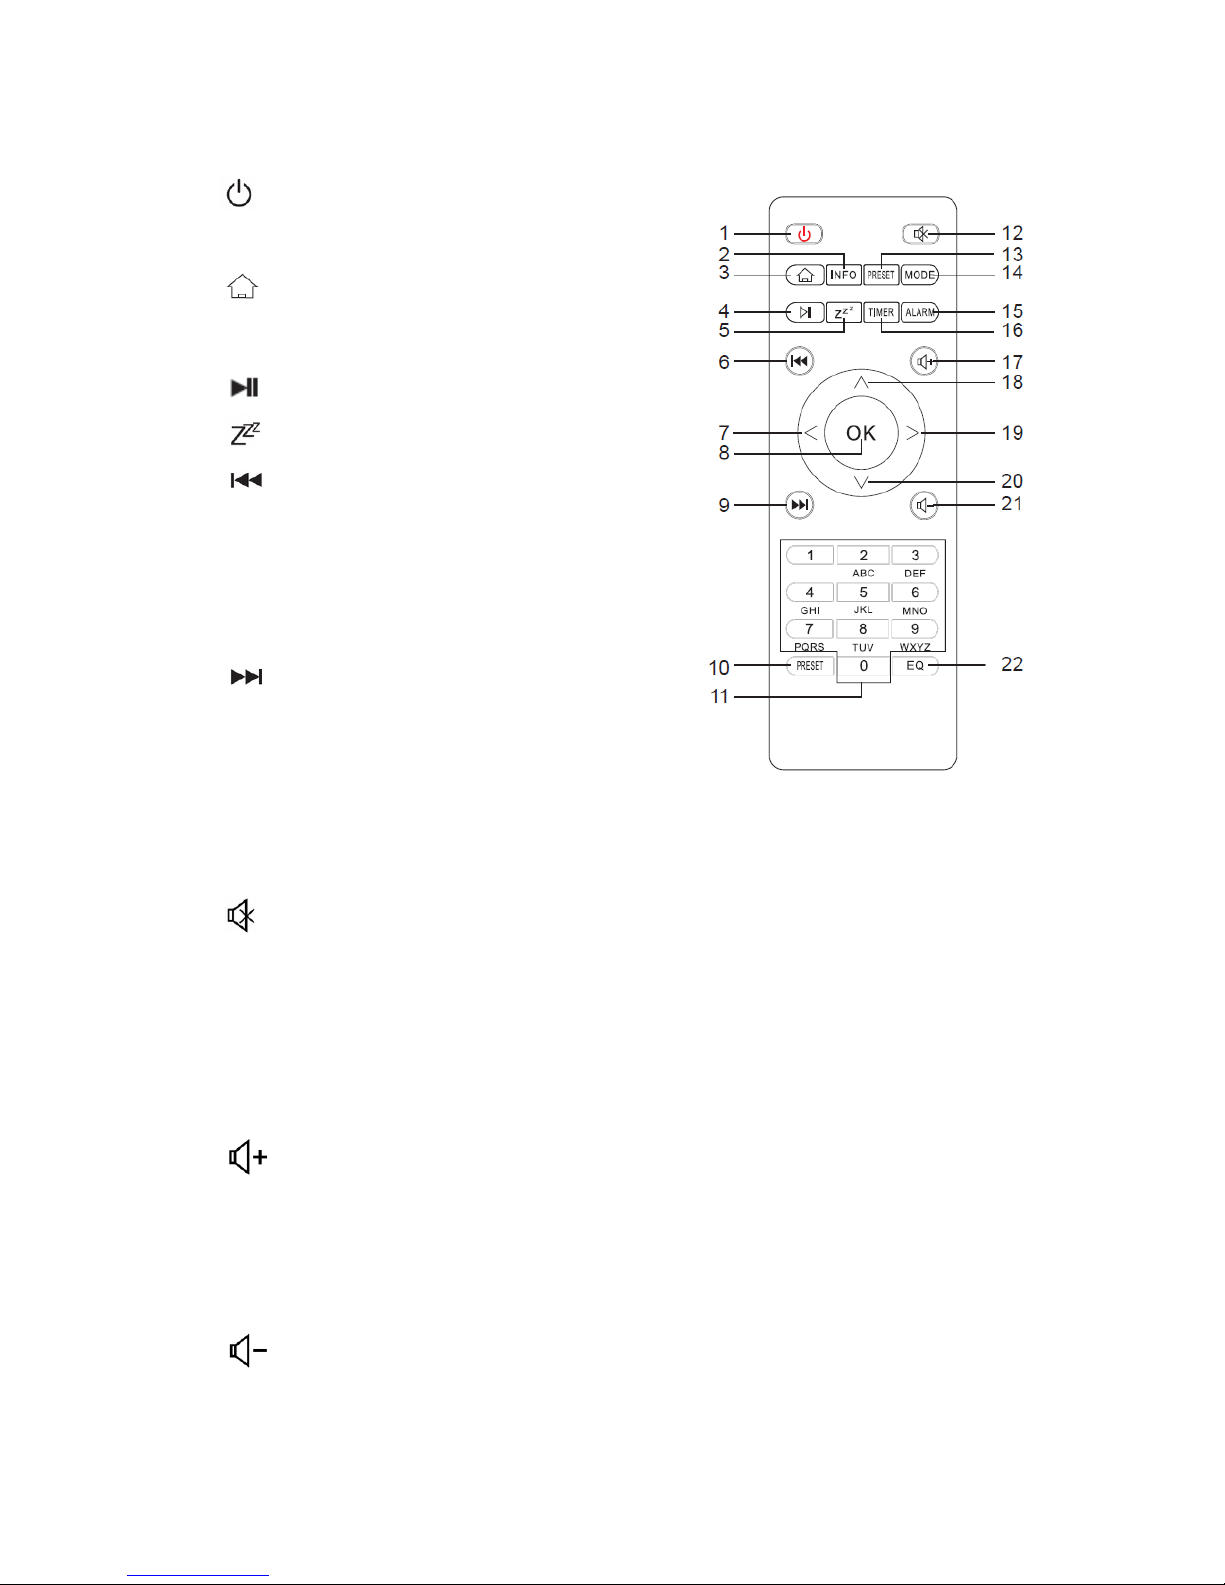
Remote Control
1. Power on/Standby button
2. INFO button
3. Home Button
-Press to return to the main menu.
4. Play/Pause button
5. Sleep button
6. button
-Press to skip to previous track
7. < Left cursor button
8. OK button
9. Buton
-Press to skip to next track
10. PRESET button
11. 0~9 call up favorites/memory;
Input letters and numbers
12. Mute button
13. PRESET button
14. MODE button
15. ALARM button
16. TIMER button
17. Increase volume button
18. ∧ Up cursor button
19. > Right cursor button
20. ∨ Down cursor button
21. Decrease volume button
22. EQ button
9
Page 10

Insert/Replace Battery in Remote Control
Open the battery compartment on the underside of the remote.
Insert AAA/R03 1.5V type batteries. Pay attention to the correct
polarity (see bottom of battery compartment)!
Close the battery compartment.
If the remote is not in use for a lengthy period of time, please
remove the battery to prevent the battery acid from “leaking”.
WARNING
:
Do not expose the batteries to intense heat, such as sunlight, fire or
similar. Danger of explosion!
Keep batteries out of the reach of children. They are not toys.
Do not force batteries open.
Avoid contact with metallic objects. (Rings, nails, screws etc.)
Danger of short circuits!
Short circuits may overheat or even ignite batteries, this may lead to
combustion.
If a battery leaks, do not rub the fluid into the eyes or the skin. If
acid comes into contact with the eyes, rinse with purified water and
seek medical advice if symptoms persist.
Caution:
Different battery types or new and used batteries may not be used
together.
Batteries must not be disposed of in the garbage. Please bring used
batteries to competent collection centers or back to the dealer.
10
Page 11
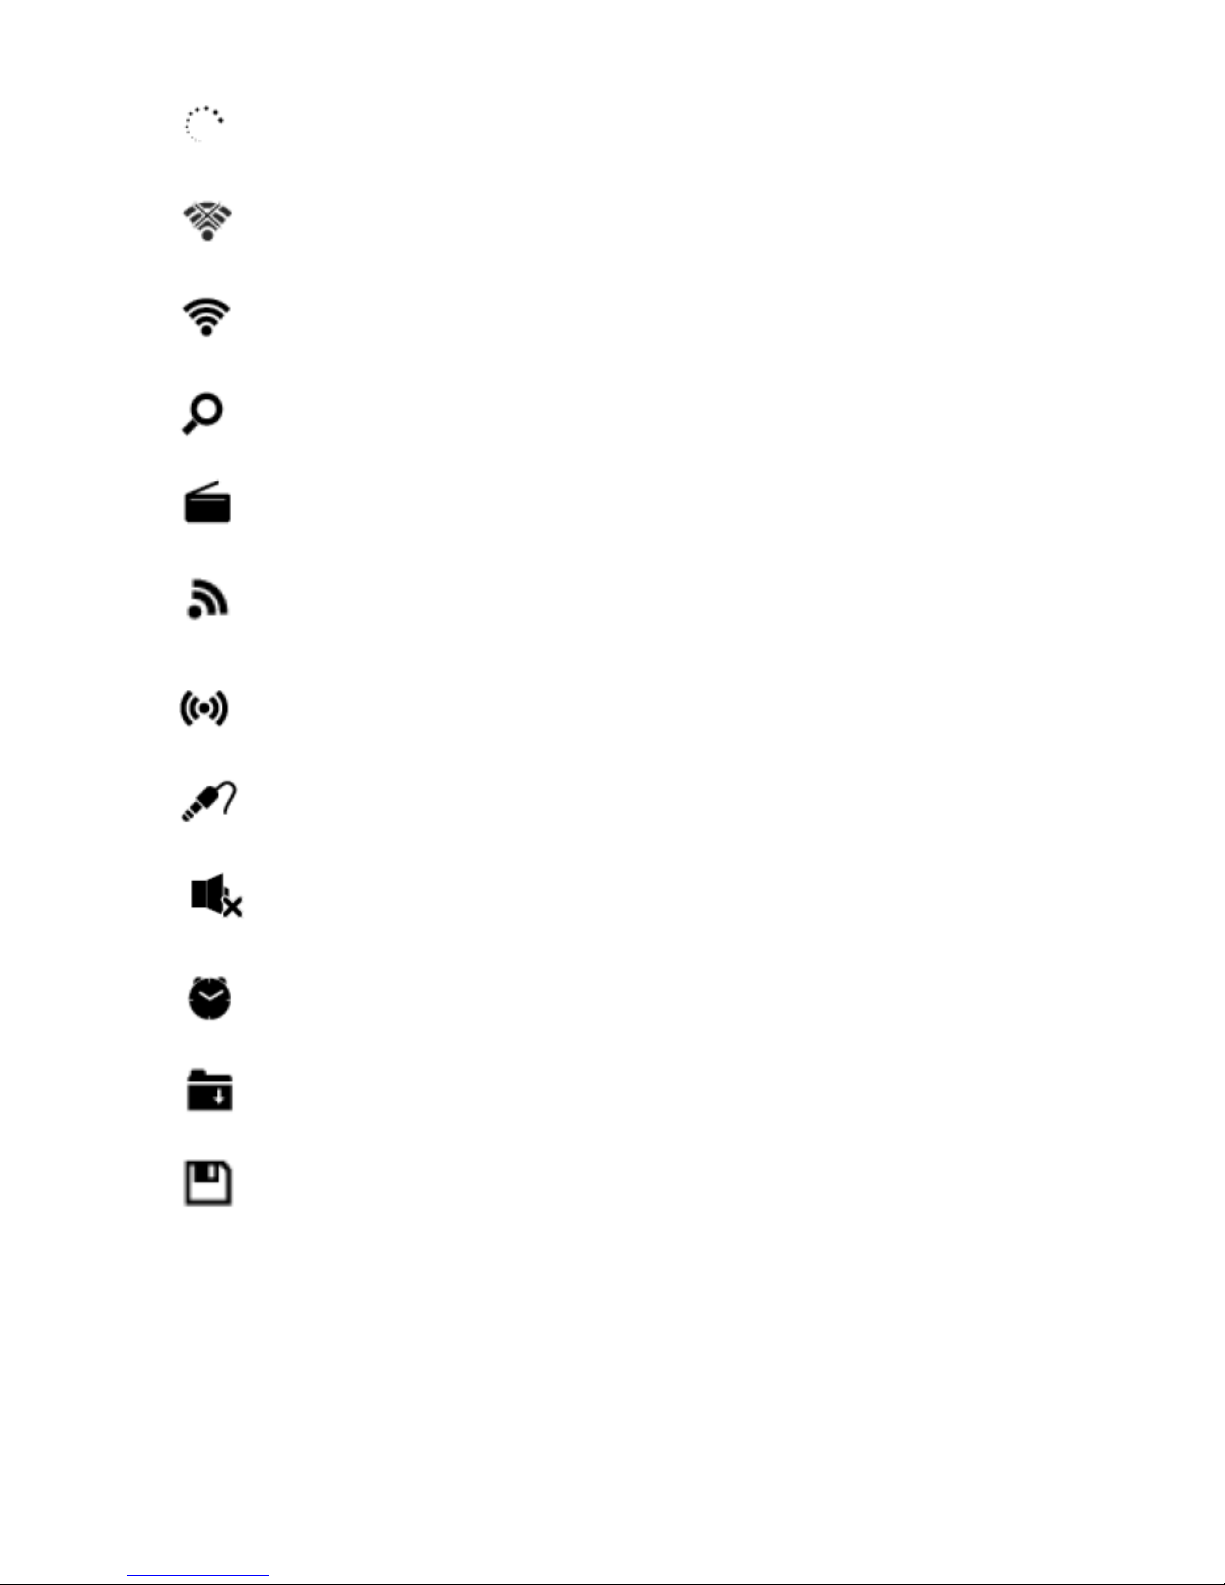
Symbols on the display
Connection is being established, device functioning
No wireless connection
Wireless connection established
Search
VHF radio function selected
VHF radio reception: Mono
VHF radio reception: Stereo
AUX function selected
Speaker off
Alarm on
Internet radio station saved as favorite
FM radio station saved
11
Page 12
1.
Getting Started
The packaging box contains the following items:
1 x Internet Radio
1 x Remote Control
1 x AC Power Cord
1 x 3.5mm Aux-in Cable
1 x User Manual
Get the network ready
For wireless LAN (WLAN) network connection:
Check if WLAN LINK/ACT light of the wired/wireless access point or
router is illuminated. Consult the user guide of that for any questions.
Note: WiFi allows data transfer over short distances within 20 meters
without the need of cabling between the devices. Any walls or ceilings
may reduce the strength of the WiFi connectivity.
Therefore try to locate the device and/or the access point within the
distance mentioned above, and avoid any obstacles between two
devices.
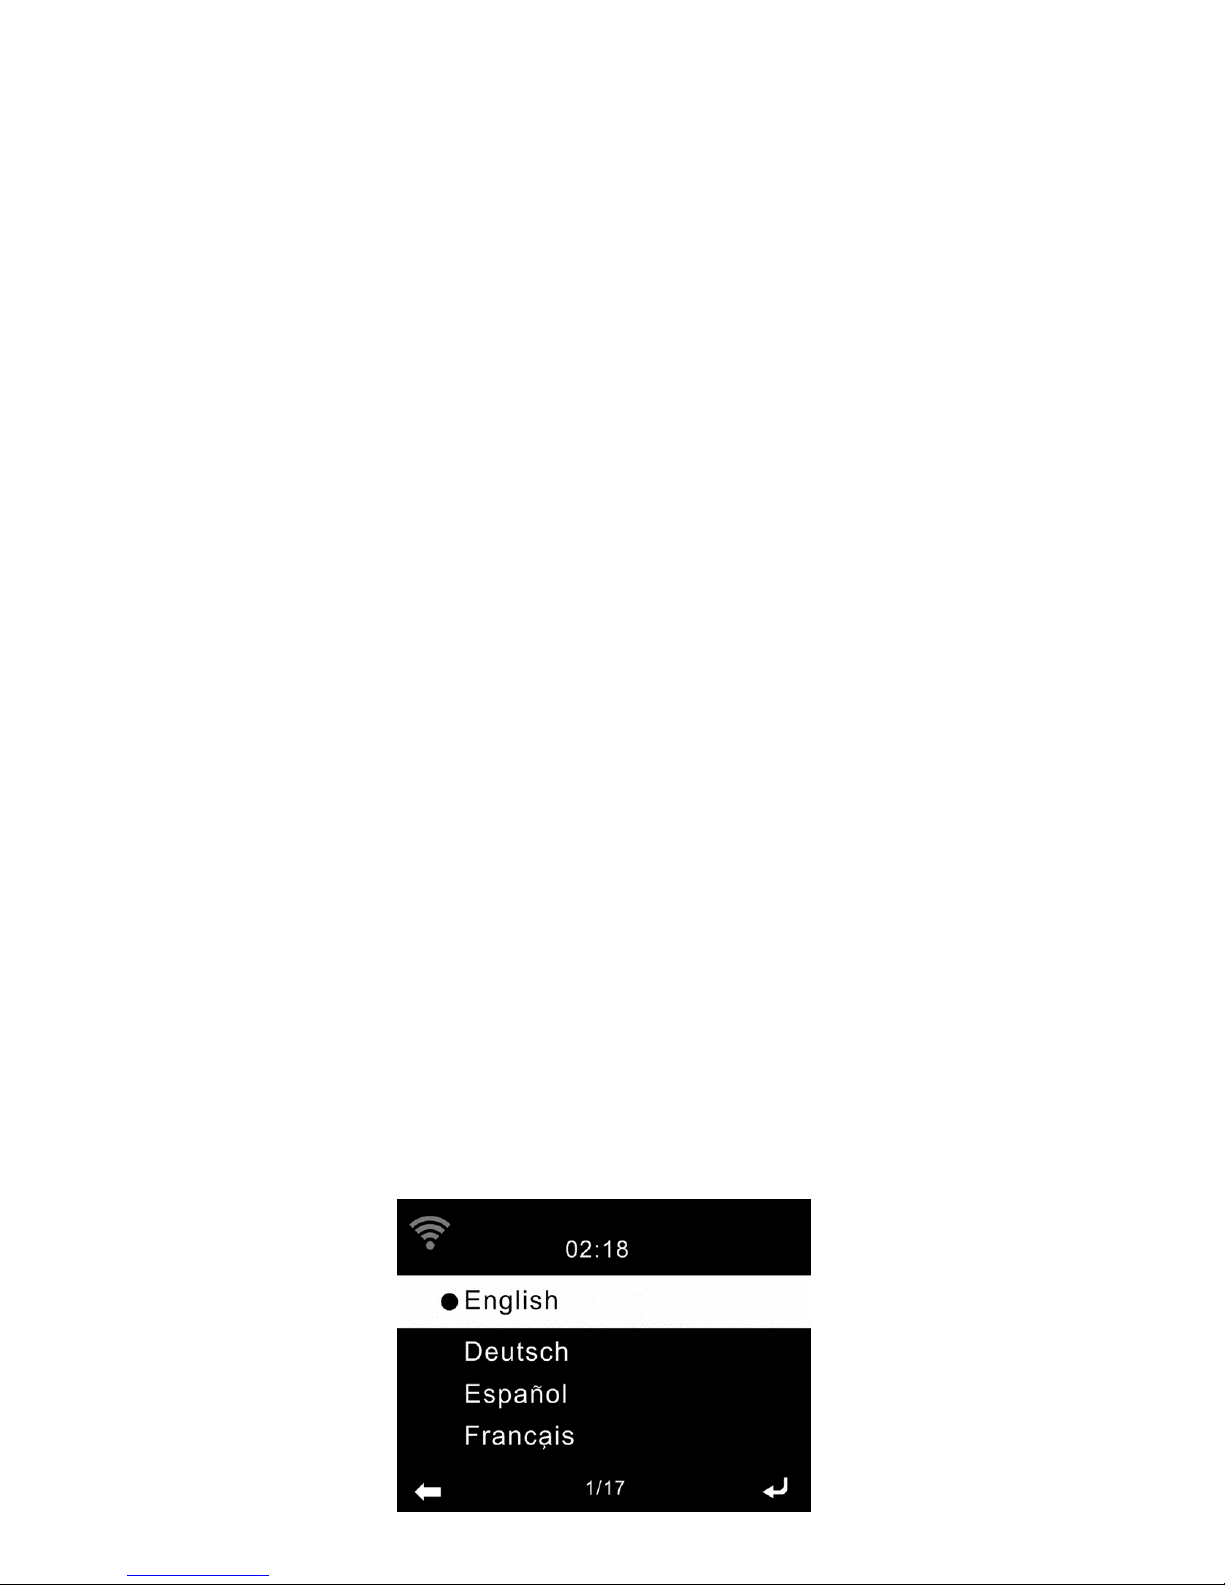
Plug the power cord into the AC socket.
When it is the first time running the device,the system will ask you to
set Language and Network Configurations.
12
Page 13
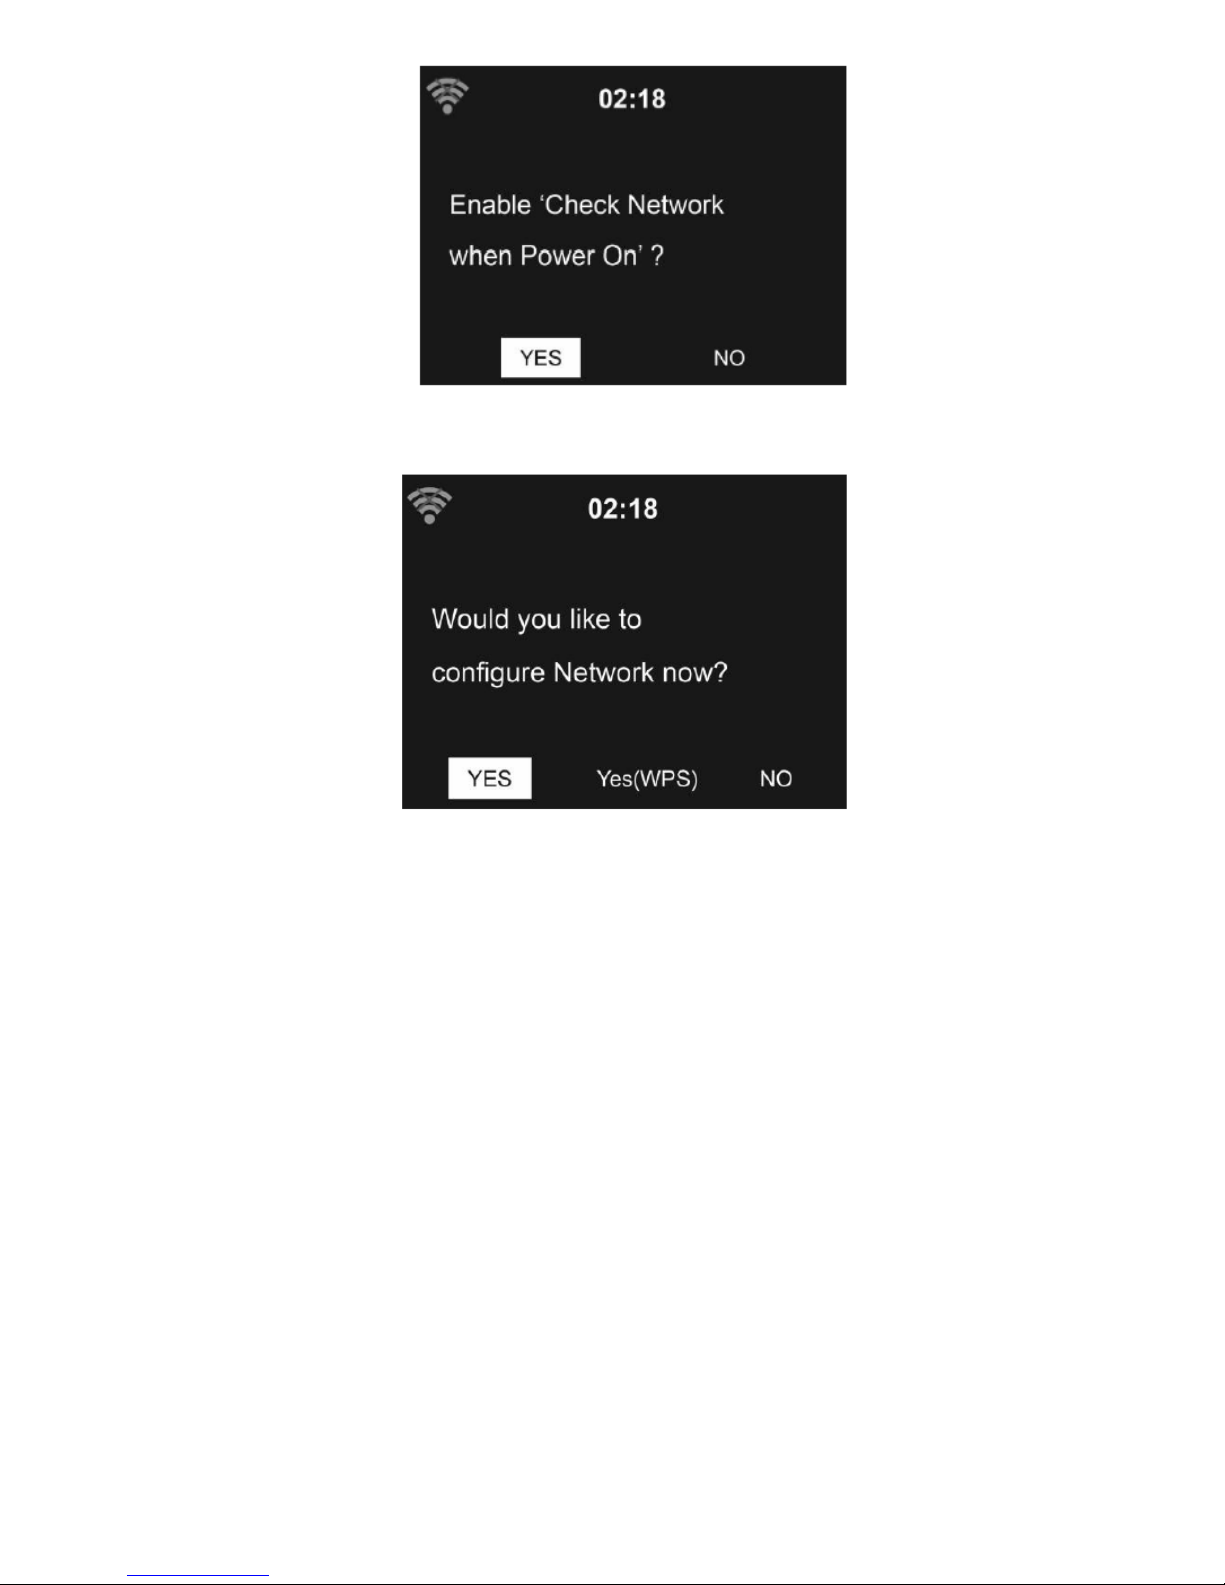
Select “Yes” to establish connection to the network.
Select “Yes (WPS)” (only for WPS routers). Then press the WPS
button on your router.
Select “No” if you would prefer to listen to a terrestrial station or to
use the speaker with an external playback device.
If selected “Yes”, the display goes to scanning for Wireless Network
and shortly afterwards a list of avaiable wireless networks will appear.
13
Page 14
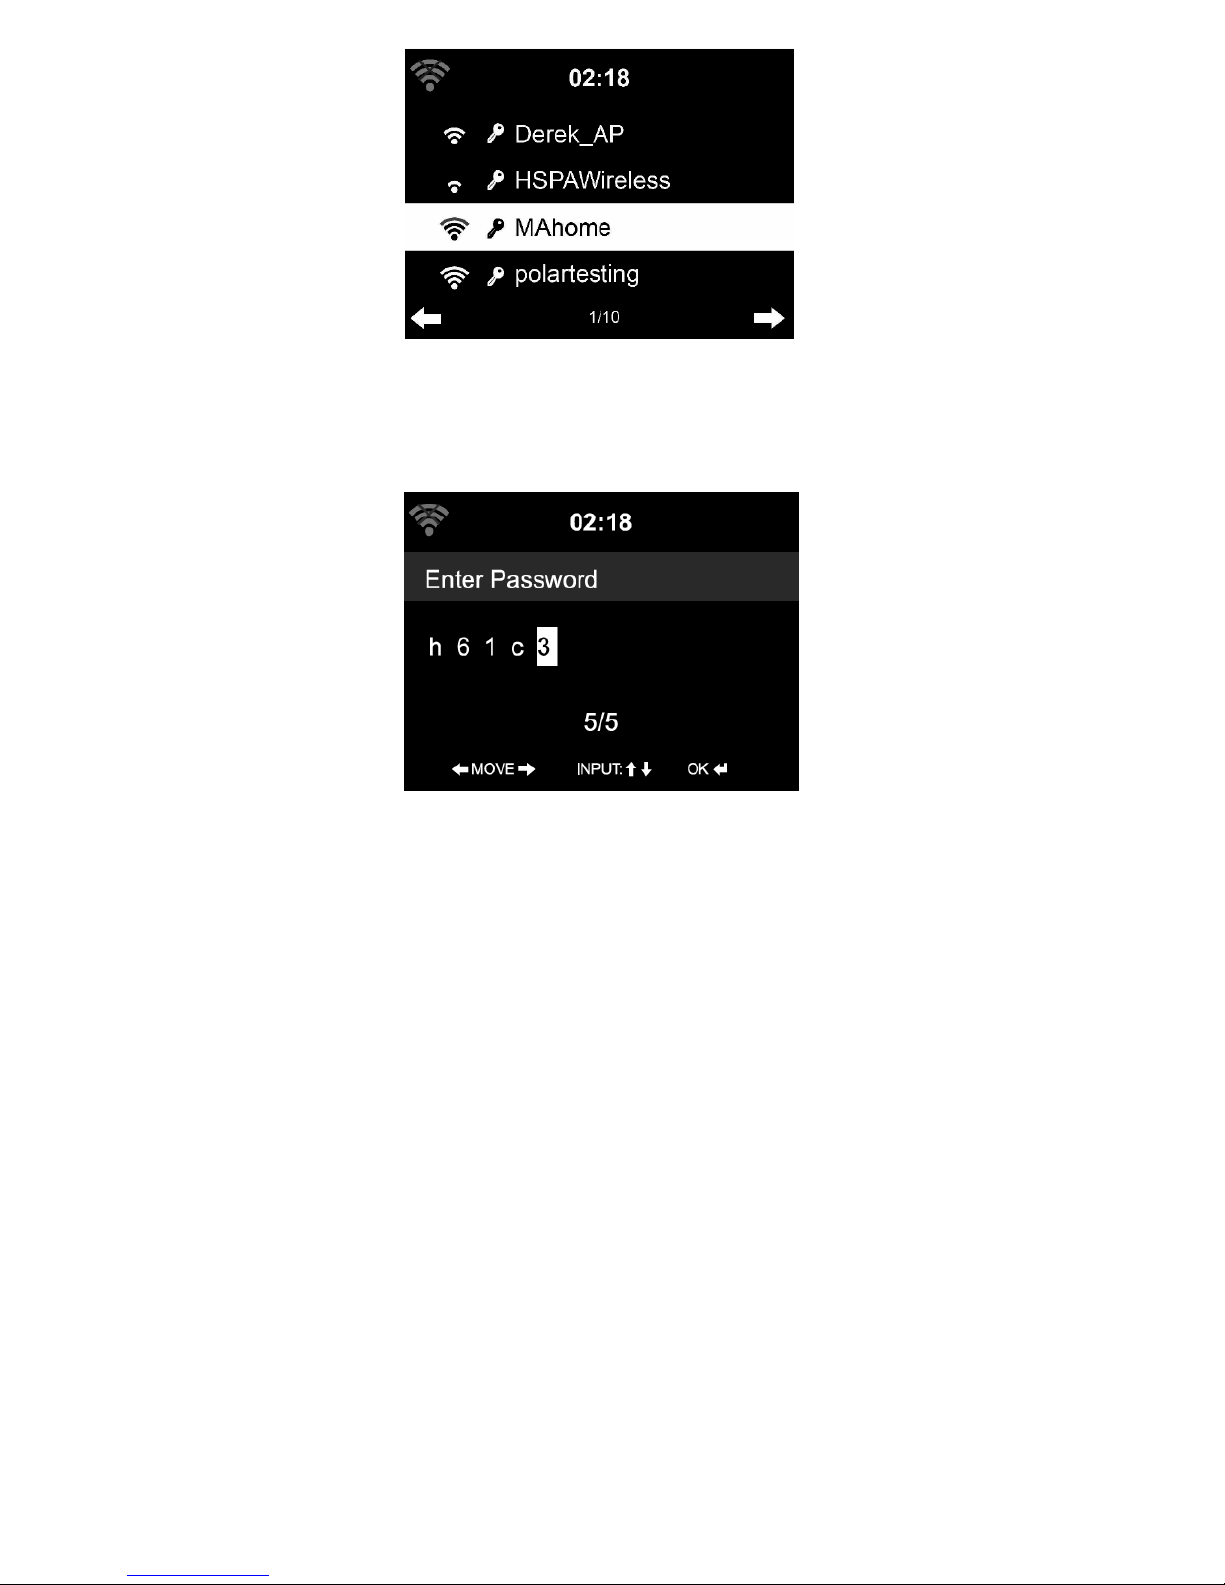
The number of bars in the wireless symbol in front of the network name
(SSID) shows the relative signal strength of the network.
The key symbol indicated that the network is password-protected.
If the device does not find any wireless networks, “No Wireless
Networks Found” appears on the display. Change your location, if
necessary, and check your WLAN router.
You can find the SSID of your Access Point in the configuration of the
Access Point (router).
Select your network and confirm with OK. If your WLAN is password-
protected, you will be prompted to enter your password.
Enter the password using the number and letter buttons of the remote
14
Page 15

control or enter it directly on the device.
Note the use of upper and lower case when entering the password.
You can use the reel to enter the password, rotary the reel to choose
the character and press OK (the reel button) to confirm it and go to the
next entry space, once the last character is inputted, double press OK
to confirm entire entry
With Remote Control
The cursor indicates the current entry space.
Press the corresponding number button repeatedly:
0 0 ?
1 1(space) @ ! # $ % & ( ) + - . / : ; < = > ? [ \ ] ^ { | } ~
2 2 A B C a b c
3 3 D E F d e f
4 4 G H I g h i
5 5 J K L j k l
6 6 M N O m n o
7 7 P Q R S p q r s
8 8 T U V t u v
9 9 W X Y Z w x y z
Alternatively, you can enter the numbers and letter using only the
cursor buttons:
<: Go to previous entry space, entry can be overwritten
>: Go to next entry space, the last entry is saved
∧/∨:
Select number / letter
OK: Double press to confirm entire entry
15
Page 16
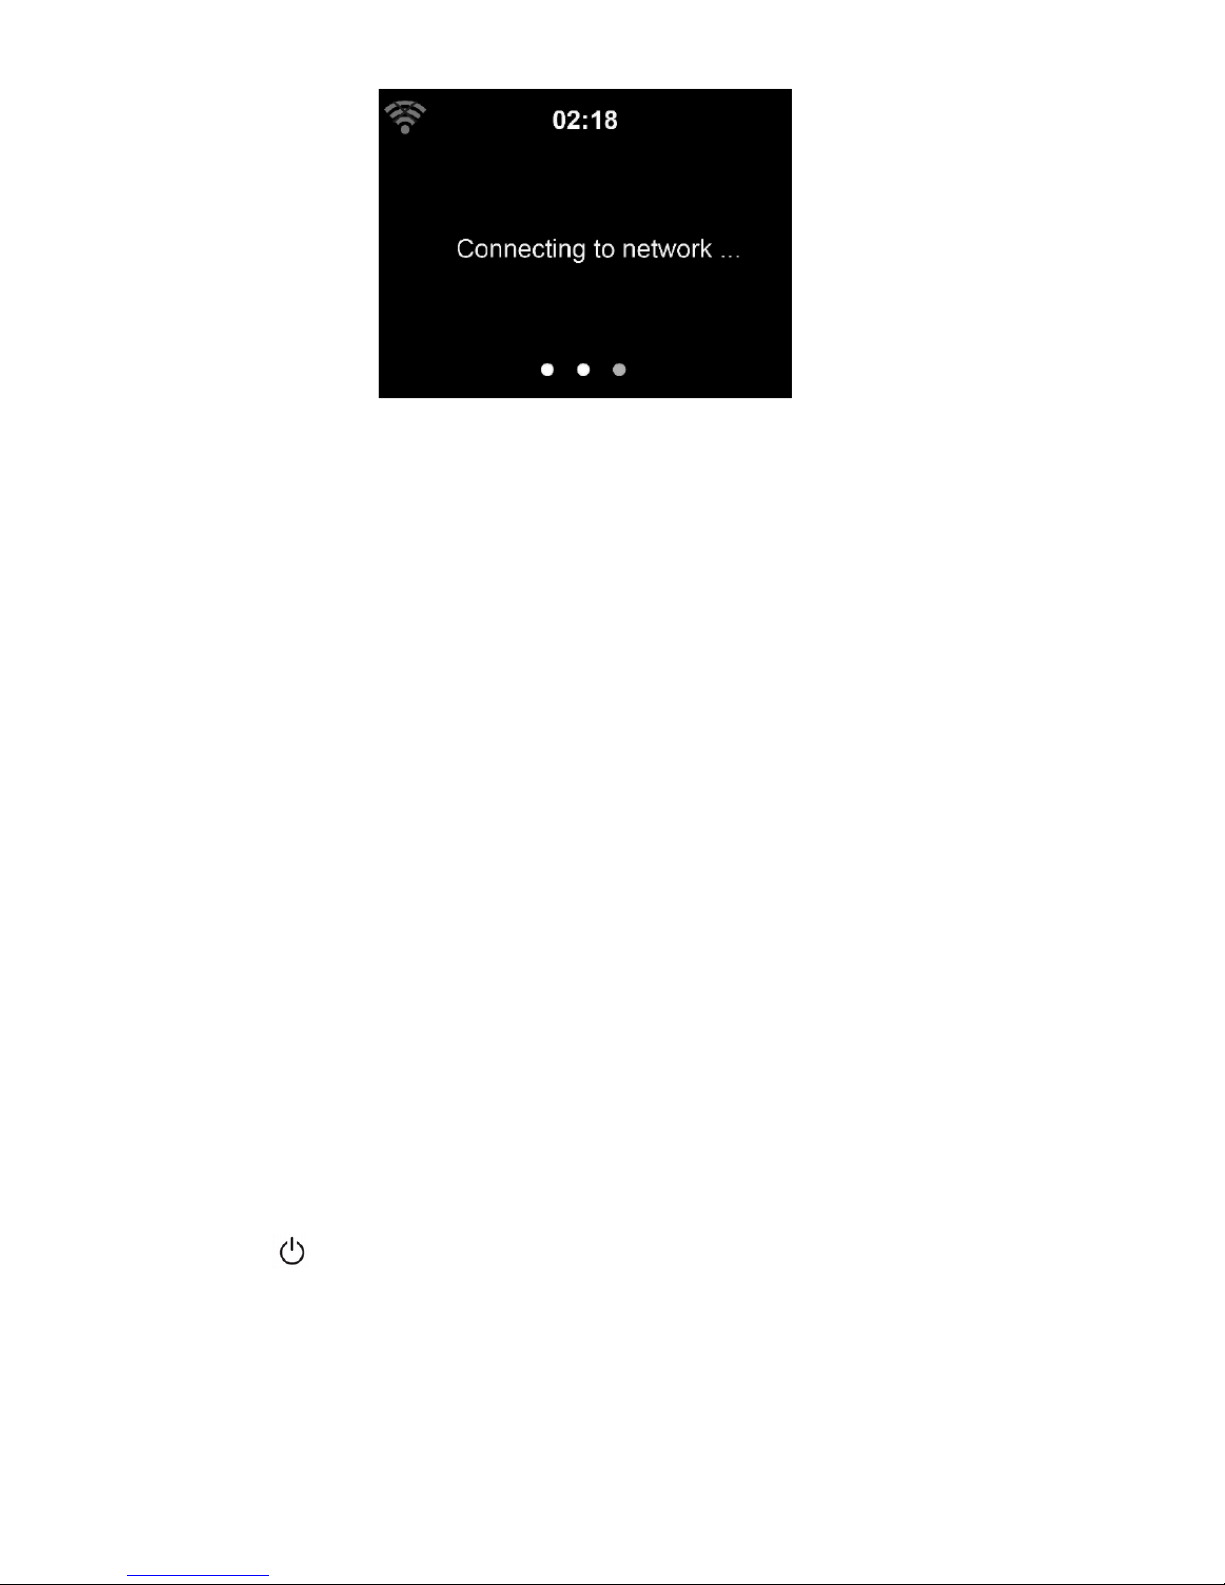
It may take a few seconds to establish the connection to the network.
Once the connection is established, the main menu appears with the
main menu items:
- Internet Radio: Access to worldwide radio stations
- Media Centre: Access to your UpnP devices via software with
straming capability.
- FM: Access to FM radio
- DAB: Access to DAB/DAB+ radio
- Information Center: Access to weather, financial and system
information.
- AUX: Access to all devices connected via the AUX IN socket.
- Bluetooth: Access to all devices connected via bluetooth.
- Configuration: Various system settings
- Local Radio: Access to radio stations in a particular region(e.g.
onlyGerman Stations)
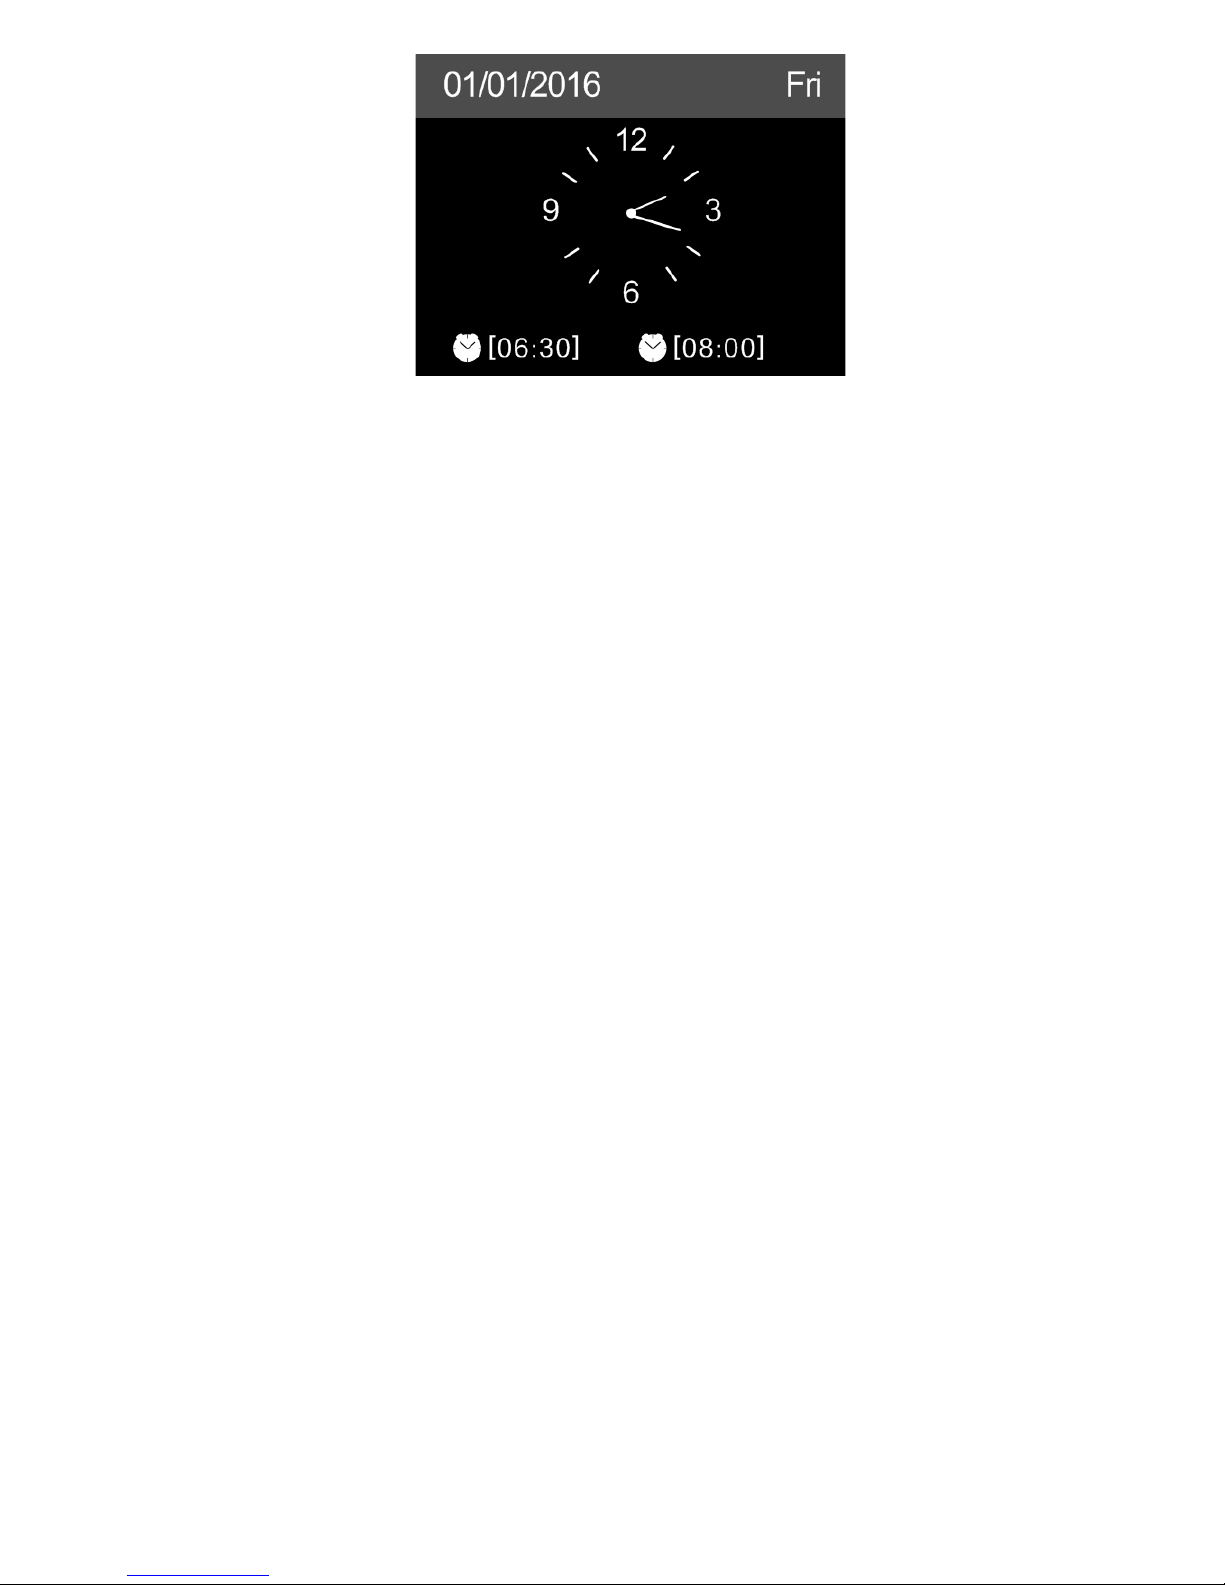
Press to enter standby mode. The time, date and any active alarm
times display on the screen.
16
Page 17
If you have set up a network connection, and would like to use this
Internet radio again within the network, it will automatically establish
the connection. In case you desire to change the network, enter
configuration to setup the corresponding connection.
Use the Number keys to input numbers/letters.
Once you are on the letter you want, press > to the next entry.
If you input wrong code, press < to delete the previous entry and
retype the correct code.
When you are at the end the input, press OK to confirm.
AirMusic Control App
The device can be controlled with your smartphone via WiFi. It is
recommended to use the app of “AirMusic Control”. Additionally to
controlling the radio, the app is able to play the smartphone’s local
music files on the device.
The app itself is avaiable for Andriod and iOS. It can be downloaded
from here:
17
Page 18
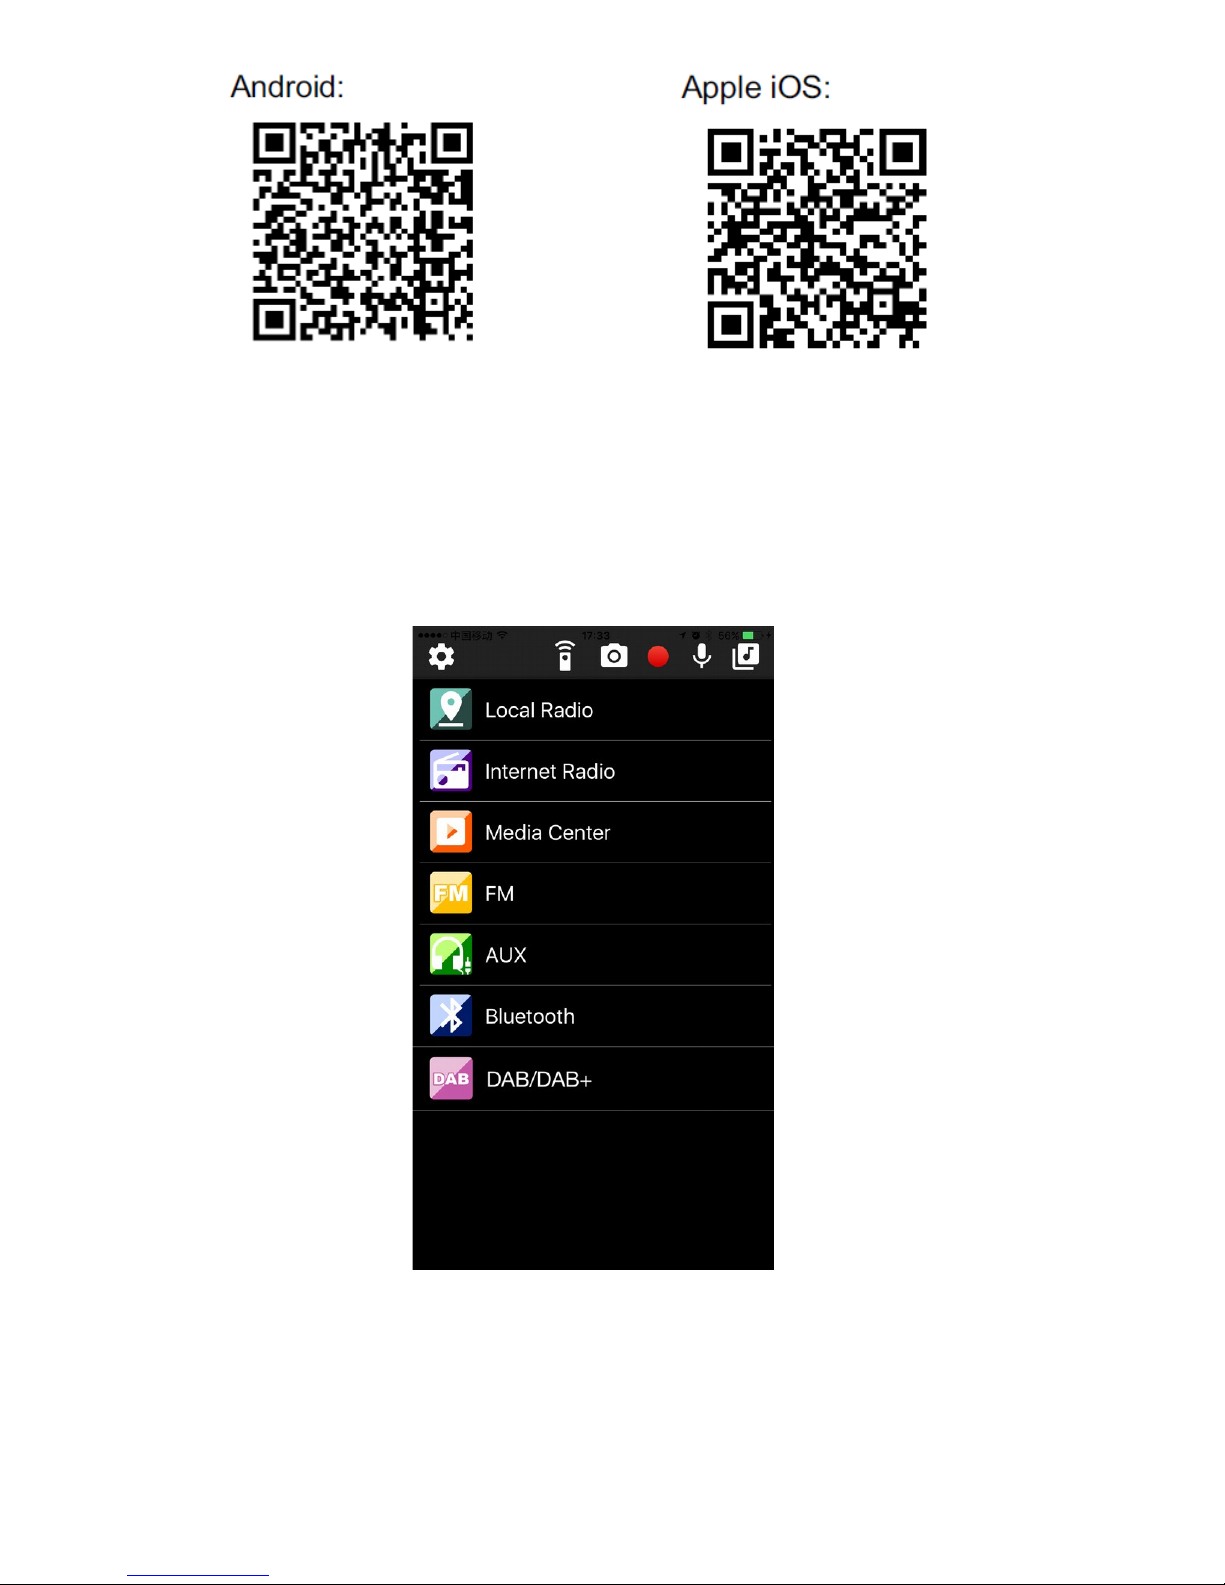
Main interface of the App “AirMusic Control”
Start the desired function by tapping on the appropriate symbol.
18
Page 19
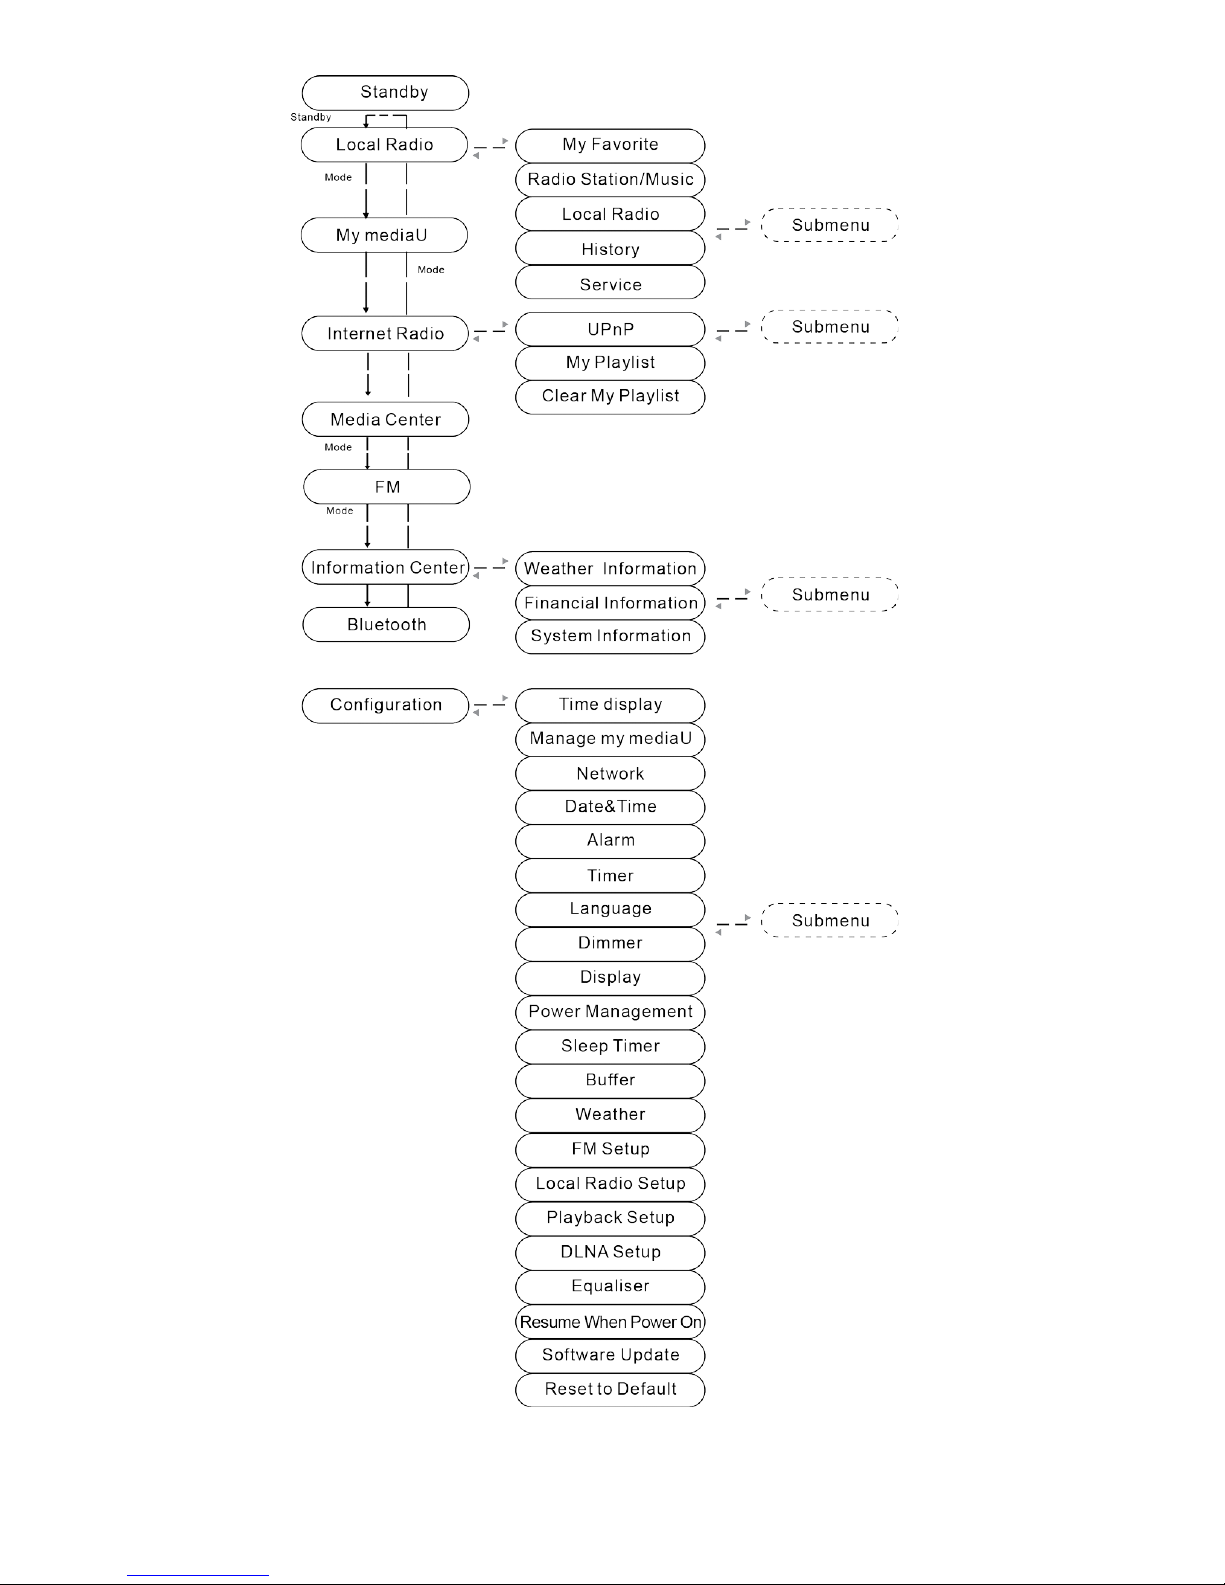
2. General overview of the menu options
19
Page 20
3. Main Menu
In the main menu you can select the following modes, Local Radio, My
mediaU (if it is enabled, see 3.9.2), Internet Radio, Media Center, FM,
DAB/DAB+, Information Center, AUX, Bluetooth, and Configuration.
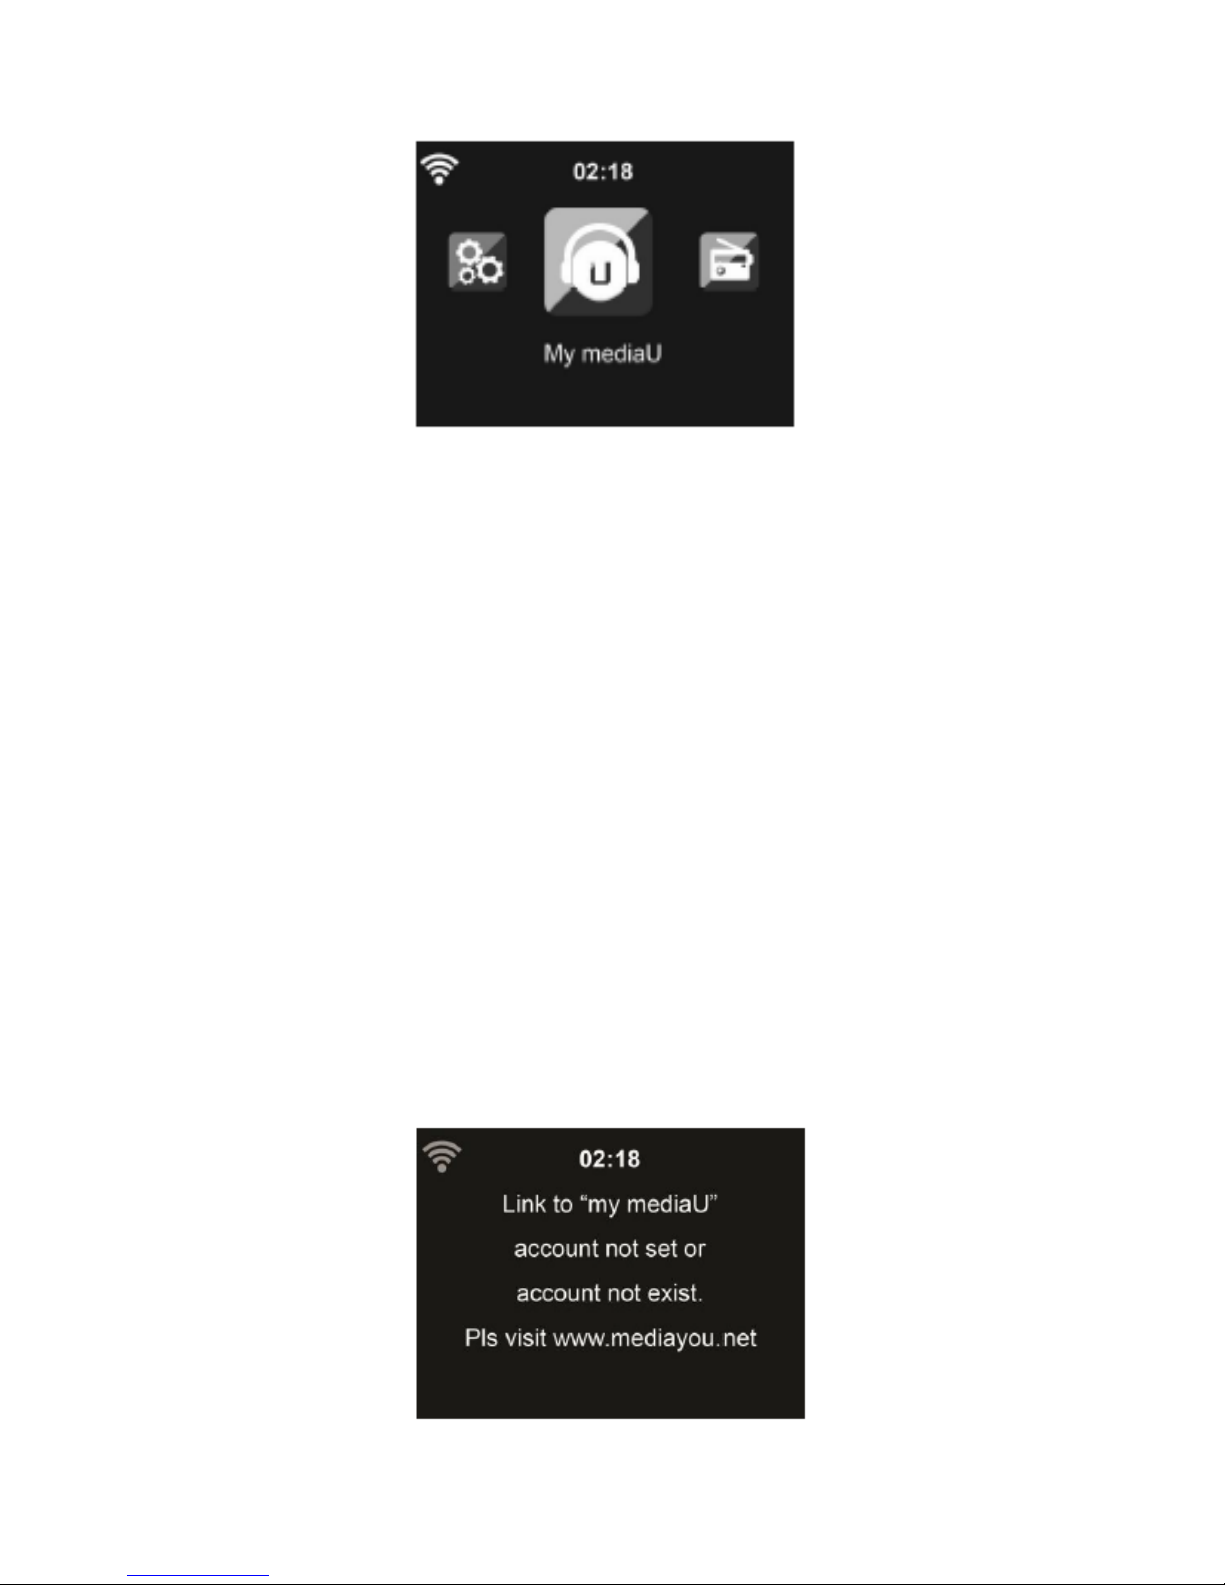
3.1 My mediaU
Display and playback your own mediaU station list on the mediaU
server. Set your account first.
When it is enabled, My mediaU will be shown on the main menu.
If various mediaU accounts exist in the device, select the default login
account in here.
20
Page 21

To activate your own station list, follow the steps below:
1. Access http://www.mediayou.net.
2. Join my mediaU membership
3. Login to the website
4. Enter the wireless MAC address of the device to the mediaU
website.This information can be obtained in Information Center >
System Information > Wireless Info
5. After successfully configuring, you are able to save and view your
own mediaU station playlist(s). Username and password are not
required to enter to the device.
6. If there are different accounts stored in the device,you can choose
the one you currently use under Configuration menu.
Each time you have made any updates on the playlist from the
website, go to Configuration > Manage my MediaU to synchronize the
change to the device.
3.2 Internet Radio
After connencting any station,the bit rate and the format of the station
are displayed on the playing screen.
3.2.1 My Favorite
Create a list of your favorite preset stations. It supports 250 favorite
entries including station and folder.
During the station playing screen, press and hold Preset on the device
& then press OK to save the station as my favorite. You may replace
the previous saved station to the new one.
You also can save the station to your favorite while scrolling through
the station list. When the station is highlighted you can press > to enter
this menu where you can add the station to your favorites.
21
Page 22
If the selected station has been saved, you cann’t save it again.
Under the preset station list, move to your station, press OK to listen.
You may also press > to enter its submenu to Delete, Shift Up, Shift
Down along the list, Rename or Play.
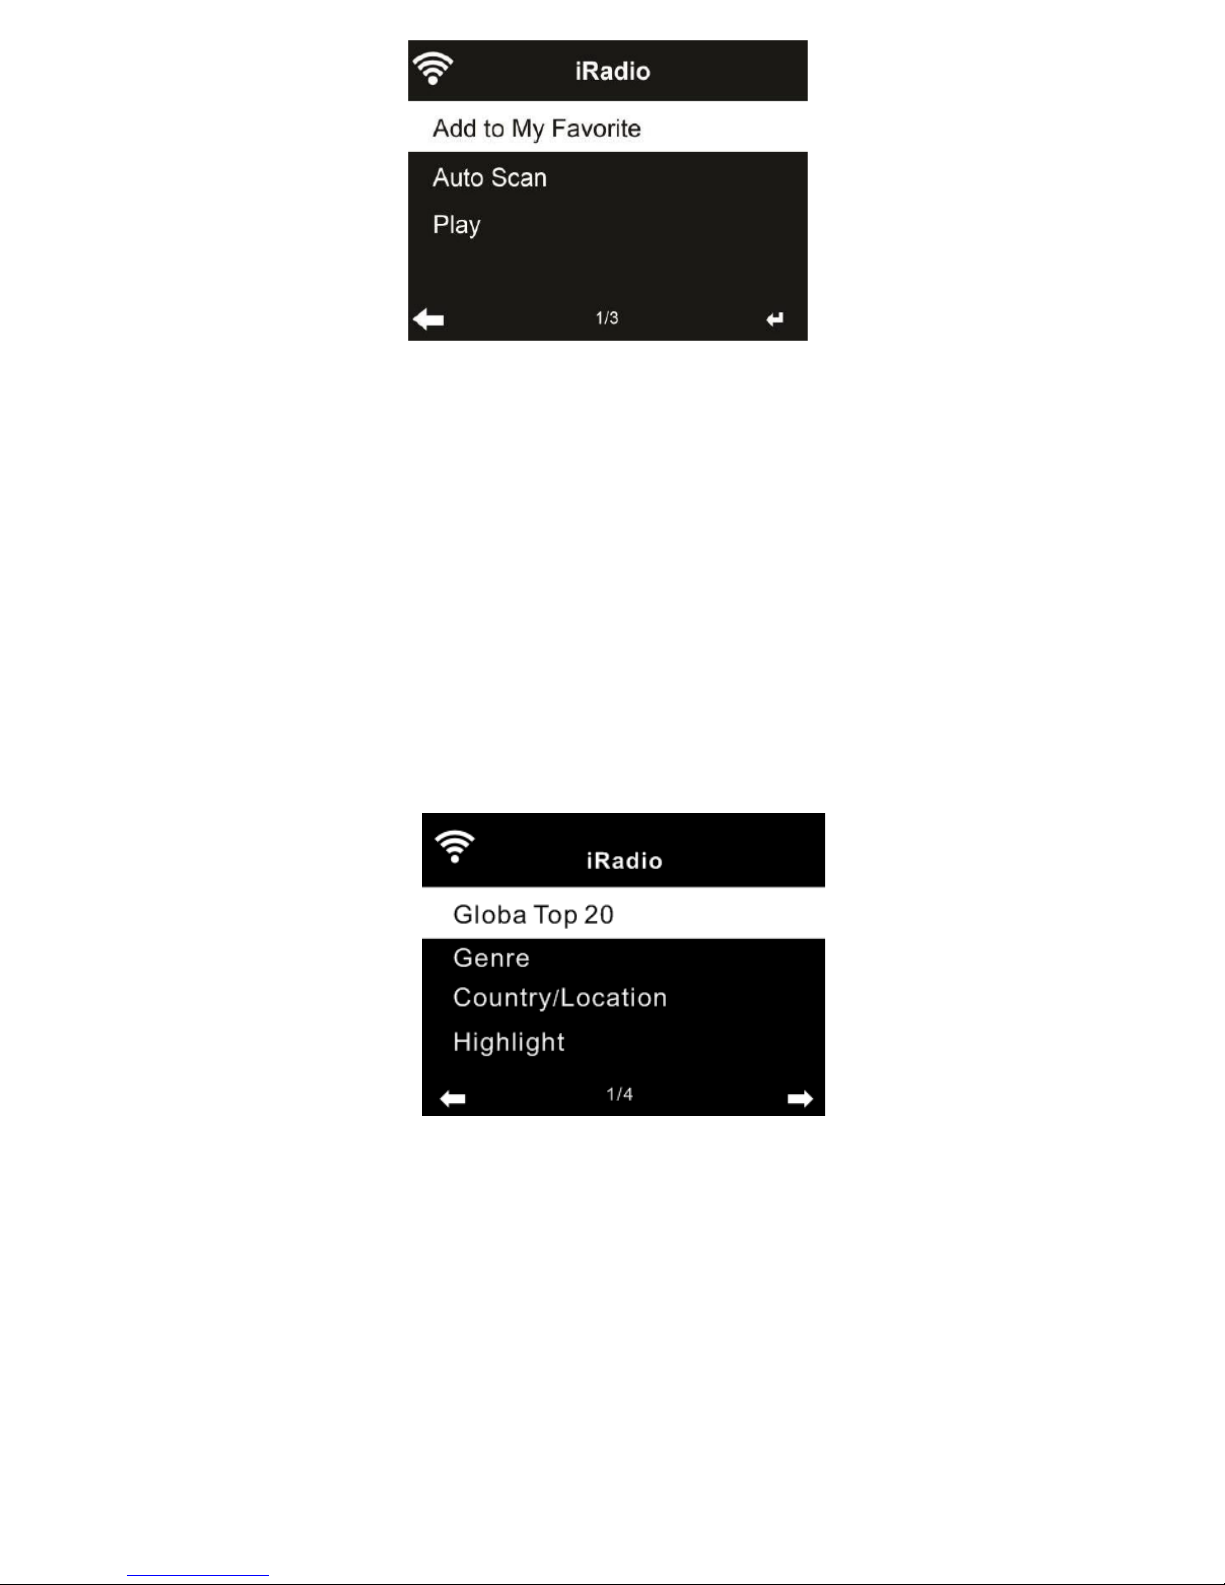
3.2.2 Radio Station/Music
Stations are categorized into Global Top 20, Genre,
Country/Location and Highlight. Enter to continue the subcategories
and choose the station to listen.
For each station, press OK to play directly. You may press > to enter its
submenu. You can Add to Favorite, Auto Scan or Play.
22
Page 23
When you choose Auto Scan, the radio introduces every station in the
list by playing it for 30 seconds. This is stopped when every station is
played or you press the OK button.
3.2.3 History
Shows you a list of last listened stations. It can save up to 10 history
stations.
For each station, press OK to play directly. You may press > to enter its
submenu. You can Add to Favorite, Auto Scan or Play.
When you choose Auto Scan, the radio introduces every station in the
list by playing it for 30 seconds. This is stopped when every station is
played or you press the OK button.
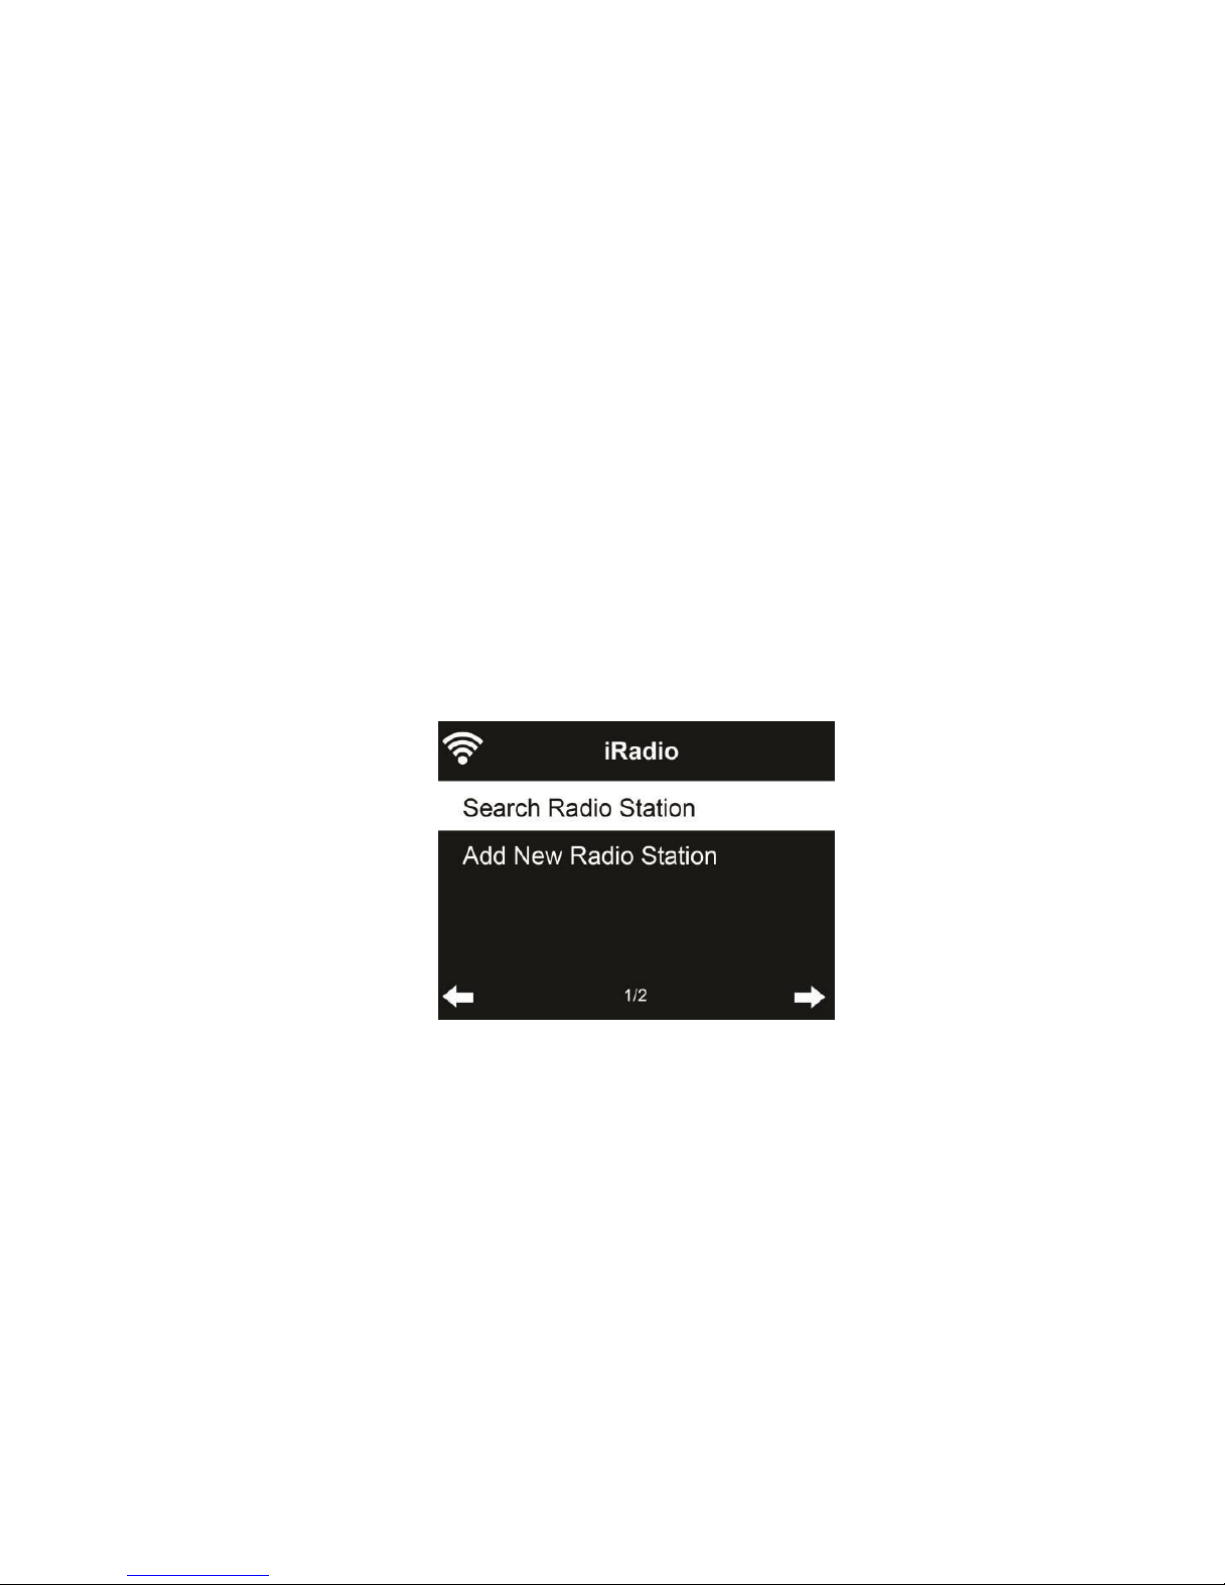
3.2.4 Service
Search Radio Station - Enter your keyword by the remote control to
search radio station from the list.
Add New Radio Station - The added stations will be stored in My
Favorite. Note that the maximum character of the station name is 250.
23
Page 24
3.3 Media Center
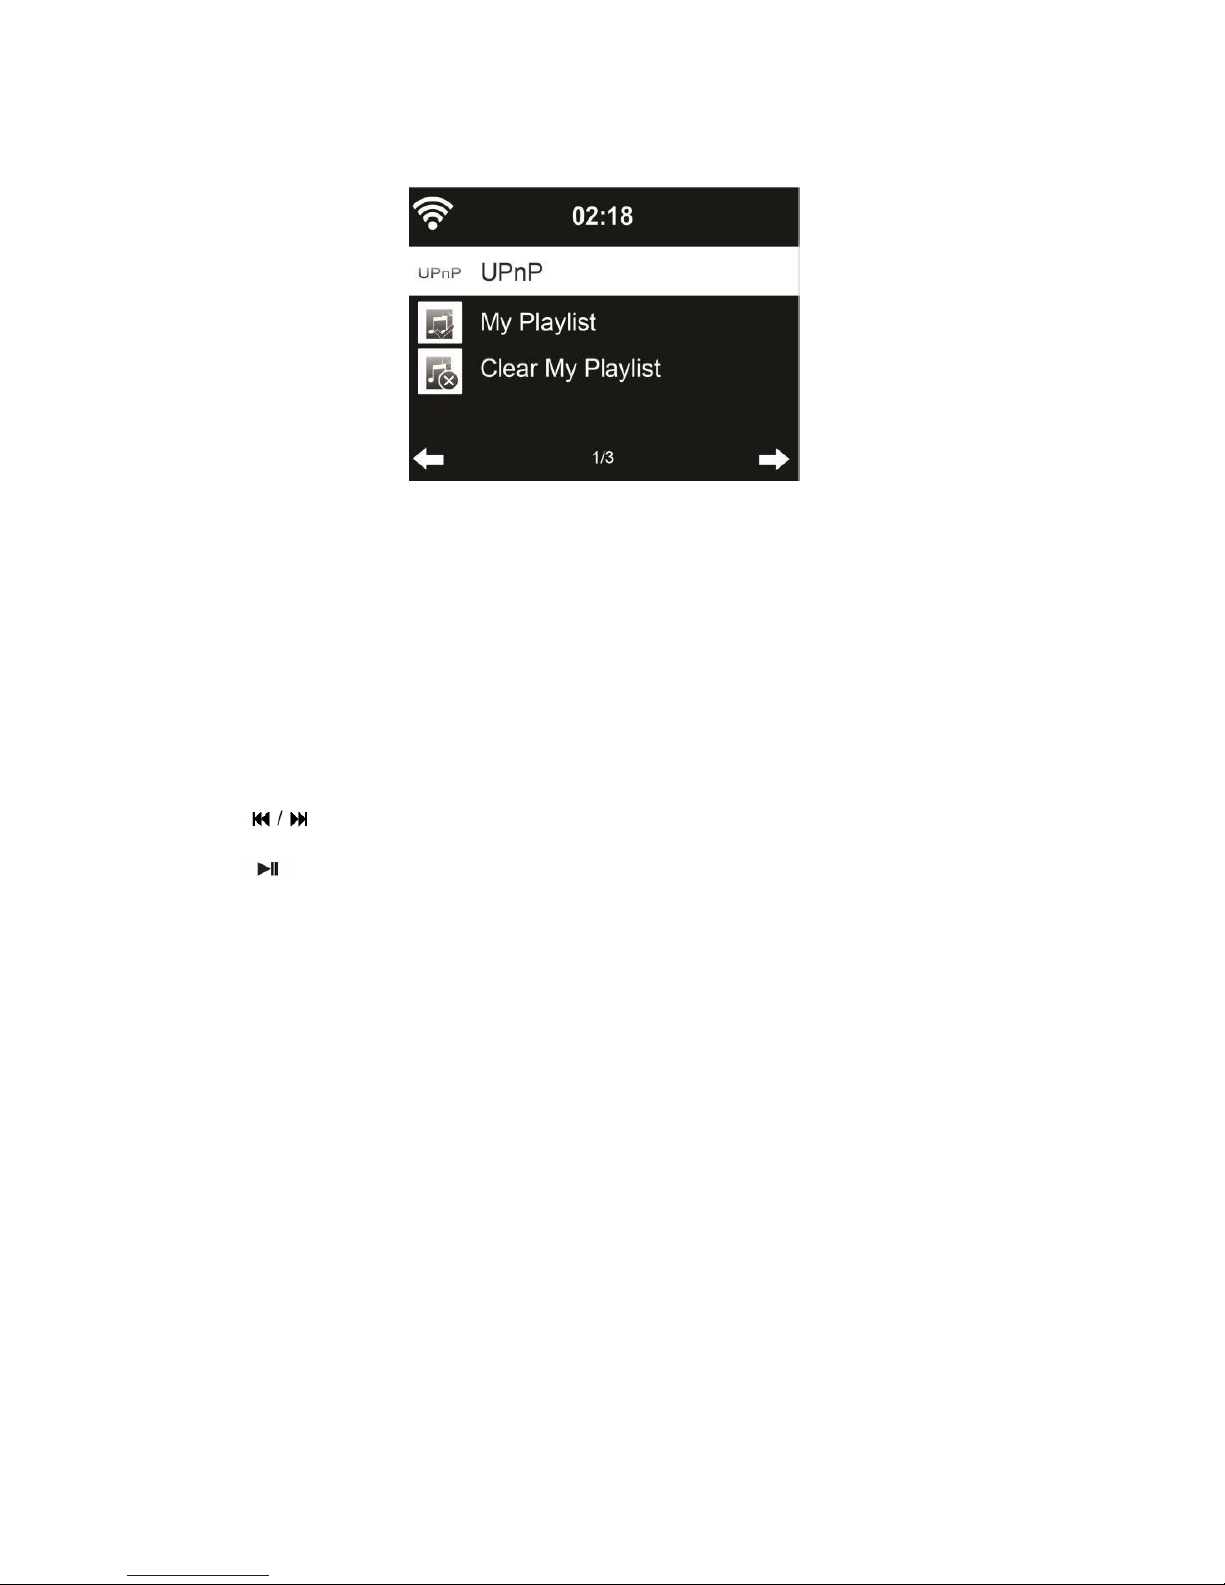
3.3.1 UPnP
If you have set up shared media, you should see the shared media
from UpnP. If you have more than one computer sharing media, the
alternatives are listed. Select the shared media you want to play.
Press on the remote contro to play previous/next music track
Press to stop or play.
Press INFO on the remote to view the display information of the
playing track.
Tips: This device can only read the track of file names with less than
40 characters. And the characters should be in European language. If
you encounter failure of reading the track under UpnP mode, you may
try to rename the file.
However, if the track is still unable to play, you can try converting the
file to a different format.
24
Page 25
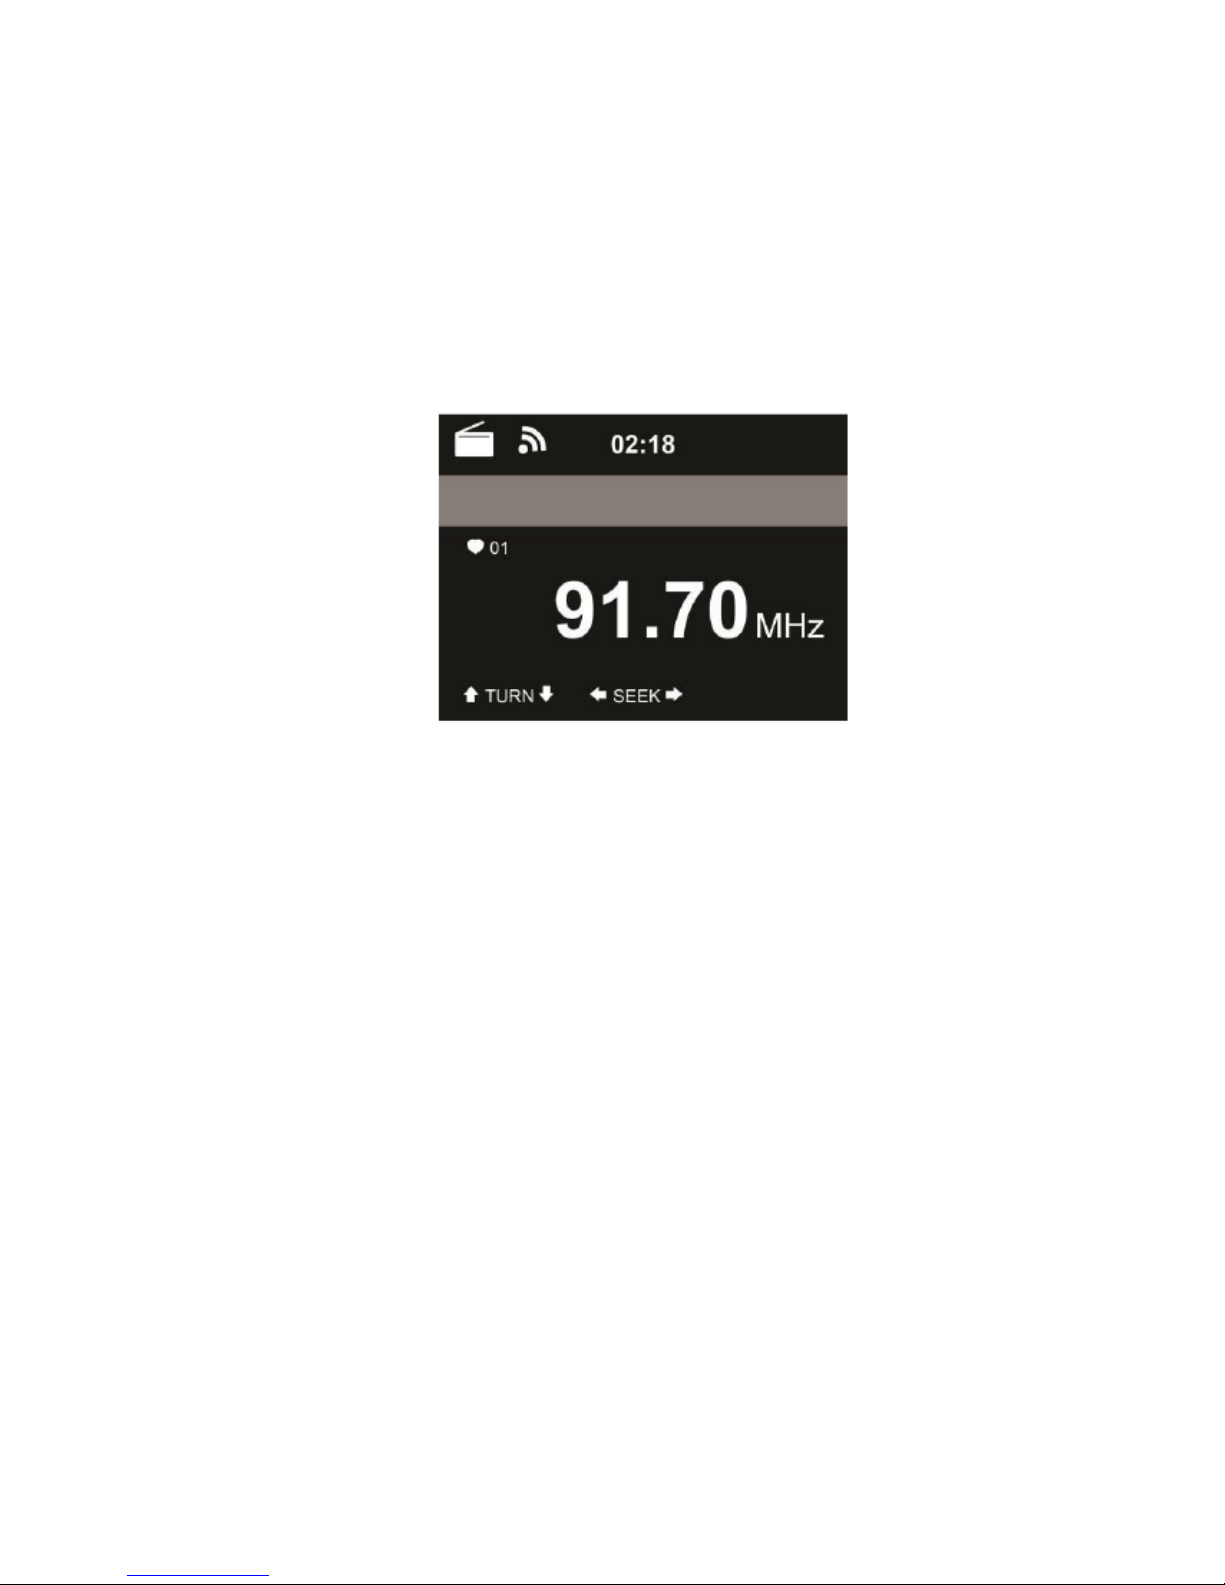
3.3.2 My Playlist
You can create a playlist of favorite music from UpnP. When you play
the music, press and hold OK to save it into My Playlist.
3.3.3
Clear My Playlist
You can remove all the saved music under My Playlist.
3.4 FM
FM radio mode receiveds analogue radio from the FM band. (Refer to
3.9.14 for the setting of FM band)
Press </> to search for FM stations. The frequency display starts to run
up as the device scans the FM band. It stops when it has received a
station.
You may press / on the remote control to tune station manually.∧ ∨
Each step moves 0.05MHz.
Press and hold the PRESET button and then press OK to save the
station.
To recall a saved station, short press the PRESET button, then press
25
Page 26

/ on remote control to select the preset station, press OK to choose∧ ∨
and play the selected station.
Alternatively, you can let the system scan ALL stations for you by
pressing OK, the searched stations will automatically be stored in
preset station list.
3.5 DAB/DAB+
Press the MODE button or press the button & use the </> to select
DAB from the main menu.
3.5.1 DAB Station Scan
When the radio is switched on to DAB mode for the first time,it will start
an automatic station scan in order to scan for all stations that can be
received at that location.
The station scan will begin and the display will show a scan progress
bar. As soon as the scan has been completed, it will start playing the
first station on the station list it finds.
3.5.2 Station selection
While in DAB mode,use the </> buttons to navigate through the DAB+
stations that can be received,press the OK to confirm to change
station.
The radio is equipped with a favourites momory for 10 radio stations.
To save a station,switch to the station you wish to save as described
above.Now press the number key 0-9 on the remote control, and keep
it pressed down for approx 2 seconds, or press the station saving key
1-4 to save the station.
The dispay will show a message that the station has been saved under
the favourites slot selected.
26
Page 27
3.5.3 DAB Radio Operation
If you have saved stations in the favourites memory, you can call these
up by pressing the desired number key.
Or while in DAB mode press the Preset button to call up the favourites
list.
Use the </> button on the radio or remote to navigate through the
favourites list, then press OK to confirm your selection.
3.6 Information Center
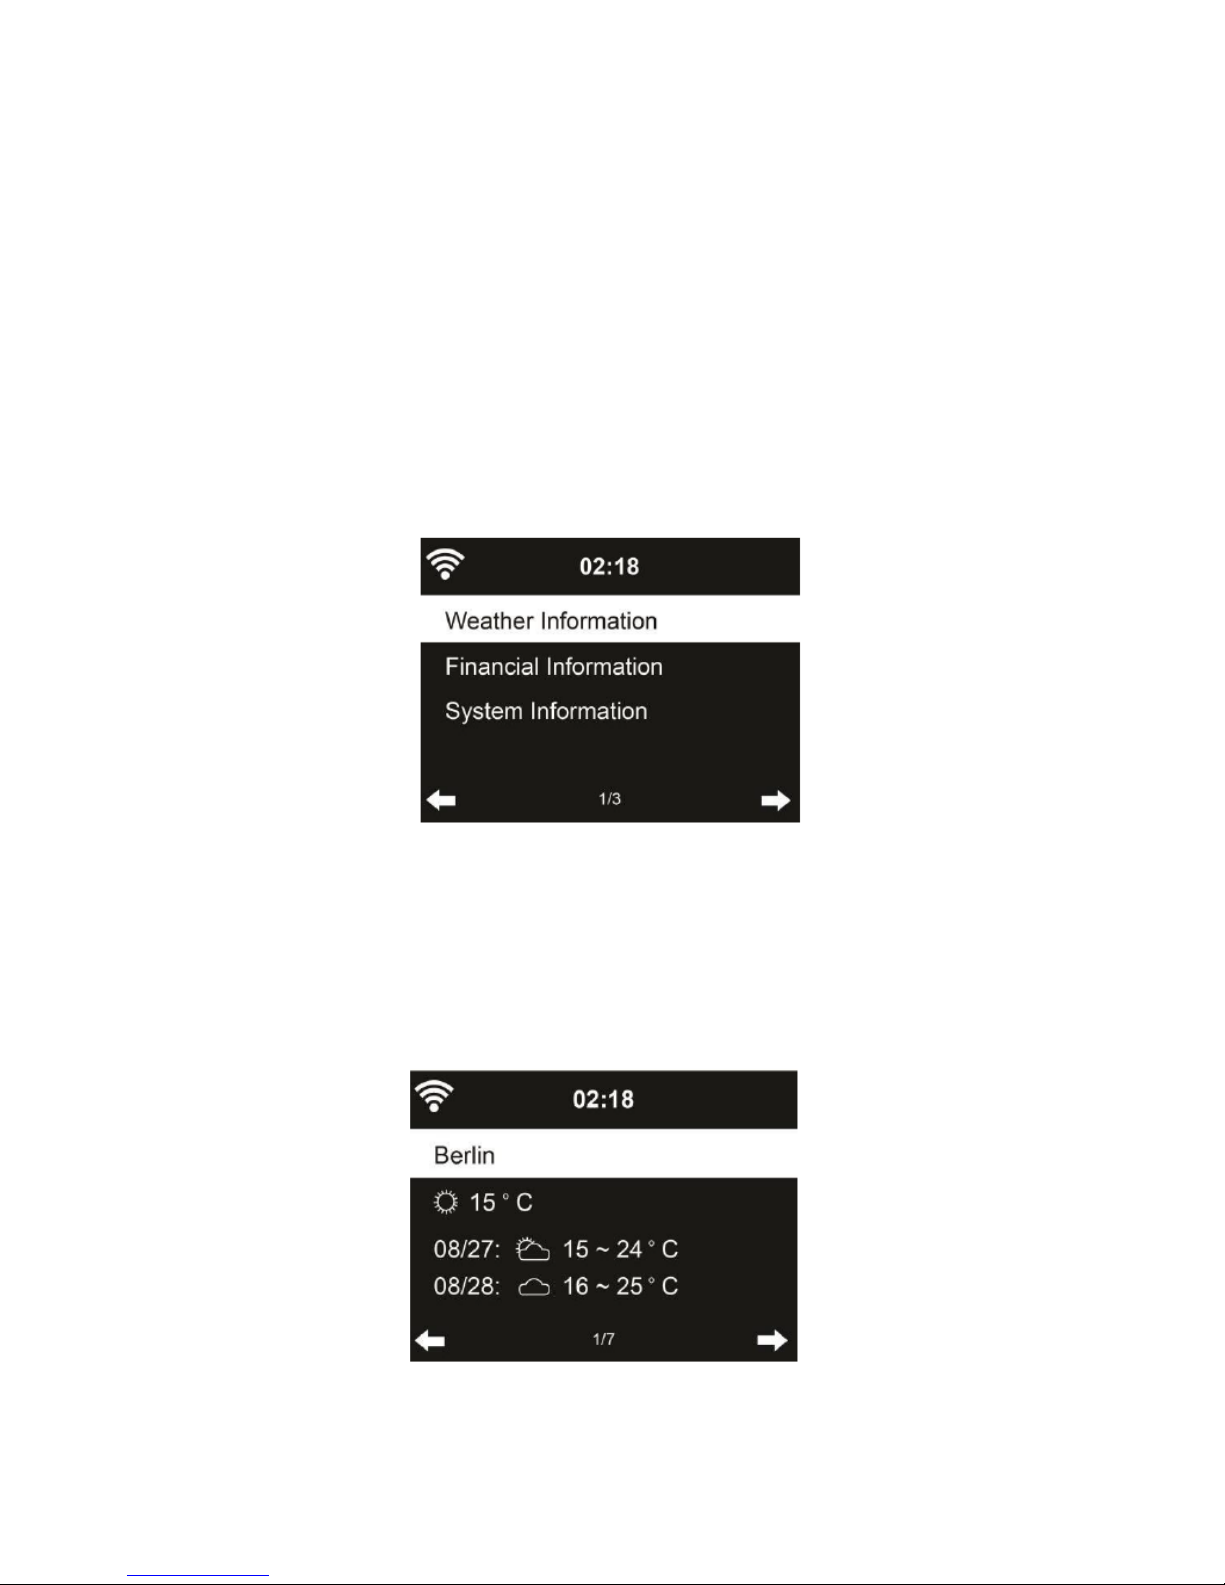
3.6.1 Weather Information
There are weather information and forecasts for 2000 cities. Select the
country and then the city for the weather details.
27
Page 28
Press </> to see the weather forecasts.
It is able to display the weather information on the standby mode. On
the weather information page, press OK to set the city to displaying on
the standby mode. Then turn on the weather display as mentioned in
6.9.13.
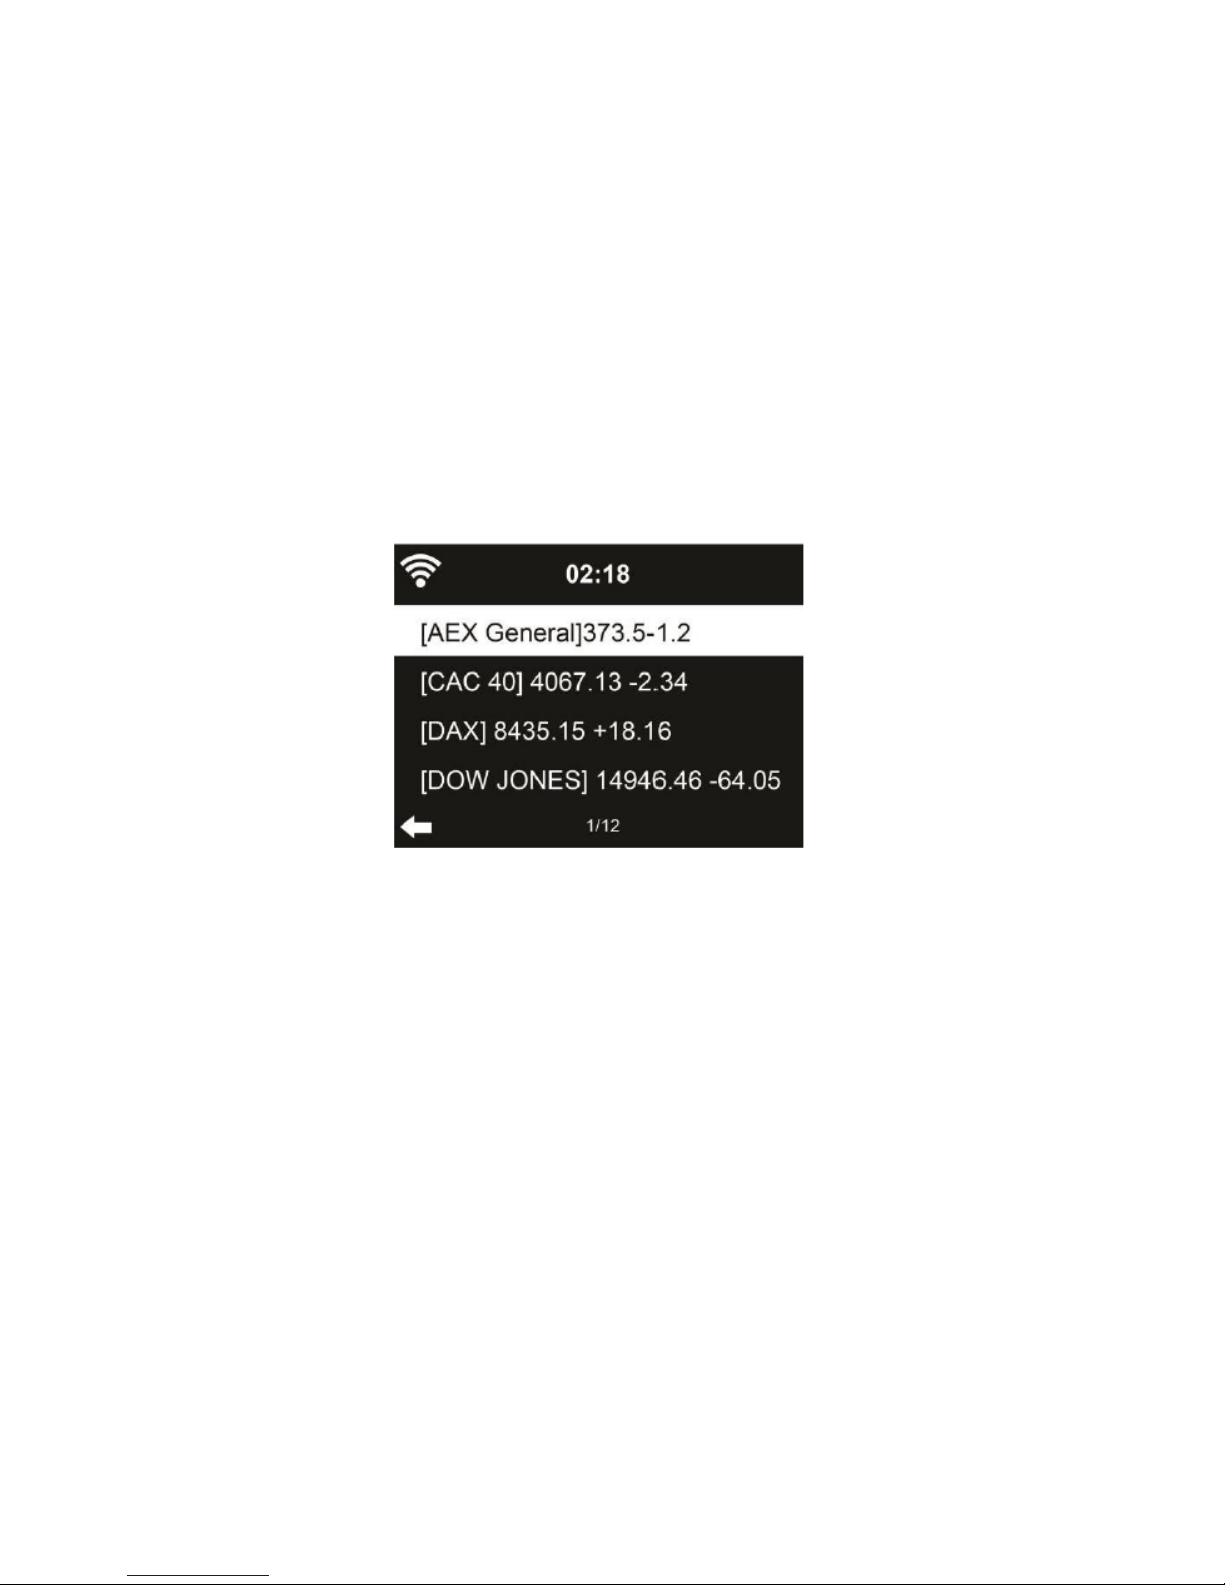
3.6.2 Financial Information
View the stock index from around the world.
3.6.3 System Information
Check out the version of the system, and the details of connected
network.
3.7 AUX
Aux in mode plays audio from an external source such as an MP3
player.
28
Page 29

To play audio with Aux-in mode:
Turn the volume low on the internet radio.
Connect the external audio source to the Aux in 3.5mm stereo
socket.
Press the MODE button or press the button & use the </> to
select AUX from the main men.
Adjust the volume of the internet radio (and, if necessary, the audio
source device) as required.
3.8 Bluetooth
Press MODE button until the display shows Bluetooth or select
Bluetooth in the main menu, then you can hear the sound “pairing” to
pair.
Select the speaker name: “Ferguson i300” from the list of found
devices.
Tips: Only one playback unit can be connected to the speaker. If the
speaker is already connected to another playback unit, the speaker will
not appear in the BT selection list.
If your device asks for a passkey (depending on the device
manufacturers, model, and software version), then enter digits
“0000”(four zeros) and press OK.
If pairing has been carried out successfully, a sound “Connected”can
be heard.
After connected completely, you can listen to music wirelessly
through Bluetooth and select music in Bluetooth device.
Short press button to pause or resume playback.
Rotary the “</>” button on the main unit or press the button
or “</>” button on the remote to skip to previous/next track.
29
Page 30

NOTES:
Depending on the device manufacturer, you need to perform the
registration (PAIRING) again to connect the devices
To be able to transfer audio data, Bluetooth needs to stay activated
in your player, Observe the operation manual of your player.
If a mobile phone on which you are playing music receives a call,
the music will be interrupted. The sound however is not played back
via the speaker. After you have ended the call, the devices are
connected to each other again and playback continues.
If there is an existing connection, press and hold the button for 3
seconds to break the current connection and initiate pairing mode.
The player will also be disconnected when your device is moved
beyond the operational range. If you want to reconnect your device
to this player, place it within the operational range.
If the connection is lost, follow the instructions above to pair your
device to the player again.
30
Page 31
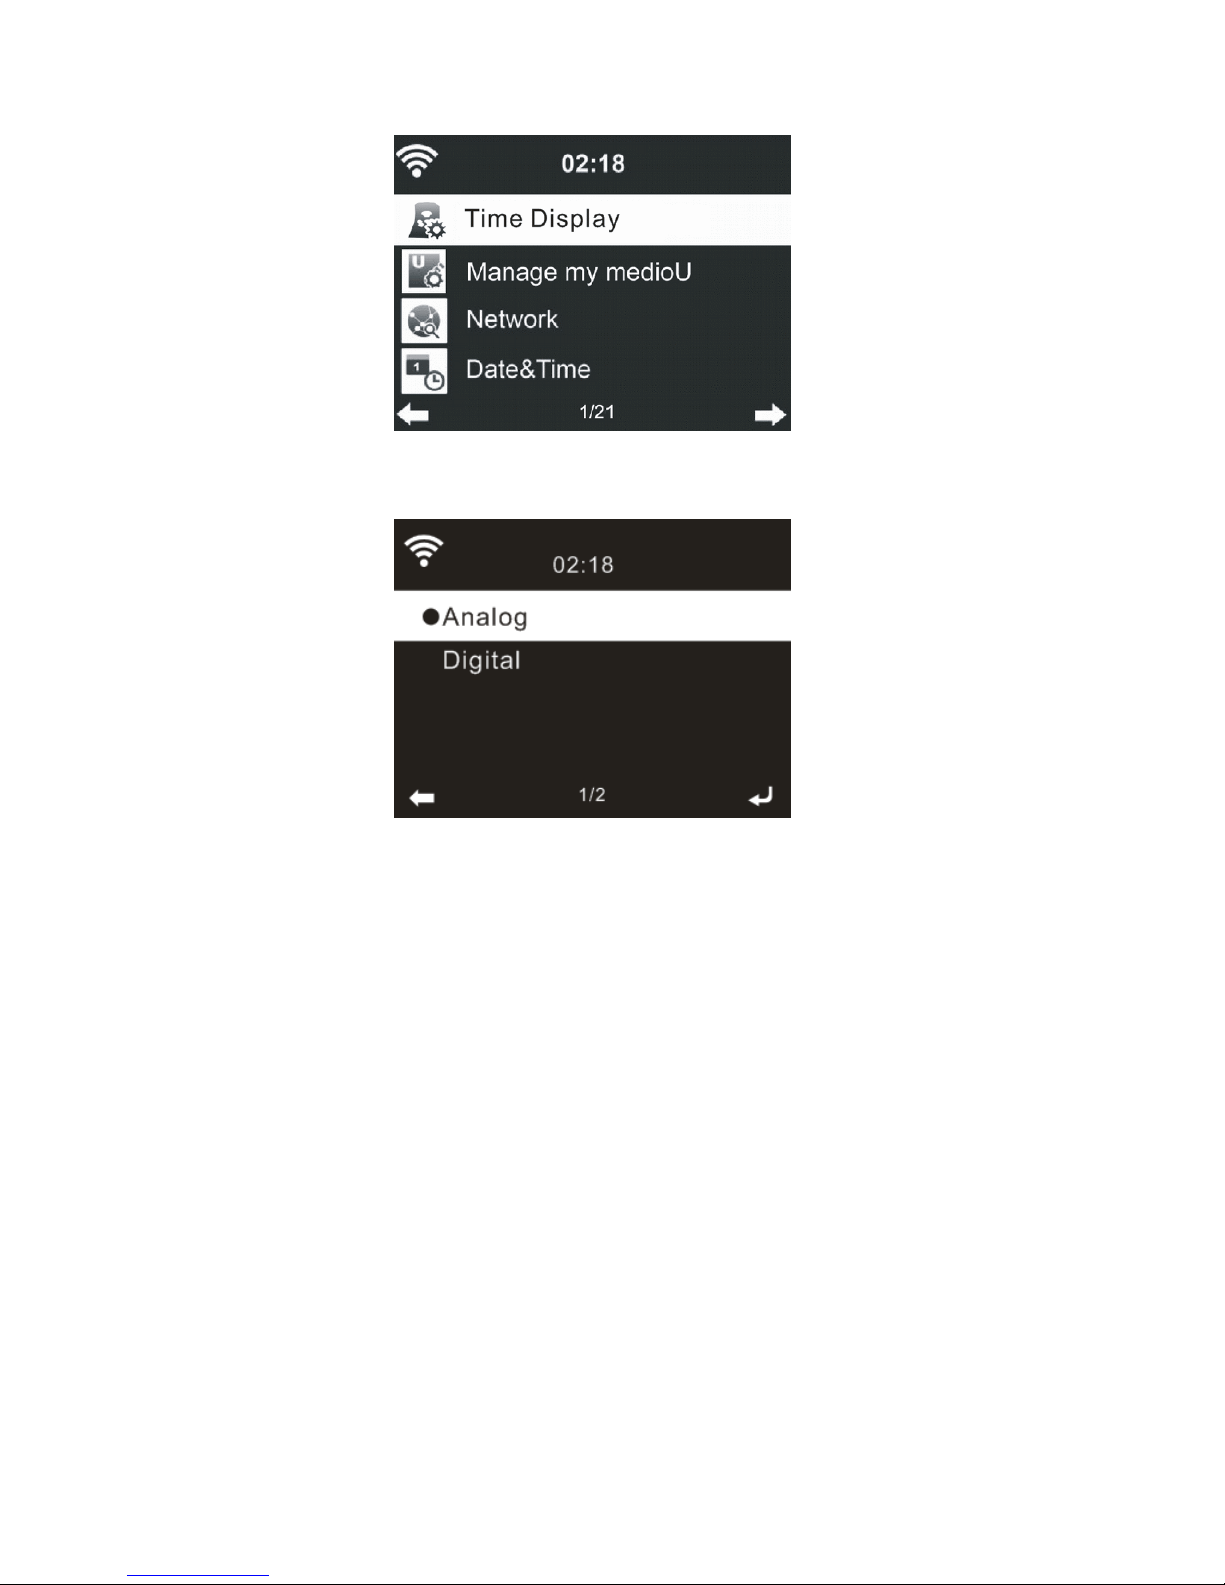
3.9 Configuration
3.9.1 Time Display
You may choose the standby display with Analog or Digital.
3.9.2 Manage my mediaU
When it is enabled, My mediaU will be shown on the main menu.
If various mediaU accounts exist in the internet radio, select the default
login account in here. Refer to 3.1 for more information of mediaU
account setup.
31
Page 32
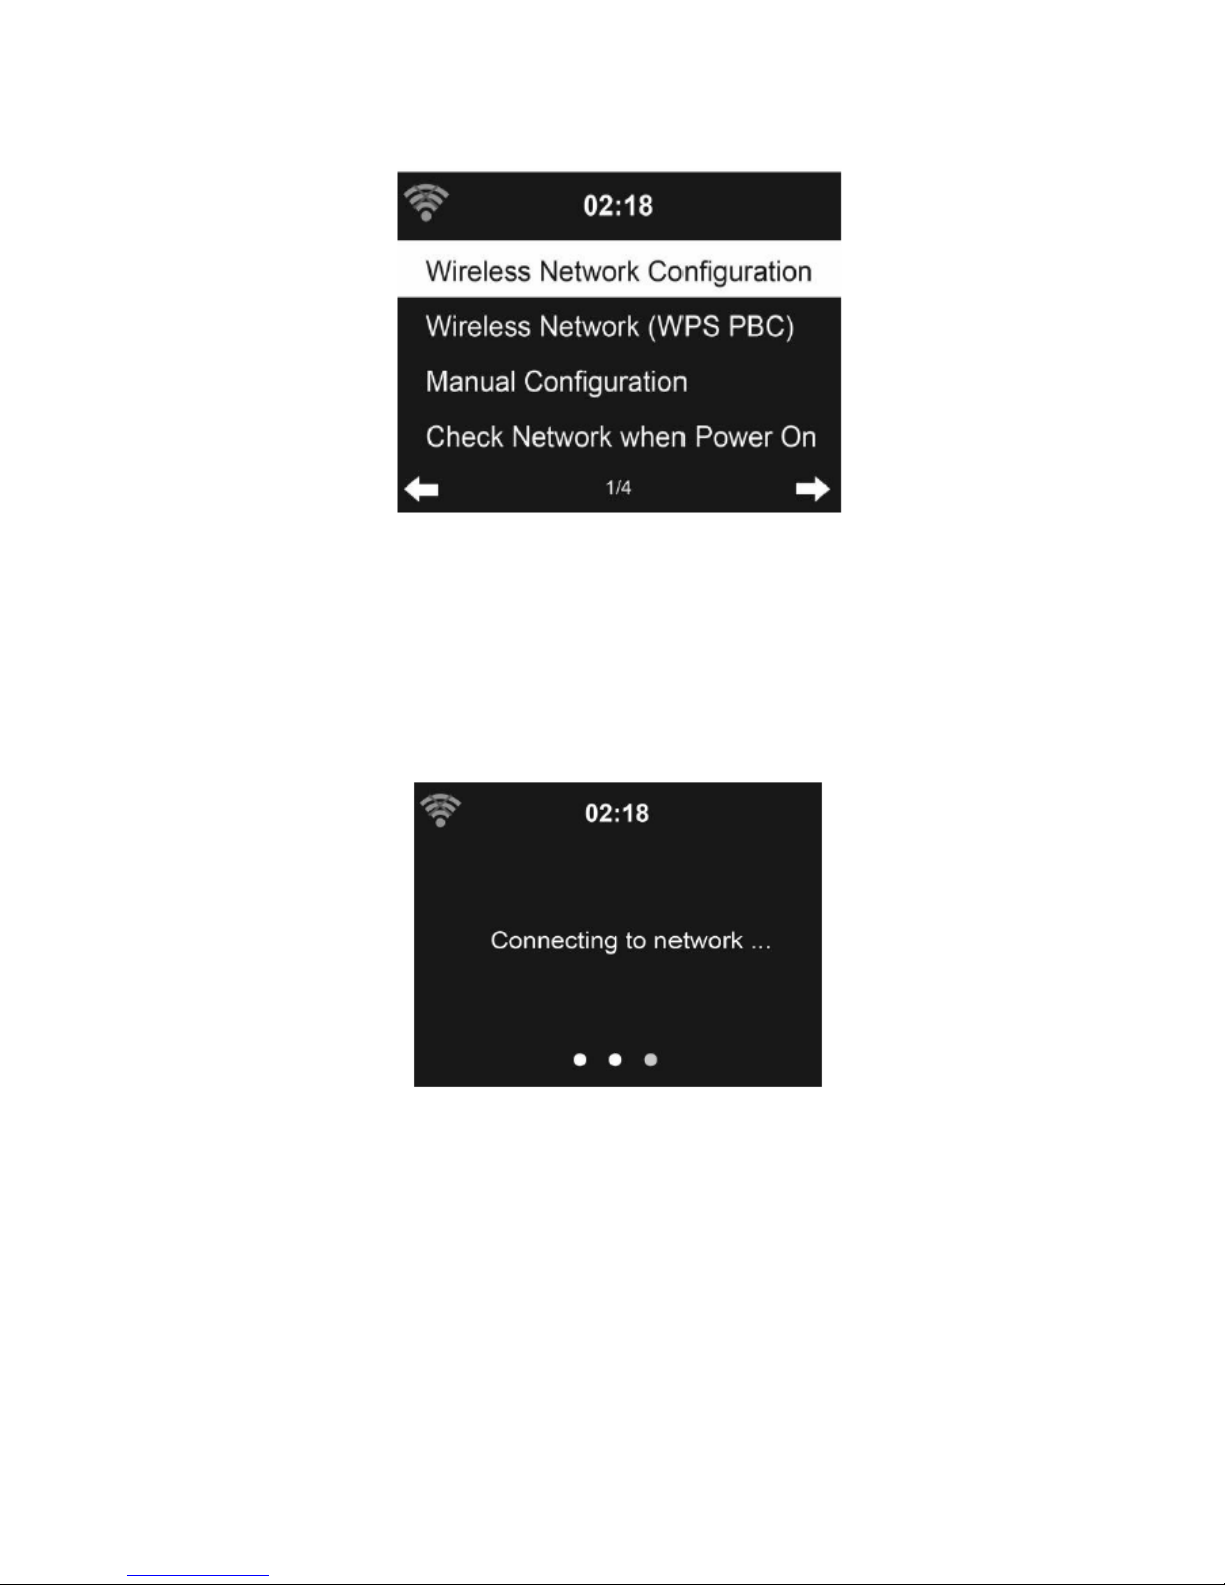
3.9.3 Network
3.9.3.1 Wireless Network Configuration
Enable / disable WiFi network. When you enable the WiFi network, the
system will automatically connnected to the network.
32
Page 33
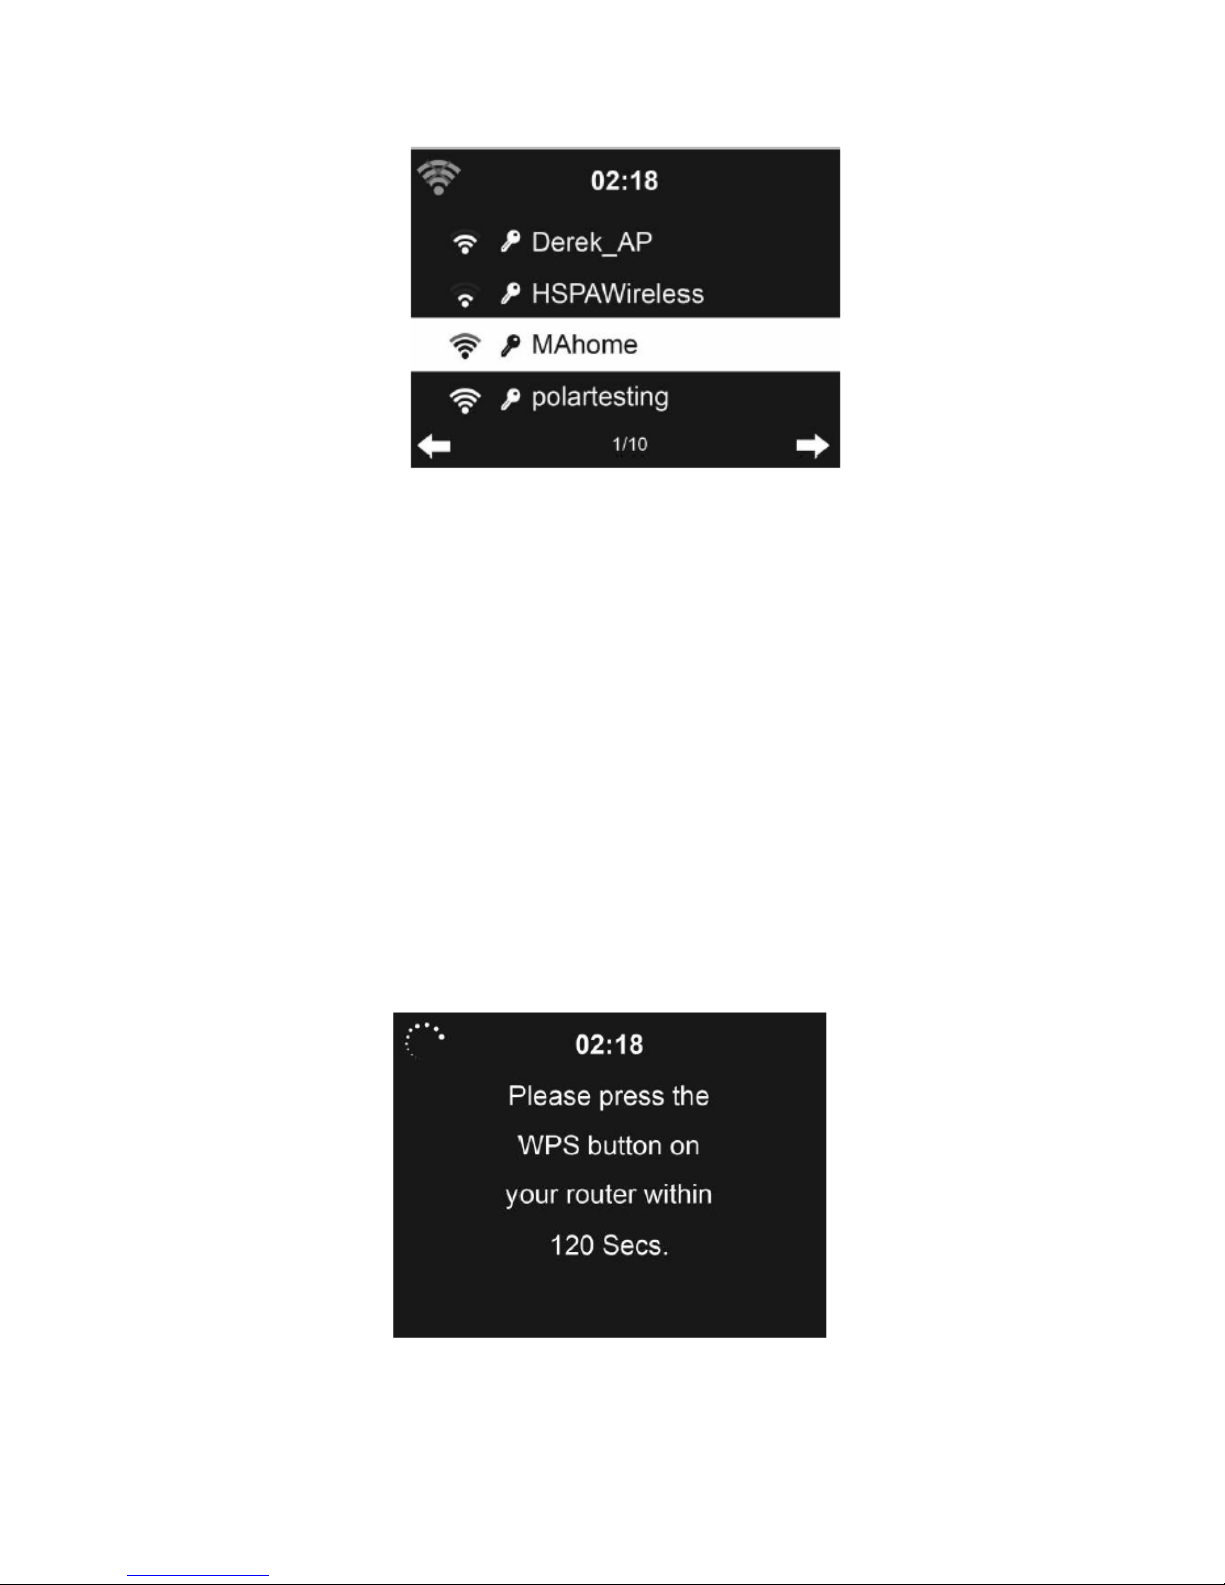
Select your required AP.
Enter WEP or WPA/WPA 2 code to connect the WiFi.
If it is accidentally pressed > to move a redundant entry, press <
to correct.
3.9.3.2 Wiress Network (WPS PBC)
If you are using a router with WPS/QSS button, you may set up the
network connection simple via WPS function. Enter it and go to press
the WPS/QSS button on your router within 120 seconds. The
connection between the router and the device will then be configured
automatically.
33
Page 34

3.9.3.3 Manual Configuration
You can choose DHPC (which IP assigned automatically) ir manually
input IP address for wireless network connection.
When you select manual setting for wired connection, the followings
have to be entered:
1. SSID ( the name of Access Point);
2. IP Address
3. Subnet Mask
4. Default Gateway
5. Preferred DNS Server
6. Alternate DNS Server
You may choose (Manage) specific network if you have setup more
than one network connection within an area.
3.9.3.4 Check Network when Power On
“Enable / disable WiFi network”:
When you enable the WiFi network, the system will automatically
search the avaiable AP.
Select your required AP.
Enger WEP or WPA/WPA 2 code to connect the WiFi.
If the wireless network connection is not exsisted or failed, the icon at
the top left conner will have a cross on it.
34
Page 35
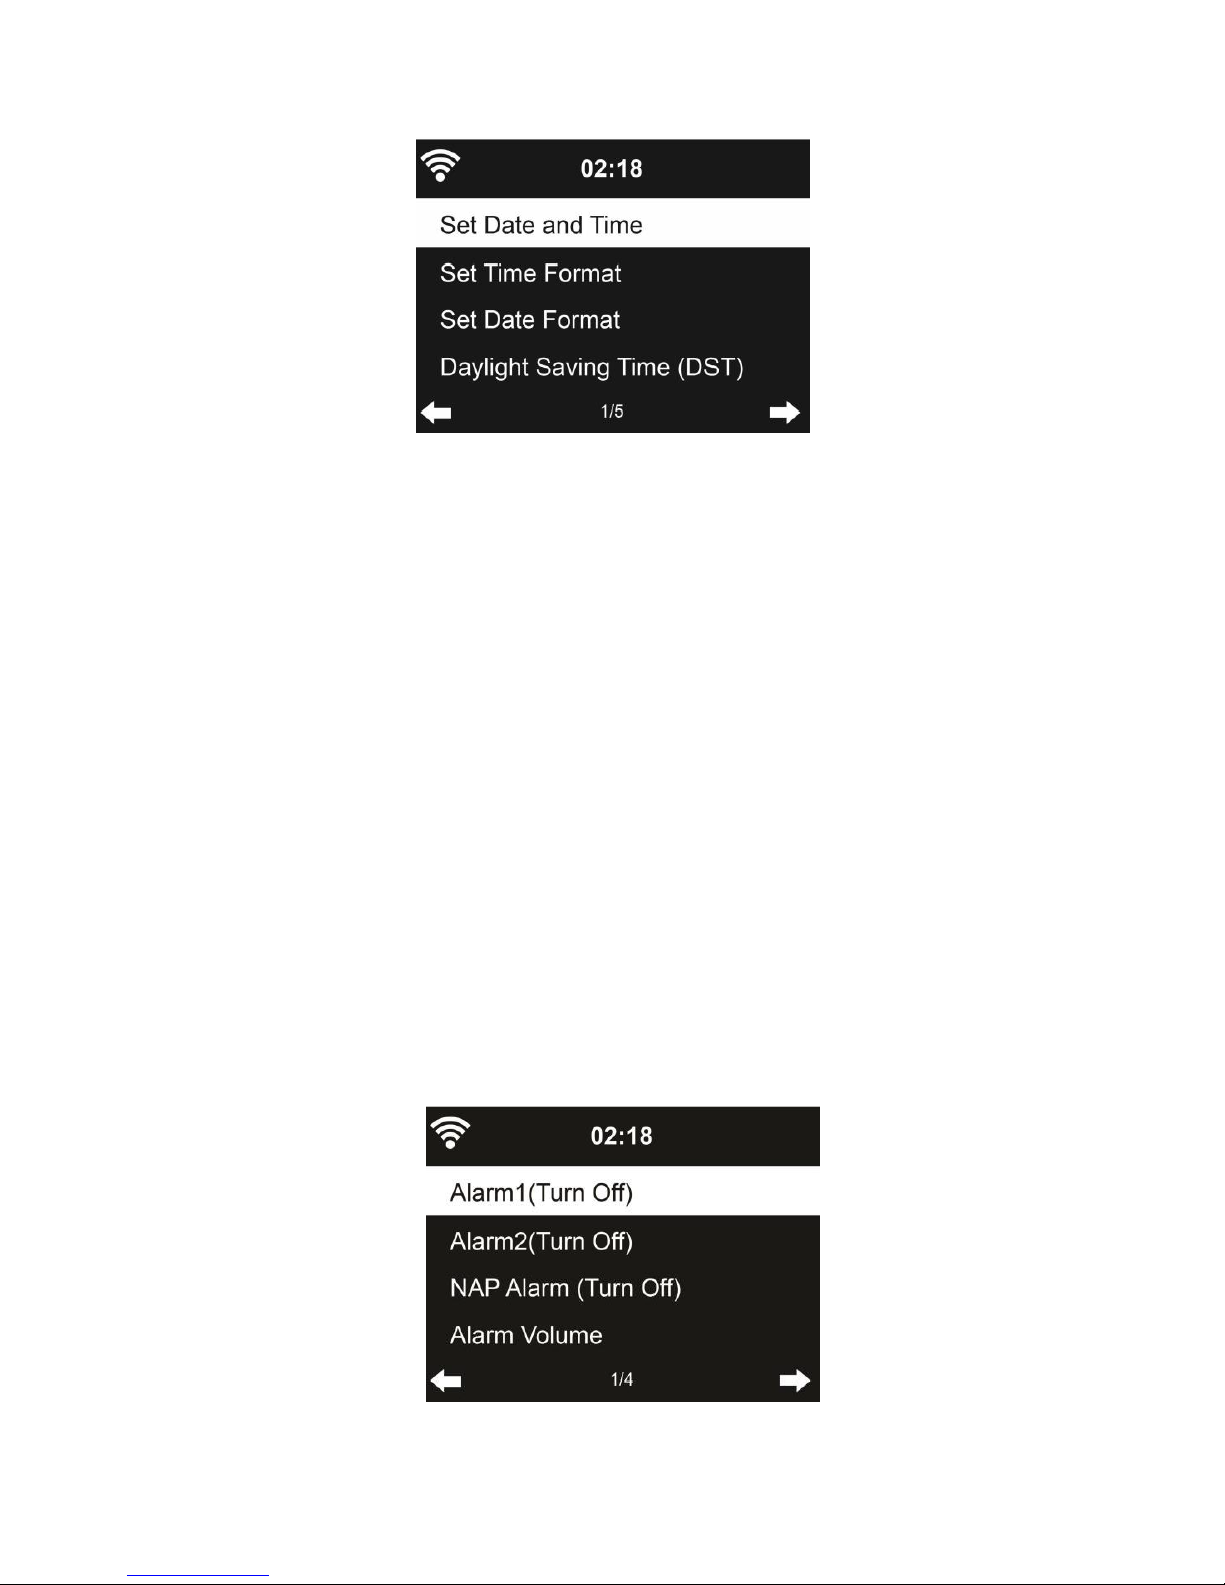
3.9.4 Date & Time
Setup the date and time
Set time format display as 12 Hour or 24 Hour (default).
Set date format in the positions of YY (year), MM (month) and DD
(day) – YY/MM/DD, DD/MM/YY (default) or MM/DD/YY.
Turn on/off (default) the Daylight Saving Time (DST).
With a wireless network connected, GMT (+00:00) time is a time
reference of time setting. Add or deduce the hour according to your
time zone when you set the time.
3.9.5 Alarm
35
Page 36

There are three independent alarms – 2 alarms of absolute time setting
(Alarm 1 and Alarm 2) and 1 alarm for relative time setting (NAP
Alarm). Press Alarm on the remote control to enter this menu directly
The first two alarms are similar to the normal alarm, turn on then set
the time and set it alarms every day, once or every specific day of
week. Choose Sound to set the sound to Beep, Melody or Internet
Radio
Note that the alarm source is from the last listened or preset internet
radio if Alarm Sound is set to Internet Radio. It can only set one station
for both alarms. When it reaches the alarm time, the unit connects to
the internet if the set network is avaiable. Therefore there may be
some delay from the alarm to the radio play. If no network is
connection in one minuter, the alarm will change to Melody
automatically.
After Alarm NAP is set, it alarms once is 5/10/20//30/6090/120 minutes
depending on which one you have set.
You may choose Alarm Volume to configure the volume of the alarms.
When the alarm(s) is/are set, there will be a clock icon at the top of the
display. The clock icon with alarm time will also clearly display on the
standby mode screen.
During alarm, press any key to enter snooze mode. It will alarm again
in 5 minutes. Press the STANDBY key to stop the alarm.
36
Page 37
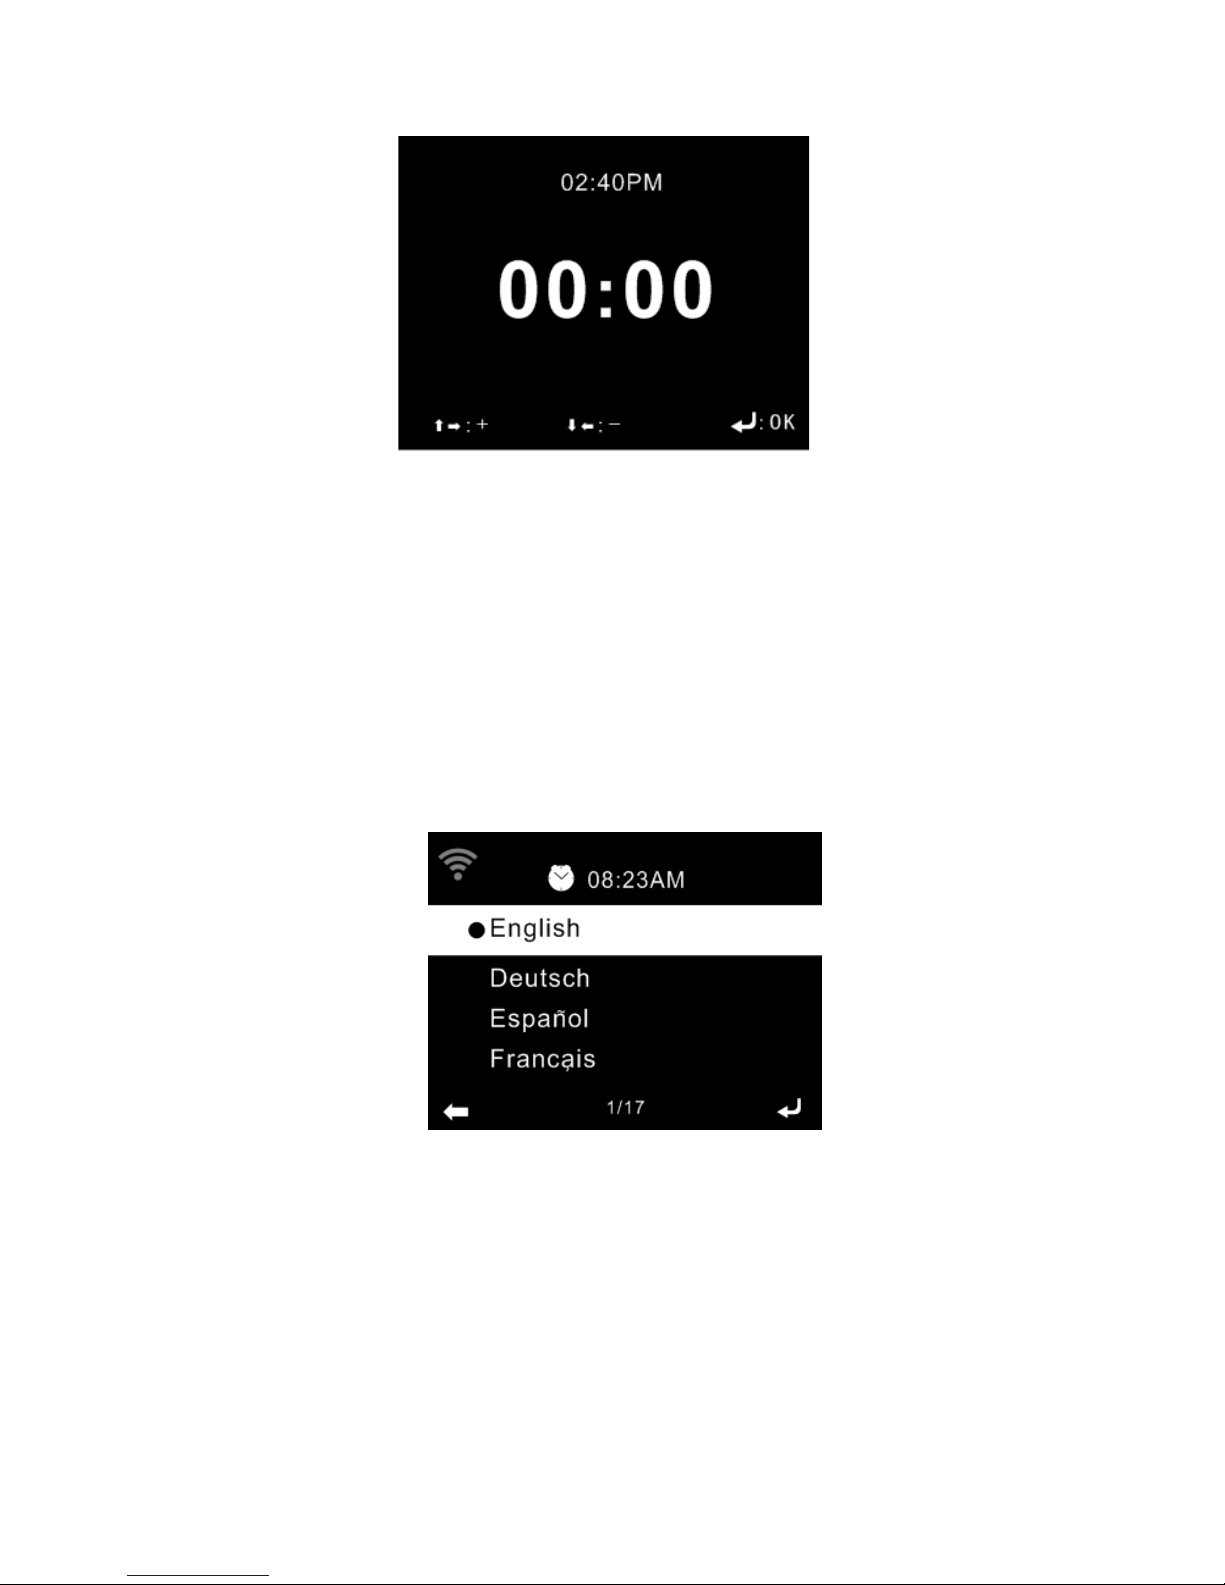
3.9.6 Timer
Press / /</>∧ ∨ on the remote control to setup the timer, then press OK
to confirm.
3.9.7 Language
Select the OSD language: English, German, Spanish, French,
Portuguese, Dutch, Italian, Russian, Swedish, Norweigian, Danish,
Hungarian, Czech, Slovakia,Polish,Turkish and Finnish.
37
Page 38
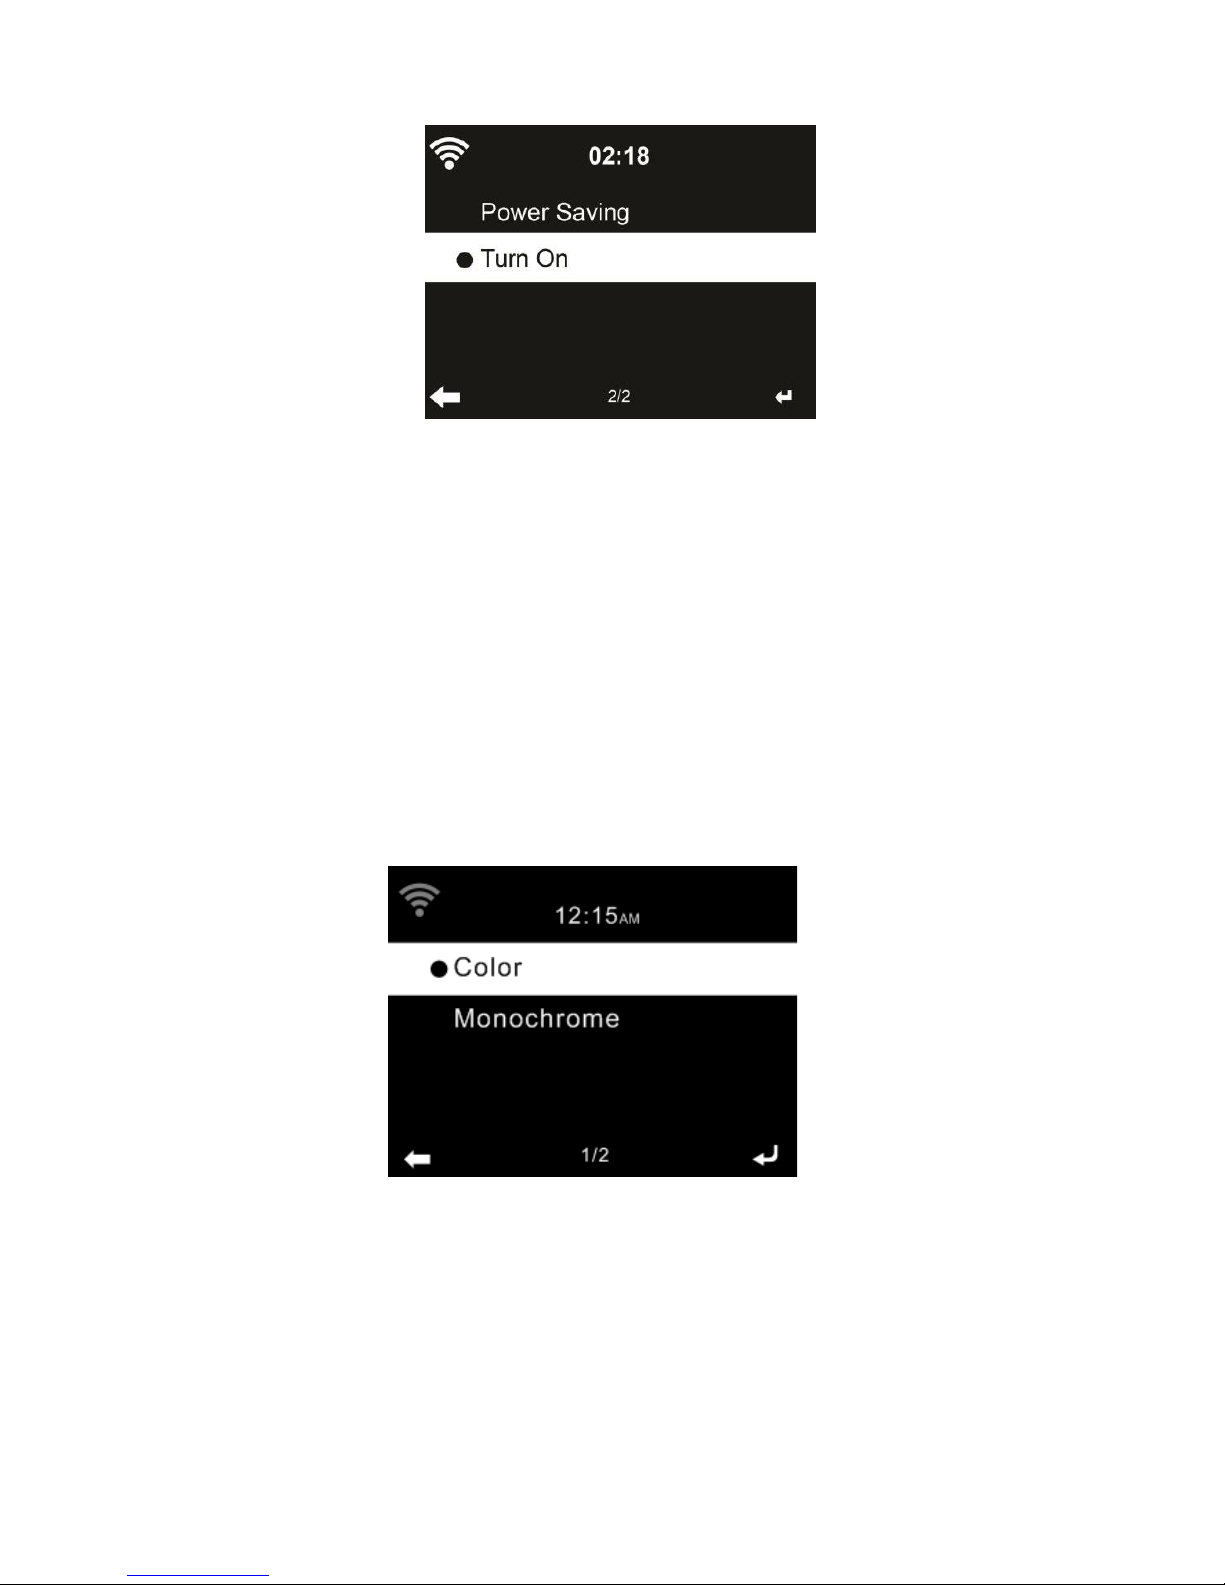
3.9.8 Dimmer
Configure the brightness of backlight on the display.
If you select Power Saving, you can select the level to which the
display is dimmed down when the radio enters the standby mode or
when the radio gets no key input for 15 seconds.
The Turn On options keep the display illumination always. If you select
it you can choose how bright the display shall be.
3.9.9 Display
You may choose to set the display in Color or Monochrome.
3.9.10 Power Management
Choose the power management timer (5/15/30mins) to set the duration
of the radio to switch to the standby mode automatically when no
network connection is avaiable.
38
Page 39
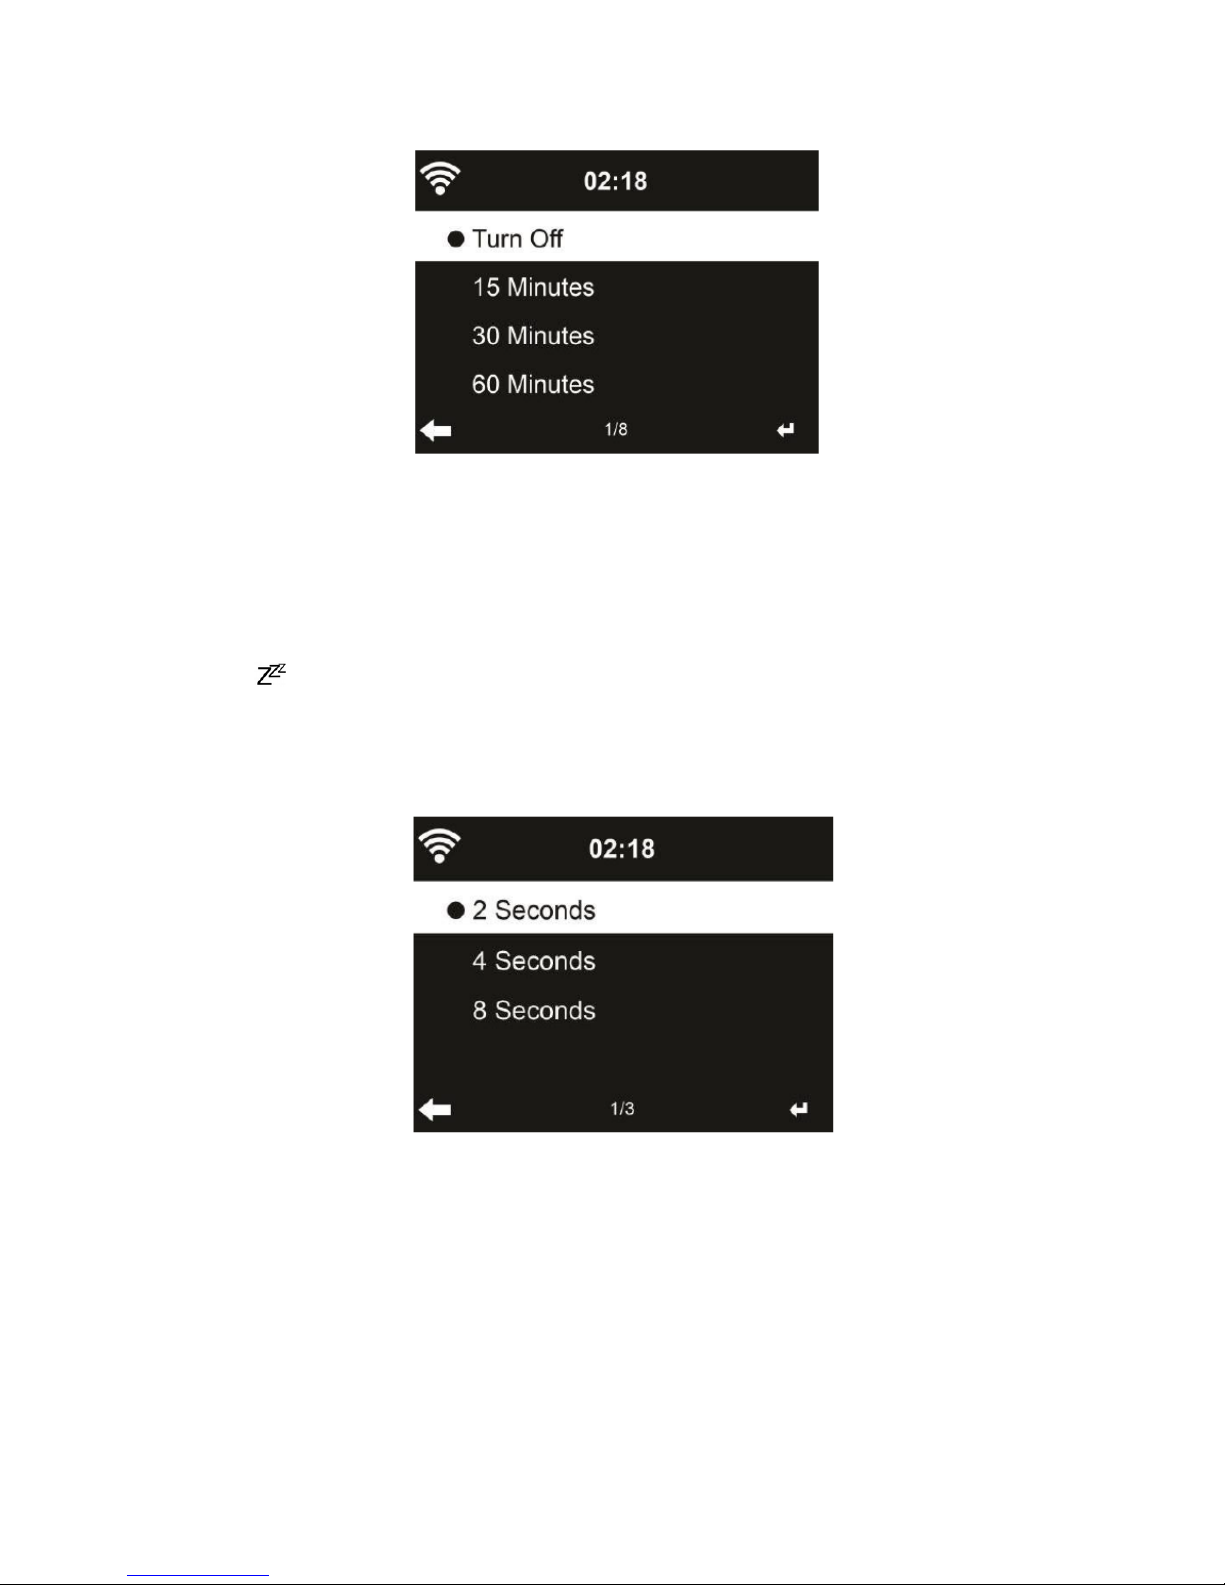
Choose “Turn Off” to ignore the power management function.
3.9.11 Sleep Timer
Turn off or set the sleep time to 15/30/60/90/120/150/180 minutes.
Once the time is set, there will be a bed icon with remaining minutes at
the top right corner. The device will shut down once the time runs out.
Press on the remote control for the shortcut of this function.
3.9.12 Buffer
Configure the buffer time of the music playback, 2/4/8 seconds.
39
Page 40
3.9.13 Weather
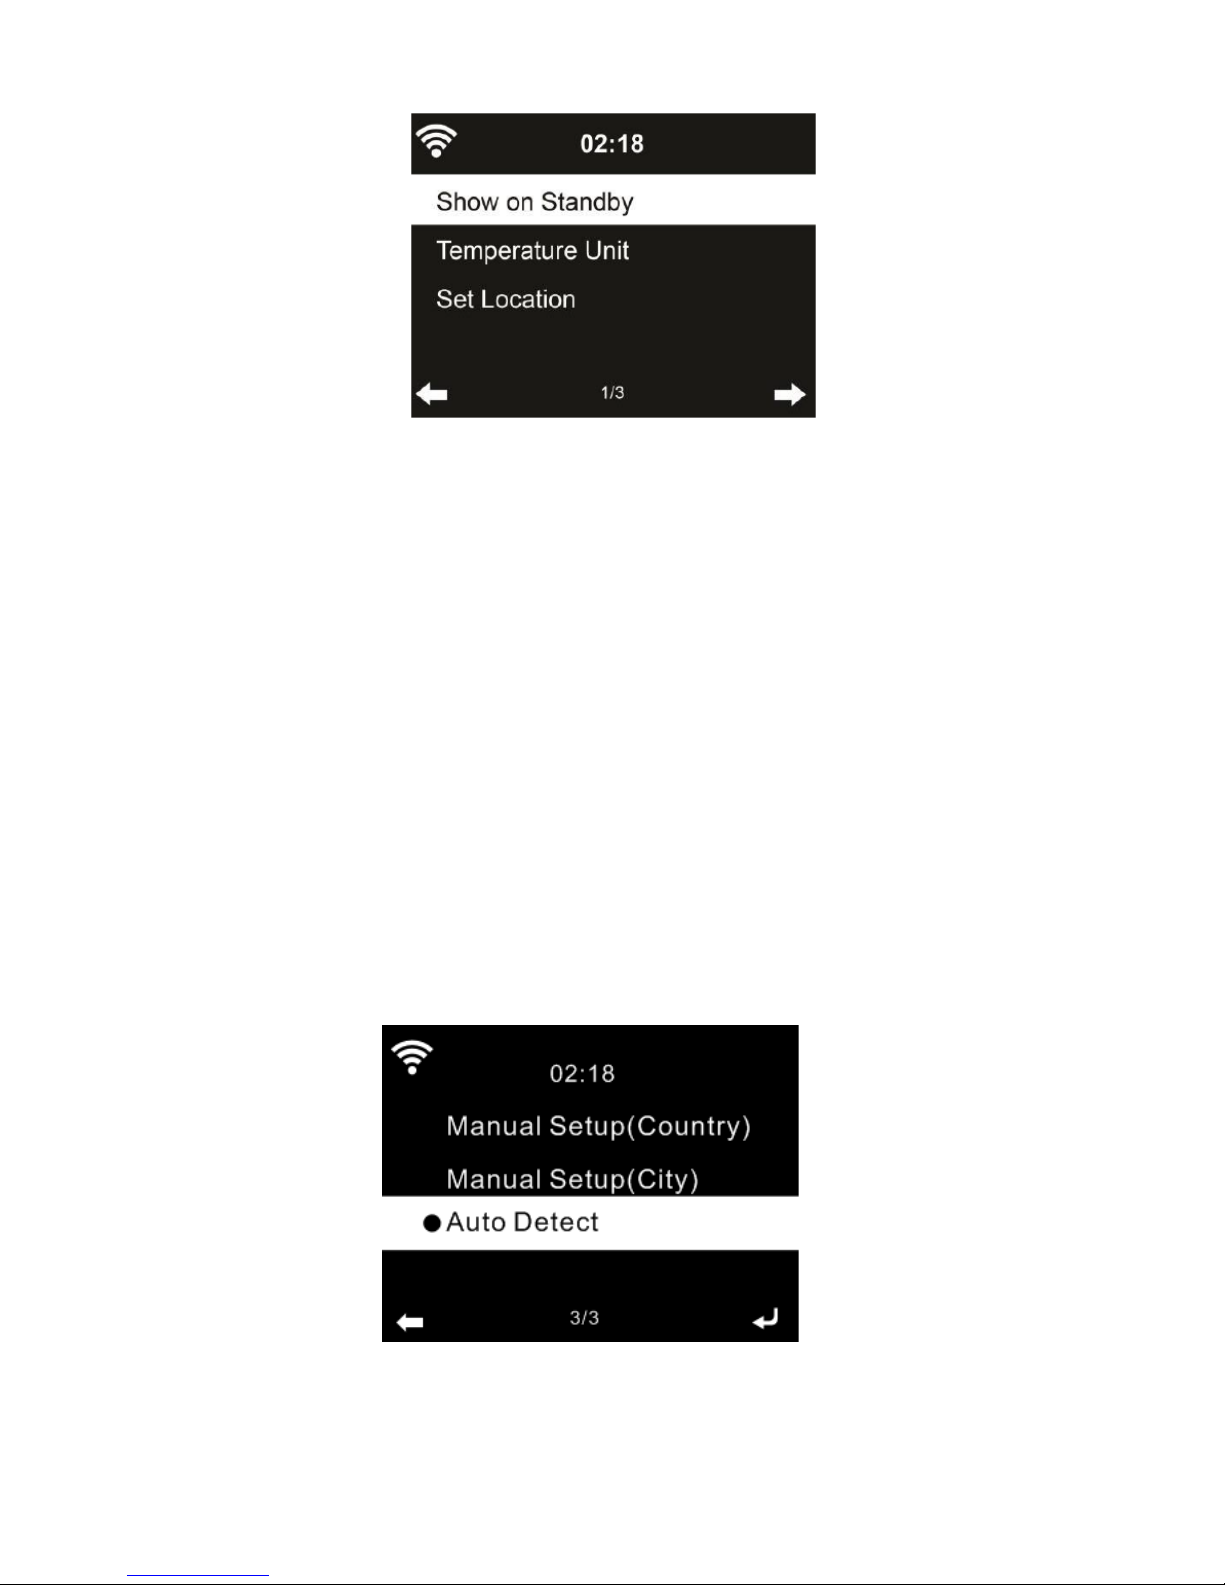
This device is able to display current weather information under
standby mode. Turn on Standby Display and set Temperature Unit (
˚C
or ˚F ) to get the weather displayed at the standby mode.
When it is turned on, the display will switch between time and weather
while being in standby mode.
3.9.14 FM Setup
Choose Mono/Stereo audio output.
3.9.15 Local Radio Setup
You may Manual Setup (Country / City) your location, or let the system
40
Page 41
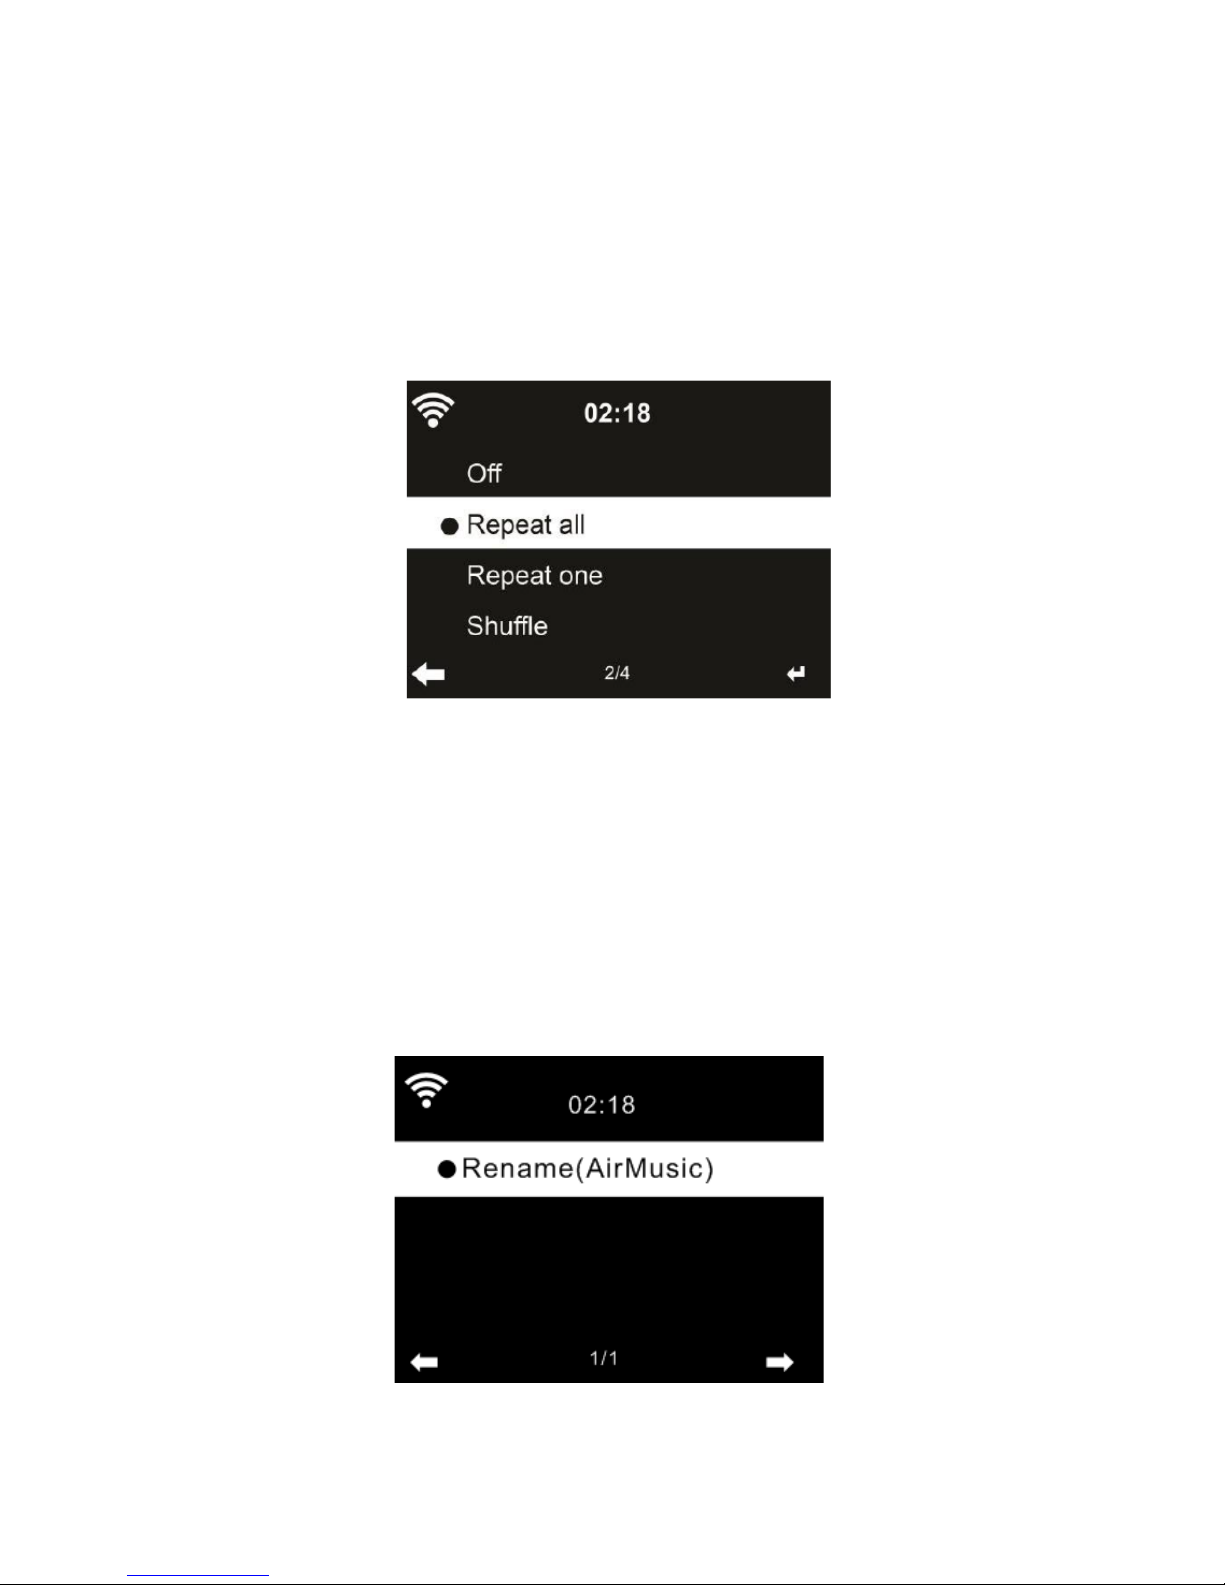
Auto Detect your current location. The system detects location
according to the IP address of your connected network.
Press Local Radio to enter this local radio list directly.
3.9.16 Playback Setup
Select the playback mode of media center – Off (no repeat or shuffle),
Repeat all, Repeat one or Shuffle.
3.9.17 DLNA Setup
41
Page 42
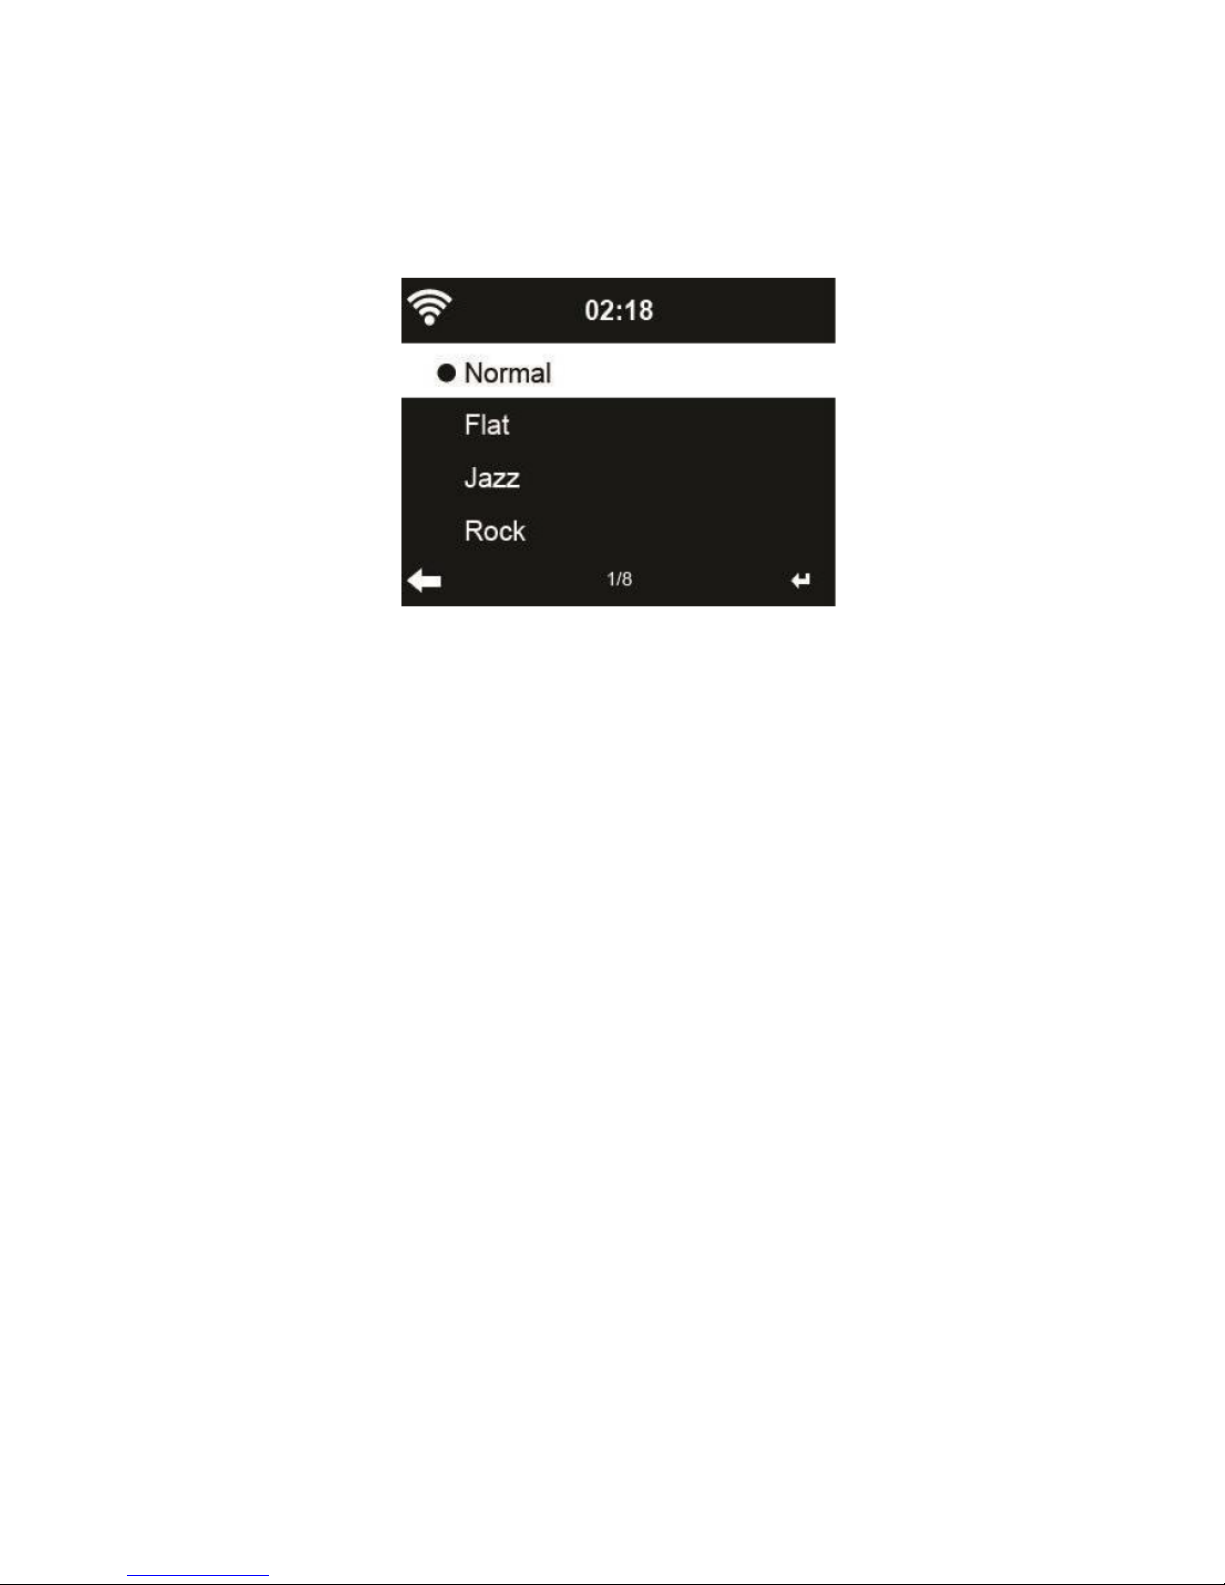
The default device name for DLNA is AirMusic. You may rename it for
DLNA setup on the PC or mobile.
3.9.18 Equaliser
Default equalizer is Normal, you may change to Flat, Jazz, Rock,
Soundtracks, Classical, Pop, News.
Press EQ on the remote control to swap among the EQ mode for
shortcut.
3.9.19 Resume When Power On
The system is default to resume internet radio playback if you were
listening to internet radio or media center before switch off the unit. If
turn this setting off, the system will remain in the main menu when
swiching on the unit.
3.9.20 Software Update
If there is an updated software version on the server, the system will
inform you when you return to the main menu.
42
Page 43
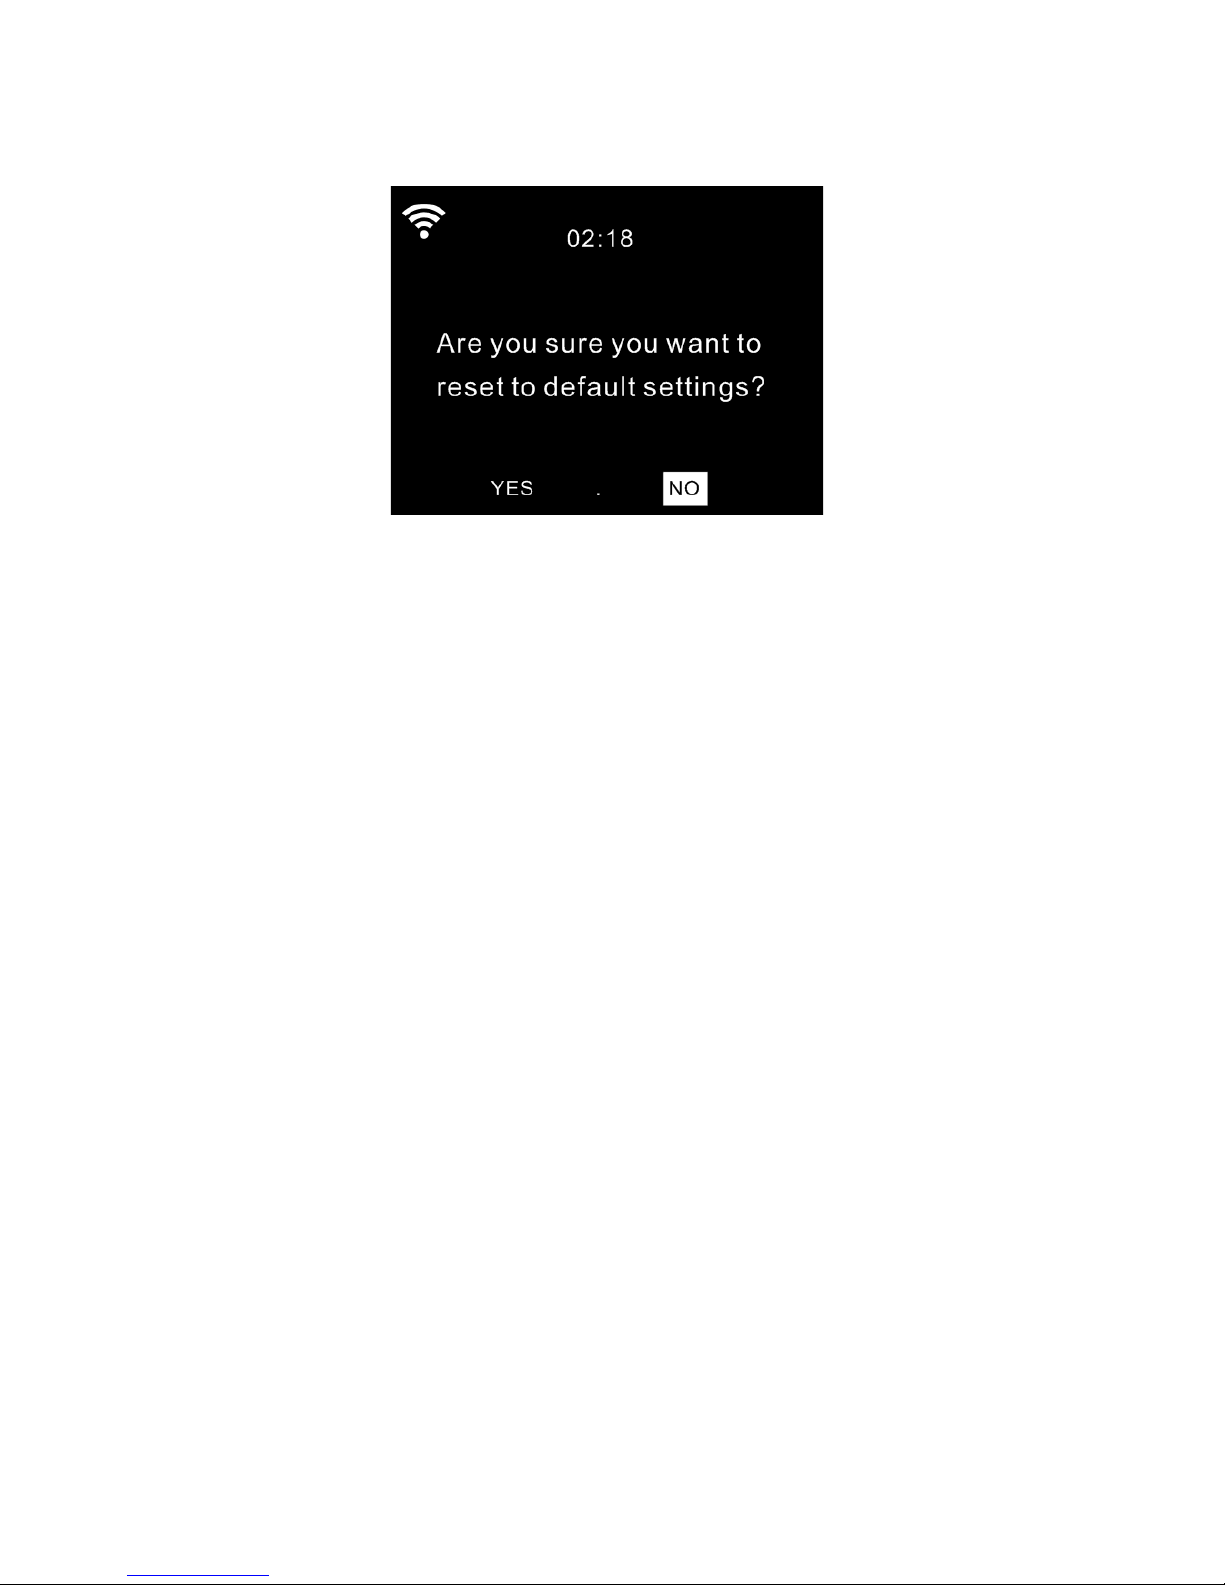
3.9.21 Reset to Default
Restore the default settings.
After this device is reset, the system will move to Language setting
menu. And it will automatically turn to Network setting menu once the
OSD language is elected.
3.10 Local Radio
There is a shortcut Local Radio under Internet Radio so that you can
easily go to the station list of your location.
The device can use the IP address to detect its current location and
can then automatically generate a list of local radio stations. However,
you can also enter a different country. (Refer to Local Radio setup
section 3.9.15)
43
Page 44
4 About Music Streaming
MW-7117 is the default device name for DLNA, and you may rename it
as you like.
The information below is the introduction of how to setup up media
streaming from PC or other media server. Study the own instruction of
the software or apps you use to enjoy music streaming if necessary.
Make sure the music files are in the format of MP3,WAV,FLAC for
music streaming to the internet radio.
7.1 UPnP
To enjoy music streaming from your PC, the following steps are to
be done on the PC:
- Connect the PC to the network
- Ensure the device is powered on and connected to the same
network
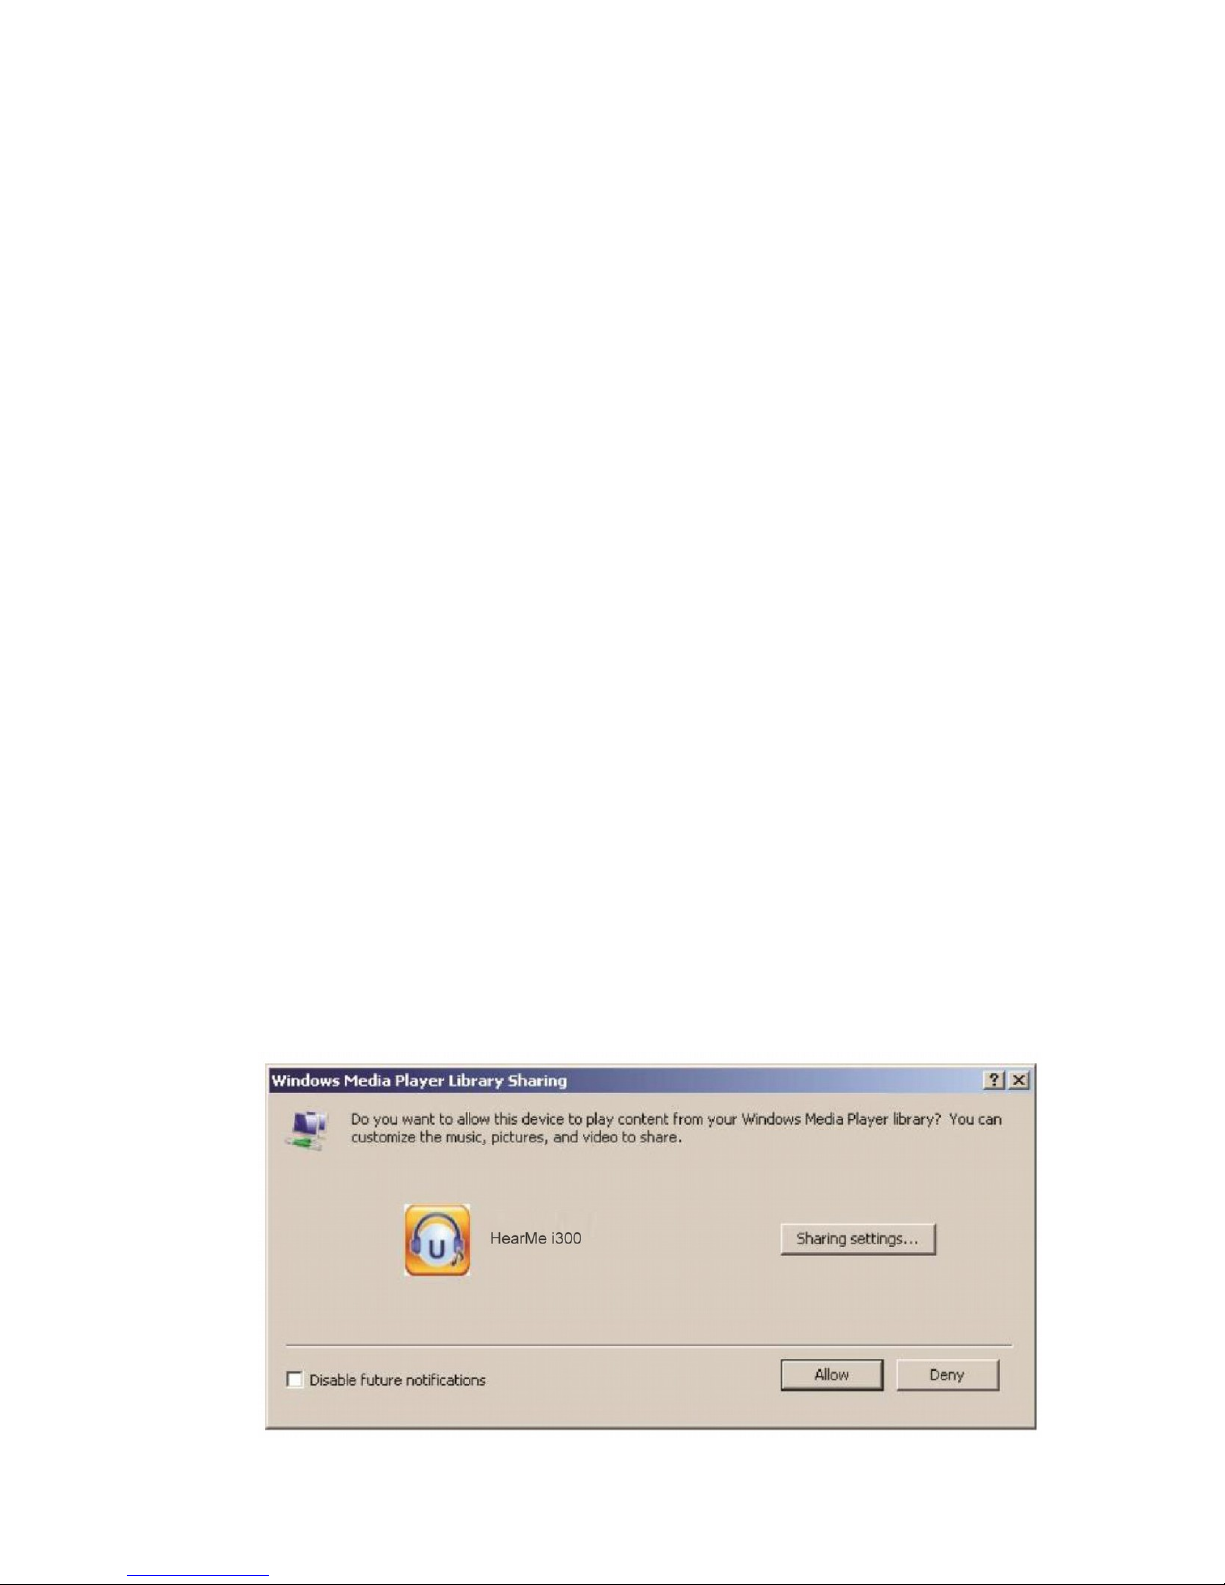
- Open the UPnP platform Windows Media Player (11 or later).
Alternatively, other platforms or server such as Windows Media
Connection may be used.
- Allow to share your media to the Ferguson i300.
-
-
44
Page 45
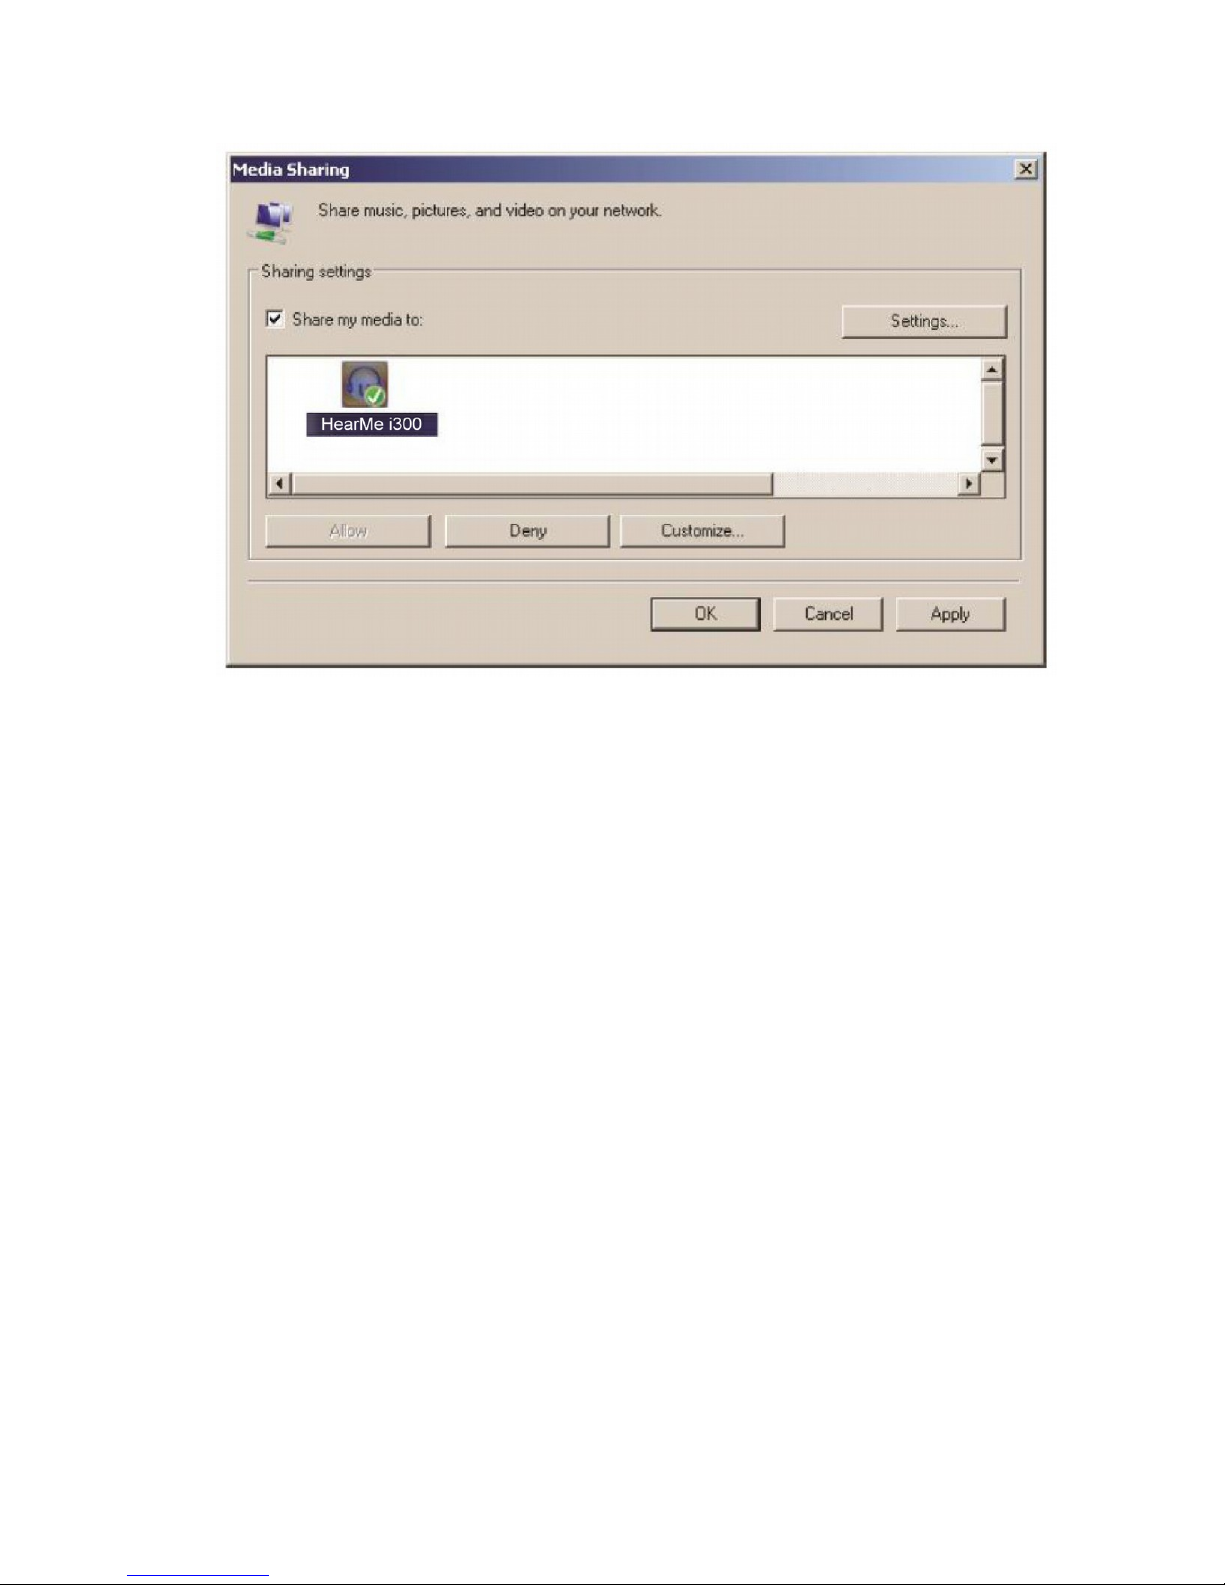
Add the audio files and folders you want to share with the Ferguson
i300 to the media library.
-
You may also enjoy the streaming music from other music server,
such as smart phone(Andriod platform):
- Connect the mobile to the network
- Search and install media sharing apps from Google Play.
- Add the audio files from your mobile you want to share.
After setup the shared server, choose the music and control
playback on the internet radio.
7.2 DLNA
Besides UPnP, this device also can support DLNA function. You can
share music files from PC or Andriod mobile and use your PC/Android
mobile/iPhone/iPad to control music playback on the internet radio (It is
not required to control each playback on the internet radio
The PC system requirement for DLNA is Windows 7 and Windows
Media Player 12.
45
Page 46
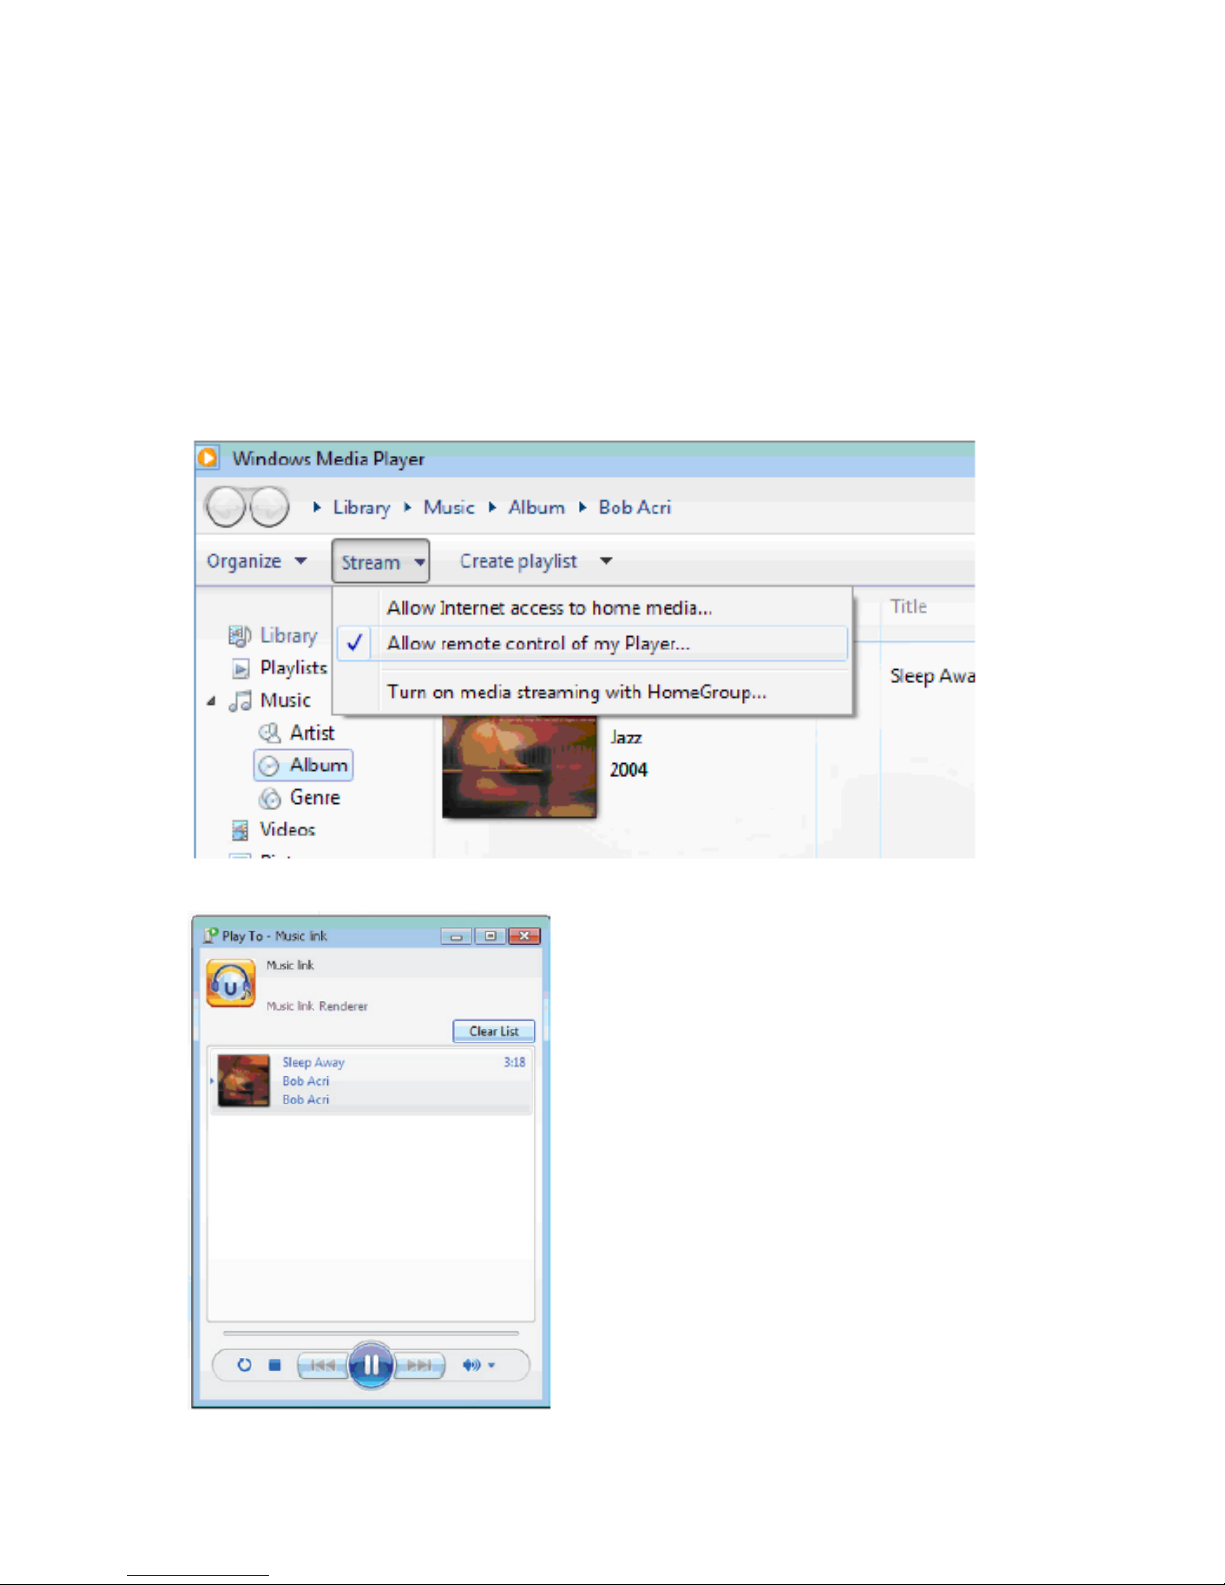
Setup as below:
Firstly, share the media on your PC to the internet radio.
Control Panel > Network and Internet > Network and Sharing
Center > Media streaming options.
Open Windows Media Player to enable Allow remote control of my
Player.
Right click any music in the library and choose Play to Ferguson i300.
There will be a window for
controlling music playback on the
Ferguson i300.
46
Page 47
You may search and install any free or commercial DLNA apps from
Google Play or Apple Store. If you are using an Andriod mobile, tablet
or iPhone/iPad. We suggest to use Airmusic Control or Bubble UPnP.
Some apps may not support streaming music from iPhone/iPod but
iPhone/iPod could still be used to control streaming music from other
servers.
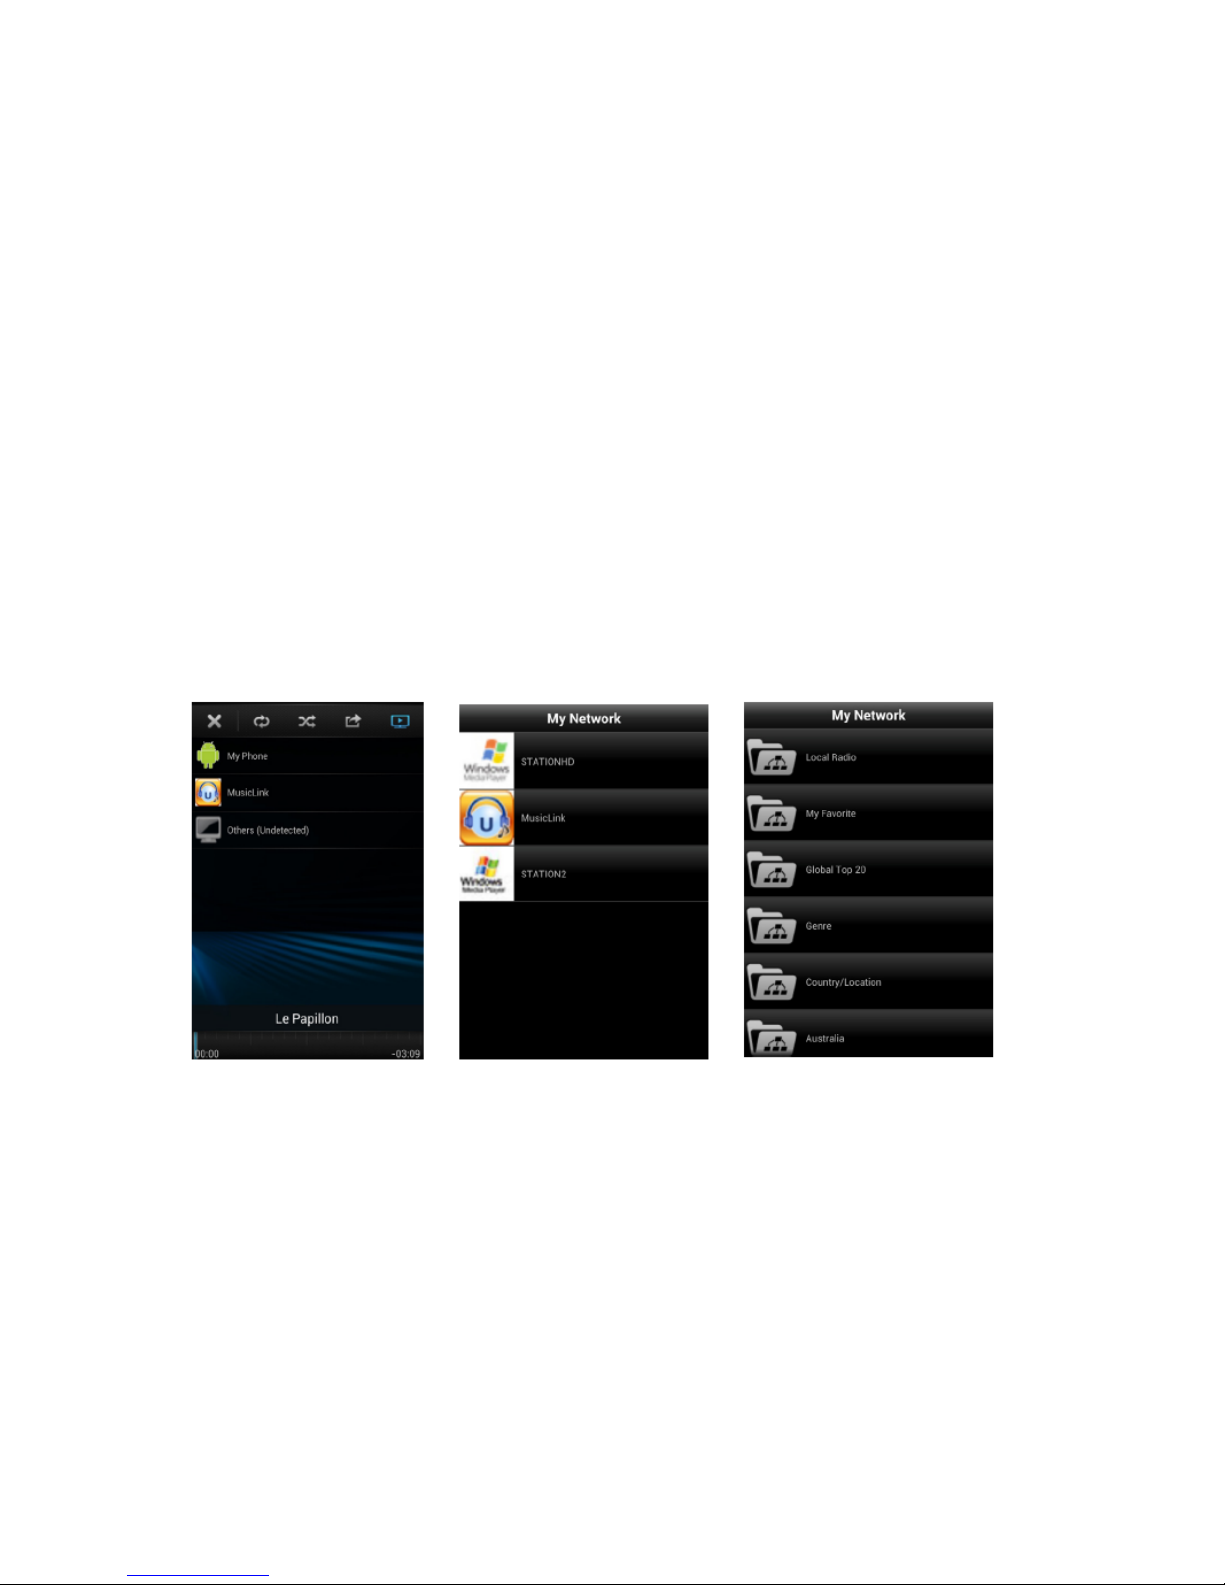
Procedures for playing shared music on the app are as follow:
Select “Ferguson i300” as the player. Some apps may allow to play
the music to multi players at the same time.
Select music server and choose the music. Some apps can create a
playlist if you choose several pieces of music.
You may choose Ferguson i300 itself as a server, then you can view
the internet radio list and select your internet radio on the app.
Select player Select server View station list
When using DLNA music streaming function on the Ferguson i300,
you can only control the volume and standby via the unit. It is
restricted to control the other function.
Stop DLNA on PC, mobile or tablet before you resume the
Ferguson i300’s own control.
47
Page 48
5
Troubleshooting
Error Remedy
No display indication,
radio does not
respond to operation
Set up power supply via mains adapter
supplied
No operation via
remote
control possible
Batteries discharged or incorrectly inserted.
Please check whether batteries inserted in
correct direction.
DAB+ reception poor No stations found, perform a station
scan (see Chapter 3.5.1.) Antenna not
fully extended.
Change the location of the radio (e.g.
closer to window), Repeat station scan
FM reception poor Antenna not fully extended, extend the
FM antenna to its full length.
Change the location of the radio (e.g.
closer to window), Repeat station scan
Poor audio quality
when playing music
File with low bit rate. Check the audio file.
Tip: For MP3 files, bit rate should be
192Kbits or higher
The device does not
switch on.
1. Check if the power adaptor is connected
properly.
2. The device may malfunction when used in areas
with strong radio interference. The device will work
properly again once there is no more interference.
No sound. 1. Turn on the sound as it may be muted.
2. Increase the volume.
48
Page 49
No network
connection can be
established.
1. Check the WLAN function.
2. Try to set an IP address at the device.
3. Activate the DHCP function on the router
and make the connection again at the device.
4. A firewall is activated on the network – set
the respective program in such a way that
access is possible.
5. Reboot the unit to try.
WLAN connection
can’t be established
1. Check the avaiability of WLAN network on
the access point.
2. Place the device closer to the router.
3. Make sure the WEP/WPA password is
correct.
No station is found. 1. Check the network as well as the access
point and firewall.
2. The station may not be avaiable currently,
try it again later or select another station.
3. The link of the station is changed or the
station no longer transmits – ask the provider
for information.
4. The link of manual added station is not
correct, make sure it is correct and re-enter.
Alarm does not work. 1. Switch on the alarm.
2. Due to the volume setting, refer to the
solutions of “No sound”.
3. The source of alarm was set to be station
but there is no network connection. Change
the source of alarm or reconfigure the
connection.
49
Page 50
Unable to do DLNA
streaming.
1. Check the connection of the network. The
Ferguson i300 and your device need to be in
the same network, and test if the nework in
good condition.
2. Make sure the settings on your device are
correct.
Electro-Magnetic
Interference
1.The nomal function of the product may be
disturbed by strong Electro-Magnetic
Interference. If so, simply reset the product to
resume normal operation by following the
instruction manual. In case the function could
not resume, please use the product in other
location.
System freezes
suddently.
1. The Ferguson i300 is overloaded, reboot
the unit.
50
Page 51
SPECIFICATIONS
Model Name Ferguson i300
Display 2,4” TFT color display
Network supported
OPEN
WEP
WPA PSK AES
WPA PSK AES / TKIP
WPA PSK TKIP
WPA 2 PSK AES
WPA 2 PSK AES / TKIP
WPA 2 PSK TKIP
Streaming UpnP, DLNA
Supported playback formats
MP3,FLAC,WAV
Output power (RMS) 30W x 2
Power Supply
Input: AC 100-240V ~ 50/60Hz
USB Port Output: DC 5V 1A
FM and DAB Frequency FM : 87.5-108MHz
DAB : 174.928-239.2MHz
Power Consumption 30 W
Standby Power Consumption <3 W
Bluetooth support V2.1+ EDR
Bluetooth operation range upto 10 metres
Transmission frequency 2.4 GHz
Protocols A2DP 1.2
Unit size: 330 (W) x 173 (D) x 115 (H) mm
Unit weight: 2.36KG
Working Temperature 0
˚C
~ +35
˚C
Working Humidity 20%~80%
51
Page 52

52
 Loading...