

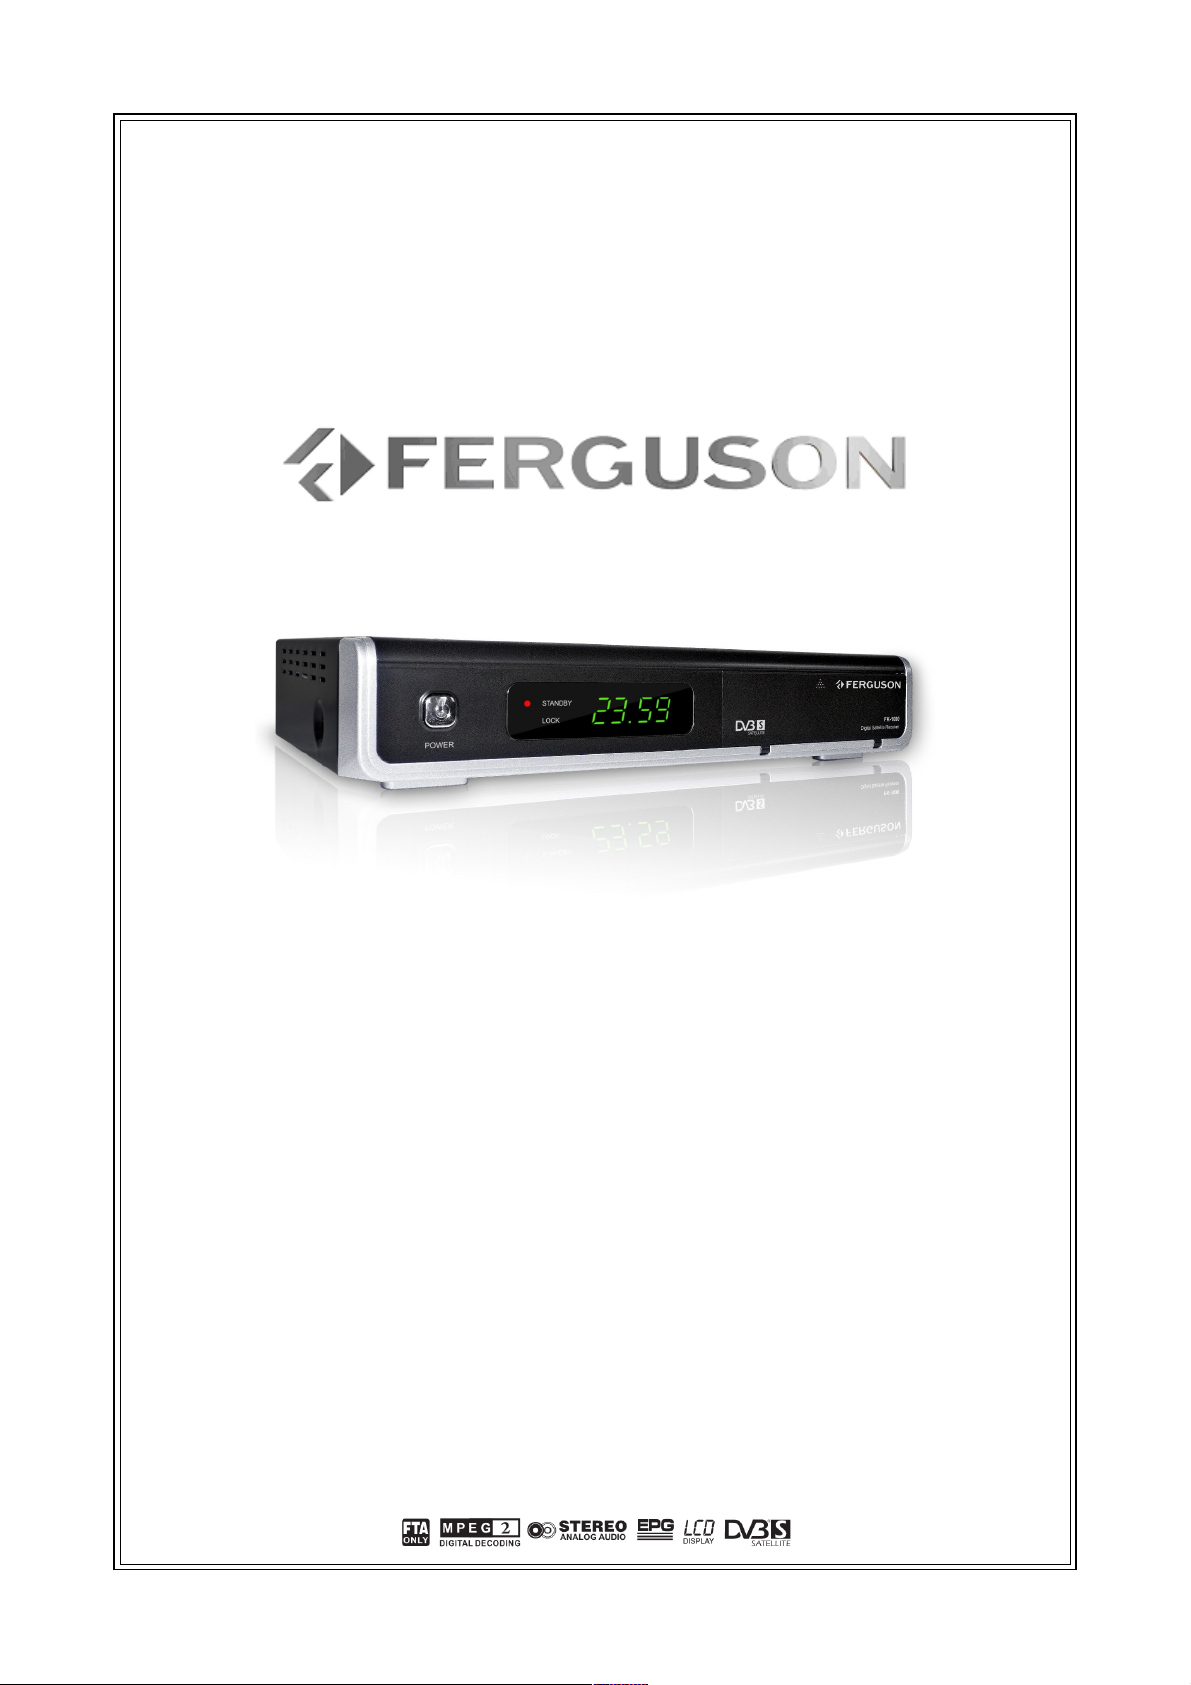
User manual
FK-1000
English

Contents
SAFETY INSTRUCTIONS.................................................................................................................3
SOFTWARE FOR DOWNLOADING.....................................................................................................3
ABOUT USER MANUAL...................................................................................................................4
SYMBOLS USED ON THE RECEIVER.................................................................................................4
GENERAL INFORMATION................................................................................................................5
1. Main Features..........................................................................................................................................5
2. Unpacking...............................................................................................................................................5
3. General Operation of STB..........................................................................................................................5
4. Remote Control Unit.................................................................................................................................6
4.1 Battery Installation ........................................................................................................7
5. Front Panel..............................................................................................................................................7
6. Rear Panel...............................................................................................................................................7
7. Setting a satellite dish..............................................................................................................................8
8. Setting motorized satellite dish..................................................................................................................8
9. Connection Diagram.................................................................................................................................9
9.1 Connect SCART port (recommended).................................................................................9
9.2 Connect composite port ..................................................................................................9
9.3 Connect RF Port............................................................................................................10
9.4 Connect Audio System...................................................................................................10
FIRST STEPS..............................................................................................................................11
MENU INFORMATION...................................................................................................................11
10. Main menu...........................................................................................................................................12
11. Installation..........................................................................................................................................12
11.1 Antenna connection ....................................................................................................12
11.2 Satellite list................................................................................................................12
11.3 Antenna setup............................................................................................................13
11.4 Single satellite search..................................................................................................14
11.5 Multi satellite search....................................................................................................14
11.6 List of transponders.....................................................................................................15
How do I search for a new channel?....................................................................................................15
12. System settings....................................................................................................................................16
12.1 Language...................................................................................................................16
12.2 TV System.................................................................................................................16
12.3 Local time settings......................................................................................................17
12.4 Timer settings............................................................................................................17
12.5 Parental lock..............................................................................................................18
12.6 OSD settings..............................................................................................................18
12.7 Other........................................................................................................................18
13. Tools...................................................................................................................................................19
14. Games................................................................................................................................................19
15. Edit channels.......................................................................................................................................19
15.1 TV channels list...........................................................................................................19
How do I move a channel?.................................................................................................................20
How do I delete a channel?................................................................................................................20
How do I add to the group of favourites?.............................................................................................21
How do I change a channel name?......................................................................................................21
15.2 Radio channel list........................................................................................................22
15.3 Delete all...................................................................................................................22
15.4 Favorite.....................................................................................................................22
16. Basic functions supported by the remote control.......................................................................................23
16.1 EPG...........................................................................................................................23
16.2 ZOOM........................................................................................................................23
16.3 FIND.........................................................................................................................24
16.4 TXT - teletext.............................................................................................................24
16.5 AUDIO.......................................................................................................................24
16.6 SLEEP........................................................................................................................24
16.7 PAUSE.......................................................................................................................25
16.8 MULTIPICTURE ...........................................................................................................25
16.9 INFO.........................................................................................................................25
16.10 FAV – favourites........................................................................................................25
TROUBLE SHOOTING...................................................................................................................26
GLOSSARY.................................................................................................................................27
Specification..............................................................................................................................28
2
SAFETY INSTRUCTIONS
Please observe all warnings and instructions on the equipment and contained in these operating
instructions. You must install the dish with correct direction and angle.
To avoid electric-shock hazards, do not open the cabinet, refer servicing to
qualified personnel only. If cabinet is opened warranty will be invalid.
Please switch off completely the receiver during thunder, during abnormal phenomenon, before
cleaning it and in case it remains out of service for a long period.
Do not expose the receiver under the sunlight. And keep it away from the heat
source or humid environments. Do not block ventilation holes of the receiver so
that air can circulate freely.
Please place the receiver in horizontal and stable conditions, keeping it away from vibrating.
If device is moved from warmer place to a colder one some problem might occur.
Please switch off the receiver and turn it on after 1 or 2 hours.
Keep the receiver away from flower vases, tubs, sinks, etc., in order to avoid
damaging the equipment. Do not touch power supply with wet hands.
Don’t put any objects on the receiver.
Be sure to turn the receiver off and disconnect the AC power cord before cleaning the receiver
surface. If the surface is dirty, wipe clean with a cloth which has been dipped in a weak
soap/and/water solution and wrung out thoroughly, and then wipe again with a dry cloth.
• Do not connect cables while power is plugged.
• Do not use damaged cables for connections: you could cause fires.
• Please switch off completely the receiver while making all connections.
• The product purchased is a sophisticated electronic device which is not suitable for
children under 18 years. We do not assume responsibility for damages caused to people
or object, deriving from use of the device made by people under 18 years.
SOFTWARE FOR DOWNLOADING
Ferguson has used all the available means to deliver to its users software updates guaranteeing
the best possible parameters of the satellite television receivers. Ferguson reserves the right to
make corrections, changes or modifications of the software used in the receiver on any basis
whatsoever and without prior notice. The current version of the software is available on the
following website http://www.ferguson-digital.eu
3
ABOUT USER MANUAL
Ferguson has used all the available means to ensure the latest information regarding its
products. Ferguson does not give a warranty regarding the contents of this User Manual and
waives any implied warranties regarding market value or fitness for specific purposes. The
information contained herein provide guidelines allowing the operation and maintenance of the
receiver.
Ferguson reserves the right to make changes, corrections or to translate the User Manual
without giving prior notice of such changes. Therefore, it is recommended that users visit our
website regularly to receive the latest information.
SYMBOLS USED ON THE RECEIVER
The Digital Video Broadcasting logo.
This logo tells you that this receiver is compliant with the DVB standards.
The caution risk of electrical shock - do not open symbol
This symbol tells you that you are not allowed to open the receiver. Only
authorized (service) technicians are allowed to open the box.
The CE mark
This mark tells you that the receiver is following the provisions of Council
Directive 89/336/EEC on the approximation of the laws of the Member States
relating to the electromagnetic compatibility and the provisions of Council
Directive 73/23/EEC and 93/68/EEC on the approximation of the laws of the
Member States relating to low voltage and electrical safety.
The double insulation symbol.
This symbol tells you that the receiver is electrically safe within the normal use of
the receiver as stated in the safety chapter.
Environment protection first!
• Your appliance contains valuable materials which can be recovered or recycled.
• Leave it at a local civic waste collection point.
4

GENERAL INFORMATION
1. Main Features
✔ 4000 channels memory space
✔ Favorite channel groups, TV and radio
✔ Quick search function
✔ Electronic Program Guide (EPG)
✔ Parental control
✔ 8 timer and 2 games
✔ DiSEqC 1.0, 1.1, 1.2 and USALS supported
✔ Teletext with 800 pages buffer
2. Unpacking
Unpack the receiver and check to make sure that all of the following items are included in the
packaging.
✔ 1 x Remote Control Unit
✔ 1 x User’s Guide
✔ 1 x Digital Satellite Receiver
3. General Operation of STB
Throughout this manual you will notice that the everyday operation of your STB is based on a
series of user friendly on screen display and menus. These menus will help you get the most
from your STB, guiding you through installation, channel organizing, viewing and many other
functions.
All functions can be carried out using the buttons on the RCU, and some of the functions can
also be carried out using the buttons on the front panel.
Please be aware that new software may change the functionality of the receiver.
Should you experience any difficulties with the operation of your unit, please consult the
relevant section of this manual, including the Problem Shooting, or alternatively call your dealer
or a customer service adviser.
NOTE:
Please be aware that new software may change the functionality of the receiver. The
photo and the function explanation involved in this specification is for reference only. If
there is any mistake, please refer to the entity.
5
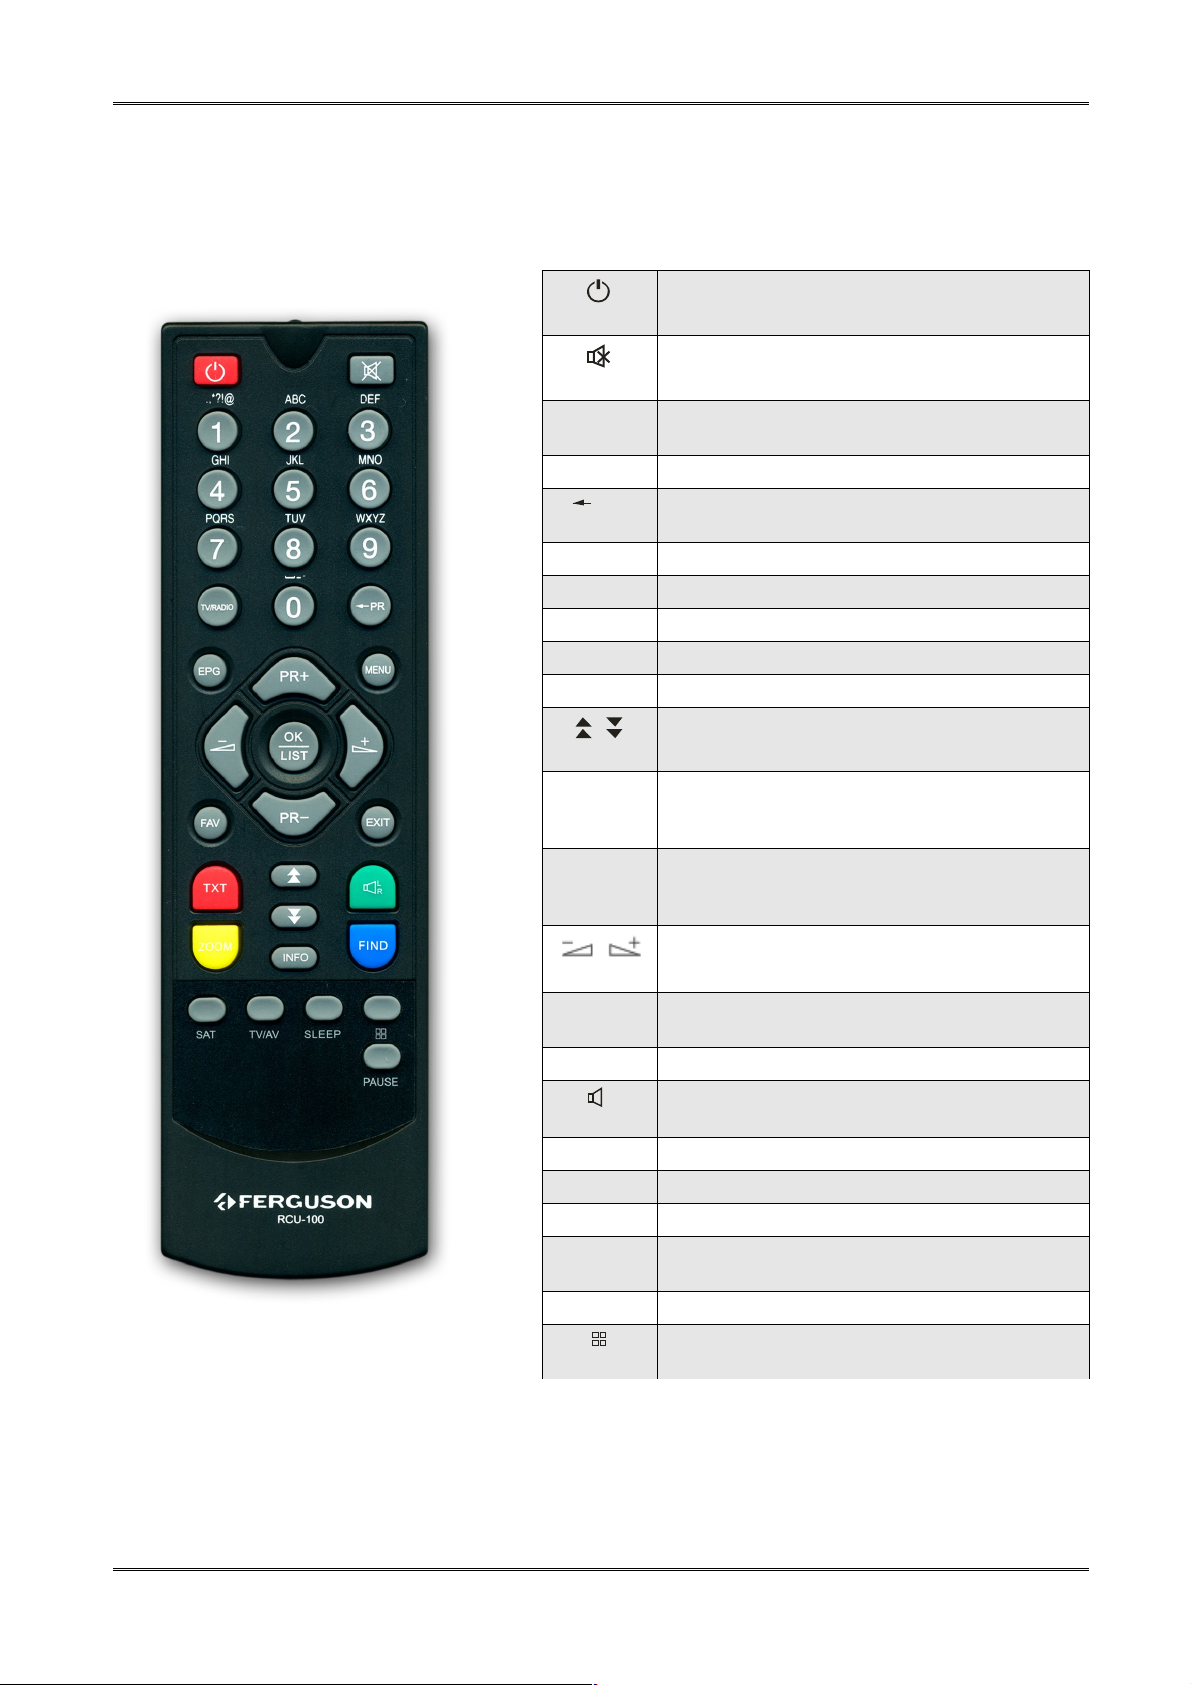
4. Remote Control Unit
P R
L
R
Due to standardization fact most of Ferguson units is using the same remote control unit RCU-
100. That is why NOT all keys are being used by this STB model!
Turns power ON/OFF of the DSR
When watching a channel, mute the sound
0~9 Enter number of the required menu item or
select a channel number to watch
TV/RADIO Switches between TV and Radio mode
Switches back to previous channel
FAV Display the favorite group list
SAT Display the satellite list
FIND Display the Find window
INFO Show information of the current channel
MENU Press this key one time to run menu onscreen
Moves up / down a page in the list
OK, LIST Executes the selected item in the menu
screen or enters the desired value in any
input mode
PR+, PR- When watching a channel, change channels or
move to the next higher or lower item in the
menu
When watching a channel, adjust the volume
or move to the left or right item in the menu
EXIT Return to the previous menu on the menu
screen or escape from the menu
EPG Call up the EPG (Electronic Program Guide)
Display the Audio window.
TV/AV Switch between TV and AV modes
TXT Switch to teletext or subtitle mode
ZOOM Enter into the zoom in mode
PAUSE Press once to pause the screen picture, press
once again to go to the normal mode
SLEEP Enter into the sleep in mode
Enter into the nine-pictures mode displayed
on the screen.
6
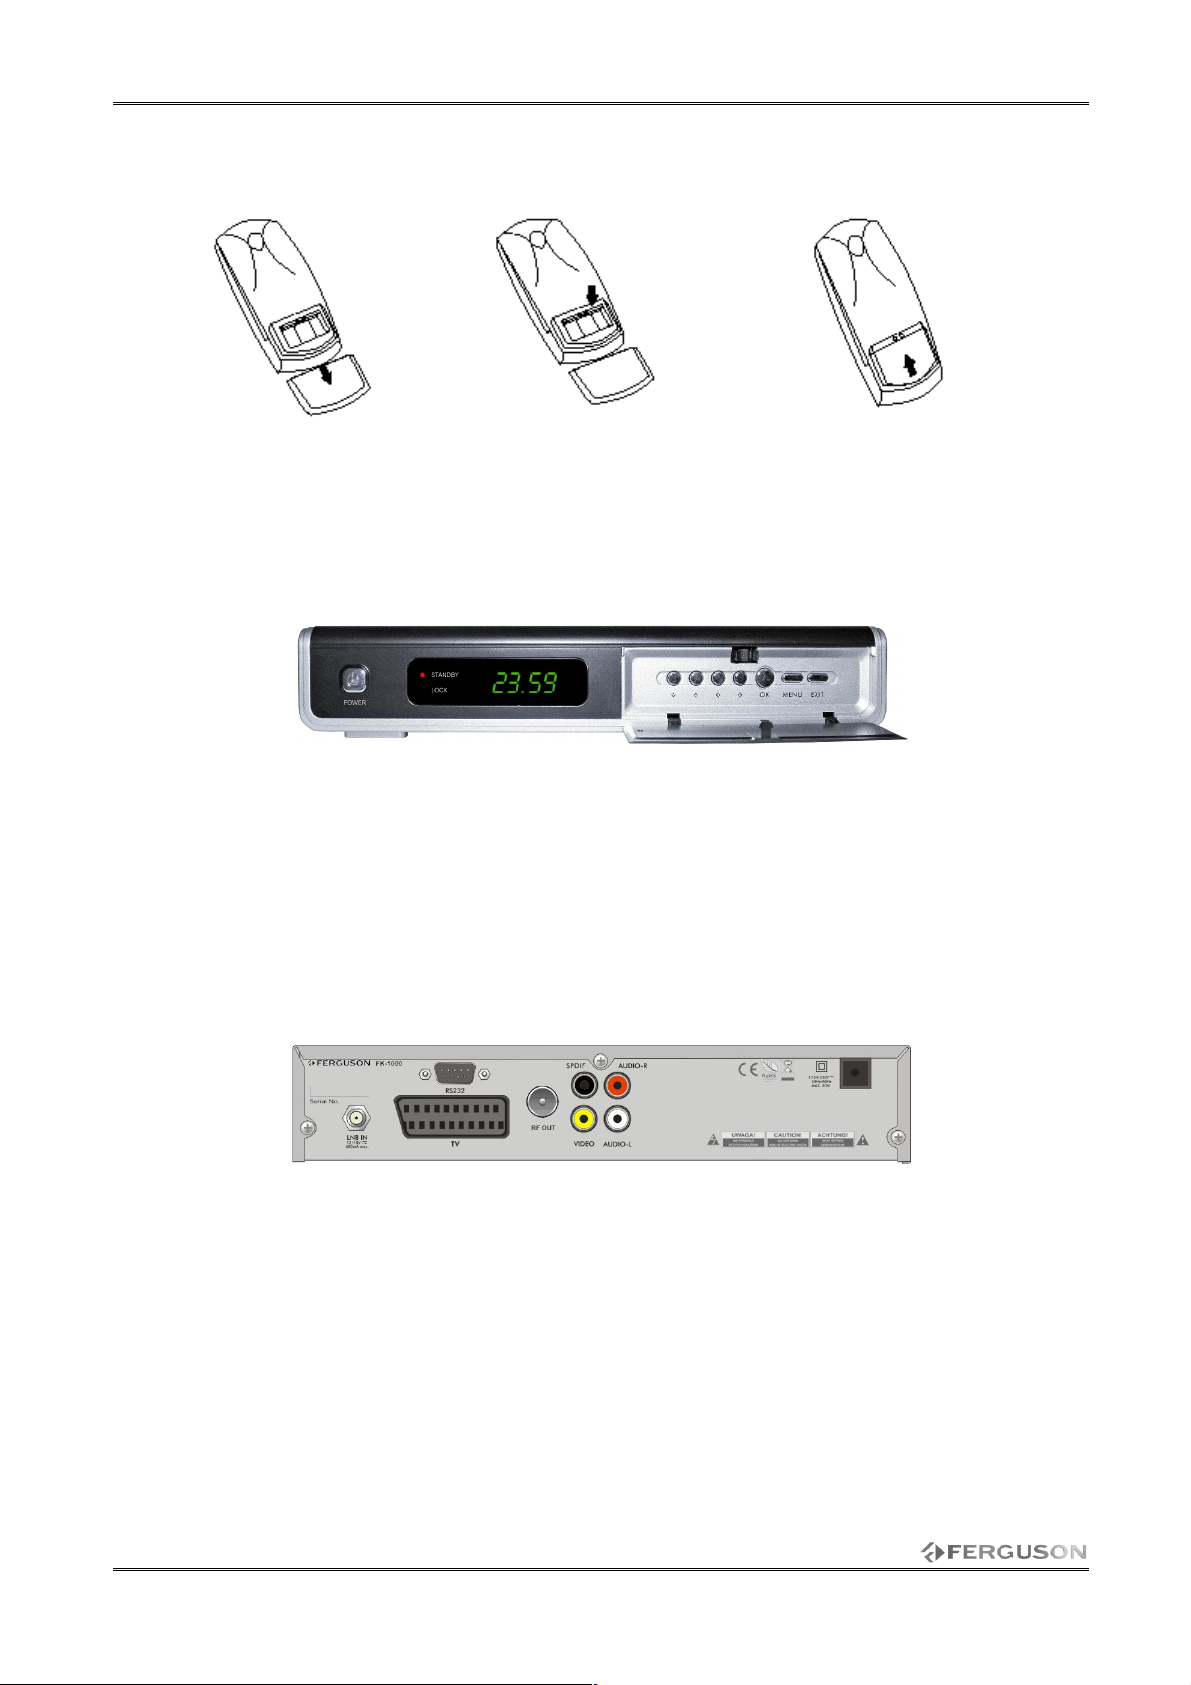
4.1 Battery Installation
Remove the battery compartment lid on the rear of the remote control by sliding the lid down,
then off. Put two AAA batteries inside the battery compartment with their + and - ends aligned
as indicated. Do not mix old and new batteries or different types of batteries Replace the
battery compartment lid. Slide the lid until to close with a bang.
5. Front Panel
✔ POWER: Turns the receiver ON/OFF
✔ ↑ ↓: Changes the channels on the screen and moves the cursor up/down in the Menu
✔ ← →: Increases/Decreases the volume levels or changes the setting in the Menu
✔ OK: Shows the Channel List on the screen and use to make selections in the Menu
✔ MENU: Shows the Main Menu on the screen
✔ EXIT : Cancels the selected function
6. Rear Panel
✔ LNB IN: Connect to satellite antenna (IF input from LNB to digital tuner)
✔ TV: Connect to TV using SCART cable
✔ VIDEO: Provides a composite video output to TV or other equipments.
✔ AUDIO (L/R): Provides the stereo audio output to TV or other equipments
✔ S/P DIF : Connect to a hi-fi system
✔ RF OUT: UHF RF output to TV set’s antenna in
✔ RS232: Connect to a PC for software upgrade
7
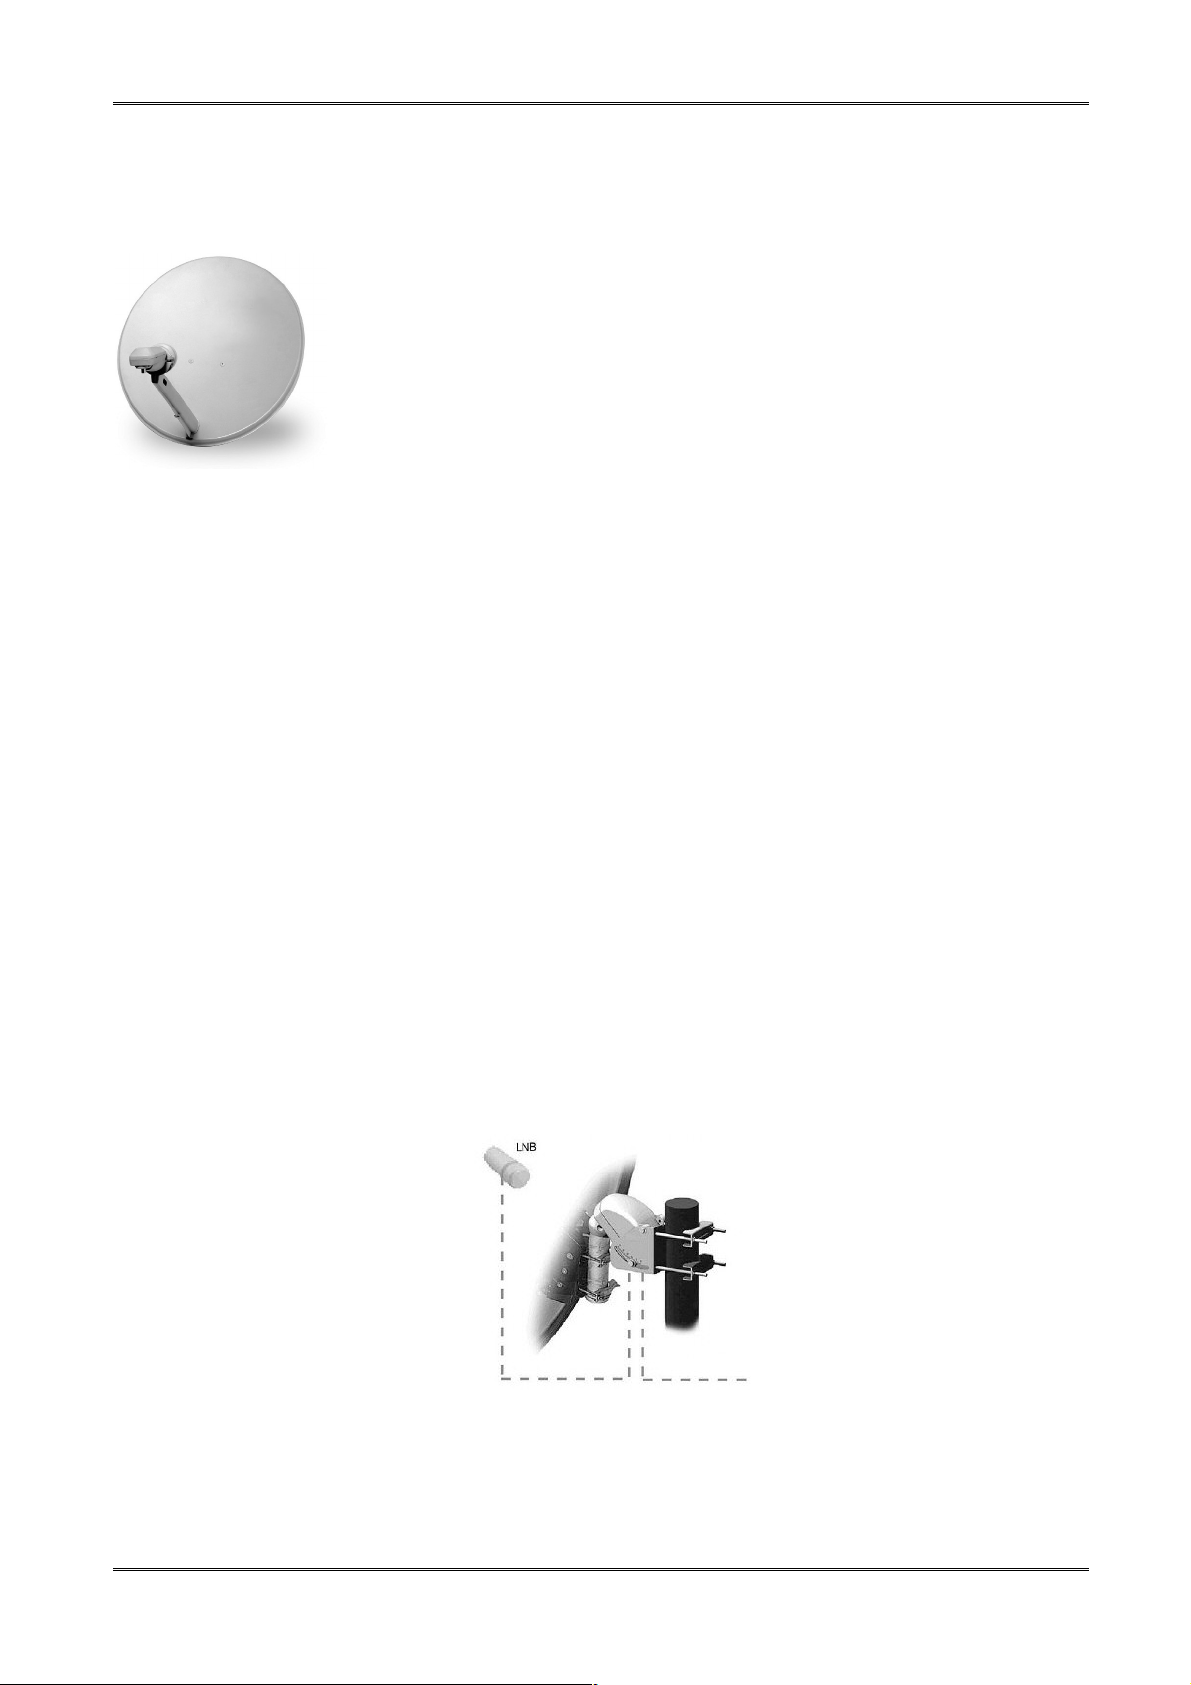
7. Setting a satellite dish
In order to connect external equipment including a satellite dish and converter, use the
installation instructions or assistance from expert - installer!
The precise setting antenna is the basis for good reception. Even the best
antenna, which is ill-adjusted will cause problems with quality. Even small
mistakes can prevent the receipt or very worsen its quality. Before the
installation, make sure whether the place lends itself to that. The
competent direction can be pre-determined by comparing with other
antennas. Immediately before the antenna can not be any obstacles cover
seeking to signal the dish! When you are choosing the best place for the
antenna, to attach and it initially set, it still must be carefully adjusted.
Each antenna is enabling regulatory adjustment screws in vertical position
and level.
In digital receivers regulation is difficult. Settings can no be done base on picture, because it
appears with delay. Also available indicators in the menu settings receiver typically operate with
a delay, so the regulation can take a long time and be very inaccurate. For the antenna setting
is necessary some meter antenna signal. Meter turns on a cable television converter between a
receiver. We will confirm the presence of switch voltage converter with a tuner, and will show
the size of the signal to satellites encountered. We invite you to benefit from expert assistance installer!
8. Setting motorized satellite dish
Proper work of Ferguson receiver ensures motorized system by USALS company Stab. To
connect the installation of the dish with motorized system USALS, connect the output of USALS
to LNB IN on rear panel of Ferguson receiver. The motor is what actually moves the antenna
between the various satellite positions and is installed in between the antenna mast and the
antenna mount. It is designed such that the axis of rotation is aligned with the North Star. This
type of mount is often referred to as a Polar Mount. As a result, azimuth and elevation do not
have to be adjusted individually. Instead, the antenna rotates on only one axis. The antenna
motor is installed on the already existing vertical mast. The local latitude position of the location
is then setup on the motor’s scale thus aligning the axis of rotation in the correct position.
Similar to a fixed antenna installation, the elevation scale on the antenna mount must be set for
a satellite as close to south as possible. In the southern hemisphere you would be looking for a
northern-most satellite. The selected satellite should lie within 5° of your southern-most
position; the southern-most position being equal to your local longitude. For example, if your
local longitude is 73° west, then the satellite you select should be located within +/- 5° of 73°
west, or within the range 68° to 78° west.
USALS greatly simplifies the antenna setup. Ferguson receiver simply asks you for your local
geographical coordinates and calculates the satellite positions on its own using a complex
mathematical formula. The receiver then drives the motor directly to the selected satellite
position. Once you have a signal, you need only finely adjust the antenna mount and horizontal
position (on the mast itself) for maximum signal. If the initial southern setting was slightly off, it
8
would now be corrected. Once the first satellite is perfectly set, all the other satellites in the arc
would also be automatically set as soon as the orbital position of these additional satellites is
entered into the receiver.
Without USALS, the alignment of the antenna system is somewhat more difficult. DiSEqC 1.2
drives the antenna to the selected satellite position in almost the same way. But since the local
geographical data is missing, the motor drives to a satellite position based on the prime
meridian and the equator. Therefore, when aligning the motor for the first time – and then again
later on with all the other satellite positions – alignment with the actual satellite position has to
be achieved with the motor commands “move east/west”. Because of these difficulties,
manufacturers of these motors make available helpful software on their web sites that enable
you to easily calculate the true position of a satellite.
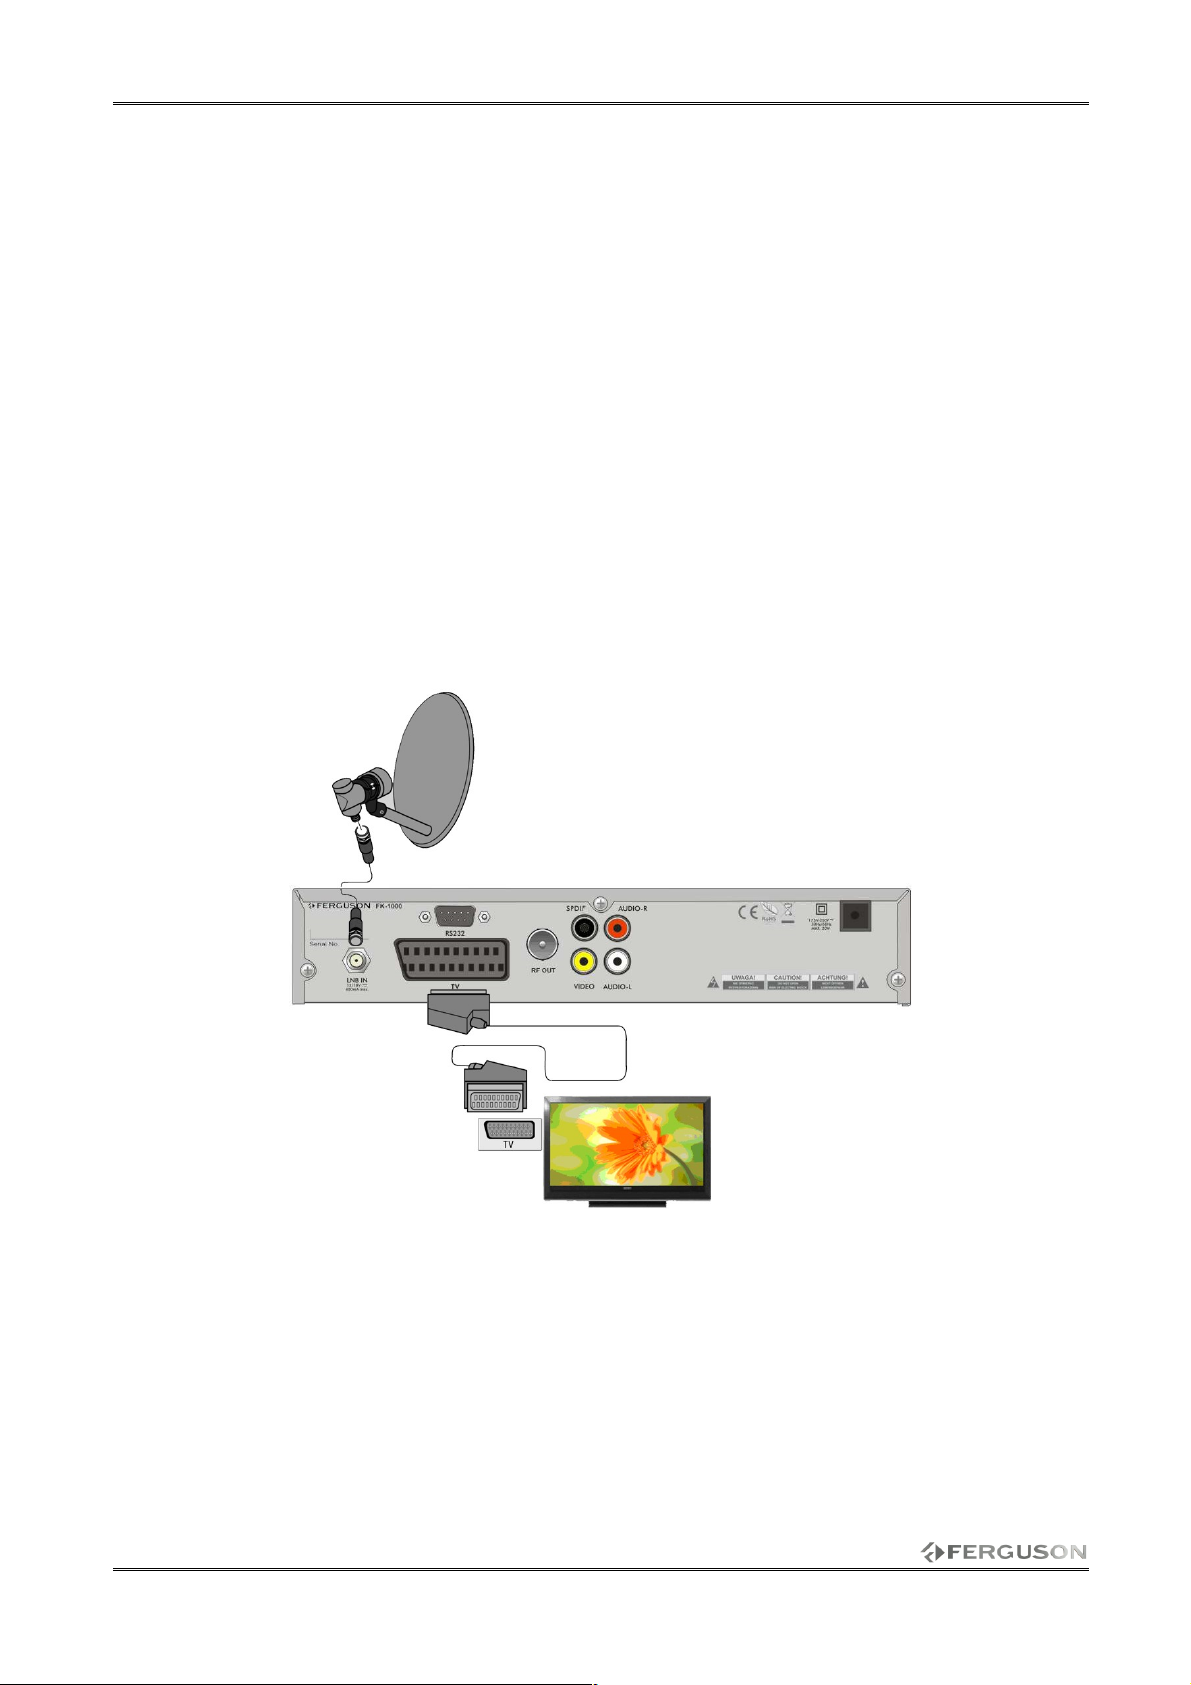
9. Connection Diagram
The following figure shows cable connections required for TV and other related electrical
equipment. If you need any assistance for specific equipment connection, please contact your
local dealer.
9.1 Connect SCART port (recommended)
• Connect the antenna with LNB IN of the STB.
• Connect to TV as following figure.
9.2 Connect composite port
• Connect LNB IN port on receiver to a satellite dish.
• Connect the video and audio by means of three cinch cables to the television set. One
cable, coloured yellow used to send video. The two remaining cable, red and white, are
used to connect sound (right and left channel).
9
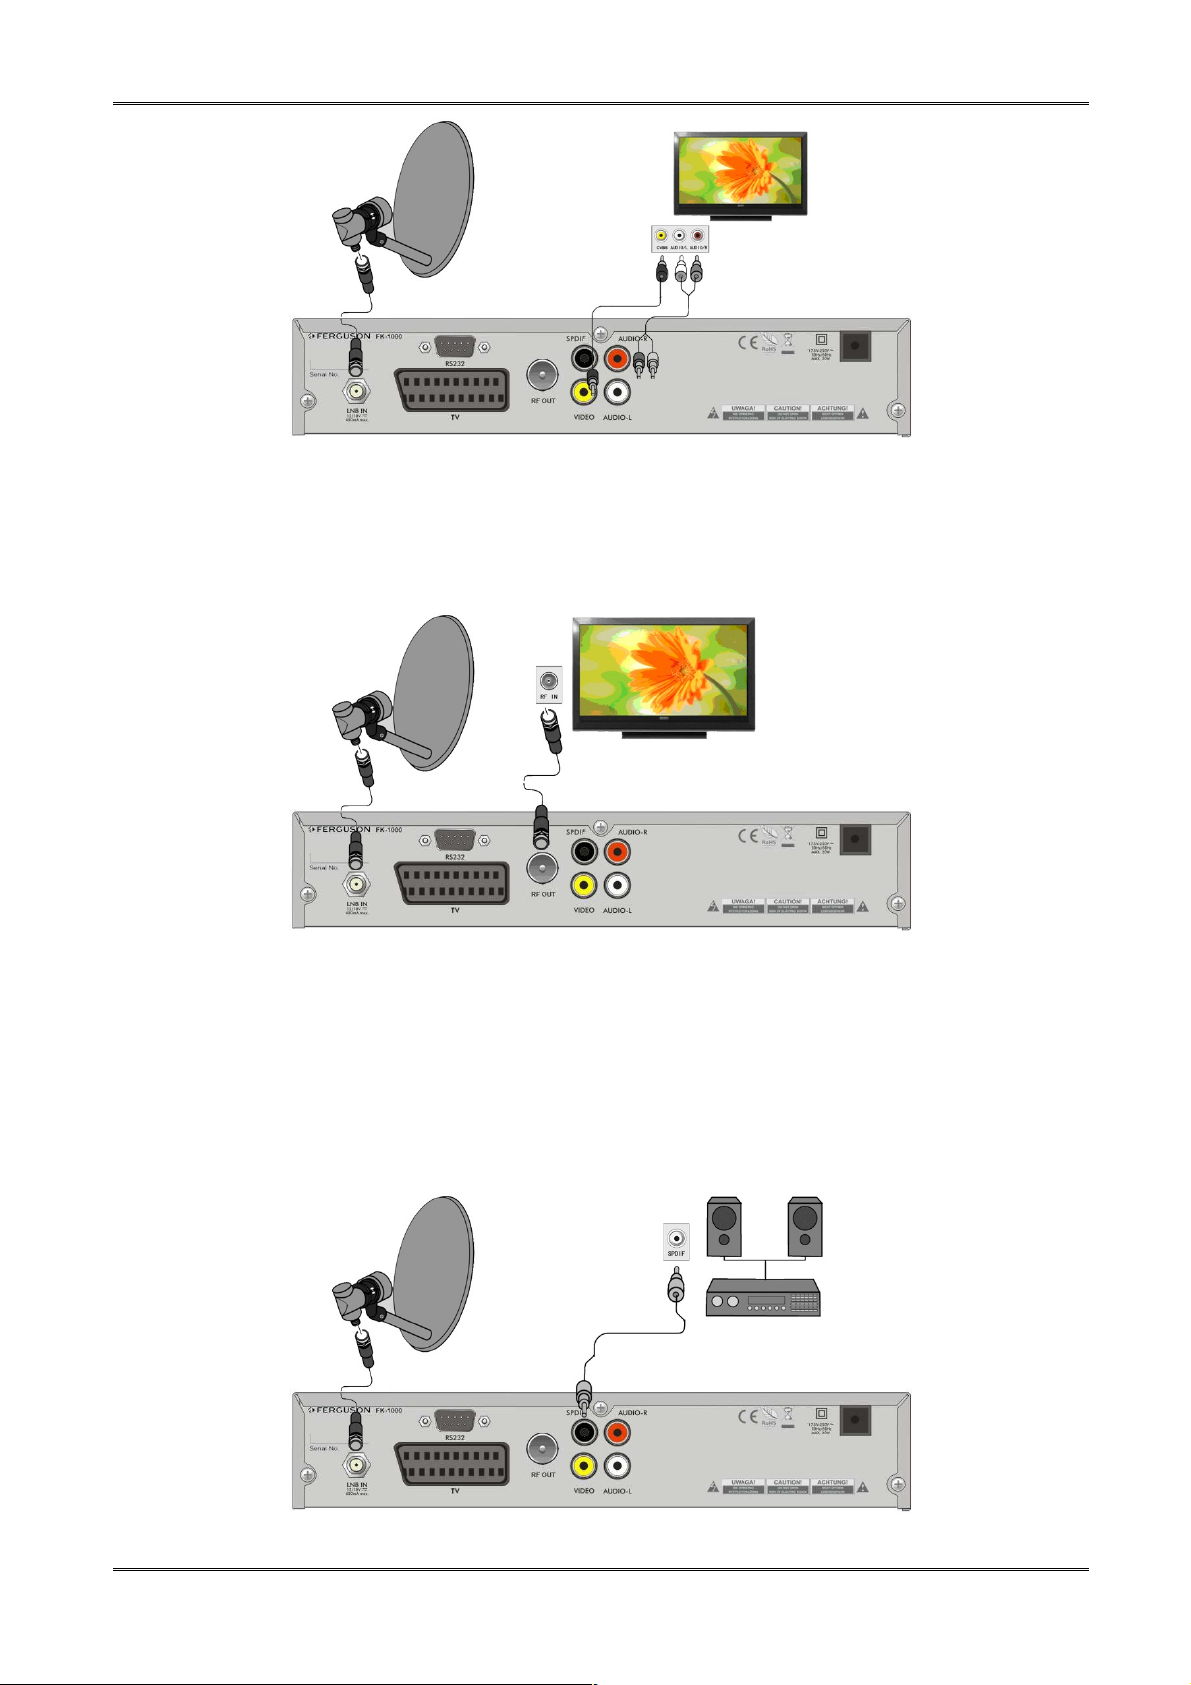
9.3 Connect RF Port
1. Plug the receiver with cable TV.
2. Search for-TV channel, which gives the receiver.
9.4 Connect Audio System
1. Connect the antenna with LNB IN of the STB.
2. Connect the SPDIF or OPTICAL with Digital Theater Systems to enjoy higher quality
sound.
3. You can also connect AUDIO L/R with AUDIO IN L/R of audio system by using the RCA
cable.
10

FIRST STEPS
1. Insert the plugs of the receiver’s and the auxiliary equipments in the power socket and switch
them on.
2. Select the AV channel on the TV set.
3. The receiver is delivered with pre-programmed TV channels and can be used immediately. To
see if there are any new channels, then activate the channel search.
Caution: Check the connections of all equipment and the antenna are in working order
before connecting the receiver to the power source.
MENU INFORMATION
The user interface has various ways to navigate through the menus and functions. Some of the
keys on the remote control unit give direct access to functions. The most important keys are
identified as EPG, colored keys, MENU and OK. Other keys are multi-functional which means
that their function changes dependent of the mode that you are in.
Unless otherwise specified; this note explains the way you can navigate through the pages of
the user menu.
1. Use the up and down keys to move the cursor up or down from one line to another line.
2. Use the left and right keys to move the cursor left or right the sub-menu.
3. Use the OK key to enter the sub-menu.
4. Use the EXIT key to leave the menu and return to the view mode.
5. In a sub-menu: use the OK key to confirm the selection; the Green bar indicates the active
selection
11

10. Main menu
Press the MENU button on the remote control in order to display the following main menu,
which contains five items:
1. editing channel lists
2. installation
3. system settings
4. tools
5. games
11. Installation
The installation menu is used to set antenna installation parameters and to search for channels
on a satellite.
11.1 Antenna connection
Select one of the two available options, depending on your system. Two options are available: a
fixed antenna (a typical system with a single converter) and an antenna with a positioner.
11.2 Satellite list
In this menu select the satellites that you want to use. Select a satellite by pressing the
up/down arrow keys. Mark by pressing OK. Each selected satellite will be accompanied by the √
symbol. The remaining menu options will be available only for selected satellites. In this menu
you can also edit, add or delete satellites it is necessary.
12

11.3 Antenna setup
This menu is used to set detailed operating parameters for previously selected satellites,
depending on your antenna system. Select a satellite by pressing the left/right arrow keys.
Only satellites marked on the list of satellites will be available. Now select the converter type
(usually, you do not have to change this option and may leave it set to "universal"). Next, if you
have a switch for more than one satellite, set the required port. Depending on the type of
switch, these will be options for DiSEqC 1.0 or DiSEqC 1.1 (do not activate these two options
simultaneously).
The correct setting of the antenna is indicated by bars presenting the strength and quality of
the signal. Both should indicate more than 80% for channel reception to be free of interference.
In order to check the strength and quality settings, use the "transponder" option in order to
alter the frequency and verify whether each V and H polarization is operative.
Confirm the settings by pressing EXIT.
If as the antenna connection you have selected: antenna with positioner, the antenna settings
menu will have a different appearance. Two operating standards will be available for the
positioner: USALS or DiSEqC 1.2. We recommend using USALS positioners, for which only the
correct longitude and latitude must be given.
13

11.4 Single satellite search
In this menu you can search for channels from one selected satellite. To this end, select a
satellite by pressing the left/right arrow keys. Only satellites marked on the list of satellites will
be available. Next, select whether you want to search only for uuencoded channels or for all
channels, or for radio channels, television channels, or all channels.
Two search modes are available:
1. Auto scan – a so-called blind scan, which consists in an automatic search for available
satellite frequencies, which are then scanned in turn.
2. Preset scan – according to the TP list – the receiver searches through only frequency by
frequency, in accordance with a list recorded for the selected satellite. This list may be
edited in a separate menu.
11.5 Multi satellite search
In this menu you can search for channels from a few satellites. The satellites will be searched
automatically one after another in the order in which they were entered in the list of satellites.
Options concerning settings and search functions are the same as in the menu: search one
satellite. The names of satellites that are to be searched are visible in the lower part of the
window.
14

11.6 List of transponders
Channels on satellites are located in "sets". Such a "set" of channels comprises a transponder.
A list of transponders is a list of frequencies available on a given satellite. In this menu you can
edit, add and remove individual frequencies. Select a satellite by pressing the left/right arrow
keys, and the desired frequency using the up/down arrow keys.
How do I search for a new channel?
In order to search for a new channel, you must know the basic channel parameter, i.e. the
frequency on which it is broadcast. This parameter may be obtained from the broadcaster, on
the internet, in the press, etc.
Next proceed to the list of transponders, select a satellite and choose the desired frequency (if it
is not on the list, use the function: add – green button on the remote control unit). Now click
OK for the selected frequency or the blue button on the remote control, in order to call out the
window for searching this frequency. Use the up/down buttons to change search options and
confirm by means of the OK button. A search will be started. Newly found channels from this
frequency will be added at the end of the list of channels.
15

12. System settings
12.1 Language
This menu is used to define the language in which the receiver's menu is displayed. The
preferred and second language options refer to audio soundtracks. If a given channel supports
more than one audio soundtrack, the receiver will by default search for soundtracks in the
selected languages in this order. The language of subtitled – as in the case of audio
soundtracks, this determines the language of subtitles to be used, provided that such subtitles
are available and active. Teletext - defines the character coding page for the teletext.
12.2 TV System
This menu is used to set the image parameters. For most of all old type TV sets we recommend
to use CVBS video output. If you are sure that TV set support RGB you can use it to get better
image quality. Additionally there are two options to set RF Out. You can choose system and
channel on witch RF Out will be working.
16

12.3 Local time settings
This menu is used to set the time and date. The receiver can automatically download the time
and date from the satellite (recommended), or you may set the time and date manually. If you
are using GMT, you should select the correct time shift value (for example +1 hour for Poland)
and turn on or off the summer time, depending on the time of year. The manual editing of the
time and date is effected by means of the numerical buttons.
12.4 Timer settings
This menu serves to programme up to 8 different events. Events enable the automatic switching
on and off of the receiver to a previously planned programme.
Select the event that you want to programme and press OK. Set the timer activation frequency.
Select the channel (press OK to display the simplified channel list). Next set the date, start time
and duration. Select ‘record’ to return to the events list. A new item has been added.
17

12.5 Parental lock
In this menu you may specify whether the receiver is to use a parental block or not. In addition,
you can turn on or off the password protection function for selected menu options and change
the default password. The default password is four zeros: 0000.
12.6 OSD settings
In this menu you can define the basic parameters of the on-screen menu (OSD). The first option
concerns support for the subtitles. If the subtitles are turned on, the receiver will display them
for channels that transmit such subtitles. By default, they are displayed in the language
specified in the language selection menu for the subtitles. Another option determines the time
for which information bars will be displayed; the default setting is 5 seconds. In addition, you
can specify the transparency of the menu to suit your preference.
12.7 Other
In this menu you can change the remaining options, such as the power supply of the converter,
select the types of channels played, and how the receiver is to behave when switching channels
or if you want to hear signal strength sound or not.
18

13. Tools
In this menu you can obtain detailed information about your software version, set factory
default settings and update transponder list from SatcoDX service. Last option requires
communication with personal computer over RS232 Null Modem cable and technical knowledge.
Note: Restoration of default settings results in the
removal of all user settings and the recall of a default
channel list; in some cases, no channel list will be
available. All changes introduced by the user,
including the channel list and configuration of
satellite antenna settings, will be removed!!!
14. Games
The receiver has two factory-installed games: Tetris (classic arranging of successive levels using
blocks of various shapes) and Othello (a logical game, which consists in the placement of your
colour on a board and changing your opponent's colour; the person whose colour dominates,
wins).
15. Edit channels
15.1 TV channels list
In this menu you can edit the list of television channels. Editing is effected by means of the
coloured buttons on the remote control unit. The raised colour function is active select OK on
the selected channel in order to use it. EXIT, in order to save.
19

How do I move a channel?
Proceed to the editing of channel lists. Select a channel and press OK in order to see a preview
in a small window. Press the yellow button in order to turn on the channel movement function
and then once again press OK on the selected channel. A symbol comprising two arrows will
appear next to the channel name.
Use the up/down arrows to move the channel to a selected position and confirm by pressing OK.
Next press the yellow button again in order to switch off the channel movement function.
Once you are finished, press EXIT. A message will appear
asking you to confirm the changes made. If you fail to do this,
changes in the channel list will not be saved.
How do I delete a channel?
Proceed to the editing of channel lists. Select a channel and press OK in order to see a preview
in a small window. Press the blue button in order to pass to the channel edition menu. Press the
blue button in order to switch on the channel delete function and OK on the channel that you
want to remove. The symbol X will appear next to the channel name.
Next press the blue button again in order to switch off the channel delete function. In this way
you can mark one or more channels that you want to delete with the X symbol. Once you are
finished, press EXIT. A message will appear asking you to confirm the changes made. If you do
not do this, the channel(s) will not be deleted.
20

How do I add to the group of favourites?
Proceed to the editing of channel lists. Select a channel and press OK in order to see a preview
in a small window. Press the FAV button in order to switch on the add-to-favourite-groups
function. A window will appear with a list of favourite groups (names of favourite groups are
changed in a separate menu).
Use the up/down arrows to select the group to which the selected channel is to be added. Next
press OK to confirm. Select a channel and press OK on this channel in order to add it to the
group. The symbol, √, will appear next to the channel name. Press EXIT to confirm.
Once you are finished, press FAV in order to switch off the
add-to-favourite-groups function.
Having completed the addition of channels to successive
favourite groups, press EXIT. A message will appear asking
you to confirm the changes made. If you fail to do it, the
changes made will not be saved!
How do I change a channel name?
Proceed to the editing of channel lists. Select a channel and press OK in order to see a preview
in a small window. Press the blue button in order to pass to the channel edition menu. Press the
green button in order to switch on the channel name change function. Use the numerical
keyboard in order to change the channel name.
Confirm the new name by pressing the yellow button. Next press the green button again to
switch off the channel name change function. In this way you can change the name of one or
more channels. Once you are finished, press EXIT. A message will appear asking you to confirm
the changes made. If you fail to do it, the changes made will not be saved!
21

15.2 Radio channel list
In this menu you can edit the list of radio channels. Editing is effected by means of the coloured
buttons on the remote control unit. The raised colour function is active - select OK on the
selected channel in order to use it. EXIT, in order to save.
15.3 Delete all
This option allows you to remove all channels from the
channel list. Note: This operation cannot be reversed! Make
sure that you are certain that you want to remove all of the
channels?
Having selected this option, you should wait a while for all of
the options available for the channel list to be highlighted as
unavailable.
15.4 Favorite
The receiver allows you to define up to 32 different groups of favourite channels. In this menu
you can change the names of all of them.
22

In order to change a name, select the favourites group and press OK. Next use the numerical
and coloured buttons to input the name. Confirm the changes by pressing the yellow button on
the remote control.
16. Basic functions supported by the remote control
16.1 EPG
This function displays a programme guide. The contents of
current, future and detailed information depend on what a
given station broadcasts.
16.2 ZOOM
Having selected a programme, you can use the timer function
(green button) to automatically plan the viewing or recording
of a given programme.
Select the desired programme and press OK in order to view
detailed information about the programme. Keep in mind that
the availability of the said information depends on what a
given television station is broadcasting.
This feature allows you to enlarge a selected area of the
picture. Another pressing zoom increases / decreases the size.
You can also use buttons left / right and up / down to change
position of zoom.
23

16.3 FIND
16.4 TXT - teletext
The FIND button calls up the quick channel search function.
Enter successive letters by means of the numerical buttons.
The results list is updated after each successive letter is
added. Press the yellow button in order to proceed to the list
containing results of the search procedure and select the
desired channel.
This function displays the teletext, provided that it is
broadcast by the selected television station. Keep in mind that
the correct code page (diacritical marks) is displayed
depending on the language settings made in the language
settings menu!
16.5 AUDIO
16.6 SLEEP
The green audio button displays a window with available audio
soundtracks. You can select any of the broadcast soundtracks.
Please keep in mind, however, that audio soundtracks with
AC3 surround sound may be played back solely through an
amplituner connected to the digital audio out – Coaxial.
SLEEP button launches sleep timer. Another button press
allows you to select the time after which the receiver
automatically turns off.
24

16.7 PAUSE
16.8 MULTIPICTURE
PAUSE is used for temporary suspension of the image.
This feature allows you to display nine channels in one
window. Only one of them (highlighted) is currently active. To
move between channels, use the up / down and left / right
buttons.
16.9 INFO
16.10 FAV – favourites
Pressing the INFO button will call up the information bar for
the current channel. This contains information about the
current and next programmes (if such information is made
available by the broadcaster)
If you press the FAV button, the receiver will display a window
with groups of favourites (provided that the user has created
such groups).
25

TROUBLE SHOOTING
Problem Possible Causes What To Do
The display on the front
panel does not light up.
No sound
or picture, but the front
panel red light is ON.
No sound or picture. The satellite dish is not pointing
Bad picture/
Blocking error.
No picture appears on
the TV screen.
Main cable is not connected. Check that the main cable is
The unit is in standby mode. Press the standby button.
at the satellite.
No signal or weak signal. Check the cable connections, LNB
The satellite dish is not pointing
at the satellite
Signal is too strong. Connect a signal attenuator to
Satellite dish is too small. Change to a larger dish.
LNB noise factor too high. Change to an LNB with lower
The LNB is faulty. Change the LNB.
The system is connected by
SCART leads and TV is not in AV/
EXT mode.
plugged into power socket.
Adjust the dish. Check the Signal
Level in the Antenna Setup menu.
and other equipment connected
between the LNB and the
receiver, and/or adjust the dish.
Adjust the dish.
the LNB input.
noise factor.
Check the UHF channel fixed in
your system and tune the UHF
channel properly.
There is interference on
your digital satellite
channel.
The RCU is not working. Battery exhausted. Change the battery.
On front display there is
just TV (ГU)
In worry about customer's satisfaction, in case of any problems, we ask you always before
dispatch device to check on our internet side: www.ferguson-digital.eu if the newer version of
software is. Due to conditions of guarantee the actualization of software does not rank to
service repairs.
The system is connected using RF
leads and the output channel of
the receiver interferes with an
existing terrestrial channel or
Video signal.
RCU is incorrectly aimed. Aim the RCU at the unit, or check
Button TV/AV was pressed. On the remote control is a button
Change the receiver output
channel to a more suitable
channel, or connect the system
using SCART leads.
that nothing blocks the front
panel.
TV / AV used to modify the
source, a second press will
change the source of the
displayed image.
26

GLOSSARY
CA - Conditional Access - Encryption system
used to secure content and grant access only
to subscribers.
CAM - conditional access module - is an
electronic device, usually incorporating a slot
for a smart card, which equips a set-top box
with the appropriate hardware facility to view
conditional access content that has been
encrypted using a conditional access system.
Pay-TV - Pay television or Premium
Television refers to subscription-based
television services, provided digital cable or
satellite, but also by digital terrestrial
methods.
SCPC - Single channel per carrier - refers
to using a single signal at a given frequency
and bandwidth.
STB - Set-top box - Receiver device that
processes an incoming signal from a satellite
dish, aerial, cable, network or telephone line.
CI - Common Interface - is the slot on a
digital television receiver into which a
conditional access module (CAM) may be
inserted for satellite television. A receiver with
a common interface allows the user to access
encrypted television broadcasts as opposed to
free-to-air (FTA) channels.
DVB-S is the original Digital Video
Broadcasting forward error coding and
modulation standard for satellite television.
DVB-S is used in both MCPC and SCPC modes
for broadcast network feeds, as well as for
direct broadcast satellite services. The
transport stream delivered by DVB-S is
mandated as MPEG-2.
EPG - Electronic Programme Guide, also
known as an Interactive Programme Guide or
IPG, provides an on screen guide to channel
listings, programme information or pay per
view events.
FTA - Free-to-air - broadcasts that are sent
unencrypted and may be received via any
suitable receiver.
TP - Transponder – One of the transmitters
on a satellite. A transponder transmits on a
particular frequency to which a set-top box
must tune to receive a signal. Typically each
transponder can carry multiple compressed
digital television channels.
DiSEqC - (Digital Satellite Equipment
Control) is a communication protocol for use
between a satellite receiver and a device such
as a multi-dish switch or a small dish antenna
rotor. It is compatible with the actuators used
to rotate large C band dishes if used with a
DiSEqC positioner.
USALS – (Universal Satellites Automatic
Location System) - is a satellite motor
protocol that automatically creates a list of
available satellite positions in a motorized
satellite dish setup. It is used in conjunction
with the DiSEqC 1.2 protocol.
LNB - low-noise block converter - is used
in communications satellite (usually broadcast
satellite) reception. The LNB is usually fixed on
the satellite dish.
MCPC - multiple channels per carrier several subcarriers are combined into a single
bitstream before being modulated onto a
carrier transmitted from a single location to
one or more remote sites.
Monoblock LNB - is a unit consisting of two
LNBs and is designed to receive satellites
spaced close together.

Specification
General
STB Type DVBS Receiver
Main Chipset ALI M3329C(128 pin)
Mechanical 7E CASE
Func/Interface FTA,RCA,21~69 RF out
Video Modulator Independent
TUNER Type Onboard Design
Demodulator Type Embed to Main Chip Set
SMPS Type Separate SMPS
Hardware Features
IR 38KHz
Remoter Type RA0
Dimension W:26.0 cm,D:18.0 cm,H:4.5 cm
Net Weight 1.5 kg
Main Chip Sets
CPU frequency 216MHz
Flash Memory 1PC 16Mbit/2MByte
SDRAM Memory 1PC 4X16Mbit/8Mbyte SDR
Demodulator IC Building in Main Chip Set
DVBS Tuner
Tuner Type ZARLINK 10039 ON BOARD
Frequency Range 950 ~ 2150MHz
Input Impedance 75Ω
Power and Polarization Vertical 13VDC;Horizontal 18VDC @ 300mA (max) 22KHz±4KHz(0.6V±0.2V)tone, Overload Protection
Input Level Range 65dBm ~ -25dBm
DVBS Channel Decoder
DVBS Demod standard DVB-S(ETS 300 421)
DVBS Demodulation QPSK
DVBS Symbol Rate 2 ~ 45MSPS(Code Rate 1/2)
DVBS Code Rate 1/2、2/3、3/4、5/6、7/8
TS Demux
Demultiplexer MPEG2 ISO/IEC 13818-1
Input Bit Rate Max 100Mbit/s
Video Decode
Video Decode MPEG2 ISO/IEC 13818-2 MP@ML
Aspect Ratio 4:3、16:9
Video Resolution 720×576(PAL) 720×480(NTSC)
Audio Decode
Audio Decode MPEG1,MPEG2 ISO/IEC 13818-3 LAYER I&II
Sampling Frequency 32KHz、44.1KHz、48KHz
AV Output
Video Bandwidth 5.5MHz(-3dB)
Video Impedance 75Ω
Video Voltage Level 1.0 Vp-p
Audio Freq. Range 20~15KHz
Audio Impedance 600Ω
Audio Voltage Level 2V rms(5.6Vp-p)
Environment
Input Voltage AC 100~240V,50Hz/60Hz
Consumption Max 20W
Temperature 0~40℃
Humidity <95%
28
 Loading...