

Page 1

SOLIUS
Notice d’installation et d’utilisation - Guide à conserver par l’utilisateur
Documentation for installation and use - The user must conserve this guide
Instrucciones de instalación y de uso - Guía a conservar por el usuario
Installatie- en gebruiksvoorschriften - Richtlijnen te bewaren door de gebruiker
Руководство по установке и эксплуатации – Руководство пользователя
F
GB
SP
NL
RU
Page 2
2
❶
❼
❽
S1
S2
CLIC
P
M
A
16
14
12
15
13
11
Page 3
Nous vous remercions de votre choix et de votre confiance. L’appareil que vous venez d’acquérir a été soumis à de nomb-
Installation
1/ Préparer l’installation de l’appareil
Règles d’installation
- cet appareil a été conçu pour être installé dans un local résidentiel. Dans tout autre cas,veuillez consulter votre
distributeur.
- L’installation doit être faite dans les règles de l’art et conforme aux normes en vigueur dans le pays
d’installation (NFC 15100 pour la France).
- L’appareil doit être alimenté en 230 V Mono 50Hz.
-
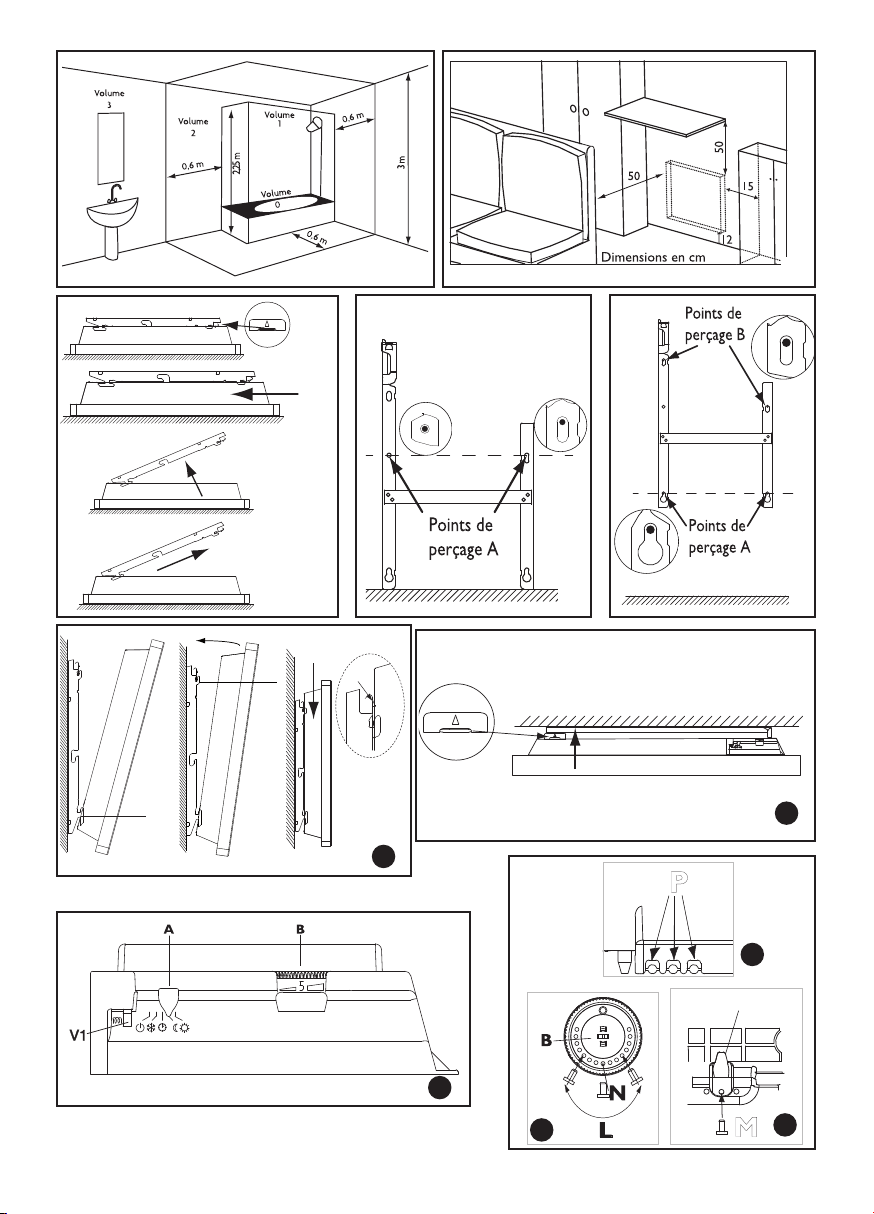
Dans des locaux humides comme les salles de bains et les cuisines, vous devez installer le boîtier de raccordement
au moins à 25 cm du sol.
Tenir l’appareil éloigné d’un courant d’air susceptible de perturber son fonctionnement (ex :
sous une Ventil ation Mécanique Centralisée,etc...).
Ne pas l’installer sous une prise de courant fixe.
Volume 1
Pas d’appareil électrique
Volume 2
Appareil électrique à condition que l’interrupteur et autres dispositifs de commandes
ne soient pas accessibles depuis la douche ou la baignoire (Norme EN 60 335-2-30).
Appareil électrique Classe II
❶
Volume 3
Appareil électrique Classe II
Respectez les distances minimales avec le mobilier pour l’emplacement de l’appareil.
Il est fortement déconseillé de monter les appareils verticaux au-dessus d'une altitude
de 1000 m (risque de mauvais fonctionnement).
L'installation d'un appareil en altitude provoque une élévation de la température de
sortie d'air (de l'ordre de 10°C par 1000 m de dénivelé).
Il est interdit de monter un appareil vertical horizontalement et vice-versa.
Il est interdit d'utiliser l'appareil en configuration mobile, sur pied ou roulettes.
F
reux tests et contrôles afin d’en assurer la qualité et ainsi vous apporter une entière satisfaction.
Les appareils munis de ce symbole ne doivent pas être mis avec les ordures ménagères, mais doivent
être collectés séparément et recyclés.
La collecte et le recyclage des produits en fin de vie doivent être effectués selon les dispositions et les
décrets locaux.
Conservez la notice, même après l’installation de l’appareil.
Mise en garde
- Les enfants ne doivent pas s’appuyer sur l’appareil.
- Veillez à ce que les enfants ne s'appuient pas sur l’appareil et ne jouent pas à proximité quand il fonctionne, la
surface de celui-ci risquant dans certaines circonstances de causer des brûlures sur la peau, notamment du fait
que leurs réflexes ne sont pas encore acquis ou sont plus lents que ceux d’un adulte. En cas de risque, prévoyez
l'installation d'une grille de protection devant l’appareil.
- cet appareil n’est pas prévu pour être utilisé par des personnes (y compris les enfants) dont les capacités physiques, sensorielles ou mentales sont réduites, ou des personnes dénuées d’expérience ou de connaissance, sauf
si elles ont pu bénéficier, par l’intermédiaire d’une personne responsable de leur sécurité, d’une surveillance ou
d’instructions préalables concernant l’utilisation de l’appareil.
- Toutes interventions sur les parties électriques doivent être effectuées par un professionnel qualifié.
- Veillez à ne pas introduire d’objets ou de papier dans l’appareil.
- A la première mise en chauffe, une légère odeur peut apparaître correspondant à l’évacuation des éventuelles
traces liées à la fabrication de l’appareil.
- Pour éviter une surchauffe, ne couvrez pas l’appareil.
3
Page 4
4
2/ Déverrouiller la patte d’accrochage de l’appareil
Nous vous conseillons de poser l’appareil à plat face vers le sol.
- Munissez-vous d’un tournevis plat et soulevez la languette en veillant à ne pas la déformer .
- Tout en maintenant la languette soulevée, poussez la patte d’accrochage vers le bas de l’appareil pour dégager les crochets supérieurs
- Faîtes pivoter la patte d’accrochage autour des crochets inférieurs .
- Retirez la patte d’accrochage
.
3/ Fixer la patte d’accrochage
- Posez la patte d’accrochage au sol et contre le mur. Repérez les points de perçage A
❼
- Remontez la patte d’accrochage en l’alignant avec les points de perçage A pour repérer les points de perçage B (vous pouvez éventuellement utiliser un niveau)
❽.
- Percez les 4 trous et mettez des chevilles. En cas de support particulier, utilisez des chevilles adaptées (ex :
plaque de plâtre).
- Positionnez et vissez la patte d’accrochage.
4/ Raccorder l’appareil
Règles de raccordement
- L’appareil doit être alimenté en 230 V Mono 50Hz.
- L’alimentation de l’appareil doit être directement raccordée au réseau après le disjoncteur et sans interrupteur
intermédiaire.
- Le raccordement au secteur se fera à l’aide du câble de l’appareil par l’intermédiaire d’un boîtier de raccordement. Dans des locaux humides comme les salles de bains et les cuisines, il faut installer le boîtier de raccordement au moins à 25 cm du sol.
- Un appareil équipé d’une prise peut être raccordé à une prise de courant murale.
- Le raccordement à la terre est interdit. Ne pas brancher le fil pilote (fil noir) à la terre.
- L’installation doit être équipée d’un dispositif de coupure omnipolaire ayant une distance d’ouverture de contact d’au
moins 3 mm.
- Si le câble d’alimentation est endommagé, il doit être remplacé par le fabricant, son service après-vente ou une
personne de qualification similaire afin d’éviter un danger.
- Si vous utilisez le fil pilote et s’il est protégé par un différentiel 30mA (ex :salle de bains), il est nécessaire de protéger l’alimentation du fil pilote sur ce différentiel.
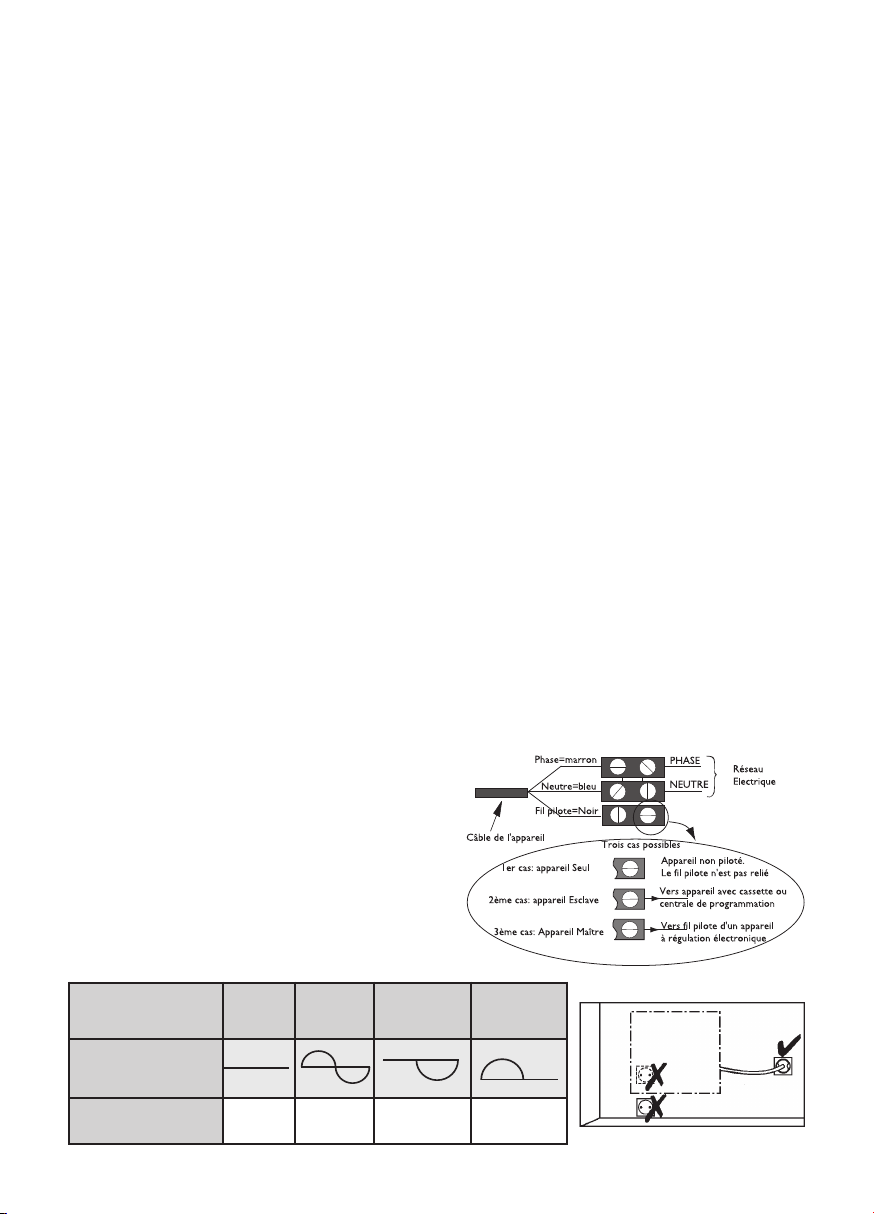
Schéma de raccordement de l’appareil
- Coupez le courant et branchez les fils d’après le schéma
suivant :
- Vous pouvez raccorder le fil pilote si votre maison est équipée d’une centrale de programmation, d’un programmateur
ou d’un gestionnaire.
Dans ce cas, pour vérifier la transmission correcte des
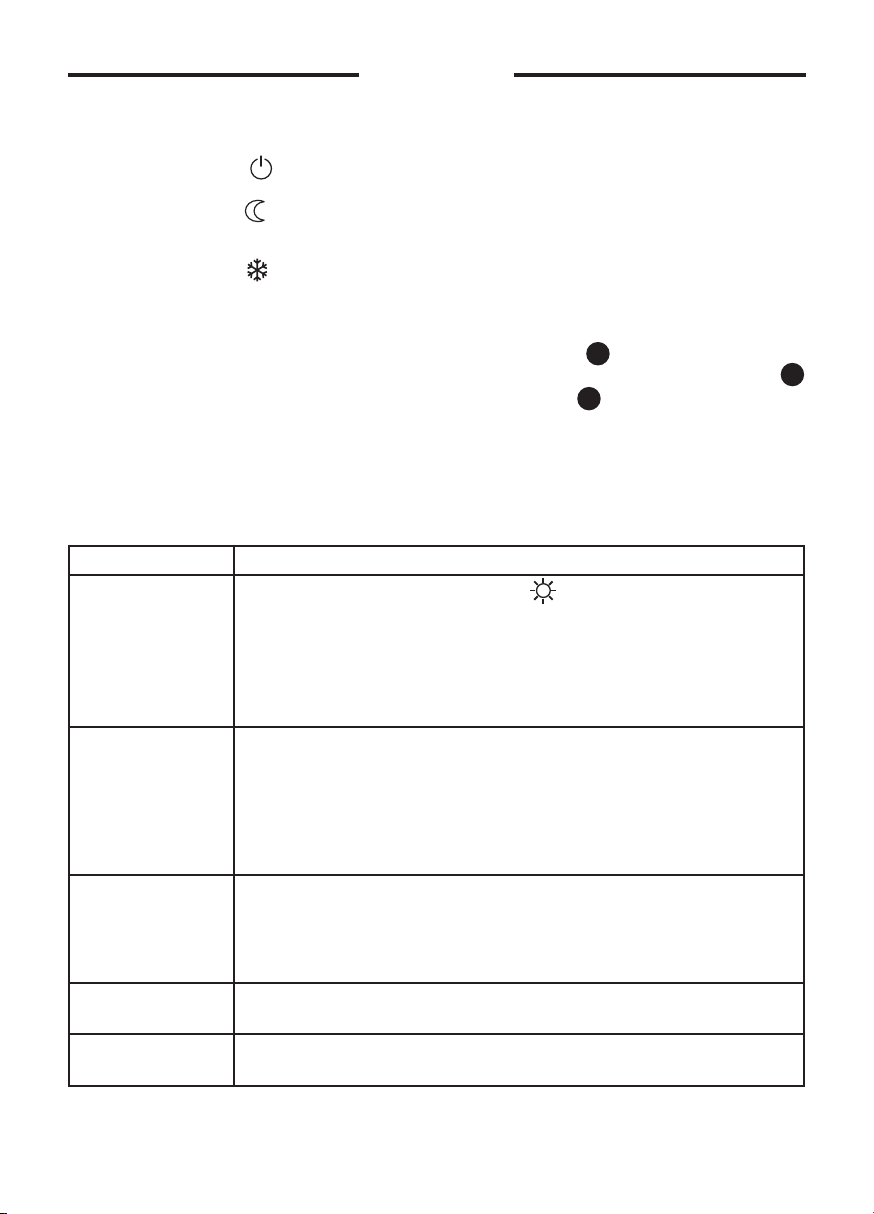
ordres de programmation, procédez aux vérifications suivantes en fonction des modes choisis (Confort, Eco, ...) :
SIGNAL A
TRANSMETTRE
MESURE ENTRE LE FIL
PILOTE ET LE NEUTRE
CONFORT ECO HORS GEL
0 Volt 230 Volt
-115 Volts
négative
ARRET DU
CHAUFFAGE
DELESTAGE
+115 Volts
positive
Page 5
Programmer votre période de chauffe : utilisation du mode Programmation
En connectant le fil pilote sur un programmateur, vous pouvez programmer vos périodes de température
Confort et Eco (reportez-vous à la notice jointe à votre programmateur).
Il est possible de brancher sur un programmateur plusieurs appareils et de réaliser ainsi des économies d’énergie.
La température réglée par la molette B est la température de base qui va servir de référence à la température
souhaitée en fonction de la programmation.
NB: En cas d’absence d’ordre sur le fil pilote,
l’appareil chauffe en mode Confort. Les ordres
HG et délestage sont prioritaires par rapport
aux modes Eco et Confort. Lors d’un passage
du mode Confort vers le mode Eco,le temps de
basculement est de l’ordre de 12 secondes.
Mettre l’appareil en mode Programmation :
Je détermine la température Confort qui me servira de base pour programmer mes abaissements.
Je mets le curseur A sur la position . Si la température est inférieure à celle désirée dans le mode choisi
(température de Confort dans le mode Confort et température abaissée dans le mode Eco), le voyant de chauffe V1
s’allume.
5
5/ Verrouiller l’appareil sur la patte d’accrochage
-
Posez l’ap
pareil incliné sur les supports S1 .
- Faîtes pivoter l’appareil en le soulevant pour le poser sur les supports S2
.
- Abaissez l’a
ppareil sur la patte d’accrochage. Un clic vous indique que l’appareil est fixé et verrouillé
.
- Pour déverrouiller l’appareil de la patte d’accrochage, munissez-vous d’un tournevis plat et poussez la lan-
guette (située en haut à gauche de la patte d’accrochage derrière l’appareil) vers le mur.
Soulevez l’appareil tout en maintenant la languette avec le tournevis. Basculez-le en avant puis retirez-le des supports S1 .
Fonctionnement
Vous pouvez faire fonctionner votre appareil dans plusieurs modes :
• Le mode Confort qui vous permet d’obtenir la bonne température ambiante.
• Le mode Eco qui vous permet d’abaisser la température de votre pièce lors d’une absence prolongée de la maison.
• Le mode Programmation qui vous permet de programmer les modes Confort et Eco en fonction des pério-
des d’occupation de la pièce
Le boîtier de commande
V1
Voyant de chauffe
A
Curseur de choix du mode
B
Molette de réglage de la température
Utilisation
Chauffer votre pièce : utilisation du mode Confort
Ce mode vous permet d’avoir une bonne température ambiante dans la pièce.
Mettre en marche le chauffage :
Je mets le curseur A sur la position . Le voyant de chauffe V
1 s’allume.
Trouver la bonne température :
Je règle la molette de température B sur 5.
Le voyant de chauffe V1 s’allume si la température ambiante est infé-
rieure à celle désirée. J’attends quelques heures pour que celle-ci se stabilise. Si la température de la pièce me
convient, le réglage est terminé. Si la température ne me convient pas, j’ajuste la molette en procédant progressivement en m’aidant des crans (un cran à la fois).
Abaisser la température de votre pièce : utilisation du mode Eco
Il s’agit d’un abaissement en degrés par rapport à la température Confort. Il est conseillé d’utiliser ce mode pour
des périodes d’absence supérieures à 2 heures.
Mettre le chauffage en mode Eco :
Je mets le curseur A sur la position . La température Confort sera abaissée d’environ 3°C à 4°C.
Ordre Abaissement
ECO -3,5°C
HORS GEL température ambiante maintenue à environ 7° C.
ARRET arrêt immédiat du chauffage (utilisé pour le délestage).
F
12
13
11
Page 6
Conseils
PROBLÈME RENCONTRÉ VÉRIFICATION À FAIRE
L’appareil ne chauffe
pas.
- Vérifiez que le curseur est sur la position .
- Si vous êtes en programmation, vérifiez que le programmateur est en mode
CONFORT.
-
Assurez-vous que les disjoncteurs de l’installation sont enclenchés, ou bien que le délesteur (si vous en avez un) n’a pas coupé l’alimentation de l’appareil.
- Vérifiez la température de l’air de la pièce : si elle est trop élevée, le voyant de chauffe V1 ne s’allume pas: l’appareil ne chauffe pas.
L’appareil chauffe tout
le temps.
- Vérifiez que l’appareil n’est pas situé dans un courant d’air ou que le réglage de température n’a pas été modifié.
- Il peut y avoir un aléa dans le réseau électrique. En cas de problème (thermostat blo-
qué...), coupez l’alimentation de l’appareil (fusible, disjoncteur) pendant environ 10
minutes, puis rallumez-le.
- Si le phénomène se reproduit fréquemment, faîtes contrôler l’alimentation par votre
distributeur d’énergie.
L’appareil est très
chaud en surface
Il est normal que l’appareil soit chaud lorsqu'il fonctionne, la température maximale de
surface étant limitée conformément à la norme NF Electricité Performance. Si toutefois vous jugez que votre appareil est toujours trop chaud, vérifiez que la puissance est
adaptée à la surface de votre pièce (nous vous préconisons 100W / m
2
) et que l’appareil
n'est pas placé dans un courant d'air qui perturberait sa régulation.
L’appareil ne suit pas la
programmation.
Assurez-vous de la bonne utilisation de la centrale de programmation (voir la notice d’u-
tilisation) ou du gestionnaire d’énergie.
Le voyant de chauffe
V1 clignote.
La sonde de mesure est détériorée.
Consultez le service après-vente du fabricant.
Si vous n’avez pas réussi à résoudre votre problème, contactez le service après-vente du fabricant
en vous munissant préalablement des références de votre appareil, de la température
de la pièce et
de votre système de programmation éventuel.
2/Entretien
Pour conserver les performances de l’appareil, il est nécessaire, environ deux fois par an,
d’effectuer son dépoussiérage. Ne jamais utiliser de produits abrasifs et de solvants.
3/En cas de problème
16
14
15
1/Conseils d’utilisation
Il est inutile de mettre l’appareil au maximum, la température de la pièce ne montera pas plus vite.
Aérer la pièce :
Je mets le curseur A sur . l’appareil ne chauffe plus. Le voyant de chauffe V1 s’éteint.
M’absenter pendant une durée comprise entre 2 et 24 heures :
Je mets le curseur A sur . Mon appareil maintiendra une température de -3,5°C par rapport à la température Confort.
Partir plus de 24 heures ou durant l’été ou l’hiver :
Je mets le curseur A sur . Mon appareil maintiendra une température de 7°C ±3 correspondant à une température Hors Gel.
Verrouiller les réglages de l’appareil :
Je mets la molette B sur la position souhaitée. Je déverrouille l’appareil de sa patte d’accrochage.
Sur le dos du boîtier de commande, je détache les pions P de leurs supports .
Je choisis la position N pour bloquer la molette ou la position L pour limiter la plage d’utilisation de la molette
Je choisis une des positions M pour bloquer le curseur dans le mode désiré .
6
Page 7
CONDITIONS DE GARANTIE :
F
DOCUMENT À CONSERVER PAR L’UTILISATEUR
(présenter le certificat uniquement en cas de réclamation)
- La durée de garantie est de 2 ans à compter de la date d’installation ou d’achat et ne saurait
excéder 30 mois à partir de la date de fabrication en l’absence de justificatif.
- La garantie couvre l’échange ou la fourniture des pièces reconnues défectueuses à l’exclusion de
tout dommage et intérêts.
- Les frais de main d’oeuvre, de déplacement et de transport sont à la charge de l’usager.
- Les détériorations provenant d’une installation non conforme, d’un réseau d’alimentation ne
respectant pas la norme NF EN 50160, d’un usage anormal ou du non respect des prescriptions
de la dite notice ne sont pas couvertes par la garantie.
- Présenter le présent certificat uniquement en cas de réclamation auprès du distributeur ou de
votre installateur, en y joignant votre facture d’achat.
- Les dispositions des présentes conditions de garantie ne sont pas exclusives du bénéfice au profit
de l’acheteur, de la garantie légale pour défauts et vices cachés qui s’appliquent en tout état de cause
dans les conditions des articles 1641 et suivants du code civil.
TYPE DE L’APPAREIL * : ______________________________________________________
N° DE SÉRIE * : _____________________________________________________________
NOM ET ADRESSE DU CLIENT : _______________________________________________
*Ces renseignements se trouvent sur la plaque signalétique située sur le côté droit de l’appareil
SATC
Service Assistance Technique Client
ZI Nord - Rue Monge
85002 LA ROCHE SUR YON
Tél. : 02 51 44 34 67
02 51 44 34 26
Fax : 02 51 37 98 27
CACHET DE L’INSTALLATEUR
7
Page 8
The device you have just purchased was submitted to many tests and checks ensuring its quality.We thank you for your
Installation
1/ Preparing the installation of the panel heater
Installation guidelines
- This device was designed to be installed in residential premises. In any other case, please call your distributor.
- Installation must comply with the standards currently enforced in the country of use.
- The panel heater must be supplied with 230V single-phase 50Hz.
-
In damp areas such as bathrooms and kitchens, you must install the connection box at least 25cm above the floor.
Keep the panel heater away from any draughts that may interfere with its operation (e. g.: unde r a
centrally cont rolled fan, etc ...).
Do not install the heater under a fixed socket.
The panel heater is fitted with a detection system, whose sensor is located on the front of the appliance.
Volume 1
No electrical appliance
Volume 2
Class II IPX24 electrical appliance ❶
Volume 3
Class II electrical appliance
Comply with the minimum distances from any furniture units when positioning the appliance
We strongly advise against installing vertical machines above an altitude of 1000m
(risk of faulty operation).
Installing a machine at altitude causes an increase in air output temperature
(of the order of 10°C per 1000m above sea level).
It is forbidden to install a vertical machine horizontally or vice versa.
Do not use the device in mobile, on feets or on casters.
choice and trust.We hope you will be fully satisfied.
Appliances with this symbol must not be scrapped with normal household rubbish but be collected
separately and recycled.
When these products come to the end of their useful life, they must be collected and recycled in accordance with the local regulations and bylaws.
Keep these instructions even once you have installed your heater.
Warning
- Please ensure that children do not lean on the device or play close to it when it is operating : its surface may
be hot enough to cause burns to their skin in some circumstances, particularly because their reflexes may not
yet have been acquired or aur slower than those of an adult. If there is any risk, fit a protective grill in front of
the device.
- This device is not intended for use by persons (including children) with physical, sensory or mental disability, or
by persons lacking experience or knowledge, unless they have received from a person in charge of their safety
adequate supervision or preliminary instructions on how to use the device.
- Care must be taken at all times to keep children from playing with the device.
- Do not obstruct the grills, even partially (either on the front of the device or underneath it): otherwise the device
may overheat.
- If the supply cord is damaged, it must be replaced by a service agentor similarly qualified person in order to
avoid a hazard (applies to units fitted with a supply cord and plug).
- Units fitted with a three core supply cord (brown, blue and black), must be directly connected to hard wiring by
a licensed electrician.
- All work on the interior of the device must be carried out by a licensed electrician.
8
Page 9

9
2/
Unlocking the panel heater’s hanging frame
We recommend that you place the panel heater face down on the floor
.
-
Take a flat-bladed screwdriver and lift the slider, taking care not to bend it
.
-
While keeping the sli-der raised, push the hanging frame towards the bottom of the heater to release the upper
brackets S2. We recommend that you wear protective gloves.
-
Swivel the hanging frame downwards on the lower brackets S1.
.
-
Remove the hanging frame.
.
3/
Fixing the hanging frame to the wall
-
Place the hanging frame on the floor against the wall. Locate drilling points A.
❼
-
Refit the hanging frame, lining up with drilling points A to find drilling points B (you can also use a level)
❽.
-
Drill the 4 holes and insert the wall plugs. Use suitable wall plugs when fitting on a specific support (e.g. plasterboard wall).
-
Position the hanging frame and screw it down.
4/
Connecting the panel heater
Connection rules and regulations
- The panel heater must be supplied with 230V single-phase current at 50Hz.
- The panel heater’s power supply must be directly connected to the main supply after the circuit breaker without
any intermediate switch.
- Panel heaters equipped with a socket can be connected to a wall socket.
- The panel heater’s power cable must be connected to the main supply via a connection box. In damp areas, such
as bathrooms and kitchens, the connection box must be installed at least 25cm above the floor.
- An Earth connection is prohibited. Do not connect the pilot wire (black wire) to Earth.
- The installation must be fitted with an all-pole cut-off switch with a contact opening distance of at least 3mm.
- If the power cable is damaged, it must only be replaced by an electrician.
- If you are using the pilot wire and it is protected by a 30mA differential (e.g.: bathroom use), the pilot wire’s power
supply must also be protected on this differential.
Wiring diagram for the heating panel
- Cut off the power supply and connect the wires as
shown in the following diagram:
- You can connect the pilot wire if your home is equipped with a programming unit or controller.
In this case, make the following checks according
the selected mode (Comfort, Eco, etc.) to that the
programming instructions are being transmitted
correctly:
Panel heater cable
Phase=brown
Neutral=blue
PHASE
NEUTRAL
Electricity
grid
Three possible cases
Pilot wire=Black
1st case: only one heater
2nd case: Slave heater
3rd case: Master heater
The pilot wire end is insulated
and not further connected
To the appliance with cassette or
programming unit.
To pilot wire of an electronically
controlled appliance
COMFORT ECO FROST
SWITCH-OFF
OF HEATING
AND POWER
CUT-OFF
SIGNAL TO BE
TRANSMITTED
MEASUREMENT BETWEEN THE PILOT
WIRE AND NEUTRAL
0 Volt 230 Volt
-115 Volts
négative
+115 Volts
positive
GB
Page 10

10
5/
Locking the panel heater onto the hanging frame
-
Position the tilted panel heater on brackets S1.
-
Pivot the panel heater upwards and lift it to position it on brackets S2.
-
Lower the panel heater onto the hanging frame. A click tells you that the panel heater is fastened and locked in
place.
-
To unlock the panel heater from the hanging frame, take a flat-bladed screwdriver and push the slider (locat-
ed on the top left-hand corner of the hanging frame behind the appliance) towards the wall. Lift the panel
heater while holding the slider in place with your screwdriver. Tilt it forwards and then remove it from
brackets S1.
Operation
You can run your panel heater in several modes:
•
Comfort mode which enables you to have the right ambient temperature.
•
Eco mode which enables you to lower the temperature in your room when you will be away from your home for
a long time
•
Programming mode which enables you to programme the Comfort and Eco modes according to how a room
will be occupied
Control box
V1
Heating light indicator
A
Mode cursor
B
Temperature adjustment control knob.
Use
Setting the comfort temperature
This is the temperature desired when the room is occupied.
Set cursor A to position , the indicator V1 lights.
Adjust knob B to 5. The heating indicator V1 will illuminate if the temperature is below the desired temperature
.
Wait a few hours for the temperature to stabilise.
When you are happy with the setting (you may wish to use a thermometer to check), mark the position once and
for all. If you are not happy with the setting, re-adjust it and proceed again
.
Setting the Eco temperature
This involves a reduction in degrees compared to the Comfort temperature. We recommend that you use this
mode for periods of absence of more than 2 hours or overnight.
Set switch A to . The device is now in Eco mode (Comfort temperature minus approx. 3°C to 4°C).
Programming mode
The device is fitted with a thermostat that can be controlled via the control wire. It recognises the following commands:
NB: If no commands are received via the control wire, the device operates in Comfort mode.The frost-free and power interruption commands are prioritised over the Eco and Comfort modes.When switching from Comfort to Eco mode, the switchover time is around 12 seconds.
To activate Programming mode, set cursor A to .
The heater will then respond to a programming device for selection of the Comfort and Eco temperature periods
by connecting the control wire to a programming unit or another device fitted with a time clock to save on energy.
Ordre Abaissement
ECO -3,5°C
HORS GEL Ambient temperature maintained at around 7°C.
ARRET
Stopping the heating immediately (used for power
cutoff).
12
13
11
Page 11

Recommendations on use
Problems Check
The device does not
heat
- Check that the programming unit is in Comfort mode. .
- Check that the premise circuit breakers are triggered or that the load shedder (if you
have one) has not interrupted the device’s power supply.
- Check the air temperature in the room.
The device heats all
the time
- Make sure that it is not in a draft and that the temperature setting has not been changed. This unit with electronic control is equipped with a microprocessor that can be distribued by some severe mains voltage disturbances (outside EC standards defi ning the
disturbance protection level). If there are any problems (thermostat blocked, etc.) switch off
the unit power supply (fuse, circuit breaker, etc.) for about 5 minutes to allow the unit to
start again.
The device’s surface
is very hot
It is normal for the device to be hot when it is operating. The maximum surface temperature is restricted in accordance with the NF Electricité Performance standard. However,
if you think that your device is always too hot, check that the output is suitable for the
area of your room (we recommend 100W / m
2
) and that the device is not placed in a
draught, which would disrupt its setting.
The device does not
follow the programming instructions
- Ensure that you use the programming unit correctly (refer to the instructions manual), that
the programmer is correctly lodged in its housing and that it is operating normally (check
the condition of the batteries).
This device is electronically controlled and its microprocessor can be affected by significant local interferences
(outside the EU norms defining the level of protecton against interference).
If a problem should arise (locked thermostat, etc), cut the power supply to the device (fuse, circuit breaker, etc) for
approx. 10 minutes to reset the device.
If the problem recurs frequently, have your electricity supply checked by your electricity supplier.
2/Maintenance
To maintain the performance of the device, the upper and lower grills must be cleaned with a vacuum clener or
a brush approximately twice per year. Do not use abrasive products.
3/In case of problem
For an absence of :
Less than 2 hours
Do not alter the controls.
2 to 24 hours
Set cursor A to .
More than 24 hours or in summer
Set cursor A to .
GB
16
14
15
1/Recommendations on use
There is no point in setting the heating to maximum, the room temperature will not rise any quicker.
When you air the room, switch off the heating by setting cursor A to .
If you will be away for several hours, consider reducing the temperature.
Locking the controls
Wheel B can be locked in position or its range restricted to prevent inappropriate use (by children, etc..).
a) Unhook the device from the wal
b) Detach pins P from their supports on the rear of the control box.
c) Select position N to lock the wheel or position L to restrict its adjustment range.
Select one of the positions M to lock the switch in the desired mode.
l bracket.
11
Page 12

WARRANTY CONDITIONS :
KEEP THIS DOCUMENT IN A SAFE PLACE
(This certificate should only be produced if you are making a complaint,
attached with the invoice of the purchase)
- This guarantee is applicable for 2 years from the date of original purchase and shall be valid for
no more than 30 months from the date of manufacture.
- Your Atlantic distributor will exchange parts shown to be defective in manufacture. The replacement parts will be of charge but Atlantic does not accept responsability for freight or labor
charges or losses in transit.
- This guaranteeexcludes damage by neglect, shipping or accident and any damage due to incorrect
installation, use or purposes other than those intended or failure to observe the instructions
given.
UNIT TYPE * * : ____________________________________________________________
SERIAL NUMBER *: __________________________________________________________
CUSTOMER’S NAME AND ADRESS : _____________________________________________
*This information is shown on the plate which can be seen on the left-side or behind the front grille of the unit.
FOR SALES IN NEW ZEAL
ANDATLANTIC AUSTRALASIA - Phone : 0800
422 000 - Fax : 04 3800 509
FOR SALES IN AUSTRALIA
ATLANTIC AUSTRALASIA PTY LTD
4/13-25 Church Street
Hawthom Victoria 3122
Australia
Free call : 1800 677 857
Phone : 03 9852 9599
Fax : 03 9852 9844
web : www.atlantics.com.au
FOR SALES IN THE U.K.,
please contact :
ATOUR ATLANTIC LTD
Malling Works, Lewes
East Sussex BN7 2AY
Phone : 01580 2431 53
Fax : 01580 2411 80
E-mail : sales@tour-atlantic.ltd.uk
INSTALLER’S STAMP
12
Page 13
13
El aparato que acaba de adquirir ha sido sometido a numerosas pruebas y controles con el fin de garantizar la calidad.Le
agradecemos por su elección y su confianza. Esperamos que le aporte una entera satisfacción.
Algunos consejos:
Lea el manual antes de comenzar la utilización del aparato.
Corte la corriente antes de la conexión del aparato y comprueba la tensión de alimentación.
Conserve el manual, incluso después de la instalación del aparato.
Características del aparato:
CAT C : Aparato que satisface la norma NF Electricidad Rendimiento.
IP24 : Aparato protegido contra las proyecciones de agua.
Classe II : Doble aislamiento.
Advertencia :
- Tenga cuidado de que los niños no se apoyen en el aparato ni jueguen cerca del mismo cuando esté en funcionamiento; en algunas circunstancias, la superficie del aparato podría provocar quemaduras en la piel, debido
especialmente a que los niños aún no han adquirido reflejos o a que sus reflejos son más lentos que los de los
adultos. En caso de riesgo, prevea la instalación de una rejilla de protección delante del aparato.
-
Este aparato no está previsto para su uso por personas (incluidos los niños) cuyas capacidades físicas, sensoriales o
mentales estén reducidas, o por personas sin experiencia ni conocimientos, salvo si han recibido la supervisión o
las instrucciones previas relativas al uso del aparato por parte de una persona responsable de su seguridad.
Es conveniente mantener vigilados a los niños de manera que no jueguen con el aparato.
- Está prohibido obstruir total o parcialmente las rejillas del frontal o de la parte inferior del aparato. Existe riesgo de sobrecalentamiento.
- Cuidad de no introducir objetos o papel en el aparato.
- Todas las intervenciones en el interior del aparato deben ser efec tuadas por un profesional cualificado.
INSTALACIÓN
1/ Dónde instalar el aparato
- Este aparato ha sido diseñado para ser instalado en un local residencial. En cualquier otro caso, sírvase consultar a su distribuidor.
- La instalación se debe realizar en las reglas del arte y conforme a las normas en vigor en el país de instalación.
- Respetar las distancias mínimas con los obstáculos para el emplazamiento del aparato.
No instalar el aparato:
• En una corriente de aire susceptible de perturbar su regulación (debajo de una Ventilación
Mecánica Centralizada, etc.).
• Debajo de una toma de corriente fija.
• En el volumen 1 de los cuartos de baño.
• En el volumen 2 si la manipulación de los mandos es posible por una persona que utilice la ducha
o la bañera.
❶
La instalación de un aparato en altitud provoca una elevación de la temperaturade salida de aire (del orden de 10 ºC por cada 1.000 m de desnivelación).
Está formalmente desaconsejado montar los aparatos verticales por encima
de una altitud de 1.000 m (riesgo de mal funcionamiento).
Está prohibido montar un aparato vertical horizontalmente y viceversa.
Está formalmente prohibido utilizar el aparato en configuración móvil, sobre
pies o sobre ruedas.
SP
2/
Desbloquear la pata de enganche del aparato
Le aconsejamos que coloque el aparato horizontalmente de cara al suelo.
Utilice un destornillador plano.
Page 14

3/
C
able del aparato
Fase= Marrón
Neutro=Azul
FASE
NEUTRO
Red
Eléctrica
Tres casos posibles
Hilo piloto=Negro
1er caso: aparato solo
2e caso: aparato Esclavo
El hilo piloto no está
conectado
Hacia aparato con cassette o
central de programación
3e caso:Aparato
Hacia hilo piloto de un aparato
de regulación electrónica
Órdenes
recibidos
Ausencia
de corriente
Alternancia
completa
230 V
Semialternancia
negativa
- 115 V
Semialternancia
positiva
+ 115 V
Oscilloscopio
ref/neutro
Método
obtenido
COMODIDAD ECO SIN HELADA
PARADA
DESCARGA
5/ Bloquear el aparato sobre la pata de enganche
UTILIZACIÓN
Descripción de los mandos
V1
Piloto indicador de calentamiento.
A
Cursor de los modos
B
Mando de ajuste del control de temperatura
12
13
11
Fijar la pata de enganche
- Puntos de perforación A ❼
- Puntos de perforación B ❽.
Nota : Está formalmente prohibido utilizar el aparato en confi guración móvil, sobre pies o sobre ruedas.
4/ Conectar el aparato :
- El aparato necesita una alimentación de 230 V 50 Hz.
- Su conexión a la red se efectuará mediante un cable de 3 hilos (marrón = fase, azul = neutro, negro = hilo piloto) a
través de una caja de conexiones. En lugares húmedos, como cuartos de baño y cocinas, el cajetín de conexión deberá instalarse,
como mínimo, a 25 cm del suelo.
- La instalación deberá contar con un dispositivo de corte omnipolar dotado de una distancia de apertura de contactode, por lo
menos, 3 mm.
- No se puede realizar una conexión a la tierra.
- No conectar el hilo negro a la tierra.
- El aparato está equipado con una toma de corriente que se conecta a una toma mural.
- La sustitución del cable de alimentación, si éste fuese demasiado
corto o se hubiese deteriorado, requiere el uso de herramientas
especiales y deberá ser realizada por un especialista.
Nota : Está formalmente prohibido utilizar el aparato en confi guración móvil, sobre pies o sobre ruedas.
Ajuste de la temperatura deseada :
Se trata de la temperatura que se desea tener al encontrarse en la habitación.
Poner el cursor A en
Poner el botónBsobre 5, el piloto de calentamiento V1 se enciende si la temperatura ambiente es inferior a
la temperatura deseada.
Espere algunas horas hasta que la temperatura se estabilice.
Si está satisfecho con el ajuste realizado (verifíquelo con un termómetro si fuera necesario), registre la posición
del mando para otra ocasión. Si el ajuste no le parece adecuado, modifíquelo.
Cómo ajustar la temperatura Eco :
Es la temperatura deseada durante los periodos en los que la habitación no está ocupada.
Se aconseja utilizar este modo para periodos de ausencia superiores a 2 horas.
Poner el cursor A en : temperatura confort bajada en 3 a 4° C.
.
14
Page 15
15
Cómo realizar una programación (Ahorro de energía)
Los aparatos equipados con un termostato electrónico pueden recibir órdenes: Confort (
Temperatura ajustada
mediante la rueda de ajuste
), ECO (
temperatura confort bajada en 3 a 4° C
), A salvo de heladas (
aproximadamente 7°
C
) o Paro.
Para esta programación, existen 2 soluciones:
1) la utilización del hilo piloto (hilo negro) con un programador, de un aparato con una interfaz y del sistema
Chronopass o de una caja mural hilo piloto.
2) la utilización de la corriente portadora con una interfaz de corriente portadora en cada aparato como complemento de un programador, del sistema Chronopass o de una caja mural corriente portadora.
El número de órdenes recibidas depende del sistema de programación.
SP
Consejos
1/Consejos de utilización
Es inútil poner el aparato al máximo; la temperatura de la habitación no aumentará más rapido.
Cuando ventile la habitación, apague el aparato colocando el cursor A en .
Si piensa ausentarse por espacio de varias horas, acuérdese de bajar la temperatura.
Ausencia de : menos de 2 horas, no es necesario cambiar el ajuste.
De 2 horas a 24 horas, poner el cursor A en .
Más de 24 horas o en verano, seleccione la posición .
Si hay varios aparatos instalados en la misma habitación, hágalos funcionar simultáneamente. De este modoconseguirá una temperatura más homogénea sin aumentar el consumo de electricidad.
Bloqueo de los mandos
Existe la posibilidad de bloquear o limitar el uso del mando de ajuste B con el fi n de evitar manipulaciones
no deseadasdel aparato (niños, etc.
). Descuelgue el aparato del soporte mural.
En la parte posterior de la caja del termostato retirar los pasadores P de sus soportes.
Seleccione la posición N para bloquear el mando, o la posición L para limitar su radio de movimiento . La
posición M se utiliza para bloqu
ear el interruptor .
2/Mantenimiento
Las partes externas del aparato pueden limpiarse con un paño húmedo. No utilice nunca productos abrasivos.
3/En caso de problemas
Problemas encontrados Verificaciones por realizar
El aparato no calienta - Comprobar que el programador está en modo CONFORT.
- Cerciorarse de que los disyuntores de la instalación están enclavados, o bien que el
interruptor de deslastre (si posee uno) no ha cortado la alimentación del aparato.
- Comprobar la temperatura del aire de la pieza.
El aparato calienta
todo el tiempo
- Comprobar que el aparato no está situado en una corriente de aire o que el reglaje
de temperatura no ha sido modificado.
La superficie del aparato está muy caliente
Es normal que el aparato esté caliente cuando está funcionando; la temperatura máxima de la superficie está limitada conforme a la norma NF Electricité Performance. Si
aun así considera que su aparato sigue estando demasiado caliente, verifique si la
potencia está adaptada a la superficie de la habitación (se recomiendan 100 W / m
2
) y si
el aparato está colocado en una corriente de aire que afecte a su regulación.
El aparato no sigue las
órdenes de programación
- Cerciorarse de la buena utilización de la central de programación (consultar su manual
de uso) o que la cassette está bien introducida en su alojamiento y que funciona normalmente (¿pilas?).
16
14
15
Page 16

CONDICIONES DE GARANTÍA
- La duración de la garantía es de dos años a contar a partir de la fecha de la instalación o de la compra y en ningún caso superior a los 30 meses a partir de la fecha de fabricación sin justificación.
- La garantía sólo es aplicable en ESPAÑA Y PORTUGAL.
- Los deterioros derivados de una instalación no conforme, de una red de alimentación que no
respete la normativa en vigor, de un uso anormal o del no respeto de las recomendaciones de
dicho documento no están cubiertos por la garantía.
- Presentar el certificado únicamente en caso de reclamación ante el distribuidor o el instalador
adjuntando la factura de compra.
- Las disposiciones de las condiciones de garantía estarán acorde con lo indicado en la ley 23/2003
de 10 de julio por la que se transpone al ordenamiento jurídico nacional, la Directiva 1999/44/CE.
Servicio de Asistencia Técnica
Pol. Ind. Cam
í Real
Paseo del Ferrocaril, 339 - 2°planta
08860 CASTELLDEFELS (Barcelona)
Tel SAT 902 45 45 66
Fax 902 45 45 20
En caso de problemas, póngase en contacto con nosotros al 902 45 45 66 (0034 93 590
25 40 desde Portugal)
16
Page 17

17
Het apparaat dat u zojuist heeft aangeschaft is onderworpen aan talrijke tests en controles om de kwaliteit ervan te verzekeren.We danken u voor uw keuze en uw vertrouwen.We hopen dat het apparaat aan uw verwachtingen zal beantwoorden.
Enkele adviezen:
Lees de g
ebruiksaanwijzing voordat u begint met het installeren van het apparaat.
Sluit de stroom af voor u gaat werken aan het apparaat en controleer de voedingsspanning.
Bewaar de gebruiksa
anwijzing, zelfs na de installatie van het apparaat.
Kenmerken van het apparaat :
CAT C : Apparaat dat voldoet aan de Franse norm NF Electricité Performance
volgens de criteria van de aangegeven categorie.
IP24 : Apparaat beschermd tegen opspattend water.
Classe II : Dubbele isolatie.
Waarschuwing
- Dit apparaat is niet geschikt om te worden gebruikt door personen (kinderen inbegrepen) met verminderde licha-
melijke, zintuigelijke of geestelijke vermogens of door personen zonder ervaring of kennis behalve in het geval
zij door degene die voor hun veiligheid verantwoordelijk is, in het oog worden gehouden of vooraf de nodige
instructies hebben gekregen met betrekking tot het gebruik van het apparaat.
- Pas op dat kinderen niet tegen het apparaat aanleunen en in de buurt spelen wanneer het aanstaat. Het opper-
vlak van het apparaat kan onder bepaalde omstandigheden brandwonden op de huid veroorzaken, vooral
wegens het feit dat kinderen niet dezelfde of minder snelle reflexen hebben dan volwassenen. Zorg er bij risico’s voor dat er een beschermingsrooster voor het apparaat wordt gezet.
- De kinderen moeten in het oog gehouden worden om te voorkomen dat zij met het apparaat gaan spelen.
- Het is verboden om de roosters (aan de voorkant of binnenin) van het apparaat geheel of gedeeltelijk af te slui-
ten: er bestaat een risico van oververhitting.
- Let erop dat er geen voorwerpen of papier in het apparaat worden gedaan.
- Alle reparaties binnen in het apparaat moeten worden uitgevoerd door een gekwalificeerde vakman.
Installatie
1/ Waar moet het apparaat worden geïnstalleerd ?
- Dit apparaat is ontworpen om geïnstalleerd te worden in een woonruimte. Voor andere installaties raadpleeg
uw verdeler.
- De installatie moet worden uitgevoerd volgens de regels der kunst en conform aan de normen die gelden in het
land van installatie.
- Bij plaatsing van het apparaat moeten de minimale afstanden ten opzichte van andere voorwerpen gerespec-
teerd worden.
Het apparaat niet installeren:
• In een luchtstroom die de regeling ervan kan verstoren (onder mechanische centrale ventilatie e.d.)
• Onder een vast stopcontact
• In volume 1 van badkamers.
• In volume 2 indien de bediening van de knoppen mogelijk is door een persoon die douche of bad
gebruikt.
❶
NL
Page 18

2/
Kabel van het apparaat
Fase=Bruin
Nulleider=Blauw
FASE
NULLEIDER
Elektriciteitsnet
1e geval : apparaat alleen
Stuurstroomdraad=Zwart
Drie mogelijke gevallen
Apparaat niet bestuurd
De stuurstroomdraad is
nergens op aangesloten
2e geval: slavenapparaat
3e geval: hoofdapparaat
Naar apparaat met cassette of de
programmeringscentrale
Naar stuurstroomdraad van een
apparaat met elektronische
regeling
Ontvangen
instructies
Green
stroom
Complete
wisselstroom
230 V
Negatieve halve
wisselstroom
- 115 V
Positieve halve
wisselstroom
+ 115 V
Oscilloscopen
Réf/Neutraal
Verkregen
functie
COMFORT ECO VORSTVRIJ
STOP TIJDELIJKE
UITSCHKELING
5/ Het apparaat vastzetten op het bevestigingshaakje
Gebruik van het apparaat
Beschrijving van het bedieningskastje
V1
Controlelampje verwarming
A
Loper van de manieren
B
Wieltje om de temperatuur te regelen
Het instellen
van de comforttemperatuur :
Dit is de gewenste temperatuur tijdens de aanwezigheid in het vertrek.
a) Zet schakelaar A op .
b) Stel de gekartelde draaiknop B in tussen 4 en 5, het lampje V1 voor de verwarming gaat branden indien de
kamertemperatuur onder de gewenste temperatuur ligt.
c) Wacht enkele uren zodat de temperatuur kan stabiliseren.
d) Indien u de instelling goed vindt (neem eventueel een thermometer om te controleren) kunt u de precieze stand
opnemen voor de toekomst.
Indien u de instelling niet goed vindt, moet u bijstellen en weer vanaf punt c) beginnen.
12
13
11
Het bevestigingssysteem van het apparaat loshalen
Wij raden u aan het apparaat plat op de vloer te leggen met de voorzijde naar beneden.
U hebt voor deze handeling een platte schroevendraaier nodig.
3/
Vastzetten van het bevestigingssysteem
- Boorpunten A ❼.
- Boorpunten B ❽.
Opmerking : Het is formeel verboden het apparaat in beweeglijke confi guratie te gebruiken, op voeten of rol-
letjes.
4/ Aansluiting van het apparaat :
- Het apparaat werk op 230V 50Hz.
- De aansluiting op het net gebeurt met behulp van een 2-dradige kabel (Kastanjebruin= Fase, Blauw=Nulleider) en
een bedieningskastje (mechanische convectoren B) ; van een 3-dradige kabel (Kastanjebruin= Fase, Blauw=Nulleider,
Zwart=Stuurdraad) en een bedieningskastje (elektronische convectoren C). In vochtige ruimten zoals badkamers en
keukens moet het bedieningskastje op minstens 25 cm van de vloer geplaatst worden.
- Een toestel uitgerust met een stekker, kan worden aangesloten op een stopcontact. Dit toestel is stekkerklaar.
- De installatie moet met een onderbrekingsinrichting voor alle polen uitgerust worden, die een contactopening-
safstand van minstens 3mm heeft.
- De aarding is verboden. Verbind de stuurdraad (zwart) niet
met de aarde.
- Als Het elektrische snoer te kort of beschadigd is, moet de ver-
vanging ervan met speciaal gereedschap en door een deskundig
technicus gebeuren.
Als een sturend of gestuurd apparaat door een differentieelinrichting van 30mA beveiligd wordt (bv. : badkamer), dient de toevoer van de stuurdraad op deze differentieel beveiligd te worden. Tabel van de opdrachten die het apparaat op zijn stuurdraad
kan ontvangen. Te meten tussen de stuurdraad en de nulleider.
18
Page 19

19
Het instellen van de ECO temperatuur
Dit is de gewenste temperatuur tijdens de afwezigheid uit het vertrek. Het wordt aanbevolen deze modus te
gebruiken voor periodes van afwezigheid van langer dan 2 uur.
Zet de schakelaar A op .
Het apparaat bevindt zich in de Eco modus (Comfort temperatuur verminderd met ongeveer 3°C tot 4°C).
Programmerinsgmodus
Dit apparaat is uitgerust met een thermostaat die in staat is om commando’s te ontvangen via zijn besturingsdraad. Hij herkent de commando’s:
COMFORT :Temperatuur ingesteld met gekartelde draaiknop B.
ECO :Comforttemperatuur verminderd met ongeveer 3°C tot 4°C.
VORSTVRIJ :Kamertemperatuur aangehouden op ongeveer 7°C.
STOP :Onmiddellijke stop van de verwarming (gebruikt voor de belastingafschakeling).
Zet de schakelaar A op om de programmeringsmodus aan te zetten.
Zo kunt u door de stuurstroomdraad aan te sluiten op een timer of een met een programmeringscassette uitgerust apparaat, uw periodes voor Comfort en Eco temperatuur programmeren. Het is mogelijk om meerdere apparaten aan te sluiten op een timer of een met een programmeringscassette uitgerust apparaat om zodoende energie te besparen.
NB: Indien er geen commando is op de stuurstroomdraad, verwarmt het apparaat in de Comfort modus. De commando’s Vorstvrij en belastingafschakeling hebben voorrang ten opzichte van de modussen Eco en Comfort.
Bij een overgang van de Comfort modus naar de Eco modus, is er een overgangstijd van ongeveer 12 seconden.
NL
GEBRUIKSADVIEZEN
- Het is niet nuttig om het apparaat op maximum te zetten, de temperatuur in het vertrek zal er niet
sneller door stijgen.
- Zet het apparaat af door de schakelaar
A op te zetten als u het vertrek lucht.
- Indien u meerdere uren afwezig bent, moet u niet vergeten de temperatuur lager te zetten.
- Afwezigheid van Minder dan 2 uur : niet aan de commando’s zitten
Tussen 2 en 24 uur : zet schakelaar
A op .
Meer dan 24 uur en ’s zomers : zet het apparaat in de vorstvrij modus.
- Indien u meerdere apparaten in een vertrek heeft, laat ze dan tegelijkertijd werken. U krijgt zo een
meer gelijkmatige temperatuur zonder echter het elektriciteitsverbruik te verhogen.
1/ Blokkering van de bediening
Om te vookomen dat iemand het apparaat ongewild (kinderen, enz) kunt u het gebruik van het wieltje B blokkeren of beperken.
a) Haak het apparaat uit zijn muurseun.
b) Haak de pionnen P op de achterzijde van de thermostaat doos uit hun houders .
c) Kies de stand N als u het wieltje wilt blokkeren of kies de stand L indien u het werkbereik van het wieltje wilt
beperken . De stand M dient om de schakelaar te blokkeren .
2/ ONDERHOUD
Om er voor te zorgen dat het apparaat goed blijft presteren, is het nodig om ongeveer twee keer per jaar met
een stofzuiger of een borstel alle stof van de roosters van het apparaat te halen.
Nooit schuurmiddelen
gebruiken.
16
14
15
Page 20

N GEVAL VAN PROBLEMEN
3/ I
Voorkomende
problemen
Het apparaat warmt
niet op
Uit te voeren controles
- Controleer dat gekartelde draaiknop A in COMFORT modus staat
- Controleer dat de stroomverbrekers van de installatie zijn gekoppeld of dat de belastingafschakeling (als u er een heeft) niet de voeding van het apparaat heeft afgesloten.
- Controleer de temperatuur van de lucht in het vertrek.
Het apparaat is zeer
warm aan de oppervlakte.
Het apparaat volgt
de programmeringscommando’s niet op
Het apparaat verwarmt
de hele tijd
Dit apparaat met elektronische regeling bevat een microprocessor die kan worden ontregeld door belangrijke storingen op het elektriciteitsnet (niet volgens EG norm die het beschermingsniveau tegen storingen bepaalt.)
In geval van problemen (geblokkeerde thermostaat e.d.) gedurende ongeveer 10 minuten de voeding van het apparaat onderbreken (zekering, stroomverbreker e.d.), daarna het apparaat weer aanzetten.
Laat indien dit verschijnsel zich vaak voordoet, de voeding controleren door uw energiebedrijf.
- Het is normaal dat het apparaat heet is als het aanstaat. De maximale temperatuur is
altijd begrensd volgens de Franse norm NF Electricité Performance. Als u echter
vindt dat uw apparaat nog steeds te warm is, moet u controleren dat het vermogen
past bij de oppervlakte van het vertrek (we raden 100W / m² aan) en de regeling niet
van slag wordt gebracht omdat het apparaat op de tocht staat.
- Controleer dat de programmeringscentrale goed wordt gebruikt (kijk hiervoor in de
gebruiksaanwijzing) of dat de programmeringscassette goed in de behuizing zijn en hij
goed werkt (controleer de staat van de batterijen, de zekering e.d.)
- Controleer dat het apparaat niet in de tocht staat of dat de tempera-tuursinstelling
niet is gewijzigd.
GARANTIEVOORWAARDEN :
DOCUMENT TE BEWAREN DOOR DE GEBRUIKER
(het garantiebewijs alleen in geval van klachten aan uw dealer of installateur voorleggen)
- De duur van de garantie is twee jaar vanaf de installatie- of aankoopdatum en mag niet langer zijn
dan 30 maanden vanaf de fabricagedatum als de nodige bewijsstukken ontbreken.
- De garantie omhelst de vervanging of levering van de als defect erkende stukken, met uitsluiting van
alle schadevergoedingen.
- De werk-, verplaatsings- en transportkosten zijn ten laste van de gebruiker.
- Beschadigingen die het gevolg zijn van een niet conforme installatie, die dus niet overeenstemmen
met de geldende normen (EN 50160), van een abnormaal gebruik of de niet-naleving van de
voorschriften van voorvermelde handleiding, worden door de garantie niet gedekt.
- Leg het garantiebewijs alleen in geval van klachten aan uw dealer of installateur voor, en voeg er uw
aankoopfactuur bij.
TYPE APPARAAT * : _________________________________________________________
SERIENUMMER * : ___________________________________________________________
NAAM EN ADRES VAN KLANT : _______________________________________________
*Deze gegevens vindt u op het kenplaatje op de linkerkant van het apparaat.
STEMPEL VAN DE INSTALLATEUR
20
Page 21

УСТАНОВКА ПРИБОРА
Прежде чем начинать установку прибора внимательно прочитайте руководство. Перед
произведением операций по обслуживанию прибора отключите электропитание.
Сохраните руководство даже после установки прибора.
1) Где устанавливать прибор ?
-
Установка должна производиться в соответствии с существующими в вашей стране нормами и правилами.
-
Эти приборы относятся к классу | | и защищены от брызг воды, следовательно, имеют
защиту IP24 . Oни могут быть установлены в помещениях любого типа, в том числе в зоне
2 ванных комнат или душевых. Hо при этом органы управления прибора не должны
быть доступны лицам, принимающим душ или ванну ❶.
-
При размещении прибора необходимо соблюдать минимальные расстояния от различных
предметов, как показано
-
Если стенное покрытие в вашем доме нанесено на пенистый материал, то следует поместить под несущий кронштейн конвектора прокладку, толщина которой равна толщине
пенистого слоя, что обеспечит образование между стеной и задней стенкой прибора свободного зазора, достаточного для поддержания постоянства его регулировки.
-
Не устанавливать прибор :
На сквозняке, который может нарушить регулирование температуры ( Под потоком воздуха регулируемой системы вентиляции и т.п.).
Под фиксированной настенной розеткой.
Установка прибора на большой высоте над уровнем моря приведет к повышению температуры выходящего воздуха (примерно на 10°C при изменении
высоты на 1000 м).
2) Как устанавливать прибор ?
2-1 Отсоедините подвеску от аппарата
Мы советуем положить его передней стороной к земле.
Воспользуйтесь плоской отверткой.
2-2 Закрепите подвеску
❼❽
Точки просверливания А
Точки просверливания В
Примечание: Категорически запрещается использовать обогреватель в мобильном положении на ножках или колесиках.
2-3 Подключение прибора :
- Прибор должен быть подключен к сети питания 230 В 50 Гц.
- Подсоединение к сети электропитания должно производиться при помощи двухжильного кабеля (Коричневый)
- Прибор, оборудованный кабелем с вилкой, может подключаться к стенной розетке.
- Установка должна иметь устройство отключения с расстоянием размыкания контакта по крайней мере 3 мм.
- Подсоединение к заземлению запрещено.
- Замена кабеля электропитания в случае, если
он слишком короткий или поврежден, требует
использование специальных инструментов и
должна производиться только квалифицированным специалистом.
21
Приобретенный вами прибор прошел многочисленные испытания и проверки для обеспечения качества его изготовления. Мы надеемся,что он оправдает все ваши ожидания.
RU
Page 22

22
2-4) Закрепите аппарат на подвеске
ЭКСПЛУАТАЦИЯ ПРИБОРА
1) Описание блока управления :
A
B
Ручка регулирования температуры
2) Регулирование температуры комфорт
Это температура, которую вы желаете получить, находясь в комнате.
a)
Установите выключатель A в положение Пуск.
b)
Отрегулируйте ручку B в положение между 4 и 5.
c)
Подождите несколько часов для стабилизации температуры.
d)
Если такое регулирование вам подходит ( (для проверки можно воспользоваться тер-
мометром)
, оставьте ручку регулирования в этом положении.
Если такое регулирование вам не подходит, измените положение ручки регулирования
температуры и перейдите к пункту
c.
3) Как установить температуру в режиме экономии :
Это температура, которую Вы хотите поддерживать в комнате во время своего отсутствия
.
Рекомендуется использовать этот режим в случае, если Вы отсутствуете более двух часов.
a)
Установите курсор A в положение .
b)
Установите ручку B между 3 и 4: если температура в помещении ниже заданного зна-
чения температуры
«Eco», загорится индикатор V1.
c)
Подождите несколько часов для стабилизации температуры.
Если Вы удовлетворены настройкой (для проверки можно воспользоваться термометром
), отметьте заданное положение и пользуйтесь им в дальнейшем. Если настройка Вам
не подходит
, измените ее и вновь выполните пункт c.
4) Регулирование против замерзания
Данная система позволяет поддерживать в комнате температуру около 7°C в случае
ухода из дома напродолжительное время. ( Обычно более 24 часов ).
a) Оставьте выключатель A в положении Пуск, установите ручку регулирования температуры в положени .
b) Оставьте выключатель A в положении
5) Индикатор отопления
Индикатор показвает моменты, когда нагревающий элемент работает. Он мигает, когда
температура стабилизирована и выключается, когда температура слишком высокая.
6) Блокирование органов управления :
Существует возможность заблокировать или ограничить использование ручки регулирования температуры B для того чтобы предотвратить неуместное использование прибора ( дети и т.п ).
a) Снимите прибор с настенного держателя.
b) Отсоедините точки P от держателей.
c) Установите ручку регулирования температуры в положение B для блокирования ручки
или в положение L для ограничения диапазона использования ручки.
13
16
14
15
12
11
Page 23

7) Как выполнить программирование (Экономия энергии)
ПРЕДУПРЕЖДЕНИЯ
Данный прибор не должен использоваться маленькими детьми и людьми с ограниченными физическими возможностями без надзора. Следите, чтобы дети не дотрагивались до
прибора.
Запрещено кидать внутрь прибора какие-либо предметы.
Запрещено частично или полностью загораживать решетки забора (на фасаде) и выхода
(снизу) воздуха, так как это может привести к перегреву прибора Замена кабеля электропитания в случае его повреждения может производиться только квалифицированным специалистом.
Приборы, поставляемые в комплекте с трехжильным кабелем должны подключаться к стационарной разводке только квалифицированным специалистом.
Все работы с внутренними частями прибора должны производиться только квалифицированным специалистом.
ТЕХНИЧЕСКОЕ ОБСЛУЖИВАНИЕ
Для того чтобы сохранить рабочие характеристики прибора, необходимо примерно раз в
месяц очищать верхние и нижние решетки прибора от пыли при помощи щетки или пылесоса.
При использовании прибора в сильно загрязненной атмосфере на поверхности решеток
прибора могут появиться пятна. Такие поверхностные загрязнения не покрываются гарантией прибора и не являются основанием для его замены. При наличии чрезмерно загрязненного воздуха в помещениях рекомендуется осуществлять более частые проветривания
и более часто проводить чистку прибора.
Корпус прибора необходимо очищать влажной тряпкой. Внимание! Ни в коем случае не
использовать для очистки абразивные материалы.
Каждые пять лет внутренние компоненты прибора должны быть проверены и протестированы квалифицированным специалистом.
RU
Аппараты, оборудованные электронным термостатом, могут получать управляющие
команды: режим Комфорт (температура регулируется бегунком), ЭКО (понижение комфортной температуры на 3-4°C), Антизамерзание (около 7°C) или Стоп. Для такого программирования имеется 2 решения:
1) использование контрольного провода (провод черного цвета) с программатором, аппарата с интерфейсом и системы Chronopass или настенного пульта с сигнальным проводом.
2) использование сигнала несущей частоты с интерфейсом на каждом аппарате в дополнение к программатору, системы Chronopass или настенного пульта с сигналом несущей
частоты Число полученных команд зависит от системы программирования.
РЕКОМЕНДАЦИИ ДЛЯ ИСПОЛЬЗОВАНИЯ
- Нет необходимости устанавливать прибор на максимальную мощность, температура комнаты не будет повышаться быстрее.
- Когда вы проветриваете комнату, отключите прибор, установив выключатель A в положение .
- Если вы уходите из дома на несколько часов, не забудьте понизить температуру.
В случае отсутствия в течение :
менее 2 часов, не изменяйте положение органов управления.
от 2 до 24 часов, уменьшить положение ручки регулирования температуры B на два деле-
ния.
более 24 часов или летом, установить конвектор в положение .
- Если в комнате установлено несколько конвекторов, оставьте их работать одновременно;
это обеспечит поддержание постоянной температуры без дополнительных затрат электроэнергии. Это также верно для незанятой комнаты: лучше оставить прибор включенным и установленным на низкую температуру, чем выключить его полностью.
23
Page 24

В СЛУЧАЕ ВОЗНИКНОВЕНИЯ ПРОБЛЕМ
Прибор не греет :
Убедитесь в том, что выключатели установки находятся во включенном положении, а также
что ограничитель мощности (если имеется) не отключил прибор. Проверьте температуру
воздуха.
Прибор греет без остановки :
Проверьте, что прибор не находится на сквозняке.
Прибор не следует указаниям программирующего устройства (для оснащенной модели): Убедиться в правильном использовании программирущего устройства или проверить
правильную установку K7 Program на свое место и его работу (батарейка?).
Работа электронных приборов с микропроцессором может быть нарушена помехами
других важных приборов ( не соответсвующих нормам CE, определяющим уровень защиты от помех). В случае возникновения проблем (термостат заблокирован…) отключить
питание прибора в течение приблизительно 5 минут, чтобы перезапустить прибор.
Если проблема возникает регулярно, обратитесь к Вашему поставщику электроэнергии чтобы проверить питание.
УСЛОВИЯ ГАРАНТИИ :
ДОКУМЕНТ ДЛЯ ПОЛЬЗОВАТЕЛЯ
(
представить это свидетельство только в случае рекламации дистрибьютору или вашему
подрядчику
- Длительность гарантии составляет два года от даты установки или покупки и не
может превышать 30 месяцев от даты изготовления в случае отсутствия оправдательных документов установки или покупки прибора.
- Гарантия покрывает замену или поставку неисправных деталей, но не возмещение убытков.
- Оплата рабочей силы и транспорта относятся на счет пользователя.
- Повреждения по причине несоответствующей установки, неправильного
использования или несоблюдения приведенных в этом руководстве инструкций
не покрываются гарантией.
- Представить это свидетельство только в случае рекламации дистрибьютору или
вашему подрядчику, приложив к нему счет на приобретенный прибор.
)
ТИП ПРИБОРА * : __________________________________________________________
N0.СЕРИИ * : ______________________________________________________________
ФАМИЛИЯ И АДРЕС ПОКУПАТЕЛЯ : __________________________________________
Эти сведения указаны на фирменном щитке,расположенном с левой стороны прибора
*
24
RSGHEP10 Janv 11 12-80-0050-B
.
 Loading...