


Declaration of Conformity
Fellowes Manufacturing Company
Yorkshire Way, West Moor Park, Doncaster, South Yorkshire, DN3 3FB, England declares that the model Voyager A3 conforms
with the requirements of (RoHS) the Restriction of Hazardous Substances Directive 89/336/EEC. The Low Voltage Directive
72/73/EEC as amended by directive 92/68/EEC. The Electromagnetic Compatability Directive 89/336/EEC as amended by
directive 92/31/EEC & 96/68/EEC and the following Harmonised European Normes EN standards and IEC standards.
Information Technology Product: EN-60950-1 2001 / IEC-60950-1 2001
EMC: EN-55014-1 / A2 : 2002 EN-55014-2 / A1 : 2001 EN-61000-3-2 : 2000 EN-61000-3-3 / A1 : 2001
Itasca, Illinois, USA
March 2009 James Fellowes
Help Line
Europe 00-800-1810-1810
Fellowes
Australia +61-3-8336-9700
Benelux +31-(0)-76-523-2090
Canada +1-905-475-6320
Deutschland +49-(0)-5131-49770
España / Portugal + 34 902 33 55 69
France +33-(0)-1-30-6-86-80
Italia +39-71-730041
1789 Norwood Avenue, Itasca, Illinois 60143-1095 • USA • 630-893-1600
Australia
Benelux
Canada
China
Deutschland
España
2008 Fellowes, Inc. Part No. 403916
France
Italia
Japan +81-(0)-3-5496-2401
Korea +82-(0)-2-3462-2844
Malaysia +60-(0)-35122-1231
Polska +48-(22)-771-47-40
Russia +7-(495)-228-14-03
Singapore +65-6221-3811
United Kingdom +44-(0)-1302-836836
United States +1-630-893-1600
fellowes.com
Japan
Korea
Polska
Singapore
United Kingdom
United States
High-Performance Ofce Laminator
Voyager
Please read these instructions before use.
GB
VOYAGER LAMINATOR
Up
Standby
Reverse
LCD Display
Left
(-)
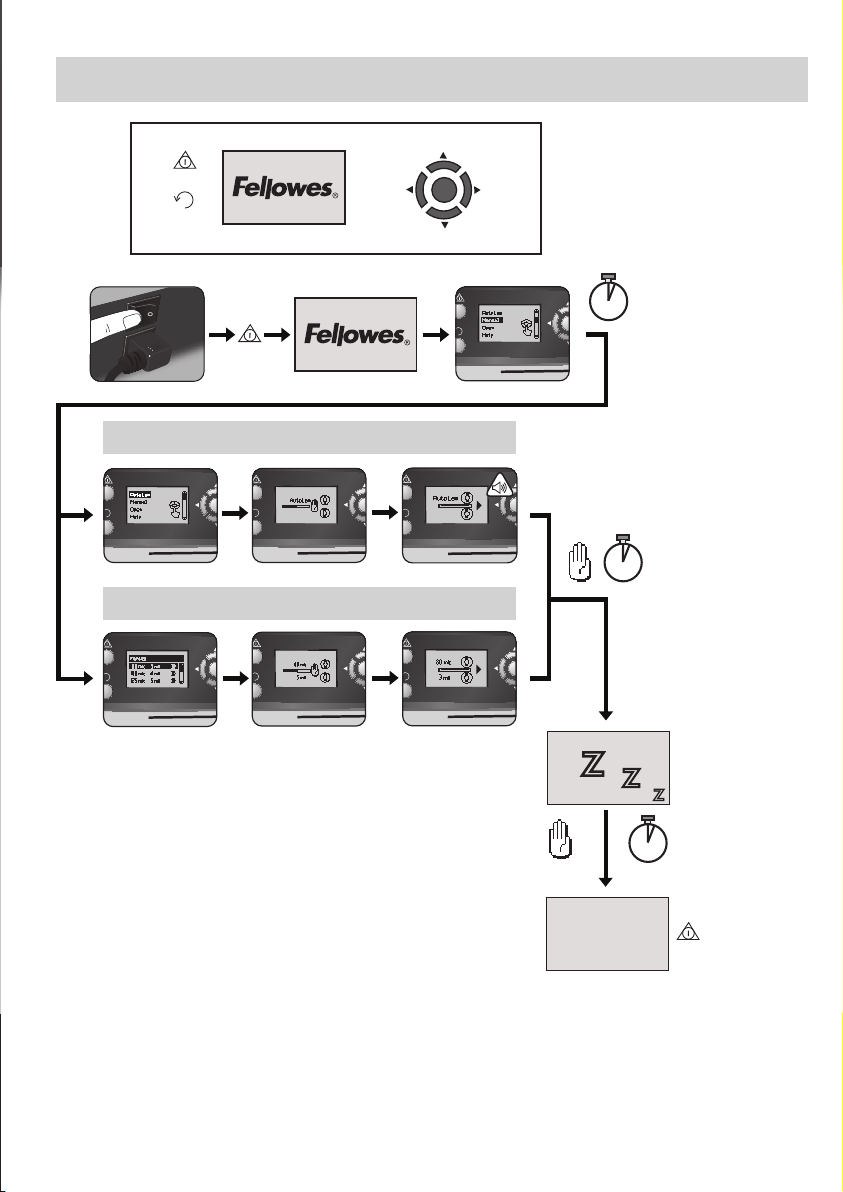
AutoLam - Automatic Lamination
Manual Lamination
Right
(+)
Down
5 sec
30 min
Z
Z
30 min
Power Save mode
LCD off
Z
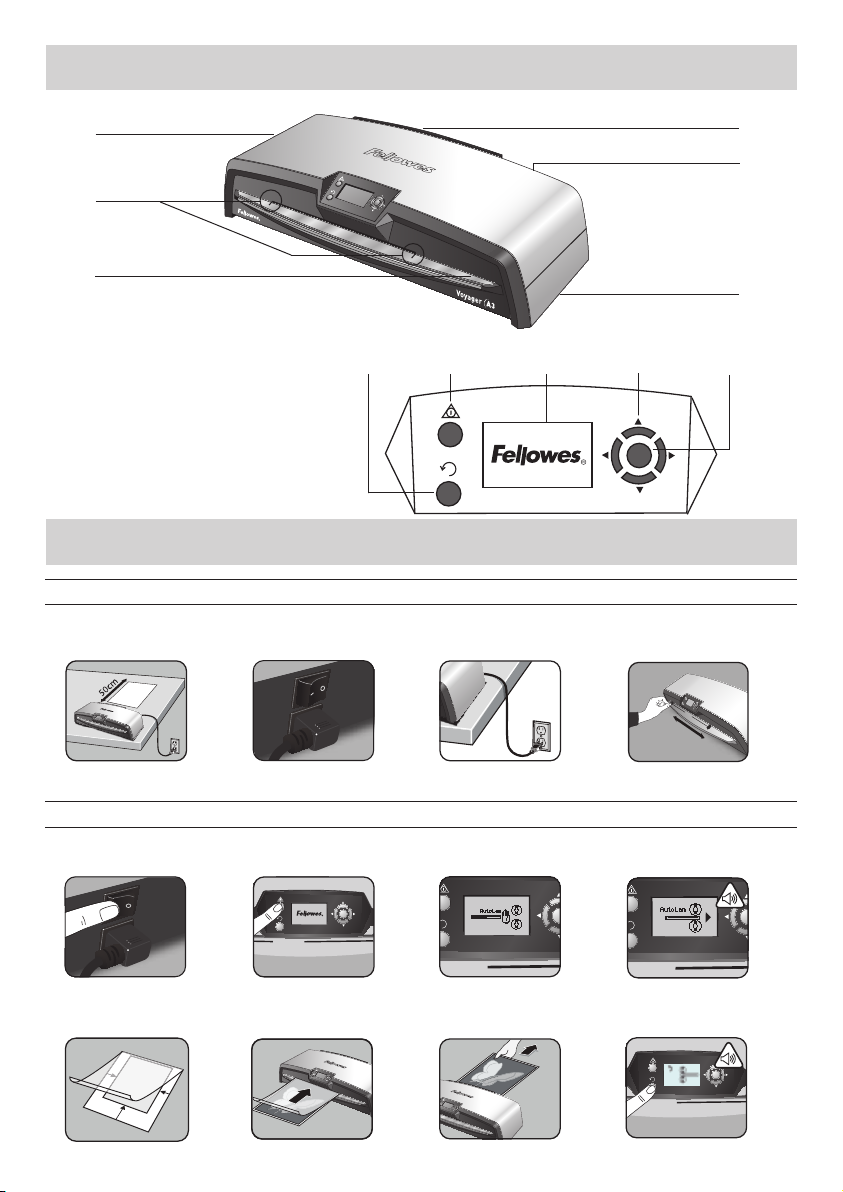
LAMINATOR CONTROLS
A
B
C
D
E
F
QUICK START GUIDE
SETTING UP THE LAMINATOR
1 2 3 4
I
J
K
G
H
STEPS TO LAMINATE - AutoLam
5 6 7 8
9 10 11 12
3

ENGLISH
CAPABILITIES
Performance
Format A3
Entry width 325mm
Estimated heat-up time 4 minutes
Cool down time 30-60 minutes
Lamination speed variable - max. 90cm/min
Laminating mechanism Belt-drive
Ready indication Light & beep
AutoLam laminating Yes
Easi-Access open mechanism Yes
Auto Reverse function Yes
Overload protection Yes
CleanMe glue sensor Yes
HeatGuard™ technology Yes
Manual override of auto-functions Yes
Clear Path / Anti-jam engine Yes
Auto shut-off Yes (30 mins)
Photo-capable Yes
Carrier-free Yes
Technical Data
Voltage / Frequency /
Current(Amps) 220-240V AC, 50/60Hz, 4.35A
Wattage 1000 Watts
Dimensions (WxDxH) 634 x 215 x 159mm
Net weight 8.5 kg
Laminating capacity (max thickness) 1mm
Min pouch thickness 75 micron
(total thickness = 2 x 75 = 150 micron)
Max pouch thickness 250 micron
(total thickness = 2 x 250 = 500 micron)
IMPORTANT SAFETY INSTRUCTIONS
CAUTION: Please read before use and keep for future reference.
When laminating;
- plug the machine into an easily accessible mains socket.
- to prevent electrical shock - do not use the appliance close to water, do not spill water on to the appliance, power cord or mains
socket.
DO ensure the machine is on a stable surface.
DO test laminate scrap sheets before final laminations.
DO remove staples and other metal articles prior to laminating.
DO keep the machine away from heat and water sources.
DO turn off the machine after each use.
DO unplug the machine when not in use for an extended
period.
DO use pouches designed for use at the appropriate settings.
DO keep away from pets, while in use.
DO only use Fellowes Roller Wipes (item #57037) for internal
cleaning.
DO NOT use appliance if the power cord is damaged.
DO NOT attempt to open or otherwise repair the machine
beyond the Easi-Access functions.
DO NOT exceed the machines quoted performance.
DO NOT allow minors to use this machine.
DO NOT laminate sharp or metal objects (eg: staples, paper
clips).
DO NOT laminate heat-sensitive documents (eg: tickets,
ultrasounds etc).
DO NOT laminate with self-adhesive pouches (which require a
cold setting).
DO NOT laminate an empty pouch.
DO NOT use sharp objects to clean laminator.
4

LAMINATOR CONTROLS
A Easi-Access opening cover G Selection buttons (up/down/left/right)
B Adjustable document entry guide H Select / OK button
C Entry support shelf I Detachable document exit tray
D Reverse button J On/off switch (at rear)
E Standby button K Carry points (at sides)
F LCD user interface
FEATURES & TIPS
FEATURES
The Auto shut-down switches the machine off if it
hasn’t been used for 30mins to save energy.
To return to the “Home” Menu at any stage, press
the “Left/back” key on the navigation buttons.
before final process.
after lamination and cooling.
®
brand laminating pouches:
Enhance 80, Impress 100, Capture 125, Protect 175,
Preserve 250
ture settings) it is recommended to start first with the
thinnest pouches.
pouch centred and touching the leading sealed edge.
Ensure the pouch is not too large for the item.
CLEAN ME
AutoLam laminating
Automatically senses the thickness of inserted
pouch and document and makes real-time
adjustments to always work under optimum
laminating conditions. The laminator defaults to
‘AutoLam’ setting if no other function is selected
within 5 seconds of switching it on.
Easi-Access open mechanism
The Easi-Access mechanism allows to safely
and easily open the laminator for cleaning and
maintenance.
Auto Reverse function / overload protection
To eject the laminating pouch during use in case
of misfeeds or overloads. Reverses laminating
process until the pouch has been ejected from
the machine.
CleanMe glue sensor
Checks if glue or dirt is on the mechanism and
guides the user to clean the laminator.
TIPS
• Always put item into the appropriate sized pouch.
• Always test laminate with a similar size and thickness
• If required, trim excess material from around the item
• For best results, use Fellowes
• When working with different pouch thickness’ (tempera-
• Prepare pouch and item for lamination. Place item within
• Please read these instructions before use.
SAFE TO TOUCH
HeatGuard™ technology
Keeps the laminator surface up to 50% cooler
and makes it more energy efficient then comparable laminators.
5

SETTING UP THE LAMINATOR
Ensure the machine is on a stable surface. Check there
1.
is enough clear space (min 50cm) behind the machine
to allow items to pass through freely.
Select the correct power lead for the appropriate power
2.
supply. Fit the lead to the machine (the socket is at the
rear of the machine).
STEPS TO LAMINATE - AutoLam
5.
Switch the power on (Power switch located at the rear
of the machine).
Select the ‘Standby’ button on the control panel. Check
6.
the LCD Screen turns on. The LCD interface allows
selection of these functions:
- AutoLam - automatic laminating
- Manual laminating
- Open for maintenance
- Help information
7.
The laminator will automatically start in AutoLam
mode and begin warm-up if no other setting is selected
within 5 seconds.
The ‘Ready’ screen will show when warm-up is
8.
complete and two short beeps indicate that machine is
ready and user can insert pouch. The AutoLam setting
automatically selects the optimum laminating settings
Plug the machine into an easily accessible mains socket.
3.
Switch the mains supply on.
To fully support pouches and items of different sizes
4.
please use the adjustable entry guide to centre the item
before laminating.
for the inserted item and pouch for best laminating
results.
9.
Place item into open pouch. Ensure it is centred against
the sealed edge. Use the appropriate pouch size for
the item.
Place the pouch, sealed edge first, into the pouch /
10.
document entry. Keep the pouch straight and central
within the document entry, not on an angle. Use the
entry markings as a guide.
Upon exit, the laminated pouch is hot and soft. Remove
11.
the pouch immediately. Place pouch onto a flat surface
to cool. This helps to prevent any jamming.
To reverse the laminating process at any stage, press
12.
the ‘Reverse’ button to eject the item. The laminator
will beep whilst reversing.
6
NEED HELP?
Let our experts help you with a solution.
Customer Service:
Help Line Europe: 00-800-1810-1810
www.fellowes.com

STEPS TO LAMINATE - MANUAL OPERATION
Set up laminator as above. On
start menu, select “Manual”
operation within 5 seconds of
switching machine on.
The ‘Ready’ screen will show
when warm-up is complete and
two short beeps indicate that
machine is ready and user can
insert pouch.
To return to the “Home”
Menu at any stage, press
the “Left/back” key on the
navigation buttons.
Place the pouch, sealed edge first,
into the pouch / document entry.
Keep the pouch straight and central
within the document entry, not on
an angle. Use the entry markings
as a guide.
Select pouch thickness
with navigation buttons as
required. Confirm selection
with “OK” button.
The warm-up screen will
show until operating
temperature is reached.
Upon exit, the laminated pouch
is hot and soft. Remove the pouch
immediately. Place pouch onto a flat
surface to cool. This helps prevent
any jamming.
MAINTENANCE - Easi-Access
The Voyager laminator can be manually opened via the LCD user interface. Please note that the power supply needs to be ON
and the laminator needs to be SWITCHED ON to open.
Select ‘Open’ in the
start-up menu using the
navigating buttons and
confirm the selection with
the ‘OK’ button.
The machine might
need to cool down if it
has already been laminating, this can take
up to 30 minutes.
The “open” LCD screen
will show and a beep
will sound when the
laminator is ready to be
opened.
Now move the lever
on each side of the
machine backwards to
open the top cover.
Open the cover with
both hands. When the
laminator is opened,
power to internal
parts is isolated so
that the user is not
in danger of electric
shock.
For further maintenance,
the internal mechanism
can be released by
experienced users. Pull
the cam levers forward to
release the mechanism
and lift it up.
To clean residue off the
laminator mechanism,
please only use
Fellowes Laminator
wipes (item No #
57037). Do not use
sharp objects to clean
laminator.
Please remember to
re-secure the mecha-
nism with the cam
levers again before
closing the cover.
7

CleanMe SYSTEM CHECK
The CleanMe system check warns the user if glue or dirt has built up inside the laminator. Glue can build up inside every
laminator, especially when low-cost laminating pouches are used. We recommend using Fellowes brand pouches to reduce the
amount of cleaning required and to get the best laminating quality.
The LCD screen will show the CleanMe sequence to guide you through the steps of the Cleaning process.
1. Warning sequence above shows that laminator needs cleaning. Machine might need to cool down if it has been laminating before. This can take up to 30 minutes.
2. Open the laminator as described in “Maintenance” on previous page.
3. To clean residue off laminator mechanism, please only use Fellowes Laminator wipes (item No # 57037). Do not use
sharp objects to clean laminator.
4. Please remember to re-secure the mechanism again before closing cover to ensure safe operation.
HELP FUNCTION
The Help function displays in a simple pictorial sequence how to laminate with the Voyager laminator. For further help please
consult ‘Troubleshooting’ at the end of this user manual or contact Fellowes customer service.
A) B) C)
To see how to laminate with
the Voyager laminator select
‘Help’ in start-up menu with
navigating buttons and confirm
selection with OK (within 5 sec.
of turning laminator on).
LCD screen will show simple pictorial sequence of how to laminate with the Voyager laminator
in the 3 operation modes in this sequence:
A) AutoLam mode
B) Manual mode
C) Refer to this user manual for further information
AUTO REVERSE AND OVERLOAD PROTECTION
An internal sensor automatically identifies mis-feeds, items that are too thick or jams and reverses machine so items can be
taken out again. This screen sequence shows that inserted item was too thick for laminator.
Item will be ejected out of the front of the laminator again to prevent jams and damage to item and laminator.
8

ADJUSTABLE ENTRY GUIDE
INTEGRATED CARRY POINTS
SERVICE
The Entry Guide can be manually adjusted (especially for smaller documents) to ensure
the items are best supported when inserted and helps avoid mis-feeds.
The Voyager laminator has integrated carry points for safe and easy movement of the
laminator – push in the flaps on both ends of the laminator to get to them.
If the service symbol shows in the LCD screen, please call your service engineer or Fellowes
customer service.
Customer Service: www.fellowes.com
Help Line Europe: 00-800-1810-1810 UK: +44-(0)-1302-836836
WORLDWIDE WARRANTY
Fellowes warrants all parts of the laminator to be free of defects in material and workmanship for 2 years from the date of
purchase by the original consumer. If any part is found to be defective during warranty period, your sale and exclusive remedy will
be repair or replacement, at Fellowes’ option and expense, of the defective part. This warranty does not apply in cases of abuse,
mishandling or unauthorised repair. Any implied warranty, including that of merchantability or fitness for particular purpose,
is hereby limited in duration to the appropriate warranty period set forth above. In no event shall Fellowes be liable for any
consequential damages attributable to this product. This warranty gives you specific legal rights. You may have other legal rights
that vary from this warranty. The duration, terms and conditions of this warranty are valid worldwide, except where different
limitations, restrictions or conditions may be required by local law. For more details or to obtain services under this warranty,
please contact Fellowes or your dealer.
PRODUCT REGISTRATION
Thank you for purchasing a Fellowes product. Please visit www.fellowes.com/register to register your product and benefit from
product news, feedback and offers. Product details can be found listed on the rating plate positioned on the rear side or underside
of the machine.
9

FUNCTION OVERVIEW
Open - Easi-Access function
CleanMe - Maintenance
0 - 30 min
Secure mechanism and
close as described above
Overload protection - Auto Reverse
Help - Information display
A)
10
B)
C)

TROUBLESHOOTING
Problem Possible cause Solution
No symbols showing in LCD screen Machine is not switched on
Ready screen does not come on after a long
period
Pouch does not completely seal the item
Item comes out the front of laminator again Item too thick to laminate
Machine speed and noise varies during
lamination
Symbols on LCD screen not clear
Machine is in a hot or humid area Move the machine to a cooler and dry area
Item may be too thick to laminate Pass through the machine again
Temperature setting may be incorrect (manual
operation)
Items of different thickness laminated
Switch on machine at rear next to plug inlet
and at the wall socket, then press standby
button to left of LCD screen
Use AutoLam setting or check pouch
thickness is correctly selected and pass
through again
Choose thinner pouch (80mic) and try
again. Photocopy item and laminate
the copy
No problem – automatic AutoLam adjustment to guarantee optimum laminating
conditions for varying items
Please refer to sections above or flow
diagram on previous page
How to stop machine when laminating? Machine is laminating
Pouch is lost in the machine Pouch is jammed
Pouch was used ‘open end’ first
Jamming
Pouch is damaged after lamination Damaged rollers or adhesive on rollers
Pouch was not centred on entry
Pouch was not straight upon entry
Empty pouch was used
Press “Reverse” [
“Left” [ ] to return to “home” menu
screen
Select reverse button and pull out the
item by hand or open laminator manually
via the LCD and follow steps described in
CleanMe
Open laminator manually via the LCD and
follow steps described in CleanMe
] to exit pouch or
STORAGE & EXTERNAL CLEANING
Switch off the machine at the wall. Allow the machine to cool.
The outside of the machine can be cleaned with a damp cloth. Do not use solvents or flammable materials to polish the machine.
Cleaning sheets can be used with the machine. When the machine is warm – run the sheets through the machine to clean any residue
off the rollers. For advanced Cleaning of the inside of the laminator, please see the section on the CleanMe function above. Use
Fellowes Laminator wipes (#57037) only for the internal cleaning. For optimum performance, it is recommended that cleaning sheets
(#53206 / #53207) are used with the machine regularly.
W.E.E.E.
This product is classified as Electrical and Electronic Equipment. Should the time come for you to dispose of
this product please ensure that you do so in accordance with the European Waste of Electrical and Electronic
Equipment (WEEE) Directive and in compliance with local laws relating to this directive.
For more information on the WEEE Directive please visit www.fellowesinternational.com/WEEE
11
 Loading...