

Page 1
125
Please read these instructions before use.
E
Lire ces instructions avant utilisation.
F
Lea estas instrucciones antes del usarlo.
S
T tan
Page 2

INDEX
LAMINATOR CONTROLS / QUICK START GUIDE 3
ENGLISH 4-9
FRANCAIS 10-15
ESPAÑOL 16-21
EASY-ACCESS LOCKING SCREW
ATTENTION:
TOP COVER LOCKING SCREW MUST
BE REMOVED BEFORE THIS MACHINE
CAN BE OPENED.
Note: You will be unable to operate
the easy access feature (to open the
machine) for cleaning/maintenance
if the top lid locking screw (A) is not
removed first.
this screw
ATTENTION:
LA VIS DE VERROUILLAGE DU COUVERCLE DOIT ÊTRE RETIRÉE AVANT
DE POUVOIR OUVRIR CET APPAREIL.
Remarque: Vous ne pourrez pas
activer la fonction d’accés facile
permettant d’ouvrir l’appareil pour
le nettoyage/entretien, si la vis de
verrouillage du couvercle (A) n’est pas
d’abord retirée.
Remove
ATENCIÓN:
ANTES DE ABRIR ESTA MAQUINA,
DEBE RETIRAR EL TORNILLO DE
RETENCION DE LA CUBIERTA
SUPERIOR.
Nota: Si no retira el tornillo de retención de la tapa superior (A), no podrà
utilizar la función de acceso ràpido
para abrir la màquina y limpiarla o
realizarle mantenimiento.
Page 3
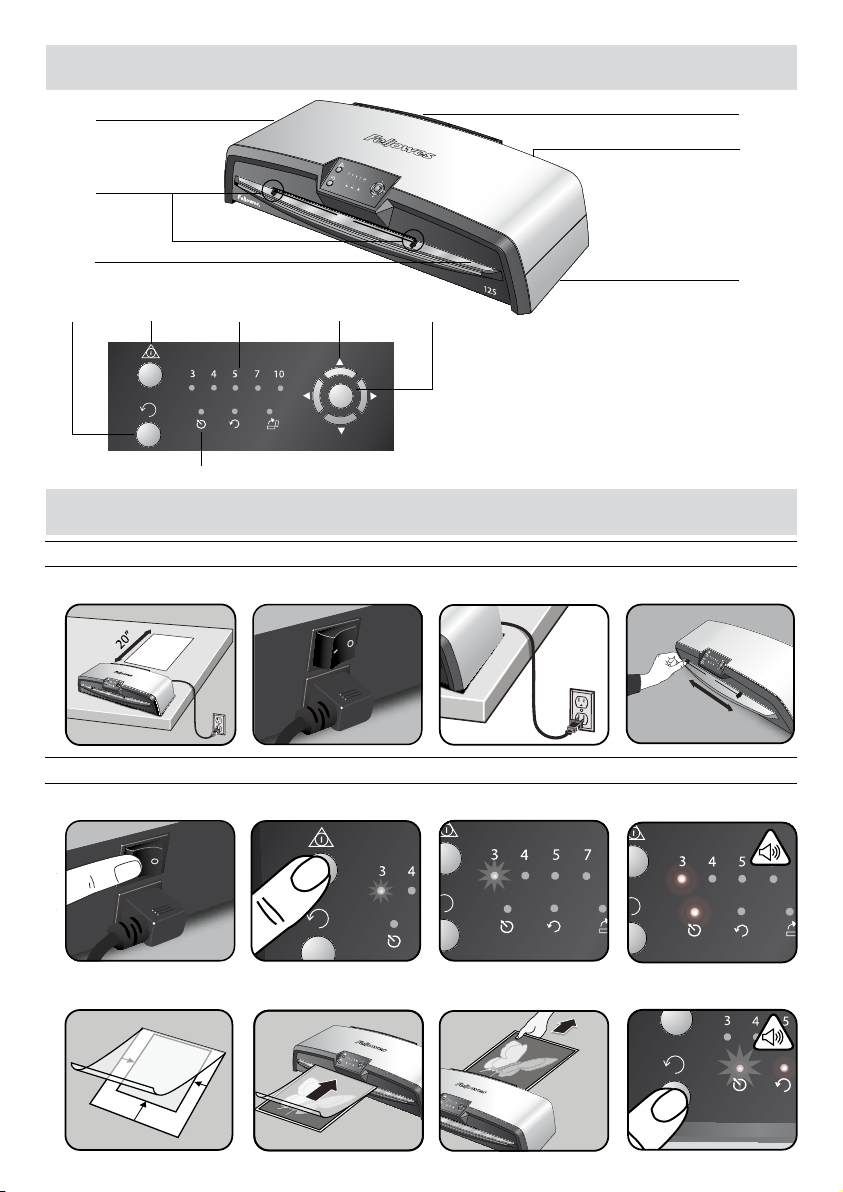
LAMINATOR CONTROLS
A
B
C
D
E
F
L
G
Titan
H
QUICK START GUIDE
SETTING UP THE LAMINATOR
1 2 3 4
I
J
K
STEPS TO LAMINATE
5 6 7 8
9 10 11 12
3
Page 4

ENGLISH
CAPABILITIES
E
Performance
Entry width 12.5” / 317mm
Estimated heat-up time 4 minutes
Cool down time 30-60 minutes
Lamination speed variable - max. 35” / 90cm/min
Laminating mechanism Belt-drive
Ready indication Light & beep
Easy-Access open mechanism Yes
HeatGuard™ technology Yes
Clear Path Yes
Auto shut-off Yes (30 mins)
Photo-capable Yes
Carrier-free Yes
Technical Data
Voltage / Frequency /
Current(Amps) 120V AC, 60Hz, 8.5A
Wattage 1100 Watts
Dimensions (WxDxH)
25” x 8.5” x 6.3” / 634 x 215 x 159mm
Net weight 22lb / 10 kg
Laminating capacity (max thickness) 0.04”
Max pouch thickness 10 Mil. / 250 micron
(total thickness = 2 x 10 = 20 Mil.)
IMPORTANT SAFETY INSTRUCTIONS
CAUTION:
Please read before use and keep for future reference.
When laminating:
- plug the machine into an easily accessible main socket.
- to prevent electrical shock - do not use the appliance close to water, do not spill water on to the appliance, power cord or main
socket.
- when working with very small pouch sizes (less than 3” / 75mm long) place the pouch within a carrier or on a sheet of paper.
DO ensure the machine is on a stable surface.
DO test laminate scrap sheets before final laminations.
DO remove staples and other metal articles prior to laminating.
DO keep the machine away from heat and water sources.
DO turn off the machine after each use.
DO unplug the machine when not in use for an extended
period.
DO use pouches designed for use at the appropriate settings.
DO keep away from pets, while in use.
DO only use Fellowes Roller Wipes (CRC #57037) for internal
cleaning.
4
DO NOT use appliance if the power cord is damaged.
DO NOT attempt to open or otherwise repair the machine
beyond the Easy-Access functions.
DO NOT exceed the machines quoted performance.
DO NOT allow children to use this machine without adult
supervision.
DO NOT laminate sharp or metal objects (eg: staples, paper
clips).
DO NOT laminate heat-sensitive documents (eg: tickets,
ultrasounds etc).
DO NOT laminate with self-adhesive pouches (which require a
cold setting).
DO NOT laminate an empty pouch.
DO NOT use sharp objects to clean laminator.
Page 5

LAMINATOR CONTROLS
A Easy-Access opening cover G Selection buttons (up/down/left/right)
B Adjustable document entry guide H Select / OK button
C Entry support shelf I Detachable document exit tray
D Reverse button J On/off switch (at rear)
E Standby button K Carry points (at sides)
F LED user interface L Ready LED
FEATURES & TIPS
TitanTM operates at a fixed temperature. The user only needs to select the required pouch setting before laminating. There is no
need to wait for the machine to warm-up or cool-down when switching between thick or thin pouch settings. Once the laminator
has reached normal operating temperature, simply select the pouch thickness required and laminate immediately.
FEATURES
SAFE TO TOUCH
‘Hot Swap’ function.
The Hot Swap function enables the user to
instantly switch between thick and thin pouch
settings without any processing delays.
Easy-Access open mechanism
The Easy-Access mechanism allows user to safely
and easily open the laminator for cleaning and
maintenance.
HeatGuard™ technology
Keeps the laminator surface up to 50% cooler
and makes it more energy efficient then comparable laminators.
‘Safe Start’ function
When switched on, the machine has a default
‘Safe Start’ function which is set to the 3 Mil.
setting. You may select other thickness settings
as required.
Power Save
The Auto shut-down switches the machine off if it
hasn’t been used for 30 mins to save energy.
To return to the “Home” Menu at any stage, press
the “Left/back” key on the navigation buttons.
TIPS
• Always put item into the appropriate sized pouch.
• Always test laminate with a similar size and thickness
before final process.
• If required, trim excess material from around the item
after lamination and cooling.
• For best results, use Fellowes
®
brand laminating pouches:
Enhance 3 Mil, Capture 5 Mil, Protect 7 Mil, Preserve 10
Mil.
• When working with different pouch thickness’ (temperature settings) it is recommended to start first with the
thinnest pouches.
• Prepare pouch and item for lamination. Center item in
pouch against the leading sealed edge. Ensure the pouch is
not too large for the item.
• Please read these instructions before use.
5
Page 6

SETTING UP THE LAMINATOR
Place the machine on a stable surface. Ensure enough
1.
clear space behind the machine to allow items to pass
through freely.
Connect the supplied power cord to the machine.
2.
STEPS TO LAMINATE
5.
Switch the power on (Power switch located at the rear
of the machine).
Select the ‘Standby’ button on the control panel. The
6.
3 Mil. and ready LED’s will flash for 5 seconds before
automatically selecting the 3 Mil. heat setting. Any
setting can be selected at any time as required. Allow
the machine to cool before opening.
The LED interface allows selection of these functions:
- 3, 4, 5, 7, 10 Mil. pouch settings
- Manual laminating
- Reverse
- ‘Easy-Access’ for cleaning and maintenance.
Plug the machine into an easily accessible main socket.
3.
To fully support pouches and items of different sizes
4.
use the adjustable entry guide to center the item
before laminating. Place exit tray onto the rear of the
machine.
9.
Place item into open pouch. Center the item against
the sealed front edge. Use the appropriate pouch size
for the item.
Place the pouch, sealed edge first into the document
10.
entry. Keep the pouch straight and centered within the
document entry, not on an angle. Use the entry markings as a guide.
Upon exit, the laminated pouch is hot and soft. Take
11.
care and remove the pouch immediately. Place the
pouch onto a flat surface to cool. This helps prevent any
jamming.
7.
8.
NEED HELP?
6
The laminator will automatically select the thinnest
pouch setting (3 Mil.) within 5 seconds of power-on
unless another setting is selected. During warm-up or
cool-down, the selected pouch setting will flash red.
When the laminator has reached the chosen setting, the
LED will stop flashing and glow red. The machine will
sound 2 short alerts.
Let our experts help you with a solution.
Customer Service:
Always call Fellowes before contacting your place of purchase.
See back cover for useful telephone numbers.
www.fellowes.com
To reverse the laminating process at any stage, press
12.
and hold the ‘Reverse’ button to eject the item. The
laminator will sound alerts continuously and the ready
LED will flash.
Page 7

MAINTENANCE - Easy-Access™
The TitanTM laminator can be opened manually by selecting the ‘open’ setting ( ) on the control panel.
Please note: the power supply and the machine must both be ON to release the electronic safety catch.
Select the ‘open’ setting
( ) using the navigation buttons on the
control panel. Press ‘OK’
button.
Lift the top cover with
both hands. The laminating engine and
belt-drive mechanism
will be visible.
The ready LED will
flash and the machine
will cool down. This
may take between
30-60 minutes.
To open the belt-drive
mechanism, Pull the 2 cam
levers forwards, on each
side of the mechanism. The
upper carriage can now
be lifted upwards from the
front. Lift the carriage and
open fully until it stops in
the rest position.
ADJUSTABLE ENTRY GUIDE
The Entry Guide can be manually adjusted (especially for smaller documents) to ensure the
items are best supported when inserted and helps avoid mis-feeds.
When the machine has
cooled to a safe temperature, the ready LED will
stop flashing and an alert
will sound.
Take care when cleaning
any residue from the rollers. Fellowes laminator
wipes (CRC# 57037) are
recommended.
To open the top cover,
move the levers on each
side of the machine
backwards to release the
electronic safety catch.
IMPORTANT:
When closing the mechanism, ensure the 2 cam
levers are both pushed
forwards to lock the beltdrive carriage correctly in
position. The lid can be
closed when the carriage
is correctly locked.
INTEGRATED CARRY POINTS
The TitanTM laminator has integrated carry points for safe and easy movement of the laminator
– push in the flaps on both ends of the laminator to access them.
7
Page 8

WORLDWIDE WARRANTY
Fellowes warrants all parts of the laminator to be free of defects in material and workmanship for 2 years from the date of
purchase by the original consumer. If any part is found to be defective during warranty period, your sole and exclusive remedy will
be repair or replacement, at Fellowes’ option and expense, of the defective part. This warranty does not apply in cases of abuse,
mishandling or unauthorized repair. Any implied warranty, including that of merchantability or fitness for particular purpose,
is hereby limited in duration to the appropriate warranty period set forth above. In no event shall Fellowes be liable for any
consequential damages attributable to this product. This warranty gives you specific legal rights. You may have other legal rights
that vary from this warranty. The duration, terms and conditions of this warranty are valid worldwide, except where different
limitations, restrictions or conditions may be required by local law. For more details or to obtain services under this warranty,
please contact Fellowes or your dealer.
PRODUCT REGISTRATION
Thank you for purchasing a Fellowes product. Please visit www.fellowes.com/register to register your product and benefit from
product news, feedback and offers. Product details can be found listed on the rating plate positioned on the rear side or underside
of the machine.
STORAGE & EXTERNAL CLEANING
Unplug the machine at the wall. Allow the machine to cool.
The outside of the machine can be cleaned with a damp cloth. Do not use solvents or flammable materials to polish the machine.
Cleaning sheets (CRC# 53206) can be used with the machine. When the machine is warm, run the sheets through the machine to
clean any residue off the rollers.
8
Page 9

TROUBLESHOOTING
Problem Possible cause Solution
No ‘red’ power on LED Machine is not switched on
Ready light does not come on after a
long period
Pouch does not completely seal the item
Pouch has waves or bubbles Thickness setting may be incorrect
Pouch is lost in the machine Pouch is jammed
Jamming
Pouch is damaged after lamination Damaged rollers or adhesive on rollers
Cannot open top cover to gain ‘Easy
Access’
Small pouch is lost in the machine
Machine is in a hot or humid area
Item may be too thick to laminate Pass through the machine again
Thickness setting may be incorrect
Pouch was used ‘open end’ first
Pouch was not centered on entry
Pouch was not straight upon entry
Empty pouch was used
Top cover locking screw is still located on the
left side of the machine
Pouch may be too small to use without a
carrier
Switch on machine at rear next to plug
inlet and at the wall socket
Move the machine to a cooler and
dry area
Check pouch thickness is correctly
selected and pass through again
Check pouch thickness is correctly
selected and pass through again
Select reverse button and pull out the
item by hand. Select the open machine
setting and clean the rollers.
Pass cleaning sheets (CRC# 53206)
through the machine to test and
clean rollers. Select the open machine
setting and clean the rollers with
Fellowes roller wipes (CRC# 57037).
Remove the screw then open the lid
as advised.
Select ‘Easy Access’ and open the
machine. Remove the pouch and
laminate small pouches with a carrier
or on a sheet of paper.
9
Page 10

FCC CLASS B NOTICE
Note: This equipment has been tested and found to comply with the limits for a Class B digital device, pursuant to part 15 of the
FCC Rules. These limits are designed to provide reasonable protection against harmful interference in a residential installation. This
equipment generates, uses and can radiate radio frequency energy and, if not installed and used in accordance with the instructions,
may cause harmful interference to radio communications. However, there is no guarantee that interference will not occur in a particular
installation. If this equipment does cause harmful interference to radio or television reception, which can be determined by turning the
equipment off and on, the user is encouraged to try to correct the interference by one or more of the following measures:
• Reorient or relocate the receiving antenna.
• Increase the separation between the equipment and receiver.
• Connect the equipment into an outlet on a circuit different from that to which the receiver is connected.
• Consult the dealer or an experienced radio/TV technician for help.
CANADA CLASS B NOTICE - AVIS CANADA, CLASSE B
This Class B digital apparatus complies with Canadian ICES-003.
Cet appareil numérique de la classe B est conforme à la norme NMB-003 du Canada.
MODIFICATIONS
Any modifications made to this device that are not approved by Fellowes may void the authority granted to the user by the FCC and/or
by Industry Canada to operate this equipment.
Toutes modifications apportées à ce dispositif et non approuvées par Fellowes annuleront le droit accordé à l’utilisateur par le FCC et/
ou par Industrie Canada de faire fonctionner cet équipement.
Fellowes
Australia +61-3-8336-9700
Benelux +31-(0)-76-523-2090
Canada +1-905-475-6320
Deutschland +49-(0)-5131-49770
España / Portugal + 34 902 33 55 69
France +33-(0)-1-78-64-91-00
Italia +39-71-730041
Japan +81-(0)-3-5496-2401
Korea +82-(0)-2-3462-2844
Malaysia +60-(0)-35122-1231
Polska +48-(22)-771-47-40
Russia +7-(495)-228-14-03
Singapore +65-6221-3811
United Kingdom +44-(0)-1302-836836
United States +1-630-893-1600
404418
 Loading...