

Page 1

Test report no. 19011679 Page 1 of 24
EUT: ID PM-ECCO+
FCC ID: PJMECCOPLUS
FCC Title 47 CFR Part 15
Date of issue: 2019-02-26
Date: 2018-06-06
Created: P4 Reviewed: P9 Released: P1
Vers. No. 1.18
TÜV NORD Hochfrequenztechnik GmbH & Co. KG
Rottland 5a, 51429 Bergisch Gladbach, Germany
Tel: +49 2207 9689-0
Fax +49 2207 9689-20
Annex acc. to FCC Title 47 CFR Part 15
relating to
FEIG Electronic GmbH
ID PM-ECCO+
Annex no. 5
User Manual
Functional Description
Title 47 - Telecommunication
Part 15 - Radio Frequency Devices
Subpart C – Intentional Radiators
ANSI C63.4-2014
ANSI C63.10-2013
Page 2

IDENTIFICATION
MANUAL
ID PM ECCO+
Compact and Robust RFID-/Barc ode S c a nne r
os: 2 /IDP/D eckblatt_M anual @ 0\mod_1526622727845_10021.docx @ 13771 @ @ 1
=== Ende der Liste für T extmarke De ckblatt ===
Page 3

IDENTIFICATION
Note
Page 2 of 2
Pos: 4 /IDP/Ma nu al s / G e n er al /N ote PANMOB IL @ 3\mod_1542028174991_10021.docx @ 56190 @ @ 1
Note
Note
© Copyright by
FEIG ELECTRONIC GmbH
Hansestraße 91
D-51149 Cologne
Tel.: +49 2203 10 334 777
http://www.panmobil.com
With the edition of this document, all previous editions become void. Indications made in this manual may be
changed without previous notic e.
Copying of this document and giving it to others and the use or communication of the contents thereof are
forbidden without express authority. Offenders are liable to the payment of damages. All rights are reserved
in the event of the grant of a patent or the registration of a utility model or design.
Composition of the information in this document has been done to the best of our knowledge.
FEIG ELECTRONIC GmbH does not guarantee the correctness and completeness of the details given in this
manual and may not be held liable for damages ensuing from incorrect or incomplete information. Since,
despite all our efforts, errors may not be completely avoided, we are always grateful for your useful tips.
The instructions given in this manual are based on advantageous boundary conditions.
FEIG ELECTRONIC GmbH does not give any guarantee promise for perfect function in cross environments
and does not give any guarantee for the functionality of the complete system which incorporates the subject
of this document.
FEIG ELECTRONIC GmbH calls explicit attention that devices which are subject of this document are not
designed with components and testing methods for a level of reliability suitable for use in or in connection
with surgical implants or as critical components in any life support systems whose failure to perform can
reasonably be expected to cause significant injury to human health. To avoid damage, injury or death the
user or application designer must take reasonably prudent steps to protect against system failures.
FEIG ELECTRONIC GmbH assumes no responsibility for the use of any information contained in this
document and makes no representation that they are free of patent infringement. FEIG ELECTRONIC GmbH
does not convey any license under its patent rights nor the rights of others.
Pos: 5 /Steu ermodule/------------ Seite numbruch ------------ @ 0\mod_1452083281983_0.docx @ 10032 @ @ 1
http://www.feig.de
info@panmobil.com
Page 4

IDENTIFICATION
Contents
Page 3 of 3
Pos: 6 /IDP/IVZ/T OC @ 0\mod_1524560731432_10021.docx @ 10175 @ @ 1
Contents
1 Introduction 5
2 Reset 7
3 Configuration Mode 7
4 Charging the Battery 8
5 Scanning Barcode 9
5.1 1D Laser ............................................................................................................................. 9
5.2 1D/2D Imager ................................................................................................................... 10
6 Scanning RFID 11
7 Bluetooth Connection 12
7.1 Numeric Barcodes for Bluetooth Pairing ....................................................................... 13
8 Wi-Fi Connection 14
9 Transmitting Barcode and/or RFID Data to a Host 15
10 Technical specification 16
11 Troubleshooting 17
12 Advanced Device Configuration 17
13 Approvals 18
13.1 USA (FCC) and Canada (IC) ............................................................................................ 18
13.2 Europe (CE) ...................................................................................................................... 19
13.3 Label ................................................................................................................................. 19
13.4 Ergonomic Recommendations ....................................................................................... 20
13.5 Vehicle Installation .......................................................................................................... 20
Page 5

IDENTIFICATION
Contents
Page 4 of 4
13.6 Safety on the Road .......................................................................................................... 20
13.7 Warnings for Use of Wireless Devices ........................................................................... 20
13.8 Potentially Hazaedous Atmospheres – Vehicle Use ..................................................... 21
13.9 Safety in Aircrafts ............................................................................................................ 21
13.10 Safety in Hospitals .......................................................................................................... 21
13.11 Pacemakers ..................................................................................................................... 21
13.12 Other Medical Devices .................................................................................................... 21
13.13 RF Exposure Guidelines ................................................................................................. 22
13.14 Laser Devices .................................................................................................................. 22
=== Ende der Liste für Textmarke Note ===
Page 6

IDENTIFICATION
1 Introduction
Page 5 of 5
Pos: 8 /IDP/M anuals/Üb erschriften/ 1/Introduct ion @ 0\mod_1526993216125_10021.docx @ 15697 @ 1 @ 1
1 Introduction
Introduction
Pos: 9 /IDP/Ma nu al s / I n tr o duction/Intr oduction ECCO + @ 3\ mod_1542013202968_10021.docx @ 55611 @ @ 1
The ID PM ECCO+ captures and stores barcodes and RFID data for a variety of uses and transmits those to
a host via USB connection, Bluetooth or WiFi. This document provides a basic instruction for using the ID
PM ECCO+ device.
Fig. 1: ID PM ECCO+ device overview
Label Description Function
1 Green LED Lights up green when ECCO+ is turned ON.
When the battery level is empty, it flashes every 2 sec.
(Further function can be user defined with the programming interface)
2 Yellow LED Lights up yellow if a barcode or RFID tag was read successfully.
Is flashing yellow (500ms) when connected to USB.
(Further function can be user defined with the programming interface)
3 Red LED Lights up red if connected to a battery charger (USB or power adapter).
Red = Battery charging
Off = Battery fully charged
4 Blue LED Lights up blue when ECCO+ is connected to Bluetooth.
Is flashing fast (500ms) while Wi-Fi is associated.
Is flashing blue (3 sec.) when Wi-Fi is connected.
(Further function can be user defined with the programming interface)
5 Key 1 (trigger button) Triggers the barcode and/or the RFID reader.
(Further function can be user defined by Master Setup or with the
programming interface)
6 Key 2 (custom) (This function can be configured by using Master Setup or with the
Page 7

IDENTIFICATION
1 Introduction
Page 6 of 6
programming interface)
7 Key 3 (custom) (This function can be configured by using Master Setup or with the
programming interface)
8 Key 4 (custom)
Power ON/OFF button
(This function can be configured by using Mas ter Setup or with the
programming interface)
Power key to turn the unit ON. Pressing this key for 3 sec. turns the unit
OFF.
9 USB protection clip
Mini-USB interface
10 Scanning window
RFID antenna (option)
Rubber clip to protect the Mini USB port.
Main communication and batte ry charging int erf ace .
Protection glass for the barcode and RFID reader. To have the best reading
performance, keep the glass clean and free of scratches.
Antenna for RFID reader/writer
11 Clip holder (accessories) Holder to fix the belt clip (accessories).
12 Int. Li-Ion battery Rechargeable Li-Ion battery 1250 mAh
Pos: 10 /Ste uermodule/------------ Seit enumbruch ------------ @ 0\mod_1452083281983_0.docx @ 10032 @ @ 1
Page 8

IDENTIFICATION
2 Reset
Page 7 of 7
Pos: 11 /IDP/Manu als/Überschriften/1 /Reset @ 3\mod_1542030229425_10021.docx @ 56199 @ 1 @ 1
2 Reset
Reset
Pos: 12 /IDP/M an u als/PANMOBI L/ R eset @ 3\mod_1542016708957_10021.docx @ 55649 @ @ 1
To reset the ID PM ECCO+ press and hold the keys 1, 2, 3 and 4 for 5 seconds.
NOTE:
• By reset the device loses its timestamp. Before continuing to use it you must synchro n ize the
time settings by connecting the ID PM ECCO+ with the Master Setup. The time thereby will be
automatically synchronized with the system time of your PC.
• Specific configuration settings a n d d ata will not be lost by the reset.
Pos: 13 /ID P/Manuals/Ü berschriften /1/Configur ation Mode @ 3\mod_1542016638737_10021.docx @ 55639 @ 1 @ 1
3 Configuration Mode
Configuration Mode
Pos: 14 /IDP/Man uals/PANMOBIL/C o nf i g ur a t io n Mode @ 3\mod_1542016988448_10021.docx @ 55658 @ @ 1
To set the alternative configuration mode follow the steps below:
1. Switch off the device.
2. Press and hold keys 4 and 5 until a beep sound appears (this may take a few seconds).
3. Connect the ID PM ECCO+ to a computer via USB.
4. The device will be mounted as a removable drive “SCANNDY”.
5. Open the file “config.ini” or use the Universal Configurator to modify the settings.
6. Press button 3 (trigger) until a beep sound appears.
7. The device restarts with the new settings.
Pos: 15 /Ste uermodule/------------ Seit enumbruch ------------ @ 0\mod_1452083281983_0.docx @ 10032 @ @ 1
Page 9

IDENTIFICATION
4 Charging the Battery
Page 8 of 8
Pos: 16 /ID P/Manuals/Ü berschriften /1/Charging the Batter y @ 3\mod_1542017653651_10021.docx @ 55667 @ 1 @ 1
4 Charging the Battery
Charging the Battery
Pos: 17 /ID P/Manuals/P ANMOBIL/Ch arging the B attery @ 3\mod_1542018436163_10021.docx @ 55907 @ @ 1
Before the first operation, the main battery should be fully charged by using the included power adapter or
through the USB interface of a computer. As long as the battery is charging the red LED (3) will light solid
red. After the battery is fully charged the red LED (3) turns off. A full recharge of the battery takes approx. 4
to 5 hours when using the included power adapter. Recharging the battery via USB may take longer.
To charge the battery via USB follow the instructions below:
1. Remove the USB protection clip (9) from the device.
2. Connect the device to the USB port of a computer or to the USB power adapter (accessories).
3. As long as the battery is charging, the red LED (3) lights solid red.
4. After the battery is fully charged the red LED (3) turns off.
Pos: 18 /Ste uermodule/------------ Seit enumbruch ------------ @ 0\mod_1452083281983_0.docx @ 10032 @ @ 1
Page 10

IDENTIFICATION
5 Scanning Barcode
Page 9 of 9
Fig. 2: Barcode Scanner Alignment
Pos: 19 /IDP/M an u als/Überschr i ft en/1/Scanni ng Barcode @ 3\mod_1542017701577_10021.docx @ 55677 @ 1 @ 1
5 Scanning Barcode
Scanning Barc od e
Pos: 20 /ID P/Manuals/Ü berschriften /2/1D Laser @ 3\mod_1542017806783_10021.docx @ 55697 @ 2 @ 1
5.1 1D Laser
Pos: 21 /ID P/Manuals/P AN M O BI L/Scanning B arcode (1D Las er ) @ 3\mod_1542018707813_10021.docx @ 55916 @ @ 1
To scan a barcode follow the steps below:
1. Aim the scanner on the barcode.
2. Press the trigger key (5).
3. Ensure that the scanning line is directed straight on the barcode.
4. The ID PM ECCO+ beeps and the yellow LED (2) lights up to indicate a successful decode.
Pos: 22 /Ste uermodule/------------ Seit enumbruch ------------ @ 0\mod_1452083281983_0.docx @ 10032 @ @ 1
Page 11

IDENTIFICATION
5 Scanning Barcode
Page 10 of 10
Fig. 3: Scan Example 1D/2D Imager
Pos: 23 /IDP/M an u als/PANMOBI L/ Scanning Bar c o de (1D / 2D I mager) @ 3\mod_1542020027013_10021.docx @ 55934 @ @ 1
5.2 1D/2D Imager
Pos: 21 /IDP/M an u als/PANMOBI L/ Scanning Bar c o de (1D L as er) @ 3\mod_1542018707813_10021.docx @ 55916 @ @ 1
To scan a barcode follow the steps below:
1. Aim the scanner on the barcode.
2. Press the trigger key (5).
3. The ID PM ECCO+ decodes the barcode closest to the cross center unless you disable the Pick-List
Mode (see below) in the 2D cameras.
4. The device beeps and the yellow LED (2) lights up yellow to indicate a successful decode.
Pos: 24 /IDP/Man
ls/Überschri f ten/2/1D/2D Im ag er @ 3\mod_1542 017823315 _1 0 02 1. docx @ 55707 @ 2 @ 1P os: 25 /Steuermod ul e / ------------ Seitenumbruch ------------ @ 0\mod_1452083281983_0.docx @ 10032 @ @ 1
Page 12

IDENTIFICATION
Page 11 of 11
Pos: 26 /ID P/Manuals/Ü berschriften /1/Scanning RFID @ 3\mod_1542017848900_10021.docx @ 55717 @ 1 @ 1
6 Scanning RFID
Scanning RFID
Pos: 27 /IDP/M an u als/PANMOBI L/ Scanning RFI D @ 3\ mod_1542020944563_10021.docx @ 55962 @ @ 1
To scan an RFID tag follow the steps below:
1. Aim the scanner on the RFID tag.
2. Make sure the tag is within the reader range.
3. Press the trigger key (5) to read data of the RFID tag.
4. The device beeps and the yellow LED (2) lights up to indicate a successful decode.
Pos: 28 /Ste uermodule/------------ Seit enumbruch ------------ @ 0\mod_1452083281983_0.docx @ 10032 @ @ 1
6 Scanning RFID
Page 13

IDENTIFICATION
7 Bluetooth Connection
Page 12 of 12
Pos: 29 /ID P/Manuals/Ü berschriften /1/Bluetoot h Connection @ 3\mod_1542017875297_10021.docx @ 55727 @ 1 @ 1
7 Bluetooth Connection
Bluetooth Connection
Pos: 30 /IDP/M an u als/PANMOBI L/ Bluetooth Co n ne c ti o n @ 3\ mod_1542021084856_10021.docx @ 55971 @ @ 1
To pair the Bluetooth enabled devices to a Bluetooth enabled host.
1. Connect the device to the host using the USB port and use the Master Setup to set the data output
mode to Bluetooth.
Select the Bluetooth profile supported by the host or required by the application.
• Serial Port Profile (S PP)
The scanner connects to the host via Bluetooth and emulates a serial connection. The scanner accepts
an incoming connection request ed b y a Bluetooth hos t.
• Bluetooth Keyboard Em ulation (HI D)
The scanner connects to the host via Bluetooth and emulates a keyboard. The scanner accepts an
incoming connection, requested by a Bluetooth host.
2. Save the settings and disconnect the device from the computer.
On the host computer, launch the third party Bluetooth pairing application and place the application into
discover Bluetooth device mode.
3. Select the ECCO+ from the discovered device list. The Bluetooth application may prompt you to scan a
passkey it generated, or for you to create one and then scan the pin code.
4. If the Bluetooth application prompts you to generate a pin, enter the c onf igure d Bl ueto oth pin
DEFAULT: 1234
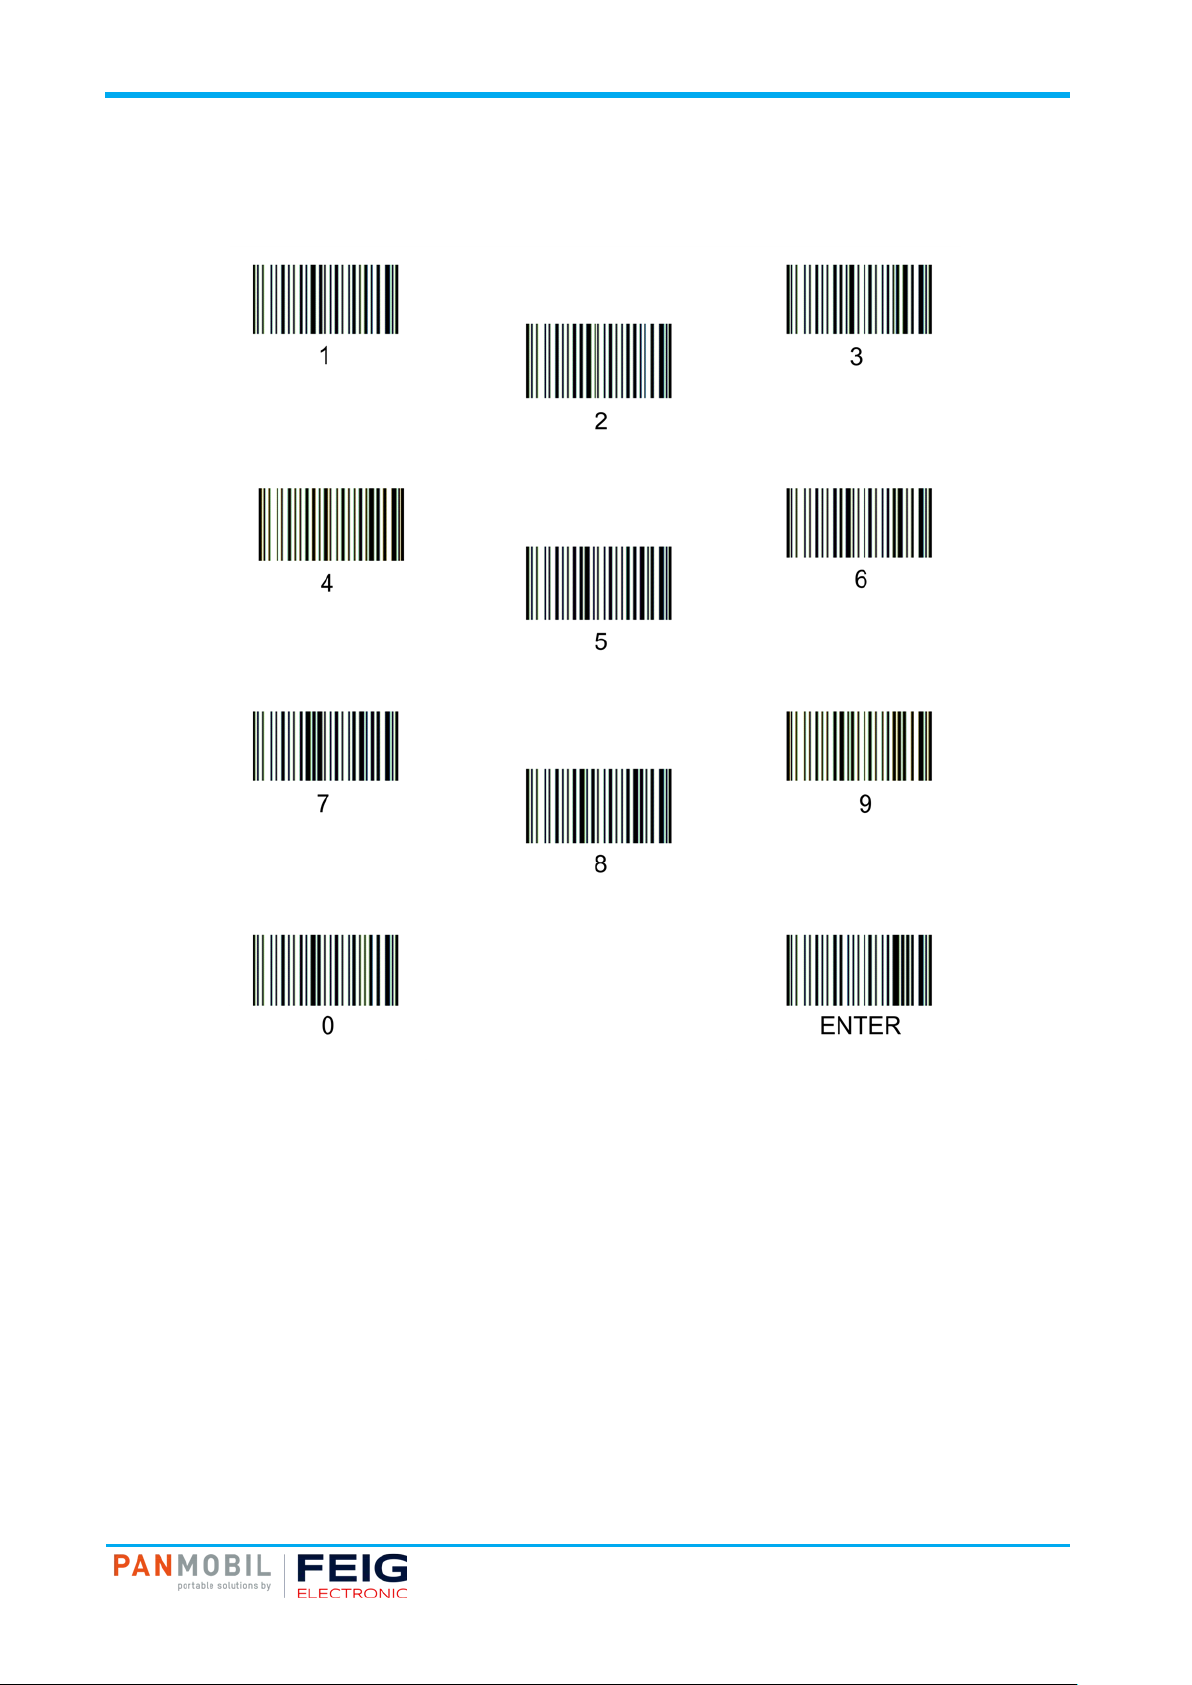
5. If the Bluetooth application prompts you to enter the pass key it generated, scan numeric barcodes on
page 13 and confirm by scanning ENTER.
6. The right LED (4) lights constantly blue as long as the device is connected.
Pos: 31 /Ste uermodule/------------ Seit enumbruch ------------ @ 0\mod_1452083281983_0.docx @ 10032 @ @ 1
Page 14
IDENTIFICATION
7 Bluetooth Connection
Page 13 of 13
Pos: 32 /ID P/Manuals/Ü berschriften /2/Numeric Barcods for Bluetooth P airing @ 3\mod_1542017912662_10021.docx @ 55737 @ 2 @ 1
7.1 Numeric Barcodes for Bluetooth Pairing
Pos: 33 /IDP/Man uals/PANMOBI L/Numeric B arcodes for Bluetooth Pai ring @ 3\mod_1542021725822_10021.docx @ 55989 @ @ 1
Pos: 34 /Ste uermodule/------------ Seit enumbruch ------------ @ 0\mod_1452083281983_0.docx @ 10032 @ @ 1
Page 15

IDENTIFICATION
8 WiFi Connection
Page 14 of 14
Pos: 35 /ID P/Manuals/Ü berschriften /1/Wi-Fi Connecti on @ 3\mod_1542017944279_10021 .docx @ 55747 @ 1 @ 1
8 Wi-Fi Connection
WiFi Connection
Pos: 36 /ID P/Manuals/P ANMOBIL/Wi-F i Connecti on @ 3\mod_1542021824140_10021.docx @ 55998 @ @ 1
To connect Wi-Fi enabled devices to a host.
1. Connect the device to the host using the USB port and use the Master Setup to set the data output mode
to Wi-Fi.
2. Open the file “config.ini” setup the parameters for Wi-Fi and host connection (See the document
“Config_ini” section Wi-Fi to learn how to set the parameters for Wi-Fi communication).
3. Save the settings and disconnect the device from the computer.
4. The device tries to connect to the configured wireless network. The right LED (4) flashes blue every
second. If the device could connect to the wireless network and to the host, the right LED (4) flashes
slowly blue every 3 seconds.
If the device fails to connect, please check the parameters configured in the file “config.ini”. Ask your network
administrator for assistance if necessary.
Pos: 37 /Ste uermodule/------------ Seit enumbruch ------------ @ 0\mod_1452083281983_0.docx @ 10032 @ @ 1
Page 16

IDENTIFICATION
9 Transmitting Data to a Host
Page 15 of 15
Pos: 38 /ID P/Manuals/Ü berschriften /1/Transmitti ng Barcod e and/or RFID Data to a H ost @ 3\mod_1542021992638_10021.docx @ 56007 @ 1 @ 1
9 Transmitting Barcode and/ or RFID Data to a Host
Transmitting Data to a Host
Pos: 39 /ID P/Manuals/P ANMOBIL/Tr ansmitting B arcode and/ or RFID Data to a Host @ 3\mod_15420220 60134_10021.docx @ 56017 @ @ 1
Batch mode
All barcodes and RFID data scanned in batch mode are saved in the file “Output.txt” on the removable drive
“SCANNDY”. Connect the device to the host computer via USB and use the Windows-Explorer to navigate to
the device “SCANNDY”. Copy the file “Output.txt” to the host.
To delete the data from the device just delete the file “Output.txt”.
Transmitting data from a Bluetooth or Wi-Fi device
When the scanner is paired to a host via Bluetooth, the data transmits to the host after each scanning
procedure and is not stored on the scanner unless the scanner moves out of the range of the host. For out of
range usage you can configure the device to either store the data in a cache memory or do not allow
scanning.
If the device was configured to store the out of range captured data, it stores the data in a file Cache.txt.
After reconnection, it transmits all cached data to the host.
Bidirectional communication for Bluetooth and Wi-Fi connected devices
For applications that require bidirectional communication between the device and the host, PANMOBIL
devices support an embedded communication protocol SCOMP and REMOTE mode.
Page 17

IDENTIFICATION
10 Transmitting Data to a Host
Page 16 of 16
10 Technical specification
Mechanical Data
Housing Double-walled
Inside: robust ABS
Outside: protective rubber coating
Dimension (W x H x D) 87 mm x 48 mm x 26 mm
(3.42“ x 1.89“ x 1.02“)
Weight 98 g (3.46 oz)
Protection Class IP 64
Color black, red
Electrical Data
Operating Frequency RFID (optional)
• HF
• UHF
Supported Transponders (optional) ISO 14443, ISO 15693
Barcode (optional) 1D: EAN-8, EAN-13, UPC-A, UPC-E Code 128, Code 39,
Interfaces
• USB
• WiFi
• Bluetooth
Battery 1250 mAh Lithium Ion, 3.7 V
Indicators LED (red, green, yellow, blue)
Keyboard 4 keys; each key is programmable / configurable
CPU ARM9, 400 MHz
Memory 128 MB RAM
Proof of Data Non-volatile memory
Date / Time Real-time clock
Supported OS Win 7 / Win 8 / Win 10 (32 and 64 bit) / Server 2003/2000
Programming ECLIPSE IDD for C/C++
Configuration MasterSetup
Environmental Conditions
Temperature Range
• Operation
• Storage
Humidity 5 % up to 95 % (non-condensing)
Drop 1.6 m drop to concrete
Standard Compliance
RoHS, WEEE, CE
s: 40 /Steuer module/------------ Seiten umbruch ------------ @ 0\mod_1452083281983_0.docx @ 10032 @ @ 1
Pos: 41 /ID P/Manuals/Ü berschriften /1/Troubles hooting @ 3 \mod_1542017 971639_10021.docx @ 55757 @ 1 @ 1
13.56 MHz
865 MHz to 928 MHz
EPC Class 1 Gen 2, ISO 18000-6-C
Code 93, Interleaved 2of5, Chinese 2of5, Codabar,
Codablock_F
2D: DataMatrix, QR Code, Micro QR, Aztec Code,
Maxi Code, PDF417, MicroPDF
USB mass storage, USB HID, USB Ethernet, USB Serial
2.4 GHz (IEEE 802.11 b/g/n)
Bluetooth Class 2, HiD SPP
Speaker
Vibration feedback
1 GB Flash (500 MB internal / 500 MB external)
0 °C up to 55 °C (32 °F up to 131 °F)
-20 °C up to 60 °C (-4 °F up to 140 °F)
Page 18

IDENTIFICATION
Page 17 of 17
11 Troubleshooting
Troubleshooting
Pos: 42 /IDP/M an u als/PANMOBI L/ Tr oublesho oti ng @ 3\ mod_1542024639030_10021.docx @ 56026 @ @ 1
Problem Possible Solution
Device does not turn on. Make sure the battery is charged.
Laser comes on but device does not
decode barcode.
The device is on but does not react on
any keystroke.
Bluetooth is not working.
Wi-Fi is not working.
Barcode reading ability has degraded.
Nothing happens when the scan key is
pushed.
• Ensure the device is configured to read the type of code being scanned.
• Ensure the code is not defaced. Try to read another barcode.
• Move the device closer to or further from the code. This depends on your
barcode size.
• Press and hold the keys 1+2+3+4 for 5 seconds to reset the device.
By reset the device loses its timestamp. Before you continue to use it,
you must synchronize the time settings by connecting to a host.
Connect the device again with the Master S etup. The time will be
automatically synchronized with the system time of your PC. Specific
configuration settings and data will not be lost by the reset. Stored data
and configuration are not affected by a reset.
• Ensure that the device is in the correct Bluetooth Mode (HID or SPP).
• Ensure that you are paired correct to your host.
• Renew your pairing with your host system.
• Ensured that the device is in the correct Wi-Fi Mode (Wi-Fi or Wi-Fi
Batch)
• Ensure that your Wi-Fi configuration (in Config.ini file) is correct (SSID,
Key, Crypto, Host, Port, DHCP, etc.)
• Move the device closer to your access point.
• Maybe the scan window has become dirty. Please clean your scan
window with a soft cloth with water.
• Make sure your device is powered on (green LED on the left must be on).
• Ensure that your keys are correctly configured.
11 Troubleshooting
Pos: 43 /ID P/Manuals/Ü berschriften /1/Advance d Device Con figuration @ 3\mod_1542017996219_10021.docx @ 55767 @ 1 @ 1
12 Advance d De vic e Conf iguration
Advanced Device Configuration
Pos: 44 /ID P/Manuals/P ANMOBIL/Adv anced Devic e Configurati on @ 3\mod_1542025887146_10021.docx @ 56035 @ @ 1
The ID PM ECCO+ config.ini file contains the most common device settings. For information about the
configuration for options like Bluetooth, Wi-Fi, HF RFID as well as barcode configuration please refer to the
document Config_ini.pdf.
Pos: 45 /Ste uermodule/------------ Seit enumbruch ------------ @ 0\mod_1452083281983_0.docx @ 10032 @ @ 1
Page 19

IDENTIFICATION
Page 18 of 18
to cause harmful interference in which case the user will be required to correct the interference
Pos: 46 /IDP/M an u als/Überschr i ft en/1/Appro v al s @ 3\ mod_1542018031708_10021.docx @ 55777 @ 1 @ 1
13 Approvals
Approvals
Pos: 47 /ID P/Manuals/Ü berschriften /2/USA (FCC) and Canada (IC) @ 3\mod_1542026154591_10021.docx @ 56044 @ 2 @ 1
13.1 USA (FCC) and Canada (IC)
Pos: 48 /IDP/M an u als/PANMOBI L/ Approvals/ US A (FCC) and Cana d a (IC ) Ap proval @ 3\mod_1542026321029_10021.docx @ 56054 @ @ 1
Product name: HF Variante UHF Variante
FCC ID:
IC:
Notice for USA and
Canada
This device complies with Part 15 of the FCC Rules and with
RSS-210 of Industry Canada.
Operation is subject to the following two conditions.
(1) this device may not cause harmful interference, and
(2) this device must accept any interference received,
including interference that may cause undesired operation.
Unauthorized modifications may void the authority granted under Federal communications
Commission Rules permitting the operation of this device.
This equipment has been tested and found to comply with the limits for a Class A digital
device, pursuant to Part 15 of the FCC Rules. These limits are designed to provide reasonabl e
protection against harmful interference when the equipment is operated in a commercial
environment. This equipment generates, uses, and can radiate radio frequency energy and, if
not installed and used in accordance with the instruction manual, may cause harmful
interference to radio communications. Operation of this equipment in a residential area is likely
PJMECCOPLUS
6633A-ECCOPLUS
2AACD-ECCOPLUS
20859-ECCOPLUS
13 Approvals
at his own expense.
Le présent appareil est conforme aux CNR d'Industrie Canada applicables aux appareils radio
exempts de licence. L'exploitation est autorisée aux deux conditions suivantes :
(1) l'appareil ne doit pas produire de brouillage, et
(2) l'utilisateur de l'appareil doit accepter tout brouillage radioélectrique subi, même si le
brouillage est susceptible d'en compr om ettre le f on ctio nne me nt.
Wireless notice:
This product emits radio frequency energy, but the radiated output power of this device is far below the FCC
radio frequency exposure limits. Nevertheless, the device should be used in such a manner that the potential
for human contact with the antenna during normal operation is minimized. The system antenna(s) used for
this transmitter must not be co-located or operating in conjunction with any other antenna or transmitter.
NOTE:
Changes or modifications made to this equipment not expressly approved by
FEIG ELECTRONIC GmbH may void the FCC authorization to operate this equipment.
Pos: 49 /Ste uermodule/------------ Seit enumbruch ------------ @ 0\mod_1452083281983_0.docx @ 10032 @ @ 1
Page 20

IDENTIFICATION
13 Approvals
Page 19 of 19
Pos: 50 /IDP/M an u als/Überschr i ft en/2/Europ e (C E) @ 3\ mod_1542018076382_10021.docx @ 55787 @ 2 @ 1
13.2 Europe (CE)
Pos: 51 /IDP/M an u als/PANMOBI L/ Approvals/ E ur o p a (CE) @ 3\mod_1542026510111_10021.docx @ 56063 @ @ 1
This equipment is intended to be commercialized in all the countries of the European Union and there is no
commercialization or operational restrictions in any of the countries.
Hereby, advanced PANMOBIL systems GmbH & Co. KG declares that this Bluetooth, Wi-Fi barcode scanner
is in compliance with the essential requirements and other relevant provisions of Directive 1999/5/EC
European countries, where this equipment can be used are : Austria (AT) - Belgium (BE) - Bulgaria (BG) Switzerland/Liechtenstein (CH) - Cyprus (CY) - Czech Republic (CZ) - Germany (DE) – Denmark (DK) Estonia (EE) - Finland (FI) - France (FR) - Greece (GR) - Hungary (HU) - Ireland (IE) - Iceland (IS) Lithuania (LT) – Luxembourg (LU) - Latvia (LV) - Malta (MT) - Netherlands (NL) - Norway (NO) - Portugal
(PT) - Romania (RO) - Sweden (SE) - Slovenia (SI) – Slovak Republic (SK) - United Kingdom (UK)-Italy (IT)Poland (PO)-Spain (SP).
Performance Classificat ion ac cor ding to ETSI EN 301 489: C lass 2
13.3 Label
Pos: 52 /Ste uermodule/------------ Seit enumbruch ------------ @ 0\mod_1452083281983_0.docx @ 10032 @ @ 1
Page 21

IDENTIFICATION
13 Approvals
Page 20 of 20
Pos: 53 /ID P/Manuals/Ü berschriften /2/Ergono mic Recommend ations @ 3\mod_1542018096612_10021.docx @ 55797 @ 2 @ 1
13.4 Ergonomic Recommendations
Pos: 54 /ID P/Manuals/P ANMOBIL/Appr ovals/Ergo nomic Recom mendations @ 3\mod_154202668033 5_10021.docx @ 56072 @ @ 1
Pos: 54 /ID P/Manuals/P ANMOBIL/Appr ovals/Ergo nomic Recom mendations @ 3\mod_154202668033 5_10021.docx @ 56072 @ @ 1
In order to avoid or minimize the potential risk of ergonomic injury, follow the recommendations below.
Consult with your loca l Health & Safety Manag er to ensure that you are adhering to your company’s safety
programs to prevent employee injury. Repairs may only be executed by the manufacturer. Installation,
operation, and maintenance procedures should only be carried out by instructed personnel. Use of the
device and its installation must be in accordance with national legal requirements and local electrical codes .
• Keep objects that are used fr equently within easy reach.
• Reduce or eliminate repetitive motion.
• Reduce or eliminate excessive force.
• Maintain a natural position.
• Improve work procedures.
• Perform tasks at correct heights.
• Provide adjustable workstations.
• Provide adequate clearance.
• Reduce or eliminate direct press ure.
• Reduce or eliminate vibration.
• Provide a suitable working environment.
Pos: 55 /IDP/M an u als/Überschr i ft en/2/Vehic le I n s tal l ation @ 3\mod_1542018124697_10021.docx @ 55807 @ 2 @ 1
13.5 Vehicle Installation
Pos: 56 /IDP/M an u als/PANMOBI L/ Approvals/ V e hi c l e Ins tallation @ 3\mod_1542026866790_10021.docx @ 56081 @ @ 1
RF signals may affect improperly installed or inadequately shielded electronic systems in motor vehicles.
You should consult the manufacturer of any equipment that has been added to your vehicle.
An air bag inflates with great force. DO NOT place objects in the area over the air bag or in the air bag
deployment area. Improperly installed wireless equipment could result in serious injur y when the air bag
inflates. Position your device in easy reach. Make sure your device is accessible without removing your eyes
from the road.
Pos: 57 /IDP/M an u als/Überschr i ft en/2/Safet y on th e R oa d @ 3\ mod_1542018148123_10021.docx @ 55817 @ 2 @ 1
13.6 Safety on the Road
Pos: 58 /IDP/M an u als/PANMOBI L/ Approvals/ S af ety on the Road @ 3\mod_1542026935606_10021.docx @ 56090 @ @ 1
Do not take note or use the device while driving. When driving a car, driving is your first responsibility.
GIVE FULL ATTENTION TO DRIVING!
Pos: 59 /ID P/Manuals/Ü berschriften /2/Warnings for Use of Wireless De vices @ 3\mod_1542018173340_10021.docx @ 55827 @ 2 @ 1
13.7 Warnings for Use of Wireless Devices
Pos: 60 /ID P/Manuals/P ANMOBIL/Appr ovals/War nings for Use of Wireless Devices @ 3 \mod_1542027041093_10021.docx @ 56 099 @ @ 1
Please observe all warning notices with regard to the usage of wireless devices.
Page 22

IDENTIFICATION
13 Approvals
Page 21 of 21
Pos: 61 /ID P/Manuals/Ü berschriften /2/Potential ly Hazardo us Atmospher es - Vehicle Us e @ 3\ mod_1542018204106_10021.docx @ 55837 @ 2 @ 1
13.8 Potentially Hazaedous Atmospheres – Vehicle Use
Pos: 62 /ID P/Manuals/P ANMOBIL/Appr ovals/Poten tially Hazar dous Atmosp heres - Vehicl e Use @ 3\mod_1542027077823_10021.docx @ 56108 @ @ 1
You are reminded to observe restrictions on the use of radio devices in fuel depots, chemical plants and
areas where the air contains chemicals or particles such as grain, dust or metal powder, as well as any other
area where you are advised to turn off your vehicle engine.
Pos: 63 /ID P/Manuals/Ü berschriften /2/Safety in Aircrafts @ 3\mod_1542018241971_10021. docx @ 55847 @ 2 @ 1
13.9 Safety in Aircrafts
Pos: 64 /IDP/M an u als/PANMOBI L/ Approvals/ S af ety in Aircrafts @ 3\ mod_1542027302931_10021.docx @ 56127 @ @ 1
Switch off your wireless device whe ne ver you are instruc ted to do so by airport or airline staff.
Consult airline staff and ask for its use in flight.
Pos: 65 /ID P/Manuals/Ü berschriften /2/Safety in Hospitals @ 3\mod_1542018262457_10021.docx @ 55857 @ 2 @ 1
13.10 Safety in Hospitals
Pos: 66 /ID P/Manuals/P ANMOBIL/Appr ovals/Safet y in Hospit als @ 3\mod_1542027380047_10021 .docx @ 56136 @ @ 1
Wireless devices transmit radio frequency and may affect medical electrical equipment. Wireless devices
should be switched off wherever you are requested to do so in hospitals or healthcare facilities to prevent
interference with sensitive medical equipment.
Pos: 67 /IDP/M an u als/Überschr i ft en/2/Pace ma k er s @ 3\ mod_1542018285636_10021.docx @ 55867 @ 2 @ 1
13.11 Pacemakers
Pos: 68 /ID P/Manuals/P ANMOBIL/Appr ovals/Pac e ma k er s @ 3\ mod_1542027431555_10021.docx @ 56145 @ @ 1
It is recommended by pacemaker manufacturers to maintain a minimum of 15cm (6 inches) between a
handheld wireless devices and a pacemaker to avoid potential interference. These recommendations are
consistent with independent research and recommendations by Wireless Technology Research. Persons
with pacemakers:
• Should not carry the device in a breast pocket
• Should use the ear furthest from the pacemaker to minimize the potential of interference.
• Should ALWAYS keep the device more than 15cm (6 Inches) from their pacemakers when turned on.
• Turn OFF your device if you have any reason to suspect that interference is taking place.
Pos: 69 /ID P/Manuals/Ü berschriften /2/Other Me dical Device s @ 3\mod_1542018306824_10021.docx @ 55877 @ 2 @ 1
13.12 Other Medical Devices
Pos: 70 /ID P/Manuals/P ANMOBIL/Appr ovals/Oth er Medical D evices @ 3\mod_1542027523139_10021.docx @ 56154 @ @ 1
Please consult the manufacturer of the medical device to determine if the operation of your wireless product
may interfere with the medical device.
Pos: 71 /IDP/M an u als/Überschr i ft en/2/RF Expos ure Guidelin es @ 3\ mod_1542018342883_10021.docx @ 55887 @ 2 @ 1
Page 23

IDENTIFICATION
13 Approvals
Page 22 of 22
13.13 RF Exposure Guidelines
Pos: 72 /IDP/M an u als/PANMOBI L/ Approvals/ RF E xposure Guidel i n e @ 3\ mod_15420275 78091_10021.docx @ 56163 @ @ 1
Safety Information
Reducing RF exposure – use properly.
Only operate the device in accordance with the ins tructions supplied.
International
The device complies with international standards covering human exposure to electromagnetic fields from
radio devices.
EU
To comply EU RF exposure requirements, this device must be operated in the hand with a minimum
separation distance of 20cm from a person’s body. Other operation configurations should be avoided.
USA and Canada
To comply with FCC exposure compliance requirement, the antenna used for this transmitter must not be
co-located or operating in conjunction with any other transmitter/antenna expect those already approv ed in
this filling.
Handheld Devices
To comply with FCC RF exposure requirements the device must be operated in the hand with a minimum
separation distance of 20cm from a person’s body.
Other operation configurations should be avoided.
Pos: 73 /ID P/Manuals/Ü berschriften /2/Laser D evices @ 3\mod_1542018363322_10021.docx @ 55897 @ 2 @ 1
13.14 Laser Devices
Pos: 74 /ID P/Manuals/P ANMOBIL/Appr ovals/Las er Devices @ 3\mod_1542027791 722_10021.docx @ 56172 @ @ 1
Use of controls or adjustments or performance of procedures other than those specified herein may result in
exposure to hazardous visible laser li ght. The las er sc anner uti li zes a lo w-power laser diode. Although
staring directly at the laser beam momentarily causes no known biological damage, avoid staring into the
beam as one would with any very strong light source, such as sunlight. Avoid that the laser beam hits the
eye of an observer, even through reflective surfaces like mirrors, etc.
The following information is shown on the laser scanner device class label:
Page 24

Test report no. 19011679 Page 2 of 24
EUT: ID PM-ECCO+
FCC ID: PJMECCOPLUS
FCC Title 47 CFR Part 15
Date of issue: 2019-02-26
Date: 2018-06-06
Created: P4 Reviewed: P9 Released: P1
Vers. No. 1.18
TÜV NORD Hochfrequenztechnik GmbH & Co. KG
Rottland 5a, 51429 Bergisch Gladbach, Germany
Tel: +49 2207 9689-0
Fax +49 2207 9689-20
User Manual / Functional Description of the test equipment (EUT)
 Loading...