


7007 SW Cardinal Lane, Ste 105 Tigard, OR 97224 USA 800.329.2225 (+1.503.597.5350) FaxBack.com | info@faxback.com
NET SatisFAXtion 9.0
Fax Server Manual
Carrier Edition
Enterprise Edition
Small Business Edition
Last Edited December 8, 2014
Author
Duane Appelman
Proprietary FaxBack, Inc. 2014 |
1 |

Table of Contents
Section 1 Introduction 1.1 About This Guide
1.2 Additional Documentation
1.3 Hardware and Software Requirements
1.3.1 Static IP Address
1.3.2 Virtualization
1.4 Product Overview
1.5 What is a Network Fax Server?
1.5.1 NET SatisFAXtion Features
1.5.2 NET SatisFAXtion Components 1.5.2.1 The NET SatisFAXtion Server 1.5.2.2 The Administration Utility 1.5.2.3 The LaunchPad Website 1.5.2.4 The Report Utility
1.5.3 Supported Clients
1.6 Training and Professional Services
1.6.1 Training
1.6.2 Preconfiguration Services
1.6.3 Professional Services
1.6.4 Custom Professional Programming Services
1.7 Technical Support
1.7.1 Support Plans
1.7.1.1 Included 30day Support Plan 1.7.1.2 Standard Support Plans
1.7.1.3 Aroundtheclock 24×7 Support Plans 1.8 Product Key
1.9 Software Updates
1.10 Installation & Upgrade Guides
1.11 Compatibility List
1.11.1 VoIP Media Gateways
1.11.1.1 AudioCodes MediaPack series 1.11.1.2 AudioCodes TrunkPack series 1.11.1.3 AudioCodes Mediant series
1.11.1.4 Other SIP & T.38 capable VoIP devices 1.11.2 VoIP Service Providers
1.11.3 Dialogic Inc.
1.11.3.1 Brooktrout TruFax Series Analog Fax Boards 1.11.3.2 Brooktrout TR114 Series Analog Fax Boards 1.11.3.3 Brooktrout TR1034 Series Analog Fax Boards 1.11.3.4 Brooktrout TR1034 Series Digital Fax Boards 1.11.3.5 Eicon Diva Server Series Digital Fax Boards
1.11.4 Mainpine, Ltd.
1.11.4.1 Rockforce Series Analog Fax Boards 1.11.4.2 IQ Express Analog Fax Boards
1.11.5 Other Class 1 / Class 2 Fax Modems Section 2 Server Administrator
2.1 How Faxes Flow Through the System
2.1.1 Queues
2.1.2 Outbound Faxes
2.1.3 Inbound Faxes
2.2 Fax Devices
2.2.1 Additional Port Configuration
2.2.2 Voice over IP
2.2.2.3 Using Multiple VoIP Gateways
2.2.2.4 Fax Server with Multiple Network Interface Cards 2.2.3 Class 1/ Class 2
Proprietary FaxBack, Inc. 2014 |
2 |
2.2.3.1 Configuring NET SatisFAXtion to use a Class 1 or Class 2 device 2.2.4 Dialogic Brooktrout TR114
2.2.5 Dialogic Brooktrout TR1034
2.2.6 Dialogic Eicon Diva Server
2.3 Services and Monitoring
2.3.1 Service Account Permissions 2.3.1.1 Service Account Printers
2.3.2 NET SatisFAXtion Service
2.3.2.1 Starting and Stopping NET SatisFAXtion 2.3.3 SMTP Gateway
2.3.4 POP3 Gateway Service
2.3.4.1 Starting and Stopping the POP3 Gateway 2.3.5 NET SatisFAXtion Service Monitor
2.3.6 NSFaxMachineIntegrationServer
2.4 Managing User and Groups
2.4.1 User Permissions
2.4.2 User Properties
2.4.2.1 General
2.4.2.2 Routing
2.4.2.3 Cover Sheet
2.4.2.4 Email
2.4.3 Group Properties
2.4.4 Built In Users and Groups
2.4.4.1 System Users
2.4.4.2 System Groups
2.4.5 Creating, Modifying and Deleting Users 2.4.5.1 Creating a User
2.4.5.2 Modifying a User
2.4.5.3 Deleting a User
2.4.6 Creating, Modifying and Deleting Groups 2.4.6.1 Creating a Group
2.4.6.2 Modifying a Group
2.4.6.3 Deleting a Group 2.4.6.4 Adding a User to a Group
2.4.6.5 Removing a User from a Group 2.4.7 AutoEnroll
2.4.8 Importing Users
2.4.8.2 Importing from Another Machine 2.4.9 Exporting Users
2.4.9.1 Excel Spreadsheet
2.4.9.2 XML
2.4.10 Enabled and Using Advanced User Settings 2.4.10.1 CSID / TSID
2.4.10.2 ANI
2.4.10.3 Per User Delivery Format
2.4.10.4 Email Notifications for NonEmail Clients 2.4.10.5 User Database
2.5 Inbound Faxes
2.5.1 Routing Methods
2.5.1.1 Manual Routing
2.5.1.2 Line Routing
2.5.1.3 DID/DTMF/DNIS Routing
2.5.1.4 CSID Routing
2.5.1.5 Caller ID / ANI Routing
2.5.1.6 T.30 Subaddress Routing
2.5.1.7 Inbound Routing Capabilities By Device 2.5.1.8 Enabling DTMF Collection
2.5.1.9 Refusing Unrouted Faxes 2.5.2 Routing to Users and Groups
2.5.2.1 Routing to Users
Proprietary FaxBack, Inc. 2014 |
3 |
2.5.2.2 Routing to Groups 2.5.3 Delivering Faxes to Clients
2.5.3.1 Email
2.5.3.2 Microsoft Fax
2.5.3.3 Fax Machine Integration Server
2.5.3.4 Delivering to Both Email and Microsoft Fax
2.5.3.5 Delivering to Both Email and Fax Machine Integration Server 2.5.4 Fax Export
2.5.4.1 Configuring Export 2.5.4.2 Global vs PerUser Export
2.5.4.3 Exporting to a Network Share (UNC Path) 2.5.4.4 File Name Format
2.5.4.5 Information TXT/XML File 2.5.5 Autoprint
2.5.5.1 Global Autoprint
2.5.5.2 Group Autoprint
2.5.5.3 Autoprint everything that comes in on a line 2.5.5.4 Autoprint everything that comes in on a DID
2.6 Outbound Faxes
2.6.1 Error and Retries 2.6.1.1 Number of Retries 2.6.1.2 Intelligent Retry 2.6.1.3 Retry Interval
2.6.1.4 Which Errors are Retries 2.6.1.5 Customizing Retryable Errors
2.6.2 Dialing the Same Number More Than Once 2.6.3 Outbound Number Validation
2.6.3.1 Starting the Validation Editor 2.6.3.2 Adding a Validation Rule 2.6.3.3 Testing Validation Rules
2.6.3.4 Scenario: Seven Digit Local Dialing
2.6.3.5 Scenario: Ten Digit Local Dialing
2.6.3.5 Scenario: Dial AsIs (No Validation) 2.6.3.7 Scenario: Adding Access Codes 2.6.3.8 Adding Pauses to the Dial String
2.6.4 ANI (Caller ID)
2.6.5 Cover Sheet Templates
2.6.5.1 Cover Sheet Templates for Email Users 2.6.5.2 Selecting Cover Sheet Templates 2.6.5.3 Cover Sheet Selection
2.6.5.4 When Cover Sheets Will Be Used 2.6.5.5 Cover Sheet Variables
2.6.5.6 Forcing Cover Sheets
2.6.6 Outbound Document Conversion 2.6.6.1 What is Document Conversion?
2.6.6.2 ServerSide Conversion vs. ClientSide Conversion 2.6.6.3 Common Conversion Helper Applications
2.6.6.4 Troubleshooting Conversion Errors 2.6.8 AutoPrint
2.7 Reporting
2.7.1 Using Reports
2.7.1.1 Saving Reports
2.7.1.2 Printing Reports
2.7.2 Basic Reporting
Simple Report Everything Report Sent Faxes Report Received Faxes Report Errors Report
2.7.3 Usage Graphs
Proprietary FaxBack, Inc. 2014 |
4 |
Fax Traffic Graph
Fax Page Traffic Report Fax Connection Time Report
2.7.4 SQL Database Structure
2.7.4.1 Table Columns
2.8 Billing Codes
2.8.1 User Billing Codes
2.8.2 Custom Billing Codes
2.8.2.1 Using the Custom Billing Code 2.9 Email Integration
2.9.1 Email Integration using POP3
2.9.1.1 How the Gateway Operates Using POP3 2.9.1.2 Mail Server Requirements
2.9.1.3 Mailbox Requirements Create a POP3 Mailbox
2.9.2 Email Integration using SMTP 2.9.2.1 Microsoft SMTP Server Installing the Microsoft SMTP Server
2.9.2.2 How the SMTP Gateway Operates 2.9.2.3 Mail Server Requirements 2.9.2.4 Choosing a Domain Name
2.9.3 Installing the Email Gateway 2.9.3.2 Configuring the Email Gateway Options
Select Mode
POP3 Settings Options Loader Monitor
2.9.4 SMTP Routing
2.9.4.1 Generic SMTP Routing
2.9.4.2 Exchange 2007 and Exchange 2010 Routing 2.9.5 Email Addressing
2.9.5.1 SMTP Address Format
2.9.5.2 POP3 Address Format
2.9.5.3 Additional Email Flags 2.9.6 User Authentication
2.9.7 Email Notifications
2.9.8 File Name Whitelist & Blacklist
2.9.9 Troubleshooting Email Issues
2.9.9.1 Outboud Fax POP3
2.9.9.2 Outbound Fax SMTP
2.9.9.3 Inbound Fax SMTP
2.10 Connector API / ASCII Packet / ClarityNS
2.10.1 Enabling and Configuring the Connector API Module 2.10.2 Controlling the Number of Packets Read By the Server 2.10.3 Multiple Order Packet Folders
2.10.3.1 Copy Connector API DLL 2.10.3.3 Create Registry Key
2.10.3.4 Add New DLL to the Server Load List 2.11 Scanner / MFP
2.11.1 Xerox
2.11.1.1 Basic Configuration
2.11.1.2 Delivery and NonDelivery Notifications 2.11.2 HP Digital Sender
2.11.2.1 Basic Configuration
2.11.2.2 Delivery and NonDelivery Notifications 2.12 Other Topics
2.12.1 Enabling Debug Logging
2.12.1.1 IPFax
2.12.1.2 Class1
Proprietary FaxBack, Inc. 2014 |
5 |
2.12.1.3 Class2
2.12.1.4 Brooktrout TR1034 (BOS_MAN)
2.12.1.5 Brooktrout TR114 (BT_MAN) Section 3 Clients
3.1 Client Protocols
3.1.1 CAS
3.1.1.1 Network Challenges for CAS Clients 3.1.2 HTTP
3.1.2.1 Requirements
3.1.2.2 Using HTTP Clients over the Internet 3.1.3 SMTP
3.1.3.1 Using SMTP Clients over the Internet 3.2 FaxOut Client Suite
3.2.1 Installing
3.2.1.1 Software Requirements
3.2.2 Sending Faxes
3.2.3 Receiving Faxes
3.2.4 Components
3.2.4.1 FaxOut Printer
3.2.4.2 Outlook Addin
3.2.4.3 Popup Notifier
3.2.4.4 Office Addin 3.2.5 Office Integration
3.2.6 Previewing Outbound Faxes
3.2.7 Inbound Fax Notification
3.2.8 Managing Cover Sheet Templates
3.2.9 Scheduling Faxes
3.2.10 Forwarding Received Faxes to A Fax Number 3.2.11 Annotating Received Faxes
3.2.12 Using Billing Codes to Track Faxes 3.2.13 Advanced Print Automation
3.2.14 Using the FaxOut Client Suite without Outlook 3.3 Connector for Microsoft Fax
3.3.1 Installing
3.3.1.1 Software Requirements
3.3.1.2 Installing the Connector for Microsoft Fax 3.4 Administration Program
Section 4 Appendices
4.1 Error Code Reference
4.1.1 4228–4323: Document Conversion 4.1.2 1032–1140: Class 1 Driver
4.1.3 1281–1626: Class 2 Driver 4.1.4 Brooktrout Driver
4.1.5 Serial Modem Driver 4.1.6 27951–28027: IPFax Driver
4.1.7 28160–28240: SIP 300 Messages 4.1.8 28439: SIP 400 Messages
4.1.9 28672–28685: SIP 500 Messages
4.1.10 28928–28934: SIP 600 Messages
4.1.11 29185–29311: Q.850 Cause Codes 4.1.11.1 Normal Class
4.1.11.2 Resource Unavailable Class 4.1.11.3 Service or Option Unavailable Class
4.1.11.4 Service or Option Not Available Class 4.1.11.5 Invalid Message Class
4.1.11.6 Protocol Error Class
4.1.11.7 Internetworking Class
4.1.12 29997–30089: Port Server Client 4.1.13 30209–30266 Portafax Driver
4.1.14 18415619–18415628: Port Server Client Driver
Proprietary FaxBack, Inc. 2014 |
6 |
4.2 Registry Configuration Reference
4.2.1 [HKEY_LOCAL_MACHINE\Software\FaxBack]
4.2.1.1 ICANFax Global
4.2.1.2 Class1 Global
4.2.1.3 Class2 Global
4.2.1.4 Convert
4.2.1.5 IP_FAX Global
4.2.1.6 DotFax Plugin
4.2.1.7 Administration
4.2.1.8 Archive
4.2.1.9 ASCIIPacketServer
4.2.1.10 AutoPrint
4.2.1.11 CAS20
4.2.1.12 CASDrive
4.2.1.13 CASPost
4.2.1.14 EMEnroll
4.2.1.15 FaxBackX
4.2.1.16 Install
4.2.1.17 Logger
4.2.1.18 LoggingServer
4.2.1.19 LogonDialog
4.2.1.20 NF_Setup
4.2.1.21 Nrouter
4.2.1.22 POP3Post
4.2.1.23 PropToJSD
4.2.1.24 ReportClient
4.2.1.25 ReportServer
4.2.1.26 SMTPPost
4.2.1.27 ULImport
4.2.1.28 UserListImport
4.2.1.29 WLoader
4.3 Glossary
Proprietary FaxBack, Inc. 2014 |
7 |

Section 1 Introduction
Congratulations on your purchase of NET SatisFAXtion from FaxBack, Inc! Many years of effort have gone into developing a system that will give you the functionality you desire today and a platform that can accommodate your growing needs in the years to come.
1.1 About This Guide
This manual is written for the person whose responsibility it is to install and maintain the fax server and network software. It contains indepth technical information about how to install, manage and maintain the NET SatisFAXtion Fax Server software and all related software.
This manual does not cover initial installation of the NET SatisFAXtion fax server. Please see the NET SatisFAXtion Installation Guide for detailed documentation of the installation process.
1.2 Additional Documentation
Look on our website for helpful guides, white papers, frequently asked questions and more:
●Knowledge Base http://www.faxback.com/support
●Document Library http://www.faxback.com/docs
1.3 Hardware and Software Requirements
It is strongly recommended that NET SatisFAXtion be installed on a dedicated machine. Faxing is a timesensitive operation and faxes can fail if NET SatisFAXtion has to contend with other applications for system resources.
CPU |
2.0 GHz or faster Intel or AMD processor. Cores: 2 |
|
|
|
|
RAM |
2 GB RAM or greater |
|
|
|
|
Available Disk |
60 |
GB minimum total hard disk space for software plus OS |
|
|
|
Operating System |
● |
32bit or 64bit Microsoft Windows operating system |
|
● |
Windows Server 2012 R2 (all editions, releases and service |
|
|
packs) |
|
● |
Windows Server 2008 R2 (all editions, releases and service |
|
|
packs) |
|
● |
Windows Server 2008 (all editions, releases and service |
|
|
packs) |
|
● |
Windows Server 2003 (all editions, releases and service |
|
|
packs) |
|
Note: Windows XP, 2000 and Windows Vista are not supported |
|
|
|
|
Proprietary FaxBack, Inc. 2014 |
8 |
|
operating systems for the NET SatisFAXtion server. |
|
|
||||
|
|
||||||
Domain Controller |
Do not attempt to install NET SatisFAXtion on a domain controller. |
||||||
|
Microsoft does not support SQL Server Express on a domain |
||||||
|
controller and it is required for NET SatisFAXtion to operate |
|
|||||
|
|
||||||
Citrix and Terminal Server |
Do not attempt to install NET SatisFAXtion on a Citrix Server or |
||||||
|
Terminal Server |
|
|
|
|
||
|
|
|
|
|
|
|
|
Prerequisite Software |
The |
following |
will |
be installed automatically |
by the |
NET |
|
|
SatisFAXtion installer if it is missing: |
|
|
||||
|
● |
Microsoft SQL Server 2008 R2 SP1 Express Edition |
|
||||
|
● |
Microsoft .NET Framework 3.5 SP1 |
|
|
|||
|
● |
Microsoft .NET Framework 3.0 Service Pack 21 |
|
|
|||
|
● |
Microsoft .NET Framework 2.0 Service Pack 21 |
|
|
|||
|
● |
Windows Installer 4.52 |
|
|
|||
|
1 Windows 2008 has Microsoft .NET Framework 2.0 SP2 and 3.0 |
||||||
|
SP2 installed by default. They are not visible in the Add/Remove |
||||||
|
Programs list. |
|
|
|
|
||
|
2 Windows 2003 and newer have Windows Installer 4.5 installed |
||||||
|
by default. It is not visible in the Add/Remove Programs list. |
|
|||||
|
|
|
|
|
|
|
|
Fax Devices |
Any |
supported |
fax |
device including internal fax |
modems, |
VoIP |
|
|
media gateway or VoIP SIP service. Please see |
1.11) |
|||||
|
Compatibility List |
|
|
|
|||
|
|
|
|
|
|
|
|
1.3.1 Static IP Address
The fax server should be assigned an IP address that won’t change, particularly if you are using VoiceoverIP equipment or are using email clients. You may also need additional static IP addresses for VoIP media gateways, see 2.2.2 Voice over IP for details.
1.3.2 Virtualization
NET SatisFAXtion with a VoIP media gateway or VoIP SIP service is fully supported on any of the above guest operating systems on most virtualization platforms including VMWare ESX and ESXi, Microsoft HyperV and Citrix XenServer.
1.4 Product Overview
All fax servers are comprised of three basic components: First, client programs allow the users to create and monitor faxes and fax activity. Second, a database on the server stores the images and information regarding the transmission attempts. And third, server applications, implemented as Windows Services, control the functioning of the server.
In order to more fully understand these three components, it is necessary to answer several questions:
●What is a Network Fax Server?
●What are the unique features about the NET SatisFAXtion server?
●What are the components in the NET SatisFAXtion server?
●How does NET SatisFAXtion work?
Proprietary FaxBack, Inc. 2014 |
9 |
1.5 What is a Network Fax Server?
Simply defined, a fax server is a selfcontained unit attached to an internal network that has the capability to allow any user on that network to send and receive faxes at their desktop.
Fax server functionality is provided by software services running on the server. Fax machines, fax clients or email clients submit jobs and request services from the server and the server handles these requests in an orderly and sequential manner.
1.5.1 NET SatisFAXtion Features
NET SatisFAXtion’s features include:
●Automatically Configure AudioCodes MediaPack MP114 & MP118 VoIP Gateways –
Simplifies installation & configuration of AudioCodes’ line of analog VoIP hardware.
●Support for Microsoft Fax / Windows Fax & Scan – Support for Windows’ builtin fax client allows easy desktop faxing through the NET SatisFAXtion Server.
●Email Gateway Whitelist / Blacklist – Reduce the headaches of conversion issues by restricting what document types your users can send.
●UserFriendly Error Messages – Faxing errors are now simplified to reduce confusion, and include a suggestion of what a user can do to remedy the problem. For administrators, error codes are still available in the message to assist troubleshooting.
1.5.2 NET SatisFAXtion Components
NET SatisFAXtion is typically installed on a Local Area Network (LAN). The server’s fax cards are connected to the telephone system (or PBX) via standard analog telephone lines (RJ11), or if digital services are available, via a T1/PRI connection.
The NET SatisFAXtion server uses a server and domain methodology for accessing the fax services. This means that a domain may actually host several NET SatisFAXtion servers, especially in a large enterprise installation. This is an important detail for administrators because NET SatisFAXtion allows an administrator to manage multiple fax servers in multiple domains from a single workstation.
Typically, faxes will be created by users using either client software such as the FaxOut Client Suite or Microsoft Fax or an email gateway which allows you to send faxes from Microsoft Exchange or SMTPbased mail systems. In some instances, your configuration may include a combination of clientbased and emailbased solutions.
The primary components that make up the NET SatisFAXtion system in these environments are:
●The NET SatisFAXtion fax server
●A supported email client or client application such as FaxOut Client Suite, Microsoft Fax, FAXability or an HTTPS enabled ATA.
●Administrative utilities such as Administration, Reports, Fax Validation Editor, Change Server Settings.
Proprietary FaxBack, Inc. 2014 |
10 |
1.5.2.1 The NET SatisFAXtion Server
The NET SatisFAXtion Fax Server is a dedicated server platform configured running Windows 2008 or Windows 2012 and NET SatisFAXtion server software. Typically, this server will also contain one or more fax boards or use existing Voice Over IP (VoIP) equipment on the network such as AudioCodes hardware.
The fax server manages the following activities:
●Outbound fax delivery – Manages the delivery of faxes from two or more fax ports per server. When all fax ports are busy, the fax server monitors each port and delivers the next job to the first available line.
●Inbound fax routing – Determines recipient of incoming fax based on Administrator’s choice of fax routing methods and delivers that fax to the intended recipient’s inbox.
●Fax activity logging – Logs the details of inbound and outbound fax activities. Allows the Report utility to log in and extract uptotheminute data for activity reports.
●Realtime status feedback – Allows users to view realtime status of incoming and outgoing faxes at their desktop workstations. NET SatisFAXtion’s software even allows you to view the realtime status of every fax port on the server.
1.5.2.2 The Administration Utility
NET SatisFAXtion makes it simple to manage your entire fax services from any workstation in your enterprise. The NET SatisFAXtion Administration utility offers a complete package of fax server management features in a single user interface. The application can be run from any workstation logged into the NET SatisFAXtion server, giving administrators unparalleled information and control. At least one client/user needs to have Administration capabilities. This person will handle routing, monitoring port activity, adding/changing/deleting users and groups, reporting, etc.
Depending on the password rights associated with each network user, NET SatisFAXtion offers different levels of administrative control. Thus, network administrators can provide department heads and MIS managers with a view of fax server activity or reporting functions without actually granting the rights to change system parameters or user information.
1.5.2.3 The LaunchPad Website
When NET SatisFAXtion is installed, a web server is also installed on the server. This becomes the hosting site of the LaunchPad Website, which is the Resource Center for administrators and users of NET SatisFAXtion. All administrator and client downloads can be installed from this site by simply clicking on the appropriate download link. There is user documentation and screenshots for each client application as well as technical support documents and a link to FaxBack’s online Knowledge Base.
1.5.2.4 The Report Utility
The NET SatisFAXtion Report Utility is a powerful tool that allows administrators to run realtime usage reports. The utility logs directly into the NET SatisFAXtion server to derive realtime message statistics.
The Report Utility performs queries against the usage database and allows you to display the results in a table or a graphical display. Also, with a single click Microsoft Excel can be opened with the table data present such that all the graphing and sorting capabilities provided by Excel can be used.
The utility allows you to extract data based on a custom calendar or for preset date ranges.
An entire chapter of this manual is devoted to this utility. Please refer to the chapter “Report Utility” for usage instructions and examples.
1.5.3 Supported Clients
Net SatisFAXtion offers native support for nearly all email clients or stand alone clients such as Microsoft Fax and Windows Fax and Scan. Regardless which of these fax interfaces you are using,
Proprietary FaxBack, Inc. 2014 |
11 |
NET SatisFAXtion delivers powerful realtime fax delivery status for every user, giving you the ultimate confidence in fax delivery.
Microsoft Fax – Built in to most Microsoft Windows platforms, Microsoft Fax is an easytouse, fullfeatured faxing application.
Email Clients – NET SatisFAXtion can easily fax from any mail client, including:
●Microsoft Outlook: Users can send, receive, manage and track the status of faxes through their Outlook mail client.
●SMTP/POP3 Internet Mail Clients: Most SMTP/POP3 Internet Mail clients.
1.6Training and Professional Services
We offer a number of additional services to help you get the most out of your NET SatisFAXtion fax server. Contact your sales rep for details and pricing. Please note we require at least 24 hours lead time to schedule most of these services.
1.6.1 Training
With most business software, employees initially use only a fraction of the functionality built into their systems. Capabilities and/or functionality you do not know exists could make a big difference in the level of ROI you receive as well as value to your own customers, suppliers and employees. Maximize the value of your FaxBack applications with expertise from the people who know it best – our technical training engineers.
Remote Online Training
Custom training designed specifically for you: we’ll work with you to create an agenda that reflects the training your company wishes to receive.
1.6.2 Preconfiguration Services
We strongly recommend this affordable service! Right along with your IT person, a highly experienced FaxBack support engineer will log onto your system and install and configure your fax system optimizing it for your organization and IT infrastructure.
1.6.3 Professional Services
You get a dedicated, twohour block of time with a Professional Services Engineer. We will remotely access your server and provide the following:
●Installation and configuration assistance
●Basic product walk through
●Q & A Session
Professional Services can be tailored to your exact needs, please contact your sales rep for details.
1.6.4 Custom Professional Programming Services
Professional services for customized fax features/functionality. Requires scope call and custom
Proprietary FaxBack, Inc. 2014 |
12 |
quote by Professional Services Engineer. Please contact your sales rep for details.
1.7Technical Support
1.7.1Support Plans
1.7.1.1 30day Trialware Support Plan
Complimentary email, fax and telephone software support is included with for every trialware evaluation. This complimentary support plan starts when the trialware is requested, not on software installation, and is only available during standard FaxBack Support hours 6:30am–5:00pm PST Monday through Friday, excluding US holidays.
1.7.1.2 Standard Support Plans
FaxBack support engineers are skilled in troubleshooting, problem diagnosis and identifying resolutions.
Benefits include:
●Support Duration: sold in 1, 2 and 3 year incremental plans
●Hours of Coverage: 6:30am–5:00pm Pacific Monday through Friday, excluding US holidays
●FaxBack Customer Connection: remote access to customersystem for rapid resolution
●Email, fax and telephone access to Technical Support Team during hours of coverage
●Online Knowledge Base access
●Number of Incidents: unlimited
●Software Updates: Service packs, software updates and product releases.
●For New and Renewing Support Customers: Standard Support is invoiced at 15% of the total current list price of the software products purchased
1.7.1.3 Aroundtheclock 24×7 Support Plans
Includes all the features of our Standard Support plan plus expedited 24×7 support. This support plan is geared toward organizations with missioncritical fax systems that cannot risk downtime. Enables customers to handle system maintenance, upgrades or other potential support issues during nonbusiness and noncritical hours of operation.
Includes all the features of the Standard Support PLUS:
●Expedited 24×7 Support: 365 days a year including holidays
●Help After Hours: Down system status that occur after business hours or on holidays will receive a phone call back from a support engineer within 30 minutes
●For new and renewing support customers: Aroundtheclock 24×7 Support is invoiced at 25% of the total current list price of the software products purchased
1.8Product Key
Your server’s product key determines what features are available. It also contains other important information such as your Customer ID, the server's Server ID, and the expiration date of your FaxBack technical support agreement.
Your product key encodes the following parameters, which you can see using the Start Programs NET SatisFAXtion Update Product Key program.
Proprietary FaxBack, Inc. 2014 |
13 |

●CustomerID: Your customer number in FaxBack’s customer database.
●ServerID: The number identifying this NET SatisFAXtion server install. If you have multiple fax servers, each will have its own unique ServerID.
●Expiration: Date when your FaxBack technical support agreement expires or in the case of trialware, the date the NET SatisFAXtion software will stop working.
○ExpirationType:
■Subscription: Retail product key; NET SatisFAXtion will continue to operate past the expiration date.
■Timeout: Trialware product key; NET SatisFAXtion will not operate beyond the expiration date.
●FaxServerType:
○SmallBusiness: NET SatisFAXtion Small Business Edition
○SmallBusinessIP: NET SatisFAXtion Small Business IP Edition
○Enterprise: NET SatisFAXtion Enterprise Edition
○EnterpriseIP: NET SatisFAXtion Enterprise IP Edition
○Carrier: NET SatisFAXtion Carrier Edition
●EmailGateway:
○SMTP: Allows installation of the Email Gateway
○None: Email gateway support is not enabled
●FaxPortCount: Number of fax ports licensed for fax server using the Server ID
●VoicePortCount: Number of FaxonDemand voice ports licensed for use with the FaxBack FaxonDemand IVR product
●FaxExport: Enables the Fax Export module
●Broadcast: Enables the Broadcast module
●PDFConverter: Enables email gateway and/or Fax Export to create PDF files as attachments
●API: Enables use of any of FaxBack's Application Programming Interface, used for custom software integration
●ConsensualFax: Enables use with the FaxBack FaxonDemand IVR product with the Consensual Fax module
●IPFax: Enables use of the IPFax Voice over IP driver
1.9 Software Updates
A current support agreement also comes with free updates. You can download any supported version of NET SatisFAXtion from our web site: http://www.faxback.com/software
1.10 Installation & Upgrade Guides
Detailed installation and upgrade guides can be found in the NET SatisFAXtion CD Image directory, created
Proprietary FaxBack, Inc. 2014 |
14 |

when you run the downloaded NS90Download.exe. Look for these two files:
●README FIRST Installation Guide.pdf
●NET SatisFAXTion Upgrade Guide.pdf
Up to date guides can be found on our website: http://www.faxback.com/docs
Also on our website there are guides to installing and configuring NET SatisFAXtion with AudioCodes MediaPack hardware and other VoIP fax hardware brands.
1.11 Compatibility List
NOTE: Not all fax hardware is supported on 64bit platforms.
1.11.1 VoIP Media Gateways
These devices are supported on both 32bit and 64bit operating systems.
1.11.1.1 AudioCodes MediaPack series
● AudioCodes MediaPack MP114: 4port FXO, 4port FXS*, or mixed. External gateway.
● AudioCodes MediaPack MP118: 8port FXO, 8port FXS*, or mixed. External gateway. FXS ports are normally used for DID (WinkStart) trunks only.
● AudioCodes MP202B Fax ATA: HTTPS Fax enabled 2ports support fax machines and MFPs.
1.11.1.2 AudioCodes TrunkPack series
● AudioCodes TrunkPack 260: 1, 2, 4 and 8span T1/PRI. Internal full length uPCI card.
1.11.1.3 AudioCodes Mediant series
●Mediant 800: Fixedlayout (nonmodular). Available with 1 T1/PRI, 8 FXO ports, 4 FXS and 4 FXO ports, or 8 FXS ports. 1U rack gateway.
■Optionally available with onboard OSN server module to host the NET SatisFAXtion server or Fax Machine Integration Server.
●Mediant 1000: Modular FXO, FXS* and 1–4 T1/PRI modules. 1U rack gateway supports 6 modules (maximum 24 FXO/FXS ports or 4 T1/PRI trunks). Optional onboard OSN server module to host the NET SatisFAXtion server or Fax Machine Integration Server. FXS ports are normally used for DID (WinkStart) trunks only.
●Mediant 2000: 1, 2, 4, and 8span T1/PRI cPCI blades. 1U rack gateway supports 2 blades (maximum 16 T1/PRI spans).
●Mediant 3000: 1, 2, or 3 DS3 cPCI blades. 4U rack gateway supports 2 redundant blades (maximum 84 T1/PRI spans).
1.11.1.4 Other SIP & T.38 capable VoIP devices
NET SatisFAXtion has been tested and certified with the majority of Cisco media gateways. Please be aware that FaxBack Technical Support can provide only basic configuration assistance with Cisco equipment. We recommend Cisco TAC for comprehensive Cisco support and configuration assistance.
Other Voice over IP devices may work, provided the device supports the SIP and T.38 protocols.
1.11.2 VoIP Service Providers
VoIP service providers are supported on both 32bit and 64bit operating systems. Please check our support Knowledge Base for an up to date list of service providers:
Proprietary FaxBack, Inc. 2014 |
15 |
http://kb.faxback.com/Supported+VoIP+Providers
1.11.3 Dialogic Inc.
Formerly Cantata Technology, Brooktrout Technology, Eicon Networks.
NOTE: These devices are supported on 32bit operating systems only.
1.11.3.1Brooktrout TruFax Series Analog Fax Boards TruFax 100: uPCI 1port loop start fax board, uPCI card TruFax 200: uPCI 2port loop start fax board, uPCI card
1.11.3.2Brooktrout TR114 Series Analog Fax Boards TR114+uP2L: 2port loop start fax board, full length uPCI card
TR114+uP2C: 2port fax board with 1 DID, 1 loop start full length uPCI card* TR114+uP2D: 2port DID fax board, full length uPCI card*
TR114+uP4L: 4port loop start fax board, full length uPCI card TR114+uP4C: 4port fax board with 2 DID, 2 loop start, full length uPCI card* TR114+uP4D: 4port DID fax board, full length uPCI card*
*Requires Tellabs 8012 –48 VDC power supply for up to 6 DID trunks
1.11.3.3Brooktrout TR1034 Series Analog Fax Boards
TR1034+P22L: 2port analog fax board, full length uPCI card
TR1034+uP2C: 2port fax board with 1 DID, 1 loop start, full length uPCI card
TR1034+uP2D: 2port DID fax board, full length uPCI card
TR1034+P44L: 4port analog fax board, full length uPCI card
TR1034+uP4C: 4port fax board with 2 DID, 2 loop start, full length uPCI card
TR1034+uP4D: 4port DID fax board, full length uPCI card
TR1034+P88L: 8port analog fax board, full length uPCI card
1.11.3.4 Brooktrout TR1034 Series Digital Fax Boards
TR1034+P4HT1: 4port v.34 fax board onboard T1/PRI interface, full length uPCI card TR1034+P8HT1: 8port v.34 fax board onboard T1/PRI interface, full length uPCI card TR1034+P16HT1: 16port v.34 fax board onboard T1/PRI interface, full length uPCI card TR1034+P24HT1: 24port v.34 fax board onboard T1/PRI interface, full length uPCI card
1.11.3.5 Eicon Diva Server Series Digital Fax Boards
Diva Server PRI/E1/T124: 24port v.34 Fax board with onboard T1/PRI interface, full length uPCI card
Diva Server PRI/E1/T18: 8port v.34 Fax board with onboard T1/PRI interface, full length uPCI card
1.11.4 Mainpine, Ltd.
NOTE: These devices are supported on 32bit operating systems only.
Proprietary FaxBack, Inc. 2014 |
16 |

1.11.4.1Rockforce Series Analog Fax Boards Rockforce DUO+ Analog PCI Card Rockforce QUATRO+ Analog PCI Card Rockforce OCTO+ Analog PCI Card
1.11.4.2IQ Express Analog Fax Boards
IQ Express: 2 Port Analog PCIe Card
IQ Express: 4 Port Analog PCIe Card
IQ Express: 8 Port Analog PCIe Card
1.11.5 Other Class 1 / Class 2 Fax Modems
Note: These devices are supported on 32bit operating systems only.
Most Class 1 and Class 2 modems should work provided they are fully Class 1 or Class 2 compliant. USB modems are known to not work and may blue screen the server due to the modem not supporting the complete Class 1 command set (STOP END_OF_NT_EVALUATION_PERIOD).
Proprietary FaxBack, Inc. 2014 |
17 |
Section 2 Server Administrator
2.1 How Faxes Flow Through the System
2.1.1 Queues
There are four important queues in NET SatisFAXtion. Any fax that is processed by the server is stored in one or more queues. The fax server’s queues should stay relatively empty. If the queues grow in size over time, it can be an an indication that something is misconfigured.
Scheduled Queue: This queue stores outbound faxes waiting to be sent. Faxes that are converting, faxes that failed and are waiting to retry, and faxes that are scheduled to send in the future will wait here.
Active Queue: This queue contains all faxes that are actively sending or receiving.
Outbox (Sent Queue): Delivery notifications are stored here before they are delivered to the sender. Some clients (notably FAXability) will only collect notifications when the user specifically checks. All other clients will retrieve notifications in real time and nothing should be left here longer than a few seconds.
Inbox (Received Queue): Received faxes are stored here before they are delivered to the receiver. Unrouted faxes (delivered to Postmaster) will remain here until manually routed. Some clients (notably FAXability) will not retrieve faxes in real time since the client application is not running all the time.
2.1.2 Outbound Faxes
A fax is sent to the fax server from a client. NET SatisFAXtion validates the phone number. The fax server places the call using a configured fax device. When the fax completes, a status notification is sent back to the client.
2.1.3 Inbound Faxes
A call comes in from a configured fax device. NET SatisFAXtion answers the call and begins receiving the fax. Once the fax is completely received, the fax server makes a decision where to send it based on fax server configuration. If the fax server is set to auto routing, the fax is delivered it to the client immediately, else the fax will sit in the inbox until manually routed.
2.2 Fax Devices
The term “fax device” refers to the means by which the NET SatisFAXtion fax server sends or receives faxes from other fax machines or fax servers. Fax devices can be a traditional PCI fax card, an onsite Voice over IP media gateway, or even a SIP provider used over the open Internet.
The ‘ReDetect Fax Devices’ utility allows you to add/remove fax devices as well as change the number of ports allocated to each device. The total number of ports that can be configured is controlled by your product key. The fax service will be stopped by ‘ReDetect Fax Devices’ utility before any changes can be made. The service will be restarted when changes are completed.
The ‘Change Server Settings’ utility allows you to modify settings on existing ports. Click the ‘Hardware
Proprietary FaxBack, Inc. 2014 |
18 |
Settings’ button on the General tab for devicespecific options. The fax service will be stopped by the ‘Change Server Settings’ utility after the OK button is clicked. The service will then be restarted with the changes.
2.2.1 Additional Port Configuration
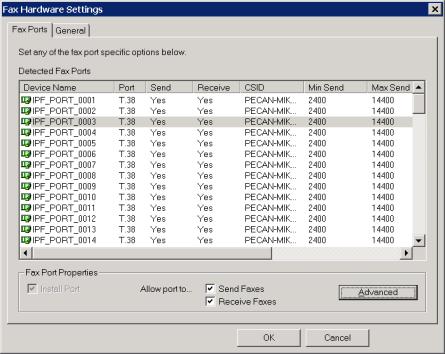
2.2.1.1 Send/Receive Only Ports
Sometimes it is useful to reserve certain fax ports for sending only or receiving only. One example would be a server that does a high volume of outbound, still has inbound needs, and inbound callers frequently get busy signals. The solution would be to reserve some ports for inbound traffic thereby reducing the chances of busy signals.
Ports can be configured as send only or receive only in the ‘Change Server Settings’ utility, located at Start Programs NET SatisFAXtion Change Server Settings. Click on the ‘Fax Hardware Settings’ button. Here you will see a list of configured ports.
Select a port and you can enable and disable send and receive capabilities using the Allow port to... Send Faxes, Receive Faxes checkboxes at the bottom of the window.
Brooktrout TR1034
Configured ports on Brooktrout TR1034 cards (and recent models of TruFax 100 and 200 cards) will not show up in Change Server Settings. Configuration must be done in the registry. Under [HKLM\Software\FaxBack\ICANFax] you will find one key per port. Look for keys named similarly to BOS_02_001. Under each key will be a mode string value, this controls whether a port can send or receive.
[HKLM\Software\FaxBack\ICANFax\<portname>] "mode" = "fax_in,fax_out"
Set the mode to reflect how you want the port configured. To only send faxes, set "mode" = "fax_out". To only receive faxes, set "mode" = "fax_in". To disable the port, set "mode" = "" (i.e. remove the value from mode).
Manually restart the NET SatisFAXtion service after making any changes to the registry.
2.2.1.2 CSID and TSID
Called Subscriber Identifier (CSID) and Transmit Subscriber Identifier (TSID) are how the fax server and other fax machines identify each other. When a fax is sent or received, one of the first things that happens is the called fax sends its CSID, and then the calling fax sends its TSID.
Proprietary FaxBack, Inc. 2014 |
19 |

NET SatisFAXtion records the other fax device’s CSID in its transaction log.
CSID is up to 20 characters long and can include letters, numbers, spaces and symbols. It is a good idea to set CSID to either your main fax line, a contact phone number, or your company name so that recipients can identify the sender. CSID cannot be blank.
CSID is initially configured during installation or ‘ReDetect Fax Devices’. You can configure CSID afterwards in the ‘Change Server Settings’ utility, located at Start Programs NET SatisFAXtion Change Server Settings. Click on the ‘Fax Hardware Settings’ button and change to the General tab.
Click the Change button next to CSID, enter your CSID, and click OK when finished.
2.2.1.3 Fax Speed
Fax speed is controlled by three things: the maximum speed the sender supports, the maximum speed the receiver supports, and what speed the phone lines and telephone network can support. The lowest of these three speeds will be used. For example, if the sender supports speeds up to 14,400, the receiver supports speeds up to 12,000, but the line can only support 9600, the fax will be sent at 9600.
There are two common reasons to change the allowed fax speed:
●Prevent Slow Faxes: At the lower speeds faxes can take an unusually long time to send or receive. It is useful to increase the minimum allowed speed to 9600 to disallow faxes from using very slow speeds. If the line quality is poor enough that the fax cannot be sent or received at 9600, it will fail instead of using lower speeds.
●Troubleshooting Poor Line Quality: If line quality is poor and many faxes are failing with communication errors, success rate may be slightly improved by decreasing the maximum allowed fax speed to 9600.
You can configure the speeds allowed for sending and receiving in the ‘Change Server Settings’ utility, located at Start Programs NET SatisFAXtion Change Server Settings. Click on the ‘Fax Hardware Settings’ button. Select a port and click Advanced.
2.2.2 Voice over IP (VoIP)
Licensing: Voice over IP requires the IPFax feature.
Proprietary FaxBack, Inc. 2014 |
20 |
Voice over IP (VoIP) is a general term for placing telephone calls over data networks. The NET SatisFAXtion fax server uses Session Initiation Protocol (SIP) and T.38 (International Telecommunication Union publication T.38) protocol to set up calls, and to transmit fax data respectively.
2.2.2.1 A Note on Fax Server Ports versus Media Gateway Ports
The ports you see in NET SatisFAXtion are ‘virtual’ ports. They do not correspond with the physical ports on the media gateway. Outbound ports are allocated lowest port number to highest (ascending) and inbound ports are allocated from highest to lowest (descending).
2.2.2.2 Configuring NET SatisFAXtion to use a VoIP device
NET SatisFAXtion can use a variety of VoIP devices and/or SIP providers to send and receive faxes. VoIP devices are initially configured in the ‘ReDetect Fax Devices’ utility. You can configure VoIP device parameters afterwards in the ‘Change Server Settings’ utility, located at Start Programs NET SatisFAXtion Change Server Settings. Click on the ‘Fax Hardware Settings’ button, select a port and click Advanced.
Click More Settings to override the IP address used for SIP.
Proprietary FaxBack, Inc. 2014 |
21 |
AudioCodes MediaPack MP114 or MP118 Gateway
Run ReDetect Fax Devices from the Start menu. Select the AudioCodes VoIP Gateways option to automatically configure the MediaPack gateway. Please refer to NET SatisFAXtion MediaPack Install online at faxback.com/docs.
AudioCodes or Cisco Media Gateway On Local Subnet
Run ReDetect Fax Devices from the Start menu. Select the AudioCodes VoIP Gateways option if you will be connecting to an AudioCodes media gateway or under Alternate Fax Devices select IP Fax (T.38) VoIP Gateways for a Cisco media gateway.
By default, ReDetect Fax Devices will attempt to locate the media gateway on the local subnet via Simple Network Management Protocol (SNMP) broadcast and Cisco Discovery Protocol (CDP). This technique is sufficient to find AudioCodes and Cisco media gateways on the local subnet. Note that it will also detect other Cisco network devices that may not be VoIP media gateways.
Other Media Gateway or Gateway Not On Local Subnet
If your media gateway is not on the local subnet or it is not a AudioCodes or a Cisco device, click on the Show Advanced Settings link to enable manual configuration. For gateways that do not require proxy authentication or registration, simply enter the IP address of the media gateway.
If you require proxy authentication and registration, choose the radio option through this SIP proxy/server. Enter the remote IP address of the SIP device and fill in the required username and password. Usually AoR will be the same as the user name. It will be used in the SIP REGISTER messages as the part of the From URI before the @.
If you only require proxy authentication but not registration, uncheck the SIP registrar logon same as SIP proxy/server checkbox and clear all values from Registrar, User name, Password and AoR.
Please note that the media gateway must support SIP and T.38 protocols, and must initiate T.38 on detection of fax tone for outbound faxes (for inbound faxes, NET SatisFAXtion will initiate T.38).
SIP Trunk Provider
If you are using a SIP provider, click on the Show Advanced Settings link to enable manual configuration. For providers that do not require authentication or registration (i.e. they use IP authentication), simply enter the IP address specified by the provider.
If you require authentication and registration, choose the radio option through this SIP proxy/server. Enter the remote IP address specified by the provider and fill in the required username and password. Usually AoR will be the same as the username. It will be used in the SIP REGISTER messages as the part of the From URI before the @.
Please note that the provider must support SIP and T.38 protocols, and must initiate T.38 on detection of fax tone for outbound faxes (for inbound faxes, NET SatisFAXtion will initiate T.38).
2.2.2.3 Using Multiple VoIP Gateways
NET SatisFAXtion will answer all calls sent to it, so there is no additional configuration necessary to receive calls from multiple gateways.
To use multiple gateways to send calls, some additional registry configuration is required.
2.2.2.4 Fax Server with Multiple Network Interface Cards
A fax server with multiple network interface cards (NICs) presents a special problem. All SIP communication will use the IP address of the first adapter in the binding order. To check the binding order, open the Control Panel Network Connections folder. Click the Advanced Advanced Settings menu. All the network connections on the server will be listed here. Move the connection that that should be used to the top of the list.
Alternately, you can manually override the IP address used by going to the ‘Change Server Settings’ utility, Start Programs NET SatisFAXtion Change Server Settings. Click the ‘Fax Hardware’ button, select a port, click Advanced, then More Settings.
Make sure the IP address you enter is valid for this server. If using a domain name, make sure the name resolves from the media gateway and the IP it resolves to is valid for this server.
Proprietary FaxBack, Inc. 2014 |
22 |

2.2.3 Class 1/ Class 2
Most internal and external serial modems use the Class 1 or Class 2 command set.
2.2.3.1 Configuring NET SatisFAXtion to use a Class 1 or Class 2 device
NET SatisFAXtion can use most Class 1 or Class 2 fax modems to send and receive faxes. Class 1 or Class 2 devices are initially configured in ReDetect Fax Devices. Ensure that the modem’s drivers are already installed and Windows has detected them. Configured modems will be listed in Window’s Phone and Modem Options control panel.
Modems cannot be shared between applications, so ensure that no other telephony application is installed on the fax server. If there are other applications using the modems, NET SatisFAXtion will report that it cannot access the device (“Windows serial device name unknown”). If you have no other telephony applications installed, check the Remote Access Connection Manager service: disable it, reboot and try again (Windows will not allow you to manually stop this service).
2.2.4 Dialogic Brooktrout TR114
Dialogic Brooktrout TR114 cards are natively supported by NET SatisFAXtion, and no additional driver software is required. These fax cards are configured in ReDetect Fax Devices.
2.2.5 Dialogic Brooktrout TR1034
Dialogic Brooktrout TR1034 cards are supported by NET SatisFAXtion using the ‘bos_man_setup’ utility. No additional driver software is required.
Please see the NET SatisFAXtion 9.0 Brooktrout Hardware Installation Guide online at faxback.com/docs for detailed instructions on installing NET SatisFAXtion with TR1034 hardware.
2.2.6 Dialogic Eicon Diva Server
Dialogic Eicon Diva Server cards are supported by NET SatisFAXtion as a Class 1 device. See the
NET SatisFAXtion 9.0 Server Installation Guide online at http://www.faxback.com/docs for instructions on installing NET SatisFAXtion with Diva Server hardware.
After the install, in order to enable DID/DNIS collection, the initialization string for each port must be updated.
[HKEY_LOCAL_MACHINE\Software\FaxBack\Class1\PORTNAME] “init_string”
Append “#CID=5” to the value of “init_string”.
Proprietary FaxBack, Inc. 2014 |
23 |

2.3 Services and Monitoring
2.3.1 Service Account Permissions
Some services need to run as an Administrator user. A local or domain account may be used so long as it has local Administrator rights. If the user account has insufficient rights, the service will fail to load with the error “Bad open ring 0 / kernel mode driver.”
Should the service account’s password change, the account is disabled, or the account is otherwise unusable, the service will fail to load with the error:
“System.InvalidOperationException: Cannot start service mloader on computer '.'. >
System.ComponentModel.Win32Exception: The service did not start due to a logon failure.”
In the event this occurs, go to the Start Menu Control Panel Administrative Tools Services. Find the service, right click on it and click Properties, then go to the Log On tab. The account can be verified and updated here. Reenter the password to ensure it is correct.
2.3.1.1 Service Account Printers
Some NET SatisFAXtion modules make use of printers (notably 2.5.5 Autoprint and 2.11 Scanner / MFP). The fax server will only see those printers configured for the service account and visible in the account’s Printers and Faxes folder.
2.3.2 NET SatisFAXtion Service
Service Name: NET SatisFAXtion (mloader) must run as an Administrator user.
2.3.2.1 Starting and Stopping NET SatisFAXtion
Manually starting and stopping the NET SatisFAXtion service is rarely needed because all configuration utilities will restart the service if needed.
The easiest way to start and stop NET SatisFAXtion is via the LoaderConsole icons in the notification area. Right click on the icon and choose Start to start the service or choose Stop to stop the service.
Proprietary FaxBack, Inc. 2014 |
24 |
You can also start or stop the service from the Start menu under Programs NET SatisFAXtion Fax Service (Start & Stop).
Finally you can start or stop the service from the Services control panel though this method is not as userfriendly as the others. In particular you will not receive any feedback to know when NET SatisFAXtion has finished loading all modules and is ready to send and receive faxes.
2.3.2.2 Running NET SatisFAXtion as an Application
Running NET SatisFAXtion as an application can be a useful diagnostic technique. It helps diagnose the following troubleshooting problems:
●Cover sheet and document conversion problems
●Autoprint failures
●Crash errors
●Rights/permissions related issues or failures
Before making a change to the service, write down the account the service is currently running as so that it can be put back to the same account later, see 2.3.1 Service Account Permissions.
First, stop any running Email Gateway and run the ‘Change Server Settings’ utility, located at Start Programs NET SatisFAXtion Change Server Settings. Uncheck the box “Run fax server as an automatic start service”. Click OK.
You will be prompted to unload the fax server. Click the OK button. The fax server will now unload.
You will be prompted to reload the fax server. Click the OK button. The fax server will now load as an application.
Reload the Email Gateway, if one was stopped.
2.3.3 Email Gateway
Service Name: NET SatisFAXtion – Email Gateway
This service is installed by the NSEMailGateway.msi installer for the NET SatisFAXtion Email Gateway.
2.3.3.1 Starting and Stopping the Email Gateway
The easiest way to start and stop the Email Gateway is via the LoaderConsole icon in the system tray area. Right click on the icon and choose Start to start the service or choose Stop to stop the service.
You can also start or stop the service from the Start menu under All Programs NET SatisFAXtion Server Management Email Gateway Service (Start & Stop).
Finally you can start or stop the service “NET SatisFAXtion Email Gateway” from the Services control panel. This method is not as userfriendly as the others as you will not receive any feedback to know when the Email Gateway has finished loading all modules and is ready to send and receive emails.
2.3.5 NET SatisFAXtion Service Monitor
Service Name: NET SatisFAXtion Service Monitor (NS700ServiceMonitor) Runs as Local System.
2.3.6 NSFaxMachineIntegrationServer
Service Name: NSFaxMachineIntegrationServer
Runs as Local System. Cannot run on the same machine as NET SatisFAXtion. This service is installed by the NSFaxMachineIntegrationServer.msi installer for the Fax Machine Integration Server.
Proprietary FaxBack, Inc. 2014 |
25 |
2.4 Managing User and Groups
The primary means of managing users is through the Administration program. It allows you to interactively create, modify and delete users and groups. Administration can also import users from Active Directory or Lightweight Directory Access Protocol (LDAP).
The Userlist Import/Export program allows you to export the entire user list and groups to an XML file, and import users and groups from XML as well.
2.4.1 User Permissions
Each user has one of three permission levels:
●Supervisors: The highest level, Supervisors have full control over the fax server. This level of access is granted when a user is in the Supervisors group.
●Routers: Routers level users can view the first page of any fax in queue, and can run reports. Routers cannot change any system setting. This level of access is granted when a user is in the Routers group.
●Users: All other users have the lowest level of permissions. They cannot view or change any setting on the fax server. Users can only send and receive faxes.
2.4.2User Properties
2.4.2.1 General
●First, Initials, Last: The name of the user
●User Name: The name the user uses to log in to the fax server
●Description: A freetext field where you can describe the user
●Routing Address: The email address to send inbound faxes to when routing to email. This can be in one of two formats: user@domain.tld or SMTPPost!domain.tld!user. See 2.5.3 Delivering Faxes to Clients for more information.
●Billing Code: The User Billing Code to log with every fax the user sends
●Password: The user’s password
2.4.2.2 Routing
●Autoforward to another user
○Enable Autoforwarding: Enable/disable autoforwarding
○Autoforward to: The specified user set to receive all forwarded faxes
●Advanced Routing
○Line: Route all faxes received on this line to this user.
○Identifier: Route all faxes received with this DID to this user.
2.4.2.3 Cover Sheet
●Current Default Template: Outbound faxes will use this cover sheet.
●Enable use of default template: Enable use of this cover sheet.
●Available Templates: List of all assigned cover sheets.
2.4.2.4 Email
●Allow this email user to preview faxes before they are sent: Postpone all faxes this user sends, to allow their preview with the FaxOut Client Suite.
Proprietary FaxBack, Inc. 2014 |
26 |
●Additional User Aliases: Additional email addresses that can send faxes using this account.
2.4.3Group Properties
●General
○Group Name: Name assigned to this group.
○Description: A freetext field where you can describe this group.
●Routing
○Line: Route all faxes received on these lines to this group.
○Identifier: Route all faxes received with this DID to this group.
●Automatic Inbound Routing
○Enable round robin routing to members of this group
○Route messages to group members even if they are not logged on: See 2.5.2.2.1 Round Robin Routing.
○The following user will always get all messages for this group: See 2.5.2.2.1 Round Robin Routing.
●Security
○Group Privileges: Assign this privilege level to all members of this group.
●Autoprint: Enable and configure Autoprint for this group. See 2.5.5 Autoprint for more information.
2.4.4 Built In Users and Groups
Supervisor: The default Supervisor level user. This user does not have a password by default.
Postmaster: The default Router level user. This user does not have a password by default. Any unrouted inbound faxes and any email bounce messages will be received by Postmaster.
2.4.4.1 System Users
System users are needed for various server functionality. It is not recommended to modify any system user, with the two exceptions below.
●Autoprint: Needed for Autoprint functionality.
●ClarityNS: Needed for Connector API / Clarity / ASCII Packet functionality.
●Export: Needed for Export functionality.
●SMTPPost: Needed for Email Gateway functionality. Cover sheets can be assigned to this user as the default cover for email users. See 2.6.5 Cover Sheet Templates for more information.
2.4.4.2 System Groups
●All Users: This group contains all nonsystem users.
●Supervisors: This group contains all Supervisor users.
●Routers: This group contains all Router users.
●System Users: This group contains all system users. It is not possible to add users to this group.
●FAXability Broadcast Users: This group enables members to see the Broadcast module in FAXability.
2.4.5Creating, Modifying and Deleting Users
Users may be created, modified and deleted using the Administration program, in the User
Proprietary FaxBack, Inc. 2014 |
27 |
Administration section. To access the User Administration section, run the Administration program and log in as a Supervisor level user. Click on the View User Administration menu. You will see a list of all groups on the left, and a list of all users on the right.
2.4.5.1 Creating a User
From the User Administration section, click on the User Add User menu. A blank Add User window will appear. See above for a description of each property.
Click Add when you have the necessary information entered. At a minimum, you must have a User Name in order to create the user.
2.4.5.2 Modifying a User
A user can be modified by rightclicking the user name and clicking Modify User... or by selecting the user and clicking on the User Modify User menu.
2.4.5.3 Deleting a User
A user can be deleted by rightclicking the user name and clicking Delete User... or by selecting the user and clicking on the User Delete User menu. Deleting a user cannot be undone, the user will have to be recreated.
If you receive the message “Error: Could not delete user due to the following error: User's folder is not empty.” – The user has faxes in one or more queues. Check the Scheduled Queue, Active Queue, Inbox and Outbox and delete or forward any faxes assigned to that user.
2.4.6 Creating, Modifying and Deleting Groups
Groups may be created, modified and deleted using the Administration program, in the User Administration section. To access the User Administration section, run the Administration program and log in as a Supervisor level user. Click on the View User Administration menu. You will see a list of all groups on the left, and a list of all users on the right. The number in parenthesis after each group name indicates how many users are members of that group.
2.4.6.1 Creating a Group
From the User Administration section, click on the User Add Group menu. A blank Add Group window will appear. See above for a description of each property.
Click Add when you have the necessary information entered. At a minimum, you must have a Group Name in order to create the group.
2.4.6.2 Modifying a Group
A user can be modified by rightclicking the group name and clicking Modify Group or by selecting the group and clicking on the User Modify Group menu.
2.4.6.3 Deleting a Group
A group can be deleted by rightclicking the group name and clicking Delete Group or by selecting the group and clicking on the User Modify Group menu. Deleting a group cannot be undone, the group will have to be recreated.
In order to delete a group it must not contain any group members. Remove all users from the group before deleting the group.
2.4.6.4 Adding a User to a Group
You can add a user to a group by rightclicking the group name and clicking Add/Remove Members or by selecting the group and clicking on the User Add/Remove Members menu. Select a user to add to the group on the righthand column of the window under Does not have users, and click the Add button. You will see the user move from the right column to the left one. You can add more users by repeating these steps. When done, click OK.
Users can also be dragged and dropped onto the group name in order to add them to the group. First, select the All Users group to see all users. Next, select the user(s) you want to add and drag and drop them onto the group name. In a moment you will see the parenthetical member count increase. The users are now members of the group.
Proprietary FaxBack, Inc. 2014 |
28 |
2.4.6.5 Removing a User from a Group
You can remove a user to a group by rightclicking the group name and clicking Add/Remove Members or by selecting the group and clicking on the User Add/Remove Members menu. Select a user to remove from the group on the lefthand column of the window under Has users, and click the Remove button. You will see the user move from the left column to the right one. You can remove more users by repeating these steps. When done, click OK.
You can also remove a user from a group by selecting the group, then selecting the user name and clicking on the User Remove Member menu.
2.4.7 AutoEnroll
The fax server can automatically create users for email clients. When the fax server receives an email and does not find an existing user matching the email address that sent the fax, it will automatically create a new user for that email address. The user name will be set to the sender’s display name. The user will not have a password nor will it have a routing identifier.
When autoenroll is enabled, it is important that the fax server not receive email from senders on the open Internet. It is strongly encouraged that only internal users be able to send email to the fax server.
To disable autoenroll, run the Change Server Settings utility, Start Programs NET SatisFAXtion Change Server Settings. On the General tab in the User Management section, select Reject attempts to send faxes if a fax user account does not exist.
2.4.8 Importing Users
2.4.8.1 Active Directory
From the Administration program it is possible to import users from Active Directory. Please note that it will only import user names and email addresses. Other information such as routing identifiers (DNIS), passwords and groups will not be imported.
Open the Administration program, and click on the menu Tools Import Users. This will open the User List Import Wizard window shown below.
Proprietary FaxBack, Inc. 2014 |
29 |

Select Active Directory Import and click Next.
Synchronize: This option will enable you to refresh the user list with Active Directory without using the User List Import Wizard. A new option will be available under the menu Tools Synchronize.
Note that enabling this option will disable manual editing of most user settings since the settings come from Active Directory. To enable manual user modification, synchronization must be disabled from Tools
Synchronize Disable Synchronization.
If the user running the Administration program is a domain administrator, select the first option to “connect to the same domain as the currently logged on user.”
Otherwise, select the second option “connect using the following,” and provide a domain, user name, and corresponding password.
Proprietary FaxBack, Inc. 2014 |
30 |
 Loading...