

Page 1

NET SatisFAXtionTM 8.7 Manual
Carrier Edition
Enterprise Edition
Small Business Edition
Copyright © 2012 FaxBack, Inc. All rights reserved.
Version 2012-01-20 Rev. 1423
Page 2

–
Table of Contents
NET SatisFAXtion 8.7 Manual
2
1 Introduction 6
1.1 About This Guide...............................................6
1.2 Additional Documentation..................................6
1.3 Hardware and Software Requirements .............6
1.3.1 Static IP Address..................................................................7
1.3.2 Virtualization.........................................................................7
1.4 Overview...........................................................7
1.5 What is a Network Fax Server?.........................8
1.5.1 NET SatisFAXtion Features...................................................8
1.5.2 NET SatisFAXtion Components............................................8
1.5.2.1 The NET SatisFAXtion Server....................................9
1.5.2.2 The Administration Utility..........................................9
1.5.2.3 The LaunchPad Website..........................................10
1.5.2.4 The Report Utility....................................................10
1.5.3 Supported Clients...............................................................10
1.6 Training and Professional Services..................11
1.6.1 Training...............................................................................11
1.6.2 Preconfiguration Services...................................................11
1.6.3 Professional Services..........................................................11
1.6.4 Custom Professional Programming Services......................12
1.7 Technical Support............................................12
1.7.1 Support Plans.....................................................................12
1.7.1.1 Included 30-day Support Plan................................12
1.7.1.2 Standard Support Plans..........................................12
1.7.1.3 Around-the-clock 24×7 Support Plans..................12
1.8 Product Key.....................................................13
1.9 Software Updates...........................................14
1.10 Installation & Upgrade Guides......................14
1.11 Compatibility List...........................................14
1.11.1 VoIP Media Gateways......................................................14
1.11.1.1 AudioCodes MediaPack series..............................14
1.11.1.2 AudioCodes TrunkPack series..............................15
1.11.1.3 AudioCodes Mediant series..................................15
1.11.1.4 Other SIP & T.38 capable VoIP devices...............15
1.11.2 VoIP Service Providers.....................................................15
1.11.3 Dialogic Inc.......................................................................15
1.11.3.1 Brooktrout TruFax Series Analog Fax Boards......15
1.11.3.2 Brooktrout TR114 Series Analog Fax Boards......16
1.11.3.3 Brooktrout TR1034 Series Analog Fax Boards....16
1.11.3.4 Brooktrout TR1034 Series Digital Fax Boards.. . .16
1.11.3.5 Eicon Diva Server Series Digital Fax Boards.........16
1.11.4 Mainpine, Ltd....................................................................17
1.11.4.1 Rockforce Series Analog Fax Boards....................17
1.11.4.2 IQ Express Analog Fax Boards.............................17
1.11.5 Other Class 1 / Class 2 Fax Modems..............................17
2 Server Administration 18
2.1 How Faxes Flow Through the System ............18
2.1.1 Queues................................................................................18
2.1.2 Outbound Faxes..................................................................18
2.1.3 Inbound Faxes.....................................................................18
2.2 Fax Devices.....................................................19
2.2.1 Additional Port Configuration.............................................19
2.2.1.1 Send / Receive Only Ports......................................19
2.2.1.1.1 Brooktrout TR1034........................................................20
2.2.1.2 CSID and TSID........................................................21
2.2.1.3 Fax Speed................................................................22
2.2.2 Voice over IP.......................................................................22
2.2.2.1 A Note on Fax Server Ports versus Media Gateway
Ports ......................................................................................23
2.2.2.2 Configuring NET SatisFAXtion to use a VoIP device
................................................................................................23
2.2.2.2.1 New AudioCodes MediaPack MP114 or MP118 Gateway
............................................................................................................24
2.2.2.2.2 AudioCodes or Cisco Media Gateway On Local Subnet 24
2.2.2.2.3 Other Media Gateway, or Gateway Not On Local Subnet
............................................................................................................24
2.2.2.2.4 SIP Trunk Provider..........................................................25
2.2.2.3 Using Multiple VoIP Gateways...............................25
2.2.2.4 Fax Server with Multiple Network Interface Cards25
2.2.3 Class 1 / Class 2.................................................................26
2.2.3.1 Configuring NET SatisFAXtion to use a Class 1 or
Class 2 device.........................................................................26
2.2.4 Dialogic Brooktrout TR114................................................26
2.2.5 Dialogic Brooktrout TR1034..............................................26
2.2.6 Dialogic Eicon Diva Server..................................................27
2.3 Services and Monitoring..................................28
2.3.1 Service Account Permissions..............................................28
2.3.1.1 Service Account Printers.........................................28
2.3.2 NET SatisFAXtion Service...................................................29
2.3.2.1 Starting and Stopping NET SatisFAXtion................29
2.3.2.2 Running NET SatisFAXtion as an Application..........29
2.3.3 Email Gateway Service........................................................30
2.3.3.1 Starting and Stopping the Email Gateway..............30
2.3.4 NET SatisFAXtion Service Monitor.....................................31
2.3.5 NS-FaxMachineIntegrationServer.......................................31
2.4 Managing Users and Groups...........................32
2.4.1 User Permissions................................................................32
2.4.2 User Properties..................................................................32
2.4.2.1 General....................................................................32
2.4.2.2 Routing....................................................................32
2.4.2.3 Cover Sheet.............................................................33
2.4.2.4 E-Mail.......................................................................33
2.4.3 Group Properties................................................................33
2.4.4 Built In Users and Groups..................................................34
2.4.4.1 System Users..........................................................34
2.4.4.2 System Groups........................................................34
2.4.5 Creating, Modifying and Deleting Users.............................34
2.4.5.1 Creating a User.......................................................35
2.4.5.2 Modifying a User.....................................................35
Page 3

–
NET SatisFAXtion 8.7 Manual
3
2.4.5.3 Deleting a User........................................................35
2.4.6 Creating, Modifying and Deleting Groups..........................35
2.4.6.1 Creating a Group.....................................................35
2.4.6.2 Modifying a Group...................................................35
2.4.6.3 Deleting a Group.....................................................36
2.4.6.4 Adding a User to a Group........................................36
2.4.6.5 Removing a User from a Group...............................36
2.4.7 Autoenroll...........................................................................36
2.4.8 Importing Users..................................................................37
2.4.8.1 Active Directory.......................................................37
2.4.8.2 Excel Spreadsheet...................................................41
2.4.8.3 XML.........................................................................44
2.4.8.3.1 User List Import/Export XML File Format......................44
2.4.9 Exporting Users..................................................................46
2.4.9.1 Excel Spreadsheet...................................................47
2.4.9.2 XML.........................................................................47
2.4.10 Enabling and Using Advanced User Settings....................47
2.4.10.1 CSID / TSID..........................................................47
2.4.10.2 ANI........................................................................48
2.4.10.3 Per-User Delivery Format.....................................48
2.4.10.4 Email Notifications for Non-Email Clients.............48
2.4.10.5 User Database......................................................49
2.5 Inbound Faxes.................................................50
2.5.1 Routing Methods.................................................................50
2.5.1.1 Manual Routing........................................................50
2.5.1.2 Line Routing.............................................................51
2.5.1.3 DID / DTMF / DNIS Routing...................................51
2.5.1.3.1 DTMF...............................................................................52
2.5.1.3.2 Strip Digits from Front or Back of DID..........................52
2.5.1.4 CSID Routing...........................................................53
2.5.1.5 Caller ID / ANI Routing...........................................53
2.5.1.6 T.30 Subaddress Routing........................................53
2.5.1.7 Inbound Routing Capabilities By Device..................53
2.5.1.7.1 AudioCodes MediaPack, Mediant, and TrunkPack..........53
2.5.1.7.1.1 Emulating Line Routing...............53
2.5.1.7.2 Brooktrout Fax Cards......................................................54
2.5.1.7.3 Eicon Diva Server.............................................................54
2.5.1.7.4 MainPine RockForce / IQ Express...................................54
2.5.1.7.5 Any T1 or PRI Equipment / Any Other VoIP Equipment 54
2.5.1.8 Enabling DTMF Collection.......................................55
2.5.1.8.1 AudioCodes MediaPack MP114 / MP118......................55
2.5.1.8.2 Dialogic Brooktrout Fax Cards........................................55
2.5.1.8.3 Dialogic Eicon Diva Server...............................................55
2.5.1.8.4 Mainpine Rockforce / IQ Express....................................56
2.5.1.9 Refusing Unrouted Faxes........................................56
2.5.2 Routing to Users and Groups.............................................56
2.5.2.1 Routing to Users.....................................................56
2.5.2.2 Routing to Groups...................................................57
2.5.2.2.1 Round Robin Routing.......................................................58
2.5.3 Delivering Faxes to Clients.................................................58
2.5.3.1 Email........................................................................58
2.5.3.2 Microsoft Fax..........................................................59
2.5.3.3 Fax Machine Integration Server..............................60
2.5.3.4 Delivering to Both Email and Microsoft Fax............60
2.5.3.5 Delivering to Both Email and Fax Machine Integration
Server.....................................................................................60
2.5.4 Fax Export...........................................................................60
2.5.4.1 Configuring Export..................................................61
2.5.4.2 Global vs. Per-User Export.....................................62
2.5.4.3 Exporting to a Network Share (UNC Path).............62
2.5.4.4 File Name Format....................................................62
2.5.4.5 Information TXT/XML File.......................................64
2.5.4.5.1 Moving from the Legacy Export System to Workflow
Export.................................................................................................64
2.5.4.5.1.1 Disable Legacy Export...............65
2.5.4.5.1.2 Publish Export Workflows.........65
2.5.4.5.1.3 Configure Export.......................65
2.5.5 Autoprint.............................................................................65
2.5.5.1 Global Autoprint......................................................65
2.5.5.2 Group Autoprint......................................................66
2.5.5.3 Autoprint everything that comes in on a line...........68
2.5.5.4 Autoprint everything that comes in on a DID.........68
2.6 Outbound Faxes..............................................69
2.6.1 Errors and Retries...............................................................69
2.6.1.1 Number of Retries...................................................69
2.6.1.2 Intelligent Retry......................................................70
2.6.1.3 Retry Interval..........................................................70
2.6.1.4 Which Errors are Retried.........................................70
2.6.1.5 Customizing Retryable Errors.................................71
2.6.2 Dialing the Same Number More Than Once........................71
2.6.3 Outbound Number Validation.............................................71
2.6.3.1 Starting the Validation Editor..................................73
2.6.3.2 Adding a Validation Rule .........................................73
2.6.3.3 Testing Validation Rules .........................................76
2.6.3.4 Scenario: Seven Digit Local Dialing.........................76
2.6.3.5 Scenario: Ten Digit Local Dialing.............................80
2.6.3.6 Scenario: Dial As-Is (No Validation)........................83
2.6.3.7 Scenario: Adding Access Codes..............................83
2.6.3.8 Adding Pauses to the Dial String............................83
2.6.4 ANI (Caller ID)....................................................................83
2.6.5 Cover Sheet Templates......................................................84
2.6.5.1 Cover Sheet Templates for Email Users ................84
2.6.5.2 Selecting Cover Sheet Templates...........................84
2.6.5.3 Cover Sheet Selection ............................................85
2.6.5.4 When Cover Sheets Will Be Used...........................85
2.6.5.5 Cover Sheet Variables.............................................86
2.6.5.6 Forcing Cover Sheets..............................................87
2.6.6 Outbound Document Conversion ......................................88
2.6.6.1 What is Document Conversion?..............................88
2.6.6.2 Server-Side Conversion vs. Client-Side Conversion
................................................................................................88
2.6.6.3 Common Conversion Helper Applications..............88
2.6.6.4 Troubleshooting Conversion Errors........................89
2.6.6.4.1 IMPORTANT: Verify Log On Account.............................90
2.6.6.4.2 Determine File Types Submitted.....................................90
2.6.6.4.3 Look Up File Association.................................................90
2.6.6.4.4 Call Application’s “printto” Action...................................90
2.6.6.4.5 If Manual Testing Doesn’t Reveal the Problem..............91
2.6.6.5 Common Issues.......................................................92
2.6.6.5.1 Adobe Acrobat................................................................92
2.6.6.5.2 Microsoft Word...............................................................92
2.6.6.5.3 WordPerfect....................................................................92
2.6.6.5.4 Microsoft Word Viewer / Excel Viewer:.........................92
2.6.6.5.5 Microsoft Snapshot Viewer.............................................92
2.6.6.6 PCL Converter.........................................................92
2.6.7 Fax Export...........................................................................92
2.6.8 Autoprint.............................................................................92
2.7 Reporting.........................................................93
2.7.1 Using Reports.....................................................................93
2.7.1.1 Saving Reports........................................................93
2.7.1.2 Printing Reports......................................................93
Page 4

–
NET SatisFAXtion 8.7 Manual
4
2.7.2 Basic Reporting...................................................................94
2.7.3 Usage Graphs.....................................................................95
2.7.4 SQL Database Structure.....................................................95
2.7.4.1 Table Columns.........................................................95
2.8 Billing Codes....................................................98
2.8.1 User Billing Codes..............................................................99
2.8.2 Custom Billing Codes..........................................................99
2.8.2.1 Using the Custom Billing Code.............................101
2.9 Email Integration...........................................102
2.9.1 Email Integration using POP3..........................................102
2.9.1.1 How the Gateway Operates Using POP3............102
2.9.1.2 Mail Server Requirements.....................................102
2.9.1.3 Mailbox Requirements...........................................102
2.9.1.3.1 Create a POP3 Mailbox................................................103
2.9.2 Email Integration using SMTP...........................................103
2.9.2.1 Microsoft SMTP Server........................................103
2.9.2.1.1 Installing the Microsoft SMTP Server..........................103
2.9.2.2 How the SMTP Gateway Operates......................103
2.9.2.3 Mail Server Requirements.....................................103
2.9.2.4 Choosing a Domain Name.....................................103
2.9.3 Installing the Email Gateway............................................104
2.9.3.1.1 Verify Functionality.......................................................105
2.9.3.2 Configuring the Email Gateway.............................106
2.9.3.2.1 NET SatisFAXtion..........................................................106
2.9.3.2.2 Options..........................................................................107
2.9.3.2.3 Select Mode..................................................................107
2.9.3.2.4 POP3 Settings..............................................................108
2.9.3.2.5 SMTP Settings..............................................................108
2.9.3.2.6 Options..........................................................................109
2.9.3.2.7 Email Delivery................................................................110
2.9.3.2.8 Attachment Settings.....................................................111
2.9.3.2.9 Loader Monitor..............................................................111
2.9.4 SMTP Routing...................................................................112
2.9.4.1 Generic SMTP Routing..........................................112
2.9.4.2 Exchange 2007 and Exchange 2010 Routing... ...113
2.9.4.2.1 Add a Send Connector to the Hub Transport..............113
2.9.4.2.2 Disable Out of Office and Auto Replies.......................117
2.9.4.2.3 Allow TNEF...................................................................120
2.9.4.2.4 Enable Message Relaying..............................................121
2.9.4.2.5 Configuring DNS to Allow Off-Site Access.................125
2.9.5 Email Addressing..............................................................126
2.9.5.1 SMTP Address Format..........................................126
2.9.5.2 POP3 Address Format..........................................126
2.9.5.3 Additional Email Flags...........................................126
2.9.6 User Authentication..........................................................127
2.9.6.1 Authentication in Email Subject.............................127
2.9.7 Email Notifications............................................................127
2.9.7.1 Inbound Email Notifications..................................127
2.9.7.2 Delivery & Non-Delivery Notifications.................127
2.9.7.3 Supported Variables..............................................128
2.9.8 File Name Whitelist & Blacklist........................................129
2.9.9 Troubleshooting Email Issues...........................................129
2.9.9.1 Outbound Fax POP3.............................................129
2.9.9.1.1 Mail Client......................................................................129
2.9.9.1.2 Mailbox..........................................................................129
2.9.9.1.3 Fax Server.....................................................................130
2.9.9.2 Outbound Fax SMTP.............................................130
2.9.9.2.1 Mail Client......................................................................130
2.9.9.2.2 Mail Server....................................................................130
2.9.9.2.3 Fax Server.....................................................................130
2.9.9.3 Inbound Fax SMTP................................................130
2.9.9.3.1 Fax Server.....................................................................130
2.9.9.3.2 SMTP Logs....................................................................131
2.9.9.3.3 Mail Server....................................................................131
2.10 Connector API / ASCII Packet / ClarityNS..131
2.10.1 Enabling and Configuring the Connector API Module....131
2.10.2 Controlling the Number of Packets Read By the Server
......................................................................................................132
2.10.3 Multiple Order Packet Folders.......................................133
2.10.3.1 Copy Connector API DLL...................................133
2.10.3.2 Create NET SatisFAXtion Account.....................133
2.10.3.3 Create Registry Key............................................133
2.10.3.4 Add New DLL to the Server Load List...............134
2.11 Scanner / MFP.............................................134
2.11.1 Xerox..............................................................................135
2.11.1.1 Basic Configuration.............................................135
2.11.1.2 Delivery and Non-Delivery Notifications............136
2.11.1.2.1 Printing Notifications..................................................136
2.11.1.2.2 Emailing Notifications..................................................136
2.11.2 HP Digital Sender...........................................................137
2.11.2.1 Basic Configuration.............................................137
2.11.2.2 Delivery and Non-Delivery Notifications............138
2.11.2.2.1 Printing Notifications..................................................138
2.11.2.2.2 Emailing Notifications..................................................138
2.12 Other Topics...............................................139
2.12.1 Enabling Debug Logging.................................................139
2.12.1.1 IPFax...................................................................139
2.12.1.2 Class1.................................................................139
2.12.1.3 Class2.................................................................139
2.12.1.4 Brooktrout TR1034 (BOS_MAN)......................140
2.12.1.5 Brooktrout TR114 (BT_MAN)............................140
2.12.1.6 HTTP Service......................................................140
2.12.1.7 Workflow............................................................140
2.12.1.8 CAS20................................................................140
3 Clients 142
3.1 Client Protocols............................................142
3.1.1 CAS...................................................................................142
3.1.1.1 Network Challenges for CAS Clients...................142
3.1.1.1.1 Multiple NICs................................................................142
3.1.1.1.2 Separate Subnet............................................................142
3.1.1.1.3 Force HTTP Connections..............................................142
3.1.2 HTTP.................................................................................142
3.1.2.1 Requirements........................................................143
3.1.2.1.1 DNS Resolution of Server Name..................................143
3.1.2.1.2 Port................................................................................143
3.1.2.2 Using HTTP Clients over the Internet..................143
3.1.3 SMTP................................................................................144
3.1.3.1 Using SMTP Clients over the Internet .................144
3.2 FaxOut Client Suite ......................................145
3.2.1 Installing...........................................................................145
3.2.1.1 Software Requirements........................................145
3.2.1.2 Installing the FaxOut Client Suite.........................145
3.2.1.2.1 Creating a New Fax User Account................................149
3.2.1.2.2 Looking Up an Existing Fax User Account....................151
3.2.2 Sending Faxes...................................................................152
3.2.3 Receiving Faxes.................................................................154
3.2.4 Components.....................................................................154
3.2.4.1 FaxOut Printer......................................................154
3.2.4.2 Outlook Addin.......................................................154
3.2.4.3 Popup Notifier.......................................................154
Page 5

–
NET SatisFAXtion 8.7 Manual
5
3.2.4.4 Office Addin..........................................................154
3.2.5 Office Integration.............................................................155
3.2.6 Previewing Outbound Faxes.............................................155
3.2.7 Inbound Fax Notification..................................................156
3.2.8 Managing Cover Sheet Templates....................................156
3.2.9 Scheduling Faxes..............................................................158
3.2.10 Forwarding Received Faxes to A Fax Number...............159
3.2.11 Annotating Received Faxes............................................159
3.2.12 Using Billing Codes to Track Faxes................................160
3.2.13 Advanced Print Automation...........................................160
3.2.14 Using the FaxOut Client Suite without Outlook............161
3.3 Connector for Microsoft Fax.........................162
3.3.1 Installing...........................................................................162
3.3.1.1 Software Requirements........................................162
3.3.1.2 Installing the Connector for Microsoft Fax..........162
3.4 Administration Program.................................163
4 Appendices 166
4.1 Error Code Reference...................................166
4.1.1 4228–4323: Document Conversion................................166
4.1.2 1032–1140: Class 1 Driver............................................167
4.1.3 1281–1626: Class 2 Driver............................................171
4.1.4 Brooktrout Driver.............................................................173
4.1.5 Serial Modem Driver.........................................................173
4.1.6 27951–28027: IPFax Driver...........................................173
4.1.7 28160–28240: SIP 300 Messages................................177
4.1.8 28439: SIP 400 Messages..............................................178
4.1.9 28672–28685: SIP 500 Messages................................179
4.1.10 28928–28934: SIP 600 Messages..............................179
4.1.11 29185–29311: Q.850 Cause Codes...........................180
4.1.11.1 Normal Class......................................................180
4.1.11.2 Resource Unavailable Class................................183
4.1.11.3 Service or Option Unavailable Class...................184
4.1.11.4 Service or Option Not Available Class...............185
4.1.11.5 Invalid Message Class........................................186
4.1.11.6 Protocol Error Class...........................................187
4.1.11.7 Internetworking Class........................................188
4.1.12 29997–30089: Port Server Client...............................188
4.1.13 30209–30266 Portafax Driver....................................189
4.1.14 18415619–18415628: Port Server Client Driver......193
4.2 Registry Configuration Reference.................194
4.2.1 [HKEY_LOCAL_MACHINE\Software\FaxBack]..............194
4.2.1.1 ICANFax Global....................................................194
4.2.1.1.1 ICANFax Device............................................................ 200
4.2.1.2 Class1 Global........................................................201
4.2.1.2.1 Class1 Device................................................................208
4.2.1.3 Class2 Global........................................................208
4.2.1.3.1 Class2 Device................................................................215
4.2.1.4 Convert.................................................................215
4.2.1.5 IP_FAX Global.......................................................216
4.2.1.5.1 IP_FAX Device..............................................................222
4.2.1.6 DotFax Plugin........................................................223
4.2.1.7 Administration.......................................................223
4.2.1.7.1 Loader............................................................................223
4.2.1.8 Archive...................................................................223
4.2.1.9 ASCIIPacketServer...............................................223
4.2.1.10 AutoPrint............................................................224
4.2.1.10.1 Login............................................................................224
4.2.1.10.2 Network......................................................................225
4.2.1.10.3 OtherSettings.............................................................225
4.2.1.10.4 PrinterSettings............................................................225
4.2.1.10.5 Settings.......................................................................225
4.2.1.11 CAS20................................................................225
4.2.1.12 CASDrive............................................................226
4.2.1.13 CASPost.............................................................229
4.2.1.14 EMEnroll..............................................................230
4.2.1.15 FaxBackX............................................................230
4.2.1.16 Install..................................................................230
4.2.1.17 Logger.................................................................231
4.2.1.17.1 Parameters..................................................................231
4.2.1.18 LoggingServer.....................................................231
4.2.1.18.1 Parameters..................................................................231
4.2.1.18.2 TableNames................................................................231
4.2.1.19 LogonDialog........................................................231
4.2.1.20 NF_Setup............................................................232
4.2.1.21 Nrouter...............................................................232
4.2.1.22 POP3Post...........................................................232
4.2.1.23 PropToJSD.........................................................232
4.2.1.24 ReportClient.......................................................233
4.2.1.24.1 Parameters..................................................................233
4.2.1.25 ReportServer......................................................233
4.2.1.25.1 Parameters..................................................................233
4.2.1.26 SMTPPost...........................................................233
4.2.1.27 ULImport.............................................................234
4.2.1.28 UserListImport...................................................234
4.2.1.29 WLoader.............................................................235
4.3 Glossary........................................................236
Page 6

1 – Introduction
1 Introduction
Congratulations on your purchase of NET SatisFAXtion from FaxBack, Inc.
Many years of effort have gone into developing a system that will give you the
functionality you desire today and a platform that can accommodate your growing needs in the years to come.
1.1 About This Guide
This manual is written for the person whose responsibility it is to install and
maintain the fax server and network software. It contains in-depth technical information about how to install, manage and maintain the NET SatisFAXtion Fax
Server software and all related software.
This manual does not cover initial installation of the NET SatisFAXtion fax server. Please see the NET SatisFAXtion Installation Guide for detailed documentation of the installation process. It can be downloaded from
http ://www.faxback.com/docs .
NET SatisFAXtion 8.7 Manual
6
1.2 Additional Documentation
Look on our website for helpful guides, white papers, frequently asked questions and more:
• Knowledge Base http ://www.faxback.com/kb
• Document Library http ://www.faxback.com/docs
1.3 Hardware and Software Requirements
It is strongly recommended that NET SatisFAXtion be installed on a dedicated
machine. Faxing is a time-sensitive operation and faxes can fail if NET SatisFAXtion has to contend with other applications for system resources.
CPU: 1.6 GHz or faster Intel or AMD processor.
RAM: 512 MB RAM or greater.
Available Disk: 650 MB hard disk space for software, plus a recommended
minimum 10 GB additional space for data files.
Operating System: 32-bit or 64-bit Microsoft Windows operating system.
Windows Server 2008 R2 (all editions, releases and service packs)
Windows Server 2008 (all editions, releases and service packs)
Windows Server 2003 (all editions, releases and service packs)
Windows XP Professional SP2 and SP3
Page 7

1 – Introduction
Prerequisite Software: The following will be installed automatically by the
NET SatisFAXtion installer if it is missing:
1
stalled by default. They are not visible in the Add/Remove Programs list.
2
is not visible in the Add/Remove Programs list.
NET SatisFAXtion 8.7 Manual
Note: Windows 2000 and Windows Vista are not supported operating
systems for the NET SatisFAXtion server. Client software is supported
on Vista Business, Enterprise and Ultimate.
Domain Controllers: Do not attempt to install NET SatisFAXtion on a
domain controller. Microsoft does not support SQL Server 2005 Express on a domain controller and it is required for NET SatisFAXtion to
operate.
Citrix and Terminal Server: Do not attempt to install NET SatisFAXtion on a Citrix Server or Terminal Server.
Microsoft SQL Server 2005 Express Edition
Microsoft .NET Framework 3.5 SP1
Microsoft .NET Framework 3.0 Service Pack 2
Microsoft .NET Framework 2.0 Service Pack 2
Windows Installer 3.1
2
1
1
Windows 2008 has Microsoft .NET Framework 2.0 SP2 and 3.0 SP2 in-
Windows 2003 and newer have Windows Installer 3.1 installed by default. It
7
Fax Devices: Any supported fax device including internal fax modems, VoIP
media gateway or VoIP SIP service. Please see 1.11) Compatibility List.
1.3.1 Static IP Address
The fax server should be assigned an IP address that won’t change, particularly
if you are using Voice-over-IP equipment or are using email clients. You may
also need additional static IP addresses for VoIP media gateways, see 2.2.2
Voice over IP for details.
1.3.2 Virtualization
NET SatisFAXtion with a VoIP media gateway or VoIP SIP service is fully supported on any of the above guest operating systems on most virtualization
platforms including VMWare ESX and ESXi, Microsoft Hyper-V and Citrix
XenServer.
1.4 Overview
All fax servers are comprised of three basic components: First, client programs
allow the users to create and monitor faxes and fax activity. Second, a database on the server stores the images and information regarding the transmission attempts. And third, server applications, implemented as Windows
Services, control the functioning of the server.
Page 8

1 – Introduction
NET SatisFAXtion 8.7 Manual
In order to more fully understand these three components, it is necessary to
answer several questions:
• What is a Network Fax Server?
• What are the unique features about the NET SatisFAXtion server?
• What are the components in the NET SatisFAXtion server?
• How does NET SatisFAXtion work?
1.5 What is a Network Fax Server?
Simply defined, a fax server is a self-contained unit attached to an internal network that has the capability to allow any user on that network to send and receive faxes at their desktop.
Fax server functionality is provided by software services running on the server.
Fax machines, fax clients or e-mail clients submit jobs and request services from
the server and the server handles these requests in an orderly and sequential
manner.
8
1.5.1 NET SatisFAXtion Features
NET SatisFAXtion’s newest features include:
• Automatically Configure AudioCodes MediaPack MP114 & MP118
VoIP Gateways – Simplifies installation & configuration of AudioCodes’
line of analog VoIP hardware.
• Support for Microsoft Fax / Windows Fax & Scan – Support for
Windows’ built-in fax client allows easy desktop faxing through the NET
SatisFAXtion Server.
• Email Gateway Whitelist / Blacklist – Reduce the headaches of con-
version issues by restricting what document types your users can send.
• User-Friendly Error Messages – Faxing errors are now simplified to
reduce confusion, and include a suggestion of what a user can do to
remedy the problem. For administrators, error codes are still available
in the message to assist troubleshooting.
1.5.2 NET SatisFAXtion Components
NET SatisFAXtion is typically installed on a Local Area Network (LAN). The
server’s fax cards are connected to the telephone system (or PBX) via standard
analog telephone lines (RJ-11), or if digital services are available, via a T1/PRI
connection.
The NET SatisFAXtion server uses a server and domain methodology for accessing the fax services. This means that a domain may actually host several
NET SatisFAXtion servers, especially in a large enterprise installation. This is an
important detail for administrators because NET SatisFAXtion allows an admin-
Page 9

1 – Introduction
NET SatisFAXtion 8.7 Manual
istrator to manage multiple fax servers in multiple domains from a single workstation.
Typically, faxes will be created by users using either client software such as the
FaxOut Client Suite or Microsoft Fax or an e-mail gateway which allows you to
send faxes from Microsoft Exchange, Lotus Notes or SMTP-based mail systems (figure 2.2). In some instances, your configuration may include a combination of client-based and email-based solutions.
The primary components that make up the NET SatisFAXtion system in these
environments are:
• The NET SatisFAXtion fax server
• A supported e-mail client or client application such as FaxOut Client
Suite or Microsoft Fax.
• Administrative utilities such as Administration, Reports, Fax Validation
Editor, Change Server Settings.
1.5.2.1 The NET SatisFAXtion Server
The NET SatisFAXtion Fax Server is a dedicated server platform configured running Windows 2003 or Windows 2008 and NET SatisFAXtion server software.
Typically, this server will also contain one or more fax boards or use existing
Voice Over IP (VoIP) equipment on the network such as AudioCodes hardware.
9
The fax server manages the following activities:
Outbound fax delivery – Manages the delivery of faxes from two or more fax
ports per server. When all fax ports are busy, the fax server monitors each port
and delivers the next job to the first available line.
Inbound fax routing – Determines recipient of incoming fax based on Administrator’s choice of fax routing methods and delivers that fax to the intended recipient’s inbox.
Fax activity logging – Logs the details of inbound and outbound fax activities.
Allows the Report utility to log in and extract up-to-the-minute data for activity
reports.
Real-time status feedback – Allows users to view real-time status of incoming
and outgoing faxes at their desktop workstations. NET SatisFAXtion’s software
even allows you to view the real-time status of every fax port on the server.
1.5.2.2 The Administration Utility
NET SatisFAXtion makes it simple to manage your entire fax services from any
workstation in your enterprise. The NET SatisFAXtion Administration utility offers a complete package of fax server management features in a single user interface. The application can be run from any workstation logged into the NET
SatisFAXtion server, giving administrators unparalleled information and control.
At least one client/user needs to have Administration capabilities. This person
Page 10

1 – Introduction
will handle routing, monitoring port activity, adding/changing/deleting users and
groups, reporting, etc.
Depending on the password rights associated with each network user, NET
SatisFAXtion offers different levels of administrative control. Thus, network
administrators can provide department heads and MIS managers with a view of
fax server activity or reporting functions without actually granting the rights to
change system parameters or user information.
1.5.2.3 The LaunchPad Website
When NET SatisFAXtion is installed, a web server is also installed on the server. This becomes the hosting site of the LaunchPad Website, which is the Resource Center for administrators and users of NET SatisFAXtion. All
administrator and client downloads can be installed from this site by simply
clicking on the appropriate download link. There is user documentation and
screen shots for each client application as well as technical support documents
and a link to FaxBack’s online Knowledge Base.
1.5.2.4 The Report Utility
NET SatisFAXtion 8.7 Manual
10
The NET SatisFAXtion Report Utility is a powerful tool that allows administrators to run real-time usage reports. The utility logs directly into the NET SatisFAXtion server to derive real-time message statistics.
The Report Utility performs queries against the usage database and allows you
to display the results in a table or a graphical display. Also, with a single click
Microsoft Excel can be opened with the table data present such that all the
graphing and sorting capabilities provided by Excel can be used.
The utility allows you to extract data based on a custom calendar or for preset
date ranges.
An entire chapter of this manual is devoted to this utility. Please refer to the
chapter “Report Utility” for usage instructions and examples.
1.5.3 Supported Clients
Net SatisFAXtion offers native support for nearly all e-mail clients or stand
alone clients such as Microsoft Fax and Windows Fax and Scan. Regardless
which of these fax interfaces you are using, NET SatisFAXtion delivers powerful
real-time fax delivery status for every user, giving you the ultimate confidence
in fax delivery.
Microsoft Fax – Built in to most Microsoft Windows platforms, Microsoft Fax
is an easy-to-use, full-featured faxing application.
Email Clients – NET SatisFAXtion can easily fax from any mail client, including:
• Microsoft Outlook: Users can send, receive, manage and track the status of faxes through their Outlook mail client.
Page 11

1 – Introduction
NET SatisFAXtion 8.7 Manual
• Lotus Notes: Send, receive, manage and track faxes right from Lotus
Notes.
• SMTP/POP3 Internet Mail Clients: Fax-enable GroupWise, Microsoft
Mail, Netscape Mail or any SMTP/POP3 Internet Mail client.
1.6 Training and Professional Services
We offer a number of additional services to help you get the most out of your
NET SatisFAXtion fax server. Contact your sales rep for details and pricing.
Please note we require 24 hour’s lead time to schedule most of these services.
1.6.1 Training
With most business software, employees initially use only a fraction of the
functionality built into their systems. Capabilities and/or functionality you do
not know exists could make a big difference in the level of ROI you receive as
well as value to your own customers, suppliers and employees. Maximize the
value of your FaxBack applications with expertise from the people who know it
best – our technical training engineers.
11
1. Training at FaxBack Headquarters
2. Remote Online Training
3. On-site Implementation and Training – 1 Day
Custom training designed specifically for you: we’ll work with you to create an
agenda that reflects the training your company wishes to receive.
1.6.2 Preconfiguration Services
We strongly recommend this affordable service! Right along with your IT person, a highly experienced FaxBack support engineer will log onto your system
and install and configure your fax system optimizing it for your organization and
IT infrastructure.
1.6.3 Professional Services
You get a dedicated, two-hour block of time with a Professional Services Engineer. We will remotely access your server and provide the following:
• Installation and configuration assistance
• Basic product walk through
• Q & A Session
Professional Services can be tailored to your exact needs, please contact your
sales rep for details.
Page 12

1 – Introduction
1.6.4 Custom Professional Programming Services
NET SatisFAXtion 8.7 Manual
Professional services for customized fax features/functionality. Requires scope
call and custom quote by Professional Services Engineer.
1.7 Technical Support
1.7.1 Support Plans
1.7.1.1 Included 30-day Support Plan
For new customers and trialware evaluations and includes email, fax and telephone software support. This complimentary support plan begins when the
software or system is estimated to arrive at your location (not on installation)
and is available during standard FaxBack Support hours (Monday through Friday, 6:30am–5:00pm Pacific time, excluding holidays).
1.7.1.2 Standard Support Plans
12
FaxBack support engineers are skilled in troubleshooting, problem diagnosis
and identifying resolutions. Benefits include:
• Support duration: sold in 1, 2 and 3 year plans
• Hours of coverage: 6:30am–5:00pm PST, on business days Monday
through Friday (Except Holidays)
• FaxBack Customer Connection: dial-in or remote access to cus-
tomer-system for rapid resolution
• Email, fax and telephone access to Technical Support Team during hours of
coverage
• Online Knowledge Base access
• Number of incidents: unlimited
• Software Updates: Service packs, software updates and product releas-
es.
• For new and renewing support customers: Standard Support is invoiced
at 15% of the total current list price of the software products purchased
1.7.1.3 Around-the-clock 24×7 Support Plans
Includes all the features of our Standard Support plan plus expedited 24×7
support. This support plan is geared toward organizations with mission-critical
fax systems that cannot risk downtime. Enables customers to handle system
maintenance, upgrades or other potential support issues during non-business
and non-critical hours of operation.
• Includes all the features of the Standard Support PLUS:
Page 13

1 – Introduction
• Expedited 24×7 support, 365 days a year including holidays.
• After business hours and holidays receive a call back from a support engi-
neer within 30 minutes
• For new and renewing support customers: Around-the-clock 24×7 Sup-
port is invoiced at 25% of the total current list price of the software products purchased
1.8 Product Key
Your server’s product key determines what features are available. It also contains other important information such as your
er ID,
and the expiration date of your FaxBack technical support agreement.
Your product key encodes the following parameters, which you can see using
the
Start ⇨ Programs ⇨ NET SatisFAXtion ⇨ Update Product Key
CustomerID: Your customer number in FaxBack’s customer database.
ServerID: The number identifying this NET SatisFAXtion server install. If you
have multiple fax servers, each will have its own unique ServerID.
NET SatisFAXtion 8.7 Manual
Customer ID,
the server's
program.
13
Serv-
Expiration: Date when your FaxBack technical support agreement expires. Or,
in the case of trialware, the date the NET SatisFAXtion software will stop
working.
ExpirationType:
Subscription: Retail product key; NET SatisFAXtion will continue to
operate past the expiration date.
Timeout: Trialware product key; NET SatisFAXtion will not operate
beyond the expiration date.
FaxServerType:
SmallBusiness: NET SatisFAXtion Small Business Edition
Enterprise: NET SatisFAXtion Enterprise Edition
EmailGateway:
NATIVE or SMTP: Allows installation of the SMTP or POP3/SMTP
email gateway.
None: Email gateway support is not enabled.
FaxPortCount: Number of fax ports licensed.
WinFaxLicenseCount: Not used.
VoicePortCount: Number of Fax-on-Demand voice ports licensed for use with
the FaxBack Fax-on-Demand IVR product.
FaxExport: Enables the Fax Export module.
Broadcast: Enables the Broadcast module.
PDFConverter: Enables email gateway and/or Fax Export to create PDF files.
Page 14

1 – Introduction
NET SatisFAXtion 8.7 Manual
API: Enables use of any of FaxBack’s Application Programming Interface, used
for custom software integration.
PCL: Not used.
ConsensualFax: Enables use with the FaxBack Fax-on-Demand IVR product
with the Consensual Fax module.
IPFax: Enables use of the IPFax Voice over IP driver.
1.9 Software Updates
A current support agreement also comes with free updates. You can download
any supported version of NET SatisFAXtion from our web site:
http ://faxback.com/support/updates .
1.10 Installation & Upgrade Guides
Detailed installation and upgrade guides can be found in the NET SatisFAX-
tion CD Image directory, created when you run the downloaded NS87Download.exe. Look for these two files:
14
• README FIRST - Installation Guide.pdf
• NET SatisFAXTion Upgrade Guide.pdf
These guides can also be found on our Web site: http ://www.faxback.com/docs
Also on our web site there are guides to installing and configuring NET SatisFAXtion with AudioCodes MediaPack hardware, NET SatisFAXtion with Brooktrout hardware, and the Mediant 1000 NET SatisFAXtion Appliance.
1.11 Compatibility List
Please note that not all fax hardware is supported on 64-bit platforms.
1.11.1 VoIP Media Gateways
These devices are supported on both 32-bit and 64-bit operating systems.
1.11.1.1 AudioCodes MediaPack series
AudioCodes MediaPack MP114: 4-port FXO, 4-port FXS*, or mixed. External
gateway.
AudioCodes MediaPack MP118: 8-port FXO, 8-port FXS*, or mixed. External
gateway.
* FXS ports are normally used for DID (WinkStart) trunks only.
Page 15

1 – Introduction
1.11.1.2 AudioCodes TrunkPack series
NET SatisFAXtion 8.7 Manual
AudioCodes TrunkPack 260: 1, 2, 4 and 8-span T1/PRI. Internal full length
uPCI card.
1.11.1.3 AudioCodes Mediant series
Mediant 800: Fixed-layout (non-modular). Available with 1 T1/PRI, 8 FXO
ports, 4 FXS and 4 FXO ports, or 8 FXS ports. 1U rack gateway.
Optionally available with onboard OSN server module to host the NET SatisFAXtion server or Fax Machine Integration Server.
Mediant 1000: Modular FXO, FXS* and 1–4 T1/PRI modules. 1U rack gateway supports 6 modules (maximum 24 FXO/FXS ports or 4 T1/PRI trunks).
Optional onboard OSN server module to host the NET SatisFAXtion server or
Fax Machine Integration Server.
* FXS ports are normally used for DID (WinkStart) trunks only.
Mediant 2000: 1, 2, 4, and 8-span T1/PRI cPCI blades. 1U rack gateway supports 2 blades (maximum 16 T1/PRI spans).
15
Mediant 3000: 1, 2, or 3 DS3 cPCI blades. 4U rack gateway supports 2 re-
dundant blades (maximum 84 T1/PRI spans).
1.11.1.4 Other SIP & T.38 capable VoIP devices
NET SatisFAXtion has been tested and certified with the majority of Cisco media gateways. Please be aware that FaxBack Technical Support can provide only
basic configuration assistance with Cisco equipment. We recommend Cisco TAC
for comprehensive Cisco support and configuration assistance.
Other Voice over IP devices may work, provided the device supports the SIP
and T.38 protocols.
1.11.2 VoIP Service Providers
VoIP service providers are supported on both 32-bit and 64-bit operating systems.
Please check our website http ://www.faxback.com/ for an up to date list of
service providers.
1.11.3 Dialogic Inc.
Formerly Cantata Technology, Brooktrout Technology, Eicon Networks.
Note: These devices are supported on 32-bit operating systems only.
1.11.3.1 Brooktrout TruFax Series Analog Fax Boards
TruFax 100: uPCI 1-port loop start fax board, uPCI card
Page 16

1 – Introduction
NET SatisFAXtion 8.7 Manual
TruFax 200: uPCI 2-port loop start fax board, uPCI card
1.11.3.2 Brooktrout TR114 Series Analog Fax Boards
TR114+uP2L: 2-port loop start fax board, full length uPCI card
TR114+uP2C: 2-port fax board with 1 DID, 1 loop start full length uPCI
card*
TR114+uP2D: 2-port DID fax board, full length uPCI card*
TR114+uP4L: 4-port loop start fax board, full length uPCI card
TR114+uP4C: 4-port fax board with 2 DID, 2 loop start, full length uPCI
card*
TR114+uP4D: 4-port DID fax board, full length uPCI card*
*Requires Tellabs 8012 –48 VDC power supply for up to 6 DID trunks
1.11.3.3 Brooktrout TR1034 Series Analog Fax Boards
TR1034+P2-2L: 2-port analog fax board, full length uPCI card
16
TR1034+uP2C: 2-port fax board with 1 DID, 1 loop start, full length uPCI
card
TR1034+uP2D: 2-port DID fax board, full length uPCI card
TR1034+P4-4L: 4-port analog fax board, full length uPCI card
TR1034+uP4C: 4-port fax board with 2 DID, 2 loop start, full length uPCI
card
TR1034+uP4D: 4-port DID fax board, full length uPCI card
TR1034+P8-8L: 8-port analog fax board, full length uPCI card
1.11.3.4 Brooktrout TR1034 Series Digital Fax Boards
TR1034+P4H-T1: 4-port v.34 Fax board with on-board T1/PRI interface, full
length uPCI card
TR1034+P8H-T1: 8-port v.34 Fax board with on-board T1/PRI interface, full
length uPCI card
TR1034+P16H-T1: 16-port v.34 Fax board with on-board T1/PRI interface,
full length uPCI card
TR1034+P24H-T1: 24-port v.34 Fax board with on-board T1/PRI interface,
full length uPCI card
1.11.3.5 Eicon Diva Server Series Digital Fax Boards
Diva Server PRI/E1/T1-24: 24-port v.34 Fax board with on-board T1/PRI interface, full length uPCI card
Page 17

1 – Introduction
NET SatisFAXtion 8.7 Manual
Diva Server PRI/E1/T1-8: 8-port v.34 Fax board with on-board T1/PRI interface, full length uPCI card
1.11.4 Mainpine, Ltd.
Note: These devices are supported on 32-bit operating systems only.
1.11.4.1 Rockforce Series Analog Fax Boards
Rockforce DUO+ Analog PCI Card
Rockforce QUATRO+ Analog PCI Card
Rockforce OCTO+ Analog PCI Card
1.11.4.2 IQ Express Analog Fax Boards
IQ Express: 2 Port Analog PCIe Card
IQ Express: 4 Port Analog PCIe Card
IQ Express: 8 Port Analog PCIe Card
17
1.11.5 Other Class 1 / Class 2 Fax Modems
Note: These devices are supported on 32-bit operating systems only.
Most Class 1 and Class 2.0 modems should work provided they are fully Class
1 or Class 2.0 compliant. USB modems are known to not work, and may bluescreen the server due to the modem not supporting the complete Class 1 command set (STOP END_OF_NT_EVALUATION_PERIOD).
Page 18

2 – Server Administration
2 Server Administration
2.1 How Faxes Flow Through the System
2.1.1 Queues
NET SatisFAXtion 8.7 Manual
There are four important queues in NET SatisFAXtion. Any fax that is processed
by the server is stored in one or more queues. The fax server’s queues should
stay relatively empty. If the queues grow in size over time, it can be an an indication that something misconfigured.
Scheduled Queue: This queue stores outbound faxes waiting to be sent. Faxes
that are converting, faxes that failed and are waiting to retry, and faxes that are
scheduled to send in the future will wait here.
Active Queue: This queue contains all faxes that are actively sending or receiving are stored here.
Outbox (Sent Queue): Delivery notifications are stored here before they are
delivered to the sender. Some clients (notably FAXability) will only collect notifications when the user specifically checks. All other clients will retrieve notifications in real time, and nothing should be left here longer than a few seconds.
18
Inbox (Received Queue): Received faxes are stored here before they are deliv-
ered to the receiver. Unrouted faxes (delivered to Postmaster) will remain here
until manually routed. Some clients (notably FAXability) will not retrieve faxes
in real time since the client application is not running all the time.
2.1.2 Outbound Faxes
A fax is sent to the fax server from a client.
NET SatisFAXtion validates the phone number
The fax server places the call using a configured fax device.
When the fax completes, a status notification is sent back to the client.
2.1.3 Inbound Faxes
A call comes in from a configured fax device.
NET SatisFAXtion answers the call and begins receiving the fax.
Once the fax is completely received, the fax server makes a decision where to
send it.
The fax is delivered it to the client.
Page 19

2 – Server Administration
2.2 Fax Devices
NET SatisFAXtion 8.7 Manual
The term “fax device” is used to refer to the means by which the NET SatisFAXtion fax server sends or receives faxes from other fax machines or fax servers.
The “fax device” can be a traditional PCI fax card, an on-site Voice over IP media gateway, or even a SIP provider used over the open Internet.
The
Re-Detect Fax Devices
utility allows you to add and remove fax devices
and change the number of ports allocated to each device. The total number of
ports that can be configured is controlled by your product key. The fax service
will be stopped by
Re-Detect Fax Devices
The service will be restarted when changes are complete.
The
Change Server Settings
ports. Click the
Hardware Settings
utility allows you to modify settings on existing
ic options. The fax service will be stopped by
OK
button is clicked. The service will then be restarted with the changes.
2.2.1 Additional Port Configuration
before any changes can be made.
button on the
Change Server Settings
General
19
tab for device-specif-
after the
2.2.1.1 Send / Receive Only Ports
Sometimes it is useful to reserve certain fax ports for sending only or receiving
only. One example would be a server that does a high volume of outbound but
still has inbound needs, and inbound callers frequently get busy signals. The solution would be to reserve some ports for inbound traffic thereby reducing the
chances of busy signals.
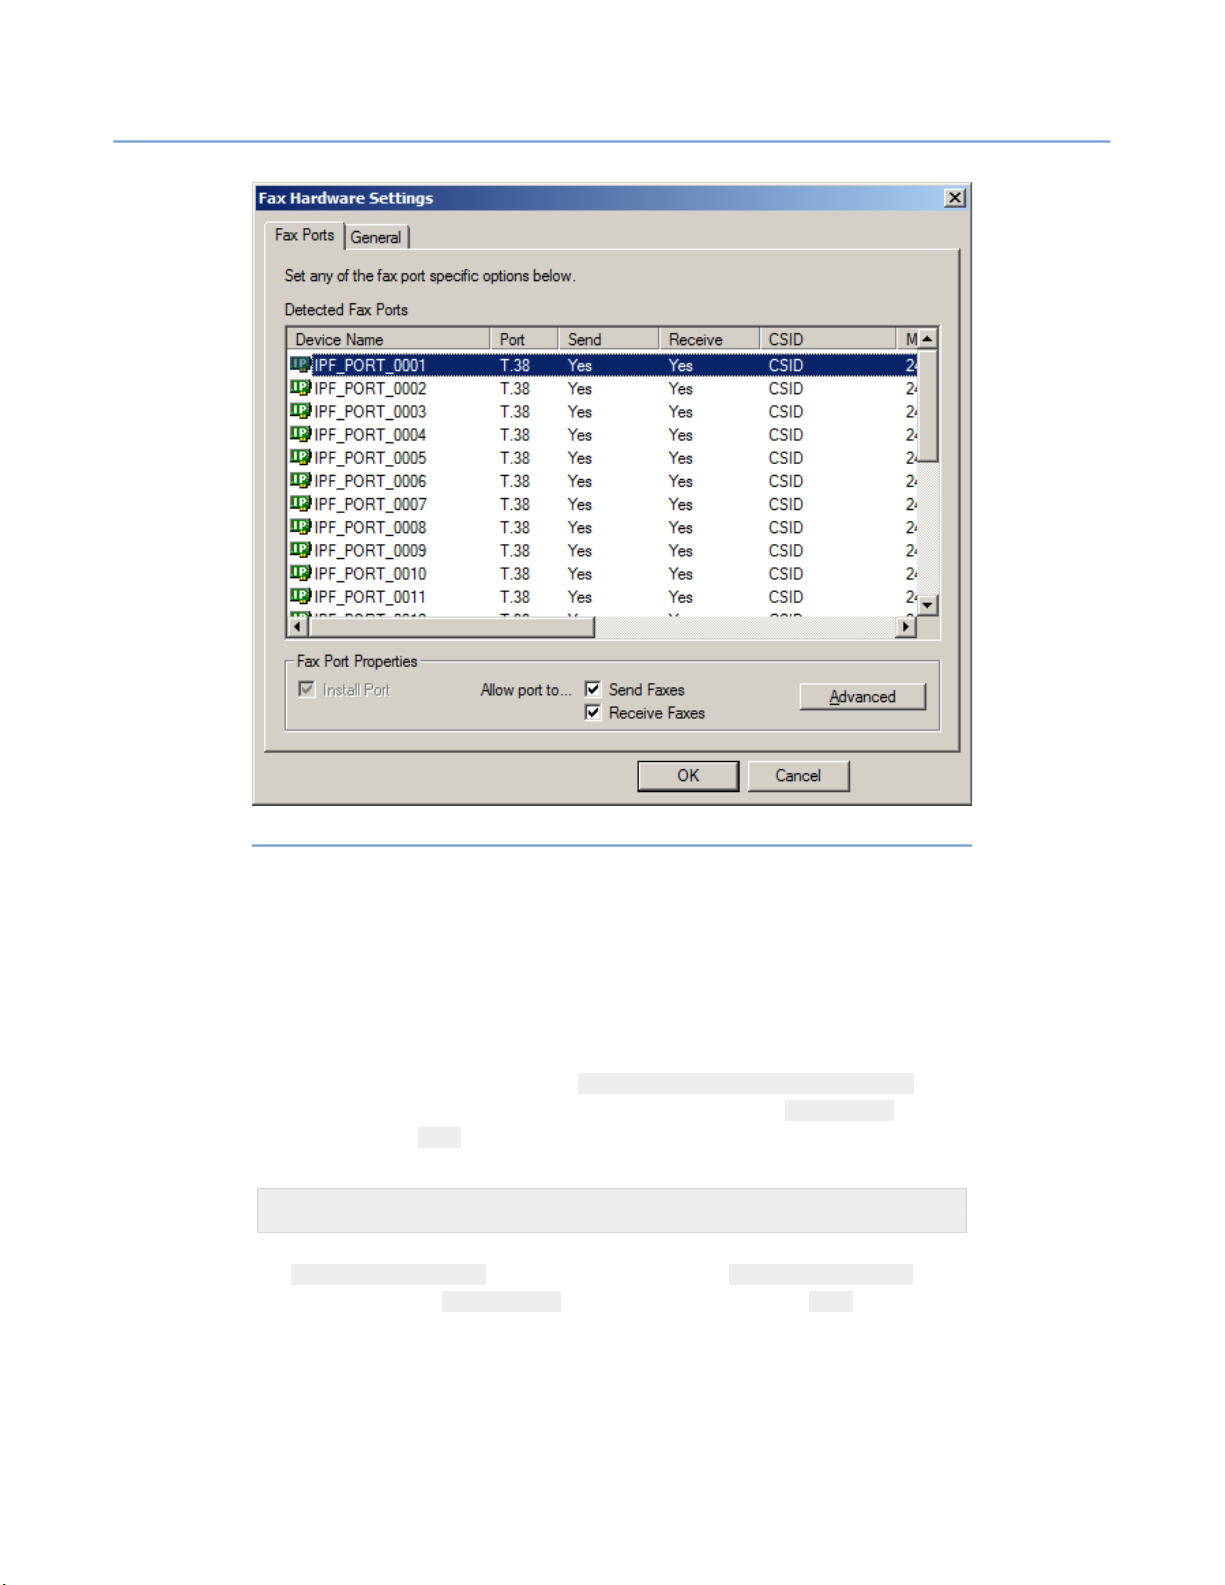
Ports can be configured as send only or receive only in the Change Server Settings utility, Start Programs NET SatisFAXtion ⇨ ⇨ ⇨ Change Server Set-
tings. Click on the Fax Hardware Settings button. Here you will see a list of
configured ports.
Page 20

2 – Server Administration
NET SatisFAXtion 8.7 Manual
20
Page 21
2 – Server Administration
NET SatisFAXtion 8.7 Manual
21
Illustration 2.2.1.1#1: Change Server Settings – Fax Hardware Settings
Select a port, and you can enable and disable send and receive capabilities using
the
Allow port to... Send Faxes, Receive Faxes
window.
2.2.1.1.1 Brooktrout TR1034
Configured ports on Brooktrout TR1034 cards (and recent models of TruFax
100 and 200 cards) will not show up in
must be done in the registry. Under [HKLM\Software\FaxBack\ICANFax] you
will find one key per port. Look for keys named similarly to BOS_02_001. Under
each key will be a mode string value, this controls whether a port can send or
receive.
[HKLM\Software\FaxBack\ICANFax\<portname>]
"mode" = "fax_in,fax_out"
Set the mode to reflect how you want the port configured. To only send faxes,
set "mode" = "fax_out". To only receive faxes, set "mode" = "fax_in". To
disable the port, set "mode" = "" (i.e. remove the value from mode).
Manually restart the NET SatisFAXtion service after making any changes to the
registry.
checkboxes at the bottom of the
Change Server Settings.
Configuration
Page 22
2 – Server Administration
2.2.1.2 CSID and TSID
Called Subscriber Identifier (CSID) and Transmit Subscriber Identifier (TSID)
are how the fax server and other fax machines identify each other. When a fax
is sent or received, one of the first things that happens is the called fax sends
its CSID, and then the calling fax sends its TSID. NET SatisFAXtion records the
other fax device’s CSID in its transaction log.
CSID is up to 20 characters long, and can include letters, numbers, spaces and
symbols. It is a good idea to set CSID to either your main fax line, a contact
phone number, or your company name so that recipients can identify the
sender. CSID cannot be blank.
NET SatisFAXtion 8.7 Manual
22
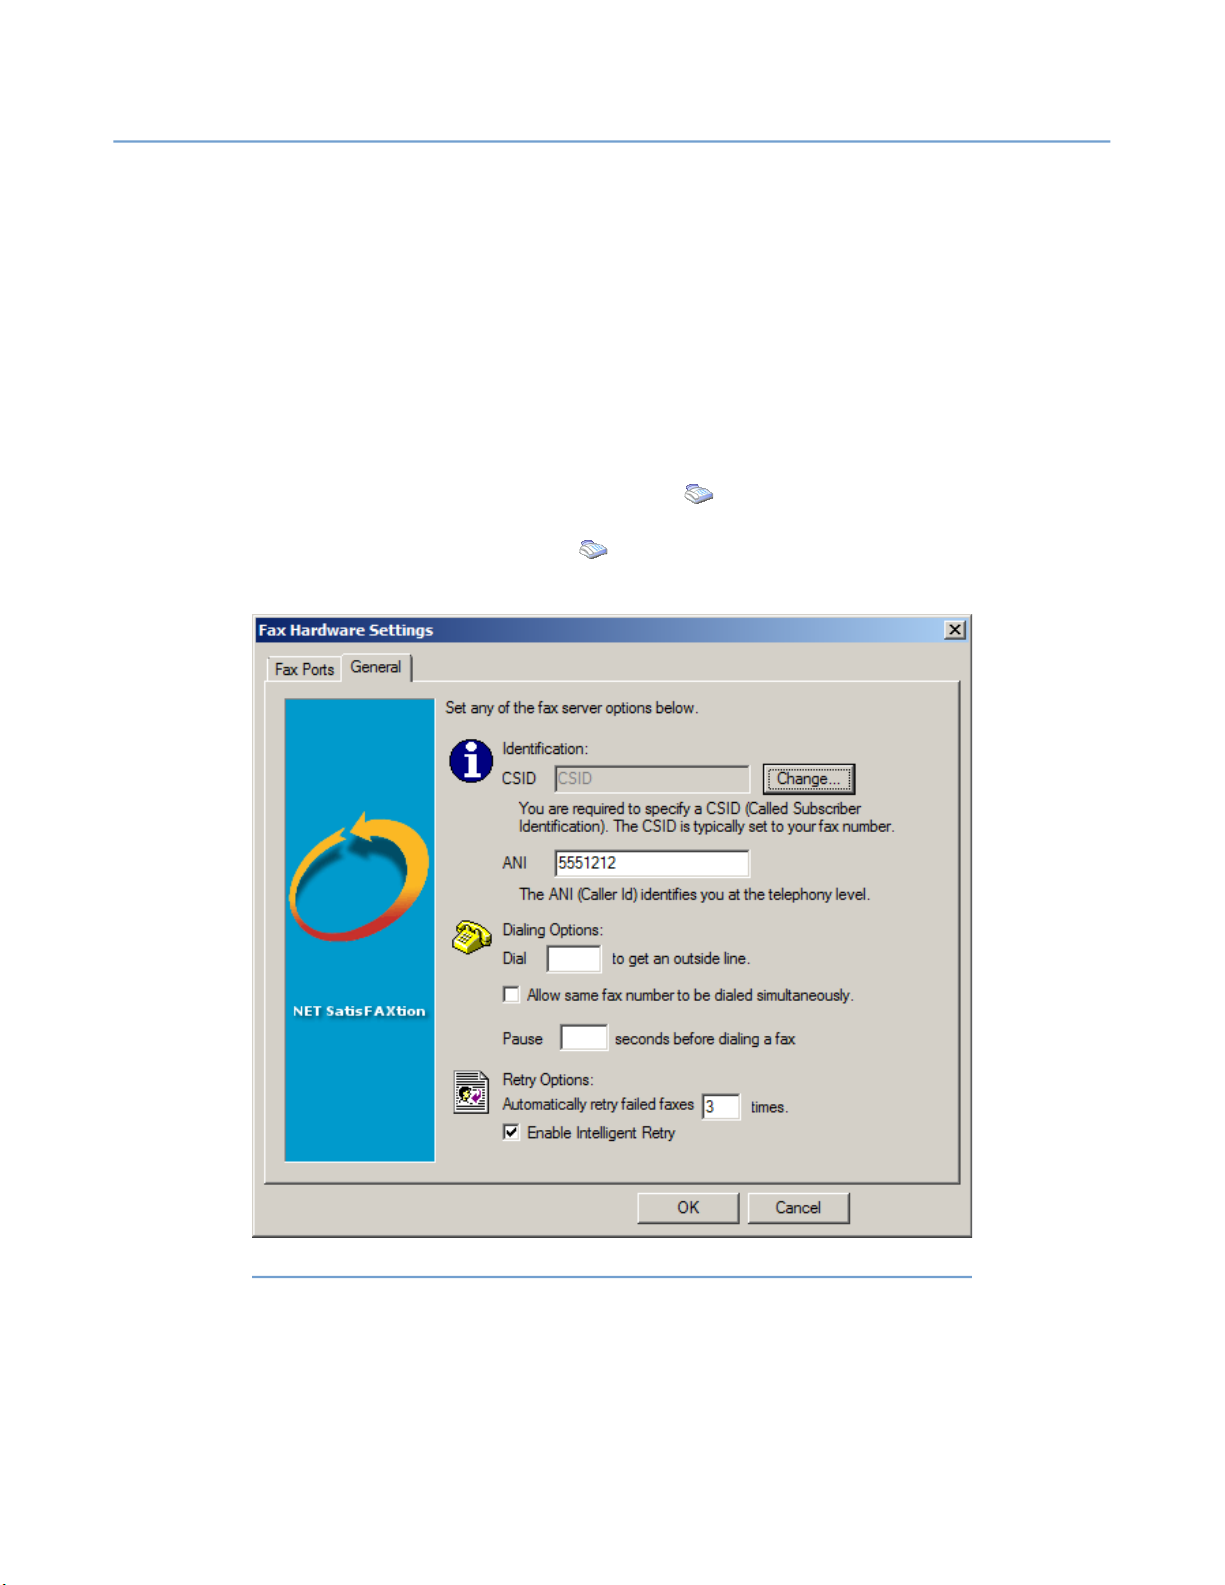
CSID is initially configured during installation or
You can configure CSID afterwards in the
Change Server Settings
Re-Detect Fax Devices
Programs NET SatisFAXtion ⇨ ⇨ ⇨ Change Server Settings
Fax Hardware Settings
button, and change to the
General
tab.
.
utility,
. Click on the
Start
Illustration 2.2.1.2#1: Change Server Settings – Fax Hardware Settings – General
Click the
ished.
Change
button next to CSID. Enter your CSID and click OK when fin-
Page 23
2 – Server Administration
2.2.1.3 Fax Speed
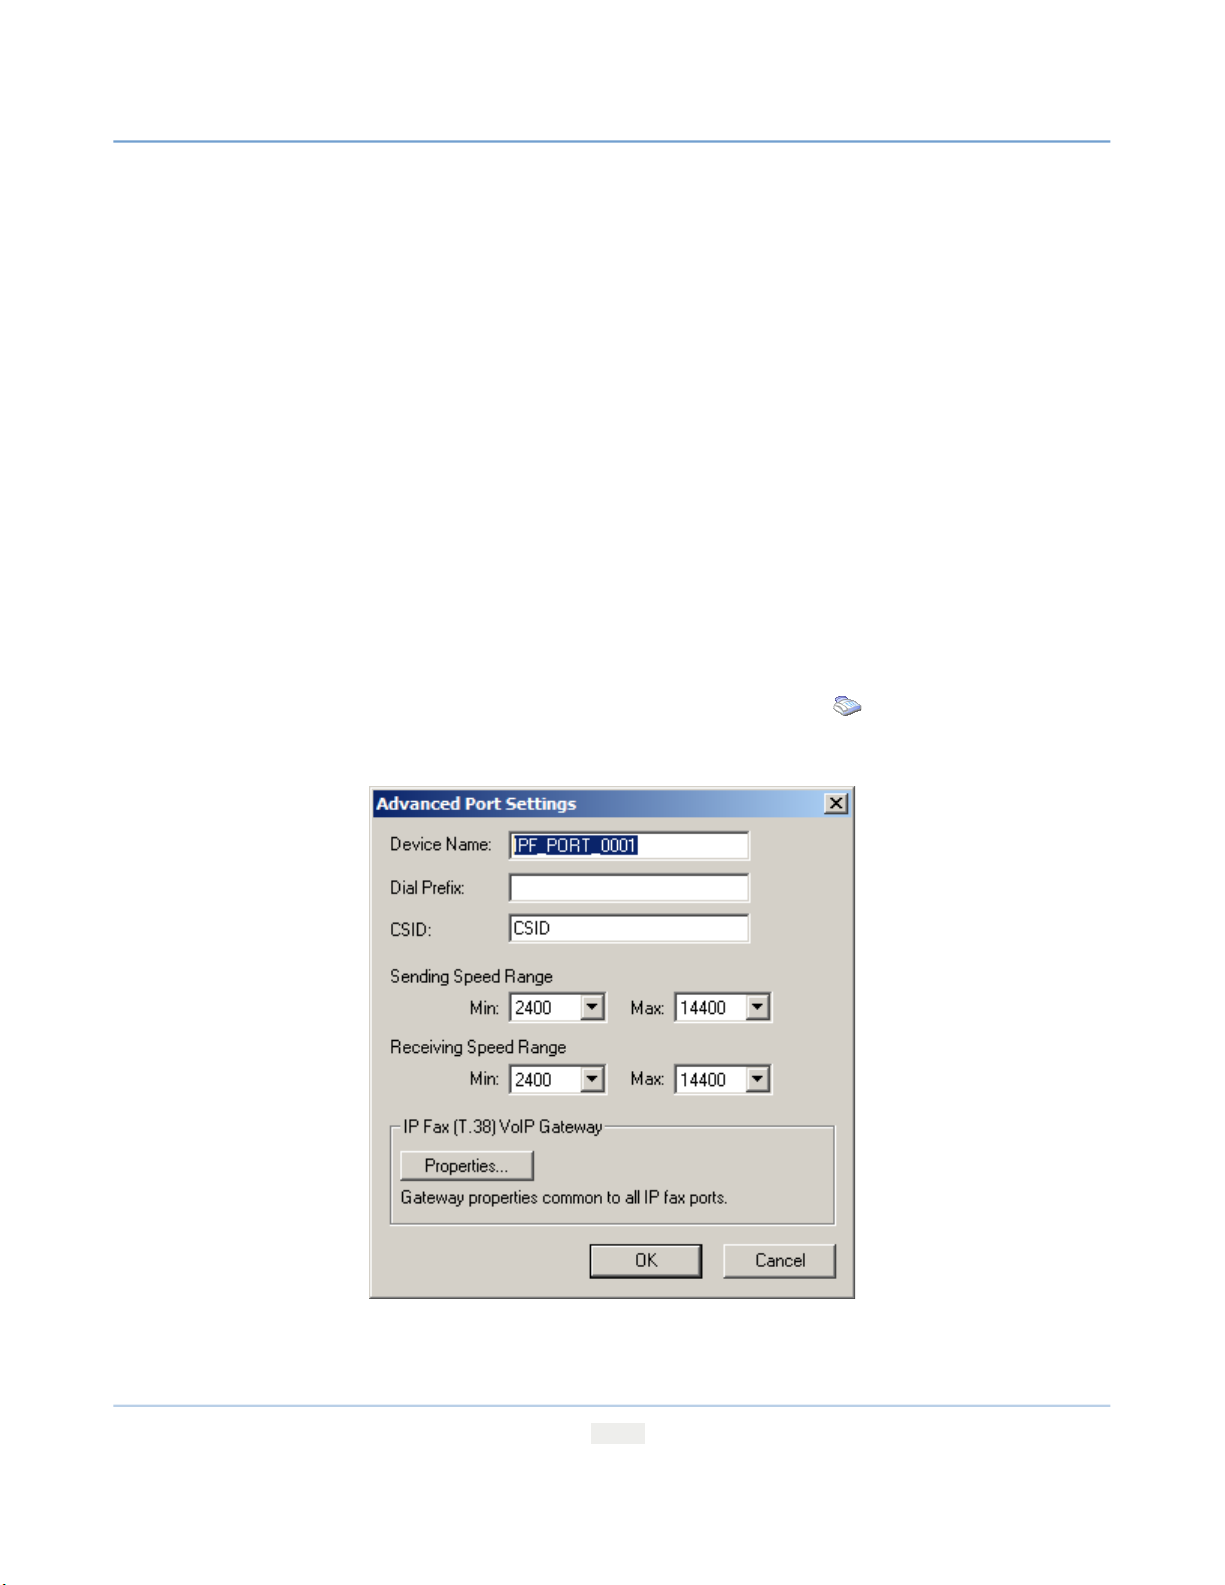
Fax speed is controlled by three things: the maximum speed the sender supports, the maximum speed the receiver supports, and what speed the phone
lines and telephone network can support. The
will be used. For example, if the sender supports speeds up to 14,400, the receiver supports speeds up to 12,000, but the line can only support 9600, the
fax will be sent at 9600.
There are two common reasons to change the allowed fax speed:
Prevent Slow Faxes: At the lower speeds faxes can take an unusually long
time to send or receive. It is useful to increase the minimum allowed speed to
9600 to disallow faxes from using very slow speeds. If the line quality is poor
enough that the fax cannot be sent or received at 9600, it will fail instead of
using lower speeds.
Troubleshooting Poor Line Quality: If line quality is poor and many faxes are
failing with communication errors, success rate may be slightly improved by decreasing the maximum allowed fax speed to 9600.
You can configure the speeds allowed for sending and receiving in the Change
Server Settings utility,
Server Settings
click
Advanced
NET SatisFAXtion 8.7 Manual
Start Programs NET SatisFAXtion ⇨ ⇨ ⇨ Change
. Click on the
.
lowest
Fax Hardware Settings
23
of these three speeds
button. Select a port and
2.2.2 Voice over IP
Licensing: Voice over IP requires the IPFax feature.
Page 24
2 – Server Administration
Voice over IP (VoIP) is a general term for placing telephone calls over data networks. The NET SatisFAXtion fax server uses Session Initiation Protocol (SIP)
and T.38 (International Telecommunication Union publication T.38) protocol to
set up calls, and to transmit fax data respectively.
2.2.2.1 A Note on Fax Server Ports versus Media Gateway Ports
The ports you see in NET SatisFAXtion are “virtual” ports. They do not correspond with the physical ports on the media gateway. Outbound ports are allocated lowest port number to highest (ascending), and inbound ports are
allocated from highest to lowest (descending).
2.2.2.2 Configuring NET SatisFAXtion to use a VoIP device
NET SatisFAXtion can use a variety of VoIP devices and/or SIP providers to
send and receive faxes. Find the section below that most closely resembles
your scenario.
NET SatisFAXtion 8.7 Manual
24
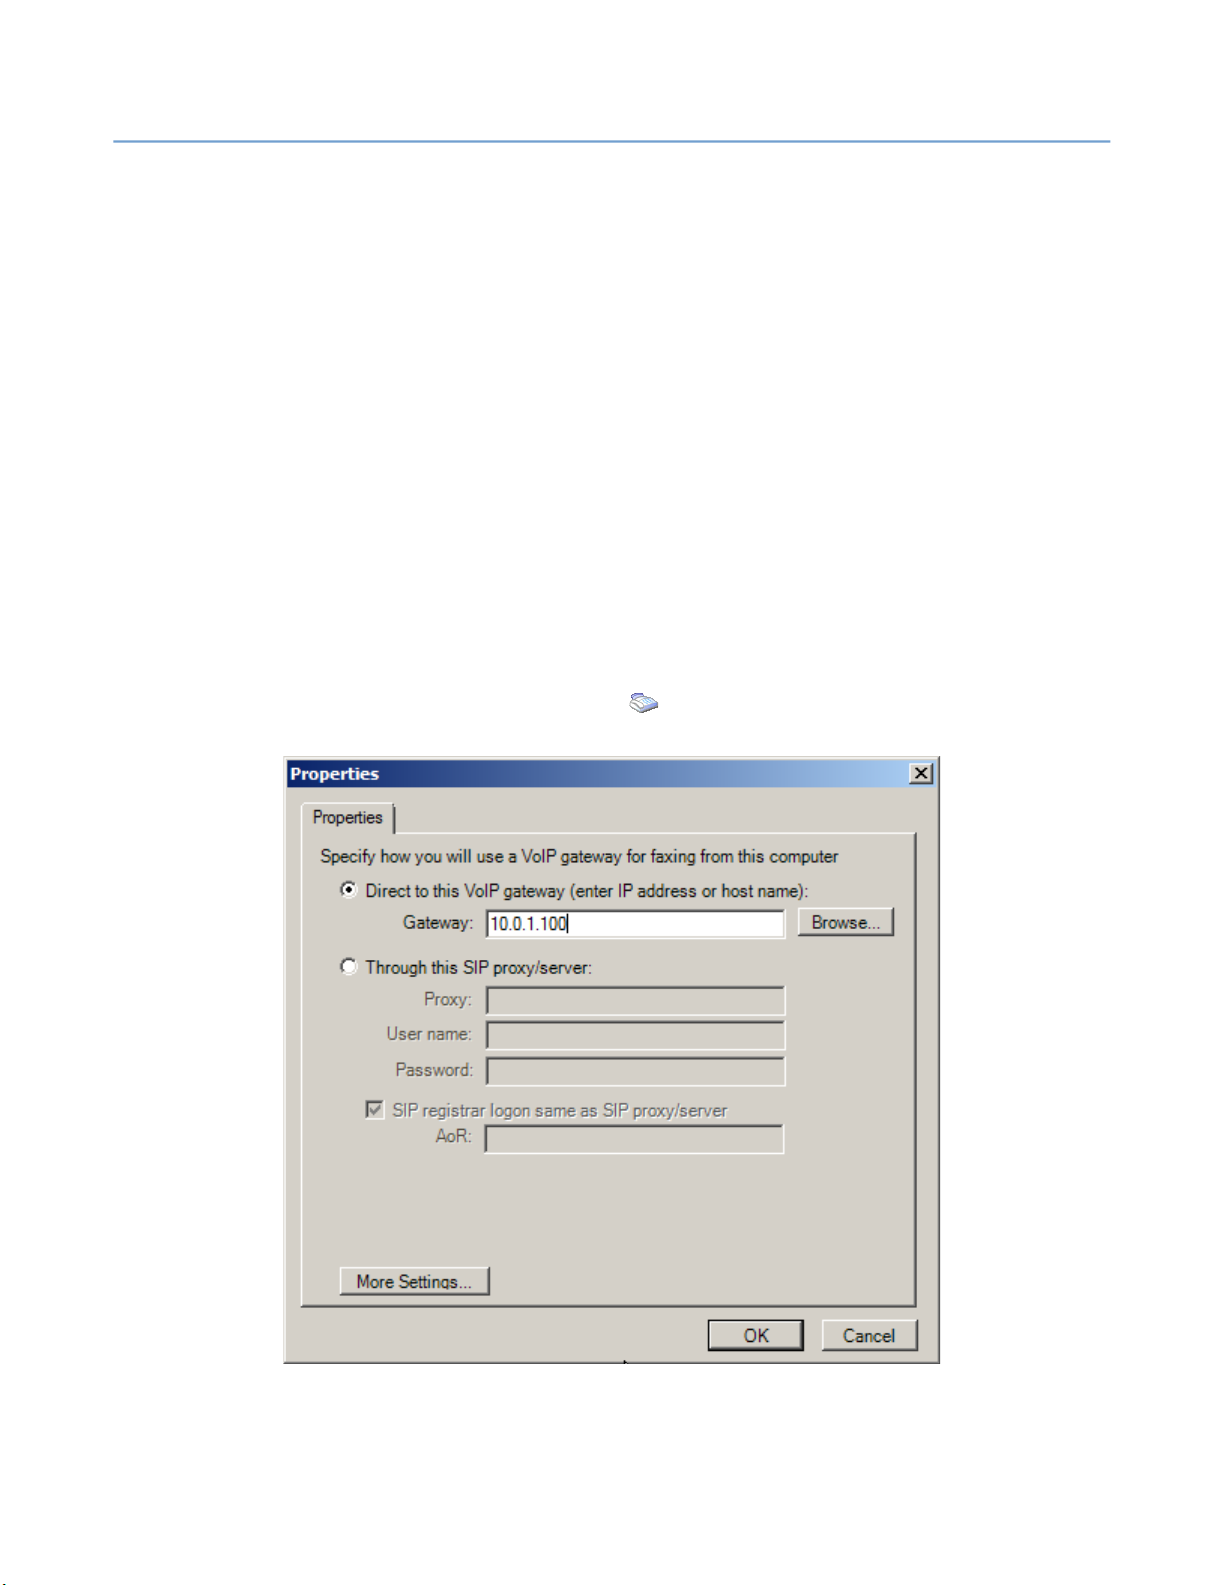
VoIP devices are initially configured in
ure VoIP device parameters afterwards in the
Re-Detect Fax Devices
Change Server Settings
. You can config-
Start Programs NET SatisFAXtion ⇨ ⇨ ⇨ Change Server Settings
the
Fax Hardware Settings
button, select a port and click
Advanced
.
utility,
. Click on
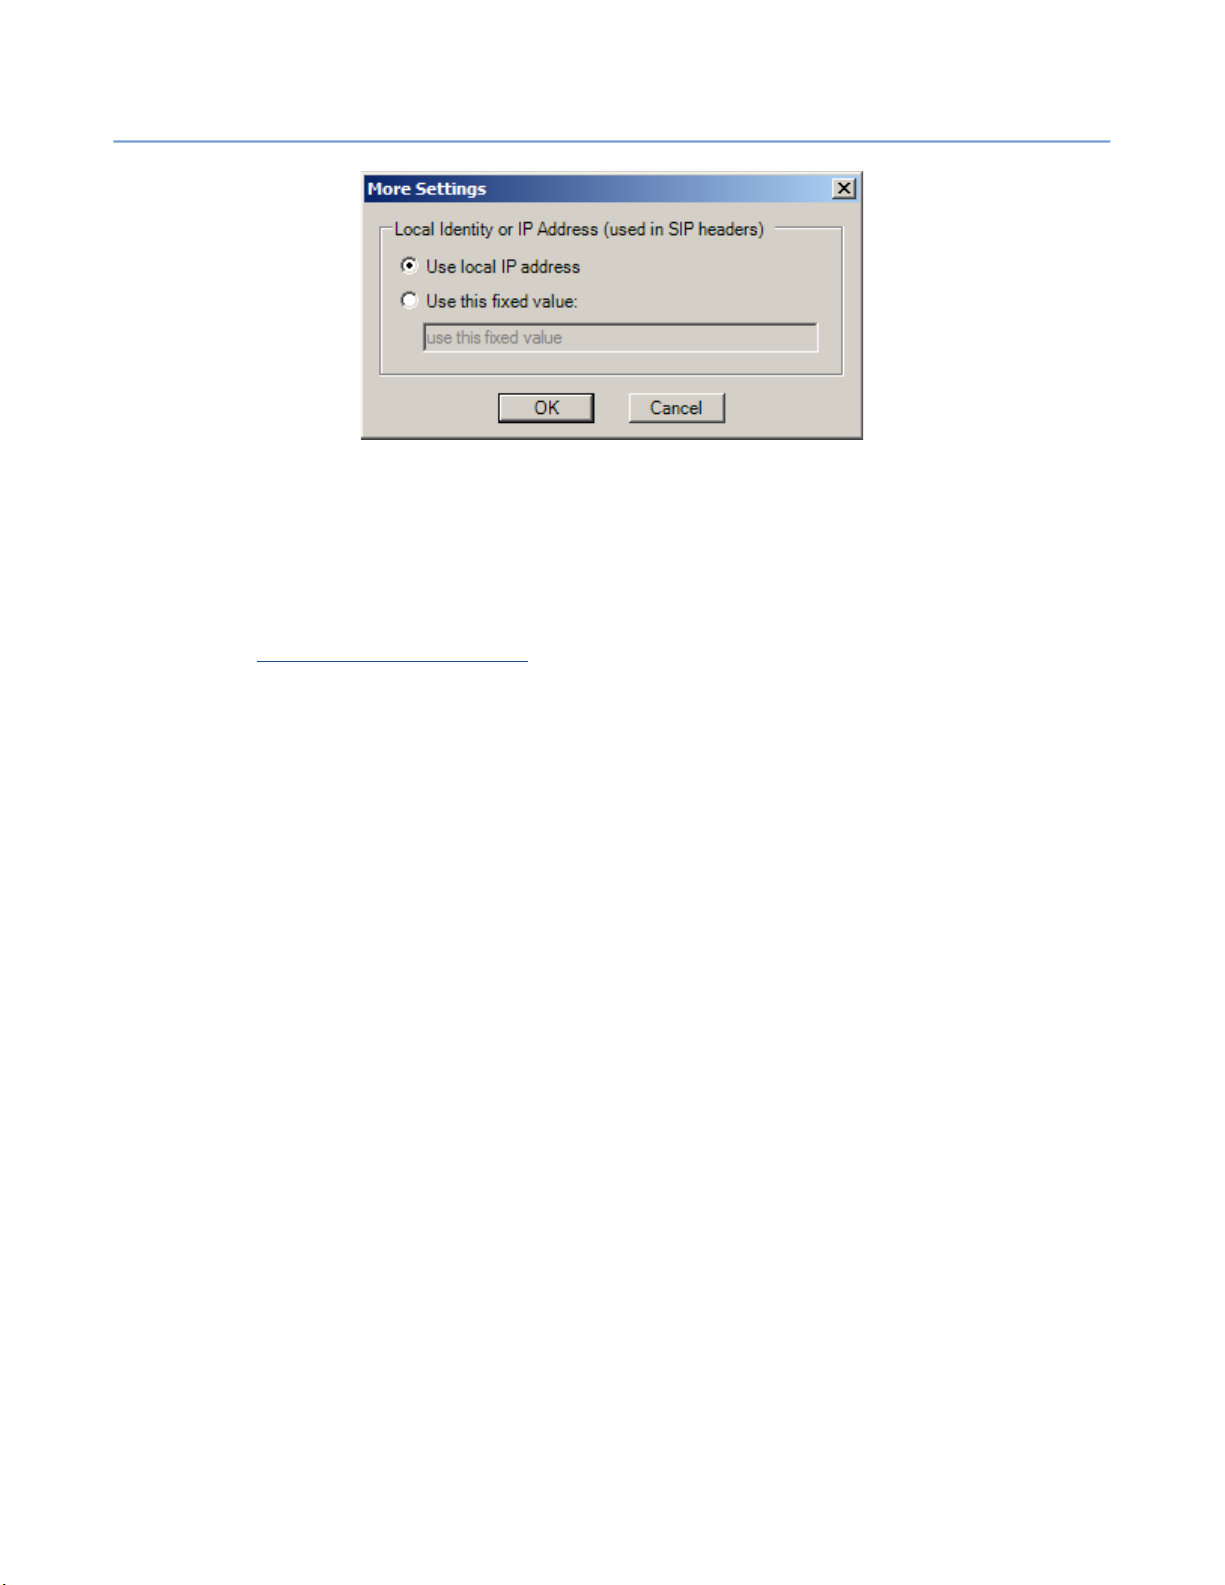
Click
More Settings
to override the IP address used for SIP.
Page 25
2 – Server Administration
2.2.2.2.1 New AudioCodes MediaPack MP114 or MP118 Gateway
Run
Re-Detect Fax Devices
Gateways
Please refer to
http ://www.faxback.com/docs .
option to automatically configure the MediaPack gateway for you.
NET SatisFAXtion MediaPack Install
NET SatisFAXtion 8.7 Manual
from the Start menu. Select the
online at
25
AudioCodes VoIP
2.2.2.2.2 AudioCodes or Cisco Media Gateway On Local Subnet
Run
Re-Detect Fax Devices
Gateways
under
media gateway.
By default,
the local subnet via Simple Network Management Protocol (SNMP) broadcast
and Cisco Discovery Protocol (CDP). This technique is sufficient to find AudioCodes and Cisco media gateways on the local subnet. Note that it will also
detect other Cisco network devices that may not be VoIP media gateways.
2.2.2.2.3 Other Media Gateway, or Gateway Not On Local Subnet
If your media gateway is not on the local subnet, or it is something other than
an AudioCodes or a Cisco device, click on the
enable manual configuration. For gateways that do not require
cation
If you require
t
hrough this SIP proxy/server
and fill in the required
as the
the
option if you will be connecting to an AudioCodes media gateway, or
Alternate Fax Devices
Re-Detect Fax Devices
or
registration
proxy authentication
user name.
From
URI before the @.
It will be used in the SIP REGISTER messages as the part of
from the start menu. Select the
select
IP Fax (T.38) VoIP Gateways
will attempt to locate the media gateway on
Show Advanced Settings
, simply enter the IP address of the media gateway.
and
. Enter the remote IP address of the SIP device
user name
and
registration,
password
choose the radio option
. Usually
AoR
AudioCodes VoIP
for a Cisco
link to
proxy authenti-
will be the same
If you only require
proxy authentication
registrar logon same as SIP proxy/server
Registrar, User name, Password
and
AoR
but not
checkbox, and clear all values from
.
registration,
uncheck the
SIP
Page 26

2 – Server Administration
Please note that the media gateway must support SIP and T.38 protocols, and
must initiate T.38 on detection of fax tone for outbound faxes. (For inbound
faxes, NET SatisFAXtion will initiate T.38.)
2.2.2.2.4 SIP Trunk Provider
NET SatisFAXtion 8.7 Manual
26
If you are using a SIP provider, click on the
able manual configuration. For providers that do not require
registration
fied by the provider.
If you require
this SIP proxy/server
and fill in the required
as the
the
From
Please note that the provider must support SIP and T.38 protocols, and must
initiate T.38 on detection of fax tone for outbound faxes. (For inbound faxes,
NET SatisFAXtion will initiate T.38.)
2.2.2.3 Using Multiple VoIP Gateways
NET SatisFAXtion will answer all calls sent to it, so there is no additional configuration necessary to
To use multiple gateways to
required.
(i.e. they use IP authentication), simply enter the IP address speci-
authentication
. Enter the remote IP address specified by the provider
and
user name
user name.
URI before the @.
It will be used in the SIP REGISTER messages as the part of
receive
Show Advanced Settings
link to en-
authentication
registration,
and
password
calls from multiple gateways.
send
calls, some additional registry configuration is
choose the radio option t
. Usually
AoR
will be the same
or
hrough
2.2.2.4 Fax Server with Multiple Network Interface Cards
A fax server with multiple network interface cards (NICs) presents a special
problem. All SIP communication will use the IP address of the first adapter in
the binding order. To check the binding order, open the
work Connections
the network connections on the server will be listed here, move the connection
that that should be used to the top.
Alternately, you can manually override the IP address used by going to the
Change Server Settings
Change Server Settings
vanced
Make sure the IP address you enter is valid for this server. If using a domain
name, make sure the name resolves from the media gateway
solves to is valid for this server.
, then click
folder. Click the
utility,
. Click the
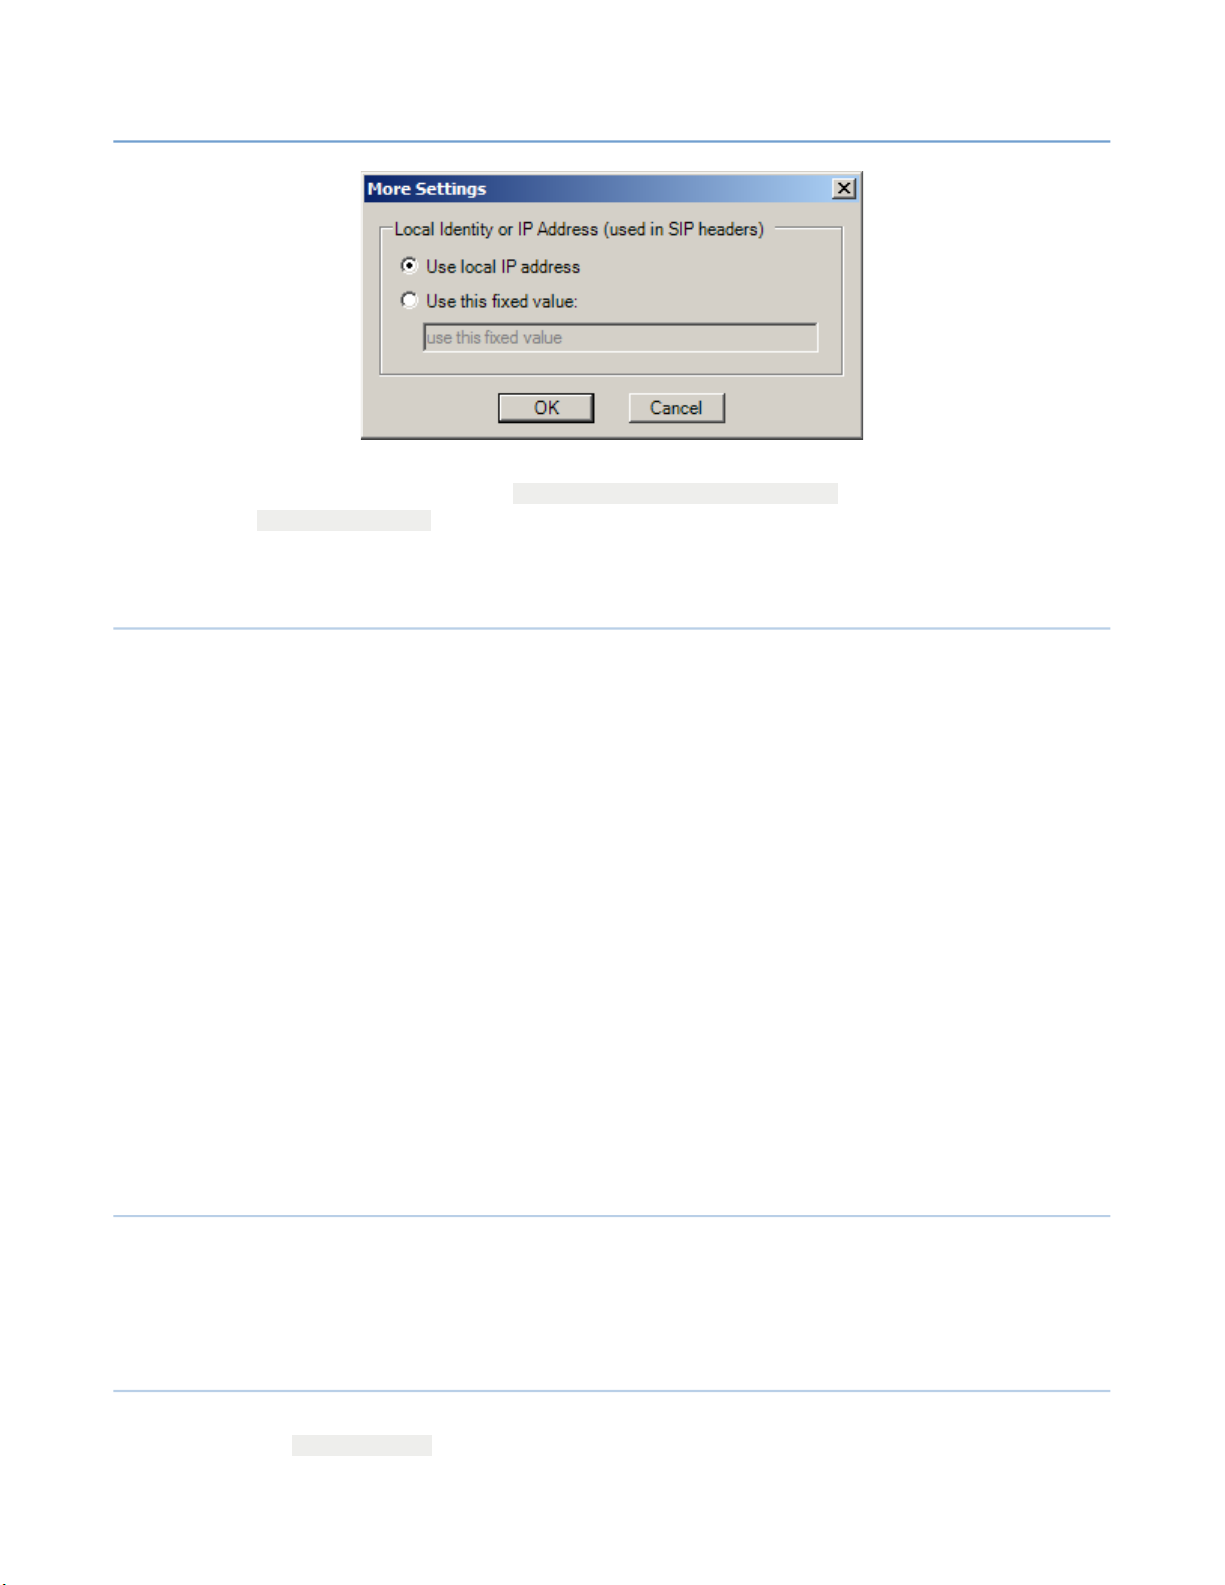
More Settings
Start Programs NET SatisFAXtion ⇨ ⇨ ⇨
.
Advanced Advanced Settings⇨
Fax Hardware
button, select a port, click
Control Panel Net⇨ -
menu. All
and
the IP it re-
Ad-
Page 27
2 – Server Administration
This will set the registry key [HKLM\Software\FaxBack\IP_FAX]
local_ip_address which indicates the IP address to use for SIP communica-
tion.
2.2.3 Class 1 / Class 2
Most internal and external serial modems use the Class 1 or Class 2 command
set.
NET SatisFAXtion 8.7 Manual
27
2.2.3.1 Configuring NET SatisFAXtion to use a Class 1 or Class 2 device
NET SatisFAXtion can use most Class 1 or Class 2 fax modems to send and receive faxes.
Class 1 or Class 2 devices are initially configured in
Re-Detect Fax Devices
sure that the modem’s drivers are already installed and Windows has detected
them. Configured modems will be listed in Window’s
tions
control panel.
Phone and Modem Op-
Modems cannot be shared between applications, so ensure that no other telephony application is installed on the fax server. If there are other applications
using the modems, NET SatisFAXtion will report that it cannot access the device (“Windows serial device name unknown”). If you have no other telephony
applications installed, check the Remote Access Connection Manager service:
disable it, reboot and try again (Windows will not allow you to manually stop
this service).
2.2.4 Dialogic Brooktrout TR114
Dialogic Brooktrout TR114 cards are natively supported by NET SatisFAXtion,
and no additional driver software is required.
These fax cards are configured in
Re-Detect Fax Devices
.
. En-
2.2.5 Dialogic Brooktrout TR1034
Dialogic Brooktrout TR1034 cards are supported by NET SatisFAXtion using
the bos_man_setup utility. No additional driver software is required.
Page 28

2 – Server Administration
NET SatisFAXtion 8.7 Manual
28
Please see the
NET SatisFAXtion 8.7 Brooktrout Hardware Installation Guide
online at http://www.faxback.com/docs for detailed instructions on installing
NET SatisFAXtion with TR1034 hardware.
2.2.6 Dialogic Eicon Diva Server
Dialogic Eicon Diva Server cards are supported by NET SatisFAXtion as a Class
1 device. See the
NET SatisFAXtion 8.7 Server Installation Guide - New Install
online at http://www.faxback.com/docs for instructions on installing NET SatisFAXtion with Diva Server hardware.
After the install, in order to enable DID/DNIS collection, the initialization string
for each port must be updated.
[HKEY_LOCAL_MACHINE\Software\FaxBack\Class1\PORTNAME]
“init_string”
Append “#CID=5” to the value of “init_string”.
Page 29
2 – Server Administration
2.3 Services and Monitoring
2.3.1 Service Account Permissions
NET SatisFAXtion 8.7 Manual
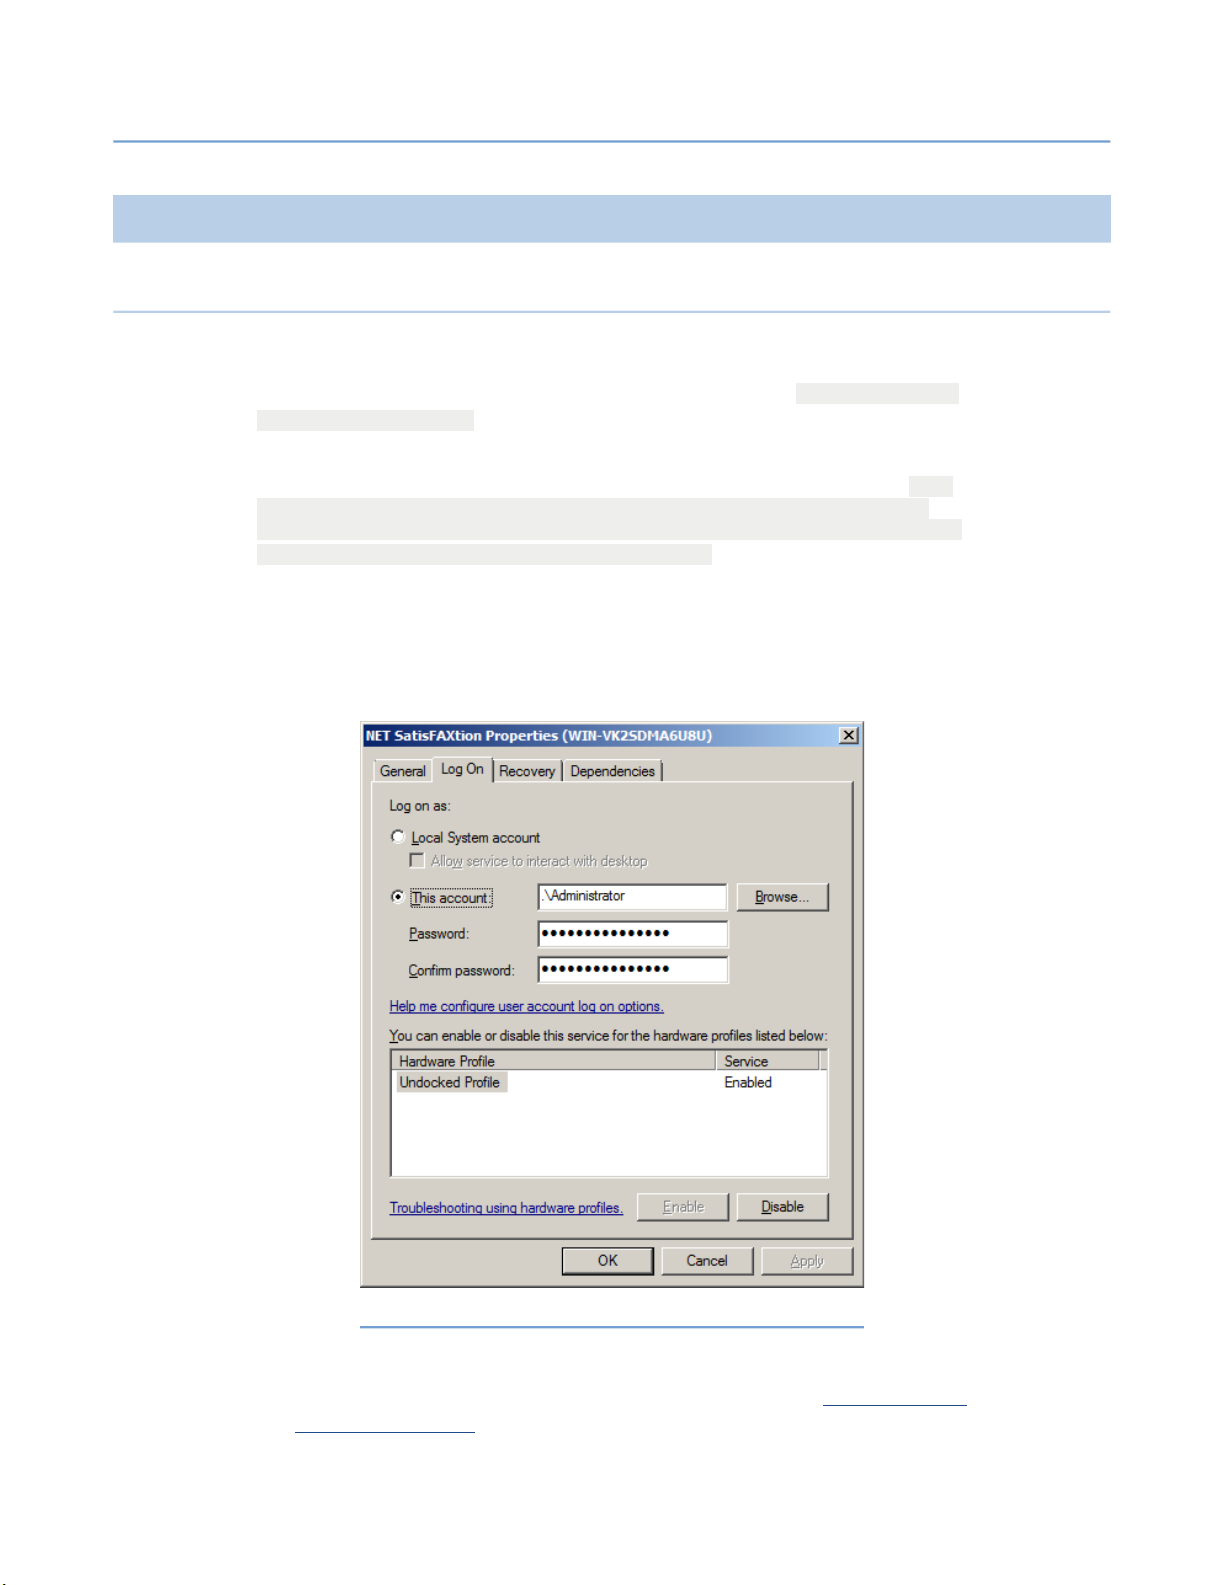
Some services need to run as an Administrator user. A local or domain account
may be used so long as it has local Administrator rights. If the user account has
insufficient rights, the service will fail to load with the error “Bad open ring 0
/ kernel mode driver.”
Should the service account’s password change, the account is disabled, or the
account is otherwise unusable, the service will fail to load with the error “Sys-
tem.InvalidOperationException: Cannot start service mloader on
computer '.'. ---> System.ComponentModel.Win32Exception: The ser-
vice did not start due to a logon failure.” In the event this occurs,
go to the
Start Menu ⇨ Control Panel ⇨Administrative Tools ⇨ Services
the service, right-click on it and click on Properties, then go to the Log On tab.
The account can be verified and updated here. Re-enter the password to ensure
it is correct.
29
. Find
Illustration 2.3.1.1#1: Service Properties, Log On Tab
2.3.1.1 Service Account Printers
Some NET SatisFAXtion modules make use of printers (notably 2.5.5 Autoprint
and 2.11 Scanner / MFP ). The fax server will only see those printers config-
Page 30

2 – Server Administration
NET SatisFAXtion 8.7 Manual
30
ured for the service account and visible in the account’s
folder.
2.3.2 NET SatisFAXtion Service
Service Name: NET SatisFAXtion (mloader)
Must run as an Administrator user.
2.3.2.1 Starting and Stopping NET SatisFAXtion
Manually starting and stopping the NET SatisFAXtion service is rarely needed
because all configuration utilities will restart the service if needed.
The easiest way to start and stop NET SatisFAXtion is via the
sole
icons in the notification area. Right click on the icon, and choose
start the service, or choose
You can also start or stop the service from the Start menu, under
Stop
to stop the service.
NET SatisFAXtion ⇨ Fax Service (Start & Stop).
Finally you can start or stop the service from the
this method is not as user-friendly as the others. In particular you will not receive any feedback to know when NET SatisFAXtion has finished loading all
modules and is ready to send and receive faxes.
Printers and Faxes
Services
control panel, though
LoaderCon-
Start
to
Programs
⇨
2.3.2.2 Running NET SatisFAXtion as an Application
Running NET SatisFAXtion as an application can be a useful diagnostic technique. It helps diagnose the following problems:
To troubleshoot cover sheet and document conversion problems
To troubleshoot Autoprint failures.
To troubleshoot crash errors.
To troubleshoot rights/permissions related issues or failures.
Before making a change to the service, write down the account the service is
currently running as, so that it can be put back to the same account later. See
2.3.1 Service Account Permissions .
First, stop any running Email Gateway (SMTP Email Gateway or POP3 Email
Gateway). Run the Change Server Settings utility,
SatisFAXtion ⇨ Change Server Settings
as an automatic start service
”. Click OK.
. Uncheck the box “
Start Programs NET⇨ ⇨
Run fax server
Page 31
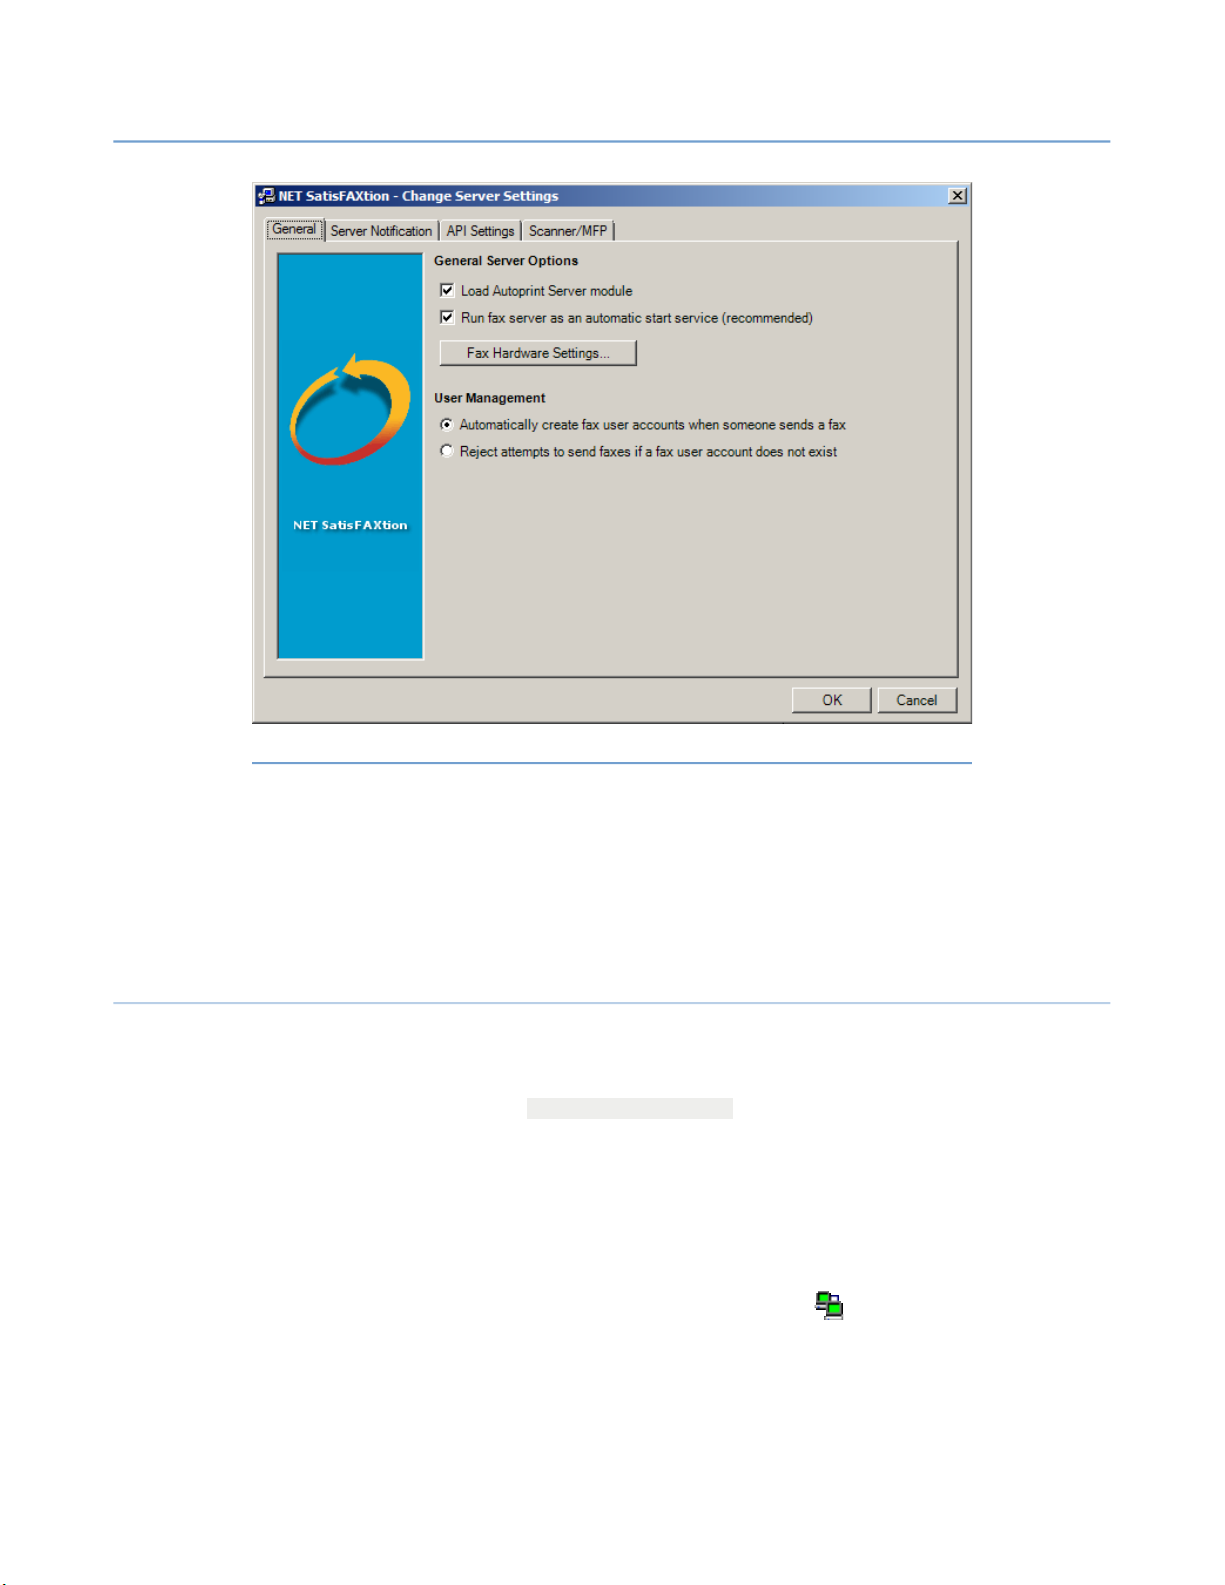
2 – Server Administration
NET SatisFAXtion 8.7 Manual
31
Illustration 2.3.2.2#1: Change Server Settings, General Tab
You will be prompted to unload the fax server. Click the OK button. The fax
server will now unload.
You will be prompted to reload the fax server. Click the OK button. The fax
server will now load as an application.
Reload the Email Gateway, if one was stopped.
2.3.3 Email Gateway Service
Service Name: NET SatisFAXtion Email Gateway (NSEmailGatewayService)
Runs as Local System.
This service is installed by the NS-EmailGateway.msi installer for the NET SatisFAXtion Email Gateway.
2.3.3.1 Starting and Stopping the Email Gateway
Manually starting and stopping the Email Gateway service is rarely needed because all configuration utilities will restart the service if needed.
The easiest way to start and stop the Email Gateway is via the
sole
icon in the notification area. Right click on the icon, and choose
start the service, or choose
Stop
to stop the service.
LoaderCon-
Start
to
You can also start or stop the service from the Start menu, under
NET SatisFAXtion ⇨ Email Gateway Service (Start & Stop).
Programs
⇨
Page 32

2 – Server Administration
NET SatisFAXtion 8.7 Manual
32
Finally you can start or stop the service from the
this method is not as user-friendly as the others. In particular you will not receive any feedback to know when the SMTP Gateway has finished loading all
modules and is ready to send and receive emails.
2.3.4 NET SatisFAXtion Service Monitor
Service Name: NET SatisFAXtion Service Monitor (NS700ServiceMonitor)
Runs as Local System.
2.3.5 NS-FaxMachineIntegrationServer
Service Name: NS-FaxMachineIntegrationServer
Runs as Local System. Cannot run on the same machine as NET SatisFAXtion.
This service is installed by the NS-FaxMachineIntegrationServer.msi installer for the Fax Machine Integration Server.
Services
control panel, though
Page 33

2 – Server Administration
2.4 Managing Users and Groups
NET SatisFAXtion 8.7 Manual
33
The primary means of managing users is through the
allows you to interactively create, modify and delete users and groups.
istration
can also import users from Active Directory or Lightweight Directory
Access Protocol (LDAP).
The
Userlist Import/Export
and groups to an XML file, and import users and groups from XML as well.
2.4.1 User Permissions
Each user has one of three permission levels:
• Supervisors: The highest level,
server. This level of access is granted when a user is in the
group.
• Routers:
and can run reports. Routers cannot change any system setting. This level
of access is granted when a user is in the
• Users: All other users have the lowest level of permissions. They cannot
view or change any setting on the fax server, they can only send and receive faxes.
Routers
Administration
program. It
Admin-
program allows you to export the entire user list
Supervisors
have full control over the fax
Supervisors
level users can view the first page of any fax in queue,
Routers
group.
2.4.2 User Properties
2.4.2.1 General
Name
First, Initials, Last: The name of this user
User Name: The user name this user uses to log in to the fax server.
Description: A free-text field where you can describe this user.
Routing Address: The SMTP email address to send inbound faxes to when
routing to email. This can be in one of two formats: [email protected] or SMTP-
Post!domain.tld!user. See 2.5.3 Delivering Faxes to Clients for more infor-
mation.
Billing Code: The
Login
Password: The user’s password.
2.4.2.2 Routing
Autoforward to another user
User Billing Code
to log with every fax this user sends.
Page 34

2 – Server Administration
Enable Autoforwarding: Enable/disable autoforwarding.
Autoforward to: The user to forward all faxes to. This user will no longer
receive any faxes, they will all go to that user.
Advanced Routing
Line: Route all faxes received on this line to this user.
Identifier: Route all faxes received with this DID to this user.
2.4.2.3 Cover Sheet
Current Default Template: Outbound faxes will use this cover sheet.
Enable use of default template: Enable use of this cover sheet.
Available Templates: List of all assigned cover sheets.
2.4.2.4 E-Mail
Allow this e-mail user to preview faxes before they are sent: Postpone all
faxes this user sends, to allow their preview with the FaxOut Client Suite.
NET SatisFAXtion 8.7 Manual
34
Additional User Aliases: Additional email addresses that can send faxes using
this account.
2.4.3 Group Properties
General
Group Name: Name assigned to this group.
Description: A free-text field where you can describe this group.
Routing
Line: Route all faxes received on these lines to this group.
Identifier: Route all faxes received with this DID to this group.
Automatic Inbound Routing
Enable round robin routing to members of this group:
Route messages to group members even if they are not logged on:
See 2.5.2.2.1 Round Robin Routing .
The following user will always get all messages for this group: See
2.5.2.2.1 Round Robin Routing .
Security
Group Privileges: Assign this privilege level to all members of this group.
Autoprint: Enable and configure Autoprint for this group. See 2.5.5 Autoprint
for more information.
Page 35

2 – Server Administration
2.4.4 Built In Users and Groups
NET SatisFAXtion 8.7 Manual
35
Supervisor: The default
word by default.
Postmaster: The default
word by default. Any unrouted inbound faxes and any email bounce messages
will be received by Postmaster.
2.4.4.1 System Users
System users are needed for various server functionality. It is not recommended to modify any system user, with the two exceptions below.
Autoprint: Needed for Autoprint functionality.
ClarityNS: Needed for Connector API / Clarity / ASCII Packet functionality.
Export: Needed for Export functionality.
SMTPPost: Needed for SMTP Email Gateway or POP3 Email Gateway func-
tionality. Cover sheets can be assigned to this user, see 2.6.5 Cover Sheet
Templates for more information.
POP3Post: Needed for POP3 Email Gateway functionality. Cover sheets can
be assigned to this user, see 2.6.5 Cover Sheet Templates for more informa-
tion.
Supervisor
Router
level user. This user does not have a pass-
level user. This user does not have a pass-
2.4.4.2 System Groups
All Users: This group contains all non-system users.
Supervisors: This group contains all
Routers: This group contains all
System Users: This group contains all system users. It is not possible to add
users to this group.
FAXability Broadcast Users: This group enables members to see the
cast
module in FAXability.
2.4.5 Creating, Modifying and Deleting Users
Users may be created, modified and deleted using the
in the
User Administration
run the
the
left, and a list of all users on the right.
Administration
View ⇨ User Administration
section. To access the
program and log in as a Supervisor level user. Click on
Supervisor
Router
menu. You will see a list of all groups on the
users.
users.
Administration
User Administration
Broad-
program,
section,
Page 36

2 – Server Administration
2.4.5.1 Creating a User
NET SatisFAXtion 8.7 Manual
36
From the
blank
erty.
Click
must have a
2.4.5.2 Modifying a User
A user can be modified by right-clicking the user name and clicking
User...
2.4.5.3 Deleting a User
A user can be deleted by right-clicking the user name and clicking
or by selecting the user and clicking on the
a user cannot be undone, the user will have to be recreated.
If you receive the message “Error:
User Administration
Add User
Add
when you have the necessary information entered. At a minimum, you
or by selecting the user and clicking on the
error: User's folder is not empty.” –
Check the Scheduled Queue, Active Queue, Inbox and Outbox and delete or
forward any faxes assigned to that user.
section, click on the
window will appear. See above for a description of each prop-
User Name
in order to create the user.
User Add User⇨
menu. A
Modify
User Modify User⇨
Delete User...
User Delete User⇨
menu. Deleting
Could not delete user due to the following
The user has faxes in one or more queues.
menu.
2.4.6 Creating, Modifying and Deleting Groups
Groups may be created, modified and deleted using the
gram, in the
section, run the
Click on the
on the left, and a list of all users on the right. The number in parenthesis after
each group name indicates how many users are members of that group.
2.4.6.1 Creating a Group
From the
blank
erty.
Click
Add
must have a
2.4.6.2 Modifying a Group
A user can be modified by right-clicking the group name and clicking
Group
menu.
User Administration
Administration
View ⇨ User Administration
User Administration
Add Group
when you have the necessary information entered. At a minimum, you
or by selecting the group and clicking on the
window will appear. See above for a description of each prop-
Group Name
in order to create the group.
section. To access the
program and log in as a Supervisor level user.
menu. You will see a list of all groups
section, click on the
Administration
User Administration
User Add Group⇨
menu. A
Modify
User Modify Group⇨
pro-
Page 37

2 – Server Administration
2.4.6.3 Deleting a Group
NET SatisFAXtion 8.7 Manual
37
A group can be deleted by right-clicking the group name and clicking
Group
or by selecting the group and clicking on the
menu. Deleting a group cannot be undone, the group will have to be recreated.
In order to delete a group it must not contain any group members. Remove all
users from the group before deleting the group.
2.4.6.4 Adding a User to a Group
You can add a user to a group by right-clicking the group name and clicking
Add/Remove Members
Add/Remove Members
hand column of the window under Does not have users, and click the
ton. You will see the user move from the right column to the left one. You can
add more users by repeating these steps. When done, click OK.
Users can also be dragged and dropped onto the group name in order to add
them to the group. First, select the All Users group to see all users. Next, select the user(s) you want to add and drag and drop them onto the group name.
In a moment you will see the parenthetical member count increase. The users
are now members of the group.
2.4.6.5 Removing a User from a Group
or by selecting the group and clicking on the
menu. Select a user to add to the group on the right-
Delete
User Modify Group⇨
User ⇨
Add
but-
You can remove a user to a group by right-clicking the group name and clicking
Add/Remove Members
Add/Remove Members
left-hand column of the window under
You will see the user move from the left column to the right one. You can remove more users by repeating these steps. When done, click OK.
You can also remove a user from a group by selecting the group, then selecting
the user name and clicking on the
2.4.7 Autoenroll
The fax server can automatically create users for email clients. When the fax
server receives an email and does not find an existing user matching the email
address that sent the fax, it will automatically create a new user for that email
address. The user name will be set to the sender’s display name. The user will
not have a password nor will it have a routing identifier.
When Autoenroll is enabled, it is important that the fax server not receive email
from senders on the open Internet. It is strongly encouraged that only internal
users be able to send email to the fax server.
To disable Autoenroll, run the Change Server Settings utility,
NET SatisFAXtion ⇨ ⇨ Change Server Settings
or by selecting the group and clicking on the
menu. Select a user to remove from the group on the
Has users
User Remove Member⇨
, and click the
menu.
User ⇨
Remove
button.
Start Programs⇨
. On the
General
tab in the
Page 38
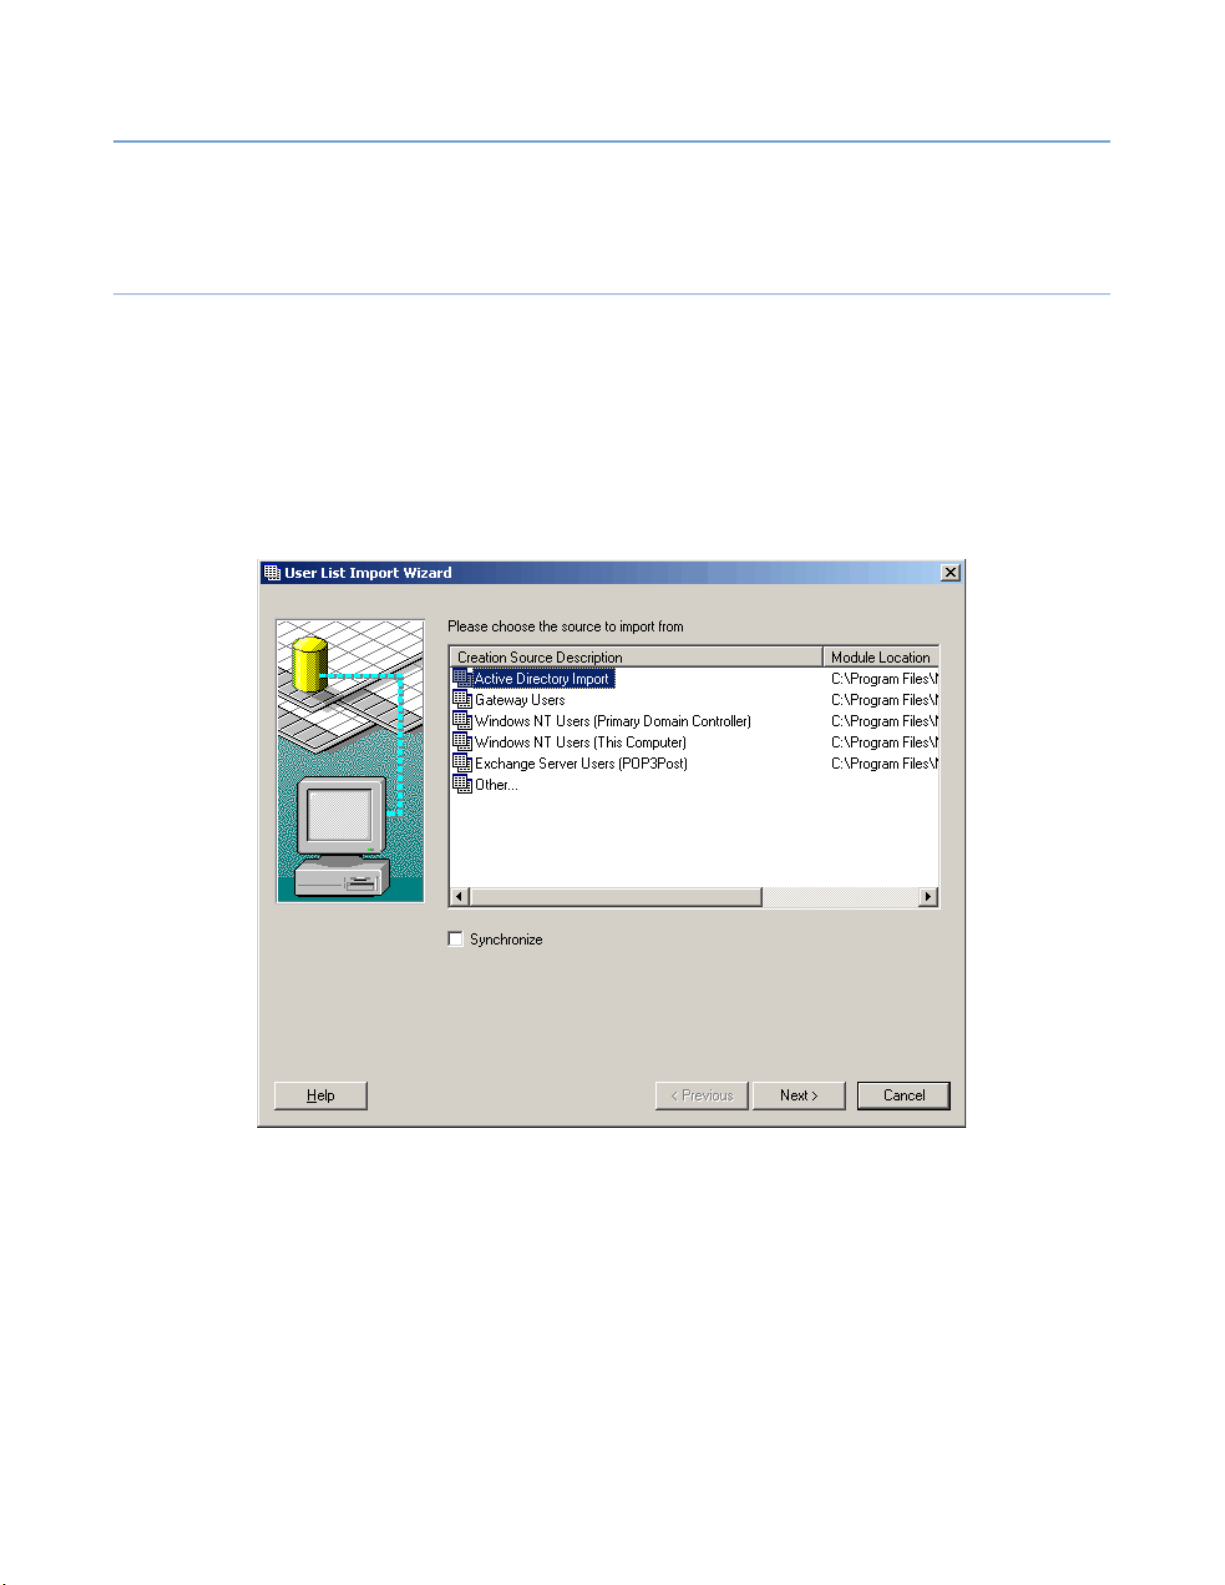
2 – Server Administration
NET SatisFAXtion 8.7 Manual
38
User Management
account does not exist.
2.4.8 Importing Users
2.4.8.1 Active Directory
From the Administration program it is possible to import users from Active Directory. Please note that it will only import user names and email addresses.
Other information such as routing identifiers (DNIS), passwords and groups
will not be imported.
Open the Administration program, and click on the menu
This will open the
section, select
Reject attempts to send faxes if a fax user
User List Import Wizard
Tools ⇨ Import Users
window shown below.
.
Select
Synchronize: This option will enable you to refresh the user list with Active Directory without using the User List Import Wizard. A new option will be available under the menu
Note that enabling this option will disable manual editing of most user settings
since the settings come from Active Directory. To enable manual user modification, synchronization must be disabled from
Active Directory Import
Tools ⇨ Synchronize.
and click
Next
.
Tools Synchronize Disable⇨ ⇨
Synchronization.
Page 39
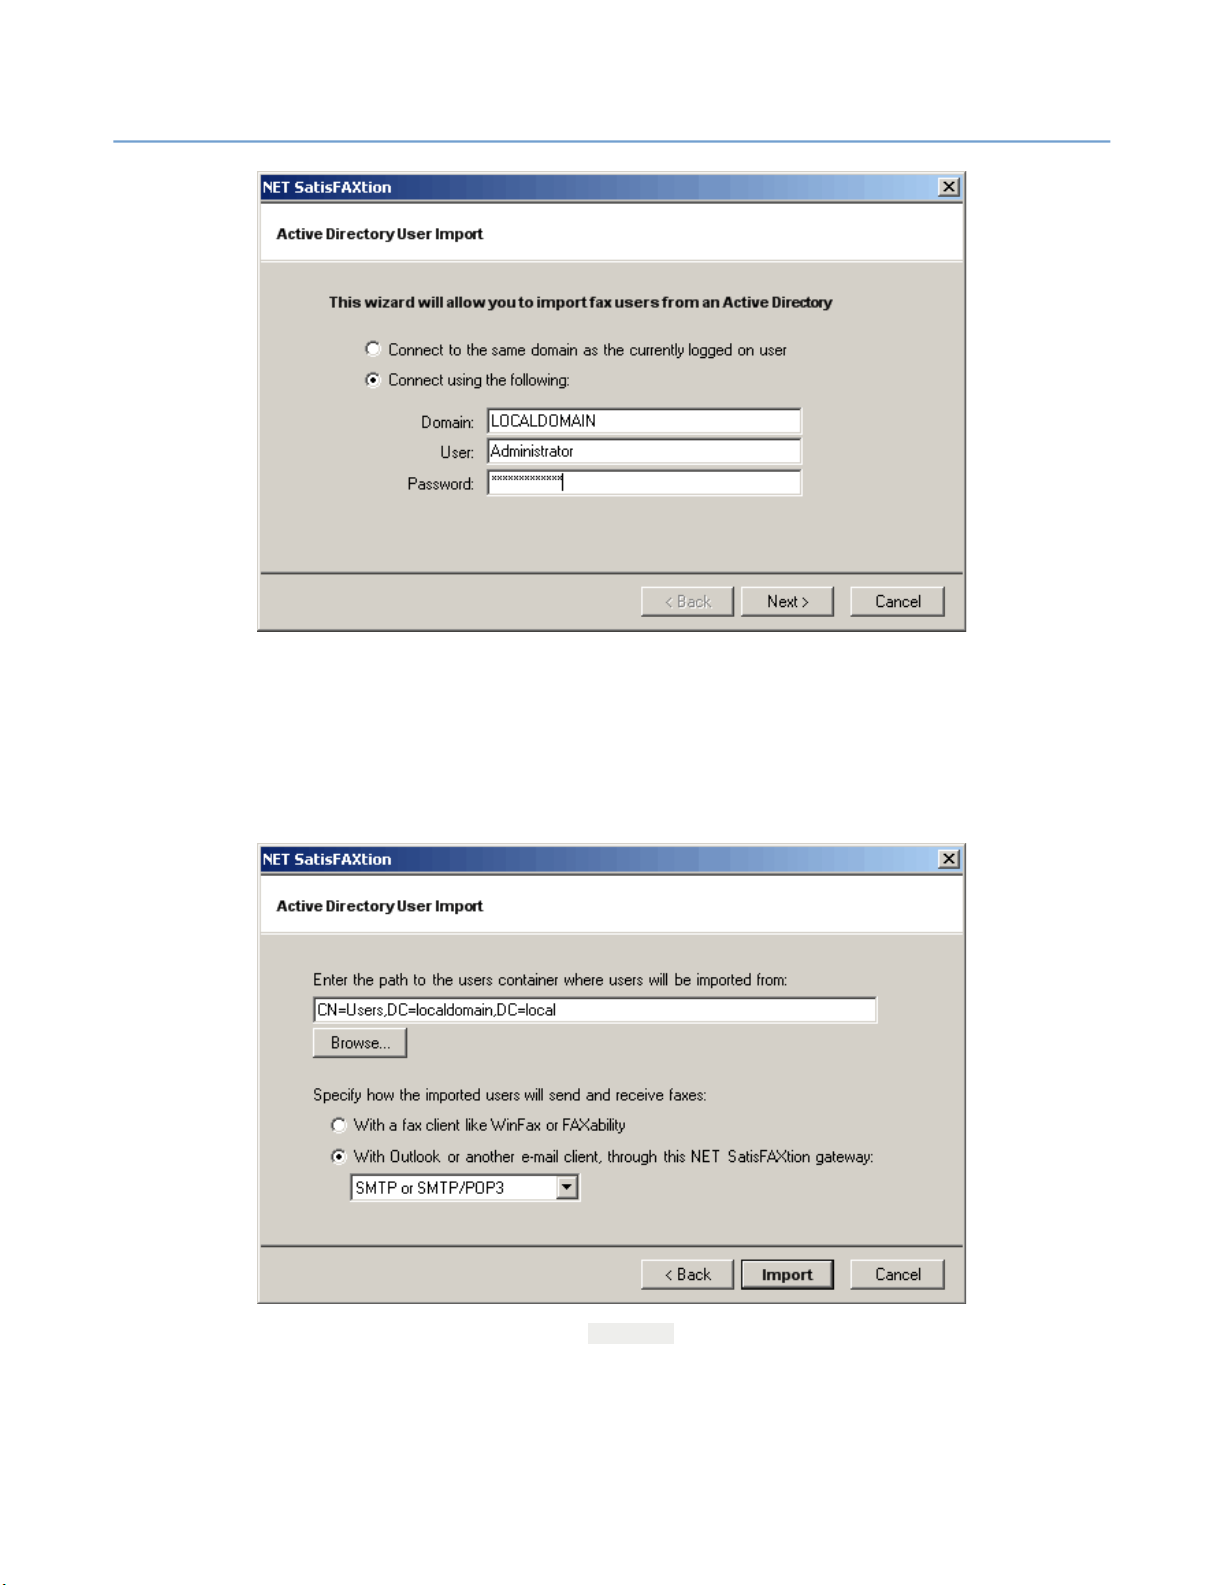
2 – Server Administration
If the user running the Administration program is a domain administrator, select
the first option to “
user
.”
NET SatisFAXtion 8.7 Manual
connect to the same domain as the currently logged on
39
Otherwise, select the second option “
a domain, user name, and corresponding password.
Click
Next
.
The import wizard will default to the CN=Users OU. To select a different OU,
click the
Browse
button. Otherwise, click
connect using the following
Import
.
,” and provide
Selecting a different OU will open the
Active Directory Browser
, seen below:
Page 40
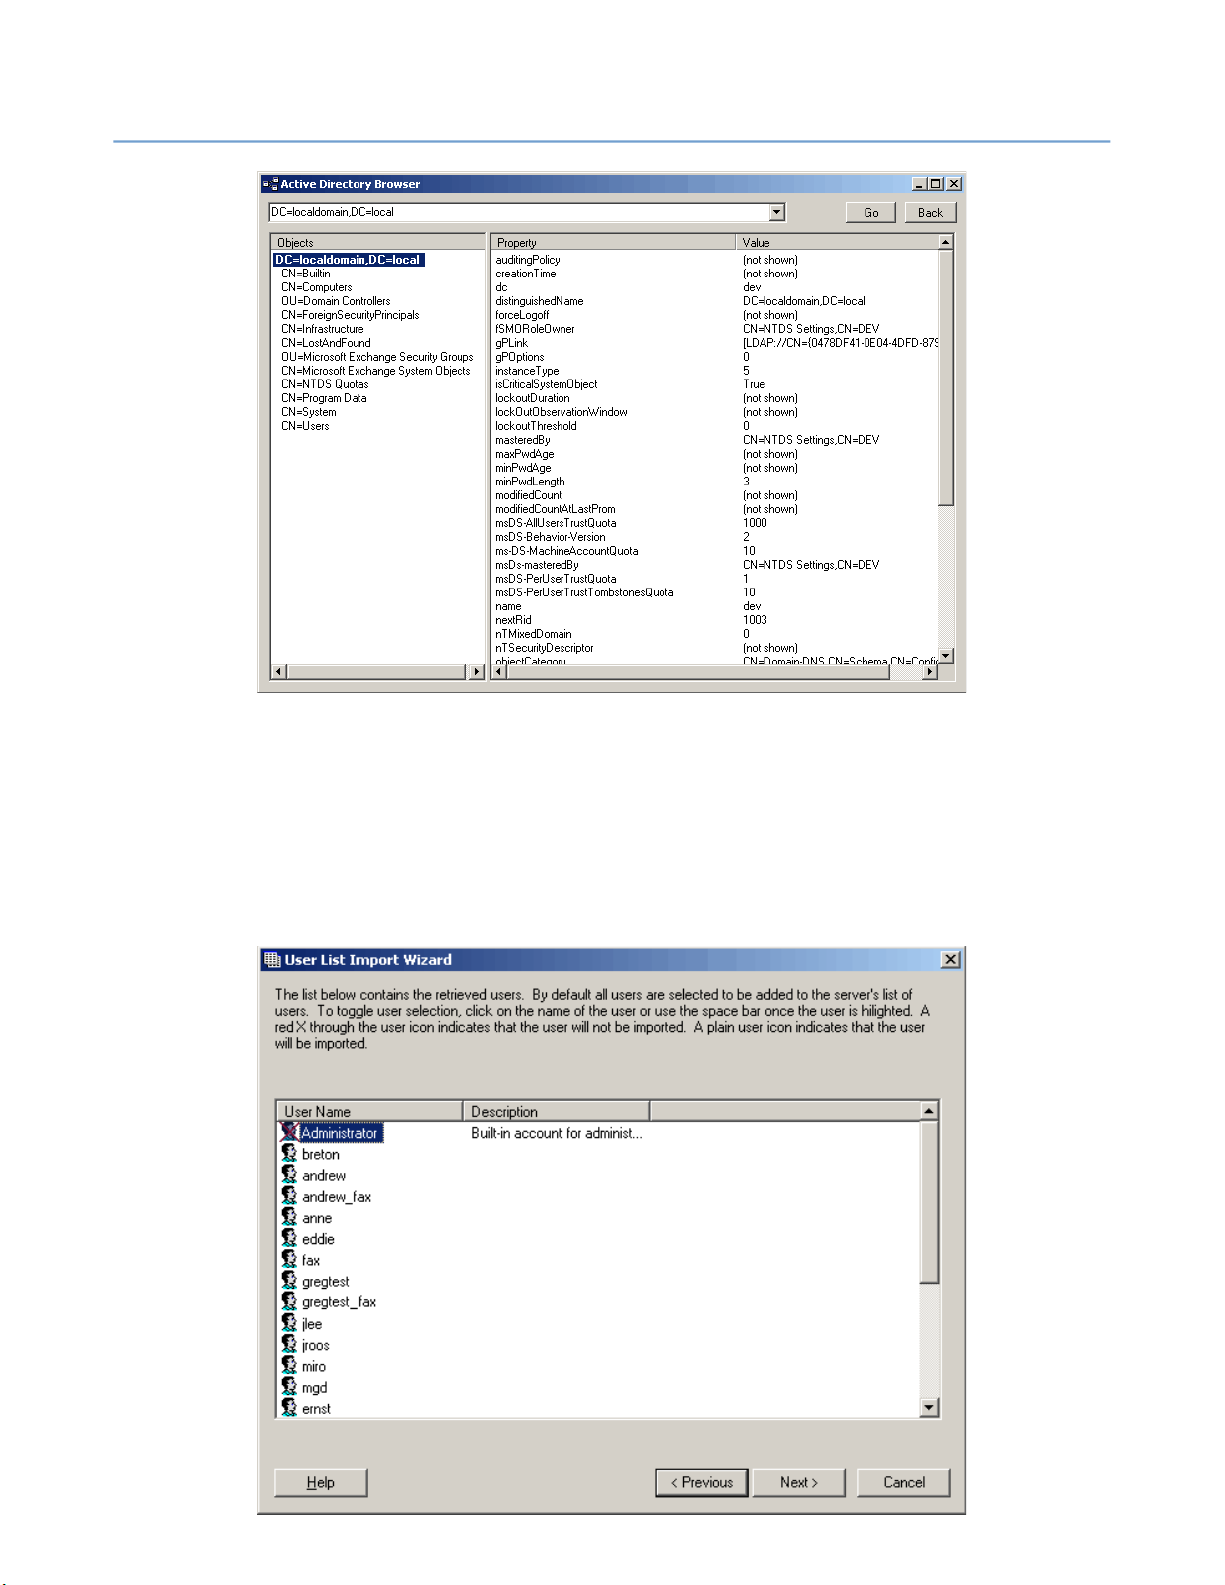
2 – Server Administration
NET SatisFAXtion 8.7 Manual
40
Use this to navigate to the correct OU. When you have found the OU needed,
simply close the window by clicking the X close button at the top right of the
window. You will be taken back to the import wizard, and the path will be updated. Click
When you click
OU. You may disable the importing of certain users by clicking on it. This will
display a red X over the user icon, indicating that the user will not be imported.
You can re-enable that user by clicking on it again.
Import
on that screen.
Import
, the import wizard will retrieve all users in the selected
Page 41
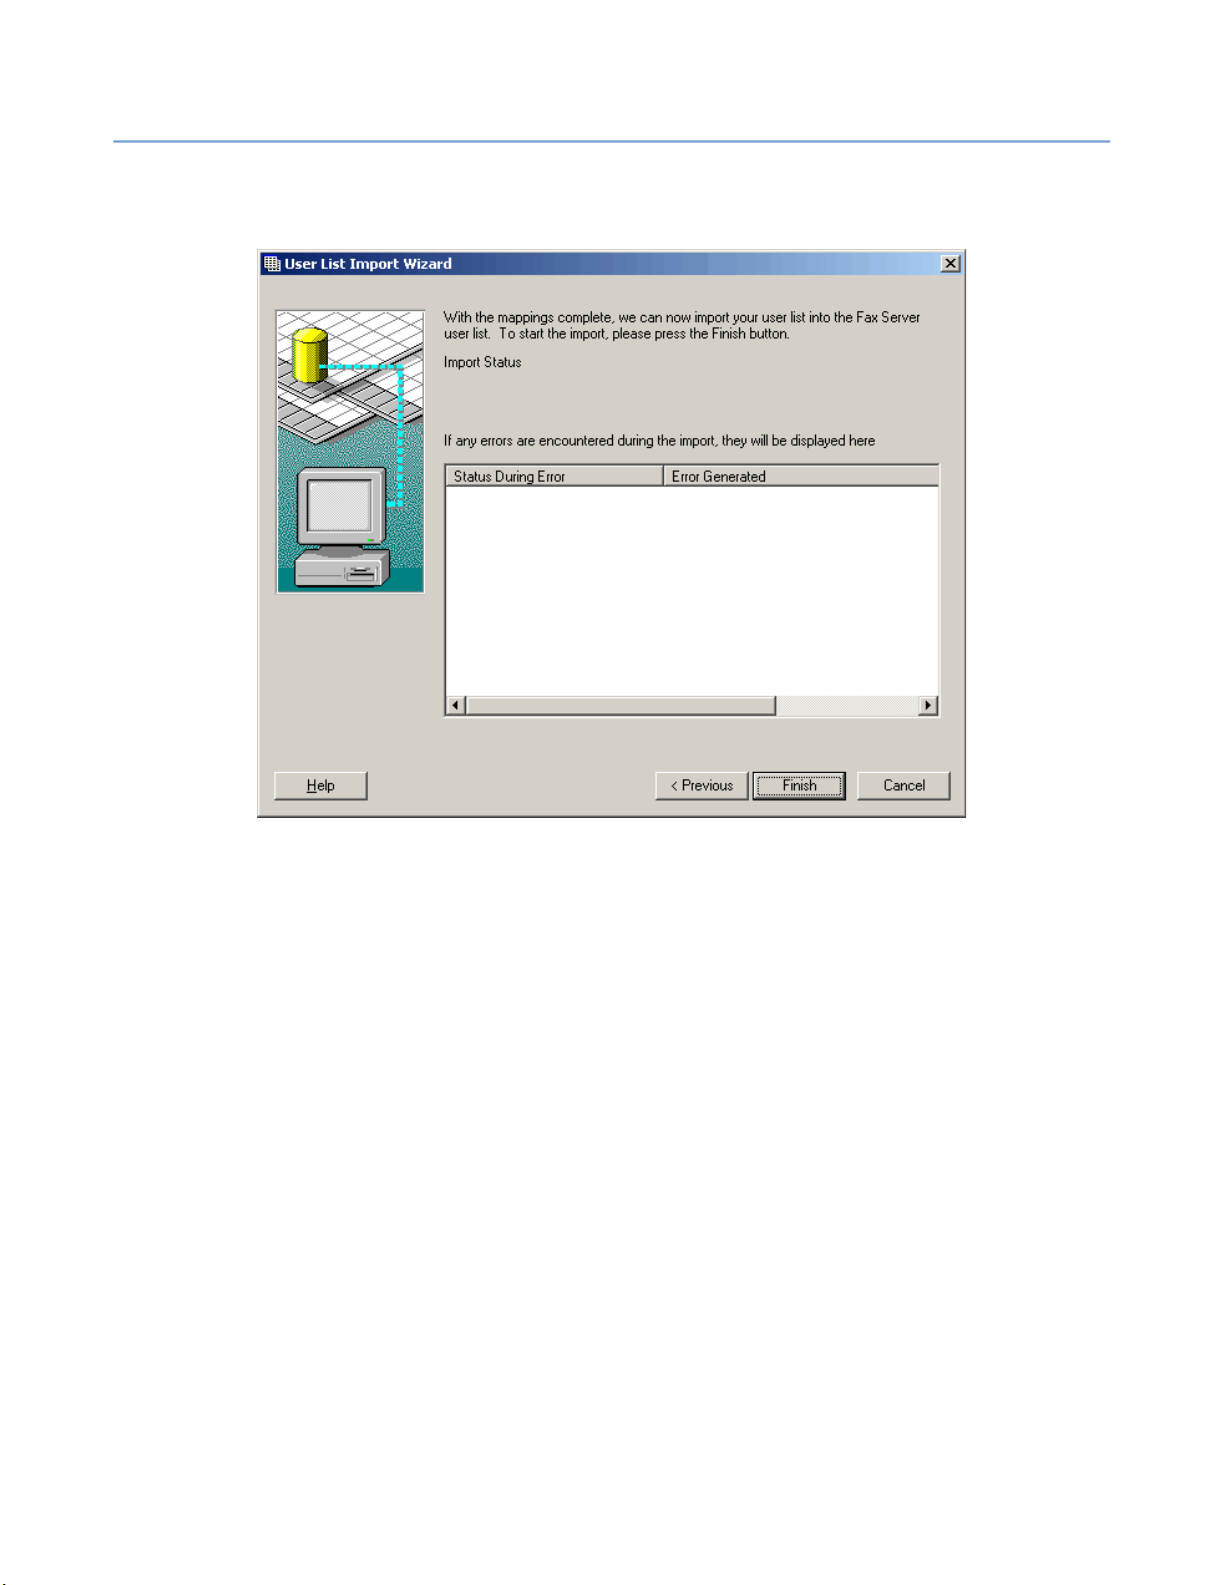
2 – Server Administration
Click
Next
NET SatisFAXtion 8.7 Manual
.
41
The import wizard is now ready to import your users. Click
Finish
.
The import wizard will now begin importing users. If there are any errors, they
will be displayed on this screen. When the process is complete, the
ton will become
Close
.
Finish
but-
Page 42
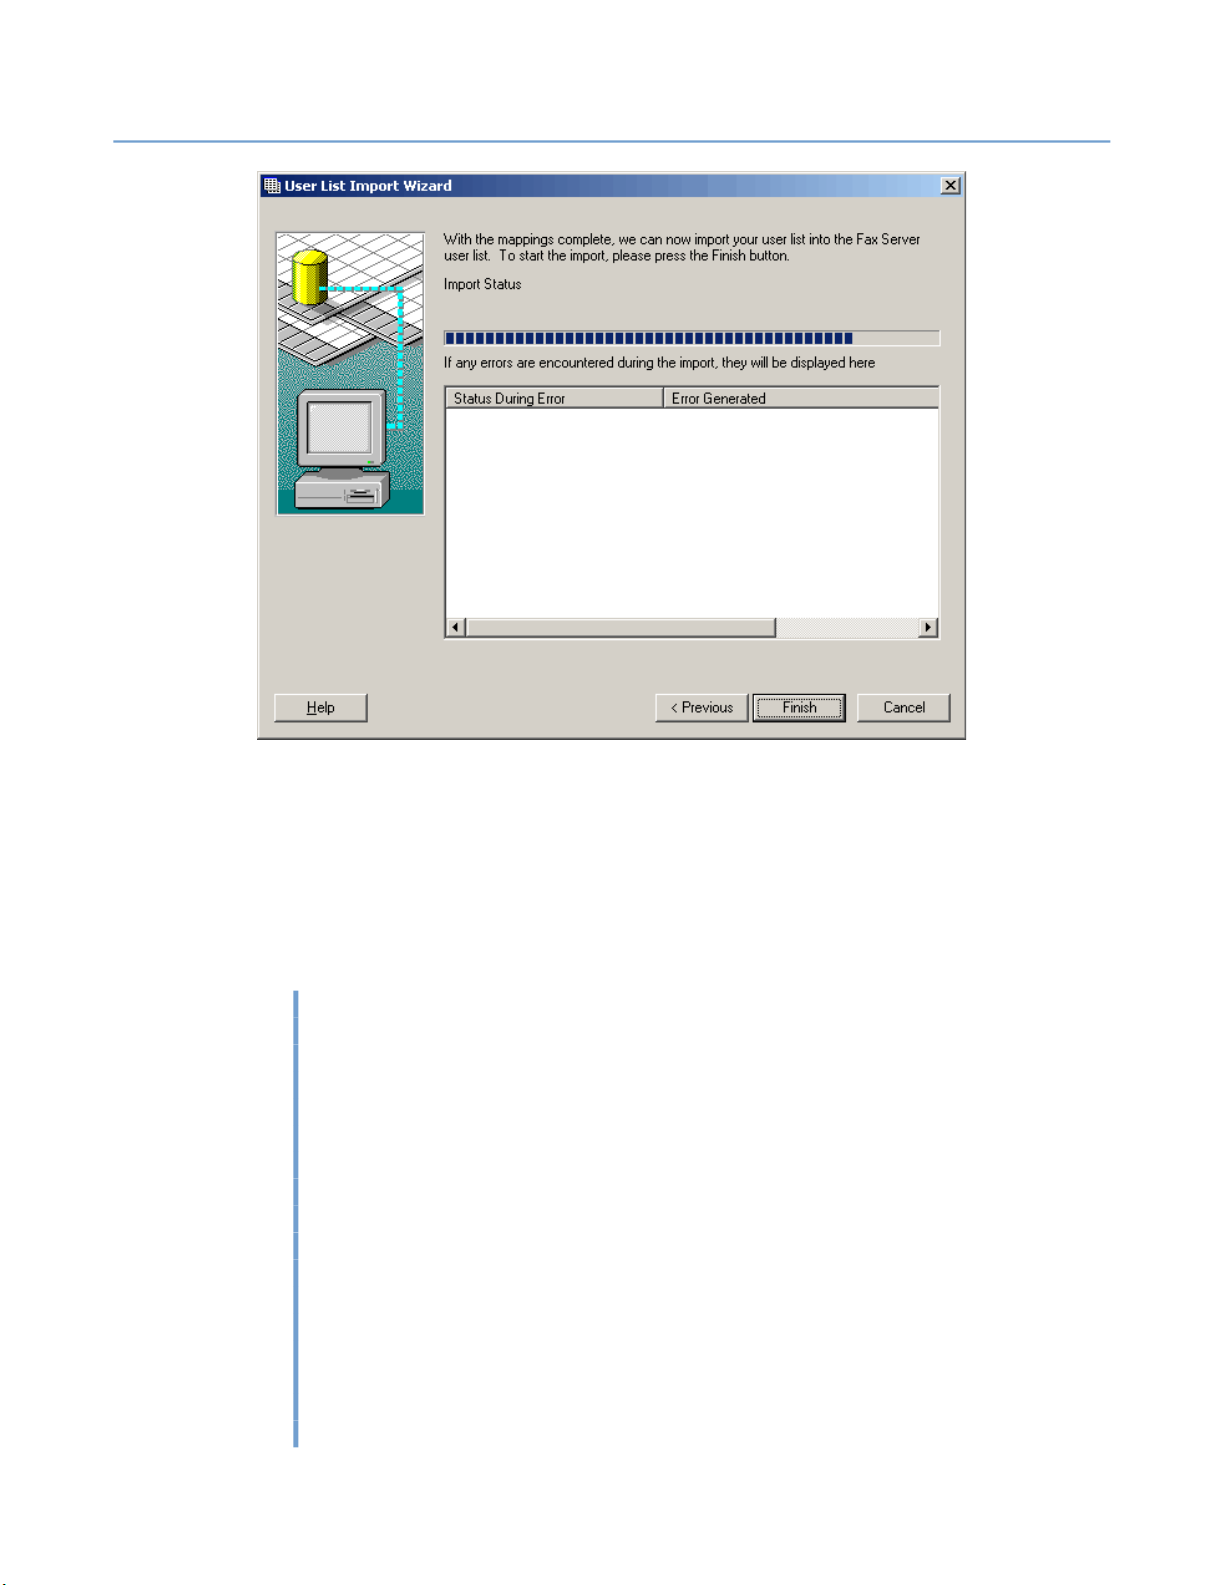
2 – Server Administration
NET SatisFAXtion 8.7 Manual
42
2.4.8.2 Excel Spreadsheet
Using the
User List Import/Export
groups) from an Excel 2003 XML Spreadsheet format file. To import groups
also, use XML import, below.
The import spreadsheet will have in row #1 the following column names:
USER_NAME
UG_UNIQUE_ID
USER_FULLNAME
USER_PASSWORD
USER_DESCRIPTION
USER_PRIVILEGES
UG_AUTOFORWARD
UG_USER_AUTOFORWARD
UG_USER_AUTOFORWARD_ON
Groups
USER_DTMF_ROUTING
USER_CSID_ROUTING
USER_T30_ROUTING
USER_BILLING_CODE
USER_EMAIL_ADDRESS
USER_MESSAGE_PREVIEW
USER_SHORT_NAME
utility it is possible to import users (but not
Page 43

2 – Server Administration
PB_FIRST_NAME
PB_MIDDLE_NAME
PB_LAST_NAME
Each row after the first will define a user. The column names in bold above are
required fields.
The columns are defined as follows:
USER_NAME : Required. The name this user uses to log in to the fax server.
UG_UNIQUE_ID : Export only; this column will be discarded on import. The in-
ternal unique identifier used for this user.
USER_FULLNAME : The name of this user.
USER_PASSWORD : Export only; this column will be discarded on import.
USER_DESCRIPTION : A free-text field where you can describe this user.
USER_PRIVILEGES : Required. The privilege level granted to the user. The val-
ues are:
1: User
17: Router
4294967295: Supervisor
UG_AUTOFORWARD : When importing users with email routing addresses,
set this to SMTPPost.
NET SatisFAXtion 8.7 Manual
43
UG_USER_AUTOFORWARD : The user to forward all faxes to. This user will
no longer receive any faxes, they will all go to that user.
UG_USER_AUTOFORWARD_ON : Enable/disable autoforwarding. 0 disables,
1 enables.
Groups : Required. Comma-separated list of groups. “All Users”
must
be listed here or the user will not show up in the Administration program’s user administration section.
USER_DTMF_ROUTING : Route all faxes received with this DID to this user.
USER_CSID_ROUTING : Route all faxes received with this CSID to this user.
By convention set to the same as USER_DTMF_ROUTING since the Administration program will synchronize all three routing identifiers.
USER_T30_ROUTING : Route all faxes received with this T.38 subaddress to
this user. By convention set to the same as USER_DTMF_ROUTING since the
Administration program will synchronize all three routing identifiers.
USER_BILLING_CODE : The User Billing Code to log with every fax this user
sends.
USER_EMAIL_ADDRESS : The SMTP email address to send inbound faxes to
when routing to email. This can be in one of two formats: [email protected] or
SMTPPost!domain.tld!user. See 2.5.3 Delivering Faxes to Clients for more
information.
Page 44
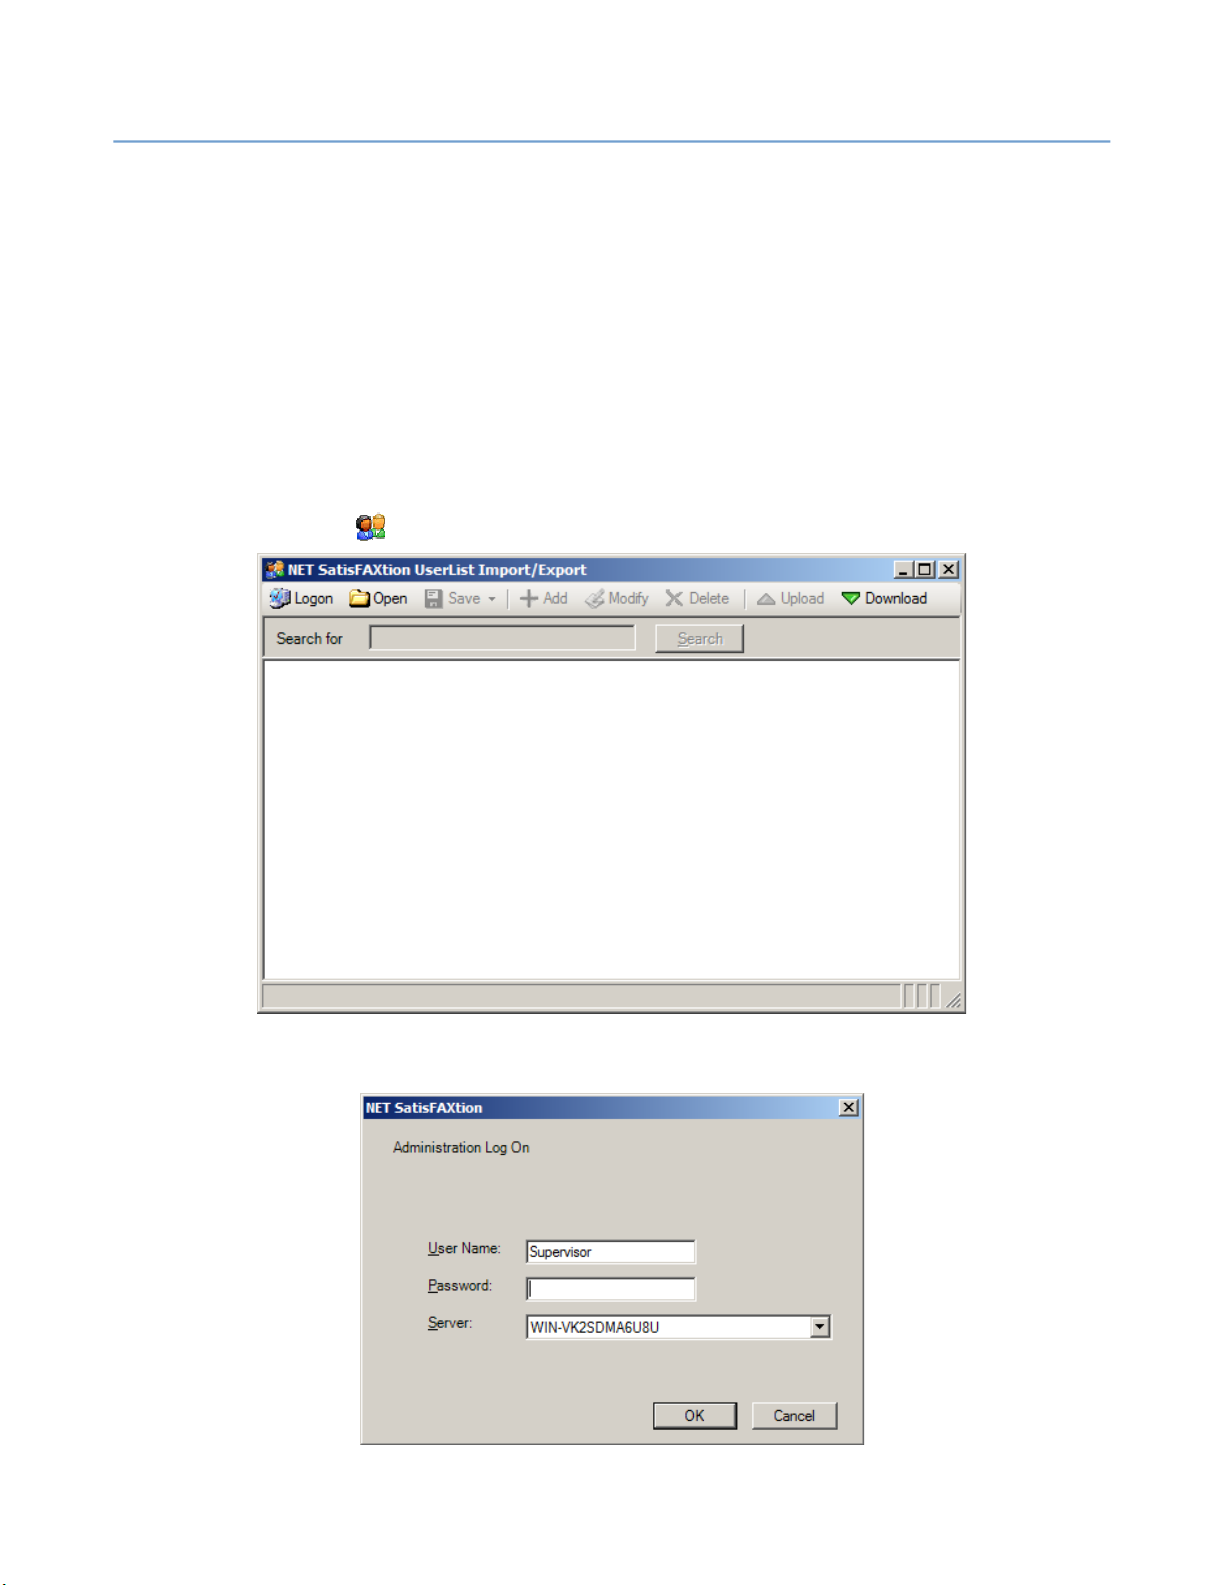
2 – Server Administration
USER_MESSAGE_PREVIEW : Corresponds to the “Allow this e-mail user to
preview faxes before they are sent” checkbox in Administration. Postpone all
faxes this user sends, to allow their preview with the FaxOut Client Suite.
USER_SHORT_NAME : Not used.
PB_FIRST_NAME : User’s first name.
PB_MIDDLE_NAME : User’s middle name.
PB_LAST_NAME : User’s last name.
Once the spreadsheet is created, save it in Excel 2003 XML Spreadsheet format.
NET SatisFAXtion 8.7 Manual
44
Run User List Import Export from the Start menu under
Programs NET Satis⇨ -
FAXtion ⇨ User List Import & Export.
First, the program must connect to the fax server. Click the
tool bar.
Logon
button in the
Page 45

2 – Server Administration
Only
Supervisor
& Export
program.
or
NET SatisFAXtion 8.7 Manual
Routers
level users are allowed to use the
45
User List Import
2.4.8.3 XML
Click the
Open
button, find and open the spreadsheet. The main window will
display the users found in the spreadsheet.
Finally, click the
Upload
button to send the users to the server. When the upload is complete, the entire user list will be downloaded and displayed in the
main window.
Using the
User List Import/Export
utility it is possible to import users and
groups from a native XML file. See the section below detailing the format of
this XML file.
Run User List Import Export from the Start menu under
Programs NET Satis⇨ -
FAXtion ⇨ User List Import & Export.
First, the program must connect to the fax server. Click the
Logon
button in the
tool bar.
Only
Supervisor
& Export
Click the
program.
Open
or
Routers
level users are allowed to use the
User List Import
button, find and open the xml file. The main window will display
the users found in the file.
Finally, click the
Upload
button to send the users to the server. When the upload is complete, the entire user list will be downloaded and displayed in the
main window.
2.4.8.3.1 User List Import/Export XML File Format
Below is an example XML file suitable for importing using the
port/Export
program. The <USER> and <GROUP> elements may be repeated as
needed.
<CAS_USERS_AND_GROUPS>
<USER_LIST>
<USER>
<USER_NAME>Sample User</USER_NAME>
<UG_UNIQUE_ID>18</UG_UNIQUE_ID>
<USER_PASSWORD>scrambled</USER_PASSWORD>
<USER_DTMF_ROUTING>5550123</USER_DTMF_ROUTING>
<USER_CSID_ROUTING>5550123</USER_CSID_ROUTING>
<USER_T30_ROUTING>5550123</USER_T30_ROUTING>
<USER_DESCRIPTION>Custom User Description</USER_DESCRIPTION>
<USER_FULLNAME />
<USER_BILLING_CODE />
<USER_EMAIL_ADDRESS />
<USER_MESSAGE_PREVIEW>0</USER_MESSAGE_PREVIEW>
<USER_PRIVILEGES>4294967295</USER_PRIVILEGES>
<USER_TYPE>131075</USER_TYPE>
<UG_AUTOFORWARD />
<DATA_SOURCE />
<UG_USER_AUTOFORWARD />
<UG_USER_AUTOFORWARD_ON>0</UG_USER_AUTOFORWARD_ON>
<USER_SHORT_NAME />
Userlist Im-
Page 46

2 – Server Administration
</USER>
</USER_LIST>
<GROUP_LIST>
<GROUP>
</GROUP>
</GROUP_LIST>
</CAS_USERS_AND_GROUPS>
See the Spreadsheet section above for descriptions of these tags.
The GROUP tags are defined as follows:
NET SatisFAXtion 8.7 Manual
<PB_FIRST_NAME />
<PB_MIDDLE_NAME />
<PB_LAST_NAME />
<Groups>Supervisors,Custom Group 1</Groups>
<GROUP_NAME>Custom Group 1</GROUP_NAME>
<UG_UNIQUE_ID>1</UG_UNIQUE_ID>
<USER_DTMF_ROUTING>5550124</USER_DTMF_ROUTING>
<USER_CSID_ROUTING>5550124</USER_CSID_ROUTING>
<USER_T30_ROUTING>5550124</USER_T30_ROUTING>
<USER_LINE_ROUTING>CLASS1_COM5</USER_LINE_ROUTING>
<USER_DESCRIPTION>Users Group</USER_DESCRIPTION>
<GROUP_PRIVILEGES>1</GROUP_PRIVILEGES>
<GROUP_TYPE>65537</GROUP_TYPE>
<GROUP_IS_ROUND_ROBIN>0</GROUP_IS_ROUND_ROBIN>
<RR_ALL_TO_USER />
<GROUP_AUTO_ADD_PASSWORD />
<GROUP_AUTO_ADD_AT_LOGON>0</GROUP_AUTO_ADD_AT_LOGON>
<UG_REQUIRE_CHANGE_PASSWORD>0</UG_REQUIRE_CHANGE_PASSWORD>
46
GROUP_NAME: The name of the group.
UG_UNIQUE_ID: Export only; this tag will be discarded on import. The internal
unique identifier used for this group.
USER_DTMF_ROUTING : Route all faxes received with this DID to this group.
USER_CSID_ROUTING : Route all faxes received with this CSID to this group.
By convention set to the same as USER_DTMF_ROUTING since the Administration program will synchronize all three routing identifiers.
USER_T30_ROUTING : Route all faxes received with this T.38 subaddress to
this group. By convention set to the same as USER_DTMF_ROUTING since the
Administration program will synchronize all three routing identifiers.
USER_LINE_ROUTING: Route all faxes received on this port to this group.
Multiple instances of this tag are allowed, to route multiple ports to this group.
USER_DESCRIPTION: A free-text field where you can describe this group.
GROUP_PRIVILEGES: The privilege level granted to the users in this group.
The values are:
1: User
17: Router
4294967295: Supervisor
GROUP_TYPE: Reserved for built-in groups. Do not specify GROUP_TYPE for
user-created groups.
GROUP_IS_ROUND_ROBIN: Enables “round-robin routing” for this group.
Page 47
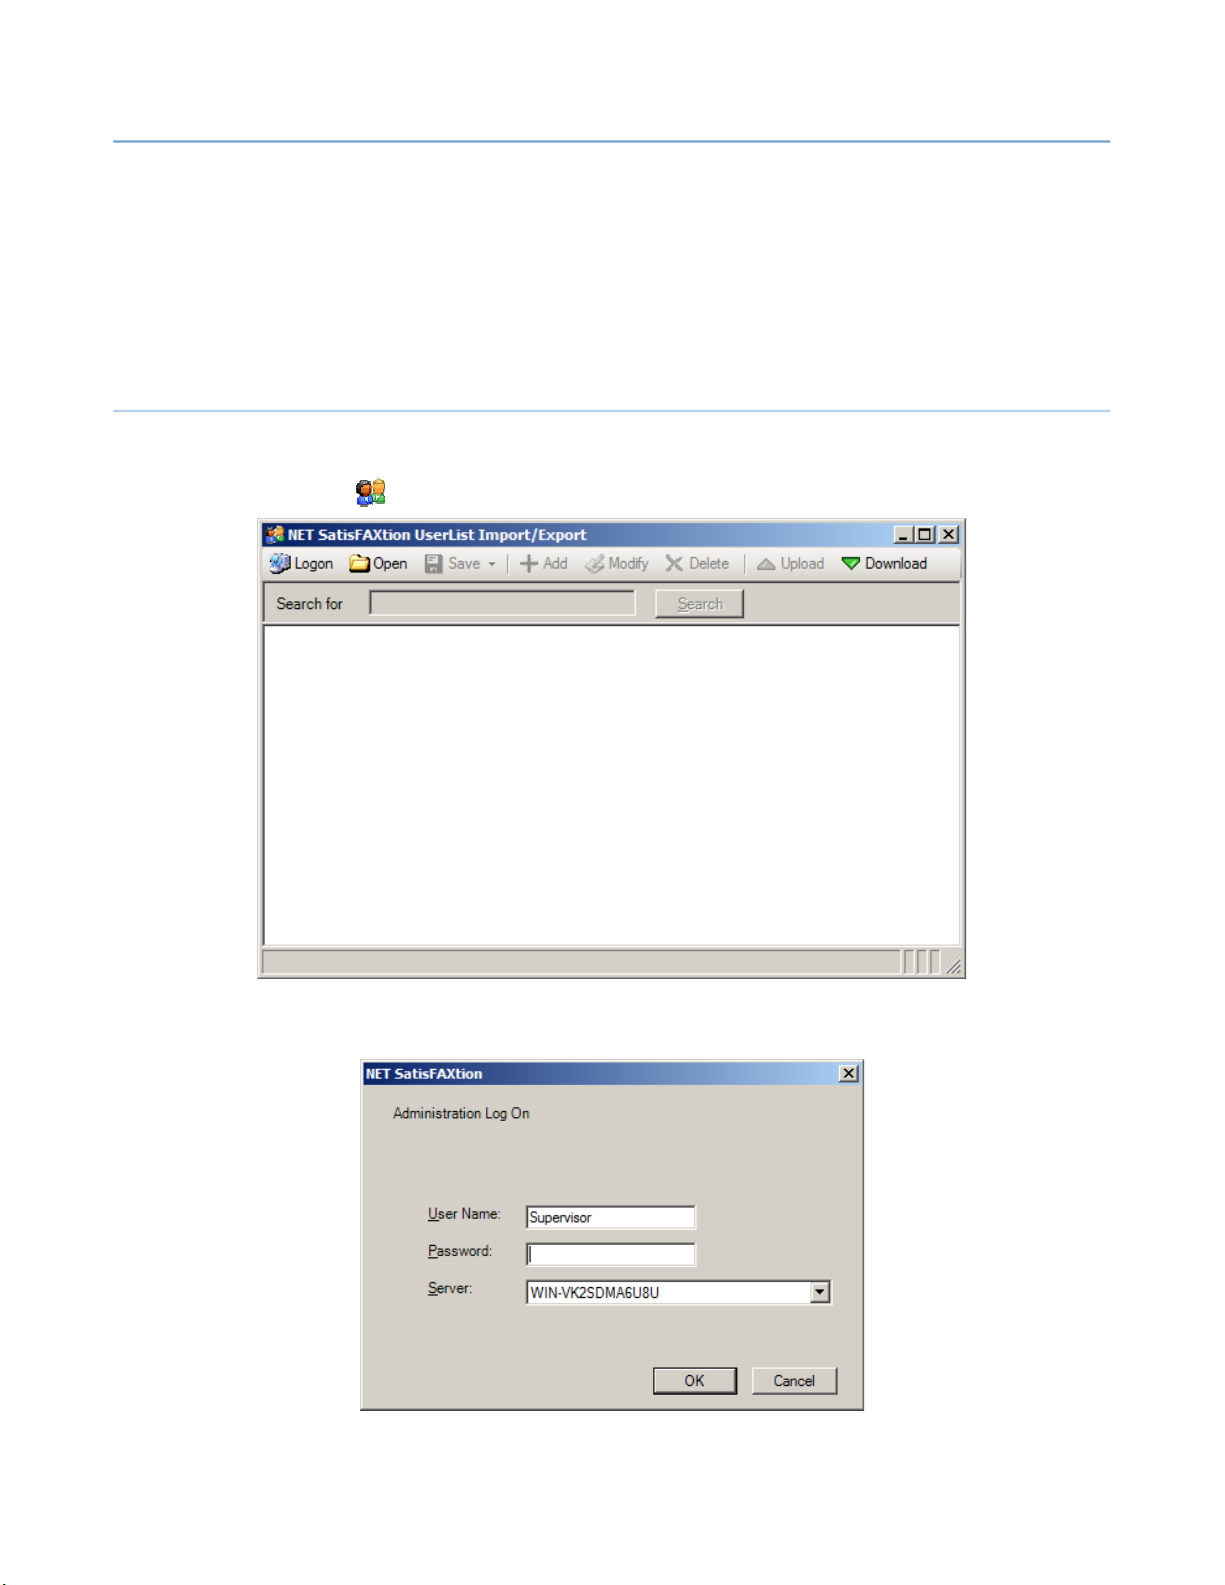
2 – Server Administration
RR_ALL_TO_USER: When round-robin routing is enabled, also send an additional copy to this user.
GROUP_AUTO_ADD_PASSWORD: Not used.
GROUP_AUTO_ADD_AT_LOGON: Not used.
UG_REQUIRE_CHANGE_PASSWORD: Not used.
2.4.9 Exporting Users
NET SatisFAXtion 8.7 Manual
47
Exporting users is accomplished using the
Run User List Import Export from the Start menu under
User List Import & Export
Programs NET Satis⇨ -
FAXtion ⇨ User List Import & Export.
First, the program must connect to the fax server. Click the
tool bar.
Logon
program.
button in the
Page 48

2 – Server Administration
Only
Supervisor
& Export
program.
or
NET SatisFAXtion 8.7 Manual
Routers
level users are allowed to use the
48
User List Import
Click the
Download
button to retrieve the user list from the server. Once the
user list is downloaded, it can be saved from the
Two output formats are supported: Excel 2003 XML Spreadsheet and native
XML. Both formats can be saved and later re-imported.
2.4.9.1 Excel Spreadsheet
Saving for Excel will create an Excel 2003 XML Spreadsheet file with an .xml
file extension. It can be opened by Excel 2003 and 2007, or any other spreadsheet application that supports the Excel 2003 XML Spreadsheet file format. It
represents the users in a simple tabular format.
2.4.9.2 XML
Saving in the native XML format will create a file with an .xml file extension
containing both users and groups. It can be opened by any text editor. See
above for a description of the file format.
2.4.10 Enabling and Using Advanced User Settings
Advanced user settings are additional flags that can be supplied in a user’s
scription
field to enable additional functionality.
Save
menu.
De-
These features do not work with
able Autoenroll first. This can be done via
User Management
account does not exist.
Each flag is in the format of ;variable=value and must come after any freetext user description. The semicolon ; is required, even if there is nothing else
in the description field (it is not simply a separator, it is part of the variable
name). The variable name is not case-sensitive.
2.4.10.1 CSID / TSID
CSID and TSID can be set per user using these settings. If not set, faxes sent
or received by the user will use the global CSID setting.
The variables provided are:
The value of each of these variables can be no longer than 20 characters.
For example, to set a user’s CSID and TSID to (888) 555-0123, add
;csid=(888) 555-0123;tsid=(888) 555-0123 at the end of that user’s de-
scription field.
;csid
;tsid
section. Select
Autoenroll
enabled, so it is necessary to dis-
Change Server Settings General ⇨ ⇨
Reject attempts to send faxes if a fax user
To enable these variables, the following registry changes must be made:
Page 49

2 – Server Administration
[HKEY_LOCAL_MACHINE\SOFTWARE\FaxBack\ICANFax]
"validation_dll"="c:\program files\net satisfaxtion\casdrive.dll"
[HKEY_LOCAL_MACHINE\SOFTWARE\FaxBack\CASDrive]
"PerUserTSID"="1"
2.4.10.2 ANI
ANI (Caller ID) can be set per user using these settings. If not set, faxes sent
by the user will use the global ANI setting.
The variable provided is:
;ani
For example, to set a user’s caller ID to 5550123, add ;ani=5550123 at the
end of that user’s description field.
To enable this variable, the following registry changes must be made:
[HKEY_LOCAL_MACHINE\SOFTWARE\FaxBack\ICANFax]
"validation_dll"="c:\program files\net satisfaxtion\casdrive.dll"
[HKEY_LOCAL_MACHINE\SOFTWARE\FaxBack\CASDrive]
"PerUserTSID"="1"
NET SatisFAXtion 8.7 Manual
49
2.4.10.3 Per-User Delivery Format
The file format used to deliver inbound faxes to a user can be set per user using
this setting. If not set, faxes received by the user will use the SMTP Gateway
or POP3 Gateway setting. This setting requires the PDFConverter license.
The variable provided is:
;rcvfmt
The value can be either tiff or pdf. For example, to set a user’s inbound fax
delivery format to TIFF, add ;rcvfmt=tiff at the end of that user’s description
field.
To enable this variable, the following registry change must be made:
[HKEY_LOCAL_MACHINE\SOFTWARE\FaxBack\CASPost]
"per_user_options"="1"
2.4.10.4 Email Notifications for Non-Email Clients
When a non-email client sends a fax, normally notification of that fax is only
available in that client. Enabling this feature allows the server to send an email
notification to that user’s Routing Address in addition to the notification provided by the fax client.
The variable provided is
;ntf
The value can be either * to notify for all non-email sent faxes, or msfax to notify for only faxes sent from the Microsoft Fax client. For example to notify on
any non-email outbound fax, add ;ntf=* at the end of that user’s description
field.
Page 50

2 – Server Administration
To enable this variable, the following registry change must be made:
[HKEY_LOCAL_MACHINE\SOFTWARE\FaxBack\CASPost]
"per_user_options"="1"
Should you wish to override the default subject line of these emails, set the following registry key:
[HKEY_LOCAL_MACHINE\SOFTWARE\FaxBack\CASDrive]
"NtfSubject"="A fax you sent"
2.4.10.5 User Database
Users and groups are stored in .FBF files in the NET SatisFAXtion program directory.
GroupMembers.fbf
Groups.fbf
LineManager.fbf
UserAliasList.fbf
UserList.fbf
UserInfo.fbf
With the NET SatisFAXtion service stopped, these files can be backed up, or
copied to another server to duplicate the user list.
NET SatisFAXtion 8.7 Manual
50
Note that group Autoprint, user Export and cover sheets are not contained in
these files.
Page 51

2 – Server Administration
2.5 Inbound Faxes
When the fax server receives a fax, it stores it in the Inbox (Receive Queue).
From there it will be
fax such as which physical fax port it was received on (
phone number (
DID
NET SatisFAXtion 8.7 Manual
routed
to clients based on information received with the
routing).
line
routing) or the dialed
51
Additional operations on faxes such as
not truly “routing” and so have different mechanisms to indicate which faxes
should be
All
Routing
from the
Managing Users and Groups for more information.
In order for the fax server to automatically route there must be enough information when the fax is received to uniquely identify a single user or a single
group. For example, this means you can only assign a single phone number to
one user or to one group.
Line Sharing: Sharing phone lines between NET SatisFAXtion and another device is not supported. Line sharing can cause numerous problems including garbled or incomplete faxes, failed fax transmissions and lost or misdirected faxes.
2.5.1 Routing Methods
Not all fax devices can perform all methods of routing. Be sure to check the capabilities of your device.
2.5.1.1 Manual Routing
Exported
information is stored in the
Administration
Exporting
or
Autoprinted
. Refer to their own sections, below.
User
program’s User Administration section. See 2.4
or
them or
Group
Autoprinting
configuration, accessible
them are
Manual routing is the simplest form of routing, and is only used when there isn’t
enough information to route to a unique user or group. With manual routing, the
only way faxes get delivered to users is when a
uses the Administration program to view each fax, make a decision about who it
should go to, and forwards the fax to a user or group.
To manually forward, run the Administration program and log in. Go to the Inbox (Received Queue) using the
routed faxes. Double-click on one of the faxes and you will see the first page of
the fax in the bottom pane. Note that if you are logging in as a
user, you will only be able to see the first page. Once you have made a decision
who to route the fax to, right-click on it and click
listing all groups and users. Select the group or user to route the fax to (multiple users can be selected by holding down the Control key). Click
fax will leave the Inbox. Repeat this process until the Inbox is empty, and be
sure to check the Inbox frequently to route any new faxes that are received.
View Inbox⇨
Router
or
Supervisor
menu. You will see a list of un-
Forward
. A window will open
Router
Forward
level user
level
. The
Page 52

2 – Server Administration
2.5.1.2 Line Routing
NET SatisFAXtion 8.7 Manual
52
Note that
and Class 1/Class 2 modems. It is not used with PRI/T1 or VoIP fax devices.
AudioCodes MediaPacks can emulate line routing with DID numbers per port.
See 2.5.1.7.1.1 Emulating Line Routing for details.
Line routing is used when each physical phone line attached to your fax hardware has a unique phone number. When a fax is received, it is immediately routed to the associated user or group. A user can only be assigned a single phone
line, but groups can be assigned multiples.
Since NET SatisFAXtion can’t automatically know which phone numbers belongs
to which ports, assigning phone lines can be tricky. The fax server will show
you the
in. These
der as the physical jacks on the card. The easiest way to determine which phone
line corresponds to which port name is by sending in a fax: when the fax is received, look in the Administration program Inbox and scroll over to the Port
column. That is the name of the port the fax was received on.
To line route, run the Administration program and log in. Go to the User Administration section using the
group you wish to route to, right-click on it and select
Group
to route to this user or group. Click OK. Note that if the line is already assigned
to a different user or group it will not show up in the list.
line routing
names
of the fax ports, not the phone number of the line that’s plugged
names
come from the modem and so may not even be in the same or-
. Change to the
is only possible using Brooktrout analog boards, Mainpine
View User Administration⇨
Routing
tab. In the
Line
box, select the line(s) you wish
menu. Select the user or
Modify User
or
Modify
2.5.1.3 DID / DTMF / DNIS Routing
The most flexible routing method is based on the dialed number. This is the actual number that the sender dialed, which gets relayed through the phone system to the fax server. This means that each user and group in the system can
have its own individual phone number if you choose. Depending on the telephony technology used the called number has a variety of names. This manual calls
this number a Direct Inward Dial number (DID number). When using a T1/PRI
or VoIP provider, Dialed Number Identification System (DNIS) is often used.
T1, PRI and VoIP providers will usually deliver DNIS digits with no additional
configuration needed in NET SatisFAXtion. Analog devices on the other hand
must use DTMF relay which need configuration on both ends of the phone line,
on the PBX / telco side as well as the NET SatisFAXtion side. See the DTMF
heading below.
To DID route, run the Administration program and log in. Go to the User Administration section using the
user or group you wish to route to, right-click on it and select
Modify Group
string you wish to route to this user or group. In order to route, the Identifier
string must match
. Change to the
exactly
View User Administration⇨
Routing
. If you are getting four digits from a PBX, enter those
tab. In the
Identifier
menu. Select the
Modify User
box, enter the digit
or
Page 53

2 – Server Administration
exact four digits. If you are getting ten digits from a PRI, enter those exact ten
digits.
When troubleshooting DID routing, remember that any fax that is not routed
will be sent to the Postmaster user. Check there, and look for the
that will show the exact digits NET SatisFAXtion received. If that column is
blank, then no DID digits were received.
2.5.1.3.1 DTMF
DTMF routing is used when the fax server’s analog fax device phone lines are
connected to a PBX, and the PBX is capable of generating DTMF tones.
DTMF (Dual Tone Multi Frequency) tones are also called touch tones. They are
the same tones that are used to dial the destination phone number when you
call out on an analog telephone. Only in this case, they are generated by a PBX
to relay to the fax server what the called number is, to allow DID routing.
With standard analog phone lines it is not possible to tell what number the caller dialed. Therefore some other mechanism must be employed to communicate
that called number to the fax server. In this case, when the fax server answers
a call it listens for a few seconds for DTMF tones. These tones are usually generated at that point by a PBX.
NET SatisFAXtion 8.7 Manual
DID
53
column,
By default, a modem will not collect DTMF tones from the PBX. It is necessary
to run the
DTMF Setup
program to enable them to collect digits.
DTMF routing is not the same as DID, CallerID or ANI. While DID numbers can
be routed from your phone switch, PBX or CO, they must be translated into
DTMF tones that are passed to the modem when it answers. To test that
DTMF is available on the line, connect an analog telephone to one of the phone
lines that will be used for the fax server. Call a DID number. When that phone
rings, answer it and listen for DTMF tones to be played back. If you do not hear
the DTMF tones, work with your phone switch or phone vendor to get this
working first.
2.5.1.3.2 Strip Digits from Front or Back of DID
With some PBXs or VoIP systems, there are more digits provided in the DID
than are desired.
When using
Tables
AudioCodes
equipment, see
in the web interface of the AudioCodes device.
To strip a fixed length of digits from the front (left) of a number, set the following registry key. Note that in Administration and Reports the full string will
still be visible, but this many digits will be ignored for routing purposes.
[HKEY_LOCAL_MACHINE\SOFTWARE\FaxBack\CASDrive]
"DtmfRouteStripCount" = <NumberToStrip>
To strip digits from the end (right) of a number, configure the number of DTMF
digits collected to be less than the full digit string being sent from the PBX.
Protocol Configuration Manipulation⇨
Page 54

2 – Server Administration
2.5.1.4 CSID Routing
Prone to failure.
Disabled by default. To enable:
[HKLM\Software\FaxBack\CasDrive]
"RouteOnCsid" = "1"
2.5.1.5 Caller ID / ANI Routing
Prone to failure.
Disabled by default. To enable:
[HKLM\Software\FaxBack\CasDrive]
"RouteOnAniCallerId" = "1"
2.5.1.6 T.30 Subaddress Routing
The T.30 fax specification allows an additional identifier to be specified by the
sender for routing purposes. This feature was never widely implemented when
it was first introduced, and is almost never implemented today.
Disabled by default. To enable:
NET SatisFAXtion 8.7 Manual
54
[HKLM\Software\FaxBack\CasDrive]
"RouteOnT30SubAddress" = "1"
"SubAddressSeparator" = "#"
Subaddress is transmitted via a T.30 HDLC SUB frame, 20 characters in length.
The allowed chars for SUB are numbers, space, *, and #”.
2.5.1.7 Inbound Routing Capabilities By Device
2.5.1.7.1 AudioCodes MediaPack, Mediant, and TrunkPack
AudioCodes MediaPacks (FXO ports) are capable of routing on Line or DTMF.
AudioCodes MediaPacks (FXS ports) are DID Trunk capable, and can route on
DNIS.
AudioCodes TrunkPack (TP260) cards, Mediant 1000s with T1/PRI cards, Mediant 2000 and 3000 gateways are capable of routing on DNIS. No additional
configuration is necessary.
2.5.1.7.1.1 Emulating Line Routing
The standard configuration NET SatisFAXtion applies enables line routing
through the use of virtual phone numbers. The DID number NET SatisFAXtion
receives will indicate on which port the MediaPack or Mediant received the fax.
To use these line phone numbers, follow the instructions for DID routing
above, and use the port phone numbers given below.
The phone numbers on AudioCodes MediaPack MP114 and MP118s default to
the following:
Page 55

2 – Server Administration
Port 1: 1000
Port 2: 1001
Port 3: 1002
Port 4: 1003
Port 5: 1004
Port 6: 1005
Port 7: 1006
Port 8: 1007
The phone numbers typically configured on a Mediant 1000 are slightly different. Note that Mediant 1000s often have customized configuration and so the
following does not necessarily reflect your Mediant’s configuration.
Module 1 Port 1: 1000
Module 1 Port 2: 1001
Module 1 Port 3: 1002
Module 1 Port 4: 1003
Module 2 Port 1: 2000
Module 2 Port 2: 2001
Module 2 Port 3: 2002
Module 2 Port 4: 2003
NET SatisFAXtion 8.7 Manual
55
Module 3 Port 1: 3001
etc...
2.5.1.7.2 Brooktrout Fax Cards
Any Brooktrout analog (loopstart) fax card is capable of routing on Line or
DTMF. These cards must use
DTMF Setup
these cards.
Any Brooktrout DID fax card is capable of routing on DNIS. No additional configuration is necessary.
Brooktrout T1/PRI cards are capable of routing on DNIS. No additional configuration is necessary.
2.5.1.7.3 Eicon Diva Server
Eicon Diva Servers are capable of routing on DNIS from the T1 or PRI.
2.5.1.7.4 MainPine RockForce / IQ Express
Any MainPine analog fax card is capable of routing on Line or DTMF. These
cards must use DTMF Setup to enable DTMF digit capture on these cards.
to enable DTMF digit capture on
2.5.1.7.5 Any T1 or PRI Equipment / Any Other VoIP Equipment
DNIS is normally captured and can be used to route faxes. No additional configuration is necessary.
Page 56
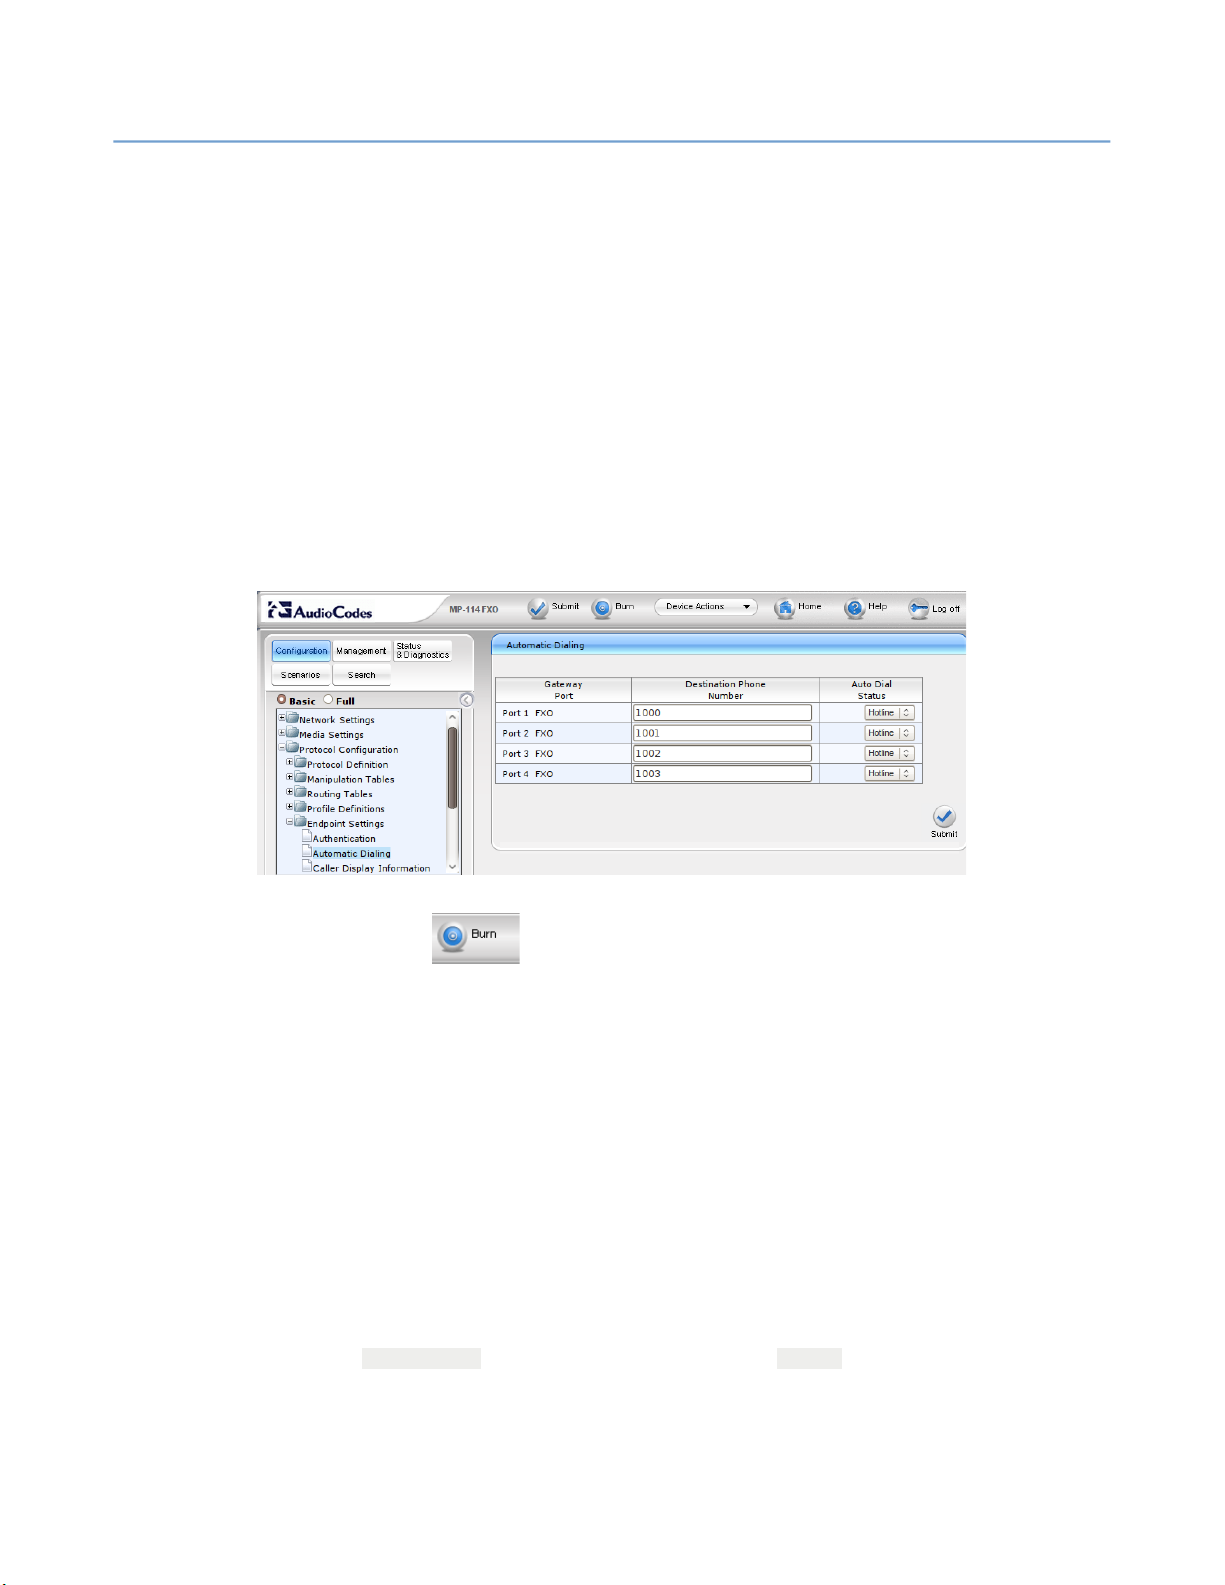
2 – Server Administration
2.5.1.8 Enabling DTMF Collection
NET SatisFAXtion 8.7 Manual
Each type of fax device has its own method for enabling DTMF collection. Refer
to the section specific to your device.
2.5.1.8.1 AudioCodes MediaPack MP114 / MP118
In order to enable DTMF collection for AudioCodes MediaPack gateways, a
simple configuration change must be made.
Log in to the MediaPack’s web interface. The default user name is “Admin” and
password is “Admin.” The administrator may have changed these defaults.
56
Navigate to
Protocol Management Endpoint Settings Automatic Dialing⇨ ⇨
Change the Auto Dial Status for all ports to “Hotline.”
Click Submit.
Be sure to click the Burn button at the top of the page to make the
changes permanent.
When the MediaPack receives a call it will now play a second dial tone. The PBX
or phone switch will deliver DTMF tones, and the call will ring through to the
fax server. If you make this change, and hear dial tone after you call a fax extension, then the PBX is not delivering DTMF.
2.5.1.8.2 Dialogic Brooktrout Fax Cards
Use the DTMF Setup utility to enable DTMF collection. DTMF Setup can be
found in
Click
2.5.1.8.3 Dialogic Eicon Diva Server
Start Programs NET SatisFAXtion Extended Server Settings⇨ ⇨ ⇨
Fax Port Settings
, then
Each port’s init_string in the Class1 registry must have #CID=5 appended.
Launch DTMF Setup
.
.
Page 57
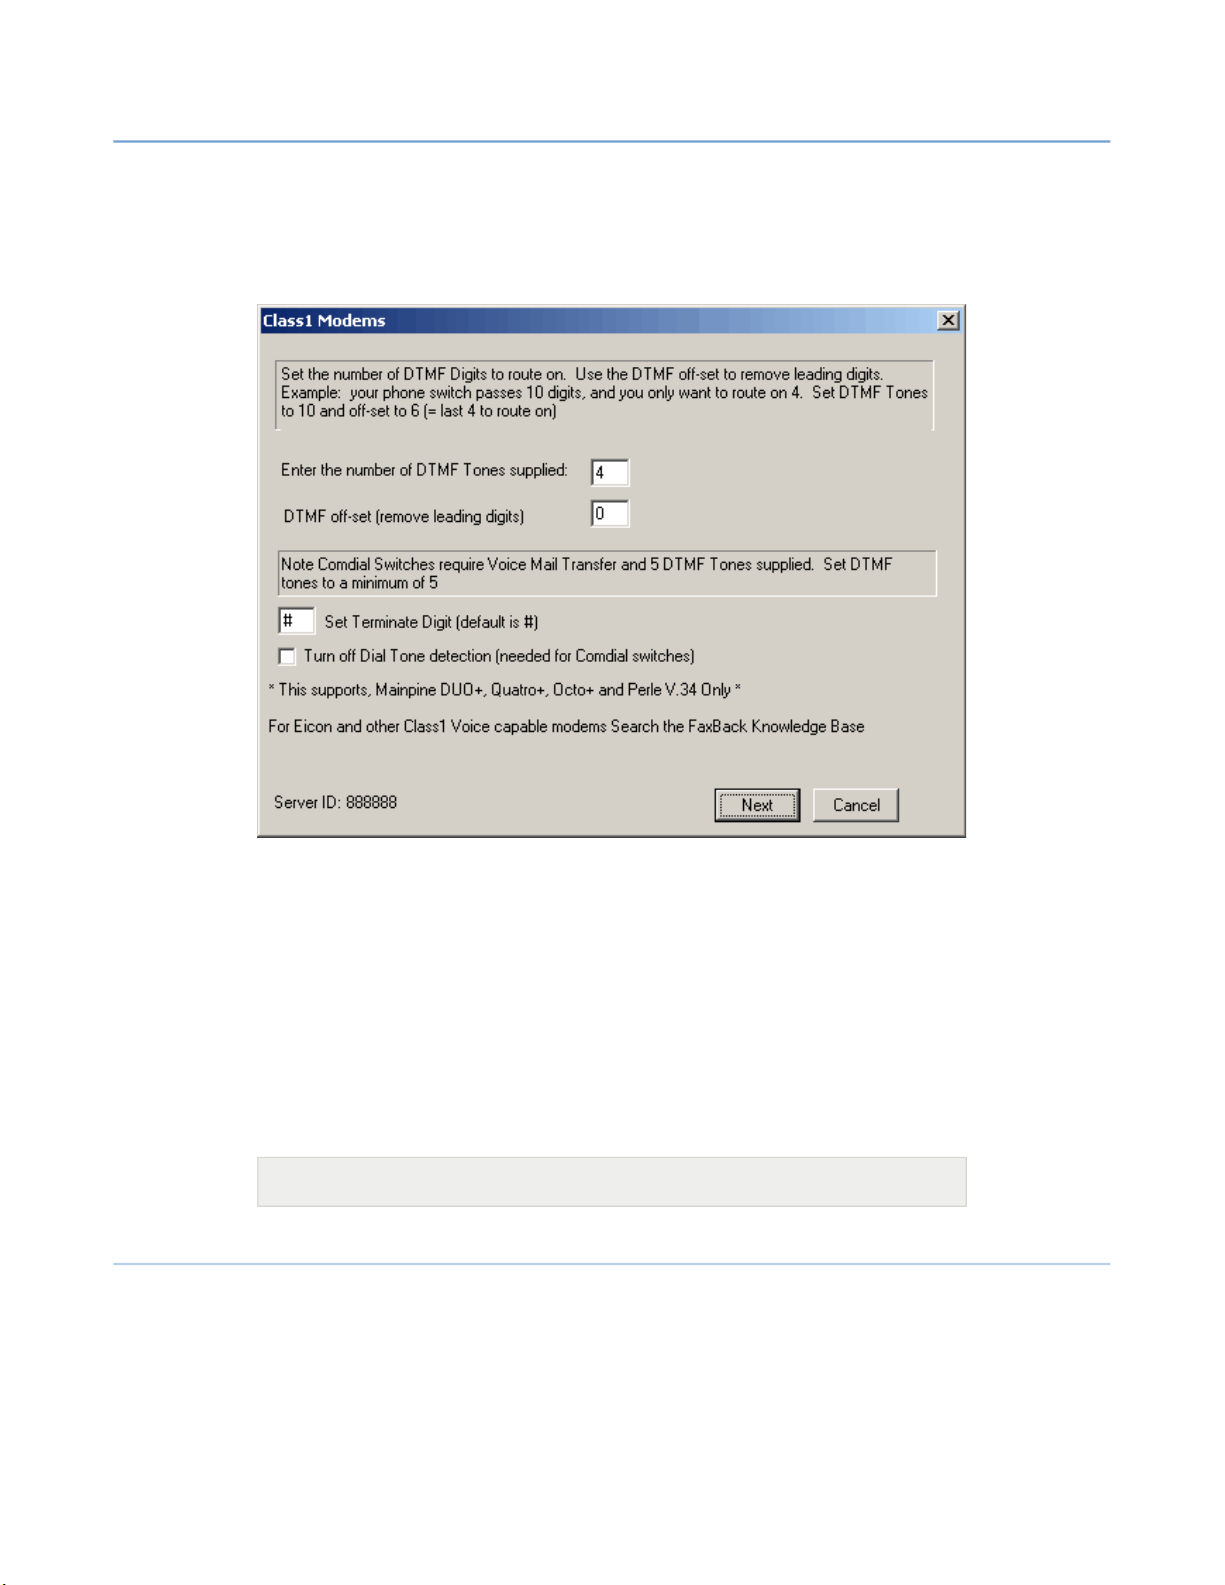
2 – Server Administration
2.5.1.8.4 Mainpine Rockforce / IQ Express
NET SatisFAXtion 8.7 Manual
Use the DTMF Setup utility to enable DTMF collection. DTMF Setup can be
found in
Click
Start Programs NET SatisFAXtion Extended Server Settings⇨ ⇨ ⇨
Fax Port Settings
, then
Launch DTMF Setup.
57
.
Set the number of DTMF Tones your phone switch is passing. Commonly this is
the last 4 digits of the DID numbers assigned to your inbound fax users. Also
included is a setting for no dial tone for outbound calls, should your PBX not
provide dial tone on the line.
2.5.1.9 Refusing Unrouted Faxes
If you only route to individual users and not to groups, it is possible to have the
fax server reject calls to unassigned DIDs. When a call comes in, the DID is examined to see if it is assigned to any user (not group) on the system. If so it is
answered, if not it is rejected as busy.
[HKEY_LOCAL_MACHINE\SOFTWARE\FaxBack\CASDrive]
"RefuseUnroutedCalls"="1"
2.5.2 Routing to Users and Groups
There are two fundamental routing methods: routing to a single user, or routing
to a group of users.
2.5.2.1 Routing to Users
User routing is simply the association of a single DID or line to a user account.
When the fax is received, the fax is sent to the specified user.
Page 58
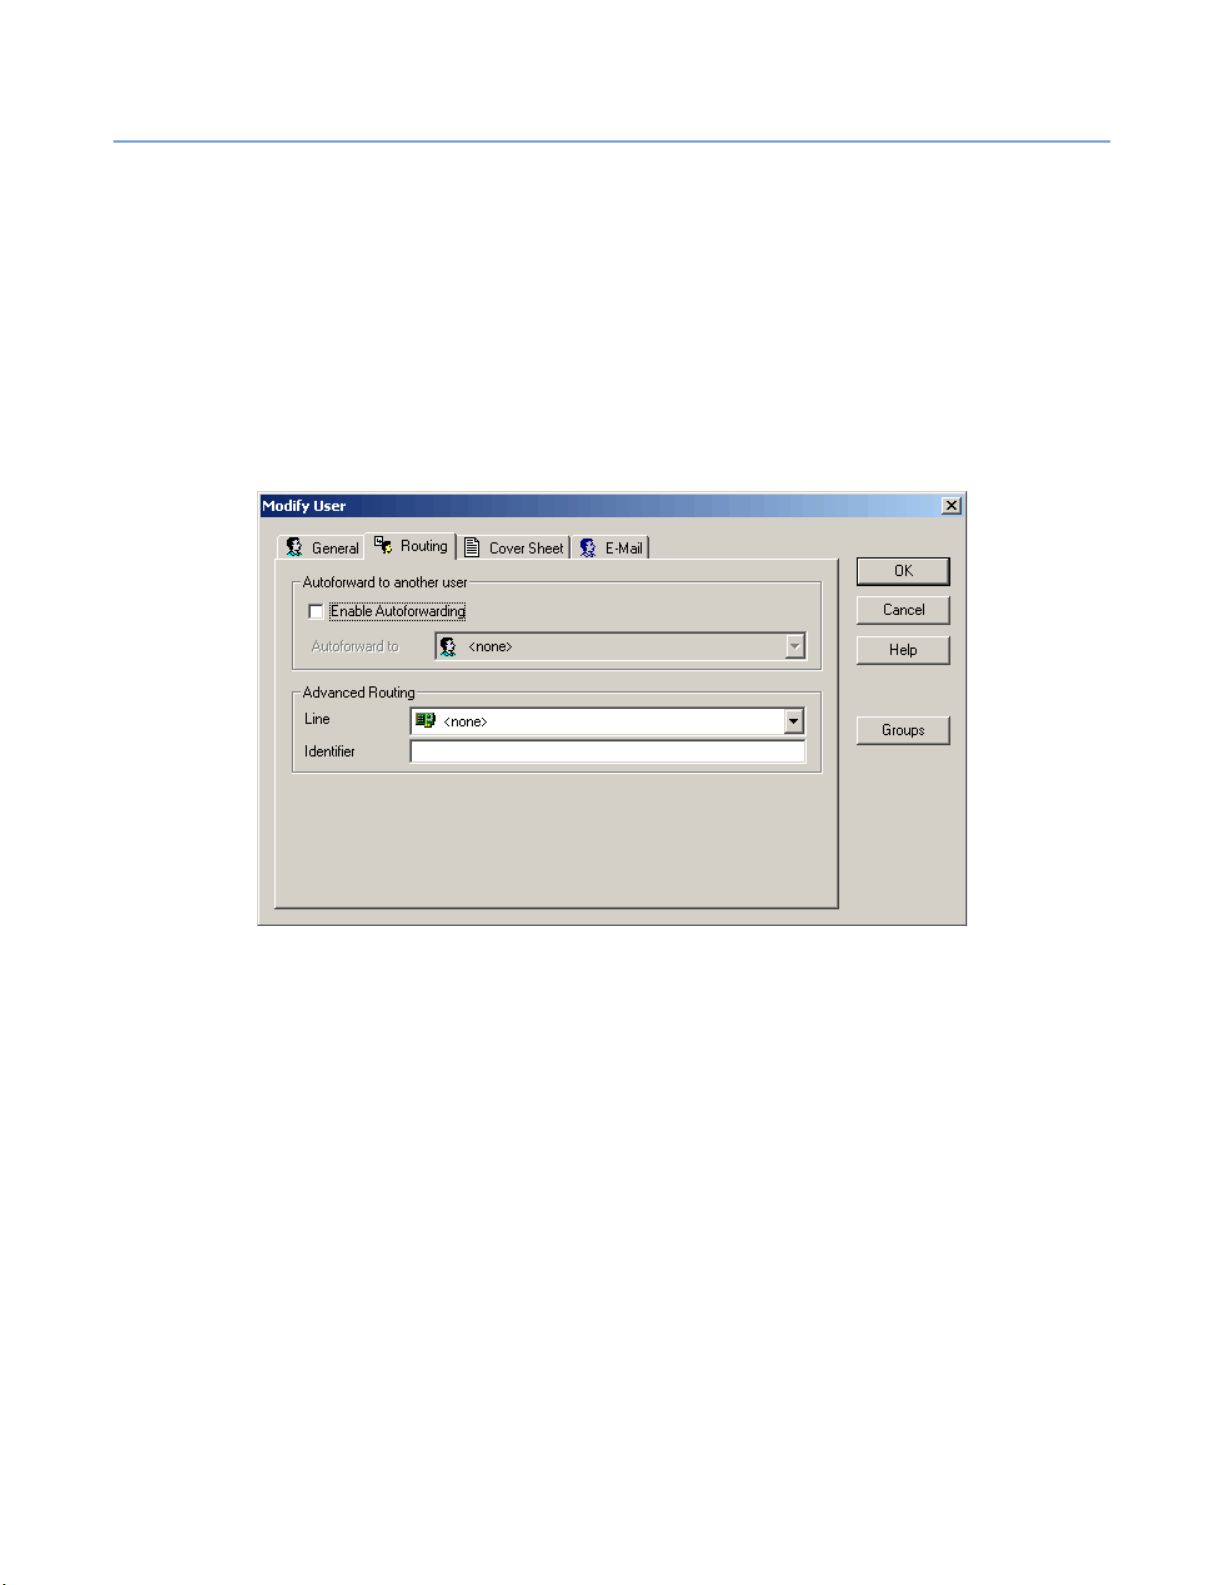
2 – Server Administration
To assign a DID to a user, run the Administration program and log in. Go to the
User Administration section using the
the user you wish to route to, right-click on it and select
to the Routing tab. In the
to this user.
To assign a line to a user (note that you cannot use line routing with VoIP or
T1/PRI equipment), run the Administration program and log in. Go to the User
Administration section using the
user you wish to route to, right-click on it and select
the Routing tab. Click the
route to this user.
NET SatisFAXtion 8.7 Manual
View User Administration⇨
menu. Select
Modify User
Identifier
Line
box, enter the DID string you wish to route
View User Administration⇨
Modify User
drop-down box and select the line you wish to
menu. Select the
. Change to
58
. Change
2.5.2.2 Routing to Groups
Group routing is the association of a single DID or line to a group. This enables
a single fax to be sent to multiple users. When the fax is received, the fax is
sent to each member of the group.
To assign a DID to a group, run the Administration program and log in. Go to
the User Administration section using the
Select the group you wish to route to, right-click on it and select
Change to the Routing tab. In the
to route to this user.
To assign a line to a user (note that you cannot use line routing with VoIP or
T1/PRI equipment), run the Administration program and log in. Go to the User
Administration section using the
user or group you wish to route to, right-click on it and select
Modify Group
select the line you wish to route to this user.
. Change to the
Identifier
View User Administration⇨
Routing
View User Administration⇨
Modify Group
box, enter the DID string you wish
menu. Select the
Modify User
tab. Click the
Line
drop-down box and
menu.
.
or
Page 59
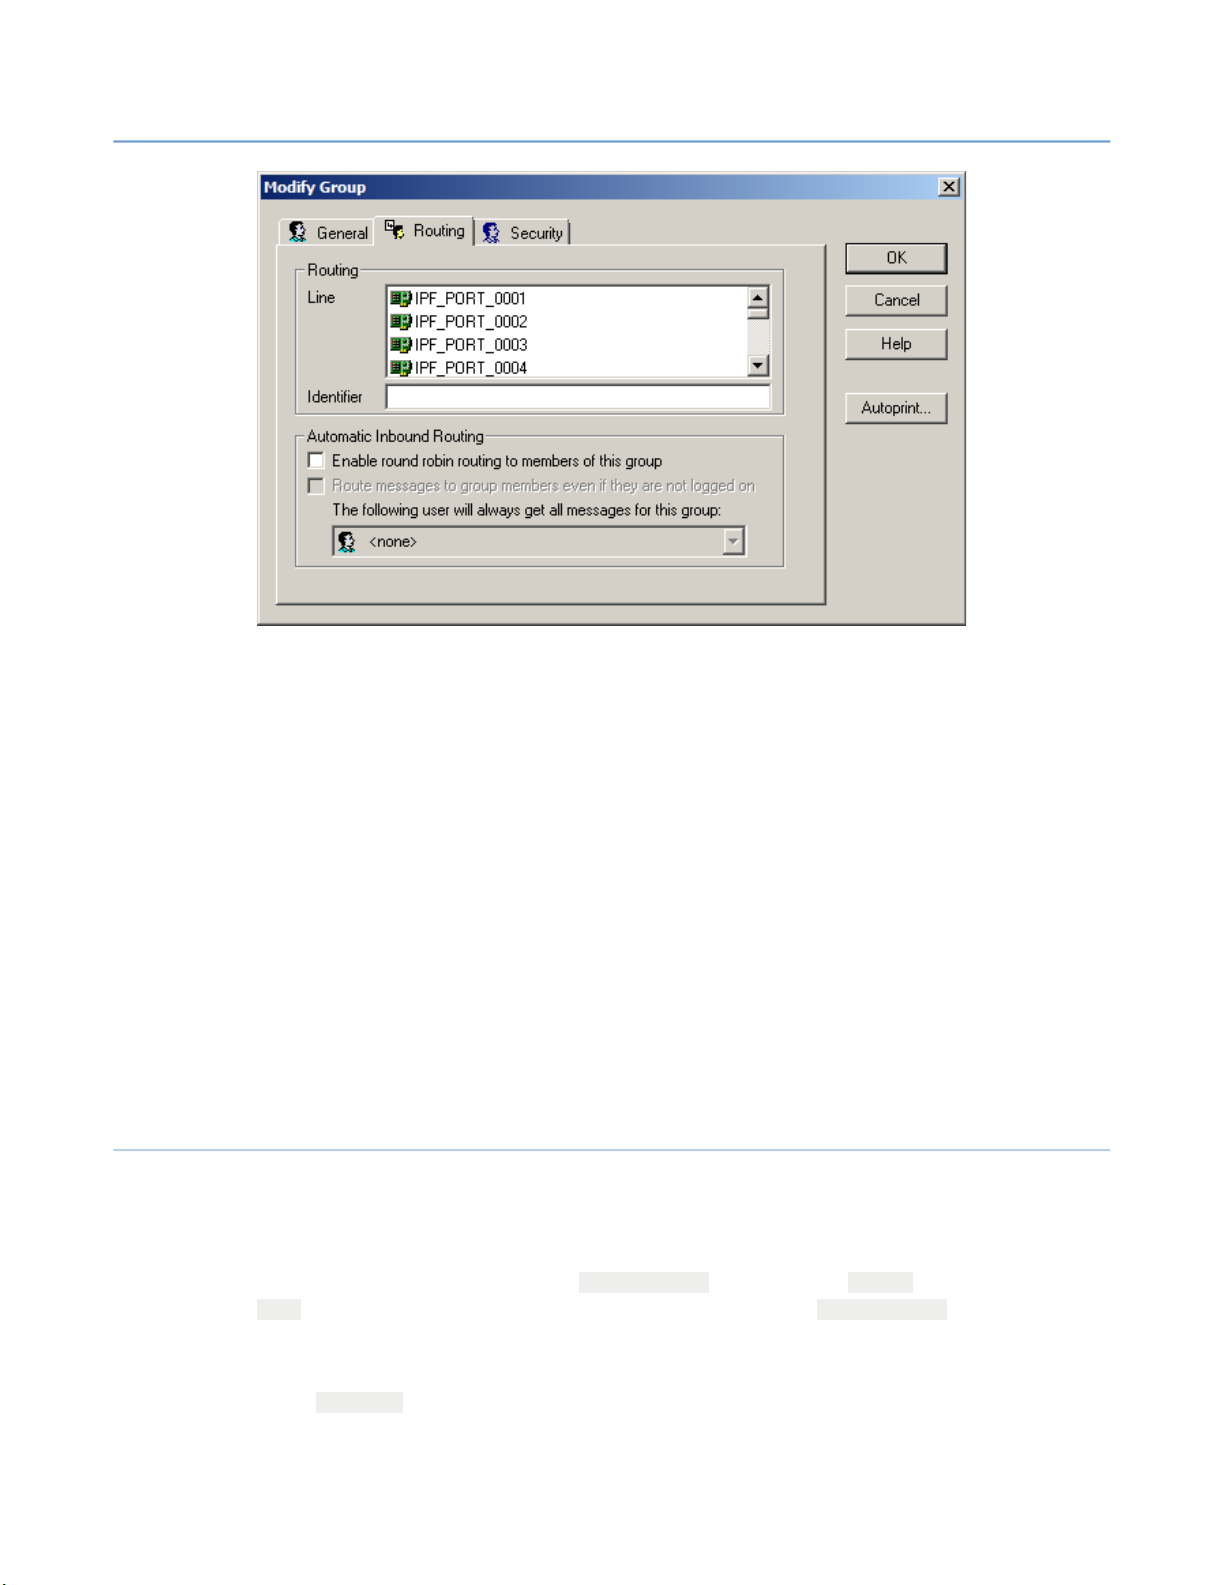
2 – Server Administration
2.5.2.2.1 Round Robin Routing
Round robin routing enables inbound faxes to be distributed amongst the
group’s members instead of every fax going to every user. The users will be cycled through from top to bottom.
NET SatisFAXtion 8.7 Manual
59
You can optionally select a user to
user need not be a group member, and the user will always get its own copy of
the fax.
By default only logged on users are routed to. If they do not have a client application running and logged on, no faxes will be routed to that user. The “client”
in this case refers specifically to the FaxOut Client Suite’s Popup Notifier application, if the user has the Popup Notifier running and logged on to the server
then that user will receive round-robin faxes. This can be disabled by checking
the route messages to group members even if they are not logged on checkbox.
This feature does not currently work with the Microsoft Fax client or FMIS
(these users are not “logged on”).
2.5.3 Delivering Faxes to Clients
Once a fax is routed to a user, it must be delivered to the fax client.
2.5.3.1 Email
Licensing: This feature requires the EmailGateway feature (either NATIVE or
SMTP). To deliver faxes as PDFs rather than TIFFs requires the PDFConverter
feature.
always get all messages for this group
. This
When a user has a
Routing Address,
the fax server will actually forward the fax
to the SMTPPost user, which allows the SMTP Email Gateway or the POP3
Email Gateway to email the fax to that Routing Address.
Page 60
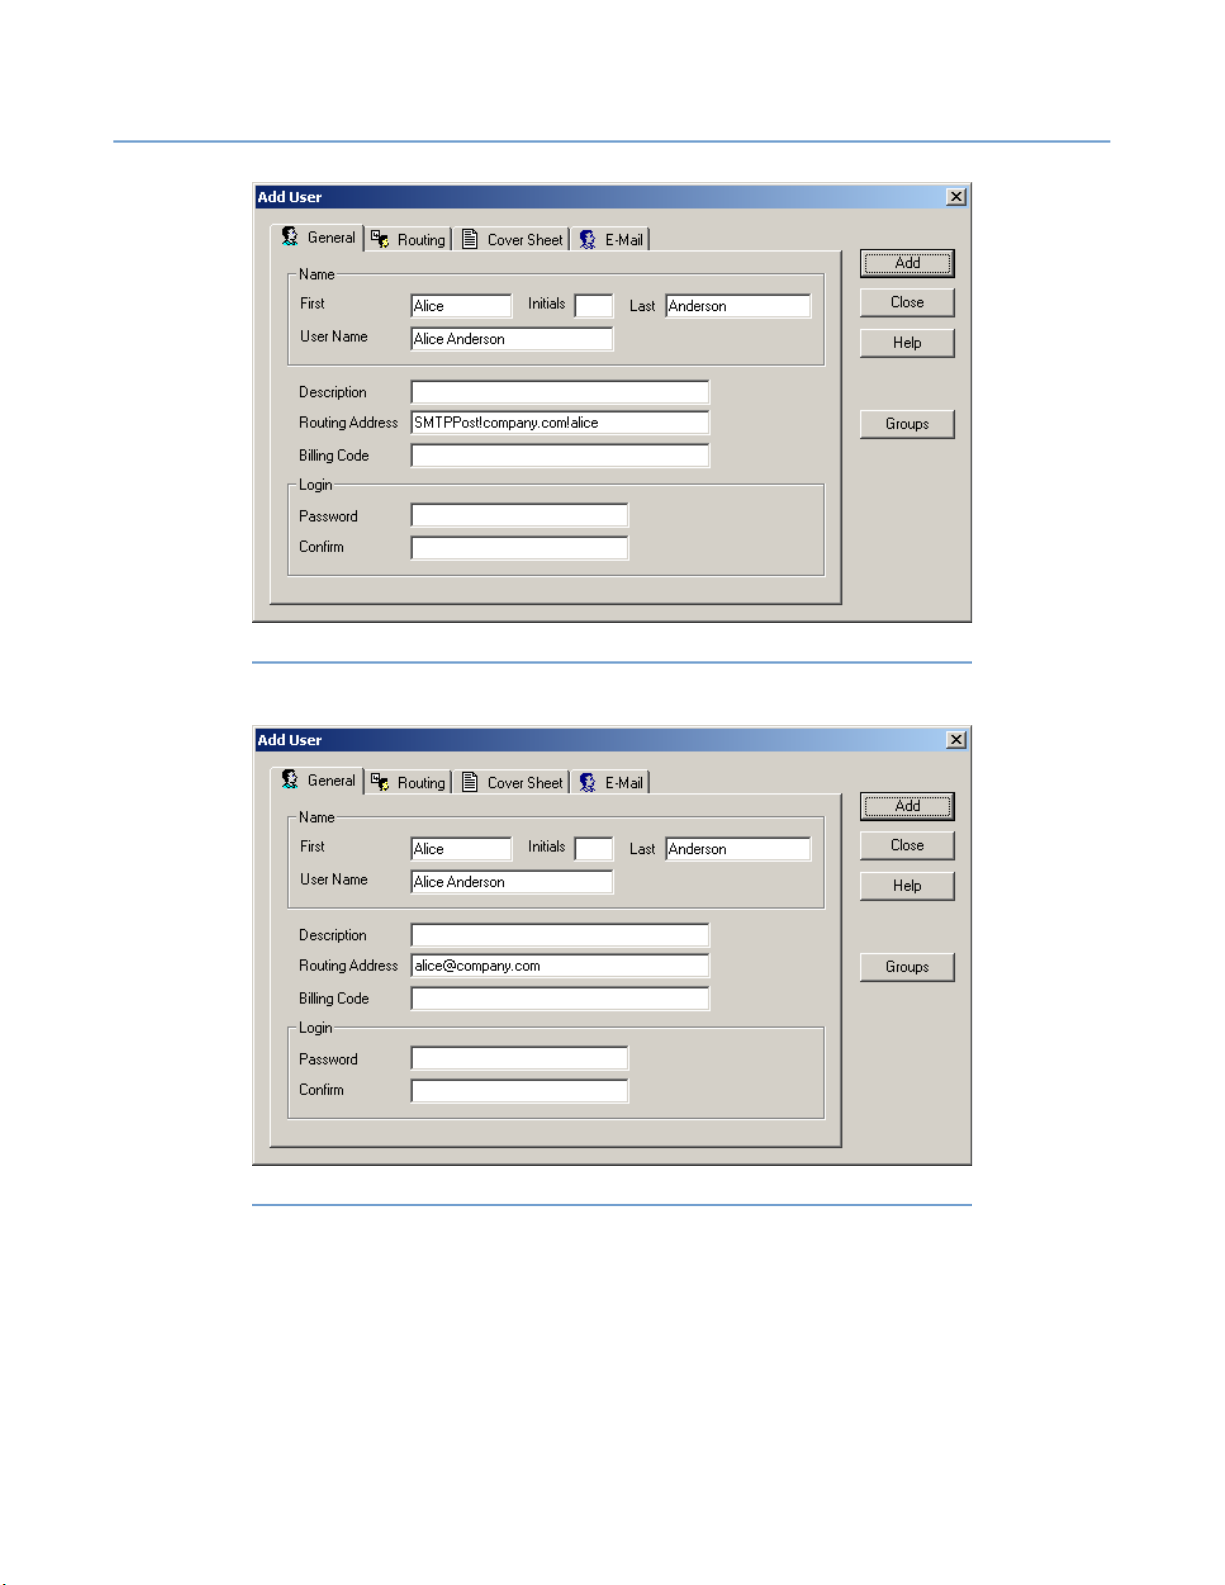
2 – Server Administration
NET SatisFAXtion 8.7 Manual
Illustration 2.5.3.1#1: Adding a user with an SMTPPost routing address
60
The email gateway will pick up the fax, then send it as an email to the configured mail server. The mail server will then relay the fax to the user’s email inbox.
2.5.3.2 Microsoft Fax
When a user does not have a
user, but remain in the fax server’s Inbox until Microsoft Fax connects to the
Illustration 2.5.3.1#2: Adding a user with an email routing address
Routing Address,
the fax will be delivered to that
Page 61

2 – Server Administration
NET SatisFAXtion 8.7 Manual
fax server and retrieves the faxes. Note that old unclaimed faxes will not be
aged out, they will remain on the server until claimed.
2.5.3.3 Fax Machine Integration Server
61
When a user does not have a
Routing Address,
the fax will be delivered to that
user, but remain in the fax server’s Inbox until FMIS connects to the fax server
and retrieves the faxes. Since FMIS polls the fax server frequently, faxes
should be moved to FMIS in less than a minute.
2.5.3.4 Delivering to Both Email and Microsoft Fax
A single account can only deliver either to email or to Microsoft Fax. In order to
deliver both ways, it is necessary to create two accounts, and route to those
accounts with a group. Create a group and assign the DID to it. Create two
users and place them in that group, giving one of those accounts a routing address and leaving the other with no routing address. Configure the Microsoft
Fax client to use the account with no routing address.
2.5.3.5 Delivering to Both Email and Fax Machine Integration Server
A single account can only deliver either to email or to FMIS. In order to deliver
both ways, it is necessary to create two accounts, and route to those accounts
with a group. Create a group and assign the DID to it. Create two users and
place them in that group, giving one of those accounts a routing address and
leaving the other with no routing address. Configure the FMIS to use the account with no routing address.
2.5.4 Fax Export
Licensing: This feature requires the FaxExport feature. To export faxes as
PDFs rather than TIFFs requires the PDFConverter feature.
The Fax Export module is typically used for two purposes: to save all faxes for
archiving, or to integrate NET SatisFAXtion with some other system. Once the
faxes are exported they are simply files on disk — the fax server no longer manages them and they can be moved, renamed and deleted as needed.
The following documentation covers the new Export system introduced in version 8.6. If the fax server is upgraded from an earlier version, the old export
system will continue to be used.
Archiving: Inbound and outbound faxes can be written to a local directory or to
a network share. Separate folders can be created for individual users, and files
can be flexibly named based on fax parameters.
Integration: Faxes are written to a “shared” directory that the other application
monitors. Faxes are saved to this folder along with an XML file containing the
fax metadata. The other application reads in the XML and fax, then deletes both
files.
Page 62
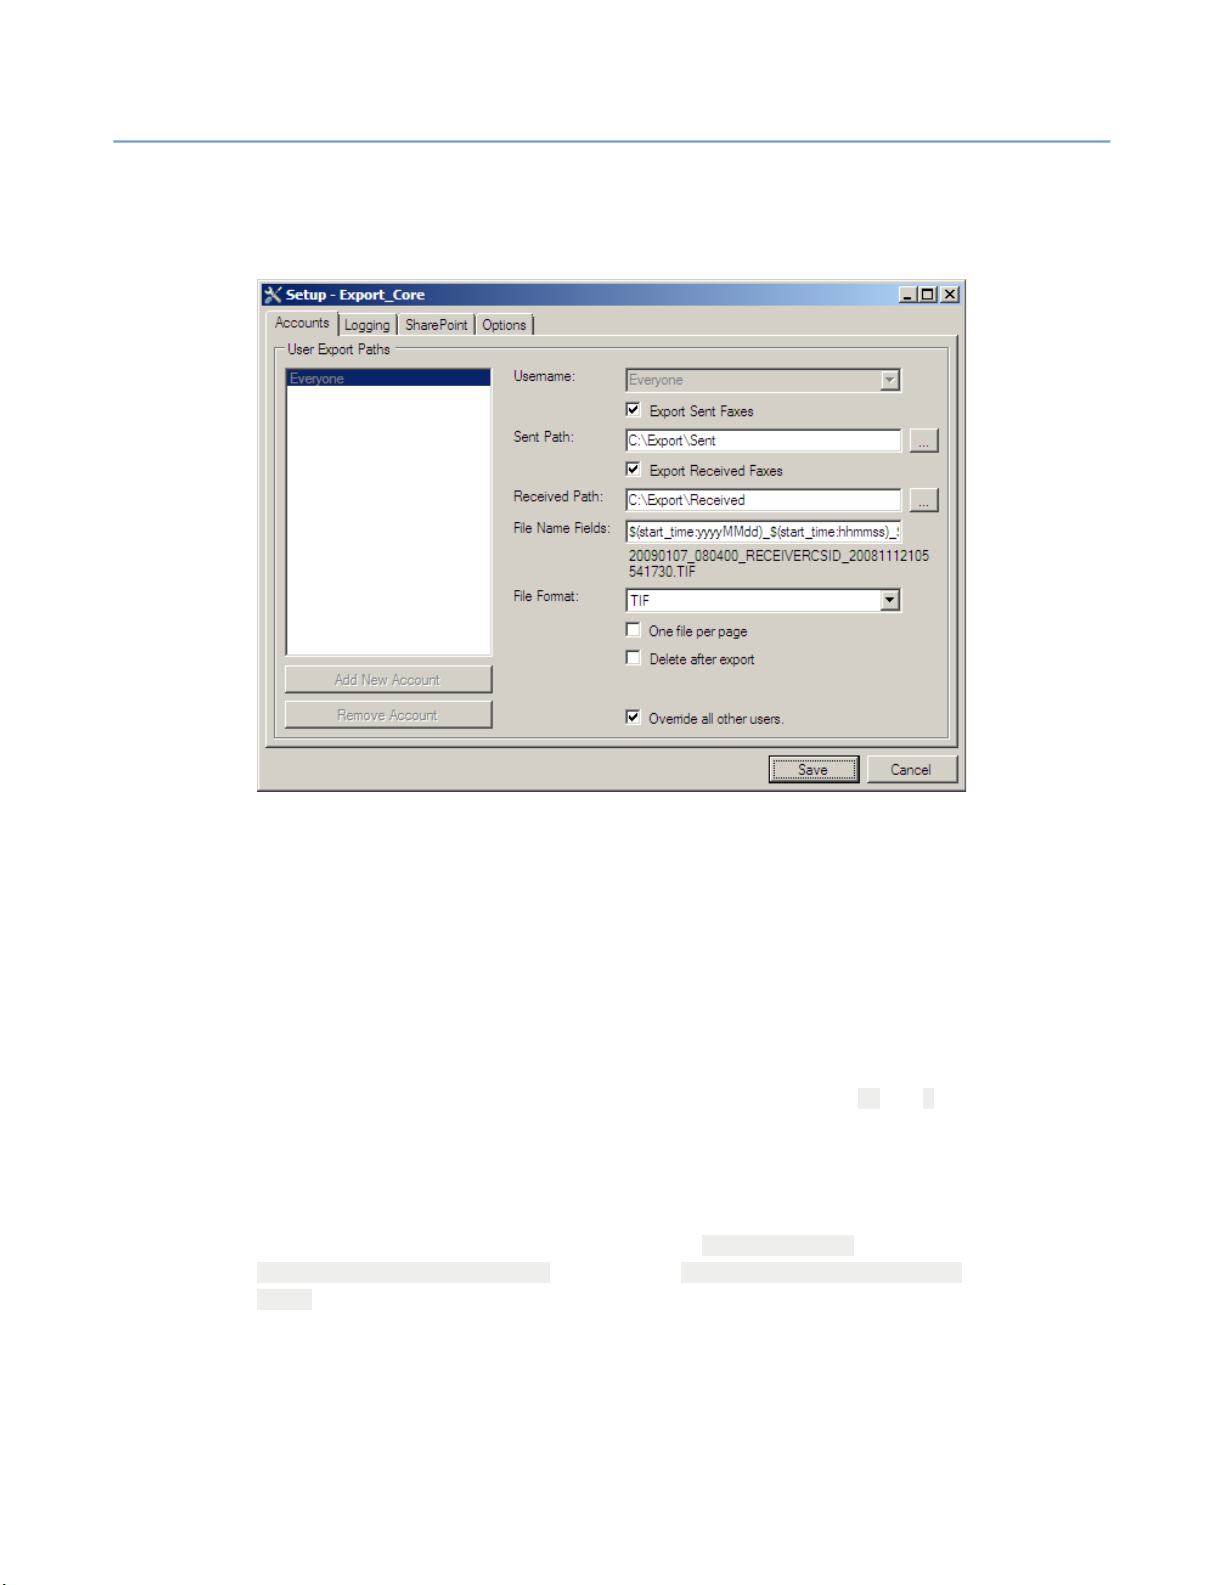
2 – Server Administration
2.5.4.1 Configuring Export
NET SatisFAXtion 8.7 Manual
62
The Fax Export module is configured from the
FAXtion Configure Export⇨
utility.
Start Programs NET Satis⇨ ⇨ -
By default, export is not enabled, and the Everyone entry overrides all others.
To configure per-user export, uncheck the
Export Sent Faxes: To export sent faxes, check the
Override all other users
Export Sent Faxes
checkbox.
checkbox and enter a path to the folder. You can click the […] box on the right side to
browse for a folder.
Export Received Faxes: To export received faxes, check the
Faxes
checkbox and enter a path to the folder. You can click the […] box on the
Export Received
right side to browse for a folder.
File Name Fields: The filename used for the exported faxes can be customized
by entering variable names here. The variable names must be within $( and )
characters. The line directly below gives a sample of what the file name will
look like. The file name will always end with a unique identifier to avoid collisions (this cannot be changed).
It is possible to export to sub-directories based on the fax parameters by including backslashes in the file name. For example, $(user_name)\$
(start_time:yyyMMdd_hhmmss) will export to USERNAME\datetime_uniqueid.tif.
One file per page: This option will split a received fax into one file per page.
The page number will be appended to the file name between the unique id and
the extension. Only TIFFs can be split in this way.
Delete after export: This will cause the fax to be deleted from queue after it is
exported. Use this option if the user used will not forward on to a client (email,
Page 63

2 – Server Administration
Microsoft Fax, etc). This will prevent the exported faxes from accumulating in
the queue. Essentially, this makes the user an “export-only” user.
Override all other users: Only an option for the “Everyone” entry, this will
disable all per-user settings.
2.5.4.2 Global vs. Per-User Export
Export can be configured both with a global export configuration, and multiple
per-user configurations. If an entry exists for a particular user, Export will use
that entry. If the user does not exist, the global setting will be used.
NET SatisFAXtion 8.7 Manual
63
When the
Override all other users
box is checked on the
other per-user export settings will be disabled.
2.5.4.3 Exporting to a Network Share (UNC Path)
Since NET SatisFAXtion runs as a service, UNC paths must be used to export to
network locations. Make sure that the service account used has permissions to
write to those locations.
2.5.4.4 File Name Format
The file name can be constructed based on fax information. The variable name
must be enclosed within $( and ) characters, for example, $(user_name) or $
(start_time). Any date/time variable (schedule, start_time, submit_time and
time_date_stamp) can be formatted by including a colon : followed by format
characters, for example $(start_time:hhMMss) will result in hours, minutes
and seconds of the start_time.
Available variables:
attachment_count
connection_bps
connection_seconds
custom_billing_code
dial_seconds
dis
ecm_frame_error_count
email_sender_address
event_id
extended_error
fax_coarse_resolution
forwarded_message
group_message_handle
icanfax_completion_code
image_transfer_method
message_completion_code
message_completion_code_string
message_handle
Everyone
entry, all
Page 64

2 – Server Administration
message_type
nsf1
nsf2
number_of_errors
original_user_name
page_count
pages_transferred
port_used
receiver_address
receiver_csid
receiver_info
receiver_name
retries
rtn_count
rtp_count
schedule
sender_csid
sender_name
server_name
source_num
start_time
submit_time
time_date_stamp
total_fax_pages
user_billing_code
user_name
v21_frame_error_count
NET SatisFAXtion 8.7 Manual
64
Available date-time format characters:
d – day number of the month
dd – day number of the month (zero padded)
ddd – abbreviated day name
dddd – full day name
h – hour on 12-hour clock
hh – hour on 12-hour clock (zero padded)
H – hour on 24-hour clock
HH – hour on 24-hour clock (zero padded)
K – time zone
m – minute
mm – minute (zero padded)
M – month number
MM – month number (zero padded)
MMM – abbreviated month name
MMMM – full month name
s – second
ss – second (zero padded)
t – a/p
tt – AM/PM
Page 65
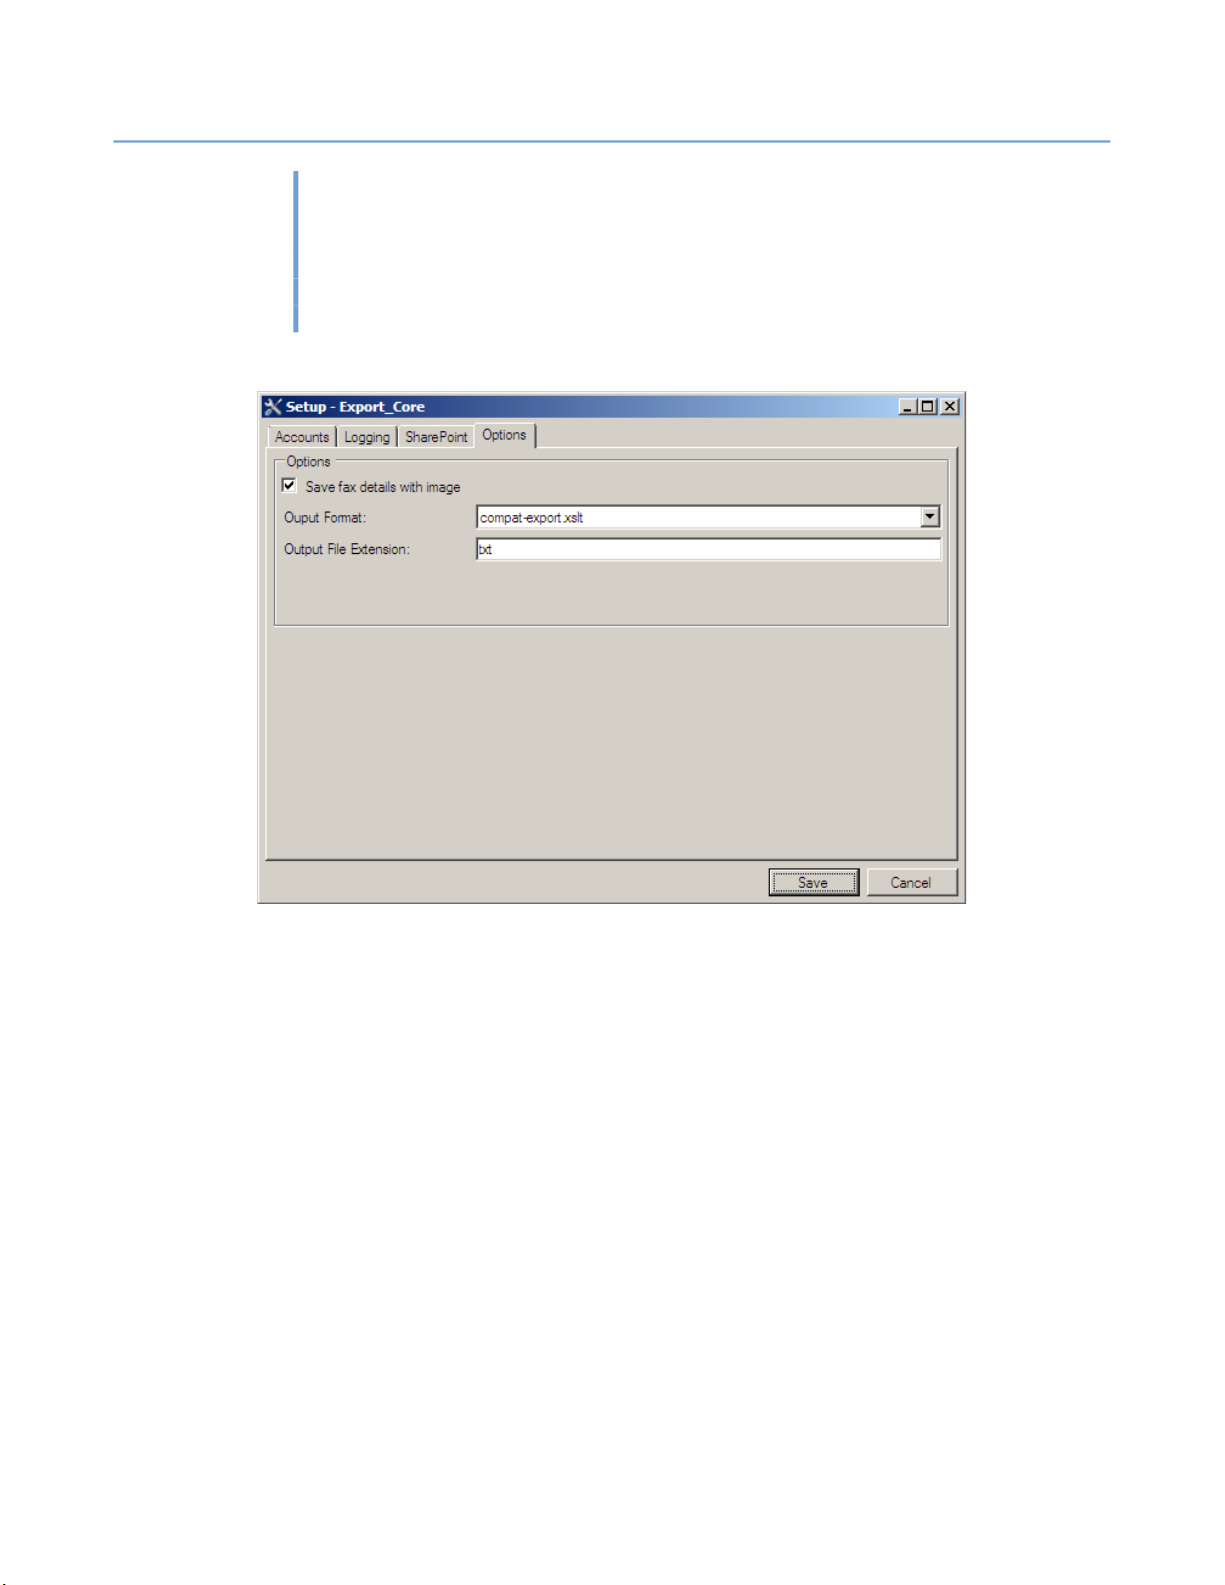
2 – Server Administration
y – two-digit year
yy – two-digit year (zero padded)
yyy – three digit year (zero padded)
yyyy – four-digit year (zero padded)
z – time zone hours offset from UTC
zz – time zone hours offset from UTC (zero padded)
2.5.4.5 Information TXT/XML File
NET SatisFAXtion 8.7 Manual
65
The fax server can create a text or xml file containing the meta-information
about the fax. This setting is global. To enable it, go to the
check the
Save fax details with image
checkbox. This is typically used for inte-
Options
gration with other systems
Output Format: Use this to choose the contents and format of the exported
text/xml file. Setting this to blank dumps the raw XML which you can use to
create and test your own XSLT transform.
Output File Extension: The file extension to use for these text/xml files. Typically set to
2.5.4.5.1 Moving from the Legacy Export System to Workflow Export
txt
or
xml.
When a fax server is upgraded from an older version to 8.7, the legacy export
system will remain in place. The easiest method to change from the legacy export system to the new more flexible export system is to uninstall NET SatisFAXtion and perform a fresh install. What follows are notes for advanced users
to manually disable the legacy export and enable the new export system.
tab and
Page 66

2 – Server Administration
2.5.4.5.1.1 Disable Legacy Export
NET SatisFAXtion 8.7 Manual
Unload the NET SatisFAXtion server and email gateway, if any.
Modify the registry. Remove UseLegacyLogAndExport from
HKLM\Software\FaxBack. Remove ScriptR.dll from the
HKLM\Software\FaxBack\WLoader\Load7 key.
Load the NET SatisFAXtion server and email gateway, if any.
2.5.4.5.1.2 Publish Export Workflows
From a command prompt, cd to C:\Program Files\NET SatisFAXtion. Run
the following command:
WorkflowDesigner.exe /install PublishedWorkflows\Export_Core\Export_handles.xml /nocopy /nowizard
Click OK to any prompts.
Run the Workflow Service Monitor, and right-click on each of the Export workflows. Select Autorun.
66
2.5.4.5.1.3 Configure Export
From the Start menu, use “Configure Export” to configure Export as needed.
2.5.5 Autoprint
The Autoprint module allows inbound and outbound faxes to be automatically
printed to any configured printer. Autoprint can be configured globally, to print
all faxes sent or received, or configured for individual groups so that only certain faxes are printed.
Only printers configured for the service account are available and displayed.
Autoprint works off a duplicate copy of a fax (sent to the user AUTOPRINT) so
that it doesn’t interfere with other fax routing that the server is doing.
2.5.5.1 Global Autoprint
To configure global Autoprint, run the Administration program and log in. Click
File Autoprint Setup⇨
for letter and legal page size faxes. On the Legal tab is a checkbox to use
8½''×14'' paper, which is often required for most printers to choose the legal-sized paper tray.
. The first two tabs allow selection of the printer to use
Page 67
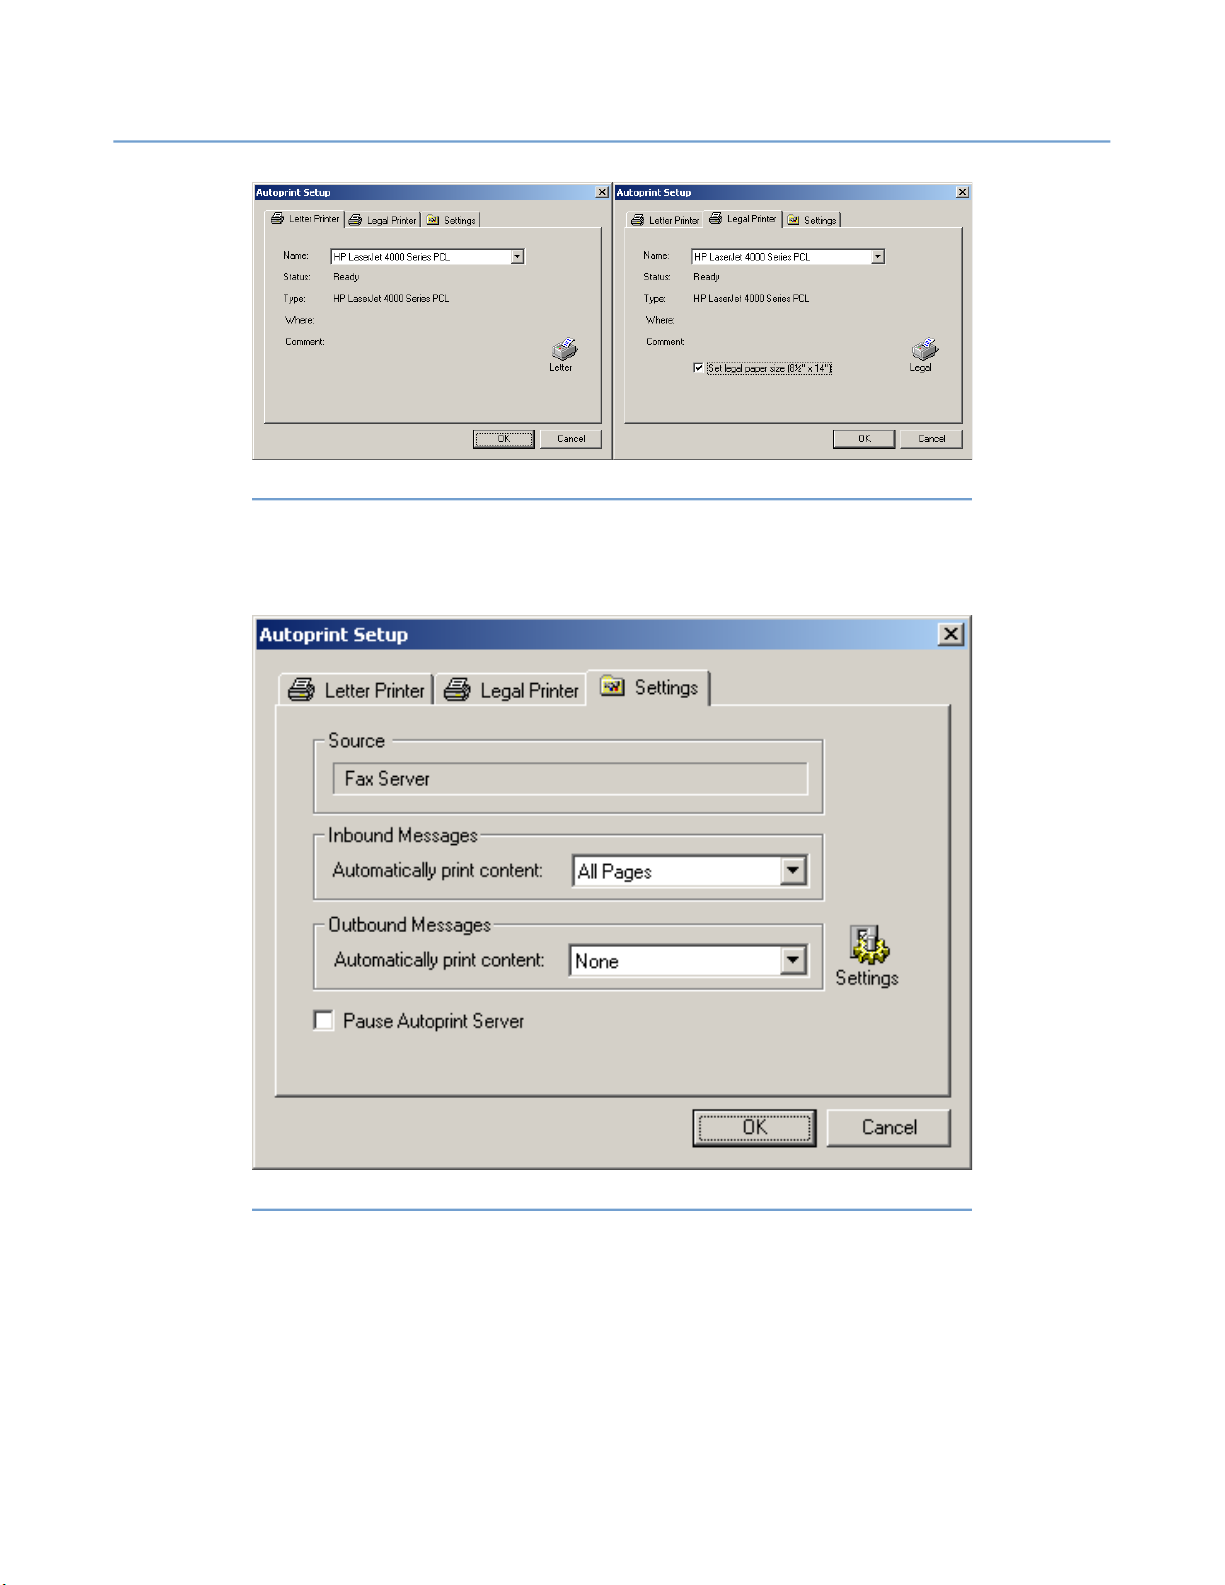
2 – Server Administration
The
Settings
faxes or both. Autoprint can also print just the first page of the fax rather than
all pages.
NET SatisFAXtion 8.7 Manual
Illustration 2.5.5.1#1: Letter and Legal Printer Selection
tab configures whether Autoprint prints inbound faxes, outbound
67
It is also possible to pause Autoprinting from this tab.
2.5.5.2 Group Autoprint
Autoprint can also be configured for a particular group rather than globally. The
fax will be printed when any user that is a member of the group receives a fax.
Note that if a user is in multiple groups with Autoprint configured, the fax will
be printed to all of those printers.
Illustration 2.5.5.1#2: Autoprint Settings
Page 68
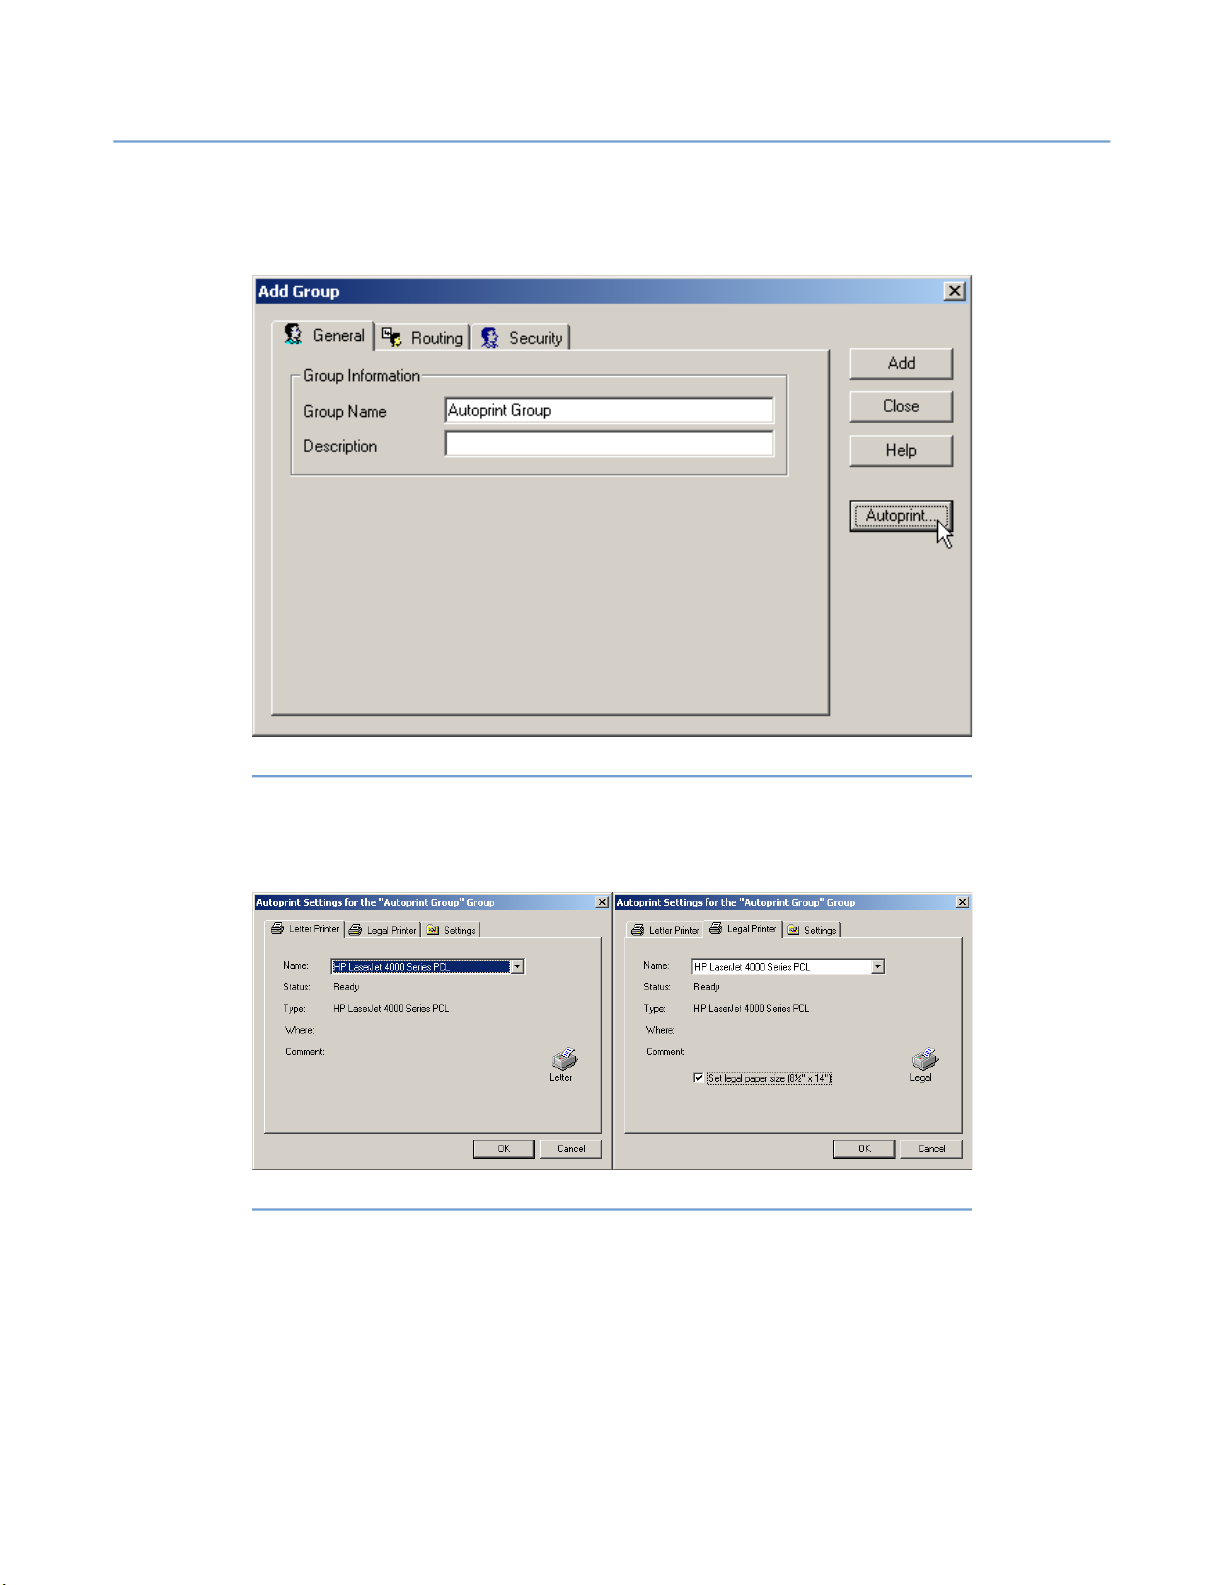
2 – Server Administration
To configure global Autoprint, run the Administration program and log in. Click
on the
fy Group
View User Administration⇨
. On the right side is an
NET SatisFAXtion 8.7 Manual
menu. Right-click a group and choose
Autoprint
button.
68
Modi-
Illustration 2.5.5.2#1: Configuring Group Autoprint
The first two tabs allow selection of the printer to use for letter and legal page
size faxes. On the
ten required for most printers to choose the legal-sized paper tray.
The
Settings
faxes or both. Autoprint can also print just the first page of the fax rather than
all pages.
Legal
tab is a checkbox to use 8½''×14'' paper, which is of-
Illustration 2.5.5.2#2: Letter and Legal Printer Selection
tab configures whether Autoprint prints inbound faxes, outbound
Page 69
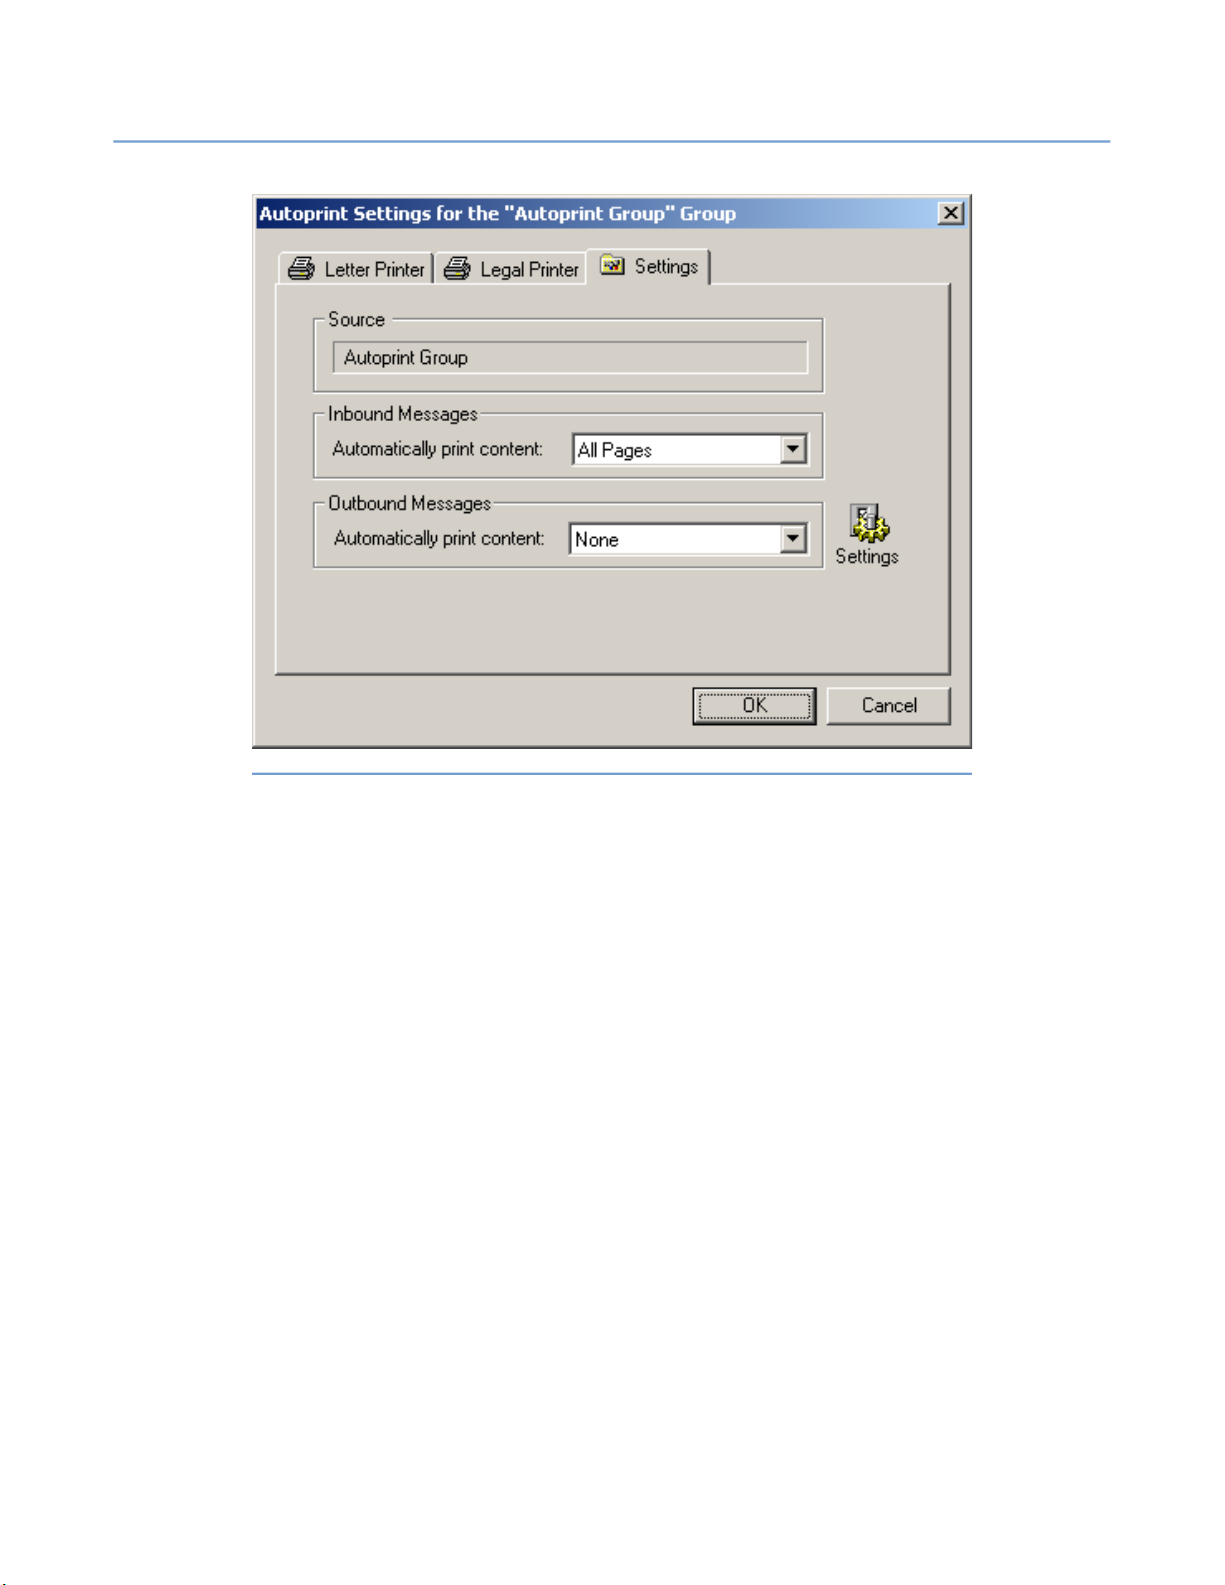
2 – Server Administration
NET SatisFAXtion 8.7 Manual
69
Illustration 2.5.5.2#3: Autoprint Settings
2.5.5.3 Autoprint everything that comes in on a line
Create a group and add a user to it. On the group’s
to be Autoprinted.
Note that the user added to the group still gets its own copy of the fax, and
should be routed off of the fax server to either an email address or to a
Microsoft Fax client.
2.5.5.4 Autoprint everything that comes in on a DID
Create a group and add a user to it. On the group’s
to be printed to the
Identifier
field.
Note that the user added to the group still gets its own copy of the fax, and
should be routed off of the fax server to either an email address or to a
Microsoft Fax client.
Routing
Routing
tab, mark the lines
tab, enter the DID
Page 70

2 – Server Administration
2.6 Outbound Faxes
2.6.1 Errors and Retries
When NET SatisFAXtion tries to send a fax and gets an error one of two things
happen. Either the error is retryable and the fax moves to the
to wait to retry, or the error is non-retryable and gets sent back to the sender.
Retryable errors are those errors that are generally intermittent and another
attempt at faxing may go through. For example, “busy” and “no answer” errors
are retryable.
Non-retryable errors are permanent failures where trying the fax again is not
going to succeed either and it is not an efficient use of phone or processing
time attempting the fax again. For example, “no dial tone” and “number not in
service” errors are not retryable.
The Microsoft Fax client manages its own retries. None of the server-side retry
settings apply to faxes sent by Microsoft Fax.
NET SatisFAXtion 8.7 Manual
70
Scheduled Queue
2.6.1.1 Number of Retries
By default, the fax server will retry a fax three times (four attempts total). This
can be configured in the Change Server Settings utility,
NET SatisFAXtion ⇨ Change Server Settings
tings button and change to the General tab.
Start Programs ⇨ ⇨
. Click the Fax Hardware Set-
Page 71
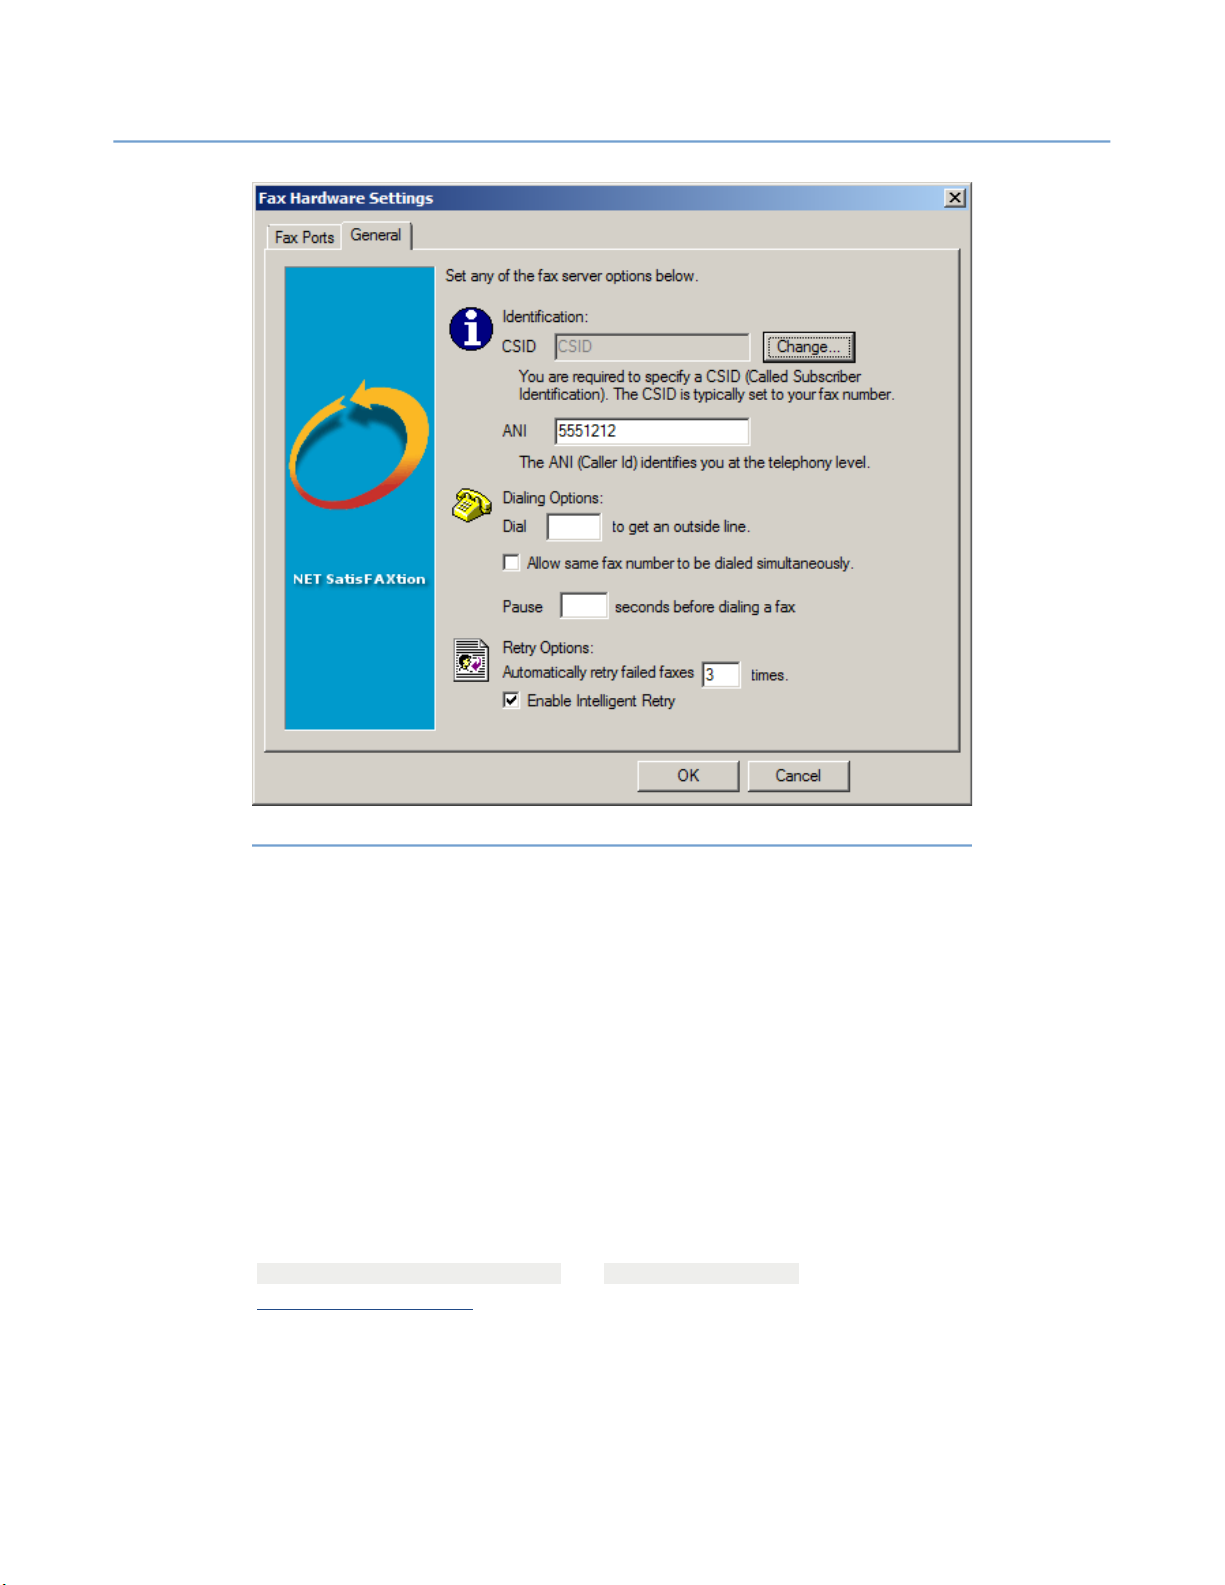
2 – Server Administration
NET SatisFAXtion 8.7 Manual
71
2.6.1.2 Intelligent Retry
“Intelligent Retry” is a method that resumes a partially successful fax from
where it left off. If a fax fails in the middle, on a retry the first page will be resent (usually the cover sheet), and then the remaining pages will be sent. This
prevents re-sending of successful pages and reduces the call time of the retries.
For example, a 10-page fax is sent, and it fails while sending page 7. On a
retry, the fax server will send page 1, then pages 7 through 10. If it fails again
on page 9, the fax server will send page 1, then pages 9 through 10.
2.6.1.3 Retry Interval
“Busy” errors are retried after 60 seconds. All other retryable errors are retried after 15 seconds. These values can be customized with the
busy_call_send_retry_seconds and send_retry_seconds respectively, see
4.2.1.1 ICANFax Global .
2.6.1.4 Which Errors are Retried
In general, all normal “call progress” errors are retryable, such as “busy” and
“no answer.” Also all transmission errors are retryable.
Illustration 2.6.1.2#1: Fax Hardware Settings, General Tab
Page 72

2 – Server Administration
NET SatisFAXtion 8.7 Manual
The exact error codes that are retried are driver-specific. See the appropriate
section in 4.1 Error Code Reference for a list of all error codes and whether
they are retryable.
2.6.1.5 Customizing Retryable Errors
In some environments, certain errors are actually retryable when normally they
are not, and vice versa. It is possible to reclassify particular error codes as
retryable with also_retry_errors, and others as non-retryable with
dont_retry_errors. See 4.2.1.1 ICANFax Global and appropriate section in
4.1 Error Code Reference for more detail.
2.6.2 Dialing the Same Number More Than Once
By default the fax server will only send one fax to any given number at the
same time. Any additional faxes to that number will queue up in the Scheduled
queue until the first fax completes. This is because most fax numbers are fax
machines that can only handle one fax call at a time.
To disable this behavior, allowing the fax server to send more than one fax to a
number at the same time, run the Change Server Settings utility,
grams NET SatisFAXtion ⇨ ⇨ Change Server Settings
Hardware Settings button, and change to the General tab. Check Allow same
fax number to be dialed simultaneously. Click OK.
72
Start Pro⇨ -
. Click on the Fax
Note that this is a global setting, and will affect all faxes submitted to the fax
server. If a fax number is sent two or more faxes at the same time but can only
handle a single fax, all but one of the faxes will typically get a “busy” error, and
retry. Since all retries will also happen simultaneously, it is likely some faxes
will still get a “busy” error on all retries and permanently fail.
2.6.3 Outbound Number Validation
Validation is a server feature that qualifies all fax transmissions that go through
the server, regardless of the client that sent the fax. The criteria for the validation are created, modified and removed in the Validation Editor. The Validation
Editor utility can be accessed from
Validation Editor
tion Editor
.
or from the Administration program under
You can use the Validation Editor to do any of the following, and more:
• Add digits required for dialing, such as when dialing through a PBX or long distance service.
• Remove digits from a telephone number, such as when dialing a local number
that does not require an area code.
• Prevent (block) faxing to certain telephone numbers and/or certain dialing areas.
Start Programs NET SatisFAXtion ⇨ ⇨ ⇨
Tools Valida⇨ -
Page 73

2 – Server Administration
There are three common dialing rule configurations that have step-by-step
guides in this manual. They are:
• 7 digit local / 11 digit long distance dialing: This is the traditional dialing scheme. Local
calls are just seven digits (e.g. 555-0123), and long distance is 1 + Area Code + Number (e.g. 1-800-555-0123).
• 10 digit local / 11 digit long distance: Some areas require local calls to have the Area
Code + Number, but without a “1” (e.g. (503) 555-0123), while long distance is 1 +
Area Code + Number (e.g. 1-800-555-0123)
A fax number can potentially go through four levels of validation at the server.
These are outlined in the following table:
NET SatisFAXtion 8.7 Manual
73
Rule Type Evaluation
Order
Pre-Process 1 Parameters specified here standardize a number in preparation for the next two validation
levels. Examples of tasks at this level include stripping a leading ‘1’ or ‘9’ or ‘91’. This
rule-type is helpful because if you want to test a number, you won’t have to write rules
for all of its possible variations.
Dial 2 This rule-type is primarily for specifying what is allowed, primarily defining local and long
distance dialing rules. An example of this would be stripping of area codes if you work in
a seven-digit dialing area.
Block 3 This rule-type blocks certain numbers (e.g. those beginning with ‘900’).
Post-Process 4 This rule-type is most useful for adding access digits to a fax number (e.g. ‘9’ to get an
outside line, etc.)
Explanation
Below are a couple of miscellaneous rule notes and highlights:
• As dictated by the evaluation order shown in the table above, the output of one ruletype is the input for the next rule-type.
• A Block rule always overrides a Dial rule.
• Any modifications made to a number by a Pre-process rule apply as the number is vali-
dated by a Block or Dial Rule.
• If a number is blocked, it does not get post-processed.
• If any Dial rule(s) exist, a number being validated must pass at least one of these rules
in order to be post-processed and dialed.
• If no Dial rules exist, any number will pass, provided it is not blocked.
You can add rules to do any of the following, and more:
• Add digits required for dialing, such as when dialing through a PBX or long distance service.
• Remove digits from a telephone number, such as when dialing a local number that does
not require an area code.
• Prevent (block) messaging to certain telephone numbers and/or certain dialing areas.
Page 74
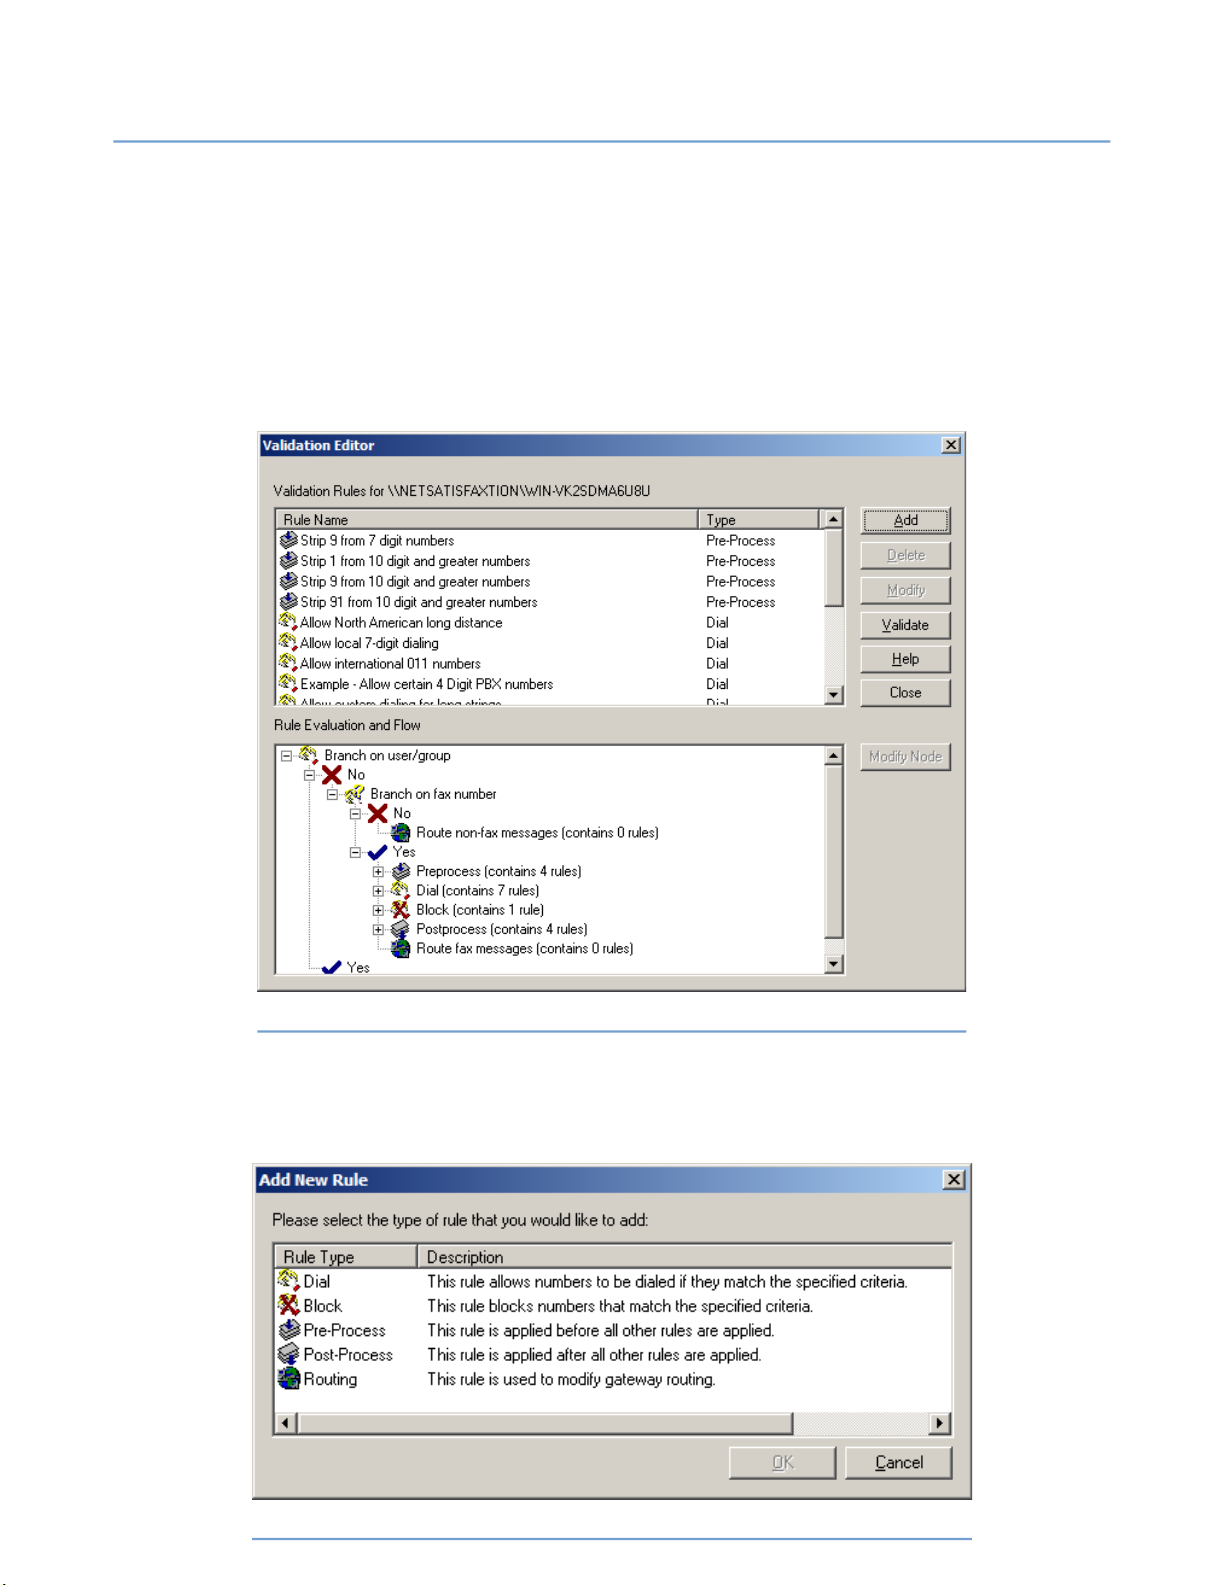
2 – Server Administration
2.6.3.1 Starting the Validation Editor
NET SatisFAXtion 8.7 Manual
There are two ways to get to the Validation Editor.
74
• Via the Windows Start menu choose the menu item
tor
• Via the Administration program choose the menu item
A dialog similar to the one below appears:
NET SatisFAXtion Validation Edi⇨ -
Tools Validation Editor.⇨
2.6.3.2 Adding a Validation Rule
1. In the open Validation Editor, click the Add button. The dialog below dis-
plays:
Illustration 2.6.3.2#1: Validation Editor main window
Illustration 2.6.3.2#2: Validation - Add New Rule Dialog
Page 75
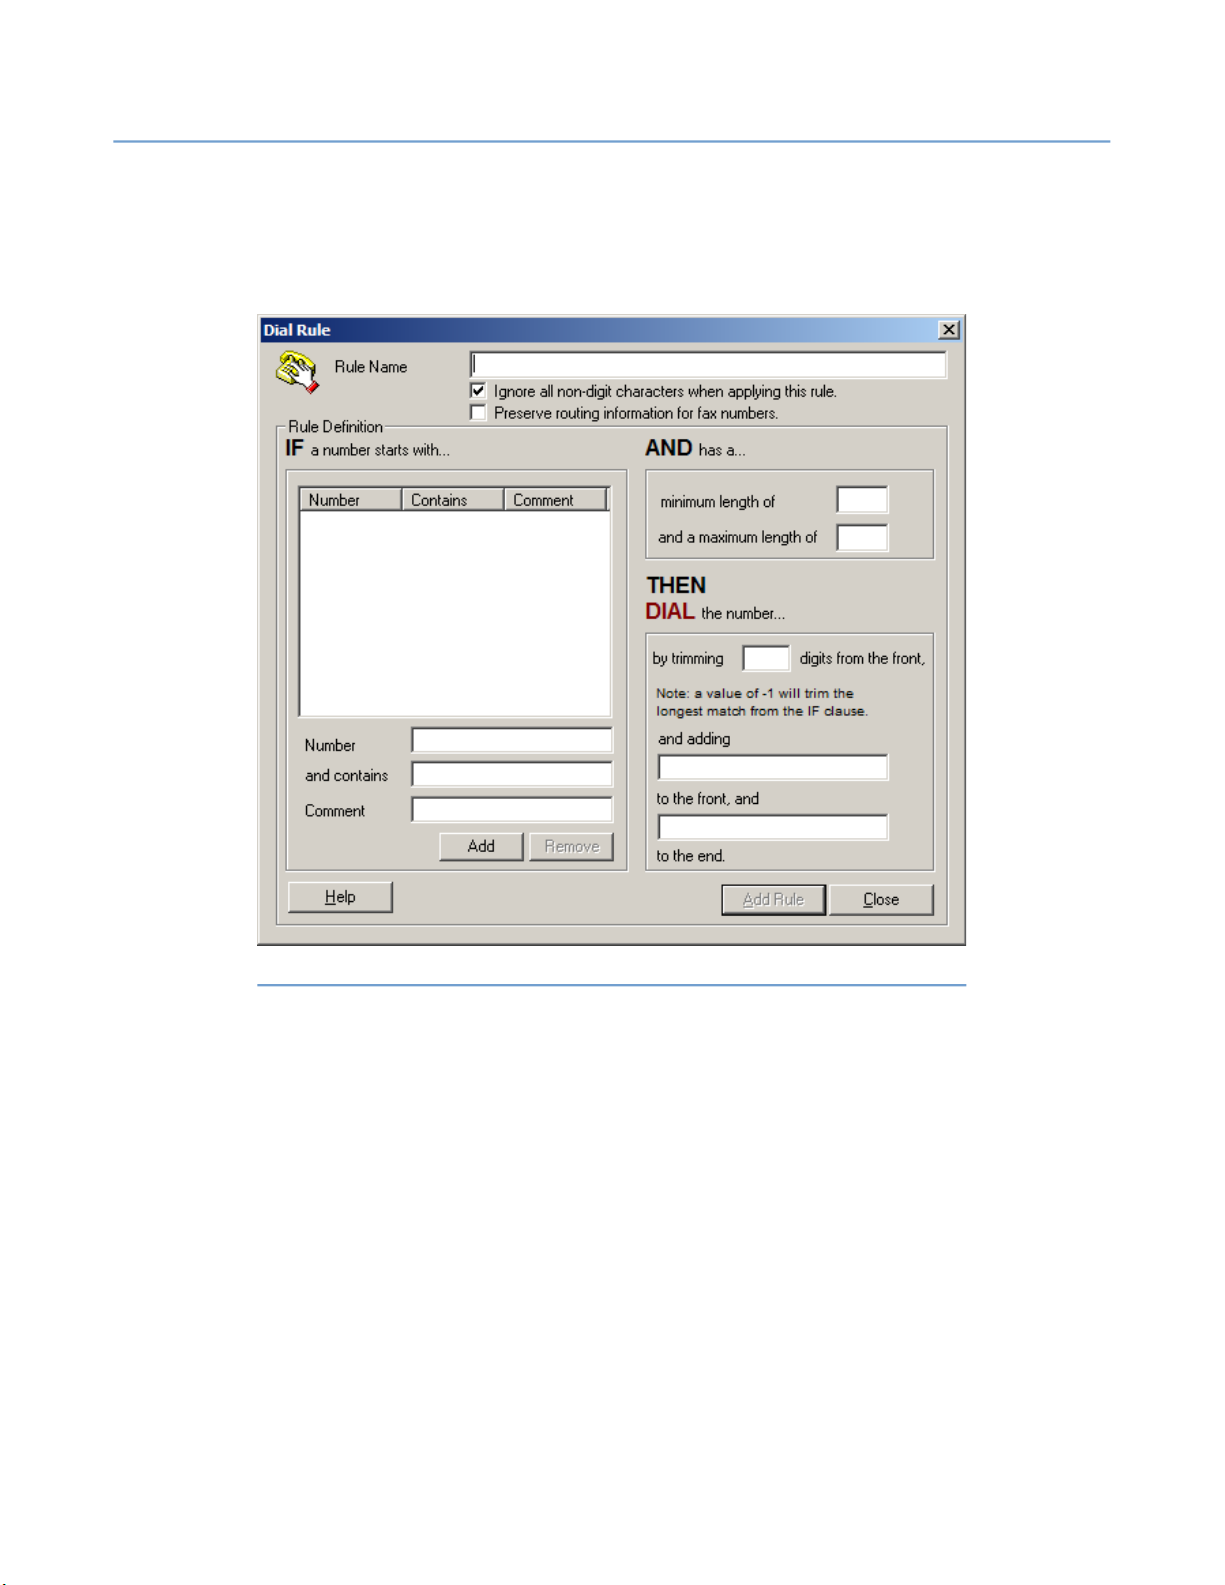
2 – Server Administration
2. Using the guide above, decide what type of rule to add, select it in the list,
and then click OK.
3. Even though each of the rule-types has a different function, their dialogs all
have a similar format. Pictured is the Dial Rule dialog.
NET SatisFAXtion 8.7 Manual
75
Illustration 2.6.3.2#3: Validation – New Dial Rule
Each of the Rule dialogs has the same basic format:
To create a rule, simply give the rule a name, then read through the dialog as a
sentence, filling in applicable criteria and instructions as indicated.
The left column of the Rule Definition area lists rule criteria, along with buttons
with which to add and remove criteria that help define a particular rule.
The right column of the Rule Definition area lists the remaining criteria and the
instructions on how to handle the number up for validation.
To cancel the Add process, click Close.
To complete the Add process, click Add Rule.
The checkbox ‘Ignore all non-digit characters when applying this rule’ specifies
that anything except number digits 0 through 9 will be ignored when determining whether or not a rule applies. This only determines if this rule will match the
input, it does not actually remove the non-digit characters.
Page 76
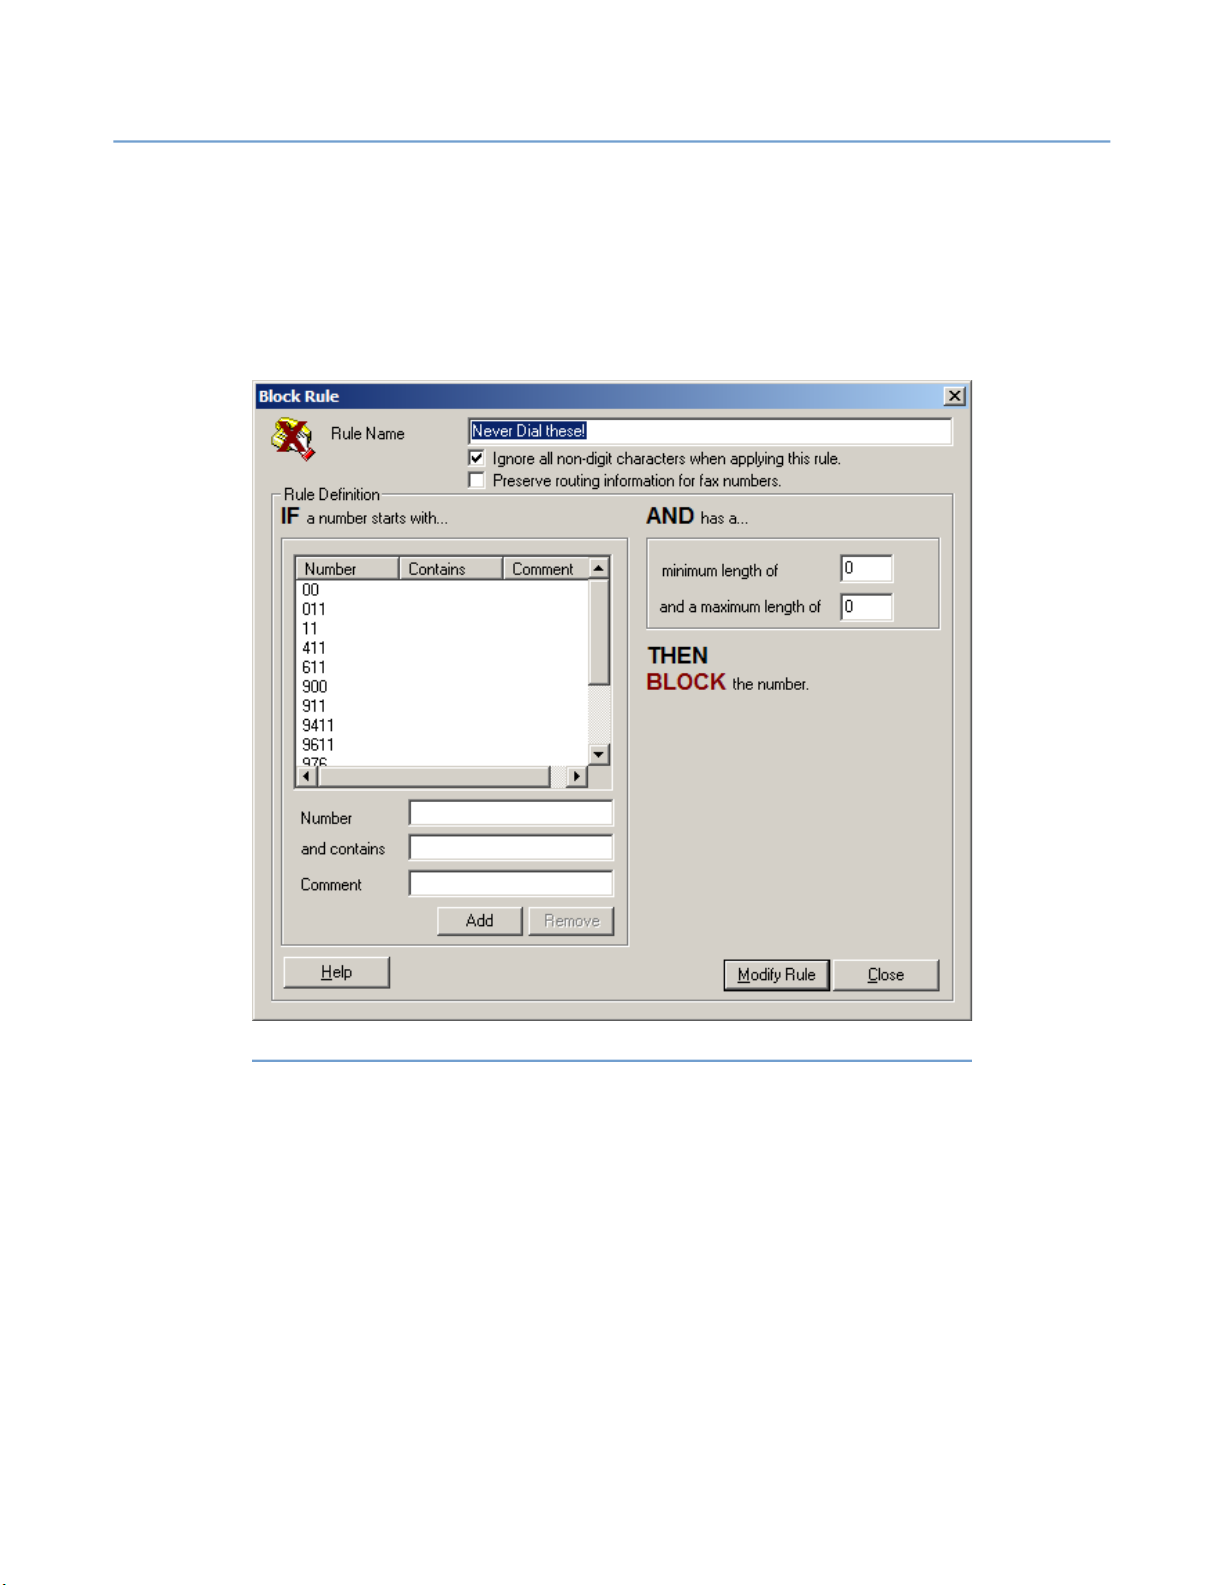
2 – Server Administration
For example, in the Block Rule dialog, if you wish to block the number
‘5035551212’, you need to check the checkbox in order to block fax numbers
submitted with the format ‘503,5551212’, for example.
Note that there are cases in which you would want to leave a comma in the
number, as it indicates a pause in the dialing sequence.
Below is an example of a common Block rule:
NET SatisFAXtion 8.7 Manual
76
Illustration 2.6.3.2#4: Validation – Block Rule Example
To delete a rule:
1. Select the rule in the Validation Editor dialog.
2. Click the Delete button.
3. In the confirmation dialog, click Yes to confirm or No to cancel.
To modify a rule:
1. Select the rule in the Validation Editor dialog.
2. Click the Modify button.
3. Make the desired changes.
4. Click the Modify Rule button.
Page 77
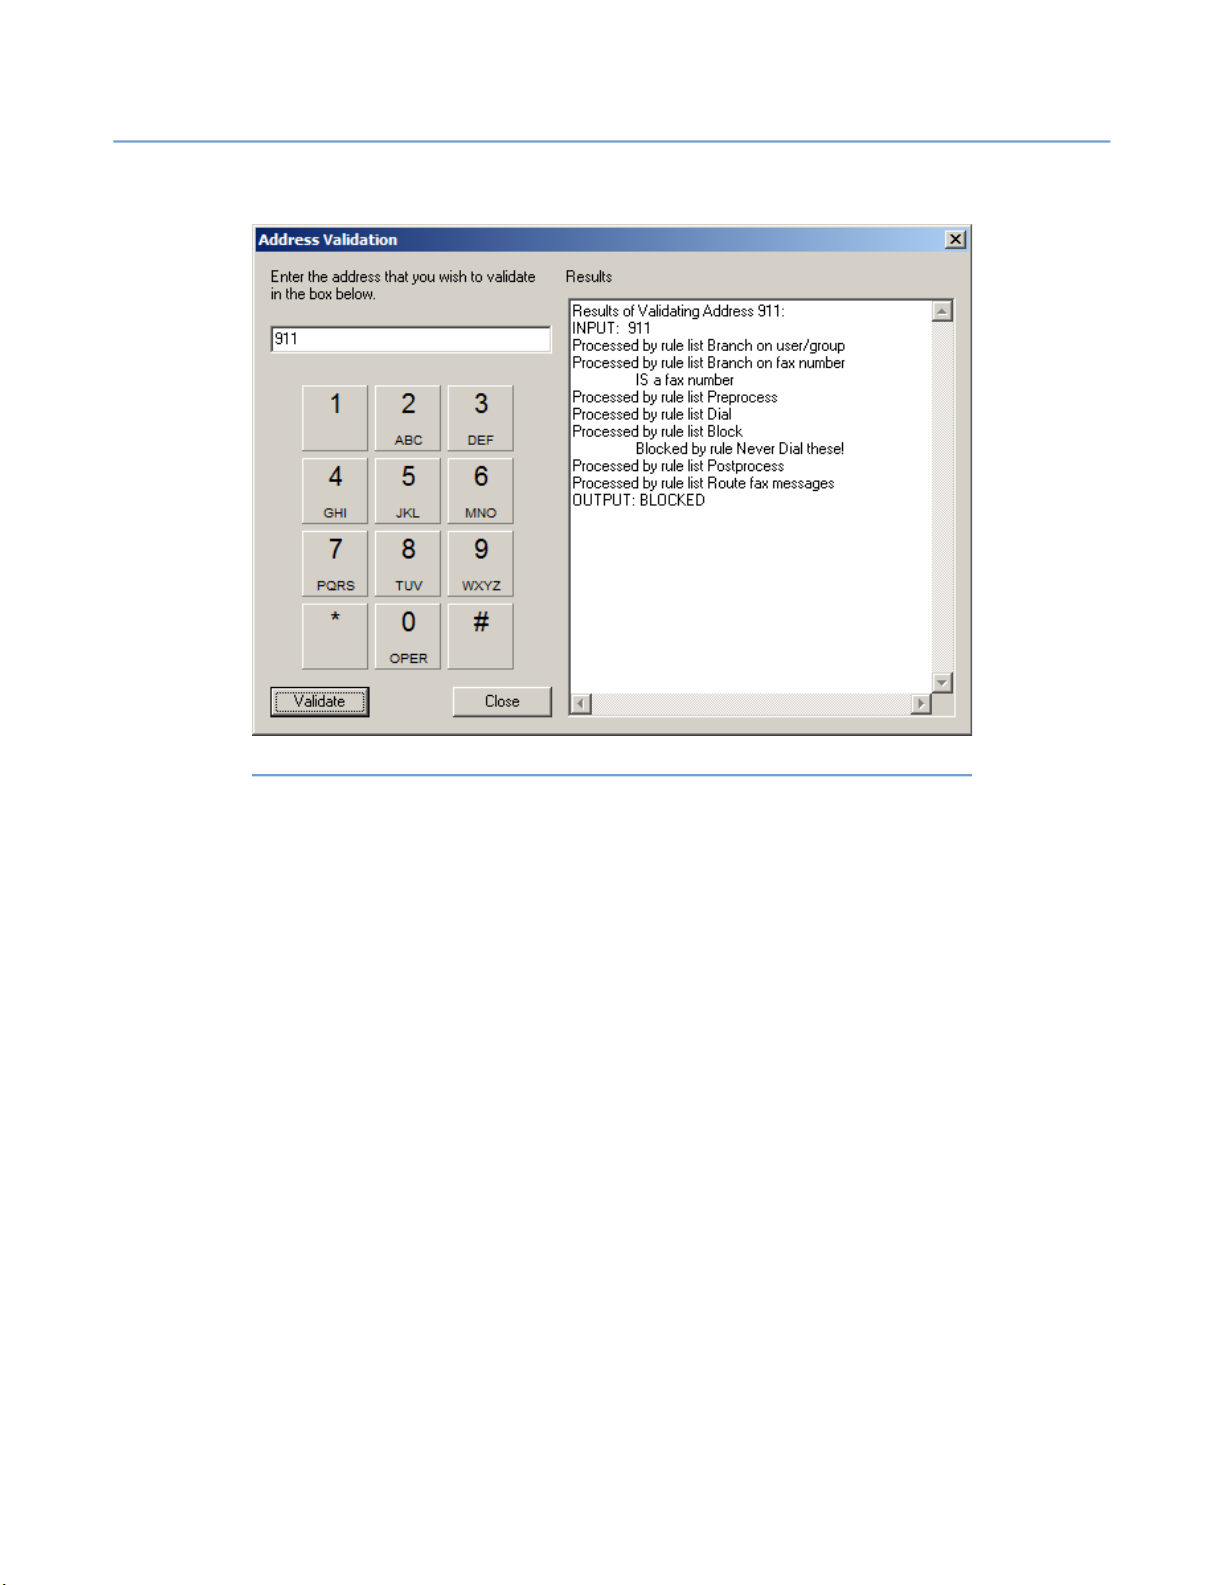
2 – Server Administration
2.6.3.3 Testing Validation Rules
NET SatisFAXtion 8.7 Manual
77
Illustration 2.6.3.3#1: Validation – Testing Address Validation
1. In the Validation Editor dialog, click the Validate button. The dialog shown
below appears.
2. Enter a number in the field provided. You can either type the number using
your keyboard or click numbers on the dialog’s number pad.
3. Click the Validate button. Note the feedback in the Results area to the
right.
4. To perform another test, repeat steps 2 and 3; to return to the Validation
Editor, click Close.
2.6.3.4 Scenario: Seven Digit Local Dialing
In this scenario, the following transformations will occur:
• User supplies 7 digits: Dials as supplied.
• User supplies local area code + 7 digits: Area code is stripped, and
the seven digits are dialed.
To implement this, open the Validation Editor and locate the rule (in the top
pane) named “Example - trim area code from local numbers.”
Page 78
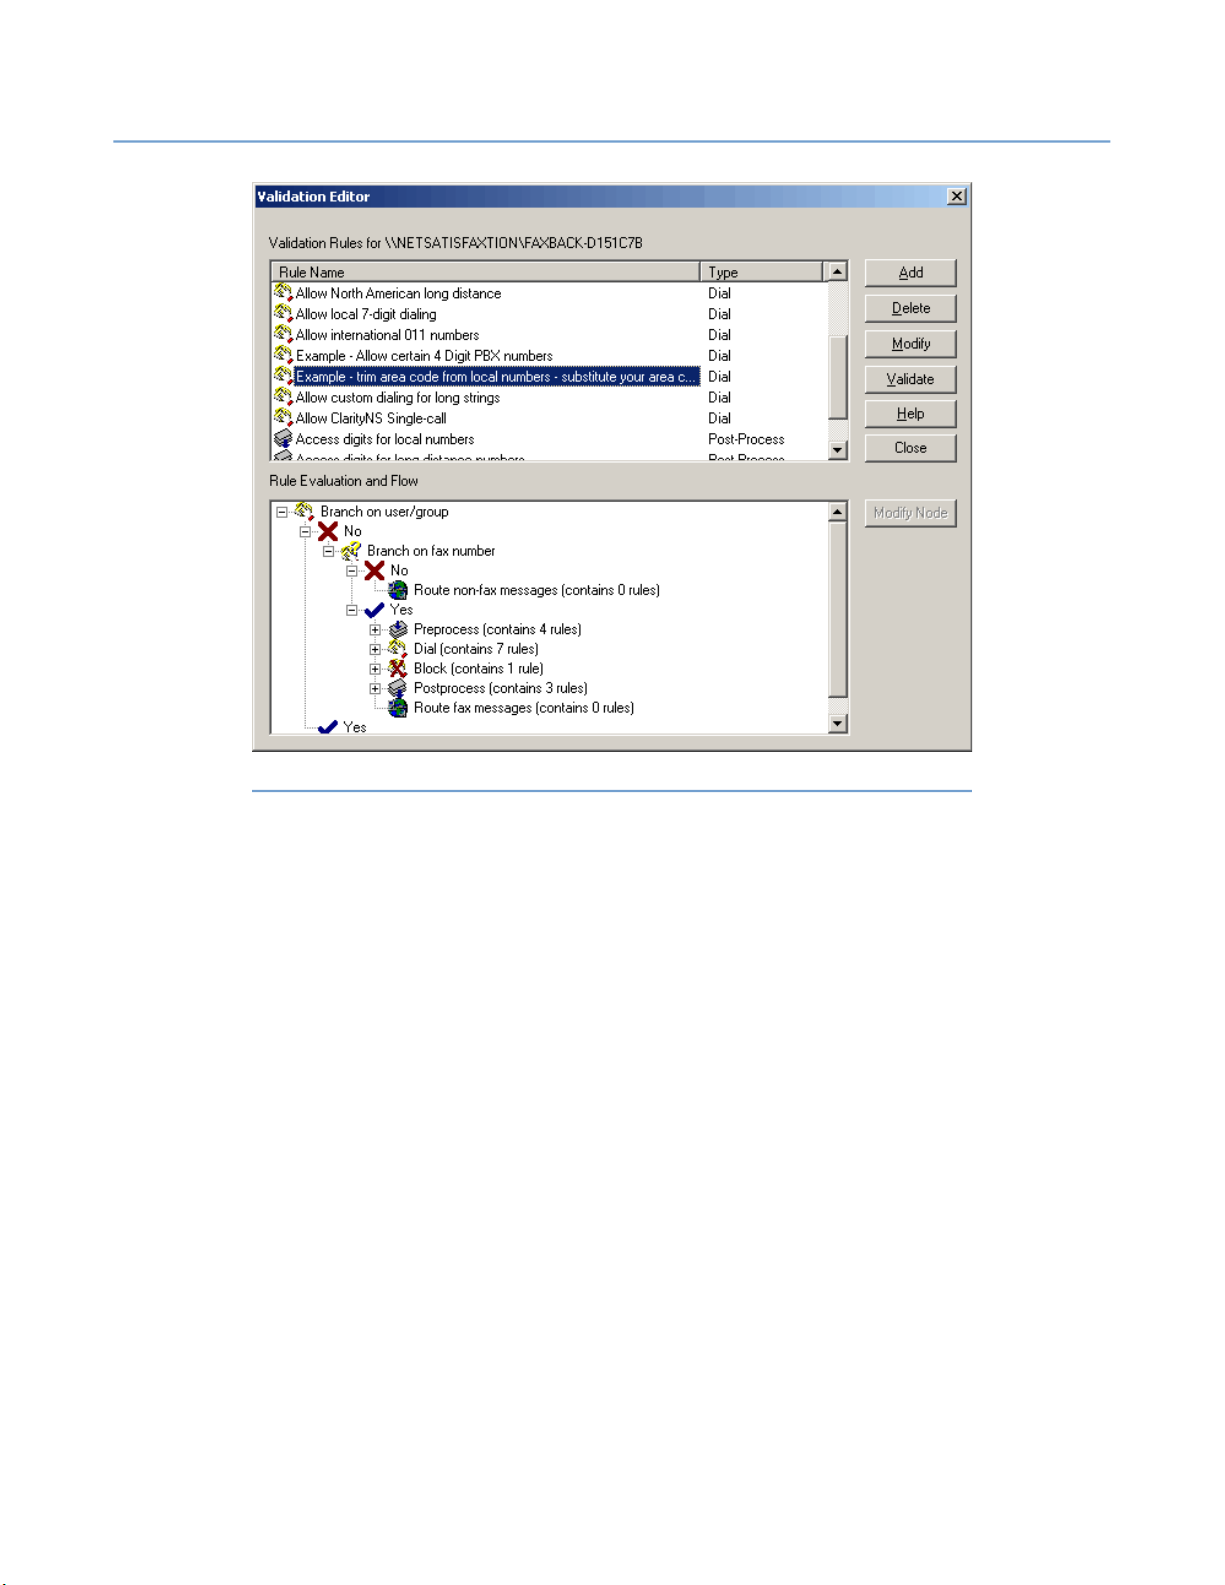
2 – Server Administration
NET SatisFAXtion 8.7 Manual
78
Illustration 2.6.3.4#1: Validation – Trim Local Area Code Example Rule
Select that rule, the click the Modify button to the right.
Page 79
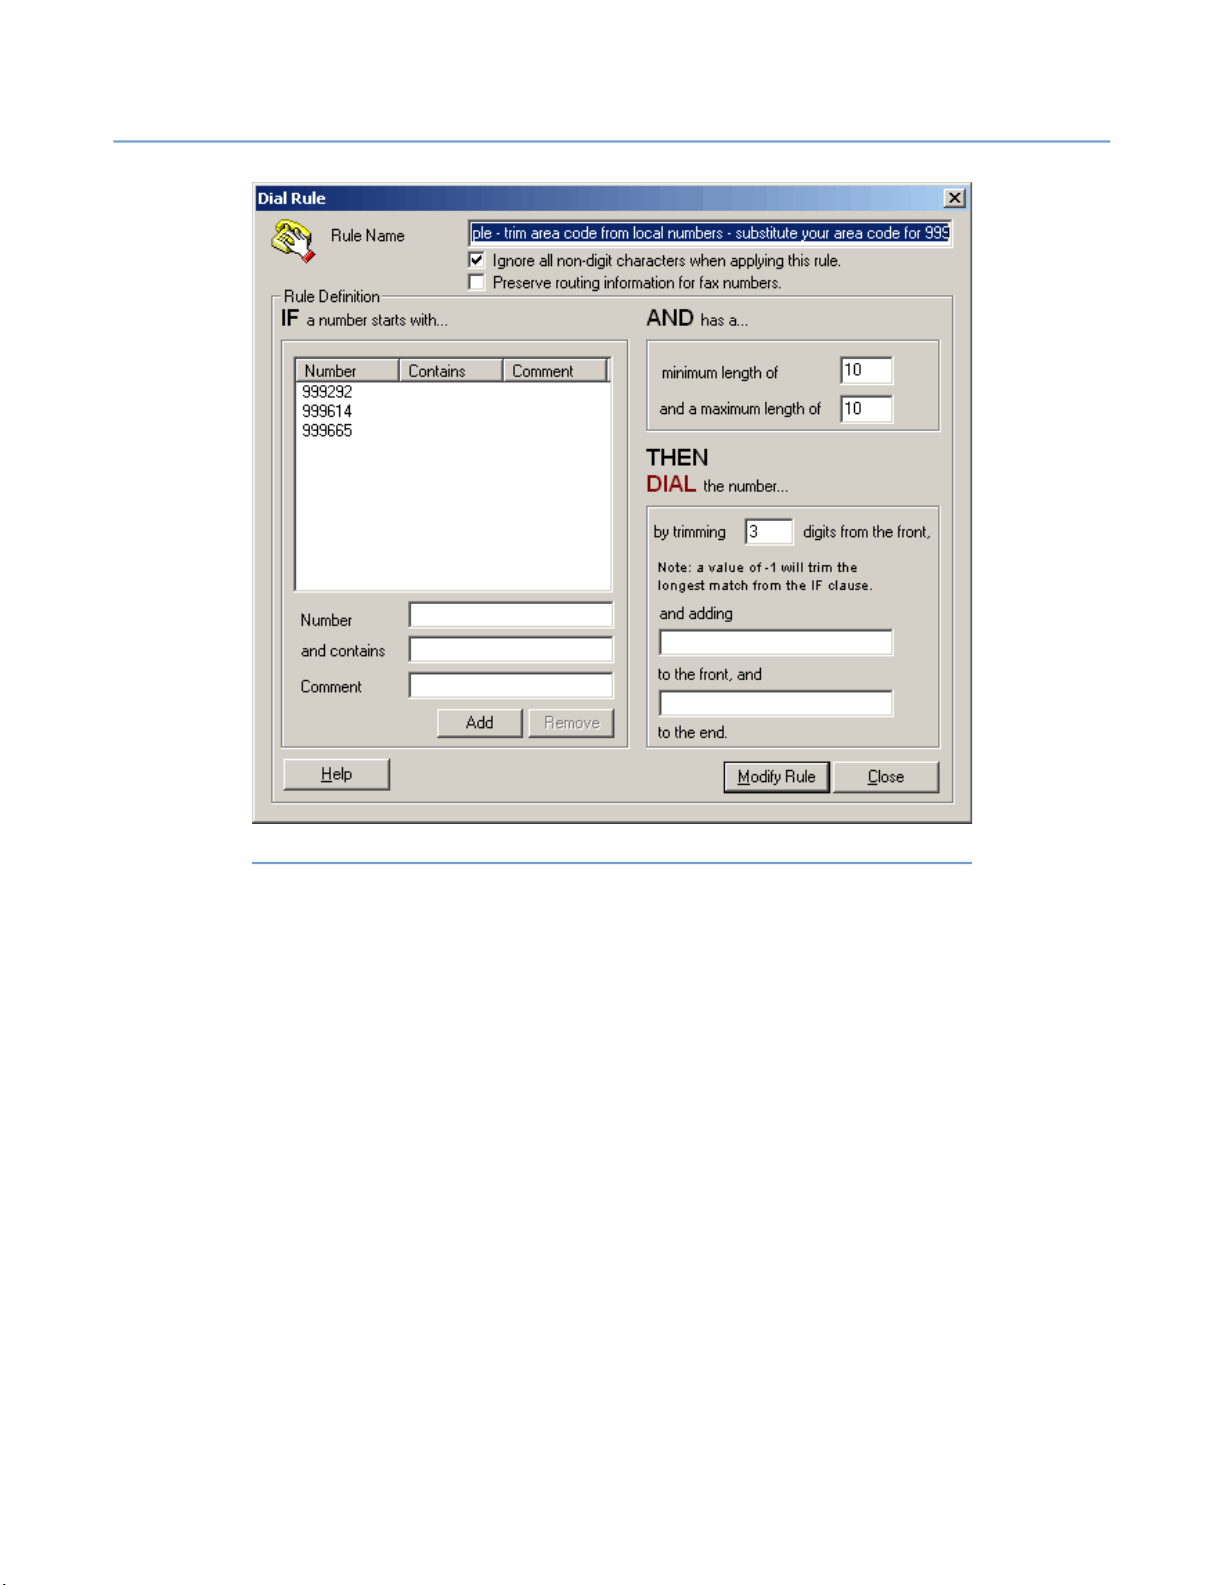
2 – Server Administration
NET SatisFAXtion 8.7 Manual
79
Illustration 2.6.3.4#2: Validation – Editing Trim Local Area Code
Next, remove the example “999292,” “99614,” and “999665” prefixes by selecting each one and clicking the Remove button at the bottom.
Enter your local area code in the “Number” field below, and click the Add button.
Page 80
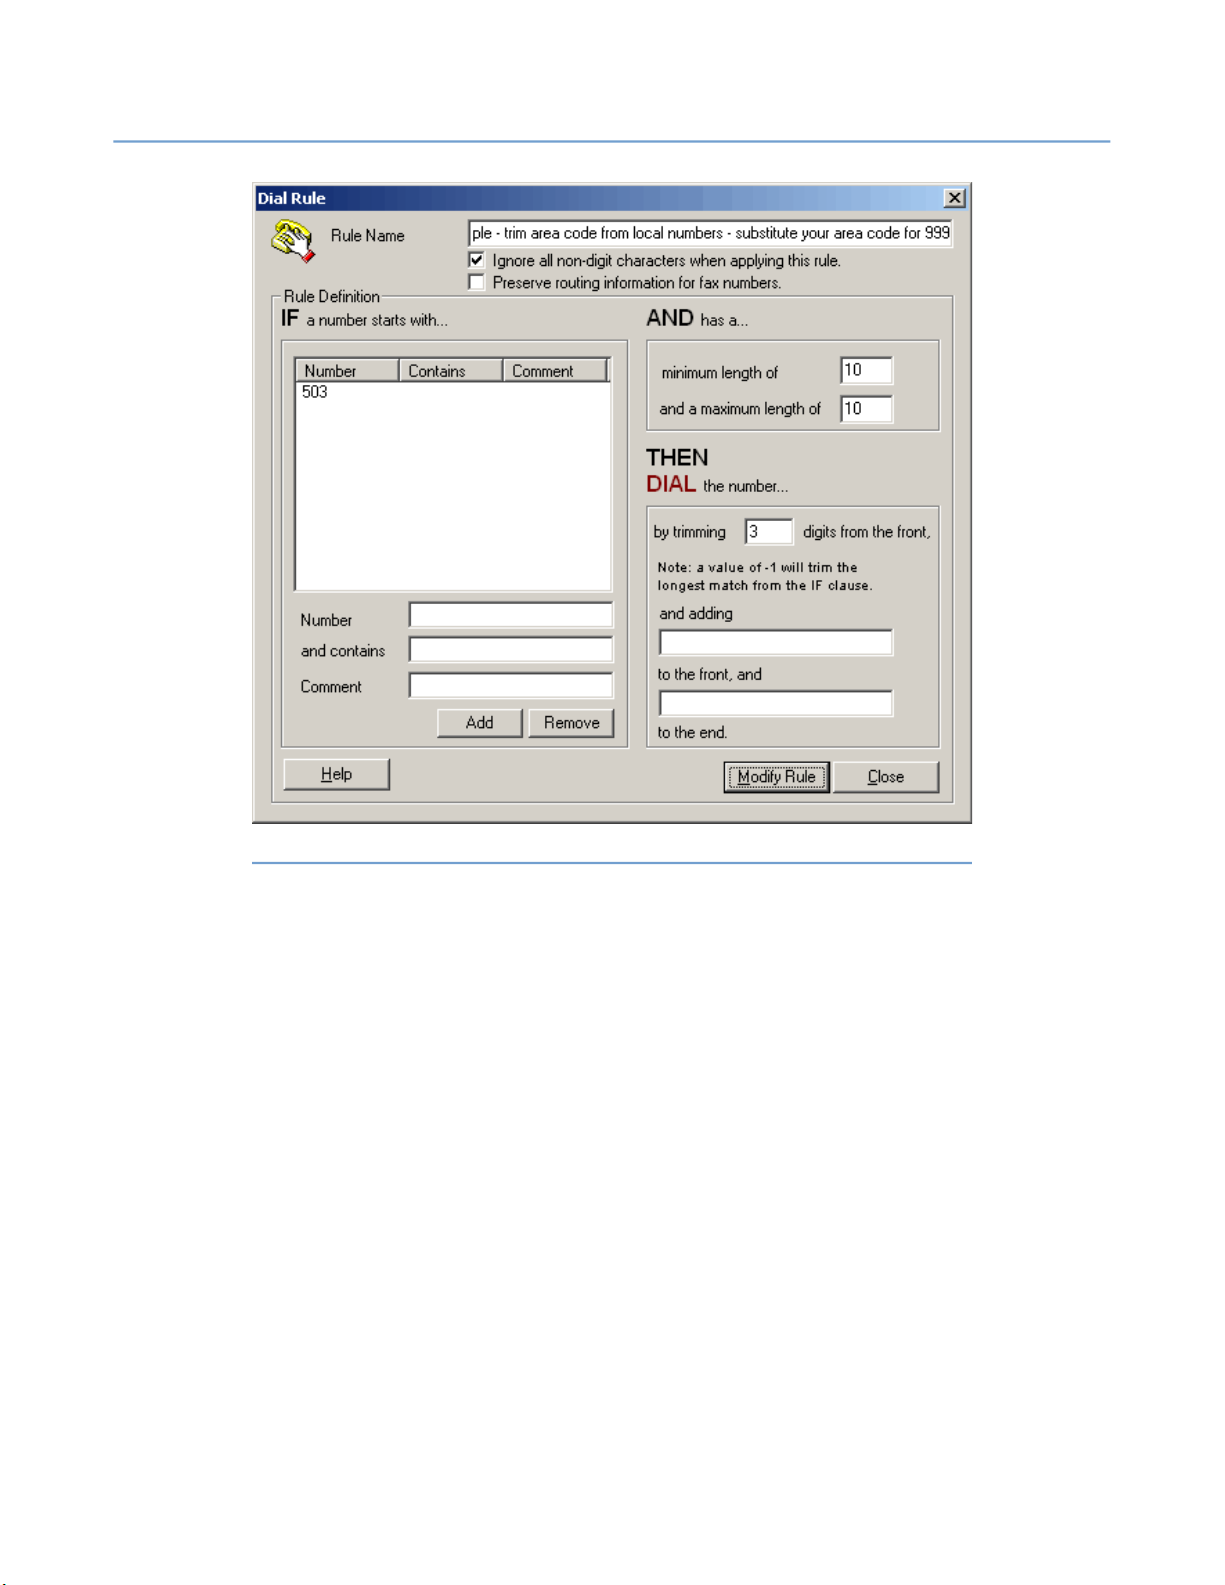
2 – Server Administration
NET SatisFAXtion 8.7 Manual
80
Illustration 2.6.3.4#3: Validation – After Editing Trim Local Area Code
Click Modify Rule. The window will close.
Now, 10 digit numbers supplied to the server will have the first 3 digits
trimmed, if those 3 digits are your local area code. You can test this by clicking
the Validate button on the main Validation Editor interface. Enter some example
input numbers, and verify the OUTPUT: listed in the results window is correct.
Page 81
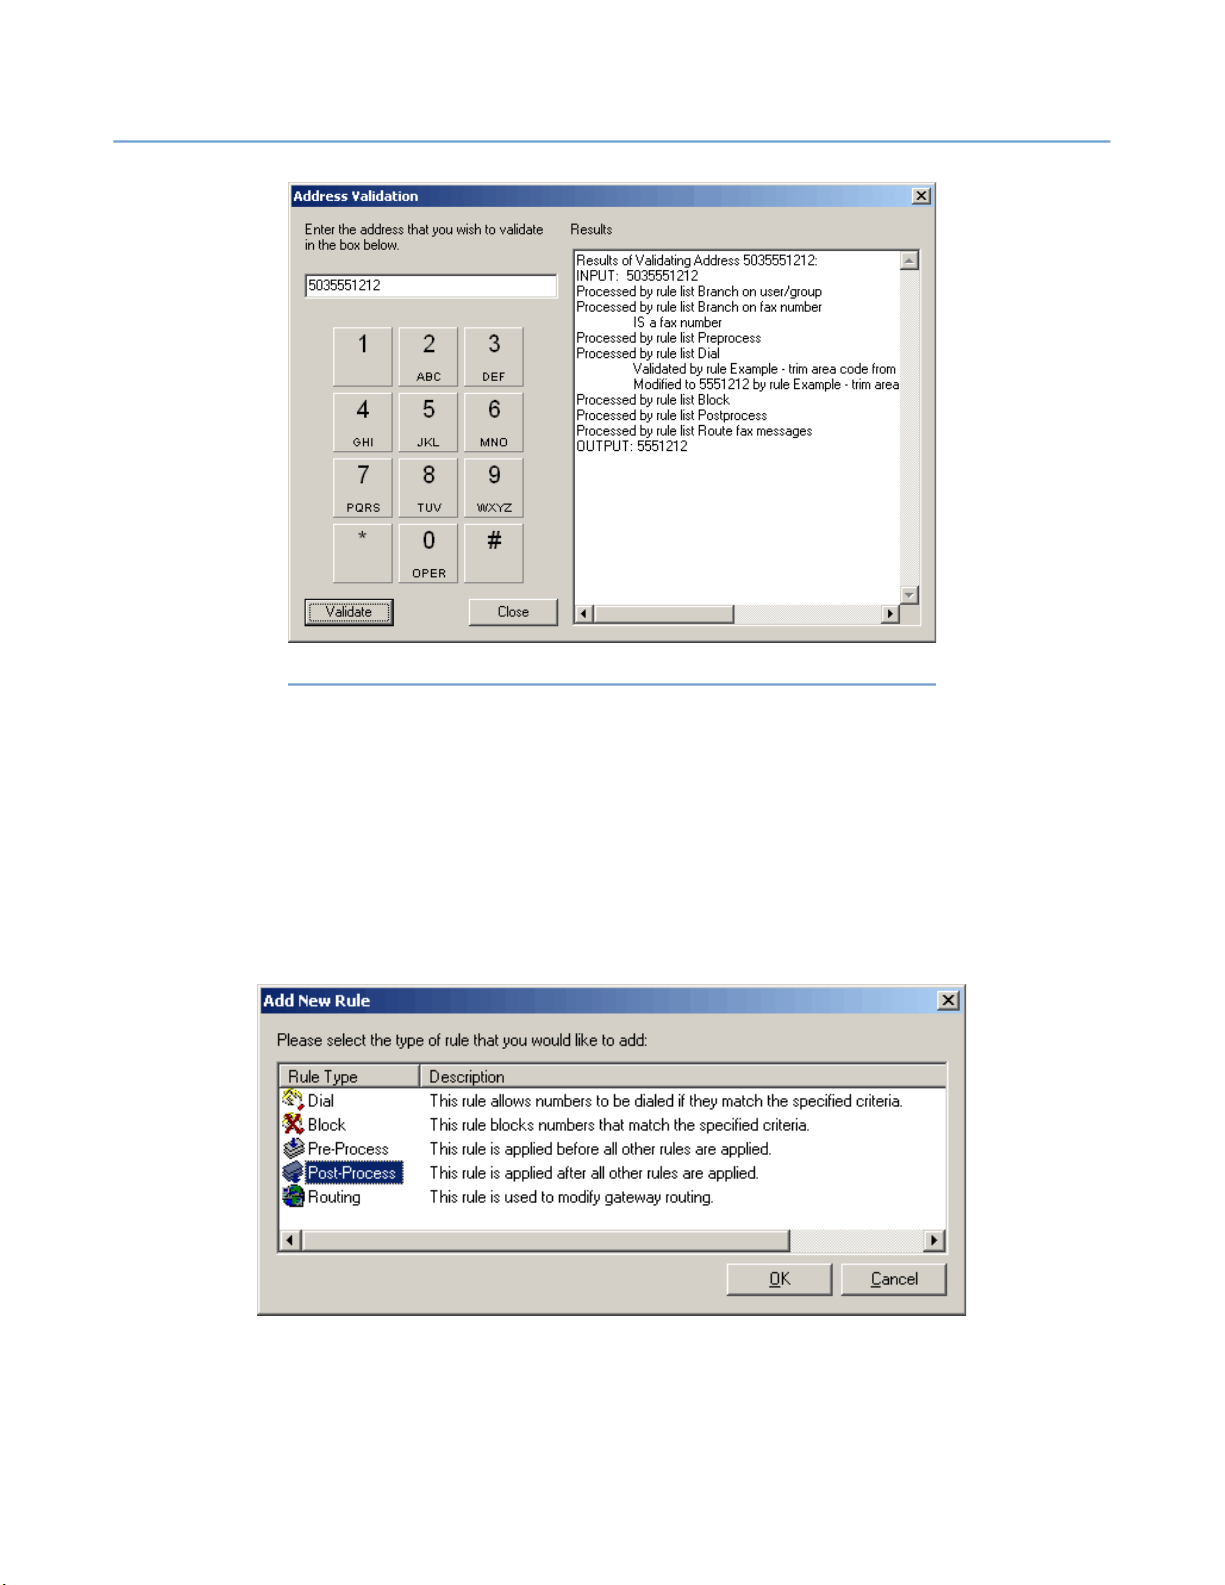
2 – Server Administration
NET SatisFAXtion 8.7 Manual
Illustration 2.6.3.4#4: Validation – Testing Trim Local Area Code
81
2.6.3.5 Scenario: Ten Digit Local Dialing
In this scenario, the following transformations will occur:
• User supplies 7 digits: Adds local area code to the front.
• User supplies local area code + 7 digits: Dials as supplied.
• User supplies long distance area code + 7 digits: Adds a “1” to the
front (if not present).
To implement this, open the Validation Editor and click the Add button to the
right. Select Post-Process as the rule type to be created.
Name the rule “10 digit local dialing” or something similar.
Page 82
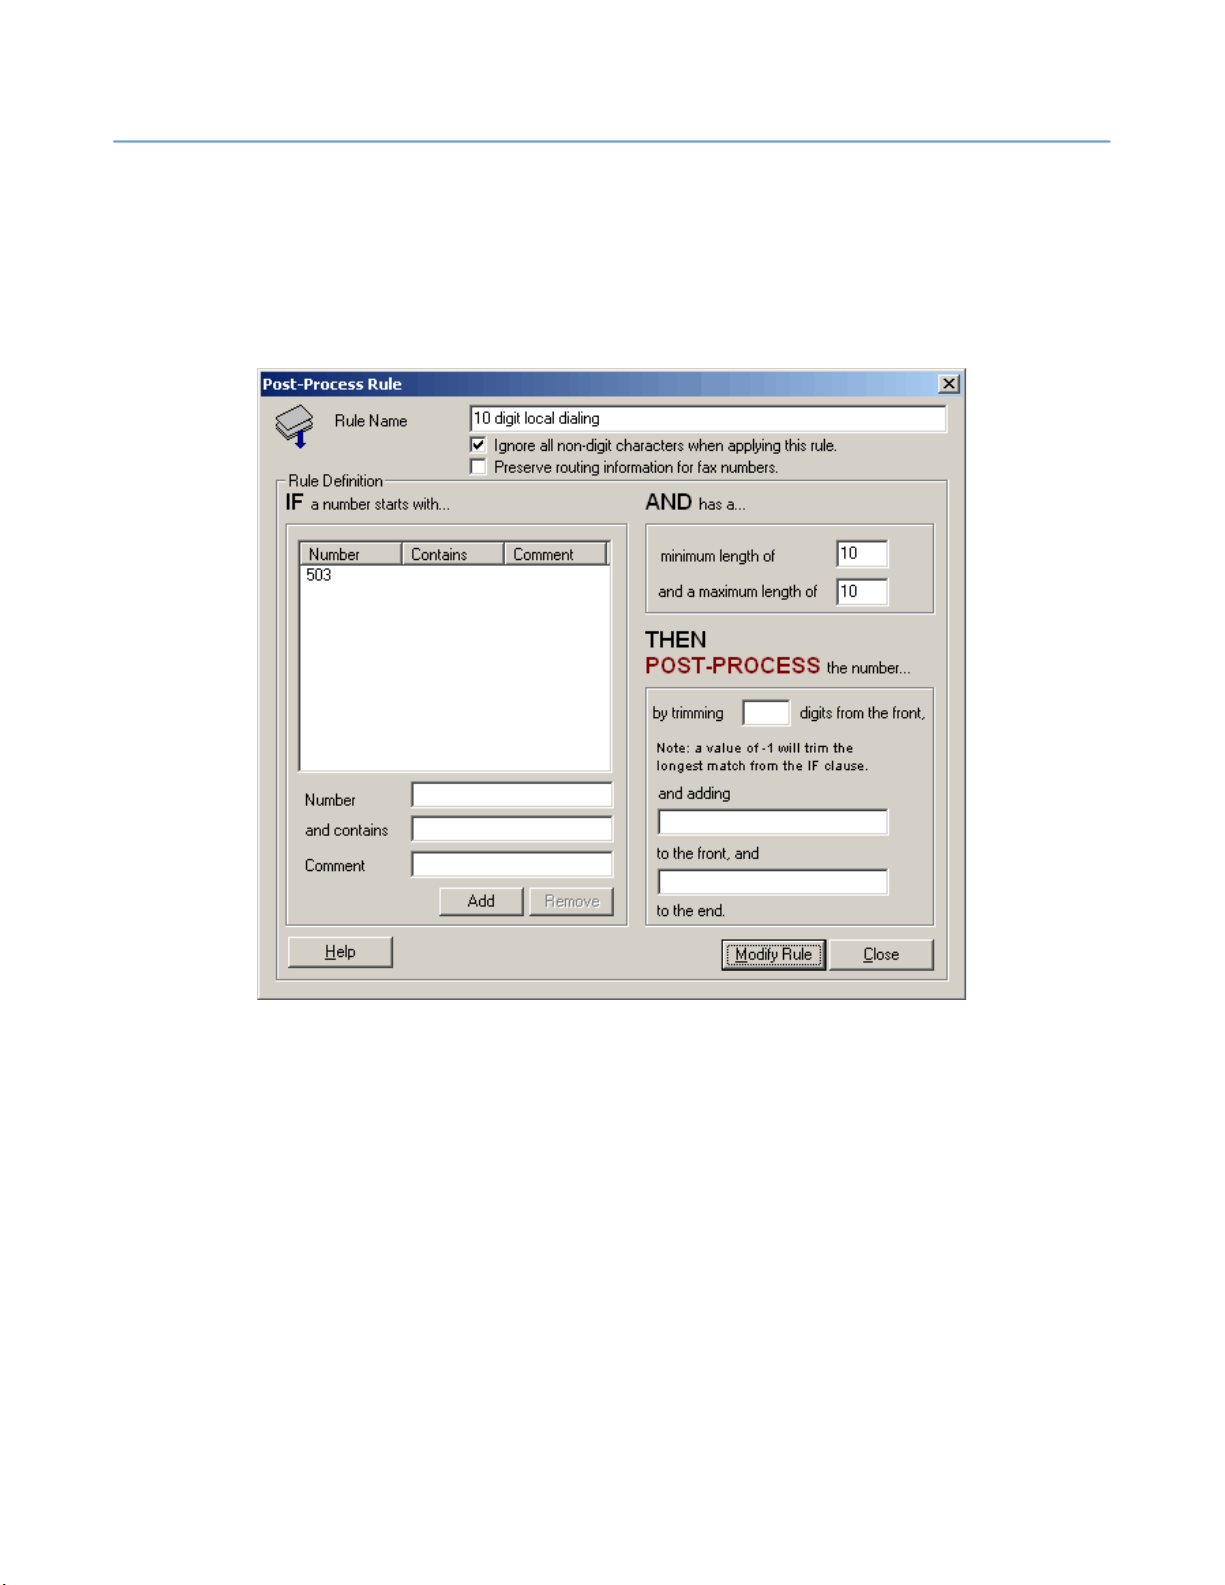
2 – Server Administration
In the left column, under “IF a number starts with...”, add your local area code
to the "Number" field and click "Add".
In the right column, under “AND has a...”, enter a minimum length of “10” and a
maximum length of “10”.
If you need a dial prefix (e.g. a “9” to get an outside line), enter it in the “and
adding” field.
NET SatisFAXtion 8.7 Manual
82
The next step will be to add this new rule to the “Rule evaluation and flow”
tree. In the bottom pane, select the “Postprocess” node, and click Modify Node
to the right.
Page 83
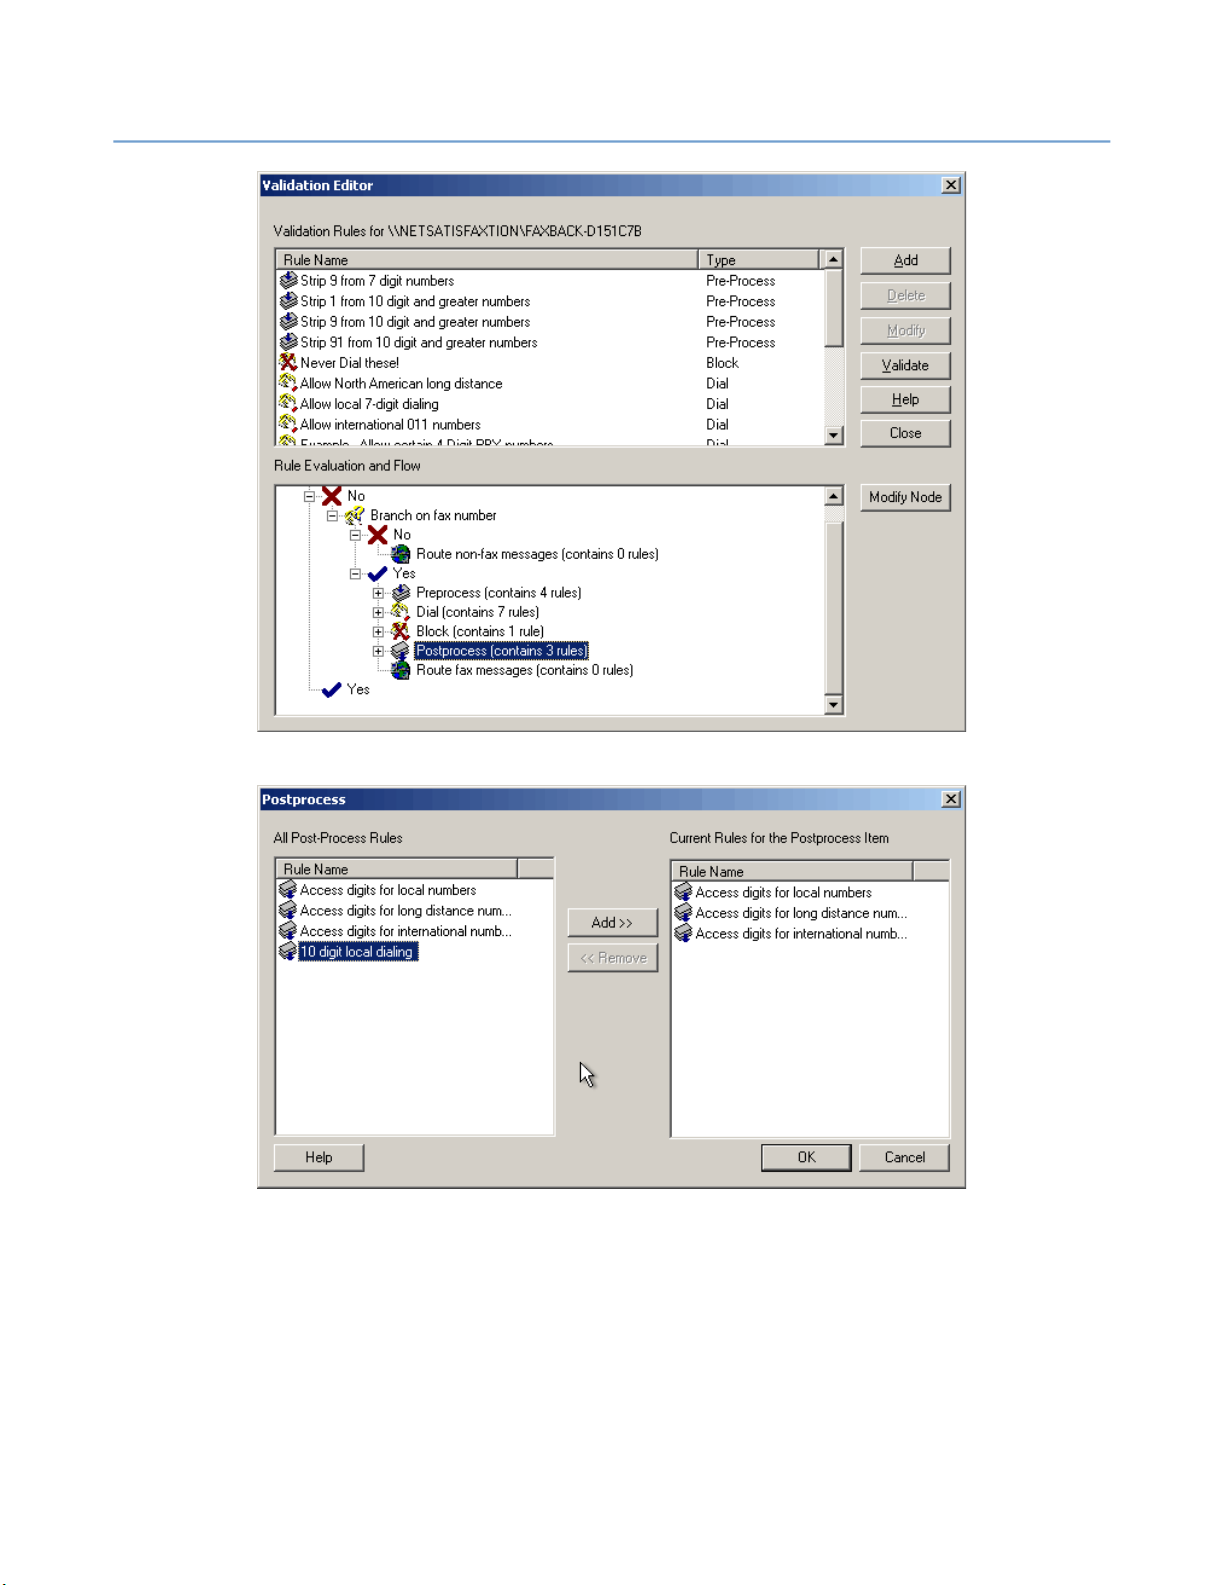
2 – Server Administration
NET SatisFAXtion 8.7 Manual
83
Select the new 10 digit local dialing rule from the left side, and click “Add >>”.
Then click OK. The window will close.
You can test the rule that was created by clicking the Validate button on the
main Validation Editor interface. Enter some example input numbers, and verify
the OUTPUT: listed in the results window is correct.
Page 84
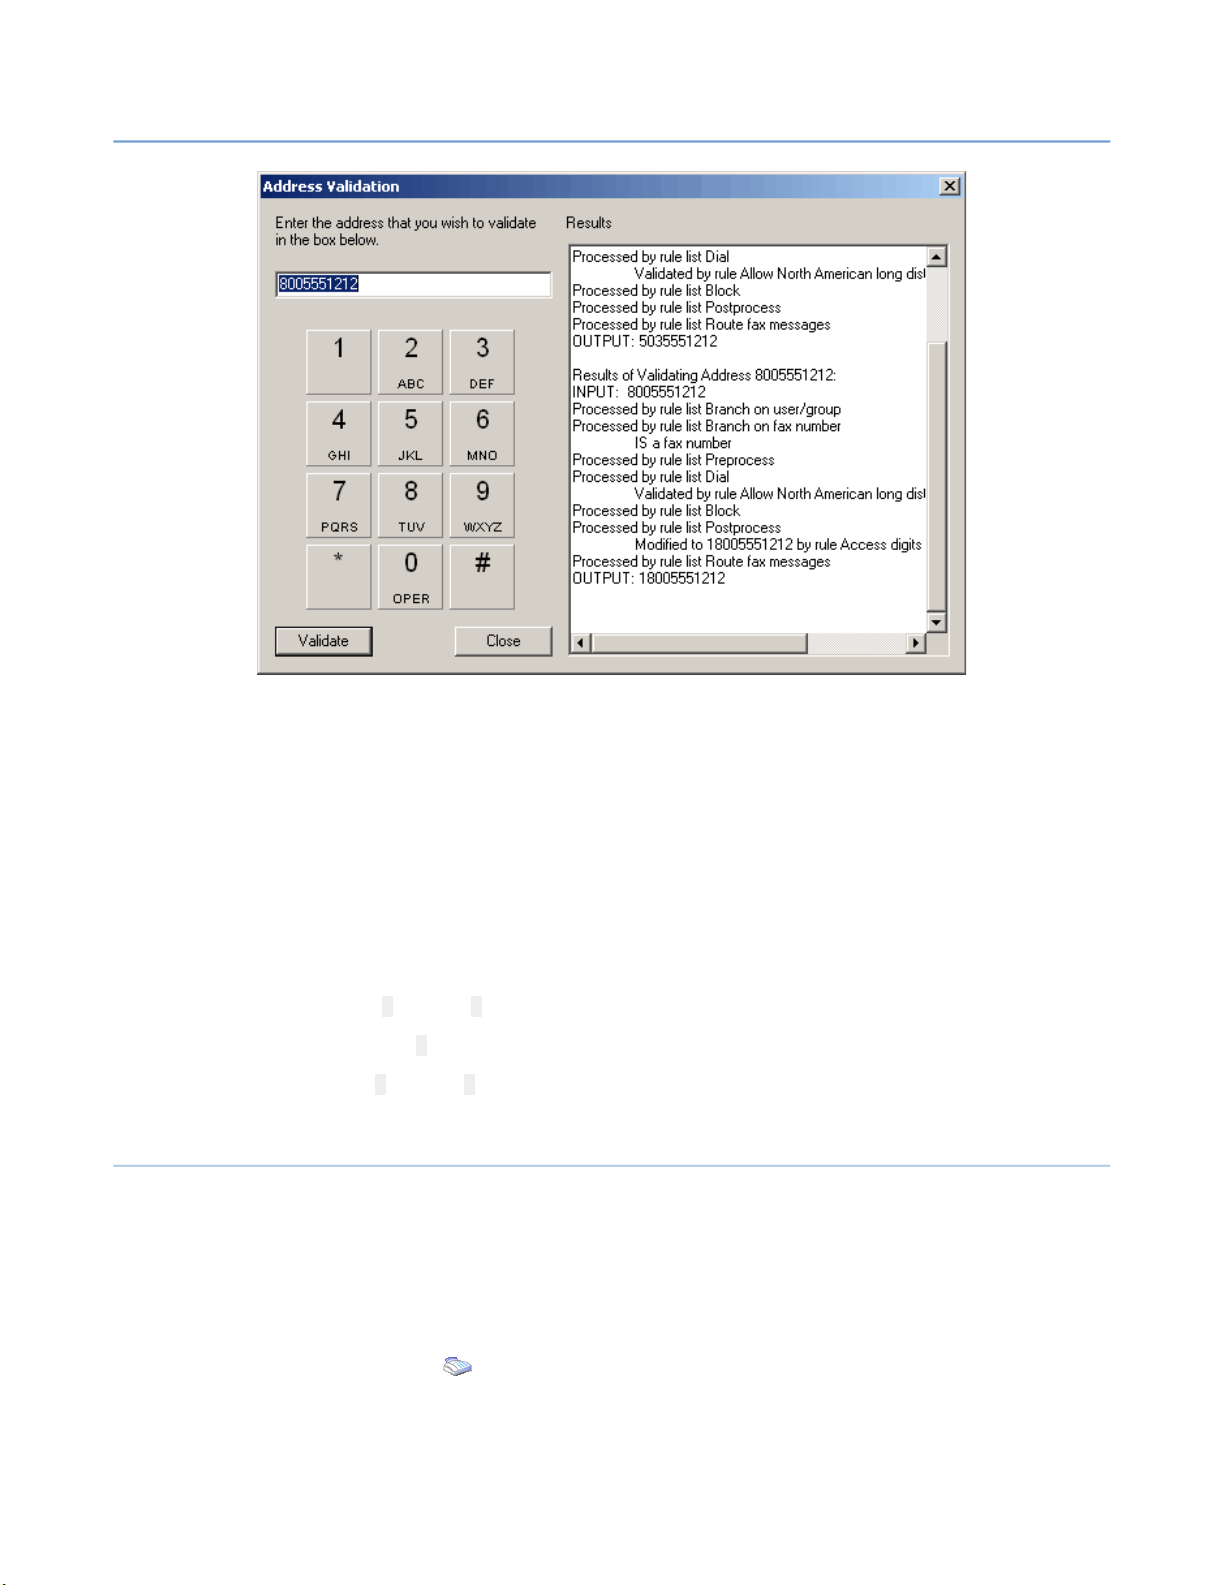
2 – Server Administration
NET SatisFAXtion 8.7 Manual
84
2.6.3.6 Scenario: Dial As-Is (No Validation)
2.6.3.7 Scenario: Adding Access Codes
Some services need long-distance access codes or other access codes appended to the end of the fax number.
2.6.3.8 Adding Pauses to the Dial String
AudioCodes: p pauses, w waits for dial tone.
Class 1/Class 2: , (comma) pauses.
Brooktrout: p pauses, w waits for dial tone.
2.6.4 ANI (Caller ID)
When using Voice over IP, you must set your ANI. This will be used as your
“From” phone number. Note that only T1/PRI hardware will actually attempt to
use the specified ANI to make a call, and even then the T1/PRI service provider
may override the ANI you set, or may even reject calls with an “invalid” ANI (as
defined by that particular service provider).
To set global ANI, run the Change Server Settings utility,
NET SatisFAXtion ⇨ Change Server Settings
Settings button, and change to the General tab. Click OK when you have set
your ANI.
Start Programs ⇨ ⇨
. Click on the Fax Hardware
Page 85

2 – Server Administration
2.6.5 Cover Sheet Templates
NET SatisFAXtion 8.7 Manual
Cover sheet templates are kept at the fax server as Rich Text Format (RTF)
documents. Any software that can create an RTF file or any file that can be converted to an RTF file can be used as a cover sheet. There is no limitation as to
how many cover sheets you may have on your fax server.
Static information in the RTF file, such as a logo or street address, is combined
with variable information to generate cover sheets for all faxes in which a cover
sheet is specified. The location of variable information is identified in the RTF
file through the use of placeholders. A placeholder is replaced with the current
value of the placeholder; for example: $(Date), $(SenderName), $(Cover),
etc.
2.6.5.1 Cover Sheet Templates for Email Users
There are 3 ways to identify a cover sheet template to be used for an email
user:
85
• The default cover sheet template for the user Supervisor will make
use that specified cover sheet.
• For Email clients, the default cover sheet template for the gateway user
(POP3Post or SMTPPost) will make all email gateway users use that cover
sheet template.
• Create a cover sheet template for each individual user which will allow only
that user to use that cover sheet template.
Note that each step, Supervisor to individual user, supersedes the previous. In
other words, if you have set a cover sheet template for the Supervisor, this
cover sheet template is the default for all users. If the Gateway user has also
specified a cover sheet template, that cover sheet template will be the default
for all users using that Gateway. Finally, if individual users have a cover sheet
template specified, that cover sheet will be used for their faxes.
2.6.5.2 Selecting Cover Sheet Templates
Selecting a cover sheet template must be done from the Administration utility.
You can create an RTF cover sheet template somewhere else, browse to it and
specify that cover sheet using the Administration program. A copy of that RTF
file will then be placed on the fax server in a sub-directory for the user selected. This is true whether the user selected is the Supervisor, the Gateway user
or an individual user.
all
users
From Administration, select the User Administration view, then select the user
Supervisor, the Gateway user or the individual user. Double click the user to
modify, or right click and click on modify user. Click on the Cover Sheet Tab and
the following screen will be displayed:
Page 86
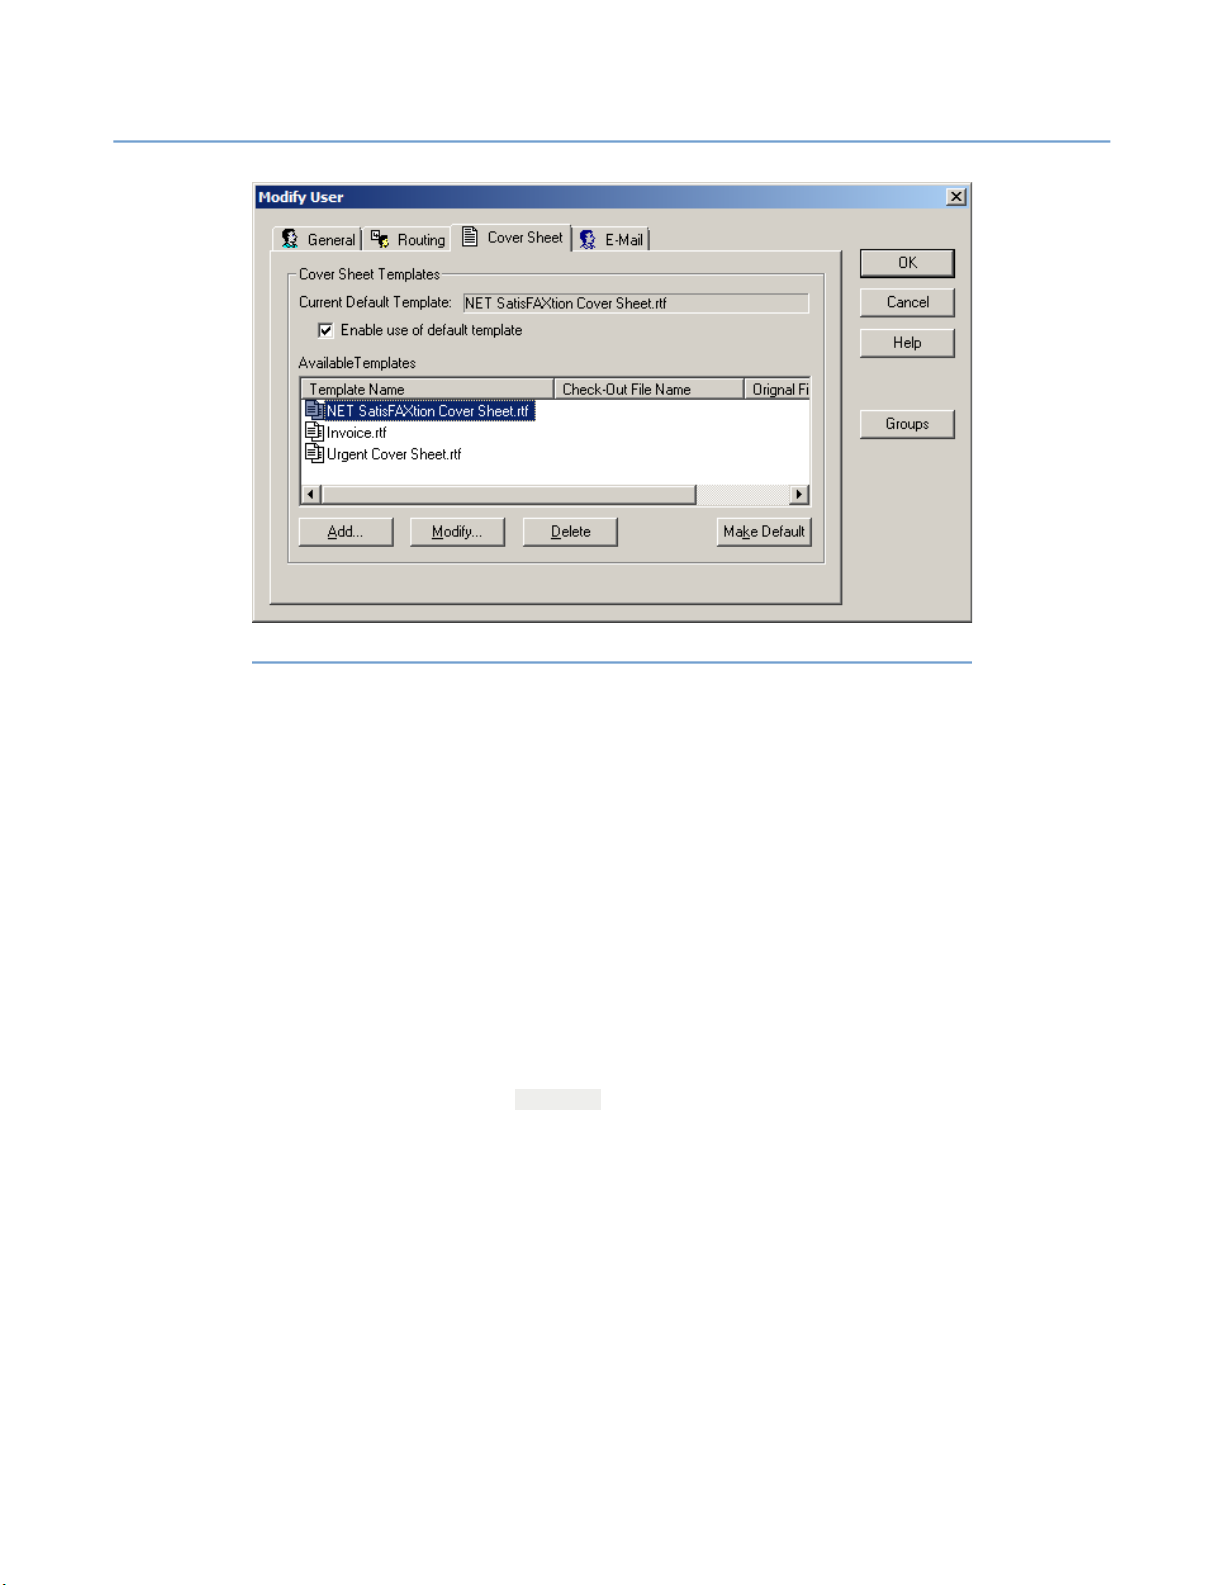
2 – Server Administration
NET SatisFAXtion 8.7 Manual
Illustration 2.6.5.2#1: Administration – Modify User – Cover Sheets
86
2.6.5.3 Cover Sheet Selection
The templates available to this user are displayed. To add a new RTF file to this
list, click Add and then browse to the file. Once added to the list, it can be
made the default for this user by selecting the file and clicking the button Make
Default.
This process can be repeated for the Gateway user or individual users.
2.6.5.4 When Cover Sheets Will Be Used
When creating a document to be faxed from an email message, the presence of
body text is what causes a cover sheet to be generated for that document.
Whatever text is placed in the body of the email message will be placed on the
cover sheet identified by the $(Cover) placeholder.
Page 87
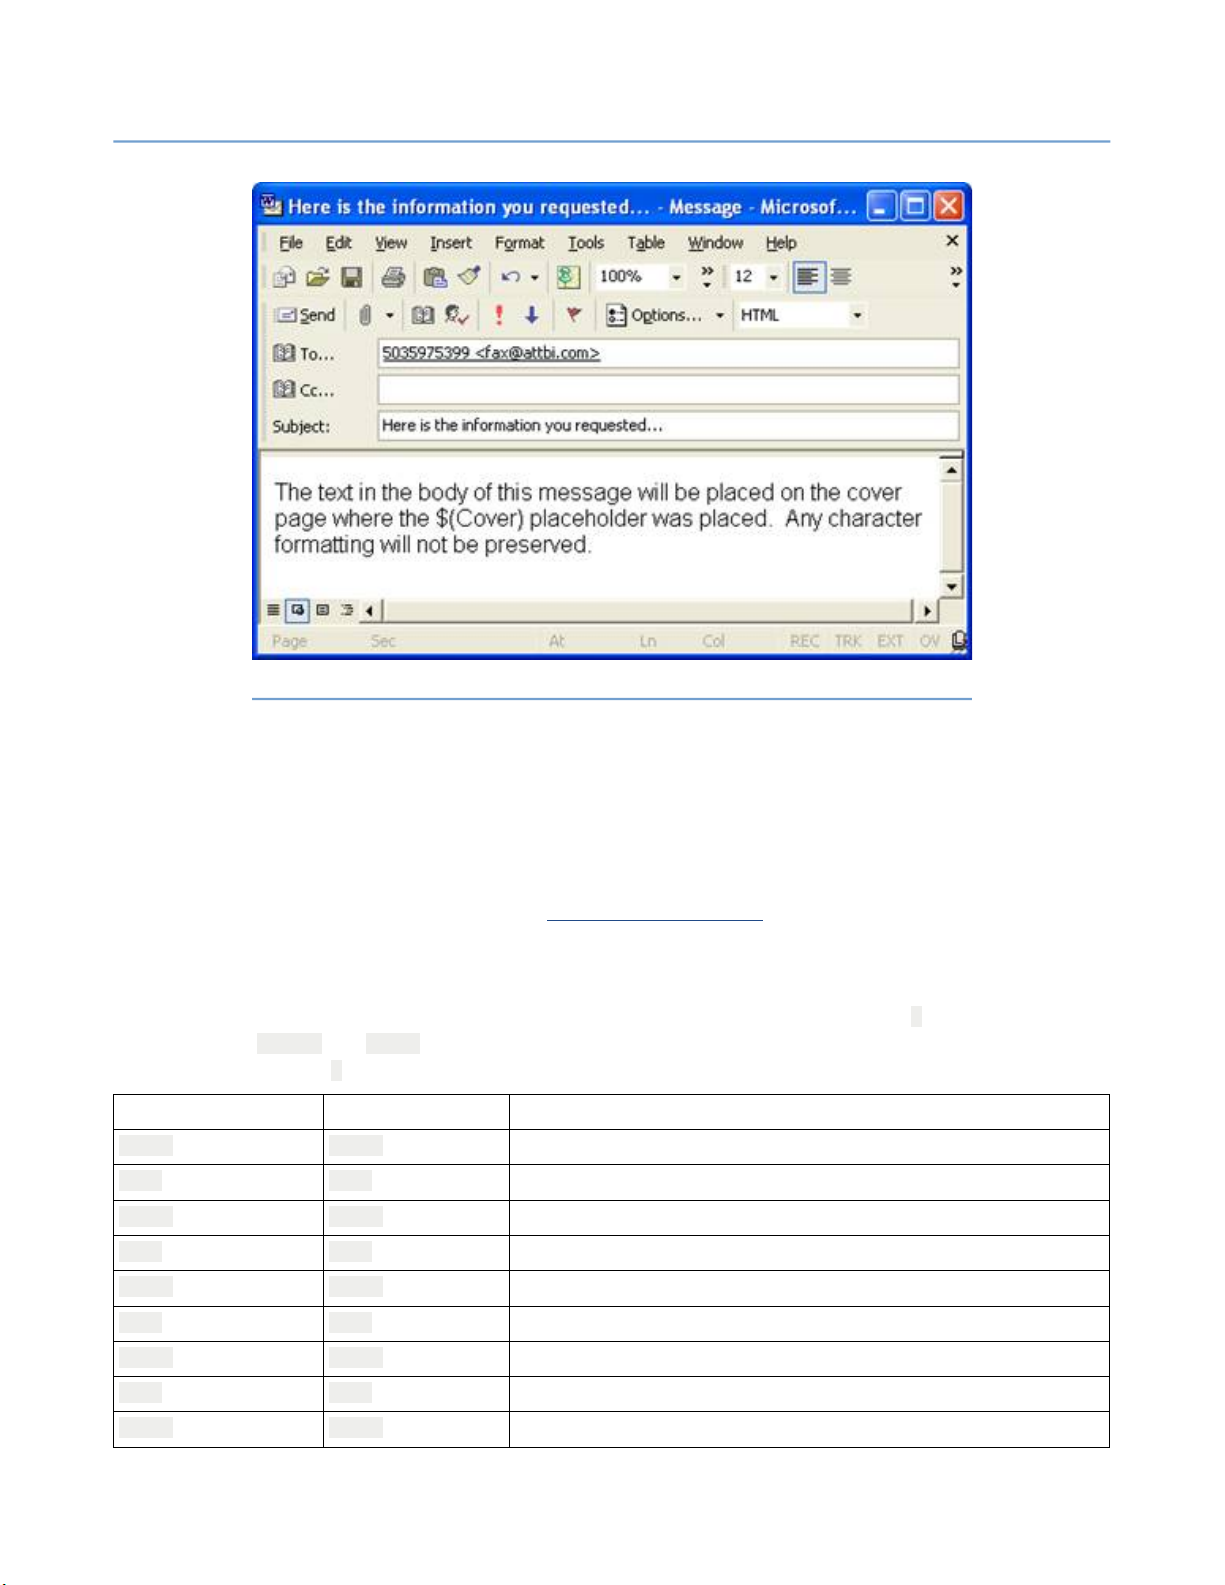
2 – Server Administration
NET SatisFAXtion 8.7 Manual
Illustration 2.6.5.4#1: Sample email which will generate a Cover Sheet
87
Since there is text appearing in the message body, this message will automatically send a cover sheet. If there was only an attachment without body text,
just the attachment would be sent as a fax.
FaxOut Client Suite: When sending a fax using the
FaxOut Client Suite
user can choose to send a cover sheet or not, or choose which cover sheet to
use on the
2.6.5.5 Cover Sheet Variables
Fax Options
tab. See 3.2 FaxOut Client Suite for more information.
Placeholders can be entered in two forms: English or Digits; for example, $
(Date) and $(84) are functionally equivalent. All placeholders being with the
symbol ‘$’ and are not case sensitive.
English Command Digit Command Description
$(HH) $(11)
$(H) $(1)
$(MM) $(22)
$(M) $(2)
$(SS) $(33)
$(S) $(3)
$(DD) $(44)
$(D) $(4)
$(NN) $(55)
Hours with leading zero for single-digit hours; 24-hour clock
Hours with no leading zero for single-digit hours; 24-hour clock
Minutes with leading zero for single-digit minutes
Minutes with no leading zero for single-digit minutes
Seconds with leading zero for single-digit seconds
Seconds with no leading zero for single-digit seconds
Day of month as digits with leading zero for single-digit days
Day of month as digits with no leading zero for single-digit days
Month as digits with leading zero for single-digit months
, the
Page 88
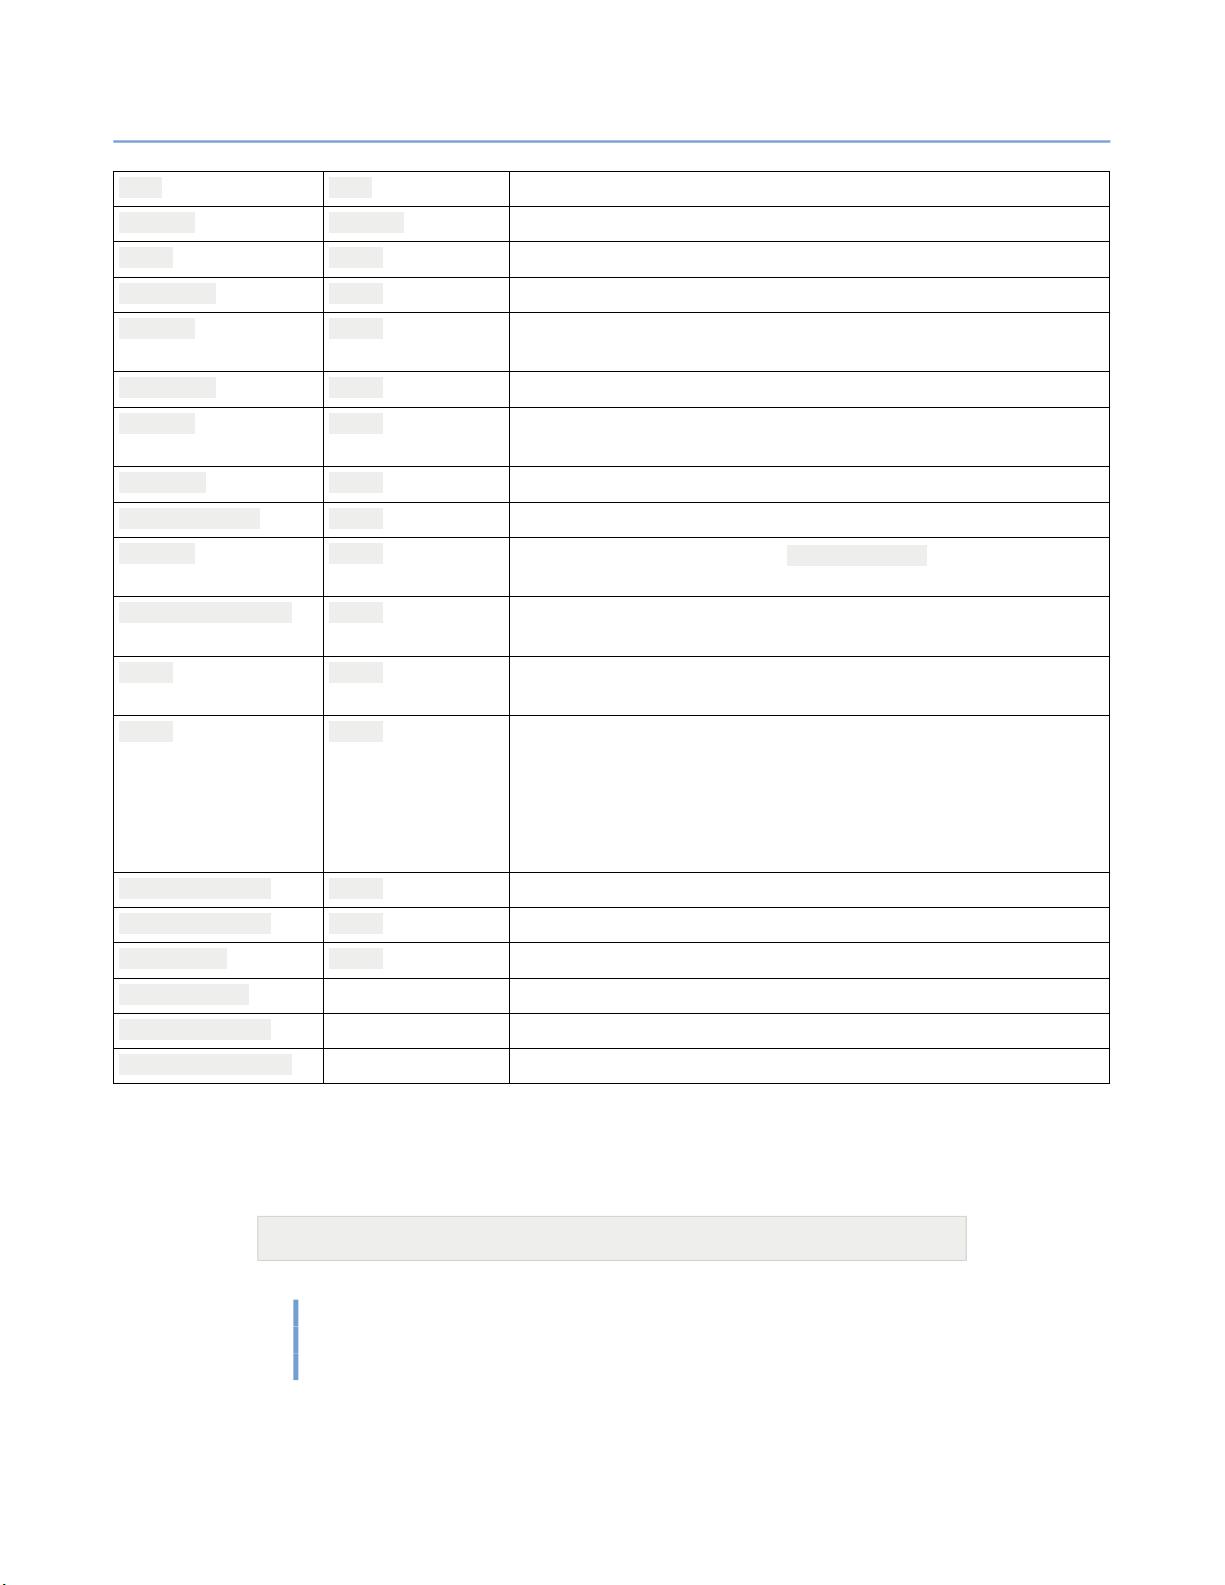
2 – Server Administration
NET SatisFAXtion 8.7 Manual
88
$(N) $(5)
$(YYYY) $(6666)
$(YY) $(66)
$(TimeUS) $(81)
$(Time) $(82)
$(DateUS) $(83)
$(Date) $(84)
$(Cover) $(90)
$(SenderName) $(92)
$(From) $(96)
$(Receiver Name) $(93)
$(To) $(94)
$(CC) $(95)
$(CompanyName) $(80)
$(PhoneNumber) $(81)
$(Subject) $(91)
$(SenderFax)
$(SenderVoice)
$(SenderCompany)
Months as digits with no leading zero for single-digit months
Year represented by full four digits
Year as last two digits, but with leading zero for years less than 10
Time in the format HH:MM:SS: AM/PM
Time formatted according to system default set in Control Panel ⇨
Regional And Language Options Time ⇨
Date in the format MM/DD/YY
Date formatted according to system default for short date style set in
Control Panel Regional And Language Options Time ⇨ ⇨
Message body
Sender name / friendly name
Replacement string for the macro $(SenderName) which will look for
the name in the email address string
Recipient name – This results in a single recipient name per cover sheet
(the names of any other recipients will be omitted)
Recipient name(s) – This will be replaced by a comma-separated list of all
email destinations that are not marked as CC or BCC
Will be replaced with comma separated list of all email destinations that
are marked as CC. Lines will wrap on word boundary.
If current destination is marked as BCC its email address will be
appended to this list in a form (bcc: …). Note that the recipient’s name
will be lost when used as a BCC and only the email address will be
displayed in the list.
Recipient company name
Recipient phone number
Subject of the message
Sender's fax number. Client Suite only, set on the Fax Options tab.
Sender's telephone number. Client Suite only, set on the Fax Options tab.
Sender's company name. Client Suite only, set on the Fax Options tab.
2.6.5.6 Forcing Cover Sheets
This setting will override all other methods of enabling or disabling cover
sheets.
[HKEY_LOCAL_MACHINE\SOFTWARE\FaxBack\CASDrive]
"TemplateMode" = 1
0: Never send a cover sheet
1: (Default) Send cover sheet only with text in message body
2: Always send cover sheet, even with nothing on it.
Page 89

2 – Server Administration
2.6.6 Outbound Document Conversion
2.6.6.1 What is Document Conversion?
NET SatisFAXtion 8.7 Manual
Document conversion is the process by which the fax server takes your cover
sheet plus any attachments and converts them into a faxable image format
(TIFF). In order to provide this functionality, NET SatisFAXtion requires the cooperation of the application that created that file.
IMPORTANT: When troubleshooting document conversion, always remember
to test cover sheet (RTF) files as well. When sending a fax that includes a cover
sheet, this document must undergo conversion as well. Even if the attachments
you are submitting are working, the cover sheet might still fail, causing the
whole fax to be returned with a “conversion failure.” Cover sheets (RTFs) are
handled by Microsoft Word (if installed) or Wordpad.
2.6.6.2 Server-Side Conversion vs. Client-Side Conversion
Normally when using Microsoft Fax or FaxOut Client Suite clients, document
conversion happens on the client when the user prints to the Fax or FaxOut
printer. When they send the fax, the only conversion the server must do is convert the cover sheet (if needed). Requiring users to convert documents on the
client delivers superior results since the user can preview the fax before it is
sent, it saves processing time on the fax server, and does not require that application to be installed on the fax server.
89
Alternately, email fax and FaxOut Client Suite users can attach the document itself to their email, and rely on the fax server performing document conversion.
It is possible for this to fail for reasons beyond the fax server administrator’s
control, for example the document might require macros or require a password
to print. Also the users have no control over print properties and must accept
the application’s defaults.
2.6.6.3 Common Conversion Helper Applications
The NET SatisFAXtion server relies on each application to convert its own file
types. The following is a basic list of commonly sent file types, and the application needed to convert each one. Make sure that all the applications are installed and functioning properly for all the file formats you need the server to
convert.
Type Application
TIFF Native fax format; no conversion necessary.
RTF Wordpad or Microsoft Word
PDF Adobe Acrobat Reader
DOC Microsoft Word
XLS Microsoft Excel
Page 90
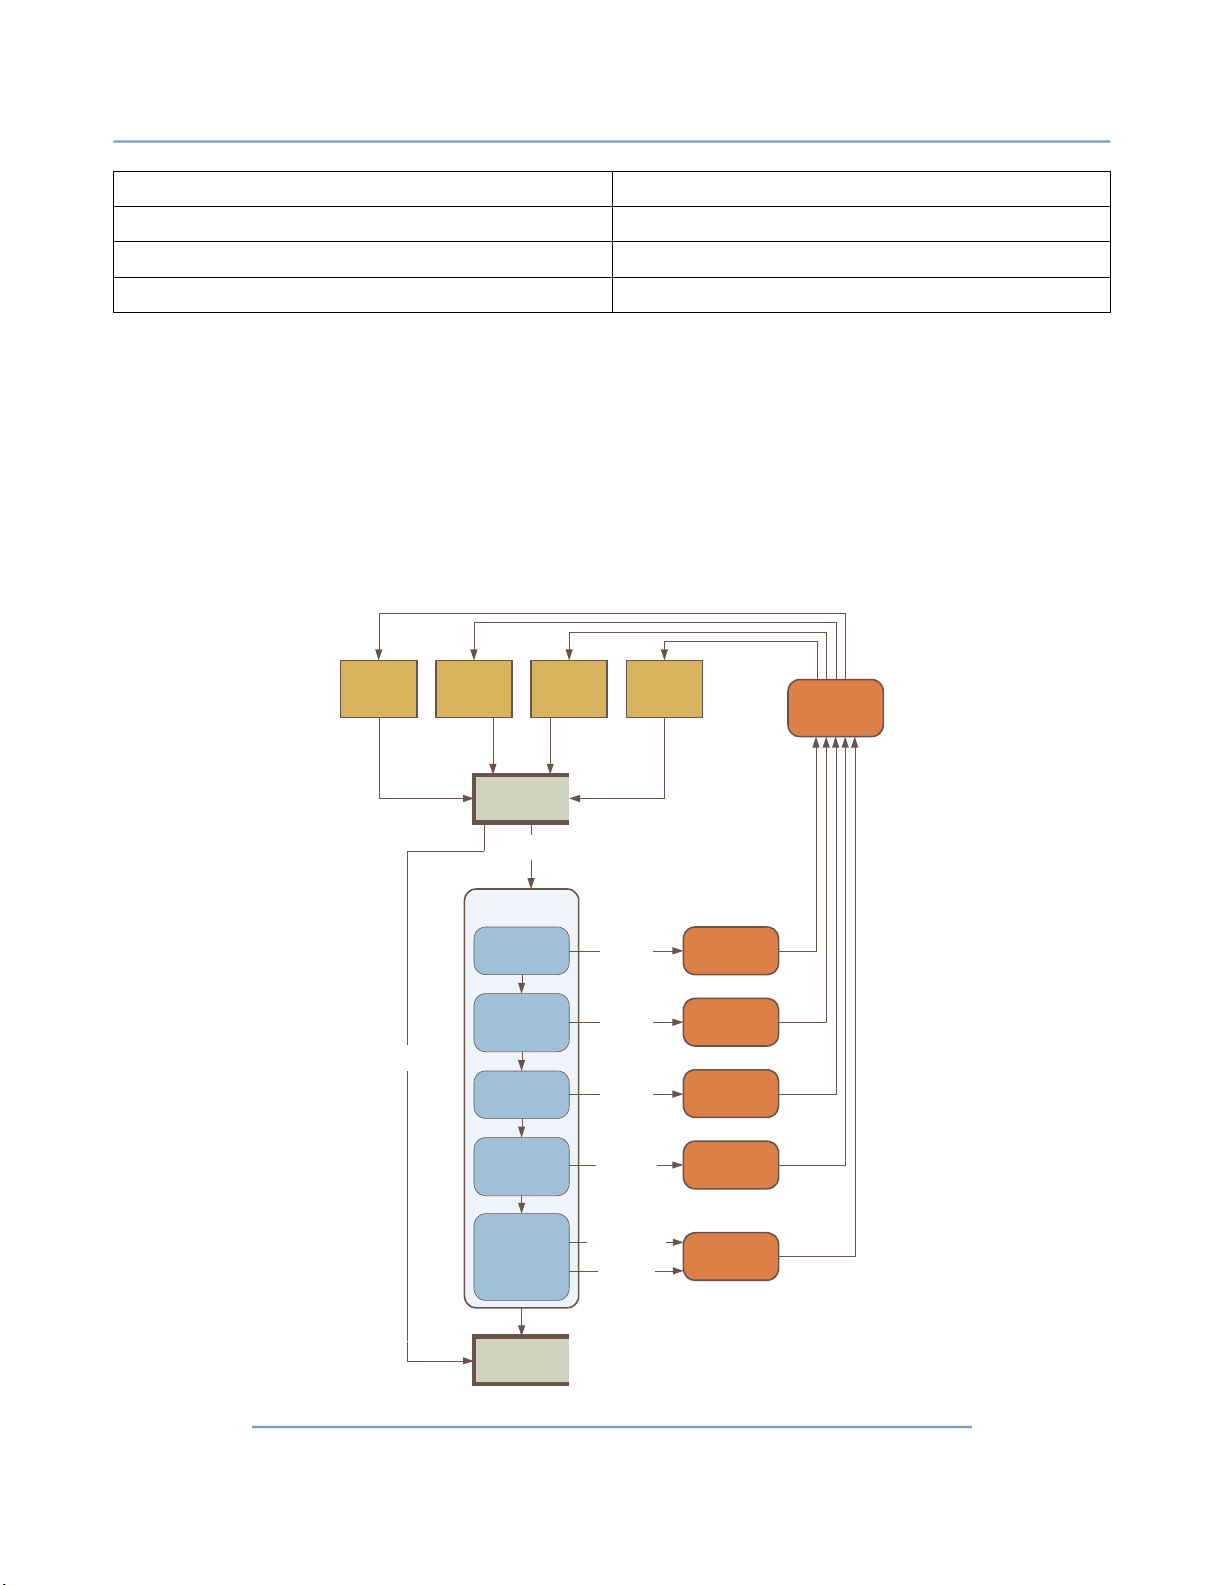
2 – Server Administration
Email
Gateway
(SMTP)
Email
Gateway
(POP3)
FAXability API
Scheduled
Queue
Other
document type
Look up file
association
Preconversion
Failed
No file
association
Call
application’s
“printto”
Preconversion
Failed
No “printto”
function
Application prints
to “NET
SatisFAXtion
Document
Conversion”
printer
Preconversion
Failed
Application
doesn’t print
Failure
Notifcation
Preconversion
Application waits
for user input
Application
runs
Application
opens
document
Preconversion
Failed
Preconversion
Failed
Application
doesn’t run
Application
doesn’t open
document
Queued for
sending
Native
TIFF
NET SatisFAXtion 8.7 Manual
Type Application
JPEG Internet Explorer*
GIF Internet Explorer*
HTML Internet Explorer
* These file types need manual configuration to function properly.
Other applications will work, provided they support the “printto” action. See
below for more information about the “printto” action.
2.6.6.4 Troubleshooting Conversion Errors
The following graphic gives a conceptual overview of the document conversion
process. This document will describe each step in the conversion process, how
to test each step, and how to correct errors encountered.
90
Illustration 1: Conversion Flow Chart
Page 91

2 – Server Administration
2.6.6.4.1 IMPORTANT: Verify Log On Account
NET SatisFAXtion 8.7 Manual
These troubleshooting steps must be performed as the same Windows user
that NET SatisFAXtion runs as.
In order to determine which account the fax server service is running as, go to
Start Control Panel Administrative Tools Services⇨ ⇨ ⇨
FAXtion
This account
2.6.6.4.2 Determine File Types Submitted
service and double-click it. Go to the
is the user you must log in as to perform any troubleshooting.
It is important to understand which file types are being submitted to the server
to be converted. Get a copy of all files the user is submitting. If they are submitting faxes via email, be aware that all images and backgrounds will also be
seen by the server as attachments to be converted.
Determine which attachments are failing:
• First submit a fax with just “test” in the body. Remove all signatures, backgrounds, etc.
from the message. If this fails, the issue is with cover sheet conversion. Cover sheets are
RTF files.
Log On
. Find the
NET Satis-
tab. The user listed under
91
• If just a cover sheet succeeds, then the issue is with one of the files being submitted. Try to
fax each one, one at a time. This will let you narrow down what file type is failing.
2.6.6.4.3 Look Up File Association
The first thing NET SatisFAXtion does upon receiving a document to be faxed is
look up the file association. To do the same:
• Double click “My Computer”
• Click the Tools menu
• Find the entry that corresponds to the file type that is failing.
• Click Advanced. Verify that it has a “printto” action. NOTE: PDFs will not have a “print-
to” action.
Resolution:
• If your file type does not have an association listed, there may be no application in-
stalled on the server to handle that file type.
• If your file type does not have a “printto” action, then either the application does not
support “printto.” or the action was deleted. Either contact the publisher of that application, or reinstall the application.
Folder Options File Types⇨ ⇨
tab.
2.6.6.4.4 Call Application’s “printto” Action
Next, NET SatisFAXtion calls the “printto” function, instructing the application
to print the document to the “NET SatisFAXtion Document Conversion” printer.
Page 92

2 – Server Administration
This can be manually replicated by dragging-and-dropping your file onto a printer.
1. Open the folder that contains your file, or put the file on the desktop.
NET SatisFAXtion 8.7 Manual
92
2. Click
3. Choose a printer. Ideally, use a real printer if you have one installed, otherwise the NET
Start Printers and Faxes⇨
to open that folder.
SatisFAXtion Document Conversion printer will work. Be aware that printing to the NET
SatisFAXtion Document Conversion printer will give you an error message indicating
"Only NET SatisFAXtion is allowed to print to this printer." This is correct behavior.
4. Drag and drop your file onto the printer's icon. This will call the “printto” action on the
file.
This should cause the document to print on the printer you dropped it onto.
You will see the following things happen:
1. The application that handles the file type will open.
2. The application will open the file.
3. The application will print.
4. The application will close the file.
5. The application may or may not close afterwards.
Make sure that there are no dialog boxes or other prompts that require user intervention. If the application does not automatically print, conversion will fail.
Resolution:
This could be caused by several things including:
• Printto action was incorrect. Reinstall the application or contact the application's pub-
lisher.
• Application is in an error state and needs user intervention to proceed. Consult the ap-
plication's documentation to determine how to resolve this. It is recommended to disable any automatic updating of the application, since this typically needs user
intervention.
Once you have cleared the error state, try this step again to insure it functions
properly.
2.6.6.4.5 If Manual Testing Doesn’t Reveal the Problem
If manual tests don't indicate what the problem is, it is useful to put NET SatisFAXtion into application mode. In order to put NET SatisFAXtion into application mode, please see 2.3.2.2 Running NET SatisFAXtion as an Application for
details.
Once NET SatisFAXtion is running as an application, submit a file to it via your
normal methods. When the server receives the message, you will be able to see
the corresponding application open on the fax server, open the document, print
and close.
Page 93

2 – Server Administration
2.6.6.5 Common Issues
2.6.6.5.1 Adobe Acrobat
You must run Acrobat and accept its license agreement before it will function.
Always disable automatic updates or you will see conversion failures when a
newer version is released.
Do not submit PDFs created by a newer version of Adobe Acrobat.
Do not submit PDFs that are locked or protected.
2.6.6.5.2 Microsoft Word
You must run Word and enter your initials before it will function.
It is not uncommon for Word to corrupt its Normal.dot template, particularly
with Word 2000. See Microsoft KB 291352.
2.6.6.5.3 WordPerfect
WordPerfect is known not to support the “printto” action.
NET SatisFAXtion 8.7 Manual
93
2.6.6.5.4 Microsoft Word Viewer / Excel Viewer:
Both of these Viewer applications are known not to support the “printto” action.
2.6.6.5.5 Microsoft Snapshot Viewer
Does not handle landscape documents properly.
2.6.6.6 PCL Converter
2.6.7 Fax Export
While more commonly used to save inbound faxes,
save outbound faxes. See 2.5.4 Fax Export above for configuration details.
2.6.8 Autoprint
While more commonly used to print inbound faxes,
to print outbound faxes. See 2.5.4.1 Configuring Export above for configura-
tion details.
Export
can also be used to
Autoprint
can also be used
Page 94
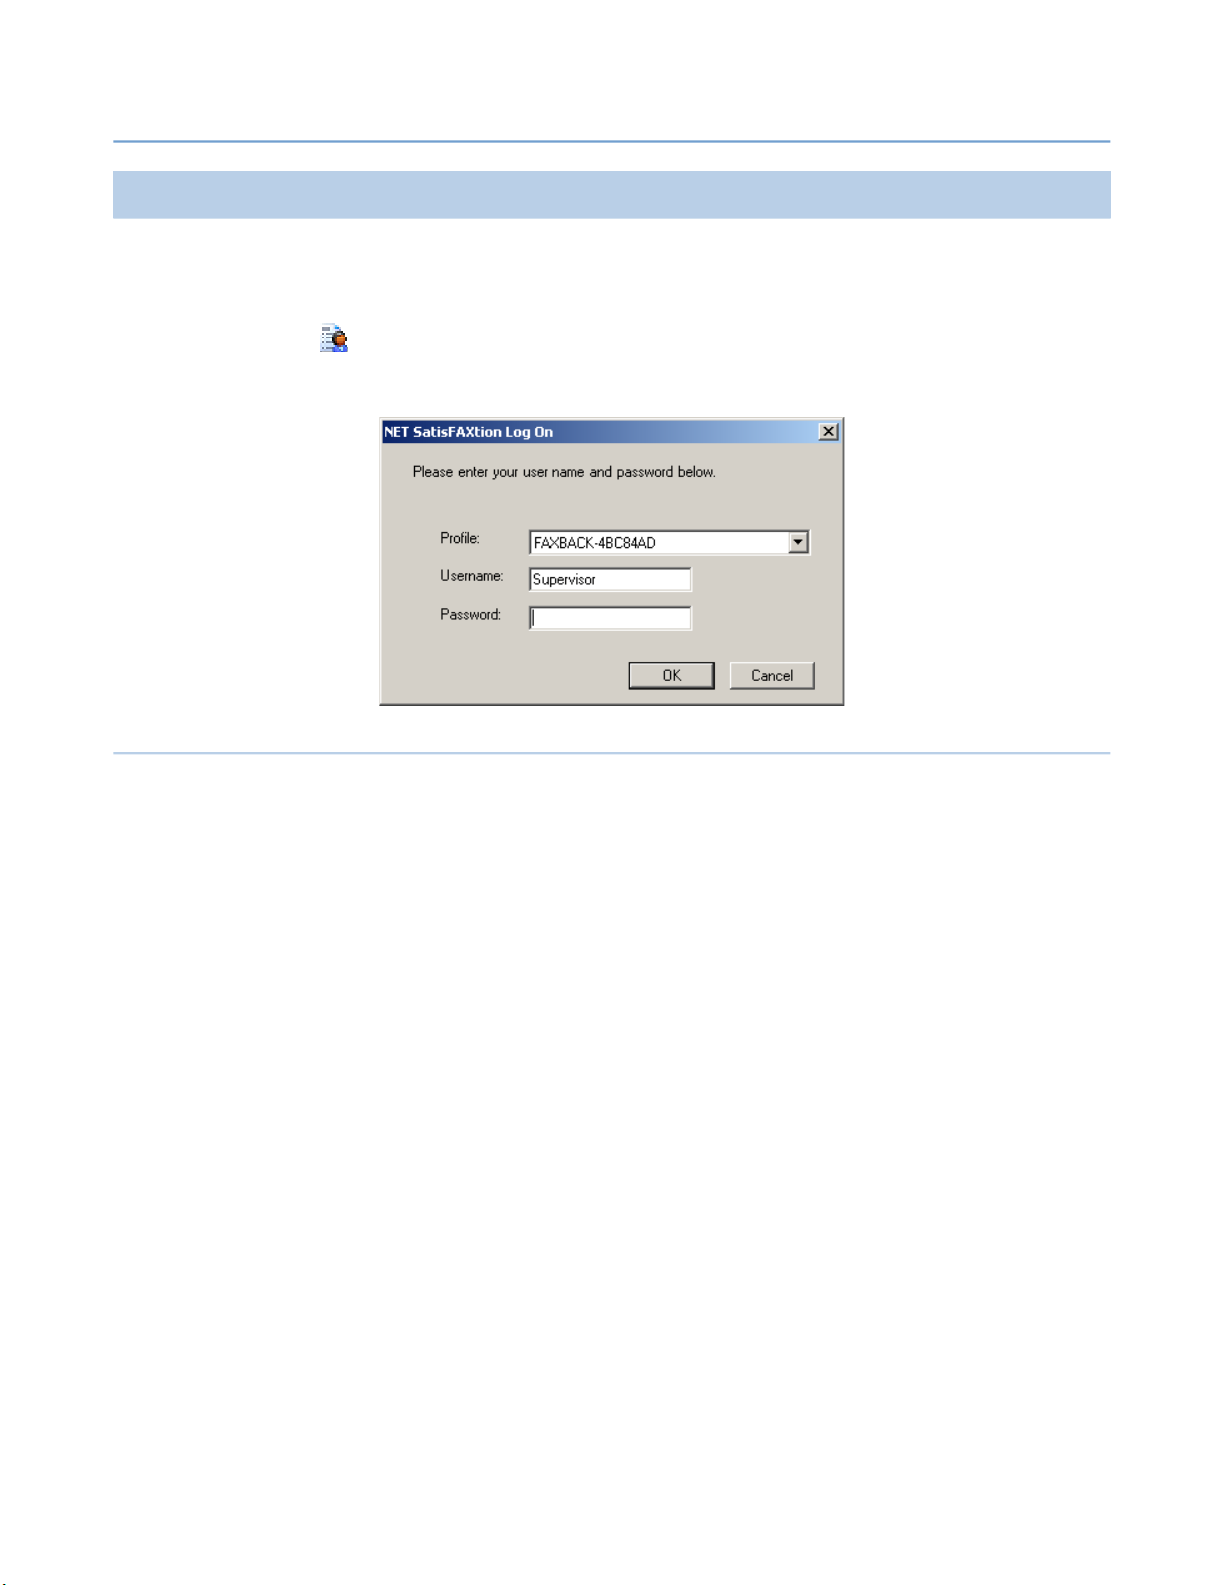
2 – Server Administration
2.7 Reporting
The reporting function allows you to view the traffic on a given server in both
table and graphical views.
NET SatisFAXtion 8.7 Manual
94
The Reports utility can be accessed from
tion ⇨ Reports
ate Report
before running reports.
2.7.1 Using Reports
To run a report, click the
an already selected report click
To change the date and time range for the report click the
down. Specific dates and times can be selected by choosing
Start Programs NET SatisFAX⇨ ⇨ -
or from the Administration program under
. If run from the Start menu, you will need to log in to the server
Report Type
drop-down and select a report. To re-run
Run Query
.
Tools Gener⇨ -
Date Range
drop-
Custom Calendar.
2.7.1.1 Saving Reports
Once a report has been generated, the results can be saved from the
Save
menu or by pressing Ctrl-S. The results are saved to either an XML or
CSV file.
XML: This is a raw XML file suitable for processing by a custom program or
XSLT.
CSV Comma Separated Value: This is a spreadsheet format suitable for opening
with Excel or other spreadsheet program.
2.7.1.2 Printing Reports
Once a report has been generated, the results can be printed from the
Print
menu or by pressing Ctrl-P.
When printing a basic report, the
control of the data printed:
Print Report
File ⇨
File ⇨
dialog appears, which allows
Page 95
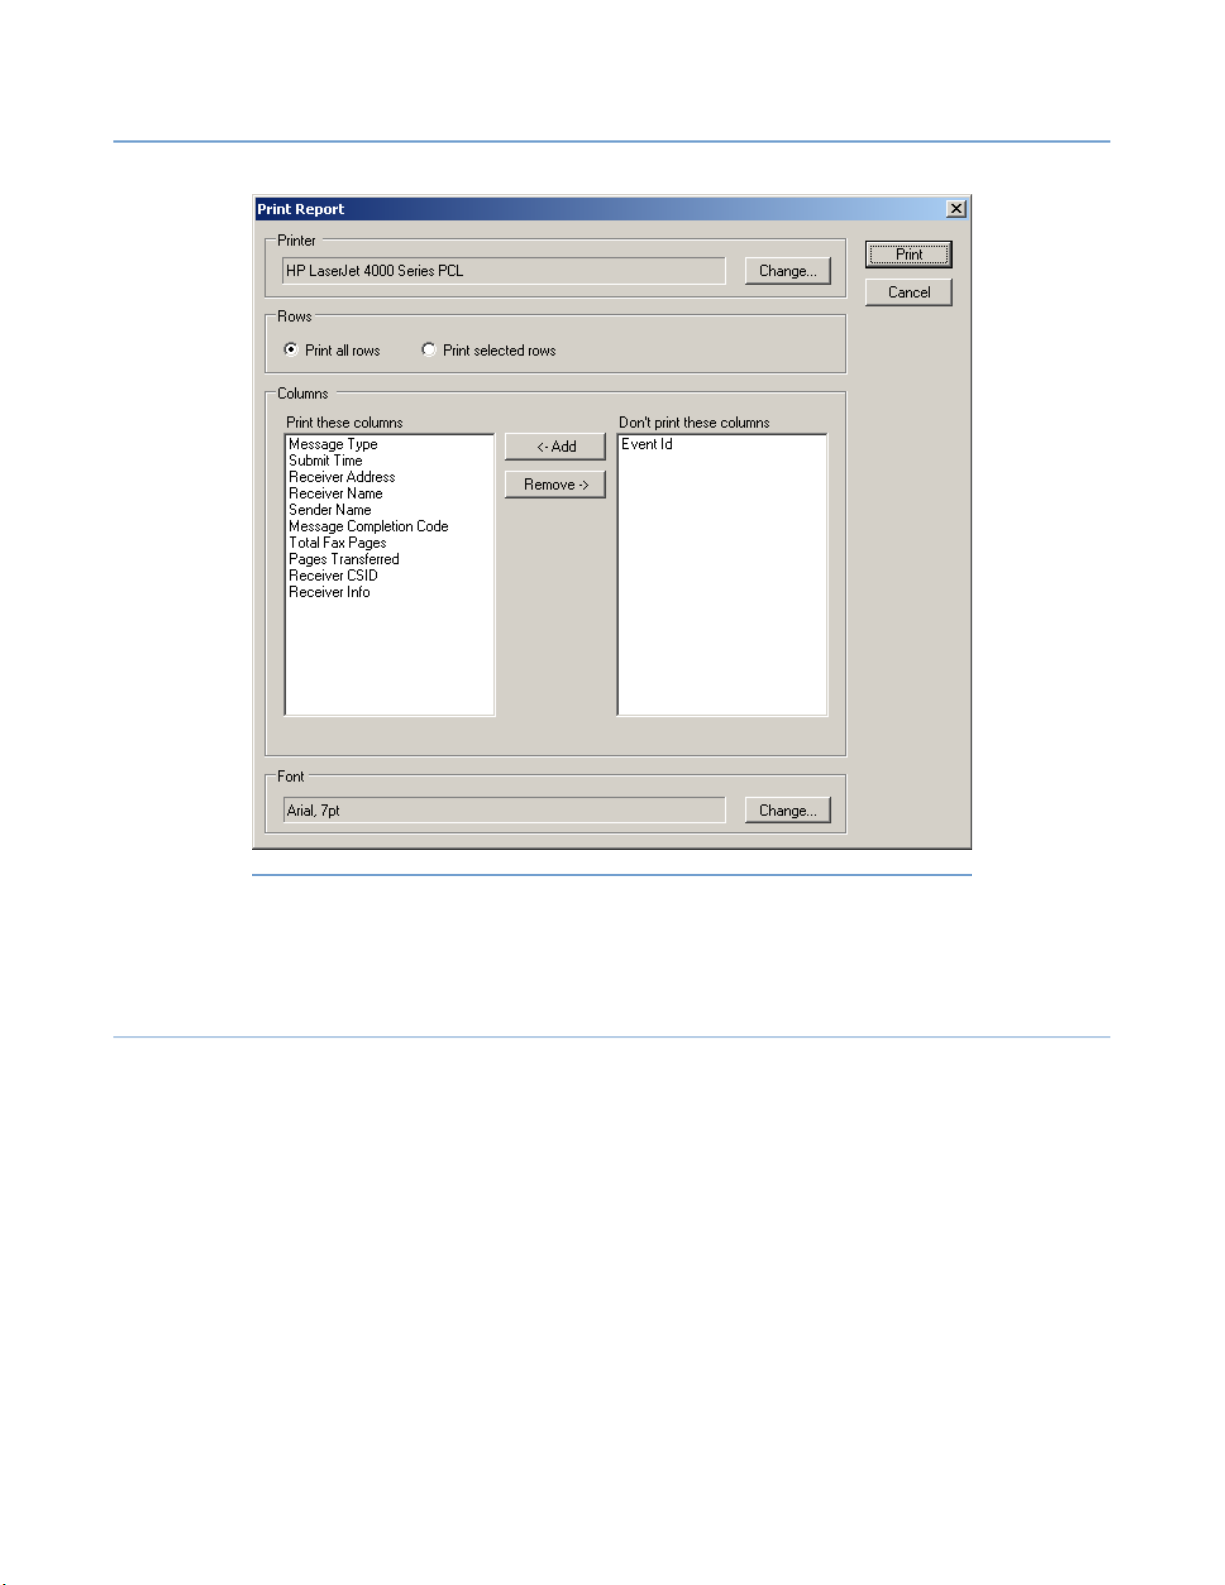
2 – Server Administration
NET SatisFAXtion 8.7 Manual
95
When printing a usage graph, a normal Windows print dialog appears since
there are no additional configurable parameters, the graph will be printed as
displayed in the Report window.
2.7.2 Basic Reporting
There are five built-in reports that will return information about the faxes that
went through the fax server during the specified time period. Click the
Range
drop-down to change the time period reported.
Simple: Lists all faxes sent and received, but only displays basic information
about them.
Everything: Lists all faxes sent and received, and all information about them.
Sent Faxes: Lists all information about faxes sent.
Received: Lists all information about faxes received.
Errors: Lists all sent and received faxes that failed.
The table can be sorted by clicking on the column header. Drag a column header
to the gray bar at the top of the table to group the results by that column’s value.
Illustration 2.7.1.2#1: Printing a Basic Report
Date
Page 96

2 – Server Administration
Double-click a row to see all details of that fax.
2.7.3 Usage Graphs
There are four built-in usage graphs that will display usage levels during the
specified time period. Click the
od reported.
Each bar in the graph will represent the next smaller unit of time. There will be
two bars per unit of time: one for sent faxes, the other for received.
Fax Traffic: Graphs number of faxes sent and received.
Fax Page Traffic: Graphs number of pages sent and received.
Fax Connection Time: Graphs call duration for sent and received calls.
Port Utilization: Graphs maximum port usage during each time period. This is
useful for capacity planning. If the server ever uses all available ports, it is possible for inbound callers to get busy signals.
2.7.4 SQL Database Structure
NET SatisFAXtion 8.7 Manual
Date Range
drop-down to change the time peri-
96
For advanced reporting, it is possible to use a third-party report generation
tool to query the SQL database directly. Note that by default, Microsoft SQL
Server 2005 Express does not allow network connections. Please consult the
Microsoft SQL Server 2005 Express documentation and your third-party re-
port generation tool documentation for more details.
SQL Instance Name: ServerName\NETSATISFAXTION
Database Name: NET_SatisFAXtion_Logs
Table Name: FAX
sa Password: IW@-2ej*M(Ic#^c@
2.7.4.1 Table Columns
[Event_ID] [varchar](50)
A unique identifier, created based on [Time_Date_Stamp].
[Time_Date_Stamp] [datetime]
When this record was added to the logs database.
[Message_Type] [int]
What type of fax it is:
0: Send
4: Receive
[Receiver_Address] [varchar](100)
The dial string on an outbound fax, or the receiver’s email address on an inbound fax.
[Receiver_Name] [varchar](100)
Page 97

2 – Server Administration
The receiver’s name, if any. Set by the sender.
[Sender_Name] [varchar](100)
The sender’s Caller ID (ANI). Note that not all fax devices collect Caller ID
from the phone call.
[Submit_Time] [datetime]
When the fax was submitted to the fax server.
[Schedule] [datetime]
When the fax was scheduled for. If the fax was not scheduled for some time
after it was submitted, [Schedule] will equal [Submit_Time].
[Start_Time] [datetime]
When the fax began actually sending. On a receive fax this will equal
[Submit_Time].
[Original_User_Name] [varchar](50)
The user who actually submitted the fax to the server. For example, email faxes
will come from the SMTPPOST user.
[User_Name] [varchar](50)
The user who sent the fax.
NET SatisFAXtion 8.7 Manual
97
[Source_Num] [int]
The application used to submit the fax.
0: Unknown
1: WinFax (deprecated)
2: Exchange MAPI gateway (deprecated)
3: Notes Domino gateway (deprecated)
5: SMTP or POP3 email gateway
9: Administration
15: Email Autoenroll
18: FAXability
[User_Billing_Code] [varchar](50)
User billing code, see 2.8.1 User Billing Codes .
[Custom_Billing_Code] [varchar](50)
Custom, user-provided billing code. See 2.8.2 Custom Billing Codes .
[Server_Name] [varchar](50)
The name of the server that received or sent the fax.
[Port_Used] [varchar](50)
The name of the port used to send or receive the fax. IPF_XXXX ports do not
correspond to the actual port on the media gateway used.
[Message_Completion_Code] [int]
Error code. “0” indicates success. See 4.1 Error Code Reference for a list of er-
ror codes.
[ICANFax_Completion_Code] [int]
Internal ICANFax error code.
Page 98

2 – Server Administration
[Extended_Error] [int]
Extended error code, if any.
[Number_Of_Errors] [int]
For non-ECM received faxes, this will indicate the number of incomplete or
missing scan lines received. Usually an indicator of poor line condition / line
noise.
[Retries] [int]
Number of times the sent fax retried.
[Connection_BPS] [int]
Last baud rate used during send or receive.
[Connection_Seconds] [int]
Total number of seconds used to send or receive the fax. On a sent fax, this
will be the sum of the duration of all retries.
[Total_Fax_Pages] [int]
Number of pages received or total number of pages submitted.
[Pages_Transferred] [int]
Number of pages actually sent or received. For received faxes this will always
equal [Total_Fax_Pages]. For sent faxes, this can be less than
[Total_Fax_Pages] if the fax failed before all pages were sent.
NET SatisFAXtion 8.7 Manual
98
[Attachment_Count] [int]
Number of documents attached to sent fax.
[Sender_CSID] [varchar](50)
The TSID of the sender.
[Receiver_CSID] [varchar](50)
The CSID of the receiver.
[Email_Sent] [int]
Whether this fax was delivered to an email user.
[Fax_Coarse_Resolution] [int]
The resolution of the fax.
0: 200 dpi resolution.
1: 100 dpi resolution.
[Group_Message_Handle] [varchar](50)
The [Message_Handle] of the parent “group” fax.
[Message_Handle] [int]
The queue handle of this fax. This will eventually wrap around to 0 after a
while, so it is not a unique identifier.
[Email_Sender_Address] [varchar](100)
Email address of the fax’s sender.
[Page_Count] [int]
Yet another page count.
[Forwarded_Message] [int]
Page 99

2 – Server Administration
Was the received fax forwarded.
[Receiver_Info] [varchar](25)
[Image_Transfer_Method] [varchar](50)
Code indicating the compression method used.
[Dial_Seconds] [int]
For outbound faxes, how many seconds elapsed from when the fax server
placed the call until when it was answered.
[V21_Frame_Error_Count] [int]
How many times V.21 signals had to be retransmitted due to lack of response
on the far side.
[ECM_Frame_Error_Count] [int]
How many times Error Correction was used to resend data corrupted due to
line impairment.
[RTP_Count] [int]
For non-ECM received faxes, how many times the fax server requested pages
be resent because 5–10% of the scan lines on that page were corrupt. Note
that the sending fax machine is not required to retransmit the page.
[RTN_Count] [int]
For non-ECM received faxes, how many times the fax server requested pages
be resent because 10% or more of the scan lines on that page were corrupt.
Note that the sending fax machine is not required to retransmit the page.
NET SatisFAXtion 8.7 Manual
99
[DIS] [varchar](30)
Raw data from the far side’s DIS frame.
[NSF1] [varchar](128)
Raw data from the far side’s NSF1 frame.
[NSF2] [varchar](128)
Raw data from the far side’s NSF2 frame.
[Export_Location] [text]
The file name of the fax as saved by the Export module. Note that once the fax
is exported to disk, there is no further management of that file, so users or other processes may have deleted, renamed or moved the file after the Export
process has completed.
2.8 Billing Codes
Billing codes provide additional information about faxes that gets logged in the
Reports database. There are two kinds of billing codes:
User Billing Codes: This is a code that is assigned to an account from the Administration program. It is logged with every fax that user sends or receives.
Custom Billing Code: This is a code that a user can optionally assign to an outbound fax. Custom billing codes can only be used with email or FaxOut Client
Suite clients.
Page 100
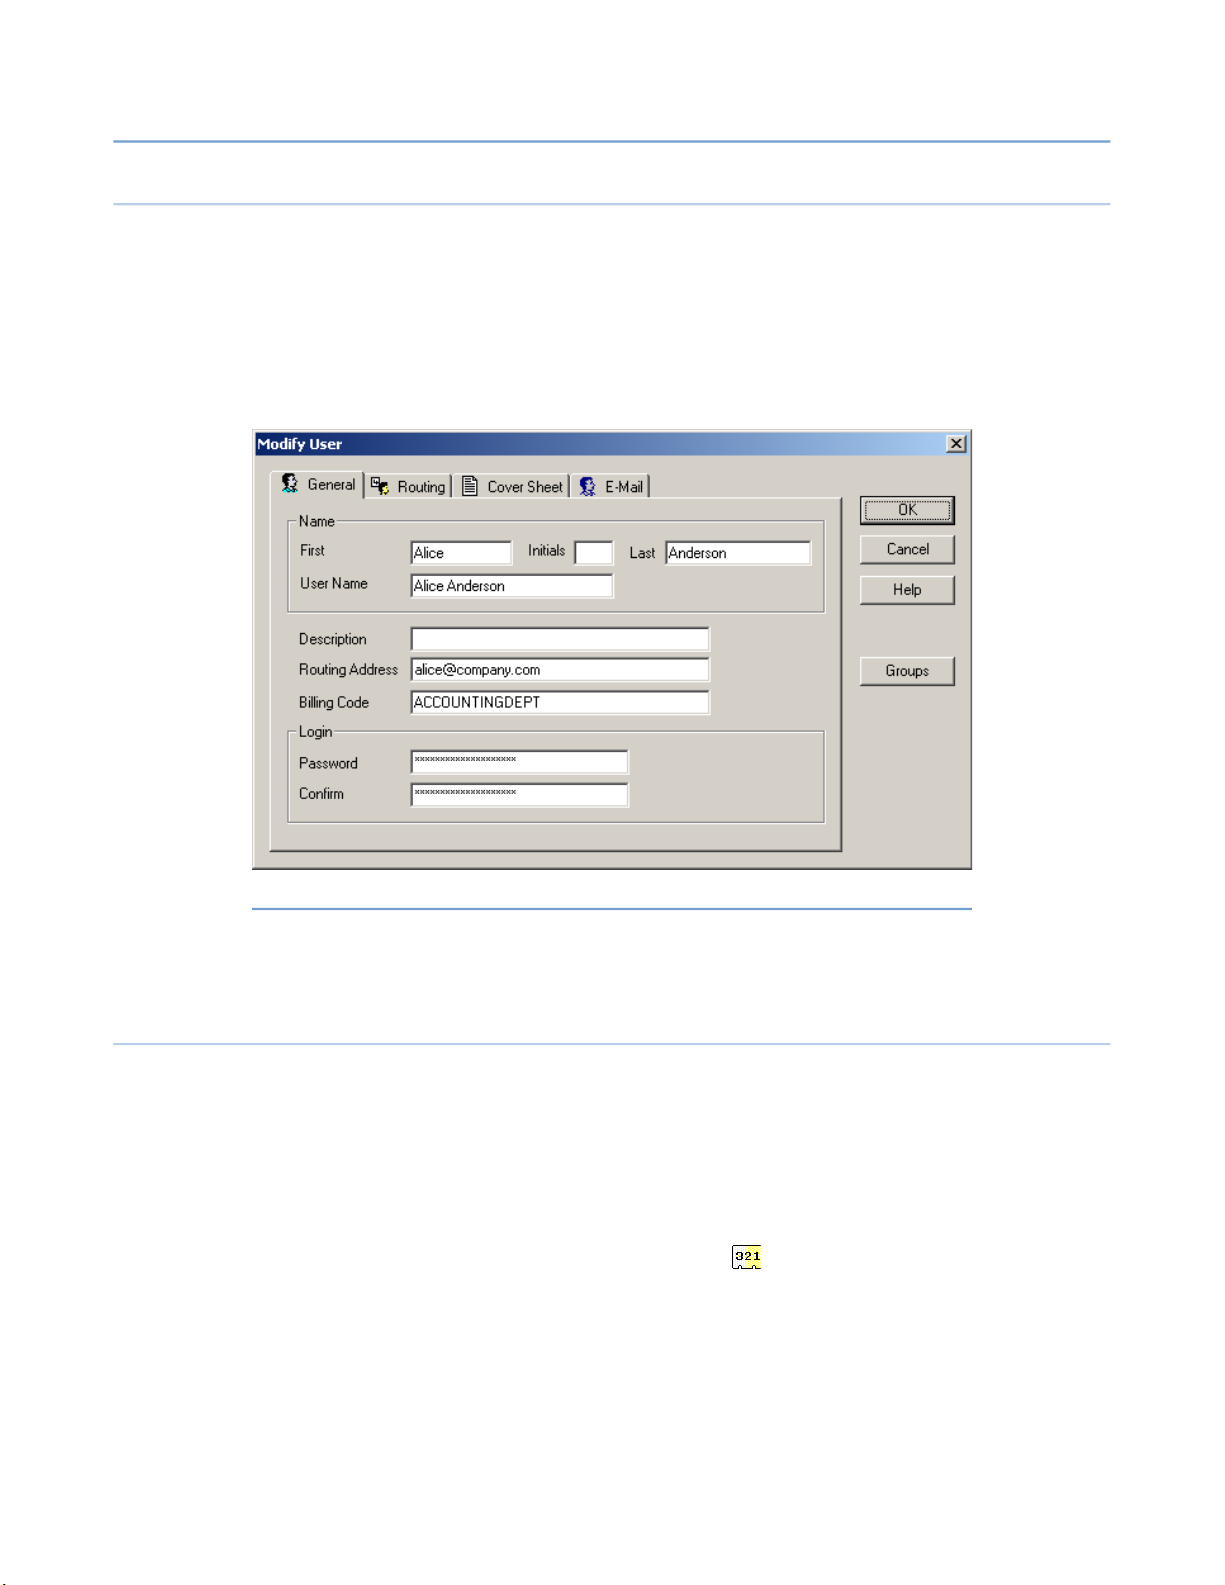
2 – Server Administration
2.8.1 User Billing Codes
User billing codes are labels of up to 15 characters, assigned to a user account
using the Administration program, in the
the
User Administration
Supervisor level user. Click on the
see a list of all groups on the left, and a list of all users on the right. Right-click
a user and choose
sign to the user.
NET SatisFAXtion 8.7 Manual
section, run the
View User Administration⇨
Modify User
. In the
Billing Code
User Administration
Administration
program and log in as a
field, type in the code to as-
100
section. To access
menu. You will
Click OK. Now every fax the user sends or receives will be labeled with that
code in the report.
2.8.2 Custom Billing Codes
Custom billing codes are labels of up to 50 characters, optionally assigned to
an outbound fax by a user when they send the fax.
The fax server can provide a list of billing codes that the user can pick from to
encourage standardization. Alternately the user can type in a billing code to
use.
To manage the server-side list of billing codes, run the Billing Code Manager
utility from
or from the Administration program under
from the Start menu, you will need to log in to the server.
Start Programs NET SatisFAXtion ⇨ ⇨ ⇨ Billing Code Manager
Illustration 2.8.1#1: Adding a User Billing Code
Tools Billing Code Manager⇨
. If run
 Loading...