

Digital Satellite Receiver
MERCURY S100
Operating Instructions
_______________________________________________________________
Version 1.2 31.08.07

Table of Contents
_______________________________________________________________
2
Table of Contents
Table of Contents................................................................................................ 2
Preface ............................................................................................................... 3
Safety Information.............................................................................................. 4
Receiver Front View ............................................................................................ 6
Receiver Back...................................................................................................... 6
Remote control ....................................................................................................7
Remote control buttons ...................................................................................... 8
Connect Receiver ................................................................................................ 9
1. Installation .....................................................................................................10
1.1 Antenna Settings .......................................................................................10
LNB Type ....................................................................................................10
22 kHz Tone ................................................................................................10
Scan mode ..................................................................................................10
1.2 Edit Satellite..............................................................................................11
1.3 Transponder List .......................................................................................11
2. Edit Program ..................................................................................................13
3. Edit Favorites .................................................................................................14
4. System settings..............................................................................................14
4.1 Set time ....................................................................................................14
4.2 Set A/V output ..........................................................................................14
4.3 OSD settings .............................................................................................15
4.4 Parental Lock........................................................................................... 16
4.5 Factory Settings....................................................................................... 16
5. Games............................................................................................................ 17
6. Timer .............................................................................................................17
7. Basic Operating Steps ....................................................................................18
Cleaning............................................................................................................ 19
Disposal ............................................................................................................ 19
Eliminating malfunctions .................................................................................. 20
Technical Information ........................................................................................21

Preface
_______________________________________________________________
3
Preface
Dear Customer,
Thank you very much for choosing our Satellite Receiver.
You have selected a receiver of our new generation – the experience of 10 years
of digital transfer technology go into our FaVal Receivers.
Please read through the operating instructions carefully to prevent
malfunctioning of the device. Please particularly observe the safety information.
Non-observance can lead not only to damage in the device, but also to personal
injury.
Your receiver is preinstalled in the delivery condition and changes do not
normally need to be made in the satellite settings. This makes the first
installation especially convenient.
Should unexpected problems arise, see the chapter entitled “Eliminating
malfunctions”. Your specialized dealer will also be glad to speak with you and
provide assistance.
Our dedication in the development of high quality entertainment electronics will
certainly ensure your satisfaction in the future with our range of products.
We wish you good reception.

Safety Information
_______________________________________________________________
4
Safety Information
Read the operating instructions thoroughly before connecting the device.
• Operate the device only on mains with a corresponding power connect ion.
• Operate the device near an outlet and configure it freely accessibly for safety
reasons.
• The digital receiver must be disconnected from the mains before it is
connected to an LNB, Mult iswitch or TV set and video recorder. Otherwise
the device could be damaged.
• Make sure the device stands free. Maintain a distance of at least 20 cm to the
left and right and 50 cm above from other devices and furniture parts where
you operate the device.
• Make sure all ventilation holes are free and adequate air can circulate
through the device. Do not put other electronic devices on the receiver. Do
not place objects such as newspapers, magazines, table cloths on the device.
Make sure the ventilation grids are not covered by net curtains or curtains.
Do not place burning objects, for example burning candles, on the device.
• Make sure the device is not exposed to steam, rain or other splashing or
dripping liquids. Do not put any objects filled with liquids such as vases on
the device.
• Never open the device. Danger of electric shock!
• To make the device completely free of tension, you must unplug the power
cable from the outlet. If you do not use the device for a long time, unplug the
power plug from the outlet.
• Lightning in the antenna is dangerous, so the LNB as well as the satellite
antenna must be bound with lightning protection or a suitable grounder.
• To protect your receiver, switch it off during thunderstorms and unplug the
power plug and antenna cable. This protects your receiver from damage.
• Do not touch the power cable with wet hands!
• Make sure you have made all connections before you connect the device to
the power network.
• Use original parts or parts recommended by a specialized dealer only to
avoid damage to your device or personal injury. By non-observance of this
warning, the device guarantee expires. All repairs must be made by a
certified specialist.

Safety Information
_______________________________________________________________
5
Proper handling of batteries
• Batteries can contain poisonous substances. Keep batteries out of reach of
children, as the batteries could be swallowed.
• Leaking batteries can cause damage in the remote control. Batteries can
contain poisonous substances which are harmful to the environment.
Dispose of the batteries in complete accordance with the legal regulations.
Never throw the batteries away with normal garbage.
Intended use
The digital satellite receiver is for reception of digital television programs or radio
programs in the private domain. It is exclusively designated for the stated
purpose and may only be used for this. This also includes observance of all
information in these operating instructions, particularly the safety information.
Any other use is not in accordance with the requirements and can cause damage
to property and even personal injury.
The manufacturer takes no responsibility for damage or injuries arising from
nonobservance of the safety information or from improper handling of the
device.
Settings in the receiver must only be made by persons who have proper
knowledge in handling entertainment electronics. This also means that every
person who mounts, connects, operates, cleans or disposes of this receiver has
read the complete operating instructions of the device to ensure intended use.
Keep the operating instructions for this purpose.
Product contents
Please check the product contents after purchase of your receiver:
1 Satellite receiver, 1 remote control, 2 batteries (AAA), instructions (1)
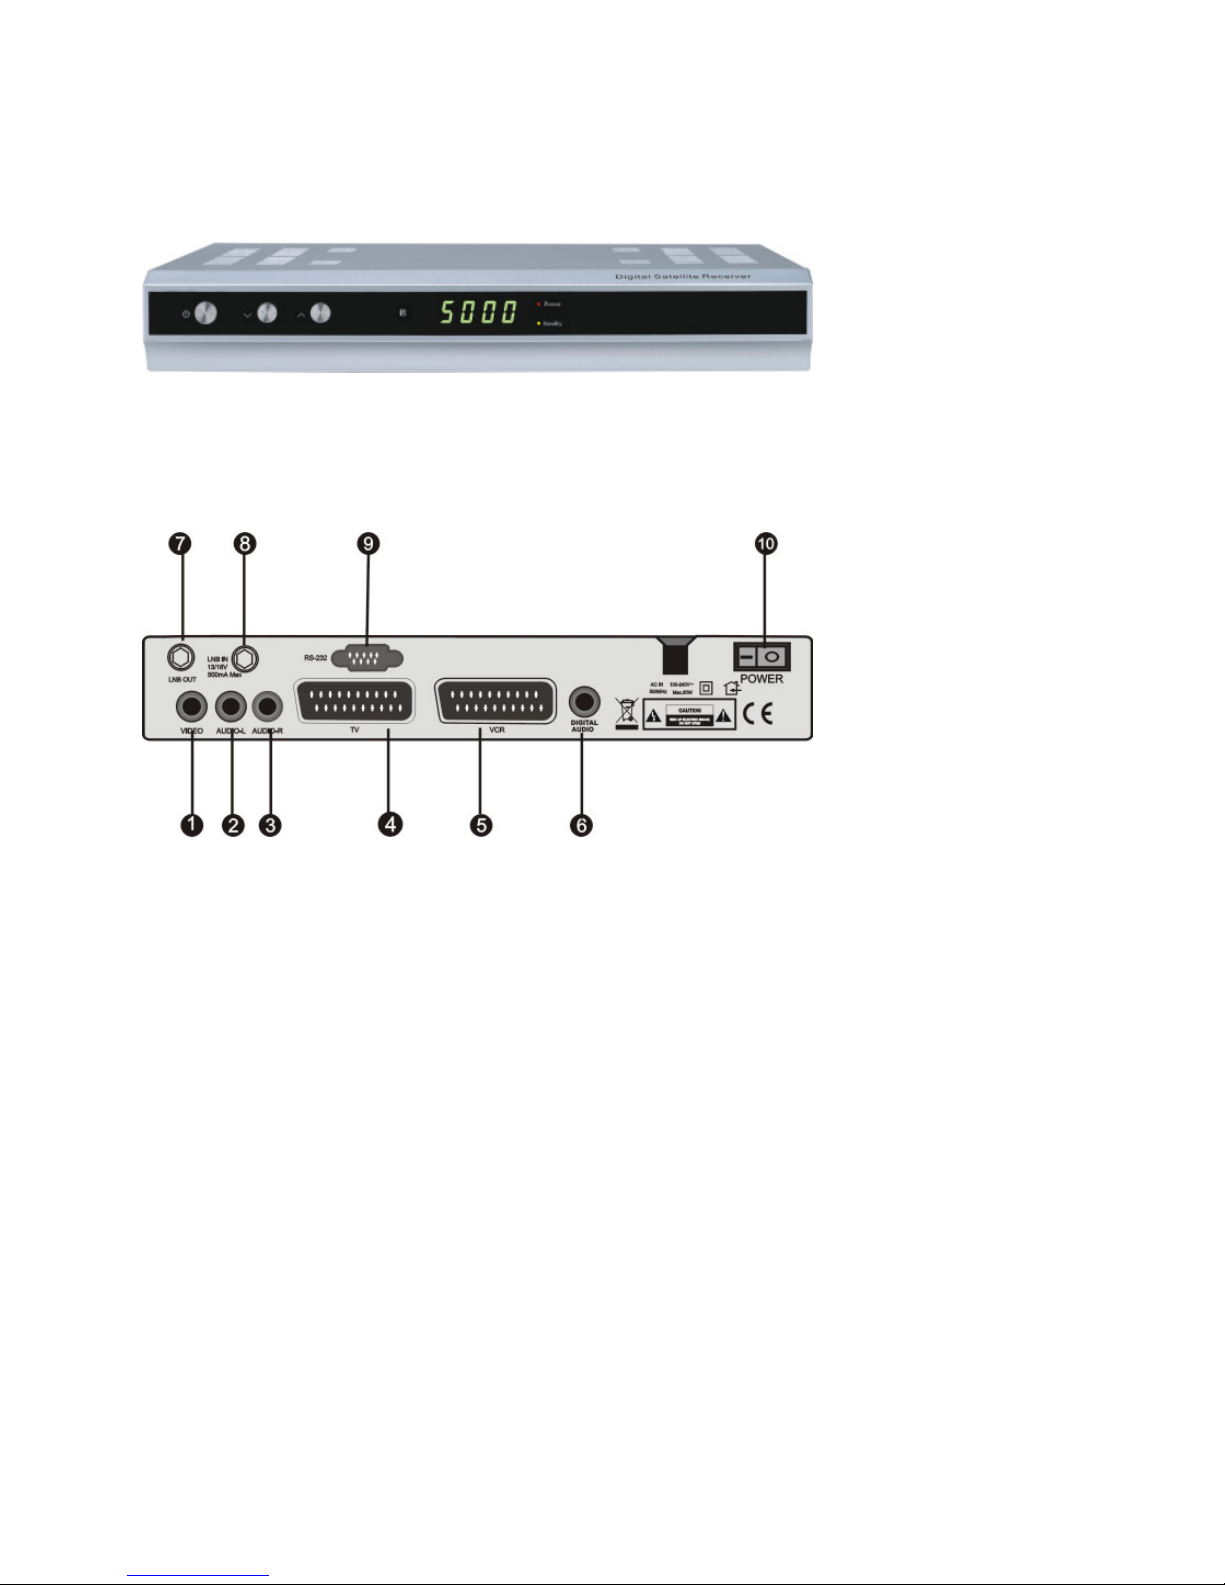
Receiver Front View
_______________________________________________________________
6
Receiver Front View
Receiver Back
1. VIDEO: Coaxial video connection
2. Audio-L: Left analog audio connection
3. Audio-R: Right analog audio connection
4. TV: SCART connection TV set
5. VCR: SCART connection video device
6. Digital Audio: Digital coaxial audio connection
7. LNB OUT: Loop-through connection of the receiver
8. LNB IN: Connection of the antenna cable
9. RS232: Serial interface for loading the software or channel list
in production. Please follow the correct connection, an
operating error can lead to disturbances in the device
and to loss of the guarantee.
10. POWER: On-off switch

Remote control
_______________________________________________________________
7
Remote control

Remote control buttons
_______________________________________________________________
8
Remote control buttons
No. Symbol Explanation
1 Turn on and standby
2
0- 9
Enter program directly, digit input
3
SUBTL
Check if subtitles are available for the broadcast
4
16:9
Switch from 4:3 to 16:9 full-screen mode
5
VOL ◄
– Lower volume
– Left menu option
6
OK
– Confirm menu or menu item
– Show channel list
7
MENU
Call up menu, basic settings
8
OK
– Confirm menu or menu item
– Show channel list
9
TXT
Activate teletext
10
EPG
Electronic Program Guide
11
AUDIO
Open expanded options for audio settings
12
SAT
Open satellite settings
13
FAV
Call up favorites lists (if created)
14
ZOOM
Enlargement of a screen
15
(MUTE)
Mute
16
TV/SAT
Source channels for TV channel select
17
SLEEP
Settings for automatic switching off of the
receiver
18
EXIT
Exit menu or menu item
19
INFO
Display data of current program
20
Pg UP
Go one page higher
21
Pg Down
Go one page lower
22
MULTI PICTURE
Multi-picture display (nine pictures)
23
TV/RADIO
Switch between TV and radio mode
24
RECALL
Switch to previous program
25
PAUSE
Switch to freeze frame during TV program

Connect Receiver
_______________________________________________________________
9
Connect Receiver
(Fig. similar)

1. Installation
_______________________________________________________________
10
1. Installation
Connect the receiver with the antenna cable and plug the receiver into your
TV set. Plug the power plugs of the connected devices in the power socket
and switch on the receiver with the Standby button.
Then press the “MENU” button
Now select the menu item “Installation” (PIN code: 0000). In this menu you can
edit your antenna settings and make additional settings to your satellite
reception.
With the direction buttons “CH ▲” and “CH ▼” (up and down) as well as “VOL◄”
and “VOL ►” (jump from one level to the next) you can navigate the menu, and
with the “OK”button you can go into a menu item. To return to a menu item, use
the “EXIT” or “MENU” button.
_____________________________________________________________________
The channels are preset. Adjust the settings only if you know the
exact values and are familiar with satellite transmission technology.
1.1 Antenna Settings
In this menu item you can set your receiver to the desired satellite. The following
parameters can be defined: LNB type, frequency, 22 kHz, DiSEqC, LNB power,
Scan mode. With the “VOL◄” and “VOL ►” buttons you can enter the desired
values, then "Save" and confirm with the “OK” button.
Satellite name
In the right column you can select among pre-programmed satellites the
satellites you receive. (Only the satellites which your satellite dish is aimed at are
receiveable.)
LNB Type
You can select the LNB type you use here (Standard: Universal).
22 kHz Tone
If your LNB is not universal, the value must be changed accordingly.
Scan mode
Select “Search” to search for channels on the selected satellite. In the next
submenu first select the type of search function for the selected satellite:

1. Installation
_______________________________________________________________
11
FTA, ALL, FTA+NIT, ALL+NIT
FTA (Free-To-Air): Search all free-to-air channels (not encrypted channels) on
the selected satellite.
ALL: Search all channels (free-to-air as well as encrypted channels) on the
selected satellite.
FTA + NIT: Search all free-to-air channels belonging to a channel group on the
selected satellite.
ALL + NIT: Search all free-to-air as well as encrypted channels belonging to a
channel group on the selected satellite.
After you have made your choice, choose between “Add” (to add found channels
at the end of the channel list) or “Overwrite” (to overwrite found channels with
old channel frequencies) and then press the “OK” button to begin the search.
The search status is shown on the screen.
1.2 Edit Satellite
In the installation menu of the antenna settings you can edit the previously
selected satellite by pressing the “VOL◄” button. Here you can rename the
selected satellite.
The following color buttons are available in the installation menu of the antenna
settings to edit the satellite:
YELLOW Add Satellite
Press the YELLOW BUTTON to add a new satellite. Enter a name for the new
satellite in the following menu by opening the alphabetic keyboard with the
“VOL►” button. Choose the proper longitude as well as east / west orientation.
The new satellite of the list is added by pressing the “OK” button.
BLUE Delete Satellite
Press the BLUE BUTTON to remove the selected satellite from the list.
1.3 Transponder List
By pressing the GREEN BUTTON in the installation menu of the antenna settings
the list of previously selected satellites is opened in the transponder list. In this

1. Installation
_______________________________________________________________
12
menu item you can search, edit, add or delete individual transponder of a
satellite.
Navigate the transponder list with the “CH ▲” and “CH ▼” buttons. You can
also use the color buttons:
RED Search
Press the RED BUTTON to search the selected transponder.
GREEN Add Transponder
Press the GREEN BUTTON to add a new transponder. Enter the correct
frequency, symbol rate and polarization of the new transponder in the following
menu. The new transponder is stored in the transponder list with “Save”.
YELLOW Edit Transponder
Press the YELLOW BUTTON to edit the previously selected transponder. Enter
the correct frequency, symbol rate and polarization of the transponder in the
following menu. The new transponder data is stored with “Save”.
BLUE Delete
Press the BLUE BUTTON to remove the selected transponder from the list.

2. Edit Program
_______________________________________________________________
13
2. Edit Program
Open the “Edit Program” menu at Main Menu / Program. In this menu you can
change, block, remove from program list, delete, move and re-sort programs.
Navigate the program list with the “CH ▲” and “CH ▼” buttons. In addition, the
following functions are available with the color buttons:
Move channel
To move a channel, select the channel to be moved and press the GREEN
BUTTON to move the channel. You are then asked which program place the
selected channel should be moved to. Enter the program place using the number
buttons and press “OK”. The channel is then moved to the desired place. You can
also select several channels at the same time with “OK” to move them. They are
then added according to the previous order to the selected program place.
Skip channel
To temporarily remove a channel from the channel list, select the channel and
press the YELLOW BUTTON “Skip channel ”. Now the channel is off the channel
list (not deleted). To restore the channel, repeat this step, and the channel is
reinserted in the channel list.
Delete Channel
Select the channel which you would like to delete and press the BLUE BUTTON.
Select “OK” in the following option to permanently delete the channel. To delete
other channels, repeat this step.
Rename Channel
Select the channel you would like to rename. First press the RED BUTTON to
open the expanded channel options and then press the GREEN BUTTON. Now
you can change the name of the selected channel on the alphabetic keyboard.
Change Channel
Select the channel you would like to change. First press the RED BUTTON to
open the expanded channel options and then press the YELLOW BUTTON. In this
menu you can change the values of the video, audio, PCR and Tele-PID with the
number buttons on your remote control. Press the “OK” button to apply the
changes or press “EXIT” to cancel the changes without saving.

3. Edit Favorites
_______________________________________________________________
14
Block channel
Select the channel you would like to block. First press the RED BUTTON to open
the expanded channel options and then press the BLUE BUTTON. The selected
channel is now shown on the list with a lock symbol. Blocked channels can only be
viewed by entering your personal identification number (PIN). To unblock the
channel, repeat this step.
3. Edit Favorites
To receive better clarity of TV and radio programs, you can add a channel (or
several) to a favorites group.
_____________________________________________________________________
You can create an individual favorites list for each member of the family,
which you can also create according to subject (information, cartoons,
news, etc.).
Open the “Edit Favorites” menu at Main Menu / Program.
To add a channel to a favorites group, first select the favorites group you would
like to add the channel to with the “VOL◄” and “VOL ►” buttons. Then select
the desired channel with the “CH ▲” and “CH ▼” buttons, select it with the “OK”
button and then press the RED BUTTON to add to the selected favorites group.
To add other channels, repeat these steps. To leave the menu press the “EXIT”
button.
4. System settings
In this menu item you can make different settings, for example video version,
time settings or timer.
The following submenus are also available:
4.1 Set time
In this menu item you can adjust the time of your receiver to your location.
GMT Time Zone
Enter your local time here (the setting for Germany, Austria and Switzerland is
Setting 1).
Then enter the date and time with the number buttons on your remote control.
4.2 Set A/V output
In this menu item you can tune the picture on your TV set.

4. System settings
_______________________________________________________________
15
TV norm
Select the output format here which your color television set supports. You can
select among PAL, NTSC, SECAM or AUTOMATIC.
Video Output Mode
Select the video output mode of your receiver here. You can select between RGB
and CVBS.
Screen Mode
Select whether your receiver should display the screen mode at 4:3 or 16:9 here.
With the "16:9" button on your remote control you can also adjust the format of
the current program on your TV set during the program.
_____________________________________________________________________
16:9: Widescreen format, used among other things with films (can only be
selected if your television supports this format).
RF Type (optional)
Select the output format here which should be displayed on the modulator.
RF Channel (optional)
Select which UHF channel your modulator should transmit the signals to the TV
set over here.
4.3 OSD settings
In this menu item you can adjust the OSD menu of the receiver.
The OSD menu (On Screen Display) is the colored menu which overlays the TV
screen and displays information (e.g., EPG).
Menu language
Choose the menu language of the OSD menu.
Menu transparency
Choose the degree of transparency of the OSD menu.
Menu display duration
Choose the display duration of program information while changing.

4. System settings
_______________________________________________________________
16
4.4 Parental Lock
In this menu you can select which menu options should be password-protected
and can be accessed only after entering the PIN number. (The PIN number in the
factory setting is “0000”.)
To block one of the menu items, select the option "On" after the corresponding
display.
Under the menu item “change password” you can enter a new PIN code. Repeat
the PIN under “Confirm PIN” for security.
_____________________________________________________________________
If you forget your PIN, set the receiver back to factory settings.
The factory-set PIN is then automatically reset in the system
(“0000”).
4.5 Factory Settings
In this menu you can reset the receiver to the delivery condition. Please note that
all settings you have made and all stored data are deleted and must then be done
again! (e.g., program lists, favorites lists, etc.)

5. Games
_______________________________________________________________
17
5. Games
On your receiver there are – according to model – games installed.
You can call up the game settings with the color buttons. While you play, the
program most recently seen is shown in a small TV window.
6. Timer
You can program the receiver so that it switches over to a certain channel at a
desired time. Up to ten timer functions are possible. You can use this function to
store a program, e.g., by video recorder.
Open the “Set Timer” menu at Main Menu/Accessories/Timer.
Timer Number
You can program up to eight independent timers with the direction buttons
“VOL◄” and “VOL ►” selecting the timer number you would like to program.
Timer Mode
To activate a timer number, select the type of timer here. The following timer
settings are available:
Only start time: The receiver is switched on at the time set.
Only stop time: The receiver is switched off at the time set.
On + Off: The receiver is switched on or off at the given time.
Off: The timer is switched off.
Replay
Select here whether the timer should replay once, daily or weekly in the defined
settings. This is useful, for example, with TV series.
Start date, start time
Enter the start date or start time when your receiver should switch on. Use the
number buttons of your remote control for this.
Stop date, stop time
Enter the start date or start time when your receiver should switch off. Use the
number buttons of your remote control for this. When the stop time is reached,
the receiver automatically switches to standby mode.
TV / radio
Select here whether the receiver should switch on a TV or radio channel.

7. Basic Operating Steps
_______________________________________________________________
18
Program
Define the channel the receiver should switch on here.
7. Basic Operating Steps
Switch between radio mode and TV mode
To switch between radio mode and TV mode, press the “TV/RADIO” button.
Channel select
To go to the previous channel or next channel, press the arrow buttons “CH ▲”
and “CH ▼” on the remote control.
You can also switch directly to a channel by entering the memory location
number of the desired channel with the number buttons.
Volume
To raise or lower the volume, press the volume buttons “VOL◄” and “VOL ►”.
To mute the receiver, press the “MUTE” button.
Program Guide (EPG)
To view additional information about the current program, the following
program or the program of the selected channel, press the “EPG” button. To
receive further information, first select the corresponding program with the “CH
▲” and “CH ▼” buttons and then press the “OK” button. To leave the menu,
press the “EXIT” button.
_____________________________________________________________________
EPG: Electronic Program Guide with current and upcoming program
information. The information is fed from the respective channels. How far
in advance the information is varies from one channel to the next. The
EPG can be directly selected with the “EPG” button.
Channel list
Press the “OK” button of your remote control during normal TV operation and
the numerically sorted program list appears. In the right edge of the screen,
additional information about the selected channel is shown.
On the upper edge of the screen there are colored (red, blue, green, yellow)
additional menus which you can call up by pressing the corresponding color
button on your remote control.

Cleaning
_______________________________________________________________
19
Cleaning
Danger of electric shock!
Liquid must not enter the receiver. Never clean with a wet cloth. Unplug from the
power socket before cleaning the power plug.
Note!
Do not use solvent-containing cleaning agents like benzine or thinner. These can
damage the surface of the case.
Clean the receiver case with a dry cloth.
Disposal
Never throw away the receiver and batteries with
normal garbage. Ask your city administration or local
government about the possibilities of environmentally
friendly and proper disposal of the device. Take
drained batteries to a collection point.

Eliminating malfunctions
_______________________________________________________________
20
Eliminating malfunctions
Symptom
Possible cause and remedy
The power cable is not connected.
Connect the power cable to the power socket.
The display does not work.
The power switch is not switched on.
Switch on the power switch.
No tone, picture, LED on
the receiver.
The receiver is in standby.
Press the "POWER" button. The receiver switches on
and the program will be shown on the TV screen.
The antenna is not adjusted to the satellite.
Adjust the antenna properly.
No tone or picture.
No signal or weak signal.
Check the cable connection from the LNB to the
receiver and from the receiver to the connected
devices.
Adjust the antenna.
The system is not properly connected.
Check the SCART or HF cable connection.
The TV set has no picture.
The TV set is not in AV mode.
Switch the TV set to the respective AV input.
The antenna is not adjusted to the satellite.
Adjust the antenna.
Bad picture, error
The LNB is defective.
Replace the LNB.
The batteries are drained.
Replace the batteries with new ones.
The remote control does
not function.
The remote control is incorrectly aimed.
Aim the remote control to the front of the
receiver and make sure that nothing is between
the remote control and receiver.
If the malfunction is not eliminated, please contact your specialized dealer.

Technical Information
_______________________________________________________________
21
Technical Information
Receiver
Operating temperature 0 ºC bis +40 ºC
Storage temperature –40 ºC bis +65 ºC
LNB/TUNER Input
F-socket IEC 169–24
Input frequency range 950 MHz ~ 2150 MHz
Input level range –65 dBm bis –25 dBm
LNB supply current 14/18 V, max. 500 mA
LNB control signal 22 kHz, 0/12 V
DiSEqC control Version 1.2
Demodulator
Front End Module QPSK
Data input rate 2 MS/s to 45 MS/s /SCPC-/MCPC-capable
System resources
Processor 16 bit, 200MHz
SDRAM 8 Mbyte
FLASH 2 Mbyte
Video Decoder
MPEG 2 Main Profile@Main Level
Video resolution (Video format) 720 x 576 (Pal), 720 x 480 (NTSC)
Screen format 4:3, 16:9
MPEG Audio (MPEG 1 Layer 1 and 2)
Type Mono, Dual Mono, Stereo
Bit rate 32 / 44,1 / 48 kHz
Remote control
Range To 7 m
Power Adaptor
Power consumption Max. 30 W
Mains voltage 100 – 240 V AC, 50/60 Hz
Back connections
Digital audio output (S/P DIF) 1 x RCA Cinch Coaxial
Data interface 9-pole, D-sub
Digital tuner input IEC 169-24
Loop-through digital tuner IEC 169-24
TV-SCART RGB, CVBS, Y/C, Audio
VCR-SCART CVBS, Y/C, Audio
Analog video output 1 x RCA Cinch Coaxial
Analog audio output 2 x RCA Cinch Coaxial

Technical Information
_______________________________________________________________
22
Service
Please contact your specialized dealer.
Declaration of conformity
Compliance with the following guidelines and norms for this product is hereby
declared:
Low Voltage Guidelines 73/23/EWG
EN 60 335-1
EN 60 335-2-15
Guidelines for Electromagnetic Compatibility 89/336/EWG
EN 55 013:2001
EN 55 020
EN 61 000-3-2000
EN 61 000-3-3:1995+A1:2001
EN 61 938
Device type: Digital Satellite Receiver
Your device bears the CE mark.
DiSEqC is a registered trade mark of EUTELSAT.
distributed by
MAX COMMUNICATION GMBH | SIEMENSSTRASSE 47 | 25462 Rellingen / Hamburg

Notes:
Thanks very much for choosing our product. Our product is in compliance with
legal requirements and was made under constant quality control. The technical
data complies with the present state at the time of printing. Subject to change.

 Loading...