

Page 1
Motion Control
Series MCLM 300x RS
Communication and
Function Manual
EN
WE CREATE MOTION
Page 2

Imprint
Version:
3rd issue, 11.11.2013
Copyright
by Dr. Fritz Faulhaber GmbH & Co. KG
Daimlerstr. 23 / 25 · 71101 Schönaich
All rights reserved, including translation rights.
No part of this description may be duplicated, reproduced, stored in an information system or processed or
transferred in any other form without prior express written permission of Dr. Fritz Faulhaber GmbH & Co. KG.
This communication and function manual has been prepared with care.
Dr. Fritz Faulhaber GmbH & Co. KG cannot accept any
liability for any errors in this communication and function
manual or for the consequences of such errors. Equally,
no liability can be accepted for direct or consequential
damages resulting from improper use of the equipment.
The relevant regulations regarding safety engineering
and interference suppression as well as the requirements
specified in this communication and function manual are
to be noted and followed when using the software.
Subject to change without notice.
The respective current version of this communication and
function manual is available on FAULHABER's internet
site:
www.faulhaber.com
2
Page 3
Overview
Overview of the Faulhaber Motion Control Drives documents
Document Contents
Technical Manual Device installation, safety, specification
Communication and function manual
(RS232)
Motion Manager instruction manual Operation of the "FAULHABER Motion Manager" PC soft-
Product data sheets Technical limit and operating data
Initial start-up, function overview, protocol description,
parameter description and notes on autonomous sequential programs
ware for configuration and commissioning
Guide to the Document
Quick Start
Notes on the initial start-up of a Faulhaber Motion Control System
at the PC in the default configuration Page 8
Functional Description
Overview of the possible operating modes Page 10
Protocol Description
Specification of the communication protocol Page 50
Commissioning
Detailed description of the parameters for the implemented
function blocks within the drive Page 56
Sequence Programs
Notes on automation of the drive function via sequence programs Page 69
Parameter Description
Description of all the drive's parameters and commands
broken down into functional areas Page 76
3
Page 4
Table of Contents
1 Important Information 6
1.1 Symbols used in this manual 6
1.2 Additional information 7
2 Quick Start 8
3 Functional Description 10
3.1 Position control 11
3.2 Velocity control 19
3.3 Homing and limit switches 27
3.4 Enhanced operating modes 32
3.5 Special fault output functions 39
3.6 Technical information 41
3.1.1 Set value presetting via the serial interface 11
3.1.2 Analog positioning mode (APCMOD) 14
3.1.3 External encoder as actual position value (ENCMOD) 16
3.2.1 Velocity presetting via the serial interface 19
3.2.2 Velocity presetting via an analog voltage or a PWM signal 22
3.2.3 External encoder as actual velocity value (ENCMOD) 24
3.3.1 Limit switch connections and switching level 27
3.3.2 Motion control commands 28
3.3.3 Configuration of homing and limit switches 29
3.4.1 Stepper motor mode 32
3.4.2 Gearing mode (electronic gear) 34
3.4.3 Voltage regulator mode 36
3.4.4 Current control with analog current presetting 37
3.6.1 Ramp generator 41
3.6.2 Sinus commutation 45
3.6.3 Current controller and I²t current limitation 45
3.6.4 Overtemperature protection 47
3.6.5 Under-voltage monitoring 47
3.6.6 Overvoltage regulation 47
3.6.7 Setting the controller parameters for velocity and position controller 47
4 Protocol Description 50
4.1 Baud rate and node number 52
4.2 Trace Function 54
4
Page 5

Table of Contents
5 Commissioning 56
5.1 Basic settings 57
5.2 Configuration using Motion Manager 58
5.2.1 Connection setting 59
5.2.2 Motor selection 60
5.2.3 Drive configuration 60
5.2.4 Basic settings 60
5.2.5 Drive parameters 63
5.2.6 Controller settings 64
5.2.7 I / O connection and use 66
5.2.8 Data set management 67
5.2.9 Diagnosis 68
5.2.10 Trace Function 68
6 Sequence Programs 69
7 Parameter Description 76
7.1 Basic setting commands 76
7.1.1 Commands for special operating modes 76
7.1.2 Parameters for basic setting 77
7.1.3 General parameters 78
7.1.4 Configuration of fault pin and digital inputs 78
7.1.5 Configuration of homing and limit switches in 79
7.2 Query commands for basic setting 80
7.2.1 Operating modes and general parameters 80
7.2.2 Configuration of fault pin and digital inputs 81
7.2.3 Configuration of homing 82
7.3 Miscellaneous commands 82
7.4 Motion control commands 83
7.5 General query commands 84
7.6 Commands for sequence programs 85
5
Page 6
1 Important Information
1.1 Symbols used in this manual
WARNING!
Warning!
This pictogram with the wording "Warning!" indicates an imminent danger which can result in
physical injuries.
f This arrow points out the appropriate action to take to prevent the imminent danger.
CAUTION! Caution!
This pictogram with the wording "Caution!" indicates an imminent danger which can result in slight
physical injuries or material damage.
f This arrow points out the appropriate precautions.
REGULATION! Regulations, guidelines and directives
This pictogram with the wording "Regulation" indicates a statutory regulation, guideline or directive
which must be observed in the respective context of the text.
NOTE Note
This "Note" pictogram provides tips and recommendations for use and handling of the component.
6
Page 7
1 Important Information
1.2 Additional information
WARNING!
NOTE
NOTE
Risk of injuries
Failure to comply with the safety instructions during installation and operation can result in irreparable damage to the device and a risk of injuries to the operating personnel.
f Please read through the whole of your drive's technical manual before installing the drive.
f Keep this communication and function manual in a safe place for subsequent use.
Always use the current version of the Faulhaber MotionManager.
The respective current version is available to download from www.faulhaber.com/MotionManager.
The information given in this instruction manual refers to the standard version of the drives.
Please refer to any additional information sheet provided in the event of differences in information
due to a customer-specific motor modification.
NOTE RS232 interface
The drive can also be operated independently of the RS232 interface if the desired function, such as
velocity or position controller, has been previously programmed via analog input, stepper motor or
electronic gear.
7
Page 8
2 Quick Start
To facilitate introduction, this chapter highlights the initial steps for commissioning and operation
of FAULHABER Motion Controllers with serial interface. However, the detailed documentation must
always be read and adhered to, particularly Chapter 5.1 „Basic settings“!
The units are delivered as standard without a valid node address (NODEADR0) and with a transfer
rate of 9 600 baud. The settings can be changed via the interface, e.g. with the FAULHABER Motion
Manager (see Chapter 5.2.1 „Connection Parameters“).
The following steps are necessary for commissioning using the default configuration:
1. Connect the drive unit to a 12V – 24V voltage source.
2. Connect drive unit to a serial interface of the PC (e.g. COM1) and switch on.
3. Configuration and motion commands can now be executed via suitable software,
For details of the connection cable assignment, see Chapter 3 “Installation” in the technical
manual.
For details of the interface, see Chapter 3 “Installation” in the technical manual.
e.g. FAULHABER Motion Manager.
NOTE
Use of a USB serial adapter is recommended if the PC used does not have a serial port.
Operation via FAULHABER Motion Manager
The FAULHABER Motion Manager offers easy access to the Motion Controller’s command set. The
desired node must have been activated beforehand by double clicking in Node Explorer in the case
of network operation.
The FAULHABER commands described below can be entered directly in the command input line or
selected from the Commands menu.
In order to drive a motor via the Motion Manager, follow the procedure below (assuming a matching
baud rate):
1. Start FAULHABER Motion Manager.
2. Configure drive functions:
Motion controllers for linear motors must be equipped with current limiting values suitable for the motor and suitable controller parameters before being started up.
The Motor Wizard is available in Motion Manager for selection of the motor and basic parameters
suitable for the motor.
Other settings, e.g. for the function of the fault output, can be made under the “Configuration –
Drive functions” menu item, where a convenient dialog is provided (see Chapter 5.2 „Configuration
using Motion Manager“). The configuration dialog is also available for direct access in the Wizard
bar of the Motion Manager (Configuration Wizard).
CAUTION! Check basic settings
Incorrect values in the Motion Controller's settings can result in damage to the controller and / or
drive (see Chapter 5.1 „Basic settings“).
To operate the drive via the PC, set value presetting must be set to digital (SOR0).
If the settings are to be permanently stored, press the “EEPSAV” button.
8
Page 9
2 Quick Start
3. Activate drive:
5. Deactivate drive again
The controller tuning wizard
Motion Manager also provides a Controller Tuning Wizard, with which the controller parameters of
the velocity and positioning controller can be adjusted to the application.
“EN” command.
Enter in command input field and press “Send” button or select in “Commands – Motion control
– Enable drive” menu and press “Send” button.
4. Operate drive (examples):
Move the motor by 10000 increments with a relative positive positioning speed of 100 mm/s:
Command “SP100” to set the positioning speed, command “LR10000” to load the relative
target position, command “M”, to move to the loaded target position.
“DI” command.
WARNING! Warning!
During operation with the tuning wizard, the motor is alternately run within the set range limits.
f The motor must be installed so that it can freely move for the parameter search.
9
Page 10
3 Functional Description
Position control Page 11
Velocity control Page 19
Homing and limit switches Page 27
Enhanced operating modes Page 32
Special fault output functions Page 39
Technical information Page 41
The Motion Controllers can be configured for different operating modes. As standard the drive unit
is delivered as a servomotor with set value presetting via the serial interface. The drive can be reconfigured by means of the corresponding FAULHABER commands.
Guide
Command Argument Function Description
SOR 0 – 4 Source for Velocity Source for velocity presetting
CONTMOD - Continuous Mode Switch back to normal mode from an enhanced mode
STEPMOD - Stepper Motor Mode Change to stepper motor mode
APCMOD - Analog Position Con-
trol Mode
ENCMOD - Encoder Mode Change to encoder mode An external encoder serves as
HALLSPEED - Hall sensor as speed
sensor
ENCSPEED - Encoder as speed
sensor
GEARMOD - Gearing Mode Change to gearing mode
VOLTMOD - Set Voltage Mode Activate Voltage Regulator Mode
0: Serial interface (default)
1: Voltage at analog input
2: PWM signal at analog input
3: Current target value via analog input
4: Current target value via analog input with preset-
ting of the direction via input polarity
.
Change to position control via analog voltage
position detector (the current position value is set to 0)
Speed via Hall sensors in encoder mode
Speed via encoder signals in encoder mode
If the settings are to be permanently stored, the command SAVE must be executed after the configuration; this saves the current settings in the Flash data memory, from where they are reloaded when
the unit is next switched on. Alternatively, the EEPSAV command can also be executed. Both commands are identical, therefore SAVE only is used in the following.
The power stage must be activated (EN) for the drive to operate.
All commands listed further below are summarised and explained again in Chapter 7 „Parameter
Description“.
10
Page 11
3 Functional Description
3.1 Position control
Positioning mode with set value presetting via the serial interface:
Set value presetting via the serial interface Page 11
Positioning mode with set value presetting via the analog input:
Analog positioning mode (APCMOD) Page 14
Positioning mode with external encoder as actual value:
External encoder as actual position value (ENCMOD) Page 16
Positioning on predefined limit switches:
Configuration of homing and limit switches Page 29
3.1.1 Set value presetting via the serial interface
Guide
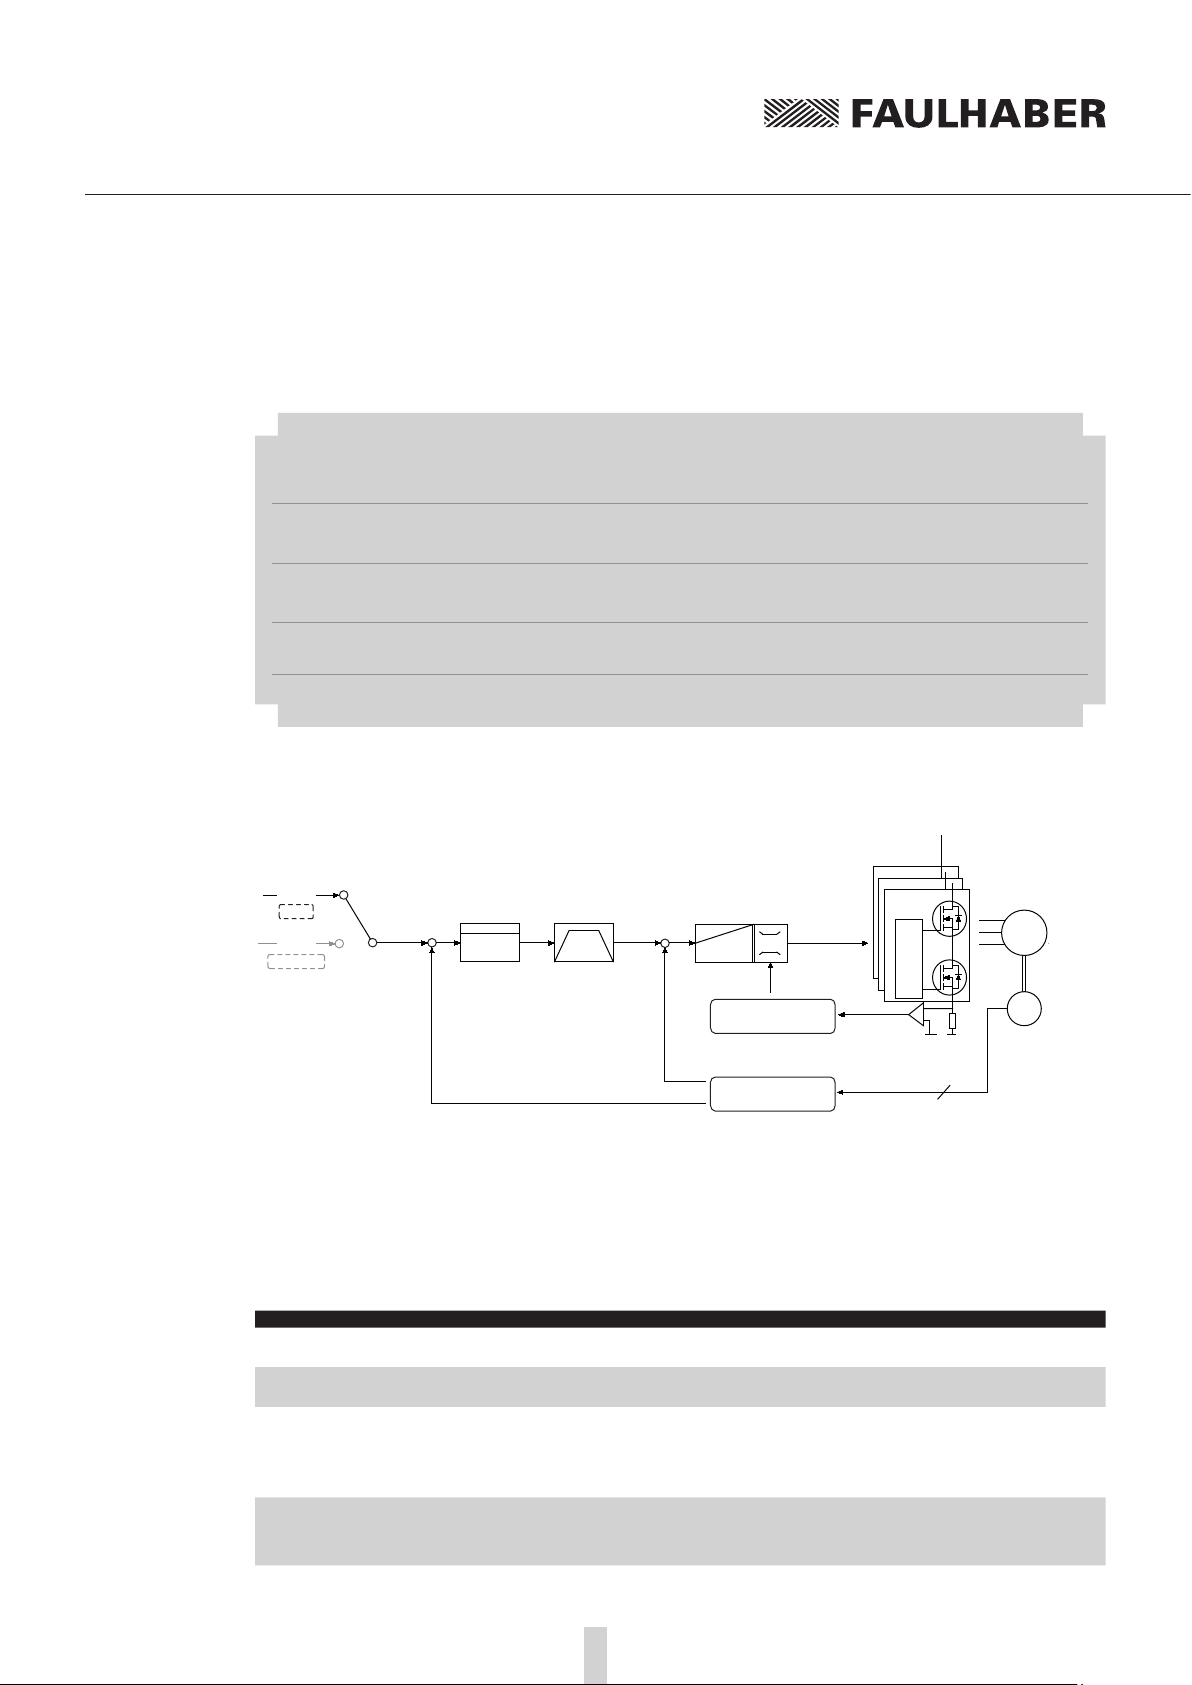
Controller structure for set value presetting via the serial interface or via a sequence program
RS232
SOR0
APCMOD
Target Pos.
Pos. controller
Pos
act.
Ramp generator
Speed controller
v
act.
I²t current limitation
PI
Position and
velocity calculation
LM
Motor
Gate Driver
I
act.
3
Hall
In this operating mode, target positions can be preset via the serial interface or a sequence program:
Basic settings
CONTMOD and SOR0 operating mode.
The positioning range limits can be set via the command LL and activated via APL.
The proportional amplification PP and a differential term PD can be set for the position controller.
Command Argument Function Description
PP Value Load Position Propor-
tional Term
PD Value Load Position Differen-
tial Term
LL Value Load Position Range
Limits
APL 0 - 1 Activate / Deactivate
Position Limits
Load position controller amplification.
Value: 1 … 255
Load position controller D-term.
Value: 1 … 255
Load limit positions (the drive cannot be moved out of
these limits). Positive values specify the upper limit and
negative values the lower.
The range limits are only active if APL1 is.
Value: –1.8 · 10
9
… 1.8 · 10
9
Activate range limits (LL) (valid for all operating modes
except VOLTMOD).
1: Position limits activated
0: Position limits deactivated
11
Page 12
3 Functional Description
3.1 Position control
Additional settings
Ramp generator
The slopes of the acceleration and deceleration ramps, and the maximum speed can be defined using
the AC, DEC and SP commands (see Chapter 3.6.1 „Ramp generator“).
Velocity controller / current limitation
The controller parameters POR and I of the velocity controller can be adjusted. In addition, the current limitation values LPC and LCC can be used to protect the drive against overload (see Chapter 3.2
„Velocity control“).
Motion control commands
The positioning is executed via the FAULHABER motion control commands. An overview of all motion control commands is given in Chapter 7.4 „Motion control commands“.
Command Argument Function Description
EN - Enable Drive Activate drive
DI - Disable Drive Deactivate drive
LA Value Load Absolute Position Load new absolute target position
LR Value Load Relative Position Load new relative target position, in relation to last
M - Initiate Motion Activate position control and start positioning
HO - / value Define Home Position Without argument:
NP - / value Notify Position Without argument:
NPOFF - Notify Position Off A notify position command not yet triggered
9
Value: –1.8 · 10
started target position.
The resulting absolute target position must lie between
the values given below.
Value: –2.14 · 10
Set actual position to 0.
With argument:
Set actual position to specified value.
Value: –1.8 · 10
A “p” is returned when the
target position is attained.
With argument:
When the specified position is passed
a "p" is returned.
Value: –1.8 · 10
is deactivated again.
… 1.8 · 10
9
… 2.14 · 10
9
… 1.8 · 10
9
… 1.8 · 10
9
9
9
9
Example:
Load target position: LA40000
Start positioning: M
Attainment of the target position or any intermediate position is indicated by a “p” on the serial
interface if “Notify Position” is set before the start of positioning, provided that ANSW1 or ANSW2 is
set:
Position resolution
The TM parameter represents the magnetic pitch (τ
the motors are used as position transducers, 3000 pulses per magnetic pitch (τ
12
m) of the linear motor. If the linear Hall sensors of
m) are supplied.
Page 13
3 Functional Description
3.1 Position control
Complex motion profiles
More complex motion profiles can be generated through appropriate presetting of new values (maximum speed, acceleration, end position) during positioning. After a value change, simply execute a
new motion start command (M). The commands NP and NV can be used to control the sequence.
Further information on compiling motion profiles is given in Chapter 3.6.1 „Ramp generator“.
Digital signal target position
The entry into the target corridor can be displayed via the fault output as a digital output signal in
the POSOUT function. The signal is not reset until a further Motion start command (M).
For notes on configuration, see Chapter 3.5 „Special fault output functions“.
13
Page 14
3 Functional Description
3.1 Position control
3.1.2 Analog positioning mode (APCMOD)
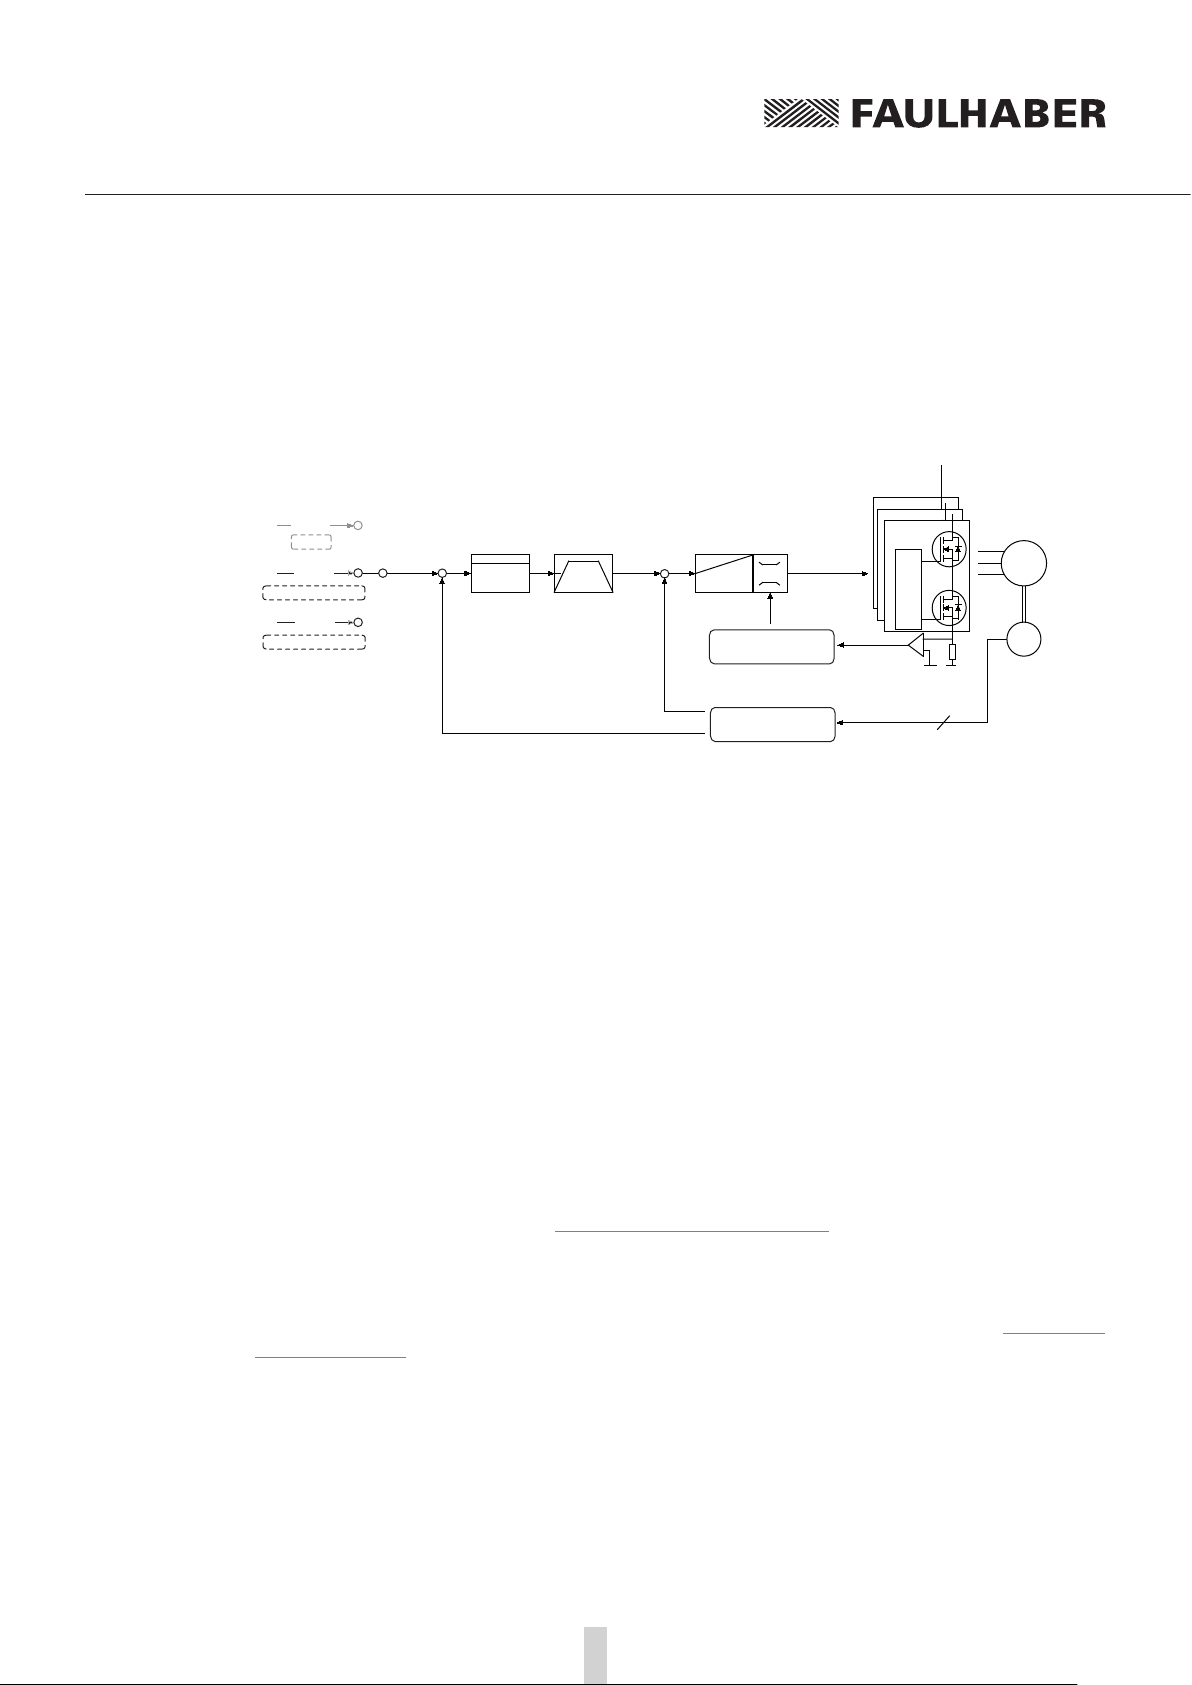
Controller structure for set-point presetting via an analog voltage
RS232
SOR0
AnIn
APCMOD + SOR1
PWM
APCMOD + SOR2
Target Pos.
Pos. controller
Pos
act.
Ramp generator
Speed controller
v
act.
I²t current limitation
PI
Position and
velocity calculation
LM
Motor
Gate Driver
I
act.
3
Hall
In this operating mode the target position can be preset using an analog voltage at the AnIn input.
Basic settings
APCMOD mode and SOR1 or SOR2.
The positioning range limits can be set via the command LL and activated via APL.
The proportional amplification PP and a differential term PD can be set for the position controller.
The maximum position to be approached with a voltage of 10 V can be preselected with the LL command. At -10 V the drive moves in the opposite direction up to the set negative range limit.
Irrespective of the preset LL value, the maximum position is limited to 3 000 000 in APCMOD.
Comment: The resolution of the analog input is limited to 12 bit (4096 steps).
The direction can be predefined with the commands ADL and ADR.
Additional settings
Ramp generator
The slopes of the acceleration and deceleration ramps, and the maximum speed can be defined using
the AC, DEC and SP commands (see Chapter 3.6.1 „Ramp generator“).
Velocity controller / current limitation
The controller parameters POR and I of the velocity controller can be adjusted. In addition, the current limitation values LPC and LCC can be used to protect the drive against overload (see Chapter 3.2
„Velocity control“).
14
Page 15
3 Functional Description
3.1 Position control
Positioning via pulse width signal (PWM) at the analog input (SOR2)
If SOR2 is set in APCMOD, the pulse duty factor of a PWM signal can be used as position set-point.
On delivery:
Pulse duty factor > 50% positive target position
Pulse duty factor = 50% target position = 0
Pulse duty factor < 50% negative target position
Absolute positioning within a magnetic pole pitch:
In motion control systems, after switching on, the initial position is absolutely initialised within a
pole pitch (-1 500 … 1 500 corresponds to the spacing of the magnetic poles). This means that even
if the power supply is disconnected, the position determination supplies the correct position value
after restarting (if the cage bar has only been moved within one magnetic pole pitch).
The following commands enable the drive to be accurately positioned in the voltage range 0 V …
10 V within one magnetic pole pitch and to return to the correct position even after the supply has
been switched off, without homing (not MCDC):
Switch over to analog positioning: APCMOD
Hide negative range: LL-1
Limit 0 V … 10 V at AnIn to one magnetic pole pitch: LL3000
15
Page 16
3 Functional Description
3.1 Position control
3.1.3 External encoder as actual position value (ENCMOD)
Controller structure for using and external encoder as the actual value encoder
SOR0
RS232
AnIn
Target Pos.
Pos
Ramp engeneratorPos. controller
-
act.
ENCSPEED
Speed controller
-
v
act.
I²t current limitation
HALLSPEED
PI
Position and
velocity calculation
LM
Gate Driver
Gate Driver
Gate Driver
I
act.
3
Motor
Hall
IE
Position and
velocity calculation
For high-precision applications, the actual values of LM motors can be derived from an external
encoder.
Depending on the application, the velocity can be derived from the encoder or from the Hall
sensors.
The external encoder can be connected directly to the motor shaft, but an encoder that is
mounted to the application output (e.g. glass scale) is particularly advantageous. This allows the
high precision to be set directly at the output.
Commutation still occurs via the analog Hall sensors.
Basic settings
ENCMOD and SOR0 operating mode.
The positioning range limits can be set via the command LL and activated via APL. The proportional
amplification PP and a differential term PD can be set for the position controller.
Command Argument Function Description
PP Value Load Position Propor-
tional Term
PD Value Load Position Differen-
tial Term
LL Value Load Position Range
Limits
APL 0 - 1 Activate / Deactivate
Position Limits
Load position controller amplification.
Value: 1 … 255
Load position controller D-term.
Value: 1 … 255
Load limit positions (the drive cannot be moved out of
these limits). Positive values specify the upper limit and
negative values the lower.
The range limits are only active if APL1 is.
Value: –1.8 · 10
9
… 1.8 · 10
9
Activate range limits (LL) (valid for all operating modes
except VOLTMOD).
1: Position limits activated
0: Position limits deactivated
16
Page 17
3 Functional Description
3.1 Position control
Settings for external encoder
Command Argument Function Description
ENCMOD - Encoder Mode Change to encoder mode An external encoder serves
ENCSPEED - Encoder as speed
HALLSPEED - Hall sensor as speed
ENCRES Value Load Encoder Resolu-
Additional settings
Ramp generator
The slopes of the acceleration and deceleration ramps, and the maximum speed can be defined using
the AC, DEC and SP commands (see Chapter 3.6.1 „Ramp generator“).
sensor
sensor
tion
as position transducer (the current position value is set
to 0).
Speed via encoder signals in encoder mode
Speed via hall sensors in encoder mode
Load resolution of external encoder (4 times lines/mm).
Value: 8 … 65 535
Velocity controller / current limitation
The controller parameters POR and I of the velocity controller can be adjusted. In addition, the current limitation values LPC and LCC can be used to protect the drive against overload (see Chapter 3.2
„Velocity control“ and Chapter 3.6.3 „Current controller and I²t current limitation“).
17
Page 18
3 Functional Description
3.1 Position control
Motion control commands
Positioning in the ENCMOD is executed in precisely the same way as in CONTMOD, using the
FAULHABER motion control commands. An overview of all motion control commands is given in
Chapter 7.4 „Motion control commands“.
Command Argument Function Description
EN - Enable Drive Activate drive
DI - Disable Drive Deactivate drive
LA Value Load Absolute Position Load new absolute target position
LR Value Load Relative Position Load new relative target position, in relation to last
M - Initiate Motion Activate position control and start positioning
HO - / value Define Home Position Without argument:
NP - / value Notify Position Without argument:
NPOFF - Notify Position Off Notify Position command that has not yet been trig-
9
Value: –1.8 · 10
started target position.
The resulting absolute target position must lie between
the values given below.
Value: –2.14 · 10
Set actual position to 0.
With argument:
Set actual position to specified value.
Value: –1.8 · 10
A “p” is returned when the target position is attained.
With argument:
A “p” is returned if the specified position is overtravelled.
Value: –1.8 · 10
gered is deactivated again.
… 1.8 · 10
9
… 2.14 · 10
9
… 1.8 · 10
9
… +1.8 · 10
9
9
9
9
Example:
Load target position: LA1000
Start positioning: M
Attainment of the target position or any intermediate position is indicated by a “p” on the serial
interface if “Notify Position” is set before the start of positioning, provided that ANSW1 or ANSW2 is
set.
Actual value resolution
In ENCMOD the resolution of the position values depends on the resolution of the encoder.
Complex motion profiles
More complex motion profiles can be generated through appropriate presetting of new values (maximum speed, acceleration, end position) during positioning. After a value change, simply execute a
new motion start command (M). The commands NP and NV can be used to control the sequence.
Further information on compiling motion profiles is given in Chapter 3.6.1 „Ramp generator“.
Digital signal target position
The entry into the target corridor can be displayed via the fault output as a digital output signal in
the POSOUT function. The signal is not reset until a further Motion start command (M).
For notes on configuration, see Chapter 3.5 „Special fault output functions“.
18
Page 19
3 Functional Description
3.2 Velocity control
In velocity control mode the velocity of the drive is controlled by a PI controller. Provided the drive is
not overloaded, the drive follows the presetting without deviation.
The current velocity of LM motors can be detected both from the Hall signals and via an additional
encoder; an incremental encoder.
The velocity can be preset via the serial interface or from sequence programs, via an analog voltage
preset or a PWM signal.
3.2.1 Velocity presetting via the serial interface
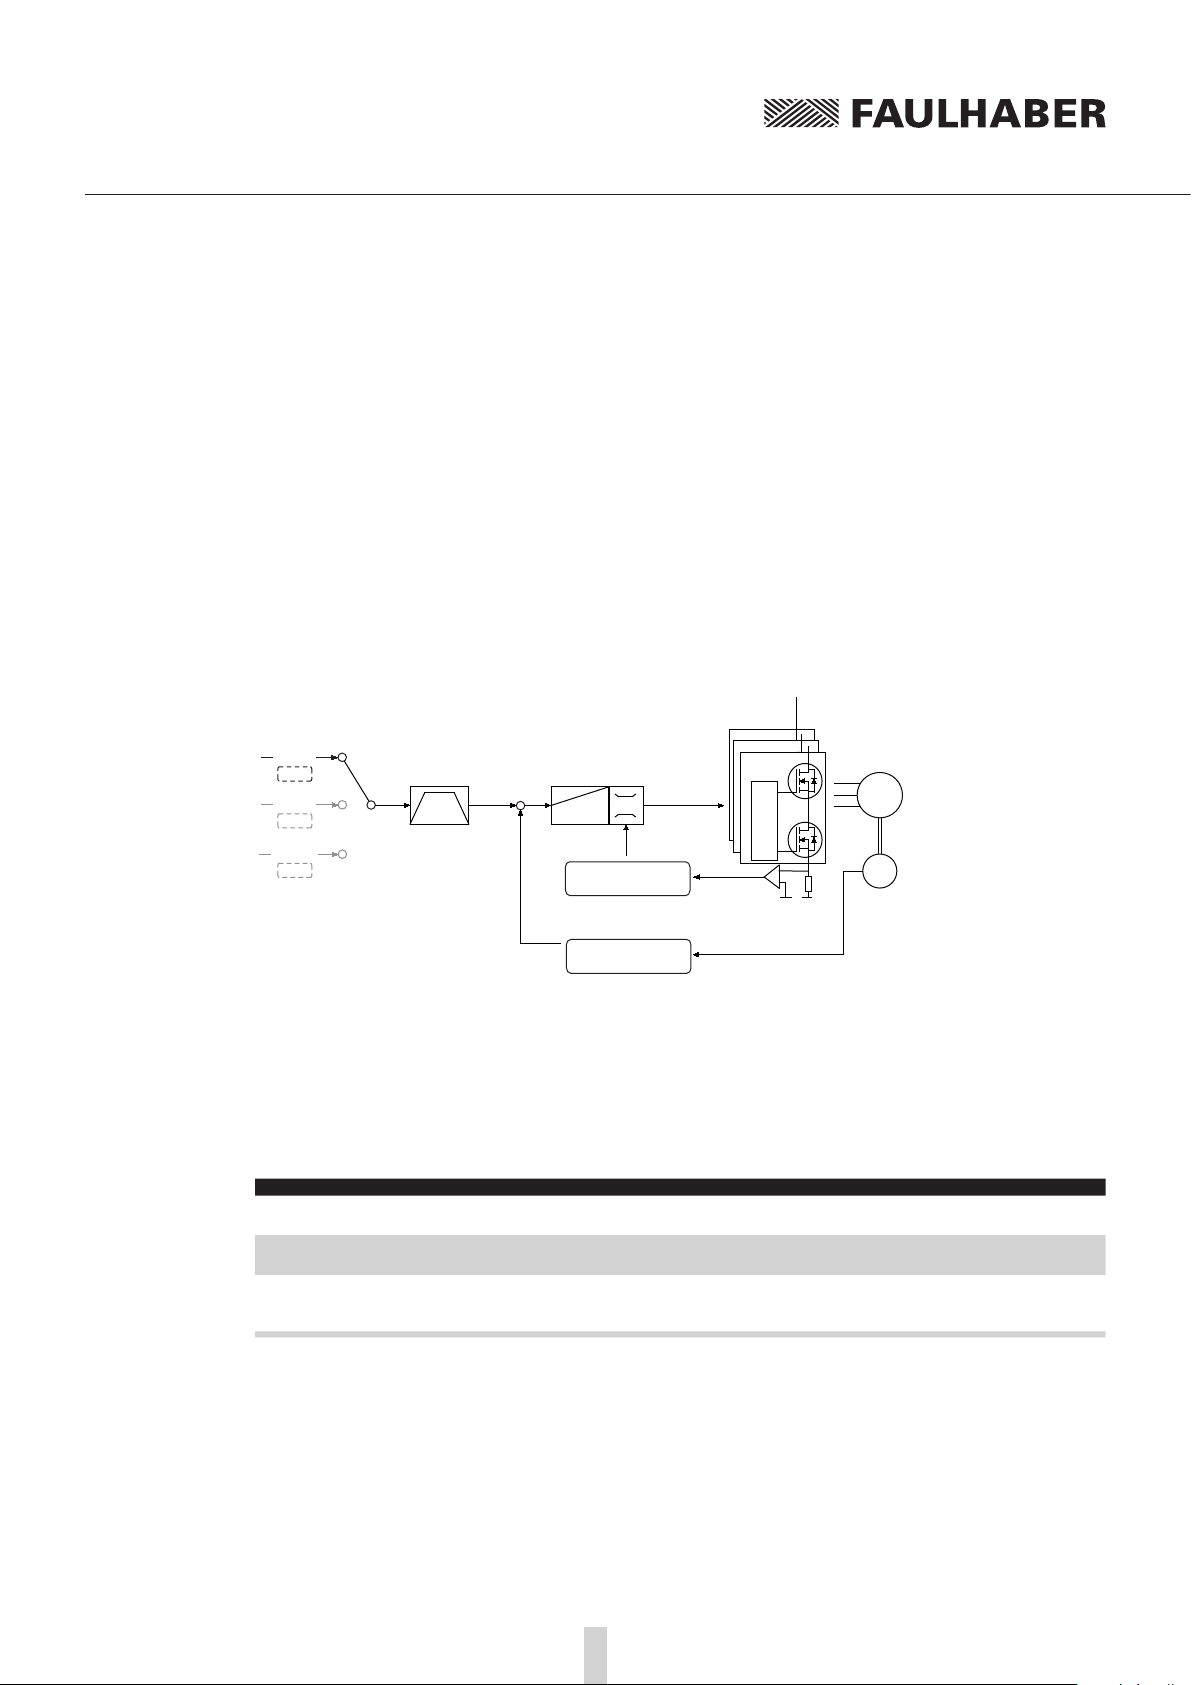
Controller structure for velocity control
RS232
SOR0
AnIn
SOR1
PWMIn
SOR2
Rampengenerator
v
target
Speed controller
-
v
act.
I²t current limitation
PI
Position and
velocity calculation
LM
Gate Driver
Gate Driver
Gate Driver
I
act.
Motor
Hall
In this operating mode the drive can be operated by velocity controlled with set-point presetting via
RS232 or from a sequence program.
Basic settings
CONTMOD and SOR0 operating mode.
The controller parameters POR and I and the sampling rate can be adjusted for the velocity controller.
Command Argument Function Description
POR Value Load Velocity Proportional
Term
I Value Load Velocity Integral Term Load velocity controller integral term.
SR Value Load Sampling Rate Load sampling rate of the velocity controller as a multi-
Load velocity controller amplification.
Value: 1 … 255
Value: 1 … 255
ple of the basic sampling time.
Value: 1 … 20
19
Page 20
3 Functional Description
3.2 Velocity control
Velocity input
In LM motors the current velocity is determined in CONTMOD by evaluating the Hall sensor signals,
which supply 3 000 pulses per magnetic pitch.
Additional settings
Movement limits
The LL command can also be used to define a movement range limit for velocity mode. The APL1
command activates monitoring of these limits.
Ramp generator
The slopes of the acceleration and deceleration ramps, and the maximum speed can be defined using
the AC, DEC and SP commands (see Chapter 3.6.1 „Ramp generator“).
Current limitation
The current limitation values LPC and LCC can be used to protect the drive against overload (see
Chapter 3.6.3 „Current controller and I²t current limitation“).
NOTE
Motion control commands
An overview of all motion control commands is given in Chapter 7.4 „Motion control commands“.
Command Argument Function Description
EN - Enable Drive Activate drive
DI - Disable Drive Deactivate drive
V Value Select Velocity Mode Activate velocity mode and set specified value as target
velocity (velocity control).
Unit: mm/s
Value: –10 000 … 10 000
Example:
Drive motor at 100 mm/s: V100
In order to change the direction, simply assign a negative velocity value (e.g. V-100).
Stop motor: V0
Check that the maximum speed SP is not set below the desired target velocity.
Due to the short stroke, the speed controller must be used with extreme caution, as the mechanical
system can be damaged if the target velocities (speeds) are too high. The positioning limits must be
defined using the APL1 command (default setting).
20
Page 21
3 Functional Description
3.2 Velocity control
Complex motion profiles
Reaching the given speed is indicated by a “v“, if “Notify Velocity” has been set before starting the
speed mode and ANSW1 or ANSW2 is set:
Command Argument Function Description
NV Value Notify Velocity A “v” is returned when the nominal speed is reached or
NVOFF - Notify Velocity Off Velocity command that has not yet been triggered is
passed through.
Value: –32 767 … 32 767
deactivated again.
21
Page 22
3 Functional Description
3.2 Velocity control
3.2.2 Velocity presetting via an analog voltage or a PWM signal
In this operating mode, the drive velocity can be controlled with set value presetting via an analog
voltage or a PWM signal.
Basic settings
CONTMOD mode and SOR1 or SOR2.
The controller parameters POR, I and the sampling rate can be adjusted for the velocity controller. In
addition, commands are available for configuring the analog velocity presetting.
Command Argument Function Description
SP Value Load Maximum Speed Load maximum speed (here: Target velocity at 10 V).
MV Value Minimum Velocity Specifies the lowest velocity
MAV Value Minimum Analog
ADL - Analog Direction Left Positive voltages at the analog input result in left-hand
ADR - Analog Direction Right Positive voltages at the analog input result in right-
DIRIN - Direction Input Use fault pin as direction input
POR Value Load Velocity Propor-
I Value Load Velocity Integral
SR Value Load Sampling Rate Load sampling rate of the velocity controller as a multi-
Voltage
tional Term
Term
Setting applies to all modes (except VOLTMOD)
Unit: mm/s
Value: 0 … 10 000
Unit: mm/s
Value: 0 … 10 000
Specifies the minimum start voltage
Unit: mm/s
Value: 0 … 10 000
movement of the cage bar
hand movement of the cage bar
Low: ... Left-hand movement (corresponding to ADL
command)
High: ... Right-hand movement (corresponding to ADR
command)
Load velocity controller amplification.
Value: 1 … 255
Load velocity controller integral term.
Value: 1 … 255
ple of the basic sampling time.
Value: 1 … 20
Velocity input
By default, in LM motors the current speed is determined by evaluating the Hall sensor signals.
Additional incremental encoders cannot be connected to motors for analog velocity presetting.
22
Page 23
3 Functional Description
3.2 Velocity control
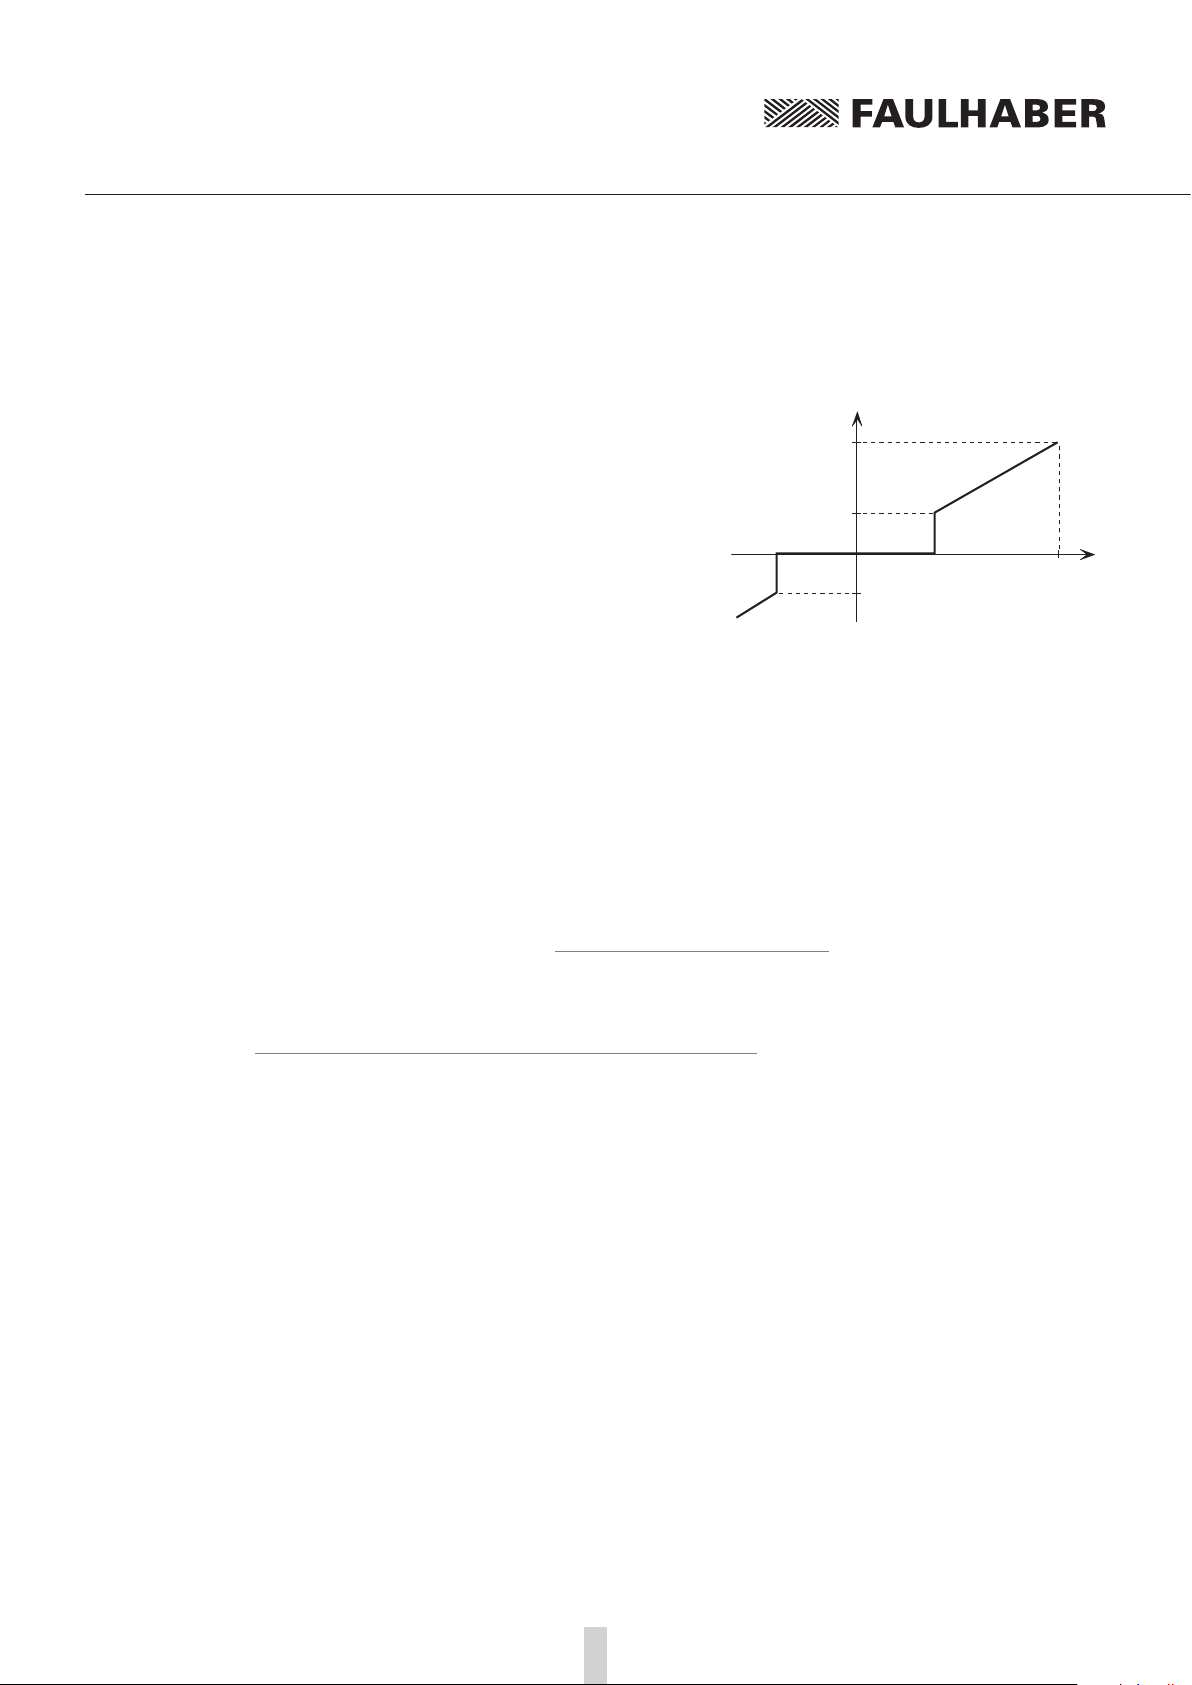
Target value input
Example:
The drive is only to start moving with voltages over
100 mV or below -100 mV at the analog input:
MAV100
Advantage:
As 0 mV is usually difficult to set at the analog input,
0 mm/s is also not easy to implement. The dead band
produced by the minimum start voltage prevents the
motor from starting as a result of small interference
voltages.
-MAV
SP
MV
v
target
-MV
U
10VMAV
in
Additional settings
Movement limits
The LL command can also be used to define a movement range limit for velocity mode. The APL1
command activates monitoring of these limits.
Ramp generator
The slopes of the acceleration and deceleration ramps, and the maximum speed can be defined using
the AC, DEC and SP commands (see Chapter 3.6.1 „Ramp generator“).
Current limitation
The current limitation values LPC and LCC can be used to protect the drive against overload (see
Chapter 3.6.3 „Current controller and I²t current limitation“).
Set-point presetting via pulse width signal (PWM) at the analog input (SOR2)
If SOR2 is set in APCMOD, the pulse duty factor of a PWM signal can be used as velocity target.
On delivery:
Pulse duty factor > 50% v > 0
Pulse duty factor = 50% v = 0
Pulse duty factor < 50% v < 0
The commands SP, MV, MAV, ADL and ADR can also be used here.
Input circuit
The input circuit at the analog input is designed as a differential amplifier. If the analog input is
open, an undefined velocity can be set. The input must be connected to AGND with low-impedance
or set to the voltage level of the AGND, in order to generate 0 mm/s.
For a protective circuit example, see Chapter 3.4 in the technical manual.
23
Page 24
3 Functional Description
3.2 Velocity control
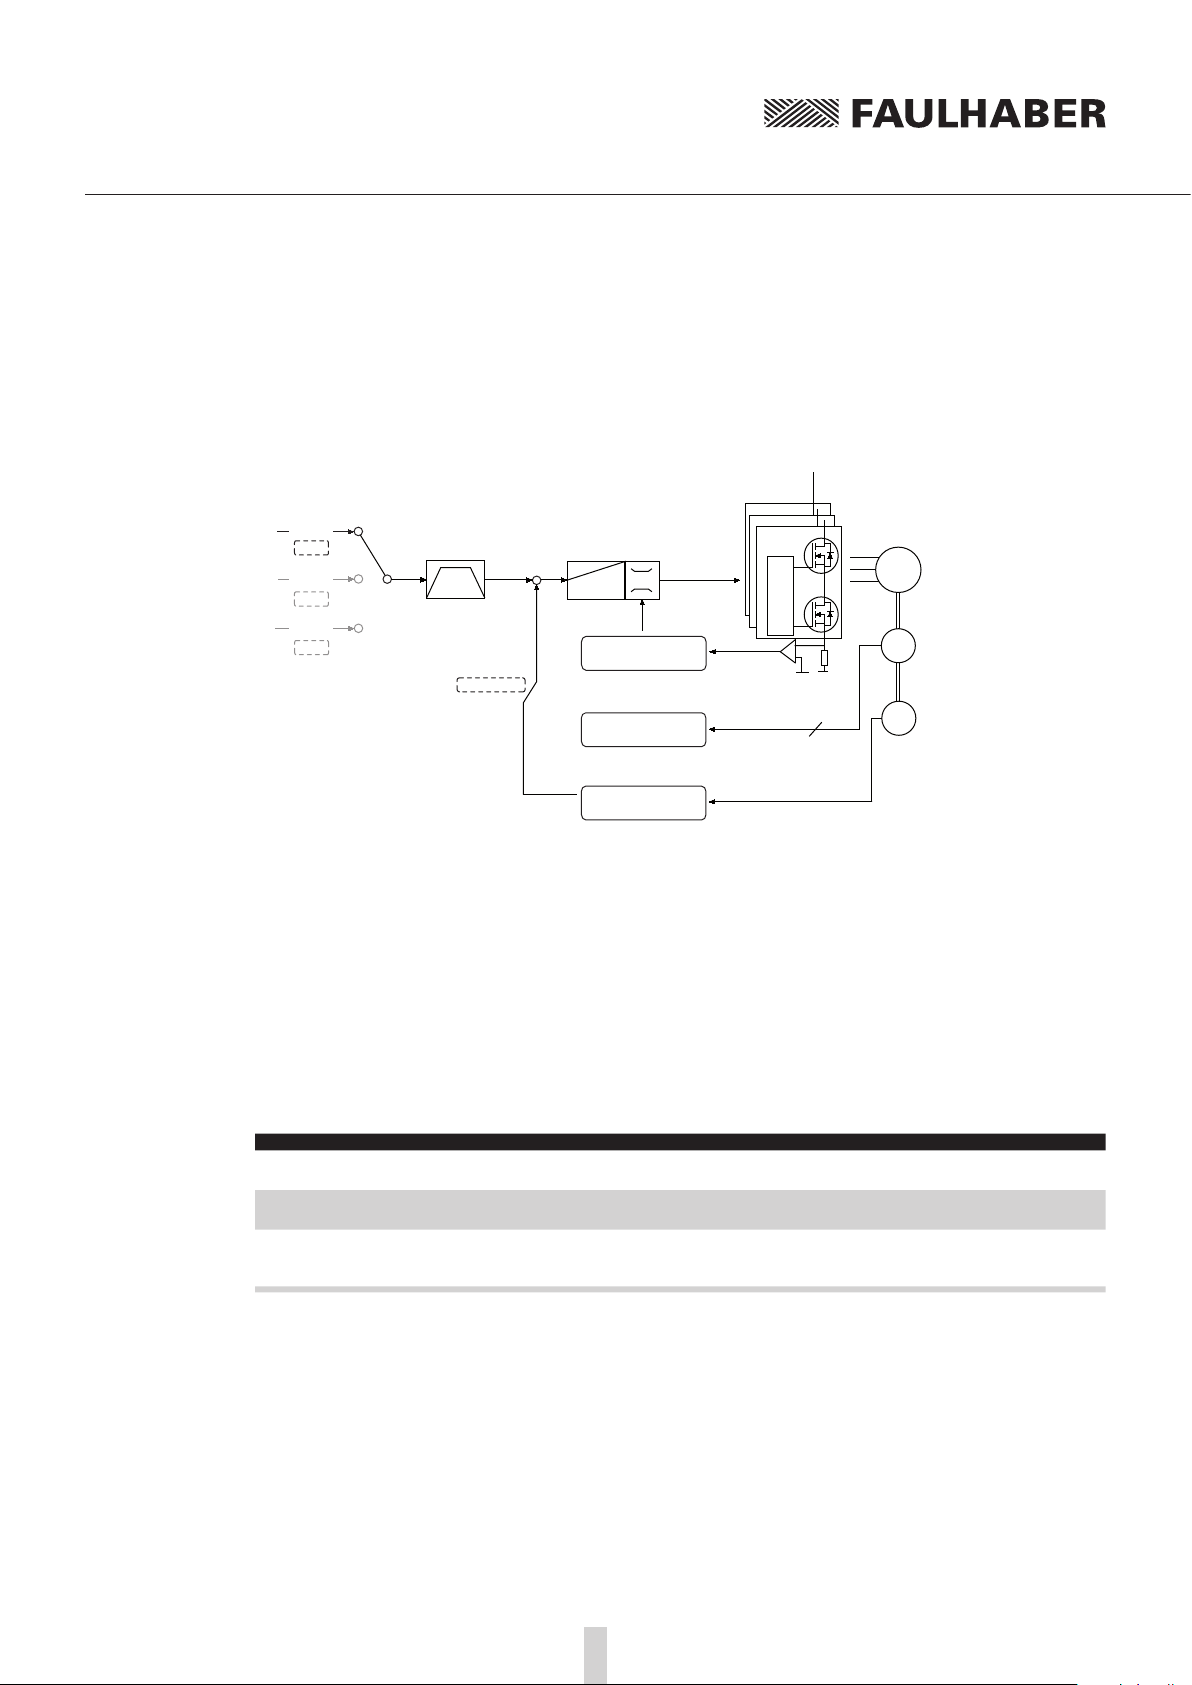
3.2.3 External encoder as actual velocity value (ENCMOD)
Velocity control with external encoder as actual value
RS232
SOR0
AnIn
SOR1
PWMIn
SOR2
Ramp generator
v
target
ENCSPEED
Speed controller
-
v
act.
I²t current limitation
velocity calculation
PI
Communication
Position and
LM
Gate Driver
Gate Driver
Gate Driver
I
act.
3
Motor
Hall
ext.
Enc.
In this operating mode the drive can be operated by velocity controlled with set-point presetting via
RS232 or from a sequence program. The velocity is evaluated via an additional encoder, external or
built onto the motor. In particular, this enables a specific load speed to be controlled by an incremental encoder at the output.
The analog Hall sensors of the motors are also evaluated in ENCMOD mode for the motor commutation.
Basic settings
ENCMOD and SOR0 operating mode.
The controller parameters POR and I and the sampling rate can be adjusted for the velocity controller.
Command Argument Function Description
POR Value Load Velocity Proportional
Term
Load velocity controller amplification.
Value: 1 … 255
I Value Load Velocity Integral Term Load velocity controller integral term.
Value: 1 … 255
SR Value Load Sampling Rate Load sampling rate of the velocity controller as a multi-
ple of the basic sampling time.
Value: 1 … 20
24
Page 25
3 Functional Description
3.2 Velocity control
Velocity input
The external incremental encoder‘s resolution must be specified with 4 edge evaluation using the
ENCRES parameter.
In addition to ENCMOD mode, velocity evaluation on the basis of the encoder must be activated
using the ENCSPEED command.
Command Argument Function Description
ENCMOD - Encoder Mode Change to encoder mode An external encoder serves as
ENCSPEED - Encoder as speed
HALLSPEED - Hall sensor as speed
ENCRES Value Load Encoder Resolu-
Additional settings
sensor
sensor
tion
position detector (the current position value is set to 0)
Speed via encoder signals in encoder mode
Speed via hall sensors in encoder mode
Load resolution of external encoder (4 times pulse/mm).
Value: 8 … 65 535
Movement limits
The LL command can also be used to define a movement range limit for velocity mode. The APL1
command activates monitoring of these limits.
Ramp generator
The slopes of the acceleration and deceleration ramps, and the maximum speed can be defined using
the AC, DEC and SP commands (see Chapter 3.6.1 „Ramp generator“).
Current limitation
The current limitation values LPC and LCC can be used to protect the drive against overload (see
Chapter 3.6.3 „Current controller and I²t current limitation“).
Motion control commands
An overview of all motion control commands is given in Chapter 7.4 „Motion control commands“.
Command Argument Function Description
EN - Enable Drive Activate drive
DI - Disable Drive Deactivate drive
V Value Select Velocity Mode Activate velocity mode and set specified value as target
Example:
Drive motor at 100 mm/s: V100
In order to change the direction, simply assign a negative velocity value (e.g. V-100).
Stop motor: V0
velocity (velocity control).
Unit: mm/s
Value: –10 000 … 10 000
NOTE
Check that the maximum speed SP is not set below the desired target velocity.
25
Page 26
3 Functional Description
3.2 Velocity control
Complex motion profiles
Reaching the given speed is indicated by a “v“, if “Notify Velocity” has been set before starting the
speed mode and ANSW1 or ANSW2 is set:
Command Argument Function Description
NV Value Notify Velocity A “v” is returned when the nominal speed is reached or
NVOFF - Notify Velocity Off Velocity command that has not yet been triggered is
passed through.
Value: –32 767 … 32 767
deactivated again.
26
Page 27
3 Functional Description
3.3 Homing and limit switches
Limit switch connections and switching level Page 27
Motion control commands Page 28
Configuration of homing and limit switches Page 29
Homing on limit switches can be used to re-initialise the absolute position of an application after
switching on.
After switching on, or by giving the GOHOSEQ command, previously defined homing is performed
up to the set limit switch and then the actions defined for it are performed. The ramp generator settings for maximum acceleration and the movement limits are taken into account.
Guide
3.3.1 Limit switch connections and switching level
The connections
AnIn
Fault
rd
3
input
can be used as reference and limit switch inputs.
In LM motors the zero crossing of the Hall sensor signals is also available as index pulse. The index
pulse occurs once per magnetic pole pitch. The index pulse of an external encoder can also be connected to the fault pin, enabling the actual position to be exactly zeroed.
The AnIn and Fault connections are designed as interrupt inputs, which means that they are edgetriggered. All other inputs are not edge-triggered, so that the signal must be at least 500 μs to be
reliably detected. The maximum reaction time to level changes at all inputs is 500 μs.
Digital input configuration
Command Argument Function Description
SETPLC - Set PLC inputs Digital inputs PLC-compatible (24 V level)
SETTTL - Set TTL inputs Digital inputs TTL-compatible (5 V level)
REFIN - Reference Input Fault pin as reference or limit switch input
The limit switch functions for the fault pin are only accepted if REFIN is activated (setting must be
saved with SAVE)!
Low: 0 V … 7.0 V
High: 12.5 … V UB
Low: 0 V … 0.5 V
High: 3 V … UB
CAUTION! Configure before applying a voltage
The electronics can be damaged if a voltage is applied to the fault pin while it is not configured as
input.
f Configure the fault pin as input first before applying external voltage!
27
Page 28
3 Functional Description
3.3 Homing and limit switches
3.3.2 Motion control commands
The function of the inputs and the homing behaviour are set using the FAULHABER commands
described in Chapter 3.3.3 „Configuration of homing and limit switches“. A previously configured
homing is then started with the following FAULHABER commands. An overview of all motion control
commands is given in Chapter 7.4 „Motion control commands“.
Command Argument Function Description
GOHOSEQ - Go Homing Sequence Execute FAULHABER homing sequence. A homing
POHOSEQ - Power-On Homing
GOHIX - Go Hall Index Move LM motor to Hall zero point (Hall index) and set
GOIX - Go Encoder Index Move to the encoder index at the Fault pin and set
If the drive is already located in the limit switch when GOHOSEQ is invoked, first of all it moves out
of the switch, in the opposite direction to that specified for HOSP. The same applies to the Power On
Homing Sequence (POHOSEQ).
Sequence
sequence is executed (if programmed) irrespective of
the current mode.
Start homing automatically after power-on.
1: Power-On Homing Sequence is activated
0: No homing after power-on
actual position value to 0.
actual position value to 0 (ext. encoder).
28
Page 29
3 Functional Description
3.3 Homing and limit switches
3.3.3 Configuration of homing and limit switches
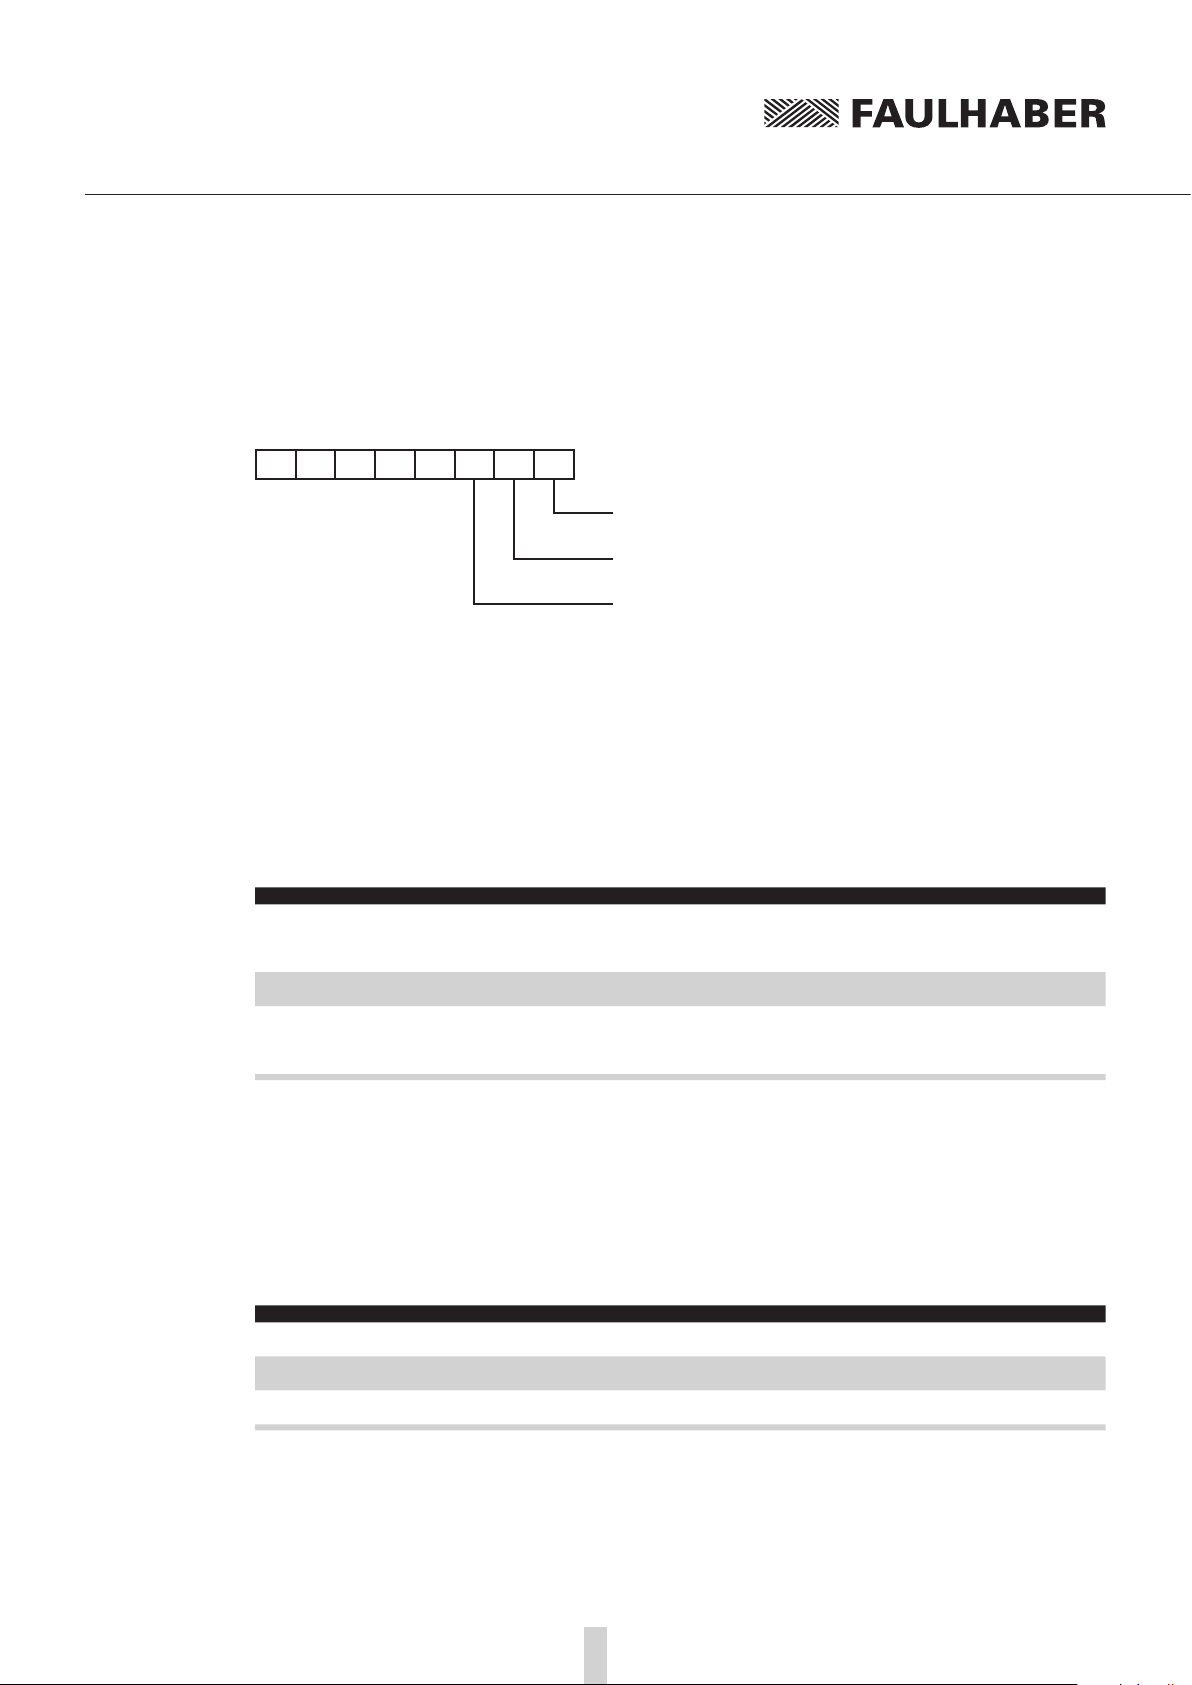
The following commands use the following bit mask for configuration of the limit switch functions:
7 6 5 4 3 2 1 0
Set or delete the bit at the position of
the required input for each command
Analog input
and assign the resulting numeric value
to the commands described below.
Fault-Pin
3rd input
Polarity and limit switch function
Limit switches can respond to the rising or falling edge (or level).
In addition, the hard blocking function can be configured for the limit switches. The hard blocking
function provides reliable protection against overshooting of the range limit switch. If the drive is
located in an HB limit switch, then the direction set with HD will be blocked, i.e. the drive can only
move further out of the limit switch.
The speed stays at 0 mm/s, if the command speed is preset in the wrong direction.
Command Argument Function Description
HP Bit mask Hard Polarity Define valid edge and polarity of respective limit
HB Bit mask Hard Blocking Activate Hard Blocking function for relevant limit
HD Bit mask Hard Direction Presetting of direction that is blocked with HB of re-
switches:
1: Rising edge and high level effective.
0: Falling edge and low level effective.
switch.
spective limit switch.
1: Right blocked
0: Left blocked
Example:
Setting of the Hard-Blocking function for Fault pin and 3rd input: 2
1+22
= 2+4 = 6 HB6
Definition of homing behaviour
In order to be able to execute a homing sequence with the command GOHOSEQ or as POHOSEQ, a
homing sequence must be defined for a specific limit switch! Definition of the hard blocking behaviour is an additional option.
Command Argument Function Description
SHA Bit mask Set Home Arming for
Homing Sequence
SHL Bit mask Set Hard Limit for
Homing Sequence
SHN Bit mask Set Hard Notify for
Homing Sequence
These settings must be saved with SAVE so that they are available immediately after switching on!
29
Homing behaviour (GOHOSEQ): Set position value to 0
at edge of respective limit switch
Homing behaviour (GOHOSEQ): Stop motor at edge of
respective limit switch.
Homing behaviour (GOHOSEQ): Send a character to
RS232 at edge of respective limit switch.
Page 30
3 Functional Description
3.3 Homing and limit switches
Example:
Homing with 3
• HP4 Low level or falling edge was evaluated at AnIn and at the fault pin,
the rising edge is evaluated at the 3rd input.
• SHA4 Activate a homing sequence for 3rd input (all others are in bit mask = 0)
Action: Set Pos = 0 on reaching the limit switch
• SHL4 Activate a homing sequence for 3rd input (all others are in bit mask = 0)
Action: Stop motor
• SHN4 Activate a homing sequence for 3rd input (all others are in bit mask = 0)
Action: Notify via RS232
Homing Speed
Command Argument Function Description
HOSP Value Load Homing Speed Load speed and direction for homing (GOHOSEQ,
rd
input as reference input (rising edge):
GOHIX).
Unit: mm/s
Example:
Homing with 100 mm/s and negative direction:
HOSP-100
Direct programming via HA, HL and HN commands
These special commands can be used to define actions that are to be triggered at an edge of the relevant input, independently of a homing sequence. A programmed limit switch function will remain
effective until the preselected edge occurs. The programming can be changed with a new command
before an edge occurs.
Command Argument Function Description
HA Bit mask Home Arming Set position value to 0 and delete relevant HA bit at
HL Bit mask Hard Limit Stop motor and delete relevant HL bit at edge of re-
HN Bit mask Hard Notify Send a character to RS232 and delete relevant HN bit at
The settings are not saved with the SAVE command, therefore all configured limit switches are inactive again after power-on.
HL / SHL command:
Positioning mode
When the edge occurs, the motor positions itself on the reference mark with maximum acceleration.
Velocity controller mode
The motor is decelerated at the set acceleration value when the edge occurs, i.e. it goes beyond the
reference mark. The reference mark can be precisely approached with a subsequent positioning command (command M).
edge of respective limit switch.
Setting is not saved
spective limit switch.
Setting is not saved.
edge of respective limit switch.
Setting is not saved.
30
Page 31
3 Functional Description
3.3 Homing and limit switches
Advantage:
No abrupt motion changes.
Re. HN- / SHN command:
Hard Notify (HN) and Set Hard Notify (SHN) return values to the RS232 interface:
Connection Return value
"AnIn" h
"Fault" f
rd
input" t
"3
31
Page 32
3 Functional Description
3.4 Enhanced operating modes
Use the CONTMOD command to revert from an enhanced operating mode to normal mode.
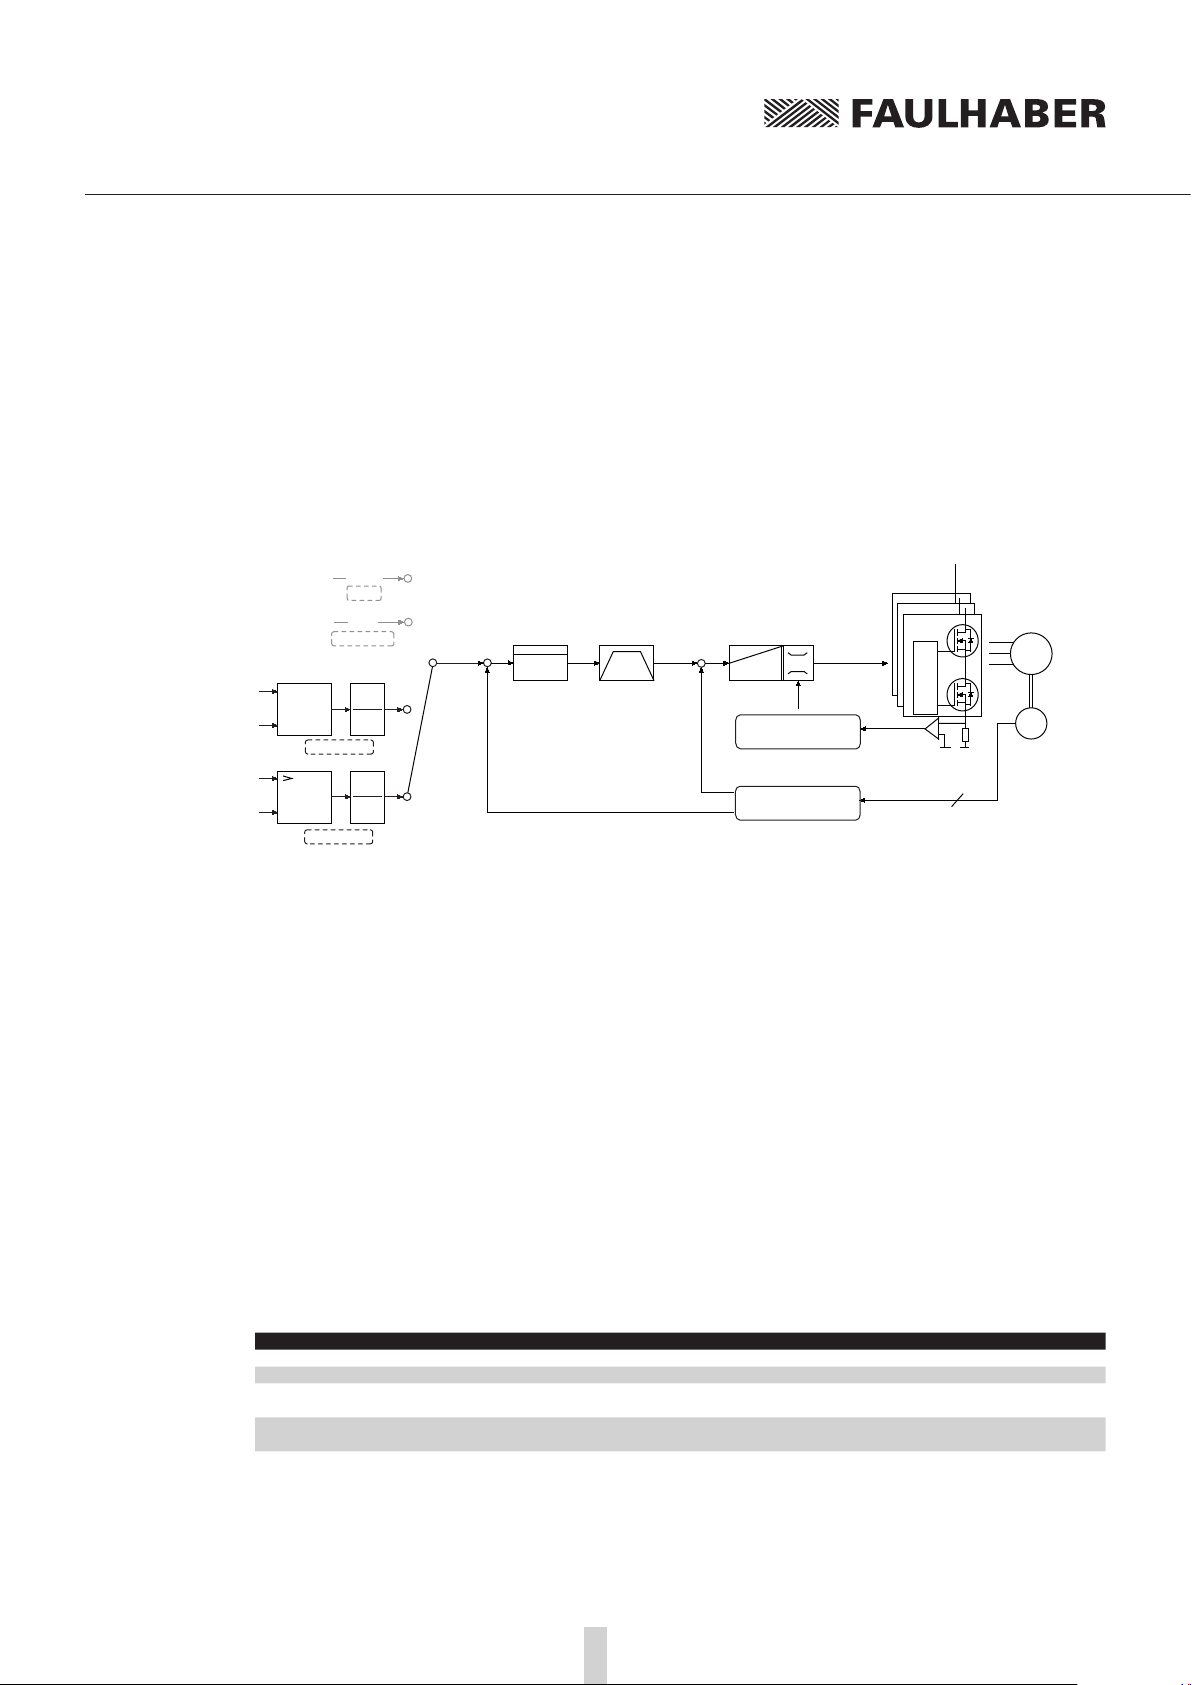
3.4.1 Stepper motor mode
Controller structure in stepper motor mode
RS232
SOR0
AnIn
APCMOD
A
B
ENC
Input
GEARMOD
STW
STN
Target pos.
Pos. controller
Pos
act.
Ramp generator
Speed controller
--
v
act.
I²t current limitation
LM
Gate Driver
Gate Driver
Gate Driver
I
cat.
Motor
Hall
STEPMOD
STW
STN
Position and
velocity calculation
3
Counter
DIR
In stepper motor mode the drive moves one programmable angle further for each pulse at the
analog input.
The number of steps per magnetic pitch is freely programmable and of a very high resolution
(encoder resolution)
The individual step widths are freely programmable
No detent force
The full dynamics of the motor can be used
The motor is very quiet
The motor monitors actual position so that no steps are “lost” (even with maximum dynamics)
No motor current flows in settled state (actual position reached)
High efficiency
Basic settings
In stepper motor mode, the analog input acts as frequency input. The error output must be configured as direction input if the direction is to be changed via a digital signal.
Alternatively, the direction can also be preset via the commands ADL and ADR.
Command Argument Function Description
STEPMOD - Stepper Motor Mode Change to stepper motor mode
DIRIN - Direction Input Fault pin as direction input
ADL - Analog Direction Left Positive voltages at the analog input result in left-hand
ADR - Analog Direction Right Positive voltages at the analog input result in clockwise
movement
movement
32
Page 33
3 Functional Description
3.4 Enhanced operating modes
Input
Maximum input frequency: 400 kHz
Level: 5 V TTL or 24 V PLC-compatible, depending on configuration.
The number of steps of the emulated stepper motor can be set to virtually any required settings
using the following formula:
Traversing distance =
pulses ·
Traversing
distance
Pulses … number of pulses at the frequency input (= number of steps)
τm
Command Argument Function Description
STW Value Load Step Width Load step width for step motor and gearing mode
STN Value Load Step Number Load number of steps per magentic pitch for step mo-
Example:
Motor should move 1/1000th of a magnetic pitch for each input pulse:
STW1
STN1000
… traversing distance of the linear motor in mm
… magnetic pole pitch in mm
STW
STN
·
τm
Value: 1 … 65 535
tor and gearing mode
Value: 1 … 65 535
Additional settings
Movement limits
The range limits set with LL are also active in stepping motor mode with APL1.
Ramp generator
The slopes of the acceleration and deceleration ramps, and the maximum speed can be defined using
the AC, DEC and SP commands (see Chapter 3.6.1 „Ramp generator“).
Current limitation
The current limitation values LPC and LCC can be used to protect the drive against overload (see
Chapter 3.6.3 „Current controller and I²t current limitation“).
33
Page 34
3 Functional Description
3.4 Enhanced operating modes
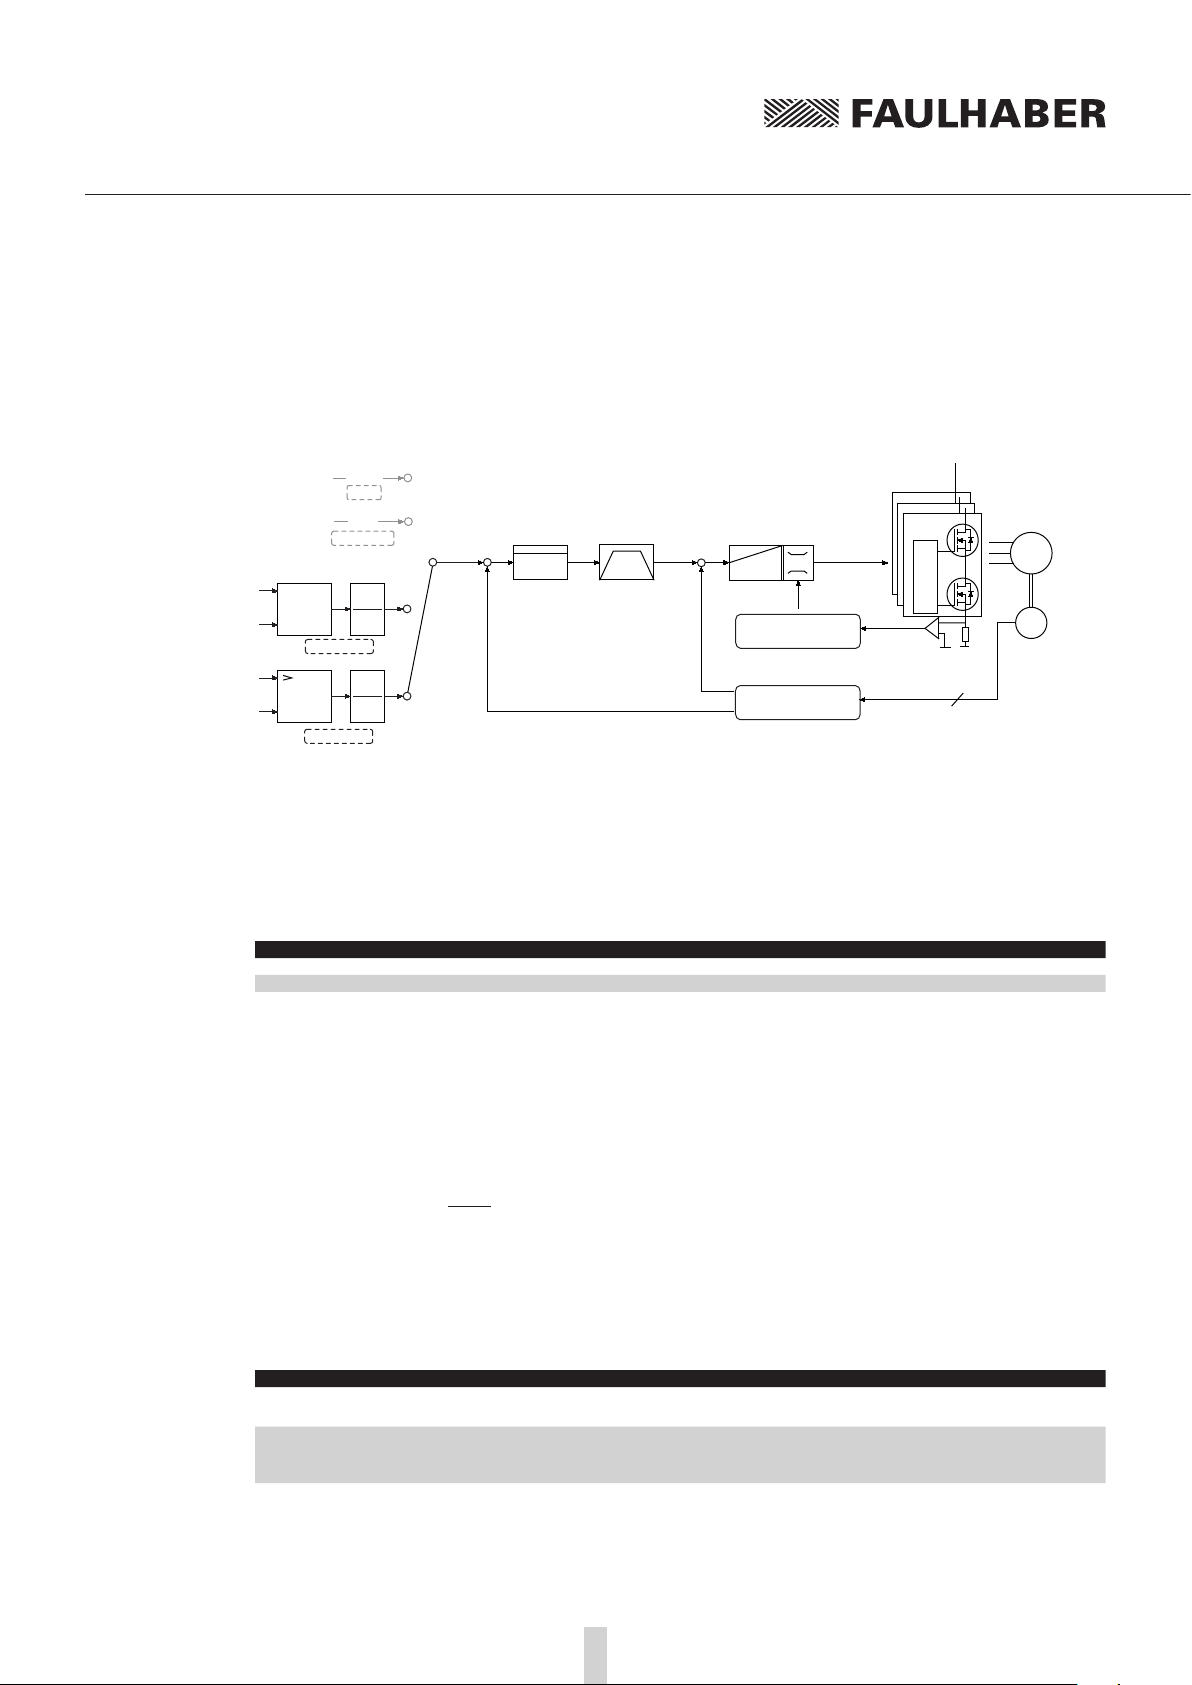
3.4.2 Gearing mode (electronic gear)
Controller structure in gearing mode
RS232
SOR0
AnIn
APCMOD
A
B
ENC
Input
GEARMOD
STW
STN
Target pos.
Pos. controller
Pos
act.
Ramp generator
Speed controller
--
v
act.
I²t current limitation
LM
Gate Driver
Gate Driver
Gate Driver
I
cat.
Motor
Hall
STEPMOD
STW
STN
Position and
velocity calculation
3
Counter
DIR
Gearing mode enables the use of an external encoder as set-point source for the position. This enables several drives to be synchronised. If the directions to be changed by a digital signal, the function
of the fault pin must be reconfigured as a direction input.
Alternatively, the direction of rotation can also be preset via the commands ADL and ADR.
Basic settings
Command Argument Function Description
GEARMOD - Gearing Mode Change to gearing mode
DIRIN - Direction Input Fault pin as direction input
Input
The two channels of an external encoder are connected to connections AnIn and AGND, which may
need to be connected to the 5 V encoder supply via a 2.7 k pull-up resistor.
The gear ratio between the pulses per count of the external encoder and the resulting movement of
the motor can be set using the following formula:
Traversing distance =
pulses ·
Traversing
… traversing distance of the linear motor in mm
distance
Pulses … pulses actually counted during four edge evaluation
τm
… magnetic pole pitch in mm
STW
STN
·
τm
Command Argument Function Description
STW Value Load Step Width Load step width for step motor and gearing mode
STN Value Load Step Number Load number of steps per magnetic pitch for step mo-
34
Value: 1 … 65 535
tor and gearing mode
Value: 1 … 65 535
Page 35
3 Functional Description
3.4 Enhanced operating modes
Example:
Motor has to move one magnetic pitch at 1 000 pulses of the external encoder:
STW1
STN1000
Additional settings
Movement limits
The range limits set with LL are also active in gearing mode with APL1.
Ramp generator
The slopes of the acceleration and deceleration ramps, and the maximum speed can be defined using
the AC, DEC and SP commands (see Chapter 3.6.1 „Ramp generator“).
Current limitation
The current limitation values LPC and LCC can be used to protect the drive against overload (see
Chapter 3.6.3 „Current controller and I²t current limitation“).
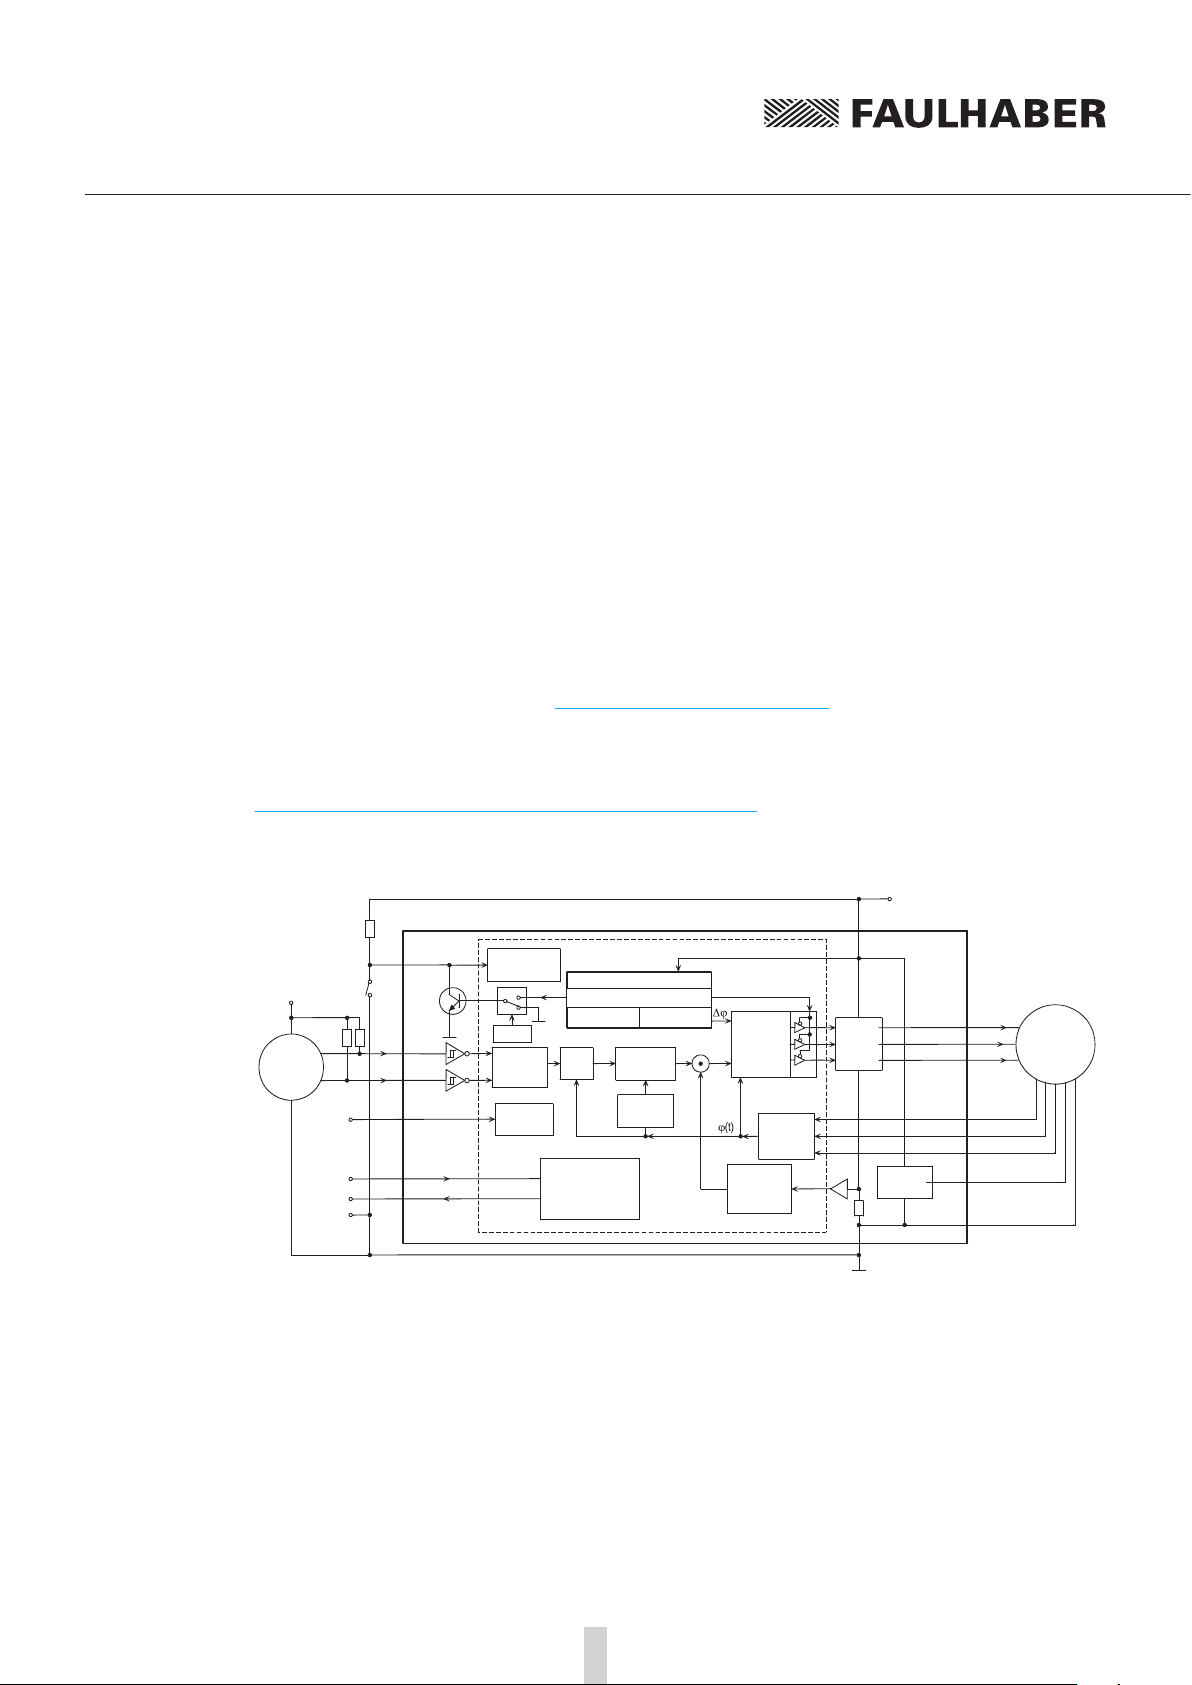
Circuit example, gearing mode for MCLM30xx and direction set via the fault pin
+24V DC
V6
U
MOSFETPower
output
stage
GND
V7
B
5V
controller
R
S
Hall sensor A
Hall sensor B
Hall sensor C
Signal GND
VDD
Set-point
encoder
10k
Circuit example:
Reference switch
2,7k
2,7k
KB
RS-232
Interface
PC TXD
PC RXD
GND
V4
V5KA
V3
V8
V2
V1
Error
output
Analog
Input
AGND
Input 3
RXD
TXD
Evaluation
reference mark
REFIN
Target
position
calculation
Evaluation
input 3
RS-232
communication
and configuration
module
Protective functions:
Overtemperature
Overcurrent
Position
controller
n
target
Overvoltage
PI velocity
controller
n
Velocity
calculation
actual
3 phase
PWM
sinus-
U
a
commutator
2
I
t current
limitation
controller
Rotor
position
calculation
I
actual
Microcontroller
Phase A
Phase B
Phase C
VCC
+5V
LM-Motor
35
Page 36
3 Functional Description
3.4 Enhanced operating modes
3.4.3 Voltage regulator mode
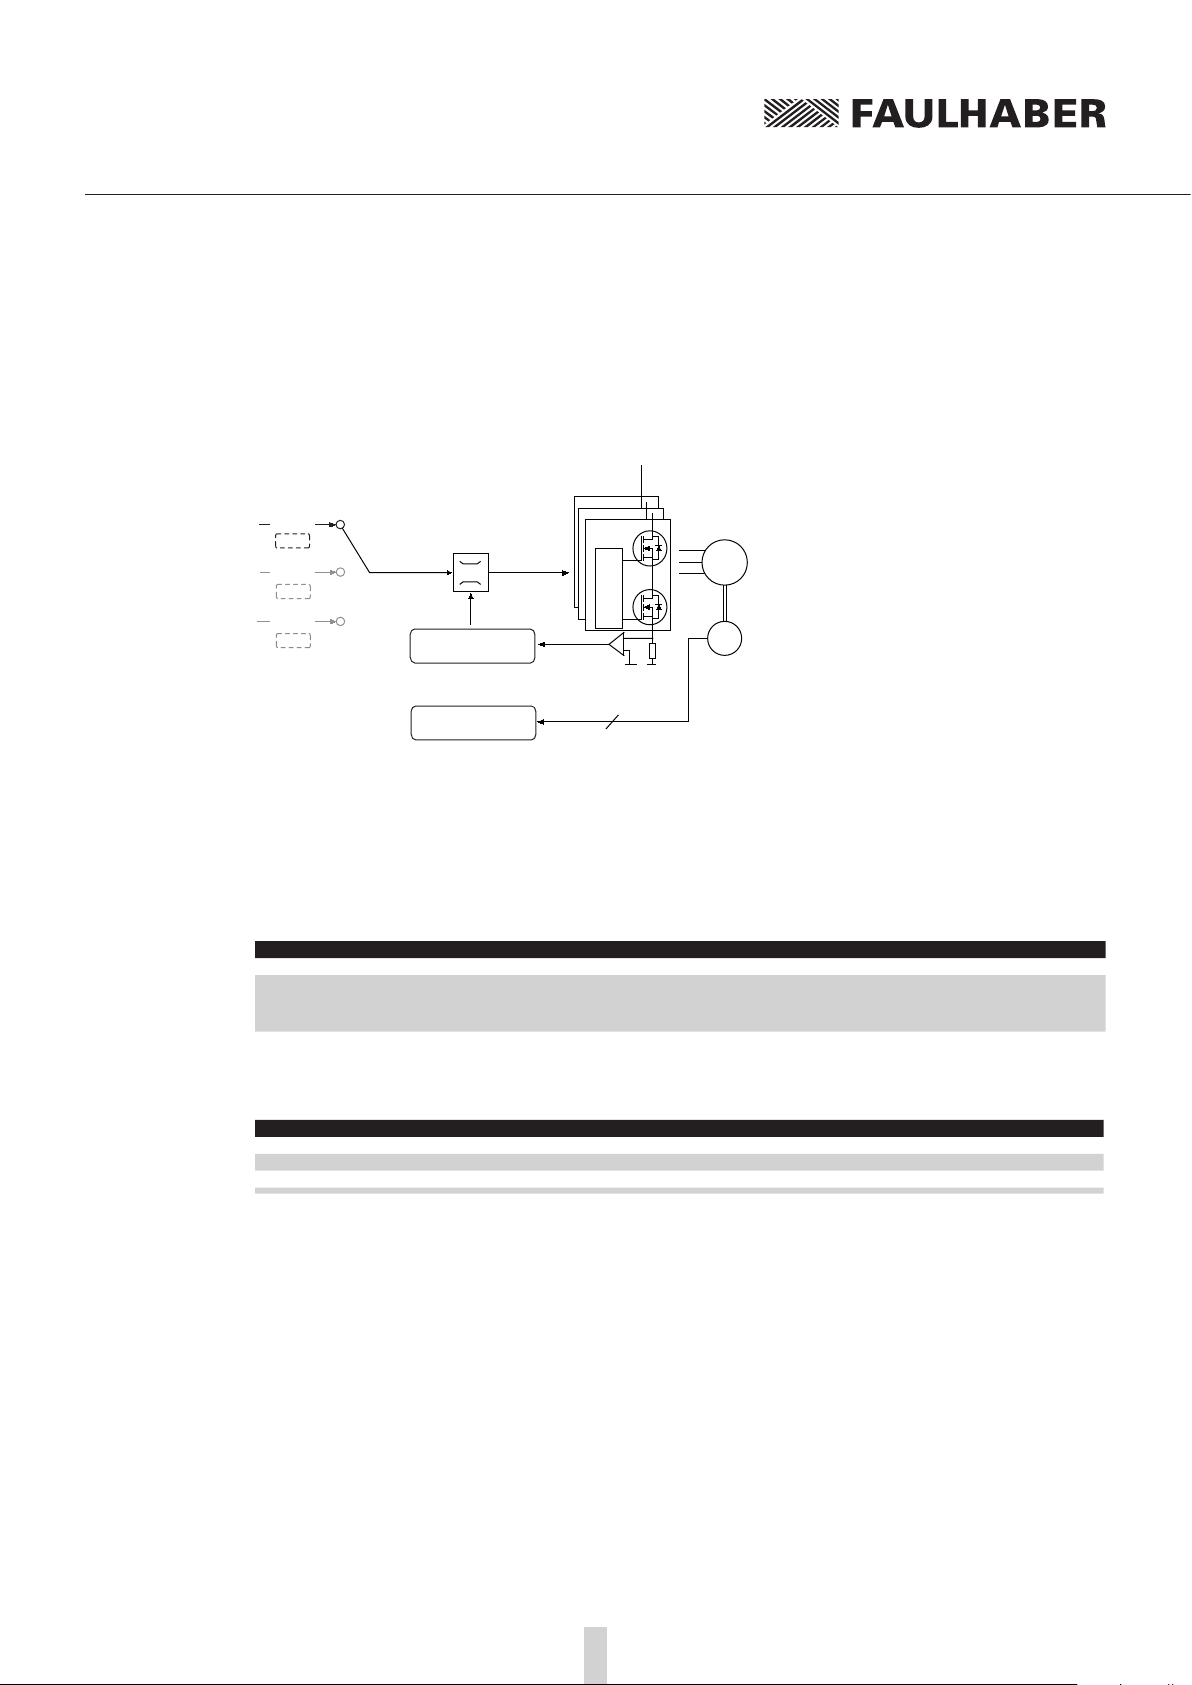
Controller structure in voltage regulator mode
RS232
SOR0
AnIn
SOR1
PWMIn
SOR2
U
s
I²t current limitation
LM
Gate Driver
Gate Driver
Gate Driver
I
act.
Motor
Hall
Commutation
3
In voltage regulator mode a motor voltage is output proportional to the preset value. Current limitation remains active.
With this mode, it is possible to use a higher level controller. The controller then serves only as a
power amplifier.
Basic settings
Command Argument Function Description
VOLTMOD - Set Voltage Mode Activate Voltage Regulator Mode
U Value Set Output Voltage Output motor voltage (corresponds to -Uv … +Uv) with
SOR0 only
Value: –32 767 … 32 767
Input
SOR0 (RS232) SOR1 (AnIn) SOR2 (PWMIn) UMOT
U-32767 -10 V 0 % -UB
U0 0 V 50 % 0
U32767 10 V 100 % +U
B
Additional settings
Current limitation
The current limitation values LPC and LCC can be used to protect the drive against overload.
36
Page 37
3 Functional Description
3.4 Enhanced operating modes
3.4.4 Current control with analog current presetting
Fixed direction (SOR3)
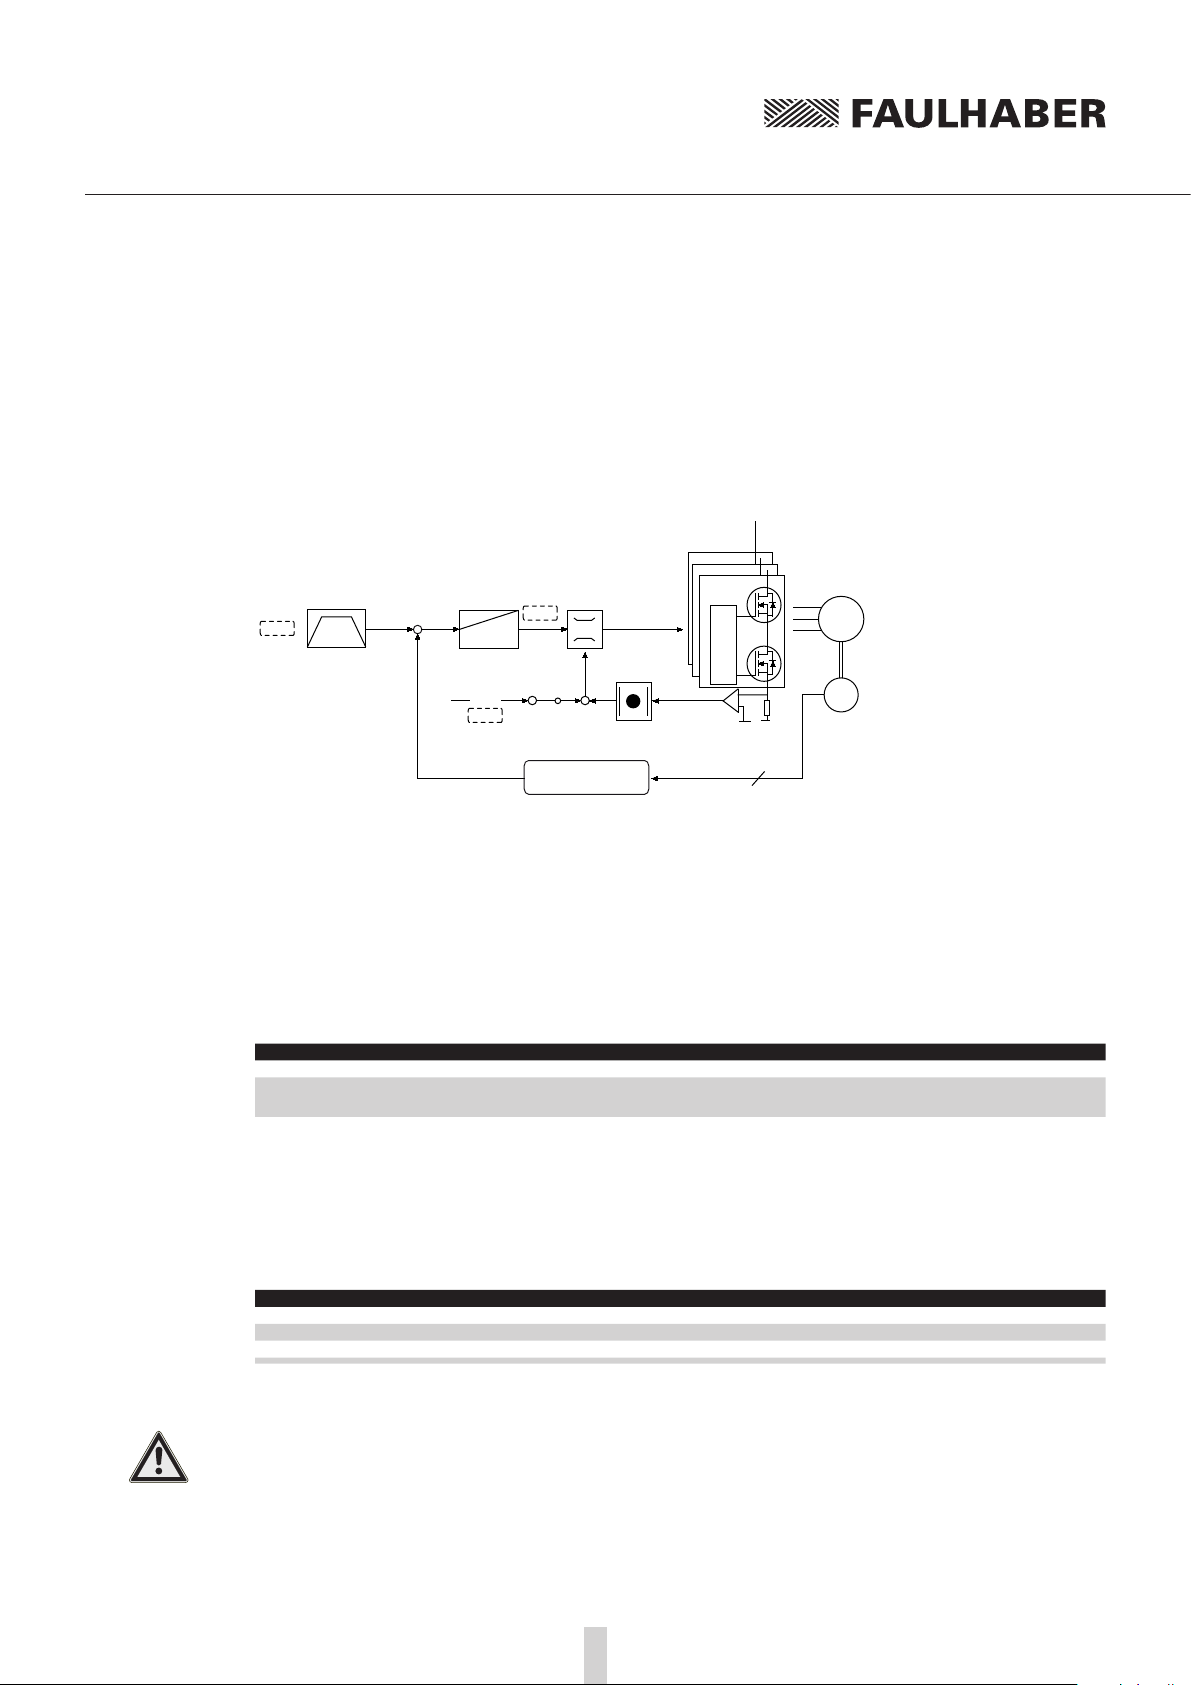
Controller structure for analog current presetting with fixed preset direction
Ramp generator Speed controller
Vxxx
-
AnIn
SOR3
Uxxx
PI
I
Commutation
Velocity calculation
target
Gate Driver
Gate Driver
-
Gate Driver
I
act.
3
LM
Motor
Hall
You can switch to analog target current presetting with the SOR3 command. In this way, both in
velocity mode and in voltage regulator mode, current amount can be limited proportional to the
voltage at the analog input. The set current is weighted with the maximum current LPC.
The motor is activated either in velocity mode by a previously fixed target velocity, or in voltage
regulator mode via a voltage value. The error output must be configured as direction input if the
direction is to be changed via a digital signal.
Basic settings
Command Argument Function Description
SOR 3 Source for Velocity 3: Current target value via analog input
LPC Value Load Peak Current
Limit
Load peak current (mA).
Value: 0 … 12 000
Input
If 10 V are present at the analog input, the current is accordingly limited to the maximum current set
with LPC.
Even if negative voltages are present at the analog input, the current is limited to the amount of the
applied voltage. Negative target current presettings therefore have no effect on the direction!
SOR3 (AnIn) Imax nmax
-10 V LPC SP
0 V 0 SP
10 V LPC SP
Warning! Risk of destruction
In current control mode with analog current presetting the internal I²t current limitation is
deactivated.
37
Page 38
3 Functional Description
3.4 Enhanced operating modes
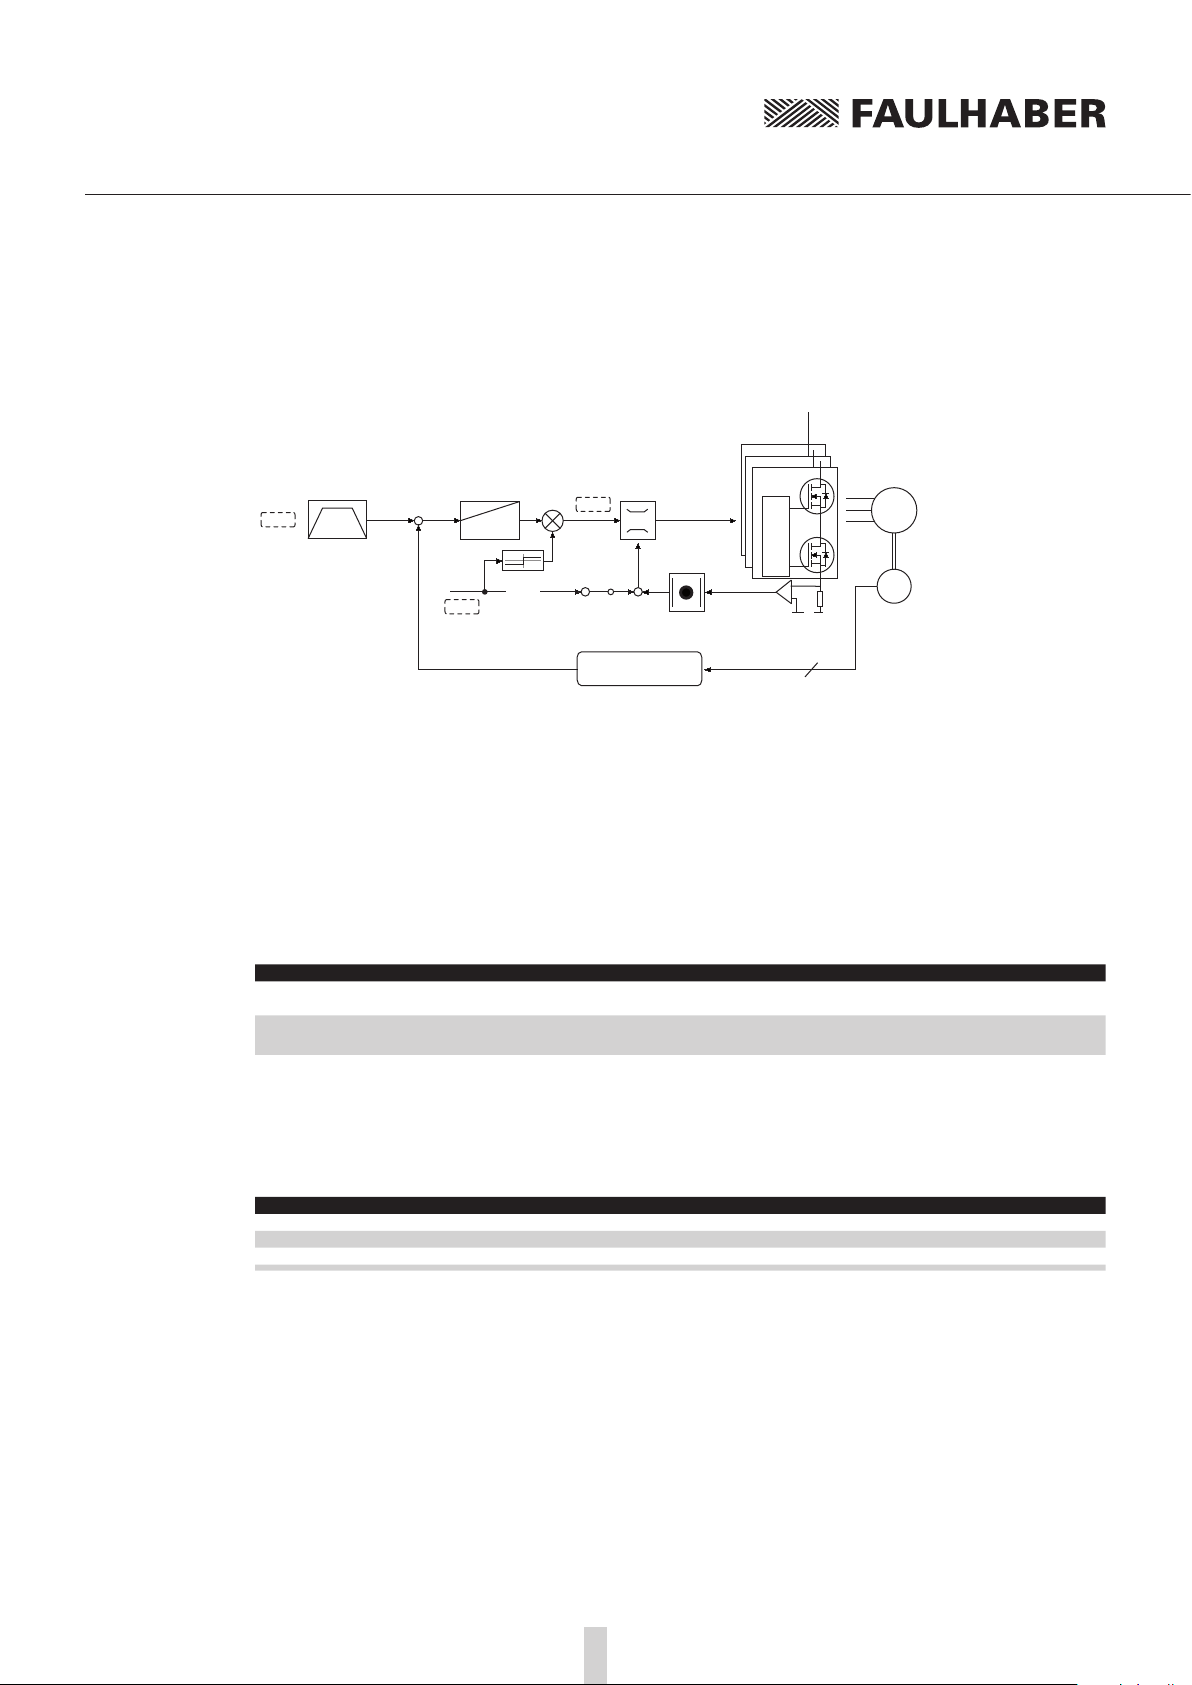
Direction depending on current target value (SOR4)
Ramp generator Speed controller
Vxxx
-
SOR4
Uxxx
PI
I
tar.
AnIn
-
Commutation
Velocity calculation
Gate Driver
Gate Driver
Gate Driver
I
act.
3
LM
Motor
Hall
You can switch to analog target current presetting with the SOR4 command. In this way, both in
velocity mode and in voltage regulator mode, current amount can be limited proportional to the
voltage at the analog input. The set current is weighted with the maximum current LPC.
The motor is activated either in velocity mode by a previously fixed target velocity, or in voltage
regulator mode via a voltage value. The direction is determined from the sign of the current target
value.
This mode corresponds to direct current control.
Basic settings
Command Argument Function Description
SOR 4 Source for Velocity 4: Target current value via analog input with presetting
LPC Value Load Peak Current
Limit
of the direction via the sign of the set-point.
Load peak current (mA).
Value: 0 … 12 000
Input
If 10 V are present at the analog input, the current is accordingly limited to the maximum current set
with LPC.
SOR4 (AnIn) Imax vmax
-10 V LPC -SP
0 V 0 SP
10 V LPC SP
38
Page 39
3 Functional Description
3.5 Special fault output functions
The error connection (fault pin) can be configured as input or output for different tasks:
Command Function Description
ERROUT Error Output Fault pin as error output (default)
ENCOUT Encoder Output Fault pin as pulse output
DIGOUT Digital Output Fault pin as digital output. The output is set to low level.
DIRIN Direction Input
REFIN Reference Input
POSOUT Position Output Fault pin as output for display of the condition: “target position reached".
Fault pin as error output
In ERROUT mode the output is set as soon as one of the following errors occurs:
One of the set current limitation values (LPC, LCC) is exceeded
Set maximum permissible speed deviation (DEV) is exceeded
Overvoltage detected
Maximum coil or MOSFET temperature exceeded
Fault pin as direction input
f Velocity control (see Chapter 3.2 „Velocity control“),
f Stepper motor mode (see Chapter 3.4.1 „Stepper motor mode“),
f Gearing mode (see Chapter 3.4.2 „Gearing mode (electronic gear)“),
f Voltage regulator mode (see Chapter 3.4.3 „Voltage regulator mode“).
f Current control with analog current presetting (see Chapter 3.4.4 „Cur-
rent control with analog current presetting“).
Fault pin as reference or limit switch input
f Homing and limit switches (see Chapter 3.3 „Homing and limit switches“)
Additional settings
Delayed signalling
In order to hide the transient occurrence of errors during the acceleration phase, for example, an
error delay can be set which specifies how long an error must be present before it is displayed at the
error output:
Command Argument Function Description
DCE Value Delayed Current Error Delayed error output with ERROUT
Example:
Wait 2 seconds before displaying error:
DCE200
Error notification via RS232
If one of the above errors occurs, automatic notification with an “r” can be implemented by setting
“Notify Error”, provided ANSW1 or ANSW2 is set:
Command Argument Function Description
NE 0 - 1 Notify Error Notification in the event of errors
Value in 1/100 sec.
1: An “r” is returned if an error occurs
0: No error notification
39
Page 40
3 Functional Description
3.5 Special fault output functions
Fault pin as pulse output:
In the ENCOUT mode the fault pin is used as pulse output, which outputs an adjustable number of
pulses per magnetic pitch. The pulses are derived from the Hall sensor signals of the LM motors and
are limited to 4000 pulses per second.
Command Argument Function Description
LPN Value Load Pulse Number Preset pulse number for ENCOUT.
Example:
Output 16 pulses per magnetic pitch at the fault pin:
LPN16
At 100 mm/s, 100 · 16 = 1 600 pulses per second are generated at the fault pin.
Value: 1 … 255
NOTE
At speeds that would generate more than the maximum possible pulse number at the set LPN value,
the maximum number is generated at the fault pin. The set pulses are precisely achieved, but the
timing does not necessarily have to exactly agree (delays possible).
Position determination via pulse counting is therefore possible, provided that no change occurs in
the direction and the maximum possible pulse number is not exceeded.
Fault pin as digital output
In DIGOUT mode, the error connection can be used as universal digital output. The digital output can
be set or cleared via the following commands.
Command Argument Function Description
CO - Clear Output Set digital output DIGOUT to low level
SO - Set Output Set digital output DIGOUT to high level
TO - Toggle Output Switch to digital output DIGOUT
40
Page 41
3 Functional Description
3.6 Technical information
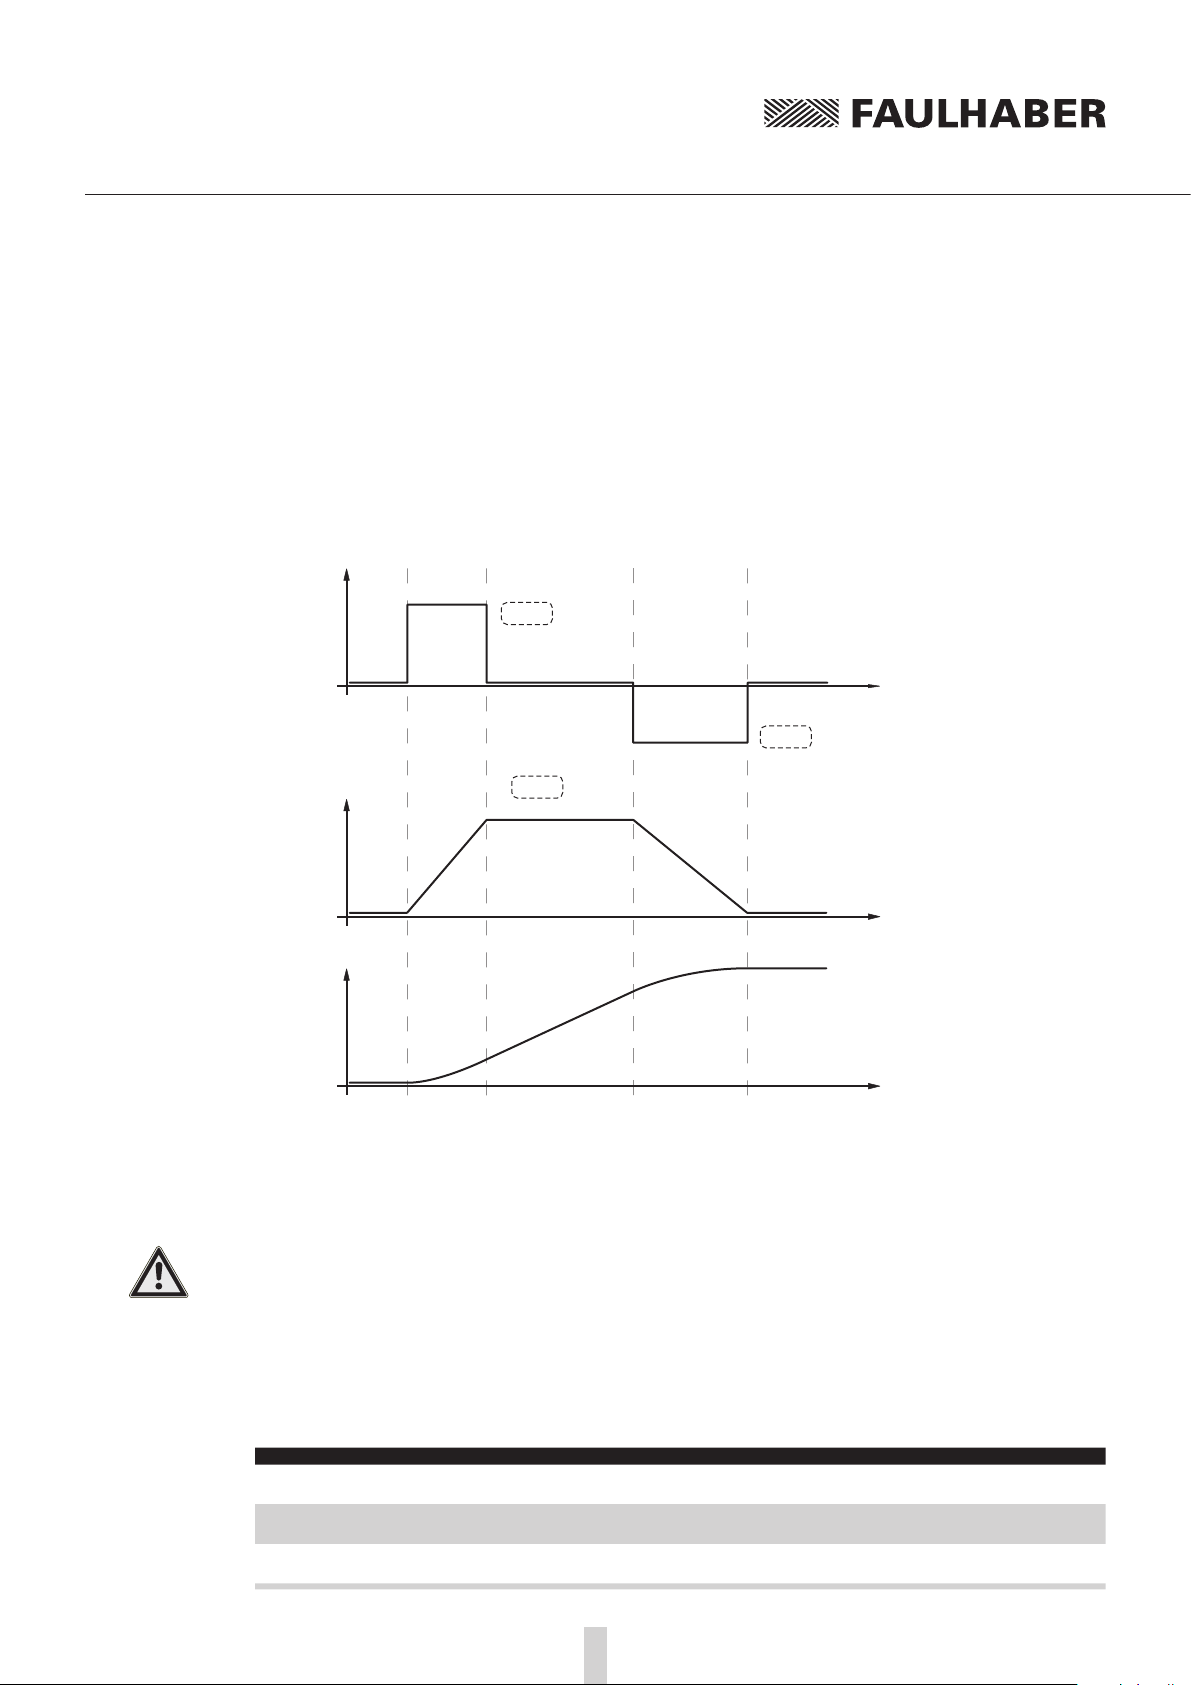
3.6.1 Ramp generator
In all modes, apart from voltage regulator mode and current control, the set-point is controlled by
the ramp generator.
Basic ramp generator function
a
[mm/s²]
AC
t
DEC
SP
v
[mm/s]
t
Pos
t
is can be used to separately set the parameters for maximum acceleration (AC), maximum delay
(DEC) and maximum speed (SP) for specific applications.
CAUTION! Overshoot at maximum acceleration / delay
If the acceleration (AC) or delay (DEC) is set to the maximum value of 30 000 mm/s² or higher the
effect of the ramp generator is switched off. With this setting, the maximum possible dynamic of the
drive system is achieved. At this setting, at times the drive swings clearly beyond the target position.
f Please note and take into account this fact during use.
Basic settings
Command Argument Function Description
AC Value Load Command
Acceleration
DEC Value Load Command
Acceleration
SP Value Load Maximum Speed Load maximum speed (mm/s).
41
Load acceleration value (1/s²).
Value: 0 … 30 000
Load deceleration value (1/s²).
Value: 0 … 30 000
Value: 0 … 10 000
Page 42
3 Functional Description
3.6 Technical information
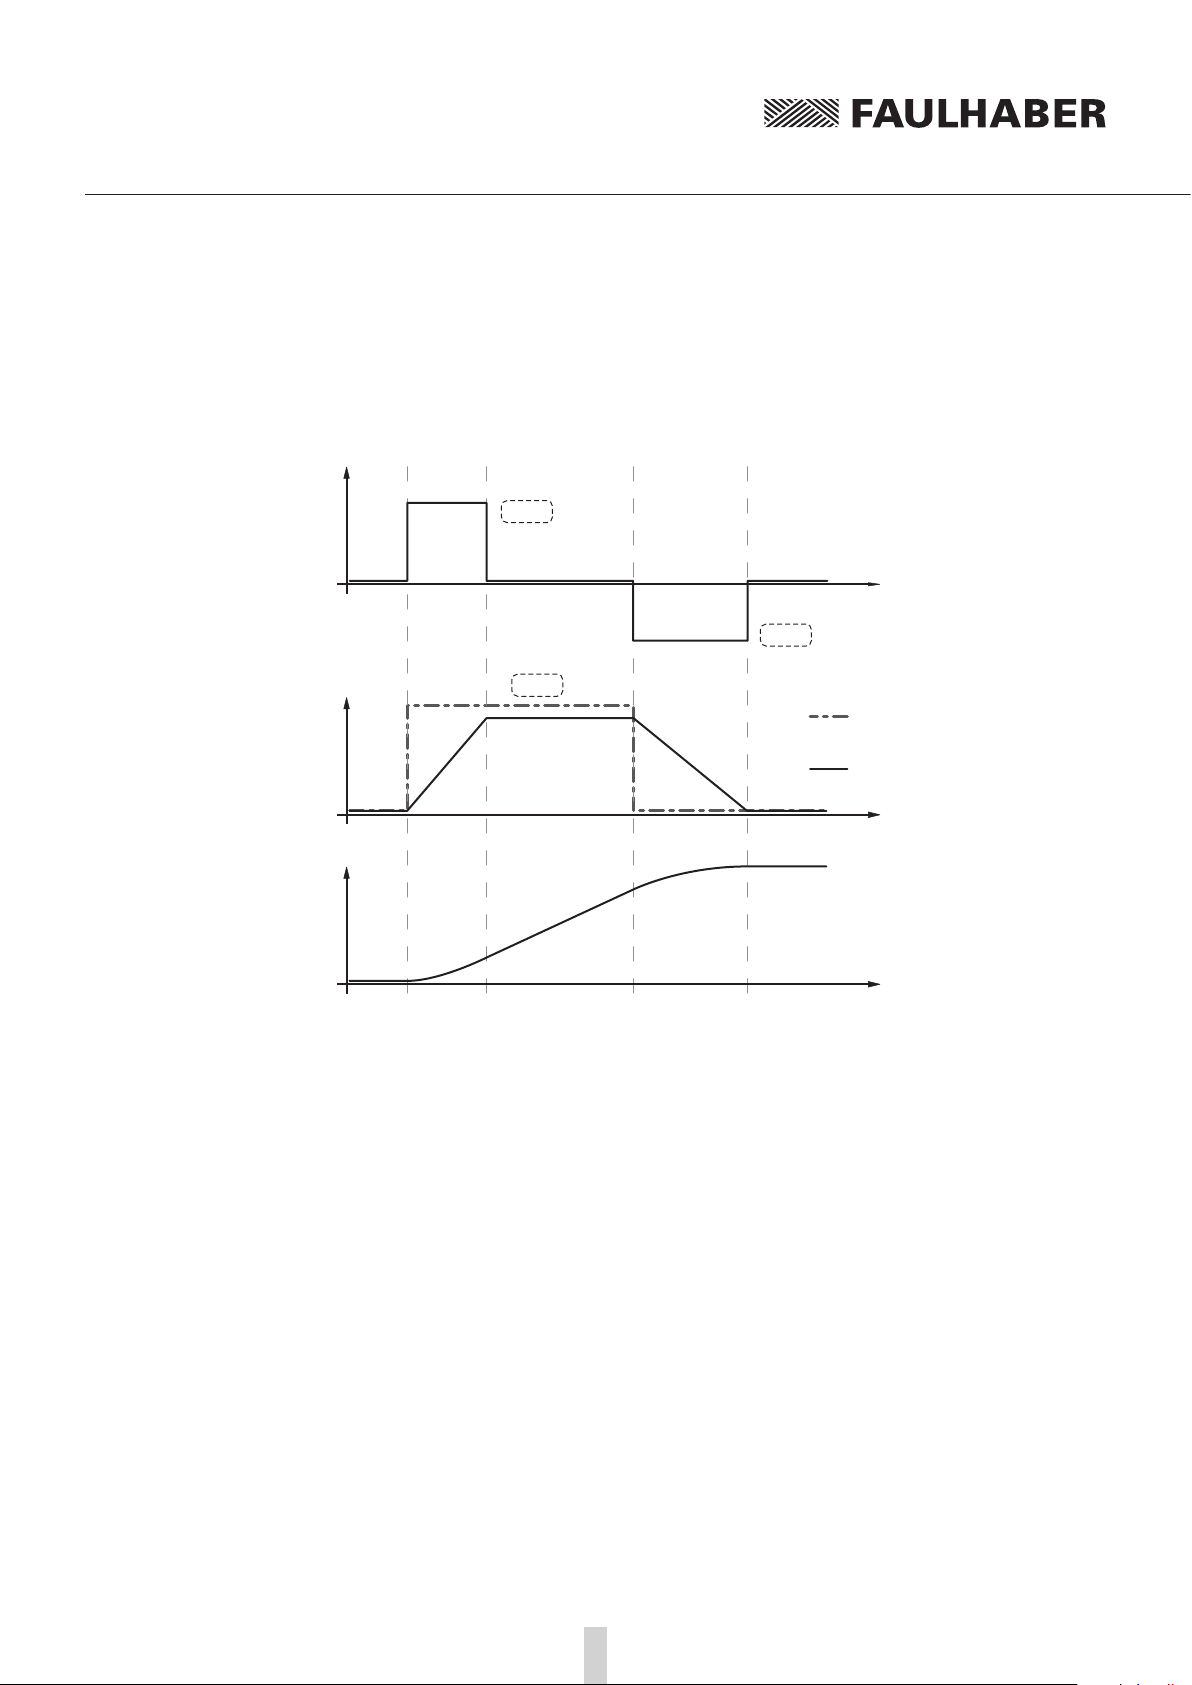
Ramp generator in velocity mode
Intervention of the ramp generator in velocity mode
[mm/s²]
[mm/s]
Pos
a
v
AC
t
DEC
SP
Target value e. g, trough
V200
Downstream of the ramp
generator
t
t
In velocity mode the ramp generator acts like a filter on the target velocity. The target value is limited to the maximum speed value (SP) and target value changes are limited according to the deceleration and acceleration ramps (AC and DEC).
Notification of the higher level control
Reaching the given speed is indicated by a “v“, if “Notify Velocity” has been set before starting the
speed mode and ANSW1 or ANSW2 is set.
42
Page 43
3 Functional Description
3.6 Technical information
Ramp generator in positioning mode
Intervention of the ramp generator in positioning mode
[mm/s²]
[mm/s]
Pos
a
AC
t
DEC
SP
v
t
Target value e. g, trough
LR 1000
M
Downstream of the ramp
generator
t
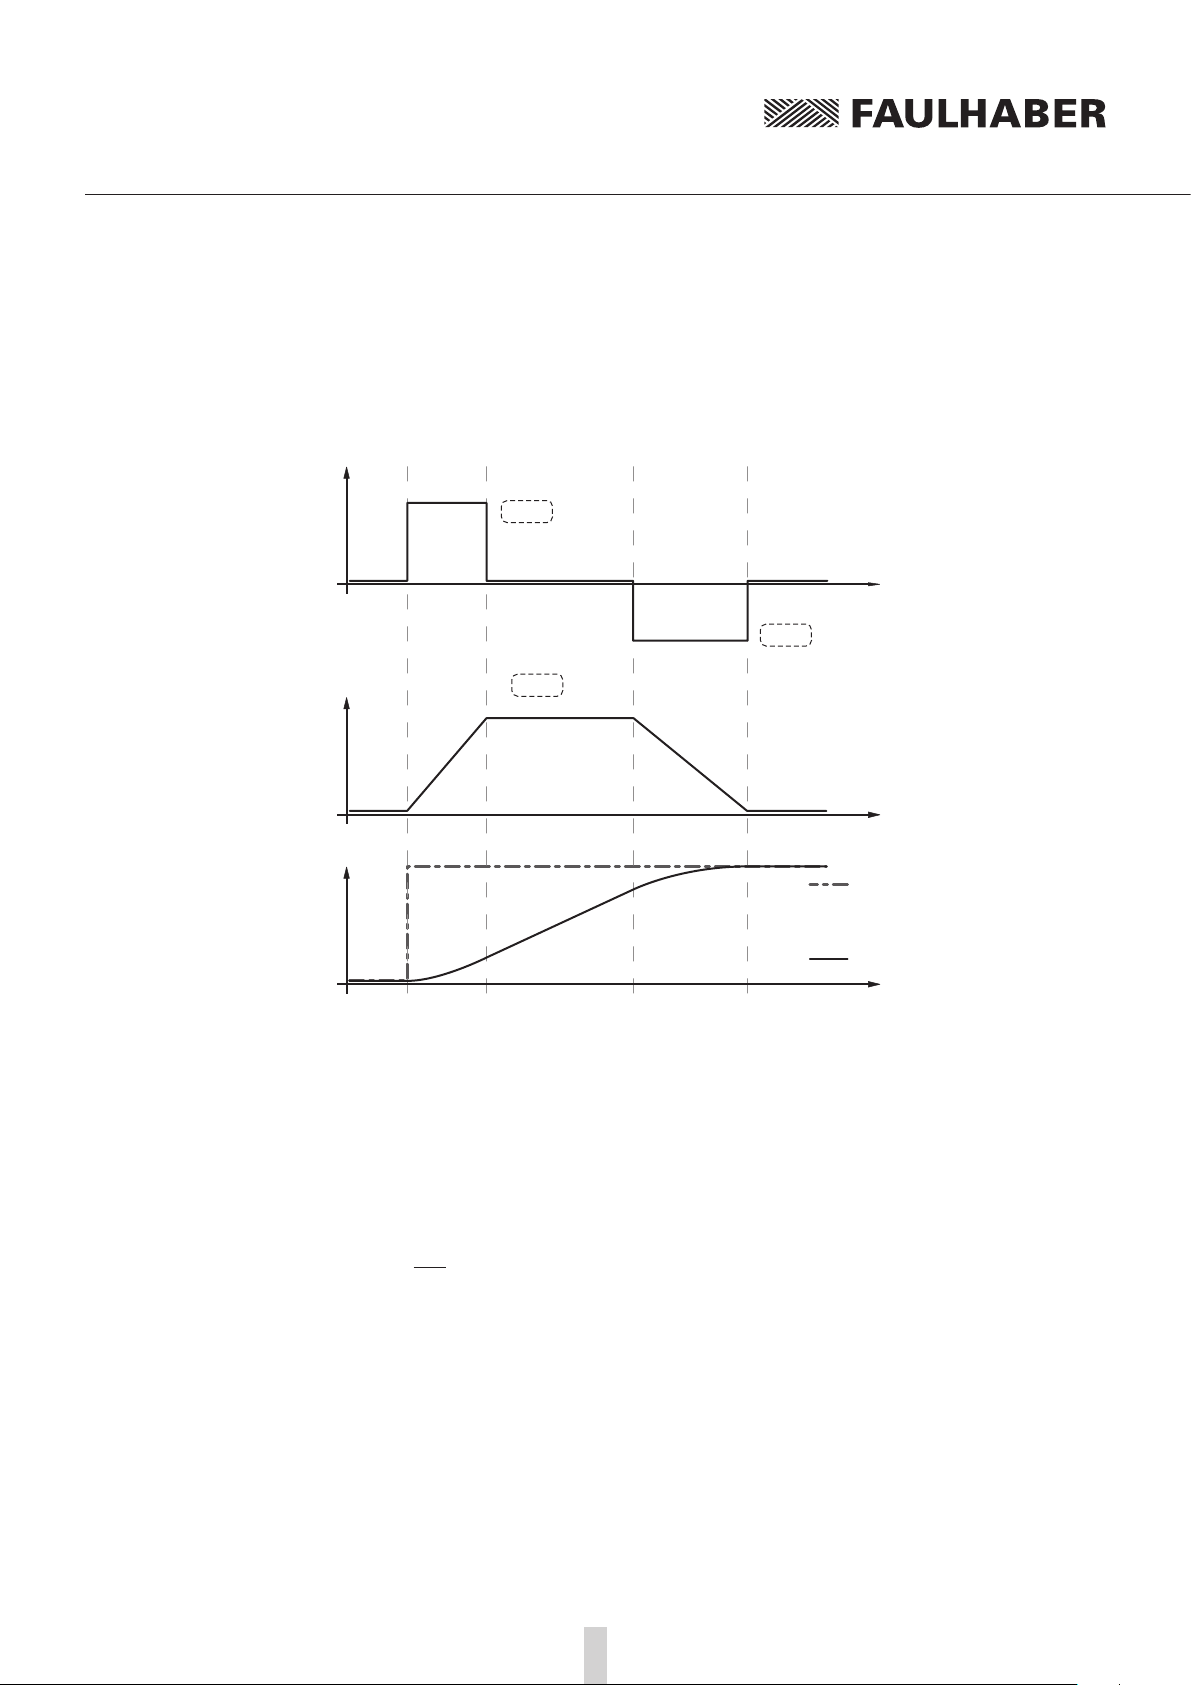
In positioning mode a preset speed is determined by the position controller from the difference
between the target position and actual position.
In the ramp generator, the preset speed output by the position controller is limited to the maximum
speed value (SP) and accelerations are limited according to the acceleration ramp (AC).
In positioning mode the deceleration process is not extended as, before reaching the limit position,
the speed has to be reduced so that the target position can be reached without overshooting.
According to the equation of motion:
2a s = v
a: Acceleration [m/s
v: Velocity [m/s]
s: remaining distance [m]
the maximum speed max n must be limited proportional to the remaining distance.
The allowable deceleration ramp, or rather the technically possible ramp depending on the motor
and the inertia of the load, is set here using the parameter DEC.
2
vmax = 2a s
2
]
43
Page 44
3 Functional Description
3.6 Technical information
Notification of the higher level control
Attainment of the target position or any intermediate position is indicated by a “p” on the serial
interface if “Notify Position” is set before the start of positioning, provided that ANSW1 or ANSW2 is
set.
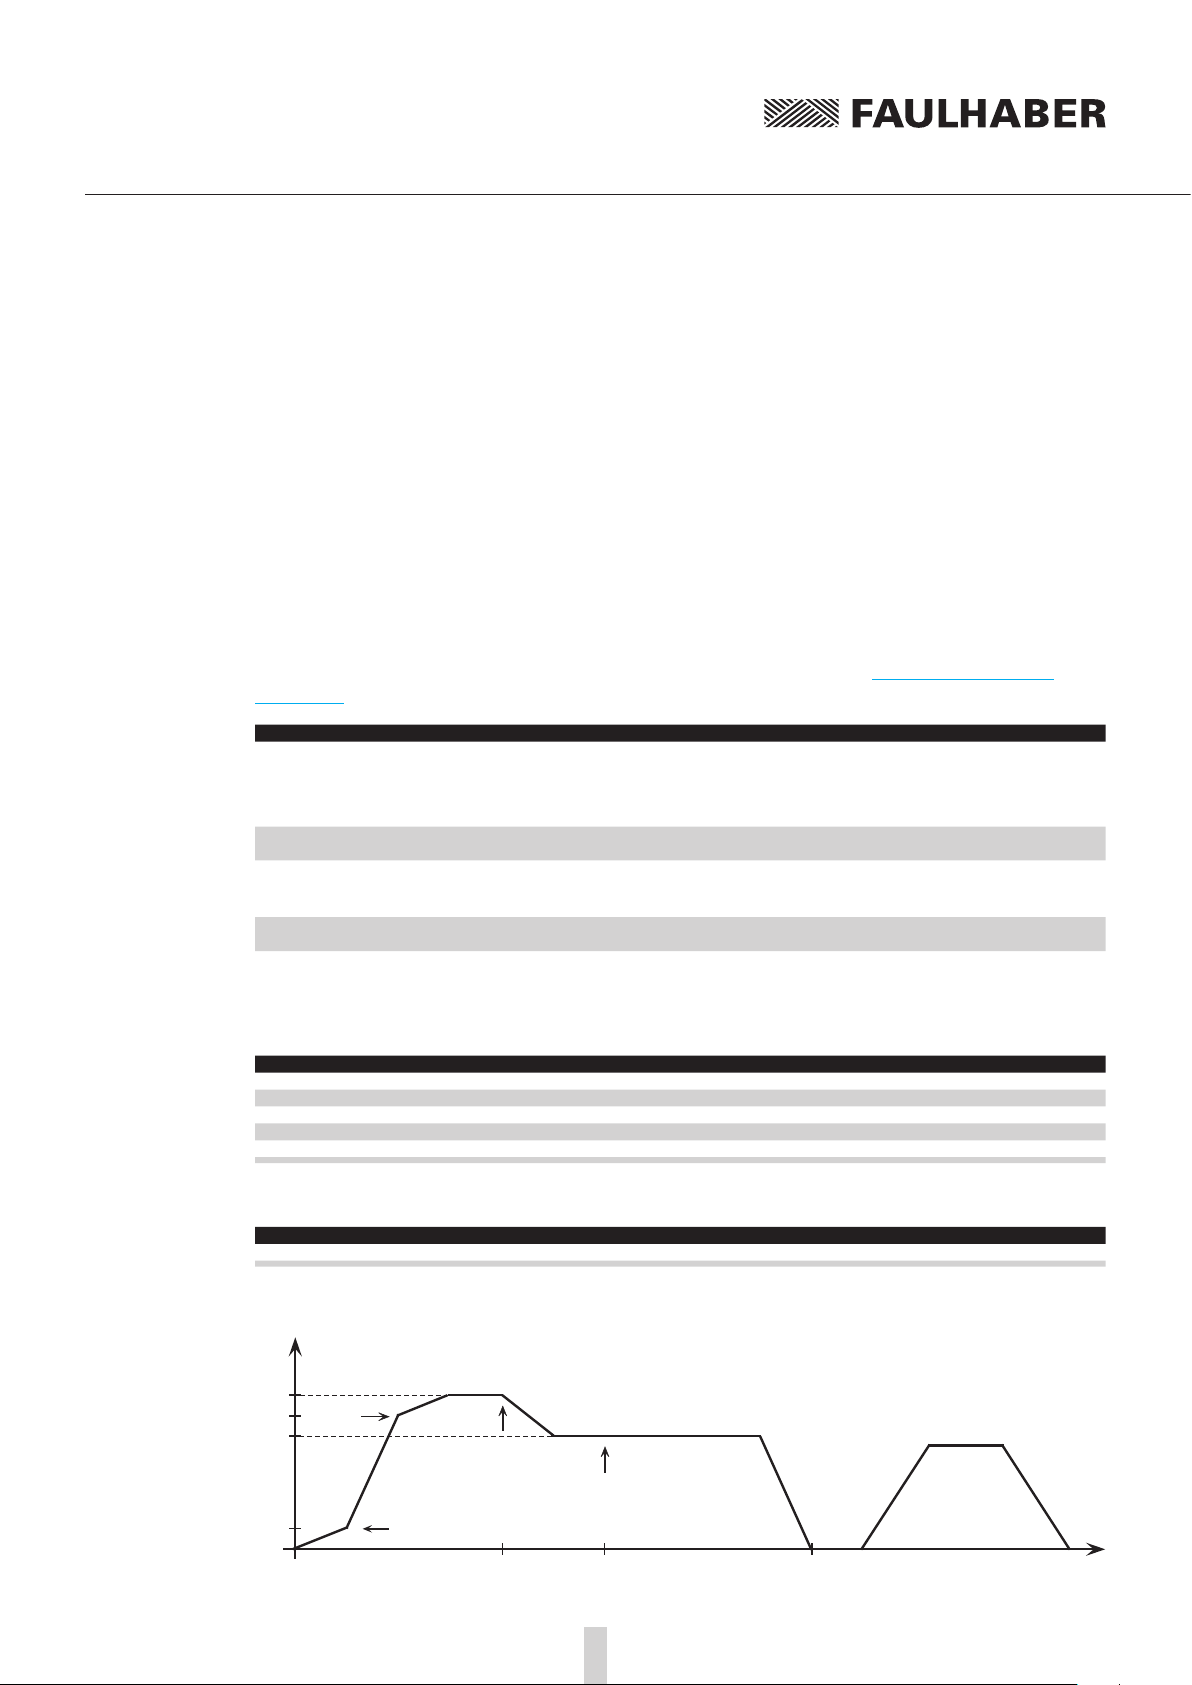
Complex motion profiles
More complex motion profiles can be generated through appropriate presetting of new values
(maximum speed, acceleration, end position) during positioning.
After a value change, simply execute a new motion start command (M). The commands NP and NV
can be used to control the sequence.
The complex profile can be generated either by a higher level control or autonomously via a sequence program. Notes on design of the sequence programs are given in Chapter 6 „Sequence
Programs“.
Command Argument Function Description
NP - / value Notify Position Without argument:
NPOFF - Notify Position Off Notify Position command that has not yet been trig-
NV Value Notify Velocity A “v” is returned when the nominal speed is reached or
NVOFF - Notify Velocity Off Velocity command that has not yet been triggered is
A “p” is returned when the target position is attained.
With argument:
A “p” is returned if the specified position is overtravelled.
gered is deactivated again.
passed through.
Value: –32 767 … 32 767
deactivated again.
Example:
Complex speed profile with notify by the drive
Start Update a) Update b) Update c) Update d)
LA[POS3] AC[AC2] AC[AC1] SP[SP2] DEC[DEC4]
AC[AC1] NV[V2] NP[POS1] DEC[DEC3] NP[POS3]
SP[SP1] M M NP[POS2] M
NV[V1] M
M
Drive response
V = V1 V = V2 Pos = Pos1 Pos = Pos2 Pos = Pos3
v v p p p
Example of complex motion profile in comparison with trapezoidal profile:
Velocity
Composed profile
SP1
V2
SP2
V1
AC1
b.)
AC2
a.)
c.)
POS1
DEC3
d.)
POS2
DEC4
Comparsion:
trapezoid profile
POS3
Time
44
Page 45
3 Functional Description
3.6 Technical information
3.6.2 Sinus commutation
The outstanding feature of FAULHABER motion controllers for Linearmotoren is their so-called sinus
commutation. This means that the preset magnetic field is always ideally positioned relative to the
cage bar. As a result, force fluctuations can be reduced to a minimum, even at very low speeds. In addition, the motor runs particularly quietly.
The sinus commutation is further enhanced by so-called flat-top modulation, which enables more
modulation. As a result, higher no-load speeds are possible.
The SIN0 command can even be used to set the system so that the sinus commutation switches to
block commutation in the upper speed range. This full modulation enables the complete speed
range of the motor to be utilised.
Command Function Description
SIN Sinus commutation 0: Full control
1: Limited to sinusoidal form (basic setting)
3.6.3 Current controller and I²t current limitation
Intervention of the current limiting controller
Higher-level controller
Ramp generator
Vxxx
Continuous Current
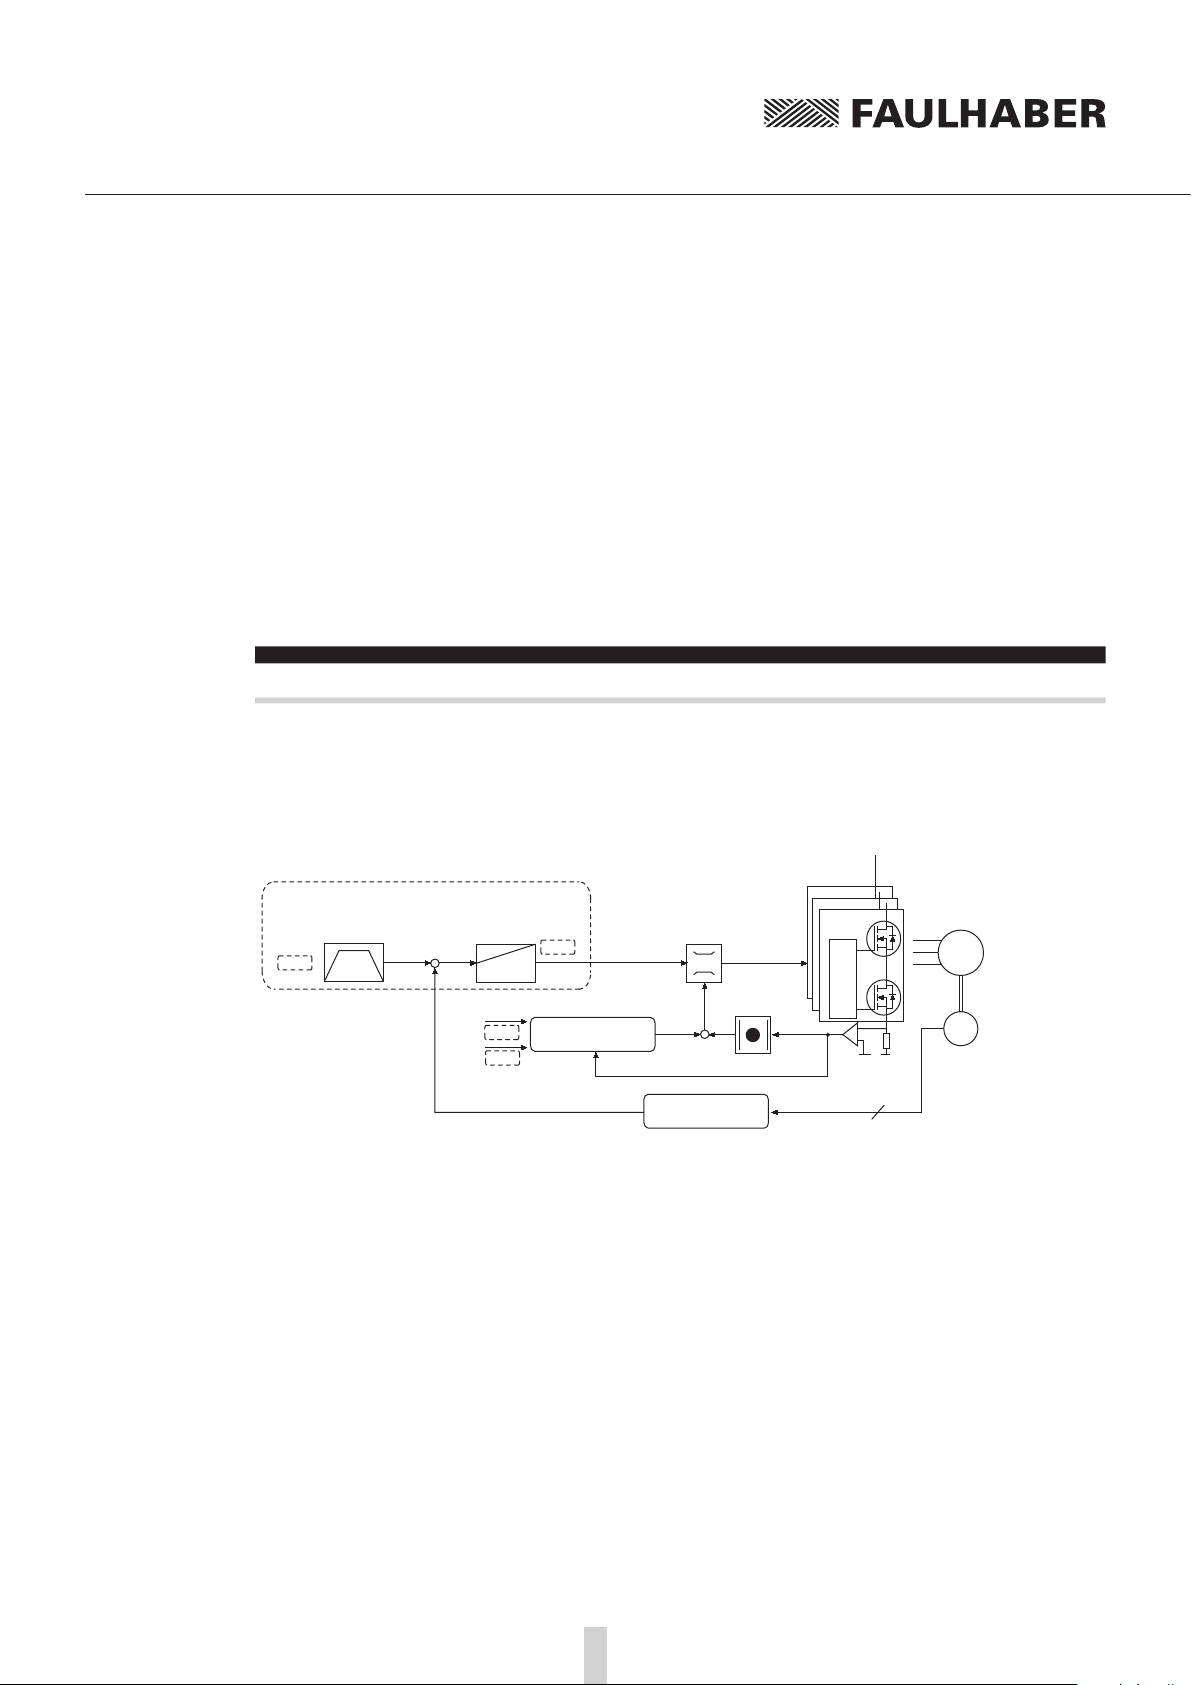
The FAULHABER Motion Controllers are equipped with an integral current controller, which enables
force limitation.
The current controller operates as a limitation controller. Depending on the previous loading, the I²t
current limitation limits to the allowable peak current or continuous current. As soon as the motor
current exceeds the currently allowed maximum value the current controller limits the voltage.
Due to its design as a current limiting controller, current control in the thermally relaxed state has
no effect on the dynamic of the velocity control. The time response of this limitation can be adjusted
using the parameter CI.
The default values for CI limit the current to the allowable value after around 5ms.
Speed controller
-
Peak Current
LPC
LCC
PI
Uxxx
2
t limit current
I
calculation
I
max
-
Commutation
Velocity calculation
LM
Gate Driver
Gate Driver
Gate Driver
I
act.
3
Motor
Hall
45
Page 46
3 Functional Description
3.6 Technical information
Basic settings
Command Argument Function Description
LPC Value Load Peak Current
LCC Value Load Continuous
CI Value Load Current Integral
Mode of operation of the current controller
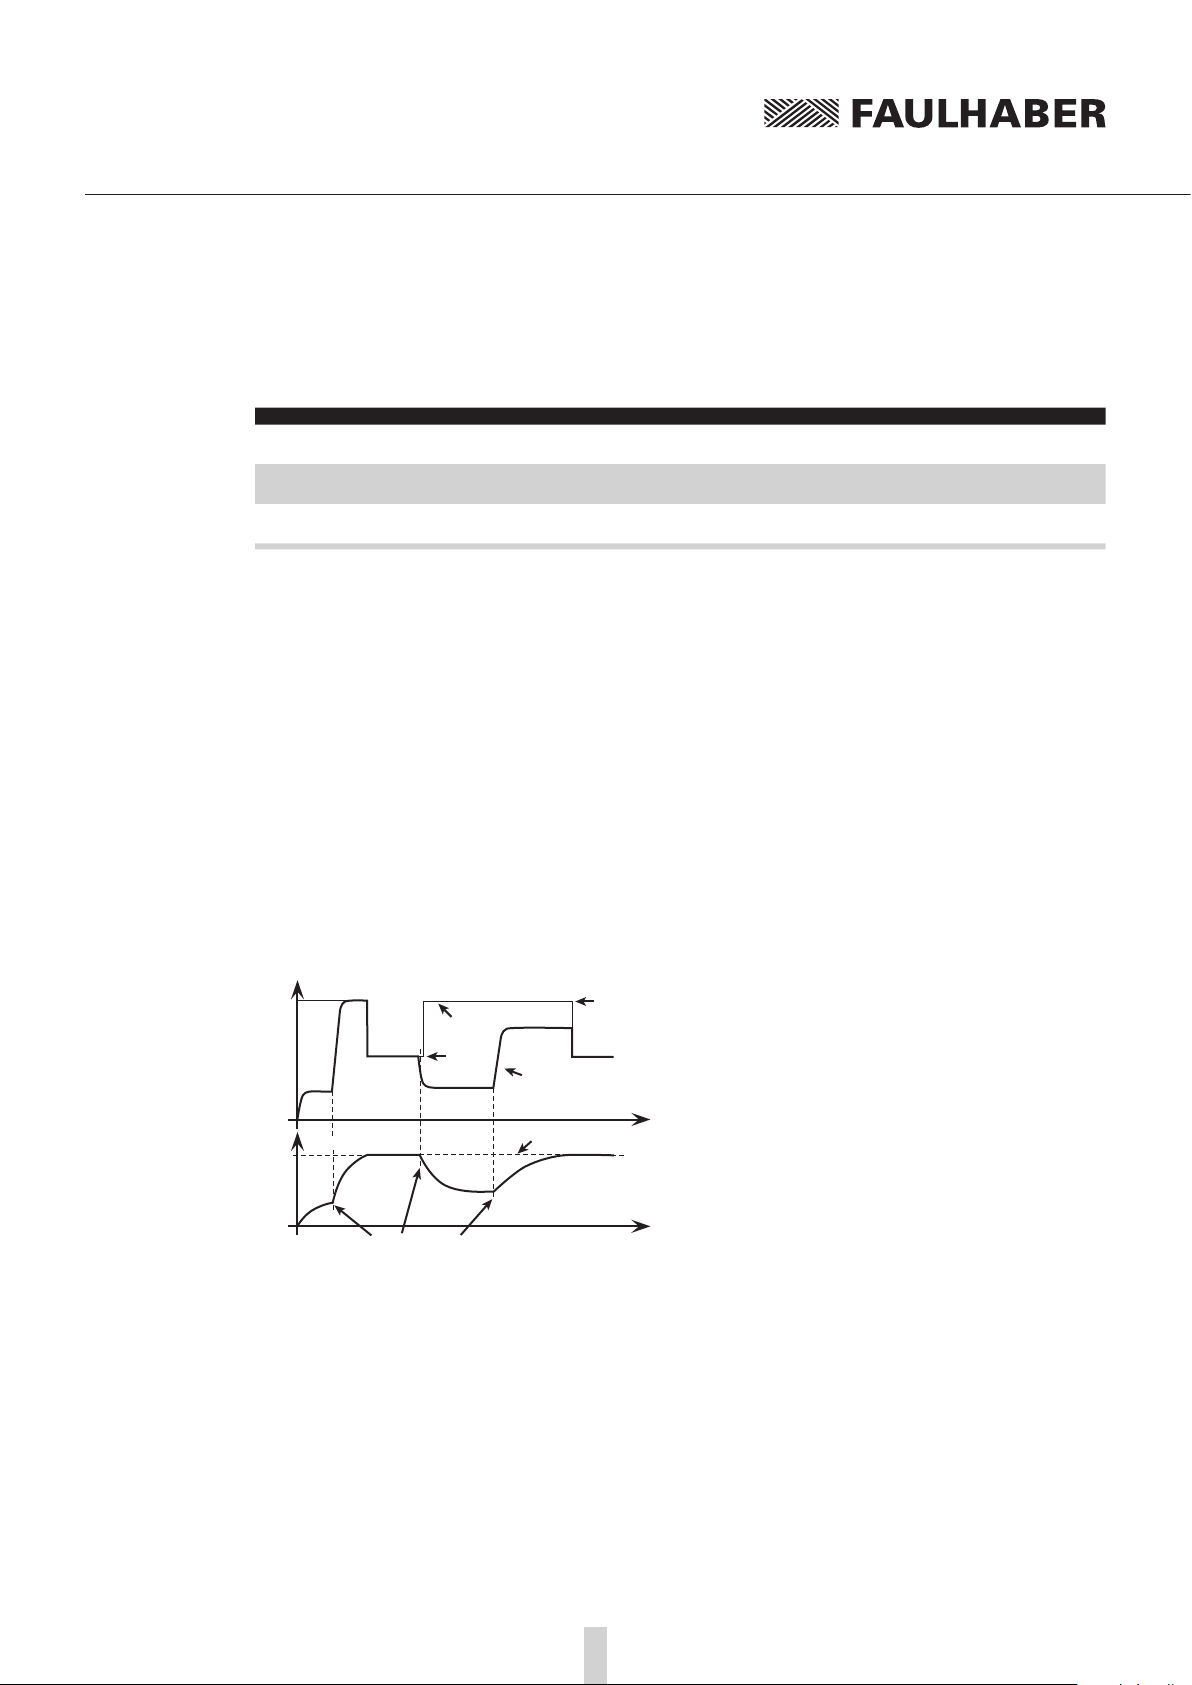
When the motor starts, the peak current is preset as the set-point for the current controller. As the
load increases, the current in the motor constantly increases until it finally reaches the peak current.
The current controller then comes into operation and limits the current to this set-point.
A thermal current model operating in parallel calculates a model temperature from the actually
flowing current. If this model temperature exceeds a critical value, continuous current is switched to
and the motor current is regulated to this. Only when the load becomes so small that the temperature falls below the critical model temperature is peak current permitted again.
The aim of this so-called I²t current limiting is not to heat the motor above the thermally allowable
temperature by selecting a suitable continuous current. On the other hand, a high load should be
temporarily possible in order to enable very dynamic movements.
Limit
Current Limit
Term
Load peak current
Value: 0 … 12 000 mA
Load continuous current
Value: 0 … 12 000 mA
Load integral term for current controller
Value: 1 … 255
Function of the I
I
T
Model
Load variation
²
t current limitation
I
Limitation
I
Duration
I
Motor
T
critical
I
max.
Time
Time
46
Page 47
3 Functional Description
3.6 Technical information
3.6.4 Overtemperature protection
If the MOSFET temperature of the external controllers exceeds a preset limit value, the motor is
switched off. The following conditions must be fulfilled in order to reactivate the motor:
Temperature below a preset limit value
Target velocity set to 0 mm/s
Actual motor speed less than 50 mm/s
NOTE Determining the coil temperature
The housing temperature is measured and the power loss concluded from the current measurement.
The MOSFET or coil temperature is calculated from these values via a thermal model. In most applications, this method represents a thermal motor protection device.
3.6.5 Under-voltage monitoring
If the supply voltage falls below the lower voltage threshold, the power stage is switched off. The
Motion Controller remains active. When the voltage returns within the permissible range, the power
stage is switched on again immediately.
3.6.6 Overvoltage regulation
If the motor is operated as a generator, it produces energy. Usually power supply units are not able to
feed this energy back into the power line. For this reason the supply voltage at the motor increases
and, depending on the speed, the allowable maximum voltage can be exceeded.
In order to avoid irreparable damage to components, FAULHABER motion controllers for linear
motors contain a controller which adjusts the rotor displacement angle if a limit voltage (32 V) is exceeded. As a result, the energy generated in the motor is converted, and the voltage of the electronics remains limited to 32 V. This method protects the drive during generating operation and rapid
braking.
3.6.7 Setting the controller parameters for velocity and position controller
The preset controller parameters must be optimised in order to optimally adjust the controller to the
respective application.
NOTE Controller sampling rate
The digital controller operates at a sampling rate of 100 μs. If necessary the sampling rate can be
increased to up to 2 ms via the Sampling Rate Parameter (Object 0x2330.01).
47
Page 48
3 Functional Description
3.6 Technical information
Default behaviour:
Without further settings, the gain set in the parameter POR is effective for the speed controller.
In Positioning Mode the gain set via the parameter POR is increased within the target corridor by
the value of the parameter PD. This enables faster adjustment to the stoppage in the target position
without having to over-stimulate the controller during the transient phenomena. To this end, the parameter PD must be set carefully and should typically be a maximum of 50% of the base value POR;
otherwise there is a risk of instability.
The following controller parameters are available:
Command Function Description
POR Load Velocity Proportional
Term
I Load Velocity Integral Term Load velocity controller integral term.
PP Load Position Proportional
Term
PD Load Position D-Term Load position controller D-term.
SR Load Sampling Rate Setting of controller sampling rate.
Load velocity controller amplification.
Value: 1 … 255
Value: 1 … 255
Load position controller amplification.
Value: 1 … 255
Value: 1 … 255
Value: 1 … 20
These values are suitably preassigned by selecting a motor type in the Motion Manager’s Motor
Wizard.
The controller tuning Wizard in Motion Manager can be used to further adjust several controller
parameters, in order to optimally adjust the controller to the respective application.
Possible procedure
It is recommended that you begin with the default settings of the Motor Wizard and then further
optimise the position controller.
Optimise position controller:
Specify appropriate motion profiles for the application, e.g. using the controller tuning Wizard. If
the system does not function stably with these settings, stability can be achieved by reducing the I
term of the velocity controller or reducing the P term of the position controller. Then increase the P
term of the position controller gradually up to the system’s stability limit. The stability can then be
restored, either by increasing the D term of the position controller or by reducing the I term of the
velocity controller.
48
Page 49

3 Functional Description
3.6 Technical information
Special mode for position control
The SR command can be used to activate a special position control mode (Gain Scheduling). To this
end, the value 100 must be added to the required SR setting.
Example:
Required setting SR10 with special mode: SR110.
If this mode is activated, the parameter POR is successively reduced in a position-controlled application as soon as the drive in within the target corridor (can be set using the CORRIDOR command).
This enables much “gentler” stoppage to be achieved in the target position. As soon as the drive
leaves the target corridor, POR is immediately increased back to the set value.
NOTE
The “Gain Scheduling” function only becomes active at sampling rates with a factor larger than 3
(sampling rate > 3).
49
Page 50
4 Protocol Description
Baud rate and node number Page 52
Trace Function Page 54
An extensive set of ASCII commands is available for configuring and operating FAULHABER Motion
Controllers. The structure of the command telegrams is described in the following.
Command frame
The ASCII commands have the following structure:
[Node No.] Command [Argument] CR
The node number is optional and is only required if several drives are being operated on one interface.
The command consists of a letter character string.
The optional argument consists of an ASCII numeric value.
The end is always a CR character (Carriage Return, ASCII decimal code 13). Space characters are
ignored, and no distinction is made between upper and lower case.
Guide
Response frame
The response to query commands or asynchronous events is also an ASCII character string, followed
by a CR character (Carriage Return, ASCII decimal code 13) and an LF character (Line Feed, ASCII
decimal code 10).
Response CR LF
NOTE Response in bus mode
The response frames do not contain a node number. In bus mode you must therefore ensure that the
response of the contacted node is received before a new command is sent!
Example:
Actual position queries:
Transmit: POS[CR]
Receive: 1234[CR][LF]
Drive nodes at 500 mm/s:
Transmit: V500[CR]
50
Page 51
4 Protocol Description
Response behaviour settings
As a default, the send commands are not acknowledged. However, the ANSW command can be used
to change the response behaviour:
Command Argument Function Description
ANSW Value Answer Mode 0: No asynchronous responses
If ANSW2 is set, you will receive an “OK” when the command has been successfully executed. If an
execution error occurred you will receive one of the following character strings:
“Unknown command”
“Invalid parameter”
“Command not available”
“Overtemperature – drive disabled”
1: Allow asynchronous responses
2: All commands with confirmation and asynchronous
responses
3: Debug mode, sent commands are returned
4-7: analogous to 0-3, but responses resulting from a
command in the sequence program are not sent
(cannot be set via Motion Manager)
Example:
Transmit: V500[CR]
Receive: OK[CR][LF]
The SAVE / EEPSAV command always responds with the character string “EEPROM writing done”
after successful saving of the current settings in the data Flash memory, or with “Flash defect”, if the
save has failed.
CAUTION! Simultaneous responses
If data is sent simultaneously by several devices, communication disturbance (interference) occurs.
f No unaddressed query commands may be sent in network mode (see Chapter 4.1 „Baud rate and
node number“), as otherwise all units will answer simultaneously and the message frames will
mix.
f Asynchronous (sporadic) responses may not be sent simultaneously by several devices.
f Switch off command acknowledgement if using unaddressed send commands.
Debug mode example:
Activate debug mode: ANSW3
Transmit: V100
Receive: v,100: OK
51
Page 52
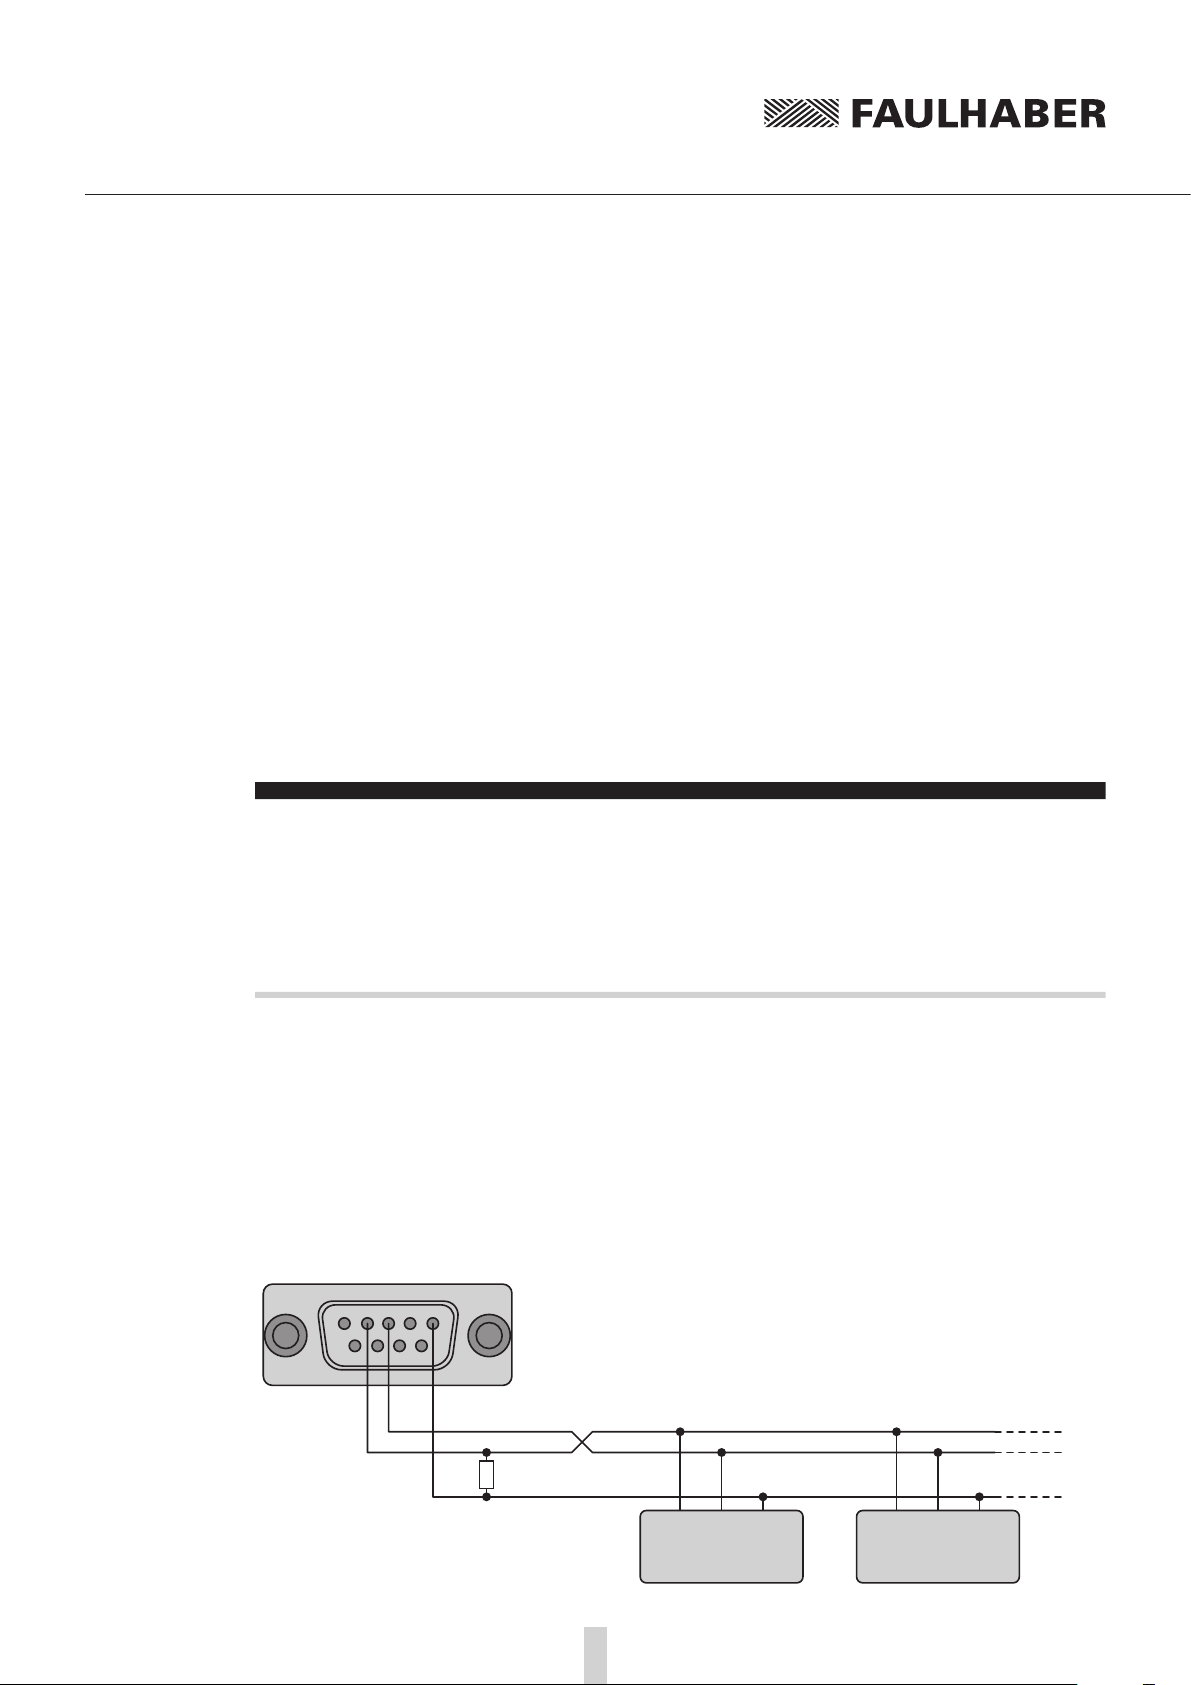
4 Protocol Description
4.1 Baud rate and node number
The serial interface must be configured as follows:
8 data bits
1 stop bit
No Parity
The Xon/Xoff protocol must be used for rapid command sequences or transfer of sequence programs
and parameter sets.
Baud rate
PC and controllers must be set to the same baud rate to enable them to communicate with each
other.
If the baud rate of the controller has been changed, the baud rate of the PC or control must then
also be set to the new baud rate.
The setting can be changed via the interface if a connection already exists with the drive node.
Command Argument Function Description
BAUD Value Select baud rate Specify transfer rate for RS232 interface
Value: Baud rate
600 (not supported by Motion Manager)
1 200
2 400
4 800
9 600 (default)
19 200
38 400
57 600
115 200
Example:
Change transfer rate to 19200 baud:
BAUD 19200
Serial network and node number
Several motion controllers can be simultaneously operated at a standard RS232 interface. Notes on
the wiring are given in the technical manual.
Interconnection of the serial interfaces of the higher level control and motion controllers in the network
1 2 3 4 5
PC
9876
or higher level control
RxD
TxD GND
4,7k
Motion Controller
52
GND GNDRxD RxDTxD TxD
Node 1
Motion Controller
Node n
Page 53
4 Protocol Description
4.1 Baud rate and node number
For each drive to be individually actuated at the bus, each drive unit must have a unique node number between 1 and 255.
The devices are all delivered with node number 0. To prepare the units for network operation, they
must first be individually connected to the PC and set to the required node address, e.g. with help of
the FAULHABER Motion Manager.
In order to address the individual drives in the network, the node number must be specified before
each ASCII command to be sent (e.g. 3V100). Commands without a node number are adopted by all
drive nodes in the network (Broadcast).
Command Argument Function Description
NODEADR Value Define Node Address Set node number
NET 0-1 Set Network Mode Activate RS232 multiplex mode for network operation.
Example:
Set drive unit to node number 3:
NODEADR3
Example:
Activate network operation:
NET1
Value. Node number 1 … 255
0: No network operation, single drive on an RS232
1: Network operation activated
53
Page 54
4 Protocol Description
4.2 Trace Function
An efficient trace function is available via an additional binary interface. This allows up to 2 values to
be read out online in a resolution of up to 3 ms.
In order to be able to use the binary interface, it must first have been opened for the desired node
with the command BINSEND1.
Command Argument Function Description
BINSEND 0 – 1 Open Binary Interface 1 = Open binary interface
Trace configuration
1. Setting of binary transmit mode for parameter 1 (curve 1):
2 binary characters are sent in direct succession: [Command][Mode1]
The relevant value is switched to, depending on the value of Mode1.
Command:
200: Set binary transmit mode for parameter 1
Mode1:
0: Actual velocity [Integer16, mm/s]
1: Target velocity [Integer16, mm/s]
2: Controller output [Integer16]
4: Motor current [Integer16, mA]
44: Housing temperature [Unsigned16, °C]
46: Coil temperature [Unsigned16, °C]
200: Current position [Integer32, Inc]
201: Target position [Integer32, Inc]
2. Setting of binary transmit mode for parameter 2 (curve 2):
2 binary characters are sent in direct succession: [Command][Mode2]
The relevant value is switched to, depending on the value of Mode2.
Command:
202: Set binary transmit mode for parameter 2
Mode2:
0: Actual velocity [Integer16, mm/s]
1: Target velocity [Integer16, mm/s]
2: Controller output [Integer16]
4: Motor current [Integer16, mA]
44: Housing temperature [Unsigned16, °C]
46: Coil temperature [Unsigned16, °C]
200: Current position [Integer32, Inc]
201: Target position [Integer32, Inc]
255: No second parameter is sent (basic setting for power-on)
0 = Close binary interface
54
Page 55
4 Protocol Description
4.2 Trace Function
Data request
A binary character is sent: [Request]
Depending on the set modes (Commands 200 and 202), 3,5,7 or 9 bytes are sent back to the PC.
Request: 201: Request a data package
Following a mode adjustment it is necessary to wait for at least 2 ms before requesting valid data.
Received data (after request 201):
1.) Mode1 between 0 and 15, Mode2 at 255 (inactive)
3 byte … 1
2
3
The data are in Integer16 format.
2.) Mode1 between 16 and 199, Mode2 at 255 (inactive)
3 byte … coding as for 1.)
The data are in Unsigned16 format.
3.) Mode1 between 200 and 255, Mode2 at 255 (inactive)
5 byte … 1
2
3
4
5
The data are in Integer32 format.
4.) Mode1 corresponding to 1.), 2.) or 3.) and Mode2 less than 255:
5 - 9 Byte …Byte 1 to 2 (4): Data bytes of Mode1
Byte 3 (5) to 4 (6) (8): Data bytes of Mode2
Byte 5 (7) (9): Time code
The data bytes of Mode2 are coded as for Mode1.
The time code corresponds to a multiple of the time basis of 1 ms and defines the time interval to
the last transmission.
nd
byte: High byte data
rd
byte: Time code
nd
byte: Second byte data
rd
byte: Third byte data
th
byte: Highest byte data
th
byte: Time code
st
byte: Low byte data
st
byte: Lowest byte data
55
Page 56
5 Commissioning
Basic settings Page 57
Configuration using Motion Manager Page 58
To make the basic settings for commissioning, the drive unit must be connected to a PC or higher
level control via the serial interface.
Guide
NOTE
Connection of the RS232 interface is described in the technical manual.
For the communication setup, ensure that the same transfer rate is set for all nodes (see Chapter
5.2.1 „Connection Parameters“).
FAULHABER Motion Management provides a convenient device configuration option using graphic
dialogs.
The configuration can also be carried out using your own PC program, a terminal program or a PCS
program.
56
Page 57
5 Commissioning
5.1 Basic settings
In the case of external motion controllers, several basic settings have to be made during the initial
start-up to adjust the controller to the connected motor.
CAUTION! Risk of destruction!
Failure to observe these basic settings can result in destruction of components!
f The basic settings described in the following must be noted and observed
The following basic settings must be made fro external motion controllers:
Motor type or motor data (KN, RM, TM) of the connected motor
Resolution of an external encoder (ENCRES), if used
Current limitation values (LCC, LPC), adjusted to the motor type and application
Controller parameters (POR, I, PP, PD), adjusted to the motor type and application
In addition, FAULHABER Motion Manager can be used to synchronise the Hall sensor signals for
smooth start-up.
The configuration must then be adjusted to the respective application. In particular, the following
basic settings are important:
Mode
Current limiting values
Controller parameters
Function of the digital inputs/outputs
Warning! Risk of destruction
If using the Fault Pin as input (REFIN, DIRIN), the desired function must be programmed before
applying external voltage!
Configuration of these parameters with the help of the FAULHABER Motion Manager is explained in
greater detail in the following chapter.
57
Page 58
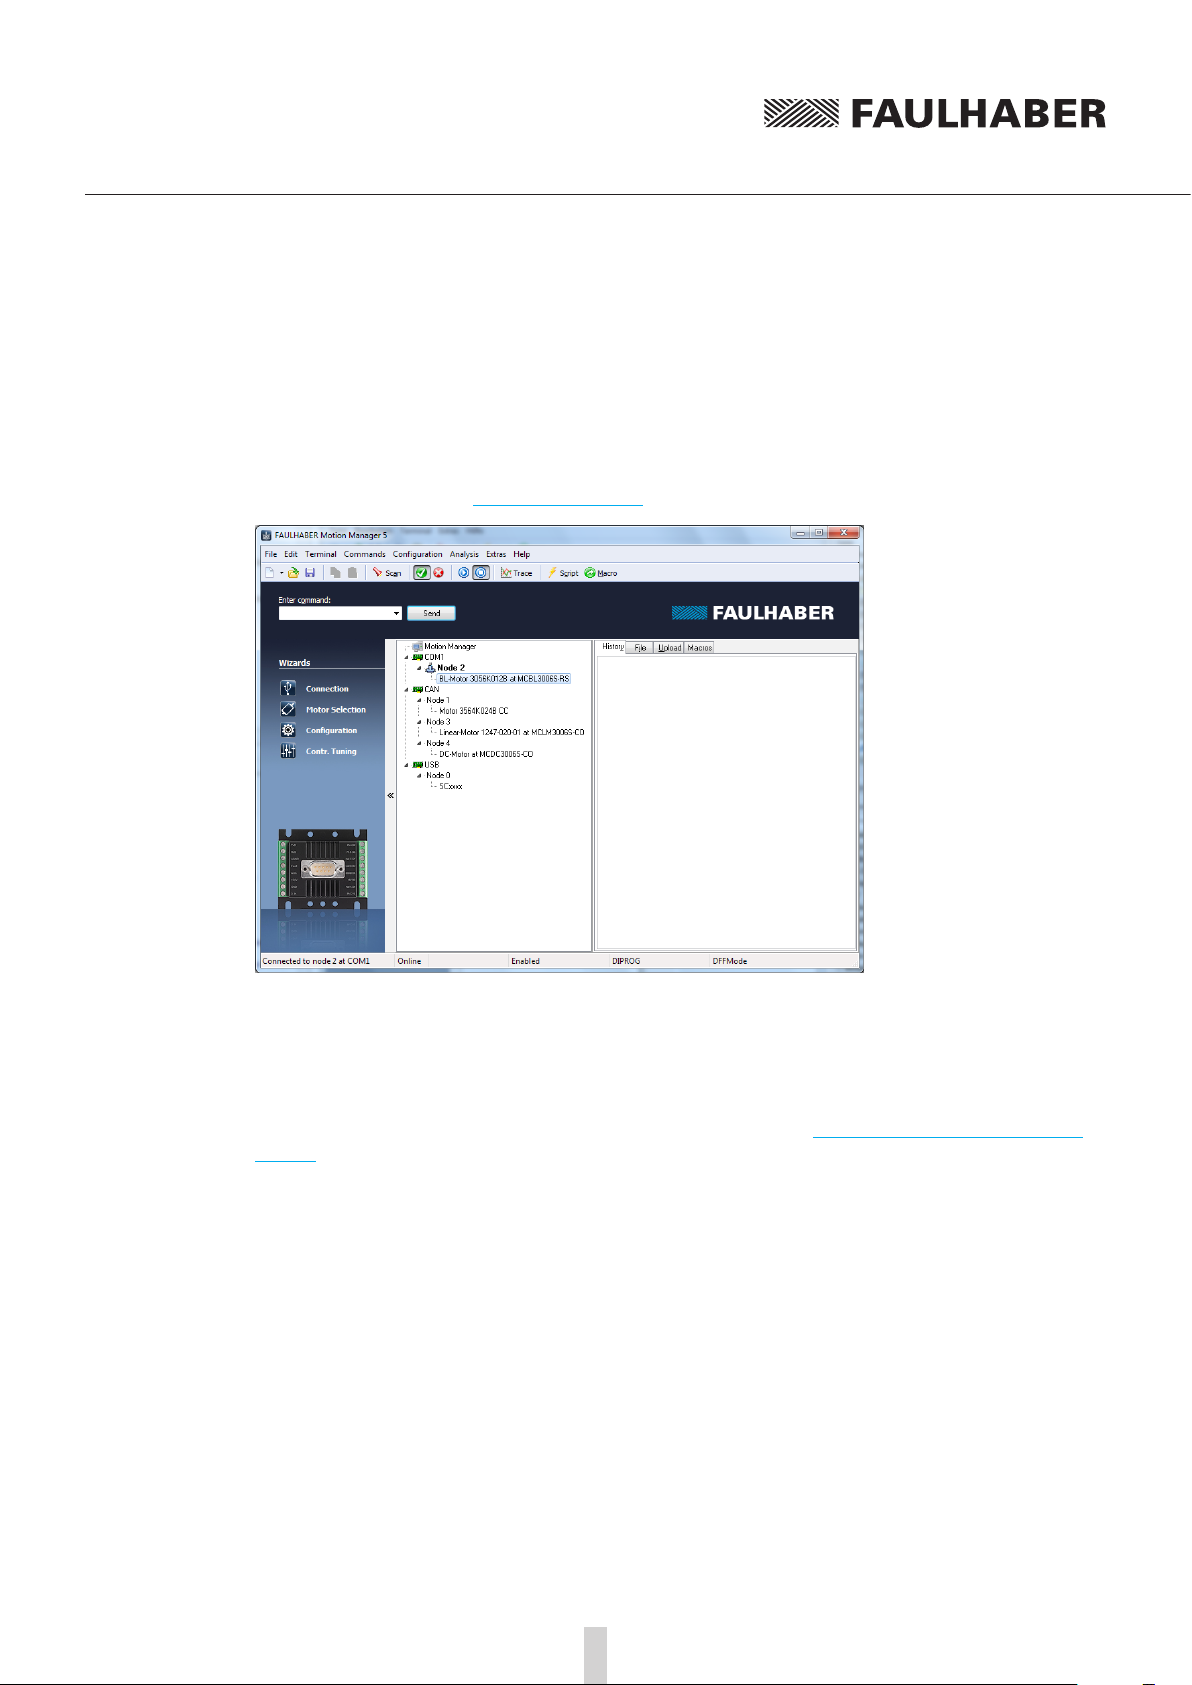
5 Commissioning
5.2 Configuration using Motion Manager
“FAULHABER Motion Manager” PC software provides a simple option for configuring the drive unit
and for performing initial tests and optimisation.
The software is available for Microsoft Windows and can be downloaded free of charge from the
FAULHABER internet site: www.faulhaber.com.
Motion controllers with a connected linear motor must be equipped with current limitation values
suitable for the motor and suitable controller parameters before being started up.
The motor selection Wizard is available for selecting the motor and the suitable basic parameters.
Other settings, e.g. for the function of the fault pin, can be made under the “configuration – drive
functions” menu item, where a convenient dialog is provided (see Chapter 5.2.3 „Antriebskonfigu-
ration“). The configuration dialog is also available for direct access in the wizard bar of the Motion
Manager.
A tuning wizard, with which the controller parameters of the speed and positioning controller can
be adjusted to the application, is also provided.
58
Page 59
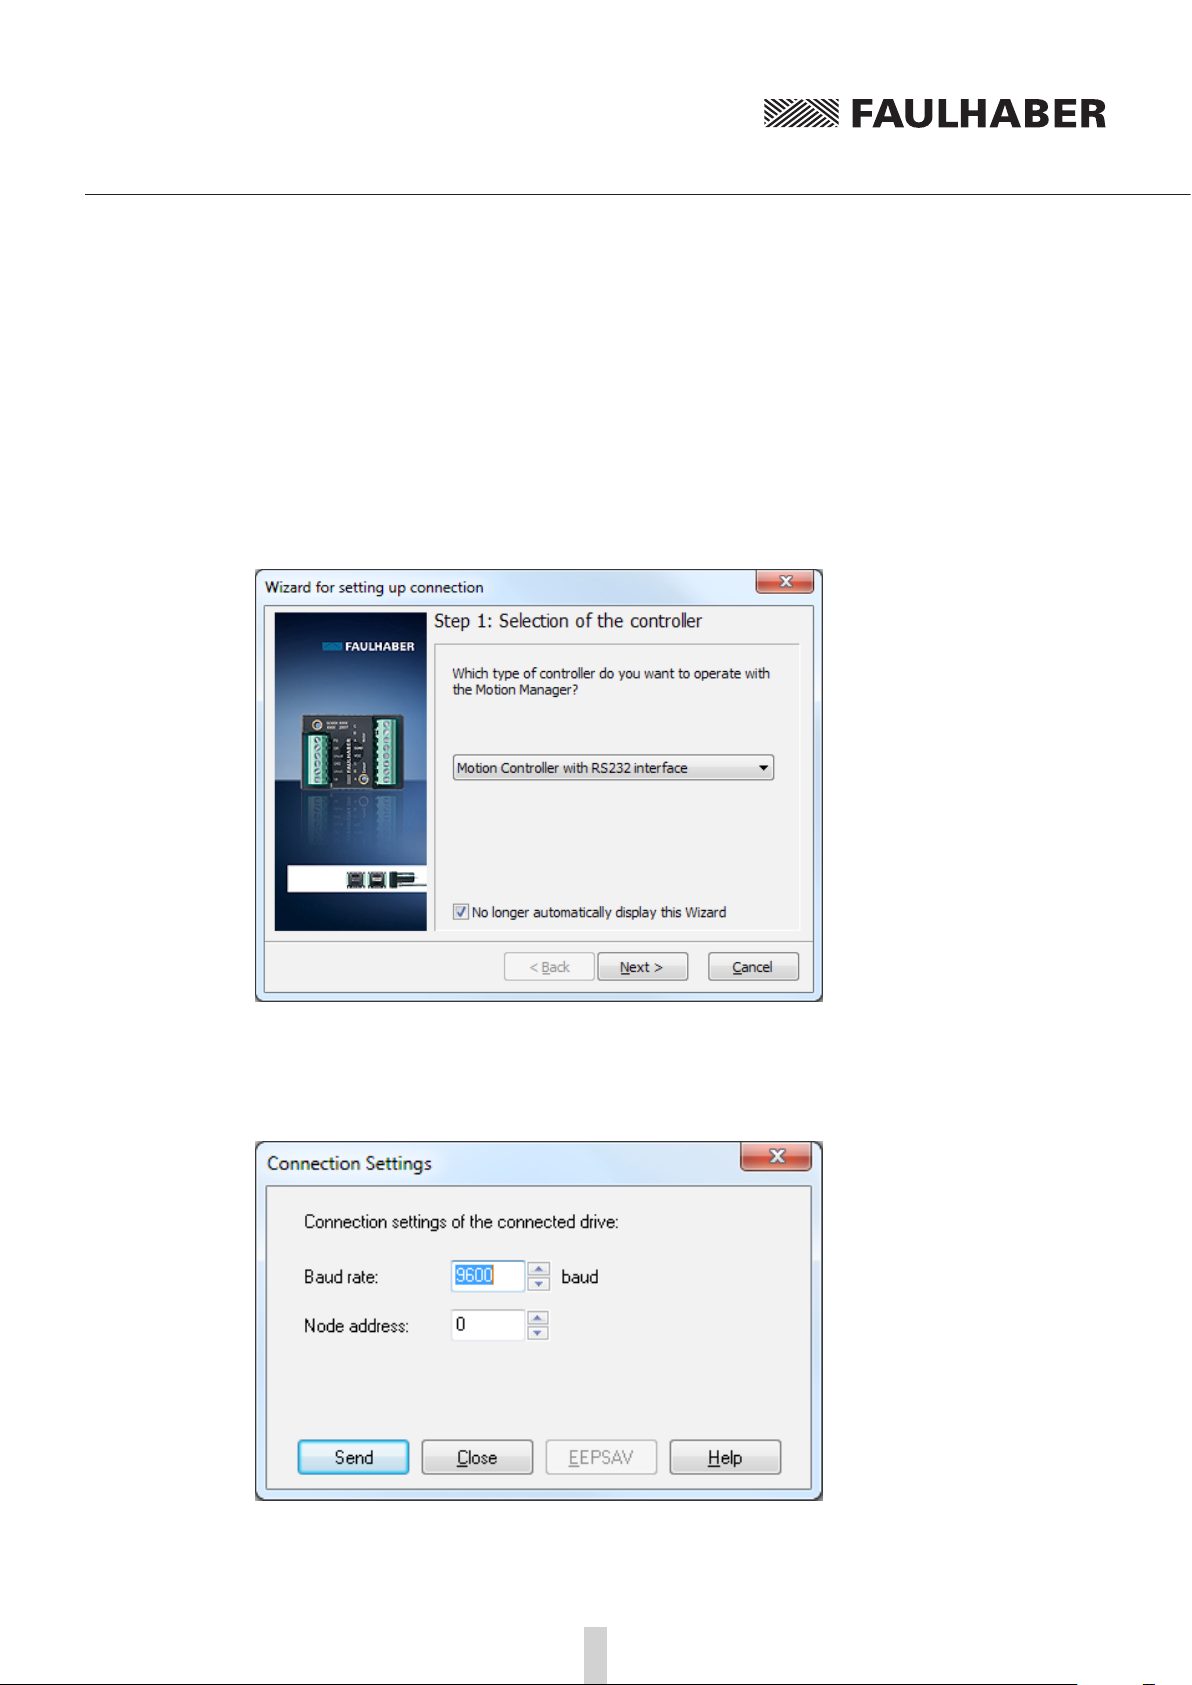
5 Commissioning
5.2 Configuration using Motion Manager
5.2.1 Connection setting
If no drive nodes were found after starting the Motion Manager, a connection wizard appears which,
following selection of the “Motion Controller with RS232 interface” product group, can be used to
set the PC COM port and the transfer rate. The connection wizard can also be started at any time via
the Wizard bar.
Setup wizard (Step 1: Select the product group)
The menu item “Configuration - Connection Parameters…” can be used to set the transfer rate and
node No. of a connected drive unit.
Configuration of the node number and transfer rate
59
Page 60
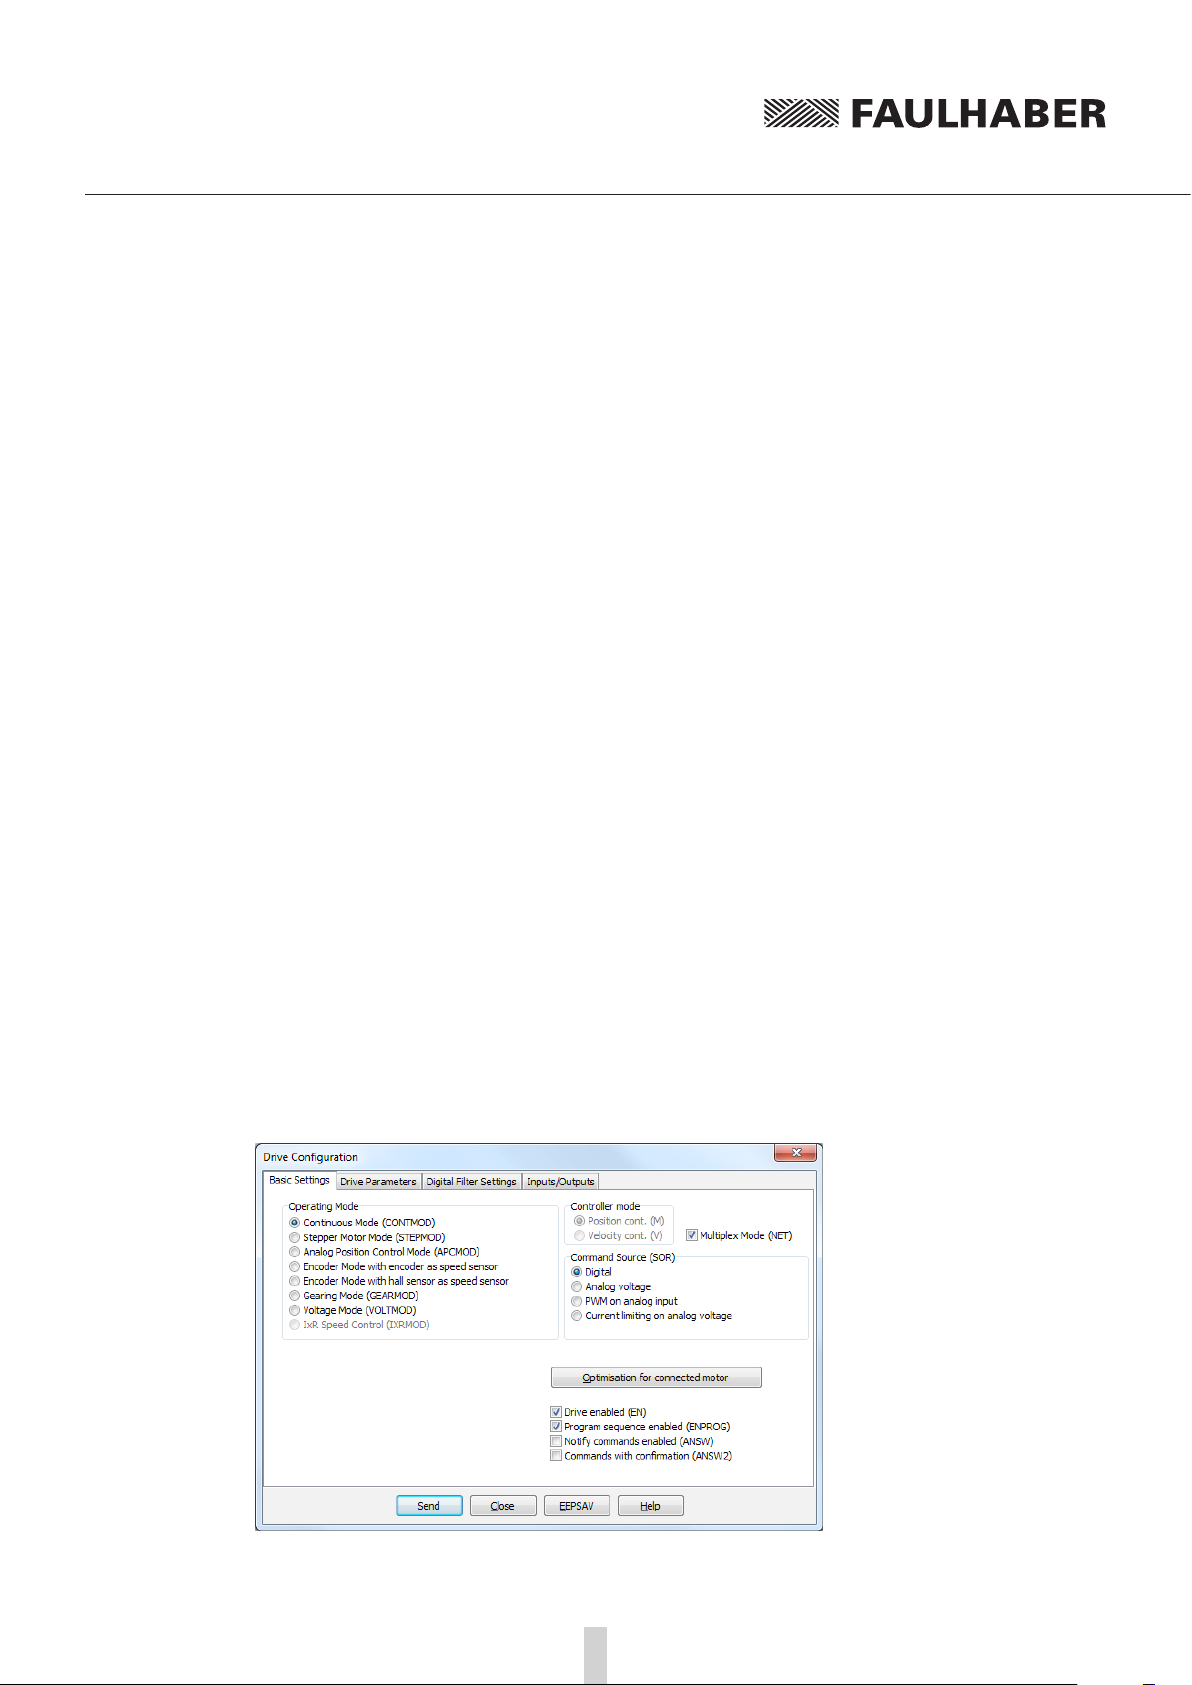
5 Commissioning
5.2 Configuration using Motion Manager
5.2.2 Motor selection
External motion controllers must be adjusted to the connected motor.
The Motor Wizard is provided for this purpose; it can be opened via the Wizard bar of the Motion
Manager.
After selecting the required FAULHABER motor from a list and setting the sensor type used, as well
as entering an inertia factor for the load to be operated, in addition to the motor and current limiting values, suitable controller parameters are also determined and transferred to the drive.
Refer to the Motion Manager instruction manual for details of how to use the Motor Wizard.
5.2.3 Drive configuration
The Motor Wizard has already set sensible default settings for the motor/sensor combination
selected.
A configuration dialog with several pages for further drive configuration and adjustment to the
required application is available in the Motion Manager’s Wizard bar or under the menu item: “Configuration – Drive functions... “.
No settings are transferred to the drive until the “Send” button is pressed. The current state of the
drive is also read back and the dialog is updated accordingly. Invalid combinations of settings are
corrected at the same time, as they are not accepted by the drive.
The settings are permanently saved in the drive using the “EEPSAV” button.
5.2.4 Basic settings
Within the scope of the commissioning,
the type of operation
and the type of set-point presetting
are set in the Basic Settings tab.
Basic settings for the motor and encoder type
60
Page 61
5 Commissioning
5.2 Configuration using Motion Manager
Encoder type and optimisation
If an incremental encoder attached to the motor is to be evaluated its effective resolution must be
given for 4 edge evaluation. If using the internal encoder, no further inputs are necessary.
A button, with which the Optimisation Wizard can be started, is available for adjusting the Hall sensor signals to the connected motor.
NOTE
Ensure that the cage bar can freely move before starting the encoder optimisation.
Controller mode
FAULHABER motion controllers support both main types of operation
Position control as servo drive.
Velocity control
The controller mode is partly automatically selected depending on the chosen operating mode.
Operating mode
In addition to the controller mode, variations of the operation can also be selected.
The following options are available:
CONTMOD
Default setting for the selected controller mode.
The actual speed and actual position are determined in CONTMOD via the motor’s Hall sensors.
CONTMOD for position control: see Chapter 3.1.1 „Set value presetting via the serial interface“
CONTMOD for velocity control: see Chapter 3.2.1 „Velocity presetting via the serial interface“
STEPMOD
Position control
The target position is derived from the number of steps at the AnIn input.
STEPMOD, see Chapter 3.4.1 „Stepper motor mode“,
APCMOD
Position control
The target position is preset by an analog voltage at the AnIn input.
APCMOD, see Chapter 3.1.2 „Analog positioning mode (APCMOD)“
ENCMOD with ENCSPEED
Position control or velocity control with evaluation of the external encoder for the actual velocity too
ENCMOD for position control: see Chapter 3.1.3 „External encoder as actual position value (ENCMOD)“
ENCMOD for velocity control: see Chapter 3.2.3 „External encoder as actual velocity value (ENCMOD)“
61
Page 62

5 Commissioning
5.2 Configuration using Motion Manager
ENCMOD with HALLSPEED
Position control with evaluation of the Hall signals for the actual velocity
ENCMOD for position control: see Chapter 3.1.3 „External encoder as actual position value (ENCMOD)“
GEARMOD
Position control
The target position is determined using the number of steps of an external encoder
GEARMOD, see Chapter 3.4.2 „Gearing mode (electronic gear)“
VOLTMOD
Direct presetting of a voltage amplitude at the motor
VOLTMOD, see Chapter 3.4.3 „Voltage regulator mode“
Set-point presetting
The set-value presetting must be chosen to match the selected type of operation and controller mode.
The following are supported:
Presetting via the serial interface or from a sequence program
Set-point presetting for position or velocity via an analog voltage
Set-point presetting for position or velocity via a PWM voltage
Set-point presetting for the limit current via an analog voltage
Power-on state
In the default state the drive‘s power stage is initially inactive after power-on.
The power stage can be automatically activated after power-on by selecting the “Drive enabled
(EN)” checkbox.
In the default setting, a sequence program is not worked through after the drive is switched on
(power-on).
A sequence program stored in the drive can be automatically started immediately after power-on by
selecting the “sequence program enabled (ENPROG)” checkbox.
Communication settings
The “Multiplex mode (NET)” checkbox is used to activate the selected drive for network mode.
The Asynchronous Responses (ANSW) checkbox can be used to suppress asynchronous responses of
the selected drive. They are enabled in the default state.
Use the “Commands with confirmation (ANSW2)” checkbox to suppress the confirmation frames for
the commands sent to the drive. They are activated in the default state.
62
Page 63
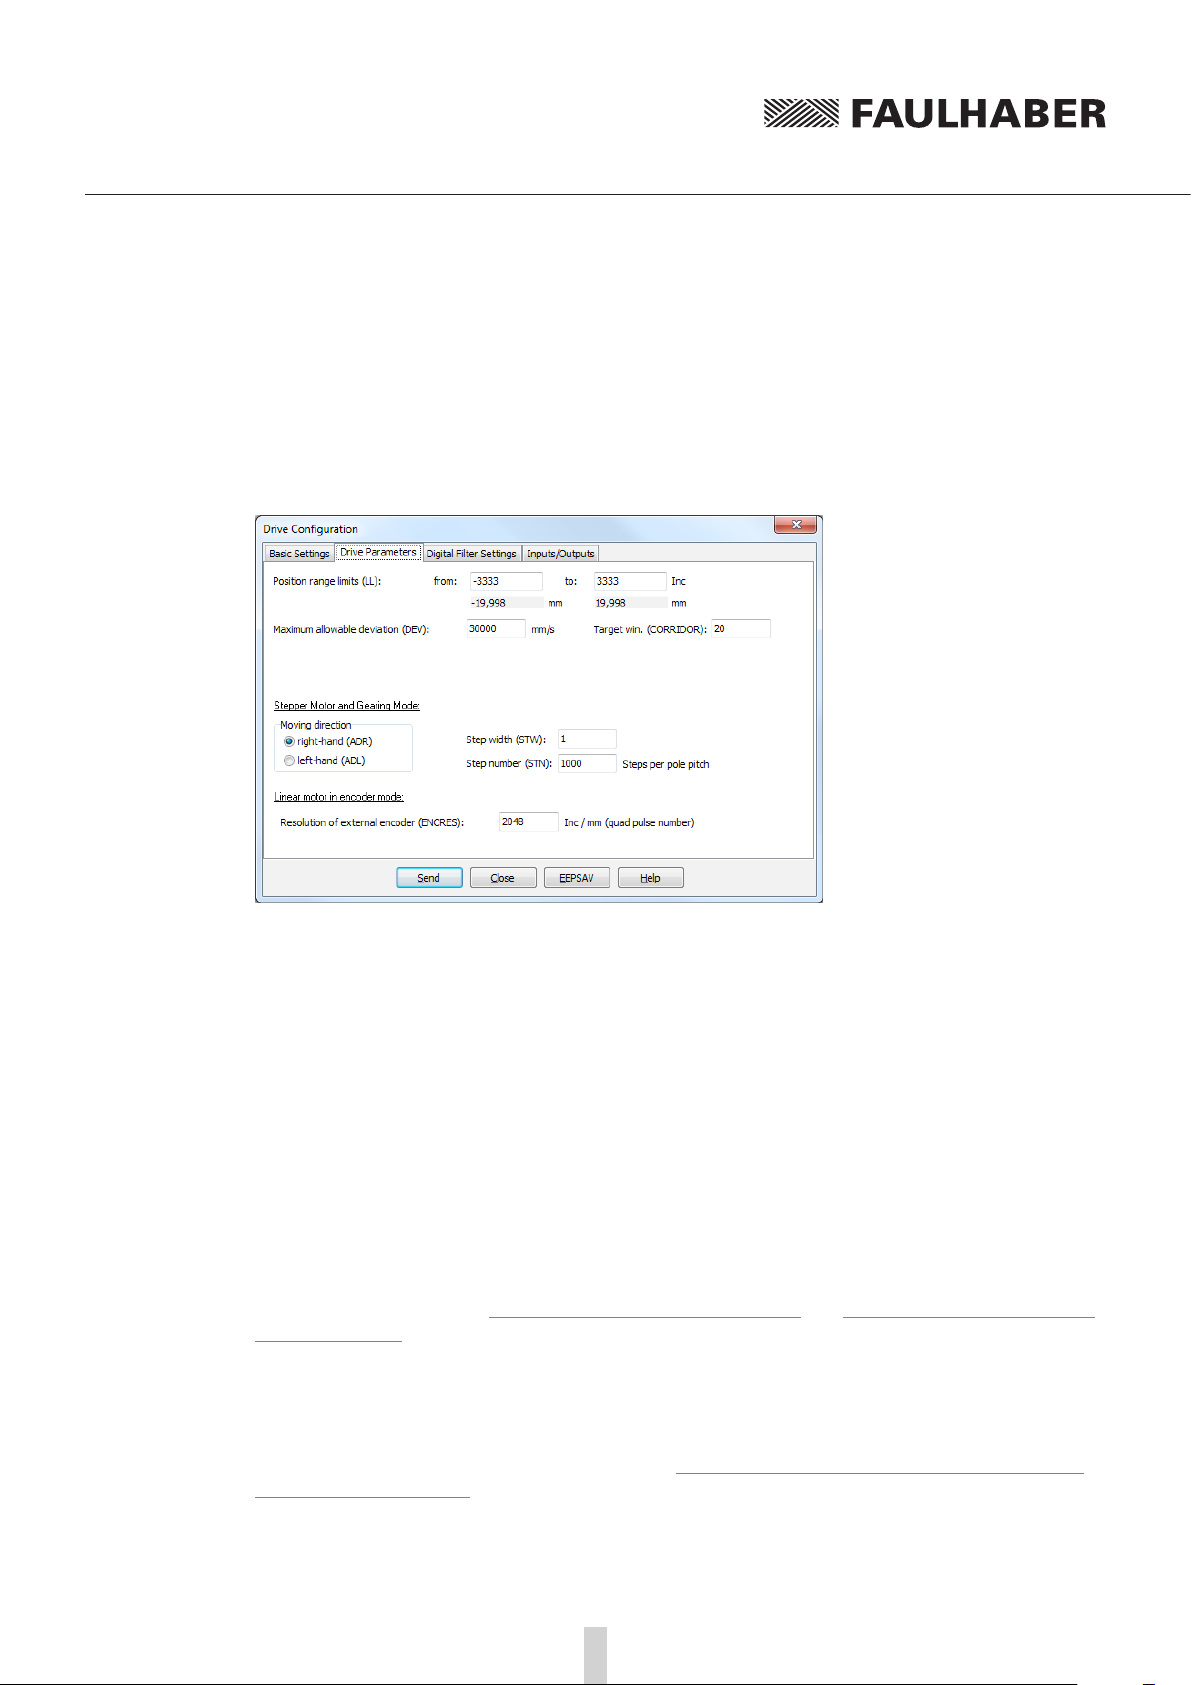
5 Commissioning
5.2 Configuration using Motion Manager
5.2.5 Drive parameters
The Drive Parameters tab is used to make additional settings for the encoder and chosen type of
operation.
Additional settings for the chosen type of operation
Encoder resolution
If an incremental encoder attached to the motor is to be evaluated its effective resolution for 4 edge
evaluation must be given.
Set-point presetting in stepper or gearing mode
For set-point presetting in stepper mode and in gearing mode the conversion from step count of the
external presetting to number of motor revolutions must be given.
Example:
At 1000 pulses of the external encoder or at 1000 steps, the motor should perform a movement of
one magnetic pole pitch:
STW1
STN1000
Detailed notes on using these parameters are given in the chapters with the functional description of
stepper and gearing mode (Chapter 3.4.1 „Stepper motor mode“ and Chapter 3.4.2 „Gearing mode
(electronic gear)“).
Velocity presetting via an analog voltage
For presetting a velocity via an analog voltage, a threshold value (MAV) can be preset, from which
the target value is evaluated starting with the minimum velocity (MV).
Detailed notes on using this parameter is given in Chapter 3.2.2 „Velocity presetting via an analog
voltage or a PWM signal“.
63
Page 64
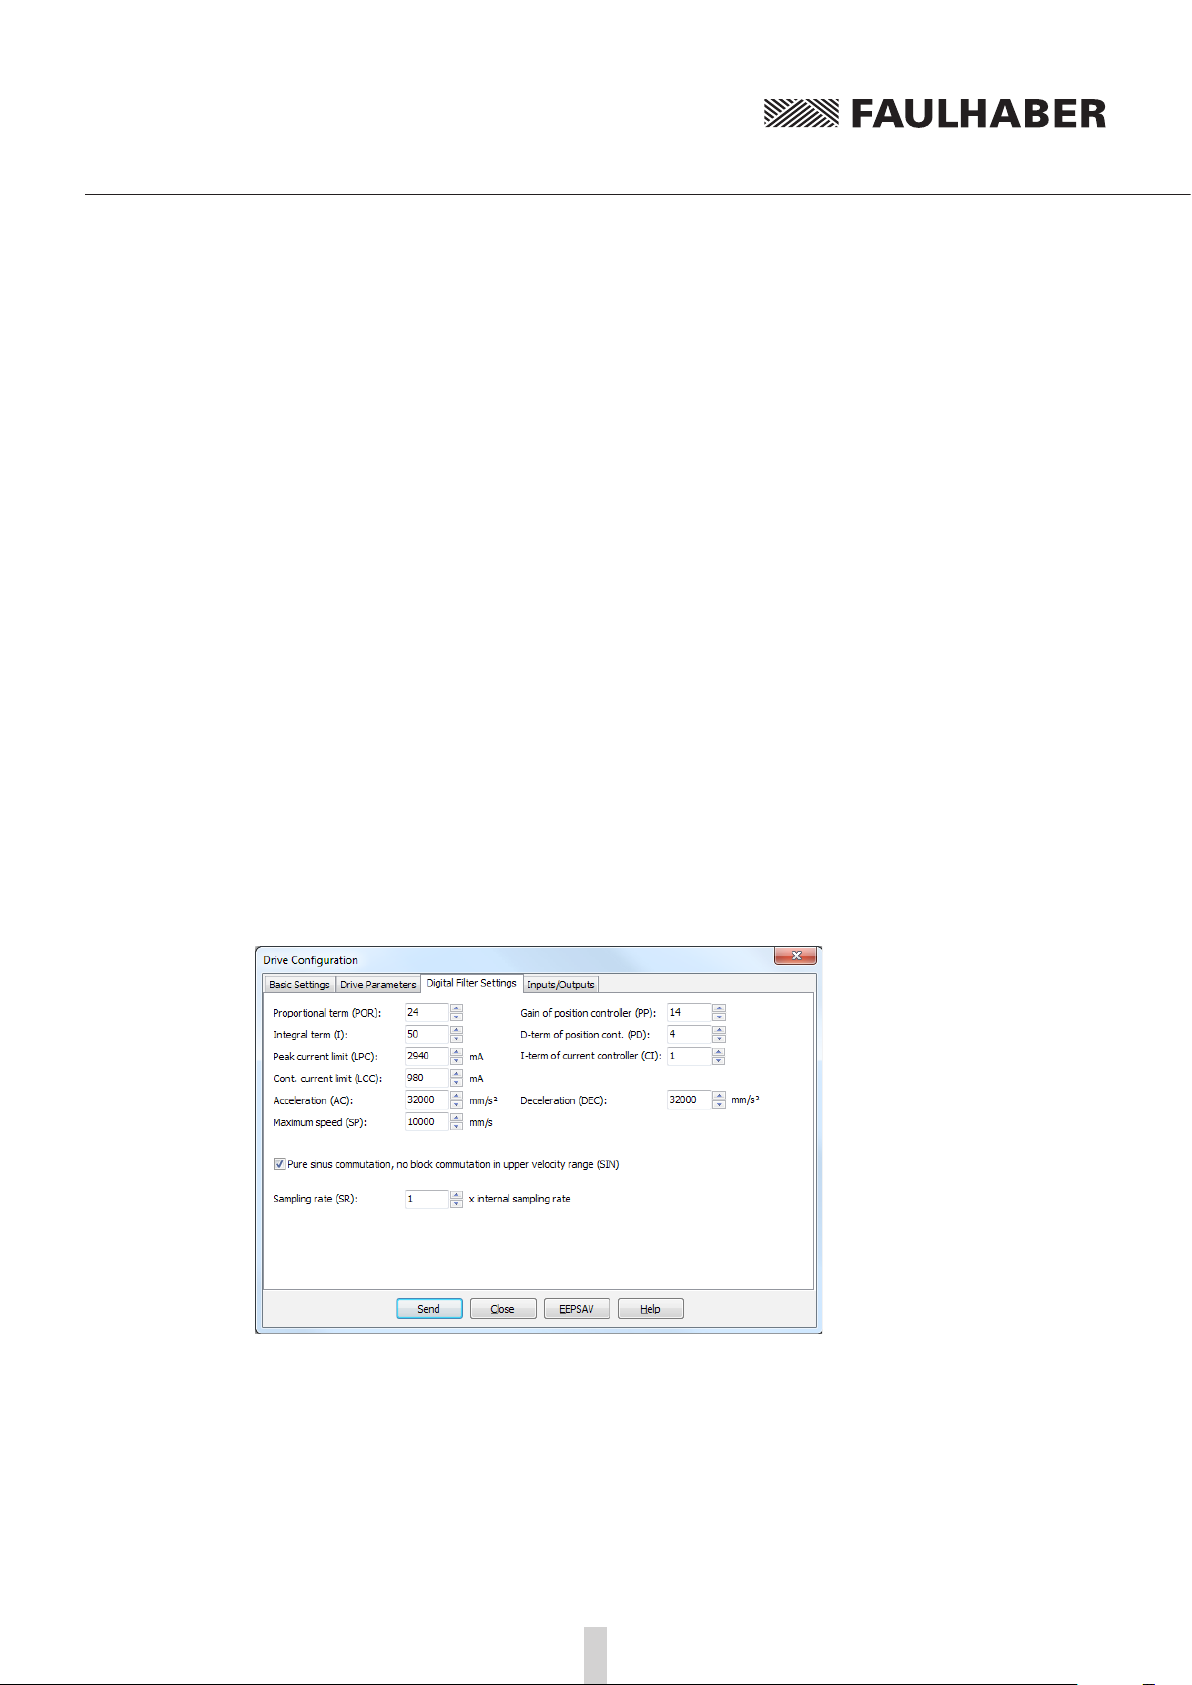
5 Commissioning
5.2 Configuration using Motion Manager
Positioning range limits
In various types of operation the movement range can be monitored and limited. The limits of this
movement rage can be given in increments of the actual position using the parameter LL.
Range monitoring is activated by the APL1 command.
Maximum allowable velocity deviation and target corridor
The parameter CORRIDOR defines a range by which the target position within which the “Target
position reached” flag is set. If required, the target position is signalled asynchronously by a notify.
Within this corridor the D term of the position controller is active and the ramp generator is inactive.
The parameter DEV can be used to preset a maximum allowable controller deviation for the velocity
controller. If this barrier is exceeded for longer than set using the parameter DCE in the Inputs and
Outputs tab, an error is signalled via the fault pin or on the serial interface.
5.2.6 Controller settings
The changes to the default set controller and current limitation parameters can be made in the
“Controller Parameters” tab of the drive configuration dialog.
In addition, under the “Configuration – Controller Parameters…” menu item, there is another dialog
in which the online parameters can be changed and the result can be observed directly or can be
recorded using the trace function in Motion Manager.
Settings for the controller
64
Page 65
5 Commissioning
5.2 Configuration using Motion Manager
Voltage output
By default the motion controller uses pure sinus commutation. This means the motor runs with the
lowest possible losses and noise.
Alternatively, at higher velocities it is possible to also allow overriding of the output signals similar to
block commutation. The maximum achievable velocity is then 7% higher.
NOTE
On changing between pure sinus commutation and operation with block commutation in the upper
velocity range the controller amplification also changes by 7%.
Current controller (LCC, LPC, CI)
The parameter LCC can be used to give the thermally allowable continuous current for the application.
Motors and the motion controller can be overloaded within certain limits. Therefore, higher currents
can be allowed for dynamic processes. The maximum current value is given by the parameter LPC.
Depending on the drive‘s load, the internal current monitoring limits the output current to the peak
current (LPC) or the allowable continuous current (LCC).
CAUTION! Risk of destruction!
The thermally allowable continuous current (LCC) should never be given above the thermally allowable continuous current of the motor according to the data sheet.
The maximum peak current (LPC) may never be given above the maximum peak output current of
the installed electronics.
The current controller of the motion controller operates as a current limiting controller and therefore in an unlimited case has no effect on the dynamics of the velocity control. The speed of the
limitation can be set using the parameter CI. If using the default values for your motor, the current is
limited to the allowable value after around 5 ms.
If a FAULHABER motor was selected via the Motor Wizard, parameters are already set here with
which the motor can be operated safely.
Further information is given in Chapter 3.6.3 „Current controller and I²t current limitation“.
Velocity controller (I, POR, SR)
The velocity controller is implemented as a PI controller. The sampling time SR can be set as multiples
of 100 μs, the proportional amplification POR and the integral term I.
If a FAULHABER motor was selected via the Motor Wizard, parameters are already set here with
which the motor can be operated safely.
If the motor is exposed to additional loads, the inertia of the load must be compensated for by a
higher proportional term and if necessary slower sampling; in most applications the integral term
can remain unchanged.
Further information on setting and adjustment is given in Chapter 3.6.7 „Setting the controller pa-
rameters for velocity and position controller“.
65
Page 66
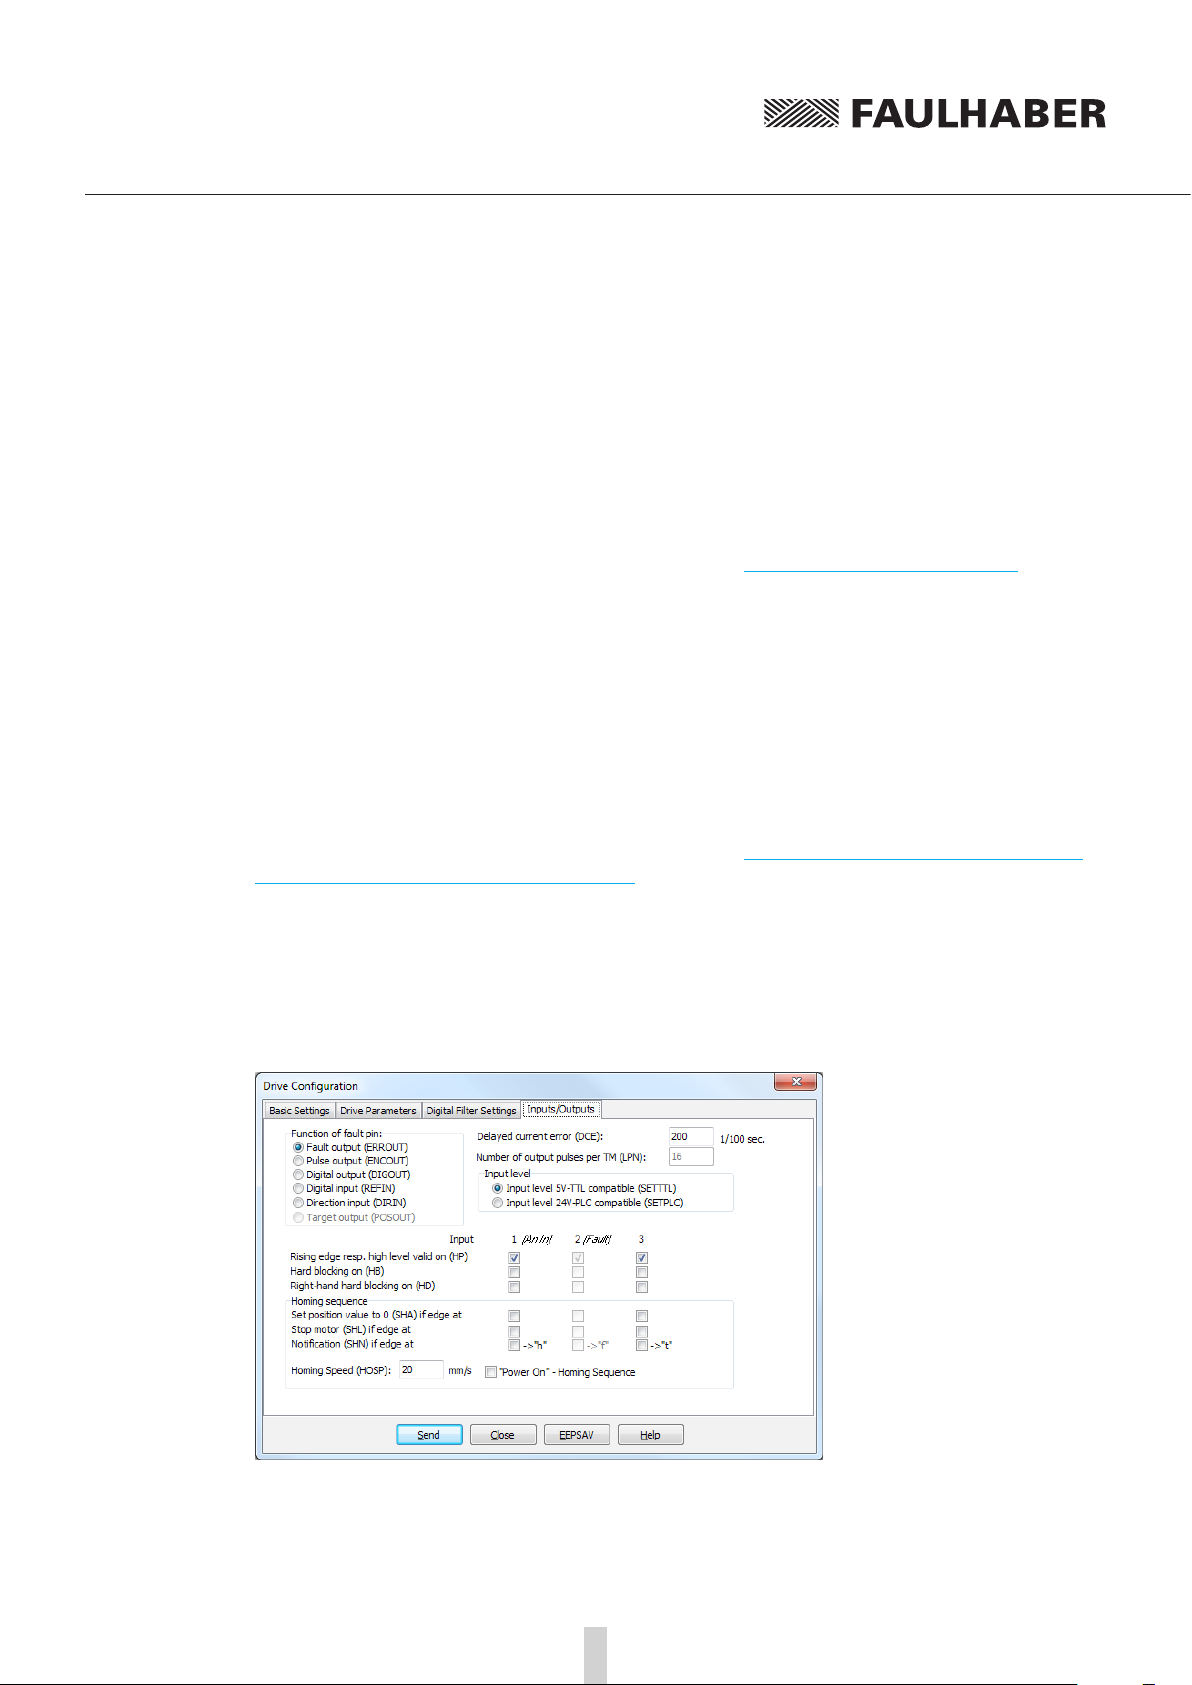
5 Commissioning
5.2 Configuration using Motion Manager
Ramp generator (AC, DEC, SP)
The ramp generator limits the velocity change at the input of the velocity controller using the
parameters AC and DEC and the maximum preset speed using the parameter SP.
The parameters AC and SP can be freely selected depending on the application; the parameter DEC
is used to specify the deceleration behaviour in positioning mode. For large loads, the deceleration
ramp must be limited using the parameter DEC to achieve dead beat (overshoot-free) run-in in the
target position.
Further information on setting and adjustment is given in Chapter 3.6.1 „Ramp generator“.
Position controller (PP, PD)
The position controller is implemented as a proportional controller. An additional D term also acts
within the target corridor only (see Drive Parameters tab).
The proportional term uses the position deviation in increments to calculate the maximum preset
die velocity for the secondary velocity controller. The ramp generator is used to additionally limit the
acceleration and maximum velocity.
Dead beat run-in in the target position can be preferentially achieved by adjusting the deceleration
ramp to the load. For a well-attenuated transient condition in the limit position, the parameter PP
must be reduced proportionally to the load inertia.
Further information on setting and adjustment is given in Chapter 3.6.7 „Setting the controller pa-
rameters for velocity and position controller“.
5.2.7 I / O connection and use
The functions of the digital inputs and outputs and homing can be defined in the “Inputs/Outputs”
tab of the drive configuration dialog.
Configuration of the inputs and outputs
66
Page 67
5 Commissioning
5.2 Configuration using Motion Manager
Input level and edge
The switching thresholds of the digital inputs are either directly 5V-TTL compatible or are adjusted to
the switching level of 24V PCS outputs.
In addition, it is also possible to select which level is to be used as the active level for each input and
to what extent the input is to be used as a limit switch (HB / HD).
Function of the fault pin
The fault pin can be used both as an input and as an output.
CAUTION!
Do not connect 24V to the fault pin, if the fault pin is configured as a digital output (ERROUT / DIGOUT / ENCOUT)!
The other settings for the 2nd input can only be made if the fault pin is configured as the reference
or rotational direction input.
For the default function as a fault output, the parameter DCE can be used to specify a delay time to
suppress the response to individual short overcurrent pulses.
For the function as pulse output, the number of pulses per magnetic pitch of the motor can be set
using the parameter LPN.
In the POSOUT function the output displays the entry into the target corridor as a digital signal (low
means target position is reached).
Homing
Use as a reference switch can be set for each of the available inputs.
To this end, either the actual position can be set to 0 by an edge at the selected input (SHA), the motor can be stopped (SHL) or a message can be set to the higher level control (SHN). The actions can
be combined.
Homing defined in this way can be executed by the GOHOSEQ command or automatically after
switching on if POHOSEQ is set.
5.2.8 Data set management
NOTE
Save parameters
The settings of a drive can be saved as a backup or as a file for configuration of other drives.
The Motion Manager offers the option of reading out the current drive configuration and saving it
as a parameter file.
Transfer parameters to the drive
Previously saved parameter files can be opened in Motion Manager, edited if necessary and transferred to the drive.
Execute the SAVE or EEPSAV command to permanently save a transferred parameter set in the drive.
67
Page 68
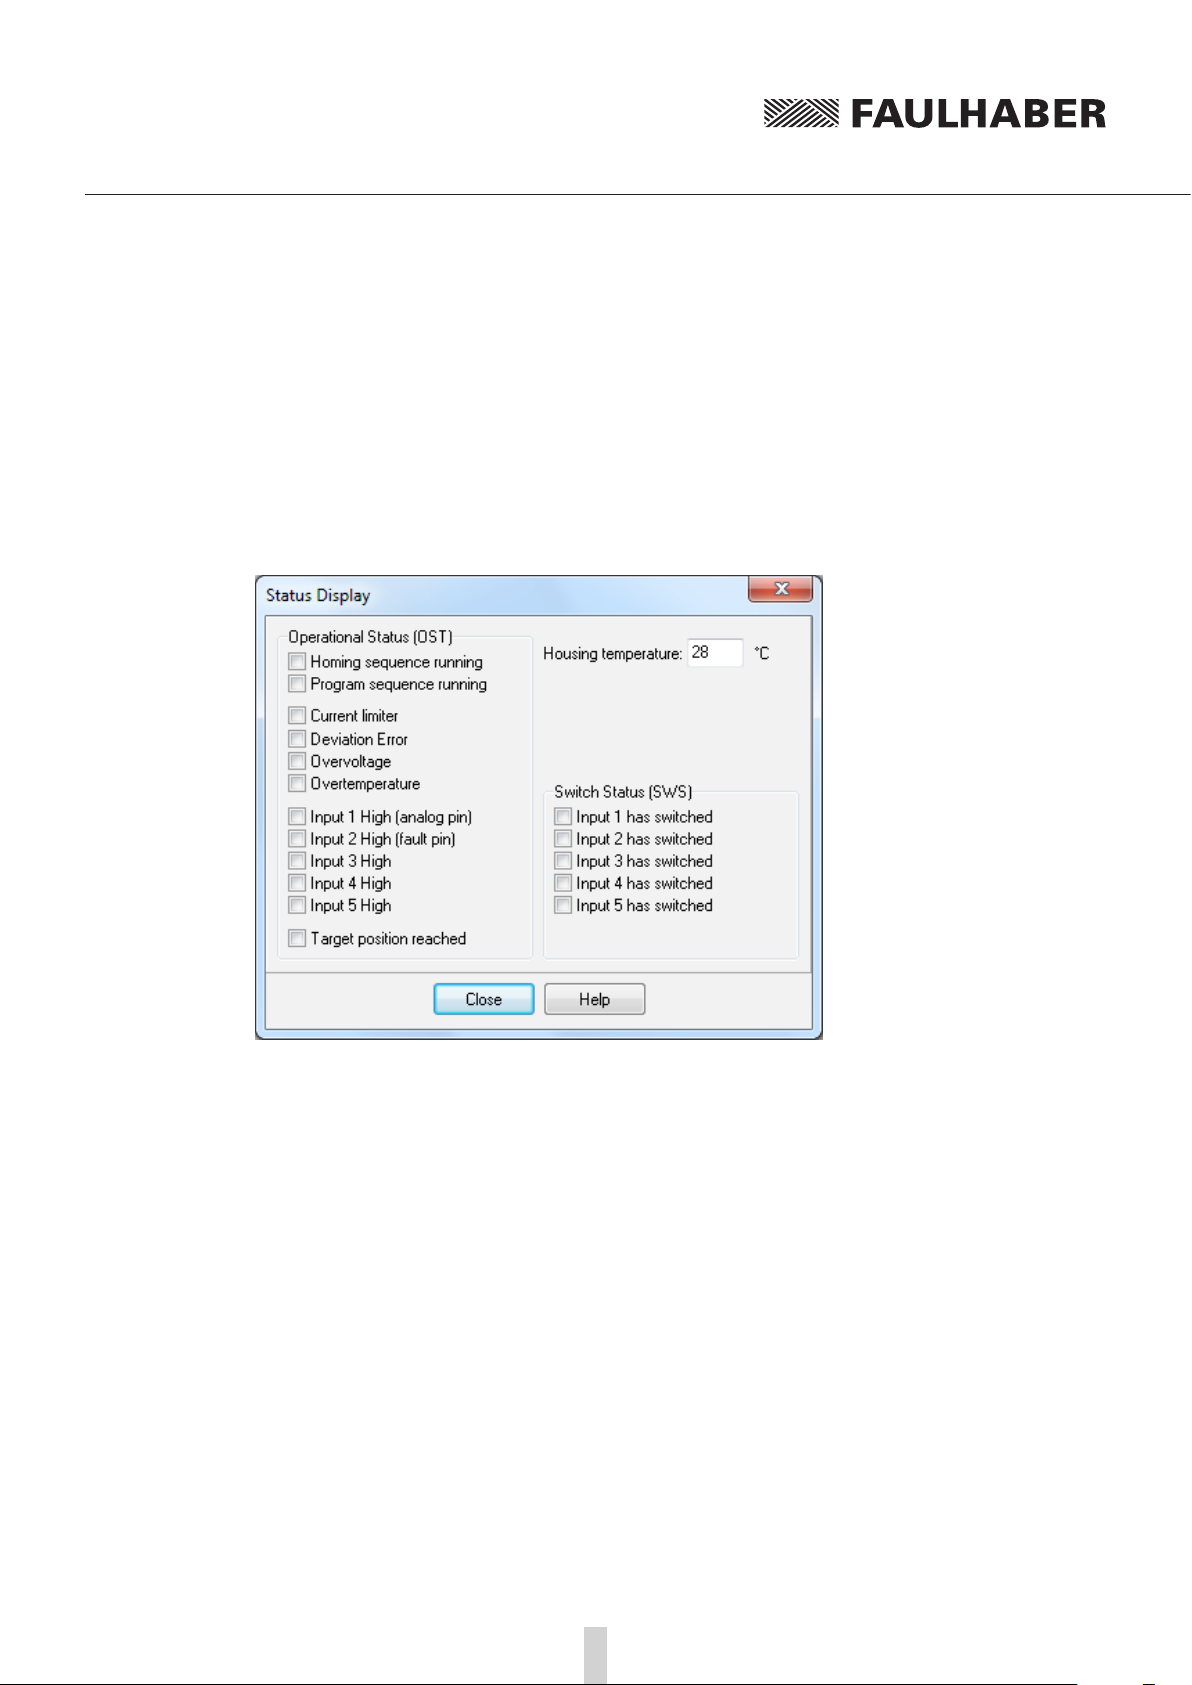
5 Commissioning
5.2 Configuration using Motion Manager
5.2.9 Diagnosis
The status display is used for continuous checking of the main operating states.
Internal states, error flags and the state of the digital inputs are signalled. In addition, the internally
measured housing temperature is also displayed here.
The display is updated by Motion Manager by means of cyclical querying of the internal states.
Display of the operating state
Internal states
Partially autonomous states of the motion controller are displayed. These are the course of homing
and an active sequence program.
Other internal states are on the one hand the error flag and the housing temperature.
The current limitation flag is set if the maximum current has been set to the continuous current (LCC)
by the i²t monitoring.
States of digital inputs
The state of the digital inputs is displayed as On or Off depending on the level setting
Status of the limit switches
The display indicates whether one of the limit switches has switched, even if the assigned input is
already back in the idle state.
5.2.10 Trace Function
Motion Manager provides a trace function as an additional diagnosis tool with which the internal
parameters can be graphically recorded. This enables the dynamic behaviour of the drive to be monitored, which is useful, e.g. for optimisation of the controller parameters.
68
Page 69
6 Sequence Programs
Sequence programs that are stored directly in the data flash memory of the controller and executed
from there can be created for stand-alone applications or for partially autonomous sequences.
The sequence programs can be created and transferred with the FAULHABER Motion Manager, but
it is also possible to use a standard text editor and to subsequently transfer the programs with the
Motion Manager or a terminal program.
During a program sequence commands can still be sent via the RS232. Almost all ASCII commands
can be used in motion programs.
The command PROGSEQ can also be used in the network with a preceding node number. The subsequent command must be send also with a preceding node number. The addressed node stores all
received instructions thereby, between the commands PROGSEQ and END.
Command Argument Function Description
PROGSEQ
[…]
END
GPROGSEQ - / 1 Get Program Sequence Reads out and sends back the stored program sequence. Each
ENPROG – Enable Program Execution of the program is released, i.e. the sequence is start-
DIPROG – Disable Program Deactivate program execution.
RESUME – Resume Continue program sequence after DIPROG at the point at which
MEM – Memory Return available program memory in Word.
– Program Sequence Defines the start and end of the sequence program.
All commands sent to PROGSEQ are not executed, but transferred to the sequence program memory. An END marks the
end of the sequence program.
All commands after END are directly executed again.
There is no SAVE command necessary for saving the program
sequence.
Command must not be executed more than 10,000 times, as
otherwise the function of the Flash memory can no longer be
guaranteed.
These commands do not have to be entered in the FAULHABER
Motion Manager, as they are automatically attached by the
“Transfer program file…” function.
Note: The Xon/Xoff protocol must be used to transfer lengthy
program sequences
program line is output in lower case letters, ending with a CR
character. At the end of the program, the "end:" line is sent
with details of the program length in bytes followed by a CR
and LF character.
GPROGSEQ1: Reads out the program sequence and indicates at
which program line the program counter is currently located
("PC--")
ed. This status can be permanently stored with SAVE/EEPSAV,
so that the drive starts up with the stored program sequence
immediately after power-on.
it was interrupted.
Control of sequence programs
There are a number of additional commands for controlling programs which are only useful within
sequence programs and are consequently only available there.
The following commands stop the sequence until the relevant position is reached:
NP … Notify Position
The sequence stops at the next M or V command, until the relevant position is reached.
HN … Hard Notify
The sequence stops at the GOHOSEQ command or at the next M or V command, until the limit
switch is overtravelled.
69
Page 70
6 Sequence Programs
NV … Notify Velocity
The sequence stops at the next M or V command, until the relevant speed is reached.
GOHIX … Go Hall Index
The sequence stops at the GOHIX command, until the Hall null position is reached.
If there are several Notify conditions, the first fulfilled condition effects continuation of the program.
Additional commands for use within sequence programs:
Command Argument Function Description
DELAY Value Delay Stop sequence for a defined time
TIMEOUT Value Timeout With Notify commands, only wait for the specified time and
JMP Adr Jump Jump to specified address. (Can also be used via RS232).
JMPGx Adr Jump if greater than x Jump to the specified address if result of last query command is
JMPLx Adr Jump if less than x Jump to the specified address if result of last query command is
JMPEx Adr Jump if equal to x Jump to specified address if result of last query command is
JPH Adr Jump if Hard-Input
JPF Adr Jump if Hard-Input
JPT Adr Jump if 3
SETx Value Set Variable x Set variable x (A, B, C) to the specified value. Value: Int32
GETx – Get Variable x Query content of variable x (A, B, C).
ADDx Value Add to Variable x Add or subtract variable x (A, B, C) with given value.
SETARGx – Set argument Set value of variable x (A, B, C) as argument for the next com-
DxJNZ Adr Decrement x, Jump if
ERI Adr Error Interrupt An error interrupt is activated from execution of this command.
activated
activated
activated
not Zero
rd
input
Argument: in 1/100 seconds
Value: 0 … 65 535
then continue the sequence again. Can also be used via RS232:
Send an “o” if Notify condition has not been fulfilled.
Argument: in 1/100 seconds
Value: 0 … 65 535
Address: 0 … 255
greater than variable x (A, B, C).
Address: 0 … 255
less than variable x (A, B, C).
Address: 0 … 255
equal to variable x (A, B, C).
Address: 0 … 255
Jump to the specified address if the analog input is active (HP
determines the polarity).
Address: 0 … 255
Jump to the specified address if the Fault Pin input is active (HP
determines the polarity). Fault Pin must be configured as input
(REFIN).
Address: 0 … 255
Jump to the specified address if the 3rd input is active (HP determines the polarity).
Address: 0 … 255
Without argument: Result of last query command is loaded into
the variable.
Value: –2 147 483 648 … 2 147 483 647
Value: –2 147 483 648 … 2 147 483 647
mand (if no argument is given there).
Decrease the value of variable x (A, B, C) by one and jump to
specified address if the value is not 0.
Address: 0 … 255
This means that if an error subsequently occurs (overvoltage,
current limitation, …), then the sequence branches to the specified address. The error handling mode is ended if a JMP or RETI
command is executed.
Address: 0 … 255
70
Page 71
6 Sequence Programs
Command Argument Function Description
RETI - Return Error Interrupt Return from an error handling routine.
DIERI - Disable Error Interrupt The ERI command is deactivated, i.e. in the event of an error
CALL Adr Call Subroutine Call a subroutine at specified address.
RET - Return from Subrou-
A Adr Define Address Definition of current position as entry address for jump com-
Response behaviour settings
As a default, the send commands are not acknowledged. However, the ANSW command can be used
to change the response behaviour:
Command Argument Function Description
ANSW Value Answer Mode 0: No asynchronous responses
tine
Important: the interrupted command is not continued, even if
it was not completed at the time of interruption!
the program does not jump to the error handling routine.
Address: 0 … 255
Return from a subroutine.
Please note that only one subroutine level is possible, i.e. no
subroutines can be called within subroutines!
mands.
Address: 0 … 255
1: Allow asynchronous responses
2: All commands with confirmation and asynchronous re-
sponses
3: Debug mode, sent commands are returned
4-7: analogous to 0-3, but responses resulting from a command
in the sequence program are not sent (cannot be set via Mo-
tion Manager)
Explanations of the commands and functions
Jump commands
The program sequence can be specifically controlled with the jump commands.
The JMP command can also be used from the RS232. This is useful in cases where different program
routines are to be called from the computer.
Example:
A1
JMP1 ;Endless loop
A2 ;Program sequence 2 (can only be called by JMP2 from the RS232)
LA1000
NP
M
JMP1 ;Return to endless loop
A3 ;Program sequence 3 (can only be called by JMP3 from the RS232)
LA-1000
NP
M
JMP1 ;Return to endless loop
The program sequences according to A2 or A3 can only be called by a JMP2 or JMP3 command from
the RS232. A JMP2 from the RS232 results in the drive moving to position 1 000 and stopping there.
The DxJNZ commands serve to form loops with a predefined number of cycles.
71
Page 72
6 Sequence Programs
The DxJNZ commands serve to form loops with a predefined number of cycles.
Example:
Move by the same relative position 5 times.
SETA5 ;Set variable A to the value 5
A2 ;Define jump address 2
LR100 ;Load relative position
NP ;Notify Position
M ;Start positioning
DAJNZ2 ;Decrease A by 1 and jump to address 2, provided that variable A is not yet 0.
The commands JPH, JPF and JPT enable jumps that are only executed if the relevant input is active.
This means that programs can be called via external switches.
The commands JMPGx, JMPLx, JMPEx enable jumps that refer to the result of the last query command.
Example:
SETA 100
GN
JMPLA3
The command JMPLA3 jumps to address 3 if the velocity value returned with GN is less than
100 mm/s (value of variable A).
Entry addresses are defined via command A. In the case of a jump, the sequence is continued at this
point.
The value range for jump commands extends from 0 to 255. Accordingly, a maximum of 256 different
entry points can be defined with JMP, JPx, ERI and CALL.
Error Interrupt
During execution of the ERI command, nothing happens initially. Only if an error situation subsequently occurs does the sequence jump immediately to the specified address. This enables sensible
continuation of the program in the event of error.
The RETI command enables you to return to the position at which the sequence was interrupted.
Please note that the interrupted command is no longer executed, but is continued with the next
command.
No new error interruption can take place within the error handling routine. The error handling status is cancelled as soon as the RETI or JMP command is executed. After this, the commands are interrupted again if an error occurs. It should therefore be ensured that the error situation disappears in
the error handling routine. Otherwise, the error handling call will be repeated.
Homing
The HN/SHN command enables you to stop the sequence until the limit switch is reached. In order to
correctly execute the GOHOSEQ command within a sequence, it is essential to set the SHN command
accordingly when defining the homing sequence. This is necessary particularly if you wish to use the
Power-On Homing sequence (POHOSEQ1).
72
Page 73
6 Sequence Programs
Notify commands
Notify commands enable you to generate complicated motion profiles.
Example:
LA6000
SP1000
AC20
NV100
M
AC100
NV800
AC50
NP
M
With this sequence, the acceleration is increased during boot-up at 100 mm/s. It is decreased again at
800 mm/s.
The NP command without argument stops the sequence until the target position is reached.
The CALL command
The CALL command enables subroutines to be called from different points, any number of times. You
can only jump back from a subroutine again with the RET command.
All commands are permitted within a subroutine except for a repeated CALL command.
General information
If a sequence program is completely processed (no jump at the end of a program), then an “n” is
sent to the RS232, if ANSW1 or ANSW2 is set.
In order to generate an endless program (useful for standalone operation), a jump command is
required at the end of the program.
Memory size
The sequence programs are stored in binary coding in the Flash memory; 2 bytes are stored for each
command, and 0 to 4 bytes for the argument. The maximum memory size available for sequence
programs is 6 656 bytes (3 328 words).
73
Page 74
6 Sequence Programs
Example:
Positioning routines called via RS232.
The program enables the calling of different routines from the RS232 interface:
JMP2: Homing Sequence. First move to a limit switch and then to the Hall sensor zero point (Hall
index), in order to obtain the most precise reference point possible.
JMP3: Move to position 0 and stop there.
JMP4: Attempt to approach a position with low current limitation. As there may be an obstacle in
the way in the application, the target position may not be attained. The motor should be stopped
after 5 seconds, in any event. (Further evaluation occurs in the higher level control).
JMP5: 1 000 cycles with following sequence: 10 revolutions forwards, 1 second pause, 5 revolu-
tions back again and then 0.5 seconds pause.
Configuration:
SOR0 ;Digital velocity presetting via RS232
LR0 ;Set current position as target position
M ;Switch to position control (Motion 0)
SHA1 ;Homing Sequence with Notify at AnIn
SHN1
SHL1
HOSP200 ;Homing speed 200 mm/s
HP1 ;Rising edge at limit switch effective
ENPROG ;Start motion program after power-on
ANSW0 ;No asynchronous responses
EEPSAV ;Save configuration
Program:
A1
JMP1 ;Endless loop
A2 ;Entry point for homing sequence (JMP2)
GOHOSEQ ;Homing to reference switch
GOHIX ;Subsequent homing to Hall sensor zero point (Hall index)
JMP1 ;Return to endless loop
A3 ;Entry point for routine 1 (JMP3)
LA0 ;Set target position to 0
NP ;Notify at target position (sequence stops until target position is reached)
M ;Start positioning
JMP1 ;Return to endless loop
A4 ;Entry point for routine 2 (JMP4)
LPC500 ;Set current limitation values to 500 mA (continuous current peak current)
LA6000
NP
74
Page 75
6 Sequence Programs
TIMEOUT500 ;Continue sequence after 5 sec., even if position has not yet been attained
M ;Start positioning
V0 ;Stop motor
LR0
M ;Switch back to positioning mode
JMP1 ;Return to endless loop
A5 ;Entry point for routine 3 (JMP5)
SETA1000 ;Predefine variable A
A6 ;Entry point for loop
LR300
NP
M
DELAY100
LR-1500
NP
M
DELAY50
DAJNZ6 ;Repeat loop 1000 times
JMP1 ;Return to endless loop
The individual routines are called from the serial interface by sending the commands “JMP2”,
“JMP3”, etc.
If the sequence is to wait until the end of a motion command (M, GOHOSEQ, etc.), a Notify (NP or
SHN1 in the Homing Sequence configuration) must be set first of all.
75
Page 76
7 Parameter Description
Basic setting commands Page 76
Query commands for basic setting Page 80
Miscellaneous commands Page 82
Motion control commands Page 83
General query commands Page 84
Commands for sequence programs Page 85
All ASCII commands that are available for operation of the FAULHABER Motion Controllers are listed
below.
Guide
The structure of the ASCII commands is explained in Chapter 4 „Protocol Description“.
7.1 Basic setting commands
The commands listed here are used for the configuration of basic setting parameters.
7.1.1 Commands for special operating modes
Command Argument Function Description
SOR 0 – 4 Source for Velocity Source for velocity presetting
CONTMOD – Continuous Mode Switch back to normal mode from an enhanced mode
STEPMOD – Stepper Motor Mode Change to stepper motor mode
APCMOD – Analog Position Con-
ENCMOD – Encoder Mode Change to encoder mode An external encoder serves as position
HALLSPEED – Hall sensor as speed
ENCSPEED – Encoder as speed
GEARMOD – Gearing Mode Change to gearing mode
VOLTMOD – Set Voltage Mode Activate Voltage Regulator Mode
IXRMOD – Set IxR Mode Activate IxR control
0: Serial interface (default)
1: Voltage at analog input
2: PWM signal at analog input
3: Current target value via analog input
4: Target current value via analog input with presetting of the
direction via input polarity
Change to position control via analog voltage
trol Mode
detector (the current position value is set to 0)
Speed via Hall sensors in encoder mode
sensor
Speed via encoder signals in encoder mode
sensor
76
Page 77
7 Parameter Description
7.1 Basic setting commands
7.1.2 Parameters for basic setting
Command Argument Function Description
ENCRES Value Load Encoder Resolu-
KN Value Load Speed Constant Load speed constant K
RM Value Load Motor Resistance Load motor resistance RM according to specification in data sheet.
TM Value Load Magnetic Pitch Magnetic pitch in mm
STW Value Load Step Width Load step width for step motor and gearing mode
STN Value Load Step Number Load number of steps per revolution for step motor and gearing
MV Value Minimum Velocity Presetting of minimum velocity in mm/s for specification via
MAV Value Minimum Analog
ADL – Analog Direction Left Positive voltages at the analog input result in left-hand movement
ADR – Analog Direction Right Positive voltages at the analog input result in right-hand move-
SIN 0 – 1 Sinus commutation
NET 0 – 1 Set Network Mode Activate RS232 multiplex mode for network operation.
BAUD Value Select baud rate
NODEADR Value Define Node Address Set node number
ANSW 0 – 7 Answer Mode 0: No asynchronous responses
tion
Voltage
Load resolution of external encoder (4 times pulse/rev).
Value: 8 … 65 535
n in accordance with information in the
data sheet.
Unit: mm/s/V.
Value: 0 … 16 383
Unit: m.
Value: 10 … 320 000
Value: 8 … 60
Value: 1 … 65 535
mode
Value: 1 … 65 535
analog voltage (SOR1, SOR2)
Value: 0 … 10 000
Presetting of minimum start voltage in mV for presetting speed
via analog voltage (SOR1, SOR2)
Value: 0 … 10 000
of the cage bar (SOR1, SOR2)
ment of the cage bar (SOR1, SOR2)
1: No block commutation within the upper velocity range (default)
0: Block commutation within the upper velocity range (full modulation) (not for MCDC)
0: No network operation, single drive on an RS232
1: Network operation activated
Specify transfer rate for RS232 interface
For value, see Chapter 4.1 „Baud rate and node number“
Value: 0 … 255
1: Allow asynchronous responses
2: All commands with confirmation and asynchronous responses
3: Debug mode, sent commands are returned (cannot be used if
configuring with Motion Manager!)
4-7: analogous to 0-3, but responses resulting from a command in
the sequence program are not sent (cannot be set via Motion
Manager)
77
Page 78
7 Parameter Description
7.1 Basic setting commands
7.1.3 General parameters
Command Argument Function Description
LL Value Load Position Range
APL 0 – 1 Activate / Deactivate
SP Value Load Maximum Speed Load maximum speed. Setting applies to all modes (mm/s).
AC Value Load Command Ac-
DEC Value Load Command Decel-
SR Value Load Sampling Rate Load sampling rate of the velocity controller as a multiplier of
POR Value Load Velocity Propor-
I Value Load Velocity Integral
PP Value Load Position Propor-
PD Value Load Position Differen-
CI Value Load Current Integral
LPC Value Load Peak Current
LCC Value Load Continuous Cur-
DEV Value Load Deviation Load maximum permissible deviation of actual velocity from
CORRIDOR Value Load Corridor Window around the target position.
Limits
Position Limits
celeration
eration
tional Term
Term
tional Term
tial Term
Term
Limit
rent Limit
Load limit positions (the drive cannot be moved out of these
limits). Positive values specify the upper limit and negative values
the lower.
The range limits are only active if APL1 is.
Value: –1.8 · 10
Activate range limits (LL) (valid for all operating modes except
VOLTMOD).
1: Position limits activated
0: Position limits deactivated
Value: 0 … 10 000
Load acceleration value (mm/s²).
Value: 0 … 30 000
Load deceleration value (mm/s²).
Value: 0 … 30 000
200 μs.
Value: 1 … 20
Load velocity controller amplification.
Value: 1 … 255
Load velocity controller integral term.
Value: 1 … 255
Load position controller amplification.
Value: 1 … 255
Load position controller D-term.
Value: 1 … 255
Load integral term for current controller.
Value: 1 … 255
Load peak current (mA).
Value: 0 … 12 000
Load continuous current (mA).
Value: 0 … 12 000
target velocity (deviation)
Value: 0 … 30 000
Value: 1 … 32 767
9
… 1.8 · 10
9
7.1.4 Configuration of fault pin and digital inputs
Command Argument Function Description
ERROUT – Error Output Fault pin as error output
ENCOUT – Encoder Output Fault pin as pulse output
DIGOUT – Digital Output Fault pin as digital output. The output is set to low level.
POSOUT – Position Output Fault pin as digital output for display of the condition: “target
DIRIN – Direction Input Fault pin as rotational direction input
REFIN – Reference Input Fault pin as reference or limit switch input
DCE Value Delayed Current Error Delayed error output for ERROUT in 1/100 sec.
LPN Value Load Pulse Number Preset pulse number for ENCOUT.
CO – Clear Output Set digital output DIGOUT to low level
SO – Set Output Set digital output DIGOUT to high level
TO – Toggle Output Switch to digital output DIGOUT
SETPLC – Set PLC inputs Digital inputs PLC-compatible (24 V level)
SETTTL – Set TTL inputs Digital inputs TTL-compatible (5 V level)
position reached".
Value: 0 … 65 535
Value: 1 … 255
78
Page 79
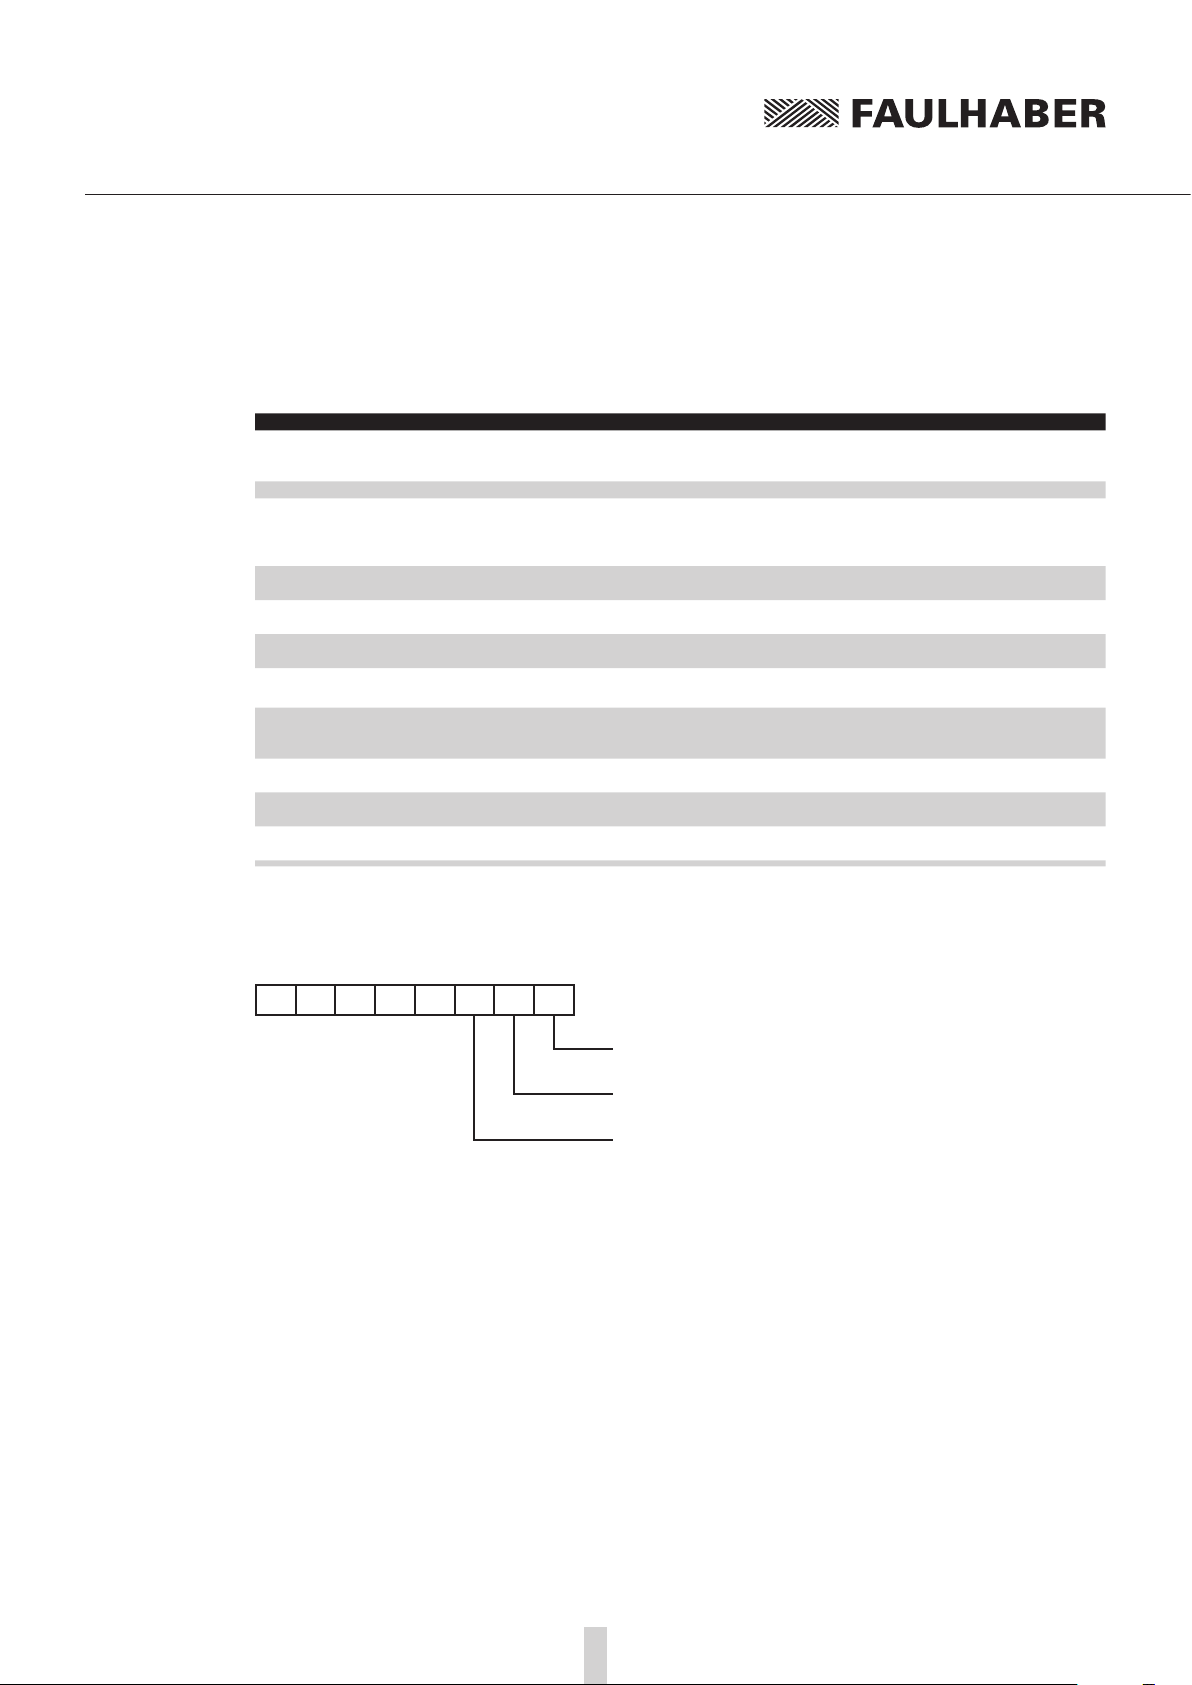
7 Parameter Description
7.1 Basic setting commands
7.1.5 Configuration of homing and limit switches in
Command Argument Function Description
HP Bit mask Hard Polarity Define valid edge and polarity of respective limit switches:
HB Bit mask Hard Blocking Activate Hard Blocking function for relevant limit switch.
HD Bit mask Hard Direction Presetting of direction of rotation that is blocked with HB of
SHA Bit mask Set Home Arming for
SHL Bit mask Set Hard Limit for
SHN Bit mask Set Hard Notify for
HOSP Bit mask Load Homing Speed Load speed and direction for homing (GOHOSEQ, GOHIX, GOIX).
POHOSEQ 0 – 1 Power-On Homing
HA Bit mask Home Arming Set position value to 0 and delete relevant HA bit at edge of
HL Bit mask Hard Limit Stop motor and delete relevant HL bit at edge of respective limit
HN Bit mask Hard Notify Send a character to RS232 and delete relevant HN bit at edge of
Homing Sequence
Homing Sequence
Homing Sequence
Sequence
1: Rising edge and high level effective.
0: Falling edge and low level effective.
respective limit switch.
1: Clockwise direction blocked
0: Anticlockwise direction blocked
Homing behaviour (GOHOSEQ):
Set position value to 0 at edge of respective limit switch.
Homing behaviour (GOHOSEQ):
Stop motor at edge of respective limit switch.
Homing behaviour (GOHOSEQ):
Send a character to RS232 at edge of respective limit switch.
Value: –10 000 … 10 000 mm/s
Start homing automatically after power-on.
0: No homing after power-on
1: Power-On Homing Sequence is activated
respective limit switch. Setting is not saved.
switch. Setting is not saved.
respective limit switch. Setting is not saved.
Bit mask of the limit switches
The resulting decimal value must be transferred to the commands given here.
7 6 5 4 3 2 1 0
Analog input
Fault-Pin
3rd input
79
Page 80
7 Parameter Description
7.2 Query commands for basic setting
7.2.1 Operating modes and general parameters
Command Argument Function Description
CST – Configuration Status Set operating mode.
GMOD – Get Mode MCBL
GENCRES – Get Encoder Resolution Set encode resolution (ENCRES)
GKN – Get Speed Constant Motor speed constant
GRM – Get Motor Resistance Motor resistance
GTM – Get Magnetic Pitch Magnetic pole pitch
GSTW – Get Step Width Set step width (STW)
GSTN – Get Step Number Set number of steps (STN)
Return value is binary encoded
(LSB = Bit 0):
Bit 0, reserved
Bit 1-2, automatic responses
0: ANSW0 (no automatic responses)
1: ANSW1 (asynchronous responses)
2: ANSW2 (additional command acknowledgements)
3: ANSW3 (Debug)
Bit 3-5, Velocity presetting:
0: SOR0 (RS232 interface)
1: SOR1 (Analog voltage)
2: SOR2 (PWM signal)
3: SOR3 (current limitation value)
4: SOR4 (current limitation value with presetting of direction via
input polarity)
Bit 6, reserved
Bit 7-9, FAULHABER mode:
0: CONTMOD
1: STEPMOD
2: APCMOD
3: ENCMOD / HALLSPEED
4: ENCMOD / ENCSPEED
5: GEARMOD
6: VOLTMOD
Bit 10, power amplifier:
0: Disabled (DI)
1: Enabled (EN)
Bit 11, position controller:
0: Switched off
1: Switched on
Bit 12, analog direction:
0: ADL
1: ADR
Bit 13, Position Limits APL:
0: deactivated
1: activated
Bit 14, sinus commutation SIN:
0: Allow block commutation
1: Do not allow block commutation
Bit 15, network operation
0: NET0 (Single device on an RS232)
1: NET1 (Multiplex mode activated)
c
s
a
h
e
g
v
Unit: mm/s/V (KN)
Unit: m (RM).
Unit: mm (TM)
Set FAULHABER mode
CONTIMOD
STEPMOD
APCMOD
ENCMOD
ENCSPEED
GEARMOD
VOLTMOD
80
Page 81

7 Parameter Description
7.2 Query commands for basic setting
Command Argument Function Description
GMV – Get Minimum Velocity Set minimum velocity in mm/s (MV)
GMAV – Get minimum analog
GPL – Get Positive Limit Set positive limit position (LL)
GNL – Get Negative Limit Set negative limit position (LL)
GSP – Get Maximum Speed Set maximum speed in mm/s (SP)
GAC – Get Acceleration Set acceleration value
GDEC – Get Deceleration Set deceleration value in mm/s² (DEC)
GSR – Get Sampling Rate Set sampling rate of the speed controller
GPOR – Get Velocity Propor-
GI – Get Velocity
GPP – Get Position
GPD – Get Position
GCI – Get Current
GPC – Get Peak Current Set peak current
GCC – Get Continuous Cur-
GDEV – Get Deviation Set deviation value (DEV)
GCORRIDOR – Get Corridor Set window around the target position (CORRIDOR)
GNODEADR – Get Node Address Set node number (NODEADR)
voltage
tional Term
Integral Term
Proportional Term
D term
Integral Term
rent
Set minimum start voltage value
Unit; mV (MAV)
Unit: mm/s² (AC)
Unit: ms/10 (SR)
Set amplification value of the speed controller (POR)
Set integral term of the speed controller (I)
Set amplification value of the position controller (POR)
Set D component of the position controller (PD)
Set integral term of the current controller (CI)
Unit: mA (LPC)
Set continuous current in mA (LCC)
7.2.2 Configuration of fault pin and digital inputs
Command Argument Function Description
IOC – I/O Configuration Set input/output configuration.
Return value binary coded (LSB=Bit 0):
Bit 0-7, Hard Blocking:
0-7: Function active for input 1-3
Bit 8-15, Hard Polarity:
0-7: Rising edge at input 1-3
Bit 16-23, Hard Direction:
0-7: Positive movement blocked at input 1-3
Bit 24, state of digital output:
0: Low
1: High
Bit 25, level of digital inputs:
0: TTL level (5V)
1: PLC LEVEL (24 V)
Bit 26-28, function of fault pin:
0: ERROUT
1: ENCOUT
2: DIGOUT
3: DIRIN
GDCE – Get Delayed
Current Error
GPN – Get Pulse Number Set pulse number (LPN)
4: REFIN
Set value of the error output delay (DCE)
81
Page 82
7 Parameter Description
7.2 Miscellaneous commands
7.2.3 Configuration of homing
Command Argument Function Description
HOC – Homing Configuration Set homing configuration.
GHOSP – Get Homing Speed Set homing speed
Return value binary coded (LSB = Bit 0):
Bit 0-7, SHA setting
Bit 8-15, SHN setting
Bit 16-23, SHL setting
Bit 24, Power-On Homing Sequence
0: deactivated
1: activated (homing after power-on)
Unit: mm/s (HOSP)
7.3 Miscellaneous commands
Command Argument Function Description
NE 0 – 1 Notify Error Notification in the event of errors
SAVE
EEPSAV
RESET Reset Restart drive node.
RN Reset Node Set application parameters to original values (ROM values) (cur-
FCONFIG Factory
1: An “r” is returned if an error occurs
Save Parameters Save current parameters and configuration setting to Flash
Configuration
0: No error notification
memory. The drive will also start with these settings when next
switched on.
Attention: Command must not be executed more than 10,000
times, as otherwise the function of the Flash memory can no
longer be guaranteed.
rent, acceleration, controller parameters, maximum speed, limit
positions…)
Communication parameters, operating mode and hardware configuration are retained
All configurations and values are reset to the standard delivery
status. After this command the drive performs a reset.
Attention: Customer-specific factory settings are also lost,
programmed sequence programs are retained!
The command can be executed a maximum 10000 times.
82
Page 83
7 Parameter Description
7.4 Motion control commands
Command Argument Function Description
DI – Disable Drive Deactivate drive
EN – Enable Drive Activate drive
M – Initiate Motion Activate position control and start positioning
LA Value Load Absolute Position Load new absolute target position
LR Value Load Relative Position Load new relative target position, in relation to last started target
NP – / value Notify Position Without argument:
NPOFF – Notify Position Off Notify Position command that has not yet been triggered is deac-
V Value Select Velocity Mode Activate velocity mode and set specified value as target velocity
NV Value Notify Velocity A “v” is returned when the nominal speed is reached or passed
NVOFF – Notify Velocity Off Velocity command that has not yet been triggered is deactivated
U Value Set Output Voltage Output motor voltage (corresponds to -Uv…+Uv) for SOR0 only in
GOHOSEQ – Go Homing Sequence Execute FAULHABER homing sequence. A homing sequence is
FHIX - Find Hall Index BL 4-pol Motor auf Hall-Nullpunkt (Hall-Index) fahren und Istpo-
GOHIX – Go Hall Index Move BL motor to Hall zero point (Hall index) and set actual posi-
GOIX – Go Encoder Index Move to the encoder index at the Fault pin and set actual position
HO – / value Define Home Position Without argument:
Value: –1.8 · 10
9
… 1.8 · 10
9
position. The resulting absolute target position must lie between
the values given below.
Value: –2.14 · 10
9
… 2.14 · 10
9
A “p” is returned when the target position is attained.
With argument:
A “p” is returned if the specified position is over-travelled.
Value: –1.8 · 10
9
… 1.8 · 10
9
tivated again.
(velocity control).
Unit: mm/s
through.
Value: –32 767 … 32 767 mm/s
again.
VOLTMOD.
Value: –32 767 … 32 767
executed (if programmed) irrespective of the current mode.
sitionswert auf 0 setzen. Bei 4-pol Motoren sind innerhalb einer
Umdrehung zwei Hall-Nullpunkte jeweils gegenüber vorhanden.
Es wird jeweils der nächstliegende Index angefahren.
(nur für BL 4-pol)
tion value to 0
value to 0 (ext. encoder).
Set actual position to 0.
With argument:
Set actual position to specified value.
Value: –1.8 · 10
9
… 1.8 · 10
9
83
Page 84
7 Parameter Description
7.5 General query commands
Command Argument Function Description
GTYP – Get Controller Type Query designation (name) of the controller
GSER – Get Serial Number Query the serial number
VER – Get Version Current software version
POS – Get Actual Position Current actual position
TPOS – Get Target Position Target position
GV – Get Velocity Current target velocity in mm/s
GN – Get N Current target velocity in mm/s
GU – Get PWM Voltage Set PWM value in VOLTMOD
GRU – Get Real PWM Voltage Current controller output value
GCL – Get Current Limit Current limitation current in mA
GRC – Get Real Current Current actual current in mA
TEM – Get Temperature Current housing temperature in °C
GADV Value Get Analog Voltage Read out the voltage applied at the given input (value).
OST – Operation Status Display current operating status.
SWS – Switch Status Temporary limit switch settings.
1: Voltage at AnIn
3: Voltage at 3rd In
Scaling: 1000 digits = 1 V
Return value input 1: –10 000 … 10 000
Return value input 3: 0 … 10 000
Value: 1, 3
Return value binary coded (LSB=Bit 0):
Bit 0: Homing running
Bit 1: Program sequence running
Bit 2: Program sequence stopped because of DELAY command
Bit 3: Program sequence stopped because of NOTIFY command
Bit 4: Current limitation active
Bit 5: Deviation error
Bit 6: Overvoltage
Bit 7: Overtemperature
Bit 8: Status input 1
Bit 9: Status input 2
Bit 10: Status input 3
Bit 13 – 15: Reserved for further inputs
Bit 16: Position attained
Bit 17: Limitation to continuous current
Return value binary coded (LSB=Bit 0):
Bit 0-7: HA setting
Bit 8-15: HN setting
Bit 16-23: HL setting
Bit 24-31: Information which limit switch has already switched (is
reset on resetting the respective input)
84
Page 85
7 Parameter Description
7.6 Commands for sequence programs
Commands for generating and executing sequence programs:
Command Argument Function Description
PROGSEQ
[…]
END
GPROGSEQ - / 1 Get Program Sequence Reads out and sends back the stored program sequence. Each
ENPROG – Enable Program Execution of the program is released, i.e. the sequence is started.
DIPROG – Disable Program Deactivate program execution.
RESUME – Resume Continue program sequence after DIPROG at the point at which it
MEM – Memory Return available program memory in Word.
– Program Sequence Defines the start and end of the sequence program.
All commands sent to PROGSEQ are not executed, but transferred
to the sequence program memory. An END marks the end of the
sequence program.
All commands after END are directly executed again.
There is no SAVE command necessary for saving the program
sequence.
Command must not be executed more than 10,000 times, as
otherwise the function of the Flash memory can no longer be
guaranteed.
These commands do not have to be entered in the FAULHABER
Motion Manager, as they are automatically attached by the
“Transfer program file…” function.
Note: The Xon/Xoff protocol must be used to transfer lengthy
program sequences
program line is output in lower case letters, ending with a CR
character. At the end of the program, the "end:" line is sent with
details of the program length in bytes followed by a CR and LF
character.
GPROGSEQ1: Reads out the program sequence and indicates at
which program line the program counter is currently located
("PC--")
This status can be permanently stored with SAVE/EEPSAV, so that
the drive starts up with the stored program sequence immediately
after power-on.
was interrupted.
85
Page 86
7 Parameter Description
7.6 Commands for sequence programs
Additional commands for use within sequence programs:
Command Argument Function Description
DELAY Value Delay Stop sequence for a defined time
TIMEOUT Value Timeout With Notify commands, only wait for the specified time and then
JMP Adr Jump Jump to the given address (can also be used via RS232).
JMPGx Adr Jump if greater than x Jump to the specified address if result of last query command is
JMPLx Adr Jump if less than x Jump to the specified address if result of last query command is
JMPEx Adr Jump if equal to x Jump to specified address if result of last query command is equal
JPH Adr Jump if Hard-Input
JPF Adr Jump if Hard-Input
JPT Adr Jump if 3
SETx Value Set Variable x Set variable x (A, B, C) to the specified value.
GETx – Get Variable x Query content of variable x (A, B, C).
ADDx Value Add to Variable x Add or subtract variable x (A, B, C) with given value.
SETARGx – Set argument Set value of variable x (A, B, C) as argument for the next com-
DxJNZ Adr Decrement x, Jump if
ERI Adr Error Interrupt An error interrupt is activated from execution of this command.
RETI – Return Error Interrupt Return from an error handling routine.
DIERI – Disable Error Interrupt The ERI command is deactivated, i.e. in the event of an error the
CALL Adr Call Subroutine Call a subroutine at specified address.
RET – Return from Subrou-
A Adr Define Address
activated
activated
vated
not Zero
tine
rd
input acti-
Argument: in 1/100 seconds
Value: 0 … 65 535
continue the sequence again. Can also be used via RS232: Send an
“o” if Notify condition has not been fulfilled.
Argument: in 1/100 seconds
Value: 0 … 65 535
Address: 0 … 255
greater than variable x (A, B, C).
Address: 0 … 255
less than variable x (A, B, C).
Address: 0 … 255
to variable x (A, B, C).
Address: 0 … 255
Jump to the specified address if the analog input is active (HP
determines the polarity).
Address: 0 … 255
Jump to the specified address if the Fault Pin input is active (HP
determines the polarity). Fault Pin must be configured as input
(REFIN).
Address: 0 … 255
Jump to the specified address if the 3rd input is active (HP determines the polarity).
Address: 0 … 255
Value: Int32
Without argument: Result of last query command is loaded into
the variable.
Value: –2 147 483 648 … 2 147 483 647
Value: –2 147 483 648 … 2 147 483 647
mand (if no argument is given there).
Decrease the value of variable x (A, B, C) by one and jump to
specified address if the value is not 0.
Address: 0 … 255
This means that if an error subsequently occurs (overvoltage, current limitation, …), then the sequence branches to the specified
address. The error handling mode is ended if a JMP or RETI command is executed.
Address: 0 … 255
Important: the interrupted command is not continued, even if it
was not completed at the time of interruption!
program does not jump to the error handling routine.
Address: 0 … 255
Return from a subroutine.
Please note that only one subroutine level is possible, i.e. no subroutines can be called within subroutines!
Definition of current position as entry address for jump commands.
Address: 0 … 255
86
Page 87
Notes
87
Page 88

MA7000.05041 English, 3rd issue, 11.2013
© DR. FRITZ FAULHABER GMBH & CO. KG
Subject to change without notice
DR. FRITZ FAULHABER
GMBH & CO. KG
Antriebssysteme
Daimlerstraße 23 / 25
71101 Schönaich · Germany
Tel. +49(0)7031/638-0
Fax +49(0)7031/638-100
[email protected]
www.faulhaber.com
 Loading...