


USER MANUAL
iTube 182
Valve Amplifier 2 x 18Watt
ENGLISH
FATMAN
by
TL A
®
udio

Contents
Safety Instructions . . . . . . . . . . . . . . . . . . . .3
Amplifier Connection Diagram . . . . . . . . . . .4
Amplifier Connections . . . . . . . . . . . . . . . . .5
Front Panel Controls . . . . . . . . . . . . . . . . . . .6
Troubleshooting . . . . . . . . . . . . . . . . . . . . . .7
Maintenance . . . . . . . . . . . . . . . . . . . . . . . .8
Specifications . . . . . . . . . . . . . . . . . . . . . . . .8
Page
Congratulations on your choice of the Fatman iTube 182 by TL Audio. We have used years of audio
engineering experience to bring you a product that will truly enhance your listening experience.
In order to obtain the best performance from this system please read this owners manual
thoroughly and use your iTube 182 only in accordance with its instructions.
2
iTube 182
Safety Instructions
USER MANUAL
ENGLISH
IMPORTANT SAFETY INSTRUCTIONS
Read instructions - All safety and operating instructions
should be read thoroughly before attempting to operate
the Fatman ITube 182.
•
Retain Instructions in a safe place for future
reference.
•
Follow all instructions detailed in this manual.
•
Observe all safety warnings given in this manual.
•
This unit should NOT be situated in close proximity
to water. Avoid placement near bathtubs, sinks,
washing machines, swimming pool, Sauna etc.
•
Avoid exposure to direct sunlight or to extremes of
temperature or humidity.
•
Do not place near direct heat sources such as
radiators, stoves, gas fires, naked flames or
candles.
•
Ensure that the unit is placed on a clean, dry and
flat surface before operation.
•
Do not drop unit, apply excessive force to the
controls or place heavy objects on top of the unit.
•
Do not allow excessive levels of dust to gather on
the 182.
•
To clean, use a soft dry cloth. If necessary, use a
damp cloth without any solvents.
•
Ensure that the area in which the unit is situated
has adequate ventilation. Do not place the ITube
182 in a position where its ventilation may become
obstructed. Avoid placement on beds, sofas, rugs,
enclosed bookcases / cabinets and any other area
which may cause interference to the ventilation of
the product thus causing it to overheat.
•
Ensure that the unit is connected to the correct
power supply as indicated on the unit. Unplug the
ITube 182 when not in use for a long period.
Always make sure power cables are placed safely
and are not obstructing a walkway.
•
This product can get hot. Do not touch the tubes
and keep away from babies and children.
•
To avoid risk of electric shock, do not attempt to
remover the cover or the back of unit - there are no
user serviceable parts.
•
When this product is moved from a cool to a warm
place, condensation may occur on the surface of
the vacuum tube. In this instance, please allow 1
hour before attempting to operate the unit. This will
avoid leakage or blowout of the vacuum tube due to
sudden heat.
•
The iTube 182 should be serviced by an authorised
service engineer in the event of any of the following
circumstances.
1. The power supply or cord sustains damage.
2. The unit is struck by a falling object.
3. The unit is exposed to rain or moisture.
4. Liquid is inadvertently spilt on the unit.
5. The unit does not seem to operate normally or
exhibits a sudden change in performance.
6. The unit has been dropped.
•
Any unauthorised changes or modifications to this
equipment would render the manufacturer's
warranty null and void.
3
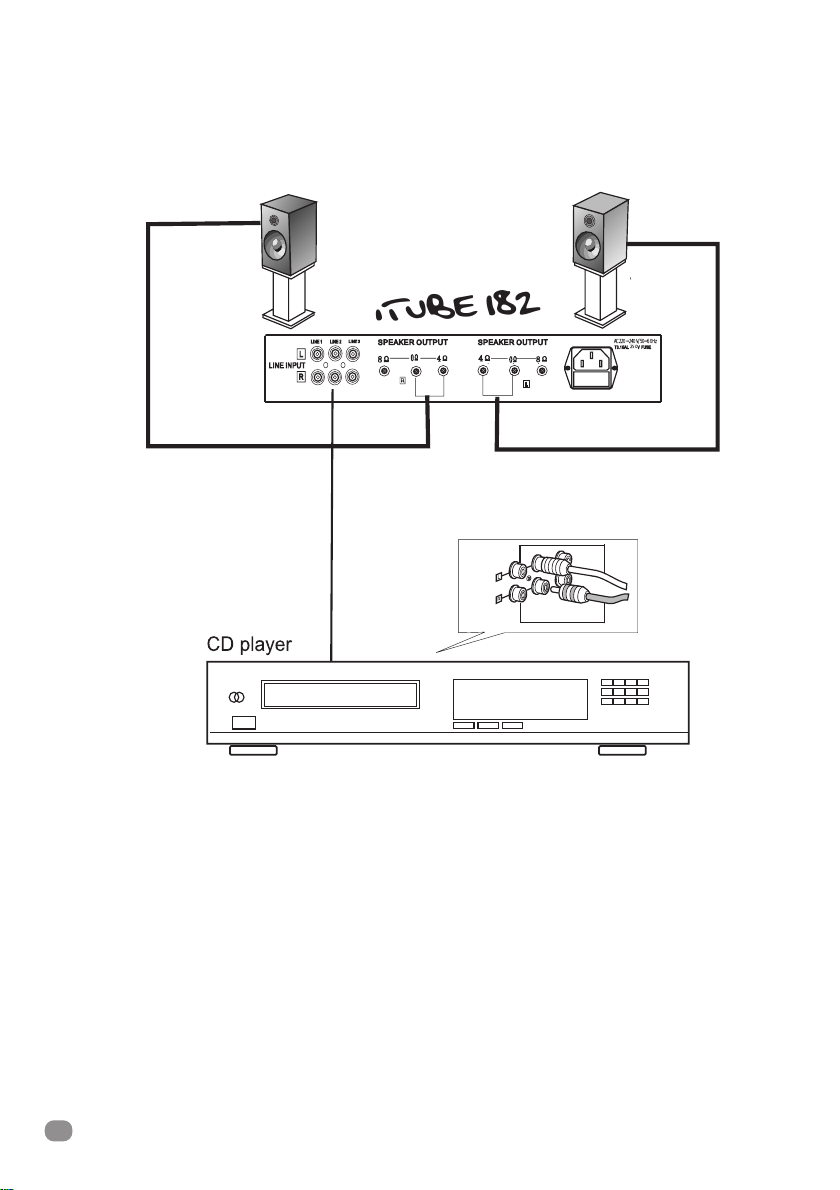
Amplifier Connections
AC220~240V/50~60Hz
250
iTube 182
• Before attempting to make any connections to or
from the unit, be sure to first switch OFF the power
to this unit and to any other components to which
connections are being made.
• Make sure that all connections between this unit and
other components are made correctly, that is to say
L(left) to L, R(Right) to R, + to + and - to - Also , refer
to the owner's manual of each component that is
connected to this unit.
4
iTube 182
• Always turn OFF the power switches when
connecting or disconnecting from mains power.
• It is recommended that you disconnect the power
supply from the mains when the unit is in a
protracted period of non-use (holidays, etc).
• When connecting speakers, ensure they have an
impedance of between 4 & 8 ohms.

Amplifier Connections
USER MANUAL
ENGLISH
• Connect using high quality, bare(stripped) speaker
wire. Please note that if your speaker wires are not
connected properly you may hear no sound or if
polarities are reversed, you will hear oddities in the
signal path with an unnatural loss of bass
frequencies
Connecting the iTube Dock
123 4
1. Video Output: Connect the video cable (yellow)
in between the video output connector (yellow) of
the iTube and the video input of your TV.
2. Audio Output: Connect the audio cable from
the audio output of the ITube docking station to
the audio input of the the iTube Valve amplifier.
3. S-Video Output: Use an S-Video cable (not
included) to connect S-Video output of your
iTube to the S-Video input of your TV.
4. Power adaptor in: Connect power cable
between iTube and mains supply.
• When using bare speaker wires, fit at least 1.6mm of
insulation inside the speaker terminals so that no
bare wire is visible
• Make sure the wire holders are firmly screwed in to
prevent wires from becoming loose. If wires touch,
the speakers and or the unit could be damaged
1
2
3
4
1. Backrest.
2. iPod dock connector.
3. iPod dock input
connected indicator LED.
4. Power indicator.
ERRATUM
PLEASE USE THE ON SWITCH ON THE REMOTE CONTROL TO TURN ON THE DOCK.
5
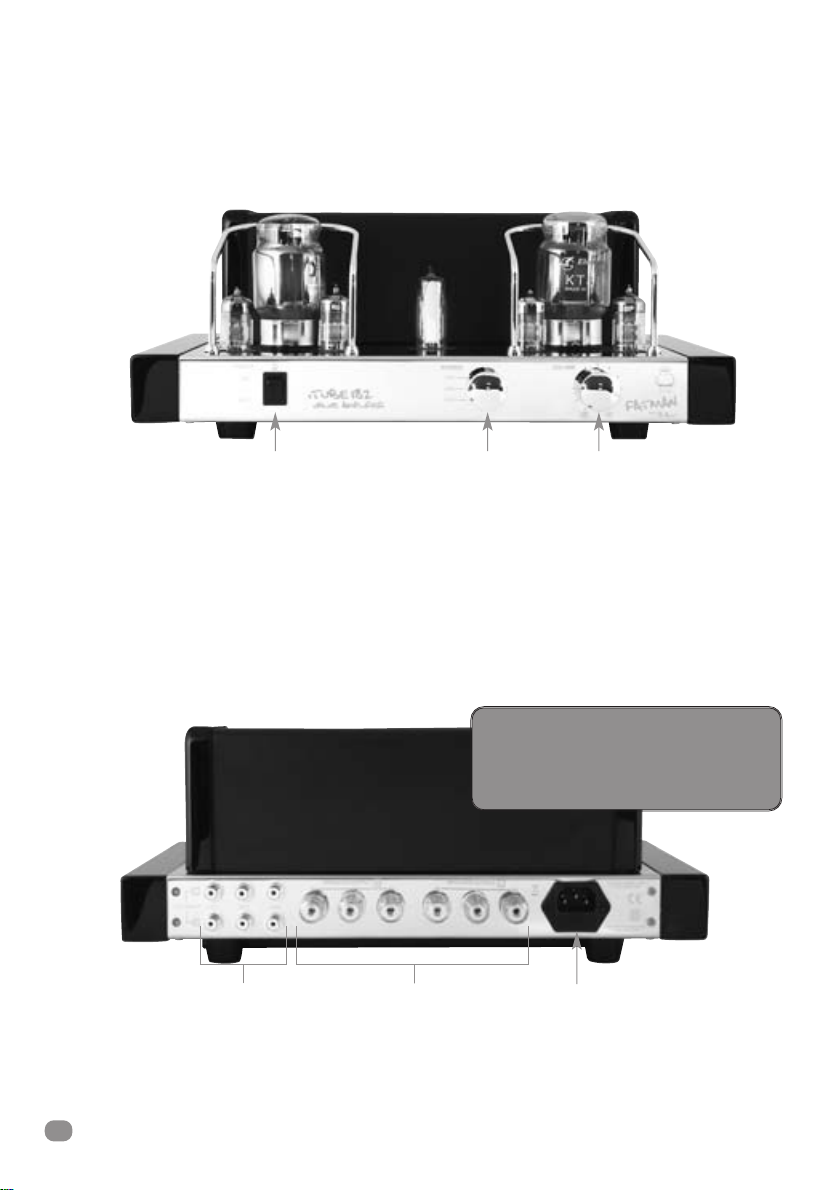
Front & Rear Panel Controls
Power Switch Source Volume
POWER SWITCH
Press to OFF to switch off the power.
Please Note The Following:
damage to the speakers - the speaker-protection circuit will mute the volume for a few seconds after power is switched ON.
SOURCE
VOLUME CONTROL - To increase or decrease the volume.
- Press this switch to ON for power. The indicator will illuminate while the power is ON.
Before switching ON the power, be sure to set the volume control to the lowest setting in order to avoid
- For selecting the different Signal Source.
ATTENTION:
Your iTube 182 should only be
re-started 5 minutes after switching
off, to avoid damaging the tubes.
!!
Line Input
Speaker Output
AC Power Input
6
iTube 182
USER MANUAL
ENGLISH
Troubleshooting
If your ITube 182 fails to operate normally, please check the following points to determine if the fault can be
corrected with one of the simple suggestions below. If you feel your unit is still faulty after reading this, please
contact your authorised dealer or service centre.
SYMPTOM
- The unit fails to turn
on when the POWER
switch is pressed.
- No Sound.
- No sound is heard
from the left and /or
the right speaker.
- The acoustic image
is unstable.
POSSIBLE CAUSE
- Power adaptor is not
connected properly.
- Mains supply is off.
- The volume control is set to
the fully counter-clockwise
position.
- Connection cords are not
connected securely to the
INPUT terminals.
- Speakers are not connected
properly.
- Speakers are not properly
connected.
- The signal input is not
properly connected.
- The positive and negative
polarities of the unit and
speakers are not matched.
REMEDY
- Make sure power is firmly plugged in.
- Turn clockwise.
- Connect securely.
- Connect securely.
- Connect correctly.
- Connect correctly.
- Re-connect correctly.
7

Specification
• Source Inputs: 3
• Max Output Power: 18W x 2
• Frequency Response: 20-20KHz (±1.5dB)
• Distortion: ≤ 2%
• Signal to Noise Ratio: ≥ 86dB
• Input Sensitivity: 230m V
• Input Impedance: 100K ohm
• Output Impedance: 4 ohm/8 ohm
• Size (LxWxH): 382mm x 290mm x 157mm
• Weight: 14.2KGs
• Tubes used: KT94 (KT88,KT90,KT100) x 2,
6N3(5670) x 4,
6E2(EM87) x 1
• Power Supply: AC100~120V/50~60Hz
AC220~240V/50~60Hz
Specifications subject to change without notice.
Service
Please contact your local authorised dealer or reseller.
info@fat-man.co.uk
www.fat-man.co.uk
8
iTube 182
FATMAN
by
TL A
®
udio

BEDIENUNGSANLEITUNG
iTube 182
Verstärker 2 x 18W
DEUTSCH
FATMAN
by
TL A
®
udio

Contents
Safety Instructions . . . . . . . . . . . . . . . . . . . .3
Amplifier Connection Diagram . . . . . . . . . . .4
Amplifier Connections . . . . . . . . . . . . . . . . .5
Front Panel Controls . . . . . . . . . . . . . . . . . . .6
Troubleshooting . . . . . . . . . . . . . . . . . . . . . .7
Maintenance . . . . . . . . . . . . . . . . . . . . . . . .8
Specifications . . . . . . . . . . . . . . . . . . . . . . . .8
Page
Wir gratulieren Ihnen zu ihrem Fatman iTube 182 von TL Audio. Wir investierten Jahre der
Erfahrung aus HiFi-Entwicklung in dieses Produkt für wahrhaftigen Musikgenuß.
Um den maximale Leistung aus Ihrem iTube 182 zu holen, lesen und befolgen Sie bitte diese
2
iTube 182
Anleitung sorgfältig.
Sicherheitshinweise
BEDIENUNGSANLEITUNG
DEUTSCH
IMPORTANT SAFETY INSTRUCTIONS
Lesen Sie die Anleitung – Sie sollten alle Sicherheitsund Bedienhinweise kennen, bevor Sie den Fatman
iTube 182 verwenden.
•
Verwahren Sie die Anleitung für später an einem
sicheren Ort.
•
Folgen Sie detailliert den Anweisungen dieser
Anleitung.
•
Leisten Sie allen Sicherheitswarnungen in dieser
Anleitung folge.
•
Das Gerät darf NICHT in der Nähe von Wasser
betrieben werden. Vermeiden Sie Aufstellung nahe
der Badewanne, Waschbecken, Waschmaschine,
Swimmingpool, Sauna, etc.
•
Setzen Sie das Gerät keinem direkten Sonnenlicht
oder extremen Teparaturen oder Feuchtigkeit aus
•
Platzieren Sie das Geräte auf keinen Fall neben
Heizkörpern, Kochplatten, Gasherden, offenem
Feuer oder Kerzen.
•
Stellen Sie das Gerät vor der Inbetriebnahme auf
eine saubere, trockene und ebene Fläche.
•
Lassen Sie das Gerät nicht fallen und üben sie
keine großen Kräfte auf die Bedienelemente aus.
Stellen Sie nichts schweres darauf.
•
Vermeiden Sie größere Staubansammlungen auf
dem 182.
•
Zur Reinigung verwenden Sie ein trockenes oder
feuchtes Tuch aber keinesfalls Lösungsmittel.
•
Stellen Sie sicher, das der Aufstellort über
ausreichenden Luftaustausch verfügt. Platzieren Sie
den iTube keinesfalls wo die Luftzirkulation
unterbrochen werden könnte. Vermeiden Sie
Betten, Sofas, Teppiche, geschlossene
Regale/Schränke und andere Bereiche, in denen
mangelnde Luftzirkulation eine Überhitzung
verursachen könnte.
•
Stellen Sie sicher, dass das Gerät mit dem richtigen
Netzteil angeschlossen ist. Benötigen Sie den iTube
252 länger nicht, ziehen Sie den Netzstecker.
Verlegen Sie das Netzkabel sorgfälltig, vermeiden
Sie Stolperfallen.
•
Dieses Gerät kann heiß werden. Berühren Sie die
Röhren nicht und halten Sie es von Babies und
Kindern fern.
•
Vermeiden Sie elektrische Schocks und versuchen
Sie nicht, die Abdeckung zu entfernen – Es
befinden sich keine anwenderrelevanten Teile im
Inneren.
•
Transportieren Sie das Gerät von einem kalten an
einen warmen Ort kann sich Kondensation auf den
Röhren bilden. In diesem Fall warten Sie
wenigstens1 Stunde vor erneuter Inbetriebnahme.
Das verhindert Undichtigkeiten oder Zerstörung der
Röhren durch die plötzliche Erwärmung.
•
Ihr iTube 252 sollte bei Folgendem von einem
authorisierten Fachmann gewartet werden:
1. Das Netzkabel ist beschädigt.
2. Das Gerät wurde durch einen Sturz beschädigt.
3. Das Gerät war Wasser oder Feuchtigkeit
ausgesetzt.
4. Flüssigkeit hat sich auf oder in das Gerät verteilt.
5. Das Gerät arbeitet nicht wie gewohnt oder zeigt
einen plötzliche Änderung in seinem Klang.
6. Sie haben das Gerät fallen gelassen.
•
ß Jede unauthorisierte Änderung oder Modifikation
an der Technik hat den Verlust der
Herstellergarantie zur Folge.
3

Verkabelung
AC220~240V/50~60Hz
250
iTube 182
• Bevor Sie mit dem Verkabeln beginnen stellen Sie
sicher, das alle zu verbindenden Geräte abgeschaltet
oder vom Stromnetz getrennt sind.
• Stellen Sie sicher, das alle Verbindungen zwischen
den Geräten korrekt ausgeführt sind, also L (links) zu
L und R (rechts) zu R, + zu + , - zu -. Beachten Sie
auch Verkabelungshinweise der Anleitungen der
anzuschließenden Geräte.
4
iTube 182
• Schalten Sie das Gerät immer erst aus (OFF), bevor
Sie es ans Stromnetz anschließen oder davon trennen.
• Wir empfehlen das Gerät bei längerem Nichtgebrauch
(Urlaub, etc.) vom Stromnetz zu trennen.
• Wenn Sie Lautsprecher anschließen, stellen Sie sicher,
das deren Impedanz zwischen 4 und 8 Ohm liegt.

Verkabelung
BEDIENUNGSANLEITUNG
DEUTSCH
• Verwenden Sie hochqualitative Lautsprecherkabel mit
abisolierten Enden. Bitte beachten Sie, das ein falsch
angeschlossenes Lautsprecherkabel zur Folge haben
kann, dass Sie gar nichts hören, oder wenn Sie eines
verpolt haben unnatürlich wenig Bass wahrnehmen.
Anschluss des iTube Dock
123 4
1. Videoausgang: Verwenden Sie das Verbindungskabel
mit den gelben Anschlüssen, um die iPOD Docking
Station mit Ihrem TV Gerät zu verbinden.
2. Audioausgang: Verwenden Sie das Verbindungskabel
mit den roten und weißen Chinchanschlüssen, um die
iPOD Docking Station mit dem Röhrenvollverstärker zu
verbinden.
3. S Viedeo Ausgang: Verwenden Sie ein optionales S
Video Verbindungskabel, u m die iPOD Docking Station
mit Ihrem TV Gerät zu verbinden.
4. Netzanschluss: Stecken Sie hier ausschließlich das
mitgelieferte Netzteil an.
•
Wenn sie blanke Kabelenden verwenden, führen Sie
wenigstens 1.6mm der Isolation noch mit in das
ein, sodass Sie kein blankes Kabel mehr sehen.
• Stellen Sie sicher, dass die Kabelklemmen gut
festgeschraubt sind um lose Kabel zu vermeiden.
Berühren sich lose Kabel können Lautsprecher oder
Verstärker beschädigt werden.
1
2
3
4
1. Gegenständer.
2. iPOD Anschluss.
3. LED leuchtet, wenn iPOD
angesteckt.
4. LED leuchtet, wenn Gerät unter
Spannung steht.
Anschlußterminal
ERRATUM
PLEASE USE THE ON SWITCH ON THE REMOTE CONTROL TO TURN ON THE DOCK.
5

Front und Bedienelemente
Power Source Volume
POWER
- Schalten sie auf ON für den Betrieb. Die Anzeige leuchtet während des Betriebs. Schalten Sie auf OFF um
abzuschalten.
Bitte beachten Sie:
Lautsprecher zu vermeiden – Die Schutzschaltung schaltet die Ausgänge bei Inbetriebnahme für ein paar Sekunden stumm.
SOURCE
VOLUME REGLER - Zum Erhöhen und Verringern der Lautstärke.
Drehen Sie vor dem Einschalten mit Power ON den Lautstärkeregler ganz herunter um eine Beschädigung der
- Zum Wählen einer anderen Quelle.
ACHTUNG:
Sie können Ihren iTube 182 erst nach 5
Minuten erneut einschalten, was eine
!!
Beschädigung der Röhren verhindert.
Line Input
6
iTube 182
Speaker Output
AC Power Input

BEDIENUNGSANLEITUNG
DEUTSCH
Fehlersuche
Falls Ihr iTube 182 nicht normal funktioniert, prüfen Sie bitte die nachfolgenden Punkte um den Fehler mit einem
der Lösungsvorschläge zu beseitigen. Falls Sie damit das Problem nicht in den Griff bekommen, fragen Sie Ihren
Händler oder einen Servicepartner um Rat.
SYMPTOM
- Das Gerät get nicht
in Betrieb wenn Sie
Power einschalten.
- Kein Ton.
- Kein Ton vom linken
oder rechten
Lautsprecher.
- Die akustische
Abbildung ist
unpräzise.
POSSIBLE CAUSE
- Netzteil ist nicht richtig
eingesteckt.
- Steckdose ohne Strom.
- Der Lautstärkeregler ist am
Linksanschlag.
- Stecker der Quelle sind nicht
richtig verbunden.
- Speakers are not connected
properly.
- Lautsprecher sind nicht
richtig angeschlossen.
- Lautsprecher sind nicht
richtig angeschlossen.
- Eingangssignal nicht richtig
verkabelt.
REMEDY
- Make sure power is firmly plugged in.
- Lautstärkeregler nach rechts drehen.
- Sicher verkabeln.
- Sicher verkabeln.
- Sicher verkabeln.
- Sicher verkabeln.
- Den verpolten Lautsprecher richtig
anschließen.
7

Specification
• Eingänge: 3
• Maximale Ausgangsleistung: 2 x 18W
• Frequenzgang: 20-20kHz (±1.5dB)
• Verzerrungen: ≤ 2%
• Rauschabstand: ≥ 86dB
• Eingangsempfindlichkeit: 230m V
• Eingangsimpedanz: 100K ohm
• Ausgangsimpedanz: 4 ohm/8 ohm
• Abmessungen (BxHxT) 382mm x 290mm x 157mm
• Gewicht: 14,2KGs
• Röhren: KT94 (KT88,KT90,KT100) x 2,
6N3(5670) x 4,
6E2(EM87) x 1
• Power Supply: AC100~120V/50~60Hz
AC220~240V/50~60Hz
Die Daten können sich ohne Ankündigung ändern.
Service
Bitte kontaktieren Sie Ihren Händler oderWiederverkäufer.
info@fat-man.co.uk
www.fat-man.co.uk
8
iTube 182
FATMAN
by
TL A
®
udio

MANUAL DEL USUARIO
iTube 182
Amplificador 18w x 2
ESPAÑOL
FATMAN
by
TL A
®
udio

Contenido
Pág
Instrucciones de seguridad . . . . . . . . . . . . . . . . .2
Panel frontal y trasero . . . . . . . . . . . . . . . . . . . . .4
Conexiones de amplificador . . . . . . . . . . . . . . . .5
Localización y resolución de problemas . . . . . . .7
Espeficaciones . . . . . . . . . . . . . . . . . . . . . . . . . .8
Servicio . . . . . . . . . . . . . . . . . . . . . . . . . . . . . . .8
Enhorabuena en tu elección del Fatman iTube 182 por TL Audio. Hemos utilizado años de
experiencia en ingeniería de audio para traerle un producto que verdaderamente realzará su
Con tal de obtener el mejor rendimiento para este sistema lea el manual de usuario
2
iTube 182
experiencia de escuchar.
minuciosamente y utilice su iTube 182 de acuerdo con las instrucciones.

Instrucciones De Seguridad
MANUAL DEL USUARIO
ESPAÑOL
LEA LAS INSTRUCCIONES
Todas las instrucciones de seguridad y operación
deberán ser leídos minuciosamente antes de intentar
operar el iTube 182.
•
Guarde las instrucciones en un lugar seguro para
futuras referencias.
• Siga todas las instrucciones detalladas en este manual.
• Observe todas las advertencias de seguridad dadas en
este manual.
• Esta unidad NO deberá ser colocada cerca de agua.
Evite colocación cerca de bañeras, fregaderos,
lavadoras, piscinas, saunas, etc.
• Evite contacto directo con la luz del sol o con
temperaturas extremas o humedad extrema.
• No colocar cerca de fuentes directas de calor tales
como radiadores, encimeras, estufas de gas, llamas o
velas.
• Asegúrese de que la unidad esté colocada en una
superficie limpia, seca y lisa antes de operar.
• No deje caer la unidad, aplicar fuerza excesiva a los
controles o colocar objetos pesados encima de la
unidad.
• No permita que se acumule mucho polvo en su iTube
182.
• Para limpiar utilice una gamuza suave y seca. Si fuera
necesario humedecer sin ningún tipo de disolvente.
• Asegúrese de que la zona donde se vaya a colocar la
unidad esté suficientemente ventilada. No coloque el
iTube 182 en una posición en la cual su ventilación
pueda ser obstruida. Evite colocarlo en camas, sofás,
alfombras, estanterías cerradas/armarios o cualquier
otro lugar que pueda interferir en la ventilación del
producto causando que se sobre caliente.
• Asegúrese de que la unidad esté conectada a la fuente
• Este producto no se puede calentar. No toque los
• Para evitar riesgos de electrocución, no intente quitar
• Cuando el producto es movido de un lugar fresco a un
• El iTube 182 deberá ser revisado por un ingeniero de
•
de potencia indicada en la unida. Desenchufe el 182
si no va a ser utilizado en un largo periodo de tiempo.
Siempre asegure que los cables estén en un lugar
seguro y que no obstruyan el paso.
tubos y mantenga alejados a los niños y bebés.
la tapa de la unidad - no hay partes serviciales al
usuario.
lugar cálido, puede haber condensación en la
superficie del tubo de vacío. En ese momento, por
favor deje una hora de tiempo antes de intentar operar
la unidad. Esto evitará escapes o reventones del tubo
de vacío debido al calor repentino.
servicio autorizado en el suceso de cualquiera de las
siguientes circunstancias.
1.
El suministro eléctrico o el cable sufren daños.
2.
La unidad es golpeada por la caída de un objeto.
3.
La unidad es expuesta a la lluvia o a la humedad.
4.
Líquido ha sido derramado involuntariamente en la
unidad.
5.
La unidad no parece operar normalmente o
muestra un cambio repentino en su ejecución.
6.
La unidad ha sido tirada.
Cualquier cambio o modificación no autorizado en
este equipamiento inutilizará la garantía del
fabricante declarándolo nulo e invalido.
3

Controladores Del Panel Delantero
AC220~240V/50~60Hz
250
iTube 182
• Antes de intentar realizar conexiones en la unidad
asegúrese de apagar la corriente a la unidad y a cualquier
componente a la cual se estén realizando conexiones.
• Asegúrese de que todas las conexiones entre la unidad y
otros componentes estén hechos correctamente, esto
quiere decir (L) izquierdo a la L, (R) derecho a la R, + a +
y - a - . También, haga referencia al manual de usuario de
cada componente que esté conectado a la unidad.
4
iTube 182
• Apague siempre todos los interruptores cuando esté
conectando o desconectando de la red de suministro.
• Es recomendable que desenchufe el suministro de energía
de la red cuando la unidad esté un tiempo prolongado sin
utilizarse (vacaciones, etc.).
• Cuando conecte los altavoces, asegúrese de que tenga
impedancia de 4 & 8 Ohms.

Conexiones
MANUAL DEL USUARIO
ESPAÑOL
• Conecte utilizando cables de altavoz de alta calidad y
descubiertos. Por favor tenga en cuenta que si sus cables
de altavoz no están conectados correctamente quizás no
podrá escuchar ningún sonido y su las polaridades han
sido invertidas escuchará rarezas en el camino de la señal
con una perdida antinatural de las frecuencias de bajo.
Conectar el iTube Dock
123 4
1. Salida de vídeo: Conecte el cable de vídeo
(amarillo) desde la salida de vídeo del iTube
(amarillo) a la entrada de vídeo de su TV.
2. Salida de audio: Conecte el cable desde la
salida de audio de la estación de conexión del
iTube hasta la entrada de audio del amplificador
de válvulas del iTube.
3. Salida S-Vídeo: Use un cable de S-Vídeo (no
incluido) para conectar la salida de S-Vídeo de
su iTube a la entrada de S-Vídeo de su TV.
4. Adaptador de potencia interno: Conecte el
cable de alimentación entre el iTube y la red.
• Utilizando cables de altavoz descubiertos, coloque como
mínimo 1,6mm de aislamiento dentro de las terminales del
altavoz para que el cable no sea visible.
• Asegúrese de que los soportes del cableado estén bien
sujetos para evitar que los cables se suelten. Si los cables
se tocan los altavoces y/o la unidad podrían ser dañados.
1
2
3
4
1. Respaldo.
2. Puerto conector del iPod.
3. Indicador LED de conexión
correcta del puerto iPod.
4. Indicador de corriente.
ERRATUM
PLEASE USE THE ON SWITCH ON THE REMOTE CONTROL TO TURN ON THE DOCK.
5

Panel delantero
Power Switch Fuente Volumen
POWER
- Apriete este interruptor a ON para que se encienda. El indicador se iluminará cuando esté encendido.
Apriete OFF para apagarlo.
Tenga en cuenta lo siguiente:
daños en los altavoces - el circuito de protección de los altavoces se pondrá en mute unos segundos después de que se haya
encendido.
FUENTE
- Para seleccionar distintas señales de fuente.
CONTROLADOR DE VOLUMEN - Para aumentar y disminuir el volumen.
Antes de encenderlo, asegúrese de que el controlador de volumen esté lo más abajo posible para evitar
ATENCIÓN:
Su iTube 182 solo puede volverse a
encender 5 minutos después de su
apagado, para evitar daños en los tubos.
!!
Line Input
6
iTube 182
Speaker Output
AC Power Input

MANUAL DEL USUARIO
ESPAÑOL
Localización y Resolución de Problemas
Si tú iTube no opera como debería, por favor mire los siguientes puntos para determinar si el fallo puede ser
corregido con alguna de las sugerencias de abajo. Si cree que la unidad sigue defectuosa después de leer esto,
por favor contacte con su distribuidor autorizado o servicio técnico.
SINTOMA
- La unidad no
enciende cuando se
le da al interruptor.
- No hay sonido.
- No se escucha nada
del altavoz izquierdo
y/o derecho.
- La imagen acústica
es instable.
CAUSA POSIBLE
- El adaptador eléctrico no está
bien conectado.
- El suministro está apagado.
- El controlador de volumen
está en una posición
completamente contraria a las
agujas del reloj.
- Los cables de conexión no
están bien conectados en las
terminales de entrada.
- Los altavoces no están bien
conectados.
- Los altavoces no están bien
conectados
- La señal de entrada no está
bien conectado.
- Las polaridades negativas y
positivas de la unidad y los
altavoces no están bien
combinados.
REMEDIO
- Asegúrese que está enchufado
firmemente.
- Gírelo en sentido de las agujas del
reloj.
- Conectar bien.
- Conectar bien.
- Conectar bien.
- Conectar bien.
- Reconectar bien.
7

Especificaciones
• Fuentes de entrada: 3
• Potencia max. De salida: 18W x 2
• Respuesta de frecuencia: 20-20KHz (±1.5dB)
• Distorsión: ≤ 2%
• Proporción señal a ruido: ≥ 86dB
• Sensibilidad de entrada: 230m V
• Impendacia de entrada: 100K ohm
• Impedancia de salida: 4 ohm/8 ohm
• Tamaño (LxWxH): 382mm x 290mm x 157mm
• Peso: 14.2KGs
• Tubos utilizados: KT94 (KT88,KT90,KT100) x 2,
6N3(5670) x 4,
6E2(EM87) x 1
Las especificaciones están sujetas a cambios sin previo aviso.
SERVICIO
Por favor contacte con su vendedor autorizado o revendedor.
info@fat-man.co.uk
www.fat-man.co.uk
8
iTube 182
FATMAN
by
TL A
®
udio

MANUEL D'UTILISATION
iTube 182
Amplificateur 18w x 2
EN FRANÇAIS
FATMAN
by
TL A
®
udio

Contents
Consignes de Securite . . . . . . . . . . . . . . . . .3
Panneaux Avant et Arriere . . . . . . . . . . . . . .4
Connections de L'Amplificateur . . . . . . . . . .5
En Cas de Probleme . . . . . . . . . . . . . . . . . . .7
Caracteristiques . . . . . . . . . . . . . . . . . . . . . .8
Service Apres-vente . . . . . . . . . . . . . . . . . . .8
Page
Félicitiations Pour Votre Achat Du Fatman Itube 182 De TL Audio. Nous Vous Faisons Ainsi
Bénéficier D’années D’expérience De R&D Dans Le Domaine De L’audio Et Vous Proposons Un
Pour Obtenir Le Meilleur De Ce Système, Lisez Soigneusement Ce Manuel D’instructions, Et
2
iTube 182
Produit Qui Optimisera Votre Ecoute.
N’utilisez Votre Itube 182 Que Dans Les Conditions Décrites.

Consignes De Sécurité
MANUEL D'UTILISATION
EN FRANÇAIS
IMPORTANT SAFETY INSTRUCTIONS
ß Lire Les Instructions- Toutes Les Instructions
D’utilisation Et De Sécurité Doivent Etre Lues
Attentivement Avant D’utiliser Le Fatman Itube 182:
•
Garder Le Manuel En Lieu Sûr Afin De Pouvoir S’y
Référer Dans Le Futur.
•
Suivre Toutes Les Instructions Détaillées Dans Le
Manuel.
•
Observer Toutes Les Consignes De Sécurité
Indiquées Dans Le Manuel.
•
Cet Appareil Ne Doit Pas Etre Situé A Proximité
Immediate De L’eau. Eviter Les Emplacements Tels
Que Baignoires, Lavabo, Piscines, Sauna Etc.
•
Eviter L’exposition Directe Au Rayons Du Soleil, A
Des Temperatures Ou Degrees D’humidité
Extrèmes.
•
Ne Pas Placer A Proximité Immediate De Sources
De Chaleur Telles Que Radiateurs, Fours, Brûleurs
Gaz, T Flammes Nues Ou Bougies.
•
Assurez-Vous Que L’appareil Est Place Sur Une
Surface Propre Et Sèche Avant Utilisation.
•
Ne Pas Laisser Tomber L’appareil Sur Le Sol, Ni
Appliquer Une Force Trop Elevée Sur Les Boutons
De Commande, Ni Placer Des Objets Lourds Sur Le
Dessus.
•
Eviter De Laisser Une Trop Grande Quantité De
Poussière S’amasser Sur L’appareil.
•
Pour Le Nettoyer, Utiliser Un Chiffon Doux. Si
Nécessaire, Mouiller Le Chiffon, Sans Utiliser De
Solvant.
•
Assurez-Vous Que L’endroit Choisi Est Correctement
Ventilé. Ne Pas Placer L’appareil Dans Un Endroit
Ne Lui Assurant Pas Une Ventilation Suffisante.
Eviter Les Lits, Canapés, Etagères Fermées, Ou
Toute Situation Risquant De Bloquer La Ventilation
Et Ainsi Provoqué Une Surchauffe De L’appareil.
•
S’assurer Que L’appareil Est Connecté Au Courant
Comme Indiqué Sur Celui-Ci. Débrancher L’appareil
Lors D’une Longue Période Sans Utilisation. Toute
Faire En Sorte Que Les Cables D’alimentation Soient
Placés Dans Un Endroit Sûr Et N’empèchent Pas
Le Passage.
•
L’appareil Peut Chauffer. Ne Pas Toucher Les Tubes
Et Eloigner Les Bébés Et Les Enfants.
•
Pour Eviter Le Risqué De Choc Electrique, Ne Pas
Tenter D’ouvrir L’appareil Ou Enlever Le Capot. Ces
Pièces Ne Sont Pas Changeables Par L’utilisateur.
•
Lorsque L’appareil Est Transporté D’une Zône
Froide A Une Zône Chaude Peut Se Produire De La
Condensation En Surface. Dans Ce Cas, Attendre
Une Heure Avant D’utiliser L’appareil. Ceci
Permettra D’éviter Une Fuite Ou Une Panne Du
Tube Due A Une Chaleur Soudaine.
•
L’itube 182 Devra Etre Réparé Par Une Station
Technique Agree Dans Les Cas Suivants.
1. L’alimentation Electrique Ou Le Cable Sont
Abîmés.
2. L’appareil Est Heurté Par Un Objet Contendant.
3. L’appareil Est Exposé A La Pluie Ou A Une Forte
Humidité.
4. Un Liquide Est Par Inadvertence Répendu Sur
L’appareil.
5. L’appareil Ne Semble Pas Fonctionner
Normalement Ou Manifeste Un Changement
Soudain De Performance.
6. L’appareil Est Tombé Sur Le Sol.
•
Toute Modification Ou Changement Apporté A Cet
Appareil Rendra La Garantie Constructuer Nulle Et
Caduque.
3

Branchements
AC220~240V/50~60Hz
250
iTube 182
• Avant D’effectuer Quelque Branchement Depuis Ou
Vers L’appareil, S’assurer Que Le Bouton De Mise En
Marche Est Sur OFF.
• S’assurer Que Tous Le Branchements Entre
L’appareil Et Tout Autre Composant Du Système Sont
Corrects.
• Toujours Mette En Position OFF Lorque De La
Connection Ou Déconnection Du Câble
D’alimentation.
4
iTube 182
• Il Est Recommandé De Déconnecter Le Câble
D’alimentation Lors D’une Période De Non-Utilisation
Prolongée (Vacances).
• Lors De La Connection Des Enceintes Acoustiques,
S’assurer Qu’elles Ont Un Impédance Comprise
Entre 4 Et 8 Ohms.

Branchements
MANUEL D'UTILISATION
EN FRANÇAIS
• Utiliser Des Câbles De Connection De Haute Qualité
Pour Les Enceintes. Veuillez Noter Que Si Vos Câbles
Ne Sont Pas Correctement Branchés, Vous N’aurez
Aucun Son, De Même Que L’inversion Des Polarités
Donnera Des Résultats Curieux Accompagnés D’un
Manque De Basses.
Connexions de l’iTube Dock
123 4
1. Sortie Vidéo : Reliez le câble vidéo (jaune) entre le
connecteur de sortie vidéo (jaune) de l'iTube et
l'entrée vidéo de votre TV.
2. Sortie Audio : Reliez le câble audio de la sortie audio
de la station d’accueil iTube à l'entrée audio de
l'amplificateur à lampe iTube.
3. Sortie S-Video : Utilisez un câble S-Video (non inclus)
pour relier la sortie S-Video de votre iTube à l'entrée
S-Video de votre TV.
4. Alimentation Secteur : Reliez le câble électrique
d’alimentation entre l'iTube et votre prise de courant.
• Lorsque Vous Utilisez Du Câble Denude, AssurezVous Que 1,6 Mm Au Moins Sont Insérés Dans
L’appareil.
• Assurez-Vous Que Les Connecteurs Sont Fermement
Serrés Pour Prévenir Les Branchements De Se
Défaire. Si Les Fils Se Touchent, Les Enceintes Ou
L’appareil Peuvent Etre Endommagés.
1
2
3
4
1. Support Arrière.
2. Connecteur station d’accueil
iPod.
3. LED témoin de connexion de
la station d’accueil iPod.
4. Témoin d’alimentation.
ERRATUM
PLEASE USE THE ON SWITCH ON THE REMOTE CONTROL TO TURN ON THE DOCK.
5

Façade Avant Et Boutons De Contrôle
Mise Sous Tension Source Volume
MISE SOUS TENSION
L’alimentation Est ON. Pousser Le Bouton Sur OFF Our Eteindre.
Veuillez Noter Ce Qui Suit: :
D’endommager Les Haut-Parleurs – Le Circuit De Protection Des Haut-Parleurs Coupera Le Volume Durant Quelques Secondes
Après La Mise Sur ON.
SOURCE
- Pour La Selection De Différentes Sources De Signal.
CONTRÔLE DU VOLUME - Pour Augmenter Ou Diminuer Le Volume.
- Pousser Le Bouton Sur ON Pour La Mise Sous Tension. L’indicateur S’allume Lorsque
Avant De Metre Sous Tension (ON), S’assurer Que Le Bouton De Volume Est En Position Basse, Pour Eviter
ATTENTION:
Votre Itube 182 Ne Doit Etre Redémarrer
Que 5 Minutes Après L’avoir Arrêté,
!!
Pour Eviter D’endommager Les Tubes.
Line Input
Speaker Output
AC Power Input
6
iTube 182

MANUEL D'UTILISATION
EN FRANÇAIS
Résolution De Problèmes
Si Votre Itube 182 Ne Fonctionne Pas Normalement, Veuillez Verifier Les Points Suivants Afin De Determiner Si Le
Problème Ne Pourrait Pas Etre Résolu Par Une De Suggestions Ci-Dessous. Si L’appareil Est Toujours En Panne
Après La Vérification, Contactez Votre Revendeur Ou Une Station Technique Agrée.
SYMPTOM
- l’appareil Ne Se Met
Pas En Marche.
Lorsque Le Bouton Est
Mis En Position ON.
- Pas De Son.
- No sound is heard
from the left and /or
the right speaker.
- l’image Acoustique Est
Instable.
POSSIBLE CAUSE
- Le Cable D’alimentation N’est
Pas Branché Correctement.
- Il N’y A Pas De Courant.
- Le Bouton De Volume Est En
Position Maxi Basse.
- Les Cables De Connection
Sont Mal Branchés Sur
INPUT.
- Les Cables Haut-Parleurs
Sont Mal Branchés.
- Les Cables Haut-Parleurs
Sont Mal Branchés.
- Les Polarités “Plus Et “Moins”
Ne Sont Pas Respectées.
REMEDY
- Assurez-Vous Que Le Câble Est
Fermement Branché.
- tourner Le Bouton Dans Le Sens Des
Aiguilles D’une Montre.
- Bien Serrer Les Branchements.
- Bien Serrer Les Branchements.
- Bien Serrer Les Branchements.
- Vérifier Et Bien Serrer Les
Branchements.
- Rebrancher Correctement.
7

Caractéristques Techniques
• Source Inputs: 3
• Max Output Power: 18W x 2
• Frequency Response: 20-20KHz (±1.5dB)
• Distortion: ≤ 2%
• Signal to Noise Ratio: ≥ 86dB
• Input Sensitivity: 230m V
• Input Impedance: 100K ohm
• Output Impedance: 4 ohm/8 ohm
• Size (LxWxH): 382mm x 290mm x 157mm
• Weight: 14.2KGs
• Tubes used: KT94 (KT88,KT90,KT100) x 2,
6N3(5670) x 4,
6E2(EM87) x 1
• Power Supply: AC100~120V/50~60Hz
AC220~240V/50~60Hz
Des changements de caractéristiques technique
peuvent être apportées sans notification.
Reparation
Veuillez Contacter Votre Revendeur Local.
info@fat-man.co.uk
www.fat-man.co.uk
8
iTube 182
FATMAN
by
TL A
®
udio

iTube 182
Versterker 2 x 18W
GEBRUIKS
AANWIJZING
FATMAN
by
TL A
®
udio

Inhoudsopgave
Veiligheidsinstructies . . . . . . . . . . . . . . . . . .3
Achterzijde en Aansluitingen . . . . . . . . . . . .4
De iTube dockingstation aansluite . . . . . . . . .5
Voorzijde en bedieningsknoppen . . . . . . . . .6
Probleemoplossingen . . . . . . . . . . . . . . . . . .7
Specificaties . . . . . . . . . . . . . . . . . . . . . . . . .8
Onderhoud . . . . . . . . . . . . . . . . . . . . . . . . .8
Pag
Gefeliciteerd met de keuze van de iTube 182 van TL Audio. We hebben vele
2
iTube 182
jaren ervaring op het gebied van de audio gebruikt om u een product te
bieden dat uw luisterervaring zeker een nieuwe dimensie zal geven.
Om de best mogelijke prestaties uit dit systeem te krijgen kunt u het best
deze gebruiksaanwijzing aandachtig doorlezen en uw iTube alleen
gebruiken zoals hierin beschreven wordt.

Veiligheidsinstructies
GEBRUIKS
AANWIJZING
Gelieve de volgende punten door te nemen alvorens de
iTube 182 aan te sluiten en te gebruiken.
•
Lees de instructies - Alle veiligheids- en
bedieningsinstructies moeten aandachtig doorgelezen
worden voordat de Fatman iTube 182 in gebruik
genomen wordt.
•
Bewaar deze instructies voor toekomstige
raadplegingen.
•
Volg alle instructies uit deze gebruiksaanwijzing op.
•
Neem alle veiligheidsinstructies uit deze
gebruiksaanwijzing in acht.
•
Dit apparaat mag niet in de nabijheid van water in
gebruik genomen worden. Vermijd plaatsing bij
badkuipen, aanrechten, wasmachines, zwembaden,
etc, etc.
•
Vermijd contact met direct zonlicht of met extreme
temperaturen of vochtigheidsgraden.
•
Plaats niet in de directe nabijheid van hittebronnen
zoals radiatoren, ovens, open vuur of kaarsen.
•
Let erop dat het apparaat op een schoon, droog en
effen oppervlak geplaatst wordt voor ingebruikname.
•
Laat het apparaat niet vallen, oefen niet teveel kracht
uit op de bedieningsknoppen en plaats geen objecten
op het apparaat.
•
Laat de iTube 182 niet teveel stof verzamelen.
•
Gebruik een schone, droge doek om de iTube 182
schoon te maken. Gebruik zonodig een vochtige doek
zonder oplosmiddelen.
•
Let erop dat er voldoende ventilatie is rondom de iTube
182. Plaats niet waar ventilatie verhinderd kan worden.
Plaats niet op bedden, sofa's, tapijt, kleden, afgesloten
boekenplanken of kasten en overige plekken waar
oververhitting van het apparaat kan ontstaan.
•
Let erop dat alleen een voeding wordt gebruikt zoals
aangegeven op het apparaat. Ontkoppel de iTube 182
als deze langere tijd niet gebruikt wordt. Vergewis u er
altijd van dat stroomkabels veilig gebruikt worden en
men er niet over kan struikelen.
•
Dit product kan heet worden. Raak de buizen niet aan
en houd uit de buurt van babies en kinderen.
•
Om het risico op een elektrische schok te vermijden,
dient men de achterzijde van het apparaat niet te
openen - er bevinden zich geen door de gebruiker te
servicen onderdelen.
•
Wanneer de iTube 182 van een koude naar een warme
ruimte verplaatst wordt kan condensvorming op de
buisoppervlakten plaatsvinden. Indien dit gebeurt
wacht dan minimaal 1 uur voor het apparaat te
gebruiken. Dit zal lekkage of opblazen van de buizen
ten gevolge van plotseling opwarmen voorkomen.
•
De iTube 182 moet geserviced worden door een
geautoriseerde reparateur in de volgende gevallen:
1. De voeding of voedingskabel is beschadigd.
2. Er is een object op de iTube 182 gevallen.
3.
De iTube 182 heeft blootgestaan aan vocht of regen.
4. Er is vloeistof in de iTube 182 terechtgekomen.
5. De iTube 182 functioneert niet normaal of vertoont
een plotselinge verandering in werking.
6.
De iTube 182 is gevallen.
•
Alle ongeautoriseerde veranderingen of modificaties
aan dit apparaat zullen de fabrieksgarantie doen
vervallen.
3

Achterzijde en Aansluitingen
AC220~240V/50~60Hz
250
iTube 182
AANSLUITINGEN
• Voordat apparaten op de iTube 182 versterker worden
aangesloten, moet de iTube 182 en alle reeds
aangesloten apparatuur uitstaan.
• Let bij alle verbindingen op de juiste manier van
aansluiten. (L) Links op Links en (R) Rechts op Rechts.
• Let erop dat contacten altijd schoon en stofvrij zijn en
dat pluggen helemaal en correct in de ingangen zijn
gestoken.
4
iTube 182
• Zet altijd de Aan/Uit knoppen van beide apparaten uit
als de iTube 182 versterker of de voedingsadapter
aangesloten wordt.
STROOM
• Zet de iTube 182 of voeding niet aan voordat de AC
voedingsadapter ook aangesloten is. Wij bevelen aan
om de voeding te ontkoppelen als het apparaat
gedurende enige tijd niet gebruikt apparaat gedurende
enige tijd niet gebruikt gaat worden (bijv. in geval van
vakantie of reizen).

Achterzijde en Diagram Aansluitingen
GEBRUIKS
AANWIJZING
LUIDSPREKERS
• Sluit alleen luidsprekers aan met een impedantie tussen
de 4 en 8 Ohm.
• Sluit de luidsprekers op de iTube 182 aan door ofwel de
bijgeleverde luidsprekerkabel met banaanpluggen te
gebruiken ofwel een andere hoogwaardige
luidsprekerkabel met de juiste connectoren. Let op de
juiste fase bij het aansluiten van de luidsprekerkabels
("+" op de "+" en "-" op de "-"). Als de kabels niet goed
verbonden zijn kan het zijn dat u geen geluid hoort en
bij een omgekeerde fase hoort u vreemde
• Let erop dat bij het aansluiten van onafgemonteerde
• Let erop dat de luidsprekerklemmen goed zijn
De iTube Dock aansluiten
verschijnselen in het geluid, zoals een onnatuurlijk
verlies van lage tonen.
luidsprekerkabels geen open verbindingen zichtbaar
dienen te zijn. Gebruik dan tenminste 1,6mm isolatie bij
de luidsprekerklemmen.
astgedraaid, zodat de kabels niet los kunnen raken. Als
de kabels losraken en in aanraking met elkaar
(kortsluiten) kunnen de luidsprekers of de iTube 182
ernstig beschadigen.
1
2
3
4
123 4
1. Video uitgang: Sluit de videokabel (geel) aan op de
video uitgang van de iTube dockingstation en de video
ingang van de TV
2. Audio uitgang: Sluit de audiokabel aan op de audio
uitgang van de iTube dockingstation en de audio
ingang van de iTube buizenversterker
3. S-Video uitgang: Sluit de S-Video kabel (niet
bijgeleverd) aan op de S-Video uitgang van de iTube
dockingstation en de S-Video ingang van de TV
4. Stroomadapter aansluiting: Sluit de stroomadapter
aan op de iTube en steek in het stopcontact.
ERRATUM
Gelieve de aan knop op de afstandsbediening te gebruiken om het dockingstation aan te zetten.
1. Achtersteun
2. iPod dock connector
3. iPod dock “ingang
aangesloten” LED indicatie
4. Power indicatie
5

Voorzijde en bedieningsknoppen
Aan/Uit Source Volumeknop
AAN/UIT
- Druk op de bovenzijde (ON) van de schakelaar om het apparaat aan te zetten. Wanneer het apparaat
aan staat zal de indicator oplichten. Druk op de onderzijde (OFF) om het apparaat uit te zetten.
Let op het volgende:
schade aan de luidsprekers te voorkomen - het luidspreker beveiligingscircuit zal het volume een aantal seconden muten nadat het
apparaat aangezet is.
SOURCE (BRON)
VOLUMEKNOP - Om het volume hoger of lager te zetten.
Voordat u de versterker aan zet, moet het volume op de laagste stand staan (volledig tegen de klok in) om
- Om verschillende signaalbronnen te kiezen.
ATTENTIE:
Uw iTube 182 mag alleen weer aangezet worden
nadat hij minimaal 5 minuten uit heeft gestaan.
Dit om schade aan de buizen te voorkomen.
!!
Line Input
6
iTube 182
Speaker Output
AC Power Input

GEBRUIKS
AANWIJZING
Probleemoplossingen
Als de iTube 182 niet normaal werkt, kunt u de onderstaande punten nakijken en nagaan of daarmee de fout
opgelost is. Mochten deze punten geen oplossing bieden, dient u contact op te nemen met uw geautoriseerde
dealer of servicepunt.
SYMPTOOM
-
Apparaat gaat niet
aan als de AAN/UIT
knop wordt ingedrukt.
- Geen geluid.
- Er komt geen geluid
uit de rechter en/of
linker luidspreker.
- Het geluidsbeeld is
niet stabiel.
MOGELIJKE OORZAAK
- Het stroomsnoer is niet
correct aangesloten.
-
De adapter is niet aangesloten.
- De volumeknop staat volledig
tegen de klok in (dicht).
- De aansluitsnoeren zijn niet
juist bevestigd.
- De luidsprekers zijn niet juist
aangesloten.
- De luidsprekers zijn niet juist
aangesloten.
- De bron is niet juist
aangesloten.
- De plus en de min zijn onjuist
aangesloten.
OPLOSSING
- Kijk na of het snoer goed ingestoken is.
- Draai met de klok mee (open).
- Sluit opnieuw aan.
- Sluit opnieuw aan.
- Sluit juist aan.
- Sluit juist aan.
- Sluit opnieuw juist aan.
7

Specificaties
• Bron ingangen: 3
• Max Uitgangsvermogen: 18W x 2
• Frequentiebereik: 20-20KHz (±1.5dB)
• Vervorming: ≤ 2%
• Signaal-Ruis Verhouding: ≥ 86dB
• Ingangsgevoeligheid: 230m V
• Ingangsimpedantie: 100K ohm
• Uitgangsimpedantie: 4 ohm/8 ohm
• Afmetingen (LxBxH): 382mm x 290mm x 157mm
• Gewicht: 14.2KGs
• Gebruikte Buizen: KT94 (KT88,KT90,KT100) x 2,
6N3(5670) x 4,
6E2(EM87) x 1
Specificaties kunnen zonder voorafgaande
mededelingen gewijzigd worde.
Service
Neem contact op met uw dealer.
info@fat-man.co.uk
www.fat-man.co.uk
8
iTube 182
FATMAN
by
TL A
®
udio
 Loading...