


SRC-2010
Programmable Remote
Operation manual

The Smart Remote Control User’s Manual
PrefacePreface
About this manual
This manual is designed to make using the SRC-2010 Smart Remote Control as easy as possible. Information in
this document has been carefully checked for accuracy; however, no guarantee is given to the correctness of the
contents. The information in this document is subject to change without notice.
The SRC-2010 comes preprogrammed with commands to control various Faroudja products. See each product’s
operations manual for details on the available functions. These commands can be changed if using the setup software from a PC. The original program can be downloaded from www.faroudja.com . For instructions on using the
PC setup software, see the Help menu in the software.
Copyright
© Copyright 2003
This document contains proprietary information protected by copyright. All rights are reserved. No part of this
manual may be reproduced by any mechanical, electronic or other means, in any form, without prior written permission of the manufacturer.
Trademarks
All trademarks and registered trademarks are the property of their respective owners.
ii

Table of Contents
PREFACE..................................................................................................................I
CHAPTER 1.............................................................................................................1
Unpacking the Smart Remote Control ................................2
Smart Remote Control features ..........................................3
Identifying components......................................................4
CHAPTER 2.............................................................................................................7
Power supply......................................................................7
Inserting the batteries............................................................................8
Power supply precautions....................................................................9
Power supply tips...................................................................................9
Battery low icon......................................................................................9
The LCD ............................................................................10
Turning the Smart Remote Control on............................................10
Touch screen precautions..................................................................11
The Information screen.......................................................................12
Smart Remote Control buttons.......................................... 13
Direct access buttons..........................................................................13
Touch screen buttons..........................................................................14
CHAPTER 3..........................................................................................................15
The main menu ................................................................ 15
The device menu ..............................................................16
The setup menu ................................................................17
CHAPTER 4..........................................................................................................18
Setting the clock ...............................................................19
Using the timer................................................................. 20
Timer view.............................................................................................21
Timer setup............................................................................................21
Relabeling timers.................................................................................22
Using the program menu.................................................. 23
Using the learning function...............................................................23
Clearing a key......................................................................................26
Clearing a device................................................................................27
Clearing all devices............................................................................27
Changing the LCD layout ..................................................28
Resizing or adding buttons on the main menu...............................29
Relabeling buttons on the main menu.............................................33
Deleting buttons on the main menu.................................................35
Adjusting buttons on the device menu.............................................36
Relabeling device menu buttons.............................................................37
Using recall.............................................................................................38
Using macros.................................................................... 39
Macro setup..........................................................................................40
Relabeling a macro.............................................................................41
iii

The Smart Remote Control User’s Manual
Deleting a macro .................................................................................42
The duplicate menu.......................................................... 43
Making LCD adjustm ents ..................................................44
Adjusting the LCD contrast...............................................................45
Adjusting the LCD backlight.............................................................46
Calibrating the LCD...........................................................................47
APPENDIX A........................................................................................................48
Specifications ...................................................................48
APPENDIX B........................................................................................................50
Troubleshooting................................................................ 50
iv

Table of Figures
Figure 1-1: Front view..........................................................................................4
Figure 1-2: Rear view ............................................................................................6
Figure 2-1: Inserting the batteries......................................................................8
Figure 2-2: Turning the LCD on.......................................................................10
Figure 2-3: The Information Screen.................................................................12
Figure 2-4: Direct access buttons....................................................................13
Figure 2-5: Touch screen buttons....................................................................14
Figure 3-1: The main menu................................................................................15
Figure 3-2: The TV device menu.......................................................................16
Figure 3-3: The setup menu...............................................................................17
Figure 4-1: The clock menu...............................................................................19
Figure 4-2: Timer list..........................................................................................20
Figure 4-3: The timer menu...............................................................................20
Figure 4-4: Setting up timer options...............................................................21
Figure 4-5: The program submenu...................................................................23
Figure 4-6: Using the Learning eye.................................................................24
Figure 4-7: Programming devices....................................................................25
Figure 4-8: Programming the direct access buttons....................................25
Figure 4-9: The adjust menu..............................................................................28
Figure 4-10: Adjusting main menu buttons....................................................29
Figure 4-11: Adjusting buttons on the device menu.....................................36
Figure 4-12: The macro list...............................................................................39
Figure 4-13: The macro menu...........................................................................39
Figure 4-14: The “other” menu........................................................................44
Figure 4-15: Adjusting the contrast.................................................................45
Figure 4-16: Adjusting the backlight..............................................................46
v


Chapter 1Chapter 1
Introducing the Smart Remote Control
Congratulations on the purchase of your SRC-2010 Smart Remote Control.
The Smart Remote Control is a digital universal remote control that is easy to
use and configure, enabling you to control all your IR equipped electronic devices.
One feature of the Smart Remote Control is the touch screen control panel,
which reduces the number of buttons on the device, making it easy for you to
find the function you want. You can control up to 10 devices, including a
VCR, DVD, amplifier, TV, and LD/VCD.
The Smart Remote Control is easy to set up. With the “Learning eye” you
can easily configure each device in your household or office. You can also easily edit the device list, make changes to the LCD appearance, and adjust other
settings. In addition, with the Macro function, you can initiate a chain of up
to 25 commands with the touch of a button.
Most universal remote controls have a set list of devices and static functions
that don’t provide you with a lot of flexibility. The Smart Remote Control
enables you to add and delete devices, relabel device buttons, and change the
size and shape of LCD panel buttons. With this convenient and easy to use
Smart Remote Control, you can control all your devices with one remote control solution. No longer will you have to search for several different remotes!

The Smart Remote Control User’s Manual
2 Faroudja
This manual will help you learn how to use all the advanced features of the Smart Remote Control. It will not
explain how to use the functions for your devices. Please
refer to your device’s user manual for information related to
your device.
Unpacking the Smart Remote Control
After you have unpacked the Smart Remote Control, check the contents to
make sure the following items are included.
l Smart Remote Control
l This user’s manual
l SLC-2081 Connecter
l Transmission cable
If any of the above items are missing or appear damaged, contact your dealer
immediately. Do not throw the shipping carton away in case you need to
ship your Smart Remote Control.

Introducing the Smart Remote Control
Faroudja 3
Smart Remote Control features
This section provides an overview of the key features of the Smart Remote
Control. For more information on getting the most from these features, refer
to Chapter 2.
• Large touch screen display with automatic backlighting for visibility
in dim lighting
• Direct access buttons for accessing frequently used functions such as
volume, channel, play, mute, and stop
• Macro button stores 12 macros—each macro can store 25 commands
• Controls up to 10 devices including LD/VCD, TV, Satellite, VCR and
CD
• Popup information screen provides you with time, date, and battery
charge information
• Uses the IR codes from your existing remote controls to quickly set
up devices

The Smart Remote Control User’s Manual
4 Faroudja
Identifying components
Please refer to the following illustrations to identify the components of the
Smart Remote Control. This section provides an overview of the Smart Remote Control’s features and controls. Refer to Chapter 4 for a detailed
description on operating and getting the most from these features.
Figure 1-1: Front view

Introducing the Smart Remote Control
Faroudja 5
1. Light Sensor
The Light Sensor detects the ambient light brightness or dimness
and will turn on according to the setting.
2. LCD
The LCD display enables you to configure and operate your devices by touching the screen on the function you want. Touch the
LCD panel to power on the Smart Remote Control. Refer to
Chapter 2, The LCD for a description of the functions in this dis-
play.
3. Off button
When the Smart Remote Control displays the main menu, press
this button to turn the Smart Remote Control off. When a device
menu is displayed, this button functions as a power-off button for
the device.
4. Device power button
After you have configured your devices, press this button to
power on the selected device.
5. Device direct access buttons
These buttons function differently according to the currently selected device. Use these buttons to change channels, raise and
lower the volume, and play or stop tapes, CDs, VCDs, and other
recorded media. For more information, please refer to page 13,
Direct access buttons.
6. Menu button
Press the Menu button for three seconds to enter and exit the advance setup function. Refer to Chapter 4 for details.
7. Enter/mute button
When the main menu is being accessed, press this button to confirm your changes. If the main menu is not being accessed, press
this button to mute the audio output of your device.
8. Beep alert speaker opening
Enables you to hear a beep when you press a button. You can disable the beep from the information screen. Refer to page 12, The
Information screen.

The Smart Remote Control User’s Manual
6 Faroudja
The following illustration shows the rear of the Smart Remote Control.
1. IR port
2. Battery compartment
3. Learning eye
Figure 1-2: Rear view
1. IR port
Point the IR port at the IR receiver of the device you wish to operate.
2. Battery cover
Remove this cover to replace the AAA batteries.
3. Learning eye
Point your device’s remote control at this eye to enable the Smart
Remote Control to learn your remote control’s functions. For
more information, refer to page 23, Using the learning function.

CChapter 2hapter 2
Getting Started
The previous chapter helped you to familiarize yourself with the various
components and controls of the Smart Remote Control. This chapter will
guide you through the steps for inserting the batteries and using the many features.
Incorrect use of the batteries may cause them to
burst or may cause leakage, which might damage
the interior of the unit. Be sure to only use the co rrect type of rechargeable Ni-MH batteries with the
Smart Remote Control.
Power supply
The Smart Remote Control operates on three AAA batteries. The batteries
are packed separately and must be inserted before you can operate the Smart
Remote Control.

The Smart Remote Control User’s Manual
8 Faroudja
Inserting the batteries
To insert the batteries, refer to the following illustration and instructions:
1. Remove
battery
cover.
2. Insert batteries.
Ensure
that you
insert
the batteries
according to
the marking
inside the
battery case.
Figure 2-1: Inserting the batteries
1. Locate the battery bay cover at the back of the Smart Remote Control.
2. Put your thumb in the battery cover slot and pull to remove the
cover.
3. Insert the batteries into the bay in the direction indicated in the battery compartment.
4. Replace the battery bay cover. You will hear it click into place.

Getting Started
Faroudja 9
Power supply precautions
• Be sure that the positive (+) and negative (-) polarities of each battery match the polarities indicated in the compartment.
• Do not expose the batteries to excessive heat or flame.
• Keep the batteries out of the reach of children.
Power supply tips
• When the batteries are weak, it will be harder to control devices from
a distance.
• Recharge the batteries immediately when the battery low powerwarning icon appears in the information screen.
• The Ni-MH batteries have to be charged for 10 hours before the first
use
• If you choose to use the rechargeable Ni-MH batteries, please replace
your batteries in time when they have been used for over two years
or have been recharged over 500 times; there might be a danger of
leakage.
• Device configuration data will be automatically saved when batteries
are being replaced.
Battery low icon
When the battery charge is low, the battery low icon will be displayed in
the information screen. You should recharge the batteries or replace the bat-
teries with new ones immediately.

The Smart Remote Control User’s Manual
10 Faroudja
The LCD
The LCD (liquid crystal display) touch screen enables you to configure and
operate your Smart Remote Control with the touch of a finger.
Turning the Smart Remote Control on
To turn the Smart Remote Control on, simply press the Hardware Access
Button with your finger:
Figure 2-2: Turning the LCD on

Getting Started
Faroudja 11
You can also turn the Smart Remote Control on by pressing one of the direct
access buttons.
Touch screen precautions
Please read the following instructions carefully:
• Tap the LCD touch screen gently; never use force.
• Do not use a pen or any sharp object to tap the screen. Otherwise,
you might damage the surface. You can use a blunt object such as a
pencil eraser or the cap of a pen.
• Keep the touch screen dry. Wipe off any spills immediately. The
Smart Remote Control is not waterproof; never immerse it in liquid.
• Do not expose the Smart Remote Control to extreme temperatures.
Keep it away from heat sources.
• Avoid dropping the Smart Remote Control.
• Do not drop anything on the touch screen.
• Clean the LCD touch screen with a soft cloth. If needed, dampen the
cloth slightly before cleaning. Never use abrasives or cleaning solutions.

The Smart Remote Control User’s Manual
12 Faroudja
The Information screen
The Information screen is displayed when you press the Information screen
shortcut icon on the Smart Remote Control:
Main
1999
01- 01
03:23
Friday
Macro screen
shortcut icon
Information screen
shortcut icon
Date and
time
Press this
icon to
enable or
disable the
beep signal.
Indicates
battery
charge
level.
Figure 2-3: The Information Screen
If you want to view the Information Screen from any menu, press the Information icon at the top right. Press the Information icon again to exit the
Information screen.
The Information Screen shows the date, day, time, and the current battery
charge level. You can also press the mute icon to mute the beep that you hear
when you press buttons on the touch screen.

Getting Started
Faroudja 13
Smart Remote Control buttons
The Smart Remote Control has two sets of buttons for your convenience—
direct access buttons and touch screen buttons.
Direct access buttons
The direct access buttons provide you with easy access to often-used functions such as volume and channel control, fast forward and fast reverse, play
and stop.
Figure 2-4: Direct access buttons

The Smart Remote Control User’s Manual
14 Faroudja
Touch screen buttons
The touch screen buttons enable you to control your devices as you would
with your remote control, set up macros, and configure your LCD panel the
way you want.
Figure 2-5: Touch screen buttons
Using the touch screen is easy. Simply press the screen to activate a function.
Press the arrow keys at the bottom of the touch screen to scroll between
pages in the menu.

Chapter 3Chapter 3
Operating the Smart Remote Control
This chapter will tell you how to set up the Smart Remote Control, how to
automatically configure devices, and how to use the advanced features such as
the macros.
Press the Hardware Access Button with your finger to turn the Smart
Remote Control on. The first screen that you see is the main menu.
The main menu
The main menu displays a list of the devices currently available on the Smart
Remote Control. You can delete, rename, and configure these devices using
the learning function (see page 23, Using the learning function).
Main
LD/
VCD
Sat
DVDVCR
AMP TV
Main
AUX
1
AUX
2
TUNER
/ TAPE
CD
Page 1 Page 2
Figure 3-1: The main menu

The Smart Remote Control User’s Manual
16 Faroudja
Press the left or right arrows to scroll between the main menu pages.
The device menu
Each device has its own device menu that contains the buttons and controls
peculiar to that device. Each device has four pages in the menu. You can
scroll between the pages using the LCD left and right arrows.
From the main menu, press the TV button to display the TV device menu:
TV
1 2 3
4 5 6
7 8 9
100 0
1
Indicates
menu
page
number
Device Header
Press this header
to return to the Main
Menu.
Figure 3-2: The TV device menu
You can return to Main menu by pressing both the Device Header or menu
button. You can easily configure the devices using the learning function. Refer
to page 23, Using the learning function).

Operating the Smart Remote Control
Faroudja 17
The setup menu
The setup menu enables you to configure your Smart Remote Control.
Press the menu button
menu
for three seconds. The setup menu appears:
Setup
Timer
Clock
Program
Adjust
Macro
Duplicate
Other
Figure 3-3: The setup menu
To scroll through the items on the setup menu, use the hardware channel up
CH+
and channel down
CH-
buttons. Press the enter (mute)
mute
button to en-
ter an item submenu. Press the menu
menu
button to return to the previous
screen.
Refer to Chapter 4 for information on using the items in the setup menu.

Chapter 4Chapter 4
Customizing the Smart Remote Control
This chapter shows you how to customize your Smart Remote Control to
make it fit your particular requirements, how to use the learning function to
configure your devices, and how to set up the LCD panel to your specifications.
Press the menu button
menu
for three seconds to open the setup menu. Seven
items are available:
Clock Enables you to set the date and time.
Timer Enables you to set a timer to run a device at a specified time.
Program Enables you to transfer commands from your device’s remote
control to buttons on the Smart Remote Control. You can
also clear the settings for buttons and devices from this
screen. You can also run macro setup from here and create
macros for specific devices.
Adjust Enables you to resize, relabel, or delete LCD buttons.
Macro Enables you to record, label, and delete macros.
Duplicate Enables you to duplicate all data to another SRC-2010
Other Enables you to adjust the LCD contrast and backlight, and to
calibrate the LCD panel.
Each item is covered in detail below:

Customizing the Smart Remote Control
Faroudja 19
Setting the clock
The clock menu enables you to set the Smart Remote Control date and time.
In the setup menu, scroll to clock and press enter. You see the following
screen:
Clock
1999
01- 01
03:23
Friday
1
Blinking
cursor
0 1 2 3 4
5 6 7 8 9
Figure 4-1: The clock menu
Change the number under the blinking cursor by pressing 0 to 9 on the LCD
panel. After you enter a number, the cursor automatically moves to the next
position. Press the right and left arrows on the LCD to move the cursor forward or backward.
When you have finished making your adjustments, press enter.

The Smart Remote Control User’s Manual
20 Faroudja
Using the timer
The timer function enables you to set up devices to turn on at specified times.
In the setup menu, scroll to timer and press enter. You see a list of timers:
Timer
Timer 01
Timer 02
Timer 03
Timer 04
Figure 4-2: Timer list
Use the channel up or channel down to scroll through the list. There are 12
timers available. Select one of the timers and press enter. You see the following screen:
Timer
Setup
View
Relabel
Figure 4-3: The timer menu
Each item is covered below.

Customizing the Smart Remote Control
Faroudja 21
Timer view
View enables you to look at previously stored timer settings.
Timer setup
Setup enables you to setup a device function to go off at a specified time.
Scroll to setup and press enter. The following screen appears:
Timer
03:23
0
0 1 2 3 4
5 6 7 8 9
Daily
Press here
to select
which day
or days you
want the timer
to run.
Press these
numbers to
enter the time
you want the
timer to run.
Figure 4-4: Setting up timer options
Enter the time and day or date that you want the timer to go off. When you
have set the timer, press enter. The device menu appears. Open a device and
then press the button of the function that you want to apply the timer settings to. For example, you can set your VCR to record a movie at a certain
time, or you can set a macro to run at a specified time.
Remarks: Selectable timer function
Disable: disable current timer function/ Daily: Everyday/ Specific: Specified
date/ Sunday: every Sunday/ Monday: every Monday/ Tuesday: every Tuesday/ Wednesday: every Wednesday/ Thursday: every Thursday/Friday: every

The Smart Remote Control User’s Manual
22 Faroudja
Friday/Saturday: Every Saturday/ Mon.~Fri.: Monday ~ Friday/ Mon.~Sat.:
Monday ~ Saturday
Relabeling timers
You can easily relabel the timer names. Follow these instructions:
1. From the timer menu (Figure 4-3) scroll to Relabel and press e n-
ter. The following screen appears:
Timer 1. . . . . . . . . . . . . . .
. . . . . . . . . . . . . . .. . . . . . .
AMBNCOD
P
F
R
E
Q
G
S
Y
H
T
Z
IUJ
V
L
X
K
W
2. Enter the alphanumeric characters from the LCD screen. Press P1
to access upper case letters, press P2 to access lower case letters,
and press P3 to access numbers and special characters.
3. Press enter when you have made your changes.

Customizing the Smart Remote Control
Faroudja 23
Using the program menu
The program menu enables you to set up devices, clear a configuration for a
key, clear the configuration for a device, or clear the configuration for all devices.
Program
Clr. Key
Learning
Clr. Device
Clr. All
Figure 4-5: The program submenu
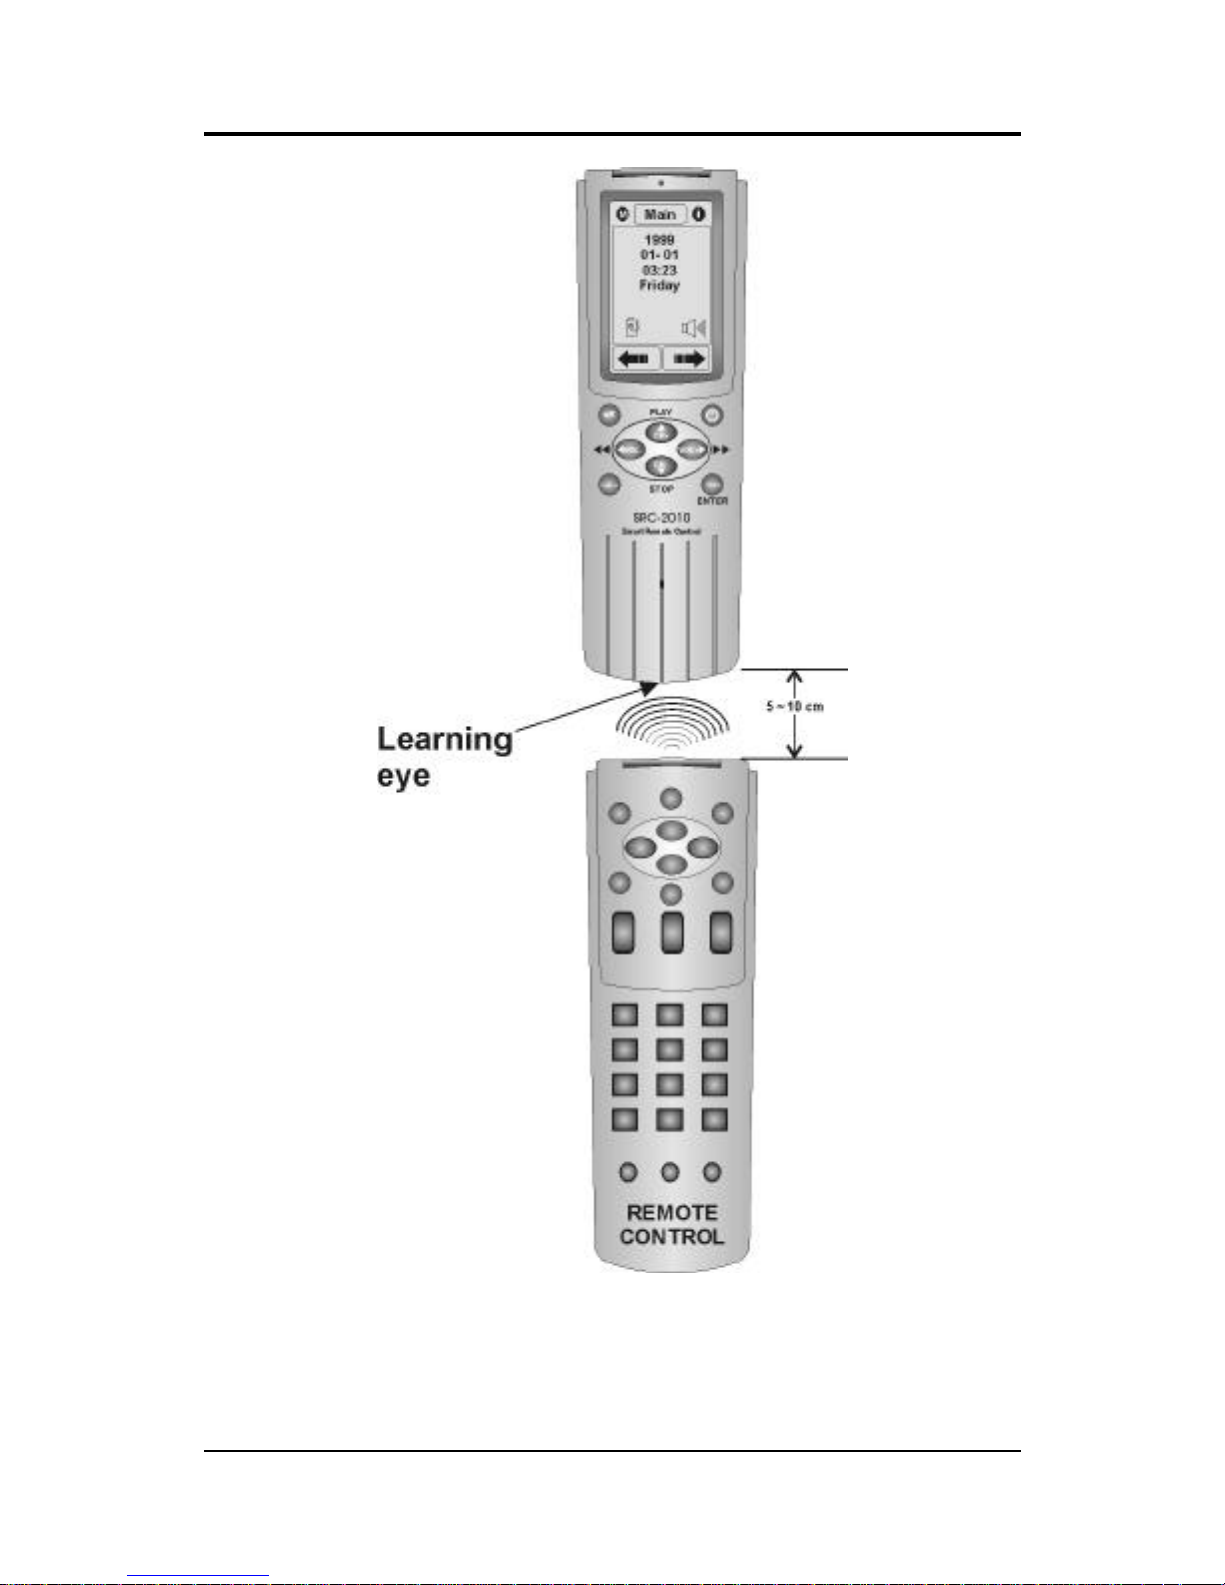
Using the learning function
This section will cover the Smart Remote Control learning function, which enables you to set up the controls for each device with your device’s remote
control.
When using the learning function, point your device’s remote control at the
Smart Remote Control’s Learning eye as shown in the following illustration:
The Smart Remote Control User’s Manual
24 Faroudja
Figure 4-6: Using the Learning eye
From the program menu (Figure 4-5), scroll to learning and press e nter. You
see the device buttons:

Customizing the Smart Remote Control
Faroudja 25
Program
AUX
1
AUX
2
TUNER
/ TAPE
CD
Figure 4-7: Programming devices
Press the button of the device that you want to program. You see the following screen:
Learn
Figure 4-8: Programming the direct access buttons
The buttons on the LCD correspond to the direct access buttons.
Press this macro shortcut icon to
open the macro recording func
tion.
Refer to page 39.
This Macro button is designed for
device menu. If you don’t need to
set any
Macro function in device
menu, Please skip this function.
In addition, from main menu’s
MACRO 1 to MACRO 12, each
MACRO button is independent.

The Smart Remote Control User’s Manual
26 Faroudja
The filled button corresponds to the direct access power button. With the
Learning eye, you can now map buttons on your device remote control to the
direct access buttons on the Smart Remote Control. Follow these instructions:
1. Point your remote control at the Smart Remote Control’s Learning
eye as shown in Figure 4-6.
2. Press your remote control power button. When the screen dis-
plays OK, release the power button. Refer to the following
illustration:
OK
3. The filled circle now corresponds to the channel up/play
CH+
di-
rect access button.
4. Follow the preceding instructions to map the remaining buttons.
You can also press a direct access button directly, and then map a remote control function to the button.
After you have finished configuring the direct access buttons, press the right
arrow button on the LCD screen to move to the next page in the device menu.
Follow the instructions above to map each button on your remote control to
the corresponding button on the Smart Remote Control’s LCD screen.
Clearing a key

Customizing the Smart Remote Control
Faroudja 27
The clear key function enables you to erase the settings for a button in one of
the device menus. Follow these instructions:
1. In the program menu, scroll to Clr. Key and press enter. The list
of devices appears.
2. Press the device you want to configure.
3. In the device menu, press the key you want to clear.
4. Repeat steps 1 through 3 for all other keys you want to clear.
Clearing a device
The clear device function enables you to erase the commands for a device.
Follow these instructions:
1. In the program menu, scroll to Clr. Device and press enter. The
list of devices appears.
2. Press the device you want to delete commands for. You see the
following screen:
Program
Sure ?
(Y) Enter
(N) Menu
3. Press enter to delete the commands for the device. Press menu to
cancel the deletion and return to the previous screen.
Clearing all devices

The Smart Remote Control User’s Manual
28 Faroudja
The Clear All function enables you to erase the commands for all devices.
Follow these instructions:
1. In the program menu, scroll to Clear All and press enter.
2. You are prompted to press the enter button to delete the settings
for all devices, or press the menu button to cancel the changes and
return to the previous screen.
Changing the LCD layout
The adjust menu enables you to resize, relabel, and delete buttons on the main
menu and on the device menus.
In the setup menu, scroll to adjust and press enter. You see the following
screen:
Adjust
Device
Main Menu
Figure 4-9: The adjust menu
Select Main Menu and press enter. You see the following screen:

Customizing the Smart Remote Control
Faroudja 29
Adjust
Relabel
Delete
Resize/Add
Figure 4-10: Adjusting main menu buttons
Each item is described below.
Resizing or adding buttons on the main menu
Follow the instructions below to resize buttons on the main menu.
1. Scroll to Resize/Add and press enter. You see the main menu:
Main
Press this icon
to toggle between
button resize and
text edit functions.
Press this icon
to undo an action.
AUX
1
AUX
2
TUNER
/ TAPE
CD
2. Press the button you want to resize.

The Smart Remote Control User’s Manual
30 Faroudja
Main
AUX
1
AUX
2
TUNER
/ TAPE
CD
3. Press the place where you want the upper left corner of the but-
ton to be. A black square appears where you pressed the LCD.
Main
AUX
1
AUX
2
TUNER
/ TAPE
CD
4. Press the place where you want the lower right corner of the
button to be. A black square appears where you pressed the LCD.

Customizing the Smart Remote Control
Faroudja 31
Main
AUX
1
AUX
2
TUNER
/ TAPE
CD
5. Press the space between the two black squares:
Main
AUX
1
AUX
2
TUNER
/ TAPE
CD
6. The button is resized:

The Smart Remote Control User’s Manual
32 Faroudja
Main
AUX
1
AUX
2
TUNER
/ TAPE
CD
Note the following points when resizi ng buttons:
• You cannot place the lower left corner above or to the
left of the upper right corner.
• You cannot resize a button to where it will overlap an
adjacent button.
• If you want to relabel a button, press the resize icon
in the upper right corner. The icon changes to a text
icon T . Press any of the device buttons, and relabel
the button according to the instructions in the next sec-
tion.
• If the total number of buttons on both main menu
pages is less than ten, you can add a new device bu tton using the procedure for resizing buttons. The only
difference is that you must select an empty space to
place the left-hand corner and the right -hand corner.

Customizing the Smart Remote Control
Faroudja 33
Relabeling buttons on the main menu
You can easily relabel the buttons on the main menu. Follow these instructions:
1. From the adjust menu (Figure 4-9) select Main Menu and press
enter.
2. Scroll to Relabel and press enter again. You see the device list.
3. Select a device to relabel. You see the following screen:
TV . . . . . . . . . . . . . . . . .
. . . . . . . . . . . . . . . . . . . . .
AMBNCOD
P
F
R
E
Q
G
S
Y
H
T
Z
IUJ
V
L
X
K
W
4. Enter the alphanumeric characters from the LCD screen. Press P1
to access upper case letters, press P2 to access lower case letters,
and press P3 to access numbers and special characters.
5. Press enter when you have made your changes. You see the fol-
lowing screen:

The Smart Remote Control User’s Manual
34 Faroudja
Adjust
SAT
VCR
DVD
AMP
TV
TUNER TAPE
CD
LD/VCD
6. Select which device attributes you want applied to your button.
When accessing your relabeled button, the menus will be the same
as the device that you select here.

Customizing the Smart Remote Control
Faroudja 35
Deleting buttons on the main menu
You can easily delete buttons on the main menu. Follow these instructions:
1. From the adjust menu (Figure 4-9) select Main Menu and press
enter.
2. Scroll to Delete and press enter again. You see the device list.
3. Select a device button to delete. You see the following screen:
Adjust
Sure ?
(Y) Enter
(N) Menu
4. Press the enter button if you want to delete settings for the but-
ton. Press the menu button if you want to cancel the deletion and
return to the previous screen.

The Smart Remote Control User’s Manual
36 Faroudja
Adjusting buttons on the device menu
From the adjust menu (Figure 4-9) select Device and press enter. You see
the following screen:
Adjust
Relabel
Delete
Recall
Resize / Add
Figure 4-11: Adjusting buttons on the device menu
The procedures for resizing and deleting buttons on the device menu are the
same as those for resizing and deleting buttons on the main menu. However,
the relabeling procedures are slightly different; there is an option to replace the
button’s text with an icon. Additionally, there is one more option in the adjust device submenu—Recall.

Customizing the Smart Remote Control
Faroudja 37
Relabeling device menu buttons
You can easily relabel the buttons in device menus or choose icons to represent the buttons. Follow these instructions:
1. From the adjust menu (Figure 4-9) select Device and press enter.
2. Scroll to Relabel and press enter again. You see the device list.
3. Select a device to relabel, for example “CD”. You see the following
screen:
Adjust
Scan Shuf.
Edit
Rept.
Time
1
T
Press the T icon to toggle between edit
button text and resize modes.
4. Press the button that you want to relabel, for example Scan. You
see the following screen:

The Smart Remote Control User’s Manual
38 Faroudja
Scan . . . . . . . . . . . . . . . . .
AMBNCOD
P
F
R
E
Q
G
S
Y
H
T
Z
IUJ
V
L
X
K
W
icon
S
5. Note that there is one additional button—the Icon button. Press
this button to display a list of icons:
Scan . . . . . . . . . . . . . . . . .
icon
S
< >
REC
CH+
CH-
6. Press any of the buttons shown to replace the text “Scan” with an
icon. Press < or > to scroll between the pages and display more
icons.
Using recall
The recall option enables you to recall the button’s original settings. After
you press recall, the device list appears. Press the device that you want to reset.

Customizing the Smart Remote Control
Faroudja 39
Using macros
The macro feature enables you to store up to 20 commands for each macro.
You can setup, relabel, and delete macros from the macro submenu. When
you have created a macro, you will be able to run many commands by pushing
only one button.
From the setup menu, scroll to macro and press enter. You see a list of macros:
Macro
Macro 01
Macro 02
Macro 03
Macro 04
Figure 4-12: The macro list
Scroll to one of the macros in the list and press enter. You see the following
screen:
Macro
Relabel
Delete
Setup
Figure 4-13: The macro menu
Each item is described below.

The Smart Remote Control User’s Manual
40 Faroudja
Macro setup
Follow these instructions to set up a macro:
1. From the macro menu, scroll to setup and press enter. The macro
is now being recorded.
2. Press the device button combination that you want to be recorded
into the macro.
If necessary, you can set a time delay between each command in
the macro. In the upper right-hand corner of the screen, you see an
hourglass icon 6. After pressing a command, press the hourglass
icon to open the following screen:
Macro
0.5
Sec
2
Sec
5
Sec
10
Sec
1
Sec
3
Sec
7
Sec
15
Sec
Press one of the listed durations (0.5 seconds to 15 seconds) if you
want to have a time delay occur between device commands.
3. When you have finished recording the macro press enter. You see
the following screen:

Customizing the Smart Remote Control
Faroudja 41
Macro
Processing
4. The macro has been recorded.
To run the macro, press the macro shortcut icon M in the upper left -hand
corner of the screen, and then select the macro you want to run from the
macro list.
Relabeling a macro
Follow these instructions to relabel a macro:
1. In the setup menu, scroll to Macro and press enter. The list of
macros appears.
2. Scroll to the macro you want to rename and press enter. The
macro menu appears:
Macro
Relabel
Delete
Setup
3. Scroll to Relabel and press enter. You see the following screen:

The Smart Remote Control User’s Manual
42 Faroudja
Macro . 1. . . . . . . . . . . . .
. . . . . . . .
AMBNCOD
P
F
R
E
Q
G
S
Y
H
T
Z
IUJ
V
L
X
K
W
P1 P2 P3
M
4. Enter the alphanumeric characters from the LCD screen. Press P1
to access upper case letters, press P2 to access lower case letters,
and press P3 to access numbers and special characters.
5. Press enter when you have made your changes.
Deleting a macro
Follow these instructions to delete a macro:
1. In the setup menu, scroll to Macro and press enter. The list of
macros appears.
2. Scroll to the macro you want to delete and press enter. The macro
menu appears:

Customizing the Smart Remote Control
Faroudja 43
Macro
Relabel
Delete
Setup
3. Scroll to Delete and press enter. You will see the following screen:
Macro
Processing
4. The macro information has been deleted.
The macro delete function only deletes the macro-recorded
data; it does not remove the macro name from the macro
list.
The duplicate menu
Please refer to the “SLC-2081 Connecter User’s guide”.

The Smart Remote Control User’s Manual
44 Faroudja
Making LCD adjustments
The other menu enables you to set the LCD contrast, adjust the backlight, and
calibrate your Smart Remote Control.
From the setup menu, scroll to Other and press enter. You see the following
screen:
Other
Backlight
Calibrate
Contrast
Figure 4-14: The “other” menu
Each item is described below.

Customizing the Smart Remote Control
Faroudja 45
Adjusting the LCD contrast
Scroll to Contrast and press enter. You see the following screen:
Other
Contrast
( )
Press this
arrow to
decrease the
LCD contrast.
Press this
arrow to
increase the
LCD contrast.
Figure 4-15: Adjusting the contrast
Press the right LCD arrow to increase the contrast. Press the left LCD arrow
to decrease the contrast.

The Smart Remote Control User’s Manual
46 Faroudja
Adjusting the LCD backlight
From the “other” menu, scroll to Backlight and press enter. You see the following screen:
Back-Light
- - Switch - -
- - Level - - -
- - Period - -
ON
Max : 99
Set : 52
Min : 00
+
_
<
<
05
sec
Press to
turn the
backlight
off and on.
Press to increase
the duration that
the backlight stays
on.
Press to decrease
the duration that
the backlight stays
on.
Indicates the current
backlight sensitivity
level.
Press to increase
the backlight sensitivity
level.
Press to decrease
the backlight sensitivity
level.
Figure 4-16: Adjusting the backlight
The backlight detects the ambient light brightness or dimness and will turn on
according to the setting in this screen.
Press and hold the Hardware Access Power button to automatically adjust the
sensitivity level of the LCD panel to the ambient light. Alternatively you can
press the + and – buttons to manually set the backlight sensitivity.
• Press + to increase the sensitivity of the backlight to the ambient
lighti ng. A high number indicates that a greater decrease of the
brightness in the ambient lighting will automatically switch the
backlight on.
• Press – to decrease the sensitivity of the backlight to the ambient
lighting. A low number indicates that a slight decrease of the
brightness in the ambient lighting will automatically switch the
backlight on.
When you have finished adjusting the backlight, press enter to save your
changes and return to the other menu.

Customizing the Smart Remote Control
Faroudja 47
Calibrating the LCD
Sometimes the LCD buttons become uncalibrated. When this happens, pres sing an LCD button will result in the adjacent button being pressed. In this
instance, you should calibrate the LCD panel.
From the other menu, scroll to Calibrate and press enter. You will see the
calibrate screen. Press the edge of the screen next to the pen icon. The pen
icon will move to the next edge. Continue pressing the edge of the screen next
to the pen icon until all four edges of the screen have been processed.
This concludes Chapter 4. The following appendixes provide specifications
and some troubleshooting information.

Appendix AAppendix A
Specifications
Model
SRC-2010
Battery
3 x AAA alkaline batteries or Ni-MH rechargeable batteries
Dimensions
210 (L) x 68 (W) x 24 (H) mm
Weight
175.5g (batteries included)
Power sa ving
LCD turns off 25 minutes after last operation
Battery consumption
In use: 50mA / Standby: 280µA
LCD off: 30µA
Display
Touch liquid crystal display
Remote capability
Ten devices
Display types
TV, DSS/SAT/cable, VCR, DVD, AMP,
tape/tuner, CD, AUX
IR Range
8~ 10 M, 35~45
Acceptable frequency
10 KHz~125 KHz
Memory
Flash memory
Backlight
EL backlight
Attachments
User’s manual
Accessories
SLC-2081 Connecter,
Transmission cable

Customizing the Smart Remote Control
Faroudja 49

Appendix BAppendix B
Troubleshooting
If you have trouble configuring or operating the SRC-2010, first check that you have
inserted the batteries correctly (page 8). Then check the items below.
Symptom Remedy
The SRC-2010
doesn’t operate your
device.
• Move closer to the device. The maximum
operating distance is approximately 10 meters.
• Ensure that you are aiming the SRC-2010
directly at the device and that there are no
obstructions between the SRC-2010 and
the device.
• Ensure that you have used the learning
function (page 23) to configure the device.
• Make sure that the desired device on the
SRC-2010 LCD panel has been selected.
You cannot operate a
device even after configuring the device
using the learning
function (page 23).
• Make sure that you have correctly “mapped”
your device’s remote control to the SRC-
2010.
• Clear the device data from the SRC-2010
(page 26) and carry out the learning function again (page 23).
You see an “error”
display during the
learning procedure.
• Try the learning procedure again (page 23).
You see an “error”
display during operation.
• The button that you pressed has not been
configured. Configure the button using the
learning procedure (page 23).
The LCD screen
turns off.
• The SRC-2010 is preset at the factory to
automatically switch the LCD off after 25
minutes if left unused. Just press the
Hardware Access Button to turn the
SRC-2010 back on again.
 Loading...