


 Loading...

2 |
Last modified: November, 2014
© 1999 - 2014 Faronics Corporation. All rights reserved. Faronics, Deep Freeze, Faronics Core, Faronics Anti-Virus, Anti-Executable, Faronics Device Filter, Faronics Power Save, Faronics Insight, Faronics System Profiler, and WINSelect are trademarks and/or registered trademarks of Faronics Corporation. All other company and product names are trademarks of their respective owners.
Deep Freeze Enterprise User Guide

|3
Contents
Preface . . . . . . . . . . . . . . . . . . . . . . . . . . . . . . . . . . . . . . . . . . . . . . . . . . . . . . . |
7 |
Important Information. . . . . . . . . . . . . . . . . . . . . . . . . . . . . . . . . . . . . . . . . . . . . . . . . . . . . 8
About Faronics . . . . . . . . . . . . . . . . . . . . . . . . . . . . . . . . . . . . . . . . . . . . . . . . . . . . . . . 8
Product Documentation . . . . . . . . . . . . . . . . . . . . . . . . . . . . . . . . . . . . . . . . . . . . . . . . . 8
Technical Support . . . . . . . . . . . . . . . . . . . . . . . . . . . . . . . . . . . . . . . . . . . . . . . . . . . . . . . . 9
Contact Information. . . . . . . . . . . . . . . . . . . . . . . . . . . . . . . . . . . . . . . . . . . . . . . . . . . . 9
Introduction . . . . . . . . . . . . . . . . . . . . . . . . . . . . . . . . . . . . . . . . . . . . . . . . . . |
11 |
Deep Freeze Overview. . . . . . . . . . . . . . . . . . . . . . . . . . . . . . . . . . . . . . . . . . . . . . . . . . . . 12
System Requirements . . . . . . . . . . . . . . . . . . . . . . . . . . . . . . . . . . . . . . . . . . . . . . . . . . . . 13
Deep Freeze Enterprise Files . . . . . . . . . . . . . . . . . . . . . . . . . . . . . . . . . . . . . . . . . . . . . . . 14
Installing Deep Freeze . . . . . . . . . . . . . . . . . . . . . . . . . . . . . . . . . . . . . . . . . . |
15 |
Installation Overview. . . . . . . . . . . . . . . . . . . . . . . . . . . . . . . . . . . . . . . . . . . . . . . . . . . . . 16
Installing Deep Freeze Configuration Administrator and Enterprise Console . . . . . . . . . . . . 16
Customization Code . . . . . . . . . . . . . . . . . . . . . . . . . . . . . . . . . . . . . . . . . . . . . . . . . . . . . 21
Re-Initializing the Customization Code . . . . . . . . . . . . . . . . . . . . . . . . . . . . . . . . . . . . . . 21
Update Mode . . . . . . . . . . . . . . . . . . . . . . . . . . . . . . . . . . . . . . . . . . . . . . . . . . . . . . . 21
One Time Passwords . . . . . . . . . . . . . . . . . . . . . . . . . . . . . . . . . . . . . . . . . . . . . . . . . . . . . 23
Using Deep Freeze Configuration Administrator . . . . . . . . . . . . . . . . . . . . . . . 25
Accessing the Configuration Administrator . . . . . . . . . . . . . . . . . . . . . . . . . . . . . . . . . . . . . . 26
Toolbar and Menus . . . . . . . . . . . . . . . . . . . . . . . . . . . . . . . . . . . . . . . . . . . . . . . . . . . 26
Passwords Tab . . . . . . . . . . . . . . . . . . . . . . . . . . . . . . . . . . . . . . . . . . . . . . . . . . . . . . . . . 28
Drives Tab . . . . . . . . . . . . . . . . . . . . . . . . . . . . . . . . . . . . . . . . . . . . . . . . . . . . . . . . . . . . 29
Frozen Drives . . . . . . . . . . . . . . . . . . . . . . . . . . . . . . . . . . . . . . . . . . . . . . . . . . . . . . . 29
ThawSpace . . . . . . . . . . . . . . . . . . . . . . . . . . . . . . . . . . . . . . . . . . . . . . . . . . . . . . . . . 30
Existing ThawSpace . . . . . . . . . . . . . . . . . . . . . . . . . . . . . . . . . . . . . . . . . . . . . . . . . . . 31
Always Thaw External Hard Drives. . . . . . . . . . . . . . . . . . . . . . . . . . . . . . . . . . . . . . . . . 32
Workstation Tasks Tab . . . . . . . . . . . . . . . . . . . . . . . . . . . . . . . . . . . . . . . . . . . . . . . . . . . . 34
Windows Update . . . . . . . . . . . . . . . . . . . . . . . . . . . . . . . . . . . . . . . . . . . . . . . . . . . . . 35
Restart. . . . . . . . . . . . . . . . . . . . . . . . . . . . . . . . . . . . . . . . . . . . . . . . . . . . . . . . . . . . 38
Shutdown. . . . . . . . . . . . . . . . . . . . . . . . . . . . . . . . . . . . . . . . . . . . . . . . . . . . . . . . . . 39
Idle Time . . . . . . . . . . . . . . . . . . . . . . . . . . . . . . . . . . . . . . . . . . . . . . . . . . . . . . . . . . 40
Batch File . . . . . . . . . . . . . . . . . . . . . . . . . . . . . . . . . . . . . . . . . . . . . . . . . . . . . . . . . . 42
Thawed Period . . . . . . . . . . . . . . . . . . . . . . . . . . . . . . . . . . . . . . . . . . . . . . . . . . . . . . 44
Windows Update Tab . . . . . . . . . . . . . . . . . . . . . . . . . . . . . . . . . . . . . . . . . . . . . . . . . . . . . 47
Batch File Tab . . . . . . . . . . . . . . . . . . . . . . . . . . . . . . . . . . . . . . . . . . . . . . . . . . . . . . . . . . 49
Advanced Options Tab . . . . . . . . . . . . . . . . . . . . . . . . . . . . . . . . . . . . . . . . . . . . . . . . . . . . 51
Network . . . . . . . . . . . . . . . . . . . . . . . . . . . . . . . . . . . . . . . . . . . . . . . . . . . . . . . . . . . 51
Advanced Options . . . . . . . . . . . . . . . . . . . . . . . . . . . . . . . . . . . . . . . . . . . . . . . . . . . . 52
Stealth Mode . . . . . . . . . . . . . . . . . . . . . . . . . . . . . . . . . . . . . . . . . . . . . . . . . . . . . . . 54
License . . . . . . . . . . . . . . . . . . . . . . . . . . . . . . . . . . . . . . . . . . . . . . . . . . . . . . . . . . . 54
Creating Workstation Install Program and Workstation Seed . . . . . . . . . . . . . . . . . . . . . . . . . 55
Deep Freeze Enterprise User Guide

4 |Contents
Using Deep Freeze Enterprise Console . . . . . . . . . . . . . . . . . . . . . . . . . . . . . . 57
Deep Freeze Configuration . . . . . . . . . . . . . . . . . . . . . . . . . . . . . . . . . . . . . . . . . . . . . . . . 58 Applying Deep Freeze Configuration . . . . . . . . . . . . . . . . . . . . . . . . . . . . . . . . . . . . . . . 58 Editing Deep Freeze Configuration . . . . . . . . . . . . . . . . . . . . . . . . . . . . . . . . . . . . . . . . 59 Deleting Deep Freeze Configuration . . . . . . . . . . . . . . . . . . . . . . . . . . . . . . . . . . . . . . . 59 Exporting Deep Freeze Configuration . . . . . . . . . . . . . . . . . . . . . . . . . . . . . . . . . . . . . . 59
Deep Freeze Enterprise Console . . . . . . . . . . . . . . . . . . . . . . . . . . . . . . . . . . . . . . . . . . . . 60 Launching the Enterprise Console . . . . . . . . . . . . . . . . . . . . . . . . . . . . . . . . . . . . . . . . 60 Activating the Enterprise Console. . . . . . . . . . . . . . . . . . . . . . . . . . . . . . . . . . . . . . . . . 60 Status Icons . . . . . . . . . . . . . . . . . . . . . . . . . . . . . . . . . . . . . . . . . . . . . . . . . . . . . . . 61
View Columns . . . . . . . . . . . . . . . . . . . . . . . . . . . . . . . . . . . . . . . . . . . . . . . . . . . . . . . . . 62 Status Based Selection. . . . . . . . . . . . . . . . . . . . . . . . . . . . . . . . . . . . . . . . . . . . . . . . . . . 63
Managing Communication Between the Console and Workstations. . . . . . . . . . . . . . . . . . . . . 64 Configuring the local service . . . . . . . . . . . . . . . . . . . . . . . . . . . . . . . . . . . . . . . . . . . . 64 Editing or Removing a local service Connection . . . . . . . . . . . . . . . . . . . . . . . . . . . . . . . 66
Remote Consoles. . . . . . . . . . . . . . . . . . . . . . . . . . . . . . . . . . . . . . . . . . . . . . . . . . . . . . . 67 Setting up Remote Control Enabled Connections . . . . . . . . . . . . . . . . . . . . . . . . . . . . . . 67
Connecting to a Remote Console . . . . . . . . . . . . . . . . . . . . . . . . . . . . . . . . . . . . . . . . . . . . 68
Managing Deep Freeze with the Console. . . . . . . . . . . . . . . . . . . . . . . . . . . . . . . . . . . . . . . 69 Updating Deep Freeze Software. . . . . . . . . . . . . . . . . . . . . . . . . . . . . . . . . . . . . . . . . . 70 Sending Messages to Computers . . . . . . . . . . . . . . . . . . . . . . . . . . . . . . . . . . . . . . . . . 70 Target Installing Deep Freeze . . . . . . . . . . . . . . . . . . . . . . . . . . . . . . . . . . . . . . . . . . . 70 Updating a Deep Freeze Configuration File . . . . . . . . . . . . . . . . . . . . . . . . . . . . . . . . . . 70 Run Windows Update . . . . . . . . . . . . . . . . . . . . . . . . . . . . . . . . . . . . . . . . . . . . . . . . . 71 Format ThawSpace. . . . . . . . . . . . . . . . . . . . . . . . . . . . . . . . . . . . . . . . . . . . . . . . . . . 71
Licensing . . . . . . . . . . . . . . . . . . . . . . . . . . . . . . . . . . . . . . . . . . . . . . . . . . . . . . . . . . . . 72
Scheduling Deep Freeze Tasks. . . . . . . . . . . . . . . . . . . . . . . . . . . . . . . . . . . . . . . . . . . . . . 74 Editing Scheduled Tasks . . . . . . . . . . . . . . . . . . . . . . . . . . . . . . . . . . . . . . . . . . . . . . . 76
Assigning Computers to Scheduled Tasks . . . . . . . . . . . . . . . . . . . . . . . . . . . . . . . . . . . . . . 77 Executing a Task Immediately . . . . . . . . . . . . . . . . . . . . . . . . . . . . . . . . . . . . . . . . . . . 78 Deleting a Task . . . . . . . . . . . . . . . . . . . . . . . . . . . . . . . . . . . . . . . . . . . . . . . . . . . . . 78 Scheduled Task Properties. . . . . . . . . . . . . . . . . . . . . . . . . . . . . . . . . . . . . . . . . . . . . . 78
Managing Network and Groups . . . . . . . . . . . . . . . . . . . . . . . . . . . . . . . . . . . . . . . . . . . . . 79 Adding a Group . . . . . . . . . . . . . . . . . . . . . . . . . . . . . . . . . . . . . . . . . . . . . . . . . . . . . 79 Building a User Defined Group Structure. . . . . . . . . . . . . . . . . . . . . . . . . . . . . . . . . . . . 81 Importing Groups from Active Directory . . . . . . . . . . . . . . . . . . . . . . . . . . . . . . . . . . . . 82
History . . . . . . . . . . . . . . . . . . . . . . . . . . . . . . . . . . . . . . . . . . . . . . . . . . . . . . . . . . . . . . 83 Adding computers to a Group . . . . . . . . . . . . . . . . . . . . . . . . . . . . . . . . . . . . . . . . . . . . . . 84
Configure Custom Actions. . . . . . . . . . . . . . . . . . . . . . . . . . . . . . . . . . . . . . . . . . . . . . . . . 86 Control with RDC . . . . . . . . . . . . . . . . . . . . . . . . . . . . . . . . . . . . . . . . . . . . . . . . . . . . 86 Remote Execute with PsExec . . . . . . . . . . . . . . . . . . . . . . . . . . . . . . . . . . . . . . . . . . . . 87 Push and Install MSI file with PsExec . . . . . . . . . . . . . . . . . . . . . . . . . . . . . . . . . . . . . . 88 Push and Launch . . . . . . . . . . . . . . . . . . . . . . . . . . . . . . . . . . . . . . . . . . . . . . . . . . . . 89 Remote Launch . . . . . . . . . . . . . . . . . . . . . . . . . . . . . . . . . . . . . . . . . . . . . . . . . . . . . 89 Deleting, Importing and Exporting Custom Actions . . . . . . . . . . . . . . . . . . . . . . . . . . . . 90
Console Customizer . . . . . . . . . . . . . . . . . . . . . . . . . . . . . . . . . . . . . . . . . . . . . . . . . . . . . 92 Deep Freeze Enterprise Console Shutdown . . . . . . . . . . . . . . . . . . . . . . . . . . . . . . . . . . . . . 93
Installing Deep Freeze on the Workstation . . . . . . . . . . . . . . . . . . . . . . . . . . . . . . . . . . . . . 94 Attended Install or Uninstall . . . . . . . . . . . . . . . . . . . . . . . . . . . . . . . . . . . . . . . . . . . . 94
Deep Freeze Enterprise User Guide

Contents |5
Uninstalling Deep Freeze on the Workstation via the Console . . . . . . . . . . . . . . . . . . . . . . . . . 95
Silent Install or Uninstall . . . . . . . . . . . . . . . . . . . . . . . . . . . . . . . . . . . . . . . . . . . . . . . . . . 96 Example Command Line. . . . . . . . . . . . . . . . . . . . . . . . . . . . . . . . . . . . . . . . . . . . . . . . 96 Silent Install or Uninstall Using a Shortcut . . . . . . . . . . . . . . . . . . . . . . . . . . . . . . . . . . . 97 Network Install on Multiple computers . . . . . . . . . . . . . . . . . . . . . . . . . . . . . . . . . . . . . . 97 Installing Over Existing Deep Freeze Versions . . . . . . . . . . . . . . . . . . . . . . . . . . . . . . . . . 97 Installing Using Imaging . . . . . . . . . . . . . . . . . . . . . . . . . . . . . . . . . . . . . . . . . . . . . . . 97 Target Install . . . . . . . . . . . . . . . . . . . . . . . . . . . . . . . . . . . . . . . . . . . . . . . . . . . . . . . 98
Check for Updates. . . . . . . . . . . . . . . . . . . . . . . . . . . . . . . . . . . . . . . . . . . . . . . . . . . . . . . 99
Managing Deep Freeze Computers . . . . . . . . . . . . . . . . . . . . . . . . . . . . . . . . |
101 |
Login Screen . . . . . . . . . . . . . . . . . . . . . . . . . . . . . . . . . . . . . . . . . . . . . . . . . . . . . . . . . 102 Launching Deep Freeze on touch screen devices . . . . . . . . . . . . . . . . . . . . . . . . . . . . . . 102
Status Tab . . . . . . . . . . . . . . . . . . . . . . . . . . . . . . . . . . . . . . . . . . . . . . . . . . . . . . . . . . . 103 Status on Next Boot . . . . . . . . . . . . . . . . . . . . . . . . . . . . . . . . . . . . . . . . . . . . . . . . . 103 Clone . . . . . . . . . . . . . . . . . . . . . . . . . . . . . . . . . . . . . . . . . . . . . . . . . . . . . . . . . . . . 103 License . . . . . . . . . . . . . . . . . . . . . . . . . . . . . . . . . . . . . . . . . . . . . . . . . . . . . . . . . . 103
Password Tab . . . . . . . . . . . . . . . . . . . . . . . . . . . . . . . . . . . . . . . . . . . . . . . . . . . . . . . . . 104 Network Tab . . . . . . . . . . . . . . . . . . . . . . . . . . . . . . . . . . . . . . . . . . . . . . . . . . . . . . . . . . 105 ThawSpace Tab. . . . . . . . . . . . . . . . . . . . . . . . . . . . . . . . . . . . . . . . . . . . . . . . . . . . . . . . 106 Permanent Software Installations, Changes, or Removals . . . . . . . . . . . . . . . . . . . . . . . . . . 107
Managing Anti-Virus . . . . . . . . . . . . . . . . . . . . . . . . . . . . . . . . . . . . . . . . . . . |
109 |
Anti-Virus Overview. . . . . . . . . . . . . . . . . . . . . . . . . . . . . . . . . . . . . . . . . . . . . . . . . . . . . 110 Enable Anti-Virus on Enterprise Console . . . . . . . . . . . . . . . . . . . . . . . . . . . . . . . . . . . . . . 111 Install Anti-Virus Client on the workstation. . . . . . . . . . . . . . . . . . . . . . . . . . . . . . . . . . . . . 113
Anti-Virus Configuration. . . . . . . . . . . . . . . . . . . . . . . . . . . . . . . . . . . . . . . . . . . . . . . . . . 114 Creating Anti-Virus Configuration . . . . . . . . . . . . . . . . . . . . . . . . . . . . . . . . . . . . . . . . 114 Applying Anti-Virus Configuration . . . . . . . . . . . . . . . . . . . . . . . . . . . . . . . . . . . . . . . . 139 Editing Anti-Virus Configuration. . . . . . . . . . . . . . . . . . . . . . . . . . . . . . . . . . . . . . . . . . 140 Deleting Anti-Virus Configuration. . . . . . . . . . . . . . . . . . . . . . . . . . . . . . . . . . . . . . . . . 140
Using Faronics Anti-Virus from the Enterprise Console . . . . . . . . . . . . . . . . . . . . . . . . . . . . . 141 Anti-Virus Commands . . . . . . . . . . . . . . . . . . . . . . . . . . . . . . . . . . . . . . . . . . . . . . . . 141
Scheduling Anti-Virus Tasks . . . . . . . . . . . . . . . . . . . . . . . . . . . . . . . . . . . . . . . . . . . . . . . 148
Using Anti-Virus on the workstation . . . . . . . . . . . . . . . . . . . . . . . . . . . . . . . . . . . . . . . . . 149 Launching Anti-Virus on the Workstation . . . . . . . . . . . . . . . . . . . . . . . . . . . . . . . . . . . 149 Scanning the Workstation. . . . . . . . . . . . . . . . . . . . . . . . . . . . . . . . . . . . . . . . . . . . . . 150 Scanning a File or a Folder via Right-Click . . . . . . . . . . . . . . . . . . . . . . . . . . . . . . . . . . 152 View Scanning History . . . . . . . . . . . . . . . . . . . . . . . . . . . . . . . . . . . . . . . . . . . . . . . . 152 View and take action on Quarantined Files . . . . . . . . . . . . . . . . . . . . . . . . . . . . . . . . . . 153 Updating Anti-Virus Definitions on the Workstation . . . . . . . . . . . . . . . . . . . . . . . . . . . . 154 Managing Anti-Virus on the Workstation via the System Tray . . . . . . . . . . . . . . . . . . . . . 155
Check for Anti-Virus Updates . . . . . . . . . . . . . . . . . . . . . . . . . . . . . . . . . . . . . . . . . . . . . . 156 Update Faronics Anti-Virus . . . . . . . . . . . . . . . . . . . . . . . . . . . . . . . . . . . . . . . . . . . . . . . . 157 Uninstall Anti-Virus Client from the Enterprise Console . . . . . . . . . . . . . . . . . . . . . . . . . . . . 158 Disable Faronics Anti-Virus from the Enterprise Console. . . . . . . . . . . . . . . . . . . . . . . . . . . . 159
Deep Freeze Command Line Control . . . . . . . . . . . . . . . . . . . . . . . . . . . . . . . 161
Deep Freeze Command Line Control (DFC.EXE) . . . . . . . . . . . . . . . . . . . . . . . . . . . . . . . . . 162 DFC Return Values. . . . . . . . . . . . . . . . . . . . . . . . . . . . . . . . . . . . . . . . . . . . . . . . . . . 162
Deep Freeze Command Line Syntax . . . . . . . . . . . . . . . . . . . . . . . . . . . . . . . . . . . . . . . . . 163
Deep Freeze Enterprise User Guide

6 |Contents
Faronics Anti-Virus Command Line Syntax . . . . . . . . . . . . . . . . . . . . . . . . . . . . . . . . . . . . |
165 |
Appendix A Ports and Protocols . . . . . . . . . . . . . . . . . . . . . . . . . . . . . . . . . . . . . . . . . . . . . . . . |
167 |
Appendix B Network Examples . . . . . . . . . . . . . . . . . . . . . . . . . . . . . . . . . . . . . . . . . . . . . . . . . |
169 |
Example 1 - Single Subnet . . . . . . . . . . . . . . . . . . . . . . . . . . . . . . . . . . . . . . . . . . . . . . . |
170 |
Example 2 - Multiple Subnets One local service. . . . . . . . . . . . . . . . . . . . . . . . . . . . . . . . . |
171 |
Example 3 - Multiple Ports, Console Accessed Remotely . . . . . . . . . . . . . . . . . . . . . . . . . . . |
172 |
Example 4 - Multiple Subnets Multiple local services . . . . . . . . . . . . . . . . . . . . . . . . . . . . . |
173 |
Appendix C Troubleshooting a Remote Console Connection . . . . . . . . . . . . . . . . . . . . . . . . |
175 |
No Clients In the Console . . . . . . . . . . . . . . . . . . . . . . . . . . . . . . . . . . . . . . . . . . . . . |
175 |
Port is in Use Error When Starting the Console . . . . . . . . . . . . . . . . . . . . . . . . . . . . . . |
176 |
Appendix D Creating a Customized Deep Freeze Enterprise Console . . . . . . . . . . . . . . . . . |
177 |
Appendix E Deep Freeze Action Files - RDC Example . . . . . . . . . . . . . . . . . . . . . . . . . . . . . . |
181 |
Deep Freeze Action Files . . . . . . . . . . . . . . . . . . . . . . . . . . . . . . . . . . . . . . . . . . . . . . |
181 |
Action File Example . . . . . . . . . . . . . . . . . . . . . . . . . . . . . . . . . . . . . . . . . . . . . . . . . |
181 |
Deep Freeze Action File Structure . . . . . . . . . . . . . . . . . . . . . . . . . . . . . . . . . . . . . . . |
182 |
Console Parameters . . . . . . . . . . . . . . . . . . . . . . . . . . . . . . . . . . . . . . . . . . . . . . . . . |
184 |
Deep Freeze Enterprise User Guide

|7
Preface
This user guide explains how to install, configure and use Deep Freeze Enterprise.
Topics
Important Information
Technical Support
Deep Freeze Enterprise User Guide

8 | Preface
Important Information
This section contains important information about your Faronics Product.
About Faronics
Faronics delivers market-leading solutions that help manage, simplify, and secure complex IT environments. Our products ensure 100% machine availability, and have dramatically impacted the day-to-day lives of thousands of information technology professionals. Fueled by a market-centric focus, Faronics’ technology innovations benefit educational institutions, health care facilities, libraries, government organizations, and corporations.
Product Documentation
The following documents form the Deep Freeze Enterprise documentation set:
•Deep Freeze Enterprise User Guide — This is the document you are reading. This document guides you how to use the product.
•Deep Freeze Enterprise Release Notes — This document lists the new features and known issues and closed issues.
Deep Freeze Enterprise User Guide

Technical Support |9
Technical Support
Every effort has been made to design this software for ease of use and to be problem free. If problems are encountered, contact Technical Support.
Email: support@faronics.com
Phone: 800-943-6422 or +1-604-637-3333
Hours: 7:00am to 5:00pm (Pacific Time)
Contact Information
•Web: www.faronics.com
•Email: sales@faronics.com
•Phone: 800-943-6422 or +1-604-637-3333
•Fax: 800-943-6488 or +1-604-637-8188
•Hours: 7:00am to 5:00pm (Pacific Time)
Address:
Faronics Technologies USA Inc.
100, W. San Fernando Street, Suite 465 San Jose, CA, 95113
USA
Faronics Corporation (Headquarters) 609 Granville Street, Suite 1400 Vancouver, BC V7Y 1G5
Canada
Faronics Corporation (Europe)
Venture House, 2 Arlington Square, Downshire Way Bracknell, RG12 1WA, England
Deep Freeze Enterprise User Guide

10 | Preface
Deep Freeze Enterprise User Guide
|11
Introduction
Deep Freeze protects the computers that are set to boot from the hard drive. Configure the CMOS to boot from the hard drive only. The CMOS must be password protected to prevent unauthorized changes. Deep Freeze protects the Master Boot Record (MBR) when the computer is Frozen.
Topics
Deep Freeze Overview
System Requirements
Deep Freeze Enterprise User Guide

12 | Introduction
Deep Freeze Overview
Faronics Deep Freeze helps eliminate computer damage and downtime by making computer configurations indestructible. Once Deep Freeze is installed on a computer, any changes made to the computer—regardless of whether they are accidental or malicious—are never permanent. Deep Freeze provides immediate immunity from many of the problems that plague computers today—inevitable configuration drift, accidental system misconfiguration, malicious software activity, and incidental system degradation.
Faronics Anti-Virus can now be managed using Deep Freeze Enterprise (a separate license is required for Faronics Anti-Virus). Faronics Anti-Virus provides protection from security threats without slowing down computers due to slow scan times and large footprints. Built with next-generation technology, Faronics Anti-Virus gives you powerful anti-virus, anti-rootkit and anti-spyware software in-one. This protects you against today’s highly complex malware threats while providing seamless integration with Deep Freeze.
Deep Freeze integration with Faronics Anti-Virus ensures your protection is up-to-date in the simplest way possible, providing deployment and management capabilities through Deep Freeze Enterprise Console. Designed to work together seamlessly, Faronics Anti-Virus is updated even while workstations are Frozen, offering the most comprehensive protection system.
Deep Freeze Enterprise User Guide

System Requirements |13
System Requirements
•Deep Freeze and Faronics Anti-Virus are supported on:
—XP, Vista, Windows 7, Windows 8.1, Server 2003, 2008, 2008 R2, 2012 and 2012 R2
—Windows Embedded 7 and 8
—Deep Freeze requires 10% of the hard drive to be left as free space
—Both 32 and 64 bit versions of Windows are supported
—Windows XP (32 and 64-bit) must have Service Pack 2 or later installed
•Faronics recommends a minimum of 256 MB of system memory in the protected systems
•The Deep Freeze Configuration Administrator and Enterprise Console are supported on:
—XP, Vista, Windows 7, Windows 8.1, Server 2003, 2008, 2008 R2, 2012, and 2012 R2
—32 and 64 bit versions are supported
—Windows XP (32 and 64-bit) must have Service Pack 2 or later installed
Deep Freeze Enterprise User Guide

14 | Introduction
Deep Freeze Enterprise Files
Deep Freeze uses different colored icons to represent its components. Files identified by a red icon should generally only be installed on an administrative computer.
Icon Definition
Deep Freeze Enterprise Configuration Administrator and Enterprise
Console installation file.
The Configuration Administrator application is used to create customized, pre-configured, computer installation program files and Workstation Seeds.
The Enterprise Console application is used to centrally deploy, monitor, manage, and maintain Deep Freeze installations.
A customized Deep Freeze workstation installation file is created in the Configuration Administrator and deployed to workstations within the enterprise. This file includes the Workstation Seed. If the Deep Freeze workstation installation file is installed, the Workstation Seed is not required to be installed separately.
A Workstation Seed enables seamless communication between the Enterprise Console and computers on a network. When the Workstation Seed is installed on a computer, the computer becomes visible on the Enterprise Console. Once a computer is visible on the Enterprise Console, various actions such as Restart, Shutdown and Wake-on-LAN can be performed on the computer remotely. Deep Freeze can also be installed remotely on visible computer thereby allowing Deep Freeze related actions on remote computers.
Deep Freeze Enterprise User Guide

|15
Installing Deep Freeze
This chapter describes the installation process of Deep Freeze.
Topics
Installation Overview
Customization Code
One Time Passwords
Deep Freeze Enterprise User Guide
16 | Installing Deep Freeze
Installation Overview
Installing Deep Freeze Configuration Administrator and Enterprise Console
The Configuration Administrator is intended to be installed only on the computer used to administrate Deep Freeze. The Configuration Administrator is used to create customized Deep Freeze installation files and Workstation Seeds. The Deep Freeze Enterprise Console installs automatically with the Deep Freeze Configuration Administrator.
If you are using Deep Freeze 6.5 (or higher), you have the option to automatically upgrade the Enterprise Console, Configuration Administrator, and Deep Freeze install/configuration files (under the Install Programs folder) during installation while installing Deep Freeze 8.1 (or higher). The Customization Code is not required while upgrading Deep Freeze.
Complete the following steps to install the Configuration Administrator:
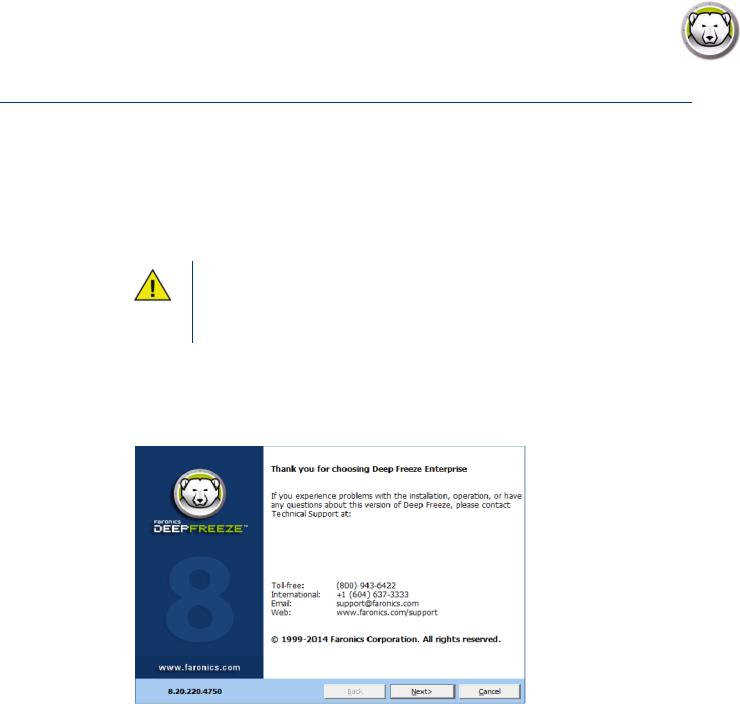
1.Double-click the file DFEnt.exe to begin the installation process. The following screen appears:
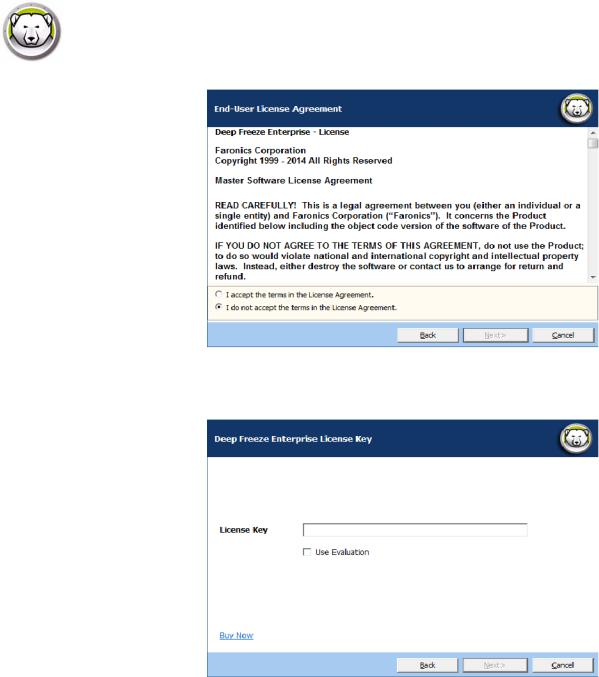
2. Click Next. Read and accept the license agreement. Click Next.
Deep Freeze Enterprise User Guide
Installation Overview |17
3.Enter the License Key in the License Key field or select the Use Evaluation check box to install in Evaluation mode. Click Next.
4.Enter the License Key in the License Key field or select the Use Evaluation check box to install in Evaluation mode. Click Next.
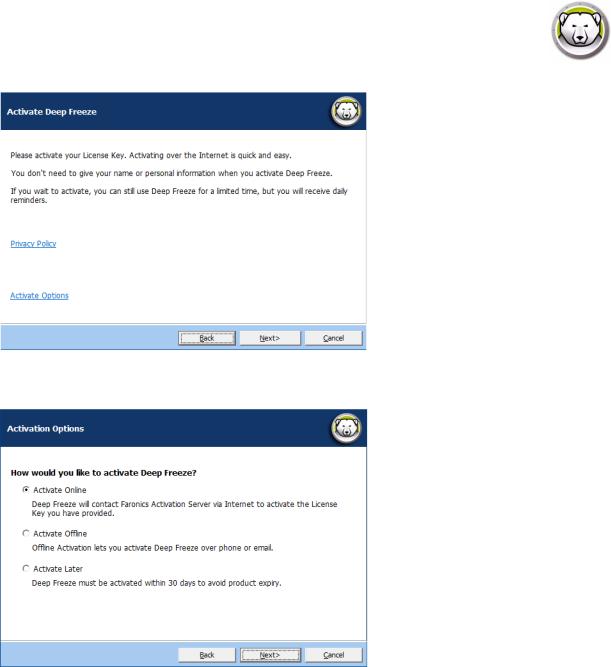
5.Click Next to view activation options. Click Next again to activate Deep Freeze License via the Internet. The computer must be connected to the Internet to Activate Online. Deep Freeze License must be activated within 30 days of installation failing which you will receive constant reminders to activate the product. During activation, Deep Freeze License is authenticated with Faronics.
Deep Freeze Enterprise User Guide
18 | Installing Deep Freeze
6. Alternatively, click Activate Options. Three options are available:
•Select Activate Online to activate Deep Freeze License online. This option is same as step 4. Click Next after selecting this option. Deep Freeze is activated online on clicking Next.
•Select Activate Offline. This option allows you to activate by phone or email. Click Next after activating. The Activate Offline screen is displayed.
•Select Activate Later. This option allows you to activate later.
Deep Freeze Enterprise User Guide
Installation Overview |19
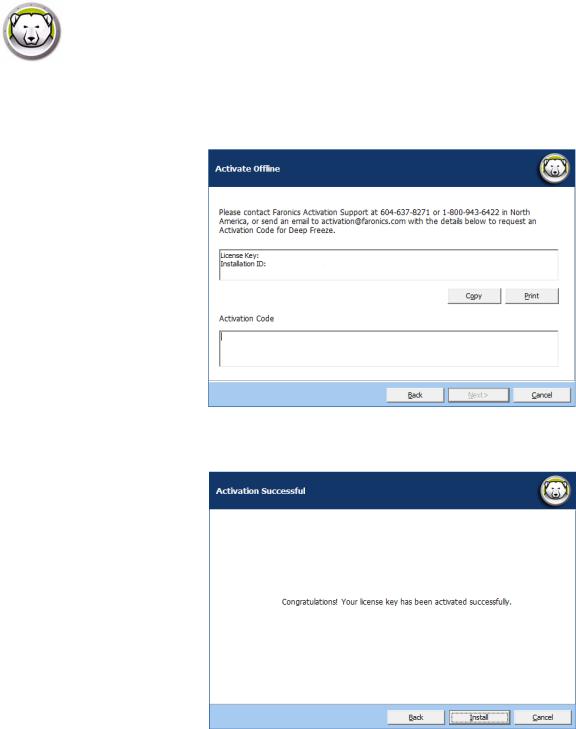
7.If you selected Activate Offline, send the License Key and Installation ID to Faronics Activation Support via phone or email. Once you receive the Activation Code from Faronics, enter it in the Activation Code field and click Next. Deep Freeze Licence is now activated.
Deep Freeze Enterprise User Guide
20 | Installing Deep Freeze
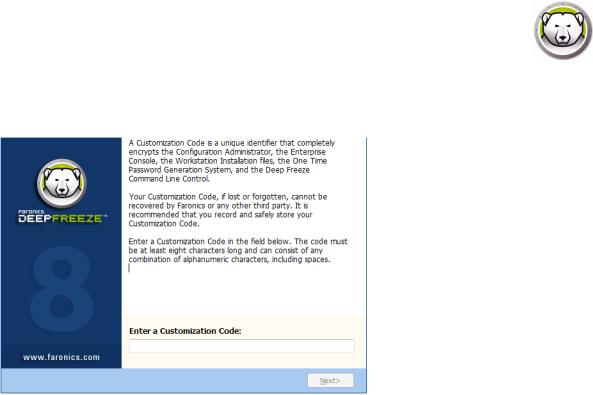
8. Once the installation process is completed, the Customization Code screen appears.
9.Specify the Customization Code and click Next. The Customization Code must be a minimum of eight characters. The installation is completed.
Deep Freeze Enterprise User Guide
Customization Code |21
Customization Code
The Customization Code is a unique identifier that encrypts the Configuration Administrator, the Enterprise Console, the computer installation files, the One Time Password Generation System, and Deep Freeze Command Line Control. This code is not a password that can be used to access Deep Freeze.
The Customization Code ensures that unauthorized administrators are prevented from accessing or controlling a computer. Multiple Deep Freeze administrators controlling the same group of computers must use a matching Customization Code.
The Customization Code must be recorded and guarded with care. Faronics is unable to recover a lost or forgotten Customization Code.
Re-Initializing the Customization Code
If another administrator wants to create installation files with the same Configuration Administrator using a different Customization Code, complete the following steps:
1.Run DFInit.exe.
2.This resets the existing Customization Code for the Configuration Administrator and Enterprise Console.
3.Enter a new Customization Code.
4.Click OK for the new Customization Code to become active.
Update Mode
Update Mode can be used to automatically create updated versions of existing files of Deep Freeze Enterprise by executing a special Update command. This command completes two tasks:
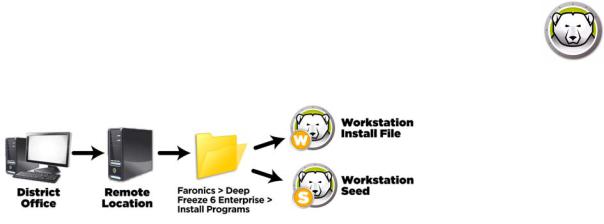
•Updates previous versions of the Deep Freeze Enterprise Console and the Deep Freeze Configuration Administrator. (Found in Faronics > Deep Freeze 7 Enterprise.)
•Updates any user created files stored in the Faronics > Deep Freeze 7 Enterprise > Install Programs folder.
The benefit of these updates is that a number of files can be updated to the latest version while retaining their configuration data (created with an older version of Deep Freeze Enterprise).
The command automatically updates files created by an administrator (.exe, .rdx) that are present in the Faronics > Deep Freeze 7 Enterprise > Install Programs directory, including the following sub-directories:
•Workstation install files
•Workstation Seed files
In the example below, the district office has received a new version of Deep Freeze Configuration Administrator and can automatically update any existing Deep Freeze Workstation Install files and Workstation Seeds at a remote location.
Deep Freeze Enterprise User Guide
22 | Installing Deep Freeze
The update command does not require a password, but does require a Customization Code. Use the following command syntax:
\PathToFile\DFEnt.exe /update=”Customization Code” c:\dfupdate.log
•PathToFile must be replaced with the actual path to the installation file (DFEnt.exe)
•DFEnt.exe must be the actual name of the installation file (it may differ if it was downloaded)
•Customization Code must be in quotes if there is a space in it
•Customization Code must match the old installation files’ Customization Code
The log file provides full details of exactly which files were updated. The update process may take a few minutes to complete.
Update Mode does not update the existing version of Deep Freeze on computers. Computers must be updated using the Enterprise Console.
Deep Freeze Enterprise User Guide

One Time Passwords |23
One Time Passwords
The One Time Passwords Generation System is used to generate temporary passwords for Deep Freeze that expire at midnight on the day they were generated.
One Time Passwords dialog can be accessed from
•Tools>One Time Passwords in the Enterprise Console. For more information refer to Using Deep Freeze Enterprise Console.
•File>One Time Passwords in the Configuration Administrator. For more information refer to
Using Deep Freeze Configuration Administrator.
A One Time Password (OTP) can be useful if, for example, a Deep Freeze password is forgotten or if a configuration file was created without any passwords defined. An OTP can also be used to provide access to a computer for an individual performing maintenance duties without requiring that individual to know the permanent Deep Freeze password.
To create an OTP, complete the following steps:
1.Select either Password valid for one use only or Password valid for multiple uses. All OTPs expire at midnight on the day they were created, regardless of type.
2.Enter the OTP Token from the computer that requires the OTP into the Token field. The OTP Token for the computer is located in the logon dialog, as shown below.
3. Click Generate.
The Deep Freeze Command Line interface does not support the use of One Time
Passwords.
Deep Freeze Enterprise User Guide

24 | Installing Deep Freeze
Deep Freeze Enterprise User Guide

|25
Using Deep Freeze Configuration
Administrator
Topics
Accessing the Configuration Administrator
Passwords Tab
Drives Tab
Workstation Tasks Tab
Windows Update Tab
Batch File Tab
Advanced Options Tab
Creating Workstation Install Program and Workstation Seed
Deep Freeze Enterprise User Guide
26 | Using Deep Freeze Configuration Administrator
Accessing the Configuration Administrator
Open the Configuration Administrator by selecting the following path from the Start menu:
Start > All Programs > Faronics > Deep Freeze 7 Enterprise > Deep Freeze Administrator
The Configuration Administrator provides various tabs to configure passwords, Frozen drives, Workstation Tasks, Windows Updates, Batch Files, and Advanced Options. Once the settings have been configured, a Workstation Install file can be created. The Workstation Install file can be installed on the computers that need to be protected by Deep Freeze. Deep Freeze Administrator can also be accessed from within the Deep Freeze Console.
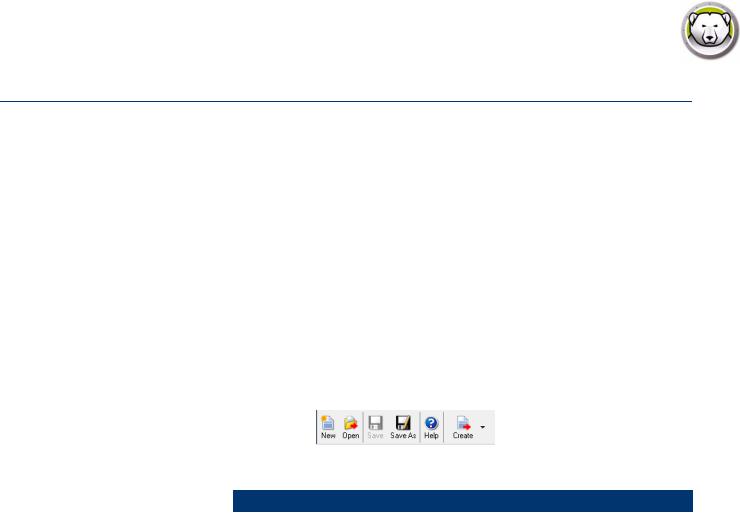
Toolbar and Menus
Toolbar
The Toolbar is available at the top of every tab in the Configuration Administrator.
Icon |
Function |
|
|
New |
Blanks out all existing configuration settings. Opens with default |
|
configuration settings. |
|
|
Open |
Open any saved .rdx, Workstation Installation file or Workstation Seed file. |
|
|
Save |
Save a .rdx, Workstation Installation file or Workstation Seed file. File name |
|
and path is listed at the bottom of the Configuration Administrator in the |
|
status section. |
|
|
Save As |
Save the configuration settings as a .rdx file. |
|
|
Help |
Access the Deep Freeze Help file. |
|
|
Create |
Create Workstation Installation File creates a customized installer for |
|
installing on workstations. The workstations can then be managed from the |
|
Deep Freeze Enterprise Console. |
|
Create Workstation Seed File creates a seed that allows Deep Freeze |
|
Console to communicate with workstations across the network. Once the |
|
seed is installed on workstations, Deep Freeze Workstation Installation File |
|
can then be deployed remotely. |
|
|
Deep Freeze Enterprise User Guide
Accessing the Configuration Administrator |27
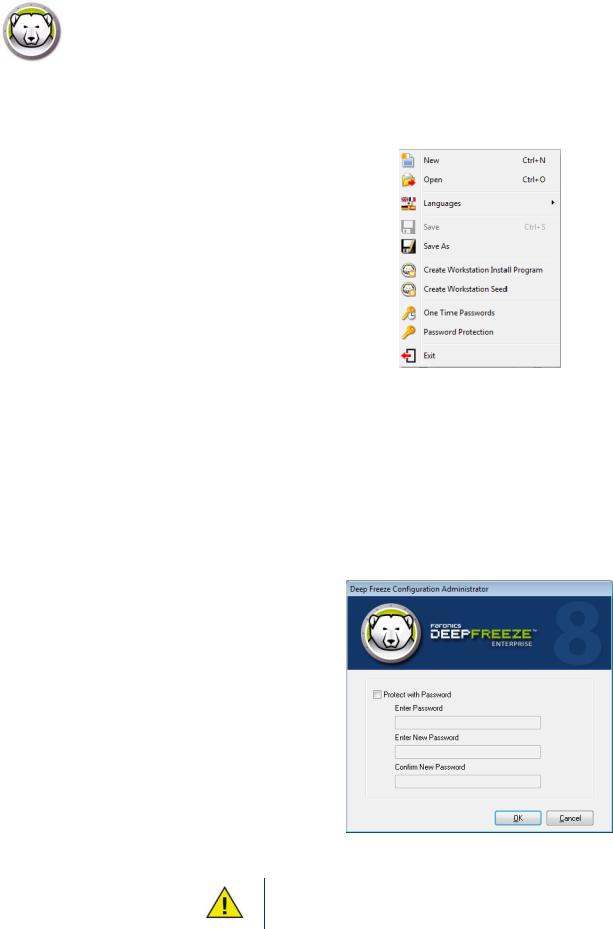
File Menu
The File menu contains the same options as those available on the Toolbar, with the additions of the option to choose from the available languages and Password Protection.
Password Protection
Password Protection offers an additional layer of security for the administrator.
To password protect access to the Configuration Administrator, complete the following steps:
1.Open the File menu and select Password Protection.
2.Select the Protect with password check box.
3.Enter and confirm the password.
4.Click OK to set the password or Cancel to exit the dialog without setting a password.
Store the password in a safe location. If the password is lost, you cannot recover it.
You will have to reinstall Deep Freeze.
Deep Freeze Enterprise User Guide
28 | Using Deep Freeze Configuration Administrator
Passwords Tab
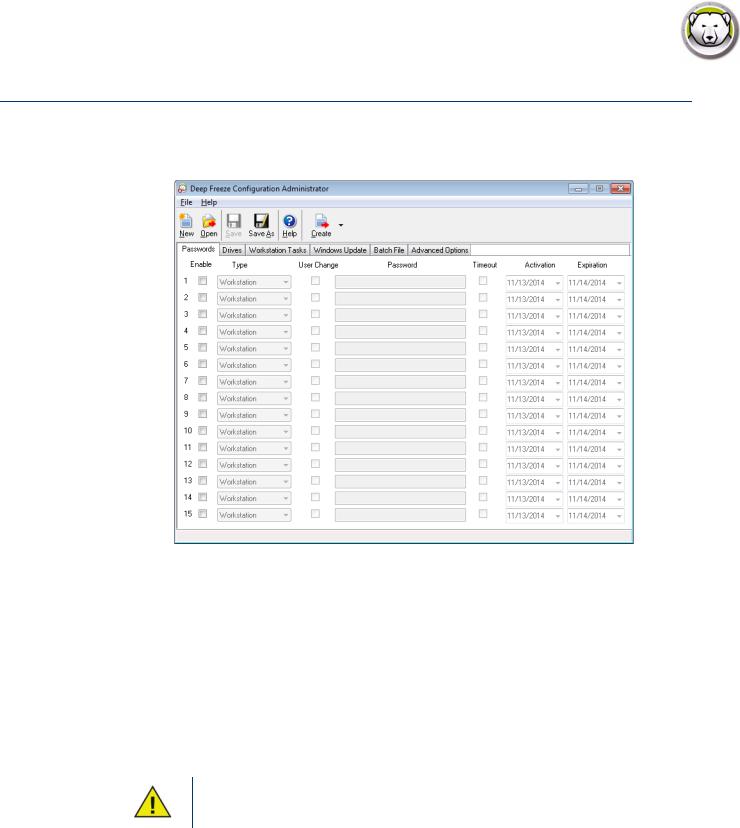
Deep Freeze Enterprise allows the administrator to choose up to 15 fixed passwords.
To create a password, complete the following steps:
1.Select Enable on the appropriate row.
2.From the Type drop-down list, choose the preferred kind of password. The following options are available:
—Workstation: designated for use at the workstation when the Login Screen is launched.
—Command Line: for use with Command Line Controls. The Command Line Control tool (DFC.exe) does not function unless at least one Command Line password is defined.
3.Optional: For passwords, select the User Change check box to allow a user to change the password at the computer.
4.Enter the password.
The password entered in the Password field is not hidden.
Do not use the same password for Command Line and the GUI.
5.To set a password to become active and expire on specified dates, select the Timeout check box and use the drop-down calendars to specify an Activation date and Expiration date.
Deep Freeze Enterprise User Guide

Drives Tab |29
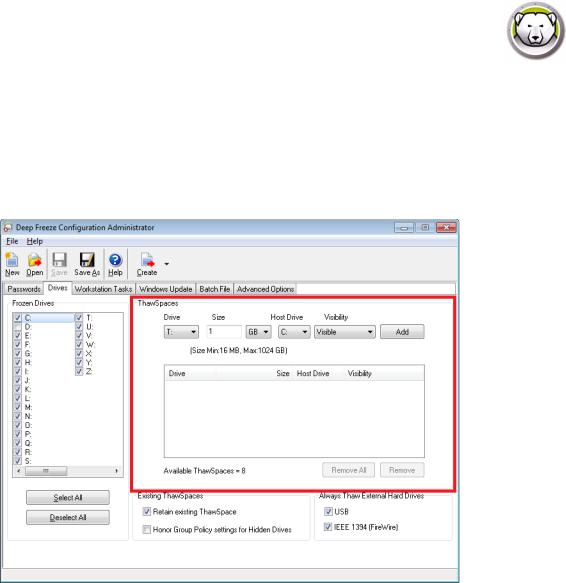
Drives Tab
The Drives tab is used to select which drives are to be Frozen (protected by Deep Freeze) or Thawed (unprotected). You can also create a ThawSpace — a virtual partition hosted on a local Frozen or Thawed drive where data can be saved permanently without being deleted by Deep Freeze during a reboot.
Frozen Drives
By default, all drives are Frozen. To put a drive in a Thawed state, clear the check box of the preferred drive.
While only local drives (partitions or physical drives) can be Frozen, all drive letters are shown because the pre-configured installation file may be installed on many computers with various hardware and software setups.
Example
In the above screen, the D: is not selected from the Frozen Drives list. Therefore, all drives except D: are Frozen.
Deep Freeze Enterprise User Guide
30 | Using Deep Freeze Configuration Administrator
ThawSpace
ThawSpace is a virtual partition that can be used to store programs, save files, or make permanent changes. All files stored in the ThawSpace are retained after a restart, even if the computer is Frozen. A ThawSpace can be created on a drive that is configured to be Frozen or Thawed.
To create a single ThawSpace or multiple ThawSpaces using the Configuration Administrator, complete the following steps:
1.Select the Drive Letter. The default letter is T:. However, it can be changed to any available letter. The next available letter is automatically used if the selected drive letter already exists on a computer when Deep Freeze is installed.
—When a Drive Letter is selected from the drop-down and used to create a ThawSpace, it is removed from the drop-down.
—When a ThawSpace is removed, the corresponding Drive Letter is added back to the drop-down.
—The Drive Letter cannot be same as the Host Drive.
2.Enter the Size. This is the size of the ThawSpace. The maximum size is 1024 GB and the minimum size is 16MB.
—If the computer does not have enough free space to accommodate the selected ThawSpace size, the size of the ThawSpace is adjusted downward to ensure proper operation of the computer.
—If you select the Size less than 16MB, the ThawSpace is set to 16MB.
—If you select the Size more than 1024GB (1TB), the ThawSpace is set to 1024GB (1TB).
Deep Freeze Enterprise User Guide
Loading...