

Page 1
1
|
Faronics Core Migration Guide
Page 2

2|
Last modified: November, 2009
© 1999 - 2009 Faronics Corporation. All rights reserved. Faronics, Deep Freeze, Faronics Core Console,
Faronics Anti-Executable, Faronics Device Filter, Faronics Power Save, Faronics Insight, Faronics System
Profiler, and WINSelect are trademarks and/or registered trademarks of Faronics Corporation. All other
company and product names are trademarks of their respective owners.
Faronics Core Migration Guide
Page 3

Contents
Preface . . . . . . . . . . . . . . . . . . . . . . . . . . . . . . . . . . . . . . . . . . . . . . . . . . . . . . . 5
Important Information. . . . . . . . . . . . . . . . . . . . . . . . . . . . . . . . . . . . . . . . . . . . . . . . . . . . . 6
About Faronics . . . . . . . . . . . . . . . . . . . . . . . . . . . . . . . . . . . . . . . . . . . . . . . . . . . . . . . 6
Product Documentation . . . . . . . . . . . . . . . . . . . . . . . . . . . . . . . . . . . . . . . . . . . . . . . . . 6
Technical Support . . . . . . . . . . . . . . . . . . . . . . . . . . . . . . . . . . . . . . . . . . . . . . . . . . . . . . . . 7
Contact Information. . . . . . . . . . . . . . . . . . . . . . . . . . . . . . . . . . . . . . . . . . . . . . . . . . . . 7
Definition of Terms . . . . . . . . . . . . . . . . . . . . . . . . . . . . . . . . . . . . . . . . . . . . . . . . . . . . . . . 8
Introduction . . . . . . . . . . . . . . . . . . . . . . . . . . . . . . . . . . . . . . . . . . . . . . . . . . . 9
Migration Overview . . . . . . . . . . . . . . . . . . . . . . . . . . . . . . . . . . . . . . . . . . . . . . . . . . . . . . 10
Faronics Core Console 2.x . . . . . . . . . . . . . . . . . . . . . . . . . . . . . . . . . . . . . . . . . . . . . . 10
Faronics Core 3.x (FC3) . . . . . . . . . . . . . . . . . . . . . . . . . . . . . . . . . . . . . . . . . . . . . . . . 10
Migration Steps. . . . . . . . . . . . . . . . . . . . . . . . . . . . . . . . . . . . . . . . . . . . . . . . . . . . . . . . . 11
Migration Tool . . . . . . . . . . . . . . . . . . . . . . . . . . . . . . . . . . . . . . . . . . . . . . . . . . . . . . . . . . 12
3
|
Migration . . . . . . . . . . . . . . . . . . . . . . . . . . . . . . . . . . . . . . . . . . . . . . . . . . . . . 13
Faronics Core Installation. . . . . . . . . . . . . . . . . . . . . . . . . . . . . . . . . . . . . . . . . . . . . . . . . . 14
Installing Faronics Core 3.x . . . . . . . . . . . . . . . . . . . . . . . . . . . . . . . . . . . . . . . . . . . . . 14
Configuring the Core Database . . . . . . . . . . . . . . . . . . . . . . . . . . . . . . . . . . . . . . . . . . . 14
Installing the updated product loadin on Faronics Core 3.x. . . . . . . . . . . . . . . . . . . . . . . . 15
Installing updated Core Agent and Product Agents . . . . . . . . . . . . . . . . . . . . . . . . . . . . . . . . 16
Push from Core Console (FC3) . . . . . . . . . . . . . . . . . . . . . . . . . . . . . . . . . . . . . . . . . . . 16
Manual Deployment. . . . . . . . . . . . . . . . . . . . . . . . . . . . . . . . . . . . . . . . . . . . . . . . . . . 19
Push using 3rd Party Tools . . . . . . . . . . . . . . . . . . . . . . . . . . . . . . . . . . . . . . . . . . . . . . 19
Database Event Migration . . . . . . . . . . . . . . . . . . . . . . . . . . . . . . . . . . . . . . . . . . . . . . . . . 20
Event Migration Using the Migration Tool . . . . . . . . . . . . . . . . . . . . . . . . . . . . . . . . . . . . 20
Manual Migration of Database Events. . . . . . . . . . . . . . . . . . . . . . . . . . . . . . . . . . . . . . . 21
Migrate the Core Console Tasks, Reports, Groups, and Filters . . . . . . . . . . . . . . . . . . . . . . . . . 22
Appendix A Creating the Core Agent . . . . . . . . . . . . . . . . . . . . . . . . . . . . . . . . . . . . . . . . . . . . . 23
Appendix B Moving the Core Console 2.4 database . . . . . . . . . . . . . . . . . . . . . . . . . . . . . . . . . 25
Backing up Faronics Core Console 2.x Database . . . . . . . . . . . . . . . . . . . . . . . . . . . . . . . . . . 26
Restoring the Faronics Core Console 2.x database into Faronics Core 3.x (Core Database). . . . . 29
Faronics Core Migration User Guide
Page 4

4|Contents
Faronics Core Migration User Guide
Page 5

Topics
Preface
This document explains the process of migrating the data from Faronics Core Console 2.x to
Faronics Core 3.x.
Important Information
Technical Support
Definition of Terms
5
|
Faronics Core Migration Guide
Page 6

6| Preface
Important Information
About Faronics
Product Documentation
This section contains important information about your Faronics Product.
Faronics delivers market-leading solutions that help manage, simplify, and secure complex IT
environments. Our products ensure 100% machine availability, and have dramatically impacted
the day-to-day lives of thousands of information technology professionals. Fueled by a
market-centric focus, Faronics’ technology innovations benefit educational institutions, health
care facilities, libraries, government organizations, and corporations.
The following documents form the Faronics Core documentation set:
• Faronics Core User Guide — This document guides you how to use the product.
• Faronics Core Release Notes — This document lists the new features and known issues and
closed issues.
• Faronics Core readme.txt — This document will guide you through the installation process.
• Faronics Core Migration Guide— This document will guide you through the migration
process.
Faronics Core Migration Guide
Page 7

Technical Support|7
Technical Support
Every effort has been made to design this software for ease of use and to be problem free. If
problems are encountered, contact Technical Support:
Email: support@faronics.com
Phone: 800-943-6422 or 604-637-3333
Hours: 7:00am to 5:00pm (Pacific Time)
Contact Information
•Web: www.faronics.com
• Email: sales@faronics.com
• Phone: 800-943-6422 or 604-637-3333
• Fax: 800-943-6488 or 604-637-8188
• Hours: 7:00am to 5:00pm (Pacific Time)
• Address: Faronics Technologies USA Inc.
2411 Old Crow Canyon Road, Suite 170
San Ramon, CA 94583
USA
Faronics Corporation
609 Granville Street, Suite 620
Vancouver, BC V7Y 1G5
Canada
Faronics Core Migration Guide
Page 8

8| Preface
Definition of Terms
Term Definition
Core Console The user interface used to manage and monitor Core Servers and
workstations.
Core Database The database stores the workstation list.
Core Agent The Core Agent, that is installed on the workstation, enables
communication between the workstation and the Core Server.
Core Server The management of workstations, processing of tasks and communication
between Core Console and workstations is done by the Core Server.
Faronics Core
3.x (FC3)
Faronics Core consists of the Core Server, Core Console, Core Database and
the Core Agent.
Loadin A Product Loadin is a software library that adds new product-specific
functionality to Faronics Core.
MAC A Media Access Control address (MAC address) or Ethernet Hardware
Address (EHA), hardware address, adapter address or physical address is a
quasi-unique identifier assigned to most network adapters or network
interface cards (NICs) by the manufacturer for identification. If assigned by
the manufacturer, a MAC address usually encodes the manufacturer's
registered identification number.
UAC User Account Control (UAC) is a technology and security infrastructure
introduced with Microsoft's Windows Vista operating system. It aims to
improve the security of Microsoft Windows by limiting application software
to standard user privileges until an administrator authorizes an increase in
privilege level.
Wake-on-LAN Wake-on-LAN (WOL) is an Ethernet computer networking standard that
allows a computer to be turned on or woken up remotely by a network
message.
Faronics Core Migration Guide
Page 9

Topics
Introduction|9
Introduction
This chapter introduces the migration process and the Migration Tool.
Migration Overview
Migration Steps
Migration Tool
Faronics Core Migration Guide
Page 10

10| Introduction
Migration Overview
Faronics Core Console 2.x
Faronics Core Console 2.x and Faronics Core 3.x have different architectural designs. Therefore,
installing Faronics Core 3.x will not upgrade Faronics Core Console 2.x installation on your
system. Faronics Core 3.x will be installed separately on the same system. Faronics Core 3.x can
also be installed on a different system.
Following are the components of Faronics Core Console 2.x and Faronics Core 3.x.
Faronics Core Console 2.x has the following components:
• Faronics Core Console — The user interface used to manage and monitor workstations. The
management of workstations, processing of tasks and communication with workstations is
done by Faronics Core Console.
• Database — The database stores the workstation list and information about the workstation.
• Core Agent — The Core Agent, that is installed on the workstation, enables communication
between Faronics Core Console and workstations.
Faronics Core 3.x (FC3)
Faronics Core has the following components:
• Core Console (UI Tier) — The user interface used to manage and monitor Core Servers and
workstations. A single instance of Core Console can connect to multiple Core Servers.
• Core Server (Logic Tier) — The management of workstations, processing of tasks and
communication between Core Console and workstations is done by the Core Server.
• Core Database (Data Tier) — The database stores the workstation list and information about
the workstation.
• Core Agent — The Core Agent, that is installed on the workstation, enables communication
between the workstation and the Core Server.
Faronics Core Migration Guide
Page 11

Migration Steps|11
Migration Steps
Faronics Core 3.x is a significant architectural improvement of the existing Faronics Core Console
2.x platform to deliver enhanced security and greater scalability. Due to the improvements which
now leverage a multi-tier architecture, upgrading to the Faronics Core 3.x will require a migration
process that follows the basic steps outlined below:
1. Install Faronics Core 3.x. Refer to the Faronics Core User Guide available at
http://www.faronics.com/library for more information.
2. Install the updated product loadins to Faronics Core 3.x. Refer to the specific product loadins
available at http://www.faronics.com/library for more information.
3. Install or upgrade the updated Core Agent to the client workstations. Refer to the Faronics
Core User Guide available at http://www.faronics.com/library for more information.
4. Install the updated product agents to the client workstations. Refer to the specific product
loadins available at http://www.faronics.com/library for more information.
5. Migrate the Faronics Core Console 2.x tasks to Faronics Core 3.x. This is explained in this
document. This step is optional.
6. Migrate the workstation event data from Faronics Core Console 2.x database to the Faronics
Core 3.0 database (Core Database). This is explained in this document. This step is optional.
The above process remains the same regardless of if the Faronics Core Console 2.x data is being
migrated on an existing server or being setup on an entirely new hardware. In the event that
Faronics Core 3.x is being configured on new hardware, either the Core Database (FC3) must be
configured on the same SQL instance as the existing Faronics Core Console 2.x database, or the
Faronics Core Console 2.x database must be moved to the new SQL instance where Core Database
(FC3) will be installed.
Faronics Core Migration Guide
Page 12

12| Introduction
Migration Tool
To aid in the migration process, Faronics has provided a migration tool that can be used to
migrate the workstation event data and other non-event based user data to Faronics Core 3.x.
This tool is not localized and will display all output in English. The tool is located in the following
location:
C:\Program Files\Faronics\Faronics Core 3\Console\Faronics Core
Migration Tool
or
C:\Program Files (x86)\Faronics\Faronics Core 3\Console\Faronics Core
Migration Tool
The Migration tool can move the following data:
• Non-event user data:
— Scheduled Tasks (Faronics Core Console 2.x tasks as well as Product Loadin tasks)
— Custom Workstation Groups
—Reports
• Workstation Event Data for all products.
Prior to launching the tool, all instances of Core Console and the Core Server must be shut down.
Instructions on using the utility can be found in the Database Event Migration and Migrate
the Core Console Tasks, Reports, Groups, and Filters sections of this document.
If migration tool is used on a computer with only Core Console installed, only the
Reports are migrated.
LDAP connections and tasks in the History are not migrated.
Faronics Core Migration Guide
Page 13

Topics
Migration
This chapter describes the migration process.
Faronics Core Installation
Installing updated Core Agent and Product Agents
Database Event Migration
Event Migration Using the Migration Tool
13
|
Faronics Core Migration Guide
Page 14
14| Migration
Faronics Core Installation
Installing Faronics Core 3.x
Configuring the Core Database
Faronics Core 3.x can be installed on either a new server or on the existing Faronics Core Console
2.x system. For larger deployments it is recommended to use a new server to deploy Faronics Core
3.x as this will provide the most flexibility.
(Refer to the Faronics Core User Guide available at http://www.faronics.com/library for more
information.)
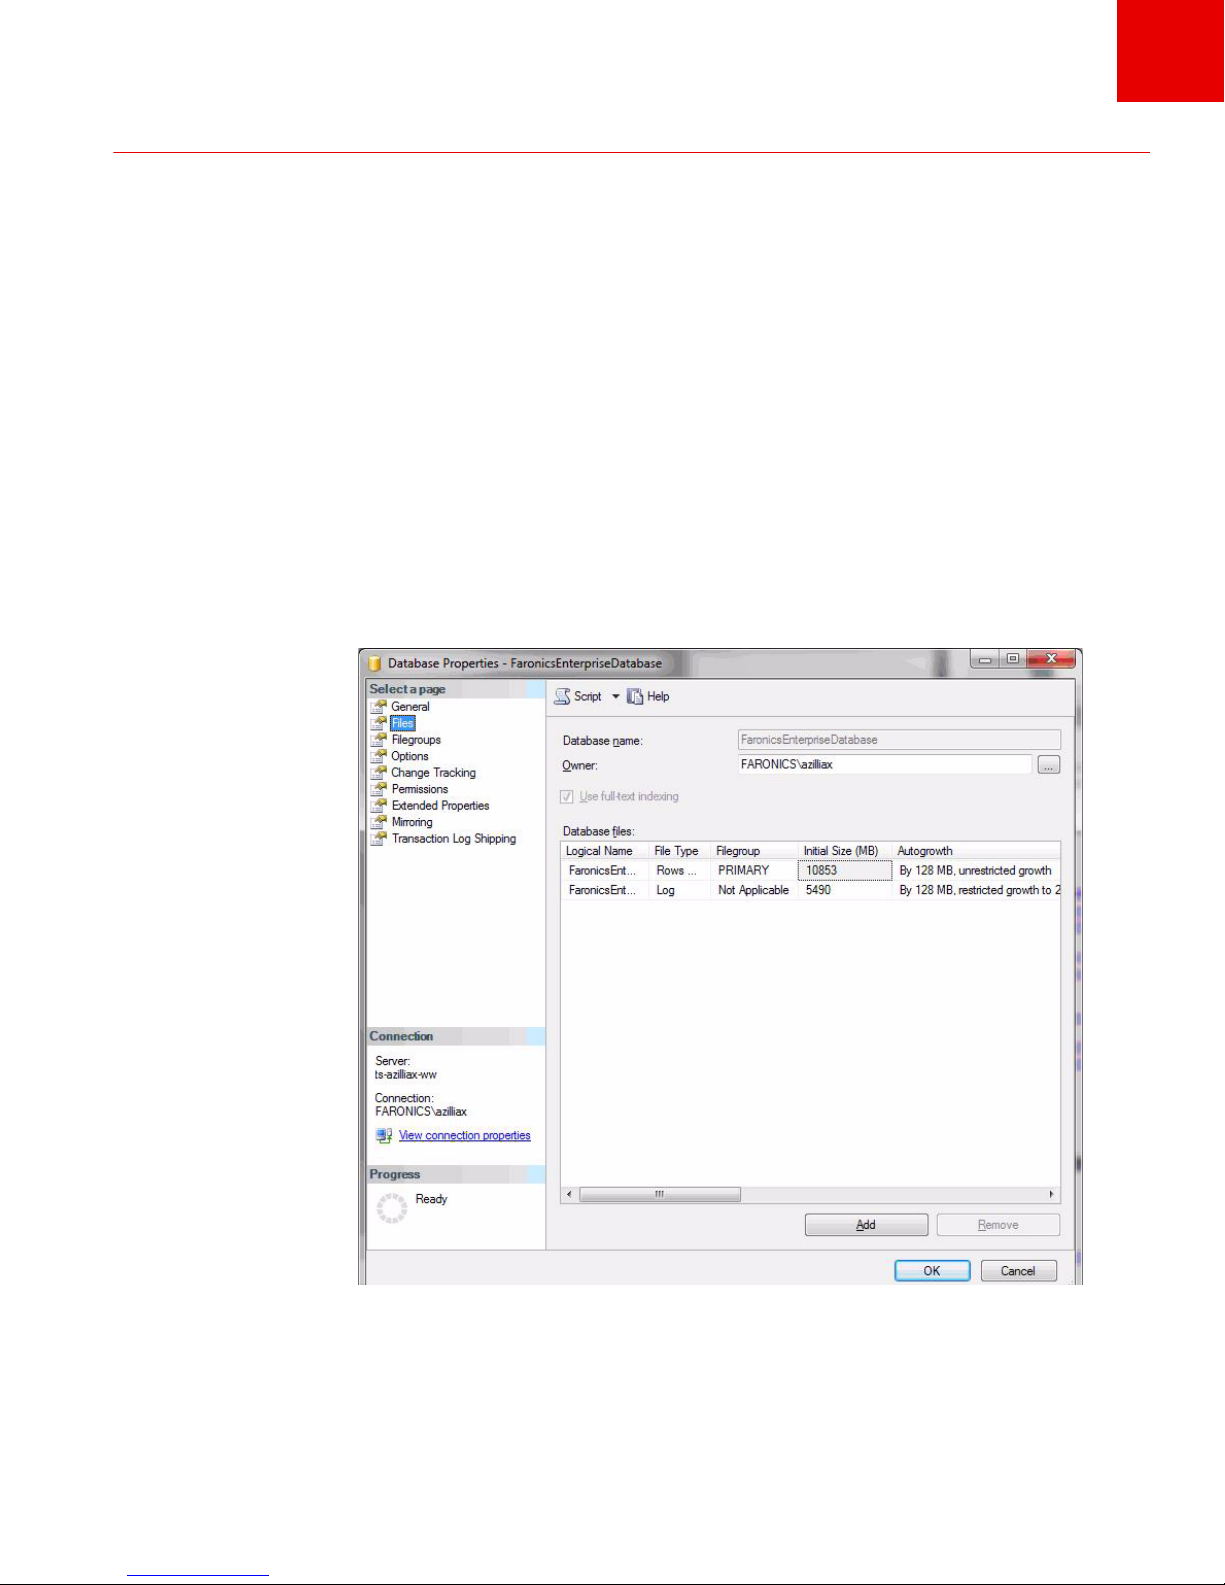
After installation, it is recommended that the following changes be implemented on the database
used by the Core Server:
1. Launch the SQL Server Management Studio.
2. Select the Database Properties of the database to be altered.
3. Click the Files node on the left side of the properties dialog.
4. Edit the following settings:
•Set the database (FaronicsCore.mdf) to grow in 100mb increments as required.
• Do not alter the Autogrowth settings for the log file (FaronicsCore.ldf).
Faronics Core Migration Guide
Page 15

Faronics Core Installation|15
• Change the initial size of the database to 100mb larger than the existing
FaronicsEnterpriseDatabase used for Faronics Core Console 2.x.
Installing the updated product loadin on Faronics Core 3.x.
A Product Loadin should be installed and updated as per the instructions in the Loadin user guide.
Once installed, further steps may be required to complete the update process and enable full
control of the products in Faronics Core 3.x.
(Refer to the specific Product Loadins available at http://www.faronics.com/library for more
information.)
Faronics Core Migration Guide
Page 16

16| Migration
Installing updated Core Agent and Product Agents
Push from Core Console (FC3)
To perform a push to a client workstation from the Core Console (FC3) follows the procedure
below:
1. Browse and select the workstation listed in the Discovered Workstations node of the Core
Console (FC3).
Faronics Core Migration Guide
Page 17

Installing updated Core Agent and Product Agents|17
2. Select the workstation to push the installation to and right-click to select Install Faronics Core
Agent.
3. Configure the options listed in the Configure Agent dialog box as shown and click Next.
Faronics Core Migration Guide
Page 18

18| Migration
4. Enter the credentials that will be used to perform the remote installation. It is recommended
to use domain credentials. Click OK to begin the installation.
5. During installation, the task progress will be displayed in the Tasks node of the Core Console
(FC3). When installation is complete, check task history to determine if the installation was
successful.
Faronics Core Migration Guide
Page 19

Installing updated Core Agent and Product Agents|19
Manual Deployment
The Core Agent can be deployed manually by copying the installation package to the local system
and executing the MSI installer package following the prompts provided on screen. The process of
creating the Core Agent is described in Appendix A, Creating the Core Agent.
Push using 3rd Party Tools
The Faronics Core Agent is packaged as a standard MSI file that can be pushed using any 3rd party
management utility. The process of creating the core agent for deployment is detailed in
Appendix A, Creating the Core Agent.
Faronics Core Migration Guide
Page 20

20| Migration
Database Event Migration
In most cases, administrators will not need to move the database between Faronics Core Console
2.x and Faronics Core 3.x. The majority of the database is made up of status tables that reflect the
current state of the workstations and these are rebuilt as workstations report into the new
Faronics Core 3.x installation. In the event that there is a need to preserve the historical event
data between the Faronics Core Console 2.x and Faronics Core 3.x installations the process below
will allow administrators to do so.
The process is as follows:
1. Backup the Faronics Core Console 2.x database. This is explained in Backing up Faronics
Core Console 2.x Database.
2. Restore the Faronics Core Console 2.4 database into the instance of SQL in use by the Core
Database (FC3). This is explained in Restoring the Faronics Core Console 2.x
database into Faronics Core 3.x (Core Database).
3. Migration of the historical event data to the new database. This step is explained in this
section. There are two methods for the migration of the data; either using the Faronics Core
Migration Tool, or manually by using the SQL command.
Event Migration Using the Migration Tool
To migrate the data using the Migration tool run the following commands:
NET STOP FaronicsCoreEventReceiver
NET STOP FaronicsCoreService
NET STOP "Faronics Core 3 Event Receiver"
C:\Program Files\Faronics\Faronics Core3\Console\Faronics Core
Migration tool\FaronicsCoreMigrationTool.exe /t
NET START FaronicsCoreEventReceiver
NET START FaronicsCoreService
NET START "Faronics Core 3 Event Receiver"
This command will transfer the event data for all workstations between the Core Console 2.4
database and the Faronics Core 3.0 database. If required, you can select to only move the data for
the workstations that are currently managed by Faronics Core 3.0 by specifying the /m switch at
runtime as below:
NET STOP FaronicsCoreEventReceiver
NET STOP FaronicsCoreService
NET STOP "Faronics Core 3 Event Receiver"
C:\Program Files\Faronics\Faronics Core3\Console\Faronics Core
Migration tool\FaronicsCoreMigrationTool.exe /t /m
NET START FaronicsCoreEventReceiver
NET START FaronicsCoreService
NET START "Faronics Core 3 Event Receiver"
This utility assumes that both databases are in the same instance. If they are not, the Faronics
Core Console 2.x database must be moved to the same SQL instance as the Core Database (FC3).
Faronics Core Migration Guide
Page 21

Database Event Migration|21
Manual Migration of Database Events
Once the database is restored, the following SQL statement can be used to move the historic log
event data from one database to the other (if you do not want to move the data using the Faronics
Core Migration Tool). This command assumes both databases exist in the same instance of SQL
and that the appropriate rights exist to move the data between both databases.
insert into FaronicsCore.dbo.tbl_LogEvents
(MachineId, ActionEventId, ProductId, LogTime, ExtraDataGuid)
(select MachineId, ActionEventId, ProductId, LogTime, ExtraDataGuid
from FaronicsEnterpriseDatabase.dbo.tbl_LogEvents)
DBCC DBREINDEX(tbl_logEvents)
insert into FaronicsCore.dbo.tbl_LogExtraData
(ExtraDataGuid, XMLData)
(select ExtraDataGuid, XMLData from
FaronicsEnterpriseDatabase.dbo.tbl_LogExtraData)
DBCC DBREINDEX(tbl_logExtraData)
Faronics Core Migration Guide
Page 22

22| Migration
Migrate the Core Console Tasks, Reports, Groups, and Filters
Faronics Migration Tool has the ability to export the existing groups, tasks, reports, and filters
from Faronics Core Console 2.x. When run on the Faronics Core Console 2.x, it will generate a ZIP
file that can be transferred to the Core Server (FC3) and imported.
To Export the data run the following commands on the Core Console 2.4
Server:
NET STOP FaronicsCoreEventReceiver
NET STOP FaronicsCoreService
NET STOP "Faronics Core 3 Event Receiver"
C:\Program Files\Faronics\Faronics Core3\Console\Faronics Core
Migration tool\FaronicsCoreMigrationTool.exe /e data.zip
NET START FaronicsCoreEventReceiver
NET START FaronicsCoreService
NET START "Faronics Core 3 Event Receiver"
To import the data copy the file created during the export into the C:\Program
Files\Faronics\Faronics Core3\Console\Faronics Core Migration tool folder
and run the following commands:
NET STOP FaronicsCoreEventReceiver
NET STOP FaronicsCoreService
NET STOP "Faronics Core 3 Event Receiver"
C:\Program Files\Faronics\Faronics Core3\Console\Faronics Core
Migration tool\FaronicsCoreMigrationTool.exe /i data.zip
NET START FaronicsCoreEventReceiver
NET START FaronicsCoreService
NET START "Faronics Core 3 Event Receiver"
It is recommended that the computer running the Core Server (FC3) be rebooted once the import
is complete.
Faronics Core Migration Guide
Page 23

Appendix A Creating the Core Agent
Creating an updated Core Agent MSI installer is only required in the event that the software is
deployed using a 3rd party utility. In the event that the software is deployed using a 3rd party tool,
follow the steps listed below to generate an updated install package.
1. Right-click on the server node in the Core Console (FC3) and select Create Core Agent
Installer.
23
|
Faronics Core Migration Guide
Page 24

24|Appendix A Creating the Core Agent
2. In the dialog displayed, ensure that the name of the Core Server (FC3) is correct and the
appropriate port is listed. If the workstation is to be a Wake-On-LAN Relay ensure that the
Workstation will act as a Wake-on-LAN (WOL) Relay option is selected.
3. Click OK.
4. Save the Core Agent installer package in an accessible location on the hard disk.
Once the Core Agent is saved, it is ready for deployment on the client workstations.
Faronics Core Migration Guide
Page 25

Appendix B Moving the Core Console 2.4 database
There are two steps involved in moving the Faronics Core Console 2.x database to Faronics Core
3.x (Core Database):
1. Backing up Faronics Core Console 2.x Database
2. Restoring the Faronics Core Console 2.x database into Faronics Core 3.x (Core Database)
25
|
Faronics Core Migration Guide
Page 26

26|Appendix B Moving the Core Console 2.4 database
Backing up Faronics Core Console 2.x Database
Before beginning the update process, it is recommended that the database be backed up for
recovery purposes. The following process details the process of backing up the database using the
Microsoft SQL Server Management studio.
1. Launch the SQL Server Management Studio
2. Expand the databases node to show the Faronics Enterprise Database.
3. Right-click on the Faronics Enterprise Database and select Tasks> Back Up . . .
Faronics Core Migration Guide
Page 27

Backing up Faronics Core Console 2.x Database|27
4. In the Wizard that appears, ensure that the database is correct and that the backup type is
listed as FULL. In the Destination field, make note of the path and file name being used to
back up the database.
5. Click on OK to begin the backup.
Faronics Core Migration Guide
Page 28

28|Appendix B Moving the Core Console 2.4 database
6. When the backup is successful, click OK in the notification dialog.
7. Close the SQL Server Management studio.
8. Browse to the location where the backup was saved.
9. Copy the backup file to a safe location on another system or on removable media.
Faronics Core Migration Guide
Page 29

Restoring the Faronics Core Console 2.x database into Faronics Core 3.x (Core Database)|29
Restoring the Faronics Core Console 2.x database into Faronics
Core 3.x (Core Database)
Complete the following steps to restore the database backed up in the previous section:
1. Launch the SQL Server Management Studio.
2. On the Databases node, right-click and select Restore Database. . .
3. In the Restore Database wizard, select the option to restore From Device and then click on the
selection button.
4. In the file selection dialog, select the backup of the Faronics Enterprise Database (backup that
was taken as explained in the previous section) by clicking the Add button.
Faronics Core Migration Guide
Page 30

30|Appendix B Moving the Core Console 2.4 database
5. Browse to the backup file and click on OK, and then click OK again.
Faronics Core Migration Guide
Page 31

Restoring the Faronics Core Console 2.x database into Faronics Core 3.x (Core Database)|31
6. Once you are back to the Restore Database wizard click on the To Database option in the
destination for restore and select FaronicsEnterpriseDatabase.
7. Click on the restore button under the Backup sets to restore pane and click OK.
Faronics Core Migration Guide
Page 32

32|Appendix B Moving the Core Console 2.4 database
8. Once the restore is complete the database will be displayed in the Management Studio along
with the existing databases for Faronics Core 3.x.
Faronics Core Migration Guide
 Loading...