

1200w MANUAL AIR FRYER
with Silicone Baking Cups
and Trivet
Model CCXM22
Instructions & Recipes
®
■ 2
Introduction
The AIR FRYER makes cooking quick, convenient and most importantly—
healthy. By using rapid hot air convection cooking techologies, the AIR
FRYER evenly circulates hot air to cook fresh or frozen foods, giving them
the same crunchy bite and moist interiors produced by conventional deep
fryers. And food is never submerged in cooking oils or fats while cooking.
The AIR FRYER can bake, broil and steam a wide variety of foods, such as
meats, vegetables, pizzas and even cakes. Get started with the great recipes
that follow—and enjoy!
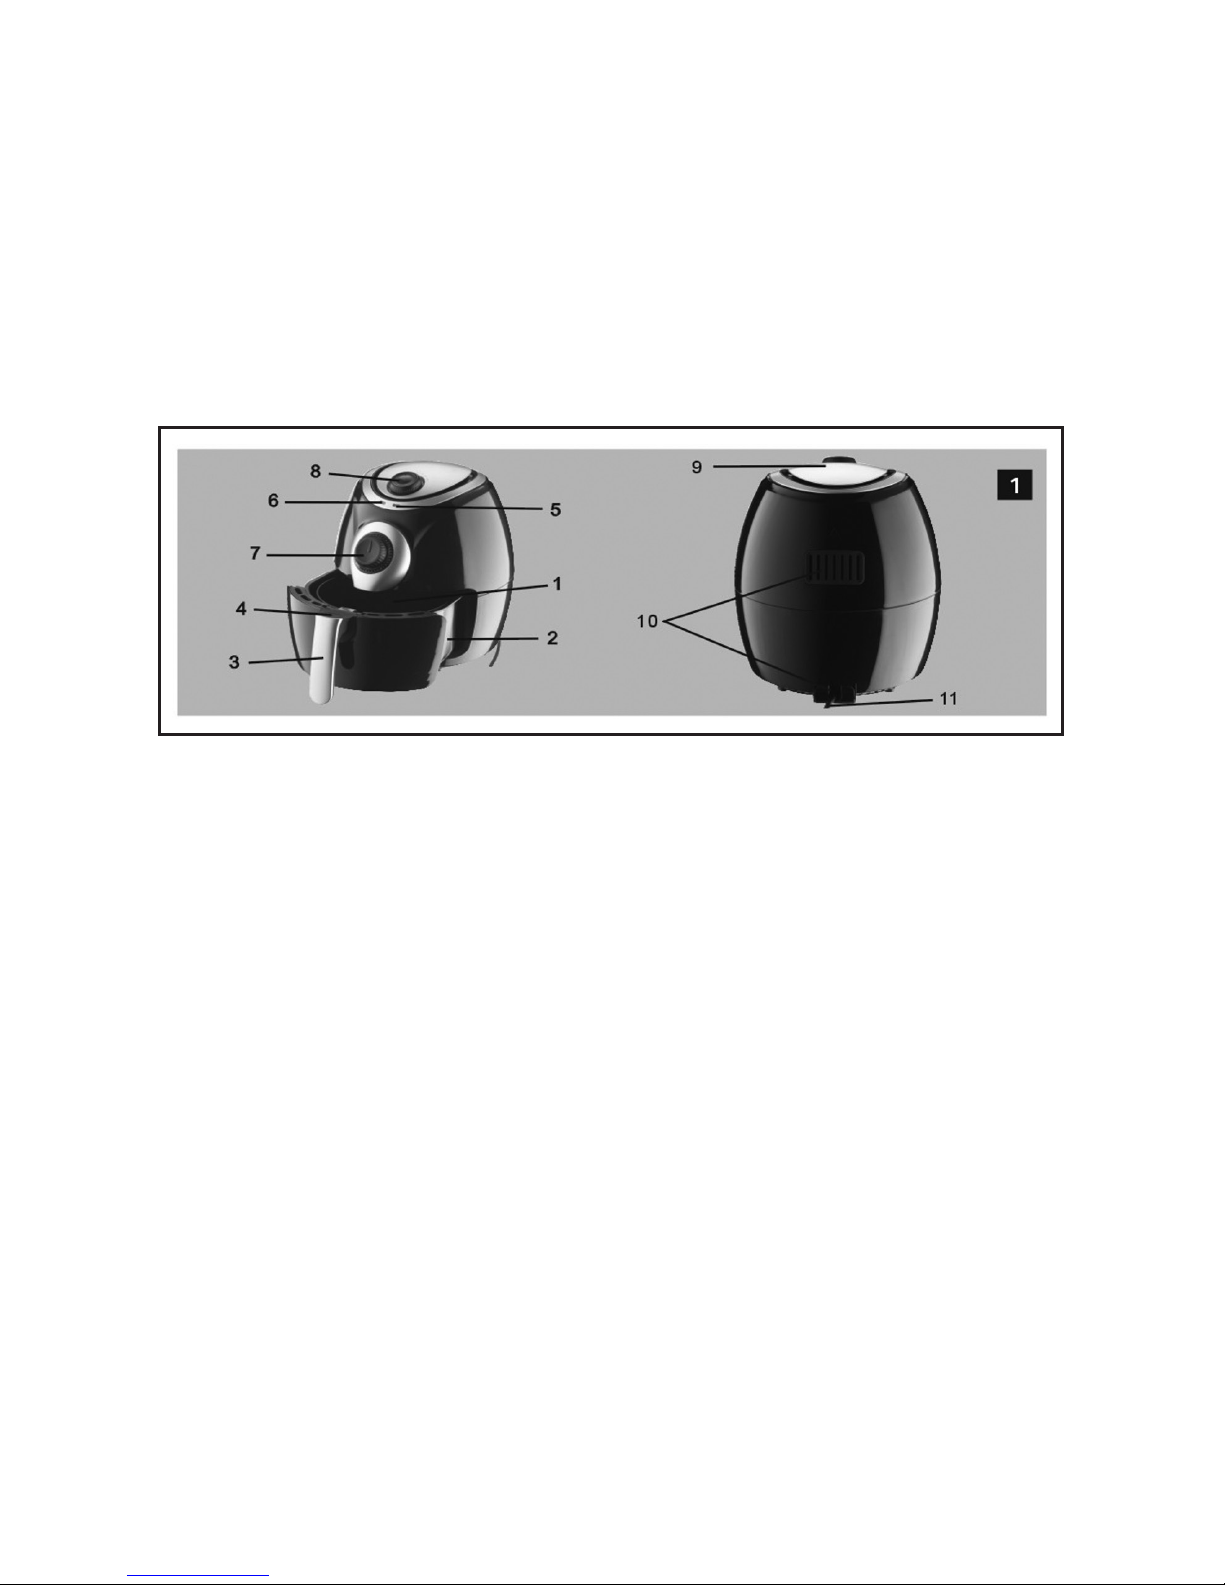
General description (Fig.1)
1. Basket 5. Heating-up light 9. Air inlet
2. Pan 6. Power-on light 10. Air outlets
3. Basket handle 7. Timer/Power-on knob 11. Power cord
4. Basket release button 8. Temperature control knob
(175–400°F)
Automatic Switch-off
The appliance has a built-in timer. It will automatically shut off the appliance
when it has counted to zero. You can manually switch off the appliance by
turning the timer knob counter-clockwise to zero.
Before First Use
1. Remove all packaging materials, stickers and labels.
2. Clean the basket and pan with hot water, dishwashing liquid, and a
non-abrasive sponge.
3. Wipe the inside and outside of the appliance with a cloth. There is
no need to ll the pan with oil or frying fat since the appliance works
using hot air.
3 ■
Using the Appliance
1. Place the appliance on a stable, horizontal and even surface.
2. Remove the pan with the basket in it from the AIR FRYER.
3. Place the ingredients in the basket. NOTE: Do not overll the basket
(for amounts, see “Settings” chart on the inside back cover), as it
may affect the quality of the food.
4. Slide the pan back into the AIR FRYER. Never use the pan without
the basket in it.
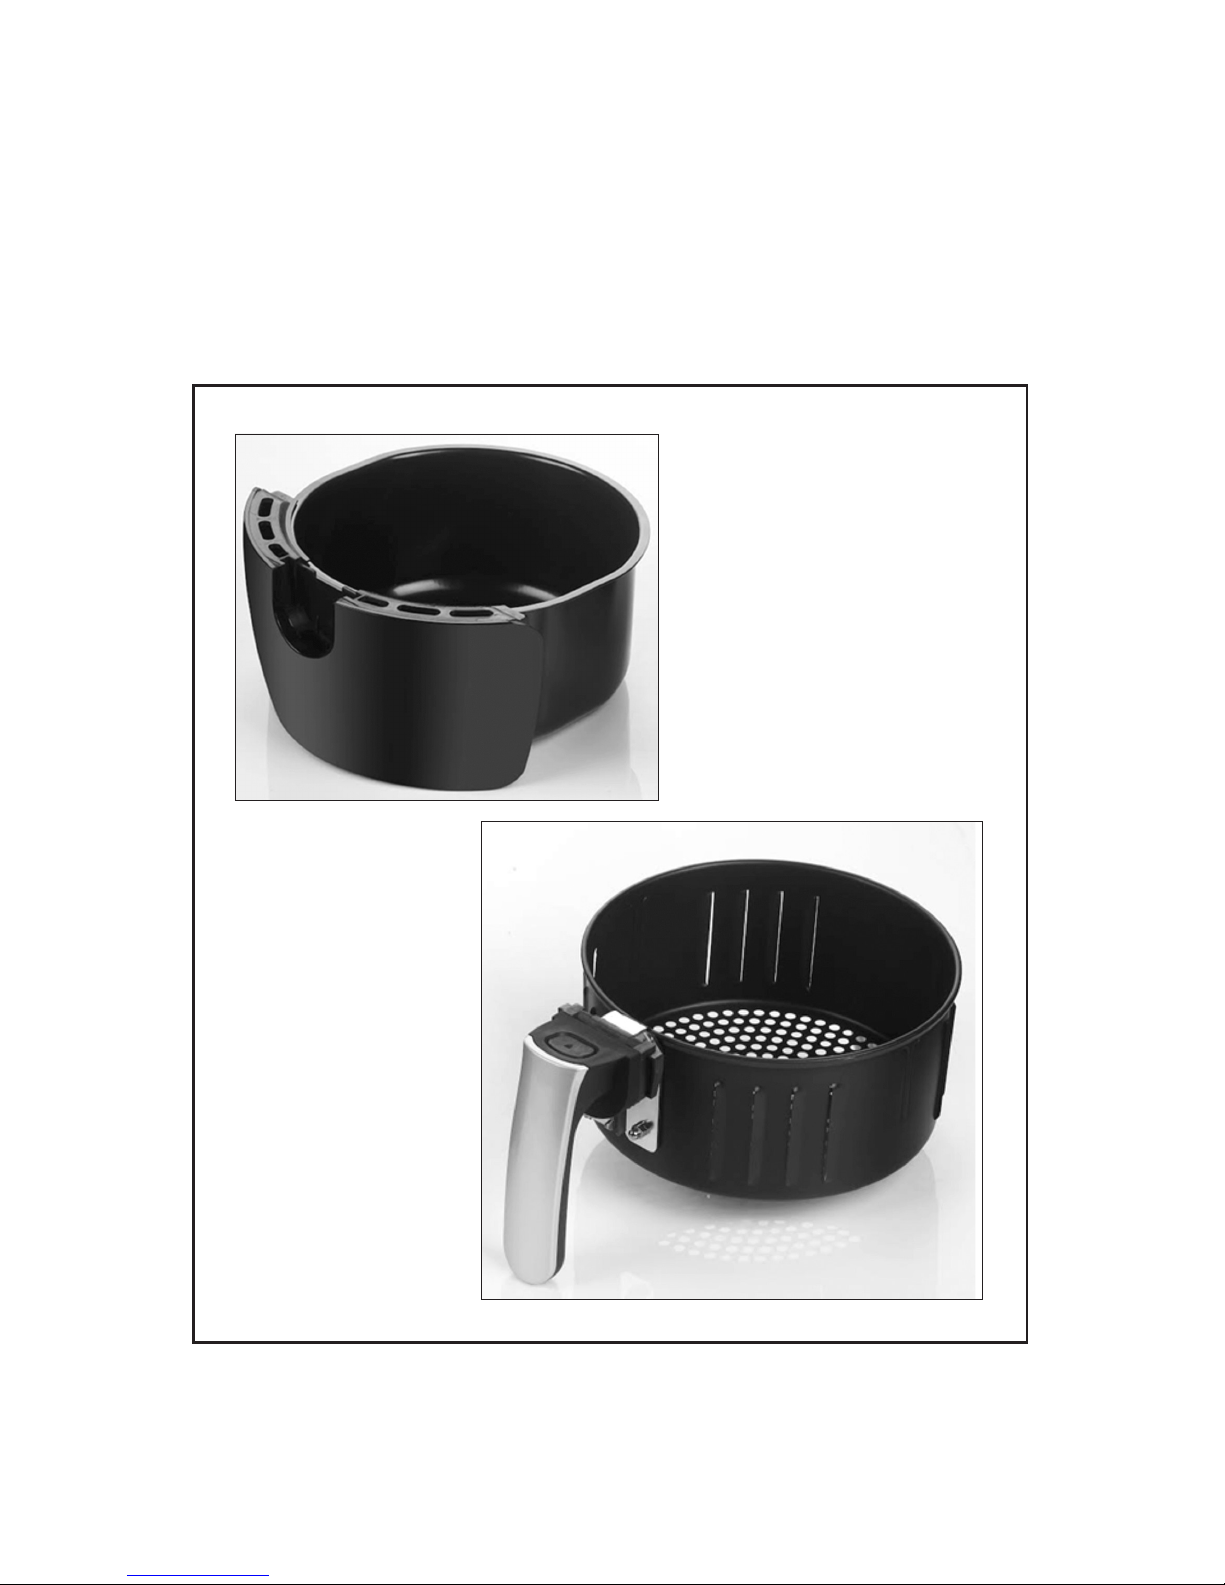
Separate the pan (g. 2)
and the basket (g. 3)
by pressing the Basket
Release Button (g. 4)
at the top of the basket
handle. Whenever removing the pan from the AIR
FRYER, ALWAYS place the
pan on a counter or trivet
because the contents will
be very hot.
2
3
4

■ 4
5. Turn the temperature control knob to the proper temperature (g.5).
See “Settings” chart on the inside back cover.
6. Determine the required preparation time for the ingredient. See
“Settings” chart on the inside back cover.
7. To switch on the appliance, turn the timer knob to the required
preparation time (g.6). Add 3 minutes to preparation time if the
appliance is cold. NOTE: If you want, you can also preheat the
appliance without any ingredients inside. Turn the timer knob for
more than 3 minutes and wait until the RED heating-up light goes out
(after about 3 minutes). Then ll the basket and turn the timer knob to
the required preparation time.
a. The GREEN power-on light and the RED heating-up light go on.
b. The timer starts counting down the set preparation time.
c. During the cooking cycle, the RED heating-up light will turn off
from time to time. This indicates that the temperature has been
reached.
d. Excess liquid from the ingredients is collected in the bottom of
the pan.
CAUTION: Do not touch the pan during and for 30 minutes after use,
because it gets very hot. Hold the pan ONLY by the handle.
8. Some ingredients require shaking halfway during the preparation
time (see “Settings” chart on the inside back cover). At the halfway
point, pull the pan out of the appliance by the handle and shake it
(g.7). Then slide the pan back into the AIR FRYER. CAUTION:
Do not press the Basket Release Button on the handle while
shaking (g.8).
5 6 7 8

5 ■
a. If there is liquid in the pan, remove the basket from the pan
before shaking. To do this, pull the pan out of the appliance.
NOTE: Use caution, as steam may be present. Place it on
a heat-proof surface. Press the basket release button before
shaking the basket (g.9). Return the basket to the pan, and
slide the pan back into the AIR FRYER.
9. When you hear the timer bell, the set preparation time has elapsed.
Pull the pan out of the appliance and place it on a heat-proof surface.
NOTE: You can also switch off the appliance manually by turning the
temperature control knob to 0.
10. Check to make sure the ingredients are ready. If the ingredients are
not fully cooked, simply slide the pan back into the appliance and set
the timer for a few extra minutes.
11. To remove ingredients, press the basket release button and lift the
basket out of the pan (g.10). The pan and the ingredients are hot
after hot air frying. Depending on the moisture content of the
ingredients in the fryer, steam may escape from the pan.
12. Empty the basket into a bowl or onto a plate (g.11). To remove
large or fragile ingredients, lift the ingredients out of the basket using
tongs.
13. When a batch of ingredients is ready, the AIR FRYER is instantly
ready for preparing another batch, since it is already pre-heated.
9 10 11

■ 6
Important Safeguards
•
The appliance needs approximately 30 minutes to cool down before
safely handling or cleaning.
•
Check that the voltage indicated on the appliance ts the voltage for
your outlet.
•
Do not use the appliance if there is any damage to the plug, cord or
other parts.
•
Do not use any unauthorized person to replace or x a damaged main
cord.
•
Keep the appliance and its cords out of the reach of children.
•
Keep the all cords away from hot surfaces.
•
Do not connect appliance to an external timer switch.
•
Do not place the appliance on or near combustible materials, such as a
tablecloth or curtain.
•
Do not place the appliance against a wall or against another appliance.
Leave at least 5 inches of free space on the back and sides and 5
inches of free space above the appliance.
•
Do not place anything on top of the appliance.
•
Do not use the appliance for any purpose other than described in this
manual.
•
Do not let the appliance operate unattended.
•
During hot air frying, hot steam is released through the air outlets. Keep
your hands and face at a safe distance from the steam and from the air
outlets. Also be careful of hot steam and air when you remove the pan
from the appliance.
•
Any accessible surfaces may become hot during use.
•
Immediately unplug the appliance if you see dark smoke coming out of
the appliance. Wait for the smoke emission to stop before you remove
the pan from the appliance.
•
Do not immerse the housing in water or rinse under the tap due to the
electrical and heating components.
•
Do not let any liquid enter the appliance (aside from cooking liquids
added to the pan) to prevent electric shock or short-circuiting.
•
Keep all ingredients in the basket to prevent contact from heating
elements.
•
Do not cover the air inlets and air outlets when the appliance is working.
•
Filling the pan with oil may cause a re hazard.
•
Do not touch the inside of the appliance while it is operating.
•
This appliance is designed for household use only.
•
Always unplug the appliance when not in use.

7 ■
Cooking Advice
•
Smaller ingredients usually require a slightly shorter cooking time than
larger ingredients.
•
Shaking smaller ingredients halfway during the preparation time
optimizes the end result and can help prevent unevenly fried
ingredients.
•
A small amount of oil (3–4 tbsp.) can be added to the pan for achieving
a crispy texture. Never overll, as this will damage the AIR FRYER. Use
caution when removing the pan from the unit, as ingredients and oil will
be very hot.
•
A small amount of water (3–4 tbsp.) can be added to the pan for
steaming food. Never overll, as this will damage the AIR FRYER. Use
caution when removing the pan from the unit, as ingredients—and
any remaining steam or water—will be very hot.
•
Because the Rapid Air technology reheats the air inside the appliance
instantly, pulling the pan out of the appliance briey during hot air frying
barely disturbs the process.
•
Frozen foods, such as fries, chicken nuggets and sh sticks can be
prepared by following the “Settings” chart on the inside back cover.
•
Snacks that can be prepared in an oven can also be prepared in the
AIR FRYER.
•
Place a glass, silicone or metal oven-safe dish in the AIR FRYER basket
when baking a cake or quiche, or frying fragile or lled ingredients.
•
For a crispy texture, spritz vegetable, olive or non-stick oil over
ingredients in the basket. Process in the AIR FRYER within a few
minutes after adding the oil.
•
You can also use the AIR FRYER to reheat ingredients by setting the
temperature to 300°F for up to 10 minutes.

■ 8
Accessories
•
A set of 8 silicone baking cups. NOTE: 4 can be used in the AIR FRYER
at one time.
•
To protect your work surface, place the hot Basket and/or Pan on the
Silicone Trivet whenever they are removed from the AIR FRYER.
•
While the items are dishwasher safe, hand washing is recommended.
Cleaning
1. Clean the appliance after every use. Do not clean the pan, basket
and the inside of the appliance with any metal kitchen utensils
or abrasive cleaning materials, as this may damage the nonstick coating of them.
2. Remove the main plug from the wall socket and let the appliance
cool down for at least 30 minutes. NOTE: Remove the pan to let the
AIR FRYER cool down more quickly.
3. Wipe the outside of the appliance with a moist cloth.
4. Clean the pan and basket with hot water, some liquid detergent and
a non-abrasive sponge. You can remove any remaining food residue
with degreasing liquid.
5. If any food particles are stuck to the basket or the bottom of the pan,
ll the pan with hot water with some liquid detergent. Put the basket
in the pan and allow them to soak for about 10 minutes.
6. Clean the inside of the appliance with hot water and a non-abrasive
sponge.
7. Clean the heating element with a cleaning brush to remove any food
residue.
Storage
1. Unplug the cord.
2. Make sure all parts are clean and dry.

9 ■
Air Fryer
Recipes

■ 10
Air Fried Eggs
Serves 4
non-stick cooking spray
1 tablespoon extra-virgin olive oil
2 cups of baby spinach rinsed
4 slices Canadian bacon
4 large eggs
½ cup shredded cheddar, divided
salt and pepper, to taste
1. Spray four ramekins with non-stick spray.
2. On the stove, heat olive oil in a sauté pan, add spinach and cook until
wilted. Drain off excess liquid.
3. Divide spinach between the ramekins.
4. Place the Canadian bacon in the ramekins.
5. Crack an egg into each, and top with cheese.
6. Sprinkle with salt and pepper.
7. Set temperature to 350 degrees and set timer for 15 minutes. Adjust
time to determine the runniness of the yolk.

11 ■
Asparagus Frittata
Serves 1
2 large eggs
1 tablespoon fresh grated Parmesan cheese
2 tablespoons milk
pinch of salt and pepper
non-stick cooking spray
5 asparagus tips steamed
1. Whisk eggs, cheese, milk, salt and pepper in a bowl to blend well.
2. Spritz an oven-safe dish* with non-stick spray.
3. Place the dish in the AIR FRYER basket.
4. Pour the egg mixture into the dish; place the asparagus in the
egg mixture.
5. Place the dish into the basket, then put the basket and pan into the
AIR FRYER.
6. Set temperature to 400 degrees and set timer for 5 minutes.
* Accessory items are sold separately and are not included.

■ 12
Blueberry Cream Cheese Stuffed
French Toast with Corn Flake Crust
Serves 2–4
2 large eggs, beaten
⅓ cup whole milk
3 teaspoon sugar
¼ teaspoon ground nutmeg
¼ teaspoon salt
¼ cup fresh blueberries
4 tablespoons berry-avored whipped cream cheese
4 2-inch slices of Challah bread, preferably a few days old
1½ cups corn akes, crumbled
1. In a shallow bowl, mix the egg, milk, sugar, nutmeg and salt.
2. Combine the blueberries and whipped cream cheese in a small bowl.
3. Cut a slit into the top crust of each slice of bread. Using a spoon, stuff
each piece of bread with 2 tablespoons of berry mixture.
4. Soak each slice of bread in the egg mixture until the entire slice is
covered.
5. Place the corn akes on a plate. Press each slice of bread into the
corn ake, evenly coating both sides.
6. Place each slice of bread into the AIR FRYER basket.
7. Set temperature to 400 degrees and set time for 8 minutes.
8. Serve hot with maple syrup and butter.

13 ■
Bacon Wrapped Dates with Blue Cheese
Serves 4–6
10 pitted dates, preferably Medjool
¼ lb. blue cheese, cut into 10 pieces
4 whole strips of bacon, cut into 3 equal pieces
1 teaspoon Cajun seasoning
1. Stuff each date with blue cheese.
2. Wrap each date with a piece of bacon and secure with a toothpick.
3. Place the dates in the basket and then put the basket and pan into
the AIR FRYER.
4. Set temperature to 400 degrees and set timer for 5 minutes.
5. After 5 minutes, turn the dates and cook another 3 minutes
6. Once cooking is complete, remove dates from basket and sprinkle
with Cajun seasoning.

■ 14
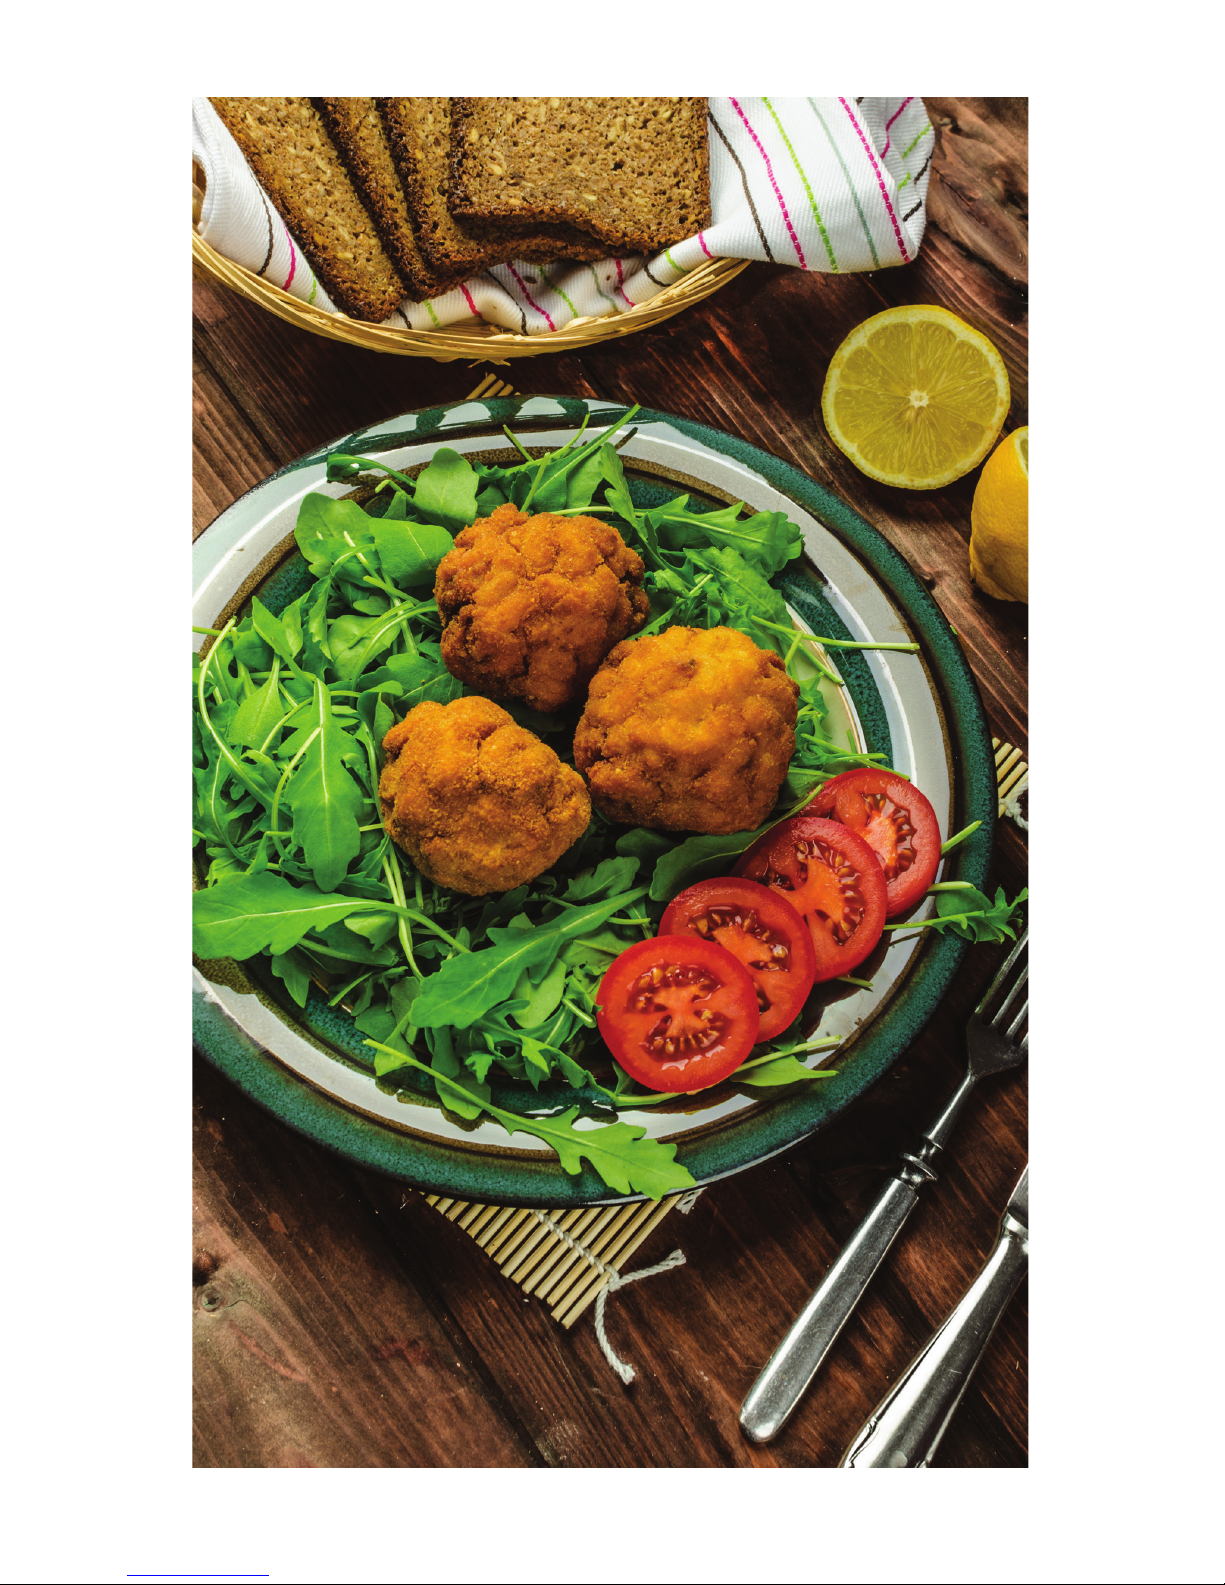
Fried Mac and Cheese Balls
Serves 6
1 pound elbow macaroni
2 tablespoons unsalted butter
2 tablespoons all-purpose our
2 cups cream, warmed, plus 2 tablespoons for egg wash
1 pound grated Cheddar cheese
½ pound shredded mozzarella
½ pound Parmesan cheese
salt and freshly ground black pepper
2 large eggs
3 cups seasoned panko bread crumbs
non-stick cooking spray
1. Cook the macaroni according to package instructions.
2. Drain and rinse with cold water to stop the cooking. Drain again, pour
into a large bowl, and set aside.
3. In a saucepan, melt the butter over medium heat. Sprinkle our into
the butter and stir it with a whisk. Cook for 2 minutes.
4. Whisk the warmed cream into the our mixture, working out any
lumps. Cook until the sauce thickens, about 2 minutes.
5. Remove from the heat, add the cheeses, and stir until melted and
smooth; season with salt and pepper.
6. Fold the cheese sauce into macaroni until blended.
7. Pour the mac and cheese into a shallow pan and refrigerate until cold,
at least 2 hours.
8. Shape the cold mac and cheese into meatball-sized balls and place
them onto a waxed paper-lined tray. Freeze the balls overnight.
9. Beat the eggs and 2 tablespoons cream together to form an egg
wash and pour into a shallow bowl. Put the bread crumbs into another
shallow bowl.
15 ■

■ 16
10. Remove the mac and cheese balls from the freezer. Dip the frozen
balls into the egg wash then into the panko breadcrumbs. Put the balls
back into the freezer until you are ready to air-fry.
11. Place mac and cheese balls in the AIR FRYER basket. Spritz with
cooking oil.
12. Set the temperature to 400 degrees and the time to 8 minutes.
13. Cook until golden brown.
Easy Baked Mac ’n’ Cheese
Serves 2–3
non-stick cooking spray
1½ cups elbow macaroni
1 cup chicken broth
½ cup heavy cream
¾ cup shredded cheddar cheese
½ cup shredded mozzarella cheese
¼ cup shredded Parmesan cheese
¼ teaspoon kosher salt, or to taste
¼ teaspoon fresh ground pepper
1. Spray an oven-safe dish* with non-stick spray.
2. Combine remaining ingredients and pour into dish.
3. Place dish in the basket, then put the basket and pan into the AIR
FRYER.
4. Set temperature to 350 degrees and the time to 30 minutes.
5. When cook time is complete, mac and cheese will be bubbling and
golden brown. Gently stir before serving.
* Accessory items are sold separately and are not included.

17 ■
Cheese Sticks
Serves 4–6
12 strings from 1 package part-skim mozzarella string cheese
¼ cup instant our
2 large eggs, beaten
2 cups Italian seasoned bread crumbs
¼ cup grated Parmesan cheese
marinara sauce for dipping
1. Open the package of string cheese and separate the cheese sticks
and freeze them for two hours.
2. Place the instant our in a large plastic bag, the beaten eggs in a
medium-size bowl, and mix the bread crumbs with the Parmesan and
place in a shallow dish or pie pan.
3. When string cheese is frozen, shake the cheese in the bag of our,
then dip into the beaten egg, then press in the crumbs.
4. Place about 6 cheese sticks evenly in the basket, do not overcrowd.
5. Put the basket and pan into the AIR FRYER.
6. Set temperature to 400 degrees and set timer to 7 minutes.
7. After 3 minutes, carefully ip each cheese stick.
8. Remove and repeat with the remaining cheese sticks.
9. Serve with marinara dipping sauce.

■ 18
Chicken Fajitas
Serves 4
1 teaspoon garlic powder
½ teaspoon chili powder
¼ teaspoon ground black pepper
½ teaspoon sea salt
¼ teaspoon ground cumin
¼ teaspoon ground coriander
1 pound chicken breasts, sliced into strips
1 tablespoon fresh lime juice
1 small onion, peeled and sliced
1 small red pepper, cored and sliced
1 small green pepper, cored and sliced
non-stick cooking spray
4–6 premade our tortillas
Garnishes
½ cup sour cream
½ cup medium salsa
1 cup shredded lettuce
½ cup shredded cheddar cheese
1. In a small bowl, mix together garlic powder, chili powder, pepper, salt,
cumin and coriander.
2. Add the chicken strips and lime juice to the bowl and let marinate for
10 minutes.
3. Toss the onion and peppers in with the chicken.
4. Add half the chicken and vegetables to the fryer basket. Spray with
non-stick oil.
5. Set the temperature to 400 degrees and the time to 8 minutes.
6. When cooking complete, repeat with the remaining chicken mixture.
7. Place the tortillas in the fryer basket and set temperature to 190 de-
grees and the time to 3 minutes.
8. Serve with sour cream, salsa, lettuce and cheese.

19 ■
Chicken Buffalo Drummies
Serves 2
3 cups water
¼ cup salt
¼ cup sugar
1 teaspoon cayenne
10 bone-in chicken drummies
1 cup ice
1 cup rice our
Buffalo Sauce
4 tablespoons unsalted butter, melted
4 tablespoons hot sauce (Franks® RedHot)
1 teaspoon cider vinegar
1 teaspoon soy sauce
1 teaspoon ketchup
1. To brine the chicken drummies, place the water in a stainless steel
container and dissolve the sugar and salt. Add the cayenne pepper and
chicken wings. Top with ice. Let wings brine for at least 2 hours and up
to 12 hours.
2. While brining, make the wing sauce recipe by mixing all the ingredi-
ents together for the sauce in a large bowl and set aside.
3. After the drummies have nished brining, pat them dry, then toss with
the rice our.
4. Place drummies in the basket and then put the basket into the AIR
FRYER.
5. Set the temperature to 400 degrees and set the timer for 25 minutes.
6. Shake a couple of times in the cooking process.
7. Once cooking is complete, remove.
8. Toss the drummies in the large bowl with the Buffalo Sauce until they
are well coated.
9. Serve with blue cheese or ranch dressing, celery or carrot sticks.

■ 20
Buffalo Chicken Tenders
Serves 4
1 pound chicken tenders, trimmed
1 cup ranch dressing
1 cup our
½ teaspoon salt
½ teaspoon garlic powder
½ teaspoon cayenne pepper
non-stick cooking spray
½ cup Buffalo sauce, bottled or see previous recipe
¼ cup crumbled blue cheese (optional)
1. Place the chicken tenders in a bowl with ranch dressing and marinate
for one hour.
2. In a shallow glass baking dish combine our, salt, garlic powder, and
cayenne pepper.
3. Dip each chicken tender into the seasoned our.
4. Shake off excess our.
5. Place 2 chicken tenders in the basket and spritz with non-stick spray.
6. Put the basket and pan into the appliance
7. Set the temperature to 400 and the timer for 13 minutes.
8. Shake basket a few times.
9. Once cooking is complete remove. Repeat with remaining chicken.
10. Toss tenders in a bowl with Buffalo sauce to coat.
11. Place the tenders on a platter and while still hot, sprinkle with
blue cheese.
12. Serve with carrot and celery sticks and blue cheese dressing.

21 ■
Buffalo Chicken Dip
Makes 2 cups
4 ounces whipped cream cheese
¼ cup ranch dressing
¼ cup cayenne pepper sauce
¼ cup crumbled bleu cheese
3 Buffalo chicken tenders, cooked and diced
1. Place all the ingredients in a large bowl, mix well.
2. Serve hot or cold.
Chicken Nuggets
Serves 2–4
1 pound boneless skinless chicken breasts, cut into 1-inch pieces
1 cup buttermilk
1 cup our
1 teaspoon salt
½ teaspoon paprika
½ teaspoon garlic powder
non-stick cooking spray
1. Marinate the chicken breast chunks in the buttermilk for at least one
hour, or up to overnight.
2. Mix the our with the salt, paprika and garlic powder.
3. Remove the chicken from the buttermilk and toss with seasoned our.
4. Place 8 chicken nuggets in the basket and spritz with oil.
5. Put the basket and pan into the AIR FRYER.
6. Set temperature to 400 degrees set timer to 10 minutes.
7. Once cooking is complete, remove. Repeat with remaining chicken.

■ 22
Barbeque Chicken
Serves 1–2
½ teaspoon salt
½ teaspoon freshly ground pepper
¼ teaspoon dry mustard
¼ teaspoon paprika
½ teaspoon garlic powder
1 tablespoons cider vinegar
2 tablespoons brown sugar
1 tablespoon ketchup
1 tablespoon molasses
2–3 chicken thighs
1. Place all ingredients except for the chicken into a bowl, mix well.
2. Add the chicken and let it marinate for at least 30 minutes.
3. Place the rack* in the AIR FRYER basket.
4. Place the chicken on the rack, basting with some of the marinade.
5. Put the basket with rack into pan, then put them into the AIR FRYER.
6. Set temperature to 380 degrees and the timer to 15 minutes.
7. When cook time is complete, ip the chicken and baste with marinade.
8. Set timer for 10 minutes longer.
* Accessory items are sold separately and are not included.

23 ■
BBQ Chicken Salad with Onion Straws
Serves 4
2 ears of corn, hulled
non-stick cooking spray
1 pound boneless chicken tenders
1 teaspoon sea salt
½ teaspoon pepper
1 teaspoon paprika
1 tablespoon brown sugar
½ teaspoon garlic powder
½ head iceberg lettuce, rinsed, dried and cut into ⅛-inch strips
½ head romaine lettuce, rinsed, dried and cut into ⅛-inch strips
1 cup shredded Monterey Jack cheese
1 cup canned black beans, drained and rinsed
3 tablespoons fresh cilantro leaves, chopped
12 grape tomatoes, sliced
3 green onions, chopped
¼ cup ranch dressing
3 tablespoons BBQ sauce
1 can French fried onions
1. Place corn into AIR FRYER basket, spritz with oil. Set temperature to
400 degrees and time for 10 minutes.
2. Toss the chicken tenders in the salt, pepper, paprika, brown sugar and
garlic powder.
3. When corn is nished, remove to a plate. Place chicken tenders into
the basket, and spritz with oil.
4. Set temperature to 400 degrees and time for 10 minutes. Turn tenders
halfway through.
5. When corn is cooled, cut kernals off the cob into a large mixing bowl.
6. Dice the chicken tenders and add to the bowl.
7. Add remaining ingredients to the bowl—except the French fried
onions.
8. Toss and serve topped with the French fried onions.

■ 24
Personal Pizzas
Serves 1
1 can Pillsbury™ Classic Pizza Crust
½ cup homemade or store-bought pizza sauce
½ cup shredded mozzarella
¼ cup grated parmesan cheese
1 tablespoon olive oil
pinch dried oregano
sprinkle of garlic powder
Toppings
pepperoni, crumbled sausage or meatballs, ham,
or pineapple, peppers, etc.
1. Slice the pizza dough into 4 even sections.
2. Roll each section into a ball.
3. Rub the dough balls with olive oil.
4. Stretch the dough into the pizza pan.
5. Spoon on ¼ of the sauce. Do not over-sauce.
6. Sprinkle on a couple tablespoons of mozzarella.
7. Sprinkle on a tablespoon of parmesan.
8. Sprinkle with oregano and garlic powder.
9. Add toppings.
10. Place rack* in the AIR FRYER basket.
11. Place pizza on the rack. Put the basket with rack into pan, then put
them into the AIR FRYER.
12. Set temperature to 350 and the timer for 6 minutes.
13. When cook time is complete, slide onto cutting board and cut into
4 pieces.
14. Repeat with the remaining dough.
* Accessory items are sold separately and are not included.

25 ■
Pizza Rolls
Serves 4–6
2 cups whole milk mozzarella, shredded
½ lb. Italian sausage, approximately two, cooked and crumbled
3 ounces sliced pepperoni, chopped
2 roasted red peppers, chopped
1 small onion, minced
1 14-ounce jar pizza sauce
1 teaspoon garlic powder
15 eggroll wrappers
non-stick cooking spray
1. In a large bowl, combine the cheese, sausage, pepperoni, peppers
and onions.
2. Add the pizza sauce and garlic powder. Mix well.
3. Place ¼ cup of lling in the center of each wrapper.
4. Fold the point of the wrapper facing you over the pizza lling, and fold
the two sides into the center.
5. Moisten the remaining point, fold over, and roll tightly.
6. Repeat with the remaining eggroll wrappers.
7. Place in freezer-safe container and freeze for 24 hours.
8. Place 5 rolls in the basket, do not overcrowd, and spritz with non-stick
spray.
9. Put the basket and pan into the AIR FRYER.
10. Set temperature to 400 and timer to 7 minutes.
11. After 7 minutes, ip pizza rolls over and cook for an additional
2 minutes.
12. Once cooking is complete, remove. Repeat with remaining rolls.
13. Serve with additional pizza sauce for dipping.

■ 26
Fair Fries
Serves 2
1 large russet potato, washed and peeled
1 tablespoon canola oil
½ teaspoon sea salt
1. Cut potato into ¼-inch matchsticks.
2. Rinse fries, then place 10 at a time in the microwave for 3 minutes.
Then toss with oil and salt.
3. Place fries evenly in the basket—do not overcrowd.
4. Then put the basket and pan into the AIR FRYER.
5. Set the temperature to 400 degrees, set the timer to 10 minutes.
6. Microwave another batch of the fries while the rst batch is frying.
7. After 5 minutes, toss fries and cook for an additional 5 minutes.
8. Once cooking is complete, remove. Repeat with remaining fries.
9. Sprinkle with a bit more salt and allow to cool slightly.
10. Serve warm with ketchup or malt vinegar.

27 ■

■ 28
Fried Green Tomatoes
Serves 2
2 large green tomatoes
1 teaspoon salt
½ teaspoon pepper
½ cup instant our
1 cup buttermilk
1 cup panko bread crumbs
½ tablespoon Creole seasoning
non-stick cooking spray
1. Cut the tomatoes into ¼-inch thick slices and season both sides
evenly with salt and pepper.
2. Place the our in a shallow dish, put the buttermilk in a shallow dish
or pie pan.
3. Then mix the panko crumbs with Creole seasoning in another dish.
4. Dredge each tomato slice in the our, then dip it in the buttermilk,
then press in the panko mixture on both sides.
5. Place the rack* in the AIR FRYER basket.
6. Place 3 tomatoes evenly on the rack, without overcrowding, and spritz
with non-stick spray.
7. Put the basket with rack into pan, then put them into the AIR FRYER.
8. Set the temperature to 400 degrees and set time to 5 minutes.
9. Once cooking is complete, remove. Repeat with remaining slices.
10. Serve with ranch dressing mixed with some of the creole seasoning.
* Accessory items are sold separately and are not included.

29 ■
Crusty Potato Wedges
Serves 4
1 teaspoon garlic powder
½ tablespoon dried rosemary
½ teaspoon pepper
½ teaspoon salt
½ teaspoon paprika
1 teaspoon dried thyme
2 medium potatoes, cut into wedges
1 large egg, beaten
¼ cup Parmesan cheese, grated
non-stick cooking spray
1. In a bowl, mix together garlic powder, rosemary, pepper, salt, paprika,
thyme and Parmesan cheese.
2. Toss the potato wedges in the egg, then toss in the spice and cheese
mixture.
3. Place the wedges in the AIR FRYER basket. Spray them with oil.
4. Set the temperature to 400 degrees and the time for 20 minutes.
5. Shake the basket at least 2 times during the cooking process.

■ 30
Crunchy Onion Rings
Serves 4
1 large sweet onion, sliced very thin
large bowl of ice water
1 cup self-rising our
1 teaspoon salt
½ teaspoon pepper
1 teaspoon paprika
½ teaspoon garlic powder
non-stick cooking spray
1. Soak the onions in the ice water for at least 10 minutes.
2. In a large bowl, mix the our with salt, pepper, paprika and garlic
powder.
3. Using a pair of chefs tongs, remove the onions from the ice water
and toss in the seasoned our. Shake off all excess our.
4. Place an even row of onions in the basket, do not overcrowd, and
spritz with non-stick spray.
5. Put the basket and pan into the AIR FRYER.
6. Set temperature to 400 degrees and the timer for 7 minutes.
7. Shake several times during the cooking process. Once cooking is
complete, remove. Repeat with remaining onions.

31 ■
Sweet Potato Fries
Serves 2
1 sweet potato, peeled and washed
1 tablespoon extra-virgin olive oil
½ teaspoon kosher salt
½ teaspoon Cajun seasoning
1 teaspoon grated Parmesan cheese
1. Cut potato into ¼-inch matchsticks.
2. In a shallow glass baking dish, toss the potatoes with remaining
ingredients.
3. Place fries evenly in the basket—do not overcrowd.
4. Put the basket and pan into the AIR FRYER.
5. Set temperature to 400 and timer for 10 minutes.
6. After 5 minutes, toss fries and cook for an additional 5 minutes.
7. Once cooking is complete, remove. Repeat with remaining fries.
Kale Chips
Serves 2
1 bundle kale
2 tablespoons olive oil
1 teaspoon sea salt
1. Trim the kale leaves by cutting off the stems. Rinse well and pat dry.
2. Place kale leaves in a large bowl and toss well with olive oil and salt.
3. Place kale leaves in AIR FRYER basket.
4. Set temperature to 400 degrees and time to 10 minutes.
5. Shake basket at least once during the cooking process.

■ 32
Crunchy Eggplant Fries
Serves 2
1 large eggplant
1 large egg, beaten
2 tablespoons milk
2 cups seasoned panko bread crumbs
½ cup shredded Italian cheese blend
non-stick cooking spray
marinara for dipping
1. Peel the eggplant and slice lengthwise into ½-inch slices. Then cut
them into quarter-inch strips.
2. In a shallow glass or baking dish beat egg and milk together.
3. In another dish combine panko and cheese.
4. Dip each piece of eggplant in egg mixture then press into panko
mixture, coat both sides well.
5. Place an even layer of eggplant in the basket, do not overcrowd,
and spritz with non-stick spray.
6. Put the basket and pan into the AIR FRYER.
7. Set temperature to 400 degrees, set the timer for 5 minutes.
8. Once cooking is complete, remove. Repeat with remaining eggplant.
9. Serve warm with marinara sauce for dipping.

33 ■
Air Fried Potato Skins
Serves 2
2 medium Yukon Gold potatoes
½ teaspoon olive oil
¼ teaspoon sea salt
4 strips bacon
non-stick cooking spray
¼ cup cheddar cheese, shredded
⅓ cup sour cream
2 green onions, chopped ne
1. Scrub potatoes and rub with olive oil and sprinkle well with salt.
2. Place potatoes in AIR FRYER, and set temperature to 400 degrees
and time for 35 minutes.
3. Remove the potatoes and place bacon strips in basket. Set tempera-
ture to 400 degrees and time for 5 minutes. When bacon is crisp, golden
brown and cooked through, remove the fry basket and let bacon cool.
(Depending on the type of bacon, the time can vary by a minute or two.)
4. Cut potatoes in half horizontally and scoop out most of the potato.
5. Place the potato skins, skin side up in AIR FRYER basket and spritz
with oil.
6. Set temperature to 400 degrees and set time for 3 minutes.
7. Remove basket, then turn over and ll each potato with cheddar
cheese and crumble bacon equally between each potato.
8. Place skins back in AIR FRYER basket, set temperature to 400, set
time for 2 minutes, or until cheese is melted.
9. Serve with a dab of sour cream and a sprinkle of green onion.

■ 34
Tuscan Style Potato Wedges
Serves 4
½ cup extra-virgin olive oil
4 Yukon Gold potatoes, or ngerlings, cut into wedges
3 cloves garlic
1 sprig rosemary, leaves removed and chopped
1 teaspoon sea salt
1 teaspoon lemon juice
¼ teaspoon cayenne pepper
1. Place all the ingredients in a large bowl and let marinate for 20 min-
utes, tossing occasionally.
2. Place half of the potato wedges into the AIR FRYER basket.
3. Set temperature to 400 degrees and time to 12 minutes. Optional:
After 9 minutes, using tongs, toss the potatoes around.
4. Repeat with remaining potatoes.
5. Serve with your favorite aoli.

35 ■
Banging Shrimp
Serves 4
½ cup milk
1 large egg, beaten
2 tablespoons cornstarch
2 tablespoons all-purpose our
1 teaspoon salt
½ teaspoon paprika
½ teaspoon cayenne pepper
½ teaspoon garlic powder
½ teaspoon sugar
½ teaspoon Sriracha
½ cup panko crumbs
1 pound jumbo shrimp, peeled and deveined
non-stick cooking spray
Dipping Sauce
¼ cup mayonnaise
1 tablespoon ketchup
1 teaspoon sriracha
1. In a shallow glass baking dish, mix together all ingredients except
panko crumbs, shrimp and cooking spray. Place panko bread crumbs in
another shallow glass baking dish.
2. Dip each shrimp in batter then dip into panko to coat.
3. Place six shrimp in the basket and spritz with oil, then put the basket
and pan into the AIR FRYER.
4. Set temperature to 400 degrees and timer for 10 minutes.
5. Shake basket halfway through.
6. Once cooking is complete, remove. Repeat with remaining shrimp.
7. Mix the ingredients for the sauce in a large bowl.
8. Toss the cooked shrimp with the sauce and serve shrimp on a platter
of shredded lettuce.

■ 36

37 ■
Coconut Shrimp
Serves 4
½ cup cornstarch
2 large eggs
1 tablespoon water
⅓ cup panko crumbs
½ cup sweetened coconut akes
½ teaspoon salt
½ pound large shrimp, peeled and deveined
non-stick cooking spray
1. Place cornstarch in a large zip bag.
2. In a shallow glass baking dish, beat egg and water together.
3. In another dish combine panko, coconut and salt.
4. Shake the shrimp in the bag with cornstarch.
5. Dip each shrimp in egg mixture, then press into coconut mixture.
6. Place 6 shrimp in the basket and spritz with oil.
7. Put the basket and pan in the AIR FRYER.
8. Set temperature to 400 degrees, set timer for 6 minutes.
9. Once cooking is complete, remove. Repeat with remaining shrimp.

■ 38
Cajun Style Fried Shrimp
Serves 2–4
½ pound large shrimp, peeled and deveined
1 egg
1 teaspoon salt
1 teaspoon cayenne
½ teaspoon garlic powder
¼ teaspoon dried leaf thyme
¼ teaspoon dried oregano
⅛ teaspoon pepper
½ cup all-purpose our
¾ to 1 cup cornmeal
non-stick cooking spray
1. Rinse the shrimp under cold water. Pat dry with paper towels.
2. In a medium bowl, beat the egg with the salt, cayenne, garlic powder,
thyme, oregano and black pepper until frothy.
3. On separate sheets of wax paper, place the our and cornmeal.
4. Dredge the shrimp in the our.
5. Using a fork, dip the shrimp into the seasoned egg mixture and coat
in the cornmeal.
6. Place the shrimp on a wire rack set over a baking sheet. Repeat until
all shrimp are coated.
7. Place 6 shrimp in the basket and spritz with oil.
8. Put the basket and pan into the AIR FRYER.
9. Set temperature to 400 degrees and set time to 10 minutes.
10. Once cooking is complete, remove. Repeat with remaining shrimp.

39 ■
Crab Stuffed Sea Scallops
Serves 2–4
½ cup instant our
½ teaspoon salt
½ teaspoon pepper
½ teaspoon paprika
1 large egg
1 tablespoon water
1 cup cracker crumbs
1 pound sea scallops, butteried
non-stick cooking spray
mixture for 2 4-ounce crab cakes—see previous recipe
1. In a glass bowl, combine instant our, salt, pepper, and paprika.
2. In a shallow glass baking dish, beat egg and water together.
3. Place cracker crumbs in another dish.
4. Dip each butteried scallop in the our mix, then stuff with ½ table-
spoon of crab mixture.
5. Dip each scallop in the egg then press into the cracker crumbs.
Repeat this procedure with remaining scallops.
6. Place 4 scallops in the basket and spritz with oil.
7. Put the basket and pan in the AIR FRYER.
8. Set temperature to 400 degrees and set timer for 8 minutes.
9. Once cooking is complete, remove. Repeat with remaining scallops.
10. Serve with lemon wedges and chopped fresh parsley.

■ 40
Crab Cakes
Serves 2–4
1 tablespoon olive oil
1 small onion, minced
1 stalk celery, minced
1 small red pepper, minced
2 tablespoons butter
½ teaspoon crab seasoning
2 tablespoons heavy cream
1 teaspoon lemon juice
1 teaspoon Cayenne pepper sauce
1 teaspoon Worcestershire sauce
8 ounces lump crab meat
1 large egg, beaten
1 cup panko crumbs
non-stick cooking spray
Dipping Sauce
1 tablespoon mayonnaise
1 teaspoon spicy mustard
1 teaspoon ketchup

41 ■
1. Heat a sauté pan over medium high heat, add olive oil and heat for
1 minute.
2. Add the onion and celery and cook until light brown, about 2 minutes.
Add the red pepper and cook 1 minute longer.
3. Add in the butter, crab seasoning, and heavy cream and cook to
reduce by half—about 3 minutes.
4. Scrape all the ingredients from the sauté pan into a bowl and chill for
10 minutes.
5. Add remaining ingredients—except panko and cooking spray—to the
bowl. Mix ingredients by hand.
6. Place panko crumbs in a shallow glass baking dish.
7. Form ¼ cup of mixture into a patty and press into panko, covering
both sides. Repeat with remaining patties.
8. Place two crab cakes in the basket and spritz with oil.
9. Put the basket and pan into the AIR FRYER.
10. Set temperature to 400 degrees, set timer to 8 minutes.
11. Once cooking is complete, remove. Repeat with remaining crab
cakes. Serve warm.
12. For the dipping sauce, blend together all ingredients.

■ 42
Crab Rangoons
Serves 4–6
4 ounces cream cheese
12 fresh chives, nely chopped
½ teaspoon soy sauce
½ teaspoon hot sauce
8 ounces crab meat
1 package wonton skins
non-stick cooking spray
Dipping Sauce
¼ cup raspberry preserves
1 tablespoon sweet chili sauce
1 teaspoon soy sauce
1. Place the cream cheese in the bowl of a food processor. Add the
chives, soy sauce and hot sauce and puree.
2. Add the crabmeat and fold in gently by hand.
3. Place one teaspoon of crab mixture in the center of each wonton skin.
4. Moisten the edges with water and fold the wonton in half to form a
triangle. Press edges to seal.
5. Repeat with remaining crab mix and wonton wrappers.
6. Place 6 crab Rangoons in the basket and spritz with oil.
7. Put the basket and pan into the AIR FRYER.
8. Set temperature to 400 degrees, set timer to 8 minutes.
9. Once cooking is complete, remove. Rangoons should be golden
brown—if not, cook an additional 2 minutes. Repeat with remaining
Rangoons.
10. Make the dipping sauce by combining the raspberry preserves with
the sweet chili sauce and soy sauce.

43 ■
Cod Fingers
Serves 4
1 cup instant our
1 teaspoon seafood seasoning
2 large eggs
2 tablespoons milk
1 cup all-purpose our
1 cup yellow cornmeal
1 teaspoon salt
1 pound cod, cut into 2 inch strips
non-stick cooking spray
1. Place instant our and seafood seasoning in a large zip bag.
2. In a shallow glass baking dish, beat egg and milk together.
3. In another dish combine our, cornmeal and salt.
4. Shake the cod in the bag with our and seasoning mix.
5. Dip each piece of cod in egg mixture then press into cornmeal
mixture, coat well.
6. Place two cod ngers in the basket and spritz with oil.
7. Put the basket and pan into the AIR FRYER.
8. Set temperature to 400 degrees, set the timer to 10 minutes.
9. Once cooking is complete, remove. Repeat with remaining sh.
10. Serve warm with lemon and tartar sauce.

■ 44
Fish Tacos
Serves 4
1 large egg
½ cup buttermilk
¼ cup our
1 cup panko bread crumbs
1 cup plain bread crumbs
½ teaspoon salt
½ teaspoon garlic powder
¼ teaspoon black pepper
2 grouper or snapper lets
non-stick cooking spray
½ cup sour cream
½ cup medium salsa
4–6 premade taco shells
1 cup shredded lettuce
1 cup salsa
1 cup sour cream
½ cup low-fat shredded cheddar cheese
1. In a glass bowl, beat the egg, buttermilk and our together. Set aside.
2. In a glass shallow dish, combine panko, bread crumbs, salt, garlic
powder and black pepper.
3. Dip each let in egg mix then gently press in bread crumbs to cover.
4. Place the lets into AIR FRYER basket. Spritz with oil.
5. Set temperature to 400 degrees and time to 12 minutes, or until sh
is cooked through.
6. Serve in taco shells with lettuce, salsa, sour cream and cheese.

45 ■

■ 46
Fish with Chips
Serves 2
1 6-ounce cod llet
¼ cup buttermilk
½ teaspoon salt
¼ teaspoon pepper
3 cups kettle cooked chips, salt and vinegar avor
1. Soak the cod in the buttermilk with the salt and pepper for 5 minutes.
2. Crush the chips in a food processor and place in a shallow baking
dish.
3. Remove the llet from the buttermilk and press rmly in the potato
chips.
4. Place the coated sh llet in the AIR FRYER basket.
5. Set temperature for 400 degrees and the time for 12 minutes.

47 ■
Sesame Encrusted Ahi Tuna
with Hoisin Sauce
Serves 2
¼ cup sesame seeds
1 tablespoon black sesame seeds
½ teaspoon salt
¼ teaspoon pepper, freshly ground
1 egg white, beaten
2 6-ounce ahi tuna steaks, approximately 1½-inches thick
Sauce
¼ cup Hoisin sauce
juice of 2 limes
2 tablespoons rice wine vinegar
2 tablespoon low sodium soy sauce
1 tablespoon honey, or agave nectar
¼ teaspoon ground white pepper
1. Prepare the sauce by wisking together all the ingredients. Set aside.
2. In a shallow baking dish, combine the sesame seeds, salt and pepper.
3. Place the egg white in a bowl.
4. Dip each tuna steak in the egg white, then press in the sesame seeds
to completely coat.
5. Place each tuna steak in the AIR FRYER basket.
6. Set temperature to 400 degrees and time for 3 minutes.
7. Turn the tuna steaks and cook for an additional 3 minutes.
8. Serve sliced with sauce on the side.

■ 48
Tuna Melt Sandwich
Serves 2
2 slices of multi-grain bread
1 5-ounce can solid white tuna in water, drained
1 celery stalk, minced
1 teaspoon onion, minced
2 tablespoons mayonnaise
⅛ teaspoon celery salt
Pinch of black pepper
4 slices of ripe tomato
½ cup sharp Cheddar cheese, shredded
1. Place the bread slices in the AIR FRYER, set temperature to
400 degrees and time to 3 minutes to toast it.
2. In a bowl, mix together the tuna, celery, onion, mayonnaise, salt
and pepper.
3. Divide the tuna mixture between the two slices of bread and top
each sandwich with 2 slices of tomato.
4. Divide the cheese between the two sandwiches.
5. Place the sandwiches one at a time in the AIR FRYER.
6. Set temperature to 400 degrees and time to 4 minutes.
7. Repeat with the remaining sandwich.

49 ■
Asian Style Baby Back Ribs
Serves 2
1 slab baby back ribs
1 teaspoon ginger, grated
1 scallion, minced
½ tablespoon cilantro, chopped
1 small jalapeño, seeded and chopped
1 garlic clove, minced
1 cup orange juice
2 tablespoons sesame oil
1. Place all ingredients in a jumbo zip plastic bag, seal, and marinate
overnight.
2. Stand the ribs vertically in the fry basket, reserving the marinade.
3. Put the basket and pan into the AIR FRYER.
4. Set temperature to 350 and the timer for 35 minutes.
5. While the ribs are cooking, place the marinade in a sauce pan. Cook
over medium high until reduced by half, approximately ve minutes.
6. When cook time is complete, brush the ribs with the marinade.
7. Place ribs back in the basket and cook for another 30 minutes.
8. Cut ribs apart and serve with marinade on the side for dipping.

■ 50
Corn Bread
Serves 2–4
½ cup yellow cornmeal
½ cup all-purpose our
2 tablespoons sugar
1½ teaspoons baking powder
½ teaspoon kosher salt
½ cup whole milk
¼ cup vegetable oil
2 eggs
½ cup fresh or frozen corn kernels
½ cup fresh jalapeño (optional), sliced thin and seeds removed
non-stick cooking spray
1. Whisk all dry ingredients together in a mixing bowl. Lightly beat wet
ingredients together, then pour over the dry mix and whisk until smooth.
Mix in corn and jalapeños.
2. Lightly coat an oven-safe dish* with non-stick spray; pour in corn bread
mixture.
3. Place the dish into the basket, then put the basket and pan into the
AIR FRYER.
4. Set temperature to 350 degrees and set timer for 25 minutes.
5. When timer goes off, check for doneness with a toothpick. When
inserted off center it should come out clean. If not done, bake 5 minutes
longer.
6. When cooking is complete, invert onto a plate, then invert onto
another plate to have rounded top facing up.
* Accessory items are sold separately and are not included.

51 ■
Chocolate Marshmallow Bread Pudding
Serves 2–4
2½ cups heavy cream
¾ cup sugar
4 large eggs
½ teaspoon kosher salt
1 teaspoon fresh lemon juice
1 teaspoon pure vanilla extract
5 croissants, cut into 1 inch cubes
non-stick cooking spray
¼ cup chocolate chips
½ cup mini marshmallows
1. With a blender, combine the cream, sugar, eggs, salt, lemon juice
and vanilla extract. Puree until smooth.
2. Place the croissant cubes in the basket. Set the temperature for
400 degrees and time to 5 minutes to toast them.
3. Place the toasted cubes in the custard mixture and allow to soak.
4. Spray an oven-safe dish* with non-stick spray; add the custard mixture
with the chocolate chips and marshmallows mixed in.
5. Place the dish into the basket, then put the basket and pan into the
AIR FRYER.
6. Set temperature to 340 degrees and the timer for 25 minutes.
7. When cook time is complete, serve warm with whipped cream.
* Accessory items are sold separately and are not included.

■ 52
Root Beer Float Cupcakes
Makes 24 cupcakes
2½ cups all-purpose our
2½ teaspoons baking powder
½ teaspoon salt
¾ cup unsalted butter
1½ cups sugar
3 large eggs
1 tablespoon root beer extract
½ teaspoon vanilla extract
1¼ cups root beer
For Finishing
homemade or store bought frosting
24 root beer-avor hard candies (optional)
12 colorful straws, cut in half
1. Line each silicone mufn cup with a cupcake liner.
2. In a medium bowl, stir together our, baking powder and salt. Set
aside.
3. In a large mixing bowl, beat butter with an electric mixer on medium to
high speed for 30 seconds.
4. Gradually add sugar, about ¼ cup at a time, beating on medium
speed until combined. Scrape sides of bowl; beat on medium speed
about 2 minutes more or until light and uffy.
5. Add eggs, one at a time, beating well after each addition.
6. Beat in root beer and vanilla extracts. Alternately add our mixture and
root beer to butter mixture, beating on low speed after each addition, just
until combined.
7. Spoon batter into prepared mufn cups, lling each halfway. Use the
back of a spoon to smooth out batter in the cups.

53 ■
8. Place cups 4 at a time in the AIR FRYER basket.
9. Set temperature to 330 degrees and time to 10 minutes.
10. Cool cupcakes in mufn cups on wire racks for 10 minutes. Remove
cupcakes from mufn cups. Cool completely on wire racks.
11. Air-fry the remaining cupcakes in batches of 4.
12. Pipe or spread frosting over cupcakes. If desired, top each cupcake
with a root beer-avor candy and a straw.
Chocolate Cake
Serves 2–4
1½ cups all-purpose our
¾ cup granulated sugar
3 tablespoons unsweetened cocoa powder
1 teaspoon baking soda
½ teaspoon kosher salt
1 teaspoon pure vanilla extract
¼ cup vegetable oil
1 cup water
1 tablespoon white vinegar
non-stick cooking spray
1. Mix all the ingredients together—except spray oil—with a hand mixer
on low.
2. Spray an oven-safe dish* with non-stick spray.
3. Place the dish into the basket, then put the basket and pan into the
AIR FRYER.
4. Set temperature to 330 and the timer for 30 minutes.
5. After 30 minutes, open and check cake with a toothpick inserted in the
center. Batter should not be sticking to the toothpick. If not done, bake
5 minutes longer.
6. Serve warm with whipped cream.
* Accessory items are sold separately and are not included.

■ 54
Pumpkin Cupcakes
Makes 12 cupcakes
1 cup all-purpose our, sifted
2 teaspoons pumpkin pie spice
½ teaspoon baking powder
¼ teaspoon kosher salt
½ cup sugar
1 stick unsalted butter, room temperature
½ cup pumpkin puree, fresh or canned
1½ teaspoon vanilla extract
2 large eggs
Maple Cream Cheese Icing (next page)
1. Sift together the our, pie spice, baking powder and salt, set aside.
2. With a hand or stand mixer, cream the sugar and butter together until
light and uffy, about 3 minutes.
3. Add the pumpkin puree, vanilla and eggs, and mix until smooth and
creamy.
4. Slowly add the dry ingredients, mixing until incorporated.
5. Line each silicone mufn cup with a parchment cupcake liner.
6. Fill each cupcake liner ⅔ of the way.
7. Place the mufns cups in the AIR FRYER basket, 4 at a time.
8. Set temperature to 350 degrees and time to 12 minutes.
9. To check for doneness, insert a toothpick in the center of one cup-
cake. If it comes out clean, it is cooked through.
10. Remove cupcakes to a rack to cool and repeat with the remaining
cupcakes.
11. Cover with Maple Cream Cheese Icing, and sprinkle with brown
sugar, if desired.

55 ■

■ 56
Maple Cream Frosting
Enough for 24 cupcakes
1 8-ounce package cream cheese
2 tablespoons unsalted butter, room temperature
2 teaspoons maple extract
2 cups powdered sugar, sifted
1. With a mixer, cream the butter and cream cheese until uffy and
smooth. Add the extract, then slowly add in the powdered sugar.
2. Mix until light and uffy.
3. Top each cupcake with frosting.
Glazed Air-Fried Donuts
Serves 2–4
1 can (8 ounces) refrigerated croissant dinner rolls
non-stick cooking spray
1 can (16 ounces) vanilla frosting
1. Slice croissant dough into 1-inch rounds.
2. Tear hole in center to make a donut shape.
3. Place 5 donuts in the basket, do not overcrowd, and spritz with non-
stick spray.
4. Put the basket and pan into the AIR FRYER.
5. Set temperature to 400 and set the timer to 5 minutes.
6. After 2 minutes, ip donuts over and cook for the remaining time.
7. Once cooking is complete, remove and place on paper plate. Repeat
with remaining rolls.
8. Microwave ½ cup of frosting in a microwave-safe dish for 30 seconds.
9. Drizzle donuts with frosting.

57 ■
White Chocolate Raspberry
Cheesecake Rolls
Serves 10
10 eggroll wrappers
2½ cups cheesecake lling
¼ cup white chocolate chips
1 pint fresh raspberries
non-stick cooking spray
powdered sugar for dusting
1. On a cutting board, place the eggroll wrapper with a corner pointing
toward you.
2. Place ¼ cup cheesecake lling in the center of the wrapper,
3. Sprinkle with white chocolate chips and 4 or 5 raspberries.
4. Fold the point of the wrapper facing you over the cheesecake lling,
and fold the two sides into the center.
5. Moisten the remaining point; fold over and roll tightly.
6. Repeat with the remaining eggroll wrappers.
7. Place 5 rolls in the basket, do not overcrowd, and spritz with non-stick
spray. Put the basket and pan into the appliance
8. Set the temperature to 400 and set the timer for 7 minutes.
9. After 7 minutes, ip cheesecake rolls over and cook for an additional
2 minutes.
10. Once cooking is complete, remove. Repeat with remaining rolls.
11. Serve dusted with powdered sugar.

■ 58
Fried Dough
Serves 4
3½ to 4 cups bread our, plus more for rolling
1 teaspoon honey
1 envelope instant dry yeast
2 teaspoons kosher salt
1½ cups water, 110° F
2 tablespoons grapeseed oil
non-stick cooking spray
powdered sugar or cinnamon sugar, for dusting
1. Place the bread our, honey, yeast and salt in the bowl of a stand
mixer and combine.
2. While the mixer is running, add the water and the grapeseed oil and
beat until the dough forms into a ball.
3. If the dough is sticky, add additional our, 1 tablespoon at a time, until
the dough comes together in a solid ball.
4. If the dough is too dry, add additional water, 1 tablespoon at a time.
5. Scrape the dough onto a lightly oured surface and gently knead into
a smooth, rm ball.
6. Cut the ball into 4 pieces. Let dough rest for 20 minutes.
7. Stretch the dough and coat with spray oil on both sides.
8. Place the dough in the AIR FRYER.
9. Set the temperature to 400 degrees and time to 6 minutes. Cook for
3 minutes on each side.
10. Top with powdered sugar or cinnamon and sugar while still warm.

55 ■
Settings
This table will help you select the basic settings for your ingredients, and
what to do during the cooking time. NOTE: Settings are indications only.
Since ingredients differ in origin, size, shape and brand, we cannot guarantee the best setting for your ingredients.
Suggested
Amount
Temp.
(°F)
Time
(minutes)
Additional
Information
Potatoes & Fries
Thin frozen fries 1–2 cups 400 10 Spritz with oil
Shake 2 times
Thick frozen fries 1–2 cups 400 12 Spritz with oil
Shake 2 times
Homemade fries 1 cup 400 14 Spritz with oil
Shake 2 times
Potato wedges 1–3 cups 360 18–22 Add ½ tbsp. oil
Shake
Homemade
potato cubes
1–3 cups 360 12–18 Add ½ tbsp. oil
Shake
Risotto 1 cup 360 15–18 Shake
Potatoes gratin 2 cups 400 15–18 Shake
Meat & Poultry
Steak 2 cuts, each
4–6 ounces
360 8–12 Turn once
Pork Chops 2 chops, each
4–6 ounces
350 14–18 Turn once
Hamburger 2 patties, each
4 ounces
360 7–14 Turn once
Chicken wings, fresh 8 wings 400 25 Shake 2 times
Chicken tenders, fresh 4 pieces 380 10 Spritz with oil
Turn once
Frozen chicken
nuggets
1–2 cups 400 12 Shake 2 times
Snacks
Spring rolls, frozen 4 rolls 400 8–10 Spritz with oil
Turn once
Frozen sh ngers 8 pieces 400 10–12 Shake 2 times
Baked Goods
Cake 1 cup 320 20–25 Use baking tin
Quiche 1½ cups 350 20–22 Use baking tin
Mufns 1 cup 400 15–18 Use baking tin
Sweet snacks 1½ cups 320 20 Use baking tin

LIMITED ONE YEAR WARRANTY
Model CCXM22
This warranty covers all defects in workmanship or materials in the mechanical
and electrical parts, arising under normal usage and care; in this product for a
period of 12 months from the date of purchase provided you are able to present
a valid proof-of-purchase. A valid proof-of-purchase is a receipt specifying item,
date purchased, and cost of item. A gift receipt with date of purchase and item
is also an acceptable proof-of-purchase. Product is intended for household use
only. Any commercial use voids the warranty.
This warranty covers the original retail purchaser or gift recipient. During the applicable warranty period within normal household use, we will repair or replace,
at our discretion, any mechanical or electrical part which proves defective, or
replace unit with a comparable model.
To obtain service under the terms of this warranty, call our customer care department at 312-526-3760 (Monday–Friday 9:00 am–4:30 pm CST), or send an email to
customercare@alliedrich.net.
THIS LIMITED WARRANTY COVERS UNITS PURCHASED AND USED WITHIN
THE UNITED STATES AND DOES NOT COVER:
• Damages from improper installation.
• Defects other than manufacturing defects.
• Damages from misuse, abuse, accident, alteration, lack of proper
care and maintenance, or incorrect current or voltage.
• Damage from service by any person or entity other than an autho-
rized dealer or service center.
• This warranty gives you special legal rights and you may also have
other rights to which you are entitled which may vary from state
to state.
Manufacturer does not assume responsibility for loss or damage for return shipment. We recommend that you keep your original packaging should you require
repair service. Before returning product please contact our customer care department for return authorization. When returning product for repair please
include your full name, return address, and daytime phone number. Also include
a brief description of the problem you are experiencing and a copy of your sales
receipt or other proof-of-purchase in order to validate warranty status.
®
 Loading...