


4 IN 1 GRILL
Model Number: 104557
UPC: 68113104557
Customer Assistance
1 855 451 2897 (US)
Please consider the option to recycle the packaging material and donate any appliance you are no longer using.

IMPORTANT SAFEGUARDS
When using electrical appliances, basic safety precautions should always be followed to prevent the risk of fire, electric shock, burns, or other injuries or damages.
•Read all instructions before using.
•Use the appliance only for its intended use.
•To protect against fire, electric shock and injury to persons, do not immerse cord, plug or the appliance in water or other liquids.
•The appliance should always be set to OFF before plugging or unplugging from the electrical outlet. Never pull on the cord to disconnect the appliance from the outlet; instead, grasp the plug and pull on the plug to disconnect the appliance.
•Do not allow cord to touch hot surfaces. Let the appliance cool completely before putting away or storing.
•Do not touch hot surfaces; use handles or knobs.
•Close supervision is necessary when any appliance is used by or near children.
•Unplug from outlet when not in use and before cleaning. Allow to cool before putting on or taking off parts, and before cleaning appliance.
•Do not operate any appliance with a damaged cord or plug, or after the appliance has malfunctioned or has been damaged in any manner. Call our toll-free customer assistance number for information on examination , repair or adjustment.
•The use of accessory attachments not recommended may result in fire, electrical shock, or risk of injury to persons.
•Do not use outdoors.
•Do not let power cord hang over edge of table or counter, or touch hot surfaces.
•Do not place on or near hot gas or electric burner, or in a heated oven.
•Unplug the unit when finished using.
•Extreme caution must be exercised when moving an appliance containing hot oil or other hot liquids.
•To disconnect, turn function switch to off setting, then remove plug from wall outlet.
•WARNING: To reduce the risk of fire or electric shock, only authorized personnel should do repairs.
•Always place the appliance on a level, stable surface.
•Never place the appliance close to the edge of a counter or table. Make sure that the power cord is positioned safely so that nobody trips or gets tangled.
•When using this appliance, provide 6-8 inches of air space above, behind and on both sides for air circulation.
2

IMPORTANT SAFEGUARDS
•It is recommended that you use an insulated hot pad underneath the appliance to avoid any heat damage to your counter or furniture.
•This appliance is not intended for use by persons (including children) with reduced physical, sensory or mental capabilities or lack of experience and knowledge unless they have been given initial supervision or instruction concerning use of the appliance by a person responsible for their safety.
•Children shall be supervised to ensure that they do not play with the appliance.
•To avoid a circuit overload, do not operate this appliance on the same circuit with another high wattage appliance.
•The appliance must not be left unattended while it is connected to the wall outlet.
•Unit should never be used in the half open position.
SAVE THESE INSTRUCTIONS!
ADDITIONAL SAFEGUARDS
This appliance is for HOUSEHOLD USE ONLY.
DO NOT OPERATE THE APPLIANCE IF THE LINE CORD SHOWS ANY DAMAGE OR IF THE APPLIANCE WORKS INTERMITTENTLY OR STOPS WORKING ENTIRELY.
EXTENSION CORDS
A short power-supply cord is to be provided to reduce the risk resulting from becoming entangled in or tripping over a longer cord. Extension cords are available and may be used if care is exercised in their use. If an extension cord is used,
1)The extension cord should be a grounding-type 3-wire cord.
2)If an extension cord is absolutely necessary, an extension cord rated a minimum of 15 ampere, 14 gage cord should be used. Cords rated for less amperage may overheat.
3)An extension cord with the power cord must be arranged so that it will not drape over the countertop or tabletop where they can be pulled on by children or tripped over accidentally.
3
ADDITIONAL SAFEGUARDS
GROUNDING INSTRUCTIONS
This appliance must be grounded while in use.
CAUTION: To ensure continued protection against risk of electric shock, connect to properly grounded outlets only.
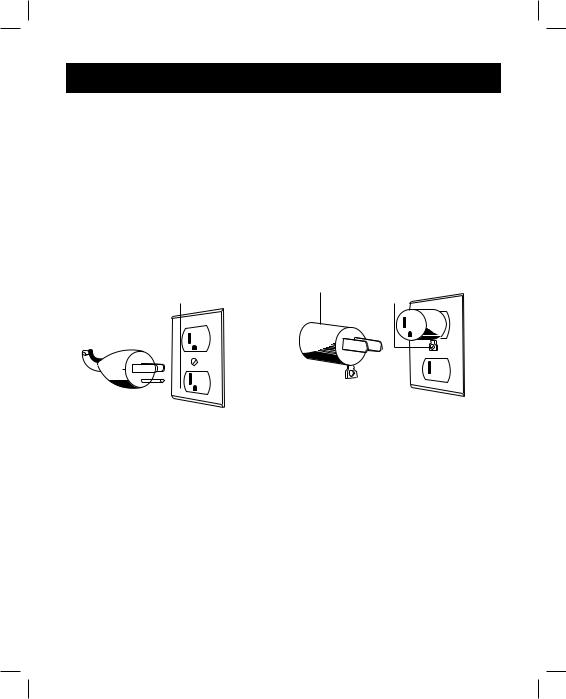
GROUNDING INSTRUCTIONS – US ONLY
The appliance has a plug that looks like Figure A. An adaptor, as shown in Figure B, should be used for connecting a 3-prong grounding plug to a 2-wire receptacle. The grounding tab, which extends from the adaptor, must be connected to a permanent ground such as a properly grounded receptacle as shown in Figure C, using a metal screw.
Circuit grounding conductor |
Adapter |
Metal mounting |
connected properly |
|
screw |
(A) |
(B) |
(C) |
|
|
|
|
|
|
|
|
|
|
|
|
|
|
|
|
|
|
|
|
|
|
|
|
|
|
|
|
|
|
|
|
|
|
|
|
|
|
|
|
|
|
|
|
|
|
|
|
|
|
|
|
|
|
|
|
|
|
|
|
|
|
|
|
|
|
|
|
|
|
|
|
|
|
|
|
|
|
|
|
|
|
|
|
|
|
|
|
|
|
|
|
|
|
|
|
|
|
|
|
|
|
|
|
|
|
|
|
|
|
|
|
|
|
|
|
|
|
|
|
|
|
|
|
|
|
|
|
|
|
|
|
|
|
|
|
|
|
|
|
|
|
|
|
|
|
|
|
|
|
|
|
|
|
|
Grounding means |
Cover |
of grounded |
||
Grounding prong |
outlet box |
||||||||||||||
4
PARTS
1 |
2 |
3 |
16
15
14
|
|
|
|
|
|
°F |
function |
off |
|
|||
|
|
|
|
300 medium 350 |
|
|
|
|||||
|
|
|
|
|
|
ready power |
griddle |
|
|
|
||
|
|
|
|
low |
high |
|
|
|
|
grill |
||
|
|
|
|
250 |
|
400 |
|
|
|
|
|
|
|
13 |
|
|
200 |
|
425 |
|
|
|
|
|
|
|
|
|
|
|
|
|
|
|
|
|||
|
|
|
warm |
|
sear |
|
|
|
|
|
|
|
|
|
|
|
|
|
|
|
|
|
|
|
|
|
|
|
|
12 |
11 10 |
|
9 |
|
||||
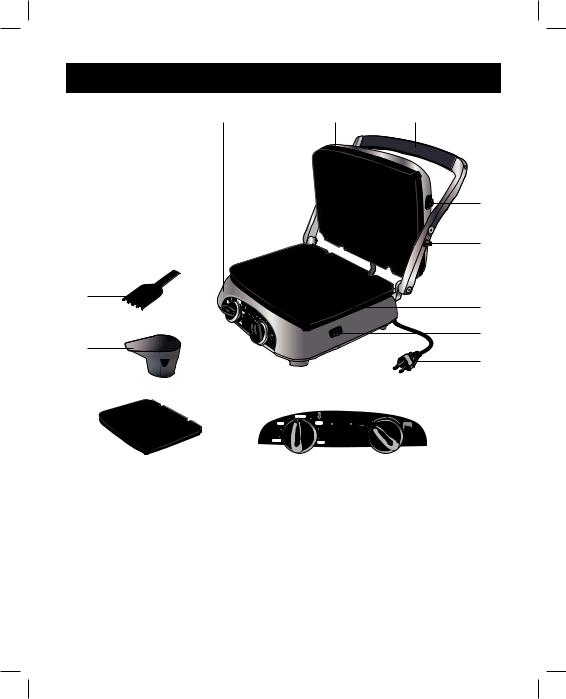
1 |
|
Lower part |
9 |
|
function switch |
|
|
|
||||
2 |
|
Upper part |
10 |
|
power light |
|
|
|
||||
3 |
|
Handle |
11 |
|
ready light |
|
|
|
|
|||
4 |
|
Lock button for cooking plate |
12 |
|
Temperature switch |
|
||||||
5 |
|
Hinge release lever |
13 |
|
Griddle plate (x2) |
|
||||||
6 |
|
Grill plates (x2) |
14 |
|
Drip cup (x2) |
|
|
|
||||
7 |
|
Lock button for cooking plate |
15 |
|
Cord storage |
|
|
|
||||
8 |
|
Power plug with power cord |
16 |
|
Cleaning / scraping tool |
|||||||
4
5
6
7
8
5

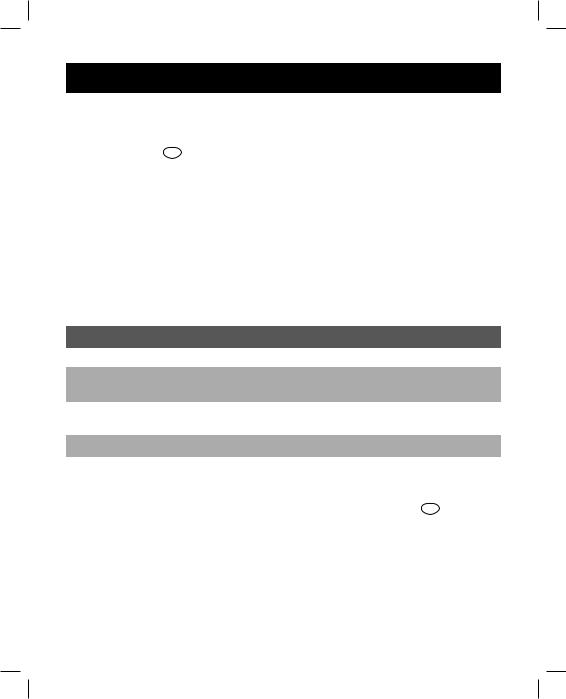
ILLUSTRATIONS
a |
d |
g |
b |
e |
h |
c |
f |
i |
6

OPERATION
Before first use
•Carefully remove the grill from the packaging and retain the packaging for future use.
•Remove all stickers from the appliance.
•Clean the outside of the grill with a damp cloth and a mild detergent.
•Clean the cooking plates (6, 13), the drip cups (14) and the cleaning / scraping tool (16) thoroughly by hand or in the dishwasher.
•Dry the cooking plates (6, 13) thoroughly, before reinserting into the appliance.
•Open the appliance completely and set the function switch (9) to griddle.
•When using the grill for the first time, we recommend to heat for at least 10 minutes on medium setting to burn off any production residue.
•The grill may produce an odor and emit smoke when first switched on, as residues from the production process are eliminated. This is normal and does not indicate a defect or hazard.
Grill usage
•The grill can be used in 4 different ways. It can be used as a Panini press, an open grill, griddle or contact grill.
•According to the function you like to use, adjust the grill and its accessories.
•Warning: Never let the power cord get in between the cooking plates
Open to horizontal position
•To use the grill in horizontal position, pull the hinge release lever (5) forward, while the upper part is closed (ill. a ).
•Note: If the upper part is already open, the hinge release lever (5) can not be moved. Close the upper part (2), then operate the hinge release lever (5).
•While holding the hinge release lever (5), turn the upper part all the way back until it lays flush with the lower part (1) (ill. b ).
7
OPERATION
Changing cooking plates
•Adjust the grill to horizontal position.
•Press the lock buttons (4, 7) then lift the cooking plates (6, 13) up and remove them backwards (ill. c ).
•Note: The cooking plates (6, 13) are marked on the front. Be sure to use the correct plate in the marked position (upper or lower).
•To reinsert the cooking plates (6, 13), insert them into the clamps then push the cooking plates (6, 13) down, until they lock in place.
Setting temperature
•To set the temperature, turn the temperature switch (12) to the required temperature setting for the food you intend to cook.
•The table below contains general information on cooking temperatures. For exact cooking temperatures check your favorite recipe.
Temperature |
Function |
|
|
warm (approx. 200°F) |
For keeping food warm |
|
|
low (approx. 250°F) |
Low temperature for cooking thin cuts of meat |
|
or vegetables |
|
|
medium (approx. 300°F to 350°F) |
Medium temperature for normal grilling (e.g. |
|
meat) |
|
|
high (approx. 400°F) |
High temperature for grilling (e.g. Panini) |
|
|
sear (approx. 425°F) |
Very high temperature for grilling (e.g. meat) |
|
|
•The temperature switch (12) can be adjusted while the grill is in use.
•WARNING: Do not touch any metal parts of the grill while in use (ill. d ). Only touch the plastic handle (3). Risk of burns!
•Do not move the grill while in use. Do not touch the upper part (2).
8

OPERATION
Use as contact grill
•The grill can be used as a contact grill for preparing burgers, boneless meat, thin meat cuts and vegetables.
•Use the contact grill function, when you want to cook food quickly (ill. e ).
•Juice and grease flow out via the drip spout of the lower cooking plates (6, 13).
•When contact grilling, use only the grill plates (6).
•When cooking more then one piece, make sure all pieces have the same thickness to guarantee even cooking.
•Connect the power plug (8) to a wall outlet.
•Install cooking plates prior to use.
•Set the function switch (9) to the grill position and the blue power light (10) will
come on. Place a drip cup (14) under the spout of the lower plate (ill. f ).
•Set the desired cooking temperature with the temperature switch (12). It may take up to 10 minutes to heat to the set temperature.
•Wait until the green ready light (11) comes on.
•Note: The ready light (11) will come on and go off while cooking. This is normal to regulate temperature.
•Place food on the lower plate.
•Press down the lever on the upper plate until both plates are in good contact with the food. Do not use force.
•Cook for the required time. You can check the cooking progress by lifting the upper part (2).
•CAUTION: When checking food, stay clear of the cooking plates (6, 13). Danger of hot oil splatter.
•After the cooking process is finished, lift the upper part (2) to the upright position.
•Remove food from the lower plate.
•Set the function switch (9) to the off position. Remove the power plug (8) from the wall outlet.
•Wait until the grill has cooled down completely before moving or cleaning.
9
 Loading...