

SINGLE SERVE BREWER
Model Number: 201762
UPC: 655772-01762-8
Customer Assistance
1-855-451-2897 (US)
Please consider the option to recycle the packaging material.
K Cup Coffee Maker_201762_FW_IM_US_180709_II.indd 1 7/9/18 15:02

IMPORTANT SAFEGUARDS
SAVE THESE INSTRUCTIONS!
When using electrical appliances, basic safety precautions should always
be followed, including the following:
• Read all instructions before use.
• Do not touch hot surfaces. Use handles or knobs.
• WARNING - to protect against electric shock, fire and personal injury:
- do not immerse cord, plug or appliance in water or other liquids;
- do not immerse the cord, plug, appliance or any electrical components
in water or any other liquids;
- always switch off and unplug the appliance before cleaning.
• Close supervision is necessary when any appliance is used by or near
children.
• Unplug from wall outlet when not in use and before cleaning. Allow
to cool before putting on or taking o parts, and before cleaning the
appliance.
• Do not operate any appliance with a damaged cord or plug, or after the
appliance malfunctions or has been damaged in any manner. Call our
toll-free customer assistance number for information on examination,
repair, or adjustment.
• The use of accessory attachments not recommended by the appliance
manufacturer may result in re, electric shock or injuries to persons.
• Do not use outdoors or in a damp area.
• Do not place the appliance close to the edge of the countertop.
• Do not let power cord hang over edge of table or counter, or touch hot
surfaces.
• Do not place on or near a hot gas or electric burner or in a heated oven.
• To turn o and disconnect, press the ON/OFF button, then remove plug
from wall outlet.
• Do not use appliance for other than intended use.
• A re may occur if the appliance is covered or touches ammable
material, including curtains, draperies, walls, and the like, when in
operation. Do not store any item on top of the appliance when in
operation.
• Do not clean with metal scouring pads. Pieces can break o the pad and
touch electrical parts involving a risk of electric shock.
• Never leave the appliance unattended during operation.
• Extreme caution must be used when moving an appliance containing
liquids.
2
K Cup Coffee Maker_201762_FW_IM_US_180709_II.indd 2 7/9/18 15:02

IMPORTANT SAFEGUARDS
SAVE THESE INSTRUCTIONS!
• Do not open the lid release lever, the lid or remove the capsule holder
during or immediately after use. Always exercise caution when opening
the lid or removing the capsule holder after use. Hot steam might be
trapped beneath. Scalding may occur if the lid is opened during the
brewing cycle.
• Do not use the appliance with an empty or under lled water reservoir.
Ensure there is always a sucient amount of water in the water reservoir.
• Keep the area above the appliance clear during use, as hot steam will
escape the appliance.
• Do not use the appliance without a suitable cup/mug placed under the
nozzle.
• Do not use the appliance without the capsule holder.
• Always use fresh and cold water for brewing.
• Do not use hot water, milk or other liquids for brewing.
• Use extreme caution when removing the capsule holder and disposing of
used capsules.
• CAUTION! Possibility of injury! The underside of the lid and capsule
holder contain sharp needles. Use caution when handling and during
cleaning. Do not touch the needles.
• CAUTION! Do not open the lid release lever and the lid during brewing.
• WARNING - TO REDUCE THE RISK OF FIRE OR ELECTRICAL SHOCK, DO NOT
REMOVE THE BOTTOM COVER ON THE APPLIANCE. NO USER SERVICEABLE
PARTS INSIDE. REPAIR SHOULD BE DONE BY AUTHORIZED SERVICE
PERSONNEL ONLY.
3
K Cup Coffee Maker_201762_FW_IM_US_180709_II.indd 3 7/9/18 15:02

IMPORTANT SAFEGUARDS
SAVE THESE INSTRUCTIONS!
ADDITIONAL SAFEGUARDS
This appliance is for HOUSEHOLD USE ONLY.
WARNING:
- DO NOT OPERATE THIS APPLIANCE, IF THE POWER CORD SHOWS
DAMAGE OR IF APPLIANCE WORKS INTERMITTENTLY OR STOPS
WORKING ENTIRELY.
• A short power-supply cord is provided to reduce the risk resulting from
becoming entangled in or tripping over a longer cord.
• Longer extension cords are available and may be used if care is exercised
in their use.
• If an extension cord is used:
- The marked electrical rating of the extension cord should be at least as
great as the electrical rating of the appliance.
- The longer cord should be arranged so that it does not drape over
the countertop or table top where it can be pulled on by children or
tripped over unintentionally.
Polarized plug
• This appliance has a polarized plug (one blade is wider than the other).
To reduce the risk of electric shock, this plug is intended to t into a
polarized outlet only one way. If the plug does not t fully in the outlet,
reverse the plug. If it still does not t, contact a qualied electrician. Do
not attempt to modify the plug in any way.
• Do not let children handle or put the electrical cord into their mouths.
44
K Cup Coffee Maker_201762_FW_IM_US_180709_II.indd 4 7/9/18 15:02
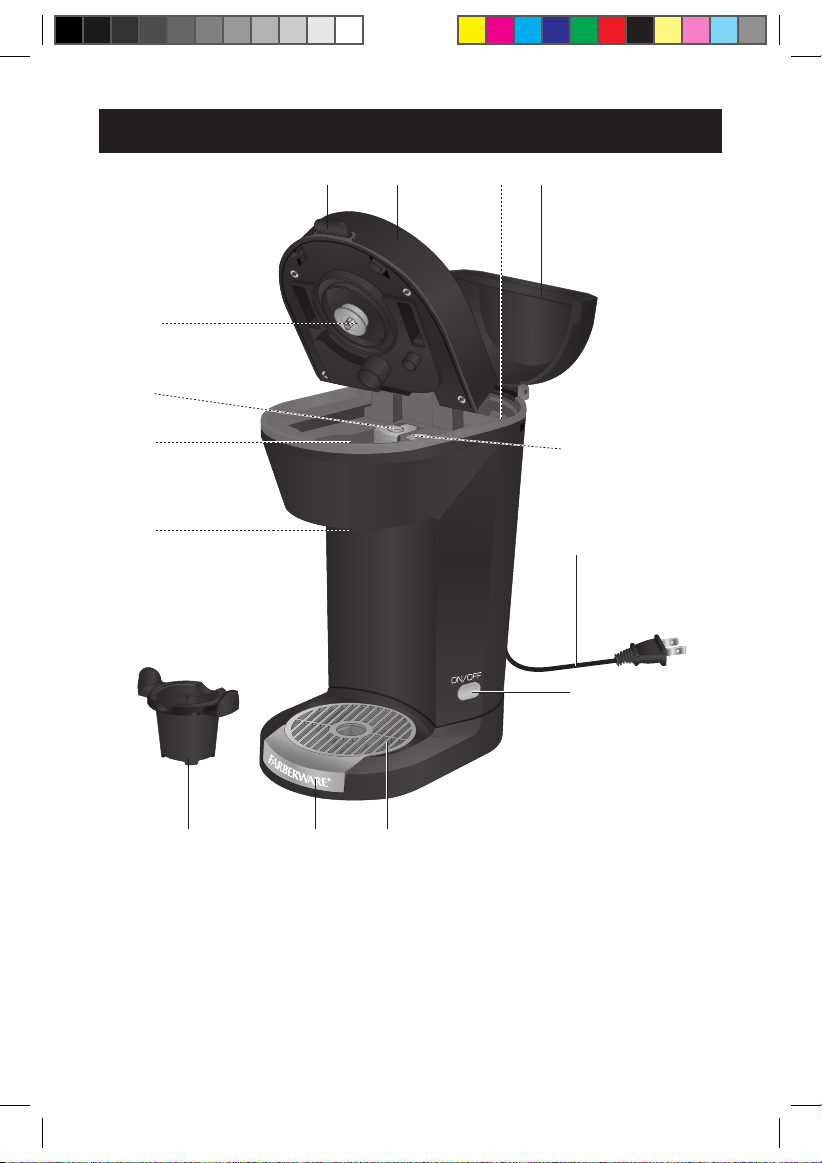
ILLUSTRATIONS
12
13
PARTS
1 2 3 4
11
10
1. Lid release lever
2. Lid with needle
3. Water reservoir
4. Water reservoir lid
5. Power cord with plug
6. Power ON/OFF switch
7. Cup holder
14
5
6
789
8. Drip tray
9. Capsule holder
10. Nozzle
11. Insert holder
12. Seal 1
13. Seal 2
14. Seal 3
5
K Cup Coffee Maker_201762_FW_IM_US_180709_II.indd 5 7/9/18 15:02

ILLUSTRATIONS
a b
2.
1.
c
d
1.
2.
g
e
h
f
i
j
6
K Cup Coffee Maker_201762_FW_IM_US_180709_II.indd 6 7/9/18 15:02
k l

ILLUSTRATIONS
m
p q
n
o
OPERATION
Before rst use
• Remove all packaging materials, labels and/or stickers from your appliance.
• Check package to verify all contents are included and undamaged. Do not
operate the appliance if the contents are incomplete or appear damaged. Return
it immediately to Walmart.
Danger of suocation!
- Packaging materials are not toys. Always keep plastic bags, foils and foam parts
away from babies and children. Packaging material could block airways and
prevent breathing.
NOTE:
- Always use the appliance with a suitable cup/mug and fully assembled.
- The appliance may produce an odor and emit smoke when switched on for
the first time, as residues from the production process are eliminated. This is
normal and does not indicate a defect or hazard.
7
K Cup Coffee Maker_201762_FW_IM_US_180709_II.indd 7 7/9/18 15:02

USING THE APPLIANCE
• When using the appliance for the first time, it is recommended to operate it for at
least 1 full cycle without a capsule ( Operation).
• Let the appliance cool completely.
• Clean the appliance ( Cleaning and Maintenance).
OPERATION
Using the appliance
This appliance can be used for brewing coee using K-cup capsules. Use only fresh
and cold water and do not use any other liquids.
NOTE:
- The appliance has a rated power of 600W. Before plugging it into the wall
outlet, ensure that the electrical circuit is not overloaded with other appliances.
This appliance should always be operated on a separate 120V ~ 60Hz wall
outlet.
- Make sure the appliance is assembled before connecting it to a wall outlet.
• Place the appliance on a clean, at and heat resistant surface (ill. a).
• Press the lid release lever (1) to unlock the lid (2) (ill. b).
WARNING:
- Do not touch the needle on the underside of the lid (2) or inside the capsule
holder (9), they are sharp.
- Only use suitable capsules. Do not place capsules directly into the insert
holder (11) (ill. c). Do not place other than the recommended capsules into
the capsule holder (9).
- Some capsules may not work with this appliance. If the capsule does not
properly t into the capsule holder (9), or leaks during the brewing cycle, do
not use that type of capsule again.
- Do not use ground coee without a capsule in this appliance.
- Do not remove the seal 1 (12) & seal 2 (13) & seal 3 (14).
• Insert a capsule in the capsule holder (9). Insert the capsule holder (9) in the
insert holder (11) (ill. d).
• Close the lid (2) and ensure it locks properly (ill. e).
• Place the drip tray (8) with cup holder (7) into the appliance (ill. f). Ensure they
sit securely in place.
• Fill the water reservoir (3) with fresh cold water by opening the water reservoir
lid (4) and pouring reservoir the water slowly into the funnel (ill. g).
• Fill the Water Tank to the desired level from 6 oz to 10 oz according to the
markings located on the Water Reservoir.
8
K Cup Coffee Maker_201762_FW_IM_US_180709_II.indd 8 7/9/18 15:02

USING THE APPLIANCE
WARNING:
- Do not over or under ll the water reservoir (3). Make sure there is always
sucient water inside and that it does not exceed the MAX line.
• Securely place a cup/mug in the center of the cup holder (10) (ill. h).
• Insert the plug (5) into a wall outlet (ill. i).
OPERATION
Brewing
• Push the ON/OFF button (6) to start the brewing process (ill. j).
TIP:
- To stop the brewing cycle at any time, press the illuminated button.
WARNING:
- Do not open the lid (2) or touch the appliance housing (ill. l) during use
(ill. k).
- Never use the appliance with the water reservoir lid (4) open (ill. m) or
without the capsule holder (9) in the insert holder (11) (ill. n).
• When the brew cycle is complete, the illuminated button will switch off and the
Coffee Brewer will shut off.
• Disconnect the plug (5) from the wall outlet (ill. p).
• Remove the cup/mug from the cup holder (7).
• Allow the appliance to cool down before removing the capsule holder (9) from
the insert holder (11). Always remove any used capsules after use. Remove with
caution as recently used capsules can be hot.
WARNING:
- The capsule holder is hot after using the appliance. Allow to cool before
removing.
- Hot steam might be trapped under the lid (2).
NOTE:
- If you want to brew another cup/mug of coffee, allow the appliance to cool
for at least 2 minutes, before starting a new brewing cycle. Always ensure
the water level is suitable for your next brew. Refill the water reservoir (3).
Always place a new capsule in the capsule holder (9). Do not reuse the same
capsule. Insert capsule holder (9) in the insert holder (11) and close the lid (2)
afterwards. Repeat previous steps ( Brewing).
9
K Cup Coffee Maker_201762_FW_IM_US_180709_II.indd 9 7/9/18 15:02

HINTS AND TIPS
• It is recommended to avoid placing the appliance under cabinets, as rising steam
can cause damage to wooden furniture.
• Empty the drip tray after each use to prevent it from overflowing.
• Use a suitable thermal cup/mug to keep your coffee hot for longer.
CLEANING AND MAINTENANCE
Proper maintenance will ensure many years of service from your appliance. Clean
the appliance after every use. The appliance contains no user serviceable parts and
requires little maintenance. Leave any servicing or repairs to qualied personnel.
WARNING:
- Always ensure the appliance is switched off. Disconnect the plug (5) from
the wall outlet before cleaning. Allow all parts of the appliance to cool down
completely.
- The underside of the lid (2) and capsule holder (9) contain sharp needles. Use
caution when handling and during cleaning. Do not touch the needles.
NOTE:
- Do not immerse the power cord with plug (5), or appliance into water or any
other liquids. Do not use abrasive cleaners, steel wool or scouring pads (ill. q).
Dry all parts thoroughly after cleaning, before using or storing the appliance.
Ensure that no water enters the appliance housing.
• Remove the drip tray (8) with cup holder (7) and capsule holder (9) from the
appliance. These parts can be washed in hot soapy water.
• Clean the surface of the appliance with a damp cloth or sponge and a mild
detergent.
• Clean the appliance housing, lid (2) and insert holder (11) with a damp sponge
or cloth.
• Clean all accessories after each use.
NOTE:
- Always clean all parts that have come into contact with food in soapy water
immediately after use and before storage
- Dry all parts and surfaces thoroughly before use.
Storage
• Before storage, always make sure the appliance is completely cool, clean and dry.
• It is recommended to store the appliance in a dry place.
• Never wrap the power cord (5) around the appliance.
• Store the appliance on a stable shelf or in a cupboard. To avoid accidents, ensure
that both the appliance and its power cord are beyond reach of children or pets.
10
K Cup Coffee Maker_201762_FW_IM_US_180709_II.indd 10 7/9/18 15:02

DESCALING
To keep your appliance operating eectively, periodically descale your appliance to
remove any build-up of lime scale. We recommend removing lime scale deposits as
follows:
• Please use a household descaler. Fill the water reservoir (3) with fresh water and
descaler. For details refer to the instructions of descaler.
• Ensure the capsule holder (9) is placed in the insert holder (11) without capsule
and the lid (2) is properly locked.
• Place a large mug onto the cup holder (7).
• Insert the plug (5) into a wall outlet.
• Press the ON/OFF button (6) to start the brewing process.
NOTE:
- Do not interrupt the process during the descaling cycle.
• Discard the solution in the mug and start another brewing process should there
still be solution in the water reservoir (3).
• Rinse the appliance by brewing fresh water at least 3 times afterwards without
capsule holder (9). Discard of the water afterwards.
• Disconnect the plug (5) from the wall outlet.
NOTE:
- Alternatively, you can use white vinegar instead of household descaler. The
ratio of water and white vinegar is 2:1.
11
K Cup Coffee Maker_201762_FW_IM_US_180709_II.indd 11 7/9/18 15:02

TROUBLESHOOTING
Problem Cause Solution
The appliance is
not working
No water comes
out from the
nozzle
Brewing process
does not start
Brewing process
stops before
completion
Coee avor is
too weak
Appliance is
leaking during
brewing cycle
Product working
intermittently
Appliance not plugged in Insert the plug into the wall outlet
Wall outlet not energized Check fuses and circuit breaker
Appliance not switched on Switch the appliance on
Malfunctioning appliance Unplug the appliance from the
wall outlet and contact qualied
personnel to check and repair the
appliance
Nozzle blocked Check the nozzle for blockages
Capsule not suitable Clean and descale the appliance
( Descaling)
Empty water reservoir Replace with a suitable capsule
Upper⁄ bottom of the capsule
not pierced by the needle
Excessive lime scale buildup Switch the appliance o and
Water reservoir is empty Rell the water reservoir with fresh
Start after a while Thermostat has not reset
Lid opened during brewing
process
Not enough water Rell the water reservoir with fresh
Capsule used more than
once
Too much water used Reduce the amount of water used
Damaged capsule holder Replace with suitable capsule holder
Capsule not suitable Replace with a suitable capsule
Upper⁄bottom of the capsule
not pierced by the needle
This is normal
Brew cycle is not complete
until light turns o
Rell the water reservoir with fresh
water after a while
carefully replace the capsule
water
Close the lid and restart
water and restart operation
Discard of the old capsule and use
a new one
on the next brew
Switch the appliance o and
carefully replace the capsule
No
12
K Cup Coffee Maker_201762_FW_IM_US_180709_II.indd 12 7/9/18 15:02

TROUBLESHOOTING
If additional assistance is needed, please contact our Customer Assistance at
1-855-451-2897 (US).
TECHNICAL DATA
Rated voltage: 120V ~ 60Hz Rated power input: 600W
Rated current: 5A Capacity 10oz
13
K Cup Coffee Maker_201762_FW_IM_US_180709_II.indd 13 7/9/18 15:02

© 2018 Farberware Licensing Company, LLC. All Rights Reserved.
Copyrights and Trademarks of Farberware Licensing Company,
LLC, including FARBERWARE®, are used under license from
Farberware Licensing Company, LLC.
CUSTOMER ASSISTANCE
If you have a claim under this warranty, please call our Customer Assistance
Number. For faster service, please have the model number and product name ready
for the operator to assist you. This number can be found on the bottom of your
appliance and on the front page of this manual.
Model Number: __________________ Product Name: __________________
Customer Assistance Number 1-855-451-2897
Keep these numbers for future reference!
Two-year limited warranty
What does your warranty cover?
• Any defect in material or workmanship.
For how long after the original purchase?
• Two years.
What will we do?
• Provide you with a new one.
• For those items still under warranty but no
longer available, WAL-MART reserves the
right to replace with a similar FARBERWARE
branded product of equal or greater value.
How do you make a warranty claim?
• Save your receipt.
• Properly pack your unit. We recommend
using the original carton and packing
materials.
• Return the product to your nearest
Walmart store or call Customer Assistance
at 1-855-451-2897.
What does your warranty not cover?
• Parts subject to wear, including, without
limitation, glass parts, glass containers,
cutter/strainer, blades, seals, gaskets,
clutches, motor brushes, and/or agitators,
etc.
• Commercial use or any other use not found
in printed directions.
• Damage from misuse, abuse, or neglect,
including failure to clean product regularly
in accordance with manufacturer's
instructions.
How does state law relate to this
warranty?
• This warranty gives you specic legal
rights, and you may also have other rights
which vary from state to state or province
to province.
• This warranty is in lieu of any other
warranty or condition, whether express or
implied, written or oral, including, without
limitation, any statutory warranty or
condition of merchantability or tness for a
particular purpose.
• WAL-MART, FARBERWARE and the product
manufacturer expressly disclaim all
responsibility for special, incidental, and
consequential damages or losses caused
by use of this appliance. Any liability is
expressly limited to an amount equal to
the purchase price paid whether a claim,
however instituted, is based on contract,
indemnity, warranty, tort (including
negligence), strict liability, or otherwise.
Some states or provinces do not allow
this exclusion or limitation of incidental
or consequential losses, so the foregoing
disclaimer may not apply to you.
What if you encounter a problem with this
product while using it outside the country
of purchase?
• The warranty is valid only in the country
of purchase and if you follow the warranty
claim procedure as noted.
14
K Cup Coffee Maker_201762_FW_IM_US_180709_II.indd 14 7/9/18 15:02
 Loading...